

Targus AMU25 User Manual

Stow-N-Go
TM
Ultra Portable
Mouse
USER GUIDE
TABLE OF CONTENTS
GB – ENGLISH
TARGUS STOW-N-GO™ ULTRA PORTABLE MOUSE .........................5
BG – ȻɔɅȽȺɊɋɄɂ (ȿɁɂɄ)
TARGUS STOW-N-GO™ ɍɅɌɊȺ ɉɈɊɌȺɌɂȼɇȺ ɆɂɒɄȺ
CZ – CEŠTINA
PěENOSNÁ MYŠ STOW-N-GO™ ULTRA TARGUS ............................17
DE – DEUTSCH
TARGUS STOW-N-GO™ ULTRA TRAGBAREN MAUS ........................ 23
DK – DANSK
PAKKET-&-KLAR ULTRA TRANSPORTABLE MUS ..............................29
EE – EESTI
STOW-N-GO™ ULTRA KAASASKANTAV HIIR .................................35
ES – ESPAÑOL
RATÓN ULTRA PORTÁTIL TARGUS STOW-N-GO™ ...........................41
FI – SUOMI
STOW-N-GO™ ULTRA KANNETTAVA HIIRI .........................................47
FR – FRANÇAIS
SOURIS ULTRA PORTABLE TARGUS STOW-N-GO™ ........................53
2

GR – ƪƯƯƬƱƭƮƟ
ƸƴƪƵĭƳƵƬƷƳ ƴƳƱƷƭƮƭ 672:1*2™ ƷƬƶ 7$5*86
HR – HRVATSKI
TARGUS STOW-N-GO™ ULTRA PRENOSIVI MIŠ ...............................65
HU – MAGYAR
TARGUS STOW-N-GO™ ULTRA HORDOZHATÓ EGÉR ......................71
IT – ITALIANO
MOUSE TARGUS STOW-N-GO™ ULTRA PORTATILE .......................77
LT – LIETUVIŠKAI
TARGUS „STOW-N-GO™ ULTRA“ PORTATYVINƠ PELƠ
LV – LATVIEŠU
TARGUS STOW-N-GO™ PƖRNƜSƖJAMƖ PELE .................................89
NL – NEDERLANDS
TARGUS STOW-N-GO™ ULTRA PORTABLE MUIS .............................95
NO – NORSK
STOW-N-GO™ ULTRABÆRBAR MUS ...............................................101
PL – POLSKI
TARGUS STMYSZ PRZENOĝNA STOW-N-GO™ ULTRAOW-N-GO
ULTRA PORTABLE MOUSE ..............................................................107
PT – PORTUGUÊS
RATO ULTRA PORTÁTIL TARGUS STOW-N-GO™ ............................113
3

RO – ROMÂNĂ
MOUSE TARGUS ULTRAPORTABIL STOW-N-GO™ .........................119
RU – ɊɍɋɋɄɂɃ
ɍɥɶɬɪɚɩɟɪɟɧɨɫɧɚɹ ɦɵɲɶ Stow-N-Go™ .............................................125
SE – SVENSKA
STOW-N-GO™ ULTRA PORTABEL MUS ............................................131
SI – SLOVENSKO
PRENOSNA MIŠKA STOW-N-GO™ ULTRA TARGUS .......................137
SK – SLOVENýINA
ULTRA PRENOSNÁ MYâ TARGUS STOW-N-GO™ ..........................143
TR – TÜRKÇE
TARGUS STOW-N-GO™ ULTRA TAùINABøLøR FARE .......................149
4

TARGUS STOW-N-GO
ULTRA PORTABLE
MOUSE
Introduction
Congratulations on your purchase of the Targus Stow-N-GoTM Ultra
Portable Mouse. This mouse features a resolution changing function
for users who require more precision with different types of applications. The attachable cable storage on the bottom of the mouse is
great for users on the go. This is a plug and play device so no
additional software is required. This mouse supports both Windows
and Macintosh platforms.
Contents
• Targus Stow-N-GoTM Ultra-Portable Mouse
• Carrying pouch
• User Guide
System Requirements
• Operating System - Windows® 2000 / XP
• Windows Vista
• Mac OS 8.9 and above
• USB 1.1 or 2.0 port
TM
TM
5

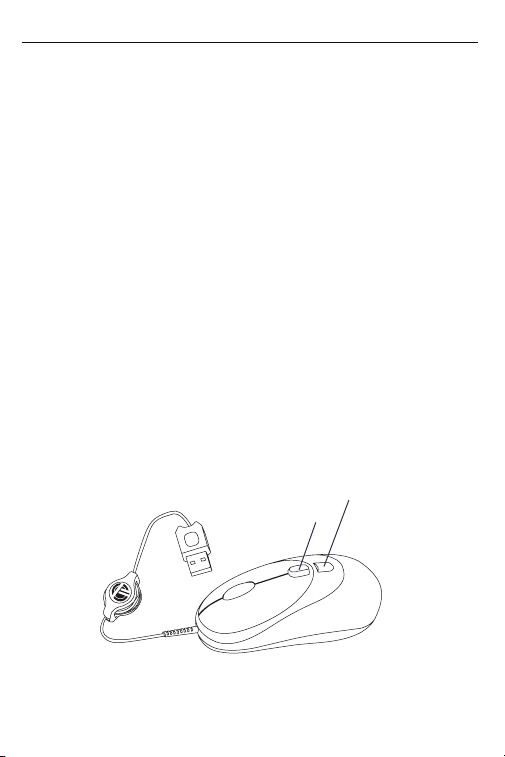
Targus Stow-N-GoTM Ultra Portable Mouse
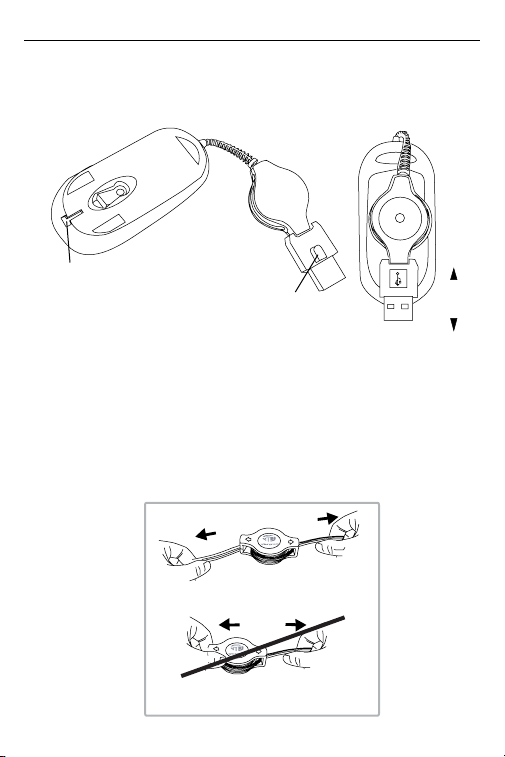
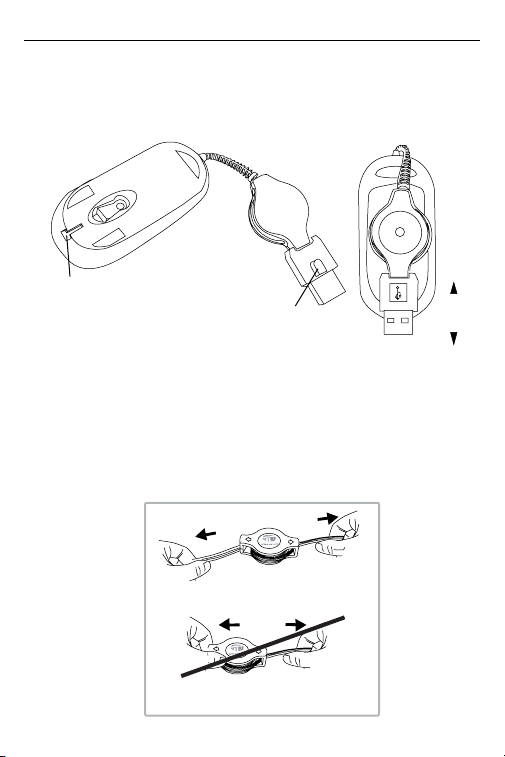
Using the Cable Clip
The retractable cable can be attached to the bottom of the mouse for
ease of carrying.
USB tip clip slot
USB tip clip
Operating Instructions
To extend the cable, pull both ends of the USB cable away from the
mouse's cord wheel at the same time. Continue pulling both ends until
the cable reaches the length you want. To retract the cable, or shorten
the length, draw both ends of the USB cable slightly and quickly
release until the cable reaches the length you want or is completely
retracted. Plug the standard USB end of the cable into an available
USB port on your computer. You are now ready to use the mouse.
Pull
Hold both ends and pull gently.
Pull
Please don't hold the scroll and pull
6
attach
release

Targus Stow-N-GoTM Ultra Portable Mouse
Connecting the mouse to your
computer
1 Plug the standard USB end of the cable into an available USB port
on your computer.
2 The Found New Hardware Wizard appears. If it does not, the
operating system has installed the default driver automatically. No
other steps are necessary.
3 Click Next. The wizard searches for the appropriate device driver.
4 Click Next.
5 Click Finish to complete the driver installation.
You are now ready to use the mouse.
Selecting the Resolution
This mouse is designed with 2 user selectable resolutions: by pressing
the resolution selection button, the user can select from the available
resolutions which provide improved precision coupled with ultra-fast
speed for the different types of applications, i.e. text, CAD drawing,
detailed drawings.
• 1,000-dpi: default, no light
• 1,500-dpi: blue LED light
Resolution
LED status
Indicator
Selection
Button
7
Targus Stow-N-GoTM Ultra Portable Mouse
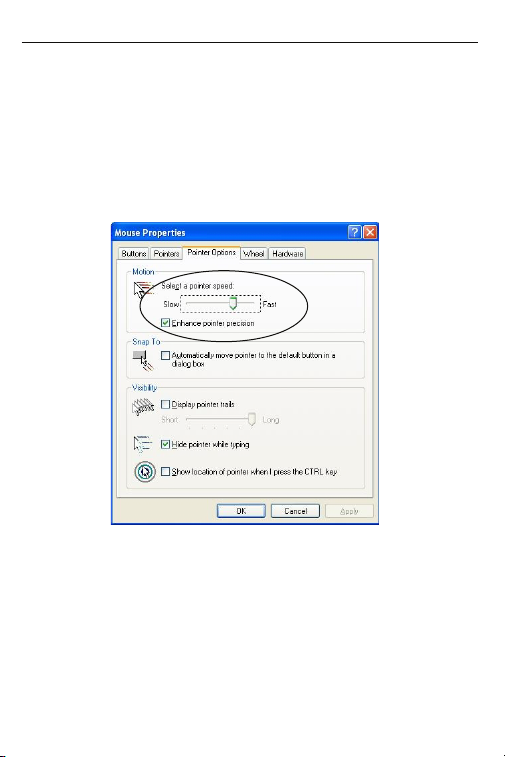
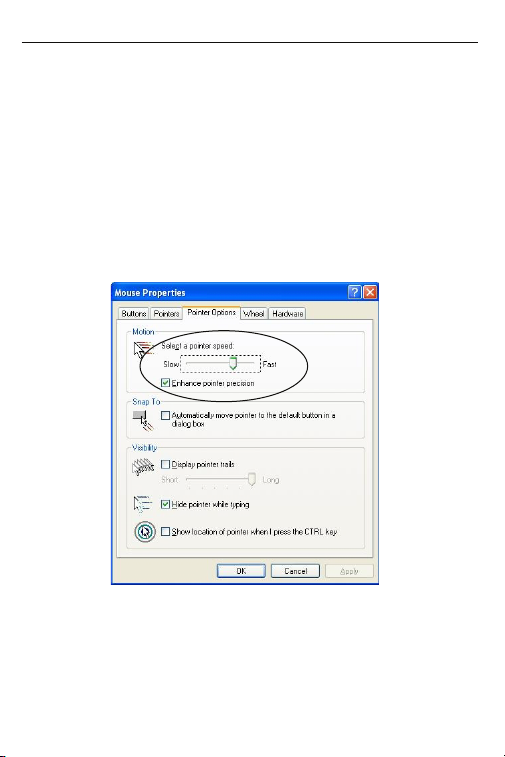
Fine Tuning the Mouse Cursor Speed
Due to the change in (high) resolution, the mouse may become too
sensitive and difficult to use (too fast for some users). After selecting
the suitable resolution, you can also fine tune the sensitivity. This can
be adjusted in the “control panel” of the Windows operating system.
Click on Start --> Setting --> Control Panel --> Mouse
In the “mouse properties” window, locate the “pointer options” tab.
Under “motion”, use the slider to change the speed of the mouse.
Click Apply to confirm the setting.
8

Targus Stow-N-GoTM Ultra Portable Mouse
Safety Measures
Never point the optical sensor toward the face, particularly the eyes, to
avoid possible injury.
NOTE: WHILE THE MOUSE IS FUNCTIONING, OPTICAL LIGHT IS VISIBLE TO THE
NAKED EYE. BE CAREFUL NOT TO LOOK DIRECTLY INTO THE EMITTER HOLE
WHILE THE MOUSE IS ACTIVE.
Operating Hints
For optimal performance:
• Never use the mouse on a glass or mirrored surface as these
surfaces will cause the mouse to fail temporarily.
• Avoid using the mouse on surfaces with repetitive patterns, such as
printed magazine photographs, as this type of surface may cause the
mouse to respond slowly or fail temporarily.
9

Targus Stow-N-GoTM Ultra Portable Mouse
Microsoft, Windows, and Windows Vista are either registered trademarks or trademarks of
Microsoft Corporation in the United States and/or other countries. All trademarks and registered
trademarks are the properties of their respective owners. All rights reserved.
10

TARGUS STOW-N-GO
ɍɅɌɊȺ ɉɈɊɌȺɌɂȼɇȺ ɆɂɒɄȺ
ȼɴɜɟɞɟɧɢɟ
ɑɟɫɬɢɬɨ! ȼɢɟ ɡɚɤɭɩɢɯɬɟ Targus Stow-N-GoTMɍɥɬɪɚ ɩɨɪɬɚɬɢɜɧɚ
ɦɢɲɤɚ. Ɍɚɡɢ ɦɢɲɤɚ ɪɚɡɩɨɥɚɝɚ ɫ ɮɭɧɤɰɢɹ ɡɚ ɫɦɹɧɚ ɧɚ
ɪɚɡɞɟɥɢɬɟɥɧɚɬɚ ɫɩɨɫɨɛɧɨɫɬ ɡɚ ɩɨɬɪɟɛɢɬɟɥɢ, ɤɨɢɬɨ ɢɦɚɬ ɧɭɠɞɚ ɨɬ
ɩɨ-ɝɨɥɹɦɚ ɩɪɟɰɢɡɧɨɫɬ ɩɪɢ ɪɚɡɥɢɱɧɢ ɜɢɞɨɜɟ ɩɪɢɥɨɠɟɧɢɹ.
Ʉɨɧɬɟɣɧɟɪɴɬ ɡɚ ɩɪɢɛɢɪɚɧɟ ɧɚ ɤɚɛɟɥɚ ɨɬ ɞɨɥɧɚɬɚ ɫɬɪɚɧɚ ɧɚ
ɦɢɲɤɚɬɚ ɟ ɦɧɨɝɨ ɭɞɨɛɟɧ ɡɚ ɩɨɬɪɟɛɢɬɟɥɢ, ɤɨɢɬɨ ɦɧɨɝɨ ɩɴɬɭɜɚɬ.
Ɍɨɜɚ ɟ ɩɥɴɝ ɟɧɞ ɩɥɟɣ ɭɫɬɪɨɣɫɬɜɨ, ɬɚɤɚ ɱɟ ɧɟ ɟ ɧɟɨɛɯɨɞɢɦ
ɞɨɩɴɥɧɢɬɟɥɟɧ ɫɨɮɬɭɟɪ. Ɍɚɡɢ ɦɢɲɤɚ ɩɨɞɞɴɪɠɚ ɤɚɤɬɨ Windows,
ɬɚɤɚ ɢ Macintosh ɩɥɚɬɮɨɪɦɢ.
ɋɴɞɴɪɠɚ
• Targus Stow-N-GoTMɍɥɬɪɚ ɩɨɪɬɚɬɢɜɧɚ ɦɢɲɤɚ
• ɑɚɧɬɚ
• ɇɚɪɴɱɧɢɤ ɧɚ ɩɨɬɪɟɛɢɬɟɥɹ
ɋɢɫɬɟɦɧɢ ɢɡɢɫɤɜɚɧɢɹ
• Ɉɩɟɪɚɰɢɨɧɧɚ ɫɢɫɬɟɦɚ - Windows® 2000 / XP
• Windows Vista
• Mac OS 8.9 ɢɩɨ-ɜɢɫɨɤɚ ɜɟɪɫɢɹ
• USB ɩɨɪɬ 1.1 ɢɥɢ 2.0
TM
TM
11
Targus Stow-N-GoTM Ultra Portable Mouse
ɂɡɩɨɥɡɜɚɧɟ ɧɚ ɤɥɢɩɫɚ ɧɚ ɤɚɛɟɥɚ
ɉɪɢɛɢɪɚɳɢɹ ɫɟ ɤɚɛɟɥ ɦɨɠɟ ɞɚ ɛɴɞɟ ɩɪɢɤɪɟɩɟɧ ɤɴɦ ɞɨɥɧɚɬɚ ɱɚɫɬ
ɡɚ ɦɢɲɤɚɬɚ ɡɚ ɩɨ-ɥɟɫɧɨ ɬɪɚɧɫɩɨɪɬɢɪɚɧɟ.
Ɉɬɜɨɪ ɡɚ USB ɧɚɤɪɚɣɧɢɤɚ ɧɚ ɤɥɢɩɫɚ
USB ɧɚɤɪɚɣɧɢɤ ɧɚ ɤɥɢɩɫɚ
ɂɧɫɬɪɭɤɰɢɢ ɡɚ ɟɤɫɩɥɨɚɬɚɰɢɹ
Ɂɚ ɞɚ ɭɞɴɥɠɢɬɟ ɤɚɛɟɥɚ, ɢɡɞɴɪɩɚɣɬɟ ɞɜɚɬɚ ɤɪɚɹ ɧɚ USB ɤɚɛɟɥɚ
ɟɞɧɨɜɪɟɦɟɧɧɨ ɨɬ ɤɨɥɟɥɰɟɬɨ ɧɚ ɦɢɲɤɚɬɚ. ɉɪɨɞɴɥɠɟɬɟ ɞɚ
ɢɡɬɟɝɥɹɬɟ ɞɜɚɬɚ ɤɪɚɹ ɞɨɤɚɬɨ ɤɚɛɟɥɴɬ ɞɨɫɬɢɝɧɟ ɞɨ ɠɟɥɚɧɚɬɚ ɨɬ ɜɚɫ
ɞɴɥɠɢɧɚ. Ɂɚ ɞɚ ɩɪɢɛɟɪɟɬɟ ɤɚɛɟɥɚ, ɢɥɢ ɞɚ ɫɤɴɫɢɬɟ ɞɴɥɠɢɧɚɬɚ ɦɭ,
ɞɪɴɩɧɟɬɟ ɥɟɤɨ ɞɜɚɬɚ ɤɪɚɹ ɧɚ USB ɤɚɛɟɥɚ ɢ ɛɴɪɡɨ ɨɫɜɨɛɨɞɟɬɟ,
ɞɨɤɚɬɨ ɤɚɛɟɥɴɬ ɞɨɫɬɢɝɧɟ ɠɟɥɚɧɚɬɚ ɨɬ ɜɚɫ ɞɴɥɠɢɧɚ ɢɥɢ ɟ ɧɚɩɴɥɧɨ
ɩɪɢɛɪɚɧ. ȼɤɥɸɱɟɬɟ ɫɬɚɧɞɚɪɬɧɢɹ USB ɧɚɤɪɚɣɧɢɤ ɧɚ ɤɚɛɟɥɚ ɜ
ɫɜɨɛɨɞɟɧ USB ɩɨɪɬ ɧɚ ɜɚɲɢɹ ɤɨɦɩɸɬɴɪ. ȼɟɱɟ ɫɬɟ ɝɨɬɨɜɢ ɞɚ
ɢɡɩɨɥɡɜɚɬɟ ɦɢɲɤɚɬɚ.
ɂɡɬɟɝɥɟɬɟ
ɏɜɚɧɟɬɟ ɞɜɚɬɚ ɤɪɚɹ ɧɚ ɤɨɧɟɤɬɨɪɚ ɢ ɬɟɝɥɟɬɟ ɥɟɤɨ
ɂɡɬɟɝɥɟɬɟ
Ɇɨɥɹ ɧɟ ɞɪɴɠɬɟ ɡɚ ɤɨɥɟɥɰɟɬɨ ɞɨɤɚɬɨ ɞɴɪɩɚɬɟ
12
ɩɪɢɤɪɟɩɜɚɧɟ
ɨɫɜɨɛɨɠɞɚɜɚɧɟ

Targus Stow-N-GoTM Ultra Portable Mouse
ɋɜɴɪɡɜɚɧɟ ɧɚ ɦɢɲɤɚɬɚ ɤɴɦ ɜɚɲɢɹ ɤɨɦɩɸɬɴɪ
1 ȼɤɥɸɱɟɬɟ ɫɬɚɧɞɚɪɬɧɢɹ USB ɧɚɤɪɚɣɧɢɤ ɧɚ ɤɚɛɟɥɚ ɜ ɫɜɨɛɨɞɟɧ
USB ɩɨɪɬ ɧɚ ɤɨɦɩɸɬɴɪɚ ɫɢ.
2 ɉɨɹɜɹɜɚ ɫɟ ɩɪɨɝɪɚɦɚɬɚ "Ɉɬɤɪɢɬ ɧɨɜ ɫɨɮɬɭɟɪ". Ⱥɤɨ ɬɹ ɧɟ ɫɟ
ɩɨɹɜɢ, ɡɧɚɱɢ ɨɩɟɪɚɰɢɨɧɧɚɬɚ ɫɢɫɬɟɦɚ ɚɜɬɨɦɚɬɢɱɧɨ ɟ
ɢɧɫɬɚɥɢɪɚɥɚ ɞɪɚɣɜɟɪɚ ɩɨ ɩɨɞɪɚɡɛɢɪɚɧɟ. ɇɟ ɫɚ ɧɟɨɛɯɨɞɢɦɢ
ɞɪɭɝɢ ɫɬɴɩɤɢ.
3 Ʉɥɢɤɧɟɬɟ ɜɴɪɯɭ "ɇɚɬɚɬɴɤ". ɉɪɨɝɪɚɦɚɬɚ ɬɴɪɫɢ ɩɨɞɯɨɞɹɳ
ɞɪɚɣɜɟɪ ɡɚ ɭɫɬɪɨɣɫɬɜɨɬɨ.
4 Ʉɥɢɤɧɟɬɟ ɜɴɪɯɭ "ɇɚɬɚɬɴɤ".
5 Ʉɥɢɤɧɟɬɟ ɜɴɪɯɭ "Ʉɪɚɣ", ɡɚ ɞɚ ɞɨɜɴɪɲɢɬɟ ɢɧɫɬɚɥɢɪɚɧɟɬɨ ɧɚ
ɞɪɚɣɜɟɪɚ.
ȼɟɱɟ ɦɨɠɟɬɟ ɞɚ ɢɡɩɨɥɡɜɚɬɟ ɦɢɲɤɚɬɚ.
ɂɡɛɨɪ ɧɚ ɪɚɡɞɟɥɢɬɟɥɧɚ ɫɩɨɫɨɛɧɨɫɬ
Ɍɚɡɢ ɦɢɲɤɚ ɟ ɩɪɨɟɤɬɢɪɚɧɚ ɫ 2 ɢɡɛɢɪɚɟɦɢ ɨɬ ɩɨɬɪɟɛɢɬɟɥɹ
ɪɚɡɞɟɥɢɬɟɥɧɢ ɫɩɨɫɨɛɧɨɫɬɢ: ɱɪɟɡ ɧɚɬɢɫɤɚɧɟ ɧɚ ɛɭɬɨɧɚ ɡɚ ɢɡɛɨɪ ɧɚ
ɪɚɡɞɟɥɢɬɟɥɧɚ ɫɩɨɫɨɛɧɨɫɬ, ɩɨɬɪɟɛɢɬɟɥɹɬ ɦɨɠɟ ɞɚ ɢɡɛɢɪɚ ɦɟɠɞɭ
ɧɚɥɢɱɧɢɬɟ ɪɚɡɞɟɥɢɬɟɥɧɢ ɫɩɨɫɨɛɧɨɫɬɢ, ɤɨɢɬɨ ɨɫɢɝɭɪɹɜɚɬ ɩɨ-ɝɨɥɹɦɚ
ɩɪɟɰɢɡɧɨɫɬ, ɤɨɦɛɢɧɢɪɚɧɚ ɫ ɭɥɬɪɚ-ɛɴɪɡɢɧɚ ɡɚ ɪɚɡɥɢɱɧɢ ɜɢɞɨɜɟ
ɩɪɢɥɨɠɟɧɢɹ, ɧɚɩɪ. ɬɟɤɫɬ, CAD ɱɟɪɬɚɧɟ, ɩɨɞɪɨɛɧɢ ɱɟɪɬɟɠɢ.
• 1,000-dpi: ɩɨ ɩɨɞɪɚɡɛɢɪɚɧɟ, ɛɟɡ ɫɜɟɬɥɢɧɚ
GSLɫɢɧɹ/('ɫɜɟɬɥɢɧɚ
LED
ɢɧɞɢɤɚɬɨɪ
ɡɚ ɫɬɚɬɭɫɚ
Ȼɭɬɨɧ ɡɚ
ɢɡɛɨɪ ɧɚ
ɪɚɡɞɟɥɢɬɟɥɧ
ɚ ɫɩɨɫɨɛɧɨɫɬ
13

Targus Stow-N-GoTM Ultra Portable Mouse
Ɏɢɧɚ ɧɚɫɬɪɨɣɤɚ ɧɚ ɫɤɨɪɨɫɬɬɚ ɧɚ ɤɭɪɫɨɪɚ ɧɚ ɦɢɲɤɚɬɚ
ɉɨɪɚɞɢ ɢɡɦɟɧɟɧɢɹɬɚ ɜɴɜ (ɜɢɫɨɤɚɬɚ) ɪɚɡɞɟɥɢɬɟɥɧɚ ɫɩɨɫɨɛɧɨɫɬ,
ɦɢɲɤɚɬɚ ɦɨɠɟ ɞɚ ɫɬɚɧɟ ɩɪɟɤɚɥɟɧɨ ɱɭɜɫɬɜɢɬɟɥɧɚ ɢ ɬɪɭɞɧɚ ɡɚ
ɢɡɩɨɥɡɜɚɧɟ (ɩɪɟɤɚɥɟɧɨ ɛɴɪɡɚ ɡɚ ɧɹɤɨɢ ɩɨɬɪɟɛɢɬɟɥɢ). ɋɥɟɞ ɤɚɬɨ
ɫɬɟ ɢɡɛɪɚɥɢ ɩɨɞɯɨɞɹɳɚɬɚ ɪɚɡɞɟɥɢɬɟɥɧɚ ɫɩɨɫɨɛɧɨɫɬ, ɦɨɠɟɬɟ
ɫɴɳɨ ɬɚɤɚ ɞɚ ɪɟɝɭɥɢɪɚɬɟ ɢ ɱɭɜɫɬɜɢɬɟɥɧɨɫɬɬɚ. Ɍɨɜɚ ɦɨɠɟ ɞɚ ɫɬɚɧɟ
ɨɬ “ɤɨɧɬɪɨɥɧɢɹ ɩɚɧɟɥ” ɧɚ ɨɩɟɪɚɰɢɨɧɧɚɬɚ ɫɢɫɬɟɦɚ Windows.
Ʉɥɢɤɧɟɬɟ ɜɴɪɯɭ ɇɚɱɚɥɨ --> ɇɚɫɬɪɨɣɤɢ --> Ʉɨɧɬɪɨɥɟɧ ɩɚɧɟɥ -->
Ɇɢɲɤɚ
ȼ ɩɪɨɡɨɪɟɰɚ “ɫɜɨɣɫɬɜɚ ɧɚ ɦɢɲɤɚɬɚ”, ɧɚɦɟɪɟɬɟ ɤɭɬɢɣɤɚ “ɨɩɰɢɢ ɧɚ
ɤɭɪɫɨɪɚ”. ɉɨɞ “ɞɜɢɠɟɧɢɟ”, ɢɡɩɨɥɡɜɚɣɬɟ ɩɥɴɡɝɚɱɚ, ɡɚ ɞɚ ɩɪɨɦɟɧɢɬɟ
ɫɤɨɪɨɫɬɬɚ ɧɚ ɦɢɲɤɚɬɚ. Ʉɥɢɤɧɟɬɟ ɜɴɪɯɭ ɉɪɢɥɨɠɢ, ɡɚ ɞɚ ɩɨɬɜɴɪɞɢɬɟ
ɧɚɫɬɪɨɣɤɢɬɟ.
14

Targus Stow-N-GoTM Ultra Portable Mouse
Ɇɟɪɤɢ ɡɚ ɛɟɡɨɩɚɫɧɨɫɬ
ɇɢɤɨɝɚ ɧɟ ɧɚɫɨɱɜɚɣɬɟ ɨɩɬɢɱɧɢɹ ɫɟɧɡɨɪ ɤɴɦ ɥɢɰɟɬɨ, ɨɫɨɛɟɧɨ ɤɴɦ
ɨɱɢɬɟ, ɡɚ ɞɚ ɢɡɛɟɝɧɟɬɟ ɟɜɟɧɬɭɚɥɧɢ ɧɚɪɚɧɹɜɚɧɢɹ.
ȻȿɅȿɀɄȺ: ɄɈȽȺɌɈ ɆɂɒɄȺɌȺ ȿ ȼ ɊȿɀɂɆ ɇȺ ɊȺȻɈɌȺ, ɈɉɌɂɑɇȺɌȺ
ɋȼȿɌɅɂɇȺ ɇȿ ɋȿ ȼɂɀȾȺ ɋ ɇȿȼɔɈɊɔɀȿɇɈ ɈɄɈ. ɇȿ ȽɅȿȾȺɃɌȿ
ȾɂɊȿɄɌɇɈ ȼ ɈɌȼɈɊȺ ɇȺ ȿɆɂɌȿɊȺ ȾɈɄȺɌɈ ɆɂɒɄȺɌȺ ȿ ȺɄɌɂȼɇȺ.
ɋɴɜɟɬɢ ɡɚ ɟɤɫɩɥɨɚɬɚɰɢɹɬɚ
Ɂɚ ɨɩɬɢɦɚɥɧɚ ɪɚɛɨɬɚ
• ɇɢɤɨɝɚ ɧɟ ɢɡɩɨɥɡɜɚɣɬɟ ɦɢɲɤɚɬɚ ɜɴɪɯɭ ɫɬɴɤɥɟɧɚ ɢɥɢ ɨɝɥɟɞɚɥɧɚ
ɩɨɜɴɪɯɧɨɫɬ, ɬɴɣ ɤɚɬɨ ɦɨɝɚɬ ɜɪɟɦɟɧɧɨ ɞɚ ɩɪɟɭɫɬɚɧɨɜɹɬ ɪɚɛɨɬɚɬɚ
ɧɚ ɦɢɲɤɚɬɚ.
• ɂɡɛɹɝɜɚɣɬɟ ɞɚ ɪɚɛɨɬɢɬɟ ɫ ɦɢɲɤɚɬɚ ɜɴɪɯɭ ɩɨɜɴɪɯɧɨɫɬ ɫ
ɩɨɜɬɚɪɹɳɢ ɫɟ ɦɨɬɢɜɢ, ɤɚɬɨ ɧɚɩɪɢɦɟɪ ɩɟɱɚɬɧɢ ɦɚɬɟɪɢɚɥɢ ɢ
ɫɧɢɦɤɢ ɨɬ ɫɩɢɫɚɧɢɹ, ɬɴɣ ɤɚɬɨ ɩɨɞɨɛɧɢ ɩɨɜɴɪɯɧɨɫɬɢ ɦɨɝɚɬ ɞɚ
ɡɚɛɚɜɹɬ ɢɥɢ ɩɪɟɭɫɬɚɧɨɜɹɬ ɜɪɟɦɟɧɧɨ ɪɚɛɨɬɚɬɚ ɧɚ ɦɢɲɤɚɬɚ.
15

Targus Stow-N-GoTM Ultra Portable Mouse
ɏɚɪɚɤɬɟɪɢɫɬɢɤɢɬɟ ɢ ɫɩɟɰɢɮɢɤɚɰɢɢɬɟ ɩɨɞɥɟɠɚɬ ɧɚ ɢɡɦɟɧɟɧɢɟ ɛɟɡ
ɩɪɟɞɢɡɜɟɫɬɢɟ. ȼɫɢɱɤɢ ɬɴɪɝɨɜɫɤɢ ɦɚɪɤɢ ɢ ɪɟɝɢɫɬɪɢɪɚɧɢ ɬɴɪɝɨɜɫɤɢ ɦɚɪɤɢ
ɩɪɢɧɚɞɥɟɠɚɬ ɧɚ ɫɴɨɬɜɟɬɧɢɬɟ ɫɨɛɫɬɜɟɧɢɰɢ. ȼɫɢɱɤɢ ɩɪɚɜɚ ɡɚɩɚɡɟɧɢ. © 2008,
Ɍɚɪɝɭɫ Ƚɪɭɩ ɂɧɬɟɪɧɟɲɴɧɴɥ, ɂɧɤ. ɢ Ɍɚɪɝɭɫ (ȼɟɥɢɤɨɛɪɢɬɚɧɢɹ), ɂɧɤ.
16

PěENOSNÁ MYŠ
STOW-N-GOTM ULTRA
TARGUS
Úvod
Gratulujeme k zakoupení pĜenosné myši Stow-N-GoTM Ultra Targus.
Tato myš obsahuje funkci pro zmČnu rozlišení a uspokojí uåivatele,
kteĜí vyåadují vČtší pĜesnost v rĤzných aplikacích. Místo pro pĜipojení
kabelu v dolní þásti myši je ideální pro uåivatele na cestČ. Jedná se o
zaĜízení typu plug & play, takåe není tĜeba další software. Tato myš
podporuje platformy Windows i Macintosh.
Obsah
• PĜenosná myš Stow-N-GoTM Ultra Targus
• PĜenosná brašna
• Uåivatelská pĜíruþka
Systémové poåadavky
• Operaþní systém - Windows® 2000 / XP
• Windows Vista
• Mac OS 8.9 a výše
• Port USB 1.1 a 2.0
TM
17
Targus Stow-N-GoTM Ultra Portable Mouse
Pouåívání kabelové spojky
Pro snadné pĜenášení lze k dolní þásti myši pĜipojit zasouvací kabel.
Patice pro konektor USB
Objímka konektoru USB
Provozní pokyny
Chcete-li vytáhnout kabel USB, táhnČte za oba konce ãĖĤry smČrem
od koleþka najednou. TáhnČte, dokud kabel nedosáhne poåadované
délky. Chcete-li kabel zasunout nebo zkrátit jeho délku, jemnČ uchopte
oba konce kabelu USB a rychle uvolĖujte, aå kabel dosáhne
poåadované délky nebo se úplnČ zatáhne. Standardní konec USB
zasuĖte do pĜíslušného portu USB v poþítaþi. Nyní mĤåete pouåívat
myš.
Táhnout
Dråte oba konce konektoru a jemnČ táhnČte
Táhnout
Nedråte koleþko, jestliåe táhnete
18
pĜipojit
uvolnit
Targus Stow-N-GoTM Ultra Portable Mouse
PĜipojení myši k poþítaþi
1 ZasuĖte standardní konektor USB kabelu do vhodného portu USB
v poþítaþi.
2 Zobrazí se prĤvodce pĜidáním nového hardware. Pokud se
neobjeví, operaþní systém instaloval ovladaþ automaticky. äádné
další kroky nejsou tĜeba.
3 KlepnČte na Další. PrĤvodce vyhledá pĜíslušný ovladaþ zaĜízení.
4 KlepnČte na Další
5 Klepnutím na Dokonþit dokonþete instalaci ovladaþe.
Nyní mĤåete pouåívat myš
Volba rozlišení
Myš umoåĖuje 2 rozlišení: po stisknutí tlaþítka pro volbu rozlišení
uåivatel mĤåe vybírat z dostupných rozlišení, umoåĖujících vČtší
pĜesnost a velkou rychlost pro rĤzné aplikace, napĜ. text, kreslení v
CADu, kreslení detailĤ.
• 1,000-dpi: výchozí, bez svČtla
• 1,500-dpi: modré svČtlo LED
Tlaþítko pro
Stavový LED
indikátor
volbu rozlišení
19

Targus Stow-N-GoTM Ultra Portable Mouse
Jemné lazení rychlosti kurzoru myši
Myš mĤåe být pĜíliš citlivá a její pouåívání mĤåe být obtíåné (pĜíliš
rychlé pro nČkteré uåivatele) v dĤsledku zmČny (vysokého) rozlišení.
Po výbČru vhodného rozlišení mĤåete vyladit citlivost. Toto lze upravit
na "ovládacím panelu" operaþního systému Windows. KlepnČte na
Start --> Nastavení --> Ovládací panel --> Myš
V oknČ "myš" klepnČte na kartu "moånosti ukazatele". Jezdcem v
oddíle "pohyb" zmČĖte rychlost myši. Potvrćte klepnutím na tlaþítko
Pouåít.
20

Targus Stow-N-GoTM Ultra Portable Mouse
Bezpeþnostní opatĜení
Optickým þidlem nemiĜte na tváĜ a zejména do oþí, zabráníte tak
moånému poranČní.
POZNÁMKA: JESTLIäE MYŠ FUNGUJE, OPTICKÉ SVċTLO JE VIDITELNÉ POUHÝM
OKEM. NEDÍVEJTE SE PěÍMO DO EMITUJÍCÍHO OTVORU, JE-LI MYŠ AKTIVNÍ.
Provozní tipy
Pro optimální výkon:
• Nepouåívejte myš na sklenČném nebo zrcadlovém povrchu, protoåe
tyto povrchy mohou zpĤsobit doþasné selhání myši.
• Nepouåívejte myš na povrchu s odráåivým povrchem, jako jsou napĜ.
tištČné fotografie v þasopise, protoåe tento typ povrchu mĤåe
zpĤsobovat pomalou reakci myši nebo její doþasnou nefunkþnost.
21

Targus Stow-N-GoTM Ultra Portable Mouse
Funkce a vlastnosti podléhají zmČnČ bez upozornČní. Všechny obchodní znaþky
a registrované známky jsou majetkem jejich pĜíslušných vlastníkĤ. Všechna
práva vyhrazena. © 2008,Targus Group International, Inc. a Targus (UK), Inc.
22

TARGUS STOW-N-GO
ULTRA TRAGBAREN
MAUS
Einleitung
Glückwunsch zum Kauf Ihrer Targus Stow-N-GoTM Ultra Tragbaren
maus. Diese Maus bietet verbesserte Präzision. Die befestigte
Kabellagerung im Boden der Maus ist nützlich für Benutzer, die viel
unterwegs sind. Dies ist ein Gerät das sofort benutzt werden kann, da
keine zusätzliche Software verlangt wird. Diese Maus unterstützt
sowohl Windows als auch Macintosh Plattformen.
Inhalt
• Targus Stow-N-Go Ultra Tragbaren Maus
• Tragtasche
• Benutzerhandbuch
Systemanforderungen
• Betriebssystem - Windows® 2000 / XP
• Windows Vista
• Mac OS 8.9 und höher
• USB 1.1 or 2.0 Ausgang
TM
TM
TM
23
Stow-N-GoTM Ultra Tragbaren Maus
Die Kabelschelle Benutzen
Das einziehbare Kabel kann am Boden der Maus für leichtes Tragen
befestigt werden.
USB oberer Kabelschelleschlitz
USB oberer Schelle
Betriebsanweisung
Um das Kabel zu verkürzen, ziehen Sie beide Enden vom USB-Kabel
der Maus zum gleichen Zeitpunkt. Ziehen Sie an beiden Enden bis
das Kabel die Länge erreicht, die Sie wünschen. Um das Kabel zu
verkürzen, zeichnen Sie beide Enden vom USB-Kabel, leicht an und
lassen Sie es schnell frei, bis das Kabel die Länge erreicht hat, die Sie
wünschen oder bis das Kabel völlig aufgerollt ist. Stecken Sie das
übliche USB-Ende vom Kabel in einen verfügbaren USB-Ausgang
Ihres Computers. Sie können jetzt die Maus benutzen.
Ziehen
Leicht an beiden Enden des Kabels ziehen.
Ziehen
Nicht die Kabelaufwicklung festhalten
und gleichzeitig ziehen.
24
befestigen
lösen

Stow-N-GoTM Ultra Tragbaren Maus
Die Maus mit Ihrem Computer
verbinden
1. Stecken Sie das übliche USB-Ende vom Kabel in einen
verfügbaren USB-Ausgang auf Ihrem computer.
2. Der Neue Hardwarewizard erscheint. Wenn er nicht erscheint, hat
das Betriebssystem den Standarddriver automatisch installiert.
Keine weiteren Schritte sind notwendig.
3. Klicken Sie auf weiter. Der Wizard sucht den geeigneten
Gerätedriver.
4. Klicken Sie weiter.
5. Klicken Sie Ende, um die Driverinstallation zu vervollständigen.
Sie können nun die Maus betätigen
Wählen Sie eine Auflösung
Diese Maus hat wählbare Auflösungen, die für 2 Benutzer eingestellt
werden können: durch das Drücken der Auflösungstaste, kann der
Benutzer von den verfügbaren Auflösungen auswählen. Es verbessert
Genauigkeit, gepaart mit ultra-schneller Geschwindigkeit für verschiedene Arten von Anwendungen, d.h. Texte, CAD-Zeichnung, detailierte
Zeichnungen.
• 1,000-dpi: Vorgabe, kein Licht
• 1,500-dpi: blaues LED Licht
LED
Statusindikator
Auflösungswahlknopf
25
Stow-N-GoTM Ultra Tragbaren Maus
Feineinstellung für die Geschwindigkeit
der Maus
Wegen der Änderung der (hohen) Auflösung, kann es sein,
dass die Maus beim Benutzen zu empfindlich und schwierig ist
(zu schnell für manche Benutzer). Nachdem Sie die geeignete
Auflösung ausgewählt haben, können Sie auch die Sensivität
einstellen.Dies kann auf der “Schalttafel” vom Windowssystem
eingestellt werden. Klicken Sie auf Start,> Einstellung,> Schalttafel,>
Maus
Im Fenster der "Mauseigenschaften" finden Sie die "Anzeigemöglichkeiten" Taste." Unter “Bewegung”, benutzen Sie den Schieber,
um die Geschwindigkeit der Maus zu verändern. Klicken
Sie auf Anwenden, um die Einstellung zu bestätigen.
26

Stow-N-GoTM Ultra Tragbaren Maus
Sicherheitsmaßnahmen
Zeigen Sie den optischen Sensor nie in Richtung Gesicht, insbesondere nicht Richtung Augen, um mögliche Verletzung zu vermeiden.
HINWEIS: WÄHREND DIE MAUS FUNKTIONIERT, IST DAS OPTISCHE LICHT FÜR
DAS NACKTE AUGE SICHTBAR . SEIEN SIE VORSICHTIG UND SCHAUEN SIE NICHT
DIREKT IN DEN EMITTER WÄHREND DIE MAUS AKTIV IST.
Tipps für die Anwendung
Für eine optimale Leistung
• Benutzten Sie die Maus niemals auf einer Glas- oder widerspiegelnden Oberfläche, die Maus wird dann vorübergehend nicht funktionieren.
• Vermeiden Sie den Gebrauch der Maus auf Oberflächen mit
wiederholenden Mustern, wie gedruckte Zeitschriftenfotos, da diese
Art von Oberfläche die Maus veranlaßt, langsam zu antworten oder
vorübergehend nicht zu funktionieren.
27

Stow-N-GoTM Ultra Tragbaren Maus
Microsoft, Windows und Windows Vista sind eingetragene Marken der Microsoft Corporation in
den USA und/oder in anderen Ländern. Alle eingetragenen Marken sind das Eigentum des
jeweiligen Eigentümers. Alle Rechte vorbehalten.
28

PAKKET-&-KLAR
TM
ULTRA
TRANSPORTABLE MUS
Introduktion
Tillykke med købet af den nye Targus Pakket-&-Klar TM Ultra
Transportable Mus. Denne mus kan ændre opløsning til brugere, der
har behov for større præcision ved forskellige programmer. Det
monterede kabellager under bunden af musen er specielt velegnet til
brugere, som ikke sidder stille. Dette er et plug and play apparat, så du
har ikke behov for yderligere software. Denne mus understøtter både
Windows og Macintosh platformene.
Indhold
• Targus Pakket-&-KlarTM Ultra Transportabel Mus
• Bærepose
• Betjeningsvejledning
Systemkrav
• Operativsystem - Windows® 2000 / XP
• Windows Vista
• Mac OS 8.9 og større
• USB 1.1 eller 2.0 port
TM
29

Targus Stow-N-GoTM Ultra Portable Mouse
Brug af Kabelklemme
Det udtrækkelige kabel kan monteres på bunden af musen, så den er
let at tage med
USB klemmeport
USB klemme
Betjeningsvejledning
Kablet trækkes ud ved at hive begge ender af USB kablet væk fra
musens hjul på samme tid. Fortsæt med at trække, indtil kablerne har
den ønskede længde. Kablet trækkes tilbage, eller gøres kortere, ved
at trække let i begge ender af kablet og give slip, indtil kablet har den
ønskede længde eller er helt trukket tilbage. Isæt USB kablet i en ledig
USB port på din computer. Musen er nu klar til brug.
Træk
Hold begge ender af forbinderen og træk let
Træk
Hold ikke fast på rulleren og træk på samme tid
30
Monter
Udløs
 Loading...