

Page 1

Targus Multimedia Presentation Remote
1
Page 2
410-1680-006D / AMP09AP
N2953
User Guide
用戶指南 / 用户指南 / 說明書 / 사용자 가이드/
Petunjuk Pengguna
3 YEARS LIMITED WARRANTY: We pride ourselves
on the quality of our products. For complete warranty
details and a list of our worldwide offices, please
visit www.targus.com. Features and specifications
are subject to change without notice. All trademarks
and registered trademarks are the property of their
respective owners. ©2015 Targus Group International,
Inc. Manufacturer/Importer: Targus Asia Pacific Ltd.,
Unit 1202-07, 12/F, Miramar Tower, 132 NathanRoad,
Tsim Sha Tsui, Kowloon, Hong Kong
24343/SDPPI/2012
3047
Page 3
Targus Multimedia Presentation Remote Targus Multimedia Presentation Remote
2 3
Introduction
Thank you for your purchase of the Targus Multimedia Presentation
Remote. This combination remote, with laser pointer and cursor control,
works with both Microsoft PowerPoint® and Apple Keynote®. This
cordless remote also offers true plug and play capability with no need
for software drivers, while the long-range 2.4 GHz technology allows for
effective presentations up to 50 feet (15 m).
System Requirements
Hardware
• USB port
Operating System
• Microsoft Windows® 2000
• Microsoft Windows® XP
• Microsoft Windows Vista
®
• Microsoft Windows® 7
• Mac OS® X v10.4 to v10.7.3
Contents
• Targus Multimedia Presentation Remote
• Mini USB Receiver
• 1 x AAA Battery
• User Guide
Setting Up Your Remote
Installing the Batteries
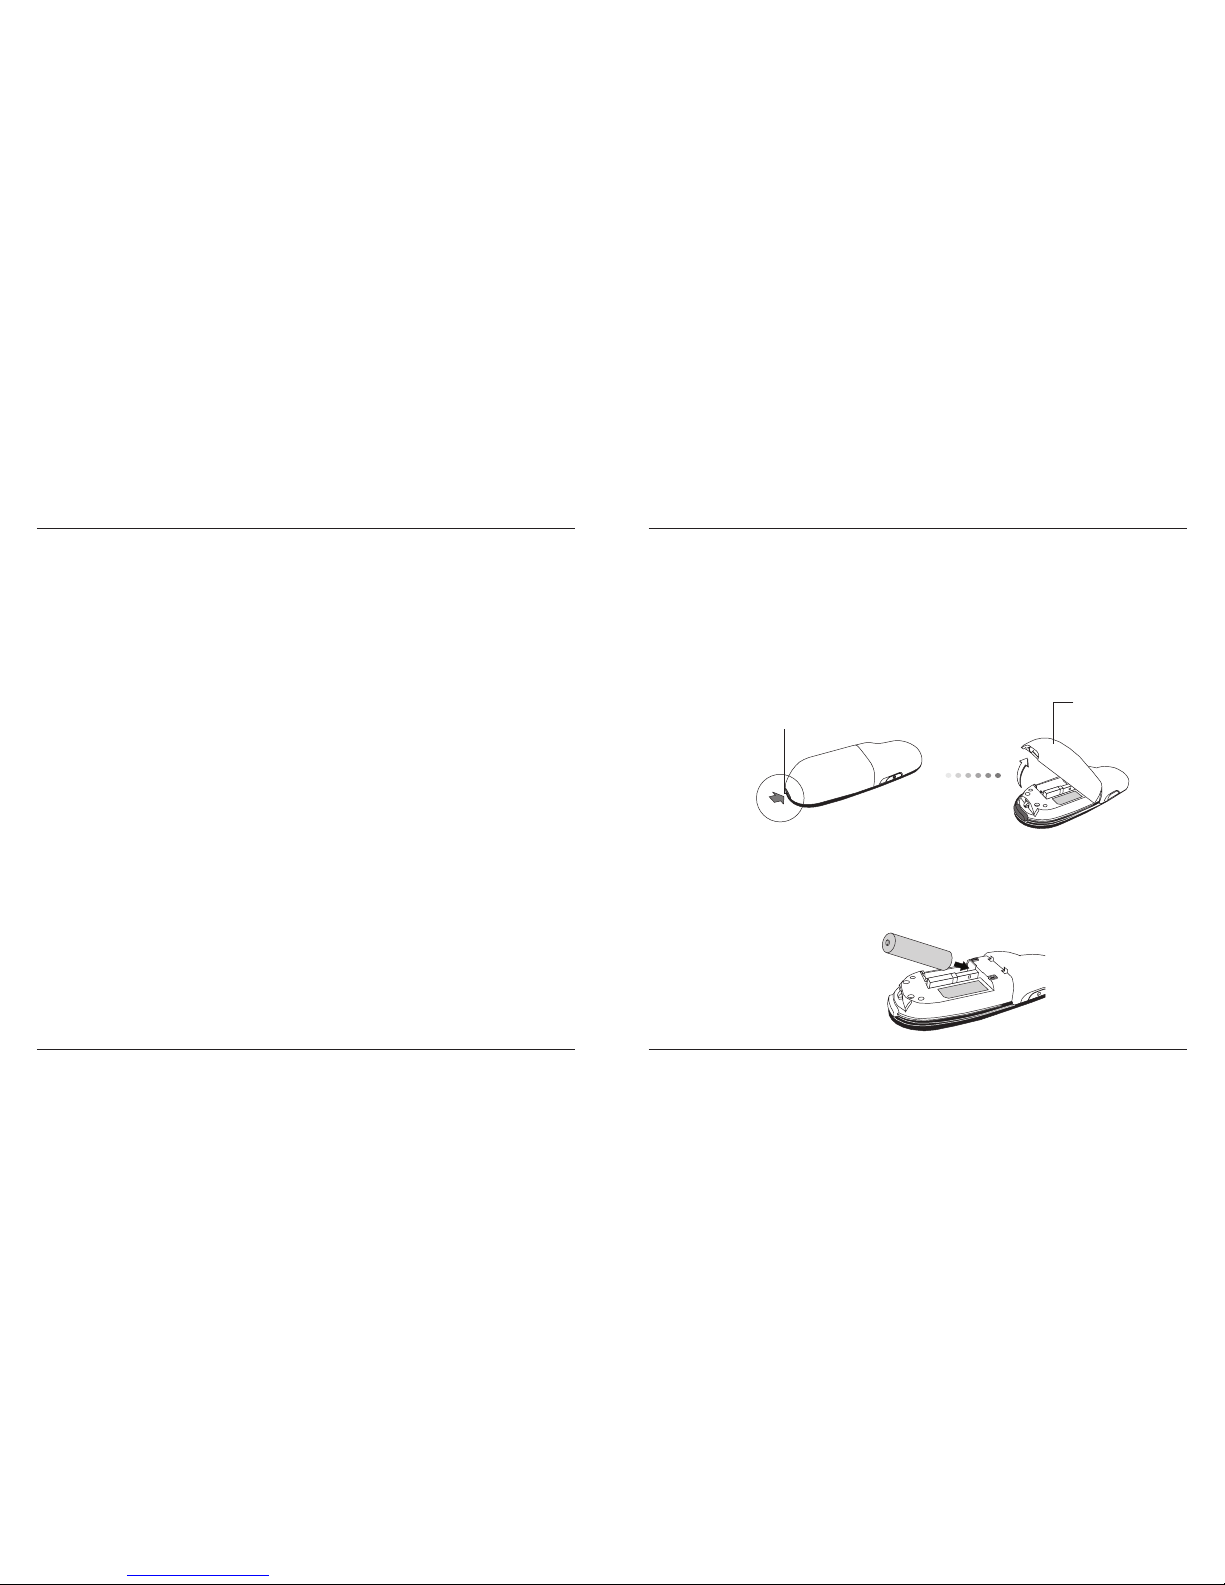
Press the battery cover release button to open the battery cover and
carefully lift the cover as shown.
Insert the supplied batteries, making sure the positive (+) and negative
(-) ends of the batteries match the polarity indicators inside the battery
compartment.
Battery cover
release button
Battery
cover
Page 4
Targus Multimedia Presentation Remote Targus Multimedia Presentation Remote
4 5
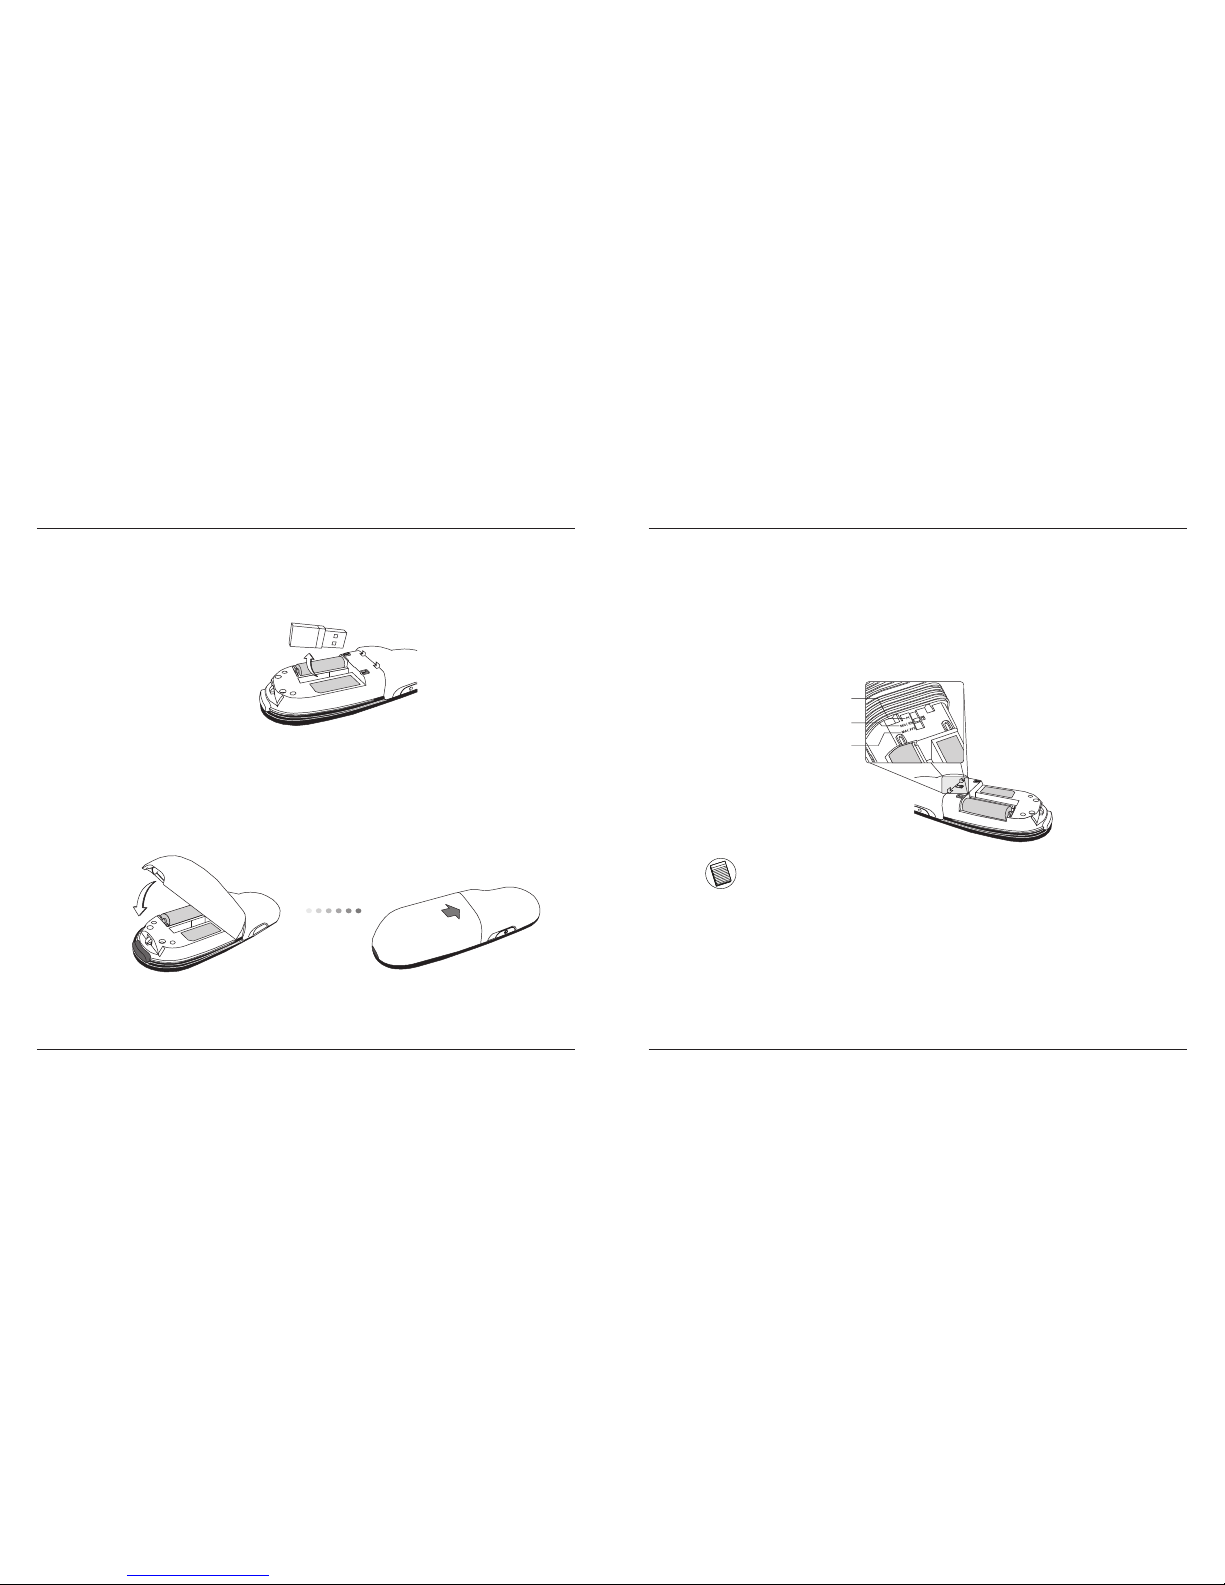
Remove the mini USB receiver stored inside the center compartment.
Slide the battery cover back into position until it “clicks” firmly into place.
Using Your Remote
Before using the remote, please select your computer type and
preferred presentation software. Locate the switch inside the battery
compartment as shown.
PC PowerPoint
®
Mac KeyNote
®
Mac PowerPoint
®
NOTE: SELECT “PC POWERPOINT” IF YOU USE A COMPUTER MADE BY:
HP/COMPAQ, DELL, TOSHIBA, GATEWAY, PANASONIC, FUJITSU, SONY,
IBM/LENOVO, ACER, ASUS, ETC.
Page 5
Targus Multimedia Presentation Remote Targus Multimedia Presentation Remote
6 7
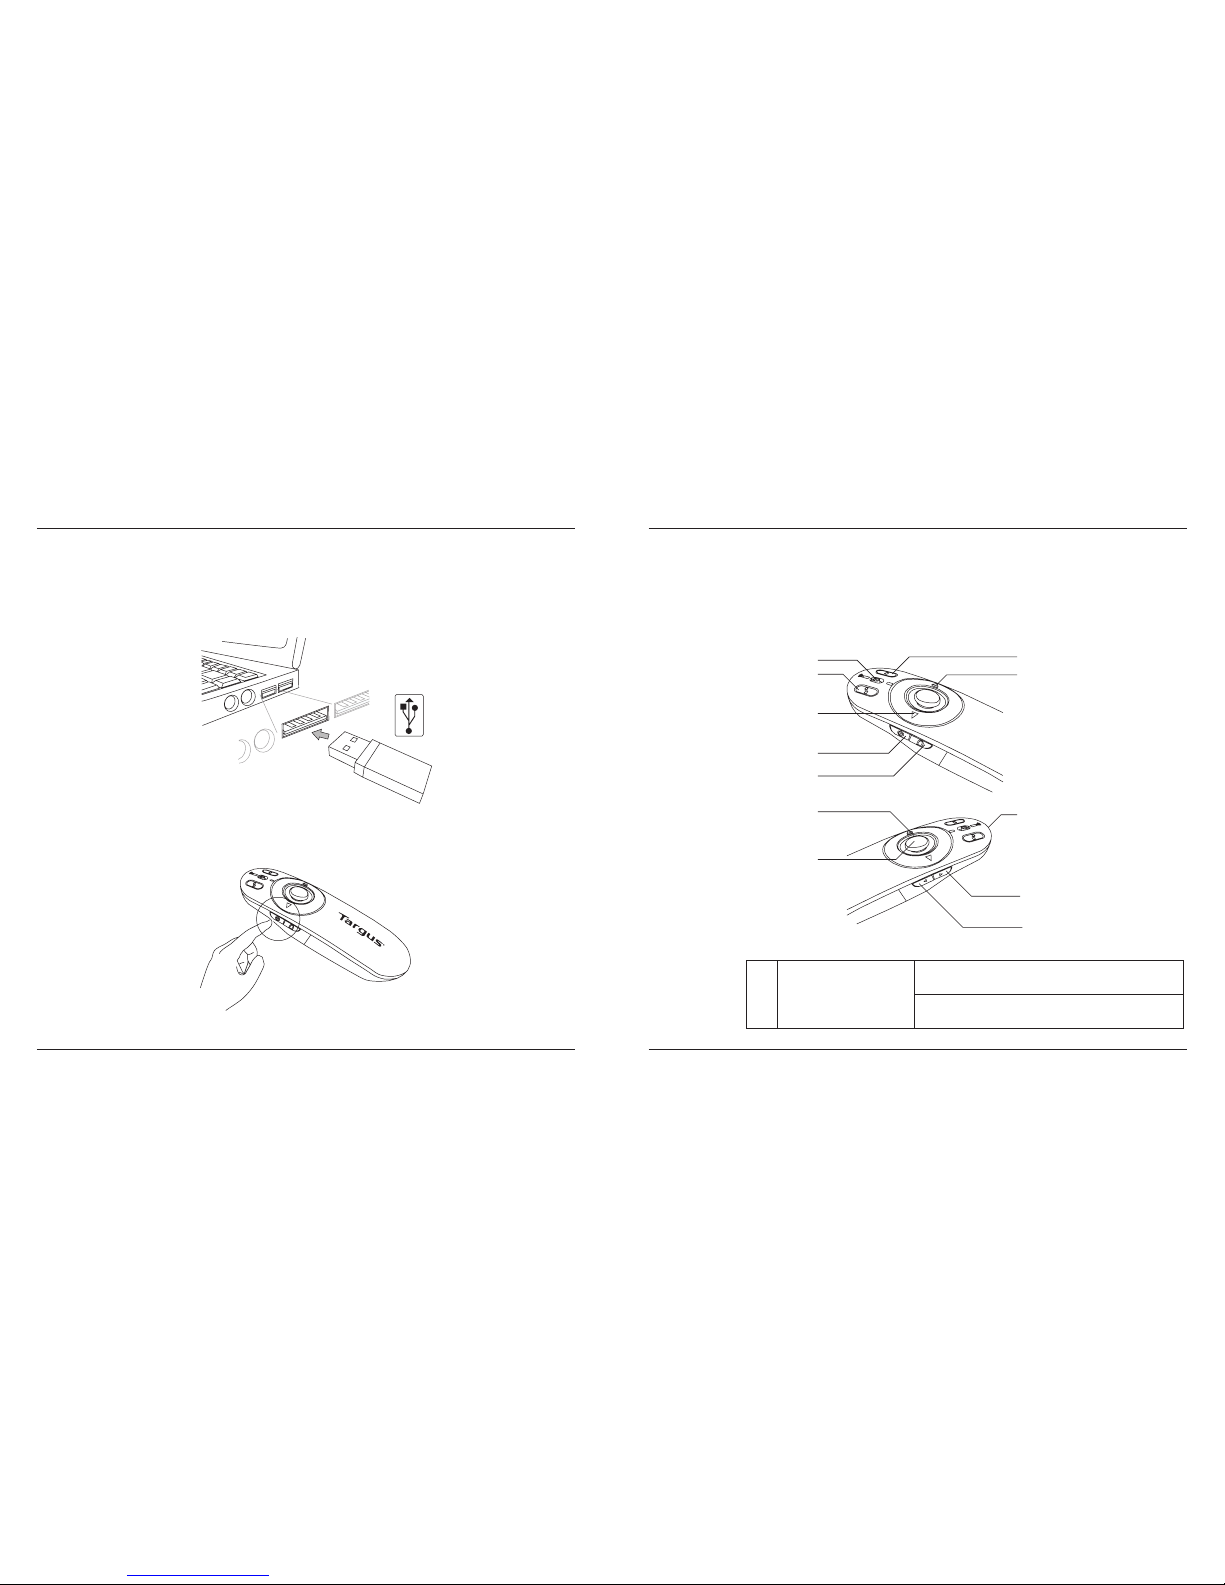
Turn on the remote by pressing and holding the On/Off power button for
3 seconds.
Keys and Functions
This device can function as a presenter or a wireless mouse by using the
mode switch (12).
1
Power button
Press and hold for 3 seconds to turn on the remote.
LED ring will turn green.
Press and hold for 3 seconds to turn off the remote.
LED ring will shut off.
This remote is a plug and play device. It will automatically operate when
the USB receiver is connected to the computer. Plug the mini USB
receiver into any available USB port on your computer.
1
2
3
4
5
6
7
8
9
10
11
12
Page 6

Targus Multimedia Presentation Remote Targus Multimedia Presentation Remote
8 9
Using the Device — Presenter Mode
2
Blank screen button The screen will become blank/dark.
3
Slide show
Start - Press once to begin.
Stop - Press and hold for 2 seconds to stop the slide
show.
4
Page Forward/Next slide Press once to go to next slide.
5
Page
Backward/Previous slide
Press once to go back one slide.
6
Laser pointer Laser light is emitted from the opening.
7
LED ring Power and KeyLockTM indicator.
8
KeyLock button
Press once to enable KeyLock function.
- Disables all keys except the laser, page forward/ next
slide and page backward/previous slide buttons.
- LED ring will become RED.
Press once to exit the KeyLock function.
- LED ring will return to GREEN.
9
Laser pointer button Press and hold to activate the laser pointer.
10
Volume up button Press to increase the volume.
11
Volume down button Press to decrease the volume.
4
Right mouse click Right mouse click.
5
Left mouse click Left mouse click.
7
LED ring Power indicator.
8
KeyLock button Disabled in mouse mode.
9
Joystick
Pressing the joystick resembles left mouse click.
Moves the mouse cursor.
10
Volume up button Press to increase the volume.
11
Volume down button Press to decrease the volume.
Using the Device — Mouse Mode
Page 7

Targus Multimedia Presentation Remote Targus Multimedia Presentation Remote
10 11
Safety Measures
• To avoid possible eye damage, never point the remote’s laser at people,
especially their faces, or look directly into the remote’s laser beam.
• Avoid pointing the remote’s laser beam at a mirror or other highly-reective
surface.
• Keep the remote away from young children.
• Never view the remote’s laser beam using telescopic devices, such as a
microscope or binoculars.
• Any attempt to disassemble, adjust or repair the remote may result in exposure
to laser light or other safety hazards.
Troubleshooting
What do I do if the response time of the remote is slow or it intermittently
stops working?
• Make sure that the remote is within 50 feet (15 m) of the mini USB receiver
and computer.
• Increase the distance between the remote’s receiver and the base units of
other wireless devices.
• Turn off any wireless devices and their base units that are near the remote’s
receiver.
• Replace the battery.
AVOID EXPOSURE — HAZARDOUS ELECTROMAGNETIC RADIATION EMITTED FROM THIS APERTURE.
LASER RADIATION. DO NOT STARE INTO THE BEAM OR VIEW DIRECTLY WITH OPTICAL INSTRUMENTS.
CLASS 2 LASER PRODUCT.
NEVER POINT A LASER BEAM INTO A PERSON’S EYES OR VIEW A LASER BEAM DIRECTLY, AS
PROLONGED EXPOSURE CAN BE HAZARDOUS TO THE EYES. MOMENTARY EXPOSURE FROM A LASER
POINTER, SUCH AS AN INADVERTENT SWEEP OF THE LIGHT ACROSS A PERSON’S EYES, MAY CAUSE
TEMPORARY FLASH BLINDNESS SIMILAR TO THE EFFECT OF A CAMERA FLASH BULB. ALTHOUGH THIS
CONDITION IS TEMPORARY, IT CAN BECOME MORE DANGEROUS IF THE EXPOSED PERSON IS ENGAGED
IN A VISION-CRITICAL ACTIVITY SUCH AS DRIVING.
CAUTION: ANY CHANGES OR MODIFICATIONS NOT EXPRESSLY APPROVED BY THE PARTY RESPONSIBLE
FOR COMPLIANCE COULD VOID THE USER’S AUTHORITY TO OPERATE THE EQUIPMENT.
THIS DEVICE AND ITS ANTENNA(S) MUST NOT BE CO-LOCATED OR OPERATING IN CONJUNCTION WITH
ANY OTHER ANTENNA OR TRANSMITTER. YOUR DEVICE CONTAINS A LOW POWER TRANSMITTER. WHEN
DEVICE IS TRANSMITTED IT SENDS OUT RADIO FREQUENCY (RF) SIGNAL. NOTE: THE MANUFACTURER IS
NOT RESPONSIBLE FOR ANY RADIO OR TV INTERFERENCE CAUSED BY UNAUTHORIZED MODIFICATIONS
TO THIS EQUIPMENT. SUCH MODIFICATIONS COULD VOID THE USER’S AUTHORITY TO OPERATE THE
EQUIPMENT.
Page 8

Targus Multimedia Presentation Remote Targus Multimedia Presentation Remote
12 13
Pengenalan
Permintaan Sistem
Hardware
• port USB
Sistem Pengoperasian
• Microsoft Windows® 2000
• Microsoft Windows® XP
• Microsoft Windows Vista
®
• Microsoft Windows® 7
• Mac OS® X v10.4 untuk v10.7.3
Daftar Isi
• Multimedia Presentasi Remote Targus
• Penerima USB Mini
• 1 x Baterai AAA
• Petunjuk penggunaan
Mengatur Remote Anda
Menginstalasi Baterai
Tekan dan geser untuk memindahkan penutup baterai untuk instalasi
baterai
Tekan penutup
baterai
Masukkan dua baterai ukuran AA, pastikan bahwa ujung positif (+) dan
negatif (-) dari setiap baterai sesuai dengan indikator kutub di dalam
kompartemen baterai.
Tombol pembuka
penutup baterai
Terima kasih atas pembelian Multimedia Presentasi Remote Targus.
Kombinasi remote, dengan penunjuk laser dan pengontrol kursor, bekerja
bersama dengan Microsoft PowerPoint
®
dan Apple Keynote®. Remote
nirkabel juga menawarkan kapabilitas siap pakai yang sebenarnya dengan
tidak membutuhkan perangkat lunak Driver, sementara teknologi 2.4 GHz
berjarak jauh membuat presentasi efektif sampai dengan 50 kaki (15 m).
Page 9

Targus Multimedia Presentation Remote Targus Multimedia Presentation Remote
14 15
Pindahkan penerima USB mini di dalam kompartemen pusat
Ganti penutup baterai, sesuaikan secara perlahan dengan penutup sampai
berbunyi klik di tempantnya.
Gunakan remote Anda
Sebelum menggunakan remote, silakan pilih jenis komputer Anda
dan software presentasi yang disukai. Lokasikan kenop di dalam
kompartemen baterai sebagaimana telah ditunjukkan.
PC PowerPoint
®
Mac KeyNote
®
Mac PowerPoint
®
CATATAN: PILIH “POWERPOINT PC” BILA ANDA MENGGUNAKAN KOMPUTER YANG DIBUAT OLEH : HP/
COMPAQ, DELL, TOSHIBA, GATEWAY, PANASONIC, FUJITSU, SONY, IBM/LENOVO, ACER, ASUS, DLL.
Page 10

Targus Multimedia Presentation Remote Targus Multimedia Presentation Remote
16 17
Hidupkan remote dengan menekan sementara waktu tombol On/Off
selama 3 detik
Kunci dan fungsinya
Perangkat dapat berfungsi sebagai presenter atau sebuah mouse
nirkabel dengan menggunakan saklar (12)
1
Tombol power
Hidupkan remote dengan menekan sementara waktu
tombol selama 3 detik
Matikan remote dengan menekan sementara waktu
tombol selama 3 detik
Remote ini merupakan perangkat siap pakai. Ia akan secara otomatis
beroperasi ketika penerima USB dihubungkan ke komputer. Pasang
penerima USB mini kepada USB yang tersedia di komputer Anda.
1
2
3
4
5
6
7
8
9
10
11
12
Page 11

Targus Multimedia Presentation Remote Targus Multimedia Presentation Remote
18 19
Menggunakan perangkat -
Mode presentasi
2
Tombol layar gelap Layar akan menjadi putih/hitam
3
Slide show
Start - Tekan sekali untuk menjadi
Stop - Dengan mematikan tombol selama 2 detik
4
Halaman sebelumnya Tekan sekali untuk ke slide selanjutnya
5
Halaman sesudahnya Tekan sekali untuk ke satu slide sebelumnya
6
Penunjuk laser Cahaya laser dipancarkan dari pembukaan
7
LED rin Power dan KeyLockTM indikator.
8
KeyLock Tombol
Tekan sekali mengaktifkan KeyLock fungsi.
- Menonaktifkan semua tombol kecuali halaman, laser
maju / slide berikutnya dan halaman belakang /
tombol slide sebelumnya.
- LED rin akan menjadi merah
Tekan sekali untuk mengaktifkan KeyLock fungsi.
- LED rin akan menjadi hijah
9
Tombol laser
Tekan dan tahan untuk mengaktivasi penunjuk laser
hijau
10
Tombol menaikkan suara Tekan untuk menaikkan suara
11
Tombol menurunkan suara Tekan untuk menurunkan volume
4
Klik mouse kanan Klik mouse kanan
5
Klik mouse kiri Left mouse click.
7
LED rin Klik mouse kiri
8
KeyLock tombol Disble cara mouse
9
Joystick
Dengan menekan klik mouse kiri joystick. Gerakkan
kursor mouse
10
Tombol menaikkan suara Tekan untuk menaikkan suara
11
Tombol menurunkan suara Tekan untuk menurunkan volume
Penggunaan perangkat - cara mouse
Page 12

Targus Multimedia Presentation Remote Targus Multimedia Presentation Remote
20 21
Pengukuran keamanan
• Untuk menghindari kerusakan pada mata, jangan pernah mengarahkan
laser remote pada orang, terutama pada bagian wajah, atau melihat secara
langsung pada lampu sorot laser.
• Hindari mengarahkan sorotan laser remote pada kaca atau permukaan yang
memantulkan cahaya.
• Jauhkan remote dari anak-anak kecil.
• Jangan pernah melihat sorotan laser remote dengan menggunakan perangkat
teleskop, seperti mikroskop atau binokuler.
• Setiap tindakan untuk membongkar, menyesuaikan atau memperbaiki remote
mungkin dapat menyebabkan perubahan pada cahaya laser atau bahaya
pada perangkat keamanan lainnya.
Penyelesaian masalah
Apa yang saya lakukan bila waktu respons remote melambat atau
tiba-tiba berhenti bekerja?
• Pastikan remote berada dalam 100 kaki (30 m) dari penerima USB
mini dan komputer.
• Menaikkan jarak antara penerima remote dan unit dasar dari
perangkat nirkabel lainnya.
• Mematikan perangkat nirkabel dan unit dasar yang berada di dekat
penerima remote.
• Menggantikan baterai.
HINDARI SAMBUNGAN - RADIASI ELEKTROMAGNETIK BERBAHAYA dipancarkan dari aperture INI.
RADIASI LASER. JANGAN menatap BALOK ATAU LIHAT LANGSUNG DENGAN INSTRUMEN OPTIK.
KELAS 2 PRODUK LASER.
PERNAH TITIK sinar laser KE MATA ORANG ATAU VIEW sinar laser LANGSUNG, SEBAGAI
SAMBUNGAN berkepanjangan bisa BERBAHAYA UNTUK MATA. SAMBUNGAN DARI sesaat
laser pointer, TERSEBUT SEBAGAI Sapu sengaja TERANG DI SELURUH mata seseorang, dapat
menyebabkan kebutaan FLASH SEMENTARA SERUPA DENGAN PENGARUH BOLA FLASH CAMERA.
MESKIPUN KONDISI INI SEMENTARA, TI BISA MENJADI LEBIH BERBAHAYA JIKA MELIHAT ORANG
ADALAH TERLIBAT DALAM KEGIATAN-KRITIS VISI SEPERTI MENGEMUDI.
PERHATIAN: SETIAP PERUBAHAN ATAU MODIFIKASI TIDAK TEGAS DISETUJUI OLEH PIHAK
BERTANGGUNG JAWAB atas kepatuhan dapat membatalkan kewenangan pengguna untuk
mengoperasikan peralatan ini.
PERANGKAT INI DAN ANTENNA ITS (S) TIDAK HARUS CO-OPERASI ATAU terletak BERSAMA
DENGAN ATAU APAPUN LAINNYA ANTENNA TRANSMITTER. PERANGKAT ANDA BERISI Sebuah
TRANSMITTER LOW POWER. SAAT INI DIKIRIM PERANGKAT itu mengirimkan FREKUENSI RADIO
(RF) SIGNAL. CATATAN: PRODUSEN YANG TIDAK BERTANGGUNG JAWAB ATAS GANGGUAN RADIO
ATAU TV DISEBABKAN OLEH PERUBAHAN YANG TIDAK SAH UNTUK PERALATAN INI. MODIFIKASI
TERSEBUT dapat membatalkan kewenangan pengguna untuk mengoperasikan peralatan.
Page 13

Targus Multimedia Presentation Remote Targus Multimedia Presentation Remote
22 23
Warranty
Targus warrants this product to be free from defects in materials and
workmanship for three years. If your Targus accessory is found to be
defective within that time, we will promptly repair or replace it upon proof
of purchase. This warranty does not cover accidental damage, wear and
tear, or consequential or incidental loss. Under no conditions is Targus
liable for loss of, or damage to, a computer or other device(s); nor loss
of, or damage to, programs, records, or data; nor any consequential or
incidental damages, even if Targus has been informed of their possibility.
This warranty does not affect your statutory rights.
Regulatory Compliance
This device complies with Part 15 of the FCC Rules. Operation is subject to the
following two conditions: (1) This device may not cause harmful interference, and (2)
This device must accept any interference received, including interference that may
cause undesired operation.
Technical Support
For technical questions, please contact us via the following options:
Email
Telephone
techsupport@targus.com
Internet
http://www.targus.com/support.asp
Targus Asia Pacific – Hong Kong
Monday through Friday, 9:00 a.m. (09:00) to 5:30 p.m. (17:30): (+852) 2526-2620
Targus Asia Pacific – South Asia
Monday through Friday, 9:00 a.m. (09:00) to 6:00 p.m. (18:00): (+65) 6383-1330
Targus Australia
Monday through Friday, 9:00 a.m. (09:00) to 5:00 p.m. (17:00): (+61) 2-9807-1222
Targus Japan
Monday through Friday, 10:00 a.m. (10:00) to 5:00 p.m. (17:00): (+81) 45-232-3082
Targus Korea
Monday through Friday, 9:00 a.m. (09:00) to 6:00 p.m. (18:00): (+82) 2-3272-0288
Targus Taiwan
Monday through Friday, 9:00 a.m. (09:00) to 5:30 p.m. (17:30): (+886) 2-2723-1836
Targus Thailand
Monday through Friday, 9:00 a.m. (09:00) to 6:00 p.m. (18:00): (+66) 0-2634-4201
Page 14

Targus Multimedia Presentation Remote Targus Multimedia Presentation Remote
24 25
低功率電波輻射性電機管理辦法
Microsoft, Windows, 及 Windows Vista為已注冊商標或在美國/其他國家的微軟公司的商標。
所有的商標及注冊商標都歸商標持有者所有。版權所有。
第 十 二 條
經型式認證合格之低功率射頻電機,非經許可,公司、商號或使用者均不
得擅自變更頻率、加大功率或變更原設計之特性及功能。
第 十 四 條
低功率射頻電機之使用不得影響飛航安全及干擾合法通信;經發現有干擾
現象時,應立即停用,並改善至無干擾時方得繼續使用。
前項合法通信,指依電信法規定作業之無線電通信。
低功率射頻電機須忍受合法通信或工業、科學及醫療用電波輻射性電機設
備之干擾。
CCAB12LP1630T5
FCC Statement
Tested to Comply
This equipment has been tested and found to comply with the limits of a Class
B digital device, pursuant to Part 15 of the FCC Rules. These limits are designed
to provide reasonable protection against harmful interference in a residential
installation. This equipment generates, uses, and can radiate radio frequency
energy and if not installed and used in accordance with the instructions, may cause
harmful interference to radio communications. However, there is no guarantee that
interference will not occur in a particular installation. If this equipment does cause
harmful interference to radio or television reception, which can be determined by
turning the equipment off and on, the user is encouraged to try to correct the
interference by one or more of the following measures:
• Reorient or relocate the receiving antenna;
• Increase the separation between the equipment and receiver;
• Connect the equipment into an outlet on a circuit different from that to which the
receiver is connected;
• Consult the dealer or an experienced radio/TV technician for help.
Changes or modifications not authorized by the party responsible for compliance
could void the user’s authority to operate this product.
Declaration of Conformity
Hereby, Targus, declares that this device is in compliance with the essential
requirements and other relevant provisions of Directive 1999/5/EC.
©2015 Manufactured or imported by Targus Asia Pacific Ltd., Unit 1202-07, 12/F, Miramar Tower, 132 Nathan Road, Tsim Sha
Tsui, Kowloon, HK. All rights reserved. Targus is either a registered trademark or trademark of Targus Group International, Inc. in
the United States and/or other countries. Features and specifications are subject to change without notice. All trademarks and
registered trademarks are the property of their respective owners.
Page 15

Targus Multimedia Presentation Remote Targus Multimedia Presentation Remote
26 27
KCC Marking Requirement
당해 무선설비는 운용 중 전파혼신 가능성이 있음
당해 무선설비는 전파혼신 가능성이 있으므로
인명안전과 관련된 서비스는 할수 없음
기기명 : 프리젠테이션 리모콘
상 호 : Targus Asia Pacic Limited
기 기 명 : 프리젠테이션 리모콘
모 델 명 : AMP09
인증 번호 : TGS-AMP09
제조 년월 : 2010, 7.
제조사/국 : Targus Asia Pacic Limited / 중국
수입자명 : (주)한국타거스
주소 및 전화번호 : 서울시 용산구 원효로2가 92-8 라온빌딩 5층
전화: 02-3272-0288 팩스:02-3272-2862
휴대용 레이저용품
종 류 : A종
사용상 주의사항 :
- 레이저빔을 들여다보지 말 것.
- 레이저광을 사람에게 향하지 말 것.
- 어린이가 사용하지 않게 할 것.
“해당무선설비는운용중전파혼신가능성이있음”
TGS - AMP09 TGS - R09
Microsoft, Windows, Windows Vista는 미국 및 기타 국가/지역에서 Microsoft Corporation의 상표 또는 등록
상표입니다. 모든 상표와 등록 상표의 저작권은 그 소유자에게 있습니다. 권리소유. 제품특징 및 규격이 변경될 수
있으며 이에 대해별도로 통보하지 않습니다. © 2015,Targus Group International, Inc.
部件名稱
Part Name
有毒有害物质或元素
Hazardous Substances or Elements
鉛
(Pb)汞(Hg)鎘(Cd)
六價鉻
(Cr(VI))
多溴聯苯
(PBB)
多溴二苯醚
(PBDE)
PCB板 O O O O O O
元器件 X O O O O O
结构件 O O O O O O
塑胶件 O O O O O O
其他辅料 O O O O O O
O: 表示該有毒有害物質在該部件所有均質材料中的含量均在SJ/T 11363-2006
標準規定的限量要求以下。
X: 表示該有毒有害物質至少在該部件的某一均質材料中的含量超出SJ/T
11363-2006標準規定的限量要求
技术说明:表格中×是含量符合欧盟ROHS标准的豁免物料。
10
Microsoft, Windows, 及 Windows Vista为已注册商标或在美国/其他国家的微软公司的商 标。所有的商 标及注册商
标都归商标持有者所有。版权所有。
 Loading...