

Page 1
USER GUIDE
Visit our Website at www.targus.com/emea
Features and spe cifications subject to ch ange without notice.
© 2006 Targus Group Inte rnational, Inc. and Targus Group (UK) Ltd.
AMB02EU / 410-036 6-003A
Bluetooth
®
media
notebook mouse
30
Bluetooth Qualified Product ID# B02776
Page 2

2
TABLE OF CONTENTS
English . . . . . . . . . . . . . . . . . . . . . . . . . 3
Deutsch . . . . . . . . . . . . . . . . . . . . . . . . 20
Español . . . . . . . . . . . . . . . . . . . . . . . . 37
Français . . . . . . . . . . . . . . . . . . . . . . . 54
Italiano . . . . . . . . . . . . . . . . . . . . . . . . 71
Nederlands. . . . . . . . . . . . . . . . . . . . . 88
Português. . . . . . . . . . . . . . . . . . . . . .105
Page 3

3
TARGUS BLUETOOTH
®
MEDIA
NOTEBOOK MOUSE
Introduction
Congratulations on your purchase of the Targus Bluetooth®
Media Notebook Mouse. You can now control your notebook
and default media player from up to 10M away.
System Requirements
Hardware - Bluetooth-enabled notebook or desktop PC
Operating System - Windows® 2000 or XP
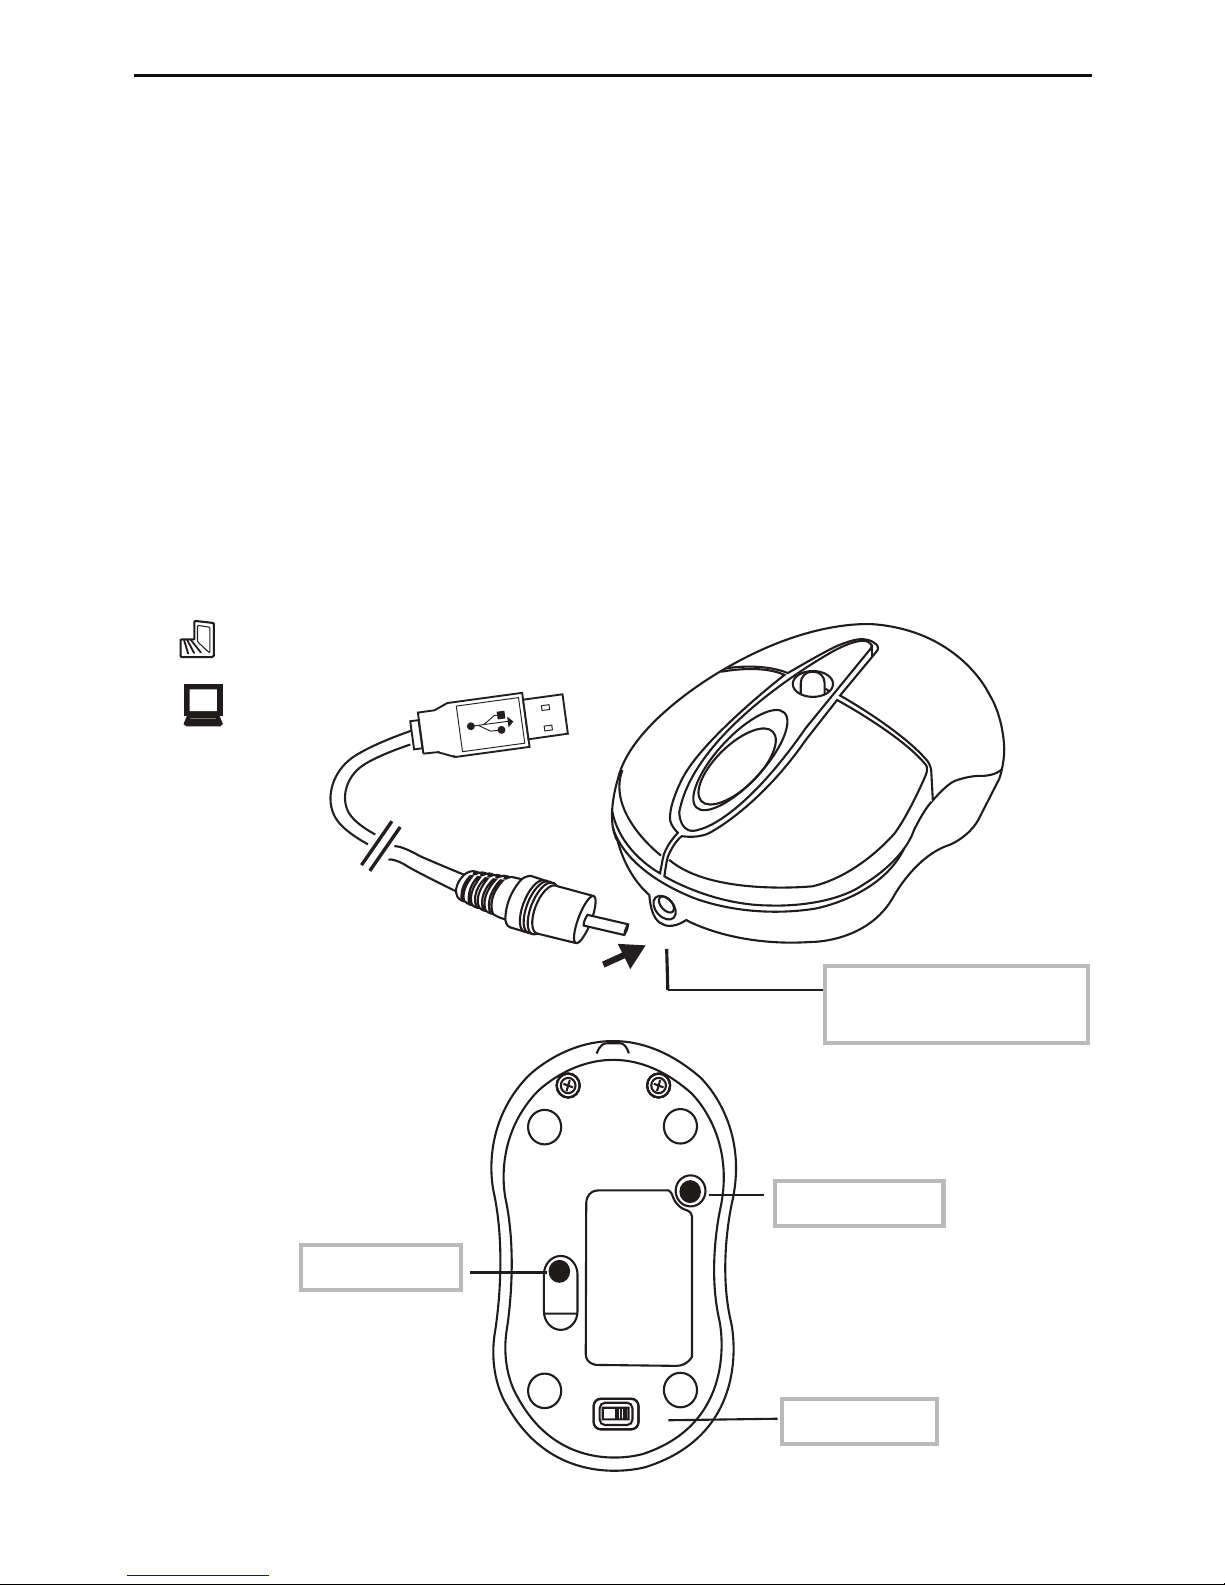
Installing the Batteries (Supplied)
•Use the two AAA-size rechargeable NIMH batteries
(supplied)
•Remove the battery cover from the top of the mouse by
sliding off the cover of the mouse
•Insert the batteries, making sure that the positive (+) and
negative (-) ends of each battery match the polarity
indicators inside the battery housing.
WARNINGS: WHEN REPLACING THE BATTERIES, ALWAYS REPLACE WITH
NiMH BATTERIES OR OTHER RECHARGEABLE BATTERIES. NEVER USE ALKALINE
BATTERIES IN A DEVICE. AVOID MIXING NEW AND USED BATTERIES IN A DEVICE
Page 4
4
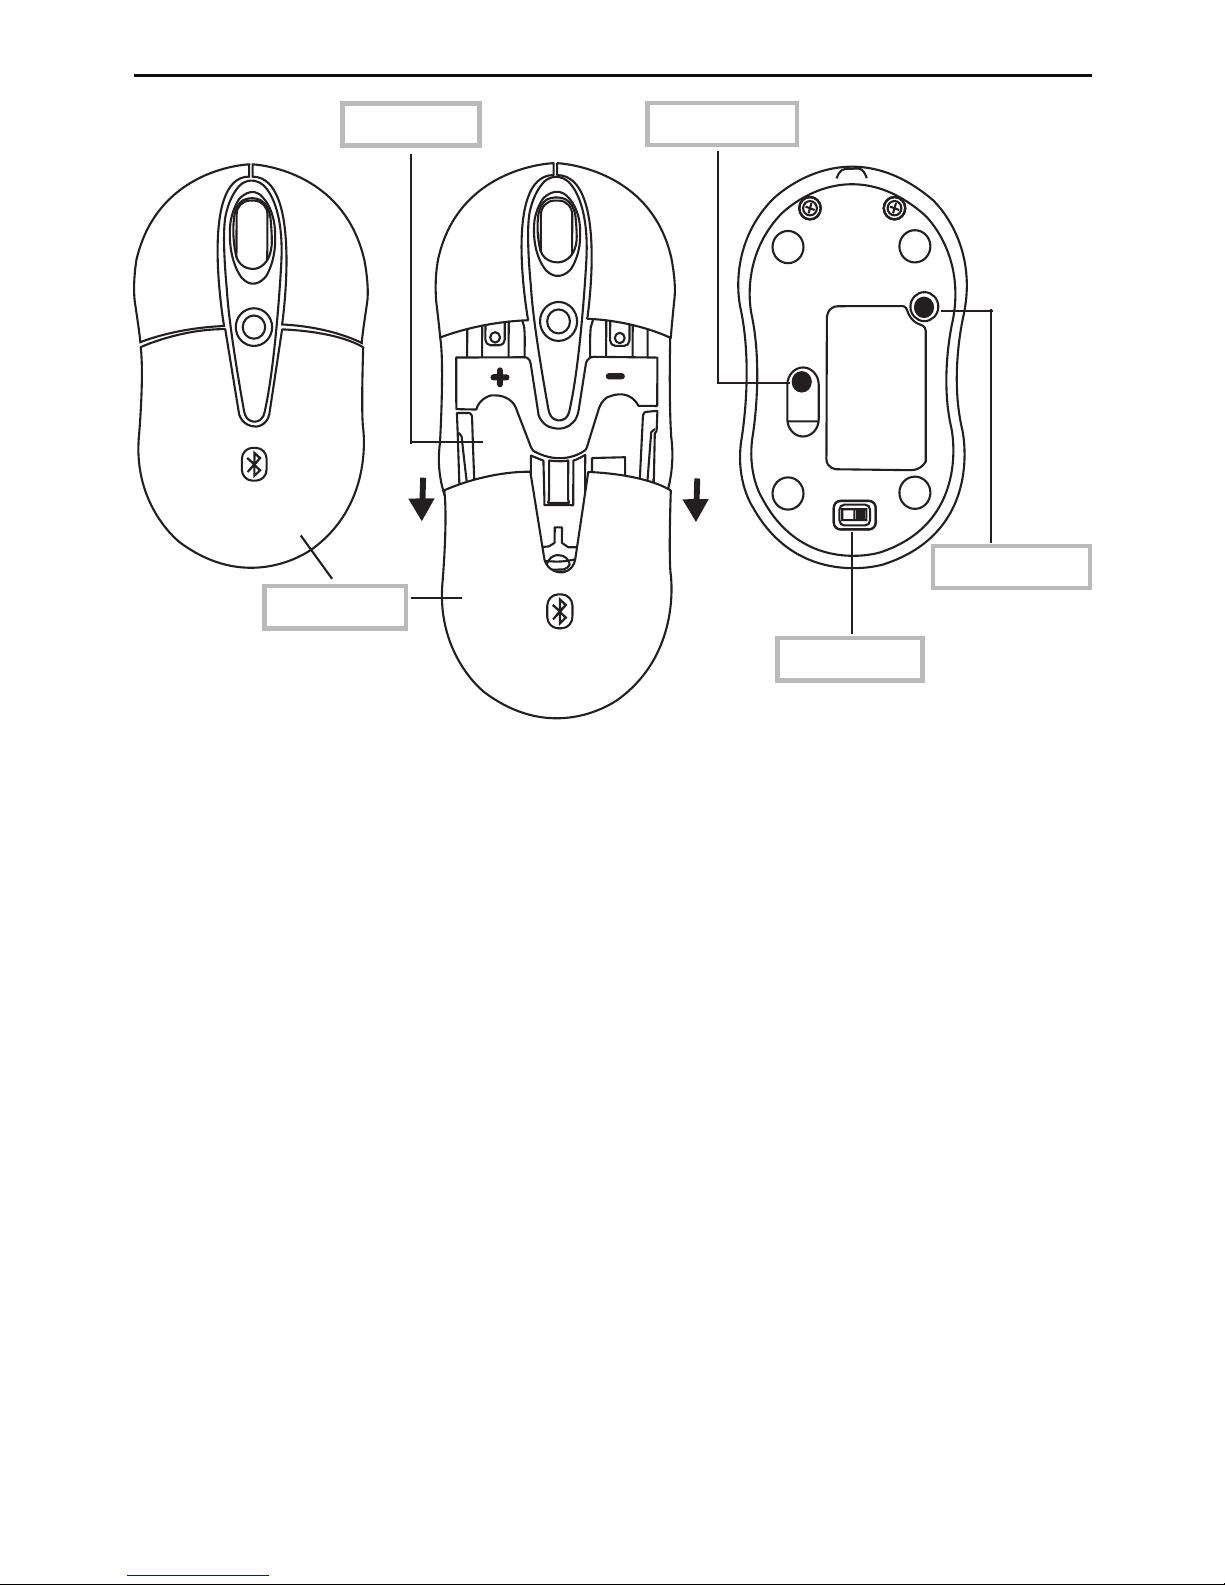
TARGUS BLUETOOTH® MEDIA NOTEBOOK MOUSE
ON OFF
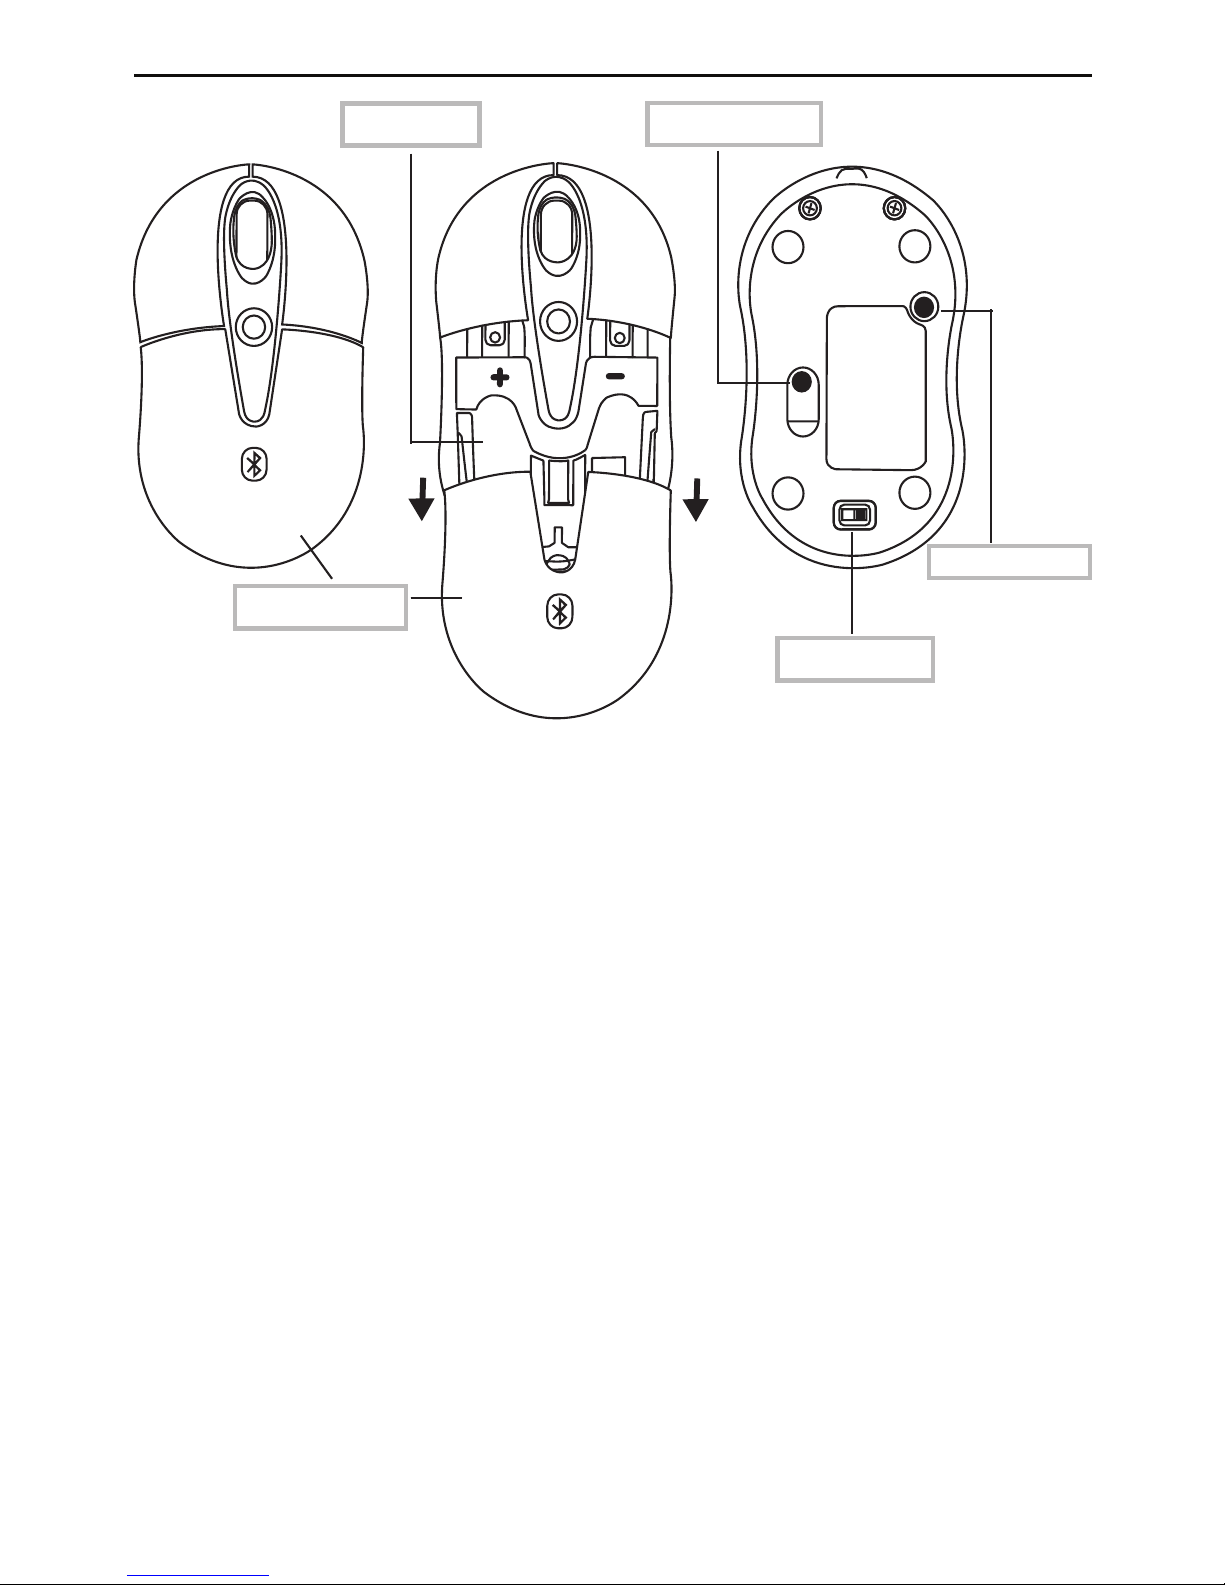
Connect Button
On/Off Switch
Optical Sensor
Battery Cover
Battery Slots
• Snap the battery cover back into position
• Turn on the mouse by sliding on/off switch on the bottom of
the mouse to the “on” position.
Initial Configuration
Before you can begin using Bluetooth connectivity on your
computer and other Bluetooth devices, you must perform
some initial setup tasks.
The Targus Bluetooth Media Notebook Mouse is designed to
work with the three major software stack (protocol) standards:
WIDCOMM, Toshiba, and Microsoft.
Please check your computer’s documentation to see which
software stack your computer has. Please contact your
system vendor if your system does not support one of the
following Bluetooth software standards.
Page 5

5
TARGUS BLUETOOTH® MEDIA NOTEBOOK MOUSE
In order to activate the Media Mode of this Class II Bluetooth
mouse, initial installation of Tilt Wheel Driver is needed
disregard standards.
Tilt Wheel Driver Installation for All
Software Stack (Protocol) Standards
To activate the Media Mode of your Targus Bluetooth Media
Notebook Mouse, please follow the following steps:
1. Insert the Software Installation CD to your computer.
2. Initial welcome screen will prompt. Please ensure you
have exit all Windows programs before running the set up.
Click Next.
3. Choose the location that you want to save and install your
mouse in the computer. Then Click Next.
4. Installation setup will begin. Click Back to review or
change the current configuration. Click Next to begin
installation.
5. The completion window will appear as the system
completes the installation. Choose Yes, I want to restart
my computer now to use the program.
Bluetooth Software: WIDCOMM
Make sure the Bluetooth radio is turned on. If necessary,
check your computer’s manual to determine if the radio is
activated. To add the Targus mouse, proceed with the
following steps:
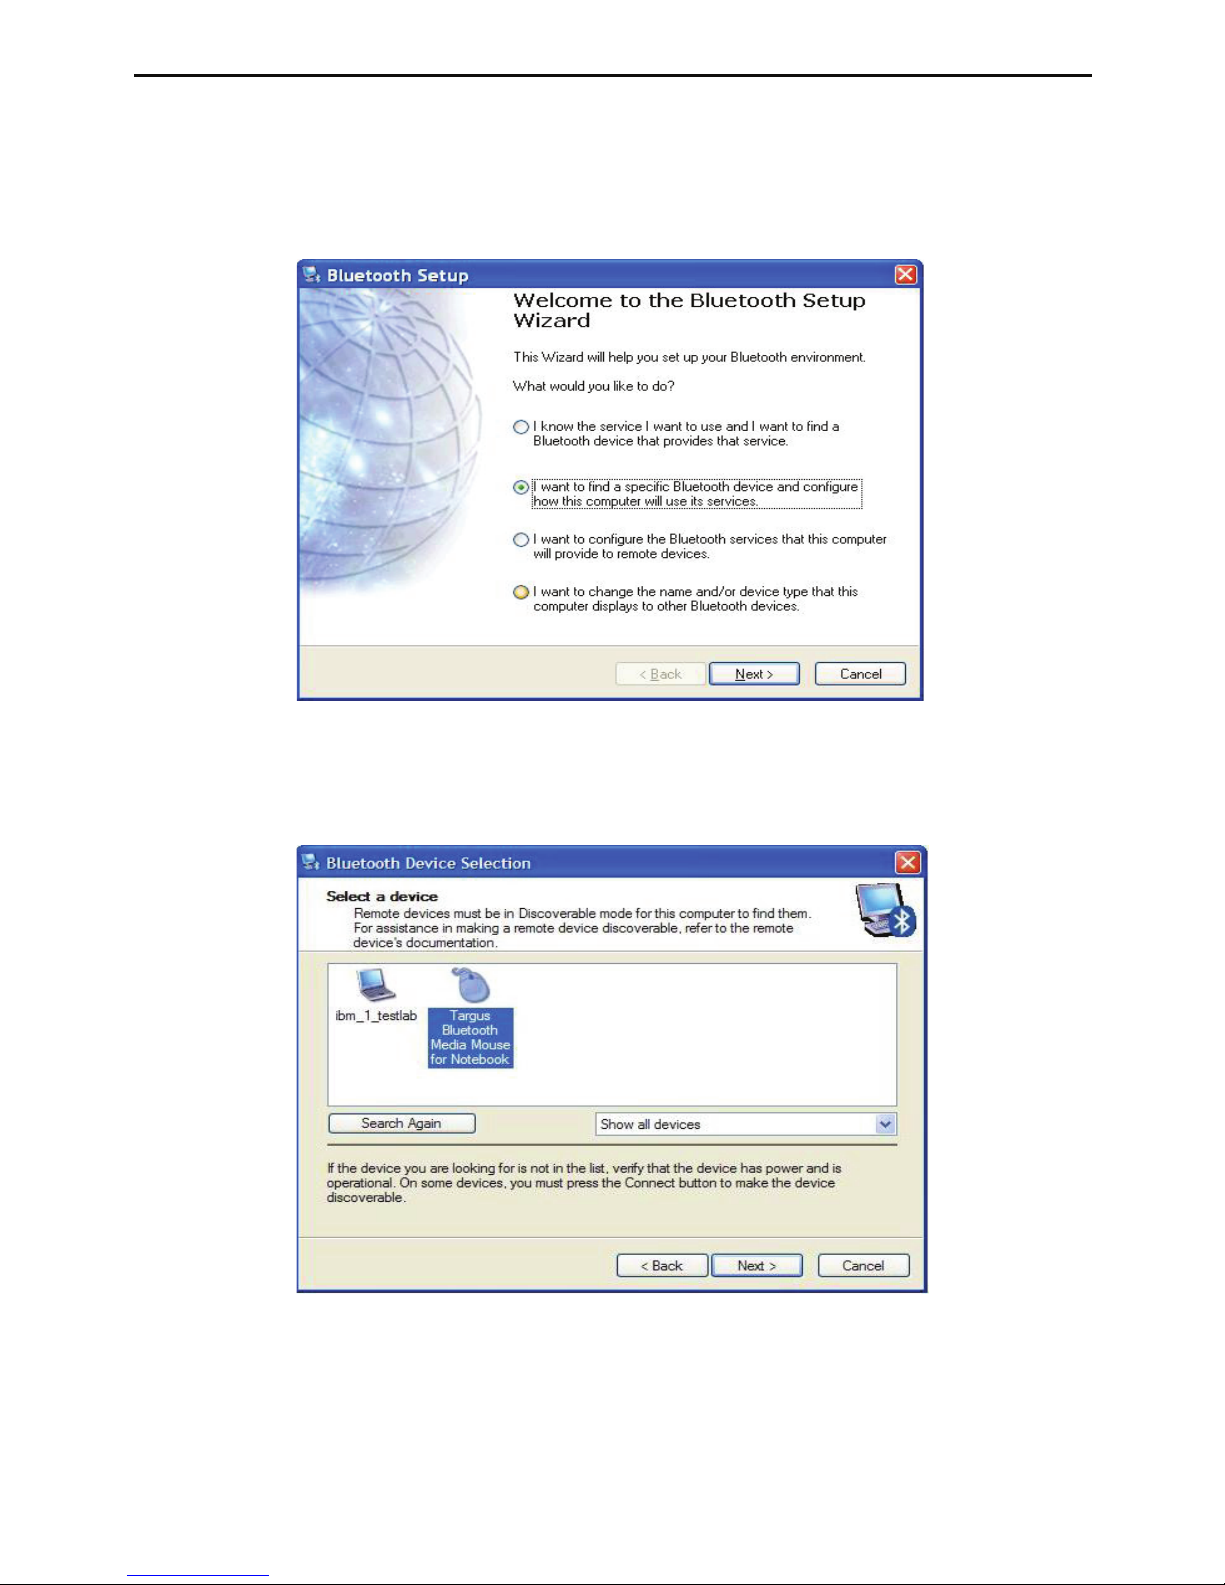
1. Go to the Bluetooth Places icon located on your desktop
or in the system tray and double click, then click Bluetooth
setup wizard.
Page 6
6
TARGUS BLUETOOTH® MEDIA NOTEBOOK MOUSE
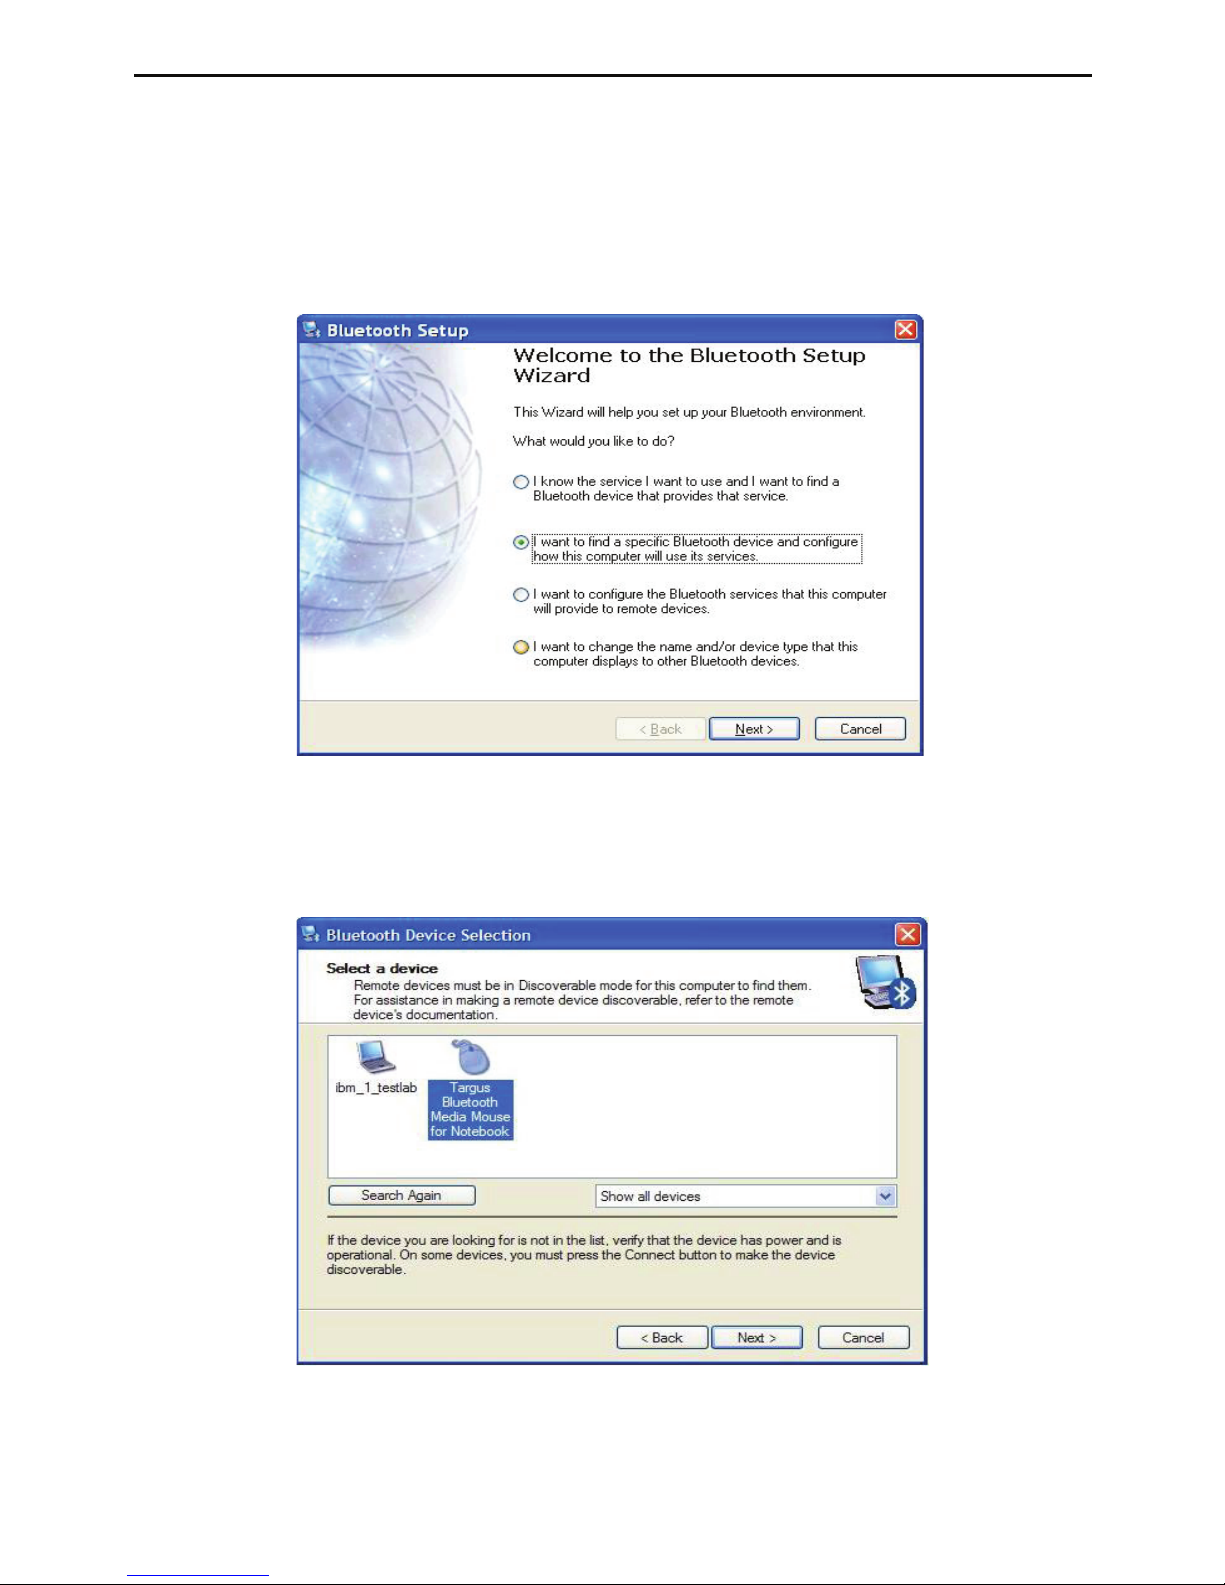
2. At the Bluetooth Setup Wizard, check I want to find a
specific Bluetooth device and configure how this computer will
use its services. Click Next.
3. Turn your mouse on. Press the connect button until the red
light sensor (at the bottom of the mouse) appears.
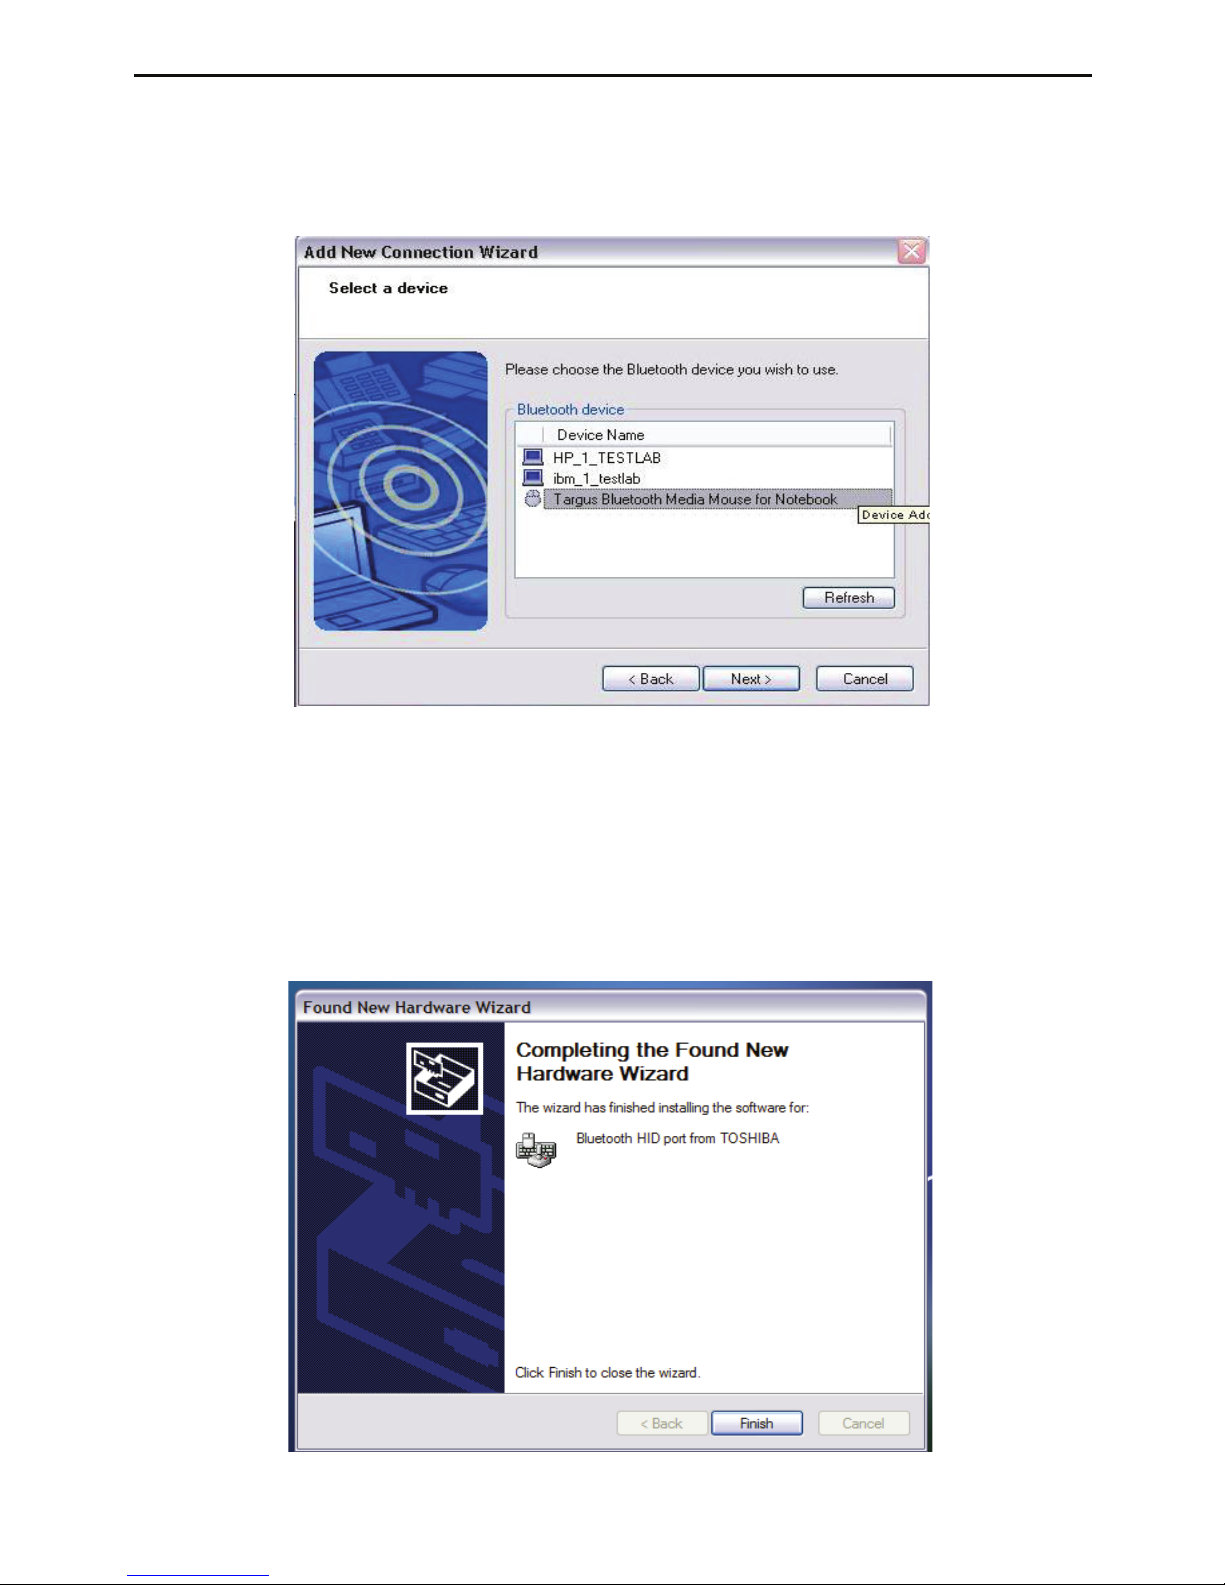
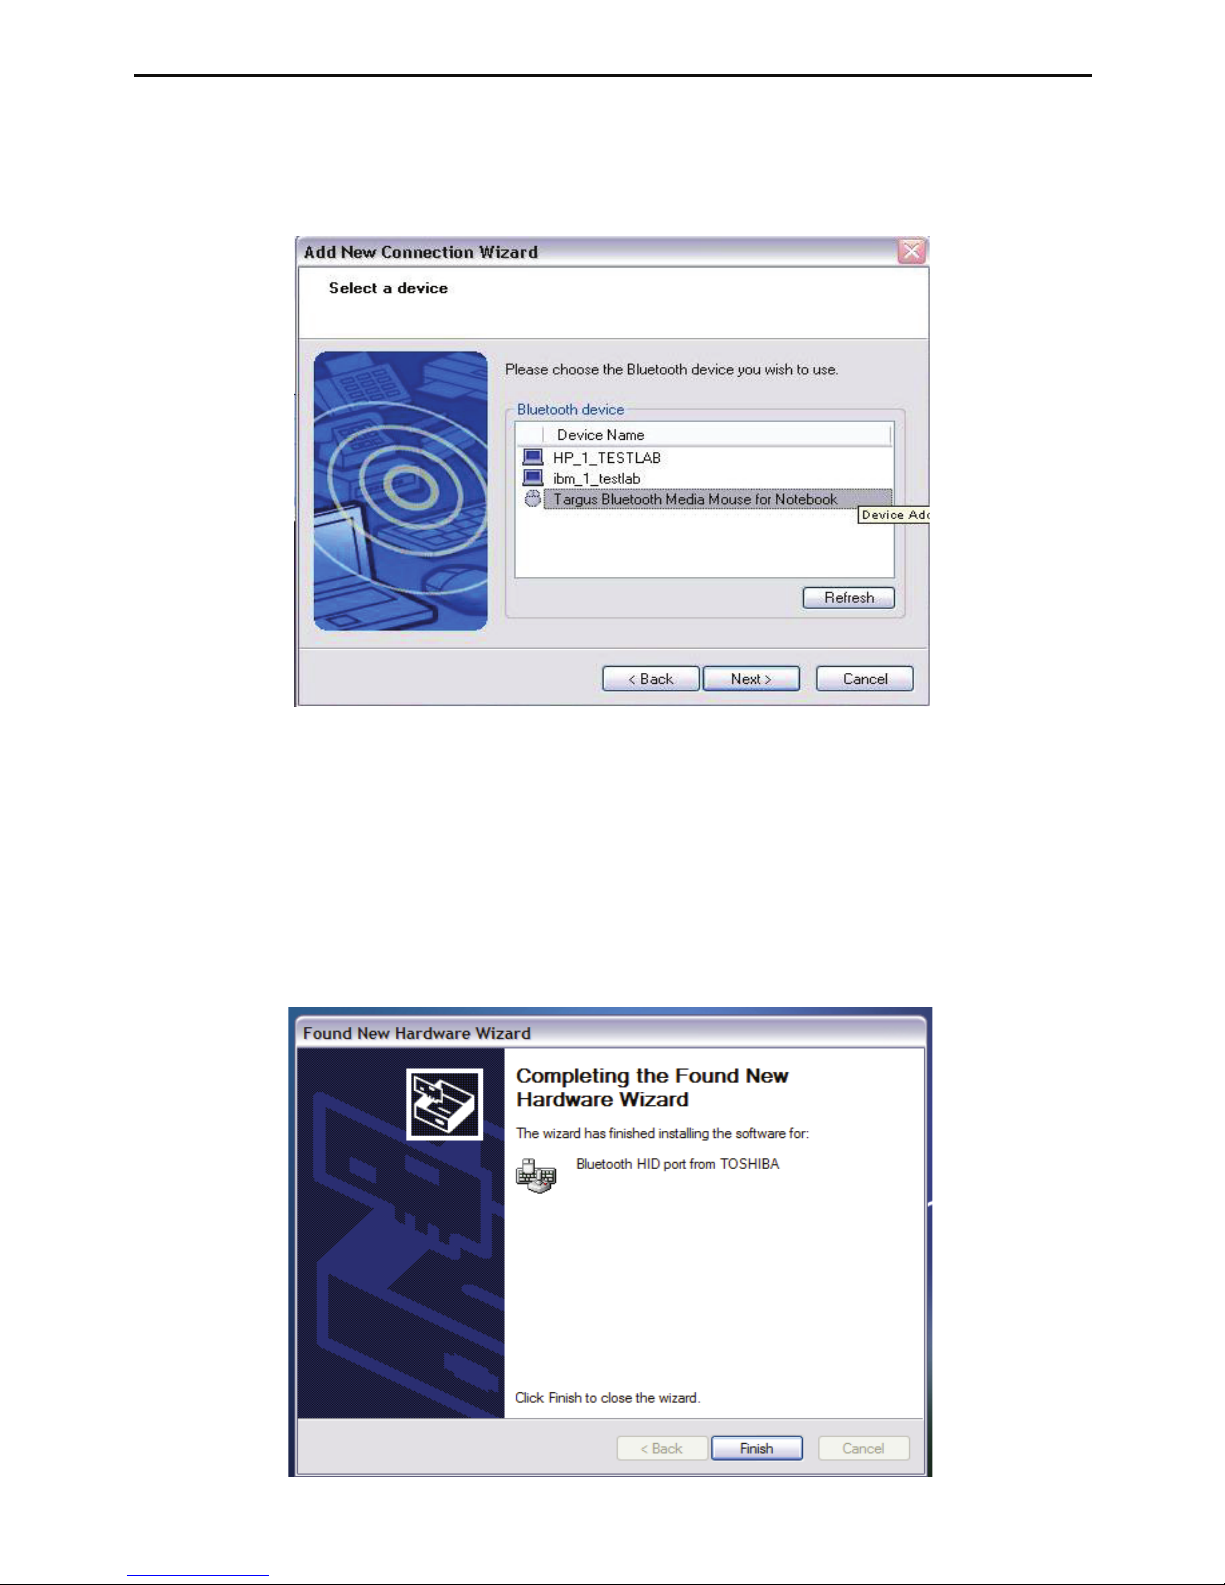
4. The computer will search for new Bluetooth accessories.
When it is finished, select the Targus Bluetooth Media Mouse
for Notebook. Click Next.
Page 7
7
TARGUS BLUETOOTH® MEDIA NOTEBOOK MOUSE
5. Installation setup will begin. Click Back to review or change
the current configuration. Click Next to begin installation.
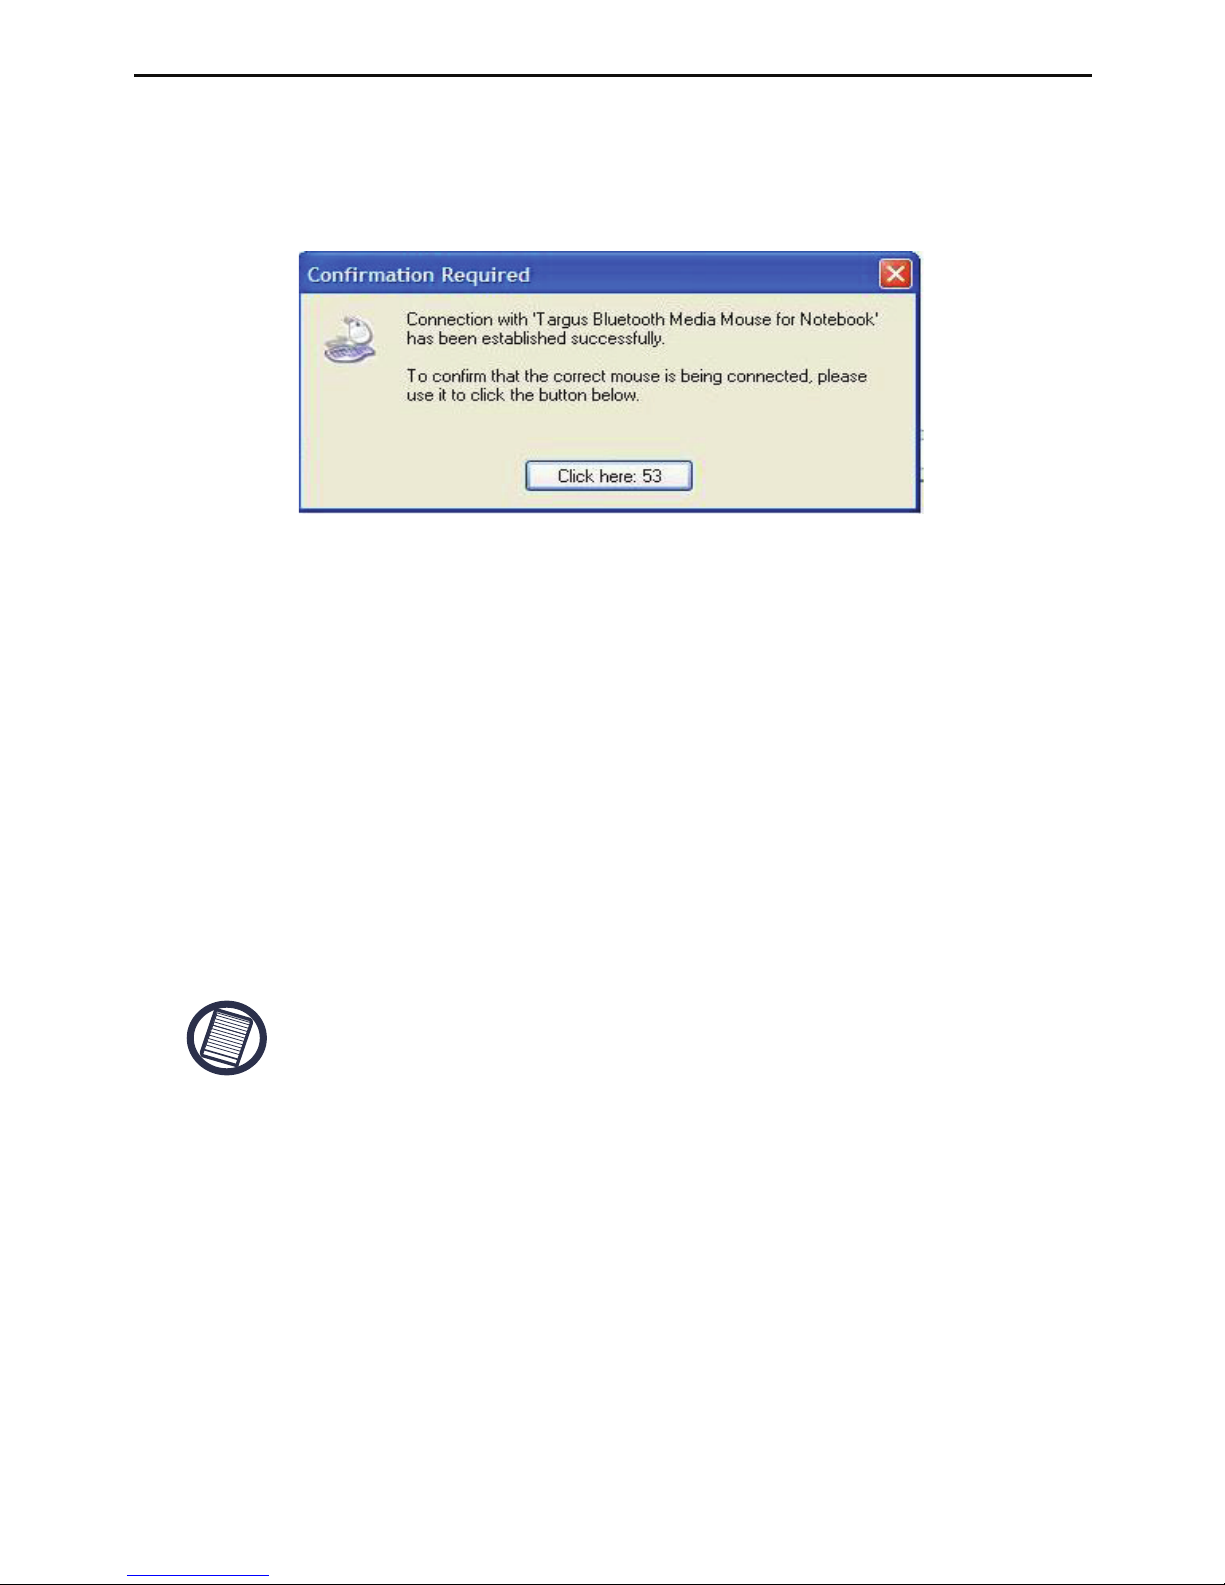
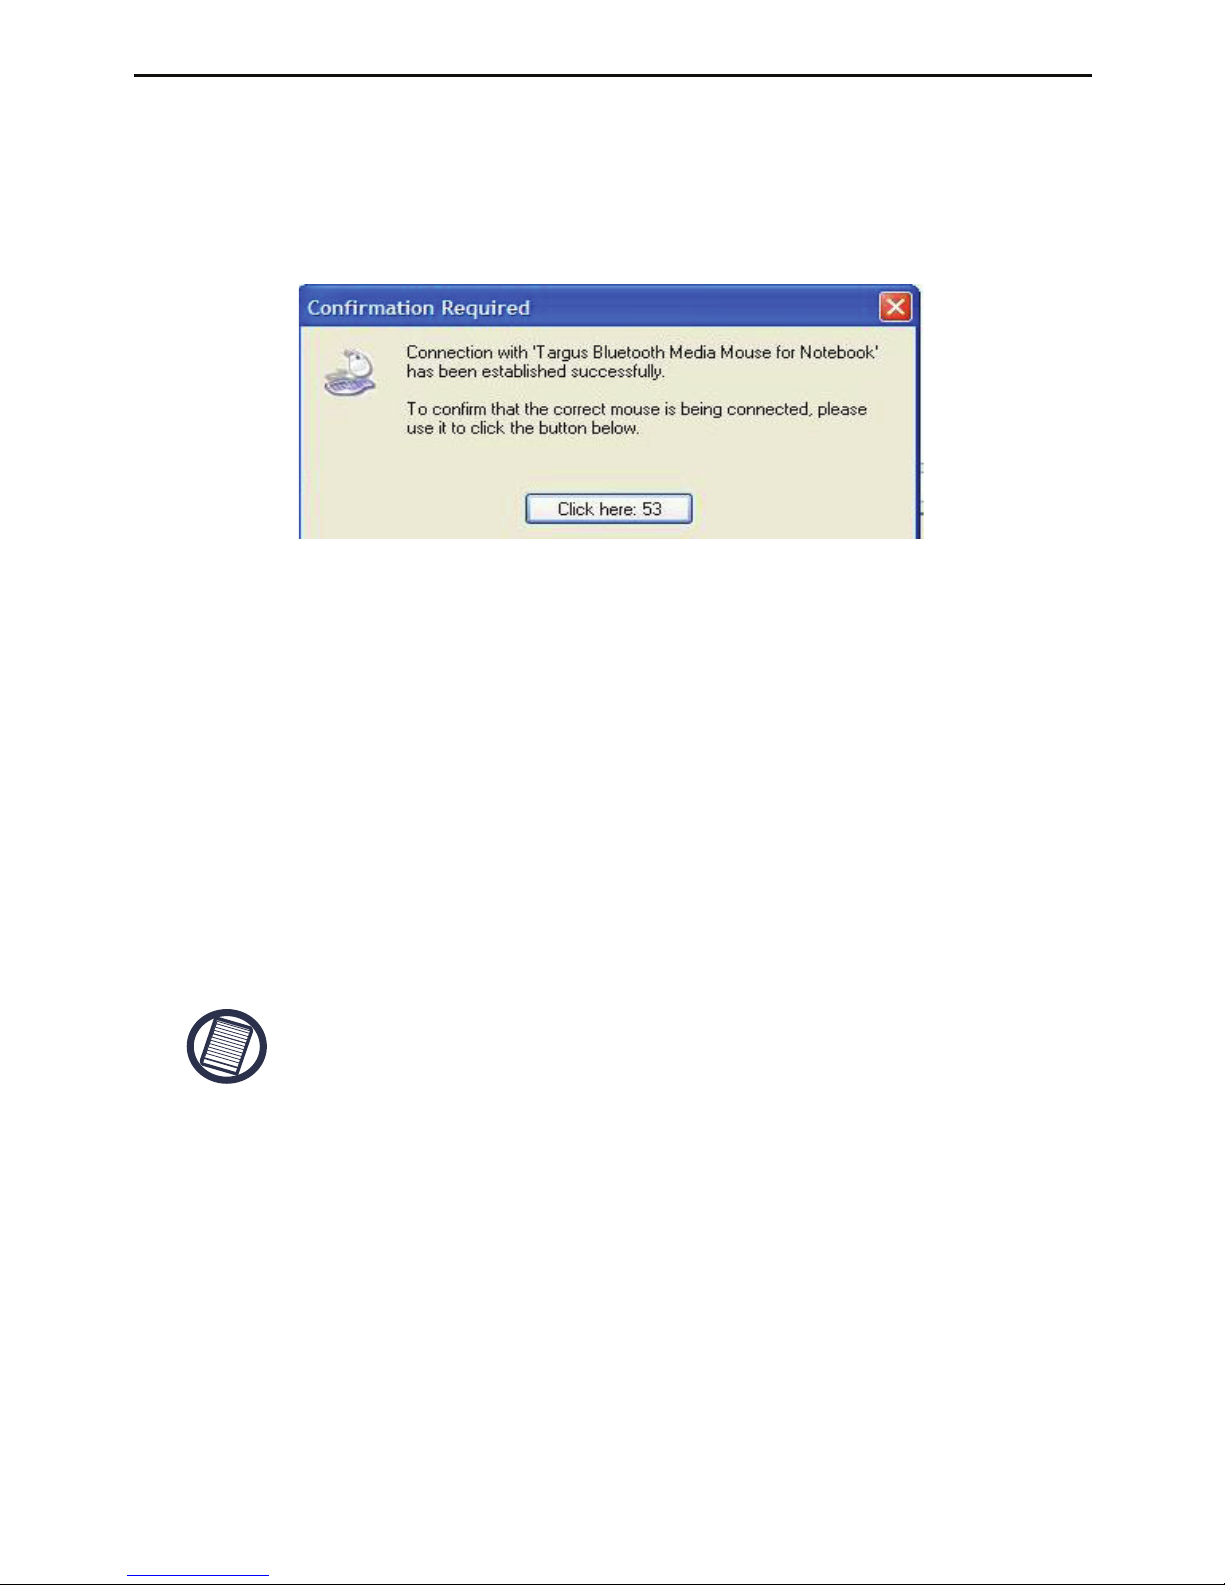
6. The confirmation window will appear as the system installs
the drivers. Click OK. When this is done, you can move the
cursor. Your Bluetooth Media Mouse has been successfully
installed.
Bluetooth Software: TOSHIBA
How to check your version of the Toshiba Bluetooth Stack
1. Launch the Bluetooth Manager.
2. Select the Help menu.
3. Select About.
NOTE: TO ENSURE OPTIMAL PERFORMANCE OF YOUR BLUETOOTH PRODUCT
YOU NEED TOSHIBA BLUETOOTH STACK V3.20.00 OR HIGHER. IF YOU HAVE A
DIFFRERENT VERSION PLEASE UPDATE IT FROM
WWW.SUPPORT.TOSHIBA.COM
Make sure the Bluetooth radio is turned on. If necessary,
check your computer’s manual to determine if the radio is
activated. To add the Targus mouse, proceed with the
following steps:
Page 8
8
TARGUS BLUETOOTH® MEDIA NOTEBOOK MOUSE
1. Double click on the Bluetooth Manager icon in the system
tray, and then click “New Connection.”
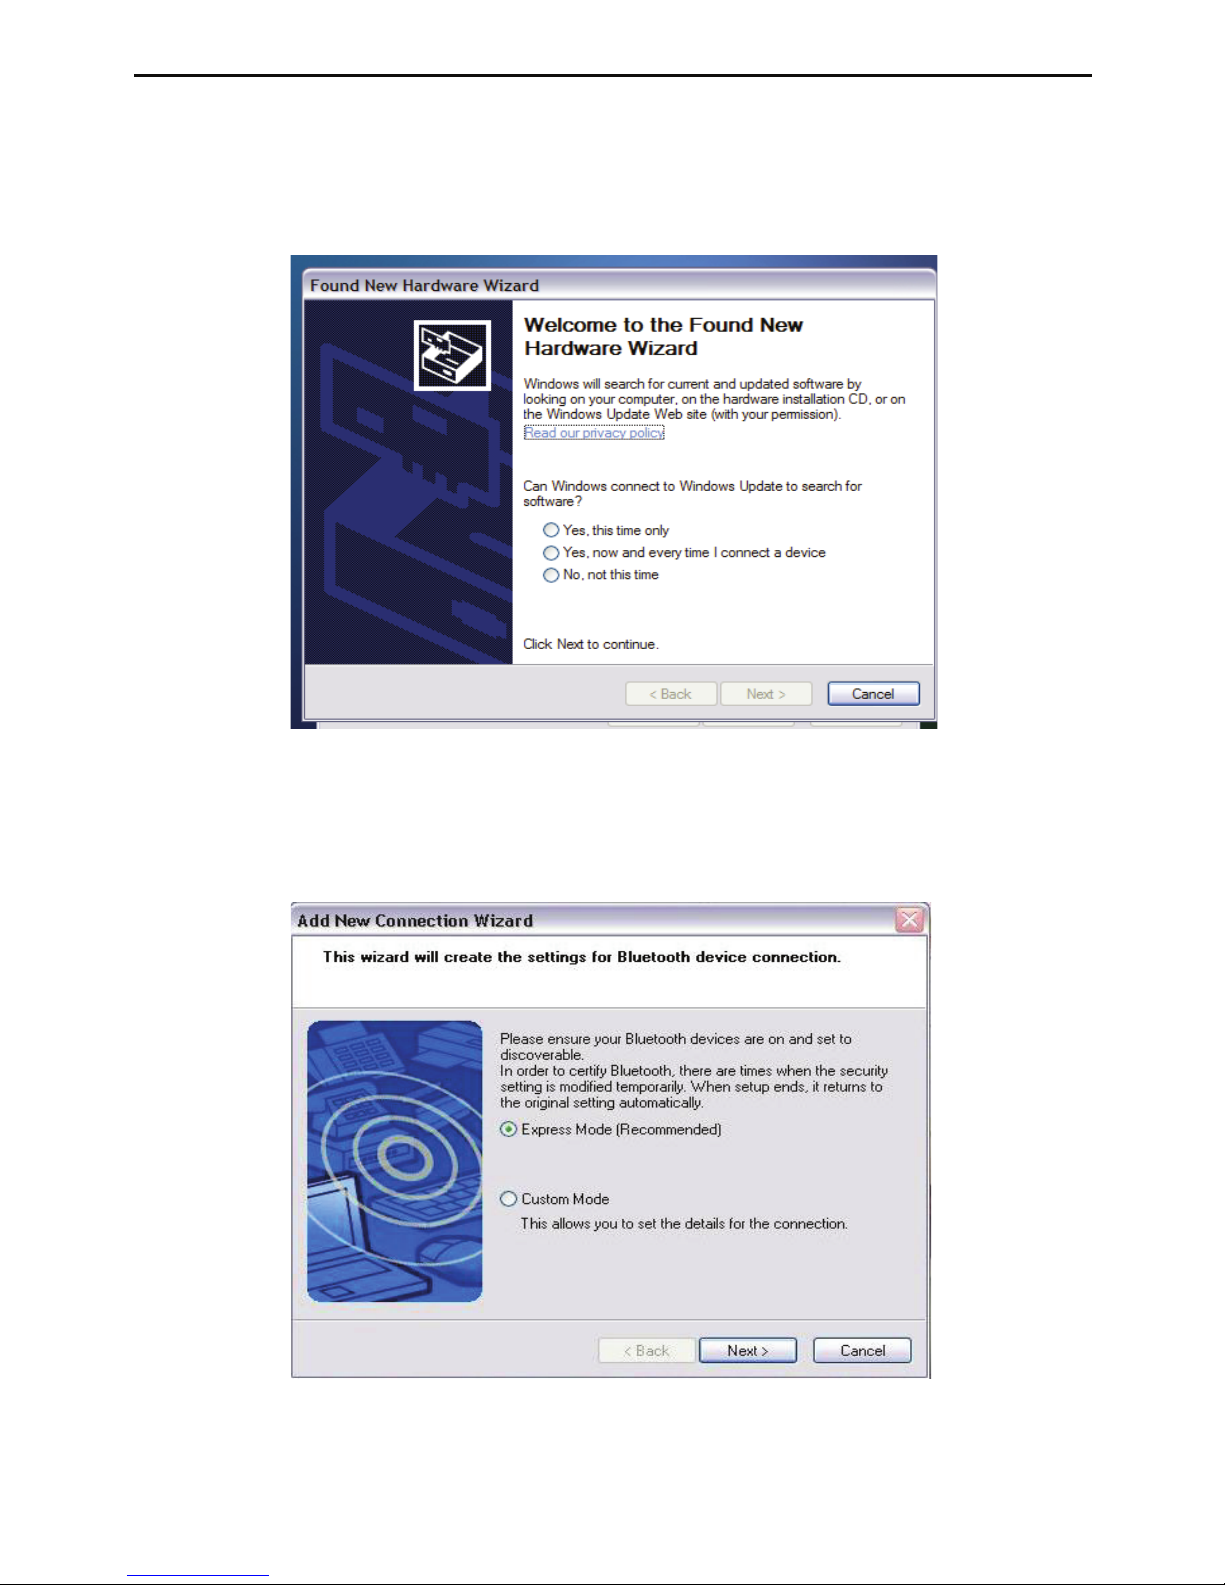
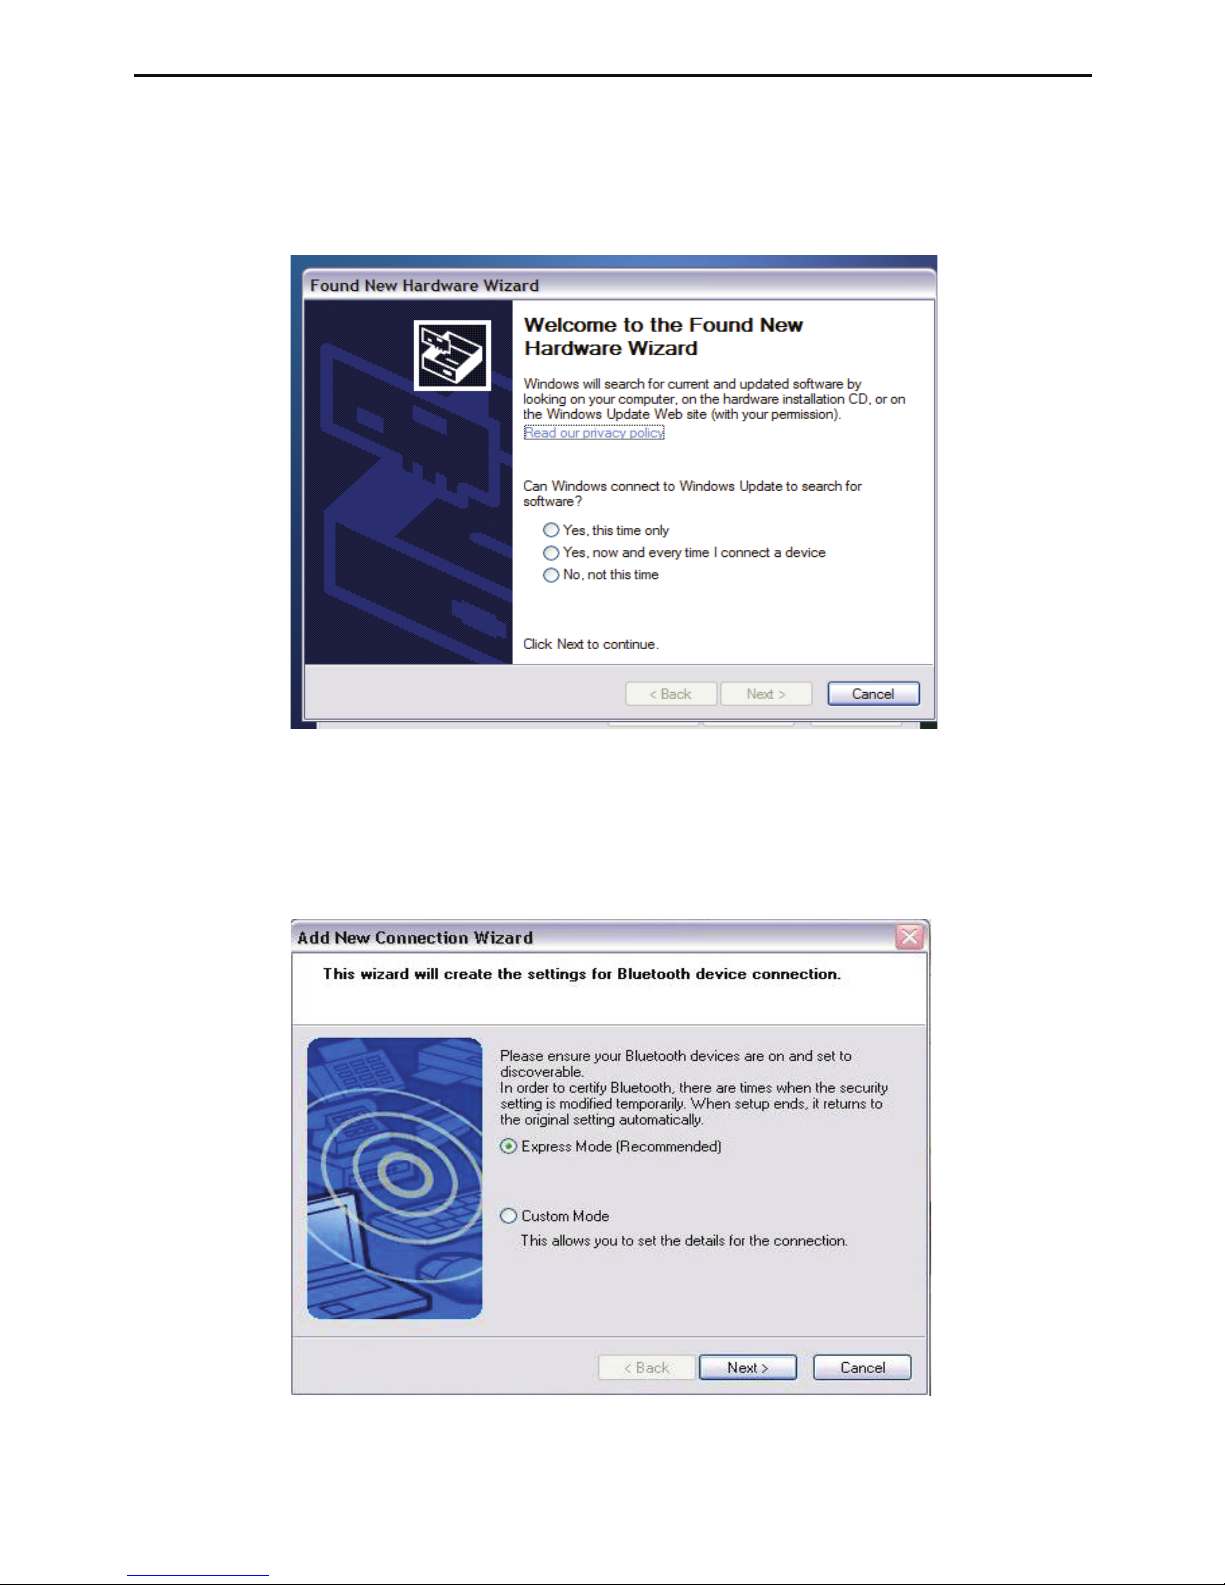
2. The Add New Connection Wizard window appears. Choose
the Express Mode and click Next.
3. Turn your mouse on. Press the connect button until the red
light sensor (at the bottom of the mouse) appears.
Page 9
9
TARGUS BLUETOOTH® MEDIA NOTEBOOK MOUSE
4. A List of devices will be shown, select the mouse and click
Next.
5. The system will install the necessary drivers.
6. After installation, the New Hardware Wizard window
appears. It will ask the user to connect to a Windows update.
Choose No.
7. Follow the onscreen instructions until finished.
Page 10
10
TARGUS BLUETOOTH® MEDIA NOTEBOOK MOUSE
Bluetooth Software: MICROSOFT
Make sure the Bluetooth radio is turned on. If necessary,
check your computer’s manual to determine if the radio is
activated. To add the Targus mouse, proceed with the
following steps:
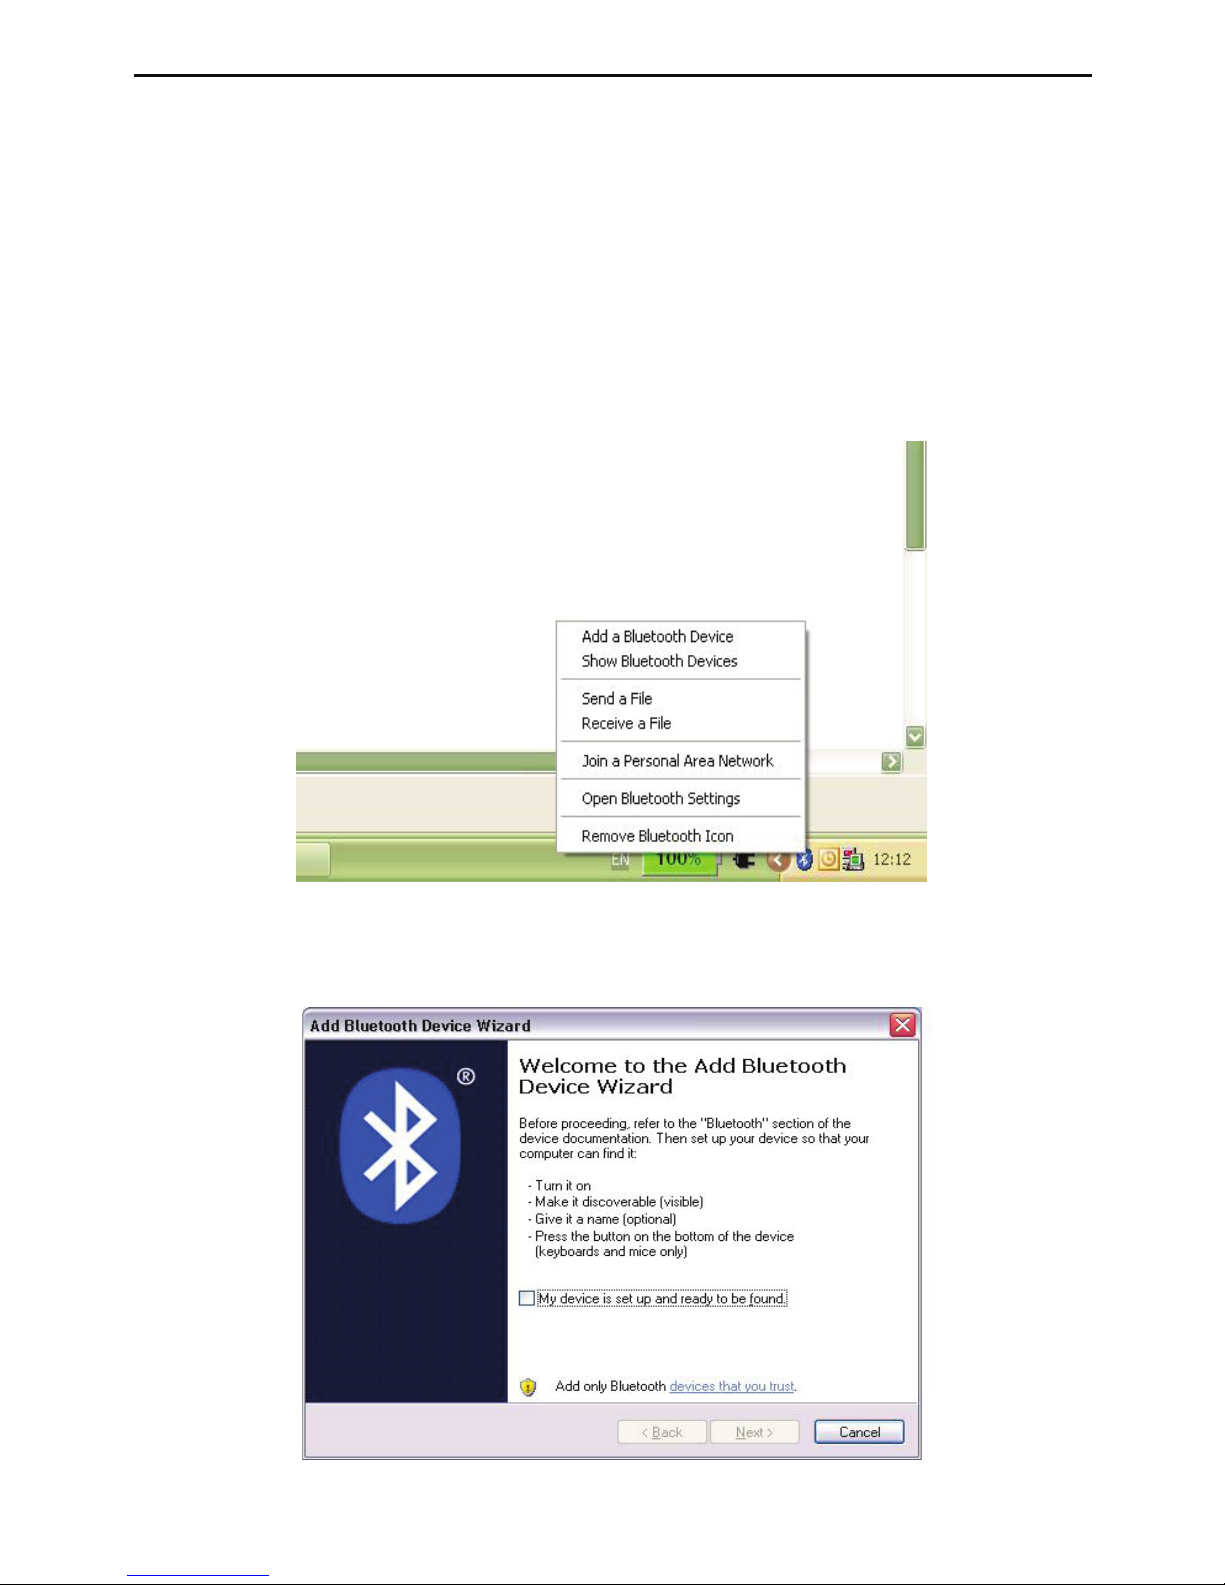
1. Double click on the Bluetooth Manager icon in the system
tray.
2. Select Add Bluetooth Device.
Page 11

11
TARGUS BLUETOOTH® MEDIA NOTEBOOK MOUSE
3. When the Add Bluetooth Device window comes up, check
the selection that says ‘My device is set up and ready to be
found.’ and click Next.
4. Turn your mouse on. Press the connect button until the red
light sensor (at the bottom of the mouse) appears.
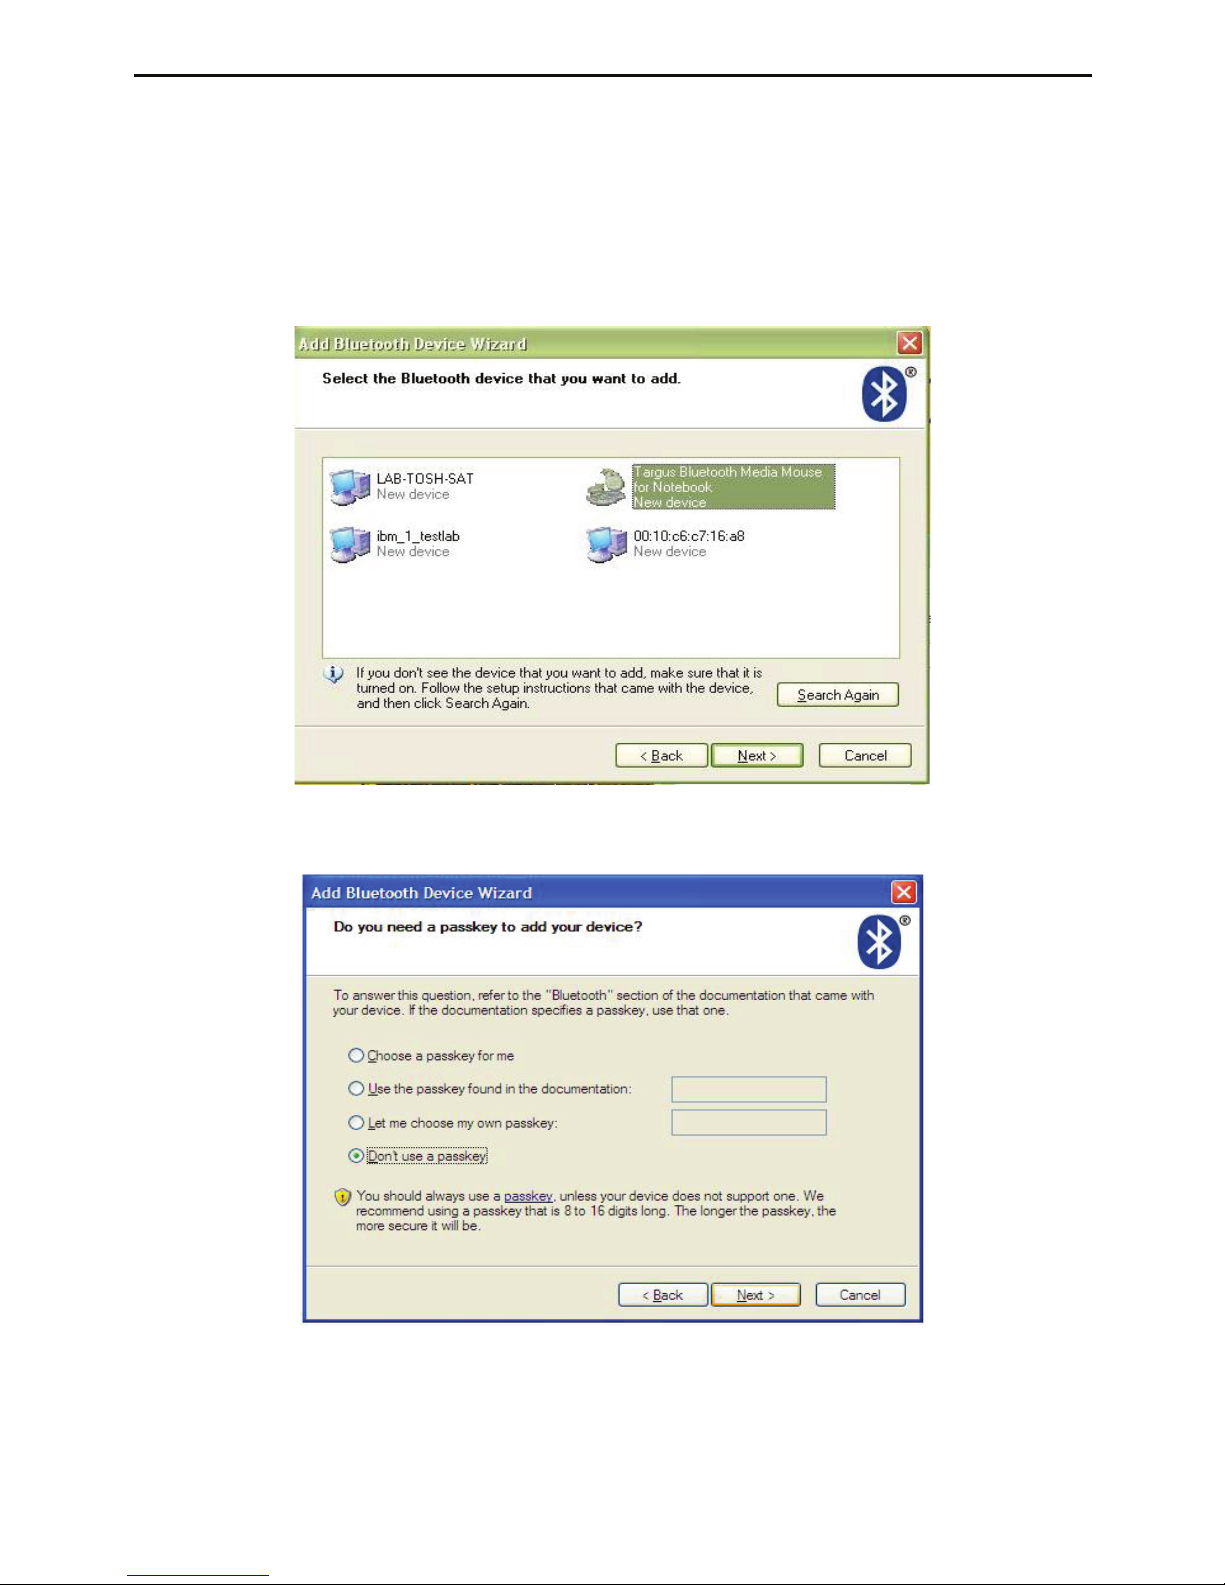
5. The software will detect a number of devices. Select the
mouse and click Next.
6. A window will appear asking for a passkey. Check the option
Don’t use a passkey and click Next.
7. Your mouse is now ready to use.
Page 12

12
TARGUS BLUETOOTH® MEDIA NOTEBOOK MOUSE
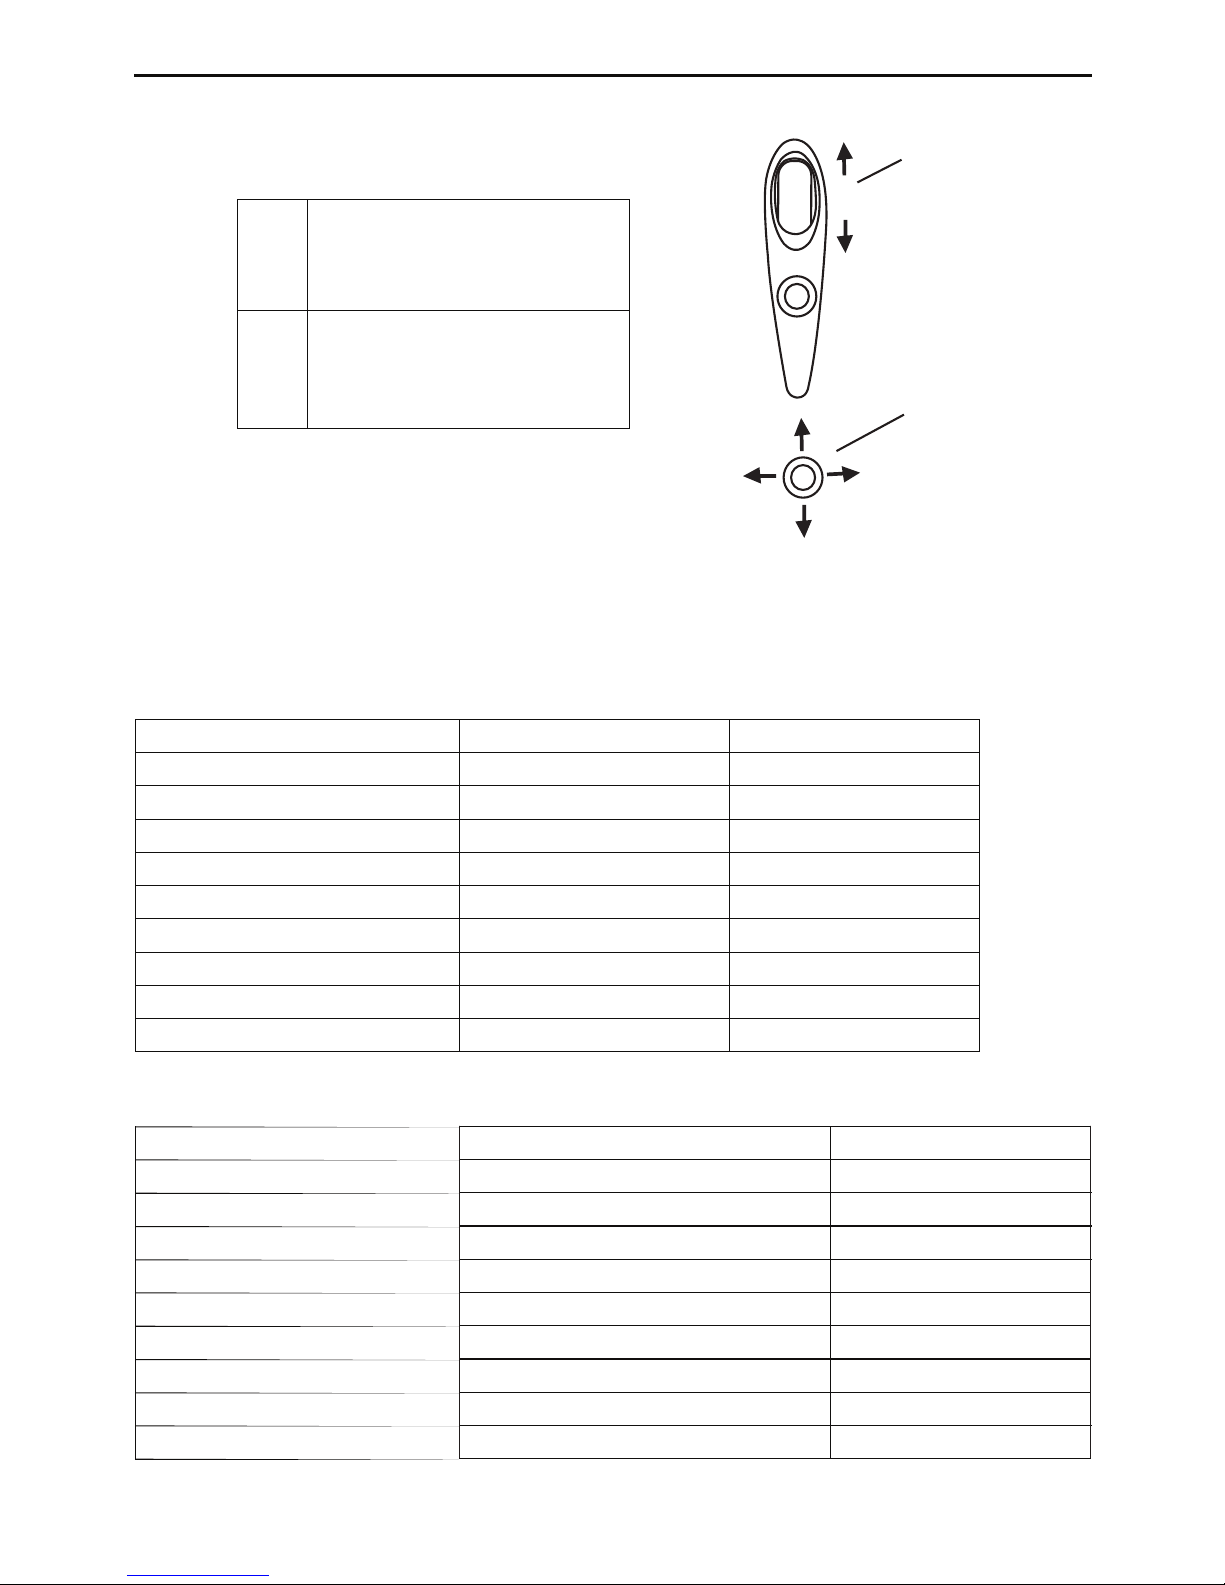
Operating Instructions
The mouse have 2 modes to define its Operation Commands:
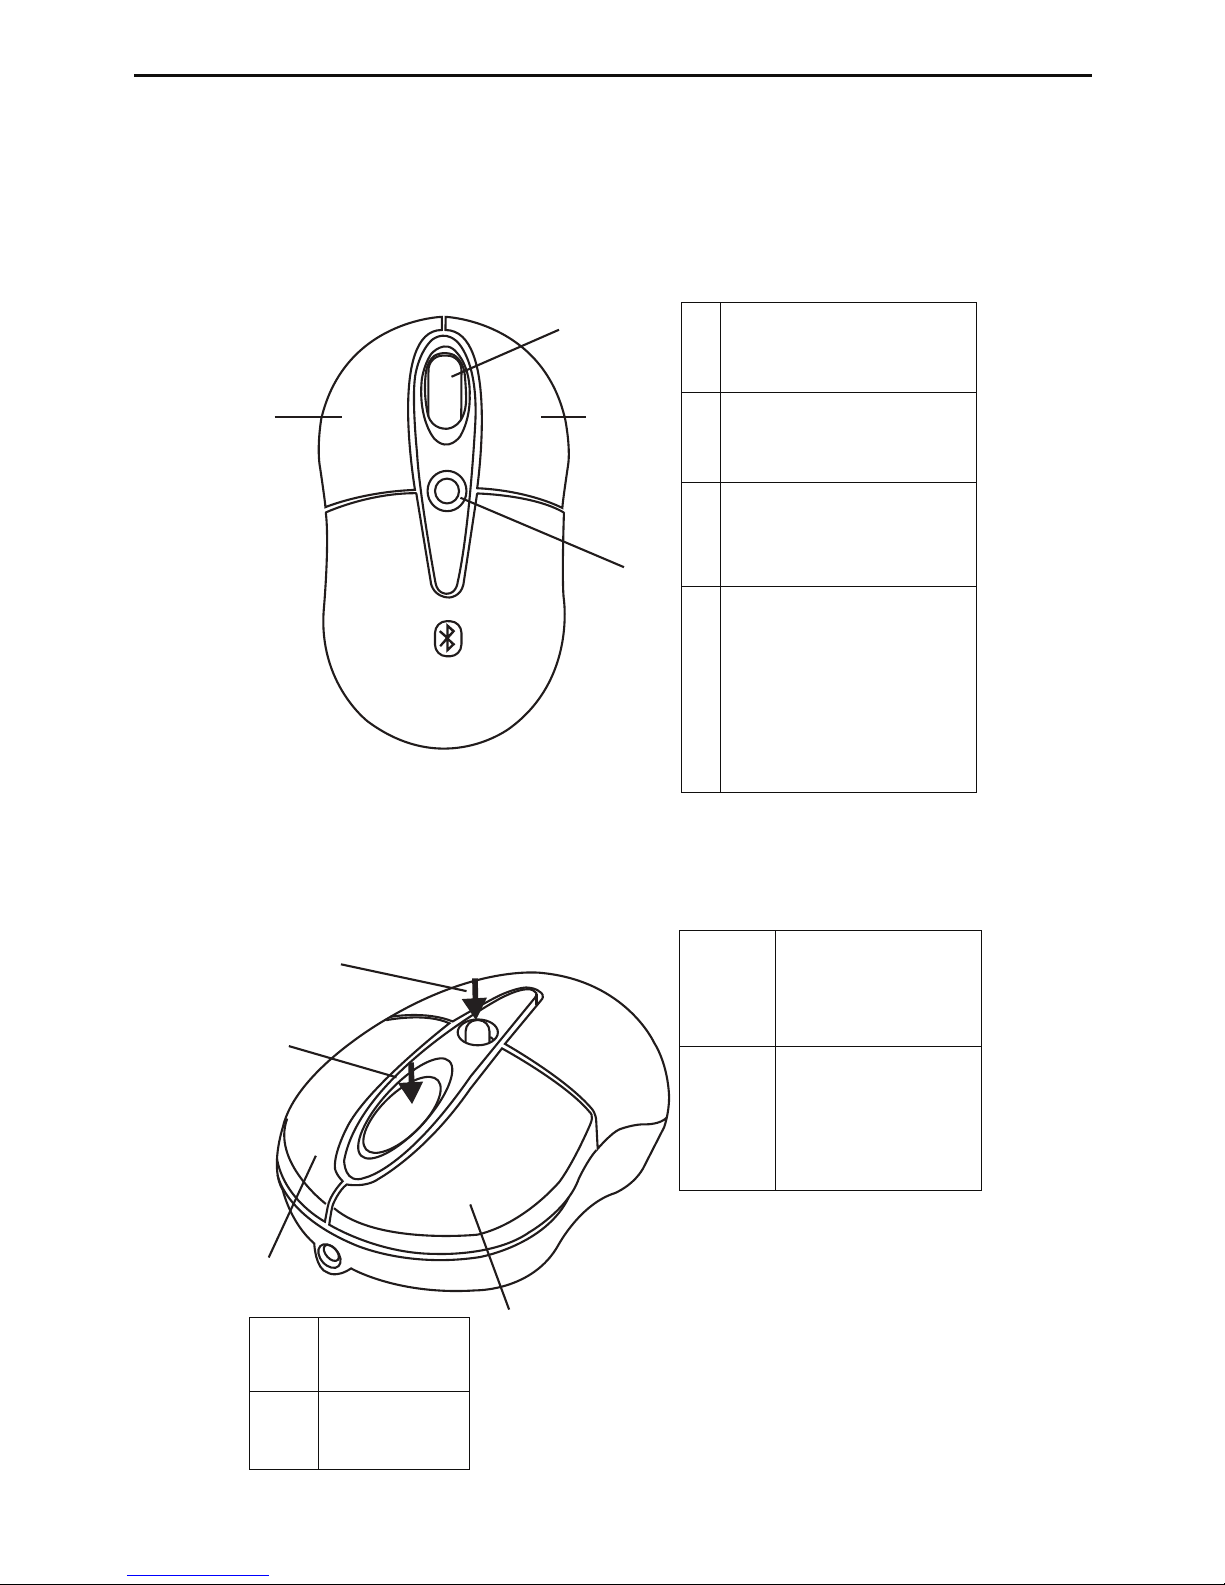
In Mouse Mode
A
B
C
D
A
Left Button: Left Click
B
Right Button: Rick Click
C
Scroller Wheel: Scroll
(mini steps) Function
Middle Button: Middle
Click
D
Joystick: Scroll up,
scroll down, scroll left,
scroll right (continuous
scrolling function). The
side way scrolls are
equivalent to
Microsoft’s tilt wheel
functions
E
F
E
Press Joystick
once, it brings up
the default media
player.
F
Press down the
scroller wheel, the
on-screen Help
Menu will show
up
H
G
G
Right Click:
Stop
H
Left Click:
Play / Pause
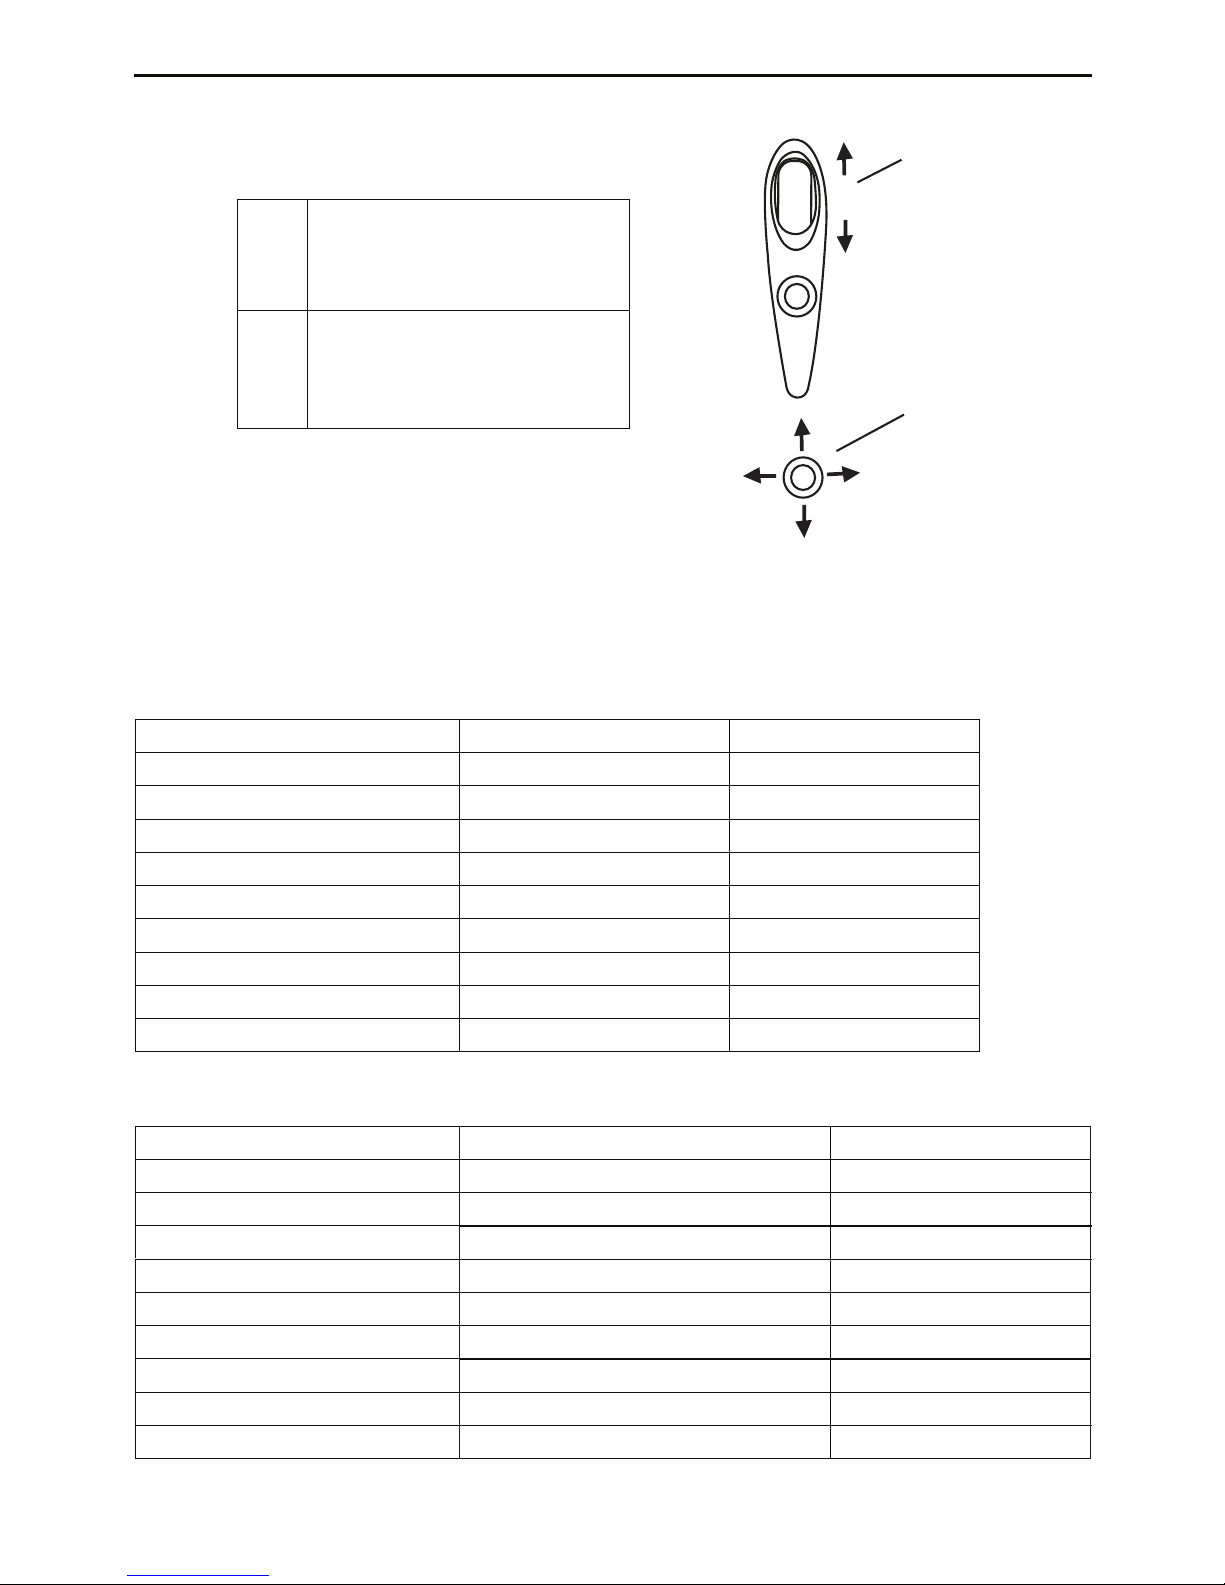
In Media Mode
Page 13
13
TARGUS BLUETOOTH® MEDIA NOTEBOOK MOUSE
I
J
I
Scroll up: to increase the audio
volume.
Scroll down: to decrease the
audio volume
J
Push up: Previous Track
Push down: Next Track
Push right: Fast Forward
Push left: Rewind
Media Players Compatibility
The mouse is compatible to the following Media Players:
Action iTunes v.6.0.1.3 Musicmatch v.10
Quintessential Player v.4.51 Real Player v.10.5
Play (Audio) X X
X X
Pause (Audio) X X
X X
Stop (Audio) X X
X X
Volume Up (Audio) X X
X X
Volume Down (Audio) X X
X X
Previous Track (Audio) X X
X X
Next Track (Audio) X X
X X
Fast Forward (Video) X
Rewind (Video) X
Action
Play (Audio)
Pause (Audio)
Stop (Audio)
Volume Up (Audio)
Volume Down (Audio)
Previous Track (Audio)
Next Track (Audio)
Fast Forward (Video)
Rewind (Video)
Page 14

TARGUS BLUETOOTH® MEDIA NOTEBOOK MOUSE
Windows Media Player v.10
X
X
X
X
X
X
X
X
Action
Play (Audio)
Pause (Audio)
Stop (Audio)
Volume Up (Audio)
Volume Down (Audio)
Previous Track (Audio)
Next Track (Audio)
Fast Forward (Video)
Rewind (Video)
NOTE: DEPENDING ON THE MEDIA PLAYERS’ SOFTWARE CAPABILITES, THE MOUSE
FUNCTIONALITIES CAN VARY.
INSTURCTIONS TO SET / CHANGE YOUR DEFAULT MEDIA PLAYER
• GO AND CLICK ON START BUTTON
• GO TO CONTROL PANEL, AND CHOOSE ADD/ REMOVE PROGRAM
• CLICK SET PROGRAM ACCESS AND DEFAULTS ON THE LEFT SIDE MENU. TO
PERSONALIZE, CHOOSE CUSTOM IN THE MAIN SCREEN
• CHOOSE YOUR DAULT PROGRAM FOR MEDIA PLAYER
• IF YOUR PREFERRED MEDIA PLAYER PROGRAM IS NOT ON THE LIST, CLICK HELP
FOR ASSISTANCE
Operating Hints
For optimal performance and RF reception:
• Avoid using the mouse on a metal surface. Metals, such as iron,
aluminum or copper, shield the radio frequency transmission and may
slow down the mouse response time or cause the mouse to fail
temporarily.
• The mouse will enter a suspend mode at the same time your
computer does. To activate the mouse, press any mouse button, and
bluelight will light up.
• If your computer has a metal case that contains aluminum or magne
sium, use the mouse to the side. The display panel may interfere with
the radio frequency signal if you use the mouse directly in front of your
computer.
• To maximize battery life, use the mouse on a white, or light colored
surface. Dark surfaces cause the mouse’s light emitter diode (LED)
light to glow brighter, which causes the battery to discharge more
rapidly.
14
Page 15
TARGUS BLUETOOTH® MEDIA NOTEBOOK MOUSE
15
Mouse Power Management
• To power the mouse on and off, slide the on/off switch at the bottom
of the mouse to the desired position.
• During the operation, the beauty of Power Saving feature allows the
mouse goes into “sleep mode” after 20 minutes
of inactivity. Click any mouse button to re-activate the mouse.
• To save battery power, turn off the mouse while traveling or while not
in use.
• Scroller Wheel will glow once the power is low. To recharge the
mouse, plug in the USB Recharging Cable to the mouse, and plug the
USB tip to the computer. The mouse is operational while charging.
Notebook
Desktop
For USB Recharging Cable
(Power Use ONLY)
ON OFF
Connect Button
On/Off Switch
Optical Sensor
Page 16

TARGUS BLUETOOTH® MEDIA NOTEBOOK MOUSE
16
Troubleshooting
The mouse is not working.
• Make sure that the polarity of the batteries is correct. The positive (+)
and negative (-) ends of each battery must match the positive (+) and
negative (-) connections in the battery housing.
• Verify that the computer is Bluetooth radio enabled.
• Verify that the device drivers are installed:
• Paired devices are always displayed in My Bluetooth Places, even if
the mouse is out of range or not powered up.
• Verify that the remote member of the pair is within range, and powered
up, and then attempt the connection again.
• Verify that batteries are properly installed. Recharge / Replace if
necessary.
1. Click Start/ Settings/ Control Panel/ System/ Hardware/ Device
Manager
2. Check under “Bluetooth Devices” that a “Targus Bluetooth Media
Notebook Mouse” is installed
The mouse does not work after it is paired with my Bluetooth
system.
Page 17

TARGUS BLUETOOTH® MEDIA NOTEBOOK MOUSE
17
Technical Support
For technical questions, please visit:
Internet http://www.targus.com/support.asp
English http://www.targus.com/uk/support.asp
French http://www.targus.com/fr/support.asp
German http://www.targus.com/de/support.asp
Spanish http://www.targus.com/sp/support.asp
Italian http://www.targus.com/it/support.asp
Our knowledgeable staff is also available to answer your
questions through one of the following telephone
numbers.
Austria 01 795 676 42
Belgium 02-717-2451
Denmark 45 35-25-87 51
Finland 922948016
France 01-6453-9151
Germany 0211-6579-1151
Italy 02-4827-1151
Netherlands 02 0504 0671
Norway 022577729
Portugal +351 21 415 4123
Spain 91 745 6221
Sweden 08-751-4058
Switzerland 01-212-0007
United Kingdom 020-7744-0330
Eastern Europe & others +31 0 20 5040671
Page 18

TARGUS BLUETOOTH® MEDIA NOTEBOOK MOUSE
18
Product Registration
Targus recommends that you register your Targus accessory
shortly after purchasing it. To register your Targus accessory, go
to: http://www.targus.com/registration.asp
You will need to provide your full name, email address, phone
number, and company information (if applicable).
Warranty
Targus warrants this product to be free from defects in materials
and workmanship for two years. If your Targus accessory is found
to be defective within that time, we will promptly repair or replace
it. This warranty does not cover accidental damage, wear and
tear, or consequential or incidental loss. Under no conditions is
Targus liable for loss of, or damage to a computer; nor loss of, or
damage to, programs, records, or data; nor any consequential or
incidental damages, even if Targus has been informed of their
possibility. This warranty does not affect your statutory rights.
Regulatory Compliance
This device complies with Part 15 of the FCC Rules. Operation is
subject to the following two conditions: (1) This device may not
cause harmful interference, and (2) This device must accept any
interference received, including interference that may cause
undesired operation.
FCC Statement
Tested to Comply
This equipment has been tested and found to comply with the
limits of a Class B digital device, pursuant to Part 15 of the FCC
Rules. These limits are designed to provide reasonable protection
against harmful interference in a residential installation. This
equipment generates, uses, and can radiate radio frequency
energy and if not installed and used in accordance with the
instructions, may cause harmful interference to radio
communications. However, there is no guarantee that
interference will not occur in a particular installation.
If this equipment does cause harmful interference to radio or
television reception, which can be determined by turning the
Page 19

TARGUS BLUETOOTH® MEDIA NOTEBOOK MOUSE
19
equipment off and on, the user is encouraged to try to correct the
interference by one or more of the following measures:
• Reorient or relocate the receiving antenna;
• Increase the separation between the equipment and receiver;
• Connect the equipment into an outlet on a circuit different from
that to which the receiver is connected;
• Consult the dealer or an experienced radio/TV technician for
help.
Declaration of Conformity
Hereby, Targus, declares that this device is in compliance with the
essential requirements and other relevant provisions of Directive
1999/5/EC.
Targus Recycling Directive
At the end of this product’s useful life please dispose at an
appropriate recycling collection point provided in your country.
Targus recycling policy is available for viewing at:
www.targus.com/recycling
Features and specifications subject to change without notice. All trademarks and
registered trademarks are the property of their respective owners.
WIDCOMM and the WIDCOMM logo are trademarks of WIDCOMM, Inc. Bluetooth
and the Bluetooth logo are trademarks owned by Bluetooth SIG, Inc., U.S.A. and
licensed to WIDCOMM, Inc..
Microsoft, Windows, and Outlook are registered trademarks of Microsoft
Corporation. All other trademarks and registered trademarks are the property of
their respective owners.
Page 20

20
TARGUS BLUETOOTH
®
MEDIA
NOTEBOOK-MAUS
Einleitung
Herzlichen Glückwunsch zum Kauf der Targus Bluetooth®
Media Notebook-Maus. Damit können Sie Ihr Notebook und
Standard-Mediaplayer in einem Abstand von max. 10 m
Systemvoraussetzungen
Hardware: Bluetooth-fähiges Notebook oder Desktop-PC
Betriebssystem: Windows® 2000 oder XP
Einlegen der Batterien
•Zwei aufladbare NiMH-Akkus der Größe AAA (im Lieferumfang enthalten) einsetzen
•Den Batteriefachdeckel oben an der Maus herunterschieben
•Die Batterien einsetzen und auf die richtige Polarität achten.
Die richtige Richtung wird im Batteriegehäuse durch ein
Plus- und Minuszeichen (+) bzw. (-) angezeigt.
ACHTUNG: BEIM BATTERIEWECHSEL IMMER NiMH BATTERIEN ODER ANDERE
AUFLADBARE BATTERIEN BENUTZEN. IN DIESEM GERÄT DÜRFEN KEINE ALKALINEBATTERIEN VERWENDET WERDEN. GEBRAUCHTE UND NEUE BATTERIEN NICHT
GEMISCHT VERWENDEN
Page 21
21
TARGUS BLUETOOTH® MEDIA NOTEBOOK MOUSE
ON OFF
Verbindungstaste
Schalter Ein/Aus
Optischer Sensor
Batteriefachdeckel
Batteriefächer
• Den Batteriefachdeckel wieder anbringen
• Zum Einschalten der Maus unten den Schalter auf Position
"on" stellen.
Erstkonfiguration
Bevor Sie die Bluetooth-Anbindungsfunktionen auf Ihrem
Computer und anderen Bluetooth-Geräten nutzen können,
müssen Sie das Gerät anhand bestimmter Arbeitsschritte von
Grund auf konfigurieren.
Die Targus Bluetooth Media Notebook-Maus wurde für die
drei verbreitetsten Software-Stack-Standards (Protokolle)
WIDCOMM, Toshiba und Microsoft konzipiert.
Prüfen Sie in der Dokumentation Ihres Computers, mit
welchem Software-Stack Ihr Computer arbeitet. Wenn das
System einen der oben genannten Bluetooth-SoftwareStandards nicht unterstützt, sollten Sie sich an einen
Fachhändler wenden.
Page 22

22
TARGUS BLUETOOTH® MEDIA NOTEBOOK MOUSE
Damit der Media-Modus dieser Class II Bluetooth-Maus
aktiviert werden kann, muss zunächst der Treiber für das
Mausrad installiert werden.
Installation des Mausradtreibers für
alle Software-Stack-Standards
(Protokolle)
Zum Aktivieren des Media-Modus der Targus Bluetooth
Media Notebook-Maus folgendermaßen vorgehen:
1. Legen Sie die Software-Installations-CD in den Computer.
2. Der Begrüßungsbildschirm wird geöffnet. Vor dem Start
der Installation sollten alle Windows-Programme beendet
worden sein. Klicken Sie auf Next (Weiter).
3. Wählen Sie den Ordner, in dem Sie den Maustreiber auf
dem Computer speichern und installieren möchten.
Klicken Sie dann auf Next (Weiter).
4. Die Installation wird nun gestartet. Klicken Sie auf Back
(Zurück), um die aktuelle Konfiguration noch einmal zu
prüfen oder zu ändern. Klicken Sie auf Next (Weiter), um
mit der Installation zu beginnen.
5. Nach Abschluss der Installation wird das Fenster zum
Beenden der Installation angezeigt. Wählen Sie “Yes, I
want to restart my computer now” (Computer jetzt neu
starten), damit das Programm genutzt werden kann.
Bluetooth-Software: WIDCOMM
Die Bluetooth-Funkkommunikation muss eingeschaltet sein.
Um festzustellen, ob die Funkkommunikation an Ihrem
Computer aktiviert ist, schlagen Sie ggf. im Handbuch Ihres
Computers nach. Anhand folgender Schritte paaren Sie die
Targus-Maus mit Ihrem Computer:
1. Doppelklicken Sie auf das Bluetooth Places-Symbol auf
dem Desktop oder in der Symbolleiste, und klicken Sie dann
auf den Bluetooth Setup Wizard (Bluetooth-
Installationsassistent).
Page 23
23
TARGUS BLUETOOTH® MEDIA NOTEBOOK MOUSE
2. Aktivieren Sie im Bluetooth Setup Wizard die Option “I want
to find a specific Bluetooh device and configure how this
computer will use its services” (Bestimmtes Bluetooth-Gerät
suchen und Computer für die Benutzung konfigurieren).
Klicken Sie auf Next (Weiter).
3. Schalten Sie die Maus ein. Drücken Sie die Verbindungstaste, bis die rote Lampe des Sensors (unter der Maus)
konstant leuchtet.
4. Der Computer sucht nun nach neuem Bluetooth-Zubehör.
Wählen Sie zum Abschluss die Targus Bluetooth Media
Mouse for Notebook aus. Klicken Sie auf Next (Weiter).
Page 24
24
TARGUS BLUETOOTH® MEDIA NOTEBOOK MOUSE
5. Die Installation wird nun gestartet. Klicken Sie auf Back
(Zurück), um die aktuelle Konfiguration noch einmal zu prüfen
oder zu ändern. Klicken Sie auf Next (Weiter), um mit der
Installation zu beginnen.
6. Zur Installation der Treiber wird das Bestätigungsfenster
angezeigt. Klicken Sie auf OK. Im Anschluss können Sie den
Cursor mit Ihrer Bluetooth Media Maus bewegen. Die
Software ist damit fehlerfrei installiert.
Bluetooth-Software: TOSHIBA
So überprüfen Sie Ihre Version des Toshiba Bluetooth-Stack
1. Starten Sie den Bluetooth Manager.
2. Wählen Sie das Menü Help (Hilfe).
3. Klicken Sie auf About (Info).
HINWEIS: ZUR OPTIMALEN NUTZUNG IHRES BLUETOOTH-PRODUKTS
BENÖTIGEN SIE TOSHIBA BLUETOOTH STACK V3.20.00 ODER HÖHER. WENN
SIE EINE ANDERE VERSION HABEN BITTE UNTER
WWW.SUPPORT.TOSHIBA.COM AKTUALISIEREN
Die Bluetooth-Funkkommunikation muss eingeschaltet sein.
Schlagen Sie ggf. im Handbuch Ihres Computers nach,
um festzustellen, ob die Funkkommunikation an Ihrem
Computer aktiviert ist. Anhand folgender Schritte paaren Sie
die Targus-Maus mit Ihrem Computer:
Page 25
25
TARGUS BLUETOOTH® MEDIA NOTEBOOK MOUSE
1. Doppelklicken Sie auf das Bluetooth Manager-Symbol in
der Taskleiste, und klicken Sie danach auf “New Connection”
(Neue Verbindung).
2. Das Fenster “Add New Connection Wizard “(Assistent für
neue Verbindungen) wird angezeigt. Wählen Sie den
Express Mode und klicken Sie auf Next (Weiter).
3. Schalten Sie die Maus ein. Drücken Sie die Verbindungstaste, bis die rote Lampe des Sensors (unter der Maus)
konstant leuchtet.
Page 26
26
TARGUS BLUETOOTH® MEDIA NOTEBOOK MOUSE
4. Eine Geräteliste wird nun angezeigt. Wählen Sie die Maus
und klicken Sie auf Next (Weiter).
5. Die erforderlichen Treiber werden installiert.
6. Nach der Installation erscheint das Fenster New Hardware
Wizard (Hardwareassistent). Sie werden zu einer Verbindung
mit dem Windows Updateserver aufgefordert. Klicken Sie auf
NO (Nein).
7. Folgen Sie bis zum Schluss den Anweisungen auf dem
Bildschirm.
Page 27

27
TARGUS BLUETOOTH® MEDIA NOTEBOOK MOUSE
Bluetooth-Software: MICROSOFT
Die Bluetooth-Funkkommunikation muss eingeschaltet sein.
Um festzustellen, ob die Funkkommunikation an Ihrem
Computer aktiviert ist, schlagen Sie ggf. im Handbuch Ihres
Computers nach. Anhand folgender Schritte paaren Sie die
Targus-Maus mit Ihrem Computer:
1. Doppelklicken Sie auf das Bluetooth Manager-Symbol in
der Taskleiste.
2. Klicken Sie auf Add Bluetooth Device (Bluetooth-Gerät
hinzufügen).
Page 28
28
TARGUS BLUETOOTH® MEDIA NOTEBOOK MOUSE
3. Wenn das Fenster Add Bluetooth Device angezeigt wird, aktivieren
Sie die Option "My device is set up and ready to be found" (Mein Gerät
ist eingerichtet und kann gesucht werden). Klicken Sie danach auf
Next (Weiter).
4. Schalten Sie die Maus ein. Drücken Sie die Verbindungstaste, bis
die rote Lampe des Sensors (unter der Maus) konstant leuchtet.
5. Die Software ermittelt eine Reihe von Geräten. Wählen Sie die
Maus, und klicken Sie auf Next (Weiter).
6. Anschließend werden Sie zur Eingabe eines Passkey (ID-
/Kennwortkombination) aufgefordert. Aktivieren Sie die Option Don’t
use a passkey (Kein Kennwort verwenden), und klicken Sie auf Next
(Weiter).
7. Ihre Maus ist nun einsatzbereit.
Page 29
29
TARGUS BLUETOOTH® MEDIA NOTEBOOK MOUSE
Bedienung
Die Maus bietet 2 Modi zur Festlegung der Bedienbefehle:
Im Mausmodus
A
B
C
D
A
B
C
D
E
F
E
F
H
G
G
H
Im Media-Modus
Linke Maustaste: links
klicken
Rechte Maustaste: rechts
klicken
Mausrad: Bildlauf
(in kleinen Schritten)
Funktion Mittlere Taste:
Mitte Klicken
Joystick: Bildlauf nach oben,
Bildlauf nach unten, Bildlauf nach
links,
Bildlauf nach rechts
(ununterbrochener
Bildlauf). Die
seitlichen Bildläufe sind
vergleichbar mit der
Mausradsteuerung von Microsoft
Joystick einmal
drücken zum Aufruf
des Standard-Media
Players.
Das Mausrad
drücken, um die
Onlinehilfe
aufzurufen
Rechts klicken:
Stopp
Links klicken:
Wiedergabe /
Pause
Page 30
30
TARGUS BLUETOOTH® MEDIA NOTEBOOK MOUSE
I
J
I
J
Kompatibilität mit Media Playern
Die Maus ist mit folgenden Media-Funktionen kompatibel:
Funktion iTunes v.6.0.1.3 Musicmatch v.10
Quintessential Player v.4.51 Real Player v.10.5
Wiedergabe (Audio) X X
X X
Pause (Audio) X X
X X
Stopp (Audio) X X
X X
Lauter (Audio) X X
X X
Leiser (Audio) X X
X X
Vorheriger Titel
(Audio)
X X
X X
Nächster Titel (Audio) X X
X X
Schnellvorlauf (Video) X
Zurückspulen (Video) X
Bildlauf nach oben:
Wiedergabe lauter.
Bildlauf nach unten:
Wiedergabe leiser
Nach oben drücken: Vorheriger Titel
Nach unten drücken: Nächster Titel
Nach rechts drücken: Schnellvorlauf
Nach links drücken: Zurückspulen
Funktion
Wiedergabe (Audio)
Pause (Audio)
Stopp (Audio)
Lauter (Audio)
Leiser (Audio)
Vorheriger Titel
(Audio)
Nächster Titel (Audio)
Schnellvorlauf (Video)
Zurückspulen (Video)
Page 31

TARGUS BLUETOOTH® MEDIA NOTEBOOK MOUSE
Windows Media Player v.10
X
X
X
X
X
X
X
X
HINWEIS: ABHÄNGIG VON DEN SOFTWAREFUNKTIONEN DES JEWEILIGEN MEDIA
PLAYERS IST AUCH DER FUNKTIONSUMFANG DER MAUS UNTERSCHIEDLICH.
EINSTELLEN/ÄNDERN DES STANDARD-MEDIA-PLAYERS
• KLICKEN SIE AUF DIE START-TASTE.
• KLICKEN SIE AUF SYSTEMSTEUERUNG, UND WÄHLEN SIE SOFTWARE.
• KLICKEN SIE IN DER LINKEN MENÜSEITE AUF PROGRAMMZUGRIFF UND
STANDARDS FESTLEGEN. ZUR AUSWAHL EINER EIGENEN KONFIGURATION WÄHLEN
SIE IM HAUPTFENSTER DEN EINTRAG BENUTZERDEFINIERT AUS.
• WÄHLEN SIE DAS GEWÜNSCHTE STANDARDPROGRAMM FÜR MEDIAPLAYER AUS:
• WENN IHR PERSÖNLICHES MEDIAPLAYERPROGRAMM NICHT AUFGELISTET IST;
KÖNNEN SIE ÜBER DIE HILFE WEITERE UNTERSTÜTZUNG ANFORDERN.
Tipps für den Betrieb
Optimale Leistung und HF-Empfang:
• Die Maus nicht auf einer Metallfläche benutzen. Metalle wie Eisen,
Aluminium oder Kupfer schirmen die Signalübertragung ab und
verlangsamen die Reaktionszeit der Maus oder bringen den Maus betrieb vorübergehend zum Stillstand.
• Sobald Ihr Computer in den Ruhezustand übergeht, schaltet auch die
Maus auf Ruhemodus um. Zum Aktivieren der Maus einfach eine
beliebige Maustaste drücken. Die Mauslampe leuchtet dann wieder
auf.
• Wenn Ihr Computergehäuse ein Metall mit Aluminium- oder Magne
sium-anteilen enthält, muss die Maus seitlich davon benutzt werden.
Die Funkfrequenz des Bluetooth-Signals kann von der Bildschirman zeige gestört werden, wenn die Maus direkt vor dem Computer
benutzt wird.
• Damit die Batterie möglichst lange hält, sollten Sie die Maus auf einer
Unterlage mit weißer oder heller Farbe benutzen. Bei einer dunklen
Unterlage leuchtet die LED-Lampe der Maus heller, benötigt mehr
Strom und entlädt die Batterie daher schneller.
31
Funktion
Wiedergabe (Audio)
Pause (Audio)
Stopp (Audio)
Lauter (Audio)
Leiser (Audio)
Vorheriger Titel (Audio)
Nächster Titel (Audio)
Schnellvorlauf (Video)
Zurückspulen (Video)
Page 32

TARGUS BLUETOOTH® MEDIA NOTEBOOK MOUSE
32
Stromsparfunktion der Maus
• Mit dem Ein-/Ausschalter auf der Unterseite der Maus kann sie ein und ausgeschaltet werden.
• Im eingeschalteten Zustand schaltet der Stromsparmodus die Maus
nach 20 Minuten auf Energiesparbetrieb um. Zum Reaktivieren der
Maus einfach mit einer beliebigen Maustaste klicken.
• Zum Batterie Sparen sollten Sie die Maus ausschalten,
wenn Sie auf Reisen sind oder die Maus nicht benötigen.
• Das Mausrad leuchtet, sobald der Batteriestatus knapp wird. Zum
Aufladen der Maus das USB-Ladekabel an die Maus und den USB Stecker an den Computer anschließen. Während des Aufladens kann
die Maus benutzt werden.
Notebook
Desktop
Für USB-Ladekabel
(NUR Netzbetrieb)
ON OFF
Verbindungstaste
Schalter Ein/Aus
Optischer Sensor
Page 33

TARGUS BLUETOOTH® MEDIA NOTEBOOK MOUSE
33
Fehlerbehebung
Die Maus funktioniert nicht.
• Überprüfen, ob die Polarität der Batterien stimmt. Die Plusseite (+)
und die Minusseite (-) der Batterie muss im Batteriegehäuse jeweils
am Plusanschluss (+) und am Minusanschluss (-) anliegen.
• Nachprüfen, ob die Bluetooth-Funkkommunikation am Computer
aktiviert ist.
• Prüfen, ob die Gerätetreiber installiert sind:
• Gerätepaare werden immer unter My Bluetooth Places (Bluetooth Geräte) angezeigt, auch wenn die Maus den Empfangsradius
verlassen hat oder ausgeschaltet ist.
• Nachprüfen, ob sich das entfernte Funkgerät noch im Funkradius
befindet und eingeschaltet ist. Danach erneut versuchen, eine
Verbindung herzustellen.
• Prüfen, ob die Batterien richtig eingesetzt sind. Gegebenenfalls
aufladen bzw. ersetzen.
1. Klicken Sie auf
Start/Einstellungen/Systemsteuerung/System/Hardware/GeräteManager.
2. Stellen Sie unter “Bluetooth-Geräte” fest, ob eine “Targus Bluetooth
Media Notebook Mouse” installiert ist.
Die Maus funktioniert nach erfolgter Suche in meinem
Bluetooth-System nicht.
Page 34

TARGUS BLUETOOTH® MEDIA NOTEBOOK MOUSE
34
Technische Unterstützung
Wenn Sie technische Fragen haben, besuchen Sie bitte:
Internet http://www.targus.com/support.asp
Englisch http://www.targus.com/uk/support.asp
Französisch http://www.targus.com/fr/support.asp
Deutsch http://www.targus.com/de/support.asp
Spanisch http://www.targus.com/sp/support.asp
Italienisch http://www.targus.com/it/support.asp
Unser Expertenteam steht Ihnen auch telefonisch zur
Beantwortung Ihrer Fragen zur Verfügung.
Belgien 02-717-2451
Dänemark 45 35-25-87 51
Finnland 922948016
Frankreich 1-6453-9151
Deutschland 0211-6579-1151
Italien 02 4827-1151
Niederlande 02 0504 0671
Norwegen 022577729
Österreich 01 795 676 42
Portugal +351 21 415 4123
Spanien 91-745-6221
Schweden 08-751-4058
Schweiz 1-212-0007
Großbritannien 020-7744-0330
Osteuropa & sonstige Länder +31 (0) 20-5040671
Page 35

TARGUS BLUETOOTH® MEDIA NOTEBOOK MOUSE
35
Produktregistrierung
Targus empfiehlt die Registrierung des Targus-Zubehörs sofort
nach dem Kauf. Die Registrierung von Targus-Zubehör erfolgt
unter: http://www.targus.com/registration.asp
Geben Sie bitte Ihren vollständigen Namen, Ihre E-Mail-Adresse,
Telefonnummer und Firmeninformationen an (falls zutreffend).
Garantie
Targus garantiert zwei (2) Jahre lang, dass Zubehör von Targus
frei von Fehlern im Material und in der Verarbeitung ist. Erweist
sich Ihr Targus-Zubehör während dieser Zeit als fehlerhaft, wird
es umgehend repariert oder ersetzt. Diese Garantie deckt weder
zufällige oder mittelbare Schäden, noch Abnutzung oder
Verschleiß ab. Unter keinen Umständen haftet Targus für Verlust
oder Schäden an Computern bzw. für Verlust oder Schäden an
Programmen, Aufzeichnungen oder Daten. Targus haftet auch
nicht für mittelbare oder zufällige Schäden, selbst wenn Targus
über deren Möglichkeit informiert wurde. Diese Garantie hat
keinen Einfluss auf Ihre gesetzlichen Rechte.
Behördliche Genehmigungen/
Zulassungen
Dieses Gerät erfüllt die Voraussetzungen von Teil 15 der FCCRegeln. Der Betrieb unterliegt den folgenden beiden
Bedingungen: (1) Dieses Gerät darf keine störenden
Interferenzen verursachen, und (2) dieses Gerät muss alle
empfangenen Interferenzen aufnehmen, einschließlich
Interferenzen, die ein unerwünschtes Betriebsverhalten
verursachen können.
FCC-Bescheinigung
Auf Konformität getestet
Dieses Gerät wurde getestet und ist mit den Grenzwerten eines
digitalen Geräts der Klasse B (gemäß Teil 15 der FCC-Regeln)
konform. Diese Grenzwerte wurden zur Gewährleistung eines
angemessenen Schutzes gegen störende Interferenzen bei einer
Installation in Wohngebieten erstellt. Dieses Gerät erzeugt und
nutzt RF-Energie und kann diese abstrahlen. Bei
Page 36

TARGUS BLUETOOTH® MEDIA NOTEBOOK MOUSE
36
unsachgemäßer Installation und einer Verwendung, die nicht
gemäß den Anweisungen erfolgt, können störende Interferenzen
in der Radiokommunikation auftreten. Es liegt jedoch keine
Garantie vor, dass bei bestimmten Installationen keine
Interferenzen auftreten.
Falls dieses Gerät beim Radio- oder Fernsehempfang störende
Interferenzen verursacht, was durch ein Aus- und Einschalten
des Geräts festgestellt werden kann, sollte der Benutzer
versuchen, die Interferenzen anhand einer oder mehrerer der
folgenden Maßnahmen zu beseitigen:
• Die Distanz zwischen Ausrüstung und Empfänger vergrößern.
• Die Ausrüstung an eine Steckdose mit einem anderen
Stromkreis als dem des Empfängers anschließen.
• Für persönliche Unterstützung wenden Sie sich bitte an Ihren
Händler oder einen erfahrenen Radio/TV-Techniker.
Konformitätserklärung
Hiermit erklärt Targus, dass sich das Gerät in Übereinstimmung
mit den grundlegenden Anforderungen und den übrigen
einschlägigen Bestimmungen der Richtlinie 1999/5/EG befindet.
Dieses Gerät hat einen niedrigen Energiebedarf. Gerät ist nur für
Büro und häuslichen Bereich bestimmt. Dieses Produkt kann in
allen CE Ländern verwendet werden.
Targus Recycling Richtlinie
Bitte werfen Sie das Gerät nicht in den normalen Hausmüll!
Entsorgen Sie es bei denIhnen bekannten Recyclingstellen in
Ihrer Nähe. In jedem Ort werden Ihnen diese Sammelstellen zu
Verfügung gestellt. Die Targus Recycling-Richtlinien können Sie
einsehen unter: www.targus.com/recycling
Die Funktionsmerkmale und Spezifikationen können ohne vorherige Mitteilung
geändert werden. Alle Zeichen und eingetragenen Zeichen sind das Eigentum
ihrer jeweiligen Besitzer.
WIDCOMM und das WIDCOMM-Logo sind Marken von WIDCOMM, Inc. Bluetooth und das
Bluetooth-Logo sind Marken von Bluetooth SIG, Inc., USA und WIDCOMM, Inc ist der Lizenznehmer.
Microsoft, Windows und Outlook sind registrierte Marken der Firma Microsoft Corporation. Alle
übrigen Marken und registrierten Marken sind das Eigentum ihrer jeweiligen Besitzer.
• Die Empfangsantenne neu ausrichten oder an einem ande ren Ort.
Page 37

37
RATO’N TARGUS
BLUETOOTH
®
MULTIMEDIA PARA
ORDENADOR PARTATIL
Introducción
Enhorabuena por adquirir el ratón Bluetooth® Media
Notebook Mouse de Targus. Ahora puede controlar su
portátil y el reproductor multimedia predeterminado a un
máximo de 10 m de distancia.
Requisitos del sistema
Hardware: portátil o PC de escritorio con funciones Bluetooth
Sistema operativo: Windows® 2000 o XP
Instalación de las pilas (incluidas)
•Utilice dos pilas AAA recargables de NIMH (incluidas)
•Quite la tapa de las pilas de la parte superior del ratón
•Inserte las pilas siguiendo los indicadores de polaridad
positiva (+) y negativa (-) que hay en el interior del compartimento de las pilas
ADVERTENCIAS: CUANDO SUSTITUYA LAS PILAS, UTILICE SIEMPRE PILAS DE
NiMH U OTRAS PILAS RECARGABLES. NO USE PILAS ALCALINAS EN ESTE
DISPOSITIVO. EVITE MEZCLAR PILAS NUEVAS Y USADAS EN ESTE DISPOSITIVO
Page 38

38
TARGUS BLUETOOTH® MEDIA NOTEBOOK MOUSE
ON OFF
Botón de
conexión
Interruptor de
encendido/apagado
Sensor óptico
Tapa de las pilas
Compartimento de las pilas
• Encaje la tapa de las pilas en su sitio
• Encienda el ratón moviendo el interruptor en la parte inferior
del ratón a la posición de "encendido".
Configuración inicial
Antes de usar la conectividad Bluetooth del ordenador y otros
dispositivos Bluetooth, debe realizar ciertos pasos de
configuración inicial.
El Targus Bluetooth Media Notebook Mouse está diseñado
para funcionar con tres estándares principales de software
(protocolo): WIDCOMM, Toshiba y Microsoft.
Consulte la documentación del ordenador para averiguar el
software que su ordenador utiliza. Póngase en contacto con
su proveedor si el sistema no admite uno de los estándares
de software Bluetooth mencionados.
Page 39

39
TARGUS BLUETOOTH® MEDIA NOTEBOOK MOUSE
Para activar el modo de medios de este ratón Bluetooth Clase
II, necesita instalar primero el driver Tilt Wheel.
Instalación del driver Tilt Wheel para
todos los estándares de software
(protocolo)
Para activar el modo de medios del Targus Bluetooth Media
Notebook Mouse, siga estos pasos:
1. Inserte el CD de instalación del software en el ordenador.
2. Aparece la pantalla inicial de bienvenida. Asegúrese de
que ha cerrado todos los programas en Windows antes de
ejecutar la instalación. Haga clic en Next (Siguiente).
3. Elija la ubicación del ordenador donde desea guardar y
instalar el driver del ratón. A continuación, haga clic en
Next (Siguiente).
4. Comienza la instalación. Haga clic en Back (Atrás) para
revisar o modificar la configuración actual. Haga clic en
Next (Siguiente) para iniciar la instalación.
5. La ventana de finalización aparecerá cuando el sistema
complete la instalación. Elija Yes, I want to restart my
computer now (Sí, deseo reiniciar el equipo ahora) para
usar el programa.
Software Bluetooth: WIDCOMM
Asegúrese de que está activada la radio Bluetooth. Si es
necesario, consulte el manual del ordenador para determinar
si la radio está activada. Para añadir el ratón Targus,
proceda como se indica a continuación:
1. Vaya al icono Sitios Bluetooth situado en el escritorio o en
la bandeja del sistema y haga doble clic; a continuación,
seleccione el asistente de instalación de Bluetooth.
Page 40

40
TARGUS BLUETOOTH® MEDIA NOTEBOOK MOUSE
2. En el asistente de instalación de Bluetooth, marque I want
to find a specific Bluetooh device and configure how this
computer will use its services (Deseo encontrar un dispositivo
Bluetooth y configurar cómo este equipo utilizará sus
servicios). Haga clic en Next (Siguiente).
3. Encienda el ratón. Pulse el botón de conexión hasta que
la luz roja del sensor (en la parte inferior del ratón) se quede
fija.
4. El ordenador buscará nuevos accesorios Bluetooth.
Cuando termine, seleccione Targus Bluetooth Media Mouse
for Notebook. Haga clic en Next (Siguiente).
Page 41

41
TARGUS BLUETOOTH® MEDIA NOTEBOOK MOUSE
5. Comienza la instalación. Haga clic en Back (Atrás) para
revisar o modificar la configuración actual. Haga clic en Next
(Siguiente) para iniciar la instalación.
6. La ventana de confirmación aparecerá cuando el sistema
instale los drivers. Haga clic en OK. Al terminar, mueva el
cursor con el Bluetooth Media Mouse. Ahora está instalado
correctamente.
Software Bluetooth: TOSHIBA
Cómo averiguar la versión de Toshiba Bluetooth Stack
1. Inicie Bluetooth Manager (Administrador de Bluetooth).
2. Seleccione el menú Help (Ayuda).
3. Seleccione About (Acerca de).
NOTA: PARA UN RENDIMIENTO ÓPTIMO DEL PRODUCTO BLUETOOTH NECESITA
TOSHIBA BLUETOOTH STACK V3.20.00 O POSTERIOR. SI TIENE UNA VERSIÓN
DIFERENTE, ACTUALÍCELA EN WWW.SUPPORT.TOSHIBA.COM
Asegúrese de que está activada la radio Bluetooth. Si es
necesario, consulte el manual del ordenador para determinar
si la radio está activada. Para añadir el ratón Targus,
proceda como se indica a continuación:
Page 42

42
TARGUS BLUETOOTH® MEDIA NOTEBOOK MOUSE
1. Haga doble clic en el icono Bluetooth Manager
(Administrador de Bluetooth) de la bandeja del sistema y
haga clic en “New Connection” (Nueva conexión)
2. Aparece la ventana Add New Connection Wizard
(Asistente para agregar nueva conexión). Seleccione
Express Mode (Modo rápido) y haga clic en Next (Siguiente).
3. Encienda el ratón. Pulse el botón de conexión hasta que
la luz roja del sensor (en la parte inferior del ratón) se quede
fija.
Page 43

43
TARGUS BLUETOOTH® MEDIA NOTEBOOK MOUSE
4. Se mostrará una lista de dispositivos; seleccione el ratón y
haga clic en Next (Siguiente)
5. El sistema instalará los drivers necesarios
6. Tras la instalación, aparece la ventana New Hardware
Wizard (Asistente para nuevo hardware). Se solicita al
usuario que se conecte a Windows Update. Elija No.
7. Siga las instrucciones en pantalla hasta que termine.
Page 44

44
TARGUS BLUETOOTH® MEDIA NOTEBOOK MOUSE
Software Bluetooth: MICROSOFT
Asegúrese de que está activada la radio Bluetooth. Si es
necesario, consulte el manual del ordenador para determinar
si la radio está activada. Para añadir el ratón Targus, proceda
como se indica a continuación:
1. Haga doble clic en el icono Bluetooth Manager
(Administrador de Bluetooth) de la bandeja del sistema.
2. Seleccione Add Bluetooth Device (Agregar dispositivo
Bluetooth).
Page 45

45
TARGUS BLUETOOTH® MEDIA NOTEBOOK MOUSE
3. Cuando aparezca la ventana Add Bluetooth Device, seleccione la
casilla ‘My device is set up and ready to be found’ (Mi dispositivo está
configurado y listo para ser detectado) y haga clic en Next (Siguiente).
4. Encienda el ratón. Pulse el botón de conexión hasta que la luz roja
del sensor (en la parte inferior del ratón) se quede fija.
5. El software detectará varios dispositivos. Seleccione el ratón y haga
clic en Next (Siguiente).
6. Aparecerá una ventana solicitando una clave de paso. Marque la
opción Don’t use a passkey (No utilizar clave de paso) y haga clic en
Next (Siguiente).
7. El ratón está listo para utilizar.
Page 46

46
TARGUS BLUETOOTH® MEDIA NOTEBOOK MOUSE
Instrucciones de manejo
El ratón tiene 2 modos para definir sus comandos de uso:
En modo de ratón
A
B
C
D
A
B
C
D
E
F
E
F
H
G
G
H
En modo de medios
Botón izquierdo:
Clic izquierdo
Botón derecho:
Clic derecho
Rueda desplazamiento:
Desplazar (mini pasos)
Función Botón central:
Centro Click
Joystick: Desplazar arriba,
desplazar abajo, desplazar
izquierda, desplazar derecha
(función de desplazamiento
continuo). Los
esplazamientos laterales
equivalen a las funciones tilt
wheel de Microsoft
Pulse Joystick
una vez, aparece
el reproductor
multimedia
predeterminado.
Pulse hacia abajo
la rueda, aparece el
menú de Ayuda
en pantalla
Clic derecho:
Detener
Clic izquierdo:
Reproducir /
Pausa
Page 47

47
TARGUS BLUETOOTH® MEDIA NOTEBOOK MOUSE
I
J
I
J
Compatibilidad con reproductores
multimedia
The mouse is compatible to the following Media Players:
iTunes v.6.0.1.3 Musicmatch v.10
Quintessential Player v.4.51 Real Player v.10.5
X X
X X
X X
X X
X X
X X
X X
X X
X X
X X
X X
X X
X X
X X
X
X
Action
Reproducir (Audio)
Pausa (Audio)
Detener (Audio)
Subir volumen (Audio)
Bajar volumen (Audio)
Pista anterior (Audio)
Pista siguiente (Audio)
Adelante rápido (Video)
Rebobinar (Video)
Desplazar arriba: aumenta el
volumen del sonido.
Desplazar abajo: disminuye el
volumen del sonido
Empujar arriba: Pista anterior
Empujar abajo: Pista siguiente
Empujar derecha: Adelante rápido
Empujar izquierda: Rebobinar
Action
Reproducir (Audio)
Pausa (Audio)
Detener (Audio)
Subir volumen (Audio)
Bajar volumen (Audio)
Pista anterior (Audio)
Pista siguiente (Audio)
Adelante rápido (Video)
Rebobinar (Video)
Page 48

TARGUS BLUETOOTH® MEDIA NOTEBOOK MOUSE
Windows Media Player v.10
X
X
X
X
X
X
X
X
NOTA: LAS FUNCIONES DEL RATÓN DEPENDEN DE LAS CARACTERÍSTICAS DEL SOFTWARE
REPRODUCTOR MULTIMEDIA
INSTRUCCIONES PARA CONFIGURAR O CAMBIAR EL REPRODUCTOR MULTIMEDIA PREDETERMINADO
• HAGA CLIC EN EL BOTÓN INICIO
• VAYA AL PANEL DE CONTROL Y SELECCIONE AGREGAR O QUITAR PROGRAMAS
• HAGA CLIC EN CONFIGURAR ACCESO Y PROGRAMAS PREDETERMINADOS EN EL MENÚ DE LA
IZQUIERDA. PARA PERSONALIZAR, SELECCIONE PERSONALIZADO EN LA PANTALLA PRINCIPAL
• ELIJA SU PROGRAMA EN REPRODUCTOR MULTIMEDIA
• SI NO APARECE SU PROGRAMA PREFERIDO EN LA LISTA, HAGA CLIC EN AYUDA PARA RECIBIR
ASISTENCIA
Consejos de uso
Para un rendimiento y recepción de RF óptimos:
• Evite usar el ratón sobre superficies metálicas. Los metales como el
hierro, aluminio o cobre bloquean la transmisión de radiofrecuencia
y pueden ralentizar la respuesta del ratón o hacer que éste falle
temporalmente.
• El ratón entrará en modo suspendido al mismo tiempo que el ordena
dor. Para activar el ratón, pulse uno de sus botones y se iluminará.
• Si el ordenador tiene una caja metálica que contiene aluminio o
magnesio, aparte el ratón a un lado. El monitor puede interferir con
la señal de radiofrecuencia si utiliza el ratón delante del ordenador.
• Para maximizar la duración de las pilas, utilice el ratón sobre una
superficie blanca o de color claro. Las superficies oscuras hacen que
el diodo emisor de luz (LED) del ratón brille más, descargándose las
pilas con mayor rapidez.
48
Action
Reproducir (Audio)
Pausa (Audio)
Detener (Audio)
Subir volumen (Audio)
Bajar volumen (Audio)
Pista anterior (Audio)
Pista siguiente (Audio)
Adelante rápido (Video)
Rebobinar (Video)
Page 49

TARGUS BLUETOOTH® MEDIA NOTEBOOK MOUSE
49
Administración de energía del
ratón
• Para encender y apagar el ratón, mueva el interruptor de la parte
inferior del ratón a la posición deseada.
• Mientras se utiliza, la función de ahorro de energía pone el ratón en
“modo de reposo” al transcurrir 20 minutos
de inactividad. Haga clic en un botón del ratón para activarlo de
nuevo.
• Para ahorrar pilas, apague el ratón cuando viaje o no lo utilice.
• La rueda de desplazamiento brillará cuando las pilas tengan poca
energía. Para recargar el ratón, conecte el cable de recarga USB al
ratón y conecte la clavija USB al ordenador. El ratón se puede utilizar
mientras se recarga.
Notebook
Desktop
Para el cable de recarga
USB (SÓLO uso con
alimentación)
ON OFF
Botón de conexión
Interruptor de
encendido/apagado
Sensor óptico
Page 50

TARGUS BLUETOOTH® MEDIA NOTEBOOK MOUSE
50
Solución de problemas
El ratón no funciona.
• Compruebe la correcta polaridad de las pilas. Los extremos
positivo (+) y negativo (-) de cada pila deben coincidir con las
conexiones positivas (+) y negativas (-) del compartimento
de las pilas.
• Verifique que la radio Bluetooth está activada.
• Verifique que los drivers del dispositivo están instalados:
• Los dispositivos pareados aparecen siempre en Mis sitios
Bluetooth, aunque el ratón esté fuera de alcance o apagado.
• Verifique que el dispositivo remoto del par está dentro del
alcance y encendido, y vuelva a intentar la conexión.
• Verifique que las pilas están instaladas correctamente.
Recargue o sustituya las pilas si es necesario.
1. Haga clic en Inicio/ Configuración/ Panel de control/
Sistema/ Hardware/ Administrador de dispositivos
2. En “Dispositivos Bluetooth”, compruebe que “Targus
Bluetooth Media Notebook Mouse” está instalado
El ratón no funciona después de parearse con mi sistema
Bluetooth.
Page 51

TARGUS BLUETOOTH® MEDIA NOTEBOOK MOUSE
51
Soporte técnico
Si tiene preguntas técnicas, por favor visite:
Internet http://www.targus.com/support
Inglés http://www.targus.com/uk/support.asp
Francés http://www.targus.com/fr/support.asp
Alemán http://www.targus.com/de/support.asp
Español http://www.targus.com/sp/support.asp
Italiano http://www.targus.com/it/support.asp
Nuestro personal experto también puede contestarle sus
preguntas a través de uno de los siguientes números
telefónicos.
Alemania 0211-6579-1151
Austria 01 795 676 42
Bélgica 02-717-2451
Dinamarca 45 0 35-25-87 51
España 91 745 6221
Finlandia 922948016
Francia 0 1-6453-9151
Italia 02-4827-1151
Noruega 022577729
Países Bajos 02 0504 0671
Portugal +351 21 415 4123
Suecia 08-751-4058
Suiza 01-212-0007
El Reino Unido 20-7744-0330
Europa Oriental y otros +31 0 20-5040671
Page 52

TARGUS BLUETOOTH® MEDIA NOTEBOOK MOUSE
52
Registro del producto
Targus le recomienda registrar su accesorio Targus
inmediatamente después de adquirirlo. Para registrar su
accesorio Targus, visite: http://www.targus.com/registration.asp
Quizás deba indicar su nombre completo, su dirección de correo
electrónico, su número de teléfono e información de su empresa
(si corresponde).
Garantía
Targus garantiza que este producto no tendrá defectos en los
materiales ni la mano de obra durante dos años. Si dentro de ese
lapso se determina que el accesorio Targus está defectuoso, lo
repararemos o reemplazaremos sin demora. Esta garantía no
cubre daños accidentales, el uso y desgaste natural ni las
pérdidas resultantes o incidentales. Targus no es responsable,
bajo circunstancia alguna, por pérdidas o daños al ordenador ni
por pérdida de programas, registros o datos ni daños a los
mismos, así como tampoco por daños resultantes o incidentales
algunos, incluso si a Targus se le informó de la posibilidad que
existieran. La presente garantía no afecta los derechos que la ley
le otorga.
Conformidad con las normas
Este dispositivo cumple con la Parte 15 de las Normas de FCC.
Su uso está sometido a las dos condiciones siguientes: (1) Este
dispositivo no debe causar interferencia nociva, y (2) este
dispositivo debe aceptar toda interferencia que reciba,
incluyendo aquella que ocasione un funcionamiento indeseado.
Declaración de FCC
Prueba de cumplimiento
Este equipo fue sometido a prueba y se ha determinado que
cumple los límites indicados para un dispositivo digital de Clase
B, en virtud de la Parte 15 de las Normas de FCC. Estos límites
se han impuesto para ofrecer una protección razonable contra la
interferencia nociva en una instalación en el hogar. Este equipo
genera, usa y puede irradiar energía de radiofrecuencia y, si no
se instala y usa de acuerdo a las instrucciones, puede causar
una interferencia nociva a las comunicaciones radiales. Sin
Page 53

TARGUS BLUETOOTH® MEDIA NOTEBOOK MOUSE
53
embargo, no se garantiza que en una instalación específica no se
produzca interferencia.
Si este equipo causa interferencia nociva a la recepción de radio
o de televisión, lo que se puede determinar encendiendo y
apagando el equipo, se anima al usuario a que trate de corregir la
interferencia aplicando una o más de las siguientes medidas:
• Reorientar o reubicar la antena receptora
• Aumentar la distancia que separa al equipo del receptor
• Conecte el equipo a un enchufe de circuito diferente a aquel al
que esté conectado el receptor
• Consulte al distribuidor o a un técnico de radio/televisión para
más ayuda.
Declaración de Conformidad
Por medio de la presente Targus declara que al equipo cumple
con los requisitos esenciales y cualesquiera otras disposiciones
aplicables o exigibles de la Directiva 1999/5/CE. Este dispositivo
es de baja potencia. Dispositivo diseñado para uso profesional y
domestico únicamente. Este producto puede utilizarse en
cualquier país de la CE.
Directiva de reciclaje de Targus
Al final de la vida útil de este producto le rogamos lo disponga en
un punto de recogida para reciclaje situado en su país. La política
de reciclaje de Targus está disponible para su consulta en:
www.targus.com/recycling
Las características y las especificaciones pueden cambiar sin previo aviso. Todas
las marcas comerciales y las marcas comerciales registradas pertenecen a sus
respectivos propietarios.
WIDCOMM y el logotipo de WIDCOMM son marcas comerciales de WIDCOMM, Inc. Bluetooth y el logotipo
de Bluetooth son marcas comerciales propiedad de Bluetooth SIG, Inc., U.S.A. y concedidas bajo licencia a
WIDCOMM, Inc..
Microsoft, Windows y Outlook son marcas comerciales registradas de Microsoft Corporation. Las demás
marcas comerciales y marcas comerciales registradas son propiedad de sus titulares respectivos.
Page 54

54
Introduction
Toutes nos félicitations ! Vous venez d'acheter la souris
multimédia Bluetooth® pour notebook de Targus. Vous
pouvez désormais contrôler votre notebook et votre lecteur
multimédia par défaut sur une distance de 10 mètres.
Configuration requise
Matériel - Notebook ou PC de bureau Bluetooth
Système d'exploitation - Windows® 2000 ou XP
Installation des piles (fournies)
•Utilisez deux piles NIMH rechargeables AAA (fournies).
•Retirez le cache du compartiment des piles situé sur la face
supérieure de la souris en le faisant glisser.
•Insérez les piles en vous assurant que les bornes positive
(+) et négative (-) de chaque pile correspondent aux
indicateurs de polarité imprimés dans le compartiment des
piles.
AVERTISSEMENTS : LORSQUE VOUS REMPLACEZ LES PILES, UTILISEZ SYSTÉMATIQUEMENT DES
PILES NiMH OU D'AUTRES PILES RECHARGEABLES. N'UTILISEZ JAMAIS DE PILES ALCALINES
AVEC CE PÉRIPHÉRIQUE. ÉVITEZ DE COMBINER DES PILES NEUVES ET USAGÉES AU SEIN DE CE
PÉRIPHÉRIQUE.
Targus Souris
multimédia Bluetooth
®
pour notebook
Page 55

55
TARGUS BLUETOOTH® MEDIA NOTEBOOK MOUSE
ON OFF
Bouton de
connexion
Commutateur On/Off
Capteur optique
Cache du
compartiment
des piles
Logements des piles
• Remettez le cache du compartiment des piles en place.
• Allumez la souris en faisant glisser le commutateur On/Off
situé sur la face inférieure de la souris en position 'on'.
Configuration initiale
Avant de pouvoir utiliser la connectivité Bluetooth sur votre
ordinateur et d'autres périphériques Bluetooth, vous devez
exécuter certaines tâches de configuration initiale.
La souris multimédia Bluetooth pour notebook de Targus est
conçue pour fonctionner avec les trois principales piles
logicielles (protocoles) : WIDCOMM, Toshiba et Microsoft.
Veuillez vérifier la documentation de votre ordinateur pour
connaître sa pile logicielle. Veuillez contacter le fournisseur
de votre système si ce dernier ne prend pas en charge les
normes logicielles Bluetooth susmentionnées.
Page 56

56
TARGUS BLUETOOTH® MEDIA NOTEBOOK MOUSE
Pour activez le mode multimédia de cette souris Bluetooth de
classe II, vous devez au préalable installer le pilote Tilt Wheel.
Installation du pilote Tilt Wheel pour
toutes les piles logicielles (protocoles)
Pour activer le mode multimédia de votre souris multimédia
Bluetooth pour notebook de Targus, procédez comme suit :
1. Insérez le CD Software Installation dans le lecteur
correspondant de votre ordinateur.
2. L'écran de bienvenue initial s'affiche. Assurez-vous que
tous vos programmes Windows sont fermés avant de
lancer l'installation. Cliquez sur Next (Suivant).
3. Sélectionnez l'emplacement dans lequel vous voulez
enregistrer et installer le pilote de votre souris. Cliquez sur
Next (Suivant).
4. L'installation s'initialise. Cliquez sur Back (Précédent) pour
revoir ou modifier la configuration actuelle. Cliquez sur
Next (Suivant) pour lancer l'installation.
5. La fenêtre de finalisation s'affiche tandis que le système
finalise l'installation. Cochez la case Yes, I want to restart
my computer now (Oui, je veux redémarrer mon ordina
teur maintenant) pour pouvoir utiliser le programme.
Logiciels Bluetooth : WIDCOMM
Assurez-vous que la radio Bluetooth est activée. Si nécessaire, vérifiez le manuel de votre ordinateur pour déterminer
si la radio est activée. Pour ajouter la souris Targus,
procédez comme suit :
1. Cliquez deux fois sur l'icône Bluetooth Places (Favoris
Bluetooth) située sur votre bureau ou dans la barre d'état du
système puis cliquez sur Bluetooth Setup Wizard (Assistant
de configuration Bluetooth).
Page 57

57
TARGUS BLUETOOTH® MEDIA NOTEBOOK MOUSE
2. Dans la fenêtre Bluetooth Setup Wizard (Assistant de configuration
Bluetooth), cochez la case I want to find a specific Bluetooh device and
configure how this computer will use its services (Je veux rechercher
un périphérique Bluetooth spécifique et configurer la façon dont cet
ordinateur utilisera ses services). Cliquez sur Next (Suivant).
3. Allumez votre souris. Appuyez sur le bouton de connexion jusqu'à
ce que le capteur rouge (sur la face inférieure de la souris) reste
allumé.
4. L'ordinateur recherche de nouveaux accessoires Bluetooth. Une
fois cette procédure terminée, sélectionnez la souris multimédia
Bluetooth pour notebook de Targus. Cliquez sur Next (Suivant).
Page 58

58
TARGUS BLUETOOTH® MEDIA NOTEBOOK MOUSE
5. L'installation s'initialise. Cliquez sur Back (Précédent) pour
revoir ou modifier la configuration actuelle. Cliquez sur Next
(Suivant) pour lancer l'installation.
6. La fenêtre de confirmation s'affiche tandis que le système
installe les pilotes. Cliquez sur OK. Lorsque vous avez
terminé, vous pouvez déplacer le curseur au moyen de votre
souris multimédia Bluetooth. Elle est désormais installée.
Logiciels Bluetooth: TOSHIBA
Comment vérifier la version de la pile Toshiba
Bluetooth don’t vous disposez
1. Lancez Bluetooth Manager (Gestionnaire Bluetooth).
2. Sélectionnez le menu Help (Aide).
3. Cliquez sur About (À propos de).
REMARQUE : POUR QUE VOTRE PRODUIT BLUETOOTH VOUS OFFRE DES
PERFORMANCES OPTIMALES, VOUS DEVEZ ÊTRE ÉQUIPÉ DE LA PILE TOSHIBA
BLUETOOTH VERSION 3.20.00 OU ULTÉRIEURE. SI VOUS DISPOSEZ D'UNE
AUTRE VERSION, VEUILLEZ LA METTRE À JOUR DEPUIS LE SITE
WWW.SUPPORT.TOSHIBA.COM.
Assurez-vous que la radio Bluetooth est activée. Si nécessaire, vérifiez le manuel de votre ordinateur pour déterminer
si la radio est activée. Pour ajouter la souris Targus,
procédez comme suit :
Page 59

59
TARGUS BLUETOOTH® MEDIA NOTEBOOK MOUSE
1. Cliquez deux fois sur l'icône Bluetooth Manager (Gestionnaire
Bluetooth) située dans la barre d'état du système puis cliquez sur
'New Connection (Nouvelle connexion)'.
2. La fenêtre Add New Connection Wizard (Assistant Ajout d'une
nouvelle connexion) s'affiche. Sélectionnez l'option Express Mode
(Mode express) et cliquez sur Next (Suivant).
3. Allumez votre souris. Appuyez sur le bouton de connexion jusqu'à
ce que le capteur rouge (sur la face inférieure de la souris) reste
allumé.
Page 60

60
TARGUS BLUETOOTH® MEDIA NOTEBOOK MOUSE
4. Une liste de périphériques s'affiche. Sélectionnez la souris
et cliquez sur Next (Suivant).
5. Le système installe les pilotes requis.
6. Une fois l'installation terminée, la fenêtre New Hardware
Wizard (Assistant Nouveau matériel détecté) s'affiche. Il
vous est demandé si vous voulez vous connecter au service
Windows Update. Cliquez sur No (Non).
7. Conformez-vous aux instructions qui s'affichent jusqu'à ce
que vous ayez terminé.
Page 61

61
TARGUS BLUETOOTH® MEDIA NOTEBOOK MOUSE
Logiciels Bluetooth : MICROSOFT
Assurez-vous que la radio Bluetooth est activée. Si nécessaire, vérifiez le manuel de votre ordinateur pour déterminer si
la radio est activée. Pour ajouter la souris Targus, procédez
comme suit :
1. Cliquez deux fois sur l'icône Bluetooth Manager
(Gestionnaire Bluetooth) située dans la barre d'état du
système.
2. Sélectionnez l'option Add a Bluetooth Device (Ajouter un
périphérique Bluetooth).
Page 62

62
TARGUS BLUETOOTH® MEDIA NOTEBOOK MOUSE
3. Lorsque la fenêtre Add Bluetooth Device (Ajout d'un périphérique
Bluetooth) s'affiche, cochez l'option 'My device is set up and ready to
be found (Mon périphérique est configuré et prêt à être détecté)’ et
cliquez sur Next (Suivant).
4. Allumez votre souris. Appuyez sur le bouton de connexion jusqu'à ce
que le capteur rouge (sur la face inférieure de la souris) reste allumé.
5. Le logiciel détecte un certain nombre de périphériques. Sélectionnez la souris et cliquez sur Next (Suivant).
6. Une fenêtre vous demandant une clé s'affiche. Cochez l'option Don’t
use a passkey (Ne pas utiliser de clé) et cliquez sur Next (Suivant).
7. Votre souris est désormais opérationnelle.
Page 63

63
TARGUS BLUETOOTH® MEDIA NOTEBOOK MOUSE
Instructions d'exploitation
La souris propose deux modes permettant de définir ses
commandes :
En mode souris
A
B
C
D
A
B
C
D
E
F
E
F
H
G
G
H
In Media Mode
Bouton gauche : clic gauche
Bouton droit : clic droit
Molette de défilement :
fonction de défilement
(graduel)
Bouton central : clic central
Joystick : défilement vers le haut,
défilement vers le bas,
défilement vers la gauche,
défilement vers la droite
(fonction de défilement
continu). Les options de
défilement latéral sont
équivalents aux fonctions de la
molette inclinable de Microsoft.
Appuyez une fois sur le
joystick pour appeler le
lecteur multimédia par
défaut.
Appuyez sur la molette
de défilement pour
ouvrir le menu Help
(Aide).
Clic droit : arrêt
Clic gauche :
lecture/pause
Page 64

64
TARGUS BLUETOOTH® MEDIA NOTEBOOK MOUSE
I
J
I
J
Lecteurs multimédia compatibles
La souris est compatible avec les fonctions multimédia suivantes :
iTunes v.6.0.1.3 Musicmatch v.10
Quintessential Player v.4.51 Real Player v.10.5
X X
X X
X X
X X
X X
X X
X X
X X
X X
X X
X X
X X
X X
X X
X
X
Action
Lecture (Audio)
Pause (Audio)
Arrêt (Audio)
Volume + (Audio)
Volume -- (Audio)
Piste précédente (Audio)
Piste suivante (Audio)
Avance rapide(Video)
Retour (Video)
Défilement vers le haut : augmentation
du volume sonore
Défilement vers le bas : diminution du
volume sonore
Pression vers le haut : piste précédente
Pression vers le bas : piste suivante
Pression vers la droite : avance rapide
Pression vers la gauche : retour
Action
Lecture (Audio)
Pause (Audio)
Arrêt (Audio)
Volume + (Audio)
Volume -- (Audio)
Piste précédente (Audio)
Piste suivante (Audio)
Avance rapide(Video)
Retour (Video)
Page 65

TARGUS BLUETOOTH® MEDIA NOTEBOOK MOUSE
Windows Media Player v.10
X
X
X
X
X
X
X
X
REMARQUE : SELON LES FONCTIONS DU LOGICIELS DE LECTURE MULTIMÉDIA, LES FONCTIONNALITÉS DE LA
SOURIS PEUVENT VARIER.
INSTURCTIONS POUR CONFIGURER/MODIFIER VOTRE LECTEUR MULTIMÉDIA PAR DÉFAUT
• CLIQUEZ SUR LE BOUTON DÉMARRER.
• RENDEZ-VOUS DANS LE PANNEAU DE CONFIGURATION ET CLIQUEZ SUR AJOUT/SUPPRESSION DE
PROGRAMMES.
• CLIQUEZ SUR SET PROGRAM ACCESS AND DEFAULTS (CONFIGURER L'ACCÈS AUX PROGRAMMES ET LES
PARAMÈTRES PAR DÉFAUT) DANS LE MENU DE GAUCHE. POUR PERSONNALISER, SÉLECTIONNEZ CUSTOM
(PERSONNALISER) DANS L'ÉCRAN PRINCIPAL.
• SÉLECTIONNEZ VOTRE PROGRAMME PAR DÉFAUT SOUS MEDIA PLAYER (LECTEUR MULTIMÉDIA).
• SI LE LECTEUR MULTIMÉDIA DE VOTRE CHOIX N'EST PAS RÉPERTORIÉ, CLIQUEZ SUR HELP (AIDE) POUR
OBTENIR DE L'AIDE.
Conseils d'utilisation
Pour des performances et une réception RF optimales :
• Évitez d'utiliser la souris sur une surface métallique. Les métaux tels
que le fer, l'aluminium ou le cuivre bloquent la transmission des
fréquences radio et peuvent ralentir le temps de réponse de la souris
ou provoquer un dysfonctionnement temporaire de la souris.
• La souris passe en mode suspension en même temps que votre
ordinateur. Pour activer la souris, appuyez sur n'importe lequel de ses
boutons : la souris s'allume.
• Si votre ordinateur est pourvu d'un boîtier métallique contenant de
l'aluminium ou du magnésium, placez la souris sur le côté. L'écran
peut interférer avec le signal RF si vous utilisez la souris directement
en face de votre ordinateur.
• Pour prolonger la durée de vie des piles, utilisez la souris sur une
surface blanche ou d'une couleur claire. Si vous l'utilisez sur une
surface sombre la DEL de la souris brillera plus intensément,
déchargeant ainsi plus rapidement les piles.
65
Action
Lecture (Audio)
Pause (Audio)
Arrêt (Audio)
Volume + (Audio)
Volume -- (Audio)
Piste précédente (Audio)
Piste suivante (Audio)
Avance rapide(Video)
Retour (Video)
Page 66

TARGUS BLUETOOTH® MEDIA NOTEBOOK MOUSE
66
Gestion de l'alimentation de la
souris
• Pour allumer/éteindre la souris, faites glisser le commutateur On/Off
situé sur la face inférieure de la souris dans la position appropriée.
• Lors de cette opération, la fonction d'économie d'énergie met la souris
en 'mode veille' au bout de 20 minutes d'inactivité. Cliquez sur
n'importe quel bouton de la souris pour la réactiver.
• Pour économiser les piles, éteignez la souris lorsque vous voyagez ou
que vous ne l'utilisez pas.
• La molette de défilement s'allume lorsque les piles sont faibles. Pour
recharger la souris, branchez le câble de chargement USB sur la
souris et la fiche USB sur l'ordinateur. La souris reste opérationnelle
lorsque vous la rechargez.
Notebook
Desktop
Pour câble de chargement
USB (utilisateur chevronné
UNIQUEMENT)
ON OFF
Bouton de
connexion
Commutateur
On/Off
Capteur optique
Page 67

TARGUS BLUETOOTH® MEDIA NOTEBOOK MOUSE
67
Dépannage
La souris ne fonctionne pas.
• Assurez-vous que la polarité des piles est correcte. Les bornes
positive (+) et négative (-) de chaque pile doivent correspondre aux
connecteur positif (+) et négatif (-) dans le compartiment des piles.
• Vérifiez que la radio Bluetooth est activée sur votre ordinateur.
• Vérifiez que les pilotes du périphérique sont installés :
• Les périphériques jumelés sont systématiquement affichés dans la
fenêtre My Bluetooth Places (Favoris Bluetooth), même si la souris est
hors de portée ou qu'elle n'est pas allumée.
• Vérifiez que le membre distant de la paire n'est pas hors de portée
et qu'il est sous tension puis réessayez d'établir la connexion.
• Vérifiez que les piles sont correctement installées. Rechargezles/remplacez-les si nécessaire.
1. Cliquez sur Démarrer/Paramètres/Panneau de
configuration/Système/Matériel/Gestionnaire de périphériques.
2. Sous 'Bluetooth Devices (Périphériques Bluetooth)', vérifiez que la
souris 'Targus Bluetooth Media Notebook Mouse' est installée.
Le souris ne fonctionne pas après avoir été jumelée avec mon
système Bluetooth.
Page 68

TARGUS BLUETOOTH® MEDIA NOTEBOOK MOUSE
68
Support technique
Pour les questions techniques, merci de visiter :
Internet http://www.targus.com/support
Anglais http://www.targus.com/uk/support.asp
Français http://www.targus.com/fr/support.asp
Allemand http://www.targus.com/de/support.asp
Espagnol http://www.targus.com/sp/support.asp
Italien http://www.targus.com/it/support.asp
Nos employés qualifiés sont également disponibles aux
numéros de téléphone ci-dessous pour répondre à vos
questions.
l'Autriche 01 795 676 42
Allemagne 0211-6579-1151
Belgique 02-717-2451
Danemark 45 0 35-25-87 51
Espagne 91-745-6221
Finlande 922948016
France 01-6453-9151
Italie 02-4827-1151
Hollandes 02 0504 0671
Norvège 022577729
Le Portugal +351 21 415 4123
Royaume-Uni 020-7744-0330
Suède 08-751-4058
Suisse 01-212-0007
Europe de l'Est et autres pays +31 0 20-05040671
Page 69

TARGUS BLUETOOTH® MEDIA NOTEBOOK MOUSE
69
Enregistrement du produit
Targus vous conseille vivement d'enregistrer votre accessoire
Targus dans les plus brefs délais après son achat. Pour
l'enregistrer connectez-vous à :
http://www.targus.com/registration.asp
Vous serez invité à fournir votre nom complet, votre adresse de
courriel et des renseignements sur votre entreprise (le cas
échéant).
Garantie
Targus garantit ce produit contre tout défaut de matériel ou de
fabrication pour une durée de deux ans. Si votre accessoire
Targus s'avère défectueux sous cette garantie, nous veillerons à
le remplacer ou à le réparer au plus vite. Cette garantie ne couvre
pas les dommages résultant d'accidents, l'usure normale ou les
pertes consécutives ou accessoires. En aucun cas, Targus ne
pourra être tenu responsable de la perte matérielle ou de
l'endommagement d'un ordinateur, ni de la perte de programmes,
d'enregistrements ou de données ou de leur endommagement, ni
de tout autre dommage indirect ou accidentel, même si Targus a
été préalablement informé de cette possibilité. Cette garantie n'a
aucun effet sur vos droits statutaires.
Respect de la réglementation
Cet appareil est conforme à la section 15 des règlements de la
FCC (Federal Communication Commission). Son utilisation est
soumise aux deux conditions suivantes : 1) Cet appareil ne peut
provoquer de brouillage préjudiciable. 2) Cet appareil doit
absorber toute interférence réceptionnée, même si cela provoque
des effets indésirables sur son fonctionnement.
Déclaration de la FCC
Testé et conforme
Cet appareil a été testé et déclaré conforme aux limites des
appareils numériques de Classe B, selon la section 15 des
règlements de la FCC (Federal Communication Commission).
Ces limites sont conçues pour assurer une protection raisonnable
contre un brouillage préjudiciable lorsque l'appareil est utilisé
Page 70

TARGUS BLUETOOTH® MEDIA NOTEBOOK MOUSE
70
dans un milieu résidentiel. L'appareil génère, utilise et peut
diffuser de l'énergie sur les fréquences radio et, s'il n'est pas
installé et utilisé conformément au mode d'emploi, il peut brouiller
les communications radio. Il n'y a aucune garantie qu'un
brouillage ne se produira pas dans un milieu particulier.
Si cet appareil brouille les communications radio ou télévision,
comme cela peut être confirmé en éteignant puis en allumant
l'appareil, l'utilisateur peut tenter de corriger toute interférence en
essayant une ou plusieurs des méthodes suivantes :
• Réorienter l'antenne réceptrice ou la placer à un autre endroit;
• Éloigner davantage l'appareil du récepteur;
• Brancher l'appareil sur une autre prise de courant ou un circuit
électrique différent de celui auquel le récepteur est connecté;
• Pour toute aide, consulter le distributeur ou un technicien
expérimenté radio/TV.
Conformément à la directive
Cet appareil se situe au-dessous de la classification Class 1
conformément à la R&TTE Directive (99/5/EC). Cet appareil
fonctionne en faible puissance. L'appareil est prévu pour un
usage au bureau ou à la maison. Cet accessoire peut être utilisé
dans tous les pays européens.
Politique de recyclage TARGUS
Lorsque ces produits ne sont plus utilisables, merci de les
apporter à un centre de recyclage approprié dans votre pays. La
politique de recyclage TARGUS est consultable à l'adresse
www.targus.com/recycling
Les caractéristiques et les spécifications sont sujettes à changement sans
préavis. Toutes les marques de commerce et les marques de commerce
déposées sont la propriété de leurs propriétairs respectifs.
WIDCOMM et le logo WIDCOMM sont des marques commerciales de WIDCOMM,
Inc. Bluetooth et le logo Bluetooth sont des marques commerciales détenues par
Bluetooth SIG, Inc., aux États-Unis et concédées sous licence à WIDCOMM, Inc..
Microsoft, Windows et Outlook sont des marques déposées de Microsoft
Corporation. Toutes les autres marques commerciales et déposées citées sont la
propriété de leurs détenteurs respectifs.
Page 71

71
TARGUS BLUETOOTH
®
MEDIA
NOTEBOOK MOUSE
Introduzione
Congratulazioni per l'acquisto del mouse per notebook
Targus Bluetooth® Media Notebook Mouse. Ora potrete
controllare il notebook e il media player predefinito fino a 10
metri di distanza.
Requisiti di sistema
Hardware - Notebook o PC desktop abilitati Bluetooth
Sistema operativo - Windows® 2000 o XP
Installazione delle batterie
(in dotazione)
•Utilizzate due batterie ricaricabili NIMH AAA (in dotazione)
•Rimuovete il coperchio del vano batteria facendo scorrere la
cover del mouse
•Inserite le batterie, verificando che i poli positivi (+) e
negativi (-) delle batterie coincidano con gli indicatori di
polarità raffigurati nel vano batteria
AVVERTENZE: NELLA SOSTITUZIONE DELLE BATTERIE, UTILIZZATE SEMPRE BATTERIE NiMH O
ALTRE BATTERIE RICARICABILI. NON UTILIZZATE MAI BATTERIE ALCALINE NEL DISPOSITIVO.
EVITATE DI UTILIZZARE NELLO STESSO DISPOSITIVO BATTERIE NUOVE ED USATE
Page 72

72
TARGUS BLUETOOTH® MEDIA NOTEBOOK MOUSE
ON OFF
Pulsante di
connessione
Interruttore
on/off
Sensore ottico
Coperchio
batteria
Vani batteria
• Fate scattare in posizione il coperchio del vano batterie
• Accendete il mouse facendo scorrere l'interruttore on/off sul
lato inferiore del mouse sulla posizione “on”.
Configurazione iniziale
Prima di poter iniziare ad utilizzare la connessione Bluetooth
sul computer e su altri dispositivi Bluetooth, è necessario
eseguire una configurazione iniziale.
Il Targus Bluetooth Media Notebook Mouse è progettato per
funzionare con i tre stack (protocolli) software principali:
WIDCOMM, Toshiba, e Microsoft.
Consultate la documentazione del vostro computer per
vedere quale stack software abbia. Rivolgetevi al vostro
rivenditore di sistema se il sistema non supporta uno degli
standard software Bluetooth sopracitati.
Page 73

73
TARGUS BLUETOOTH® MEDIA NOTEBOOK MOUSE
Per attivare la modalità media di questo mouse Bluetooth
classe II, è richiesta l'installazione iniziale del driver Tilt
Wheel.
Installazione driver Tilt Wheel per tutti
gli standard stack (protocolli) software
Per attivare la modalità media del Targus Bluetooth Media
Notebook Mouse, seguite i passaggi seguenti:
1. Inserite il CD d'installazione del software nel computer.
2. Comparirà la schermata iniziale di benvenuto. Assicuratevi
di aver chiuso tutte le applicazioni Windows prima di
procedere con l'installazione. Fate clic su Next (Avanti).
3. Selezionate la cartella nel computer nella quale volete
salvare ed installare il driver del mouse. Fate clic su Next
(Avanti).
4. Ha inizio la procedura d'installazione. Fate clic su Back
(Indietro) per rivedere o modificare la configurazione
corrente. Fate clic su Next (Avanti) per iniziare
l'installazione.
5. La finestra di fine installazione appare non appena il
sistema completa l'installazione. Selezionate Yes, I want to
restart my computer now (Sì, voglio riavviare il computer
ora) per utilizzare il programma.
Software Bluetooth: WIDCOMM
Assicuratevi che l'adattatore radio Bluetooth sia acceso. Se
necessario, consultate il manuale del computer per verificare
che sia attivo. Per aggiungere il mouse Targus, procedete
come descritto di seguito:
1. Fate doppio clic sull'icona Bluetooth Places (Risorse di
rete Bluetooth) che si trova sul desktop o nell'area di notifica,
quindi fate clic su Bluetooth setup wizard (Installazione
guidata Bluetooth)
Page 74

74
TARGUS BLUETOOTH® MEDIA NOTEBOOK MOUSE
2. Nella finestra di installazione guidata Bluetooth, selezionate I want
to find a specific Bluetooh device and configure how this computer will
use its services (Voglio trovare un dispositivo Bluetooth specifico e
configurare la modalità di utilizzo del computer dei servizi). Fate clic su
Next (Avanti).
3. Accendete il mouse. Premete il pulsante di connessione finché la
luce emessa dal LED rosso (alla base del mouse) rimane fissa.
4. Il computer cercherà nuovi accessori Bluetooth. Al termine della
ricerca, selezionate Targus Bluetooth Media Mouse for Notebook.
Fate clic su Next (Avanti).
Page 75

75
TARGUS BLUETOOTH® MEDIA NOTEBOOK MOUSE
5. Ha inizio la procedura d'installazione. Fate clic su Back
(Indietro) per rivedere o modificare la configurazione
corrente. Fate clic su Next (Avanti) per iniziare l'installazione.
6. Quando il sistema installa i driver appare la finestra di
conferma. Fate clic su OK. Dopo questa operazione, potete
muovere il cursore con il Bluetooth Media Mouse. Ora è
installato perfettamente
Software Bluetooth: TOSHIBA
Come verificare la vostra versione di Toshiba Bluetooth
Stack
1. Avviate il Bluetooth Manager.
2. Selezionate il menu Help (Guida).
3. Selezionate About. (Informazioni su...)
NOTA: PER ASSICURARE PRESTAZIONI OTTIMALI DEL VOSTRO PRODOTTO
BLUETOOTH E' NECESSARIO TOSHIBA BLUETOOTH STACK V3.20.00 O
VERSIONE SUCCESSIVA. SE AVETE UNA VERSIONE DIVERSA SCARICATE GLI
AGGIORNAMENTI DA WWW.SUPPORT.TOSHIBA.COM
Assicuratevi che l'adattatore radio Bluetooth del computer
sia acceso. Se necessario, consultate il manuale del
computer per verificare se l'adattatore è attivo. Per aggiungere il mouse Targus, procedete come descritto di seguito:
Page 76

76
TARGUS BLUETOOTH® MEDIA NOTEBOOK MOUSE
1. Fate doppio clic sull'icona Bluetooth Manager nell'area di
notifica quindi fate clic su “New Connection” (“Nuova
connessione").
2. Compare la finestra Add New Connection Wizard
(Definizione guidata nuova connessione). Selezionate
Express Mode (Modalità semplificata) e fate clic su Next
(Avanti).
3. Accendete il mouse. Premete il pulsante di connessione
finché la luce emessa dal led rosso (sul lato inferiore del
mouse) rimane fissa.
Page 77

77
TARGUS BLUETOOTH® MEDIA NOTEBOOK MOUSE
4. Verrà visualizzata una lista di dispositivi, selezionate il
mouse e fate clic su Next (Avanti).
5. Il sistema installerà i driver necessari.
6. Dopo l'installazione comparirà la finestra New Hardware
Wizard (Installazione guidata di nuovo hardware). Vi
chiederà di collegarvi ad un aggiornamento di Windows.
Selezionate No.
7. Seguite le istruzioni sullo schermo fino al completamento
dell'installazione guidata.
Page 78

78
TARGUS BLUETOOTH® MEDIA NOTEBOOK MOUSE
Software Bluetooth: MICROSOFT
Assicuratevi che l'adattatore radio Bluetooth sia acceso. Se
necessario, consultate il manuale del computer per verificare
che sia attivo. Per aggiungere il mouse Targus, procedete
come descritto di seguito:
1. Fate doppio clic sull'icona Bluetooth Manager nell'area di
notifica.
2. Selezionate Add Bluetooth Device (Aggiungi periferica
Bluetooth).
Page 79

79
TARGUS BLUETOOTH® MEDIA NOTEBOOK MOUSE
3. Quando compare la finestra Add Bluetooth Device (Aggiungere
periferica Bluetooth), selezionate ‘My device is set up and ready to be
found.’ (La periferica è configurata e pronta per il rilevamento) quindi
fate clic su Next (Avanti).
4. Accendete il mouse. Premete il pulsante di connessione finché la
luce emessa dal led rosso (sul lato inferiore del mouse) rimane fissa.
5. Il software rileverà un certo numero di dispositivi. Selezionate il
mouse e fate clic su Next (Avanti).
6. Nella finestra visualizzata appare una richiesta di passkey. Selezionate l'opzione Don’t use a passkey (Non utilizzare nessuna passkey) e
fate clic su Next (Avanti).
7. Il mouse è ora pronto per l'uso.
Page 80

80
TARGUS BLUETOOTH® MEDIA NOTEBOOK MOUSE
Istruzioni per l'uso
Il mouse ha 2 modalità di funzionamento:
In modalità mouse
A
B
C
D
A
B
C
D
E
F
E
F
H
G
G
H
Clic destro: Stop
Clic sinistro:
Play / Pausa
In modalità media
Tasto sinistro: Clic
sinistro
Tasto destro: Clic
destro
Rotellina di scorrimento:
Funzione di scorrimento
(graduale) Tasto centrale: Clic
Centrale
Joystick: Scorrimento verso
l'alto, scorrimento verso il
basso, scorrimento a sinistra,
scorrimento a destra (funzione
di scorrimento continuo). Gli
scorrimenti laterali sono
l'equivalente delle funzioni tilt
wheel di Microsoft
Premete Joystick
una volta, per
visualizzare
il media player
predefinito.
Premete la rotellina di
scorrimento, per
visualizzare il menu
della Guida sullo
schermo
Page 81

81
TARGUS BLUETOOTH® MEDIA NOTEBOOK MOUSE
I
J
I
J
Compatibilità Media Player
Il mouse è compatibile con i seguenti comandi Media:
iTunes v.6.0.1.3 Musicmatch v.10
Quintessential Player v.4.51 Real Player v.10.5
X X
X X
X X
X X
X X
X X
X X
X X
X X
X X
X X
X X
X X
X X
X
X
Azione
Play (Audio)
Pausa (Audio)
Stop (Audio)
Volume Su (Audio)
Volume Giù (Audio)
Traccia precedente
(Audio)
Traccia successiva
(Audio)
Avanzamento rapido(Video)
Riavvolgimento (Video)
Scorrimento verso l'alto: aumenta il
volume dell'audio.
Scorrimento verso il basso: riduce il
volume dell'audio
Verso l'alto: Traccia precedente
Verso il basso: Traccia successiva
Verso destra: Avanti rapido
Verso sinistra: Riavvolgimento
Azione
Play (Audio)
Pausa (Audio)
Stop (Audio)
Volume Su (Audio)
Volume Giù (Audio)
Traccia precedente
(Audio)
Traccia successiva
(Audio)
Avanzamento rapido(Video)
Riavvolgimento (Video)
Page 82

TARGUS BLUETOOTH® MEDIA NOTEBOOK MOUSE
Windows Media Player v.10
X
X
X
X
X
X
X
X
NOTA: LE FUNZIONALITA' DEL MOUSE VARIANO IN BASE ALLE PRESTAZIONI DEL SOFTWARE MEDIA PLAYER
ISTRUZIONI PER IMPOSTARE / MODIFICARE IL MEDIA PLAYER PREDEFINITO
• FATE CLIC SU START
• ANDATE NELPANNELLO DI CONTROLLO, E SELEZIONATE INSTALLAZIONE APPLICAZIONI
• FATE CLIC SU IMPOSTAZIONI ACCESSO AI PROGRAMMI SULLA BARRA DEL MENU SUL LATO SINISTRO. PER
PERSONALIZZARE, SELEZIONATE PERSONALIZZATANELLA SCHERMATA PRINCIPALE
• SELEZIONATE IL PROGRAMMA PREDEFINITO PER MEDIA PLAYER
• SE IL PROGRAMMA MEDIA PLAYER PREFERITO NON E' INCLUSO NELLA LISTA, FATE CLIC SULLA GUIDAPER
SUPPORTO
Suggerimenti
Per ottenere delle prestazioni ed una ricezione RF ottimali:
• Evitate di utilizzare il mouse su una superficie metallica. I metalli,
come il ferro, l'alluminio o il rame, schermano la trasmissione in radio
frequenza e potrebbero rallentare i tempi di funzionamento del mouse
o provocarne temporaneamente il malfunzionamento.
• Il mouse entrerà in stato suspend simultaneamente al computer. Per
attivare il mouse, premete un tasto qualsiasi del mouse, e si accend
erà.
• Se il computer ha un case metallico contenente alluminio o magne
sio, utilizzate il mouse lateralmente. Il pannello del monitor può
interferire con i segnali di radio frequenza, se si utilizza il mouse
direttamente di fronte al computer.
• Per una maggiore durata della batteria, utilizzate il mouse su una
superficie bianca o di colore chiaro. Le superfici scure provocano una
maggiore intensità della luce emessa dal diodo (LED) del mouse,
causando in tal modo un maggior consumo della batteria.
82
Azione
Play (Audio)
Pausa (Audio)
Stop (Audio)
Volume Su (Audio)
Volume Giù (Audio)
Traccia precedente
(Audio)
Traccia successiva
(Audio)
Avanzamento rapido(Video)
Riavvolgimento (Video)
Page 83

TARGUS BLUETOOTH® MEDIA NOTEBOOK MOUSE
83
Gestione risparmio energia del
mouse
• Per accendere e spegnere il mouse, fate scorrere l'interruttore on/off
sul lato inferiore del mouse sulla posizione desiderata.
• La funzione di risparmio energia imposta il mouse in modalità "sleep"
dopo 20 minuti di inattività. Per riattivarlo, fate clic su un tasto qualsiasi
del mouse.
• Per un minor consumo della batteria, spegnete il mouse quanto siete
in viaggio o quando non lo utilizzate.
• La rotellina di scorrimento si illumina quando il livello della batteria è
basso. Per ricaricare il mouse, collegate il mouse al cavo di ricarica
USB, quindi collegate il cavo USB al computer. Durante la ricarica è
possibile utilizzare il mouse.
Notebook
Desktop
Per il cavo di ricarica USB
(SOLO per alimentazione)
ON OFF
Pulsante di
connessione
Interruttore
on/off
Sensore ottico
Page 84

TARGUS BLUETOOTH® MEDIA NOTEBOOK MOUSE
84
Risoluzione di problemi
Il mouse non funziona.
• Verificate che la polarità delle batterie sia corretta. I poli positivo (+) e
negativo (-) devono coincidere con le connessioni positiva (+) e
negativa (-) presenti nel vano batteria.
• Verificate che il computer sia abilitato alla ricezione Bluetooth.
• Assicuratevi che i driver del dispositivo siano installati:
• Le periferiche accoppiate sono sempre visualizzate in Risorse di rete
Bluetooth anche se il mouse è fuori del campo di copertura o non è
acceso.
• Verificate che la periferica remota della coppia sia all'interno del
campo di copertura, quindi tentate nuovamente la connessione.
• Assicuratevi che le batterie siano state installate correttamente.
Eventualmente ricaricatele / sostituitele.
1. Fate clic su Start/ Pannello di controllo/ Prestazioni e
manutenzione/ Sistema/ Hardware/ Gestione periferiche
2. Verificate che sotto “Dispositivi Bluetooth” sia installato “Targus
Bluetooth Media Notebook Mouse”
Il mouse non funziona dopo aver eseguito il pairing con il sistema
Bluetooth.
Page 85

TARGUS BLUETOOTH® MEDIA NOTEBOOK MOUSE
85
Supporto tecnico
In caso di quesiti tecnici, visitare:
Internet http://www.targus.com/support.asp
Inglese http://www.targus.com/uk/support.asp
Francese http://www.targus.com/fr/support.asp
Tedesco http://www.targus.com/de/support.asp
Spagnolo http://www.targus.com/sp/support.asp
Italiano http://www.targus.com/it/support.asp
Il nostro staff di tecnici esperti è anche disponibile per
rispondere telefonicamente alle vostre domande. Potete
quindi chiamare uno dei numeri seguenti.
l'Austria 01 795 676 42
Belgio 02-717-2451
Danimarca 45 35-25-87 51
Finlandia 922948016
Francia 01-64-53-9151
Germania 0211-657-911-51
Italia 02 4827-1151
Norvegia 022577729
Paesi Bassi 02 0504 0671
Il Portogallo +351 21 415 4123
Spagna 91 745 6221
Svezia 8-751-4058
Svizzera 1-212-0007
Regno Unito 20-7744-0330
Europa dell'est e altri Paesi +31 0 20 05040671
Page 86

TARGUS BLUETOOTH® MEDIA NOTEBOOK MOUSE
86
Registrazione del prodotto
Targus vi raccomanda di registrare il vostro prodotto Targus
subito dopo averlo acquistato. Per registrare il vostro prodotto
Targus, visitate: http://www.targus.com/registration.asp
Dovrete fornire il vostro nome e cognome, l'indirizzo e-mail, il
numero di telefono, e le informazioni dell'azienda (se applicabili).
Garanzia
Targus garantisce per la durata di due anni che questo prodotto è
privo di difetti di materiale e di manodopera. Se l'accessorio
Targus dovesse rivelarsi difettoso durante questo periodo, verrà
riparato o sostituito. Questa garanzia non copre i danni
accidentali, la normale usura e perdita consequenziale o
accidentale. In nessuna circostanza Targus sarà responsabile per
perdita di dati o danni a computer e/o programmi, dati
memorizzati o qualsiasi altro danno consequenziale o
accidentale, anche nel caso Targus sia stata informata di questa
possibilità. Questa garanzia non influisce sui diritti statutari
dell'utente.
Conformità alla normativa
Questo apparato è conforme alla Parte 15 delle Norme FCC
(Federal Communications Commission). La sua operatività è
soggetta alle due condizioni sottostanti: (1) Questo apparato può
non creare interferenze, e (2) Questo apparato deve accettare
eventuali interferenze ricevute, comprese quelle interferenze che
possono causare operazioni non desiderate.
Dichiarazione della FCC
Testato per la conformità
Questo apparato è stato testato e si è riscontrato essere
conforme ai limiti stabiliti per gli apparati di Classe B digitale, ai
sensi della Parte 15 del regolamento della FCC. Questi limiti sono
stabiliti per fornire una protezione ragionevole dalle interferenze
in installazioni residenziali. Questo apparecchio genera, utilizza,
e può emettere energia da radiofrequenze, e qualora non venisse
installato ed utilizzato secondo le istruzioni, può creare
interferenze alle comunicazioni radio. Comunque, non vi sono
Page 87

TARGUS BLUETOOTH® MEDIA NOTEBOOK MOUSE
87
garanzie che non avvengano interferenze in particolari
installazioni.
Qualora questo apparecchio dovesse creare interferenze per la
ricezione di radio o televisioni, che possono essere determinate
dall'accensione e dallo spegnimento dell'apparato, al cliente
viene consigliato di provare a correggere l'interferenza tramite
l'utilizzo di una o piu' di una delle seguenti soluzioni:
• Riorientare o riposizionare l'antenna ricevente
• Aumentare la distanza tra l'apparecchio ed il ricevitore
• Collegare l'apparato in una presa di un circuito diverso da
quello al quale è collegato il ricevitore
• Consulta il rivenditore o un tecnico radio/TV specializzato per
ricevere supporto.
Conformemente alle Direttive
Questa periferica rientra nella categoria Classe 1
conformemente alle Direttive R&TTE (99/5/EC). Questa periferica
è a basso consumo ed è eslcusivamente utilizzabile in casa e in
ufficio. Questo prodotto può essere utilizzato in tutti i Paesi della
Comunità Europea.
Direttive di Riciclaggio Targus
Disporre il prodotto alla fine del suo ciclo di vita utile, in un punto
appropriato di raccolta per il riciclaggio collocato nel tuo territorio.
www.targus.com/recycling
Le caratteristiche e le specifiche sono soggette a modifiche senza alcun
preavviso. Tutti i marchi di fabbrica e i marchi registrati sono di proprietà dei
rispettivi titolari.
WIDCOMM ed il logo WIDCOMM sono marchi registrati di WIDCOMM, Inc.
Bluetooth ed il logo Bluetooth logo sono marchi registrati di proprietà di Bluetooth
SIG, Inc., U.S.A. e concessi in licenza a WIDCOMM, Inc..
Microsoft, Windows, e Outlook sono marchi registrati di Microsoft Corporation. Tutti
gli altri marchi di fabbrica e marchi registrati sono di proprietà dei rispettivi
depositari.
Page 88

88
TARGUS BLUETOOTH®
MEDIANOTEBOOK-MUIS
Inleiding
Hartelijk gefeliciteerd met de aanschaf van de Targus
Bluetooth® medianotebook-muis. Nu kunt u uw notebook en
een standaard mediaspeler tot op een afstand van 10 m
bedienen.
Systeemvereisten
Hardware – Bluetooth-notebook of desktop-PC
Besturingssysteem - Windows® 2000 of XP
Installatie van de batterijen
(bijgeleverd)
•Gebruik twee oplaadbare AAA-NIMH-batterijen (bijgeleverd)
•Verwijder het kapje van het batterijvakje aan de bovenkant
van de muis door het weg te schuiven
•Plaats de batterijen en zorg dat de positieve (+) en
negatieve (–) polen overeenkomen met de markeringen in
het batterijvakje
WAARSCHUWINGEN: VERVANG DE BATTERIJEN ALTIJD DOOR NIMH-BATTERIJEN OF
ANDERE OPLAADBARE BATTERIJEN. GEBRUIK NOOIT ALKALINEBATTERIJEN IN DIT
APPARAAT. GEBRUIK OUDE EN EN NIEUWE BATTERIJEN NOOIT TEGELIJKERTIJD.
Page 89

89
TARGUS BLUETOOTH® MEDIA NOTEBOOK MOUSE
ON OFF
verbindingsknop
Aan/uitschakelaar
Optische sensor
Kapje van
batterijvakje
Batterijvakjes
• Klik het kapje van het batterijvakje weer dicht.
• Zet de muis aan door de aan/uit-schakelaar aan de
onderzijde van de muis in de positie “aan” te schuiven.
Startconfiguratie
Voordat u de Bluetooth-aansluiting op uw computer en op
andere Bluetooth-apparatuur kunt gebruiken, dient u enige
software te installeren.
De Targus Bluetooth medianotebook-muis kan worden
gebruikt met drie bekende softwareprotocollen: WIDCOMM,
Toshiba en Microsoft.
Kijk in de documentatie van uw computer welk softwareprotocol op uw computer wordt gebruikt. Neem contact op met
de leverancier van uw systeem als op uw systeem geen van
de hierboven genoemde Bluetooth-softwareprotocollen wordt
gebruikt.
Page 90

90
TARGUS BLUETOOTH® MEDIA NOTEBOOK MOUSE
Wanneer u de mediafunctie van deze klasse II Bluetooth-muis
wilt activeren, moet u eerst het muiswielstuurprogramma
installeren.
Installatie Muiswielstuurprogramma
Voor Alle Softwareprotocollen
Voer de volgende stappen uit om de mediafunctie van de
Targus Bluetooth medianotebook-muis te activeren:
1. Plaats de installatie-CD in uw computer.
2. Het introductiescherm verschijnt. Controleer of u alle
Windows-programma’s hebt afgesloten voordat u de
software installeert. Klik op Next (Volgende).
3. Kies de locatie waar u het muisstuurprogramma op de
computer wilt installeren en opslaan. Klik vervolgens op Next
(Volgende).
4. De installatie wordt gestart. Klik op Back (Terug) om de
huidige configuratie te bekijken of te wijzigen. Klik op Next
(Volgende) om te beginnen met de installatie.
5. Het afsluitvenster verschijnt als de installatie is voltooid.
Kies Yes, I want to restart my computer now (Ja, ik wil mijn
computer nu opnieuw opstarten) om het programma te
gebruiken.
Bluetooth-software: WIDCOMM
Controleer of de Bluetooth-radio is ingeschakeld. Kijk
eventueel in de handleiding van uw computer of de radio is
geactiveerd. Ga als volgt te werk om de Targus-muis toe te
voegen:
1. Ga naar het pictogram Bluetooth Places op uw bureaublad
of op de taakbalk en dubbelklik erop. Klik vervolgens op
Bluetooth Setup Wizard.
Page 91

91
TARGUS BLUETOOTH® MEDIA NOTEBOOK MOUSE
2. Schakel in de Bluetooth Setup Wizard de optie I want to find
a specific Bluetooth device and configure how this computer
will use its services (Ik zoek een specifiek Bluetooth-apparaat
en wil configureren hoe deze computer de services van dat
apparaat gebruikt) in. Klik op Next (Volgende).
3. Zet de muis aan. Druk op de verbindingsknop totdat de
sensor met het rode lampje (aan de onderkant van de muis)
continu brandt.
4. De computer zoekt naar nieuwe Bluetooth-accessoires.
Selecteer als deze klaar is de “Targus Bluetooth Media
Mouse for Notebook”. Klik op Next (Volgende).
Page 92

92
TARGUS BLUETOOTH® MEDIA NOTEBOOK MOUSE
5. De installatie wordt gestart. Klik op Back (Terug) om de
huidige configuratie te bekijken of te wijzigen. Klik op Next
(Volgende) om te beginnen met de installatie.
6. Het bevestigingsvenster verschijnt als het systeem de
stuurprogramma’s installeert. Klik op OK. Als u klaar bent,
kunt u de cursor verplaatsen met uw Bluetooth-mediamuis.
Deze is nu geïnstalleerd.
Bluetooth-software: TOSHIBA
Uw versie van het toshiba bluetooth-protocol controleren
1. Start de Bluetooth Manager.
2. Selecteer het Help-menu.
3. Selecteer About (Info).
OPMERKING: VOOR OPTIMALE PRESTATIES VAN UW BLUETOOTH-PRODUCT
HEBT U TOSHIBA BLUETOOTH VERSIE 3.20.00 OF HOGER NODIG. VOER
WANNEER U EEN ANDERE VERSIE HEBT EEN UPDATE UIT VIA
WWW.SUPPORT.TOSHIBA.COM
Controleer of de Bluetooth-radio is ingeschakeld. Kijk
eventueel in de handleiding van uw computer of de radio is
geactiveerd. Ga als volgt te werk om de Targus-muis toe te
voegen:
Page 93

93
TARGUS BLUETOOTH® MEDIA NOTEBOOK MOUSE
1. Dubbelklik op het pictogram Bluetooth Manager op de
taakbalk en klik vervolgens op “New Connection” (Nieuwe
verbinding).
2. Het venster Add New Connection Wizard (Wizard Nieuwe
verbinding toevoegen) verschijnt. Kies de Express Mode
(Expressmodus) en klik op Next (Volgende).
3. Zet de muis aan. Druk op de verbindingsknop totdat de
sensor met het rode lampje (aan de onderkant van de muis)
continu brandt.
Page 94

94
TARGUS BLUETOOTH® MEDIA NOTEBOOK MOUSE
4. Er verschijnt een lijst met apparaten. Selecteer de muis en
klik op Next (Volgende).
5. Het systeem installeert de benodigde stuurprogramma’s
6. Na installatie verschijnt het venster New Hardware Wizard
(Wizard Nieuwe hardware). U wordt gevraagd een verbinding
tot stand te brengen met een Windows-update. Kies No
(Nee).
7. Volg de instructies op het scherm totdat u klaar bent.
Page 95

95
TARGUS BLUETOOTH® MEDIA NOTEBOOK MOUSE
Bluetooth-software: MICROSOFT
Controleer of de Bluetooth-radio is ingeschakeld. Kijk
eventueel in de handleiding van uw computer of de radio is
geactiveerd. Ga als volgt te werk om de Targus-muis toe te
voegen:
1. Dubbelklik op het pictogram Bluetooth Manager op de
taakbalk.
2. Selecteer Add Bluetooth Device (Bluetooth-apparaat
toevoegen).
Page 96

96
TARGUS BLUETOOTH® MEDIA NOTEBOOK MOUSE
3. Wanneer het venster Add Bluetooth Device (Bluetooth-apparaat
toevoegen) verschijnt, selecteert u de optie ‘My device is set up and
ready to be found’ (Mijn apparaat is geïnstalleerd en kan worden
opgespoord.). Klik op Next (Volgende).
4. Zet de muis aan. Druk op de verbindingsknop totdat de sensor met
het rode lampje (aan de onderkant van de muis) continu brandt.
5. Er worden verschillende apparaten gevonden. Selecteer de muis en
klik op Next (Volgende).
6. Er verschijnt een venster waarin om een toegangscode wordt
gevraagd. Schakel de optie Don’t use a passkey (Geen toegangscode
gebruiken) in en klik op Next (Volgende).
7. Uw muis is nu klaar voor gebruik.
Page 97

97
TARGUS BLUETOOTH® MEDIA NOTEBOOK MOUSE
Gebruiksaanwijzing
De muis heeft twee standen voor definitie van de bedieningsopties:
In muismodus
A
B
C
D
A
B
C
D
E
F
E
F
H
G
G
H
In mediamodus
Linkerknop:
linksklikken
Rechterknop:
rechtsklikken
Schuifwiel: schuiven
(ministappen) Functie
middelste knop: in het
midden klikken
Joystick: omhoog schuiven,
omlaag schuiven, naar links
schuiven, naar rechts
schuiven (continue
schuiffunctie). De zijwaartse
schuiffuncties zijn equivalent
aan de muiswielfuncties van
de Microsoft-muis
Joystick eenmaal
indrukken roept de
standaardmediaspeler op
Het schuifwiel
eenmaal indrukken
opent het Helpmenu op het scherm
Rechtsklikken:
Stop
Linksklikken:
Afspelen /
Pauze
Page 98

98
TARGUS BLUETOOTH® MEDIA NOTEBOOK MOUSE
I
J
I
J
Compatibiliteit van mediaspelers
De muis is compatibel met de volgende mediafuncties:
Handeling iTunes v.6.0.1.3 Musicmatch v.10
Quintessential Player v.4.51 Real Player v.10.5
Afspelen (Audio) X X
X X
Pauzeren (Audio) X X
X X
Stoppen (Audio) X X
X X
Volume omhoog (Audio) X X
X X
Volume omlaag (Audio) X X
X X
Vorige track (Audio) X X
X X
Volgende track (Audio) X X
X X
Snel vooruitspoelen (Video) X
Terugspoelen (Video) X
Omhoog schuiven: verhoogt het
geluidsvolume.
Omlaag schuiven: verlaagt het
geluidsvolume
Omhoog drukken: vorige track
Omlaag drukken: volgende track
Naar rechts drukken: snel
vooruitspoelen
Naar links drukken: terugspoelen
Handeling
Afspelen (Audio)
Pauzeren (Audio)
Stoppen (Audio)
Volume omhoog (Audio)
Volume omlaag (Audio)
Vorige track (Audio)
Volgende track (Audio)
Snel vooruitspoelen (Video)
Terugspoelen (Video)
Page 99

TARGUS BLUETOOTH® MEDIA NOTEBOOK MOUSE
Windows Media Player v.10
X
X
X
X
X
X
X
X
OPMERKING: AFHANKELIJK VAN DE SOFTWAREFUNCTIES VAN UW MEDIASPELER KUNNEN
DE MUISFUNCTIES VARIËREN
INSTRUCTIES VOOR INSTELLING/WIJZIGING VAN UW STANDAARDMEDIASPELER
• KLIK OP DE KNOP START
• GA NAAR CONFIGURATIESCHERM EN KIES SOFTWARE
• KLIK OP PROGRAMMATOEGANG EN INSTELLINGEN IN HET MENU AAN DE LINKERKANT.
KIES AANGEPAST) IN HET HOOFDSCHERM OM DE MEDIASPELER TE PERSONALISEREN
• KIES UW STANDAARDMEDIASPELER
• WANNEER DE DOOR U GEWENSTE MEDIASPELER NIET IN DE LIJST VOORKOMT, KLIKT U OP
HELP
Tips voor bediening
Voor optimale prestaties en RF-ontvangst:
• Gebruik de muis niet op een metalen oppervlak. Metalen als ijzer,
aluminium of koper schermen de radiofrequentietransmissie af en
kunnen de reactietijd van de muis vertragen of ervoor zorgen dat de
muis tijdelijk uitvalt.
• De muis gaat tegelijkertijd met uw computer naar de stand-bypositie.
U activeert de muis door op een muisknop te drukken. Het lampje van
de muis gaat branden.
• Gebruik de muis aan de zijkant van de computer wanneer deze een
metalen kast met aluminium of magnesium heeft. Het scherm kan het
radiofrequentiesignaal verstoren als u de muis aan de voorkant van
de computer gebruikt.
• Gebruik om de levensduur van de batterij te sparen de muis op een
wit of licht gekleurd oppervlak. Door donkere oppervlakken gaat de
LED van de muis feller branden, zodat de batterij sneller leeg is.
99
Handeling
Afspelen (Audio)
Pauzeren (Audio)
Stoppen (Audio)
Volume omhoog (Audio)
Volume omlaag (Audio)
Vorige track (Audio)
Volgende track (Audio)
Snel vooruitspoelen (Video)
Terugspoelen (Video)
Page 100

TARGUS BLUETOOTH® MEDIA NOTEBOOK MOUSE
100
Energiebeheer voor de muis
• U zet de muis aan en uit door de aan/uit-schakelaar aan de onderkant
van de muis in de gewenste positie te schuiven.
• Tijdens gebruik zet de energiebesparingsfunctie de muis na 20
minuten inactiviteit op "stand-by". Klik op een muisknop om de muis
weer te activeren.
• U spaart de batterij door de muis onderweg of als u deze niet
gebruikt, uit te zetten.
• Wanneer de batterijen bijna leeg zijn, gaat het schuifwiel licht geven.
U laadt de muis op door de USB-oplaadkabel op de muis en de USB stekker op de computer aan te sluiten. U kunt de muis tijdens het
opladen gebruiken.
Notebook
Desktop
Voor USB-oplaadkabel
(Alleen voor opladen)
ON OFF
Verbindingsknop
Aan/uit-schakelaar
Optische sensor
 Loading...