

Page 1
USER GUIDE
MANUEL DE
L'UTILISATEUR
mobile
docking station
with video
station d’accueil
mobile
avec vidéo
Visit our websit e at www.targus.com/ca
Features and spe cifications are subject t o change without notice.
© 2009 Targus Group Inte rnational, Inc. and Targus, Inc.
Visitez notre Si te: www.targus.com/ca
Caractéristiques et spécifications sujett es à modification sans pr éavis.
© 2009 Targus Group Inte rnational, Inc. et Targus, Inc.
ACP50CA / 410-00 03-002C
Page 2

2
Table of Contents
English
Mobile Docking Station with Video .................... 3
Français
Station d'accueil mobile avec vidéo ................... 20
Page 3

3
TARGUS MOBILE
DOCKING STATION
WITH VIDEO
Introduction
Congratulations on your purchase of the Targus Mobile
Docking Station with Video. This portable expansion
module allows you to connect through a single USB
connection up to 4 USB devices, monitor, network
(Ethernet/LAN) connection, speakers, microphone and a
serial device.
The docking station also offers Targus Always On
technology, Targus Power Port providing twice the USB
spec for high power devices, and USB ports that are
widely spaced for larger adapters. Targus Always ON
provides power to the USB ports even when the
notebook is shut-down, disconnected from the docking
station or in hibernate/stand-by mode. This allows USB
devices that charge via the USB port to keep charging
under any circumstance.
Fe ature s
Heat dissipation by natural convection:
Place the back edge of your laptop on the rubber pads of
the Docking Station. Most laptops dissipate heat through
the bottom and the more air that’s allowed to flow under
the bottom, the better chance that heat will dissipate by
natural convection.
Page 4

4
Targus Mobile Docking Station with Video
Comfort
The raised platform provides a more comfortable position
for hands and increased airflow for better cooling.
The Docking Station provides the
following ports:
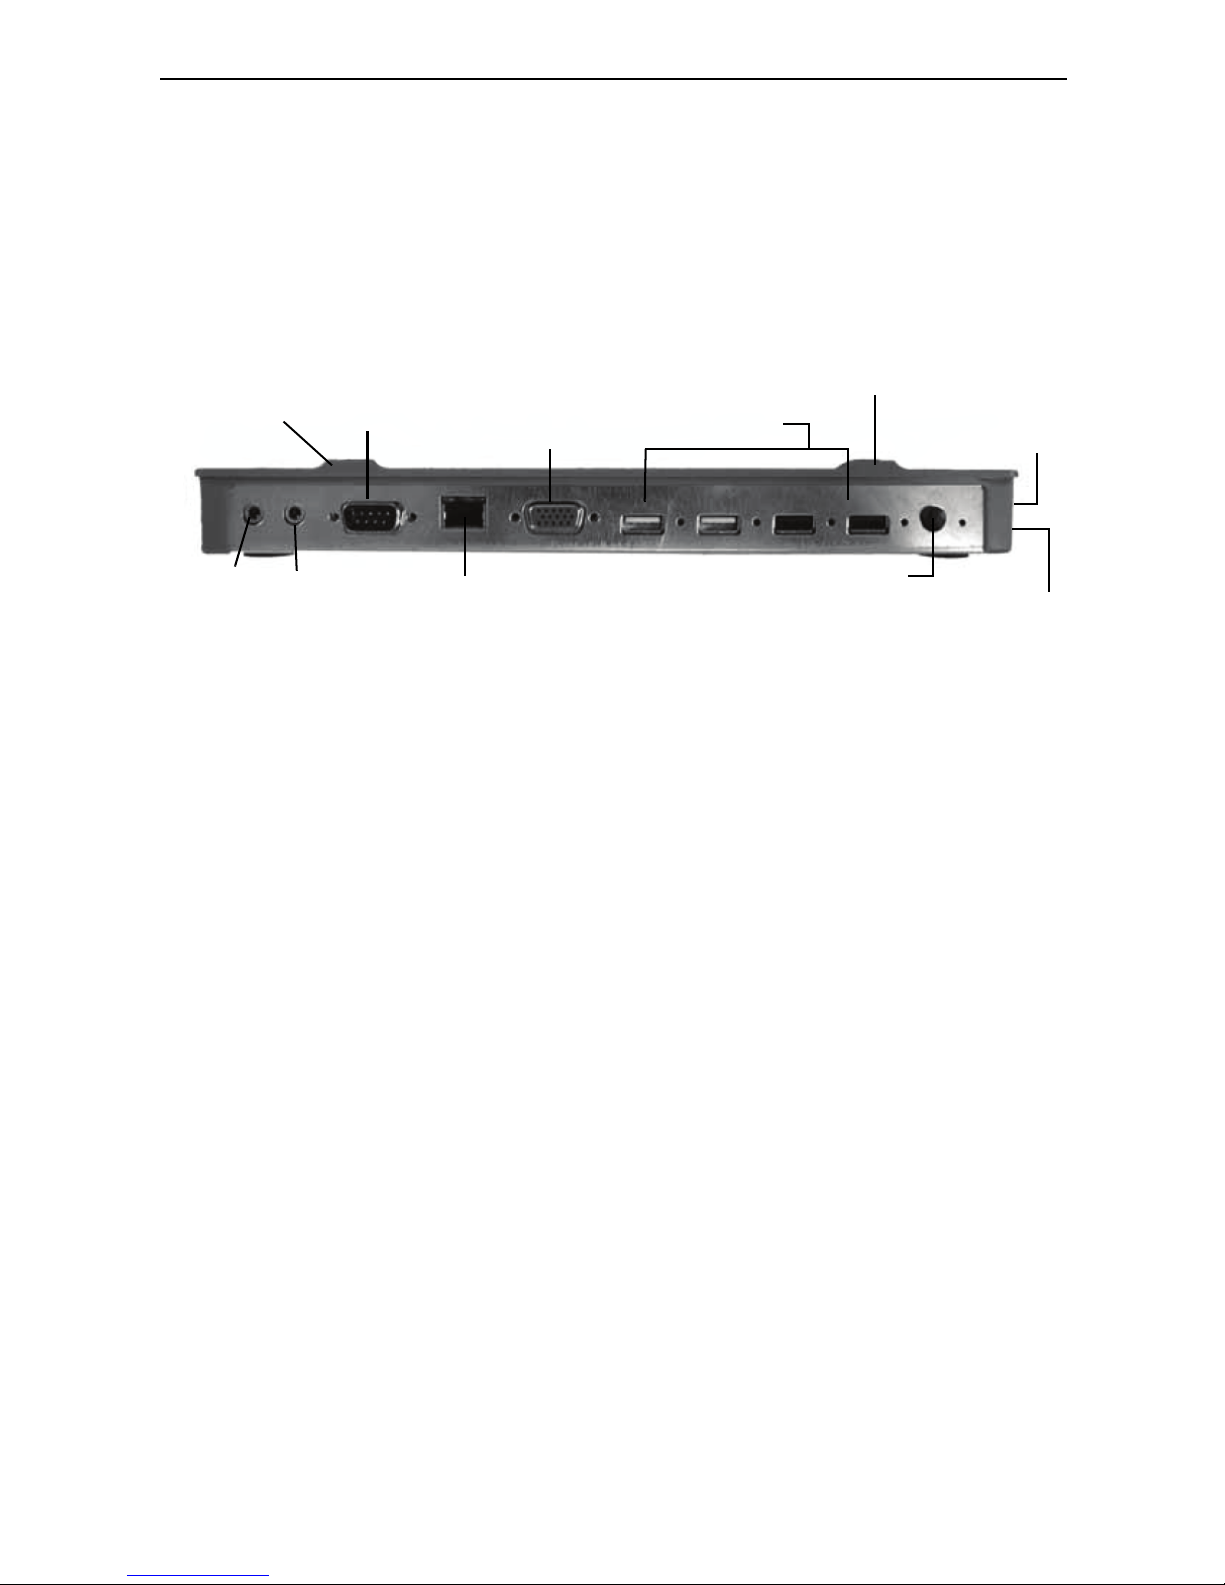
• 15-pin VGA (supports up to 1600 x 1200 at 16 bit color)
• Two 3.5 mm Audio: (1) stereo out and (1) microphone
in
• RS232 serial
• RJ-45 Ethernet 10/100
• Two USB 2.0 (White)
• Two USB Power Ports (Black) - providing up to 1Amp
Package Contents
In addition to this user’s guide, the package contains:
• Targus Mobile Docking Station with Video
• High-speed USB 2.0 upstream cable
• Driver software CD
• AC power adapter (required)
System Requirements
Hardware
• PC with an Intel® Pentium® processor or equivalent
• CD-ROM drive
• USB version 2.0 port
Page 5

5
Targus Mobile Docking Station with Video
• AC power source (AC adapter required)
NOTE: W
HEN CONNECTED TO A USB VERSION 1.1 PORT ON YOUR
COMPUTER
, THE DOCKING STATION’S PERFORMANCE LEVEL WILL BE
LESS
THAN OPTIMAL AND THE VIDEO PORT WILL NOT FUNCTION
PROPERLY
. FOR BEST RESULTS, CONNECT IT TO A USB VERSION 2.0
PORT.
Operating System
• Windows® 2000 Service Pack 2 or greater
• Windows
®
XP Service Pack 1 or greater
• Windows Vista
®
NOTE: TO DOWNLOAD LATEST SERVICE PACKS, PLEASE VISIT YOUR
COMPUTER
MANUFACTURER’S WEBSITE OR MICROSOFT’S DOWNLOAD
CENTER
:
http://support.microsoft.com
Installing the Device and
Drivers
To use the Targus Docking Station, you must first install
the driver onto your computer. Connect the docking
station to your computer and Windows plug-and-play will
install the hardware drivers for each port.
WARNING: Y
OU MUST INSTALL THE DOCKING STATION SOFTWARE
BEFORE CONNECTING IT TO YOUR COMPUTER. OTHERWISE, THE
DOCKING STATION WILL NOT WORK PROPERLY.
Page 6

6
Targus Mobile Docking Station with Video
Installing the Docking Station Driver
Installing the docking station driver enables your
operating system to recognize the docking station and its
ports once it’s connected.
1 Turn on your computer.
2 Insert the driver software CD into your computer’s CD-
ROM drive.
3 If setup does not begin automatically, click Start, Run,
then enter D:\Setup.exe (where D: is the path of your
CD-ROM drive) and then click OK.
4 Follow any on-screen instructions to complete the
installation.
5Click Finish and restart your computer when
prompted.
Connecting the Docking Station to
Your Computer
After installing the docking station software, you are
ready to connect the docking station to your computer. To
do this:
1 Connect the supplied AC power adapter to the AC
power jack on the docking station.
2 Connect one end of the USB cable to the docking
station and the other end into an available USB 2.0
port on your computer.
NOTE: T
HE DOCKING STATION WILL NOT FUNCTION PROPERLY
WITHOUT
THE AC ADAPTER PLUGGED INTO AN AC OUTLET.
Page 7

7
Targus Mobile Docking Station with Video
DO NOT CONNECT ANY DEVICES TO THE DOCKING STATION UNTIL THE
INSTALLATION
IS COMPLETED.
Installing the Default Device Drivers
Once you connect the docking station to your computer,
the default drivers begin installing for each of the ports.
Some hardware devices may prompt you to install the
drivers.
To install the drivers:
1 Select Install the software automatically
(Recommended) and click Next.
The Found New Hardware Wizard program begins
installing the hardware drivers.
The Completing the Found New Hardware Wizard
screen appears.
2Click Finish and repeat as needed for each device.
3 Restart your computer.
LED Status Indicator Lights
Once all device drivers are installed, the USB LED status
indicator lights on the back of the docking station glow
and you can connect devices to the docking station.
• Green Tx light illuminates when connected to a
network and the yellow Rx light flashes when data is
transmitting to or from the network.
NOTE: T
HE DOCKING STATION SUPPORTS HOT SWAPPING OF THE
NETWORK
CABLE.
Page 8
8
Targus Mobile Docking Station with Video
• USB lights will glow when the docking station is
connected to your computer.
• Always ON LED glows green when button is
depressed.
Docking Station Ports
Connecting New Devices
To avoid possible damage when connecting a new
device, do not force the cable connector into the port on
the docking station. If the cable connector does not
attach smoothly, turn the connector over and try attaching
it again.
Connecting a Serial Mouse
To connect a serial mouse, attach the cable connector to
the serial port on the docking station.
USB Ports
Serial
Audio Audio
In Out
VGA
Always On
AC Adapter
Laptop
USB to P
C
Network
Laptop Support Pad
Connectio
n
Support
Pad
Page 9

9
Targus Mobile Docking Station with Video
Connecting and Configuring a Serial
Modem
To connect a serial modem:
1 Attach the cable connector to the serial port on the
docking station.
2 Install the modem software driver according to the
instructions that come with the device.
3 When prompted to select the port, choose the Serial
USB (COMx), where x is the COM port number
assigned by your operating system.
Connecting a PDA
1 Attach the cable connector to the serial port on the
docking station.
2 Verify that the COM port setting, in either your
HotSync
®
or ActiveSync® software, matches the
setting on the docking station.
To verify the COM port setting on the docking station,
refer to “Verifying Devices are Installed” on page 16.
To verify the COM port setting on your PDA, refer to
the documentation that came with it.
Connecting to a Local Area Network
To connect an ethernet cable with RJ-45 connect, attach
the cable connector to the ethernet/network port on the
docking station. Additional procedures to connect to an
actual network depend on the type of network you are
Page 10

10
Targus Mobile Docking Station with Video
using. Contact your network administrator for detailed
instructions.
Connecting a USB Device
To connect a USB device, plug it into a USB port on the
docking station and follow the additional instructions
provided with the device.
All four USB ports meet USB hi-speed requirements by
providing 480Mbps through-put and 500mA of power.
However, the two black USB ports have two unique
features. See “Targus Always On” on page 14 for more
details.
The white USB ports are high-speed ports that provide
standard 500mA of power. The black USB power ports
are high-speed ports that provide up to 1Amp.
Connecting and Configuring an
Audio Device
1 Plug your headphones or speakers into the green 3.5
mm Audio Out port on the docking station.
2 To connect a microphone, plug it into the mono Audio
In port.
3 To enable your headphones or speakers:
a For Windows 2000, click Start, Settings, Control
Panel, and then open the Sounds and Multimedia folder. Select the Audio tab. Under Sound
Playback, change Preferred Device to USB
Audio from the drop down list.
› Click Apply, then click OK.
Page 11

11
Targus Mobile Docking Station with Video
b For Windows XP, go to the Control Panel and
choose Sound and Audio. Select the Audio tab.
Under Sound Playback, change Preferred
Device to USB Audio from the drop down list.
› Click Apply, then click OK.
c For Windows Vista, go to the Control Panel and
select Sound. Under the Playback tab, check that
C-Media USB Headphone Set is set as the
default. If it is, click OK. If it isn’t, select C-Media
USB Headphone Set, click Set Default, then click
OK.
4 Make sure the volume is not set to MUTE.
NOTE: A
UDIO DEVICES WILL NOT WORK SIMULTANEOUSLY ON THE
PORT
STATION AND THE HOST COMPUTER.
CAUTION: ALL AUDIO OR MULTIMEDIA APPLICATIONS MUST BE
TERMINATED
BEFORE SWITCHING BETWEEN THE PORT STATION AUDIO
OUTPUT
AND THE HOST COMPUTER AUDIO OUTPUT.
Connecting to a Monitor or LCD
Any monitor or LCD connected to the video port of the
docking station will be limited to a maximum resolution of
1600 x 1200, 16-bit color.
NOTE: T
HE MAXIMUM RESOLUTION OF 1600 X 1200 IS ONLY
SUPPORTED
IF THE MONITOR OR LCD IS PLUGGED INTO THE DOCKING
STATION
BEFORE CONNECTING THE DOCKING STATION TO THE
NOTEBOOK
. IF THE MONITOR OR LCD IS PLUGGED INTO THE DOCKING
STATION
AFTER THE DOCKING STATION IS CONNECTED TO THE
NOTEBOOK
, THE RESOLUTION IS SET TO 1024 X 768.
Page 12

12
Targus Mobile Docking Station with Video
Video Menu Options
Video menu options can be accessed by right-clicking on
the Targus Display icon in the system tray or through the
Windows Display Properties.
The only menu option not accessible through Windows
Display Properties is Mirror. This must be accessed
through the Targus Display icon.
Primary: You are using a monitor or LCD (not your
notebook screen) as your primary screen.
Extended: You are using your notebook screen as
your primary display and your monitor or LCD is a
secondary screen.
Mirror: You are using your notebook screen as your
primary display and your monitor or LCD replicates your
notebook screen.
Off: You are using your notebook screen as your
primary display and your monitor or LCD is turned off.
Resolution: Changing resolution from the Targus
utility will only affect the monitor connected to the docking
Notebook Screen
Secondary Monitor or LCD
Primary: Off On
Extended: On On
Mirror: On On
Off: On Off
Page 13

13
Targus Mobile Docking Station with Video
station video port. Video output will support the following
resolutions and color quality:
Close: Removes the Targus video utility icon from the
system tray. The icon can be replaced from the Start
Menu or from the shortcut on your desktop.
Global Suspend Mode
When your computer is in suspend mode, the docking
station also enters suspend mode to avoid power
consumption. When your computer wakes up, the
docking station wakes up automatically.
640 x 480: 8, 16, 32 bit color depth
800 x 600: 8, 16, 32 bit color depth
1024 x 768: 8, 16, 32 bit color depth
1152 x 864: 8, 16, 32 bit color depth
1280 x 768: 8, 16, 32 bit color depth
1280 x 800: 8, 16, 32 bit color depth
1280 x 960: 8, 16, 32 bit color depth
1280 x 1024: 8,16, 32 bit color depth
1400 x 1050: 8, 16 bit color depth
1440 x 900: 8, 16, 32 bit color depth
1600 x 1200: 8, 16 bit color depth
Page 14

14
Targus Mobile Docking Station with Video
Targus Always On
Press the Targus Always On button to enable the black
USB ports to continue providing power even when the
laptop is powered down or disconnected from the
docking station. This allows you to charge the batteries of
any USB rechargeable accessory you may have
connected.
Using USB Devices That
Require More Power
Some devices, which use large amounts of power, such
as printers and optical drives, should be plugged into the
USB Power Ports. These ports will provide up to 1000mA
of power - double the power on standard USB ports.
Product Limitations
Some devices may halt temporarily when a high data
transfer is occurring. For example, your mouse may
respond slowly while a graphic print job is printing or
while you are experiencing heavy network traffic.
We recommend the following guidelines:
• Do not transfer data to or from multiple high-speed
devices, such as a digital camera or scanner, at the
same time.
• If speed degradation does occur, close other programs
that use a USB device to improve device performance.
Page 15

15
Targus Mobile Docking Station with Video
Troubleshooting
Device Not Working
• Make sure that the device is fully inserted into the
correct port on the docking station.
• Plug the device into a different port on the docking
station. If it still doesn’t work, test the device by
connecting it directly to your computer.
• Verify that you ran the Setup or Install program for the
device.
• Make sure that the device appears in Device Manager.
For more information refer to “Verifying Devices are
Installed” on page 16.
• Disconnect all devices from the docking station and
reconnect them, one at a time. Check that each device
works before plugging in the next one.
• Each USB port is equipped with over-current
protection. Should a USB device draw more current
than the USB port can supply, the port will shut down.
To re-enable the port, unplug the device and go to
Device Manager or to the message in the system tray
and choose the Reset option. You can then plug the
device back into the USB port. If a shut down reoccurs,
check the power requirements of the device.
Verifying Devices are Installed
You can view the devices installed on the docking station
from the Device Manager window in System Properties.
Page 16

16
Targus Mobile Docking Station with Video
Right-click My Computer, Properties, then click the
Hardware tab, and then the Device Manager button.
From the Device Manager window, expand the following:
• Display Adapters — displays Targus USB 2.0 VGA
Dock Device
• Human Interface Devices — displays keyboards and
pointing devices: mice, trackballs, and joysticks
• Network Adapters — displays ADM851X USB to Fast
Ethernet Adapter
• Ports (COM & LPT) — Serial On USB Port [COMx]
• Sound, Video and Game Controllers — displays CMedia USB Headphone Set
• Universal Serial Bus Controllers — displays the other
devices installed for the docking station and generic
hub.
Verifying a Serial Modem
Connection
When attaching a modem to the serial (RS232) port,
verify that the port assigned to your modem is Serial USB
(COMx), where x is the number of the COM port.
If the operating system does not detect automatically that
your modem is assigned to Serial USB (COMx), run the
Hardware Wizard again and choose Select from the list
instead of Autodetect. Then, select Serial USB (COMx)
as the COM port.
Page 17

17
Targus Mobile Docking Station with Video
Error Message on Your PDA
If the error message “Connection Not Established”
appears on your PDA, check that the COM port setting in
either your HotSync or ActiveSync software matches the
setting on the docking station. See “Verifying Devices
are Installed” on page 16 to verify the COM port setting
on the docking station.
Some older versions of the Palm
®
Desktop software are
not compatible with the USB to Serial conversion. Please
contact your PDA vendor for software updates.
Video
Can I get a higher resolution on my
monitor?
• No, resolution is set at 1600 x 1200, 16-bit color.
Can disk I/O functions such as,
extensive reading and writing to an
external hard drive or DVD, degrade
video functionality?
• Yes. Since all data has to pass through a single USB
connection, you may notice some degradation of your
video performance. Video performance will return
when disk read/write decreases or stops.
Technical Support
For technical questions, please visit:
Internet: http://www.targus.com/support.asp
E-Mail: info.cn@targus.com
Page 18

18
Targus Mobile Docking Station with Video
Product Registration
Targus recommends that you register your Targus accessory
shortly after purchasing it. To register your Targus accessory, go
to:
http://www.targus.com/registration.asp
You will need to provide your full name, email address, country of
residence and product information.
Warranty
Targus warrants this product to be free from defects in materials
and workmanship for one year. If your Targus accessory is found
to be defective within that time, we will promptly repair or replace
it. This warranty does not cover accidental damage, wear and
tear, or consequential or incidental loss. Under no conditions is
Targus liable for loss of, or damage to a computer; nor loss of, or
damage to, programs, records, or data; nor any consequential or
incidental damages, even if Targus has been informed of their
possibility. This warranty does not affect your statutory rights.
Regulatory Compliance
This device complies with Part 15 of the FCC Rules. Operation is
subject to the following two conditions: (1) This device may not
cause harmful interference, and (2) This device must accept any
interference received, including interference that may cause
undesired operation.
FCC Statement
Te st ed t o C om p ly
This equipment has been tested and found to comply with the
limits of a Class B digital device, pursuant to Part 15 of the FCC
Rules. These limits are designed to provide reasonable protection
Page 19

19
Targus Mobile Docking Station with Video
against harmful interference in a residential installation. This
equipment generates, uses, and can radiate radio frequency
energy and if not installed and used in accordance with the
instructions, may cause harmful interference to radio
communications. However, there is no guarantee that interference
will not occur in a particular installation.
If this equipment does cause harmful interference to radio or
television reception, which can be determined by turning the
equipment off and on, the user is encouraged to try to correct the
interference by one or more of the following measures:
• Reorient or relocate the receiving antenna;
• Increase the separation between the equipment and receiver;
• Move the computer away from the receiver;
• Connect the equipment into an outlet on a circuit different from
that to which the receiver is connected.
Changes or modifications not authorized by the party responsible
for compliance could void the user’s authority to operate this
product.
r
Microsoft, Windows, and Windows Vista are either registered trademarks or trademarks
of Microsoft Corporation in the United States and/or other countries. All trademarks and
registered trademarks are the properties of their respective owners. All rights reserved.
Page 20

20
STATION D'ACCUEIL
MOBILE AVEC
VIDÉO DE TARGUS
Introduction
Nous vous félicitons d'avoir acheté la station d'accueil
mobile avec vidéo de Targus. Ce module d'extension
portable vous permettra de connecter par le biais de la
prise USB jusqu'à quatre périphériques munis d'une
prise USB, un moniteur, une connexion réseau (Ethernet
ou LAN), des HP, un micro et un appareil en série.
La station d'accueil vous permet également de
bénéficier de la technologie Targus Always On,
proposant à la fois la spécification USB pour les
appareils à forte puissance et les ports USB avec la
place nécessaire pour des adaptateurs plus grands.
Targus Always On fournit l'alimentation aux ports USB
même lorsque le portable est éteint, déconnecté de la
station d'accueil ou en mode veille. Ceci permet aux
périphériques qui se chargent par le port USB de garder
la charge en continu.
Caractéristiques
Dissipation de la chaleur par
convection naturelle :
Placez le bord arrière de votre portable sur le support en
caoutchouc de la station d'accueil. La plupart des
ordinateurs portables émettent de la chaleur par le bas,
Page 21

21
Station d'accueil mobile avec vidéo de Targus
et plus l'air a de la place pour circuler, meilleures sont les
conditions pour la dissipation par convection naturelle.
Confort
La plate-forme surélevée procure une position plus
confortable pour les mains et un flux d'air supérieur pour
une meilleure aération.
La station d'accueil possède les ports
suivants
• VGA à 15 broches (compatible avec une résolution
maximale de 1600 x 1200 et une profondeur de couleur
de 16 bits)
• Deux audio à 3,5 mm : (1) sortie stéréo et (1)
microphone incorporé
• Série RS232
• Ethernet 10/100 RJ-45
• Deux USB 2.0 (Blancs)
• Deux ports d'alimentation USB (Noirs) - Fournissant
jusqu'à 1 ampère
Contenu du boîtier
En plus du présent mode d'emploi, le boîtier contient :
• Une station d'accueil mobile avec vidéo de Targus
• Un câble haute vitesse entrant USB 2.0
• Le CD d'installation du logiciel
• Un adaptateur secteur (nécessaire)
Configuration requise :
Matériel
• Ordinateur avec processeur Intel® Pentium® ou
équivalent
• Lecteur de CD-ROM
Page 22

22
Station d'accueil mobile avec vidéo de Targus
• Un port USB version 2.0
• Une source d'alimentation secteur (adaptateur secteur
nécessaire)
REMARQUE : lorsque la station d'accueil est
connectée à votre ordinateur via un port USB version
1.1, le niveau de ses performances sera moindre que
son potentiel optimal, et le port vidéo ne fonctionnera
pas correctement. Pour de meilleurs résultats,
connectez-la à un port USB version 2.0.
Système d'exploitation
• Windows® 2000 Service Pack 2 ou supérieur
• Windows
®
XP Service Pack 1 ou supérieur
• Windows Vista
®
REMARQUE : pour télécharger les derniers Service
packs, veuillez consulter le site web du fabricant de
votre ordinateur ou le centre de téléchargement de
Microsoft :
http://support.microsoft.com
Installation de
l'appareil et des pilotes
Pour utiliser la station d'accueil de Targus, vous devez
d'abord installer le pilote sur votre ordinateur. Connectez
la station d'accueil à votre ordinateur et Windows
procédera à l'installation des pilotes pour chaque port.
AVERTISSEMENT : vous devez installer la station
d'accueil AVANT de connecter celle-ci à votre
ordinateur, sinon, elle ne fonctionnera pas
correctement.
Page 23

23
Station d'accueil mobile avec vidéo de Targus
Installation du pilote de la
station d'accueil
L'installation du pilote de la station d'accueil permettra à
votre système d'exploitation de reconnaître celle-ci ainsi
que ses ports une fois la connexion effective.
1 Mettez l'ordinateur en marche.
2 Insérez le CD-ROM d'installation dans le lecteur CD
de l'ordinateur.
3 Si l'installation ne commence pas automatiquement,
cliquez sur Démarrer, Exécuter, puis tapez
« D:\Setup.exe » (si D: désigne votre lecteur de CD),
puis cliquez sur OK.
4 Suivez les instructions qui s'affichent à l'écran pour
terminer l'installation.
5 Cliquez sur Terminer et redémarrez votre ordinateur.
Connexion de la station
d'accueil sur votre ordinateur
Après avoir installé le logiciel de la station d'accueil, vous
êtes prêt à connecter celle-ci à votre ordinateur. Pour
cela :
1 Raccordez l'adaptateur secteur à la prise secteur de
la station d'accueil.
2 Raccordez une extrémité du câble USB à la station
d'accueil et l'autre à un port USB 2.0 disponible de
votre ordinateur.
REMARQUE : la station d'accueil ne fonctionnera pas
si l'adaptateur secteur n'est pas raccordé à la prise
secteur.
Ne connectez aucun périphérique à la station d'accueil
tant que vous n'avez pas terminé l'installation.
Page 24

24
Station d'accueil mobile avec vidéo de Targus
Connexion des pilotes des
périphériques par défaut
Une fois que la station d'accueil est connectée à votre
ordinateur, les pilotes des périphériques par défaut pour
chacun des ports commencent à s'installer.
Certains périphériques exigeront l'installation de pilotes.
Pour installer les pilotes :
1 Sélectionnez l'option Installer le logiciel automatique-
ment (recommandé) et cliquez sur Suivant.
Le programme de détection automatique procédera à
l'installation des pilotes des périphériques.
L'assistant vous préviendra de l'avancée de la
procédure.
2 À la fin, cliquez sur Terminer et recommencez aussi
souvent que nécessaire pour chaque périphérique.
3 Redémarrez votre ordinateur.
Indicateur d'état par diodes
électroluminescentes
Lorsque l'ensemble des pilotes de périphériques sont
installés, les diodes électroluminescentes des prises
USB situées à l'arrière de la station d'accueil s'allument,
et vous pouvez alors connecter les périphériques à la
station.
• La lumière verte (émetteur) s'allume lorsque la station
est connectée à un réseau et la rouge (récepteur)
clignote lorsque des données sont transmises depuis
le réseau ou vers lui.
Page 25

25
Station d'accueil mobile avec vidéo de Targus
REMARQUE : la station d'accueil supporte le
branchement à chaud du câble réseau.
• Les diodes des prises USB s'allument lorsque la
station d'accueil est connectée à votre ordinateur.
• La lumière verte de l'indicateur Always On s'allume
lorsque le bouton est relâché.
Ports de la station d'accueil
Connexion de
nouveaux
périphériques
Afin d'éviter tout dommage éventuel lorsque vous
connectez un nouveau périphérique, ne forcez pas le
connecteur de câble dans le port de la station d'accueil.
Si le connecteur de câble ne s'ajuste pas en douceur,
tournez le connecteur et essayez à nouveau.
Connexion d'une souris de port
série
Pour connecter une souris de port série, branchez le
connecteur de câble au port série de la station d'accueil.
Ports USB
Port série
Entrée
Sortie
Audio
Audio
VGA
Always On
Adaptateur
Réseau
Connexion
USB vers PC
secteur
Support pour le portable
Support pour le portable
Page 26

26
Station d'accueil mobile avec vidéo de Targus
Connexion et configuration d'un
modem de port série
Pour connecter un modem de port série :
1 Branchez le connecteur de câble au port série de la
station d'accueil.
2 Installez le pilote du modem en suivant les
instructions qui vous ont été fournies avec cet
appareil.
3 Lorsque l'ordinateur vous demande de sélectionner
un port, choisissez le port USB en série (COMx), x
représentant le numéro de port assigné par votre
système d'exploitation.
Connexion d'un assistant
numérique
1 Branchez le connecteur de câble au port série de la
station d'accueil.
2 Vérifiez que les paramètres du port COM
correspondent aux paramètres de la station d'accueil,
soit dans le logiciel HotSync
®
ou dans ActiveSync®.
Pour vérifier les paramètres du port COM sur la
station d'accueil, veuillez consulter “Vérifier que les
périphériques sont bien installés” à la page 33.
Pour vérifier les paramètres du port COM de votre
assistant numérique, référez-vous à la documentation
qui est fournie avec lui.
Connexion à un réseau local
d'entreprise
Pour connecter un câble Ethernet avec une connexion
RJ-45, branchez le connecteur de câble au port Ethernet
Page 27

27
Station d'accueil mobile avec vidéo de Targus
ou réseau de la station d'accueil. En fonction du type de
réseau que vous utilisez, il se peut que vous deviez
procéder à d'autres manipulations. Contactez votre
administrateur de réseau pour obtenir des instructions
détaillées.
Connexion d'un périphérique
USB
Pour connecter un périphérique USB, branchez-le dans
le port USB de la station d'accueil et suivez les
procédures fournies avec l'appareil en question.
L'ensemble des quatre ports USB répondent aux normes
USB haute-vitesse en fournissant un débit de 480
mégabits par seconde et une puissance de 500
milliampères. Cependant, les deux ports USB noirs
possèdent deux caractéristiques spécifiques. Voir
“Targus Always On” à la page 31 pour davantage de
détails.
Les ports USB blancs sont des ports à haute-vitesse qui
fournissent une puissance de 500 milliampères. Les
ports USB noirs sont des ports à haute-vitesse qui
fournissent une puissance allant jusqu'à 1 ampère.
Connexion et configuration d'un
périphérique audio
1 Branchez les haut-parleurs ou le casque dans le port
vert de 3,5 mm Audio Out sur la station d'accueil.
2 Pour brancher un micro, connectez-le au port mono
Audio In.
3 Pour activer les haut-parleurs ou le casque:
Page 28

28
Station d'accueil mobile avec vidéo de Targus
a Pour Windows 2000, cliquez sur Démarrer,
Paramètres, Panneau de Configuration, puis
cliquez sur l'icône du dossier Sons et Périphériques audio. Sélectionnez l'onglet Audio. Dans
Lecture audio, changez Unité par défaut par USB
Audio dans la liste déroulante.
› Cliquez sur Appliquer, puis sur OK.
b Pour Windows XP, allez dans le Panneau de Con-
figuration et choisissez Sons et Périphériques
audio. Sélectionnez l'onglet Audio. Dans Lecture
audio changez Unité par défaut par USB Audio
dans la liste déroulante.
› Cliquez sur Appliquer, puis sur OK.
c Pour Windows Vista, sélectionnez Panneau de
configuration puis Son. Ouvrez l'onglet Lecture et
vérifiez que le périphérique C-Media USB Head-
phone Set (Casque USB C-Media) est le périphérique de lecture par défaut. Si c'est le cas, cliquez
simplement sur OK. Sinon, sélectionnez C-Media
USB Headphone Set dans la liste, cliquez sur le
bouton Par défaut puis sur OK.
4 Assurez-vous que le volume n'est pas sur MUET.
REMARQUE : Les appareils audio ne pourront pas
être utilisés simultanément sur la station d’accueil et le
serveur.
ATTENTION : Toutes les applications audio et
multimédia doivent être fermées avant de passer du
périphérique de sortie audio de la station d’accueil au
serveur.
Page 29

29
Station d'accueil mobile avec vidéo de Targus
Connexion d'un moniteur ou
d'un écran ACL
Les moniteurs ou écrans ACL connectés au port vidéo de
la station d'accueil verront leur résolution limitée à 1600 x
1200, couleurs 16 bits.
REMARQUE : Pour travailler à la résolution maximale
de 1600 x 1200, connectez le moniteur ou l'écran LCD
sur la base d'accueil AVANT de connecter la base à
votre ordinateur portable. Si vous connectez le
moniteur ou l'écran LCD sur la base d'accueil APRÈS
avoir connecté la base à votre ordinateur portable, la
résolution maximale est ramenée à 1024 x 768.
Options du menu vidéo
Il est possible d'avoir accès aux options du menu vidéo
avec un clic droit sur l'icône Targus figurant sur la barre
d'état système, ou en ouvrant les Propriétés d'affichage
Windows.
Mirror est la seule option du menu qui ne soit pas
accessible dans les Propriétés d'affichage Windows. En
revanche, vous pouvez y accéder par l'icône Targus.
Primary : vous utilisez un moniteur ou un écran ACL
(pas l'écran de votre portable) comme écran principal.
Extended : vous utilisez l'écran de votre portable
comme afficheur principal et votre moniteur ou écran
ACL comme écran secondaire.
Mirror : vous utilisez l'écran de votre portable comme
afficheur principal et votre moniteur ou écran ACL
reproduit l'écran de celui-ci.
Page 30

30
Station d'accueil mobile avec vidéo de Targus
Off : vous utilisez l'écran de votre portable comme
afficheur principal et votre moniteur ou écran ACL est
éteint.
Résolution : modifier la résolution du programme
Targus n'affectera que le moniteur connecté au port
vidéo de la station d'accueil. La sortie vidéo est
compatible avec les résolutions et qualités de couleur
suivantes :
Écran du portable
Moniteur ou ACL
secondaire
Primary Arrêt Marche
Extended Marche Marche
Mirror Marche Marche
Off Marche Arrêt
640 x 480 : couleur sur 8, 16 et 32 bits
800 x 600 : couleur sur 8, 16 et 32 bits
1024 x 768 : couleur sur 8, 16 et 32 bits
1152 x 864 : couleur sur 8, 16 et 32 bits
1280 x 768 : couleur sur 8, 16 et 32 bits
1280 x 800 : couleur sur 8, 16 et 32 bits
1280 x 960 : couleur sur 8, 16 et 32 bits
1280 x 1024 : couleur sur 8, 16 et 32 bits
1400 x 1050 : couleur sur 8 et 16 bits
1440 x 900 : couleur sur 8, 16 et 32 bits
1600 x 1200 : couleur sur 8 et 16 bits
Page 31

31
Station d'accueil mobile avec vidéo de Targus
Close : retire l'icône Targus de la barre d'état système.
L'icône peut être replacée à partir du menu Démarrer ou
avec le raccourci sur votre bureau.
Mode veille
Lorsque votre ordinateur est en mode veille, la station
d'accueil se met également en mode veille afin d'éviter
de consommer de l'électricité inutilement. Lorsque votre
ordinateur revient en mode actif, la station d'accueil fait
de même.
Targus Always On
Pressez le bouton Targus Always On pour permettre aux
ports USB noirs de continuer à produire une
alimentation, même lorsque l'ordinateur portable est
éteint ou déconnecté de la station d'accueil. Cela vous
permettra de recharger les batteries de tous les
périphériques USB rechargeables qui sont connectés.
Utilisation de
périphériques USB qui
nécessitent plus
d'alimentation
Certains périphériques qui ont besoin de beaucoup de
puissance électrique, comme les imprimantes ou les
lecteurs optiques, doivent être connectés aux ports USB.
Ces ports peuvent fournir jusqu'à 1000 milliampères, soit
le double de la puissance des ports USB classiques.
Page 32

32
Station d'accueil mobile avec vidéo de Targus
Limites du produit
Certains périphériques peuvent s'arrêter temporairement
lorsqu'un important transfert de données s'effectue. Par
exemple, votre souris peut réagir plus lentement
lorsqu'une impression graphique est en cours ou lorsque
le trafic sur le réseau est intense.
Nous vous recommandons de suivre les procédures
suivantes :
• Ne lancez pas en même temps des transferts de
données à partir de plusieurs périphériques hautevitesse, ou vers ceux-ci, comme un appareil-photo
numérique ou un scanner.
• Si vous constatez une baisse de la vitesse, fermez
d'autres programmes qui utilisent un périphérique USB
afin d'améliorer la performance du périphérique en
question.
Dépannage
Le périphérique ne marche pas
• Assurez-vous qu'il est bien inséré dans le bon port de
la station d'accueil.
• Connectez le périphérique à un autre port de la station
d'accueil. S'il ne fonctionne toujours pas, testez le
périphérique en le connectant directement à votre
ordinateur.
• Vérifiez que vous avez bien suivi la procédure
d'installation pour ce périphérique.
• Assurez-vous que ce périphérique apparaît bien dans
le Gestionnaire de périphériques. Pour plus
Page 33

33
Station d'accueil mobile avec vidéo de Targus
d'informations, veuillez consulter “Vérifier que les
périphériques sont bien installés” à la page 33.
• Débranchez l'ensemble des périphériques de la station
d'accueil, puis rebranchez-les un à la fois. Vérifiez que
chaque périphérique fonctionne avant de brancher le
suivant.
• Chaque port USB est équipé d'un dispositif de
protection contre la surtension. Si un port USB
consomme plus de courant que ce port peut produire, il
se fermera. Pour le réactiver, débranchez le
périphérique et allez dans le Gestionnaire de
périphériques ou dans les options de la barre d'état
système et choisissez Reset. Vous pouvez rebrancher
le périphérique dans le port USB. Si une coupure se
reproduit, vérifiez la puissance nécessaire du
périphérique.
Vérifier que les périphériques
sont bien installés
Vous pouvez voir les périphériques installés sur la station
d'accueil à partir de la fenêtre du Gestionnaire de
périphériques dans les Propriétés système.
Faites un clic droit sur Mon ordinateur, Propriétés
système, puis cliquez sur l'onglet Matériel, puis sur le
bouton Gestionnaire de périphériques.
À partir de la fenêtre du gestionnaire de périphériques,
affichez les informations suivantes :
• Adaptateurs d’affichage — L'ordinateur affiche
Périphérique Targus USB 2.0 VGA
• Périphériques interface humaine — L'ordinateur affiche
les claviers et les dispositif de pointage : souris, boules
de commande et manettes de jeu
Page 34

34
Station d'accueil mobile avec vidéo de Targus
• Adaptateurs réseau — L'ordinateur affiche ADM851X
USB pour adaptateur ethernet rapide
• Ports (COM et LPT) — Port série sur USB [COM x]
• Contrôleurs de son, de la vidéo et de jeux —
L'ordinateur affiche C-Media USB Headphone Set
(Casque USB C-Media)
• Contrôleurs de bus — L'ordinateur affiche les autres
périphériques installés sur la station d'accueil et le
concentrateur géréral.
Vérifier une connexion de
modem de port série
Lorsque vous branchez un modem de port série au port
série (RS232), vérifiez que le port assigné à votre
modem est bien le port série USB, (COMx), x
représentant le numéro du port COM.
Si le système d'exploitation ne détecte pas
automatiquement l'affectation de votre modem à la prise
série USB (COMx), utilisez à nouveau l'assistant et
choisissez Sélectionner dans la liste à la place de
Détection automatique. Puis, choisissez Port USB série
(COMx) comme port COM.
Message d'erreur sur votre
assistant numérique
Si le message d'erreur « Connexion non établie »
apparaît sur votre assistant numérique, vérifiez que les
paramètres du port COM du logiciel HotSync ou
ActiveSync correspondent aux paramètres de la station
d'accueil. Voir le paragraphe “Vérifier que les
périphériques sont bien installés” à la page 33 afin de
vérifier les paramètres du port COM sur la station
d'accueil.
Page 35

35
Station d'accueil mobile avec vidéo de Targus
Certaines versions anciennes du logiciel Palm® Desktop
ne sont pas compatibles avec le port USB pour la
conversion en série. Veuillez contacter le revendeur de
votre assistant numérique pour vous procurer les
dernières mises à jour.
Vidéo
Puis-je obtenir une meilleure
résolution sur mon moniteur ?
• Non, la résolution est paramétrée à 1600 x 1200,
couleurs 16 bits.
Les fonctions disques E/S, telles que
la lecture ou l'écriture extensives vers
un disque dur ou un DVD externe
peuvent-elles dégrader les
fonctionnalités vidéo ?
• Oui. Comme l'ensemble des données doivent passer
par une connexion USB unique, il se peut que vous
constatiez des dégradations dans vos performances
vidéo. Celles-ci reviendront lorsque la lecture ou
l'écriture du disque diminuera ou s'arrêtera.
Support technique
Pour les questions techniques, prière de visiter :
Internet : http://www.targus.com/support.asp
Courrier électronique : info.cn@targus.com
Page 36

36
Station d'accueil mobile avec vidéo de Targus
Enregistrement du
produit
Targus vous recommande d'enregistrer votre accessoire
Targus tout de suite après son achat.
Enregistrement de votre accessoire Targus à l'adresse
suivante :
http://www.targus.com/registration.asp
Vous devrez préciser votre nom au complet, votre
adresse courriel, pays de résidence et information sur le
produit.
Garantie
Targus garantit ce produit contre tout défaut de matériel
ou de fabrication pour une durée d'un an. Si votre
accessoire Targus s'avère défectueux sous cette
garantie, nous veillerons à le remplacer ou à le réparer
au plus vite. Cette garantie ne couvre pas les dommages
résultant d'accidents, l'usure normale ou les pertes
consécutives ou accessoires. En aucun cas, Targus ne
pourra être tenu responsable de la perte matérielle ou de
l'endommagement d'un ordinateur, ni de la perte de
programmes, d'enregistrements ou de données ou de
leur endommagement, ni de tous autres dommages
conséquentiel ou accidentel, même si Targus a été
préalablement informé de cette possibilité. Cette garantie
n'a aucun effet sur vos droits statutaires.
Page 37

37
Station d'accueil mobile avec vidéo de Targus
Respect de la
réglementation
Cet appareil est conforme à la section 15 des règlements
de la FCC (Federal Communication Commission). Son
utilisation est soumise aux deux conditions suivantes : (1)
Cet appareil ne peut provoquer de brouillage
préjudiciable. (2) Cet appareil doit absorber toute
interférence réceptionnée, même si cela provoque des
effets indésirables sur son fonctionnement.
Déclaration de la FCC
Testé et confo rme
Cet appareil a été testé et déclaré conforme aux limites
des appareils numériques de Classe B, selon la section
15 des règlements de la FCC (Federal Communication
Commission). Ces limites sont conçues pour assurer une
protection raisonnable contre un brouillage préjudiciable
lorsque l'appareil est utilisé dans un milieu résidentiel.
L'appareil génère, utilise et peut diffuser de l'énergie sur
les fréquences radio et, s'il n'est pas installé et utilisé
conformément au mode d'emploi, il peut brouiller les
communications radio. Il n'y a aucune garantie qu'un
brouillage ne se produira pas dans un milieu particulier.
Si cet appareil brouille les communications radio ou
télévision, comme cela peut être confirmé en éteignant
puis en allumant l'appareil, l'utilisateur peut tenter de
corriger toute interférence en essayant une ou plusieurs
des méthodes suivantes :
• Réorienter l'antenne réceptrice ou la placer à un autre
endroit ;
Page 38

38
Station d'accueil mobile avec vidéo de Targus
• Éloigner davantage l'appareil du récepteur ;
• Déplacer l'ordinateur et le tenir éloigné du récepteur ;
• Brancher l'appareil sur une autre prise de courant ou
un circuit élec-trique différent de celui auquel le
récepteur est connecté.
Toute modification non autorisée par les autorités
responsables de la conformité peut entraîner la
révocation du droit d'utilisation de ce produit.
Microsoft, Windows et Windows Vista sont des marques déposées ou
commerciales de Microsoft Corporation aux États-Unis et/ou dans d'autres pays.
Toutes les marques commerciales et déposées sont les propriétés de leurs
détenteurs respectifs. Tous droits réservés.
 Loading...