

Page 1

©2010 Manufactured or imported by Targus Europe
Ltd., Hounslow, Middlesex, TW4 5DZ, UK. All rights
reserved. Targus is either a registered trademark or
trademark of Targus Group International, Inc. in the
United States and/or other countries. Features and
specications are subject to change without notice. All
trademarks and registered trademarks are the property
of their respective owners.
410-1938-003A / ACA11EU
USB 2.0
MULTI - MONITOR
ADAPTER
N2953
User Guide
Page 2

Targus USB 2.0 Multi - Monitor Adapter
Targus USB 2.0 Multi - Monitor Adapter
Table of Contents
GB – English
USB 2.0 MULTI - MONITOR ADAPTER .................................................3
DE – Deutsch
USB 2.0 MULTI-MONITOR ADAPTER ....................................................23
ES – Español
ADAPTADOR USB 2.0 MULTI MONITOR ....................................................43
FR - Français
ADAPTATEUR USB 2.0 MULTI-ÉCRAN ...................................................63
IT - Italiano
ADATTATORE MONITOR USB 2.0 MULTI ....................................................83
NL - Nederlands
USB 2.0 MULTI - MONITOR ADAPTER ..................................................103
PT - Português
ADAPTADOR MULTI-MONITOR USB 2.0........................................................123
2
GB - Introduction
Thank you for your purchase of the USB 2.0 Multi - Monitor Adapter.
Package Contents
In addition to this user guide, the package contains:
• USB 2.0 Multi - Monitor Adapter
• Driver software CD (mini CD)
• User Guide
• DVI to VGA adaptor
System Requirements
Hardware
• PC with an Intel® Pentium® processor or equivalent
• USB version 2.0 port
• CD-ROM drive (support mini CD)
Operating System
• Mircosoft Windows® XP with Service Pack 3
• Mircosoft Windows Vista® with Service Pack 1
• Mircosoft Windows® 7
3
Page 3

Targus USB 2.0 Multi - Monitor Adapter
Targus USB 2.0 Multi - Monitor Adapter
Installing the Device and Drivers
To use the monitor adaptor, you must rst install the driver onto your
computer. Then, connect the monitor adaptor to your computer and
Windows plug-and-play will install the hardware drivers for each port.
WARNING: YOU MUST INSTALL THE ADAPTOR SOFTWARE BEFORE CONNECTING IT TO YOUR COMPUTER. OTHERWISE, THE ADAPTOR WILL NOT WORK
PROPERLY.
Installing the Monitor Adaptor
Installing the adaptor driver enables your operating system to recognize the
adaptor once it’s connected.
1 Turn on your computer.
2 Insert the driver software CD into your computer’s CD-ROM drive.
If setup does not begin automatically, click Start, Run, and enter D:\
Setup.exe (where D: is the path of your CD-ROM drive) and then click OK.
3 Follow any on-screen instructions to complete the installation.
4 Click Finish and restart your computer when prompted.
4
Connecting the Monitor Adaptor to Your
Computer
After installing the Monitor Adaptor software, you are ready to connect
the Adaptor to your computer. Connect one end of the USB cable to the
adaptor and the other end into an available USB 2.0 port on your computer.
DO NOT CONNECT ANY DEVICES TO THE ADAPTOR UNTIL THE
INSTALLATION IS COMPLETED.
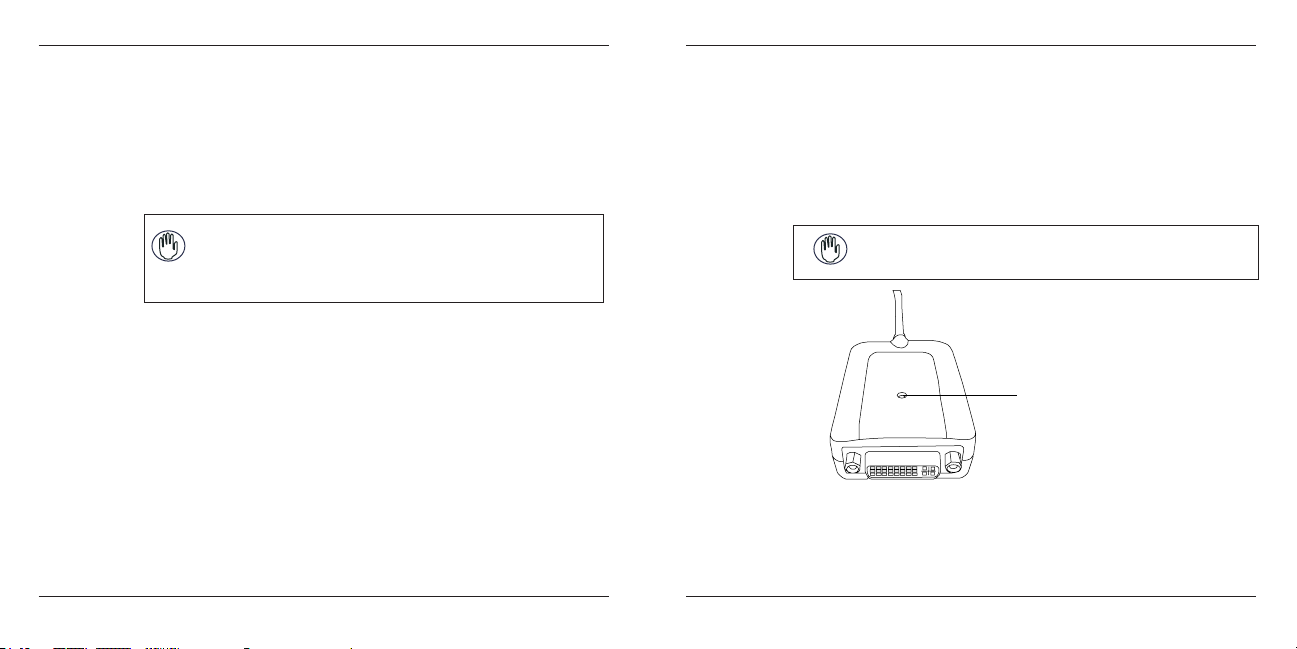
• A green light will be ON when
the adaptor is functioning
Multi - Monitor Adapter
To avoid possible damage when connecting a new device, do not force the
cable connector into the port on the adaptor. If the cable connector does not
attach smoothly, turn the connector over and try attaching it again.
5
Page 4

Targus USB 2.0 Multi - Monitor Adapter
Targus USB 2.0 Multi - Monitor Adapter
Connecting to a Monitor or LCD
Any monitor or LCD connected to the video port of the adaptor will be
limited to a maximum resolution of 2048 x 1152 at 32 bit color
NOTE: THE MAXIMUM RESOLUTION OF 2048 x 1152 IS ONLY SUPPORTED IF THE MONITOR OR LCD
IS PLUGGED INTO THE ADAPTOR BEFORE CONNECTING THE ADAPTOR TO THE NOTEBOOK. IF THE
MONITOR OR LCD IS PLUGGED INTO THE ADAPTOR AFTER THE ADAPTOR IS CONNECTED TO THE
NOTEBOOK, THE RESOLUTION IS SET TO 1024 X 768.
DVI to VGA adapter
6
Controlling the Display using Adaptor’s
Video Menu Options
Video menu options can be accessed by right-clicking on the Adaptor icon
in the system tray or through the Windows Display Properties.
Windows XP / Windows Vista
Windows 7
7
Page 5

Targus USB 2.0 Multi - Monitor Adapter
Targus USB 2.0 Multi - Monitor Adapter
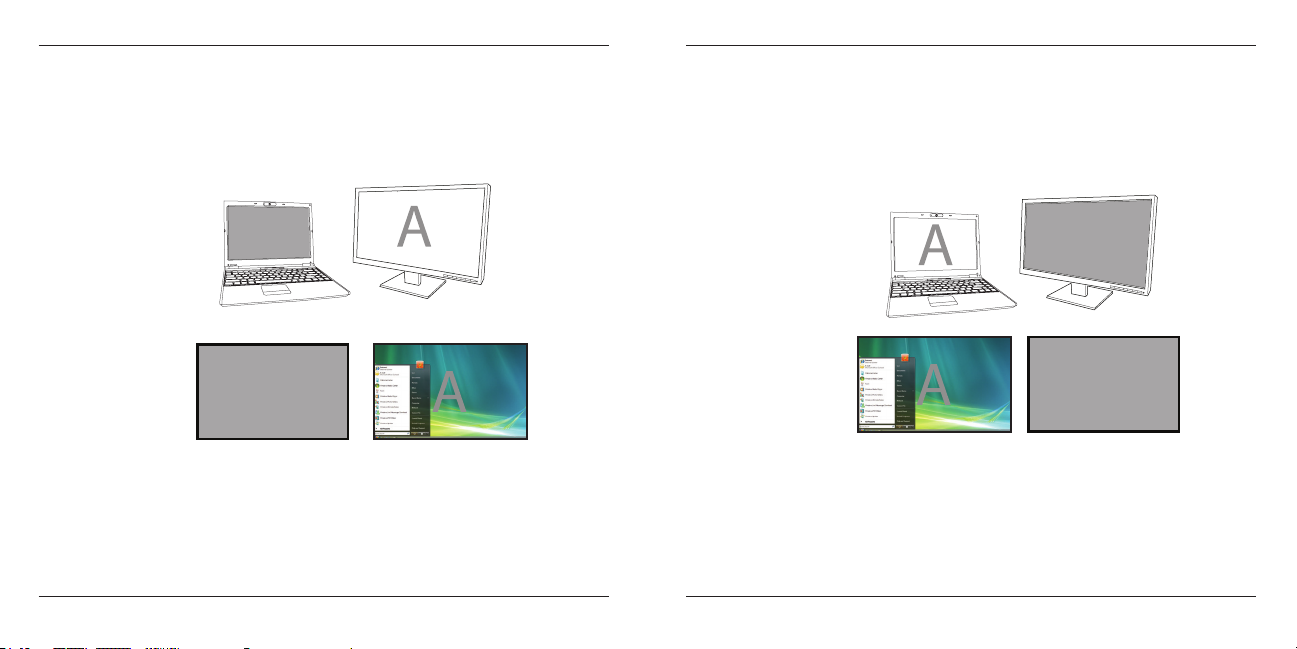
Extend: You are using your notebook screen as your primary display and
your monitor or LCD is a secondary screen.
To set the display into this mode, select ‘Extend’ in the Adaptor Icon application menu. The device will now be extending in the direction it was
the last time the display was in this mode. For more control, navigating
to the ‘Extend To’ submenu and selecting one of the options will not only
put the device into extend mode, but will also place it to the Left/Right/
Above/Below the main (primary) monitor.
Extend Mode
8
Mirror: You are using your notebook screen as your primary display and
your monitor or LCD replicates your notebook screen.
To set the display into this mode, simply select ‘mirror’ from the adaptor
icon application menu. The resolution, colour depth and refresh rate
of the primary screen are replicated on the monitor connected to the
adaptor graphics adapter.
NOTE: IF THE MONITOR CONNECTED TO THE ADAPTOR SUPPORTS A LOWER RESOLUTION THAN
THE PRIMARY PICTURE FITS ON THE EXTERNAL SCREEN. WHERE THE MONITOR CONNECTED TO
THE DOCKING STATION IS OF A LARGER SIZE THAN THE PRIMARY SCREEN THE IMAGE WILL BE
LETTER-BOXED TO KEEP THE ASPECT RATIO CORRECT.
Mirror
9
Page 6
Targus USB 2.0 Multi - Monitor Adapter
Targus USB 2.0 Multi - Monitor Adapter
Primary (Notebook Monitor Off): You are using your monitor or LCD as
your primary display and your notebook screen is turned off. To set the display into this mode, simply select ‘ notebook monitor off’ from the adapter
icon application monitor.
Primary
10
Off: You are using your notebook screen as your primary display and your
monitor or LCD is turned off.
Off
11
Page 7

Targus USB 2.0 Multi - Monitor Adapter
Targus USB 2.0 Multi - Monitor Adapter
Controlling the Display using Windows
Display Properties (for Windows XP and Vista)
Adaptor’s video setting can also be congured from the Windows Display
Properties dialog box. To do this on Windows Vista, right click on the desktop,
click on “Personalize” and then select the ‘Display Settings’ link. The corresponding feature is available in Windows XP by right clicking on the desktop,
selecting ‘Properties’ and then navigating to the ‘Settings’ tab.
4
1
2
3
Windows Vista
Figure 1
12
4
2
1
3
Windows XP
Extend Mode: To set the display into this mode, check the box marked
‘Extend my Windows desktop onto this monitor’ (1 in Figure 1). Arrange
screen resolution and colour quality using the appropriate controls (2 and
3), and arrange its position with respect to the other monitors on the extended desktop in using the drag area (4).
Mirror Mode: To set the display into mirror mode, simply uncheck the box
marked ‘Extend the desktop onto this monitor’ (1 in Figure 1 on previous
page.).
Setting the Primary Display: To make the monitor attached to the Adaptor
as the primary display, follow the instructions below:
13
Page 8

Targus USB 2.0 Multi - Monitor Adapter
Targus USB 2.0 Multi - Monitor Adapter
1. In Display Properties window, using the drop down list, select the monitor
that is attached to the Adaptor.
1
Windows Vista
1
Windows XP
14
2. After selecting the corresponding monitor, check the box next to “extend
the desktop onto this monitor” (for Vista) or “extend my Windows desktop
onto this monitor” (for XP).
2
2
Windows Vista
Windows XP
15
Page 9

Targus USB 2.0 Multi - Monitor Adapter
Targus USB 2.0 Multi - Monitor Adapter
3. Then, check the box next to “This is my main monitor” (for Vista) “ Use this
device as the primary monitor” (for XP).
3
3
Windows Vista
Windows XP
4. Click “Apply”.
16
5. Select the Laptop monitor using the drop down list and uncheck the box
“extend the desktop onto this monitor” (for Vista) or “ Extend my Windows
desktop onto this monitor” (for XP) and click “Apply”
4
Windows Vista
NOTE: IT IS POSSIBLE TO WORK MORE CONVENIENTLY WITH A LAPTOP BY SETTING ITS ACTION
ON LID CLOSED TO ‘DO NOTHING’ AND SETTING THE DOCKING TO PRIMARY MODE. THE LAPTOP
LID CAN THEN BE CLOSED AND THE LAPTOP USED WITH THE EXTERNAL KEYBOARD AND MOUSE.
4
Windows XP
The monitor attached to the Adaptor stays primary if the PC enters hibernate or suspend mode or is rebooted. If the Adaptor is detached, the
laptop’s display becomes primary again.
Upon reconnection, the monitor attached to the Adaptor will return to primary mode.
17
Page 10

Targus USB 2.0 Multi - Monitor Adapter
Targus USB 2.0 Multi - Monitor Adapter
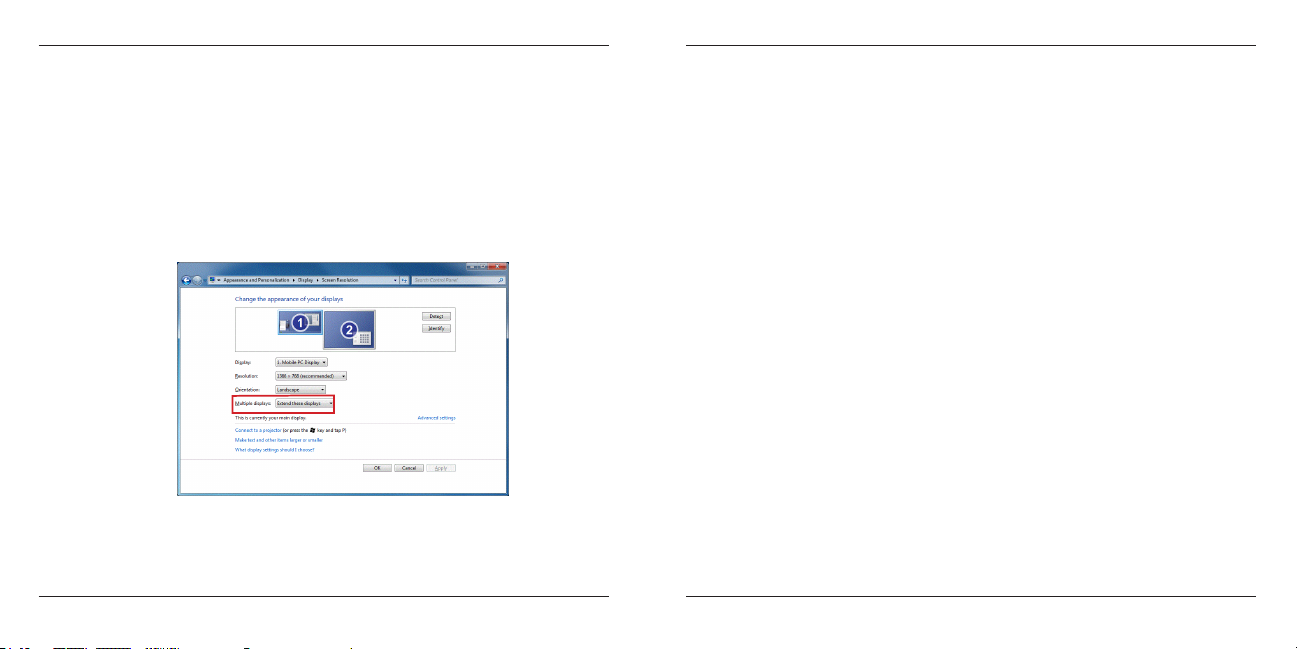
Controlling the Display using Windows
Display Properties (for Windows 7)
Adaptor’s video setting can also be congured from the Windows Display
Properties dialog box. To do this on Windows 7, right click on the desktop,
click on “Personalize” and then select the ‘Display” and then “Change display setting’ link. Or right click on “Targus USB Video adapter” icon in the
notication area and choose “advance”.
The various display output setting can be controlled by choosing the options
provided in the “multiple display” drop-down list. Choose the desired setting
and click “apply”. The screen will refresh and conrm ok by selecting “keep
changes”.
18
Automatic Updates
Automatic Updates is a product maintenance feature from DisplayLink. The
automatic update mechanism ensures that the Adaptor’s graphics Adapter
has the most up-to-date drivers and software, providing the user with increased performance and stability.
Disconnecting the Adaptor
If the Adaptor is powered off or the USB cable is removed from the computer, the display blanks. All windows and icons will shift to the primary screen.
On reconnection or powering up of the Adaptor, the display returns to the
same mode as it was before disconnection. However, windows and icons
that were previously on the screen will not be moved back.
19
Page 11

Targus USB 2.0 Multi - Monitor Adapter
Targus USB 2.0 Multi - Monitor Adapter
Supported Resolution
Resolution Refresh Rates
640 x 480 60 67 72 75 85
720 x 480 50 60
768 x 576 50 60
800 x 600 56 60 72 75 85
832 x 624 75
800 x 480 60
848 x 480 60
1024 x 600 60
1024 x 768 60 70 72 85
1152 x 864 75
1152 x 870 75
1280 x 720 50 60
Actual support resolutions area depend on the support of connected monitor.
available at 32 bit
20
Resolution Refresh Rates
1280 x 800 60 75 85
1280 x 960 60
1280 x 1024 60 75
1360 x 768 60
1366 x 768 60 75 85
1400 x 1050 60
1440 x 900 60
1600 x 1200 60
1680 x 1050 60
1920 x 1080 50 60
1920 x 1200 60
2048 x 1152 60
available at 32 bit
Troubleshooting
Device Not Working
• Make sure that the device is fully inserted into the correct port on the
adaptor.
• Plug the device into a different port on the adaptor. If it still doesn’t work,
test the device by connecting it directly to your computer.
• Verify that you ran the Setup or Install program for the device.
• Make sure that the device appears in Device Manager. For more informa-
tion refer to “Verifying Devices are Installed”
Verifying Devices are Installed
You can view the devices installed on the adaptor from the Device Manager
window in System Properties. Right-click My Computer, Properties, then
click the Hardware tab, and then the Device Manager button.From the Device Manager window, expand the following:
• Display Adapters:
- Displaylink Graphic Adapter (XP only)
- Displaylink Mirror Adapter (XP only)
• Network Adapters:
- High speed USB Ethernet Adapter
• Monitor
- Targus USB Video Adapter
21
Page 12

Targus USB 2.0 Multi - Monitor Adapter
Targus USB 2.0 Multi - Monitor Adapter
FAQ - DisplayLink
DisplayLink provides this support website to help answer questions. This
may answer any questions you may have.
http://www.displaylink.com/support/index.php
22
DE - Introduction
Vielen Dank, dass Sie sich für den USB 2.0 MULTI-MONITOR ADAPTER
entschieden haben.
Packungsinhalt
Zusätzlich zu dieser Bedienungsanleitung enthält die Verpackung:
• USB 2.0 MULTI-MONITOR ADAPTER
• Treibersoftware CD (mini CD)
• Bedienungsanleitung
• DVI zu VGA Adapter
Systemanforderungen
Hardware
• PC mit Intel® Pentium® Prozessor oder gleichwertig
• USB Port Version 2.0
• CD-ROM Laufwerk (mini CD unterstützend)
Betriebssystem
• Mircosoft Windows® XP mit Service Pack 3
• Mircosoft Windows Vista® mit Service Pack 1
• Mircosoft Windows® 7
23
Page 13
Targus USB 2.0 Multi - Monitor Adapter
Targus USB 2.0 Multi - Monitor Adapter
Gerät und Treiber installieren
Um den Monitor Adapter nutzen zu können, müssen Sie zuerst den
Treiber auf Ihrem Computer installieren. Schließen Sie den Monitor
Adapter an Ihren Computer an, und Windows Plug-and-Play wird die
Hardwaretreiber für jeden Port installieren.
WARNUNG: SIE MÜSSEN DIE SOFTWARE FÜR DEN ADAPTER INSTALLIEREN,
BEVOR SIE SIE AN DEN COMPUTER ANSCHLIESSEN. ANDERNFALLS ARBEITET
DER ADAPTER NICHT ORDNUNGSGEMÄSS.
Monitor Adapter installieren
Die Installation des Adapter-Treibers ermöglicht es Ihrem Betriebssystem,
den Adapter zu erkennen, wenn er angeschlossen ist.
1 Schalten Sie Ihren Computer ein.
2 Legen Sie die CD mit der Treibersoftware in das CD-ROM-Laufwerk
Ihres Computers ein.
Sollte die Einrichtung nicht automatisch beginnen, klicken Sie Start,
Ausführen und und rufen Sie D:\Setup.exe auf (wenn D: der Pfad Ihres
CD-ROM-Laufwerks ist), und klicken Sie dann OK.
3 Folgen Sie den Anweisungen auf dem Bildschirm, um die Installation
fertig zu stellen.
4 Klicken Sie Fertigstellen und starten Sie den Computer neu, wenn Sie
dazu aufgefordert werden.
24
Anschluss des Monitor Adapters an Ihren
Computer
Nach der Installation der Monitor Adapter-Software können Sie den
Adapter an den Computer anschliessen. Schließen Sie ein Ende des USBKabels an den Adapter und das andere Ende an einen freien USB 2.0 Port
Ihres Computers an.
SCHLIESSEN SIE KEINE GERÄTE AN DEN ADAPTER AN, BEVOR DIE
INSTALLATION FERTIGGESTELLT IST.
• Ein grünes Licht ist AN, wenn
der Adapter arbeitet
Monitor Adapter
Um mögliche Beschädigungen beim Anschluss eines neuen Gerätes zu
vermeiden, zwingen Sie den Kabelstecker niemals mit Gewalt in den Port
des Adapters. Lässt sich der Kabelstecker nicht problemlos einstecken,
drehen Sie ihn um und versuchen Sie es erneut.
25
Page 14

Targus USB 2.0 Multi - Monitor Adapter
Targus USB 2.0 Multi - Monitor Adapter
Anschluss an einen Monitor oder LCDBildschirm
Jeder Monitor oder LCD-Bildschirm, der an den Videoport des Adapters
angeschlossen wird, ist auf eine maximale Auösung von 2048 x 1152 bei
32 bit color limitiert.
HINWEIS: DIE MAXIMALE AUFLÖSUNG VON 2048 X 1152 WIRD NUR DANN UNTERSTÜTZT, WENN
DER MONITOR ODER LCD-BILDSCHIRM IN DEN ADAPTER EINGESTECKT WIRD, BEVOR DER ADAPTER
IN DAS NOTEBOOK EINGESTECKT WIRD. WIRD DER MONITOR ODER LCD-BILDSCHIRM IN DEN
ADAPTER EINGESTECKT, NACHDEM DER ADAPTER AN DAS NOTEBOOK ANGESCHLOSSEN WURDE,
IST DIE AUFLÖSUNG AUF 1024 X 768 EINGESTELLT.
DVI zu VGA Adapter
26
Kontrolle des Displays über die VideoMenüoptionen des Adapters
Sie können die Video-Menüoptionen über Rechtsklick auf das AdapterSymbol im Systemordner oder über Windows Displayeigenschaften
aufrufen.
Windows XP / Windows Vista
Windows 7
27
Page 15

Targus USB 2.0 Multi - Monitor Adapter
Targus USB 2.0 Multi - Monitor Adapter
Erweitert: Sie verwenden Ihren Notebookbildschirm als Primärdisplay, und
Ihr Monitor oder LCD-Bildschirm als sekundären Bildschirm.
Wählen Sie, um die Anzeige auf diesen Modus einzustellen, “Erweitert”
im Anwendungsmenü des Adapter-Symbols. Das Gerät wird jetzt in
die Richtung, in die es das letzte Mal, als sich die Anzeige in diesem
Modus befand, erweitert. Für weitere Optionen navigieren Sie zum “Erweitern Auf”- Untermenü. Die Wahl einer der Optionen dort führt das
Gerät nicht nur in den Erweiterungsmodus, sondern platziert es auch
Links/Rechts/Über/ Unter dem Haupt-(Primär-) Monitor.
Erweiterungsmodus
28
Spiegel: Sie verwenden Ihren Notebookbildschirm als Primärdisplay und
Ihr Monitor oder LCD-Bildschirm kopiert den Notebookbildschirm.
Wählen Sie, um die Anzeige auf diesen Modus einzustellen, einfach
“Spiegel” im Anwendungsmenü des Adaper-Symbols. Auösung, Farbtiefe und Bildwiederholrate des Primärbildschirms werden auf dem
Monitor, der an den Grakadapter des Adapters angeschlossen ist,
kopiert.
HINWEIS: WENN DER AN DEN ADAPTER ANGESCHLOSSENE MONITOR EINE NIEDRIGERE AUFLÖSUNG ALS DER PRIMÄRBILDSCHIRM UNTERSTÜTZT, WIRD DIE GRÖSSE DES BILDES SO
GEÄNDERT,DASS ES AUF DEN EXTERNEN BILDSCHIRM PASST. WENN DER AN DIE DOCKSTATION
ANGESCHLOSSENE MONITOR GRÖSSER ALS DER PRIMÄRBILDSCHIRM IST, WIRD DAS BILD ALS
LETTERBOX-BILD ANGEZEIGT, UM DAS RICHTIGE BILDSEITENVERHÄLTNIS ZU BEWAHREN.
Spiegel
29
Page 16

Targus USB 2.0 Multi - Monitor Adapter
Targus USB 2.0 Multi - Monitor Adapter
Primär (Notebookbildschirm aus): Sie verwenden Ihren Monitor oder
LCD-Bildschirm als Ihr Primärdisplay und Ihr Notebookbildschirm ist abgeschaltet. Um das Display auf diesen Modus einzustellen, wählen Sie einfach
‘Notebookbildschirm aus’ vom Anwendungsbildschirm des Adapter-Symbols.
Primär
30
Aus: Sie verwenden Ihren Monitor oder LCD-Bildschirm als Ihr Primärdisplay und Ihr Notebookbildschirm ist abgeschaltet.
Aus
31
Page 17

Targus USB 2.0 Multi - Monitor Adapter
Targus USB 2.0 Multi - Monitor Adapter
Kontrolle des Displays über Windows
Displayeigenschaften (für Windows XP und Vista)
Die Videoeinstellung des Adapters kann auch über die Dialogfelder der
Windows Grakeigenschaften gesteuert werden. Bei Windows Vista müssen Sie auf dem Desktop rechtsklicken, “Anpassen” klicken und wählen Sie
“Grakoptionen”. Die entsprechende Möglichkeit haben Sie bei Windows XP,
indem Sie auf dem Desktop rechtsklicken, “Eigenschaften” wählen und dann
zum Reiter “Einstellungen” navigieren.
4
1
2
3
Windows Vista
Abbildung 1
32
4
2
1
3
Windows XP
Erweiterungsmodus: Um das Display auf diesen Modus einzustellen,
markieren Sie die Box “Windows Desktop auf diesen Monitor erweitern” (1
in Abbildung 1). Passen Sie Auösung und Farbqualität mit den entsprechenden Kontrollen an (2 und 3) und arrangieren Sie seine Position unter
Berücksichtigung der anderen Monitore in der Drag-Zone unter “Erweiterter
Desktop” (4).
Spiegelmodus: Um das Display auf Spiegelmodus einzustellen, entfernen
Sie einfach die Markierung der Box “Desktop auf diesen Monitor erweitern”
(1 in Abbildung 1 auf der vorigen Seite).
Einrichtung des Primärdisplays: Folgen Sie den Anweisungen unten,
um den an den Adapter angeschlossenen Monitor als Primärdisplay einzurichten:
33
Page 18

Targus USB 2.0 Multi - Monitor Adapter
Targus USB 2.0 Multi - Monitor Adapter
1. Wählen Sie den an den Adapter angeschlossenen Monitor in der Auistung im Fenster Grakeigenschaften.
1
Windows Vista
1
Windows XP
34
2. Markieren Sie, nachdem Sie den entsprechenden Monitor gewählt haben, die Box neben “Desktop auf diesen Monitor erweitern” (bei Vista)
oder “Windows Desktop auf diesen Monitor erweitern” (bei XP).
2
2
Windows Vista
Windows XP
35
Page 19

Targus USB 2.0 Multi - Monitor Adapter
Targus USB 2.0 Multi - Monitor Adapter
3. Markieren Sie dann die Box neben “Mein Hauptmonitor” (bei Vista), “Dieses Gerät als primären Monitor verwenden ” (bei XP)
3
3
Windows Vista
Windows XP
4. Klicken Sie “Anwenden”.
36
5. Wählen Sie den Laptopmonitor in der Auistung und entfernen Sie die
Markierung der Box “Desktop auf diesen Monitor erweitern” (bei Vista)
oder “Windows Desktop auf diesen Monitor erweitern” (bei XP) und klicken Sie “Anwenden”.
4
Windows Vista
HINWEIS: SIE KÖNNEN NOCH BEQUEMER MIT EINEM LAPTOP ARBEITEN, WENN SIE SEINE AKTION
BEIM SCHLIESSEN DES DECKELS AUF “NICHTS TUN” UND DIE DOCKSTATION AUF PRIMÄRMODUS
STELLEN. DANN KÖNNEN SIE DEN LAPTOPDECKEL SCHLIESSEN UND DEN LAPTOP MIT EXTERNER
TASTAUR UND MAUS VERWENDEN.
4
Windows XP
Der an den Adapter angeschlossene Monitor bleibt der Primärmonitor,
wenn er in den Ruhe- oder Schlafmodus übergeht oder neu gestartet wird.
Wird der Adapter entfernt, wird das Display des Laptop wieder zum Primärmonitor.
Bei Wiederanschluss wird der an den Adapter angeschlossene Monitor in
den Primärmodus zurückkehren.
37
Page 20
Targus USB 2.0 Multi - Monitor Adapter
Targus USB 2.0 Multi - Monitor Adapter
Kontrolle des Displays über Windows
Displayeigenschaften (für Windows 7)
Die Videoeinstellungen des Adapters können auch über das Dialogfeld von
Windows Displayeigenschaften konguriert werden. Um dies bei Windows
7 zu tun, rechtsklicken Sie den Desktop. Klicken Sie “Anpassen”, wählen
Sie “Anzeige” und dann den Link “Displayeigenschaften ändern”. Sie können auch das Symbol “Targus USB Video Adapter” im Mitteilungsbereich
rechtsklicken und “Fortgeschritten” wählen.
Die verschiedenen Diplay-Ausgabeeinstellungen können über die Auswahl
der Optionen, die in der “Mehrfache Displays”- Auistung enthalten sind,
gesteuert werden. Wählen Sie die gewünschte Einstellung und klicken Sie
“Anwenden”. Der Bildschirm erneuert sich und Sie bestätigen ok durch
Wählen von “Änderungen speichern”.
38
Automatische Updates
Automatische Updates sind eine Produktwartungsfunktion von DisplayLink. Der Automatische Updates-Mechanismus stellt sicher, dass der Grakadapter der Dockstation über die modernsten Treiber und Software verfügt und dem Nutzer sich stetig verbessernde Leistung und Stabilität bietet.
Abtrennung des Adapters
Wird der Adapter abgeschaltet oder das USB-Kabel vom Computer getrennt, wird das Display gelöscht. Alle Fenster und Symbole werden auf den
Primärbildschirm verschoben. Bei Wiederanschluss oder Einschalten des
Adapters geht die Anzeige in den Modus, den sie vor der Abtrennung inne
hatte, zurück. Allerdings werden die vorher dort bendlichlichen Fenster
und Symbole nicht zurück verschoben.
39
Page 21

Targus USB 2.0 Multi - Monitor Adapter
Targus USB 2.0 Multi - Monitor Adapter
Unterstützte Auflösung
Auösung Bildwiederholung-
640 x 480 60 67 72 75 85
720 x 480 50 60
768 x 576 50 60
800 x 600 56 60 72 75 85
832 x 624 75
800 x 480 60
848 x 480 60
1024 x 600 60
1024 x 768 60 70 72 85
1152 x 864 75
1152 x 870 75
1280 x 720 50 60
Reale unterstützte Auösungen sind von der Unterstützung des angeschlossenen Monitors abhängig.
srate bei 32 bit
40
Auösung Bildwiederholung-
1280 x 800 60 75 85
1280 x 960 60
1280 x 1024 60 75
1360 x 768 60
1366 x 768 60 75 85
1400 x 1050 60
1440 x 900 60
1600 x 1200 60
1680 x 1050 60
1920 x 1080 50 60
1920 x 1200 60
2048 x 1152 60
srate bei 32 bit
Problemlösung
Das Gerät arbeitet nicht
• Stellen Sie sicher, dass das Gerät vollständig in den korrekten Port des
Adapters eingesteckt ist.
• Stecken Sie das Gerät in einen anderen Port des Adapters ein. Wenn es
immer noch nicht arbeitet, testen Sie das Gerät, indem Sie es direkt an
den Computer anschließen.
• Vergewissern Sie sich, dass Sie das Einrichtungs- oder Installationspro-
gramm für das Gerät durchgeführt haben.
• Stellen Sie sicher, dass das Gerät im Gerätemanager gelistet ist. Weitere
Informationen nden Sie unter “Sichern, dass Geräte installiert sind”
Sichern, dass Geräte installiert sind
Sie können die an der Dockstation installierten Geräte im Fenster Gerätem anager unter Systemeigenschaften einsehen. Rechtsklicken Sie Systemsteuerung, Eigenschaften, klicken Sie dann den Reiter Hardware und dann
den Button Gerätemanager. Klappen Sie Flogendes im Fenster Gerätemanager auf:
• Displayadapter:
- Displaylink Grakadapter (nur XP)
- Displaylink Spiegeladapter (nur XP)
• Netzwerkadapter:
- Hochgeschwindigkeits- USB Ethernet Adapter
• Monitor
-Targus USB Videoadapter
41
Page 22

Targus USB 2.0 Multi - Monitor Adapter
Targus USB 2.0 Multi - Monitor Adapter
FAQ – DisplayLink
DisplayLink stellt diese Support-Website zur Verfügung, um Ihnen zu helfen, Ihre Fragen zu beantworten. Die Website sollte alle Ihre eventuellen
Fragen beantworten.
http://www.displaylink.com/support/index.php
42
ES - Introducción
Gracias por la adquisición del Adaptador USB 2.0 Multi Monitor
Contenido de la Caja
Junto con esta guía de usuario, la caja contiene:
• Adaptador USB 2.0 Multi Monitor
• CD de software del controlador (mini CD)
• Guía de Usuario
• Adaptador de DVI a VGA
Requisitos del Sistema
Hardware
• Ordenador con procesador Intel® Pentium® o equivalente
• Puerto USB versión 2.0
• Unidad de CD-ROM (compatible con mini CD)
Sistema Operativo
• Mircosoft Windows® XP con Paquete de Servicio 3
• Mircosoft Windows Vista® con Paquete de Servicio 1
• Mircosoft Windows® 7
43
Page 23

Targus USB 2.0 Multi - Monitor Adapter
Targus USB 2.0 Multi - Monitor Adapter
Instalar el Dispositivo y los Drivers
Para utilizar el adaptador a monitor, primero deberá instalar el driver en su
ordenador. A continuación, conecte el adaptador a monitor a su ordenador
y el Windows plug-and-play instalará los drivers de hardware para cada
puerto.
ADVERTENCIA: DEBE INSTALAR EL SOFTWARE DEL ADAPTADOR ANTES DE
CONECTARLO A SU ORDENADOR. DE LO CONTRARIO, EL ADAPTADOR NO
FUNCIONARÁ CORRECTAMENTE
Instalar el Adaptador de Soporte de
Monitor
El instalar el driver del adaptador permite a su sistema operativo el
reconocer el adaptador una vez esté conectado
1. Encienda su ordenador
2 Inserte el CD de software del driver en la unidad CD-ROM de su
ordenador.
Si la instalación no se inicia automáticamente, haga clic en Inicio,
Ejecutar y escriba D: \ setup.exe (donde D: es la ruta de su unidad de
CD-ROM) luego haga clic en Aceptar OK
3 Siga las instrucciones de la pantalla para completar la instalación.
4 Haga clic en Finalizar y reinicie su ordenador cuando se le indique.
44
Conectar el Adaptador para Monitor a su
Ordenador
Después de instalar el software del adaptador para monitor, estará usted
listo para conectar el adaptador a su ordenador. Conecte un extremo del
cable USB al adaptador y el otro extremo a un puerto disponible USB 2.0
de su ordenador
NO CONECTE NINGÚN DISPOSITIVO AL ADAPTADOR HASTA QUE LA
INSTALACIÓN HAYA FINALIZADO
• Se ENCENDERÁ una luz
verde cuando el adaptador esté
funcionando.
Adaptador para Monitor
Para evitar posibles daños cuando conecta un dispositivo nuevo, no fuerce
el conector del cable en el puerto del adaptador. Si el conector del cable
no encajase correctamente, de la vuelta al conector y trate de conectarlo
otra vez.
45
Page 24

Targus USB 2.0 Multi - Monitor Adapter
Targus USB 2.0 Multi - Monitor Adapter
Conectar a un Monitor o LCD
Cualquier monitor o pantalla LCD conectado al puerto de vídeo del
adaptador estará limitado a una resolución máxima de 2048 x 1152 a 32
bits de color
NOTA: LA RESOLUCIÓN MÁXIMA DE 2048 X 1152 SÓLO SERÁ SOPORTADA SI EL MONITOR O LA
PANTALLA LCD SE CONECTAN AL ADAPTADOR ANTES DE CONECTAR EL ADAPTADOR AL PORTÁTIL.
SI EL MONITOR O PANTALLA LCD SE CONECTAN AL ADAPTADOR DESPUÉS DE QUE ÉSTE ESTÉ
CONECTADO AL PORTÁTIL, LA RESOLUCIÓN SE CONFIGURARÁ A 1024 X 768.
Adaptador de DVI a
VGA
46
Controlar la Pantalla utilizando la Opción
de Menú del Vídeo del Adaptador
Puede acceder a las opciones de menú de vídeo haciendo clic con el botón
derecho del ratón sobre el icono del Adaptador , en la bandeja del
sistema, o a través de las Propiedades de Pantalla de Windows.
Windows XP / Windows Vista
Windows 7
47
Page 25

Targus USB 2.0 Multi - Monitor Adapter
Targus USB 2.0 Multi - Monitor Adapter
Extensión: Está utilizando la pantalla de su ordenador portátil como pantalla principal y su monitor o pantalla LCD como pantalla secundaria.
Para congurar la pantalla en este modo, seleccione ‘Extender’ en
el menú de aplicación del Icono del Adaptador. El dispositivo se extenderá ahora hacia la dirección en la que estuvo la última vez que
el visualizador estuvo en este modo. Para mayor control, navegando
al submenú “Extender a” y seleccionando una de las opciones no solamente pondrá al dispositivo en el modo “Extender” sino que también
lo colocará en la Izquierda/Derecha/Arriba/Abajo del monitor principal.
Modo Extensión
48
Espejo: Está utilizando la pantalla de si portátil como pantalla principal y su
monitor o pantalla LCD duplica la pantalla del portátil.
Para congurar la pantalla en este modo, seleccione simplemente
“espejo” del menú de aplicación del icono del adaptador. La resolución,
profundidad de color y la frecuencia de refresco de la pantalla principal
se duplicarán en el monitor conectado al adaptador de grácos del
adaptador
NOTA: SI EL MONITOR CONECTADO AL ADAPTADOR SOPORTA UNA RESOLUCIÓN MENOR QUE EL
PRINCIPAL, LA IMAGEN SE AJUSTA A LA PANTALLA EXTERNA. CUANDO EL MONITOR CONECTADO
A LA ESTACIÓN DE ACOPLAMIENTO ES DE UN TAMAÑO MAYOR QUE LA PANTALLA PRINCIPAL, LA
IMAGEN SERÁ APAISADA PARA MANTENER EL PORCENTAJE DE ASPECTO CORRECTO.
Espejo
49
Page 26

Targus USB 2.0 Multi - Monitor Adapter
Targus USB 2.0 Multi - Monitor Adapter
Pantalla principal (Pantalla del Portátil Apagada): Usted está utilizando
su monitor o pantalla LCD como pantalla principal y la pantalla de su ordenador portátil está apagada. Para congurar la visualización en este modo,
simplemente seleccione “apagar pantalla de portátil” en el ícono de adaptador del monitor de aplicaciones.
Pantalla Principal
50
Apagado: Está utilizando la pantalla de su ordenador portátil como pantalla principal y su monitor o LDC están apagados.
Apagado
51
Page 27

Targus USB 2.0 Multi - Monitor Adapter
Targus USB 2.0 Multi - Monitor Adapter
Administrar la pantalla utilizando las Propiedades de Pantalla de Windows (Para Windows XP y Vista)
Los ajustes de vídeo del adaptador también pueden congurarse desde la
ventana de dialogo de Propiedades de Pantalla de Windows. Para hacer
esto en Windows Vista, haga clic con el botón derecho sobre el escritorio,
haga clic en “Personalizar” y luego seleccione el vínculo de “Conguraciones
de Pantalla”. La característica correspondiente está disponible en Windows
XP haciendo clic con el botón derecho sobre el escritorio, seleccionado
“Propiedades” y luego navegando hasta la pestaña “Conguraciones”
4
1
2
3
Windows Vista
Dibujo 1
52
4
2
1
3
Windows XP
Modo de Extensión: Para congurar la pantalla en este modo, cruce la
casilla marcada “Extender mi escritorio Windows en este monitor” (1 in en
Dibujo 1). Seleccione la resolución de la pantalla y la calidad de color utilizando los controles correspondientes (2 y 3), y seleccione su posición con
respecto a los otros monitores en el escritorio extendido, utilizando el área
de arrastre (4)
Modo de Espejo: Para congurar la pantalla en el modo de espejo, simplemente quite la cruz de la casilla “Extender mi escritorio Windows a este
monitor” (1 en Dibujo 1 de la página anterior)
Congurar la Pantalla Principal: Para congurar el monitor conectado
al adaptador como pantalla principal, siga las instrucciones indicadas a
continuación:
53
Page 28

Targus USB 2.0 Multi - Monitor Adapter
Targus USB 2.0 Multi - Monitor Adapter
1. En la ventana de Propiedades de Pantalla, usando la lista desplegable,
seleccione el monitor conectado al adaptador.
1
Windows Vista
1
Windows XP
54
2. Después de seleccionar el monitor correspondiente, cruce la casilla junto
a “extender el escritorio a este monitor” (para Vista) o “extender mi escritorio de Windows a este monitor” (para XP)
2
2
Windows Vista
Windows XP
55
Page 29

Targus USB 2.0 Multi - Monitor Adapter
Targus USB 2.0 Multi - Monitor Adapter
3. Seguidamente, marque la casilla junto a “Este es mi monitor principal”
(para Vista) o “Utilice este dispositivo como monitor principal” (para XP)
3
3
Windows Vista
Windows XP
4. Haga clic en “Aplicar”
56
5. Seleccione el monitor de su portátil utilizando la lista desplegable y quite
la cruz de la casilla “extender el escritorio a este monitor” (para Vista)
o “Extender mi escritorio de Windows a este monitor” (para XP) y haga
clic en “Aplicar”
4
Windows Vista
NOTA: ES POSIBLE TRABAJAR MAS CÓMODAMENTE CON UN PORTÁTIL CONFIGURANDO SUS ACCIONES CON LA TAPA CERRADA “NO HACER NADA” Y CONFIGURAR EL ACOPLAMIENTO COMO
MODO PRINCIPAL. LA TAPA DEL PORTÁTIL PUEDE ENTONCES CERRARSE Y UTILIZARSE CON EL
TECLADO Y RATÓN EXTERNOS
4
Windows XP
El monitor conectado al adaptador se mantendrá como principal si el ordenador entra en el modo de hibernación o suspensión, o se reinicia. Si
el Adaptador es desconectado, la pantalla del ordenador portátil volverá a
ser pantalla principal
Al reconectarse, el monitor conectado al Adaptador volverá al modo principal.
57
Page 30

Targus USB 2.0 Multi - Monitor Adapter
Targus USB 2.0 Multi - Monitor Adapter
Controlar la Pantalla utilizando las Propiedades de Pantalla de Windows (para Windows 7)
Los ajustes de vídeo del adaptador también pueden congurarse desde la
ventana de dialogo de las Propiedades de Pantalla de Windows. Para hacer
esto en Windows 7, haga clic con el botón derecho sobre el escritorio, haga clic
en “Personalizar” y luego seleccione “Pantalla” y lego el vínculo de “Cambiar
Conguración de Pantalla”. O haga clic con el botón derecho del ratón sobre
el icono “Adaptador de Vídeo USB de Targus” en la zona de noticaciones y
seleccione “avanzar”
Las diversas conguraciones para la salida de imagen pueden controlarse
seleccionando las opciones provistas en la lista desplegable de la visualización múltiple. Seleccione la opción deseada y haga clic en aplicar. La
pantalla se actualizará y conrme seleccionando “guardar cambios”
58
Actualizaciones Automáticas
Las actualizaciones automáticas son una característica de mantenimiento
del producto de DisplayLink. El mecanismo de actualización automática
asegura que el Adaptador de grácos del adaptador dispone de los drivers y software mas avanzados, proporcionando al usuario un mayor rendimiento y estabilidad
Desconectar el Adaptador
Si el adaptador se apaga o se desenchufa el cable USB del ordenador, la
pantalla quedará en blanco. Todas las ventanas y los íconos se volcarán a
la pantalla principal.
Al reconectar o encender el Adaptador, la pantalla volverá al mismo modo
en el que se encontraba antes de desconectar. No obstante las ventanas y
los iconos que con anterioridad aparecían en la pantalla no serán movidos.
59
Page 31

Targus USB 2.0 Multi - Monitor Adapter
Targus USB 2.0 Multi - Monitor Adapter
Resolución Soportada
Resolución Frecuencias de
640 x 480 60 67 72 75 85
720 x 480 50 60
768 x 576 50 60
800 x 600 56 60 72 75 85
832 x 624 75
800 x 480 60
848 x 480 60
1024 x 600 60
1024 x 768 60 70 72 85
1152 x 864 75
1152 x 870 75
1280 x 720 50 60
El área de soporte de resoluciones depende del soporte conectado al monitor
actualización
disponibles en
32 bits
60
Resolución Frecuencias de
1280 x 800 60 75 85
1280 x 960 60
1280 x 1024 60 75
1360 x 768 60
1366 x 768 60 75 85
1400 x 1050 60
1440 x 900 60
1600 x 1200 60
1680 x 1050 60
1920 x 1080 50 60
1920 x 1200 60
2048 x 1152 60
actualización
disponibles en
32 bits
Solución de Problemas
El Dispositivo no Funciona
• Asegúrese de que el dispositivo esta insertado completamente en el
puerto correcto del adaptador.
• Conecte el dispositivo a un puerto diferente del adaptador. Si todavía no
funciona, pruebe a conectar el dispositivo directamente a su ordenador.
• Conrme que ha ejecutado el programa de Conguración o Instalación
para el dispositivo
• Asegúrese que el dispositivo aparecer en el “Administrador de Dispositivos”. Para mas información lea “Vericar los Dispositivos Instalados”
Verificar que los Dispositivos están Instalados
Puede ver los dispositivos instalados en el adaptador desde la ventana del
Administrador de Dispositivos en las Propiedades del Sistema. Haga clic
con el botón derecho sobre Mi PC, Propiedades, luego haga clic sobre la
pestaña Hardware y, a continuación:
• Adaptadores de Pantalla:
- Adaptador Gráco Displaylink (solo XP)
- Adaptador Espejo Displaylink (solo XP)
• Adaptadores de Red:
- Adaptadores USB Ethernet de alta velocidad
• Monitor
- Adaptador USB Targus para Vídeo
61
Page 32

Targus USB 2.0 Multi - Monitor Adapter
Targus USB 2.0 Multi - Monitor Adapter
Preguntas Frecuentes - DisplayLink
DisplayLink le ofrece esta página Web de soporte para ayudarle a resolver
sus dudas. Ésta podrá responder cualquier pregunta que pueda tener.
http://www.displaylink.com/support/index.php
62
FR - Introduction
Nous vous remercions d’avoir acheté cet ADAPTATEUR USB 2.0 MULTIÉCRAN.
Contenu de la boîte
En complément du guide d’utilisateur, vous trouverez avec votre
produit :
• Un ADAPTATEUR USB 2.0 MULTI-ÉCRAN
• Un mini CD pour les éléments logiciels
• Un manuel d’utilisateur
• Adaptateur DVI vers VGA
Configuration système requise
Matériel
• Un ordinateur équipé d’un processeur Intel® Pentium® ou équivalent
• Un port USB version 2.0 disponible
• Un lecteur de CD-ROM (acceptant également les mini CD)
Système d’exploitation
• Microsoft Windows® XP avec Service Pack 3
• Microsoft Windows® XP avec Service Pack 1
• Microsoft Windows® 7
63
Page 33

Targus USB 2.0 Multi - Monitor Adapter
Targus USB 2.0 Multi - Monitor Adapter
Installation de l’adaptateur et de son pilote
Avant d’utiliser votre adaptateur, vous devez installer son pilote sur
l’ordinateur puis connecter l’adaptateur à l’ordinateur. Windows détectera
l’adaptateur et installera le pilote pour chaque port.
AVERTISSEMENT : VOUS DEVEZ INSTALLER LE LOGICIEL DE L’ADAPTATEUR
AVANT DE CONNECTER L’ADAPTATEUR À L’ORDINATEUR. SINON, L’ADAPTATEUR
RISQUE DE NE PAS FONCTIONNER CORRECTEMENT.
Installation de l’adaptateur pour écran
L’installation du logiciel pilote est nécessaire si vous voulez que votre
ordinateur puisse reconnaître l’adaptateur.
1 Allumez votre ordinateur.
2 Insérez le mini-CD fourni dans le lecteur de CD-ROM de l’ordinateur.
Si le programme d’installation du CD ne démarre pas automatiquement,
cliquez sur Démarrer, Exécuter, tapez D:\Setup.exe (si D: désigne le
lecteur de CD-ROM) et cliquez sur OK.
3 Suivez les instructions afchées à l’écran.
4 Cliquez sur Finish (Terminer) et redémarrez votre ordinateur après
l’afchage du message de redémarrage.
64
Connexion de l’adaptateur pour écran à
votre ordinateur
Si vous avez suivi toutes nos instructions, vous pouvez maintenant
connecter l’adaptateur pour écran à l’ordinateur. Branchez une extrémité
du câble USB sur l’adaptateur et l’autre extrémité dans l’un des ports USB
2.0 disponibles de l’ordinateur.
NE BRANCHEZ AUCUN APPAREIL SUR L’ADAPTATEUR AVANT D’AVOIR
COMPLÈTEMENT TERMINÉ D’INSTALLER CE DERNIER.
• Une lumière verte s’allume (ON)
lorsque l’adaptateur est prêt à
fonctionner.
Adaptateur pour écran
Ne forcez jamais le connecteur d’un périphérique dans le port de l’adaptateur.
Vous risquez d’endommager le port et/ou le connecteur. Si un branchement
s’avère difcile, sortez le connecteur du port et rebranchez-le. L’opération
doit s’effectuer très facilement.
65
Page 34

Targus USB 2.0 Multi - Monitor Adapter
Targus USB 2.0 Multi - Monitor Adapter
Connexion à un moniteur ou un écran LCD
Tout moniteur et écran LCD que vous connectez à l’adaptateur est limité à
une résolution de 2048 x 1152, en mode couleur 32 bits.
REMARQUE : POUR TRAVAILLER À LA RÉSOLUTION MAXIMALE AUTORISÉE DE 2048 X 1152,
CONNECTEZ LE MONITEUR OU L’ÉCRAN LCD SUR L’ADAPTATEUR AVANT DE CONNECTER
L’ADAPTATEUR À VOTRE ORDINATEUR PORTABLE. SI VOUS CONNECTEZ LE MONITEUR OU L’ÉCRAN
LCD SUR L’ADAPTATEUR APRÈS AVOIR CONNECTÉ L’ADAPTATEUR À VOTRE ORDINATEUR PORTABLE,
LA RÉSOLUTION MAXIMALE EST RAMENÉE À 1024 X 768.
Adaptateur DVI vers
VGA
66
Contrôle de l’affichage depuis le menu
Video (Vidéo) de l’adaptateur
Pour accéder au menu Video (Vidéo), cliquez avec le bouton droit de la
souris sur l’icône de l’adaptateur, dans la barre de tâches de Windows, ou
afchez la fenêtre Propriétés d’afchage de Windows.
Windows XP / Windows Vista
Windows 7
67
Page 35

Targus USB 2.0 Multi - Monitor Adapter
Targus USB 2.0 Multi - Monitor Adapter
Extend (Extension): Vous voulez utiliser l’écran de l’ordinateur comme
écran principal et le moniteur ou l’écran LCD comme écran secondaire.
Pour activer cette conguration, sélectionnez ‘Extend’ (Extension) dans
le menu de l’adaptateur. Le moniteur ou l’écran LCD étend l’afchage
de l’écran principal, dans la même direction que celle que vous aviez
choisie la dernière fois que vous avez travaillé en mode extension. Pour
modier la direction d’extension par rapport à l’écran principal, choisissez l’option ‘Extend To’ (Étendre à) puis l’une des directions proposées
: Left/Right/Above/ Below (Gauche/Droit/Au dessus/En-dessous). Le
mode extension est activé dans la direction choisie.
Mode extension
68
Option Mirror (Miroir): Vous voulez afcher le contenu exact de l’écran de
l’ordinateur sur le moniteur ou l’écran LCD.
Pour activer cette conguration, sélectionnez ‘Mirror’ (Miroir) dans le
menu de l’adaptateur. La résolution, la profondeur de la couleur et la vitesse de rafraîchissement de l’écran primaire sont appliquées à l’écran
branché sur l’adaptateur.
REMARQUE : SI L’ÉCRAN CONNECTÉ À L’ADAPTATEUR NE PEUT PAS TRAVAILLER AVEC UNE RÉSOLUTION AUSSI GRANDE QUE CELLE DE L’ÉCRAN PRINCIPAL, L’IMAGE EST AUTOMATIQUEMENT ADAPTÉE À SA RÉSOLUTION. SI L’ÉCRAN CONNECTÉ À L’ADAPTATEUR EST PLUS GRAND QUE L’ÉCRAN
PRINCIPAL, L’IMAGE EST AFFICHÉE EN MODE LETTERBOX POUR NE PAS ÊTRE DÉFORMÉE.
Option Mirror (Miroir)
69
Page 36

Targus USB 2.0 Multi - Monitor Adapter
Targus USB 2.0 Multi - Monitor Adapter
Écran principal (écran de l’ordinateur portable éteint): Vous voulez
utiliser uniquement le moniteur ou l’écran LCD et éteindre l’écran de votre
ordinateur portable. Pour activer cette conguration, sélectionnez ‘Notebook
monitor off’ (Écran portable éteint) dans le menu de l’adaptateur.
Écran principal
70
Off (Désactivé): vous voulez utiliser uniquement l’écran de l’ordinateur et
éteindre le moniteur ou l’écran LCD.
Désactivé
71
Page 37

Targus USB 2.0 Multi - Monitor Adapter
Targus USB 2.0 Multi - Monitor Adapter
Contrôle de l’affichage depuis la fenêtre
Propriétés d’affichage de Windows (pour Windows XP et Vista)
Vous pouvez congurer le mode vidéo de l’adaptateur depuis la fenêtre
Propriétés d’afchage de Windows. Depuis Windows Vista, cliquez avec le
bouton droit de la souris sur le Bureau, cliquez sur l’option “Personnaliser”
et sélectionnez le raccourci ‘Paramètres d’afchage’. Depuis Windows XP,
cliquez avec le bouton droit de la souris sur le Bureau, cliquez sur l’option
“Propriétés” et ouvrez l’onglet ‘Paramètres’.
4
1
2
3
Windows Vista
Figure 1
72
4
2
1
3
Windows XP
Extend Mode: mode extension pour travailler en mode extension d’écran,
cochez l’option “Étendre le Bureau à ce moniteur” (1 dans la Figure 1).
Sélectionnez la résolution et la qualité de la couleur (2 et 3), puis la position
de prolongement par rapport à l’écran principal (4).
Mode miroir: pour travailler en mode miroir, cliquez sur la case de sélection de l’option “Étendre le Bureau à ce moniteur” (1 dans la Figure 1 de la
page précédente) pour effacer la coche.
Sélection de l’écran principal: Pour utiliser l’écran branché sur
l’adaptateur comme écran principal, procédez comme suit :
73
Page 38

Targus USB 2.0 Multi - Monitor Adapter
Targus USB 2.0 Multi - Monitor Adapter
1. Dans la fenêtre Paramètres d’afchage, sélectionnez l’écran branché sur
l’adaptateur dans la liste déroulante.
1
Windows Vista
1
Windows XP
74
2. Cliquez sur la case de sélection “Étendre le Bureau à ce moniteur“ (pour
Vista et XP).
2
2
Windows Vista
Windows XP
75
Page 39

Targus USB 2.0 Multi - Monitor Adapter
Targus USB 2.0 Multi - Monitor Adapter
3. Cliquez sur la case de sélection “Il s’agit de mon moniteur principal” (pour
Vista et XP).
3
3
Windows Vista
Windows XP
4. Cliquez sur “Appliquer”.
76
5. Sélectionnez l’écran de l’ordinateur portable dans la liste déroulante et
enlevez la sélection de l’option “Étendre le Bureau à ce moniteur” (pour
Vista et XP) et cliquez sur “Appliquer”.
4
Windows Vista
REMARQUE : POUR TRAVAILLER PLUS AISÉMENT, CONFIGUREZ L’OPTION ‘ÉCRAN FERMÉ DE
L’ORDINATEUR PORTABLE’ SUR “DO NOTHING” (NE RIEN FAIRE) ET SÉLECTIONNEZ L’ÉCRAN DE
L’ADAPTATEUR COMME ÉCRAN PRINCIPAL. VOUS POUVEZ MAINTENANT FERMER L’ÉCRAN DE
L’ORDINATEUR PORTABLE ET TRAVAILLER AVEC UN ÉCRAN, UN CLAVIER ET UNE SOURIS EXTERNES.
4
Windows XP
L’écran connecté à l’adaptateur devient l’écran principal lorsque l’ordinateur
passe en mode veille ou déconnecté, ou redémarre. Si vous déconnectez
ou éteignez l’adaptateur, l’écran de l’ordinateur portable redevient l’écran
principal.
À la reconnexion, l’écran qui est connecté à l’adaptateur redevient l’écran
principal.
77
Page 40

Targus USB 2.0 Multi - Monitor Adapter
Targus USB 2.0 Multi - Monitor Adapter
Contrôle de l’affichage depuis la fenêtre
Propriétés d’affichage de Windows (pour Windows 7)
Vous pouvez congurer le mode vidéo de l’adaptateur depuis la fenêtre
Propriétés d’afchage de Windows. Depuis Windows 7, cliquez avec le
bouton droit de la souris sur le Bureau, cliquez sur l’option “Personnaliser”,
sélectionnez “Afchage” puis le lien “Modier les paramètres d’afchage”.
Vous pouvez également cliquer avec le bouton droit de la souris sur l’icône
“Targus USB Video adapter” (“Adaptateur vidéo USB de Targus”) dans la
zone de notication et choisir “advance” (Avancé).
La liste déroulante “multiple display” (Afchages multiples) vous propose
diverses congurations d’afchage. Choisissez une conguration et cliquez
sur “apply” (“Appliquer”). Le contenu de l’écran est réactualisé. Sélectionnez
“keep changes” (“Conserver les modications”) pour valider vos choix.
78
Mises à jour automatiques
DisplayLink a équipé l’adaptateur d’une fonction de mise à jour automatique
an que son adaptateur graphique travaille toujours avec les dernières versions du pilote et du logiciel, fournissant à l’utilisateur le meilleur de ses
performances et davantage de stabilité.
Déconnexion de l’adaptateur
Lorsque vous éteignez l’adaptateur ou débranchez son câble USB de
l’ordinateur, l’écran secondaire devient blanc. Toutes les fenêtres et toutes
les icônes repassent sur l’écran principal.
À la reconnexion ou à la remise sous tension de l’adaptateur, la dernière
conguration d’afchage est réactivée mais aucune des fenêtres et des
icônes alors afchées ne réapparaissent.
79
Page 41

Targus USB 2.0 Multi - Monitor Adapter
Targus USB 2.0 Multi - Monitor Adapter
Résolutions possibles
Résolution Vitesses de
640 x 480 60 67 72 75 85
720 x 480 50 60
768 x 576 50 60
800 x 600 56 60 72 75 85
832 x 624 75
800 x 480 60
848 x 480 60
1024 x 600 60
1024 x 768 60 70 72 85
1152 x 864 75
1152 x 870 75
1280 x 720 50 60
Les résolutions effectivement prises en charge dépendent de l’écran connecté.
rafraîchissement
à 32 bits
80
Résolution Vitesses de
1280 x 800 60 75 85
1280 x 960 60
1280 x 1024 60 75
1360 x 768 60
1366 x 768 60 75 85
1400 x 1050 60
1440 x 900 60
1600 x 1200 60
1680 x 1050 60
1920 x 1080 50 60
1920 x 1200 60
2048 x 1152 60
rafraîchissement
à 32 bits
Guide de dépannage
Un périphérique ne fonctionne pas
• Vériez que le périphérique est correctement branché sur l’adaptateur.
• Essayez de brancher le périphérique sur un autre port de l’adaptateur.
Si le périphérique ne fonctionne toujours pas, essayez de le connecter
directement sur l’ordinateur.
• Vériez que vous avez correctement conguré et/ou installé le périphéri-
que.
• Vériez que le périphérique apparaît dans le Gestionnaire de périphéri-
ques. Pour plus d’information, reportez-vous à la section “Afchage des
périphériques installés”.
Affichage des périphériques installés
Vous afchez la liste des périphériques installés sur l’adaptateur depuis la
fenêtre Gestionnaire de périphériques. Cliquez avec le bouton droit de la
souris sur Poste de travail, Propriétés. Ouvrez l’onglet Matériel et cliquez
sur le bouton Gestionnaire de périphériques.
• Cartes graphiques :
- Displaylink Graphic Adapter (Adaptateur graphique Displaylink) (XP
uniquement)
- Displaylink Mirror Adapter (Adaptateur en miroir Displaylink) (XP
uniquement)
• Cartes réseau :
- High speed USB Ethernet Adapter (Carte Eternet USB à grande vitesse)
• Écran
- Adaptateur vidéo USB de Targus
81
Page 42

Targus USB 2.0 Multi - Monitor Adapter
Targus USB 2.0 Multi - Monitor Adapter
Foire aux questions - DisplayLink
DisplayLink a ouvert un site Web d’assistance pour ses clients. Si vous avez
des questions, n’hésitez pas à nous les poser.
http://www.displaylink.com/support/index.php
82
IT - Introduzione
Grazie per aver acquistato l’adattatore monitor USB 2.0 Multi
Contenuto dell’imballo
Oltre a questa guida per l’utente, l’imballo contiene:
•Adattatore monitor USB 2.0 Multi
•CD contenente il software per l’installazione del driver (mini CD)
•Guida per l’utente
• Adattatore DVI/VGA
Requisiti necessari al sistema
Hardware
• PC con processore Intel® Pentium® o equivalente
• porta USB versione 2.0
• CD-ROM drive (compatibile con mini CD)
Sistema operativo
• Mircosoft Windows® XP con Service Pack 3
• Mircosoft Windows Vista® con Service Pack 1
• Mircosoft Windows® 7
83
Page 43

Targus USB 2.0 Multi - Monitor Adapter
Targus USB 2.0 Multi - Monitor Adapter
Installare l’apparecchio e il driver
Per poter usare l’adattatore per monitor occorre prima installare il driver
sul computer. Successivamente si può collegare l’adattatore per monitor al
computer e Windows plug-and-play installerà i driver per ogni porta
ATTENZIONE: PRIMA DI COLLEGARE L’ADATTATORE AL COMPUTER OCCORRE
INSTALLARE IL SOFTWARE. IN CASO CONTRARIO L’ADATTATORE NON FUNZIONERÀ CORRETTAMENTE.
Come installare l’adattatore per il monitor
Installare il driver dell’adattatore consente al sistema operativo di
riconoscerlo quando lo si connette.
1 Accendere il computer.
2 Inserire il CD con il software per l’installazione del driver nel CD-Rom
drive del computer.
Se il processo d’installazione non si avvia automaticamente fare clic su
Avvia, esegui, e inserire D:\Setup.exe (dove D: rappresenta il percorso
del CD-Rom drive) poi fare clic su OK.
3 Per completare l’installazione seguire le istruzioni sullo schermo.
4 Fare clic su Fine e riavviare il computer quando vi viene richiesto.
84
Collegare l’adattatore per il monitor al
computer
Dopo aver installato il software dell’adattatore per monitor siete pronti per
collegarlo al computer. Collegare un’estremità del cavo USB all’adattatore e
l’altra estremità a una porta USB 2.0 disponibile del computer.
NON CONNETTERE NESSUN APPARECCHIO ALL’ADATTATORE FINO AL
TERMINE DELL’INSTALLAZIONE
•Quando l’adattatore è in
funzione si ACCENDE una luce
verde
Adattatore per il monitor
Per evitare danni durante il collegamento a un nuovo apparecchio non
forzare l’inserimento del cavo connettore alla porta dell’adattatore. Se il
cavo non si inserisce facilmente, girare il connettore e provare nuovamente
a collegarlo
85
Page 44

Targus USB 2.0 Multi - Monitor Adapter
Targus USB 2.0 Multi - Monitor Adapter
Collegare a un monitor o a un LCD
Qualsiasi monitor o schermo LCD collegato alla porta video dell’adattatore
avrà una risoluzione massima di 2048 x 1152 con colori a 32 bit
NOTA: LA RISOLUZIONE MASSIMA DI 2048 X 1152 È SUPPORTATA SOLO SE IL MONITOR O LCD VIENE
COLLEGATO ALL’ADATTATORE PRIMA DI COLLEGARE QUEST’ULTIMO AL COMPUTER. SE IL MONITOR
O LCD VIENE COLLEGATO ALL’ADATTATORE DOPO CHE QUEST’ULTIMO È STATO COLLEGATO AL
COMPUTER, LA RISOLUZIONE SI IMPOSTA SU 1024 X 768
Adattatore DVI/VGA
86
Controllare il Display usando le opzioni del
menù Video dell’adattatore.
È possibile accedere alle opzioni del menù video facendo clic sull’icona
dell’adattatore con il tasto destro del mouse nella nestra del sistema o attraverso le Proprietà dello schermo di Windows
Windows XP / Windows Vista
Windows 7
87
Page 45

Targus USB 2.0 Multi - Monitor Adapter
Targus USB 2.0 Multi - Monitor Adapter
Espandi: Si usa lo schermo del notebook come schermo principale e il
monitor o LCD come schermo secondario.
Per impostare lo schermo in questa modalità, selezionare “Espandi” nel
menù delle applicazioni sull’Icona dell’Adattatore. L’apparecchio si espanderà nella direzione in cui era l’ultima volta in cui lo schermo si trovava in questa modalità. È possibile un maggiore controllo, navigando
nel sottomenù “Espandi su” e selezionando una delle opzioni non solo
si metterà l’apparecchio in modalità di espansione ma lo si sistemerà a
sinistra/destra/sopra/sotto il monitor principale.
Modalità d’espansione
88
A specchio: Si usa lo schermo del computer come schermo principale mentre il
monitor o LCD replica lo schermo del computer.
Per impostare lo schermo in questa modalità, selezionare “Specchio”
nel menù delle applicazioni sull’Icona dell’Adattatore. La risoluzione, la
profondità del colore e la velocità di ripristino dello schermo principale saranno replicate nel monitor collegato all’adattatore graco dell’adattatore.
NOTA:SE IL MONITOR CONNESSO ALL’ADATTATORE È COMPATIBILE CON UNA RISOLUZIONE INFERIORE A QUELLA DELL’IMMAGINE PRINCIPALE L’IMMAGINE VERRÀ RIDIMENSIONATA PER ADATTARSI ALLO SCHERMO ESTERNO. SE IL MONITOR COLLEGATO ALLA DOCKING STATION HA DIMENSIONI
SUPERIORI A QUELLE DELLO SCHERMO PRINCIPALE L’IMMAGINE SARÀ IN FORMATO LETTER-BOX
PER MANTENERE LE PROPORZIONI CORRETTE.
A specchio
89
Page 46

Targus USB 2.0 Multi - Monitor Adapter
Targus USB 2.0 Multi - Monitor Adapter
Principale (Monitor del computer spento): Si usa il monitor o lo schermo LCD
come schermo principale e lo schermo del computer è spento. Per impostare lo
schermo in questa modalità selezionare “Monitor computer spento” dall’icona
del programma applicativo dell’adattatore.
Principale
90
Off: Si usa lo schermo del computer come schermo principale e il monitor o
LCD è spento.
Off
91
Page 47

Targus USB 2.0 Multi - Monitor Adapter
Targus USB 2.0 Multi - Monitor Adapter
Controlla il Display usando le Proprietà
dello schermo di Windows (per Windows XP e Vista)
Si possono anche congurare le impostazioni video dell’adattatore dalla nestra di dialogo delle proprietà di Windows. Per farlo con Windows Vista fare clic
col tasto destro sul desktop, fare clic su “Personalizza” e poi selezionare il link
“Impostazioni dello schermo”. La caratteristica corrispondente è disponibile in
Windows XP facendo clic col tasto destro sul desktop, selezionando “Proprietà”
e poi navigando sull’opzione “Impostazioni”
4
1
2
3
Windows Vista
Figura 1
92
4
2
1
3
Windows XP
Modalità d’espansione: Per impostare lo schermo su questa modalità spuntare il riquadro contrassegnato con “Espandi il mio desktop di Windows su
questo monitor” (1 nella gura 1). Regolare la risoluzione dello schermo e la
qualità del colore usando gli appositi comandi (2 e 3) e regolarne la posizione in
rapporto all’altro monitor sul desktop espanso usando l’area di trascinamento
(4).
Modalità a specchio: Per impostare lo schermo in modalità specchio togliere
il segno di spunta dal riquadro contrassegnato “Espandi il desktop su questo
monitor” (1 nella gura 1 sulla pagina precedente)
Impostare lo schermo principale: Per rendere il monitor collegato
all’adattatore lo schermo principale, seguire le istruzioni che seguono:
93
Page 48

Targus USB 2.0 Multi - Monitor Adapter
Targus USB 2.0 Multi - Monitor Adapter
1. Nella nestra delle Proprietà dello schermo usare la lista a tendina e scegliere il monitor collegato all’adattatore.
1
Windows Vista
1
Windows XP
94
2. Dopo aver selezionato il monitor corrispondente, spuntare il riquadro vicino a “Espandere il desktop su questo monitor” (per Vista) o “Espandi il mio
desktop di Windows su questo monitor” (per XP).
2
2
Windows Vista
Windows XP
95
Page 49

Targus USB 2.0 Multi - Monitor Adapter
Targus USB 2.0 Multi - Monitor Adapter
3. Poi spuntare il riquadro vicino a “Questo è il mio monitor principale” (per vista” “usare questo apparecchio come monitor principale” (per XP).
3
3
Windows Vista
Windows XP
4. Fare clic su “applica”
96
5. Selezionare il monitor del notebook con la lista a tendina e togliere la spunta
da “espandi il desktop su questo monitor” (per Vista) o “Espandi il desktop di
Windows su questo monitor” (per XP) e fare clic su “applica”
4
Windows Vista
NOTA: SI PUÒ LAVORARE IN MODO PIÙ CONFORTEVOLE CON IL NOTEBOOK A COPERCHIO CHIUSO IMPOSTANDOLO SU “NON FARE NIENTE” E IMPOSTANDO LA DOCKING STATION IN MODALITÀ
PRINCIPALE. SI PUÒ A QUESTO PUNTO CHIUDERE IL COPERCHIO DEL COMPUTER E USARE IL
NOTEBOOK CON TASTIERA E MOUSE ESTERNI.
4
Windows XP
Il monitor collegato all’adattatore rimane il principale anche se il PC va in
ibernazione, in modalità di sospensione o viene riavviato. Se si stacca
l’adattatore, quello del notebook diventa di nuovo lo schermo principale.
Quando si ricollega l’adattatore il monitor collegato ritorna ad essere il monitor principale.
97
Page 50

Targus USB 2.0 Multi - Monitor Adapter
Targus USB 2.0 Multi - Monitor Adapter
Controllare lo schermo usando le proprietà
dello schermo di Windows (per Windows 7)
Si possono anche congurare le impostazioni video dell’adattatore dalla nestra di dialogo delle proprietà di Windows. Per farlo con Windows 7 fare clic col
tasto destro sul desktop, fare clic su “Personalizza” e poi selezionare “display”
e poi il link “Cambiare le impostazioni del display”. Oppure fare clic col tasto
destro sull’icona “Adattatore video USB Targus” nell’area di notica e scegliere “Avanzate”
Si possono controllare le varie impostazioni di uscita dello schermo scegliendo
le opzioni disponibili nella lista a tendina per i “Display multipli”. Scegliere
l’impostazione desiderata e fare clic su “Applica”. Lo schermo si aggiornerà,
confermare OK dopo aver selezionato “Mantieni i cambiamenti”.
98
Aggiornamenti automatici
Aggiornamenti automatici è una caratteristica di manutenzione del prodotto
disponibile su DisplayLink. Il meccanismo di aggiornamento automatico assicura che l’adattatore abbia a disposizione i software e i driver più aggiornati,
fornendo all’utente le migliori prestazioni disponibili e stabilità.
Scollegare l’adattatore
Se l’adattatore è spento o il cavo USB viene scollegato dal computer lo schermo diventa scuro. Tutte le nestre e le icone si sposteranno sullo schermo principale. Ricollegando o rialimentando l’adattatore il display torna alla modalità
in cui si trovava prima della disconnessione. Tuttavia le nestre e le icone che si
trovavano sullo schermo precedentemente non ritorneranno.
99
Page 51

Targus USB 2.0 Multi - Monitor Adapter
Targus USB 2.0 Multi - Monitor Adapter
Risoluzione supportata
Risoluzione Velocità di ripris-
640 x 480 60 67 72 75 85
720 x 480 50 60
768 x 576 50 60
800 x 600 56 60 72 75 85
832 x 624 75
800 x 480 60
848 x 480 60
1024 x 600 60
1024 x 768 60 70 72 85
1152 x 864 75
1152 x 870 75
1280 x 720 50 60
Le aree di risoluzione reale dipendono dalla compatibilità del monitor connesso
tino disponibile
a 32 bit
100
Risoluzione Velocità di ripris-
1280 x 800 60 75 85
1280 x 960 60
1280 x 1024 60 75
1360 x 768 60
1366 x 768 60 75 85
1400 x 1050 60
1440 x 900 60
1600 x 1200 60
1680 x 1050 60
1920 x 1080 50 60
1920 x 1200 60
2048 x 1152 60
tino disponibile
a 32 bit
Risoluzione dei problemi
L’apparecchio non funziona
•Assicurarsi che l’apparecchio sia inserito correttamente nella porta
dell’adattatore.
•Collegare l’apparecchio a una porta diversa dell’adattatore. Se ancora non
funziona, controllare l’apparecchio collegandolo direttamente al computer.
•Vericare di aver eseguito il programma d’installazione o d’impostazione per
l’apparecchio.
•Assicurarsi che l’apparecchio compaia in Gestione periferiche. Per ulteriori
informazioni fare riferimento a “Vericare che le periferiche siano installate”
Verificare che gli apparecchi siano
installati
Si possono vedere gli apparecchi installati sull’adattatore dalla nestra di Gestione Periferiche in Proprietà del sistema. Fare clic col tasto destro su Computer, Proprietà e poi fare clic sull’opzione Hardware e poi sul tasto Gestione
periferiche. Dalla nestra di Gestione periferiche, espandere quanto segue:
• Adattatori schermo
- Adattatore graco Displaylink (solo XP)
- Adattatore specchio Displaylink (solo XP)
•.Adattatori di rete:
- Adattatore Ethernet USB ad alta velocità
• Monitor
- Adattatore video USB Targus
101
Page 52

Targus USB 2.0 Multi - Monitor Adapter
Targus USB 2.0 Multi - Monitor Adapter
FAQ -DisplayLink
DisplayLink fornisce un sito web di supporto per aiutare a rispondere ai quesiti.
Questo può rispondere a qualsiasi domanda abbiate
http://www.displaylink.com/support/index.php
102
NL - Introductie
Hartelijk dank voor uw aankoop van de USB 2.0 Multi-Monitor Adapter.
Inhoud pakket
Naast deze gebruikershandleiding, bevat dit pakket ook:
• USB 2.0 Multi-Monitor Adapter
• Driver software CD (mini CD)
• Handleiding
• Van DVI naar VGA adapter
Systeemvereisten
Hardware
• PC met een Intel® Pentium® of gelijkwaardige processor
• USB versie 2.0 uitgang
• CD-ROM schijf (ondersteunt mini CD)
Besturingssysteem
• Microsoft Windows® XP met Service Pack 3
• Microsoft Windows Vista® met Service Pack 1
• Microsoft Windows® 7
103
Page 53

Targus USB 2.0 Multi - Monitor Adapter
Targus USB 2.0 Multi - Monitor Adapter
Het apparaat en de drivers installeren
Voordat u de monitoradapter gaat gebruiken, moet u eerst de driver op
uw computer installeren. Sluit vervolgens de monitoradapter aan op
uw computer en Windows ‘plug-and-play’ (“insteken en spelen”) zal de
hardware drivers voor elke uitgang installeren.
WAARSCHUWING: U MOET DE ADAPTERSOFTWARE INSTALLEREN VOORDAT
U DE ADAPTER OP UW COMPUTER AANSLUIT, ANDERS ZAL DEZE NIET CORRECT FUNCTIONEREN.
De Ondersteuningsadapter voor de Monitor
installeren
Na installatie van de adapterdriver zal uw besturingssysteem de adapter
herkennen zodra deze wordt aangesloten.
1 Zet uw computer aan
2 Plaats de cd met de driversoftware in de CD-ROM schijf van uw
computer.
Klik, indien de setup niet automatisch opstart, op Start, Uitvoeren en
voer in: “D:\Setup.exe” (waar D: is het pad van uw CD-ROM schijf) en
klik daarna op OK.
3 Volg de instructies op het scherm om de installatie te voltooien.
4 Klik op voltooien en start uw computer opnieuw op als dat gevraagd
wordt.
104
De Monitoradapter op uw computer
aansluiten
Nadat u de software voor de Monitoradapter heeft geinstalleerd, bent u
klaar om de adapter op uw computer aan te sluiten. Sluit het ene einde van
de USB kabel aan op de adapter en het andere einde op een beschikbare
USB 2.0 uitgang van uw computer.
SLUIT NOOIT APPARATEN AAN OP DE ADAPTER TOTDAT DE INSTALLATIE
VOLTOOID IS
• Een groen lampje zal aangaan
op het moment dat de adapter
in werking is
Ondersteuningsadapter voor de Monitor
Om mogelijke schade bij het aansluiten van een nieuw apparaat te
voorkomen, moet u erop letten dat u de verloopkabel niet met (te)veel kracht
in de uitgang op de adapter probeert te steken. Indien de verloopkabel niet
makkelijk aanklikt, probeert u dan de verloop om te draaien en probeer het
opnieuw te bevestigen.
105
Page 54

Targus USB 2.0 Multi - Monitor Adapter
Targus USB 2.0 Multi - Monitor Adapter
Aansluiten op een monitor of LCD scherm
Elke monitor of LCD scherm dat aangesloten is op de videouitgang van de
adapter zal beperkt worden tot een maximale resolutie van 2048 x 1152
met 32 bits kleuren.
OPMERKING: DE MAXIMALE RESOLUTIE VAN 2048 X 1152 WORDT ALLEEN ONDERSTEUND INDIEN
DE MONITOR OF HET LCD SCHERM AL OP DE ADAPTER IS AANGESLOTEN VOORDAT U DE ADAPTER
OP DE LAPTOP AANSLUIT. INDIEN DE MONITOR OF HET LCD SCHERM PAS OP DE ADAPTER WORDT
AANGESLOTEN NADAT DE ADAPTER IS AANGESLOTEN OP DE LAPTOP, ZAL DE RESOLUTIE WORDEN
INGESTELD OP 1024 X 768.
Van DVI naar VGA
adapter
106
Het beeldscherm instellen met behulp van
videomenuopties voor de adapter.
U kunt de videomenuopties openen door met rechtermuisknop te klikken op
het adapterpictogram in de systeembalk of via Windows’ “Eigenschappen
voor beeldscherm”
Windows XP / Windows Vista
Windows 7
107
Page 55

Targus USB 2.0 Multi - Monitor Adapter
Targus USB 2.0 Multi - Monitor Adapter
Uitbreiden: u gebruikt uw laptopscherm als uw hoofdscherm en uw monitor of LCD scherm als extra scherm.
Selecteer, om het beeldscherm in deze modus te zetten, ‘Extend’ (Uitbreiden) in het toepassingenmenu van het Adapterpictogram. Het apparaat zal nu worden uitgebreid in de richting waarin het de laatste keer
was toen het in deze modus was. Navigeer naar het submenu ‘Extend
to’ (Uitbreiden naar) voor meer controle en als u een van de opties selecteert zal het apparaat niet alleen in de uitbreidmodus worden gezet,
maar zal het ook Links/Rechts/Boven/Onder het hoofdscherm worden
geplaatst.
Uitbreidmodus
108
Spiegel: u gebruikt uw laptopscherm als uw hoofdscherm en uw monitor of
LCD scherm kopieert uw laptopscherm.
Selecteer, om het beeldscherm in deze modus te zetten, eenvoudigweg ‘spiegel’ in het toepassingenmenu van het adapterpictogram. De
resolutie, kleurendiepte en verversingsfrequentie van het hoofdscherm
worden gekopieerd op de monitor die aangesloten is op de graphics
van de adapter.
OPMERKING: INDIEN DE OP DE ADAPTER AANGESLOTEN MONITOR EEN LAGERE RESOLUTIE
ONDERSTEUNT, DAN ZAL HET HOOFDBEELD OP HET EXTERNE SCHERM PASSEN. WANNEER DE
OP DE ADAPTER AANGESLOTEN MONITOR VAN EEN GROTERE GROOTTE IS DAN HET HOOFDSCHERM, ZAL HET BEELD TWEE HORIZONTALE BANDEN KRIJGEN OM DE BREEDTE/HOOGTE VERHOUDING CORRECT TE HOUDEN.
Spiegel
109
Page 56

Targus USB 2.0 Multi - Monitor Adapter
Targus USB 2.0 Multi - Monitor Adapter
Hoofdscherm (laptopmonitor uit): u gebruikt uw monitor of LCD scherm
als uw hoofdscherm en uw laptopscherm is uitgeschakeld. Selecteer, om het
beeldscherm in deze modus te zetten, eenvoudigweg ‘laptopmonitor uit’ in
het toepassingenmenu van het adapterpictogram.
Hoofdscherm
110
Uit: u gebruikt uw laptopscherm als uw hoofdscherm en uw monitor of LCD
scherm is uitgeschakeld
Uit
111
Page 57

Targus USB 2.0 Multi - Monitor Adapter
Targus USB 2.0 Multi - Monitor Adapter
Het beeldscherm instellen met behulp van
Windows’ “Eigenschappen voor Beeldscherm”
(voor Windows XP en Vista)
De videoinstellingen van de adapter kunnen ook geregeld worden in het dialoogvenster van Windows’ ‘Eigenschappen voor Beeldscherm’. Klik, om dit
in Windows Vista te doen, met rechtermuisknop op het bureaublad, klik op
“Aan persoonlijke voorkeur aanpassen” en selecteer dan de link “Beeldscherminstellingen”. Het betreffende onderdeel is beschikbaar in Windows XP
door met rechtermuisknop op het bureaublad te klikken, ‘Eigenschappen’ te
selecteren en vervolgens te navigeren naar het tabblad ‘Instellingen’.
4
1
2
3
Windows Vista
Figuur 1
112
4
2
1
3
Windows XP
Uitbreidmodus: vink, om het beeldscherm in deze modus te zetten, het
vakje ‘Het Windows-bureaublad uitbreiden naar deze monitor’ aan (1 in
Figuur 1). Stel de schermresolutie en de kleurkwaliteit in met behulp van de
keuzelijsten (2 en 3) en bepaal vervolgens door te slepen ook zijn positie
ten opzichte van de andere monitoren op het uitgebreide bureaublad (4).
Spiegelmodus: vink, om het beeldscherm in spiegelmodus te zetten, eenvoudigweg de optie ‘Het bureaublad uitbreiden naar deze monitor’ uit (1 in
Figuur 1 op de vorige pagina).
Het hoofdscherm instellen: volg de onderstaande instructies om de aan
de Adapter bevestigde monitor als het hoofdscherm in te stellen:
113
Page 58

Targus USB 2.0 Multi - Monitor Adapter
Targus USB 2.0 Multi - Monitor Adapter
1. Selecteer, in het venster Eigenschappen voor Beeldscherm, met behulp
van de keuzelijst de monitor die aan de Adapter is bevestigd.
1
Windows Vista
1
Windows XP
114
2. Vink, nadat u de juiste monitor heeft geselecteerd, het vakje naast “Het
bureaublad uitbreiden naar deze monitor” aan (voor Vista) of “Het Windows bureaublad uitbreiden naar deze monitor” (voor XP).
2
2
Windows Vista
Windows XP
115
Page 59

Targus USB 2.0 Multi - Monitor Adapter
Targus USB 2.0 Multi - Monitor Adapter
3. Vink vervolgens het vakje aan naast “Dit is mijn hoofdmonitor” (voor Vista) “Dit apparaat als de hoofdmonitor gebruiken” (voor XP).
3
3
Windows Vista
Windows XP
4. Klik op “Toepassen”
116
5. Selecteer de laptopmonitor met behulp van de keuzelijst en vink het
vakje “het bureaublad uitbreiden naar deze monitor” (voor Vista) of “Mijn
Windows-bureaublad uitbreiden naar deze monitor” (voor XP) uit en klik
op “Toepassen”.
4
Windows Vista
OPMERKING: HET IS MOGELIJK OM MET EEN LAPTOP COMFORTABELER TE WERKEN DOOR HET
LAPTOPSCHERM TE SLUITEN OM “NIETS DOEN”, EN VERVOLGENS DE ADAPTER NAAR HOOFDSCHERM- MODUS TE ZETTEN. DAN KAN HET LAPTOPSCHERM GESLOTEN WORDEN EN KAN DE LAPTOP GEBRUIKT WORDEN MET HET EXTERNE TOETSENBORD EN MUIS.
4
Windows XP
De monitor die aangesloten is op de Adapter blijft het hoofdscherm als de
pc de slaapmodus ingaat of opnieuw opgestart wordt. Als de adapter losgekoppeld wordt, wordt het laptopscherm weer het hoofdscherm.
Zodra er een nieuwe verbinding is gemaakt, zal de monitor die aangesloten
is op de Adapter teruggaan naar de hoofdschermmodus.
117
Page 60

Targus USB 2.0 Multi - Monitor Adapter
Targus USB 2.0 Multi - Monitor Adapter
Het beeldscherm configureren met behulp van
Windows’ ‘Eigenschappen voor Beeldscherm’
(voor Windows 7)
De videoinstellingen van de adapter kunnen ook geregeld worden in het
dialoogvenster van Windows’ ‘Eigenschappen voor Beeldscherm’. Klik, om
dit in Windows 7 te doen, met rechtermuisknop op het bureaublad, klik op
“Aan persoonlijke voorkeur aanpassen” en selecteer dan de link ‘Beeldschermweergave’ en daarna de link ‘Verander de beeldscherminstelling’. Of
klik met rechtermuisknop op het pictogram “Targus USB Video adapter” in
het berichtengebied en kies “toepassen”.
De verschillende beeldscherminstellingen kunnen geregeld worden door uit
de gegeven opties te kiezen in de keuzelijst van “meerdere beeldschermen”.
Kies de gewenste instelling en klik op “toepassen”. Het scherm zal zich
verversen; bevestig daarna ok door ‘behoud veranderingen” te selecteren.
118
Automatische updates
Automatische updates is een onderhoudsonderdeel voor het product van
DisplayLink. Het automatische update-mechanisme zorgt ervoor dat de
graphics van de Adapter de meest recente drivers en software hebben,
waardoor de gebruiker verhoogde prestaties en stabiliteit ervaart.
De adapter loskoppelen
Indien de adapter geen stroom meer krijgt of als de USB kabel uit de computer is verwijderd, zal het scherm leeg worden. Alle vensters en pictogrammen zullen naar het hoofdscherm schuiven.
Op het moment dat de adapter opnieuw wordt aangesloten of weer stroom
krijgt, zal het scherm weer teruggaan naar dezelfde modus als waarin het
was vóór het verbreken van de verbinding. Vensters en pictogrammen die
toen op het scherm waren zullen echter niet teruggeplaatst worden.
119
Page 61

Targus USB 2.0 Multi - Monitor Adapter
Targus USB 2.0 Multi - Monitor Adapter
Ondersteunde resolutie
Resolutie Verversingsfre-
640 x 480 60 67 72 75 85
720 x 480 50 60
768 x 576 50 60
800 x 600 56 60 72 75 85
832 x 624 75
800 x 480 60
848 x 480 60
1024 x 600 60
1024 x 768 60 70 72 85
1152 x 864 75
1152 x 870 75
1280 x 720 50 60
Het werkelijke ondersteunde resolutiegebied hangt af van de ondersteuning van de
aangesloten monitor
quenties zijn
beschikbaar op
32 bits kleuren
120
Resolutie Verversingsfre-
1280 x 800 60 75 85
1280 x 960 60
1280 x 1024 60 75
1360 x 768 60
1366 x 768 60 75 85
1400 x 1050 60
1440 x 900 60
1600 x 1200 60
1680 x 1050 60
1920 x 1080 50 60
1920 x 1200 60
2048 x 1152 60
quenties zijn
beschikbaar op
32 bits kleuren
Probleemoplosser
Apparaat werkt niet
• Zorg ervoor dat het apparaat volledig in de juiste uitgang op de adapter
is gestoken.
• Steek het apparaat in een andere uitgang op de adapter. Test, als het dan
nog steeds niet werkt, het apparaat door het rechtstreeks op uw computer
aan te sluiten.
• Controleer of u de setup of het installatieprogramma voor het apparaat
heeft uitgevoerd.
• Zorg ervoor dat het apparaat verschijnt in het venster van Apparaatbeheer. Raadpleeg de sectie “Controleren of apparaten zijn geinstalleerd”
voor meer informatie.
Controleren of apparaten geinstalleerd zijn
U kunt de apparaten die op de adapter geinstalleerd zijn bekijken in het
venster Apparaatbeheer in “Systeemeigenschappen”. Rechtermuisklik op
“Mijn Computer”, “Eigenschappen”, klik vervolgens op het tabblad “Hardware”, en daarna op de knop “Apparaatbeheer”. Toon, in het venster Apparaatbeheer, de volgende opties:
• Beelschermadapters:
- Displaylink Grasche Adapter (Uitsluitend XP)
- Displaylink Spiegeladapter (Uitsluitend XP)
• Netwerkadapters:
- USB Hoge snelheidskabel voor de Ethernet Adapter
• Monitor
- Targus USB Video Adapter
121
Page 62

Targus USB 2.0 Multi - Monitor Adapter
Targus USB 2.0 Multi - Monitor Adapter
FAQ - DisplayLink
DisplayLink biedt deze ondersteuningswebsite aan om vragen te beantwoorden. Hier vindt u mogelijk antwoorden op elke vraag die u heeft.
http://www.displaylink.com/support/index.php
122
PT - Introdução
Obrigado por ter comprado o seu Adaptador Multi-Monitor USB 2.0
Conteúdo da embalagem
Além deste guia do utilizador, a embalagem inclui:
• Adaptador Multi-Monitor USB 2.0
• CD com software do controlador (mini CD)
• Guia do Utilizador
• Adaptador DVI para VGA!
Requisitos do sistema
Hardware
• PC com processador Intel® Pentium® ou equivalente
• Porta USB versão 2.0
• Unidade de CD-ROM (suporte para mini CD)
Sistema operativo
• Microsoft Windows® XP com Service Pack 3
• Microsoft Windows Vista® com Service Pack 1
• Microsoft Windows® 7
123
Page 63

Targus USB 2.0 Multi - Monitor Adapter
Targus USB 2.0 Multi - Monitor Adapter
Instalação do dispositivo e controladores
Para usar o adaptador do monitor terá de instalar primeiro o controlador no
seu computador. Depois, ligue o adaptador do monitor ao seu computador
e o “plug-and-play” (ligar e usar) do Windows instalará os controladores do
hardware para cada porta.
AVISO: DEVE INSTALAR O SOFTWARE DO ADAPTADOR ANTES DE O LIGAR AO
COMPUTADOR. DE OUTRO MODO, O ADAPTADOR NÃO FUNCIONARÁ CORRECTAMENTE.
Instalação do adaptador de suporte do
monitor
Ao instalar o controlador do adaptador permite-lhe operar o sistema para
reconhecer o adaptador quando este estiver ligado.
1 Ligue o computador
2 Insira o CD do software do controlador na unidade de CD-ROM do
computador.
Se a instalação não começar imediatamente, clique em Start (Iniciar),
Run (Executar) e Enter (Conrmar) D:\Setup.exe (em que D: é o caminho
da sua unidade de CD-ROM) e clique em OK.
3 Siga todas as instruções exibidas no ecrã para concluir a instalação.
4 Clique em Finish (Terminar) e reinicie o seu computador quando for
solicitado.
124
Ligação do adaptador do monitor ao seu
computador
Depois de ter instalado o software do adaptador do monitor , você estará
pronto a ligar o adaptador ao seu computador. Ligue uma extremidade do
cabo USB ao adaptador e a outra numa porta USB 2.0 disponível no seu
computador.
NÃO LIGUE QUAISQUER DISPOSITIVOS AO ADAPTADOR ATÉ QUE A
INSTALAÇÃO ESTEJA CONCLUÍDA.
• A luz verde acende (ON)
quando o adaptador estiver em
funcionamento
Adaptador de suporte do monitor
Para evitar possíveis danos quando ligar um novo dispositivo, não force a
entrada do conector do cabo na porta do adaptador. Se o conector do cabo
não encaixar facilmente, rode-o ao contrário e tente ligá-lo novamente.
125
Page 64

Targus USB 2.0 Multi - Monitor Adapter
Targus USB 2.0 Multi - Monitor Adapter
Ligação da um monitor ou LCD
Qualquer monitor ou LCD ligado à porta do vídeo do adaptador cará
limitado a uma resolução máxima de 2048 x 1152 a 32 bits de cor.
NOTA: A RESOLUÇÃO MÁXIMA DE 2048 X 1152 APENAS É SUPORTADO SE O MONITOR OU O LCD
ESTIVEREM LIGADOS AO ADAPTADOR ANTES DE O LIGAR AO PC PORTÁTIL. SE O MONITOR OU O
LCD ESTIVEREM LIGADOS AO ADAPTADOR DEPOIS DE ESTE ESTAR LIGADO AO PC PORTÁTIL, A
RESOLUÇÃO É CONFIGURADA PARA 1024 X 768.
Adaptador DVI para
VGA!
126
Controlo do ecrã usando as opções do
menu do vídeo do adaptador
As opções do menu de vídeo podem ser acedidas clicando com o botão
do lado direito do rato no ícone do Adaptador no tabuleiro do sistema ou
através de Windows Display Properties (Propriedades de Visualização do
Windows).
Windows XP / Windows Vista
Windows 7
127
Page 65

Targus USB 2.0 Multi - Monitor Adapter
Targus USB 2.0 Multi - Monitor Adapter
Extend (Expandir): Está a utilizar o ecrã do seu PC portátil como dispositivo de visualização principal e o monitor ou LCD como ecra secundário.
Para congurar a visualização para este modo, seleccione “Extend” (Expandir) no menu da aplicação do ícone do Adaptador. O dispositivo será
expandido no mesmo sentido da última vez que a visualização foi realizada neste modo. Para maior controlo, a navegação pelo submenu “Extend to” (Expandir para) e a selecção de uma das opções não colocará
apenas o dispositivo no modo expandido, como também o deslocará
para Left/Right/Above/Below (Esquerda/Direita/Acima/Abaixo) do monitor principal (primário).
Modo Expandir
128
Mirror (Espelho): Está a utilizar o ecrã do seu PC portátil como dispositivo
de visualização principal e o seu monitor ou LCD reproduzem o ecrã do PC
portátil.
Para congurar a visualização para este modo, seleccione “Mirror”
(Espelho) no menu da aplicação do ícone do Adaptador. O valor da
resolução, da intensidade da cor e a frequência de actualização do
seu ecrã principal são reproduzidos no monitor ligado ao adaptador de
grácos do adaptador.
NOTA: SE O MONITOR LIGADO AO ADAPTADOR SUPORTAR UMA RESOLUÇÃO INFERIOR À DO
ECRÃ PRINCIPAL, A IMAGEM SERÁ REDIMENSIONADA PARA SE ENQUADRAR NO ECRÃ EXTERNO.
QUANDO O MONITOR LIGADO AO ADAPTADOR FOR DE TAMANHO SUPERIOR AO ECRÃ PRINCIPAL, A
IMAGEM SERÁ AJUSTADA PARA MANTER A PROPORÇÃO DE ASPECTO ADEQUADA.
Mirror (Espelho)
129
Page 66

Targus USB 2.0 Multi - Monitor Adapter
Targus USB 2.0 Multi - Monitor Adapter
Primário (Monitor do PC portátil desligado): Está a usar o seu monitor ou LCD como visualização primária e o ecrã do seu PC portátil está
desligado. Para congurar o ecrã neste modo, basta seleccionar “notebook
monitor off” (monitor do PC portátil desligado) do monitor da aplicação do
ícone do adaptador.
Primário
130
Off: Está a utilizar o ecrã do seu PC portátil como dispositivo de visualização principal e o monitor ou LCD estão desligados.
Off (Desligado)
131
Page 67

Targus USB 2.0 Multi - Monitor Adapter
Targus USB 2.0 Multi - Monitor Adapter
Controlar o ecrã usando Windows Display
Properties (Propriedades de Visualização do
Windows) (para Windows XP e Windows Vista)
A denição de vídeo do Adaptador também pode ser congurada na caixa
de diálogo de Windows Display Properties (Propriedades de Visualização do
Windows). Para o fazer no Windows Vista, clique com o botão direito do rato
no ambiente de trabalho, clique em “Personalize” (Personalizar) e depois na
ligação “Display Settings” (Congurações de Visualização). A mesma funcionalidade está disponível no Windows XP clicando com o botão direito do
rato no ambiente de trabalho, seleccionando “Properties” (Propriedades) e
acedendo depois ao separador “Settings” (Denições).
4
1
2
3
Windows Vista
Figura 1
132
4
2
1
3
Windows XP
Modo Expandido: Para congurar a visualização para este modo, marque
a caixa “Extend Windows desktop onto this monitor” (Expandir o ambiente
de trabalho Windows para este monitor) (1 na Figura 1). Regule a resolução do ecrã e a qualidade da cor utilizando os respectivos controlos (2
e 3) e regule a sua posição em relação aos outros monitores no ambiente
de trabalho expandido, utilizando a área para arrastar (4).
Modo Mirror (Espelho): Para congurar a visualização para o modo “Mirror” (Espelho), basta desmarcar a caixa “Extend the desktop onto this monitor” (Expandir o ambiente de trabalho para este monitor) (1 na Figura 1, na
página anterior).
Congurar a Visualizaçao Principal: Para tornar o monitor ligado ao
Adaptador como dispositivo de visualização principal, siga as seguintes
instruções:
133
Page 68

Targus USB 2.0 Multi - Monitor Adapter
Targus USB 2.0 Multi - Monitor Adapter
1. Na janela Display Properties (Propriedades de Visualização), utilizando a
lista pendente, seleccione o monitor que está ligado ao Adaptador.
1
Windows Vista
1
Windows XP
134
2. Depois de seleccionar o monitor correspondente, marque a caixa junto a
“extend the desktop onto this monitor” (expandir o ambiente de trabalho
para este monitor) (no Vista) ou “extend my Windows desktop onto this
monitor” (Expandir o ambiente de trabalho Windows para este monitor)
(no XP).
2
2
Windows Vista
Windows XP
135
Page 69

Targus USB 2.0 Multi - Monitor Adapter
Targus USB 2.0 Multi - Monitor Adapter
3. De seguida, marque a caixa junto a “This is my main monitor” (Este é
o meu monitor principal) para Vista) ou “Use this device as the primary
monitor” (Utilizar este dispositivo como monitor principal) (no XP).
3
3
Windows Vista
Windows XP
4. Clique em “Apply” (Aplicar).
136
5. Seleccione o monitor do PC portátil utilizando a lista pendente e desmarcando a caixa “Extend the desktop onto this monitor” (Expandir o ambiente de trabalho para este monitor) (no Vista) ou “Extend my Windows
desktop onto this monitor” (Expandir o ambiente de trabalho Windows
para este monitor) (no XP) e clique em “Apply” (Aplicar).
4
Windows Vista
NOTA: É POSSÍVEL TRABALHAR COM MAIOR COMODIDADE COM UM PC PORTÁTIL CONFIGURANDO
A SUA ACÇÃO COM A TAMPA FECHADA PARA “DO NOTHING” (NÃO AGIR) E CONFIGURAR A BASE
DE LIGAÇÃO PARA O MODO PRINCIPAL. A TAMPA DO PC PORTÁTIL PODE SER FECHADA E O PC
PORTÁTIL PODE SER UTILIZADO COM O TECLADO E O RATO EXTERNOS.
4
Windows XP
O monitor ligado ao Adaptador mantém-se como principal se o PC entrar no modo de hibernação ou de suspensão ou se for reiniciado. Se o
Adaptador for desligado, a visualização no PC portátil torna-se novamente
principal.
Depois de voltar a ligar, o monitor ligado ao Adaptador volta ao modo principal.
137
Page 70

Targus USB 2.0 Multi - Monitor Adapter
Targus USB 2.0 Multi - Monitor Adapter
Controlo do ecrã usando as Propriedades
de Visualização do Windows (para Windows 7)
A conguração de vídeo do Adaptador também pode ser congurada a
partir da caixa de diálogo Propriedades de Visualização Windows. Para
fazer isso em Windows 7, clique com o lado direito do rato no teclado em
“Personalize” (Personalizar), depois em “Display” (Visualizar) e a seguir em
“Change Display Setting” (Mudar a conguração do ecrã). Ou clique com
o lado direito do rato em “Targus USB Video adapter” (Adaptador do USB
vídeo) na área de noticação e escolha “Advance” (Avançar).
Existem várias congurações de visualização que podem ser controladas
escolhendo as opções dadas na lista prop-down (interface de utilizador) em
“multiple display” (visualização múltipla). Escolha a conguração e clique
em “Apply” (Aplicar). O ecrã refrescará e conrme OK seleccionando “keep
changes” (manter alterações).
138
Actualizações automáticas
As actualizações automáticas são uma funcionalidade de manutenção do
produto de DisplayLink. O mecanismo de actualização automática assegura que o Adaptador de grácos do Adaptador possui os controladores e
o software mais actualizados, proporcionando ao utilizador melhor desempenho e estabilidade.
Desligar o adaptador
Se o Adaptador for desligado ou o cabo USB for retirado do computador,
perde-se a visualização. Todas as janelas e ícones se deslocam para o ecrã
principal. Quando for restabelecida a ligação ou a energia do Adaptador, a
visualização volta ao mesmo modo em que estava antes de desligar. No
entanto, as janelas e os ícones que estavam anteriormente no ecrã não
serão reposicionados.
139
Page 71

Targus USB 2.0 Multi - Monitor Adapter
Targus USB 2.0 Multi - Monitor Adapter
Resolução suportada
Resolução Frequências de
640 x 480 60 67 72 75 85
720 x 480 50 60
768 x 576 50 60
800 x 600 56 60 72 75 85
832 x 624 75
800 x 480 60
848 x 480 60
1024 x 600 60
1024 x 768 60 70 72 85
1152 x 864 75
1152 x 870 75
1280 x 720 50 60
A área de resolução realmente suportada depende do suporte do monitor ligado.
actualização
disponíveis a
32 bits
140
Resolução Frequências de
1280 x 800 60 75 85
1280 x 960 60
1280 x 1024 60 75
1360 x 768 60
1366 x 768 60 75 85
1400 x 1050 60
1440 x 900 60
1600 x 1200 60
1680 x 1050 60
1920 x 1080 50 60
1920 x 1200 60
2048 x 1152 60
actualização
disponíveis a
32 bits
Resolução de problemas
O dispositivo não funciona
• Certique-se de que o dispositivo está devidamente ligado na porta correcta do adaptador.
• Ligue o dispositivo numa porta diferente da do adaptador. Se mesmo
assim não funcionar, teste o dispositivo, ligando-o directamente ao seu
computador.
• Verique se executou o programa Setup (Conguração) ou Install (Instalação) para o dispositivo.
• Certique-se de que o dispositivo é exibido no Device Manager (Gestor
de Dispositivo). Para mais informações, consulte “Verifying Devices are
Installed” (Vericação dos Dispositivos Instalados).
Verificação dos dispositivos instalados
Pode consultar os dispositivos instalados no adaptador na janela do Device
Manager (Gestor do Dispositivo) em System Properties (Propriedades do
Sistema). Clique com o botão direito do rato em My Computer (O meu
computador), Properties (Propriedades), clique no separador Hardware e
depois no botão Device Manager (Gestor do Dispositivo).
• Adaptadores de visualização:
- Adaptador gráco Displaylink (apenas no XP)
- Adaptador do adaptador de espelho (apenas no XP)
• Adaptadores de rede:
- Adaptador USB para Ethernet de alta velocidade
• Monitor
- Targus USB para adaptadores de vídeo
141
Page 72

Targus USB 2.0 Multi - Monitor Adapter
FAQ (Perguntas frequentes) - Displaylink
Displaylink proporciona este website de suporte para ajudar a responder
a perguntas. Esta funcionalidade pode responder a quaisquer perguntas
que queira colocar.
http://www.displaylink.com/support/index.php
Targus USB 2.0 Multi - Monitor Adapter
142
143
 Loading...