

Page 1
LCD-DISPLAY 22"
GB
User manual and
IE
CY
service information
Targa Visionary LCD 22-1 Wide
Page 2
Targa Visionary LCD 22-1 Wide
Operating Notes
First of all, many thanks for choosing this high-end multiscan
monitor. Before starting installation, please read this manual
completely.
Intended Use
This TFT monitor is an IT electronic device. It may only be used for
private use, not industrial or other commercial purposes.
Furthermore, the device may not be used outdoors or in tropical
climates. Only connection cables and external devices may be used
that comply with safety standards and the electromagnetic
compatibility and shielding quality of this device. This device fulfils
all that relates to CE Conformity, relevant norms and standards.
Any modifications to the equipment other than recommended
changes by the manufacturer may lead to the result that these
directives are not met any more. Only use the accessories
recommended by the manufacturer.
English
Conformity
This device fully complies with the basic and other
relevant requirements of the EMC Directive
2004/108/EC, as well as the Low-voltage Directive
2006/95/EC.
You’ll find the signed CE Declaration of Conformity on
the website www.service.targa.co.uk.
The Declaration of Conformity can also be found at the
end of this User's Manual.
1
Page 3

Targa Visionary LCD 22-1 Wide
Table of Contents
English
Operating Notes............................................................................... 1
Intended Use ............................................................................................1
Conformity ................................................................................................1
Table of Contents ............................................................................ 2
Safety Information............................................................................ 3
Warnings................................................................................................... 3
Disposal of Old Devices ...........................................................................5
Getting started ................................................................................. 6
Back Panel Connectors ............................................................................ 7
Quick Guide .............................................................................................. 7
Setting the Resolution ..............................................................................8
Front Panel Controls................................................................................. 9
Setting the Menu Language ...................................................................10
Button Function Overview ......................................................................11
OSD Menu ..................................................................................... 13
Advanced....................................................................................... 17
Supported resolutions............................................................................. 17
Wall-Mounting.........................................................................................18
Technical Specifications .........................................................................19
Troubleshooting...................................................................................... 20
Pixel Error Classes .................................................................................20
2
Page 4

Targa Visionary LCD 22-1 Wide
Safety Information
During the manufacturing and testing of this monitor, the safety of
the future user was our main goal. However, inadequate operation
or installation can cause damage to the device and harm to the
user. Therefore, please first read the following warnings prior to
starting with its installation. Proceed exactly as described in the
instructions. Keep this manual for any future reference.
Warnings
Connect the monitor to a grounded wall outlet only, with a
rating identical to those on the label of the back panel of the
unit. If you are not sure about the electrical output, please
contact a qualified electrician or your local electrical company.
Warning: The wall outlet must be within easy reach and next to
the device.
Do not use any extension cords.
English
Only use accessories recommended by the manufacturer
(cables, stand, cart, etc.).
Move the device carefully to avoid it from tipping over.
For your own safety, remember that the monitor will be fully
separated from the mains only when the power cord has been
disconnected from the wall outlet.
During a thunderstorm, unplug the device from the mains
power by unplugging the power cord. Do this also when you are
not going to use the device for a long period of time.
Do not attempt to repair the monitor yourself. Any repair must
be performed by a qualified technician.
3
Page 5

Targa Visionary LCD 22-1 Wide
English
Place the monitor in a clean, dry environment.
Do not place any recipients containing liquids (beverages,
Do not place any fire sources (e.g. burning candles) on or near
Disconnect the power supply immediately if liquid gets into the
Do not open the monitor’s housing.
components inside the device may produce an electric shock
even after the power cord has been disconnected.
Do not use the device if the casing is damaged. If this happens,
it must first be examined by authorized service personnel.
vases, etc.) onto or next to the device.
the device.
device and seek the help of a service technician.
Unplug the device from the mains before cleaning the monitor.
First spray an ammonia-free detergent onto a cloth to slightly
dampen it, and do not spray it onto the display itself.
The high-voltage
Do not place the monitor next to any magnetic objects, electric
motors, TV sets or transformers.
Do not place the device near heat sources such as radiators,
ovens or other appliances emitting heat.
Do not place heavy objects on the cable or power supply.
Position the cables so that they cannot obstruct or catch
anyone.
The output connectors of the connected devices must be within
easy reach and next to the monitor.
Always make sure there is sufficient ventilation. Do not place
any device onto the display preventing proper ventilation and
cooling.
4
Page 6

Targa Visionary LCD 22-1 Wide
If you notice any smoke, unusual noise or strange smells,
switch off the LCD display immediately and pull the plug out
from the wall outlet. Contact customer service. It is very
dangerous to continue using the LCD display under these
conditions.
To avoid electric shock or fire, prevent this product from being
exposed to rain, dripping or splashing.
Children: electrical appliances do not belong in the hands of
children. Do not allow children to use electrical devices when
not under supervision. Children may not comprehend the
presence of potential risks. Keep all packaging away from
children as this can cause suffocation.
If you are not using the device within the Republic of Germany,
you must observe the regulations and laws in the country of
use.
Disposal of Old Devices
Devices marked with this symbol are subject to the
European Directive 2002/96/EC. All electric and electronic
devices must be disposed of separately from household
waste at established bodies. Avoid hazards to the
environment and dangers to your personal health by disposing of
the device properly. For further information about proper disposal,
contact your local government, disposal bodies or the shop where
you bought the device.
English
5
Page 7

Targa Visionary LCD 22-1 Wide
Getting started
English
Mount the supplied socket to the base of your LCD 22-1 Wide as
indicated on the bottom of the base.
Please check that delivery contents are complete using the list
below:
1 - Monitor
2 - VGA cable
3 - Audio cable
4 - Power cord
(not illustrated)
5 - User’s Manual
(not illustrated)
6
Page 8
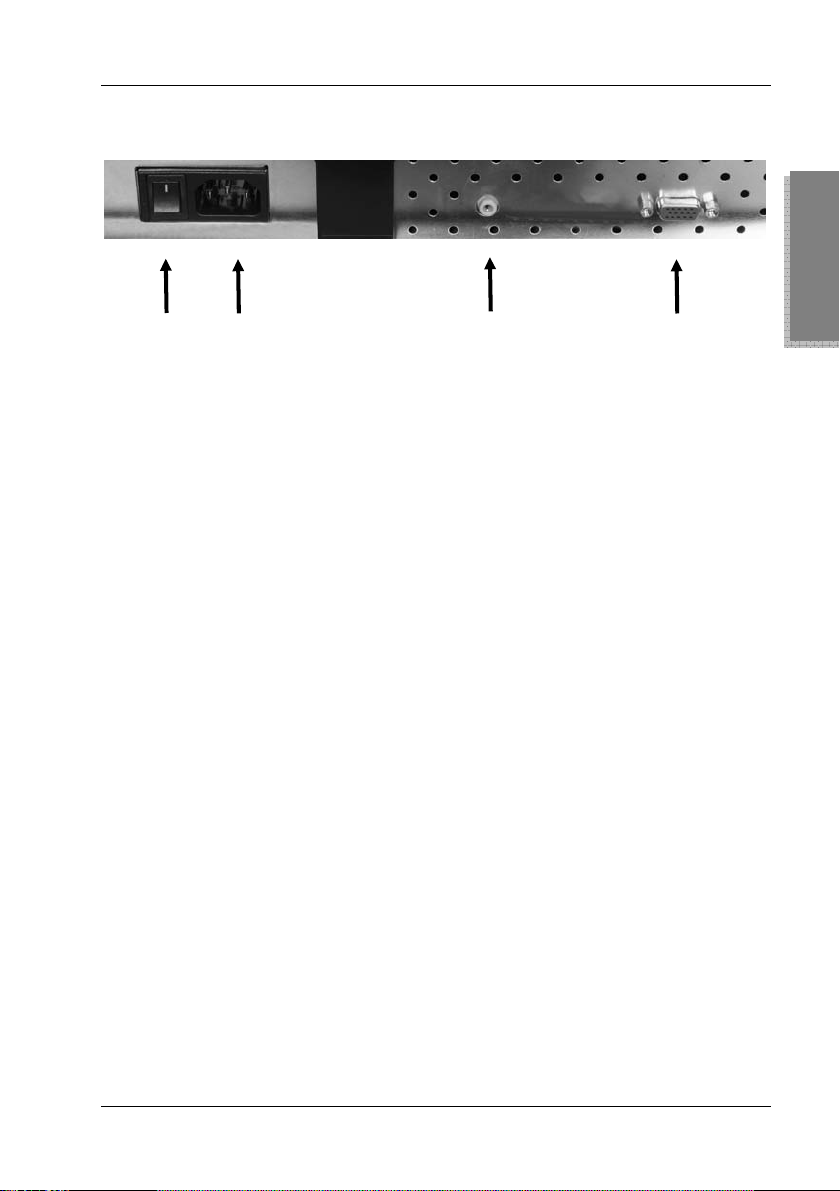
Back Panel Connectors
Targa Visionary LCD 22-1 Wide
6 7 8 9
Quick Guide
1. Connecting the Video Cable
Power your monitor and computer off.
Use the VGA cable (2) to connect the computer to the port (9)
of the monitor.
2. Connecting the Audio Cable
Use the audio cable (3) to connect the computer’s Audio Out
port to the audio input (8) of your monitor.
3. Connecting the Power Cord
Connect the power cord (4) to the power receptacle (7) of the
monitor. Connect the other end to a wall outlet.
4. Powering On
To power the monitor on, toggle the power switch (6) located
on the back panel of the unit to “I”. If the front-panel power
indicator (16) does not light, press the On/Standby button (15)
on the front panel of the unit.
English
7
Page 9

Targa Visionary LCD 22-1 Wide
Setting the Resolution
The recommended screen resolution for your LCD 22-1 Wide is
English
1680 x 1050 (max. refresh rate 60 Hz). In the following we will
explain the resolution setting for the operating systems
Windows
For Microsoft
For Microsoft
®
XP and Windows Vista™.
®
Windows® XP:
- Right-click on the Desktop.
- Click on “Properties”.
- Click on the “Settings” tab.
- Use the ruler to select the proper screen resolution.
- Confirm the setting by clicking “OK”.
®
Windows Vista®:
- Right-click on the Desktop.
- Click on “Customize”.
- Click on “Display”.
- Use the ruler to select the proper screen resolution.
- Confirm the setting by clicking “OK”.
If the recommended resolution of 1680 x 1050 is not
available on your computer, please update the driver of
the graphics card. Contact the manufacturer of the
computer or the graphics card.
8
Page 10

Front Panel Controls
Targa Visionary LCD 22-1 Wide
11 13 15
12 14 16
11. Display / hide the OSD menu.
12. Decrease value / navigate downwards
13. Increase value / navigate upwards
14. Confirm setting
15. On/Standby button
16. Power indicator
English
9
Page 11

Targa Visionary LCD 22-1 Wide
Setting the Menu Language
You can display the OSD (On Screen Display) menu in your local
English
language. Proceed as follows:
1. Press button 1 (11) on the monitor.
2. Press the button (12) to select the menu option “Setup
Menu”.
3. Press button 2 (14).
The “Setup Menu” opens and the item “Language Select”
should be highlighted otherwise press the
buttons to select it.
4. Press button 2 (14).
5. Press the button (12) to scroll downwards or press (13)
to scroll upwards to select the desired display language.
6. Press button 2 (14) to confirm your selection.
(12) or (13)
7. Wait until the menu disappears or press button 1 (11) twice
to exit the menu immediately.
10
Page 12

Targa Visionary LCD 22-1 Wide
Button Function Overview
You can use the control buttons to access the most common
settings directly.
Setting Brightness and Contrast
1. Press the
(12) or (13) buttons. The brightness and
contrast menu will appear.
2. Press the
(12) or (13) buttons to select a menu option
(Brightness will be disabled while DCR is on).
3. Press button 2 (14) to enable the selected menu item.
4. Press the (12) or (13) buttons to select the desired
value.
5. Wait until the menu disappears or press button 1 (11) twice
to exit the menu immediately.
DCR means „Dynamic Contrast Ratio“ and offers an
optimum contrast by adjusting the display backlight
automatically depending on the picture contents.
Auto Image Adjust
Automatically adjusts the settings for the horizontal and vertical
position, the horizontal size as well as the fine control and
sharpness.
English
To do this, press button 2.
11
Page 13

Targa Visionary LCD 22-1 Wide
Locking the On/Standby Button
Press and hold the 1 and
English
bar is completed to enable or disable the On/Standby button lock.
The lock will disable the Power On/Standby button (15) located on
the front panel of the device.
OSD Lock
Press and hold the 1 and
bar is completed to enable or disable the OSD lock. The OSD lock
will prevent the OSD menu from being displayed.
buttons simultaneously until the status
buttons simultaneously until the status
12
Page 14

Targa Visionary LCD 22-1 Wide
OSD Menu
Via the OSD menu you can access multiple settings to customize
the LCD 22-1 Wide according to your and your computer’s
requirements.
Use the buttons 11 to 14 (as described on page 9) to navigate the
menu.
Start with the main menu by pressing button 1 on the monitor.
Press the and buttons to choose a menu item, and press
button 2 to confirm the selection.
Auto Image Adjust
Automatically adjusts the settings for the horizontal and
vertical position, the horizontal size as well as the fine
control and sharpness.
English
Contrast/Brightness
Opens the Contrast and Brightness menu.
13
Page 15

Targa Visionary LCD 22-1 Wide
English
Press the and buttons to choose an option and
press button 2 to confirm. Then press the
or buttons
to select the desired value. The Brightness option will be
disabled while DCR is on.
DCR means „Dynamic Contrast Ratio“ and offers an
optimum contrast by adjusting the display backlight
automatically depending on the picture contents.
Audio Adjust
Press the
and buttons to choose between the
options Volume and Mute. Press 2 to confirm. Press
or to change the value.
The option Volume allows you to adjust the volume of the
built-in speaker, the option “Mute” lets you disable the
sound.
Color Adjust
Choose between the following options:
14
9300K: Adds blue to the picture achieving a cooler white.
6500K: Adds red to the picture achieving a warmer
white.
5400K: Adds green to the picture achieving a darker
colour tint.
User Adjust: Custom settings for red (R), green (G) and
blue (B). Press button 2 to select the desired colour and
press the or buttons to adjust the selected colour.
Page 16

Targa Visionary LCD 22-1 Wide
Information
Shows information about the input signal coming from
your computer’s graphics card as well as the model and
serial number of your monitor.
Manual Image Adjust:
To manually adjust the picture position.
Horizontal Size sets the horizontal picture size.
H./V. Position sets the horizontal and vertical picture
position.
Fine Tune sets the picture delay and therefore the
sharpness.
Sharpness (available only if the set resolution does not
match the recommended resolution of 1680x1050). If
necessary, re-adjust the sharpness.
English
Setup Menu
Choose between the following options:
Language Select: Here you select the menu language.
Resolution Notice: If you enable this function, a
message will remind you every 30 seconds to set the
optimum picture resolution. This message appears only if
the set resolution does not match the recommended
resolution of 1680x1050.
OSD Position: Press button 2 to toggle between
horizontal and vertical movement. Press or to move
the OSD menu upwards, downwards, to the left or to the
right.
15
Page 17

Targa Visionary LCD 22-1 Wide
English
OSD Time Out: After the set time, the OSD menu will
disappear if you don’t perform any further settings. You
can select values between 5, 15, 30 and 60 seconds.
OSD Background Off: Press button 2 to enable or
disable the coloured background for the OSD display.
Memory Recall: Restores the factory-default video and
audio configuration.
16
Page 18

Targa Visionary LCD 22-1 Wide
Advanced
Supported resolutions
VGA 640 x 480 @ 60Hz
VESA 640 x 480 @ 72Hz
VESA 640 x 480 @ 75Hz
MAC 640 x 480 @ 67Hz
VGA 720 x 400 @ 70Hz
VESA 800 x 600 @ 56Hz
VESA 800 x 600 @ 60Hz
VESA 800 x 600 @ 72Hz
VESA 800 x 600 @ 75Hz
MAC 832 x 624 @ 75Hz
VESA 1024 x 768 @ 60Hz
VESA 1024 x 768 @ 70Hz
VESA 1024 x 768 @ 75Hz
VESA 1152 x 864 @ 75Hz
MAC 1152 x 870 @ 75Hz
VESA 1280 x 960 @ 60Hz
VESA 1280 x 1024 @ 60Hz
VESA 1280 x 1024 @ 75Hz
VESA 1440 x 900 @ 60Hz
VESA 1440 x 900 @ 75Hz
VESA 1680 x 1050 @ 60Hz
Warning: Do not set your computer’s graphics card refresh rate to a
value exceeding the above maximum limits otherwise you risk
seriously damaging your monitor.
English
17
Page 19

Targa Visionary LCD 22-1 Wide
Wall-Mounting
You can mount your LCD 22-1 Wide to the wall by using a VESA
English
wall mount (not included in the package) with a 100 x 100 mm
receptacle. To do so, disassemble the base as follows:
1. Power the device off and unplug all cables and connectors.
For the following steps you’ll need a conventional Philips
screwdriver.
2. Lie a soft cloth on an empty, level table and carefully place
the LCD 22-1 Wide with its front on it.
3. Loosen the monitor socket by carefully pushing the six
hooks inwards and pulling the socket towards the bottom.
4. Loosen the four screws located inside the base. Next you
can pull the base off downwards.
5. Install the VESA wall mount on the back of the monitor.
Follow the installation instructions that came with your wall
mount kit.
Note: Keep the base, the socket and the screws in a safe place in
case you need to reassemble the base again.
18
Page 20

Technical Specifications
Targa Visionary LCD 22-1 Wide
LCD Display
Power Management
Supported Resolution
Pixel size
Display Colours
Viewing angle (hor./ver.)
Inclination
Contrast Ratio
Brightness
Response time
Active Screen Area
Temperature
Compliance
22” Wide TFT (16:10)
Complies with Energy Star,
VESA DPMS-compatible = 1 W
Power on consumption: max. 55 W
max. 1680 x 1050
Refresh rate max. 75 Hz
0.285 x 0.285 mm
16.7 million
170°/160° (CR > 10)
0°~20°
3000 : 1 (typical, dynamic)
300 cd/m² (typical)
2 ms (typical)
477 mm x 298 mm
Operation: 0°C ~ + 35°C
Storage -20°C ~ +60°C
CE, TCO ’99, ISO 13406-2,
Energy-Star, TÜV GS,
Works with Windows Vista™
2002/95/EC (RoHS),
English
Input voltage
Input current
Speaker
VESA Wall Mount
Signal Input
Dimensions (WxHxD):
Weight
Input voltage 220-240 VAC, 50 Hz
2 A
1W x 2
Receptacle 100 x 100 mm
15-pin D-Sub VGA (Analogue)
518 mm x 430 mm x 216 mm
6.3 kg
19
Page 21

Targa Visionary LCD 22-1 Wide
Troubleshooting
No power
English
Make sure that the power cord is properly connected to the wall
Connect a different electrical appliance to the wall outlet to
Double-check all cable connections.
Power OK but no picture
Make sure that the supplied video cable is properly connected
Adjust the brightness.
Wrong or distorted colours
If a colour (red, green, blue) is missing, check the connection of
Connect the monitor to a different computer.
outlet and that the cables to the monitor are fixed properly into
their respective ports.
verify that it is working properly.
to the graphics card output connector of your computer and to
the monitor. If necessary, re-connect it.
the video cable. Loose, bent or broken pins in the connector
may deteriorate the signal transmission.
Pixel Error Classes
Pixels are single dots making up the picture that appears on the
screen. One pixel always consists of three sub-pixels for displaying
the basic colours (red, green and blue).
The Pixel Error Classes are rated from Level I (very good) to Level
IV (bad quality). Your LCD 22-1 Wide belongs to Error Class II and
therefore offers a high-quality display. Within the Error Classes a
limited number of pixel may present errors. There are three types of
errors:
Type 1: Continuous lighting pixel (a bright, white dot), even when
it should not light.
20
Page 22

Targa Visionary LCD 22-1 Wide
Type 2: Non-lighting pixel (a dark or black dot) even when it
should light.
Type 3: Abnormal or defective sub-pixels of the basic colours
(e.g. steady lighting with half intensity, non-lighting of a
specific colour, blinking or flickering, but not included in
Type 1 or Type 2).
Furthermore, a so-called cluster (a matrix of 5x5 pixel) may contain
a limited number of erroneous pixel only.
For Error Class II, for each 1 million pixel only 2 pixel may contain
errors of Type 1, Type 2 and Cluster; it may present up to 5
erroneous pixels of Type 3 (see the following table).
Error Class Type 1 Type 2 Type 3 Cluster
English
I
II
III
IV
0 0 0 0
2 2 5 2
5 15 50 5
50 150 500 50
Considering the recommended resolution of your LCD 22-1 Wide
(1680 x 1050) it contains 1,764,000 pixel. From this value we can
deduce the maximum amount of erroneous pixel (see the following
table).
Error Class Type 1 Type 2 Type 3 Cluster
LCD 22-1 Wide
4 4 9 4
21
Page 23

Targa Visionary LCD 22-1 Wide
English
22
Page 24

Declaration of Conformity
We: Targa GmbH
Lange Wende 41
59494 Soest, Germany
declare our responsibility that the
product: LCD Monitor
model: Targa Visionary LCD 22-1 Wide
is confirmed to comply with the requirements set out in the Council Directive on the
Approximation of the Laws of the Member States relating to Electromagnetic
Compatibility (2004/108/EC) and the Council Directive relating to Low Voltage
2006/95/EC.
The measurements were carried out in accredited laboratories.
For the evaluation of above mentioned Council Directives for Electromagnetic
Compatibility and for Low Voltage standards were consulted:
EMC: EN 55022: 2006 limit class B
EN 55024: 1998+A1:2001+A2:2003
EN 61000-3-2:2000+A2:2005
EN 61000-3-3:1995+A1:2001+A2:2005
Safety: EN 60950-1: 2001
th
Soest, 13
of October. 2008
_________________________________________________
authorised signature Matthias Klauke, Managing Director
Page 25

TARGA GmbH
Lange Wende 41
D-59494 Soest
Germany
www.targa-online.com
Ready for you:
www.targa-online.com
Mat.-No.: 1428348
6
 Loading...