

Page 1
Ready for you:
www.targa.co.uk
Targa TSR 5200 HDD
User's Manual and Service Information
2 3 4 5 76
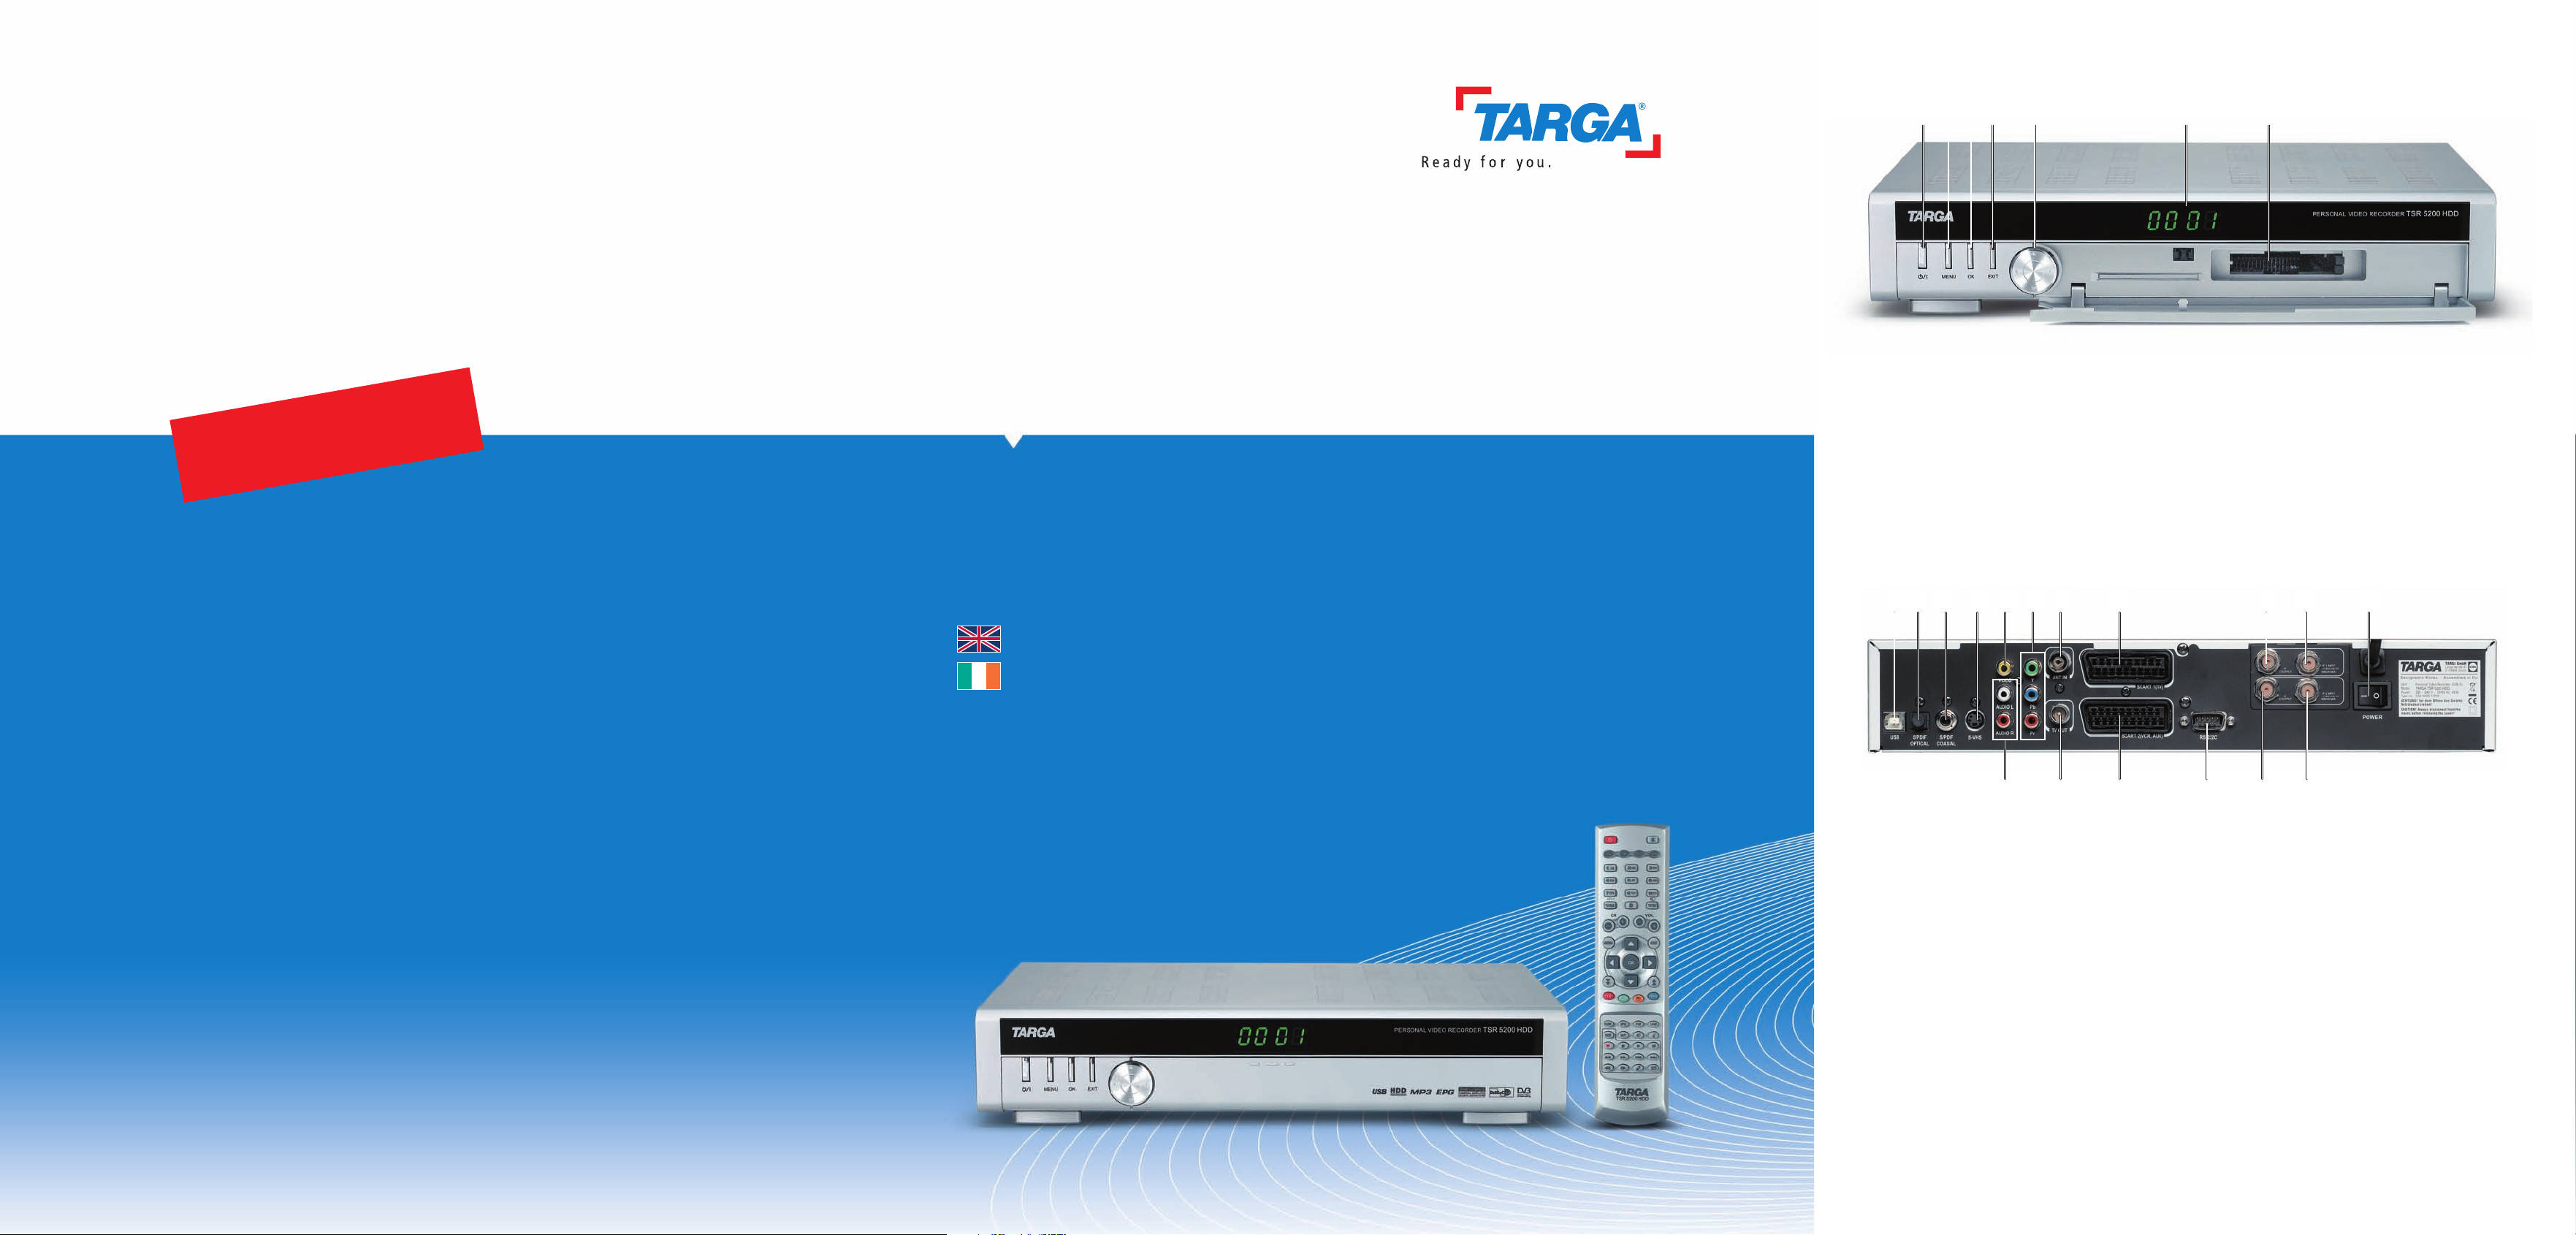
Front Panel Adjustments
1 Stand-by (On/Off)
2 Menu (display main menu)
3 OK (enter a selection)
4 EXIT (quit a menu)
5 Arrow buttons
to select menu items
6 Display window
7 Add-on card slots (Pay TV)
For open the flap please push on the marking below the display
TARGA GmbH
Lange Wende 41
D-59494 Soest
www.targa-online.com
819 10 11 12 13 14 15 16 17 18
19 20 21 22 23 24
Rear Panel Connections
8 USB port
9 Optical digital output (audio)
10 Coaxial digital output (audio)
11 S-Video output (video)
12 CVBS output (video)
13 YPbPr output (video)
14 Input for terrestrial antenna signal
15 Scart output (TV)
16 IF 1 output
17 IF 1 input
18 Power switch
19 Audio output (left + right)
20 Antenna signal output
21 Scart in/output (VCR/AUX)
22 RS 232 interface
23 IF 2 output
24 IF 2 input
Page 2
28
30
32
34
36
10
11
14
16
17
21
23
24
27
29
31
33
35
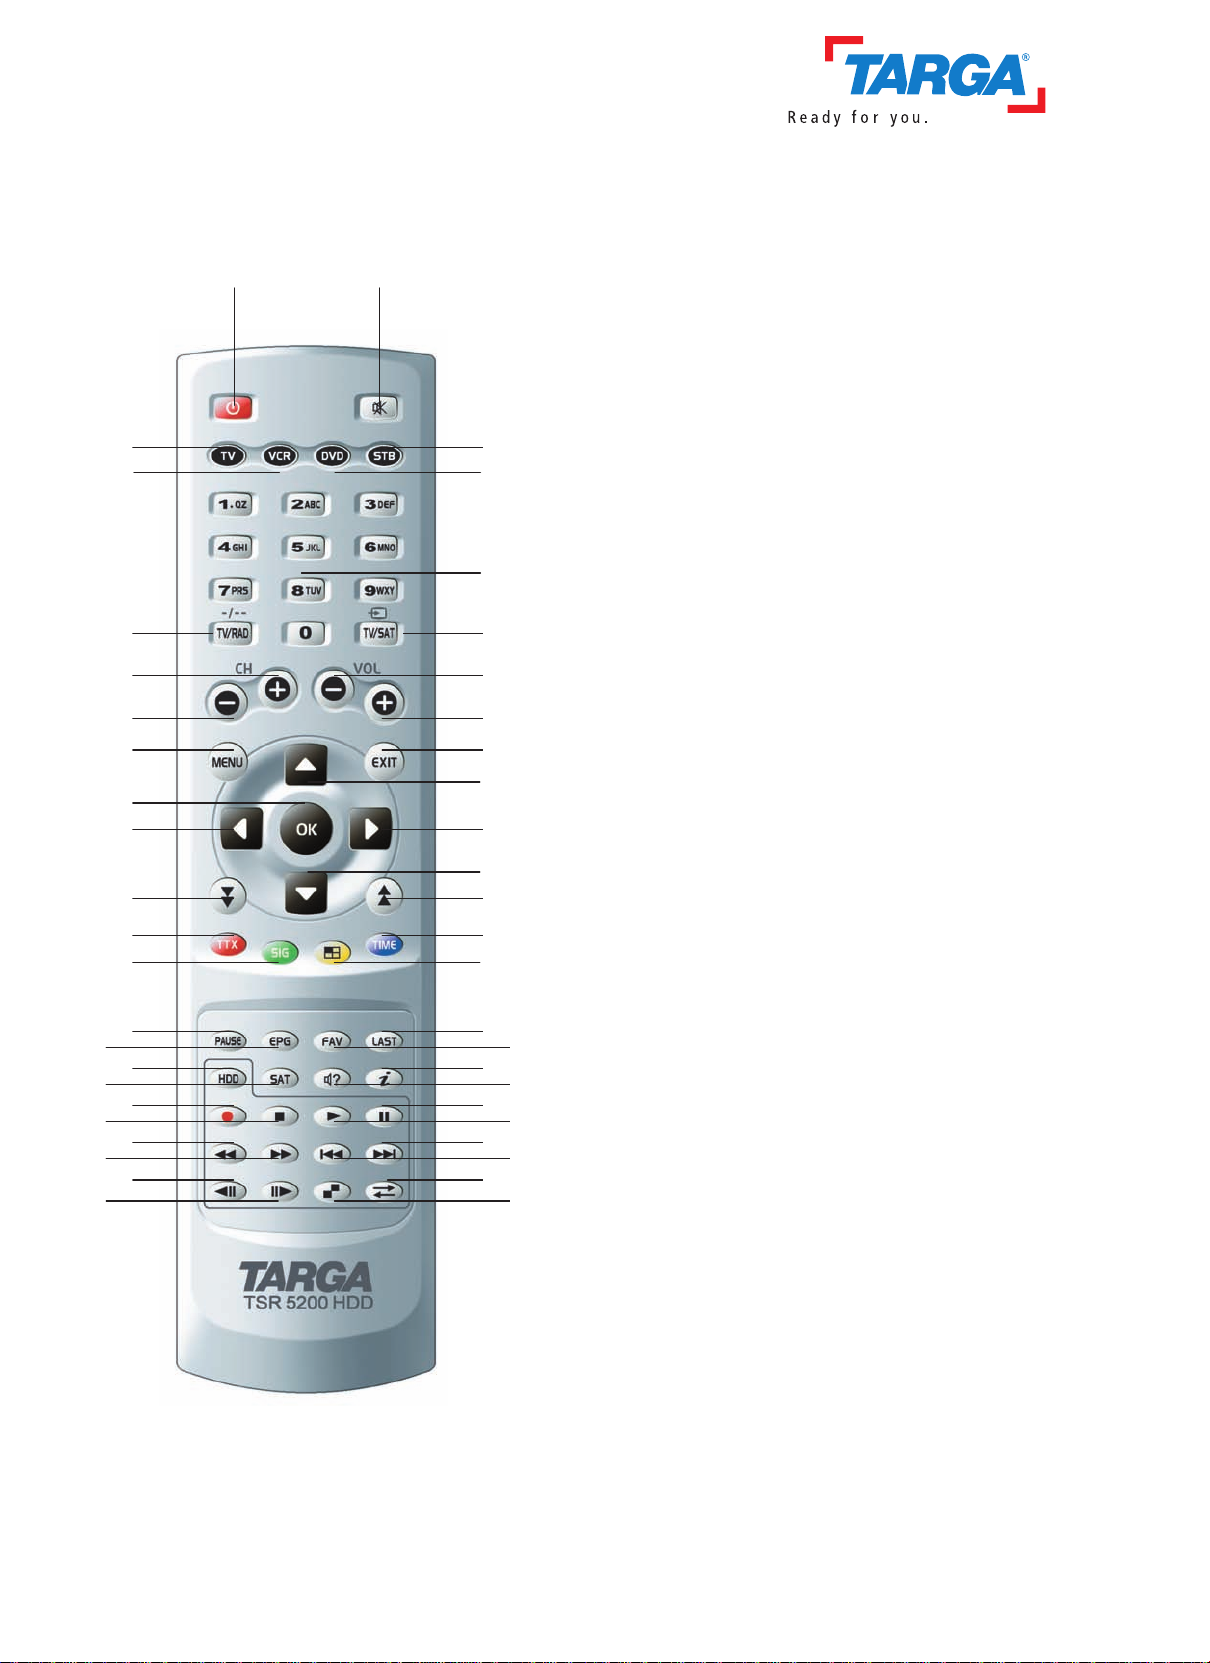
Remote control
1 2
4
8
12
13
15
18
19
20
22
25
26
37
39
41
43
45
1 Standby (On/Off)
2 Mute
3 Toggle to TV control
4 Toggle to VCR control
5 Toggle to Set Top Box control
6 Toggle to DVD control
7 Numeric keys (0 to 9)
8 TV/Radio switching
9 TV/Sat switching
53
6
10 Channel up
11 Channel down
12 Reduce audio volume
13 Increase audio volume
7
14 Menu (display main menu)
15 Exit (quit a menu)
9
16 OK
17 Left arrow
18 Up arrow
19 Right arrow
20 Down arrow
21 Fast down
22 Fast up
23 TTX (Videotext)
24 SIG (show signal quality)
25 TIME (Date/Time setting menu)
26 Multi Picture
27 Pause live TV
28 EPG (Electronic Program Guide)
29 HDD (hard disk)
38
30 Satellite selection
40
31 One-touch recording
42
32 Stop
44
33 Fast Rewind
46
34 Fast Forward
35 Slow-motion backward
36 Slow-motion forward
37 LAST (last programme)
38 FAV (display Favorite menu)
39 Info button
40 Audio mode
41 Pause for HDD playback
42 Playback
43 Step forward
44 Step backward
45 Toggle between PIP pictures
46 PIP (Picture-in-Picture)
Page 3

TSR 5200 HDD Table of Contents
Table of Contents
INTRODUCTION............................................................................................................................................1
SAFETY INSTRUCTIONS .................................................................................................................................... 1
POSITIONING ..................................................................................................................................................... 2
INTENDED USE...................................................................................................................................................3
PACKAGE CONTENTS ........................................................................................................................................3
NOTICE ON USE OF THIS MANUAL...................................................................................................................3
CONNECTION TYPES ..................................................................................................................................4
CONNECTING TO A SATELLITE ANTENNA.......................................................................................................4
SINGLE-USER SATELLITE SYSTEM 4
MULTIPLE-USER SATELLITE ANTENNA SYSTEM 5
TWO SATELLITE ANTENNAS 5
CONNECTING TO TV.........................................................................................................................................6
SCART (EURO AV) CONNECTOR 6
COAXIAL (TV ANTENNA CONNECTOR) 7
VIDEO CONNECTOR 7
S-VHS CONNECTOR 7
COMPONENT CONNECTOR 8
CONNECTING TO A VIDEO RECORDER............................................................................................................9
CONNECTING TO A VIDEO RECORDER USING A SCART CABLE 9
CONNECTING TO A VIDEO RECORDER USING A COAXIAL CABLE 9
GETTING STARTED ...................................................................................................................................10
INSERTING THE BATTERIES ...........................................................................................................................10
POWERING THE DEVICE ON/OFF...................................................................................................................11
POWERING ON 11
POWERING OFF 11
INSTALLATION ................................................................................................................................................11
SELECTING SCREEN LANGUAGE 11
SETTING THE TIME 12
USER SETTINGS..........................................................................................................................................14
ASPECT RATIO ................................................................................................................................................14
DISPLAY MODE ...............................................................................................................................................15
TV TYPE ..........................................................................................................................................................15
i
Page 4

TSR 5200 HDD Table of Contents
VIDEO OUTPUT............................................................................................................................................... 16
TIMER ............................................................................................................................................................. 17
MODULATOR TYPE ........................................................................................................................................ 18
MODULATOR CHANNEL................................................................................................................................. 18
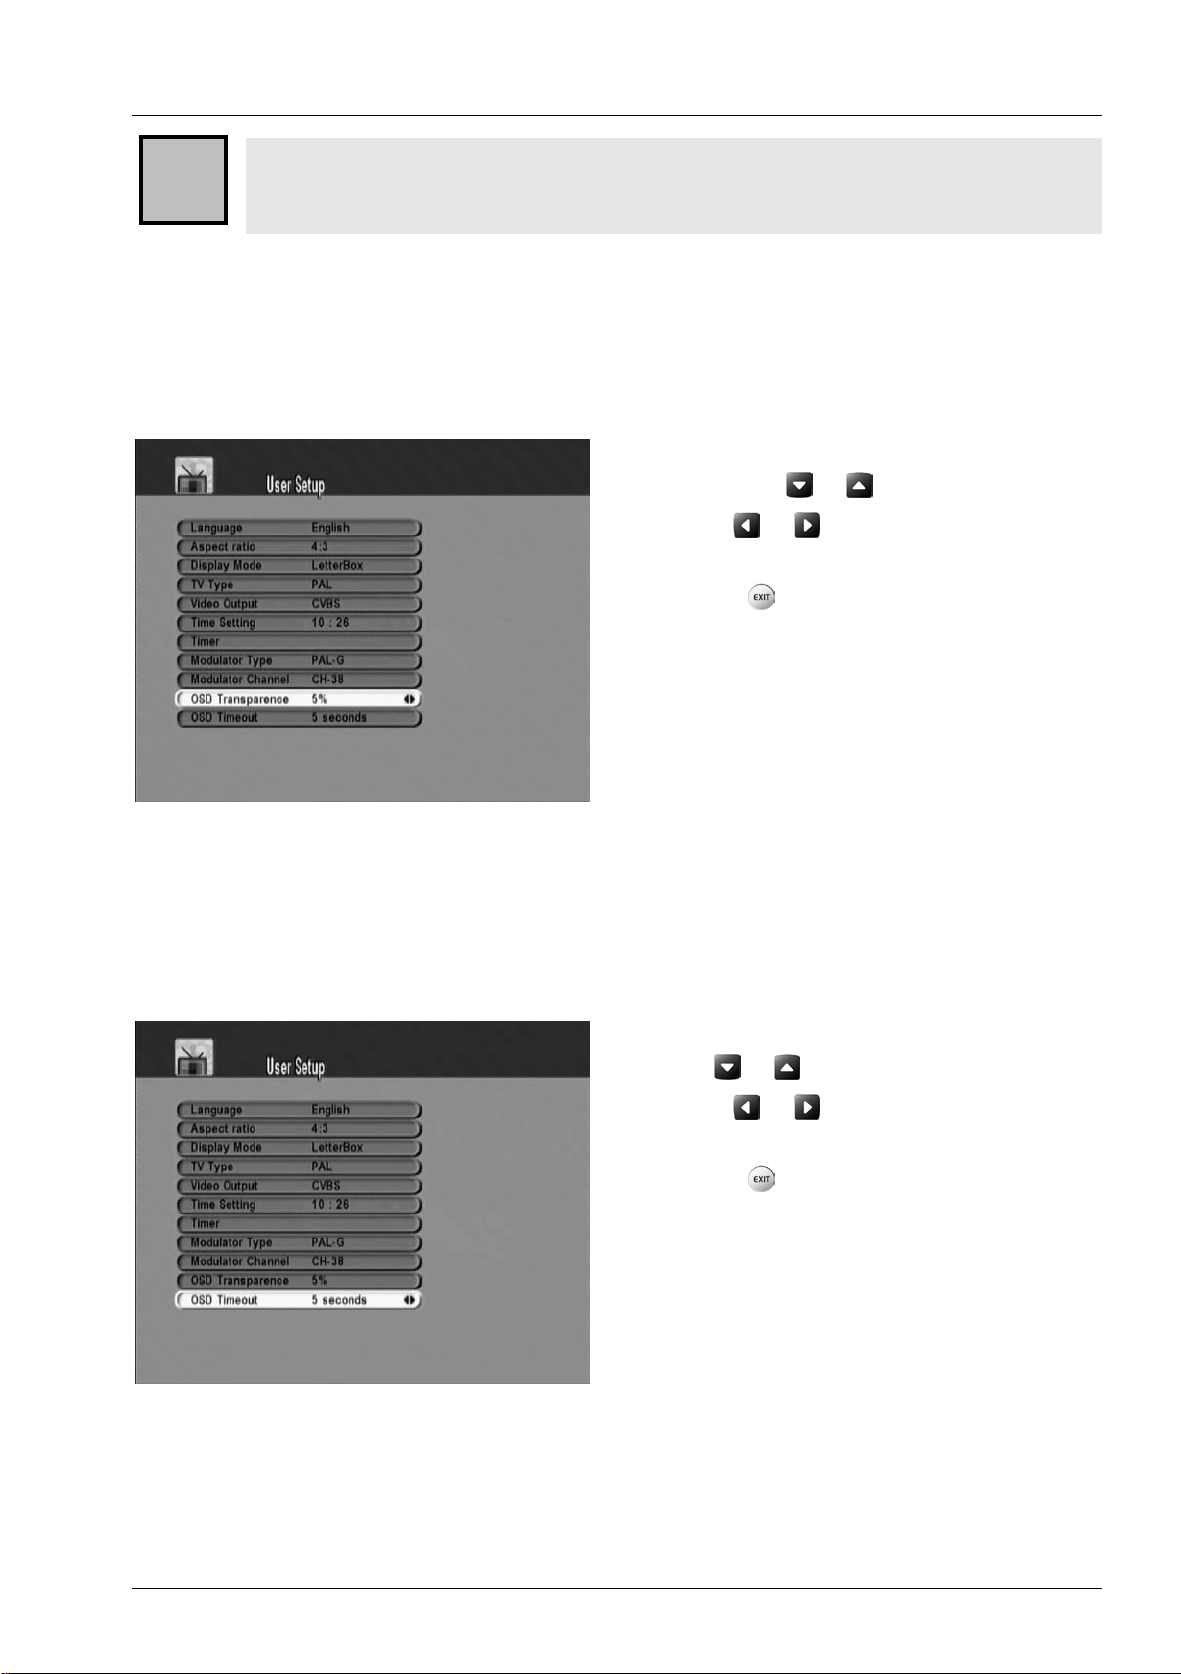
OSD TRANSPARENCY .................................................................................................................................... 19
OSD TIMEOUT................................................................................................................................................ 19
PLAYBACK................................................................................................................................................... 20
WATCHING TV CHANNELS............................................................................................................................ 20
SWITCHING TV CHANNELS 20
ADJUSTING THE VOLUME 20
MUTE 20
FAVORITES...................................................................................................................................................... 21
DISPLAYING FAVORITES 21
RENAMING FAVOURITES 22
PROGRAMMING FAVORITES 23
PLAYING BACK RECORDINGS FROM HARD DISK ........................................................................................ 25
PLAYBACK 25
FAST FORWARD AND REWIND 25
SLOW-MOTION FORWARD AND REWIND 25
STEP-BY-STEP PLAYBACK FORWARD/BACKWARD 25
PAUSE 25
STOPPING PLAYBACK 25
BOOKMARKS................................................................................................................................................... 26
INSERTING BOOKMARKS 26
GOING TO A BOOKMARK 26
DELETING BOOKMARKS 26
VIEWING TWO TV SHOWS SIMULTANEOUSLY (PIP) .................................................................................. 26
DISPLAYING MULTIPLE CHANNELS SIMULTANEOUSLY (MULTI-PICTURE).............................................. 27
TIME-SHIFT FUNCTION.................................................................................................................................. 27
RECORDING AND EDITING .................................................................................................................... 28
RECORDING .................................................................................................................................................... 28
ONE-TOUCH RECORDING 28
STOPPING RECORDING 28
VIEWING A TV PROGRAMME WHILE RECORDING ANOTHER PROGRAMME 28
PROGRAMMED RECORDING .......................................................................................................................... 29
EPG RECORDING 29
ERASING PROGRAMMED RECORDINGS 30
ii
Page 5

TSR 5200 HDD Table of Contents
PROGRAMMING A RECORDING MANUALLY 31
EDITING RECORDINGS....................................................................................................................................33
CUTTING A RECORDING 35
AUDIO FUNCTIONS....................................................................................................................................37
LISTENING TO THE RADIO..............................................................................................................................37
RADIO STATION SETTINGS 37
RECORDING RADIO BROADCASTS 38
SWITCHING BACK TO TV MODE 38
PLAYING MP3 MUSIC.....................................................................................................................................39
ADVANCED SETTINGS..............................................................................................................................40
EDITING TV CHANNELS .................................................................................................................................40
SYSTEM SETUP ................................................................................................................................................ 41
PARENTAL CONTROL 42
FACTORY SETTING 43
SYSTEM INFORMATION 43
MENU LOCK 43
FINDING THE SATELLITE................................................................................................................................44
THE HARD DISK..............................................................................................................................................45
FORMATTING THE HARD DISK 45
SAVING THE CHANNEL LIST ON THE HARD DISK 46
UPDATING THE CHANNEL LIST ON THE HARD DISK 46
UPDATING THE SOFTWARE FROM HARD DISK 47
TIME SHIFT 48
VIDEOTEXT......................................................................................................................................................48
COMMON INTERFACE CARDS ........................................................................................................................49
SELECTING THE TUNER..................................................................................................................................49
LNB TYPE .......................................................................................................................................................51
ENABLING/DISABLING THE 22KHZ SIGNAL..................................................................................................52
DISEQC...........................................................................................................................................................52
LNB POWER....................................................................................................................................................53
TRANSPONDER ................................................................................................................................................54
POSITIONER SETTING.....................................................................................................................................54
POSITIONER CONTROL VIA DISEQC 1.2 55
POSITIONER CONTROL VIA USALS 56
SATELLITE SCAN (CHANNEL SEARCH)..........................................................................................................56
TP SCAN (TRANSPONDER SCAN) ....................................................................................................................58
iii
Page 6

TSR 5200 HDD Table of Contents
NETWORK SCAN............................................................................................................................................. 58
ADVANCED SCAN............................................................................................................................................ 58
SMART SEARCH.............................................................................................................................................. 59
EDITING TRANSPONDERS/SATELLITES......................................................................................................... 60
EDITING TRANSPONDERS 61
TRANSFERRING SOFTWARE........................................................................................................................... 62
SYSTEM UPGRADE.......................................................................................................................................... 62
EXCHANGING DATA WITH THE PC............................................................................................................... 64
USING THE REMOTE CONTROL WITH OTHER DEVICES.............................................................................. 65
APPENDIX .................................................................................................................................................... 66
CLEANING AND TROUBLESHOOTING............................................................................................................ 66
CLEANING 66
TROUBLESHOOTING 66
TECHNICAL SPECIFICATIONS........................................................................................................................ 68
DEVICE CODES................................................................................................................................................ 70
TV SETS 70
VIDEO RECORDERS 82
DVD PLAYERS 86
iv
Page 7

TSR 5200 HDD Introduction
Introduction
Safety Instructions
• Please read the following instructions carefully.
• Please keep this User's Guide for later use.
• If you sell or pass this device on to another person, it is imperative that you also
hand over this manual.
• Follow all warnings.
• Proceed exactly as described in the instructions.
• Never use the device near water.
• Only use a dry and soft cloth for cleaning.
• Never block the ventilation holes.
• Do not place the device near heat sources such as radiators, ovens or other
appliances emitting heat (including amplifiers).
• Only connect the device to a power outle t with a grounding pin. If the provided plug
does not fit into your outlet, consult an electrician for replacement of the obsolete
outlet.
• Install the power cord in such a way that nobody can trip over it. Take spec ial care
that the cable does not become pinched, particularly at the plug and ports.
• The power switch of this device does not fully disconnect the device from the mains.
Furthermore, the device consumes electricity in the Standby mode. In order to
completely disconnect the device from the mains, the power plug must be pulled out
from the wall outlet. For this reason, the device should be positioned in a way that
assures unobstructed access to the wall outlet so that the power plug can be
immediately pulled out in an emergency situation. To avoid the danger of fire if the
device is not going to be used for a long while (e.g. during holidays), it should
always be disconnected from the power socket.
• Do not use any extension cords.
• Only use accessories recommended by the manufacturer.
• Use only suitable carts, stands, brackets or tables for the device, that make it
impossible for it to fall or tip over. When a cart is used, operate carefully to prevent
the device from tipping over.
• Separate the device from the mains during storms or when not using it for a long
period of time, and also pull out the antenna plug.
• Always hold all cables by the plug and never pull on the cable itself. Never hold the
power cord with wet hands as this may cause a short circuit or electric shock.
• Contact qualified personnel when servicing is needed. Servicing is required when
this device has been damaged in any way, for example, when the power cord or
plug is damaged, when liquid has been spilled on the product, when objects have
fallen into the product, when the product has been exposed to rain or moisture,
when the product does not work normally or if the product has been dropped.
• Battery Safety Instructions - To prevent battery leakage which may result in bodily
injury or property damage:
1
Page 8

TSR 5200 HDD Introduction
- Install all batteries correctly, with + and - signs matching the marks indicated.
Do not mix batteries (old and new or carbon and alkaline, etc.).
- Remove batteries when the device is not used for a long time.
- Respect the environment. Old batteries do not belong in with the domestic
waste. They must be handed in to a collection point for old batteries.
• To avoid electric shock or fire, prevent this product from being exposed to any rain,
dripping or splashing.
• Do not place it under dripping or flowing liquids. Do not place any receptacles
containing liquids (beverages, vases, etc.) on the device.
• Do not place any fire sources (such as candles) onto the device.
• Outdoor Antenna Grounding - If an outside antenna is connected to the product, be
sure that the antenna system is grounded so as to provide sufficient protection
against voltage surges and built-up static charges.
• If you are not using the device within the Republic of Germany, you must observe
the regulations and laws in the country of use.
Positioning
• Do not place the device in direct sunlight.
• Avoid damp or dusty places.
• Place the device only on flat, vibration-free surfaces.
• Avoid positioning it in the vicinity of air-conditioning and heating units.
• Always make sure there is sufficient ventilation. The ventilation slots on the lid of
the device should never be covered (e.g. by laying a cloth on the device).
• Never place the device in the immediate vicinity of magnetic fields (e.g.
loudspeakers).
• The device should be easy to access from all sides.
• Make sure that no liquid gets into the device.
• Avoid severe temperature changes as this may cause moisture in the device
through condensation.
2
Page 9
TSR 5200 HDD Introduction
Intended Use
This device is a consumer electronics device. It may only be used for private use, not
industrial. Furthermore, the device should only be used indoors, never in tropical regions
and never for commercial purposes. Only connection cables and external devices may be
used that comply with safety standards and the electromagnetic compatibility and shielding
quality of the TSR 5200 HDD.
If the product is labelled with a struck-out waste bin, it is subject to the European
Guideline 2002/96/EC. All electric and electronic devices must be disposed of
separately from household waste at established bodies. Avoid damaging the
environment and danger to your personal health by disposing of the device
properly.
This device fulfils all that relates to CE Conformity, relevant norms and
standards. Any changes to the equipment other than the recommended changes
by the manufacturer may lead to the result that these directives are not met any
more. Only use accessories recommended by the manufacturer.
Package contents
First check that the package contents are complete.
1. TSR 5200 HDD
2. Remote control
3. Batteries
4. Stereo Audio/Video adapter cable
5. Scart (Euro AV) cable
6. Loop cable
7. User manual with service information
Notice on Use of this Manual
i
!
This symbol signifies further information on the topic.
This symbol signifies important notes.
3
Page 10
TSR 5200 HDD Connection Types
Connection types
The TSR 5200 HDD offers many connection possibilities. This ensures that the device is
usable in any environment.
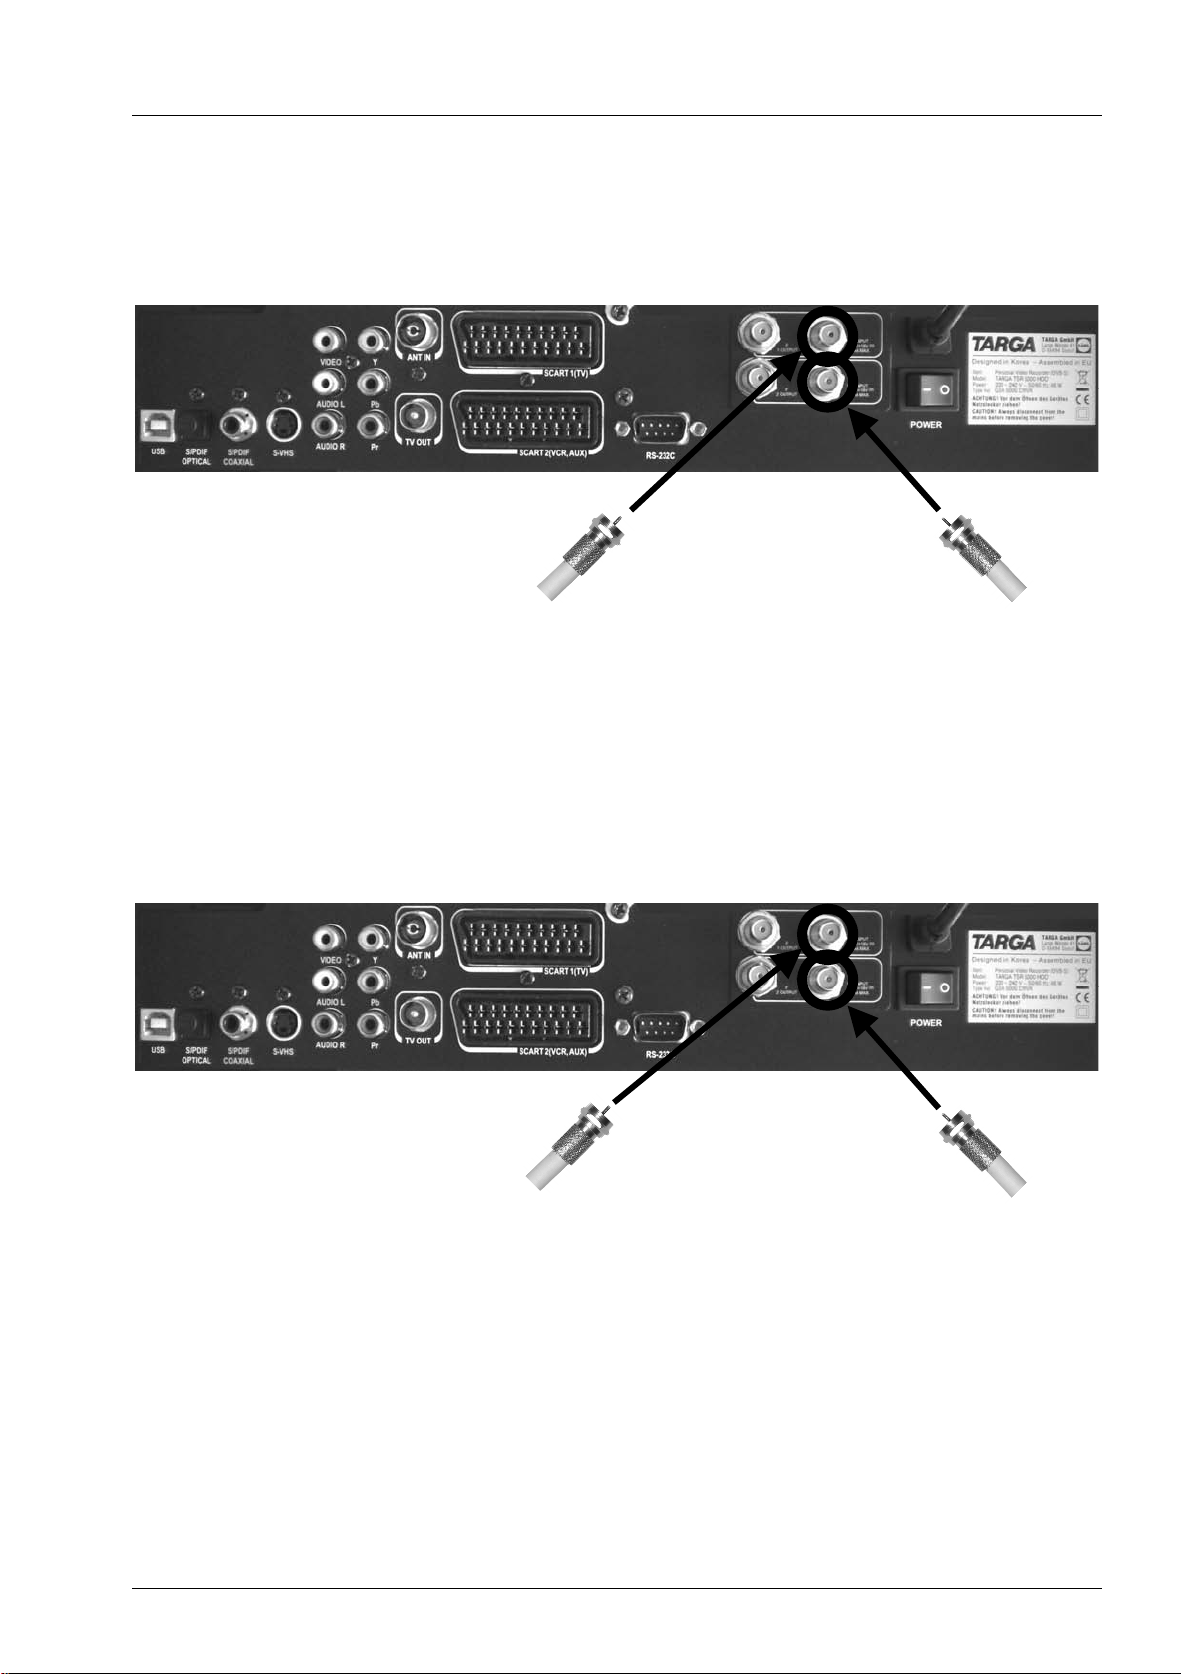
Connecting to a Satellite Antenna
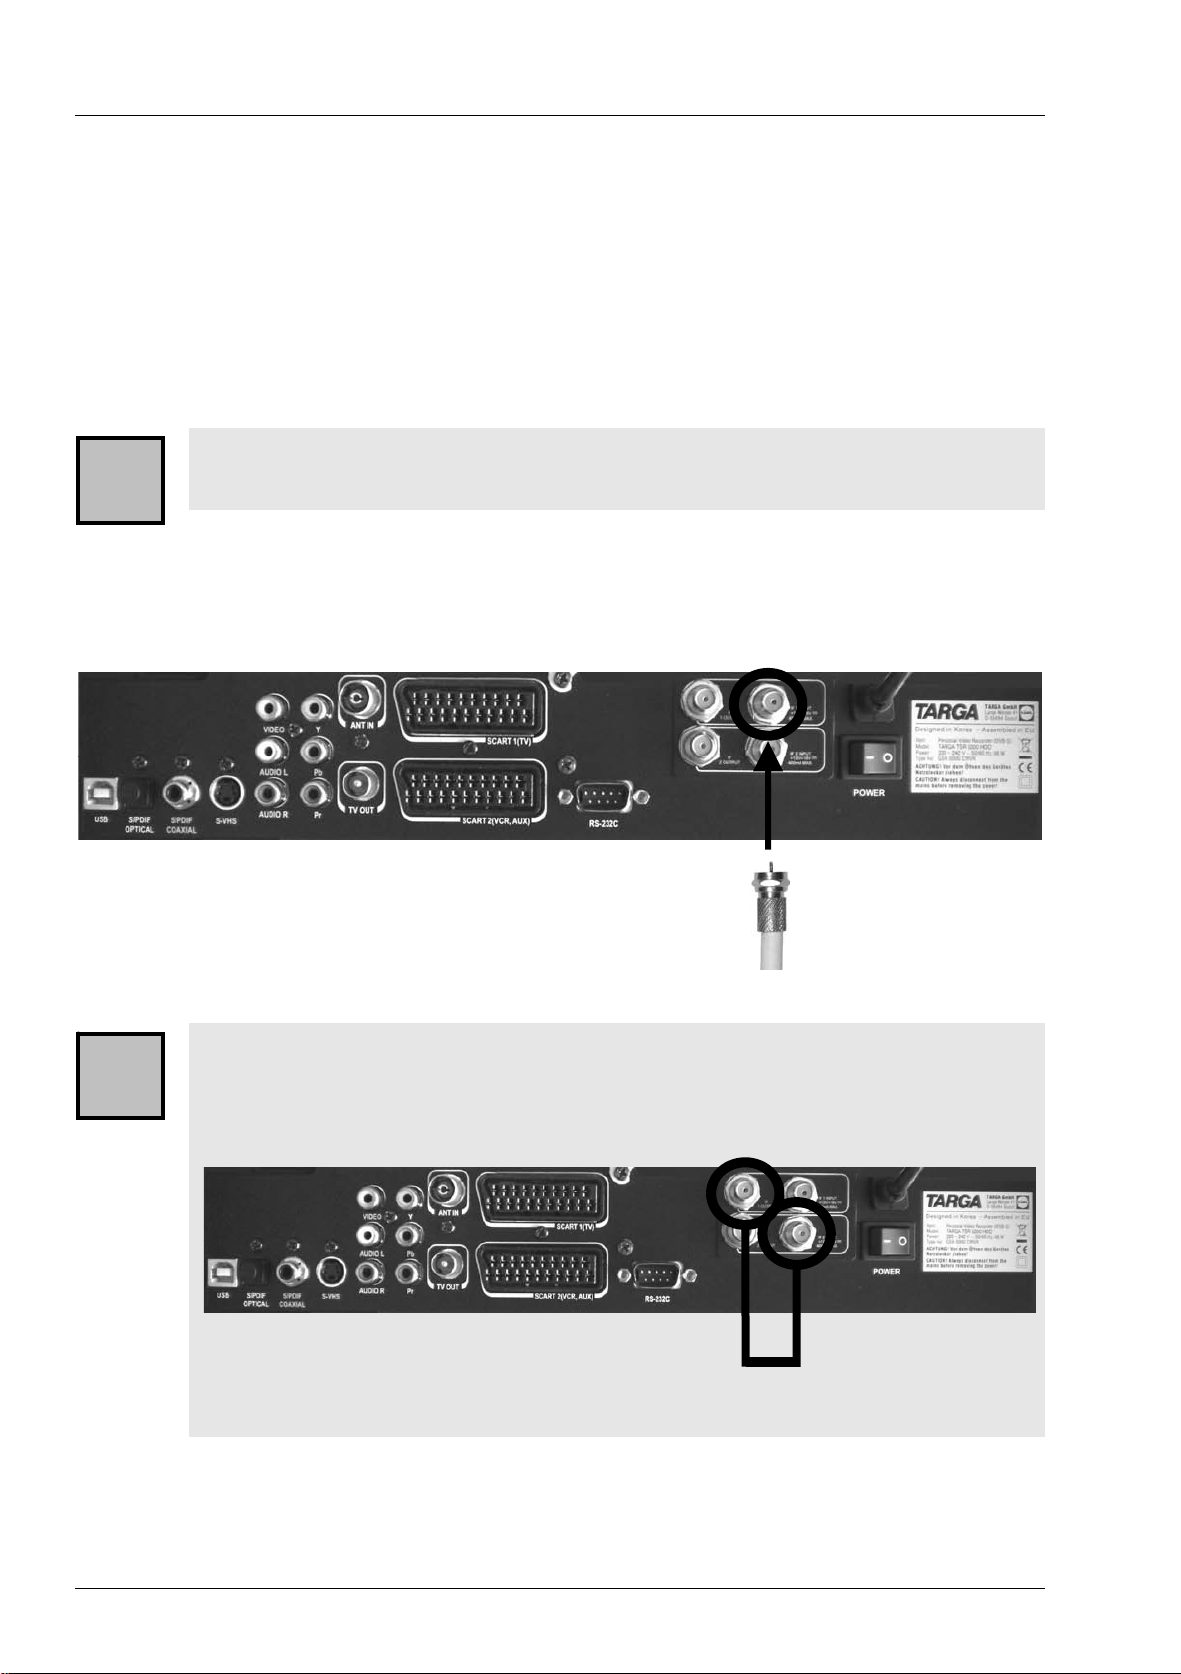
The device has two tuners. With these you can use it with a satellite antenna that has one
or two ports, or two different satellite antennas.
Make sure that the satellite antenna has been professionally installed and is
grounded. It the satellite antenna is not grounded, power surges may occur
!
Single-user satellite system
To use this system with a single-user satellite system, connect the coaxial of the satellite
antenna's LNB to the IF 1 INPUT [17], as shown in the following figure.
i
which can damage the device and can cause a build-up of static electricity.
IF 1 INPUT
F-type connector of
satellite antenna system
Alternatively, you can use the supplied loop cable (6) to connect the output of
the first connector to the input of the second connector. This enables limited use
of the second tuner although you are only using a single-user satellite antenna
system.
4
Page 11
TSR 5200 HDD Connection Types
Multiple-User Satellite Antenna System
Independently of whether you are using a satellite antenna with a multi-switch, or whether
your satellite equipment is equipped with a multiple LNB, connect both the coaxial cables
with the connectors IF 1 INPUT [17] and IF 2 INPUT [24], as shown in the following figure.
1. F-type connector of
satellite antenna system
IF 1 INPUT
2. F-type connector
of satellite antenna
system
IF 2 INPUT
Two Satellite Antennas
If you are using two different satellite antennas, connect the coaxial cable of the first
satellite antenna to the connector labelled IF 1 INPUT [17]. Connect the coaxial cable of
the second satellite unit to the IF 2 INPUT [24] connector.
F-type connector of
first satellite antenna
IF 1 INPUT IF 2 INPUT
F-type connector of
second satellite
5
Page 12
TSR 5200 HDD Connection Types
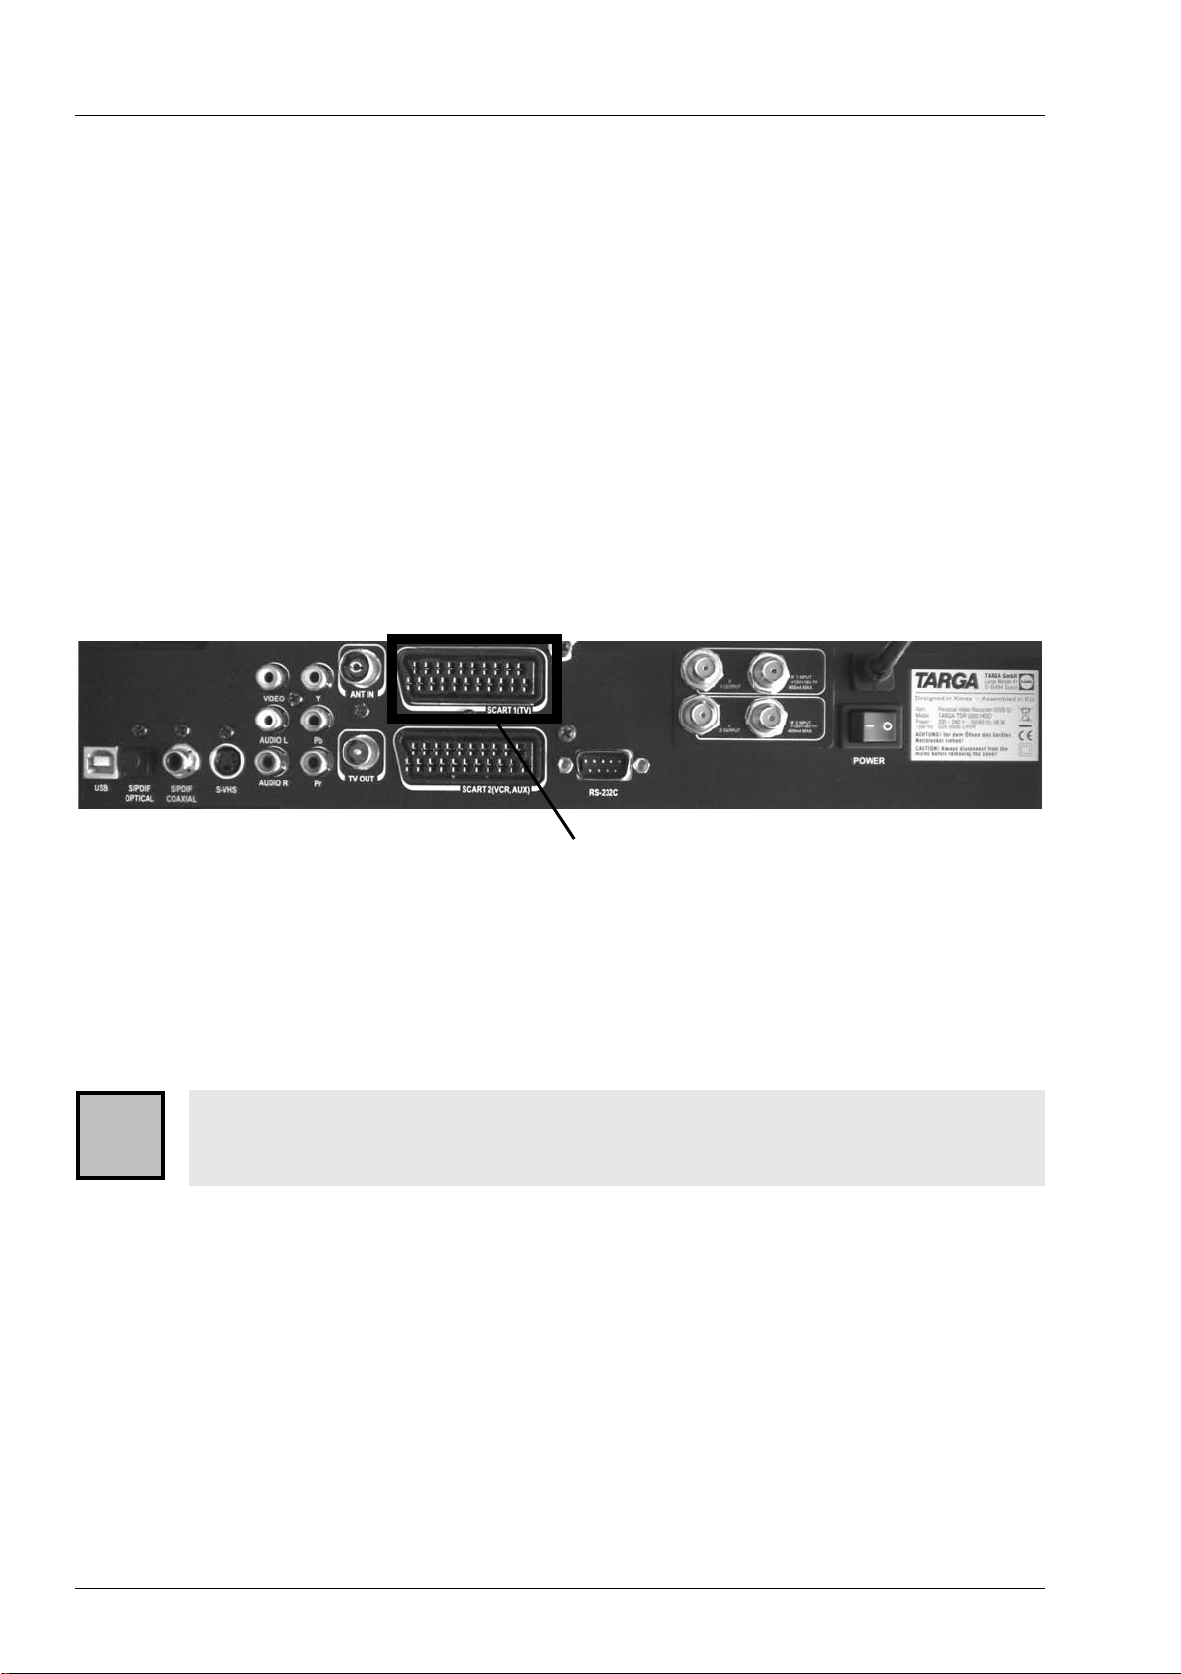
Connecting to TV
The TSR 5200 HDD offers many possibilities for connecting to a TV or projector. These
are:
1. Scart (Euro AV) connector
2. Coaxial (TV antenna connector)
3. Video connector
4. S-VHS connector
5. Component connector
These connector types are explained in more detail in the following pages.
Scart (Euro AV) connector
Plug the Scart cable into the upper Scart jack of the TSR 5200 HDD (labelled
SCART 1 (TV) [15]). Insert the other end of the Scart cable into the Scart jack of the TV.
The picture of the TSR 5200 HDD will be transmitted on the AV channel of your TV. If you
are not sure how to switch to the AV channel on your TV, please refer to the TV manual.
The lower Scart jack on the TSR 5200 HDD SCART 2 (VCR, AUX) [21] is
i
reserved for a video recorder, decoder or similar devices.
Scart (Euro AV) connector
(SCART 1 TV)
6
Page 13
TSR 5200 HDD Connection Types
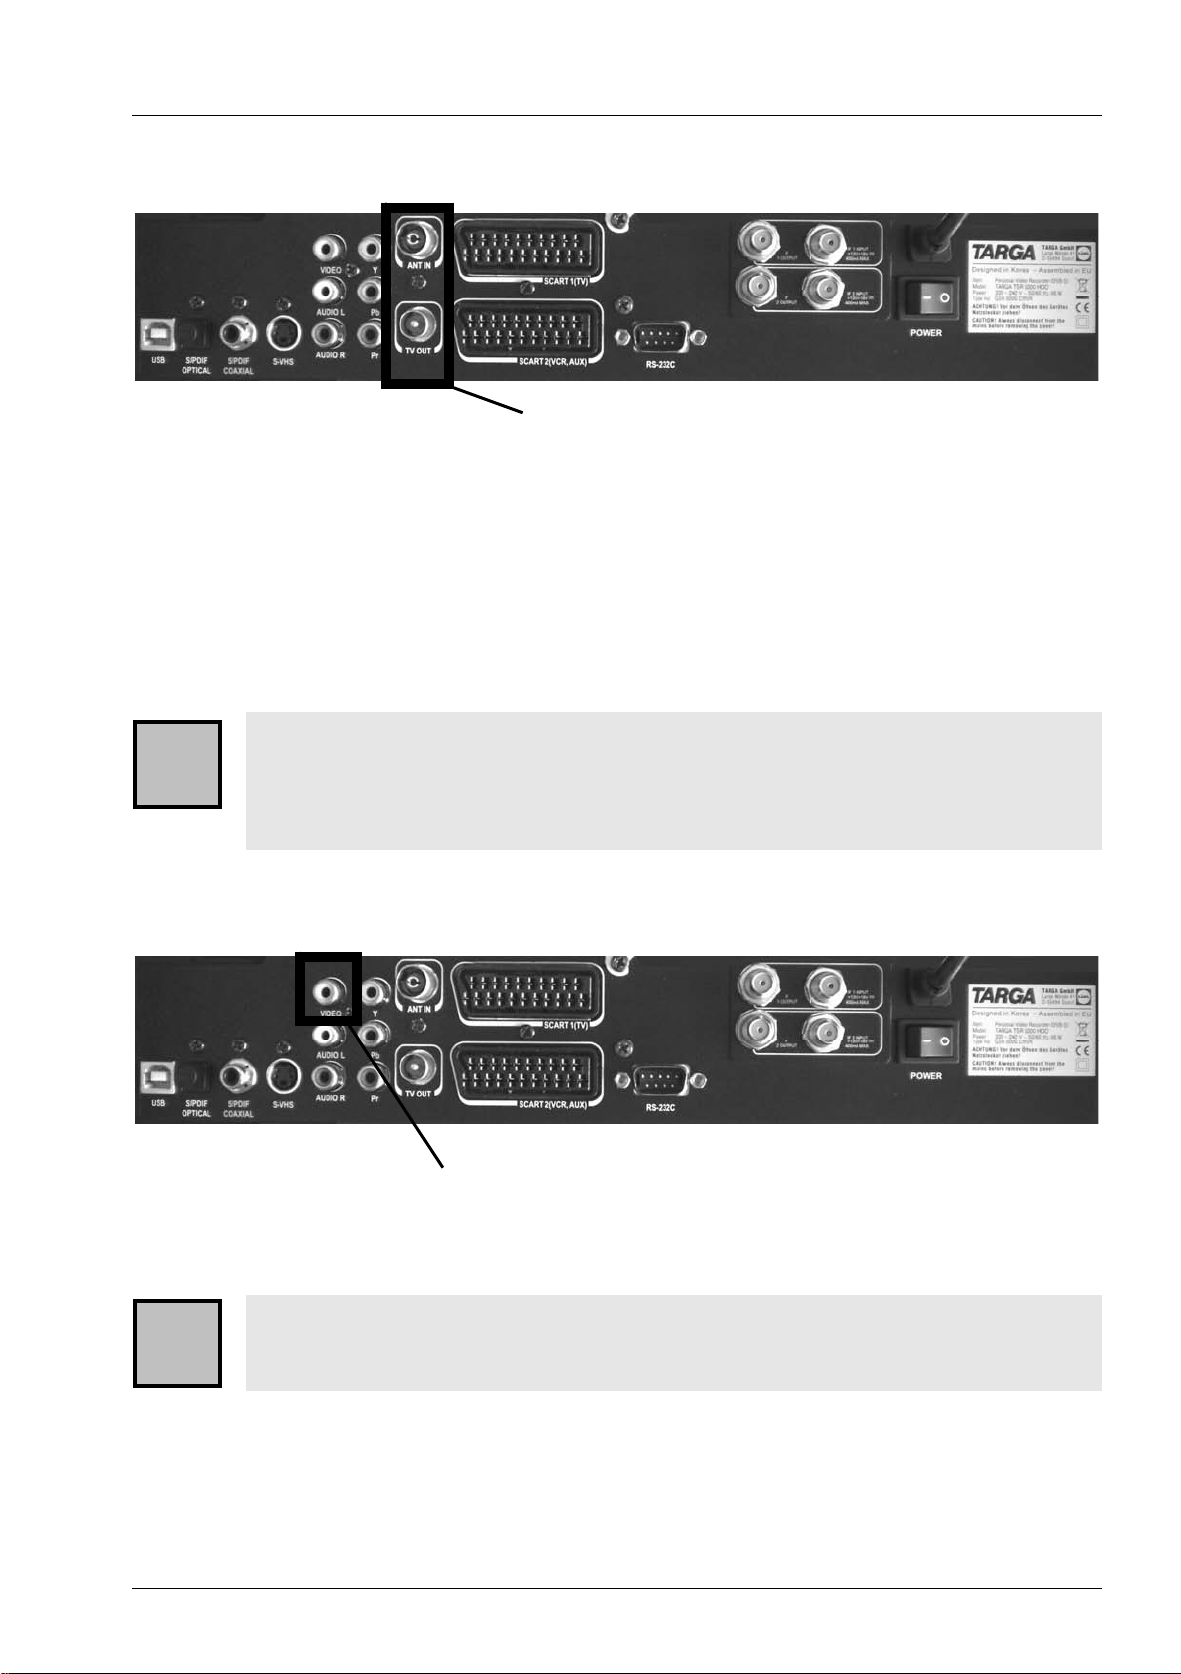
Coaxial (TV antenna connector)
If your TV does not offer any Scart connector, you can connect the TSR 5200 HDD to your
TV using a coaxial cable. To do so, connect the coaxial jack TV OUT [20] of the TSR 5200
HDD to the antenna input of your TV.
The default output frequency of the TSR 5200 HDD is tuned to channel 38. You must set a
program preset on your TV on channel 38 to be able to reproduce the image and sound of
the TSR 5200 HDD. If you are not sure how to tune to channel 38 on your TV, please refer
to the TV manual.
If you are additionally using a video recorder via the antenna cable, make sure
that its output frequency is not tuned to channel 38. If this is the case, select
!
another output frequency for the video recorder or the TSR 5200 HDD. To find
out how to change the output frequency of the TSR 5200 HDD, see page 18 –
Channel Modulator.
Coaxial connector
Video connector
If required, use a cinch cable to connect the video jack VIDEO [12] of the TSR 5200 HDD
to the corresponding video jack on your TV.
Please note that only the picture signal will be transferred via a video connector.
!
To transfer sound to the TV also you must connect the additional audio
connectors AUDIO L and AUDIO R [19] of the TSR 5200 HDD to the TV.
Video connector (with audio connector)
S-VHS connector
7
Page 14

TSR 5200 HDD Connection Types
If your TV offers an S-VHS connector, you can connect the TSR 5200 HDD to your TV
using an S-VHS cable. This enhances the playback quality compared to the regular
antenna or Scart connection.
Please note, that only the picture signal will be transferred via an S-VHS
!
connector. To transfer sound to the TV also you must connect the additional
audio connectors AUDIO L and AUDIO R [19] of the TSR 5200 HDD to the TV.
S-VHS connector jack
Component connector
The component connector (YPbPr) offers the best playback quality. Many modern TVs and
projectors have this means of connection. If required, connect the component connector
[13] to the connector jack of your TV or projector using a triple cinch cable.
Component connector (Y Pb Pr)
8
!
i
Please note that only the picture signal will be transferred via a component
connector. To transfer sound to the TV also you must connect the additional
audio connectors [19] of the TSR 5200 HDD to the TV.
The component connector transfers the picture signal with three different pieces
of information:
Y - transfers the brightness
Pb - transfers the colour variation from grey on the blue-yellow scale
Pr - transfers the colour variation from grey on the red-cyan scale
(See also page 16 – Video Playback)
Page 15
TSR 5200 HDD Connection Types
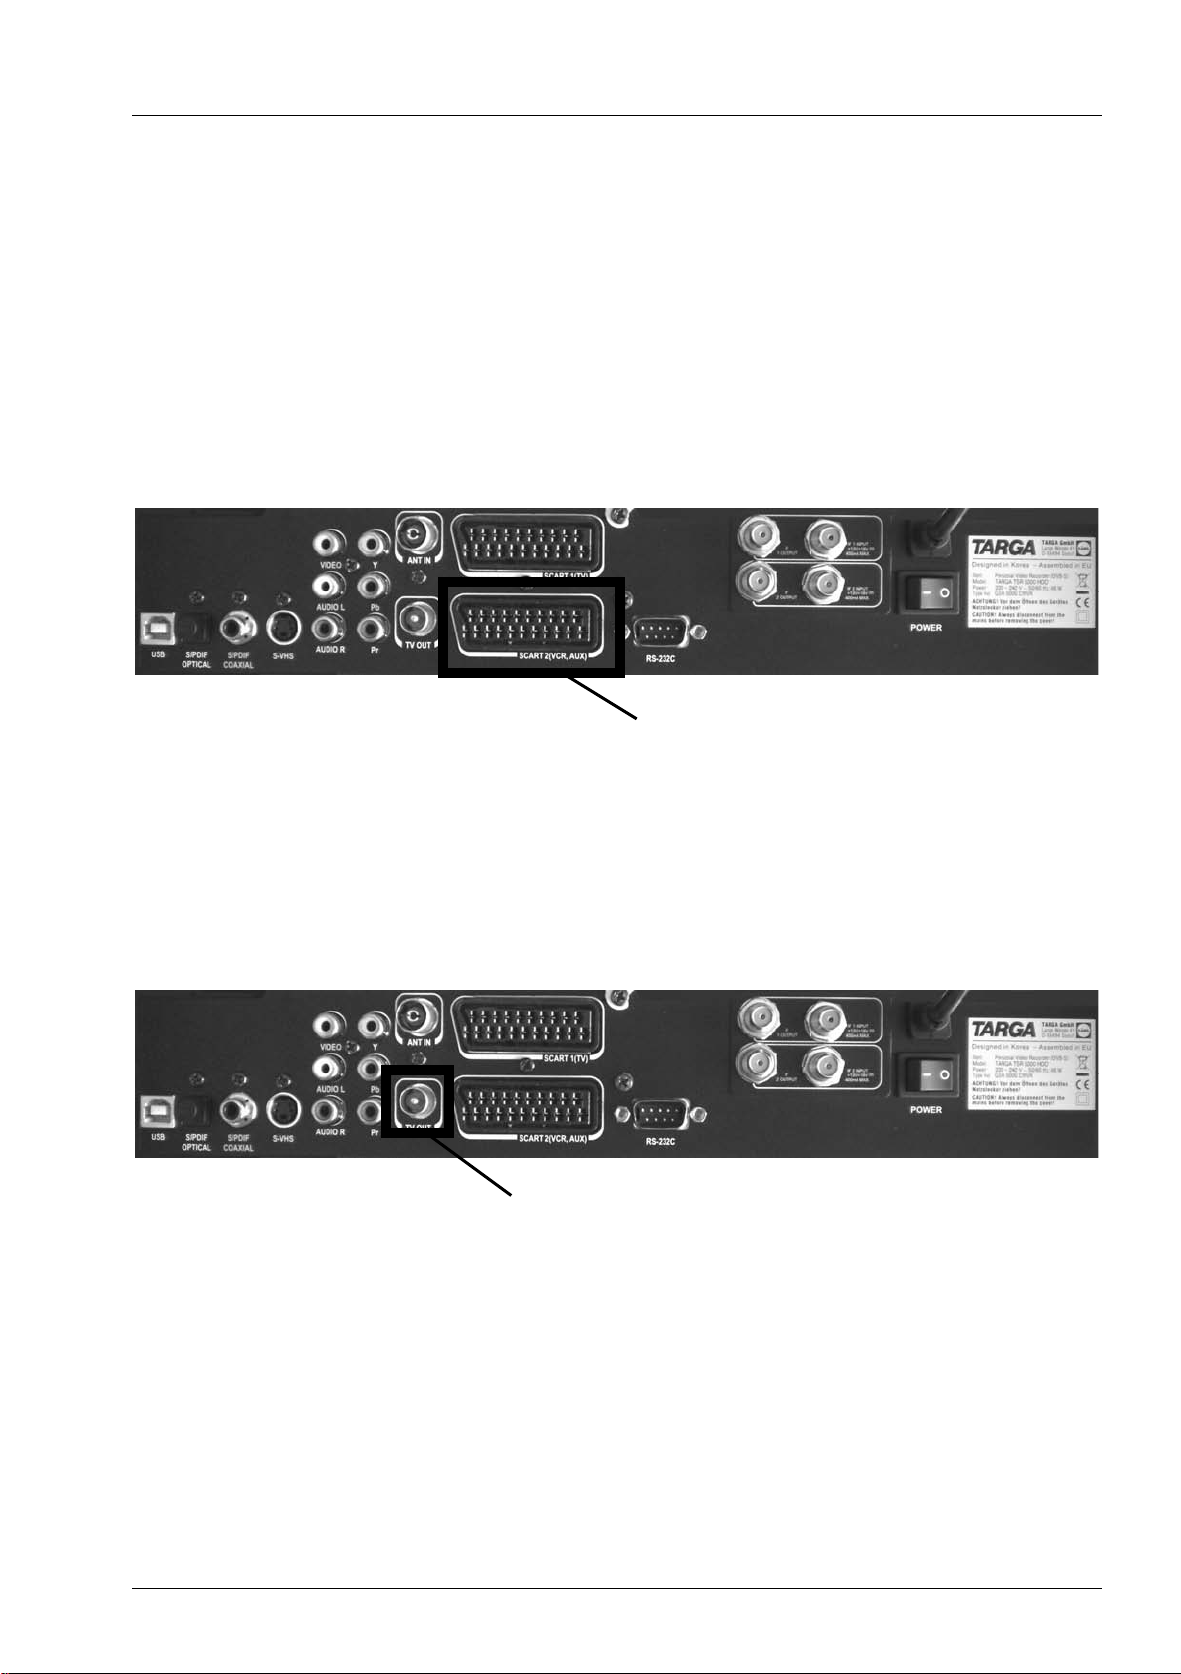
Connecting to a Video Recorder
You can use the TSR 5200 HDD in combination with a video recorder. Either connect the
TSR 5200 HDD and your video recorder with a Scart cable or with a coaxial cable. The
Scart cable offers better playback quality.
Connecting to a Video Recorder using a Scart Cable
If your video recorder has a Scart jack, plug the Scart cable into the Scart jack
SCART 2 (VCR, AUX) [21] on the TSR 5200 HDD. Insert the other end of the Scart cable
into the Scart jack of the video recorder.
Scart 2 (VCR, AUX)
Connecting to a Video Recorder using a Coaxial Cable
If your video recorder has no Scart jack, you can also connect the TSR 5200 HDD to the
video recorder using a coaxial cable. To do so, plug the coaxial cable into the jack TV OUT
[20] and the other end of the cable into the video recorder.
The default output frequency of the TSR 5200 HDD is tuned to channel 38. To avoid
picture interference, take care that the connected video recorder is not tuned into channel
38. If this is the case, select another output frequency for the video recorder or the TSR
5200 HDD. To find out how to change the output frequency of the TSR 5200 HDD, see
page 18 – Channel Modulator.
Coaxial connector
9
Page 16
TSR 5200 HDD Getting Started
Getting St arted
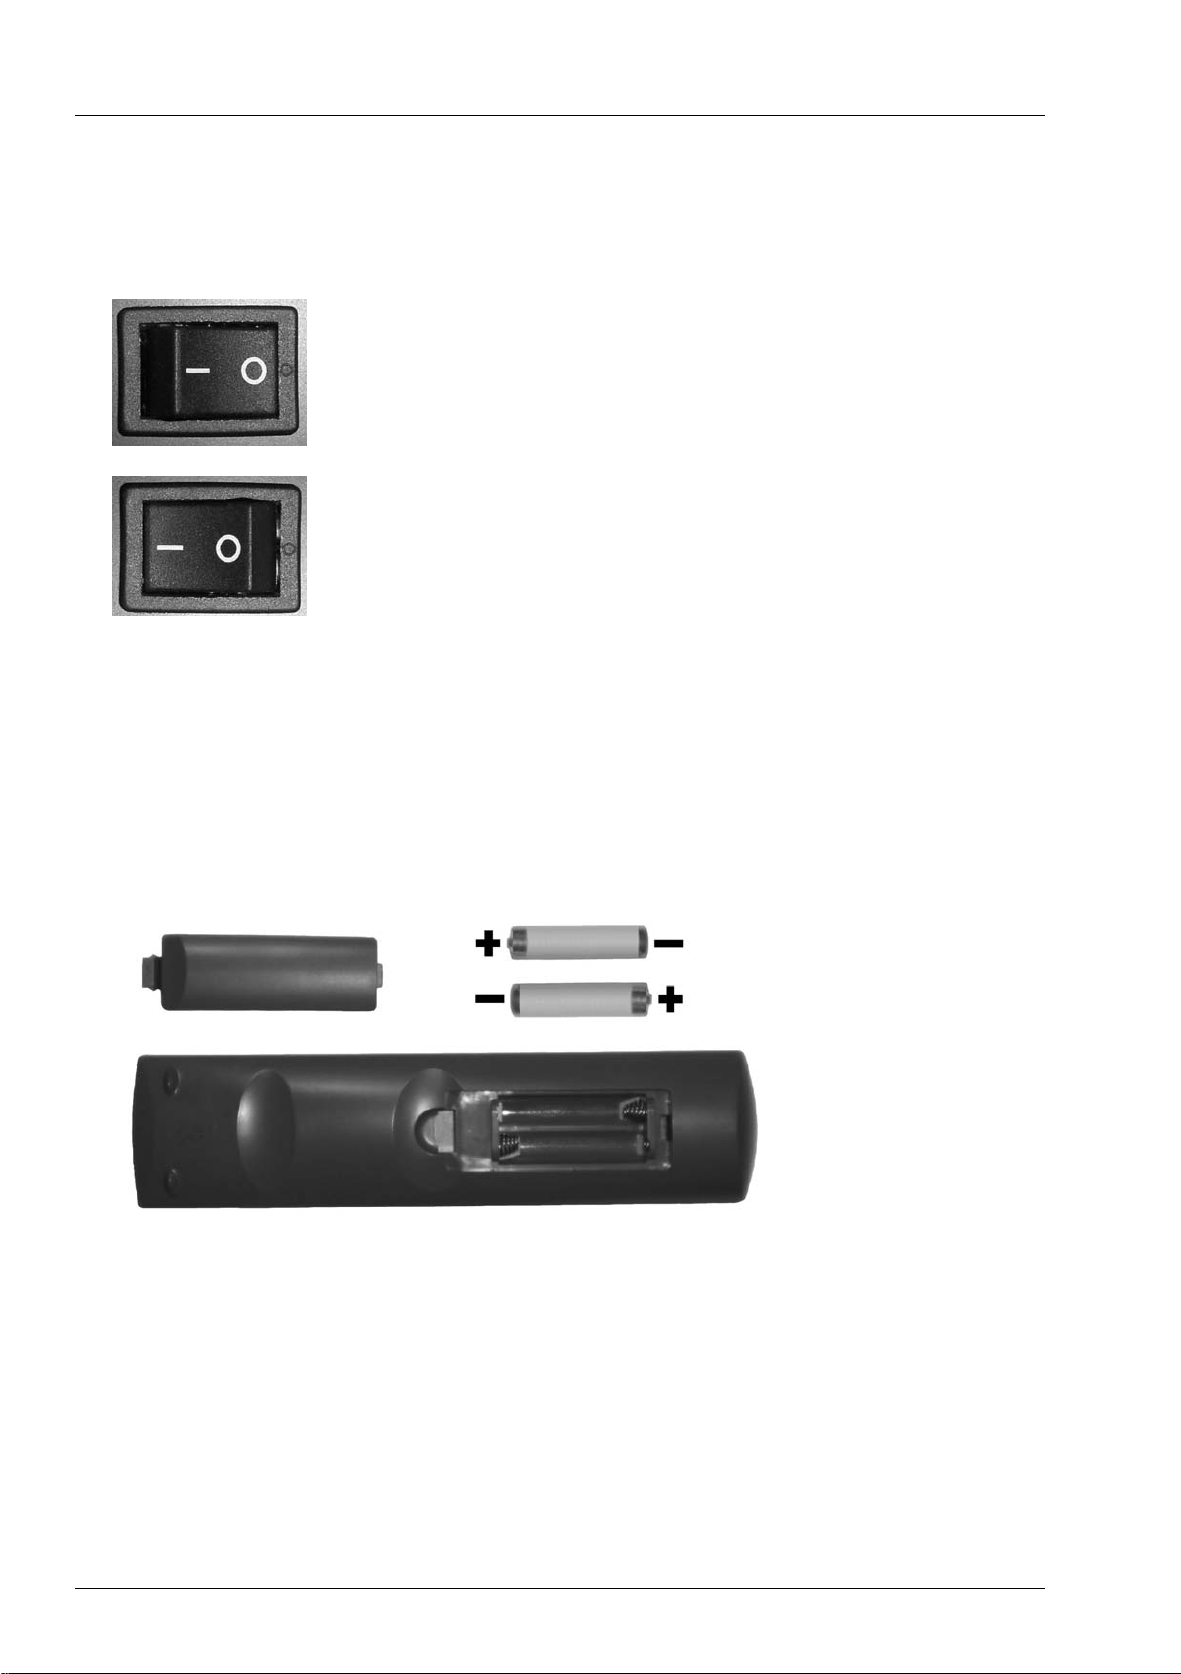
When you have connected all required cables, plug the TSR 5200 HDD power plug into a
wall outlet and switch on the power switch on the back of the device.
Power switch in "Off" position
Power switch in "On" position
Inserting the Batteries
Insert the supplied batteries type LR03, size AAA, into the remote control. Be sure to
respect the polarity. The polarity is indicated with the symbols + and – on the batteries and
in the battery compartment on the remote control.
10
Page 17
TSR 5200 HDD Getting Started
Powering the Device On/Off
Powering On
Make sure that the power switch on the back of the TSR 5200 HDD is switched on. Press
key [1] on the remote control or key [1] on the front of the device to power on the TSR
5200 HDD.
Powering Off
Press key [1] on the remote control or key [1] on the front of the device to power off the
device. The TSR 5200 HDD is now in Stand-by mode.
In Stand-by mode, the TSR 5200 HDD is not fully switched off and still
!
i
consumes a little power. This allows you to power the device back on at any
time using the remote control.
If you wish to fully turn off the TSR 5200 HDD, toggle the power switch [18] on
the back of the device to "0" (see figure on page 10 – Getting Started).
Please note that when you next switch on the device using the power switch
[18] on the back of the TSR 5200 HDD, it will take a few minutes before it is
ready for use.
Installation
The channels that can be received via satellite are already preset in the TSR 5200 HDD.
As soon as new channels are available via satellite, the settings will be updated.
Furthermore, it is possible to tune the channels manually and also adjust the channel order
to suit your wishes.
It is essential that the satellite antenna is correctly orientated for reception.
Selecting Screen Language
The screen display is available in the following languages:
- Press the button on the remote
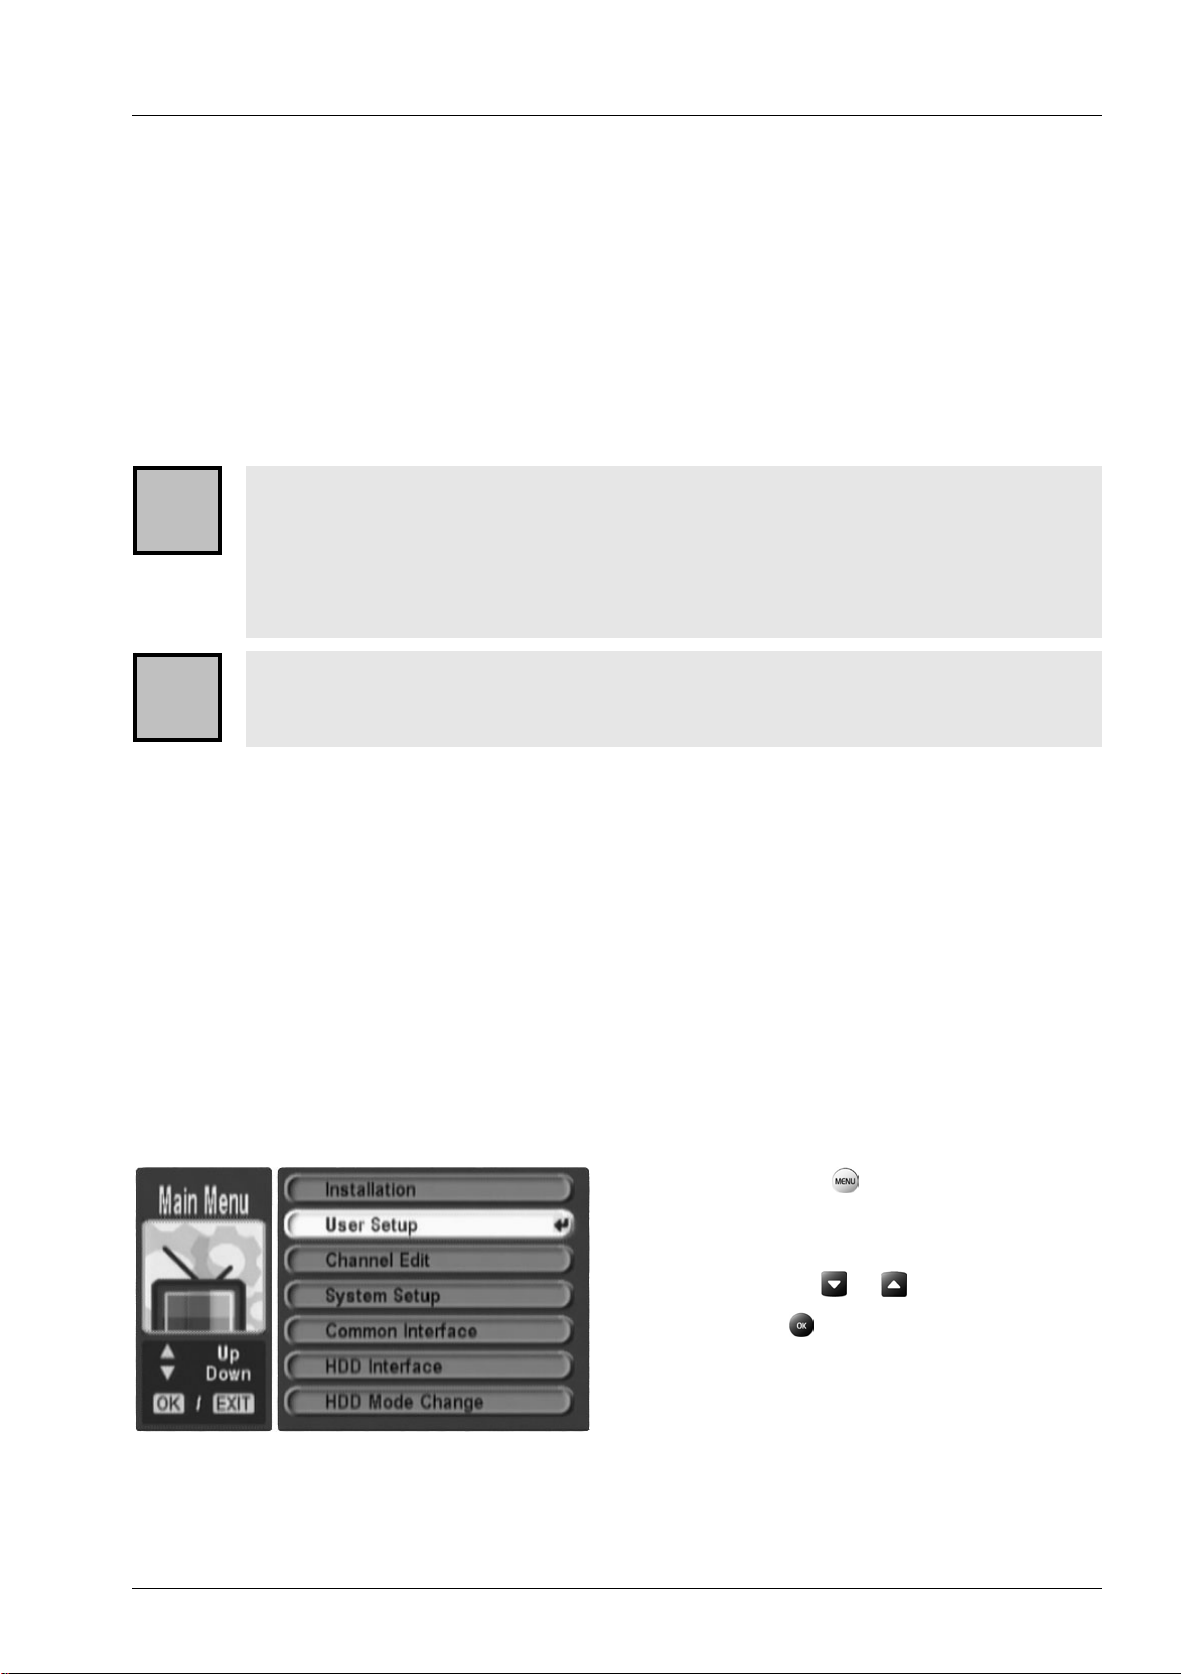
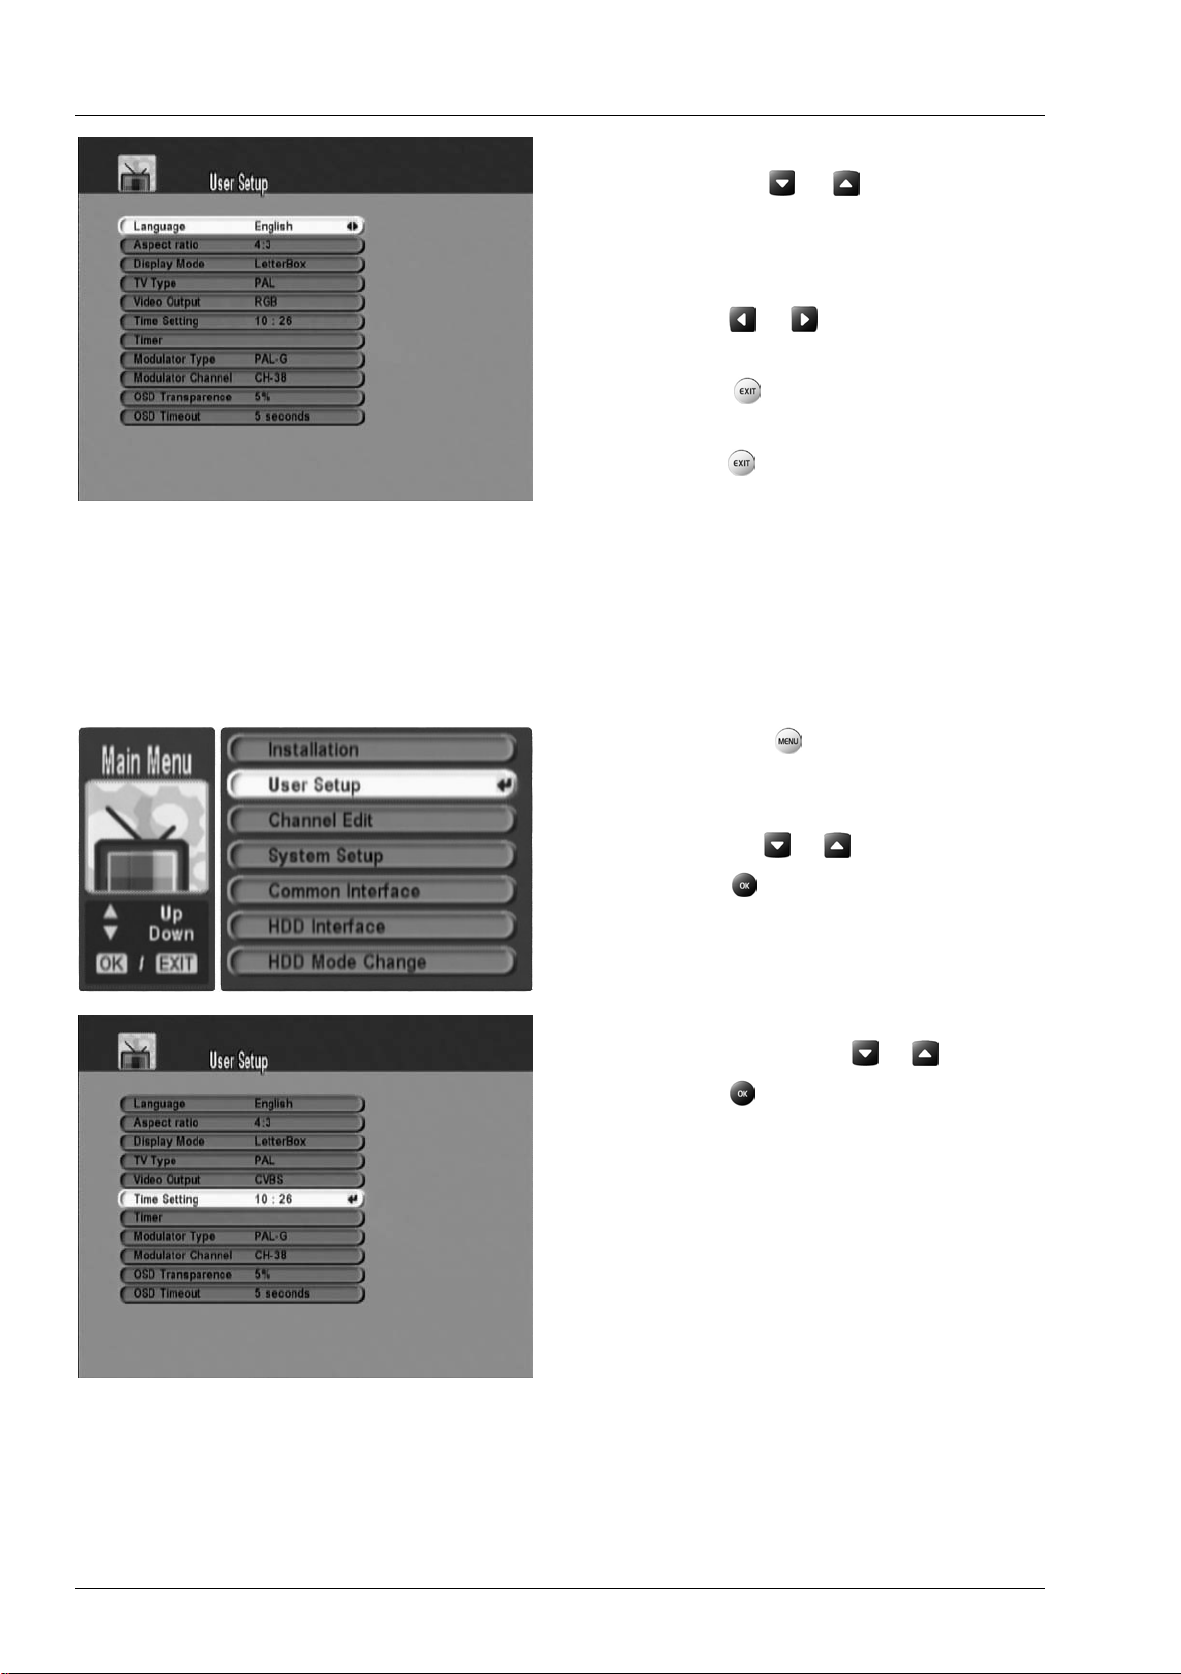
control to go to the Main Menu.
- Select the menu option User Setup
using the or buttons.
- Press to go to the User Setup
menu.
11
Page 18
TSR 5200 HDD Getting Started
- Select the menu option Language
using the or buttons. On first
use, the language is set to English.
To change, go to the menu option
Language.
- Press or to select the desired
language.
- Press to exit User Setup: the
changes will be saved.
- Press to exit the Main Menu.
Setting the Time
In order to be able to enter the correct time for recording, you must set the clock in your
satellite receiver. The TSR 5200 HDD receives the current time from the respective
programmes, but you can also set the clock manually.
- Press the button on the remote
control to go to the Main Menu.
- Select the menu option User Setup
using the or buttons.
- Press to go to the User Setup
menu.
- Select the menu option Time
Setting using the
- Press to go to the Time Setting
menu.
or buttons.
12
Page 19
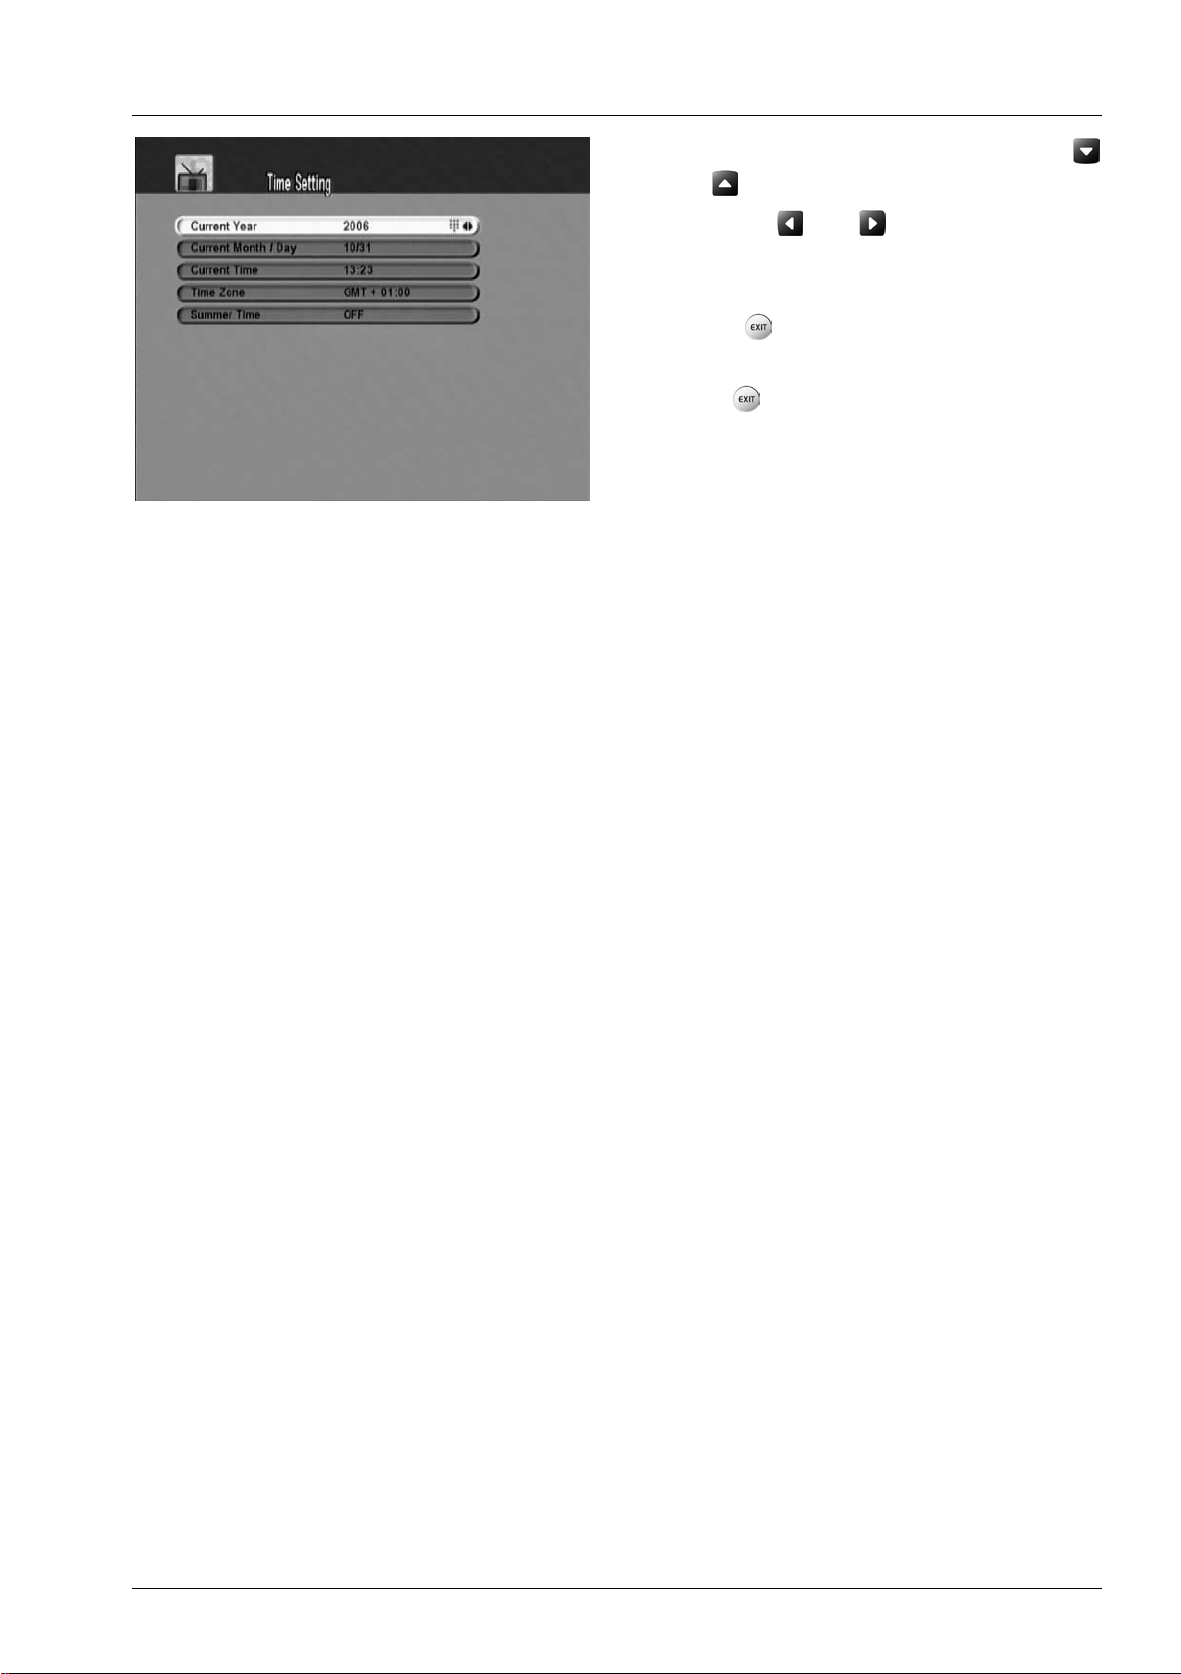
TSR 5200 HDD Getting Started
- Select the desired setting with the
and buttons.
- Press the and buttons to alter the
respective settings or enter the data
using the numeric keypad.
- Press
changes will be saved.
- Press
to exit Time Setting: the
to exit the Main Menu.
13
Page 20
TSR 5200 HDD User Settings
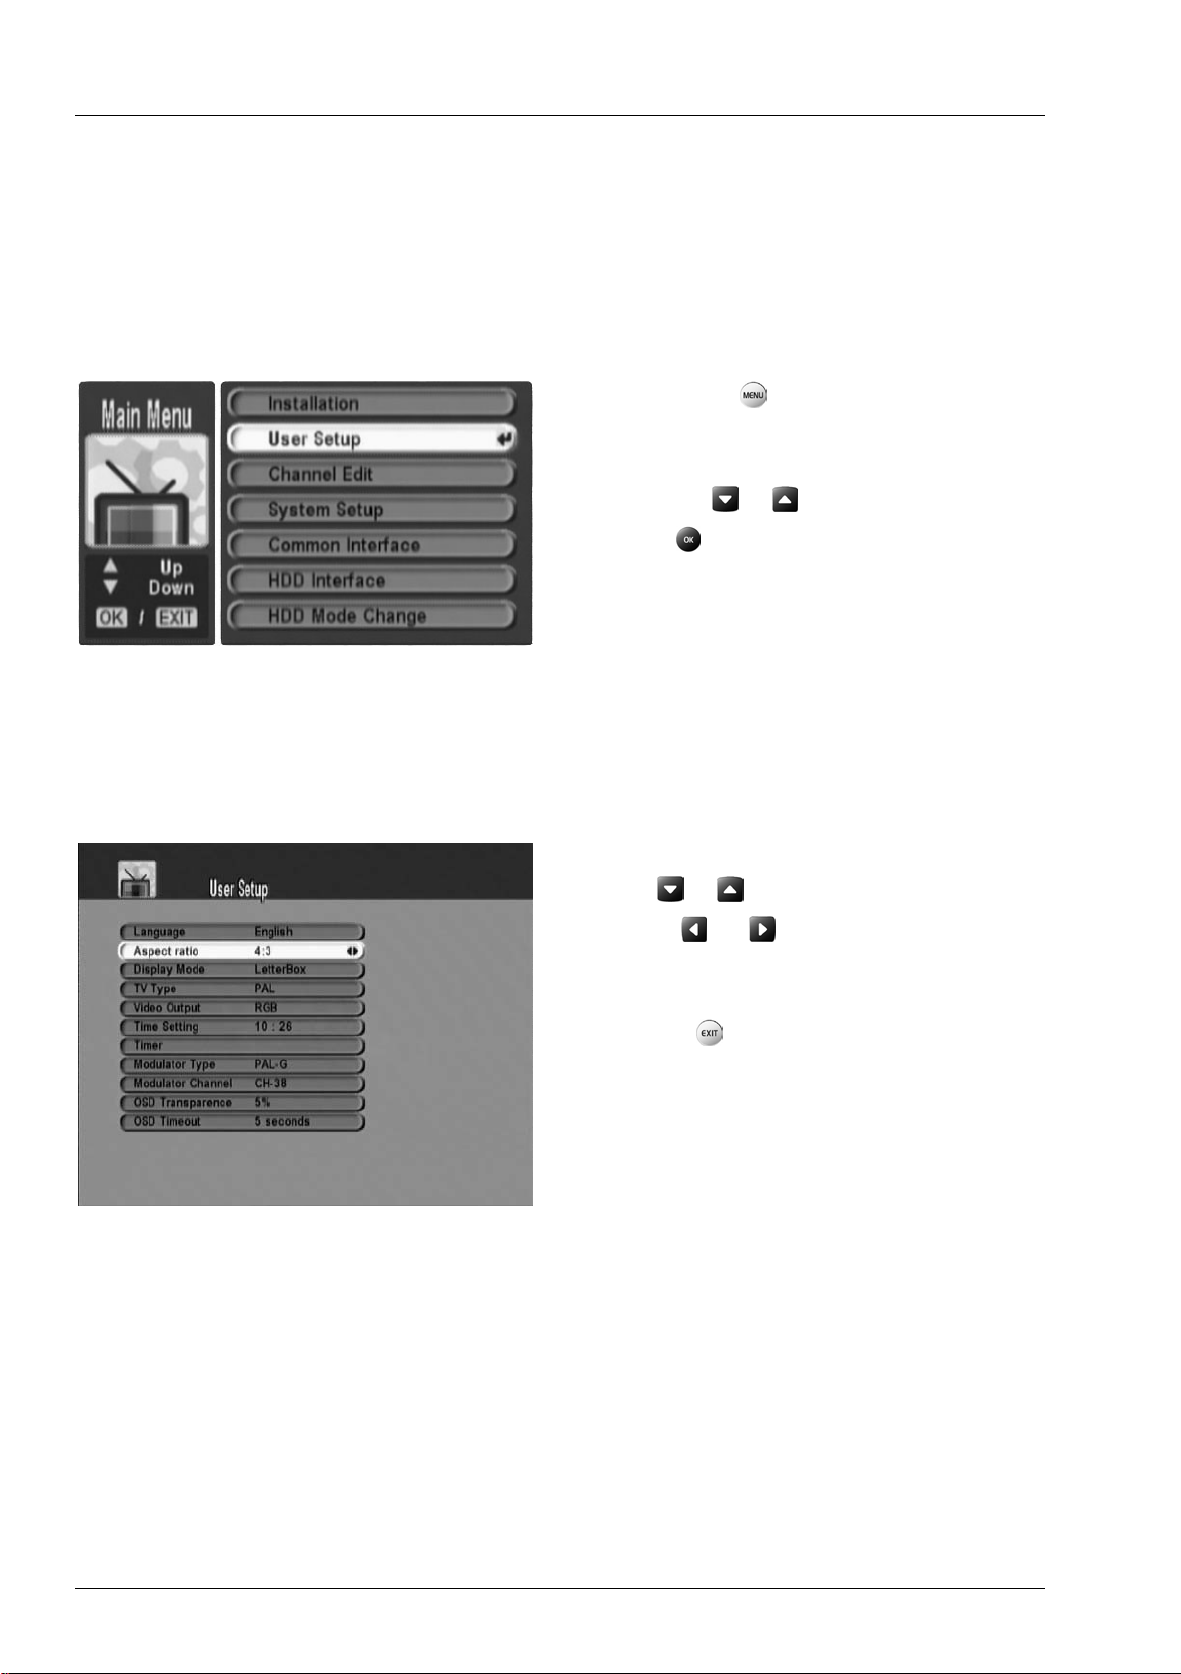
User Settings
You can make various settings to the TSR 5200 HDD to adjust to your requirements. You
have already met the Language and Time Setting functions in the previous chapter,
"Getting Started". Further functions in User Setup will be described on the following pages.
The User Setup Menu is as follows:
- Press the button on the remote
control to go to the Main Menu.
- Select the menu option User Setup
using the or buttons.
- Press to go to the User Setup menu.
Aspect Ratio
In this menu you can adjust the picture format of the TSR 5200 HDD to your TV or
projector. To do so, first go to the User Setup menu as described in previous pages.
- Select the Aspect Ratio menu option
with or .
- Press or to change between the
standard format (4:3) and widescreen
(16:9).
- Press
changes will be saved.
to exit User Setup: the
14
Page 21
TSR 5200 HDD User Settings
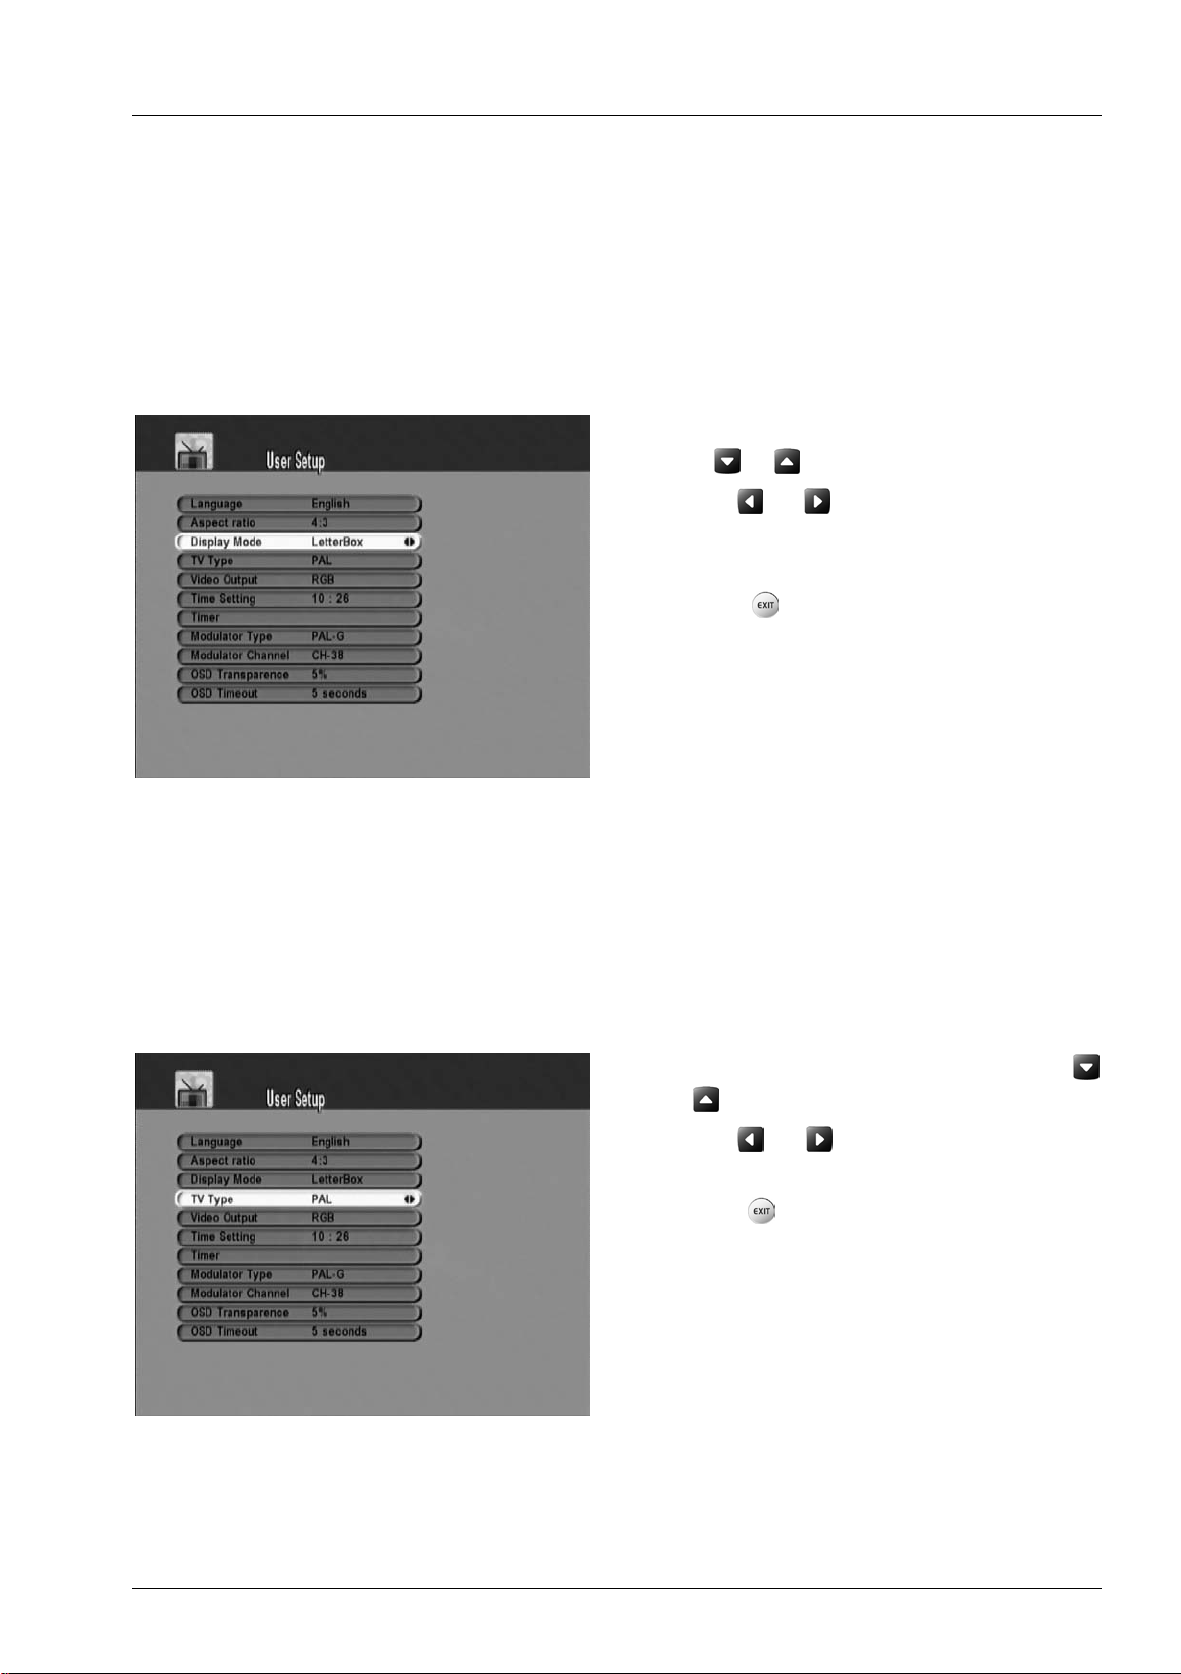
Display Mode
Depending on the aspect ratio settings (see page 14 – Aspect Ratio) you can select in the
4:3 format between the Full and LetterBox display or in the 16:9 format between Center
and Full display. In the setting Full screen, the image fills the entire screen up to the
borders. The LetterBox mode (in 4:3 format) shows black bars in the upper and lower
picture margins, and the Center setting (in 16:9 format) shows black bars on the right and
left-hand sides.
- Select the Display Mode menu option
with or .
- Press
and LetterBox (or between Full and
Center).
- Press
changes will be saved.
or to change between Full
to exit User Setup: the
TV Type
Here you can specify the colour system standard of your TV. In Europe, PAL is generally
the standard whereas NTSC is the standard on the American continent. The setting AUTO
is also possible, and the TSR 5200 HDD will automatically detect the suitable system. First
go to the User Setup menu, as described on page 14.
- Select the TV Type menu option with
.
or
- Press
PAL and NTSC standards, or AUTO.
- Press to exit User Setup: the
changes will be saved.
or to change between the
15
Page 22
TSR 5200 HDD User Settings
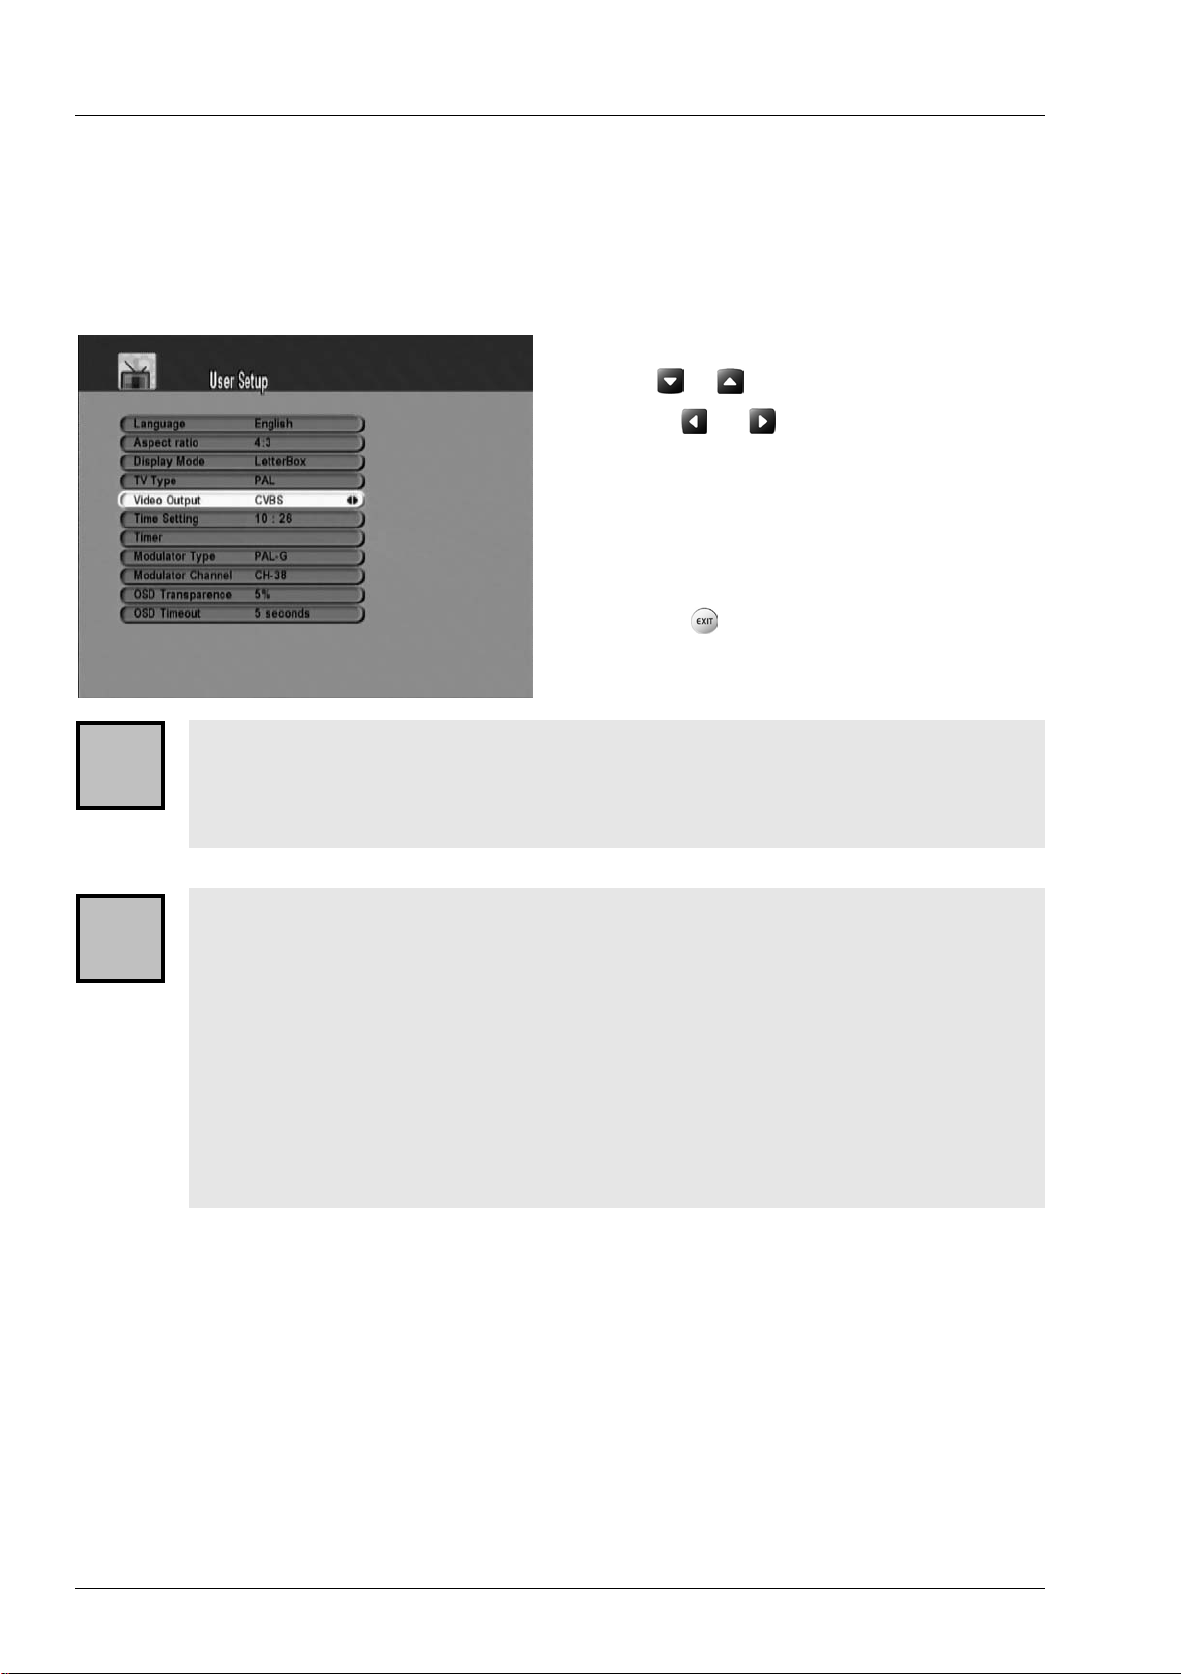
Video Output
Here you can set the picture output according to the cabling to the TV or projector. CVBS,
RGB and YpbPr are available. By default, the CVBS is configured. First go to the User
Setup menu, as described on page 14.
- Select the Video Output menu option
with or .
- Press or to change between the
CVBS, RGB and YpbPr standards. To
be able to change the RGB setting,
enter the password using the numeric
keypad (the factory-default password is
0000)
- Press to exit User Setup: the
changes will be saved.
It is possible to restart the device by switching to RGB mode. After entering the
i
i
password, the "Restart – Change Output to RGB" message appears. Whilst
restarting, the display [6] on the front side of the device shows the booting
information. Restarting takes about 35 seconds.
CVBS (Color Video Baseband Signal) is the standard for picture transfer to
TVs and is transferred via the Scart connectors [15 and 21], the video
connector [12] and the coaxial connector [20].
RGB transfers the primary colours red, green and blue via a wire each on
the Scart cable. This signal is only output to the Scart jack [15].
Please note that your TV or projector must support this signal type.
YPbPr is a video signal that is output to the three-part component connector
[13]. This offers you the best playback quality, although it requires a
TV or projector with corresponding component input (see also page 8
– Component Connector).
16
Page 23

TSR 5200 HDD User Settings
Timer
You can manually set up to nine wakeup times with the timer. This is not programmed
recording, but rather merely an automatic start mechanism. To find out how to program
recordings, please see page 29 – Programmed Recording. To program the Timer, first go
to the User Setup menu, as described on page 14.
- Select the Timer menu option with
or .
- Press to go to the Timer menu.
- Select the menu option Timer with or
and next choose a free timer preset
(1-9) with and .
- Select the menu option Week Mode with
or and then either Once, Daily or
Weekly with and .
- If you have chosen weekly recording you
can select the day in the next line.
- Select the menu option Wakeup Time with or and then the start time for the TSR
5200 HDD using and (another option is to enter the start time using the numeric
keypad).
- Select the menu option Wakeup Service No. with or and then the desired program
preset with and (the corresponding channel name will be shown in the next line).
- Select the menu option Sleep Timer using or and then the power-off countdown
time for the TSR 5200 HDD with the and buttons.
- Press to exit Timer: the programming will be saved.
17
Page 24
TSR 5200 HDD User Settings
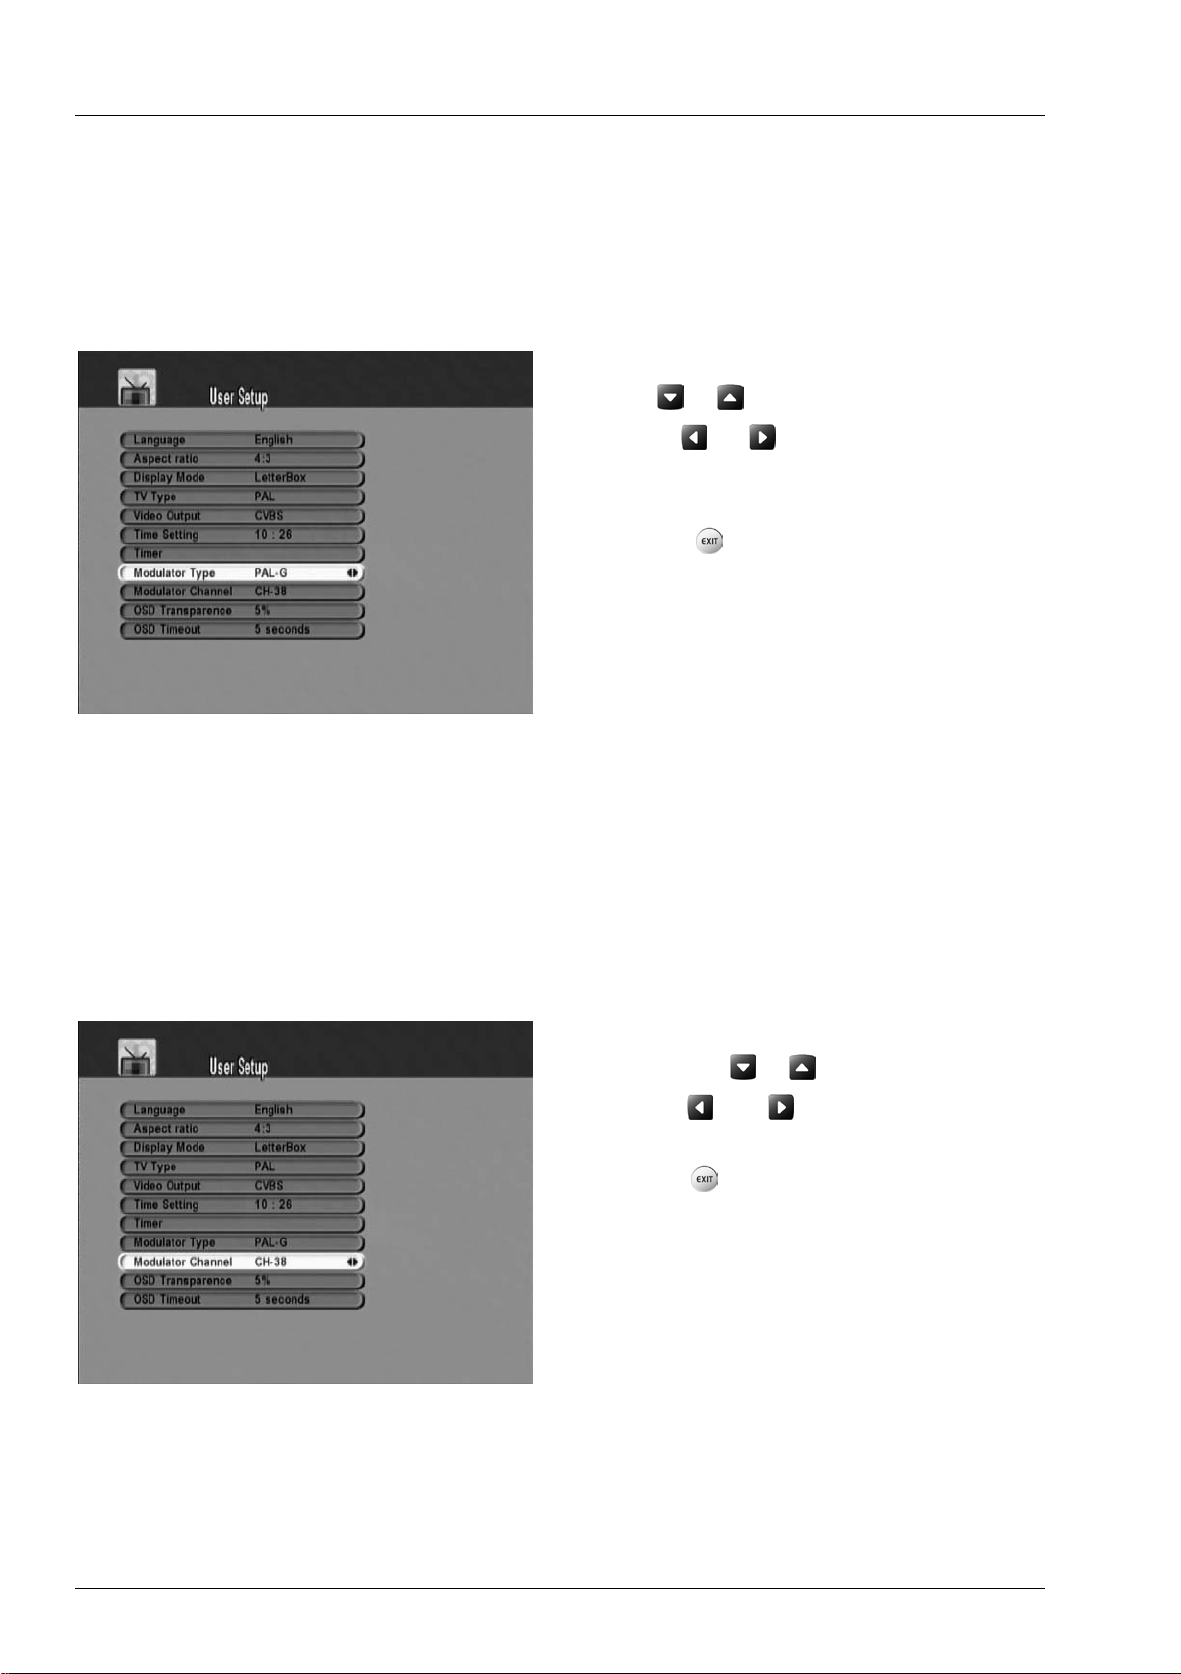
Modulator Type
The Modulator Type option determines the output format on the antenna connector of the
TSR 5200 HDD. Synchronise the modulator type with the connected devices by selecting
the appropriate input. PAL-G, PAL-K, PAL-I and NTSC are available. The European
standard is PAL-G. NTSC is used on the American continent and in Japan.
- Select the Modulator Type menu option
with or .
- Press or to change between the
PAL-G, PAL-K, PAL-I and NTSC
standards
- Press to exit User Setup: the
changes will be saved.
Modulator Channel
The modulator channel determines the frequency that the TSR 5200 HDD outputs to its
antenna connector. By default, channel 38 in the UHF band is used. If you connect
external devices, such as a video recorder, via the antenna connector with a TV and this is
sending signals on channel 38, you can change the output channel of the TSR 5200 HDD
to here to avoid any picture interference.
- Select the Modulator Channel menu
option with or .
- Press
between 21 and 69.
- Press to exit User Setup: the
changes will be saved.
or to select a channel
18
Page 25
TSR 5200 HDD User Settings
If you change the modulator channel of the TSR 5200 HDD you must
!
correspondingly adjust the tuned channel on the connected device (video
recorder or TV).
OSD Transparency
This function allows you to set the transparency of the OSD menu. Choose a value
between 5% (lower transparency) and 70% (higher transparency).
- Select the OSD Transparence menu
option with or .
- Press
5% and 70%.
- Press
changes will be saved.
or to select a value between
to exit User Setup: the
OSD Timeout
This function lets you set the time the on-screen menu will remain visible if you don't press
any keys. You can choose between 3, 5, 7 and 10 seconds.
- Select the OSD Timeout menu option
with or .
- Press
3s and 10s.
- Press to exit User Setup: the
changes will be saved.
or to select a value between
19
Page 26
TSR 5200 HDD Playback
Playback
Watching TV Channels
After powering the device on, the last channel you have been watching will appear.
Switching TV Channels
Press or on the remote control to switch the channels up or down, or press the
CH [10] button to toggle to the next channel or CH [11] to switch to the previous
channel.
You can also select a channel from the channel list. If there is any menu displayed on
screen press as many times as necessary until all menus have been closed. The
currently tuned-in TV channel will appear.
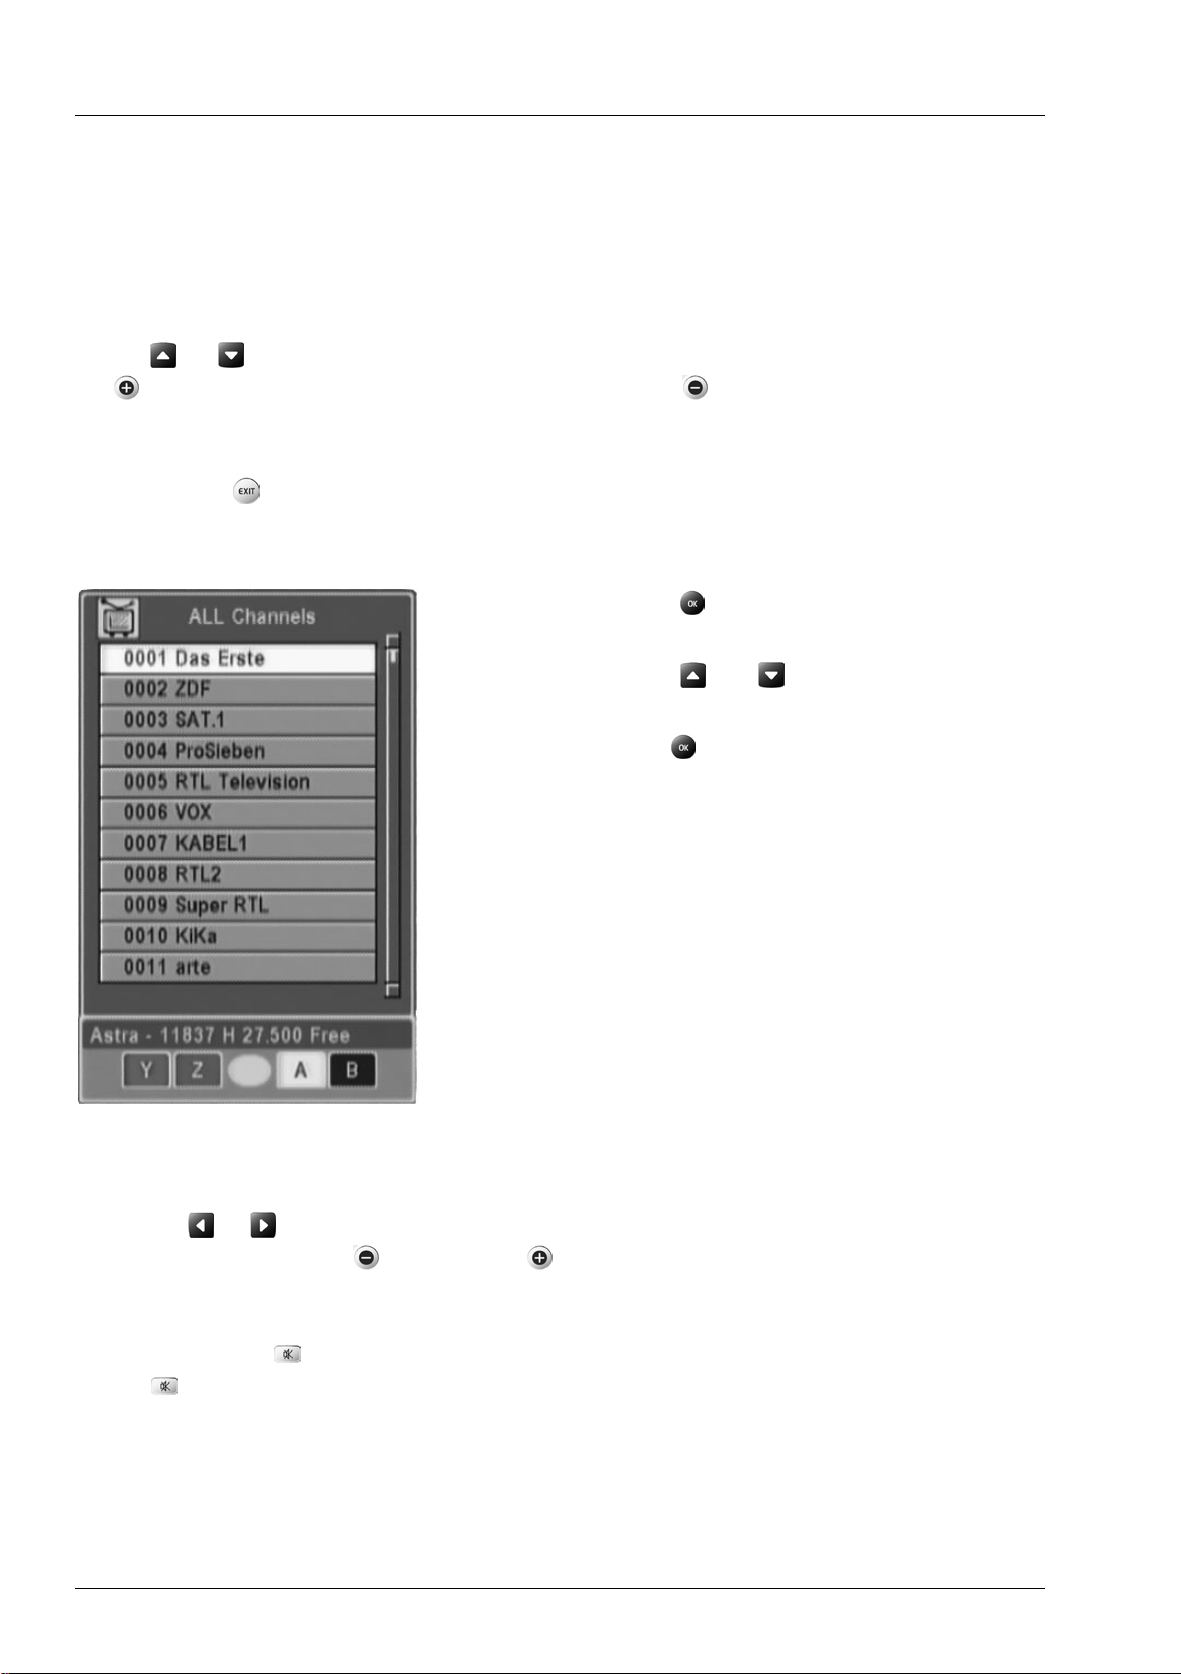
- Press to go to the All Channels
menu.
- Press or to select the desired
channel.
- Press , to enable the selected channel:
the menu All Channels will close
automatically.
Adjusting the Volume
Press the or button on the remote control to select the desired volume. Alternatively
you can also use the VOL [12] and VOL [13] buttons on the remote control.
Mute
Press the button [2] on the remote control to cut the sound temporarily. Press the
button
20
again to resume the sound output.
Page 27
TSR 5200 HDD Playback
Favorites
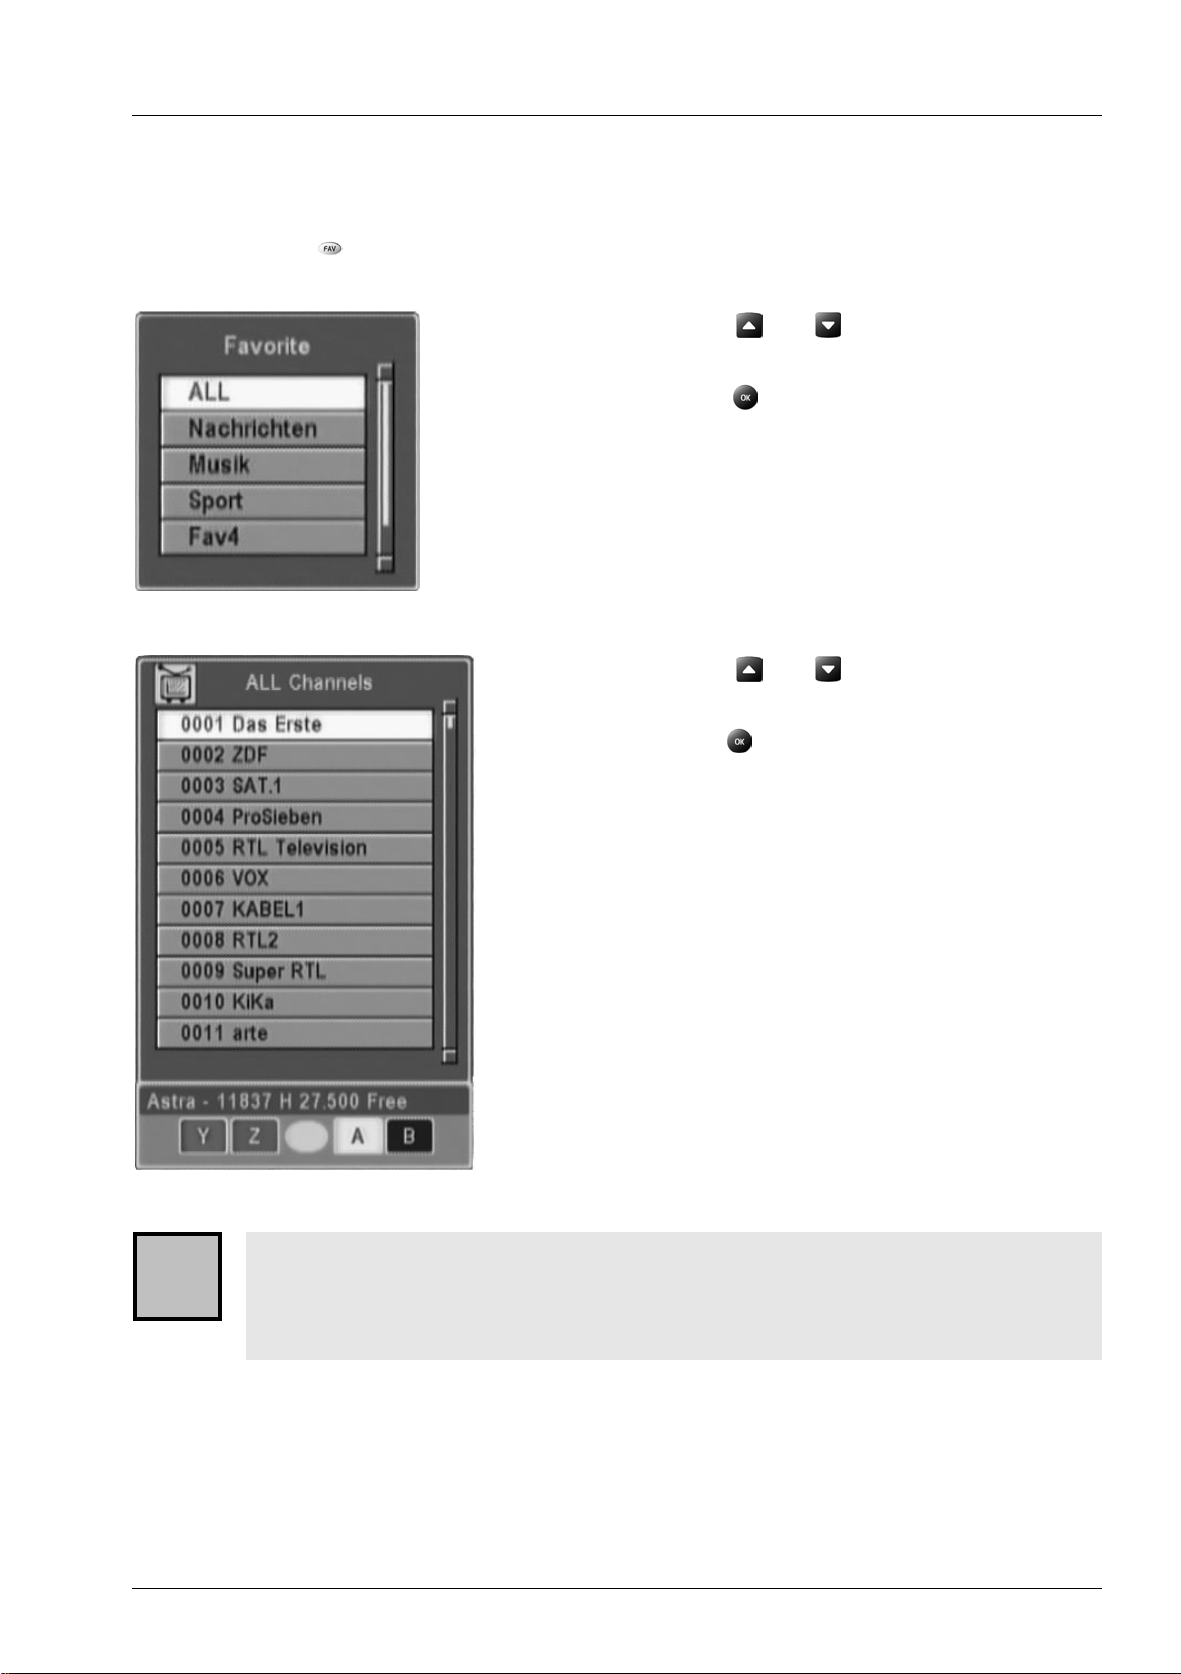
Displaying Favorites
Press the button [38] on the remote control to display the channel favourite menu.
- Press or to select the desired
favourite channel.
- Press to display the list of selected
favourite channels.
- Press or to select the desired
channel.
- Press , to enable the selected channel:
the menu Favorites will close
automatically.
By default, the favourite list contains the groups ALL, NACHRICHTEN, MUSIK,
i
SPORT, FAV4 and FAV5. With exception of the entry ALL you can rename the
favourite folders and add channels. For more information, see the section
starting on page 22 – Renaming and Programming Favourites.
21
Page 28
TSR 5200 HDD Playback
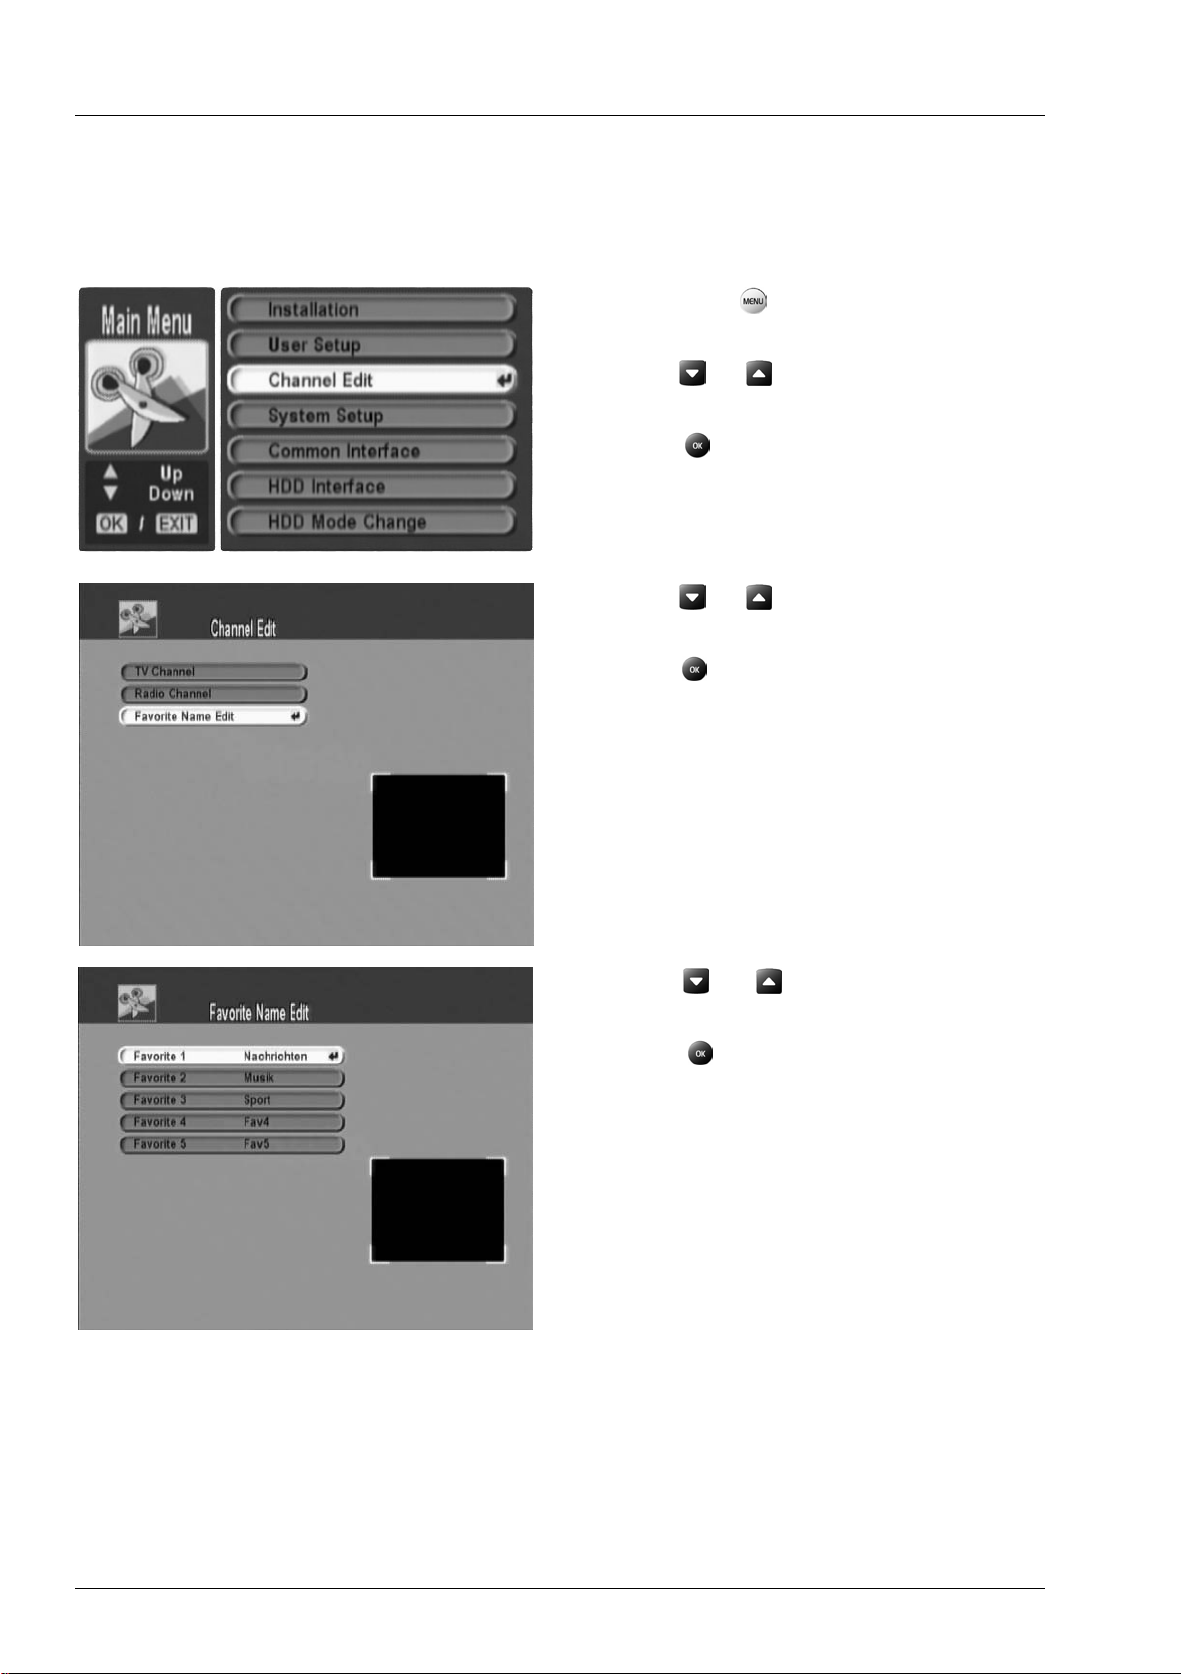
Renaming Favourites
Favourites are divided into five groups. By default, these groups are named Nachrichten,
Musik, Sport, Fav4 and Fav5. To edit these names, proceed as follows:
- Press the button on the remote
control to go to the Main Menu.
- Press or to select the menu item
Channel Edit.
- Press to go to the Channel Edit
menu.
- Press or to select the menu item
Favorite Name Edit.
- Press to go to the Favorite Name
Edit menu.
- Press
group you wish to rename.
- Press to display another window
where you can rename them.
or to select the favourite
22
Page 29
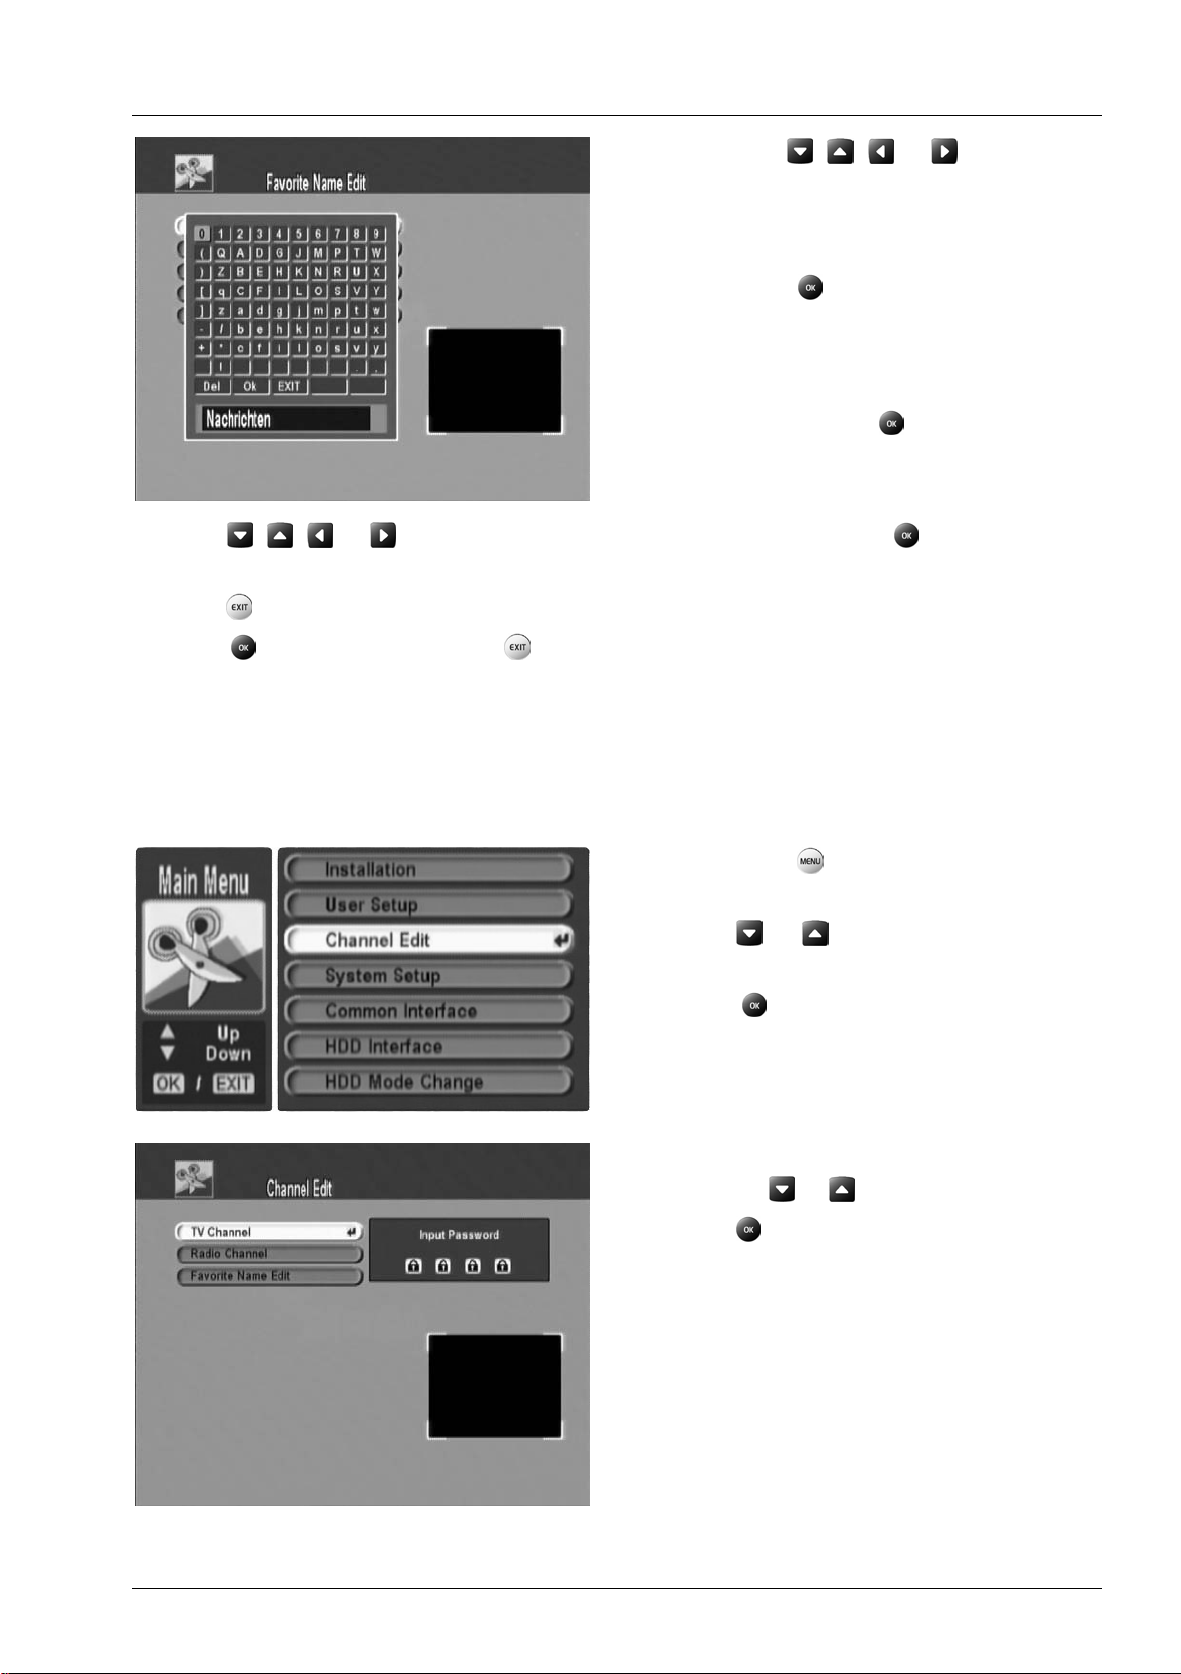
TSR 5200 HDD Playback
- Press , , or to select the
first character for the new favourite
name and to overwrite the existing
name.
- Press to enter the selected
character.
- Repeat the above steps until you
have written the full name (if you
mistype, press on the field Del to
erase the last entered character.
- Press , , or to move the cursor to the field OK and press to save the new
name (or press EXIT to cancel and go back).
- Press to exit the menu.
- Select to save your setting or to quit the menu without saving any changes.
Programming Favorites
You can add custom channels to the favourite list.
- Press the button on the remote
- Press or to select the menu item
- Press
- Select the menu option TV Channel
- Press and enter the password using
control to go to the Main Menu.
Channel Edit.
to go to the Channel Edit
menu.
using the
the numeric keypad (the factory-default
password is 0000) to open the TV
Channel menu.
or buttons.
23
Page 30

TSR 5200 HDD Playback
- Press or to select the desired
favourite channel (our example shows
Fav1) from the selection bar.
- Press
channel from the channel list.
- Press to add the selected channel to
the favourites (pressing
will remove that channel from the
favourite list).
- Repeat the above steps to add more
channels to the favourite list.
- Press to exit the menu.
- Select to save your setting or to quit the menu without saving any changes.
- Press several times to exit the all menus.
It is also possible to add one channel to different favourite groups. To do so,
i
select another favourite group from the selection bar and press on the
remote control.
or to select the desired
once again
24
Page 31

TSR 5200 HDD Playback
Playing Back Recordings from Hard Disk
You can play back your recorded TV shows form hard disk.
Playback
- Press the button [29] on the remote control to open a list containing all recordings.
- Press or on the remote control to select the desired recording.
- Press to start playback.
Fast Forward and Rewind
- Pressing the button [34] on the remote control repeatedly will accelerate playback to
2x, 4x, 8x and 12x.
- Pressing the button [33] on the remote control repeatedly will accelerate playback to
2x, 4x, 8x and 12x backwards.
- Press [42] on the remote control to resume playback.
Slow-Motion Forward and Rewind
- Pressing the button [36] on the remote control repeatedly will decelerate playback to
1/2, 1/4 and 1/8.
- Pressing the button [35] on the remote control repeatedly will decelerate playback to
1/2, 1/4 and 1/8 backwards.
- Press [42] on the remote control to resume playback.
Step-by-Step Playback Forward/Backward
- Pressing repeatedly the button [43] on the remote control will skip forward a small
portion.
- Pressing repeatedly the button [44] on the remote control will skip backward a small
portion.
Pause
- Press [41] on the remote control to pause the playback.
- Press the button
[41] or the button [42] again to resume playback.
Stopping Playback
- Press the button [32] on the remote control to stop playback.
25
Page 32

TSR 5200 HDD Playback
Bookmarks
For recordings that have been saved on the hard disk you can insert bookmarks into
specific scenes to locate them easily.
Inserting Bookmarks
- Start playback of a recorded show from hard disk (see page 25, Playback).
- Press the button
You can insert up to 50 bookmarks. The interval between two bookmarks must be at
least 10 seconds. For shorter intervals the previous bookmark will be erased.
[23] on the remote control during playback to insert a bookmark.
Going to a Bookmark
- Press the button [25] on the remote control during playback to continue playback
from the next bookmark.
Deleting Bookmarks
- When the playback has reached the bookmark you want to erase, press [23] to
remove the bookmark.
Viewing Two TV Shows Simultaneously (PIP)
PIP (Picture In Picture) allows you to display a second TV channel while viewing another
one. This function will only be available while both tuners of the TSR 5200 HDD are
receiving a signal.
If you have only one satellite antenna or are only using one connection while
i
- Press the button
picture represents the currently tuned-in TV station.
- Press or on the remote control or use the All Channels menu (see page 20 –
Switching TV Channels) to tune in a different channel. The second picture window will
still display the previously tuned-in station.
- Use the button [45] on the remote control to switch between these channels.
- Press the button [46] on the remote control again to hide the secondary picture
window.
operating a multi-user antenna system you can use the supplied adapter cable
(6) to interconnect both tuners (see page 4 - Single-user satellite system). This
will allow a limited PIP functionality.
[46] on the remote control to display a second picture window. This
26
Page 33

TSR 5200 HDD Playback
Displaying Multiple Channels Simultaneously (Multi-Picture)
This function allows you to watch several channels at the same time. You can watch 4, 9
or 16 channels simultaneously. This function will only be available while both tuners of the
TSR 5200 HDD are receiving a signal.
If you have only one satellite antenna or are only using one connection while
i
- Press the button [26] on the remote control to display a menu for choosing the
number of picture windows.
- Press or on the remote control to select the desired setting.
- Press to enable the selected setting.
- Press , , or to select a channel from the table.
operating a multi-user antenna system you can use the supplied adapter cable
(6) to interconnect both tuners (see page 4 - Single-user satellite system). This
will allow a limited PIP functionality.
- Press to enable a channel.
- To finish this display mode, press .
After enabling this function the last tuned-in channel will appear in the upper-left
i
corner of the table, all other channels will be sorted upwards. The currently
enabled channel will show a yellow frame. The output sound also belongs to
this channel.
Time-Shift Function
You can pause a live TV show (for instance in order to answer a phone call). Then the
programme is buffered onto the hard disk.
- Press [27] on the remote control to pause the current TV show.
- Press
i
[27] again when you want to resume watching the show.
This function can be executed several times, as necessary. After using it for the
first time, the current TV show will be played back time-shifted from the live TV
programme.
27
Page 34

TSR 5200 HDD Recording and Editing
Recording and Editing
Recording
The TSR 5200 HDD allows you to record TV programmes onto the internal hard disk. The
hard disk has a capacity of 250GB. This allows you to record approx. 120 hours of TV
programmes.
One-Touch Recording
You can record the current TV programme "on the fly". Programmes are saved onto the
hard disk.
- Press the button [31] on the remote control to start the recording.
- A red circle in the upper-left corner indicates that recording is in progress.
You can also record several TV programmes simultaneously. Please note that
i
this function is not available for all channels when using a single-user antenna
system only. To record the second show proceed as for the first show.
Stopping Recording
- Press the button [32] on the remote control to stop recording.
- Press the button [32] on the remote control to confirm stopping the playback.
Viewing a TV Programme While Recording Another Programme
You can watch a TV programme while recording another one.
- Press the button
small window.
- Press or on the remote control or use the All Channels menu (see page 20 –
Switching TV Channels) to tune in a different channel, the second picture window will
still display the current recording.
Please note that this function is not available for all channels when using a
i
single-user antenna system only.
[46] on the remote control, the current recording will continue in a
28
Page 35

TSR 5200 HDD Recording and Editing
Programmed Recording
EPG Recording
This function lets you select entries from the Electronic Programme Guide (EPG) for
recording. Select the desired TV channel (see page 20 – Switching TV Channels) and
press
[28] on the remote control to display the Electronic Programme Guide.
TV stations broadcast information about their TV and radio programmes in
!
parallel to the programmes. It depends on the station whether this information is
available or not.
- Press or to select the desired day.
- Press or to select the desired
programme.
- Press [31] to program the selected
TV show.
A popup status window lets you edit the
programme data, if necessary.
- Press or to select the desired
entry.
- Press , or the numeric keys to
select a different start or end time for the
recording.
- Press
Reminder or the mode Record.
- Select the menu options OK or Cancel
under Save using the
- Press to apply the entered data.
or to select the mode
or buttons.
The corresponding entry will be marked with a red circle to acknowledge.
29
Page 36

TSR 5200 HDD Recording and Editing
In order for the recording to work properly it is essential that date and time are
!
Press the Information button [39] to display further information about the highlighted
programme in a popup window. Press
Press
multi-channel mode shows an overview of the current and the following seven TV
channels. The current programme is marked in green.
Here you can also press
programming the single-channel mode (see page 29).
Programmed recordings appear marked in red. You can continue programming more
programmes by repeating the above steps.
Once you are done programming all desired TV shows, press
Programme Guide.
set correctly. If necessary, read - Setting the Time - on page 12.
once again to close this window.
[26] to toggle to multi-channel mode in the Electronic Programme Guide. The
- Press
yellow marker to select a programme.
[31] to program the selected show. Proceed as for
, , and to move the
[15] to exit the Electronic
Erasing Programmed Recordings
30
- Press the
control to go to the Main Menu.
- Select the menu option HDD Interface
using the or buttons.
- Press to go to the HDD Interface
menu.
button on the remote
Page 37

TSR 5200 HDD Recording and Editing
- Select the menu option Pre-recording
using the or buttons.
- Press to go to the Pre-recording
menu.
- Press or to select the menu option
Event Number and then press or
to select the event number of the
programmed recording you want to
erase.
- Press to select the menu option
Prerecording and press or to
DISABLE the function (all TV
programme-specific data will be erased).
- Select the menu option Save using the
or buttons and press to
confirm.
The event number has become available for a new programmed recording. Press [15]
repeatedly to exit the menu.
Programming a Recording Manually
- Press the
control to go to the Main Menu.
- Select the menu option HDD Interface
using the or buttons.
button on the remote
- Press to go to the HDD Interface
menu.
31
Page 38

TSR 5200 HDD Recording and Editing
- Select the menu option Pre-recording
using the or buttons.
- Press to go to the Pre-recording
menu.
- Press or to select Event Number
and press or to choose a free
number.
- Select the menu option Pre-recording
using the or buttons and enable it
by pressing or .
To access any of the other menu items,
press or on the remote control.
Recording Mode Press
Recording Date Enter the recording date by pressing or on the remote
control or by using the numeric keys (if you have selected the
Recording Mode "Daily" this option won't appear; if you have
selected "Weekly", press or to enter the day of the week).
Recording Start Time Press
your recording.
Recording Stop Time Press , or use the numeric keys to enter the stop time for
your recording.
Event Alarm Press or to ENABLE or DISABLE this function. When
enabled, the TSR 5200 HDD will advise you of any approaching
recordings.
or to select Once, Daily, Weekly or Disabled.
, or use the numeric keys to enter the start time for
Satellite If you are linked to multiple satellites, press
to select the desired satellite.
32
and then and
Page 39

TSR 5200 HDD Recording and Editing
TV Station Press and then or to choose the TV channel you wish to
record.
Save Press to save all settings and enable the programmed
recordings.
The TSR 5200 HDD will record the specified station at the set time. The programmed
event number will be occupied until the specific programmed recording has been
completed or erased. If you want to add further programmed recordings, select a new free
event number and repeat the above steps.
Editing Recordings
- Press the
control to go to the Main Menu.
- Select the menu option HDD Interface
using the or buttons.
button on the remote
- Press to go to the HDD Interface
menu.
- Press or to select the menu item
Edit Recorded Channels.
- Press to go to the Edit Recorded
Channels menu.
33
Page 40

TSR 5200 HDD Recording and Editing
- Press or to select the desired
action (our example shows "Delete")
from the selection bar.
- Press the
recording.
- Press to apply the selected action to
the recording.
The following functions are available:
Play The selected recording is played back.
Group A counter is assigned to the selected recording according to the playback
order in HDD playback mode.
Rename To rename the selected recording.
- Press
to overwrite the existing name.
- Press to enter the selected character.
, , or to select the first character for the new name and
or buttons to choose the
- Repeat the above steps until you have written the full name.
- Press , , or to move the cursor to the field OK and press
to save the new name (or press EXIT to cancel and go back).
Delete To delete the selected recording.
First, the recording will be marked. You can unmark it by pressing
again. The recording will only be deleted after exiting the menu by
pressing
Lock To protect the recording against playback or modifications.
A key icon will appear behind the recording entry. Playback or editing will
only be possible after entering the password (the default password is
0000).
Press
several times to exit the menu.
.
34
Page 41

TSR 5200 HDD Recording and Editing
Cutting a Recording
This function allows you to cut specific scenes out of a recording.
- Press the button on the remote
control to go to the Main Menu.
- Select the menu option HDD Interface
using the or buttons.
- Press to go to the HDD Interface
menu.
- Select the menu option Cut Recorded
Channels using the or buttons.
- Press to go to the Cut Recorded
Channels menu.
35
Page 42

TSR 5200 HDD Recording and Editing
- Press or to select the recording
you wish to cut.
- Press : the recording plays back in the
monitor window.
- Press [24] to set the beginning of the
segment.
- Press [26] to set the end of the
segment.
- Press [23] to confirm your selection (if
you made a mistake you can press
[25] to remove the defined segment).
- Press [29] to execute the cutting.
Press
i
several times to exit the menu.
To cancel the process at any time, press .
36
Page 43

TSR 5200 HDD Radio Stations
Audio Functions
The TSR 5200 HDD also allows you to receive radio broadcasts. To listen to the radio we
recommend that you connect your TSR 5200 HDD to you Hifi equipment via audio cables.
For this, use the audio output [19] on the back panel. If you have established no
connection to external audio equipment, the sound will be played back through the TV set.
Listening to the Radio
Press [8] on the remote control to switch to radio mode.
Radio Station Settings
To configure any radio station, proceed as described for TV stations. Please note that not
all setting apply to radio stations.
- Press the
control to go to the Main Menu.
- Press or to select the menu item
Channel Edit.
- Press to go to the Channel Edit
menu.
- Press or to select the menu item
Radio Channel.
- Press
the numeric keypad (the factory-default
password is 0000) to open the Radio
Channel menu.
and enter the password using
button on the remote
37
Page 44

TSR 5200 HDD Radio Stations
- Press or to select the desired
radio channel.
- Press or to select the desired
action.
- Press to apply the selected action to
the radio station.
The function description for radio stations is equivalent to those of the TV
i
stations (see page 40 – Editing TV Channels).
Recording Radio Broadcasts
If you want to record a radio programme, proceed as for recording TV shows (see the
sections starting from page 28 – Recording). Please note that the minimum recording time
is 1 minute.
Switching Back to TV Mode
Press [8] on the remote control to switch back to TV mode.
38
Page 45

TSR 5200 HDD Radio Stations
Playing MP3 Music
You can play back music from the hard disk. Just as on a computer, you can also store
music files in subfolders (see page 64 – Exchanging Data with a PC)
- Press the button
- Press the button
[29] on the remote control to open a list containing all recordings.
[29] on the remote control to show a list of saved music titles.
- Press or to select the desired
folder or music title.
- Press
press
title.
- Press [32] to stop playback.
- Press to exit the menu.
Press the button when a music title has
been highlighted to open a submenu.
to open the selected folder or
[42] to play the selected music
- Press or to select the desired
action.
- Click to confirm the action.
The following actions are available:
Play Start playback from the selected music title.
Delete Erases the selected music title.
Single Plays only the selected music title and then stops playback.
LOOP Plays all music titles from the selected title in sequence.
Random Plays all music titles in random order.
.
39
Page 46

TSR 5200 HDD Advanced Settings
Advanced Settings
Editing TV Channels
- Press the
control to go to the Main Menu.
- Press or to select the menu item
Channel Edit.
- Press to go to the Channel Edit
menu.
- Select the menu option TV Channel
using the or buttons.
- Press and enter the password using
the numeric keypad (the factory-default
password is 0000) to open the TV
Channel menu.
button on the remote
- Press
channel.
- Press or to select the desired
action from the selection bar.
- Press
the station.
or to select the desired
to apply the selected action to
40
Page 47

TSR 5200 HDD Advanced Settings
The following settings are available:
Rename To rename the selected station.
- Press
to overwrite the existing name.
- Press to enter the selected character.
- Repeat the above steps until you have written the full name.
- Press
to save the new name (or press EXIT to cancel and go back).
Move Press or to move a channel up or down in the channel list. Press
to confirm the new position.
Delete Delete channel
Sort: Alphabet Sorts the channels alphabetically.
Sort: FTA/SCR Sorts the channels by code.
Sort: P_Lock Sorts the channels by child lock.
Sort: TP Sorts the channels by transponder order.
P_Lock Enable/disable Child lock.
Skip Enables/disables channel skipping whilst navigating.
Fav1 – Fav5 Assigns channels to the favourite list (see page 23 - Programming
Favorites).
, , or to select the first character for the new name and
, , or to move the cursor to the field OK and press
- Press to exit the menu.
- Press to save your setting or to quit the menu without saving any changes.
System Setup
System Setup contains further settings to configure the TSR 5200 HDD.
- Press the button on the remote
control to go to the Main Menu.
- Select the menu option System Setup
using the
- Press to go to the System Setup
menu.
or buttons.
41
Page 48

TSR 5200 HDD Advanced Settings
- Press or to select the desired
option. On the following pages you'll find
a more detailed description on the
different settings.
- Press to exit the System Setup menu.
The following settings are available:
Parental Control
Here you can change the PIN code. Select Parental Control from the System Setup
menu (see above) and press on the remote control.
- Enter the current PIN code (the default
PIN code is 0000).
- If entered correctly, the cursor will jump
to the following entry. Enter the PIN
code again via the numeric keys.
- In the third line, enter a new four-digit
PIN code.
- Confirm the new PIN code by entering it
again in the Confirm PIN line.
!
Keep the new PIN in a safe place.
42
Page 49

TSR 5200 HDD Advanced Settings
Factory Setting
This option will restore the factory-default configuration of your TSR 5200 HDD. All
personal settings will be erased, only the recording on your hard disk will be kept. Select
Factory Setting from the System Setup menu (see page 41) and press on the remote
control.
- Enter the password via the numeric keys.
- Press to restore the factory-default settings or to quit the menu without saving any
changes.
After executing this function the device will power off and reboot. This process
i
may take a few minutes.
System Information
Here you can view the current software version and the system date of your TSR 5200
HDD. Select System Information from the System Setup menu (see page 41). The
information will appear in the menu.
Menu Lock
This function allows you to restrict access to the menus so the settings cannot be changed
accidentally. After this, any changes can be performed after entering the password only.
Select Menu Lock from the System Setup menu (see page 41) and press on the
remote control.
- Enter the password via the numeric keys.
- Press to enable the menu lock or to quit the menu without saving any changes.
To disable the active menu lock, proceed the same way.
43
Page 50

TSR 5200 HDD Advanced Settings
Finding the Satellite
If your satellite antenna doesn't point to the satellite, proceed as follows:
- Press the button on the remote
control to go to the Main Menu.
- Select the menu option Installation
using the or buttons.
- Press to go to the Installation menu.
- Select the menu option Antenna Setup
using the or buttons.
- Press to go to the Antenna Setup
menu.
- Select the menu option Satellite using
the or buttons.
- Press
select the desired satellite (our example
shows ASTRA).
- Orientate your satellite antenna to the
satellite.
and then press or to
The two bars on the right pane of the screen show the signal quality. These bars will help
you to find the optimum orientation of your satellite antenna in case it's not perfectly
pointing towards the satellite yet.
To adjust the satellite antenna system, see also page 54 - Transponder where
i
44
you can find some tips to control the reception settings.
Page 51

TSR 5200 HDD Advanced Settings
The Hard Disk
The HDD Interface menu contains several options to backup and restore data as well as to
delete the hard disk.
- Press the button on the remote
control to go to the Main Menu.
- Select the menu option HDD Interface
using the or buttons.
- Press to go to the HDD Interface
menu.
Formatting the Hard Disk
The TSR 5200 HDD saves the recording on a hard disk drive. This function allows you to
erase all data from the hard disk and to restore its factory-default configuration.
All recording, channel lists and software data stored on the hard disk will be
!
Select Format from the HDD Interface menu (see above) and press on the remote
control.
erased during formatting. Make sure that all contents that you want to keep
have been backed-up on a different media. To backup hard disk data, see page
64 - Exchanging Data with the PC.
- Enter the password via the numeric keys
(the default password is 0000).
- Press to continue or press to
cancel formatting.
45
Page 52

TSR 5200 HDD Advanced Settings
Saving the Channel List on the Hard Disk
This function allows you to save channels on your hard disk. This is useful when you have
edited the stations (for instance, renamed them or changed the order).
Select Channel Data Backup to HDD from the HDD Interface menu (see page 45) and
press on the remote control.
- Enter the password via the numeric
keys. The process begins and a
message with the name of the backup
file and the word "Success" will appear
after a while.
Updating the Channel List on the Hard Disk
If you want to restore a previously-saved channel list or if you have obtained a new
channel list from the manufacturer, you can use this function to transfer the list from the
hard disk to the TSR 5200 HDD working memory in order for the device to use it.
Select Channel Upgrade from HDD from the HDD Interface menu (see page 45) and
press on the remote control.
- Press
entry from the Channel Upgrade from
HDD menu.
- Press and enter the password v ia the
numeric keys.
The device will load the channel list.
or to select the desired
46
Page 53

TSR 5200 HDD Advanced Settings
Do not power the device off during this procedure! If you power the system off,
!
If you are prompted to power the system off and on and this does not happen
automatically, toggle the power switch [18] to restart it.
the installation will be aborted and it will not be possible to power the device
back on.
Updating the Software from Hard Disk
If you have downloaded an updated device software (firmware) for your TSR 5200 HDD
(see page 64 – Exchanging Data with the PC), you can use this function to execute this
software.
If you have customised the channel list it is recommended that you backup the
!
Select Software Upgrade from HDD from the HDD Interface menu (see page 45) and
press on the remote control.
channel list before executing this procedure (see page 46 - Saving the Channel
List on the Hard Disk) so you can restore it after the process is completed (see
page 46 - Updating the Channel List on the Hard Disk).
- Press or to select the desired
entry from the Software Upgrade from
HDD menu.
- Press and enter the password v ia the
numeric keys.
The device will load the software.
Do not power the device off during this procedure! If you power the system off,
!
the installation will be aborted and it will not be possible to power the device
back on.
If you are prompted to power the system off and on and this does not happen
automatically, toggle the power switch [18] to restart it.
47
Page 54

TSR 5200 HDD Advanced Settings
After restarting your TSR 5200 HDD you must restore the factory-default configuration in
order for the new software to be used (see page 43 – Factory Setting).
Depending on the type of upgrade, the menus and display structure may
i
change.
Time Shift
This function allows you to temporarily save the current TV show on the hard disk. This
allows you to pause a live TV programme (see also page 27 - Time-Shift Function). Later
you can resume the TV show from where you have paused it. The entire broadcast from
the time of pausing will be temporarily saved on the hard disk.
To use the Time-Shift function, select Time Shift from the HDD Interface menu (see
page 45).
- Press
enabled) or OFF (Time Shift disabled).
or to select ON (Time Shift
Videotext
This feature is available only when the current station is broadcasting Videotext
information.
- Press
- Press or to select Videotext.
[23] on the remote control.
- Press .
- To control the videotext, enter the page numbers via the numeric keys.
- To finish this display mode, press .
48
Page 55

TSR 5200 HDD Advanced Settings
Common Interface Cards
In order to be able to receive coded channels you need a CI card (Common Interface
smart card) from your channel provider. They will also inform you of any additional
hardware (e.g. card slot module) necessary to use the smart card with your device's card
slots. If you want to use a smart card, insert it into an available slot [7] behind the front
panel door. To open the front panel door, press the marking on the upper part of the door.
To configure the card, proceed as follows:
- Press the button on the remote
control to go to the Main Menu.
- Select the menu option Common
Interface using the or buttons.
- Press to go to the Common
Interface menu.
Selecting the Tuner
- Press or to select the desired slot.
- Press .
The card's main menu will appear. Please
read the user information accompanying
your card.
- Press the button on the remote
control to go to the Main Menu.
- Select the menu option Installation
using the or buttons.
- Press to go to the Installation menu.
49
Page 56

TSR 5200 HDD Advanced Settings
- Select the menu option Antenna Setup
using the or buttons.
- Press to go to the Antenna Setup
menu.
- Select the menu option Tuner Select
using the or buttons.
- Select the options 1, 2, 1and2 or Loop
using the or buttons.
- Press and then press to save the
settings, or press to cancel the
process.
The following settings are available:
Tuner 1 Uses the first tuner IF 1 INPUT [17].
Use this setting if you are using the first satellite antenna input connector
only on the TSR 5200 HDD.
Tuner 2 Uses the second tuner IF 2 INPUT [24].
Use this setting if you are using only the second satellite antenna input
connector on the TSR 5200 HDD.
Tuner 1and2 Use this setting if you are using both satellite antenna input connectors on
the TSR 5200 HDD or if you are using a multi-user satellite antenna
system.
Loop If only the first satellite antenna connector IF 1 INPUT [17] has been
connected to the satellite dish and you have connected the adapter cable
from IF 1 OUTPUT [16] to IF 2 INPUT [24], select this setting to use the PIP
and MultiPicture functions with certain restrictions.
50
Page 57

TSR 5200 HDD Advanced Settings
LNB Type
Depending on the type of satellite antenna system the setting LNB type allows you to
customize the TSR 5200 HDD to your antenna system.
LNB means "Low Noise Block Converter" and is the signal reception unit of a
i
To specify the LNB type, select Antenna Setting from the Installation menu (see page
49) and press on the remote control.
satellite antenna. Due to the technical development in satellite reception
technology there are different LNBs on the market.
- Select the menu option LNB Type using
the or buttons.
- Press or to select one of the
options Universal 1, Universal 2,
Single - SL, Single - SH and Standard.
This setting will determine the local LNB
frequency that will be shown in the
following line.
Universal 1 A Universal LNB receives in the lower (9750 MHz) and upper (10600 MHz)
frequency spectrum. This is a very common model.
Universal 2 Like Universal 1, this LNB receives in both the lower 9750 MHz and the
higher 10750 MHz band.
Single - SL Single LNB for the lower band.
Single - SH Single LNB for the higher band.
Standard If none of the previous LNB types matches your satellite antenna system
you can set the local LNB frequency manually.
- Press the button on t he remote control to go to the LNB Local Freq.
line.
- Enter the frequency via the numeric keys.
Press and then press to save the settings, or press to cancel the process.
51
Page 58

TSR 5200 HDD Advanced Settings
Enabling/Disabling the 22kHz Signal
A satellite antenna system receiving digital channels has to switch the polarity
(horizontal/vertical) and the frequency band (low/high). Universal LNBs do this
automatically: there is no setting you need to perform. Therefore this function is not
available for Universal LNBs.
If you have a satellite antenna with a LNB requiring the 22kHz signal for switching, select
Antenna Setting from the Installation menu (see page 49) and press on the remote
control.
Older satellite antenna systems do not use the 22kHz signal for switching the
i
frequency band but for switching different satellite positions.
- Select the menu option 22kHz using the
or buttons.
DiSEqC
i
- Select the menu option ON or OFF
using the or buttons.
- Press and then press to save the
settings, or press to cancel the
process.
DiSEqC means "Digital Satellite Equipment Control". While older satellite
antenna system use the 22kHz signal for feed-switching (multiple satellite
positions) and later for frequency switching, DiSEqC is a new standard for
different status switching. The DiSEqC standard is available in different levels:
from Level 1.2 DiSEqC allows you to control rotor units. The TSR 5200 HDD
supports this technology.
Select Antenna Setup from the Installation menu (see page 49) and press on the
remote control.
52
Page 59

TSR 5200 HDD Advanced Settings
- Select the menu option DiSEqC using
the or buttons.
- Select one of the options Tone A,
Tone B, #1, #2, #3, #4 and OFF using
the or buttons.
- Press
settings, or press
process.
Tone A, Tone B These settings are the "Tone Bursts":
A tone burst is a simple switching command that is only capable of
sending control information together with an analogue switching status
(14/18V and 22kHz).
#1, #2, #3, #4 Allows for the control of up to four LNBs via DiSEqC.
This is necessary when using multiple satellite antennas or multi-feed
systems (one antenna with multiple LNBs) that are interconnected via a
multi switch.
OFF DiSEqC is disabled.
DiSEqC is not necessary when using a single-user antenna system.
and then press to save the
to cancel the
LNB Power
LNB Power is ON in factory-default configuration. Turn this feature off if you are connected
to a multi-user satellite antenna system using single cabling. This system is typical for
large residential buildings.
Select Antenna Setup from the Installation menu (see page 49) and press
remote control.
- Select the menu option LNB Power
using the
- Select the menu option ON or OFF
using the or buttons.
- Press and then press to save the
settings, or press to cancel the
process.
or buttons.
on the
53
Page 60

TSR 5200 HDD Advanced Settings
Transponder
Each satellite broadcasts TV and radio programmes via transponders. Under Transponder
you'll find all necessary settings for receiving a specific station. You can select the different
transponders from the Antenna Setup menu. Select Antenna Setup from the Installation
menu (see page 49) and press
on the remote control.
- Select the menu option TP
(Transponder) using the
buttons.
- Select the desired transponder using the
or buttons.
or
- Press
cannot be saved.
This function is for monitoring purposes only. While configuring the TSR 5200 HDD for
your satellite antenna system you can use this feature to verify whether all required
transponders can be received.
to exit the menu: the changes
Positioner Setting
You can control a rotor mechanism (positioner) using the DiSEqC 1.2 or USALS
standards. Select Antenna Setup from the Installation menu (see page 49) and press
on the remote control.
- Select the menu option Positioner
Setting using the or buttons.
54
- Select the menu option Disable, 1.2 or
USALS using the or buttons.
- Press
positioner.
to continue programming the
Page 61

TSR 5200 HDD Advanced Settings
Positioner Control via DiSEqC 1.2
- Press or to select the desired
menu item.
- Press or to select the desired
setting.
- Press to exit the menu.
The following settings are available:
Current position Press the or buttons to choose the position. Positions
0-26 are preset, positions 27-49 are user-defined.
Movement Press to turn the satellite antenna to the West or press
to move East. To stop the movement, press .
Recalculation Recalculates the position for all satellites. To do this, press
.
East Limit Set Move the satellite antenna to the furthest easterly position.
To save this position, press .
West Limit Set Move the satellite antenna to the furthest westerly position.
To save this position, press
Limits Disable To delete the limits set, press
Go to reference Press
Store Press to save all settings.
to move to the reference point.
.
.
55
Page 62

TSR 5200 HDD Advanced Settings
Positioner Control via USALS
- Press or to select the desired
menu item.
- Press or to select the desired
setting.
- Press to exit the menu.
The following settings are available:
Satellite Po sition Enter the satellite's position via the numeric keys and select
the direction using or .
My Longitude Enter the longitude via the numeric keys.
My Latitude Enter the latitude via the numeric keys.
Reference Position Save the present position as reference.
Move Start the desired movement by pressing .
Store Save the present position. To do so, press .
Satellite Scan (Channel Search)
To start scanning for channels, select Antenna Setting from the Installation menu (see
page 49) and press
on the remote control.
- Select the menu option Satellite Scan
using the
- Select one of the options FTA, FTA+D,
FTA+SCR or FTA+SCR+D using the
or buttons.
or buttons.
56
- Press
to start the scanning process.
Page 63

TSR 5200 HDD Advanced Settings
The available settings have the following meaning:
FTA Free To Air (free channels)
D Digital (digital channels)
SCR Scrambled (encoded channels)
i
It is also possible to launch the scanning process from the Installation menu. For this
purpose it contains the menu items Scan Mode and Satellite Scan.
To cancel the scanning at any time, press .
- Press the button on the remote
control to go to the Main Menu.
- Select the menu option Installation
using the or buttons.
- Press to go to the Installation menu.
- Press or to select the menu option
Scan Mode and then a combination of
FTA, SCR and D (see above
description).
- Press the
control to go to the Satellite Scan menu
option.
- Press and then or to select the
satellite you want to scan from the menu
that appears.
- Press
to start the scanning process.
button on the remote
The scan is performed automatically, and any found channels will be stored into the
channel list. During this process a progress indicator appears with a table of all available
TV and radio channels that have been found. This process may take a few minutes.
57
Page 64

TSR 5200 HDD Advanced Settings
TP Scan (Transponder Scan)
The Transponder Scan allows you to scan a specific transponder for available channels.
Select TP Scan from the Installation menu (see page 57) and press on the remote
control.
- Press or to select the desired satellite.
- Press
- Press
- Press to start the scanning process.
A window with status information about the TV and radio channels that have been found
will appear (see also page 56 – Satellite Scan).
.
or to select the desired transponder.
Network Scan
Select Network Scan from the Installation menu (see page 57) and press on the
remote control.
To control the Network Scan, proceed as for the Transponder Scan (see above). This
function allows you to search for other stations if the selected transponder contains
information about nearby transponders. For example, you can use this function to locate
stations for a specific cultural audience.
Advanced Scan
Advanced Scan allows you to set transponder data manually. You can retrieve the
necessary details form the satellite provider (e.g. www.astra.de). To enter the data, select
Advanced Scan from the Installation menu (see page 57) and press
control.
on the remote
- Select the menu option Advanced Scan
using the or buttons.
- Press .
- Select the desired satellite for which you
want to setup the transponder using the
or buttons.
- Press .
58
Page 65

TSR 5200 HDD Advanced Settings
- Press or to select the desired
menu item.
- Enter the required digits via the numeric
keys.
- Press to exit the menu.
- Press several times to exit all menus.
The following settings are required:
Down Frequency Enter the transponder frequency in MHz.
Symbol Rate The transponder's symbol rate must be known. It determines the
number of TV and radio stations that can be transmitted. Enter the
symbol rate in Msps (Million scannings per second).
Polarity Specify the polarity (horizontal or vertical).
Channel Name Press to enter a name for the channel. In the windows that
appears you can enter a name as described on page 22.
Video PID PID means "packet identifier". The video PID is a three- to four-digit
number determining the channel to be received from the transponder.
This is only required for TV stations as the video PID is only used for
the picture signal. For radio broadcasts leave the setting AUTO.
Audio PID Here you can specify the PID for the audio signal.
PCR PID PCR means "program clock recovery" and is required for
synchronising the audio data with the video (picture) data. Enter the
three- or four-digit PCR PID into this field.
Smart Search
Smart Search is similar to the Antenna Setup menu (see also page 44 - Finding the
Satellite). Please consult that chapter for details. In addition to the settings contained in the
Antenna Setup menu, you can also set the Symbol Rate here (see also page 58 –
Advanced Scan). The available settings for the symbol rate are:
- Low (max. 5.6 Msps)
- High (max. 5.6 Msps)
- All
59
Page 66

TSR 5200 HDD Advanced Settings
Select Smart Search from the Installation menu (see page 57) and press on the
remote control.
- Select the menu option Symbol Rate
using the or buttons.
- Press or to select the desired
symbol rate.
- Press to exit the menu.
- Press
several times to exit all menus.
Editing Transponders/Satellites
Here you can modify any preset information. Select Edit TP/Satellite from the Installation
menu (see page 57) and press on the remote control.
- Press or to select the desired
satellite.
- Press .
- Press or to select the desired
setting.
- Press
.
- Press
The following settings are available:
Rename From here you can rename the satellite. Proceed as described on
page 22.
Delete From here you can delete an entry. This function is available only if the
corresponding satellite has not been enabled in the Antenna Setup
menu (see also page 44 - Finding the Satellite). Enabled satellites
have a mark behind their names.
Restore If you have made any changes you can undo them by pressing
here.
Edit TP Press to edit a specific transponder of this satellite.
60
several times to exit all menus.
Page 67

TSR 5200 HDD Advanced Settings
Editing Transponders
- Press or to select the desired
transponder of the current satellite.
- Press .
- Press
- Press
- Press several times to exit all menus.
The following settings are available:
Delete Press to delete the selected transponder.
Edit Press to open a menu showing the transponder settings.
- Press or to select the desired
setting.
- Enter the numbers via the numeric keys,
switch the polarity pressing and .
or to select Delete or Edit.
.
- Press to quit the menu without saving
any changes or press
changes.
- Press several times to exit all menus.
The following settings are available:
Down Frequency Enter the transmission frequency in MHz.
Polarity Choose between horizontal and vertical polarity.
Symbol Rate Enter the symbol rate in Msps (Million scannings per second).
to apply the
61
Page 68

TSR 5200 HDD Advanced Settings
Transferring Software
Using this function you can transfer data through the RS232 interface [22] on the back
panel. This feature has been designed for service purposes. To transfer program data and
device software (firmware) you can use the USB port (see the descriptions starting on
page 46 – Saving/Updating the Cannel List on the Hard Disk and Updating the Software
from Hard Disk).
System Upgrade
By upgrading your system you can load the latest device software directly from the
satellite. You can have the system do this automatically or you can manually specify the
transponder if you know the location of the upgrade. Select System Setup from the main
menu and press
If you have customised the channel list it is recommended that you backup the
!
channel list before executing this procedure (see page 46 - Saving the Channel
List on the Hard Disk) so you can restore it after the process is completed (see
page 47 - Updating the Channel List on the Hard Disk).
on the remote control.
- Select the menu option System
Upgrade using the or buttons.
- Press to go to the System Upgrade
menu.
62
Page 69

TSR 5200 HDD Advanced Settings
- Select the desired satellite from which
you want to upgrade automatically using
the or buttons, or choose Manual.
- If you have selected "Manual", press the
and buttons to choose the
respective settings and enter the data
using the numeric keypad.
- Press to apply the settings (the TSR
5200 HDD will search for suitable device
software according to the above
settings).
The system upgrade can take up to 15 minutes. To cancel the process at any time, press
. As soon as all data has been loaded the TSR 5200 HDD will restart.
After your TSR 5200 HDD has restarted you have to restore the factory-default
configuration in order for the new software to be used (see page 43 – Factory Setting).
Depending on the type of upgrade the menus and display structure may
i
For a manual upgrade the following settings are required:
Satellite Here you can select the satellite providing the device software.
Down Frequency Enter the transmission frequency in MHz.
Symbol Rate Enter the symbol rate in Msps (see also page 58 – Advanced Scan).
Polarity Press the or buttons to choose the polarity (vertical or
change.
horizontal).
63
Page 70

TSR 5200 HDD Advanced Settings
Exchanging Data with the PC
Recorded programmes are stored on the internal hard disk. You can also access this hard
disk from your computer. To do so, connect the computer and the TSR 5200 HDD via a
USB cable on the USB port [8] on the back panel of the device.
- Press the
control to go to the Main Menu.
- Select the menu option HDD Mode
Change using the
- Enter the password via the numeric keys
(the default password is 0000).
The TSR 5200 HDD will switch the hard disk for computer access. The option "PC"
appears behind the menu item HDD Mode Change. Additionally "Pc" will appear on the
front panel display [6].
On your PC, open My Computer. The hard disk will appear as a new storage device and
you will be able to copy or delete data (movies, recordings, music etc.).
button on the remote
or buttons.
For music titles, there is a folder MP3. If you copy MP3 music files into this
i
After you are done with all the desired tasks you have to switch back the internal hard disk
access of the SR 5200 HDD. To do so, enter the password via the numeric keys again.
The device will restart. This process may take a few minutes. Whilst restarting, the display
[6] on the front side of the device shows the message "boot".
folder you can play them back via the Music Box (see page 39 Playing MP3
Music). You can also organise your music files in subfolders, like you do on
your computer.
If you want to copy new device software this must be placed into the folder
Firmware.
64
Page 71

TSR 5200 HDD Advanced Settings
Using the Remote Control with Other Devices
The remote control unit of the TSR 5200 HDD is a preset remote control for different
devices. It also allows you to control your TV set, VCR and DVD player.
The appendix in this User's Manual contains a list of codes for different devices from
multiple manufacturers. Look for the manufacturer of the desired device in the list and
proceed as follows to program your remote control (shown on the example of the TV set):
1. Turn your TV set on and point the remote control to the TV set while entering the
following.
2. Press and hold [3] for at least 3 seconds until it lights up continuously.
3. Within the next 20 seconds, enter the code for your TV set (if there is more than
one code for the manufacturer of your TV set, use the first code that appears in
the list).
4. If the code is correct, the TV set will power off. If this does not occur, repeat
steps 2 and 3 and enter the next code from the list.
5. After the TV set has powered off, press on the remote control to confirm.
Test the remote control functions. If not all the functions are available, try a different
code from the list (for some manufacturers certain functions will not be available even if
the settings are correct).
To program the remote control for a VCR, press and hold the button [4] for at least
three seconds and proceed as described above.
To program the remote control for a DVD player, press and hold the button
least three seconds and proceed as described above.
To control the TSR 5200 HDD, press [5] on the remote control.
[6] for at
65
Page 72

TSR 5200 HDD Appendix
Appendix
Cleaning and Troubleshooting
Cleaning
Only use a dry and soft cloth for cleaning. Never use any water, detergents or
!
Troubleshooting
If you have any trouble with your TSR 5200 HDD, please check the following items before
contacting Technical Support.
!
aerosol cleaners.
Never open the case of the device! There is risk of electric shock and the
warranty will be void.
No picture and no sound
Make sure that the TSR 5200 HDD and the TV set are connected to the mains and have
been powered on.
Check if all connection cables are free of damage and seat properly in the respective jacks
on the TSR 5200 HDD and the TV set.
When using a coaxial cable, make sure that the TV set is tuned to the corresponding video
channel.
When using a Scart (Euro AV) cable, check whether the cable is connected properly and
that you have selected the correct AV channel on the TV set.
Unplug the power cord and plug it again into the wall outlet, or toggle the main power
switch on the back panel off and back on.
Picture is Black & White or shows bars
Check whether the colour settings of the TSR 5200 HDD match those of your TV Set (see
page 15 – TV Type and page 16 – Video Output).
66
Page 73

TSR 5200 HDD Appendix
Menus are distorted
Check the settings for brightness and contrast on the TV set and adjust, if necessary.
When using a Scart cable you should select RGB (see page 16 – Video Output).
The remote control doesn't function
Make sure that the TSR 5200 HDD is connected to the mains and has been powered on.
Check if the batteries have been inserted properly into the remote control and they are
charged. To verify, replace the batteries.
Check if you have pressed a function key for a different device (the active function key
blinks when operating the remote control).
Other errors
If you are still unable to solve the problem, contact your dealer or TARGA GmbH, Lange
Wende 41, 59494 Soest, Germany (www.targa.de). On the Warranty Card on the back
cover of this User's Manual you'll find the corresponding hotline number. Please have the
serial number of your device ready! You'll find the serial number on the back of the device
67
Page 74

TSR 5200 HDD Appendix
Technical Specifications
General
Input voltage AC 220-240 V, 50/60Hz
Power consumption max. 48 W
Dimensions 340 x 265 x 65 mm
Weight 3 kg
Operating temperature 0°C – 35°C
Storage temperature -20°C – 60°C
Receiver / LNB
Input jack F-type connector, IEC 169-24
Loop F-type connector, IEC 169-24
Frequency range 950 – 2150 MHz
LNB power and polarisation Vertical: DC13V / DC14V
Horizontal: DC 18V
Power consumption: max. 500mA
overload protection
22kHz signal 22 kHz ±1 kHz
Amplitude: 0.6V ±0.2V
DiSEqC switch Compatibility: Version 1.3
Demodulation QPSK
Symbol rate 1 – 45 Msps (SCPC, MCPC)
Viterbi decoder rate 1/2, 2/3, 3/4, 5/6, 7/8
Reed Solomon decoding FEC: 204, 188 t=8
MPEG transmission and A/V decoding
Transport MPEG-2 ISO/IEC 13818-1
Profile Level MPEG-2 MP@ML
Input max. 90 Mbit/s
Aspect Ratio 4:3, 16:9
Video decoding MPEG Layer I and II
Audio mode Single/Dual Channel, Stereo, Joint Stereo
Sampling Frequency 16/22,05/24/32/44.1/48 kHz
Processor and memory
Main processor EMMA2
CPU clock 187 MHz
Flash memory 4 MB
SDRAM 46 MB
68
Page 75

TSR 5200 HDD Appendix
EEPROM 32 kB
Hard Disk Drive 250 GB
Data input
Connector 9pin D-Sub
Protocol RS232 serial
Data transfer speed max. 115.2 kbps
RF Modulator
RF interface 75 Ohm IEC 169-2 connector/jack
Frequency 470 – 860 MHz (UHF)
Output channel CH 21 – 69
TV encoding PAL-G, K, I, NTSC
Preset channel CH 38, can be changed via menu
Card slots
PCMCIA 2 CI slots
Front panel
4-digit display Channel indicator
8 buttons Stand-By, Channel up/down, Menu, Exit,
OK, Volume up/down
Back panel
TV Scart RGB, CVBS, Audio L/R
VCR Scart CVBS, Audio L/R
Component connector YPbPr
RCA A/V Video, Audio L/R, S/PDIF
S/PDIF optical digital output or Dolby AC-3
Bitstream output
USB USB 2.0
S-Video S-Video out
Remote control
Type Infrared (TX frequency 38 kHz)
Battery 2 x 1.5V size AAA
69
Page 76

TSR 5200 HDD Appendix
Device codes
TVse
ts
70
Page 77

TSR 5200 HDD Appendix
TV sets
71
Page 78

TSR 5200 HDD Appendix
TV sets
72
Page 79

TSR 5200 HDD Appendix
TV sets
73
Page 80

TSR 5200 HDD Appendix
TV sets
74
Page 81

TSR 5200 HDD Appendix
TV sets
75
Page 82

TSR 5200 HDD Appendix
TV sets
76
Page 83

TSR 5200 HDD Appendix
TV sets
77
Page 84

TSR 5200 HDD Appendix
TV sets
78
Page 85

TSR 5200 HDD Appendix
TV sets
79
Page 86

TSR 5200 HDD Appendix
TV sets
80
Page 87

TSR 5200 HDD Appendix
TV sets
81
Page 88

TSR 5200 HDD Appendix
Video recorde
rs
82
Page 89

TSR 5200 HDD Appendix
Video recorde
rs
83
Page 90

TSR 5200 HDD Appendix
Video recorde
rs
84
Page 91

TSR 5200 HDD Appendix
Video recorde
rs
85
Page 92

TSR 5200 HDD Appendix
DVD-
Playe
rs
86
Page 93

TSR 5200 HDD Appendix
DVD-
Players
87
Page 94

TSR 5200 HDD Appendix
DVD-
Players
88
 Loading...