

Page 1

About this manual
Dear customer,
Thank you for choosing our product.
Please read through these instructions carefully.
Please pay particular attention to the following safety instructions.
These instructions are part of this product.
Please retain these instructions for future reference.
Page 2

Safety Instructions
Electrical devices are not for children. Never allow children to user electrical
devices unsupervised.
Batteries can be extremely dangerous if swallowed. Therefore keep this device
and batteries out of reach of small children.
If a battery is swallowed, seek medical help immediately.
Carrying strap
To avoid danger of suffocation, do not put the carrying strap around a child’s
neck.
Proper recycling
Batteries and packaging material should not be disposed in domestic waste.
Batteries must be handed in to a used-battery collection point.
Separated disposal of packaging material cares for the environment.
Dampness and Cleaning
This product is not waterproof! Do not submerge the player in water or let it
come in contact with water. If water penetrates the player, it can cause serious
damage.
Do not use cleaning agents, which contain alcohol, ammonia, benzene or
abrasives, as these can damage the player.
Heat
Do not expose the device to direct sunlight. Ensure that the device is not
exposed to any direct heat sources, such as radiators or open fires. Ensure
that the ventilation slots of the device are not covered.
Page 3

Important information for hearing protection
Caution:
Your hearing is important to you and us. Therefore please be careful when
using this device. We recommend you to:
Avoid high volumes.
If the device is to be used by children, make sure that it is not set too loud.
Attention!
Volumes that are too high can cause irreparable damage to children’s hearing.
SETTING A SAFE VOLUME LEVEL
If you continually listen to loud music, your hearing gradually adapts to it and
gives you the impression that the volume is lower.
What seems normal to you can actually be damaging.
To protect yourself from this, set the volume to a low level.
Increase the volume slowly, until you can hear clearly and without problems.
Damage to your hearing can be extensive and cannot be reversed.
If you notice a problem with your ears, please consult a doctor.
Do not use the device when in traffic.
Traffic calls for your increased attention.
Wearing headphones and playing music too loud distracts you from the traffic.
Surrounding noises cannot be heard.
Accidents can result from lack of attention.
Interference with other equipment
If TV or radio interference occurs during use, place the device in a different
location in the room/building.
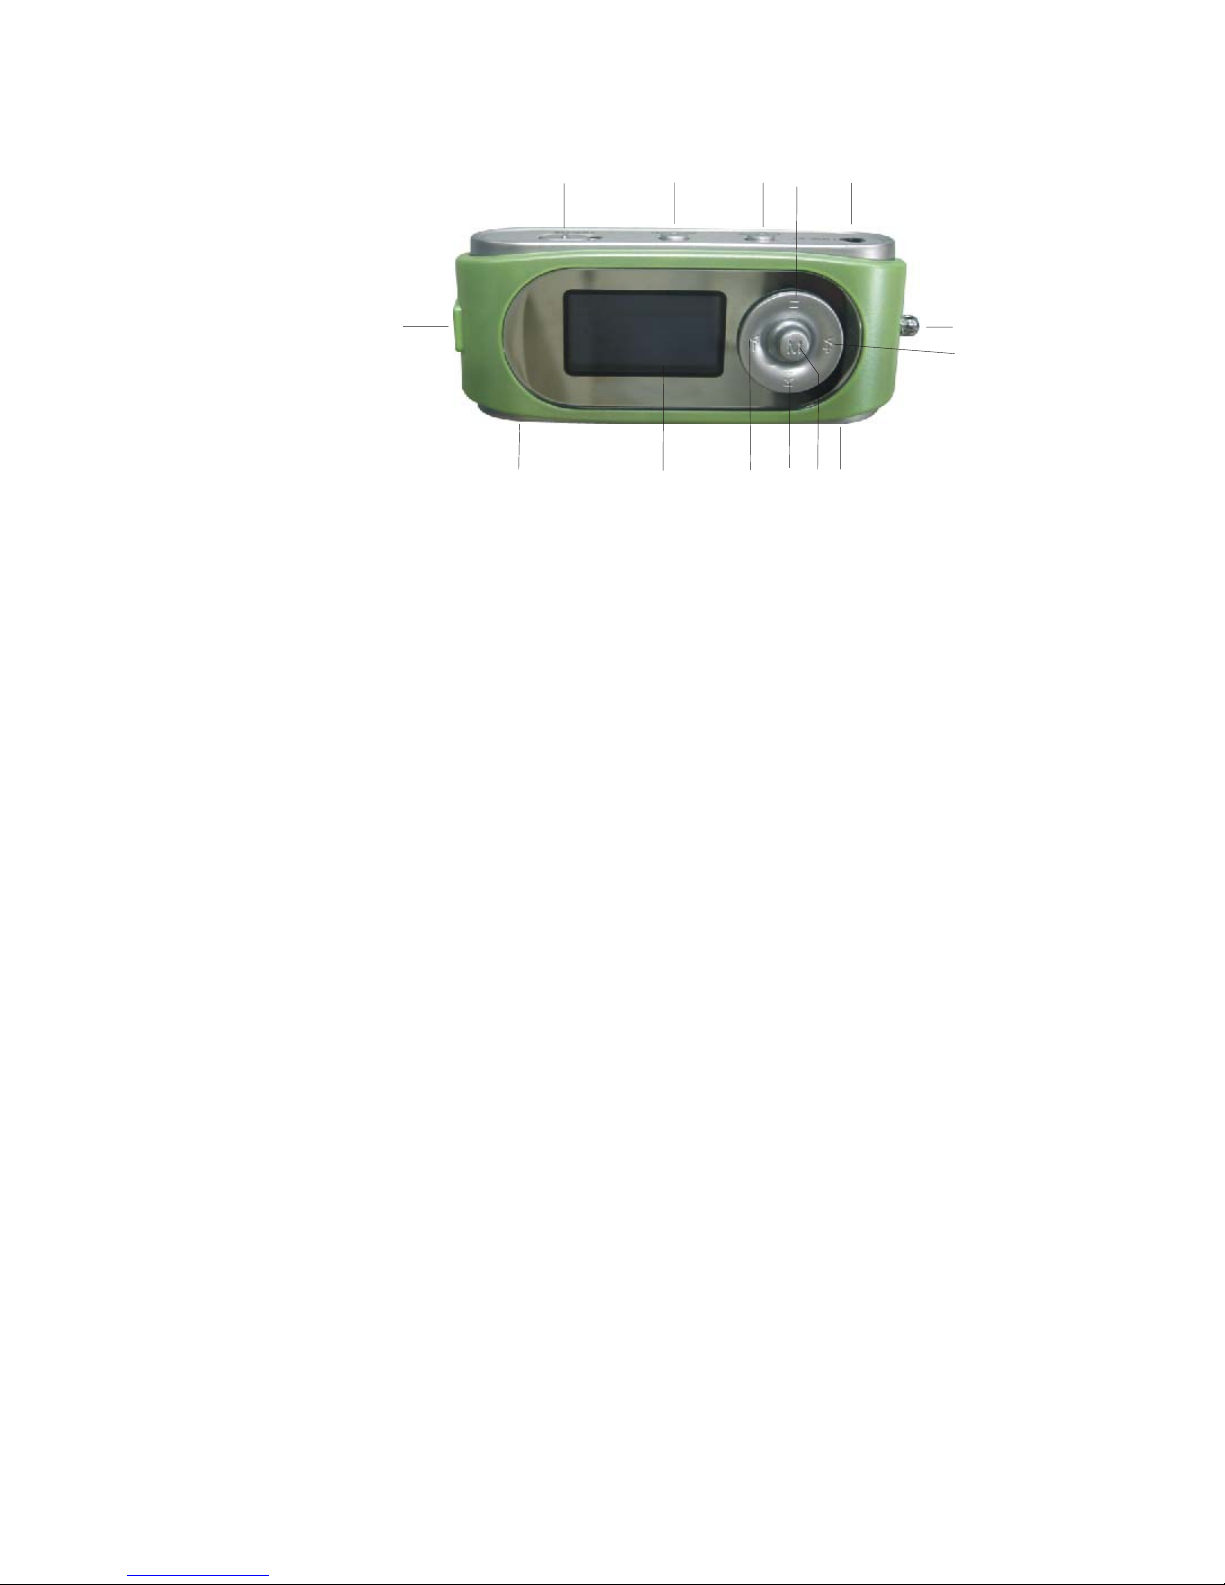
Player illustration
Page 4
1
2
3
45
6
7
8
9
10
11
12
13
14
1. HOLD 2. A-B/REC
3. Play/ Stop 4. NEXT
5. Line-in 6. String hole
7. VOL+ 8. Earphone
9. MENU 10. Previous
11. VOL- 12. LCD
13. MIC 14. USB
SCREEN DISPLAY
Page 5

Features
●Supports MP3 and WMA
●Lyrics show in step
● Screen saving
● 6 EQ
● Digital recorder
● FM radio
● A-B segment repeat
● Line-in
Page 6

● Shutdown automatically
● Graphic menu
● Removable disk
WIN98 User
As for WIN98 user, please install the software on the CD provided, before
connecting your player. This will install the necessary drivers.
1、 Place the CD in the CD-ROM drive of your computer. If the CD
does not start automatically, open Windows Explorer.
a.) Double click <My Computer> 。
b.) Select the CD ROM drive, in which the installation CD is
inserted and double click to confirm.
c.) Run the Setup.exe file on the CD-ROM by double clicking
on it.
2、 The Setup Wizard guides you through the installation, click on
Next>.
Page 7

3、 When it appears the following imagine, click on Yes to
continue.
4、 Select a drive on which you would like to install the program
and click on Next>.
Page 8

5、 Click on Next> to start the installation.
6、 The program and the device drivers will now be installed onto
your computer.
7、 After successful installation, close the program by clicking on
Finish.
When you connect the player to the USB Port of your PC, the player is
automatically detected by the operating system and installed.
Upload and download
When connects this device to PC, it will enter USB mode and display as the
following.
The operating system detects the player as a USB removable storage device
e.g.(H:) in the My Computer.
You can now work with your player as you would with a normal drive, i.e. you
can copy, rename or delete files or create folders.
Do not remove the player from your USB port until the copying process is
complete.
Please do not connect the player to PC when music is playing.
Page 9

HOLD
Push the HOLD key to the ON opposition, to lock other keys to avoid
accidental pressing.
The screen will display the message “LOCKED”.
And there will be a HOLD icon on the screen.
In locked state, the player will make no response when you press other keys.
POWER ON
Page 10

Press PLAY key to start the player.
Now the player is ready to play music.
Please make sure that the HOLD switch is on the OFF opposite.
OFF
If you press PLAY key to start the player when the HOLD switch is ON, the
player will show the message “LOCKED” and then shut down automatically.
Shutdown
Press and hold PLAY key for about 3 seconds to turn off the device.
If there is no operating in the off time set, or the sleep time set elapsed, the
player will shut down automatically.
Main menu
Page 11

Press MENU key to show the main menu.
Structure of the main menu:
MUSIC
VOICE
FM
RECORD
SET
DELETE
ABOUT
EXIT
MUSIC:Music mode.
VOICE:To playback the recording files.
FM:To receive local FM program.
RECORD:Record mode
SET:System settings.
DELETE:To delete files.
ABOUT: To get the information about this player.
Press PREVIOUS or NEXT key to select.
Press MENU key to confirm.
Press PLAY key to exit.
If there is no any operation in 8 seconds, the system will exit automatically.
Music
Page 12

Press MENU key to show the main menu.
Select to enter the music mode, the player will be ready to play music.
Press PREVIOUS key or NEXT key to select the music you want to play.
Press VOL+ key or VOL- key to adjust the volume.
After selecting the music, press PALY key to play.
Now you can enjoy your music.
When the music is playing,
Press PLAY key to stop temporarily, and press PLAY key again to continue.
Long press PLAY key for about 1 second to stop playing.
Press PREVIOUS or NEXT key to play previous or next track.
Press and hold PREVIOUS or NEXT key to quickly backward or fast forward.
Press VOL+ key or VOL- key to adjust the volume.
Press A-B/REC key to set A-B segment repeat.
Press MENU key to show main menu.
A-B Repeat
When the music is playing, press A-B/REC key to set A-B segment repeat.
Press A-B key to set the beginning point of the A-B segment. It will show the
icon “A-” on the LCD.
Press A-B key again to set the end point of the A-B segment. It will show the
Page 13

icon “A-B” on the LCD.
Then the player begins to play the A-B segment again and again, until you
press A-B key for the third time to exit A-B segment repeat.
Lyrics show in step
This player supports “*.LRC” file.
Keep the music file and LRC file in the same folder with the same name.
For example, the name of the music file: Rhythm of the rain.mp3,
the name of the LRC file: Rhythm of the rain.lrc
Then the lyrics will show in step when music is playing.
Page 14

RECORD
Press MENU key to show the Main Menu.
Press PREVIOUS or NEXT key to select the item “RECORD”.
Press MENU key to start to record.
Press PLAY key to stop recording temporarily and press again to continue.
Press MENU or A-B/REC key to stop recording and save the recording file.
The recording files are saved in WAV format, named as V***.WAV.
When you stop the recording, the player will return to VOICE mode
automatically.
User can also press A-B/REC key to start new recording in the VOICE mode.
Page 15

VOICE
Press MENU key to show the Main Menu.
Press PREVIOUS or NEXT key to select the item “VOICE”.
Press MENU key to enter the VOICE mode.
If there are any recording files in the player, the LCD will show as the following:
Press PREVIOUS key or NEXT key to select the recording file you want to
playback.
Press PLAY key to play.
If there is no recording file in the player, the screen will give the message “>
NO FILES<”
Press A-B/REC key to start new recording.
FM radio
Page 16

Press MENU key to show the Main Menu.
Press PREVIOUS or NEXT key to select the item “FM”.
Press MENU key to enter the FM mode.
23
FM
Radio
P0 1
99.8 Mhz
Mono
Press MENU key to select from the three working mode, Radio, Scan and
Store.
Radio
Scan
Store
Exit
Press A-B/REC key to record current FM program.
The FM recording files are saved in WAV format, named as F***.WAV。
SET
Page 17

Press MENU key to show the Main Menu.
Press PREVIOUS or NEXT key to select the item “SET”.
Press MENU key to enter the SET interface.
Structure of the SET submenu:
EQ
Play Mode
Screen Savings
Power set
Record Set
Language
Exit
Press PREVIOUS key or NEXT key to select.
Press MENU key to confirm.
Press PLAY key to exit.
If there is no any operation in 8 seconds, the system will exit automatically.
EQ
Press MENU key to show the Main Menu.
Press PREVIOUS or NEXT key to select the item “SET”.
Press MENU key to enter the SET interface.
Press PREVIOUS or NEXT key to select the item “EQ”.
Press MENU key to enter the EQ set interface.
Page 18

This device offers 6 kinds of EQ modes.
Structure of the EQ submenu menu:
CLASSIC
POP
BASS
NORMAL
ROCK
JAZZ
Press PREVIOUS key or NEXT key to select.
Press MENU key to confirm.
Press PLAY key to exit.
If there is no any operation in 8 seconds, the system will exit automatically.
PLAY MODE
Press MENU key to show the Main Menu.
Press PREVIOUS or NEXT key to select the item “SET”.
Press MENU key to enter the SET interface.
Press PREVIOUS or NEXT key to select the item “PLAY MODE”.
Press MENU key to enter the PLAY MODE set interface.
Page 19

This device offers 6 kinds of repeat modes.
Structure of the EQ submenu menu:
NORMAL
REPEAT ONE
REPEAT ALL
SHUFFLE
SHUF & REPE
Intro
NORAML: Play all tracks for once then stop.
REPEAT ONE:Play the single track repeatedly.
REPEAT ALL:Play all tracks repeatedly.
SHUFFLE:Play all tracks for once at random then stop.
SHUF & REPE:Play all tracks at random repeatedly.
Intro:Play the first 10 seconds of each track.
Press PREVIOUS key or NEXT key to select.
Press MENU key to confirm.
Press PLAY key to exit.
If there is no any operation in 8 seconds, the system will exit automatically.
User can also press short-cut key A-B/REC to adjust play mode in idle state.
Screen Savings
Press MENU key to show the Main Menu.
Press PREVIOUS or NEXT key to select the item “SET”.
Press MENU key to enter the SET interface.
Press PREVIOUS or NEXT key to select the item “Screen Savings”.
Press MENU key to enter the Screen Savings interface.
Page 20

There are 7 items in Screen Savings, 5,10,20,30,40,50,∞。
5,10,20,30,40,50 mean the screen saving will start to work after the time
set if there is no any operation.
∞ means to cancel the screen saving.
Press VOL+ key or VOL- key to select.
Press MENU key to confirm.
Press PLAY key to exit.
If there is no any operation in 8 seconds, the system will exit automatically.
Power Set
Press MENU key to show the Main Menu.
Press PREVIOUS or NEXT key to select the item “SET”.
Press MENU key to enter the SET interface.
Press PREVIOUS or NEXT key to select the item “Power Set”.
Press MENU key to enter the Power Set interface.
Page 21

There are 4 items in Power Set mode, DISABLE, 2MINS, 5MINS and 10MINS.
2MINS, 5MINS and 10MINS mean the player will shutdown automatically in 2,
5, or 10 minutes in idle state, if there is no any operation.
Disable means never shutdown automatically.
Press VOL+ key or VOL- key to select.
Press MENU key to confirm.
Press PLAY key to exit.
If there is no any operation in 8 seconds, the system will exit automatically.
Record Set
Press MENU key to show the Main Menu.
Press PREVIOUS or NEXT key to select the item “SET”.
Press MENU key to enter the SET interface.
Press PREVIOUS or NEXT key to select the item “Record Set”.
Press MENU key to enter the Record Set interface.
Page 22

Structure of the Record Set:
Press VOL+ key or VOL- key to select the item.
Press MENU key to adjust.
Press PLAY key to exit.
If there is no any operation in 8 seconds, the system will exit automatically.
LINE IN
Press MENU key to show the Main Menu.
Press PREVIOUS or NEXT key to select the item “SET”.
Press MENU key to enter the SET interface.
Press PREVIOUS or NEXT key to select the item “Record Set”.
Press MENU key to enter the Record Set interface.
Select the item Source from the Record Set interface.
Press PLAY key to choose the item LINE IN.
Connect the player to the music device through the Line-in cable.
Choose to enter Record mode to record.
Page 23

Language
Press MENU key to show the Main Menu.
Press PREVIOUS or NEXT key to select the item “SET”.
Press MENU key to enter the SET interface.
Press PREVIOUS or NEXT key to select the item “LANGUAGE”.
Press MENU key to enter the Language Set interface.
This player offers 7 kinds of languages.
Structure of the Language submenu:
ENGLISH & GBK
ENGLISH & BIG5
中文&简体
中文&繁体
ENGLISH & KOR
ENGLISH & JPN
ENGLISH & EUR
Page 24

Press PREVIOUS key or NEXT key to select.
Press MENU key to confirm.
Press PLAY key to exit.
If there is no any operation in 8 seconds, the system will exit automatically.
DELETE
Press MENU key to show the Main Menu.
Press PREVIOUS or NEXT key to select the item “DELETE”.
Press MENU key to enter the DELETE interface.
PRESS VOL+ or VOL- key to select the file type you would like to delete,
Music or Voice?
Music
Voice
Exit
Press MENU key to confirm to enter the file deletion interface.
Press VOL+ or VOL- key to select “YES”.
Page 25

PRESS MENU to confirm.
Press PLAY key to exit.
ABOUT
Press MENU key to show the Main Menu.
Press PREVIOUS or NEXT key to select the item “ABOUT”.
Press MENU key to enter the information about the player.
You can see the memory information and the reversion of the firmware in
ABOUT interface.
注意此处删除了一个功能
Accessory
Please check that the following accessories have been provided:
Headphone
CD
USB cable
Line-in cable
User Manual
Carrying strap
Page 26

Specifications
Memory 64/128/256MB
Battery AAA battery
OLED 128*64 dots matrix
Dimension 73*30*20mm
S/N radio 90dB
Frequency range 20Hz-20KHz
File type MP3 / WMA
WMA Bit Rate 32 Kbps - 384 Kbps
MP3 Bit Rate 8 Kbps - 320 Kbps
 Loading...