

Page 1
LD ST LOC
TAG-6900
INSTRUCTION MANUAL
Car Stereo CD/CD-R/CD-RW/MP3 Player with
PLL AM/FM Stereo Radio
Detachable Front Panel System
Page 2
E-1
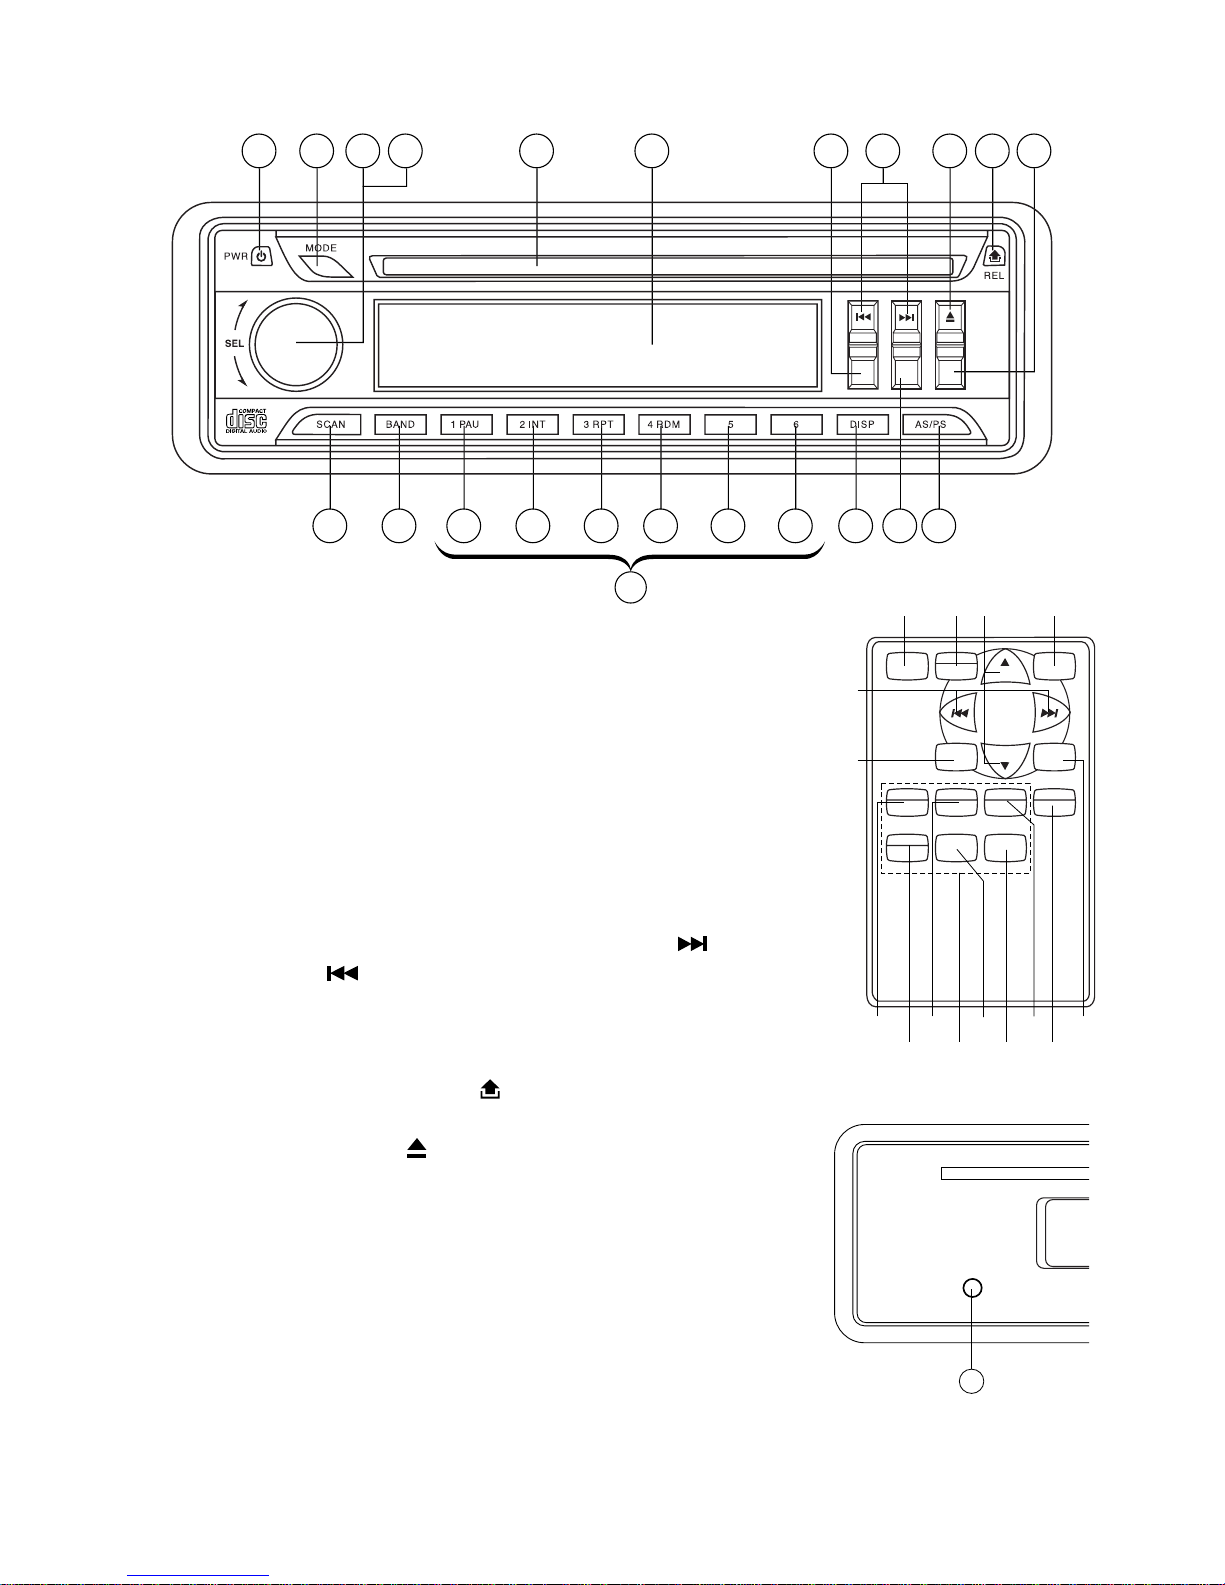
LOCATIONS OF CONTROLS
1. POWER ON/OFF
2. FUNCTION SELECT BUTTON: BASS/TREBLE/BALANCE/
FADER / AUDIO DSP/BEEP/SEEK/VOL LAST (SEL)
3. VOL UP/VOL DOWN FOR BASS/TREBLE/BALANCE/FADER
4. PRESET STATIONS (1,2,3,4,5,6)
5. STEREO/MONO BUTTON (ST)
6. LOUDNESS BUTTON (LD)
7. LOCAL/DISTANT SELECT (LOC)
8. DISPLAY BUTTON (DISP)
9. MODE BUTTON (MODE)
10. BAND BUTTON (BAND)
11. AUTOMATIC OR MANUAL TUNING (FREQ UP
OR
FREQ DOWN ) / CD TRACK/SEARCH BUTTON
12. AUTO SEEK SEARCH TUNING (AS/PS)
13. ‘SCAN’ AUTOMATIC TUNING CONTROL (SCN)
14. LCD DISPLAY
15. PANEL RELEASE BUTTON (
)
16. CD SLOT
17. CD EJECT BUTTON (
)
18. PAUSE BUTTON
19. INTRO BUTTON (Preview all Tracks)
20. REPEAT BUTTON 'RPT'
21. RANDOM BUTTON 'RDM'
22, 23. 10 TRACK UP/DOWN SELECT: (In case of MP3 files)
24. RESET BUTTON
24
RESET
14 6 15 717111 9 2 163
82322212019181013 125
4
(1-6)
LD ST LOC
POWER
2
INT
RDM
3
RPT
AS/PS
1
PAUSE
VOL
5
6
4
MP3
VOL
TUNE/SEEK
MODE
DISPLAY
BAND
SEL
ENTER
1
11
10
4
2 93
23
2022
21
18 19
12
8
(1-6)
Page 3
E-2
B
A
INSTALLATION
PRECAUTIONS
• Choose the mounting location carefully so that the unit will not interfere with the normal
driving functions of the driver.
• Avoid installing the unit where it would be subject to high temperatures, such as from direct
sunlight or hot air from the heater, or where it would be subject to dust, dirt or excessive
vibration.
• Use only the supplied mounting hardware for a safe and secure installation.
• Be sure to remove the front panel before installing the unit.
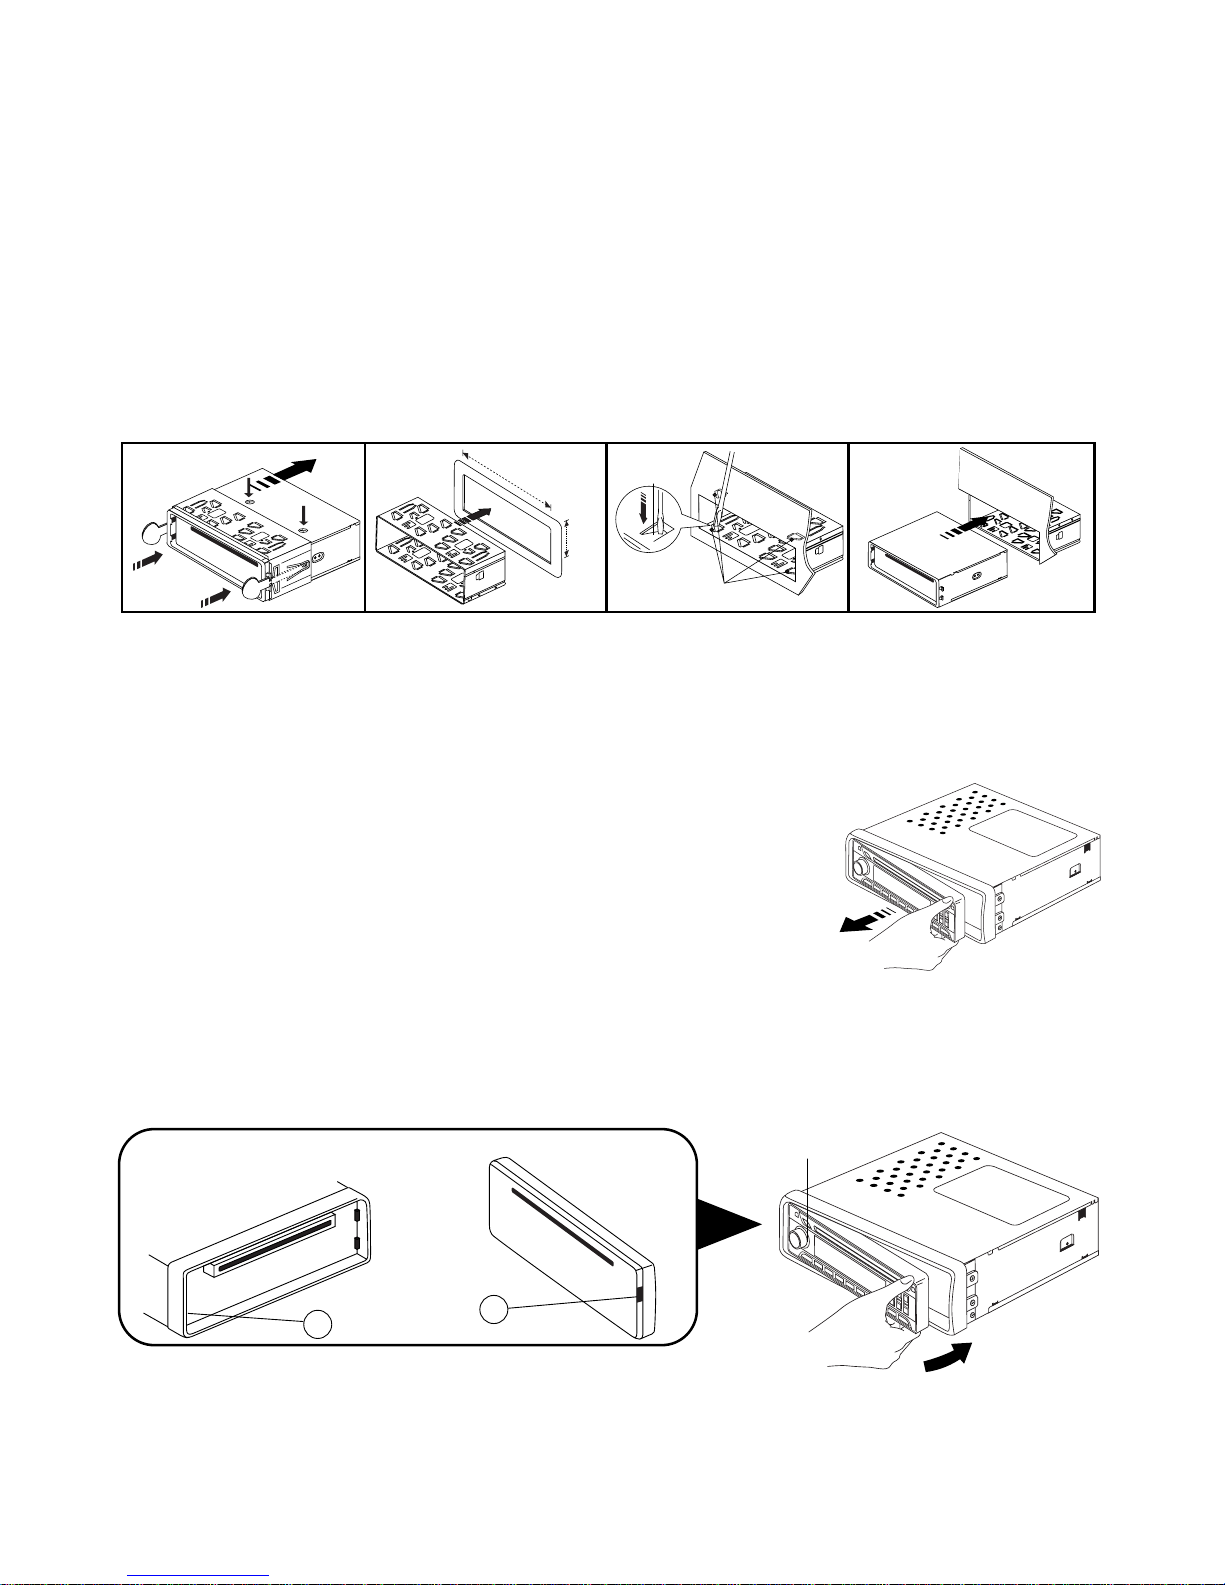
Mounting angle adjustment
Adjust the mounting angle to less than 20°.
MOUNTING EXAMPLE
Installation in the dashboard
Note: Keep the release key in the safe place as you may need it in future to remove the unit
from the car.
Detaching and attaching the front panel
The front panel of this unit can be detached in order to prevent the unit from being stolen.
DETACHING THE FRONT PANEL
Before detaching the front panel, be sure to press the PWR button
OFF first.
Pull out the panel towards you in order to detach completely the
panel from the main unit.
Refer to instruction.
ATTACHING THE FRONT PANEL
Make sure the front panel is the right way up when attaching it to the unit as it cannot be
attached upside down. Bring side B of panel to side A of main unit.
Insert the panel in and push until it clicks.
Panel is attached.
Notes:
• Do not press the front panel hard against the unit when attaching it. It can be easily attached
by pressing it lightly against the unit.
• When you carry the front panel with you, put it in the supplied front panel case.
• Do not press hard or give excessive pressure to the display window of the front panel when
attaching it to the unit.
Front Panel
Rear of the
front panel
Main unit
2
182mm
53mm
3
4
TAP
1
2
1
3
Bend these
claws, if necessary
Release screw and
bracket
Page 4
E-3
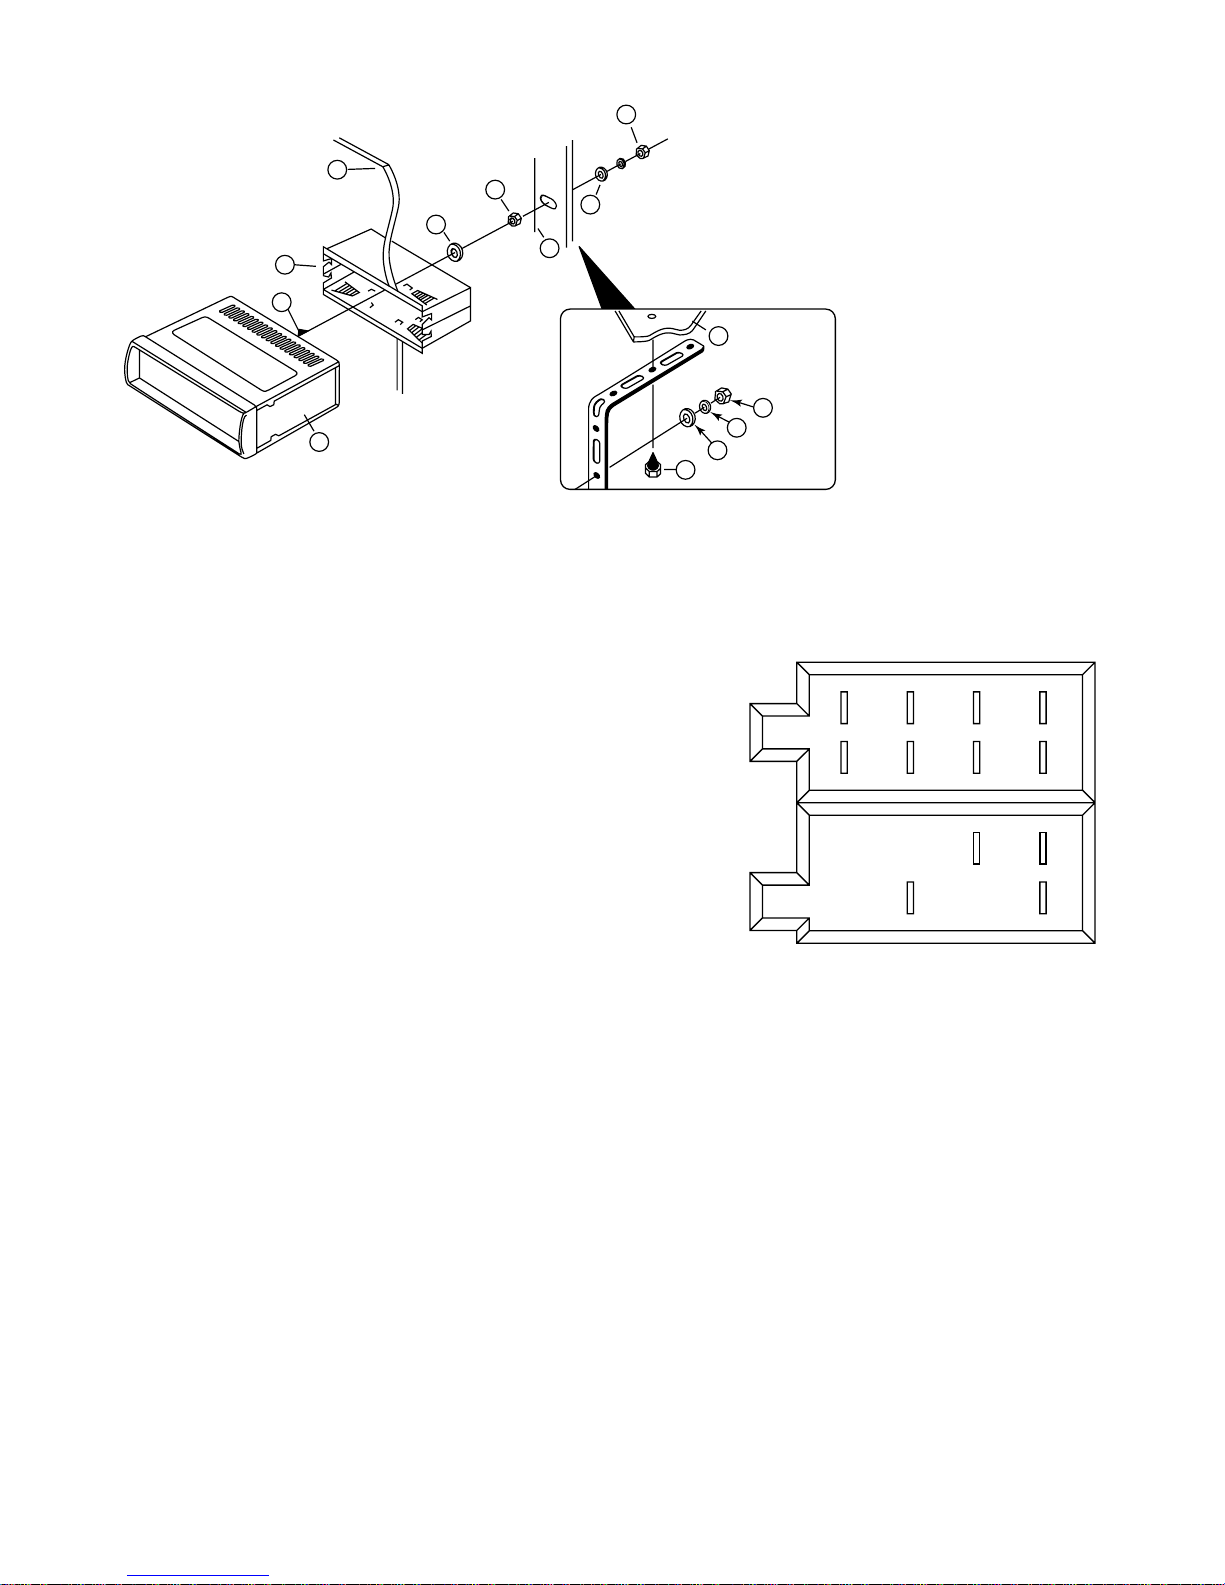
TO SUPPORT THE UNIT
ISO CONNECTOR
RCA Jack Line Out (Gray)
: Red (right)
: White (left)
RCA Jack Line In (Black)
: Red (right)
: White (left)
CONNECTOR A
1.
2.
3.
4. MEMORY +12V
5. AUTO ANTENNA OUTPUT
6.
7. +12V (TO IGNITION KEY)
8. GROUND
Note: (connector A no. 7) must be connected by car ignition key in order to avoid that car
battery becomes weak when the car will be not used for long period.
CONNECTOR B
1. REAR RIGHT SPEAKER (+)
2. REAR RIGHT SPEAKER (-)
3. FRONT RIGHT SPEAKER (+)
4. FRONT RIGHT SPEAKER (-)
5. FRONT LEFT SPEAKER (+)
6. FRONT LEFT SPEAKER (-)
7. REAR LEFT SPEAKER (+)
8. REAR LEFT SPEAKER (-)
Maintenance
FUSE REPLACEMENT
If the fuse blows, check the power connecton and replace the fuse. If the fuse blows again after
the replacement, there may be an internal malfunction. In this case, consult your nearest repairing
center.
Warning
Use the specified amperage fuse for each lead. Use of a higher amperage fuse may cause
serious damage.
1. UNIT
2. RELEASE CASE
3. DASH BOARD
4. HEX NUT
5. LOCK WASHER
6. PLAIN WASHER
7. CAR BODY
8. REAR SUPPORT STRAP
9. TAPPING SCREW
10.M5 X 15 HEX BOLT
Dashboard
10
7
1
2
3
4
4
4
5
5
6
6
8
9
B
1 3 5 7
2 4 6 8
5 7
4 8
A
Page 5
E-4
OPERATING INSTRUCTIONS
1. POWER ON/OFF
Insert the front panel in the unit and push Power button in order to switch on the unit. Push
button newly in order to switch off the unit and push REL button (15) to release the front
panel.
Note: Never release the front panel when the unit is on. Power remains on even when car
radio is off.
2. SELECT
3. VOLUME UP/DOWN
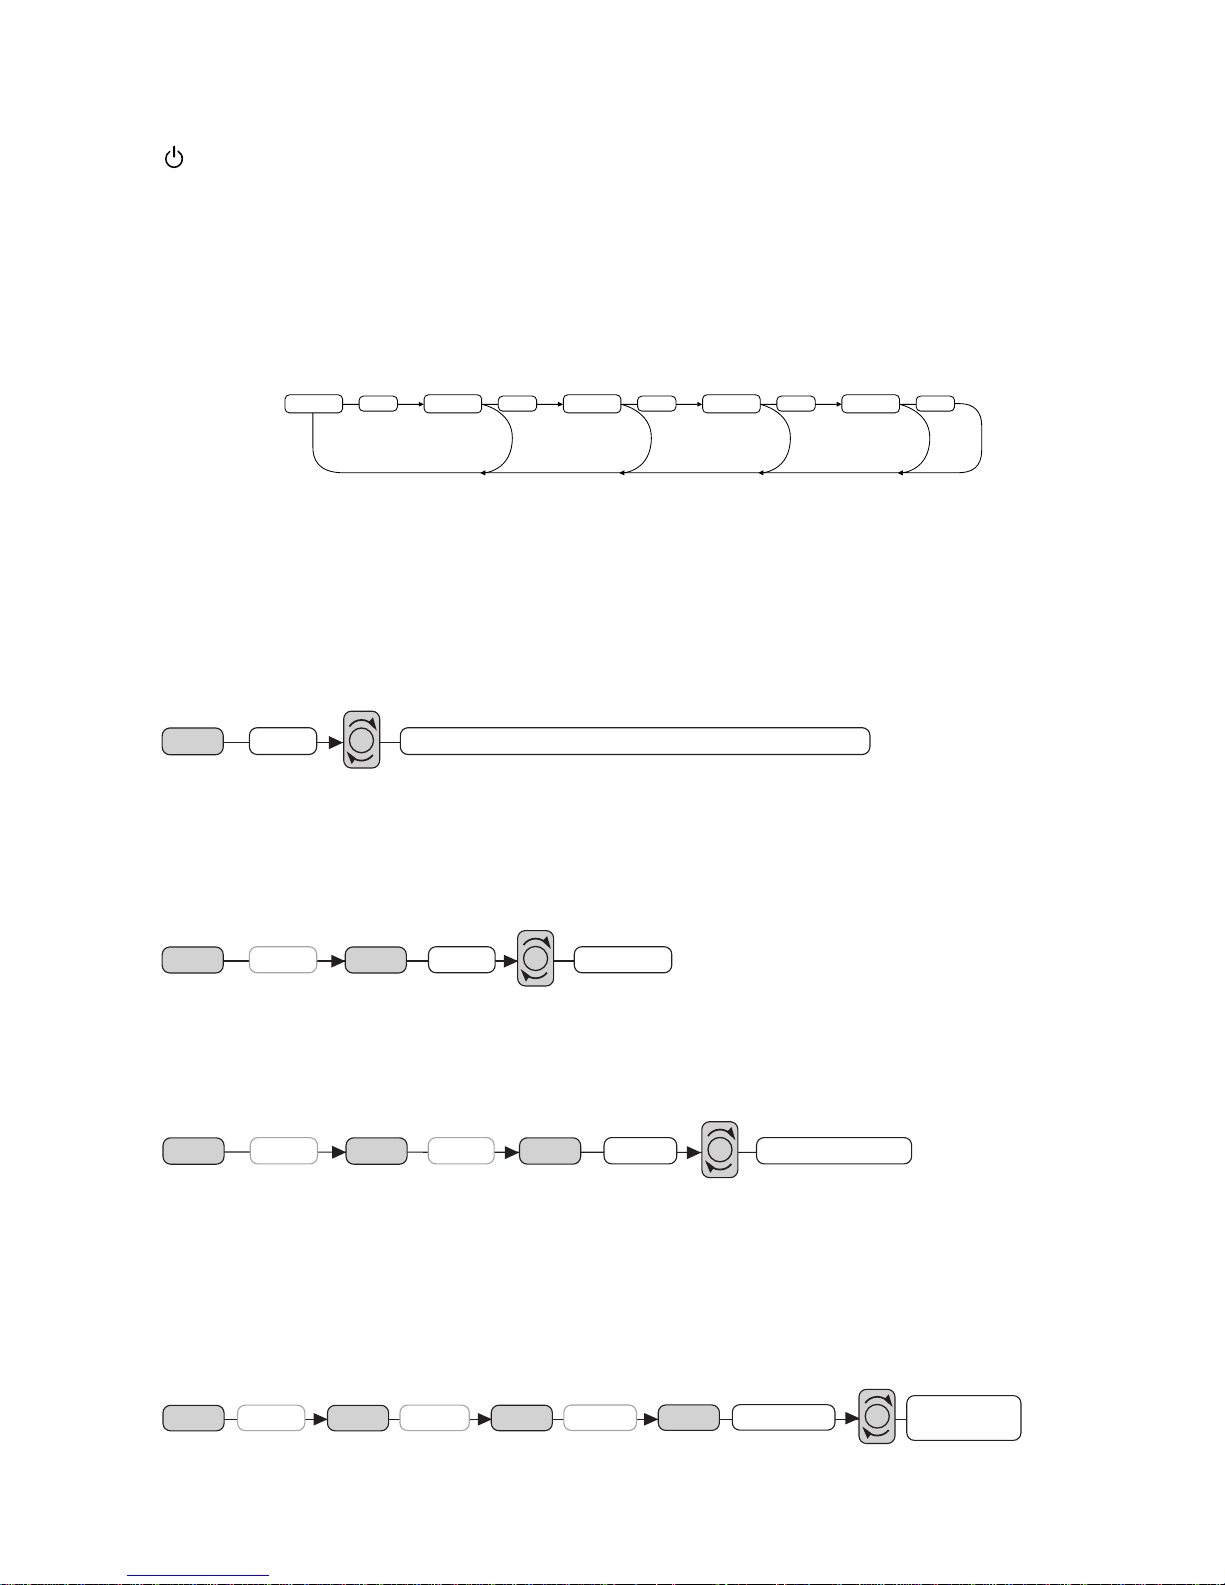
Turing the VOL knob to right or left (3) to control the VOLUME. To select other functions, press
the SEL (2) button shortly until the desired functions is shown on the display. Figure 1 shows
how control functions are selected using the SEL button.
Fig. 1 Selection of sound control functions
1. VOLUME 2. SELECT 3. BASS 4. TREBLE 5. BALANCE 6. FADER
These buttons can be used to adjust the BASS, TREBLE, BALANCE and FADER.
AUDIO DSP CONTROLS (2)
When press the SEL button for more than 2 seconds, it is activated as selecting mode of these
function.
DSP can be selected by turing the VOL knob to right or left (3)
POP M---ROCK M---CLASS---FLAT M---DSP OFF
BEEP MODE (2)
When press the SEL button for more than 2 seconds, it is activated as selecting mode of these
function.
BEEP ON: BEEP sound can be heard from speaker when the buttons are pressed.
SEEK MODE (2)
When press the SEL button for more than 2 seconds, it is activated as selecting mode of these
function.
SEEK 1: When SEEK 1 mode is activated, AUTO SEEK SCAN is stopped when station is
detected even user still push SEEK button.
SEEK 2: Auto SEEK SCAN is not stopped even station is detected if user push SEEK button.
When release this SEEK button, then stop when station is defected.
VOL LAST/ADJUST (2)
When press the SEL button for more than 2 seconds, it is activated as selecting mode of these
function.
VOL LAST:The volume level which user adjust lately is selected whenever power is ON and OFF.
VOL ADJ: The initial volume level (user can adjust) is selected whenever power is ON and OFF
1 3
2
4
2
5
2
6
2
2
DSP
SEL
2 sec.
POP M --- ROCK M --- CLASS --- FLAT M --- DSP OFF
VOL
ON/OFFDSP
SEL
2 sec.
SEL
BEEP
VOL
DSP
SEL
SEEK
SEL
2 sec.
SEL
BEEP
SEEK1 / SEEK 2
VOL
VOL LAST /
VOL ADJ
DSP
SEL
SEEK
SEL
VOL LAST
SEL
2 sec.
SEL
BEEP
VOL
Page 6

E-5
4. PRESET STATIONS (1,2,3,4,5,6)
(A) RADIO MODE:
1. Press BAND to select the desired band, FM1, FM2, FM3, AM1, AM2.
2. Tune in the desired station by using Automatic Tuning or Manual Tuning.
3. Keep the desired preset number buttons (4) pressed until the radio bleeps (2 seconds).
4. Repeat this step for each station.
TO RECALL A PRESET STATION
1. Press BND to select the desired band FM1, FM2, FM3, AM1, AM2.
2. Press the desired preset number button, shortly.
N.B. The previously memorized station will be eased when:
You enter a new station from the same band on the same number preset button.
(B) CD PLAYER MODE:
1. PAUSE 2. INTRO 3. REPEAT 4. RANDOM
5. STEREO/MONO Selector
When FM stations are weak and are disturbed, listening can be improved by selecting MONO.
Press the button once, reception will then be in MONO. Repress to go back to FM-stereo
mode, “ST” appears on the display.
6. LOUDNESS CONTROL
Press this button to operate. The bass and treble response will be boosted. Push this button
again to return the player to its normal operation. This function is useful when listening at low
levels. The loudness control will boost the bass and treble response thus giving a more lively
performance.
While this function is operating, the display shows “LOUD”.
7. LOCAL/DISTANT Button
Press this button to select “Local” position in areas with strong signals to let radio stop at only
strong stations during manual tuning (LOC appears). Press to Distant position in areas with
weak signals to listen to all stations.
8. DISPLAY (DISP)
Press this button to show time.
To set the clock:
Press DISP (14) and keep pressed until display blinks. Set the hours with
VOL
. Set the minutes
with the
VOL
.
9. MODE BUTTON (MODE)
By pressing this key, user can select.
RADIO mode, CD PLAYER or LINE IN mode.
10. BAND BUTTON (BAND)
Each band is toggled cyclically by pressing this key FM1---FM2---FM3---AM1---AM2.
11. AUTOMATIC OR MANUAL TUNING (FREQ UP
OR FREQ DOWN )
(A) RADIO MODE
When pressed short, these keys are operated as MANUAL tuning mode.
When pressed longer than 1 sec., they are operated as SEEK tuning mode.
(B) CD PLAYER MODE
When pressed short, they are operated as TRACK UP or TRACK DOWN mode.
When pressed longer than 1 sec., they are operated as CUE or REVIEW mode.
12. AUTO SEEK SEARCH TUNING (AS/PS)
By pressing shortly, the radio searches for each preset station.
When field strength level is bigger than the threshold level of stop level, the radio is holding at
that preset number for 5 sec. with releasing mute, and than searches again.
By pressing longer than 1 sec, and then 6 strongest stations are preset to the corresponding
preset number. When AS operation is finished, the radio executes the preset scan.
Page 7
E-6
13. ‘SCAN’ AUTOMATIC TUNING CONTROL (SCN)
This key is operated as RADIO SCAN
The operation is similar as normal search but different thing is holding 5 seconds on every
station detected in RADIO SCAN mode.
14. LCD DISPLAY
The Liquid Crystal Display will display the current state of the unit.
CD/MP3 CONTROL LOCATION OF PARTS
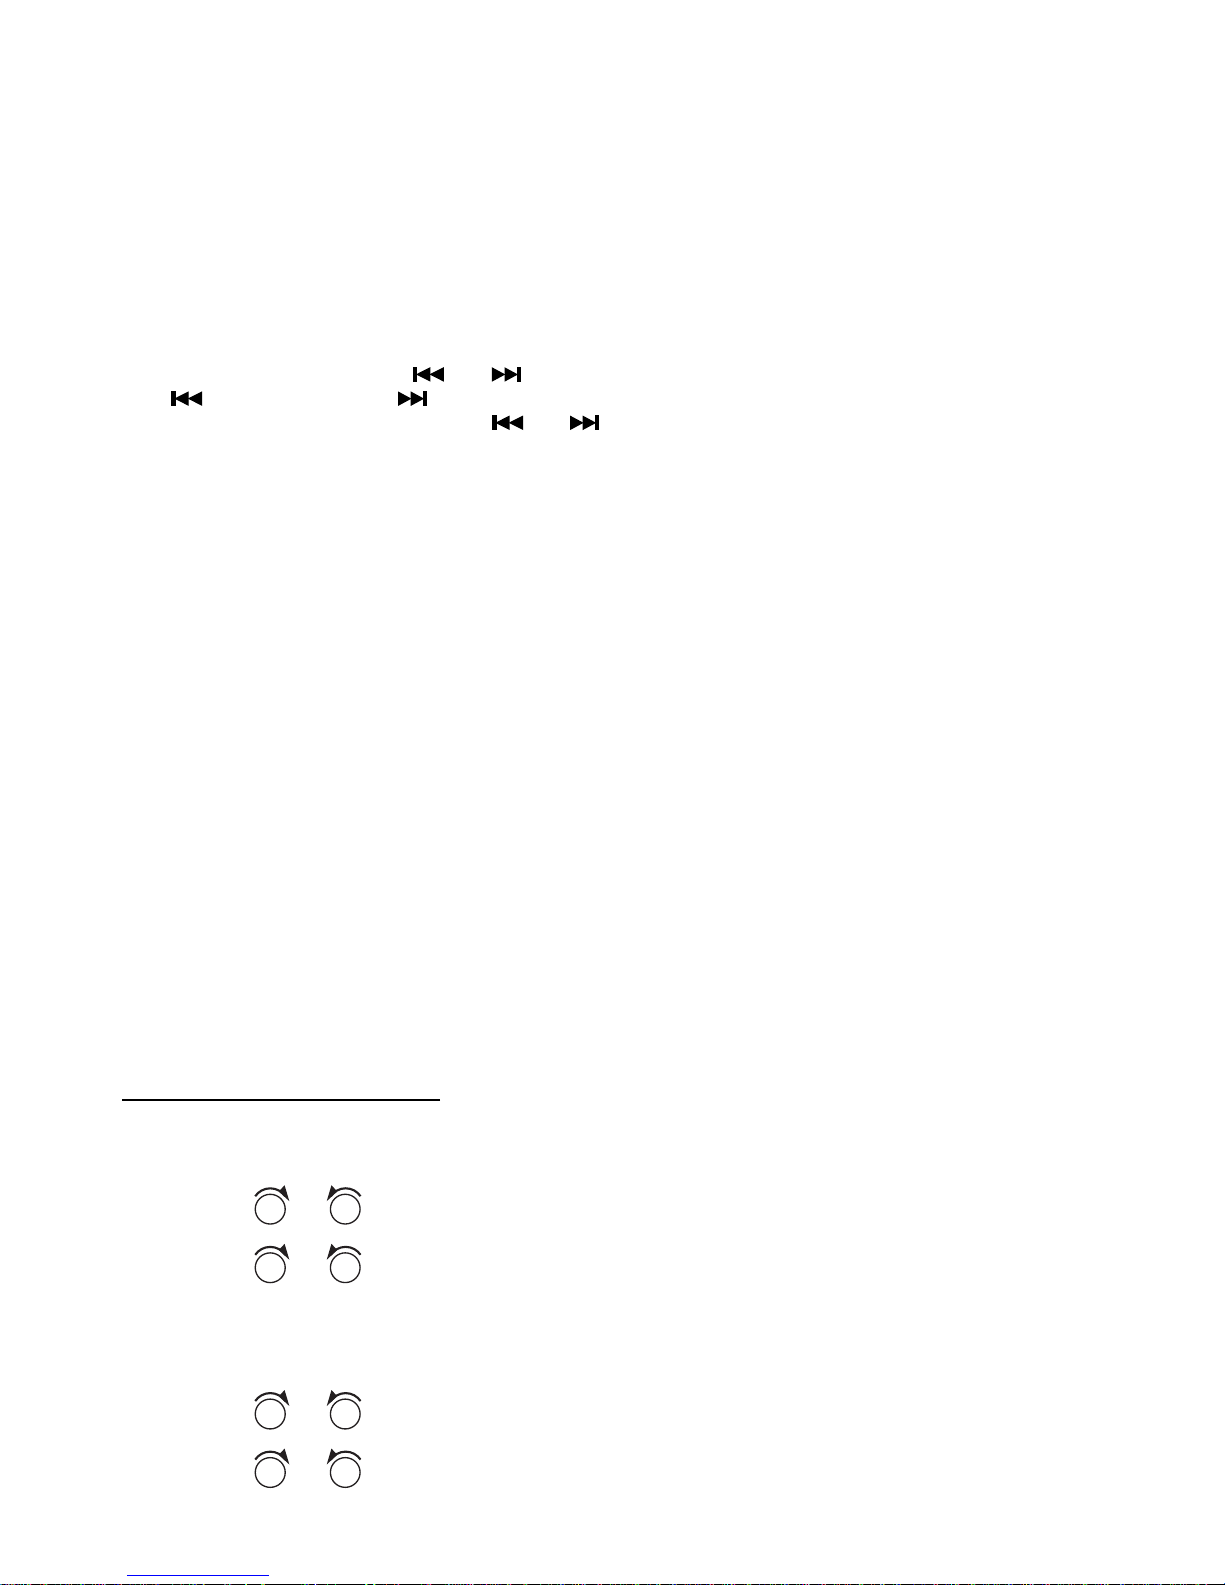
11. TRACK/SEARCH BUTTON
FORWARD AND REVERSE TRACK SEARCH (or changing songs)
Press the SKIP button (
or ) during play to go to the desired track(song).
....REVERSE ....FORWARD
Press and hold the SKIP button (
or ) during play to scan the disc at high speed. When
the desired music section of the disc is found, release the button. Normal play will resume.
When CD play is finished, CD mode automatically changes to radio mode.
16. CD SLOT
17. CD EJECT BUTTON
Press the EJECT button to remove the CD.
18. PAUSE BUTTON
During “PLAY”, press (18) ‘PAU’ button to “PAUSE”. Press it again to resume play.
19. INTRO BUTTON (Preview all Tracks)
When this button is pressed, ‘INT ON’ indication is displayed and the first several seconds of
each track of the disc are played. Press again to stop intro and listen to track.
20. REPEAT BUTTON 'RPT'
When this button is pressed, ‘RPT’ indication is displayed and play of the selected track will be
continually repeated until the Track repeat mode is cancelled by pressing ‘RPT’ button again.
21. RANDOM BUTTON 'RDM'
When this button is pressed, ‘RDM’ indication is displayed and each track of the disc are
played in random instead of normal progression. To cancel RANDOM mode, press ‘RDM’
button (21) again.
22, 23. 10 TRACK UP/DOWN SELECT: (In case of MP3 files)
M5: 10 Track down / M6: 10 Track up
HOW TO SELECT MP3 FILES
1. Searching Track:
• Press “A/PS”, then searching track is activated.
• Press “SEL”, then the first digit is blinking.
• With “
VOL
/
VOL
” knob, select first digit you want.
• Press “SEL”, then the first digit is fixed and second digit is blinking.
• With “
VOL
/
VOL
” knob, select 2’nd 3’rd respectively.
• Then automatically the song you selected will start.
2. Searching File Name:
• Press “A/PS” twice, then file search is activated.
• Press “SEL”, then the first directory is displayed.
• With “
VOL
/
VOL
” knob, you can select the directory you want.
• Press “SEL” again, then the directory is fixed and the first file name is displayed.
• With “
VOL
/
VOL
” knob, you can select the file you want.
• Press “SEL”, then the song you selected will start.
Page 8

E-7
3. Searching Character:
• Press “A/PS” 3 times, then character search mode is activated.
• Press enter “SEL” button, then “A” character is displayed.
• With “
VOL
/
VOL
” knob, you can select the letter you want.
• Press enter “SEL” key longer than 2 sec.
• The song which has same character you selected is displayed.
• With “
VOL
/
VOL
” knob, you can select the song you want.
• Press enter “SEL” key, then the song you selected will start.
• RESET
Reset button (24) is placed on the housing.
The reset button is to be activated for the following reason:
• Initial installation of the unit when all wiring is completed.
• All the funciton button do not operated.
• Error symbol on the display.
SPECIFICATIONS
CD/MP3 PLAYER SECTION
Signal to Noise Ratio > 100dB
Channel Separation > 50 dB (1kHz)
Frequency Response 20Hz - 20 kHz
TUNER (FM)
Frequency range 87.5-108 MHz
Sensitivity 2.8µV
Stereo separation 35 dB
Signal to noise radio 55 dB
Channel step 50 kHz
Intermediate frequency 10.7 MHz
TUNER (AM)
Frequency range 530-1620 kHz
Sensitivity 32dB at S/N 20dB
I.F. Frequency 450 kHz
Image Rejection 50 dB
LINE-OUT
Output 350mV
Impedance 10kOhm
GENERAL
Power Supply 13.8V DC
(10.8-15.6V allowable)
Speaker impedance 4 or 8 ohm
Output power 50W x 4CH
Note: Specifications and the design are subject to possible modification without notice due to
improvement.
Page 9

LD ST LOC
TAG-6900
MANUAL DE INSTRUCCIONES
Reproductor estéreo de CD/CD-R/CD-RW/MP3
para automóvil con
Radio estéreo AM/ FM PLL
Sistema de panel frontal desmontable
Page 10

SP-1
Ubicación de Controles
1 ENCENDIDO/ APAGADO
2 BOTÓN SELECTOR DE FUNCIÓN: GRAVES/ AGUDOS/
BALANCE/ FADER/ AUDIO DSP/ BEEP/ BÚSQUEDA/ VOL
LAST (SEL)
3 CONTROL DE VOLUMEN PARA GRAVES/ AGUDOS/
BALANCE/ FADER
4 ESTACIONES PRE-PROGRAMABLES. (1, 2, 3, 4, 5, 6)
5 BOTÓN ESTÉREO/ MONO (ST)
6 INTENSIDAD DE SONIDOS (LD)
7 SELECTOR DE ESTACIONES LOCAL/ DISTANTE (LOC)
8 BOTÓN DISPLAY (DISP)
9 SELECTOR DE MODO (MODE)
10 SELECTOR DE BANDA (BAND)
11 SINTONIZADOR AUTOMÁTICO O MANUAL (AUMENTO DE
FRECUENCIA
O DISMINUCIÓN DE FRECUENCIA )
BOTÓN BÚSQUEDA / PISTA CD
12 SINTONIZADOR DE BÚSQUEDA AUTOMÁTICA(AS/ PS)
13 CONTROL DE SINTONIZACIÓN AUTOMÁTICA “SCAN” (SCN)
14 DISPLAY LCD.
15 BOTÓN “RELEASE” (para liberar el panel desmontable) (
)
16 RANURA PARA CD
17 BOTÓN EXPULSOR DE CD (
)
18 BOTÓN DE PAUSA
19 BOTÓN INTRO (REPRODUCE LOS PRIMEROS SEGUNDOS
DE CADA PISTA)
20 BOTÓN REPETIR “RPT”
21 BOTÓN RANDOM “RDM” (Al AZAR)
22, 23 SELECTOR DE BÚSQUEDA DE 10 PISTAS HACIA ARRIBA/ HACIA ABAJO:
(En el caso de archivos MP3)
24 BOTÓN RESET
24
RESET
14 6 15 717111 9 2 163
82322212019181013 125
4
(1-6)
LD ST LOC
POWER
2
INT
RDM
3
RPT
AS/PS
1
PAUSE
VOL
5
6
4
MP3
VOL
TUNE/SEEK
MODE
DISPLAY
BAND
SEL
ENTER
1
11
10
4
2 93
23
2022
21
18 19
12
8
(1-6)
Page 11

SP-2
B
A
INSTALACIÓN
PRECAUCIONES
• Elija el lugar donde se va a instalar el equipo cuidadosamente para que la unidad no
interfiera con las funciones de operación normales.
• Evite instalar la unidad donde se encuentre sujeta a altas temperaturas tales como luz
directa del sol o aire caliente proveniente de estufas, o donde haya polvo, suciedad o
vibraciones excesivas.
• Para una instalación segura utilice únicamente el equipo y accesorios suministrados.
• Asegúrese de remover el panel frontal antes de instalar la unidad.
Ajuste del ángulo de montaje
Ajuste el ángulo de montaje a menos de 20°.
EJEMPLO DE MONTAJE
Instalación en el tablero
Nota: Mantenga la tecla “Release” en un lugar seguro ya que será necesaria en el futuro para
remover la unidad del automóvil.
Desmontaje y montaje del panel frontal
El panel frontal puede ser extraído para evitar que la unidad sea robada.
DESMONTAJE DEL PANEL FRONTAL
Antes de desmontar el panel frontal, asegúrese de presionar
primero el botón de apagado. (PWR OFF)
Retire hacia usted el panel para extraerlo por completo de la unidad.
Refiérase a las instrucciones.
MONTAJE DEL PANEL FRONTAL
Al montar el panel frontal asegúrese de que se encuentre la parte
derecha hacia arriba ya que no puede montarse de arriba hacia abajo. Traiga el lado B del
panel hacia el lado A de la unidad principal.
Inserte el panel y empuje hasta oír un sonido “Clic”.
De esta manera el panel queda montado.
Notas:
• No presione el panel frontal fuertemente contra la unidad al montarlo. Puede insertarse
fácilmente presionándolo suavemente contra la unidad.
• Cuando lleve el panel frontal junto con usted, guárdelo en la caja provista para ese fin.
• No presione fuerte o excesivamente el display del panel frontal cuando lo fije a la unidad.
2
182mm
53mm
3
4
TAP
1
2
1
3
Doble ls aletas
próximas al borde interno
Retire los tornillos
de transporte
Page 12

SP-3
SOPORTE DE LA UNIDAD
CONECTOR ISO
Salida de Conector RCA (Gris)
: Rojo (derecha)
: Blanco (izquierda)
Entrada de conector RCA (Negro)
: Rojo (derecha)
: Blanco (Izquierda)
CONECTOR A
1.
2.
3.
4. MEMORIA + 12 V
5. SALIDA PARA ANTENA.
6.
7. +12V (PARA LLAVE DE ENCENDIDO)
8. TIERRA
Nota: El conector A N°7 debe conectarse por la llave de encendido para evitar que la batería
del automóvil se debilite al no ser utilizado por un período prolongado.
CONECTOR B
1. PARLANTE TRASERO DERECHO (+)
2. PARLANTE TRASERO DERECHO (-)
3. PARLANTE FRONTAL DERECHO (+)
4. PARLANTE FRONTAL DERECHO (-)
5. PARLANTE FRONTAL IZQUIERDO (+)
6. PARLANTE FRONTAL IZQUIERDO (-)
7. PARLANTE TRASERO IZQUIERDO (+)
8. PARLANTE TRASERO IZQUIERDO (-)
Mantenimiento
CAMBIO DE FUSIBLES
Si se quema el fusible, verifique la conexión de encendido y reemplace el fusible. Si el fusible
se quema nuevamente luego del cambio, puede haber un mal funcionamiento interno. En ese
caso, consulte al servicio técnico más cercano.
Atención
Utilice el fusible con el amperaje adecuado para cada cable. Utilizar un fusible de mayor
amperaje puede provocar serios daños.
10
7
1
2
3
4
4
4
5
5
6
6
8
9
B
1 3 5 7
2 4 6 8
5 7
4 8
A
1. Unidad
2. Compartimiento de extracción
3. Tablero
4. Tuerca
5. Arandela de fijación
6. Arandela plana
7. Cuerpo del automóvil
8. Correa trasera de soporte
9. Tornillo
10. Perno M5 X 15
Page 13

SP-4
INSTRUCCIONES DE OPERACIÓN
1. ENCENDIDO/ APAGADO
Inserte el panel frontal en la unidad y presione el botón de encendido para encender la unidad.
Presione el botón
nuevamente para apagar la unidad y presione el botón REL (15) para extraer
el panel frontal.
Nota: Nunca extraiga el panel frontal cuando la unidad esté encendida. La potencia permanece
aún cuando la radio del automóvil esté apagada.
2. SELECTOR
3. CONTROL DE VOLUMEN
Gire la llave VOL hacia la derecha o izquierda (3) para ajustar el VOLUMEN. Para seleccionar
otras funciones, presione el botón SEL (2) hasta que se muestren en el display las funciones
deseadas. La figura 1 muestra cómo se seleccionan las funciones de control utilizando el botón
SEL.
Fig. 1 Selección de las funciones audio
1. VOL 2. SEL 3. BAS 4. TRE 5. BAL 6. FAD
Estos botones pueden utilizarse para ajustar GRAVE, AGUDO, BALANCE y FADER.
CONTROLES AUDIO DSP (2)
Al presionar el botón SEL por más de 2 segundos, se activa como modo selector de estas funciones.
Se puede seleccionar DSP girando la perilla VOL hacia la derecha o izquierda (3)
POP M---ROCK M---CLASS--- FLAT M—DSP OFF
MODO BEEP (2)
Cuando presione el botón SEL por más de 2 segundos, se activará como modo selector de esta
función.
BEEP ENCENDIDO: Se puede escuchar por el parlante un sonido BEEP cuando se presionan
estos botones.
MODO BÚSQUEDA (SEEK) (2)
Cuando presione el botón SEL por más de dos segundos, se activará como modo selector de esta
función.
SEEK 1: Cuando se activa el modo de búsqueda 1, la búsqueda automática (AUTO SEEK SCAN)
se detiene al detectar una estación aún cuando el usuario continúe presionando el botón SEEK.
SEEK 2: La búsqueda (SEEK SCAN) no se detiene aún cuando se detecte una estación si el
usuario presiona el botón SEEK. Después de soltar este botón de búsqueda (SEEK), la búsqueda
se detiene cuando se encuentra una estación.
ÚLTIMO/ AJUSTE DE VOL (2)
Si se presiona el botón SEL por más de 2 segundos, se activa como modo selector de estas
funciones.
VOLUMEN ÚLTIMO: El último nivel de volumen ajustado por el usuario se selecciona siempre que se
encienda (ON) y apague (OFF) la unidad.
AJUSTE DE VOLUMEN: El nivel inicial de volumen (que el usuario puede ajustar) se selecciona
siempre que se encienda y apague la unidad.
1 3
2
4
2
5
2
6
2
2
DSP
SEL
2 sec.
POP M --- ROCK M --- CLASS --- FLAT M --- DSP OFF
VOL
ON/OFFDSP
SEL
2 sec.
SEL
BEEP
VOL
DSP
SEL
SEEK
SEL
2 sec.
SEL
BEEP
SEEK1 / SEEK 2
VOL
VOL LAST /
VOL ADJ
DSP
SEL
SEEK
SEL
VOL LAST
SEL
2 sec.
SEL
BEEP
VOL
Page 14

SP-5
4. ESTACIONES PRE-PROGRAMABLES (1, 2, 3, 4, 5, 6)
(A) MODO RADIO:
1. Presione BAND para seleccionar la banda deseada: FM1, FM2, FM3, AM1, AM2.
2. Sintonice la estación deseada utilizando el sintonizador automático o manual.
3. Mantenga presionado el botón numeral deseado (4) hasta que la radio emita un sonido (2
segundos)
4. Repita este paso para cada estación.
VOLVER A UNA ESTACIÓN PRE-PROGRAMADA
1. Presione BND para seleccionar la banda deseada FM1, FM2, FM3, AM1, AM2.
2. Presione el botón numeral deseado.
Nota: Se llegará a la última estación memorizada cuando se entre a una nueva estación de la
misma banda en el mismo botón numeral pre-programado.
(B) MODO REPRODUCTOR DE CD:
1. PAUSA 2. INTRO 3. REPEAT 4. RANDOM
5. SELECTOR ESTÉREO/ MONO
Cuando las señales de estaciones FM son débiles, se puede mejorar la escucha al seleccionar el
modo MONO. Presione una vez el botón para que la recepción sea en MONO. Presione nuevamente
para volver al modo FM estéreo y aparecerá en el display “ST”.
6. INTENSIDAD DE SONIDOS
Presione este botón para que funcione dicha función. Se aumentará la respuesta de graves (BASS)
y agudos (TREBLE). Presione nuevamente este botón para que el reproductor vuelva a su normal
funcionamiento. Esta función es útil al escuchar en niveles bajos. La intensidad de sonidos
aumentará la respuesta de graves y agudos dando una ejecución más vívida.
Al utilizar esta función, el display muestra “LOUD”.
7. Botón LOCAL/ DISTANTE
Presione este botón para seleccionar la posición “LOCAL” en áreas con señales fuertes para que
la radio se detenga sólo en las estaciones de mayor potencia durante la sintonización manual
(aparecerá LOC). Presione la posición “DISTANTE” en áreas con señales de menor potencia para
escuchar todas las estaciones.
8. DISPLAY (DISP)
Presione este botón para mostrar la hora.
Programación del reloj:
Presione DISP (14) y manténgalo presionado hasta que el display titile. Programe la hora con
VOL
.
Programe los minutos con
VOL
.
9. SELECTOR DE MODO (MODE)
Al presionar esta tecla, el usuario puede seleccionar el modo RADIO, REPRODUCTOR DE CD o
ENTRADA.
10. SELECTOR DE BANDA (BAND)
Cada banda se selecciona cíclicamente presionando esta tecla: FM1---FM2---FM3---AM1---AM2.
11. SINTONIZACIÓN AUTOMÁTICA O MANUAL ( FREQ UP
O FREQ DOWN )
(A) MODO RADIO
Al presionar por poco tiempo, estas llaves funcionan como modo de sintonización MANUAL.
Al presionar por más de un segundo, las mismas funcionan como modos de sintonización SEEK.
(B) MODO REPRODUCTOR DE CD
Al presionar estas teclas por corto tiempo, funcionan como modos de búsqueda de pistas TRACK
UP (hacia arriba) o TRACK DOWN (hacia abajo)
Al ser presionadas por más de 1 segundo, funcionan como modos de AVANCE (CUE) o
RETROCESO (REVIEW).
12. SINTONIZACIÓN DE BÚSQUEDA AUTOMÁTICA (AS/ PS)
Al presionar este botón por poco tiempo, la radio busca las estaciones pre-programadas.
Cuando el nivel de potencia del campo es mayor al nivel de frecuencia de detención, la radio
mantendrá ese número pre-programado por 5 segundos con el MUTE, y luego volverá a realizar
la búsqueda.
Page 15

SP-6
Al presionarlo por más de 1 segundo, se pre-programarán en los botones numerales
correspondientes las 6 estaciones con señales de mayor potencia.
Al finalizar el funcionamiento AS, la radio ejecutará el recorrido de las estaciones preprogramadas.
13. CONTROL DE SINTONIZACIÓN AUTOMÁTICA “SCAN” (SCN)
Esta tecla funciona como RADIO SCAN.
El funcionamiento de la misma es similar a la búsqueda normal pero permanece por 5 segundos
en cada estación detectada en el modo RADIO SCAN.
14. DISPLAY LCD
El visor de cristal líquido mostrará el estado actual de la unidad.
UBICACIÓN DE CONTROLES DE CD/ MP3
11. BOTÓN DE RASTREO/ BÚSQUEDA
BÚSQUEDA HACIA DELANTE O HACIA ATRÁS (o cambio de canciones)
Presione el botón SALTEAR (SKIP) (
or ) durante la reproducción para llegar a la pista
deseada (canción).
....REVERSE ....FORWARD
Presione y mantenga presionado el botón SKIP (
or ) durante la reproducción para rastrear
el disco a alta velocidad. Cuando se encuentre la sección de música deseada, suelte el botón. Se
reproducirá normalmente.
Al finalizar la reproducción del CD, el modo CD cambiará automáticamente al modo radio.
16. RANURA PARA CD
17. BOTÓN DE EXPULSOR DE CD
Presione el botón EJECT para retirar el CD.
18. BOTÓN PAUSA
Durante la reproducción (PLAY), presione el botón (18) “PAU” para realizar una PAUSA. Presione
nuevamente para la reproducción normal.
19. BOTÓN INTRO (Reproduce los primeros segundos de cada pista)
Cuando se presiona este botón, aparece en el display la indicación “INT ON” y se reproducen los
primeros segundos de cada pista del disco. Presione nuevamente para detener la función INTRO
y escuchar la pista completa.
20. BOTÓN REPETIR “RPT”
Cuando se presiona este botón, aparece la indicación “RPT” en el display y se reproduce
continuamente la pista seleccionada hasta que se cancele el modo de repetición al presionar una
vez más el botón “RPT”.
21. BOTÓN RANDOM (AL AZAR) “RDM”
Cuando se presiona este botón, aparece en el display la indicación “RDM” y se reproducen al azar
todas las pistas del disco en vez de hacerlo en orden progresivo. Para cancelar el modo RANDOM,
presione el botón “RDM” (21) nuevamente.
22, 23. SELECTOR DE 10 PISTAS-TRACK UP (hacia arriba) / DOWN (hacia abajo):
(En el caso de archivos MP3)
M5: Rastreo de 10 pistas hacia abajo/ M6: Rastreo de pistas hacia arriba.
SELECCIÓN DE ARCHIVOS MP3
1. Búsqueda de pistas:
• Presione “A/PS” para activar la búsqueda de pistas.
• Presione “SEL” y el primer dígito titilará.
• Con la perilla “
VOL
/
VOL
” seleccione el primer dígito deseado.
• Presione “SEL” para confirmar el primer dígito y el segundo comenzará a titilar.
• Con la perilla “
VOL
/
VOL
” seleccione el segundo y tercer dígito respectivamente.
• Luego se reproducirá automáticamente la canción deseada.
Page 16

SP-7
2. Búsqueda de Nombres de Archivos:
• Presione dos veces “A/ PS” y se activará la búsqueda de archivos.
• Presione “SEL” y se mostrará el primer directorio.
• Con la perilla “
VOL
/
VOL
” seleccione el directorio deseado.
• Presione “SEL” nuevamente para confirmar el directorio y se mostrará el nombre del primer
archivo.
• Con la perilla “
VOL
/
VOL
” puede seleccionar el archivo deseado.
• Presione “SEL” y se reproducirá la canción seleccionada.
3. Búsqueda de caracteres:
• Presione el botón “A/PS” tres veces para activar el modo de búsqueda de caracteres.
• Presione el botón “SEL”y se mostrará el caracter “A”.
• Con la perilla “
VOL
/
VOL
” seleccione la letra deseada.
• Presione la tecla “SEL” por más de 2 segundos.
• Se mostrará la canción que tenga el mismo caracter que usted haya seleccionado.
• Con la perilla “
VOL
/
VOL
” seleccione la canción deseada.
• Presione la tecla “SEL” y se reproducirá la canción seleccionada.
• RESET
El botón RESET (24) se ubica en la cubierta plástica.
Se activa en los siguientes casos:
• Instalación inicial de la unidad una vez finalizada la conexión.
• No funciona ninguna de las teclas de función.
• Aparición de un símbolo de error en el display.
ESPECIFICACIONES
REPRODUCTOR DE CD/ MP3
Índice Señal/ Ruido > 100dB
Separación de Canal > 50dB (1kHz)
Respuesta de Frecuencia 20Hz-20kHz
SINTONIZADOR (FM)
Rango de Frecuencia 87.5-108 MHz
Sensibilidad 2.8 µV
Separación Estéreo 35 dB
Índice Señal/ Ruido 55 dB
Paso de Canal 50 kHz
Frecuencia Intermedia 10.7 MHz
SINTONIZADOR (AM)
Rango de Frecuencia 530-1620 kHz
Sensibilidad 32dB a Señal/ Ruido 20dB
Frecuencia I.F. 450 kHz
Rechazo de Imagen 50dB
CONEXIÓN DE SALIDA
Salida 350mV
Impedancia 10kOhm
GENERAL
Fuente de Alimentación 13.8V DC (10.8-15.6V aceptada)
Impedancia del Parlante 4 o 8 ohm
Potencia de Salida 50W x 4CH
Nota: Las especificaciones y el diseño de la unidad se encuentran sujetos a cambio por mejoras sin
previo aviso.
Page 17

LD ST LOC
TAG-6900
MANUAL DE INSTRUÇÕES
Reprodutor de CD/ CD-R/ CD-RW/MP3
Radio estéreo AM/FM PLL
Sistema de Painel Frontal Desmontável
Page 18

PO-1
Diagrama dos controles
1. LIGAR / DESLIGAR
2. BOTÃO SELETOR DE FUNÇÃO: GRAVES/ AGUDOS/
BALANCE/ FADER/ AUDIO DSP/ ESP/ BEEP/ BUSCA/ VOL
LAST (SEL)
3. CONTROLE DE VOLUME PARA GRAVES/ AGUDOS/
BALANCE/ FADER
4.
EMISSORAS DE RÁDIO PRÉ-PROGRAMÁVEIS. (1, 2, 3, 4, 5, 6)
5. SELETOR ESTÉREO / MONO (ST)
6. INTENSIDADE DE SONS (LD)
7. SELETOR DE EMISSORAS LOCAIS / DISTANTES (LOC)
8. BOTÃO DISPLAY (DISP)
9. SELETOR DE MODO (MODE)
10. SELETOR DE BANDA (BAND)
11. SINTONIZADOR AUTOMÁTICO OU MANUAL (AUMENTO
DE FREQÜÊNCIA
OUDIMINUIÇÃO DE
FREQÜÊNCIA
)/ BOTÃO DE BUSCA / FAIXA CD
12. SINTONIZADOR DE BUSCA AUTOMÁTICA (AS/PS)
13. CONTROLE DE SINTONIZAÇÃO AUTOMÁTICA “SCAN” (SCN)
14. DISPLAY LCD.
15. BOTÃO “RELEASE” (para liberar o painel desmontável) (
)
16. GAVETA DO CD
17. BOTÃO PARA EXPULSAR O CD (
)
18. BOTÃO DE PAUSA
19. BOTÃO INTRO (REPRODUZ OS PRIMEIROS SEGUNDOS
DE CADA FAIXA)
20. BOTÃO DE REPETIÇÃO “RPT”
21. BOTÃO RANDOM ”RDM” (SELEÇÃO ALEATÓRIA)
24. BOTÃO RESET
24
RESET
14 6 15 717111 9 2 163
82322212019181013 125
4
(1-6)
LD ST LOC
POWER
2
INT3RPT
MP3
1
PAUSE
MODE
DISP
5 64
RDM
AS/PS
BAND
SEL
ENTER
VOL
VOL
TUNE/SEEK
1
11
10
4
2 93
23
2022
21
18 19
12
8
(1-6)
Page 19

PO-2
B
A
INSTALAÇÃO
PRECAUÇÕES
• Escolha cuidadosamente o local onde vai instalar o aparelho para que a unidade não
interfira com as funções normais de operação.
• Evite instalar a unidade onde podem ocorrer altas temperaturas tais como luz direta do sol
ou ar quente proveniente de aquecedores, ou onde haja pó, sujeira ou vibrações em
excesso.
• Para a segurança na instalação utilize unicamente o equipamento e os acessórios entregues
pelo fornecedor.
• Tome cuidado de remover o painel frontal antes de instalar a unidade.
Ajuste do ângulo de montagem
Ajuste o ângulo de montagem a menos de 20°.
EXEMPLO DE MONTAGEM
Instalação no console
Nota: Mantenha a tecla “Release” em um lugar seguro já que servirá para desbloquear a
unidade do automóvel.
Montar e desmontar o painel frontal
O painel frontal pode ser extraído para evitar que a unidade seja roubada.
DESMONTAGEM DO PAINEL FRONTAL
Antes de desmontar o painel frontal, certifique-se de pressionar
primeiro o botão de desligar. (PWR OFF)
Puxe o painel do aparelho para poder extraí-lo completamente da
unidade. Siga as instruções
MONTAGEM DO PAINEL FRONTAL
Quando montar o painel assegure-se que a parte direita fique para
cima, já que não pode ser montada de cima para baixo. Puxe o lado B do painel para o lado A
da unidade principal.
Insira o painel e empurre até ouvir um “clique”.
Assim o painel fica montado.
Notas:
• Quando montar o painel frontal não o aperte contra a unidade. Pode inserir-se simplesmente
apertando-o ligeiramente contra a unidade.
• Quando trazer o painel frontal com você, guarde-o na caixa fornecida para esse fim.
• Quando fixar a unidade, não empurre o display do painel frontal de mais.
Painel frontal
Painel frontal
Unidade
principal
2
182mm
53mm
3
4
TAP
1
2
1
3
Curvar estas
garras se necessário
Desaparafusar o parafuso
e o esquadro
Page 20

PO-3
INSTALAÇÃO DO APARELHO
CONECTOR ISO
Saída para pino RCA:
Vermelho (direita) Branco (esquerda)
RCA Entrada:
Vermelho (direita) Branco (esquerda)
CONECTOR A
1.
2.
3.
4. MEMÓRIA +12 V
5. SAÍDA PARA A ANTENA.
6.
7. +12V (PARA O BOTÃO DE LIGAR)
8. TERRA
Nota: (conector A N°7) deve se ligar com o botão de ligar para evitar que a bateria do carro
enfraqueça quando não for usado durante muito tempo.
CONECTOR B
1. ALTO-FALANTE TRASEIRO DIREITO (+)
2. ALTO-FALANTE TRASEIRO DIREITO (-)
3. ALTO-FALANTE FRONTAL DIREITO (+)
4. ALTO-FALANTE FRONTAL DIREITO (-)
5. ALTO-FALANTE FRONTAL ESQUERDO (+)
6. ALTO-FALANTE FRONTAL ESQUERDO (-)
7. ALTO-FALANTE TRASEIRO ESQUERDO (+)
8. ALTO-FALANTE TRASEIRO ESQUERDO (-)
Manutenção
MUDANÇA DE FUSÍVEIS
Se o fusível queimar, verifique a conexão de acendido e substitua o fusível. Se o fusível
queimar mais uma vez, possivelmente o aparelho esteja funcionando mal. Neste caso, chame
ao serviço técnico mais próximo.
Atenção
Use um fusível com a amperagem apropriada para cada fio. Se usar um fusível com uma
amperagem mais alta, pode danificar seriamente o equipamento.
PAINEL DE BORDO
10
7
1
2
3
4
4
4
5
5
6
6
8
9
B
1 3 5 7
2 4 6 8
5 7
4 8
A
1. AUTO-RÁDIO
2. SUPORTE DE ENCAIXE
3. PAINEL DE BORDO
4. PORCA SEXTAVADA
5. ANILHA DENTADA
6. ANILHA PLANA
7. CARROÇARIA
8. CANTONEIRA DE FIXAÇÃO
9. PARAFUSO DE CHAPA
10.PERNO SEXTAVADO M5X 15
Page 21

PO-4
INSTRUÇÕES PARA A OPERAÇÃO
1. LIGAR / DESLIGAR
Insira o painel frontal na unidade e aperte o botão de ligar para acender a unidade. Aperte mais
uma vez o botão
para desligar a unidade, e puxe o botão REL (15) para tirar o painel frontal.
Nota: Nunca tire o painel frontal quando o equipamento estiver ligado. A energia elétrica está
presente ainda que o rádio do carro estiver desligado.
2. SELETOR
CONTROLE DE VOLUME
Faça girar os botões para aumento (VOL. UP) e diminuição (VOL DOWN) para ajustar o volume.
Para escolher outras funções, pressione o botão SEL (2) até que o display exiba a função desejada.
A figura 1 mostra como escolher as funções de controle usando o botão SEL.
Fig. 1 Selecção do funções audio
1. VOLUME 2. SELECT 3. BASS 4. TREBLE 5. BALANCE 6. FADER
Estes botões podem se usar para ajustar O GRAVE, AGUDO, BALANCE E FADER.
CONTROLES ÁUDIO DSP (2)
Se pressionar o botão SEL durante mais de dois segundos, se liga o seletor destas funções.
Pode-se escolher DSP girando o botão VOL para a direita ou para a esquerda.
POP M---ROCK M---CLASS--- FLAT M—DSP OFF
MODALITA’ ESP (2) (Anti-shock)
Se premete il tasto SEL per più di 2 secondi, è possibile scegliere fra la modalità 12 sec. o 45
sec. di ESP.
Observação: 12 seg./45 seg. para CD, 120 seg. para MP3 automaticamente trabalha.
MODO BEEP (2)
Se pressionar o botão SEL durante mais de dois segundos, se liga o seletor desta função.
BEEP LIGADO: Quando pressionar estes botões, pode se escutar um BEEP pelo alto-falante.
MODO BUSCA (SEEK) (2)
Se pressionar o botão SEL durante mais de dois segundos, se liga o seletor desta função.
BUSCA 1: Quando ligar o modo 1 de busca, a busca automática detém-se quando detectar
uma emissora, ainda quando o usuário mantenha o botão SEEK apertado.
BUSCA 2: Se o usuário pressiona o botão SEEK, a busca (SEEK SCAN) não se deter ainda
que detectar uma emissora. Depois de soltar o botão de busca (SEEK), a busca se deter quando
achar uma emissora.
ÚLTIMO / AJUSTE DE VOL. (2)
Se pressionar o botão SEL durante mais de dois segundos, se liga o seletor destas funções.
1 3
2
4
2
5
2
6
2
2
DSP
SEL
2 sec.
POP M --- ROCK M --- CLASS --- FLAT M --- DSP OFF
VOL
ESP 12s. / 45s.DSP
SEL
2 sec.
SEL
ESP
VOL
ON/OFFDSP
SEL
2 sec.
SEL
BEEP
ESP
SEL
VOL
ESP
SEL
DSP
SEL
SEEK
SEL
2 sec.
SEL
BEEP
SEEK1 / SEEK 2
VOL
VOL LAST /
VOL ADJ
ESP
SEL
DSP
SEL
SEEK
SEL
VOL LAST
SEL
2 sec.
SEL
BEEP
VOL
Page 22

PO-5
VOLUME ÚLTIMO: O último nível de volume ajustado pelo usuário se escolhe quando ligar
(ON) ou desligar (OFF) o aparelho.
AJUSTE DE VOLUME: O nível de volume inicial (que o usuário pode ajustar) se escolhe sempre
que ligar (ON) ou desligar (OFF) o equipamento.
4. EMISSORAS PRE-PROGRAMÁVEIS (1, 2, 3, 4, 5, 6)
MODO RÁDIO
1. Pressione BAND para escolher a banda desejada: FM1, FM2, FM3, AM1, AM2.
2. Sintonize a emissora desejada usando o sintonizador automático ou manual.
3. Mantenha pressionado o botão numeral desejado (4) até que o rádio emita um som (2 segundos).
4. Repita este passo com cada emissora.
VOLTAR A UMA EMISSORA PRE-PROGRAMADA
1. Pressione BND para escolher a banda desejada: FM1, FM2, FM3, AM1, AM2.
2. Pressione o botão numeral desejado.
Nota: Chegará à última emissora memorizada quando entre a uma emissora nova da mesma
banda no mesmo botão numeral pre-programado
(B) MODO REPRODUTOR DE CD:
1. PAUSE 2. INTRO 3. REPEAT 4. RANDOM
5. SELETOR ESTÉREO / MONO
Quando os sinais das emissoras FM for fracas, pode se melhorar o som selecionado o modo
MONO. Pressione só uma vez o botão para que a recepção seja MONO. Pressione mais uma
vez para voltar ao modo FM estéreo e o display exibirá “ST”.
6. INTENSIDADE DOS SONS
Pressione este botão para ligar essa função. A resposta dos graves (BASS) e dos agudos
(TREBLE) aumentará. Pressione mais uma vez o botão para que o reprodutor volta ao
funcionamento normal. Esta função é útil quando escutar em níveis baixos. A intensidade dos
sons aumentará a resposta de graves e agudos gerando uma performance melhor.
Quando utilizar esta função, o display mostra a palavra “LOUD”.
7. Botão LOCAL / DISTANTE
Pressione este botão para escolher a posição “LOCAL” nas áreas com sinais fortes par que o
rádio só se detenha nas emissoras com maior potência durante a sintonização manual (mostrará
a palavra LOC). Escolha “DISTANTE” nas áreas com sinais de menor potência para ouvir todas
as emissoras.
8. DISPLAY (DISP)
Pressione este botão para ver a hora.
Programação do relógio:
Pressione DISP e mantenha-o pressionado até que o display piscar. Programe a hora com
VOL
.
Programe os minutos com
VOL
.
9. SELETOR DE MODO (MODE)
Se pressionar este botão, o usuário poderá escolher entre o modo RÁDIO, REPRODUTOR DE
CD ou ENTRADA.
10. SELETOR DE BANDA (BAND)
Cada banda se seleciona ciclicamente pressionado o botão FM1--FM2--FM3--AM1--AM2.
11. SINTONIZAÇÃO AUTOMÁTICA OU MANUAL ( FREQ UP
OU FREQ DOWN )
(A) MODO RÁDIO
Se pressionar por pouco tempo, estas teclas funcionam como modo de sintonização manual.
Se pressionar durante mais de um segundo, as teclas funcionam como modo de sintonização
de busca automática.
(B) MODO REPRODUTOR DE CD
Quando pressionar estas teclas por pouco tempo, funcionam como modos de busca de faixas
TRACK UP (para cima) ou TRACK DOWN (para baixo).
Se forem pressionadas durante mais de um segundo, funcionam como modos de AVANCE
(CUE) or RETROCESSO (REVIEW).
Page 23

PO-6
12. SINTONIZADOR DE BUSCA AUTOMÁTICA (AS/PS)
Se pressionar este botão brevemente, o rádio busca as emissoras pre-programadas.
Quanto o nível de potência do campo for maior que o nível de freqüência de detenção, o rádio
manterá esse número pre-programado durante 5 segundos com o MUTE, e depois voltará a
fazer a busca.
Se pressionar durante mais de um segundo, a busca se pre- programará nos botões numerais
correspondentes às 6 emissoras cujos sinais tiverem maior potência.
Ao final do funcionamento AS, o rádio executará a trilha das emissoras pre-programadas.
13. CONTROLE DE SINTONIZAÇÃO AUTOMÁTICA “SCAN” (SCN)
Esta tecla funciona como RADIO SCAN.
O funcionamento da mesma é similar à busca normal, mas fica durante 5 segundos em cada
emissora detectada no modo RADIO SCAN.
14. DISPLAY LCD
O visor de cristal líquido exibirá o estado atual da unidade.
LOCAL DOS CONTROLES DE CD /MP3
11. BOTÃO PARA SEGUIR A PISTA / BUSCA
BUSCA PARA A FRENTE OU PARA ATRÁS (ou mudança de canções)
Pressione o botão SALTAR (SKIP) (
ou ) durante a reprodução até chegar a faixa
desejada (canção).
....REVERSE ....FORWARD
Pressione sem soltar o botão SALTAR (SKIP) (
ou ) durante a reprodução para procurar
a faixa desejada a alta velocidade. Quando achar a seção de música desejada, solte o botão. Se
reproduzirá normalmente.
16. GAVETA DO CD
17. BOTÃO DE EXPULSÃO DE CD
Pressione o botão EJECT para tirar o CD.
18. BOTÃO PAUSA
Durante a reprodução (PLAY), pressione o botão (18) “PAU” para fazer uma PAUSA. Pressione
mais uma vez o botão para que a reprodução volte a normal.
19. BOTÃO INTRO (Reproduz os primeiros segundos de cada faixa)
Quando este botão estiver apertado, no visor aparecerá a legenda “INT ON” e reproduzirá os
primeiros segundos de cada faixa do disco. Pressione mais uma vez para deter a função
INTRO e ouvir a faixa completa.
20. BOTÃO DE REPETIÇÃO “RPT”
Se pressionar este botão, no visor aparecerá a legenda “RPT”, e a faixa escolhida se reproduzirá
continuamente até que cancelar o modo de repetição pressionando “RPT” mais uma vez.
21. BOTÃO RANDOM ”RDM” (SELEÇÃO ALEATÓRIA)
Quando este botão estiver apertado, no visor aparecerá a legenda “RDM” e reproduzirá de
maneira aleatória todas as faixas do disco, e não em ordem. Para cancelar o modo RANDOM,
pressione mais uma vez o botão “RDM” (21).
22, 23. SELETOR DE 10 FAIXAS-TRACK UP (para cima) /DOWN (para baixo): (No caso dos
arquivos MP3)
M5: Trilha de 10 faixas para baixo/ M6: Trilha de 10 faixas para cima
SELEÇÃO DE ARQUIVOS MP3
1. Busca de faixas:
• Pressione “A/PS” para ativar a busca de faixas.
• Pressione “SEL” e piscará o primeiro dígito.
• Com o botão “
VOL
/
VOL
”escolha o primeiro dígito desejado.
• Pressione “SEL” para confirmar o primeiro dígito, e o segundo começará a piscar.
Page 24

PO-7
• Com o botão “
VOL
/
VOL
”escolha o segundo e o terceiro dígito.
• Em seguida se reproduzirá automaticamente a canção desejada.
2. Busca de nomes de arquivos:
• Pressione duas vezes “A/PS” e se ativará a busca de arquivos.
• Pressione “SEL” e aparecerá o primeiro diretório.
• Com o botão “
VOL
/
VOL
” escolha o primeiro diretório desejado.
• Pressione “SEL” mais uma vez para confirmar o diretório e aparecerá o nome do primeiro
diretório.
• Com o botão “
VOL
/
VOL
” escolha o arquivo desejado.
• Pressione “SEL” e se reproduzirá a canção selecionada.
3. Busca de caracteres:
• Pressione o botão “A/PS” três vezes para ativar o modo de busca de caracteres.
• Pressione “SEL” e aparecerá a letra “A”.
• Com o botão “
VOL
/
VOL
” escolha a letra desejada.
• Pressione a tecla “SEL” durante mais de 2 segundos.
• Aparecerá a canção que tenha a mesma letra que você tinha escolhido.
• Com o botão “
VOL
/
VOL
” escolha a canção desejada.
• Pressione “SEL” e se reproduzirá a canção selecionada.
• RESET
O botão RESET (24) está na tampa de plástico.
Ativa-se nos casos seguintes:
• A instalação inicial da unidade uma vez que finalizar a conexão.
• Nenhuma das teclas de função funcionarão.
• No visor aparecerá um símbolo de erro.
ESPECIFICAÇÕES
REPRODUTOR DE CD / MP3
Índice do sinal/ ruído > 100 dB
Separação do canal > 60 dB (1kHz)
Freqüência de resposta 20Hz - 20 kHz
SINTONIZADOR (FM)
Freqüência de resposta 87.5-108 MHz
Sensibilidade 2.8 µV
Separação estéreo 30 dB
Índice do sinal/ ruído 50 dB
Passo do canal 100 kHz
Freqüência intermédia 10.7 MHz
SINTONIZADOR (AM)
Gama de freqüências 530-1620 kHz
Sensibilidade 32dB a Sinal/ Ruído 20dB
Freqüência I.F. 450 kHz
Rejeição da imagem 50 dB
SAÍDA
Saída 1000 mV
Impedância 10kOhm
GERAL
Fonte de energia 12V DC (10.8-15.6V aceitada)
Impedância do alto-falante 4 ou 8 ohm
Potência de saída 50W x 4CH
NOTA: O fabricante se reserva o direito de alterar as especificações e o desenho do equipamento
sem prévio aviso.
 Loading...