


MOBILE NAVIGATION SYSTEM
GB
PNA-E4330T
User manual and
service information

Contents
Navigation Device
Targa PNA-E4330T
Contents
Important Safety Notice Page 6
Introduction Page 11
Navigation Page 33
Appendix Page 105
Contents
Navigation Device PNA-E4330T 1

Contents
Important Safety Notice ..........................................6
1.
1.1 Operating Environment .............................................................. 6
1.2 Power Supply............................................................................. 7
1.3 Rechargeable Battery ................................................................ 8
Contents
1.4 Cables........................................................................................ 8
1.5 Maintenance and Care............................................................... 8
1.6 Children...................................................................................... 9
1.7 Intended Use.............................................................................. 9
1.8 Conformity.................................................................................. 9
1.9 Disposal of Old Devices........................................................... 10
2. Introduction ...........................................................11
2.1 Package Contents.................................................................... 12
2.2 Overview .................................................................................. 14
2.3 Care ......................................................................................... 15
2.3.1 Caring for the Display.......................................................... 15
2.4 General Operation Notes ......................................................... 16
2.5 Charging the Battery ................................................................ 16
2.5.1 Recharging in the Car ......................................................... 17
2.5.2 Recharging from a Computer .............................................. 18
2.6 Memory Card ........................................................................... 19
2.6.1 Inserting the Memory Card.................................................. 19
2.6.2 Removing the Memory Card ............................................... 19
2.7 Car mount ................................................................................ 20
2.8 TMC Function .......................................................................... 23
2.9 Powering the Device On/Off .................................................... 24
2.9.1 Daily Use ............................................................................. 24
2.9.2 Powering Off Completely..................................................... 24
2 English

Contents
2.10 First-time Setup ........................................................................25
2.11 General Operation Notes .........................................................28
2.11.1 Input.....................................................................................28
2.11.2 Map browsing ......................................................................29
2.11.3 Adjusting the Volume...........................................................30
2.11.3.1 Muting the sound...............................................................32
2.11.3.2 Button sound ..................................................................... 32
3. GPS ........................................................................ 33
3.1 GPS Connection.......................................................................33
TM
3.1.1 SiRFInstantFixII
................................................................33
3.2 The GPS Main Menu................................................................34
3.3 Programming a Route .............................................................. 36
3.3.1 Quick Guide ......................................................................... 36
3.3.2 Navigation Display ............................................................... 40
3.3.3 Setting Other Destinations...................................................41
3.3.4 Entering Data without GPS Reception.................................43
3.4 Planning an alternative Route .................................................. 44
3.4.1 Avoiding Route Legs............................................................46
3.5 Frequently Visited Destinations................................................47
3.5.1 Favourites ............................................................................ 48
3.5.2 Home Address ..................................................................... 49
3.5.2.1 Set Home Location............................................................49
3.5.2.2 Recalling Your Home Address ..........................................50
3.5.3 History..................................................................................51
3.6 Map Options .............................................................................53
3.6.1 Angle....................................................................................53
3.6.2 Colour .................................................................................. 54
3.6.3 Backlight settings.................................................................54
3.6.4 Memorize Position ............................................................... 55
3.6.5 Browse map.........................................................................56
3.6.5.1 Options for Browse map.................................................... 57
Navigation Device PNA-E4330T 3
Contents

Contents
3.6.5.2 Options for the position mark ............................................ 58
3.6.5.3 Avoid... .............................................................................. 59
3.6.6 Optimising the Display......................................................... 60
3.6.6.1 Signpost Settings .............................................................. 60
3.6.6.2 Rotate display ................................................................... 61
3.6.6.3 Setup for Left-Handed Users ............................................ 62
3.6.6.4 Advanced settings............................................................. 62
Contents
3.7 Route Settings ......................................................................... 67
3.7.1 Planning preferences .......................................................... 67
3.7.2 Avoid toll roads.................................................................... 68
3.7.3 Programming Routes .......................................................... 69
3.7.3.1 Editing a Programmed route ............................................. 71
3.7.4 Show route instructions ....................................................... 73
3.7.5 Show route as images......................................................... 74
3.7.6 Show route summary .......................................................... 75
3.7.7 Show on map ...................................................................... 76
3.7.8 Cancel route ........................................................................ 77
3.7.9 Demo................................................................................... 77
3.8 Receiving Traffic Information with TMC ................................... 79
3.8.1 Showing Traffic Information................................................. 80
3.8.2 Recalculating the Route ...................................................... 81
3.8.3 Settings ............................................................................... 81
3.8.3.1 Setting the TMC Frequency .............................................. 82
3.9 POI - Points of Interest............................................................. 83
3.9.1 Adding a POI ....................................................................... 84
3.9.1.1
Creating a Custom Category............................................. 85
3.9.2 Edit POI name ..................................................................... 87
3.9.3 Delete POI........................................................................... 88
3.9.4 Deleting a Category............................................................. 90
3.9.5 Showing and hiding POIs .................................................... 91
3.9.6 Enable a POI Notification .................................................... 92
3.10 General Settings ...................................................................... 94
4 English

Contents
3.10.1 Selecting a Map ................................................................... 94
3.10.2 Regional settings .................................................................95
3.10.3 Setting the Guidance Voice ................................................. 96
3.10.4 Setting the On-Screen Keypad ............................................97
3.11 Miscellaneous Applications ...................................................... 99
3.11.1 World Clock .......................................................................100
3.11.2 Calculator...........................................................................100
3.11.3 Unit Convertor....................................................................100
3.11.4 Country info .......................................................................101
3.11.5 GPS Status ........................................................................103
3.11.6 Calibrating the Display.......................................................104
4. Appendix ............................................................. 105
4.1 Troubleshooting......................................................................105
4.2 Connecting to a Computer .....................................................107
4.3 The Supplied DVD..................................................................108
4.3.1 Installing Maps...................................................................110
4.3.2 Installing Guidance Voices ................................................111
4.3.3 Support .............................................................................. 113
4.4 Map material...........................................................................115
4.5 Index.......................................................................................116
4.6 Technical Specifications.........................................................119
4.7 Details of Guarantee ..............................................................120
4.8 Serial number .........................................................................121
4.9 Declaration of conformity........................................................ 122
Navigation Device PNA-E4330T 5
Contents

Operating Environment
1. Important Safety Notice
Before you use this device for the first time, please read the following notes in
this manual and heed all warnings, even if you are familiar with handling
electronic devices. Keep this manual safe for future reference. If you sell the
device or pass it on, it is essential you hand over this manual also.
Used icons:
Important Safety Notice
This icon denotes important information for the safe operation of
the product and for the user’s safety.
This symbol denotes further information on the topic.
1.1 Operating Environment
Position the device on a stable, even surface and do not place any objects on
the device. The device is not for use in environments with a high temperature
or humidity (e.g. bathrooms), and must be kept free of dust. Operating
temperature and operating humidity: 5°C to 35°C, max. 85 % RH.
When using the navigation device in a vehicle, please install it on
the supplied car mount only and make sure that the device sits
properly on the car mount.
Install any cables in the vehicle so that neither the driver is
obstructed nor the capacity for driving the car.
6 English

Power Supply
Do not install the car mount (with or without the navigation device)
within the operating area of the vehicle’s airbag and install the car
mount so that the driver’s view is not obstructed.
Always make sure that:
there is free circulation of air (do not place the device on shelves, on a
thick carpet, on a bed, or anywhere that obstructs the ventilation slots, and
leave at least 10 cm clearance on all sides;
no direct heat sources (e.g. heating) can affect the device;
no direct sunlight or bright artificial light reaches the device. When
installing the device in a vehicle, make sure that it doesn’t become
overheated;
contact with sprayed and dripping water and abrasive liquids must be
avoided and the device should never be operated near water. It must
especially never be immersed (do not place any recipients containing
liquids such as beverages, vases, etc. onto or next to the device);
the device is never placed in the immediate vicinity of magnetic fields (e.g.
loudspeakers);
no fire sources (e.g. burning candles) are placed on or near the device;
no foreign bodies are introduced into the device;
the device is not subject to any great temperature changes as this may
cause moisture through condensation and short-circuit;
the device is not subject to excessive shocks and vibrations.
1.2 Power Supply
Use only the supplied car charger cable IC-MUBU-DBT-G or the supplied USB
cable to avoid overheating, deformation of housing, fire, electric shock,
explosions and other dangers. Never connect the car charger cable or the
USB cable to other devices. Please note that this navigation system and the
Navigation Device PNA-E4330T 7
Important Safety Notice

Rechargeable Battery
supplied car charger are not suitable for trucks. Do not use the car charger in a
truck.
1.3 Rechargeable Battery
This device uses a high-end Lithium-Polymer battery. This battery should only
be removed or replaced by an authorized service centre. Under very rare
conditions, sparks may appear at the contacts causing any explosive and/or
inflammable gases to ignite. Therefore we recommend that you do not use the
Important Safety Notice
device in dangerous areas such as fuel stations and to power it off.
1.4 Cables
Always hold cables by the plug and never pull on the cable itself. Never place
the device, heavy objects or furniture on the cable and take care that the cord
does not become trapped, especially at the plug and socket. Never make
knots in the cable and do not tie it together with other cords. All cables should
be positioned so that nobody can trip over them or be obstructed by them.
Never use adapter plugs or extension cables that do not comply with the
current safety regulations in your country, and do not modify any of the cables
yourself.
1.5 Maintenance and Care
Servicing is required when this device has been damaged in any way, for
example, when the device housing is damaged, when liquid has been spilled
on the product, when objects have fallen into the product, when the product
has been exposed to rain or moisture, when the product does not work
normally or if the product has been dropped. If you notice any smoke, unusual
noise or strange smells, switch off the device immediately and pull the
corresponding charger cable from the power supply. In this case the device
should not be used further and should be inspected by authorized service
personnel. Please contact qualified personnel when servicing is needed.
Never open the housing of the device. By opening the housing you endanger
your life through risk of electric shock. Only use a clean, dry cloth for cleaning.
Never use any abrasive liquids. Do not attempt to open the housing of the
device otherwise you will void your warranty.
8 English

Children
1.6 Children
Electrical appliances do not belong in the hands of children! Do not allow
children to use electrical devices when not under supervision. Children may
not comprehend the presence of potential risks. Small parts can represent
choking hazards. Keep the packaging away from children too as there is
danger of suffocation.
1.7 Intended Use
This is an information technology electronics device. It may only be used for
private use, not industrial or commercial purposes. In its default configuration,
this product has not been designed for medical, lifesaving, rescue or lifemaintaining purposes. Furthermore, the device may not be used in tropical
climates. Only connection cables and external devices may be used that
comply with safety standards and the electromagnetic compatibility and
shielding quality of this device. This device fulfils all that relates to CE
Conformity, relevant norms and standards. Any modifications to the equipment
other than recommended changes by the manufacturer may lead to the result
that these directives are not met any more. The manufacturer is not liable for
any damage or interference caused by unauthorized modifications. Only use
the accessories recommended by the manufacturer. Do not use this device for
purposes other than those indicated and do not modify it in any way. Any use
other than that mentioned above does not correspond to the intended use. If
you are not using the device within the Republic of Germany, you must
observe the regulations and laws in the country of use.
1.8 Conformity
This device fully complies with the basic and other relevant
requirements of the Vehicle Directive 2004/104/EC and the EMC
Directive 2004/108/EC.
You’ll find the signed CE Declaration of Conformity on
the website www.service.targa.co.uk under
Targa Automotive/Targa PNA-E4330T/Manuals as well
as at the end of this User’s Manual.
Navigation Device PNA-E4330T 9
Important Safety Notice

Disposal of Old Devices
1.9 Disposal of Old Devices
If the product is labelled with a crossed-out waste bin, it is subject to
the European Guideline 2002/96/EC. All electric and electronic
devices must be disposed of separately from household waste at
established bodies. With the proper disposal of old devices you
avoid damage to the environment and your personal health. For further
information about proper disposal, contact your local government, disposal
Important Safety Notice
bodies or the shop where you bought the device.
10 English

Disposal of Old Devices
2. Introduction
Thank you for choosing this high-end Targa product. The navigation device
PNA-E4330T enables accurate navigation to your destination using different
configurations. The device can store multiple destinations as well as your
home address, and when traveling in unknown areas you can navigate to POIs
(points of interest) to find places according to different search criteria. You can
also program a route to your destination before starting your journey, if
necessary also using multiple waypoints. The device additionally uses the
supplied TMC antenna to integrate traffic information for dynamic traffic jam
avoidance en route.
First of all, read this manual to set up the device and then read from page 34,
to learn more about the different features of the navigation application.
Navigation Device PNA-E4330T 11
Introduction

Package Contents
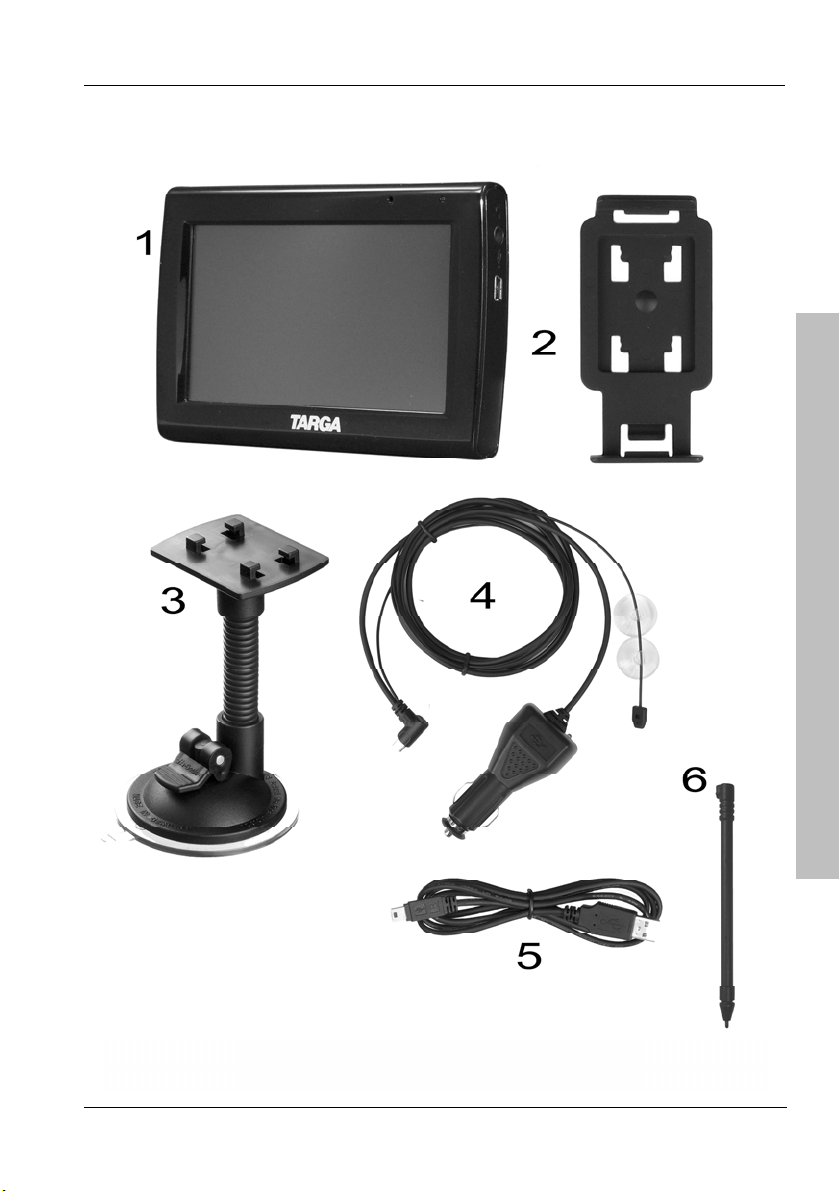
2.1 Package Contents
1 Navigation device PNA-E4330T
2 Adapter plate
3 Car mount
4 Car charger cable with TMC antenna
Introduction
5 USB cable
6 Stylus
7 User's manual (not shown)
8 Software DVD (not illustrated)
12 English
Package Contents
Navigation Device PNA-E4330T 13
Introduction

Overview
2.2 Overview
Introduction
14 English

Care
1 On/Off button
2 Charge indicator
3 Memory card slot
4 Mini-USB port
5 Display
6 Speaker
2.3 Care
2.3.1 Caring for the Display
Avoid scratching the display surface as it can be easily damaged. To operate
the device, use only the supplied stylus or your finger.
If necessary, clean the display with a damp cloth. Never use any abrasive
detergents: use water only. Take care to dry all remaining wetness in order to
avoid any drops accumulating on the display. These can generate sediments
and produce colour distortions.
Navigation Device PNA-E4330T 15
Introduction

General Operation Notes
2.4 General Operation Notes
Please always bear in mind that the Road Traffic Act always has
priority over any instructions output by your navigation device.
Do not operate the device while driving.
Introduction
2.5 Charging the Battery
If the capacity of the built-in battery becomes low, the following will appear in
the upper right-hand corner of the display:
Recharge the battery in your car or using a computer by means of the USB
cable. This will guarantee the uninterrupted operation of your device. As soon
as the battery is being charged, this message will disappear.
You can continue using the device while recharging it from the car cigarette
lighter or a power outlet. When recharging it from a computer the device will be
locked and cannot be operated.
16 English

Charging the Battery
2.5.1 Recharging in the Car
Plug the Mini-USB connector of the car charger cable [page 13, item 4]
into the receptacle [page 14, item 4] of your navigation device.
Then connect the car charger to a suitable cigarette lighter in your car.
The charging process starts automatically, and the charger indicator
[page 14, item 2] lights green. When charging is completed, the
indicator will stop lighting.
Please note that this navigation system and the supplied car
charger are not suitable for trucks. Do not use the car charger in a
truck.
In order to protect your device from any sudden voltage surges,
connect the car charger cable after you have started your car
engine.
Navigation Device PNA-E4330T 17
Introduction

Charging the Battery
2.5.2 Recharging from a Computer
Plug the Mini-USB connector of the USB cable [page 13, item 5] into
the receptacle [page 14, item 4] of your navigation device.
Plug the USB connector of the cable into a USB port on your
Introduction
computer. If your navigation device was in standby mode it will power
on automatically.
The charging process starts automatically, and the charger indicator
[page 14, item 2] lights green. At the same time, the computer will
establish a connection to the built-in memory of the device (see
page 107).
18 English

Memory Card
2.6 Memory Card
The navigation device can read SD memory cards. It will detect automatically if
a memory card has been inserted.
Make sure that the contacts of the memory card are not dirty and
do not apply any pressure on the card.
2.6.1 Inserting the Memory Card
Insert a compatible memory card with the contacts facing forward into the
memory card slot [page 14, item 3] of your navigation device. The contacts of
the card must be facing the back. Insert the card carefully until it clicks into
place.
2.6.2 Removing the Memory Card
Gently press onto the inserted memory card to unlock it. The card will protrude
a little so that you can get a hold of it and remove it.
Save any changes and power the device off by briefly pressing the
On/Off button [page 14, item.1] prior to removing the memory card
otherwise loss of data may occur.
Navigation Device PNA-E4330T 19
Introduction

Car mount
2.7 Car mount
To install the navigation device on its car mount, first install the supplied
adapter plate [page 13, item 2] on the car mount.
Then press the suction pad of the car mount against the windshield and fix it
by turning the lock.
Introduction
20 English

Car mount
In order to obtain good GPS signal reception the navigation device must be
placed so it has an obstacle-free sight to the sky. Choose a suitable location
on the car’s windshield.
Do not install the car mount (with or without the navigation device)
within the operating area of the vehicle’s airbag and install the car
mount so that the driver’s view is not obstructed.
Navigation Device PNA-E4330T 21
Introduction

Car mount
Once the car mount has been fixed in place you can insert the navigation
device into the adapter plate. The noses on the adapter plate must fit into the
corresponding holes of the navigation device (see figure, arrow 1). In order to
orientate the navigation device to the correct viewing angle, move the flexible
gooseneck of the car mount to the desired position.
To loosen the navigation device from the car mount, press on the latch on top
of the adapter plate and remove the device.
Introduction
To remove the car mount from the windshield, rotate the lock again and then
pull from the latch located at the bottom of the suction pad (see figure,
arrow 2).
22 English

TMC Function
2.8 TMC Function
Your navigation device features a built-in TMC receiver (Traffic Message
Channel). It can receive FM radio signals and read broadcast up-to-date traffic
jam information. Whenever necessary, this information is considered for the
route calculation in order to guarantee a journey free of any traffic jams. To be
able to receive real-time traffic messages, it is necessary to connect the
supplied TMC wire antenna as follows to the navigation device:
Plug the Mini-USB connector of the car charger cable [page 13, item 4]
into the receptacle [page 14, item 4] of your navigation device.
Mount the wire antenna on the windshield of your vehicle by using its
suctions pads.
For optimum reception, the wire antenna should be placed vertically at
one side of the windshield. It is recommended, however, to install the
wire on the passenger's side.
TMC information consists of digital signals broadcast continuously.
Therefore they are independent of the traditional spoken traffic
announcements and usually faster.
The TMC service is only available for free in the following
European countries: Austria, Denmark, Germany, Switzerland,
Belgium, Italy, Spain, Netherlands, France and Sweden.
Navigation Device PNA-E4330T 23
Introduction

Powering the Device On/Off
f
2.9 Powering the Device On/Off
To power the device on for the first time, slide the device’s On/Off switch
[page 14, item 1] from the center position to the ON position and hold it there
for a few seconds. Then release the On/Off switch. The switch will return to the
center position and the device powers on.
Introduction
On delivery, the battery of your navigation device is not fully
charged. Recharge the battery completely. The device can charge
the battery also while it's powered off.
2.9.1 Daily Use
To power the device off, slide the On/Off switch [page 14, item 1] from the
center position to the ON position and hold it there for a few seconds. Then
release the On/Off switch. The switch will return to the center position and the
device will go to stand-by. All entered information and settings will be saved.
The next time you want to power the device back on, simply slide the On/Off
switch to the ON position. The device will resume power with the last opened
application.
The device consumes electricity in the standby mode. Therefore it
can discharge the battery when in standby mode over a longer
period of time.
2.9.2 Powering Off Completely
To power the device off completely, slide the On/Off switch [page 14, item 1]
into the OFF position. This will not save any changes.
To make sure that all current information will be saved, we
recommend that you first power the device off by using the On/Of
button.
24 English

First-time Setup
2.10 First-time Setup
Prior to using the device for the first time, charge the battery
completely. The device can also charge the battery while it's
powered off.
Slide the device’s On/Off switch [page 14, item 1] from the center
position to the ON position and hold it there for a few seconds. Then
release the On/Off switch. The switch will return to the center position
and the device powers on.
Select a display language by
tapping the corresponding entry.
You can use the
and buttons
to change the displayed page.
Confirm your selection by tapping
the Select button.
Select a voice by tapping the
corresponding entry.
You can use the
and buttons
to change the displayed page.
Confirm your selection by tapping
the Select button.
Introduction
Navigation Device PNA-E4330T 25

First-time Setup
You can choose here whether
distances should be displayed in
kilometres or statute miles.
To do this, tap the corresponding
option.
Confirm your selection by tapping
the Next button.
Introduction
Next select your time zone by
tapping the corresponding entry.
You can use the
and buttons
to change the displayed page.
Confirm your selection by tapping
the Next button.
The Help page will be shown. You
can obtain help about a category by
tapping the desired button.
Use the Skip button to continue with
the First-Time Setup.
You can also open the Help at anytime after the First-Time Setup.
To do this, tap Settings from the main menu, navigate to the third
screen page and then tap Help.
26 English

First-time Setup
p
Read the operation notice and tap
I agree.
Upon delivery the device has several maps already installed. If necessary, you
can install more maps from the supplied DVD.
The internal memory of the device is limited. Therefore it is not
possible to install all country maps. To install more maps, first you
will need to remove some existing maps. You can do this with the
supplied software (see the description starting from page 108).
When launching the device for the first time may it take a few minutes for
initialising. As soon as enough satellites have been found the
SiRFInstantFixII™ technology will start working (see also page 33). The next
time you power the device on, it will be ready much faster.
When launching the device for the first time will it take a few seconds for
initialising. As soon as this process is completed, the map with your current
position will be displayed.
In the case that no GPS signal is received (e.g. when you have
owered the device on inside a building) no position can be
tracked.
Introduction
Please read the following pages to learn about the GPS technology and about
general operation for navigation purposes. A quick guide for programming your
first route can be found on page 36.
Navigation Device PNA-E4330T 27

General Operation Notes
2.11 General Operation Notes
Do not operate the device while driving. Plan your route prior to
start driving. If you need to change the route while on your way,
stop your car at a convenient place.
Introduction
2.11.1 Input
To control navigation, tap the corresponding icons. If any icons appear greyedout, they are not available at this time. It is only possible to select functions
that are allowed for the current action.
Sometimes labelled switches will be displayed, allowing you to confirm or reset
an action (like "Back" and "Done"). To do this, tap the desired switch:
During navigation you can tap the display at any time to display the navigation
main menu. Any active navigation will continue running in background.
Further control of the navigation settings is done through several icons:
These buttons will display if the menu shown
consists of more than one page. Tap several
times on the button Left or Right to toggle
between the different views.
These buttons will appear when a list
exceeding the display height is shown. Tap
several times on the button Up or Down to
move the list up or down.
This Slider allows choosing a value between a
minimum and maximum. To do this, use the
stylus to tap and hold the mark and slide it to
the desired position.
28 English

General Operation Notes
Checkboxes allow you to enable or disable
additional options. Tap on the checkbox to
place a checkmark in it or to remove the
checkmark. It is possible to select multiple or all
options shown.
Radio buttons are used to select one of
multiple options by tapping the corresponding
radio button. It is mandatory to select an option.
When selecting a new option, the previous one
will be disabled automatically.
2.11.2 Map browsing
In Browse Map view (see page 56)
When performing a search for destination or nearby places you can move the
displayed map area by placing the stylus or finger onto the map and dragging
it into the desired direction. The displayed map area will follow into this
direction. To enlarge or reduce the map view, drag the slider on the right up or
down.
In Navigation view (see page 40)
In Navigation view you can press the - button in the upper-left corner to
enlarge the displayed map area. Use the button + in the upper-right corner to
reduce the displayed map area. Keep the corresponding button pressed to
accelerate the zoom adjustment. Tap the map to open the GPS main menu.
Any active navigation will continue running in background. Also the voice
guidance will continue.
Navigation Device PNA-E4330T 29
Introduction
 Loading...