

Page 1
EXTERNAL
NETWORK HARD DISK
GB
EXTERNAL NETWORK HARD DISK
User manual
and service information
HR
VANJSKI MREŽNI DISK
Korisnički priručnik
i informacije o servisu
SI
TRDI DISK ZUNANJEGA OMREŽJA
Navodila za uporabo
in servisne informacije
DataBox NDAS 500 eSATA
Page 2

Targa NDAS 500 eSATA English
Table of Contents
General Information .......................................................................................................2
System Requirements................................................................................................................3
Package Contents......................................................................................................................
CE Declaration of Conformity.....................................................................................................
Disposal of Old Devices .............................................................................................................
Technical Specifications................................................................................................. 4
Intended Use..............................................................................................................................4
EMC and Safety Regulations .....................................................................................................
Important Safety Instructions..........................................................................................5
Maintenance and care............................................................................................................... 6
Getting Started...............................................................................................................8
Connecting via a USB Cable..................................................................................................... 9
Disconnecting the USB Connection .......................................................................................
Connecting via the eSATA cable............................................................................................. 11
Disconnecting..........................................................................................................................12
Connecting via a Network .......................................................................................................
Closing the Network Connection.............................................................................................
Further Options for Network Connections............................................................................... 22
Advanced.....................................................................................................................24
RAID........................................................................................................................................24
Partitioning and Formatting .....................................................................................................27
Unregistering...........................................................................................................................
Updating the Status.................................................................................................................35
Information on Software ..........................................................................................................35
Properties................................................................................................................................ 35
3
3
3
4
10
13
21
34
Details of Guarantee....................................................................................................37
1
Page 3

English Targa NDAS 500 eSATA
General Information
Thank you for choosing a Targa product.
Before you use this device for the first time, please read the following notes in this
manual and heed all warnings, even if you are familiar with handling electronic devices.
Keep this manual in a safe place for future reference. If you sell or pass this device on
to another person, it is imperative that you also hand over this manual.
Your Targa DataBox NDAS 500 eSATA is an external hard disk drive that lets you
enlarge your computer's storage capacity for saving a nd managing documents, videos,
music files, photographs, graphics, etc. You can also use your new hard disk as a
backup device for saving important information. To prevent data loss by damage to the
hard drive caused by over-heating due to lengthy operation, the Targa D ataBox NDAS
500 eSATA is equipped with a 7.5cm cooling fan. Regardless of whether you use your
hard disk as a storage extension or a backup solution, this manual contains all
necessary information and hints you need for its operation.
The Targa DataBox NDAS 500 eSATA offers the following functions:
- Large storage capacity
- Plug and Play
- High data transfer rate
- USB 1.1 or 2.0
- Network connection
- eSATA II connector
- Hot-Swap for easy connection to other computers
- Solid housing
2
Page 4
Targa NDAS 500 eSATA English
System Requirements
The minimum system requirements are:
- Computer with: Pentium or other compatible processor, or higher
- Microsoft Windows Vista™, Microsoft Windows
98SE/ME with native drivers
- 32MB RAM or higher, according to the requirements of Windows
- Available USB 1.1 or 2.0 port or network port or eSATA connector
- CD-ROM drive
- Internet connection (for system updates)
Package contents
- External housing with installed hard disk
- External power adapter
- USB cable
- Network cable
- eSATA cable
- Pedestal
- User manual
- CD with software and drivers
CE Declaration of Conformity
®
XP, Windows® 2000, Windows
®
®
This device has been tested for compliance with the relev ant requirements of
the EMC Directive 2004/108/EC and the Low Voltage Directive 2006/95/EC.
Disposal of Old Devices
The European Directive 2002/96/EC applies to this product. All electric and
electronic devices must be disposed of separately from household waste at
established bodies. Avoid hazards to the environment and dangers to your
personal health by disposing of the device properl y. For further information
about proper disposal, contact your local government, disposal bodies or the
shop where you bought the device.
3
Page 5

English Targa NDAS 500 eSATA
Technical Specifications
Model Targa DataBox NDAS 500 eSATA
Type External hard disk for connection to USB 2.0, (downwards
compatible to USB 1.1) or to a network or eSATA
Housing High-quality stainless steel housing with 75mm cooling fan for
3.5" hard disk
Dimensions 4.8 x 12.0 x 21.3 cm (H x W x D)
Storage capacity 500 GB storage capacity (unformatted), brand name hard
disk, 3.5" format, 7200 r.p.m., 8 MB cache memory, preformatted for Windows
Vista™ (NTFS).
System Requirements Microsoft Windows Vista™, Microsoft Windows
Windows
®
2000, Windows® 98SE/ME, USB 2.0 (or USB 1.1)
or network port or eSATA
USB Standard Universal Serial Bus
eSATA External Serial Advanced Technology Attachment
Network RJ45 port
Special features Downwards-compatible to USB 1.1
Power consumption 12V
2A
Warranty 36 months
Technical Data for TARGA Power Adapter, Model KSAF E1200250W1UK
Input 110-240 V ~ 50/60 Hz 0.6A
Output 12 V 2.5A
®
XP , Windows® 2000 and Windows
®
XP,
Intended Use
The Targa DataBox NDAS 500 eSAT A has been developed for data backup an d data
transfer from or to a PC or notebook with USB ports or eSATA connection or a network
port, for use indoors. If used for non-intended purposes or i f the hous ing is open ed, the
warranty is rendered void. The Targa DataBox NDAS 500 eSATA in its default
configuration has not been designed for medical, lifesaving, rescue or life-maint aining
purposes. It may be used for home, office and small business applications (accordin g
to EN 61000-6-1 / EN 61000-6-3). This includes games, communication and office
applications and others.
EMC and Safety Regulations
This device conforms to the EN 55022, EN 55024, EN 61000-3-2, EN 61000-3-3 and
EN 60950 Standards. Any changes to the equipment other than the recommended
changes by the manufacturer may lead to the result that these directives are not met
any more.
4
Page 6

Targa NDAS 500 eSATA English
Important Safety Instructions
Before you use this device for the first time, please read the following notes in this
manual and heed all warnings, even if you are familiar with handling electronic devices.
Keep this manual in a safe place for future reference. If you sell or pass this device on
to another person, it is imperative that you also hand over this manual.
- Handle your hard disk with care. Please always follow these safety instructions in
order to avoid any damage or voiding the warranty. Damage to the hard disk can
result in loss of data.
- Position the device on a stable, even surface and do not place any (heavy) objects
on the device.
- The device is not for use in rooms with a high temperature or humidity (e.g.
bathrooms), and must be kept free of dust.
- Operating temperature and humidity: 5 °C to 25 °C, max. 85% RH
Always make sure that
- there is free circulation of air (do not place the d evice on shelves, on a thick carpet,
on a bed, or anywhere that obstructs the ventilation slots, and le ave at least 10cm
clearance on all sides;
- no direct heat sources (eg heating) can affect the device;
- no direct sunlight or bright artificial light reaches the device;
- contact with spray and dripp ing water and abrasive liquids must be avoided and
the device should never be operated near water, and it must especially never be
immersed (do no place any objects filled with liqu ids such as vases or dri nks near
the device);
- never place the device in the immediate vicinity of magnetic fields (e.g.
loudspeakers);
- do not place any fire sources (e.g. burning candles) on or near the device;
- do not introduce any foreign bodies into the device;
- the device must not be subject to any great temperature changes as this may
cause moisture through condensation;
- the device should not be subject to excessive knocks and vibrations.
If you are not using the device within the Republic of Germany, you mu st observe the
regulations and laws in the country of use.
- In its default configuration, this product has not been designed for medical,
lifesaving, rescue or life-maintaining purposes. It may be used for home, office and
small business applications (according to EN 61000-6-1 / EN61000-6-3). This
includes games, communication and office applications and others. Furthermore,
the device may not be used outdoors or in tropical climates. Only connection
5
Page 7

English Targa NDAS 500 eSATA
cables and external devices may be used that comply with safety standards and
the electromagnetic compatibility and shieldi ng quality of this device. This device
fulfills all that relates to CE Conformity, relevant norms and standards. Any
changes to the equipment other than the recommended changes by the
manufacturer may lead to the result that these directives are not met any more.
Only use accessories recommended by the manufacturer.
- Do not allow children to play with electrical devices when not under supervision.
Children may not be able to comprehend the presence of potential risks.
- Keep the packaging away from children to avoid the danger of suffocation.
Maintenance and care
- Servicing is required when this device has been dam age d in an y way, for examp le,
when the power plug, power cord or housing is damaged, when liquid or objects
have entered the device, when the product has been exposed to rain or moisture,
when the product does not work normally or if the prod uct has been dropped. If
you notice any smoke, unusual noise or strange smells, switch off the device
immediately and pull the plug from the wall outlet. In this case the device should
not be used further and should be inspected by authorized service personnel.
Contact qualified personnel when servicing is needed. Never open the h ousing of
the device, the power adapter or the accessories. If the housi ng is opened, your
life is in danger due to electric shock. Only use a clean, dry cloth for cleaning.
- Always hold all cables by the plug and never pull on the c able itself. Nev er hol d the
power cord with wet hands as this may cause a short circuit or electric shock.
Never place the device, heavy objects or furniture on th e cable and take care that
the cord does not become trapped, especially at th e plug and sockets. Never make
knots in the cable and do not tie it together with other cord s. All cables should be
positioned so that nobody can trip over them or be obstructed by them. A damaged
power cord can cause a fire or electric shock. Inspect the power cord from time to
time. Never use adapter plugs or extension cables that don't comply with the
current safety regulations in your country, and don't modify any of the power cords
or electrical installations yourself.
- The power switch of this device does not fully disconnect the device from the
mains. Furthermore, the device consumes electricity in the Standb y mode. In ord er
to completely disconnect the device from the mains, the power adapter must be
pulled out from the wall outlet. For this reason, the device should be positioned in a
way that assures a direct and unobstructed access to the wall outlet so that the
power adapter can be immediately pulled out in an emergency situation. To avoid
the danger of fire if the power adapter is not going to be used for a long while (eg.
during holidays), it should always be disc onnected from the power socket. Before
stormy weather when there is the danger of lightning, disconnect the d evice from
the power supply.
- Use only the supplied power adapter model KSAF E1200250W1UK to avoid
overheating, deformation of housing, fire, electric shock, explosions and other
dangers. Never connect this power adapter to other devices.
- The wall outlet must be within easy reach and next to the place of use.
6
Page 8

Targa NDAS 500 eSATA English
- The Targa DataBox NDAS 500 eSATA saves data on a magnetic surface. For this
reason, keep your Targa DataBox NDAS 500 eSATA away from sources that
generate magnetic and electromagnetic fields.
- Install the cables in a safe way. Avoid tripping over them.
- Do not attempt to open the Targa DataBox NDAS 500 eSAT A housing. Otherwise
you will lose your warranty rights.
- Do not remove any cables before properly shutting down the device in the
operating system.
- Place the Targa DataBox NDAS 500 eSATA in a safe position so it cannot fall
over. Use the stand supplied.
7
Page 9

English Targa NDAS 500 eSATA
Getting Started
Please read this user manual before using the device for t he first time. This prevents
incorrect operation and use. Unpack the Targa DataBox N DAS 500 eSATA and keep
the packaging.
Front view Back view
1
2
1 LED indicator (Power on = blue, HDD access = orange)
2 On/Off button
3 USB port
4 eSATA connector
5 Network connection
6 Connection for external power adapter
7 8 9 10 11
4
5 3 6
Power adapter [A] USB cable [B] Network cable [C] eSATA cable [D]
7 Connector for Targa DataBox NDAS 500 eSATA
(Depending on the country version of your power supply, the item
shown in the illustration may differ from the original version.)
8 USB connector for Targa DataBox NDAS 500 eSATA
9 USB connector for PC
10 Network cable (both connectors are identical)
11 eSATA cable (both connectors are identical)
8
Page 10
Targa NDAS 500 eSATA English
Connect the Targa DataBox NDAS 500 eSATA to the supplied po wer adapter [A], by
inserting the power adapter connector [7] into the connector port [6] of the Targa
DataBox NDAS 500 eSATA. Plug the power adapter into a wall outlet.
Connecting via a USB Cable
If you are using Windows
Prior to connecting your Targa DataBox NDAS 500 eSATA to the comp uter, install
the driver from the supplied CD. If the CD automatically starts up once inserted,
interrupt the process by closing the window and double click the "PL2507USB_DISK_DRIVER.exe" file in the "Driver/Windows/Windows98SE_ME" folder to
run manually. Follow the on-screen instructions and rest art the computer once the
installation is completed.
®
98SE/ME:
Note: The Targa DataBox NDAS 500 eSATA has been pre-formatted with the NTFS
file system (for Windows
®
Vista/XP/2000). When using it with Windows® 98SE/ME it
must be formatted with the FAT32 file system.
If you are using Windows
®
XP/2000:
Windows® XP/2000 will automatically detect that a new USB device has been
connected and will install the corresponding drivers.
If you are using Windows Vista™:
Windows Vista™ will automatically detect that a new USB device has been
connected and will install the corresponding drivers.
Insert the flat connector [9] of the USB cable [B] into a free USB port on your desktop
PC or notebook. Next connect the other connector [8] of the USB cable to the USB port
[3] of your Targa DataBox NDAS 500 eSATA. Power on the Targa DataBox NDAS 500
eSATA using the On/Off switch [2].
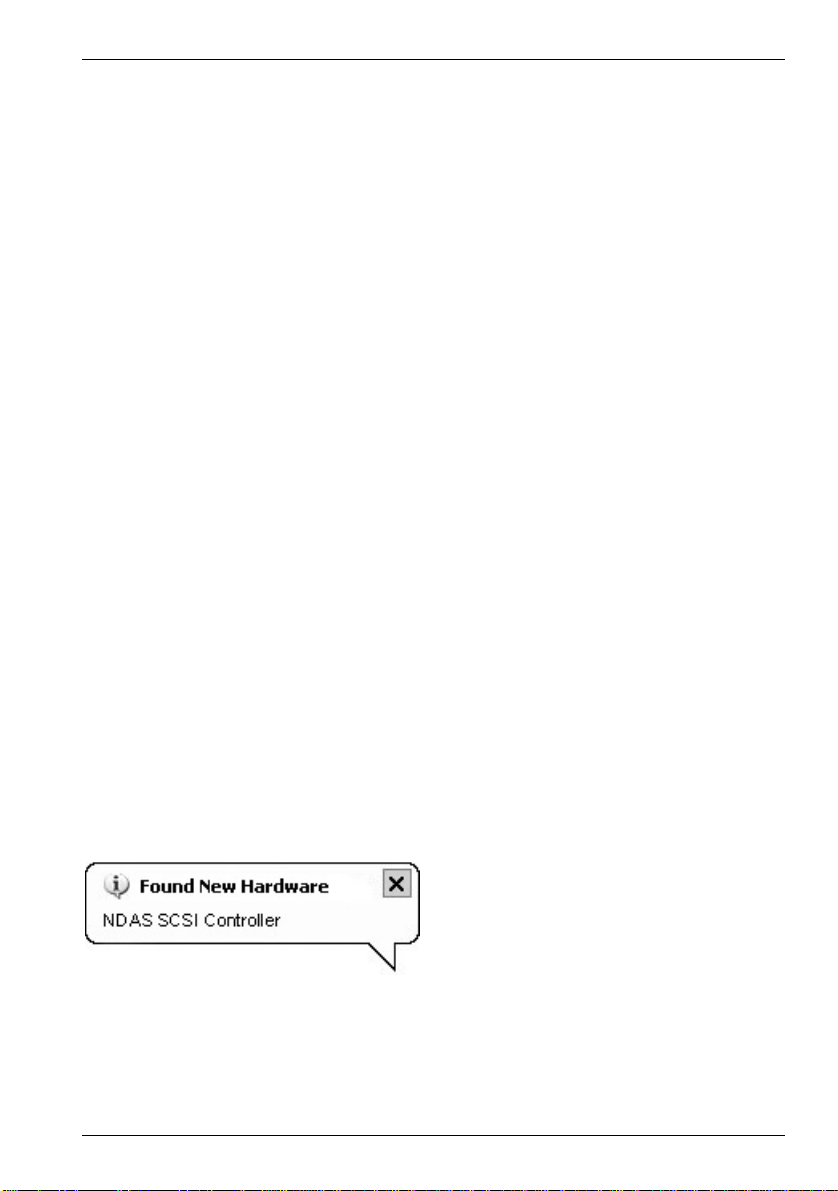
Fig.: Operating system hardware message
example from Windows
Vista™ is similar)
®
XP (Windows
9
Page 11
English Targa NDAS 500 eSATA
The built-in hard disk has already been formatted for the NTFS file system and is
therefore ready for immediate use. The Targa DataBox NDAS 500 eSATA shows as a
new disk in "My Computer" with a drive letter assigned by the operatin g system. The
drive letter assigned depends on the number of disk drives you already have connected
to your computer.
After this installation you can use the new Targa DataBox NDAS 500 eSATA hard disk
in exactly the same way as any other hard disk on your computer. Targa DataBox
NDAS 500 eSATA fields of application include:
- Moving or copying files or folders from other drives, CD-ROMs, or other media
- Saving and opening all kinds of program files on the new hard disk
- Saving video clips, games and other data
- Making safety copies of important data from you PC (backup)
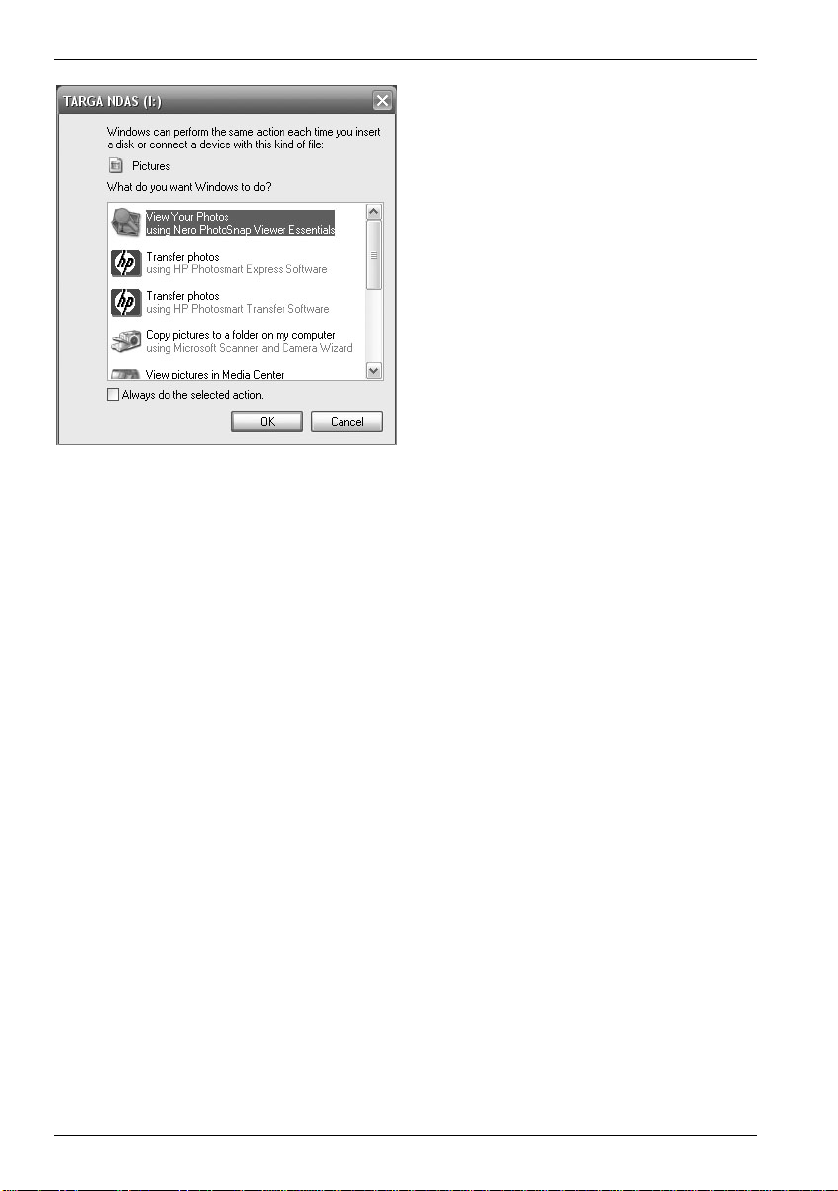
As soon as the Targa DataBox NDAS
500 eSATA is detected by the
operating system, this message
appears. Depending on the data
contained, the operating system will
offer suggestions on how to open the
contents. Confirm the required or
desired action with OK, or select
Cancel to access the drive manually.
Fig.: USB message example from Windows®
XP (Windows Vista™ is similar)
Disconnecting the USB Connection
The Targa DataBox NDAS 500 eSATA can be connected to, and removed from, the
USB port while the computer is powered on. However, if you remove the DataBox from
the computer without stopping it properly from the operating system, file damage or
loss of data may result.
10
Page 12
Targa NDAS 500 eSATA English
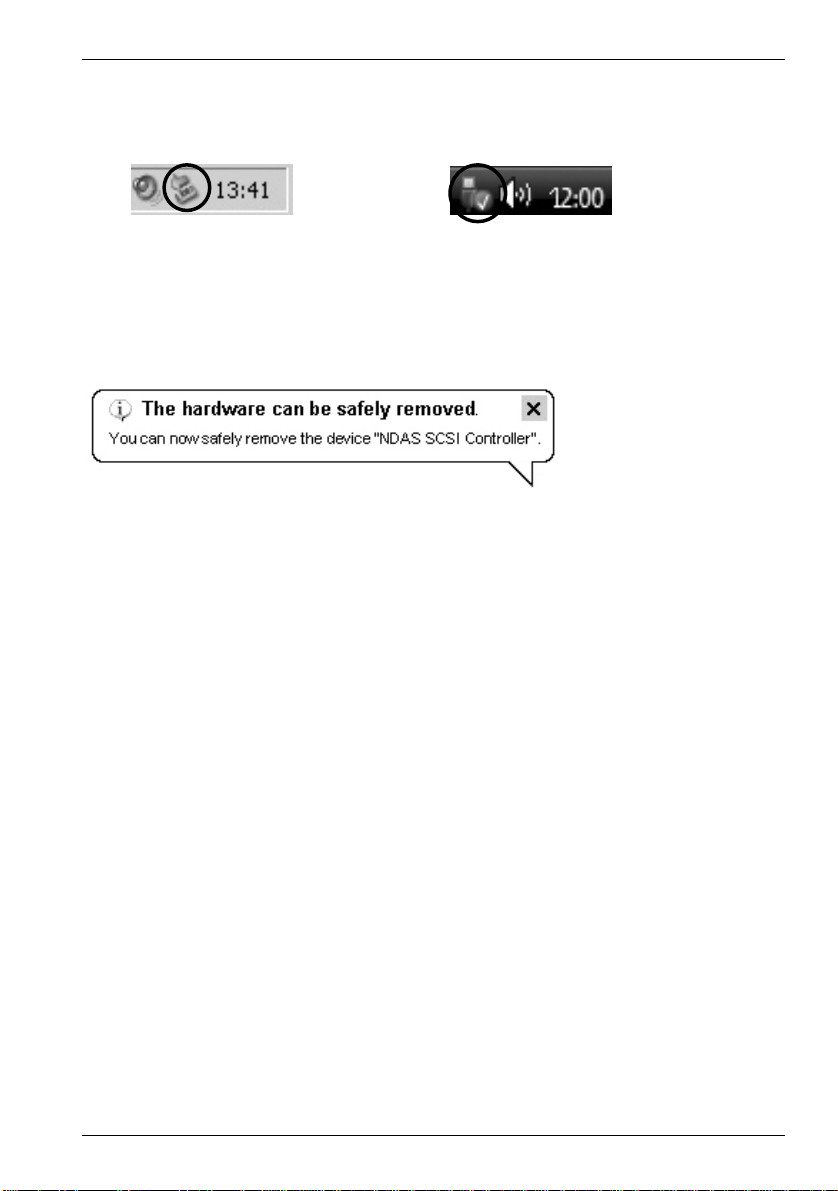
To disconnect, first click with the left mouse button on the "Safely Remove Hardware"
icon in the task bar beside the system clock (see figure below).
Fig.: Safely remove hardware example
from Windows
®
XP
In the following menu select the "USB Mass Storage Device" by clicking with the left
mouse button. A message will soon appear, indicating that you can now safely remove
the Targa DataBox NDAS 500 eSATA:
Connecting via the eSATA Cable
To use the SATA standard your computer must have available an external SATA
connector (eSATA). This should be properly installed on your operating system.
Depending on the manufacturer of the eSATA connector, you must also have the
corresponding driver installed on your computer. If you are not sure whether the
connector is correctly installed, check in the documentation of your computer or in the
third-party expansion card.
Fig.: Safely remove hardware example
from Windows Vista™
The Targa DataBox NDAS 500 eSATA is designed for the eSATA standard and
therefore offers also "Hot Swap" technology. This means that you can connect and
disconnect the Targa DataBox NDAS 500 eSATA from your computer without having t o
shut down the operating system.
On first use – depending on the hardware used – an automatic messa ge may appear
or an acoustic signal may be heard.
1. Insert any connector of the eSATA cable [D] into a free eSATA port on your
computer.
2. Next connect the other connector of the eSA TA cable to the eSAT A port [4] of
your Targa DataBox NDAS 500 eSATA.
3. Power on the Targa DataBox NDAS 500 eSATA using the On/Off switch [2].
The operating system will automatically detect that a new device has been
connected and will install the corresponding driver.
11
Page 13
English Targa NDAS 500 eSATA
Just as with a USB connection, the eSATA connection of the Targa DataBox
NDAS 500 eSATA is immediately ready for use and is added to "My Com puter" of your
operating system. In addition, the Targa DataBox IV 250 automatically obtains a
specific drive letter. The drive letter assigned depends on the number of disk drives yo u
already have connected to your computer.
After this installation you can use the new Targa DataBox NDAS 500 eSATA hard disk
in exactly the same way as any other hard disk on your computer. Targa DataBox
NDAS 500 eSATA fields of application include:
- Moving or copying files or folders from other drives, CD-ROMs, or other media
- Installing and opening all kinds of program files on the new hard disk
- Saving video clips, games and other data
- Making safety copies of important data from your PC (backup)
Disconnecting
The Targa DataBox NDAS 500 eSATA can be connected to, and removed from, the
computer while the computer is powered on. However, if you remove the DataBox from
the computer without stopping it properly from the operating system, file damage or
loss of data may result.
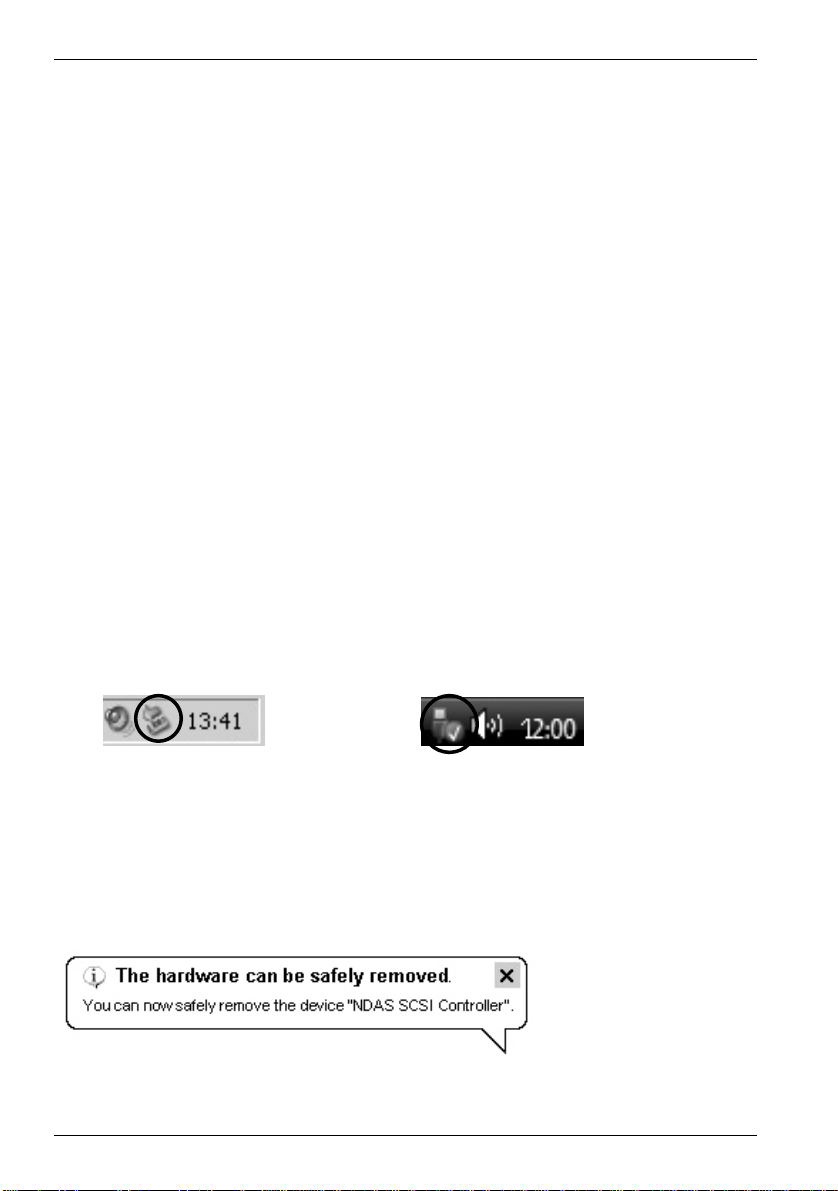
Independently of whether you have connected the Targa DataBox NDAS 500 eSATA
via the USB cable or the eSATA cable, left-click on the "Safely Rem ove H ard ware" icon
in the task bar beside the system clock (see figure below) and keep pressed do wn.
Fig.: Safely remove hardware example
from Windows
®
XP
Fig.: Safely remove hardware example
from Windows Vista™
In the window that follows it is possible that more than one e xternal dev ice is displa yed .
Select the Targa DataBox NDAS 500 eS ATA by left-licking on it. A message will soon
appear, indicating that you can now safely remove the Targa DataBox
NDAS 500 eSATA:
12
Page 14

Targa NDAS 500 eSATA English
Connecting via a Network
An alternative to connecting with a USB cable or an eSA TA cable is to connect the
Targa DataBox NDAS 500 eSATA using a network cable.
Important Information: Do not use several connections at the same time.
If you have several computers connected via a network you can access the Targa
DataBox NDAS 500 eSATA from all these computers via the NDAS (Network Direct
Attached Storage). This function is also possible with a wireless WLAN.
On the following pages you'll find out how to connect the Targa DataBo x NDAS 500
eSATA via a network cable and how to get started.
Connect the Targa DataBox NDAS 500 eSATA to a wall outlet as described on page 9.
Next connect the network port of the Targa DataBo x NDAS 500 eSATA [4] using the
supplied network cable [C] to a free port of your network switch or hub or directly to
your computer.
To be able to establish a network connection with the Targa DataBox NDAS 500
eSATA you must first install the software from the supplied CD-ROM. Do so for every
computer on your network that needs to be connected to the Targa DataBox NDAS 500
eSATA.
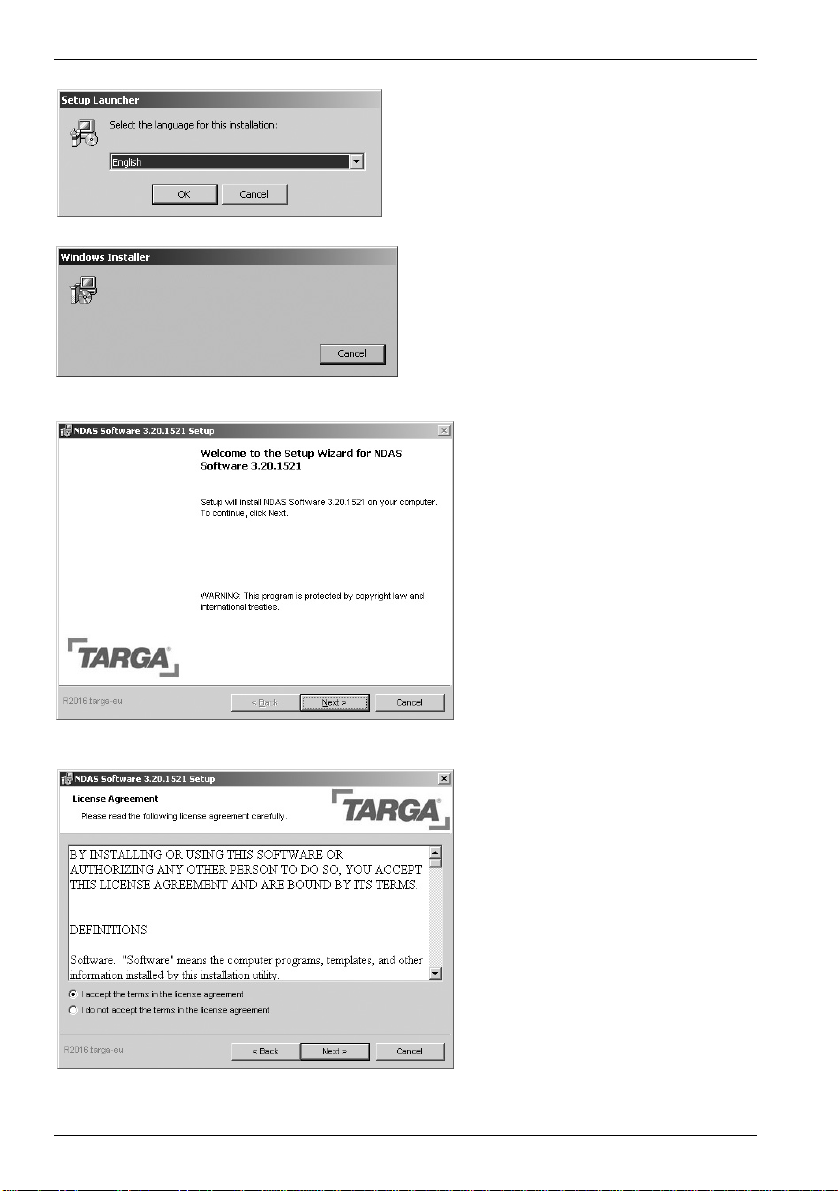
Insert the supplied CD-ROM into your CD-ROM or DVD drive (depending on the
computer). If the auto run function is disabled, you can launch the setup manually by
running the file "start.exe" from the CD.
The following installation is explained for the Windows XP operating system. The
figures under Windows Vista™ have identical contents, however the appearance ma y
differ depending on the design setting.
If the installation starts via the Autorun, please click on the menu option "NDAS
Software Installation" that is displayed. If the installation has been launched manually,
the following window appears without any default selections made.
13
Page 15
English Targa NDAS 500 eSATA
First select the installation language
and then click OK.
The "Install Shield Wizard" appears:
please wait.
To launch installation, click on
Next.
14
Mark the point "I accept the
terms in the license agreement"
and click
Next.
Page 16
Targa NDAS 500 eSATA English
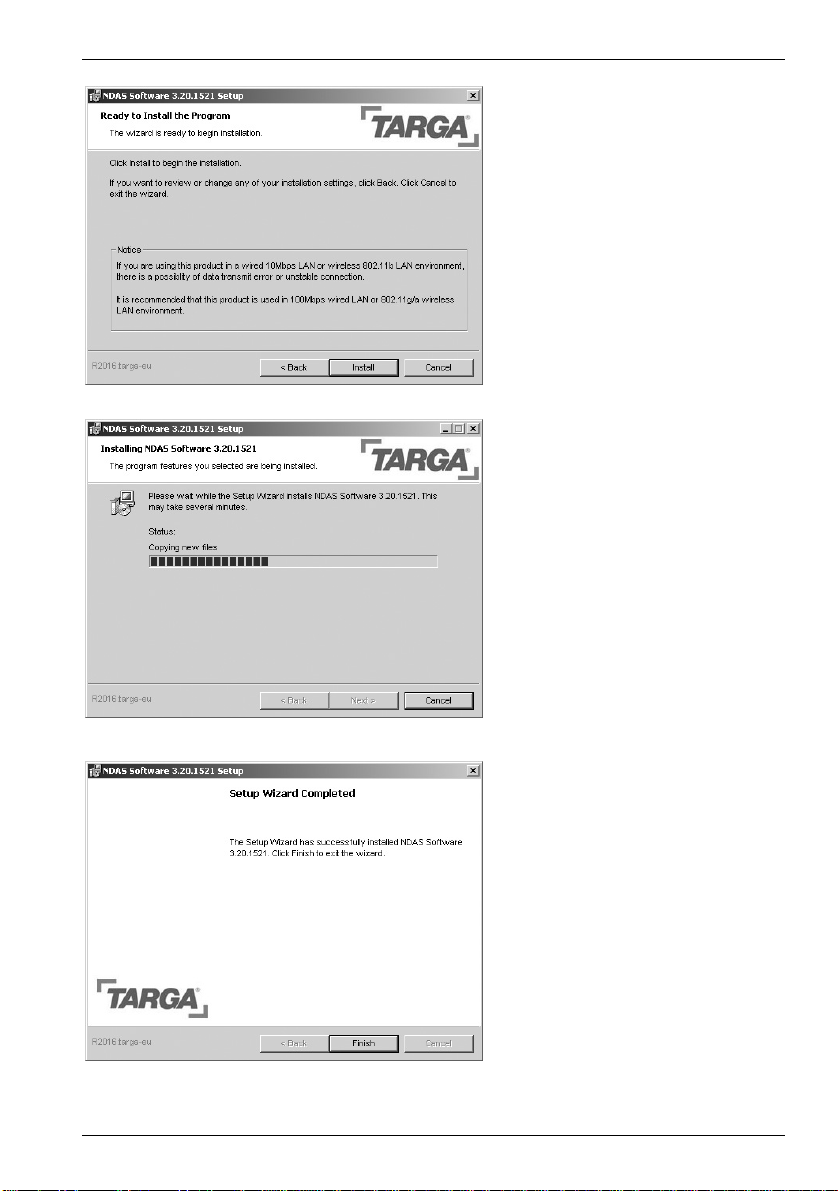
®
The setup software calls your
attention to the fact that transfer
errors may occur in wired and
wireless networks with low
bandwidths. A 100Mbit wired
LAN network or 54 Mbit
wireless LAN network is
recommended. To proceed click
Install.
The required files will be
automatically copied:
please wait.
Under Windows
warning message appears
XP: If a
indicating that the software may
not be compatible, click on
Continue anyway.
Under Windows Vista™: The
UAC security message of the
User Account controller asks
several times for administrative
rights. For this, click on Install
each time.
This message means setup is
completed. Click Finish to
confirm.
15
Page 17
English Targa NDAS 500 eSATA
After your computer has restarted, you will see a new icon in the task bar with the title
"NDAS Device Management" (see figure below).
Fig.: NDAS Device Management
Click with the left mouse button on the icon to open the following menu:
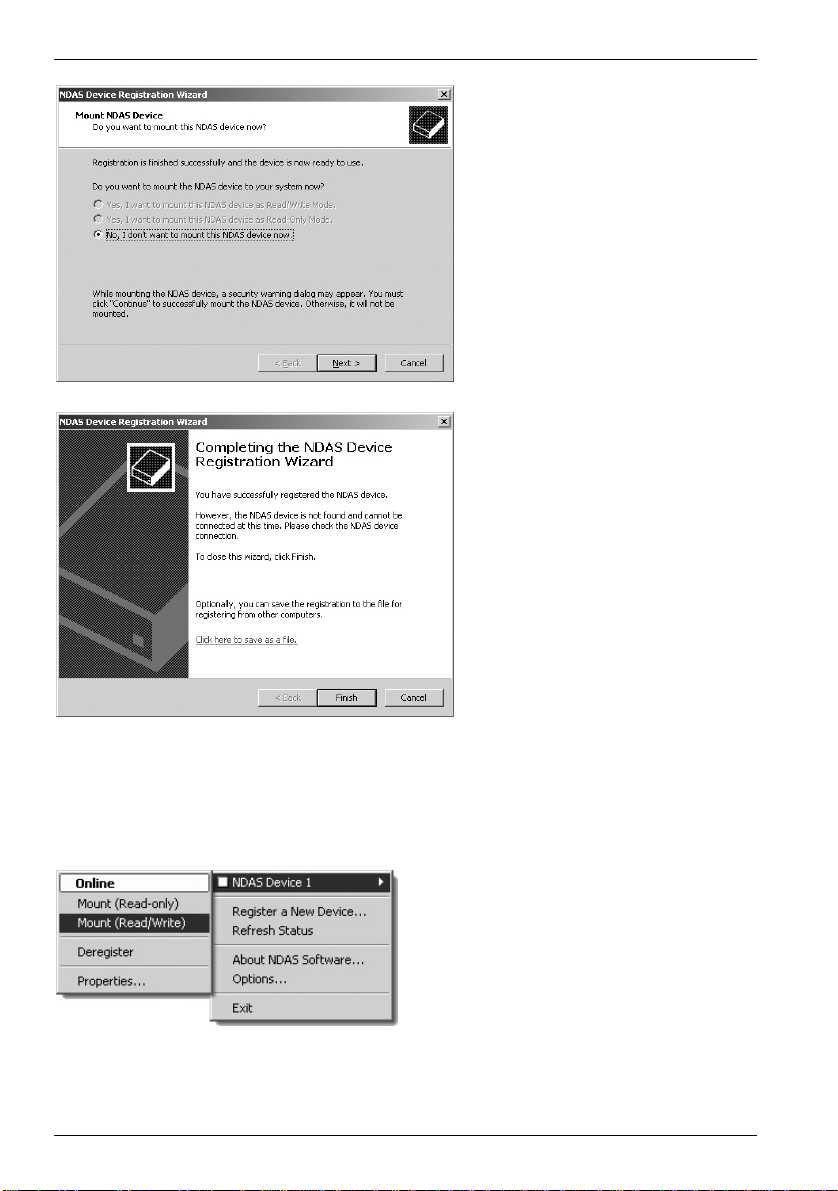
This is where you must register the
new drive. Click on the menu item
Register a new device….
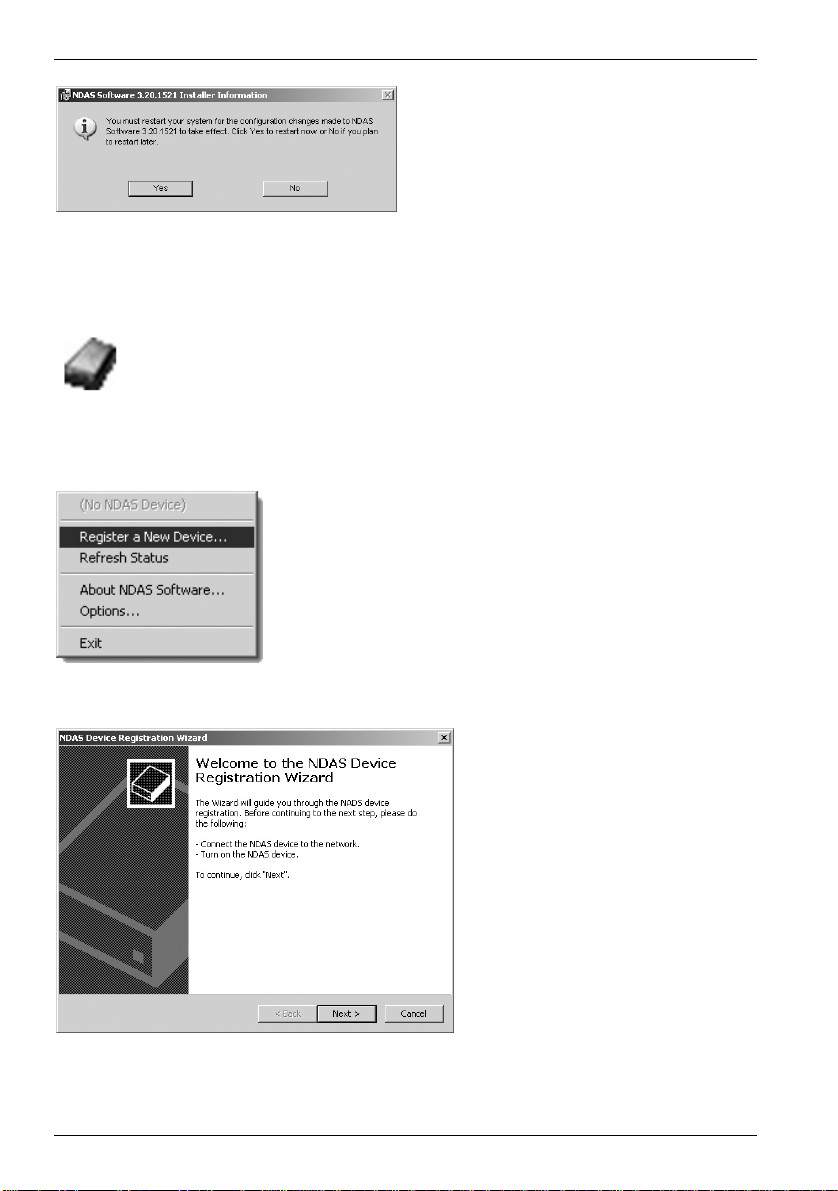
To restart the computer and complete
the installation process, click Yes.
16
During first-time registration a
welcome window will appear.
To proceed, click
Next.
Page 18
Targa NDAS 500 eSATA English
Enter any name for your new
device or leave the default
name of "NDAS Device 1" and
click
Next.
Enter the device ID number into
the input fields. All computers
that you want to grant write
access to need a write access
key. Both can be found on the
sticker of the DataBox NDAS
500 eSATA or at the end of this
User Manual then, click
Next.
The software checks if the
DataBox NDAS 500 eSATA is
present on the network.
Please wait.
17
Page 19
English Targa NDAS 500 eSATA
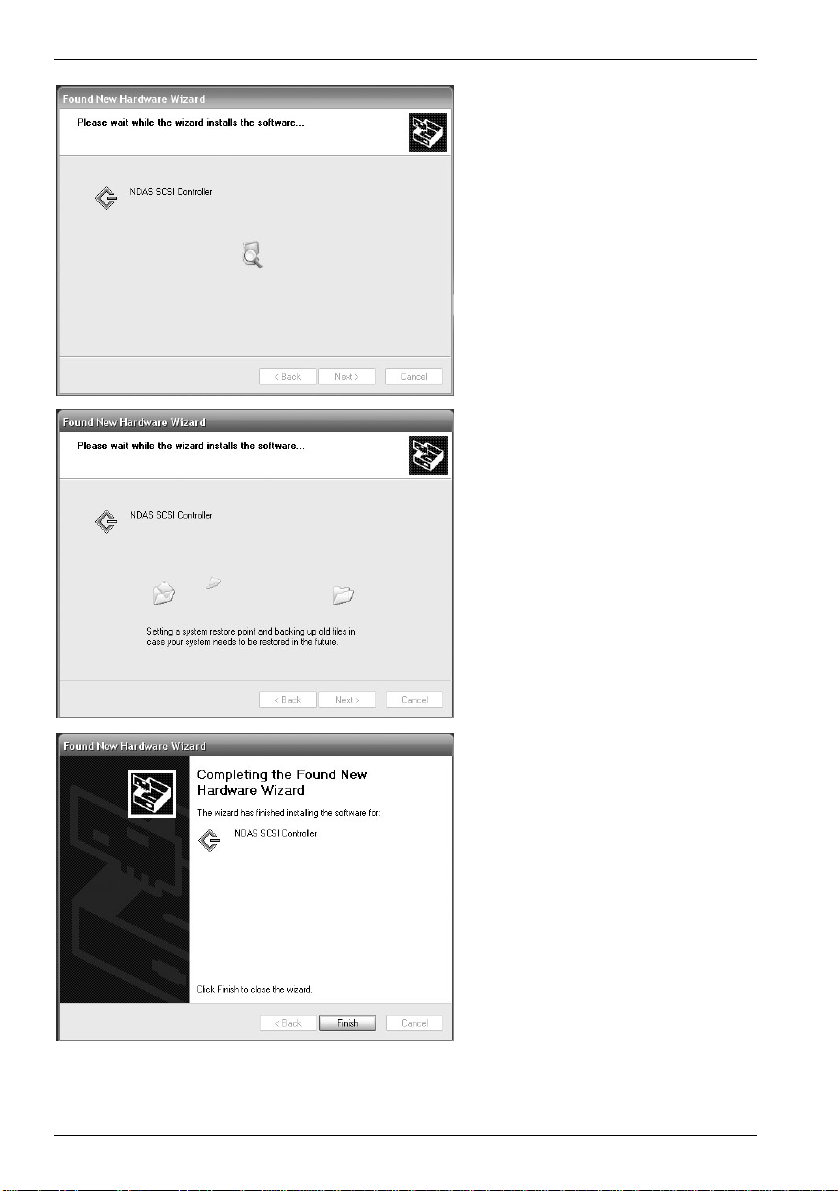
The registration process is
completed. The software offers
three choices:
1. You can mount the device
with read and write access
rights
2. You can mount the device
with read access rights
3. You do not mount the
device at this time
Please select you choice and
click
Next.
This completes the procedure.
To finish, click
Finish.
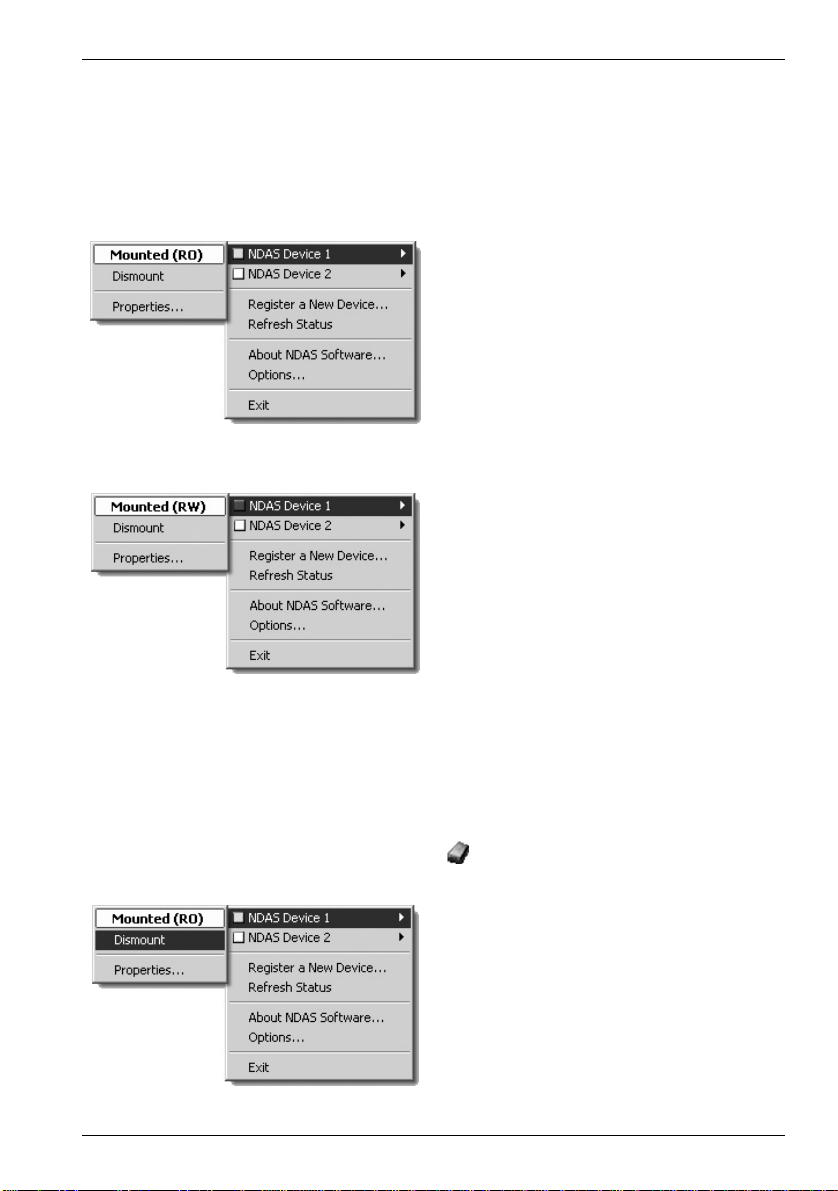
Mounting
After registering successfully you can now integrate the new drive into your system
(mounting). To do this, click again with the left mouse button on the "NDAS Device
Management" icon in the task bar. The following menu will appear:
18
Page 20

Targa NDAS 500 eSATA English
Select the menu item "NDAS Device 1" (or whatever name you selected during
registration) with the mouse to open the second windo w. Here you can integrate the
drive to the system as "Read Only" or "Read/Write".
Read Only
You may only read data from the hard disk, but not delete, rename, move or write
new data on it.
Read/Write
You may read all data from the h ard disk, as well as del ete, rename, move or write
new data on it.
This menu item is only available if you have entered the write acc ess key during
setup.
On first setup of the hard disk, your computer will need to install the driver. This
happens automatically: you only need to confirm the messages.
A connection to "Windows
Update" is not necessary. You
can check "No, not this time"
and click Next.
Select "Install the software
automatically", and click
Next.
19
Page 21
English Targa NDAS 500 eSATA
The required files will be
searched for: please wait.
If a warning message appears
indicating that the software may
not be compatible, click on
Continue anyway.
The required files will be
automatically copied: please
wait.
20
When all files have been
copied, click on Finish.
Page 22
Targa NDAS 500 eSATA English
The Targa DataBox NDAS 500 eSATA is now connected to your computer over the
network and is available at all times. The "NDAS Device Management" menu will
appear in the task bar depending on the type of integratio n in your system (Read On ly
or Write/Read).
Read Only
Read/Write
The Targa DataBox NDAS 500
eSATA is integrated with Read
Only Access Rights.
The Targa DataBox NDAS 500
eSATA is integrated with Read
and Write Access Rights.
The Targa DataBox NDAS 500 eSATA shows as a new disk medium in "My Computer"
with a drive letter assigned by the operating system.
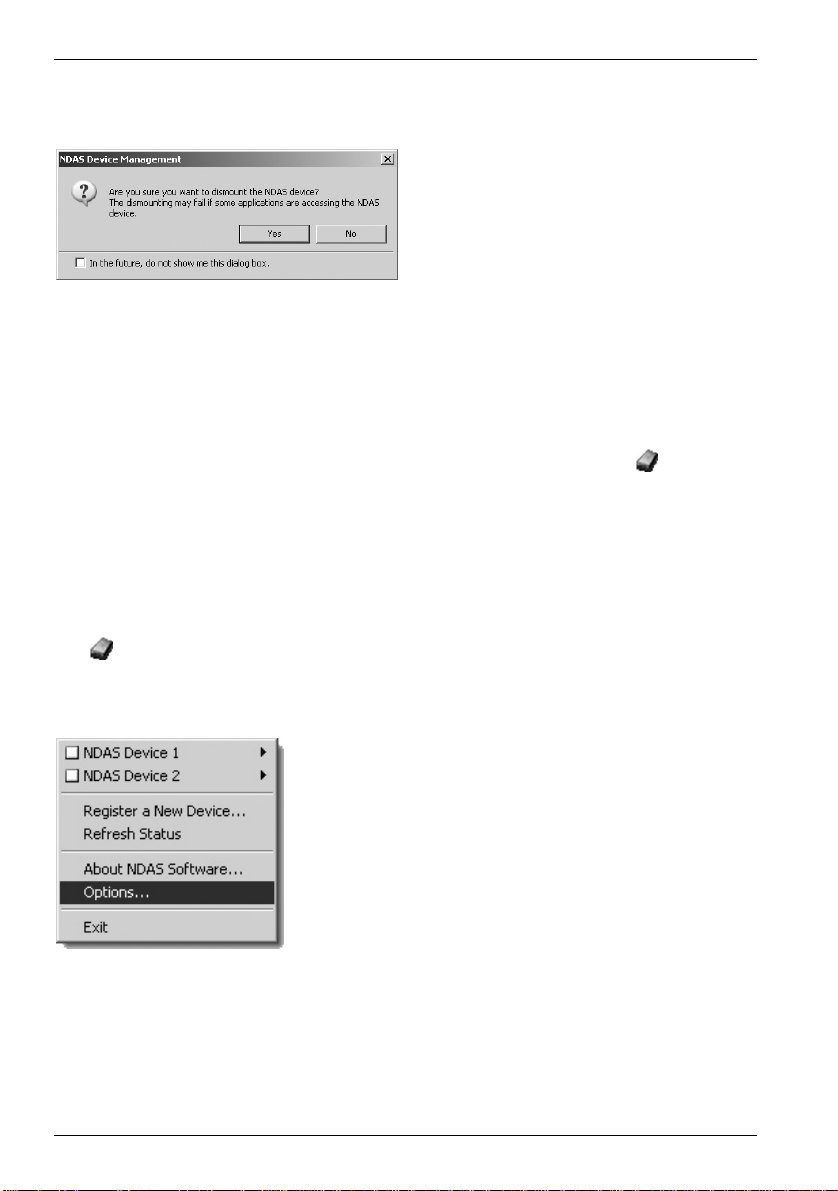
Closing the Network Connection
You can disconnect the network connection to the Targa DataBox NDA S 500 eSATA
from a network connection by clicking on the
(in the example, "NDAS Device 1") and then click "Dismount" (see figure below).
icon in the task bar, selecting the drive
21
Page 23
English Targa NDAS 500 eSATA
When you disconnect (Unmount) the Targa DataBox NDAS 500 eSATA displays the
following message:
Confirm with Yes when you want to disconnect the Targa DataBox NDAS 500 eSATA
from your computer and have made sure that no appl ications are accessing data on the
Targa DataBox NDAS 500 eSATA.
You can suppress this message the next time yo u disconne ct by marking " in the future,
do not show me this dialog box".
To connect the Targa DataBox NDAS 500 eSATA again, click on the
task bar, select the device (in the example, NDAS Device 1) and click on Mount (Read
Only) to connect the Targa DataBox NDAS 500 eSATA with Read-only access, or on
Mount (Read/Write), to grant full access to the Targa DataBox NDAS 500 eSATA.
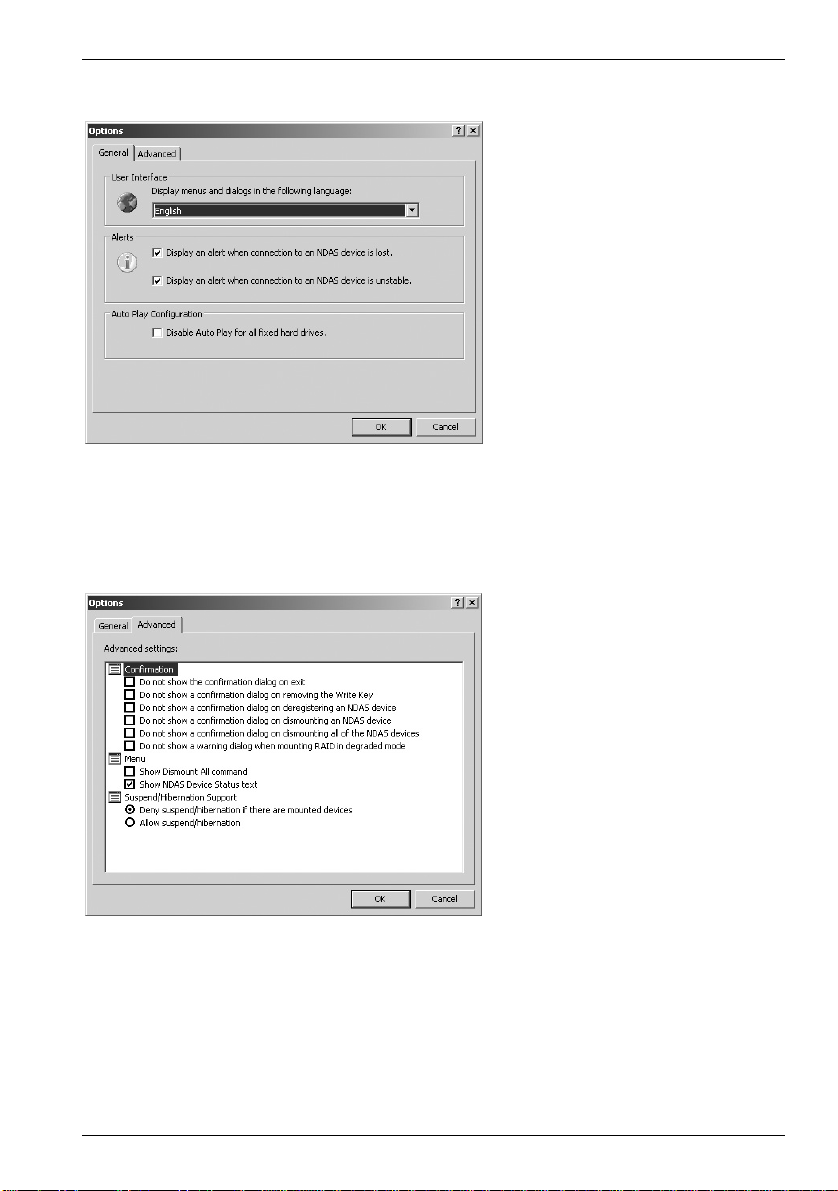
Further Options for Network Connections
If required, you can make further settings. To do so, click with the left mouse button on
the
icon in the task bar and select the menu item Options by left-clicking once
again (see figure below).
If applications have been saved onto
your hard disk and are currently being
used, disconnection may fail.
icon in the
22
Click on Options to make further settings.
Page 24
Targa NDAS 500 eSATA English
The following menu will appear:
Under User Interface you can change the display language for the menus. The
configuration under Alerts offers you the possibility of suppressing notifications of
interrupted or unstable connections by removing the corresponding check marks. With
Auto Play Configuration you can enable or disable the automatic display of NDAS
devices.
The Menu for General Settings
of the Targa DataBox NDAS
500 eSATA
The Menu for Advanced
Settings of the Targa DataBox
NDAS 500 eSATA
Below the item Confirmation mark the selection box to activate the corresponding
confirmation dialogue. Under Menu you can activate or deactivate the various dis play
settings. Suspend/Hibernation Support allows or disallows the computer from
entering Standby mode with mounted devices.
23
Page 25

English Targa NDAS 500 eSATA
Advanced
RAID
You can group more than one Targa DataBox to a RAID cluster. When you create a
RAID cluster, all existing data on the hard disk will be lost. Take c are therefore to back
up your data if you have any important data on the disk.
RAID stands for "Redundant Array of Independent Disks" and serves to improve data
integrity or access speed. The Targa DataBox NDAS 500 eSATA supports the
following RAID configurations:
RAID 0 (Data Striping)
With this procedure all data in parallel is written in batches to at least two hard disks.
While the first disk is writing, the second disk contains further d ata from the computer.
The writing speed is doubled. This is how it behaves when reading from the hard disk.
In this way, this process offers the full storage space of all connected hard disks with
the highest access speed. For data backup, this process is not recommended.
RAID 1 (Data Mirroring)
In RAID 1 all data from the first hard disk is mirrored onto the second hard disk. If one
of the hard disks fails, no data is lost as all the data stock is contained on the second
hard disk. Owing to the double writing work, this process is slower than using a single
hard disk and the total storage space is only equiva lent to one single DataBox NDAS
500 eSATA. The advantage of this process is the high level of data security.
Spanning
Spanning groups two or more DataBoxes one with another to create a very big
partition. This process offers however neither higher speed nor higher data security.
24
Page 26

Targa NDAS 500 eSATA English
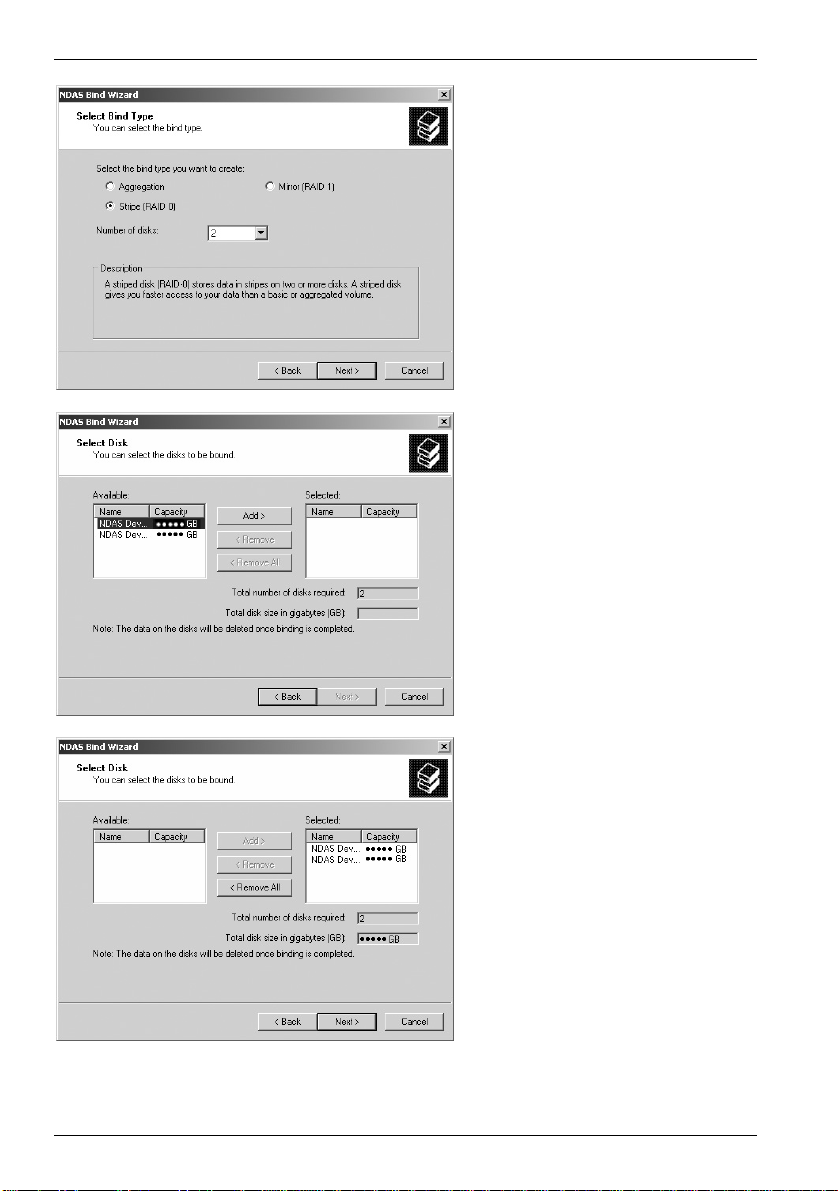
To create a group, the corresponding Databoxes must be connected via an accessibl e
network, but not mounted on the connected computer. Additionall y, the write access
key must be entered upon registering.
Click on "NDAS Bind
Management" in the Program
folder.
A window with a list of all NDAS
devices is displayed. The status
should show "Ready". If this is
not the case, the Databoxes
should be firstly disconnected
from all computers.
Click on the "Bind" button to
start the RAID configuration.
The Wizard for the
configuration will appear. Click
Next.
25
Page 27
English Targa NDAS 500 eSATA
Select the desired action and
specify how many DataBoxes
are to be bound.
Then click on
Next.
Highlight the relevant NDAS
device in the "Available" field
and click the "Add >" button to
add the device to the binding.
26
Repeat the process until all
desired NDAS devices are
displayed in the "Selected"
field. If you have accidentally
selected a wrong device, you
can highlight it in the "Selected"
field and delete it from the
binding using the "< Remove"
button.
Page 28
Targa NDAS 500 eSATA English
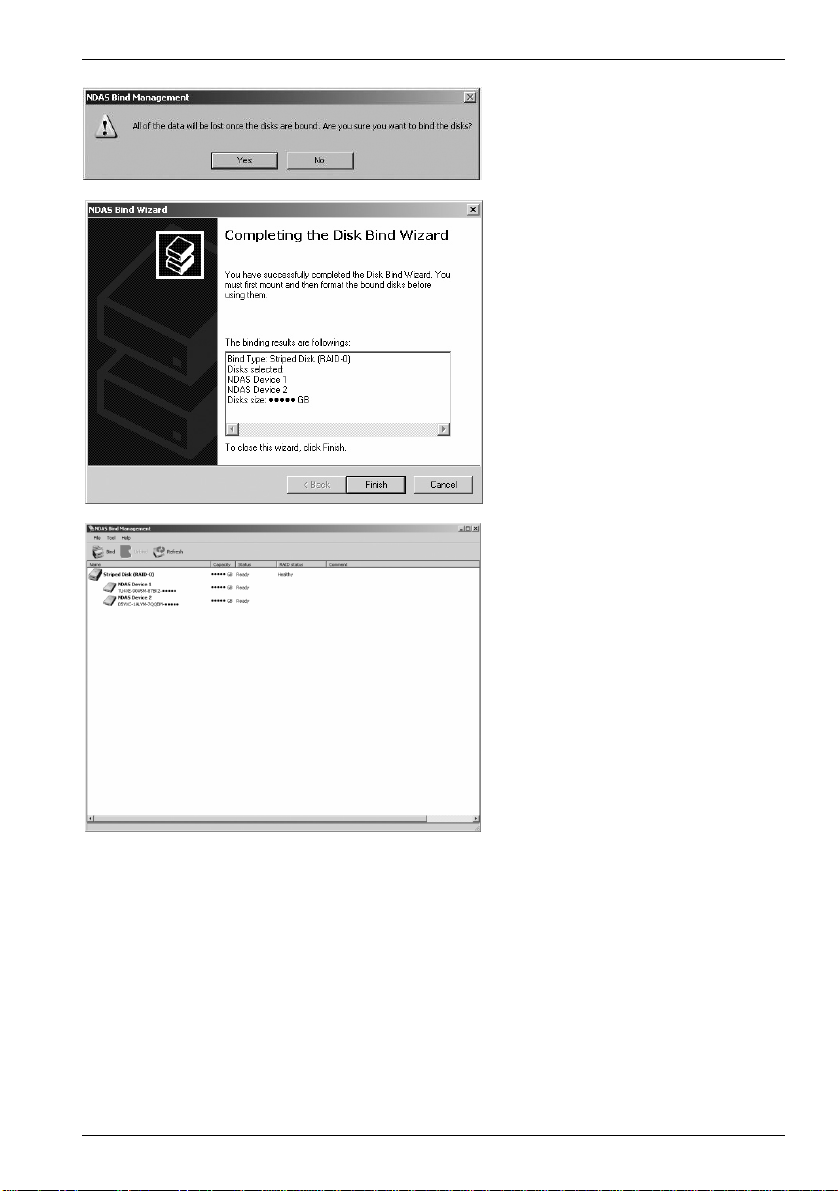
Remember that all data in the
hard disk will be deleted. Click
Yes on the security prompt to
continue.
Now, the Wizard has all the
necessary information and is
ready to put the binding into
operation. Click on Finish.
An overview appears where
you can control the settings
made. You have successfully
completed the configuration.
Close the window by clicking
the button "Close".
Partitioning and Formatting
The new storage medium cannot be used unt il the RAID cluster has been initialised,
partitioned and formatted. You only have to do this process once and only on one
computer. All other computers within the network will detect the new partition.
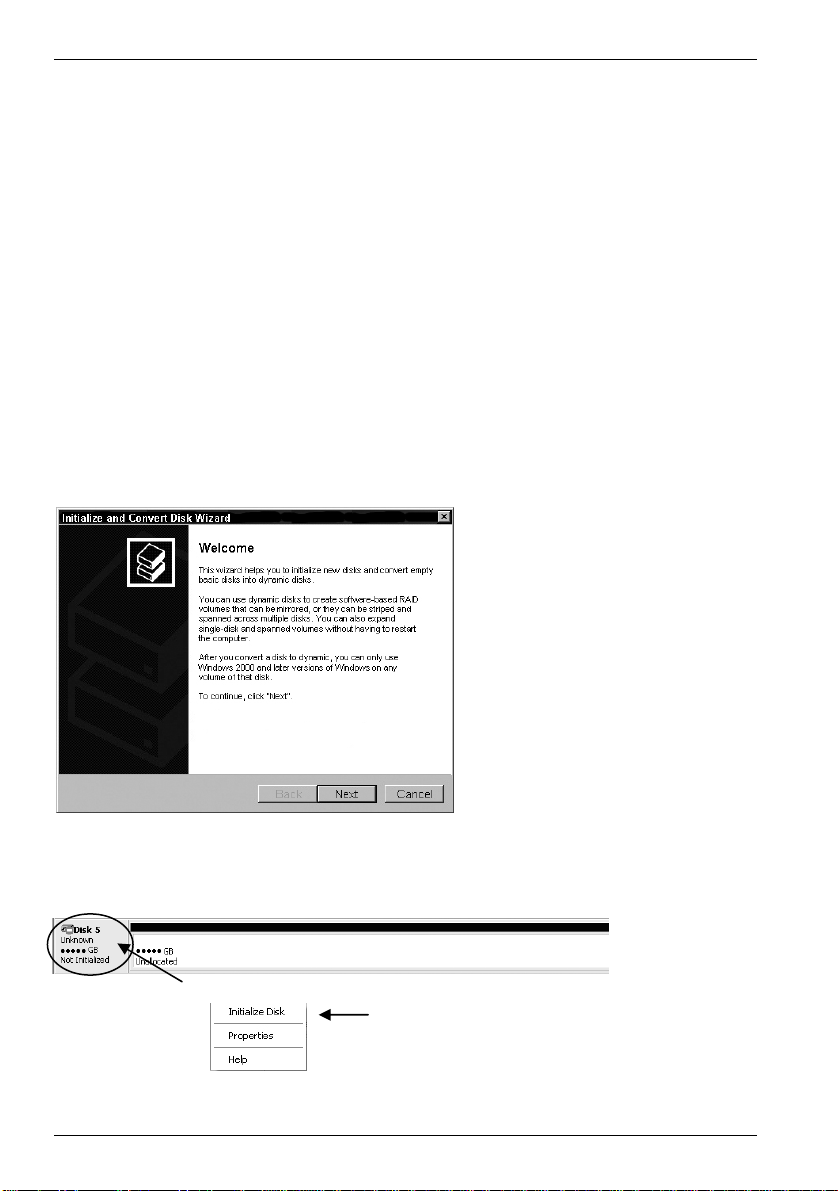
First group the RAID cluster, as described on page 18. Then open Disk Management
and follow this path:
27
Page 29
English Targa NDAS 500 eSATA
Under Windows
®
XP:
[Start] > [Control Panel] > [Performance and Maintenance] > [Administrative Tools] >
[Computer Management] > [Disk Management]
Under Windows Vista™:
[Windows icon]> [Control Panel] > [Administrative Tools] > [Computer Management] >
[Disk Management]
The next procedure is explained for the Windows
®
XP operating system. The figures
under Windows Vista™ have identical contents, however the appearance may differ
depending on the design setting.
In the Disk Management of your operating system you will find all the administrated
disk drives. Depending on the number of the existing drives, the RAID cluster takes a
name with a consecutive figure (in this example, "Storage Medium 5"). On openi ng Disk
Management, the Wizard to initialize new drives will show a first window.
Start the Wizard with the button
Next.
If the Wizard does not automatically show, click with the right mouse button on the
corresponding name entry (see figure below) and then select with the left mouse button
the menu item, "Initialize Disk".
Click here with the right mouse button.
Left-click to start the Wizard.
28
Page 30
Targa NDAS 500 eSATA English
Click on "Finish" in the next window to finish the process.
The list entry changes as follows:
Click here with the right mouse button
Configure a partition by clicking on the white area (see figure) with the right mouse
button. The following context menu will appear:
After the Wizard starts a
window appears where all the
drives are listed that have not
yet been initialized. Select the
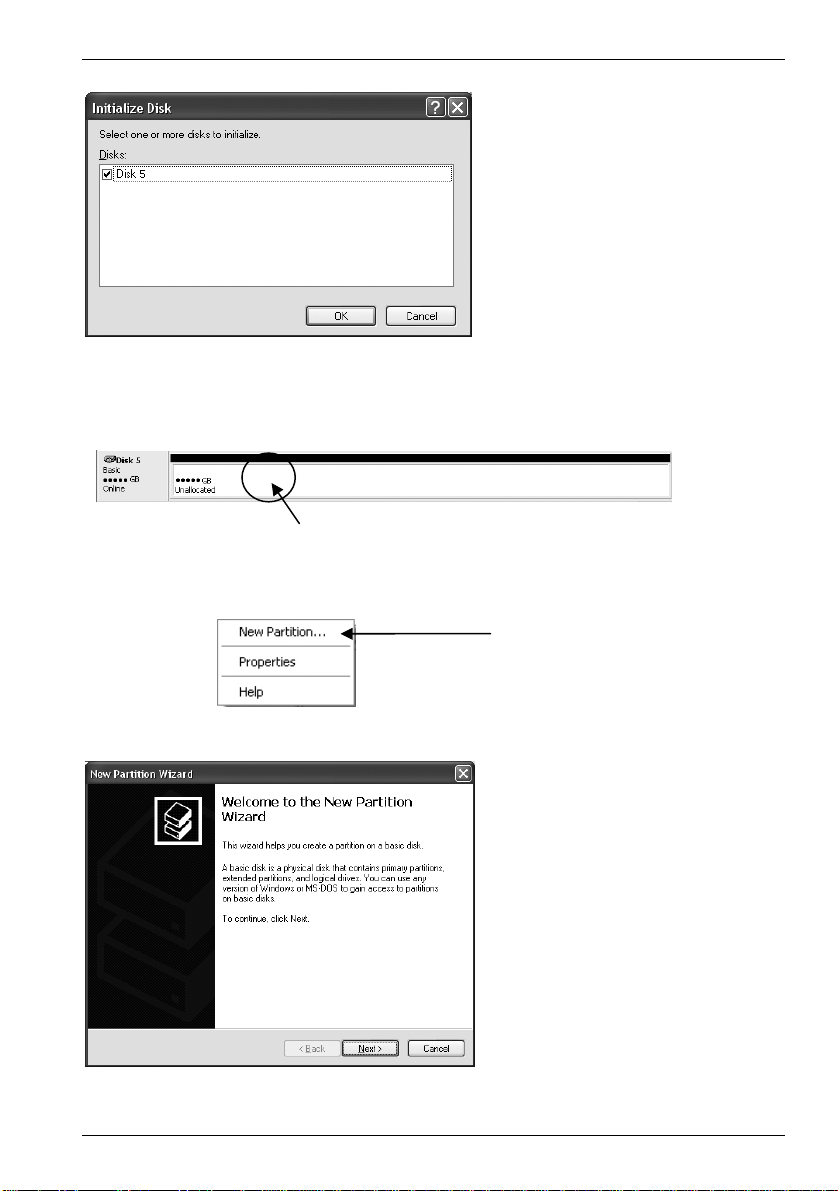
desired entry with a left click
(e.g. Disk 5) and then click on
OK.
Choose the menu option "New
Partition…" by clicking with the
left mouse button.
A Wizard appears to help
configure a new partition. To
start, click Next.
29
Page 31

English Targa NDAS 500 eSATA
To use the DataBox as a storage medium, it is recommended that you create a further
partition. Within this further partition you can create multiple "logical drives". This
means you can organise user data or programme applications and thereby simplify
data backup.
In this menu you can choose
between a primary and
extended partition.
A primary partition is only
required if you want to install an
operating system on it.
Confirm this selection with
Next.
Specify the size of the partition
here. A maximum storage
space will be suggested. You
can also enter a smaller value
to reserve the storage space for
further primary or other
partitions. In our example we
use the maximum storage
space as we want to create
various "logical drives".
Confirm your selection with
Next.
30
To close the Wizard, click on
Finish.
Page 32

Targa NDAS 500 eSATA English
In the list entry the "Free space" in the Disk Mana geme nt is shown. The configured and
enlarged partition now serves to hold new logical drives. Right-click on the free stora ge
memory to invoke a context menu. Choose the menu option "New Logic al Drive…" by
clicking with the left mouse button.
Click here with the right mouse button
Left-click to start the Wizard
The Wizard appears to help
configure a new partition. To
restart, click Next.
At this point, "Logical Drive" is
the only available option. Then,
click Next.
31
Page 33

English Targa NDAS 500 eSATA
Here you can specify the size of
the logical drive in Megabytes.
Maximum storage space will
once again be suggested. We
select for example 180 000MB
(180 GB), as we want to create
further logical drives. Confirm the
entry with
Next.
Specify with which drive letter
the new drive should be
displayed on your computer.
The next available drive letter
will automatically be displayed.
Confirm the entry with Next.
"Mount in the following empty NTFS folder:"
You can also allocate the drive as a folder. Then it will not be displayed directl y on the
Desktop, but in a freely selected (existing) folder.
"Do not assign a drive letter or drive path"
This configuration is only recommended if you want to format a hard disk only, l ater but
use it on another computer.
32
Page 34

Targa NDAS 500 eSATA English
File system
If you are using the Targa DataBox only with a modern operating system, we
recommend that the file system is in NTFS configuration (standard setting).
Allocation unit size
Depending on the use of the hard disk, you can select the cluster size of the partition
between 16KB and 4096KB here. A cluster is the small est possible size of data. If you
want to save very large files, a higher value is recommen ded. If you want to save many
small files, select a lower value. You are recommended to le ave the setting here on
"Default".
In this option you can add
further entries to the logical
drive.
If you are not sure, leave all
settings and confirm the setting
with Next.
Volume label
Give the logical drive any meaningful name (in our example, "New Volume").
Perform a quick format
When you format quickly detection of defective sectors remains unchecked and is
therefore faster. If you do not want to carry out this revision, mark a tick in the box to
format faster.
Enable file and folder compression
With this option all saved data is automatically compressed (made smaller). This
means you will have more free storage space but also slower access speed.
33
Page 35

English Targa NDAS 500 eSATA
Within the extended partition the logical drive with the name "New Volume" is shown.
New logical drives can be created in the remaining free memory space. To do this,
repeat the steps on page 31.
The display of the memory storage of the ne w drive is smaller than the value that is
entered in the configuration. This is partly because of the differing calculation of the
Byte and a normal appearance of the hard disk. A Kilobyte does not equal 1000 Bytes,
as our common decimal number system suggests, but exactly 1024 Bytes, as a
computer calculates using the binary system.
Close the Wizard by clicking
Finish.
Unregistering
You can unregister your Targa DataBox NDAS 500 eSATA by clicking the
Device Management" icon. The following menu will appear:
34
"NDAS
Page 36

Targa NDAS 500 eSATA English
Select the menu item "NDAS Device 1" (or whatever name you selected during
registration) with the mouse to open the second window. Here you can us e the functio n
"Deregister" to remove the drive from your system. This will not erase any data from
your hard disk.
Updating the Status
You can update the status of the menus by clickin g the "Refresh Status" function (see
the figure below)
Information On Software
In the menu (see above figure), click "About NDAS Software…” to display th e version
of the installed software.
Fig.: NDAS Device Management menu
Properties
Properties allows you to display relevant information about your Targa DataBox NDAS
500 eSATA and the connected hard disk drive. To do this, click on the "NDAS Device
Management" icon
in the task bar.
35
Page 37

English Targa NDAS 500 eSATA
From the second menu, select "Properties…" to display this window:
The first tab "General" allows you to rename your T arga DataBo x NDAS 500 eSATA by
clicking "Rename". You can see whether the write access key has been entered and
remove it by clicking "Remove". In this case you will only be able to mount the devic e
with read access rights (see page 18 – Mounting the Targa DataBox NDAS 500
eSATA).
The tabs Hardware and Hosts show hardware information on the Targa DataBox NDAS
500 eSATA as well as on the connected hard disk drive and the users that have
established a connection.
The last tab, "Advanced", allows you to disable or to reset the Targa DataBo x NDAS
500 eSATA. These functions will only be available when the device has not been
mounted.
36
Page 38

Targa NDAS 500 eSATA English
37
Page 39

English Targa NDAS 500 eSATA
38
Page 40

Targa NDAS 500 eSATA Slovenščina
Vsebina
Splošne informacije........................................................................................................2
Sistemske zahteve .....................................................................................................................3
Vsebina paketa...........................................................................................................................
CE izjava o skladnosti ................................................................................................................
Odlaganje rabljenih izdelkov ......................................................................................................
Tehnični podatki............................................................................................................. 4
Namenska uporaba....................................................................................................................4
EMC in varnostni predpisi ..........................................................................................................
Pomembna varnostna navodila ...................................................................................... 5
Vzdrževanje in nega.................................................................................................................. 6
Začetek uporabe............................................................................................................8
Priključitev prek USB kabla....................................................................................................... 9
Odklop USB povezave ...........................................................................................................
Priključitev prek eSATA kabla.................................................................................................11
Odklop..................................................................................................................................... 12
Priključitev prek omrežja .........................................................................................................
Zapiranje omrežne povezave..................................................................................................
Dodatne možnosti za omrežne povezave ...............................................................................22
Dodatno .......................................................................................................................24
RAID........................................................................................................................................24
Izdelava particij in formatiranje................................................................................................27
Brisanje iz registra...................................................................................................................
Posodobitev stanja..................................................................................................................35
Informacije o programski opremi............................................................................................. 35
Lastnosti.................................................................................................................................. 35
3
3
3
4
10
13
21
34
Podrobnosti glede garancije......................................................................................... 37
1
Page 41

Slovenščina Targa NDAS 500 eSATA
Splošne informacije
Zahvaljujemo se vam za nakup izdelka podjetja Targa.
Pred prvo uporabo naprave preberite naslednje opombe v tem priročniku ter
upoštevajte vsa opozorila, tudi če ste dobro seznanjeni z upravljanjem elektronskih
naprav. Priročnik shranite na varnem mestu za kasnejšo uporabo. V primeru, ko
napravo prodate ali izročite drugi osebi, obvezno priložite tu di ta priročnik.
Targa DataBox NDAS 500 eSATA je zunanji trdi disk, ki omogoča povečanje velikosti
pomnilnika vašega računalnika za shranjevanje in urejanje dokumentov, video in
glasbenih datotek, fotografij, grafičnih datotek itd. Vaš novi trdi disk lahko uporabite tudi
kot napravo za varnostno shranjevanje pomembnih podatkov. Za preprečitev izgube
podatkov zaradi poškodbe trdega diska, ki ga lahk o povzroči pregrevanje ob predolgem
delovanju, ima Targa DataBox NDAS 500 eSATA vgrajen hladilni ventilator premera
7,5 cm. Ne gle de na to, ali trdi disk uporabljate kot razširitev pomnilniške zmogljivosti
ali kot rešitev za varnostno shranjevanje, so v tem priročniku na voljo vse potrebne
informacije in nasveti, ki jih potrebujete za njegovo delovanje.
Funkcije, ki jih omogoča Targa DataBox NDAS 500 eSATA:
- Velik pomnilnik
- Vstavi in poženi
- Visoka hitrost prenosa podatkov
- USB 1.1 ali 2.0
- Omrežna povezava
- eSATA II priključek
- Hitra menjava za enostavno priključitev na druge računalnike
- Kompaktno ohišje
2
Page 42

Targa NDAS 500 eSATA Slovenščina
Sistemske zahteve
Minimalne sistemske zahteve:
- Računalnik s procesorjem Pentium ali drugim združljivim oz. boljšim procesorjem
- Microsoft Windows Vista™, Microsoft Windows
98SE/ME z gonilniki ustrezne države
- Najmanj 32 MB RAM-a, v skladu z zahtevami sistema Windows
- Razpoložljiv USB 1.1 ali 2.0 priključek oz. omrežni priključek ali eSATA priključek
- CD-ROM pogon
- Internetna povezava (za sistemske posodobitve)
Vsebina paketa
- Zunanje ohišje z nameščenim trdim diskom
- Zunanji napajalnik
- USB kabel
- Omrežni kabel
- eSATA kabel
- Stojalo
- Navodila za uporabo
- CD plošča s programsko opremo in gonilniki
CE izjava o skladnosti
®
XP, Windows® 2000, Windows
®
®
Naprava je bila preizkušena v skladu s potrebnimi zahtevami smernice za
elektromagnetno združljivost 2004/108/ES in nizkonapetostne smernice
2006/95/ES.
Odlaganje rabljenih izdelkov
Za izdelek velja Evropska smernica 2002/96/ES. Vse električne in
elektronske naprave je potrebno odstraniti ločeno od gospodinjskih
odpadkov na ustreznih odlagališčih. Z ustreznim odlaganjem rabljenih
izdelkov preprečite nevarnosti za okolje in ogrožanje lastnega zdravja. Za
dodatne informacije glede pravilnega odlaganja se pozanimajte na
ustreznem občinskem uradu, pri komunalni službi ali v trgovini, kjer ste
izdelek kupili.
3
Page 43

Slovenščina Targa NDAS 500 eSATA
Tehnični podatki
Model Targa DataBox NDAS 500 eSATA
Tip Zunanji trdi disk za priključitev na USB 2.0 (navzd ol združljiv z
USB 1.1) oz. na omrežje ali eSATA
Ohišje Kakovostno ohišje iz nerjavnega jekl a s hladilnim venti latorjem
premera 75 mm za trdi disk 3,5"
Dimenzije 4,8 x 12,0 x 21,3 cm (V x Š x G)
Velikost pomnilnika 500 GB prostega pomnilnika (neformatiran), trdi disk z
blagovno znamko, format 3,5", 7200 obr./min., 8 MB
predpomnilnika, formatiran za Windows
in Windows Vista™ (NTFS).
Sistemske zahteve Microsoft Windows Vista™, Microsoft Windows
Windows
®
2000, Windows® 98SE/ME, USB 2.0 (ali USB 1.1)
oz. omrežni priključek ali eSATA
USB Standardno USB vodilo
eSATA External Serial Advanced Technology Attachment
Omrežje RJ45 priključek
Posebnosti Navzdol združljiv z USB 1.1
Poraba 12 V
2 A
Garancija 36 mesecev
Tehnični podatki za napajalnik Targa, model KSAF E1200250W1UK
Vhod 110-240 V ~ 50/60 Hz, 0,6 A
Izhod 12 V 2,5 A
®
XP , Windows® 2000
®
XP,
Namenska uporaba
Targa DataBox NDAS 500 eSATA je izdelan za notranjo uporabo in je predviden za
varnostno shranjevanje podatkov in za prenos podatkov iz osebnega ali prenosnega
računalnika z USB priključki ali eSATA priključkom oz. omrežnim priključkom. V
primeru nenamenske uporabe ali v primeru odpiranja ohišja izgubite pravico do
garancije. Privzeta konfiguracija diska Targa DataBox NDAS 500 eSATA ni primerna
za uporabo v medicinske namene, reševanje življenj ali za ohranjanje pri življenju.
Naprava je primerna za domačo uporabo, v pisarnah in za malo gospodarstvo (v
skladu s standardoma EN 61000-6-1 / EN 61000-6-3). Uporablja se lahko za igre,
komunikacije, pisarniško poslovanje in drugo.
EMC in varnostni predpisi
Naprava je izdelana v skladu s standardi EN 55022, EN 55024, EN 61000-3-2, EN
61000-3-3 in EN 60950. Vse spremembe na opremi - z izjemo sprememb, ki jih svetuje
proizvajalec - imajo lahko za posledico, da te smernice niso več izpolnjene.
4
Page 44

Targa NDAS 500 eSATA Slovenščina
Pomembna varnostna navodila
Pred prvo uporabo naprave preberite naslednje opombe v tem priročniku ter
upoštevajte vsa opozorila, tudi če ste dobro seznanjeni z upravljanjem elektronskih
naprav. Priročnik shranite na varnem mestu za kasnejšo uporabo. V primeru, ko
napravo prodate ali izročite drugi osebi, obvezno priložite tu di ta priročnik.
- Pri delu s trdim diskom bodite previdni. Vedno upoštevajte varnostna navodila, da
ne pride do poškodb ali razveljavitve garanc ije. V primeru poškodbe trdega diska
lahko izgubite podatke.
- Napravo namestite na stabilno, ravno površino ter nanjo ne postavljajte nobenih
(težkih) predmetov.
- Naprava ni namenjena upor abi v prostorih z visoko temperaturo ali vlago (npr. v
kopalnicah), biti mora čista in brez prahu.
- Delovna temperatura in vlaga: 5 °C do 25 °C, maks. 85 % RV
Vedno se prepričajte, da
- je zagotovljeno prosto kroženje zraka ( naprave ne postavljajte na police, debelo
preprogo, posteljo ali mesto, kjer bi bile ovirane prezračevalne odprtine, ter na
vseh straneh pustite najmanj 10 cm praznega prostora);
- na napravo ne vplivajo direktni toplotni viri (npr. kurjava);
- naprava ni izpostavljena neposredni sončni svetlobi ali močni umetni razsvetljavi;
- je preprečen stik z brizgajočo in tekočo vodo ter abrazivnimi tekočinami, naprava
nikoli ne sme delovati v bližini vode, nikdar ne sme biti potopljena (v bližino
naprave ne postavljajte predmetov, napolnjenih z vodo, kot so npr. vaze ali pijače);
- naprave nikoli ne postavite v neposredno bližino magnetnih polj (npr. zvočnikov);
- na ali v bližino naprave ne postavite virov ognja (npr. gorečih sveč);
- v napravo ne vstavite tujkov;
- naprava ni izpostavljena velikim temperaturnim spremembam, ker le-te lahko
povzročijo nastanek vlage zaradi kondenzacije;
- naprava ni izpostavljena prevelikim udarcem in vibracijam.
Če naprave ne uporabljate v Nemčiji, upoštevajte predpise in zakone, ki veljajo v
državi, kjer napravo uporabljate.
- Privzeta konfiguracija naprave ni primerna za uporabo v medicinske namene,
reševanje življenj ali za ohranjanje pri življenj u. Naprava je primerna za domačo
uporabo, v pisarnah in za malo gospodarstvo (v skladu s standardom a EN 610006-1 / EN 61000-6-3). Uporablja se lahko za igre, komunikacije, pisarniško
poslovanje in drugo. Naprava se ne sme uporabljati na prostem ali v tropskih
razmerah. Uporabljate lahko samo kable in zunanje naprave, ki so izdelani v
skladu z veljavnimi varnostnimi standardi ter ustrezajo kakovostnim zahtevam za
5
Page 45

Slovenščina Targa NDAS 500 eSATA
elektromagnetno združljivost in oklop naprave. Naprava izpolnjuje vse s tandarde,
ki so potrebni za oznako skladnosti CE. Vse spremembe na opremi - z izjemo
sprememb, ki jih svetuje proizvajalec - imajo lahko za po sledico, da te smernice
niso več izpolnjene. Uporabljajte samo opremo, ki jo priporoča proizvajalec.
- Otrokom ne dovolite, da se brez nadzora igrajo z električnimi napravami. Otroci
ponavadi ne prepoznavajo prisotnih potencialnih nevarnosti.
- Embalažni material odstranite izven dosega otrok, da preprečite nevarnost
zadušitve.
Vzdrževanje in nega
- V primeru kakršnekoli poškodbe je potreben servisni poseg na napravi: npr. v
primeru poškodbe omrežnega vtiča, napajalnega kabla ali ohišja; ko v napravo
zaide tekočina ali predmeti; ko je bila naprava izpostavljen a dežju ali vlagi, ko ne
deluje normalno oz. v primeru padca naprave. V primeru, ko opazite dim,
nenavaden zvok ali nepričakovane vonjave, napr avo t akoj izklopit e ter izvl ecite vtič
iz omrežne vtičnice. Naprave v tem primeru ne uporablja jte več ter jo odnesite v
pregled v pooblaščen servisni center. Ko je potreben servi sni poseg, se obrnite na
strokovno usposobljene osebe. Nikoli ne o dpirajte ohišja naprave, napajalnika ali
dodatne opreme. Če je ohišje odprto, je v nevarnosti vaše življenje zaradi možnosti
udara električnega toka. Za čiščenje uporabljajte samo čisto, suho krpo.
- Vse kable vedno izvlecite tako, da jih primete za vtič, nikoli ne povlecite samo za
kabel. Napajalnega kabla nikoli ne držite z mokrimi rokami, da ne pride do
kratkega stika ali udara električnega toka. Na kabel nikoli ne postavljajt e naprave,
težkih predmetov ali pohištva ter poskrbite, da se kabel ne zavoz la, predvsem pri
vtiču in vtičnicah. Na kablu nikoli ne delajte vozlov ter ga ne povezujte z drugimi
kabli. Vse kable namestite tako, da se nihče ne more spotakniti o bnj e in ni kogar ne
ovirajo. Poškodovan napajalni kabel lahko povzroči požar ali udar električnega
toka. Napajalni kabel občasno preverite. Nikoli ne uporabljajte adapterjev ali
podaljškov, ki ne ustrezajo trenutno veljavnim držav nim varnostnim predpisom, ter
nikoli sami ne spreminjajte napajalnega kabla ali električne napeljave.
- Glavno stikalo napr ave ne odklopi povs em iz omrežne napetosti. Napr ava porablja
električno energijo tudi v stanju pripravljenosti. Za popoln odklop naprave iz
omrežne napetosti izvlecite napajalnik iz omrežne vtičnice. Zaradi tega je potrebno
napravo namestiti tako, da je zagotovljen neposreden in neoviran dostop do
omrežne vtičnice in je v nujnem primeru možno napajalnik takoj izvleči iz vtičnice.
Nevarnosti požara se izognete tako, da napajalnik v primerih, ko naprave dalj č
ne uporabljate (npr. med dopustom), izklopite iz omrežne vtičnice. Pred začetkom
neviht, ko obstaja nevarnost strel, odklopite napravo iz omrežne napetosti.
- Za preprečitev pregrevanja, deformacije ohišja, požara, udara električnega toka,
eksplozije in drugih nevarnosti uporabljajte samo priložen napajalnik, model
KSAF E1200250W1UK. Tega napajalnika nikoli ne priključite na druge naprave.
- Omrežna vtičnica mora biti lahko dostopna, v bližini mesta uporabe.
asa
6
Page 46

Targa NDAS 500 eSATA Slovenščina
- Targa DataBox NDAS 500 eSATA shranjuje podatke na magnetno površino.
Zaradi tega odstranite napravo Targa DataBox NDAS 500 eSATA iz bližine virov,
ki povzročajo magnetna in elektromagnetna polja.
- Kable napeljite tako, da ne povzročajo nevarnosti. Namestite jih tako, da se nihče
ne more spotakniti vanje.
- Ne poskušajte odpirati ohišja naprave Targa DataBox NDAS 500 eSATA. V
nasprotnem primeru izgubite pravice do garancije.
- Ne odstranjujte kablov, dokler naprave na pravilen način ne zaustavite v
operacijskem sistemu.
- Targa DataBox NDAS 500 eSATA namestite v varen položaj, da se ne more
prevrniti. Uporabite priloženo stojalo.
7
Page 47

Slovenščina Targa NDAS 500 eSATA
Začetek uporabe
Pred prvo uporabo naprave preberite ta navodila za uporabo. Na ta n ačin preprečite
nepravilno delovanje in uporabo. Odpakiraj te enoto Targa DataBox NDAS 500 eSATA
in shranite embalažo.
Pogled s sprednje strani Pogled z zadnje strani
1
2
1 LED indikator (vklop = modra, dostop do diska = oranžna)
2 Tipka za vklop/izklop
3 USB priključek
4 eSATA priključek
5 Omrežna povezava
6 Priključek za zunanji napajalnik
7 8 9 10 11
4
5 3 6
Napajalnik [A] USB kabel [B] Omrežni kabel [C] eSATA kabel [D]
7 Priključek za Targa DataBox NDAS 500 eSATA
(V odvisnosti od izvedbe napajalnika za posamezne države se slika
lahko razlikuje od originalne izvedbe.)
8 USB priključek za Targa DataBox NDAS 500 eSATA
9 USB priključek za osebni računalnik
10 Omrežni kabel (oba priključka sta identična)
11 eSATA kabel (oba priključka sta identična)
8
Page 48

Targa NDAS 500 eSATA Slovenščina
Napravo Targa DataBox NDAS 500 eSATA priključite na priložen napajalnik [A] tako,
da priključek napajalnika [7] vstavite v vtičnico [6] na napravi Targa DataBox
NDAS 500 eSATA. Napajalnik priključite v omrežno vtičnico.
Priključitev prek USB kabla
Če uporabljate sistem Windows
Pred priključitvijo naprave Targa DataBox NDAS 500 eSATA na računalnik
namestite gonilnik, ki je na priloženi CD plošči. Če se CD plošča po vstavljanju
samodejno zažene, zaprite okno in tako prekinite postopek zagona. Zatem z
dvojnim klikom ročno zaženite datoteko "PL2507-USB_DISK_DRIVER.exe" v mapi
"Driver/Windows/Windows98SE_ME". Sledite navodilom na zaslonu ter po
zaključeni namestitvi ponovno zaženite računalnik.
®
98SE/ME:
Opomba: Disk Targa DataBox NDAS 500 eSATA je formatiran z datotečnim
sistemom NTFS (za sisteme Windows
Windows
®
98SE/ME mora biti formatiran z datotečnim sistemom FAT32.
®
Vista/XP/2000). Pri uporabi s sistemom
Če uporabljate sistem Windows® XP/2000:
Windows® XP/2000 samodejno zazna, da je priključena nova USB naprava in
namesti ustrezne gonilnike.
Če uporabljate sistem Windows Vista™:
Windows Vista™ samodejno zazna, da je priklju čena n ova USB n aprava in namesti
ustrezne gonilnike.
Ploščati priključek [9] USB kabla [B] vstavite v prost USB priključek na namiz nem ali
prenosnem računalniku. Zatem drugi priključek [8] USB kabla priključite v USB
priključek [3] na enoti Targa DataBox NDAS 500 eSATA. S stikalom za vklop/izklop [2]
vklopite enoto Targa DataBox NDAS 500 eSATA.
Sl.: Primer sporočila o najdeni strojni opremi
v operacijskem sistemu Windows
(podobno je v sistemu Windows
Vista™)
®
XP
9
Page 49

Slovenščina Targa NDAS 500 eSATA
To sporočilo se pojavi takoj, ko
operacijski sistem zazna enoto Targa
DataBox NDAS 500 eSATA. Operacijski
sistem v odvisnosti od vsebovanih
podatkov predlaga različne načine
odpiranja vsebine. Potrebno oz. želeno
akcijo potrdite z Prekliči, oz. izberite V
redu za ročni dostop do pogona.
Sl.: Primer sporočila USB v operacijskem
sistemu Windows
sistemu Windows Vista™)
®
XP (podobno je v
Vgrajen trdi disk je že formatiran za datotečni sistem NTFS in je torej pripravljen za
takojšnjo uporabo. Targa DataBox NDAS 500 eSATA je v oknu "Moj računalnik"
prikazan kot nov disk, s črko pogona, ki jo dodeli o peracijski sistem. Dodeljena črka
pogona je odvisna od števila diskovnih pogonov, ki so že priključeni na vaš računalnik.
Po zaključeni namestitvi lahko trdi disk Targa DataBox N DAS 500 eSATA uporabljate
na povsem enak način, kot katerikoli drug trdi disk na vašem računalnik. Možnosti
uporabe diska Targa DataBox NDAS 500 eSATA:
- Premikanje ali kopiranje datotek ali map iz drugih pogonov, CD plošč ali drugih
medijev
- Shranjevanje in odpiranje različnih vrst programskih datotek na novem trdem disku
- Shranjevanje video izrezkov, iger in drugih podatkov
- Izdelava varnostnih kopij pomembnih podatkov z vašega računalnika (varnostno
kopiranje)
Odklop USB povezave
Enoto Targa DataBox NDAS 500 eSATA lahko med delovanjem računalnika priključite
v, oz. odstranite iz USB priključka. Če enoto DataBox odstranite iz računalnika brez
ustrezne zaustavitve v operacijskem sistemu, pa lahko pride do poškodbe ali izgube
podatkov.
10
Page 50

Targa NDAS 500 eSATA Slovenščina
Za varen izklop najprej z levo miškino tipko kliknite na ikono "Varno odstranjevanje
strojne opreme" v opravilni vrstici za sistemsko uro (glejte spodnjo sliko).
Sl.: Primer za varno odstranjevanje strojne
opreme iz sistema Windows
®
XP
Sl.: Primer za varno odstranjevanje strojne
opreme iz sistema Windows Vista™
V naslednjem meniju z levo miškino tipko kliknite na "USB Mass Storage Device".
Kmalu se prikaže sporočilo, da lahko enot o Targa DataBox NDAS 500 eSATA varno
odstranite:
Priključitev prek eSATA kabla
Za možnost uporabe standarda SATA mora imeti vaš računalnik na vol jo zunanji S ATA
priključek (eSATA). Le-ta mora biti pravilno nameščen v vaš operacijski sistem. V
odvisnosti od proizvajalca eSATA priključka mora biti na računalniku nameščen tudi
ustrezen gonilnik. Če niste prepričani v pravilno namestitev priključka, preverite
dokumentacijo vašega računalnika oz. dokumentacijo razširitvene kartice.
Targa DataBox NDAS 500 eSATA je načrtovan za standard eSATA in tako zagotavlja
tudi tehnologijo "hitra menjava". To pomeni, da lahko enoto Targa DataBox
NDAS 500 eSATA priklopite ali odklopite z osebnega računalnika brez zaustavitve
operacijskega sistema.
Pri prvi uporabi se – v odvisnosti od uporabljene strojne opreme – lahko prikaže
samodejno sporočilo oz. se lahko oglasi zvočni signal.
1. Enega izmed priključkov eSATA kabla [D] vstavite v prost eSATA priključek na
vašem računalniku.
2. Zatem drugi priključek eSATA kabla priključite v eSATA priključek [4] na enoti
Targa DataBox NDAS 500 eSATA.
3. S stikalom za vklop/izklop [2] vklopite enoto Targa DataBox NDAS 500
eSATA. Operacijski sistem samodejno zazna, da je priključena nova naprava
in namesti ustrezen gonilnik.
11
Page 51

Slovenščina Targa NDAS 500 eSATA
Podobno kot USB priključitev je tudi eSATA priključitev enote Targa DataBox
NDAS 500 eSATA takoj pripravljena za uporabo in je dodana v operacijski sistem v
okno "Moj računalnik". Enoti Targa DataBox IV 250 je pole g tega samodejn o dodeljena
črka pogona. Dodeljena črka pogona je odvisna od števila diskovnih p ogonov, ki so že
priključeni na vaš računalnik.
Po zaključeni namestitvi lahko trdi disk Targa DataBox N DAS 500 eSATA uporabljate
na povsem enak način, kot katerikoli drug trdi disk na vašem računalnik. Možnosti
uporabe diska Targa DataBox NDAS 500 eSATA:
- Premikanje ali kopiranje datotek ali map iz drugih pogonov, CD plošč ali drugih
medijev
- Namestitev in odpiranje različnih vrst programskih datotek na novem trdem disku
- Shranjevanje video izrezkov, iger in drugih podatkov
- Izdelava varnostnih kopij pomembnih podatkov z vašega računalnika (varnostno
kopiranje)
Odklop
Enoto Targa DataBox NDAS 500 eSATA lahko med delovanjem računalnika priključite
v, oz. odstranite iz računalnika. Če enoto DataBox odstranite iz računalnika brez
ustrezne zaustavitve v operacijskem sistemu, pa lahko pride do poškodbe ali izgube
podatkov.
Ne glede na način priključitve enote Targa DataBox NDAS 500 eSATA prek USB kabla
ali eSATA kabla - z levo miškino tipko kliknite na ikono "Va rno odstranjevanje strojne
opreme" v opravilni vrstici za sistemsko uro (glejte spodnjo sliko) in tipko držite
pritisnjeno.
Sl.: Primer za varno odstranjevanje strojne
opreme iz sistema Windows
®
XP
Sl.: Primer za varno odstranjevanje strojne
opreme iz sistema Windows Vista™
V oknu, ki se odpre, se lahko prikaže več zunanjih naprav. S klikom z levo miškino
tipko izberite Targa DataBox NDAS 500 eSATA. Kmalu se prikaže sporočilo, da lahko
enoto Targa DataBox NDAS 500 eSATA varno odstranite.
12
Page 52

Targa NDAS 500 eSATA Slovenščina
Priključitev prek omrežja
Poleg priključitve z USB ali eSATA kablom lahko enoto Targa DataBox NDAS 500
eSATA priključite tudi z uporabo omrežnega kabla.
Pomembna informacija: istočasno ne uporabite več načinov priključitve.
Če imate prek omrežja povezanih več računalnikov, lahko do diska Targa DataBox
NDAS 500 eSATA dostopate iz vseh teh računalnikov prek omrežja NDAS (Network
Direct Attached Storage). Ta funkcija je možna tudi z brezžičnim omrežjem WLAN.
Na naslednjih straneh je razložena priključitev enote T arga DataBox NDA S 500 eSATA
prek omrežnega kabla ter postopek zagona.
Trdi disk Targa DataBox NDAS 500 eSATA priključite v omrežno vtičnico, kot je
opisano na strani 9. Zatem s priloženim omrežnim kablom [C] povežite omrežni
priključek enote Targa DataBox NDAS 500 eSATA [4] s prostim priključkom na
omrežnem usmerjevalniku ali koncentratorju oz. neposredno v računalniku.
Za možnost vzpostavitve omrežne povezave z enoto Targa DataBox NDAS 500
eSATA najprej namestite programsko opremo s priložene CD plošče. Namestitev je
potrebna za vse računalnike v omrežju, ki jih želite povezati z enoto Targa DataBox
NDAS 500 eSATA.
Priloženo CD ploščo vstavite v CD-ROM ali DVD pogon (odvisno od računalnika). Če je
funkcija samodejnega zagona onemogočena , lahko z zagonom datoteke "start.exe" na
CD plošči ročno zaženete postopek namestitve.
Za operacijski sistem Windows XP so razložene naslednje informacije. Slike v sistemu
Windows Vista™ imajo identične vsebine, izgled pa je lahko drugače n in je odvisen od
nastavitev prikaza.
Če se nastavitev začne s samodejnim zagonom kliknite na prikazano možnost "N DAS
Software Installation". V primeru ročnega zagona namestitve se odpre naslednj e okno
brez privzete možnosti za izbiro.
13
Page 53

Slovenščina Targa NDAS 500 eSATA
Najprej izberite jezik za postopek
namestitve in nato kliknite OK.
Odpre se "Čarovnik za namestitev":
prosimo počakajte.
Za začetek namestitve kliknite
na Next.
14
Označite točko "I accept the
terms in the license agreement"
in kliknite
Next.
Page 54

Targa NDAS 500 eSATA Slovenščina
®
Program za namestitev vas
opozori na možnost, da lahko v
žičnih in brezžičnih omrežjih z
nizko pasovno širino pride do
napak med prenosom.
Priporočeno je žično omrežje
100 Mbit ali brezžično omrežje
(WLAN) 54 Mbit. Za
nadaljevanje kliknite Install.
Potrebne datoteke se
samodejno kopirajo:
prosimo počakajte.
V sistemu Windows
prikaže sporočilo, ki opozarja
na možnost, da program morda
ni združljiv, kliknite na Vseeno
nadaljuj.
V sistemu Windows Vista™:
Varnostno sporočilo za nadzor
uporabniškega računa (UAC)
vas večkrat vpraša za skrbniške
pravice. V teh primerih vselej
kliknite na Install.
XP: Če se
To sporočilo pomeni, da je
namestitev zaključena. Potrdite
s klikom na Finish.
15
Page 55

Slovenščina Targa NDAS 500 eSATA
Ko se računalnik ponovno zažene, se v opravilni vrstici pojavi nov a ikona z naslovom
"NDAS Device Management" (glejte spodnjo sliko).
Sl.: NDAS Device Management
Ko z levo miškino tipko kliknite na ikono, se odpre naslednji meni:
Za ponoven zagon računalnika in
zaključitev postopka namestitve
kliknite Yes.
To je meni za registracijo
novega pogona. Kliknite na
element menija Register a new
device….
16
Med prvim postopkom
registracije se odpre pozdravno
okno. Za nadaljevanje kliknite
Next.
Page 56

Targa NDAS 500 eSATA Slovenščina
Vpišite poljubno ime za vašo
novo napravo ali pustite
privzeto ime "NDAS Device 1"
in kliknite
Next.
V vnosna polja vpišite ID
številko naprave. Vsi
računalniki, katerim želite
omogočiti dostop za pisanje,
potrebujejo geslo za možnost
pisanja. ID številka in geslo sta
na nalepki na enoti DataBox
NDAS 500 eSATA ali na koncu
teh navodil za uporabo; nato
kliknite
Next.
Program preverja, če je enota
DataBox NDAS 500 eSATA
prisotna v omrežju.
Prosimo počakajte.
17
Page 57

Slovenščina Targa NDAS 500 eSATA
Postopek registracije je
zaključen. Program vam ponudi
tri možne izbire:
1. Napravo lahko namestite s
pravicami za dostop za
branje in pisanje
2. Napravo lahko namestite s
pravicami za dostop samo
za branje
3. Naprave tokrat ne boste
namestili
Izberite želeno možnost in
kliknite
Next.
Postopek namestitve je
zaključen. Za zaključek kliknite
Finish.
Priključitev
Po uspešno zaključenem postopku registracije lahko vaš nov pogon vključite v sistem
(priključitev). V ta namen z levo miškino tipko ponovno kliknite na ikono "NDAS Device
Management" v opravilni vrstici. Odpre se naslednji meni:
18
Page 58

Targa NDAS 500 eSATA Slovenščina
Z miško izberite element menija "NDAS Device 1" (oz. ime, ki ste ga izbrali med
postopkom registracije). Odpre se drugo okno. Tu lahko pogon vgradite v sistem z
možnostjo "Read Only" ali "Read/Write".
Read Only (samo za branje)
Podatke s trdega diska lahko samo berete, ne morete pa jih brisati, preimenovati,
premikati ali vpisati nove podatke.
Read/Write (branje/pisanje)
Vse podatke s trdega diska lahko berete, lahko pa jih tudi brišete, preimenujete,
premikate ali vpisujete nove podatke.
Ta element menija je na voljo samo, če ste med postopkom namestitve vpisali
geslo za možnost pisanja.
Ob prvi namestitvi trdega diska je potrebno na računalnik namestiti gonilnik. To se
izvede samodejno: vi samo potrdite sporočila.
Povezava z "Windows Update"
ni potrebna. Izberete lahko "No,
not this time" in kliknite Next.
Izberite "Samodejno namesti
programsko opremo", in kliknite
Naprej.
19
Page 59

Slovenščina Targa NDAS 500 eSATA
Iskanje potrebnih datotek:
prosimo počakajte.
Če se prikaže sporočilo, ki
opozarja na možnost, da
program morda ni združljiv,
kliknite na Vseeno nadaljuj.
Potrebne datoteke se
samodejno kopirajo: prosimo
počakajte.
20
Ko so prekopirane vse
datoteke, kliknite Finish.
Page 60

Targa NDAS 500 eSATA Slovenščina
Disk Targa DataBox NDAS 5 00 eSATA je prek omrežja priključen na računalnik in je
vedno na voljo. V opravilni vrstici se odpre meni "NDAS Device Management", ki je
odvisen od tipa vključitve v vaš sistem (Read Only ali Write/Read).
Read Only (samo za branje)
Read/Write (branje/pisanje)
Disk Targa DataBox NDAS 500
eSATA je vključen s pravicami
za dostop samo za branje.
Disk Targa DataBox NDAS 500
eSATA je vključen s pravicami
za dostop za branje in pisanje.
Targa DataBox NDAS 500 eSATA je v oknu "Moj računalnik" prikazan kot nova
diskovna enota, s črko pogona, ki jo dodeli operacijski sistem.
Zapiranje omrežne povezave
Napravo Targa DataBox NDAS 500 eSATA lahko izklopite iz omrežne povezave s
klikom na ikono
klikom na "Dismount" (glejte spodnjo sliko).
v opravilni vrstici, izbiro pogona (v tem primeru "NDAS Device 1") in
21
Page 61

Slovenščina Targa NDAS 500 eSATA
Po prekinitvi (izključitvi) naprave Targa DataBox NDAS 500 eSATA se prikaže
naslednje sporočilo:
Z Yes potrdite, če želite prekiniti povezavo naprave Targa DataBox NDAS 500 eSATA
z računalnikom in ste prepričani, da nobena aplikacija ne dostopa do podatkov na
napravi Targa DataBox NDAS 500 eSATA.
To sporočilo lahko preprečite za naslednje postopke prekinitve povezave z označitvijo
možnosti "In the future, do not show me this dialog box".
Za ponovno priključitev naprave Targa DataBox NDAS 500 eSATA kliknite na ikono
v opravilni vrstici, izberite napravo (v tem primeru NDAS Device 1) in za priključitev
naprave Targa DataBox NDAS 500 eSATA s pravicami za dostop samo za branje
kliknite na Mount (Read Only) oz. kliknite na Mount (Read/Write) za omogočanje
polnega dostopa do naprave Targa DataBox NDAS 500 eSAT A.
Dodatne možnosti za omrežne povezave
Po potrebi lahko izvedete dodatne nastavitve. Z levo miškino tipko kliknite na iko no
v opravilni vrstici in s ponovnim klikom z levo miškino tipko izberite element menija
Options (glejte spodnjo sliko).
Če so aplikacije shranjene na trdi disk
in se trenutno uporabljajo, je možno,
da prekinitev povezave ne bo
uspešna.
22
Za izvedbo dodatnih nastavitev kliknite na
Options.
Page 62

Targa NDAS 500 eSATA Slovenščina
Odpre se naslednji meni:
Pod User Interface lahko spreminjate jezik zaslonskih menijev. Konfiguracija pod
Alerts omogoča preprečitev pošiljanja obvestil o prekinjenih ali n estabilnih povezavah.
V ta namen odstranite potrditveno oznako. Z opcijo Auto Play Configuration lahko
vključite ali izključite možnost samodejnega prikaza NDAS naprav.
Meni za splošne nastavitve
naprave Targa DataBox NDAS
500 eSATA
Meni za dodatne nastavitve
naprave Targa DataBox NDAS
500 eSATA
Pod točko Confirmation označite izbirno polje. S tem vključite ustrezno pogovorno
okno za potrditev. Pod Menu lahko vključite ali izključite različne nastavitve zaslona.
Suspend/Hibernation Support dovoli ali ne dovoli računalniku aktiviranje stanja
pripravljenosti s priključenimi napravami.
23
Page 63

Slovenščina Targa NDAS 500 eSATA
Dodatno
RAID
V gručo RAID lahko združite več naprav Targa DataBox. Pri izdelavi gruče RAID s e
izgubijo vsi obstoječi podatki na trdem disku. Zato obvezno shranite vse pomembne
podatke, ki so na disku.
RAID je kratica za "Redundant Array of Independent Disks" in je način povezave
diskov, ki je namenjen večji varnosti podatkov in povečanju hitrosti. Konfigurac ije, ki jih
podpira Targa DataBox NDAS 500 eSATA:
RAID 0 (Data Striping)
Pri tem postopku se vsi podatki v paketih vzporedno zapisujejo na vsaj dva diska. Me d
zapisovanjem na prvi disk drugi disk zadržuje dodatne podatke iz račun alnika. Hitrost
zapisovanja se podvoji. Podobno velja tudi pri branju iz diska. Postopek na ta način
omogoča celoten pomnilniški prostor vseh priključenih diskov z najvišjo dostopno
hitrostjo. Za varnostno shranjevanje podatkov tega postopka ne priporočamo.
RAID 1 (Data Mirroring)
Pri postopku RAID 1 so vsi podatki iz prvega diska zrcalno shranjeni na drugem disku.
V primeru odpovedi enega diska ne izgubite nobenih podatkov, ker so vsi podatki
shranjeni na drugem disku. Zaradi dvojnega zapisovanja je ta postopek počasnejši kot
postopek z uporabo enega samega diska, skupni pomnilniški pr ostor pa je enak samo
prostoru enega diska DataBox NDAS 500 eSATA. Prednost tega postopka pa je ve lika
zanesljivost ohranjanja podatkov.
Spanning (spajanje)
Medsebojno spajanje skupin dveh ali več enot DataBox z namenom izdelave zelo
velike particije. Ta postopek pa ne zagotavlja niti visoke hitrosti, niti večje zanesljivosti
ohranjanja podatkov.
24
Page 64

Targa NDAS 500 eSATA Slovenščina
Za izdelavo skupine je potrebno ustrezne enote DataBox povezati prek dostopnega
omrežja, ki pa ni nameščeno na priključen računalnik. Poleg tega je med postopkom
registracije potrebno vnesti geslo za možnost pisanja.
Kliknite na "NDAS Bind
Management" v mapi Program.
Odpre se okno s seznamom
NDAS naprav. Stanje mora
kazati "Ready". V nasprotnem
primeru je potrebno enote
DataBox najprej izklopiti iz vseh
računalnikov.
Za začetek konfiguracije RAID
kliknite na gumb "Bind".
Odpre se čarovnik za
konfiguracijo. Kliknite Next.
25
Page 65

Slovenščina Targa NDAS 500 eSATA
Izberite želeno akcijo in določite
število enot DataBox za
spajanje.
Zatem kliknite na
Next.
V polju "Available" poudarite
ustrezno NDAS napravo ter za
dodajanje naprave v povezavo
kliknite gumb "Add >".
26
Postopek ponavljajte, dokler
niso vse želene NDAS naprave
prikazane v polju "Selected".
Če ste pomotoma izbrali
napačno napravo, jo lahko v
polju "Selected" poudarite in s
pomočjo gumba "< Remove"
izbrišete iz povezave.
Page 66

Targa NDAS 500 eSATA Slovenščina
Upoštevajte, da se med tem
postopkom izbrišejo vsi podatki
na disku. Za nadaljevanje
kliknite Da v varnostnem
pozivnem oknu.
Čarovnik ima zdaj na voljo vse
potrebne podatke in je
pripravljen za pripravo
povezave. Kliknite Finish.
Odpre se pregled vseh
nastavitev, ki ste jih izvedli.
Postopek konfiguracije je
uspešno zaključen. S klikom na
gumb "Close" zaprite okno.
Izdelava particij in formatiranje
Novega pomnilniškega medija ni možno upor abljati, dokler gruča RAID ni i nicializirana,
razdeljena na particije in formatirana. Ta postopek je potrebno izvesti samo enkrat in
samo na enem računalniku. Vsi ostali računalniki v omrežju bodo zaznali novo particijo.
Najprej združite gručo RAID, kot je opisano na strani 18. Zatem odprite “Upravljanj e
diskov” in upoštevajte pot:
27
Page 67

Slovenščina Targa NDAS 500 eSATA
V sistemu Windows
®
XP:
[Start] > [Nadzorna plošča] > [Skrbniška orodja] > [Upravljanje računalnika] >
[Upravljanje diskov]
V sistemu Windows Vista™:
[Windows ikona] > [Nadzorna plošča] > [Sistem in vzdrževanje] > [Skrbniška oro dja] >
[Upravljanje računalnika] > [Upravljanje diskov]
Naslednji postopek velja za operacijski sistem Windo ws
®
XP. Slike v sistemu Windows
Vista™ imajo identične vsebine, izgled pa je lahko druga čen in j e odv isen od n astavitev
prikaza.
V oknu "Upravljanje diskov" v vašem operacijskem sistemu so na voljo vsi diskovni
pogoni, ki jih lahko upravljate. V odvisnosti od števila obstoječih po gonov dobi gruča
RAID ime z zaporedno sliko (v tem primeru "Pomnilniški medij 5"). Pri odpiranju
funkcije "Upravljanje diskov" čarovnik za inicializacijo novih pogonov prikaže prvo okno.
Čarovnika zaženite s pritiskom
na gumb Naprej.
Če se čarovnik ne prikaže samodejno, z desno miškino tipko kliknite na ustrezno
vnosno polje (glejte spodnjo sliko) in nato z levo miškino tipko izberite element menija
"Inicializiraj disk".
Tukaj kliknite z desno miškino tipko.
S klikom na levo miškino tipko zaženite čarovnika.
28
Page 68

Targa NDAS 500 eSATA Slovenščina
Za zaključek postopka kliknite gumb "Dokončaj" v naslednjem oknu.
Sprememba vnosa v seznamu:
Tukaj kliknite z desno miškino tipko
S klikom na belo področje (glejte sliko) z desno miškino tipko nastavite pa rticijo. Odpre
se naslednji priročni meni:
Po zagonu čarovnika se odpre
okno s seznamom vseh
pogonov, ki še niso
inicializirani. S klikom na levo
miškino tipko izberite želen
vnos (npr. Disk 5) in zatem
kliknite Naprej.
S klikom z levo miškino tipko
izberite element menija
"Iniciliziraj disk".
Prikaže se čarovnik za pomoč
pri konfiguraciji nove particije.
Za začetek kliknite Naprej.
29
Page 69

Slovenščina Targa NDAS 500 eSATA
Za uporabo enote DataBox za pomnilniški medij priporočamo izdelavo dodatne
particije. Znotraj te dodatne particije lahko izdelate večkratne "logične pogone". To
pomeni, da lahko organizirate uporabniške podatke ali programske aplikacije in na ta
način poenostavite varnostno shranjevanje podatkov.
V tem meniju lahko izberete
med primarno in razširjeno
particijo.
Primarna particija je potrebna
samo v primeru, če želite nanjo
namestiti operacijski sistem.
Izbiro potrdite s klikom na gumb
Naprej.
Tukaj določite velikost particije.
Predlaga se največji pomnilniški
prostor. Vstavite lahko tudi
manjšo vrednost, da rezervirate
pomnilniški prostor za dodatne
primarne in druge particije. V
našem primeru uporabimo
največji pomnilniški prostor z
namenom izdelave "logičnih
pogonov".
Izbiro potrdite s pritiskom na
Naprej.
30
Čarovnika zaprite s klikom na
Dokončaj.
Page 70

Targa NDAS 500 eSATA Slovenščina
V seznamu vnosov v oknu Upravljanje diskov je prikazan "Nezaseden prostor".
Konfigurirana in povečana particija se zdaj uporablja za nove log ične pog one. Za prikli c
priročnega menija kliknite z desno miškino tipko na nezaseden pomnilnik. S klikom z
levo miškino tipko izberite element menija "Nov logičen pogon ...".
Tukaj kliknite z desno miškino tipko
S klikom na levo miškino tipko zaženite
čarovnika
Prikaže se čarovnik za pomoč
pri konfiguraciji nove particije.
Za nadaljevanje kliknite Naprej.
V tej točki je "Logični pogon"
edina možna izbira. Zatem
kliknite Naprej.
31
Page 71

Slovenščina Targa NDAS 500 eSATA
Tu lahko določite velikost
logičnega pogona v megabajtih.
Ponovno se predlaga največji
pomnilniški prostor. Izberimo npr.
180.000 MB (180 GB), ker
želimo izdelati dodatne logične
pogone. Vnos potrdite z gumbom
Naprej.
Določite črko pogona, ki jo bo
računalnik prikazoval za nov
pogon. Samodejno se prikaže
naslednja razpoložljiva črka
pogona.
Vnos potrdite z gumbom
Naprej.
"Mount in the following empty NTFS folder:"
Pogon lahko določite tudi kot mapo. V tem primeru se pogon ne bo prikazal
neposredno na namizju, temveč v prosto izbrani (obstoječi) mapi.
"Do not assign a drive letter or drive path"
Ta konfiguracija se priporoča samo v primeru, ko želite trd i disk samo formatirati in ga
kasneje uporabiti na drugem računalniku.
32
Page 72

Targa NDAS 500 eSATA Slovenščina
Datotečni sistem
Če disk Targa DataBox uporabljate samo s sodobnim operacijskim sistemom,
priporočamo, da nastavitev datotečnega sistema pustite na NTFS (privzeta nastavitev).
Velikost gruče
V odvisnosti od uporabe trdega diska lahko tukaj izberete velikost gru če particije med
16 KB in 4096 KB. Gruča je najmanjša možna velikost podatkov. Če želite shranjevati
zelo velike datoteke, priporočamo večjo vrednost. Za shranjevanje več majh nih datotek
izberite manjšo vrednost. Priporočamo, da tukaj pustite privzeto nastavitev (Default).
Ta opcija omogoča dodajanje
drugih vnosov za logični pogon.
Če niste prepričani, katera
izbira je pravilna, pustite vse
nastavitve in potrdite z Naprej.
Oznaka nosilca
Logičnemu pogonu dodelite želeno ime (v našem primeru "Ne w Volume").
Izvedi hitro formatiranje
Pri hitrem formatiranju ostane zaznavanje poškodovanih se ktorjev neoznačeno, zat o je
formatiranje hitrejše. Če ne želite, da se izvaja to zaznavanje, s kljuk ico označite polje
za hitro formatiranje.
Omogoči stiskanje datotek in map
S to opcijo se vsi podatki samodejno shranijo v stisnjeni obliki (manjša velikost). To
pomeni, da imate na voljo več prostega pomnilniškega prostora, vendar tudi manjšo
dostopno hitrost.
33
Page 73

Slovenščina Targa NDAS 500 eSATA
V razširjeni particiji se prikaže logični pogon z imenom "New Volume". V preostalem
prostem pomnilniškem prostoru lahko izdelate nove logične pogone. V ta namen
ponovite korake s strani 31.
S klikom na Dokončaj zaprite
čarovnika.
Prikaz pomnilniškega prostora novega pogona je manjši od vrednosti, k i je vpisana v
konfiguraciji. Do tega delno prihaja zaradi različnega izračuna bajtov in normalnega
videza trdega diska. Kilobajt ni enak 1000 bajtom, kot bi veljalo v splošnem desetiškem
številskem sistemu, temveč natančno 1024 bajtov, kajti računalnik za izračun uporablja
binarni sistem.
Brisanje iz registra
Disk Targa DataBox NDAS 500 eSATA lahko izbrišete iz registra s klikom na ikono
"NDAS Device Management". Odpre se naslednji meni:
34
Page 74

Targa NDAS 500 eSATA Slovenščina
Z miško izberite element menija "NDAS Device 1" (oz. ime, ki ste ga izbrali med
postopkom registracije). Odpre se drugo okno. Tu lahko s pomočjo funkcije
"Deregister" odstranite pogon iz vašega sistema. Ta postopek ne izbriše nobenih
podatkov s trdega diska.
Posodobitev stanja
S klikom na funkcijo "Refresh Status" lahko posodobite stanje men ijev (glejte spodnjo
sliko)
Sl.: Meni NDAS Device Management
Informacije o programski opremi
V meniju (glejte zgornjo sliko) kliknite "About NDAS Software…” za prikaz verzije
nameščene programske opreme.
Lastnosti
Funkcija Properties (lastnosti) omogoča prikaz ustreznih informacij o enoti Targa
DataBox NDAS 500 eSATA in priključenem trdem disku. Z a prikaz kliknit e na ikono
"NDAS Device Management" v opravilni vrstici.
35
Page 75

Slovenščina Targa NDAS 500 eSATA
V drugem meniju izberite "Properties…"; odpre se naslednje okno:
Prvi jeziček "General" omogoča, da s kliko m na "Rename" preimenujete enoto Targa
DataBox NDAS 500 eSATA. Vidite lahko, če je vpisano geslo za možnos t pisanja. Leto lahko odstranite s klikom na "Remove". V tem primeru lahko napravo namestite
samo s pravicami za dostop samo za branje (glejte stran 18 – Priklju čitev enote Targa
DataBox NDAS 500 eSATA).
Jezička Hardware in Hosts prikazujeta informacije o strojni opremi na enoti Targa
DataBox NDAS 500 eSATA ter o priključenem trdem disku in o uporabnikih, ki so
vzpostavili povezavo.
Zadnji jeziček "Advanced" omogoča izklop ali pon astavitev enote Targa DataBox NDAS
500 eSATA. Te funkcije so na voljo samo, ko naprava še ni priključena.
36
Page 76

Targa NDAS 500 eSATA Slovenščina
37
Page 77

Slovenščina Targa NDAS 500 eSATA
38
Page 78

Targa NDAS 500 eSATA Hrvatski
Sadržaj
Opće informacije............................................................................................................2
Zahtjevi sustava..........................................................................................................................3
Sadržaj kutije..............................................................................................................................
CE izjava o usklađenosti ............................................................................................................
Zbrinjavanje rabljenih uređaja ....................................................................................................
Tehničke karakteristike ..................................................................................................4
Namjena.....................................................................................................................................4
EMC i sigurnosni propisi.............................................................................................................
Važne sigurnosne upute ................................................................................................5
Čišćenje i održavanje ................................................................................................................ 6
Pripremne radnje............................................................................................................8
Povezivanje putem USB-kabela................................................................................................ 9
Prekidanje USB-veze .............................................................................................................
Povezivanje putem eSATA-kabela..........................................................................................11
Prekid veze.............................................................................................................................. 12
Povezivanje putem mreže.......................................................................................................
Prekid mrežne veze.................................................................................................................
Dodatne opcije mrežne veze...................................................................................................22
Napredno .....................................................................................................................24
RAID........................................................................................................................................24
Particioniranje i formatiranje....................................................................................................27
Deregistriranje.........................................................................................................................
Ažuriranje statusa.................................................................................................................... 35
Podaci o softveru..................................................................................................................... 35
Svojstva...................................................................................................................................35
3
3
3
4
10
13
21
34
Jamstvo........................................................................................................................37
1
Page 79

Hrvatski Targa NDAS 500 eSATA
Opće informacije
Hvala vam na kupnji proizvoda tvrtke Targa.
Molimo pročitajte upute iz ovog priručnika i pridržavajte s e svih upozorenja prije prve
uporabe uređaja, čak i ako ste upoznati s načinom rukovanja elektroničkim uređajima.
Priručnik spremite na sigurno mjesto za buduće potrebe. Ako uređaj pro date ili predate
trećoj osobi, morate joj predati i ovaj priručnik.
Targa DataBox NDAS 500 eSATA je vanjska disk-jedinica koja omogućava proširenj e
prostora za pohranu vašeg računala za spremanje i rad s dokumentima,
videoisječcima, glazbenim datotekama, fotografijama, grafikama i sl. Novi disk možete
koristiti i kao uređaj za sigurnosno spremanje važnih podataka. Radi sprečavanja
gubitka podataka oštećenjem diska uslijed pregrijavanja zbog predugog rada, Targa
DataBox NDAS 500 eSATA je opremljen rashladnim ventilatorom od 7,5 cm. Bez
obzira koristite li disk za proširenje prostora za pohranu ili sigurnosno kopiranje, u
ovom priručniku nalaze se sve informacije nužne za njegov rad.
Targa DataBox NDAS 500 eSATA sadrži sljedeće značajke:
- Veliki prostor za pohranu
- Sustav "Priključi i pokreni" (Plug and Play)
- Velika brzina prijenosa podataka
- USB 1.1 ili 2.0
- Mrežna veza
- eSATA II utičnica
- Hot-Swap za brzo povezivanje s drugim računalima
- Čvrsto kućište
2
Page 80

Targa NDAS 500 eSATA Hrvatski
Zahtjevi sustava
Minimalni zahtjevi sustava su:
- Računalo s: Pentium ili sličnim kompatibilnim procesorom, ili snažnijim
- Microsoft Windows Vista™, Microsoft Windows
98SE/ME s ugrađenim upravljačkim programima
- 32 MB RAM-memorije ili više, ovisno o potrebama sustava Windows
- Slobodna utičnica USB 1.1 ili 2.0, mrežna utičnica ili eSATA-utičnica
- CD-ROM jedinica
- Internetska veza (radi ažuriranja sustava)
Sadržaj kutije
- Vanjsko kućište s ugrađenim diskom
- Vanjski strujni pretvarač
- USB-kabel
- Mrežni kabel
- eSATA-kabel
- Postolje
- Priručnik
- CD sa softverom i upravljačkim programima
CE izjava o usklađenosti
®
XP, Windows® 2000, Windows
®
®
Ovaj uređaj je ispitan radi usklađenosti s bitnim zahtjevim a EMC-smjernice
2004/108/EZ i Smjernice o niskom naponu 2006/95/EZ.
Zbrinjavanje rabljenih uređaja
Europska smjernica 2002/96/EZ odnosi se na ovaj uređaj. Svi električni i
elektronički uređaji moraju se zbrinjavati odvojeno od komunalnog otpada na
za to propisanim mjestima. Uređaj zbrinite na propisani način kako biste
pomogli zaštiti okoliša i izbjegli opasnost po zdravlje. Dodatne obavijesti o
ispravnom zbrinjavanju potražite kod nadležnih tijela lokalne vlasti,
komunalne službe ili trgovine u kojoj ste kupili uređaj.
3
Page 81

Hrvatski Targa NDAS 500 eSATA
Tehničke karakteristike
Model Targa DataBox NDAS 500 eSATA
Tip Vanjski disk za povezivanje na USB 2.0, (kompatibilno i s USB
1.1), mrežu ili eSATA
Kućište Visokokvalitetno kućište od nehrđajućeg čelika s rashladnim
ventilatorom od 75 mm za disk od 3,5"
Dimenzije 4,8 x 12,0 x 21,3 cm (V x Š x D)
Kapacitet pohrane 500 GB prostora (neformatirano), disk poznate mark e, format
3,5", 7200 o/min, pričuvna memorija 8 MB, predformatira za
Windows
Zahtjevi sustava Microsoft Windows Vista™, Microsoft Windows
Windows
mrežna utičnica ili eSATA
USB Standardni "Universal Serial Bus"
eSATA "External Serial Advanced Technology Attachment"
Mreža RJ45-utičnica
Posebne značajke Kompatibilan sa standardom USB 1.1
Potrošnja energije 12 V
Jamstvo 36 mjeseci
Tehnički podaci strujnog pretvarača TARGA, model KSAF E1200250W1UK
Ulaz 110-240 V ~ 50/60 Hz 0,6 A
Izlaz 12 V 2,5 A
®
XP, Windows® 2000 i Windows Vista™ (NTFS).
®
2000, Windows® 98SE/ME, USB 2.0 (ili USB 1.1),
®
XP,
2 A
Namjena
Targa DataBox NDAS 500 eSATA namijenjen je za sigurnosnu pohranu i prijenos
podataka iz ili na osobno ili prijenosno računalo s USB-priključk om, eSATA-vezom ili
mrežnim priključkom, te za zatvorene prostorije. Koristi li se u nenamj enske svrhe ili
ako se kućište otvori, poništava se valjanost jamstva. Targa DataBox
NDAS 500 eSATA u svojoj zadanoj konfiguraciji nije namijenjen za medicinu,
spašavanje života, spašavanje ili održavanje na životu. Smije se koristiti u kućanstvima,
uredima i malim poduzećima (sukladno normi EN 61000-6-1 / EN 61000-6-3). Ta
primjena obuhvaća videoigre, komunikaciju, uredsku upora bu i sl.
EMC i sigurnosni propisi
Uređaj je usklađen s normama EN 55022, EN 55024, EN 61000-3-2, EN 61000-3- 3 i
EN 60950. Bilo kakve izmjene na uređaju koje nije odobr io proizvođač mogu rezultirati
kršenjem navedenih normi.
4
Page 82

Targa NDAS 500 eSATA Hrvatski
Važne sigurnosne upute
Molimo pročitajte upute iz ovog priručnika i pridržavajte s e svih upozorenja prije prve
uporabe uređaja, čak i ako ste upoznati s načinom rukovanja elektroničkim uređajima.
Priručnik spremite na sigurno mjesto za buduće potrebe. Ako uređaj pro date ili predate
trećoj osobi, morate joj predati i ovaj priručnik.
- Oprezno rukujte diskom. Obavezno se pridržavajte ovih sigurnosnih uputa radi
sprečavanja oštećenja ili poništenja jamstva. Oštećenje diska može prouzročiti
gubitak podataka.
- Uređaj postavite na stabilnu, ravnu podlogu. Ne postavljajte teške predmete na
uređaj.
- Uređaj nije namijenjen za rad u prostorijama s vis okom temperaturom ili vlagom
(npr. kupaonicama). Zaštitite uređaj od prašine.
- Radna temperatura i vlaga: od 5 °C do 25 °C, maks. 85% RV
Uvijek pripazite na sljedeće
- osigurajte slobodan protok zraka (ne postavljajte uređaj na police, debeli tepih,
krevet ni druga mjesta na kojima se mogu blokirati otvori za prozračivanje te
ostavite barem 10cm slobodnog prostora sa svih strana),
- zaštitite uređaj od izravnih izvora topline (npr. radijatora),
- zaštitite uređaj od izravnog sunčevog svjetla i jake umjetne rasvjete,
- uređaj ne smije doći u dodir s vodom i nagrizajućim tekućinama; uređaj nikada ne
koristite u blizini vode, a posebice g a nikada ne uranjajte u vodu (ne postavljajte
posude s tekućinama, poput vaza ili napitaka, u blizinu uređaja),
- nikada ne postavljajte uređaj u blizinu magnetskih polja (npr. zvučnika),
- ne postavljajte izvore plamena (npr. voštanice) na ili u blizinu uređaja,
- ne umećite strana tijela u uređ
- uređaj ne smije biti izložen velikim temperaturnim promjenama budući da u tom
slučaju može doći do kondenzacije,
- ne izlažite uređaj prekomjernim udarcima i vibracijama.
aj,
Ako uređaj koristite izvan Republike Njemačke, pridržavajte se važećih propisa i
zakona.
- Prema svojoj temeljnoj izvedbi, uređaj nije predviđen za primje nu u medicini, za
spašavanje života, pomaganje ili održavanje na životu. Smije se koristiti u
kućanstvima, uredima i malim poduzećima (sukladno normi EN 61000-6-1 / EN
61000-6-3). Ta primjena obuhvaća videoigre, komunikaciju, uredsku uporabu i sl.
Osim toga, uređaj se ne smije koristiti na otvorenom ni u podr učjima s tropskom
klimom. Koristite samo priključne kabele i vanjske uređaje koji ispunjavaju
sigurnosne standarde te elektromagnetsku usklađenost i kvalitetu zaštite ovog
5
Page 83

Hrvatski Targa NDAS 500 eSATA
uređaja. Ovaj uređaj ispunjava sve propise CE usklađenosti, bitne norme i
standarde. Bilo kakve izmjene na uređaju koje nije odobrio proizvođač mogu
rezultirati kršenjem navedenih normi. Koristite samo pribor koji je preporučio
proizvođač.
- Z abranite djeci da se igraju električnim uređajima bez nadzora odraslih. Djeca ne
mogu razumjeti potencijalne opasnosti.
- Ambalažu držite dalje od dohvata djece kako biste spriječili opasnost od gušenja.
Čišćenje i održavanje
- Servis je potreban u slučaju bilo kakvih oštećenja uređaja, primjerice ako je
oštećen utikač, strujni kabel ili kućište proizvoda, ako je u uređaj dospjela tekućina
ili strani predmeti, ako je bio izložen kiši ili vlazi te u sl učaju neispravnog rada ili
pada uređaja. Ako primijetite dim, šumove ili neobične mirise, odmah isključite
uređaj i izvucite strujni kabel iz utičnice. U tom slučaju prestanite k oristiti uređaj i
odnesite ga na pregled u ovlašteni servis. Popravke prepustite ovlaštenom osobl ju
servisa. Nikada ne otvarajte kućište uređaja, strujnog pretvarača i dodatne
opreme. Otvaranjem kućišta izlažete se opasnosti od strujnog udara. Ure đaj čistite
samo čistom, suhom krpom.
- Sve kabele uvijek isključujte povlačenjem utikača. Nikada ne povlačite kabel.
Nikada ne dodirujte kabel za napajanje mokrim rukama kako b iste izbjegli kratki
spoj ili električni udar. Nikada ne postavljajte uređaj, teške pre dmete ili namještaj
na kabel i pripazite da se kabel ne zapetlja, posebice u blizini utikača i utičnica.
Kabel nikada ne vežite u čvor i ne povezujte ga s drugim kabelima. Sve kabele
postavite tako da nikome ne smetaju i da se preko njih nitko ne može spotaknuti.
Oštećeni strujni kabel može prouzročiti požar ili strujni udar. Povremeno provjerite
stanje strujnog kabela. Nikada ne koristite pretvarače i produžne kabele koji ne
zadovoljavaju važeće sigurnosne propise u vašoj zemlji. Nemojte vršiti preinake na
strujnim kabelima i električnim instalacijama.
- Glavna sklopka ovog uređaja ne iskl jučuje uređaj u potpunosti iz električne mreže.
Uz to, uređaj troši energiju i u stanju mirovanja. Za potpuno isključenje uređaja iz
strujne mreže izvucite strujni pretvarač iz utičnice. Uređaj bi stoga trebao biti
smješten tako da se osigura izravan i nesmetan pristup utičnici kako bi se strujni
pretvarač mogao odmah izvući u slučaju nužde. Radi izbj egavanja opasnosti od
požara, strujni pretvarač uvijek isključite iz utičnice ako ga ne namjeravate koristiti
dulje vrijeme (npr. za vrijeme blagdana). U slučaju opasnosti od grmljavine,
isključite uređaj iz električne mreže prije nevremena.
- Koristite samo priloženi strujni pretvarač model KSAF E1200250W1UK radi
izbjegavanja pregrijavanja, deformacije kućišta, požara, struj nog udar a, eks plozije i
ostalih opasnosti. Ovaj strujni pretvarač ne priključujte na druge uređaje.
- Strujna utičnica mora biti lako dostupna i u blizini mjesta uporabe.
- Targa DataBox NDAS 500 eSATA sprema podatke na magnetsku površinu. Zbog
toga ure
elektromagnetskog polja.
- Kabele položite na siguran način. Položite ih tako da ne zapinjete o njih.
đaj Targa DataBox NDAS 500 eSATA držite dalje od izvora magnetskog i
6
Page 84

Targa NDAS 500 eSATA Hrvatski
- Ne pokušavajte otvoriti kućište uređaja Targa DataBox NDAS 500 eSATA. U
suprotnom ćete poništiti valjanost jamstva.
- Ne iskopčavajte kabele ako prethodno niste ispravno isključili uređaj u
operacijskom sustavu.
- Targa DataBox NDAS 500 eSATA postavite u siguran položaj kako se ne bi
prevrnuo. Koristite priloženo postolje.
7
Page 85

Hrvatski Targa NDAS 500 eSATA
Pripremne radnje
Prije prve uporabe uređaja pročitajte ovaj priručnik. Tako ćete izbjeći neispravno
rukovanje i uporabu. Raspakirajte Targa DataBox NDAS 500 eSATA i sačuvajte
ambalažu.
Prednja strana Poleđina
1
2
1 LED-žaruljica (napajanje uključeno = plava, pristup disku = narančasta)
2 Glavna sklopka
3 USB utičnica
4 eSATA utičnica
5 Mrežna veza
6 Utičnica za vanjski strujni pretvarač
7 8 9 10 11
4
5 3 6
Strujni pretvarač [A] USB-kabel [B] Mrežni kabel [C] eSATA-kabel [D]
7 Priključak za Targa DataBox NDAS 500 eSATA
(Ovisno o izvedbi strujnog pretvarača, predmet prikazan na fotografiji
možda će se razlikovati od priloženoga.)
8 Priključak USB za Targa DataBox NDAS 500 eSATA
9 Priključak USB za računalo
10 Mrežni kabel (oba priključka su jednaka)
11 eSATA-kabel (oba priključka su jednaka)
8
Page 86

Targa NDAS 500 eSATA Hrvatski
Priključite priloženi strujni pretvarač [A] u uređaj Targa DataBox NDAS 500 eSATA
ukopčavanjem priključka strujnog pretvarača [7] u utičnicu [6] na uređaju Targa
DataBox NDAS 500 eSATA. Priključite strujni pretvarač u strujnu utičnicu.
Povezivanje putem USB-kabela
Koristite li Windows
Prije priključivanja uređaja Targa DataBox NDAS 500 eSATA na računalo
instalirajte upravljački program s priloženog CD-a. Ak o se CD automatski pokrene
nakon stavljanja, prekinite postupak zatvaranjem prozora i dvaput pritisnite datoteku
"PL2507-USB_DISK_DRIVER.exe" u mapi "Driver/Windows/Windows98SE_ME"
kako biste je ručno pokrenuli. Slijedite upute na zaslonu i nakon instalac ije ponovn o
pokrenite računalo.
®
98SE/ME:
Napomena: Uređaj Targa DataBox NDAS 500 eSATA je predformatiran za sustav
datoteka NTFS (za Windows
Windows
®
98SE/ME, potrebno ga je formatirati za sustav datoteka FAT32.
®
Vista/XP/2000). Koristite li ga sa sustavom
Koristite li Windows® XP/2000:
Windows® XP/2000 će automatski prepoznati novi priključeni USB- uređaj i instalirat
će potrebne upravljačke programe.
Koristite li Windows Vista™:
Windows Vista™ će automatski prepoznati novi priključeni USB-uređaj i instalirat će
potrebne upravljačke programe.
Priključite ravni priključak [9] USB-kabela [B] u slobodnu USB-utičnicu na stolnom ili
prijenosnom računalu. Nakon toga, drugi priključak [8] USB-kabela priklj učite u USButičnicu [3] uređaja Targa DataBox NDAS 500 eSATA. Uključite uređaj Targa DataBox
NDAS 500 eSATA preko glavne sklopke [2].
Slika: Primjer poruke o novom hardveru iz
operacijskog sustava Windows
(Windows Vista™ je sličan)
®
XP
9
Page 87

Hrvatski Targa NDAS 500 eSATA
Kada operacijski sustav prepozna
uređaj Targa DataBox NDAS 500
eSATA, prikazat će se ova poruka.
Ovisno o podacima na disku,
operacijski sustav će ponuditi
prijedloge za otvaranje sadržaja.
Potvrdite potrebnu ili željenu radnju
gumbom OK (U redu) ili odaberite
Cancel (Odustani) želite li ručno
pristupiti disku.
Slika: Primjer USB-poruke iz sustava
Windows
je sličan)
®
XP (Windows Vista™
Ugrađeni disk unaprijed je formatiran za sus tav datoteka NTF S i odmah je spreman za
uporabu. Uređaj Targa DataBox NDAS 500 eSATA prikazan je kao novi disk u "My
Computer" (Moje računalo), sa slovom jedinice koje je dodijelio operacijski sustav.
Dodijeljeno slovo jedinice ovisi o broju diskova koji su već priključeni na računalo.
Nakon instalacije, novi disk Targa DataBox NDAS 500 eSATA možete koristiti potpuno
jednako kao i ostale diskove u računalu. Uređaj Targa DataBox NDAS 500 eSATA
možete koristiti za:
- Premještanje i kopira nje datoteka ili mapa s drugih diskova, CD-ROM-a ili drugih
medija
- Spremanje i otvaranje raznih programskih datoteka na novom disku
- Spremanje videoisječaka, igara i drugih podataka
- Stvaranje sigurnosne kopije važnih podataka na računalu
Prekidanje USB-veze
Uređaj Targa DataBox NDAS 500 eSATA može se priključivati i iskopčavati iz USButičnice dok je računalo uključeno. Međutim, ako DataBox iskopčate iz računala, a da
ga prethodno niste ispravno zaustavili putem operacijskog sustava, posljedice mogu
biti oštećenje ili gubitak podataka.
10
Page 88

Targa NDAS 500 eSATA Hrvatski
Za prekidanje veze prvo lijevom tipkom miša pritisnite ikonu "Safely Remove Hardware"
(Sigurno uklanjanje hardvera) na programskoj traci pored sata (vidi donju sliku).
Slika: Primjer sigurnog uklanjanja
hardvera iz sustava Windows
Na sljedećem izborniku pritiskom lijeve tipke miša odaberite "USB Mass Storage
Device" (USB-uređaj za masovnu pohranu). Ubrzo će se prikazati poruka kada je
sigurno iskopčati uređaj Targa DataBox NDAS 500 eSATA:
Povezivanje putem eSATA-kabela
Za korištenje standarda SATA računalo mora imati slobodnu vanjsku utičnicu SATA
(eSATA). Ona mora biti ispravno instalirana u operacijski sustav. Ovisno o proizvo đaču
utičnice eSATA, na računalu morate imati instaliran i odgovarajući upravljački pr ogram.
Ako niste sigurni je li utičnica ispravno instalirana, pročitajte dokume ntaciju računala ili
upute proizvođača kartice za proširenje.
Slika: Primjer sigurnog uklanjanja
®
XP
hardvera iz sustava Windows
Vista™
Uređaj Targa DataBox NDAS 500 eSATA namijenjen je za stan dard eSATA i zbog toga
omogućava tehnologiju "Hot Swap". To znači da uređaj Targa DataBox
NDAS 500 eSATA možete priključivati i iskopčavati iz računala bez isključivanja
operacijskog sustava.
Pri prvoj uporabi, ovisno o korištenom hardveru, može se prikazati automatska poruka
ili oglasiti zvučni signal.
1. Priključite bilo koji priključak eSATA-kabela [D] u slobodnu eSAT A-utičnicu na
računalu.
2. Nakon toga, drugi priključak eSATA-kabela priključite u eSATA-utičnicu [4]
uređaja Targa DataBox NDAS 500 eSATA.
3. Uključite uređaj Targa DataBox NDAS 500 eSATA preko glav ne sklopke [2].
Operacijski sustav će automatski prepoznati novi priključeni uređaj i instalirat
će potreban upravljački program.
11
Page 89

Hrvatski Targa NDAS 500 eSATA
Kao i kod USB-priključka, eSATA-priključak uređaja Targa DataBox NDAS 500 eSATA
odmah je spreman za uporabu i dodan je u "My Computer" (Moje računalo)
operacijskog sustava. Osim toga, Targa DataBox NDAS 500 eSATA automatski dobiva
određeno slovo jedinice. Dodijeljeno slovo jedinice ovisi o broju diskova koji su već
priključeni na računalo.
Nakon instalacije, novi disk Targa DataBox NDAS 500 eSATA možete koristiti potpuno
jednako kao i ostale diskove u računalu. Uređaj Targa DataBox NDAS 500 eSATA
možete koristiti za:
- Premještanje i kopira nje datoteka ili mapa s drugih diskova, CD-ROM-a ili drugih
medija
- Instaliranje i otvaranje raznih programskih datoteka na novom disku
- Spremanje videoisječaka, igara i drugih podataka
- Stvaranje sigurnosne kopije važnih podataka na računalu
Prekid veze
Uređaj Targa DataBox NDAS 500 eSATA može se priključivati i iskopčavati iz računala
dok je računalo uključeno. Međutim, ako DataBox iskopčate iz računala, a da ga
prethodno niste ispravno zaustavili putem operacijskog sustava, posljedice mogu biti
oštećenje ili gubitak podataka.
Bez obzira je li uređaj Targa DataBox NDAS 500 eSATA priključen putem USB ili
eSATA-kabela, lijevom tipkom miša pritisnite ikonu "Safely Remove Hardware"
(Sigurno uklanjanje hardvera) na programskoj traci pored sata (vidi donju sliku) i držite
je pritisnutu.
Slika: Primjer sigurnog uklanjanja
hardvera iz sustava Windows
®
Slika: Primjer sigurnog uklanjanja hardvera
XP
iz sustava Windows Vista™
U sljedećem prozoru možda će biti prikazano neko liko vanjs kih ur e đaja. Lij evom tipkom
miša odaberite uređaj Targa DataBox NDAS 500 eSATA. Ubrzo će se prikazati poruka
kada je sigurno iskopčati uređaj Targa DataBox NDAS 500 eSATA:
12
Page 90

Targa NDAS 500 eSATA Hrvatski
Povezivanje putem mreže
Osim povezivanja putem USB-kabela ili eSATA-kabela, druga je mogućnosti
povezivanje uređaja Targa DataBox NDAS 500 eSATA putem mrežnog kabela.
Važna napomena: Ne koristite istodobno više vrsta veza.
Ako je putem mreže povezano nekoliko računalo, uređaju Targa DataBox
NDAS 500 eSATA možete pristupiti sa svih tih računala koristeći NDAS (umrežena
izravno priključena pohrana, engl. Network Direct Attached Storage). Ta funkcija
moguća je i putem bežične lokalne mreže (WLAN).
U ovom dijelu priručniku opisan je način povezivanja uređaja Targa DataBox NDAS
500 eSATA putem mrežnog kabela i pripremne radnje.
Priključite uređaj Targa DataBox NDAS 500 eSATA u strujnu utičnicu kako je opisano
na str. 9. Nakon toga, povežite mrežnu utičnicu na uređaju Targa DataBox
NDAS 500 eSATA [4] priloženim mrežnim kabelom [C] sa slobodnom utičnicom na
mrežnom usmjerivaču ili sabirnici, ili izravno s računalom.
Kako biste mogli uspostaviti mrežnu vezu s uređajem Targa DataBox NDAS 500
eSATA, prvo morate instalirati softver s priloženog CD-ROM-a. Učinite to na svakom
računalu na mreži koje treba imati pristup uređaju Targa DataBox NDAS 500 eSATA.
Stavite priloženi CD-ROM u CD-ROM ili DVD-jedinicu (ovisno o računalu). Ako je
onemogućena funkcija samopokretanja, instalacijski progr am možete ručno pokrenuti
aktiviranjem datoteke "start.exe" s CD-a.
Sljedeći postupak instaliranja odnosi se na operacijski sustav Windows XP. Slike u
sustavu Windows Vista™ imaju identičan sadržaj, ali im se izgled može razlikovati.
Ako instaliranje započne zbog samopokretanja, pritisnite opciju "NDAS Software
Installation" (Instaliranje NDAS-softvera) na prikazanom izborniku. Ako je instaliranje
pokrenuto ručno, prikazat će se sljedeći prozor bez mogućnosti odabira.
13
Page 91

Hrvatski Targa NDAS 500 eSATA
Prvo odaberite instalacijski jezik i
pritisnite OK.
Prikazat će se "Install Shield Wizard"
(Čarobnjak za instaliranje): pričekajte.
Za pokretanje instaliranja
pritisnite Next.
14
Odaberite opciju "I accept the
terms in the license agreement"
(Prihvaćam odredbe ugovora o
licenci) i pritisnite
Next.
Page 92

Targa NDAS 500 eSATA Hrvatski
®
Instalacijski program vas
upozorava da kod žičanih i
bežičnih mreža niske
propusnosti mogu nastati
pogreške pri prijenosu.
Preporučujemo žičanu (LAN)
mrežu od 100 Mbit ili bežičnu
(WLAN) mrežu od 54 Mbit. Za
nastavak pritisnite Install
(Instaliraj).
Automatski se kopiraju
potrebne datoteke:
pričekajte.
U sustavu Windows
li se poruka s upozorenjem da
softver možda nije
kompatibilan, pritisnite
Continue anyway (Svejedno
nastavi).
U sustavu Windows Vista™:
UAC-poruka o sigurnosti
regulatora za korisničke račune
nekoliko će puta tražiti
administratorska prava. Pritom
svaki put pritisnite Install
(Instaliraj).
XP: Pojavi
Ova poruka označava da je
instaliranje dovršeno. Za
potvrdu pritisnite Finish
(Završi).
15
Page 93

Hrvatski Targa NDAS 500 eSATA
Nakon ponovnog pokretanja računala, na programskoj traci će se po javiti nova ikona
naziva "NDAS Device Management" (vidi donju sliku).
Slika: NDAS Device Management
Lijevom tipkom miša pritisnite ikonu i otvorit će se sljedeći izbornik:
Sada morate registrirati novi disk.
Pritisnite stavku Register a new
device… (Registriraj novi uređaj).
Za ponovno pokretanje računala i
dovršetak instaliranja pritisnite Yes
(Da).
16
Pri prvom registriranju prikazat
će se prozor dobrodošlice.Za
nastavak pritisnite
Next (Dalje).
Page 94

Targa NDAS 500 eSATA Hrvatski
Upišite naziv novog uređaja ili
ostavite zadani naziv "NDAS
Device 1" i pritisnite
Next (Dalje).
Upišite identifikacijski broj
uređaja u polja za unos. Sva
računala kojima želite odobriti
pristup disku moraju imati šifru
za odobrenje pristupa. Oba
broja nalaze se na naljepnici
uređaja DataBox NDAS 500
eSATA ili na kraju ovog
priručnika. Nakon toga pritisnite
Next (Dalje).
Softver provjerava je li uređaj
DataBox NDAS 500 eSATA
umrežen.
Pričekajte.
17
Page 95

Hrvatski Targa NDAS 500 eSATA
Registriranje je dovršeno.
Softver nudi tri mogućnosti:
1. Uređaj možete integrirati s
pravom čitanja i pisanja
2. Uređaj možete integrirati s
pravom čitanja
3. Uređaj trenutačno ne želite
integrirati
Odaberite željenu opciju i
pritisnite
Next (Dalje).
Time je postupak dovršen. Za
završetak pritisnite
Finish (Završi).
Integriranje
Nakon uspješnog registriranja, novi disk sada možete integrirati u sustav. U tu svrhu
ponovno lijevom tipkom miša pritisnite ikonu "NDAS Device Management" na
programskoj traci. Pojavit će se sljedeći izbornik:
18
Page 96

Targa NDAS 500 eSATA Hrvatski
Mišem odaberite stavku "NDAS Device 1" (ili naziv koji ste napisali tijekom registriranja)
i otvorit će se novi prozor. Ovdje možete integrirati disk u sustav kao "Read Only"
(Samo čitanje) ili "Read/Write" (Čitanje/pisanje).
Read Only (Samo čitanje)
Možete samo čitati podatke s diska, ali ne možete brisati, preimenovati, premještati
ni pisati nove podatke na njega.
Read/Write (Čitanje/pisanje)
Možete čitati sve podatke s diska, te brisati, preimenovati, premještati i pisati nove
podatke na njega.
Ova opcija dostupna je samo ako ste tijekom instalacije upisali šifru za o dobrenje
pristupa.
Pri prvom postavljanju diska računalo će instalirati upravljački program. To se odvija
automatski: dovoljno je da samo potvrdite poruke.
Nije potrebna veza na
"Windows Update". Možete
odabrati "Ne, ne ovaj put" i
prtisnuti Dalje.
Odaberite "Automatski instaliraj
softver” i pritisnite
Dalje.
19
Page 97

Hrvatski Targa NDAS 500 eSATA
Traže se potrebne datoteke:
pričekajte.
Pojavi li se poruka s
upozorenjem da softver možda
nije kompatibilan, pritisnite
Svejedno nastavi.
Potrebne datoteke se
automatski kopiraju: pričekajte.
20
Kada se kopiraju sve datoteke,
pritisnite Završi.
Page 98

Targa NDAS 500 eSATA Hrvatski
Uređaj Targa DataBox NDAS 500 eSATA sada je povezan s računalom putem mreže i
stalno je dostupan. Izbornik "NDAS Device Management" na programsk oj traci bit će
prikazan ovisno o vrsti integracije u sustav ("Read Only" ili "Write/Read").
Read Only (Samo čitanje)
Read/Write (Čitanje/pisanje)
Uređaj Targa DataBox NDAS
500 eSATA je integriran samo s
pravom pristupa na čitanje.
Uređaj Targa DataBox NDAS
500 eSATA je integriran s
pravom pristupa na čitanje i
pisanje.
Uređaj Targa DataBox NDAS 500 eSATA prikaz an je kao novi disk u "My Computer"
(Moje računalo), sa slovom jedinice koje je dodijelio operacijski sustav.
Prekid mrežne veze
Mrežnu vezu s uređajem Targa DataBox NDAS 500 eSATA možete prekinuti tako da
pritisnete ikonu
Device 1"), a zatim opciju "Dismount" (Prekini integraciju) (vidi donju sliku).
na programskoj traci, odaberete disk (u ovom primjeru, "NDAS
21
Page 99

Hrvatski Targa NDAS 500 eSATA
Kada prekinete vezu (odnosno integraciju), uređaj Targa DataBox NDAS 500 eSATA
će prikazati sljedeću poruku:
Potvrdite sa Yes (Da) kada želite prekinuti vezu između uređaja Targa DataBox
NDAS 500 eSATA i računala, ako ste prije toga provjerili d a nijedan program ne koristi
podatke na uređaju Targa DataBox NDAS 500 eSATA.
Ovu poruku možete onemogućiti pri sljedećem prekidu veze označavanj em opcije "In
the future, do not show me this dialog box" (Ubuduće ne prikazuj ovu poruku).
Za ponovno povezivanje uređaja Targa DataBox NDA S 500 eSATA pritisnite ikonu
na programskoj traci, odaberite uređaj (u ovom primjeru, NDAS Device 1) i pritisnite
Mount (Read Only) (Integriraj (samo čitanje)) za povezivanje uređaja Targa DataBox
NDAS 500 eSATA s pravom samo na čitanje ili Mount (Read/Write) (Integriraj
(čitanje/pisanje)) s punim pravom pristupa uređaju Targa DataBox NDAS 500 eSATA.
Dodatne opcije mrežne veze
Ako je potrebno, možete konfigurirati dodatne postavke. U tu svrhu lijevom tipkom miša
pritisnite ikonu
sliku).
na programskoj traci i odaberite stavku Options (Opcije) (vidi donju
Ako su na disku pohranjeni programi
koji se trenutačno koriste, prekid veze
možda neće uspjeti.
22
Pritisnite Options (Opcije) za konfiguriranje
dodatnih postavki.
Page 100

Targa NDAS 500 eSATA Hrvatski
Pojavit će se sljedeći izbornik:
U polju User Interface (Korisničko sučelje) možete promijeniti jezik izbornika. Opc ije u
polju Alerts (Upozorenja) pružaju mogućnost neprikazivanja obavijesti o prekidu ili
nestabilnosti veze (isključite odgovarajuće kvačice). U polju Auto Play Configuration
(Konfiguracija sampokretanja) možete uključiti i isključiti automatsko prikazivanje
NDAS-uređaja.
Izbornik općih postavki uređaja
Targa DataBox NDAS 500
eSATA
Izbornik naprednih postavki
uređaja Targa DataBox NDAS
500 eSATA
Pod stavkom Confirmation (Potvrda), uključite izborni okvir za aktiviranje
odgovarajućih poruka za potvrdu. Pod stavkom Menu (Izbornik) možete uključiti i
isključiti postavke prikaza. Suspend/Hibernation Support (Mirovanje/hibernacija)
omogućava odnosno sprečava da računalo uđe u mirovanje dok su uređaji integrirani.
23
 Loading...