

Page 1
DVD-HDD RECORDER
GB
User manual
IE
and service information
DRH-5700x
Page 2
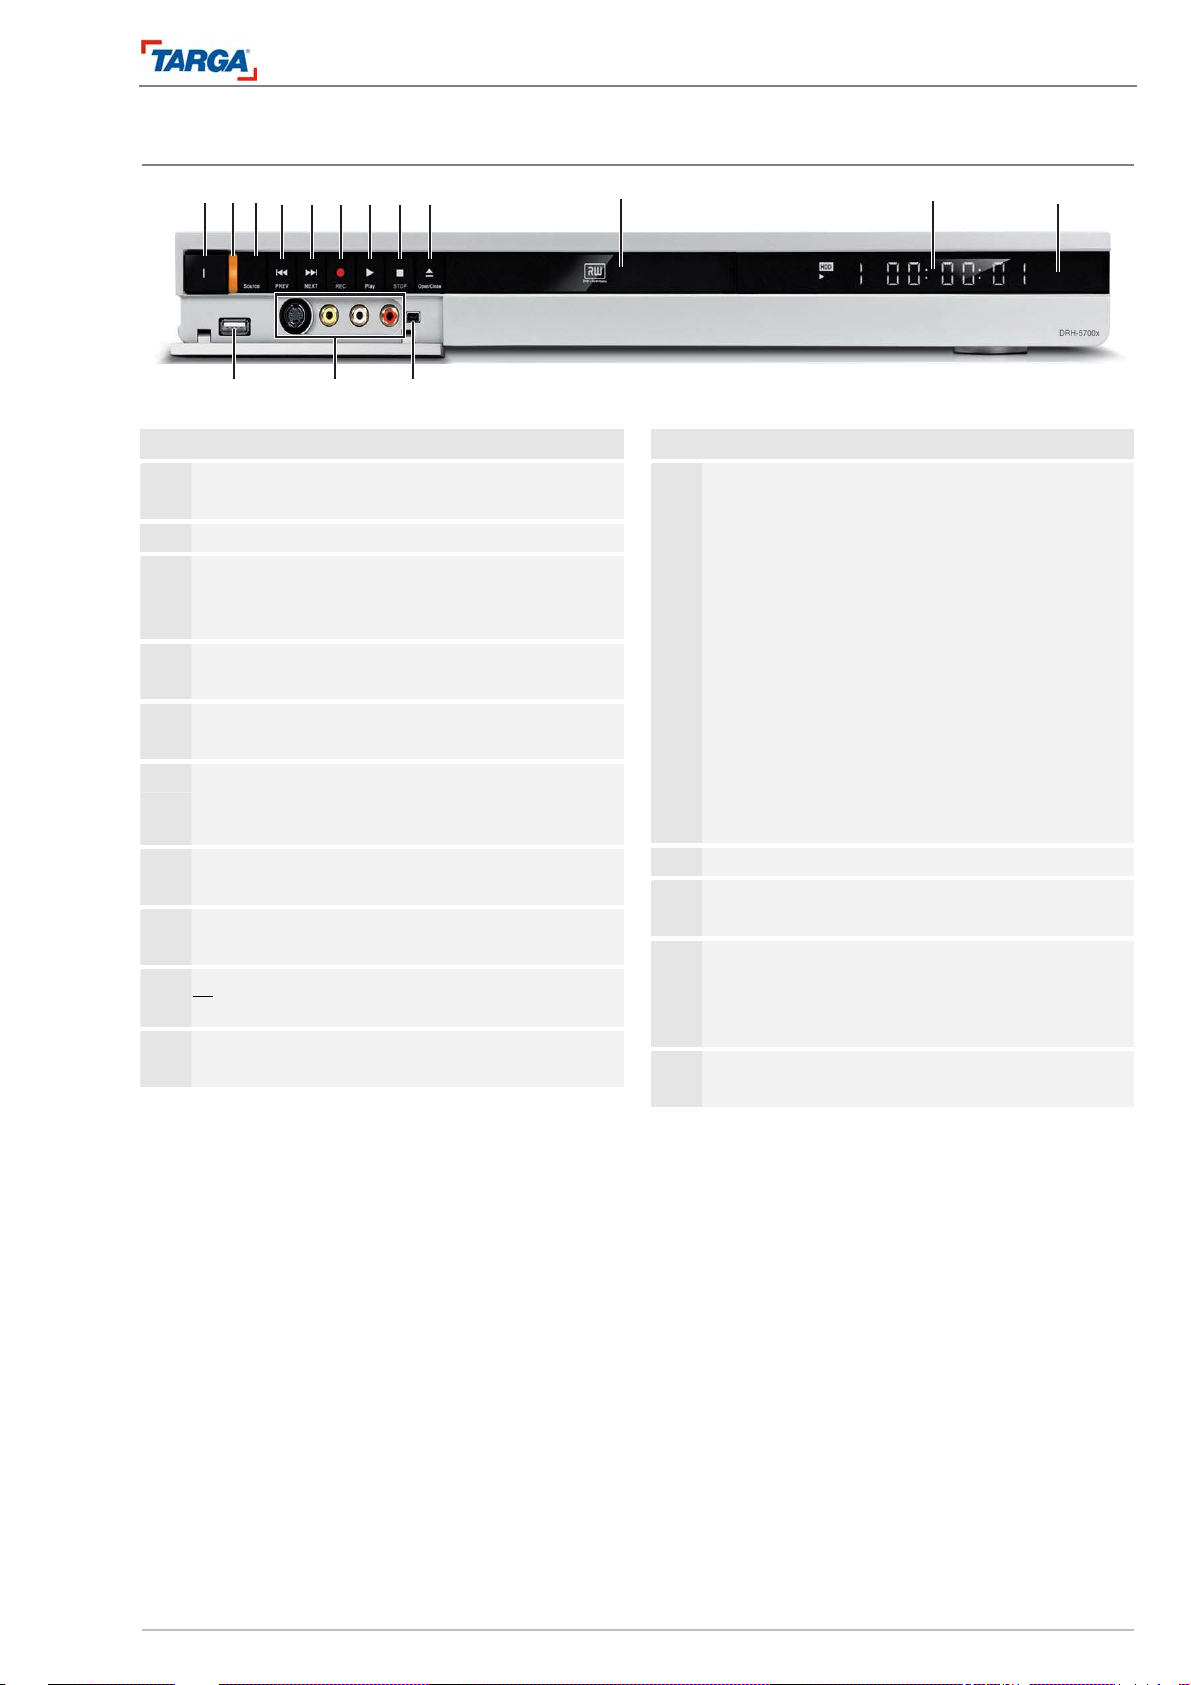
Front of the unit
456789
21 3
10
11
12
No. Designation
1
2
3
4
5
6
7
13
On/off switch
Power switch, switches the recorder on and off.
Operating indicator
SOURCE
Selects the signal input.
IWW PREV
Selects the previous chapter/title.
XXI NEXT
Selects the next chapter/title.
z REC
Record button for starting a recording immediately
X PLAY
Starts playback.
14 15
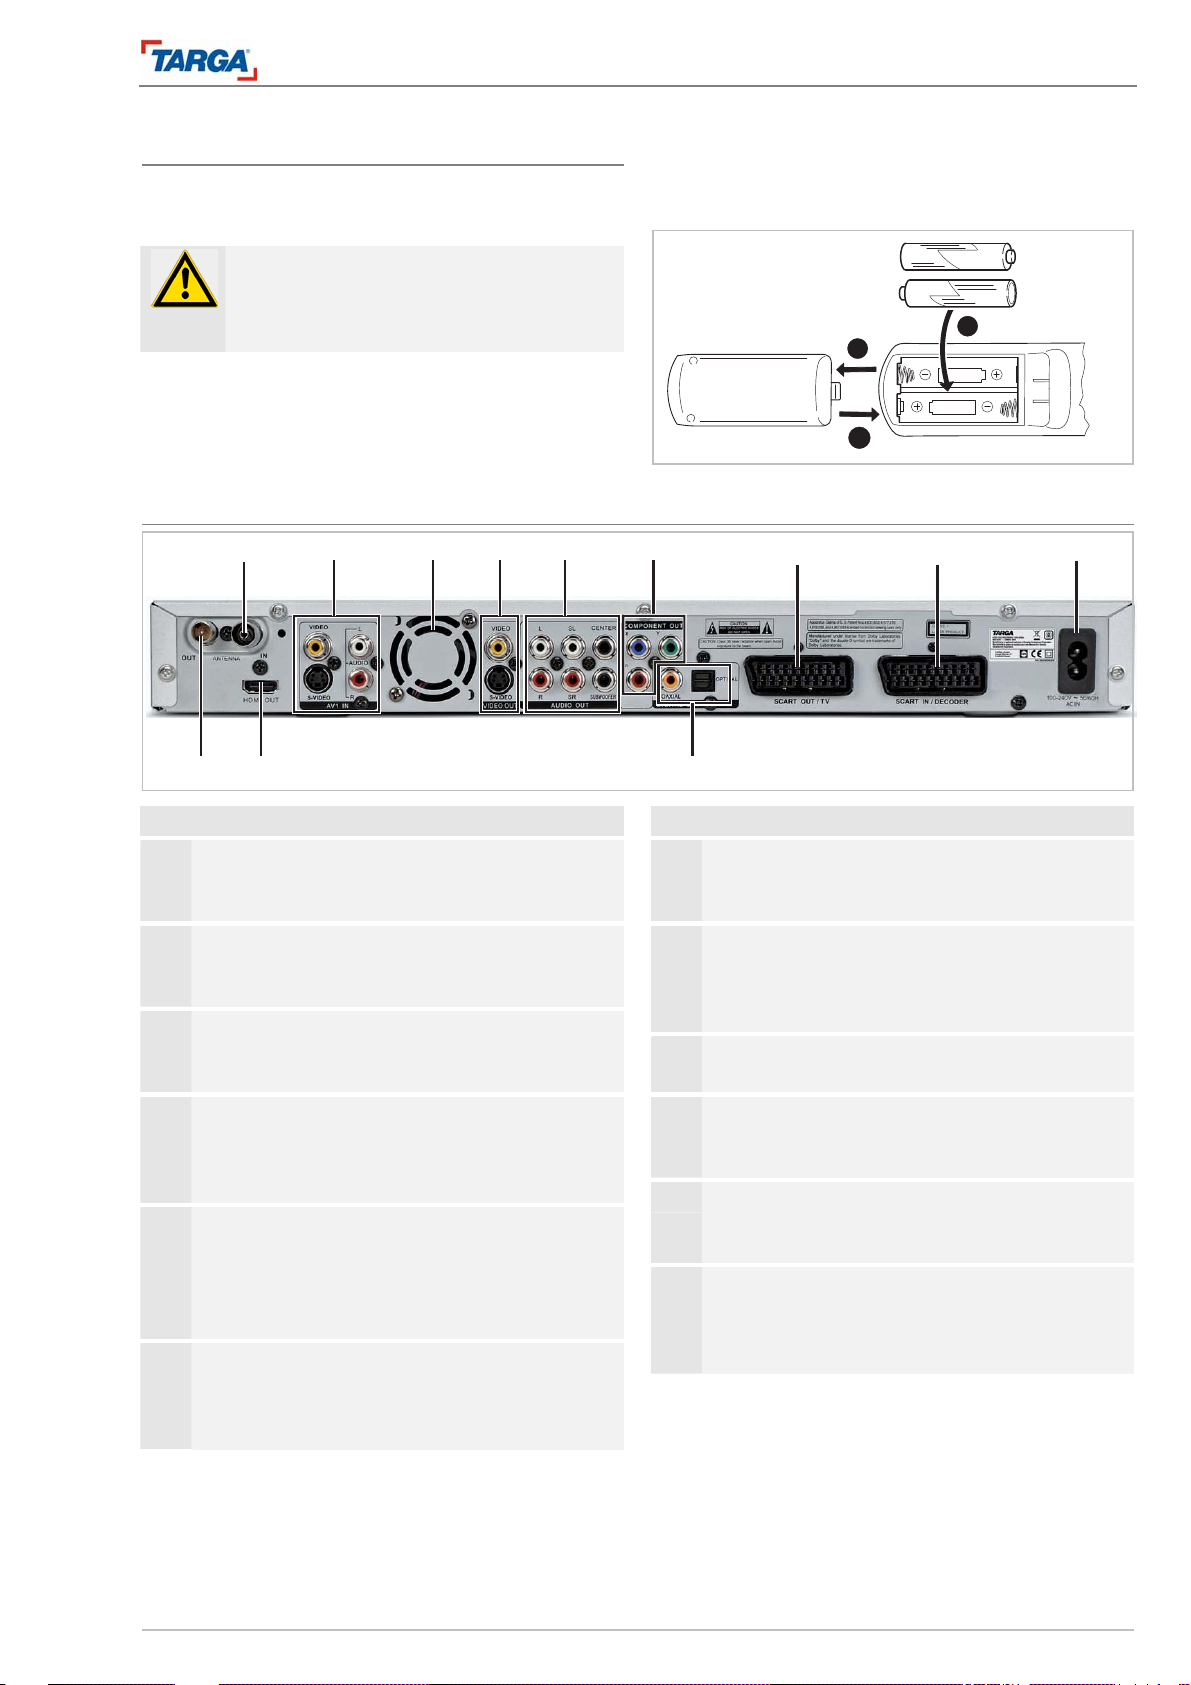
Rear
16 17 18 19 20 21 22 23 24
No. Designation
8
STOP
Stops playback/recording.
9
OPEN/CLOSE
Opens and closes the disc loader.
10
Disc loader
The disc is inserted here.
11
Display
Displays information.
12
Remote control sensor
Receives control signals from the remote control.
13
USB socket
For connecting a USB memory st ick or a card rea der.
14
Front AV input (picture and sound)
S-video/video input, AUDIO input (L, R).
15
DV IN
For connecting to the DV output on a digital camcorder.
No. Designation
16 ANTENNA IN
For connecting a television antenna or cable television.
17 AV1 IN (picture and sound)
S-video 1, CVBS 1, AUDIO signal input.
Fan
18
The fan provides sufficient ventilation inside the housing.
Never cover the ventilation openings.
VIDEO OUT (picture)
19
VIDEO or S-VIDEO signal output (analogue) for connecting
an S-video cable or video cable (cinch).
AUDIO OUT (sound)
20
5.1 channel sound output parallel to the audio amplif ier, six coaxial cinch cable (L, R, SL, SR, CENTRE, SUBWOOFER). Stereo sound via L and R conne ctions.
21 COMPONENT OUT (picture)
Component signal output YPbPr for connecting a component
video cable.
252627
No. Designation
SCART OUT / TV (picture and sound)
22
Analogue picture and sound output for connecting a television.
23 SCART IN / DECODER (picture and sound)
Analogue picture and sound input for connecting decoders,
satellite receivers, video recorders, etc.
24 AC IN
Socket for power supply cable
DIGITAL OUT (sound)
25
Digital optical sound output (fibre optic cable),
digital coaxial sound output (cinch cable).
26 HDMI OUT (picture and sound)
Digital picture and sound output for connecting a HDMI cable.
27 ANTEN NA OUT
For connecting the antenna in put on the t ele vision. Th e antenna signal at socket 16 is redirected to the television via this
connection.
2 DRH-5700x
Page 3

No. Designation
28 Open/Close
Opens and closes the disc loader.
29 Numerical buttons 0 to 9
Keypad entries.
30 CH MARK
>For entering a chapter marker/bookmark at the current position.
31 1/ALL
Repeat function when playing an
MP3 title or all MP3 titles.
32 A-B
Repeats a section.
33 Subtitle
Changes the subtitle language.
34 ANGLE
Plays scenes from different angles (if
available on DVD).
35 PLAY X
Starts playback (from hard drive
or disc) or opens the file manager/title list.
36 PAUSE II
Pauses playback temporarily,
press * W or X to move frame by
frame
37
WW REW XX FF
Fast forward / rewind, press the
59
button repeatedly to change the
speed
38
IWW PREV XXI NEXT
Selects the previous / next chap-
58
ter or title.
39 W S X T ENTER
Control buttons for navigating in
menus, press ENTER to confirm.
40 SOURCE
Selects the input signal.
41 TITLE
Opens the DVD title menu.
42 DISPLAY
Displays the current device status
and playback information (title,
chapter, play time, etc.).
43 TIMER
Opens and closes the timer menu.
44 VIDEO+
Enter the VideoPlus code to record automatically from the TV.
31
33
35
37
41
43
45
47
Remote control
28
29
30
32
34
36
38
39
40
42
44
46
48
65
64
62
61
58
57
55
53
51
49
63
60
59
56
54
52
50
No. Designation
46 SETUP
Opens the system menu.
47 HDD
Changes to hard drive mode.
48 DVD
Changes to DVD mode.
49 MUTE
Muted sound.
50 USB
Switches to USB mode (MP3
stick, card reader).
51,
- VOL +
53
Adjusts the volume.
52,
- CH +
54
Selects television channels.
55 RECORD
Starts a recording immediately.
56 MENU/PBC
Displays video information on the
DVD, HDD.
57 RETURN
Hide menu, return to the previous
menu.
60 STOP
Stops playback, recording.
61 Audio
Changes the subtitle language or
the audio channel.
62 TV SYS
Switches the picture output signal
to PAL/NTSC
63
ZOOM
Enlarges the picture.
64 CM SKIP
Playback skips forwards 30 seconds from the current position.
65 POWER
Switches on the unit or switches
to standby mode.
CE Declaration of Conformity
This unit has been tested and approved with regard to conformity with
the basic requirements and other relevant regulations of the EMC Directive 2004/108/EC, the Directive on low-voltage devices 2006/95/EC.
Included in delivery
Targa DRH-5700x, mains cable Remote control incl. batteries
Operating instructions HDMI cable
Antenna cable Scart cable
Video cable Audio cable
Targa test DVD* Blank DVD
*) Germany and Austria
DRH-5700x 3
Page 4
Contents
Overview of basic functions
Overview of basic functions
1. Read the information on the hard drive (page 11), general instructions, safety notes (page 6) and details on
setting up and connecting the unit (see 16).
2. Insert the batteries in the remote control.
3. Press button (1) to switch the u nit on/off.
• LED (2) lights up and DISPLAY (11) switches on,
• The operating mode appears on the display (PR, HDD,
DVD, DATA DISC, etc.).
4. Press the POWER (65) button on the remote control to
switch the unit to or from standby .
• The time appears on the DISPLAY (11) in standby mode.
First time setup
When setting up the unit for the first time, follow the instructions on page 21. The unit is set up according to your living
environment and a channel search starts automatically.
Setup menu
1. Press SETUP (46) to open the general setup menu.
Read the information on page 22.
Television channels
1. Press the HDD button (47).
2. Press the numerical buttons (29) to select the desired
channel/station directly. Press –CH+ (52, 54) to browse
through the channels.
CD/DVD playback
1. Press the OPEN/CLOSE (9) button or (28) on the remote control to open the disc loader (10). The loader
opens forwards, do not obstruct the tray while the loader
is opening!
2. Then insert the disc with the labelled side facing up and
close the loader.
3. Playback begins automatically. If playback does not start,
press the PLAY X (7, 35) button. See page 30.
HDD playback, jukebox
1. Press HDD (47) to access stored TV channels and then
press MENU (56) to open the title list.
2. Press W S X T to select the title and then press PLAY
X. Playback begins. See page 30.
Jukebox
Data copied from your media (CD, DVD, USB) is stored
in the jukebox.
3. Press JUKEBOX. The file manager opens. This area is
your "private" folder on the HDD.
4. Press T, S to select [Picture], [Audio] or [Video]. The
data is displayed on the right. See page 35.
Recording onto DVD/hard drive
1. Connect the external device.
2. Set up the input signal.
3. Open the disc loader (10), insert the blank DVD with the
printed side facing up and then close the disc loader
(10).
4. Press the SOURCE button (40) to select the recording
source (PR, AV1, SV1, AV2, SV2, SCART or DV).
5. Press RECORD (6, 55) to start the recording.
6. Press STOP (8, 60) to stop the recording.
Recording onto the HDD: first press the HDD
button (47). Continue with step 5. See page 41.
USB playback
Insert the stick or connect the card reader and then press
the USB button (50). Press several times, if necessary.
Press the PLAY X button (7, 35) , the file manager opens
(page 35).
Recording with the timer function
See page 43 (DVD, hard disk).
Recording with the Vid eoPlus fun ction
See page 45 (DVD, hard disk).
Recording from DV devices
See page 46.
Copying from HDD to DVD
See page 53.
Copying from USB to HDD
See page 40.
Time shift
1. While the television is on, press the PAUSE II button
(36) to freeze the picture. See page 42.
General information
appears on the screen if a function is un-
available.
Title list menu, file manager
Title list File manager
The title list or the file manager opens depending on the data displayed. Processes for navigation and operation are
similar.
An overview of the media/folder structure appears on the left
side of the window Each individual title/data appears on the
right. All available button functions appear in the bar at the
bottom of the screen.
You can activate different functions.
• [ENTER] opens editing options such as playback, copy,
protect, edit, play list, sort, attribute, etc.
• [RETURN] closes the option or the menu.
• PLAY X starts playback.
• W S X T navigation buttons for moving the cursor.
• Title list menu: See page 48.
• File manager: See page 35.
4 DRH-5700x
Page 5

Important safety notes
Overview of basic functions
Over v ie w o f ba s ic f un c ti o n s.......................................4
Important safety notes..............................................6
General......................................................................6
Installation location....................................................6
Power supply.............................................................6
Cables .......................................................................6
Care and maintenance..............................................7
Disposing of old appliances.......................................7
Children.....................................................................7
Intended use..............................................................7
Introduction................................................................8
General information...................................................8
Recordable media .....................................................9
Recommended recordable DVD discs................... 10
Playback media...................................................... 10
Copying and duplicating options .............................11
Via the internal hard disk drive................................11
Controls on the front of the unit.............................. 13
Remote control....................................................... 14
Connections and settings...................................... 15
Connections on the back of the unit....................... 15
Connecting the antenna ......................................... 16
Connecting to a television ...................................... 16
HDMI socket........................................................... 17
Connecting to an amplifier..................................... 18
Other audio/video connections............................... 19
Connecting to AV IN 2 sockets............................... 20
Connecting a digital camcorder.............................. 21
Automatic setting.................................................... 21
Setup menu............................................................. 22
Using the setup menu............................................. 22
Tuner menu............................................................ 22
Disc menu............................................................... 23
Playback menu....................................................... 25
Recording menu..................................................... 26
Video menu............................................................. 27
Audio menu ............................................................ 28
System menu.......................................................... 29
General description of the screen menu ................ 30
Playback...................................................................30
General playback functions.....................................30
Using a displayed menu screen..............................33
Playing DivX film files..............................................34
Playing audio CDs or MP3/WMA files.....................35
Programmed playback of audio CDs and MP3/WMA
files..........................................................................36
Displaying JPEG files..............................................38
Managing MP3/WMA, JPEG and DivX files ...........39
Recording ................................................................41
Information on DVD recordings...............................41
Adding chapter markers..........................................41
Timeshift..................................................................42
Recording a television program..............................42
Recording time........................................................43
Timer recording.......................................................43
Timer recordings with VideoPlus®..........................45
Editing a timer recording.........................................45
Reco r d i n g f r o m e x t e r n a l a u x i liary devi c e s.................46
Recording from DV devices ....................................46
Simultaneous recording and playback....................47
Editing......................................................................48
Overview of the title list menu.................................48
Selecting several titles ............................................48
Naming a title..........................................................49
Copying....................................................................52
Prior to copying.......................................................52
Reference.................................................................54
Additional information..............................................54
Language codes......................................................54
Menu overview........................................................55
Troubleshooting.......................................................56
Index .......................................................................58
Specifications...........................................................59
DRH-5700x 5
Page 6

Important safety notes
General
Important safety notes
General
Before using unit for the first time, please read
through the following notes carefully and observe all
warning instructions, even if you are familiar with using electrical equipment. Keep this manual in a safe
place for future reference. If you decide to sell or pass
on the device to third parties, always include this manual.
Installation location
• Install the unit on a solid, level surface and do not
place heavy objects on top.
• The unit is not designed for use in rooms ex-
posed to high temperatures or air humidity (e.g.
bathrooms) or excessive quantities of accumulated dust
• Operating temperature and air humidity: 5 °C to
35 °C, max. 85 % rel. humidity
Make sure that
• the unit is always ventilated sufficiently (do not
place the unit in enclosed shelving units, on thick
carpets, beds or anywhere where the ventilation
slits are covered and always leave a minimum of
10 cm space around the unit);
• direct heat sources (such as radiators) do not af-
fect the unit;
• direct sunlight and strong artificial light does not
shine on the unit;
• the unit is not located in the direct vicinity of mag-
netic fields (such as speakers);
• sources of naked flames (such as burning can-
dles) are not placed on or next to the unit;
• contact with splash and dripping water and ag-
gressive fluids is avoided and the unit is not operated next to water. Under no circumstances
should the unit be immersed underwater (do not
place objects filled with liquid such as vases or
drinks on or near the unit);
• foreign objects cannot enter the unit;
• the unit is not exposed to sharp fluctuations in
temperature, otherwise condensation may form
and cause short circuiting;
• the unit is not exposed to excessive shaking and
vibrations;
Power supply
• The on/off switch on the unit does not isolate the
unit completely from the mains power supply.
• The unit continues to consume electricity in
standby mode. Pull the plug from the mains socket to disconnect the unit completely from the
mains power supply. Position the unit in such a
way as to guarantee direct, unobstructed access
to the mains socket so that the plug can be disconnected immediately in an emergency. If you
do not intend to use the unit for longer periods
such as during a holiday, always disconnect the
plug from the mains socket to avoid any potential
fire hazards. Please disconnect the unit from the
mains power supply if there is a risk of lightning
striking during a storm.
• Do not insert batteries with the terminals re-
versed, do not recharge the batteries supplied
with the unit and never throw batteries into an
open fire! Do not use different types of battery
(old and new, alkaline and carbon, etc.) simultaneously. Remove the batteries if you do not intend to use the unit for longer periods. Incorrect
use may cause the batteries to explode or leak!
• Make a conscious effort to protect the environ-
ment! Used batteries should be disposed of separately from the household waste! Deposit them at
a collection point for used batteries or special
waste.
Cables
• Always pull cables by the plug and not by the ca-
ble itself.
• Do not touch the mains cable with wet hands as
you may short circuit the unit or receive an electric shock.
• Do not place the unit, items of furniture or other
heavy objects on cables and make sure that the
cables are not kinked, in particular next to the
plug and connecting sockets. Never tie knots in
cables and do not tie the ends of cables together.
Lay all cables so that people cannot tread on or
trip over them.
• A damaged mains cable poses a risk of fire or e-
lectric shock. Check the mains cable from time to
time. Do not use adapter plugs or extension cables
that do not correspond to applicable safety standards and do not tamper with power or mains cables!
6 DRH-5700x
Page 7

Important safety notes
Care and maintenance
Care and maintenance
• Maintenance work is necessary, for example, if
the mains plug, mains cable or housing is damaged, liquid or objects enter the unit, the unit is
exposed to rain or moisture, no longer functions
correctly or has suffered a fall. If you notice
smoke emissions, unusual noises or odd smells,
switch off the unit immediately and disconnect the
plug from the power socket. Have the unit inspected by a qualified specialist before you use it
again. Only allow qualified specialists to perform
maintenance work on the unit. Never open the
housing of the unit or accessories. Opening the
housing poses a risk of fatal injury from electric
shock. Always clean the unit with a clean, dry
cloth and never use aggressive fluids.
• The DVD/CD drive in the unit is categorised as a
"Class 1 laser product", indicated by a corresponding sticker affixed to the housing. Never
open the unit and do not attempt to repair the unit
yourself. The unit operates with an invisible laser
beam inside the housing. Do not make contact
with the laser beam.
• Do not attempt to open the unit housing. Opening
the unit will void the warranty.
Disposing of old appliances
Products that display a symbol of a crossed-out waste
bin are subject to European Directive 2002/96/EC.
All old electrical and electronic appliances should be
disposed of separately from the household waste at
special recycling centres run by the local council.
Correct disposal of old appliances preserves the environment and prevents public health hazards.
For more detailed information about disposal of your
old appliance, please contact your local council office,
waste disposal service or the shop where you purchased the product.
Children
• Do not allow children to play with electrical e-
quipment! Never allow children to use electrical
equipment unsupervised. Children may not always be able to identify potential dangers. Swallowing small parts can be extremely dangerous.
• Keep all kinds of battery out of the reach of small
children. Should a child swallow a battery, seek
immediate medical assistance.
• Keep any packaging away from children. Risk of
suffocation!
• Keep this unit out of the reach of children. If chil-
dren are allowed to tamper with the unit, springloaded components may be ejected and cause
eye injuries.
Intended use
• This electronic entertainment equipment is in-
tended for private use only and not industrial or
commercial purposes.
• Furthermore, the unit should not be operated out-
doors and in tropical climatic regions. Always use
connecting cables and external appliances that
correspond to the requirements relating to safety,
electromagnetic compatibility and shielding quality of this appliance. This appliance fulfils all relevant norms and standards relating to CE conformity. Modifying the appliance without prior approval from the manufacturer no longer guarantees compliance with these standards. Always
use accessories specified by the manufacturer.
• When using the appliance outside of the Federal
Republic of Germany, always observe the national regulations and laws in the country of use.
• When connecting peripheral devices, make sure
that the cables are of sufficient length and the
connectors are not subject to mechanical load!
DRH-5700x 7
Page 8
Introduction
General information
Introduction
General information
Before using the appliance, read through this user
manual carefully and keep in a safe place for future
use.
This manual contains instructions for operating and
maintaining the recorder. Contact an authorised specialist company to carry out repairs on the appliance.
Display symbol
The symbol " " may appear when certain buttons are
pressed during operation. This symbol indicates that
the selected function is not available in this operating
mode.
Symbols used in this manual
Important
Note
Tip
Symbols used in this manual
Sections with one of the following symbols in the title
only apply to the disc type indicated by the symbol.
Warns of possible damage.
Highlights special functions.
Highlights useful tips
Titles recorded on the hard drive
All the DVD disc types listed below.
DVD-RW in VR recording mode
DVD+RW disc
DVD-R disc
DVD+R (DL) disc
DVD video disc
Video CDs
Audio CDs
DivX files
MP3 files
WMA files
JPEG files
Disc information
Handling discs
Never touch the playback side of the disc. Hold the
disc by the edges to avoid leaving fingerprints on the
disc surface. Do not affix labels or apply adhesive
tape.
Storing discs
After playing the disc, replace in the box. Do not expose the disc to direct sunlight or heat sources and
never leave the disc in a vehicle parked in direct sunlight.
Cleaning discs
Fingerprints and dust may impair the picture and
sound quality. Before playing the disc, clean from the
centre outwards using a clean cloth.
Important!
Do not use aggressive solvents such as alcohol, benzene, thinner, commercially available cleaning agents or antistatic sprays intended for records.
Important!
Risk of condensation forming!
When moving the unit from a cold to a warm
place, always allow to acclimatise before using otherwise discs and internal components
may be damaged.
8 DRH-5700x
Page 9
Recordable media
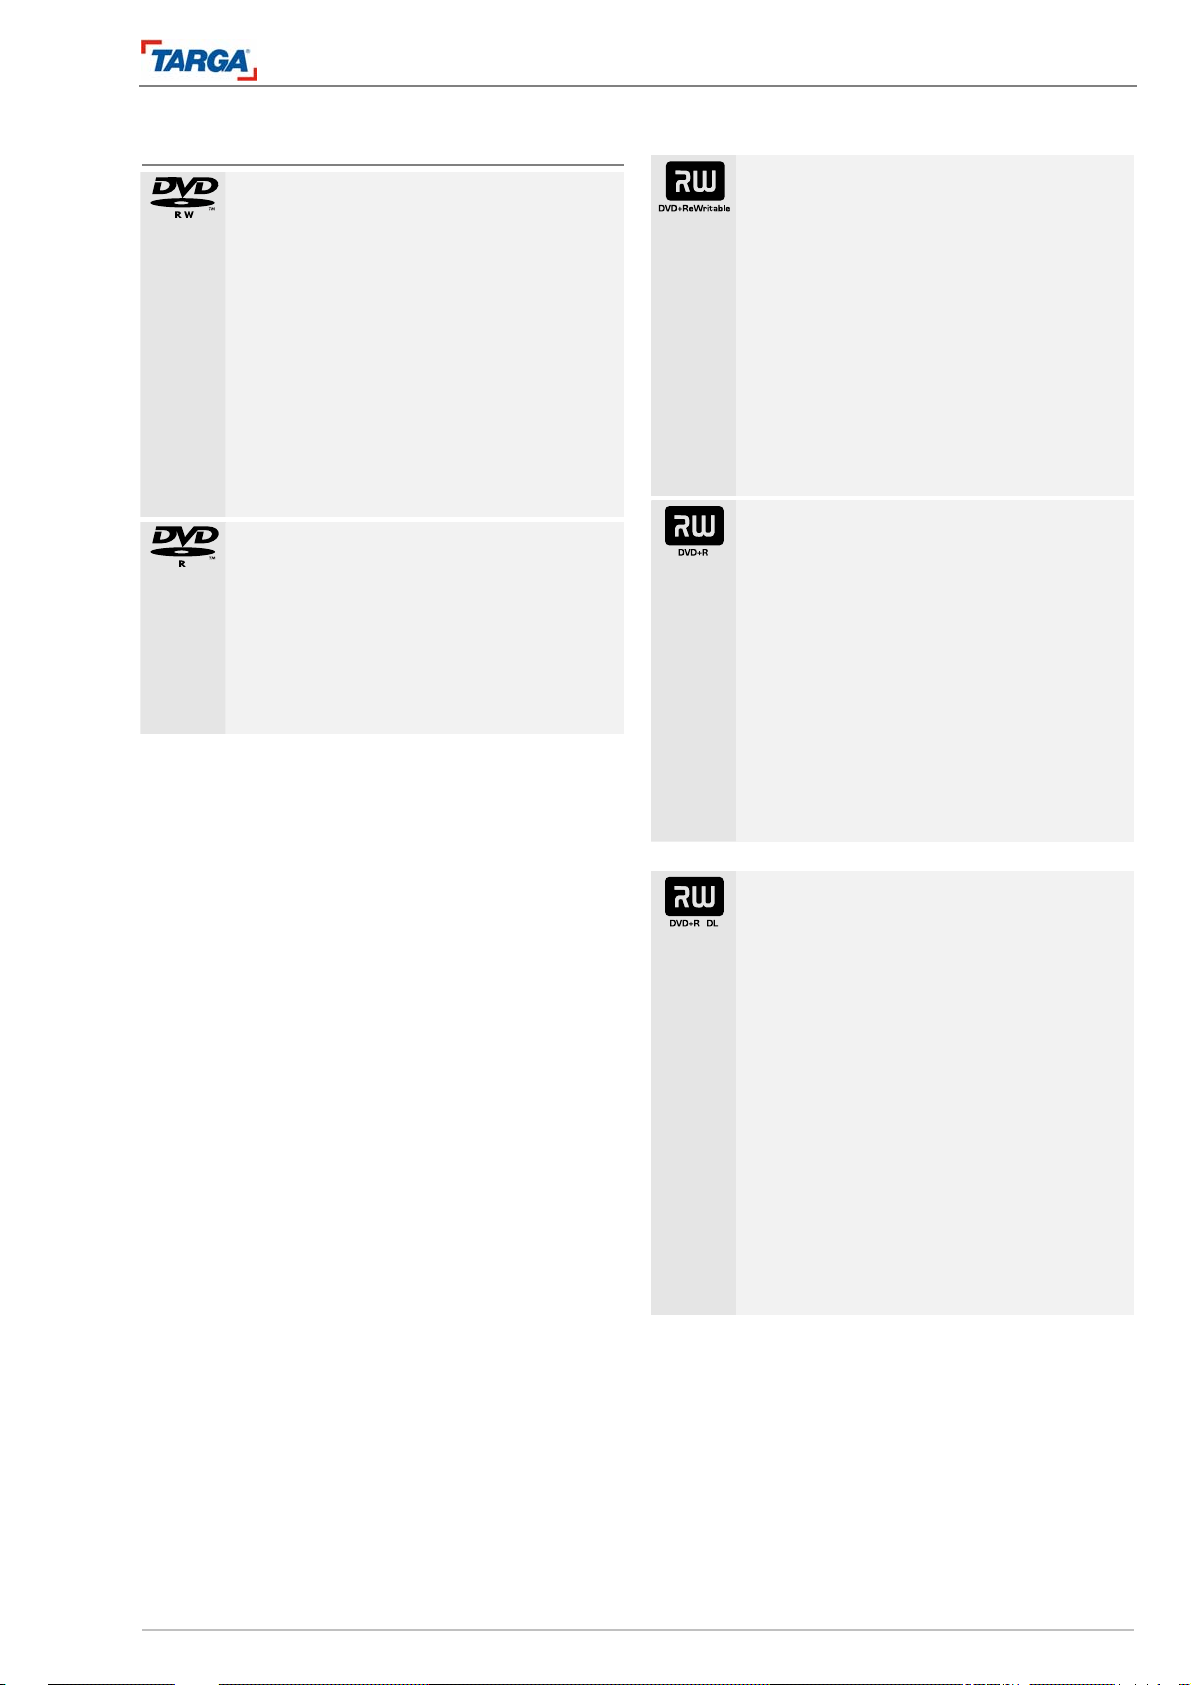
DVD-RW (Digital Video Disc - ReWritable)
• DVD-RW discs can be formatted to re-
cord in VR mode.
• Data can be recorded on these discs
more than once. Recordings can be deleted and then new recordings stored on
the same disc.
[VR mode]
• Recordings can be comprehensively ed-
ited
• Playback only on players compatible with
VR mode (after disc is finalised)
DVD-R (Digital Video Disc - Rec ordable)
• Data can be recorded onto these discs
once. Once the DVD-R disc is finalised,
you cannot modify or record any more
data on the disc.
• Playback on standard DVD players (af-
ter disc is finalised)
• Limited modifications possible
Introduction
Recordable media
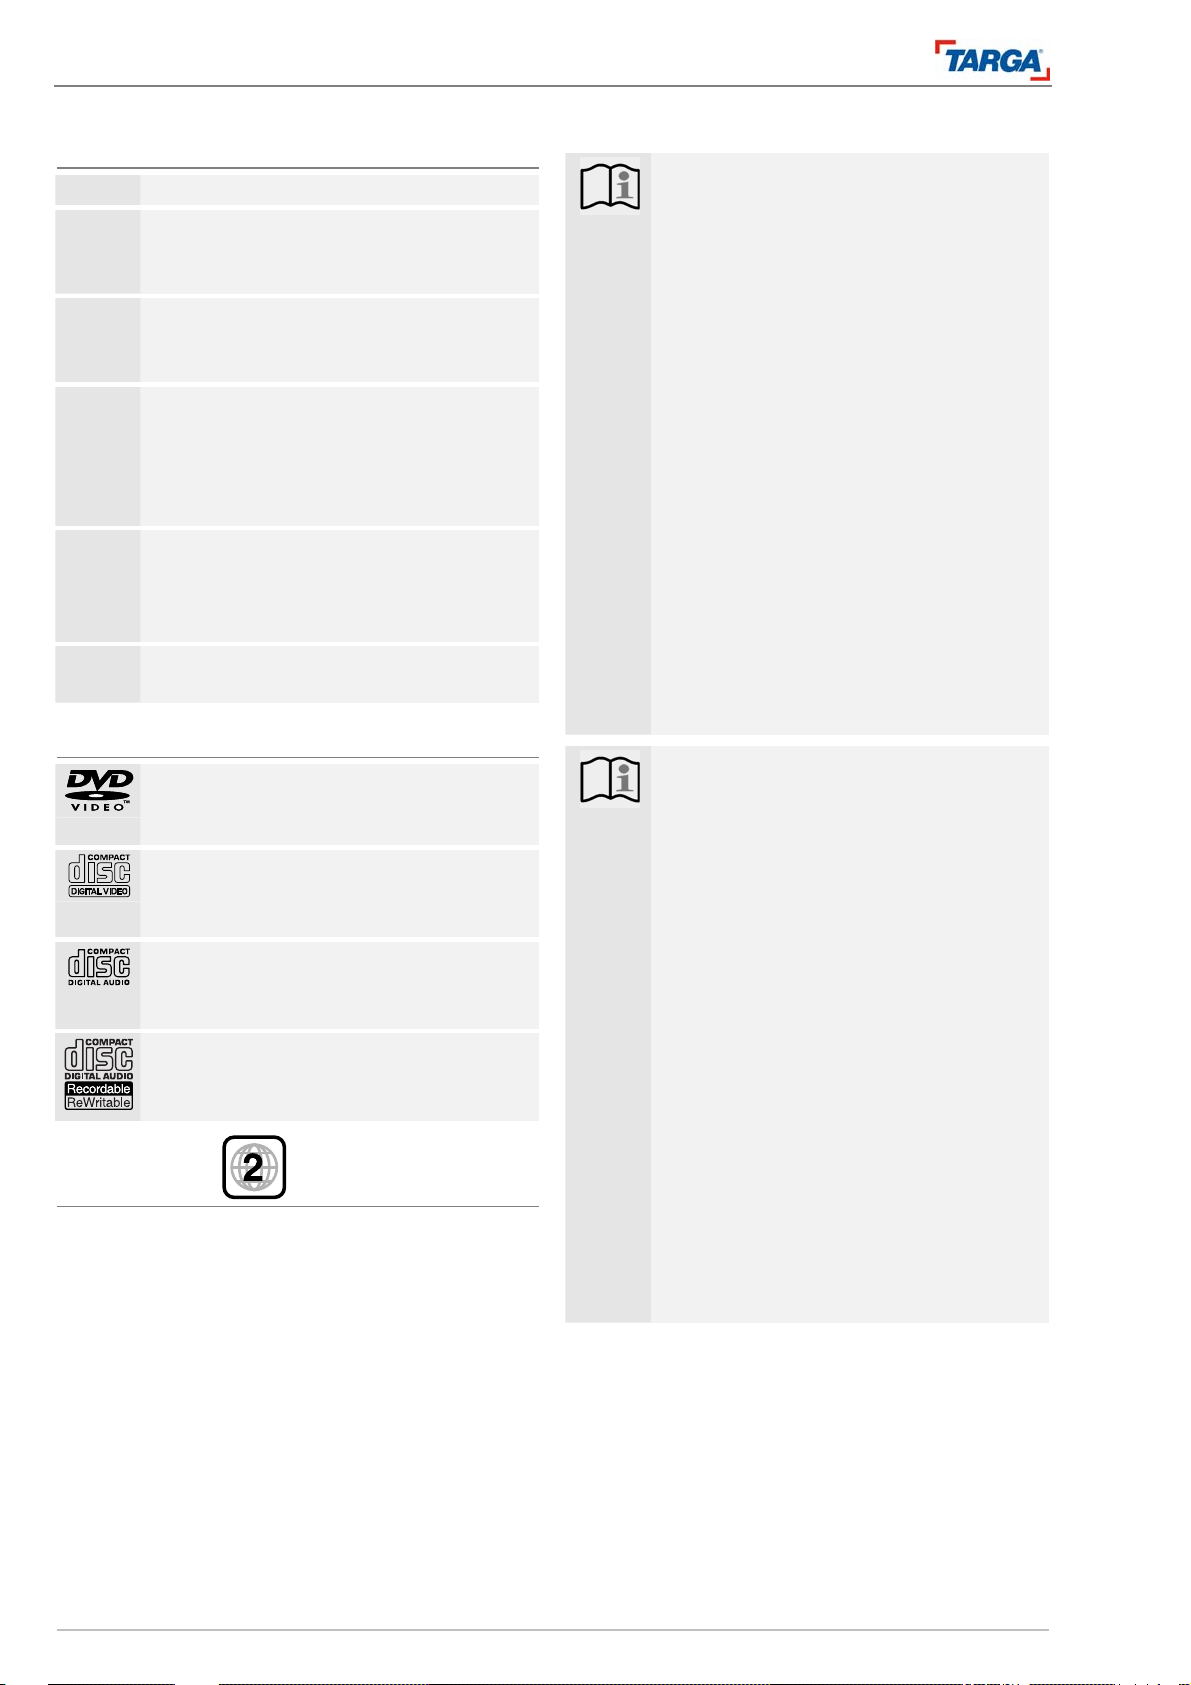
DVD+RW (Digital Video Disc + ReWritable)
• Data can be recorded on these discs
more than once. Recordings can be deleted and then new recordings stored on
the same disc.
• Playback on DVD+RW compatible play-
ers only (disc is finalised automatically)
• Edited contents can only be played on
DVD+RW-compatible pl ayers once the
disc is finalised.
• The name of recording titles/chapters
can be edited.
DVD+R (Digital Video Disc + Recordable)
• Data can be recorded onto these discs
once. Once the DVD+R disc is finalised,
you cannot modify or record any more
data on the disc.
• Playback on DVD+R compatible players
only (after disc is finalised)
• Edited contents (hide, merge chapter,
add chapter markers, etc.) can no longer be played on DVD+R compatible
players.
• Titles/chapters can be edited to a lim-
ited extent.
DVD+R DL (Digital Video Disc + Recordable; Double Layer)
• Data can be recorded onto these discs
once. Once the DVD+R DL disc is finalised, you cannot modify or record any
more data on the disc.
• Double Layer DVD+R discs have about
twice as much storage capacity, allowing you to store up to 8.5 GB of film material on a single DVD+R disc.
• Playback on DVD+R DL compatibl e play-
ers only (after disc is finalised)
• Edited contents (hide, merge chapter , add
chapter markers, etc.) can no longer be
played on DVD+R DL com pati ble player s.
• Titles/chapters can be edited to a lim-
ited extent.
DRH-5700x 9
Page 10
Introduction
Recommended recordable DVD discs
Recommended recordable DVD discs
DVD
-RW
+RW
+R(DL)
Manufacturer
-R
• Mitsubishi (8x, 16x)
• That’s (8x, 16x)
• SONY (16x)
+R
• Mitsubishi (8x, 16x)
• Ricoh (8x, 16x)
• SONY (16x)
• Mitsubishi (4x)
• Verbatim (4x)
• JVC (4x)
• Victor (4x)
• Maxell (4x)
• Mitsubishi (4x)
• SONY (2.4x)
• Verbatim (2.4x)
• Ricoh (2.4x, 4x)
• Mitsubishi (2.4x)
• Maxell (2.4x)
Playback media
DVD discs (8 cm/12 cm)
• For example, purchased or rented mo-
tion picture DVDs
Video CDs (VCD) (8 cm/12 cm)
• Video CDs or CD-Rs/CD-RWs in VIDEO
CD/Super Video CD format
Audio CDs (8 cm/12 cm)
• Purchased music CDs or CD-Rs/CD-
RWs in music CD format
CD-R/CD-RW discs (8 cm/12 cm)
• CD-R/CD-RW discs with audio titles,
DivX, MP3, WMA or JPEG files.
Country code
The country code of this player is printed on the back
of the unit. The player can only play DVDs with this
code or the "ALL" country code.
Information on country codes
• Most DVDs have a globe symbol and one or more
numbers printed on the box. The player can only play
the disc if these numbers correspond with the country
code on the unit.
If a DVD with a different country code to that printed
on the unit is played, the message "Incorrect regional
code. Playback not possible." appears on the television screen.
Note
• This unit may not be able to play some
CD-R/RW (or DVD±R/RW) discs because of the recording device used or
the actual CD-R/RW (or DVD±R/RW)
disc.
• Do not affix stickers or labels to either
side of the disc.
• Do not insert CDs that are not perfectly
round (e.g. heart-shaped or octagonal)
as malfunctions could occur.
• Under certain circumstances, this unit
may not be able to play some recordable discs (CD-R/RW or DVD±R/RW)
depending on the recording software
used and whether the disc is finalised.
• Under certain circumstances, the unit
may not be able to play DVD-R/RW,
DVD+R/RW and CD-R/RW discs recorded on a PC or DVD/CD burner if the
discs are damaged or dirty and the lens
on the recorder is dirty or damp.
Note
• The unit may not be able to play discs
burned on a PC, even if the disc format
is compatible because of the recording
software settings. (Contact the recording software manufacturer for more
detailed information).
• Discs and recordings should comply
with certain technical standards for this
recorder to achieve maximum playback
quality. Recorded DVDs comply with
these standards. There are a number of
different formats for recordable discs
(incl. CD-R discs containing MP3 or
WMA files). Certain requirements must
be fulfilled for discs to play correctly
(see above).
• Remember that permission is required
to download MP3/WMA files and music
from the internet. Our company cannot
grant such permission. Permission must
be obtained from the creator.
10 DRH-5700x
Page 11
Introduction
Copying and duplicating options
Copying and duplicating options
The recorder has three storage features: the HDD hard disk, the jukebox (separate area on the HDD for your
data) and recordable media (discs) or a memory device connected to the USB slot.
From To MP3/WMA JPEG DivX Audio CD Video CD Title *1
HDD Disc No No No No No
HDD USB No No No No No No
Jukebox USB Yes Yes Yes No No No
Jukebox Disc No No No No No No
Disc HDD
Yes Yes Yes
No No
Disc USB No No No No No No
USB Jukebox
Yes Yes Yes
No No No
USB Disc No No No No No No
*1
the title is recorded from this device.
Via the internal hard disk drive
The internal hard disk drive (HDD) is extremely sensitive. Always follow the instructions below when operating the recorder to avoid hard drive errors. DVD discs
containing important recordings should be backed up
to avoid accidental data loss.
Note
• Do not move the recorder during opera-
tion.
• Set up the recorder on a solid, flat sur-
face.
• Do not use the recorder in warm or hu-
mid locations, or locations prone to
sudden fluctuations in temperature as
moisture may condense on the inside of
the recorder and cause the hard disk
drive to malfunction.
• Never disconnect the mains plug or use
the fuse switch to interrupt the power
supply while the recorder is switched
on.
Note
• Do not move the recorder immediately af-
ter switching off. To move the recorder,
proceed as follows:
1. When the message OFF (unit display)
appears, wait at least two minutes.
2. Disconnect the mains plug.
3. Move the recorder.
• Data on the hard disk may be lost if the
power fails while the recorder is in operation.
• The hard disk is very sensitive. Operating
the hard disk improperly or in an unsuitable environment for several years may
cause serious damage. Playback stopping unexpectedly and a mosaic effe ct visible on the screen are clear signs that
the hard disk is damaged. Hard disk faults
are impossible to predict.
• A faulty disk will no longer play re-
cordings. In this case, the hard disk must
be replaced.
Yes
Yes
DRH-5700x 11
Page 12
Introduction
Via the internal hard disk drive
Using the USB socket
This appliance can play MP3/WMA, JPEG files and
MPEG4 files on a USB memory stick or a USB card
reader or copy these files onto the hard disk.
Note
• The unit supports USB card readers
with up to four slots.
• The model of your card reader deter-
mines which memory cards the unit can
play.
• Only compatible file types are dis-
played.
Important!
Never disconnect the USB memory stick or
the card reader while they are communicating with the player (during playback, when
copying, etc.) as this may cause the player
to malfunction.
Note
• Keep the USB memory stick and mem-
ory cards out of the reach of children. If
swallowed, seek immediate medical assistance.
• This unit only supports USB flash me-
mories with the file formats FAT16 or
FAT32.
• USB memory sticks that require the in-
stallation of additional software for connection to a computer are not supported.
• This unit is compatible with flash USB
memory sticks that support USB 1.1.
• Certain USB memory sticks or memory
cards are not supported by this unit.
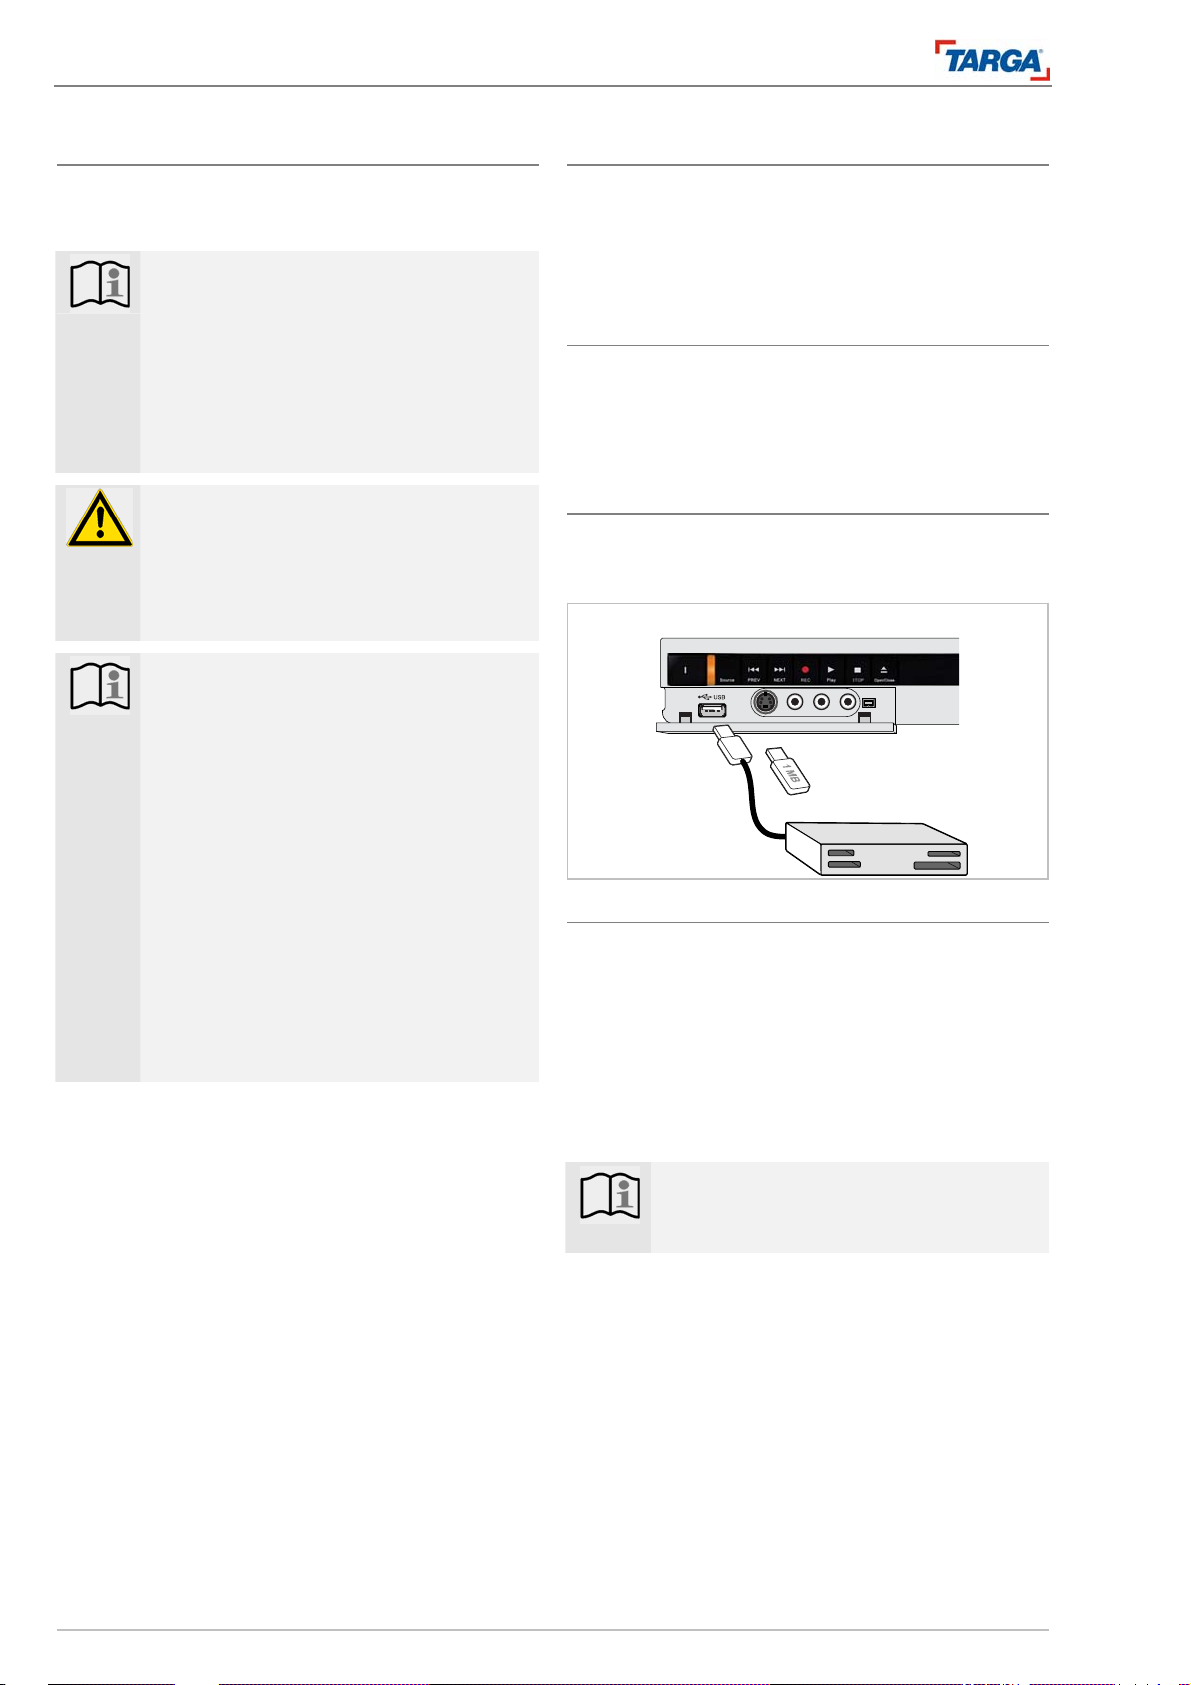
Inserting/Removing a USB memory stick
Inserting a USB memory stick
Slide the stick into the slot until it engages.
Removing a USB memory stick
Carefully pull out the USB memory stick.
Using the USB memory stick
1. Insert the USB memory stick.
2. Press the USB button on the remote control and
then press PLAY X. Refer to page 38 for more details on the individual options.
Using a USB card reader
Connect the card reader to the USB socket. The device supports up to four cards, which can be selected
by pressing the USB button repeatedly.
Operating the USB card reader
1. Insert the memory card into the card reader.
2. Press the USB button on the remote control and
then select the card. If necessary, press the USB
button repeatedly.
3. Press the PLAY button X to open the file manager
(contents directory) for the card.
4. Refer to page 38 for a more detaile d description
on how to operate the reader .
Note
You can copy files from the USB socket to
the jukebox on the hard disk, not onto DVD.
12 DRH-5700x
Page 13
Controls on the front of the unit
Introduction
Controls on the front of the unit
456789
21 3
13
14 15
No. Designation
1 On/off switch
Power switch, switches the recorder on and off.
2 Operating indicator
3 SOURCE
Selects the signal input:
AV1, SV1, AV2, SV2, SCART, DV, tuner
4 IWW PREV
Selects the previous chapter/title.
5 XXI NEXT
Selects the next chapter/title.
6
z REC
Record button for starting a recording immediately; lights up when recording.
7
X PLAY
Starts playback.
STOP
8
Stops playback/recording.
9 S OPEN/CLOSE
Opens and closes the disc loader.
10 Disc loader
Insert the disc here.
10
No. Designation
11 Display
Displays the status of recorder.
T/S: Timeshift mode indicator .
REC: A recording is in progress.
HDD: The recorder is in HDD mode.
DVD: The recorder is in DVD mode.
MEM CARD: The recorder is in USB mode.
DUBBING: Copying process in progress.
PR: The recorder is in TV receive mode.
: a timer recording is currently in progress or
has been programmed.
XX:00:00:00: time, total play time, play time elapsed, title number, chapter/track number,
channel, etc.
12 Remote control sensor
USB socket
13
For connecting a USB stick or card reader.
Front AV input (picture and sound)
14
For connecting auxiliary equipment (video) to
the S-VIDEO IN 2 and CVBS 2 sockets or audio
equipment to AUDIO IN L/R.
DV IN
15
For connecting digital camcorders for playback.
11
12
DRH-5700x 13
Page 14

Introduction
Remote control
Remote control
No. Designation
28 Open/Close
Opens and closes the disc loader.
29 Numerical buttons 0 to 9
Keypad entries.
30 CH MARK
Inserts a chapter marker/bookmark during
a recording.
31 1/ALL
Repeat function when playing an MP3
title or all MP3 titles.
32 A-B
Repeat section.
33 Subtitle
Changes the subtitle language.
34 ANGLE
Plays scenes from different angles (if available on DVD).
35 PLAY X
Starts playback (from hard drive or
disc) or opens the file manager/title list.
36 PAUSE II
Pauses playback temporarily; press W
, X to move to the previous or next
frame
37
WW REW XX FF
Fast forward / rewind, press the button
59
repeatedly to change the speed
38
IWW PREV XXI NEXT
58
Selects the next/previous chapter/title.
39 W S X T ENTER
Control buttons for navigating in menus, press ENTER to confirm.
40 SOURCE
Selects the input signal.
41 TITLE
Opens the DVD title menu.
42 DISPLAY
Displays the device status and playback information (title, chapter, play
time, etc.).
43 TIMER
Opens and closes the timer menu.
44 VIDEO+
Enter the VideoPlus code to record automatically from the TV.
45 JUKEBOX
Opens the jukebox on the HDD.
No. Designation
46 SETUP
Opens the system menu.
47 HDD
Changes to hard drive mode.
48 DVD
Changes to DVD mode.
49 MUTE
Muted sound.
50 USB
Changes to USB mode (MP3 stick,
card reader).
51,
- VOL +
53
Volume setting.
52,
- CH +
54
Select television channels.
55 RECORD
Starts a recording immediately.
56 MENU/PBC
Displays video data on the DVD, HDD.
57 RETURN
Hide menu, return to the previous menu.
60 STOP
Stops playback, recording.
61 Audio
Changes the subtitle language or the
audio channel.
62 TV SYS
Changes the picture output signal to
PAL/NTSC.
63
ZOOM*
Enlarges the picture.
64 CM SKIP
Skips to the next chapter marker or
jumps forward 30 seconds from the
current position.
65 POWER
Switches on the unit or switches to
standby mode.
31
33
35
37
41
43
45
47
28
29
30
32
34
36
38
39
40
42
44
46
48
65
64
62
61
58
57
55
53
51
49
63
60
59
56
54
52
50
14 DRH-5700x
Page 15
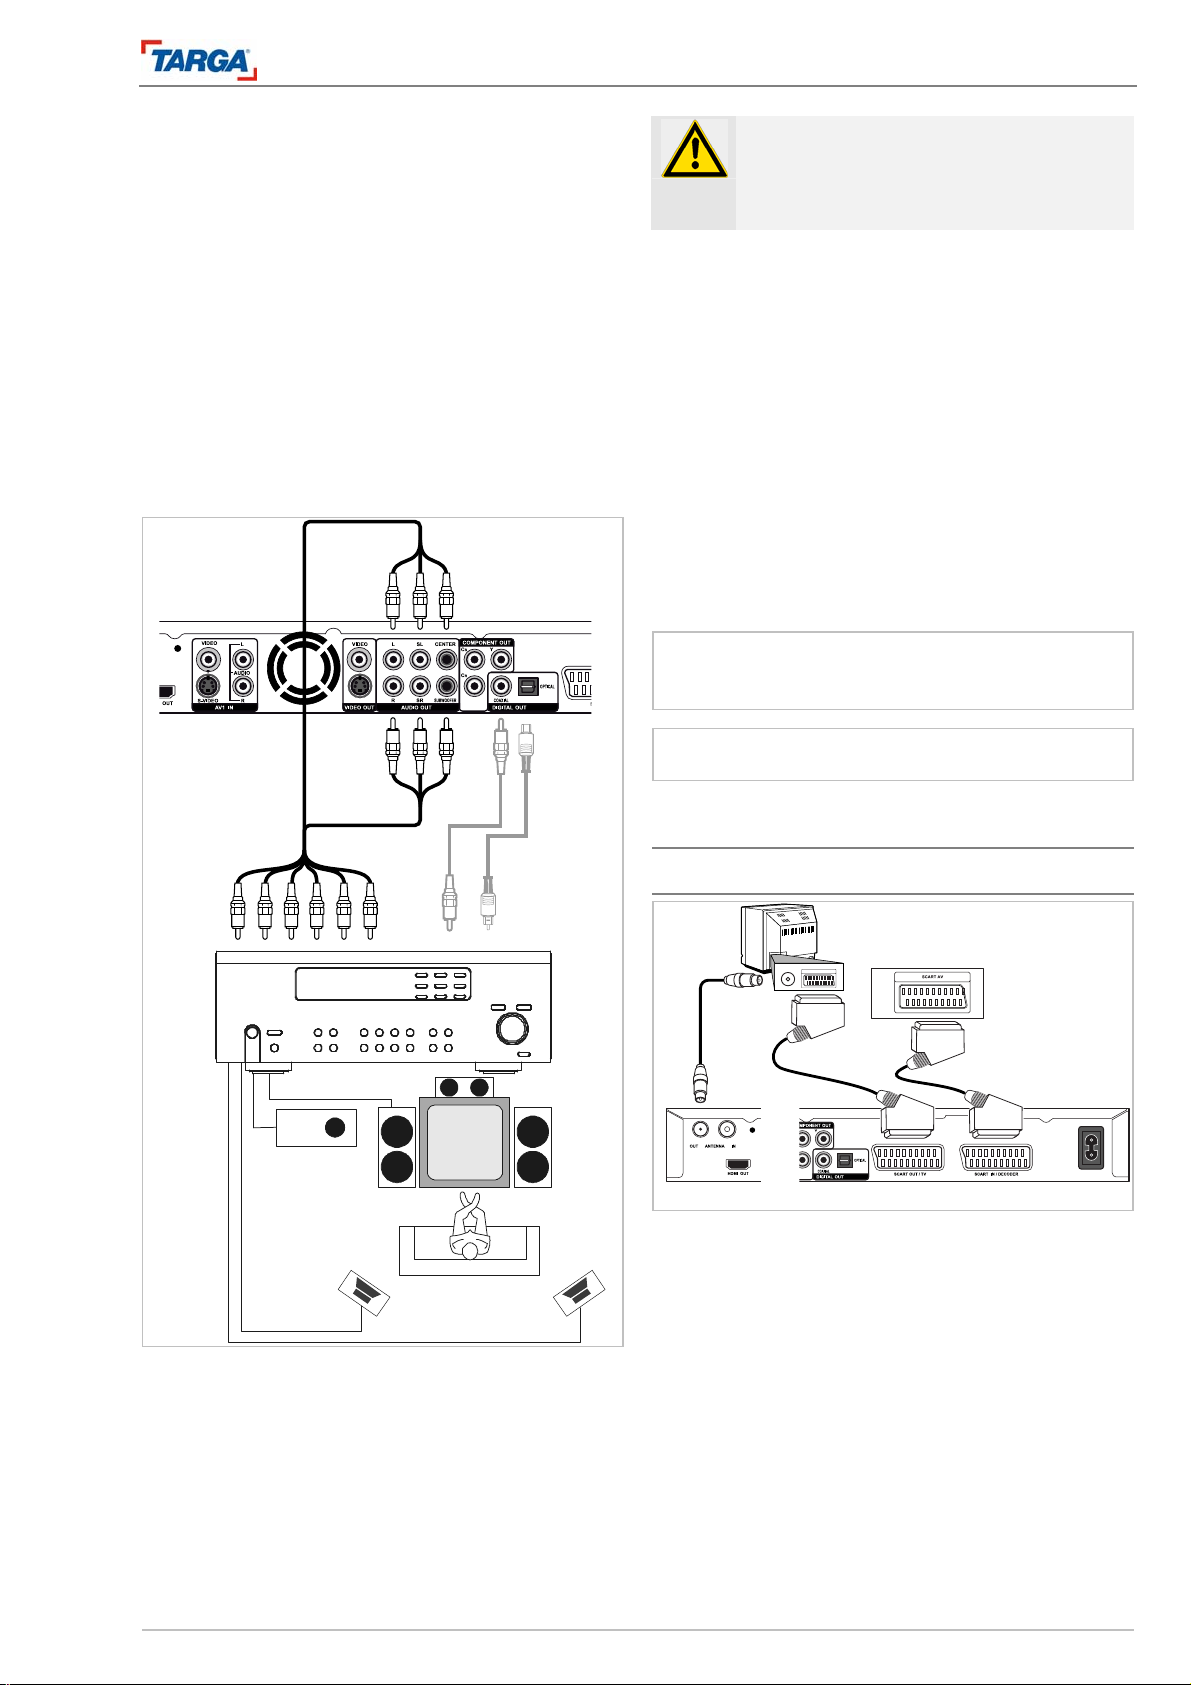
Connections and settings
A
Connections on the back of the unit
Remove the battery compartment cover on the back
Using the remote control
Direct the remote control at the remote control sensor.
of the remote control and insert two LR03 batteries
(size AAA) with the correct polarity.
See the diagram inside the battery compartment.
Inserting batteries in the remote control
Important!
Do not use old and new batteries or different
types of battery (standard, alkaline, etc.) together.
1
2
3
Connections and settings
Connections on the back of the unit
16 17 18 19 20 21 22 23 24
No. Designation
ANTENNA IN
16
For connecting a television antenna or cable television.
AV1 IN (picture and sound)
17
S-Video 1, CVBS 1
AUDIO signal input.
Fan
18
The fan provides sufficient ventilation inside the
housing. Never cover the ventilation openings.
VIDEO OUT (picture)
19
VIDEO or S-VIDEO signal output (analogue) for
connecting to an S-video cable or video cable
(cinch).
AUDIO OUT (sound)
20
5.1 channel surround sound: signal output pa rallel
to the A/V amplifier or active speaker system, six
coaxial cinch cables (L, R, SL, SR, CENTER,
SUBWOOFER).
COMPONENT OUT (picture)
21
Analogue component signal output, YPbPr, for
connecting televisions, displays via component
video cable.
252627
No. Designation
SCART OUT / TV (picture and sound)
22
Analogue picture and sound output for connecting a television.
SCART IN / DECODER (picture and sound)
23
nalogue picture and sound input for connecting
decoders, satellite receivers, video recorders,
etc.
AC IN (AC 230 V, 50 Hz)
24
Socket for power supply cable.
DIGITAL OUT (sound)
25
Digital optical sound output (fibre optic cable),
digital coaxial sound output (cinch cable).
HDMI OUT (picture and sound)
26
Digital picture and sound output for connecting
televisions, displays with an HDMI cable.
ANTENNA OUT
27
For connecting to the antenna input on the television. The antenna signal at socket 16 is redirected to the television via this socket.
DRH-5700x 15
Page 16

Connections and settings
Connecting the antenna
Connecting the antenna
HF coaxial socket
1. Disconnect the antenna from the television and
insert in the antenna socket (16).
2. Connect the ANTENNA OUT socket (27) on the
recorder to the antenna input socket on the television using the 75-ohm coaxial cable (R).
The ANTENNA OUT socket redirects the signal
from the ANTENNA IN socket.
Important!
The recorder must be connected directly to
the TV set. Set the television to the correct
video channel.
• Do not connect the AUDIO OUTPUT
socket on the recorder to the phono input on the audio system.
• Do not connect the recorder via a video
recorder because a copy protection system may distort the DVD picture.
Back of the television
V
Connecting to a television
• Make one of the following connections, depending on
the functions available on your unit.
• T o use the COMPONENT OUTPUT so cket, set the
video output format to YUV in the Video Setup menu
[Video Output] (page 27).
• T o use the SCART socket, set the video output for-
mat to video or RGB in the Video Setup menu
[SCART Input] (page 27).
Tips
• There are many different ways you can connect
up the recorder , regardless of the model of your
television or device. Only use one of the following
connections.
• Before connecting up any equipment, read the
manuals for the television, video recorder, stereo
system or other device.
SCART socket
Connect the SCART OUT/TV socket on the recorder
to the corresponding input sockets on the television
using the scart cable (T).
An audio connection is already incorporated in the
scart cable and so an additional connection is not required.
Audio sockets (left/right)
Connect the L and R audio sockets on the recorder to
the left and right audio input sockets on the television
using the audio cable (A).
(for video, S-video and component sockets).
16 DRH-5700x
Page 17
S-video socket
Connect the S-VIDEO OUTPUT socket on the recorder to the S-video input socket on the television using the S-video cable (S).
Video socket
Connect the VIDEO OUTPUT socket on the recorder
to the video input socket on the television using the
video cable (V).
Component video socket
Connect the COMPONENT OUTPUT sockets on the
recorder to the corresponding input sockets on the television using a component cable (C).
If you have a HDTV or HD Ready television, you c an
use the Progressive Scan output on the recorder to obtain the best possible picture resolution. If the television
does not support Progressive Scan, the TV picture appears distorted when the Progressive Scan output is
used.
• Set the [Scan Mode] to P-SCAN in the video se-
tup menu to configure the resolution for the progressive signal to 576p (page 27).
Note
Progressive Scan cannot be used in combination with the VIDEO and S-VIDEO sockets
Important!
The VIDEO, S-VIDEO OUTPUT and COMPONENT OUTPUT sockets cannot be used
at a resolution of 720p or 1080i.
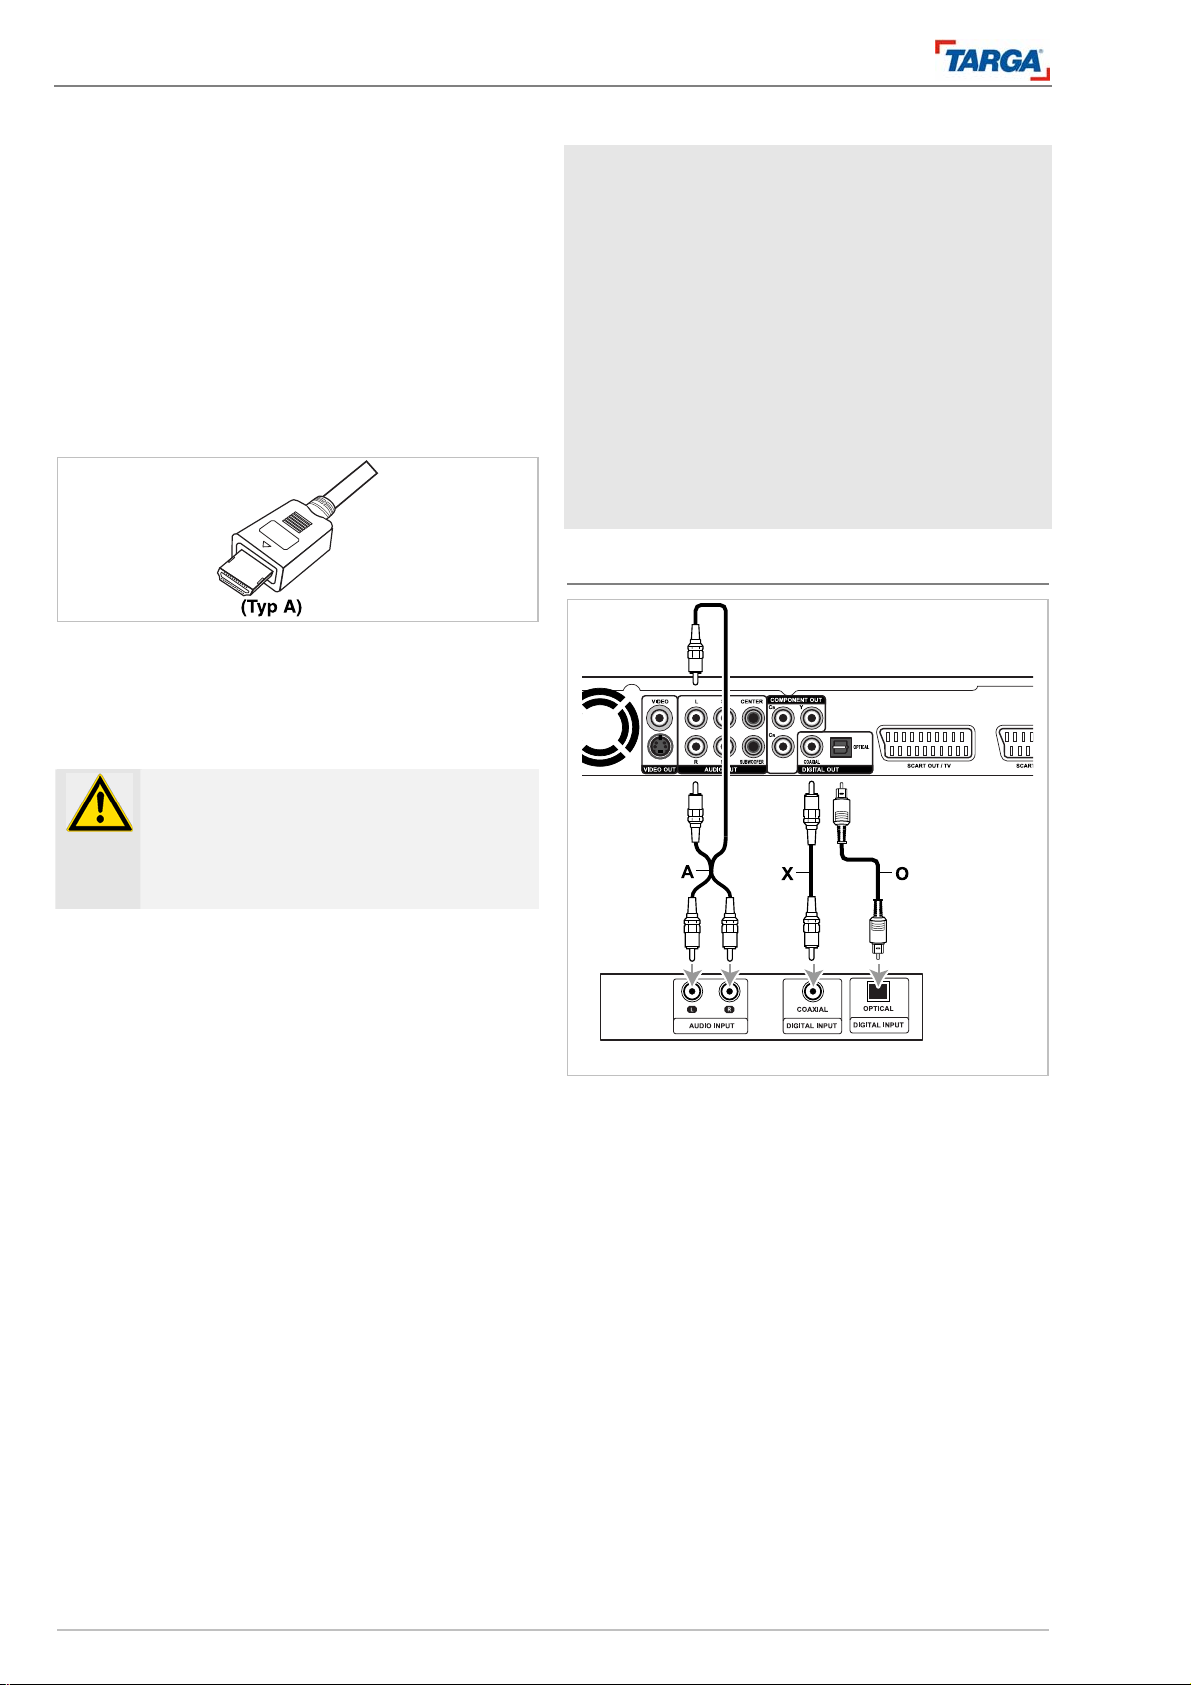
Cables included in the delivery
A) Stereo cin ch cable
T) Scart cable
H) HDMI cable
V) Video cable
R) Antenna cable
Cables not included in the delivery
C) Component cable
S) S-video cable
O) Optical digital audio cable
D) DVin cable
X) Coaxial digital audio cable (you can also use the
video cable (V) instead of this cable).
Connections and settings
HDMI socket
HDMI socket
A HDMI television or monitor can be connected to the
recorder via an HDMI cable.
1. Connect the HDMI OUTPUT socket on the recorder to the HDMI input socket on an HDMIcompatible display (H).
Note: Please refer to the operating instructions
supplied with your display for more information.
The DVD player start menu appears on the screen.
2. Set the display input to HDMI (see display operating instructions).
Note: If your display has a DVI socket instead of
an HDMI socket, connect both devices using an
HDMI DVI adapter cable (not included in the delivery). Remember that this type of connection requires a separate audio connection via the stereo
sound outputs on the DVD HDD recorder.
Notes
• If your display cannot process the 96 k sampling
frequency, set the [LPCM Out] option in the audio
menu to [48k] (see page 28). Once this setting is
configured, the unit should be able to automatically convert all 96k decoding signals into 48k
signals.
DRH-5700x 17
Page 18
Connections and settings
Connecting to an amplifier
• If your display is not equipped with a Dolby Digital
or MPEG decoder, set the [Digital Output] option
in the audio setup menu to [PCM] (see page 28).
• If your display is not equipped with a DTS de-
coder, set the [Digital Output] option in the audio
setup menu to [OFF] (see page 28). To produce
DTS multi-channel surround sound, connect the
recorder to a DTS compatible receiver via one of
the digital audio outputs.
• Insert the connector with the arrow facing up-
wards.
• If the picture distorts or stripes appear, check the
HDMI cable.
Tip
For HDMI connections, the resolution for HDMI output
in video setup mode can be preset to Interlace, PSCAN, 720p or 1080i.
Important!
Malfunctions may occur if the resolution is
changed while the recorder is connected to
a HDMI socket. In this case, switch the recorder off and back on again.
Additional information on HDMI
• When connecting an HDMI or DVI-compatible de-
vice, note the following points:
• Switch off the HDMI/DVI device and the recorder.
Then switch on the HDMI/DVI device fir st of all, wait
30 seconds and switch on the recorder .
• The video input on the connected device must be
configured for this device.
• The connected device must be able to support input
resolutions 720 (1440)x576i, 720x576p, 1280x720p
or 1920x1080i.
• Not all HDCP-compatible DVI devices can operate
with this recorder .
• Non-HDCP devices do not display the picture cor-
rectly .
Connecting to an amplifier
Via HDMI
HDMI (High Definition Multimedia Interface) transfers
video and audio data for DVD players, digital receivers and other AV devices via a single digital connection. HDMI was developed for HDCP technology (High
Definition Content Protection). HDCP provides protection during the transfer and receipt of digital content.
HDMI supports the following norms: Standard, Extended, High Definition Video Plus and Multi-Channel
Surround Sound. Characteristics of HDMI include uncompressed digital video, a maximum bandwidth of 5
gigabytes per second, a single connection (instead of
several cables and sockets) and communication between AV source and AV devices such as digital televisions.
HDMI, the HDMI logo and High-Definition Multimedia
Interface are registered trademarks of HDMI licensing
LLC.
Connecting an amplifier with dual channel analogue stereo or Dolby Pro Logic ll/Pro Logic
Connect the AUDIO OUT L, R sockets on the recorder
to the L, R audio input sockets on the amplifier, receiver or stereo system via the audio cable (A).
Connecting an amplifier with dual channel digital
stereo (PCM) or an audio/video receiver with multi-channel decoder (Dolby Digital™, MPEG 2 or
DTS)
1. Connect the DIGITAL OUT sockets on the recorder
(OPTICAL O or COAXIAL X) to the corresponding input socket on the amplifier using an optional digital audio cable (OPTICAL O or COAXIAL X).
2. The digital output on the recorder must be activated
(see "Sound" on page 28).
18 DRH-5700x
Page 19
Connections and settings
Other audio/video connections
Digital multi-channel sound
A digital multi-channel connection generates the best
sound quality. You will require a multi-channel audio/video receiver that supports one or more of the recorder audio formats (MPEG 2, Dolby Digital™ and
DTS). Read the manual and note the logos on the
front of the receiver.
Connecting a 5.1 channel audio/video receiver (analogue)
1. Connect the AUDIO OUTPUT sockets on the recorder (L, R, SL, SR, CENTER, SUBWOOFER) to
the corresponding input sockets on the amplifier
using the cinch audio cable (not included in the
delivery). An active speaker system (PC speakers)
can be connected to these sockets.
Important!
The digital DTS output is activated when a DTS
audio stream is selected due to the DTS licence
agreement.
Notes
• If the receiver does not support the audio format
of the digital output, the receiver emits a loud, distorted noise or no sound at all.
• Six-channel digital surround sound is only possi-
ble via a digital connection and if the receiver is
fitted with a digital multi-channel decoder.
• Press AUDIO to display the audio format of the
current DVD on the screen.
• This recorder does not decode (2 channel) DTS
audio languages internally. To produce DTS multichannel surround sound, connect the recorder to
a DTS compatible receiver via one of the digital
audio outputs.
Produced with permission from Dolby Laboratories.
"Dolby", "Pro Logic" and the double D symbol are
trademarks of Dolby Laboratories.
"DTS" and "DTS Digital Out" are trademarks of Digi-
tal Theater Systems, Inc.
Other audio/video connections
Connecting a PAY TV/Canal Plus decoder
1
2
1 TV
2 Canal Plus decoder
3 Recorder
Connect a PAY TV/Canal Plus decoder to the SCART
IN/DECODER socket as illustrated.
3
DRH-5700x 19
Page 20

Connections and settings
Connecting to AV IN 2 sockets
PAY TV/Canal Plus channels can only be viewed or
recorded if a decoder (not included) is connected to
the recorder. Disconnect the recorder from the power
supply before connecting the decoder.
Set the option [Decoder On/Off] in the [Program List] tuner menu to [On] (see page 22) to display or record PAY
TV/Canal Plus channels.
Important!
The connected decoder cannot receive signals unless the recorder is connected to the
mains power supply.
The connection type may vary depending on
Connecting a satellite receiver or video recorder
the PAY TV provider.
Notes
• Motion pictures with copy-protected signals can-
not be recorded.
• If these signals are directed via a video recorder,
the picture on the screen may not be displayed
correctly. Connect the video recorder , recorder
and television in the sequence indicated. Video
films must be played via a second line input on
the television.
• The connected video recorder or receiver cannot
transmit signals if the recorder is disconnected
from the mains power supply.
Connecting to AV IN 2 sockets
Connect a satellite receiver, video recorder or similar
device to the SCART IN/DECODER socket . Press the
SOURCE button to select SCART (see page 46) and
play or record a source signal at the SCART
IN/DECODER socket.
Tip
The recorder does not need to be switched on to play
the signals from the tuner connected to the television.
Connect the input sockets (AV IN 2) on the recorder to the
audio/video output sockets or the S-VIDEO output socket
on the auxiliary device using an A/V cable or S-VIDEO
cable.
20 DRH-5700x
Page 21

Connections and settings
Connecting a digital camcorder
Connecting a digital camcorder
A digital DV camcorder can be connected to the DV IN
socket on the control panel in order to copy digital DV
tape or DVD discs.
Press the SOURCE button to select the DV source
(see page 46).
Use a DV cable (not included in the delivery) to connect the DV input/output socket on the DV camcorder
to the DV IN socket on the recorder.
Important!
• This socket is designed exclusively for
connecting a digital DV camcorder and
is not compatible with digital satellite receivers or digital VHS recorders.
• Disconnecting the DV cable while re-
cording from a connected digital camcorder can cause malfunctions.
1. Press ENTER.
2. Press the S/T buttons to select a language and
then press ENTER.
3. Select a country and then press ENTER. Press
RETURN to return to the previous screen.
4. Please check the antenna socket.
5. Press ENTER to start the st ation search.
6. A list of stations appears at the end of the search.
You can move the stations to the channel positions of your choice, activate/deactivate or rename
them (page 22). Then press ENTER.
7. Press the numerical buttons or S/T/W/X to set
the date and time and then press ENTER.
The unit is now ready to use. You can now change the
unit settings in the setup menu to match your own
personal preferences.
Automatic setting
When switching on the unit for the first time or after a
factory reset, the start-up assistant will help you to set
the language, country, time and television channels.
Note
The automatic time and date setting only
works if the station search function has
found at least one station.
DRH-5700x 21
Page 22

Setup menu
Using the setup menu
Setup menu
Using the setup menu
The following basic settings are defined in the setup
menu: language, password, output configuration and
unit settings. These basic settings can be altered in
the setup menu and are stored even if the unit is disconnected from the power.
1. Press SETUP to open the setup menu. The selected root menu is highlighted yellow.
Tuner menu
Automatic search
This recorder is equipped with a frequency tuner that
can receive up to 255 TV channels.
Preparation
• Connect the recorder to the required antenna ty-
pe as described in the chapter "Connecting the
antenna" on page 16.
The screen menus contain the following information
areas:
No. Designation
Root menu
1
Submenu
2
Settings
3
Bottom bar with variable buttons for navigating or
4
changing unit settings.
2. Press S/T to select a root menu item. Submenus
and any available settings are then displayed.
3. Press ENTER or X to open the submenu. The
mark indicates the selected submenu.
4. Press the S/T buttons to select an item in the
submenu. The settings then appear. Active settings are marked with a tick. Many submenu items
do not have settings but functions such as [Change Password]. Press ENTER to activate the function.
5. Press the S/T buttons to select and ENTER to
activate settings. Further steps are required for
some options.
6. The remote control buttons available for operation
appear in the bar at the bottom of the screen.
7. Press RETURN or W to navigate back to the menu.
8. Press SETUP to exit the root menu.
1. Select the submenu [Auto Scan] and press ENTER.
2. The channel search starts. The tuner automatically displays all channels available in the area
one after the other and stores them in the memory.
Note
During the channel search, the progress bar
indicates the progress of the search and the
number of located channels.
Program list
Channels can be edited manually (move, activate, rename, set manually).
1. Select the submenu [Program List] and press ENTER.
2. The channel list appears.
3. Press S/T to select a channel.
4. Press W to select the editing option and then
press ENTER.
22 DRH-5700x
Page 23

Setup menu
Disc menu
• [Mov e Up], [M ove Down] ar e used to mov e cha nnels to a different memory location.
• [Inactive] is switched to [Off]. When browsing
through channels using the buttons SCHT, the
system skips channels that are set to inactive.
Only active channels appear.
• [Decoder] sets channels for the decoder. This setting is required for displaying or recording PAY
TV/Canal Plus programs.
• [Rename] opens the keypad menu for entering
characters (see page 49). Names can only be a
maximum of 5 characters long.
• [Manual Setting] opens the window for setting
stations manually. See the description below.
5. Press RETURN several times to exit the Program
List menu.
Editing programs
Set up television stations manually as follows.
1. Select the program, select the option [Manual Setting] in the program list and then press ENTER to
confirm.
Country settings
Press S/T to select a country and press ENTER to
confirm. An automatic search then starts (page 22 ).
Channel mapping
Assign VideoPlus numbers to TV programs (see 45).
Automatic installation
Press ENTER to confirm. Automatic installation then
starts (page 21).
Disc menu
2. Press W/X to select an option and S/T to modify
the setting.
• [PR] indicates the channel position.
• [Search/MHz] Reception frequency. This setting
should not be changed.
• [CH] Channel number provided by the station.
This setting should not be changed.
• [MFT] Fine channel tuning for a perfect picture.
Press S/T.
• [Standard] Selects the PAL, SECAM or NTSC
television system.
3. Press ENTER to adopt the settings and return to
the Program List menu.
Disc formatting (initialisation)
The recorder automatically formats blank discs inserted in the loader. The message FORMAT appears
on the DISPLAY.
• DVD-R: The recorder formats the disc in video
recording mode.
• DVD-RW/DVD+RW/DVD+R(DL): These discs are
formatted automatically, the message FORMAT
appears on the display.
• DVD-RAM, CD-R, CD-RW discs cannot be for-
matted.
DVD-RW/DVD+RW discs can be formatted several
times in the setup menu. The disc menu is disabled if
non-recordable discs are inserted.
1. Select [Format] and press ENTER.
2. Select the mode [DVD+VR] and press ENTER. A
confirmation message appears.
Important!
All data is deleted when the disc is formatted.
3. Press W/X to select [OK] and then press ENTER.
Disc formatting may take a few minutes. The system returns to the Setup menu when formatting is
complete.
DRH-5700x 23
Page 24

Setup menu
Disc menu
Finalising
When the disc is finalised, the recordings are "fixed"
so that the disc can be played on normal DVD players
or computers with a DVD-ROM drive.
When a disc is finalised, a screen menu is generated
so that you can play the disc. Press the MENU/PBC
or TITLE buttons to access the menu.
Important!
• You can no longer edit or record more
data onto DVD-R or DVD+R discs that
have already been finalised.
• To continue editing or recording on a
DVD-RW disc that has already been finalised, select the option [Unfinalize].
• You can also edit or record onto
DVD+RW discs that have been final-
1. Select [Finalize] and press ENTER.
2. A confirmation message appears.
3. Press W/X to select [OK] and then press ENTER.
The recorder starts finalising the disc. The system
returns to the Setup menu when finalising is complete.
ised.
Note
• The duration of the finalisation process
depends on the disc type, how much
data was recorded onto the disc and the
number of titles.
• Finalising a DVD+R DL disc may take
up to 30 minutes.
Note
• To unfinalise a DVD-RW disc, insert in
the recorder and select "Unfinalize"
from the disc menu. You can now edit
and record on the disc again.
• You cannot unfinalise DVD-R and
DVD+R discs.
• Finalising is not possible when the op-
tion [Protect] is set to [On]. Set the option [Protect] to [Off] in order to enable
finalising.
Disc protection
When recording from DVD-RW discs in DVD+RW/+R
or VR mode, set the option [Protect] to [On] to prevent
the inserted disc from being recorded over, modified
or deleted accidentally. Select [Off] to remove protection.
Disc label
Enter a name for the disc here. This name appears
when the disc is inserted and when disc information is
displayed on the screen.
• A maximum of 13 cha racte rs of the disc name are
shown.
• The recorder only displays a limited number of
characters from discs formatted on other recorders.
1. Select [Disc Label] and press ENTER.
2. The keypad menu for entering characters opens
(see page 49).
Disc info
Disc info displays disc information on the screen.
• Label (disc name)
• Title number (number of titles)
• Media (disc type e.g. DVD-RW)
• Status (e.g. recordable, blank, full)
• Space (occupied/ available me mory)
• Remainder (capacity available on the disc for the
quality setting selected, e.g. SP: 120 minutes)
and progress bar
24 DRH-5700x
Page 25

Setup menu
Playback menu
Playback menu
Menu/Audio/Subtitle language
• Select the desired language for the OSD menu,
audio playback and subtitles.
• Select the language from the list or select [Oth-
ers] and press ENTER. To select another language, use the numerical buttons to enter the relevant four-digit code for the language of your
choice, see reference chapter (page 54).
• Select the setting [Off] to deactivate subtitles.
Note
Not all languages are available for every
disc.
TV screen ratio
[TV Screen]: Selects the picture format for the connected television (4:3 or 16:9) (function does not work
if HDMI output is used to connect TV).
• [4:3 PS] Select this setting when connecting a te-
levision with the picture format 4:3. With wide
screen programs, the left and right edges of the
picture are cut off and scaled to fill the whole
screen.
• [4:3 LB] Select this setting when connecting a te-
levision with the picture format 4:3. Black bars
appear at the top and bottom of the screen when
wide screen programs are broadcast.
• [16:9] Select this setting when connecting the re-
corder to a wide screen television or a television
with wide screen function.
Last memory
If this menu item is active, the last selected function
starts when the recorder is switched on.
Parental lock
Parental control
Some DVDs have a parental control code. These
DVDs will only play if the preset classification matches
the code.
Note
Notes on film approval for children and teenagers can be found on the DVD case.
The parental control function can only be used
on DVDs that support this feature. The majority
of DVDs available on the US market support
If you wish to set a different classification, you have to
enter the password. The default password is: 0 0 0 0.
1. Select the option [Parental Control] and press
2. Press S/T to select a classification.
3. Press ENTER to confirm the classification.
4. Enter the password using the numerical keys and
The password window remains open if you enter the
password incorrectly. Press W to move the cursor
back to the first digit and try again.
this feature.
ENTER.
[1 KID SAFE] Children under 6 years
[2 G] Children under 6 years in the
presence of adults
[3 PG] Children under 12 years
[4 PG 13] Children over 12 years
[5 PGR] Children over 16 years
[6 R] Children over 16 years in the
presence of adults
[7 NC17] Children over 18 years
[8 ADUL T] Adults
[Off] No parental guidance setting
press ENTER to confirm. The selected classification is activated.
Note
Once the recorder authorisation level is defined, all scenes from the same authorisation
level or lower are played. Scenes that are
assigned to a higher category are not shown
if alternative scenes are not available. The
same authorisation level must be assigned
to alternative scenes otherwise playback
stops and the message "Parental guidance"
is displayed. In this case, enter the four-digit
password and change the authorisation level
to continue playback.
DRH-5700x 25
Page 26

Setup menu
Recording menu
Setting the password
Note
The preset default password is
0 0 0 0.
1. Select [Change Password] and press ENTER, the
2. Enter the old four-digit password. The message
3. Enter the new password and enter again to con-
4. Press ENTER. The message "Password has been
5. Press W to move the cursor back to the first digit
Write down your new password.
password window opens.
"The old password is incorrect" appears if the
password you entered is incorrect. Press [OK] to
confirm and re-enter the password. Repeat the input procedure. When you enter the correct password, the cursor automatically appears in the new
password box.
firm.
changed." appears as confirmation. If you enter an
incorrect password, the message "The passwo rds
you typed do not match!" appears. Press [OK] to
confirm and re-enter the new passwords.
and try again.
3. The registration code allows you to rent or purchase films via the DivX® VOD service at
www.divx.com/vod. To play films on this recorder,
follow the instructions for transferring the films onto disc.
Note
Any films purchased from DivX® VOD can
only be played on this unit.
Recording menu
Recording quality
Forgotten four-digit pa ssword
If you forget your password or reset the system, you
can reset the current password as follows.
1. Select [Change Password] and press ENTER, the
password window opens.
2. Enter the super password 1 3 6 9 under [Old
Password].
3. Enter the new password twice.
4. Press ENTER to confirm. The password has been
changed.
DivX registration code
The DivX® VOD (Video On Demand) registration code for renting and purchasing films is available from
the DivX® VOD service. Visit www.divx.com/vod for
more information.
1. Select [DivX Reg. Code] and press X.
2. The code is displayed. Press ENTER to return.
Several picture quality settings are available for recordings: HQ (high quality), SP (standard quality) and
SEP (low quality), see also page 58:
• HQ – Best quality, recording time approx. 1 hour
for one DVD disc (4.7 GB).
• SP – Standard quality, sufficient for most applica-
tions, recording time approx. 2 hours for one DVD
(4.7 GB).
• LP – Slightly reduced picture quality, the re-
cording time for one DVD (4,7 GB) increases to
approx. 3 hours however.
• EP – Significantly reduced picture quality , recording
time for one DVD disc (4.7 GB) approx. 4 hours.
• SLP – Extremely low picture quality, recording
time for one DVD disc (4.7 GB) approx. 6 hours.
• SEP – Lowest picture quality, recording time for
one DVD disc (4.7 GB) approx. 8 hours.
Note
When recordings made in SLP and SEP
mode are played, picture fragments or subtitles may appear distorted.
26 DRH-5700x
Page 27

Setup menu
Video menu
Chapter marks
Chapter marks are inserted at defined intervals during
the recording. The intervals can be changed to 10 minutes, 15 minutes or 20 minutes. Select [Off] to disable automatic chapter creation.
Video menu
TV type
Select the television standard applicable in your country.
• PAL – Western Europe
• NTSC – America
• Auto – the unit attempts to set the standard au-
tomatically .
Scan mode
HDMI
Activate and deactivate picture transfer via the HDMI
output.
1. Press the W/X buttons to select OK in the mes-
sage window and then press ENTER. All changes
are discarded if you do not confirm within approx.
15 seconds.
Note
The screen may turn green if you connect
the unit via a scart cable and then activate
the HDMI output. If you wish to continue using the recorder via a scart cable, please do
not confirm the query in the message window.
HDMI resolution
Select a television resolution to transfer pictures via
the HDMI output. This setting is only available if the
HDMI output is activated.
• Interlace – for pictures in interlace mode.
• P-SCAN – for pictures in progressive mode.
• 720p – for televisions that can display images
with 720 rows in progressive mode (full frame).
• 1080i - for televisions that can display images
with 1080 rows in interlace mode.
Note
Read the instructions in the operating manual supplied with your television.
Select the standard applicable for your television set.
• Interlace – for televisions with tubes or flat
screens that display images using the interlace
technique.
• P-SCAN – for televisions (LCD, plasma) that can
display images in progressive mode, i.e. full frame pictures.
Note
This setting is obsolete if your television is
connected via a SCART cable.
Component: Video output
Select the video output format. (Not available if HDMI
output is activated.).
• [Off] – Only one CVBS signal is transmitted via
scart cable and one S-video signal is transmitted
via S-video output.
• [YUV] – High-quality output signal via the compo-
nent output.
• [RGB] – High-quality output signal via the scart
output.
SCART input
Select the video output format that you wish to receive
at the scart in/decoder socket (23) or transmit from the
scart out socket.
• [Video] – CVBS (Composite) signal.
• [RGB] – High-quality output signal in RGB format.
Check whether your television is able to display
RGB via a SCART connection before making any
changes.
DRH-5700x 27
Page 28

Setup menu
Audio menu
Audio menu
In the audio menu, you can adapt the recorder to a
specific sound environment. There are two available
settings:
• 2-channel arrangement (stereo),
• 5.1-channel arrangement (Dolby Prologic or Dol-
by Digital).
The submenus and settings that appear in the audio
menu depend on the arrangement.
No. Designation
2channel
5.1CH Downmix, Front/Center/Rear Speaker, Sub-
Downmix
Select the setting for playing multi-channel sound via
a 2-channel arrangement.
• [Lt/Rt] – Surround sound on (pseudo sound).
• [Stereo] – Stereo sound
• [V-SURR] – 2-ch annel sound with amplified sur-
Digital output
• [RAW]: Select this setting if the DIGITAL AUDIO
• [PCM] (for Dolby Digital/MPEG): Select this set-
• [Automatic]: Signal digital output configured au-
• [Off] (for DTS): If "Off" is selected, the DTS signal
Downmix, Digital Output, LPCM, Dynamic
woofer, Digital Output, Test Tone, Dialog
Gain, Panorama, Speech Balance, Spatial,
Dual Mono, PRO Logic II, PRO Logic II
Mode, Dynamic
round effects
OUT socket on the recorder is connected to an
amplifier or other device with Dolby Digital, DTS
or MPEG decoder.
ting if a dual channel stereo amplifier is connected to the recorder. Dol by Digital or MPEG
encoded DVDs are converted automatically to the
dual channel PCM sound format.
tomatically in line with the audio data on the disc.
is not transmitted via the DIGITAL AUDIO OUT
socket.
LPCM (sampling frequency)
• [48 k]: Select this setting if your receiver or ampli-
fier IS NOT designed for 96 k signals. The unit
converts high-frequency signals into 48k sig nals
that the system is able to decode.
• [96k]: Select this setting if your receiver or ampli-
fier IS designed for 96 k signals. The device
transfers the individual signal types without subsequent processing.
Dynamic
Activate the dynamic output setting to optimise the
dynamics (ratio between quiet and loud scenes).
This setting allows you to watch a motion picture at a
low volume without losing the sound quality. Set the
DRC to [Full] or [Center].
Select [Off] to hear the original sound.
Special 5.1CH audio settings
Note
Select the options Downmix, Digital Output,
Sampling Frequency and Dynamic as described under 2-channel sound.
• [Front Speaker], [Center Speaker], [Rear S peaker]:
Select the speaker type that you wish to connect:
large/small speakers or central/rear surround
speakers.
• [Subwoofer]: Select "On" if you wish to use a
subwoofer.
• [Test Tone ]: Broadcasts a test tone from each
speaker in succession to test the wiring and connections.
• [Dialog Gain]: You can adjust the sound emitted
from the central speaker in "Downmix" mode.
• [Panorama]: Activate the panorama function for
PRO logic II sound.
• [Speech balance]: Adjusts the balance of sound
from the front speakers (centre, front left, right).
• [Spatial]: Adjusts the balance of sound between
the front and rear.
• [Dual Mono]: Selects the playback mode for AC-3
mono bit stream (L-Mono, R-Mono, St ereo, MixMono)
• [PRO Logic II]: Activate this function if you wish to
hear stereo signals in surround mode.
• [PRO Logic II Mode]: In PRO Logic II mode, you
can define whether the sound is from a film, music or PRO Logic.
28 DRH-5700x
Page 29

Setup menu
System menu
System menu
OSD language
Menu language
Select a language for the Setup menu and the screen
menus.
Setting the time automatically
The current date and time are set automatically once
the automatic channel search is complete.
1. Select the option [Auto Clock Setting] and press
ENTER.
2. The time is set automatically and the new system
time is displayed.
Note
The TV channel may not transmit a date or
the date and/or time transmitted may be incorrect. The recorder will then display the incorrect time.
Setting the time manually
1. Select the option [Clock Setting] and press EN-
2. Enter the date and time.
3. Press ENTER to confirm.
In this case, the time must be set manually.
TER.
W/X: move the cursor to the previous or next column.
S/T: change the setting at the current cursor position.
Screen saver
Activate or deactivate the screen saver.
Format HDD
This function formats the hard disk drive (HDD). All
data, such as saved TV recordings, DVDs copied to
the HDD and data copied to the jukebox (video, photos, audio data) is deleted.
WARNING!
Data cannot be recovered once deleted!
Make a backup DVD of all data copied onto
the hard disk before formatting.
1. Select the submenu [Format HDD] and then press
ENTER to confirm.
2. A warning message appears: press [OK] to confirm or select [Cancel] to exit the menu without
formatting the disk drive and then press ENTER.
3. If you pressed [OK] to confirm, the bar indicates
the progress of the formatting process.
Default settings
The recorder can be reset to original delivery status
(reset). All personal settings are reset to the default
values.
WARNING!
Connect your television to the recorder using
1. Select the submenu [Load Default] and then press
2. A warning message appears: press [OK] to con-
3. If you pressed [OK] to confirm, the bar indicates
4. The automatic installation assistant for initial setup
a scart cable before resetting!
Note
Resetting the recorder will delete the channel list and any settings you stored for recording purposes.
ENTER to confirm.
firm or select [Cancel] to exit the menu without resetting the unit and then press ENTER.
the progress of the resetting process.
appears once resetting is complete, see page 21.
DRH-5700x 29
Page 30

Playback
General description of the screen menu
General description of the screen menu
This manual contains basic instructions for operating
the recorder. Some DVDs must be used in a specific
way and the playback options for some DVDs may be
limited.
In this case, the symbol
screen. This symbol indicates that the recorder/disc
does not support a function.
Information displayed on the screen
Various pieces of information relating to the inserted
disc can be displayed on the screen.
1. Click on DISPLAY to show current information.
2. The information displayed may change depending
on the disc type and the playback status (HDD,
jukebox and USB playback).
3. Press S/T to select information and press W/X
or numerical buttons 0 to 9 to change or select the
settings. The following information appears in the
sequence below:
• Disc name, format (DVD video, HDD, MPEG)
• [1/4]: Current title number (or track num-
ber)/total number of titles (or tracks).
• [1/13]: Current chapter number/total number of
chapters.
• [Time]: Elapsed play time, press the X button to
select between the remaining play time, total
play time and remaining play time in the current
chapter.
• [Sound (audio)]: Selected language (DVDVIDEO only) or audio channel.
• [….]: Selected subtitles.
• [ ]: Repeat function.
appears on the television
Playback
General playback functions
1. Insert the disc of your choice into the disc loader
with the playback side facing downwards.
2. Press the X PLAY button to start playback. Press
the MENU/PBC button to open the title list.
3. Press STOP to stop playback. The p oint at
which the disc stops is stored and the symbol "II
" appears briefly on the screen, depending on
the disc type. Press X PLAY to continue playback
(from the point where the disc stopped). Pressing
STOP again or ejecting the disc ("" is displayed) deletes the stopping point.
4. Press OPEN/CLOSE (S
OPEN/CLOSE again to close the disc loader or
press POWER
to close the disc loader auto-
matically and switch off the unit.
Note
If the parental control is activated and the
disc classification is higher than the parental
control settings (access not authorised), you
must enter the four-digit code and/or authorise the disc (see "Classification" on page 25)
to open the recorder.
) to eject the disc. Press
30 DRH-5700x
Page 31

General playback functions
Buttons Functions Discs
X PLAY S tarts playback (from hard drive or disc) or opens the file man-
ager/title list.
STOP Stops playback, recording.
OPEN / CLOSE
S
PAUSE II Press to pause playback (II).
When the disc is paused (PAUSE II pressed), press the W/X but-
PREV NEXT
IWW XXI
REW FF
WW XX
Pause playback and press REW FF WW XX several times to
MENU/PBC The disc menu appears on the screen.
SUBTITLE Press SUBTITLE during playback and press W/X to select the
Opens and closes the disc loader. All discs
tons for frame by frame playback.
Tip
Press the W/X buttons several times to play several individual
frames forwards or backwards while the disc is paused. Backwards frame by frame playback function is not available for video
CDs.
Press the SKIP buttons IWW XXI during playback to skip to the
next chapter/track or return to the start of the current chapter/track.
Press PREV IWW twice in rapid succession to skip to the previous
chapter/track.
Tips
• To skip directly to a chapter during DVD playback, press
DISPLAY and then select the chapter symbol by pressing
S/T. After that, enter the chapter number or press W/X to
select a chapter.
• To skip directly to any track on an audio CD, enter the track
number during playback using the numerical buttons (0-9).
Press the SCAN button WW XX several times during playback
to select the desired search speed.
Hard disk, DVD: 5 speeds
DivX: 4 speeds
Video CD, audio CD: 3 speeds
play in slow motion.
HDD, DVD; 4 speeds
Video CD; 3 speeds (forwards only)
desired subtitle language.
All discs and
All discs and
All discs and
Playback
DRH-5700x 31
Page 32

Playback
General playback functions
Buttons Functions Discs
ZOOM Press ZOOM during playback or while the disc is paused to enlar-
ge the video image.
Size x1 → size x2→ size x3 → size x4 → size x1 (normal size)
Press the S/T/W/X buttons to move the enlarged image.
1/ALL Press 1/ALL several times during playback to select the desire d
repeat function.
HDD (title/chapter/off)
DVD, video mode DVD-R/RW (title/chapter/off)
VR mode DVD-RW, DVD+R/RW (title/chapter/all/off)
Video CD, audio CD (track/all/off)
MP3/WMA (track/folder/off)
DivX (file, folder, single, folder/alb um)
Notes
• For video CDs with PBC, the PBC option for the repeat func-
tion must be deactivated in the setup menu.
• Press NEXT XXI to stop repeat playback of a chapter/track.
A-B When configuring the section repeat function, press the A-B but-
ton once during playback to set the starting point (A) and once to
set the finishing point (B).
Press the A-B button to finish configu rin g the A-B section repeat.
Note
• A section mu st be at least five seconds long.
TITLE If the inserted DVD contains a menu, the title menu is displayed
on the screen. If not, the disc menu appears on the screen.
AUDIO Press AUDIO several times during playback to set a different
language, audio track or encoding method.
Note
Many discs contain Dolby Digital and DTS sound tracks. Ana-
logue audio outputs are not available when DTS is selected.
Connect the recorder to one of the digital outputs to listen to the
DTS sound track (see page 18 for instructions).
Press AUDIO several times during playback to select the de-
sired channel.
On DVD-RW discs recorded in VR mode and hard disks with a
main channel and an audio channel in two languages, you can
select between the main channel (L), auxiliary channel (R) and
main/auxiliary channel (L+R).
32 DRH-5700x
Page 33

Playback
Using a displayed menu screen
Using a displayed menu screen
The menu screen usually appears when a DVD or video CD containing a menu is loaded.
Press S/T/W/X to select the desired title/chapter and
press ENTER to start playback. Press TITLE or MENU/PBC to return to the menu screen.
• Press the numerical buttons to select the track of
your choice. Press RETURN to return to the menu screen.
Menu options and menu operation may vary ac-
•
cording to the disc. Follow the instructions on the
menu screen.
Selecting a different TITLE
On discs containing several titles, select a different title as follows:
• Press DISPLAY during playback and then press
S/T to select the title symbol. Press the relevant
number buttons (0-9) or W/X to select the desired
title number.
Time search function
Playback from a specific point on the disc:
1. Press DISPLAY during playback. The disc infor-
mation is displayed.
2. Press S/T to select the clock symbol.
3. Press the numerical buttons to enter the desired
start time in hours, minutes and seconds from left
to right. If you make an incorrect entry, press W/X
to move the underscore cursor (_) to the incorrect
entry and then enter the correct number.
4. Press ENTER to confirm. Playback starts from the
selected time on the disc.
Camera angle
If the disc contains scenes that were recorded from
different camera perspectives, you can select the desired camera angle during playback.
1. Press the ANGLE button during playback.
2. Press the button repeatedly to select the different
perspectives.
Note
This function is only available if the DVD
contains recordings taken from different camera angles.
Saving recent settings
The recorder saves the user settings for the last disc
that you viewed. The settings remain saved until you
press the Stop button (60) twice or insert another disc.
When you insert a disc whose settings have been saved, the disc automatically plays from the position
where the disc last stopped.
Note
• The settings remain saved even if you
switch the recorder off (1) or to standby
(65).
• The settings remain saved even if you
remove the DVD temporarily and insert
it again.
DRH-5700x 33
Page 34

Playback
Playing DivX film files
Playing DivX film files
The recorder can play DivX files.
1. HDD: Press the JUKEBOX button to play a DivX
file.
DVD: Press DVD and PLAY X. The file manager
appears on the television screen.
USB: Press USB and PLAY X. The file manager
appears on the television screen. Select Video.
2. Press S/T to select a folder. A list of files in the
folder appears. Press X to access the file list.
Press W to return to the folder.
3. Press S/T to select a specific file and then press
X. A tick appears next to the file. Different functions are available. See page 36.
4. Playback: Press PLAY X to play a file.
5. Other functions: Select a file and press ENTER.
See "Options in file manager" on page 35.
6. Press STOP to stop playb ack. The file manager
appears.
• Press the RETURN button and select the option
[DVD] or [HDD] to exit the file manager.
34 DRH-5700x
Page 35

Playback
Playing audio CDs or MP3/WMA files
Options in file manager
1. Press S/T to select a folder/file in the file man-
ager and then press ENTER. The various options
appear. The displayed menu options may vary depending on the selected data carrier.
2. Press S/T to select an option and then press
ENTER.
• [Playback] Starts playing the selected title.
• [Copy] Copies files to another folder or data
carrier. (Page 40).
• [Delete] Deletes files or folders from the data
carrier.
• [Attribute] Displays the attributes.
• [Play List] Adds files or folders to the play list.
Note
• The files added to the play list are sto-
red in a subfolder in the relevant direc-
• [Sort] Sorts files or folders by name and in
chronological order.
• [Cancel] Exits the options menu.
• [Close] Closes the folder.
• [Open] Opens the folder and shows the files
contained in the folder.
tory.
Playing audio CDs or MP3/WMA files
The recorder can play audio CDs and MP3/WMA files.
Before playing MP3/WMA files, read the section "Requirements for MP3/WMA audio files" on the next page.
1. HDD: Press the JUKEBOX button to play music files stored on a HDD.
DVD: Insert an audio/MP3 CD. The file manager
appears and the first title starts playing.
2. In the file manager, the title appears on the right.
The recording level and the play time/total play
time appear on the left.
3. Navigating in the file manager: Opening albums:
Press W, the cursor moves to Audio. Press ENTER and select Open. Changing between albums
and titles: Press X to change to titles or W to
change to albums.
Tips
• Press DISPLAY to display ID3 tag info r-
mation for the MP3 file. If ID3 tag info rmation is not available, [ID3 Tag: None] is
displayed. When a folder is selected, the
number of subfolders and MP3 file s contained in the subfolders are displ ayed.
Press DISPLAY again to hide the information.
• Press the RETURN button and select the
option [DVD] or [HDD] to exit the m enu
screen.
4. Press STOP to stop playb ack at any time.
DRH-5700x 35
Page 36

Playback
Programmed playback of audio CDs and MP3/WMA files
Options in audio CD and music menus
1. Press S/T to select a folder/file and then press
ENTER. The various options appear. The displayed options may vary depending on the selected data carrier.
2. Press S/T to select an option and then press
ENTER.
• [Playback] Starts playing the selected title.
• [Copy] Copies files to another folder or data
carrier. (Page 40).
• [Attribute] Displays the attributes.
• [Play List] Adds files or folders to the play list.
Note
• The files added to the play list are sto-
red in a subfolder in the relevant directory.
• [Sort] Sorts files or folders by name and in
chronological order.
• [Cancel] Exits the options menu.
Repeat function
1. Press the 1/ALL button repeatedly . "Rep File",
"Rep Group", "Single" and "Folder" are displayed
one after the other.
Tip:
Press the NEXT XXI button during random playback,
the unit selects a different track and continues random
playback.
Requirements for MP3/WMA audio files
File extensions: ".mp3", ".wma".
Sampling frequency: 8 - 48 kHz (MP3), 32 - 48 kHz
(WMA)
Bit rate: 8 - 320 kbps (MP3), 32 -192 kbps (WMA)
CD-R format: ISO 9660 and JOLIET.
DVD±R/RW format: ISO 9660 (UDF bridge format)
Maximum number of files/discs: 1999 (total number
of files and folders).
Programmed playback of audio CDs and
MP3/WMA files
Users can program their own play lists containing audio
CD or MP3/WMA tracks. User-defined play lists can contain a maximum of 99 audio CD tracks or 256 MP3/WMA
files.
1. Select a track/file (or folder) in the file manager.
Selecting several file/tracks (folders)
• Press the X button. A tick appears on the fi-
le/track or folder. Press X again to remove the
tick. Repeat this procedure to select more files/tracks (folders).
2. Press ENTER. The various options are displayed.
3. Press S/T to select the option [Play List] and
then press ENTER. The titles are marked with "P".
4. Repeat steps 1 to 3 to select more tracks.
If you select a folder when programming a
playback sequence, all tracks in the folder are
5. Press W and S to change between the play list
6. Press S/T to select the title you wish to play.
7. Press PLAY X to play the title. Playback stops
8. To change from programmed to normal playback,
added to the play list.
and the audio directory. All programmed titles appear in the list.
when the last programmed track in the play list finishes.
select an album in the file manager and press
PLAY X.
36 DRH-5700x
Page 37

Playback
Programmed playback of audio CDs and MP3/WMA files
Options in the play list menu
1. Press S/T to select a title/file from the play list
and then press ENTER. The various options appear.
2. Press S/T to select the required option and press
ENTER to confirm your selection.
• [Play] Playback begins in the programmed sequence from the selected title.
• [Copy] Saves the play list. (hard disk only).
• [Delete] Deletes titles from the play list.
• [Move] Moves a title within a sequence.
• [Cancel] Exits the options menu.
Repeating programmed tracks
Press 1/ALL to select the desired repeat function.
• [Group] Repeats all titles (entire play list).
• [Rep File] Repeats titles in the play list.
• [Rep Group] Repeats the group.
• [Single] Repeats the file.
Deleting a track from the play list
Changing the track sequence in the play list
1. Select the track that you wish to move within the
play list.
2. Press ENTER to show the options.
3. Select the option [Move] and press ENTER.
4. Press S/T to move the cursor to the desired po-
sition and then press ENTER.
Copying the play list (hard disk only)
Y o u can copy your play list onto hard di sk.
1. Select your play list and press ENTER. The various options appear.
2. Select the option [Copy] and press ENTER. You
can save the play list under Automatic Group or
according to Music Info.
1. Press the X button to select the title or titles you
wish to delete from the play list.
2. Press ENTER to show the options.
3. Select [Delete] and press ENTER.
Note:
Data stored in the jukebox can only be cop-
ied to USB devices.
DRH-5700x 37
Page 38

Playback
Displaying JPEG files
Displaying JPEG files
The recorder can display JPEG files. Before displaying JPEG images, read the section "Requirements for
image files" on the next page.
1. HDD: Press the JUKEBOX button to display photos stored on the HDD.
USB: Press the USB button to display photos stored on a USB device.
DVD: Insert a photo CD and press PLAY X. The
file manager appears and the first title starts playing.
2. Press X to change to the list and then press S/T
to select a file. A preview appears in the file manager.
3. Press ENTER. The various options are displayed.
4. Press S/T to select the option [Play] and press
ENTER. The selected image is displayed in full
screen mode and the slide show begins. The disc
may take a few minutes to read, depending on the
size and number of JPEG files.
Press RETURN during the slide show to display/hide the file manager.
5. Press STOP to stop the slide show. The image
overview (thumbnails) appears.
6. Press the DISPLAY button to open an information
window with further options.
• Press the RETURN button and select the option
[DVD] or [HDD] to exit the menu screen.
Options in file manager
1. Press S/T in the file manager to select a file and
then press ENTER. The options then appear. The
displayed options may vary depending on the selected data carrier.
Selecting several files (folders)
• Press the X button. A marker appears on the file
or folder. Press X again to remove the marker.
• Repeat this procedure to select more files (fold-
ers).
1. Press S/T to select the required option and press
ENTER to confirm your selection.
• [Play] Displays the selected file in full screen
mode and starts the slide show
• [Copy] Copies files to another data carrier. (Page 40)
• [Play List] Copies files to the play list. (Page 36)
• [Sort] Changes the displayed sequence
• [Cancel] Exits the options menu
Tip:
New folders can be created on the hard disk.
Select the copying methods [My Group] and
[New Group] and press ENTER.
Y ou ca n now enter a name for the new grou p.
Requirements for image files
File extensions ".jpg"
File size: Maximum 4 MB recommended
CD-R format: ISO 9660 and JOLIET.
DVD±R/RW format: ISO 9660 (UDF bridge format)
Maximum number of files/discs: 1999
(total number of files and folders)
Information on JPEG files
• Progressive and lossless compression of JPEG
files is not supported.
• The disc may take a few minutes to read, de-
pending on the size and number of JPEG files.
38 DRH-5700x
Page 39

Playback
Managing MP3/WMA, JPEG and DivX files
Skipping images
Press the PREV NEXT (IWW or XXI) once on the image display to show the next or previous file.
Rotating images
Press S/T to rotate a displayed image clockwise or
anticlockwise.
Starting a slide show
1. Select the option [Play] in the file manager or
press PLAY X.
2. The slide show starts.
3. Press the TIMER button to open an overview of
the button commands.
4. Press STOP to stop the slide show. The image
overview (thumbnails) appears. Press DISPLAY
here to show or hide the command line.
5. Press S/T/W/X to skip to any image.
6. Press ENTER to continue the slide show from the
selected picture.
7. Press ZOOM to open the command line for
enlarging the view. Press WW or XX to reduce or
enlarge the view, press S/T/W/X to flip the image up, down, left or right.
Pausing the slide show
1. Press PAUSE (II) to pause the slide show.
2. Press the PLAY ( X) button to continue the show.
Managing MP3/WMA, JPEG and DivX files
The following descriptions refer to MP3 files, but also
apply to other file types.
Note:
DivX, MP3, WMA and JPEG files on a disc
cannot be copied or moved to a USB memory stick.
Deleting files/folders from the hard disk
MP3/WMA, JPEG and DivX files/folders can be deleted from the hard disk.
1. Select the file you wish to delete in the file manager.
Selecting several files (folders)
• Press the X button. A marker appears on the file
or folder. Press X again to remove the marker.
• Repeat this procedure to select more files (fold-
ers).
2. Press ENTER. The options appear in the menu.
3. Select [Delete] and press ENTER. A confirmation
message appears.
4. Press the W/X buttons to select the option [OK]
and then press ENTER. The selected file/s is/are
deleted.
Files on the hard disk
MP3 and WMA files on the hard disk can be named
individually. A maximum of 13 characters of the disc
name are shown.
1. Select the file you wish to name in the menu.
2. Press ENTER. The menu options appear in the
menu.
3. Select the option [Attribute] and press ENTER. Attributes such as Title, Artist, Album and Genre are
displayed.
DRH-5700x 39
Page 40

Playback
Managing MP3/WMA, JPEG and DivX files
4. Press S/T to select a title, for example, and then
press ENTER. The keypad menu for entering characters appears (see page 49).
5. You can now modify the title. A selection window
opens when Artist, Album or Genre is selected.
Press X to change to the selection window and
select "New Artist" to enter a new name or select
an artist from the selection list, for example.
Copying files to the hard disk
Files and folders can be copied from DVD and USB
devices to the hard disk.
1. Select the file you wish to copy in the file manager. To copy all files in a folder, select the folder.
Selecting several files (folders)
• Press the X button. A marker appears on the file
or folder. Press X again to remove the marker.
• Repeat this procedure to select more files (fold-
ers).
2. Press ENTER. The options appear in the menu.
3. Select [Copy] and press ENTER. The copying
menu opens.
4. Press S/T to select [Smart Group] and copy data
to the "Image/Video" directory. Press ENTER to
confirm, the copying process starts automatically.
5. Press S/T to select [My Group] and copy files to
your personal directory. The personal directories
appear in the overview .
6. Press the X button to select [New Group] from the
overview and then press ENTER.
• Enter a name and press "Finish" to confirm. The co-
pying process starts automatically.
• Alternatively, select an existing personal directory
from the overview and press ENTER to confirm. The
copying process starts a utomatically.
7. You can cancel the copying process at any time by
pressing the ENTER button.
Note:
You cannot copy files in folder structures
containing more than five subfolders.
Note:
The copying process may take some time,
depending on the file size, copying quality
and connected external device.
E.g.:
Copying 500 MB from USB to HDD takes
approx. 15 minutes
Copying a 2-hour recording from DVD to
HDD (fast) takes approx. 40 minutes.
Copying files onto USB devices
Files and folders on the hard disk can be copied to
USB sticks or memory cards.
1. Press JUKEBOX.
2. Select the files you wish to copy as described above.
3. Press ENTER. The options appear in the menu.
4. Select [Copy] and press ENTER. The copying
menu opens.
5. Press S/T to select the card to which you would
like to copy files and then press ENTER to confirm. You can only select cards inserted in the card
reader.
6. The card is checked (free memory, write protection).
7. In the directory structure, select the directory on
the card to which you would like to copy the files.
8. You can create a new directory (NONAME00,
NONAME01, etc.) using the option [New Album].
9. Select [Copy] and press ENTER to start the process.
40 DRH-5700x
Page 41

Recording
Information on DVD recordings
Recording
Information on DVD recordings
Note:
• This recorder cannot record data onto CD-
R or CD-RW discs.
• We cannot assume any liability for re-
cording errors caused by power failures,
faulty discs or damage to the recorder.
• Fingerprints and minor scratches on the
disc can affect playback and the recording
quality . Handle your discs with care.
Recording onto the hard disk
The procedure for recording onto the internal hard
disk (HDD) is the same as the procedure for recording
onto DVD-RW discs. Options such as recording quality and manual mode are available. Recordings can
be made, deleted and overwritten as often as required. The hard disk has sufficient capacity to store
many hours of high-quality video recordings. Recordings are managed in the title list.
Adding chapter markers
You can set chapter markers at any point within a title
while a recording is in progress.
To start a new chapter, press the CH MARK button at
the desired point during the recording. A chapter marker symbol appears on the screen.
Note:
Chapter markers are inserted automatically at
regular intervals. You can change the frequency of these intervals in the [Recording],
[Chapter Mark] menus.
Information on recordings
• The recording time displayed is not exact be-
cause the recorder uses a video compression
technique with variable bit rates, which means
that the exact recording time depends on the material that is recorded.
• When a TV program is recorded, the recording
time may be shorter if reception is poor or the picture breaks up.
• If you are only recording freeze frames or audio,
the recording time may be shorter.
• The displayed recording time and the remaining
time do not always add up exactly to the number
of minutes available on the disc.
• The available recording time may be less if the
disc is processed more intensively.
• If you are using a DVD-R or DVD+R disc, you can
continue recording until the disc is full or finalised.
Check the remaining recording time on the disc
before starting a recording.
• Select the option [Erase Title] in the title list to e-
rase the title. The title is not deleted from the disc
and the available recording time does not increase.
• Only recordings on DVD+RW discs can be over-
written.
• With DVD+R/RW discs, this recorder creates new
menus to update the new title or edit the title before the disc is ejected or the unit switched off. A
disc must therefore be removed from the recorder
after the DVD operating mode is selected.
DRH-5700x 41
Page 42

Recording
Timeshift
Timeshift
Never miss a scene from a live program again. If the
telephone rings during your favourite live program,
simply press "PAUSE" before picking up the telephone. The timeshift function is activated and records
the program. After the telephone conversation or interruption, press "PAUSE" or "PLAY" to continue watching the program. Press "STOP" to watch the live program directly.
Requirements for timeshift mode:
• A minimum of 10 minutes of recording ca-
pacity on the hard disk.
• TV mode selected, TV channel preset in
the recorder .
• No recording currently in progress.
• A timer recording has not been pro-
grammed.
Skipping to another point in a recor ding d uring
a timeshift
1. Press the DISPLAY button during the timeshift.
The "Time Shift" display appears.
2. Press IWW to skip 5 minutes back. Press XXI to
skip 5 minutes forwards.
Searching forwards and backwards during a
timeshift
1. Press the DISPLAY button during a timeshift recording. The "Time Shift" display appears.
2. Press WW to start searching backwards. Press
the button repeatedly to select different speeds.
Press XX to start searching forwards. Press the
button repeatedly to select different speeds.
Stopping a timeshift
Using the timeshift function (pause, live
TV/playback)
The current program is recorded continually onto the
hard disk.
1. Press the PAUSE button during a TV p r ogram.
The display "Time Shift" appears and di sappears
again after five seconds, the PAUSE symbol II on
the screen indicates the status.
Symbols from top to bottom:
Start time.
Current time.
Current timeshift position.
Audio settings.
Repeat function.
You can view the "Time Shift" display at any time by
pressing the DISPLAY button.
If you attempt to record a copy-protected program that
cannot be decrypted, the unit records a blank screen
together with a sound signal.
1. Press the PLAY button to start playback.
Playback begins at the point at which you pressed the
PAUSE button. The recorder continues recording the
current program.
1. Press STOP to exit the timeshift function. The current program should then appear on the screen.
Recording a television program
The recorder can record TV programs onto hard disk
or DVD. Simultaneous recordings onto HDD and DVD
are not possible. To record TV programs, proceed as
follows. The recording stops when the disc is full or
when you stop the recording manually.
Note
• Also make sure that the TV input is config-
1. Select a television channel for the recording.
2. Check the preset time in the system setup and
change the setting if necessary.
[Auto Clock Setting]: The recorder can set the time
automatically if a television signal is received.
[Clock Setting]: Set the system time manually.
3. Select the recording mode in the [Recording] menu (HQ, SP, LP, EP, SLP, SEP). Remember that
quality has an effect on the recording capacity of
your storage media (DVD, HDD), see page 26.
4. Set the [Chapter Marks]. Setting chapter markers
allows you to skip from one chapter to the next
within the recording.
ured for this recorder.
42 DRH-5700x
Page 43

Recording
Recording time
5. Press [HDD] to start a hard disk recordin g or insert
a DVD and press [DVD] to start a DVD recording.
Note
• The recorder initialises blank discs first of
all.
6. Press RECORD once. The recording begins.
(REC LED lights up and HDD or DVD flashes on
the display.)
• The source, preset quality, elapsed play time
and the remaining time appear in the recording
window.
• The recording continues until you press STOP
or the disc or the hard disk is full.
7. Press the CH MARK button to set chapter marks
so that you can skip directly to these positions
during playback.
8. Press STOP to stop the recording.
Pausing the recording
1. Press PAUSE II to pause the recording.
2. Press PAUSE II to continue the recording.
Recording time
You can preset the recording time.
1. Press the RECORD button during a recording.
The recording time increases by 30 minutes each
time you press the button.
The recording time is then displayed on the screen. At
the end of the recording, the recorder stops and switches off.
Checking the recording time
Press DISPLAY to check the recording time. The recording window appears. The remaining recording
time is also shown in the display window. Press DISPLAY to close the window.
Extending the recording time
You can extend the recording time at any time by
pressing RECORD.
The recording time increases every time you press the
button, depending on the free memory space on the
DVD or HDD and the quality level.
Warning!
If the recorder is disconnected from t he mai ns
power supply (or in the event of a power failure) during the recording phase, the recordi ng
will be lost.
Timer recording
This recorder can be programmed to record up to 32
programs every month. If you wish to make unsupervised recordings, the channels and the start and finish
times of the recordings must be programmed in advance.
Note:
Always format blank discs before inserting in
the machine for timer recordings. (see "Disc
initialisation" on page 23.)
Note:
Please remember to set the timer recording
to start at least 10 minutes early so that all of
the program is recorded.
DRH-5700x 43
Page 44

Recording
Timer recording
1. Press the TIMER button. The timer recording list is
then displayed.
2. Press ENTER. The input line opens.
3. Enter the information required for the timer recording(s).
• W/X (left/right) – Move the cursor to the left or
right
• S/T (up/down) – Change the setting at the cur-
rent cursor position.
• [Date] Selects a date up to one month in advance.
• [Start] Specifies the start time of the recording.
• [Stop] Specifies the end time of the recording.
• [Source] Source selection: stored program
numbers or one of the external inputs for the
recording, the DV input cannot be selected. (PR
1 to PR99, SCART, SV1, AV1, SV2, AV2).
• [Target] Select the data carrier for the recording
(HDD or DVD).
• [Quality] Select the recording quality (Auto, HQ,
SP, LP, EP, SLP, SEP; the remaining storage
capacity varies depending on the settings and
is displayed in the title bar of the timer menu).
• [PDC] The PDC system adjusts the recording
time automatically so that you do not miss the
program if the program schedule changes. The
PDC/PDC function will only work correctly if you
enter the right time and date of the program that
you wish to record. Please note that PDC/PDC
does not work on every channel.
Note:
• Stations that use PDC usually display all
the relevant PDC information on their teletext pages. Refer to these pages whenever you decide to record a program with
the timer recording function.
• [Repeat] Select the desired repeat setting (once, weekend, weekdays, weekly, daily).
• [Result] Indicates whether programming was
successful or whether an error occurred after
entries were made.
4. Press ENTER once you have entered all program
information. The recording is programmed.
Press ENTER to program another timer recording
immediately afterwards.
5. Press RETURN to exit the timer recording list.
6. Press the POWER button on the remote control to
switch the unit to standby mode.
Note:
• The timer symbol appears on the display
when the recorder is switched to standby
mode and the timer is active.
• Timer recordings can be stopped halfway
through. Press STOP. A confirmation message appears. Select "OK" and then press
ENTER to stop the recordin g or select
"Cancel" and then press ENTER to continue the recording. After app rox. 10 seconds, the confirmation message disappears automatically and the recording continues.
44 DRH-5700x
Page 45

Recording
Timer recordings with VideoPlus®
Timer recordings with VideoPlus®
This system makes programming timer recordings extremely easy. Most TV guides publish VideoPlus program numbers in addition to information on TV programs. If you would like to record a program using the
timer record function, you simply enter the relevant
VideoPlus program number into the recorder. The
date, start, finish and channel settings are adopted
automatically. However, you have to configure the
destination of the recording and the recording quality
and specify whether it is a one-off or repeat recording.
The recorder can store a maximum of 32 timer programs.
VideoPlus is a registered trademark of Gemstar Development Corporation. The VideoPlus system was
developed with permission from Gemstar Development Corporation.
1. Press the VIDEO+ button to open the VideoPlus
menu.
Press RETURN to exit the menu.
Editing a timer recording
You can check or edit your programming selections
when the recorder is switched on.
1. Press the TIMER button. The timer recording list
appears.
• Press S/T to select a timer recording.
• Press ENTER to edit the selected recording,
the editing menu opens. The following options
are available:
• [Edit] The input line for editing the data opens.
• [Delete] For deleting the selected recording
from the list.
• [Disable] For disabling the selected recording in
the list.
• [Cancel] For exiting the editing menu.
Stopping a timer recording while in progress
You can always stop a timer recording after it has started.
• See page 44.
2. Enter the VideoPlus program number via the numerical buttons.
• If you make a mistake, you will need to enter
the number again.
3. Press X and then press S/T to select the desti-
nation (HDD, DVD).
4. Press X and then press S/T to select the re-
cording quality (HQ, SP, LP, etc.).
5. Press X and then press S/T to define the repeat-
ing frequency (once, daily, etc.).
6. Press ENTER.
7. The channel mapping screen opens. Enter the
number of the TV channel. Press the ENTER button to finish programming.
8. The timer recording list appears so that you can
check your programs on timer record. The display
"Valid" in the timer recording list indicates that everything has been programmed correctly.
9. Press RETURN to exit the timer recording menu.
10. Press the POWER button on the remote control to
switch the unit to standby mode.
Note:
The channel map is saved and is therefore only
required once for each program. You can
change the settings at any time in the "Channel
Mapping" setup menu (page 23).
Timer recording - troubleshooting
The recorder will not record under the following conditions when the timer is set:
• Y ou have not inserted a d isc or there is not enough
hard disk memory available.
• A non-recordable d isc is inserted.
• When the option [Disc Protection] is activated in the
setup menu (see page 24).
DRH-5700x 45
Page 46

Recording
Recording from external auxiliary devices
You cannot program a timer recording under the following conditions:
• A recording is in progress.
• The desired time has already passed.
• More than 32 recordings have been programmed.
Recording from external auxiliary devices
Recording from auxiliary devices
You can record from an external device such as a
camcorder or video recorder connected to an external
input on the recorder.
1. The device from which you wish to record must be
connected to the recorder correctly (see page 20).
2. Press HDD or DVD to specify the recording destination.
3. Press SOURCE several times to select the input
source for the recording.
• PR-XX: The integrated tuner
• AV1: Video socket (17) on the rear of the unit
• SV1: S-video socket (17) on the rear of the unit
• AV2: Video socket (14) on the front of the unit
• SV2: S-Video socket (14) on the front of the unit
• SCART: SCART IN/DECODER socket (23) on
the rear of the unit
• DV: DV IN (15) on the front of the unit
4. Press RECORD once. The recording begins. (the
REC LED lights up)
• The recording continues until you press STOP
or the hard disk is full.
• Refer to page 43 for information on how to
modify the recording time.
5. Press STOP to stop the recording.
Note:
This recorder cannot record from sources
that are copy-protected by CopyGuard.
Read the copyright information on page 52.
Recording from DV devices
Recording from a digital camcorder
You can record from a digital camcorder connected to
the DV IN socket on the front of the recorder. You can
also control both the camcorder and recorder with the
recorder remote control.
Tips:
• The source signal must be in DVC-SD format.
• The recorder remote control cannot control all cam-
corders.
• Y ou cannot co ntrol the device from a component
connected to the DV IN socket.
1. Press HDD or DVD to specify the recording desti-
nation.
2. To select the auxiliary device for the recording,
press SOURCE several times until DV appears.
3. Search for the point on the camcorder tape from
which you wish to start the recording. For the best
results, pause playback at the point at which you
wish to start the recording.
4. You may be able to use the recorder remote con-
trol to activate the functions STOP, PLAYBACK
and PAUSE, depending on the camcorder model.
5. Press RECORD once. The recording begins. (the
REC LED lights up on the display window.)
6. Press STOP or PAUSE II to stop the recording.
You cannot use the remote control to operate the
camcorder during a recording.
• The recording stops automatically when the recorder no longer detects a signal.
• Refer to "Instant timer recording" on page 43 for
information on how to program the recording
time.
46 DRH-5700x
Page 47

Trou bleshootin g
If you are unable to receive a picture and/or sound via
the DV IN socket, check the following points:
• The DV cable must be connected correctly.
• Switch all connected devices off and on again.
Simultaneous recording and playback
Playing another title during a recording
You can play material from another data carrier during
a recording.
Recording from To media Playback from
1. TUNER HDD DVD
2. TUNER HDD HDD, USB
3. TUNER DVD HDD, USB
1. DVD playback
1. Start a HDD recording.
2. Press the DVD and PLAY buttons. The file manager or the title menu opens.
3. Start playback, see page 30, 35.
4. Press MENU/PBC to open the file manager or the
title menu at any time and select another title/chapter.
5. You can pause playback by pressing STOP , the
symbol "II " appears. Press PLAY to resume
playback.
6. Press STOP again to stop the recording.
2. HDD/USB playback
1. Start a HDD recording.
2. HDD: Press MENU/PBC. The title list on the HDD
opens. The current recording is marked with a red
dot.
USB: Press USB and PLAY. The file manager opens.
3. Press W/X/S/T to select the file that you wish to
play and press ENTER to confirm.
4. Select [Play] and press ENTER to confirm. Playback begins.
5. Press MENU/PBC to open the file manager at any
time and select another title.
USB: Press the USB button and PLAY to open the
file manager.
Recording
Simultaneous recording and playback
6. HDD: You can pause playback by pressing STOP
, the symbol "II " appears. Press PLAY to resume playback.
7. HDD: Press STOP again to stop the recording.
3. HDD/USB playback
1. Start a DVD recording, see page 42.
2. Press the HDD or JUKEBOX button and PLAY.
The title menu or the file manager opens.
USB: Press USB and PLAY. The file manager opens.
3. Press W/X/S/T to select the file that you wish to
play and press ENTER to confirm.
4. Select [Play] and press ENTER to confirm. Playback begins.
5. Press MENU/PBC to open the file manager at any
time and select another title.
USB: Press the USB button and PLAY to open the
file manager.
6. HDD: You can pause playback by pressing STOP
, the symbol "II " appears. Press PLAY to resume playback.
7. HDD: Press STOP again to stop the recording.
Time slip HDD
A recording can be playe d while in p rogress.
1. Start the HDD recording.
2. Press HDD and then MENU/PBC, the file manager opens.
3. Select the recording marked with the red dot and
press ENTER.
4. Select [Play] and press ENTER to confirm. Playback begins while the recording continues.
Y ou can p ause, search through or play the recording
•
in slow motion by pressing the PAUSE, REW and FF
WW/XXbuttons respectively.
5. Press STOP . Playback stops and the current
position in the recording is displayed.
Note:
• Playback can begin no earlier than 15 se-
conds after the recording starts.
DRH-5700x 47
Page 48

Editing
Overview of the title list menu
Editing
Overview of the title list menu
In the title list menu, you can edit video contents on
unfinalised DVD discs and video contents on the internal hard disk (or the jukebox). The available editing
functions vary.
Recordings on the hard disk are edited in the same
way as the contents of a DVD-RW. Similar commands
for deleting and renaming titles or adapting the chapter contents within the title are available.
1. Press MENU/PBC to open the title list menu.
Playback stops.
Information on the media (HDD in the example
shown) and title is displayed in the left half of the
screen. The titles (or chapters) on the DVD or hard
disk are displayed in the main section of the screen.
The number of pages appears in the information bar
at the top of the screen and all available button commands appear in the bar at the bottom of the screen.
Information on media/titles:
• Remain: remaining time in the relevant recording
mode (SP) in minutes and percent of the tota l capacity .
• Sort criteria: Oldest first, all attributes.
• Title Used: Recording mode (SP) , length in
hh:mm:ss, file size
• Attribute: films
2. Press TITLE to return to the title list and back.
• When selecting titles, use the buttons
W/X/S/T to display the previous/next page.
3. Press RETURN to exit the title list menu.
Overview of menu commands
Select a title or a chapter and then press ENTER. Various options are displayed depending on the disc type. Press S/T to select an option and then press
ENTER to confirm.
• [Resume Play] Resumes playback of the selected ti-
tle at the point where playback last stopped.
• [Play] Start s playing the selected title.
• [Delete] Ti tle - deletes the title or the chapter (page
49), All – deletes all unprotected titles.
• [Copy] Copies the title to another data carrier (p age
53).
• [Protect] Prevents you from accidentally recording
over, changing or deleting a title (p age 51).
• [Edit] Rename, divide, A-B erase, set index picture
(page 49).
• [Set Attribute] Lists the programs in the title list menu
according to their attributes (category) (page 50).
• [Config] Defines sort criteria (e.g. most recent fir st),
sets attribute filter s, defines attribu tes (e.g. sci-fi, crime, thriller , etc.).
Selecting several titles
For some options, you can select several titles simultaneously to delete, copy or protect them, for example.
1. Press TITLE to open the title list.
2. Press X to select the titles that you wish to edit.
3. Press ENTER to display the options.
4. Press S/T to select an option and then press
ENTER. Follow the instructions below to execute
the menu command.
5. Press [OK] to confirm.
48 DRH-5700x
Page 49

Editing
Naming a title
Changing title thumbnails
Each title displayed in the title list menu is represented
by an index picture (thumbnail) that appears at the
start of the title or chapter. If you prefer, you can select
a different freeze frame picture from a title. The selected freeze frame picture appears in the original
menu and in the play list menu.
Tip:
In the chapter list menu, the thumbnails of titles for
DVD-RW discs can be changed in VR mode.
1. Select a chapter from the chapter list menu and
press ENTER to open the options.
2. Select [Edit] and then [Set Idx Pic] in the submenu. The Set Index Picture menu appears.
3. Press the PLAY, PAUSE, FF and REW buttons to
search for the desired index picture and press
ENTER to confirm [Set Idx Pic]. The current selected index picture is displayed.
4. Press [OK] to activate the new index picture.
The thumbnail of the title that contains the chapter
is changed.
Erasing titles
Erasing a title from the play list menu only removes
the title/chapter from the play list. The titles/chapters
remain in the original menu. Erasing a title or chapter
from the original menu (title/chapter) deletes the title
or chapter from the disc and increases the time available for recording. Titles or chapters deleted from the
original menu are also deleted from the play list.
Note:
You may not be able to delete chapters that
are less than five seconds long.
1. Press S/T/W/X to select a chapter or title that
you wish to delete from the title list or chapter list
menu and then press ENTER. The options appear
on the left of the screen.
2. Select the option [Delete] in the menu.
3. A submenu opens.
4. Select [Erase Title] or [Erase All] from the submenu and press ENTER to confirm. A deletion
confirmation message appears.
5. Press W/X to select [OK] and then press ENTER.
The selected chapter or title is deleted or all titles
are deleted. An updated menu then appears.
6. Repeat steps 1-5 to delete other chapters or titles.
7. Press RETURN several times to exit the menu.
Deleting a title section
1. Press S/T/W/X to select a title to delete from the
title list menu and then press ENTER. The various
options are displayed.
2. Select [Edit] and then [A-B Erase] from the submenu and press ENTER. The A-B Erase menu
appears.
The options appear on the right:
• Set Point A: Starting point of the section you wish
to delete
• Set Point B: Finishing point of the section
• OK: Confirm the deletion process
• Cancel: Cancel the process
The thumbnails appear on the right
• Top: Main preview of the paused title (PAUSE II)
• Bottom: Thumbnails of the preset starting point A
and finishing point B.
3. Press the PLAY, PAUSE, FF and REW buttons to
search for the desired starting point. The arrow
marker indicates your current location within the title.
4. Press ENTER at the starting point of the section
you wish to delete. This appears in progress bar.
The option [Set Point B] is selected.
5. Press the PLAY, PAUSE, FF and REW buttons to
search for the desired finishing point.
6. Press ENTER at the finishing point of the section
you wish to delete. The section marked for deletion appears in red in the progress bar.
To cancel the process, press S/T to select the
option [Cancel] and then press ENTER. The title
list menu appears.
7. Then select [OK] and press ENTER to confirm.
The selected section is deleted from the title and
the title list menu then appears.
Note:
This function is not available for titles less
than five seconds long.
You can delete a section of the title that you no longer
require.
Naming a title
You can allocate any name to a title. A maximum of 13
characters of the name are shown.
DRH-5700x 49
Page 50

Editing
Naming a title
1. Select the title you wish to name from the title list
menu and then press ENTER. The various options
are displayed.
2. Press the S/T buttons to select the option [Edit]
and then [Rename] in the submenu and press
ENTER. The keyboard menu appears.
3. Enter a name for the title. Press S/T/W/X to select a character and press ENTER to confirm.
• Press IW/XI to change between upper/lower
case letters and symbols.
• ENTER: Confirms entries.
• Back: Deletes the character in front of the cur-
sor.
• Space: Inserts a space at the cursor position.
• Exit: Adopts the name.
• Cancel: Cancels the process.
• W/X/S/T: Move the cursor.
• Number buttons (0-9): Select the column.
4. Select Finish and press ENTER to adopt the name and return to the previous menu.
5. Press RETURN several times to exit the menu.
Note:
• A maximum of 13 characters of the name
are shown.
• The recorder only displays a limited num-
ber of characters from discs formatted on
other recorders.
• For recordings on DVD-R, DVD+R or
DVD+RW discs, the entered name is only
displayed on the DVD player when the
disc is finalised.
Sorting the title list
You can use this function to sort lists in the title list
menu on the hard disk by date, title name or category
so that you can locate the title of your choice more
quickly.
1. Select a title from the title list menu on the hard
disk and press ENTER. The various options are
displayed.
2. Press S/T to select the option [Config] and then
[Sort] in the submenu and press ENTER. The various sort options appear.
• [Sort]: by date, title name
• [Attr Filter]: by selected attribute (Movies, Sport,
Children, Other, Attr.1-Attr .4, All Attributes, No
Attribute
• [Attr. Name]: Enter user-specific attributes via
the keyboard menu
3. Press S/T under the option [Sort] to select the
sort criteria or specify the desired attribute filters
and then press ENTER. Press ENTER to display
the sorted menu.
Dividing a title into two
This function divides a title into two new titles.
1. Select the title you wish to divide from the title list
menu and press ENTER.
The various options are displayed. Select the option [Edit].
2. Select [Divide] from the submenu.
3. Press ENTER. The Divide menu appea rs.
4. Press the PLAY, PAUSE, FF and REW buttons to
search for the desired starting point.
5. Select the option [Divide] and press ENTER at the
end of the first section. To remove the dividing
point, select [Divide] at a different point and press
ENTER.
6. Select [Cancel] to cancel the process and return
to the title list.
50 DRH-5700x
Page 51

7. Select the option [OK] and then press ENTER to
adopt the dividing point. The title is divided into
two new titles. This process can take up to four
minutes.
Note:
Dividing points must be a minimum of three
seconds apart.
Protecting titles
This function prevents you from accidentally recording
over, changin g or deletin g a title.
1. Press MENU/PBC to open the title list menu.
2. Press S/T/W/X to select a title you wish to pro-
tect and then press ENTER. The various options
are displayed.
3. Select the option [Protect].
4. Press ENTER to confirm. A padlock symbol appears on the title thumbnail.
Tip
To unlock a title that has already been locked, select
the relevant title and then select [Unprotect]. You can
now edit and delete the title again.
Editing
Naming a title
DRH-5700x 51
Page 52

Copying
Prior to copying
Copying
Prior to copying
The copying function on the recorder allows you to:
• make backup copies of important recordings from
the hard disk onto DVD.
• create a DVD copy of a recording on the hard
disk to play on other players.
• copy films that you wish to edit from a DVD to the
hard disk.
• copy edited films from the hard disk to a DVD.
The "One Touch Copy" function is the simplest way of
making copies. Titles that have just finished playing
can be copied from the hard disk to DVD or vice versa. See page 53.
Note:
Title that are less than five seconds long
cannot be copied (from hard disk to DVD).
Copying limitations
Some films are copy protected: these films cannot be
copied onto hard disk or DVD.
You can see whether a film is copy-protected by referring to the disc information during playback.
• This recorder cannot record signals in NTSC for-
mat from analogue or DV inputs correctly.
• Video signals in SECAM format (from integrated
TV tuners or analogue inputs) are recorded in
PAL-format.
What does "CPRM" mean?
CPRM is a copy protection system (encoded) only allowing the recording of "copy once" broadcast programs. CPRM stands for Content Protection for Recordable Media. CPRM recordings can only be made
on DVD-RW discs formatted in VR mode and CPRM
recordings can only be played on players that are
specifically compatible with CPRM.
Copyright
• Recording equipment should be used only for
lawful copying and you are advised to check
carefully what is lawful copying in the country in
which you are making a copy. Copying of copyright material such as films or music is unlawful
unless permitted by a legal exception or consented to by the rights owner.
• This product incorporates copyright protection
technology that is protected by method claims of
certain U.S. patents and other intellectu al prop erty rights owned by Macrovision Corporation and
other rights owners. Use of this copyright protection technology must be authorised by Macrovision Corporation, and is intended for home and
other limited viewing uses only unless otherwise
authorised by Macrovision corporation. Reverse
engineering or disassembly is prohibited.
• CONSUMERS SHOULD NOTE THAT NOT ALL
HIGH DEFINITION TELEVISION SETS ARE
FULLY COMPATIBLE WITH THIS PRODUCT
AND MAY CAUSE ARTEFACTS TO BE DISPLAYED IN THE PICTURE. IF A 576 PROGRESSIVE SCAN PICTURE IS DISPLAYED INCORRECTLY, IT IS RECOMMENDED THAT THE
USER SWITCH THE CONNECTION TO THE
"STANDARD DEFINITION" OUTPUT. IF THERE
ARE QUESTIONS REGARDING THE COMPATIBILITY OF YOUR TV SET WITH THIS 576p
HDD/DVD RECORDER, PLEASE CONTACT
OUR CUSTOMER SERVICE CENTRE.
High speed copying (maximum 12x)
Copying between DVD and hard disk is a fully digital
procedure that prevents losses in picture and sound
quality. You can make any number of copies without
the quality suffering. The speed of the copying process can also be accelerated. When copying from hard
disk to DVD, the copying speed depends on the recording mode and the DVD disc used.
52 DRH-5700x
Page 53

Copying
Prior to copying
Minimum high-speed copying times
The following table contains the corresponding minimum times for copying a two-hour film recorded in SP
mode from hard disk to DVD.
Disc
Type
DVD-R
DVD+R
DVD-R
DVD+R
DVD+RW
DVD+R DL 8x 13 min. (4x)
DVD-RW 6x 12 min. (6x)
DVD-R
DVD+R
Notes:
• The times specified are approximate.
Disc
Speed
16x 6.5 min. (12x)
8x 8 min. (8x)
4x 13 min. (4x)
Copying time
(recording speed)
• The actual disc copying speed may vary
from recording to recording.
• It may not be possible to copy some
4x/6x/8x/16x compatible discs at maximum speed.
• The high-speed copying function may no t
be available for discs that have been initialised on another recorder .
Copying from hard disk to DVD (one touch
copy)
1. Select the title you wish to copy from the title list
menu on the hard disk and press ENTER.
Selecting several titles on the hard disk
• Press TITLE to access the list view.
• Press the X button. A marker appears on the ti-
tle. Press X again to remove the markers.
• Repeat this procedure for every other title.
• Press ENTER, the menu options are displayed
on the left of the screen.
2. Press S/T to select the option [Copy] and press
ENTER. The copying menu opens.
3. Press W/X to select the copying quality (HQ, Fast,
SEP, SLP, EP, LP, SP) and then press T.
Fast: See the left column of this page for further
information on high-speed copying.
4. Press ENTER when the [OK] symbol is selected.
The copying process starts.
5. Press STOP () to stop the copying process at
any time.
Note:
• The recording time in Fast mode may vary depend-
ing on the quantity of source data.
• Stopping the copying process in Fast mode cancel s
the recording and all data recorded up to that point is
lost.
• Fast mode cannot be used if there is insuf ficient
space on the disc.
• When copying modified hard disk titles and clip re-
cordings onto a DVD-RW di sc in VR mode, Fa st
mode is not available.
Copying from DVD to hard disk (one touch
copy)
See "Copying from hard disk to DVD".
Notes:
• Copying may not be possible, depending
on the recording device or disc requirements.
• Stopping the copying process in Fast
mode cancels the recording and all data
recorded up to that point is los t.
• Recording in Fast mode may take up to 19
minutes.
• Fast mode is not available for recording
modified titles onto DVD-RW disc in VR
recording mode.
DRH-5700x 53
Page 54

Reference
Additional information
Reference
Additional information
Playing recordings on other DVD players (finalising a disc)
Notes:
• Most standard DVD players can play unfinal-
ised DVD+RW discs.
• Edited contents on a DVD+RW disc can only
be played on normal DVD players after t he
Most DVD players can play finalised discs recorded in
video mode and finalised DVD+R or DVD+RW discs.
Some players can play finalised/unfinalised DVD-RW
discs recorded in VR mode. Refer to the manual accompanying the player to find out which discs are
supported. When the disc is finalised, the recordings
are "fixed" so that the disc can be played on normal
DVD players or computers with a DVD-ROM drive.
When a disc is finalised in video mode, a menu for using the disc is generated. Press MENU/PBC
or TITLE to access the menu.
Read the section "Finalising" on page 24 for information on finalising discs.
disc is finalised.
• Edited contents on a DVD+R disc (hidden in-
formation, merged chapters, added chapter
markers, etc.) cannot be played on normal
DVD players.
• The duration of the finalisation process d e-
pends on the disc type, how much data was
recorded onto the disc and the number of titles.
• Finalising a DVD+R DL disc may take up to
30 minutes.
Language codes
Use this list to configure "Other" languages in the [Playback] menu for the menu language, audio language and
subtitle language:
Language Code Language Code Language Code Language Code
Abkhazian 6566 Fijian 7074 Lingala 7678 Sinhalese 8373
Afar 6565 Finnish 7073 Lithuanian 7684 Slovak 8375
Afrikaans 6570 French 7082 Macedonian 7775 Slovenian 8376
Albanian 8381 Friesian 7089 Malagasy 7771 Somali 8379
Amharic 6577 Galician 7176 Malay 7783 Spanish 6983
Arabic 6582 Georgian 7565 Malayalam 7776 Sudanese 8385
Armenian 7289 German 6869 Maltese 7784 Swahili 8387
Assamese 6583 Greek 6976 Maori 7773 Swedish 8386
Aymara 6588 Greenlandic 7576 Marathi 7782 Tagalog 8476
Azerbaijani 6590 Guarani 7178 Moldavian 7779 Tajik 8471
Bashkir 6665 Gujarati 7185 Mongolian 7778 Tamil 8465
Basque 6985 Hausa 7265 Nauru 7865 Tatar 8484
Bengali, Bangla 6678 Hebrew 7387 Nepali 7869 Telugu 8469
Bhutani 6890 Hindi 7273 Norwegian 7879 Thai 8472
Bihari 6672 Hungarian 7285 Oriya 7982 Tibetan 6679
Breton 6682 Icelandic 7383 Panjabi 8065 Tigrinya 8473
Bulgarian 6671 Indonesian 7378 Pashto 8083 Tonga 8479
Burmese 7789 Interlingua 7365 Persian 7065 Turkish 8482
Belarusian 6669 Irish 7165 Polish 8076 Turkmen 8475
Cambodian 7577 Italian 7384 Portuguese 8084 Twi 8487
Catalan 6765 Japanese 7465 Quechua 8185 Ukrainian 8575
Chinese 9072 Javanese 7487 Romansch 8277 Urdu 8582
Corsican 6779 Kannada 7578 Romanian 8279 Uzbek 8590
Croatian 7282 Kashmiri 7583 Russian 8285 Vietnamese 8673
Czech 6783 Kazakh 7575 Samoan 8377 Volapük 8679
Danish 6865 Kirghiz 7589 Sanskrit 8365 Welsh 6789
Dutch 7876 Korean 7579 Scots Gaelic 7168 Wolof 8779
English 6978 Kurdish 7585 Serbian 8382 Xhosa 8872
Esperanto 6979 Lao 7679 Serbo-Croatian 8372 Yiddish 7473
Estonian 6984 Latin 7665 Shona 8378 Yoruba 8979
Faeroese 7079 Latvian 7686 Sindhi 8368 Zulu 9085
54 DRH-5700x
Page 55

Reference
Menu overview
Menu overview
Root menu Submenu Function
Tuner Auto Scan Starts the automatic channel search
Play List Opens the play list
Country settings Country Selection
Channel Mapping Assigns VideoPlus numbers to channels
Auto Install Starts the automatic setup, including channel search (e.g. after a reset)
Disc Format Formats a recordable disc
Finalize Finalises a disc
Protect Protects a disc against accidental deletion, disc protection can be deactivated
Disc Label Enter a name for a disc
Disc Info Access disc information such as name, title number, media, status, free memory or re-
Playback Menu Language Selects the menu language
Audio Language Selects the audio language for DVDs
Subtitle Language Selects the subtitle language for DVDs
TV Screen Information on the picture format of your TV, 4:3 PS, 4:3 LB or 16:9
Last Memory Continue function for playing DVDs after the unit is switched on/off
Parental Control Defines the parental control authorisation level and prevents the playback of locked infor-
Change Password Changes the password (universal password: 1369).
DivX(R) VOD DRM Registration code for Video On Demand
Recording Recording Quality Determines the quality of DVD and HDD recordings (HQ, SP, LP, EP SLP, SEP)
Chapter Mark Sets automatic markers during DVD/HDD recordings
Video TV Type Television standard: Auto, NTSC, PAL
Scan Mode Interlace, P-SCAN (Progressive Scan)
HDMI Digital picture transfer via HDMI output: On, Off
HDMI Resolution HDMI output setting: Interlace, P-SCAN, 720 p, 1080i
Video Output Signal setting for the component output: Off, YUV, RGB
SCART Input Setting for signals received via the SCART IN/DECODER: Video, RGB
Audio Downmix Defines playback of multi-channel sound: LT/RT, Stereo, V-SURR, Off
Front Speaker Large, Small
Center Speaker Large, Small, Off
Rear Speaker Large, Small, Off
Subwoofer On, Off
Digital Output Bit Stream, PCM, Automatic, Off
Test T one Transmits a test tone from the speakers
Dialog Gain Dynamic dialogue setting (difference between loud and quiet scenes)
Panorama On, Off
Speech Balance Dynamic setting, left and right
Spatial Dynamic setting, front and rear
Dual Mono L-Mono, R-Mono, Stereo, Mix-Mono
PRO Logic II On, Off, Automatic
PRO Logic II Mode Film, Music, PRO Logic, Automatic
LPCM Out Sampling frequency setting
Dynamic Full, Centre, Off
System OSD Language Defines the menu language
Auto Clock Setting Automatic time setting
Clock Setting Manual time setting
Screen Saver Switches the screen saver On, Off
Format HDD Deletes all recordings and data on the hard disk
Load Default Resets the unit settings to the factory default
maining play time
mation. DVDs must support this function (for the US market only)
DRH-5700x 55
Page 56

Reference
Troubleshooting
Troubleshooting
Before calling our customer service centre, please read the following information to establish the possible cause
of a fault.
Fault Cause Solution
No power. Mains cable is not plugged in. Plug the mains cable firmly into the so-
cket.
No picture. TV/DVD mode on the recorder is set to TV. Press the DVD button on the remote con-
trol to select DVD mode. The TV symbol
appears on the display window.
The television has not been configured to
receive recorder signals.
Video cable is not connected properly. Connect the video cable properly.
Connected television is switched off. Switch on the television.
No sound. Devices connected via the audio cable ha-
ve not been configured to receive recorder
signals.
Audio cables are not connected properly. Connect the audio cables properly.
Devices connected via the audio cables are
not switched on.
Audio connecting cable is damaged. Replace the cable.
Poor picture during playback. Disc is dirty. Clean the disc.
The recorder does not play. No disc inserted. Insert a disc. (the disc symbol must ap-
Unplayable disc inserted. Insert a playable disc. (check the disc ty Disc is inserted the wrong way up. Insert the disc with the playback side fac Disc is not positioned in the loader recess
correctly.
Disc is dirty. Clean the disc.
Preset authorisation level. Disable the parental control function or
Picture from the auxiliary device is distorted.
The recorder skips some
channels when the -CH+ buttons are pressed.
Picture or sound received
from the station is poor or
absent.
Camcorder picture not displayed.
The camcorder picture connected to the recorder via the
A/V or DV IN input is not displayed correctly.
The video signal from the auxiliary device is
copy protected.
These channels are not stored in the re-
corder.
Channel not active.
The antenna or cables are loose. Check the connections or replace the ca-
The camcorder is switched off. Switch on the camcorder and operate
The input source is configured incorrectly
on the recorder.
Configure the correct video input mode
so that the television displays the picture
transmitted by the recorder.
Configure the correct audio receiver input
mode so that you can hear the sound
transmitted by the recorder.
Devices connected via the audio cables
are not switched on.
pear on the display.)
pe, colour system and country code.)
ing downwards.
Place the disc in the disc loader recess
correctly.
change the authorisation level.
You cannot connect the device via the
recorder. Connect the device directly to
the television.
Restore the channels. See "Channel setup" on page 22.
Activate the channel in the channel list.
bles.
correctly.
Press AV/INPUT and select an input
channel (AV1, AV2, DV, etc.)
56 DRH-5700x
Page 57

Fault Cause Solution
A disc recorded on
this recorder cannot
be played on other
players.
The disc was recorded in video recording
mode.
Reference
Troubleshooting
Finalise the disc (see page 24).
The other player must be compatible with RW me-
dia.
Recording is or was
not possible.
Timer recording is not
possible.
Stereo recording
and/or playback is not
possible.
The remote control
does not function correctly.
Insufficient space on the disc. Use another disc.
The source that you wish to copy from is co-
You cannot record from a copy-protected source.
py-protected.
When you configure the recording channel,
the channel is tuned on the TV tuner.
Select the channel using the TV tuner integrated in
the recorder.
The recorder clock shows the incorrect time. Set the time. See "Automatic time setting" or "Man-
ual time setting" on page 29.
The timer was programmed incorrectly. Reprogram the timer. See "Timer recording" on pa-
ge 43.
The timer recording symbol disappears when
Reprogram the timer.
programming is finished.
The television is not stereo-compatible. No solution.
The program is not broadcast in stereo. No solution.
The A/V output sockets on the recorder are
not connected to the A/V input sockets on the
Connect the A/V sockets. Stereo sound is only pos-
sible via the A/V output on the recorder.
television.
The audio/video output on the recorder is not
Select AUX or A/V as a source for the TV input.
configured to display pictures on a television.
TV sound channel on the recorder is set to
mono.
The remote control is not directed at the sensor on the recorder.
Remote control is too far away from the re-
Set the audio channel on the television to stereo.
See "Changing the TV audio channel" on page 42.
Direct the remote control at the receiver sensor on
the recorder.
Use the remote control within a range of 7
m.
corder.
There is an obstacle between the remote con-
Remove the obstacle.
trol and the recorder.
The remote control batteries are flat. Replace the batteries with new ones.
DRH-5700x 57
Page 58

Reference
Index
Index
16:9 25
4:3 LB 25
4:3 PS 25
Audio
5.1 channel 28
Audio menu 28
Digital 28
Downmix 28
LPCM 28
Audio settings 28
Automatic search 22
Automatic setting 21
Camera angle 33
Care 6
Channel mapping 23
Chapter markers 41
Chapter marks 27
Chapter selection 33
Components 27
Connection
Amplifier 18
Antenna 16
AV2 20
Camcorder 21
Decoder 19
HDMI 17
Television 16
Connections 15
Controls 13
Copying 11, 52
DVD to hard disk 53
Hard disk to DVD 53
Copying to USB 40
Country code 9
CPRM 52
Default settings 29
Digital output 28
Disc info 24
Disc information
Cleaning 8
Handling 8
Disc label 24
Disc menu 23
Disc protection 24
Disposal 6
DivX 26
Playback 34
DivX registration code 26
Downmix 28
DVD recording 41
Dynamic 28
EP 26
File manager 35, 38
Options 35, 36
Finalising 24, 54
Formatting 23
Hard disk 11, 29
Formatting 29
HDD 11
HDD, VR mode
Deleting sections 49
Dividing titles 50
Erasing titles 49
Index pictures 49
Naming a title 49
Protecting titles 51
Selecting titles 48
Thumbnails 49
HDMI 17, 27
High-speed 53
HQ 26
ID3 tag 35
Initialisation 23
Installation location 5
JPEG files 38
Overview 38
Requirement 38
Slide show 39
Thumbnails 38
JUKEBOX 35
Keyboard menu 49
Language 25
Language codes 54
Last memory 25
LP 26
LPCM 28
Maintenance 6
Managing
Copying 40
Copying onto USB devices 40
Deleting 39
Hard disk 39
MP3, WMA, JPEG, DivX 39
Media 8
Menu commands 48
Menu overview 55
Options 36, 38
OSD 29
Parental control 25
Parental lock 25
Password 26
Play list
Copying 37
Options 37
Playback 30
Audio CD 35
Functions 31
Jukebox 35
MP3 35
WMA 35
Playback menu 25
Languages 25
Program list 22, 23
Editing 23
Programmed playback 36
Quick guide 4
Quick start 4
Recording
DV device 46
External auxiliary devices 46
From TV 42
Hard disk 41
Simultaneous playback 47
Time 43
Timer 43
Recording list 44
Recording menu 26
Recording mode 26
Recording time 43
Repeat function 36
Requirement
MP3 36
WMA 36
ode 27
Scan m
SCART input 27
Screen menus
Description 30
Disc information 30
Screen saver 29
SEP 26
Setup menu 22
Overview 22
VideoPlus 45
Slide show 39
SLP 26
SP 26
System menu 29
Thumbnails 38
Time
Automatically 29
Manually 29
Time search function 33
Time slip HDD 47
Timer
Recording list 44
VideoPlus 45
PDC 44
Timer recording 43
Timeshift 42, 47
Title list menu
Menu commands 48
Overview 48
Title selection 33
Tuner menu 22
TV screen ratio 25
TV type 27
USB
Card reader 12
Memory stick 12
Operation 12
Socket 12
Video menu 27
HDMI 27
Resolution 27
PDC 44
58 DRH-5700x
Page 59

Specifications
Reference
Specifications
General
Power supply AC 100-240V, 50/60 Hz
Power consumption 30W, STANDBY 3 W
Dimensions (approx.) 430 X 55 X 278 mm (W x H x D)
Total weight (approx.) 3.9 kg
Operating temperature 5°C to 35°C
Humidity 5% to 85%
Television standard PAL I, B/G, I/I, SECAM D/K, K1 colour system
Recording format PAL
Recording
Recording format DVD video recording
Recordable data carriers Hard disk (500GB), DVD-RW,
Approximate DVD recording time (4.7 GB): 1 h in HQ mode, 2 h in SP mode, 3 h in LP mode, 4 h in EP mode,
DVD+R DL (8.5 GB)
Hard disk (500GB, MPEG2 recording):
Video recording format
DVD-R, DVD+RW, DVD+R, DVD+R (Double Layer)
6 h in SLP mode
Approx. 1h 54 min. in HQ mode, 3h 50 min. in SP mode, 5h 48 min. in LP
mode,
7h 42 min. in EP mode, 11h 42 min. in SLP mode
Approx. 113h 54 min. in HQ mode, 227h 50 min. in SP mode, 341h 42 min. in
LP mode,
455h 42 min. (EP mode), 683h 24 min. SLP mode
Sampling frequency 27 MHz
Compression format MPEG2
Audio recording format
Sampling frequency 48 kHz
Compression format Dolby Digital
Playback
Frequency response DVD (PCM): 20 Hz to 20 kHz
CD: 20 Hz to 20 kHz
Signal-to-noise ratio More than 85 dB (AUDIO OUT socket)
Distortion factor Less than 0.5% (AUDIO OUT socket)
Dynamic range 85 dB (AUDIO OUT socket)
Inputs
ANTENNA IN Antenna input, 75 ohms
VIDEO IN 1.0 Vp-p (75 ohms)
S-VIDEO IN (Y): 1 Vp-p (75 ohms); (C): 0.3 Vp-p (75 ohms)
AUDIO IN 2.0 Vrms more than 47 kohms, cinch socket (L, R)
DV IN 4-pi n (standard IEEE 1394)
USB IN 4-pi n (Standard USB 1.1)
Outputs
ANTENNA OUT Antenna output, 75 ohms
S-VIDEO OUT (Y) 1.0 V (p-p), 75 ohms, (C) 0.3 V (p-p)75 ohms
VIDEO OUT 1.0 Vp-p (75 ohms)
COMPONENT VIDEO OUT (Y) 1.0 V (p-p), 75 ohms, (PB)/(PR) 0.7 V (p-p), 75 ohms
SCART RGB, video (FBAS)
HDMI OUT V. 1.3, 19-pin (HDMI standard, type A)
COAXIAL DIGITAL AUDIO OUT 0.5 V (p-p), 75 ohms, cinch socket x 1
OPTICAL DIGITAL AUDIO OUT Optical connection x 1
ANALOGUE AUDIO OUT 2.0 Vrms (1 kHz, 0 dB), 600 ohms
DRH-5700x 59
Page 60

UK 1191514
36 month warranty from
date of purchase
Important warranty
information
Dear Customer,
Thank you for purchasing a TARGA product.
Please carefully read through the enclosed documentation or online help before putting your
(Please have your
0207-3650744
Hotline number:
Targa product into service. If you have a problem, which can’t be solved in this way, please
contact our hotline.
If the problem cannot be solved over the phone, you will be given a reference number
(RMA), which you should enclose together with a copy of the proof of purchase. After you
have packaged the unit safe for transport and in plain packaging, please send it for warranty
processing, with the RMA noted on the outside of the package, to the address given to you
by our hotline employee. After receiving the unit we will correct the manufacturing and
material defect free of charge.
Up-to-date information and answers to the most frequently asked questions are available on
the internet from:
www.targa-online.com
This guarantee is valid in the UK.
Your statutory guarantees from the seller are in addition to this warranty and are not limited
by it.
www.targa-online.com
serial number to hand!)
D-59482 Soest
Manufacturer: TARGA GmbH, Postfach 2244,
Ireland 1191515
36 month warranty from
date of purchase
Important warranty
information
Dear Customer,
Thank you for purchasing a TARGA product.
Please carefully read through the enclosed documentation or online help before putting your
(Please have your
01-2421583
Hotline number:
Targa product into service. If you have a problem, which can’t be solved in this way, please
contact our hotline.
If the problem cannot be solved over the phone, you will be given a reference number
(RMA), which you should enclose together with a copy of the proof of purchase. After you
have packaged the unit safe for transport and in plain packaging, please send it for warranty
processing, with the RMA noted on the outside of the package, to the address given to you
by our hotline employee. After receiving the unit we will correct the manufacturing and
material defect free of charge.
Up-to-date information and answers to the most frequently asked questions are available on
the internet from:
www.targa-online.com
This guarantee is valid in the Ireland.
Your statutory guarantees from the seller are in addition to this warranty and are not limited
by it.
www.targa-online.com
serial number to hand!)
D-59482 Soest
Manufacturer: TARGA GmbH, Postfach 2244,
Page 61

Ready for you:
www.targa-online.com
TARGA GmbH
Lange Wende 41
D-59494 Soest
www.targa-online.com
 Loading...