

Page 1
™
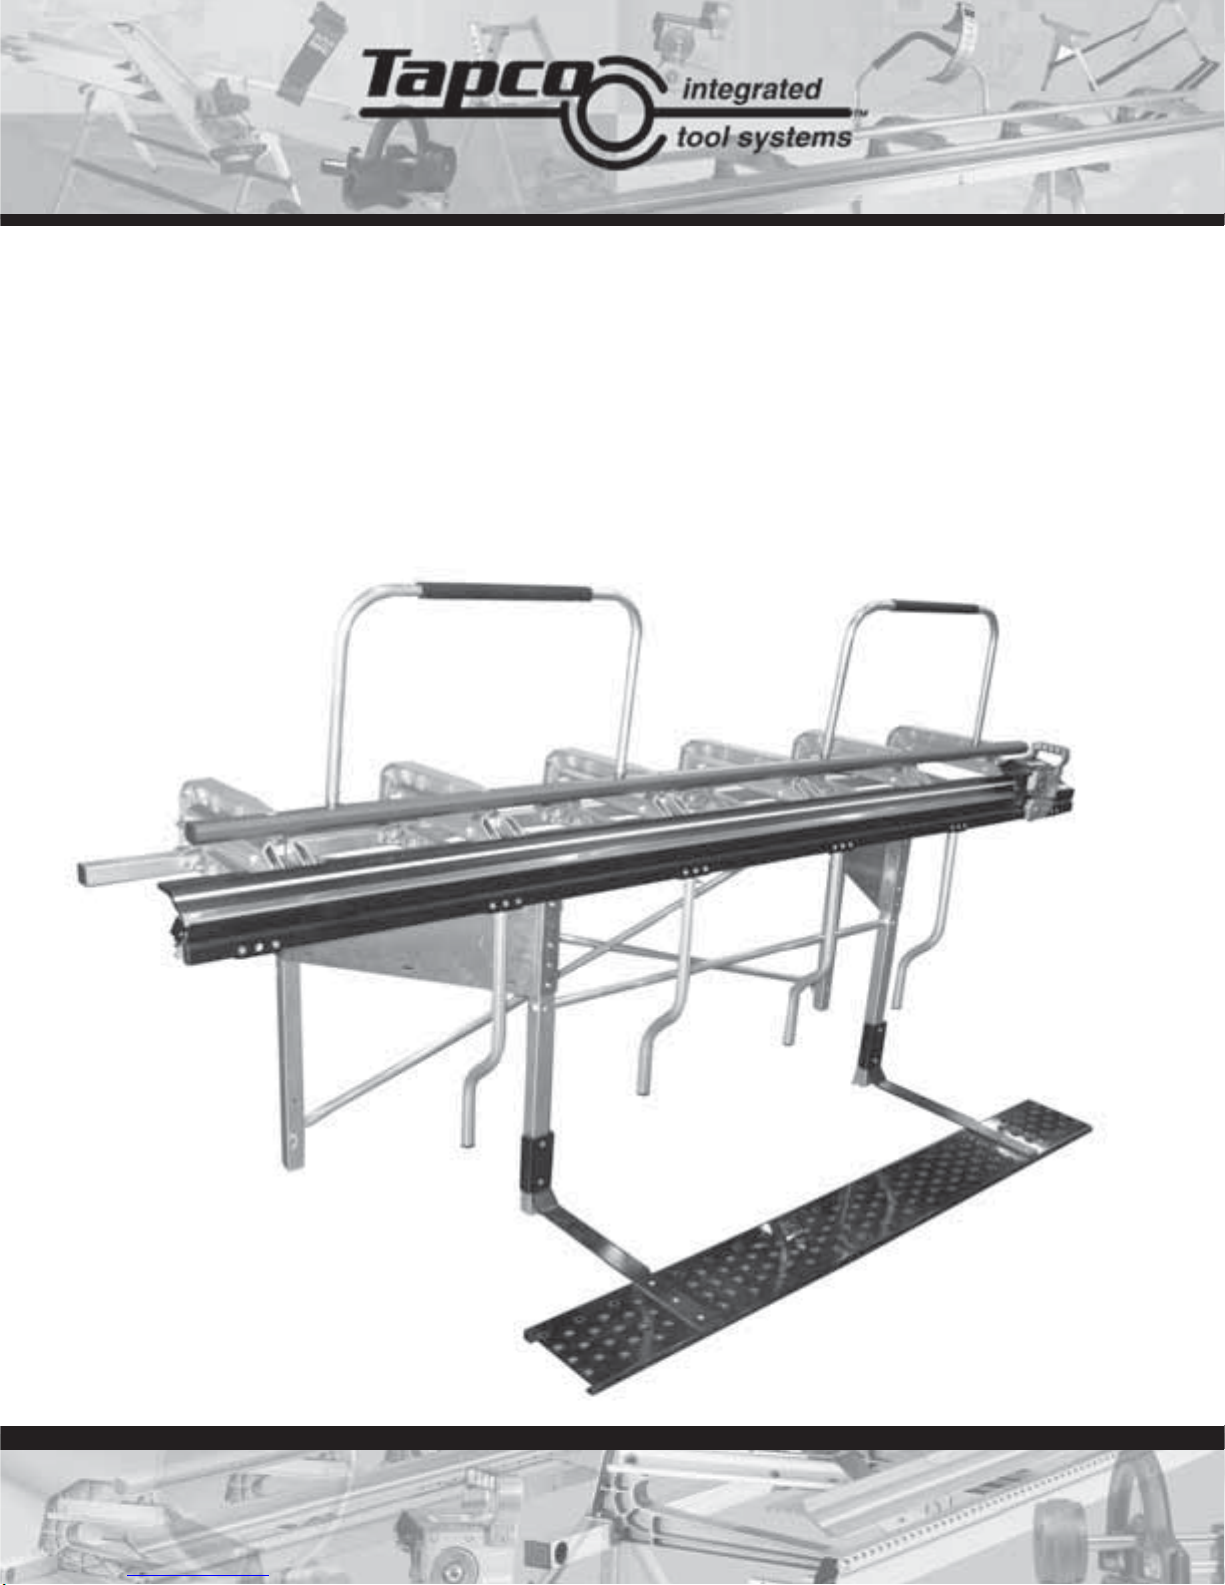
MX Series
Operating Instructions
MX 8™ • MX 10™ • MX 12™ • MX Stand™ • MAX Cut-Off
™
Page 2
Snap StandMX Series
™
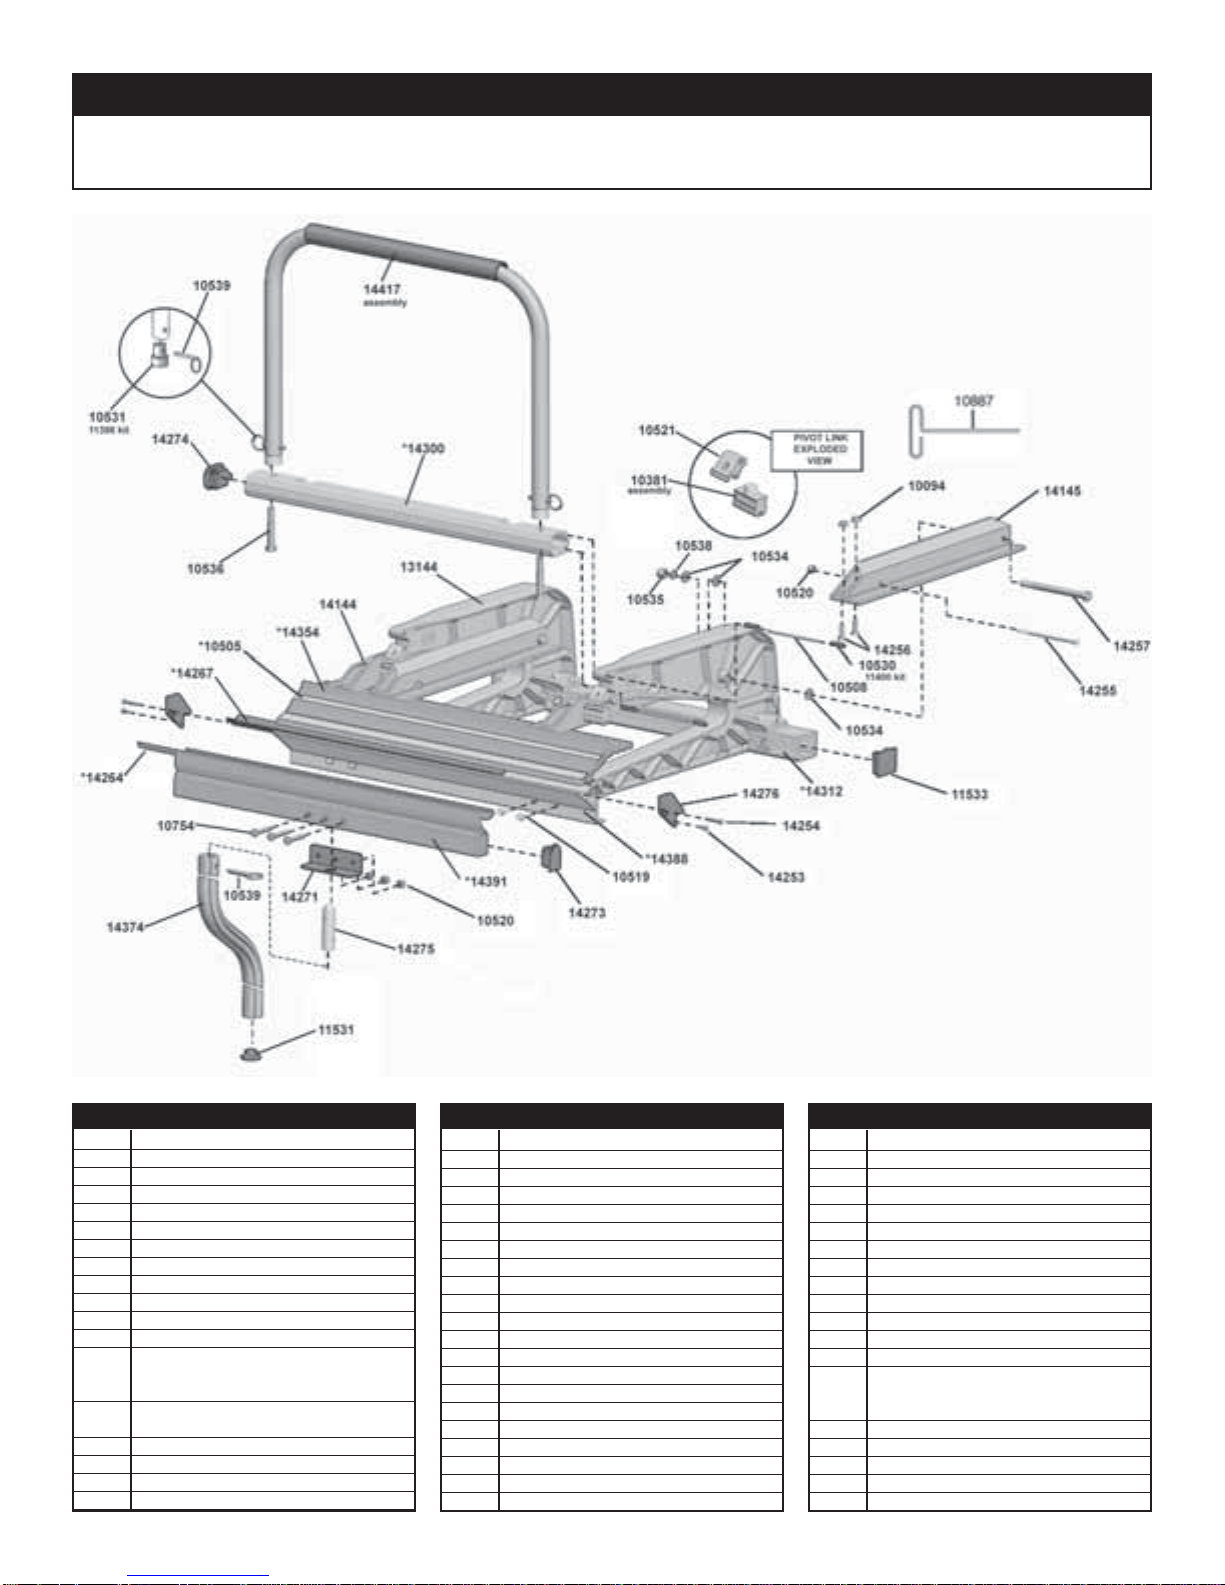
MX Series™ Brake Parts List
Item# Description Item# Description Item# Description
10491 8'6" Stainless Edge
10492 10'6" Stainless Edge
10493 12'6" Stainless Edge
10504 12'6" Tape Measure
10505 10'6" Tape Measure
10506 8'6" Tape Measure
10519 ¼ -20 x ¾ " Hex Wash HD Sc
10534 3/8" Flat Washer
10535 3/8-16 Nylock Hex Nut
10887 T-Handle Hex Key
11396 Pivot Link Assembly Kit (6)
11397 ¼ " x 1 ¼ " Faspin Kit (4)
11398 Locking Handle Plug Kit
Locking Handle Plug
3/8-16 x 2 ¼ " Bolt
11400 Locking bar Pin Kit
10 pins, 20 keepers
11531 Lifting Handle Cap
11533 Back Rail Cap
13144 C Castings
14144 Pivot Arm - Left
14145 Pivot Arm - Right
14253 8-32 x 5/16" Phil Pan HD Sc
14254 8-32 x 1" Phil Pan HD Sc
14256 ¼ -20 x 1" FL HD Sc
14257 3/8-16 x 5" Hex Cap Bolt
14263 8'6" Rubber Strip
14264 10'6" Rubber Strip
14265 12'6" Rubber Strip
14266 8'6" Wear Strip
14267 10'6" Wear Strip
14268 12'6" Wear Strip
14271 Lifting Handle Support Bracket (2)
14273 Moving Hinge Cap
14274 Locking bar Cap
14276 Fixed Hinge Endcap
14299 8'6" Locking bar
14300 10'6" Locking bar
14301 12'6" Locking bar
14311 8'6" Back Rail
14312 10'6" Back Rail
14313 12'6" Back Rail
2
14353 8'6" Locking Anvil
14354 10'6" Locking Anvil
14355 12'6" Locking Anvil
14374 Lifting Handle Assembly
14387 8'6" Fixed Hinge
14388 10'6" Fixed Hinge
14389 12'6" Fixed Hinge
14390 8'6" Moving Hinge
14391 10'6" Moving Hinge
14392 12'6" Moving Hinge
14414 Locking handle Assembly
14456 MX Series™ Brake Parts Bag 8'
14457 MX Series™ Brake Parts Bag 10'/12'
14480 Bolt and Nut Kit
¼ -20 x 4 ½ "" Bolt (5)
¼ -20 x Nylok Nut (5)
Page 3
Locking bar Installation
Locking
Handle
Snap StandMX Series
™
Setting up the MX Series™ Brake
Handle
Plug
Locking Bar
MX Locking Bar Assembly includes:
Faspin
Hex Bolt
1. Insert Hex Bolt through Locking bar
(2) Locking bars,
(4) Handle Plugs, (4) Faspins, (4) Hex Bolts
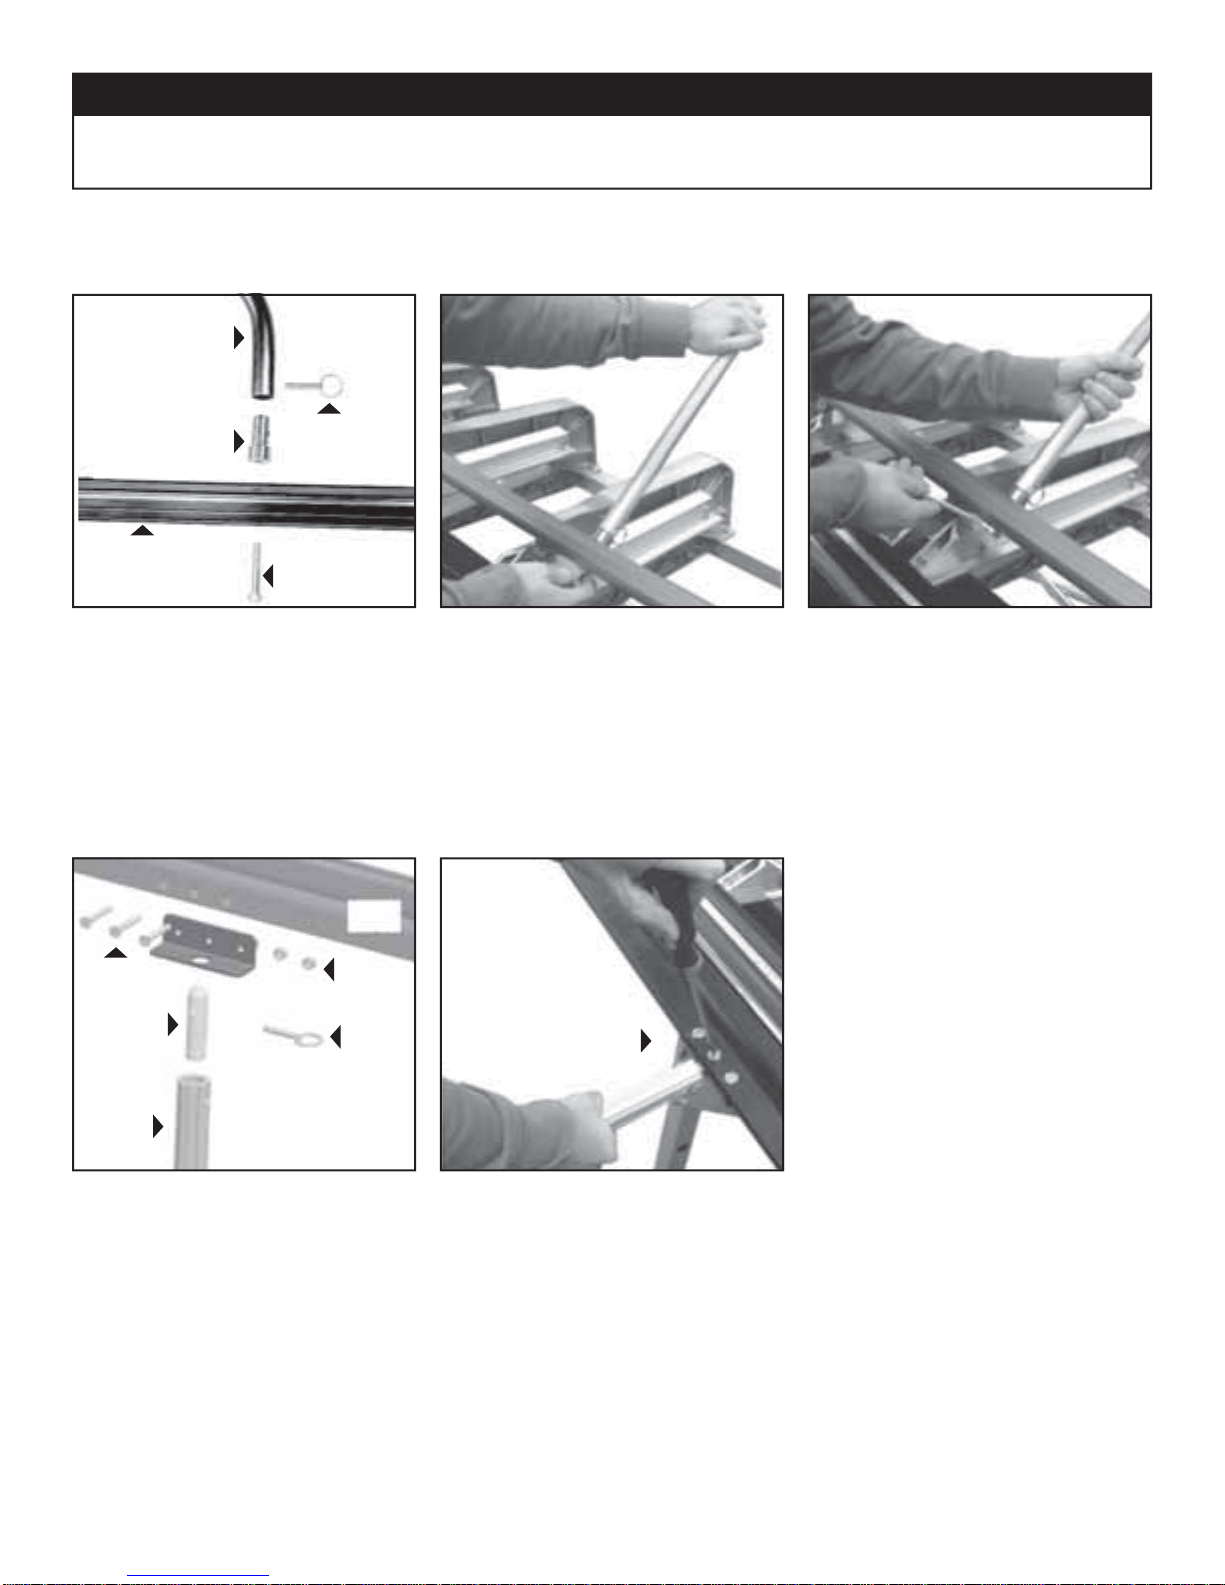
Lifting/Bending Handle Installation
Moving
Hinge
1/4-20 x 1 1/2"
Screw
1/4-20
Lock Nut
of your MX Series™ Brake and into the
base of Locking bar(s) as indicated using the 3/8" Hex Bolts provided. HAND
TIGHTEN ONLY. Repeat for other side.
2. Attach the Locking bar over the Handle
Plugs and secure them with Faspins.
Now tighten the 3/8" Hex Bolts with a
9/16" wrench. Handle can be detached
from now on by simply removing the
Faspins.
Handle
Lifting/
Bending
Handle
Plug
Exploded view of
Handle Assembly
Faspin
1. First insert one end of the Handle Plug
into Lifting / Bending Handle and install
Faspin through holes.
Secure with
1/4-20 Lock Nut
2. Next, insert Handle Assembly into hole
in bottom of Moving Hinge. Align hole
in hinge with Handle Plug and insert
screw using Phillips Screw Driver as
shown. Secure with 1/4-20 Lock Nut
Repeat for other handles. To remove
handles, simply remove Faspins. Always use more than one handle when
bending.
3
Page 4
Snap StandMX Series
™
Pivot Link Adjustment Instructions
IMPORTANT: The Pivot Links on your MX Industrial Brake have been pre-set at the factory for average holding capacity and ease of
operation. However, it's important that you readjust your MX Industrial Brake to your stock thickness. Your MX Series™ Brake may
also need periodic adjustment due to extreme weather and/or working conditions. It is important that you follow these steps when you
adjust your MX Series™ Brake to ensure proper gripping tension and maximum performance.
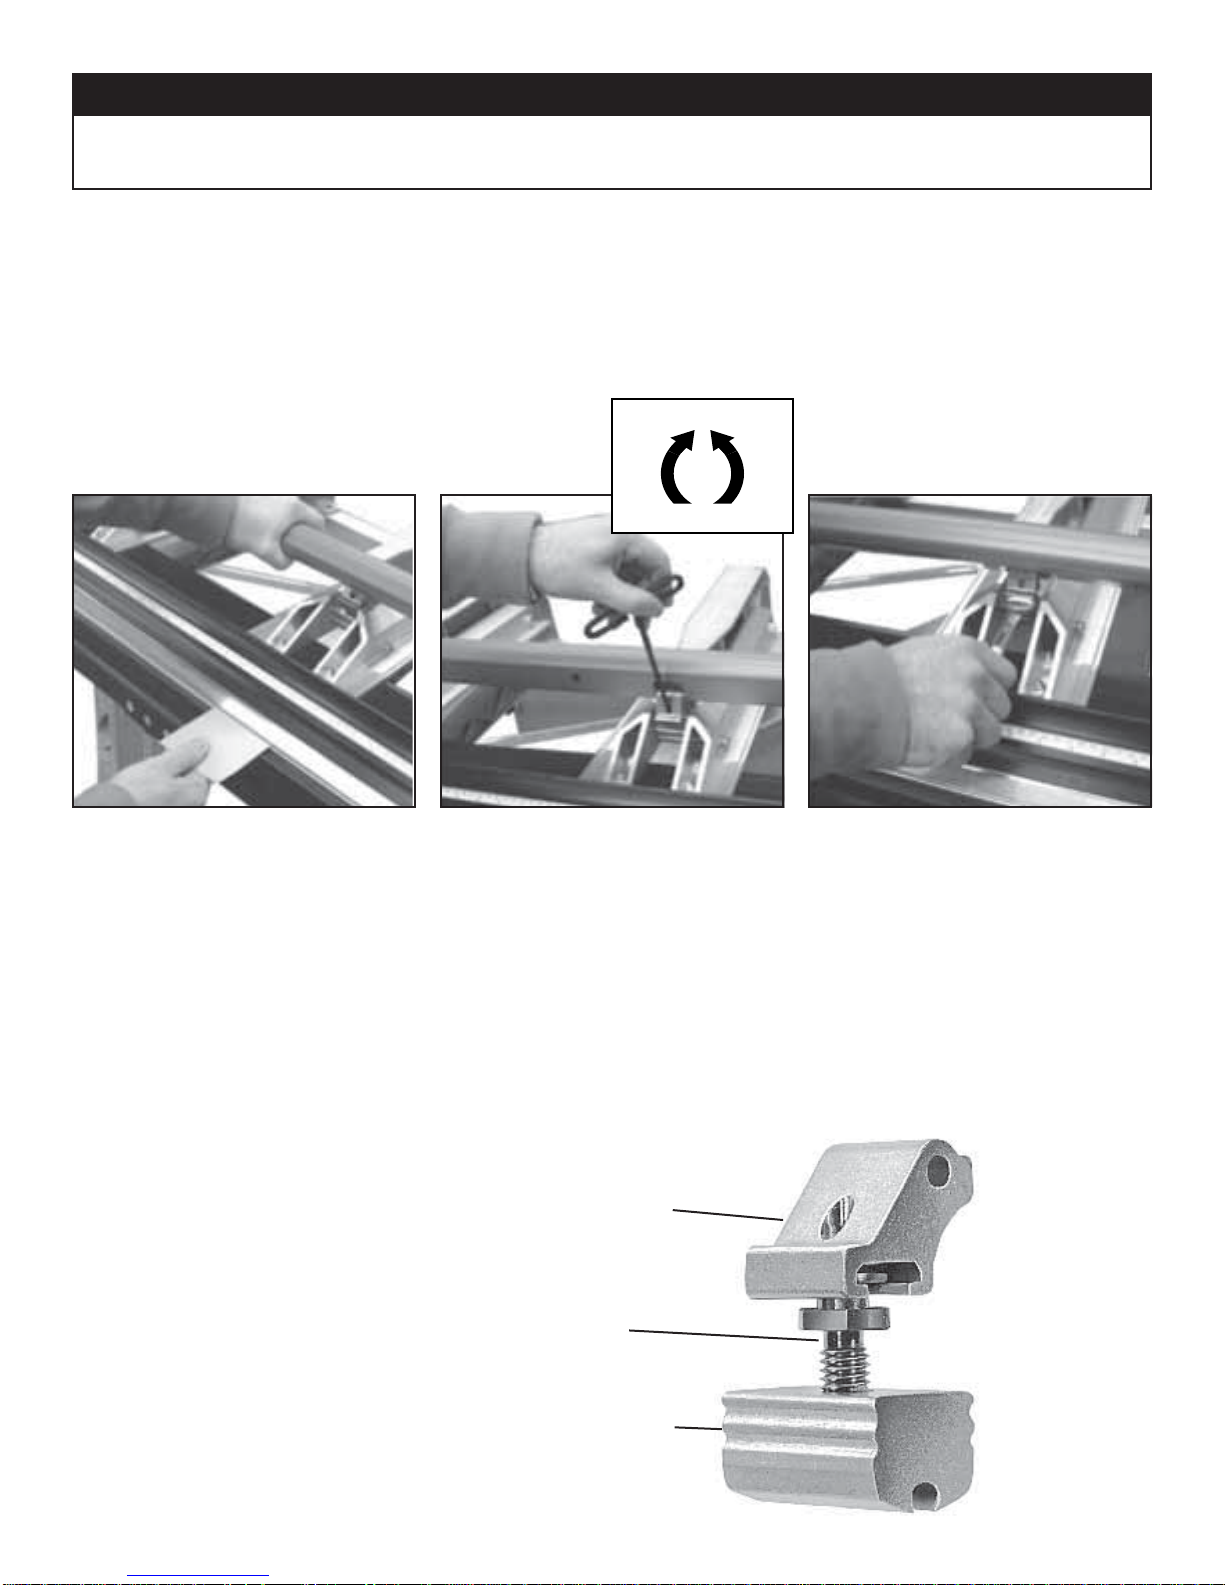
First check the uniformity of the clamping pressure along the entire length of your MX Series™ Brake by using the following method.
Decrease
Increase
TO TEST
Cut some narrow strips of aluminum or use
strips from stock you will be using and lock
one under each shoe casting as indicated
above. Then lightly pull the material to
determine the tightness and uniformity
of each Pivot Link. If the material can be
moved when the MX handle is locked or if
it requires excessive pressure to lock the
handle down on the material then the Pivot
Arms may need adjustment.
NOTE: All adjustments are made with the
MX Series™ Brake in the “open" position.
All adjustments are tested with strips of
material placed in the MX Series™ Brake in
the “locked" position.
TO ADJUST
Insert the 3/16" hex wrench into the Pivot
Link Stud through the access hole in the
upper link. Turn 1/4 turn either COUNTERCLOCKWISE to INCREASE locking tension
or CLOCKWISE to DECREASE locking
tension.
Repeat test step above to check tension.
Pivot Link Assembly
Upper
Adjustment
Link
Pivot Link
Stud
Lower
Adjustment
Link
TO ADJUST (Optional method)-
As an alternate method you may use a 5/8"
open-end wrench directly on the Pivot Link
Stud by turning 1/4 turn either COUNTERCLOCKWISE to INCREASE locking tension
or CLOCKWISE to DECREASE locking
tension.
Repeat test step above to check tension.
4
Page 5

Snap StandMX Series
™
MX Stand™ Parts List
14394
14318
(large stand) *
10539
14316
(large stand) *
10795
14319
14285
14284
14321
11533
14320
14279
Item# Description
10539 ¼ ” x 1 ¼ ” Faspin
10795 3/8-16 x 2 ½ T-Knob
11533 Back Rail Endcap
14279 Stand Counter Balance Bracket
14284 Right Stand Leg Assembly
14285 Back Rail Clamp
14316 Rear Cross Tube (large stand)
14318 Front Support Tube (large stand)
14319 Back Rail Clamp Wedge
14320 Stand Counter Balance Plank
14321 Toggle Pin
14394 Left Stand Leg Assembly
14402 Front Support Tube (small stand)
14403 Rear Cross Tube (small stand)
5
Page 6

Hardware Requirements: (2) 7/16" & (2) 9/16" Open end wrench.
STEP 1
Attach Stand Counter Balance Brackets to
Plank with Carriage Bolts and Nylock Nuts
using a 7/16" Socket or Open end Wrench.
Counter Balance is required for operation.
Snap StandMX Series
™
MX Stand™ Set-up
Stand Counter
Balance Bracket
1/4-20 x 3/4" Carriage Bolt &
1/4-20 Nylock Nut
Stand Counter
Balance Plank
STEP 2
Slide Stand Counter Balance Assembly up
to the Stand Legs. Insert the 3/8-16 x 2 3/4"
Hex Bolts through the Stand Counter Balance Bracket and Leg as shown in Figure
2. Use a 9/16" wrench to tighten down 3/816 Nylock Nut.
STEP 3
Insert Front Support Tube through both
Right and Left Legs as shown in Figure 3.
Next slide the 1/4-20 x 2 1/2" bolt through
the Stand Leg and Support tube. Use the
7/16" wrench to secure the Support Tube
in place with 1/4-20 Nylock Nuts.
Left Stand
Leg Assembly
Stand Counter
Balance Assembly
Right Stand
Leg Assembly
3/8-16 x 2 3/4" Hex Hd Bolt
3/8" Flat Washer
3/8" Lock Washer
3/8" Nylock Nut
6
Page 7

STEP 4
Rotate the Toggle Pin 90 degrees and
slide the Rear Cross Tube onto the
Pin. To secure the Tube in place allow
the arm on the Toggle Pin to drop
down. Repeat steps in all locations.
Snap StandMX Series
™
MX Stand™ Set-up
Rotate arm on Toggle Pin
to insert Rear Support Tube.
Toggle Pin in
Locked position.
Toggle Pin (locked)
Rear Cross
Tube Assembly
Toggle Pin (unlocked)
7
Page 8

Snap StandMX Series
™
Installing a MX Series™ Brake on MX Stand
STEP 5
Align the hole in the Fixed Hinge with the Slot on the Stand Top
Bracket. See 5a.
Insert Faspin through the Stand Top Bracket and into the Fixed
Hinge to secure Brake in place. See 5b.
The Brake must be secured with Faspins on the Left & Right
Stand Leg Assemblies.
Using 2 people, set Brake on Stand with the hinges above the
Front Support Tube.
™
5a
5b
STEP 6
Place Back Rail Clamp on the Back Rail. Slide Knob through
the Wedge and turn clockwise into the Threaded Insert.
See 6.
Back Rail Clamp Assembly must be attached on Left and
Right Stand Leg Assemblies.
6
Removing a MX Series™ Brake from MX Stand
- Removing the brake from the MX Stand is essentially the opposite of attaching it to the stand.
- Remove the Back Rail Clamp Assembly from the Stand.
- Lift the Moving Hinge and remove the Faspins and place in the Stand Leg Faspin storage hole.
3/8-16 Knob
Stand Back Rail
Clamp Wedge
Stand Back
Rail Clamp
™
8
Page 9

10021
Snap StandMX Series
™
Adjustable MAX Cut-Off Parts
10008
10013
10225
12396
10020
11409
10015
10227
ASSEMBLY
10021
12264
12293
12263
10227
ASSEMBLY
Item# Description
10008 Handle
10013 1/4-20 X 1-1/4” Button Hd Screw
10020 1/4-20 X 5/8” Hex Button HD Screw
10021 1/4-20 X 1” Hex Button Hd Screw
10225 Bridge
10227 MAX Knife Assembly**
10349 Coupling Nut (hook, not shown)
10519 1/4-20 X 3/4” Hex Wash Hd Screw
(not shown)
11393 Track Bearing Kit (not shown)
(2) Track Bearing 10012
11404 Material Stop Kit (not shown)
(2) Material Stop 10740
(2) 1/4-20 Knurled Knob 10776
(2) Cut-Off Tape Measure 10023
Item# Description
11409 Cut-Off Guide Bearing Kit
(2) Guide Bearing 10016
(2) 5/16” Roll Pin 10015
12263 Adjusting Nut
12264 Adjustable MAX Cut-Off Body
12293 1/4-20 X 1 1/2 Socket Head Cap Screws
12396 Flange Track Bearing Kit*
(2) Wide Flange Track Bearing 12334
(2) 1/4-20 X 5/8” Hex Button Hd Screw 12364
* This kit replaces the Track Bearing Kit 11393. Both are
still available for purchase.
** Please contact Customer Service if these parts need to
be replaced.
9
6
Page 10

Snap StandMX Series
™
Setup for Adjustable MAX Cut-Off
LIST OF PARTS:
(1) Adjustable MAX Cut-Off
(2) MX Material Stop Kit #14485
IMPORTANT! Read this safety information before using product.
Tools Needed for Initial Set Up:
hammer, punch or nail set,
9/16" wrench, Phillips screw driver .
1. Always keep hands and fi ngers clear of the knives during all phases of use.
2. If using both hands to push tool through material, ensure hands are not in the path of
the exiting material as it leaves the rear area of the tool.
3. Remove cut-off from anvil prior to bending material. Failure to do so can cause the
tool to fall from brake resulting in tool damage or personal injury to user.
4. Never use tool to cut material not fi rmly clamped in brake.
1. Slide measuring tapes into Pivot Arm
slots from rear of Pivot Arm till they
stop. Tape measures take into account
1 1/2" difference between the bending
edge and the shear point of Cut-Off for
accurate cuts.
2. Slide material stop onto Pivot Arms
from rear as shown.
Note: Recommended locations are on
the second castings in from each end
of your brake.
3. Secure the tape measures in place
by “punching" down the edge of the
pivot arm onto the tape measure. Use a
standard nail set or punch.
10
Page 11

Items Needed
-Clean Cloth
-WD-40® or equivalent
-Phillips Head Screw Driver
Wear Strip and Rubber Strip
• Use a Phillips head screw driver to
loosen the screw enough to allow the
Endcap to be removed by sliding it off of
the screw (see Figure 1 & Figure 2).
• With the Endcap removed, slide the
Moving Hinge half way down the length
of the Fixed Hinge exposing the Wear
Strip and Rubber Strip on the Fixed and
Moving Hinges (see Figure 3).
• Use a clean cloth to wipe the portions of
the Wear Strip and Rubber Strip that are
exposed (see Figures 4-7).
• At this time WD-40® or equivalent
should be used on cleaned Moving
Hinge surfaces to reduce wear and friction. (see Figure 6)
• Return the Moving Hinge to the working position and repeat steps 1 thru 4,
sliding the fi xed hinge in the opposite
direction.
• Slide Moving Hinge back into working
position.
• Reattach Endcaps
Clamping Surfaces
• Clean Clamping Surface each day before using. Use only clean shop towels
that are free of dirt, oil and metal chips.
• Do not use your MX Series™ Brake
around saw tables as the cuttings may
get in between clamping surfaces or
hinges and cause excessive wear or
material scratching.
• If material is getting scratched,
examine the Stainless Bending Edge,
Fixed Hinge, or Moving Hinge for roughness or burrs. Remove burrs with emery
cloth or replace excessively worn parts.
Snap StandMX Series
™
Care and Maintenance
1
2
4
5
6
Wear Strip
Rubber Strip
x
x
x
x
x
x
x
x
x
x
x
x
x
x
Lubricate this
surface only.
x
Moving Hinge
Transportation
• The MX Series™ Brake should be
transported in the unlocked position
unless a piece of cardboard or vinyl
siding is clamped between the clamping
surfaces.
3
Fixed Hinge
7
11
Page 12

MX Series™
™
Examples of BASIC Shapes
NOTE: UP and DOWN refers to the clad, painted or FINISH SIDE of the material as it is placed into the Bender.
1. Gravel Stop
6. Outside Corner
2. Coping Cover 7. Counter Flashing
3. One Piece Soffi t Mitre 8. Brick Frieze
5. Hip/Ridge Cap
© Boral Building Products Inc.
9. “F” Channel/Inside Corner4. Reglet Flashing
10. “D” Style Gutter
Tapco Integrated Tools
www.tapcotools.com • (800) 521-7567
Item # 14489
T5373 4/06
 Loading...