

Page 1
Quick Start Guide
LIVE MINI
Portable Mini Bluetooth Loudspeaker with
Advanced Acoustics
V 3.0
Page 2
2 LIVE MINI 3Quick Start Guide
Important Safety
Instructions
Terminals marked
with this symbol
carry electr ical current of
sucient magnitude to
constitute risk of electric
shock. Use only high-quality
professional speaker cables
with ¼" TS or twi st-locking
plugs pre-installed. Allother
installation or modication
should be performed only by
qualiedpersonnel.
This symbol,
wherever it appears,
alert s you to the presence o f
uninsulated dangerous voltage
inside the enclosure - voltage
that may be su cient to
constit ute a risk ofshock .
This symbol,
wherever it appears,
alerts you to important
operating and maintenance
instructions in the
accompanying literature.
Please read themanual.
Caution
To reduce the ris k of
elect ric shock, do not r emove
the top cover (or th e rear
section). No user serviceable
parts inside. Refer servicing to
qualiedpersonnel.
Caution
To reduce the risk
of re or ele ctric shock , do not
expose this appliance to rain
and moist ure. Theapparatu s
shall not be e xposed to
dripping or splashing liquids
and no objec ts lled with
liquids, su ch as vases, shall be
placed on th e apparatus.
Caution
These service
instructions are for use by
qualied service personnel
only. Toreduce the r isk of
elect ric shock do not per form
any servicing other than that
contained in the operation
instructions. Repairshave to
be perf ormed by qualie d
servicepersonnel.
1. Read these instructions.
2. Keep these instructions.
3. Heed all warnings.
4. Follow all instructions.
5. Do not use this apparatus
near water.
6. Clean only with dr y cloth.
7. Do not bloc k any
ventilation openings. Install
in accordan ce with the
manufacturer’s instruct ions.
8. Do not install near any
heat sourc es such as radiator s,
heat regis ters, stoves, or
other apparatus (including
ampliers) that produce heat.
9. Do not defeat t he safety
purpos e of the polarized
or grounding-type plug.
A polarize d plug has two
blades wi th one wider than
the other. A grounding-type
plug has t wo blades and a
third grounding prong. The
wide blade o r the third prong
are provid ed for your safe ty.
Ifthe prov ided plug does not
t into your o utlet, consult an
electrician for replacement of
the obsolete outlet.
10. Protec t the power cord
from bei ng walked on or
pinched particularly at plugs,
convenience receptacles, and
the point where they exit from
the apparatus.
11. Use only attachments/
accessories specied by
themanufacturer.
12. Use
only with t he
cart, stand,
tripod,
bracket, or
table spe cied by the
manufac turer, or sold with t he
apparat us. When a cart is u sed,
use caution when moving the
cart/apparatus combination to
avoid injury from tip-over.
13. Unplug this app aratus
during lightning storms or
when unused for long periods
of time.
14. Refer all servicing to
qualied service personnel.
Servicing is required when
the appar atus has been
damaged in a ny way, such
as power sup ply cord or
plug is damag ed, liquid has
been spill ed or objects h ave
fallen into the apparatus, the
apparat us has been expos ed
to rain or moi sture, does
not operate normally, or has
beendrop ped.
15. The apparatus shall be
connec ted to a MAINS socket
outlet with a protective
earthing connection.
16. Where th e MAINS plug
or an applia nce coupler is used
as the disconnect device, the
disconnect device shall remain
readily operable.
17. Correct
disposal of
this product:
This symbol
indicates that
this product
must not be d isposed of with
household waste, according to
the WEEE Dire ctive (2012/19/
EU) and your nat ional law. This
produc t should be taken to a
collection center license d for
the rec ycling of waste
electrical and electr onic
equipment (EEE). The
mishandling of this type of
waste cou ld have a possible
negative impact on the
environment and human
health due to potentially
hazardous substances that are
generally associated with EEE.
At the same ti me, your
cooperation in the correct
disposal of this product will
contrib ute to the ecient u se
of natural resources. For more
information about where you
can take you r waste
equipment for recycling,
please contact your local city
oce, or your household
waste coll ection ser vice.
18. Do not ins tall in a
conned sp ace, such as a book
case or sim ilar unit.
19. Do not plac e naked
ame sourc es, such as lighted
candles , on the apparatus .
20. Please keep the
environmental aspects of
battery disposal in mind.
Batter ies must be dispo sed-of
at a batte ry collecti on point.
21. This apparatus may be
used in tr opical and moder ate
climates u p to 45°C.
LEGAL DISCLAIMER
Music Tribe acce pts no liabilit y
for any loss w hich may be
suered b y any person who
relies either wholly or in
part upon any description,
photograph, or statement
contained herein. Technical
specications, appearances
and other information are
subjec t to change withou t
notice. All trademarks
are the pro perty of thei r
respective owners. Midas,
Klark Teknik, Lab Gruppen,
Lake, Tannoy, Turbosound,
TC Electronic, TC Helicon,
Behringer, Bugera, Oberheim,
Auratone, Aston Microphones,
Aston Microphones and
Coolaudio are trademarks
or registered trademarks of
Music Tribe Global Brands Ltd.
© Music Tribe Global Brands
Ltd. 2021 All right s reserved.
LIMITED WARRANTY
For the applicable warranty
terms and co nditions and
additional information
regarding Music Tribe’s
Limited Warranty, please see
complete details online at
musictribe.com/warranty.
WARNING
If the bat tery is
not properly replaced, there
is a danger of e xplosion and
it can only b e replaced with
a batter y of the same ty pe or
equivalent.
WARNING
The battery
(battery pack or combination
batter y) must not be exp osed
to environments such as
sunlight, re, or similar that
may cause overheating.
Instrucciones de
seguridad
Las terminales
marcadas con este
símbolo transportan corriente
eléctrica de magnitud
suciente como para constituir
un riesg o de descarga
eléctrica. Utilicesolo cables de
altavoz profesionales y de alta
calidad co n conectores T S de
6,3 mm o de bayone ta
prejados. Cualquier otra
instalación o modicación
debe ser realizada únicamente
por un técn icocualicado.
Este símbolo,
siempre que
aparece, lea dvierte de la
presencia de voltaje peligroso
sin aislar de ntro de la caja;
estevolt aje puede ser
suciente para constituir un
riesgo d edescarga.
Este símbolo,
siempre que
aparece, lea dvierte sobr e
instrucciones operativas y de
mantenimiento que aparecen
en la documentación adjunta.
Por favor, leaelman ual.
Atención
Para reducir el
riesgo de descarga eléctrica,
no quite la ta pa (olaparte
poster ior). Nohay piezas en
el interior del equipo que
puedan se r reparadas por
el usuario. S ies necesario,
póngase en contacto con
personal cualicado.
Atención
Para reducir el
riesgo d e incendio o desca rga
eléct rica, no expong a este
aparato a la ll uvia, humedad
o alguna otra fuente que
pueda salpicar o derramar
algún líquido sobre el aparato.
Nocoloque ningún tipo de
recipiente para líquidos sobre
elaparato.
Atención
Las instrucciones
de servicio deben llevarlas
a cabo exclusivamente
personal cualicado.
Paraevit ar el riesgo de
una descarga eléctrica, no
Page 3
4 LIVE MINI 5Quick Start Guide
realice reparaciones que no
se encuentren descritas en
el manual de operaciones.
Lasreparaciones deben ser
realizadas exclusivamente por
person alcualicado.
1. Lea las instrucciones.
2. Conserve estas
instrucciones.
3. Preste atenció n a todas
las advertencias.
4. Siga todas las
instrucciones.
5. No use este apara to
cerca del agua.
6. Limpie este apar ato con
un paño sec o.
7. No bloquee las aberturas
de ventilación. Instale el
equipo de acuerdo con las
instrucciones del fabricante.
8. No instale este equipo
cerca de fuentes de calor
tales como radiadores,
acumuladores de calor, estufas
u otros apa ratos (incluyend o
amplicadores) que puedan
producir calor.
9. No elimine o deshabilite
nunca la conexión a tierra
del apara to o del cable de
alimentación de corriente.
Unenchufe polarizado tiene
dos polos , uno de los cuales
tiene un contacto más ancho
que el otro. Un a clavija con
puesta a t ierra dispone d e
tres cont actos: dos polo s y la
puesta a t ierra. El contac to
ancho y el ter cer contacto,
respectivamente, son los
que garantizan una mayor
seguridad. Si el enchufe
suministrado con el equipo
no concuer da con la toma de
corriente, consulte con un
electricista para cambiar la
toma de corr iente obsolet a.
10. Coloque el cable de
suministro de energía de
manera que no pueda ser
pisado y que esté protegido
de objetos alados. Asegúrese
de que el cable de suministro
de energía esté protegido,
especia lmente en la zona de
la clavija y en e l punto donde
sale del aparato.
11. Use únicamente los
dispositivos o accesorios
especi cados por el fa bricante.
12. Use
únicamente la
carretilla,
plataforma,
trípode,
sopor te o mesa especi cados
por el fabricante o
suministrados junto con el
equipo. Al t ransportar e l
equipo, tenga cuidado para
evitar daños y caídas al
tropez ar con algún obst áculo.
13. Desenchufe el equipo
durante to rmentas o si no va a
utilizarlo durante un periodo
largo.
14. Confíe las reparaciones
únicamente a servicios
técnicos cualicados.
La unidad requiere
mantenimiento siempre que
haya sufr ido algún daño, si el
cable de suministro de energía
o el enchufe presentaran
daños, sehubiera derramado
un líquido o hubieran caído
objetos dentro del equipo,
si el aparat o hubiera estad o
expues to a la humedad o
la lluvia, si ha d ejado de
funcionar de manera normal
o si ha sufr ido algún golpe
o caída.
15. Al cone ctar la unidad a
la toma de corriente eléctrica
asegúrese de que la conexión
disponga de una unión
atierra.
16. Si el enchu fe o conector
de red sir ve como único medio
de desconexión, éste debe ser
accesiblef ácilmente.
17. Cómo
debe
deshacerse
de este
aparato: Este
símbolo
indica qu e este aparato no
debe ser tratado como basura
orgánica, según lo indicado en
la Direc tiva WEEE (2012/19/
EU) y a las normat ivas
aplicables en su país. En lugar
de ello deberá llevarlo al punto
limpio más cercano para el
reciclaje de sus elementos
eléctricos/ electrónicos (EEE).
Al hacer esto estará ayudando
a prevenir las posibles
consecuencias negativas para
el medio am biente y la salud
que podrí an ser provocada s
por una gestión inadecuada de
este tip o de aparatos. Ademá s,
el reciclaje de materiales
ayudará a conservar los
recursos naturales. Para más
información acerca del
reciclaje de este aparato,
póngase e n contacto con el
Ayuntamiento de su ciudad o
con el punto li mpio local.
18. No instale esta unidad
en un espac io muy reducido,
tal como enc astrada en una
librería o similar.
19. No coloque objetos
con llama, com o una vela
encendida , sobre este apar ato.
20. Tenga presentes todas
las advertencias relativas al
reciclaje y correcta eliminación
de las pilas. Las pilas deben
ser siempre eliminadas en un
punto limpi o y nunca con el
resto de la b asura orgánica .
21. Puede usar este
aparato en lugares con climas
tropicales y moderados que
soporten temperaturas de
hasta 45 °C.
NEGACIÓN LEGAL
Music Tribe no admite ningún
tipo de responsabilidad por
cualquier daño o pérdida
que pudiera sufrir cualquier
person a por conar total
o parcialmente en la
descripciones, fotografías
o armaciones contenidas
en este doc umento.
Las especicaciones
técnicas, imágenes y otras
informaciones contenidas
en este doc umento están
sujetas a modicaciones
sin previo av iso. Todas las
marcas comerciales que
aparecen aquí son propiedad
de sus respectivos dueños.
Midas, Klark Teknik,
Lab Gruppen, Lake, Tannoy,
Turbosound, TC Electronic,
TC Helicon, Behringer, Bugera,
Oberheim, Auratone, Aston
Microphones y Coolaudio
son marcas comerciales o
marcas registradas de Music
Tribe Global B rands Ltd.
© Music Tribe Global Brands
Ltd. 2021 Reser vados todos
los derechos.
GARANTÍA LIMITADA
Si quiere conocer los detalles
y condiciones aplicables
de la garant ía así como
información adicional sobre
la Garantía limitada de Music
Tribe, consulte online toda
la información en la web
musictribe.com/warranty.
PRECAUCIÓN
Si la batería n o es
sustit uida de forma corr ecta,
existe e l riesgo de expl osión.
Además, es ta batería solo
debe ser su stituida por ot ra
del mismo ti po o equivalente.
PRECAUCIÓN
La batería (pack
o combinación de batería)
no debe que dar expuesta
a entorno s tales como la
luz solar di recta, fue gos o
entornos similares que puedan
producir un recalentamiento
de la baterí a.
Consignes de
sécurité
Les points repérés
par ce symbole
portent une tension électrique
susant e pour constitu er un
risque d’électrocution. Utilisez
uniquement des câbles
d’enceintes professionnels de
haute quali té avec ches Jack
mono 6,35 mm ou c hes à
verrouillages déjà installées.
Touteautre ins tallation ou
modication doit être
eectuée uniquement par un
personnel qualié.
Ce symbol e avertit
de la prése nce d’une
tension dangereuse et non
isolée à l’intérieur de l’appareil
- elle peut pr ovoquer des
chocs électriques.
Attention
Ce symbol signale
les consignes d’utilisation et
d’entre ! Tienimportantes
dans la documentation
fournie. Lisez les consignes
de sécur ité du manuel
d’utilisa tion del’appareil.
Attention
Pour éviter tout
risque de choc électrique,
ne pas ouv rir le capot de
l’appareil ni démonter
le panneau arrière.
L’intérieur de l’appareil ne
possède aucun élément
réparable par l’utilisateur.
Laissert oute réparatio n à un
profes sionnelqualié.
Attention
Pour réduire les
risques d e feu et de choc
électrique, n’exposez pas
cet appar eil à la pluie, à la
moisissu re, auxgouttes o u
aux éclab oussures. Ne pos ez
pas de récipient contenant un
liquide su r l’appareil (unvase
par exemple).
Attention
Ces consignes de
sécurité et d’entretien sont
destinées à un personnel
qualié. Pou r éviter tout
risque de choc électrique,
n’eectuez aucune
réparation sur l’appareil qui
ne soit déc rite par le manuel
d’utilisation. Les éventuelles
réparations doivent être
eectuées uniquement par un
technicienspécialisé.
1. Lisez ces consignes.
2. Conservez ces consignes.
3. Respectez tous les
avertissements.
4. Respectez toutes les
consignes d’utilisation.
5. N’utilisez jamais
l’appareil à proximité d’un
liquide.
6. Nettoyez l’appareil avec
un chion sec.
7. Veillez à ne pas
empêcher la bonne ventilation
de l’apparei l via ses ouïes de
ventilation. Respectezles
consignes du fabricant
concernant l’installation
del’appareil.
Page 4
6 LIVE MINI 7Quick Start Guide
8. Ne placez pas l’appar eil
à proximit é d’une source de
chaleur telle qu’un chauage,
une cuisinière ou tout
appareil dégageant de la
chaleur (y compris un ampli
depuissa nce).
9. Ne supprimez jamais la
sécurité des prises bipolaires
ou des pris es terre. Les pris es
bipolaires possèdent deux
contacts de largeur diérente.
Leplus large e st le contact
de sécur ité. Les prises ter re
possèdent deux contacts plus
une mise à la ter re servant
de sécur ité. Si la prise du blo c
d’alimentation ou du cordon
d’ali-mentation fourni ne
corresp ond pas à celles de
votre installation électrique,
faites ap pel à un électr icien
pour eectuer le changement
de prise.
10. Installez le cordon
d’alimentation de telle
façon que personne ne
puisse marcher dessus et
qu’il soit protégé d’arêtes
coupantes. Assurez-vous
que le cordon d’alimentation
est sufsamment protégé,
notamment au niveau de
sa prise é lectrique e t de
l’endroit où il e st relié à
l’appareil; cela est également
valable pour une éventuelle
rallonge électrique.
11. Utilisez exclusivement
des accessoires et des
appareils supplémentaires
recommandés par lefabricant.
12. Utilisez
exclusivement
des chariots,
des diables, des
présentoirs,
despieds e t des surface s de
travail recommandés par le
fabricant ou livrés avec le
produit. Déplacez
précautionneusement tout
chariot ou diable chargé pour
éviter d’éventuelles blessures
en cas de chu te.
13. Débranchez l’appareil
de la tension s ecteur en cas
d’orage ou si l ’appareil r este
inutilisé pendant une longue
période de temps.
14. Les travaux d’entretien
de l’appareil doivent être
eectués uniquement
par du personnel qualié.
Aucunentretien n’est
nécess aire sauf si l’appare il est
endommagé de quelque façon
que ce soit (dom magessur
le cordon d’alimentation ou
la prise pa r exemple), siun
liquide ou un objet a pénétré
à l’intérieur du châssis, si
l’appareil a é té exposé à la
pluie ou à l’ humidité, s’il ne
fonctionne pas correctement
ou à la suite d ’une chute.
15. L’appareil doit être
connec té à une prise sec teur
dotée d’une protection par
mise à la terr e.
16. La pris e électriqu e ou
la prise IEC d e tout appareil
dénué de bouton marche/
arrêt doi t rester accessi ble
enpermanence.
17. Mise
au rebut
appropriée
de ce produ it:
Ce symbole
indique qu’en
accord avec la d irective DEEE
(2012/19/EU) et les lois en
vigueur da ns votre pays, ce
produit n e doit pas être jet é
avec les déchets ménagers.
Ce produit d oit être dépos é
dans un poin t de collecte
agréé pou r le recyclage de s
déchets d’équipements
électriques et élect roniques
(EEE). Une mauvaise
manipulat ion de ce type de
déchets pourrait avoir un
impact négatif sur
l’environnement et la santé à
cause des substances
potentiellement dangereuses
généralement associées à ces
équipements. En même
temps, votre coopération dans
la mise au reb ut de ce produit
contribuera à l’utilisation
ecace des ressources
naturelles. Pour plus
d’informations sur l’endroit où
vous pouve z déposer vos
déchets d’équipements pour
le recyclage, veuillez contacter
votre mairie ou votre centre
local de co llecte des déc hets.
18. N’installez pas l’appareil
dans un espa ce conné tel
qu’une bibliothèque ou
meuble similaire.
19. Ne placez jamais
d’objets enammés, tels que
des bougies allumées, sur
l’appareil.
20. Garde z à l’esprit l’impac t
environnemental lorsque vous
mettez des piles au rebus.
Les piles u sées doivent êtr e
déposé es dans un point de
collecte adapté.
21. Cet appareil peut
être utilisé sous un climat
tropic al ou modéré avec
des tempér atures de 45°C
maximum.
DÉNI LÉGAL
Music Tribe ne pe ut être
tenu pour responsable pour
toute perte pouvant être
subie par to ute personne
se ant en par tie ou en
totalité à to ute descript ion,
photographie ou armation
contenue dans ce document.
Les caractéristiques,
l’apparence et d’autres
informations peuvent faire
l’objet de modications
sans notication. Toutes les
marques appartiennent à
leurs propriétaires respectifs.
Midas, Klark Teknik,
Lab Gruppen, Lake, Tannoy,
Turbosound , TC Electronic,
TC Helicon, Behringer, Bugera,
Oberheim, Auratone, Aston
Microphones et Coolaudio
sont des marques ou
marques déposées de Music
Tribe Global B rands Ltd.
© Music Tribe Global Brands
Ltd. 2021 Tous droits r éservés.
markierten Anschlüsse führen
so viel Spa nnung, dassdie
Gefahr eines Stromschlags
besteht. Verwenden Sie nur
hochwertige, professionelle
GARANTIE LIMITÉE
Pour connaître les termes
et conditions de garantie
applicables, ainsi que les
informations supplémentaires
et détail lées sur la Garanti e
Limitée de Music Tribe,
consultez le site Internet
musictribe.com/warranty.
Lautsprecherkabel mit
vorinstallierten 6,35 mm
MONO-Klinkensteckern
oder Lautsprecherstecker
mit Drehverriegelung. Alle
anderen Installationen oder
Modikationen sollten nur von
qualiziertem Fachpersonal
ausgeführt werden.
Gefährdung durch
Stromschlag auszuschließen,
darf die Geräteabdeckung
AVERTISSEMENT
Si la batte rie n'est pas
correctement mise en
place, une ex plosion peut
se produi re. Remplacez la
batterie uniquement par une
batterie similaire ou de type
équivalent.
bzw. Geräterückwandnicht
abgenommen werden.
ImInnern de s Geräts
benden sich keine vom
Benutzer reparierbaren Teile.
Reparaturarbeiten dürfen nur
von qualiziertem Personal
ausgeführtwerden.
Gefährdung durch Feuer bzw.
AVERTISSEMENT
La batterie (bloc-batterie ou
piles) ne doit p as être expos ée
à la lumière di recte du solei l,
à une amme ou à to ute autre
condition pouvant provoquer
une surcha ue.
Stromschlag auszuschließen,
darf die ses Gerät weder R egen
oder Feuchtigkeit ausgesetzt
werden noch sollten
Spritzwasser oder tropfende
Flüssigkeiten in das Gerät
gelangen können. Stellen Sie
keine mit Flüssigkeit gefüllten
Gegens tände, wie z. B. Vasen,
aufdasGerät.
Wichtige
Sicherhteitshinweise
Vorsicht
Die mit dem Sym bol
Achtung
Um eine
Achtung
Um eine
Achtung
Die ServiceHinweise sind nur durch
qualiziertes Personal zu
befolgen. Umeine Gefährdung
durch Stromschlag zu
vermeiden, führen Sie bitte
keinerlei Reparaturen an
dem Gerät durch, dienicht
in der Bedienungsanleitung
beschrieben sind. Reparaturen
sind nur von qualiziertem
Fachpersonaldurchzuführen.
1. Lesen Sie diese
Hinweise.
2. Bewahren Sie diese
Hinweise auf.
3. Beachten Sie alle
Warnhinweise.
4. Befolgen Sie alle
Bedienungshinweise.
5. Betreiben Sie das Gerät
nicht in der N ähe vonWasser.
6. Reinigen Sie das Gerät
mit einem trockenen Tuch.
7. Blockieren Sie nicht die
Belüftungsschlit ze. Beachten
Sie beim Einb au des Gerätes
die Herstellerhinweise.
8. Stelle n Sie das Gerät
nicht in der N ähe von
Wärmequellen auf. Solche
Wärmequ ellen sind z. B.
Heizkörper, Herde oder andere
Wärme erzeugende Geräte
(auc h Verst ärker).
9. Ent fernen Sie in keinem
Fall die Sicherheitsvorrichtung
von Zweipol- oder geerdeten
Steckern. Ein Zweipolstecker
hat zwei unterschiedlich
breite Stec kkontakte. Ein
geerdet er Stecker hat zwei
Steckkontakte und einen
dritten Erdungskontakt.
Derbreite re Steckkontak t
oder der zusätzliche
Erdungskontakt dient
Ihrer Sicherheit. Falls das
mitgelieferte Steckerformat
Page 5
8 LIVE MINI 9Quick Start Guide
nicht zu Ihrer Steckdose passt,
wenden Sie sich bitte an einen
Elektr iker, damit die Steckdos e
entsprechend ausgetauscht
wird.
10. Verlegen Sie das
Netzka bel so, dass es vor
Tritten und scharfen Kanten
geschützt ist und nicht
beschädigt werden kann.
Achten Sie bitte insbesondere
im Bereich der Stecker,
Verlängerungskabel und
an der Stelle, an d er das
Netzkabel das Gerät verlässt,
aufausrei chendenSchut z.
11. Das Gerä t muss jederzeit
mit intaktem Schutzleiter an
das Stromnetz angeschlossen
sein.
12. Sollte der
Hauptnetzstecker oder
eine Gerätesteckdose die
Funktionseinheit zum
Abschalten sein, muss diese
immer zugänglich sein.
13. Verwenden Sie nur
Zusatzgeräte/Zubehörteile,
dielaut Hersteller geeignet
sind.
14.
Verwenden
Sie nur
Wagen,
Standvorrich-tungen, Stative, Halter
oder Tische, die vom Hersteller
benannt oder im Lieferumfang
des Geräts enthalten sind.
Falls Sie einen Wagen
benutzen, seien Sie vorsichtig
beim Bewegen der
Wagen- Gerätkombination,
umVerletzungen durch
Stolpern zuvermeiden.
15. Ziehen Sie den
Netzstecker bei Gewitter oder
wenn Sie das Gerät längere
Zeit nicht benutzen.
16. Lassen Sie alle
Wartungsarbeiten nur von
qualiziertem ServicePersonal ausführen.
EineWartung ist notwendig,
wenn das Gerät in irgendeiner
Weise besc hädigt wurde (z. B.
Beschädigung des Netzkabels
oder Steckers), Gegenstände
oder Flüssigkeit in das
Geräteinnere gelangt sind, das
Gerät Regen oder Feuchtigkeit
ausgesetzt wurde, das
Gerät nicht ordnungsgemäß
funktioniert oder auf den
Boden gefallen ist.
17.
Korrekte
Entsorgung
dieses
Produkts:
Dieses
Symbol weis t darauf hin, das
Produkt entsprechend der
WEEE Direk tive (2012/19/EU)
und der jeweiligen nationalen
Gesetze nicht zusammen mit
Ihren Haushaltsabfällen zu
entsorgen. DiesesProdukt
sollte bei einer autorisierten
Sammelstelle für Rec ycling
elektrischer und
elektronischer Geräte (EEE)
abgegeben werden. Wegen
bedenklicher Substanzen,
diegenerell mit elektrischen
und elektronischen Geräten in
Verbindung stehen, könnte
eine unsachgemäße
Behandlung dieser Abfallart
eine negative Auswirkung auf
Umwelt und Gesundheit
haben. Gleichzeitig
gewährleistet Ihr Beitrag zur
richtigen Entsorgung dieses
Produkts die eektive Nutzung
natürlicher Ressourcen.
Fürweitere Informationen zur
Entsorgung Ihrer Geräte bei
einer Recycling-Stelle nehmen
Sie bitt e Kontakt zum
zuständigen städtischen Büro,
Entsorgungsamt oder zu Ihrem
Haushaltsabfallentsorgerauf.
18. Installieren Sie das
Gerät nicht in einer beengten
Umgebung, zum Beispiel
Bücherregal oder ähnliches.
19. Stellen Sie keine
Gegenstände mit oenen
Flammen, etwa brennende
Kerzen, auf d as Gerät.
20. Beach ten Sie bei der
Entsorgung von Batterien
den Umweltschutz-Aspekt.
Batterien müssen bei einer
Batterie-Sammels telle
entsorgt werden.
21. Dieses Gerät
ist in tropischen und
gemäßigten Klimazonen bis
45° C einsetzbar.
HAFTUNGSAUSSCHLUSS
Music Tribe übernimmt
keine Haftung für Verluste,
die Personen entstanden
sind, die sic h ganz oder
teilweise auf hier enthaltene
Beschreibungen, Fotos oder
Aussagen verlassen haben.
Technische Daten,
Erscheinungsbild und andere
Informationen können ohne
vorherige Ankündigung
geändert werden. Alle
Warenzeichen sind Eigentum
der jeweiligen Inhaber.
Midas, Klark Teknik, Lab
Gruppen, Lake, Tannoy,
Turbosound, TC Electronic,
TC Helicon, Behringer, Bugera,
Oberheim, Auratone, Aston
Microphones und Coolaudio
sind Warenzeichen oder
eingetragene Warenzeichen
der Music Tribe Global Brands
Ltd. © Music Tribe Global
Brands Ltd. 2 021 Alle Rechte
vorbehalten.
BESCHRÄNKTE GARANTIE
Die geltenden
Garantiebedingungen und
zusätzliche Informationen
bezüglich der von
Music Tribe gewährten
beschränkten Garantie
nden Sie online unter
musictribe.com/warranty.
marcados com o símbolo
carregam corrente elétrica
de magnitude suciente para
ACHTUNG
Bei inkorrektem
Austausch der Batterie/
des Akkus besteht
Explosionsgefahr. Verwenden
Sie als Ers atz nur Batter ien
gleichen Typs oder
gleichwertige Batterien.
ACHTUNG
constit uir um risco de cho que
elétric o. Use apenas cabos d e
alto-falantes de alta qualidade
com plugue s TS de ¼" ou
plugues com trava de torção
pré-instalados. Todas as outras
instalações e modicações
devem ser ef etuadas por
pessoasqualicadas.
Setzen Sie die
Batterie (Batteriepack oder
-kombination) keinem
Sonnenlicht, Feuer oder
ähnlichen Umgebungen aus,
die zu einer Überhitzung
führen können.
encontre, alerta-o para a
leitura das instruções de
manuseamento que
acompanham o equipamento.
Por favor leia o m anual
deinstr uções.
diminuir o risco de choque
eléct rico, nãoremover a
cober tura (ouasecção de
trás). Não exis tem peças
substi tuíveis por par te do
utilizador no seu interior.
Para esse e feito recorre r a um
técnicoqu alicado.
de incêndios ou choques
eléctricos o aparelho não deve
ser expo sto à chuva nem à
humidade. Al émdisso, não
deve ser suje ito a salpicos,
nem devem ser colocados
em cima do aparelho
objectos contendo líquidos,
taiscomoja rras.
Instruções de
Segurança Importantes
Aviso!
Terminais
Este sím bolo, onde
quer que o
Atenção
De forma a
Atenção
Para reduzir o risco
Atenção
Estas instruções de
operação devem ser utilizadas,
emexclusi vo, por técnicos
de assistência qualicados.
Para evitar choques eléctricos
não proceda a reparações
ou intervenções, que não as
indicadas nas instruções de
operaç ão, salvo se possuir a s
quali-cações necessárias.
Para evitar choques
eléct ricos não proced a a
reparações ou intervenções,
que não as indicadas nas
instru ções de operaçã o. Só
o deverá fa zer se possuir as
qualicaçõesnecessárias.
1. Leia esta s instruções .
2. Guarde estas inst ruções.
3. Pre ste atenção a todo s
os avisos.
4. Siga to das as instruçõ es.
5. Não utilize es te
disposit ivo perto de água .
6. Limpe apenas com um
pano seco.
7. Não obstr ua as entradas
de ventilação. Instale de
acordo com a s instruções do
fabricante.
8. Não instale perto de
quaisquer fontes de calor tais
como radiadores, bocas de
ar quente, fo gões de sala ou
outros aparelhos (incluindo
amplicadores) que produzam
calor.
9. N ão anule o object ivo
de segurança das chas
polariz adas ou do tipo de
ligação à te rra. Uma cha
polarizada dispõe de duas
palhetas sendo uma mais
larga do que a o utra. Uma
cha do tip o ligação à terra
dispõe de du as palhetas e
um terceiro dente de ligação
à terra. A pa lheta larga ou o
terceiro dente são fornecidos
Page 6
10 LIV E MINI 11Quick Start Guide
para sua segurança. Se a
cha fornecida não encaixar
na sua tomada, consulte um
electricista para a substit uição
da tomada ob soleta.
10. Proteja o ca bo de
alimentação de pisadelas
ou apertos, especialmente
nas chas, e xtensões, e no
local de s aída da unidade.
Certi que-se de que o ca bo
eléct rico está prote gido.
Verique particularmente
nas chas, nos receptáculos
e no ponto em qu e o cabo sai
doaparelh o.
11. O aparelh o tem de estar
sempre conectado à rede
eléct rica com o conduto r de
protecção intacto.
12. Se ut ilizar uma cha de
rede principal ou uma tomada
de aparelhos para desligar a
unidade de funcionamento,
esta deve e star sempre
acessível.
13. Utilize apenas ligações/
acessórios especicados
pelofabricante.
14. Utilize
apenas com o
carrinho,
estrutura,
tripé, su porte,
ou mesa es pecicados p elo
fabric ante ou vendidos com o
dispositivo. Quandoutilizar
um carrinho, tenha cuidado ao
mover o conjun to carrinho/
dispositivo para evitar danos
provocados pela terpidação.
15. Desligue este dispositivo
durante as t rovoadas ou
quando não for utilizado
durante longos períodos
detempo.
16. Qualquer tipo de
reparação deve ser sempre
efectuado por pessoal
qualicado. É necessária
uma reparação sempre que a
unidade tiver sido de alguma
forma dan icada, como por
exemplo: no c aso do cabo
de aliment ação ou cha se
encontrarem danicados;
naeventualidade de líquido
ter sido derramado ou
objec tos terem caído par a
dentro do d ispositivo; no cas o
da unidade ter estado exposta
à chuva ou à hu midade; seesta
não funcionar normalmente,
ou se tiver c aído.
17. Correcta
eliminação
deste
produto:
este símbolo
indica que
o produto
não deve ser eliminado
juntamente com os resíduos
domésticos, segundo a
Direc tiva REEE (2012/19/EU)
e a legislação nacional. Este
produto deverá ser levado
para um cent ro de recolha
licenciado para a reciclagem
de resíduos de equipamentos
eléctricos e electrónicos (EEE).
O tratame nto incorrec to deste
tipo de res íduos pode ter um
eventual impacto negativo
no ambiente e n a saúde
humana devido a substâncias
potencialmente perigosas
que estão geralmente
associa das aos EEE. Ao mesmo
tempo, a sua cola boração
para a elimi nação correc ta
deste pr oduto irá contri buir
para a utilização eciente
dos recursos naturais.
Paramais informação acerca
dos locais onde poderá
deixar o seu equipamento
usado para reciclagem, é
favor contactar os serviços
municipais locais, a entidade
de gestã o de resíduos ou
os serv iços de recolha de
resíduosdomésticos.
18. Não instale em lugares
connados, tais como estantes
ou unidades similares.
19. Não co loque fontes de
chama, tai s como velas acesas ,
sobre o aparelho.
20. Favor, obed ecer os
aspectos ambientais de
descar te de bateria. B aterias
devem ser descartadas em um
ponto de coletas de baterias.
21. Esse aparelho pode ser
usado em cl imas tropicai s e
moderados até 45°C.
LEGAL RENUNCIANTE
O Music Tribe não s e
responsabiliza por perda
alguma que possa ser sofrida
por qualquer pessoa que
dependa, seja de maneira
completa ou parcial, de
qualquer descrição, fotograa,
ou declaração aqui contidas.
Dados técnicos, aparências
e outras in formações es tão
sujeitas a modicações
sem aviso pr évio. Todas as
marcas s ão propriedad e de
seus respectivos donos.
Midas, Klar k Teknik, Lab
Gruppen , Lake, Tannoy,
Turbosound, TC Electronic,
TC Helicon, Behringer, Bugera,
Oberheim, Auratone, Aston
Microphones e Coolaudio são
marcas ou marcas registradas
do Music Tribe Gl obal Brands
Ltd. © Music Tribe G lobal
Brands Ltd. 2 021 Todos direi tos
reservados.
GARANTIA LIMITADA
Para obter o s termos de
garantia aplicáveis e condições
e informações adicionais
a respeito da garantia
limitada d o Music Tribe,
favor veri car detalhe s na
íntegra at ravés do website
musictribe.com/warranty.
AVISO
Se a bateri a não for
trocada de forma apropriada,
há perigo d e explosão.
Somente um a bateria do
mesmo tipo ou equivalente
pode ser us ada.
AVISO
A bateria (pacote
de baterias ou combinação de
baterias) não d eve ser expost a
a elemento s tais como luz
do sol, fog o ou elementos
similares que possam causar
super aquecimento.
Informazioni importanti
Attenzione
I terminali
contrassegnati da questo
simbolo conducono una
corrente elettrica di
magnitudine suciente
a costit uire un rischio di
scossa elettrica. Utilizzare
solo cavi per altoparlanti
professionali di alta qualità
con jack sbilanciati da
6,35mm. o connet tori con
blocco a rot azione. Tutte
le altre installazioni o
modiche devono essere
eseguite esclusivamente da
personale qualicato.
Attenzione
Questo simbolo,
ovunque ap paia, avverte d ella
presenza di una tensione
pericolosa non isolata
all'interno dello chassis,
tensione che può essere
suciente per costituire un
rischio di scossa elettrica.
Attenzione
Questo simbolo,
ovunque appaia, segnala
importanti istruzioni operative
e di manutenzione nella
documentazione allegata. Si
invita a le ggere il manuale.
Attenzione
Per ridurr e il
rischio di scosse elettriche,
non rimuovere il coperchio
superiore (o la sezione
posteriore). All'interno
non ci sono parti riparabili
dall'utente. Per l a
manutenzione rivolgersi a
personale qualicato.
Attenzione
Per ridurr e il
rischio d i incendi o scosse
elettriche, non esporre
questo apparecchio a pioggia
e umidità. L'apparecchio
non deve ess ere esposto a
gocciolio o schizzi di liquidi e
nessun oggetto contenente
liquidi, come vasi, deve essere
collocato sull'apparecchio.
Attenzione
Queste istruzioni
di servizio sono destinate
esclusivamente a personale
qualic ato. Per ridurre il
rischio di scosse elettriche
non eseguire interventi di
manutenzione diversi da
quelli contenuti nel manuale
di istruzioni. Le riparazioni
devono essere eseguite
da personale di assistenza
qualicato.
1. Leggere queste
istruzioni.
2. Conservare ques te
istruzioni.
3. Prestare attenzione a
tutti gli avvisi.
4. Applicare tut te le
istruzioni.
5. Non utilizzare questo
dispositivo vicino l'acqua.
6. Pulire esc lusivamente
con un panno a sciutto.
7. Non bloccare le aperture
di ventilazione. Installare in
conformità con le istruzioni
del produttore.
8. Non installare vicino a
fonti di calore come radiatori,
termoregolatori, stufe o
altri apparecchi (inclusi
amplicatori) che producono
calore.
9. N on escludere la
sicurezza fornita dalla spina
polariz zata o con mess a a
terra. Una spina polarizzata
ha due lame, una p iù larga
dell'altra. U na spina con
messa a ter ra ha due lame
e un terzo po lo di messa a
terra. L a lama larga o il terzo
polo sono f orniti per la vos tra
sicurez za. Se la spina for nita
non si adat ta alla presa,
consultare un elettricista per
la sosti tuzione della pre sa
obsoleta.
10. Protegge re il cavo di
alimentazione dal calpestio
o essere schiacciato in
particolare alle spine, prese di
corrente e i l punto in cui esce
dall'apparecchio.
11. Utiliz zare esclusivamente
dispositivi/accessori specicati
dal produ ttore.
12. Utilizzare
solo car relli,
supporti,
treppiedi,
stae o t avoli
indicat i dal produttor e o
venduti co n l'apparecchio.
Utilizzando un carrello,
prestare attenzione quando si
sposta la combinazione
carrello/apparecchio per
evitare lesioni dovute al
ribaltamento.
Page 7
12 LIVE MINI 13Quick Start Guide
13. Scollegare questo
apparecchio durante i
temporal i o se non è utilizz ato
per lunghi periodi di tempo.
14. Per tu tte le riparazi oni
rivolgersi a personale
qualicato. La manutenzione
è necess aria quando
l'apparecchio è danneggiato
in qualsiasi modo, come
danneggiamento del
cavo di alimentazione o
della spina, versamento
di liquido o oggetti caduti
nell'apparecchio, se
l'apparecchio è stato esposto
a pioggia o um idità, se non
funziona normalmente o è
caduto.
15. L'apparecchio deve
essere co llegato a una pres a di
corrente e lettrica co n messa a
terra di protezione.
16. Se la spina o u na
presa del dispositivo è
utilizzata come dispositivo di
disconnessione, deve essere
facilmente utilizzabile.
17.
Smaltimento
corretto di
questo
prodotto:
questo
simbolo indica che questo
disposit ivo non deve esser e
smaltito insieme ai riuti
domestici, secondo la Direttiva
RAEE (2012/19 / UE) e la vostr a
legislazione nazionale. Questo
prodot to deve essere por tato
in un centro d i raccolta
autoriz zato per il ricic laggio di
riuti di apparecchiature
elettriche ed elettroniche
(RAEE). La cattiva gestione di
questo tipo di riuti potrebbe
avere un possibile impatto
negativo sull'ambiente e sulla
salute uma na a causa di
sostanze potenzialmente
pericolose che sono
generalmente associate alle
apparecchiature elettriche ed
elettroniche. Nello stesso
tempo la vostra collaborazione
al corretto smaltimento di
questo prodotto contribuirà
all'utilizzo eciente delle
risorse naturali. Per ulteriori
informazioni su dove è
possibile trasportare le
apparecchiature per il
ricicla ggio vi invitiamo a
contattare l'ucio comunale
locale o il s ervizio di rac colta
dei riuti domestici.
18. Non installare in uno
spazio ri stretto, come i n una
libreria o i n una strutt ura
simile.
19. Non collocare sul
dispositivo fonti di amme
libere, com e candele accese.
20. Per lo smaltimento
delle batterie, tenere in
considerazione gli aspetti
ambientali. Le batterie devono
essere sm altite in un punto di
raccolta d elle batterie e sauste.
21. Questo apparecchio può
essere us ato in climi tropi cali e
temperati no a 45°C.
DISCLAIMER LEGALE
Music Tribe non s i assume
alcuna responsabilità per
eventuali danni che possono
essere su biti da chiunque
si adi in tu tto o in parte
a qualsiasi descrizione,
fotograa o dichiarazione
contenuta qui. Speciche
tecnich e, aspetti e altr e
informazioni sono soggette
a modiche senza preav viso.
Tutti i march i sono di proprie tà
dei rispettivi titolari. Midas,
Klark Teknik, Lab Gruppen,
Lake, Tannoy, Turbosound,
TC Electronic, TC Helicon,
Behringer, Bugera, Oberheim,
Auratone, Aston Microphones
e Coolaudio sono marchi o
marchi registrati di Music Tribe
Global Br ands Ltd. © Music
Tribe Global B rands Ltd. 2021
Tutti i diri tti riser vati.
GARANZIA LIMITATA
Per i termini e l e condizioni
di garanzia applicabili e le
informazioni aggiuntive
relative alla garanzia limitata
di Music Tribe, consultare
online i det tagli comple ti su
musictribe.com/warranty.
AVVERTIMENTO
Se la batt eria
non viene sostituita
correttamente, esiste il
pericol o di esplosione e può
essere s ostituita so lo con una
batter ia dello stesso ti po o
equivalente.
AVVERTIMENTO
La batteria (batteria
o batteria combinata) non
deve esser e esposta ad
ambienti quali luce solare,
fuoco o simili che potrebbero
causare surriscaldamento.
Belangrijke
veiligheidsvoorschriften
Waarschuwing
Aansluitingen
die gemerkt zijn met het
symbool voeren een zodanig
hoge spann ing dat ze een
risico vormen voor elektrische
schokken. Gebruikuitsluitend
kwalitatief hoogwaardige,
in de handel ve rkrijgbare
luidsprekerkabels die
voorzie n zijn van ¼"TS
stekkers. Laatuitsluitend
gekwaliceerd personeel
alleoverig e installatie- o f
modicatiehandelingen
uitvoeren.
Dit symb ool wijst u
altijd op belangrijke
bedienings - en
onderhoudsvoorschrif ten in
de bijbehorende documenten.
Wijvrage n u dringend de
handleiding te lezen.
Attentie
Verwijder in geen
geval de bovenste afdekking
(vanhet achte rste gedeelt e)
anders bestaat er gevaar
voor een elektrische schok.
Hetappar aat bevat geen te
onderhouden onderdelen.
Reparatiewerkzaamheden
mogen uitsluitend door
gekwaliceerd personeel
uitgevoerdworden.
Attentie
Om het risi co op
brand of elektrische schokken
te beperken, dient u te
voorkomen dat dit apparaat
wordt blo otgesteld aan re gen
en vocht. He tapparaat mag
niet worden blootgesteld aan
neerdruppelend of opspattend
water en er mo gen geen met
water gevulde voorwerpen
– zoals een va as – op het
apparaat wordengezet.
Attentie
Deze
onderhoudsinstructies
zijn uitsluitend bedoeld
voor gekwaliceerd
onderhoudspersoneel.
Omelektrische
schokken te voorkomen,
mag u geen and ere
onderhoudshandelingen
verrich ten dan in de
bedieningsinstructies
vermeld staan.
Reparatiewerkzaamheden
mogen alleen uitgevoerd
worden door gekwaliceerd
onderhoudspersoneel.
1. Lees deze voorschriften.
2. Bewaar deze
voorschriften.
3. Neem alle
waarschuwingen in acht.
4. Volg alle voors chriften o p.
5. Gebruik dit apparaat
niet in de buu rt vanwater.
6. Reinig het uitsluitend
met een drogedoek.
7. Let erop ge en van de
ventilatie-openingen te
bedekken. Plaats en installeer
het volgens de voor- schriften
van de fabrikant.
8. Het apparaat mag niet
worden gep laatst in de buur t
van radiatoren, warmteuitlaten, k achels of andere
zaken (ook versterkers) die
warmte afgeven.
9. Maak de veiligheid
waarin door de polarisatieof aardingsstekker wordt
voorzien, niet ongedaan.
Eenpolarisatiestekker heeft
twee bla den, waarvaner
een brede r is dan het andere.
Een aardingsstekker heeft
twee bladen en een derde
uitsteeksel voor de aarding.
Het brede re blad of het
derde uitsteeksel zijn er voor
uw veilighe id. Mochtde
geleverde stekker niet in
uw stopco ntact passe n, laat
het conta ct dan door een
elektricien vervangen.
10. Om beschadiging
te voorkome n, moetde
stroomleiding zo gelegd
worden dat e r niet kan
worden over g elopen en dat
ze beschermd is tegen scherpe
kanten. Zor g zeker voor
voldoende bescherming aan
de stekker s, deverlengkab els
en het punt waar het netsnoer
het apparaat verlaat.
11. Het toestel met
altijd met e en intacte
aarddraad aan het stroomnet
aangeslotenzijn.
12. Wanneer de stekker
van het hoofdnetwerk of
een apparaatstopcontact de
functionele eenheid voor het
uitschakelen is, dientdeze
altijd toegankelijk te zijn.
13. Gebruik uitsluitend door
de producent gespeci- ceerd
toebehoren c.q. onderdelen.
14. G
ebruik
het apparaat
uitsluitend in
combinatie
met de
wagen, hetstatief,
dedriepo ot, de beugel of taf el
die door de producent is
aangegeven, of die in
combinatie met het apparaat
wordt verkocht. Bij gebruik
van een wagen dient men
voorzic htig te zijn bij het
verrijden van de combinatie
wagen/apparaat en letsel door
vallen tevoo rkomen.
15. Bij onwe er en als u het
apparaat langere tijd niet
gebruik t, haalt u de stek ker uit
hetstop contact.
Page 8
14 LIVE MINI 15Quick Start Guide
16. Laat alle voorkomende
reparaties door vakkundig en
bevoegd personeel uitvoeren.
Reparatiewerk-zaamheden
zijn nodig a ls het toestel op
enige wijze beschadigd is
geraakt, bijvoorbeeld als
de hoofd-stroomkabel of
-stekke r is beschadigd, al s er
vloeist of of voorwerp en in
terecht zijn gekomen, als het
aan regen of vochtigheid heeft
bloot-gestaan, niet normaal
functioneert of wanneer het
isgevallen.
17.
Correcte
afv
oer van dit
product: dit
symbool
geeft aan dat
u dit produ ct
op grond van de AEEA-richtlijn
(2012/19/EU) en de nationale
wetgevin g van uw land niet
met het gewone huishoudelijke
afval mag weggooien. Dit
produc t moet na aoop va n de
nuttige levensduur naar een
ociële inzamelpost voor
afgedankte elektrische en
elektronische apparatuur
(AEEA) worde n gebracht, zoda t
het kan worden gerecycleerd.
Vanwegede pote ntieel
gevaarlijke stoen die in
elektrische en elektronische
apparatuur kunnen voorkomen,
kaneen onju iste afvoer v an
afval van het onderhavige type
een negatieve invloed op het
milieu en de menselijke
gezondheid hebben. Eenjuiste
afvoe r van dit produc t is echter
niet alleen beter voor het milieu
en de gezond heid, maardraag t
tevens bij aan e en doelmatige r
gebruik van de natuurlijke
hulpbronnen. Voormeer
informatie over de plaatsen
waar u uw afg edankte
apparatuur kunt inleveren, kunt
u contac t opnemen met uw
gemeente of de
plaatselijkereinigingsdienst.
18. Installeer niet in een
kleine ruimte, zoals een
boekenkast of iets dergelijks.
19. Plaats ge en open
vlammen, zoals brandende
kaarsen, op het apparaat.
20. Houd rekening met
de milieuaspecten van het
afvoeren van batterijen.
Batterijen moeten bij een
inzamelpunt voor batterijen
worden ingeleverd.
21. Dit appar aat kan worden
gebruikt in tropische en
gematigd e klimaten tot 45 ° C.
WETTELIJKE
ONTKENNING
Music Tribe aanv aardt geen
aansprakelijkheid voor enig
verlies da t kan worden geled en
door een persoon die geheel of
gedeeltelijk vertrouwt op enige
beschrijving, foto of verklaring
hierin. Technische specicaties,
verschijningen en andere
informatie kunnen zonder
voorafgaande kennisgeving
worden gewijzigd. Alle
handelsmerken zijn eigendom
van hun respectievelijke
eigenaren.
Midas, Klark Teknik,
Lab Gruppen, Lake, Tannoy,
Turbosound , TC Electronic,
TC Helicon, Behringer, Bugera,
Oberheim, Auratone, Aston
Microphones en Coolaudio
zijn handelsmerken of
gedeponeerde handelsmerken
van Music Tribe G lobal Brands
Ltd. © Music Tribe G lobal
Brands Ltd. 2 021 Alle rechten
voorbehouden.
BEPERKTE GARANTIE
Voor de toepasselijke
garantievoorwaarden en
aanvullende informatie met
betrekking tot de beperkte
garantie van Music Tribe, zie
de volledige details online op
musictribe.com/warranty.
WAARSCHUWING
Als de bat terij niet
correct wordt vervangen,
bestaat er explosiegevaar
en kan deze al leen worden
vervangen door een batterij
van hetze lfde type of
gelijkwaardig.
WAARSCHUWING
De batterij (accu
of combinatiebatterij) mag
niet worden blootgesteld
aan omgevingen zoals
zonlicht, vuur en dergelijke
die oververhitting kunnen
veroorzaken.
Viktiga
säkerhetsanvisningar
Varning
Uttag markerade
med symbolen leder elektrisk
ströms tyrka som är t illräckligt
stark f ör att utgöra en r isk
för elchock. Använd endast
högkvalitativa, kommersiellt
tillgängliga högtalarkablar
med förhandsinstallerade
¼"TS-kontak ter. Allannan
installering eller modikation
bör endas t utföras av
kompetentpersonal.
Den här symbolen
hänvisar till viktiga
punkter om användning och
underhåll i den medfölljande
dokumentationen. Varvänlig
och läs bruksanvisningen.
Försiktighet
Minska risken för
elektriska stötar genom att
aldrig ta av höljet upptill
på appara ten (ellerta av
baksidan). Inuti apparaten
nns det ing a delar som kan
repareras av användaren.
Endastkvalicerad personal
får genomföra reparationer.
Försiktighet
För att minska
risken fö r brand och elek triska
stötar ska apparaten
skyddas mot regn och fukt.
Apparaten går inte utsättas
för drop p eller spill och ing a
vattenbehållare som vaser etc.
fårplacer as på den.
Försiktighet
Serviceinstruktionen
är enbar t avsedd för
kvalicerad servicepersonal.
Föratt undvika risker genom
elektriska stötar, genomför
inga reparationer på apparaten,
vilka inte ä r beskrivna i
bruksanvisningen. Endast
kvalicerad fackpersonal får
genomförareparationerna.
1. Läs dessa anvisningar.
2. Spara dessa anvisningar.
3. Beakt a alla varningar.
4. Följ alla anvisningar.
5. Använd inte apparaten i
närheten av vatten.
6. Rengör endast med
torr trasa.
7. Bloc kera inte
ventilationsöppningarna.
Installeraenligt tillverkarens
anvisningar.
8. Installera aldrig
intill värmekällor
som vär me- element,
varmluftsintag, spisareller
annan utr ustning som avger
värme (ink lusiveförst ärkare).
9. Ändra aldrig en
polariserad eller jordad kontakt.
Enpolaris erad kontakt h ar två
blad – det ena b redare än det
andra. En jo rdad kontakt ha r
två blad o ch ett tredj e jordstif t.
Det breda b ladet eller jor dstiftet
är till för d in säkerhet. Omd en
medföljande kontakten inte
passar i d itt uttag, s kadu
kontak ta en elektri ker för att få
uttaget bytt.
10. Förlägg elkabeln så,
att det in te är möjligt att
trampa p å den och att den är
skyddad mot skarpa kanter
och inte kan s kadas. Ge i
synnerhet akt på områdena
omkring stickkontakterna,
förlängningskablarna
och på det s tälle, där
elkabeln lämnar apparaten,
ärtillräc kligtskyddade.
11. Apparaten måste alltid
vara anslu ten till elnätet me d
intaktskyddsledare.
12. Om huvudkontakten,
ellerett apparatuttag,
fungerar som
avstängningsenhet måste
denna alltid varatillgänglig.
13. Använd endast
tillkopplingar och tillbehör
som angetts av tillverkaren.
14. A
nvänd
endast med
vagn, stativ,
trefot,
hållareeller
bord som an getts av
tillverkaren, ellersom sålts
till-sammans med apparaten.
Om du använd er en vagn, var
försiktig, när du föry ttar
kombinationen vagn-apparat,
för att f örhindra olyc ksfall
genomsnubbling.
15. Dra ur
anslutningskontakten und
åskväder eller när apparaten
inte ska användas under
någon längre tid.
16. Låt kvalicerad personal
utfö ra all service. S erviceär
nödvändig när apparaten har
skadats, t .ex.när en elkabe l
eller kontakt är skadad,
vätskaeller främmande
föremål har kommit in i
apparaten, eller när den har
fallit i go lvet.
17. Kassera
produkten på
rätt sä tt: den
här symbolen
indikerar att
produkten
inte ska kas tas i hushållss oporna,
enligtWEEE d irektivet (2012/19/
EU) ochgällan de, nationell
lagstiftning. Produkten ska
lämnas till e tt auktori serat
återvinningsställe för elektr onisk
och elektrisk utrustning (EEE).
Om den här so rtens avfal l
hanteras p å fel sätt kan mi ljön,
och
människors hälsa, påverkas
negativ t på grund av
Page 9
16 LIVE MINI 17Quick Start Guide
potentiella risksubstanser som
ofta associeras med EEE.
Avfallshanteras produk ten
däremot på r ätt sätt bid rar
detta t ill att naturen s resurser
används på e tt bra sätt .
Kontakta kommun, ansvarig
förvaltning eller
avfallshanteringsföretag för
mer information om
återvinningscentral där
produk ten kanlämnas.
18. Installera inte i ett
trångt u trymme, t.ex. i e n
bokhylsa eller liknande enhet.
19. Placera inte källor med
öppen eld, t .ex. tända ljus, på
apparaten.
20. Tänk på miljöaspekterna
vid kassering av batterier.
Batterier måste kasseras på
ett batteriuppsamlingsställe.
21. Denna apparat kan
användas i tropiska och
måttli ga klimat upp till 45 ° C.
FRISKRIVNINGSKLAUSUL
Music Tribe tar inget ansvar
för någo n förlust som k an
drabbas av någon person som
helt eller d elvis förlit ar sig på
någon beskrivning, fotogra
eller uttalande som nns
här. Tekniska specikationer,
utseenden och annan
information kan ändras utan
föregående meddelande. Alla
varumärken tillhör respektive
ägare.
Midas, Klark Teknik,
Lab Gruppen, Lake, Tannoy,
Turbosound , TC Electronic,
TC Helicon, Behringer, Bugera,
Oberheim, Auratone, Aston
Microphones och Coolaudio
varumärken eller registrerade
är
varumärken som tillhör Music
Tribe Global B rands Ltd.
© Music Tribe Glo bal Brands
Ltd. 2021 Alla Rättigheter
reserverade.
BEGRÄNSAD GARANTI
För tillämpliga garantivillkor
och ytterligare information
om Music Tribes begränsade
garanti, se fullständig
information online på
musictribe.com/warranty.
oznaczone symbolem
VARNING
Om batteriet inte
byts ut o rdentligt nns d et risk
för exp losion och det kan b ara
bytas u t med ett batte ri av
samma ty p eller motsvar ande.
VARNING
Batteriet
(batteripaket eller
kombinationsbatteri) får
inte uts ättas för milj öer som
solljus, e ld eller liknande so m
przenoszą wystarc zająco
wysokie napięcie elektryc zne,
aby stwo rzyć ryz yko
porażenia prądem. Uż ywaj
wyłącznie wy sokiej jakości
fabrycznie prz ygotowanych
kabli z zainstalowanymi
wtyc zkami ¼"TS. Wszyst kie
inne instalacje lub
modykacje powinny być
wykonywane wyłącznie przez
wykwalikowany personel
techniczny.
kan orsaka överhettning.
ważnych wskazówkach
dotyczących obsługi i
konserwacji urządzenia w
dołączonej dokumentacji.
Proszę przeczytać stosowne
informacje w instrukcji
obsługi.
wyeliminowania zagrożenia
porażenia prądem zabrania
się zdejmowania obudowy
lub tylnej ścianki urząd zenia.
Elementyznajdujące się
we wnętr zu urządzenia
nie mogą być na prawiane
przez użytkownika.
Naprawym ogą być
wykonywane jedynie przez
wykwalikowanypersonel.
wyeliminowania zagrożenia
porażenia prądem lub
zapalenia się urządzenia
nie wolno w ystawiać go na
działanie deszczu i wilgotności
Ważne informacje o
bezpieczeństwie
Uwaga
Terminale
Ten symbol
informuje o
Uwaga
W celu
Uwaga
W celu
oraz dopuszczać do tego,
aby do wnęt rza dostał a się
woda lub inna c iecz. Nie
należy stawiać na urządzeniu
napełnionych cieczą
przedmiotów takich jak np.
wazony lub szklanki.
Uwaga
Prace
serwisowe mogą być
wykonywane jedynie przez
wykwalikowany personel.
Wcelu uniknięcia zagrożenia
porażenia prądem nie
należy wykonywać żadnych
manipulacji, które nie są
opisane w instrukcji obsługi.
Naprawywykonywane
mogą być jed ynie przez
wykwalikowany
person eltechniczny.
1. Proszę przeczytać
poniższewskazówki.
2. Proszę przechowywać
niniejsząinstrukcję.
3. Należy przes trzegać
wszystkich wskazówek
ostrzegawc zych.
4. Należ y postępować
zgodnie z in strukcjąobsł ugi.
5. Urząd zenia nie wolno
używ ać w pobliżuwody.
6. Urz ądzenie można
czyścić wy łącznie
suchąszm atką.
7. Nie zasłaniać otworów
wentyla cyjnych. Wcz asie
podłączania urządzenia
należy przestrze gać
zaleceńproducenta.
8. Nie stawiać urz ądzenia
w pobliżu ź ródeł ciep ła
takich, j ak grzejniki, pie celub
urządzenia produkujące ciepło
(np.wzmacni acze).
9. W żadnym w ypadku nie
należy usuwać zabezpieczeń
z wtyczek dwubiegunowych
oraz wtyczek z uziemieniem.
Wtyczka dwubiegunowa
posiada dw a wtyki
kontaktowe o różnej
szerokoś ci. Wtyczkaz
uziemieniem ma dwa wtyki
kontakt owe i trzeci wt yk
uziemienia. Szerszy wtyk
kontaktowy lub dodat kowy
wtyk uziemienia służą do
zapewnienia bezpieczeńst wa
użytkownikowi. Je śli format
wtyczki urz ądzenia nie
odpowiada standardowi
gniazdka, proszę zwrócić
się do elek tryka z proś bą o
wymienienie gniazda.
10. Kabel sieciowy
należy ułożyć tak, aby nie
był narażo ny na deptanie i
działanie ostrych krawędzi,
co mogłoby doprowadzić do
jego uszkodzenia. Szczególną
uwagę zw rócić należ y na
odpowiednią ochronę miejsc w
pobliżu w tyczek i pr zedłużac zy
oraz miejs ce, wktórym ka bel
sieciowy przymocowany jest
dourząd zenia.
11. Urządzenie musi być
zawsze po dłączone do si eci
sprawnym p rzewodem z
uziemieniem.
12. Jeżeli w tyk sieciow y
lub gniazd o sieciowe w
urządzeniu pełnią funkcję
wyłąc znika, tomuszą o ne być
zawsze ła twodostępne.
13. Używać w yłącznie
sprzętu dodatkowego
i akcesori ów zgodnie z
zaleceniami producenta.
14. Używać
jedynie
zalecanych
przez
producenta
lub znajduj ących się w
zes tawi e wóz ków, st ojakó w,
staty wów, uchwytów i s tołów.
Wprzy padku posług iwania się
wózkiem należy zachować
szczególną ostrożność w
trakcie przewożenia zes tawu,
abyuniknąć niebezpieczeństwa
potknięcia się i zranienia.
15. W trakcie burzy
oraz na c zas dłuższe go
nieużywania urządzenia
należy w yjąć wtyc zkę z
gniazdkas ieciowego.
16. Wykonywanie wszelkich
napraw należy zlecać
jedynie wykwalikowanym
pracownikom serwisu.
Przeprowadzenie pr zeglądu
technicznego staje się
konieczne, jeśli urządzenie
zostało uszkodzone w
jakikolwiek sposób (dotyczy
to także k abla sieciowego
lub wt yczki), jeśli do wnę trza
urządz enia dostał y się
przedmioty lub ciecz, jeśli
urządzenie wystawione było
na dział anie deszczu lu b
wilgoci, jeśli urządzenie nie
funkcjonuje poprawnie oraz
kiedy spadło napodłogę.
17.
Prawidłowa
utylizacja
produktu: Ten
symbol
wskazuje, że
tego produktu nie należy wyrzuc ać
razem ze zwykłymi odpadami
domowymi, tylko zgodnie z
dyrektywą w sprawie zużytego
sprzęt u elektryc znego i
elektronicznego (WEEE) (2012/19/
EU) oraz pr zepisami krajo wymi.
Niniejszy produkt należy przeka zać
do autoryzowanego punktu zbiórki
zużytego sprzętu elektryc znego i
elektronicznego. Niewłaściwe
postęp owanie z tego typ u
odpadami może wywołać
szkodliwe działanie na środowisko
naturaln ej i zdrowie czło wieka z
powodu potencjalnych substancji
niebezpiecznych zaliczanych jako
zuży ty sprzęt ele ktrycz ny i
elektroniczny. Jednocześnie, Twój
wkład w prawidłową utylizację
niniejszego produktu przyc zynia
Page 10
18 LI VE MINI 19Quick Start Guide
się do oszczędnego
wykorzystywania zasobów
naturalnych. Szczegółowych
informa cji o miejscach, w k tórych
można oddaw ać zużyt y sprzęt do
recyklingu, udzielają urzędy
miejskie, przedsiębiorstwa
utylizacji odp adów lub najbliższy
zakład utylizacji odpadów.
18. Nie instaluj w
ograniczonej przestrzeni,
takiej jak p ółka na ksią żki lub
podobny zes taw.
19. Nie staw iaj na
urządzeniu źródeł
otwartego ognia, takich jak
zapalone świece.
20. Należy pamiętać o
środowiskowych aspektach
utylizacji bater ii. Baterie
należy u tylizować w punkc ie
zbiórki baterii.
21. To urządzenie może
być uży wane w klimacie
tropikalnym i umiarkowanym
do 45 ° C.
ZASTRZEŻENIA
PRAWNE
Music Tribe nie p onosi
odpowiedzialności za
jakiekol wiek straty, któ re
mogą poni eść osoby, które
polegają w c ałości lub w
częśc i na jakimkolwiek op isie,
fotograi lub oświadczeniu
zawart ym w niniejsz ym
dokumencie. Specykacje
technic zne, wygląd i inne
informacje mogą ulec
zmianie bez powiadomienia.
Wszys tkie znaki towarowe
są własn ością ich
odpowiednich właścicieli.
Midas, Klark Teknik,
Lab Gruppen, Lake, Tannoy,
Turbosound, TC Electronic,
TC Helicon, Behringer, Bugera,
Oberheim, Auratone, Aston
Microphones i Coolaudio są
znakami towarowymi lub
zastrzeżonymi znakami
towarowymi rmy Music
Tribe Global B rands Ltd. ©
Music Tribe Glo bal Brands
Ltd. 2021 Wszys tkie prawa
zastrzeżone.
OGRANICZONA
GWARANCJA
Aby zapozn ać się z
obowiązującymi warunkami
gwarancji i dodatkowymi
informacjami dotycząc ymi
ograniczonej gwarancji
Music Tribe, za poznaj się ze
wszystkimi szcze gółami w
trybie online pod adresem
musictribe.com/warranty.
OSTRZEŻENIE
Jeśli bateria
nie zostanie prawidłowo
wymieniona, istnieje ryz yko
wybuchu i można ją wymienić
tylko na ba terię tego same go
typu lub równoważną.
OSTRZEŻENIE
Akumulator
(akumulator lub akumulator
kombinowany) nie może być
wystawiany na działanie
czynników środowiskowych,
takich jak światło słoneczne,
ogień itp., Któ re mogą
spowodować przegrzanie.
Page 11
20 LIVE MINI 21Quick Start Guide
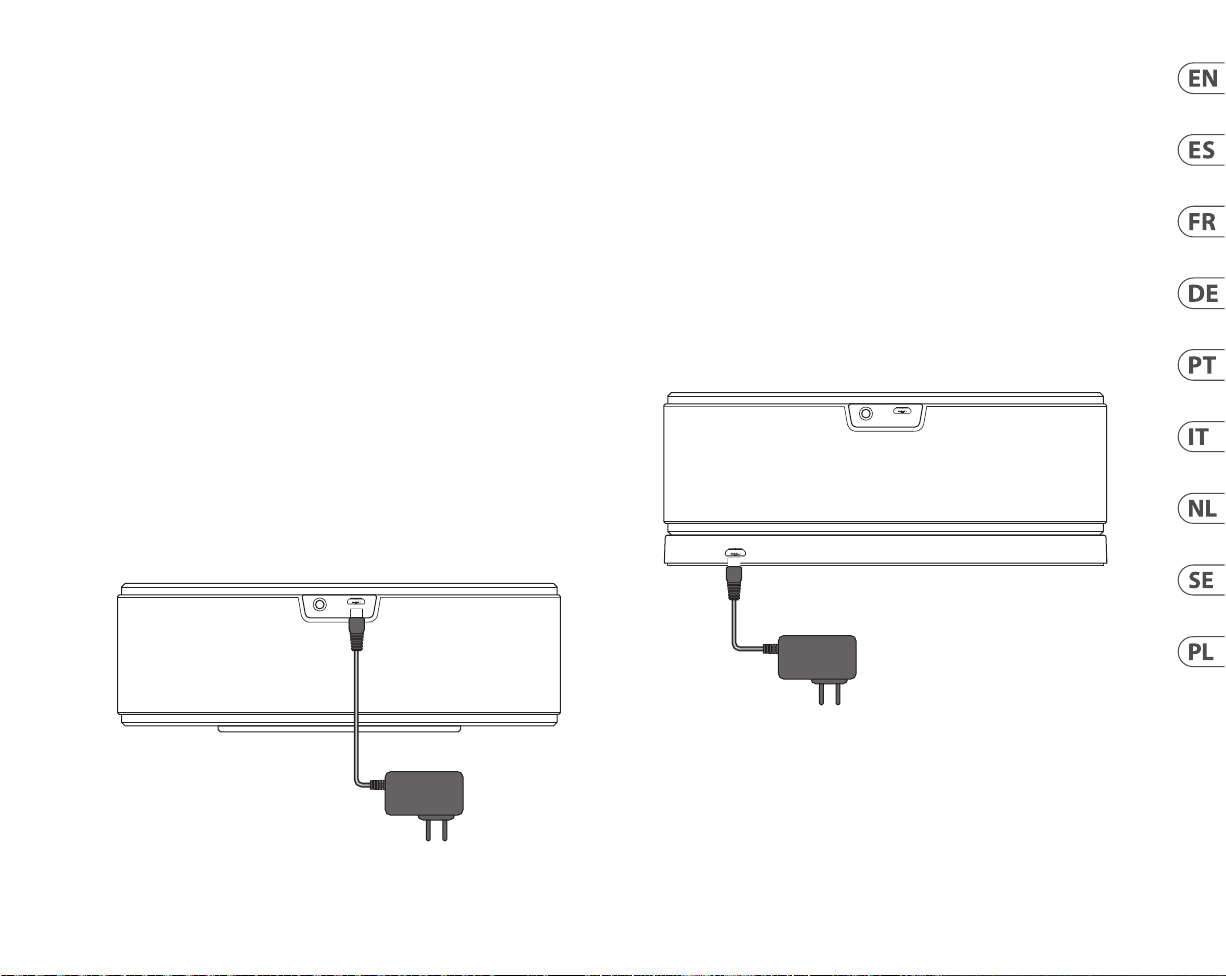
LIVE MINI
Power Adapter
LIVE MINI
LIVE MINI Hook-up
(EN) Step 1: Hook-Up
(ES) Paso 1: Conexión
(FR) Etape 1 : Connexions
(DE) Schritt 1: Verkabelung
(PT) Passo 1: Conexões
(IT) Passo 1: Allacciare
(NL) Stap 1: Aansluiten
(SE) Steg 1: Anslutning
(PL) Krok 1: Podłączeni
Power Connectio n direct to LIVE MINI
Conexión de a limentación directa a LIVE MIN I
Connexion él ectrique directe à LIVE MIN I
Stromanschluss d irekt an LIVE MINI
Conexão de ene rgia direta para LIVE MINI
Collegamento elettrico diretto a LIVE MINI
Stroomaanslu iting rechtstreeks naa r LIVE MINI
Strömanslutni ng direkt till LIVE MINI
Podłączeni e zasilania bezpośredni o do LIVE MINI
Power Connectio n using the LIVE MINI charging base (recomm ended)
Conexión de alimentación mediante la base de carga LIVE MINI (recomendado)
Connexion él ectrique à l'aide de la base d e chargement LIVE MINI (recommandé e)
Stromanschluss über die LIVE MINI Ladestation (empfohlen)
Conexão de energia usando a base de carregamento LIVE MINI (recomendado)
Collegamento all'alimentazione tramite la base di ricarica LIVE MINI (consigliato)
Stroomaansluiting met behulp van het LIVE MINI-oplaadstation (aanbevolen)
Strömanslutning med LIVE MINI laddningsbas (rekommenderas)
Podłączeni e zasilania za pomocą bazy ła dującej LIVE MINI (zalecane)
LIVE MINI
Charging Base
Power Adapter
Power Adapter
Page 12
22 LIVE MINI 23Quick Start Guide
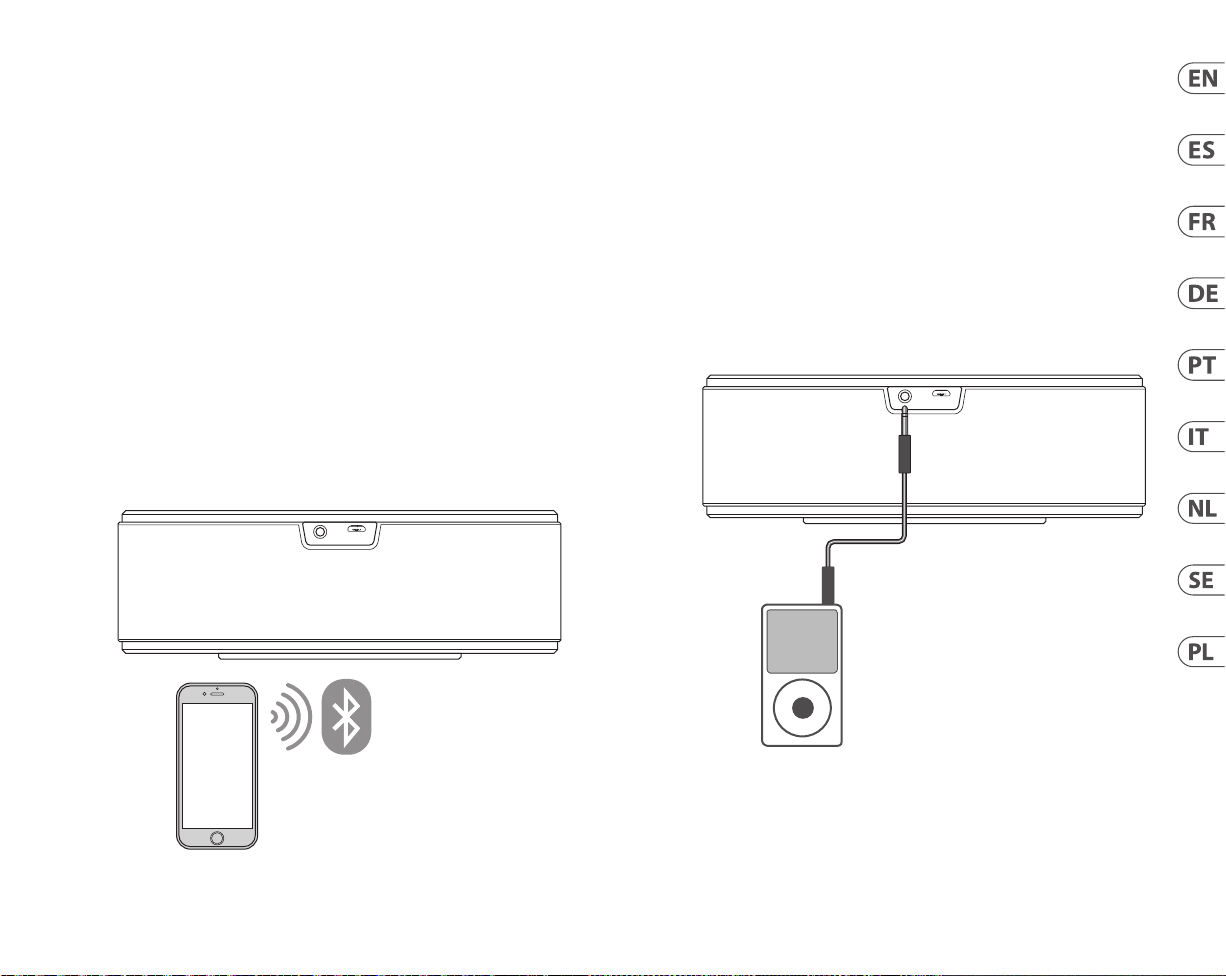
LIVE MINI Hook-up
(EN) Step 1: Hook-Up
(ES) Paso 1: Conexión
(FR) Etape 1 : Connexions
(DE) Schritt 1: Verkabelung
(PT) Passo 1: Conexões
(IT) Passo 1: Allacciare
(NL) Stap 1: Aansluiten
(SE) Steg 1: Anslutning
(PL) Krok 1: Podłączeni
Bluetooth Conn ection to LIVE MINI
Conexión Blu etooth a LIVE MINI
Connexion Bl uetooth à LIVE MINI
Bluetooth-Verbindung zu LIVE MINI
Conexão Blue tooth para LIVE MINI
Connessione Bluetooth a LIVE MINI
Bluetooth-verbinding met LIVE MINI
Bluetooth-anslutning till LIVE MINI
Połączenie B luetooth z LIVE MINI
Auxiliar y Connection to LIVE MINI
Conexión au xiliar a LIVE MINI
Connexion auxiliaire à LIVE MINI
Hilfsanschl uss an LIVE MINI
Conexão Auxi liar para LIVE MINI
Collegamento ausiliario a LIVE MINI
Extra verbi nding met LIVE MINI
Extra anslu tning till LIVE MINI
Dodatkowe po łączenie z LIVE MINI
Page 13
24 LIVE MINI 25Quick Start Guide
LIVE MINI Controls LIVE MINI Controls
(EN) Step 2: Controls
Top
Front
Rear
Base Top
Front
Rear
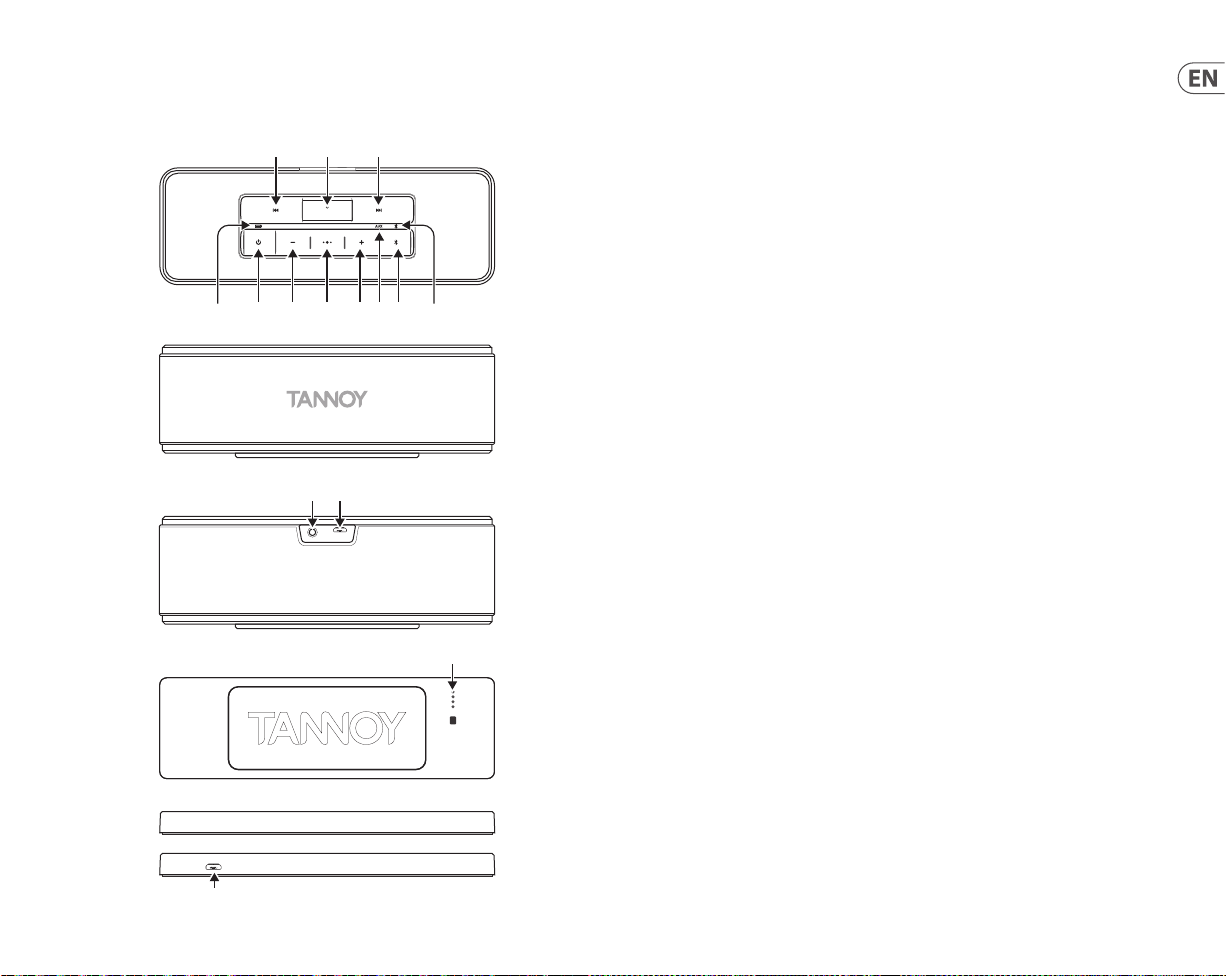
(1) (2) (3)
(5) (6) (7) (8)(9) (10)
(4)
(12) (13)
(15)
(11)
(14)
Top Panel Controls
(1) Prev ious –
playing th e previous song in t he play list.
(2 ) Microphone Aperture– below
this small ho le is the element for t he
internal microphone.
This micr ophone is used for p hone calls
and voice inte raction with yo ur mobile
devices. Ke ep this area clean and d ry,
and do not cove r, o r the microphone
response will be degraded.
(3 ) Next – thi s button is used f or playing
the nex t song in the play list.
(4 ) Power ON/Battery Indicator
When the p ower adapter is not
inserted or powered on:
When the p ower adapter is
inserted and powered on:
this but ton is used for
This LED tur ns ON for 10 seconds
after t he LIVE MINI Power butto n is
presse d. (Press the Power but ton
momenta rily and the LED will tu rn
on again for 3 s econds.) The LED
color will s how the battery s tatus
as follows:
Green: Batter y charge > 50%
Yellow: Batter y charge is
betwe en 20% and 50%
Red: Batt ery charge is low
The LED colo r will show the chargin g
progress as follows:
Green (solid): Battery is f ully charged
Yellow (ashing slowly): Charging
progre ss is above half way
Red (ashing slowly): Charging
progre ss is below half way
(5 ) Power Butt on – press this
button o nce to turn the LIVE MINI o n.
Press the b utton for abou t 1 second to
turn o the L IVE MINI.
(6 ) – Button – t his button is use d
for various operations, including
Volume Down.
(7 ) Multi-Function Button – this MFB
button i s used in various op erations of
the LIVE MINI, i ncluding Pause
and Play.
(8 ) + Button – t his button is use d
for various operations, including
Vo l um e U P.
(9 ) Aux Input Indicator – this indicates
that the LIV E MINI is connected t o an
auxillia ry device such as an MP3 p layer,
via the rear p anel 3.5 mm TRS Aux
connector.
(10) Bluetooth Button– this butt on
is used in va rious operatio ns such
as Bluetooth pairing to compatible
devices.
See the Ge tting Starte d section of this
manual for d etails of setti ng up the
Bluetooth connection.
(11) Bluetooth Indicator – this indicates
the stat us of the bluetooth c onnection.
Page 14

26 LIVE MINI 27Quick Start Guide
Rear Panel Connectors
(12 ) A ux Input – this 3.5 mm TR S
connector accepts line-level stereo
input sign als from exter nal devices
such as MP3 playe rs or computer aud io
outputs.
(13 ) Power Input – t his connector is u sed
with the su pplied power adapte r to
charge th e internal batter y of the LIVE
MINI when it is n ot attached to i ts
charging base.
The LIVE MINI c an be charged usin g
this power in put connector, or
charged w hen it is connecte d
to the charg ing base (this is the
recommended method).
Use only the supplied power adapter.
Charging Base
The LIVE MINI i s supplied with a
charging b ase. This base shou ld be
placed on a dr y and clean,
horizon tal surface.
We recommend charging using the
charging b ase, because the p ower
connec tion can be lef t in place on the
charging b ase. This reduces t he chance
of damage due to multiple connecting
and discon necting of the po wer
connection directly to the LIVE MINI.
(14) Power Connector – these four sprin g
terminals make the power connection
to the bot tom of the LIVE MINI when i t
is connec ted to the chargin g base.
When tt ing the LIVE MINI to the
charging b ase, make sure this
connec tor lines up corre ctly to the
corresp onding connec tor on the
bottom o f the LIVE MINI.
Keep this con nector clean an d dry,
as well as the co rresponding ma ting
connec tor on the bottom o f the
LIVE MINI.
(15) Power Input – t his connector is u sed
with the su pplied power adapte r to
charge th e internal batter y of the
LIVE MINI whe n it is connected to t he
charging base.
The suppli ed power adapter can b e left
connec ted to the charging b ase.
Use only the supplied power adapter.
LIVE MINI Controles
(ES) Paso 2: Controles
Controles del Panel Superior
(1) Prev ious - este botón se uti liza para
reprodu cir la canción anter ior en la lista
de reproducción.
(2 ) Microphone Aperture - debajo de
este pequeño oricio está el elemento
para el mic rófono interno.
Este mic rófono se utiliz a para llamadas
telefón icas e interacción d e voz con sus
disposit ivos móviles. Mant enga esta
área limpia y s eca, y no la cubra, o la
respuesta del micrófono se degradará.
(3 ) Next - es te botón se utiliz a para
reproducir la siguiente canción de la
lista de reproducción.
(4 ) Power ON/Battery Indicator
Cuando el adaptador de corriente
no está insertado o encendido:
Este LED s e enciende durante 10
segundos después de presionar
el botón LIV E MINI Power.
(Presione el botón de encendido
momentá neamente y el LED se
encenderá nuevamente durante 3
segundo s). E l color del LED mostr ará
el estad o de la batería de la sigui ente
manera:
Verde : Carga de la batería > 5 0%
Amarillo: La carga de la bat ería está
entre el 20 % y el 50%
Rojo: La c arga de la batería es b aja
Cuando el adaptador de corriente
está insertado y encendido:
El color del L ED mostrará el pro greso
de la carga d e la siguiente manera:
Verde (fijo): La b atería está
completamente cargada
Amarillo (parpadeando
lentamente): El progreso de ca rga
está po r encima de la mitad
(5 ) Power Butt on - presione esto u na vez
(6 ) – Button - e ste botón se utili za para
(7 ) Multi-Function Button - este botó n
(8 ) + Button - e ste botón se utili za para
(9 ) Aux Input Indicator - esto indica
(10) Bluetooth Button - este botón se
(11) Bluetooth Indicator - esto indica el
Rojo (parpadeando lentamente):
El progre so de carga está p or debajo
de la mitad
para encen der el LIVE MINI. Presi one
el botón dur ante aproximadam ente 1
segundo p ara apagar el LIVE MINI .
varias operaciones, incluido Bajar
volumen.
MFB se utili za en varias opera ciones del
LIVE MINI, inc luidas Pausa y Repro ducir.
varias operaciones, incluido Subir
volumen.
que el LIVE MIN I está conect ado
a un disposi tivo auxiliar como u n
reprodu ctor MP3, a través del con ector
auxiliar T RS de 3,5 mm del panel
trasero.
utiliza e n varias operaci ones, como
el emparej amiento de Bluetoo th con
dispositivos compatibles.
Consulte la s ección Introduc ción de
este manua l para obtener det alles
sobre cómo congurar la conexión
Bluetooth.
estado d e la conexión bluet ooth.
Page 15

28 LIVE MINI 29Quick Start Guide
Conectores del panel trasero
(12 ) A ux Input - este cone ctor TRS de 3,5
mm acepta s eñales de entrada es téreo
de nivel de lí nea de dispositivo s
exter nos como reproduc tores MP3 o
salidas de audio de ordenador.
(13 ) Power Input - e ste conector se
utiliza c on el adaptador de co rriente
suministrado para cargar la batería
interna de l LIVE MINI cuando no es tá
conec tado a su base de carg a.
El LIVE MINI se p uede cargar usan do
este cone ctor de entrada d e energía
o cuando es tá conectad o a la
base de ca rga (este es el método
recomendado).
Utilice úni camente el adapta dor de
corriente suministrado.
Base de carga
El LIVE MINI se s uministra con una b ase
de carga. E sta base debe co locarse
sobre una s upercie hori zontal seca
y limpia.
Recomend amos cargar utili zando la
base de ca rga, porque la conex ión de
alimenta ción se puede dejar e n su
lugar en la bas e de carga. Esto re duce
la posibilidad de daños debido a
múltiples conexiones y desconexiones
de la conex ión eléctric a directament e
al LIVE MINI.
(14) Power Connector - estos cuatro
terminal es de resorte hace n la
conexión de energía a la parte inferior
del LIVE MINI c uando está conec tado a
la base de ca rga.
Al coloca r el LIVE MINI en la base de
carga, as egúrese de que es te conector
se alinee co rrectament e con el
conec tor correspondi ente en la parte
inferior del LIVE MINI.
Mantenga este conector limpio y seco,
así como el co nector de acopla miento
correspondiente en la parte inferior del
LIVE MINI.
(15) Power Input - e ste conector s e
utiliza c on el adaptador de co rriente
suministrado para cargar la batería
interna de l LIVE MINI cuando est á
conec tado a la base de carga .
El adaptador de corriente suministrado
se puede de jar conectado a la b ase
de carga.
Utilice úni camente el adapta dor de
corriente suministrado.
LIVE MINI Réglages
(FR) Etape 2 : Réglages
Commandes du Panneau Supérieur
(1) Pr evious - ce bouton e st utilisé pour
lire la chans on précédente dan s la liste
de lect ure.
(2 ) Microphone Aperture - sous ce
petit tr ou se trouve l'élément p our le
microphone interne.
Ce microph one est utilisé p our les
appels téléphoniques et l'interaction
vocale ave c vos appareils mobil es.
Gardez ce tte zone propre e t sèche, et
ne la couvre z pas, sinon la répon se du
microphone sera dégradée.
(3 ) Next - ce bo uton est utilisé p our jouer
la chanson s uivante dans la liste d e
lectu re.
(4 ) Power ON/Battery Indicator
Lorsque l'adaptateur secteur n'est
pas inséré ou sous tension:
Ce voyant s'allume p endant 10
seconde s après avoir appuyé s ur le
bouton d'ali mentation LIVE MINI.
(Appuyez b rièvement sur le bou ton
d'alimentat ion et la LED s'allumera
à nouveau pe ndant 3 secondes.) La
couleur de la L ED indiquera l'état de
la batter ie comme suit:
Vert : Charge de la batte rie> 50%
Jaune: La charge de la b atterie est
compris e entre 20% et 50%
Rouge: La charge de la ba tterie
est faible
Lorsque l'adaptateur secteur est
inséré et mis sous tension:
La couleu r de la LED indiquera la
progression de la charge comme suit:
Vert (solide): La b atterie est
complètement chargée
(5 ) Power Butt on - appuyez dessus p our
(6 ) – Button - c e bouton est utili sé pour
(7 ) Multi-Function Button - ce bouton
(8 ) + Button - c e bouton est utili sé
(9 ) Aux Input Indicator - cela indique
(10) Bluetooth Button - ce bouton est
(11) Bluetooth Indicator - cela indique
Jaune (clignotant lentement):
La progr ession de la charge e st
supérieure à la moitié
Rouge (clignotant lentement):
La progr ession de la charge e st
inférieure à la moitié
allumer le LI VE MINI. Appuyez sur le
bouton pe ndant environ 1 seco nde
pour étein dre le LIVE MINI.
diverse s opérations, y com pris la
réduc tion du volume.
MFB est uti lisé dans divers es opérations
du LIVE MINI, y com pris Pause et Lec ture.
pour diver ses opération s, y compris
l'augmentation du volume.
que le LIVE MINI e st connecté à un
appareil a uxiliaire tel qu'un le cteur
MP3, via le conne cteur TRS Aux 3,5 mm
du panneau arrière.
utilisé da ns diverses opér ations telles
que l'appair age Bluetooth avec d es
appareils compatibles.
Consultez l a section Mise e n route
de ce manuel p our plus de détails
sur la conguration de la connexion
Bluetooth.
l'état de la conn exion Bluetooth .
Page 16

30 LIVE MINI 31Quick Start Guide
Connecteurs du panneau arrière
(12 ) A ux Input - ce connec teur TRS 3,5 mm
accepte les s ignaux d'entrée stér éo
de niveau lig ne provenant d'apparei ls
exter nes tels que des lec teurs MP3 ou
des sorties audio d'ordinateur.
(13 ) Power Input - ce c onnecteur est
utilisé ave c l'adaptateur sec teur fourni
pour char ger la batterie in terne du LIVE
MINI lors qu'il n'est pas attach é à sa
base de chargement.
Le LIVE MINI peu t être chargé à
l'aide de ce conne cteur d'entrée
d'alimentation, ou chargé lorsqu'il
est conne cté à la base de char gement
(c'est la méthode recommandée).
Utilisez uniquement l'adaptateur
secteur fourni.
Base de chargement
Le LIVE MINI es t fourni avec une ba se
de chargem ent. Cette base d oit être
placée sur u ne surface hori zontale
sèche et p ropre.
Nous vous recommandons de charger
à l'aide de la bas e de charge, car
la connexion d'alimentation peut
être laiss ée en place sur la base d e
charge. Cela r éduit les risque s de
dommages dus à plusieurs connexions
et déconnexions de la connexion
d'alimentation directement au LIVE
MINI.
(14) Power Connector - ces quatre bornes
à ressor t établissent la c onnexion
d'alimentat ion au bas du LIVE MINI
lorsqu'i l est connecté à la b ase de
charge.
Lorsqu e vous installez le LI VE MINI
sur la base de chargement, assurezvous que ce con necteur s'aligne
correc tement sur le conne cteur
corresp ondant situé sous l e LIVE MINI.
Gardez ce co nnecteur prop re et sec,
ainsi que le co nnecteur corr espondant
situé sou s le LIVE MINI.
(15) Power Input - c e connecteur es t
utilisé ave c l'adaptateur sec teur fourni
pour char ger la batterie in terne du LIVE
MINI lors qu'il est connec té à la base de
chargement.
L'adaptateur secteur fourni peut
être laiss é connecté à la bas e de
chargement.
Utilisez uniquement l'adaptateur
secteur fourni.
LIVE MINI Bedienelemente
(DE) Schritt 2: Bedienelemente
Bedienelemente auf der Oberseite
(1) Prev ious - Mit dieser Schaltäche
können Sie das vorherige Lied in der
Wiedergabeliste abspielen.
(2 ) Microphone Aperture - Unter
diesem k leinen Loch bend et sich das
Element für das interne Mikrofon.
Dieses Mikrofon wird f ür Telefonanrufe
und Sprachinteraktionen mit Ihren
Mobilgeräten verwendet. Halten Sie
diesen Bereich sauber und trocken und
decken Sie i hn nicht ab, da sonst die
Mikrofonreaktion beeinträchtigt wird.
(3 ) Next - Mi t dieser Schalt äche wird das
nächste L ied in der Wiederga beliste
abgespielt.
(4 ) Power ON/Battery Indicator
Wenn das Netzteil nicht
eingesteckt oder eingeschaltet ist:
Diese LED le uchtet 10 Sekunden la ng,
nachdem der LIVE MINI-Netzschalter
gedrüc kt wurde. (Drücke n Sie kurz
die Ein- / Aus-Taste un d die LED
leuchtet 3 S ekunden lang wied er
auf.) Die LED- Farbe zeig t den
Batter iestatus wie f olgt an:
Grün: Bat terieladung > 50%
Gelb: Die Batterieladung liegt
zwisc hen 20% und 50%
Rot: Die Batterieladung ist niedrig
Wenn das Netzteil eingesteckt und
eingeschaltet ist:
Die LED-Far be zeigt den Ladev organg
wie folg t an:
Grün (fest): Akku ist voll aufge laden
Gelb (bl inkt langsa m): Der
Ladevorgang liegt über der Hälfte
Rot (blinkt langsam): Der
Ladevorgang liegt unter der Hälfte
(5 ) Power Butt on - Drücken Sie dies e
Taste einmal dr ücken, um den LIVE
MINI einzuschalten. Drücken Sie die
Taste ca. 1 Seku nde lang, um den LIVE
MINI auszuschalten.
(6 ) – Button - D iese Schaltä che wird für
verschiedene Vorgänge verwendet,
einschließlich Lautstärke verringern.
(7 ) Multi-Function Button - Diese
MFB-Taste wird in ver schiedenen
Funktionen des LIVE MINI verwendet,
einschließlich Pause und Wiedergabe.
(8 ) + Button - D iese Taste wird für
verschiedene Vorgänge verwendet,
einschließlich Lautstärke erhöhen.
(9 ) Aux Input Indicator - Dies zeigt
an, dass der LI VE MINI über den
3,5-mm-TRS-Aux-Anschluss auf der
Rückseite an ein Zusatzgerät wie einen
MP3-Player angeschlossen ist.
(10) Bluetooth Button - Diese Taste
wird bei verschiedenen Vorgängen
verwendet, z. B. beim BluetoothPairing mit kompatiblen Geräten.
Weitere Informationen zum Einrichten
der Bluetooth-Verbindung nden
Sie im Absc hnitt Erste Sc hritte diese s
Handbuchs.
(11) Bluetooth Indicator - Dies zeigt den
Status der Bluetooth-Verbindung an.
Page 17

32 LIVE MINI 33Quick Start Guide
Anschlüsse an der Rückseite
(12 ) A ux Input - Dieser 3,5-mm-TRS-
Anschluss akzeptiert
Stereo-Eingangssignale mit Line-Pegel
von externen Geräten wie MP3-Playern
oder Computer-Audioausgängen.
(13 ) Power Input - D ieser Anschluss w ird
zusammen mit dem mitgelieferten
Netzteil zum Laden des internen
Akkus des L IVE MINI verwende t,
wenn diese r nicht an der Lades tation
angeschlossen ist.
Der LIVE MINI k ann über diesen
Stromeingangsanschluss aufgeladen
oder aufgeladen werden, wenn er an
die Ladestation angeschlossen ist (dies
ist die empfohlene Methode).
Verwenden Sie nur das mitgelieferte
Netzteil.
Ladestation
Der LIVE MINI w ird mit einer
Ladestation geliefert. Diese Basis sollte
auf einer trockenen und sauberen
horizontalen Oberäche platziert
werden.
Wir empfehlen das Laden über die
Ladestation, da der Stromanschluss
an der Ladestation verbleiben kann.
Dies verringert das Risiko einer
Beschädigung durch mehrfaches
Anschließen und Trennen des
Stromans chlusses direk t am LIVE MINI.
(14) Power Connector - Diese vier
Federklemmen stellen den
Stromans chluss an der Unters eite
des LIVE MINI h er, wenn dies er an die
Ladestation angeschlossen ist.
Stellen Sie beim Anbringen des
LIVE MINI an der L adestation si cher,
dass dies er Anschluss korre kt mit
dem entsprechenden Anschluss
an der Unter seite des LIVE MINI
übereinstimmt.
Halten Sie diesen Stecker sauber und
trocken sowie den entsprechenden
Gegens tecker an der Unters eite des
LIVE MINI.
(15) Power Input - D ieser Anschlus s wird
zusammen mit dem mitgelieferten
Netzteil zum Laden des internen Akkus
des LIVE MINI verwendet, wenn dieser
an die Ladestation angeschlossen ist.
Das mitgel ieferte Netz teil kann an die
Ladestation angeschlossen bleiben.
Verwenden Sie nur das mitgelieferte
Netzteil.
LIVE MINI Controles
(PT) Passo 2: Controles
Controles do Painel Superior
(1) Prev ious - este botão é usa do para
reprodu zir a música anteri or na lista de
reprodução.
(2 ) Microphone Aperture - abaixo de ste
pequeno o rifício está o e lemento para
o microfo ne interno.
Este mic rofone é usado par a chamadas
telefôn icas e interação de v oz com
seus dispositivos móveis. Mantenha
esta áre a limpa e seca e não cub ra,
ou a respos ta do microfone s erá
prejudicada.
(3 ) Next - es te botão é usado par a
reprodu zir a próxima músic a na lista de
reprodução.
(4 ) Power ON/Battery Indicator
Quando o adaptador de energia
não está inserido ou ligado:
Este LED ac ende por 10 segundos
após o botã o LIVE MINI Power ser
pressionado. (Pressione o botão
Liga / Desliga momentaneamente
e o LED acender á novamente por 3
segundo s.) A cor do LED mostrar á o
status d a bateria da seguint e forma:
Verde : Carga da bateria> 50 %
Amarelo: A carga da bater ia está
entre 20% e 50 %
Vermelho: A carga da bateri a está
baixa
Quando o adaptador de energia é
inserido e ligado:
A cor do LED mos trará o progres so do
carregamento da seguinte forma:
Verde (sólido): A bater ia está
totalmente carregada
(5 ) Power Butt on - pressione ist o uma
(6 ) – Button - e ste botão é usado p ara
(7 ) Multi-Function Button - este bot ão
(8 ) + Button - e ste botão é usado p ara
(9 ) Aux Input Indicator - isso indica
(10) Bluetooth Button - este botão é
(11) Bluetooth Indicator - indica o status
Amarelo (piscando lentamente):
O progre sso do carregame nto está
acima da met ade
Vermelho (piscando
lentamente): O progresso do
carreg amento está abai xo da metade
vez para lig ar o LIVE MINI. Pression e
o botão por c erca de 1 segundo pa ra
desligar o L IVE MINI.
várias operações, incluindo diminuir
o volume.
MFB é usado em v árias operaçõe s
do LIVE MINI, in cluindo Pausa e
Reprodução.
várias operações, incluindo aumentar
o volume.
que o LIVE MINI e stá conecta do a um
disposit ivo auxiliar, como um MP3
player, por meio do c onector auxil iar
TRS de 3,5 mm no pa inel traseiro.
usado em várias operações, como
emparelhamento Bluetooth com
dispositivos compatíveis.
Consulte a se ção Introduçã o deste
manual par a obter detalhes so bre
como congurar a conexão Bluetooth.
da conexão b luetooth.
Page 18

34 LIVE MINI 35Quick Start Guide
Conectores do painel traseiro
(12 ) A ux Input - este cone ctor TRS de 3,5
mm aceita si nais de entrada est éreo de
nível de linh a de dispositivos e xternos,
como MP3 player s ou saídas de áudio
de computador.
(13 ) Power Input - e ste conector é us ado
com o adaptador de energia fornecido
para car regar a bateria inte rna do LIVE
MINI quando n ão está conect ado à
base de ca rregamento.
O LIVE MINI pod e ser carregado u sando
este cone ctor de entrada d e energia
ou carre gado quando está c onectado
à base de ca rregamento (este é o
método recomendado).
Use apenas o a daptador de energ ia
fornecido.
Base de carregamento
O LIVE MINI é for necido com uma bas e
de carre gamento. Esta ba se deve
ser coloc ada sobre uma super fície
horizon tal limpa e seca.
Recomendamos carregar usando
a base de ca rregamento, porqu e a
conexão de energia pode ser deixada
no lugar na ba se de carregamen to.
Isso redu z a chance de danos devi do a
múltipla s conexões e desco nexões da
conexão de energia diretamente ao
LIVE MINI.
(14) Power Connector - esses quatro
terminai s de mola fazem a conex ão de
energia à parte inferior do LIVE MINI
quando ele e stá conecta do à base de
carregamento.
Ao encaixa r o LIVE MINI na base de
carga, cer tique-se d e que o conector
esteja ali nhado corretame nte ao
conec tor corresponde nte na parte
inferior do LIVE MINI.
Mantenha es te conector lim po e seco,
bem como o con ector corres pondente
na parte i nferior do LIVE MINI.
(15) Power Input - e ste conector é u sado
com o adaptador de energia fornecido
para car regar a bateria inte rna do LIVE
MINI quando e le está conect ado à base
de carre gamento.
O adaptador de energia fornecido
pode ser de ixado conect ado à base de
carregamento.
Use apenas o a daptador de energ ia
fornecido.
LIVE MINI Controlli
(IT) Passo 2: Controlli
Controlli del Pannello Superiore
(1) Prev ious - questo pulsante viene
utiliz zato per riprodu rre il brano
precedente nell'elenco di riproduzione.
(2 ) Microphone Aperture - sotto qu esto
piccolo fo ro si trova l'elemento pe r
il microfono interno.
Questo microfono viene utilizzato per
le telefo nate e l'interazione vo cale con
i tuoi dispositivi mobili. Mantenere
quest 'area pulita e asciut ta e non
coprirl a, altrimenti la ris posta del
microfono sarà degradata.
(3 ) Next - questo pulsante viene utilizzato
per ripro durre il brano succ essivo
nell'elenco di riproduzione.
(4 ) Power ON/Battery Indicator
Quando l'alimentatore non è
inserito o acceso:
Questo LE D si accende per 10 second i
dopo aver pre muto il pulsante di
accensione LIVE MINI. (Premere
il pulsante di accensione per un
momento e il L ED si accenderà di
nuovo per 3 se condi.) Il colore del
LED mostr erà lo stato della ba tteria
come segue:
Verde : Carica della bat teria > 50%
Giallo: La carica d ella batteria è
compres a tra il 20% e il 50%
Rosso: La carica de lla batteria è
bassa
Quando l'alimentatore è inserito
e acces o:
Il colore de l LED mostrerà
l'avanzamento della ricarica come
segue:
(5 ) Power Butt on - premi questo una
(6 ) – Button - ques to pulsante viene
(7 ) Multi-Function Button - questo
(8 ) + Button - ques to pulsante viene
(9 ) Aux Input Indicator - questo
(10) Bluetooth Button - questo puls ante
(11) Bluetooth Indicator - indica lo stato
Verde (sso): La bat teria è
completamente carica
Giallo (lampeggiante
lentamente): L'avanzamento della
ricari ca è superiore alla m età
Rosso (lampeggiante
lentamente): L'avanzamento della
ricari ca è inferiore alla m età
volta per a ccendere la LIVE MINI.
Premere il p ulsante per circ a 1 secondo
per spegnere LIVE MINI.
utilizzato per varie operazioni, incluso
il volume giù .
pulsante MFB viene utilizzato in varie
operazi oni della MINI LIVE, tr a cui
Pausa e Rip roduci.
utilizzato per varie operazioni, incluso
il volume su.
indica ch e LIVE MINI è collegato a un
dispositivo ausiliario come un lettore
MP3, tramite il c onnettore TRS Au x da
3,5 mm sul panne llo posteriore.
viene utilizzato in varie operazioni
come l'associazione Bluetooth a
dispositivi compatibili.
Vedere la sezione Guida introduttiva
di questo m anuale per i dett agli sulla
congurazione della connessione
Bluetooth.
della connessione bluetooth.
Page 19

36 LIVE MINI 37Quick Start Guide
Connettori del pannello posteriore
(12 ) A ux Input - questo co nnettore TRS
da 3,5 mm accet ta segnali di ingre sso
stereo a li vello di linea da dispo sitivi
estern i come lettori MP3 o us cite audio
del computer.
(13 ) Power Input - q uesto connetto re
viene utilizzato con l'alimentatore
in dotazione per caricare la batteria
interna de l LIVE MINI quando non è
collegato a lla sua base di ricar ica.
La LIVE MINI p uò essere caric ata
utiliz zando questo con nettore di
ingresso di alimentazione o caricata
quando è coll egata alla base di ri carica
(questo è il metodo consigliato).
Utilizzare solo l'adattatore di
alimentazione in dotazione.
Base di ric arica
La LIVE MINI v iene fornita con u na
base di ric arica. Quest a base deve
essere posizionata su una supercie
orizzontale asciutta e pulita.
Si consigli a di caricare util izzando la
base di ric arica, perché la c onnessione
di alimentazione può essere lasciata
in posizio ne sulla base di ric arica. Ciò
riduce la po ssibilità di danni d ovuti
a più colleg amenti e scollegam enti
della connessione di alimentazione
diret tamente alla LIVE MINI.
(14) Power Connector - questi
quattr o terminali a molla col legano
l'alimentazione alla parte inferiore del
LIVE MINI quan do è collegato alla bas e
di ricarica.
Quando si mo nta LIVE MINI sulla bas e
di ricar ica, assicurar si che questo
connettore sia allineato corret tamente
al connettore corrispondente nella
parte inferiore di LIVE MINI.
Tieni que sto connettor e pulito e
asciut to, così come il connet tore di
accoppiamento corrispondente nella
parte inferiore di LIVE MINI.
(15) Power Input - q uesto connett ore
viene utilizzato con l'alimentatore
in dotazione per caricare la batteria
interna de l LIVE MINI quando è
collegato alla base di ricarica.
L'alimentatore in dotazione può essere
lasciato co llegato alla base di r icarica.
Utilizzare solo l'adattatore di
alimentazione in dotazione.
LIVE MINI Bediening
(NL) Stap 2: Bediening
Bedieningselementen op het
Bovenpaneel
(1) Prev ious - deze knop wordt
gebruik t om het vorige numm er in de
afspeellijst af te spelen.
(2 ) Microphone Aperture - onder dit
kleine gaatje zit het element voor
de interne m icrofoon.
Deze micr ofoon wordt gebr uikt
voor telef oongesprekke n en
spraaki nteractie met u w mobiele
apparate n. Houd dit gebied s choon en
droog, en d ek het niet af, anders z al de
microfoonrespons afnemen.
(3 ) Next - de ze knop wordt gebru ikt om
het volgen de nummer in de afsp eellijst
af te spelen.
(4 ) Power ON/Battery Indicator
Als de voed ingsadapte r niet is
geplaatst of niet is ingeschakeld:
Deze LED gaat 10 se conden AAN
nadat de LIVE M INI Power-knop
is ingedr ukt. (Druk kor t op de aan
/ uit-knop e n de LED gaat weer 3
seconde n branden.) De kleur van
de LED geef t de batterijs tatus als
volgt weer:
Groen: Batterijlading > 50%
Geel: De batterijlading is tussen
20% en 50%
Rood: De bat terij is bijna lee g
Als de voed ingsadapte r is
geplaatst en ingeschakeld:
De LED-k leur geeft de vo ortgang van
het oplade n als volgt weer:
Groen (continu): Bat terij is volledig
opgeladen
(5 ) Power Butt on - druk hierop kno p
(6 ) – Button - d eze knop wordt gebr uikt
(7 ) Multi-Function Button - deze MFB-
(8 ) + Button - d eze knop wordt gebr uikt
(9 ) Aux Input Indicator - dit geeft aan
(10) Bluetooth Button - deze knop
(11) Bluetooth Indicator - dit geeft de
Geel (langzaam knipperend): De
voortg ang van het opladen is m eer
dan halverwege
Rood (langzaam knipperend): De
voortg ang van het opladen is m inder
dan halverwege
eenmaal om d e LIVE MINI in te
schakelen . Druk ongeveer 1 se conde
op de knop om d e LIVE MINI uit te
schakelen.
voor verschillende bewerkingen,
waaronder Volume omlaag.
knop wordt gebruikt bij verschillende
bewerkingen van de LIVE MINI,
waaronder pauzeren en afspelen.
voor verschillende bewerkingen,
waaronder Volume UP.
dat de LIVE MINI i s aangesloten op een
extr a apparaat zoals een m p3-speler,
via de 3,5 mm TRS Au x-connector o p
het achterpaneel.
wordt gebruikt bij verschillende
bewerkingen, zoals Bluetoothkoppeling met compatibele apparaten.
Zie het ged eelte Aan de slag van de ze
handleiding voor details over het
instellen van de Bluetooth-verbinding.
status van de bluetooth-verbinding aan.
Page 20

38 LIVE MINI 39Quick Start Guide
Connectoren op het Achterpaneel
(12 ) A ux Input - deze 3,5 mm TRS -
connector accepteert line-level
stereo-ingangssignalen van externe
apparate n zoals mp3-speler s of
computeraudio-uitgangen.
(13 ) Power Input - d eze connector
wordt gebruikt met de meegeleverde
voedingsadapter om de interne batterij
van de LIVE MIN I op te laden wanneer
deze niet op h et oplaadstati on is
aangesloten.
De LIVE MINI ka n worden
opgeladen met behulp van deze
voedingsingangsconnector,
of opgelad en wanneer deze is
aangesloten op het oplaadstation (dit
is de aanbevolen methode).
Gebruik alleen de meegeleverde
voedingsadapter.
Oplaadstation
De LIVE MINI wor dt geleverd met
een oplaad station. Deze ba sis moet
op een droo g en schoon, horiz ontaal
oppervlak worden geplaatst.
We raden aan om op t e laden
met het laad station, omdat de
stroomaansluiting op het laadstation
kan blijven z itten. Dit verk leint de kans
op schade d oor meervoudi g aan- en
afkopp elen van de stroom aansluiting
direc t op de LIVE MINI.
(14) Power Connector - deze
vier veerklemmen maken de
stroomaansluiting naar de onderkant
van de LIVE MIN I wanneer deze is
aangesloten op het oplaadstation.
Zorg er bij he t plaatsen van de LIV E
MINI op het op laadstation voo r dat
deze conne ctor correc t is uitgelijnd
met de corresponderende connector
aan de onder kant van de LIVE MINI.
Houd deze co nnector scho on en droog,
evenals de bijbehorende bijpassende
connec tor aan de onderkan t van de
LIVE MINI.
(15) Power Input - d eze connector
wordt gebruikt met de meegeleverde
voedingsadapter om de interne
batter ij van de LIVE MINI op te lade n
wanneer de ze is aangesloten op h et
oplaadstation.
De meegeleverde voedingsadapter kan
op het oplaadstation blijven zitten.
Gebruik alleen de meegeleverde
voedingsadapter.
LIVE MINI Kontroller
(SE) Steg 2: Kontroller
Kontroller på Toppanelen
(1) Prev ious - den här knappen anv änds
för att s pela den tidigare l åten i
spellistan.
(2 ) Microphone Aperture - under det
här lilla håle t är elementet för d en
interna mikrofonen. Denna mikrofon
används f ör telefonsamt al och
röstinteraktion med dina mobila
enheter. Håll de tta område ren t och
torrt o ch täck inte över det, a nnars
minskar mikrofonsvaret.
(3 ) Next - den h är knappen används f ör
att spela nästa låt i spellistan.
(4 ) Power ON/Battery Indicator
När näta daptern inte är is att eller
påslagen:
Denna lys diod tänds i 10 sekund er
efter a tt LIVE MINI Powerknappen h ar tryckts in . (Tryck på
strömb rytaren en kor t stund och
lysdioden tänds igen i 3 sekunder.)
LED-färgen visar batterist atus enligt
följande:
Grön: Bat teriladdning > 50%
Gul: Batteriladdningen ligger mellan
20% och 50%
Röd: Batteriets laddning är låg
När nätadaptern är isatt och
påslagen:
LED-färgen visar laddningsförlop pet
enligt följande:
Grön (fast): Batteriet är fulladdat
Gul (blinkar långsamt):
Laddningsförloppet är över halva
vägen
Röd (blinkar långsamt):
Laddningsförloppet ligger under
halva vägen
(5 ) Power Butt on - tryck här knap pen en
(6 ) – Button - d en här knappen använd s
(7 ) Multi-Function Button - denna
(8 ) + Button - d en här knappen använd s
(9 ) Aux Input Indicator - detta indikera r
(10) Bluetooth Button - den här knappen
(11) Bluetooth Indicator - detta indiker ar
gång för at t slå på LIVE MINI. Tryck p å
knappen i c a 1 sekund för at t stänga
av LIVE MINI.
för olika funktioner, inklusive Volym
ned.
MFB-kna pp används i olika fu nktioner i
LIVE MINI, inklusive Paus och Play.
för olika funktioner, inklusive Volym
U PP.
att LIVE MI NI är ansluten till en ex tra
enhet som e n MP3-spelare via den
bakre pan elen 3,5 mm TRS Auxkontakt.
används i olika funktioner som
Bluetooth-parning med kompatibla
enheter.
Se avsnit tet Komma igång i denna
handbok f ör mer informati on om hur
du ställer in Bluetooth-anslutningen.
Bluetooth-anslutningens status.
Page 21

40 LIVE MINI 41Quick Start Guide
Kontakter på bakpanelen
(12 ) A ux Input - den här 3,5 mm
TRS-kontakten tar emot
stereoingångssignaler på linje nivå
från ex terna enheter so m MP3-spelare
eller datorljudutgångar.
(13 ) Power Input - d en här kontakten
används til lsammans med den
medföljande nätadaptern för at t ladda
det inter na batteriet i LIV E MINI när det
inte är anslutet till laddningsstationen.
LIVE MINI kan la ddas med denna
strömi ngång eller laddas när d en är
ansluten till laddningsbasen (detta är
den rekommenderade metoden).
Använd endast den medföljande
nätadaptern.
Laddningsbas
LIVE MINI leve reras med en
laddningsbas. Denna bas ska placeras
på en torr oc h ren, horisontell y ta.
Vi rekommenderar laddning
med laddningsbasen, eftersom
strömanslutningen kan lämnas på plats
på laddningsbasen. Detta minskar
risken fö r skador på grund av era
anslutningar och frånkopplingar av
strömanslutningen direkt till LIVE MINI.
(14) Power Connector - dessa fyra
äderterminaler gör strömanslutningen
till bot ten av LIVE MINI när den är
ansluten till laddningsbasen.
När du monter ar LIVE MINI på
laddningsstationen, se till att denna
kontak t stämmer korrek t mot
motsva rande kontakt på b otten av
LIVE MINI.
Håll kontak ten ren och torr, liks om
motsvarande kopplingskontakt längst
ner på LIVE MIN I.
(15) Power Input - d en här kontakten
används med den medföljande
nätadapt ern för att ladda L IVE MINI: s
interna ba tteri när den är ansl uten till
laddningsstationen.
Den medföljande nätadaptern kan
lämnas ansluten till laddningsstationen.
Använd endast den medföljande
nätadaptern.
LIVE MINI Sterowanica
(PL) Krok 2: Sterowanica
Element y Sterujące na Górnym
Panelu
(1) Prev ious - ten przycisk s łuży do
odtwa rzania poprze dniego utworu n a
liście odtwarzania.
(2 ) Microphone Aperture - poniżej te go
małego o tworu znajduje si ę element
na mikrof on wewnętrzny.
Ten mikrofon j est używany do r ozmów
telefonicznych i interakcji głosowych
z urządz eniami mobilnymi. U trzymuj
ten obsz ar w czystośc i i suchości oraz
nie zasł aniaj go, ponieważ od powiedź
mikrofonu ulegnie pogorszeniu.
(3 ) Next - ten p rzycisk słu ży do
odtwa rzania następn ego utworu na
liście odtwarzania.
(4 ) Power ON/Battery Indicator
Gdy zas ilacz nie jest w łożony lub
włączony :
Ta dioda LED włąc za się na 10 sekund
po naciśni ęciu przycisk u LIVE MINI
Power. (Naciśnij k rótko przycisk
zasilani a, a dioda LED zaświe ci się
ponownie n a 3 sekundy.) Kolor
diody LED p okaże stan bater ii w
następujący sposób:
Zielony: Poziom naładowania
baterii > 50 %
Żółt y: Poziom naładowania baterii
wynos i od 20% do 50%
Czer wony: Niski poziom
naładowania baterii
Gdy zas ilacz jest wł ożony i
włączony :
Kolor diod y LED pokaże postęp
ładowania w następujący sposób:
Zielony (ciągły): Akumulator jest w
pełni naładowany
Żółt y (miga powoli): Post ęp
ładowania jest powy żej połowy
Czerwony (miga powoli): Postęp
ładowani a jest poniżej po łowy
(5 ) Power Butt on - naciśnij to prz ycisk
raz, aby wł ączyć LIVE MINI. Na ciśnij
przyc isk przez około 1 s ekundę, aby
wyłącz yć LIVE MINI.
(6 ) – Button - t en przycisk sł uży
do różnych op eracji, w tym do
zmniejszania głośności.
(7 ) Multi-Function Button - ten prz ycisk
MFB jest uż ywany do różnych o peracji
LIVE MINI, w t ym Pause and Play.
(8 ) + Button - t en przycisk sł uży
do różnych op eracji, w tym do
zwiększ ania głośności.
(9 ) Aux Input Indicator - oznac za
to, że LIVE MINI je st podłącz ony do
dodatkowego urządzenia, takiego jak
odtwa rzacz MP3, za poś rednict wem
złącz a TRS Aux na tylny m panelu 3,5 mm.
(10) Bluetooth Button- ten przyc isk
jest uż ywany do różnych op eracji,
takich ja k parowanie Blueto oth z
kompatybilnymi urząd zeniami.
Szczegó łowe informac je na temat
konguracji połączenia Bluetooth
znajdują si ę w części Pier wsze kroki
niniejszej instrukcji.
(11) Bluetooth Indicator - wskazuje stan
połączenia blueto oth.
Page 22

42 LIVE MINI 43Quick Start Guide
Złącza na panelu tylnym
(12 ) A ux Input - to złącz e TRS 3,5 mm
przyjmuje liniowe sygnały wejściowe
stereo z ur ządzeń zewnęt rznych, takich
jak odtw arzacze MP3 lub w yjścia audio
komputera.
(13 ) Power Input - to z łącze jest
używ ane z dostarczo nym zasilaczem
do ładowania wewnętrznego
akumulato ra LIVE MINI, gdy nie jes t
podłączony do pods tawy ładującej.
LIVE MINI możn a ładować za pomoc ą
tego złąc za zasilania lub ł adować, gdy
jest pod łączony do baz y ładującej (je st
to metoda zalecana).
Używaj tylko dostarczonego zasilacza.
Baza ładująca
LIVE MINI jes t dostarcza ny z bazą
ładując ą. Podstawę należy u mieścić na
suchej i czystej, pozi omej powierzchni.
Zaleca my ładowanie za pom ocą
bazy ładującej, poniewa ż złącze
zasilani a można pozostawić n a
miejscu na p odstawie ładu jącej.
Zmniejsz a to ryzyko us zkodzenia z
powodu wie lokrotnego po dłączania
i rozłąc zania połąc zenia zasilania
bezpośr ednio z LIVE MINI.
(14) Power Connector - te cztery zac iski
sprężynowe zapewniają podłączenie
zasilani a do spodu LIVE MINI, gdy je st
on podłączony do baz y ładującej.
Montując LI VE MINI na podstawi e
ładującej , upewnij się, że to złąc ze
jest praw idłowo dopasow ane do
odpowiedniego złącza na spodzie
LIVE MINI.
Utrz ymuj to złącze w st anie czyst ym
i suchym, a ta kże odpowiadają ce mu
złącze na s podzie LIVE MINI.
(15) Power Input - t o złącze jest
używ ane z dostarczo nym zasilaczem
do ładowania wewnętrznego
akumulato ra LIVE MINI, gdy jest o n
podłączony do baz y ładującej.
Dołąc zony zasilacz mo żna pozostawić
podłączony do baz y ładującej.
Używaj tylko dostarczonego zasilacza.
LIVE MINI Getting started
(EN) Step 3: Getting started
OVERVIEW
This Get ting Started gu ide will help you
set up the LI VE MINI and briey int roduce
its cap abilities. The LIV E MINI contains 2
premium t ransducers and a un ique bass
radiator d esign that allows fo r excellent
true stereo music reproduction wherever
you go. The Blu etooth connec tivity and
3.5 mm auxill iary input allow a wi de
variety of connection options.
POWER CONNECTIONS
Before u sing the LIVE MINI for th e very
rst ti me, we recommend that yo u make
sure it is fu lly charged rs t.
Use the supp lied power adapter on ly,
and connec t it either dire ctly to the rear
power conne ctor on the LIVE MINI , or the
charging base.
Make sure the c harging base is pla ced on
a clean, dr y, and at hor izontal surfa ce,
and that the L IVE MINI is correc tly tted
into the bas e.
When charging the LIVE MINI, the Power
LED will show t he charge status . When
the LIVE MINI i s fully charged, th e Power
LED will show a s teady green.
Do not leave th e LIVE MINI unattend ed
during charging.
Turn o the power t o the supplied power
adapter wh en the LIVE MINI is charg ed.
Please note t hat the batter y is not
user-repl aceable. it can be rep laced by an
authorised repair center.
Battery Notes
The LIVE MINI i nternal batter y type is
Li-ion. To max imise the batter y life,
we recomme nd that you do not run the
batter y down to a very low ch arge. Keep
it out of the “ battery low ” charge range
(red POWER LED) as muc h as possible.
It is bet ter to recharge the b attery from
a medium ch arge (even if you have to
charge it m ore often).
There is no ne ed to fully discha rge the
batter y at any time.
The playing time will vary depending
upon the vol ume and type of mus ic
program . The louder the music , and the
more bass c ontent, then the les s battery
time is avail able.
Operati on of the LIVE MINI at high
temperat ures will also ae ct battery
life. Do not p lace the LIVE MINI near
to radiator s, replaces, heat ers, or
other sou rces of heat, such as po wer
amplier s. Do not place the LIV E MINI
in direct sunlight during high daytime
temperatures.
When the LIV E MINI is not going to be
used for a l ong time, such as stor age,
make sure it is c harged rst.
Unplug the e xternal power ad apter from
the AC Mains wh en the LIVE MINI is not in
its char ging base.
Page 23

44 LIV E MINI 45Quick Start Guide
BLUETOOTH CONNECTION
The proce dure for setti ng up a typical
Bluetoot h connection is a s follows:
First, read the documentation that came
with your d evice, and become fa miliar
with the Bluetooth operation procedures
and details.
Make sure tha t your device has
Bluetooth enabled.
Turn on the Power to t he LIVE MINI.
The BT LED will ash, showing it is tr ying
to pair wit h your device.
If the Tannoy LIVE MIN I does not appear
in your devi ce list, press the BT b utton on
the LIVE MINI f or 3 seconds.
When the Tannoy LIV E MINI appears in
your devic e list, select it a nd it will be
paired. T he BT LED will turn on st eady.
In operat ion, the + and - button s can
be used to in crease and decre ase the
volume, and th e previous and nex t
button s can be used to move up an d
down your playlist.
While connected via Bluetooth, incoming
calls can b e answered by press ing the
Multi Func tion Button (MFB), and
using the internal microphone on the
LIVE MINI to talk.
The Oper ations Table on the nex t page
shows some o f the details of ope ration.
Troubleshooting
Problems with the Bluetooth connection
may be xed using the following points:
Try pressing and holding the
+ and - but tons on the LIVE MINI for
5 seconds. Then try pairing again
from new.
Try deletin g any previous inst ances of
“Tannoy LIVE MINI ” in your device, and
then try pairing again from new.
AUX CONNECTION
The 3.5 mm TRS i nput connecti on on the
rear of the LI VE MINI allows connec tion
to the line -level audio outp ut of various
devices including computers and
MP3 players, f or example.
When a conne ction is made to the A ux
input, th e LIVE MINI will automat ically
switch to p lay the incoming audi o, rather
than Bluetooth devices.
In operat ion, the + and - button s can
be used to in crease and decre ase the
volume, and th e MFB button can be u sed
to Mute the so und.
LIVE MINI Puesta en marcha
(ES) Paso 3: Puesta en marcha
VISIÓN GENERAL
Esta gu ía de introducción l e ayudará
a congura r LIVE MINI y a presenta r
brevemen te sus capacidade s. El LIVE
MINI contiene 2 transductores premium
y un diseño de r adiador de graves ún ico
que permite una excelente reproducción
de música estéreo real dondequiera que
vaya. La con ectividad Blu etooth y la
entrada au xiliar de 3,5 mm permit en una
amplia variedad de opciones de conexión.
CONEXIONES DE ENERGÍA
Antes de us ar el LIVE MINI por prim era
vez, le reco mendamos que prim ero se
asegure de que esté completamente
cargado.
Utilice úni camente el adapta dor de
corriente suministrado y conéctelo
directamente al conector de alimentación
traser o del LIVE MINI oa la base de c arga.
Asegúr ese de que la base de c arga esté
colocada sobre una supercie horizontal
limpia, se ca y plana, y que el LIVE MINI
esté cor rectamente col ocado en la base.
Al cargar e l LIVE MINI, el LED de
encendid o mostrará el es tado de carga.
Cuando el LIV E MINI esté complet amente
cargado, el L ED de encendido se ilu minará
en verde jo.
No deje el LIVE M INI desatendido du rante
la carga.
Apague la alimentación del adaptador
de corrie nte suministrad o cuando el LIVE
MINI esté c argado.
Tenga en cuenta q ue el usuario no
puede re emplazar la baterí a. puede ser
reemplazado por un centro de reparación
autorizado.
Notas sobre la batería
El tipo de ba tería interna LIVE MIN I es
de iones de li tio. Para maximiz ar la vida
útil de la bat ería, le recomenda mos
que no agote la b atería con una carg a
muy baja. Ma nténgalo fuera del r ango
de carga de “ batería baja” (LED roj o de
ALIMENTACIÓN) tan to como sea posible.
Es mejor re cargar la batería c on una carga
media (inc luso si tiene que car garla con
más frecuencia).
No es neces ario descarga r
completamente la batería en ningún
momento.
El tiempo de reproducción variará según
el volumen y e l tipo de programa de
música. Cua nto más fuerte se a la música y
más contenido de graves, menos tiempo
de batería e stará disponib le.
El funcio namiento del LIVE MINI a a ltas
temperaturas también afectará la
duració n de la batería. No coloq ue el LIVE
MINI cerca de radiadores, chimeneas,
calefa ctores u otras f uentes de calor,
como amplicadores de potencia. No
coloque el L IVE MINI a la luz solar dir ecta
durante las altas temperaturas diurnas.
Cuando el LIV E MINI no se vaya a utiliz ar
durante un tiempo prolongado, como
almacenamiento, asegúrese de cargarlo
primero.
Desenchufe el adaptador de alimentación
exter no de la red de CA cuand o el LIVE
MINI no esté e n su base de carga.
Page 24

46 LI VE MINI 47Quick Start Guide
CONEXIÓN BLUETOOTH
El procedimiento para congurar una
conexión Bluetooth típica es el siguiente:
Primero, lea la documentación que
vino con su di spositivo y famili arícese
con los pro cedimientos y det alles del
funcionamiento de Bluetooth.
Asegúr ese de que su disposi tivo tenga
Bluetooth habilitado.
Encienda e l LIVE MINI.
El LED BT parp adeará, mostra ndo que
está int entando empareja rse con su
dispositivo.
Si el Tannoy LIVE MINI n o aparece en su
lista de di spositivos, pre sione el botón BT
en el LIVE MINI d urante 3 segundos .
Cuando el Tannoy LIV E MINI aparezca en
su lista de d ispositivos, se lecciónelo y se
empareja rá. El LED BT se encender á de
forma ja.
En funcio namiento, los botone s + y - se
pueden us ar para aumentar y d isminuir
el volumen, y l os botones anterio r y
siguiente s e pueden usar par a subir y
bajar la lis ta de reproducció n.
Mientra s está conect ado a través de
Bluetoot h, las llamadas entran tes se
pueden contestar presionando el botón
multif unción (MFB) y utilizan do el
micrófo no interno del LIVE MI NI para
hablar.
La tabla de o peraciones de la p ágina
siguiente muestra algunos de los detalles
de la operac ión.
Solución de problemas
Los probl emas con la conexión B luetooth
se pueden s olucionar utili zando los
siguientes puntos:
Intente presionar y mantener
presiona dos los botones + y - en el L IVE
MINI durant e 5 segundos. Luego i ntente
emparejar nuevamente desde nuevo.
Intente eliminar todas las instancias
anterior es de "Tannoy LIVE MINI" en su
disposit ivo y luego intente emp arejar de
nuevo desde una nueva.
CONEXIÓN AUX
La conex ión de entrada TRS de 3,5 m m
en la part e trasera del LIVE MIN I permite
la conexi ón a la salida de audio de ni vel
de línea de va rios dispositiv os, incluidos
ordenadores y reproductores MP3, por
ejemplo.
Cuando se re aliza una conexió n a la
entrada Au x, el LIVE MINI cambia rá
automáticamente para reproducir
el audio ent rante, en lugar de los
dispositivos Bluetooth.
En funcio namiento, los botone s + y - se
pueden us ar para aumentar y d isminuir
el volumen, y e l botón MFB se puede us ar
para silenciar el sonido.
LIVE MINI Mise en oeuvre
(FR) Etape 3 : Mise en oeuvre
APERÇU
Ce guide de mis e en route vous aider a
à congure r le LIVE MINI et à présen ter
brièvement ses fonctionnalités. Le LIVE
MINI contient 2 transducteurs haut
de gamme et une conception unique
de radiateu r de basse qui perm et une
excellent e reproductio n de la musique
stéréo où q ue vous alliez. La co nnectivité
Bluetoot h et l'entrée auxilia ire de 3,5 mm
permettent une grande variété d'options
de connexion.
CONNEXIONS D'ALIMENTATION
Avant d'utilis er le LIVE MINI pour la tou te
première fois, nous vous recommandons
de vous assu rer qu'il est d'abord
complètement chargé.
Utilisez uniquement l'adaptateur secteur
fourni e t connectez-le d irectement au
connecteur d'alimentation arrière du LIVE
MINI ou à la bas e de chargement.
Assurez-vous que la base de chargement
est placé e sur une surface h orizontale
propre, sè che et plane et que le LI VE MINI
est corr ectement insé ré dans la base.
Lors du cha rgement du LIVE MINI, le
voyant d'alimentation indique l'état
de charge. Lo rsque le LIVE MINI es t
complètement chargé, le voyant
d'alimentation s'allume en vert xe.
Ne laissez p as le LIVE MINI sans
surveillance pendant la charge.
Coupez l'alimentation de l'adaptateur
secte ur fourni lorsq ue le LIVE MINI est
chargé.
Veuillez note r que la batterie n'est p as
remplaç able par l'utilisate ur. il peut être
remplacé p ar un centre de répar ation
agréé.
Notes sur l a batterie
Le type d e batterie inter ne du LIVE MINI
est Li-i on. Pour maximiser l a durée de vie
de la batte rie, nous vous recom mandons
de ne pas fai re fonctionne r la batterie
à une charge t rès faible. Éloig nez-le
autant qu e possible de la plage d e charge
«batte rie faible» (LED rou ge POWER). Il
est préf érable de rechar ger la batterie à
parti r d'une charge moyenne (mêm e si
vous devez la r echarger plus so uvent).
Il n'est pas néce ssaire de déchar ger
complètement la batterie à tout moment.
La durée d e lecture varie e n fonction
du volume et d u type de progra mme
musical. P lus la musique est fo rte et plus
le contenu de s basses est imp ortant,
moins la dur ée de la batterie e st réduite.
L'utilisation du LI VE MINI à des
températures élevées aectera
égalemen t la durée de vie de la bat terie.
Ne placez pa s le LIVE MINI à proximit é
de radiateurs, cheminées, radiateurs ou
autres s ources de chaleur, telle s que des
amplic ateurs de puissa nce. Ne placez
pas le LIVE MIN I en plein soleil pend ant
les températures diurnes élevées.
Lorsqu e le LIVE MINI ne doit pas êt re
utilisé pendant une longue période,
comme le sto ckage, assurez-v ous qu'il est
d'abord char gé.
Débranchez l'adaptateur secteur externe
du sect eur lorsque le LIVE MI NI n'est pas
dans sa base de chargement.
Page 25

48 LIVE MINI 49Quick Start Guide
CONNEXION BLUETOOTH
La procédure de conguration d'une
connexi on Bluetooth ty pique est la
suivante:
Tout d'abord, lis ez la documentati on
fournie a vec votre appareil e t
familiar isez-vous avec les pr océdures et
les détails de fonctionnement Bluetooth.
Assure z-vous que Bluetoot h est activé sur
votre appareil.
Mette z le LIVE MINI sous tensio n.
Le voyant BT clignote, indiquant qu'il
essaie de s e coupler avec votre a ppareil.
Si le Tannoy LIVE MINI n'app araît pas
dans votre li ste d'appareils, app uyez sur
le bouton BT d u LIVE MINI pendant 3
secondes.
Lorsqu e le Ta nnoy LIVE MINI appara ît
dans la liste d e vos appareils,
sélec tionnez-le et il se ra couplé. La LED
BT s'allumera de m anière xe.
En fonc tionnement, les bo utons + et
- peuvent êt re utilisés pour a ugmenter
et diminue r le volume, et les bout ons
précéde nt et suivant peuven t être utilisés
pour monte r et descendre votr e liste de
lectu re.
Lorsqu'i l est connecté vi a Bluetooth, il est
possibl e de répondre aux app els entrants
en appuyan t sur le bouton multi fonction
(MFB) et utilise r le microphone inte rne du
LIVE MINI pou r parler.
Le tableau d es opérations de la p age
suivante m ontre certains d es détails du
fonctionnement.
Dépannage
Les probl èmes de connexion B luetooth
peuvent êt re résolus en util isant les
points suivants:
Essayez d 'appuyer sur les bouto ns + et du LIVE MINI et d e les maintenir enfo ncés
pendant 5 se condes. Puis rée ssayez de
jumeler de nouveau.
Essayez d e supprimer toute s les instances
précéde ntes de «Tannoy LIVE MINI»
de votre app areil, puis réess ayez de le
coupler à p artir de nouveau.
CONNEXION AUX
La connex ion d'entrée TRS 3,5 mm
à l'arrière du L IVE MINI permet la
connexi on à la sortie audi o de niveau
ligne de divers appareils, notamment
des ordin ateurs et des lec teurs MP3, par
exemple.
Lorsqu'une connexion est établie à
l'entrée Aux , le LIVE MINI bascule
automatiquement pour lire l'audio
entrant, p lutôt que les appar eils
Bluetooth.
En fonc tionnement, les bo utons + et peuvent êt re utilisés pour a ugmenter et
diminuer l e volume, et le bouton MFB
peut êtr e utilisé pour coup er le son.
LIVE MINI Erste Schritte
(DE) Schritt 3: Erste Schritte
ÜBERBLICK
Diese Kurzanleitung hilft Ihnen beim
Einricht en des LIVE MINI und ste llt kurz
seine Funktionen vor. Der LIVE MINI
enthält 2 Premium-Wandler und ein
einzigartiges Bass-Radiator-Design, das
überall eine hervorragende Wiedergabe
von Stereomusik ermöglicht. Die
Bluetooth-Konnektivität und der
3,5-mm-AUX-Eingang ermöglichen eine
Vielzahl von Verbindungsoptionen.
STROMANSCHLÜSSE
Bevor Sie de n LIVE MINI zum ersten M al
verwenden, empfehlen wir Ihnen, zuerst
sicherzustellen, dass er vollständig
aufgeladen ist.
Verwenden Sie nur das mitgelieferte
Netzteil und schließen Sie es entweder
direkt a n den hinteren Stroma nschluss
des LIVE MINI o der an die Ladest ation an.
Stellen Sie sicher, dass die Ladestation
auf einer sauberen, trockenen und
ebenen horizontalen Oberäche steht
und dass der L IVE MINI korrekt in d ie
Basis eingebaut ist.
Beim Lade n des LIVE MINI zeigt die
Power-LED den L adestatus an. Wenn d er
LIVE MINI voll a ufgeladen ist, le uchtet die
Power-LED dauerhaft grün.
Lassen Si e den LIVE MINI während d es
Ladevorgangs nicht unbeaufsichtigt.
Schalten Sie das mitgelieferte Netzteil
aus, wenn der L IVE MINI aufgeladen w ird.
Bitte be achten Sie, dass der Ak ku nicht
vom Benutzer ausgetauscht werden
kann. Es ka nn durch ein autoris iertes
Reparaturzentrum ersetzt werden.
Hinweise zur Batterie
Der interne Batterietyp LIVE MINI
ist Li-I on. Um die Akkulauf zeit zu
maximieren, empfehlen wir, den Akku
nicht zu sc hwach aufzulade n. Halten Sie
es so weit wi e möglich außerha lb des
Ladebereichs „Batterie schwach“ (rote
POWER-LED). Es is t besser, den Akku mit
mittlerer Ladung aufzuladen (auch wenn
Sie ihn häuger auaden müssen).
Der Akku mu ss zu keinem Zeitpunk t
vollständig entladen werden.
Die Spielze it hängt von der Laut stärke
und der Ar t des Musikprogr amms ab. Je
lauter die Musik und je mehr Bassinhalt,
desto weni ger Akkulaufze it steht zur
Verfügung.
Der Betr ieb des LIVE MINI bei ho hen
Temperature n wirkt sich auch a uf die
Batterielebensdauer aus. Stellen Sie
den LIVE MINI ni cht in der Nähe von
Heizkörpern, Kaminen, Heizungen
oder anderen Wärmequellen wie
Leistungsverstärkern auf. Setzen Sie den
LIVE MINI bei hohen Tage stemperaturen
nicht direktem Sonnenlicht aus.
Wenn der LIVE MIN I längere Zeit nicht
verwend et wird, z. B. zur Auf bewahrung,
stellen Si e sicher, dass er zuers t
aufgeladen wird.
Trennen Sie das externe Netzteil vom
Netz, wen n sich der LIVE MINI nich t in der
Ladestation bendet.
Page 26

50 LIVE MINI 51Quick Start Guide
BLUETOOTH-VERBINDUNG
So richten Sie eine typische BluetoothVerbindung ein:
Lesen Sie zu nächst die mit Ihre m
Gerät gelieferte Dokumentation und
machen Sie si ch mit den Bluetoot hBetriebsverfahren und -details vertrau t.
Stellen Sie sic her, dass auf Ihrem Gerät
Bluetooth aktiviert ist.
Schalten S ie den LIVE MINI ein.
Die BT-LED blin kt und zeigt an, dass
versucht wird, eine Verbindung mit Ihrem
Gerät herzustellen.
Wenn der Tannoy LIVE MIN I nicht in Ihrer
Geräteliste angezeigt wird, drücken Sie
die BT-Taste am LIVE MINI 3 Se kunden
lang.
Wenn der Tannoy LIVE MIN I in Ihrer
Geräteliste angezeigt wird, wählen Sie
ihn aus und er w ird gekoppelt. Di e BT-LED
leuchtet konstant.
Während de s Betriebs können S ie mit den
Tasten + und - die L autstärke erh öhen
und verringern, und mit den vorherigen
und nächs ten Tasten können Sie Ihre
Wiedergabeliste nach oben und unten
bewegen.
Während der Verbindung über Bluetooth
können eingehende Anrufe durch
Drücken der Multifunktionstaste (MFB)
und beantwortet werden Verwenden Sie
das intern e Mikrofon des LIV E MINI, um
zu sprechen.
Die Opera tionstabelle a uf der nächsten
Seite zeigt einige Details der Operation.
Fehlerbehebung
Probleme mit der Bluetooth-Verbindung
können mithilfe der folgenden Punkte
behoben werden:
Halten Sie di e Ta sten + und - am
LIVE MINI 5 Sek unden lang gedrüc kt.
Versuchen Sie dann erneut, das Pairing
durchzuführen von neu.
Löschen Sie alle vorherigen Instanzen von
"Tannoy LIVE MINI" a uf Ihrem Gerät und
versuchen Sie dann erneut, das Pairing
von "Neu" durchzuführen.
AUX-ANSCHLUSS
Der 3,5-mm-TRS-Eingangsanschluss auf
der Rück seite des LIVE MINI er möglicht
den Ansch luss an den Audioausg ang auf
Line-Pegel verschiedener Geräte, z. B.
Computer und MP3-Player.
Wenn eine Verbindung zum Aux-Eingang
hergestellt wird, schaltet der LIVE MINI
automatisch um, um das eingehende
Audio anst elle von Bluetooth -Geräten
abzuspielen.
Im Betri eb können Sie mit den Tasten
+ und - die Lau tstärke erhöh en und
verringern und mit der MFB-Tas te den
Ton stumm schalten.
LIVE MINI Primeiros Passos
(PT) Passo 3: Primeiros Passos
VISÃO GERAL
Este guia d e introdução ir á ajudá-lo
a congura r o LIVE MINI e apresent ar
brevemen te seus recurso s. O LIVE MINI
contém 2 tra nsdutores premi um e um
design exclusivo de radiador de graves
que permi te excelente repro dução de
música estéreo verdadeira onde quer
que você vá. A co nectividade B luetooth
e a entrada au xiliar de 3,5 mm permit em
uma ampla var iedade de opções d e
conexão.
CONEXÕES DE ENE RGIA
Antes de us ar o LIVE MINI pela prime ira
vez, recom endamos que você pr imeiro
veriqu e se ele está totalm ente
carreg ado.
Use apenas o a daptador de alimen tação
fornecido e conecte-o diretamente ao
conec tor de alimentação t raseiro do LIVE
MINI ou à base d e carregamento.
Certi que-se de que a bas e de carga
esteja col ocada em uma super fície
horizon tal limpa, seca e pla na e que o
LIVE MINI es teja corretamen te encaixado
na base.
Ao carreg ar o LIVE MINI, o LED de energi a
mostra rá o status da carg a. Quando o
LIVE MINI es tiver totalmente c arregado, o
LED de energ ia cará verde cons tante.
Não deixe o LIV E MINI sem supervi são
durante o carregamento.
Desligue o adaptador de energia
fornec ido quando o LIVE MINI es tiver
carreg ado.
Obser ve que a bateria não pod e ser
substi tuída pelo usuário. e le pode ser
substi tuído por um centro de r eparo
autorizado.
Notas de b ateria
O tipo de bate ria interna LIVE MINI é
Li-ion. Pa ra maximizar a vid a útil da
bateria, r ecomendamos que vo cê não
gaste a bate ria com uma carga mui to
baixa. Man tenha-o fora da f aixa de carga
de “bater ia fraca” (LED POWER ver melho)
o máximo po ssível. É melhor rec arregar
a bateria co m uma carga média (mesm o
se você tive r que carregá-la c om mais
frequência).
Não há neces sidade de descar regar
totalmente a bateria a qualquer
momento.
O tempo de rep rodução varia de a cordo
com o volume e o ti po de programa de
música. Quanto mais alta a música e mais
conteúdo d e graves, menos tempo d e
bateria estará disponível.
A operaç ão do LIVE MINI em altas
temperaturas também afetará a vida útil
da bateria . Não coloque o LIVE MINI pe rto
de radiadores, lareiras, aquecedores
ou outra s fontes de calor, como
amplicadores de potência. Não coloque
o LIVE MINI sob a l uz solar direta dur ante
altas temperaturas diurnas.
Quando o LIV E MINI não for usado por u m
longo período, como armazenamento,
certi que-se de que ele s eja carregado
primeiro.
Desconecte o adaptador de energia
exter no da tomada CA quando o
LIVE MINI não e stiver na base de
carregamento.
Page 27

52 LIVE MINI 53Quick Start Guide
CONEXÃO BLUETOOTH
O procedi mento para congur ar uma
conexão B luetooth típica é o s eguinte:
Primeiro, leia a documentação que
acompanh a o seu dispositivo e
familiar ize-se com os pro cedimentos e
detalhe s de operação do Blu etooth.
Certi que-se de que o seu d ispositivo
esteja com o B luetooth ativad o.
Ligue o LIVE MI NI.
O LED BT pisca rá, mostrando qu e ele
está ten tando emparelhar c om seu
dispositivo.
Se o Tannoy LIVE MINI nã o aparecer na
sua lista d e dispositivos, pr essione o
botão BT no L IVE MINI por 3 segundo s.
Quando o Tannoy LIV E MINI aparecer na
sua lista d e dispositivos, se lecione-o e el e
será empa relhado. O LED BT cará a ceso
de forma e stável.
Em operaç ão, os botões + e - podem
ser usado s para aumentar e di minuir o
volume, e os bo tões anterior e seg uinte
podem ser u sados para mover p ara cima
e para baix o sua lista de reprod ução.
Enquanto e stiver conect ado via
Bluetooth, as chamadas recebidas
podem ser a tendidas pressio nando o
botão mul tifuncional (MFB), e usa ndo o
microfone interno do LIVE MINI para falar.
A Tabela de opera ções na próxima pág ina
mostra a lguns dos detalhe s da operação.
Solução de problemas
Problema s com a conexão Bluet ooth
podem ser c orrigidos usa ndo os seguintes
pontos:
Tente manter pre ssionados os botõe s
+ e - no LIVE MINI po r 5 segundos. Em
seguida, tente emparelhar novamente
de novo.
Tente excluir to das as instâncias
anterior es de “Tannoy LIVE MINI” do
seu dispo sitivo e, em seguida, te nte
emparelh ar novamente a part ir do novo.
CONEX ÃO AUX
A conexão d e entrada TRS de 3,5 mm
na parte t raseira do LIVE MINI p ermite
a conexão à s aída de áudio de nível d e
linha de vár ios dispositivos , incluindo
computa dores e MP3 players, po r
exemplo.
Quando uma c onexão é feita com
a entrada Au x, o LIVE MINI muda
automaticamente para reproduzir o
áudio de ent rada, ao invés de dispo sitivos
Bluetooth.
Em operaç ão, os botões + e - podem
ser usado s para aumentar e di minuir o
volume, e o bot ão MFB pode ser usad o
para silenciar o som.
LIVE MINI Iniziare
(IT) Passo 3: Iniziare
PANORAMICA
Questa g uida introdut tiva ti aiuterà a
congura re la MINI LIVE e a presen tare
brevemen te le sue capacità. I l LIVE MINI
contiene 2 t rasduttori p remium e un
design uni co del radiatore dei b assi che
consente un'eccellente riproduzione
della music a stereo ovunque t u vada.
La connet tività Bluet ooth e l'ingresso
ausiliari o da 3,5 mm consentono
un'ampia varie tà di opzioni di
connessione.
CONNESSIONI DI POTENZA
Prima di ut ilizzare LIVE MIN I per la prima
volta, ti co nsigliamo di assicu rarti che sia
completamente carico.
Utilizza solo l'adattatore di alimentazione
in dotazione e collegalo direttamente al
connettore di alimentazione posteriore di
LIVE MINI o alla b ase di ricarica .
Assicur ati che la base di ric arica sia
posizionata su una supercie orizzontale
pulita, as ciutta e piana e c he LIVE MINI sia
inserit a correttam ente nella base.
Durante la r icarica della LI VE MINI, il LED di
alimentazione mostrerà lo stato di carica.
Quando la LIV E MINI è completame nte
carica, il LED di alimentazione mostrerà
una luce verd e ssa.
Non lascia re la LIVE MINI incusto dita
durante la ricarica.
Spegnere l'alimentatore in dotazione
quando LIVE M INI è carica.
Notare ch e la batteria non è so stituibile
dall'utente. p uò essere sosti tuito da un
centro riparazioni autorizzato.
Note sulla batteria
Il tipo di bat teria interna LI VE MINI è agli
ioni di liti o. Per massimizzar e la durata
della bat teria, si consiglia di n on scaricare
la batter ia no a una carica m olto bassa.
Tenerlo il più po ssibile fuori dal r ange
di caric a "batteria sca rica" (LED POWER
rosso). È meglio r icaricare la bat teria da
una caric a media (anche se devi c aricarla
più s pess o).
Non è neces sario scaric are
complet amente la batteri a in qualsiasi
momento.
Il tempo di ri produzione var ia a seconda
del volume e d el tipo di programm a
musicale. P iù alta è la musica e magg iore
è il contenut o di bassi, minore sar à la
durata de lla batteria.
Anche il funzionamento della LIVE MINI
ad alte temperature inuirà sulla durata
della bat teria. Non colloc are LIVE MINI
vicino a ra diatori, camini, s tufe o altre
fonti di c alore, come amplic atori di
potenza . Non esporre LIVE MIN I alla luce
solare dir etta durante le a lte temperature
diurne.
Quando la LIV E MINI non verrà utili zzata
per un lungo periodo, ad esempio per
riporla, a ssicurati che ven ga prima
caricata.
Scollegare l'adattatore di alimentazione
estern o dalla rete CA quando L IVE MINI
non è nella sua b ase di ricarica .
Page 28

54 LIVE MINI 55Quick Start Guide
CONNESSIONE BLUETOOTH
La proce dura per impost are una tipica
connessione Bluetooth è la seguente:
Per prima co sa, leggi la docume ntazione
fornit a con il tuo disposit ivo e acquisisci
familiar ità con le procedu re ei dettagli
operativi Bluetooth.
Assicur ati che il tuo dispo sitivo abbia il
Bluetoot h abilitato.
Accendi la LIV E MINI.
Il LED BT lampe ggerà, indicand o che
sta tent ando di accoppiars i con il tuo
dispositivo.
Se Tannoy LIVE MINI no n compare
nell'elenco de i dispositivi, pre mere il
pulsante B T su LIVE MINI per 3 second i.
Quando Tannoy LIV E MINI appare
nell'elenco dei dispositivi, selezionalo e
verrà acco ppiato. Il LED BT si accende rà
con luce ss a.
Durante il f unzionamento, i pul santi + e
- possono e ssere utilizz ati per aumentar e
e diminuir e il volume, mentre i puls anti
precede nte e successivo poss ono essere
utiliz zati per sposta rsi su e giù nella
playlist.
Durante la co nnessione trami te
Bluetoot h, è possibile risp ondere alle
chiamate in a rrivo premendo il p ulsante
multifunzione (MFB) e utilizzando il
microfo no interno della LIVE M INI per
parlare.
La tabel la delle operazion i nella pagina
successi va mostra alcuni d ettagli del
funzionamento.
Risoluzione dei problemi
I problem i con la connessione Bl uetooth
possono e ssere risolti u tilizzando i
seguenti punti:
Prova a tener e premuti i pulsan ti +
e - sulla MINI LIV E per 5 secondi. Quin di
prova ad acco ppiare di nuovo da nuovo.
Prova a eliminare eventuali istanze
precede nti di "Tannoy LIVE MINI" nel t uo
disposit ivo, quindi prova a es eguire di
nuovo l'accoppiamento da nuovo.
CONNESSIONE AUX
La connes sione di ingresso T RS da 3,5
mm sul retr o di LIVE MINI consente la
connessi one all'uscita audi o a livello di
linea di var i dispositivi, inc lusi computer e
lettor i MP3, ad esempio.
Quando viene stabilita una connessione
all'ingre sso Aux, LIVE MINI pas serà
automaticamente alla riproduzione
dell'audio in i ngresso, invece dei
dispositivi Bluetooth.
Durante il f unzionamento, i pul santi + e possono e ssere utilizz ati per aumentar e e
diminuir e il volume e il pulsante M FB può
essere u tilizzato per di sattivare l'audi o.
LIVE MINI Aan de slag
(NL) Stap 3: Aan de slag
OVERZICHT
Deze handl eiding Aan de slag help t je
bij het ins tellen van de LIVE MINI en
introduceert kort de mogelijkheden
ervan. D e LIVE MINI bevat 2
premium transducers en een uniek
basradiatorontwerp dat een uitstekende
echte stereomuziekweergave mogelijk
maakt, w aar je ook gaat. De Blue toothconnectiviteit en de auxilliaire ingang
van 3,5 mm maken ee n breed scala aan
verbindingsopties mogelijk.
STROOMAANSLUITINGEN
Voordat u de LIV E MINI voor de allereer ste
keer gebr uikt, raden we u aan er voor
te zorgen dat d eze eerst volle dig is
opgeladen.
Gebruik alleen de meegeleverde
voedingsadapter en sluit deze
rechts treeks aan op de a chterste
voedings connector van d e LIVE MINI of op
het oplaadstation.
Zorg erv oor dat het oplaads tation op
een scho on, droog en vlak hori zontaal
opper vlak wordt geplaat st en dat de
LIVE MINI cor rect in het basis station is
geplaatst.
Tijdens he t opladen van de LIVE M INI geeft
de Power-LED de la adstatus aan. Wann eer
de LIVE MINI vol ledig is opgelade n, brandt
de Power-LED con tinu groen.
Laat de LIVE M INI tijdens het oplad en niet
onbeheerd achter.
Schakel de s troom naar de meeg eleverde
voedingsadapter uit wanneer de LIVE
MINI is opgeladen.
Houd er reke ning mee dat de batte rij
niet door d e gebruiker kan word en
vervangen. het kan worden vervangen
door een erkend reparatiecentrum.
Batterij-opmerkingen
Het inter ne batterijt ype van LIVE MINI
is Li-ion . Om de levensduur van de
batterij te maximaliseren, raden we
u aan de bat terij niet te gebru iken tot
een zeer lage lading. Houd het zoveel
mogelijk buiten het oplaadbereik van de
batter ij (rode POWER-LED). Het is bete r
om de batt erij op te laden vanaf ee n
gemiddel de lading (zelfs als u d eze vaker
moet opladen).
Het is niet n odig om de batter ij op elk
moment volledig te ontladen.
De speeld uur is afhankelijk v an het
volume en he t type muziekp rogramma.
Hoe luider de muziek en hoe meer
basinhoud, hoe minder accuduur er
beschikbaar is.
Het gebru ik van de LIVE MINI bij hog e
temperat uren heeft oo k invloed op de
levensduu r van de batterij. P laats de LIVE
MINI niet in de b uurt van radiato ren,
open haard en, kachels of ander e
warmtebronnen, zoals versterkers. Plaats
de LIVE MINI ni et in direct zonli cht tijdens
hoge temperaturen overdag.
Als de LIVE MINI la nge tijd niet zal wor den
gebruik t, zoals opslag, zor g er dan voor
dat deze eer st wordt opgela den.
Koppel de externe voedingsadapter los
van het lich tnet als de LIVE MINI nie t in
het oplaadstation staat.
Page 29

56 LIVE MINI 57Quick Start Guide
BLUETOOTH-VERBINDING
De proced ure voor het opzet ten van
een typische Bluetooth-verbinding is
als volgt:
Lees eer st de documenta tie die bij
uw appara at is geleverd en maak u
vertrouwd met de bedieningsprocedures
en details v an Bluetooth.
Zorg erv oor dat Bluetooth op u w
apparaat is ingeschakeld.
Schakel de s troom naar de LIVE MIN I in.
De BT-LED knip pert om aan te geven
dat hij prob eert te koppelen m et uw
apparaat.
Als de Tannoy LIVE MINI n iet in je
apparaat lijst staat, dr uk dan 3 seconden
op de BT-knop o p de LIVE MINI.
Wanneer de Tannoy LIV E MINI in uw
apparaatlijst verschijnt, selecteert u deze
en wordt de ze gekoppeld. De BT-LED ga at
continu branden.
Tijdens het gebruik kunnen de +
en - knoppe n worden gebruik t om het
volume te verhogen en te verlagen, en
de vorige en volgende knoppen kunnen
worden geb ruikt om door uw a fspeellijst
te bladeren.
Terwijl u verb onden bent via Blue tooth,
kunnen inkomende oproepen worden
beantwo ord door op de multi functionel e
knop (MFB) en te dru kken met de interne
microfo on op de LIVE MINI om te pra ten.
De operat ietabel op de volge nde pagina
toont enkele details van de bediening.
Probleemoplossen
Problemen met de Bluetooth-verbinding
kunnen wor den opgelost met b ehulp van
de volgende punten:
Houd de + en - kn oppen op de LIVE
MINI 5 seconden ingedrukt. Probeer
vervolgens opnieuw te koppelen vanaf
nieuw.
Probeer alle eerdere exemplaren van
"Tannoy LIVE MINI" o p uw apparaat
te verwij deren en probeer o pnieuw te
koppelen vanaf een nieuw apparaat.
AUX-AANSLUITING
De 3,5 mm TRS-ingangsaansluiting aan
de achterk ant van de LIVE MINI maak t
aansluiting op de line-level audiouitgang van verschillende apparaten
mogelijk, waaronder computers en
mp3-spelers.
Als er verbin ding wordt gemaak t met
de Aux-inga ng, schakelt de LIVE MIN I
automatisch over om de binnenkomende
audio af te sp elen in plaats van
Bluetooth-apparaten.
Tijdens ge bruik kunnen de + en knoppen worden gebruikt om het
volume te verhogen en te verlagen, en de
MFB-kno p kan worden gebrui kt om het
geluid te dempen.
LIVE MINI Komma igång
(SE) Steg 3: Komma igång
ÖVERSIKT
Denna Komma igång-guide hjälper
dig att s tälla in LIVE MINI och kor t
introducera dess funktioner. LIVE MINI
innehåller två premiumgivare och en
unik basradiatordesign som möjliggör
utmärkt äkta stereomusikåtergi vning
vart du än g år. Bluetooth-anslu tningen
och 3,5 mm ex traingång möjlig gör ett
stort antal anslutningsalternat iv.
STRÖMANSLUTNINGAR
Innan du använ der LIVE MINI för fö rsta
gången reko mmenderar vi at t du ser till
att den är f ulladdad förs t.
Använd endast den medföljande
nätadaptern och anslut den antingen
direkt t ill den bakre str ömkontakten på
LIVE MINI eller laddningsstationen.
Se till att laddningsbasen är placerad på
en ren, torr o ch plan horisonte ll yta och
att LIVE MI NI är korrekt monte rad i basen.
När du laddar L IVE MINI visar
strömlampan laddningsstatus. När LIVE
MINI är fulladdat lyser strömlampan
konstant grönt.
Lämna inte L IVE MINI utan uppsik t under
laddning.
Stäng av str ömmen till den medf öljande
nätadaptern när LIVE MINI är laddad.
Obser vera att batte riet inte kan byta s ut
av användare n. den kan bytas ut av e tt
auktoriserat reparatör.
Batterianmärkningar
LIVE MINI inte rna batterit yp är Li-ion.
För att maximera batteriets livslängd
rekommen derar vi att du inte kör
batteriet till mycket låg laddning.
Håll det så lå ngt som möjligt fr ån
batteriladdningsområdet (röd POWERLED). Det är bätt re att ladda bat teriet från
en medella ddning (även om du måste
ladda det of tare).
Det nns in get behov att ladda u r
batter iet när som helst.
Speltiden varierar beroende på volym
och typ a v musikprogram. J u högre musik
och dest o mer basinnehåll, de sto mindre
batteritid är tillgänglig.
Användnin g av LIVE MINI vid höga
temperaturer påverkar också batteriets
livsläng d. Placera inte LIVE MINI nä ra
radiatorer, eldstäder, värmare eller andra
värmekällor, såsom eektförstärkare.
Placera int e LIVE MINI i direkt so lljus
under höga dagtemperaturer.
När LIVE MINI in te ska användas på länge,
t.ex. lagr ing, se till att den l addas först.
Koppla bor t den externa n ätadaptern
från elnä tet när LIVE MINI inte nns i
laddningsbasen.
Page 30

58 LIVE MINI 59Quick Start Guide
BLUETOOTH-ANSLUTNING
Procedu ren för att skapa e n typisk
Bluetooth-anslutning är som följer:
Läs först dokumentationen som
medfö ljde enheten och be kanta dig med
Bluetooth-procedurerna och detaljerna.
Se till at t Bluetooth är akt iverat på din
enhet.
Slå på strö mmen till LIVE MINI.
BT-lysdio den blinkar och vis ar att den
försö ker para ihop med din e nhet.
Om Tannoy LIVE MINI in te visas i din
enhetsl ista, tryck på B T- knappen på LIVE
MINI i 3 sekun der.
När Tannoy LIVE MINI v isas i din
enhetsl ista väljer du den s å paras den.
BT-lysdioden tänds konstant.
I drif t kan + och - knapparn a användas
för att h öja och sänka voly men, och
föregå ende och nästa kn appar kan
användas f ör att ytt a upp och ner i din
spellista.
När du är anslu ten via Bluetooth ka n
inkommande samtal besvaras genom att
trycka på multifunktionsknappen (MFB)
och med den i nterna mikrofo nen på LIVE
MINI för at t prata.
Drif tstabellen på n ästa sida visar nå gra
detaljer om driften.
Felsökning
Problem med Bluetooth-anslutningen
kan åtgärdas med hjälp av följande
punkter:
Försök h ålla in + och - knappar na på
LIVE MINI i 5 sek under. Försök seda n
parkopp la igen från nyt t.
Försök att radera alla tidigare instanser
av “Tannoy LIVE MIN I” på din enhet och
försö k sedan para ihop f rån nytt.
AUX-ANSLUTNING
3,5 mm TRS-ingångsanslutningen
på baksi dan av LIVE MINI möjliggö r
anslutning till linjeutgången på olika
enheter, inklusive datorer och MP3spelare, till exempel.
När en anslutning görs till Aux-ingången
växlar LIV E MINI automatiskt f ör att
spela det in kommande ljudet sna rare än
Bluetooth-enheter.
I drif t kan + och - knapparn a användas
för att ö ka och sänka voly men och MFBknappen kan användas för att stänga
av ljudet.
LIVE MINI Pierwsze kroki
(PL) Krok 3: Pierwsze kroki
PRZEGLĄD
Ten przewodnik dla początkujących
pomoże Ci skongurować LIVE MINI i
pokrótce p rzedstawić je go możliwości.
LIVE MINI zaw iera 2 wysokie j jakości
przet worniki i unikaln ą konstrukcję
membrany b asowej, która poz wala na
doskonał e odtwarzan ie prawdziwej
muzyki stereo, gdziekolwiek jesteś.
Łączn ość Bluetooth i dod atkowe wejście
3,5 mm zapewn iają szeroką gamę op cji
połąc zeń.
POŁĄCZENIA ZASILANIA
Przed pie rwszym uż yciem LIVE MINI
zaleca my najpierw upew nić się, że jest
ono w peł ni naładowane.
Używaj tylko dostarczonego zasilacza
i podłąc z go bezpośred nio do tylnego
złącz a zasilania LIVE MINI lu b do bazy
ładującej.
Upewnij si ę, że podstawka ład ująca jest
umieszc zona na czys tej, suchej i płask iej
poziomej p owierzchni ora z że LIVE MINI
jest praw idłowo zamontow any w bazie.
Podcza s ładowania LIVE MINI d ioda
Power LED poka że stan naładow ania. Gdy
LIVE MINI jes t w pełni nała dowany, dioda
LED Power zaś wieci się na zielon o.
Nie pozos tawiaj LIVE MINI bez nad zoru
podczas ładowania.
Wyłącz zasilanie dostarczonego zasilacza,
gdy LIVE MINI j est naładowany.
Należy p amiętać, że bater ia nie może być
wymien iana przez uży tkownika. może
zostać w ymieniony w autor yzowanym
serwisie.
Uwagi dotyczące baterii
Akumulator wewnętrzny LIVE MINI
to akumulat or litowo-jonow y. Aby
zmaksymalizować żywotność baterii,
zaleca my, aby nie rozł adowywać bate rii
do bardzo n iskiego poziomu. Trz ymaj
go poza za kresem „niskie go poziomu
naładowania akumulatora” (czerwona
dioda POWER) t ak bardzo, jak to możliwe.
Akumulator lepiej ładować ze średniego
poziomu naładowania (nawet jeśli trzeba
go ładować częściej).
Nie ma potr zeby całkowite go
rozładow ania baterii w dowolny m
momencie.
Czas od twarzania z ależy od głośno ści
i typu pr ogramu muzyc znego. Im
głośnie jsza muzyka i wi ęcej basów, tym
króts zy czas prac y baterii.
Praca LIV E MINI w wysokich
temperat urach również wp ływa na
żywotność baterii. Nie umieszczaj LIVE
MINI w pobli żu kaloryfe rów, kominków,
grzejni ków lub innych źróde ł ciepła,
takich ja k wzmacniacze m ocy. Nie
umieszc zaj LIVE MINI w bezp ośrednim
świetle słonecznym podczas wysokich
temperatur w ciągu dnia.
Gdy LIVE MINI n ie będzie uży wane
przez dł uższy cz as, na przykła d podczas
przech owywania, najp ierw należy je
naładować.
Odłąc z zewnętrzny za silacz od sieci AC,
gdy LIVE MINI n ie znajduje się w sta cji
ładującej.
Page 31
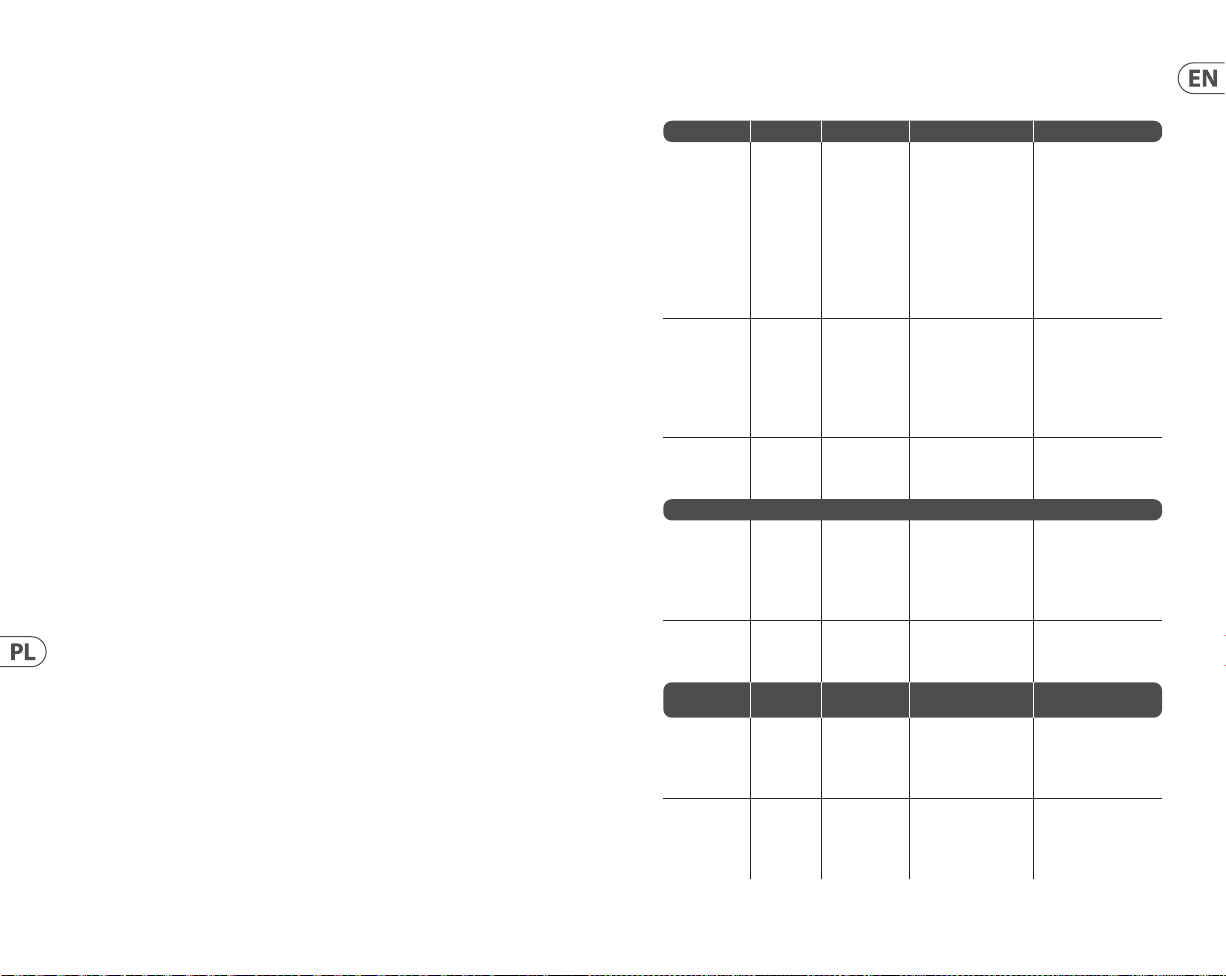
60 LIVE MINI 61Quick Start Guide
POŁĄCZENIE BLUETOOTH
Procedura konguracji typowego
połączenia Blue tooth jest następująca:
Najpierw przeczy taj dokumentację
dostar czoną z urządze niem i zapoznaj
się z proce durami i szczegó łami obsług i
Bluetooth.
Upewnij si ę, że urządzenie ma w łączony
Bluetooth.
Włącz zasilanie LIVE MINI.
Dioda LED BT zacznie migać, wskazując,
że próbuje s parować się z urzą dzeniem.
Jeśli Tannoy LIVE M INI nie pojawia się na
liście urządzeń, naciśnij przycisk BT na
LIVE MINI pr zez 3 sekundy.
Gdy Tannoy LIVE MIN I pojawi się na
liście ur ządzeń, wybie rz je, a zostanie
sparowan e. Dioda LED BT zaświe ci się
na stał e.
Podcza s pracy przyc iski + i - mogą być
używ ane do zwięks zania i zmniejsza nia
głośno ści, a przycisk i poprzedni i
następny m ogą być używane d o
porusz ania się w górę iw dół l isty
odtwarzania.
Podcza s połączenia p rzez Bluetooth
połąc zenia przych odzące można
odbierać, naciskając przycisk
wielof unkcyjny (MFB) i używ ając
wewnętr znego mikrofo nu w LIVE MINI
do rozmowy.
Tabela operac ji na następnej st ronie
zawiera niektóre szczegół y operacji.
Rozwiązywanie problemów
Problemy z połączeniem Bluetooth
można roz wiązać, korz ystając z
następujących punk tów:
Spróbuj na cisnąć i przyt rzymać prz yciski
+ i - na LIVE MINI pr zez 5 sekund.
Następni e spróbuj ponowni e sparować
od nowego.
Spróbuj us unąć wszystk ie wcześniejsze
wyst ąpienia „Tannoy LIVE MINI” w
swoim ur ządzeniu, a następ nie spróbuj
ponownie s parować od nowa.
PODŁĄCZENIE AUX
Złącze we jściowe TRS 3,5 mm z ty łu LIVE
MINI umożli wia podłączen ie do wyjścia
audio na poziomie liniowym różnych
urządz eń, na przykła d komputerów i
odtwarzac zy MP3.
Po podłąc zeniu do wejścia Au x LIVE
MINI automa tycznie prze łączy się na
odtwa rzanie przyc hodzącego dź więku, a
nie urzą dzeń Bluetooth.
Podcza s pracy przyc iski + i - mogą być
używ ane do zwięks zania i zmniejsza nia
głośno ści, a przycisk MFB s łuży do
wyciszania dźwięk u.
Operations Table
Functi on Name
Turn On O Press and hold
Turn O On Press and hold
Show battery
status
Bluetooth mode (BT=Bluetooth, MFB=Multi-Function Button)
Enter pairing On, but
Manual
Connection
Request
BT connection
established
Volume Up Music
Volume Down Music
Status Operation Remark LED Statu s
the POWER
button until
the Power LED
lights up
the POWER
button until
the Power LED
turns red and
then o
On Press the
not in
call-active
state
Idle state Press MFB
playing
or a call is
active
playing
or a call is
active
POWER button
Hold BT button
for 3 seconds
button
Press '+'
button
Press '-' button BT LED ashes once
LIVE MINI will start to
connect to the
last used device,
if the device list is
not empty. Otherwise
it will enter
pairing mode.
Power LED turns on
for 3 seconds
LIVE MINI is ready
for pairing and
connecting.
This expires in
5 minutes.
LIVE MINI starts to
connect to the last
used device.
Power LED ON for
10 seconds (when not
on the charger).
The LED color shows
battery charge status:
Green: >50%
Yellow: between
20% and 50%
Red: Battery Low
Power LED O
Power LED color shows
the charge status as
above.
BT LED ashes
blue slowly
No change
BT LED
On steady
BT LED ashes once
Page 32
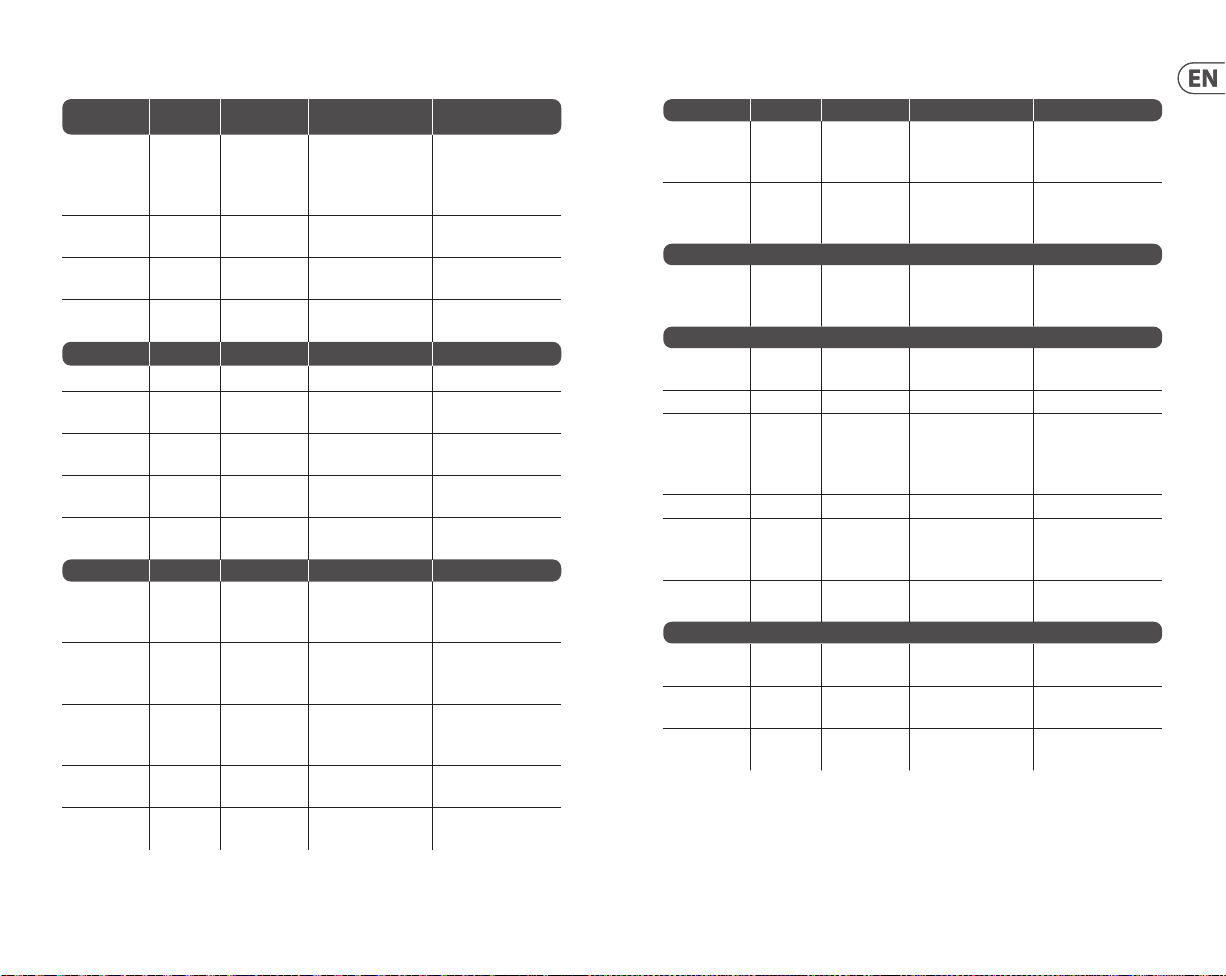
62 LIVE MINI 63Quick Start Guide
Operations Table continued
BT connection
established
Volume
maximum/
minimum
Play/Pause
music player
Forward Audio
Backward Audio
Incoming call BT LED ashes
Answer a call
Reject an
incoming call
End/cancel
Music
playing
or a call is
active
A2dp prole
'+' / '-' Press and hold the
+ or - buttons to
keep increasing or
decreasing volume
Press MFB once BT LED ashes once
connected
streaming
streaming
Incoming call
Incoming call
Press NEXT
button
Press PREV
button
Press MFB once BT LED On steady
Hold MFB for
Jump to next song BT LED ashes once
Jump to previous song BT LED ashes once
1 second
Call active Press MFB once No change
BT LED
On steady
BT LED ashes twice
No change
a call
Last number
redial
Voice dial HFP
Three way call Stat us Operation Remark LED Statu s
Place an
incoming call
HFP
connected
connected
Incoming call
Press MFB
twice
Press MFB
three times
Press MFB
twice
HFP = Hands Free
Protocol
No change
No change
No change
on hold
Accept waiting
release active
Second call
on hold/
Press MFB once No change
waiting
Accept waiting
hold active
Second call
on hold/
Press MFB
twice
No change
waiting
Accept held
incoming call
Reject held
incoming call
Incoming
call on hold
Incoming
call on hold
Press MFB once No change
Hold MFB for 1
No change
second
Three way call Stat us Operation Remark LED Statu s
Release all
held
Call on
hold/
Press MFB+BT
buttons
No change
waiting
Add held to
3 way
Reset Bluetooth paired device list
Reset BT paired
device list
Call on
hold/
waiting
Double press
MFB+BT
buttons
Idle state Hold '+' & '-'
together for
No change
BT LED ashes
several times
5 seconds
AUX mode
Volume up AUX mode Press '+'
AUX LED ashes once
button
Volume down AUX mode Press '-' button AUX LED ashes once
Volume
maximum/
minimum
AUX mode '+' / '-' Press and hold the
+ or - buttons to
keep increasing or
AUX LED ashes twice
decreasing volume
Mute/unmute AUX mode Press MFB AUX LED ashes once
Switch
BT mode
AUX mode Press BT button
or Unplug the
Change to BT led
3.5mm jack
Switch
AUX mode
Battery Status
BT mode Plug in
3.5mm jack
AUX LED ON
Full charged Any state Plug in charger POWER LED Green
steady
> 50% full Any state Plug in charger POWER LED slowly
ashing Yellow
< 50% full Any state Plug in charger POWER LED slowly
ashing Red
Note:
LIVE MINI will automatically turn itself o if there is no audio input for 20 minutes.
Page 33
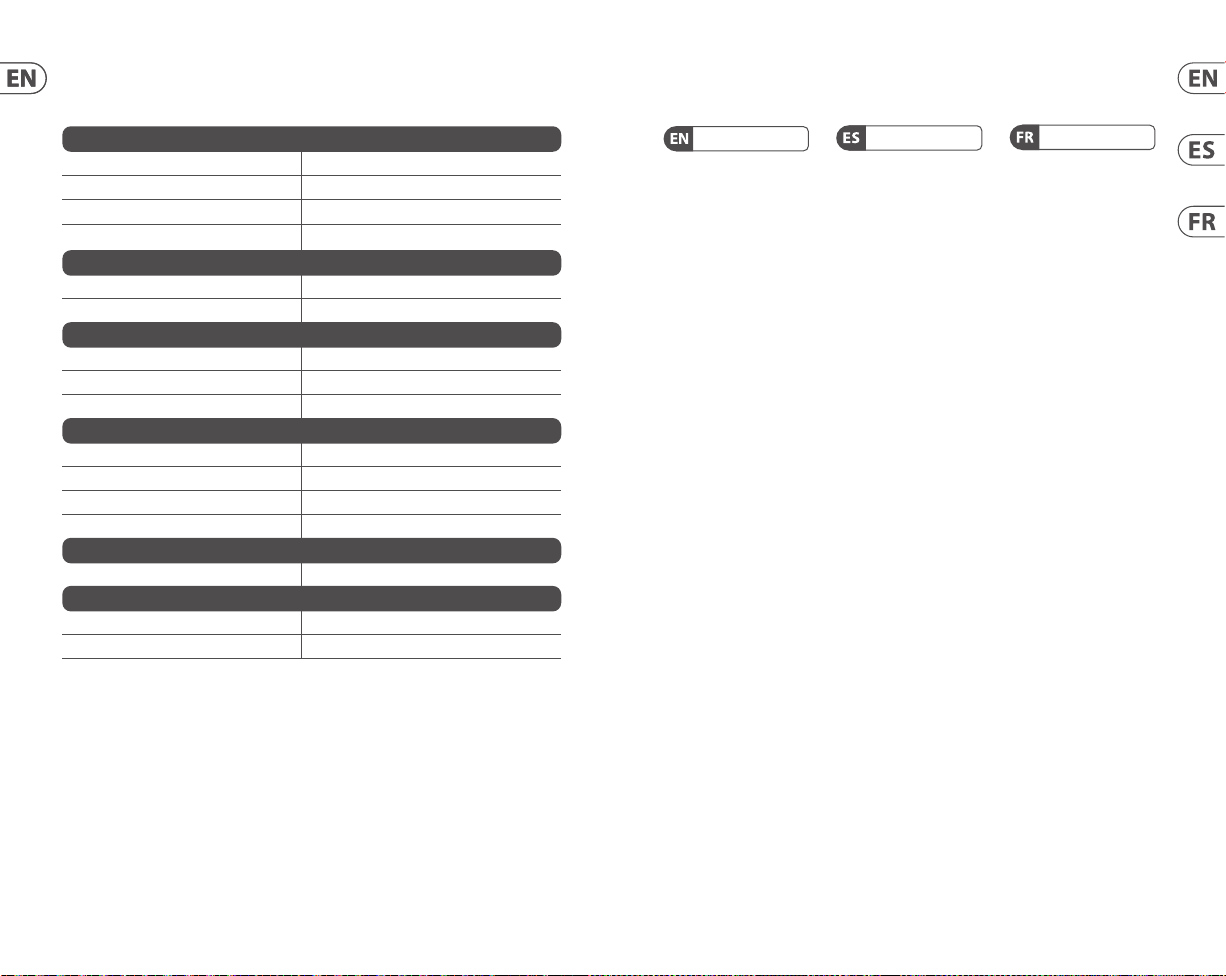
64 LIVE MINI 65Quick Start Guide 65Quick Start Guide
Specications
Performance
Audio output power (Stereo) 2 x 8 Watts RM S @ 4 Ohms
Transducers 2 x 1.75" with neodym ium magnets
Passive radiators 2 x Oval Shape R adiators 3.3" x 1.5"
Aux input 3.5 mm TRS
Power Requirements
External power adapter input 100-240 VAC 50/60 Hz
External power adapter output 5 VDC, 2 A maxi mum
Internal Battery
Type Li-ion
Rating voltage 7.4 V
Capacity 2600 mAh
Bluetooth Wireless Technology
Version Bluetoot h 4.2
RF frequency range 2402 to 2480 MHz
Channel No. 79
Maximum output power 10 dBm
Environmental
Operating temperature range 5°C to 40°C (41°F to 104°F)
Physical
Dimensio ns (H x W x D) 63 x 186 x 65 mm (2.5 x 7.3 x 2.6")
Weight 0.89 kg (1.96 lbs)
Other important informationOther important information
Important information
1. Register online.
Pleaseregister your new Music
Tribe equipment right after you
purchase it by visiting musictribe.
com. Registeringyour purchase
using our simple online form helps
us to process your repair claims more
quickly and eciently. Also, read the
terms and conditions of our warranty,
ifapplicable.
2. Malfunction. Should your
Music Tribe Authorized Reseller not be
located in your vicinity, you may contact
the Music Tribe Authorized Fulller for
your country listed under “Support” at
musictribe.com. Shouldyour country
not be listed, pleasecheck if your
problem can be dealt with by our
“OnlineSupport” which may also be
found under “Support” at musictribe.
com. Alternatively, please submit an
online warranty claim at musictribe.
com BEFORE returning theproduct.
3. Power Connections.
Beforeplugging the unit into a power
socket, please make sure you are using
the correct mains voltage for your
particular model. Faulty fuses must be
replaced with fuses of the same type
and rating withoutexception.
Aspectos importantes
1. Registro online.
Lerecomendamos que registre su
nuevo aparato Music Tribe justo
después de su compra accediendo
a la página web musictribe.com.
Elregistro de su compra a través de
nuestro sencillo sistema online nos
ayudará a resolver cualquier incidencia
que se presente a la mayor brevedad
posible. Además,aproveche para leer
los términos y condiciones de nuestra
garantía, siesaplicable en sucaso.
2. Averías. En el caso de que
no exista un distribuidor Music Tribe
en las inmediaciones, puede ponerse
en contacto con el distribuidor Music
Tribe de su país, queencontrará dentro
del apartado “Support” de nuestra
página web musictribe.com. En caso
de que su país no aparezca en ese
listado, acceda a la sección “Online
Support” (quetambiénencontrará
dentro del apartado “Support” de
nuestra páginaweb) y compruebe si su
problema aparece descrito y solucionado
allí. Deforma alternativa, envíenos a
través de la página web una solicitud
online de soporte en periodo de garantía
ANTES de devolvernoselaparato.
3. Conexiones de
corriente. Antes de enchufar este
aparato a una salida de corriente,
asegúrese de que dicha salida sea
del voltaje adecuado para su modelo
concreto. En caso de que deba sustituir
un fusible quemado, deberáhacerlo
por otro de idénticas especicaciones,
sinexcepción.
Informations importantes
1. Enregistrez-vous
enligne. Prenezle temps
d’enregistrer votre produit Music
Tribe aussi vite que possible sur le
site Internet musictribe.com. Lefait
d’enregistrer le produit en ligne nous
permet de gérer les réparations plus
rapidement et plus ecacement.
Prenezégalement le temps de
lire les termes et conditions de
notregarantie.
2. Dysfonctionnement.
Si vous n’avez pas de revendeur Music
Tribe près de chez vous, contactez le
distributeur Music Tribe de votre pays:
consultez la liste des distributeurs de
votre pays dans la page “Support” de
notre site Internet musictribe.com.
Si votre pays n’est pas dans la liste,
essayez de résoudre votre problème
avec notre “aideen ligne” que vous
trouverez également dans la section
“Support” du site musictribe.com.
Vouspouvez également nous faire
parvenir directement votre demande
de réparation sous garantie par Internet
sur le site musictribe.com AVANT de
nous renvoyer leproduit.
3. Raccordement au
secteur. Avant de relier cet
équipement au secteur, assurez-vous
que la tension secteur de votre région
soit compatible avec l’appareil. Veillez
à remplacer les fusibles uniquement
par des modèles exactement de même
taille et de même valeur électrique —
sans aucuneexception.
Page 34
66 LIVE MINI 67Quick Start Guide
Other important informationOther important information
Weitere wichtige
Informationen
1. Online registrieren.
Bitteregistrieren Sie Ihr neues
Music Tribe-Gerät direkt nach dem
Kauf auf der Website musictribe.
com. WennSie Ihren Kauf mit
unserem einfachen online Formular
registrieren, könnenwir Ihre
Reparaturansprüche schneller und
ezienter bearbeiten. Lesen Sie bitte
auch unsere Garantiebedingungen,
fallszutreend.
2. Funktionsfehler. Sollte sich
kein Music Tribe Händler in Ihrer Nähe
benden, können Sie den Music Tribe
Vertrieb Ihres Landes kontaktieren, der
auf musictribe.com unter „Support“
aufgeführt ist. Sollte Ihr Land nicht
aufgelistet sein, prüfen Sie bitte, ob Ihr
Problem von unserem „Online Support“
gelöst werden kann, den Sie ebenfalls
auf musictribe.com unter „Support“
nden. Alternativ reichen Sie bitte
Ihren Garantieanspruch online auf
musictribe.com ein, BEVOR Sie das
Produktzurücksenden.
3. Stromanschluss. Bevor
Sie das Gerät an eine Netzsteckdose
anschließen, prüfen Sie bitte, obSie die
korrekte Netzspannung für Ihr spezielles
Modell verwenden. Fehlerhafte
Sicherungen müssen ausnahmslos
durch Sicherungen des gleichen Typs
und Nennwerts ersetztwerden.
Outras Informações
Importantes
1. Registre-se online.
Porfavor, registreseu novo
equipamento Music Tribe logo após
a compra visitando o site musictribe.
com Registrar sua compra usando
nosso simples formulário online
nos ajuda a processar seus pedidos
de reparos com maior rapidez e
eciência. Além disso, leia nossos
termos e condições de garantia,
caso sejanecessário.
2. Funcionamento
Defeituoso. Casoseufornecedor
Music Tribe não esteja localizado nas
proximidades, vocêpode contatar
um distribuidor Music Tribe para o
seu país listado abaixo de “Suporte”
emmusictribe.com. Se seu país não
estiver na lista, favor checar se seu
problema pode ser resolvido com o
nosso “SuporteOnline” que também
pode ser achado abaixo de “Suporte”em
musictribe.com. Alternativamente,
favorenviar uma solicitação de garantia
online em musictribe.com ANTES da
devolução doproduto.
3. Ligações. Antes de ligar a
unidade à tomada, assegure-se de
que está a utilizar a voltagem correcta
para o modelo em questão. Osfusíveis
com defeito terão de ser substituídos,
sem qualquer excepção, porfusíveis do
mesmo tipo e correntenominal.
1. Registratevi online.
Vi invitiamo a registrare il nuovo
apparecchio Music Tribe subito
dopo averlo acquistato visitando
musictribe.com. La registrazione
dell'acquisto tramite il nostro
semplice modulo online ci consente
di elaborare le richieste di riparazione
in modo più rapido ed eciente.
Leggete anche i termini e le
condizioni della nostra garanzia,
qualora applicabile.
2. Malfunzionamento.
Nel caso in cui il rivenditore autorizzato
Music Tribe non si trovi nelle vostre
vicinanze, potete contattare il Music
Tribe Authorized Fulller per il vostro
paese, elencato in “Support” @
musictribe.com. Se la vostra nazione
non è elencata, controllate se il
problema può essere risolto tramite
il nostro “Online Support”che può
anche essere trovato sotto “Support”
@ musictribe.com. In alternativa,
inviate una richiesta di garanzia online
su musictribe.com PRIMA di restituire
il prodotto.
3. Collegamento
all'alimentazione. Prima di
collegare l'unità a una presa di corrente,
assicuratevi di utilizzare la tensione di
rete corretta per il modello specico. I
fusibili guasti devono essere sostituiti,
senza eccezioni, con fusibili dello stesso
tipo e valore nominale.
Informazioni importanti
Belangrijke informatie
1. Registreer online.
Registreer uw nieuwe Music Tribeapparatuur direct nadat u deze hebt
gekocht door naar musictribe.com te
gaan. Door uw aankoop te registreren
via ons eenvoudige online formulier,
kunnen wij uw reparatieclaims sneller
en eciënter verwerken. Lees ook
de voorwaarden van onze garantie,
indien van toepassing.
2. Storing. Mocht uw door Music
Tribe geautoriseerde wederverkoper
niet bij u in de buurt zijn gevestigd,
dan kunt u contact opnemen met de
door Music Tribe Authorized Fulller
voor uw land vermeld onder “Support”
op musictribe.com. Als uw land niet
in de lijst staat, controleer dan of
uw probleem kan worden opgelost
door onze "Online Support", die u
ook kunt vinden onder "Support"
op musictribe.com. U kunt ook een
online garantieclaim indienen op
musictribe.com VOORDAT u het product
retourneert.
3. Stroomaansluitingen.
Voordat u het apparaat op een
stopcontact aansluit, moet u ervoor
zorgen dat u de juiste netspanning voor
uw specieke model gebruikt. Defecte
zekeringen moeten zonder uitzondering
worden vervangen door zekeringen van
hetzelfde type en dezelfde waarde.
Viktig information
1. Registrera online.
Registrera din nya Music Tribeutrustning direkt efter att du köpt
den genom att besöka musictribe.
com. Att registrera ditt köp med vårt
enkla onlineformulär hjälper oss att
behandla dina reparationsanspråk
snabbare och mer eektivt. Läs också
villkoren i vår garanti, om tillämpligt.
2. Fel. Om din Music Tribeauktoriserade återförsäljare inte nns i
din närhet kan du kontakta Music Tribe
Authorized Fulller för ditt land listat
under “Support” på musictribe.com.
Om ditt land inte är listat, kontrollera
om ditt problem kan hanteras av
vår “Onlinesupport” som också nns
under “Support” på musictribe.com.
Alternativt kan du skicka in ett onlinegarantianspråk på musictribe.com
INNAN du returnerar produkten.
3. Strömanslutningar. Innan
du ansluter enheten till ett eluttag, se
till att du använder rätt nätspänning
för just din modell. Felaktiga säkringar
måste bytas ut mot säkringar av samma
typ och märkning utan undantag.
Ważna informacja
1. Zarejestrować online.
Zarejestruj swój nowy sprzęt Music
Tribe zaraz po zakupie na stronie
musictribe.com. Zarejestrowanie
zakupu za pomocą naszego prostego
formularza online pomaga nam
szybciej i efektywniej rozpatrywać
roszczenia dotyczące naprawy.
Przeczytaj również warunki naszej
gwarancji, jeśli dotyczy.
2. Awaria. Jeśli Twój
autoryzowany sprzedawca Music Tribe
nie znajduje się w pobliżu, możesz
skontaktować się z autoryzowanym
dostawcą Music Tribe dla swojego kraju,
wymienionym w sekcji „Wsparcie” na
stronie musictribe.com. Jeśli Twojego
kraju nie ma na liście, sprawdź, czy Twój
problem może zostać rozwiązany przez
nasze „Wsparcie online”, które można
również znaleźć w sekcji „Wsparcie” na
stronie musictribe.com. Alternatywnie,
prześlij zgłoszenie gwarancyjne online
na musictribe.com PRZED zwrotem
produktu.
3. Połączenia zasilania.
Przed podłączeniem urządzenia do
gniazdka sieciowego upewnij się, że
używasz odpowiedniego napięcia
sieciowego dla danego modelu.
Wadliwe bezpieczniki należy bez
wyjątku wymienić na bezpieczniki tego
samego typu i wartości.
Page 35
LIVE MINI 69Quick Start Guide
68
FEDERAL COMMUNICATIONS COMMISSION
COMPLIANCE INFORMATION
LIVE MIN I
Respon sible Part y Name: Music Tribe Commercial NV Inc.
Address: 5270 Procyon Street,
Phone Number: +1 702 800 8290
LIVE MIN I
This equ ipment has bee n tested and fo und to comply wi th the limits f or a Class B digit al device, pur suant to par t
15 of the FCC Rules. These limits are designed to provide reasonable protection against harmful interference
in a resid ential insta llation. This e quipment gen erates, use s and can radiat e radio frequ ency energ y and, if not
instal led and used in a ccordance wit h the instruc tions, may c ause harmfu l interfere nce to radio com munication s.
However, the re is no guarante e that interf erence will no t occur in a par ticular ins tallation. If t his equipmen t does
cause ha rmful inter ference to ra dio or televis ion receptio n, which can be d etermined by t urning the eq uipment
o and on, th e user is encour aged to try to c orrect the i nterfere nce by one or more of t he following m easures:
• • Reori ent or reloca te the receivi ng antenna.
• • Increa se the separa tion betwe en the equipm ent and receive r.
• • Connec t the equipm ent into an outl et on a circuit d ierent fro m that to which th e receiver is co nnected.
• • Consul t the dealer or an e xperience d radio/TV t echnician fo r help.
This devi ce complies wi th Part 15 of the FCC r ules. Opera tion is subjec t to the follow ing two condi tions:
(1) this device ma y not cause harm ful interf erence, and
(2) this devi ce must accept an y interfere nce received , including int erferenc e that may cause un desired ope ration.
Important information:
Changes o r modicat ions to the equi pment not exp ressly appro ved by Music Tribe c an void the user ’s authorit y to
use the equipment.
This equ ipment compli es with FCC RF rad iation expo sure limits s et forth fo r an uncontrol led environme nt.
Las Vegas NV 89118,
United States
Hereby, Mus ic Tribe declare s that this prod uct is in comp liance with Dir ective 2014/53/EU, Di rective 2014/3 0/
EU, Direc tive 2014/35/EU, Direc tive 2011/65/EU and Amend ment 2015/863/EU, Direc tive 2012/19/EU, Regula tion
519/2012 REACH SVHC an d Directive 19 07/2006/ EC.
Full text of EU DoC is available at https://community.musictr ibe.com/
EU Repres entative: Mu sic Tribe Brands D K A/S
Addres s: Ib Spang Olsen s Gade 17, DK - 8200 Aarhus N, Den mark
Page 36

 Loading...