


1
2
UK |
USER MANUAL |
5 |
F |
MODE D’EMPLOI |
25 |
DE |
BEDIENUNGSANLAITUNG |
45 |
NL |
INSTRUCTIEHANDLEIDING |
65 |
DK |
BETJENINGSVEJLEDNING |
85 |
S |
BRUKSANVISNING |
105 |
FIN |
KÄYTTÖOHJE |
127 |
I |
ISTRUZIONI DEL L’USO |
147 |
ES |
MANUAL DEL USUARIO |
167 |
P |
MANUAL DO UTILIZADOR |
187 |
3
4
UK - USER MANUAL |
|
Contents |
|
Important information |
6 |
Front panel |
7 |
Rear panel |
9 |
Remote control |
10 |
Using the radio |
12 |
Connecting the radio |
12 |
DAB mode |
12 |
Scanning for station in DAB mode |
12 |
Manual tuning in DAB mode |
13 |
Using the INFO function.. |
13 |
Saving a station to a preset. |
13 |
FM mode |
14 |
Scanning for station in FM mode |
14 |
Selecting audio mode on FM |
14 |
AUX mode |
14 |
CD mode |
15 |
The settings menu |
16 |
Shuffle |
16 |
Repeat |
16 |
Disc text |
16 |
Date and time |
16 |
Snooze |
17 |
Loudness |
17 |
Treble |
17 |
Bass |
17 |
Sysem reset |
18 |
Software version |
18 |
Snooze and mute |
18 |
Sleep timer |
19 |
Checking the sleep timer function |
19 |
Setting the alarm |
19 |
Resetting the radio |
20 |
Displaying the firmware version |
21 |
Notes regarding playback of discs |
22 |
Specifications |
23 |
5
Important information
Congratulations on your new radio. Please read this manual carefully to avoid malfunction and damage to the clock radio and to ensure that the radio will be a source of great pleasure to you for a very long time.
1.Do not expose the clock radio to direct sunlight, high humidity, dirt, heavy vibration or extreme temperatures.
2.Place the unit on a solid and plane surface.
3.Make sure that there is sufficient ventilation around the clock radio. Do not place the unit on a soft surface such as a carpet. Make sure that there is a clearance of 20 cm behind the unit.
4.Do not open the cabinet. Only qualified technicians are allowed clean the internal parts.
5.Make sure that liquid and foreign matter cannot penetrate the unit.
6.If service or repair is required, this must be carried out by qualified technicians.
7.Unplug the unit in the following cases:
A.The mains plug or the mains cable is defective.
B.Foreign matter or liquid has penetrated the radio.
C.The unit cannot be operated properly.
D.The unit has fallen down or the cabinet has been damaged.
8.Store this instruction manual carefully for future reference.
9.Use a duster or a slightly damp, soft and non-fluffy rag to clean the radio.
10.Do not use corrosive or strong cleaning agents. Make sure that no moisture penetrates the radio during cleaning. Unplug the unit before cleaning.
11.Check that the mains voltage indicated on the back of the clock radio corresponds to the mains voltage that the unit is connected to.
12.Unplug the unit if the clock radio is not to be used for a long time.
Disclaimer
Despite extensive efforts we cannot guarantee that the technical data indicated are correct, complete and updated. We reserve the right to make technical changes without notice.
6
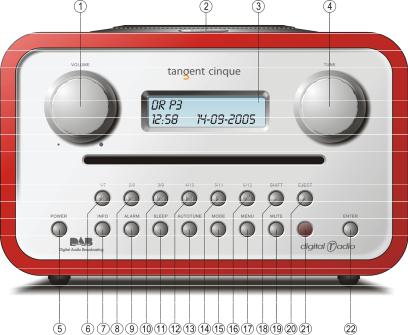
Front panel
1.VOLUME: Turn the volume knob to the right to increase the volume or to the left to decrease the volume of the speakers. This knob will also control the volume of headphones when connected.
2.SNOOZE: (On top of the clock radio) Press this button during an alarm to delay the alarm 5 and 22 minutes. (The snooze time can be adjusted in the menu)
When the unit is in standby, press this button to light up the display for 10 seconds When the unit is on the SNOOZE button works as a MUTE button.
3.LCD DISPLAY: Liquid Crystal Display. The display shows information such as the radio station name, date and time, signal strength, etc.
4.TUNE: Turn the tune knob to the right or to the left to change the frequency range, or to select between the found DAB stations.
In CD mode te button works as previous and next button.
5.POWER: Press this button to turn the unit on and set it into standby
6.1/6/FAST REVERSE: Selects the station saved at the current number. If pressed in combination with the SHIFT button (18) the largest of the two numbers at the button is selected. If the button is pressed for more than two seconds, a station will be saved at
7
the current number.
Press and hold the button in CD mode to go fast reverse on the disc playing.
7.INFO: Press this button to change between DAB and RDS information (program information, time and date, signal strength, etc.).
Note: Not all station send out all the above mentioned informations.
8.2/8/FAST FORWARD: Selects the station saved at the current number. If pressed in combination with the SHIFT button (18) the largest of the two numbers at the button is selected. If the button is pressed for more than two seconds, a station will be saved at the current number.
Press and hold the button in CD mode to go fast forward on the disc playing.
9.ALARM: This button sets the alarm function on and off. Press and hold the button to set the alarm time and source.
10.3/9/PREV: Selects the station saved at the current number. If pressed in combination with the SHIFT button (18) the largest of the two numbers at the button is selected. If the button is pressed for more than two seconds, a station will be saved at the current number.
Press the button in CD mode to select the previous track on the disc playing.
11.SLEEP: This button sets the sleep timer. When the sleep timer is activated the Tangent Cinque will turn off after 15, 30, 45, 60, 75 or 90 minutes.
12.4/10/NEXT: Selects the station saved at the current number. If pressed in combination with the SHIFT button (18) the largest of the two numbers at the button is selected. If the button is pressed for more than two seconds, a station will be saved at the current number.
Press the button in CD mode to select the next track on the disc playing.
13.AUTO TUNE: Press once in DAB mode to quick scan for DAB stations. Press and hold the button for two seconds in DAB mode to make a full scan for DAB station.
Press the button in FM mode to scan up in frequency. Press and hold the button in FM mode to scan down in frequency.
14.5/11/STOP: Selects the station saved at the current number. If pressed in combination with the SHIFT button (18) the largest of the two numbers at the button is selected. If the button is pressed for more than two seconds, a station will be saved at the current number.
Press the button in CD mode to stop playback of the loaded disc.
15.MODE: This button changes between DAB, FM, CD and AUX mode.
16.6/12/PLAY/PAUSE: Selects the station saved at the current number. If pressed in combination with the SHIFT button (18) the largest of the two numbers at the button is selected. If the button is pressed for more than two seconds, a station will be saved at the current number.
Press the button in CD mode to start playback of the disc loaded. If pressed during playback the disc playing is temperarely stopped. Press it again to resume playback.
17.MENU: Press this button to enter and exit the settings menu.
18.SHIFT: Activates the double function on the digit buttons. Press the button once in combination with one of the digit buttons and the largest of the two numbers at the digit
8
button will be selected. When the Shift button is pressed the text “sh” will flash in the top left corner of the display.
19.MUTE: Press this button once to mute the sound. Press it again and the sound will reappear.
20.EJECT: Ejects the disc loaded into the unit.
21.IR RECEIVER: For receiving remote codes from the included remote control.
22.ENTER: This button confirms your choice when choosing DAB stations or setting the alarm.
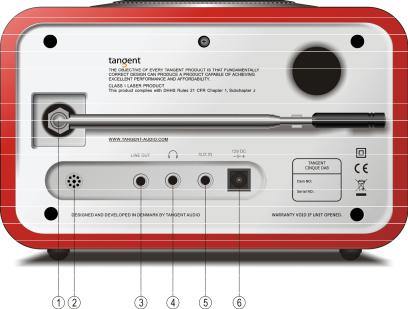
Rear panel
1.ANTENNA: The Tangent Cinque comes with a telescopic antenna. To improve FM or DAB reception, adjust the antenna for the best reception.
2.BUZZER: The Buzzer is used for the alarm when you want to be woken to a buzz instead of music.
3.LINE OUTPUT: The Tangent Cinque can be used as a separate tuner by connecting it to an amplifier or a receiver.
4.HEADPHONE: Connect a separate headset to this connecter to listen to Tangent Cinque with a headset. Inserting a headset will turn off the main speaker
5.AUX INPUT: Connect a stereo or mono audio source to this input. (Like a MP3 player or a cell phone)
6.POWER INPUT: Use this input to connect the included Tangent Cinque power supply.
9

Remote control
1.POWER: Press this button to turn the unit on and set it into standby
2.VOLUME UP: Press this button to increase the volume. This button will also control the volume of headphones when connected.
3.MUTE: Press this button once to mute the sound. Press it again and the sound will reappear.
4.ENTER: This button confirms your choice when choosing DAB stations or setting the alarm.
5.TUNE LEFT: Press this button to lower the frequency in FM mode, or to select between the found DAB stations.
6.VOLUME DOWN: Press this button to decrease the volume. This button will also control the volume of headphones when connected.
10
7.AUTO TUNE: Press once in DAB mode to quick scan for DAB stations. Press and hold the button for two seconds in DAB mode to make a full scan for DAB station.
Press the button in FM mode to scan up in frequency. Press and hold the button in FM mode to scan down in frequency.
8.0-9 DIGITS: Selects the station saved or the track at the current number. If pressed in combination with the +10 button (19) numbers larger than 9 can be selected. If the buttons are pressed for more than two seconds, a station will be saved at the current number.
9.FAST REVERSE: Press and hold the button in CD mode to go fast reverse on the disc playing.
10.PREVIOUS: Press the button in CD mode to select the previous track on the disc playing.
11.STOP: Press the button in CD mode to stop playback of the loaded disc.
12.EJECT: Ejects the disc loaded into the unit.
13.MODE: This button changes between DAB, FM, CD and AUX mode.
14.MENU: Press this button to enter and exit the settings menu.
15.TUNE RIGHT: Press this button to higher the frequency in FM mode, or to select between the found DAB stations.
16.SLEEP: This button sets the sleep timer. When the sleep timer is activated the Tangent Cinque will turn off after 15, 30, 45, 60, 75 or 90 minutes.
17.INFO: Press this button to change between DAB and RDS information (program information, time and date, signal strength, etc.).
Note: Not all station send out all the above mentioned informations.
18.ALARM: This button sets the alarm function on and off. Press and hold the button to set the alarm time and source.
19.+10: Use this button in combination with one of the 0-9 digit buttons to select tracks or presets higher than 9.
20.GOTO: Press this button in combination with the 0-9 digit buttons to go directly to a track on the disc. Ex.: if you would like to play track number 62, press GOTO, 0, 6 and 2.
21.FAST FORWARD: Press and hold the button in CD mode to go fast forward on the disc playing.
22.NEXT: Press the button in CD mode to select the next track on the disc playing.
23.PLAY/PAUSE: Press the button in CD mode to start playback of the disc loaded. If pressed during playback the disc playing is temperarely stopped. Press it again to resume playback.
11
Using the radio
Connecting the radio
Place the radio on a plain surface. Connect the included adaptor to the radio.
Check that all other connections have been made correctly before inserting the mains plug into the wall socket. Check that the mains voltage is correct according to the voltage stated on the adaptor before turning on the power.
The Tangent Cinque will go into standby and is ready for use.
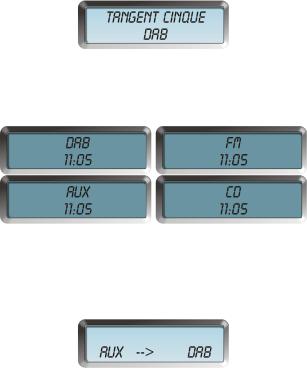
Turn the unit on by pressing the power button on the front panel. The display will show the message below.
When the radio is in standby, you can see what mode the radio will start up in, when it is turned on next time. The radio will display either DAB and the time or FM and the time. The display will not be as brightly illuminated in standby mode, as when the unit is turned on.
DAB mode
When the radio is on, select DAB mode by pressing the MODE button until the message below appears in the display.
Scanning for station in DAB mode
When the unit has been turned on, channels must be saved. This is done by means of the autotune function.
12
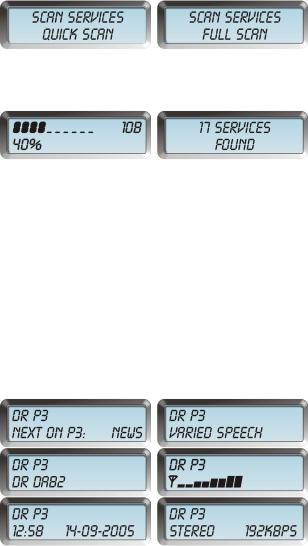
Press the AUTOTUNE button for two seconds. An international search(Full scan) will be initiated. Note: If the button is only pressed once, the unit will re scan for the channels already found.
The messages below to the right will be shown when tuning. The picture below to the left, showing the number of channels found, will be shown when tuning is finished.
Manual tuning in DAB mode
It is possible to do a manual scan in DAB mode. When the radio is in DAB mode, press and hold the INFO button for 2 seconds, and then press ENTER. The manual tuning mode will be activated, and the TUNE knob can be used to tune up and down. When a frequency with station is found, press enter and you will be able to choose between the station at the current frequency. Confirm your choice by pressing ENTER.
Using the INFO function..
This tuner features information possibilities on DAB that resemble RDS as we know it from FM. To activate this information from DAB, you must press the INFO button on the front panel. The display will show information about for instance time and date, name of station, name of artist, title, signal strength, etc.
Saving a station to a preset.
13

If you want to save a channel under one of the 12 presets, you must press down the button with the number concerned for two seconds. When the channel has been saved and you wish to listen to that channel, press the button with the number that you have saved the channel under. The procedure is the same for both FM and DAB.
Channels that have not been saved can be selected by means of the TUNE knob on the front panel. Note that if the channel is selected by means of the TUNE knob, you must confirm your choice by pressing the ENTER button.
Note: If you press and hold the ENTER button for 2 seconds, you will set the auto enter function on and off. When the auto enter function is on, it is not needed to press enter to confirm your choice of station.
FM mode
When the radio is on, select FM mode by pressing the MODE button until the message below appears in the display.
Scanning for station in FM mode
To scan for stations in FM mode, press the AUTOTUNE button to scan up in frequencies. To scan down in frequencies press and hold the AUTOTUNE button for two seconds. The radio will stop autotuning when it reaches a station with a adequate signal.
Selecting audio mode on FM
In FM mode press the ENTER button to choose between AUTO and MONO.
When the audio mode is set to AUTO, the radio will in stereo in the headphones and on the line output when stereo is available. If you choose MONO the radio will force all outputs to play in MONO.
This function is used if you are trying to received a radio station with a not adequate signal. Some stations might be better received in mono when the signal strength is not adequate.
AUX mode
The unit has an auxiliary stereo input. This input can be used to connect an external CD player or similar to. To select the auxiliary input, press the MODE button. Press the MODE again to change back to listen to radio.
14

CD mode
This radio can also play several different types of discs including MP3 and WMA discs. When the radio is on, select CD mode by pressing the MODE button until the message below appears in the display.
To start playback, simply load a disc into the slot in disc drive on the front of the radio. The radio will start playback automatically when it has detected the disc.
You can always stop the disc from playing by pressing the STOP button.
If you would like to pause the disc from playing, simply press the PLAY/PAUSE button. Press the PLAY/PAUSE button once again to resume playback.
If you would like to listen to a different track on the disc loaded in the radio you can press the I<< (PREV.) or >>I (NEXT) buttons on the front or remote. Then you will step the next or previous track.
Note: The TUNE button on the front panel, has the same function in CD mode as the I<< and >>I button.
You can also punch in the number of the preferred track directly, by using the 0-9 and +10 buttons on the remote. If you use the GOTO function on the remote, you must remember to punch in 3 digits always. That means if you would like to go directly to track 57 on the disc in the radio, then press GOTO, 0, 5 and 7.
15
The settings menu
This radio features a settings menu where it is possible to set up different features like sound and playback mode. Enter the settings menu by pressing the menu button. Choose the menu point you would like to adjust by turning the TUNE button and select be pressing ENTER. Make all adjustment in the settings menu by turning the TUNE button and confirm each choice by pressing ENTER.
The settings menu features the follwing options:
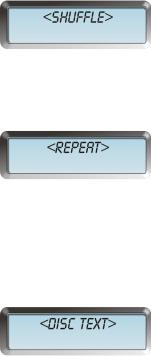
Shuffle
This function makes it possible to listen to the tracks the loaded disc in a random order. Choose between ON or OFF and confirm your choice by pressing ENTER.
Repeat
This function makes it possible to listen to the tracks the loaded disc in a repeat order. Choose between 1 TRACK, ALL or OFF and confirm your choice by pressing ENTER.
Disc text
This function changes between the way the disc text is shown on the display. Choose between SCROLLING, STATIC and OFF.
SCROLLING will make the disc all the disc text scroll across the display. STATIC will make the display show only one still standing line on the display. OFF will deactivate the disc text.
Date and time
This radio features automatic time setting. In order for the automatic time setting to work, DAB channels must be tuned in. So before the time will be shown correctly you must make make a scan for DAB stations (see the part “Scanning for station in DAB mode”) Then time and date should be automatically adjusted. It is however still possible that the time does not
16
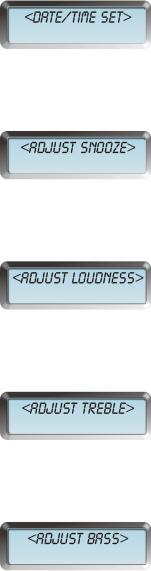
set it self. In that case, enter the DATE/TIME SET menu by pressing ENTER. The display will show “UPDATE DAB TIME – AUTOCORRECT”. If any time settings are available, the radio will now find them and set the date and time after the available information.
Snooze
This function gives the possibility of changing the snooze time. Please see the part “Snooze and mute” below for further information.
Loudness
This radio features a built in equalizer. Here you can set loudness on and off for the built in speaker and on the headphone output. Adjust by turn the TUNE button and confirm be pressing ENTER.
Treble
This radio features a built in equalizer. Here you can adjust the treble level of the built in speaker and on the headphone output with +/- 3dB. Adjust by turn the TUNE button and confirm be pressing ENTER.
Bass
This radio features a built in equalizer. Here you can adjust the bass level of the built in speaker and on the headphone output with +/- 3dB. Adjust by turn the TUNE button and confirm be pressing ENTER.
17

Sysem reset
This function makes it possible to set all setting back to factory defaults. Please notice that once you have pressed ENTER to this menu setting, all alarm, tuner and time settings will be deleted.
Software version
Here you can see the current software version in the radio.
Snooze and mute
The SNOOZE button works as MUTE button when the radio is on.
If you press the SNOOZE button after an alarm has been activated, the alarm will be delayed for between 5 and 22 minutes.
When the snooze function is active, the display will show a “Z” in the upper right conrner.
To adjust the snooze time, press the MENU button to enter the settings menu. Turn the TUNE button on the front panel until the display shows <Adjust Snooze> and then press the ENTER button to enter the Snooze settings.
Turn the TUNE button to adjust and confirm by pressing ENTER.
Exit the settings menu by pressing the MENU button again.
Note: If the SNOOZE button is pressed during standby, the display will be iluminated for 10 seconds, so it is possible to check the time in darkness.
18

Sleep timer
The radio has a sleep timer function. This makes the radio able to turn off by it self. To activate the sleep function press and hold the SLEEP button for 2 seconds, set the sleep function on or off by turning the TUNE button, and confirm with ENTER. Then choose how long there should go before the radio turns off by turning the TUNE button. Choose between 15 minutes, 30 minutes, 45 minutes, 60 minutes, 75 minutes and 90 minutes. Confirm your choice with ENTER.
When the sleep timer is activated. The display will show a little “s” on the right side. When the POWER button is pressed, the radio will go into standby and the sleep timer function will be cancelled
It is also possible cancelling the sleep function by choosing off in the sleep timer menu, the same way as the sleep timer was set on.
Checking the sleep timer function
To check how much time are left before the sleep timer is activated. Press the SLEEP button. The display will now show if the sleep timer on or off, and how much time is left before the sleep timer is activated.
Setting the alarm
Before setting the alarm, a DAB radio station must be tuned in. The radio uses the DAB stations to set the internal clock.
To set the alarm, press and hold the ALARM button for 2 seconds to access the alarm time set mode. In the alarm time set mode, use the TUNE knob to change values in alarm time and alarm type, and confirm the choice by pressing the ENTER button.
When in the alarm time set mode the display will show the current time in the upper center of the display. The lower center of the display will show the alarm time. The lower left corner
19
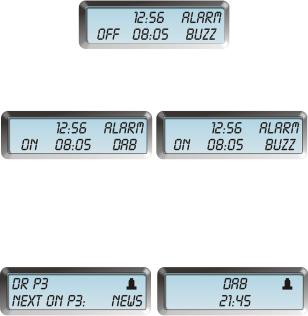
of the display will show if the alarm is ON or OFF. The lower right corner of the display will show the alarm type.
The on/off indicator in the lower left corner will start to flash, select on of off by turning the TUNE button and press enter to confirm.
Now the hour indicator of the alarm time will start to flash. Adjust the hour of the alarm time by turning the TUNE knob and confirm by pressing ENTER.
Now the minute indicator of the alarm time will start to flash. Adjust the minute of the alarm time by turning the TUNE knob and confirm by pressing ENTER.
The alarm type indicator in the lower right corner will start to flash. Adjust the alarm type by turning the TUNE knob and confirm by pressing ENTER.
The finally the alarm volume needs to be set. Adjust the volume of the alarm by turning the TUNE knob and confirm by pressing ENTER.
The alarm is now set, and the radio must be turned off, in order for the alarm to work. When the alarm is on, the display will show a bell in the right side of the screen.
To set the alarm off before it has been activated, enter the alarm time set mode and choose OFF. Confirm by pressing ENTER 5 times.
To set the alarm off after it has been activated, press the POWER button. Note:
The alarm time will be remembered to the next day.
The volume of the alarm will be the same as when the radio was set into standby.
Resetting the radio
If you want to erase your settings on the radio, including presets, alarm and sleep settings. Press and hold the INFO button for 2 seconds. Press the INFO button once again to select system reset, and press ENTER. The radio will now reset.
20
Note:
This function can also be entered via the settings menu.
Displaying the firmware version
To display the firmware version, press and hold the INFO button for 2 seconds. Press the INFO button twice again. The display will show the firmware version on the second line, like on the picture below.
Press the INFO button once again to exit the mode.
21
Notes regarding playback of discs
-Not all discs can be played on the Tangent Cinque. The unit supports Audio CD, CD-r, MP3 discs and WMA discs.
-Not all CD-r discs can be played on the Tangent Cinque.
If the discs used are not of a proper quality, playback cannot be guaratied. If the quality of the CD writer is not OK, playback can not be guarantied. If the disc is scratches playback cannot be guaratied.
-Never use discs with labels glued on to them. This can seriously damage the slot in loader.
-Discs containing many tracks (i.e. MP3 or WMA discs) can use more time to load then an ordinairy CD.
-The soundquality on disc may vary. MP3 and WMA discs are normally not of the same soundquality as an ordinairy disc.
-Never try to clean the CD player you self by using a “cleaning disc” Always let profisional technicians handle the maintence of the CD player
-Never try to load a disc that has been bended or has cracks.
-Always have the Tangent Cinque on a stable surface before using it.
-Never move the Tangent Cinque during playback.
-Never try to load more than one CD at the time.
-Never load discs that are not ordinairy 120mm standard sized round discs.
22
Specifications
Band: |
DAB band III / L band / FM |
|
Frequency Range: |
DAB band III 174 MHz ~ 240 Mhz |
|
|
DAB L band |
1452 Mhz ~ 1492 MHz |
|
FM-RDS |
87,5 MHz ~ 108,0 MHz |
Compatible formats: |
CD, CD-r, MP3 & WMA |
|
Speaker: |
Full range dynamic speaker (3”) |
|
System Output: |
5 Watt RMS |
|
Connections: |
3,5mm jack for stereo analog audio headphone output |
|
|
3,5mm jack for stereo analog audio AUX input |
|
|
3,5mm jack for stereo analog audio Line output |
|
|
12 V DC input |
|
Antenna: |
F-connector for DAB and FM antenna input |
|
|
DAB / FM telescope antenna included |
|
Power: |
DC 12 V |
|
Dimensions (WxHxD): |
210 x 129 x 200mm (Including feet) |
|
Weight: |
3,80Kg (Power supply and radio) |
|
23
24
F - MODE D’EMPLOI
Sommaire
INFORMATIONS IMPORTANTES |
26 |
Façade |
27 |
Panneau arrière |
30 |
Télécommande |
31 |
Utilisation de la radio |
33 |
Connexion de la radio |
33 |
Mode DAB |
33 |
Balayage de stations en mode DAB |
33 |
Syntonisation manuelle en mode DAB |
34 |
Utilisation de la fonction INFO |
34 |
Sauvegarder une station sur un préréglage. |
34 |
Mode FM |
35 |
Balayage de stations en mode FM |
35 |
Sélection du mode audio en FM |
35 |
Mode AUX |
35 |
Mode CD |
36 |
Menu réglages |
37 |
Shuffle |
37 |
Repeat |
37 |
Disc text |
37 |
Date et time |
37 |
Snooze |
38 |
Loudness |
38 |
Treble |
38 |
Bass |
38 |
System reset |
39 |
Software version |
39 |
Snooze et mute |
39 |
Minuteur sleep |
40 |
Vérification de la fonction minuteur sleep |
40 |
Régler l’alarme |
40 |
Réinitialisation de la radio |
42 |
Affichage de la version du microprogramme |
42 |
Remarques concerant la lecture de disques |
43 |
Spécifications |
44 |
25
INFORMATIONS IMPORTANTES
Nous vous félicitons pour l'achat de votre nouvel appareil. Veuillez lire attentivement ces instructions afin
d'éviter toute erreur de fonctionnement et détérioration de l'appareil, et de profiter de votre appareil le plus
longtemps possible.
1.Ne jamais exposer l'appareil aux rayons directs du soleil, à une humidité importante, aux impuretés, aux fortes vibrations ou à des températures extrêmes.
2.Placer l'appareil sur un support stable et plan.
3.Assurer une ventilation suffisante autour de l'appareil. Ne jamais placer l'appareil sur un support souple, comme par exemple une couverture. Vérifier que l'espace libre derrière l'appareil est d'au moins 20 cm.
4.Ne jamais ouvrir le boîtier. Le nettoyage des parties intérieures doit être fait uniquement par des techniciens habilités.
5.Vérifier que les corps étrangers et fluides ne puissent pas pénétrer dans l'appareil.
6.Les réparations éventuelles de l'appareil doivent être uniquement faites par des techniciens habilités.
7.Couper immédiatement l'alimentation électrique dans les cas suivants :
A.Le cordon ou la prise secteur sont défectueux.
B.Un liquide s'est renversé sur l'appareil ou un objet est tombé dans l'appareil.
C.L'exploitation de l'appareil ne peut se poursuivre correctement.
D.L'appareil est tombé ou le Boîtier est Endommagé.
8.Conserver soigneusement ce manuel pour toute référence ultérieure.
9.Pour nettoyer l'appareil, utiliser un chiffon à poussières ou un chiffon doux sans peluche et Légèrement humide.
10.Ne pas utiliser de détergents puissants ou corrosifs. Vérifier que l'humidité ne pénètre pas dans l'appareil lors du nettoyage. Débrancher le cordon secteur avant tout nettoyage.
11.Vérifier que la tension spécifiée sur le panneau arrière de l'appareil correspond à la tension de réseau locale.
12.Couper le courant si l'appareil est inutilisé pendant une longue période.
Dégagement de responsabilité
Malgré tous les efforts déployés par nos services, nous ne pouvons garantir l'exactitude ou l'intégralité des données techniques indiquées. Nous nous réservons le droit d'apporter sans préavis toutes modifications techniques à nos produits.
26

Façade
1.VOLUME: Tournez le bouton volume vers la droite pour augmenter le volume des haut-parleurs ou vers la gauche pour le baisser. Ce bouton permettra aussi le contrôle du volume du casque lorsque ce dernier sera branché.
2.SNOOZE: (Sur le dessus du radio-réveil). Appuyez sur ce bouton, lorsque l’alarme sonne, pour retarder l’alarme de 5 à 22 minutes. (L’heure du mode snooze peut être réglée dans le menu). Lorsque l’appareil est en mode stand-by, appuyez sur ce bouton pour illuminer l’affichage pendant 10 secondes. Lorsque l’unité est sur le bouton SNOOZE, ce dernier fonctionne comme un bouton MUTE.
3.AFFICHAGE LCD : Affichage à Cristaux Liquides. L’affichage indique les informations comme par exemple le nom de la station, la date et l’heure, la force du signal, etc.
4.TUNE: Tournez le bouton vers la droite ou vers la gauche pour changer la gamme de fréquence ou pour choisir parmi les stations DAB trouvées.
En mode CD, le bouton fonctionne comme un bouton ‘précédent’ ou ‘suivant’.
5.POWER: Appuyez sur ce bouton pour allumer l’appareil et le régler en mode stand-by
6.1/7/FAST REVERSE: Permet de sélectionner la station sauvegardée sur le numéro en cours. Si vous appuyez en même temps sur le bouton SHIFT (18), le plus élevé des deux nombres sera sélectionné. Si vous appuyez sur ce bouton pendant plus de deux secondes, la station sera sauvegardée sur le numéro en cours.
27
En mode CD, appuyez et maintenez le bouton pour faire un retour rapide pendant la lecture de disque.
7.INFO : Appuyez sur ce bouton pour choisir entre les informations DAB et RDS (informations de programme, heure et date, force de signal, etc.).
Remarque : Toutes les stations n’envoient pas les informations mentionnées cidessus.
8.2/8/FAST FORWARD: Permet de sélectionner la station sauvegardée sur le numéro en cours. Si vous appuyez en même temps sur le bouton SHIFT (18), le plus élevé des deux nombres sera sélectionné. Si vous appuyez sur ce bouton pendant plus de deux secondes, la station sera sauvegardée sur le numéro en cours.
En mode CD, appuyez et maintenez le bouton pour faire une avance rapide pendant la lecture de disque.
9.ALARM : Ce bouton permet d’allumer ou d’éteindre la fonction alarme. Appuyez ou maintenez le bouton pour régler l’heure de l’alarme et la source.
10.3/9/PREV: Permet de sélectionner la station sauvegardée sur le numéro en cours. Si vous appuyez en même temps sur le bouton SHIFT (18), le plus élevé des deux nombres sera sélectionné. Si vous appuyez sur ce bouton pendant plus de deux secondes, la station sera sauvegardée sur le numéro en cours.
En mode CD, appuyez sur le bouton pour sélectionner la piste précédente du disque en cours de lecture.
11.SLEEP: Ce bouton sert à régler le minuteur sleep. Lorsque le minuteur sleep est activé, votre Tangent Cinque s’éteint après 15, 30, 45, 60, 75 ou 90 minutes.
12.4/10/NEXT: Permet de sélectionner la station sauvegardée sur le numéro en cours. Si vous appuyez en même temps sur le bouton SHIFT (18), le plus élevé des deux nombres sera sélectionné. Si vous appuyez sur ce bouton pendant plus de deux secondes, la station sera sauvegardée sur le numéro en cours.
En mode CD, appuyez sur le bouton pour sélectionner la piste suivante du disque en cours de lecture.
13.AUTO TUNE: Appuyez une fois sur le mode DAB pour effectuer un balayage rapide des stations DAB. En mode DAB, appuyez et maintenez le bouton pendant deux secondes pour effectuer un balayage complet de la station DAB.
En mode FM, appuyez sur ce bouton pour effectuer un balayage des fréquences vers le haut. En mode FM, appuyez sur ce bouton pour effectuer un balayage des fréquences vers le bas.
14.5/11/STOP: Permet de sélectionner la station sauvegardée sur le numéro en cours. Si vous appuyez en même temps sur le bouton SHIFT (18), le plus élevé des deux nombres sera sélectionné. Si vous appuyez sur ce bouton pendant plus de deux secondes, la station sera sauvegardée sur le numéro en cours.
En mode CD, appuyez sur ce bouton pour arrêter la lecture du disque chargé.
15.MODE: Ce bouton permet de choisir parmi les modes DAB, FM, CD et AUX.
16.6/12/PLAY/PAUSE: Permet de sélectionner la station sauvegardée sur le numéro en cours. Si vous appuyez en même temps sur le bouton SHIFT (18), le plus élevé des deux nombres sera sélectionné. Si vous appuyez sur ce bouton pendant plus de deux
28
secondes, la station sera sauvegardée sur le numéro en cours.
En mode CD, appuyez sur ce bouton pour démarrer la lecture du disque chargé. Si vous appuyez sur ce bouton, la lecture du disque s’arrête temporairement. Appuyez à nouveau pour reprendre la lecture.
17.MENU: Appuyez sur ce bouton pour accéder et sortir du menu réglages.
18.SHIFT: Permet d’activer la double fonction des boutons numériques. Appuyez sur ce bouton une fois en même temps que sur un des boutons numériques et le plus élevé des deux nombres du bouton numérique sera sélectionné.
Lorsque vous appuyez sur le bouton Shift, le texte ‘sh’ clignote dans l’angle supérieur gauche de l’écran.
19.MUTE: Appuyez sur ce bouton une fois pour mettre le son muet. Appuyez à nouveau pour remettre le son.
20.EJECT: Permet d’éjecter le disque chargé dans l’appareil.
21.RÉCEPTEUR IR: Permet de recevoir les signaux à distance depuis la télécommande fournie.
22.ENTER: Ce bouton permet de confirmer votre choix lorsque vous choisissez les stations DAB ou que vous réglez l’alarme.
29

Panneau arrière
1.ANTENNE: Votre Tangent Cinque est livré avec une antenne télescopique. Afin d’améliorer la réception FM ou DAB, réglez l’antenne pour obtenir une meilleure réception.
2.BUZZER: Le buzzer sert d’alarme lorsque vous désirez être réveillé(e) avec un avertisseur sonore plutôt qu’avec de la musique.
3.SORTIE LIGNE: Votre Tangent Cinque peut être utilisé comme tuner séparé si vous le connectez à un amplificateur ou à un récepteur.
4.CASQUE : Connectez un casque séparé au connecteur pour écouter votre Tangent Cinque avec un casque. En branchant un casque, cela éteindra le haut-parleur principal
5.ENTRÉE AUX: Connectez une source stéréo ou mono à cette entrée. (Comme un lecteur MP3 ou un téléphone portable)
6.PUISSANCE EN ENTRÉE : Utilisez cette entrée pour connecter l’alimentation Tangent Cinque fournie.
30
 Loading...