

Page 1
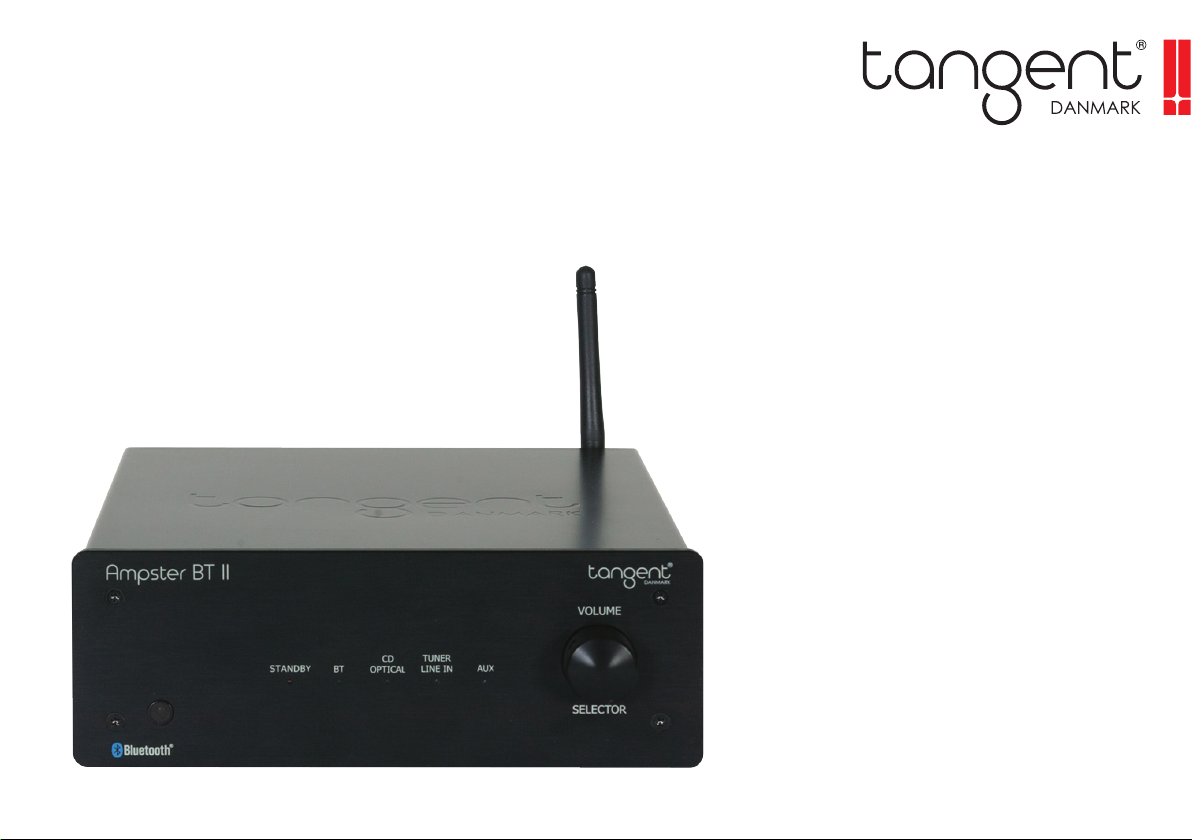
Ampster BT II
Mini stereo amplifier
User’s manual
Brugermanual
Mode d’emploi
Bedienungsanleitung
Bruksanvisning
Käyttöopas
Manual del usuario
Brukermanual
Page 2

Page 3

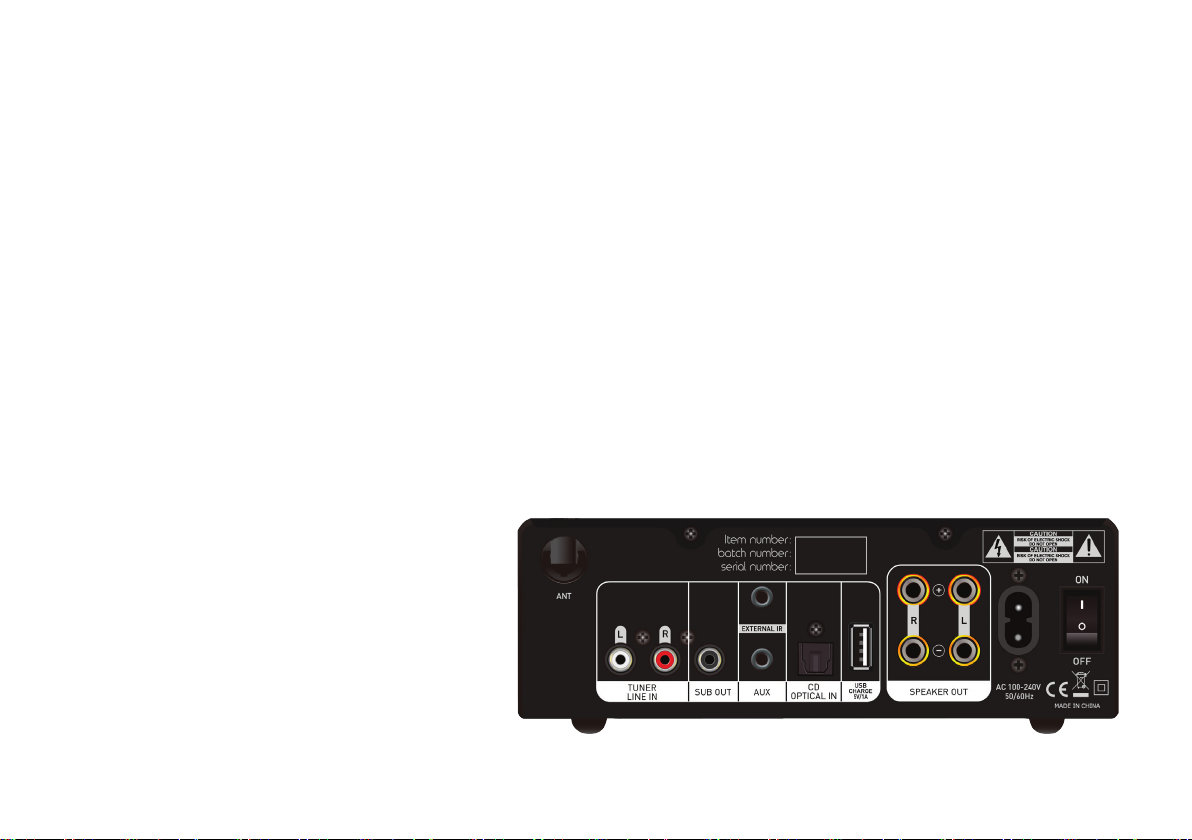
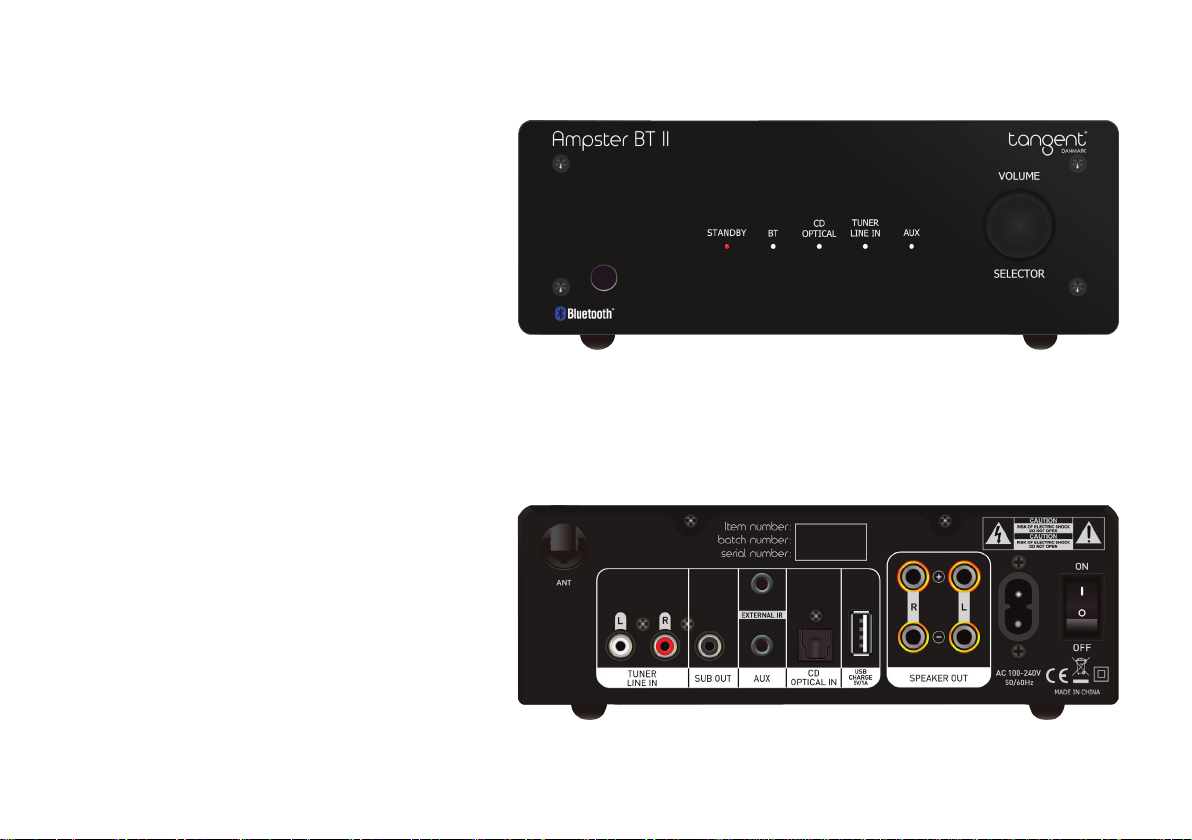
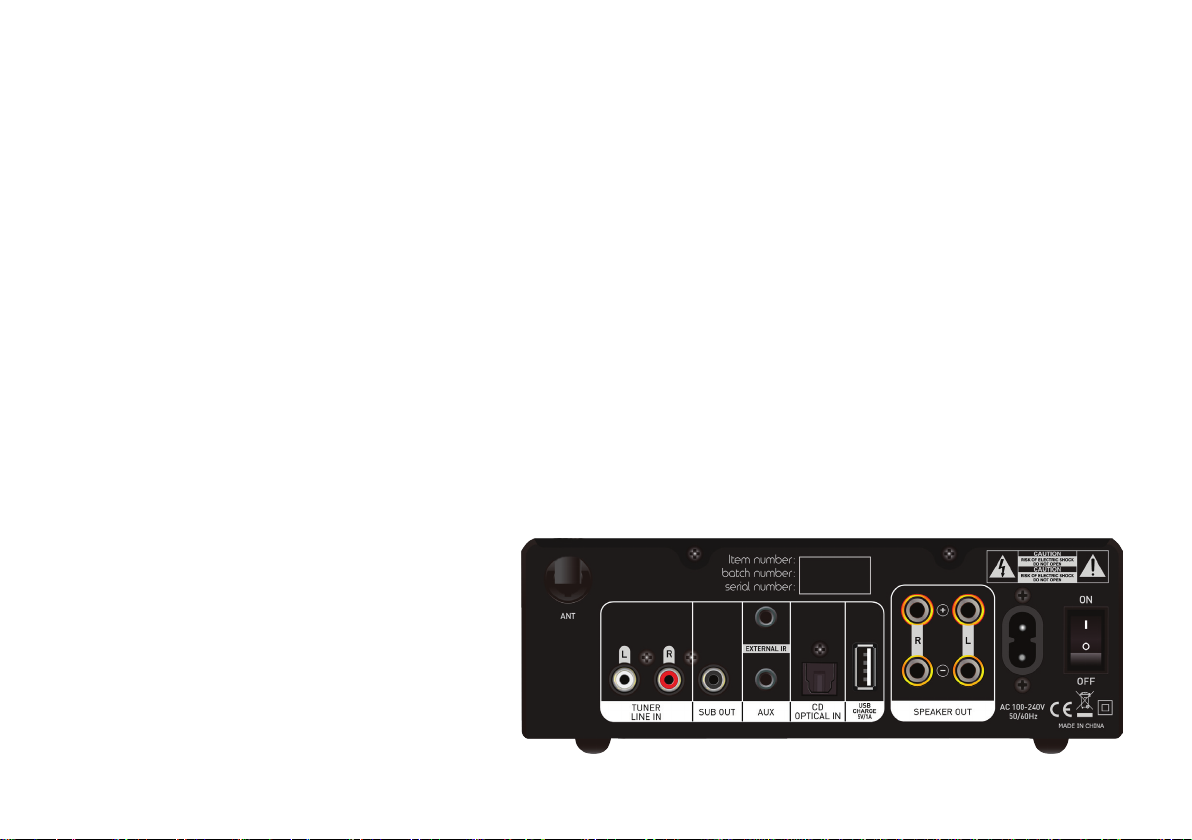
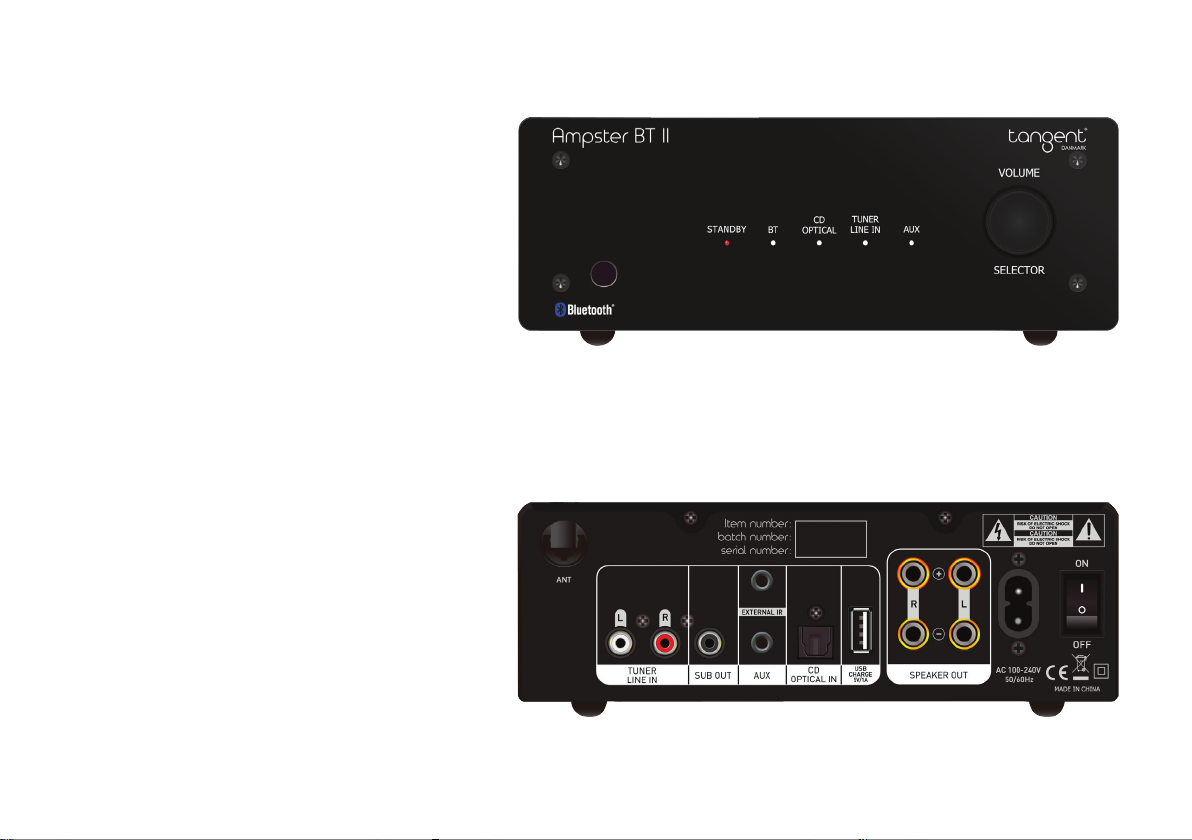
Amplier:
1. Power Indicator
2. Bluetooth Indicator
3. OPT Indicator
4. Line In Indicator
5. AUX Indicator
6. Remote Sensor
7. Volume Knob/Input Selector
8. Antenna
9. RCA L/R
10. SUB Out
11. AUX In
12. Optical Input
13. Speaker Output - L/R
14. Speaker Output + L/R
15. Power Input
16. On/O Switch
17. External IR
18. USB Charge 5VDC/1A
Including in the package:
Remote Control
Instruction Manual
7
6
1 2 3 4 5
8
9 10
8
17
11
12
18
14
13
16
15
(UK)
Page 4
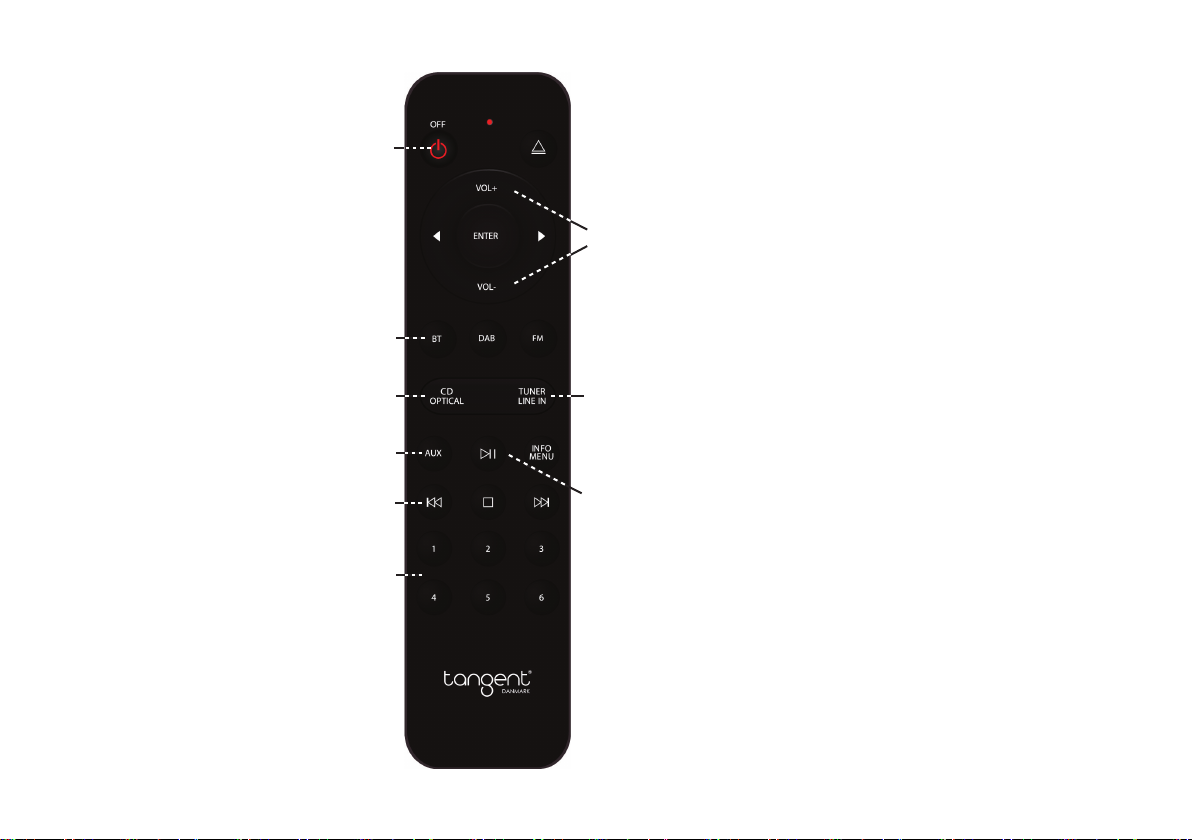
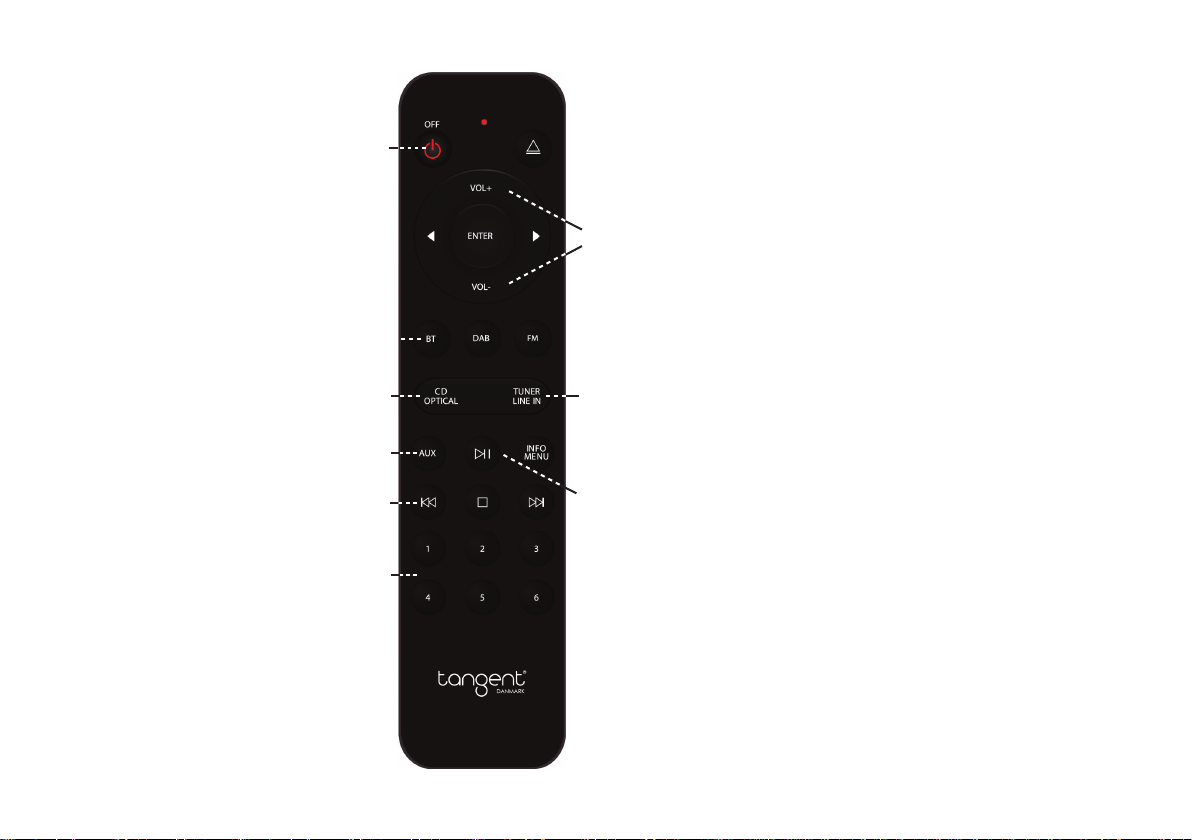
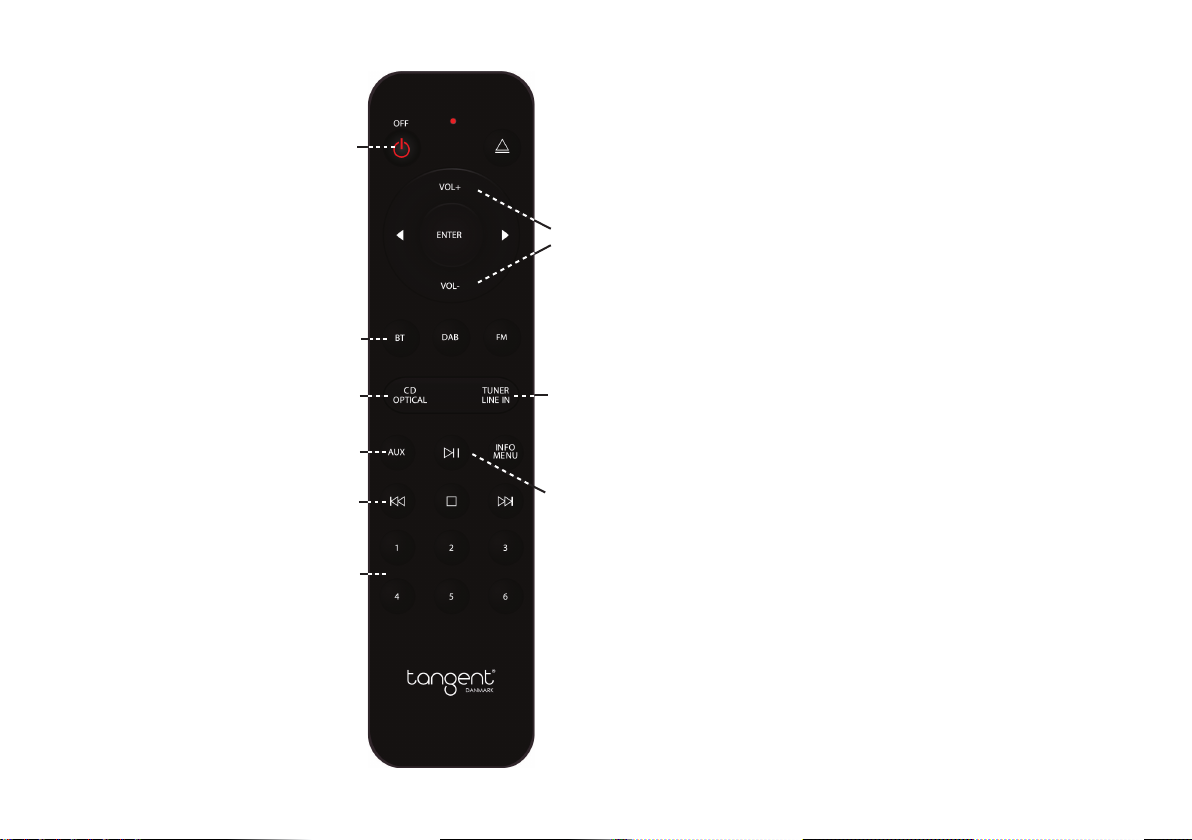
Remote control:
1
1. On/O Button
2. Optical Source(CD)
3. Volume +/-
4. Previous/Next (BT/CD mode)
5. Line In Source (TUNER)
6. Play/Pause (BT/CD mode)
7. AUX Source
8. Preset 1-6
9. Bluetooth Source
Connect:
1. Connect the power cord to the back of the
amplier then connect it to a wall outlet.
2. Connect your devices to the desired input.
3. Turn the power button to the On position,
after two seconds the unit will enter working
3
status and the input indicator will lit up.
4. Press the Bluetooth, OPT, LINE or AUX button
on the remote or the volume knob to choose
the desired audio source.
9
2
7
4
8
Control the playback via the remote control by
pressing the buttons.
5
Note: The amplier will shut o automatically
if the temperature exceeds 85°C, to indicate
this the Power indicator will turn orange. The
6
amplier will re-start automatically when the
temperature has dropped below 60±10°C.
Bluetooth Pairing:
1. Press the Bluetooth on the remote (or push the
selector button) to activate the Bluetooth source.
2. Activate Bluetooth on your phone/tablet and
start searching for new Bluetooth devices.
3. When your phone/tablet nds the Tangent
Ampster BT II, choose this unit and begin pairing up.
(You can force the Ampster into pairing mode, with long press on BT)
(UK)
Page 5
Connect Your Device:
Connect your loudspeakers to the Speaker
Output.
Make sure you connect the -/+ and the
L/R cables to the correct input.
Connect your subwoofer to SUB out.
Connect a CD player or other device via
its RCA cable to the RCA L/R input.
Make sure you connect the “L” plug to the
left input channel and the “R“ plug to the
right input channel.
Connect your phone/tablet/MP3 via an
AUX cable to AUX Input.
Use the optical input by connecting a
device using a optical ber cable to the
Optical Input.
Note:
Remember to change into the desired
source on the amplier.
8
(UK)
Page 6

Indicator Function
Power/Standby indicator
Power: Power on-The product in power o status, then push the power source button on rear panel at
“ON” position the LED indicator blinks one time and the startup sound from electric relay in the unit,
after about 2 seconds the amplier will be in working status. Note that the unit will not remember the
settings from before it was powered o.
Power o:
Push the power source button at “OFF” position, then the close sound from the electric relay and unit
go into power o status.
Standby:
Press the standby button on the remote control, or push the Volume/selector button (3-4sec). Then the
unit will go into standby, and the standby LED will be red color. The unit is in standby status.
(When the Ampster goes into auto standby when inactive (no signal) in 15min, you can wake it up via bluetooth/
line in/ AUX signal) Wake up on same input as auto power down on.
Power on (from standby mode): Press standby on the remote control or push the Volume/selector button.
And after about 2 seconds the amplier will be in last time working status before standby.
Bluetooth input indicator
Press to select Bluetooth as your audio source.
Optical input indicator
Press to select input method as optical ber wired audio source.
AUX input indicator
Press to select input method as 3.5mm audio jack line in.
Line-in input indicator
Press to select input method as wired RCA Line-in.
Volume and input switch button
This selector can adjust volume (turn left or right) and also switch the input mode (push)
(For standby push and hold the button)
(UK)
Page 7

Important Safety Instructions:
To reduce the risk of electrical shock, fire, etc.:
1. Do not place unit near any heat source such as radiators, heat registers, stoves, or other apparatus (including amplifiers) that
produce heat.
2. Do not block any ventilation openings of unit.
3. The unit shall not be exposed to dripping or splashing and no objects filled with liquids, such as vases, shall be placed on the unit.
4. Do not place any heavy loads onto the unit, and do not step on it, the load may fall and cause serious injury to the unit.
5. Never unplug your unit by pulling on the power cord. Always grap the plug firmly and pull straight out from the outlet.
6. Repair or replace all electric service cords that have become frayed or otherwise damaged immediately. Do not use a cord that
shows cracks or abrasion damage along its length, the plug, or the connector end.
7. To prevent fire or shock hazard, do not expose unit to rain or moisture.
8. During lightning or raining days, unplug the unit for additional protection dur ing thunderstorms or when the unit is not used
for prolonged periods. This will prevent damage to the unit from lightning and power surges.
9. Do not attempt to carry out any service work yourself. By opening or removing the cabinet, you may be exposed to dangerous
voltage or other hazards. Any service work should be carried out by qualified technicians.
10. In the interests of safety and to avoid unnecessary energy consumption, never leave the unit switched on while unattended for
long periods of time, e.g. overnight, while on holiday or while out of the house. Switch it off and disconnect the mains plug
from the mains socket.
11. Clean only with dry cloth
12. Please pay attention to the environmental aspects of battery disposal. Battery must be recycled or disposed of properly. This
product must not be disposed together with the domestic waste. This product has to be disposed at an authorized place for
recycling of electrical and electronic appliances. By collecting and recycling waste, you help save natural resources, and make
sure the product is disposed in an environmental friendly and healthy way.
This symbol on the product or in the instructions means that your
electrical and electronic equipment should be disposed at the end of its
life separately from your household waste.There are separate collection
systems for recycling in the EU. For more information, please contact
the local authority or your retailer where you purchased the product.
(UK)
The Bluetooth® word mark and logos are
registered trademarks owned by Bluetooth
SIG,. Inc. and any use of such marks is
under license. Other trademarks and trade
names are those of their respective owners.
Page 8
Forstærker forside/bagside:
1. Standby indikator
2. Bluetooth indikator
3. CD/Optisk indikator
4. Tuner/Line In indikator
5. AUX indikator
6. Remote sensor
7. Volume Kontrol/Input vælger
8. Antenne
9. Tuner/Line in RCA L/R
10. SUB Out RCA
11. AUX In 3.5mm
12. CD/Optisk Input
13. Højttaler udgang - L/R
14. Højttaler udgang + L/R
15. Strøm tilslutning
16. On/O kontakt
17. Ekstern IR
18. USB Charge 5VDC/1A
Inkluderet i pakken:
Fjernbetjening
Strømkabel
Manual
7
6
1 2 3 4 5
8
9 10
8
17
11
12
18
14
13
16
15
(DK)
Page 9
Fjernbetjening:
1
1. On/O knap
2. CD/Optisk input
3. Volume +/-
4. Forrige/Næste (BT/CD mode)
5. Tuner/Line In input
6. Play/Pause (BT/CD mode)
7. AUX input
8. Knap 1-6
9. Bluetooth input
Tilslutning:
1. Tilslut strømledningen bag på forstærkeren og
til strømnettet.
2. Tilslut din smartphone/tablet eller andet til det
ønskede input.
3. Tænd ved at skifte ON/OFF knappen til ON,
efter 2 sekunder vil din Ampster BT blive aktiv
3
og input indikatoren vil lyse.
4. Tryk på Bluetooth, Optical, Line in eller AUX
knappen på fjernbetjeningen eller brug volume
9
2
7
4
8
knappen til at vælge det ønskede input.
Juster volumen på forstærkeren via fjernbetjenin-
5
gen eller volumen knappen. (Ampster BT II husker det sidste volume trin, ved standby)
Bemærk: Forstærkeren lukker ned hvis temperaturen overstiger 85°C, Standby LED vil blive
6
orange. Forstærkeren vil genstarte automatisk når
temperaturen er faldet til 60±10°C.
Bluetooth Pairing:
1. Vælg Bluetooth input.
2. Aktiver Bluetooth på din smartphone/tablet og
søg efter Bluetooth enheder.
3. Når din smartphone/tablet nder Tangent
Ampster BT, vælger du denne og de bliver tilsluttet.
(Man kan tvinge Ampster BT II i pairing mode, ved et langt tryk på BT)
(DK)(UK)
Page 10
Tilslutninger
Tilslut dine højttalere til speaker output på
forstærkeren.
Tilslut minus til minus og plus til plus.
Du kan tilslutte en aktiv sub via sub out.
Tilslut en CD eller andet med et RCA kabel
til Line IN RCA L/R input.
Husk at tilslutte venstre kanal til Left og
højre kanal til Right.
Tilslut din telefon/tablet/MP3 via et AUX
kabel til AUX input.
For at bruge det optiske input, skal du
tilslutte et apparat med et optisk kabel.
Note:
Husk at skifte til det ønskede input på
forstærkeren.
(DK)
Page 11

Funktion
Tænd:
Tænd produktet ved at sætte power knappen på bagside til ON.
LED-indikatoren blinker én gang, og du vil kunne høre et rele klikke. Efter ca 2 sekunder vil forstærkeren være klar.
Bemærk: at enheden ikke vil huske indstillingerne fra før den blev slukket.
Sluk:
Du kan slukke produktet heltved at sætte power knappen på bagsiden til OFF.
Standby:
Tryk på standby-knappen på fjernbetjeningen, eller tryk på Volume/Selector knappen i 3-4sek. Så vil
enheden gå i standby, og standby-LED bliver rød. Enheden er nu i standby-status.
(Når Ampster BT er i auto standby, (hvis inaktiv i 15min) kan den vågne op igen via bluetooth signal)
Tænd (fra standby): Tryk på standby på fjernbetjeningen eller tryk Volume/Selector button (lang
tryk). Efter ca. 2 sekunder forstærkeren vil være klar og husker sidste volume setting mm.
Bluetooth input-indikator
Tryk for at vælge Bluetooth som din lydkilde.
Optisk indgang indikator
Tryk for at vælge input metoden som optisk ber kabel lydkilde.
AUX-indgang Indikator
Tryk for at vælge input metoden som 3,5 mm lydstik linje i.
Line-in indgang indikator
Tryk for at vælge input metoden som kablet RCA Line-in.
Knappen Lydstyrke og input-kontakt
Denne vælgeren kan justere lydstyrken (drej til venstre eller højre), og også skifte indtastningstilstand
(push) (For standby tryk og hold knappen)
(DK)
Page 12

Vigtige sikkerhedsinstruktioner
1. Placer ikke enheden i nærheden af varmekilder så som radiatorer, varmeapparater, ovne eller andre apparater
(inklusiv forstærkere) der udvikler varme.
2. Blokker ikke nogen af ventilationsåbningerne.
3. Apparatet må ikke udsættes for dryp eller sprøjt, og beholdere fyldt med væsker, så som vaser, må ikke plac
eres på enheden.
4. Placer ikke tunge ting på enheden og træd ikke på den, tingene kan falde ned og forårsage alvorlige skader på enheden.
5. Frakobl aldrig din enhed ved at trække i netledningen. Tag altid godt fast i stikket og træk det ud af stikkontakten.
6. Reparer eller udskift alle elektriske ledninger der er blevet osset, eller på anden måde er beskadiget. Brug ikke
en ledning der har revner eller har slidmærker i isolationen, stikket, etc.
7. For at forhindre mulighed for brand eller stød, må dette apparat ikke udsættes for regn eller fugt.
8. Fjern netstikket i tordenvejr og på regnvejrsdage for at opnå en ekstra beskyttelse, eller hvis apparatet ikke skal
anvendes i en længere periode. Dette vil forhindre at apparatet ødelægges ved lynnedslag og overspændinger.
9. Prøv ikke selv på at foretage service på apparatet. Ved fjernelse af kabinettet kan man udsætte sig selv for far
lige spændinger eller andre farer. Et hvert serviceefter syn skal foretages af kvalicerede teknikere.
10. Af hensyn til sikkerheden og unødvendigt energiforbrug, efterlad aldrig enheden tændt, når den ikke er under
opsyn i længere perioder, fx om natten, under ferier, eller når man har forladt hjemmet. Sluk for den og tag net
stikket ud af stikkontakten.
11. Rengør kun med en tør klud
12. Der skal udvises miljøhensyn ved bortskaelse af brugte batterier. Batterier skal genanvendes eller bortskaes
korrekt. Dette produkt må ikke bortskaes sammen med husholdningsaald. Dette produkt skal aeveres på
autoriserede steder for genbrug af elektriske- og elektroniske apparater. Ved at indsamle og genanvende
aald hjælper du med til at spare på de naturlige ressourcer, og sikrer at produktet bortskaes på en miljøvenlig
og sundhedsmæssig sikker måde.
Dette symbol på produktet eller i vejledningen betyder, at dit elektriske eller elektroniske udstyr ikke må kasseres sammen med
almindeligt husholdningsaffald. Der findes, inden for EU, forskellige
opsamlingssystemer til genbrug. For yderligere information, kontakt
dine lokale myndigheder eller den forhandler hvor du købte produktet.
(DK)
The Bluetooth® word mark and logos are
registered trademarks owned by Bluetooth
SIG,. Inc. and any use of such marks is
under license. Other trademarks and trade
names are those of their respective owners.
Page 13
Amplicateur :
1. Voyant d’alimentation
2. Voyant Bluetooth
3. Voyant OPT
4. Voyant d’entrée de ligne
5. Voyant Aux
6. Capteur à distance
7. Bouton Volume/Sélecteur d’entrée
8. Antenne
9. RCA G/D
10. Sortie Caisson
11. Entrée AUX
12. Entrée optique
13. Sortie du haut-parleur – G/D
14. Sortie du haut-parleur + G/D
15. Entrée d’alimentation
16. Bouton Marche/Arrêt (On/O)
17. IR externe
18. Charge USB 5VDC / 1A
Inclus dans l’emballage :
Télécommande
Mode d’emploi
7
6
1 2 3 4 5
8
9 10
8
17
11
12
18
14
13
16
15
(F)
Page 14
Télécommande:
1. Bouton Marche/Arrêt
(On/O)
2. Source optique
3. Volume +/-
4. Précédent/Suivant
(mode BT/CD)
5. Source d’entrée de ligne
6. Lecture/Pause
(mode BT/CD)
7. Source AUX
8. 1-6
9. Source Bluetooth
1
9
2
7
4
8
Branchement:
1. Branchez le câble d’alimentation à l’arrière de
l’amplicateur puis branchez-le à une prise murale.
2. Branchez vos appareils sur l’entrée désirée.
3. Mettez le bouton d’alimentation sur la position
Marche (On), deux secondes plus tard l’appareil se
mettra sera activé et le voyant d’entrée s’allumera.
3
4. Appuyez sur le bouton Bluetooth, OPT, LINE ou AUX
de la télécommande ou le bouton du volume pour la
sélection de la source audio souhaitée.
Contrôlez la lecture avec la télécommande en
appuyant sur les boutons.
NB : L’amplicateur s’éteindra automatiquement
5
si la température dépasse 85°C, pour le signaler
le voyant d’alimentation deviendra orange. L’
amplicateur redémarrera automatiquement lorsque
la température descend en dessous de 60±10°C.
6
Connexion Bluetooth:
1. Appuyez sur Bluetooth sur la télécommande (ou
poussez le bouton de sélection) pour activer la source
Bluetooth.
2. Activez le Bluetooth sur votre téléphone/tablette et commencez à rechercher les nouveaux appareils Bluetooth.
3. Lorsque votre téléphone/tablette trouve Tangent
Ampster BT II, sélectionnez cet appareil et commencez
la connexion.
(Vous pouvez forcer le Ampster en mode d’appairage,
avec une longue pression sur BT)
(F)
Page 15

Branchement de votre appareil:
Branchez vos haut-parleurs à la sortie de la
bae
Veillez à ce que les câbles -/+ et G/D
soient branchés à l’entrée adéquate.
Branchez votre caisson de basse à la sortie
SUB.
Branchez un lecteur de CD ou autre appareil par son câble RCA à l’entrée RCA G/D.
Veillez à ce que la che ‘G’ (L) soit branchée à l’entrée de gauche de la station et
la che ‘D’ (R) à l’entrée de droite de la
station.
Branchez votre téléphone/tablette/MP3 par
le câble AUX à l’entrée AUX.
Utilisez l’entrée optique en branchant un
appareil muni d’un câble de bre optique à
l’entrée optique.
NB :
N’oubliez pas de changer la source sou-
haitée sur l’amplicateur.
(F)
Page 16

Fonction des voyants:
Voyant Alimentation/Veille
Alimentation : Activation – L’appareil est en mode d’arrêt, alors poussez le bouton de la source
d’alimentation sur le panneau arrière sur la position ‘MARCHE’ (On), le voyant LED clignote une fois
et le signal d’activation du relais électrique retentit, 2 secondes plus tard l’amplicateur est activé.
N’oubliez pas que l’appareil ne sauvegardera pas les réglages antécédents à l’arrêt précédent.
Désactivation :
Poussez le bouton de source d’alimentation sur la position ‘OFF’, puis le signal d’arrêt du relais électrique et de l’appareil retentira et l’appareil sera désactivé.
Veille :
Appuyez sur le bouton de veille de la télécommande, ou poussez le bouton Volume/sélection (3-4sec),
et l’appareil se mettra en veille, et la LED de veille deviendra rouge. L’appareil est en mode de veille.
(Lorsque l’Ampster se met automatiquement en veille après 15 min d’inactivité, il vous est possible de
le réactiver par signal Bluetooth)
Réactivation (depuis le mode veille): Appuyez sur veille sur la télécommande ou poussez le bouton
Volume/sélecteur, et 2 secondes plus tard l’amplicateur quittera le mode veille et se réactivea.
Voyant d’entrée Bluetooth
Appuyez pour sélectionner Bluetooth comme source audio.
Voyant d’entrée optique
Appuyez pour sélectionner la source audio laire à bre optique come méthode d’entrée.
Voyant d’entrée AUX
Appuyez pour sélectionner l’entrée de ligne de la prise audio 3,5 mm comme méthode.
Voyant d’entrée de ligne
Appuyez pour sélectionner l’entrée de ligne laire RCA comme méthode d’entrée.
Bouton volume et d’entrée
Ce sélecteur peut régler le volume (tournez vers la gauche ou la droite) et activer aussi le mode
d’entrée (en appuyant) (Pour appuyez et maintenez le bouton veille enfoncé)
(F)
Page 17

Importantes consignes de sécurité:
Pour réduire les risques de chocs électriques, de feu, etc.:
1. Ne placez pas l’appareil à proximité de sources de chaleur telles que des radiateurs, appareils de chauage, fours
ou autre dispositif (y compris les amplicateurs) produisant de la chaleur.
2. Ne bloquez pas les orices de ventilation de l’appareil.
3. L’appareil ne doit pas être exposé aux égouttements ou aux éclaboussures, et aucun objet rempli de liquides, tels
que des vases, ne devra être posé sur l’appareil.
4. Ne placez pas de lourdes charges sur l’appareil, et ne marchez pas dessus, la charge peut tomber et causer de séri
eux dommages à l’appareil.
5. Ne débranchez jamais votre appareil en tirant sur le cordon d’alimentation. Tenez toujours fermement la che et
tirez-la directement de la prise.
6. Réparez ou remplacez immédiatement tous les cordons électriques qui s’elochent ou sont autrement endommagés.
N’utilisez pas un cordon qui présente des ssures ou des abrasions sur sa longueur, à la che ou à l’extrémité du raccord.
7. Pour éviter les risques d’incendie ou de chocs électriques, n’exposez pas cet appareil à la pluie ou à l’humidité.
8. Pendant les orages ou les jours de pluie, débranchez l’appareil par précaution supplémentaire pendant les orages,
ou lorsque l’appareil n’est pas utilisé pendant de longues périodes. Cela évitera d’endommager l’appareil en raison
d’orage ou de surtensions électriques.
9. N’essayez pas de procéder vous-même à l’entretien de l’appareil. En ouvrant ou en démont ant le boîtier, vous pou
vez vous exposer à une tension dangereuse ou à d’autres dangers. Tous les travaux d’entretien doivent être eectués
par des techniciens qualiés.
10.Par souci de sécurité et pour éviter une consommation inutile d’énergie, ne jamais laisser l’appareil allumé sans sur
veillance pendant de longues périodes de temps, ex : la nuit, pendant les vacances ou durant les absences. Éteignez-
le et débranchez la che secteur de la prise.
11. Nettoyez uniquement l’appareil avec un chion sec.
12. Merci de penser à l’environnnement lorsque vous jetez la batterie. La batterie doit être recyclée et éliminée cor
rectement. Ce produit ne doit pas être jeté avec les ordures ménagères. Ce produit doit être éliminé dans un cen
tre autorisé pour le recyclage des appareils électriques et électroniques. En récoltant et en recyclant les déchets,
vous aidez à la préservation des ressources naturelles et vous assurez que le produit et éliminé de manière responsa
ble pour l’environnement.
Ce symbole sur le produit ou le mode d’emploi signifie que votre équipement
électrique ou électronique, à la fin de sa vie utile, doit être éliminé séparément
des ordures ménagères. Il existe un système de collecte spécifique pour le
recyclage dans l’UE. Pour de plus amples informations, veuillez contacter les
autorités locales ou le revendeur auprès duquel vous avez acheté ce produit.
(F)
The Bluetooth® word mark and logos are
registered trademarks owned by Bluetooth
SIG,. Inc. and any use of such marks is
under license. Other trademarks and trade
names are those of their respective owners.
Page 18

Verstärker:
1. Betriebsanzeige
2. Bluetooth-Anzeige
3. OPT-Anzeige
4. Line-In-Anzeige
5. AUX-Anzeige
6. Fernbedienungssensor
7. Lautstärkeknopf/Eingang
swahlschalter
8. Antenne
9. Cinch L/R
10. SUB-Ausgang
11. AUX-Eingang
12. Optischer Eingang
13. Lautsprecherausgang - L/R
14. Lautsprecherausgang + L/R
15. Netzstromversorgung
16. Ein-/Ausschalter
17. Externe IR
18. USB Laden 5VDC / 1A
Im Lieferumfang enthalten:
Fernbedienung
Bedienungsanleitung
7
6
1 2 3 4 5
8
9 10
8
17
11
12
18
14
13
16
15
(D)
Page 19

Fernbedienung:
1. Ein-/Ausschalter
2. Optische Quelle
3. Lautstärke +/-
4. Vorherige/Nächste
(BT/CD-Modus)
5. Line-In-Quelle
6. Abspielen/Pause
(BT/CD-Modus)
7. AUX-Quelle
8. 1-6
9. Bluetooth-Quelle
Verbindung:
1. Verbinden Sie das Netzkabel mit der Rückseite des
1
9
2
7
4
8
Verstärkers und dann mit einer Netzsteckdose.
2. Schließen Sie Ihre Geräte an den gewünschten Ein
gang an.
3. Schalten Sie den Netzschalter in die Stellung Ein.
3
Nach zwei Sekunden ist das Gerät funktionsbereit
und die Statusanzeige leuchtet auf.
4. Drücken Sie die Bluetooth-, OPT-, LINE- oder AUX Taste auf der Fernbedienung oder den Lautstärke
knopf, um die gewünschte Audio-Quelle auszuwählen.
Steuern Sie die Wiedergabe über die Fernbedienung
durch Drücken der Tasten.
5
Hinweis: Der Verstärker schaltet sich automatisch aus,
wenn die Temperatur 85 °C übersteigt. Um dies anzuzeigen, wechselt die Farbe der Betriebsanzeige nach orange.
Der Verstärker wird automatisch erneu eingeschaltet,
6
wenn die Temperatur unter 60 ± 10 °C fällt.
Bluetooth Pairing:
1. Drücken Sie die Bluetooth-Taste auf der Fernbedi
enung (oder drücken Sie die Auswahltaste), um die
Bluetooth-Quelle zu aktivieren.
2. Aktivieren Sie Bluetooth auf Ihrem Handy/Tablet und
starten die Suche nach neuen Bluetooth-Geräten.
3. Wenn Ihr Handy/Tablet den Tangent Ampster BT II nd
et, wählen Sie dieses Gerät und beginnen Sie das Pairing.
(Sie können den Ampster in den Pairing-Modus zwingen,
indem Sie lange auf BT drücken)
(D)
Page 20

Anschließen Ihres Gerätes:
Verbinden Sie Ihre Lautsprecher mit dem Lautsprecherausgang.
Stellen Sie sicher, dass Sie die Kabel für -/+ und L/R-Kabel mit dem richtigen Eingang verbinden.
Verbinden Sie Ihren Subwoofer mit dem SUB-Ausgang.
Schließen Sie einen CD-Player oder ein anderes Gerät über seine Cinch-Kabel an den Cinch-L/R-Eingang an.
Achten Sie darauf, dass Sie den Stecker „L“ mit dem linken Eingangskanal und den Stecker „R“ mit
dem rechten Eingangskanal verbinden.
Verbinden Sie Ihr Handy/Tablet/MP3-Gerät über ein AUX-Kabel mit dem AUX-Eingang.
Verwenden Sie den optischen Eingang, indem Sie ein Gerät per Lichtleiterkabel mit dem optischen Eingang verbinden.
Hinweis:
Denken Sie daran, am Verstärker die gewünschte Quelle auszuwählen.
(D)
Page 21

Anzeige-Funktion
Betriebs-/Standby-Anzeige
Betrieb: Einschalten - Wenn das Gerät ausgeschaltet ist, dann drücken Sie die Einschalttaste auf der
Rückseite, so dass sie auf „ON“ (EIN) steht. Die LED-Anzeige blinkt einmal und sie hören das Einschaltgeräusch des elektrischen Relais im Gerät. Nach ca. 2 Sekunden ist der Verstärker funktionsbereit.
Beachten Sie, dass das Gerät nicht die Einstellungen beibehält, die es vor dem Ausschalten hatte.
Ausschalten:
Stellen Sie die Einschalttaste auf „OFF“ (AUS). Dann hören Sie das Ausschaltgeräusch des elektrischen
Relais im Gerät und das Gerät schaltet sich aus.
Standby:
Drücken Sie die Standby-Taste auf der Fernbedienung, oder drücken Sie die Lautstärkeknopf/Auswahlschalter (3-4sek). Dann geht das Gerät in den Status Standby und die Standby-LED leuchtet rot. Das
Gerät bendet sich dann im Standby-Status. (Der Ampster geht bei Inaktivität nach 15 Minuten au-
tomatisch in den Standby. Sie können ihn dann über ein Bluetooth-Signal aufwecken)
Einschalten (aus Standby-Modus): Drücken Sie auf der Fernbedienung auf Standby oder drücken Sie
den Lautstärke/Auswahlknopf. Nach ca. 2 Sekunden geht der Verstärker in den Status den er vor dem
Standby hatte.
Anzeige für Bluetooth-Eingang
Drücken Sie auf die Bluetooth-Taste, um Bluetooth als Audioquelle auszuwählen.
Anzeige für optischen Eingang
Drücken Sie auf die Taste OPT, um als Eingang eine Audio-Quelle per Lichtleiter auszuwählen.
Anzeige für AUX-Eingang
Drücken Sie auf die Taste AUX, um als Eingang einen 3,5-mm-Audioklinkenstecker auszuwählen.
Anzeige für Line-In-Eingang
Drücken Sie auf die Taste LINE, um als Eingang ein Cinch-Line-IN-Kabel auszuwählen.
Lautstärke- und Eingangsumschaltknopf
Mit diesem Auswahlschalter können Sie sowohl die Lautstärke einstellen (nach links oder rechts drehen) als auch die Eingangsquelle auswählen (Drücken) (Für Standby drücken und halten Sie die Taste.)
(D)
Page 22

Wichtige Sicherheitshinweise:
Um die Gefahr von elektrischem Schlag, Feuer usw. zu vermeiden:
1. Das Gerät darf nicht in der Nähe von Wärmequellen, wie Radiatoren, Heizkörpern, Herden oder anderen Geräten
(inklusive Verstärkern) aufgestellt werden, die Hitze abgeben.
2. Blockieren Sie nicht die Lüftungsönungen des Geräts.
3. Das Gerät darf keinen Tropfen oder Spritzern ausgesetzt werden und es dürfen keine üssigkeitsgefüllten Ob-
jekte, wie Vasen, das Gerät gestellt werden.
4. Stellen Sie keine schweren Gegenstände auf das Gerät, und treten Sie nicht darauf. Der Gegenstand könnte
herunterfallen und das Gerät beschädigen.
5. Ziehen Sie niemals am Kabel, um den Netzstecker herauszuziehen. Fassen Sie immer am Stecker an und ziehen
Sie ihn gerade aus der Netzsteckdose.
6. Reparieren oder ersetzen Sie sofort alle Elektrokabel, die durchgescheuert oder anderweitig beschädigt sind. Verwenden
Sie kein Kabel, das Risse oder Abriebschäden entlang seiner Länge, am Stecker oder am Anschlussende aufweist.
7. Zur Vermeidung von Feuer oder elektrischem Schlag setzen Sie dieses Gerät nicht Regen oder Feuchtigkeit aus.
8. Trennen Sie zum zusätzlichen Schutz das Gerät bei Gewitter oder Regentagen vom Stromnetz, oder wenn das Gerät für längere Zeit nicht verwendet wird. Dadurch wird eine Beschädigung des Geräts durch Blitzschlag und Überspannung verhindert.
9. Versuchen Sie nicht, irgendwelche Reparaturarbeiten selbst durchzuführen. Durch Önen oder Entfernen des Gehäuses
können Sie gefährlichen Spannungen oder anderen Gefahren ausgesetzt sein. Alle Reparaturarbeiten müssen von quali-
ziertem Fachpersonal durchgeführt werden.
10.Lassen Sie das Gerät im Interesse der Sicherheit und um unnötigen Energieverbrauch zu vermeiden nie eingeschaltet, wenn es für längere Zeit nicht genutzt wird, z. B. über Nacht, während des Urlaubs oder wenn Sie das
Haus verlassen. Schalten Sie es aus und ziehen Sie den Netzstecker aus der Steckdose.
11.Reinigen Sie das Gerät nur mit einem trockenen Tuch.
12. Bitte achten Sie auf die Umweltaspekte der Akkuentsorgung. Der Akku muss angemessen recycelt oder entsorgt werden.
Dieses Produkt darf nicht mit Haushaltsmüll entsorgt werden. Dieses Produkt muss bei einer autorisierten Stelle für Recycling
von Elektro- und Elektronikgeräten entsorgt werden. Durch Sammeln und Recycling von Abfall helfen Sie, natürliche Ressourcen zu sparen und stellen sicher, dass das Produkt umweltfreundlich und sicher entsorgt wird.
Dieses Symbol auf dem Produkt oder in der Anleitung bedeutet, dass Ihre elektrische und elektronische Ausrüstung am Ende Ihrer Verwendung separat vom
Haushaltsmüll entsorgt werden muss. In der EU gibt es separate Sammelsysteme für Recycling. Wenden Sie sich für weitere Informationen an die lokale
Behörde oder an den Händler, bei dem Sie das Produkt gekauft haben.
(D)
The Bluetooth® word mark and logos are
registered trademarks owned by Bluetooth
SIG,. Inc. and any use of such marks is
under license. Other trademarks and trade
names are those of their respective owners.
Page 23

Förstärkare:
1. Strömindikator
2. Bluetoothindikator
3. OPT-indikator
4. Linjeingångsindikator
5. AUX-indikator
6. Fjärrsensor
7. Volymknapp/ingångsväljare
8. Antenn
9. RCA V/H
10. SUB ut
11. AUX in
12. Optisk ingång
13. Högtalarutmatning - V/H
14. Högtalarutmatning + V/H
15. Strömingång
16. Strömbrytare
17. Extern IR
18. USB-laddning 5VDC / 1A
Inkluderat i paketet:
Fjärrkontroll
Instruktionsbok
7
6
1 2 3 4 5
8
9 10
8
17
11
12
18
14
13
16
15
(S)
Page 24

Fjärrkontroll:
1. På-/Av-knapp
2. Optisk källa
3. Volym +/-
4. Föregående/Nästa
(BT/CD-läge)
5. Ingångskälla
6. Spela/Paus
(BT/CD-läge)
7. AUX-källa
8. 1-6
9. Bluetooth-källa
Anslut:
1. Anslut nätsladden på förstärkarens baksida och
1
9
2
7
4
8
till ett vägguttag.
2. Anslut dina enheter till önskad ingång.
3. Sätt På strömbrytarknappen gå går den i arbetsläge och ingångsindikatorn tänds.
3
4. Tryck på knappen Bluetooth, OPT, LINE eller AUX
på fjärrkontrollen eller volymknappen för att
välja önskad ljudkälla.
Kontrollera uppspelningen med fjärrkontrollen
genom att trycka på knapparna.
5
OBS: Förstärkaren stängs av automatiskt om tem-
peraturen går över 85°C. För att indikera detta
blir strömindikatorn orange. Förstärkaren startar
automatiskt om när temperaturen sjunkit under
6
60±10°C.
Bluetooth-hopkoppling:
1. Tryck på Bluetooth på fjärrkontrollen (eller tryck
på valknappen) för att aktivera Bluetooth-källan.
2. Aktivera Bluetooth på din telefon/surfplatta och
börja söka efter nya Bluetooth-enheter.
3. När din telefon/surfplatta hittar Tangent Ampster
BT II, välj denna enhet och starta hopkopplingen. (Du kan tvinga Ampster till parningsläge,
med lång tryckning på BT)
(S)
Page 25

Anslut din enhet:
Anslut dina högtalare till högtalarutgången.
Se till att du ansluter kablarna för -/+ och
V/H till rätt ingång.
Anslut din subwoofer till SUB-ut.
Anslut en CD-spelare eller annan enhet
via dess RCA-kabel till ingången RCA V/H.
Se till att du kopplar kontakten “V” till
vänster ingångskanal och kontakten “H”
till höger ingångskanal.
Anslut din telefon/surfplatta/MP3 via en
AUX-kabel till AUX-ingången.
Använd den optiska ingången genom att
ansluta en enhet som har optisk berkabel i den optiska ingången.
OBS:
Kon ihåg att byta till önskad källa på
förstärkaren.
(S)
Page 26

Indikatorfunktion
Ström-/standbyindikator
Ström: Ström på-Produkten är i strömlöst läge. Tryck då på strömbrytaren på bakre panelen till
“PÅ”. LED-indikatorn blinkar en gång och reläets startljud hörs från enheten. Efter ca. 2 sekunder går
förstärkaren att använda. Notera att enheten inte kommer ihåg några inställningar från innan den
stängdes av.
Avstängd:
Tryck strömbrytarknappen till “AV” så att du hör avstängningsljudet från reläet och enheten går i
strömlöst läge.
Standby:
Tryck på standbyknappen på fjärrkontrollen, eller tryck på volym-/valknappen(3-4sek), så går enheten
i standbyläge och standbyindikatorn lyser rött. Enheten är i standbyläge.
(När Ampster går i automatiskt standbyläge efter 15 minuters inaktivitet kan du väcka den med en
bluetoothsignal)
Starta (från standbyläge): Tryck på standby på fjärrkontrollen eller tryck på volym-/valknappen. Efter
ca. 2 sekunder är förstärkaren i samma fungerande läge som tidigare.
Indikator för bluetoothingång
Tryck för att välja bluetooth som din ljudkälla.
Indikator för optisk ingång
Tryck för att välja ljudkälla med optisk ber som önskad inmatningsmetod.
Indikator för AUX-ingång
Tryck för att välja 3,5 mm ljudingångskontakt som inmatningsmetod.
Linjeingångsindikator
Tryck för att välja RCA-linjeingång som inmatningsmetod.
Volym och ingångsvalknapp
Denna knapp kan anpassa volymen (vrid vänster eller höger) och också byta inmatningsläge (tryck)
(För standby, tryck och håll in knappen)
(S)
Page 27

Viktiga säkerhetsinstruktioner:
För att minska risken för elektriska stötar, brand, etc.:
1. Placera inte enheten nära värmekällor såsom element, värmeutsläpp, spisar eller andra apparater (inklusive
förstärkare) som alstrar värme.
2. Blockera inte ventilationsöppningarna på enheten.
3. Enheten får inte utsättas för dropp eller stänk och inga föremål fyllda med vätska, som vaser, får placeras på
enheten.
4. Placera inte tung belastning på enheten, och kliv inte på den, belastningen kan falla och orsaka allvarlig skada
på enheten.
5. Koppla aldrig ur din enhet genom att dra i nätsladden. Håll alltid ordentligt i kontakten och dra rakt ut från uttaget.
6. Reparera eller byt ut alla elsladdar som blivit nötta eller skadade på annat sätt omedelbart. Använd inte en
sladd som uppvisar sprickor eller slitskador längs dess längd, kontakten eller kontaktänden.
7. För att förhindra brand eller elektriska stötar utsätt inte denna enhet för regn eller fukt.
8. Vid åskväder eller regniga dagar, koppla från enheten för extra skydd under åskväder eller när enheten inte
används under längre perioder. Detta förhindrar skador på enheten från blixtar och överspänningar.
9. Försök inte att utföra något servicearbete själv. Genom att öppna eller ta bort höljet kan du utsättas för farlig
spänning eller andra risker. Allt servicearbete ska utföras av kvalicerade tekniker.
10. Av säkerhetsskäl och för att undvika onödig energiförbrukning, lämna aldrig enheten påslagen obevakad under
långa perioder, t.ex. över natten, när du är på semester eller när du är ute ur huset. Stäng av den och dra ur
stickkontakten ur vägguttaget.
11. Rengör endast med torr trasa.
12. Observera miljöaspekterna vid kassering av batterier. Batterier måste återvinnas eller kasseras på rätt sätt.
Denna produkt får inte kastas tillsammans med hushållsavfall. Denna produkt måste kasseras på en behörig
plats för återvinning av elektriskt och elektroniskt avfall. Genom att samla in och återvinna avfall hjälper du till
att spara naturens resurser och se till att produkten kasseras på ett miljövänligt och hälsosamt sätt.
Denna symbol på produkten eller i instruktionerna betyder att elektrisk
eller elektronisk utrustning vid slutet av sin livslängd ska kasseras
separat från hushållsavfall. Det finns separata insamlingssystem för
återvinning inom EU. För mer information, kontakta lokala myndigheter
eller den återförsäljare du köpte produkten av.
(S)
The Bluetooth® word mark and logos are
registered trademarks owned by Bluetooth
SIG,. Inc. and any use of such marks is
under license. Other trademarks and trade
names are those of their respective owners.
Page 28

Vahvistin:
1. Virran merkkivalo
2. Bluetooth-merkkivalo
3. OPT-merkkivalo
4. Line In -merkkivalo
5. AUX-merkkivalo
6. Kaukosäätimen tunnistin
7. Äänenvoimakkuus/tulon val-
inta
8. Antenni
9. RCA V/O
10. SUB Out
11. AUX In
12. Optical-liitin
13. Kaiuttimen liitin - L/R
14. Kaiuttimen liitin + L/R
15. Virtaliitin
16. ON/OFF-kytkin
17. Ulkoinen IR
18. USB-lataus 5VDC / 1A
Pakkauksen sisältö:
Kaukosäädin
Käyttöohje
7
6
1 2 3 4 5
8
9 10
8
17
11
12
18
14
13
16
15
(FIN)
Page 29

Kaukosäädin:
1. ON/OFF-painike
2. OPT-painike
3. Äänenvoimakkuus +/-
4. Edellinen/seuraava
(BT/CD-tila)
5. Line In -lähde
6. Toisto/tauko
(BT/CD-tila)
7. AUX-lähde
8. 1-6
9. Bluetooth-lähde
Liitäntä:
1. Liitä verkkojohto vahvistimen takaosassa olevaan
liittimeen.
1
9
2
7
4
8
2. Kytke haluamasi laitteet niille tarkoitettuihin liittimiin.
3. Käännä virtapainike On-asentoon. Laite alkaa toimia kahden sekunnin kuluttua ja virtavalo syttyy.
3
4. Paina kaukosäätimestä Bluetooth, OPT, LINE tai
AUX tai äänenvoimakkuuspainiketta ja valitse
haluamasi audiolähde.
Ohjaa toistoa kaukosäätimen painikkeista.
Huomaa: Vahvistin sammuu automaattisesti, jos
5
lämpötila ylittää 85 °C, jolloin virtavalo muuttuu
oranssiksi. Vahvistin käynnistyy automaattisesti
uudelleen, kun lämpötila on laskenut alle 60 ±10
°C.
6
Bluetooth-yhteys:
1. Paina kaukosäätimestä Bluetooth-painiketta
(tai paina valitsinpainiketta) aktivoidaksesi Bluetooth-lähteen.
2. Aktivoi Bluetooth puhelimesta tai tabletista ja
käynnistä uuden Bluetooth-laitteen haku.
3. Kun puhelin/tabletti löytää Tangent Ampster BT II,
valitse se yhdistämisen aloittamiseksi.
(Voit pakottaa Ampsterin pariliitotilaan, pitämällä
BT: n pitkään painettuna)
(FIN)
Page 30

Oman laitteen yhdistäminen:
Kytke kaiuttimet kaiutin-liitäntään.
Varmista, että kytket kaapelit -/+ ja L/R
oikeisiin liittimiin.
Kytke alibassokaiutin SUB-liittimeen.
Kytke CD-soitin tai muu laite RCA-kaapelin avulla RCA L/R-liittimeen.
Varmista, että kytket L-liittimen vasempaan tuloliittimeen ja R-liittimen oikeaan
tuloliittimeen.
Kytke puhelin/tabletti/MP3 AUX-kaapelilla
AUX-liittimeen.
Käytä optista liitintä kytkiessäsi laitteen
valokuitukaapelilla Opt-liittimeen.
Huomaa:
Muista vaihtaa haluamaasi lähteeseen
vahvistimella.
(FIN)
Page 31

Merkkivalon toiminta
Virta-/valmiustilavalo
Virta: Virran kytkeminen päälle - Jos tuotteesta on virta pois päältä, paina takapaneelin virtapainike
ON-asentoon. Merkkivalo välähtää kerran, ja laitteesta kuuluu käynnistysääni. Noin 2 sekunnin kuluttua vahvistin on käyttövalmis. Huomaa, että laite ei muista edellisen sammutuksen aikaisia asetuksia.
Virran sammuttaminen:
Työnnä virtapainike OFF-asentoon. Kuulet sulkemisäänen ja laitteen virta sammuu.
Valmiustila:
Paina valmiustilapainiketta kaukosäätimestä tai paina äänenvoimakkuuden valintaa. Laite siirtyy valmiustilaan, ja punainen merkkivalo syttyy. Laite on valmiustilassa.
(Kun Ampster siirtyy automaattiseen valmiustilaan olleessaan käyttämättä 15 minuuttia, voit herättää
sen Bluetooth-signaalilla)
Käynnistäminen (valmiustilasta): Paina valmiustilan painiketta kaukosäätimestä tai paina äänenvoimakkuuspainiketta. Laite siirtyy valmiustilaan 2 sekunnin kuluttua.
Bluetooth-merkkivalo
Valitse painamalla Bluetooth radiolähteeksi.
Opt-merkkivalo
Valitse painamalla syötöksi valokuitu-audiolähde.
AUX-merkkivalo
Valitse painamalla tavaksi 3,5 mm:n audio jack line in -valinta.
Line in -merkkivalo
Valitse painamalla tavaksi RCA Line-in -valinta.
Äänenvoimakkus ja tulokytkimen painike
Tämä valitsin voi säätää äänenvoimakkuutta (käännä vasemmalle tai oikealle) ja myös vaihtaa tulotilan
(push)
(Valmiustila = paina ja pidä painiketta)
(FIN)
Page 32

Tärkeitä turvaohjeita:
Vähennä sähköiskun, tulipalon yms. vaaraa:
1. Älä aseta laitetta lämmönlähteiden kuten pattereiden, lämmittimien, liesien tai muiden laitteiden (kuten vahvistimien) lähelle.
2. Laitteen ilmankiertoaukkoja ei saa tukkia.
3. Laitteelle ei saa kaataa tai roiskuttaa mitään nesteitä, eikä sen päälle saa sijoittaa nestettä sisältäviä esineitä
kuten maljakoita.
4. Älä aseta raskaita esineitä laitteen päälle, sillä se voi vaurioittaa laitetta merkittävästi.
5. Verkkojohtoa ei irrottaa pistorasiasta kaapelista vetämällä. Tartu aina pistotulppaan napakasti ja vedä se irti
pistorasiasta.
6. Korjaa tai vaihda vaurioituneet tai rispaantuneet virtajohdot välittömästi. Älä käytä virtajohtoa, jossa on merkkejä hankauksesta koko matkalta, pistotulpan kohdalta tai liitinpäässä.
7. Tulipalon tai sähköiskun välttämiseksi laitetta ei saa altistaa sateelle tai kosteudelle.
8. Suosittelemme käyttämään ukkossuojattua pistorasiaa sateella ja ukkosella ja aina, kun laite on pidempään
käyttämättä. Näin estät ukkosen aiheuttamien virtapiikkien laitteelle aiheuttamat vauriot.
9. Älä yritä korjata laitetta itse. Kotelon avaaminen altistaa korkealle jännitteelle ja voi aiheuttaa muita vaaratilanteita. Kaikki korjaustyöt on annettava osaavan korjaamin tehtäviksi.
10. Turvallisuuden vuoksi ja tarpeettoman sähkönkulutuksen estämiseksi ei laitetta koskaan saa jättää päälle pitkäksi aikaa valvomatta esim. yöksi, loman ajaksi tai kun olet poissa kotoa. Sammuta laite ja irrota verkkojohto
pistorasiasta.
11. Puhdista vain kuivalla liinalla.
12. Huomioi ympäristö akkua hävitettäessä. Akku pitää kierrättää tai hävittää oikein. Tätä tuotetta ei saa hävittää talousjätteen mukana. Tuote pitää hävittää toimittamalla se sähkö- ja elektroniikkalaitteiden kierrätyspisteeseen. Keräämällä ja kierrättämällä jätteet voit auttaa säästämään luonnonvaroja sekä varmistamaan, että
tuote hävitetään ympäristöystävällisellä ja terveellisellä tavalla.
Tämä merkki tuotteessa tai ohjeissa osoittaa, että sähkö- tai elektroniikkatuote tulee sen käyttöiän lopuksi hävittää erillään talousjätteestä.
EU:ssa on käytössä erilliset keräysjärjestelmät kierrätystä varten.
Saat lisätietoja ottamalla yhteyttä paikallisiin viranomaisiin tai tuotteen
myyneeseen jälleenmyyjään.
(FIN)
The Bluetooth® word mark and logos are
registered trademarks owned by Bluetooth
SIG,. Inc. and any use of such marks is
under license. Other trademarks and trade
names are those of their respective owners.
Page 33

Amplicador:
1. Indicador de energía
2. Indicador Bluetooth
3. Indicador OPT
4. Indicador de entrada de línea
5. Indicador AUX
6. Sensor remoto
7. Selector de volumen/Selector
de entrada
8. Antena
9. RCA L/R
10. Salida SUB
11. Entrada AUX
12. Entrada óptica
13. Salida de altavoz - L/R
14. Salida de altavoz + I/D
15. Entrada de energía
16. Interruptor On/O
17. IR externo
18. Carga USB 5VDC / 1A
En el embalaje se incluye:
Mando a distancia
Manual de instrucciones
7
6
1 2 3 4 5
8
9 10
8
17
11
12
18
14
13
16
15
(ES)
Page 34

Mando a distancia:
1. Botón On/O
2. Origen óptico
3. Volumen +/-
4. Anterior/Siguiente
(modo BT/CD)
5. Origen de entrada
de línea
6. Reproducir/Pausa
(modo BT/CD)
7. Origen AUX
8. 1-6
9. Origen Bluetooth
Conexión:
1. Conecte el cable de alimentación a la parte posterior del
1
9
2
7
4
amplicador y después conéctelo a una toma de pared.
2. Conecte sus dispositivos a la entrada que desee.
3. Ponga el botón de encendido en la posición On. Dos
segundos después, la unidad entrará en estado de
3
funcionamiento y el indicador de entrada se iluminará.
4. Pulse el botón Bluetooth, OPT, LINE o AUX en el mando a distancia o el selector de volumen para elegir el
origen de audio que desee.
Controle la reproducción mediante el mando a distancia
pulsando los botones.
5
Nota: El amplicador se apagará automáticamente si la
temperatura supera los 85 °C. Para indicarlo, el indicador de energía se iluminará en naranja. El ampli-
6
cador se reiniciará automáticamente cuando la temperatura caiga por debajo de los 60±10 °C.
8
Sincronización con Bluetooth:
1. Pulse la tecla Bluetooth en el mando (o pulse el botón
selector) para activar el origen de Bluetooth.
2. Active el Bluetooth en su teléfono/tableta y empiece a
buscar nuevos dispositivos Bluetooth.
3. Cuando su teléfono/tableta encuentre Tangent Ampster BT, elija esta unidad y comience la sincronización.
(ES)
Page 35

Conexión del dispositivo:
Conecte los altavoces a la salida de altavoz.
Asegúrese de conectar los cables -/+ y L/R
a la entrada correcta.
Conecte el subwoofer a la salida SUB.
Conecte un reproductor de CD u otro dispositivo con el cable RCA a la entrada RCA
I/D.
Asegúrese de conectar el conector “L” al
canal de entrada izquierdo y el conector “R“
al canal de entrada derecho.
Conecte su teléfono/tableta/MP3 con un
cable AUX a la entrada AUX.
Utilice la entrada óptica conectando un
dispositivo con un cable de bra óptica a la
entrada óptica.
Nota:
Recuerde cambiar al origen que desee en
el amplicador.
(ES)
Page 36

Función de indicador
Indicador de nivel de energía/espera
Energía: Encendido: El producto está en estado de apagado. A continuación, ponga el botón de origen
de energía del panel trasero en la posición “ON”. El indicador LED parpadeará una vez y se oirá el so-
nido de arranque de relé eléctrico de la unidad. Tras unos 2 segundos, el amplicador estará en modo
de funcionamiento. Tenga en cuenta que la unidad no recordará los ajustes de antes de apagarse.
Apagado:
Ponga el botón de origen de energía en posición “OFF” y oirá el sonido de cierre del relé eléctrico. La
unidad pasará a estado apagado.
Espera:
Pulse el botón de espera en el mando a distancia (Standby) o pulse el botón de selector/volumen (34seg. A continuación, la unidad pasará a modo espera y el LED se iluminará en color rojo. La unidad
entra en estado de espera. (Cuando Ampster entre en espera automática al permanecer inactivo 15
minutos, podrá reactivarlo mediante una señal Bluetooth.)
Encendido (desde el modo de espera): Pulse Standby en el mando a distancia o pulse el botón de se-
lector/volumen. Tras unos 2 segundos, el amplicador se pondrá en el último estado de funcionamiento
antes de la espera.
Indicador de entrada Bluetooth
Pulse para seleccionar Bluetooth como origen de audio.
Indicador de entrada óptica
Pulse para seleccionar el método de entrada como origen de audio con cable de bra óptica.
Indicador de entrada AUX
Pulse para seleccionar el método de entrada como entrada de línea de conector de 3,5 mm.
Indicador de entrada de línea
Pulse para seleccionar el método de entrada como línea RCA con cable.
Botón de interruptor de entrada y volumen
Este selector puede ajustar el volumen (girar a izquierda o derecha) y también cambiar el modo de
entrada (pulsar) (Para el modo de espera, mantenga pulsado el botón.)
(ES)
Page 37

Instrucciones importantes de seguridad
Para reducir el riesgo de descarga eléctrica, incendio, etc.:
1. No coloque la unidad cerca de fuentes de calor, como radiadores, rejillas de aire caliente, fogones ni cualquier otro
aparato que genere calor (incluidos los amplicadores).
2. No bloquee las aperturas de ventilación de la unidad.
3. Evite que la unidad quede expuesta a goteo o salpicaduras de líquidos y no coloque sobre ella ningún objeto que
contenga líquidos, como por ejemplo, jarrones.
4. No coloque objetos pesados sobre la unidad y no se suba en ella. La carga podría caer y provocar daños graves en la unidad.
5. No desenchufe nunca la unidad tirando del cable de alimentación. Coja siempre el enchufe con rmeza y tire recto
hacia atrás para extraerlo de la toma.
6. Repare o cambie inmediatamente todos los cables de dispositivos eléctricos que se hayan deshilachado o dañado
de cualquier otra manera. No utilice ningún cable que muestre grietas o daños por abrasión en alguna parte de su
recorrido, en el enchufe o en el extremo de conexión.
7.Para evitar el riesgo de incendio o de descarga eléctrica no exponga la unidad a la lluvia ni a la humedad.
8.En días de lluvia o con tormentas eléctricas, desenchufe la unidad para tener una mayor protección contra los rayos.
Esto también es aconsejable si no va a utilizar la unidad durante un periodo de tiempo prolongado. Esto evitará
que la unidad pueda sufrir daños a causa de los relámpagos y los picos de tensión.
9.No intente reparar la unidad usted mismo. Si abre o quita la carcasa, podría estar expuesto a tensiones peligrosas o
a otros peligros. Todas las reparaciones deberán ser realizadas por personal cualicado.
10.Por motivos de seguridad y para evitar un consumo de energía innecesario, no deje nunca la unidad encendida si
la va a dejar desatendida durante largos periodos de tiempo, por ejemplo, por la noche, cuando se vaya de vacaciones o cuando esté fuera de casa. Apáguela y desconecte el cable de alimentación de la toma de corriente.
11.Límpielo solo con un paño seco.
12.Preste atención a los aspectos ambientales de la eliminación de la batería. La batería debe ser reciclada o eliminada apropiadamente. Este producto no debe eliminarse con la basura doméstica. Este producto tiene que eliminarse en un lugar
autorizado para reciclaje de aparatos eléctricos y electrónicos. Cuando se recoge y se recicla basura, se ayuda a ahorrar
recursos naturales, asegúrese de que el producto se elimina de una manera sana y amigable con el medio ambiente.
Este símbolo, en el producto o en las instrucciones, significa que el
equipo eléctrico o electrónico debe eliminarse al final de su vida por
separado de la basura doméstica. En la UE hay sistemas de recogida
aparte para el reciclaje. Para obtener más información, contacte con las
autoridades locales o con el vendedor en el que adquirió el producto.
(ES)
The Bluetooth® word mark and logos are
registered trademarks owned by Bluetooth
SIG,. Inc. and any use of such marks is
under license. Other trademarks and trade
names are those of their respective owners.
Page 38

Forsterker:
1. Strømindikator
2. Bluetooth-indikator
3. OPT-indikator
4. Linjeindikator
5. AUX-indikator
6. Fjernsensor
7. Volumknapp / inngangsvelger
8. Antenne
9. RCA L / R
10. SUB ut
11. AUX In
12. Optisk inngang
13. Høyttalerutgang - L / R
14. Høyttalerutgang + L / R
15. Strøminngang
16. På / Av bryter
17. Ekstern IR
18. USB-lade 5VDC / 1A
Inkludert i pakken:
Fjernkontroll
Bruksanvisningen
7
6
1 2 3 4 5
8
9 10
8
17
11
12
18
14
13
16
15
(N)
Page 39

Fjernkontroll:
1. På / Av-knapp
2. Optisk kilde (CD)
3. volum +/-
4. Forrige / Neste (BT /
CD-modus)
5. Linje i kilde (TUNER)
6. Spill / Pause (BT /
CD-modus)
7. AUX-kilde
8. Forhåndsinnstilt 1-6
9. Bluetooth-kilde
Koble:
1. Koble strømledningen til baksiden av forsterker og
1
9
2
7
4
koble den til en stikkontakt.
2. Koble enhetene til ønsket inngang.
3. Slå på strømknappen til På-stilling, etter to
sekunder vil enheten gå inn i arbeidsstatus og
inntaksindikatoren lyser.
3
4. Trykk på Bluetooth, OPT, LINE eller AUX-knappen
på fjernkontrollen eller volumknappen for å velge
ønsket lydkilde.
Kontroller avspillingen via fjernkontrollen med
trykke på knappene.
5
Merk: Forsterkeren slår seg av automatisk
hvis temperaturen overstiger 85 ° C, for å indikere
dette vil strømindikatoren bli oransje. De forsterkeren starter automatisk igjen når temperaturen har
6
falt under 60 ± 10 ° C.
8
Bluetooth-paring:
1. Trykk på Bluetooth på fjernkontrollen (eller trykk
på velgeren) for å aktivere Bluetooth-kilden.
2. Aktiver Bluetooth på telefonen / nettbrettet, og
start å søke etter nye Bluetooth-enheter.
3. Når du nner telefon / nettbrett, nner du Tangent Ampster BT II, velger du denne enheten og
begynner å koble sammen.
(Du kan tvinge Ampster til parringsmodus, med lang trykk på BT)
(N)
Page 40

Koble enheten din:
Koble høyttalerne til Høyttalerutgang.
Pass på at du kobler - / + og L / R-kablene til riktig inngang.
Koble subwooferen din til SUB ut.
Koble en CD-spiller eller annen enhet via
RCA-kabelen til RCA L / R-inngangen.
Pass på at du kobler “L” -pluggen til
venstre inngangskanal og “R” -pluggen til
høyre inngangskanal.
Koble telefonen / nettbrettet / MP3-en via
en AUX-kabel til AUX-inngangen.
Bruk den optiske inngangen ved å koble
en enhet med en optisk berkabel til den
optiske inngangen.
Merk:
Husk å bytte til ønsket kilde på forsterkeren.
8
(N)
Page 41

Indikator Funksjon
Strøm / ventemodus
Strøm: Slå på - Produktet er slått av, og trykk deretter på strømkilden på bakpanelet i “ON” -posisjon
LED-indikatoren blinker en gang og oppstartslåsen fra elektrisk relé i enheten, etter ca. 2 sekunder vil
forsterkeren være i arbeidsstatus Merk at enheten ikke vil huske innstillingene fra før den ble slått av.
Slå av:
Skyv strømkilde-knappen i “OFF” -posisjon, og lukk lyden fra det elektriske reléet og enheten går i
strømmen.
Vent litt:
Trykk på standby-knappen på fjernkontrollen, eller trykk Volum / velg-knappen (3-4sek). så går enheten
i ventemodus, og standby-lysdioden vil bli rød farge. Enheten er i standby-status.
(Når forsterkeren går i automatisk standby når den er inaktiv (ikke-signal) om 15 minutter, kan du vekke
det opp via Bluetooth / linje inn / AUX-signal) Vekk på samme inngang som automatisk strømmen på.
Slå på (fra standby-modus): Trykk på standby på fjernkontrollen eller trykk på volum / velg-knappen. Og etter omtrent 2 sekunder vil forsterkeren være i siste arbeidsstatus før standby.
Bluetooth-inngangsindikator
Trykk for å velge Bluetooth som lydkilde.
Optisk inngangsindikator
Trykk for å velge inngangsmetode som ledet lydkilde med optisk ber.
AUX-inngangsindikator
Trykk for å velge inngangsmetode som 3,5 mm lydkontaktlinje inn.
Line-in inngangsindikator
Trykk for å velge inngangsmetode som kablet RCA-linjeinngang.
Volum og inngangskontaktknapp
Denne velgeren kan justere volumet (sving til venstre eller høyre) og også bytte inngangsmodus
(trykk) (For standby trykk og hold knappen nede)
(N)
Page 42

Viktige sikkerhetsinstruksjoner:
For å redusere risikoen for elektrisk støt, brann osv .:
1. Ikke plasser enheten i nærheten av varmekilder som radiatorer, varmeapparater, ovner eller annet apparat (inkludert forsterkere) som produserer varme.
2. Ikke blokkér ventilasjonsåpninger på enheten.
3. Enheten skal ikke utsettes for drypp eller sprut, og ingen gjenstander som er fylt med væsker, som vaser, skal plasseres på
enheten.
4. Legg ikke tung belastning på enheten, og ikke tråkk på det, lasten kan falle og forårsake alvorlig skade på enheten.
5. Trekk aldri ut støpselet ved å trekke på strømledningen. Ta alltid støpselet fast og trekk rett ut fra stikkontakten.
6. Reparér eller bytt ut alle elektriske ledninger som har blitt slått eller skadet på annen måte umiddelbart. Ikke bruk en ledning
som viser sprekker eller slitasje i lengden, kontakten eller kontakten.
7. Ikke utsett enheten for regn eller fuktighet for å unngå fare for brann eller støt.
8. Under lynet eller regnperioden må du trekke ut støpselet for ekstra beskyttelse under tordenvær eller når enheten ikke brukes i
lengre perioder. Dette forhindrer skade på enheten fra lyn og strømstøt.
9. Forsøk ikke å utføre noen tjeneste selv. Ved å åpne eller fjerne kabinettet kan du bli utsatt for farlig spenning eller andre farer.
Eventuelt arbeid skal utføres av kvalifiserte teknikere.
10. For å unngå sikkerhet og for å unngå unødvendig energiforbruk, la aldri enheten være slått på uten tilsyn uten lengre tid, f.eks.
over natten, mens du er på ferie eller mens du er ute av huset. Slå av og koble fra støpselet fra stikkontakten.
11. Rengjør kun med tørr klut
12. Vær oppmerksom på de miljømessige aspektene ved bortskaffelse av batterier. Batteriet må resirkuleres eller kasseres på
riktig måte. Dette produktet må ikke kastes sammen med husholdningsavfallet. Dette produktet må avhendes på et autorisert sted
for gjenvinning av elektriske og elektroniske apparater. Ved å samle og gjenvinne avfall, hjelper du med å redde naturressurser, og
sørg for at produktet er plassert på en miljøvennlig og sunn måte.
Dette symbolet på produktet eller i instruksjonene betyr at ditt elektriske og elektroniske utstyr skal avhendes ved slutten av livet, separat
fra husholdningsavfall. Det finnes separate innsamlingssystemer for
resirkulering i EU. For mer informasjon, vennligst kontakt den lokale
myndigheten eller forhandleren der du kjøpte produktet.
(N)
Bluetooth® ordmerke og logoer er registrerte varemerker eid av Bluetooth SIG
,. Inc. og enhver bruk av slike merker er
under lisens. Andre varemerker og handelsnavn er de tilhørende respektive eiere.
Page 43

Page 44

WWW.TANGENT-AUDIO.COM
Product name: Tangent Ampster BT II
Power supply: AC 100V~240V/50Hz
Frequency response: 20Hz ~ 20KHz
Power: 2x50Watt@4Ohm
Bluetooth range: 10 meters
Dimensions: 195 x 194 x 70mm
Weight: 1.8 kg
 Loading...