

Page 1

ALIO BAZE
CD/DAB+/DAB/FM/Bluetooth radio
User’s manual
Mode d’emploi
Bedienungsanleitung
Gebruikershandleiding
Brugermanual
Bruksanvisning
Käyttöopas
Manuale utente
Manual del usuario
Manual do utilizador
Page 2
DAB/DAB+ and FM radio with CD player and Bluetooth
Instruction Manual
Page 3

2
Important Safety Instructions
1. Read these instructions.
2. Keep these Instructions.
3. Heed all Warnings.
4. Follow all instructions.
5. Do not use the speaker near water.
6. Clean only with dry cloth.
WARNING: TO REDUCE THE RISK OF FIRE OR ELECTRIC SHOCK, DO NOT EXPOSE THIS
SPEAKER TO RAIN OR MOISTURE.
To reduce the risk of electrical shock, fire, etc.:
1. Do not place unit near any heat source such as radiators, heat registers, stoves, or other
apparatus (including amplifiers) that produce heat.
2. Do not block any ventilation openings of unit.
3. The unit shall not be exposed to dripping or splashing and no objects filled with liquids, such as
vases, shall be placed on the unit.
4. Do not place any heavy loads onto the unit, and do not step on it, the load may fall and cause
serious injury to the unit.
5. Please read Rating Labels at the back of unit for power input and other safety information.
6. This unit is intended to be used only with the power supply provided.
7. Protect the power cord from being walked on or pinched particularly at the plugs, convenience
receptacles, and at any point where they exit from the unit.
8. Never unplug your unit by pulling on the power cord. Always grasp the plug firmly and pull
straight out from the outlet.
9. Repair or replace all electric service cords that have become frayed or otherwise damaged
immediately. Do not use a cord that shows cracks or abrasion damage along its length, the
plug, or the connector end.
10. To prevent fire or shock hazard, do not use this plug with an extension cord or other outlet
unless the blades can be fully inserted to prevent blade exposure.
11. To prevent fire or shock hazard, do not expose unit to rain or moisture.
12. During lightning or raining days, unplug the unit for additional protection during thunderstorms
or when the unit is not used for prolonged periods. This will prevent damage to the unit from
lightning and power surges.
13. Do not attempt to carry out any service work yourself. By opening or removing the cabinet, you
may be exposed to dangerous voltage or other hazards. Any service work should be carried
out by qualified technicians.
14. The battery of remote control shall not be exposed to excessive heat such as sunshine, fire or
the like.
15. Danger of explosion if battery is incorrectly replaced. Replace only with the same or equivalent
type.
16. In the interests of safety and to avoid unnecessary energy consumption, never leave the unit
switched on while unattended for long periods of time, e.g. overnight, while on holiday or while
out of the house. Switch it off and disconnect the mains plug from the mains socket.
Page 4

3
Contents
Important Safety Instructions ............................................................................................................. 2
Contents ............................................................................................................................................ 3
Getting Started .................................................................................................................................. 5
Unit T op View
............................................................................................................................. 6
Unit Front View
........................................................................................................................... 7
Unit Back View
........................................................................................................................... 8
Remote Control View
................................................................................................................. 9
DAB Mode ....................................................................................................................................... 11
Station List
................................................................................................................................ 11
Secondary Service
................................................................................................................... 11
Station Order
............................................................................................................................ 12
Full Scan
.................................................................................................................................. 12
Manual Tune
............................................................................................................................. 12
DRC (Dynamic Range Control) value
...................................................................................... 12
Prune
........................................................................................................................................ 13
Viewing Station Information
..................................................................................................... 13
Storing Preset Stations
............................................................................................................ 13
Recalling Preset Stations
......................................................................................................... 14
FM Mode ......................................................................................................................................... 15
Selecting FM Mode
.................................................................................................................. 15
Scan Setting
............................................................................................................................. 15
Audio Setting
............................................................................................................................ 15
Viewing Station Information
..................................................................................................... 15
Storing Preset Stations
............................................................................................................ 16
Recalling Preset Stations
......................................................................................................... 16
Bluetooth Mode ............................................................................................................................... 17
CD Mode ................................
......................................................................................................... 18
Inserting CD to CD Tray
........................................................................................................... 18
Playing CD Program
................................................................................................................ 18
Setting Random Playback
........................................................................................................ 18
Setting Repeat Playback
.......................................................................................................... 19
Ejecting CD from CD Tray
........................................................................................................ 19
Aux in Mode ..................................................................................................................................... 20
Genera Operations .......................................................................................................................... 21
Setting Alarm
............................................................................................................................ 21
Setting Sleep
............................................................................................................................ 21
Setting Date/Time
..................................................................................................................... 21
Setting Time Format
................................................................................................................. 22
Setting Snooze Time
................................................................................................................ 22
Setting Brightness
.................................................................................................................... 22
Setting Equaliser
...................................................................................................................... 22
Setting Loudness
..................................................................................................................... 22
Page 5

4
Factory Reset ........................................................................................................................... 23
Firmware Information
............................................................................................................... 23
Specifications .................................................................................................................................. 24
Page 6

5
Getting Started
Carefully unpack your radio from the box. You may wish to store the packaging for future use.
What you can find inside of your package
• Main unit
• Po wer ada pter
• Remote control
• Instruction manual
Positioning your Radio
Place your radio on a flat / stable surface that is not subject to vibrations.
Avoid the following locations:
• Where the radio will be exposed to direct sunlight.
• Where the radio will be close to heat radiating sources.
• Where the humidity is high and ventilation is poor.
• Where it is dusty.
• Where it is damp or there is a possibility of water dripping or splashing onto unit.
Adjusting the Antenna
Extend the antenna to ens ure you receive the best reception possibl e in both DAB and FM radio
modes. It may be necess ar y to adjust the positio n of t he radio and / or antenna to achiev e the b est
signal.
Turning the Unit On/Off
Connect the plug at the end of power adapter cable to the DC IN jack on the back of the unit. Then
insert the power adapter into the mains socket. Press POWER button to turn the unit on or standby.
To switch the unit off completely, unplug the power adapter from the mains socket.
Volume Control
Adjust the radio volume by turning the VOLUME knob.
Page 7

6
Unit Top View
1. ALARM button
Press to set alarm.
2. PRESET buttons 1/5, 2/6, 3/7, 4/8
• Press and hold one button to store preset station 1, 2, 3 or 4.
• Press one button to recall preset station 1, 2, 3 or 4.
3. SNOOZE button, Press to activate snooze function when alarm
sounds.
4. SHIFT button
• Press this button first, and then press and hold one of
PRESET buttons 1/5, 2/6, 3/7, 4/8 to store preset station 5, 6,
7 or 8.
• Press this button first, and then press one of PRESET
buttons 1/5, 2/6, 3/7, 4/8 to recall preset station 5, 6, 7 or 8.
5. SLEEP button
Press to set sleep time.
6. Speaker
7. DAB/FM antenna
Page 8
7
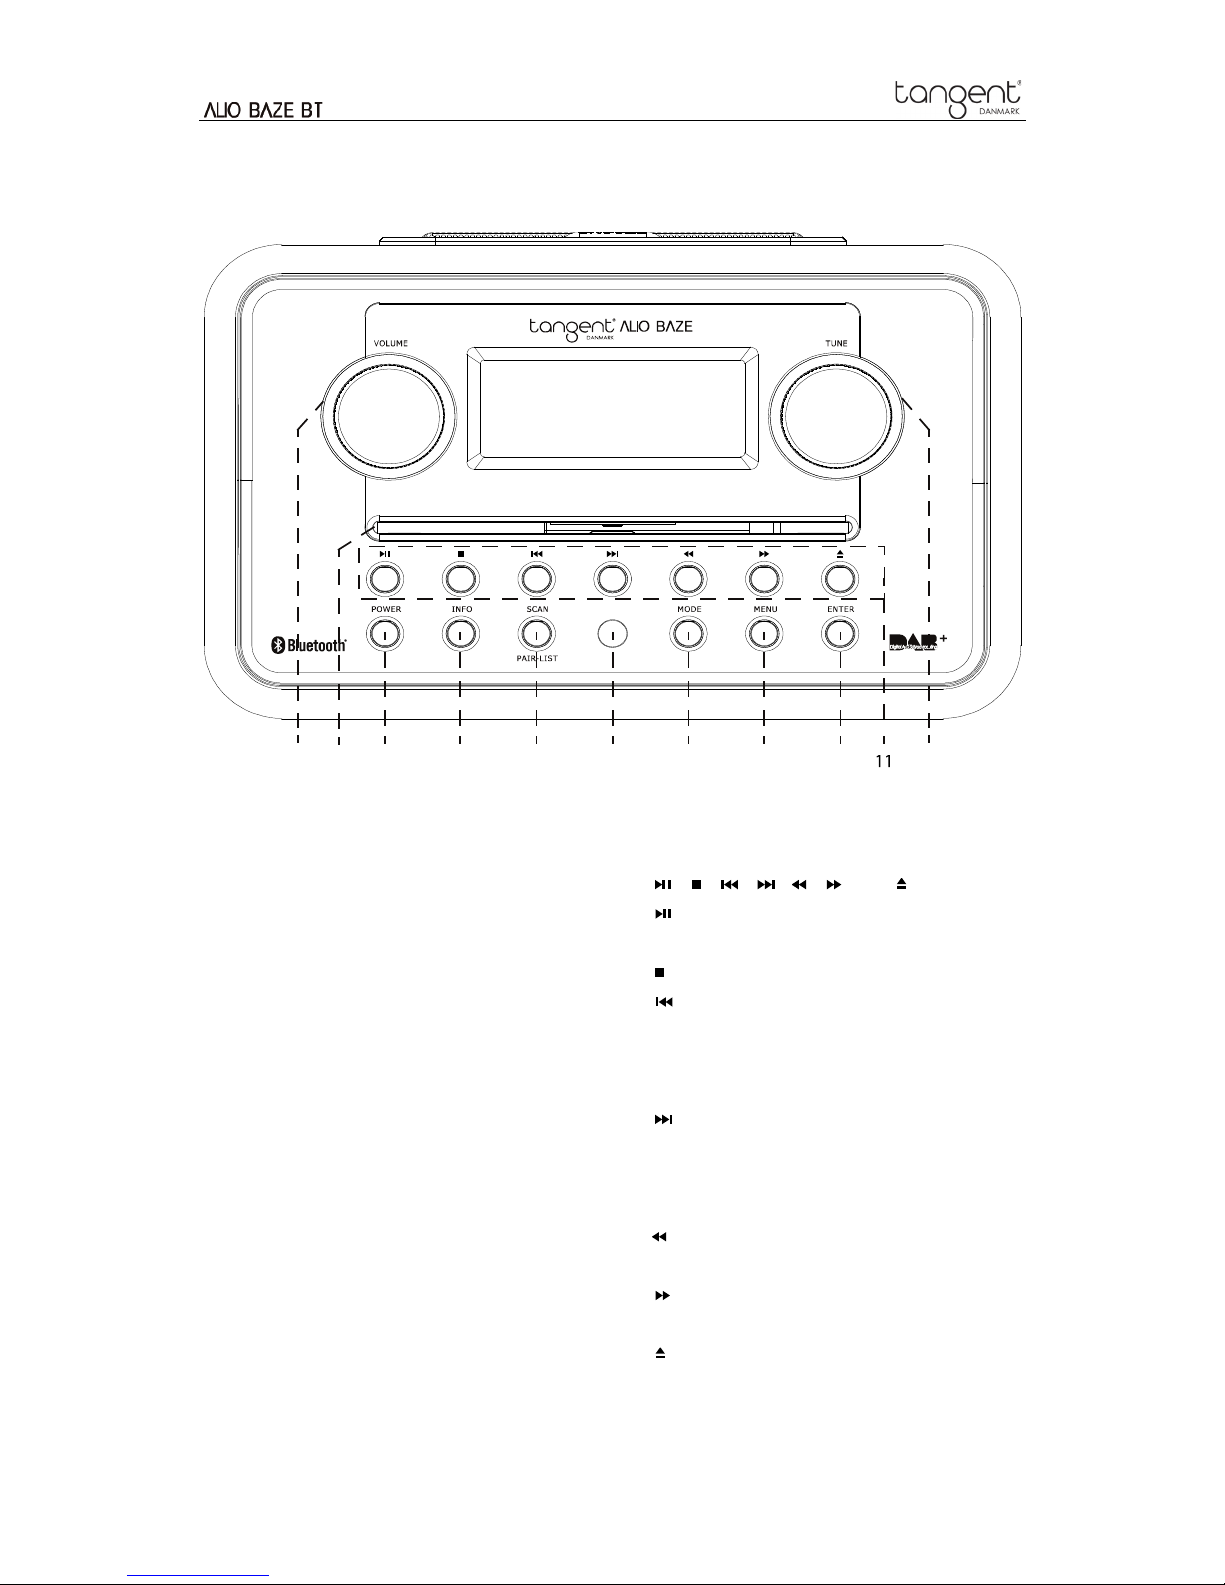
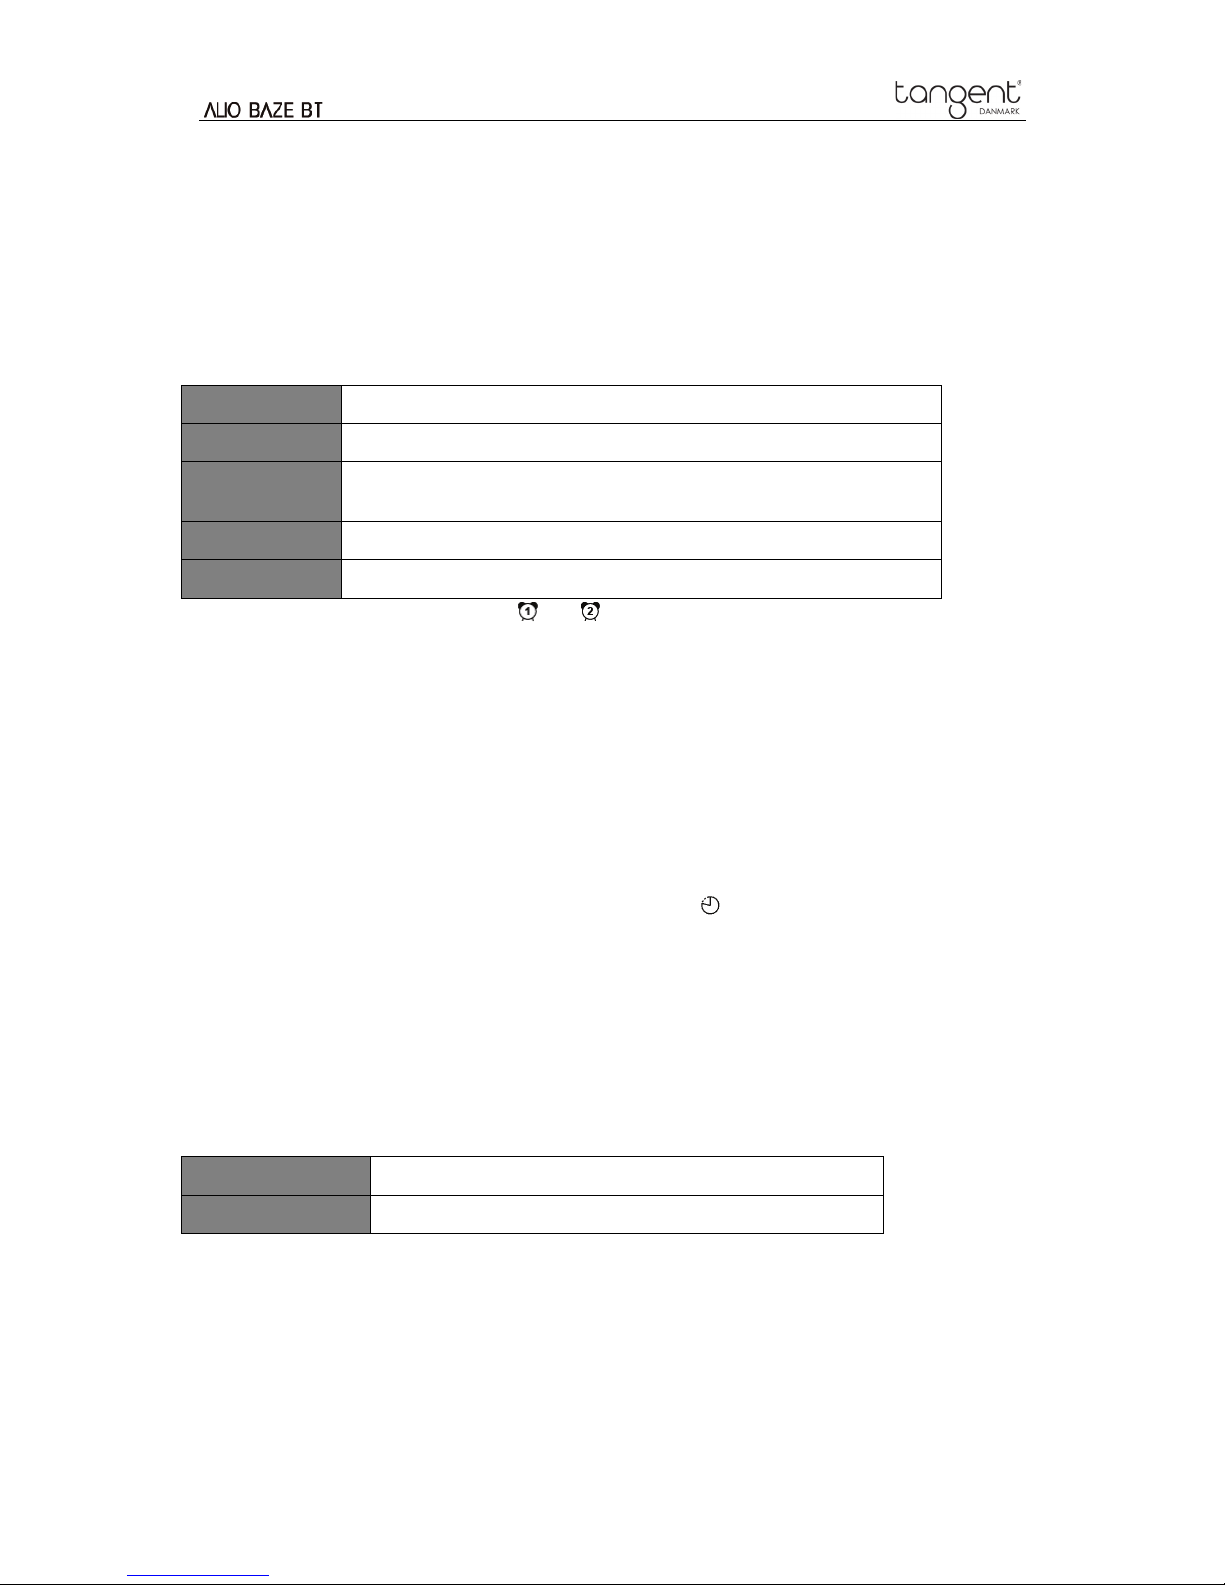
Unit Front View
1. Display
2. VOLUME knob
Turn to adjust volume.
3. CD tray
4. POWER Button
Press to switch unit on or standby.
5. INFO button
Press to view station information.
6. SCAN button
• Press to automatically scan stations in
DAB and FM mode.
• Press to select Bluetooth device in
Bluetooth mode.
• Press and hold to disconnect Bluetooth
connection in Bluetooth mode.
7. Remote control sensor
8. MODE button
Press to switch among DAB, FM,
Bluetooth, CD and AUX mode.
9. MENU button
Press to display or exit menu screen.
10. ENTER button
Press to confirm selection.
11. , , , , , and buttons
: press to pause or play current playing
track in Bluetooth and CD mode.
: press to stop music in CD mode.
: press to skip to previous track in
Bluetooth and CD mode; press and hold to
fast reverse current playing track in
Bluetooth mode.
: press to skip to next track in Bluetooth
and CD mode; press and hold to fast
forward current playing track in Bluetooth
mode
: press and hold to fast reverse current
playing track in CD mode
: press and hold to fast forward current
playing track in CD mode.
: press to eject CD from CD tray.
12. TUNE knob
Turn to browse options.
1
2 4 5 6 8 9 10 12
3
7
Page 9
8
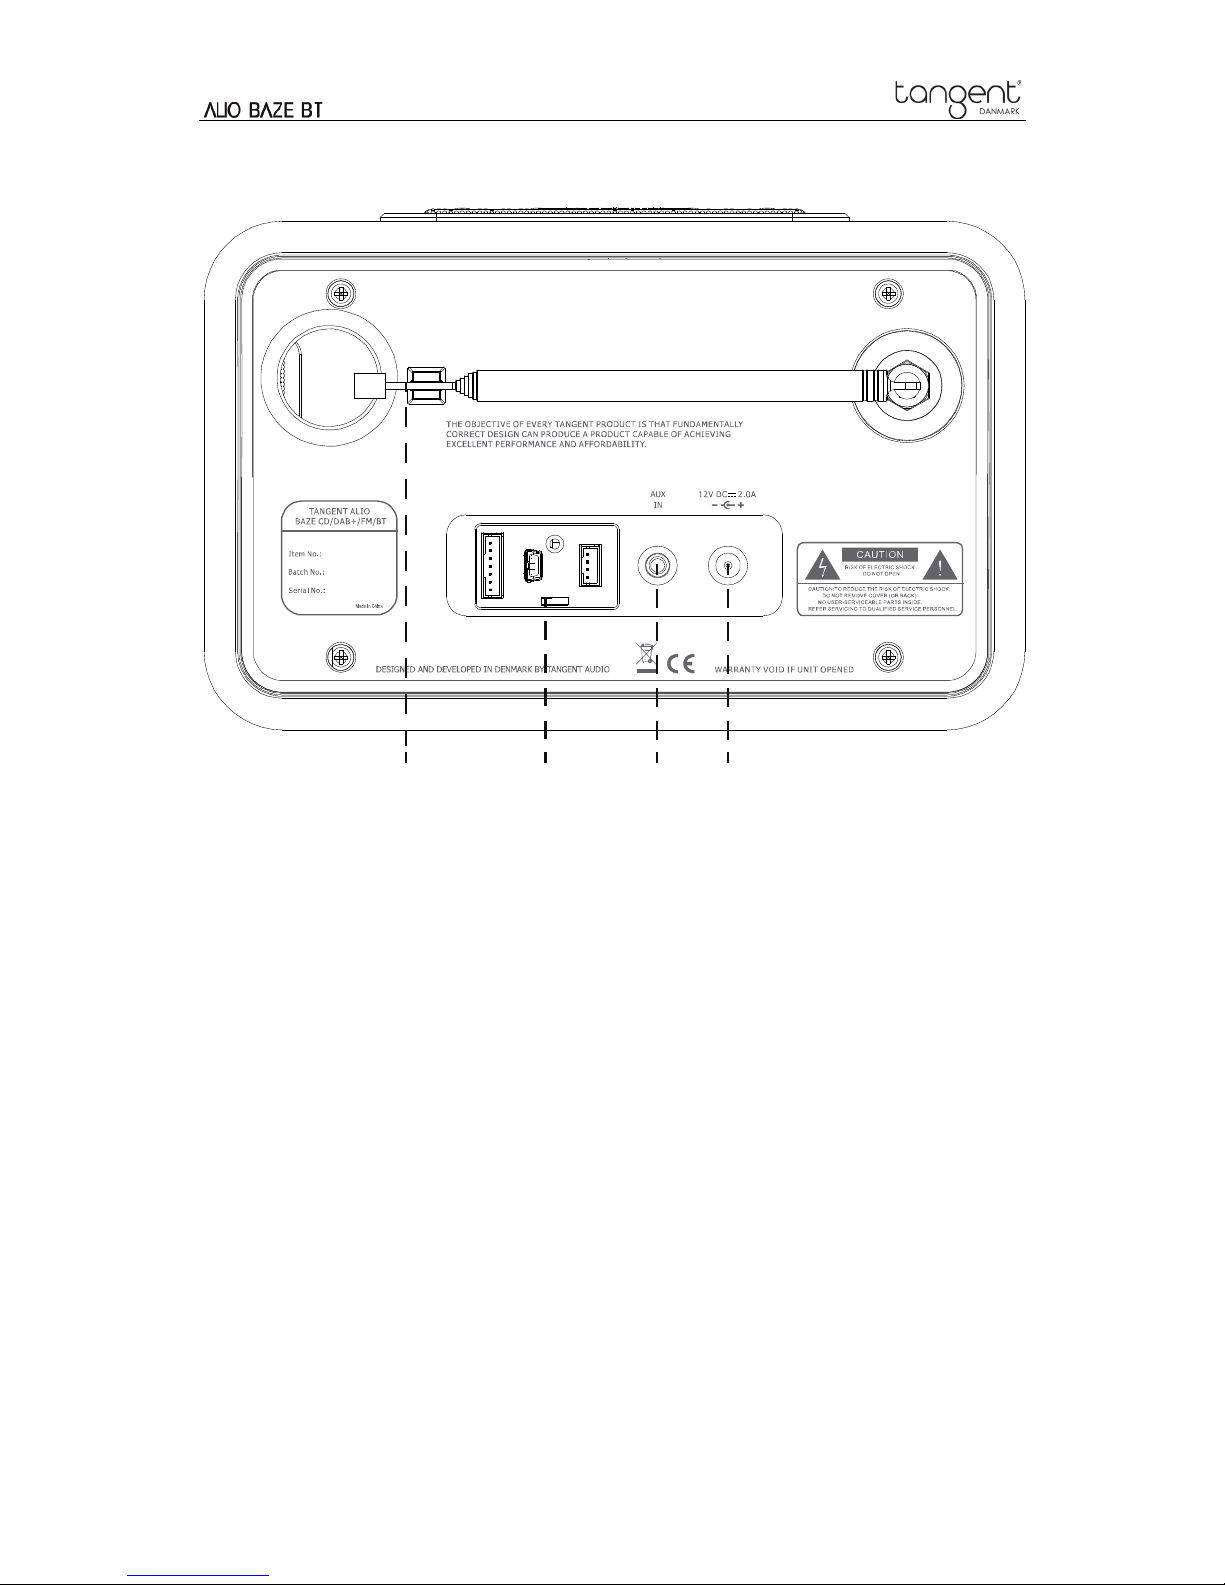
Unit Back View
1. DAB/FM antenna
2. SERVICE sockets
Please leave this for service professional only!
3. AUX IN socket
4. DC IN socket
1 2
3 4
Page 10

9
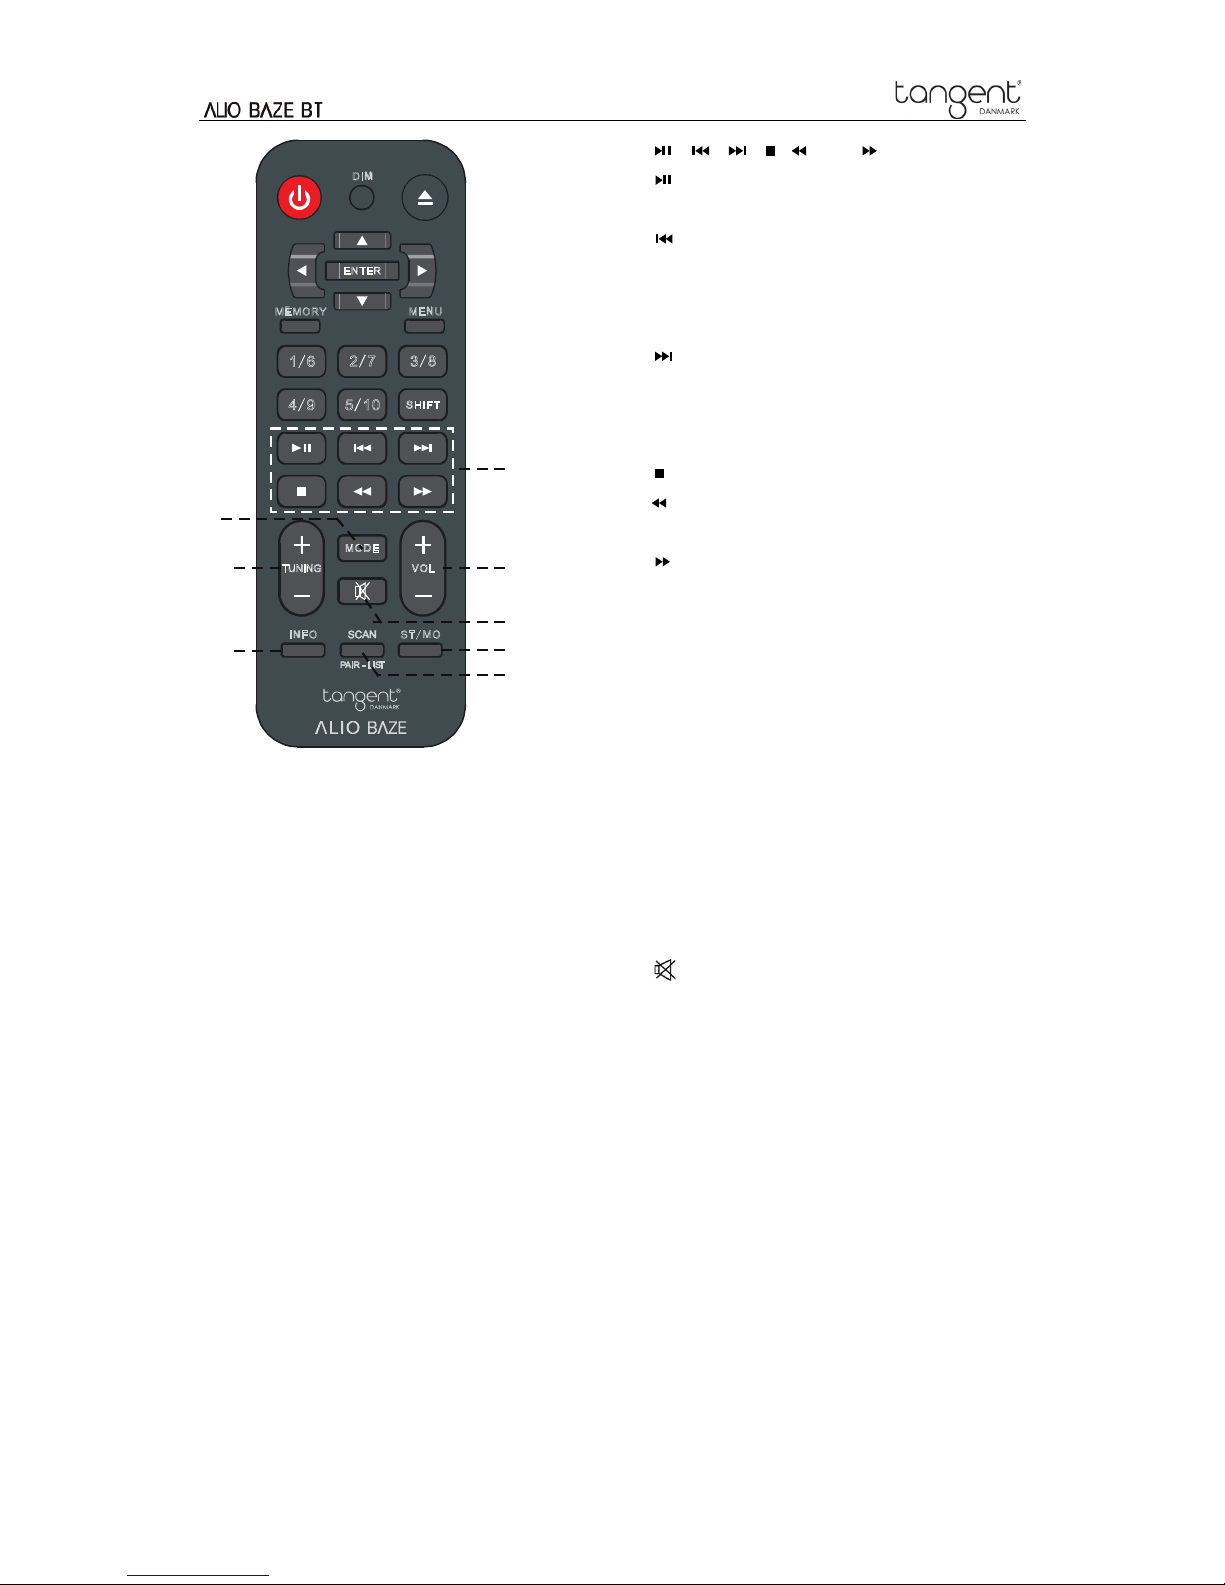
Remote Control View
1. button
Press to switch unit on or standby.
2. DIM button
Press to set the dimmer of power on and
standby mode.
3. button
Press to eject CD from CD tray.
4. ENTER button
Press to confirm selection.
5. Navigation buttons
▲ up
▼ down
◄ backward
► forward
6. MEMORY button
Press and hold to store preset station.
Press to recall stored preset station
7. MENU button
Press to display or exit menu screen.
8. PRESET buttons 1/6, 2/7, 3/8, 4/9, 5/10
and SHIFT button
Press and hold one of PRESET
buttons to store pr eset station 1, 2 , 3,
4 or 5.
Press one of PRESET buttons to recall
preset station 1, 2, 3, 4 or 5.
Press SHIFT
button first, and then
press and hold PRESET buttons to
store preset station 6, 7, 8, 9 or10.
Press SHIFT
button first, and then
press PRESET buttons 1/5, 2/6, 3/7
and 4/8 to recall pres et stat ion 6, 7, 8,
9 or10.
DIM
ENTER
MEMORY ME NU
1/ 6
2/ 7 3/ 8
4/ 9 5/ 10
SHIF T
MODE
TUNING VOL
IN FO ST/ MO
1
5
8
6
7
3
4
2
Page 11
10
The way of replace batteries:
1. Open the battery compartment cover by
using your thumb downward push the
projection on the back of your remote
control.
2. Install two AAA new batteries referring to the
markings direction inside the battery
compartment.
Note: do not reverse any battery and
do not mix battery types, also do not
mix old and new batteries. When
discard your old battery, please
considering eco-friendly.
3. Cover the battery compartment door.
9. , , , , and buttons
: press to pause or play current playing
track in Bluetooth and CD mode.
: press to skip to previous track in
Bluetooth and CD mode; press and hold to
fast reverse current playing track in
Bluetooth mode.
: press to skip to next track in Bluetooth
and CD mode; press and hold to fast
forward current playing track in Bluetooth
mode
: press to stop music in CD mode.
: press and hold to fast reverse current
playing track in CD mode
: press and hold to fast forward current
playing track in CD mode.
10. MODE button
Press to switch among DAB, FM,
Bluetooth, CD and AUX mode.
11. TUNING +, - buttons
Press to browse station list in DAB
mode.
Press to manually scan frequency in
FM mode.
Press and hold to automatically scan
frequency in FM mode.
12. VOLUME +, - buttons
Press to adjust volume.
13. button
Press to set ‘MUTE ON’ or ‘MUTE OFF’.
14. INFO button
Press to view station information.
15. ST/MO button
Press to shift audio to stereo or mono in
DAB and FM mode.
16. SCAN button
Press to automatically scan stations in
DAB and FM mode.
Press to select Bluetooth device in
Bluetooth mode.
Press and hold to disconnect
Bluetooth connection in Bluetooth
mode.
DIM
ENTER
MEMORY ME NU
1/ 6
2/ 7 3/ 8
4/ 9 5/ 10
SHIF T
MODE
TUNING VO L
IN
FO
ST/ MO
11
10
9
13
16
15
12
14
Page 12
11
DAB Mode
When you turn on t he radio it will automatically sear ch and store all the available stati ons. You
should conduct an additio nal Full Scan to ensure all statio ns are picked up and stored. It is als o
recommended ever y few months to run a new scan to pic k up any new DAB/DAB+ that may have
begun broadcasting after purchasing your DAB radio.
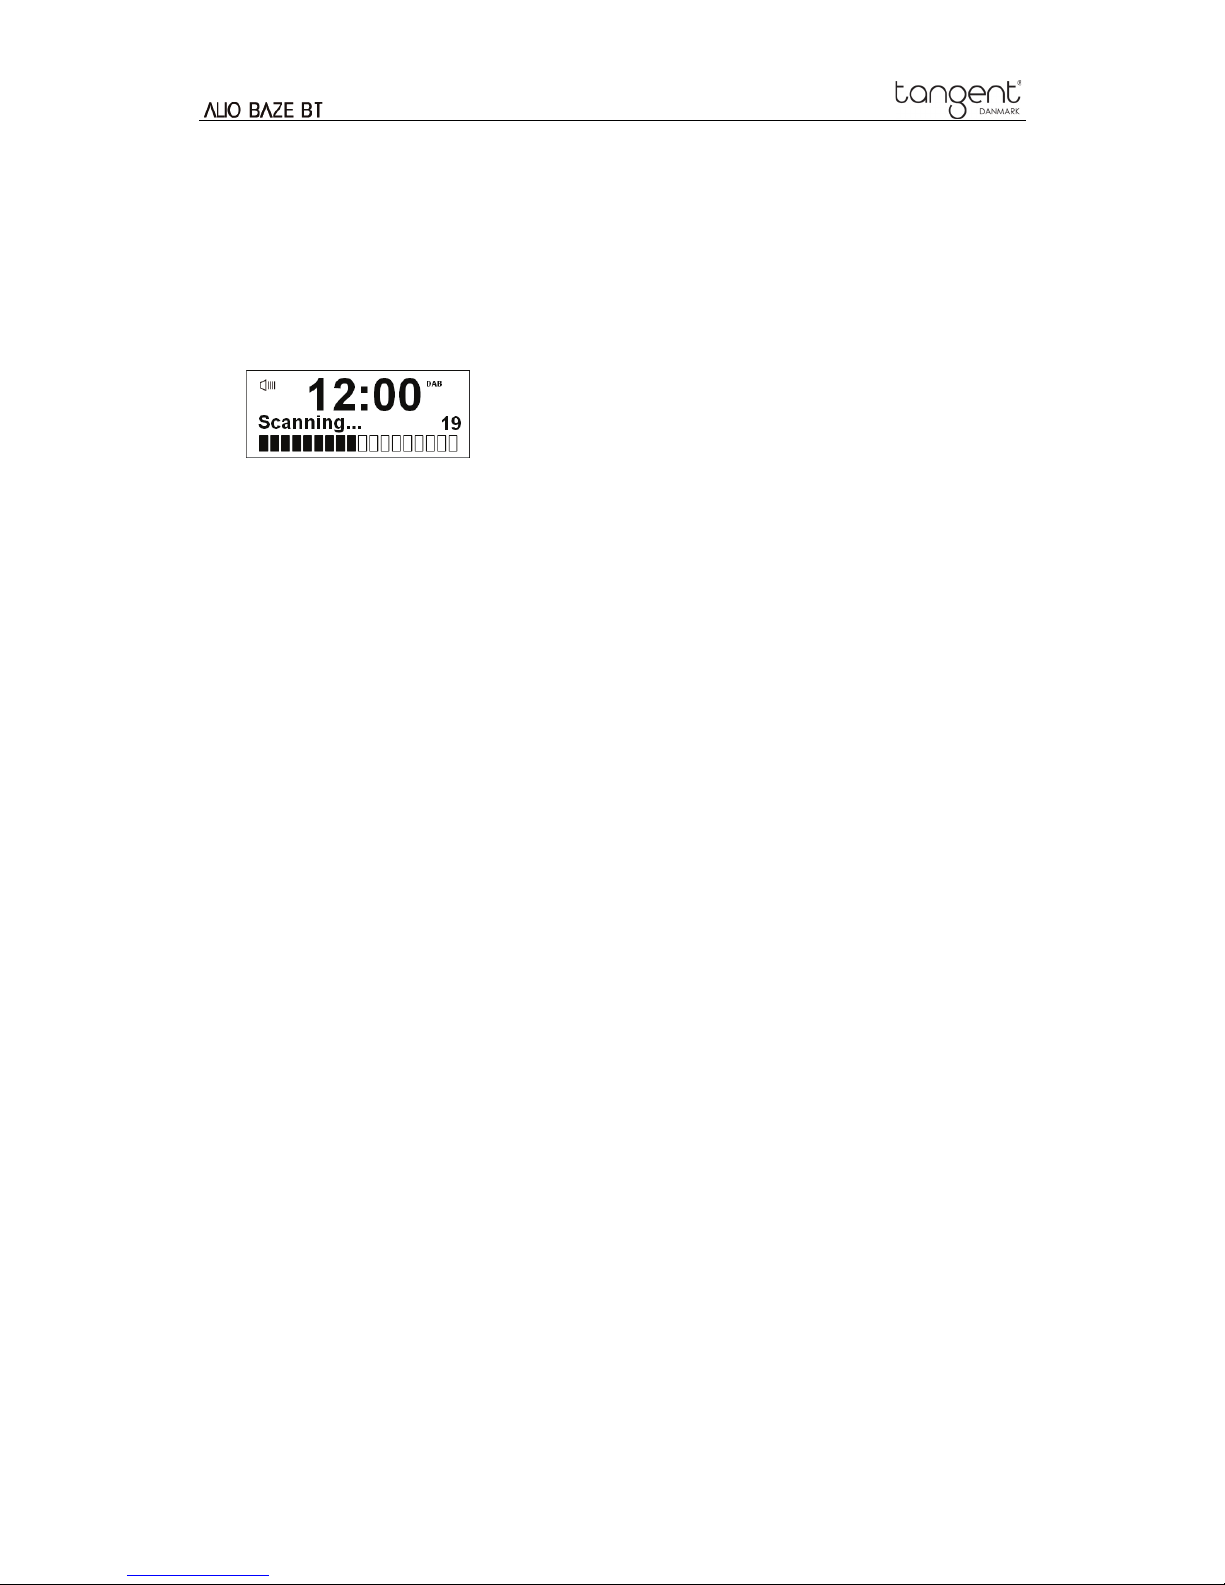
1. For initial use, your radio will conduct a full scan and store stations list in memory.
2. Once the scanning is completed, the DAB/DAB+ stations will be displayed in alphanumeric
order. The first station in the list will be selected.
Note: a. The DAB/DAB+ stations will be displayed and stored in alphanumeric order.
b. If no DAB/DAB+ sig nal is found, it may be necessar y for you to relocate your
radio.
Station List
This feature enables you to select a station from available station list.
1. While a program is playing, turn TUNE knob to show station list.
2. Alternatively, press MENU button, and then turn TUNE knob to select DAB Menu, press
ENTER button to confirm.
3. Turn TUNE knob to select Station List, and then press ENTER button to confirm.
4. Turn TUNE knob to browse stations list, and then press ENTER button to confirm. The
selected station will be broadcast.
Secondary Service
Yo u may see a “>>” symbol after the name of the station, this indicates that th ere are secondary
services available to t hat st ation. T hese sec ondary services conta in extr a services that ar e relat ed
to the primary station. E.g . a sports station m ay want to add extra c ommentaries. T he secondary
services are inserted directly after the pr imary station (a “< <” symbol is before the name of the
station) in the station list.
To select the secondary station, turn TUNE knob until you find the sec ondary service you want,
then press ENTER button to select it.
When the secondary service ends, the unit will automatically switch back to the primary station.
Page 13
12
Station Order
You may want to display the stations in different order.
1. Press MENU button, and then turn TUNE knob to select DAB Menu, press ENTER button to
confirm.
2. Turn TUNE knob to select Station Order, and then press ENTER button to confirm.
3. Turn TUNE knob to select 'Alphanumeric' or 'Ensemble', and then press ENTER button to
confirm your selecting option.
Alphanumeric
Display all stations in alphanum eric order.
Ensemble
List currently broadcasting ac tive stat ions before inactive ones.
Full Scan
This feature enables your radio to scan for all available stations.
1. Press MENU button, and then turn TUNE knob to select DAB Menu, press ENTER button to
confirm.
2. Turn TUNE knob to select Full Scan, and then press ENTER button to confirm.
Manual Tu ne
1. Press MENU button, and then turn TUNE knob to select DAB Menu, press ENTER button to
confirm.
2. Turn TUNE knob to select Manual Tune, and then press ENTER button to confirm. The
display will show the channel number and frequency.
3. Turn TUNE knob to step among the channels and then press ENTER button select the current
channel.
Note: If there is a multiplex corresponding to this channel and frequency, then the display will show
a tuning meter with the signal strength and the multiplex name after a few seconds.
4. Press MENU button to exit manual tune.
DRC (Dynamic Range Control) value
You can set the com pression level of stations to elim inate the differences in dynamic range or
sound level between radio stations.
Note: set DRC to off indicates no compression; set DRC to low indicates little compression; set DRC to
high shows maximum compression.
1. Press MENU button, and then turn TUNE knob to select DAB Menu, press ENTER button to
confirm.
2. Turn TUNE knob to select DRC, and then press ENTER button to confirm.
3. Turn TUNE knob to select 'DRC High', 'DRC Low' or 'DRC Off', and then press ENTER button
to confirm.
Page 14
13
Prune
You may remove all unavailable stations from the station list.
1. Press MENU button, and then turn TUNE knob to select DAB Menu, press ENTER button to
confirm.
2. Turn TUNE knob to select Prune, and then press ENTER button to confirm.
3. Turn TUNE knob to select ‘YES’, and then press ENTER button to confirm.
Viewing Station Information
DAB/DAB+ stations broadcast additional information. Press INFO button repeatedly the display will
show the information t hrough Scrolling text, Program Type, Ensemble, Date, Frequency, Bitrate
and Codec and Signal strength.
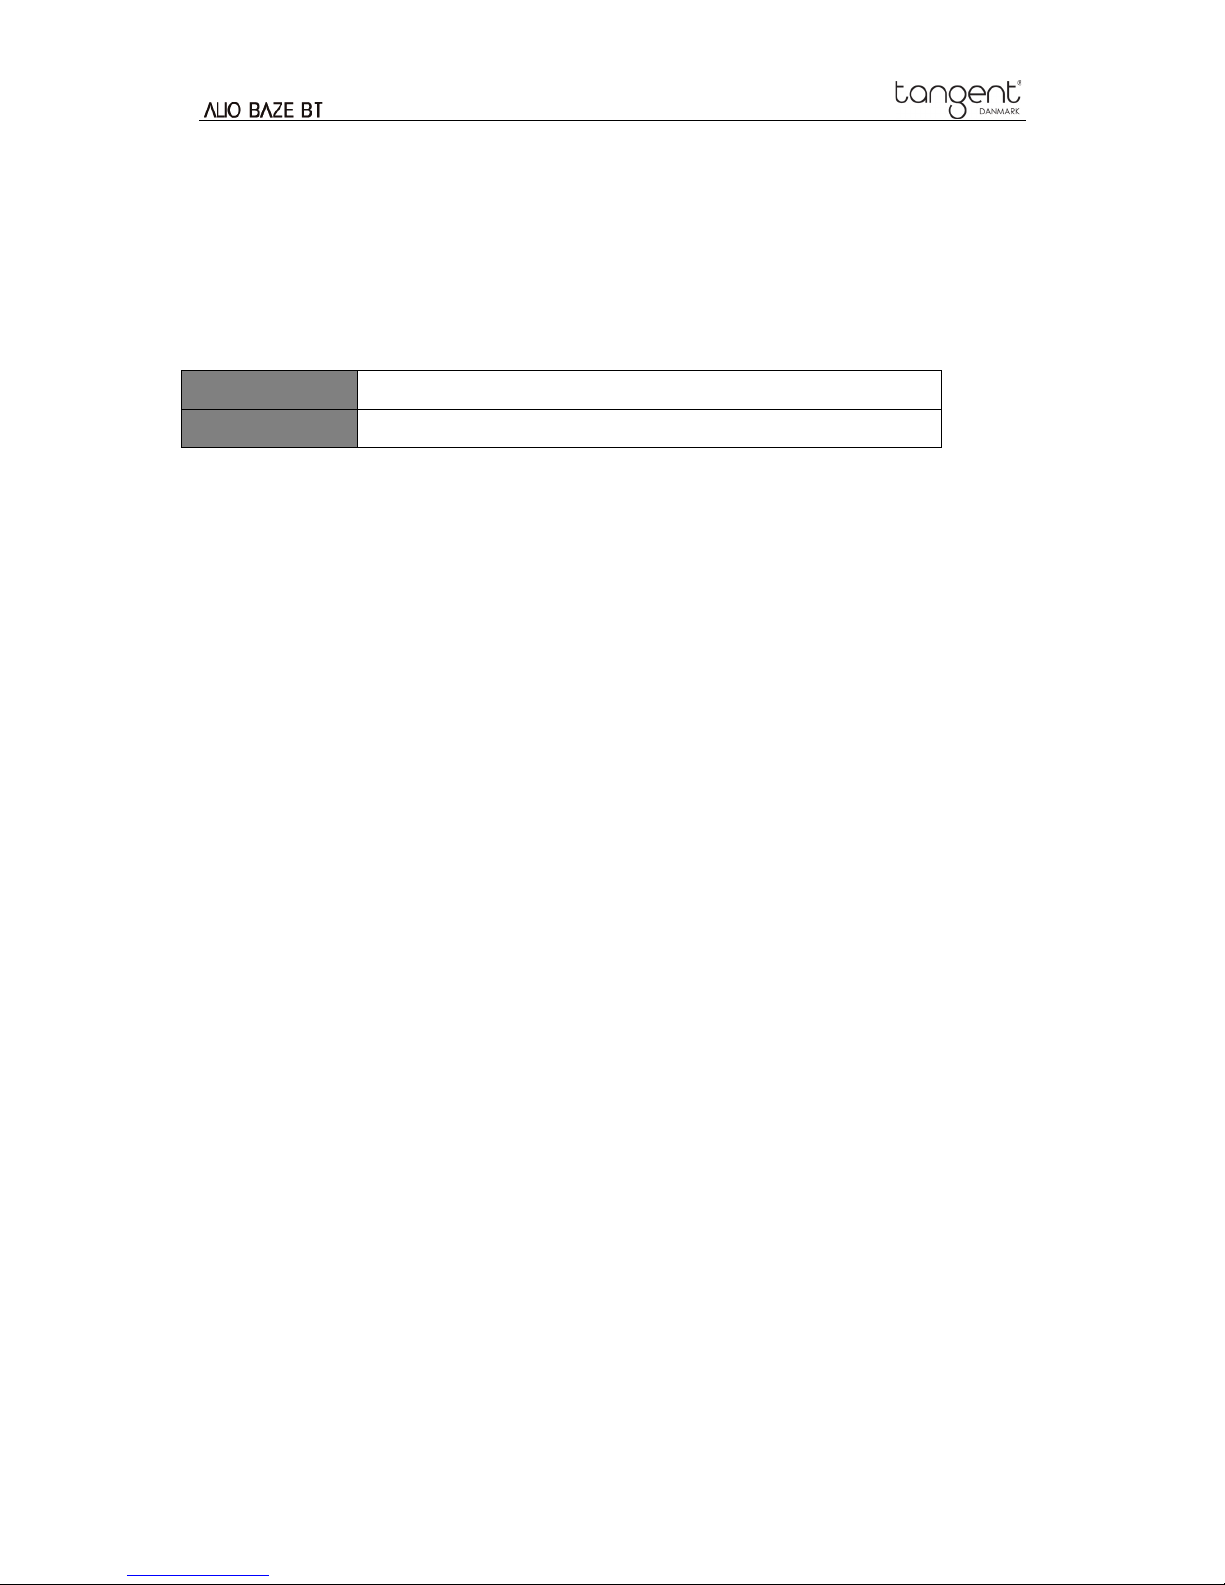
Showing Signal Strength
While you selected Signal strength, a signal bar with the strength of the current station will show on
the display.
The indicator on the signal bar shows the
minimum acceptable signal level.
Note: Stations with signal strength below the
minimum signal level may not provide a
steady stream of audio.
Storing Preset Stations
Yo ur radio can store up to 10 of your favourite DAB/DAB+ stati ons as preset stations. This will
enable you to access your favourite stations quickly and easily.
1. While your favorite station is playing, press and hold one of PRESET buttons 1/5, 2/6, 3/7, 4/8
on the unit or PRESET buttons 1/6, 2/7, 3/8, 4/9, 5/10 on the remote control until display show
‘Preset # stored’. (*# indicates 1, 2, 3, 4 or 5)
2. Press SHIFT button first, then press and hold one of preset buttons 1/5, 2/6, 3/7, 4/8 on the
unit or PRESET buttons 1/6, 2/7, 3/8, 4/9, 5/10 on the remote control until display show
‘Preset # stored’. (*# indicates 6, 7, 8, 9 or 10)
3. Alternatively , press and hold MEMORY button on the remote control until display show ‘Preset
Store <1: (Empty)>’. Turn TUNE knob on the unit or Navigation buttons ▲ or ▼ on the remote
control to select among preset numbers 1-10. Press ENTER button on the unit and remote
control to confirm. The display will show ‘Preset # stored’.
Page 15

14
Recalling Preset Stations
1. Press one of PRESET buttons 1/5, 2/6, 3/7, 4/8 on the unit or PRESET buttons 1/6, 2/7, 3/8,
4/9, 5/10 on the remote control, the preset station (1, 2, 3, 4 or 5) will be broadcast.
2. Press SHIFT button first, then press one of PRESET buttons 1/5, 2/6, 3/7, 4/8 on the unit or
PRESET buttons 1/6, 2/7, 3/8, 4/9, 5/10 on the remote control, the preset station (6, 7, 8, 9 or
10) will be broadcast.
3. Alternatively, press MEMORY button on the remote control to show ‘Preset Recall’. Turn
TUNE knob on the unit or Navigation buttons ▲ or ▼ on the remote control to select through
stored preset stations, and then pr ess ENTER button on both unit and remote control to
confirm the station which you want to play.
Page 16

15
FM Mode
Selecting FM Mode
1. Press MODE button repeatedly to select FM mode.
2. For initial use, it will start at the beginning of the FM frequency range (87.50MHz). Or it will play
the last FM station you were listening to.
3. To manually chang e the FM frequency, make sure no other order/system setting is going on,
turn TUNE knob to change the freque ncy by 0.05MHz per step.
4. To automatically scan, while FM frequency shows up, turn TUNE knob clockwise or
anticlockwise, and then press SCAN button, you r radio will skip forwards or backwards until it
reached the next available station.
Scan Setting
By default, FM scans stop at any available station. This may result in a poor signal-to-noise ratio
(hiss) from weak stations.
1. To change the scan settings to stop only at stations with good signal strength, press MENU
button, and then turn TUNE knob to select FM Menu, press ENTER button to confirm.
2. Turn TUNE knob to select Scan setting, and then press ENTER button to confirm.
3. Turn TUNE knob to browse ‘Strong stations only’, and then press ENTER button to confirm.
Audio Setting
By default, all stereo stations are reproduced in stereo. For weak stations, this may result in a poor
signal-to-noise ratio (hiss).
1. To play weak stations in mono, press MENU button, and then turn TUNE knob to select FM
Menu, press ENTER button to confirm.
2. Turn TUNE knob to select Audio setting, and then press ENTER button to confirm.
3. Turn TUNE knob to browse ‘Forced mono’, and then press ENTER button to confirm.
Viewing Station Information
FM stations broadcast additional information. Press INFO button repeatedly. The display will show
the information through Radio Text, Program Type, Date and Program Name.
Page 17

16
Storing Preset Stations
Yo ur radio can s tore up to 10 of your favour ite FM stations as preset stat ions. This will enabl e you
to access your favourite stations quickly and easily.
1. While your favorite station is playing, press and hold one of PRESET buttons 1/5, 2/6, 3/7, 4/8
on the unit or PRESET buttons 1/6, 2/7, 3/8, 4/9, 5/10 on the remote control until display show
‘Preset # stored’. (*# indicates 1, 2, 3, 4 or 5)
2. Press SHIFT button first, then press and hold one of preset buttons 1/5, 2/6, 3/7, 4/8 on the
unit or PRESET buttons 1/6, 2/7, 3/8, 4/9, 5/10 on the remote control until display show
‘Preset # stored’. (*# indicates 6, 7, 8, 9 or 10)
3. Alternatively , press and hold MEMORY button on the remote control until display show ‘Preset
Store <1: (Empty)>’. Turn TUNE knob on the unit or Navigation buttons ▲ or ▼ on the remote
control to select among preset numbers 1-10. Press ENTER button on the unit and remote
control to confirm. The display will show ‘Preset # stored’.
Recalling Preset Stations
1. Press one of PRESET buttons 1/5, 2/6, 3/7, 4/8 on the unit or PRESET buttons 1/6, 2/7, 3/8,
4/9, 5/10 on the remote control, the preset station (1, 2, 3, 4 or 5) will be broadcast.
2. Press SHIFT button first, then press one of PRESET buttons 1/5, 2/6, 3/7, 4/8 on the unit or
PRESET buttons 1/6, 2/7, 3/8, 4/9, 5/10 on the remote control, the preset station (6, 7, 8, 9 or
10) will be broadcast.
3. Alternatively, press MEMORY button on the remote control to show ‘Preset Recall’. Turn
TUNE knob on the unit or Navigation buttons ▲ or ▼ on the remote control to select through
stored preset stations, and then pr ess ENTER button on both unit and remote control to
confirm the station which you want to play.
Page 18

17
Bluetooth Mode
Pair the unit with a Bluetooth device to listen to music:
1. Press MODE button repeatedly to select Bluetooth mode.
2. The display will show 'Bluetooth discoverable'.
3. Activate your Bluetooth device and select the search mode.
4. “ALIO BAZE” will appear on your Bluetooth device.
5. Select “ALIO BAZE” and enter “0000” for the password if necessary.
6. ‘BT connected: Your Bluetooth Device’ will show on the display when connection is successful.
7. While a track is playing, you can:
a. Press button to skip to previous track; press and hold button to fast reverse
current playing track.
b. Press button to pause or play current playing track.
c. Press button to skip to next track; pres s and hold button to fast forward current
playing track.
8. To disconnect current Bluetooth connection, press and hold SCAN button for 3 seconds.
9. To connect to another paired Bluetooth device, press SCAN button repeatedly to select the
Bluetooth device you want to connect, and then press ENTER button knob to confirm
connecting.
Note: the unit will automatically switch off after 10 minutes if the Bluetooth device is
disconnect, switch off or the volume is too close to mute.
Page 19
18
CD Mode
Inserting CD to CD Tray
In order to play CD, please insert the Audio CD. Some CDs may be incompatible.
Insert an Audio CD into the CD tray when unit in any mode, the display will show ‘READING’, wait a
few seconds.
Note: to select CD mode by pressing MODE button r epeatedly only available while a CD is
inserted into CD tray.
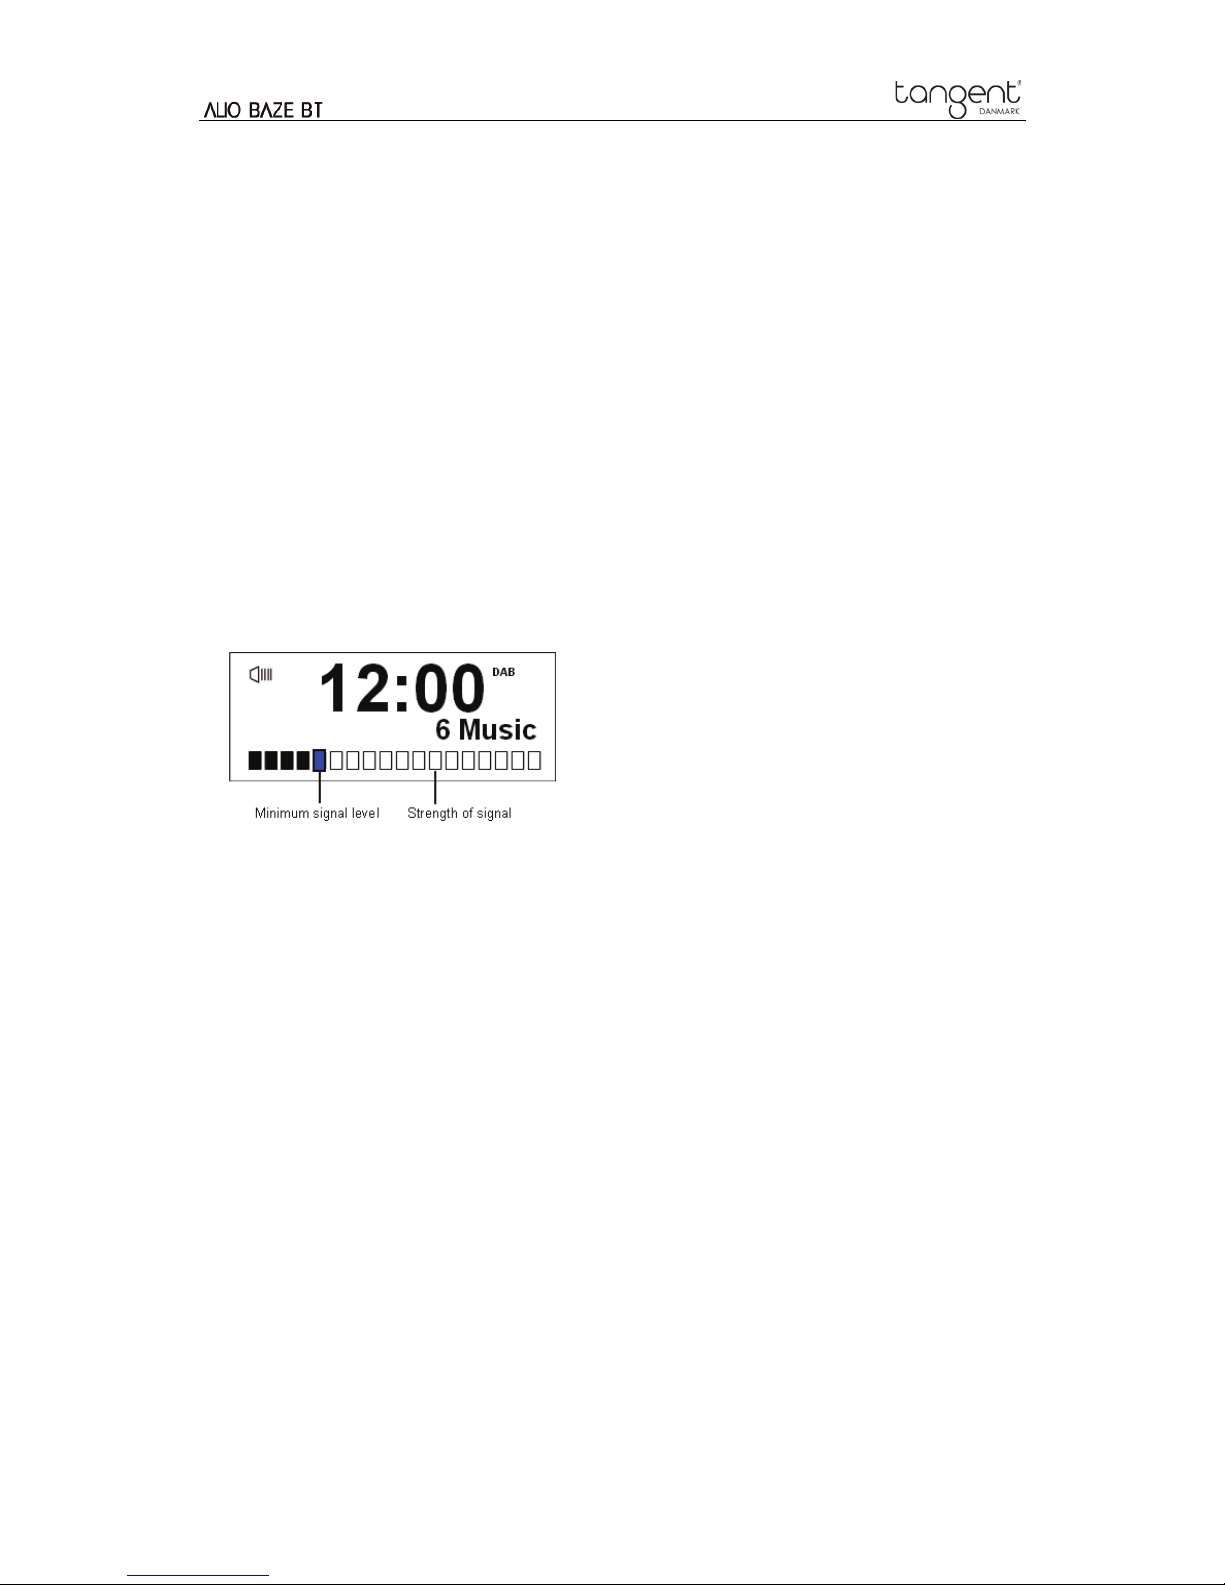
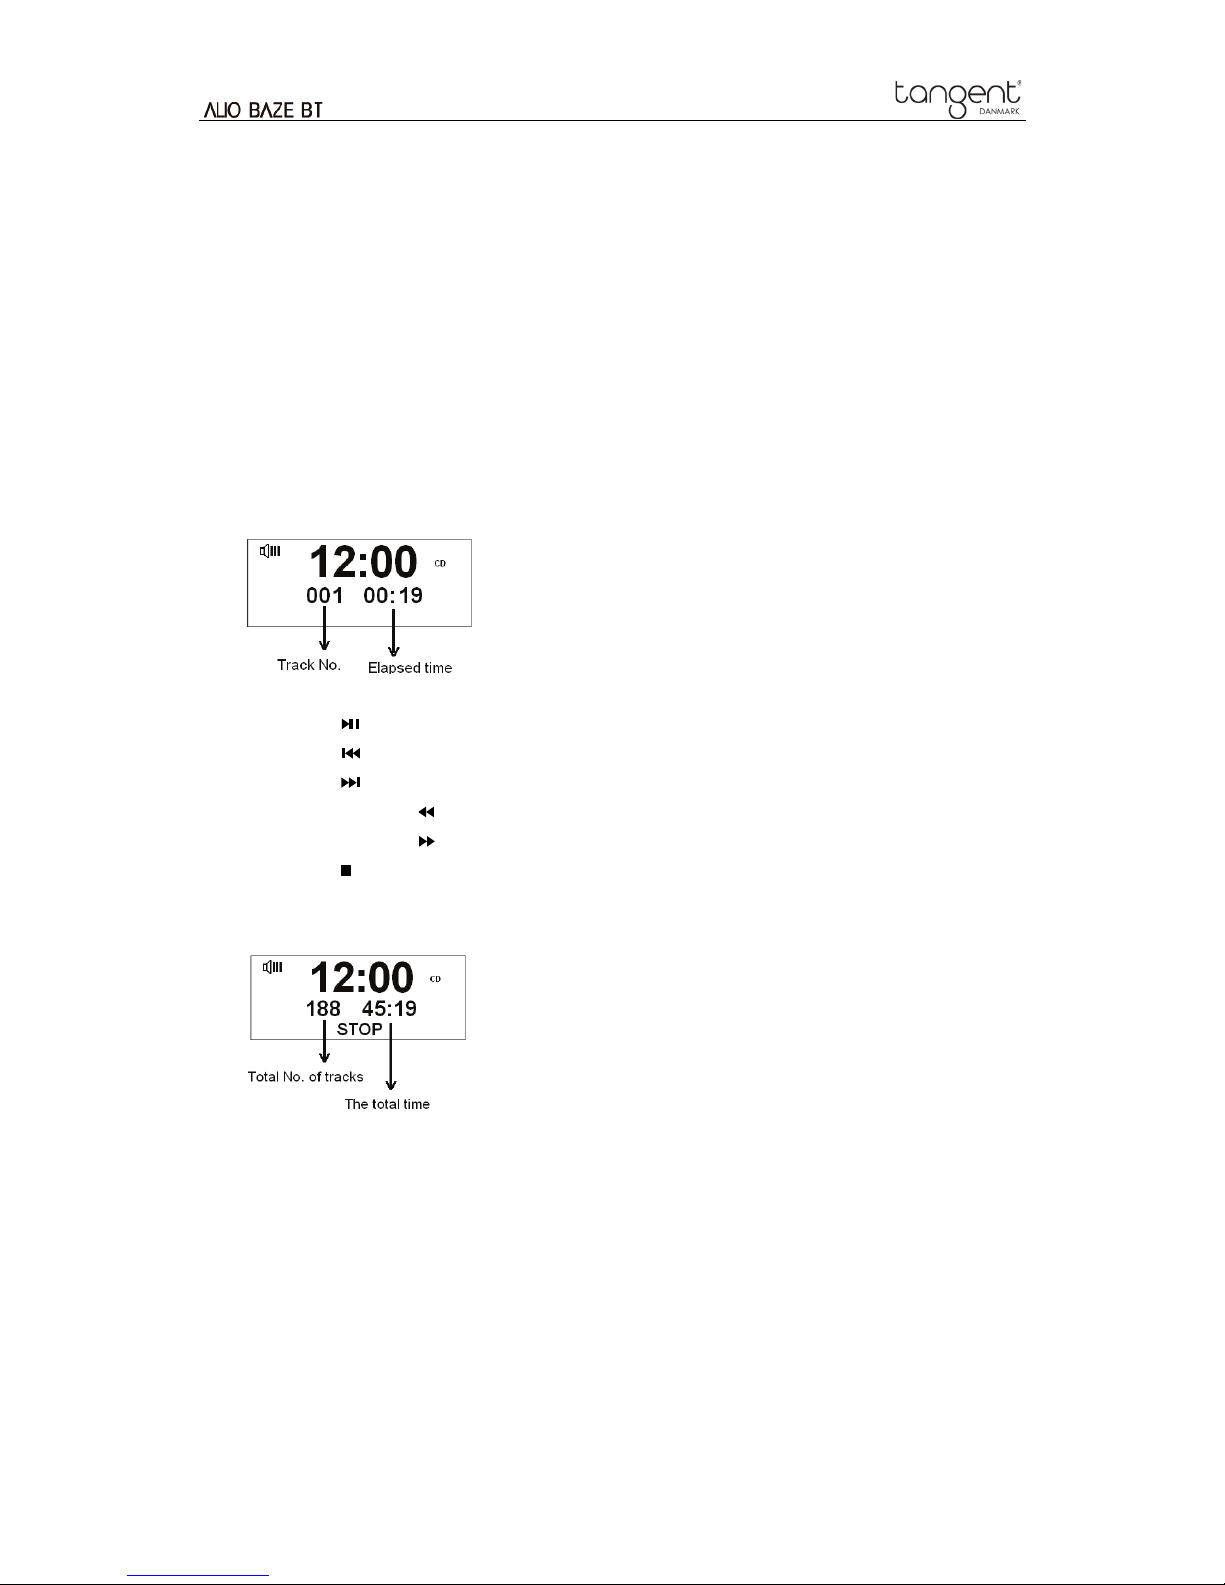
Playing CD Program
1. During Audio CD playback, the display shows the track number and the elapsed time.
2. When a track is playing, you can:
a. Press button to pause or play current playing track.
b. Press button to skip to previous track.
c. Press button to skip to next track.
d. Press and hold button to fast reverse current playing track.
e. Press and hold button to fast forward current playing track.
f. Press button to stop music.
3. In CD STOP mode, if the disc is a normal audio CD, the display shows the total number of
tracks and the total track time.
Setting Random Playback
1. Press MENU button, and then turn TUNE knob to select CD: Random, press ENTER button to
confirm.
2. Turn TUNE knob to select through Off or On, and then press ENTER button to confirm your
selection.
Page 20

19
Setting Repeat Playback
1. Press MENU button, and then turn TUNE knob to select CD: Repeat, press ENTER button to
confirm.
2. Turn TUNE knob to select through Off, One and All, and then press ENTER button to confirm
your selection.
Ejecting CD from CD Tray
Press button, the display will show ‘OPEN’, then CD can be ejected from CD tray.
Note: the unit will automatically switch to standby mode after 10 minutes if the CD isn’t
playing.
Page 21

20
Aux in Mode
AUX IN allows for quick and easy connection to an MP3 player or other external audio sources.
Note: to select AUX mode by pressing MODE button repeatedly only available while an audio
cable is plug into AUX IN socket.
1. Before connecting to the mains socket, use a 3.5mm audio cable (not supplied) to connect to
your external audio device through the AUX IN socket on the back of unit.
2. Connect power adapter to mains socket, press POWER button to switch unit on.
3. Unit will automatically switch to AUX mode.
4. In Aux in mode, you may operate your audio device directly for playback features.
5. To gain optimal volume levels, adjusting the output volume level on the audio device as well is
recommended.
Note: the unit will automatically switch to standby mode after 10 minutes if the source device is
disconnect, switch off or the volume is too close to mute.
Page 22
21
General Operations
Setting Alarm
Your radio includes dual alarms. Set Alarm, making sure set time at first.
1. Press ALARM button on the unit repeatedly to set alarm .
2. Turn TUNE knob to select ‘Al arm 1’ or ‘Alarm 2’, and then press ENTER button to confirm.
3. Turn TUNE knob to select options, and then press ENTER button to confirm the setting.
Set Alarm:
On or Off
Set Time:
06:00 (manually set up the alarm time )
Set Source:
DAB, FM, Buzzer or CD (Buzzer will sound instead if there is no CD in
the unit when alarm sounds)
Set Repetition:
Daily, Once, Weekends or W eekdays
Set volume: turn TUNE knob to adjust the alarm volume
4. The alarm setting is successful. or will show on the display.
5. To tempo rarily switch off alarm, press SNOOZE button on the unit to activate snooze time.
The set snooze time will show on the display.
6. To turn off alarm, press POWER button when the alarm sounds
7. To cancel Alarm, refer to steps1-3 to set alarm ‘Off’.
Setting Sleep
This feature enables your radio to switch to standby mode by itself after a set sleep time.
1. Press SLEEP button on the unit repeatedly to select through Sleep off, 15, 30, 45, 60 or 90
mins, press ENTER button to confirm. The sleep icon will show on the display.
2. To turn the sleep function off while the sleep timer is still counting down, redo step 1 to select
'Sleep off'.
Setting Date/Time
1. Press MENU button, and then turn TUNE knob to select Date/Time Set, press ENTER button
to confirm.
2. Turn TUNE knob to select options, and then press ENTER button to confirm the setting.
DAB Autocorrect:
Update date and time from DAB mode
Manual:
Manually set-up both Time and Date
3. Then setting time according to your personal preference.
Page 23

22
Setting Time Format
1. Press MENU button, and then turn TUNE knob to select Time Mode, press ENTER button to
confirm.
2. Turn TUNE knob to select through 24 Hours and 12 Hours, and then press ENTER button to
confirm.
Setting Snooze Time
This feature enables you to set the snooze time when alarm sounds.
1. Press MENU button, and then turn TUNE knob to select Snooze Adjust, press ENTER button
to confirm.
2. Turn TUNE knob to set snooze time among 1-9 mins, and then press ENTER button to
confirm.
Setting Brightness
1. Press MENU button, and then turn TUNE knob to select Brightness, press ENTER button to
confirm.
2. Turn TUNE knob to select through Standby Mode and Normal Mode, and then press ENTER
button to confirm.
3. Turn TUNE knob to select through Level 1- Level 5, and then press ENTER button to confirm.
Setting Equalizer
This feature enables you to choose a sound equ alization profile. Each of the equalization setting
will change the tone of the sound from your radio when selected.
1. Press MENU button, and then turn TUNE knob to select Set EQ, press ENTER button to
confirm.
2. Turn TUNE knob to select through Normal, Rock, Pop, Jazz and My EQ, and then press
ENTER button to confirm.
3. To set up My EQ, select My EQ and then press ENTER button to confirm. Turn TUNE knob to
select through Treble and Bass, and then press ENTER button to confirm. Turn TUNE knob to
set treble and bass value, and then press ENTER button to confirm.
Setting Loudness
1. Press MENU button, and then turn TUNE knob to select Loudness, press ENTER button to
confirm.
2. Turn TUNE knob to select through OFF and ON, and then press ENTER button to confirm.
Page 24

23
Factory Reset
Doing a factory reset resets all user settings to default values, so time/date and presets are lost.
1. Press MENU button, and then turn TUNE knob to select Factory Reset, press ENTER button
to confirm.
2. Turn TUNE knob to select YES or NO, and then press ENTER button to confirm.
3. If YES is selec ted, the un it wil l reset and restar t.
Firmware Information
1. Press MENU button, and then turn TUNE knob to select Firmware, press ENTER button to
confirm.
2. Turn TUNE knob to select DAB or MCU, and then press ENTER button to confirm.
3. The version information will show on the display.
Page 25
24
Specifications
Items Specifications
Description:
DAB/DAB+ and FM radio with CD player and Bluetooth
Frequency Range:
FM: 87.5-108MHz
DAB/DAB+: 174.928 – 239.200MHz
Power Requirements:
AC Input: 110-240Vac, 50-60 Hz
DC Output: 12V, 2A
Audio Output Power:
>5 Watt RMS@1% THD
Power Consumption:
12W (Max)
Dimension (W x H x D):
210mm x 130mm x 210mm
This symbol on the product or in the instructions means
that your electrical and electronic equipment should be
disposed at the end of its life separately from your
household waste. T here are separate collection system s
for recycling in the EU.
For more information, please contact the local authority or your retailer where you purchas ed
the product.
Page 26
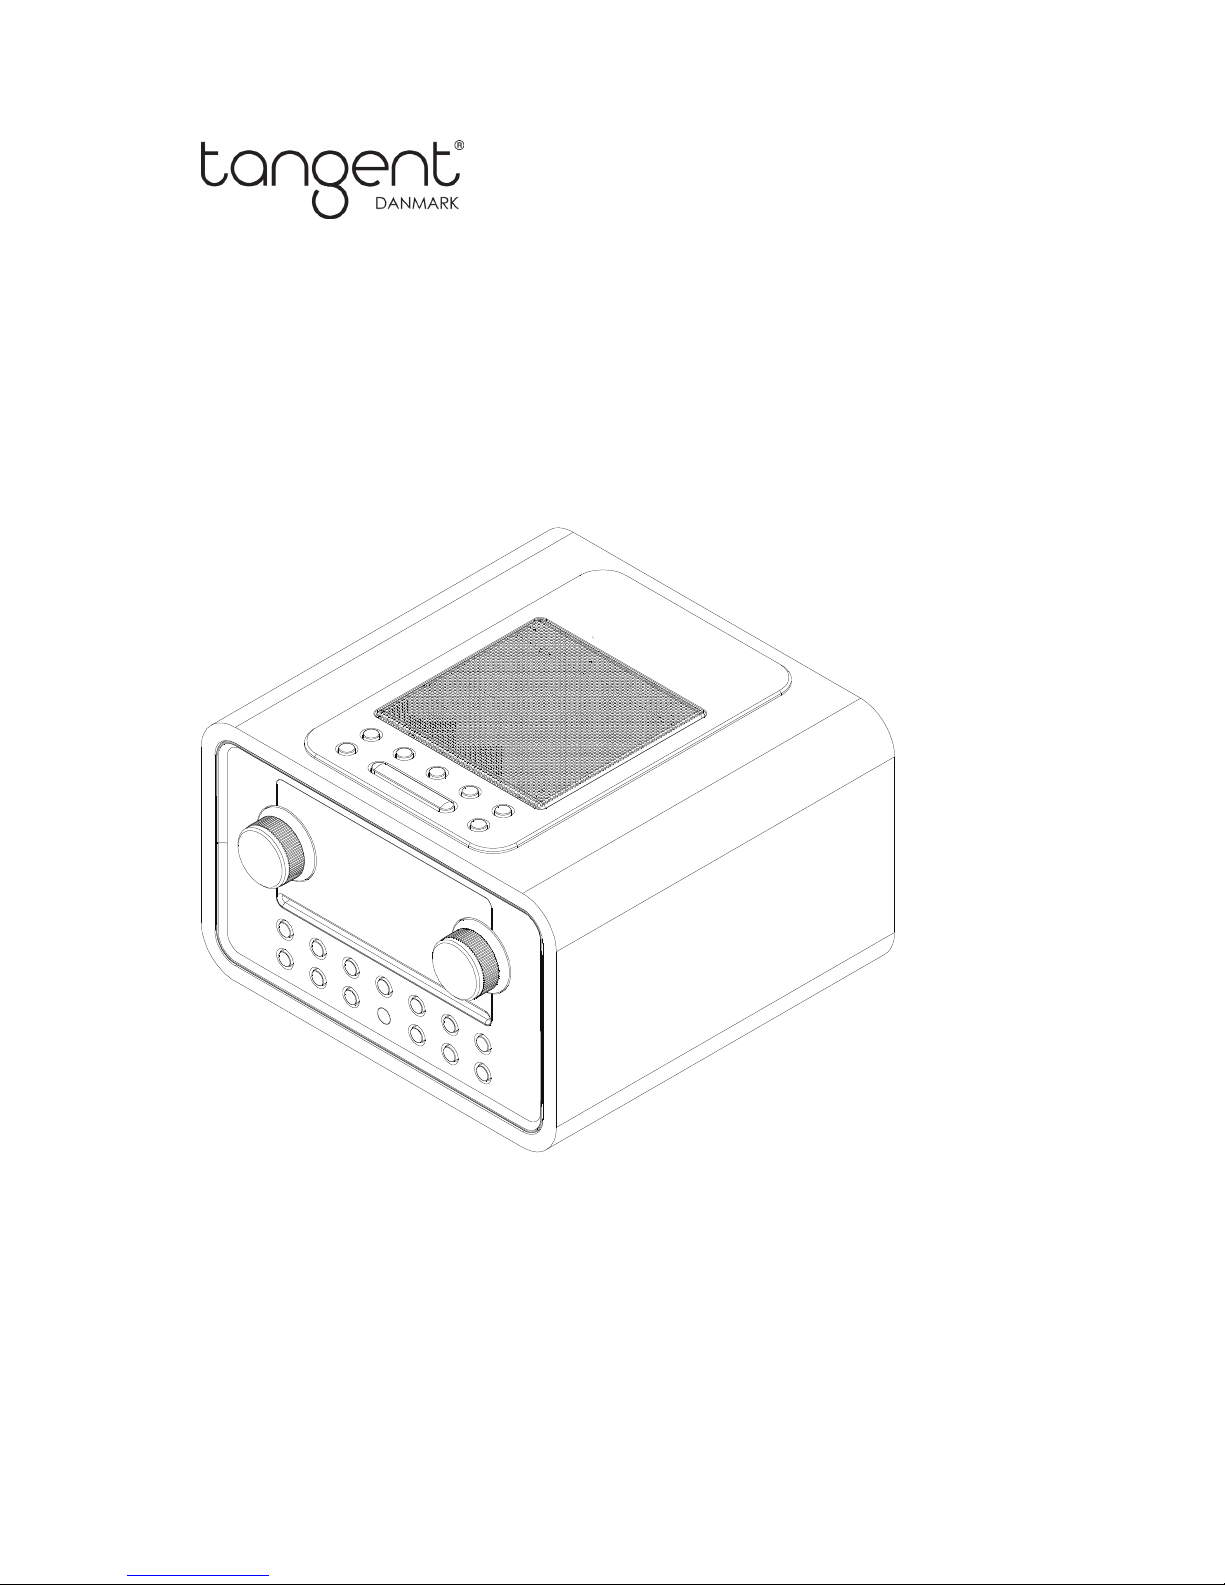
ALIO BAZE
Radio DAB/DAB+ /FM avec lecteur CD et Bluetooth
Mode d'emploi
Page 27

2
Importantes consignes de sécurité
1. Lisez ces consignes.
2. Conservez ces consignes.
3. Respectez tous les avertissements.
4. Suivez toutes les instructions.
5. N'utilisez pas le haut-parleur à proximité
de l'eau.
6. Nettoyez uniquement l'appareil avec un
chiffon sec.
AVERTISSEMENT : POUR RÉDUIRE LES RISQUES D'INCENDIE OU DE CHOCS
ÉLECTRIQUES, N' EX POSEZ PAS CE HAUT-PARLEUR À LA PLUIE OU À L'HUMIDITÉ.
Pour réduire les risques de chocs électriques, de feu, etc. :
1. Ne placez pas l'appareil à proximité de sources de chaleur telles que des radiateurs, appareils
de chauffage, fours ou autre dispositif (y compris les amplificateurs) produisant de la chaleur.
2. Ne bloquez pas les orifices de ventilation de l'appareil.
3. L'appareil ne doit pas être exposé aux égouttements ou aux éclaboussures, et aucun objet
rempli de liquides, tels que des vases, ne devra être posé sur l'appareil.
4. Ne placez pas de lourdes charges sur l'appareil, et ne marchez pas dessus, la charge peut
tomber et causer de sérieux dommages à l'appareil.
5. Veuillez lire les étiquettes signalétiques au dos de l'appareil pour connaitre la puissance
d'entrée et autres informations de sécurité.
6. Cet appareil est uniquement destiné à être utilisé avec l'alimentation électrique fournie.
7. Protégez le cordon d'alimentation pour éviter de le piétiner ou pincer ; en particulier au niveau
des prises, des réceptacles utiles et aux endroits sortant de l'appareil.
8. Ne débranchez jamais votre appareil en tirant sur le cordon d'alimentation. Tenez toujours
fermement la fiche et tirez-la directement de la prise.
9. Réparez ou remplacez immédiatement tous les cordons électriques qui s’effilochent ou sont
autrement endommagés. N'utilisez pas un cordon qui présente des fissures ou des abrasions
sur sa longueur, à la fiche ou à l'extrémité du raccord.
10. Afin d’évtier les risques d'incendie ou de chocs, n'utilisez pas cette fiche avec une rallonge
électrique ou autre fiche à moins que les broches puissent être entièrement insérées afin de ne
pas les exposer.
11. Pour éviter les risques d'incendie ou de chocs électriques, n'exposez pas cet appareil à la pluie
ou à l'humidité.
12. Pendant les orages ou les jours de pluie, débranchez l'appareil par précaution supplémentaire
pendant les orages, ou lorsque l'appareil n'est pas utilisé pendant de longues périodes. Cela
évitera d'endommager l'appareil en raison d'orage ou de surtensions électriques.
13. N'essayez pas de procéder vous-même à l'entretien de l'appareil. En ouvrant ou en démontant
le boîtier, vous pouvez vous exposer à une tension dangereuse ou à d'autres dangers. T ous les
travaux d'entretien doivent être effectués par des techniciens qualifiés.
14. La pile de la télécommande ne doit pas être exposée à une chaleur excessive telle que la
lumière du soleil, des flammes ou semblables.
15. Une pile mal remplacée présente un risque d'explosion. Ne la remplacer que par des piles
identiques ou de type équivalent.
16. Par souci de sécurité et pour éviter une consommation inutile d'énergie, ne jamais laisser
l'appareil allumé sans surveillance pendant de longues périodes de temps, ex : la nuit, pendant
les vacances ou durant les absences. Éteignez-le et débranchez la fiche secteur de la prise.
Page 28

3
Sommaire
Importantes consignes de sécurité .................................................................................................... 2
Sommaire
.......................................................................................................................................... 3
Premiers pas
..................................................................................................................................... 5
Vue du haut de l'appareil
............................................................................................................ 6
Vue avant de l'appareil
............................................................................................................... 7
Vue arrière de l'appareil
............................................................................................................. 8
Vue de la télécommande
............................................................................................................ 9
Mode DAB
....................................................................................................................................... 11
Liste des stations
...................................................................................................................... 11
Service secondaire
................................................................................................................... 11
Ordre de station
........................................................................................................................ 12
Balayage total
........................................................................................................................... 12
Syntonisation manuelle
............................................................................................................ 12
DRC valeur (Commande de plage dynamique)
....................................................................... 12
Trier
.......................................................................................................................................... 13
Voir les informations d'une station
........................................................................................... 13
Stockages des stations présélectionnées
................................................................................ 13
Rappel des stations présélectionnées
..................................................................................... 14
Mode FM
......................................................................................................................................... 15
Sélection du mode FM
............................................................................................................. 15
Option de recherche
................................................................................................................. 15
Réglage sonore
........................................................................................................................ 15
Visualisation des informations de station
................................................................................. 15
Stocker les stations présélectionnées
...................................................................................... 16
Rappel des stations présélectionnées
..................................................................................... 16
Mode Bluetooth
............................................................................................................................... 17
Mode CD
......................................................................................................................................... 18
Insérer un CD dans le tiroir CD
................................................................................................ 18
Lire un programme CD
............................................................................................................. 18
Configurer la lecture aléatoire
.................................................................................................. 18
Configurer la lecture répétée
.................................................................................................... 19
Ejecter un CD du tiroir du CD
................................................................................................... 19
Mode Aux in
..................................................................................................................................... 20
Fonctionnement général
.................................................................................................................. 21
Réglage de l'alarme
................................................................................................................. 21
Régler la fonction veille
............................................................................................................ 21
Régler la date/l'heure
............................................................................................................... 21
Régler le format de l'heure
....................................................................................................... 22
Régler la durée de rappel d'alarme
.......................................................................................... 22
Régler la luminosité
.................................................................................................................. 22
Régler l'égalisateur
................................................................................................................... 22
Régler le niveau sonore
........................................................................................................... 22
Page 29

4
Retour aux paramètres d'usine ................................................................................................ 23
Information du micro-logiciel
.................................................................................................... 23
Caractéristiques techniques
............................................................................................................ 24
Page 30

5
Premiers pas
Sortez soigneusement votre radio de la boîte. L’emballage peut être rangé pour une utilisation
ultérieure.
Ce qui se trouve à l'intérieur de l'emballage
• Appareil principal
• Transformateur électrique
• Télécommande
• Mode d'emploi
Placer votre radio
Placez votre radio sur une surface plate / stable qui n'est pas sujette aux vibrations.
Évitez les emplacements suivants :
• Exposition de la radio aux rayons plein soleil.
• Proximité de la radio à des sources dégageant de la chaleur.
• A l'humidité élevée et à faible ventilation.
• Dans les endroits poussiéreux
• Dans les endroits humides ou à d’éventuels égouttements ou éclaboussures de l'appareil.
Réglage de l'antenne
Déployez l'antenne pour v ous assurer de recevoir la meilleure réception poss ible à la fois sur les
modes radio DAB et FM. Il s e peut que la position de la radio et/ou d e l'antenne doit être aj ustée
pour obtenir le meilleur signal.
Allumer/Éteindre l'appareil
Branchez la fiche à l'extré m ité du câble du tra nsf ormateur é lectriq ue à la prise DC IN à l'arrière de
l'appareil. Insérez ensuite le transformateur électrique dans la prise secteur. Appuyez sur le bouton
POWER pour mettre l'appareil en marche ou en veille. Pour éteindre complètement l'appareil,
débranchez le transformateur électrique de la prise secteur.
Contrôle du volume
Réglez le volume de la radio en tournant le bouton VOLUME.
Page 31

6
Vue du haut de l'appareil
1. Bouton ALARM
Appuyez pour régler l'alarme.
2. Boutons de PRÉSÉLECTION 1/5, 2/6, 3/7, 4/8
• Maintenez l'un de ces boutons enfoncés pour stocker une
station présélectionnée 1, 2, 3 ou 4.
•
Appuyez sur un bouton pour obtenir une station
présélectionnée 1, 2, 3 ou 4.
3. Bouton SNOOZE, Appuyez pour activer la fonction de rappel
d'alarme lorsque l'alarme retentit.
4. Bouton SHIFT
• Appuyez d’abord sur ce bouton, et puis maintenez l'un des
boutons de PRÉSÉLECT ION 1/5, 2/6, 3/7, 4/8 enf oncé pour
stocker la station présélectionnée 5, 6, 7 ou 8.
• Appuyez d'abord sur ce bouton , et puis appuyez sur l'un des
boutons de PRÉSÉLECTIO N 1/5, 2/6, 3/7, 4/8 pour rappeler
la station présélectionnée 5, 6, 7 ou 8.
5. Bouton SLEEP
Appuyez pour régler le temps de repos.
6. Haut-parleur
7. Antenne DAB/FM
Page 32

7
Vue avant de l'appareil
1
2 4 5 6 8 9 10 12
3 7
1. Écran
2. Bouton VOLUME
Tournez pour régler le volume.
3. Tiroir CD
4. Bouton POWER
Appuyez pour allumer l'appareil ou le
mettre en veille.
5. Bouton INFO
Appuyez pour visualiser les informations de
la station.
6. Bouton SCAN / Pair-List
• Appuyez pour effectuer un balayage
automatique des stations en mode DAB
et FM.
• App u yez po ur sélect ion ner l'apparei l
Bluetooth en mode Bluetooth.
• Mai nten e z enfonc é pour dé c onnec ter la
connexion Bluetooth en mode
Bluetooth.
7. Capteur de télécommande
8. Bouton MODE
10. Bouton ENTER
Appuyez pour valider la sélection.
11. Boutons
, , , , , et
: appuyez pour mettre sur pause ou lire
la piste actuelle en mode Bluetooth et CD.
: appuyez pour arrêter la musique en
mode CD.
: appuyez pour passer à la piste
précédente en mode Bluetooth et CD ;
maintenez ce bouton enfoncé pour
procéder à un retour rapide de la piste en
cours de lecture en mode Bluetooth.
: pressez pour passer à la piste suivante
en mode Bluetooth et CD ; maintenez ce
bouton enfoncé pour procéder à une
avance rapide de la piste en cours de
lecture en mode Bluetooth.
: maintenez enfoncé pour effectuer un
retour rapide de la piste en cours de lecture
en mode CD.
: maintenez enfoncé pour effectuer une
Page 33

8
Appuyez pour basculer entre les modes
DAB, FM, Bluetooth, CD et AUX.
9. Bouton MENU
Appuyez pour afficher ou quitter l'écran du
menu.
avance rapide de la piste en cours de
lecture en mode CD.
: appuyez pour éjecter le CD du tiroir CD.
12. Bouton TUNE
Tournez pour parcourir les options.
Vue arrière de l'appareil
1 2 3 4
1. Antenne DAB/FM
2. Prises SERVICE
Réservé aux techniciens professionnels uniquement !
3. Prise AUX IN
4. Prise DC IN
Page 34

9
Vue de la télécommande
D
I
M
E
N
T
E
R
M
E
M
O
R
Y
ME
N
U
1
/
6
2
/
7
3/
8
4
/9
5/
1
0
S
H
IF
T
MO
DE
TU
NI
N
G V
OL
I
NF
O S
T
/ M
O
1
5
8
6
7
3
4
2
1. Bouton
Appuyez pour allumer sur l'appareil ou le
mettre en veille.
2. Bouton DIM
Appuyez pour régler le variateur de mise en
marche et du mode veille.
3. Bouton
Appuyez pour éjecter le CD du tiroir CD.
4. Bouton ENTER
Appuyez pour valider la sélection.
5. Boutons Navigation
▲ haut
▼ bas
◄ retour
► avant
6. Bouton MEMORY
Maintenez enfoncé pour stocker la station
présélectionnée.
Appuyez pour rappeler la station
présélectionnée.
7. Bouton MENU
Appuyez pour afficher ou quitter l'écran du
menu.
8. Boutons PRÉSÉLECTIONNÉS 1/6, 2/7,
3/8, 4/9, 5/10 et bouton SHIFT
Maintenez l'un de ces boutons enfoncé
pour stocker une station
présélectionnée 1, 2, 3, 4 ou 5.
Appuyez sur un des boutons
PRÉSÉLECTIONNÉ pour rappeler la
station présélectionnée 1, 2, 3, 4 ou 5.
Appuyez d'abord sur le bo uton SHIFT
puis maintenez le bouton
PRESELECTIONNE enfoncé pour
stocker les stations présélectionnées
6, 7, 8, 9 ou 10.
Appuyez d'abord sur le bouton SHIFT,
et
puis appuyez sur les boutons
PRESELECTIONNE 1/5, 2/6, 3/7 et
4/8
pour rappelerr la station
présélectionnée 6, 7, 8, 9 ou 10.
Page 35

10
D
I
M
E
N
T
E
R
M
E
M
O
R
Y
M
E
N
U
1
/
6
2
/
7
3
/
8
4
/
9
5
/
1
0
S
H
I
F
T
M
O
D
E
T
U
N
I
N
G
V
O
L
I
N
F
O
S
T/
M
O
11
10
9
13
16
15
12
14
Méthode de remplacement des piles :
1. Ouvrez le couvercle du compartiment à piles
en poussant avec le pouce vers le bas sur le
renfoncement à l'arrière de votre
télécommande.
2. Installez deux nouvelles piles AAA en
respectant les marquages de direction à
l'intérieur du compartiment à piles.
Note : n'inversez pas les piles et ne
mélangez pas les types de pile, de plus
ne mélangez pas les piles usagées
avec des piles neuves. Lorsque vous
mettez vos piles usagées au rebut,
merci d'être éco-responsable.
3. Remettez le couvercle du compartiment à
piles.
9. Boutons
, , , et
: appuyez pour mettre en pause ou lire
la piste actuelle en mode Bluetooth et CD.
: appuyez pour passer à la piste
précédente en mode Bluetooth et CD ;
maintenez enfoncé pour procéder à un
retour rapide de la piste en cours de lecture
en mode Bluetooth.
: appuyez pour passer à la piste
suivante en mode Bluetooth et CD ;
maintenez enfoncé pour procéder à une
avance rapide de la piste en cours de
lecture en mode Bluetooth.
: appuyez pour arrêter la musique en
mode CD.
: maintenez enfoncé pour effectuer un
retour rapide de la piste en cours de lecture
en mode CD.
: maintenez enfoncé pour effectuer une
avance rapide de la piste en cours de
lecture en mode CD.
10. Bouton MODE
Appuyez pour basculer entre les modes
DAB, FM, Bluetooth, CD et AUX.
11. Boutons TUNING +, -
Appuyez pour parcourir la liste des
stations en mode DAB.
Appuyez pour effectuer un balayage
manuel des fréquences en mode FM.
Maintenez enfoncé pour effectuer un
balayage automatique des f réquenc es
en mode FM.
12. Boutons VOLUME +, Appuyez pour régler le volume.
13. Bouton
Appuyez pour régler 'A VEC SOURDINE' ou
'SANS SOURDINE' .
14. Bouton INFO
Appuyez pour visualiser les informations de
la station.
15. Bouton ST/MO
Appuyez pour changer l’audio sur stéréo ou
mono en mode DAB et FM.
16. Bouton SCAN / Pair-List
Appuyez pour effectuer un balayage
automatique des stations en mode
DAB et FM.
Appuyez po ur sélect ion ner l'apparei l
Bluetooth en mode Bluetooth.
Maintene z enfonc é pour dé c onnec ter
la connexion Bluetooth en mode
Bluetooth.
Page 36

11
Mode DAB
Lorsque vous allumez la radio, elle recherchera et mémorisera automatiquement toutes les stations
disponibles. Vous devez procéder à un balayage complet s upplémentaire pour vous ass urer que
toutes les stations sont trouvées et stockées. Il est également recommandé d'effectuer un nouveau
balayage après quelques mois afin de trouver tout nouveau DAB / DAB + pouvant avoir commencé
la diffusion après l'achat de votre radio DAB.
1. Pour la première utilisation, votre radio effectuera un balayage complet et stockera la liste des
stations en mémoire.
2. Une fois le balayage terminé, les stations DAB/DAB+ seront affichées dans l'ordre
alphanumérique. La première station de la liste sera sélectionnée.
Note: a. Les stations DAB/DAB+ seront affichées et stockées dans l'ordre
alphanumérique.
b. Si aucun signal DAB / DAB + n'est trouvé, il pourrait être nécessaire de déplacer
votre radio.
Liste des stations
Cette fonction vous permet de sélectionner une station de la liste des stations disponibles.
1. Durant la lecture d'un programme, tournez le bouton TUNE pour afficher la liste des stations.
2. Autrement, appuyez sur le bouton MENU, puis tournez le bouton TUNE pour sélectionner DAB
Menu, appuyez sur le bouton ENTER pour valider.
3. Tournez le bouton TUNE pour sélectionner Station List et puis appuyez sur le bouton ENTER
pour valider.
4. Tournez le bouton TUNE pour parcourir la liste des stations et puis appuyez sur le bouton
ENTER pour valider. La station sélectionnée sera diffusée.
Service secondaire
Vous pouvez voir un symbole ">>" après le nom de la station, cela signifie que des services
secondaires sont disponibles pour cette station. Ces services secondaires contiennent des services
supplémentaires relatifs à la station pr em ière. Par ex. une s tation de s port pe ut voul oir ajou ter des
commentaires supplémentaires. Les services secondaires sont insérés directement après la station
première (un symbole "<<" se trouve avant le nom de la station) dans la liste des stations.
Pour sélectionner la station secondaire, t ournez le bou ton TUNE jusqu'à ce que vous trouvie z le
service secondaire voulu, puis appuyez sur le bouton ENTER pour le sélectionner.
Lorsque le service secondaire est terminé, l'appareil reviendra automatiquement à la station
première.
Page 37

12
Ordre de station
Vous pouvez choisir d'afficher les stations dans un ordre différent.
1. Appuyez sur le bouton MENU, puis tournez le bouton TUNE pour sélectionner DAB Menu,
appuyez sur le bouton ENTER pour valid er.
2. Tournez le bouton TUNE pour sélectionner Station Order et puis appuyez sur le bouton
ENTER pour valider.
3. Tournez le bouton TUNE pour sélectionner 'Alphanumérique' ou 'Ensemble', et puis appuyez
sur le bouton ENTER pour valider l'option sélectionnée.
Alphanumérique
Affiche toutes les stations dans l’ordre alphanumérique.
Ensemble
Énumère les stations en cours de diffusion avant les stations
inactives.
Balayage total
Cette fonction permet à votre radio d'effectuer un balayage de toutes les stations disponibles.
1. Appuyez sur le bouton MENU, et puis tournez le bouton TUNE pour sélectionner DAB Menu,
appuyez sur le bouton ENTER pour valider.
2. Tournez le bouton TUNE pour sélectionner Full Scan et appuyez sur le bouton ENTER pour
valider.
Syntonisation manuelle
1. Appuyez sur le bouton MENU, et puis tournez le bouton TUNE pour sélectionner DAB Menu,
appuyez sur le bouton ENTER pour valid er.
2. Tournez le bouton TUNE pour sélectionner Manual Tune et appuyez sur le bouton ENTER
pour valider. L'écran affichera le numéro du canal ainsi que la fréquence.
3. Tournez le bouton TUNE pour parcourir les canaux et puis appuyez sur le bouton ENTER pour
sélectionner le canal actuel.
Note: S'il existe un multiplex cor respondant à ce ca nal et à cette fréq uence, alors l'écra n afficher a un
indicateur de syntonisation avec la puissance du signal et le nom multiplex après quelques
secondes.
4. Appuyez sur le bouton MENU pour quitter la syntonisation manuelle.
DRC valeur (Commande de plage dynamique)
Vous pouvez régler le nivveau de compression pour éliminer les différences dans la plage
dynamique ou le niveau du son entre les stations de radio.
Note: le réglage de DRC sur arrêt (off) indique une absence de compression ; un réglage de DRC sur
faible (low) indiqu e une faib le compression; un réglag e de DRC sur élevé (high) indique une compr ession
maximale.
Page 38

13
1. Appuyez sur le bouton MENU, et puis tournez le bouton TUNE pour sélectionner DAB Menu,
appuyez sur le bouton ENTER pour valid er.
2. Tournez le bouton TUNE pour sélectionner DRC et puis appuyez sur le bouton ENTER pour
valider.
3. T ournez le bouton TUNE pour sélectionner 'DRC High', 'DRC Low' ou 'DRC Off' et puis appuyez
sur le bouton ENTER pour valider.
Trier
Vous pouvez éliminer toutes les stations indisponibles de la liste des stations.
1. Appuyez sur le bouton MENU, et puis tournez le bouton TUNE pour sélectionner DAB Menu,
appuyez sur le bouton ENTER pour valid er.
2. Tournez le bouton TUNE pour sélectionner Prune et puis appuyez sur le bouton ENTER pour
valider.
3. T ournez le bouton TUNE pour sélectionner ‘YES’ et puis ap puyez su r le bout on ENTER pour
valider.
Voir les informations d'une station
DAB/DAB+ diffusent des informations supplémentaires . Appuyez plusieurs fois sur le bouton INFO
et l'écran affichera l’infor m ation par texte défilant, t ype de pro gram m e, ensem ble, date, fréquenc e,
taux en bauds, Codec et puissance de signal.
Affichage de la puissance du signal
Lorsque vous sélectionnez puissance du signal, une barre de signal avec la puissance de la station
actuelle s'affiche sur l'écran.
L'indicateur sur la barre de signal indique le
niveau minimum de signal acceptable
Note : Les stations dont le signal est inférieur
au niveau de signal minimum peuvent ne pas
fournir un flux audio constant.
Stockages des stations présélectionnées
Votre radio peut stocker jusqu'à 10 de vos stations DAB/DAB+ préférées en stations
présélectionnées. Cela vous permettra d'accéder rapidement et simplement à vos stations
préférées.
1. Durant la diffusion de votre station préférée, maintene z l'un des boutons
PRÉSÉLECTIONNÉS 1/5, 2/6, 3/7, 4/8 enfoncé sur l'appareil ou les boutons
PRÉSÉLECTIONNÉS 1/6, 2/7, 3/8, 4/9, 5/10 sur la télécommande jusqu'à ce que l'écran
affiche ‘Preset # stored’. (*# indique 1, 2, 3, 4 ou 5)
Niveau minimum du signal
Force du signal
Page 39

14
2. Appuyez d'abord sur SHIFT, puis maintenez l'un des boutons présélectionnés 1/5, 2/6, 3/7,
4/8 enfoncé sur l'appareil ou des boutons PRÉSÉLECTIONNÉS 1/6, 2/7, 3/8, 4/9, 5/10 sur la
télécommande jusqu'à ce que l'écran affiche ‘Preset # stored’. (*# indique 6, 7, 8, 9 ou 10)
3. Autrement, maintenez le bouton MEMORY enfoncé sur la télécommande jusqu'à ce que
l'écran affiche ‘Preset Store <1: (Empty)>’. Tournez le bouton TUNE de l'appareil ou les
boutons directionnels ▲ ou ▼ de la télécommande pour sélectionner parmi les numéros
présélectionnés 1-10. Appuyez sur le bouton ENTER de l'appareil et de la télécommande pour
valider. L'écran affichera ‘Preset # stored’.
Rappel des stations présélectionnées
1. Appuyez sur l'un des boutons PRÉSÉLECTIONNÉS 1/5, 2/6, 3/7, 4/8 sur l'appareil ou sur les
boutons PRÉSÉLECTIONNÉS 1/6, 2/7, 3/8, 4/9, 5/10 de la télécommande, la station
présélectionnée (1, 2, 3, 4 ou 5) sera diffusée.
2. Appuyez d'abord sur le bouton SHIFT, puis appuyez sur l'un des boutons
PRÉSÉLECTIONNÉS 1/5, 2/6, 3/7, 4/8 sur l'appareil ou sur l'un des boutons
PRÉSÉLECTIONNÉS 1/6, 2/7, 3/8, 4/9, 5/10 sur la télécommande, la station présélectionnée
(6, 7, 8, 9 ou 10) sera diffusée.
3. Autrement, appuyez sur le bouton MEMORY sur la télécommande pour afficher ‘Preset Recall’.
Tournez le bouton TUNE sur l'appareil ou les boutons directionnels ▲ ou ▼ de la
télécommande pour effectuer une sélection parmi les stations présélectionnées, et puis
appuyez sur le bouton ENTER à la fois sur l'appareil et la télécommande pour valider la station
que vous voulez diffuser.
Page 40

15
Mode FM
Sélection du mode FM
1. Appuyez plusieurs fois sur le bouton MODE pour sélectionner le mode FM.
2. À la première utilisation, l'appareil commence au début de la plage de fréquences FM (87,50
MHz). Ou il diffusera la dernière station FM que vous avez écouté.
3. Pour changer manuellement la fréquence FM, assurez-vous qu'aucun autre ordre/réglage
du système ne soit en cours, tournez le bouton TUNE pour changer la fréquence par incrément
de 0.05MHz.
4. Pour effectuer un balayage automatique lorsque la fréquence FM s'affiche, tournez le
bouton TUNE dans le sens des aiguilles d'une montre ou dans le sens inverse, et puis appuyez
sur le bouton SCAN, votre radio avancera ou reviendra en arrière jusqu'à ce qu'elle trouve la
prochaine station disponible.
Option de recherche
Par défaut, la recherche FM s'arrête sur toute station disponible. Cela peut résulter
en un faible rapport de signal sur bruit (sifflement) ds stations à réception faible.
1. Pour changer les options de recherche pour s'arrêter uniquement sur les stations avec une
puissance de signal adéquat, appuyez sur le bouton MENU et tournez ensuite le bouton TUNE
pour sélectionner FM Menu appuyez sur le bouton ENTER pour valider.
2. Tournez le bouton TUNE pour sélectionner Scan sett i n g, et puis appuyez sur le bouton
ENTER pour valider.
3. Tournez le bouton TUNE pour parcourir les 'Stations fortes uniquement' et appuyez sur le
bouton ENTER pour valider.
Réglage sonore
Par défaut, toutes les stations stéréo sont reproduites en stéréo. Pour les stations à réception faible,
un rapport signal sur bruit pauvre (sifflement) est obtenu.
1. Pour diffuser les stations faibles en mono, appuyez sur le bouton MENU et puis tournez le
bouton TUNE pour sélectionner FM Menu, appuyez sur le bouton ENTER po ur valid er .
2. Tournez le bouton TUNE pour sélectionner Audio setting, et puis appuyez sur le bouton
ENTER pour valider.
3. Tournez le bouton TUNE pour parcourir ‘Mono forcé’ et puis appuyez sur le bouton ENTER
pour valider.
Visualisation des informations de station
Les stations FM diffusent des informations supplémentaires . Appuyez plusieurs fois sur le bouton
INFO. L’écran affichera l'information par texte radio, type de programme, date et nom de
programme.
Page 41

16
Stocker les stations présélectionnées
Votre radio peut stocker jusqu'à 10 de vos stations FM préférées en stations présélectionnées. Cela
vous permettra d'accéder rapidement et simplement à vos stations préférées.
1. Lorsque votre station préférée est diffusée, maintenez l'un des boutons PRÉSÉLECTIONNÉS
1/5, 2/6, 3/7, 4/8 enfoncé de l'appareil ou les boutons PRÉSÉLECTIONNÉS 1/6, 2/7, 3/8, 4/9,
5/10 sur la télécommande jusqu'à ce que l'écran affiche ‘Preset # stored’. (*# indique 1, 2, 3, 4
ou 5)
2. Appuyez d'abord sur SHIFT, puis maintenez l'un des boutons présélectionnés 1/5, 2/6, 3/7,
4/8 enfoncé sur l'appareil ou des boutons PRÉSÉLECTIONNÉS 1/6, 2/7, 3/8, 4/9, 5/10 sur la
télécommande jusqu'à ce que l'écran affiche ‘Preset # stored’. (*# indique 6, 7, 8, 9 ou 10)
3. Autrement, maintenez le bouton MEMORY enfoncé sur la télécommande jusqu'à ce que
l'écran affiche ‘Preset Store <1: (Empty)>’. Tournez le bouton TUNE de l'appareil ou les
boutons directionnels ▲ ou ▼ sur la télécommande pour sélectionner parmi les numéros
présélectionnés 1-10. Appuyez sur le bouton ENTER sur l'appareil et la télécommande pour
valider. L'écran affichera ‘Preset # stored’.
Rappel des stations présélectionnées
1. Appuyez sur l'un des boutons PRÉSÉLECTIONNÉS 1/5, 2/6, 3/7, 4/8 sur l'appareil ou sur les
boutons PRÉSÉLECTIONNÉS 1/6, 2/7, 3/8, 4/9, 5/10 de la télécommande, la station
présélectionnée (1, 2, 3, 4 ou 5) sera diffusée.
2. Appuyez d'abord sur le bouton SHIFT, puis appuyez sur l'un des boutons
PRÉSÉLECTIONNÉS 1/5, 2/6, 3/7, 4/8 sur l'appareil ou sur l'un des boutons
PRÉSÉLECTIONNÉS 1/6, 2/7, 3/8, 4/9, 5/10 sur la télécommande, la station présélectionnée
(6, 7, 8, 9 ou 10) sera diffusée.
3. Autrement, appuyez sur le bouton MEMORY de la télécommande pour afficher ‘Preset Recall’.
Tournez le bouton TUNE sur l'appareil ou les boutons directionnels ▲ ou ▼ de la
télécommande pour effectuer une sélection parmi les stations présélectionnées, et puis
appuyez sur le bouton ENTER à la fois sur l'appareil et la télécommande pour valider la station
que vous voulez diffuser.
Page 42

17
Mode Bluetooth
Appariez l'appareil à un dispositif Bluetooth pour écouter de la musique :
1. Appuyez sur le bouton MODE plusieurs fois pour sélectionner le mode Bluetooth.
2. L'écran affichera 'Bluetooth à découvrir'.
3. Activez votre appareil Bluetooth et sélectionnez le mode de recherche.
4. “ALIO BAZE” apparaitra sur votre appareil Bluetooth.
5. Sélectionnez “ALIO BAZE” et saisissez le mot de passe “0000” si nécessaire.
6. ‘BT connecté: Votre dispositif Bluetooth s'affichera sur l'écran lorsque la connexion est réussie.
7. Durant la lecture d'une piste vous pouvez :
a. Appuyer sur le bouton
pour passer à la piste précédente, maintenir le bouton
enfoncé pour effectuer un retour rapide de la piste en cours de lecture.
b. Appuyer sur le bouton
pour mettre en pause ou lire la piste actuelle.
c. Appuyer sur le bouton
pour passer à la piste suivante, maintenir le bouton
enfoncé pour procéder à une avance rapide de la piste en cours de lecture.
8. Pour déconnecter la connexion Blueto oth ac tue ll e, m ainten e z le bouton SCAN enfoncé
pendant 3 secondes.
9. Pour connecter un autre dispositif apparié Bluetooth, appuyez plusieurs fois sur le bouton
SCAN pour sélectionner l'appareil Bluetooth que vous souhaitez connecter et puis appuyez sur
le bouton ENTER pour valider la connexion.
Note: l'appareil s’éteindra automatiquement après 10 minutes si le dispositif Bluetooth est
déconnecté, éteint, ou si le volume est trop proche de la sourdine.
Page 43

18
Mode CD
Insérer un CD dans le tiroir CD
Pour lire un CD, veuillez insérer un CD audio. Certains CD peuvent être incompatibles.
Insérez un CD Audio dans le tiroir CD lorsqu e l'appareil est sur u n des modes, l'a ppareil affichera
'READING' (lecture), attendez quelques secondes.
Note: sélectionner le mode CD en appuyant plusieurs fois sur le bouton MODE est uniquement
possible lorsqu'un CD est installé dans le tiroir CD.
Lire un programme CD
1. Pendant la lecture d'un CD Audio, l'écran montre le numéro de la piste et le temps écoulé.
2. Durant la lecture d'une piste, vous pouvez :
a. Appuyer sur le bouton
pour mettre en pause ou lire la piste actuelle.
b. Appuyer sur le bouton
pour passer à la piste précédente.
c. Appuyer sur le bouton
pour passer à la piste suivante.
d. Maintenir le bouton
enfoncé pour effectuer un retour rapide de la piste en cours de
lecture.
e. Maintenir le bouton
enfoncé pour effectuer une avance rapide de la piste en cours de
lecture.
f. Appuyer sur le bouton
pour arrêter la musique.
3. En mode ARRET CD , si le disque est un CD audio normal, l'écran affiche le nombre total de
pistes et la durée totale.
Configurer la lecture aléatoire
1. Appuyez sur le bouton MENU, et puis tournez le bouton TUNE pour sélectionner CD :
Aléatoire, appuyez sur le bouton ENTER pour valider..
2. Tournez le bouton TUNE pour sélectionner Off ou On et appuyez sur le bouton ENTER pour
valider votre sélection.
No. de piste
Temps écoulé.
No. total de pistes
La durée totale
Page 44

19
Configurer la lecture répétée
1. Appuyez su r le b out on MENU, et puis tournez le bouton TUNE pour sélectionner CD : Repeat,
appuyez sur le bouton ENTER pour valid er.
2. Tournez le bouton TUNE pour sélectionner Off, One et All, et puis appuyez sur le bouton
ENTER pour valider votre sélection.
Ejecter un CD du tiroir du CD
Appuyez sur le bouton , l'écran affiche ‘OPEN’ (ouvert), le CD peut alors être éjecté du tiroir CD.
Note: l'appareil passera automatiq uement en mode v eille a près 10 m inutes si le CD n'es t pas
lu.
Page 45

20
Mode Aux in
L'entrée auxiliaire AUX IN permet une connexion rapide et simple à un lecteur MP3 ou à d'autres
sources audio externes.
Note: sélectionner le mode AUX en appuyant plusieurs fois sur le bouton MODE n’est
uniquement disponible lorsqu'un câble audio est branché à la prise AUX IN.
1. Avant de brancher l'appareil à la prise d'alimentation principale, utilisez un câble audio de 3,5
mm (non fourni) pour connecter votre dispositif audio externe à la prise AUX IN sur l'arrière de
l'appareil.
2. Branchez le transformateur électrique à la prise d'alimentation secteur, appuyez sur le bouton
POWER pour allumer l'appareil.
3. L'appareil passera automatiquement au mode AUX.
4. En mode d'entrée auxiliaire, votre dispositif audio peut fonctionner pour les fonctions de
lecture.
5. Pour obtenir un niveau de volume optimum, réglez le niveau de volume de sortie sur le
dispositif audio comme recommandé.
Note: l'appareil se mettra automatiquement en mode veille après 10 minutes si l'appareil
source est débranché, éteint, ou si le volume est trop proche de la sourdine.
Page 46

21
Fonctionnement général
Réglage de l'alarme
Votre radio offre une double alarme. Pour régler la fonction d'alarme, réglez d'abord l'heure.
1. Appuyez plusieurs fois sur le bouton ALARM de l'appareil pour régler l'alarme.
2. T ournez le bouton TUNE pour sélectionner ‘Alarm 1’ ou ‘Alarm 2’ et puis appuyez sur le bouton
ENTER pour valider.
3. Tournez le bouton TUNE pour choisir les options, et puis appuyez sur le bouton ENTER pour
valider les réglages.
Régler
l'alarme :
Larche(On) ou Arrêt (Off).
Régler l'heure :
06:00 (configuration manuelle de l'heure d'alarme)
Régler la
source :
DAB, FM, Ronfleur ou CD (le ronfleur retentira si aucun CD n'est dans
l'appareil à l'heure de l'alarme)
Régler la
répétition :
Daily (T ous les jours), Once (Une fois), Weekends (Fin de semaine) ou
weekdays (Jour de la semaine)
Régler le
volume :
tournez le bouton TUNE pour régler le volume de l'alarme
4. Le réglage de l'alarme est réussi. ou apparaitra sur l'écran.
5. Pour arrêter temporairement l'alarme, appuyez sur le bouton SNOOZE de l’appareil pour
activer la veille d'alarme. La durée de veille d'alarme sera affichée sur l'écran.
6. Pour éteindre l'alarme, appuyez sur le bouton POWER lorsque l'alarme retentit
7. Pour annuler l'alarme, consultez les étapes 1 à 3 pour régler l'alarme sur ‘Off’.
Régler la fonction veille
Cette fonction permet à votre appareil de passer automatiquement en mode veille après une durée
de veille spécifiée.
1. Appuyez plusieurs fois sur le bouton SLEEP de l'appareil pour sélectionner Sleep off, 15, 30,
45, 60 ou 90 mins, appuyez sur le bouton ENTER pour valider. L'icône de veille
apparait
sur l'écran.
2. Pour arrêter la fonction de veuille lorsque le minuteur est en marche, recommencez l'étape 1
pour sélectionner 'Sleep off'.
Régler la date/l'heure
1. Appuyez sur le bouton MENU et puis tournez le bouton TUNE pour sélectionner Régler Date/
Heure (Date/Time Set), appuyez sur le bouton ENTER pour valider.
2. Tournez le bouton TUNE pour choisir les options, et puis appuyez sur le bouton ENTER pour
valider les réglages.
Auto-correction
DAB
Mettre à jour la date et l'heure à partir du mode DAB
Manuel :
Réglage manuel à la fois de l'heure et de la date
3. Réglez ensuite l'heure en fonction de vos préférences.
Page 47

22
Régler le format de l'heure
1. Appuyez sur le bouton MENU, et puis tournez le bouton TUNE pour sélectionner Time Mode,
appuyez sur le bouton ENTER pour valid er.
2. Tournez le bouton TUNE pour sélectionner 24 Hours ou 12 Hours, et puis appuyez sur le
bouton ENTER pour valider.
Régler la durée de rappel d'alarme
Cette fonction vous permet de configurer le rappel d'alarme lorsque l'alarme retentit.
1. Appuyez sur le bouton MENU, et puis tournez le bouton TUNE pour sélectionner Snooze
Adjust, appuyez sur le bouton ENTER pour valider.
2. Tournez le bouton TUNE pour configurer la durée de rappel d'alarme entre 1-9 mins, et puis
appuyez sur le bouton ENTER pour valid er.
Régler la luminosité
1. Appuyez sur le bouton MENU, et puis tournez le bouton TUNE pour sélectionner Brightness,
appuyez sur le bouton ENTER pour valid er.
2. Tournez le bouton TUNE pour sélectionner Standby Mode ou Normal Mode, et puis appuyez
sur le bouton ENTER pour valider.
3. Tournez le bouton TUNE pour sélectionner entre Level 1- Level 5, et puis appuyez sur le
bouton ENTER pour confirmer.
Régler l'égalisateur
Cette fonction vous permet de choisir un profil d'égalisation du son. Chacun des réglages
d'égalisation changera la tonalité du son de votre radio lorsqu'il est sélectionné.
1. Appuyez sur le bouton MENU et puis tournez le bouto n TUNE pour sélectionner Set EQ,
appuyez sur le bouton ENTER pour valid er.
2. Tournez le bouton TUNE pour sélectionner Normal, Rock, Pop, Jazz et M y E Q, et puis
appuyez sur le bouton ENTER pour valid er.
3. Pour configurer My EQ, sélectionnez My EQ et puis appuyez sur le bouton ENTER pour valider.
Tournez le bouton TUNE pour sélectionner Treble et Bass, et puis appuyez sur le bouton
ENTER pour valider. T ournez le bouton TUNE pour régler la valeur des basses et des aigües et
puis appuyez sur le bouton ENTER pour valider.
Régler le niveau sonore
1. Appuyez sur le bouton MENU et puis tournez le bouton TUNE pour sélectionner Loudness,
appuyez sur le bouton ENTER pour valid er.
2. Tournez le bouton TUNE pour sélectionner OFF ou ON, et puis appuyez sur le bouton ENTER
pour valider.
Page 48

23
Retour aux paramètres d'usine
Le retour aux paramètres d'usine ré initialisera tous les paramètr es par défaut, l'heure/date et les
présélections seront perdues.
1. Appuyez sur le bouton MENU , et puis tournez le bouton TUNE pour sélectionner Factory
Reset, appuyez sur le bouton ENTER pour valider.
2. Tournez le bouton TUNE pour sélectionner YES ou NO, et puis appuyez sur le bouton ENTER
pour valider.
3. Si vous sélectionnez YES, l'appareil sera réinitialisé et il redémarrera.
Information du micro-logiciel
1. Appuyez sur le bouton MENU , et puis tournez le bouton TUNE pour sélectionner Firmware,
appuyez sur le bouton ENTER pour valider.
2. Tournez le bouton TUNE pour sélectionner DAB ou MCU, et puis appuyez sur le bouton
ENTER pour valider.
3. La version du micro-logiciel apparaît sur l’écran.
Page 49

24
Caractéristiques techniques
Articles Caractéristiques techniques
Description :
Radio DAB/DAB+/FM avec lecteur CD et Bluetooth
Plage de fréquence :
FM : 87.5-108MHz
DAB/DAB+ : 174.928 – 239.200 MHz
Alimentation requise :
Entrée CA 110-240Vca, 50-60 Hz
Sortie CC 12 V, 2 A
Puissance de sortie
audio :
>5 Watt RMS@1% THD
Consommation d'énergie :
12 W (Max)
Dimension (L x H x P) :
210 mm x 130 mm x 210 mm
Ce symbole sur le produit ou da ns les instruc tions ind ique
que votre équipement électrique et électro nique doit être
éliminé, en fin de vie utile, séparément des ordures
ménagères. Des systèmes de collecte séparées de
recyclage sont en place en UE.
Pour plus d'informations, veuillez contacter vos autorités locales ou votre revendeur auprès
duquel vous avez acheté ce produit.
Page 50

ALIO BAZE
DAB/DAB+/UKW-Radio mit CD-Player und Bluetooth
Bedienungsanleitung
Page 51

2
Wichtige Sicherheitshinweise
1. Lesen Sie diese Anweisungen.
2. Bewahren Sie diese
Bedienungsanleitung auf.
3. Beachten Sie alle Warnungen.
4. Befolgen Sie alle Anweisungen!
5. Verwenden Sie das Gerät nicht in der
Nähe von Wasser.
6. Reinigen Sie das Gerät nur mit einem
trockenen Tuch.
WARNHINWEIS: SETZEN SIE DAS GERÄT NICHT REGEN ODER FEUCHTIGKEIT AUS, UM
DAS RISIKO EINES BRANDS ODER EINES ELEKTRISCHEN SCHLAGS ZU VERMEIDEN.
Um die Gefahr von elektrischem Schlag, Feuer usw. zu vermeiden:
1. Das Gerät darf nicht in der Nähe von Wärmequellen, wie Radiatoren, Heizkörpern, Herden
oder anderen Geräten (inklusive Verstärkern) aufgestellt werden, die Hitze abgeben.
2. Blockieren Sie nicht die Lüftungsöffnungen des Geräts.
3. Das Gerät darf keinen Tropfen oder Spritzern ausgesetzt werden und es dürfen keine
flüssigkeitsgefüllten Objek te, wie Vasen, das Gerät gestellt werden.
4. Stellen Sie keine schweren Gegenstände auf das Gerät, und treten Sie nicht darauf. Der
Gegenstand könnte herunterfallen und das Gerät beschädigen.
5. Lesen Sie bitte die Typenschilder für den Stromanschluss und andere Sicherheitsinformation
auf der Rückseite des Geräts.
6. Dieses Gerät ist nur für die Verwendung mit der vorgesehenen Stromversorgung gedacht.
7. Schützen Sie das Netzstromkabel vor dem Darauftreten oder besonders an den Steckern dem
Durchstechen, wobei die Kabel in der Nähe der Stecker oder am Ausgang besonders beachtet
werden sollten.
8. Ziehen Sie niemals am Kabel, um den Netzstecker herauszuziehen. Fassen Sie immer am
Stecker an und ziehen Sie ihn gerade aus der Netzsteckdose.
9. Reparieren oder ersetzen Sie sofort alle Elektrokabel, die durchgescheuert oder a nder we it ig
beschädigt sind. Verwenden Sie kein Kabel, das Risse oder Abriebschäden entlang seiner
Länge, am Stecker oder am Anschlussende aufweist.
10. Um Brände und Stromschlag zu vermeiden, verwenden Sie diesen Stecker nur mit einem
Verlängerungskabel oder einer anderen Steckdose, bei der die Erdungskontakte vollständig
eingeführt werden können, um ein Freiliegen der Kontakte zu verhindern.
11. Zur Vermeidung von Feuer oder elektrischem Schlag setzen Sie dieses Gerät nicht Regen
oder Feuchtigkeit aus.
12. Trennen Sie zum zusätzlichen Schutz das Gerät bei Gewitter oder Regentagen vom
Stromnetz, oder wenn das Gerät für längere Zeit nicht verwendet wird. Dadur ch w ird eine
Beschädigung des Geräts durch Blitzsc hlag und Ü ber s pannung verh ind er t.
13. Versuchen Sie nicht, irgendwelche Reparaturarbeiten selbst durchzuführen. Durch Öffnen
oder Entfernen des Gehäuses können Sie gefährlichen Spannungen oder anderen Gefahren
ausgesetzt sein. Alle Reparaturarbeiten müssen von qualifiziertem Fachpersonal durchgeführt
Page 52

3
werden.
14. Die Batterie der Fernbedienung darf keiner exzessiven Hitze, wie Sonnenschein, Feuer oder
Ähnlichem ausgesetzt werden.
15. Es besteht Explosionsgefahr, wenn die Batterie durch eine falsche ersetzt wird. Nur durch
denselben oder gleichwertigen Typ ersetzen.
16. Lassen Sie das Gerät im Interesse der Sicherheit und um unnötigen Energieverbrauch zu
vermeiden nie eingeschalte t, wen n es für längere Zeit nicht gen ut zt wir d, z. B. über Nacht,
während des Urlaubs oder wenn Sie das Haus ver las sen. Schal ten S ie es aus und ziehen Si e
den Netzstecker aus der Steckdose.
Page 53

4
Inhaltsverzeichnis
Wichtige Sicherheitshinweise ............................................................................................................ 2
Inhaltsverzeichnis
.............................................................................................................................. 4
Erste Schritte
..................................................................................................................................... 6
Obere Geräteansicht
.................................................................................................................. 7
Vordere Geräteansicht
............................................................................................................... 8
Hintere Geräteansicht
................................................................................................................ 9
Überblick über die Fernbedienung
........................................................................................... 10
DAB-Modus
..................................................................................................................................... 12
Senderliste
............................................................................................................................... 12
Zusatzdienste
........................................................................................................................... 12
Reihenfolge der Sender
........................................................................................................... 13
Vollständiger Suchlauf
.............................................................................................................. 13
Manuelle Sendersuche
............................................................................................................ 13
DRC-Wert (Dynamic Range Control, Regelung des Dynamikbereichs)
.................................. 13
Prune (Reduzieren)
.................................................................................................................. 14
Senderinformationen anzeigen
................................................................................................ 14
Speicherung der voreingestellten Sender
................................................................................ 14
Aufrufen der voreingestellten Sender
...................................................................................... 15
UKW-Modus
.................................................................................................................................... 15
UKW-Modus auswählen
........................................................................................................... 15
Einstellung des Suchlaufs
........................................................................................................ 15
Audio-Einstellung
..................................................................................................................... 16
Senderinformationen anzeigen
................................................................................................ 16
Speicherung der voreingestellten Sender
................................................................................ 16
Aufrufen der voreingestellten Sender
...................................................................................... 16
Bluetooth-Modus
............................................................................................................................. 17
CD-Modus
....................................................................................................................................... 17
CD in das CD-Fach einlegen
................................................................................................... 17
CD-Programm wiedergeben
.................................................................................................... 18
Einstellung der Zufallswiedergabe
........................................................................................... 18
Einstellung der Wiedergabe-Wiederholung
............................................................................. 18
CD aus dem CD-Fach auswerfen
............................................................................................ 18
AUX IN-Modus
................................................................................................................................. 19
Allgemeine Bedienung
.................................................................................................................... 19
Einstellen eines Alarms
............................................................................................................ 19
Schlafzeit einstellen
................................................................................................................. 20
Einstellung von Datum und Uhrzeit
.......................................................................................... 20
Zeitformat einstellen
................................................................................................................. 20
Schlummerzeit einstellen
......................................................................................................... 20
Helligkeit einstellen
.................................................................................................................. 21
Entzerrung (EQ) einstellen
....................................................................................................... 21
Page 54

5
Lautstärke einstellen ................................................................................................................ 21
Werksseitiges Zurücksetzen
.................................................................................................... 21
Firmware-Informationen
........................................................................................................... 21
Technische Daten
............................................................................................................................ 22
Page 55

6
Erste Schritte
Packen Sie Ihr Radi o vors i cht igaus d em Karton aus. Vielleicht möchten Sie die Verpackung für die
spätere Verwendung aufheben.
Packungsinhalt
• Hauptgerät
• Netzadapter
• Fernbedienung
• Bedienungsanleitung
Aufstellen Ihres Radios
Stellen Sie das Radio auf eine flache/stabile Oberfläche, die keinen Vibrationen ausgesetzt ist.
Vermeiden Sie, das Radio an folgenden Orten aufzustellen:
• Wo das Radio direkter Sonneneinstrahlung ausgesetzt ist.
• Wo sich das Radio in der Nähe von Wärmequell en bef i ndet.
• Wo die Luftfeuchtigkeit hoch ist und die Belüftungsmöglichkeiten unzureichend sind.
• Wo es staubig ist.
• Wo es feucht ist oder die Möglichkeit besteht, dass Wasser auf das Gerät tropft oder
spritzt.
Einstellen der Antenne
Ziehen Sie die Anten ne heraus, um sicher zustell en, da s s Sie den bes t en Empfang in beiden DABund UKW-Radio-Modi erhalten. Für den besten Signalempfang kann es erforderlich sein, die
Position des Radios und/oder der Antenne zu verändern.
Ein/Ausschalten des Geräts
Verbinden Sie den Stecker am Ende des Netza dapters mit der DC IN-Buchs e auf der Rückseite
des Geräts. Stecken Sie dann den Netzadapter in die Netzsteckdose. Drücken Sie die Taste
POWER, um das G erät einzuschalten oder in den Standby-Modus zu versetze n. Um das Gerät
vollständig auszuschalten, ziehen Sie den Netzadapter aus der Netzsteckdose.
Lautstärkeregelung
Passen Sie die Radiolautstärke durch Drehen des VOLUME-Knopfs an.
Page 56

7
Obere Geräteansicht
1. ALARM-Taste
Diese Taste drücken, um den Alarm einzustellen.
2. SENDERSPEICHER-Tasten 1/5, 2/6, 3/7, 4/8
• Drücken und halten Sie eine Taste, um den voreingestellten
Sender 1, 2, 3 oder 4 zu speichern.
• Drücken Sie eine Taste, um den voreingestellten Sender 1, 2,
3 oder 4 aufzurufen.
3. SNOOZE-Taste. Drück
en Sie diese Taste, um die
Schlummer-Funktion zu aktivier e n, wenn der Alarm ertönt.
4. SHIFT-Taste
• Drücken Sie zuerst diese Taste, und dann drücken und halten
Sie eine der SENDERSPEICHER-Tasten 1/5, 2/6, 3/7, 4/8,
um die voreingestellten Sender 5, 6, 7 oder 8 zu speichern.
• Drücken Sie zuerst diese Taste, und dann drücken Sie eine der
SENDERSPEICHER-Tasten 1/5, 2/6, 3/7, 4/8
, um die
voreingestellten Sender 5, 6, 7 oder 8 aufzurufen.
5. SLEEP-Taste
Drücken Sie diese Taste, um die Schlafzeit einzustellen.
6. Lautsprecher
7. DAB/UKW-Antenne
Page 57

8
Vordere Geräteansich t
1
2 4 5 6 8 9 10 12
3
7
1. Display
2. VOLUME-Knopf
Drehen Sie diesen Knopf, um die Lautstärke
einzustellen.
3. CD-Fach
4. POWER-Ta ste
Drücken Sie diese Taste, um das Gerät
einzuschalten oder in den Standby-Modus zu
versetzen.
5. INFO-Ta s t e
Drücken Sie diese Taste, um
Senderinformationen anzuzeigen.
6. SCAN/Pair-List-Ta s t e
• Drücken Sie diese Taste, um automatisch
Stationen im DAB- und FM-Modus zu
suchen.
• Drücken Sie diese Taste, um das
Bluetooth-Gerät im Bluetooth-Modus zu
wählen.
• Drücken und halten Sie die Taste, um die
Bluetooth-Verbindung im Bluetooth-Modus
zu trennen.
7. Fernbedienungssensor
8. MODE-Taste
Drücken Sie diese Taste, um zwischen den
Modi DAB, UKW, Bluetooth, CD und AUX zu
wechseln.
9. MENU-Tast e
Drücken Sie diese Taste, um den
Menübildschirm anzuzeigen oder zu verlassen.
10. ENTER-Ta s t e
Diese Taste zur Bestätigung drücken.
11.
, , , , , und Ta st en
: Drücken Sie diese Taste, um die aktuelle
Wiedergabe eines Titels im Bluetooth- und
CD-Modus anzuhalten oder fortzusetzen.
: Drücken Sie diese Taste, um die
Musikwiedergabe im CD-Modus zu beenden.
: Drücken Sie diese Taste, um zum
vorherigen Titel im Bluetooth- und CD-Modus
zurückzuspringen. Wenn Sie diese Taste
gedrückt halten, wird im Bluetooth-Modus der
aktuelle Titel schnell rückwärts gespult.
: Drücken Sie diese Taste, um zum nächsten
Titel im Bluetooth- und CD-Modus
zurückzuspringen. Wenn Sie diese Taste
gedrückt halten, wird im Bluetooth-Modus der
aktuelle Titel schnell vorwärts gespult.
: Drücken und halten Sie diese Taste, um im
CD-Modus den aktuellen Titel schnell
rückwärts zu spulen.
: Drücken und halten Sie diese Taste, um im
CD-Modus den aktuellen Titel schnell vorwärts
zu spulen.
: Drücken Sie diese Taste, um das CD-Fach zu
öffnen.
12. TUNE-Knopf Drehen Sie diesen Knopf, um die
Optionen zu durchsuchen.
Page 58

9
Hintere Geräteansicht
1
2 3 4
1. DAB/UKW-Antenne
2. SERVICE-Buchsen
Nur für Kundendienstmitarbeiter!
3. AUX IN-Buchse
4. DC IN-Buchse
Page 59

10
Überblick über die Fernbedienung
DIM
ENTER
MEMORY ME NU
1/ 6
2/ 7 3/ 8
4/ 9 5/ 10
SHIF T
MODE
TUNING VOL
IN FO ST/ MO
1
5
8
6
7
3
4
2
1.
Taste
Drücken Sie diese Taste, um das Gerät einzuschalten oder
in den Standby-Modus zu versetzen.
2. DIM-Taste
Drücken Sie diese Taste, um den Dimmer einzuschalten
und in den Standby-Modus zu setzen.
3.
-Taste
Drücken Sie diese Taste, um das CD-Fach zu öffnen.
4. ENTER-Taste
Diese Tast e zur Bestätigu n g drüc k en.
5. Navigationstasten
▲ Aufwärts
▼ Abwärts
◄ Rückwärts
► Vorwärts
6. MEMORY-Taste
Drücken und halten Sie diese Taste, um den
voreingestellten Sender zu speic hern.
Drücken Sie sie, um den gespeicherten voreingestellten
Sender abzurufen
7. MENU-Taste
Drücken Sie diese Taste, um den Menübildschirm
anzuzeigen oder zu verlassen.
8. SENDERSPEICHER-Tasten 1/6, 2/7, 3/8, 4/9, 5/10 und
SHIFT-Taste
Drücken und halten Sie eine der
SENDERSPEICHER-Tasten, um den voreingestellten
Sender 1, 2, 3, 4 oder 5 zu speichern.
Drücken Sie eine der SENDERSPEICHER-Tasten, um
den voreingestellten Sende r 1, 2, 3, 4 oder 5
aufzurufen.
Drüc ken Sie zuerst die SHIFT-Taste, und dann
drücken und halten Sie die
SENDERSPEICHER-Tasten, um den voreingestellten
Sender 6, 7, 8, 9 oder 10 zu speichern.
Drücken Sie zuerst die SHIFT-Taste, und dann die
SENDERSPEICHER-Tasten 1/5, 2/6, 3/7 und 4/8, um
den voreingestellten Sender 6, 7, 8, 9 oder 10
aufzurufen.
Page 60

11
DIM
ENTER
MEMORY ME NU
1/
6
2/ 7 3
/8
4
/9
5
/10
SHIF T
MODE
TUNING
VO
L
IN FO
ST/ MO
11
10
9
13
16
15
12
14
Austauschen der Batterien:
1. Öffnen Sie den Batteriefachdeckel,
indem Sie mit Ihren Daumen die
Aussparung auf der Rückseite der
Fernbedienung nach unten schieben.
2. Legen Sie zwei neue AAA-Batterien
entsprechend der
Richtungsmarkierungen in das
Batteriefach ein.
Hinweis: Leg en Sie kei ne
Batterie falsch herum ein,
mischen Sie keine
unterschiedlichen Batterietypen,
mischen Sie auch nicht alte und
neue Batterien. Beachten Sie
bitte bei der Entsorgung von
alten Batterien den
Umweltschutz.
3. Schließen Sie die
Batteriefachabdeckung.
9. , , , , und Tasten
: Drücken Sie diese Taste, um die aktuelle
Wiedergabe eines Titels im Bluetooth- und
CD-Modus anzuhalten oder fortzusetzen.
: Drücken Sie diese Taste, um zum vorherigen Titel
im Bluetooth- und CD-Mod us zurückzuspringen.
Wenn Sie diese Taste gedrückt halten, wird im
Bluetooth-Modus der aktuelle Titel schnell rückwärts
gespult.
: Drücken Sie diese Taste, um zum nächsten Titel
im Bluetooth- und CD-Mod us zurückzuspringen.
Wenn Sie diese Taste gedrückt halten, wird im
Bluetooth-Modus der aktuelle Titel schnell vorwärts
gespult.
: Drücken Sie diese Taste, um die Musikwiedergabe
im CD-Modus zu beenden.
: Drücken und halten Sie diese Taste, um im
CD-Modus den aktuellen Titel schnell rückwärts zu
spulen.
: Drücken und halten Sie diese Taste, um im
CD-Modus den aktuellen Titel schnell vorwärts zu
spulen.
10. MODE-Taste
Drücken Sie diese Taste, um zwischen den Modi
DAB, UKW, Bluetooth, CD und AUX zu wechseln.
11. TUNING +, --Tasten
Drücken Sie diese Tasten, um die Senderliste im
DAB-Modus zu durchsuchen.
Drücken Sie diese Tasten, um im UWK-Modus
die Frequenz manuell zu suchen.
Drücken und halten Sie diese Taste, um im
UKW-Modus automatisch die Sender zu suchen.
12. VOLUME +, - -Tasten
Drücken Sie diese Tasten zur Regelung der
Lautstärke.
13.
-Taste
Drücken Sie diese Taste, um „STUMM AN“ oder
„STUMM AUS“ einzuschalten.
14. INFO-Taste
Drücken Sie diese Taste, um Senderinformationen
anzuzeigen.
15. ST/MO-Taste
Drücken Sie diese Taste, um im DAB- und
UWK-Modus den Ton zwischen Stereo oder Mono zu
wechseln.
16. SCAN/Pair-List-Taste
Drücken Sie diese Taste, um automatisch
Stationen im DAB- und FM-Modus zu suchen.
Drücken Sie diese Taste, um das
Bluetooth-Gerät im Bluetooth-Modus zu wählen.
Drücken und halten Sie die Taste, um die
Bluetooth-Verbindung im Bluetooth-M odus zu
trennen.
Page 61

12
DAB-Modus
Wenn Sie das Radio einschalten, werden automatisch alle verfügbaren Sender gesucht und
gespeichert. Sie sollten einen zusätzlichen vollständigen Suchlauf durchführen, um sicherzustellen,
dass alle Sender empfangen und g espe ichert werden. Es wird auch em pfohlen, das s Sie alle paar
Monate einen neuen Suc hlauf starten, um alle neuen DAB/DAB +-Sender zu empfangen, die mit
der Ausstrahlung begonnen haben, nachdem Sie Ihr DAB-Radio erworben haben.
1. Bei Erstinbetriebnahme führt Ihr Radio einen vollständigen Suchlauf durch und speichert die
Senderliste.
2. Sobald der Suchlauf abgeschlos sen is t, werd en die DAB/ DA B+ -Se nder in alpha numerischer
Reihenfolge angezeigt. Der erste Sender in der Liste wird ausgewählt.
Hinweis: a. Die DAB/DAB+ -Sender werden in alphabetischer Reihenfolge angezeigt und
gespeichert.
b. Wenn kein DAB/DAB+ -Signal gefunden wird, müssen Sie eventuell Ihr Radio an
einer anderen Stelle aufstellen.
Senderliste
Mit diese Funktion können Sie einen Sender aus der verfügbaren Senderliste auswählen.
1. Wenn Sie beim Abspielen eines Programms am TUNE-Knopf drehen, wird die Senderliste
angezeigt.
2. Alternativ können Sie auch die Taste MENU drücken und dann den TUNE-Knopf drehen, um
das DAB Menu auszuwählen. Drücken Sie zur Bestätigung die Taste ENTER.
3. Drehen Sie den TUNE-Knopf, um die Senderliste Station List auszuwählen. Drücken Sie
dann zur Bestätigung die Taste ENTER.
4. Drehen Sie den TUNE-Kno pf, um die Senderl is te zu dur c hsuc hen. Drüc k en Sie d ann zur
Bestätigung die T aste ENTER. Der ausgewählte Sender wird wiedergegeben.
Zusatzdienste
Wenn das Symbol „>>“ nach dem Namen der Station angezeigt wird, bedeutet dies, dass zu
diesem Sender zusätzliche Dienste zur Verfügung stehen. Diese Zusatzdienste enthalten
zusätzliche Serviceleistungen, die mit dem Primärsender in Zusammenhang stehen.
Beispielsweise könnte ein Sportsender zusätzliche Kommentare hinzufügen. Die Zusatzdienste
werden direkt nach dem Primär sender (ein „<<“ -Symbol wird vor dem Senderna men ange zeigt) in
der Senderliste eingeblendet.
Um den Zusatzsender auszuwählen, drehen Sie den TUNE-Knopf, bis Sie den gewünschten
Zusatzdienst gefunden haben. Drücken Sie dann zur Bestätigung die Taste ENTER.
Wenn der Zusatzdienste beendet wird, wechselt das Gerät wieder automatisch zum Primärsender.
Page 62

13
Reihenfolge der Sender
Sie können die Sender in unterschiedlicher Reihenfolge anzeigen.
1. Drücken Sie die MENU-Taste, und drehen Sie dann den TUNE-Knopf, um das DAB Menu
auszuwählen. Drücken Sie zur Bestätigung die Tas te ENTER.
2. Drehen Sie den TUNE-Knopf, um Station Order (Senderreihenfolge) auszuwählen. Drücken
Sie dann zur Bestätigung die Taste ENTER.
3. Drehen Sie den TUNE-Knopf, um „Alphanumerisch“ oder „Ensemble“ auszuwählen, und
drücken Sie dann die Taste ENTER, um die Auswahloption zu bestätigen.
Alphanumerisch
Zeigt alle Sender in alphanumer isc her Reihenfol ge an.
Ensemble
Listet die aktuell se nde nde n S end er vor de ne n a uf , die zurzeit nicht
senden.
Vollständiger Suchlauf
Mit dieser Funktion kann Ihr Radio nach allen verfügbaren Sendern suchen.
1. Drücken Sie die MENU-Taste, und drehen Sie dann den TUNE-Knopf, um das DAB Menu
auszuwählen. Drücken Sie zur Bestätigung die Tas te ENTER.
2. Drehen Sie den TUNE-Knopf, um Full Scan auszuwählen. Drücken Sie dann zur Bestätigung
die T aste ENTER.
Manuelle Sendersuche
1. Drücken Sie die MENU-Taste, und drehen Sie dann den TUNE-Knopf, um das DAB Menu
auszuwählen. Drücken Sie zur Bestätigung die Taste ENTER.
2. Drehen Sie den TUNE-Knopf, um Manual Tune auszuwählen. Drücken Sie dann zur
Bestätigung die T aste ENTER. Das Display zeigt die Sendernummer und die Frequenz an.
3. Drehen Sie den TUNE-Knopf, um durch die Kanäle zu schalten, und drücken Sie dann die
Taste ENTER, um den aktuellen Kanal auszuwählen.
Hinweis: Wenn es für diesen Kanal und diese Frequenz eine Mehrfachauswahl gibt, dann wird
nach ein paar Sekunden eine Tuning-Anzeige mit der Signalstärke und der Mehrfachauswahl
angezeigt.
4. Drücken Sie die MENU-Taste, um die manuelle Sendersuche zu verlassen.
DRC-Wert (Dynamic Range Control, Regelung des Dynamikbereichs)
Sie können den Kompres sionsgradder Sender einstellen, um die Unterschiede im dynamischen
Bereich oder den Klangpegel zwischen zwei Radiosendern zu eliminieren.
Hinweis:Wenn DRC auf aus eingestellt ist, bedeutet dies keine Kompression. Wenn DRC auf niedrig
eingestellt ist, bedeutet dies eine geringe Kompressionund wennDRC auf hoch eingestellt ist eine
maximale Kompression.
1. Drücken Sie die MENU-Taste, und drehen Sie dann den TUNE-Knopf, um das DAB Menu
auszuwählen. Drücken Sie zur Bestätigung die Tas te ENTER.
2. Drehen Sie den TUNE-Knopf, um DRC auszuwählen. Drücken Sie dann zur Bestätigung die
Taste ENTER.
3. Drehen Sie den TUNE-Knopf, um „DRC Hoch“, „DRCNiedrig“ oder „DRC Aus“ auszuwählen.
Drücken Sie dann zur Bestätigung die Taste ENTER.
Page 63

14
Prune (Reduzieren)
Sie können alle nicht verfügbaren Sender aus der Senderliste streichen.
1. Drücken Sie die MENU-Taste, und drehen Sie dann den TUNE-Knopf, um das DAB Menu
auszuwählen. Drücken Sie zur Bestätigung die Tas te ENTER.
2. Drehen Sie den TUNE-Knopf, um Prune auszuwählen. Drücken Sie dann zur Bestätigung die
Taste ENTER.
3. Drehen Sie den TUNE-Knopf, um „YES (JA)“ auszuwählen. Drücken Sie dann zur Bestätigung
die T aste ENTER.
Senderinformationen anzeigen
DAB/DAB+-Sender strahlen zusätzliche Informationen aus. Drücken Sie mehrmals die Taste INFO,
dann zeigt das Display die Informationen in laufendem Text, Programmtyp, Ensemble, Datum,
Frequenz, Bitrate und Codec und die Signalstärke an.
Anzeige der Signalstärke
Bei der Auswahl der Signalstärke wird auf dem Display ein Signalbalken mit der Stärke des
aktuellen Senders angezeigt.
Die Anzeige im Signalbalken zeigt den
Mindestsignalpegel an.
Hinweis: Sender mit einer Signalstärke, der
unter dem Mindestsignalpegel liegt, können
möglicherweise keinen kontinu ierlichen
Audioempfang gewährleiste n.
Speicherung der voreingestellten Sender
Sie können bei Ihrem Radio bis zu 10 Ihrer Lieblings-DAB/DAB+-Sender als voreingestellte Sender
speichern.So können Sie Ihre Lieblingssender schnell und einfach aufrufen.
1. Während Ihr Lieblingssender wiedergegeben wird, drücken und halten Sie eine der
SENDERSPEICHER-Tasten 1/5, 2/6, 3/7, 4/8 auf dem Gerät oder eine der
SENDERSPEICHER-Tasten 1/6, 2/7, 3/8, 4/9, 5/10 auf der Fernbedienung, bis auf dem
Display „Senderspeicher # gespeichert“ angezeigt wird. (*# zeigt 1, 2, 3, 4 oder 5 an)
2. Drücken Sie zuerst die Taste SHIFT, und dann drücken und halten Sie eine der
SENDERSPEICHER-Tasten 1/5, 2/6, 3/7, 4/8 auf dem Gerät oder eine der
SENDERSPEICHER-Tasten 1/6, 2/7, 3/8, 4/9, 5/10 auf der Fernbedienung, bis auf dem
Display „Senderspeicher # gespeichert“ angezeigt wird. (*# zeigt 6, 7, 8, 9 oder 10 an)
3. Alternativ können Sie auch auf der Fernbedienung die Taste MEMORY drücken und halten,
bis auf dem Display „Senderspeicher <1: (Leer)>“ angeze igt wird. Dr ehe n Sie den
TUNE-Knopf am Gerät oder drücken Sie die Navigationstasten ▲ oder ▼ auf der
Fernbedienung, um zwischen den voreingestellten Zahlen 1-10 zu wählen. Dr üc k en Sie zur
Bestätigung die T aste ENTER am Gerät oder auf der Fernbedienung. Das Display zeigt
„Senderspeicher # gespeichert“ an.
Mindestsignalpegel Signalstärke
Page 64

15
Aufrufen der voreingestellten Sender
1. Drücken Sie eine der SENDERSPEICHER-Tasten 1/5, 2/6, 3/7, 4/8 auf dem Gerät oder eine
der SENDERSPEICHER-Tasten 1/6, 2/7, 3/8, 4/9, 5/10 auf der Fernbedienung. Der
voreingestellte Sender (1, 2, 3, 4 oder 5) wird wieder g e gebe n.
2. Drücken Sie zuerst die Taste SHIFT und dann eine der SENDERSPEICHER-Tasten 1/5, 2/6,
3/7, 4/8 auf dem Gerät oder eine der SENDERSPEICHER-Tasten 1/6, 2/7, 3/8, 4/9, 5/10 auf
der Fernbedienung. Der voreingestellte Sender (6, 7, 8, 9 oder 10) wird wiedergegeben.
3. Oder drücken Sie alternativ auf der Fernbedienung die Taste MEMORY, um „Aufruf
voreingestellter Sender“ anzuzeigen. Drehen Sie den TUNE-Knopf am Gerät oder drücken
Sie die Navigationstasten ▲ oder ▼ auf der Fernbedienung, um durch die gespeicherten
voreingestellten Sender zu rollen. Drücken Sie dann die Taste ENTER am Gerät oder der
Fernbedienung, um den Sender zu bestätigen, der wiedergegeben werden soll.
UKW-Modus
UKW-Modus auswählen
1. Drücken Sie wiederholt die Taste MODUS, um den UKW-Modus auszuwählen.
2. Bei Erstgebrauch wird das Gerät am Anfang der UKW-Frequenz (87,50 MHz) beginnen. Oder
es wird der letzte UKW-Sender wiedergegeben, den Sie zuvor gehört haben.
3. Zum manuellen Ändern der UKW-Frequenz, vergewissern Sie sich, dass keine andere
Reihenfolge/System einste ll ung aktiv ist. Drehen Sie den TUNE-Knopf, um die Frequenz in
0,05-MHz-Schritten zu ändern.
4. Wenn ein automatischer Suchlauf durchgeführt werden soll, während die UKW-Frequenz
angezeigt wird, drehen Sie den TUNE-Knopf im Uhrzeigersinn oder gegen den Uhrzeigersinn,
und dann drücken Sie die Taste SCAN. Das Radio springt im Frequenzband vor- oder
rückwärts, bis es den nächsten verfügbaren Sender erreicht hat.
Einstellung des Suchlaufs
Standardmäßig hält der UKW-Suchlauf bei irgendeinem verfügbaren Sender an. Dies kann bei
schwachen Sendern zu einem schwachen Signal-Rauschabstand (Rauschen) führen.
1. Um die Scaneinstellungen für den Suchlauf so zu ändern, dass der Scan nur an Sendern mit
guter Signalstärke anhält, drücken Sie die Taste MENU, und drehen Sie den TUNE-Knopf, um
das FM Menu (UKW) auszuwählen. Drücken Sie zur Bestätigung die Taste ENTER.
2. Drehen Sie den TUNE-Knopf, um Scan setting (Einstellung des Suchlaufs) auszuwählen.
Drücken Sie dann zur Bestätigung die Taste ENTER.
3. Drehen Sie den TUNE-Knopf, um „Nur starke Sender“ zu durchsuchen. Drücken Sie dann zur
Bestätigung die Taste ENTER.
Page 65

16
Audio-Einstellung
Standardmäßig werden alle Stereo-Sender in Stereo wiedergegeben. Dies kann bei schwachen
Sendern zu einem schwachen Signal-Rauschabstand (Rauschen) führen.
1. Wenn zu schwache Sender in Mono wiedergegeben werden sollen, drücken Sie die Taste
MENU, und drehen Sie den TUNE-Knopf, um FM Menu (UKW) auszuwählen. Drücken Sie zur
Bestätigung die Taste ENTER.
2. Drehen Sie den TUNE-Knopf, um Audio setting (Audio-Einstellung) auszuwählen. Drücken
Sie dann zur Bestätigung die Taste ENTER.
3. Drehen Sie den TUNE-Knopf, um „Zwangs-Mono“ zu durchsuchen. Drücken Sie dann zur
Bestätigung die Taste ENTER.
Senderinformationen anzeigen
UKW-Sender strahlen zusätzliche Informationen aus. Drücken Sie wiederholt die Taste INFO. Das
Display zeigt die Informationen über Radiotext, Programmtyp, Datum und Programmname an.
Speicherung der voreingestellten Sender
Sie können bei Ihrem Radio bis zu 10 Ihrer Lieblings-UKW-Sender als voreingestellte Sender
speichern.So können Sie Ihre Lieblingssender schnell und einfach aufrufen.
1. Während Ihr Lieblingssender wiedergegeben wir d, drü cken und halten Sie eine der
SENDERSPEICHER-Tasten 1/5, 2/6, 3/7, 4/8 auf dem Gerät oder eine der
SENDERSPEICHER-Tasten 1/6, 2/7, 3/8, 4/9, 5/10 auf der Fernbedienung, bis auf dem
Display „Senderspeicher # gespeichert“ angezeigt wird. (* # zeigt 1, 2, 3, 4 oder 5 an)
2. Drücken Sie zuerst die Taste SHIFT, und dann drücken und halten Sie eine der
SENDERSPEICHER-Tasten 1/5, 2/6, 3/7, 4/8 auf dem Gerät oder eine der
SENDERSPEICHER-Tasten 1/6, 2/7, 3/8, 4/9, 5/10 auf der Fernbedienung, bis auf dem
Display „Senderspeicher # gespeichert“ angezeigt wird. (*# zeigt 6, 7, 8, 9 oder 10 an)
3. Alternativ können Sie auch auf der Fernbedienung die T aste MEMORY drücken und halten,
bis auf dem Display „Senderspeicher <1: (Leer)>“ angeze igt wird. Dr ehe n Sie den
TUNE-Knopf am Gerät oder drücken Sie die Navigationstasten ▲ oder ▼ auf der
Fernbedienung, um zwischen den voreingestellten Zahlen 1-10 zu wähl en. Dr ück en Sie zur
Bestätigung die T aste ENTER am Gerät oder auf der Fernbedienung. Das Display zeigt
„Senderspeicher # gespeichert“ an.
Aufrufen der voreingestellten Sender
1. Drücken Sie eine der SENDERSPEICHER-Tasten 1/5, 2/6, 3/7, 4/8 auf dem Gerät oder eine
der SENDERSPEICHER-Tasten 1/6, 2/7, 3/8, 4/9, 5/10 auf der Fernbedienung. Der
voreingestellte Sender (1, 2, 3, 4 oder 5) wird wiedergegeben.
2. Drücken Sie zuerst die Taste SHIFT und dann eine der SENDERSPEICHER-Tasten 1/5, 2/6,
3/7, 4/8 auf dem Gerät oder eine der SENDERSPEICHER-Tasten 1/6, 2/7, 3/8, 4/9, 5/10 auf
der Fernbedienung. Der voreingestellte Sender (6, 7, 8, 9 oder 10) wird wiedergegeben.
Page 66

17
3. Oder drücken Sie alternativ auf der Fernbedienung die Taste MEMORY, um „Aufruf
voreingestellter Sender“ anzuzeigen. Drehen Sie den TUNE-Knopf am Gerät oder drücken
Sie die Navigationstasten ▲ oder ▼ auf der Fernbedienung, um durch die gespeicherten
voreingestellten Sender zu rollen. Drücken Sie dann die Taste ENTER am Gerät oder der
Fernbedienung, um den Sender zu bestätigen, der wiedergegeben werden soll.
Bluetooth-Modus
Koppeln Sie das Gerät mit einem Bluetooth-Gerät, um Musik zu hören:
1. Drücken Sie wiederholt auf die MODE-Taste, um den Bluetooth-Modus auszuwählen.
2. Das Display zeigt „Bluetooth erkennbar“ an.
3. Aktivieren Sie Ihr Bluetooth-Gerät, und wählen Sie den Suchmodus.
4. „ALIO BAZE“ wird auf Ihrem Bluetooth-Gerät angezeigt.
5. Wählen Sie „ALIO BAZ E“, und geb en Si e als Passwort „0000“ ein, falls notwendig.
6. „BT verbunden: Ihr Bluetooth-Gerät“ wird auf dem Display ange zeigt, wenn di e Verbindung
erfolgreich ist.
7. Während ein Titel abgespielt wird, können Sie:
a. Die Taste
drücken, um zum vorherigen Titel zu wechseln, die Taste drück en und
halten, um den aktuell wiedergegebenen Titel schnell rückwärts zu spulen.
b. Für Wiedergabe oder Pa use des aktuell wiedergegebenen Titels drück en Sie die Taste
.
c. Die Taste
drücken, um zum nächsten Titel zu wechseln, die Taste drücken und
halten, um den aktuell wiedergegebenen Titel schnell vorwärts zu spulen.
8. Um die aktuelle Bluetooth-Verbindung zu trennen, drücken und halten Sie für 3 Sekunden die
Taste SCAN.
9. Um das Gerät mit einem anderen Bluetooth-Gerät zu paaren, drücken Sie wiederholt die Taste
SCAN, um das Bluetooth-Gerät auszuwählen, mit dem eine Verbindung hergestellt werden
soll. Drücken Sie zur Bestätigung der Verbindung die Taste ENTER.
Hinweis: Das Gerät schaltet sich automatisch nach 10 Minuten aus, wenn das
Bluetooth-Gerät getrennt is t, ausg es chalt et ist oder di e Lautstärke in der Nähe der
Stummschaltung liegt.
CD-Modus
CD in das CD-Fach einlegen
Um eine CD wiederzugeben, legen Sie bitte die Audio-CD ein. Einige CDs könnten nicht
kompatibel sein.
Legen Sie eine Audio-CD i n das CD-Fach ein, wenn sich das Gerät in einem b eliebigen Modus
befindet. Das Display zeigt „LESEN“ an, wart en Sie ein ige Sekunden.
Hinweis: Sie k önnen den CD-Modus nur dann durch wieder holtes Drücken d er Taste MODE
auswählen, wenn eine CD im CD-Fach eingelegt ist.
Page 67

18
CD-Programm w iederge ben
1. Während der Audio-CD-Wiedergabe zeigt das Display die Titelnummer und die abgelaufene
Zeit an.
2. Wenn ein Titel wiedergegebenen wird, steht Folgendes zur Auswahl:
a. Für Wiedergabe oder Pause des aktuell wiedergegebenen Titels drücken Sie die Taste
.
b. Drücken Sie die Taste
, um zum vorherigen Titel zurück zu springen.
c. Drücken Sie die Taste
, um zum nächsten Titel zu springen.
d. Drücken und halten Sie die Taste
, um den aktuell wiedergegebenen Titel schnell
rückwärts zu spulen.
e. Drücken und halten Sie die Taste
, um den aktuell wiedergegebenen Titel schnell
vorwärts zu spulen.
f. Drücken Sie die Taste
, um die Musikwiedergabe zu stoppen.
3. Wenn die Disk eine normale Audio-CD ist, zeigt das Display im CD-STOP-Modus die
Gesamtanzahl der Titel und die Gesamtwiedergabezeit der Titel an.
Einstellung der Zufallswiedergabe
1. Drücken Sie die MENU-Taste, und drehen Sie dann den TUNE-Knopf, um CD: Random
(Zufallswiedergabe) aus zuwähl en. D rüc ken Sie zur Bestätigung die T aste ENTER.
2. Drehen Sie den TUNE-Knopf, um zwischen der Auswahl von Off (Aus) oder On (Ein) zu
wechseln. Drücken Sie zur Bestätigung Ihrer Auswahl auf die Taste ENTER.
Einstellung der Wiedergabe-Wiederholung
1. Drücken Sie die MENU-Taste, und drehen Sie dann den TUNE-Knopf, um CD: Repeat
(Wiederholung) auszuwählen. Drücken Sie zur Bestätigung auf die Taste ENTER.
2. Drehen Sie den TUNE-Knopf, um zwischen der Auswahl von Off (Aus), On (Ein)oder All
(Alle) zu wechseln. Drück en Sie zur Bestät ig ung Ihrer Auswahl auf die T aste ENTER.
CD aus dem CD-Fach auswerfen
Drücken Sie die Taste , das Display zeigt „OPEN/ÖFFNEN“ an, dann kann die CD aus dem Fach
Titelnummer Abgelaufene
Gesamtanzahl der Titel
Gesamtwiedergabezeit
Page 68

19
entnommen werden.
Hinweis: Das Ger ät wec hselt autom atisc h nach 1 0 Minute n in den Standby-Modus , wenn die
CD nicht wiedergegebenen wird.
AUX IN-Modus
AUX IN ermöglicht eine schnelle und einfache Verbindung mit einem MP3-Player oder anderen
externen Audioquellen.
Hinweis: Sie können den AUX-Modus nur dann durch wiederholtes Drücken der MODE-Taste
auszuwählen, wenn ein Audiokabel in die AUX IN-Buchse eingesteckt wurde.
1. Bevor Sie den Netzstecker in die Netzsteckdose stecken, verbinden Sie mit einem
3,5-mm-Audio-Kabel (nicht im Lieferumfang enthalten) Ihr externes Audiogerät mit der
AUX-IN-Buchse auf der Rückseite Ihres Gerätes.
2. Stecken Sie den Netzadapter in die Netzsteckdose, und drücken Sie zum Einschalten des
Gerätes auf die Taste POWER.
3. Das Gerät wechselt automatisch in den AUX-Modus.
4. Im AUX IN-Modus können Sie Ihr Audiogerät direkt für die Wiedergabe nutzen.
5. Um ein optimales Lautstärkenvolumen zu erreichen, wird auch empfohlen, das
Output-Lautstärkenvolumen am Audio-Gerät anzupassen.
Hinweis: Das Gerä t sc ha lt et a utomatisch nach 10 Mi nute n in den Stand-by-Modus , we nn das
Gerät getrennt ist, ausgeschaltet ist oder die Lautstärke in der Nähe der Stummschaltung liegt.
Allgemeine Bedienung
Einstellen eines Alarms
Ihr Radio ist m it zwei Al armen ausgestattet. Stellen Sie den A larm ein und achten Sie d arauf , das s
die Zeit zuerst eingestellt wird.
1. Drücken Sie mehrmals die Taste ALARM am Gerät, um den Alarm einzustellen.
2. Drehen Sie den TUNE-Knopf, um „Alarm 1“ oder „Alarm 2“ auszuwählen. Drücken Sie dann
zur Bestätigung die Taste ENTER.
3. Drehen Sie den TUNE-Knopf, um die Optionen auszuwählen. Drück en Sie dann zur
Bestätigung der Einstellun g en die Taste ENTER.
Alarm
einstellen:
Ein oder Aus
Zeit einstellen:
06:00 (Stellen Sie die Alarmzeit manuell ein)
Quelle
einstellen:
DAB, UKW,Sum mer oder CD (Der Summer ertönt, wen n keine CD im
Gerät eingelegt ist, wenn der Alarm ertönt)
Wiederholung
einstellen:
Täglich, Einmal, an Wochenenden, woche ntags
Lautstärke
einstellen:
Drehen Sie zur Einstellung der Alarmlautstärke den TUNE-Knopf
Page 69

20
4. Die Alarmeinstellung ist erfolgreich. oder wird auf dem Display angezeigt.
5. Um den Alarm temporär auszuschalten, drücken Sie auf dem Gerät die Taste SNOOZE, um
die Schlummerzeit zu aktivieren. Die eingestellte Schlummerzeit wird auf dem Display
angezeigt.
6. Um den Alarm auszuschalt en , drücken Sie die Taste POWER, wenn der Alarm ertönt.
7. Wie Sie den Alarm beenden können, finden Sie in den Schritten 1-3, Alarmeinstellung „Off
(Aus)“.
Schlafzeit einstellen
Durch diese Funktion wird Ihr Gerät nach einer bestimmten Zeit in den Standby-Modus gesetzt.
1. Drücken Sie wiederholt die Taste SLEEP am Gerät, um zwischen Keine Schlafzeit, 15, 30,
45, 60 oder 90 min. auszuwählen. Drücken Sie zur Bestät igun g die Taste ENTER. Das
Schlaf-Symbol
wird auf dem Display angezeigt.
2. Um die Schlaf-Funk t ion zu deaktivieren, während der Schlaf-Timer herunterzählt, wiederholen
Sie Schritt 1, um „Keine Schlafzeit“ zu wählen.
Einstellung von Datum und Uhrzeit
1. Drücken Sie die MENU-Taste, und drehen Sie dann den TUNE-Knopf, um Datum/Uhrzeit
einstellen auszuwähl en. D r ück en Sie zur Bestätigung die Tas te ENTER.
2. Drehen Sie den TUNE-Knopf, um die Optionen auszuwählen. Drücken Sie dann zur
Bestätigung der Einstellung en die Taste ENTER.
Automatische
DAB-Korrektur:
Aktualisierung von Datum und Uhrzeit im DAB-Modus
Manuell:
Manuelle Einstellung von Zeit und Datum.
3. Stellen Sie dann die Zeit gemäß Ihren persönlichen Bedürfnissen ein.
Zeitformat einstellen
1. Drücken Sie die MENU-Taste, und drehen Sie dann den TUNE-Knopf, um Time Mode
(Zeit-Modus) auszuwählen. Drücken Sie zur Bestätigung die Taste ENTER.
2. Drehen Sie den TUNE-Knopf, um zwischen 24 Hours (Stunden) oder 12 Hours (Stunden) zu
wechseln. Drücken Sie zur Bestätigung Ihrer Auswahl auf die Taste ENTER.
Schlummerzeit einstellen
Diese Funktion ermöglicht es Ihnen, die Schlummerzeit einzustellen, wenn der Alarm ertönt.
1. Drücken Sie die MENU-Taste, und drehen Sie dann den TUNE-Knopf, um Snooze Adjust
(Schlummerzeit anpassen) aus zuwäh len . Drücken Sie zur Bestätigung die Taste ENTER.
2. Drehen Sie den TUNE-Knopf, um eine Zeit zwischen 1-9 min. festzulegen. Drücken Sie zur
Bestätigung Ihrer Auswahl auf die Taste ENTER.
Page 70

21
Helligkeit einstellen
1. Drücken Sie die MENU-Taste, und drehen Sie dann den TUNE-Knopf, um Brightness
(Helligkeit) auszuwählen. Drücken Sie zur Bestätigung die Taste ENTER.
2. Drehen Sie den TUNE-Knopf, um zwischen Standby Mode oder Normal Mode zu wechseln.
Drücken Sie zur Bestätigung Ihrer Auswahl auf die Taste ENTER.
3. Drehen Sie den TUNE-Knopf, um eine Stufe zwischen Level 1 - Level 5 festzulegen. Drücken
Sie zur Bestätigung Ihrer Auswahl auf die Taste ENTER.
Entzerrung (EQ) einstellen
Mit dieser Funktion können Sie ein Klang-Entzerrungsprofil auswählen. Jede der ausgewählten
Entzerrungs-Einstellungen ändert die Klangfarbe Ihres Radios.
1. Drücken Sie die MENU-Taste, und drehen Sie dann den TUNE-Knopf, um Set EQ
auszuwählen. Drücken Sie zur Bestätigung die Taste ENTER.
2. Drehen Sie den TUNE-Knopf, um eine Auswahl zwischen Normal, Rock, Pop, Jazz oder My
EQ zu treffen. Drücken Sie zur Bestätigung Ihrer Auswahl auf die Taste ENTER.
3. Um MeinEQ einzustellen, wählen Sie My EQ. Drücken Sie zur Bestät igung I hrer Auswahl auf
die T aste ENTER. Drehen Sie den TUNE-Knopf, um zwischen Treble (Höhen) oder Bass zu
wechseln. Drücken Sie zur Bestätigung Ihrer Auswahl auf die Taste ENTER.Drehen Sie den
TUNE-Knopf, um Werte für Treble (Höhen) oder Bass festzulegen. Drücken Sie zur
Bestätigung Ihrer Auswahl auf die Taste ENTER.
Lautstärke einstellen
1. Drücken Sie die MENU-Taste, und drehen Sie dann den TUNE-Knopf, um Loudness
auszuwählen. Drücken Sie zur Bestätigung die Tas te ENTER.
2. Drehen Sie den TUNE-Knopf, um zwischen der Auswahl von OFF (AUS) oder ON (EIN) zu
wechseln. Drücken Sie zur Bestätigung Ihrer Auswahl auf die Taste ENTER.
Werksseitiges Zurücksetzen
Wenn Sie das Gerät auf die werksseitigen Einstellungen zurüc ksetzen, werden alle Einstellu ngen
auf die Standardwerte zurückgesetzt, Zeit/Datum und Voreinstellungen gehen ver loren.
1. Drücken Sie die MENU-Taste, und drehen Sie dann den TUNE-Knopf, um Factory Reset
auszuwählen. Drücken Sie zur Bestätigung die Tas te ENTER.
2. Drehen Sie den TUNE-Knopf, um YES (JA) oder NO (NEIN) auszuwählen. Drücken Sie dann
zur Bestätigung die Taste ENTER.
3. Wenn Sie YES (JA) auswählen, wird das Gerät zurückgesetzt und neu gestartet.
Firmware-Informationen
1. Drücken Sie die MENU-Taste, und drehen Sie dann den TUNE-Knopf, um Firmware
auszuwählen. Drücken Sie zur Bestätigung die Tas te ENTER.
Page 71

22
2. Drehen Sie den TUNE-Knopf, um DAB oder MCU auszuwählen. Drücken Sie dann zur
Bestätigung die T aste ENTER.
3. Der Display zeigt die Versionsinformationen an.
Technische Daten
Einzelheiten Technische Daten
Beschreibung:
DAB/DAB+- und UKW-Radio mit CD-Player und Bluetooth
Frequenzbereich:
UKW: 87,5-108 MHz
DAB/DAB+: 174,928 – 239,200 MHz
Strombedarf:
Netzspannungseingang: 110-240 V AC, 50-60 Hz
DC Ausgangsleistung: 12 V, 2 A
Audio-Ausgangsleistung:
>5 Watt RMS bei 1 % THD
Stromverbrauch:
12 W (maximal)
Abmessungen (B x H x T):
210 mm X 130 mm X 210 mm
Dieses Symbol auf dem Produkt oder in der
Bedienungsanleitung zeigt an, dass Sie Ihr elektrisches
Gerät am Ende der Lebensdauer separat von Ihrem
Hausmüll entsorgen m üssen. In der gesamten EU gib t es
separate Sammelstellen für Recycling.
Für mehr Informationen kontaktieren Sie bitte die Behörden vor Ort oder den Einzelhändler,
bei dem Sie das Gerät gekauft haben.
Page 72

ALIO BAZE
DAB/DAB+/FM radio met CD-speler en Bluetooth
Gebruiksaanwijzing
Page 73

2
Belangrijke veiligheidsinstructies
1. Lees deze gebruiksaanwijzing.
2. Bewaar deze gebruiksaanwij zing .
3. Besteed aandacht aan alle
waarschuwingen.
4. Volg alle instructies op.
5. Gebruik de luidsprek er niet in de buurt
van water.
6. Reinig alleen met een droge doek.
WAARSCHUWING: OM HET RISICO VAN BRAND OF EEN ELEKTRISCHE SCHOK TE
VERMINDEREN, STEL DEZE LUIDSPREKER NIET BLOOT AAN REGEN OF VOCHT.
Om het risico van een elektrische schok, brand enz. te verminderen:
1. Plaats het apparaat niet in de buurt van warmtebronnen zoals radiatoren, kachels, ovens of
andere apparaten (inclusief versterkers) die warmte produceren.
2. Blokkeer geen ventilatieop eni nge n van het apparaat.
3. Het apparaat mag niet aan druip- of spatwater worden blootgesteld en er mogen geen
voorwerpen gevuld met vloeistoffen, zoals vazen, op het product worden geplaatst.
4. Plaats geen zware voorwerpen op het apparaat en stap er niet op, het voorwerp kan vallen en
het apparaat ernstig beschadigen.
5. Raadpleeg het typeplaatje aan de achterk ant van het apparaat voor het ingangsvermogen
alsook voor andere veiligheids inf ormatie.
6. Dit apparaat is alleen bedoeld om te worden gebruikt met de meegeleverde voeding.
7. Bescherm het netsnoer zodat er niet overheen gelopen kan worden of bekneld kan raken,
vooral bij de stekkers, stopcontacten en het punt waar het snoer het apparaat verlaat.
8. Trek nooit aan het netsnoer om de stekker van het apparaat uit het stopcontact te trekken. Pak
altijd stevig de stekker vast en trek het rechtstreeks uit het stopcontact.
9. Repareer of vervang onmiddellijk alle elektrische snoeren die gerafeld of op enigerlei wijze
beschadigd zijn. Gebruik geen snoer dat scheuren of schuurplekken over de lengte, bij de
stekker of de connector vertoont.
10. Om brand- of schokgevaar te voorkomen, gebruik deze stekker niet met een verlengsnoer of
andere stopcontacten, tenzij de pennen volledig kunnen worden ingestoken om blootstelling
van de pennen te voorkomen.
11. Om brand- of schokgevaar te voorkomen, stel dit apparaat niet bloot aan regen of vocht.
12. Haal tijdens bliksem of regen de stekker van het apparaat uit het stopcontact voor extra
bescherming tijdens onweersbuien of wanneer het apparaat gedurende langere tijd niet wordt
gebruikt. Dit voorkomt schade aan het apparaat door bliksem en spanningspieken.
13. Probeer geen onderhoudswerkzaamheden zelf uit te voeren. Door de behuizing te openen of
verwijderen, kunt u aan een gevaarlijke spanning of andere gevaren worden blootgesteld.
Onderhoudswerkzaamheden moeten door gekwalificeerde technici worden uitgevoerd.
14. De batterij van de afstandsbediening mag nooit worden blootgesteld aan overmatige hitte,
zoals zonlicht, open vlammen e.d.
15. Explosiegevaar indien de batter ij verkeerd wordt geplaatst. Vervang de batter ij alleen door
Page 74

3
hetzelfde of gelijkwaardig type.
16. In het belang van veiligheid en om energieverspilling te voorkomen, laat het apparaat nooit
voor lange perioden zonder toezicht aan staan, bijv. 's nachts, terwijl u op vakantie of uit het
huis bent. Schakel het apparaat uit en verwijder de stekker uit het stopcontact.
Inhoud
Belangrijke veiligheidsinstructies ....................................................................................................... 2
Inhoud
................................................................................................................................................ 3
Aan de slag
........................................................................................................................................ 5
Bovenaanzicht van het apparaat
................................................................................................ 6
Vooraanzicht van het apparaat
.................................................................................................. 7
Achteraanzicht van het apparaat
............................................................................................... 8
Overzicht van de afstandsbediening
.......................................................................................... 9
DAB-modus
..................................................................................................................................... 11
Stationlijst
................................................................................................................................. 11
Secundaire dienst
.................................................................................................................... 11
Volgorde van de stations
.......................................................................................................... 12
Volledige scan
.......................................................................................................................... 12
Handmatig afstemmen
............................................................................................................. 12
DRC (Dynamic Range Control) waarde
................................................................................... 12
Prune
........................................................................................................................................ 13
Stationinformatie bekijken
........................................................................................................ 13
Voorkeurstations opslaan
......................................................................................................... 13
Voorkeurstations oproepen
...................................................................................................... 14
FM-modus
....................................................................................................................................... 15
De FM-modus selecteren
......................................................................................................... 15
Het scannen instellen
............................................................................................................... 15
Audio instellen
.......................................................................................................................... 15
Stationinformatie bekijken
........................................................................................................ 15
Voorkeurstations opslaan
......................................................................................................... 16
Voorkeurstations oproepen
...................................................................................................... 16
Bluetooth-m
odus ............................................................................................................................. 17
CD-modus
....................................................................................................................................... 18
Een CD in de CD-lade plaatsen
............................................................................................... 18
Een CD-programma afspelen
.................................................................................................. 18
Willekeurig afspelen instellen
................................................................................................... 18
Herhaald afspelen instellen
...................................................................................................... 19
De CD uit de CD-lade wer p en
.................................................................................................. 19
Aux In-modus
.................................................................................................................................. 20
Algemene bediening
........................................................................................................................ 21
Het alarm instellen
................................................................................................................... 21
Slaap instellen
.......................................................................................................................... 21
Datum/Tijd instelllen
................................................................................................................. 21
Tijdnotatie instellen
................................................................................................................... 22
Page 75

4
Sluimertijd instellen .................................................................................................................. 22
Helderheid instellen
.................................................................................................................. 22
De equalizer instellen
............................................................................................................... 22
De geluidssterkte instellen
....................................................................................................... 22
Fabrieksinstellingen
................................................................................................................. 23
Firmware-informatie
................................................................................................................. 23
Specificaties
..................................................................................................................................... 24
Page 76

5
Aan de slag
Haal voorzichtig uw radio uit de doos. U kunt de verpakking voor toekomstig gebruik bewaren.
Wat u in uw pakket zult vinden
• Hoofdapparaat
• Voedingsadapter
• Afstandsbediening
• Gebruiksaanwijzing
Uw radio plaatsen
Plaats uw radio op een vlak/stabiel oppervlak dat niet aan trillingen onderhevig is.
Vermijd de volgende locaties:
• Waar de radio aan direct zo nlich t wordt bloot gesteld.
• Waar de radio dicht bij warmte uitstralende bronnen staat opgesteld.
• Waar de vochtigheid hoog en ventilatie slecht is.
• Waar het stoffig is.
• Waar het vochtig is of waar water op het apparaat kan druppelen of spatten.
De antenne instellen
Trek de antenne uit om te zorgen dat u in de DAB en FM radiomodi de beste moge lijk ontvangst
zult hebben. Mogelijk moet de posi tie van de ra dio en/of ante nne worden aangepast om de bes te
signaalontvangst te bereiken.
Het apparaat Aan/Uit zetten
Sluit de plug van de voedingsadapter aan op de DC IN-aansluiting op de achterkant van het
apparaat. Steek vervolgens de stekker van de voedingsadapter in het stopcontact. Druk op de
POWER-toets om het apparaat aan te zetten of in de stand-bymodus te schakelen. Trek de stekker
uit het stopcontact om het apparaat volledig uit te schakelen.
Volumeregelaar
Stel het volume van de radio in door aan de VOLUME-knop te draaien.
Page 77

6
Bovenaanzicht van het apparaat
1. ALARM-toets
Druk erop om het alarm in te stellen.
2. VOORKEUR-toetsen 1/5, 2/6, 3/7, 4/8
• Druk op en houd één toets ingedrukt om het voorkeurstation 1,
2, 3 of 4 op te slaan.
• Druk op en houd één toets ingedrukt om het voorkeurstation 1,
2, 3 of 4 op te roepen.
3. SNOOZE-toets
Druk erop om de sluimerfunctie te activeren wanneer het alarm
luidt.
4. SHIFT-toets
• Druk eerst op deze toets en druk vervolgens op één van de
VOORKEUR-toetsen 1/5, 2/6, 3/7, 4/8 en hou d ingedruk t om
het voorkeurstation 5, 6, 7 of 8 op te slaan.
• Druk eerst op deze toets en druk vervolgens op één van de
VOORKEUR-toetsen 1/5, 2/6, 3/7, 4/8 en hou d ingedruk t om
het voorkeurstation 5, 6, 7 of 8 op te roepen.
5. SLEEP-toets
Druk erop om de slaaptijd in te stellen.
6. Luidspreker
7. DAB/FM-antenne
Page 78

7
Vooraanzicht van het apparaat
1
2 4 5 6 8 9 10 12
3
7
1. Display
2. VOLUME-knop
Draai eraan om het volume aan te passen.
3. CD-lade
4. POWER-toets
Druk erop om het apparaat aan te zetten of
in de stand-bymodus te schakelen.
5. INFO-toets
Druk erop om de stationinformatie te
bekijken.
6. SCAN / Pair-List-toets
• Druk erop om in de DAB- en FM-modus
automatisch naar stations te scannen.
• Druk erop om een Bluetooth-apparaat
in de Bluetooth-modus te selecteren.
• Drukken en ingedrukt houden om in de
Bluetooth-modus de verbinding van de
Bluetooth te verbreken.
7. Sensor van de afstandsbediening
8. MODE-toets
10. ENTER-toets
Druk erop om de selectie te bevestigen.
11.
, , , , , en -toetsen
: druk erop om de huidige track in de
Bluetooth- en CD-modus te pauzeren of af
te spelen.
: druk erop om in de CD-modus het
afspelen te stoppen.
: druk erop om in de Bluetooth- en
CD-modus naar de vorige track te
springen; drukken en ingedrukt houden om
de huidige track in de Bluetooth-modus
snel terug te spoelen.
: druk erop om in de Bluetooth- en
CD-modus naar de volgende track te
springen; drukken en ingedrukt houden om
de huidige track in de Bluetooth-modus
snel vooruit te spoelen.
: drukken en ingedrukt houden om de
huidige track in de CD-modus snel terug te
Page 79

8
Druk erop om tussen de DAB-, FM-,
Bluetooth-, CD- en AUX-modus te
schakelen.
9. MENU-toets
Druk erop om het menuscherm weer te
geven of af te sluiten.
spoelen.
: drukken en ingedrukt houden om de
huidige track in de CD-modus snel vooruit
te spoelen.
: druk erop om de CD uit de CD-lade te
werpen.
12. TUNE-knop
Draaien om de opties door te bladeren.
Achteraanzicht van het apparaat
1 2
3 4
1. DAB/FM-antenne
2. SERVICE-aansluitingen
Laat dit aan professioneel onderhou ds per soneel over!
3. AUX IN-aansluiting
4. DC IN-aansluiting
Page 80

9
Overzicht van de afstandsbediening
D
I
M
E
N
T
E
R
M
E
M
O
R
Y
M
E
NU
1
/
6
2/
7 3
/
8
4
/
9
5
/
1
0
S
H
I
F
T
MO
DE
T
UN
IN
G
V
O
L
IN
FO
S
T
/
M
O
1
5
8
6
7
3
4
2
1.
-toets
Druk erop om het apparaat aan te zetten of
in de stand-bymodus te schakelen.
2. DIM-toets
Druk erop om de dimmer aan te zetten of in
de stand-bymodus te schakelen.
3.
-toets
Druk erop om de CD uit de CD-lade te
werpen.
4. ENTER-toets
Druk erop om de selectie te bevestigen.
5. Navigatietoetsen
▲ Omhoog
▼ Omlaag
◄ Achteruit
► Vooruit
6. MEMORY-toets
Drukken en ingedrukt houden om het
voorkeurstation op te slaan.
Druk erop om een opgeslagen
voorkeurstation op te roepen.
7. MENU-toets
Druk erop om het menuscherm weer te
geven of af te sluiten.
8. VOORKEUR-toetsen 1/6, 2/7, 3/8, 4/9,
5/10 en de SHIFT-toets
Druk op één van de
VOORKEUR-toetsen en houd
ingedrukt om het voorkeur station 1, 2,
3, 4 of 5 op te slaan.
Druk op één van de
VOORKEUR-
toetsen om het
voorkeurstation 1, 2, 3, 4 of 5 op te
roepen.
Druk eerst op de SHIFT-toets en druk
vervolgens op één van de
VOORKEUR-
toetsen en houd
ingedrukt om het voorkeurs tation 6, 7,
8, 9 of 10 op te slaan.
Druk eerst op de SHIFT-toets en druk
vervolgens op één van de
VOORKEUR-toetsen 1/5, 2/6, 3/7 en
4/8 om het voorkeurstation 6, 7, 8, 9 of
Page 81

10
10 op te roepen.
D
I
M
E
N
T
E
R
M
E
M
O
R
Y
M
E
N
U
1
/
6
2
/
7
3
/
8
4
/
9
5
/
1
0
S
H
I
F
T
M
O
D
E
T
U
N
I
N
G
V
O
L
I
N
F
O
S
T
/
M
O
11
10
9
13
16
15
12
14
De batterijen vervangen:
1. Open het deksel van het batterijvak door
met uw duim het uitspringend gedeelte op
de achterkant van uw afstandsbediening
omlaag te duwen.
2. Plaats twee nieuwe AAA-batterijen met de
polariteiten in de richting volgens de
merktekens in het batterijvak.
Opmerking: plaats geen batterijen
verkeerd om, gebruik geen
verschillende type batterijen door
elkaar en gebruik geen oude en
nieuwe batterijen samen. Gooi uw
oude batterijen op een
milieuverantwoordelijke wijze weg.
3. Plaats de klep van het batterijvak terug.
9. , , , , en -toetsen
: druk erop om de huidige track in de
Bluetooth- en CD-modus te pauzeren of af
te spelen.
: druk erop om in de Bluetooth- en
CD-modus naar de vorige track te
springen; drukken en ingedrukt houden om
de huidige track in de Bluetooth-modus
snel terug te spoelen.
: druk erop om in de Bluetooth- en
CD-modus naar de volgende track te
springen; drukken en ingedrukt houden om
de huidige track in de Bluetooth-modus
snel vooruit te spoelen.
: druk erop om in de CD-modus het
afspelen te stoppen.
: drukken en ingedrukt houden om de
huidige track in de CD-modus snel terug te
spoelen.
: drukken en ingedrukt houden om de
huidige track in de CD-modus snel vooruit
te spoelen.
10. MODE-toets
Druk erop om tussen de DAB-, FM-,
Bluetooth-, CD- en AUX-modus te
schakelen.
11. TUNING +, - toetsen
Druk erop om in de DAB-modus de
stationlijst te bladeren.
Druk erop om in de FM-modus
handmatig de frequentie te scannen.
Drukken en ingedrukt houden om in de
FM-modus automatisch de frequentie
te scannen.
12. VOLUME +, - toetsen
Druk erop om het volume aan te passen.
13.
-toets
Druk erop om “DEMPEN AAN” of
“DEMPEN UIT” in te schakelen.
14. INFO-toets
Druk erop om de stationinformatie te
bekijken.
15. ST/MO-toets
Druk erop om in de DAB- en FM-modus de
audio naar stereo of mono over te
schakelen.
16. SCAN/Pair-List-toets
Druk erop om in de DAB- en
FM-modus automatisch naar stations
te scannen.
Druk erop om een Bluetooth-apparaat
in de Bluetooth-modus te selecteren.
Drukken en ingedrukt houden om in de
Bluetooth-modus de verbinding van de
Bluetooth te verbreken.
Page 82

11
DAB-modus
Wanneer u de radio aanze t zal het automatisch alle beschikbare stations zoeken e n opslaan. U
dient een extra volledig e scan ui t te voere n om ervoor te zorgen dat all e stations zijn ge vonden en
opgeslagen. Het is ook aanbevolen om elke paar maanden een nieuwe scan uit te voeren om
nieuwe DAB/DAB+ stations te zoeken die na de aankoop van uw DAB-radio met uitzenden zijn
begonnen.
1. Voor het eerste gebruik, zal uw radio een volledige scan uitvoeren en de stationlijst in het
geheugen opslaan.
2. Zodra het scannen is voltooid, zullen de DAB/DAB+ stations in alfanumerieke volgorde worden
weergegeven. Het eerste station in de lijst zal worden geselecteerd.
Opmerking: a. De DAB/DAB+ stations zullen in alfanumerieke volgorde worden
weergegeven en opgeslagen.
b. Indien geen DAB/D AB+ signaal wor dt gevonden, kan het voor u nodig
zijn om uw radio te verplaatsen.
Stationlijst
Met deze functie kunt u een station uit de lijst met beschikbare stations selecteren.
1. Draai tijdens het afspelen van een programma aan de TUNE-knop om de stationlijst weer te
geven.
2. Druk op de MENU-toets, draai vervolgens aan de TUNE-knop om DAB Menu te selecteren en
druk op de ENTER-toets om te bevestigen.
3. Draai aan de TUNE-knop om Station List te selecteren en druk vervolgens op de
ENTER-toets om te bevestigen.
4. Draai aan de TUNE-knop om de stationlijst te bladeren en druk vervolgens op de ENTER-toets
om te bevestigen. Het geselecteerde station zal worden gespeeld.
Secundaire dienst
U kunt na de naam van het station een “ >>” symboo l te zien krijgen, dit g eeft aan dat er voor dat
station secundaire diens ten beschikbaar zijn. Deze secundaire diensten bevatten ex tra diensten
die gerelateerd zijn aan het primaire station. Bijv. een sportstation kan bijvoorbeeld extra
commentaren toevoegen. De secundaire diensten worden direct na het primaire station (een
“<<”-symbool staat voor de naam van het station) in de stationlijst gevoegd.
Om het secundaire s tation te selecteren, draai aan de TUNE-knop tot u de s ecun dair e d ie nst vindt
die u wenst en druk vervolgens op de ENTER-toets om het te selecteren.
Wanneer de secundaire diens t beëindigt, zal het apparaat automatisch naar het pr imaire station
terugschakelen.
Page 83

12
Volgorde van de stations
U kunt de stations in een verschillende volgorde weergeven.
1. Druk op de MENU-toets, draai aan de TUNE-knop om DAB Menu te selecteren en druk
vervolgens op de ENTER-toets om te bevestigen.
2. Draai aan de TUNE-knop om Station Order te selecteren en druk vervolgens op de
ENTER-toets om te bevestigen.
3. Draai aan de TUNE-knop om “Alfanumeriek” of “Ensemble” te selecteren en druk vervolgens
op de ENTER-toets om de selectie te bevestigen.
Alfanumeriek
Geef alle zenders in alfanumerieke volgorde weer.
Ensemble
Toon de momenteel uitzendend e actieve s tations vóór de inactieve
stations.
Volledige scan
Met deze functie kan uw radio naar alle beschikbare stations scannen.
1. Druk op de MENU-toets, draai aan de TUNE-knop om DAB Menu te selecteren en druk
vervolgens op de ENTER-toets om te bevestigen.
2. Draai aan de TUNE-knop om Full Scan te selecteren en druk vervolgens op de ENTER-toets
om te bevestigen.
Handmatig afstemmen
1. Druk op de MENU-toets, draai aan de TUNE-knop om DAB Menu te selecteren en druk
vervolgens op de ENTER-toets om te bevestigen.
2. Draai aan de TUNE-knop om Manual Tune te selecteren en druk vervolgens op de
ENTER-toets om te bevestigen. De display zal het stationnummer en de frequentie
weergeven.
3. Draai aan de TUNE-knop om de kanalen te bladeren en druk vervolgens op de ENTER-toets
om het huidige kanaal te selecteren.
Opmerking: Als met dit kanaal en frequentie ee n m ultiplex overeenkomt, dan zal de display na een
paar seconden een afstemmeter weergeven met de sterkte van het signaal en de naam van het
multiplex.
4. Druk op de MENU-toets om het handmatig afstemmen af te sluiten.
DRC (Dynamic Range Control) waarde
U kunt het compr essieniveau van stations ins tellen om de versc hillen in het d ynamisch bereik of
geluidsniveau tussen radiostations op te heffen.
Opmerking: DRC op uit instellen betekent geen compressie; DRC op laag instellen geeft weinig
compressie aan; DRC op hoog instellen geeft maximale compressie aan.
1. Druk op de MENU-toets, draai aan de TUNE-knop om DAB Menu te selecteren en druk
vervolgens op de ENTER-toets om te bevestigen.
Page 84

13
2. Draai aan de TUNE-knop om DRC te selecteren en druk vervolgens op de ENTER-toets om te
bevestigen.
3. Draai aan de TUNE-knop om “DRC hoog”, “DRC laag” of “DRC uit” te selecteren en druk
vervolgens op de ENTER-toets om te bevestigen.
Prune
U kunt alle stations die niet in de stationlijst beschikbaar zijn verwijderen.
1. Druk op de MENU-toets, draai aan de TUNE-knop om DAB Menu te selecteren en druk
vervolgens op de ENTER-toets om te bevestigen.
2. Draai aan de TUNE-knop om Prune te selecteren en druk vervolgens op de ENTER-toets om
te bevestigen.
3. Draai aan de TUNE-knop om “YES” te selecteren en druk vervolgens op de ENTER-toets om
te bevestigen.
Stationinformatie bekijken
DAB/DAB+ stations zende n aanvullende informatie uit. Druk herhaald elijk op de INFO-toets, de
display zal de informatie waaronder Programmatype, Ensemble, Datum, Frequentie, Bitrate en
Codec en Signaalsterkte via schuivende tekst weergeven.
De signaalsterkte weergeven
Wanneer u de signaalsterk te sel ecteert, zal een s igna albalk m et de ster k te van h et h uidige s tation
op de display worden weergegeven.
De indicator op de signaalbalk geeft het
minimale aanvaardbare signaalniveau weer.
Opmerking: Stations met een signaalsterkte
onder het minimale signaalniveau kunnen
geen constante audio-stream leveren.
Voorkeurstations opslaan
Uw radio kan maximaal 10 van uw favoriete DAB/DAB+ stations als voorkeurstation opslaan.
Hierdoor hebt u snel en gemakkelijk toegang tot uw favoriete stations.
1. T erwijl uw favoriete station wordt afgespeeld, druk op één van de VOORKEUR-toetsen 1/5, 2/6,
3/7, 4/8 op het apparaat of de VOORKEUR-toetsen 1/6, 2/7, 3/8, 4/9, 5/10 op de
afstandsbediening en houd ingedrukt totdat de display “Voorkeur # opgeslagen” weergeeft.
(*# geeft 1, 2, 3, 4 of 5 aan)
2. Druk eerst op de SHIFT-toets en druk vervolgens op één van VOORKEUR-toetsen 1/5, 2/6,
3/7, 4/8 op het apparaat of de VOORKEUR-toetsen 1/6, 2/7, 3/8, 4/9, 5/10 op de
afstandsbediening en houd ingedrukt totdat de display “Voorkeur # opgeslagen” weergeeft.
(*# geeft 6, 7, 8, 9 of 10 aan)
3. U kunt ook op de MEMORY-toets op de afstandsbediening drukken en ingedrukt houden
totdat de display “Vo o rk eur opslag <1: (Leeg)>” weergeeft. Draai aan de TUNE-knop op het
apparaat of druk op de navigatietoetsen ▲ of ▼ op de afstandsbediening om het
voorkeurnummer 1-10 te selecteren en druk op de ENTER-toets op het apparaat of de
afstandsbediening om te bevestigen. De display zal “Voorkeur # opgeslagen” weergeven:
Minimale signaalniveau
Sterkte van het signaal
Page 85

14
Voorkeurstations oproepen
1. Druk op één van de VOORKEUR-toetsen 1/5, 2/6, 3/7, 4/8 op het apparaat of op de
VOORKEUR-toetsen 1/6, 2/7, 3/8, 4/9, 5/10 op de af s tandsbedieni ng om het voorkeurstation
(1, 2, 3, 4 of 5) af te spelen.
2. Druk eerst op de SHIFT-toets en druk vervolgens op één van de VOORKEUR-toetsen 1/5, 2/6,
3/7, 4/8 op het apparaat of op de VOORKEUR-toetsen 1/6, 2/7, 3/8, 4/9, 5/10 op de
afstandsbediening om het voorkeurstation (6, 7, 8, 9 of 10) af te spelen.
3. U kunt ook op de MEMORY-toets op de afstandsbediening drukken om “Voorkeur oproepen”
weer te geven. Draai aan de TUNE-knop op het apparaat of druk op de navigatietoetsen ▲ of
▼ op de afstandsbediening om het voorkeurstation te selecteren en druk op de ENTER-toets
op het apparaat of de afstandsbediening om het station te bevestigen dat u wilt beluister en .
Page 86

15
FM-modus
De FM-modus selecteren
1. Druk herhaaldelijk op de MODE-toets om FM-modus te selecteren.
2. Bij gebruik voor de eerste keer, zal het apparaat aan het begin van het FM-frequentiebereik
(87,50 MHz) beginnen. Of het zal het FM-station selecteren waar u het laatst naar luisterde.
3. Om handmatig de FM-frequentie te wijzigen, zorg ervoor dat geen andere
volgorde/systeeminstelling is ingesteld, draai aan de TUNE-knop om de frequentie met een
0,05 MHz per stap te wijzigen.
4. Om automatisch te scannen, wanneer de FM-frequentie wordt weerg ege ve n, draai de
TUNE-knop rechtsom of linksom en druk vervolgens op de SCAN-toets, uw radio zal vooruit of
achteruit springen totdat het volgende beschikbare station is bereikt.
Het scannen instellen
FM-scans stoppen standaard bij elk beschikbaar station. Dit kan resulteren in een slechte
signaal-ruisverhouding (ruis) van zwakke zenders.
1. Voor het wijzigen van de scaninstellingen zodat alleen bij stations met een goede
signaalsterkte wordt gestop t, druk op de MENU-toets, draai aan de TUNE-knop om FM Menu
te selecteren, druk vervolgens op de ENTER-toets om te bevestigen.
2. Draai aan de TUNE-knop om Scan setting te selecteren en druk vervolgens op de
ENTER-toets om te bevestigen.
3. Draai aan de TUNE-knop om “Alleen sterke stations” te bladeren en druk vervolgens op de
ENTER-toets om te bevestigen.
Audio instellen
Standaard worden alle stereo stations in ster eo weer g ege ven . Voor zwakke stations kan dit
resulteren in een slechte signaal-ruisverhouding (ruis).
1. Druk op de MENU-toets, draai vervolgens aan de TUNE-knop om FM Menu te selecteren en
druk vervolgens op de ENTER-toets om te bevestigen.
2. Draai aan de TUNE-knop om Audio setting te selecteren en druk vervolgens op de
ENTER-toets om te bevestigen.
3. Draai aan de TUNE-knop om “Forced mono” te bladeren en druk vervolgens op de
ENTER-toets om te bevestigen.
Stationinformatie bekijken
FM stations zenden aanvullende informatie uit. Druk herhaaldelijk op de INFO-toets. De display zal
de informatie, Programmatype, Datum en Naam van het programma via Radiotekst weergeven.
Page 87

16
Voorkeurstations opslaan
Uw radio kan max imaal 10 van uw favoriete FM stations als vo orkeurstations opslaan. Hierdoor
hebt u snel en gemakkelijk toegang tot uw favoriete stations.
1. T erwijl uw favoriete station wordt afgespeeld, druk op één van de VOORKEUR-toetsen 1/5, 2/6,
3/7, 4/8 op het apparaat of de VOORKEUR-toetsen 1/6, 2/7, 3/8, 4/9, 5/10 op de
afstandsbediening en houd ingedrukt totdat de display “Voorkeur # opgeslagen” weergeeft.
(*# geeft 1, 2, 3, 4 of 5 aan)
2. Druk eerst op de SHIFT-toets en druk vervolgens op één van VOORKEUR-toetsen 1/5, 2/6,
3/7, 4/8 op het apparaat of de VOORKEUR-toetsen 1/6, 2/7, 3/8, 4/9, 5/10 op de
afstandsbediening en houd ingedrukt totdat de display “Voorkeur # opgeslagen” weergeeft.
(*# geeft 6, 7, 8, 9 of 10 aan)
3. U kunt ook op de MEMORY-toets op de afstandsbediening drukken en ingedrukt houden
totdat de display “Vo o rk eur opslag <1: (Leeg)>” weergeeft. Draai aan de TUNE-knop op het
apparaat of druk op de navigatietoetsen ▲ of ▼ op de afstandsbediening om het
voorkeurnummer 1-10 te selecteren en druk op de ENTER-toets op het apparaat of de
afstandsbediening om te bevestigen. De display zal “Voorkeur # opgeslagen” weergeven:
Voorkeurstations oproepen
1. Druk op één van de VOORKEUR-toetsen 1/5, 2/6, 3/7, 4/8 op het apparaat of op de
VOORKEUR-toetsen 1/6, 2/7, 3/8, 4/9, 5/10 op de af s tandsbedieni ng om het voorkeurstation
(1, 2, 3, 4 of 5) af te spelen.
2. Druk eerst op de SHIFT-toets en druk vervolgens op één van de VOORKEUR-toetsen 1/5, 2/6,
3/7, 4/8 op het apparaat of op de VOORKEUR-toetsen 1/6, 2/7, 3/8, 4/9, 5/10 op de
afstandsbediening om het voorkeurstation (6, 7, 8, 9 of 10) af te spelen.
3. U kunt ook op de MEMORY-toets op de afstandsbediening drukken om “Voorkeur oproepen”
weer te geven. Draai aan de TUNE-knop op het apparaat of druk op de navigatietoetsen ▲ of
▼ op de afstandsbediening om het voorkeurstation te selecteren en druk op de ENTER-toets
op het apparaat of de afstandsbediening om het statio n te beves ti gen dat u wilt b eluis teren.
Page 88

17
Bluetooth-modus
Koppel het apparaat met een Bluetooth-apparaat om naar muziek te luisteren:
1. Druk herhaaldelijk op de MODE-toets om Bluetooth-modus te selecteren.
2. De display zal “Bluetooth vindbaar” weerg even.
3. Activeer uw Bluetooth-apparaat en selecteer de zoekmodus.
4. Op uw Bluetooth-apparaat zal “ALIO BAZE” verschijnen.
5. Selecteer “ALIO BAZE” en voer “0000” voor het wacht w oord in, in die n nodig.
6. Op de display zal “BT verbonden: Uw Bluetooth-appar aat” word en weergegeven wanneer de
verbinding geslaagd is.
7. Terwijl een track wordt afgespeeld, kunt u:
a. Op de
-toets drukken om naar de vorige track te s prin gen; op d e -toets drukken en
ingedrukt houden om de huidige track snel terug te spoelen.
b. Op de
-toets drukken om de huidige track af te spelen of te pauzeren.
c. Op de
-toets drukken om naar de v olgen de track te sp ringe n; op d e -t oets druk ken
en ingedrukt houden om de huidige track snel vooruit te spoelen.
8. Om de huidige Bluetooth-verbinding te verbeken, druk op en houd de SCAN-toets voor 3
seconden ingedrukt.
9. Om met een ander gekoppeld Bluetooth-apparaat te verbinden, druk herhaaldelijk op de
SCAN-toets om het Bluetooth-apparaat te selecteren waarmee u wilt verbinden en druk
vervolgens op de ENTER-toets om de verbinding te bevestigen.
Opmerking: Het apparaat zal na 10 minuten automatisch uitschakelen indien de
verbinding van het Bluetooth apparaat verbroken is, het uitgeschakeld is of het volume
bijna volledig gedempt is.
Page 89

18
CD-modus
Een CD in de CD-lade plaatsen
Om een CD af te spelen, plaats de Audio CD. Sommige CD's zijn niet compatibel.
Plaats in een willekeurige modus een Audio CD in de CD-lade, de display zal “LEZEN”
weergegeven, wacht enkele seconden.
Opmerking: Alleen wanneer een CD in de CD-lade is geplaatst, druk herhaaldelijk op de
MODE-toets om de CD-modus te selecteren.
Een CD-programma afspelen
1. Tijdens het afspelen van een Audio CD geeft de display het tracknummer en de verstreken tijd
weer.
2. Terwijl een track wordt afgespeeld, kunt u:
a. Op de
-toets drukken om de huidige track af te spelen of te pauzeren.
b. Op de
-toets drukken om naar de vorige track te springen.
c. Op de
-toets drukken om naar de volgende track te springen.
d. Op de
-toets drukken en ingedrukt houden om de huidige track snel terug te spoelen.
e. Op de
-toets drukken en ingedrukt houden om de huidige track snel vooruit te spoelen.
f. Tweemaal op de
-toets om het afspelen te stoppen.
3. In CD STOP-modus, indien de schijf een normale Audio CD is, zal de display het totale aantal
tracks en de totale tracktijd weergeven.
Willekeurig afspelen instellen
1. Druk op de MENU-toets, draai aan de TUNE-knop om CD: Willekeurig te selecteren, druk
vervolgens op de ENTER-toets om te bevestigen.
2. Draai aan de TUNE-knop om Off of On te selecteren en druk vervolgens op de ENTER-toets
om uw selectie te bevestigen.
Tracknr. Verstreken tijd
Aantal tracks
De totale tijd
Page 90

19
Herhaald afspelen instellen
1. Druk op de MENU-toets, draai aan de TUNE-knop om CD: Repeat te selecteren, druk
vervolgens op de ENTER-toets om te bevestigen.
2. Draai aan de TUNE-knop om Off, One of All te selecteren en druk vervolgens op de
ENTER-toets om uw selectie te bevestigen.
De CD uit de CD-lade werpen
Druk op de -toets, de display zal “OPEN” weergeven vervolgens kan de CD uit de CD-lade
worden geworpen.
Opmerking: Het apparaat zal na 10 minuten automatisch naar de stand-bymodus
overschakelen, indien de CD niet speelt.
Page 91

20
Aux In-modus
De AUX IN zorgt voor snelle en gemakkelijke verbinding met een MP3-speler of andere externe
audiobronnen.
Note: Alleen wanneer audiokabel op de AUX IN-aansluiting is aangesloten, druk herhaaldelijk
op de MODE-toets om de AUX-modus te selecteren.
1. Voordat u op het stopcontact aansluit, gebruik een 3,5 mm audiokabel (niet meegeleverd) om
via de AUX IN-aansluiting aan de achterzijde van het apparaat op uw externe audioapparaat
aan te sluiten.
2. Sluit de voedingsadapter op het stopcontact aan, druk op de POWER-toets om het apparaat in
te schakelen.
3. Het apparaat zal automatisch naar de AUX-modus overschakelen.
4. In de AUX-In-modus, kunt u uw audioapparaat rechtstreeks voor afspeelfuncties bedienen.
5. Om optimale volumeniveaus te krijgen, wordt aanpassing van het uitgangsvolume op het
audioapparaat aanbevolen.
Opmerking: Het apparaat zal na 10 minute n automatisch uitschakelen indien de verbinding
van het Bluetooth apparaat verbroken is, het uitgeschakeld is of het volume bijna volledig
gedempt is.
Page 92

21
Algemene bediening
Het alarm instellen
Uw radio bevat dubbele al armen. Zorg bij het instellen van het alarm ervoor dat eerst de tijd is
ingesteld.
1. Druk herhaaldelijk op de ALARM-toets op het apparaat om het alarm in te stellen.
2. Draai aan de TUNE-knop om “Alarm 1” of “Alarm 2” te selecteren en druk vervolgens op de
ENTER-toets om te bevestigen.
3. Draai aan de TUNE-knop om opties te selecteren en druk vervolgens op de ENTER-toets om
te bevestigen.
Alarm
instellen:
Aan of Uit
Tijd instellen:
06:00 (handmatig instellen van de alarmtijd)
Bron instellen:
DAB, FM, Zoemer of CD (indien er geen CD in het apparaat zit
wanneer het alarm luidt, zal in plaats de zoemer te horen zijn)
Herhaling
instellen:
Dagelijks, Eenmaal, Weekend of Weekdagen
Volume
instellen:
Draai aan de TUNE-knop om het alarmvolume aan te passen
4. Het instellen van het alarm is geslaagd. De display zal of weergeven:
5. Om tijdelijk het alarm uit te schakelen, druk op de SNOOZE-toets op het apparaat om de
sluimertijd te activeren. De displa y zal de inges tel de sluimertijd weergeven.
6. Om het alarm uit te zetten, druk op de POWER-toets wanneer het alarm luidt.
7. Om het Alarm te annuleren, raadpleeg de stappen 1-3 om het alarm op “Uit” in te stellen.
Slaap instellen
Met deze functie kan uw apparaat na een ingestelde slaaptijd zelf naar de stand-bymodus
schakelen.
1. Druk herhaaldelijk op de SLEEP-toets op het apparaat om Slapen uit, 15, 30, 45, 60 of 90
mins te selecteren, druk op de ENTER-toets om te bevestigen. De display zal het
slaappictogram
weergeven.
2. Om de sluimerfunctie uit te schakelen terwijl de sluimertimer nog steeds aftelt, herhaal stap 1
om “Slapen uit” te selecteren.
Datum/Tijd instelllen
1. Druk op de MENU-toets, draai aan de TUNE-knop om Datum/Tijd instellen te selecteren en
druk vervolgens op de ENTER-toets om te bevestigen.
2. Draai aan de TUNE-knop om opties te selecteren en druk vervolgens op de ENTER-toets om
te bevestigen.
DAB Autocorrect:
Werk de datum en tijd vanuit de DAB-modus bij
Handmatig:
Stel handmatig de tijd en datum in
3. Stel vervolgens de tijd volgens uw persoonlijke voorkeur in.
Page 93

22
Tijdnotatie instellen
1. Druk op de MENU-toets, draai aan de TUNE-knop om Time Mode te selecteren en druk
vervolgens op de ENTER-toets om te bevestigen.
2. Draai aan de TUNE-knop om 24 Hours of 12 Hours te selecteren en druk vervolgens op de
ENTER-toets om te bevestigen.
Sluimertijd instellen
Met deze functie kunt u de sluimertijd instellen wanneer het alarm luidt.
1. Druk op de MENU-toets, draai aan de TUNE-knop om Snooze Adjust te selecteren en druk
vervolgens op de ENTER-toets om te bevestigen.
2. Draai aan de TUNE-knop om de sluimertijd tussen 1-9 mins in te stellen en druk vervolgens
op de ENTER-toets om te bevestigen.
Helderheid instellen
1. Druk op de MENU-toets, draai aan de TUNE-knop om Brightness te selecteren en druk
vervolgens op de ENTER-toets om te bevestigen.
2. Draai aan de TUNE-knop om Standby Mode of Normal Mode te selecteren en druk
vervolgens op de ENTER-toets om te bevestigen.
3. Draai aan de TUNE-knop om Level 1- Level 5 te selecteren en druk vervolgens op de
ENTER-toets om te bevestigen.
De equalizer instellen
Met de functie kunt u een vereffeningprofiel voor het geluid kiezen. Elk van de
vereffeninginstellingen ver andert de toon van he t geluid van uw radio wanneer het geselecteerd
wordt.
1. Druk op de MENU-toets, draai aan de TUNE-knop om Set EQ te selecteren en druk
vervolgens op de ENTER-toets om te bevestigen.
2. Draai aan de TUNE-knop om uit Normal, Rock, Pop, Jazz en M y E Q te selecteren en druk
vervolgens op de ENTER-toets om te bevestigen.
3. Voor het instellen van My EQ, selecteer My EQ en druk vervolgens op de ENTER-toets om te
bevestigen. Draai aan de TUNE-knop om Treble of Bass te selecteren en druk vervolgens op
de ENTER-toets om te bevestigen. Draai aan de TUNE-knop om de waarde van de hoge en
lage tonen in te stellen en druk vervolgens op de ENTER-toets om te bevestigen.
De geluidssterkte instellen
1. Druk op de MENU-toets, draai aan de TUNE-knop om Loudness te selecteren en druk
vervolgens op de ENTER-toets om te bevestigen.
Page 94

23
2. Draai aan de TUNE-knop om OFF of ON te selecteren en druk vervolgens op de ENTER-toets
om te bevestigen.
Fabrieksinstellingen
Het terugzetten van de fabrieksinstellingen zet alle gebruikersinstellingen op de standaardwaarden,
dus tijd/datum en voork eurs tations gaa n verlore n.
1. Druk op de MENU-toets en draai vervolgens aan de TUNE-knop om Factory Reset te
selecteren en druk op de ENTER-toets om te bevestigen.
2. Draai aan de TUNE-knop om YES of NO te selecteren en druk vervolgens op de ENTER-toets
om te bevestigen.
3. Als YES is geselecteerd, zal het apparaat resetten en opnieuw opstarten.
Firmware-informatie
1. Druk op de MENU-toets, draai aan de TUNE-knop om Firmware te selecteren en druk
vervolgens op de ENTER-toets om te bevestigen.
2. Draai aan de TUNE-knop om DAB of MCU te selecteren en druk vervolgens op de
ENTER-toets om te bevestigen.
3. De versie-informatie zal op de displ a y worden weer ge g eve n.
Page 95

24
Specificaties
Items Specificaties
Beschrijving:
DAB/DAB+ en FM radio met CD-speler en Bluetooth
Frequentiebereik:
FM: 87,5 - 108 MHz
DAB/DAB+: 174,928 - 239,200 MHz
Voedingseisen:
AC-ingang: 110-240 Vac, 50-60 Hz
DC-uitgang: 12 V, 2 A
Audio-uitgangsvermogen:
> 5 Watt RMS bij 1% THV
Vermogenverbuik:
12 W (max.)
Afmetingen (L x B x H):
210 x 130 x 210 mm
Het symbool op het prod uct of in de instructies betekent
dat uw elektrische en elektronische apparatuur aan het
einde van de levensduur, gescheiden van uw huishoudelijk
afval moet worden verwijderd. Er zijn aparte
inzamelsystemen voor recycling in de EU.
Voor meer informatie, neem contact op met de lokale autoriteiten of uw verkoper waar u het
product hebt gekocht.
Page 96

25
Page 97

ALIO BAZE
DAB-/DAB+/FM-radio med CD-afspiller og Bluetooth
Brugermanual
Page 98

2
Vigtige sikkerhedsinstruktioner
1. Læs disse instruktioner.
2. Gem disse instruktioner.
3. Vær opmærksom på alle advarsler.
4. Følg anvisningerne.
5. Brug ikke radioen i nærheden af vand.
6. Rengør kun med en tør klud.
ADVARSEL: FOR AT REDUCERE RISIKOEN FOR BRAND ELLER ELEKTRISK STØD, MÅ
DETTE APPARA T IKKE UDSÆTTES FOR REGN ELLER FUGT.
For at undgå risiko for elektrisk stød, brand, etc.:
1. Placer ikke enheden i nærheden af varmekilder så som radiatorer, varmeapparater, ovne eller
andre apparater (inklusiv forstærkere) der udvikler varme.
2. Blokker ikke nogen af ventilationsåbningerne.
3. Apparatet må ikke udsættes for dryp eller sprøjt, og beholdere fyldt med væsker, så som
vaser, må ikke placeres på enheden.
4. Placer ikke tunge ting på enheden og træd ikke på den, tingene kan falde ned og forårsage
alvorlige skader på enheden.
5. Læs klassificeringsmærkaterne, på enhedens bagside, for strøm-input og andre
sikkerhedsinformationer.
6. Denne enhed må kun anvendes med den medfølgende strømforsyning.
7. Beskyt netledningen, så der ikke trædes på den, eller den bliver klemt, i særdeleshed ved stik,
stikkontakt, og der hvor ledningen kommer ud af apparatet.
8. Frakobl aldrig din enhed ved at trække i netledningen. Tag altid godt fast i stikket og træk det
ud af stikkontakten.
9. Reparer eller udskift alle elektriske ledninger der er blevet flosset, eller på anden måde er
beskadiget. Brug ikke en ledning der har revner eller har slidmærker i isolationen, stikket, etc.
10. For at forhindre elektrisk stød, brug ikke dette stik med forlængerledninger eller stikkontakter
med mindre stikkets ben kan sættes helt ind, således at ikke noget af benene er frilagte.
11. For at forhindre mulighed for brand eller stød, må dette apparat ikke udsættes for regn eller
fugt.
12. Fjern netstikket i tordenvejr og på regnvejrsdage for at opnå en ekstra beskyttelse, eller hvis
apparatet ikke skal anvendes i en længere periode. Dette vil forhindre at apparatet ødelægges
ved lynnedslag og overspændinger.
13. Prøv ikke selv på at foretage service på apparatet. Ved fjernelse af kabinettet kan man
udsætte sig selv for farlige spændinger eller andre farer. Et hvert serviceeftersyn sk al
foretages af kvalificerede teknikere.
14. Udsæt ikke fjernbetjeningens batteri for høje temperaturer så som direkte sollys, åben ild eller
lignende.
15. Der er fare for eksplosion, hvis batterierne sættes forkert i. Udskift kun med den samme type
batteri, eller en tilsvarende type.
16. Af hensyn til sikkerheden og unødvendigt energiforbrug, efterlad aldrig enheden tændt, når
Page 99

3
den ikke er under opsyn i længere perioder, fx om natten, under ferier, eller når man har forladt
hjemmet. Sluk for den og tag netstikket ud af stikkontakten.
Indhold
Vigtige sikkerhedsinstruktioner .......................................................................................................... 2
Indhold ............................................................................................................................................... 3
Komme i gang ................................................................................................................................... 5
Enheden set ovenfra .................................................................................................................. 6
Enheden set forfra ...................................................................................................................... 7
Enheden set bagfra .................................................................................................................... 8
Visning af fjernbetjening ............................................................................................................. 9
DAB-funktion ................................................................................................................................... 11
Stationsliste .............................................................................................................................. 11
Sekundær service .................................................................................................................... 11
Stationsrækkefølge .................................................................................................................. 12
Fuld scanning ........................................................................................................................... 12
Manuel tuning ........................................................................................................................... 12
DRC (Dynamic Range Control) ................................................................................................ 12
Prune ........................................................................................................................................ 13
Visning af stationsinformation .................................................................................................. 13
Lagring af forudindstillede stationer ......................................................................................... 13
Hentning af forudindstillede stationer ....................................................................................... 14
FM-radio .......................................................................................................................................... 15
Valg af FM-radio ....................................................................................................................... 15
Scanningsindstillinger .............................................................................................................. 15
Lydindstilling ............................................................................................................................. 15
Visning af stationsinformation .................................................................................................. 15
Lagring af forudindstillede stationer ......................................................................................... 16
Hentning af forudindstillede stationer ....................................................................................... 16
Bluetooth-funktion............................................................................................................................ 17
CD-funktion ...................................................................................................................................... 18
Indsætning af en CD i CD-bakken ........................................................................................... 18
Afspilning af CD-program ......................................................................................................... 18
Indstilling af tilfældig afspillerækkefølge .................................................................................. 18
Indstilling af gentaget afspilning ............................................................................................... 19
For at skubbe en CD ud af CD-bakken .................................................................................... 19
Aux in-funktion ................................................................................................................................. 20
Generel betjening ............................................................................................................................ 21
Indstilling af alarm .................................................................................................................... 21
Indstilling af sovetid .................................................................................................................. 21
Indstilling af dato/tid ................................................................................................................. 21
Indstilling af tidsformat ............................................................................................................. 22
Indstilling af snooze-tid ............................................................................................................. 22
Indstilling af lysstyrke ............................................................................................................... 22
Page 100

4
Indstilling af equalizer ............................................................................................................... 22
Indstilling af lydstyrke ............................................................................................................... 22
Fabriksnulstilling ....................................................................................................................... 23
Firmwareoplysninger ................................................................................................................ 23
Specifikationer……………………………………………………………………………………………24
 Loading...