

Page 1
with Basal-IQ™ Technology
400
50
100
150
200
250
300
350
3
HRS
mg/dL
88
3:24 PM
123
100%
INSULIN ON BOARD 1.1 u | 1:09 hrs
November 14
235 u
Training Manual
Page 2

Page 3

As an important member of our family, we would like you to know we
understand the importance of managing your diabetes. We care about
your health and respect your time. In every aspect of our Company,
from the creation of the t:slim X2 insulin pump with Basal-IQ technology to the development of this training manual, you are always our
top priority.
This manual is designed to educate you on the features and functions
of the t:slim X2 insulin pump with Basal-IQ technology, also referred
to in this manual as the “System.” It provides step-by-step illustrative
instructions on how to properly operate, manage, and care for your
System. Look for special content boxes, which highlight useful tips
and important notes that may help you interact with the System.
This Training Manual highlights common interactions with the System
and is not meant to replace the t:slim X2 Insulin Pump with Basal-IQ
Technology User Guide. For more comprehensive information on the
System, please refer to the t:slim X2 Insulin Pump with Basal-IQ Technology User Guide and additional information on our website: www.
tandemdiabetes.com.
Need help? We are here for you 24 hours a day, seven days a week
at (877) 801-6901.
We know you can’t wait to start using your t:slim X2 insulin pump
with Basal-IQ technology! If you have not scheduled your in-person
pump training, call us at (877) 801-6901, and we will notify your local trainer that you are ready to schedule. If you are trying to access
your online CGM or PLGS training, please visit the patient portal at
www.portal.tandemdiabetes.com.
DO NOT deliver insulin with your t:slim X2 insulin pump with Basal-IQ
technology until you receive training.
Customer Technical Support: (877) 801-6901 1
Page 4

Table of Contents
Overview
Indications for Use and Contraindications ............................................... 5
Pump Overview ........................................................................................ 5
Pump Terminology .................................................................................... 6
Basal-IQ Screen Lock .............................................................................. 8
Basal-IQ Home Screen ............................................................................. 9
Status Screen ......................................................................................... 10
Bolus Screen .......................................................................................... 12
Options Screen ....................................................................................... 14
Number Keypad ..................................................................................... 16
Letter Keypad ......................................................................................... 17
My Pump Screen .................................................................................... 18
Basal-IQ Screen ..................................................................................... 19
Getting Started
Charging Your Pump .............................................................................. 21
Turning On Pump Screen ....................................................................... 22
Unlock Pump Screen ............................................................................. 22
Edit Time ................................................................................................ 24
Edit Date ................................................................................................. 26
Personal Profile
Personal Profile Overview ...................................................................... 29
Creating a New Profile ............................................................................29
Programming a New Profile....................................................................31
Edit an Existing Profile ............................................................................ 36
Duplicate an Existing Profile ................................................................... 40
Activate, Delete, or Rename a Profile ..................................................... 42
My CGM
Entering the Transmitter ID ..................................................................... 47
Starting a Sensor Session ...................................................................... 49
Calibrating the Sensor ............................................................................ 51
Setting Up CGM Alerts ........................................................................... 54
2 Customer Technical Support: (877) 801-6901
Page 5

Table of Contents
Basal-IQ Technology
Basal-IQ Overview .................................................................................. 65
Basal-IQ Settings ................................................................................... 65
Basal-IQ Alerts ....................................................................................... 66
Load
Fill and Load a Cartridge ........................................................................ 71
Bolus
Bolus Overview ...................................................................................... 83
Food Bolus Using Grams ....................................................................... 83
Food Bolus Using Units ......................................................................... 85
Correction Bolus ..................................................................................... 86
Extended Bolus ...................................................................................... 88
Quick Bolus Setup .................................................................................. 92
Quick Bolus ............................................................................................ 96
Cancel or Stop a Bolus .......................................................................... 98
Pump Features
Stop and Resume Insulin Delivery........................................................ 101
Setting a Temp Rate ............................................................................. 104
Pump History ........................................................................................ 106
Reminders and Alerts ........................................................................... 108
Pump Volume and Screen Options ...................................................... 111
Alerts and Technical Support
Alerts .................................................................................................... 115
Alarms .................................................................................................. 115
Malfunction ........................................................................................... 115
Customer Technical Support ................................................................ 116
Customer Technical Support: (877) 801-6901 3
Page 6

Overview
Page 7

Overview
Indications for Use and Contraindications
Indications for Use
The t:slim X2 insulin pump with Basal-IQ technology is intended for the subcutaneous delivery of insulin, at set and variable rates, for the management of diabetes
mellitus in persons requiring insulin. The System is indicated for use in individuals 6
years of age and older.
Contraindications
The t:slim X2 insulin pump with Basal-IQ technology is not intended for anyone
unable or unwilling to:
•
Test blood glucose (BG) levels as recommended by your healthcare provider
•
Maintain sufficient diabetes self-care skills
•
See his or her healthcare provider(s) regularly
•
Demonstrate adequate carbohydrate-counting skills (preferred, but not required)
You must also have adequate vision and/or hearing in order to operate your t:slim
X2 insulin pump with Basal-IQ technology.
Federal law restricts this device to sale by or on the order of a licensed healthcare
provider with prescriptive authority.
Pump Overview
Your t:slim X2 insulin pump with Basal-IQ technology uses touchscreen technology.
To activate and interact with your System, use the pad of your finger to quickly and
lightly tap on the screen.
Do not use your finger nail or other object to interact with the screen. It will not
activate the screen or its functions. A soft-tipped stylus may be used on the touchscreen.
QUICK TIP
Fingers should be clean and dry. Oily or damp fingers may interfere with activation of the
touch screen.
ALERT
Turn screen off and position the screen away from the skin when worn under clothing.
Customer Technical Support: (877) 801-6901 5
Page 8

Overview
Pump Terminology
Basal
Basal is a slow, continuous delivery of insulin, which keeps BG levels stable between meals and during sleep. It is measured in units per hour (units/hour).
Basal-IQ
Basal-IQ is the name of the technology embedded in the System that predicts
when your glucose level will reach 80 mg/dL or less within 30 minutes and suspends insulin delivery to prevent hypoglycemia. It will also suspend insulin delivery if
the CGM glucose reading is already 70 mg/dL or less.
Blood Glucose (BG)
BG is the level of glucose in blood, measured in milligrams per deciliter (mg/dL).
Glucose Target
Glucose target is a specific blood glucose goal; it’s an exact number, not a range.
When a BG or CGM value is entered in the t:slim X2 insulin pump Bolus Calculator,
the calculated insulin bolus will be adjusted up or down as needed to attain this
target.
Bolus
A bolus is a quick dose of insulin that is usually delivered to cover meals or an
elevated BG. There are several types of boluses that can be delivered by the t:slim
X2 insulin pump with Basal-IQ technology, including food, correction, extended, and
quick boluses.
Cannula
Insulin is delivered through the cannula, the part of the infusion set that is inserted
under the skin.
Carb
Carbohydrates (carbs) are the sugars and starches in food that the body breaks
down into glucose and uses as an energy source. Carbs are measured in grams.
Carb Ratio
The carb ratio is the number of grams of carbohydrate that one unit of insulin will
cover. Also known as insulin-to-carbohydrate ratio.
Continuous Glucose Monitor (CGM)
CGM systems sense glucose in the interstitial fluid at regular intervals.
Correction Bolus
A correction bolus is given to correct elevated BG.
Correction Factor
A correction factor is the amount that BG is lowered by one unit of insulin. Also
known as the insulin sensitivity factor (ISF).
6 Customer Technical Support: (877) 801-6901
Page 9

Overview
Extended Bolus
An Extended Bolus is delivered over a period of time. It is intended for times when
you have a high-fat meal or a meal spread out over a long period of time.
Grams
Grams are a unit of measurement used to measure carbohydrates.
Insulin Duration
Insulin duration is the amount of time that insulin is active and available in the body
after a bolus has been delivered. This also relates to the calculation for insulin on
board (IOB).
Insulin on Board (IOB)
IOB is the insulin that is still active (has the ability to continue to lower the BG) in the
body after a bolus has been delivered.
Load
Load refers to the process of removing, replacing, and filling a new cartridge and
infusion set.
Personal Profile
A Personal Profile is a personalized group of settings that defines the delivery of
basal and bolus insulin within specific time segments throughout a 24-hour period.
Quick Bolus
A Quick Bolus is a way to deliver a bolus (using the Quick Bolus button) by following beep/vibration commands without navigating through or viewing the t:slim X2
insulin pump screen.
Temporary Basal Rate (Temp Rate)
Temp Rate is used to increase or decrease the current basal rate for a short period
of time to accommodate special situations, such as exercise or illness. The programmed basal rate is represented as 100%, with percentages greater or less than
100% representing how much more or less insulin is delivered compared with the
basal rate. A 120% temp rate, for example, represents 20% more insulin than the
regular basal rate.
Unit
A unit is the increment of measurement for insulin.
USB Cable
USB is the abbreviation for universal serial bus. The cable connects into the micro
USB port on the t:slim X2 insulin pump with Basal-IQ technology.
Customer Technical Support: (877) 801-6901 7
Page 10

Overview
400
50
100
150
200
250
300
350
3
HRS
mg/dL
88
123
1
2
3
4
5
Basal-IQ Screen Lock
3:24 PM
100%
INSULIN ON BOARD 1.1 u | 1:09 hrs
November 14
7
8
235 u
6
9 10
1. Alert icon: Indicates a reminder, alert, or alarm is active behind the screen lock
2. USB port: Charge your t:slim X2 insulin pump battery. Close the cover when
not in use
3. Basal-IQ technology status: Indicates the status of the Basal-IQ technology
4. CGM graph shading: Red shading indicates the Basal-IQ technology is,
or was, active for the period indicated
5. CGM graph: Visual view of data from the continuous glucose monitor
6. 1–2–3: Unlocks pump screen
7. Screen On/Quick Bolus button: Turns on the t:slim X2 insulin pump screen
or programs a Quick Bolus (if activated)
8. LED Indicator: Illuminates when the t:slim X2 insulin pump is connected
to a power supply and functioning properly
9. Cartridge tubing: Tubing attached to the cartridge
10. Tubing connector: Connects the cartridge tubing to the infusion set tubing
8 Customer Technical Support: (877) 801-6901
Page 11
Basal-IQ Home Screen
400
50
100
150
200
250
300
350
3
HRS
mg/dL
88
Overview
1
2
3
4
100%
INSULIN ON BOARD 1.1 u | 1:09 hrs
3:24 PM
November 14
235 u
OPTIONS BOLUS
5 6
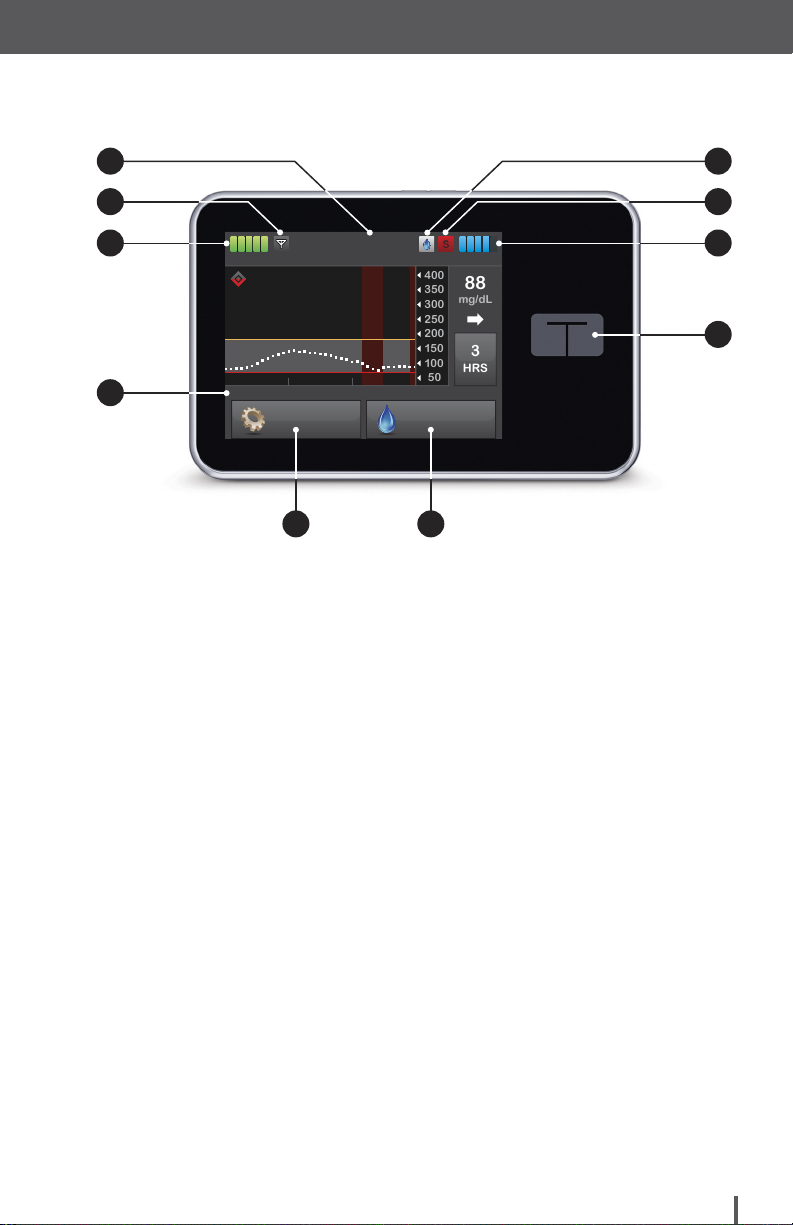
1. Time and date display: Displays the current time and date
2. Antenna: Indicates communication status between pump
and transmitter
3. Battery level: Displays the level of battery power remaining. When
connected for charging, the charging icon (lightning bolt) will display
7
8
9
10
4. Insulin on board (IOB): Indicates the amount and time remaining
for any active insulin on board
5. Options: Stop/Resume insulin delivery, manage Pump Settings,
Load Cartridge, program a Temp Rate, and view History
6. Bolus: Program and deliver a bolus
7. Active Bolus icon: Indicates an active bolus
8. Status: Displays current pump settings and insulin delivery status
9. Insulin level: Displays the current amount of insulin in the cartridge
10. Tandem logo: Returns to the Home Screen
Customer Technical Support: (877) 801-6901 9
Page 12
Overview
B
Status Screen
BACK
1
P
2
3
4
BACK
6
7
8
9
Current Status
Weekday
Basal Rate 0.625 u/hr
Last Bolus
Carbohydrates
3 u
11/14 - 2:55 PM
ON
Current Status
Correction
Factor
Carb Ratio
Target BG
Insulin Duration
1u: 42 mg/dL
1u: 12 g
100 mg/dL
4 hours
5
BACK
10
11
12
13
10 Customer Technical Support: (877) 801-6901
Current Status
Last Calibration
Time Sensor
Started
Transmitter
Battery
Basal-IQ
11/14/18
8:46 AM
11/14/18
11:13 AM
OK
ON
Page 13

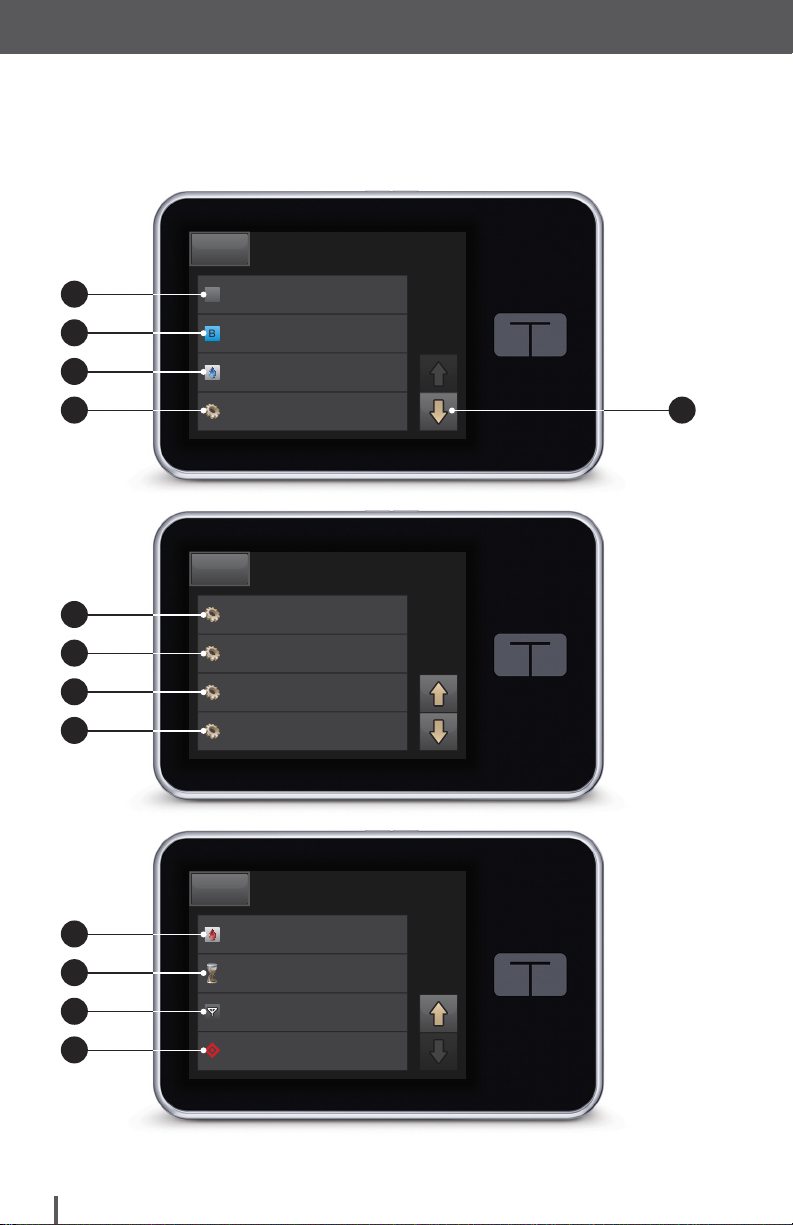
1. Profile: Displays current active Personal Profile
2. Basal Rate: Displays current basal rate being delivered
(if a Temp Rate is active, this is displayed in units/hour)
3. Last Bolus: Displays the amount, date, and time of last bolus
4. Carbohydrates: Indicates whether feature is on or off
5. Up/Down Arrow: Indicates there is more information
6. Correction Factor: Displays current correction factor
used to calculate bolus
7. Carb Ratio: Displays current carb ratio used to calculate
bolus for food
8. Target BG: Displays current BG target used to calculate bolus
Overview
9. Insulin Duration: Displays current insulin duration used to
calculate insulin on board
10. Last Calibration: Indicates whether feature is on or off
11. Time Sensor Started: Displays date and time of last time
sensor started
12. Transmitter Battery: Displays transmitter battery status
13. Basal-IQ Status: Displays the Basal-IQ technology status
NOTE
No changes can be made from this screen.
Customer Technical Support: (877) 801-6901 11
Page 14

Overview
BG
View Calculation
Add BG
CARBS
grams
0
BG
View Calculation
Add BG
INSULIN
units
0
Bolus Screen
Using Grams
1
2
0
units
3
NEXTBACK
54
6
Using Units
1
2
0
units
NEXTBACK
6
12 Customer Technical Support: (877) 801-6901
3
54
Page 15

Using Grams
1. BACK: Returns to the Home Screen
2. CARBS: Enter grams of carb
3. Units: Displays total units calculated
4. View Calculation: Displays how the insulin dose
was calculated using the current settings
5. Add BG: Enter BG level
6. NEXT: Moves to next step
Overview
Using Units
1. BACK: Returns to the Home Screen
2. INSULIN: Enter units of insulin
3. Units: Displays total units calculated
4. View Calculation: Displays how the insulin dose
was calculated using the current settings
5. Add BG: Enter BG level
6. NEXT: Moves to next step
COLOR NOTE
Use of blue text may relate to bolus delivery activity.
Customer Technical Support: (877) 801-6901 13
Page 16
Overview
Options Screen
1
2
3
4
5
7
8
9
10
BACK
STOP INSULIN
My Pump
My CGM
Temp Rate
BACK
Load
Pump History
CGM History
Basal-IQ
Options
6
Options
11
14 Customer Technical Support: (877) 801-6901
Page 17

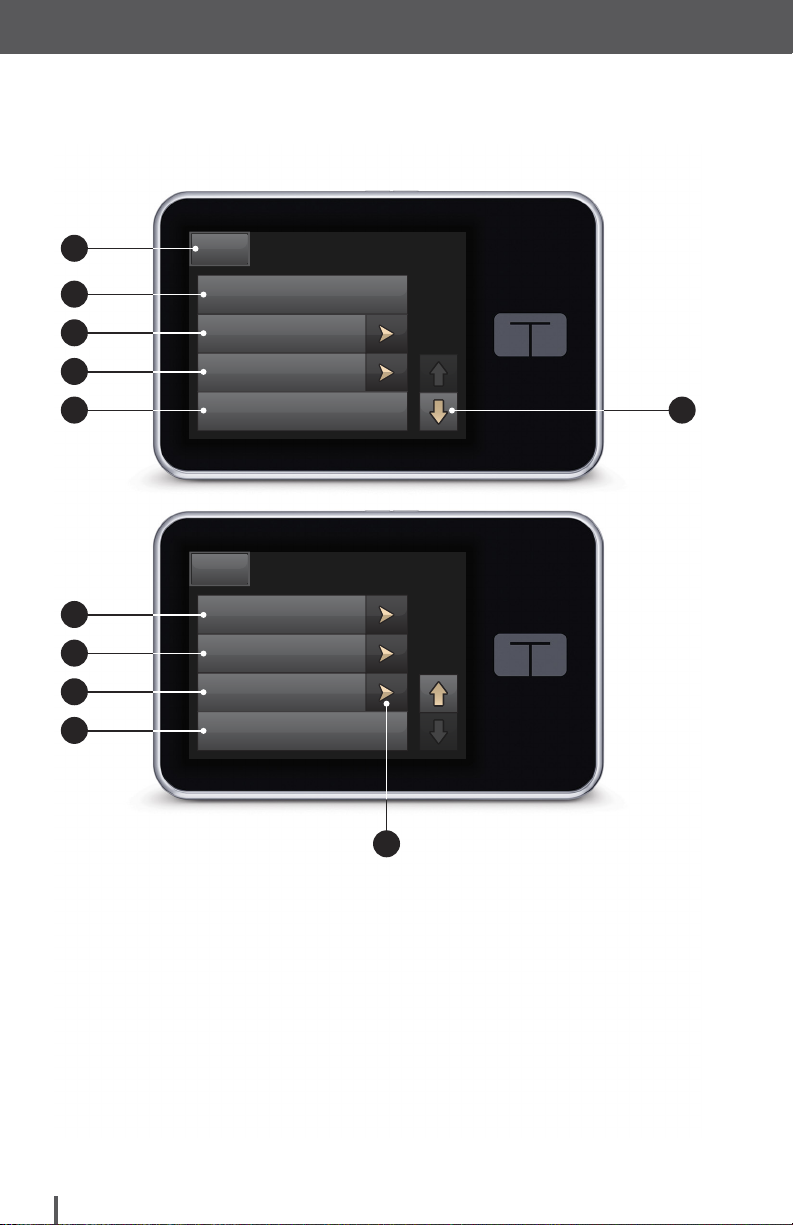
1. BACK: Returns to the Home Screen
2. STOP INSULIN: Stops insulin delivery. If insulin delivery is
stopped, RESUME INSULIN will be displayed
3. My Pump: Personal Profiles, Alert Settings, Pump Settings,
and Pump Info
4. My CGM: STOP/START SENSOR, Calibrate CGM, CGM Alerts,
and CGM Settings
5. Temp Rate: Programs a temporary basal rate
6. Up/Down Arrow: Indicates that there is more information
7. Load: Change Cartridge, Fill Tubing, Fill Cannula, and
Site Reminder
8. Pump History: Displays historical log of pump events
Overview
9. CGM History: Sessions and Calibrations, Alerts and Errors,
and Complete
10. Basal-IQ: On/Off, Suspend Alert, Resume Alert
11. Menu Arrows: Indicates additional menu options are available
COLOR NOTE
Orange text relates to t:slim X2 insulin pump setup or delivery settings.
Customer Technical Support: (877) 801-6901 15
Page 18
Overview
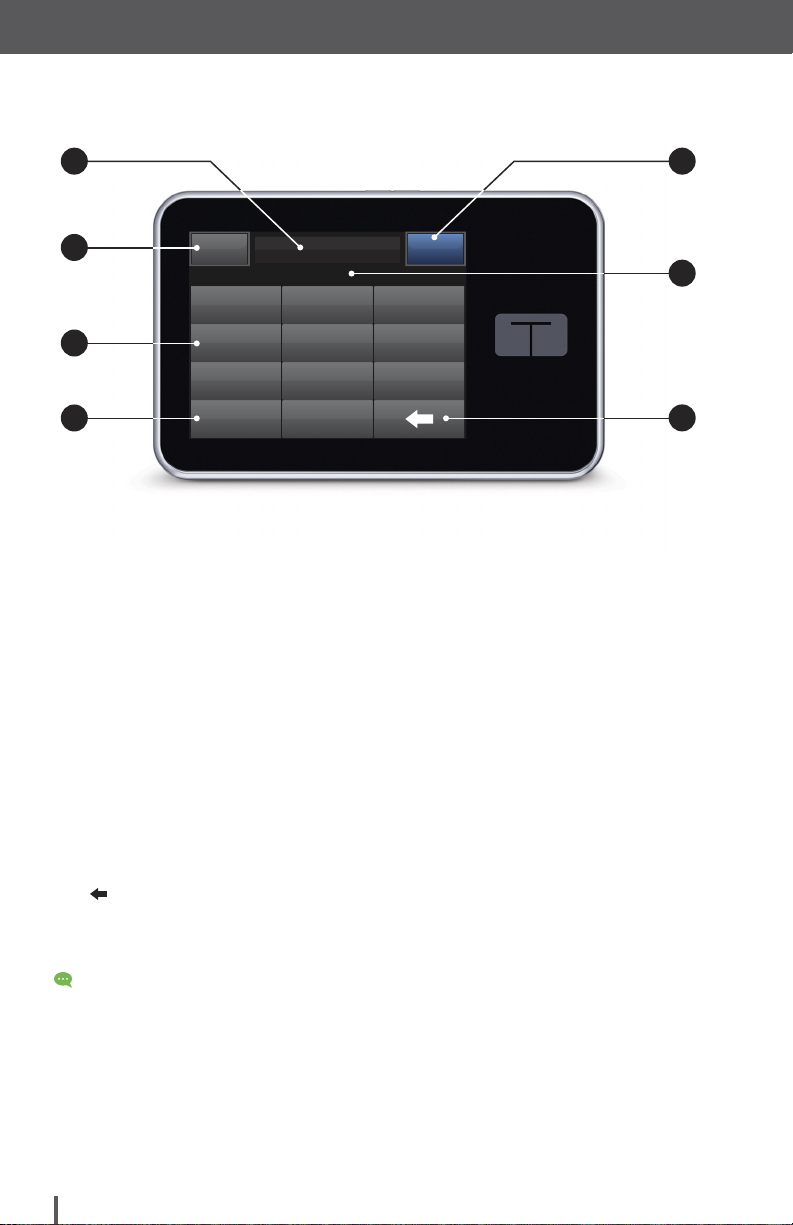
Number Keypad
1
2
20
grams
21 3
3
54 6
87 9
4
1. Value entered
2. BACK: Returns to previous screen
3. Keypad numbers
+ / =
0
5
DONEBACK
6
7
4. +/=: Allows numbers to be added on gram keypad screen.
If in units, this displays as a decimal point
5. DONE: Completes task and saves information entered
6. Units/grams: Value of what is entered
:
7.
To change an existing number, begin by tapping the numbers on the keypad
to override the current value.
Deletes last number entered
QUICK TIP
16 Customer Technical Support: (877) 801-6901
Page 19
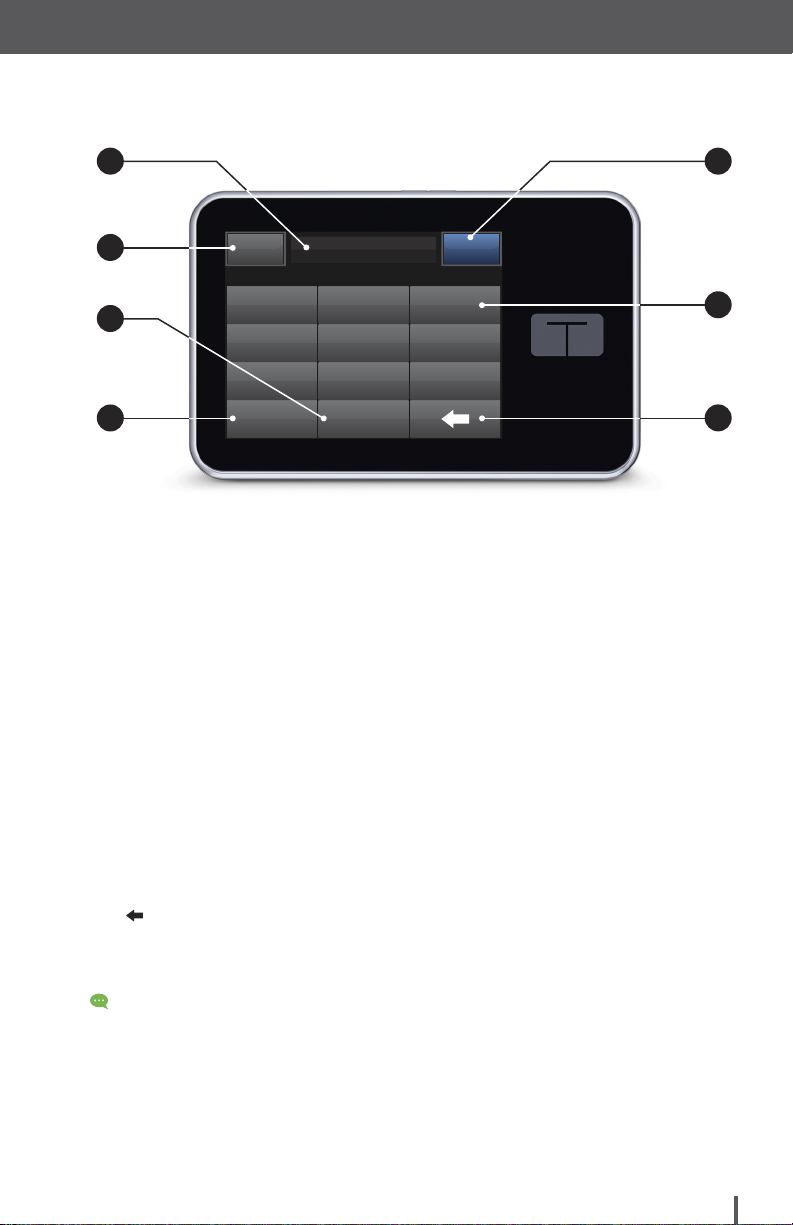
Letter Keypad
Overview
1
2
3
Weekday
name
defabc ghi
mnojkl pqr
vwxstu yz
4
1. Name of profile
2. BACK: Returns to previous screen
3. Space: Enters a space
123
space
5
SAVEBAC K
6
7
4. 123: Changes keypad mode from letters (ABC)
to numerals (123)
5. SAVE: Saves entered information
6. Letters: Tap once for first letter displayed, two quick taps
for middle letter, and three quick taps for third letter
7. : Deletes last letter or number entered
QUICK TIP
If changing an existing name, begin by tapping the letters on the keypad
to enter new text. The maximum number of characters is 16.
Customer Technical Support: (877) 801-6901 17
Page 20
Overview
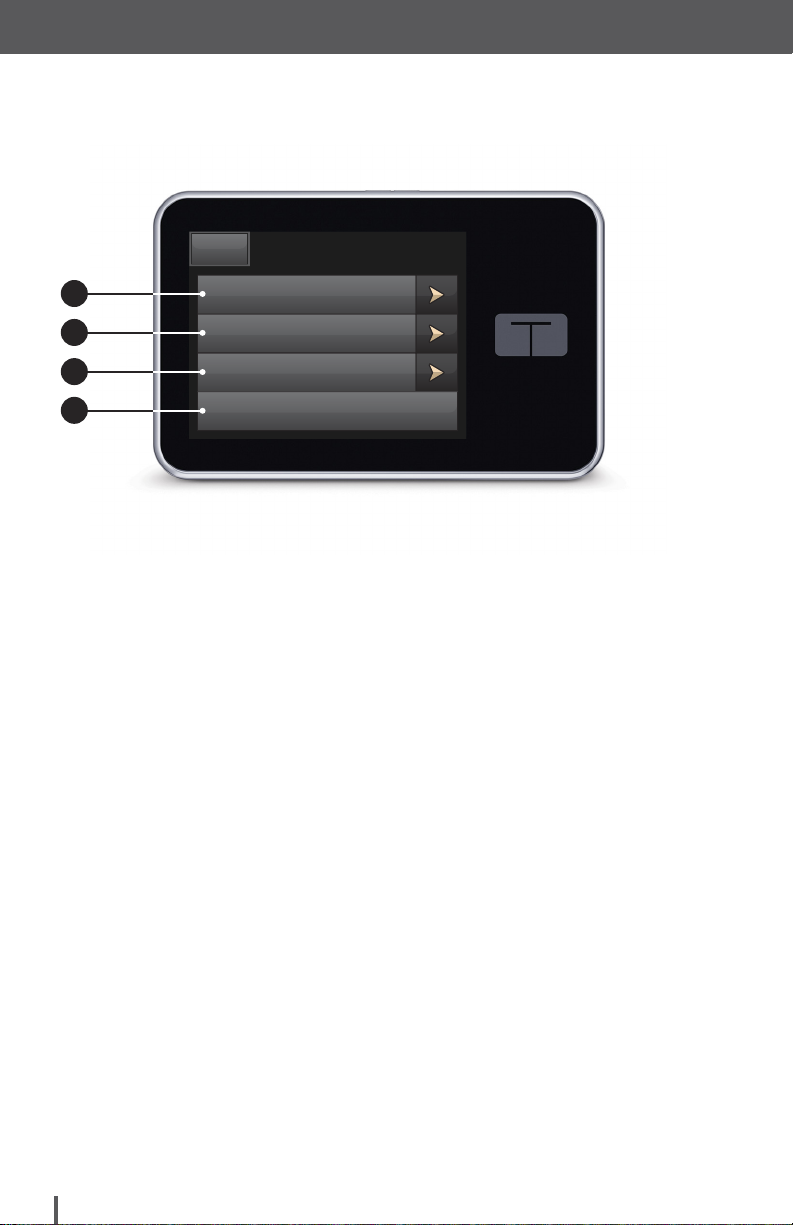
My Pump Screen
BACK
1
2
3
4
Personal Profiles
Alert Settings
Pump Settings
Pump Info
My Pump
1. Personal Profiles: A group of settings that defines basal
and bolus delivery
2. Alert Settings: Pump Reminders and Pump Alerts
3. Pump Settings: Quick Bolus, Pump Volume, Screen Options,
and Time and Date
4. Pump Info: t:slim X2 insulin pump serial number, Tandem Diabetes
Care Customer Technical Support phone number, website, and
other technical information
18 Customer Technical Support: (877) 801-6901
Page 21

Basal-IQ Screen
Overview
Basal-IQ
1
2
3
Basal-IQBasal-IQ
Suspend Alert
Resume Alert
SAVEBAC K
OFF ON
OFF
ON
ONOFF
1. Basal-IQ Technology ON/OFF: Turns Basal-IQ technology on or off
2. Suspend Alert ON/OFF: Turns on or off, the alert that indicates when
insulin has been suspended
3. Resume Alert ON/OFF: Turns on or off the alert indicating when
insulin has been resumed after a suspension
NOTE
If this is your first time using your t:slim X2 insulin pump with the Basal-IQ technology,
you must first begin an active sensor session before using the Basal-IQ technology.
The Basal-IQ technology is turned on by default and will begin working once there is an
active sensor session.
NOTE
The Suspend and Resume Alerts are turned off by default.
Customer Technical Support: (877) 801-6901 19
Page 22

Getting Started
Page 23
Getting Started
Charging Your Pump
The t:slim X2 insulin pump with Basal-IQ technology is powered by an internal
lithium polymer rechargeable battery. Included with the System are accessories
for charging from AC wall outlets, automobile outlets, and a PC USB port. Upon
receipt of the t:slim X2 insulin pump with Basal-IQ technology, you should charge
it using the AC charger long enough to ensure a full charge, then plug in for a few
minutes every day or two to keep the battery optimally charged. Battery life depends on use (for example, screen-on time can be shortened to extend battery life).
NOTE
When you plug in the t:slim X2 insulin pump with Basal-IQ technology, the following are
signals that the pump is charging:
»
An illuminated screen
»
An audible alert
»
An illuminated LED (edge around the Screen On/Quick Bolus button)
»
A vibrating alert
»
A charge symbol (lightning bolt) on the battery level indicator appears
QUICK TIP
Tandem Diabetes Care recommends periodically checking the battery level indicator,
charging the System for a short period of time every day (10-15 minutes), and also
avoiding frequent full discharges.
1. Plug the two-prong end of the AC charger into a grounded AC electrical outlet.
2. Plug the USB cable into the AC charger and the other end into the micro USB
port on your t:slim X2 insulin pump with Basal-IQ technology. The screen is
illuminated.
NOTE
The Screen On/Quick Bolus button can also be used to turn the screen off.
Customer Technical Support: (877) 801-6901 21
Page 24
Getting Started
400
50
100
150
200
250
300
350
3
HRS
mg/dL
88
3:24 PM
123
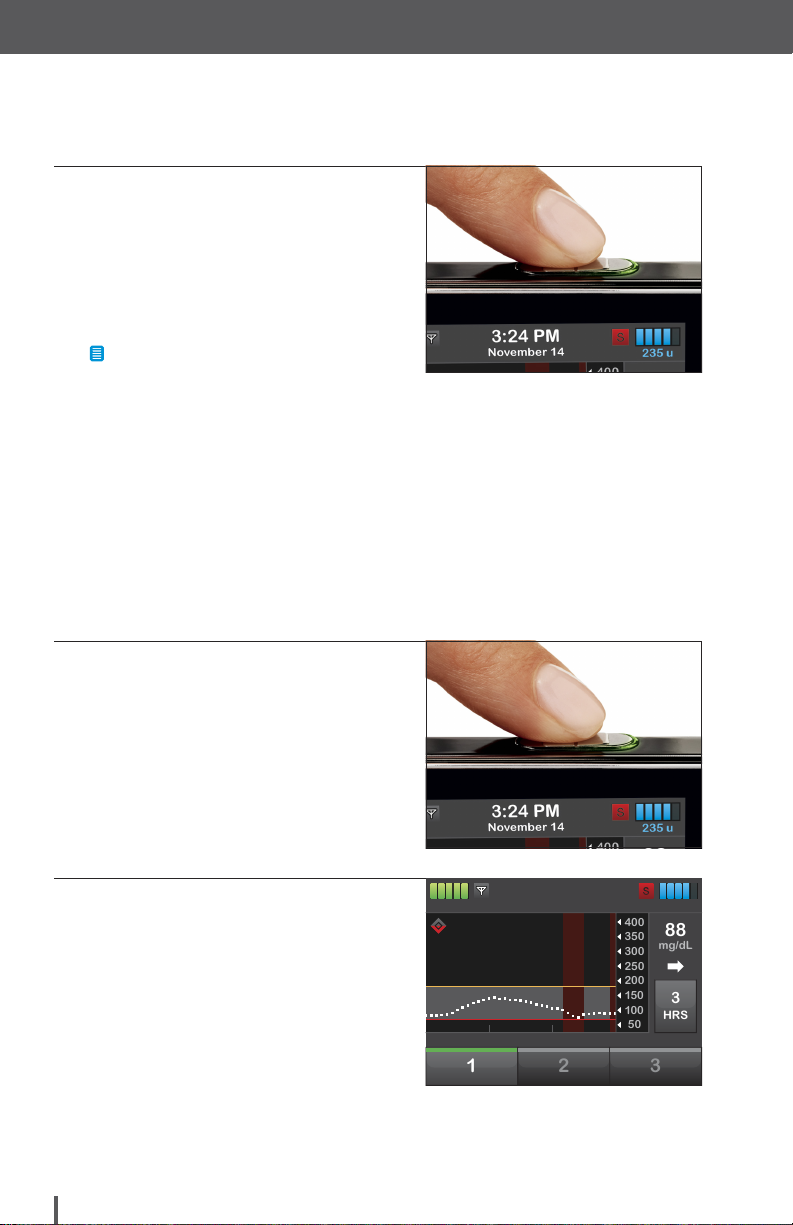
Turning On Pump Screen
1. Press the Screen On/Quick Bolus
button.
ü The Screen Lock screen is
displayed. Once unlocked, the
Home Screen or the last screen
that was viewed is displayed.
NOTE
The Screen On/Quick Bolus button can
also be used to turn the screen off.
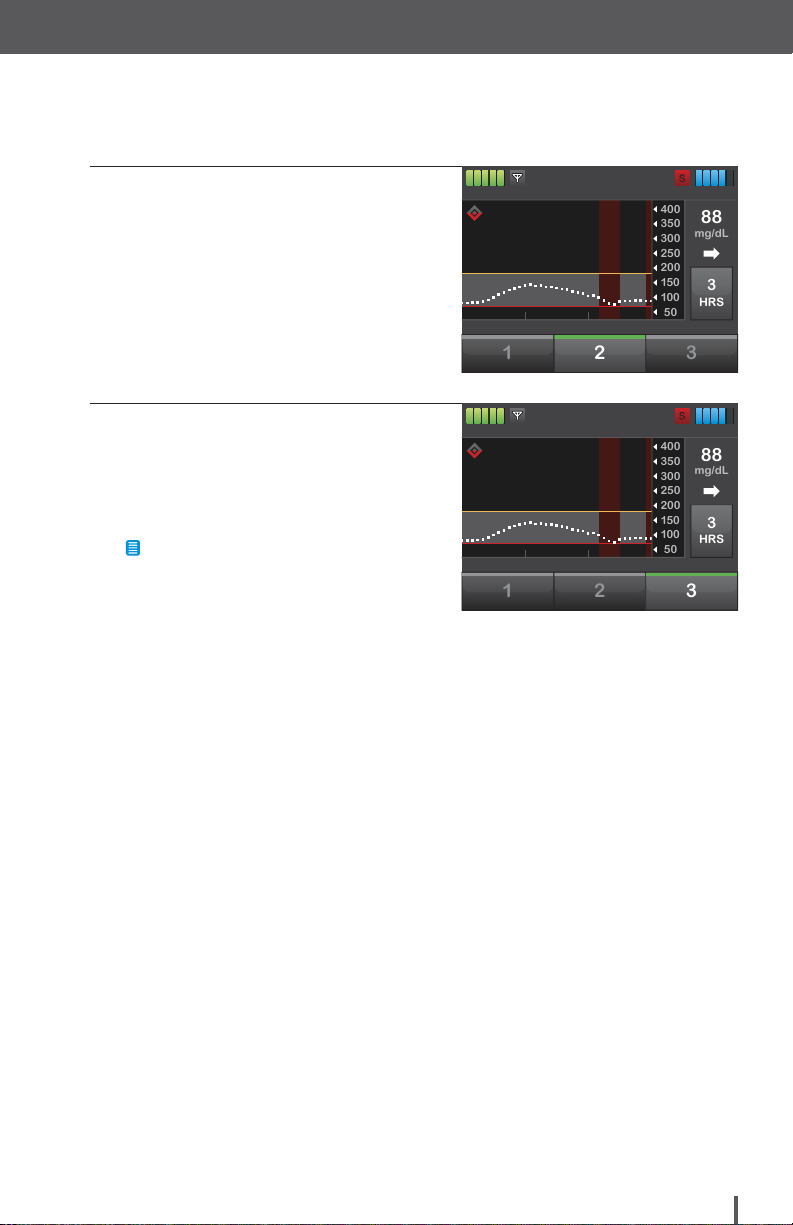
Unlock Pump Screen
1. Press Screen On/Quick Bolus
button.
2. Tap 1.
100%
INSULIN ON BOARD 1.1 u | 1:09 hrs
November 14
235 u
22 Customer Technical Support: (877) 801-6901
Page 25
Getting Started
400
50
100
150
200
250
300
350
3
HRS
mg/dL
88
321
400
50
100
150
200
250
300
350
3
HRS
mg/dL
88
231
3. Tap 2.
4. Tap 3.
ü The pump screen is now unlocked.
The last screen that was viewed
is displayed.
NOTE
You must tap 1-2-3 in sequential order,
or you will have to begin again to unlock
the pump screen. The screen will turn
off after three accidental screen taps.
3:24 PM
100%
INSULIN ON BOARD 1.1 u | 1:09 hrs
100%
INSULIN ON BOARD 1.1 u | 1:09 hrs
November 14
3:24 PM
November 14
235 u
235 u
Customer Technical Support: (877) 801-6901 23
Page 26

Getting Started
400
50
100
150
200
250
300
350
3
HRS
mg/dL
88
Edit Time
1. From the Home Screen,
tap OPTIONS.
2. Tap My Pump.
3. Tap Pump Settings.
6:32 PM
100%
INSULIN ON BOARD 1.1 u | 1:09 hrs
November 14
OPTIONS BOLUS
BACK
STOP INSULIN
My Pump
My CGM
Temp Rate
BACK
Personal Profiles
Alert Settings
Pump Settings
Pump Info
Options
My Pump
235 u
4. Tap Time and Date.
24 Customer Technical Support: (877) 801-6901
BACK
Quick Bolus
Pump Volume
Screen Options
Time and Date
Pump Settings
2 g
Page 27
Getting Started
SAVE
213087954
6
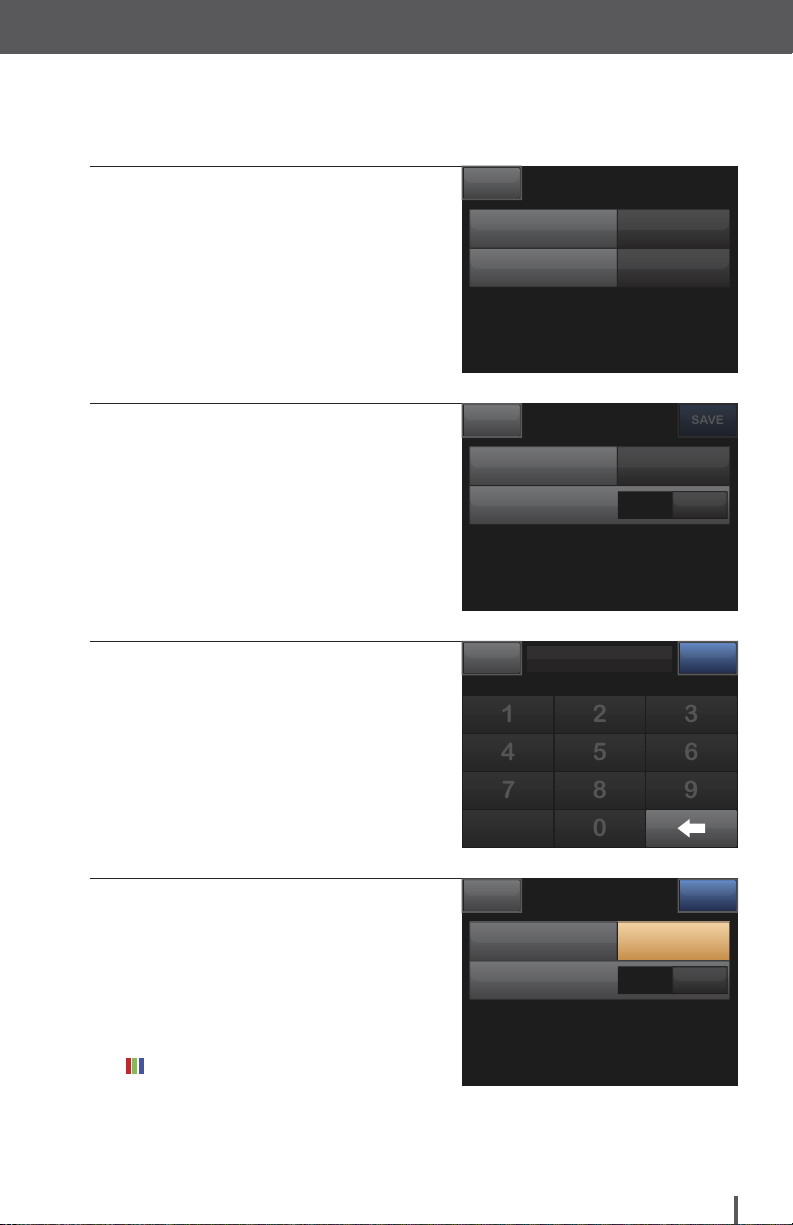
5. Tap Edit Time.
6. Tap Time.
7. Using the on-screen keypad, enter
the hour and minutes values. Verify
and tap DONE.
BACK
Edit Time
Edit Date
BACK
Time
Time of Day
Time and Date
Edit Time
AM PM
7 : 32
hour minute
6:32 PM
11/14/18
6:32 PM
DONEBACK
8. Tap Time of Day to set AM or PM.
9. Verify the correct time is set and
Time
Edit Time
tap SAVE.
Time of Day
ü The Settings Saved screen
is displayed.
COLOR NOTE
The orange highlighted area indicates a
recent change made to a setting.
Customer Technical Support: (877) 801-6901 25
SAVEBAC K
7:32
AM PM
Page 28

Getting Started
SAVE
Edit Date
1. From the Time and Date screen,
tap Edit Date.
2. Tap Month.
3. Find and tap current month. Use
Up/Down Arrows to view months
not displayed.
BACK
Edit Time
Edit Date
BACK
Month
Day
Year
BACK
September
October
November
December
Time and Date
7:32 PM
11/14/18
Edit Date
November
14
2018
Select Month
4. Tap Day. Using the on-screen
BACK
Edit Date
keypad, enter the current day.
Verify and tap DONE.
Month
Day
Year
26 Customer Technical Support: (877) 801-6901
SAVE
December
14
2018
Page 29
Getting Started
213
087
9
546
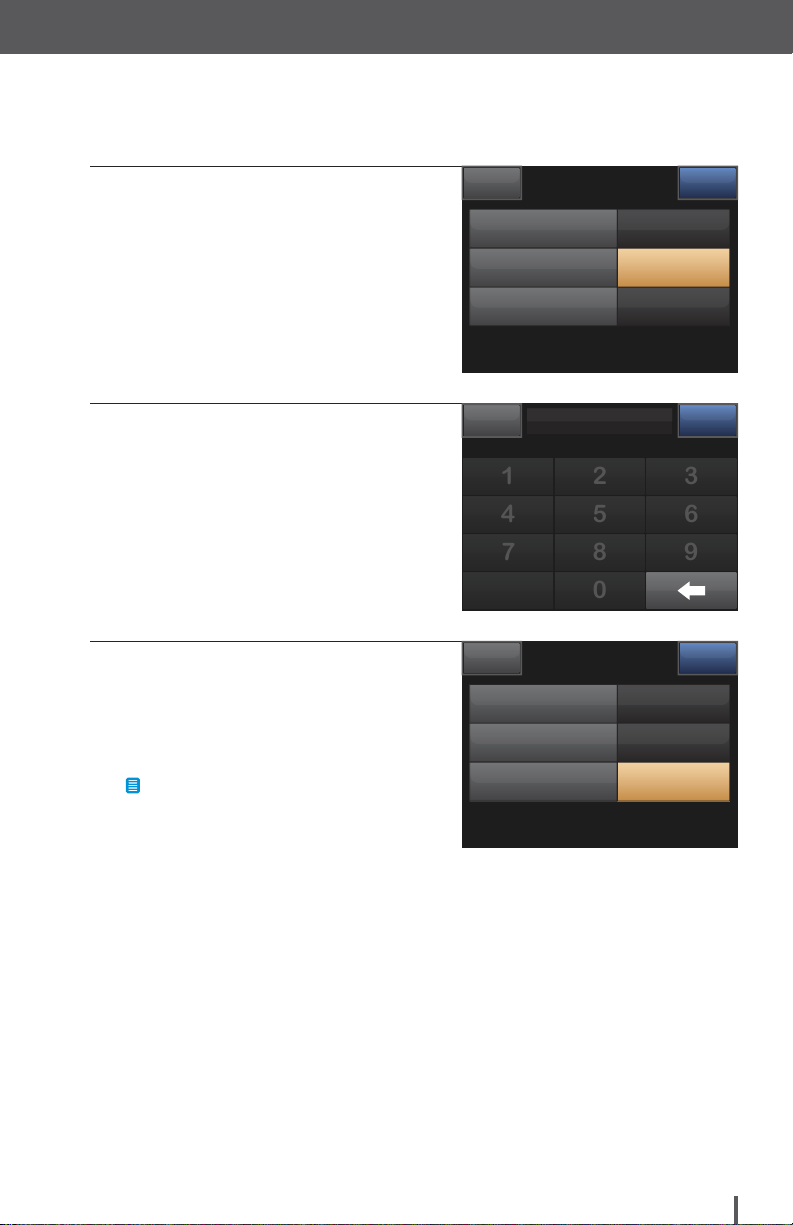
5. Tap Year.
6. Using the on-screen keypad
enter the current year. Verify
and tap DONE.
7. Verify the correct date is set and
tap SAVE.
ü The Settings Saved screen
is displayed.
BACK
Month
Day
Year
BACK
Month
Day
Edit Date
2018
year
Edit Date
SAVE
December
1
2018
DONEBACK
SAVE
December
1
NOTE
Year
Setting the correct time and date
on your t:slim X2 insulin pump with
Basal-IQ technology is very important
to ensure that your settings reflect
your insulin needs and also that data
uploaded into the t:connect application
are accurate.
Customer Technical Support: (877) 801-6901 27
2018
Page 30

Personal Profile
Page 31

Personal Profile
22
18
14
10
6
2
400
50
100
150
200
250
300
350
3
HRS
mg/dL
88
Personal Profile Overview
A Personal Profile is a group of settings that define the basal and bolus delivery
within specific time segments throughout a 24-hour period. Each profile can be
personalized with a name. Within a Personal Profile, the following can be set:
•
Timed Settings: Basal Rate, Correction Factor, Carb Ratio, and Target BG.
•
Bolus Settings: Insulin Duration, Max Bolus, and Carbohydrates setting (On/Off).
NOTE
Up to six different Personal Profiles can be created and up to 16 different time segments
can be set in each Personal Profile.
The first time segment starts at 12:00 AM (Midnight). Basal Rate, Correction Factor,
Carb Ratio, and Target BG are set for each segment.
Creating a New Profile
1. From the Home Screen,
tap OPTIONS.
100%
6:32 PM
November 14
235 u
2. Tap My Pump.
INSULIN ON BOARD 1.1 u | 1:09 hrs
OPTIONS BOLUS
BACK
Options
STOP INSULIN
My Pump
My CGM
Temp Rate
Customer Technical Support: (877) 801-6901 29
Page 32

Personal Profile
space
Timed Settings
Bolus Settings
3. Tap Personal Profiles.
4. Tap NEW to create a new profile.
5. Using the on-screen keypad, enter
a profile name (up to 16 characters)
and tap SAVE.
NOTE
Refer to the Overview section for
instructions on using the
on-screen keypad.
BACK
Personal Profiles
Alert Settings
Pump Settings
Pump Info
BACK
Profile 1 ON
My Pump
Personal Profiles
Profile 1
name
defabc ghi
mnojkl pqr
vwxstu yz
123
NEW
SAVEBAC K
6. Tap Press to Set Up to begin
setting insulin delivery settings.
NOTE
Once the Personal Profile has
been created, the settings must
be programmed.
30 Customer Technical Support: (877) 801-6901
BACK
5 hrs
DURATION
New Profile
Press to Set Up
10 u
MAX BOLUSONCARBS
Page 33

Personal Profile
SAVE
0
Programming a New Profile
NOTE
Data entered will affect insulin delivery. Make sure all information is entered correctly.
1. Tap Basal.
NOTE
The first time segment will start at
12:00 AM (Midnight).
2. Using the on-screen keypad, enter
the desired basal rate and tap
DONE.
NOTE
Always confirm that the decimal point
placement is correct.
3. Tap Correction Factor.
COLOR NOTE
The orange highlighted area indicates a
recent change made to a setting.
BACK
Basal Press to Set Up
Correction Factor Press to Set Up
Carb Ratio Press to Set Up
Target BG Press to Set Up
12:00 AM
Enter Rate
u/hr
DONEBACK
21 3
54 6
87 9
.
Basal
Correction Factor Press to Set Up
Carb Ratio Press to Set Up
Target BG Press to Set Up
0
12:00 AM
0.75 u/hr
SAVEBAC K
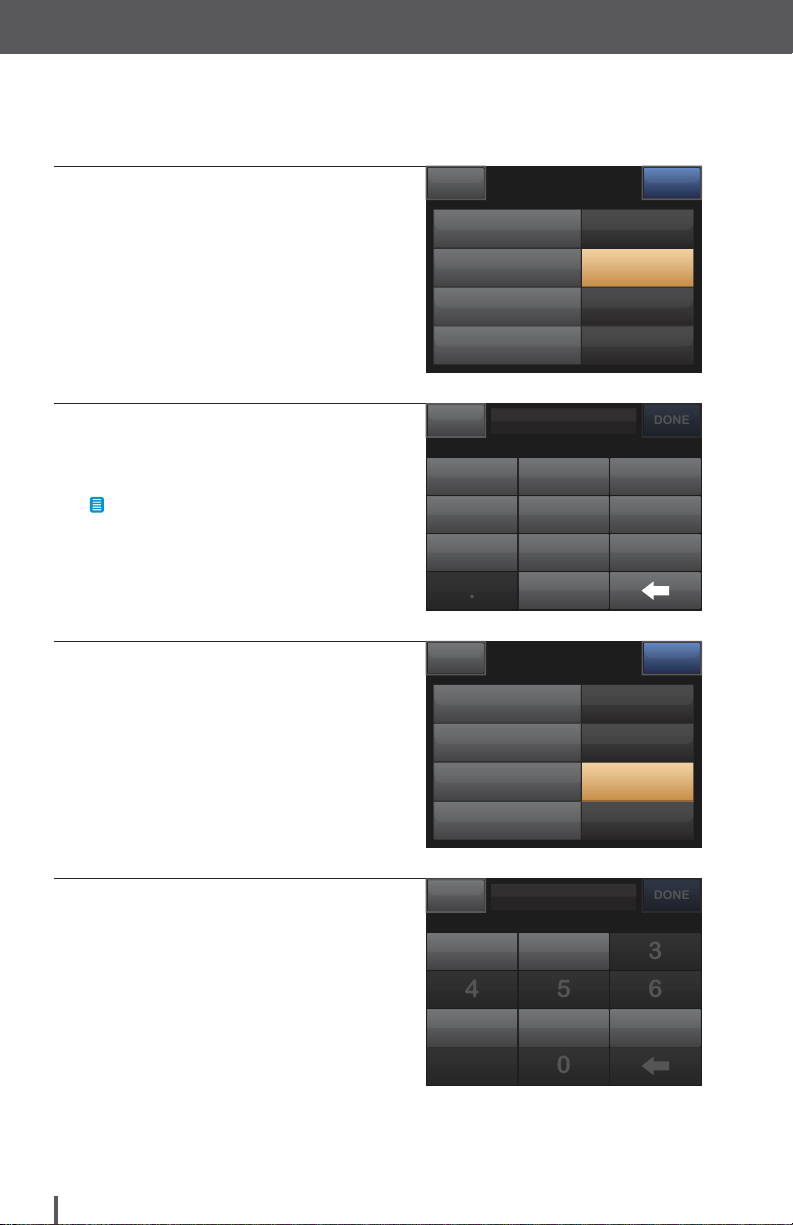
4. Using the on-screen keypad, enter
the desired correction factor and
unit mg/dL
tap DONE.
21 3
NOTE
Enter the mg/dL that 1 unit of insulin
will lower BG.
COLOR NOTE
Gray text indicates values that do not
need to be added.
Customer Technical Support: (877) 801-6901 31
54 6
87 9
--1 :
DONEBACK
Page 34
Personal Profile
DONE
.
3
0
546
DONE
5. Tap Carb Ratio.
6. Using the on-screen keypad, enter
the desired insulin-to-carbohydrate
ratio and tap DONE.
NOTE
Enter the grams of carbohydrate to be
covered by 1 unit of insulin.
7. Tap Target BG.
12:00 AM
Basal
Correction Factor
Carb Ratio Press to Set Up
Target BG Press to Set Up
BACK
unit grams
0.75 u/hr
1u:50 mg/dL
- -1 :
21 3
54 6
87 9
0
12:00 AM
Basal
Correction Factor
Carb Ratio
Target BG Press to Set Up
0.75 u/hr
1u:50 mg/dL
1u:10 mg
SAVEBAC K
SAVEBAC K
8. Using the on-screen keypad,
enter the desired BG target
BACK
Enter Target
mg/dL
and tap DONE.
21
87 9
32 Customer Technical Support: (877) 801-6901
Page 35
Personal Profile
NO
YES
Target BG
120 mg/dL
Carb Ratio
1u: 10g
Correction Factor
1u: 50 mg/dL
Basal
0.75 u/hr
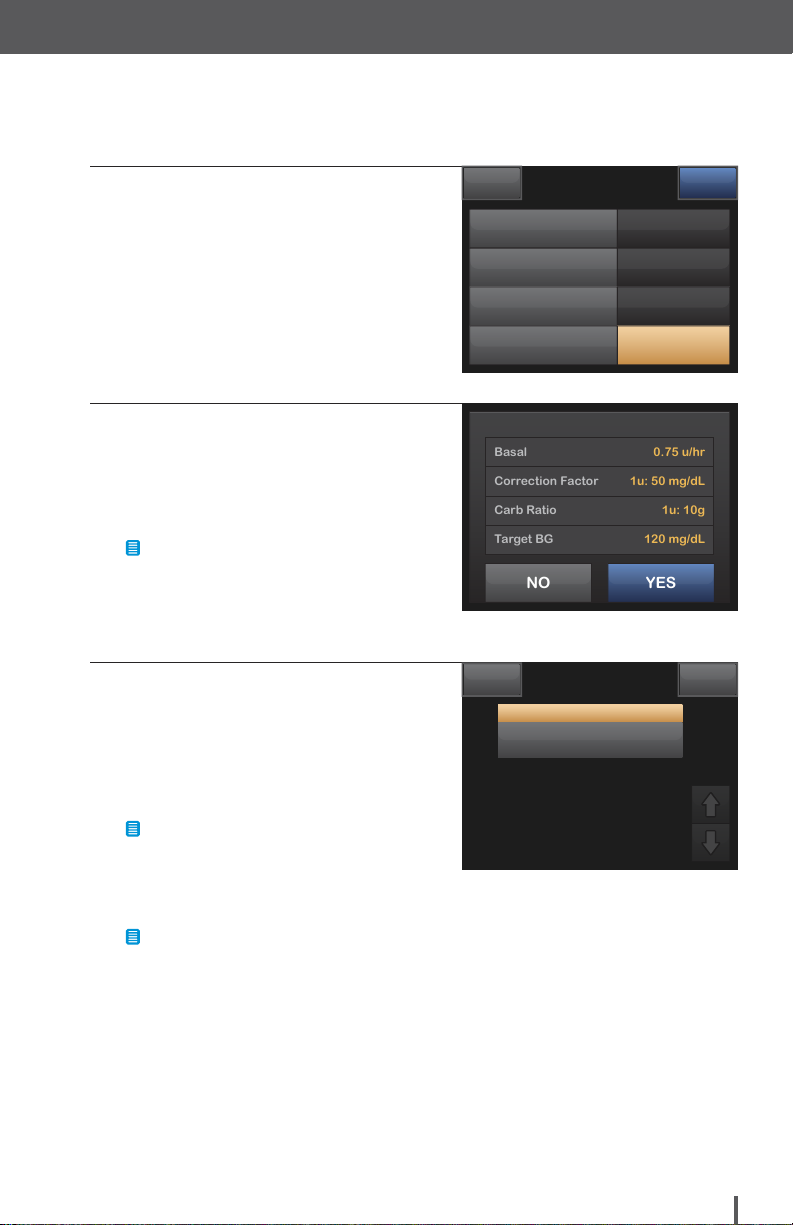
9. Review entered values and
tap SAVE.
10. Confirm settings.
Tap YES if entered data is correct.
Tap NO to make changes.
NOTE
Any settings defined in the previous
time segment are copied and appear
in the new time segment. Tap on each
setting to edit as needed.
11. Tap BACK to set the Bolus settings.
- OR -
Tap ADD to create additional
time settings.
Basal
Correction Factor
Carb Ratio
Target BG
Confirm Settings?
BACK
Timed Settings
0.75
1:50
BASAL
CORRECT
12:00 AM
12:00 AM
1:10
CARB TARGET BG
SAVEBAC K
0.75 u/hr
1u:50 mg/dL
1u:10 mg
120 mg/dL
ADD
120
NOTE
Your t:slim X2 insulin pump with
Basal-IQ technology delivers insulin at
basal rates as low as 0.1 unit/hour.
NOTE
You will notice that many functions of
your t:slim X2 insulin pump with Basal-IQ technology include confirmation
screens. Confirmation screens are an
important part of the safety feature of
your System. Please confirm that the
information is correct before changing
settings or delivering a bolus.
Customer Technical Support: (877) 801-6901 33
Page 36
Personal Profile
Bolus Settings
Timed Settings 12:00a - 12:00a
130879
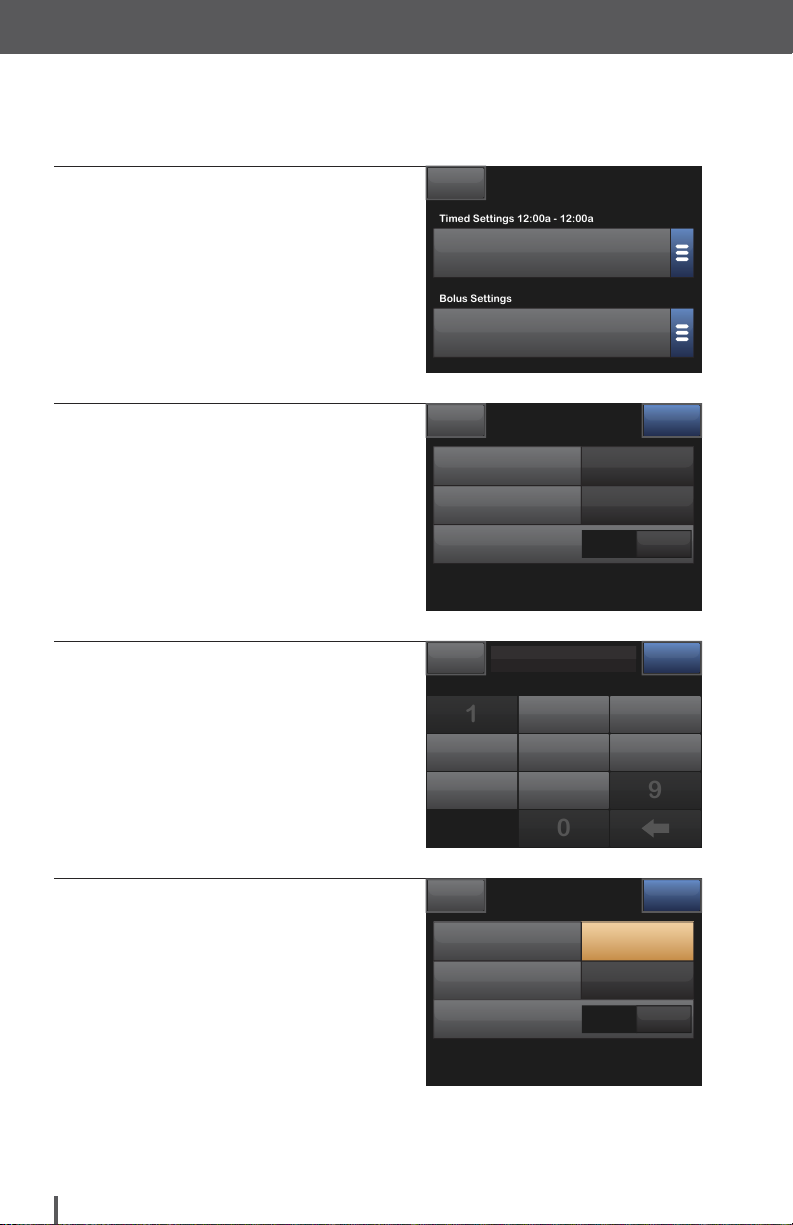
12. Tap the Bolus Settings panel.
13. Tap Insulin Duration.
14. Using the on-screen keypad, enter
the desired time for the duration of
insulin action and tap DONE.
BACK
0.75
1:50
BASAL
CORRECT
5 hrs
DURATION
Insulin Duration
Max Bolus
Carbohydrates
New Profile
1:10
CARB
10 u
MAX BOLUSONCARBS
Bolus Settings
OFF
005 :
hour minute
2
54 6
120
TARGET BG
5 hrs
10 u
SAVEBAC K
ON
DONEBACK
15. Tap Max Bolus.
34 Customer Technical Support: (877) 801-6901
Bolus Settings
Insulin Duration
Max Bolus
Carbohydrates
OFF
SAVEBAC K
5 hrs
10 u
ON
Page 37
Personal Profile
0
NO
YES
Max Bolus
10 u
Insulin Duration
5 hrs
Carbohydrates
ON
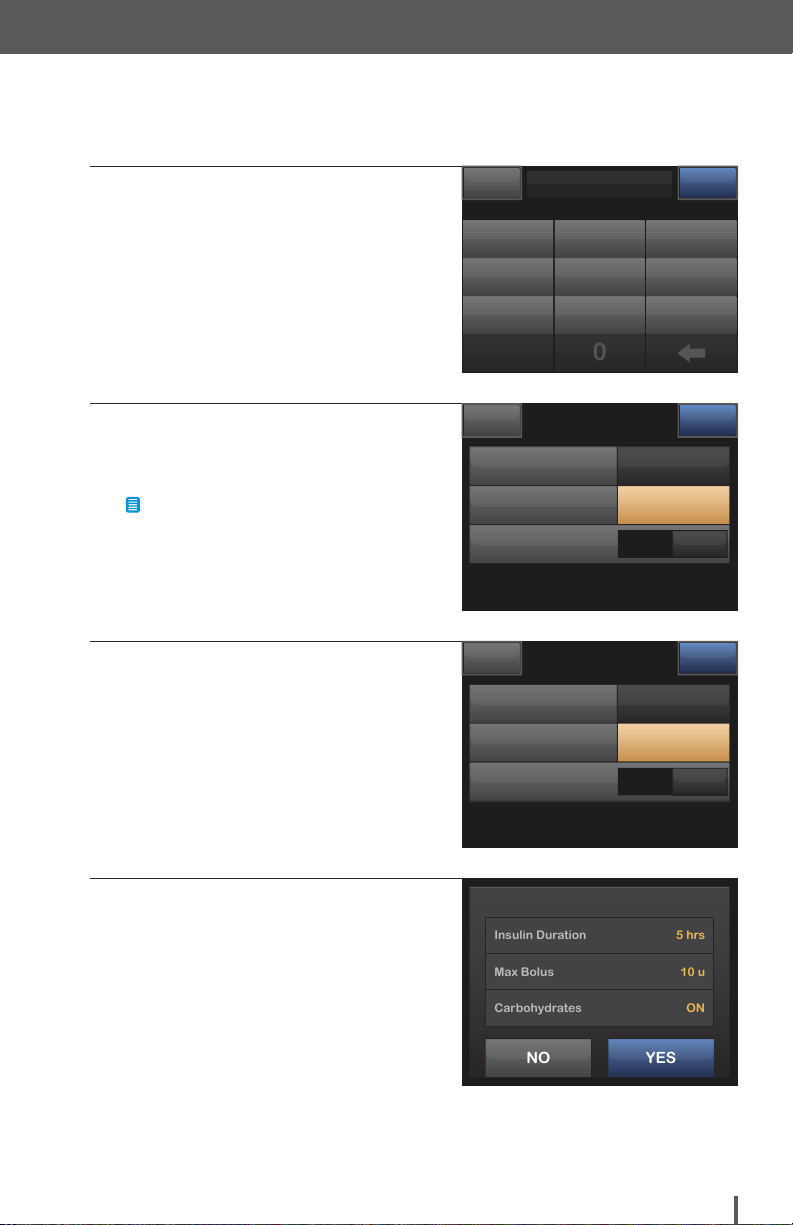
16. Using the on-screen keypad, enter
the desired amount for maximum
bolus (1-25 units), and tap DONE.
17. Tap Carbohydrates to activate
and use the carb ratio when
calculating boluses.
NOTE
Your t:slim X2 insulin pump with
Basal-IQ technology will deliver
boluses between 0.05 and 25 units.
18. Review entered values and
tap SAVE.
Bolus Settings
Insulin Duration
Max Bolus
Carbohydrates
Bolus Settings
Insulin Duration
Max Bolus
Carbohydrates
10
units
21 3
54 6
87 9
5 hrs
10 u
OFF
5 hrs
10 u
OFF
DONEBACK
SAVEBAC K
ON
SAVEBAC K
ON
19. Confirm settings.
Confirm Request?
Tap YES if entered data is correct.
Tap NO to make changes.
20. Tap the Tandem logo on the face
of the pump to return to the Home
Screen.
Customer Technical Support: (877) 801-6901 35
Page 38
Personal Profile
22
18
14
10
6
2
400
50
100
150
200
250
300
350
3
HRS
mg/dL
88
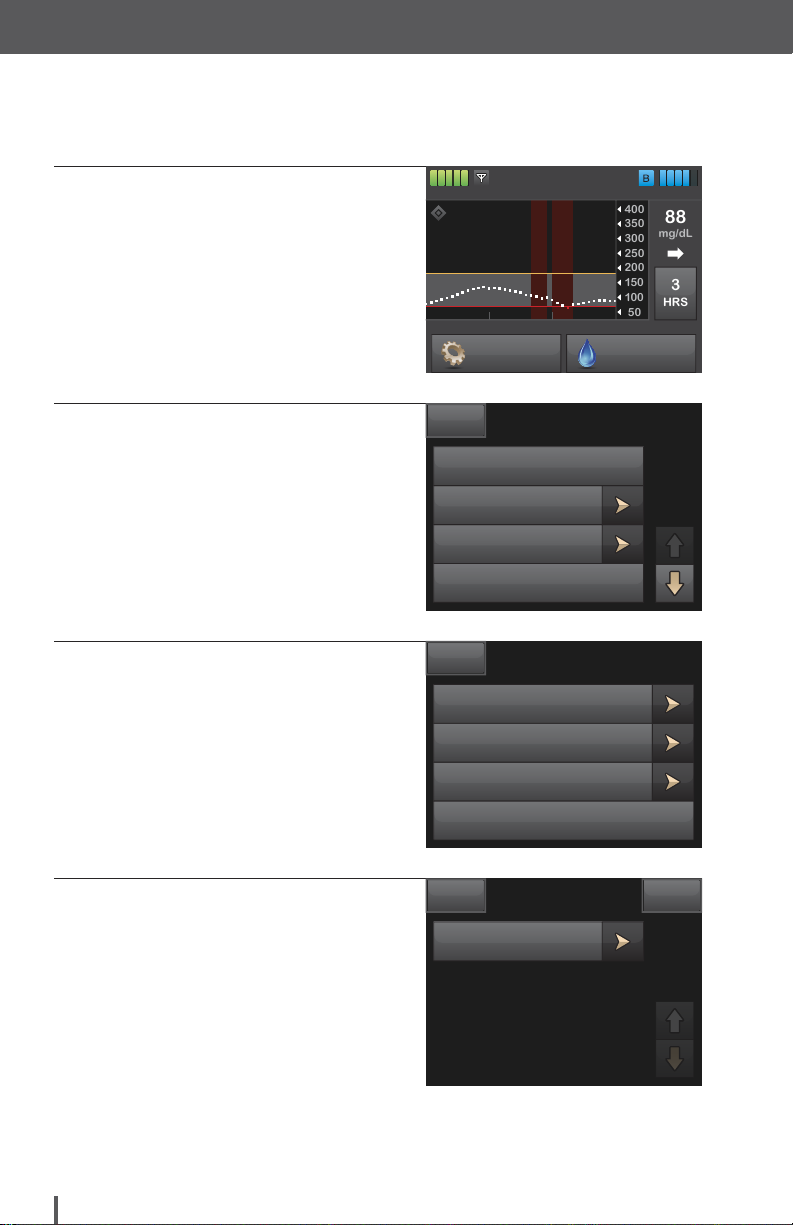
Edit an Existing Profile
1. From the Home Screen,
tap OPTIONS.
2. Tap My Pump.
3. Tap Personal Profiles.
6:32 PM
100%
INSULIN ON BOARD 1.1 u | 1:09 hrs
November 14
OPTIONS BOLUS
BACK
STOP INSULIN
My Pump
My CGM
Temp Rate
BACK
Personal Profiles
Alert Settings
Pump Settings
Pump Info
Options
My Pump
235 u
4. Tap the name of the Personal
Profile to edit.
36 Customer Technical Support: (877) 801-6901
BACK
Personal Profiles
Profile 1 ON
NEW
Page 39
Personal Profile
Delete
Activate
Bolus Settings
Timed Settings 12:00a - 12:00a
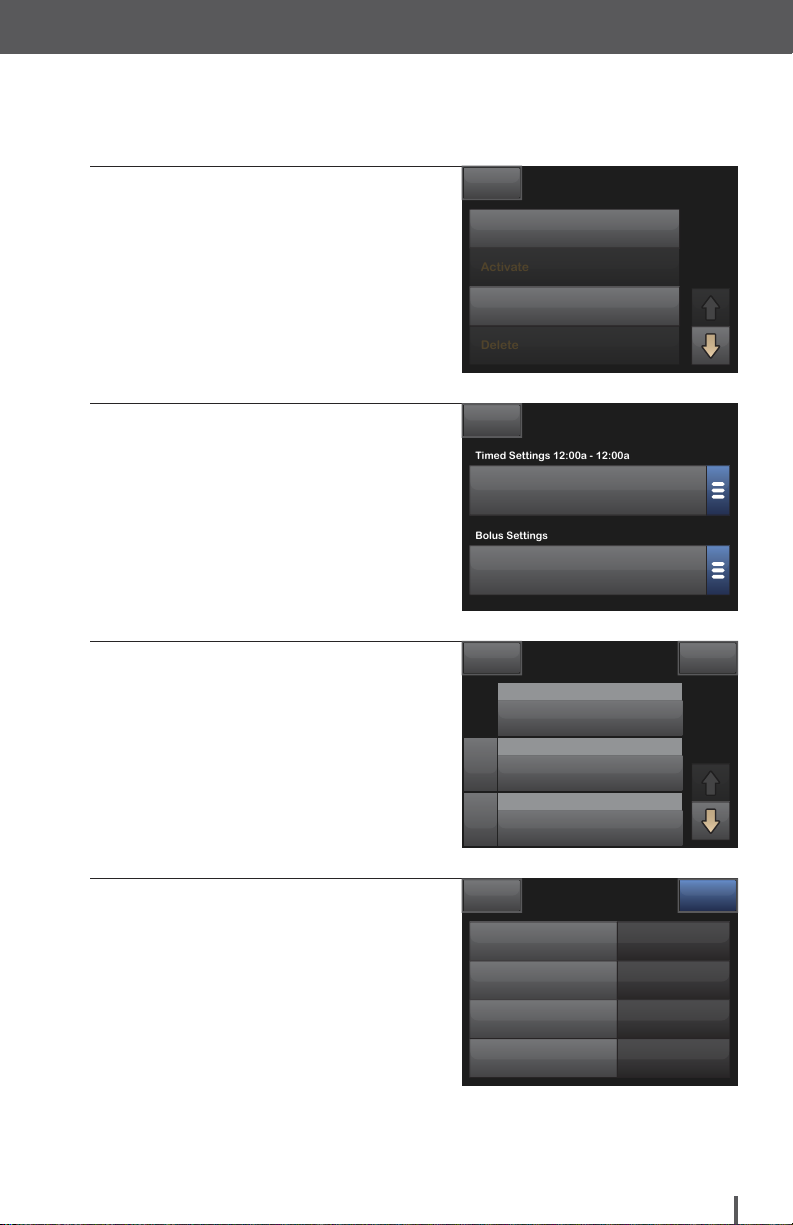
5. Tap Edit.
6. Tap Timed Settings panel.
7. Tap the desired time segment to
be edited.
BACK
Edit
Duplicate
BACK
0.75
BASAL
5 hrs
DURATION
BACK
0.75
BASAL
0.80
X
BASAL
0.70
X
BASAL
Profile 1
Profile 1
1:50
CORRECT
1:10
CARB
10 u
MAX BOLUSONCARBS
Timed Settings
12:00 AM
1:50
1:10
CORRECT
CARB TARGET BG
3:00 AM
1:50
1:15
CORRECT
CARB TARGET BG
7:00 AM
1:55
1:12
CORRECT
CARB TARGET BG
120
TARGET BG
120
120
100
ADD
8. Tap Basal, Correction Factor,
Carb Ratio, or Target BG to make
changes as needed and use the
on-screen keypad to enter desired
changes. Tap SAVE.
Customer Technical Support: (877) 801-6901 37
12:00 AM
Basal
Correction Factor
Carb Ratio
Target BG
SAVEBAC K
0.75 u/hr
1u:50 mg/dL
1u:10 mg
120 mg/dL
Page 40

Personal Profile
NO
YES
Target BG
130 mg/dL
Carb Ratio
1u: 10g
Correction Factor
1u: 50 mg/dL
Basal
0.75 u/hr
9. View recent changes and, if correct,
tap SAVE.
10. Confirm settings.
Tap YES if entered data is correct.
Tap NO to make changes.
11. Tap BACK after editing all of the
time segments.
NOTE
Edit other time segments within the
Timed Settings by tapping on them
and using the same method
described above.
NOTE
To delete a time segment:
1. Tap on the X to the left of the
time segment.
2. Tap YES to confirm.
Basal
Correction Factor
Carb Ratio
Target BG
Confirm Settings?
BACK
X
X
Timed Settings
0.75
1:50
BASAL
CORRECT
0.80
1:50
BASAL
CORRECT
0.70
1:55
BASAL
CORRECT
12:00 AM
12:00 AM
1:10
CARB TARGET BG
3:00 AM
1:15
CARB TARGET BG
7:00 AM
1:12
CARB TARGET BG
SAVEBAC K
0.75 u/hr
1u:50 mg/dL
1u:10 mg
130 mg/dL
ADD
130
120
100
38 Customer Technical Support: (877) 801-6901
Page 41
Personal Profile
Bolus Settings
Timed Settings 12:00a - 12:00a
NO
YES
Max Bolus
10 u
Insulin Duration
3 hrs
Carbohydrates
ON
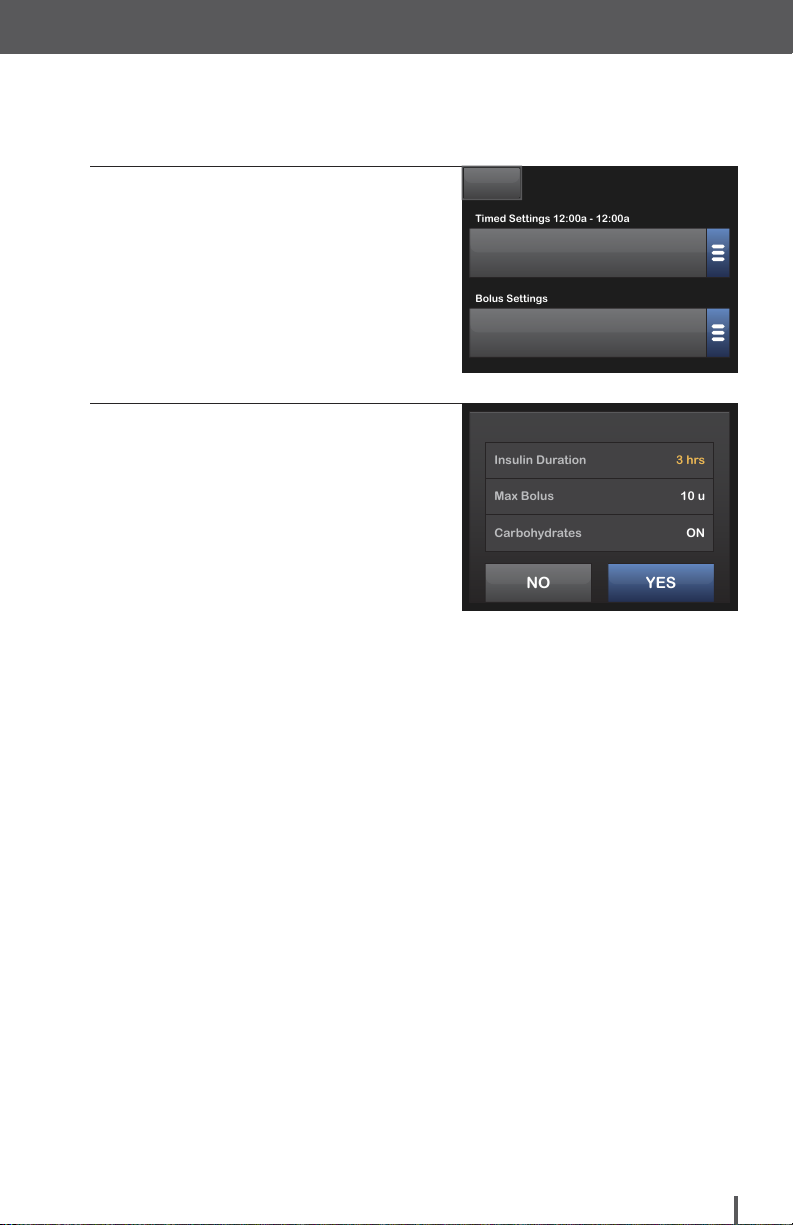
12. Tap the Bolus Settings panel to
change DURATION, MAX BOLUS
or CARBS as needed. Use the
on-screen keypad to enter desired
changes. Tap SAVE.
13. Confirm settings.
Tap YES if entered data is correct.
Tap NO to make changes.
14. Tap the Tandem logo on the face
of the pump to return to the Home
Screen.
BACK
0.75
BASAL
CORRECT
5 hrs
DURATION
Confirm Settings?
Profile 1
1:50
1:10
CARB
10 u
MAX BOLUSONCARBS
120
TARGET BG
Customer Technical Support: (877) 801-6901 39
Page 42

Personal Profile
22
18
14
10
6
2
400
50
100
150
200
250
300
350
3
HRS
mg/dL
88
Duplicate an Existing Profile
1. From the Home Screen,
tap OPTIONS.
2. Tap My Pump.
3. Tap Personal Profiles.
6:32 PM
100%
INSULIN ON BOARD 1.1 u | 1:09 hrs
November 14
OPTIONS BOLUS
BACK
STOP INSULIN
My Pump
My CGM
Temp Rate
BACK
Personal Profiles
Alert Settings
Pump Settings
Pump Info
Options
My Pump
235 u
4. Tap the name of the Personal
Profile to duplicate.
40 Customer Technical Support: (877) 801-6901
BACK
Personal Profiles
Profile 1 ON
NEW
Page 43
Personal Profile
Delete
Activate
NO
YES
space
Bolus Settings
Timed Settings 12:00a - 12:00a
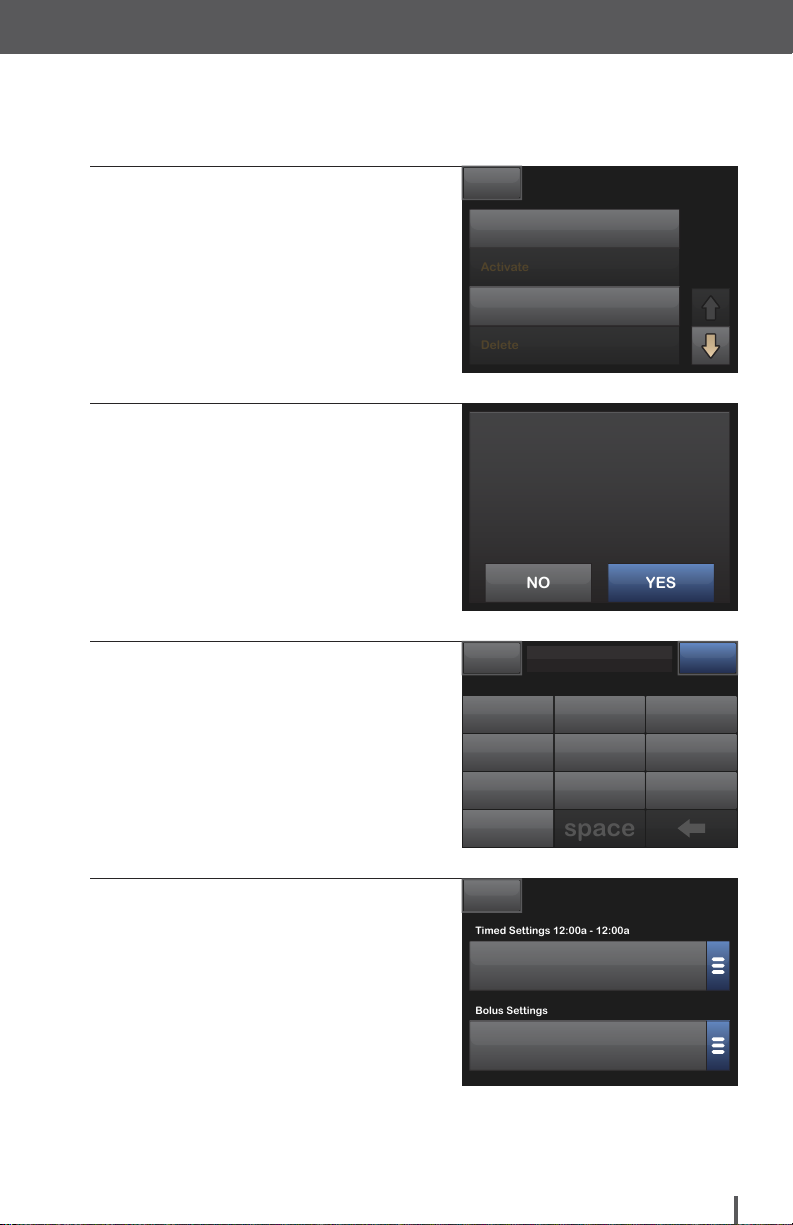
5. Tap Duplicate.
6. Confirm profile to duplicate by
tapping YES.
7. Using the on-screen keypad, enter
the name (up to 16 characters) for
the new profile and tap SAVE.
ü The Profile Duplicated screen is
displayed. A new Personal Profile
will be created with the same
settings as the profile copied.
BACK
Edit
Duplicate
This copies all settings and saves
them as a new profile.
Duplicate Profile 1?
Profile 1
Profile 1
name
defabc ghi
mnojkl pqr
vwxstu yz
123
SAVEBAC K
8. Tap the Timed Settings or Bolus
Settings panel to make changes to
the new profile.
Customer Technical Support: (877) 801-6901 41
BACK
0.75
BASAL
5 hrs
DURATION
Profile 1
1:50
CORRECT
10 u
MAX BOLUSONCARBS
1:10
CARB
120
TARGET BG
Page 44

Personal Profile
22
18
14
10
6
2
400
50
100
150
200
250
300
350
3
HRS
mg/dL
88
Activate, Delete, or Rename a Profile
1. From the Home Screen,
tap OPTIONS.
2. Tap My Pump.
3. Tap Personal Profiles.
6:32 PM
100%
INSULIN ON BOARD 1.1 u | 1:09 hrs
November 14
OPTIONS BOLUS
BACK
STOP INSULIN
My Pump
My CGM
Temp Rate
BACK
Personal Profiles
Alert Settings
Pump Settings
Pump Info
Options
My Pump
235 u
4. Tap the name of the
Personal Profile.
42 Customer Technical Support: (877) 801-6901
BACK
Personal Profiles
Profile 1 ON
Profile 2 OFF
NEW
Page 45
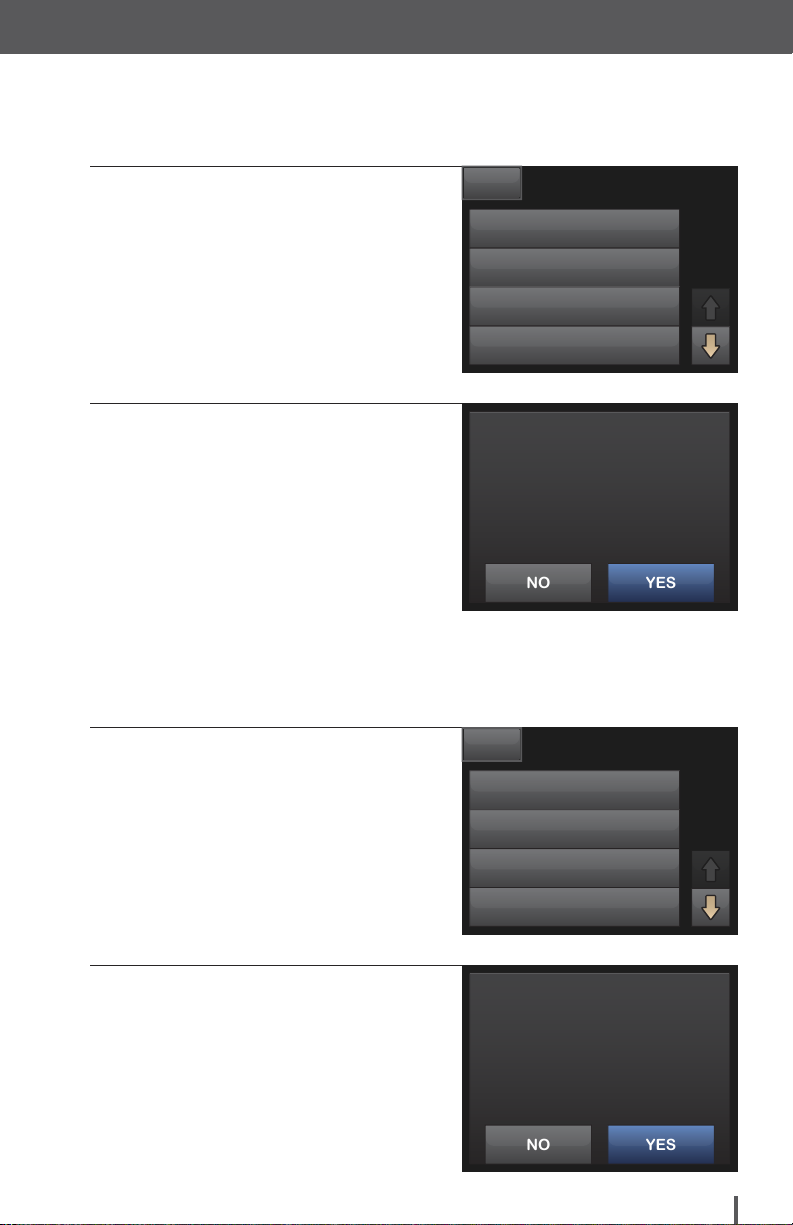
To Activate Profile:
NO
YES
NO
YES
Personal Profile
1. Tap Activate.
2. Tap YES.
ü The Profile Activated screen
is displayed.
To Delete a Profile:
1. Tap Delete.
BACK
Edit
Activate
Duplicate
Delete
This turns on the selected profile
and uses its settings for delivery
calculations.
Activate Profile 1?
BACK
Edit
Activate
Duplicate
Delete
Profile 1
Profile 1
2. Tap YES.
ü The Profile Deleted screen
is displayed.
This deletes all settings and
removes the profile from the list.
Delete Profile 1?
Customer Technical Support: (877) 801-6901 43
Page 46

Personal Profile
space
To Rename a Profile:
1. Tap Down Arrow.
2. Tap Rename.
3. Using the on-screen keypad,
rename the profile name (up to
16 characters) and tap SAVE.
4. Tap the Tandem logo on the face
of the pump to return to the Home
Screen.
BACK
Edit
Activate
Duplicate
Delete
BACK
Rename
Profile 1
Profile 1
Profile 1
name
defabc ghi
mnojkl pqr
vwxstu yz
SAVEBAC K
123
44 Customer Technical Support: (877) 801-6901
Page 47
THIS PAGE IS
INTENTIONALLY
LEFT BLANK
Personal Profile
Customer Technical Support: (877) 801-6901 45
Page 48

My CGM
Page 49
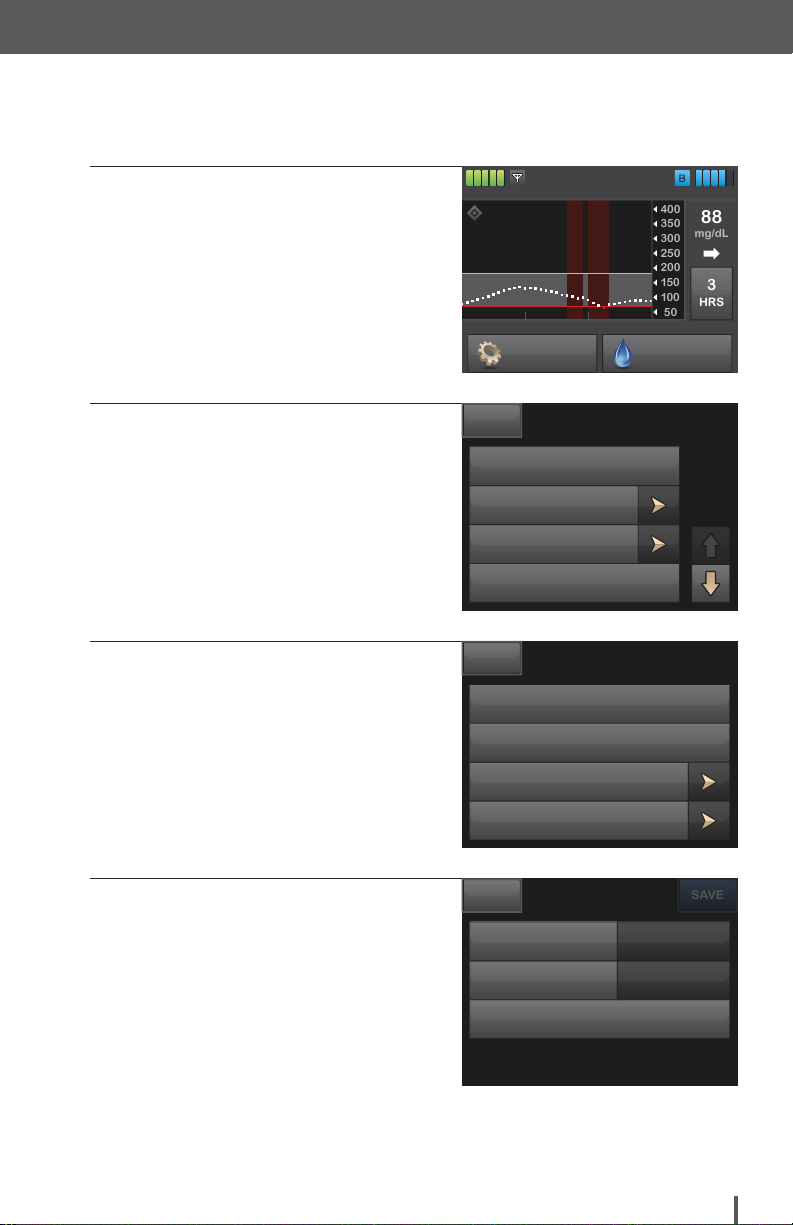
Entering the Transmitter ID
22
18
14
10
6
2
400
50
100
150
200
250
300
350
3
HRS
mg/dL
88
SAVE
My CGM
1. From the Home Screen,
tap OPTIONS.
2. Tap My CGM.
3. Tap CGM Settings.
6:32 PM
100%
INSULIN ON BOARD 1.1 u | 1:09 hrs
November 14
OPTIONS BOLUS
BACK
STOP INSULIN
My Pump
My CGM
Temp Rate
BACK
STOP SENSOR
Calibrate CGM
CGM Alerts
CGM Settings
Options
My CGM
235 u
4. Tap Transmitter ID.
BACK
CGM Settings
Transmitter ID Press to Set Up
CGM Volume
CGM Info
Normal
Customer Technical Support: (877) 801-6901 47
Page 50
My CGM
SAVE
213
087
9
546
ABC
VERIFY TRANSMITTER ID
ENTER ID AGAIN
213087954
6
ABC
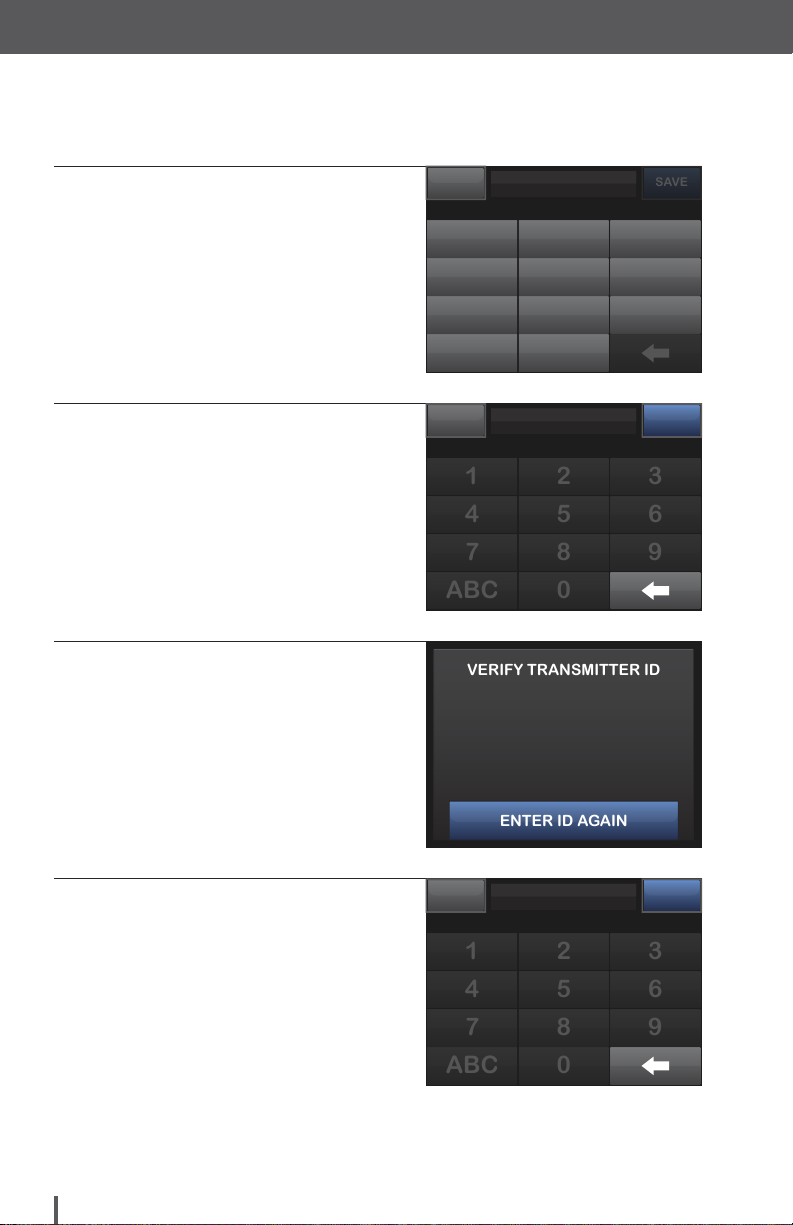
5. Enter the six-character transmitter
ID (found on the bottom of the
transmitter).
6. Tap SAVE.
7. Tap ENTER ID AGAIN to verify
transmitter ID.
BACK
Enter ID
Transmitter ID
21 3
54 6
87 9
ABC
Please verify your transmitter ID
by entering it a second time.
0
8Y4H5A
Transmitter ID
SAVEBAC K
8. Tap SAVE.
48 Customer Technical Support: (877) 801-6901
8Y4H5A
Transmitter ID
SAVEBAC K
Page 51
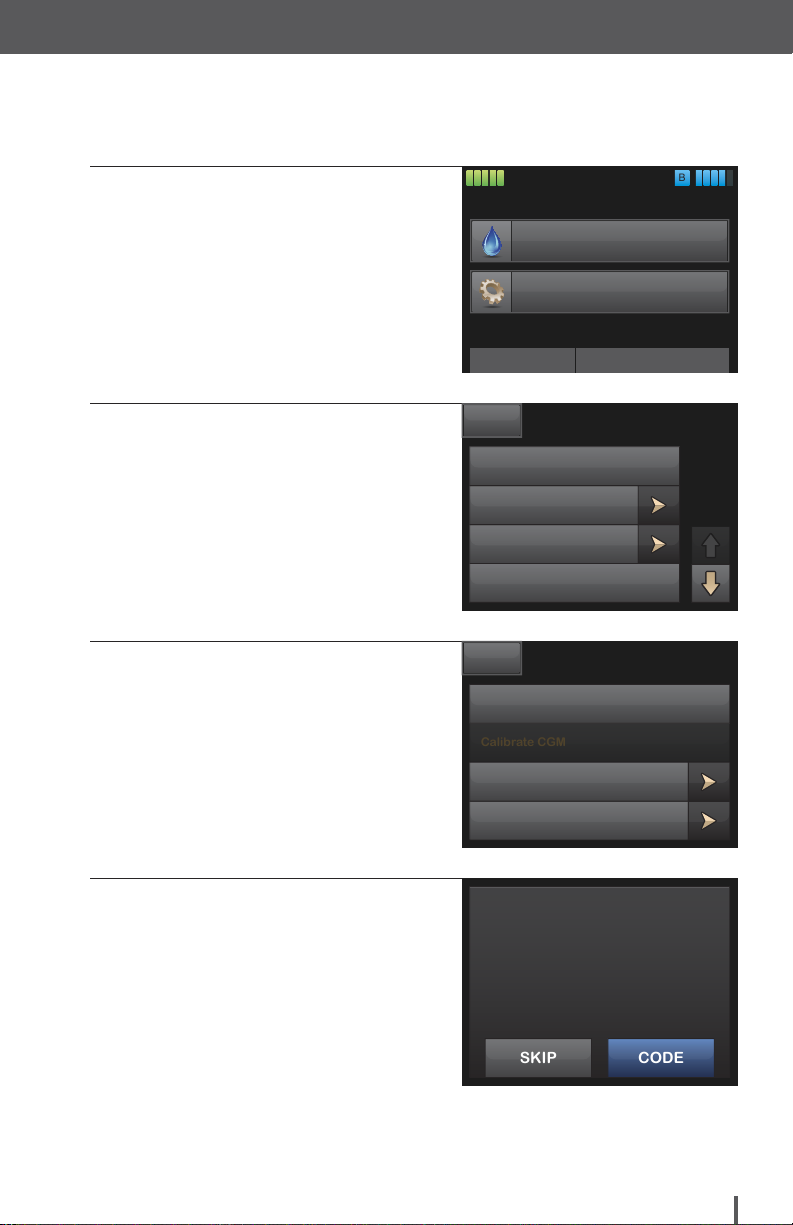
Starting a Sensor Session
B
Calibrate CGM
SKIP
CODE
My CGM
1. From the Home Screen,
tap OPTIONS.
2. Tap My CGM.
3. Tap START SENSOR.
6:32 PM
100%
November 14 235 u
BOLUS
OPTIONS
INSULIN ON BOARD (IOB)
Units 1.1 u 1:0 9 hrsTime Remaining
BACK
STOP INSULIN
My Pump
My CGM
Temp Rate
BACK
START SENSOR
CGM Alerts
CGM Settings
Options
My CGM
4. Tap CODE.
If you have a Sensor Code, press
CODE to enter it now.
If you do not have a Sensor Code,
or have already started your CGM
session on a mobile device, press
SKIP.
Customer Technical Support: (877) 801-6901 49
Page 52
My CGM
213
087
9
546
DONE
213
087
9
546
NO
YES
22
18
14
10
6
2
400
50
100
150
200
250
300
350
3
HRS
6:32 PM
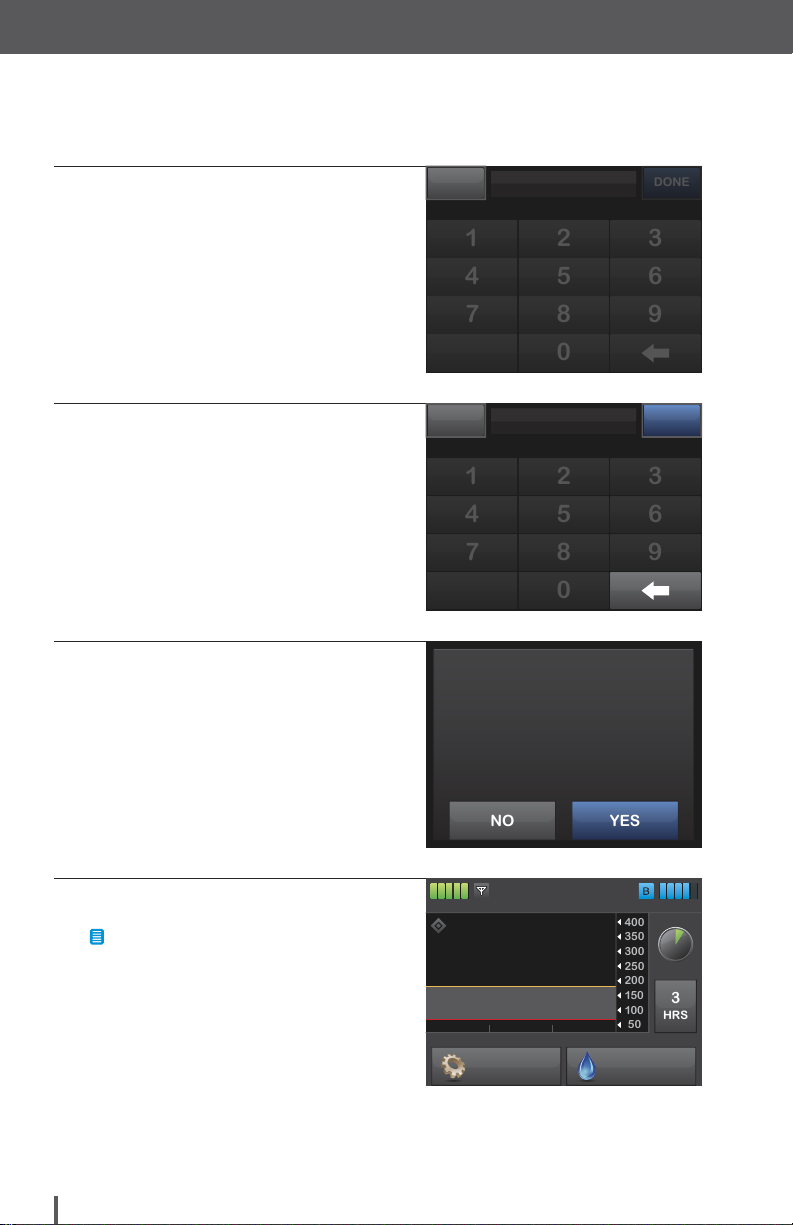
5. Enter the four-digit sensor code
(found on the bottom of the
applicator on the adhesive strip).
6. Tap DONE.
7. Tap YES to start sensor session.
BACK
Enter Code
Sensor Code
9713
Sensor Code
This will start your CGM session.
New sensor readings will display
on your home screen.
Start Sensor?
DONEBACK
8. Two-hour warm up period starts.
NOTE
A graph of your CGM values will
appear on your pump screen. Tap
the Trending Time button to change
the timeline of the graph. The default
setting is 3 HRS. You can select: 1 HR,
3 HRS, 6 HRS, 12 HRS, or 24 HRS.
50 Customer Technical Support: (877) 801-6901
100%
INSULIN ON BOARD 1.1 u | 1:09 hrs
November 14
OPTIONS BOLUS
235 u
Page 53

My CGM
CALIBRATE CGM
CLOSE
Enter 2 BGs to
calibrate CGM sensor.
22
18
14
10
6
2
400
50
100
150
200
250
300
350
3
HRS
mg/dL
88
Calibrating the Sensor
NOTE
If you enter the Sensor Code when you start a sensor session, you will not be prompted
to calibrate the Dexcom G6 sensor. However, if you do not enter a sensor code, but
choose SKIP when starting the sensor session, you will be required to calibrate with your
fingerstick BG with a blood glucose meter.
1. If you see this prompt, tap CLOSE.
2. To calibrate your sensor,
tap OPTIONS.
3. Tap My CGM.
6:32 PM
100%
INSULIN ON BOARD 1.1 u | 1:09 hrs
BACK
STOP INSULIN
My Pump
My CGM
Temp Rate
November 14
OPTIONS BOLUS
Options
235 u
Customer Technical Support: (877) 801-6901 51
Page 54
My CGM
0
DONE
213087954
6
NO
YES
Date
11/14/18
BG
130 mg/dL
Time
6:32 PM
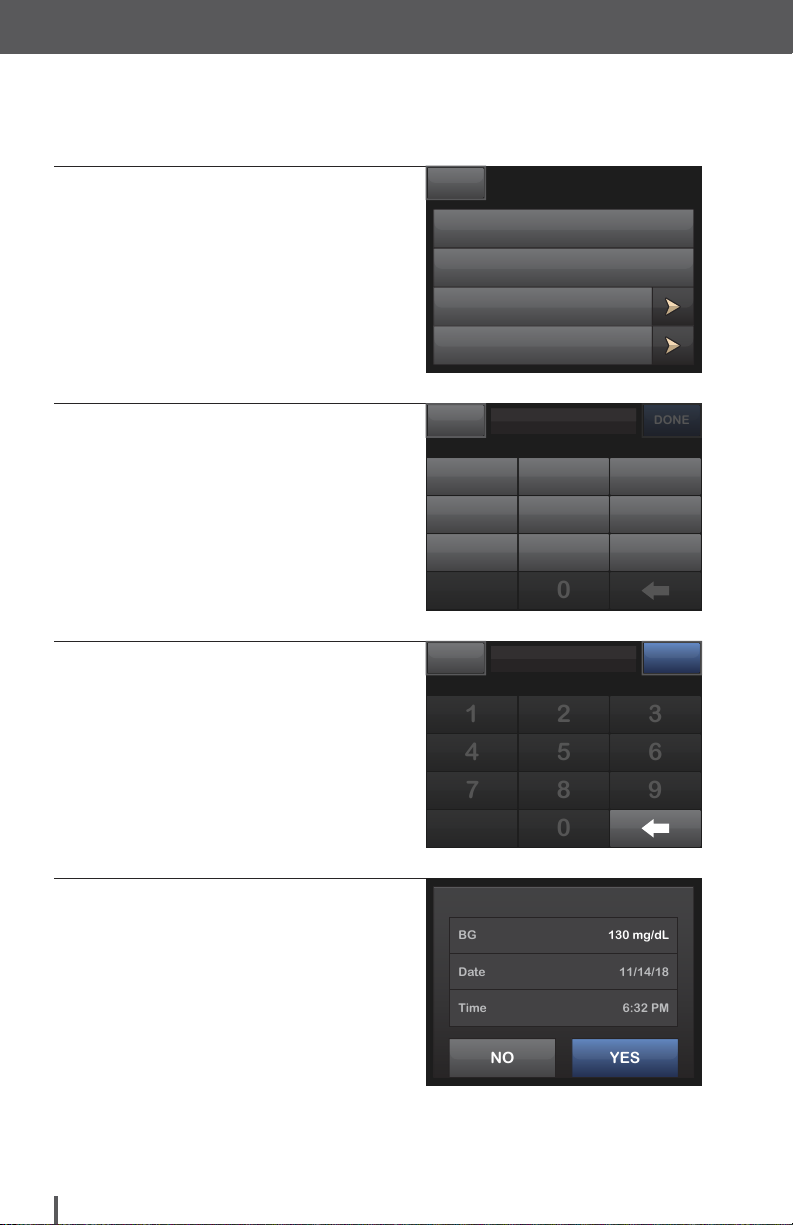
4. Tap Calibrate CGM.
5. Enter BG reading from meter
into keypad.
6. Tap DONE.
BACK
STOP SENSOR
Calibrate CGM
CGM Alerts
CGM Settings
BACK
My CGM
Enter BG
mg/dL
21 3
54 6
87 9
130
mg/dL
DONEBACK
7. Tap YES to confirm calibration.
ü The CALIBRATION ACCEPTED
screen is displayed.
52 Customer Technical Support: (877) 801-6901
Confirm Calibration?
Page 55
My CGM
213
087
9
546
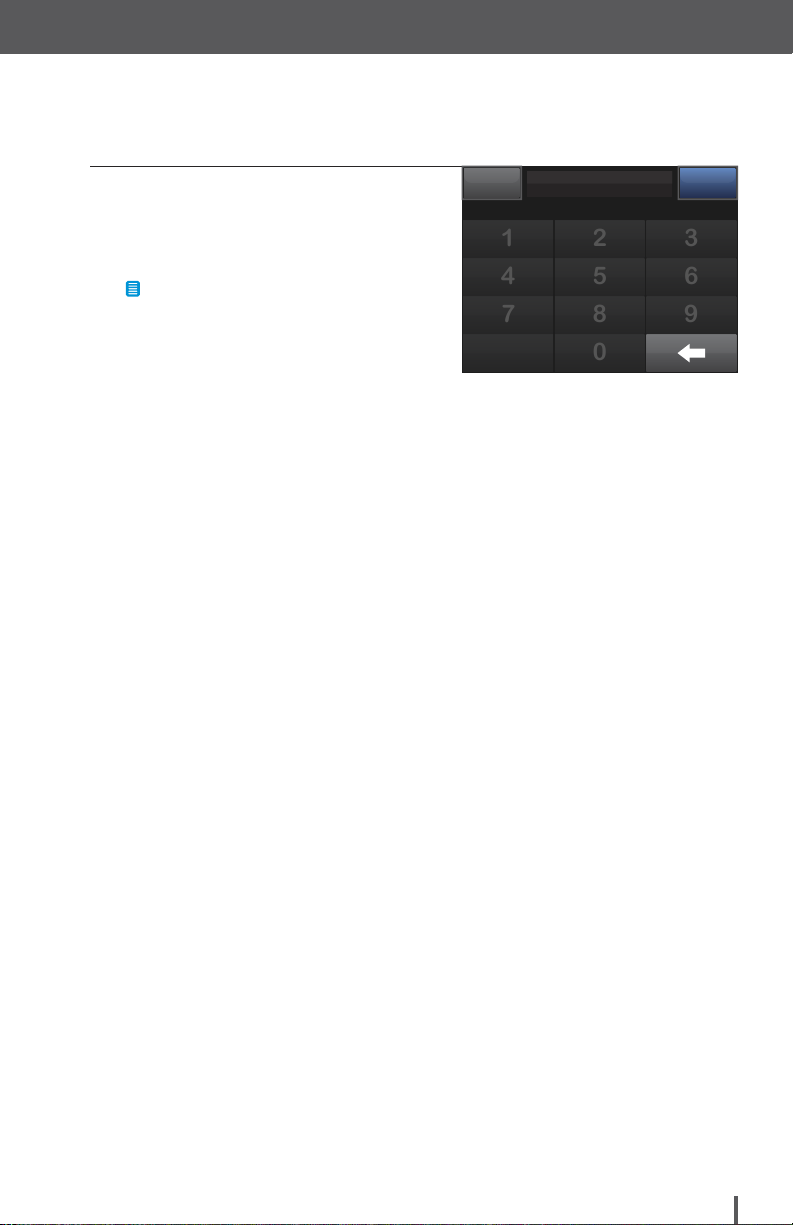
8. Repeat with a second BG value.
ü The CALIBRATION ACCEPTED
screen is displayed.
NOTE
You will see a Trend Arrow below the
current CGM value displayed on your
pump screen. The direction of the
arrow estimates the direction and rate
of change of your CGM values.
130
mg/dL
DONEBACK
Customer Technical Support: (877) 801-6901 53
Page 56

My CGM
22
18
14
10
6
2
400
50
100
150
200
250
300
350
3
HRS
mg/dL
88
Setting Up CGM Alerts
1. From the Home Screen,
tap OPTIONS.
2. Tap My CGM.
3. Tap CGM Alerts.
6:32 PM
100%
INSULIN ON BOARD 1.1 u | 1:09 hrs
November 14
OPTIONS BOLUS
BACK
STOP INSULIN
My Pump
My CGM
Temp Rate
BACK
STOP SENSOR
Calibrate CGM
CGM Alerts
CGM Settings
Options
My CGM
235 u
4. Tap High and Low.
54 Customer Technical Support: (877) 801-6901
BACK
High and Low
Rise and Fall
Out of Range Press to Turn On
CGM Alerts
Page 57

My CGM
SAVE
0879546
DONE
213087954
6
5. To set the High Alert, tap
High Alert.
6. Tap Alert Me Above.
7. Using the on-screen keypad, enter
the value above which you want to
be notified.
BACK
High Alert
Low Alert
BACK
High Alert
Alert Me Above
Repeat
BACK
High and Low
200 mg/dL
Never
70 mg/dL
Never
High Alert
OFF
200 mg/dL
200
mg/dL
21 3
ON
Never
8. Tap DONE.
180
mg/dL
Customer Technical Support: (877) 801-6901 55
DONEBACK
Page 58

My CGM
9. If you want the High Alert to repeat,
tap Repeat.
10. To select the repeat time, tap the
time you want the alert to sound
again. Use the up and down arrows
to view all Repeat options.
ü Once a value is selected, the pump
will return to the previous screen.
11. Tap SAVE.
ü The Setting Saved screen
is displayed.
High Alert
Alert Me Above
Repeat
BACK
Never
15 min
30 min
1 hr
High Alert
Alert Me Above
Repeat
High Alert
Repeat
High Alert
SAVEBAC K
ON
OFF
180 mg/dL
Never
SAVEBAC K
ON
OFF
180 mg/dL
1 Hr
12. To set the Low Alert, tap Low Alert.
BACK
High and Low
High Alert
Low Alert
180 mg/dL
30 min
70 mg/dL
Never
56 Customer Technical Support: (877) 801-6901
Page 59
My CGM
SAVE
213
0
5
4
DONE
213087954
6
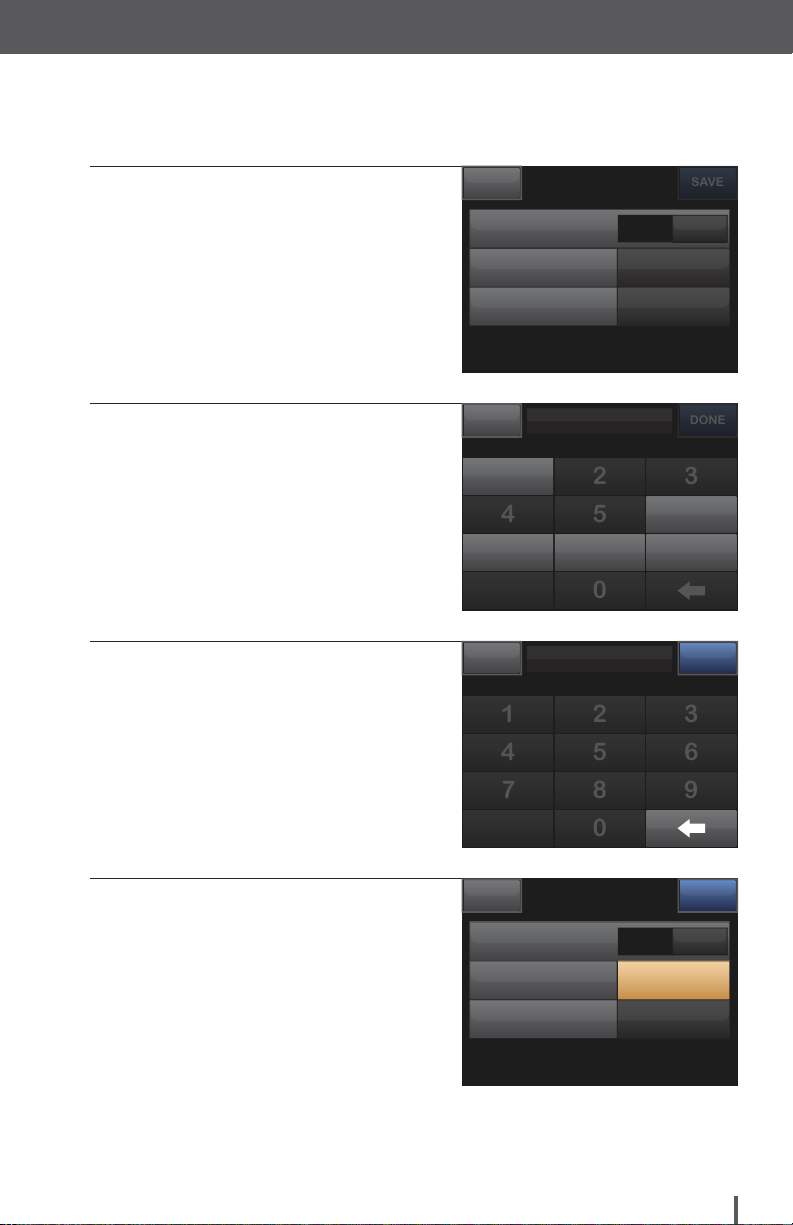
13. Tap Alert Me Below.
14. Using the on-screen keypad, enter
the value below which you want to
be notified.
15. Tap DONE.
BACK
Low Alert
Alert Me Below
Repeat
BACK
Low Alert
70
mg/dL
87 9
75
mg/dL
OFF
70 mg/dL
Never
ON
6
DONEBACK
16. If you want the Low Alert to repeat,
Low Alert
tap Repeat.
Low Alert
Alert Me Below
Repeat
Customer Technical Support: (877) 801-6901 57
OFF
75 mg/dL
Never
SAVEBAC K
ON
Page 60
My CGM
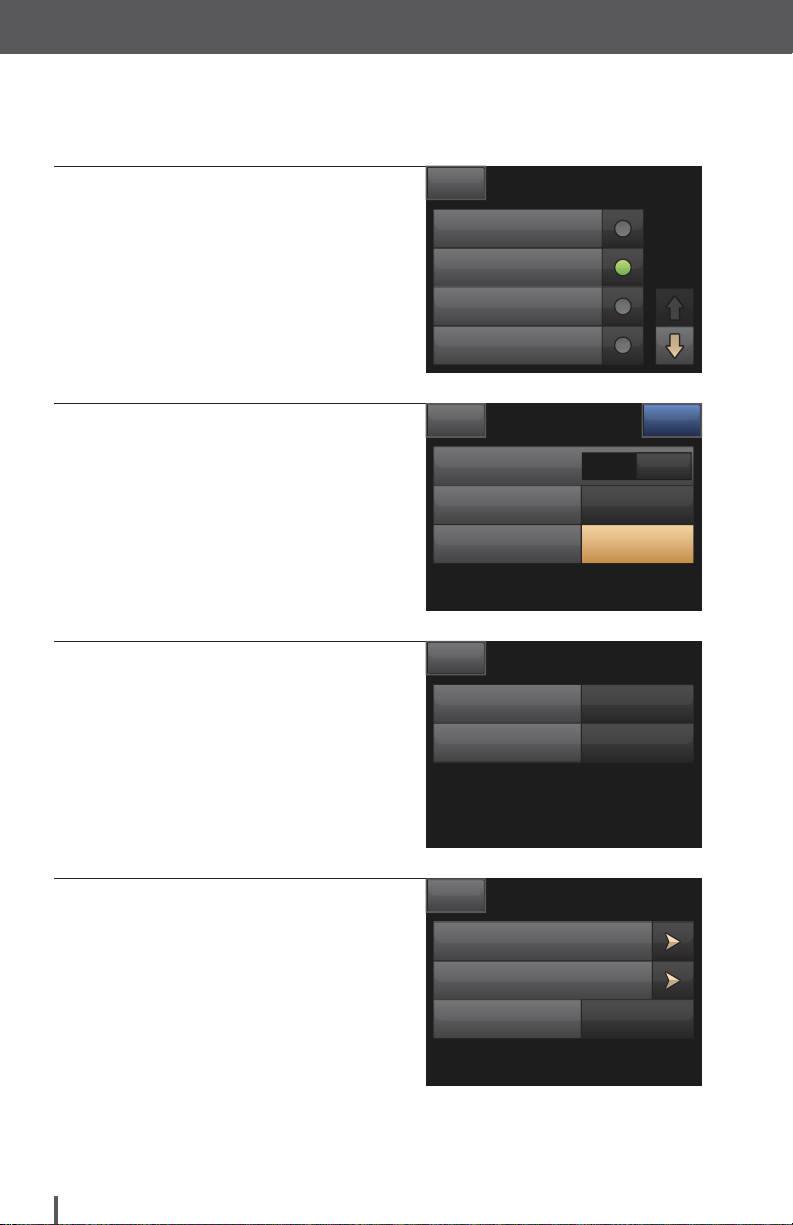
17. To select the repeat time, tap the
time you want the alert to sound
again. Use the up and down arrows
to view all Repeat options.
ü Once a value is selected, the pump
will return to the previous screen.
18. Tap SAVE.
ü The Setting Saved screen
is displayed.
19. Tap BACK to get to the CGM
Alerts menu.
BACK
Never
15 min
30 min
1 hr
Low Alert
Alert Me Below
Repeat
BACK
High Alert
Low Alert
Repeat
Low Alert
OFF
High and Low
180 mg/dL
30 min
75 mg/dL
15 min
SAVEBAC K
ON
75 mg/dL
15 min
20. Tap Rise and Fall.
BACK
CGM Alerts
High and Low
Rise and Fall
Out of Range Press to Turn On
58 Customer Technical Support: (877) 801-6901
Page 61
My CGM
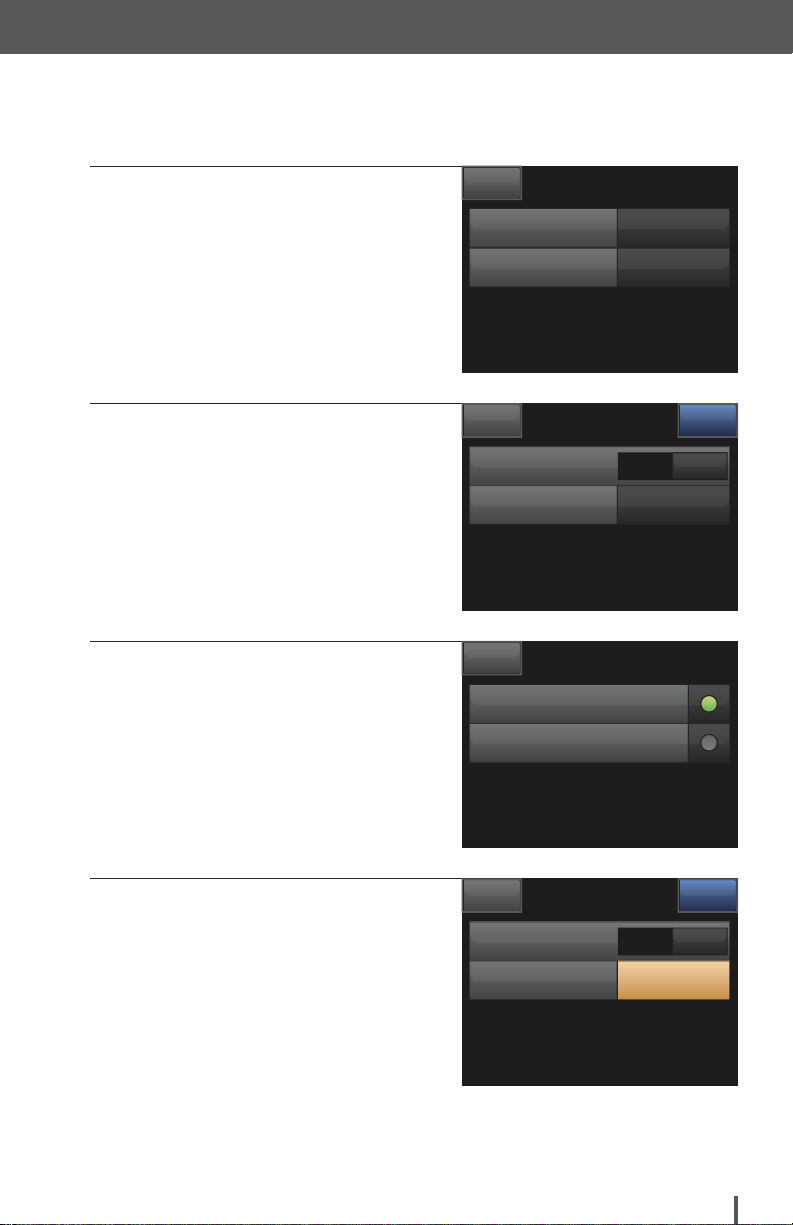
21. Tap Rise Alert.
22. Tap Rate.
23. Select the rate of CGM rise you
want to be notified of.
ü Once a value is selected, the pump
will return to the previous screen.
BACK
Rise Alert Press to Turn On
Fall Alert Press to Turn On
Rise Alert
Rate
BACK
2 mg/dL/min
3 mg/dL/min
Rise and Fall
Rise Alert
3 mg/dL/min
Rate
OFF
SAVEBAC K
ON
24. Tap SAVE.
ü The Setting Saved screen
Rise Alert
Rise Alert
OFF
SAVEBAC K
ON
is displayed.
Rate
2 mg/dL/min
Customer Technical Support: (877) 801-6901 59
Page 62
My CGM
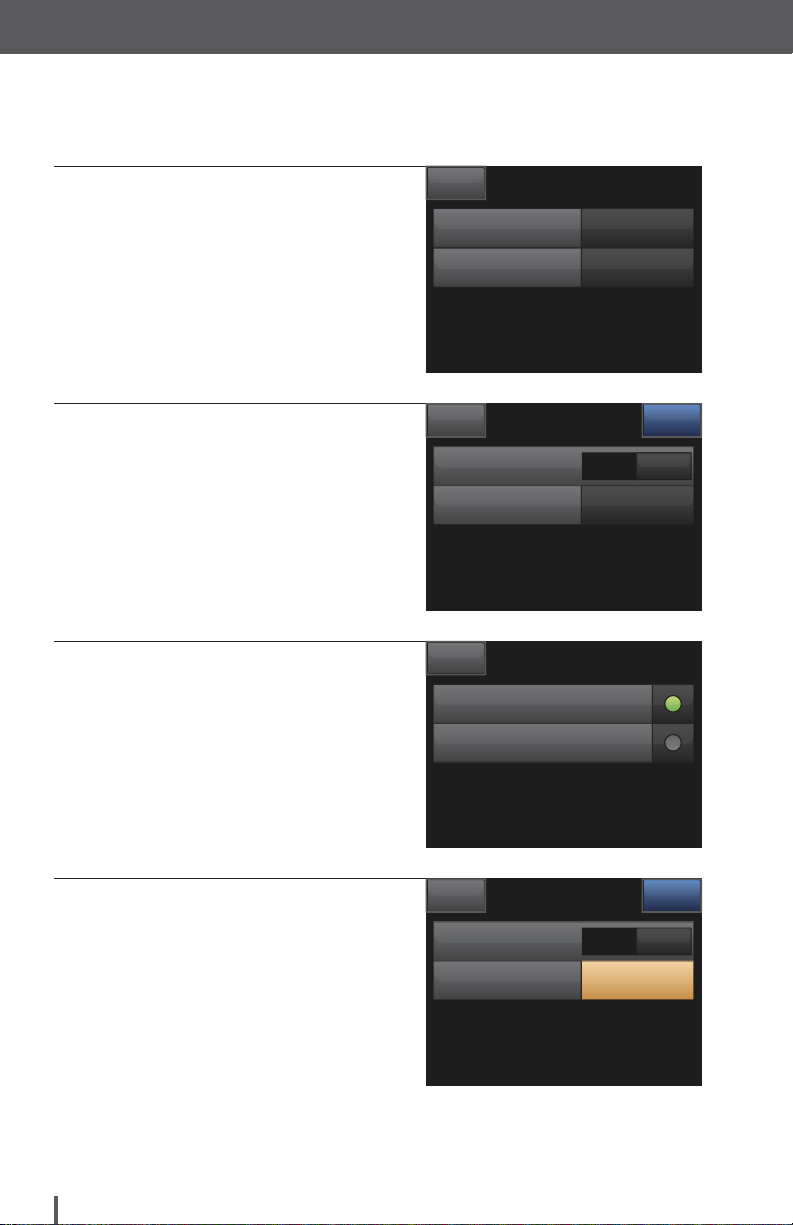
25. Tap Fall Alert.
26. Tap Rate.
27. Select the rate of CGM fall you
want to be notified of.
BACK
Rise Alert 3 mg/dL/min
Fall Alert Press to Turn On
Fall Alert
Rate
BACK
2 mg/dL/min
3 mg/dL/min
Rise and Fall
Fall Alert
3 mg/dL/min
Rate
OFF
SAVEBAC K
ON
28. Tap SAVE.
ü The Setting Saved screen
Fall Alert
Fall Alert
OFF
SAVEBAC K
ON
is displayed.
Rate
2 mg/dL/min
60 Customer Technical Support: (877) 801-6901
Page 63
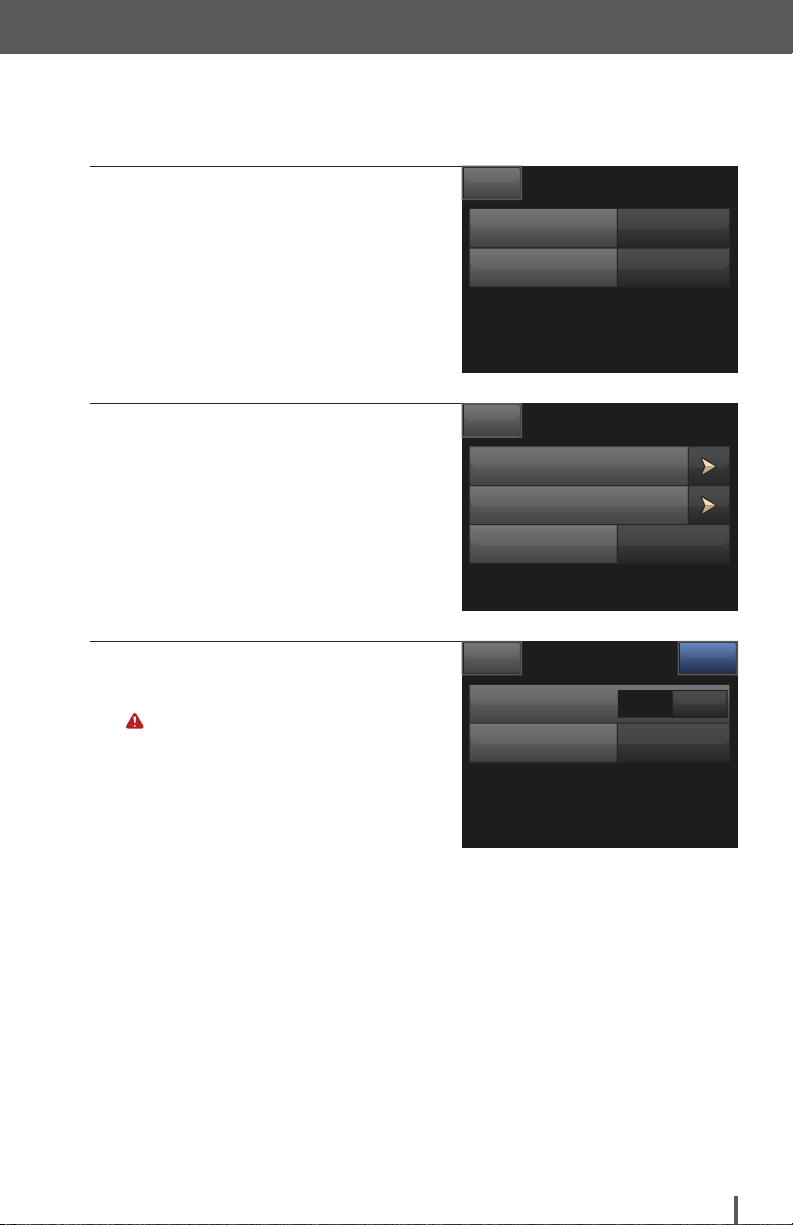
My CGM
29. Tap BACK to get to the CGM
Alerts menu.
30. Tap Out of Range.
31. To change the time, Tap
Alert Me After.
ALERT
Your CGM is providing the data that
Basal-IQ needs to make predictions to
suspend insulin delivery. We recommend that you turn the CGM Out of
Range Alert ON to notify you within
20-30 minutes if your CGM is disconnected from your pump.
BACK
Rise Alert 3 mg/dL/min
Fall Alert 3 mg/dL/min
BACK
High and Low
Rise and Fall
Out of Range Press to Turn On
Out of Range
Alert Me After
Rise and Fall
CGM Alerts
Out of Range
OFF
SAVEBAC K
ON
30 min
Customer Technical Support: (877) 801-6901 61
Page 64
My CGM
087
9
6
DONE
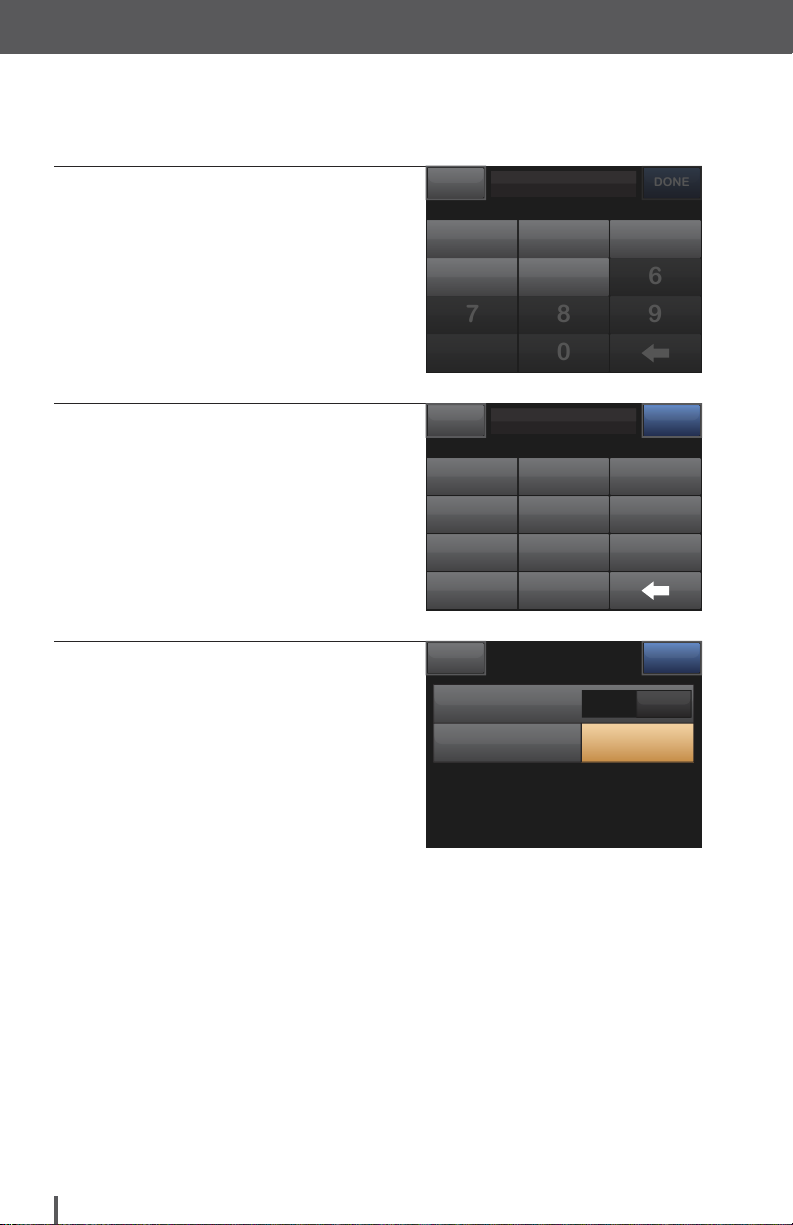
32. Using the on-screen keypad, enter
the time after which you want to be
alerted.
33. Tap DONE.
34. Tap SAVE.
ü The Setting Saved screen
is displayed.
BACK
Out of Range
Alert Me After
300 :
hour minute
21 3
54
200 :
hour minute
21 3
54 6
87 9
0
Out of Range
OFF
20 min
DONEBACK
SAVEBAC K
ON
62 Customer Technical Support: (877) 801-6901
Page 65
THIS PAGE IS
INTENTIONALLY
LEFT BLANK
My CGM
Customer Technical Support: (877) 801-6901 63
Page 66

Basal-IQ Technology
Page 67
Basal-IQ Technology
22
18
14
10
6
2
400
50
100
150
200
250
300
350
3
HRS
mg/dL
88
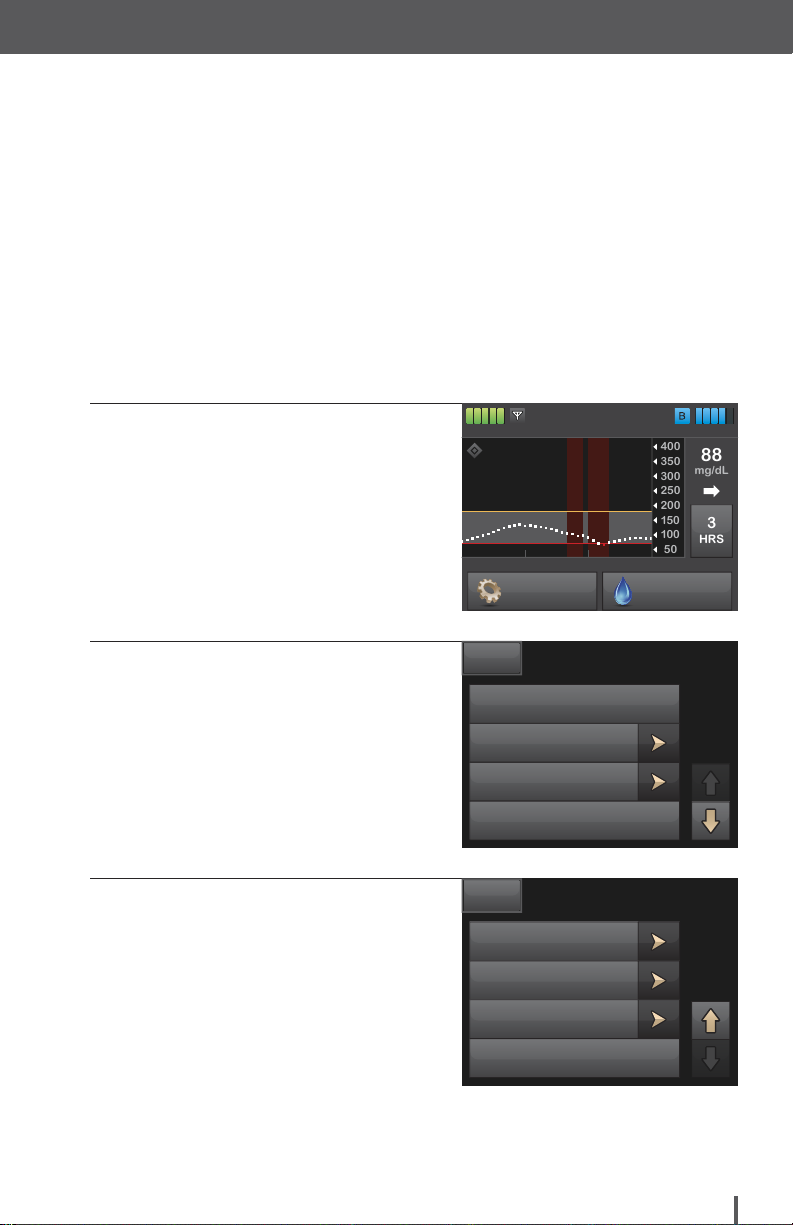
Basal-IQ Overview
The Basal-IQ feature helps reduce the frequency and duration of low-glucose
events by predicting glucose levels 30 minutes ahead and suspending insulin if
they are expected to drop below 80 mg/dL. It will also suspend immediately if your
glucose is 70 mg/dL or less. Insulin delivery resumes as soon as sensor glucose
values begin to rise.
Basal-IQ Settings
1. From the Home Screen,
tap OPTIONS.
2. Tap Down Arrow.
3. Tap Basal-IQ.
6:32 PM
100%
INSULIN ON BOARD 1.1 u | 1:09 hrs
November 14
OPTIONS BOLUS
BACK
STOP INSULIN
My Pump
My CGM
Temp Rate
BACK
Load
Pump History
CGM History
Basal-IQ
Options
Options
235 u
Customer Technical Support: (877) 801-6901 65
Page 68
Basal-IQ Technology
SAVE
22
18
14
10
6
2
400
50
100
150
200
250
300
350
3
HRS
mg/dL
88
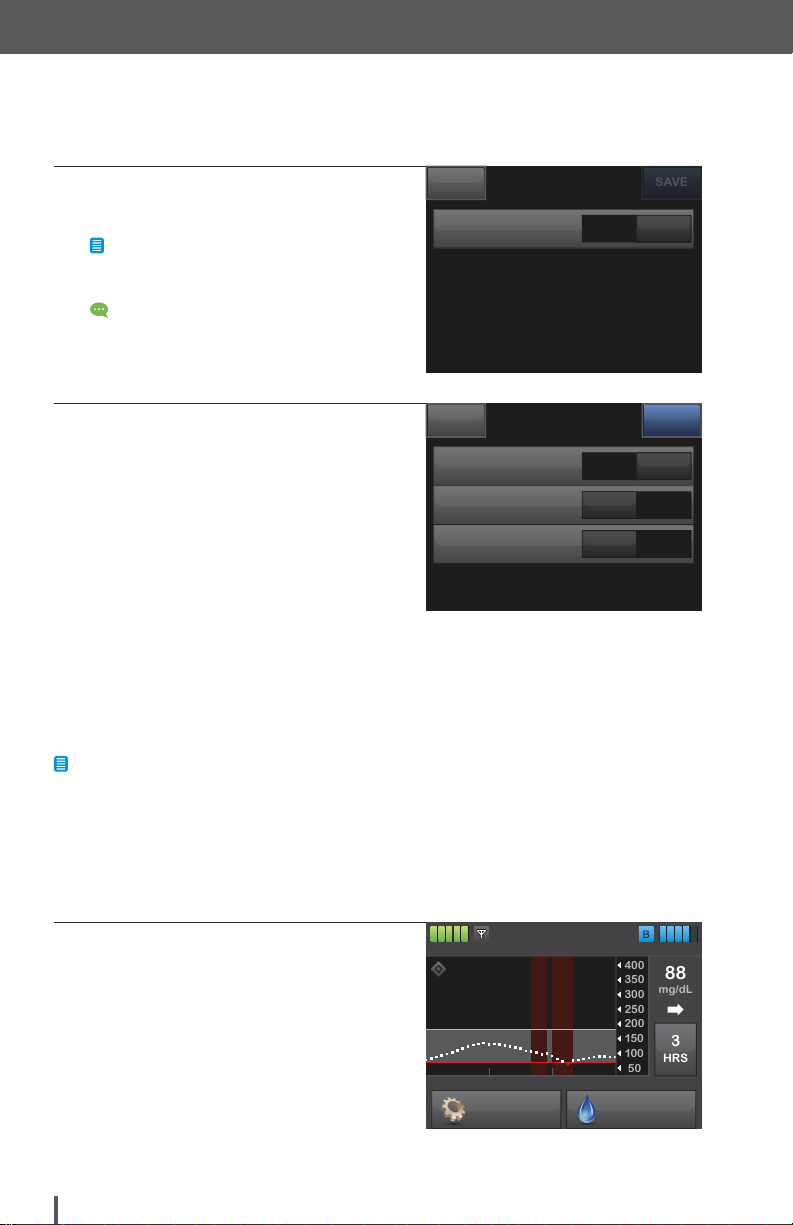
4. Tap Basal-IQ to turn the feature ON
or OFF.
NOTE
Basal-IQ is turned on by default.
QUICK TIP
A CGM session must be currently
running to turn on the Basal-IQ feature.
5. Tap SAVE.
ü The Settings Saved screen
is displayed.
6. Tap the Tandem logo on the face
of the pump to return to the Home
Screen.
Basal-IQ Alerts
BACK
Basal-IQBasal-IQ
Basal-IQBasal-IQ
Suspend Alert
Resume Alert
Basal-IQ
Basal-IQ
OFF ON
SAVEBAC K
OFF ON
ONOFF
ONOFF
NOTE
There are two optional Basal-IQ Alerts that you will see on the Basal-IQ menu. Turn
these alerts on only if you want to be notified every time the System suspends or
resumes insulin. Typically, no action will need to be taken when the Basal-IQ feature
suspends or resumes insulin delivery. The CGM High and Low Alerts are independent
of Basal-IQ Alerts and will alert you to take action when your CGM values are above or
below your personal target.
1. From the Home Screen,
tap OPTIONS.
100%
6:32 PM
November 14
INSULIN ON BOARD 1.1 u | 1:09 hrs
OPTIONS BOLUS
66 Customer Technical Support: (877) 801-6901
235 u
Page 69

Basal-IQ Technology
NO
YES
2. Tap Down Arrow.
3. Tap Basal-IQ.
4. To turn on Suspend Alert, tap
Suspend Alert and you will be
notified when the Basal-IQ feature
suspends insulin delivery.
NOTE
Basal-IQ Alerts are turned off
by default.
BACK
STOP INSULIN
My Pump
My CGM
Temp Rate
BACK
Load
Pump History
CGM History
Basal-IQ
Basal-IQBasal-IQ
Suspend Alert
Resume Alert
Options
Options
Basal-IQ
SAVEBAC K
OFF ON
ONOFF
ONOFF
5. Tap YES.
You will be notified when insulin is
automatically suspended due to
the Basal-IQ feature.
Turn Suspended Alert on?
Customer Technical Support: (877) 801-6901 67
Page 70

Basal-IQ Technology
NO
YES
6. To turn on Resume Alert, tap
Resume Alert and you will be
notified when Basal-IQ resumes
insulin delivery.
7. Tap YES.
8. Tap SAVE.
ü The Settings Saved screen
is displayed.
9. Tap the Tandem logo on the face
of the pump to return to the Home
Screen.
Basal-IQ
Basal-IQBasal-IQ
Basal-IQSuspend Alert
Resume Alert
You will be notified when your
regular basal rate is automatically
resumed due to the Basal-IQ
feature.
Turn Resume Alert on?
Basal-IQ
Basal-IQBasal-IQ
Basal-IQSuspend Alert
Basal-IQResume Alert
OFF ON
OFF ON
ONOFF
OFF ON
OFF ON
OFF ON
SAVEBAC K
SAVEBAC K
NOTE
Basal-IQ will suspend insulin if your
glucose value is PREDICTED to be
less than 80 mg/dL within 30 minutes.
These values are not adjustable.
68 Customer Technical Support: (877) 801-6901
Page 71
THIS PAGE IS
INTENTIONALLY
LEFT BLANK
Basal-IQ Technology
Customer Technical Support: (877) 801-6901 69
Page 72

Load
Page 73
Load
NOTE
Before you begin, make sure you have the following items:
»
One unopened, disposable, sterile, single-use cartridge
»
One vial of room temperature, rapid-acting insulin
»
3.0 mL syringe and fill needle, filled with the desired amount of insulin
»
Alcohol prep swab
»
One new infusion set
QUICK TIP
Avoid changing an infusion set before going to bed or if you will not be able to test your
BG one to two hours after a new set is placed.
NOTE
Once in use, do not disconnect the connection between the cartridge tubing and the
infusion set tubing. If the connection comes loose, disconnect the infusion set from the
site on your body before tightening to avoid unintentional insulin delivery.
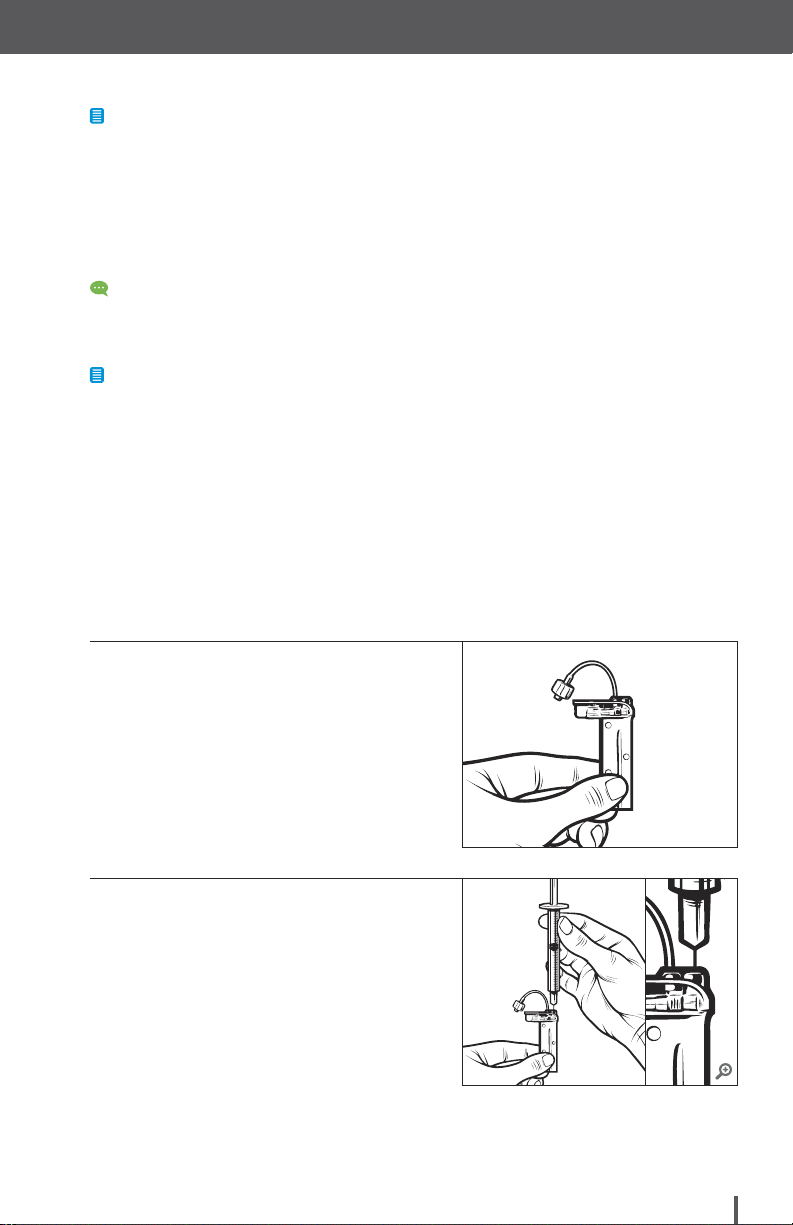
Fill and Load a Cartridge
Fill the Cartridge:
1. Remove a new cartridge from
the pouch.
2. After filling the syringe with insulin,
hold the cartridge upright and
insert the needle of the filled
syringe into the white fill port
on top of the cartridge.
Customer Technical Support: (877) 801-6901 71
Page 74
Load
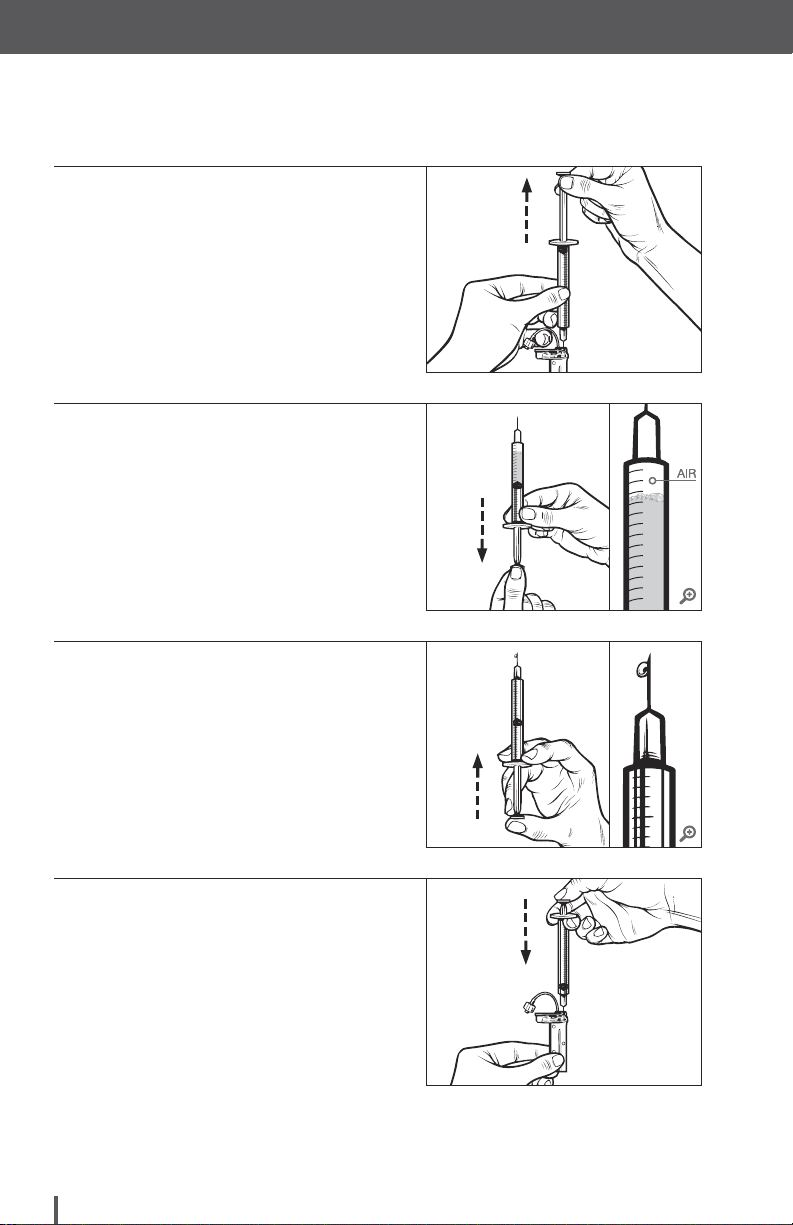
3. Keeping the syringe and cartridge
vertical and the needle inside the
fill port, pull back on the plunger
to remove air.
4. Turn the syringe upright and pull
down on the plunger. Flick the
barrel to make sure that any air
bubbles rise to the top.
5. Remove the syringe from the
cartridge and remove air by
pressing on the plunger until
you see a drop of insulin at
the tip of the needle.
6. Reinsert the needle into the fill port
on the cartridge, and slowly press
the plunger to fill your cartridge
with insulin. When the cartridge
is filled, maintain pressure on the
plunger as you remove the needle.
72 Customer Technical Support: (877) 801-6901
Page 75

Load the Cartridge:
22
18
14
10
6
2
400
50
100
150
200
250
300
350
3
HRS
mg/dL
88
Load
1. From the Home Screen,
tap OPTIONS.
2. Tap Down Arrow.
3. Tap Load.
6:32 PM
100%
INSULIN ON BOARD 1.1 u | 1:09 hrs
November 14
OPTIONS BOLUS
BACK
STOP INSULIN
My Pump
My CGM
Temp Rate
BACK
Load
Pump History
CGM History
Basal-IQ
Options
Options
235 u
4. Tap Change Cartridge.
BACK
Load
DONE
Change Cartridge
Fill Tubing
Fill Cannula
Site Reminder Press to Turn On
Customer Technical Support: (877) 801-6901 73
Page 76

Load
NO
YES
CLOSE
NEXT
SCREEN IS LOCKED
5. A screen will display that all insulin
deliveries will be stopped. Tap YES.
6. Disconnect the infusion set
from your body and tap NEXT
to continue.
ü The Preparing for Cartridge screen
is displayed.
7. Remove the used cartridge and
install the filled cartridge. Tap
UNLOCK when completed, then
tap NEXT to continue.
QUICK TIP
If needed, place the cartridge removal
tool or the edge of a coin in the slot at
the bottom of the cartridge and twist to
aid in the removal of the cartridge.
In order to change a cartridge,
all insulin deliveries, including
basal and any active bolus or
temp rate will be stopped.
Continue?
Disconnect the infusion set from
your body and press NEXT to
continue.
Remove the
cartridge and
install a filled
cartridge. Press the
UNLOCK button
when completed.
NOTE
To install a filled cartridge, place the
bottom of the cartridge at the end of
the pump, make sure it is lined up on
the guide tracks, and push on the
circular fill port to slide the cartridge
until you feel it click into place.
74 Customer Technical Support: (877) 801-6901
Page 77

Load
NEXT
FILL
DONE
8. Tap NEXT.
ü The DETECTING CARTRIDGE
screen is displayed, followed by the
CARTRIDGE CHANGED screen.
NOTE
Always dispose of used components
such as cartridges, syringes, needles, infusion sets, and CGM sensors
following the instructions from your
healthcare provider. Wash your hands
thoroughly before and after handling
System components.
9. Tap START.
ü The Starting Fill screen
is displayed.
NOTE
The minimum amount of insulin
required to fill tubing after a cartridge
change is 10 units.
10. Tap STOP once three drops of
insulin are seen at the end of
the tubing.
Make sure the set is disconnected
from your body and that the tubing
is securely connected to the
cartridge.
Press NEXT to fill your tubing
with insulin.
Fill Tubing
Fill Tubing
Amount Filled 0 u
Fill Tubing
Fill Tubing
START
STOP
ü The Stopping Fill screen
Amount Filled 15.5 u
is displayed.
11. Verify that drops are seen and
tap DONE.
If you see drops at the end of the
tubing, press DONE. If no insulin
drops are noticed, press FILL to
continue filling.
Amount Filled: 15.5 u
Customer Technical Support: (877) 801-6901 75
Page 78
Load
CLOSE
NEXT
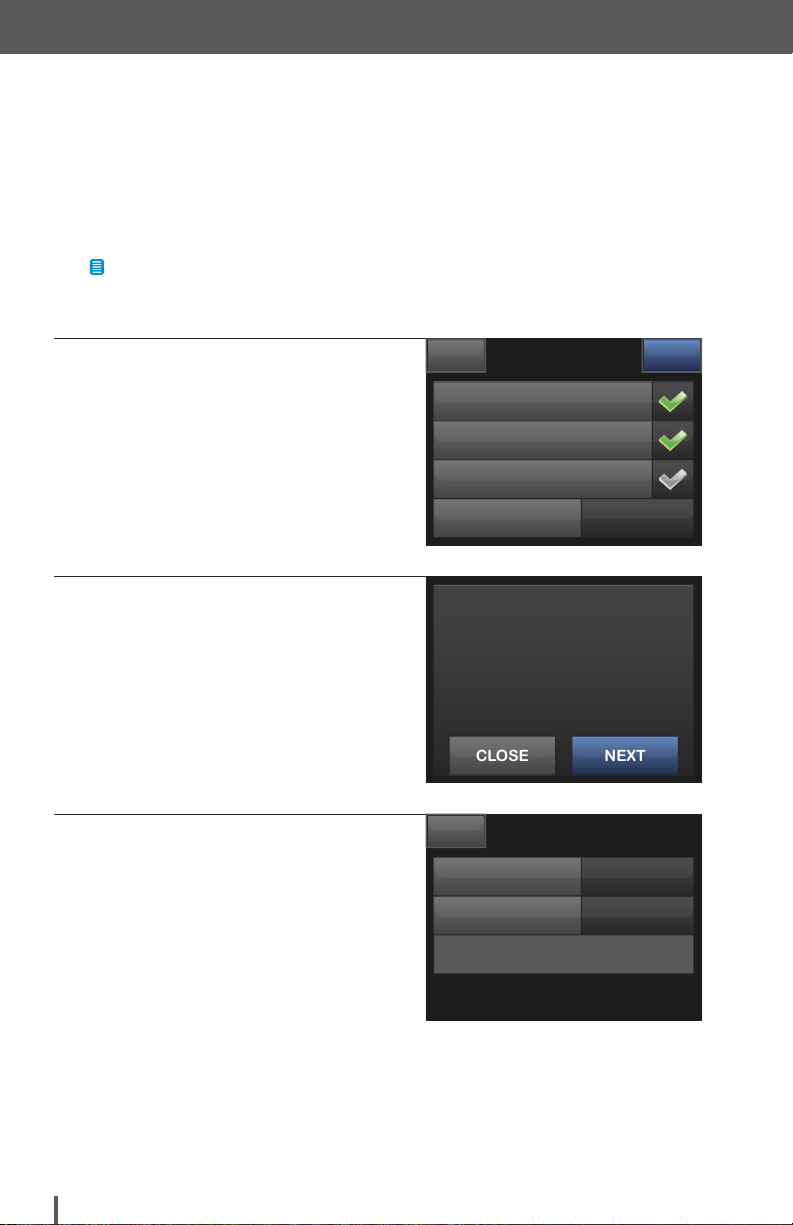
12. Fill Tubing is complete. Ensure
that there are no leaks from the
tubing connections.
NOTE
Refer to your infusion set instructions
for proper tubing fill amount.
13. Tap Fill Cannula.
14. Insert a new infusion set and
connect filled tubing to site,
then tap NEXT.
15. Tap Edit Fill Amount if you want to
change it. Otherwise, tap START
and skip the next two steps.
BACK
Change Cartridge
Fill Tubing
Fill Cannula
Site Reminder Press to Turn On
Insert a new set and connect to
the filled tubing.
Press NEXT to fill the cannula with
insulin.
BACK
Edit Fill Amount
Fill Cannula
Amount Filled 0 u
Load
Fill Cannula
DONE
0.7 u
START
76 Customer Technical Support: (877) 801-6901
Page 79
Load
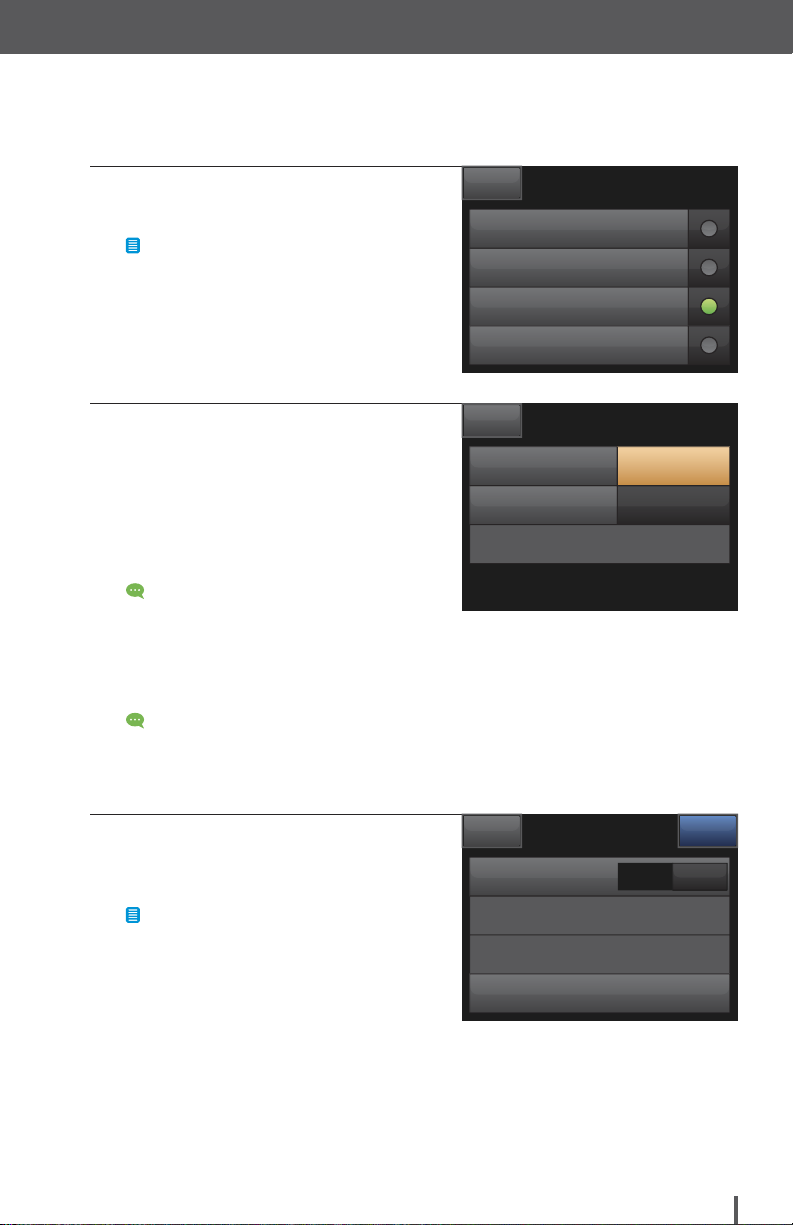
16. Select amount needed for
cannula fill.
NOTE
If the amount needed is not listed, tap
Other Amount and use the on-screen
keypad to enter a value between
0.1 to 1.0 units.
17. Tap START.
ü The Starting Fill screen
is displayed.
ü After fill is complete, The Stopping
Fill screen is displayed.
QUICK TIP
Avoid changing an infusion set before
going to bed or if you will not be able
to test your BG one to two hours after
a new set is placed.
QUICK TIP
Refer to your infusion set instructions
for proper insertion and cannula
fill amount.
BACK
0.2 u
0.3 u
0.7 u
Other amount
BACK
Edit Fill Amount
Fill Cannula
Amount Filled 0 u
Fill Amount
Fill Cannula
0.7 u
START
18. Review settings and tap SAVE
Site Reminder
SAVEBAC K
if correct. Tap Edit Reminder if
settings need to be changed.
NOTE
Reminder is set to three days by
default.
Site Reminder
Scheduled Day Friday
Scheduled Time 5:00 PM
Edit Reminder
OFF
ON
Customer Technical Support: (877) 801-6901 77
Page 80

Load
213087954
6
19. Tap Remind Me In.
ü The SETTINGS SAVED screen
is displayed.
20. Select the number of days.
21. Tap Remind Me At.
Remind Me In
Remind Me At
Time of Day
BACK
1 day
2 days
3 days
Remind Me In
Remind Me At
Time of Day
Site Reminder
AM PM
Remind Me In
Site Reminder
AM PM
SAVEBAC K
3 days
5:00
DONEBACK
2 days
5:30
22. Use the on-screen keypad to enter
time and tap DONE.
306 :
hour minute
78 Customer Technical Support: (877) 801-6901
DONEBACK
Page 81
Load
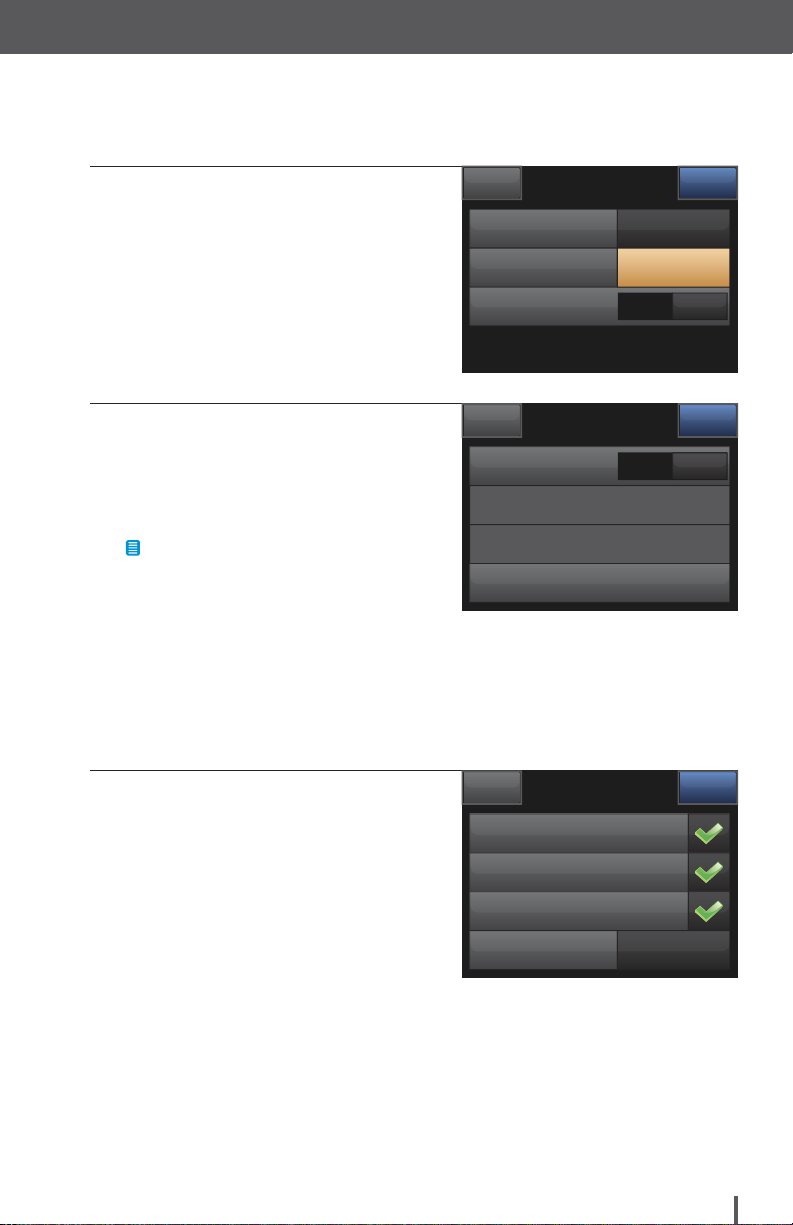
23. Tap Time of Day to change AM
or PM. Tap DONE.
24. Verify Site Reminder is set correctly
and tap SAVE.
ü The SETTINGS SAVED screen
is displayed.
NOTE
»
The screen will return to the Load
menu if the Site Reminder is turned
OFF. Tap DONE to resume insulin
if finished.
»
Or tap Site Reminder to set
reminder.
»
If Site Reminder is ON, the pump
will automatically display the Site
Reminder screen.
Site Reminder
Remind Me In
Remind Me At
Time of Day
Site Reminder
Site Reminder
Scheduled Day Sunday
Scheduled Time 6:30 PM
Edit Reminder
2 days
6:30
AM PM
OFF
DONEBACK
SAVEBAC K
ON
25. Tap DONE.
ü A reminder to test BG in one to
BACK
Change Cartridge
Load
DONE
two hours is displayed.
Fill Tubing
Fill Cannula
Site Reminder
ON
Customer Technical Support: (877) 801-6901 79
Page 82

Load
BACK
RESUME
26. Tap RESUME.
ü The RESUMING INSULIN screen
is displayed.
NOTE
If this is the first time using your
t:slim X2 insulin pump with Basal-IQ
technology and a personal profile has
not been defined, a screen will notify
you that a profile must be activated to
resume insulin. Tap CLOSE.
Resume insulin now?
This will resume all deliveries.
80 Customer Technical Support: (877) 801-6901
Page 83
THIS PAGE IS
INTENTIONALLY
LEFT BLANK
Load
Customer Technical Support: (877) 801-6901 81
Page 84

Bolus
Page 85

Bolus
22
18
14
10
6
2
400
50
100
150
200
250
300
350
3
HRS
mg/dL
88
NEXT
BG
View Calculation
Add BG
CARBS
grams
0
Bolus Overview
A bolus is a quick dose of insulin that is usually delivered to cover food eaten or an
elevated BG.
After entering grams of carb or units of insulin needed for food, and/or entering a
BG value, tap View Calculation to see how the delivery amount was calculated.
NOTE
An Incomplete Bolus Alert will be displayed if bolus programming is not completed within
90 seconds.
NOTE
Turn off the pump screen by tapping the Screen On/Quick Bolus button. Position the
screen away from the skin before placing the pump back in its case or in any pocket/
clothing to prevent unintentional interactions with the touchscreen.
Food Bolus Using Grams
1. From the Home Screen,
tap BOLUS.
100%
6:32 PM
November 14
235 u
2. Tap 0 grams.
INSULIN ON BOARD 1.1 u | 1:09 hrs
OPTIONS BOLUS
BACK
0
units
Customer Technical Support: (877) 801-6901 83
Page 86

Bolus
BG
View Calculation
Add BG
CARBS
grams
38
NO
YES
BGNACarbs
38 g
Units To Deliver
3.8 u
BACK
DELIVER
Food
3.8 u
Correction
NA
EXTENDED
3. Using the on-screen keypad, enter
grams of carbohydrate and tap
DONE.
NOTE
»
To add multiple carb values, enter
first value, then tap +/=, enter second value, tap +/=. Continue until
done and then tap TOTAL.
»
To clear the value entered and start
over, tap the Back Arrow.
4. Tap NEXT to confirm the units of
insulin to be delivered.
NOTE
Tap the displayed units calculated to
override the amount.
NOTE
When administering a Food Bolus, it
is recommended that you enter a BG
value whenever possible.
5. Tap YES to confirm request if
entered data is correct.
Tap NO to go back to make
changes or view calculations.
+ / =
Confirm Request?
38
grams
21 3
54 6
87 9
0
3.8
units
DONEBACK
NEXTBACK
6. Tap DELIVER.
84 Customer Technical Support: (877) 801-6901
NOTE
If the Basal-IQ feature suspends insulin
delivery during a Food Bolus, the remainder of the bolus WILL be delivered
before all insulin delivery is stopped.
Deliver 3.8 u Bolus?
OFF
ON
Page 87
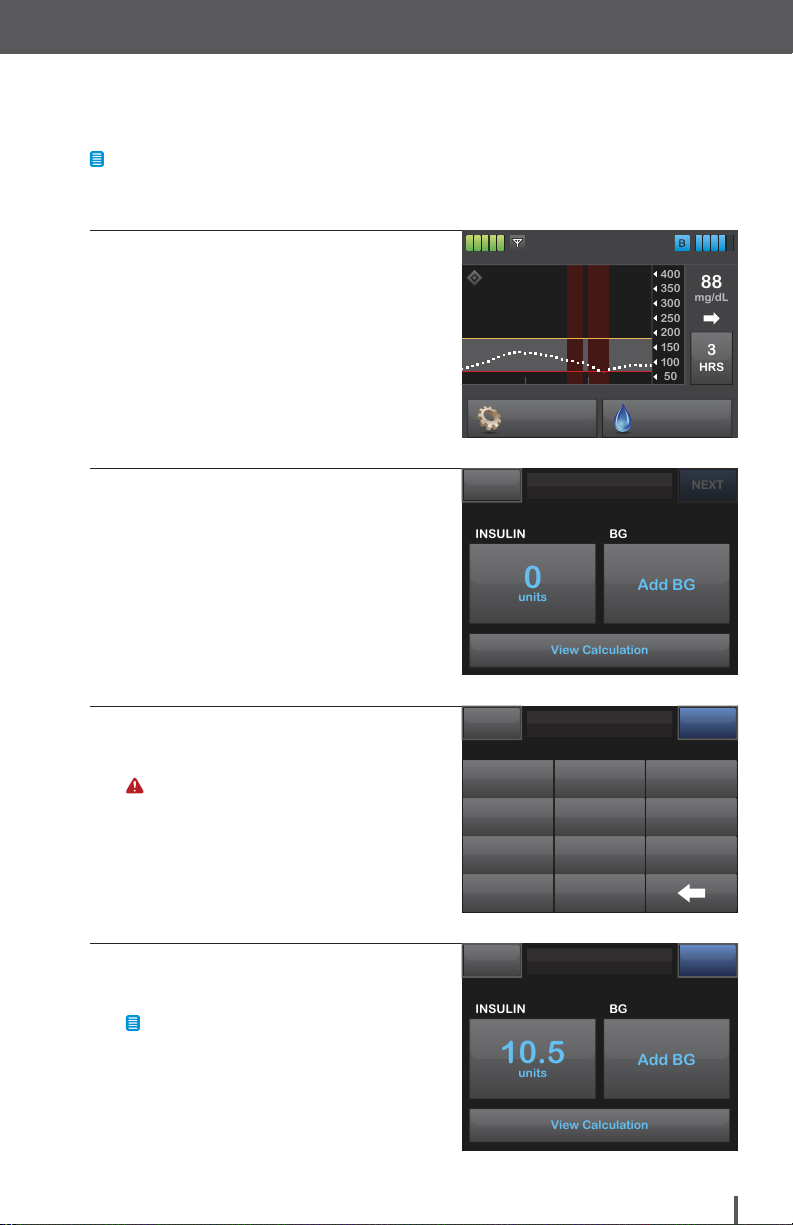
Bolus
22
18
14
10
6
2
400
50
100
150
200
250
300
350
3
HRS
mg/dL
88
6:32 PM
NEXT
BG
View Calculation
Add BG
INSULIN
units
0
BG
View Calculation
Add BG
INSULIN
units
10.5
Food Bolus Using Units
NOTE
If bolusing using a carb ratio, refer to the previous section: Food Bolus Using Grams.
Always confirm that the decimal point placement is correct.
1. From the Home Screen,
tap BOLUS.
2. Tap 0 units on the left side of the
screen.
3. Using the on-screen keypad enter
desired units of insulin. Tap DONE.
ALERT
Always confirm that the decimal point
placement is correct.
100%
INSULIN ON BOARD 1.1 u | 1:09 hrs
BACK
November 14
OPTIONS BOLUS
0
units
10.5
units
21 3
54 6
87 9
.
0
235 u
DONEBACK
4. Tap NEXT to confirm the units of
insulin to be delivered.
NOTE
10.5
units
NEXTBACK
When administering a Food Bolus, it
is recommended that you enter a BG
value whenever possible.
Customer Technical Support: (877) 801-6901 85
Page 88
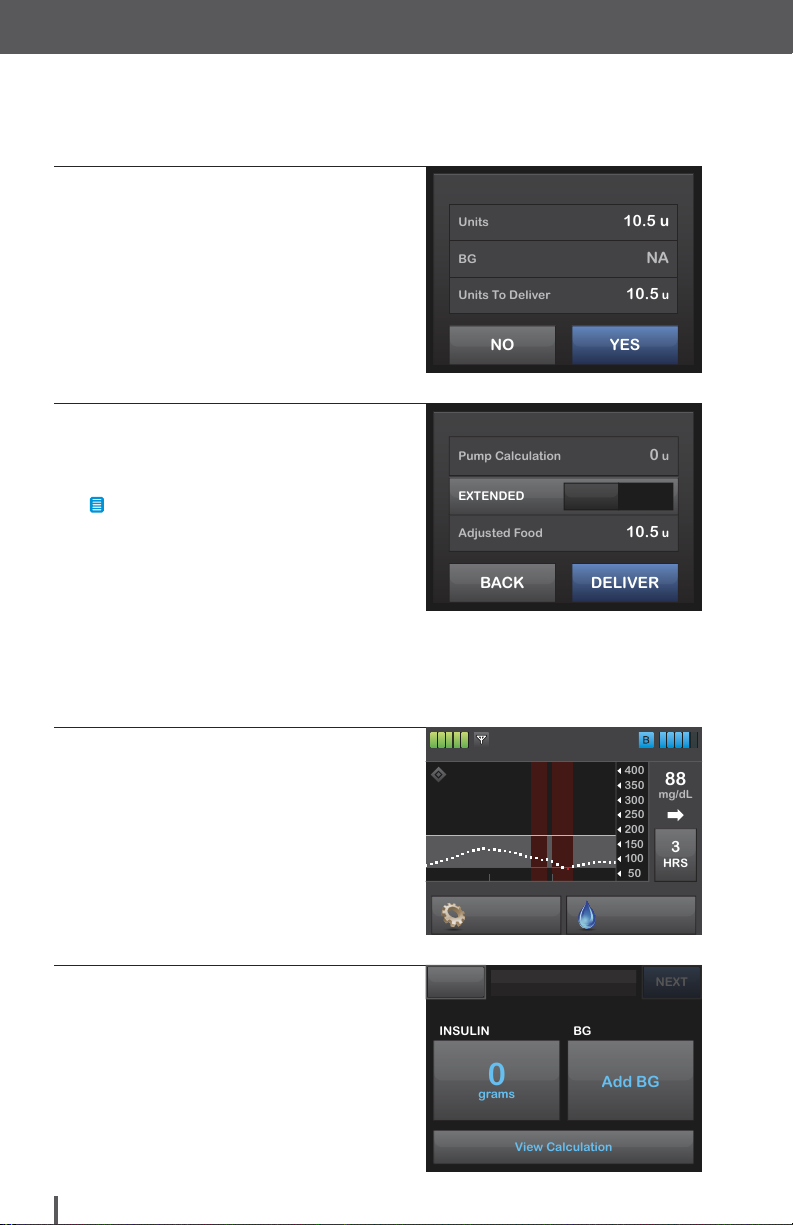
Bolus
NO
YES
BGNAUnits
10.5 u
Units To Deliver
10.5 u
BACK
DELIVER
Adjusted Food
10.5 u
Pump Calculation
0 u
EXTENDED
22
18
14
10
6
2
400
50
100
150
200
250
300
350
3
HRS
mg/dL
88
NEXT
BG
View Calculation
Add BG
INSULIN
grams
0
5. Tap YES to confirm request if
entered data is correct. Tap NO to
go back to make changes or view
calculations.
6. Tap DELIVER.
ü The Bolus screen is displayed.
NOTE
If the Basal-IQ feature suspends insulin
delivery during a Food Bolus, the remainder of the bolus WILL be delivered
before all insulin delivery is stopped.
Correction Bolus
1. From the Home Screen,
tap BOLUS.
Confirm Request?
Deliver 10 u Bolus?
OFF
6:32 PM
100%
INSULIN ON BOARD 1.1 u | 1:09 hrs
November 14
OPTIONS BOLUS
ON
235 u
2. Tap Add BG.
86 Customer Technical Support: (877) 801-6901
BACK
0
units
Page 89
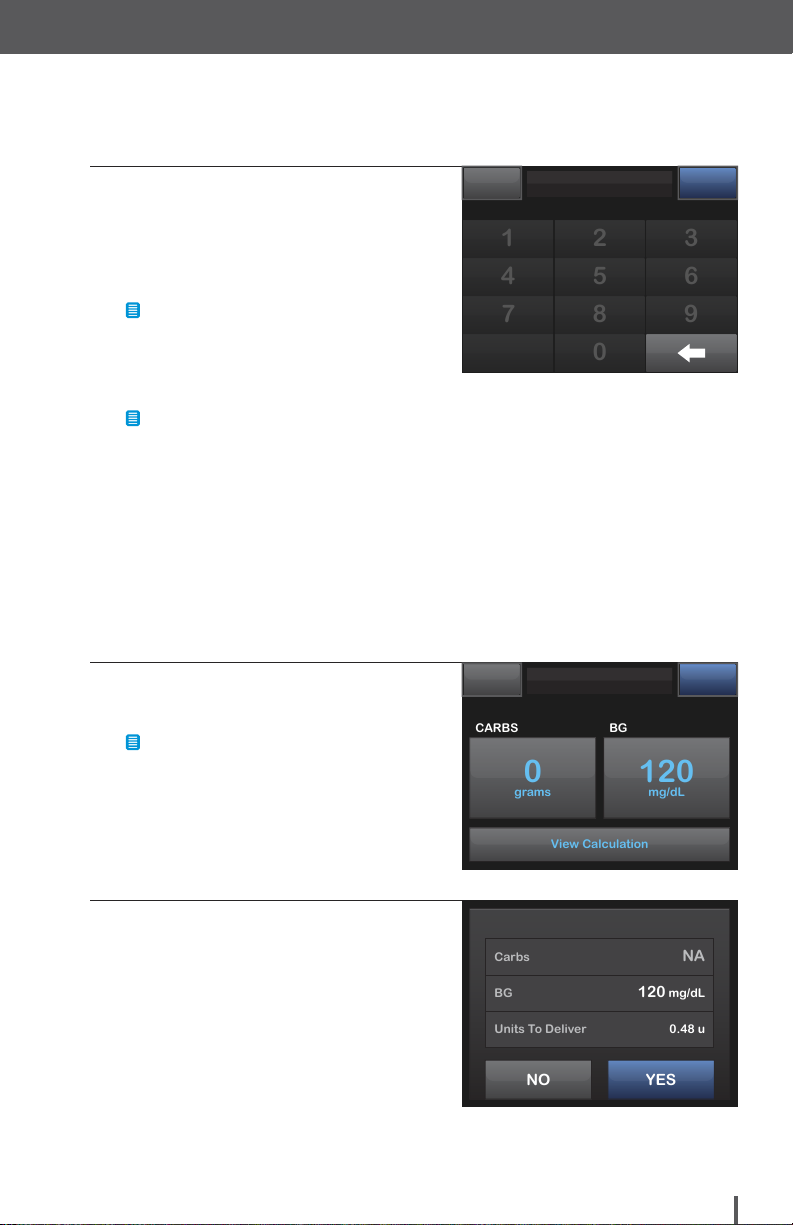
Bolus
213
087
9
546
View Calculation
CARBS
grams
0
BG
mg/dL
120
NO
YES
BG
120 mg/dL
CarbsNAUnits To Deliver
0.48 u
3. Using the on-screen keypad,
enter BG value and tap DONE.
Alternatively, you can enter the
current CGM value, then tap
DONE.
NOTE
Once DONE is tapped, the BG value is
saved in the pump history whether or
not a bolus is delivered.
NOTE
»
If BG is above Target BG, the pump
offers to calculate and add a correction bolus.
»
If BG is below Target BG, a message
screen advises to eat carbs and
retest.
»
If BG is at Target BG, it will return
to the Bolus screen with no
recommended bolus amount
for correction.
4. Tap NEXT to confirm the units of
insulin to be delivered.
NOTE
Tap the displayed units calculated to
override the amount.
120
mg/dL
0.48
units
DONEBACK
NEXTBACK
5. Tap YES to confirm request if
entered data is correct. Tap NO to
Confirm Request?
go back to make changes or view
calculations.
Customer Technical Support: (877) 801-6901 87
Page 90
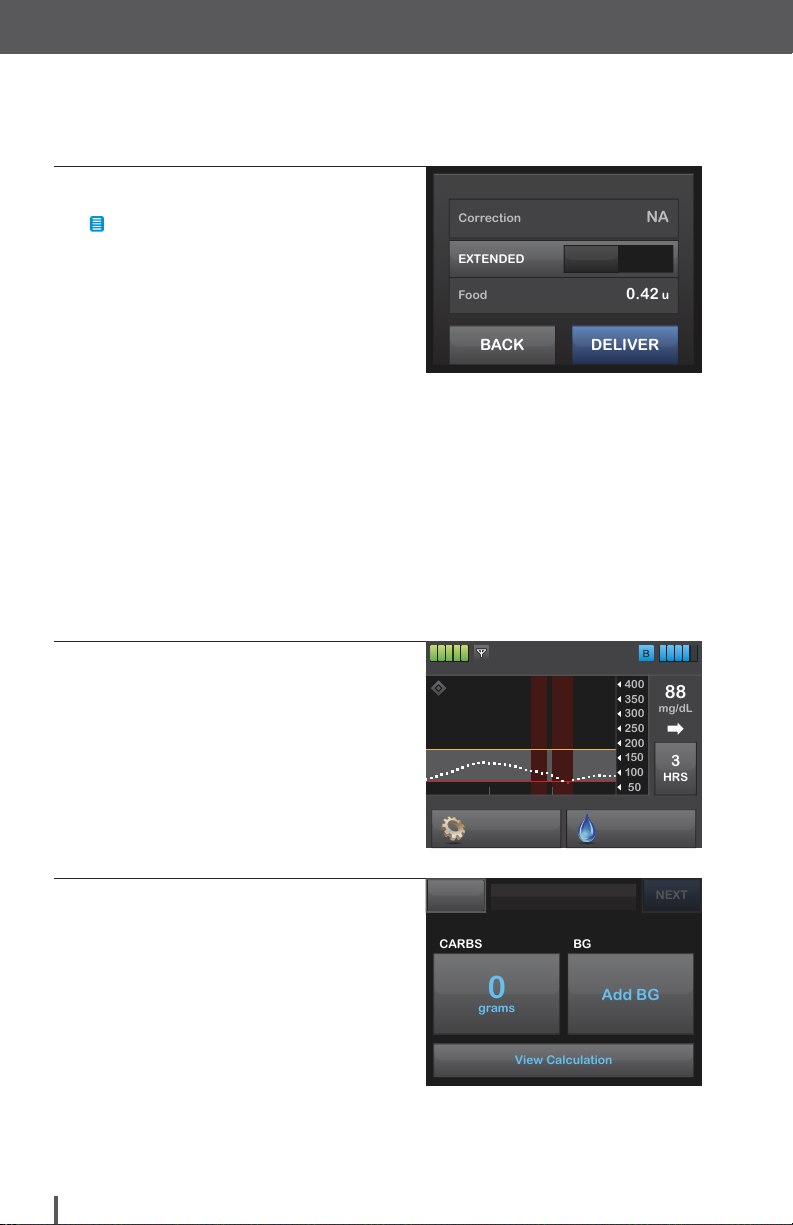
Bolus
BACK
DELIVER
Food
0.42 u
Correction
NA
EXTENDED
22
18
14
10
6
2
400
50
100
150
200
250
300
350
3
HRS
mg/dL
88
NEXT
BG
View Calculation
Add BG
CARBS
grams
0
6. Tap DELIVER.
NOTE
If the Basal-IQ feature suspends insulin
delivery during a Food Bolus, the remainder of the bolus WILL be delivered
before all insulin delivery is stopped.
Extended Bolus
1. From the Home Screen,
tap BOLUS.
Deliver 0.42 u Bolus?
OFF
6:32 PM
100%
INSULIN ON BOARD 1.1 u | 1:09 hrs
November 14
OPTIONS BOLUS
ON
235 u
2. Tap 0 grams (or 0 units).
88 Customer Technical Support: (877) 801-6901
BACK
0
units
Page 91

Bolus
BG
View Calculation
Add BG
CARBS
grams
38
View Calculation
CARBS
grams
38
BG
mg/dL
100
NO
YES
BG
100 mg/dL
Carbs
38 g
Units To Deliver
3.17 u
3. Using the on-screen keypad enter
grams of carbohydrate (or units of
insulin). Tap DONE.
4. If desired, tap Add BG and using
the on-screen keypad enter BG
value. Tap DONE.
5. Tap NEXT to confirm the units of
insulin to be delivered.
+ / =
38
grams
21 3
54 6
87 9
0
3.8
units
3.17
units
DONEBACK
NEXTBACK
NEXTBACK
6. Tap YES to confirm request if
entered data is correct. Tap NO
Confirm Request?
to go back to make changes or
view calculations.
Customer Technical Support: (877) 801-6901 89
Page 92

Bolus
BACK
NEXT
Food
3.17 u
Correction
NA
EXTENDED
50%
DELIVER NOW
2 hrs
DURATION
50%
DELIVER LATER
View Units
7. Tap EXTENDED to turn on the
extended bolus, then tap NEXT.
8. Tap 50% under DELIVER NOW
to adjust the percentage of the
Food Bolus that is to be
delivered immediately.
NOTE
The percentage value for DELIVER
LATER is automatically calculated by
the pump. The default is 50% NOW
and 50% LATER. The default for
DURATION is two hours.
NOTE
A Correction Bolus will always be given
in the DELIVER NOW portion.
Extend Food Bolus?
OFF
3.8
units
ON
NEXTBACK
9. Use the on-screen keypad to enter
the percentage of the bolus to
DELIVER NOW and tap DONE.
90 Customer Technical Support: (877) 801-6901
50
%
21 3
54 6
87 9
0
DONEBACK
Page 93

Bolus
60%
DELIVER NOW
2 hrs
DURATION
40%
DELIVER LATER
View Units
3.17
60%
DELIVER NOW
3:30 hrs
DURATION
40%
DELIVER LATER
View Units
NO
YES
Deliver Later
40%
Deliver Now
60%
Duration
3:30 hrs
10. Tap 2 hrs under DURATION.
11. Use the on-screen keypad to adjust
the length of time the bolus is to be
delivered, then tap DONE.
12. Tap NEXT.
NOTE
Tap View Units to display the breakdown of units to be delivered now
versus later.
3.17
units
303 :
hour minute
21 3
54 6
87 9
0
units
NEXTBACK
DONEBACK
NEXTBACK
13. Confirm request. Tap YES if
entered data is correct. Tap NO
Confirm Request?
to go back to make changes or
view calculations.
Customer Technical Support: (877) 801-6901 91
Page 94
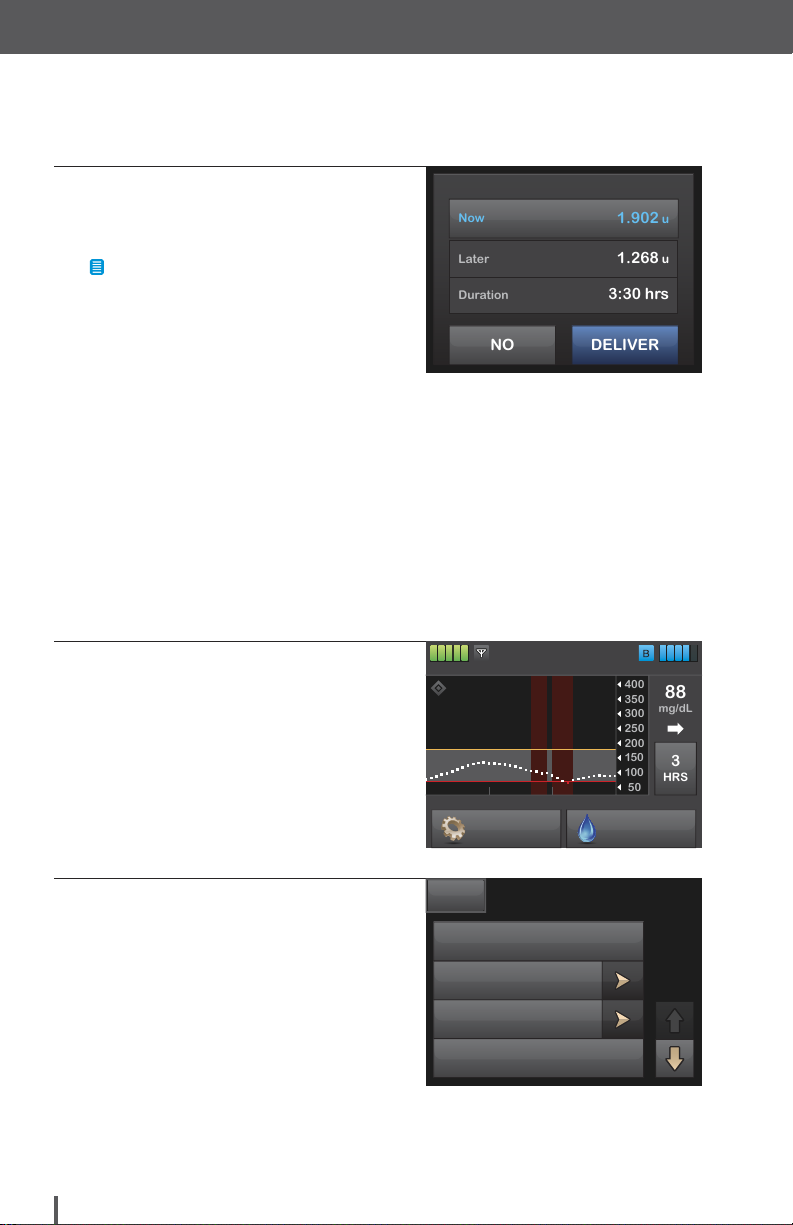
Bolus
NO
DELIVER
Later
1.268 u
Duration
3:30 hrs
Now
1.902 u
22
18
14
10
6
2
400
50
100
150
200
250
300
350
3
HRS
mg/dL
88
14. Verify settings and tap DELIVER.
ü The Bolus screen is displayed.
NOTE
If the Basal-IQ feature suspends insulin
delivery during the extended portion of
the bolus, the remainder of the Extended Bolus will be canceled.
Quick Bolus Setup
1. From the Home Screen,
tap OPTIONS.
Deliver 3.8 u Bolus?
6:32 PM
100%
INSULIN ON BOARD 1.1 u | 1:09 hrs
November 14
OPTIONS BOLUS
235 u
2. Tap My Pump.
92 Customer Technical Support: (877) 801-6901
BACK
Options
STOP INSULIN
My Pump
My CGM
Temp Rate
Page 95
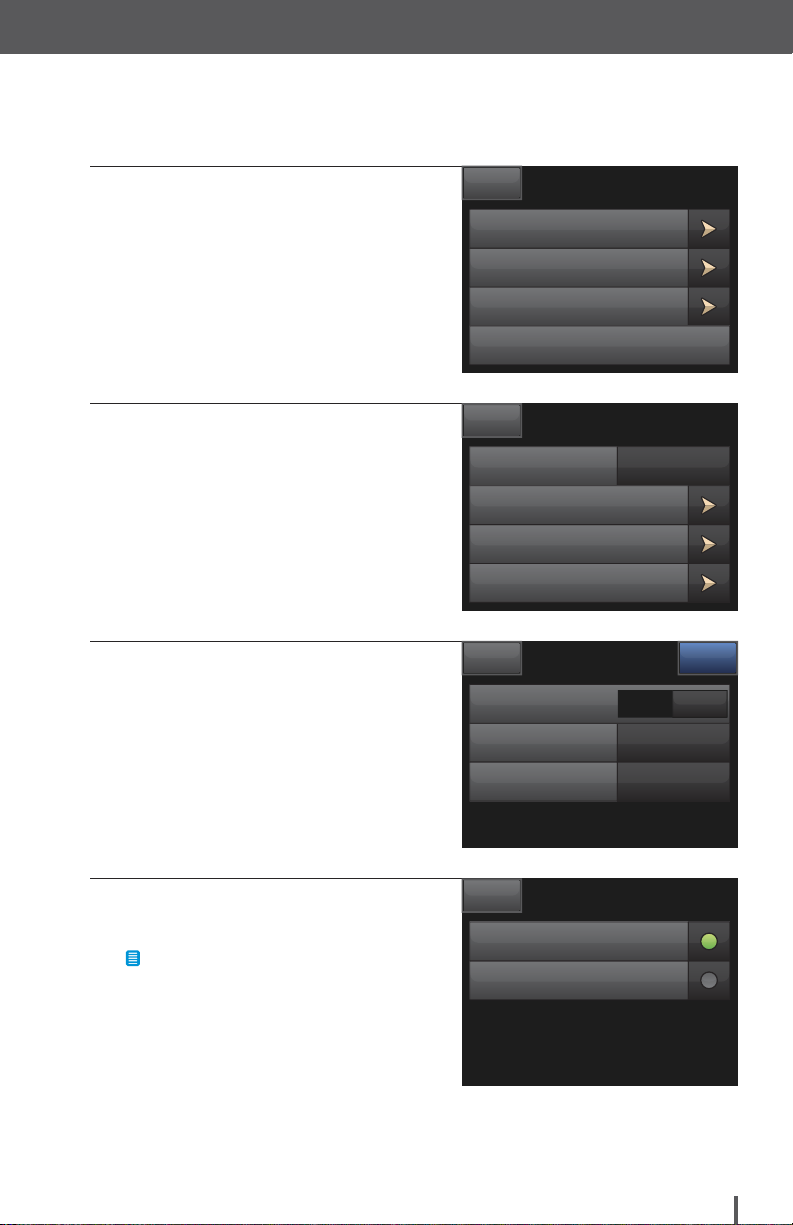
Bolus
3. Tap Pump Settings.
4. Tap Quick Bolus to turn on.
5. Tap Increment Type.
BACK
Personal Profiles
Alert Settings
Pump Settings
Pump Info
BACK
Quick Bolus Press to Turn On
Pump Volume
Screen Options
Time and Date
Insulin Duration
Increment Type
Increment Amount
My Pump
Pump Settings
Quick Bolus
OFF
SAVEBAC K
ON
units
1 u
6. Tap units of insulin or grams of
BACK
Increment Type
carbohydrate.
NOTE
units of insulin
The increment amount is added with
grams of carbohydrate
each press of the Quick Bolus button
when delivering a Quick Bolus.
Customer Technical Support: (877) 801-6901 93
Page 96
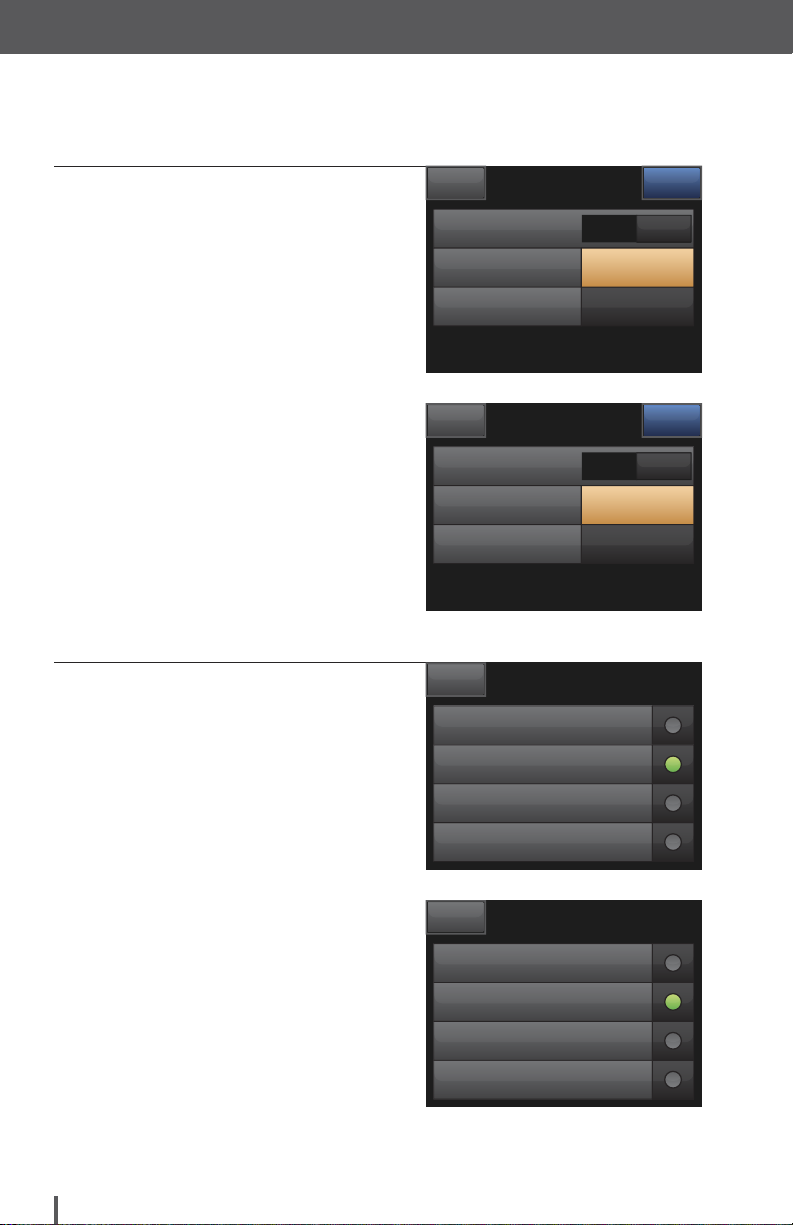
Bolus
7. Tap Increment Amount.
8. Select the preferred
increment amount.
Quick Bolus
Insulin Duration
Increment Type
Increment Amount
Quick Bolus using units
Quick Bolus
Insulin Duration
Increment Type
Increment Amount
Quick Bolus using grams
Increment in Units
BACK
0.5 u
1 u
2 u
5 u
Quick Bolus using units
Increment in Grams
BACK
2 g
5 g
10 g
15 g
Quick Bolus using grams
OFF
OFF
grams
SAVEBAC K
ON
units
1 u
SAVEBAC K
ON
2 g
94 Customer Technical Support: (877) 801-6901
Page 97

Bolus
NO
YES
Increment Type
Grams
Quick Bolus
ON
Increment Amount
5 g
9. Verify settings and tap SAVE.
10. Confirm settings.
Tap YES if entered data is correct.
Tap NO to make changes.
Quick Bolus
Insulin Duration
Increment Type
Increment Amount
Quick Bolus using units
Quick Bolus
Insulin Duration
Increment Type
Increment Amount
Quick Bolus using grams
Confirm Settings?
OFF
OFF
grams
SAVEBAC K
ON
units
1 u
SAVEBAC K
ON
5 g
11. Tap the Tandem logo on the face
Customer Technical Support: (877) 801-6901 95
of the pump to return to the Home
Screen.
Page 98

Bolus
Increment: 0.5 u
units
1.5
Increment: 0.5 u
units
1.5
Quick Bolus
ALERT
When you first use the Quick Bolus feature, you should always look at the screen to
confirm correct programming until you are comfortable with this feature.
1. Press and hold Quick Bolus button
for about two seconds. The Quick
Bolus screen will appear. Listen for
two beeps (if Pump Volume is set
to beep) and feel for two vibrations.
2. Press Quick Bolus button for each
increment until desired amount
is reached. The pump will beep/
vibrate for each button press.
3. Wait a few seconds for the pump
to beep/vibrate back for each
increment pressed to confirm
desired amount.
CANCEL
Press and hold the Quick Bolus
button to deliver.
CANCEL
Press and hold the Quick Bolus
button to deliver.
Quick Bolus
Quick Bolus
96 Customer Technical Support: (877) 801-6901
Page 99
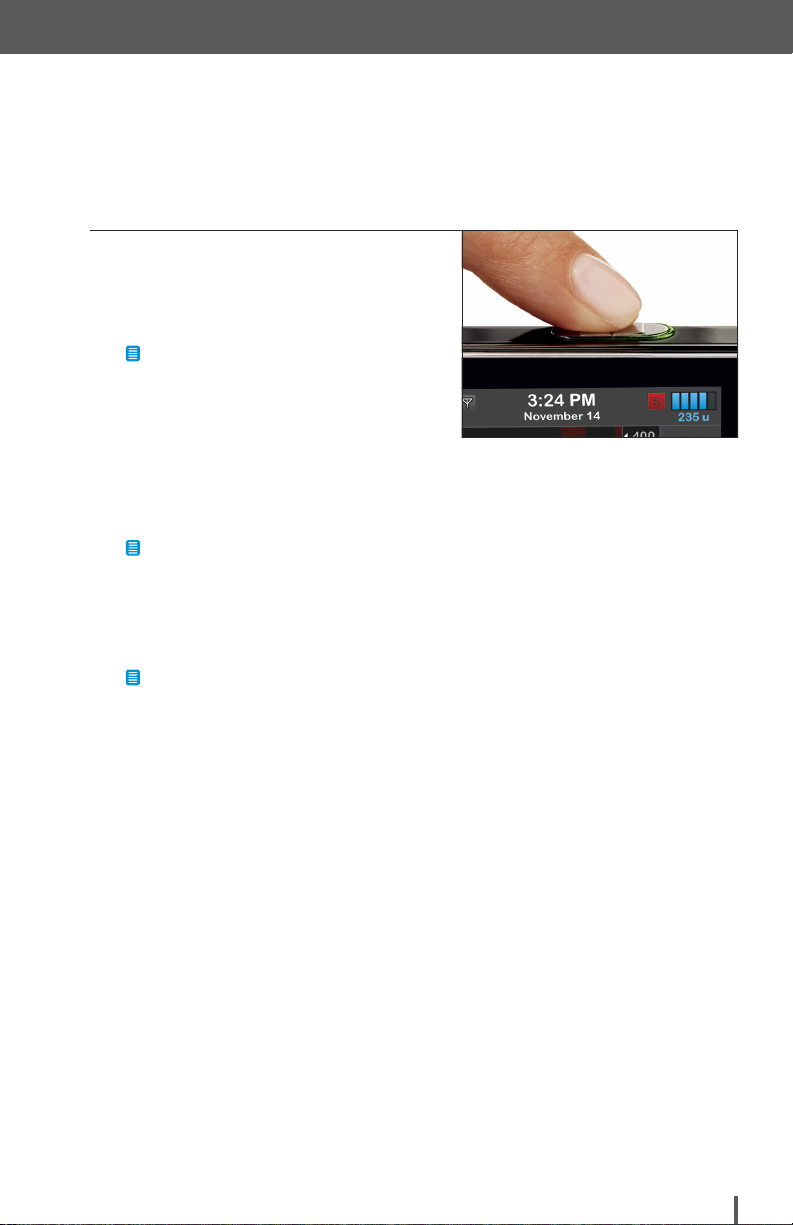
4. After the beeps/vibrations,
press and hold Quick Bolus
button for about two seconds
to deliver the bolus.
NOTE
»
If more than 10 seconds have
passed with no input, the Quick
Bolus will be canceled and
never delivered.
»
If you want to cancel the bolus and
return to the Home Screen, tap
CANCEL on the Quick Bolus screen.
NOTE
The t:slim X2 insulin pump will beep
and vibrate during a Quick Bolus if a
button volume is set. It will only vibrate
if the vibrate option is selected.
Bolus
NOTE
If the Basal-IQ feature suspends insulin
delivery during a Quick Bolus, the
remainder of the bolus will be delivered
before all insulin delivery is stopped.
Customer Technical Support: (877) 801-6901 97
Page 100

Bolus
22
18
14
10
6
2
400
50
100
150
200
250
300
350
3
HRS
mg/dL
88
Requesting 1.25 u Bolus ...
BOLUS
22
18
14
10
6
2
400
50
100
150
200
250
300
350
3
HRS
mg/dL
88
6:32 PM
Bolus Canelled
BOLUS
22
18
14
10
6
2
400
50
100
150
200
250
300
350
3
HRS
mg/dL
88
6:32 PM
Cancel or Stop a Bolus
If Delivery HAS NOT Started:
1. Tap the X to cancel the bolus.
2. The BOLUS option will remain
inactive while a bolus is being
canceled.
3. Once cancellation is complete, the
BOLUS option will become active
again on the Home Screen.
6:32 PM
100%
INSULIN ON BOARD 1.1 u | 1:09 hrs
100%
INSULIN ON BOARD 1.1 u | 1:09 hrs
100%
INSULIN ON BOARD 1.1 u | 1:09 hrs
November 14
November 14
November 14
OPTIONS BOLUS
235 u
235 u
235 u
98 Customer Technical Support: (877) 801-6901
 Loading...