

Page 1

1
Section 1: Getting Started.............................................................3
Introduction and Safe Operation..................................................4-5
General Description........................................................................6-8
Battery Information.......................................................................9-11
Quick Start with the VIPER™ LS6...................................................12
Ribbon Loading & Selection ......................................................13-14
Label Loading....................................................................................15
Keyboard......................................................................................16-20
Section 2: Working with the VIPER™ LS6................................21
Using the VIPER™ LS6...............................................................22-24
Creating Labels
Creating Text ..................................................................25-27
Creating Serializations ...................................................28-31
Creating Symbols............................................................32-33
Creating Lines .................................................................34-35
Creating Boxes......................................................................36
Creating Data Lists.........................................................37-38
Creating Bar Codes........................................................39-40
Creating Date/Time Stamps..........................................41-42
Using the Pages Function...................................................43
Setting up the VIPER™ LS6.......................................................44-47
Using File Manager ..........................................................................48
Interfacing with a Computer............................................................49
ViperLink™..................................................................................50-52
Using Remote Printer Utility..........................................53-54
Printer Cleaning Instructions...........................................................55
Printer Troubleshooting..............................................................56-59
Warranty Information …..................................................................60
General Specifications .....................................................................61
Replacement Parts and Accessories.............................................62
Page 2

2
Page 3

3
SECTION 1
GETTING STARTED
Page 4

INTRODUCTION & SAFE OPERATION
4
The VIPER LS6 Thermal Transfer Portable Printer is the complete printing
solution for Electricians, Assemblers, Installers, Maintenance & Repair,
Construction, and Network Communications Personnel. This versatile on -site,
on-demand printer provides users with the ability to save, retrieve, and edit
custom or serialized labels for wire and cable marking, component labeling,
network labeling, safety identification, and general facilities identification.
This manual will guide you step by step through the set -up, operation, and
troubleshooting of the VIPER™ LS6 Printer. If you have problems not covered
herein, contact your local Panduit Sales Representative, call Panduit
Technical Support at 866-871-4571, or call Panduit Customer Service at 800777-3300. More information is available on the Internet at www.panduit.com.
SAFE OPERATION PRACTICES
The following general safety practices supplement the specific warnings and
cautions depicted elsewhere in this manual. They are recommended
precautions that must be understood and applied during the operation and
maintenance of this printer.
Do Not Operate In An Explosive Environment
Do not operate the printer in the presence of flammable gases or fumes.
Operation of this printer in such an environment constitutes a definite safety
hazard.
Do Not Operate In Wet Or Damp Areas
Do not operate this printer in wet or damp areas. Operation of the printer in
such an environment constitutes a definite safety hazard.
Do Not Substitute Parts Or Modify Equipment
Because of the danger of introducing additional hazards, do not install
substitute parts or perform an unauthorized modification to the printer or its
accessories. The proper components for service and repair may be obtained
from Panduit Corp.
Page 5

INTRODUCTION & SAFE OPERATION
5
WARNING:
When the printer has been in use for an extended period of time, the
printer motor may become hot. DO NOT touch the printer motor with
bare hands.
Information to USA Users
NOTE: This printer has been tested and found to comply with the limits for a
Class A digital device, pursuant to Part 15 of FCC rules. These limits are
designed to provide reasonable protection against harmful interference when
the printer is operated in a commercial environment. This printer generates,
uses, and can radiate radio frequency energy and, if not used in accordance
with this instruction manual, may cause harmful interference to radio
communications. Operation of this printer in a residential area is likely to
cause interference in which case the user will be required to correct the
interference at his own expense.
Information to Canadian Users
This digital apparatus does not exceed Class A limits for radio noise
emissions for digital apparatus set out in the Radio Interference Regulations
of the Canadian Department of Communications.
Le present appareil numerique n’emet pas de bruits radioelectriques
depassant les limites applicables aux appareils numeriques de la class A
prescrites dans le Reglement sur le brouillage radioelectrique edicte par le
ministere des Communications du Canada.
It is possible that infrequent electrical phenomena (static discharge, power
line fluctuations) may cause printer function to be temporarily interrupted. In
this case, the printer will usually reset itself. In extreme cases, the user should
remove then re-apply power (battery pack and/or AC Adapter).
Printer Power Supply
The VIPER LS6 is supplied with a NiMH (Nickel-Metal Hydride) battery. This
battery is re-chargeable. The life expectancy of the NiMH battery is
approximately 500 charge/discharge cycles. After the NiMH has surpassed its
useful life, it must be disposed of properly. DO NOT PLACE THE SPENT
NiMH BATTERY IN AN UNAPPROVED TRASH RECEPTACLE. All NiMH
batteries should be disposed of according to local rules and regulations. It is
strongly recommended that the NiMH battery be recycled.
Page 6
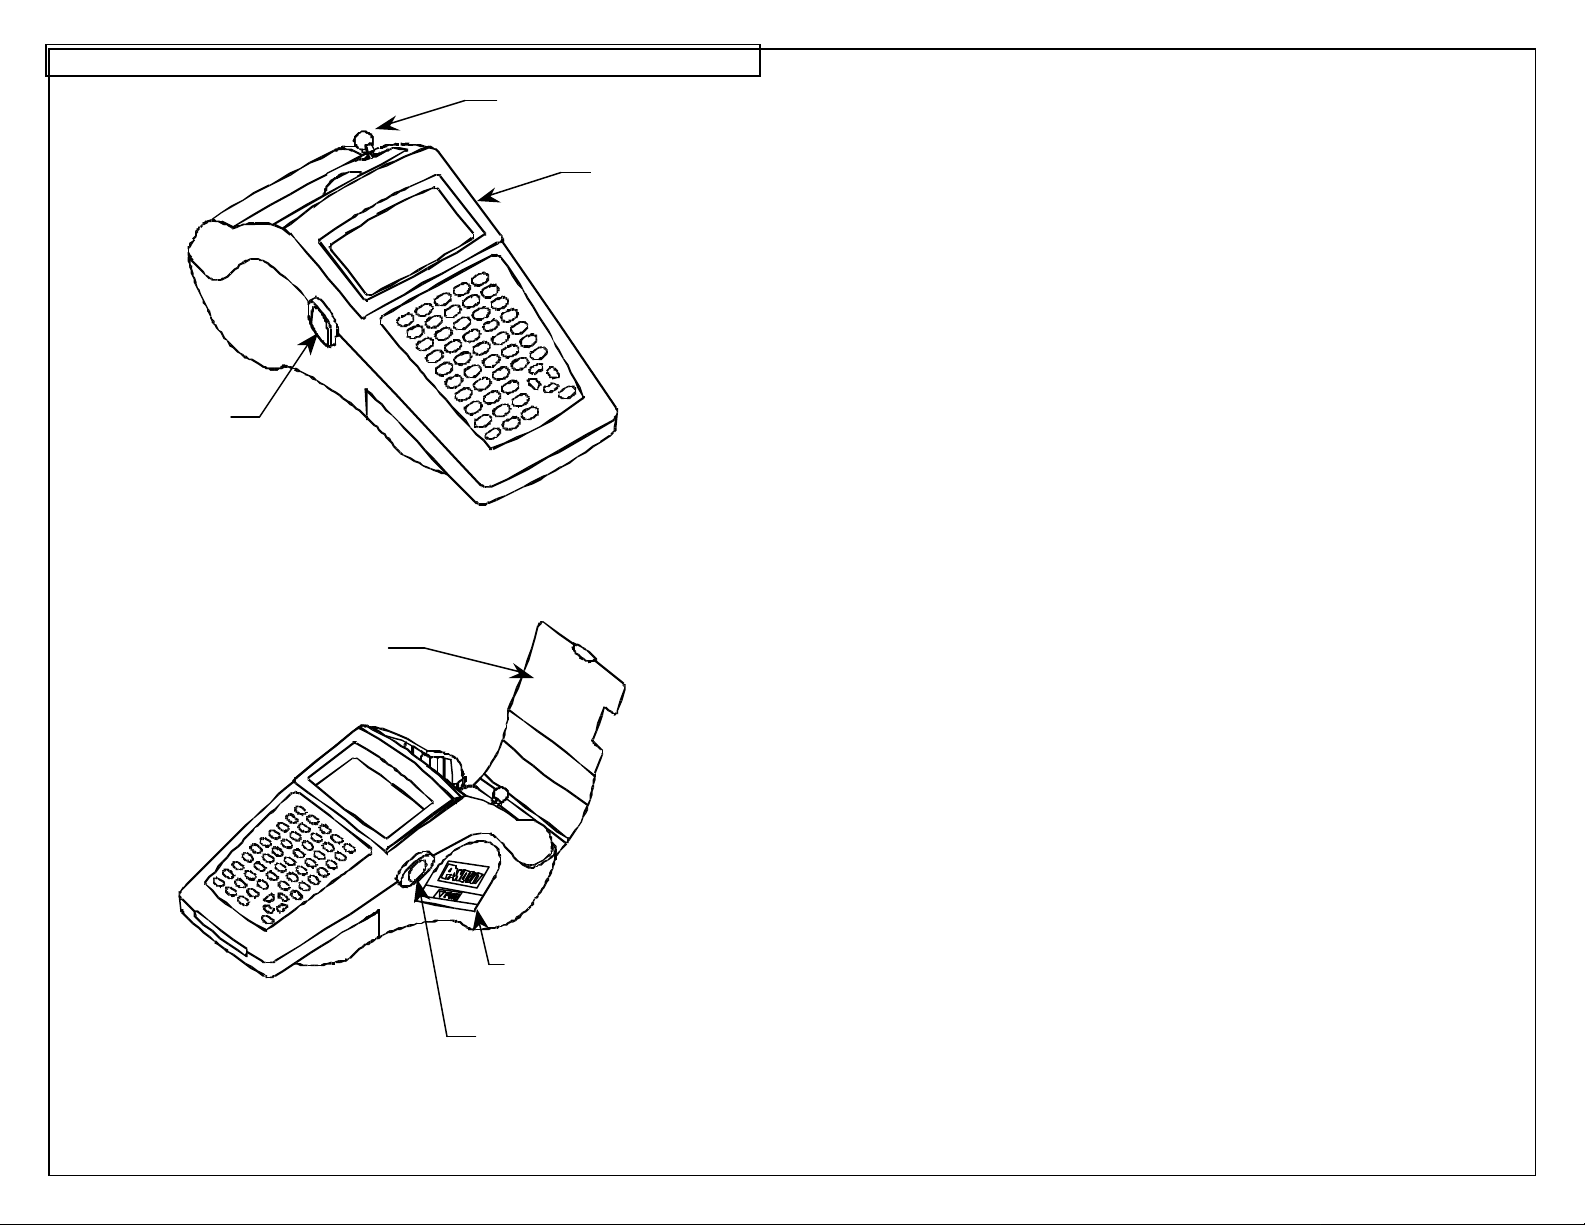
GENERAL DESCRIPTION
6
RS232 Serial
Port
Ribbon
Door
Label Door
Cutter Knob
LCD Display
AC Adapter Plug
Page 7

GENERAL DESCRIPTION
7
The VIPER LS6 printer kit contains each of the following items:
1. VIPER LS6 thermal transfer portable printer
2. TPDEMO direct thermal labeling tape sample
3. LS6-RWBLK, black wax ribbon cartridge
4. LS6-ACS, 120 VAC adapter and battery charger
5. LS6-BP, NiMH rechargeable battery pack
6. LS6-CLN, package of 5 cleaning cards
7. LS6-MAN-A, operator’s manual in English*
8. Hardside carrying case
9. Product registration and warranty card
*Operator’s manuals are also available in other languages.
Optional accessories and replacement parts are listed on page 62 of this
operator’s manual.
Page 8

GENERAL DESCRIPTION
8
Print Technology
The VIPER LS6 prints labels using thermal transfer printing technology. The
print head melts ink contained on a thin web of ribbon material allowing the
ink to transfer to the label material. The print head operates at a resolution of
203 dots per inch (dpi).
Smart Label Roll – See page 15
The VIPER LS6 label supplies are wound on a label cartridge that is plugged
into a socket in the printer. The label cartridge is read by the printer operating
system. The operating system AUTOMATICALLY selects the appropriate
printer settings. Also, the operating system will keep track of the number of
labels used from each roll and report the remaining labels to the user unless
labels are manually removed.
Ribbon Cartridge – See page 13
The ribbon material, which contains the thermal transfer ink, is housed in a
plastic housing to keep it clean, and to allow for easy installation and
replacement. Ribbons are available in wax, hybrid, and resin materials.
Battery Pack – See page 9
A 12 volt battery powers the VIPER LS6. The battery is a rechargeable NiMH
(Nickel-Metal Hydride) type which offers longer life than an equivalently sized
Ni-Cad (Nickel-Cadmium) battery. Also, NiMH batteries are more
environmentally friendly than Ni-Cad batteries, resulting in less stringent
recycling requirements.
AC Adapter / Battery Charger – See page 9
An AC Adapter is included for powering the VIPER LS6. The AC adapter is
compatible with international power systems (100 – 240 VAC). The VIPER
LS6 includes an internal overnight battery charging circuit. The AC Adapter is
used to power the charging circuit. This circuit is intended to charge a
completely discharged battery pack in less than 15 hours.
Label Cutter
A manually operated label cutter is included. The VIPER LS6 will
automatically place the printed label in the proper position for cutting.
Carrying Case
A custom carrying case to protect and transport the printer and accessories is
included.
PC-KIT – See page 47
An upgrade kit consisting of a serial cable for connection to a personal
computer (PC) and a CD of ViperLink software. The PC-KIT is used to
communicate between a PC and the VIPER LS6 printer.
Page 9

BATTERY INFORMATION
9
A 12 volt NiMH (Nickel-Metal Hydride) battery comes with the VIPER LS6
printer. The battery is PARTIALLY CHARGED. Panduit recommends
charging the battery for 15 HOURS PRIOR TO USE. Charging of the
VIPER LS6 battery should be accomplished ONLY with Panduit Model LS6
AC Adapter/Battery Chargers (Part No. LS6-ACS, which is supplied with the
printer). The user MUST manually activate the battery charger with the LS6
powered on to start the charging process (see Charging the Battery below).
NOTE: The Battery (LS6-BP) should only be removed during its own
replacement or during the replacement of the Lithium Battery. Charging
of the NiMH battery pack will only occur while the battery (LS6-BP) is
installed INSIDE of the VIPER LS6 printer.
NOTE: The battery may lose capacity after extended periods of non-use,
and may require several charge/use cycles to recover to its full capacity.
Charging the Battery
1. Connect the AC Adapter to the printer at the AC Adapter Plug.
2. Plug the AC Adapter into an ordinary wall outlet.
3. Turn the Printer On.
4. Wait for the printer to cycle through its start up screens.
5. From the Home Screen press the key to enter the setup menu.
6. Next, use the arrow keys to scroll down to Utilities. Select Battery next
to Utilities and press the key.
7. The current charge level of the battery will appear on the screen briefly.
8. The printer will then prompt to Start charger now? 1-Yes 2-No
9. Press 1 first and then press any other key to begin charging or Press 2 to
exit the battery charging prompt screen and return to the setup menu.
10. Press to end charging. A fully charged battery will completely darken
the status bar vertically.
Page 10

BATTERY INFORMATION
10
Battery
Door
Battery
Compartment
Adjustable
NOTE:
• Completely charge the battery pack before use. The operating system
reports the battery charge status.
• Completely drain the battery pack before charging. The operating system
will warn the user on power up and power down of low battery conditions.
• Consult your local guidelines for instructions on proper disposal of spent
battery packs.
Battery Removal
1. Remove battery door by using a coin to depress the tab.
2. Remove battery by unplugging and lifting it out of the battery
compartment.
3. Re-install the battery by reversing steps 1 and 2 ensuring that the battery
is firmly plugged into the plug connection on the printer.
Battery
Strap
Page 11

BATTERY INFORMATION
11
Lithium Battery
The VIPERTM LS6 uses a Lithium coin-cell battery to preserve the printer
settings and stored files when the main battery pack is removed and the AC
Adapter is not plugged in.
Do not leave the main battery pack out for extended
periods of time, as this will drain the Lithium cell.
Do not remove the Lithium cell as this may result in
a loss of all stored settings and files.
If the printer does not preserve the printer settings and files when both the
battery pack and the AC Adapter are disconnected, then the Lithium cell
should be replaced using the procedure below.
Replacing the Lithium Battery
1. Plug-in the AC Adapter to preserve the stored settings and files during the
battery replacement.
2. Remove the main battery pack to gain access to the lithium cell.
3. Peel away the lithium cell warning label to expose the lithium cell in a
plastic holder. Save the warning label.
4. With your finger, firmly push on the circular plastic tab holding the cell in
place to slightly eject the lithium cell from the holder.
5. Noting the polarity markings on the cell, remove the cell and replace it
with a Panasonic CR2032 or equivalent. The cell should snap in place
when properly installed. This common cell can be found at most office
and computer supply stores.
6. Replace Warning Label over Lithium Battery.
7. Replace the main battery pack.
Page 12

QUICK START WITH THE Viper™ LS6
12
1. Plug in the AC adapter.
2. Install a ribbon cartridge. (See section entitled “RIBBON LOADING &
NOTE: A ribbon is not required for TPDEMO, the thermal paper roll
supplied with the printer.
3. Install a label cartridge. (See section entitled “LABEL LOADING” on page
15.)
4. Turn ON the printer by pressing . If the low battery message
appears, select 2 to disregard and continue. (For detailed battery
charging instructions, see page 9.) The home screen will appear:
5. You may immediately begin typing text at the home screen or otherwise
press the key to enter the Tools menu. (See detail instructions for
creating tools beginning on page 23.)
6. From the home screen, press the key to print your label.
Page 13

RIBBON LOADING & SELECTION
13
Ribbon
Ribbon
Ribbon
Lock Knob
Cartridge
Door
The VIPER™ LS6 uses a cartridge based ribbon (wax, resin, or hybrid) to form
legends on labels. The ribbon is loaded into the printer by the following steps:
1. Open the ribbon door on the side of printer.
2. Rotate the ribbon lock knob into the open (unlocked) position
[Counter clockwise].
3. Remove slack from the ribbon by winding the left roller of the ribbon
cartridge.
4. Insert the ribbon cartridge into the printer, the web of the ribbon
should slide freely between the rubber roller and the print head.
5. Rotate the ribbon lock knob into the closed (locked) position –
[Clockwise].
6. Close the ribbon door on the side of printer.
7. Install a label cartridge. (See LABEL LOADING on page 15.)
8. Press the key to advance the ribbon forward.
Page 14

RIBBON LOADING & SELECTION
14
Use the chart below to determine the ri bbon cartridge part number that is
recommended for your application.
Vinyl, Self -Laminating X X
Heat Shrink X X
Vinyl Cloth X X
Vinyl Tape, White X
Vinyl Tape, Colored X X
Polyester, White X
Polyester, Clear X X
Polyolefin X X
Non-Adhesive
Polyester
Thermal Paper No ribbon required
VIPER™ LS6 label media and ribbon compatibility chart
Label Material
Recommended Ribbon
Black Wax
LS6-RWBLK
Black Hybrid
LS6-RHBLK
X X
Black Resin
LS6-RRBLK
White Resin
LS6-RRWHT
Page 15

15
Label Roll
Socket
Width Guide
Adjust)
Cutter Knob
Label Feed
Path
LABEL LOADING
Label Door
Label Roll
Mandrel
(Push Down to
(Pull Forward for
Cutting)
Each roll of labels or tape used in the VIPER LS6 is uniquely identified by the
mandrel holding the labels. This allows the operating system to automatically
set the printer for optimum usage of each label. Also, the operating system
keeps track of the remaining labels on each roll. Use steps 1-5 below to load
each label roll.
1. Ensure that the printer is turned OFF. If the printer is on, press the
and keys to turn the printer off. Insert the Label Roll into the socket
as shown above until it is firmly seated.
2. Ensure that the ribbon knob is in the locked position.
3. Insert the end of the label roll into the label guide path (see yellow
arrows). This requires positioning the label width guide to the proper
width. IF THE WIDTH GUIDE IS NOT LOCKED INTO A WIDTH
NOTCH, LABEL RECOGNI TION FAILURE MAY OCC UR.
4. Labels should be inserted into the label path until resistance is met –
approximately ½”.
5. Turn the printer ON. Press the key to position the label for printing.
6. You are now ready to begin printing!
Page 16
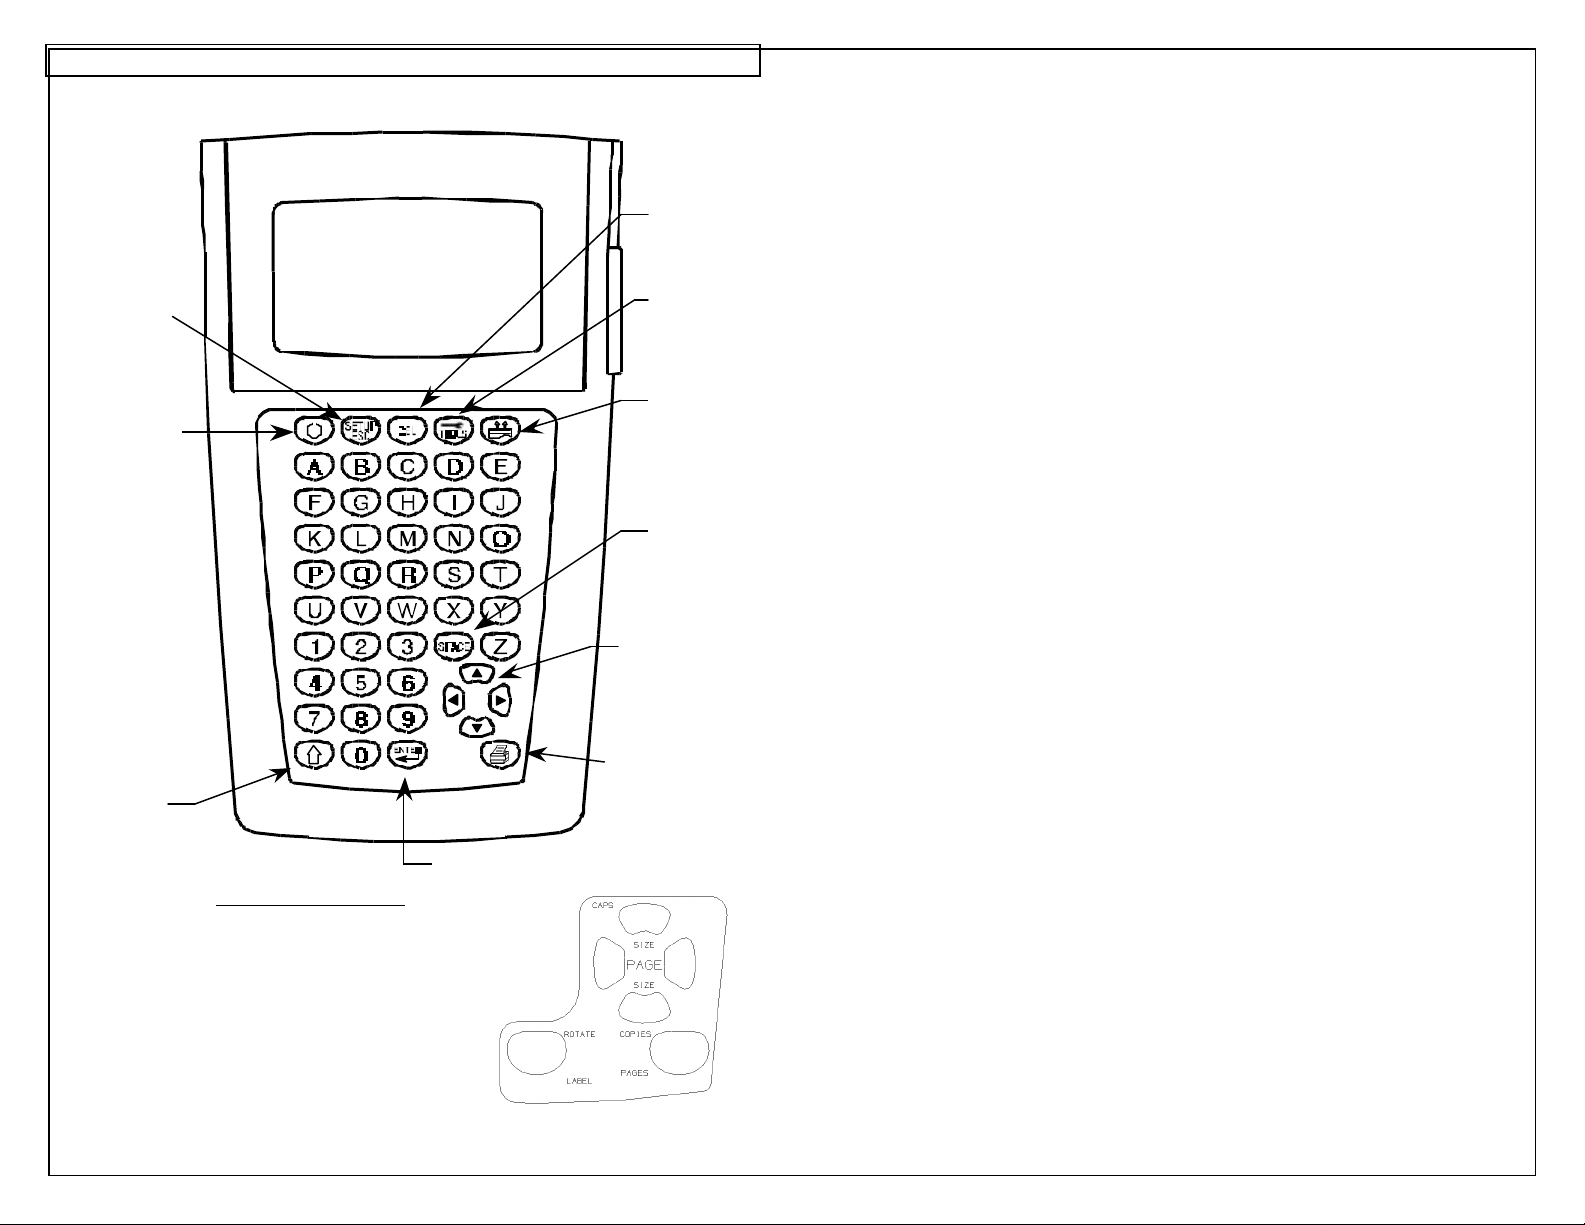
KEYBOARD
16
Shift
Power
Directional
Space
Label
Tools
Delete
More Function Keys
Setup /
Key
Escape Key
On /
Off
Key
Key
or
Ribbon
Feed
Key
Key
Arrows
Print Key
Enter Key
Caps lock
Text size
Change page
Rotate label
Read label mandrel
Print multiple copies
Print selection of pages
Page 17
17
POWER
SETUP/
ESCAPE
DELETE
TOOLS
FEED
UP
ARROW
DOWN
ARROW
RIGHT
ARROW
LEFT
ARROW
PRINTING
SPACE
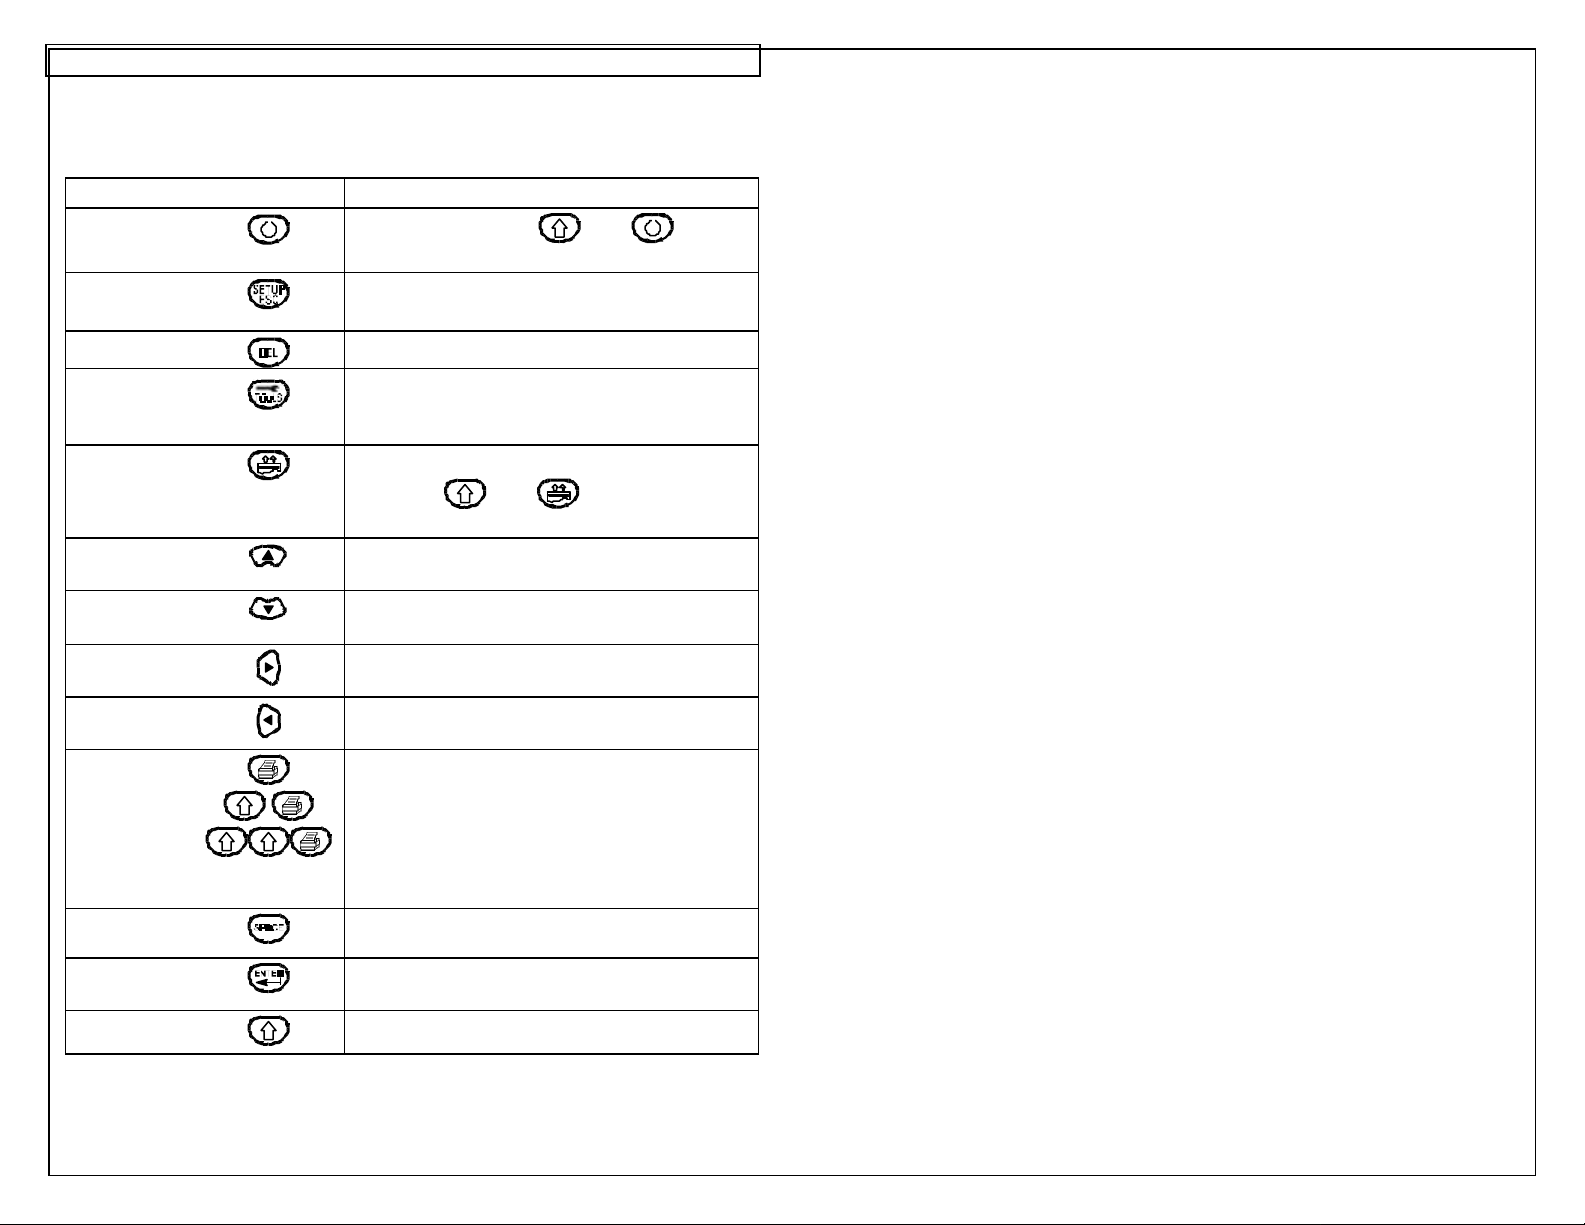
KEYBOARD
Basic Keyboard Functions
KEY / SYMBOL COMMON FUNCTIONS
Turn the printer ON, then turns
the printer OFF.
Activate the Setup Menu from the home
screen or back out of internal menus.
Delete characters or tools.
Used for creating serializations, symbols,
data lists, boxes, lines, bar codes, and
date/time stamps.
Advance labels and ribbon.
Pressing then reverse feeds
labels and ribbon.
Move cursor up one line.
Move cursor down one line.
Move cursor one space to the right.
Move cursor one space to the left.
Print label.
Print multiple copies of the entir e label.
Print a selection of pages from the label.
A print job can be terminated by pressing
any key.
Insert a blank character.
ENTER
SHIFT
Complete a selection or move the cursor to
the next line.
Access alternate functions or characters.
Page 18

KEYBOARD
18
Using the Shift Key
Press the shift key once to access the functions listed in the table below.
PRESS
SHIFT FIRST
THEN
PRESS
Any
Alphabetic
or Numeric
Key
RESULT
Turn the printer OFF.
Delete all items on a label and return
formats to default values.
Delete all items on the current page only.
Does not delete current formats.
Left, center, or right justify the label items.
Reverse feed the label media.
Enter secondary function from keypad
overlay onto text screen.
Enter the = symbol onto text screen
Increase the text size.
Decrease the text size.
Move forward one page in the current label.
Move backward one page in the current
label.
Rotate the label 90 degrees in the clockwise
or counterclockwise directions.
Print multiple copies of the entire label(s).
Page 19
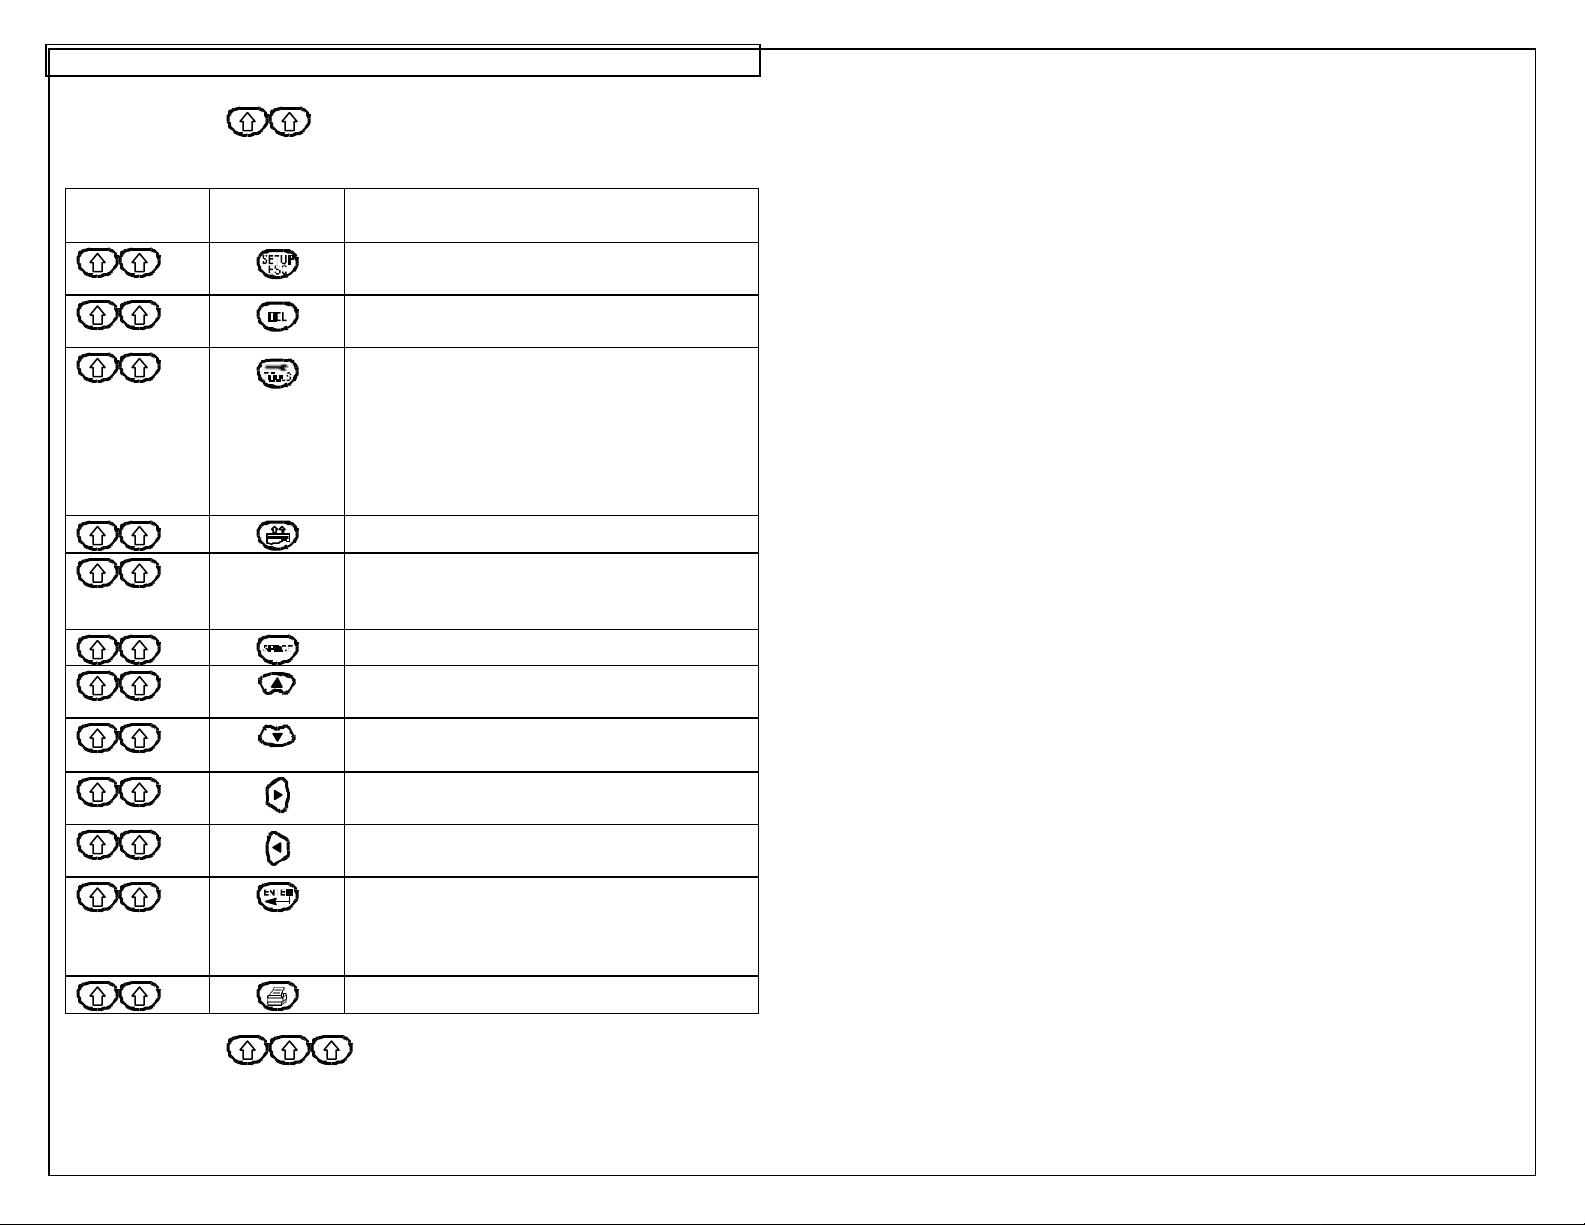
KEYBOARD
19
Press the shift key twice to access the functions listed in the table
below.
PRESS
SHIFT FIRST
Press the shift key three times in a row to exit the shift mode.
THEN
PRESS
Any
Alphabetic
Key
RESULT
Display the version of firmware currently
installed on the printer.
Delete all items on the entire label. Does
not delete current formats.
Activate or deactivate fit checking. Fit
checking automatically checks the size of
the label items to determine if they will fit on
the label. Fit checking occurs after each
new item is entered onto the home screen.
If fit checking if deactivated, the printer will
only perform fit checking before printing.
Reverse feeds the label media.
Enter lower case character if caps lock is
on. Enter upper case character if caps lock
is off.
Activate or deactivate caps lock.
Move cursor to home position on the home
screen.
Move cursor to end position on the home
screen.
Move cursor to far right position of current
line on the home screen.
Move cursor to far left position of current
line on the home screen.
Automatically read the label mandrel in
order to restore default formats for a new
label roll or to enter an exact label length for
continuous tape.
Print a selection of pages from the label.
Page 20

KEYBOARD
20
Using the Delete Function
The four methods available for deleting labels are listed in the table below.
PRESS
FIRST
THEN
PRESS
Delete individual characters or items on a
label.
Delete all items on the current page only.
Does not delete current formats.
Delete all items on the entire label. Does
not delete current formats.
Delete all items on the entire label and
return formats to default values.
RESULT
Page 21

21
SECTION 2
WORKING WITH THE
VIPER™ LS6
Page 22

USING THE VIPER ™ LS6
22
Home Screen
The home screen is where the user enters and edits text or places label items
known as tools. The home screen is also where the user prints labels. The
home screen appears as:
Home Screen Indicators
INDICATOR ICON DESCRIPTION
Caps Lock
Shift
Text Size
Tool
Text Line
Page
Rotation
Rotation
Vertical or
Horizontal Line
Box
or
Indicates if caps lock is on or off.
Indicates if shift or alternate mode is
selected.
Indicates the text size for the current line.
Prompts the user to press and enter
the tools men u.
Indicates the current line.
Indicates the current page. There are 8
total pages.
Indicates 0 degrees rotation.
Indicates 90 degrees clockwise rotation.
Indicates whether the line tool is on or off.
Indicates whether the box tool is on or off.
Fit Checking
Justification
Justification
Justification
Indicates whether fit checking is on or off.
Indicates left justification.
Indicates center justification.
Indicates right justification.
Page 23

USING THE VIPER ™ LS6
23
Tool Menu
The tool menu includes serializations, symbols, data lists, boxes, lines, bar
codes, and date/time stamps. These items are placed on the home screen.
The tool menu is accessed by pressing the key.
Tool Icons
The following icons represent the available tools:
- Serialization
- Symbol
- Line
- Box
- Data List
- Barcode
- Date/Time Stamp
Page 24

USING THE VIPER ™ LS6
24
POWER Key
To turn ON the VIPER™ LS6, press and hold the key until activity is seen
on the display. To turn OFF the VIPER™ LS6, press and release the key,
then press and hold the key until the powering down message appears.
This method of power control reduces the chance of accidentally turning off
the printer. The VIPER™ LS6 will automatically turn off after 10 minutes of idle
time in order to conserve battery life.
SETUP Key
From the home screen, press and release the key to activate the setup
menu. The key also functions as an ESCAPE key to end a function and
return to the previous screen.
DEL Key
The key is used to delete characters or label items. For a detailed
description of the delete function, see page 20.
TOOL Key
The key is used to activate the tool selection menu.
FEED Key
The key is used to manually advance or reverse the label and ribbon.
PRINT Key
The key is used to print labels. A PRINT JOB CAN BE TERMINATED
BY PRESSING ANY KEY.
SHIFT Key
The key is used to select characters from the keypad or access
secondary functions. For a detailed description of the shift key, see pages
18-19.
ARROW Key
The keys are used to move the cursor, change text size, and
move between pages.
Page 25

CREATING TEXT
25
The Text Tool
After turning on the VIPER™ LS6, the home screen will appear. The home
screen is also the text editor.
To create text on the home screen, simply begin pressing the alphabetic or
numeric keys on the keypad. Text will be entered at the position of the
cursor. The cursor is indicated by a dark line or dark box highlighting a
character. To insert blank spaces, press the key. Press to move
down to the next line. Use the directional arrow keys to move the cursor up,
down, right, or left. The maximum number of text characters allowed to be
placed on each line is 32. Typically, continuous tape must be used to fit up to
32 characters on a line. The maximum number of lines available for each
label page is 8.
Inserting or Deleting Text
To remove characters from the screen, press the key. Each press of
the key will delete one character at a time immediately to the left of the
cursor. To insert characters into a string of text, move the cursor to the
position immediately to the right of where the text will be inserted and then
begin entering text.
Text Size
The VIPER™ LS6 has 13 different font sizes available for creating text. The
font sizes range from 6 pt. to 192 pt. Text size can be increased by pressing
the key and then the key. Text size can be decreased by pressing
the key and then the key. The current text size is displayed on the
top of the home screen next to the text size icon.
Page 26

CREATING TEXT
26
Initially, the text size will be set to the default value according to the label
loaded in the printer. The text size can be increased or decreased for each
individual line of the label. There is a maximum of 8 lines available for
creating text.
Text Rotation
Label legends may be rotated from 0 degrees to 90 degrees in the clockwise
direction. The page shaped icon in the lower right hand corner of the display
indicates the current rotation. To change the rotation, press the key and
then press the key. Repeat this procedure to return the rotation back to
the previous setting.
Text Justification
Label legends may be left justified, center justified, or rig ht justified. The page
shaped icon in the lower right hand corner of the display indicates the current
justification setting. To change the justification, press the key and then
press the key. Repeat this procedure until the desired justification is
selected.
Text Options
There are two text options available for each line of text. The options are
called style and orientation. The style can be set to either normal or
underlined. The orientation can be set to 0 degrees, 90 degrees, 180
degrees, or 270 degrees. The orientation setting refers to the rotational
position of the individual text characters, not the rotational position of the
legend as a whole. To rotate the entire legend simultaneously, refer to text
rotation described above.
To access text options, move the cursor over any character within a text string
and then press the key. Use the up or down directional arrows to select
‘Style’ or ‘Orient’. Next, use the right or left directional arrows to change the
settings. Last, press the key to accept the changes and to return to the
home screen. Each individual line on a label may have different text options
selected.
Page 27

CREATING TEXT
27
A
Vertical Text
Vertical text can be created by following these steps:
1. At the home screen, press and then press to rotate the entire
label 90 degrees in the clockwise direction. (Note: when using continuous
tape, the label will automatically be rotated 90 degrees in the clockwise
directions by default.)
2. Enter text
3. Move the cursor over any character within the text string and then press
the key. Use the up or down directional arrows to select ‘Orient’.
Next, use the left directional arrows to change the setting to 270. Last,
press the key to accept the change and to return to the home
screen.
4. The result will appear similar to this example:
B
C
Page 28

CREATING SERIALIZATIONS
28
The Serialization Tool
The serialization tool is used to automatically number labels in a sequence.
The sequence can be either numeric (1 to 999) or alphabetic (A to Z). A
serialization is defined by a start value, an end value, and a step value.
To correctly define a serialization, the end value must be larger than the start
value and the start and end values must be both numeric or both alphabetic.
(Numbers and letters cannot be used together when defining a particular
serialization.)
The step value can be any number between 1 and 99.
Serializations can be combined with other label items, such as text, boxes,
lines, etc. For example, to create a prefix or a suffix to a serialization, enter
text immediately before or after the serialization.
Serializations can be printed as text or as bar codes on a label.
Creating a Serialization
The serialization tool should be accessed from the home screen. To access
the serialization tool:
1. Press the key to enter the tools menu.
2. Press the down directional arrow key to highlight the serialization tool.
3. Press the key to select the serialization tool.
4. Use the up or down directional arrow keys to select the serialization
parameters: Start, End, or Increment.
5. Use the right or left directional arrow keys to set the values for Start,
End, or Increment.
NOTE: Pressing the right directional arrow key will highlight the
current value of the selected parameter. For a new
serialization the start and end values will display an asterisk *.
When the value is highlighted, enter a number (1 to 999) or a
letter (A to Z) and then press the key.
The cursor will automatically move to the next parameter.
6. Repeat step 5 for each parameter.
Page 29

CREATING SERIALIZATIONS
29
7. Press the key to accept the changes and to return to the home
screen. Otherwise, press the key to return to the home screen
without accepting changes.
8. On the home screen, the serialization tool icon will appear at the
position of the cursor.
More Serialization Parameters
The serialization tool includes more parameters on a second screen following
the first screen. The second screen includes Text Options, Copies, and
Group. To access the second screen press the down directional arrow twice
after Increment.
1. The Text Options parameter allows greater customization of the
serialization text. There are two text options available in Text Options:
style and orientation. The style can be set to either normal or
underlined. The orientation can be set to 0 degrees, 90 degrees, 180
degrees, or 270 degrees. The orientation setting refers to the rotational
position of the individual serialization characters.
To access text options, press the up or down directional arrow keys to
select the style or orientation.
Press the right directional arrow key to change the value of the text
options.
Press the key to accept the changes and to return to the previous
screen.
2. The Copies parameter determines the number of copies to print for the
serialization. The Copies paramet er can be set to any number from 1 to
99.
To change the Copies parameter, press the up or down directional
arrow keys to highlight Copies.
Press the right directional arrow key to highlight the current value of the
Copies parameter. The Copies parameter will default to a value of 1.
Enter the number of copies to print.
Page 30

CREATING SERIALIZATIONS
30
Press the key to accept the changes and to return to the previous
screen.
3. The Group parameter determines whether or not the copies of the
serialization items will be grouped together. The Group parameter only
works when more than one copy of a serialization is defined. The Group
parameter defaults to Yes.
If Yes is selected, then consecutive copies of the serialization items will
not be placed together. The result will resemble the following legend:
A01 A02 A03 A01 A02 A03
If No is selected, the consecutive copies of the serialization items will be
placed together. The result will resemble the following legend:
A01 A01 A02 A02 A03 A03
To change the Group parameter, press the up or down directional arrow
keys to highlight Group.
Press the right directional arrow key to select Yes or No.
Press the key to accept the changes and to return to the home
screen.
Advanced Serialization Options
The serialization tool includes several advanced options for customizing
labels. The advanced serialization options are Print As and Place On.
1. The Print As option determines whether the serialization will print as text
or as a bar code on the labels. The default setting will print as text. The
bar code settings can be changed in the setup menu. Printing a
serialization as a bar code is useful for asset tracking and component
manufacturing.
Page 31

CREATING SERIALIZATIONS
31
2. The Place On option determines whether the serialization will print on
consecutive labels or on consecutive pages of the same label. The
default setting for will print on labels. Printing a serialization on pages is
useful for creating serialized patch panel labels using die cut network
systems label media.
Editing a Serialization
To edit a serialization on the home screen, move the cursor over the
serialization and then press the key. Follow the steps listed above for
creating a serialization.
Page 32

CREATING SYMBOLS
32
The Symbol Tool
The Symbol Tool is used for creating safety or facility identification labels.
Common applications for these types of labels include pipe marking and
safety hazard signs. Most often these types of labels will require continuous
tape label media. Symbols may also be used on die cut label media, such as
self-laminating labels or heat shrink markers. However, for die cut label
media the symbol size will be restricted by the physical size of the labels.
Creating a Symbol
The symbol tool should be accessed from the home screen. To access the
symbol tool:
1. Press the key to enter the tools menu.
2. Press the down directional arrow key to highlight the symbol tool.
3. Press the key to select the symbol tool.
4. Use the right or left directional arrow keys to search the symbol library.
(see the next page for available symbols
5. Use the up or down directional arro w keys to increase or decrease the
size of the symbol.
6. Press the key to accept the changes and to return to the home
screen. Otherwise, press the key to return to the home screen
without accepting changes.
7. On the home screen, the symbol tool icon will appear at the position
of the cursor.
Editing a Symbol
To edit a symbol on the home screen, move the cursor over the symbol and
then press the key.
1. Use the right or left directional arrow keys to search the symbol library.
(see the next page for available symbols
2. Use the up or down directional arrow keys to increase or decrease the
size of the symbol.
3. Press the key to accept the changes and to return to the home
screen. Otherwise, press the key to return to the home screen
without accepting changes.
Page 33

CREATING SYMBOLS
33
NOTE: The symbol size will automatically default to match the text size on the
current line. Changing the text size will automatically change the symbol size
accordingly. There are 5 sizes available for each symbol. The sizes range
from 1 (smallest) to 5 (largest).
Currently available symbols and their assigned library numbers are listed
below. Additional symbols may be added to the VIPER™ LS6 firmware in the
future.
1 2 3 4 5 6 7 8 9
10 11 12 13 14 15 16 17 18
19 20 21 22 23 24 25 26 27
28 29 30 31 32 33 34 35 36
37 38 39 40 41
Page 34

CREATING LINES
34
A01
The Line Tool
The line tool allows custom placement of vertical and horizontal lines on a
label. The line tool is especially useful for creating patch panel, faceplate, or
terminal block labels. There are seven unique line settings available: Center
Horizontal, Center Vertical, Top, Bottom, Left, Right, and @ Pages. Each
of these settings may be turned on or off independently.
NOTE: The top, bottom, left, and right sides of the label will rotate
with the legend when a label is rotated between 0 and 90
degrees.
1. The Center Horizontal setting places a line through the center of the
label in the horizontal direction.
2. The Center Vertical setting places a line through the center of the label
in the vertical direction.
3. The Top setting places a line at the top of the label.
4. The Bottom setting places a line at the bottom of the label.
5. The Left setting places a line at the far left side of the label.
A02
A01 A02
A01
A01
A01
Page 35

CREATING LINES
35
6. The Right setting places a line at the far right side of the label.
7. The @ Pages setting places lines between each page of a label that has
multiple pages defined. The @ Pages setting is used for patch panel,
outlet, and terminal block labeling.
Creating a Line Tool
The line tool should be accessed from the home screen. To access the line
tool:
1. Press the key to enter the tools menu.
2. Press the right directional arrow key and then press the down directional
arrow key to highlight the line tool.
A01
A01 A02 A03 A04 A05 A06
3. Press the key to select the line tool.
4. Use the up or down directional arrow keys to select the desired line
position.
5. Use the right or left directional arrow keys to turn on or turn off the line
tool at the selected position.
6. Press the key to accept the changes and to return to the home
screen. Otherwise, press the key to return to the home screen
without accepting changes.
7. On the home screen, the line tool icon will appear on the right side of
the display when the line tool is activated.
Page 36

CREATING BOXES
36
The Box Tool
The box tool is useful for customizing a label. There are three unique box
settings available: Frame, Reverse, and Box Off.
The Frame setting places a box outline around the perimeter of the entire
label area.
The Reverse setting places a dark background with light text characters on a
label.
The Box Off setting deactivates the box tool.
Creating a Box Tool
The box tool should be accessed from the home screen. To access the box
tool:
1. Press the key to enter the tools menu.
2. Use the right directional arrow key to highlight the box tool.
3. Press the key to select the box tool.
4. Use the right or left directional arrow keys to select the box tool setting.
5. Press the key to accept the changes and to return to the home
screen. Otherwise, press the key to return to the home screen
without accepting changes.
6. On the home screen, the box tool icon will appear on the right side of
the display when the box tool is activated.
NOTE: If the box tool is activated, it will appear on all printed pages of a label.
WARNING
WARNING
Page 37

CREATING DATA LISTS
37
The Data Tool
The data tool is used to create printable data lists in the VIPER™ LS6. The
data tool is very useful for customizing labels because it allows up to one
hundred unique labels to be created from a list of data. With the data tool,
users can input, store, or transfer custom lists of data.
Creating a Data Tool
The data tool should be accessed from the home screen. To access the data
tool:
1. Press the key to enter the tools menu.
2. Press the down directional arrow key to highlight the data tool.
3. Press the key to select the data tool.
4. Use the up or down directional arrow keys to highlight the data tool
options, File, Data, Text Options, or Place On (see the description of
the data tool options below).
5. Use the right directional arrow keys to select each data tool option.
6. After making all changes to the data tool options, press the key to
accept all of the changes and to return to the home screen. Otherwise,
press the key to return to the home screen without accepting
changes.
7. On the home screen, the data tool icon will appear at the position of
the cursor.
Data Tool Options
The data tool menu lists four different options: File, Data, Text, and Place
On.
1. Selecting File enters the File Manager. Label files and data lists are
stored in the File Manager. File Manager can also be accessed from the
main setup menu. For detailed information about File Manager see the
section entitled Using File Manager on page 48.
In File Manager, use the up or down directional arrow keys to highlight
the file name or required action.
Use the right or left directional arrow keys to select a file name from the
list. There are twenty file storage locations in the VIPER™ LS6.
Page 38

CREATING DATA LISTS
38
Files may be saved, loaded, or deleted in File Manager.
Note: Selecting Delete All will erase all stored label files and data lists.
2. Selecting Data View/Edit enters the data list editing screen. This screen
looks very similar to the home screen because the data list editing
screen is a text editor. Use the data list editing screen to create or edit
text. Use the directional arrow keys to navigate within the text editor.
A data list may include up to one hundred individual labels. The current
label being edited is denoted by the number at the top of the data list
editing screen. Each list begins at label number one. To increase or
decrease the label number, press the shift key once and then press
either or . To exit the data list editing screen, press the key.
The VIPER™ LS6 will ask to Save the List? Press 1 to save or 2 to
bypass this screen. To save the list, enter a file name and press ,
then press . The screen will return to the data tool menu.
3. Selecting Text Options enters an editing screen for text style and
orientation. These two settings may be changed to provide greater label
customization. For more information about Text Options refer to the
section entitled “CREATING TEXT” on page 25.
4. Selecting Place On determines whether the data list will print on
consecutive labels or on consecutive pages of the same label. The
default setting for Place On will print on labels. Printing a data list on
pages is useful for creating patch panel labels or terminal block labels.
Use the right or left directional arrow keys to change the Place On option.
Editing a Data Tool
To edit a data tool on the home screen, move the cursor over the data tool
and then press the key. Follow the steps list above for creating a data
tool.
Transferring a Data List
A data list created using the data tool may be transferred to or from a
personal computer in the .DAT format by using the LS6-PCKIT. The LS6-
PCKIT includes ViperLink software and a serial cable for connecting the
VIPER™ LS6 to a computer. For more information about ViperLink refer to
the sections entitled “INTERFACING WITH A COMPUTER” and
Page 39

CREATING BAR CODES
39
The Bar Code Tool
The bar code tool can be used for bin labeling, component identification, or
asset management and can be used in combination with other tools. The bar
code tool can be printed with or without a checksum digit or human readable
text. The bar code symbology available in the VIPER™ LS6 is CODE 39.
Creating a Bar Code
The bar code tool should be accessed from the home screen. To access the
bar code tool:
1. Press the key to enter the tools menu.
2. Press the right directional arrow key and then press the down directional
arrow key to highlight the bar code tool.
3. Press the key to select the bar code tool.
4. Press the right directional arrow key to input text. Type the text in the
text window. The bar code must include at least one digit of text.
5. Press the key to accept the text.
6. Use the up or down directional arrow keys to highlight the other bar code
settings.
7. Use the right or left directional arrow keys to change the bar code
settings.
8. Press the key to accept all of the changes and to return to the home
screen. Otherwise, press the key to return to the home screen
without accepting changes.
9. On the home screen, the bar code tool icon will appear at the
position of the cursor.
Editing a Bar Code
To edit a bar code on the home screen, move the cursor over the bar code
and then press the key.
1. Press the right directional arrow key to input text. Type the text in the
text window. The bar code must include at least one digit of text.
2. Press the key to accept the text.
3. Use the up or down directional arrow keys to highli ght the other bar code
settings.
Page 40

CREATING BAR CODES
40
4. Use the right or left directional arrow keys to change the bar code
settings.
5. Press the key to accept all of the changes and to return to the home
screen. Otherwise, press the key to return to the home screen
without ac cepting changes.
Bar Code Settings
The default bar code settings can be changed in the setup menu. To change
the default settings, access the printer settings in the setup menu.
Readable: Indicates whether the bar code text is human readable or not. If
activated (bar code text is human readable) the setting will display Yes.
Checksum: Indicates whether the checksum digit is activated or not. If
activated (checksum digit is turned on) the setting will display Yes.
Bar Size: Indicates the width of the bar code. Available sizes are 0.010
inches, 0.015 inches, and 0.020 inches. The default width is 0.010 inches.
Serialized Bar Codes
The VIPER ™ LS6 is able to serialize bar codes. In order to do so, a
serialization must first be defined. Please see the section entitled
“CREATING SERIALIZATIONS” on page 28 for more information about
serialized bar codes.
Page 41

CREATING DATE/TIME STAMPS
41
The Date/Time Tool
The Date/Time Tool allows the user to print a date and/or a time stamp on a
label. The date and time printed on the label are defined by the internal clock
of the VIPER™ LS6. Please see section entitled “SETTING UP THE VIPER™
LS6” on page 44 for more information about setting the internal time and date.
Creating a Date/Time Tool
The date/time tool should be accessed from the home screen. To access the
date/time tool:
1. Press the key to enter the tools menu.
2. Press the up directional arrow key to highlight the date/time tool.
3. Press the key to select the date/time tool.
4. Use the up or down directional arrows to select date/time or text options.
5. Use the right or left directional arrow keys to select time or date
specifically or to modify the text options.
NOTE: The text options available within a date/time tool are the
same as those available for text editing on the home screen.
For more information about text options refer to the section
entitled “CREATING TEXT” on page 25.
6. Press the key to accept the changes and return the home screen.
Otherwise, press the key to return to the home screen without
accepting changes.
NOTE: If editing the text options, press the key twice to accept
the changes and return the home screen. Otherwise, press
the key twice to return to the home screen without
accepting changes.
7. On the home screen, the date/time tool icon will appear at the
position of the cursor.
Page 42

CREATING DATE/TIME STAMPS
42
Editing a Date/Time Tool
To edit a date/time tool on the home screen, move the cursor over the
date/time tool and then press the key.
1. Use the up or down directional arrows to select date/time or text options.
2. Use the right or left directional arrow keys to select time or date
specifically or to modify the text options.
3. Press the key to accept the changes and return the home screen.
Otherwise, press the key to return to the home screen without
accepting changes.
Page 43

USING THE PAGES FUNCTION
43
The Pages Function
The VIPER™ LS6 provides 8 separate pages for each label. Label items,
including text and tools may be placed on each of the 8 pages. The pages
function is particularly useful for creating non -standard serializations that do
not follow a common increment. The pages function is also useful for creating
text on patch panel labels.
Using the Pages Function
The page number icon in the lower right hand corner of the display indicates
the current page. For example, 1:8 indicates that page 1 of 8 is currently
displayed. To move forward one page, press the key and then press the
right directional arrow key. Likewise, to move backward one page, press the
key and then press the left directional arrow key.
Page 44

SETTING UP THE VIPER™ LS6
44
The Setup Menu
The setup menu is used to modify the default printer settings. The setup
menu should be accessed from the home screen. To access the setup menu
press the key. The setup menu will appear:
The available categories in the setup menu are Files, Mode, Utilities, and
Printer. Use the up or down directional arrow keys to highlight these options.
Use the right directional arrow keys to select the settings for each option.
After making all changes to the setup menu, press the key to accept all
of the changes and to return to the home screen.
1. The Files category accesses saved label files. Use the up or down
directional arrows to highlight Files, then use the right directional arrow
to enter File Manager. For more information about File Manager refer
to the section entitled “USING FILE MANAGER” on page 48.
2. The Mode category includes all of the predefined label formats available
in the VIPER™ LS6. These formats are Component, Wiremarker,
Terminal, Tape, Strip, and Network. See Editing Label Mode on page
45.
3. The Utilities category includes the VIPER™ LS6 utility functions. These
functions are Battery, ViperLink mode, and Remote Printer mode. See
Using Printer Utilities on page 45.
4. The Printer category includes VIPER™ LS6 printer settings. The settings
include Time, Date, Contrast, Heat, Label Feed, Languages, Units,
and Bar Code. See Adjusting Printer Settings on page 46.
Page 45

SETTING UP THE VIPER™ LS6
45
Editing Label Mode
To edit the label mode, press to enter the setup menu and:
1. Use the up or down directional arrows to highlight Mode.
2. Use the right or left directional arrow keys to change the mode.
3. Press the key to select the desired mode. A check mark icon will
appear next to the selected mode.
4. Press the key to accept the changes and return to the home screen.
MODE DESCRIPTION APPLICATIONS
Component Vertically centers legend Electrical components
Wiremarker Repeats legend until label is filled Wire and cable marking
Terminal Places legends at terminal
locations
Tape Rotates legends 90° Safety/facility ID, pipe
Strip Repeats legend until label is filled
and copies legend on two sides of
middle perforation
Network Places legends at port locations Data communications
Using Printer Utilities
To use printer utilities, press to enter the setup menu and:
1. Use the up or down directional arrows to highlight Utilities.
2. Use the right or left directional arrow keys to change the utilities setting.
3. Press the key to select the desired utility. A new screen will appear
indicating either Battery, ViperLink, or Remote Printer.
The Battery utility is used to charge the battery. See section entitled
“BATTERY INFORMATION” on pages 9-11.
The ViperLink utility is used to interface with ViperLink ™ software. See
sections entitled “INTERFACING WITH A COMPUTER” and
“VIPERLINK” on pages 49-52.
Terminal blocks
marking
Wire and cable ma rking
components
Page 46

SETTING UP THE VIPER™ LS6
46
The Remote Printer utility is used to print directly from Panduit software
applications such as PAN-MARK® or EASY-MARK™. See section entitled
“USING REMOTE P RINTER UTILITY” on pages 53-54.
Adjusting Printer Settings
To adjust the printer settings, press to enter the setup menu and:
1. Use the up or down directional arrows to highlight Printer.
2. Use the right or left directional arrow keys to change the Printer setting.
1. The Time setting adjusts the internal clock. Press the key to
select Time. Use the right or left directional arrow keys to move the
cursor to the desired position. Use the numeric keys to change the
time. Press A for AM or P for PM. Press the key to accept all
of the changes and return to the setup menu.
2. The Date setting adjusts the internal date. Press the key to
select Date. Use the right or left directional arrow keys to move the
cursor to the desired position. Use the numeric keys to change the
date. Press the key to accept all of the changes and return to
the setup menu.
3. The Contrast setting adjusts the contrast of the printer display.
Press the key to select Contrast. Use the up or down
directional arrow keys to adj ust the contrast from 0 (light) to 9 (dark).
Press the key to accept the change and return to the setup
menu.
4. The Heat setting adjusts the temperature of the print head inside of
the printer. Press the key to select Heat. Use the up or down
directional arrow keys to adjust the heat from 0 (lower temperature)
to 9 (higher temperature). Press the key to accept the change
and return to the setup menu.
Page 47
SETTING UP THE VIPER™ LS6
47
NOTE: The heat setting is automatically adjusted to the
appropriate number for the installed label roll when the
printer is turned on.
5. The Label Feed setting adjusts the amount of media that is fed past
the cutter mechanism after printing. Cut Label feeds just enough
media to allow cutting. Peel Label feeds extra media to allow
convenient removal of die cut labels from the liner. Press the
key to select Label Feed. Use the right or left directional arrow keys
to select Cut Label or Peel Label. Press the key to accept the
change and return to the setup menu.
6. The Languages setting adjusts the operating system language.
Press the key to select Languages. A check mark icon is
displayed next to the currently selected language. Use the right or
left directional arrow keys to select or
Deutsch. Press the key to accept the change and return to the
setup menu. The display will immediately change to the language
selected.
7. The Units setting adjusts the internal unit of measurement within the
printer from English units (inches) to Metric units (millimeters). The
unit of measurement is important when entering a fixed length for
continuous tape. Press the key to select Units. A check mark
icon is displayed next to the currently selected unit of measurement.
Use the right or left directional arrow keys to select Inches or
Millimeters. Press the key to select the desired units and return
to the setup menu.
8. The Bar Code setting adjusts the default values for the bar code
tool. This setting is used to change the default values for human
readable, checksum, and bar size.
Page 48

USING FILE MANAGER
48
The VIPER™ LS6 has the ability to store and recall label files and data lists.
Label files and data lists are stored and recalled within File Manager. Label
files are designated with a .LS6 ending. Data lists are designated with a
.DAT ending.
To access File Manager, enter the setup menu and:
1. Use the up or down directional arrows to highlight File.
2. Press the right directional arrow key to enter File Manager.
3. Use the up or down directional arrow keys to highlight Filename .
4. Use the right or left directional arrow keys to select the desired file.
There are 20 file storage locations in the VIPER™ LS6.
NOTE: When saving a new file, press the key to begin entering
a file name. Use the alphabetic or numeric keys to enter a
file name. After entering a file name, press the key
again to Save .
NOTE: When renaming a previously saved file, press the key to
begin entering the new file name. Use the alphabetic or
numeric keys to enter the new file name. After entering the
name, press the key again to Save . The printer will
then prompt to Overwrite File? 1-Yes 2-No. Press 1 to
accept the new file name or press 2 to keep the previous file
name.
5. Use the up or down directional arrow keys to highlight Action.
6. Use the right or left directional arrow keys to select Save , Load, Delete,
or Delete All.
WARNING: Selecting Delete All will erase all stored label and data
files.
7. Press the key to complete the selected action.
8. Press the key to return to the setup menu.
9. Press the key again to return to the home screen.
NOTE: When recalling a previously stored label file, the part number
of the stored label file must match the part number of the
label roll installed in the printer. If the part numbers do not
match, an error message will display on the screen.
Page 49

INTERFACING WITH A COMPUTER
49
The VIPER™ LS6 can be connected to a personal computer (PC) using the
VIPER™ LS6 Upgrade Kit (Part No. LS6-PCKIT). The kit contains a CD with
ViperLink software and a serial cable for connecting the VIPER™ LS6 to your
personal computer (PC). ViperLink™ must be used with the serial cable to
communicate with the VIPER™ LS6 printer. If the personal computer has a
USB port, but does not have a serial port, it is recommended that the user
purchase a USB to serial adapter.
ViperLink™ software allows the user to:
• Upgrade the printer operating system.
• Transfer files (.DAT or .LS6) from the VIPER™ LS6 to the PC.
• Transfer files (.DAT, .LS6, or .CSV) from the PC to the VIPER™ LS6.
• Create, edit, and store a data list (.DAT file).
• Convert a .DAT file to a .CSV file
• Convert a .CSV file to a .DAT file
• Retrieve printer status information.
• Print directly to the VIPER™ LS6 using a simple label editor.
When printing directly from ViperLink to the VIPER™ LS6, the
VIPER™ LS6 must be in the remote printer utility.
The serial cable also allows the user to:
• Print directly to the VIPER™ LS6 using PAN-MARK® or EASY-MARK™
software from Panduit Corp. PAN-MARK® or EASY-MARK™ files cannot
be stored in the LS6.
For more information about using the Viper™ LS6 with PAN-MARK® or
EASY-MARK™ see the section entitled “USING REMOTE PRINTER
UTILITY” on pages 53 -54.
NOTE: ViperLink software does not allow a user to download .bmp
or .jpg images to the VIPER™ LS6 printer.
Page 50

VIPERLINK
50
Installing ViperLink
Use the ViperLink CD to install ViperLink software onto a personal
computer. The ViperLink CD is only available with the purchase of LS6-
PCKIT.
Insert the CD into a personal computer. The installation program will begin
automatically. Follow the instructions in the installation wizard in order to
complete the installation process.
Using ViperLink
To use ViperLink software with the Viper™ LS6 printer:
1. Connect the serial cable (included with the LS6-PCKIT) to a personal
computer at the 9 pin serial port.
2. Connect the serial cable to the Viper™ LS6 at the RS232 port.
3. Turn ON the Viper ™ LS6.
4. Press the key to access the setup menu.
5. Use the up or down directional arrow keys to highlight Utilities.
6. Use the right or left directional arrow keys to select ViperLink.
7. Press the key to begin using the ViperLink utility. The LS6 is now
ready to communicate to a personal computer.
8. Open ViperLink software on a personal computer.
To upload or download label files or data lists, select:
Transfer -> File Transfer
Choose COM 1 or COM 2
Choose to Upload or Download a file.
Page 51

VIPERLINK
51
If uploading, choose a file from the VIPER™ memory and Save As.
If downloading, first Browse for the file and select the file type, click
Open, and click OK.
To upgrade the LS6 operating system, select:
Transfer -> Upgrade Flash Memory
Browse to locate the operating system file
Click Open
Choose COM 1 or COM 2
Click Upgrade
NOTE: Upgrades for the VIPER™ LS6 internal operating system are
available for downloading from the Panduit Corp. web site at
www.panduit.com.
NOTE: The VIPER™ LS6 screen will go blank and flicker during the
upgrading process.
NOTE: Downloading an unauthorized binary (.BIN) file into the LS6
will result in non-functionality of the printer.
DO NOT INTERRUPT THE FILE TRANFERRING PROCESS!
To convert a .CSV or .DAT file, select:
Transfer -> CSV/DAT conversion
Click CSV to DAT or DAT to CSV
Browse to locate the appropriate file
Click Open, Enter the file name, Click Save
NOTE: Use Microsoft® Excel to create a spreadsheet of up to 4
columns by 100 rows. Save this data as a .CSV file.
Transfer this file to the VIPER™ LS6 by using ViperLink and
selecting download. The .CSV file will be converted into a
.DAT file automatically. The columns from the spreadsheet
will convert into lines 1 through 4 within a data list item. The
rows from the spreadsheet will convert into consecutive items
within a data list.
Page 52

VIPERLINK
52
To request information from the VIPER™ LS6, select:
Request -> LS6 Info
Choose COM 1 or COM 2
Choose Version, Status, or History
Information from the VIPER™ LS6 will be retrieved and displayed in
ViperLink
To access the help topics, select:
Help -> Help Topics
To create a data list,
Enter a database name, Enter text on lines 1-4 of item 1
Use the up directional arrow button to advance to the next item
Use the down directional arrow button to return to the previous item
(The maximum number of items is 100) Click File -> Save
After creating a data list, follow the above instructions for
downloading a data list to the VIPER™ LS6
NOTE: The above operations are also available on the tool bar.
9. Press the key on the VIPER™ LS6 printer to exit the ViperLink
utility and return to the setup menu.
Page 53

USING REMOTE PRINTER UTILITY
53
In order to operate the remote printing feature on the VIPER™ LS6
printer, the personal computer connected to the VIPER™ LS6 must be set
up in the following manner:
1. Either PAN-MARK® or EASY-MARK™ software applications must be installed
on the personal computer. These applications are available exclusively
from Panduit Corp.
2. The LS6 print driver must be installed on the personal computer. The
LS6 print driver is included with PAN-MARK® or EASY-MARK™ software.
3. The communications port (COM PORT) must be set up correctly. For
example, to set up COM1 follow this procedure:
1. Click the start button at the bottom left corner of your computer screen.
2. Select Settings.
3. Select Printers.
4. Right click on PTR3.
5. Select Properties.
6. Select the Details tab.
7. Select Port Settings (make sure COM1 is selected above).
8. Use these settings:
Bits per second: 57600
Data bits: 8
Parity: None
Stop Bits: 1
Flow Control: Xon/Xoff
9. Click OK.
10. Click OK.
NOTE: Example above is for the Windows® 98 operating system.
Other Windows® operating systems may require
modifications to this procedure.
NOTE: Deactivate the communication of other peripheral devices to
the local serial port before using ViperLink.
To access the Remote Printer Utility with the Viper™ LS6 follow this
simple procedure:
1. With the printer ON and at the home screen, press .
2. Use the up or down arrow keys to scroll down to Utilities.
3. At Utilities, use the right or left arrow keys to scroll to Remote Printer.
4. Press Enter. The Remote Printer Screen will appear.
Page 54

USING REMOTE PRINTER UTILITY
54
5. The LS6 is now ready to print directly from PAN-MARK® or EASY-MARK
™
software.
6. If the label roll installed in the VIPER™ LS6 is changed while in the
Remote Printer utility, press the key to automatically adjust the
printer to the default settings for the new label roll.
7. To exit Remote Printer Mode, press .
With the VIPER™ LS6 in Remote Printer utility, open PAN-MARK® or EASY-
™
MARK
and begin creating labels. Make sure to select the appropriate LS6
label format within the software.
EASY-M ARK™ PAN-MARK®
In order to print from PAN-MARK® or EASY-M ARK™:
1. Attach the serial cable to the personal computer and the Viper™ LS6.
2. Click File on the computer screen.
3. Click Print.
4. Choose Panduit PTR3.
5. Ensure that ‘Portrait’ is selected in the PTR3 properties window.
6. Click OK until the print window disappears.
7. The following message may appear:
8. Click Yes.
9. A printing message will appear and the Viper™ LS6 will begin to print.
NOTE: Windows® XP printer properties may default to a larger page
size than allowed by the Viper ™ LS6 and may require
adjustment.
Page 55

PRINTER CLEANING INSTRUCTIONS
55
Cleaning the Print Head and Drive Roller
The print head should be cleaned regularly, and more often in harsh
environments. The drive roller should be cleaned whenever foreign matter,
such as dust or adhesive, is present.
1. Turn OFF power to printer.
2. Open the ribbon lock knob.
3. Remove any label media from print path.
4. Remove the ribbo n.
5. Power the printer on .
6. Position ribbon lock knob in locked position.
7. Extend width guide to greatest width.
8. Insert cleaning card (Part No.LS6-CLN) until resistance is met.
9. Press to feed cleaning card completely through printer.
10. Flip cleaning card over and repeat steps 8 & 9 as necessary.
11. If there are large deposits on the drive rollers, soak cotton swab in
Isopropyl Alcohol (Rubbing Alcohol) and remove deposits from rubber
roller with sweeping motion.
Caution: LS6-CLN (cleaning card) contains
alcohol, keep away from flames.
Page 56

PRINTER TROUBLESHOOTING
56
This section helps identify printer conditions and problems that can often be
solved by the user. If you are unable to correct the problem contact Panduit
Technical Support at 866-871-4571 or Panduit Customer Service at 800-777-
3300.
SYMPTOM ACTION
POWER
Printer does not
power up properly,
and LCD does not
come on.
PRINTING
Not pri nting.
Tools Too Big!
• To turn printer ON, depress the power button.
• Make sure the battery pack is fully charged.
Charge a drained battery pack for a minimum of
15 hours with LS6-ACS.
• Plug in AC Adapter. Ensure power cord is firmly
seated into adapter.
• Make sure battery pack plug is connected to
printer plug in battery compartment
• Battery pack is spent or damaged. Try a new
charged battery pack. (LS6-BP).
• Make sure printer:
1. Is turned ON
2. Has ribbon cartridge properly loaded
3. Ribbon cartridge locked in place
4. Label mandrel seated properly
5. Labels positioned in width guide correctly
• Remove ribbon cartridge and clean print
mechanism with provided cleaning card.
• The items on the home screen are too large for
the printable area. Adjust the text size on the
home screen, adjust the symbol size, rotate the
label, or use a larger label.
Page 57

PRINTER TROUBLESHOOTING
57
SYMPTOM ACTION
Media is not
advancing properly
in the printer.
Printed image is
full, but grayish or
“translucent”.
• Ribbon knob not locked. Rotate ribbon knob into
locked position.
• Ensure that labels are properly positioned in label
path and that width guides are in contact with both
sides of the label. Ensure that adjustable width
guide is locked in place in the correct notch.
• End of label roll reached. Detach end of label roll
from core.
• Label jam in printer. Label is caught in print
mechanism. To clear jam:
1. Turn printer power OFF.
2. Open label door.
3. Detach any printed labels with cutter.
4. Open ribbon lock knob.
5. Remove unprinted labels from the printer.
6. Carefully remove any labels caught in the
printer.
• Print head heat setting is too high. Reduce heat
setting. See procedure on page 46.
• Ribbon and media are incompatible. Test
alternative ribbon or media. See compatibility
chart on page 14.
Voids in printed
image: areas where
there is no print.
• Dust on label. Remove dust with compressed air
or place static tinsel across label unwind.
• Ribbon and media are incompatible. Tes t
alternative ribbon or media. See compatibility
chart on page 14.
• Print head elements or “dots” are dirty or
obstructed. Clean print head with pre-saturated
cleaning card (LS6-CLN) or soft -stemmed swab
and isopropyl alcohol. See cleaning instructions
on page 55.
• Ribbon may be wrinkled.
1. Unlock and remove ribbon cartridge from
printer.
2. Tighten ribbon in ribbon cartridge by turning
knobs.
3. Insert ribbon cartridge into printer.
• Print head elements or “dots” are burned out.
Replace print head.
Page 58
PRINTER TROUBLESHOOTING
58
SYMPTOM ACTION
Repetitive voids in
image.
Not printing any
image (or barely
any image).
Printer stalls or will
not print.
RIBBON
Ribbon is not
advancing properly.
Ribbon wrinkling.
Printer doesn’t stop
when out of ribbon.
Ribbon breaking.
LABELS
Labels not
registering
• Print head elements or “dots” are dirty or
obstructed. Clean print head with pre-saturated
cleaning card (LS6-CLN), or soft -stemmed swab
and isopropyl alcohol. See cleaning instructions
on page 55.
• Ribbon and media are incompatible. Test
alternative ribbon or media. See compatibility
chart on page 14.
• Ribbon or media is not loaded properly. Reload
ribbon and media, making sure both pass under
respective sensors.
• Ensure that labels are properly positioned in label
path and that width guides are in contact with both
sides of the label and locked in place in the
correct notch.
• Ribbon or media sensors are dirty or obstructed.
Clean sensors with soft -stemmed swabs and
isopropyl alcohol or compressed air.
• Ribbon is not loaded correctly. Load ribbon
properly at side of printer and ensure knob is in
lock position.
• Ribbon not loaded correctly. Remove ribbon, reinsert and lock.
• Ribbon not wound tightly prior to installation.
Remove ribbon, wind take-up until slack
disappears, re-insert ribbon and lock in position.
• Ribbon sensor is dirty or obstructed. Clean
sensor with soft -stemmed swab and isopropyl
alcohol or compressed air.
• Ribbon cartridge empty. Replace ribbon
cartridge.
• Make sure that label mandrel is firmly seated in
socket.
• Width guide is loose. Make sure the width guide
is properly located and fixed in place.
• Printer not reset for new label format. Turn printer
OFF, then ON again. Printer will re -calibrate for
new label.
Page 59

PRINTER TROUBLESHOOTING
59
SYMPTOM ACTION
Die-cut labels
continue to feed
without stopping.
BAR CODES
Poor edge
definition (bar
codes and
alphanumerics).
Bar codes
smearing (bar code
edges “bleeding” or
“feathering”.
Bars in bar codes
are too wide or too
narrow resulting in
a poor scan grade.
Insufficient print
contrast: Bars are
not dark enough,
spaces are not light
enough.
OTHER
Printer Locked Up
• Label sensor is dirty or obstructed. Clean sensor
with soft -stemmed swab and isopropyl alcohol or
compressed air.
• Width guide is loose. Make sure the width guide
is properly located and fixed in place.
• Ribbon and media are incompatible. Test
alternative ribbon or media. See compatibility
chart on page 14.
• Print head heat setting is too high. Reduce heat
setting until bar edges are clean. See proced ure
on page 46.
• Print head heat setting it too high/too low. Adjust
to optimize average bar growth (visually or with
verifier). See procedure on page 46.
• Overburn (too much ribbon transfer). Reduce
print head heat setting. See procedure on page
46.
• Print head heat setting is too low. Increase print
head heat setting. See procedure on page 46.
With printer OFF, Press and hold [R] and to
RESET the printer.
Note: Saved Label files will NOT be lost during reset.
Page 60

WARRANTY INFORMATION
60
Our products are warranted to be free from defects in material and
workmanship at the time of sale but our obligation under this warranty is
limited to the replacement of any product proved to be defective within 6
months (for product) or 90 days (for printers) from the date of delivery. Printer
warranty is void if Panduit printers are modified, altered or misused in any
way. Use of Panduit printers with any product other than the specified Panduit
products for which the printer was designed, constitutes misuse. Before using,
user shall determine the suitability of the product for his intended use and
user assumes all risk and liability whatsoever in connection therewith.
This warranty is made in lieu of and excludes all other warranties, expressed
or implied. THE IMPLIED WARRANTIES OF MERCHANTABILITY AND
FITNESS FOR A PARTICULAR USE ARE SPECIFICALLY EXCLUDED.
Neither seller nor manufacturer shall be liable for any other injury, loss or
damage, whether direct or consequential, arising out of the use of, or the
inability to use the product.
The information contained in this literature is based on our experience to date
and is believed to be reliable. It is intended as a guide for use by persons
having technical skill at their own discretion and risk. We do not guarantee
favorable results or assume any liability in connection with its use.
Dimensions contained herein are for reference purposes only. For specific
dimensional requirements consult the factory. This publication is not to be
taken as a license to operate under, or a recommendation to infringe any
existing patents. This supersedes and voids all previous literature, etc.
Page 61

GENERAL SPECIFICATIONS
61
Print Method: Thermal transfer or direct thermal
Effective Print Width: 1.89” (48 mm)
Print Length: 19.99” (maximum label length)
Print Resolution: 203 dpi (horizontally and vertically)
Print Speed: Up to 1 ips
Feed Speed: Up to 2 ips
Label Width: 0.24” to 2.0”
Media Length: 50’ continuous tapes
Media Types: Die cut or continuous tapes
Materials: Vinyl self-laminating, flattened heat shrink,
vinyl cloth, polyester, continuous tape, vinyl,
non-adhesive polyester, polyolefin, thermal paper
Media Cutting: Manually operated cutter
Ribbons: Replaceable cartridges (wax, resin, or hybrid)
Keypad: 49 color coded keys
Display: 128 x 64 dots graphic LCD
LCD Contrast Control: Adjustable via keypad
Operating System: Panduit proprietary – user upgradeable
User Memory: 128 Kbytes of RAM available for label storage
Serial Port: RS-232 Serial Interface for PC connection
Battery Pack: 12 VDC, 1200 mAh rechargeable NiMH
(Nickel-Metal Hydride) battery pack
(Battery life – approx. 1500 TWS-2V labels)
AC Adapter: Universal Input (100 - 240 VAC, 50/60 Hz) with
IEC-320-C14 input connector
(accepts international cord sets)
Regulated DC Output 12 VDC, 0 to 1.2 Amp
Powers the printer’s internal battery charger Charging
time 15 hours
Oper. Temp/Hum: 41-104° F (5-40 °C),
0 - 90% relative humidity (non-condensing)
Stor. Temp/Hum: -40-140° F (-40-60 °C),
0 - 90% relative humidity (non-condensing)
Compliance: FCC Part 15 Class A, European Community EMC
and Low Voltage Directives regarding safety,
emissions, and immunity
Size Height: 6.2” (157.5 mm)
Width: 4.9” (124.5mm)
Length: 13.8” (350.5 mm)
Weight 4.1 lbs. (1.86 kg) - includes battery pack
Page 62

REPLACEMENT PARTS AND ACCESSORIES
62
DESCRIPTION PART
NUMBER
Wax Ribbon – Black LS6-RWBLK
Resin Ribb on – Black LS6-RRBLK
Resin Ribbon – White LS6-RRWHT
Hybrid Ribbon – Black LS6-RHBLK
Battery Pack LS6-BP
LS6 ViperLink™ software and 9 pin serial cable LS6-PCKIT
LS6 AC Adapter/Battery Charger for Australia LS6-ACA
LS6 AC Adapter/Battery Charger for Europe LS6-ACE
LS6 AC Adapter/Battery Charger for North America LS6-ACS
LS6 AC Adapter/Battery Charger for the United Kingdom LS6-ACU
Cleaning Card (5 cards in a package) LS6-CLN
Operator’s Manual LS6-MAN-*
* Insert Language code as applicable:
A - English, D - German, E - Spanish, F - French, I - Italian
For more information on the VIPER™ LS6, visit the Panduit website at
www.panduit.com or call Panduit Customer Service at 1-800-777-3300 to
request a brochure.
 Loading...