


GS-1
Congratulations on your choice of the Zenza Bronica GS-1, a lens shutter type single reflex camera in the 6 x 7 format.
The GS-1 provides the professional user with a lightweight and compact 6 x 7 format single lens reflex of extremely useful versatility and multi-functional performance, which is based on the history and experience gained in the development of the Zenza Bronica ETRS and SQ-A single lens reflexes, as well as the latest technological advances in the electronic field.
The GS-1 has been developed as a full-scale system camera, with a wide range of versatile accessories and especially with complete film back interchangeability which gives it multi-format capability for use in a wide field of applications, including commercial photography, news photography, scientific photography, etc., as well as giving this 6 x 7 format single reflex versatility equal to the 35mm single reflex camera. Although instructions following are based on the GS-1 camera main body, the Zenzanon-PG 100mm lens and the Film Back GS 120, the choice of the finder is left to the discretion of the photographer who should also read the instructions for the finder chosen. The choice of lens, film back and finder should be based on the type of assignment contemplated by the user.
To obtain best results from the Zenza Bronica GS-1, may we suggest that you read this instruction manual through carefully, before you even touch the camera, as your pleasure in using the camera will be even greater if you thoroughly familiarize yourself with its working parts before loading your first roll of film.
1
Contents |
Page |
Specifications of the Zenza Bronica GS-1 |
3, 4 |
|
Parts of the Zenza Bronica GS-1 |
5 |
|
1. |
Loading the Battery |
|
2. |
Main Switch |
6 |
3. |
Finder Display and Battery Checking |
6, 7 |
4. |
Attachment and Removal of Film Backs |
7, 8 |
5. |
Construction of Film Back |
8, 9 |
6. |
Film Loading |
10, 11 |
7. |
Film Speed Dial |
11 |
8. |
Exposure Counter |
11 |
9. |
Film Type Indicator Frame |
12 |
10. |
Exposure Counter |
12 |
11. |
Film Winding/Shutter Cocking |
12 |
12. |
Film Unloading |
13 |
13. |
Setting the Shutter Speed Dial |
13, 14 |
14. |
Shutter Release Button |
14 |
15. |
Time (T) Exposure |
15 |
16. |
Exchanging Lenses |
15 |
17. |
Interchanging Finders |
16 |
18. |
Setting the Aperture Ring |
16, 17 |
19. |
Focusing Adjustments |
17 |
20. |
Distance Scale and Depth of Field Scale |
17 |
21. |
Infrared Photography |
18 |
22. |
Flash Photography |
18 |
23. |
Multiple Exposures |
19 |
24. |
Mirror Lock-Up |
19, 20 |
25. |
Remote Control Operations |
20 |
26. |
Interchanging Focusing Screens |
21 |
27. |
Removal and Attachment of the Film Winding Crank Assembly |
22 |
28. |
Attachment of Neck Strap |
22 |
29.Facts about the Battery
30.Pointers on Shooting
31.Care of the Zenza Bronica GS-1
32.Depth of Field Tables
33.Specifications of Zenzanon-PG Lenses
2

|
Specifications of the ZENZA BRONICA GS-1 |
|
|
|
|
Type |
|
6 x 7cm format lens, shutter single lens reflex |
|
|
camera with interchangeable lens, film back, |
|
|
finder and focusing screen systems. |
|
|
|
Frame Size |
|
55.6 x 69.0mm (4:5 ratio matching the size of |
|
|
the photographic paper.) |
|
|
|
Film |
|
120 roll film; 220 roll film; 135 roll film in film |
|
|
cartridges; and Polaroid Land Pack films (with |
|
|
exclusive film backs required for each film |
|
|
type.) |
|
|
|
Standard Lens |
|
Zenzanon-PG 100mm F3.5; interchangeable |
|
|
type; six elements in four groups; multi-layer |
|
|
anti-reflection coated; 48 degree angle of |
|
|
view; F22 minimum aperture; and minimum |
|
|
0.75m focusing distance. |
|
|
|
Filter Size |
|
72mm diameter on 100mm F3.5 standard |
|
|
lens. |
|
|
|
Lens Mount |
|
Bronica GS mount (exclusive four-claw bayo- |
|
|
net.) |
|
|
|
Focusing Adjustment |
|
Helical focusing system built into each lens. |
|
|
|
Lens Diaphragm |
|
Fully automatic instant reopening lens |
|
|
diaphragm; ½ stop increments; equal-distant |
|
|
aperture scale graduations. |
|
|
|
Shutter |
|
Electronic control SEIKO #0 between-lens leaf |
|
|
shutter; shutter speeds from 16 sec. to 1/500 |
|
|
sec., without intermediate settings, plus T |
|
|
(time exposure), B (bulb) and A (automatic |
|
|
exposure.) |
|
|
|
Shutter Release |
|
Electro-magnetic shutter release system; also |
|
|
has electro-magnetic cable release system. |
|
|
|
Film Winding |
|
Film winding crank, with one full forward rev- |
|
|
olution or ratcheted winding action. |
|
|
|
Multiple Exposure |
|
Multiple exposures possible with multiple |
|
|
exposure lever on camera body. |
|
|
|
Mirror Lock-up |
|
Continuous mirror lock-up possible with mir- |
|
|
ror lock-up lever on camera body. |
|
|
|
3
Specifications of the ZENZA BRONICA GS-1 (con’t) |
|
|
|
Film Back |
Daylight loading interchangeable type; exclu- |
|
sive film backs for 120 and 220 roll films (6 x |
|
7, 6 x 6 and 6 x 4.5 formats) and Polaroid |
|
Land Pack film; with ASA/ISO film speed dial |
|
and exposure compensation dial (coupling to |
|
finders with built-in exposure meter. |
|
|
Finder |
Interchangeable type; shows 94% of the |
|
actual field of view (which does not change |
|
upon exchanging finders.) |
|
|
Focusing Screen |
Interchangeable type; standard type, sup- |
|
plied with camera, has full-area matte screen. |
|
|
Finder Indications |
Shutter speed, etc., is shown at the top of the |
|
finder area, outside the screen area; 5 digits, 7 |
|
segments and dot indication, depending on |
|
the finder attached. |
|
|
Flash Synchronization |
X-setting (for all speeds up to 1/500 sec.) |
|
|
Battery Checking |
Steady illumination or flickering of shutter |
|
speed display in finder, with half-stroke of the |
|
shutter release button. |
|
|
Battery |
Single 6 volt silver oxide or alkaline-man- |
|
ganese battery. |
|
|
Dimensions |
106.5 (wide) x 99 (high) x 80 (long) mm- GS-1 |
|
main bodies only. |
|
106.5 (wide) x 116 (high) x 196.5 (long) mm- |
|
GS-1, with standard 100mm lens, Film Back |
|
GS 120 and Waist-level Finder G. |
|
|
Weight |
630 grams (GS-1 main body only, without |
|
battery.) |
|
1,830 grams (GS-1, with standard 100mm |
|
lens, Film Back GS 120 and Waist-level Finder |
|
G, but without battery.) |
|
|
*The above specifications are subject to change without prior notice.
4

Parts of the ZENZA BRONICA GS-1
Finder release button |
|
|
|
|
|
|
Main switch |
|
|
|
|
|
|
Shutter speed dial lock button |
|
|
|
|
|
|
|
|
|
|
|
|
|
Film Winding Crank |
|
Depth of field preview lever |
|
|
|||
|
|
|
|
|
|
|
|
|
|
|
|
|
|
|
|
|
Lens release button |
|
|
|
|
|
|
|
|
|
|
|
|
|
|
|
|||
|
|
|
|
|
|
|
|
|
|
|
|
|
|
|
|
|
|
Neck strap eyelet |
|
|
|
|
|
|
|
|
|
|
|
|
|
||||
|
|
|
|
|
|
|
|
|
|
|
|
|
|
|
|
|
|
|
|
|
|
|
|
|
|
|
|
|
|
|
|
|
|
|
|
|
|
|
|
|
|
|
Multiple exposure lever |
|
|
|
|
|
|
Electro-magnetic cable |
|
|
|
|
|
|
|
|
|
|
|
|
|||||||||
|
|
|
|
|
|
|
|
|
|
|
|
|
release socket |
|
|
|
|
|
|
|
|
|
|
|
|
||||||||||
|
|
|
|
|
|
|
|
|
|
|
|
|
|
|
|
|
|
|
|
|
|
|
|
|
|
|
|
|
|
|
|
|
|
|
|
|
|
|
|
|
|
Neck strap eyelet |
|
|
|
|
|
|
|
|
|
|
|
Film back release |
|
|
|
|
|
|
|
|
|
|
|
||||||
|
|
|
|
|
|
|
|
|
|
|
|
|
|
|
|
|
|
|
|
|
|
button |
|
|
|
|
|
|
|
|
|
|
|
||
|
|
|
|
|
|
Back cover release button (bottom) |
|
|
|
|
|
|
|
|
|
Dark slide slit |
|
|
|
|
|
|
|
|
|
||||||||||
|
|
|
|
|
|
|
|
|
|
|
|
|
|
|
|
|
|
|
|
|
|
|
|
|
|
|
|
|
|
|
|||||
|
|
|
|
|
Back cover release button (top) |
|
|
|
|
|
|
|
|
|
|
|
|
|
|
|
|
|
|
|
|
|
|
|
|||||||
|
|
|
|
|
|
|
|
Film plane mark |
|
|
|
|
|
|
|
||||||||||||||||||||
|
|
|
|
|
|
|
|
|
|
|
|
|
|
|
|
|
|
|
|
|
|
|
|
|
|
|
|
|
|
|
|
|
|
|
|
|
|
|
|
|
|
|
|
|
|
|
|
|
|
|
|
|
|
|
|
|
|
|
|
|
|
|
|
|
|
|
|
|
|
|
|
|
|
|
|
|
|
|
|
|
|
|
|
|
|
|
|
|
|
|
|
|
|
|
|
|
|
|
|
|
|
|
|
|
|
|
|
|
|
|
|
|
|
|
|
|
|
|
|
|
|
|
|
|
|
|
|
|
|
|
|
|
Aperture ring |
|
|
|
|
|
|
||||
|
|
|
|
|
|
|
|
|
|
|
|
|
|
|
|
|
|
|
|
|
|
|
|
|
|
|
|
|
|
|
|
||||
|
|
|
|
|
|
|
|
|
|
|
|
|
|
|
|
|
|
|
|
|
|
|
|
|
|
Depth of field scale |
|
|
|
||||||
|
|
|
|
|
|
|
|
|
|
|
|
|
|
|
|
|
|
|
|
|
|
|
|
|
|
|
|
|
|
|
|||||
|
|
|
|
|
|
|
|
|
|
|
|
|
|
|
|
|
|
|
|
|
|
|
|
|
|
Distance scales |
|
|
|
||||||
|
|
|
|
|
|
|
|
|
|
|
|
|
|
|
|
|
|
|
|
|
|
|
|
|
|
|
|
|
|
|
|
|
|
|
|
|
|
|
|
|
|
|
|
|
|
|
Focusing ring |
|
|
|
|
|
|
|
|
|
|
|
|
|
|
|
|
|
|
|
|
|
|||
|
|
|
|
|
|
|
|
|
|
|
|
|
|
|
|
|
|
|
|
|
|
|
|
|
|
|
|
|
|
|
|
||||
|
|
|
|
|
|
|
|
|
|
|
Flash synch socket |
|
|
|
|
|
|
|
|
|
|
Lens alignment dot |
|
|
|||||||||||
|
|
|
|
|
|
|
|
|
|
|
|
|
|
|
|
|
|
|
|
|
|
|
|
|
|
|
|
|
|
|
|
|
|||
|
|
|
|
|
|
|
|
|
|
|
|
|
|
|
|
|
|
|
|
|
|
|
|
|
|
LED display plate |
|
|
|
||||||
|
|
|
|
|
|
|
|
|
|
|
|
|
|
|
|
|
|
|
|
|
|
|
|
|
|
|
|
|
|
|
|
|
|
|
|
|
|
|
|
|
|
|
|
|
|
|
AE finder contacts |
|
|
|
|
|
|
|
|
|
|
|
Film winding crank |
|
|||||||||||
|
|
|
|
|
|
|
|
|
|
|
|
|
|
|
|
|
|
|
|
|
|
|
|
|
|
assembly release lever |
|
||||||||
|
|
|
|
|
|
|
|
|
|
|
Shutter speed dial |
|
|
|
|
|
|
|
|
|
|
|
|
|
|
|
|
|
|
|
|
|
|||
|
|
|
|
|
|
|
|
|
|
Shutter speed scale |
|
|
|
|
|
|
|
|
|
|
|
Screen removal lever |
|
||||||||||||
|
|
|
|
|
|
|
|
|
|
|
|
|
|
|
|
|
|
|
|
|
|
(right) |
|
|
|||||||||||
|
|
|
|
|
|
|
|
|
|
|
window |
|
|
|
|
|
|
|
|
|
|
|
|
|
|||||||||||
|
|
|
|
|
|
|
|
|
|
|
|
|
|
|
|
|
|
|
|
|
|
|
|
|
|
|
|
|
|
|
|
||||
|
|
|
|
|
|
|
|
|
|
|
|
|
|
|
|
|
|
|
|
|
|
|
|
|
|
|
|
|
|
|
|
|
|
|
|
|
|
|
|
|
|
|
|
|
|
|
|
|
|
|
|
|
|
|
|
|
|
|
|
|
|
|
|
|
|
|
|
|
|||
|
|
|
|
|
|
|
|
|
|
Screen removal lever |
|
|
|
|
|
|
|
|
|
|
|
|
|
|
|
|
|
|
|
|
|
||||
|
|
|
|
|
|
|
|
|
|
|
(left) |
|
|
|
|
|
|
|
|
|
|
|
|
|
|
|
|
|
|
|
|
|
|||
|
|
|
|
|
|
|
|
|
|
|
|
|
|
|
|
|
|
|
|
|
|
|
|
|
|
ASA/ISO film speed |
|
||||||||
|
|
|
|
|
|
|
|
|
|
|
Mirror lock-up lever |
|
|
|
|
|
|
|
|
|
|
|
contacts |
|
|||||||||||
|
|
|
|
|
|
|
|
|
|
|
|
|
|
|
|
|
|
|
|
|
|
|
|
|
|
|
|
|
|
|
|
||||
|
|
|
|
|
|
|
|
|
|
|
|
|
|
|
|
|
|
|
|
|
|
|
|
|
Manual film winder |
|
|
|
|||||||
|
|
|
|
|
|
|
|
|
|
|
|
|
|
|
|
|
|
|
|
|
|
|
|
|
|
|
|
|
|
|
|
|
|
|
|
|
|
|
Shutter release button |
|
|
|
|
|
|
|
|
|
|
|
|
|
|
|
|
|
|
|
|
|
|
|
|
|
|
|
|
|
|||
|
|
|
|
|
|
|
|
|
|
|
|
|
|
|
|
|
|
|
|
|
|
|
|
|
|
|
|
|
|
|
|
|
|
|
|
|
|
|
|
|
|
|
|
|
|
|
|
|
|
|
|
|
|
|
|
|
|
Spool holder |
|
|
|
|
|
|
|
|
|
|
|||
|
|
|
|
|
|
|
|
|
|
|
|
|
|
|
|
|
|
|
|
|
|
|
|
|
|
|
|
|
|
|
|
|
|
|
|
|
|
|
|
|
|
|
|
|
|
|
|
|
|
|
|
|
|
|
|
|
|
|
|
|
|
|
|
|
|
|
|
|
|
|
|
|
|
|
|
|
|
|
|
|
|
|
|
|
|
|
|
|
|
|
|
|
|
|
Film widing crank assembly |
|
|
|
|
|
|||||||
|
|
|
|
|
|
|
|
|
|
|
|
|
|
|
|
|
Exposure compensation dial lock button |
|
|
|
|
|
|
|
|
|
|
|
|||||||
|
|
|
|
|
|
|
|
|
|
|
|
|
|
|
|
|
|
|
|
|
|
|
|
|
|
|
|
|
|
|
|
|
|
|
|
|
|
|
Time exposure |
|
|
|
|
|
|
|
|
|
|
Time exposure lever |
|
|
|
|
|||||||||||||||||
|
|
|
lever release |
|
|
|
|
|
|
|
|
|
|
|
|
|
|
|
|
|
|
|
|
|
|
|
|
|
|
|
|
|
|||
|
|
|
|
|
|
|
|
|
|
|
|
|
|
|
|
|
|
|
|
|
|
|
|||||||||||||
|
|
|
|
|
|
|
|
|
|
|
|
|
|
|
|
|
Tripod socket |
|
|
|
|
|
|
|
|
|
|
|
|
|
|
|
|
|
|
|
|
|
|
|
|
|
|
|
|
|
|
|
|
|
|
|
|
|
|
|
|
|
|
|
|
|
|
|
|
|
|
|
|
|
|
|
|
|
Accessory contacts |
|
|
|
|
|
|
|
|
|
|
|
|
|
|
|
|
|
|
|
|
|
|
|
|
|
|
|
|
|
|||
|
|
|
|
|
|
|
|
|
|
|
|
|
|
|
|
|
Battery chamber |
|
|
|
|
|
|||||||||||||
|
|
|
|
|
|
|
|
|
|
|
|
|
|
|
|
|
|
cover |
|
|
|
|
|
||||||||||||
|
|
|
|
|
|
|
|
|
|
|
|
|
|
|
|
|
|
|
|
|
|
|
|||||||||||||
|
|
|
|
|
|
|
|
|
|
|
|
|
|
|
|
|
Battery chamber |
|
|
|
|
|
|||||||||||||
|
|
|
Film winding |
|
|
|
|
|
button |
|
|
|
|
|
|
|
|
|
|
|
|
|
|
|
|
|
|||||||||
|
|
|
|
coupler |
|
|
|
|
|
|
|
|
|
|
|
|
|
|
|
|
|||||||||||||||
|
|
|
|
|
|
|
|
|
|
|
|
|
|
ASA/ISO film |
|
|
|
|
|
|
|
|
|
|
|
|
|
|
|
|
|
||||
|
|
|
|
|
|
|
|
|
|
|
|
|
|
|
|
|
|
|
|
|
|
||||||||||||||
|
|
|
|
|
|
|
|
|
|
|
|
|
|
|
|
|
|
||||||||||||||||||
|
|
|
|
|
|
|
|
|
|
|
|
|
|
|
|
|
speed scale |
|
|
|
|
|
|||||||||||||
|
|
|
|
|
|
|
|
|
|
|
|
|
|
|
|
|
|
|
|
|
|
|
|||||||||||||
|
|
|
|
|
|
|
|
|
|
|
|
|
|
|
|
|
ASA/ISO film |
|
|
|
|
|
|
|
|
|
|
|
|
|
|
|
|
|
|
|
|
|
|
|
|
|
|
|
|
|
|
|
|
|
|
|
speed dial lock |
|
|
|
|
|
|||||||||||||
|
|
|
|
|
|
|
|
|
|
|
|
|
|
|
|
|
|
button |
|
|
|
|
|
||||||||||||
|
|
|
|
|
|
|
|
|
|
|
|
|
|
|
|
|
|
|
|
|
|
|
|
|
|
|
|
|
|||||||
|
|
|
|
|
|
|
|
|
|
|
|
|
|
|
|
|
|
|
|
|
|
|
|
|
|
|
|
|
|
|
|
|
|
|
|
|
|
|
|
|
|
|
|
|
|
|
|
|
|
|
|
|
|
Exposure compensation dial |
|
|
|
|
|
|
|
|
|
|
|
||||||
|
|
|
|
|
|
|
|
|
|
|
|
|
|
|
|
|
|
|
|
|
|
|
|
|
|
|
|
|
|
|
|
|
|
|
|
|
|
|
|
|
|
|
|
Accessory guide sockets |
|
|
|
|
|
|
|
|
Exposure counter window |
|
|
|
|
||||||||||||||
|
|
|
|
|
|
|
|
|
|
|
|
|
|
|
|
|
|
|
|
|
|
|
Film type indicator frame |
|
|
||||||||||
|
|
|
|
|
|
|
|
|
|
|
|
|
|
|
|
|
|
|
|
|
|
|
|||||||||||||
5
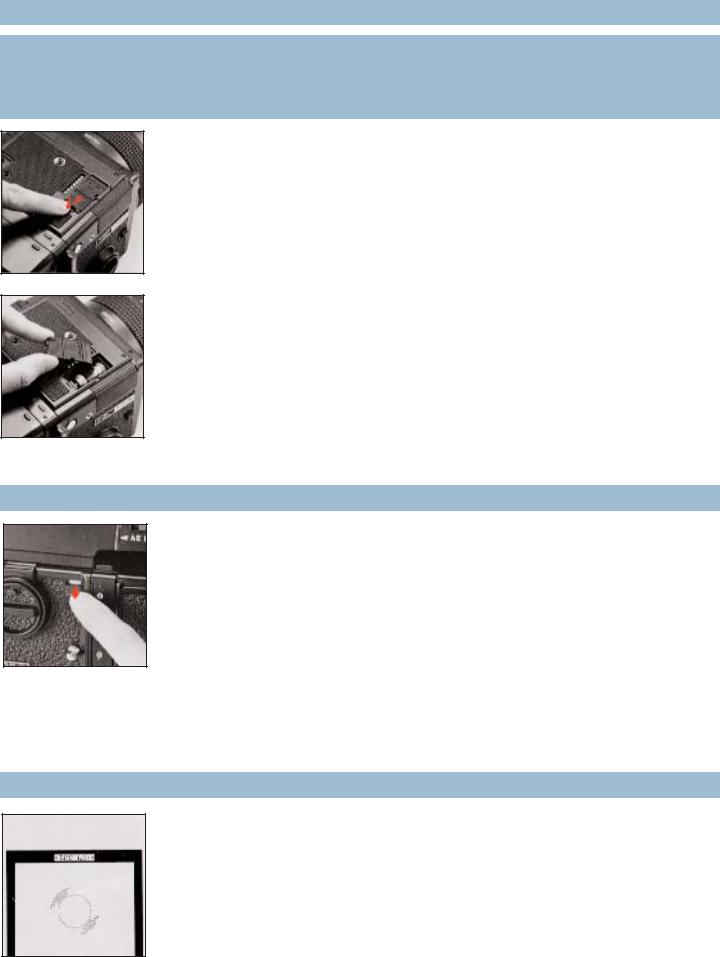
1. Loading the Battery
The electronically controlled shutter and, of course, the electro-magnetic shutter release system will not work without loading the battery. Use one 6 volt silver oxide battery or alkaline-manganese battery.
*The battery may be obtained at any photographic equipment or electrical appliance shop.
A.Depress the battery chamber button with your finger and, at the same time, move the battery chamber cover in the arrow-indicated direction. The cover will come off quite easily.
B.Coincide the plus (+) and minus (-) marks on the battery with similar polarity indications in the battery chamber. Then, push in the battery. Insert the battery chamber cover into the BATTERY end first and then move the cover in the other direction until it locks.
* The shutter will not operate when the battery is loaded with polarity marks reserved.
2. Main Switch
The main switch is located on the upper left side of the main body. There will be no operation unless the main switch is pushed down (i.e., switched ON).
* There is no power consumption, even with the main switch ON. However, the battery life will be shortened when the shutter release is stroked half-way and the shutter speed display lights up steadily or flickers. Therefore, switch OFF (push up) the main switch when you are not planning to use the camera for some time.
3.Finder Display and Battery Checking
A.A LED display located over the top center of the focusing screen shows the shutter speed, which is viewed laterally reversed with the waist-level finder. Since the LED display differs with the finder in use, please read the instructions supplied with the finder for correct usage and reading.
6

3. Finder Display and Battery Checking (con’t)
B. Turn ON the main switch and then stroke the shutter release button halfway. If the LED display in the finder lights up steadily or flickers, as the case may be, the battery is loaded properly and there is sufficient power for operation.
* If the LED display does not light up steadily or does not flicker, (1) the battery is not loaded properly or (2) the battery is completely drained and should be exchanged.
4. Attachment and Removal of Film Backs
The film back is a film chamber that can be attached or detached freely from the main body, thus permitting free exchange of film types, at all times. Since the main body and film back are always fully coupled, upon connection, always turn the film winding crank completely one time, upon attaching the film back. If winding is not possible, however, rotating the film winding crank until it stops automatically takes care of the incomplete action, whether the shutter is not cocked or film not advanced. This means, of course, that it's possible to choose the film type most suited for the shot, even midway in a roll.
An ASA/ISO film speed dial and an exposure compensation dial are available on the film backs. When used for setting the film speed of the film loaded in the film back, there is automatic coupling when finders with built-in exposure meters are attached on the main body. This will, of course, be very convenient when using films of different sensitivities in the film backs.
*Make full use of film back interchangeability, in the following manner: -
1.Take full advantage of the multi-format superiority of the GS-1 and use film backs in many different formats, which will not only give you different effects but will economize on film.
2.Take your pictures in color and black-and-white, and in different film speeds, as required.
3.Keep sufficient quantity of pre-loaded film backs on hand and speedy, continuous shooting will be possible.
4.Don't waste unsuitable film used in a previous session but simply load up a new film back with the required film type.
5.The Polaroid Film Back can be used for instant color or black-and-white pictures, when in a rush, or used for checking composition or lighting effect, before taking the actual picture.
*Film backs are available optionally and the type meeting the requirements of the photographer should be chosen.
7
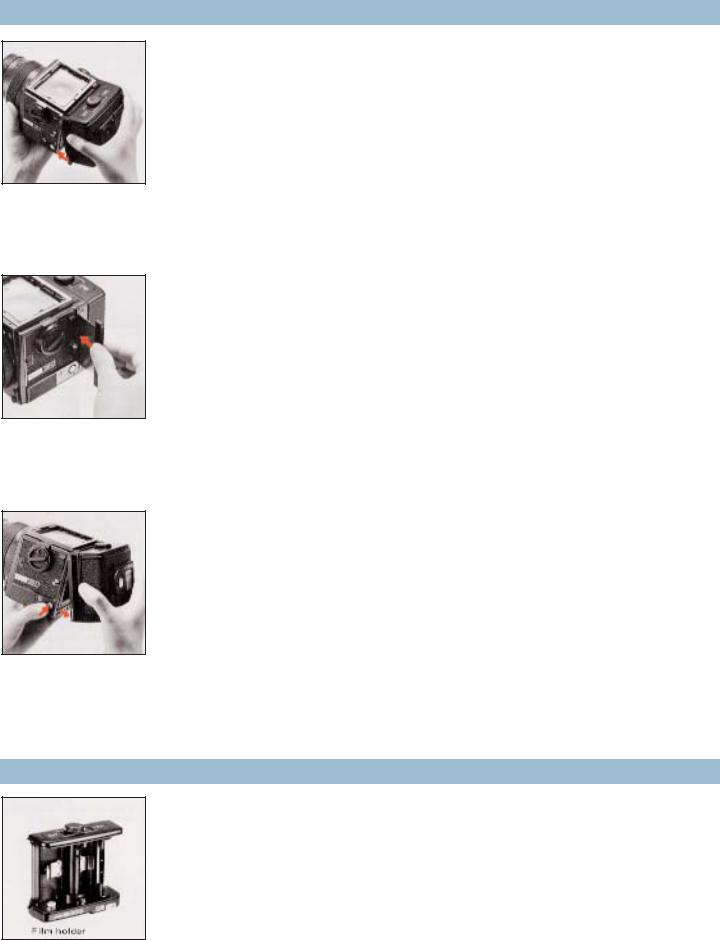
4. Attachment and Removal of Film Backs (con’t)
A. To attach the film back to the main body, simply insert the latches at the upper end of the film back into the attachment openings at the upper end of the main body. Then, press the lower end of the film back against the main body until it locks securely.
* The dark slide must be withdrawn from its slit, upon attachment of the film back to the main body, as otherwise the shutter cannot be released.
B. The dark slide must be inserted into the dark slide slit in order to remove the film back from the main body. Insert, with the mark at the top, as illustrated, and then push in all the way.
*There is danger of the film back becoming detached from the main body, if the dark slide is left in its slit while the camera is being carried. Therefore, make it a rule to withdraw the dark slide whenever the film back is attached to the main body.
C.Depress the film back release button and the lower end of the film back can be removed, as illustrated. Simply shift the film back up slightly and pull it away.
*The dark slide cannot be withdrawn from the film back when the film back is detached from the main body.
5.Construction of Film Back
A.The film back consists of a film holder and film back frame, with exclusive film backs available for 120 and 220 roll films. The film holder is not only detachable from the film back but also has a built-in film winding mechanism.
*Read instructions supplied with the Film Back GS 135 for loading 135 roll film.
8
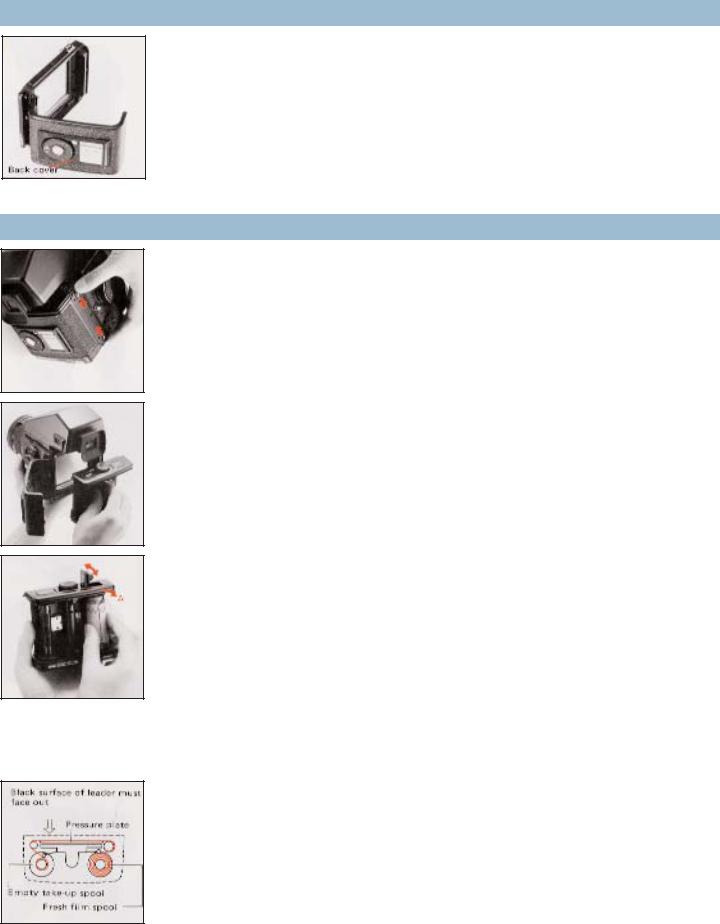
5. Construction of Film Back (con’t)
B. The film back frame has a base with dark slide slit and a back cover with an ASA/ISO film speed dial, and exposure compensation dial and a film type indicator frame. The film back frame completely encloses the film holder and shields it from outside light, as well as connecting it to the main body and also coupling with finders with built-in exposure meters.
6. Film Loading
A.To open the back cover, squeeze the top and bottom back cover release buttons, in the arrow-indicated directions, at the same time and the back cover will open.
B.It will be possible to take out the film holder, upon opening the back cover.
C.The film holder has two spool holders, with the right one for the fresh film spool while the left one is for the empty take-up spool. The top spool holder is opened, as illustrated, by sliding the film (spool) in the arrow-indicated "A" direction. The new film spool should be coincided on the right-side bottom shaft, which is fixed, after which the top spool holder should be closed to engage the spool.
* The spool holders on the top will be locked securely, when the back cover is closed.
D. After loading the fresh film spool properly, draw out the leading end of the film and turn it across the film pressure plate (as illustrated). Run it across and turn it over to the take-up spool. Insert the leading end into the slit of the take-up spool and wind slightly until securely engaged.
* The inside black surface of the leader must face out when running across the pressure plate, in this case.
9
 Loading...