


®
ROLL VENT
CONTINUOUS RIDGE VENT
Installing TAMKO® Roll Vent is a simple step for a contractor that
can have dramatic results for a homeowner. Used in conjunction
with soffit vents, it’s one of the easiest and most affordable ways to
help assure proper roof ventilation.
1
2
3
4
®
TAMKO® ROLL VENT
CONTINUOUS RIDGE VENT
USES
For application to roof decks with inclines between 3" and 12" per foot.
For slopes greater than 12" per foot, call for technical support at 1-800-641-4691.
FEATU RES AND BENEFI TS
• See-through hinge for easier centering over the ridge.
• Innovative design provides effective shingle-over ventilation (cannot be dented).
Nylon 6 plus carbon black for U.V. resistance with nonwoven nylon-polyester
weather barrier.
• 18 square inches of net free area per linear foot for maximum ventilation.
• Lightweight, easy-to-cut material eases installation.
• Compression-resistant design creates a stiffer nailing area and smooth finish.
• 21⁄2" nails and nail line provided for ease of installation.
• Requires no special tools, baffles, metal connectors, end caps, or special filters,
simplifying the installation process.
• Virtually invisible to enhance curb appeal.
• Fast, easy installation helps reduce labor costs.
• Up to a 50-year limited warranty*—backed by TAMKO
• Meets or exceeds the following codes: ICC-ES Report No. ESR 1059,
Texas Dept. of Insurance, FHA, HUD, CCMC #12523-R (for ridge application
only), and Miami Dade County, FL NOA#02-0529.04 exp. 07/17/07.
• Patent #5,960,595; #4,942,699
• Breathable weather barrier to help prevent rain, snow, and insect infiltration
REQUIREMENTS
• Must be used with an equal or greater amount of soffit ventilation.
• Minimum 3/12 roof pitch(14˚)
• Cover with standard 12"-wide ridge cap shingles.
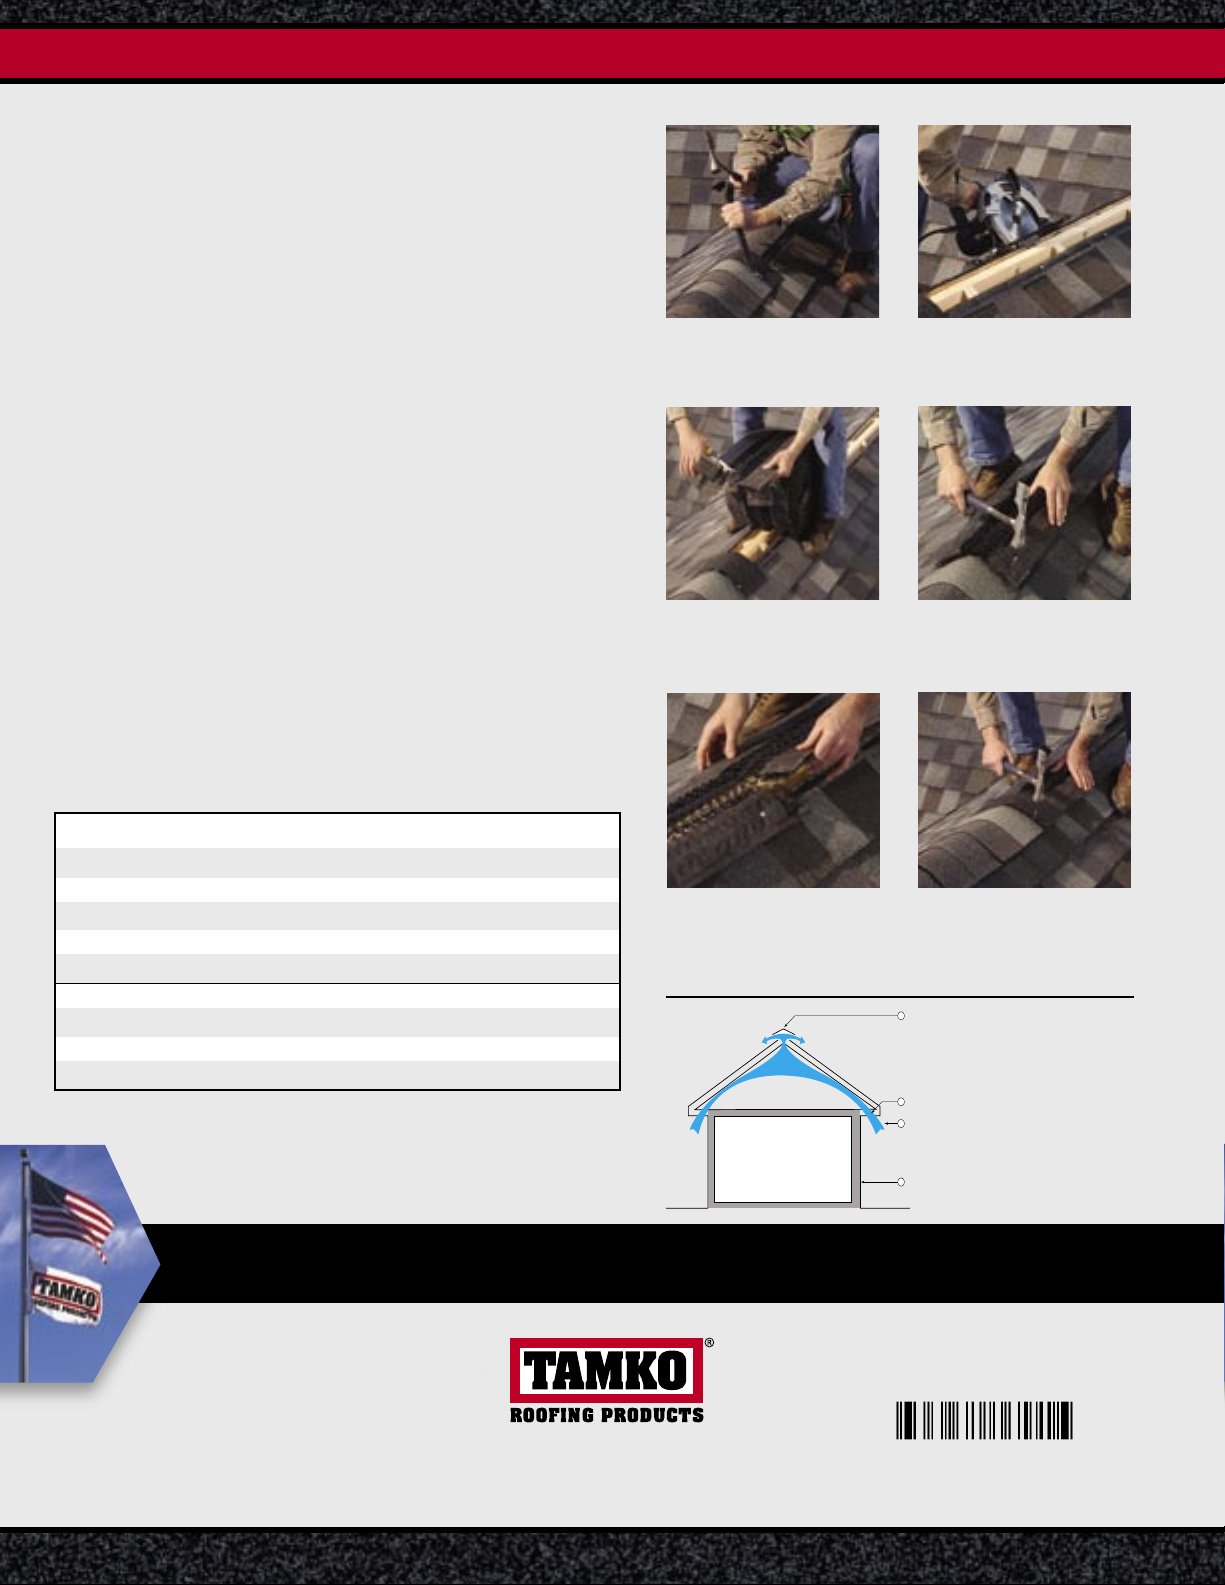
INSTALLATION INSTRUCTIONS
1
Remove ridge cap shingles along
the entire length of roof.
3
Loosen about 6" of nylon matrix
from fabric and cut out with snips.
5
2
Snap chalk line and cut a slot 31⁄2"
wide (13⁄4" on each side of ridge beam).
Allow for a closed area of sheathing
(with no slot) approximately 18" at
both ends of ridge.
4
Create end cap by folding fabric
in toward center at each side; then
up and over nylon matrix so that it
covers the end of the vent. Center
Roll Vent over slot and fasten with
nail lines up. Nail on nailing line.
6
PRODUCT DATA**
Width 101/2" 101/2"
Length 20' 50'
Weight 4.0 lb. 10.9 lb.
Thickness .9" min. .9" min.
Uses Shingles Shingles
101⁄2" x 20' 5 rolls per bag = 100' per bag
8 bags per skid = 800' per skid
101⁄2" x 50' 2 rolls per box = 100' per box
12 boxes per skid = 1,200' per skid
VISIT OUR WEB SITE AT WWW.TAMKO.COM
TAMKO® is a registered trademark of TAMKO® Roofing Products, Inc.
Roll Vent® is a trademark of Benjamin Obdyke Incorporated. Note:
TAMKO products should be applied in accordance with the directions
listed above and on the product wrapper. If conditions require special
fastening methods, obtain written recommendations from TAMKO.
*See limited warranty for details. **All values stated as nominal.
©2005 TAMKO Roofing Products, Inc.
.
P.O. Box 1404 Joplin, MO 64802
1-800-641-4691
To splice, remove nylon matrix (3")
as shown in photo #3 and fit together
by overlapping remaining fabric with
next section and fasten to roof deck.
Install ridge cap shingles with even
spacing on both sides of Roll Vent
using 21⁄2" in from cap shingle edge
on nailing line. Nails should penetrate
the sheathing a minimum of 3⁄4".
Ridge cap must overhang Roll Vent
by a 1" minimum at each gable end.
BUILDING SECTION CUTAWAY
1. Roll Vent® attic ventilation system.
2. Adequate soffit ventilation provides
proper airflow. Check local residential
building codes for minimum ventilation
requirements.
3. Airflow creates a venturi (a vacuum effect
at the peak), drawing air in through the
soffit and out the ridge vent.
4. Building insulation envelope.
997647
 Loading...