

Page 1
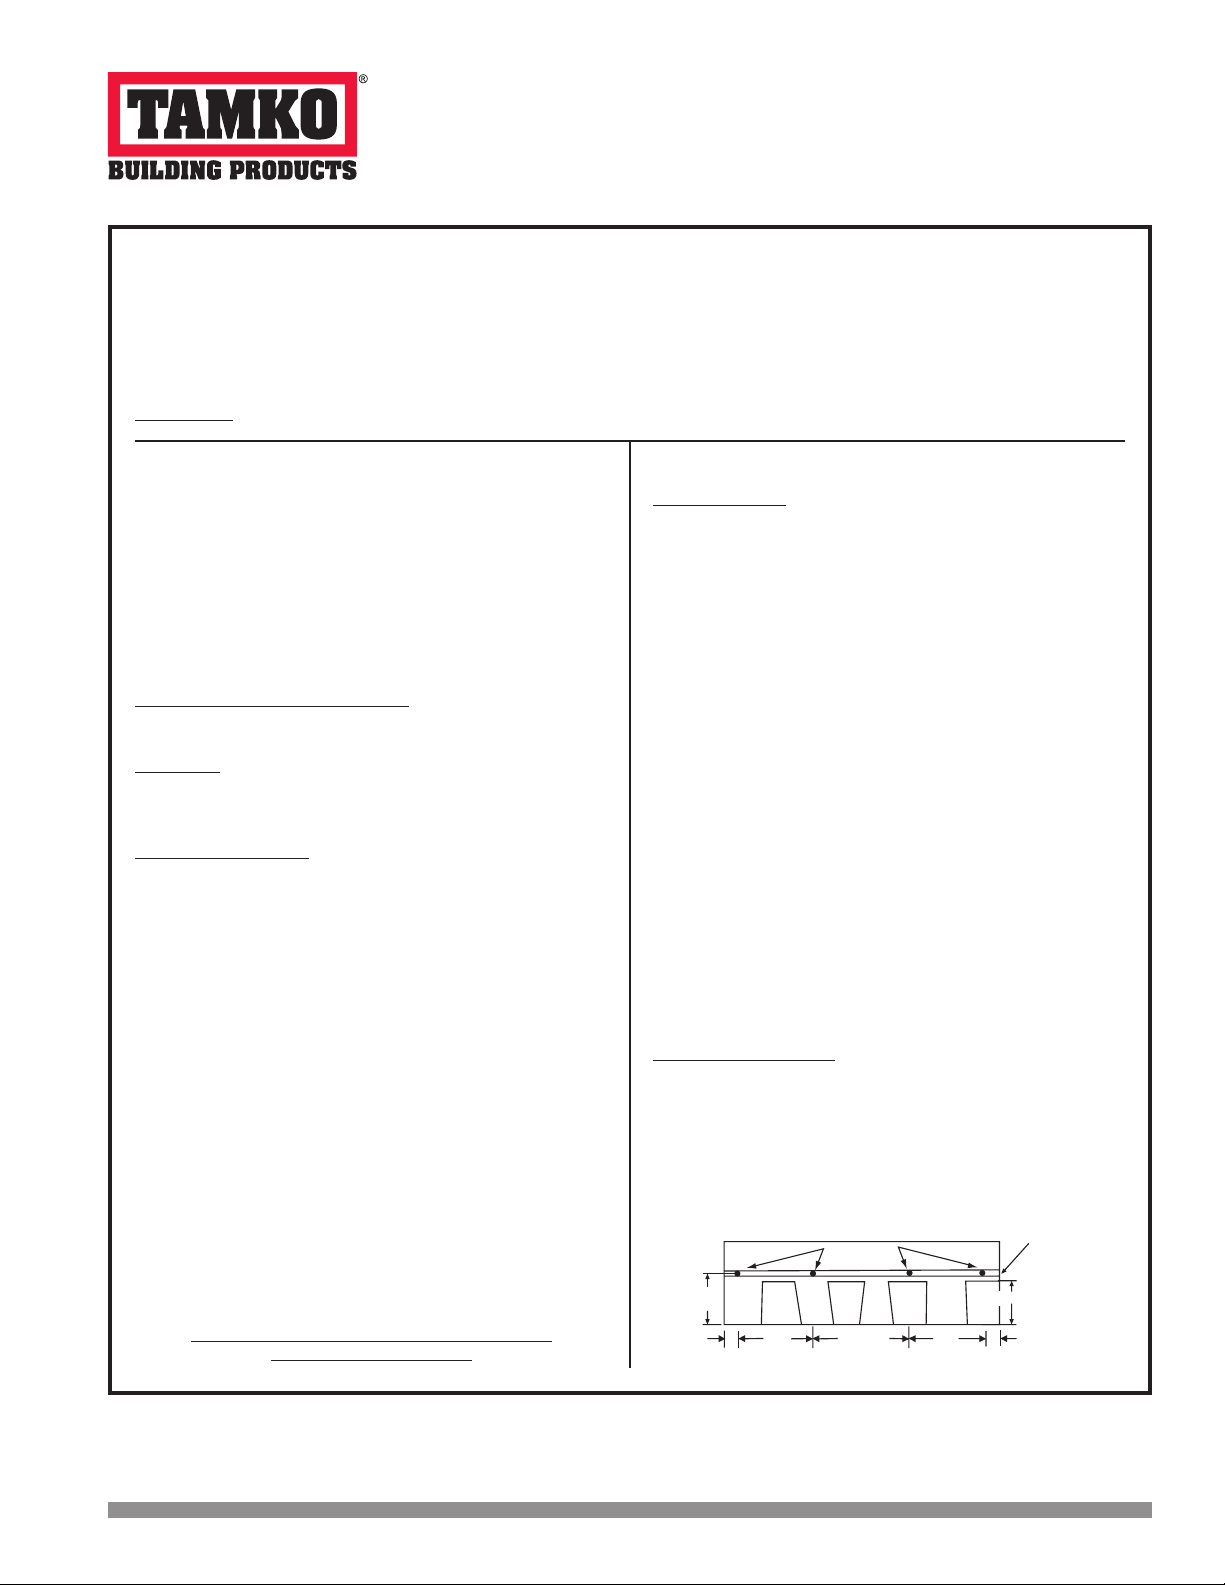
STANDARD FASTENING PATTERN
51/2"
1"
11" 12
3
/8" 11" 1"
5"
FASTENERS
NAIL ZONE/
COMMON BOND
EXPOSURE
Application Instructions for
®
HERITAGE
LAMINATED ASPHALT SHINGLES
Frederick, MD
THESE ARE THE MANUFACTURER’S APPLICATION INSTRUCTIONS FOR THE ROOFING CONDITIONS DESCRIBED.
TAMKO BUILDING PRODUCTS, INC. ASSUMES NO RESPONSIBILITY FOR LEAKS OR OTHER ROOFING DEFECTS RESULTING FROM
FAILURE TO FOLLOW THE MANUFACTURER’S INSTRUCTIONS. FAILURE TO FOLLOW THESE INSTRUCTIONS WILL ADVERSELY
AFFECT COVERAGE UNDER THE LIMITED WARRANTY. SEE THE LIMITED WARRANTY FOR DETAILS.
THIS PRODUCT IS COVERED BY A LIMITED WARRANTY, THE TERMS OF WHICH ARE PRINTED ON THE WRAPPER.
IN COLD WEATHER (BELOW 40°F), CARE MUST BE TAKEN TO AVOID DAMAGE TO THE EDGES AND CORNERS OF THE SHINGLES.
IMPORTANT: It is not necessary to remove the plastic strip from the back of the shingles.
I. ROOF DECK
These shingles are for application to roof decks consisting of
plywood or sheathing boards capable of receiving and retaining
fasteners, and to inclines of not less than 2 in. per foot. For roofs
having pitches 2 in. per foot to less than 4 in. per foot, refer to
special instructions titled “Low Slope Application”. For roofs having
pitches greater than 21 in. per foot, refer to special instructions titled
“Mansard Roof or Steep Slope Roof”. Shingles must be applied
properly. TAMKO assumes no responsibility for leaks or defects
resulting from improper application, or failure to properly prepare
the surface to be roofed over.
NEW ROOF DECK CONSTRUCTION: Roof deck must be smooth,
dry and free from warped surfaces. It is recommended that metal
drip edges be installed at eaves and rakes.
PLYWOOD: All plywood shall be exterior grade as dened by the
Engineered Wood Association. Plywood shall be a minimum of 3/8
in. thickness and applied in accordance with the recommendations
of the Engineered Wood Association.
SHEATHING BOARDS: Boards shall be well-seasoned tongueand-groove boards and not over 6 in. nominal width. Boards shall
be a 1 in. nominal minimum thickness. Boards shall be properly
spaced and nailed.
2. VENTILATION
Inadequate ventilation of attic spaces can cause accumulation of
moisture in winter months and a build up of heat in the summer.
These conditions can lead to:
1. Vapor Condensation
2. Buckling of shingles due to deck movement.
3. Rotting of wood members.
4. Premature failure of roof.
To insure adequate ventilation and circulation of air, place louvers
of sufcient size high in the gable ends and/or install continuous
ridge and soft vents. FHA minimum property standards require
one square foot of net free ventilation area to each 150 square feet
of space to be vented, or one square foot per 300 square feet if a
vapor barrier is installed on the warm side of the ceiling or if at least
one half of the ventilation is provided near the ridge. If the ventilation
openings are screened, the total area should be doubled.
3. FASTENERS
WIND CAUTION: Extreme wind velocities can damage these
shingles after application when proper sealing of the shingles does
not occur. This can especially be a problem if the shingles are
applied in cooler months or in areas on the roof that do not receive
direct sunlight. These conditions may impede the sealing of the
adhesive strips on the shingles. The inability to seal down may be
compounded by prolonged cold weather conditions and/or blowing
dust. In these situations, hand sealing of the shingles is required. To
insure immediate sealing, apply 4 quarter-sized dabs of TAM-PRO
Premium SBS Adhesive or TAMKO Tam-Seal Adhesive on the back of
the shingle 1 in. (25mm) and 13 in. (330mm) in from each side and 1
in. (25mm) up from the bottom of the shingle. Press shingle rmly into
the adhesive. For maximum wind resistance along rakes, install any
TAMKO starter shingle including sealant or cement shingles to the
underlayment and each other in a 4 in. (102mm) width of TAM-PRO
SBS Adhesive or TAMKO Tam-Seal Adhesive. Caution: Apply ONLY a
thin uniform layer of adhesive less than 1/8 in. (3mm) thick. Excessive
amounts can cause blistering of the shingles and may soften the
asphalt in certain underlayments resulting in the asphalt owing,
dripping and staining. Shingles must also be fastened according to
the fastening instructions described below.
Correct placement of the fasteners is critical to the performance
of the shingle. If the fasteners are not placed as shown in the
diagram and described below, this will result in the termination of
TAMKO’s liabilities under the Limited Warranty. TAMKO will not be
responsible for damage to shingles caused by winds in excess of
the applicable mph as stated in the Limited Warranty. See Limited
Warranty for details.
FASTENING PATTERNS: Fasteners must be placed 5-1/2 in. from
the bottom edge of the shingle, penetrating through the common
bond, and located horizontally as follows:
1) Standard Fastening Pattern. (For use on decks with slopes 2
in. per foot to 21 in. per foot.) One fastener 1 in. from each end and
one 12 in. from each end of the shingle for a total of 4 fasteners.
(See Standard Fastening Pattern illustrated below).
®
IT IS PARTICULARLY IMPORTANT TO PROVIDE
Visit Our Web Site at
tamko.com
ADEQUATE VENTILATION.
Central District 220 West 4th St., Joplin, MO 64801 800-641-4691 10/12
Northeast District 4500 Tamko Dr., Frederick, MD 21701 800-368-2055
Southeast District 2300 35th St., Tuscaloosa, AL 35401 800-228-2656
Southwest District 7910 S. Central Exp., Dallas, TX 75216 800-443-1834
Western District 5300 East 43rd Ave., Denver, CO 80216 800-530-8868
(Continued)
1
Page 2
(CONTINUED from page 1)
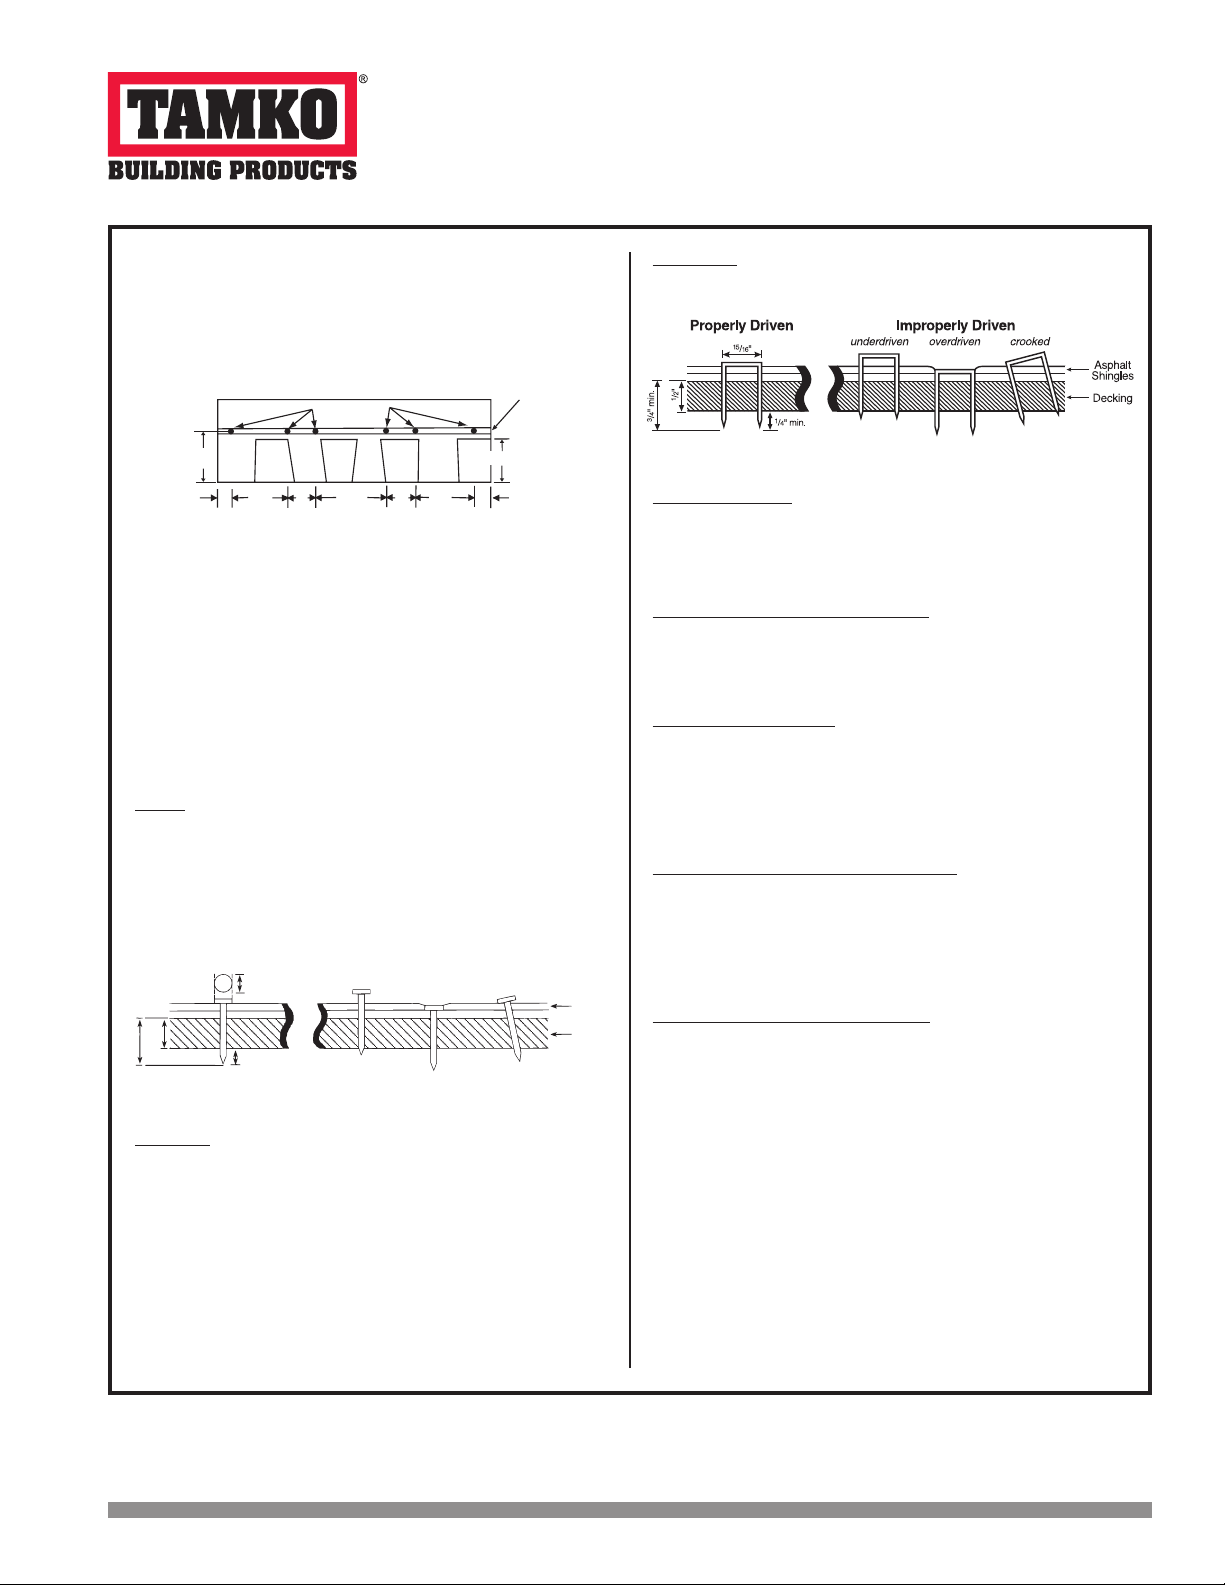
Properly Driven
3/8" min diameter
underdriven
overdriven
Improperly Driven
crooked
Asphalt
Shingles
Decking
inadequate
anchorage
too deep, cuts
into shingle
inadequate
penetration
straight, good penetration,
and flush with shingle surface
1/4" nominal
1/2"
3/4" min
51/2"
FASTENERS
1"
3"
1"
91/2"9
3
/8"
91/2"
NAIL ZONE/
COMMON BOND
5"
EXPOSURE
3"
®
HERITAGE
LAMINATED ASPHALT SHINGLES
Frederick, MD
2) Mansard Fastening Pattern. (For use on decks with slopes
greater than 21 in. per foot.) One fastener 1 in. from each end and one
fastener 10-1/2 in. from each end and one fastener 13-1/2 in. back
from each end for a total of 6 fasteners per shingle. (See Mansard
and High Wind Fastening Pattern illustrated below.)
MANSARD AND HIGH WIND FASTENING PATTERN
3) High Wind Fastening Pattern. (For High Wind Application
requirements) One fastener 1 in. from each end. One fastener 101/2 in. from each end and one fastener 13-1/2 in. from each end
for a total of six (6) fasteners per shingle. In addition to this shingle
fastening pattern requirement for High Wind Application, TAMKO
also requires the use of TAMKO starter shingles including sealant
strip at eaves and rakes. High Wind Application is offered on new
construction or complete tear-off applications only. It is not offered
for recover applications. If High Wind Application requirements are
not followed, the High Wind Application Warranty MPH, as stated on
Table I in the Limited Warranty, reverts to the Standard Application
Wind Warranty MPH limit. (See Mansard and High Wind Fastening
Pattern illustrated above.)
NAILS: TAMKO recommends the use of nails as the preferred method
of application. Standard type roong nails should be used. Nail
shanks should be made of minimum 12 gauge wire, and a minimum
head diameter of 3/8 in. Nails should be long enough to penetrate
3/4 in. into the roof deck. Where the deck is less than 3/4 in. thick,
the nails should be long enough to penetrate completely through
plywood decking and extend at least 1/8 in. through the roof deck.
Drive nail head ush with the shingle surface.
STAPLES: If staples are used in the attaching process, follow the
above instructions for placement. All staples must be driven with
pneumatic staplers. The staple must meet the following minimum
dimensional requirements. Staples must be made from a minimum
16 gauge galvanized wire. Crown width must be at least 15/16 in.
(staple crown width is measured outside the legs). Leg length should
be a minimum of 1-1/4 in. for new construction and 1-1/2 in. for
reroong thus allowing a minimum deck penetration of 3/4 in. The
crown of the staple must be parallel to the length of the shingle.
The staple crown should be driven ush with the shingle surface.
Staples that are crooked, underdriven or overdriven are considered
improperly applied.
Central District 220 West 4th St., Joplin, MO 64801 800-641-4691 10/12
Northeast District 4500 Tamko Dr., Frederick, MD 21701 800-368-2055
Southeast District 2300 35th St., Tuscaloosa, AL 35401 800-228-2656
Southwest District 7910 S. Central Exp., Dallas, TX 75216 800-443-1834
Western District 5300 East 43rd Ave., Denver, CO 80216 800-530-8868
Visit Our Web Site at
tamko.com
CAUTION: ALL FASTENERS MUST BE DRIVEN INTO THE
NAIL ZONE/COMMON BOND AS SHOWN IN THE FASTENING
PATTERN DIAGRAMS.
4. UNDERLAYMENT
UNDERLAYMENT: An underlayment must be applied over the
entire deck before the installation of TAMKO shingles. Failure to add
underlayment can cause premature failure of the shingles which is
not covered by TAMKO’s Limited Warranty.
Products which are acceptable for use as underlayment are:
Asphalt Saturated Felt Underlayments:
• TAMKO No. 15 Asphalt Saturated Organic Felt
• Any TAMKO non-perforated asphalt saturated organic felt
• A non-perforated asphalt saturated organic felt which meets
ASTM: D226, Type I or II or ASTM D4869
Specialty Underlayments:
• TAMKO Peel-N-Stick Felt
• Tam-Shield™ Synthetic Underlayment
• TAMKO TW Metal and Tile Underlayment, TW Underlayment
and Moisture Guard Plus® (additional ventilation may be
required. Contact TAMKO’s Technical Services Department
for more information.)
For Asphalt Saturated Felt Underlayments:
Apply the felt when the deck is dry. On roof decks with slopes
4 in. per foot and greater apply the felt parallel to the eaves
lapping each course of the felt over the lower course at least
2 in. Where ends join, lap the felt 4 in. If left exposed, the felt
may be adversely affected by moisture and weathering. Laying
of the felt and the shingle application must be done together.
For All Other Specialty Underlayments:
On roof decks with slopes 4 in. per foot and greater apply
the underlayment parallel to the eaves in accordance
with underlayment written application instructions. The
underlayment should not be left exposed for a longer period of
time than is specied in the underlayments written application
instructions. The nal roof covering must be installed before
the structure is exposed to adverse weather conditions, such
as wind driven rain, high wind, hail, ice storms, etc.
In areas where ice builds up along the eaves or a back-up of water
from frozen or clogged gutters is a potential problem, TAMKO’s
Moisture Guard Plus
®
, TW Metal and Tile Underlayment or TW
Underlayment (or any specialty eaves ashing product) may be
applied to eaves, rakes, ridges, valleys, around chimneys, skylights
or dormers to help prevent water damage. Contact TAMKO’s
Technical Services Department for more information.
Substitute products as shingle underlayment should not be used.
(Continued)
2
Page 3
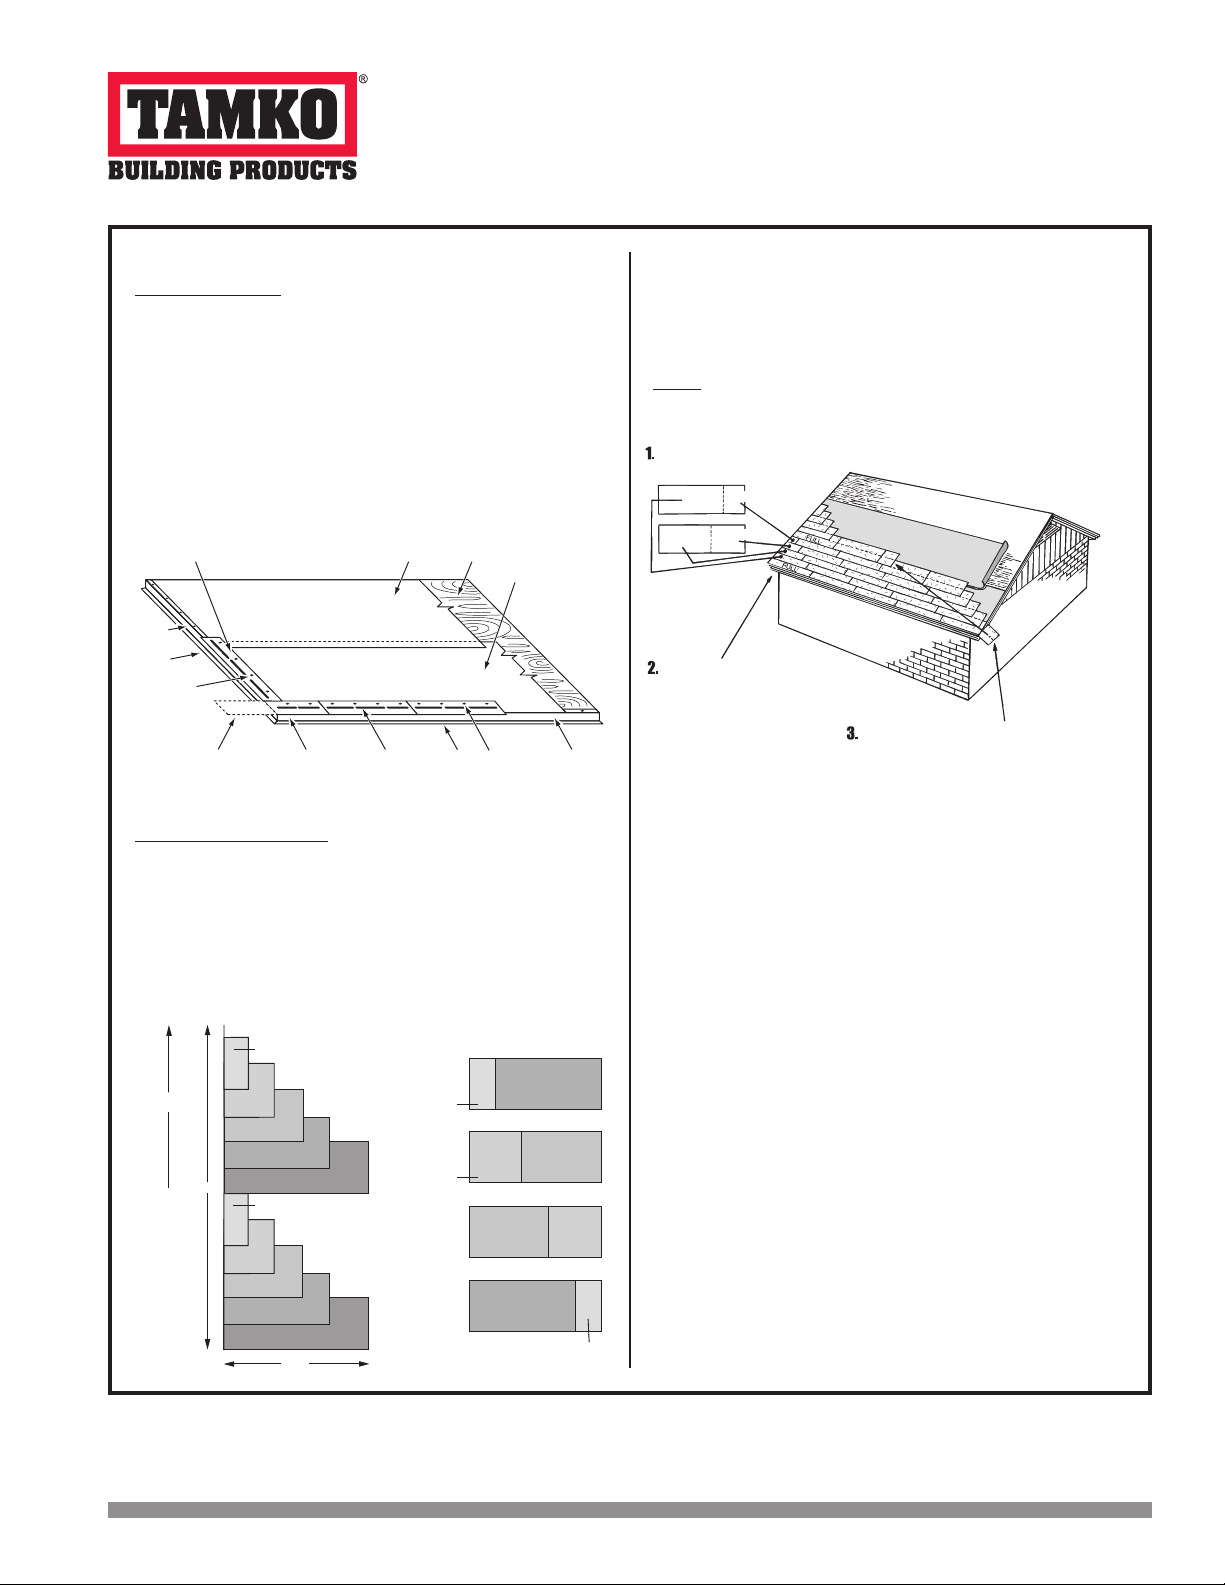
Cut your rst course shingle to make 29" and a 7 3/8"
length. Cut a second shingle to make a 22" and
a 14 3/8" length.
29"
22"
Begin application with a full length shingle
Then lay your 29", 22", 14 3/8" and 7 3/8" lengths.
As you can see, three shingles with two cuts
make ve courses.
Continue working your way across the roof. When you make your
nal cut at the roof’s edge, ip any pieces that are 8" or longer
back onto the roof. These pieces can be worked in anywhere without
creating zippers or color variations.
NOTE: Do not align joints of shingle courses when working in
cut pieces. Joints should be no closer than 4" from one another.
7 3/8"
14 3/8"
14-3/8"
22"
29"
Full
rake
repeat
courses
5th course
4th course
3rd course
2nd course
1st course
eave
14-3/8"
22"
29"
Full
22"
29"
14-3/8"
14-3/8"
7-3/8"
7-3/8"
22"
29"
7-3/8"
7-3/8"
(CONTINUED from page 2)
®
HERITAGE
LAMINATED ASPHALT SHINGLES
Frederick, MD
5. APPLICATION INSTRUCTIONS
STARTER COURSE: A starter course may consist of TAMKO Shingle
Starter, TAMKO 10-inch Starter or self-sealing 3-tab shingles. If selfsealing 3-tab shingles are used, remove the exposed tab portion
and install with the factory applied adhesive adjacent to the eaves.
Attach the starter course with approved fasteners along a line
parallel to and 3 in. to 4 in. above the eaves edge. The starter course
should overhang both the eaves and rake edges 1/4 in. to 3/8 in. If
a roll roong is used, seal down the shingles in the rst course by
applying TAM-PRO SBS Adhesive or TAMKO Tam-Seal Adhesive
in four spots equally spaced to the surface of the starter strip and
press the shingle down on the spots of adhesive. Adhesive should
be used sparingly, as excessive amounts may cause blistering.
For maximum wind resistance along rakes, install
any TAMKO starter shingle including sealant strip
Drip
edge
Rake
Fasteners
located 3" to 4"
from rake edge
Start first strip with 1/2 shingle
removed, then follow with full
strips in order to offset with the
first shingle course.
Starter strips
overhang eaves
and rakes
1/4" to 3/8"
Underlayment Deck
Self-sealing
adhesive positioned
along eaves
or rake edge
Eave
Eave flashing or
underlayment
Fasteners
located 3" to 4"
from eave edge
Drip edge
SHINGLE APPLICATION: Start the rst course with a full size
shingle and overhang the rake edge 1/4 in. Cut 7-3/8 in. from a full
shingle to form a shingle 29 in. long. Use this to start the second
course (see diagram below). Cut a 22 in. long shingle to start the
third course. Use the remaining 14-3/8 in. piece of shingle to start
the fourth course and use the remaining 7-3/8 in. piece to begin the
fth course. Continue up the rake in as many rows as necessary
using the same formula as outlined above.
The butt of the shingle should be aligned with the top edge of the
sawtooth of the underlying shingle for a 5 in. exposure (see shingle
application drawing illustrated on this panel). When you make your
nal cut at the roof’s edge, ip any pieces that are 8 in. or longer
back onto the roof. These pieces can be worked in anywhere without
creating zippers or color variations.
NOTE: Do not align joints of shingle courses when working in cut
pieces. Joints should be no closer than 4 in. from one another.
6. LOW SLOPE APPLICATION
On pitches 2 in. per foot to 4 in. per foot cover the deck with two
layers of underlayment. Begin by applying the underlayment in a
1/2-sheet width along the eaves and overhanging the drip edge
by 1/4 to 3/4 in. Place a full-sheet width over the 1/2-sheet width
starter piece, completely overlapping it. All succeeding courses will
be positioned to overlap the preceding course by 1/2-sheet width. If
winter temperatures average 25°F or less, thoroughly cement the laps
of the entire underlayment to each other with TAM-PRO or TAMKO
Plastic Roof Cement from eaves and rakes to a point of a least 24 in.
inside the interior wall line of the building. As an alternative, TAMKO’s
Moisture Guard Plus
®
self-adhering waterproong underlayment may
be used in lieu of the cemented felts.
Visit Our Web Site at
tamko.com
7. MANSARD ROOF OR STEEP SLOPE ROOF
If the slope exceeds 21 in. per foot (60˚), each shingle must be
sealed with TAM-PRO SBS Adhesive or TAMKO Tam-Seal Adhesive
immediately upon installation. Quarter-sized dabs of cement must
be applied to shingles with a 5 in. exposure, use 6 fasteners per
shingle. See Section 3 for the Mansard Fastening Pattern.
(Continued)
Central District 220 West 4th St., Joplin, MO 64801 800-641-4691 10/12
Northeast District 4500 Tamko Dr., Frederick, MD 21701 800-368-2055
Southeast District 2300 35th St., Tuscaloosa, AL 35401 800-228-2656
Southwest District 7910 S. Central Exp., Dallas, TX 75216 800-443-1834
Western District 5300 East 43rd Ave., Denver, CO 80216 800-530-8868
3
Page 4
(CONTINUED from page 3)
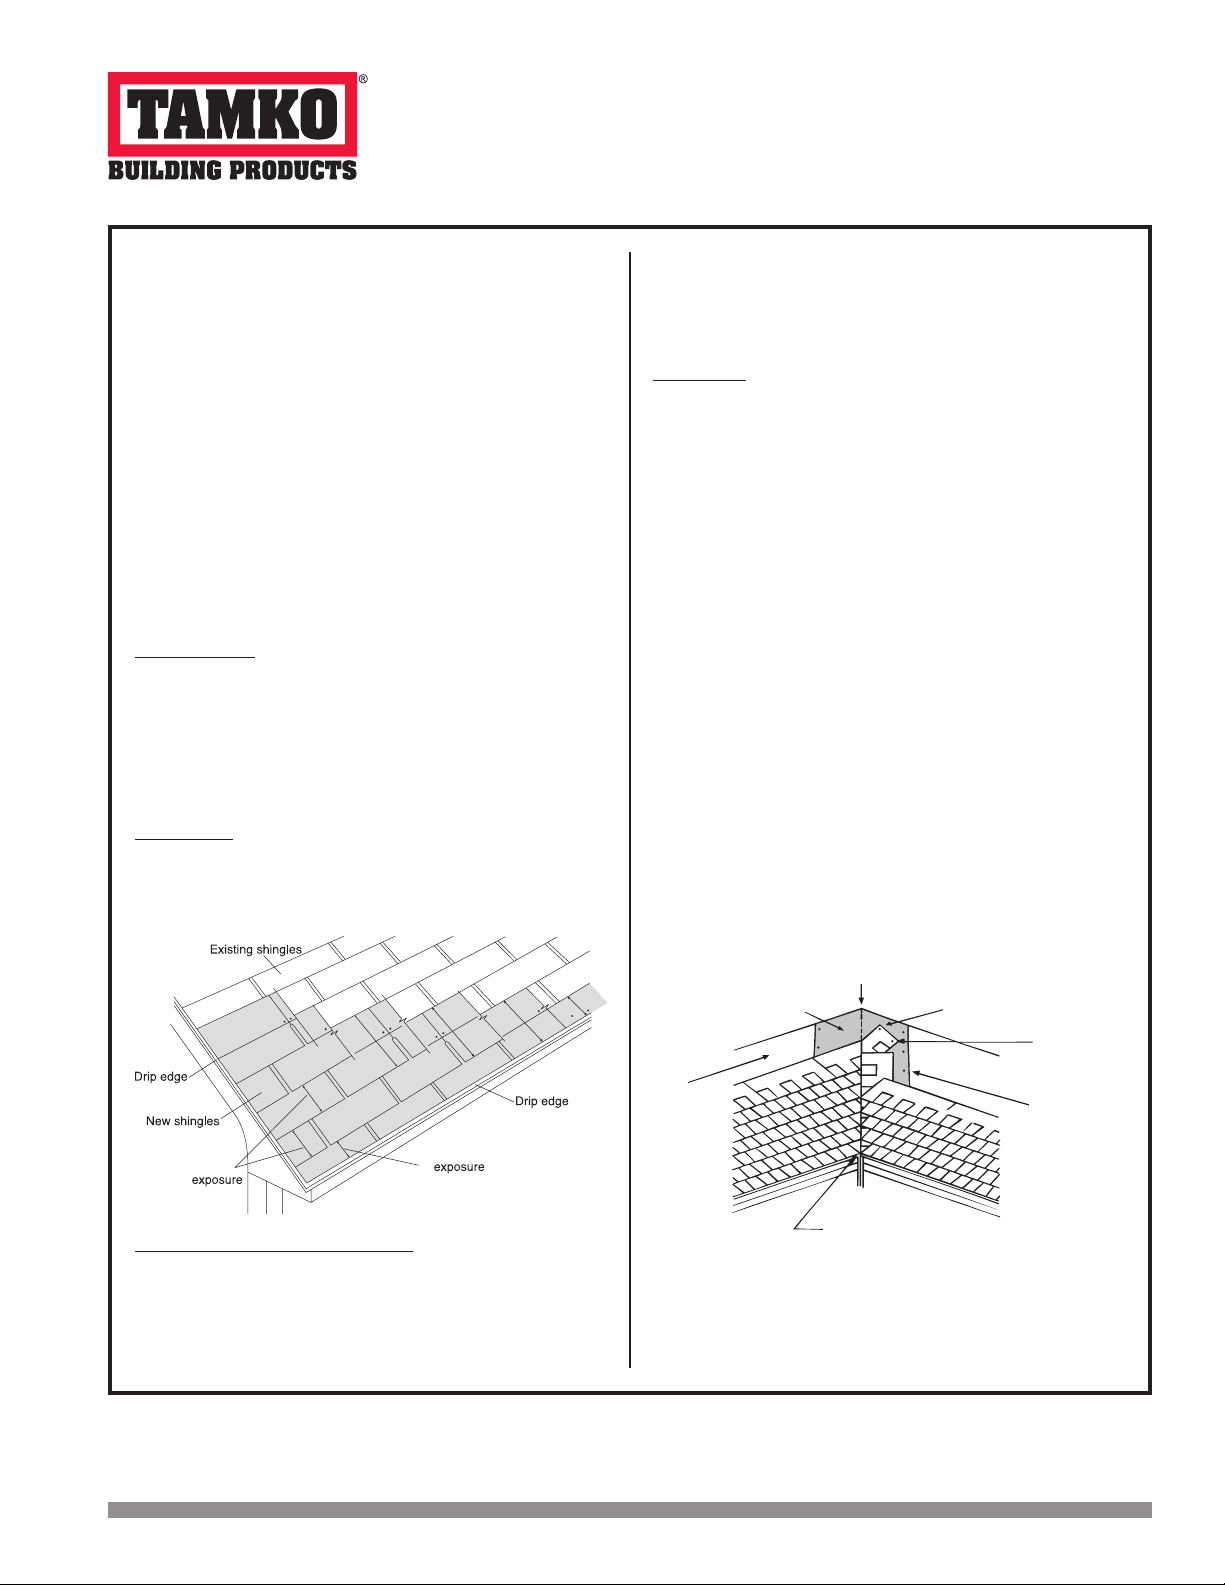
No fasteners within
6" of centerline
Extend end shingle
12"–18" beyond
valley centerline
Extra nail in
end of shingle
Valley centerline
Underlayment
Minimum 36" wide sheet
of Nail Fast, Moisture
Guard Plus or 50 lb.
or heavier roll roong
Place tip of shingle on the edge of
the vertical shingle, 2 inches back
from valley centerline and covering
the vertical shingle.
®
HERITAGE
LAMINATED ASPHALT SHINGLES
Frederick, MD
8. RE-ROOFING
Before re-roong, be certain to inspect the roof decks. All plywood
shall meet the requirements listed in Section 1.
Nail down or remove curled or broken shingles from the existing
roof. Replace all missing shingles with new ones to provide a smooth
base. Shingles that are buckled usually indicate warped decking
or protruding nails. Hammer down all protruding nails or remove
them and refasten in a new location. Remove all drip edge metal
and replace with new.
If re-roong over an existing roof where new ashing is required
to protect against ice dams (freeze/thaw cycle of water and/or
the backup of water in frozen or clogged gutters), remove the old
roong to a point at least 24 in. beyond the interior wall line and
apply TAMKO’s Moisture Guard Plus
®
waterproong underlayment.
Contact TAMKO’s Technical Services Department for more
information.
The nesting procedure described below is the preferred method
for re-roong over square tab strip shingles with a 5 in. exposure.
Starter Course: Begin by cutting shingles into 5 × 36-3/8 inch
strips. This is done by removing the 5 in. tabs from the bottom and
approximately 2 in. from the top of the shingles so that the remaining
portion is the same width as the exposure of the old shingles. Apply
the starter piece so that the self-sealing adhesive lies along the
eaves and is even with the existing roof. The starter strip should be
wide enough to overhang the eaves and carry water into the gutter.
Remove 3 in. from the length of the rst starter shingle to ensure
that the joints from the old roof do not align with the new.
First Course: Cut off approximately 2 in. from the bottom edge of
the shingles so that the shingles t beneath the existing third course
and align with the edge of the starter strip. Start the rst course with
a full 36 in. long shingle and fasten according to the instructions
printed in Section 3.
9. VALLEY APPLICATION
Over the shingle underlayment, center a minimum 36 in. wide sheet
of TAMKO Nail-Fast
®
, Moisture Guard Plus® or a minimum 50 lb. roll
roong in the valley. Nail the underlayment only where necessary to
hold it in place and then only nail the outside edges.
IMPORTANT: PRIOR TO INSTALLATION WARM SHINGLES TO
PREVENT DAMAGE WHICH CAN OCCUR WHILE BENDING
SHINGLES TO FORM VALLEY.
After valley ashing is in place:
• Applythe rstcourse ofshingles alongthe eavesof oneof
the intersecting roof planes and across the valley.
Note: For proper ow of water over the trimmed shingle,
always start applying the shingles on the roof plane that has
the lower slope or less height.
• Extendtheendshingleatleast12in.ontotheadjoiningroof.
Apply succeeding courses in the same manner, extending
them across the valley and onto the adjoining roof.
• Presstheshinglestightlyintothevalley.
• Usenormalshinglefasteningmethods.
Note: No fastener should be within 6 in. of the valley centerline,
and two fasteners should be placed at the end of each shingle
crossing the valley.
• Totheadjoiningroofplane,applyonerowofshinglesvertically
facing the valley and 2 in. back from the valley centerline.
Note: For a neater installation, snap a chalkline over the
shingles for guidance.
• Tocomplete thevalley,apply shingleson theadjoining roof
plane by positioning the tip of the rst shingle of each row at
the 2 in. point from the centerline where the edge of the vertical
shingle has been applied, covering the vertical shingle.
10"
12"
5"
12"
3"
5"
Second and Succeeding Courses: According to the off-set
application method you choose to use, remove the appropriate
length from the rake end of the rst shingle in each succeeding
course. Place the top edge of the new shingle against the butt edge
of the old shingles in the courses above. The full width shingle used
on the second course will reduce the exposure of the rst course to
3 in. The remaining courses will automatically have a 5 in. exposure.
Visit Our Web Site at
tamko.com
Central District 220 West 4th St., Joplin, MO 64801 800-641-4691 10/12
Northeast District 4500 Tamko Dr., Frederick, MD 21701 800-368-2055
Southeast District 2300 35th St., Tuscaloosa, AL 35401 800-228-2656
Southwest District 7910 S. Central Exp., Dallas, TX 75216 800-443-1834
Western District 5300 East 43rd Ave., Denver, CO 80216 800-530-8868
FOR ALTERNATE VALLEY APPLICATION METHODS, PLEASE
CONTACT TAMKO’S TECHNICAL SERVICES DEPARTMENT AT
800-641-4691.
(Continued)
4
Page 5
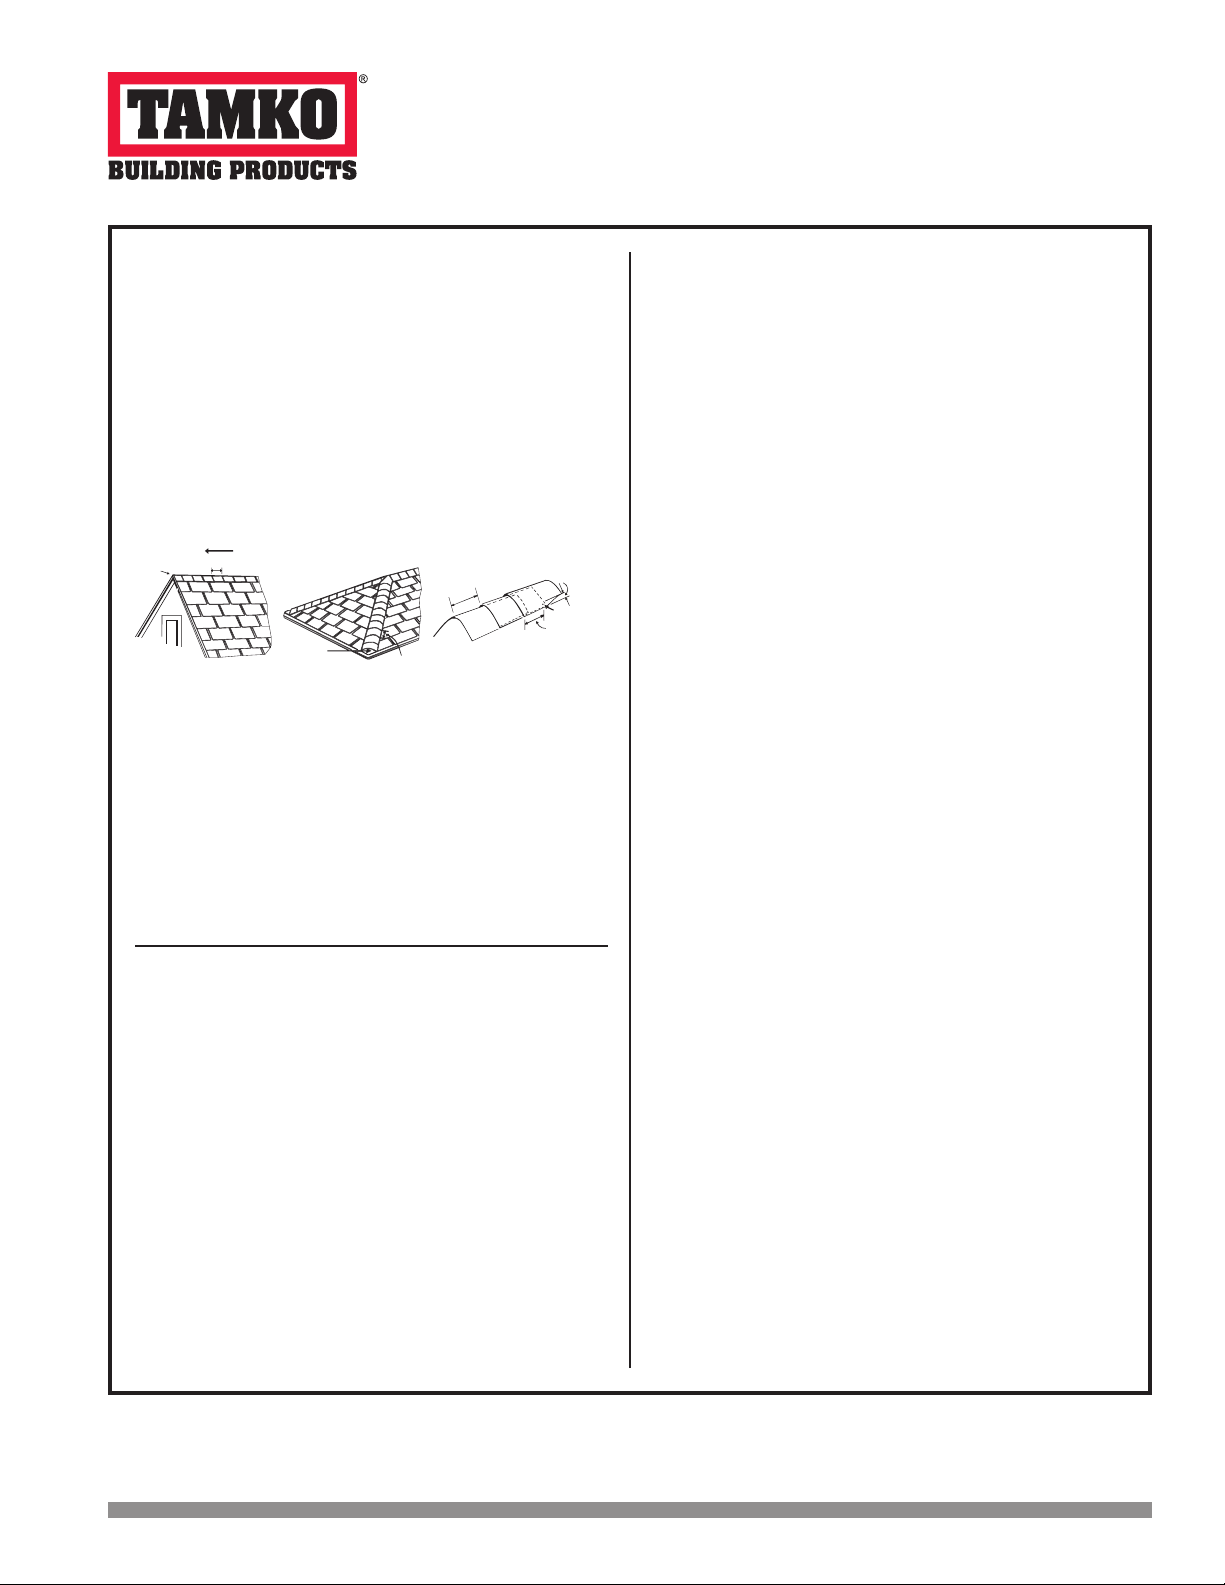
Start
here
5-1/8" exposure
Direction of prevailing wind
Start
here
5-1/8" exposure
Fastener
5-5/8"
1"
5-1/8"
(CONTINUED from page 4)
HERITAGE
LAMINATED ASPHALT SHINGLES
Frederick, MD
10. HIP AND RIDGE FASTENING DETAIL
Apply the shingles with a 5-1/8 in. exposure beginning at the bottom
of the hip or from the end of the ridge opposite the direction of the
prevailing winds. Secure each shingle with one fastener on each side,
5-1/2 in. back from the exposed end and 1 in. up from the edge.
TAMKO recommends the use of TAMKO Hip & Ridge shingle
products. Where matching colors are available, it is acceptable to
use TAMKO’s Elite Glass-Seal shingles cut down to 12 in. pieces.
Fasteners should be 1/4 in. longer than the one used for shingles
IMPORTANT: PRIOR TO INSTALLATION, CARE NEEDS TO BE
TAKEN TO PREVENT DAMAGE WHICH CAN OCCUR WHILE
BENDING SHINGLE IN COLD WEATHER.
®
THESE ARE THE MANUFACTURER’S APPLICATION
INSTRUCTIONS FOR THE ROOFING CONDITIONS
DESCRIBED. TAMKO BUILDING PRODUCTS, INC. ASSUMES
NO RESPONSIBILITY FOR LEAKS OR OTHER ROOFING
DEFECTS RESULTING FROM FAILURE TO FOLLOW THE
MANUFACTURER’S INSTRUCTIONS. FAILURE TO FOLLOW
THESE INSTRUCTIONS WILL ADVERSELY AFFECT COVERAGE
UNDER THE LIMITED WARRANTY. SEE THE LIMITED
WARRANTY FOR DETAILS. IF YOU HAVE ANY QUESTIONS
REGARDING THESE APPLICATION INSTRUCTIONS, PLEASE
CONTACT TAMKO’S TECHNICAL SERVICES DEPARTMENT AT
800-641-4691.
TAMKO®, Moisture Guard Plus®, Nail Fast®, TAM-PRO® and Heritage® are registered
trademarks of TAMKO Building Products, Inc.
Information included in these application instructions was current at time of printing. To
obtain a copy of the most current version of these application instructions, visit us online
at tamko.com or call us at 800-641-4691.
Visit Our Web Site at
tamko.com
Central District 220 West 4th St., Joplin, MO 64801 800-641-4691 10/12
Northeast District 4500 Tamko Dr., Frederick, MD 21701 800-368-2055
Southeast District 2300 35th St., Tuscaloosa, AL 35401 800-228-2656
Southwest District 7910 S. Central Exp., Dallas, TX 75216 800-443-1834
Western District 5300 East 43rd Ave., Denver, CO 80216 800-530-8868
5
 Loading...