

TAMKO GABLE MOUNT User Manual
Application Instructions for
GABLE MOUNT
TAMKO SOLAR ATTIC VENT
MODEL 31001283
THESE ARE THE MANUFACTURER’S APPLICATION INSTRUCTIONS FOR THE ROOFING CONDITIONS DESCRIBED.
TAMKO BUILDING PRODUCTS, INC. ASSUMES NO RESPONSIBILITY FOR LEAKS OR OTHER ROOFING PROBLEMS RESULTING
FROM FAILURE TO FOLLOW THE MANUFACTURER’S INSTRUCTIONS.
This product carries a Six (6) Year Limited Material Warranty on all parts except the fan motor which carries a Two (2) Year Limited
Warranty. See Limited Warranty section of this document for details. To obtain an additional copy of TAMKO’s Limited Warranty,
visit us online at tamko.com of call us at 800-641-4691. The obligations contained in the Limited Warranty are expressed in lieu of all
other obligations, guarantees, warranties, expressed or implied, including any implied warranties of merchantability or fitness for a
particular purpose, and other obligations of liability on the part of TAMKO.
IN COLD WEATHER (BELOW 40°F), CARE MUST BE TAKEN TO AVOID DAMAGE TO THE EDGES AND CORNERS OF THE SHINGLES.
This product has been designed to ventilate an area of up to 1,600 sq. ft.* of attic floor space. For larger areas, multiple ventilators will be
necessary. The number of ventilators required will vary depending on roof slope, attic configuration and sq. ft. of open air inlets. For the
ventilation requirements of your building, please contact an architect or building professional.
WARNING
TO REDUCE THE RISK OF FIRE, ELECTRIC SHOCK, OR INJURY
TO PERSONS, OBSERVE THE FOLLOWING:
1. Use this unit only in the manner intended by the manufacturer.
If you have any questions, contact TAMKO’s Technical Systems
Department at 1-800-641-4691.
2. Before servicing or cleaning unit, disable the ventilator by
covering the solar panel with cardboard taping it to the unit to
prevent motor from running. Then disconnect the wires from
the motor terminals (note wire locations before disconnecting
so wires may be re-connected in the proper location).
3. Installation work must be done by a qualified person(s) in
accordance with all applicable codes and standards, including
fire-rated construction codes and standards.
4. If removing an existing 120 VAC powered attic ventilator, use
only a qualified person(s) to remove any electrical wiring in
accordance with all applicable codes and standards.
5. When cutting or drilling into wall or ceiling, do not damage
electrical wiring and other hidden utilities.
6. Stay away from all power lines.
TOOLS AND MATERIALS REQUIRED
◊ Safety Glasses and Hearing Protection
◊ Slotted Screwdriver
◊ Drill
◊ 1/4" Drill Bit
◊ Sabre Saw or Keyhole Saw
◊ Saw
◊ Hammer
◊ Ruler/ Tape Measure
◊ Pencil, Marker or Scribe
◊ Utility Knife
◊ TAMKO’s TAM-PRO SBS Adhesive or
TAMKO TAM-SEAL Adhesive
◊ Galvanized Roofing Nails (1-3/4" in.)
CAUTION
DO NOT REMOVE CARDBOARD UNTIL INSTALLATION IS
COMPLETED.
1. For general ventilating use only. Do not use to exhaust
hazardous or explosive materials or vapors.
2. To avoid motor bearing damage and noisy and/or unbalanced
impellers, keep drywall spray, construction dust, etc. off the unit.
3. This unit has an unguarded impeller. Do not use in locations
readily accessible to people or animals.
4. This ventilator operates when the solar panel is exposed to sunlight.
To reduce risk of injury while installing, servicing or cleaning unit,
cover the solar panel with cardboard then disconnect the wires
from the motor terminals (note wire locations when disconnecting
so wires can be re-connected in the proper location).
5. Your attic fan installation will create a screened opening into
your attic space. During a heavy rain storm there could be a
light spray of rain into this attic space. This is a normal condition
with all attic ventilators and will not cause any damage to the
structure. Do not store any valuable articles directly under
the fan opening in the roof.
6. This ventilator is intended for side wall installation. Other
TAMKO models are available for roof applications.
7. Plea se read speci fic ati on labe l on produ ct for furthe r
information and requirements.
8. When working with asphalt shingles in cold weather (below 40°F),
take care to avoid damage to the shingle edges and corners.
9. Inadequate ventilation of attic spaces can cause accumulation
of moisture in winter months and build up of heat in the summer.
These conditions can lead to:
(i) Vapor condensation
(ii) Deterioration of insulation, wood and other construction
materials
(iii) Mold and mildew
(iv) Ice damming on the roof
To help ensure adequate ventilation and circulation of air, this
ventilator is designed with recommended open air inlet of 4.25
square feet using soffit vents with direct access to the attic.
Visit Our Web Site at
tamko.com
*1,600 sq. ft. based on 3/12 roof slope with open attic space. Contact an architect or a
building professional to determine the ventilation requirements of your building.
Central District 220 West 4th St., Joplin, MO 64801 800-641-4691
Northeast District 4500 Tamko Dr., Frederick, MD 21701 800-368-2055
Southeast District 2300 35th St., Tuscaloosa, AL 35401 800-228-2656
Southwest District 7910 S. Central Exp., Dallas, TX 75216 800-443-1834
Western District 5300 East 43rd Ave., Denver, CO 80216 800-530-8868
(Continued)
1

(CONTINUED from page 1)
GABLE MOUNT
TAMKO SOLAR ATTIC VENT
MODEL 31001283
VENTILATOR INSTALLATION
Note: This ventilator is capable of replacing an existing
120 volt powered attic ventilator. Only a qualified person should
remove any electrical wiring in accordance with local codes
and standards.
19-1/4”
16-1/8”
1. The ventilator is designed to mount behind existing louvers.
Louvers should be mounted in the center of the gable as high
as possible. For maximum efficiency, the open area of the louver
should be greater than the outlet area of the ventilator. If no
louver exists, one must be installed. Follow the manufacturer’s
recommendation for installing the louver.
CAUTION! When installing louvers or ventilator, contact a
building professional or architect to be certain you do not
remove any existing structural members without providing
alternate support members.
2. Locate the remote solar panel on your roof where the sun’s
exposure is best barring shade (trees, other buildings, etc.) at
4:00pm in the hottest month of the year. The solar panel comes
from the factory with 15 feet of wire. If the desired location of
the solar panel is greater than 15 feet away from the ventilator,
an additional 50 ft of 14 AWG (minimum) UL listed or recognized
copper wire may be used.
3. Prior to installation, we recommend setting up the ventilator and
solar panel to verify operation. Take the fan and solar panel to a
location exposed to sun. Connect the red solar panel wire to the
black (negative) motor terminal and the black solar panel wire to
the red (positive) motor terminal. Removing the cardboard cover
from the solar panel should cause the ventilator to operate.
For safe installation, re-secure cardboard over solar panel (for
safety), disconnect wire from motor terminals and proceed
to installation instructions outlined below. Once installed,
reconnect the wires as stated above.
2” MIN.
4. The ventilator can be installed between studs or placed over
a curb manufactured from 2" x 4" or 2" x 6" wood (refer to
illustration above for curb dimensions). Nail or screw the
ventilator to the wall studs or curb around perimeter of base
every 6 inches.
5. Make sure the outlet of the ventilator is properly sealed to the
exterior wall to maximize the amount of air exhausted by the
ventilator. When installing the ventilator behind louvers, seal off
any louver area not covered by the ventilator base to prevent
air leakage and recirculation.
Visit Our Web Site at
tamko.com
2
(Continued)
Central District 220 West 4th St., Joplin, MO 64801 800-641-4691
Northeast District 4500 Tamko Dr., Frederick, MD 21701 800-368-2055
Southeast District 2300 35th St., Tuscaloosa, AL 35401 800-228-2656
Southwest District 7910 S. Central Exp., Dallas, TX 75216 800-443-1834
Western District 5300 East 43rd Ave., Denver, CO 80216 800-530-8868
(CONTINUED from page 2)
GABLE MOUNT
TAMKO SOLAR ATTIC VENT
MODEL 31001283
REMOTE SOLAR PANEL INSTALLATION
6. Working from inside the attic, find the center of the selected
solar panel location identified in step 2, drill a small hole in
the roof decking large enough for the solar panel wire to fit
through.
7. Working from the roof, feed the solar panel wire through the
hole into the attic.
8. Run a bead of silicone or roof cement around the perimeter of
the underside of the solar panel and around the wire where it
enters the roof, then secure to the roof using nails or screws.
Nail or screw all corners and perimeter of base every 6 inches.
Seal the fastener heads with silicone or roof cement.
9. From inside the attic, apply silicone around the wire where it
enters the roof.
10. Connect the red wire to the negative motor terminal and
the black wire to the positive motor terminal. Tape or tie
extra wire to prevent contact with the fan blade.
11. Remove cardboard from the solar panel and verify that the
ventilator operates.
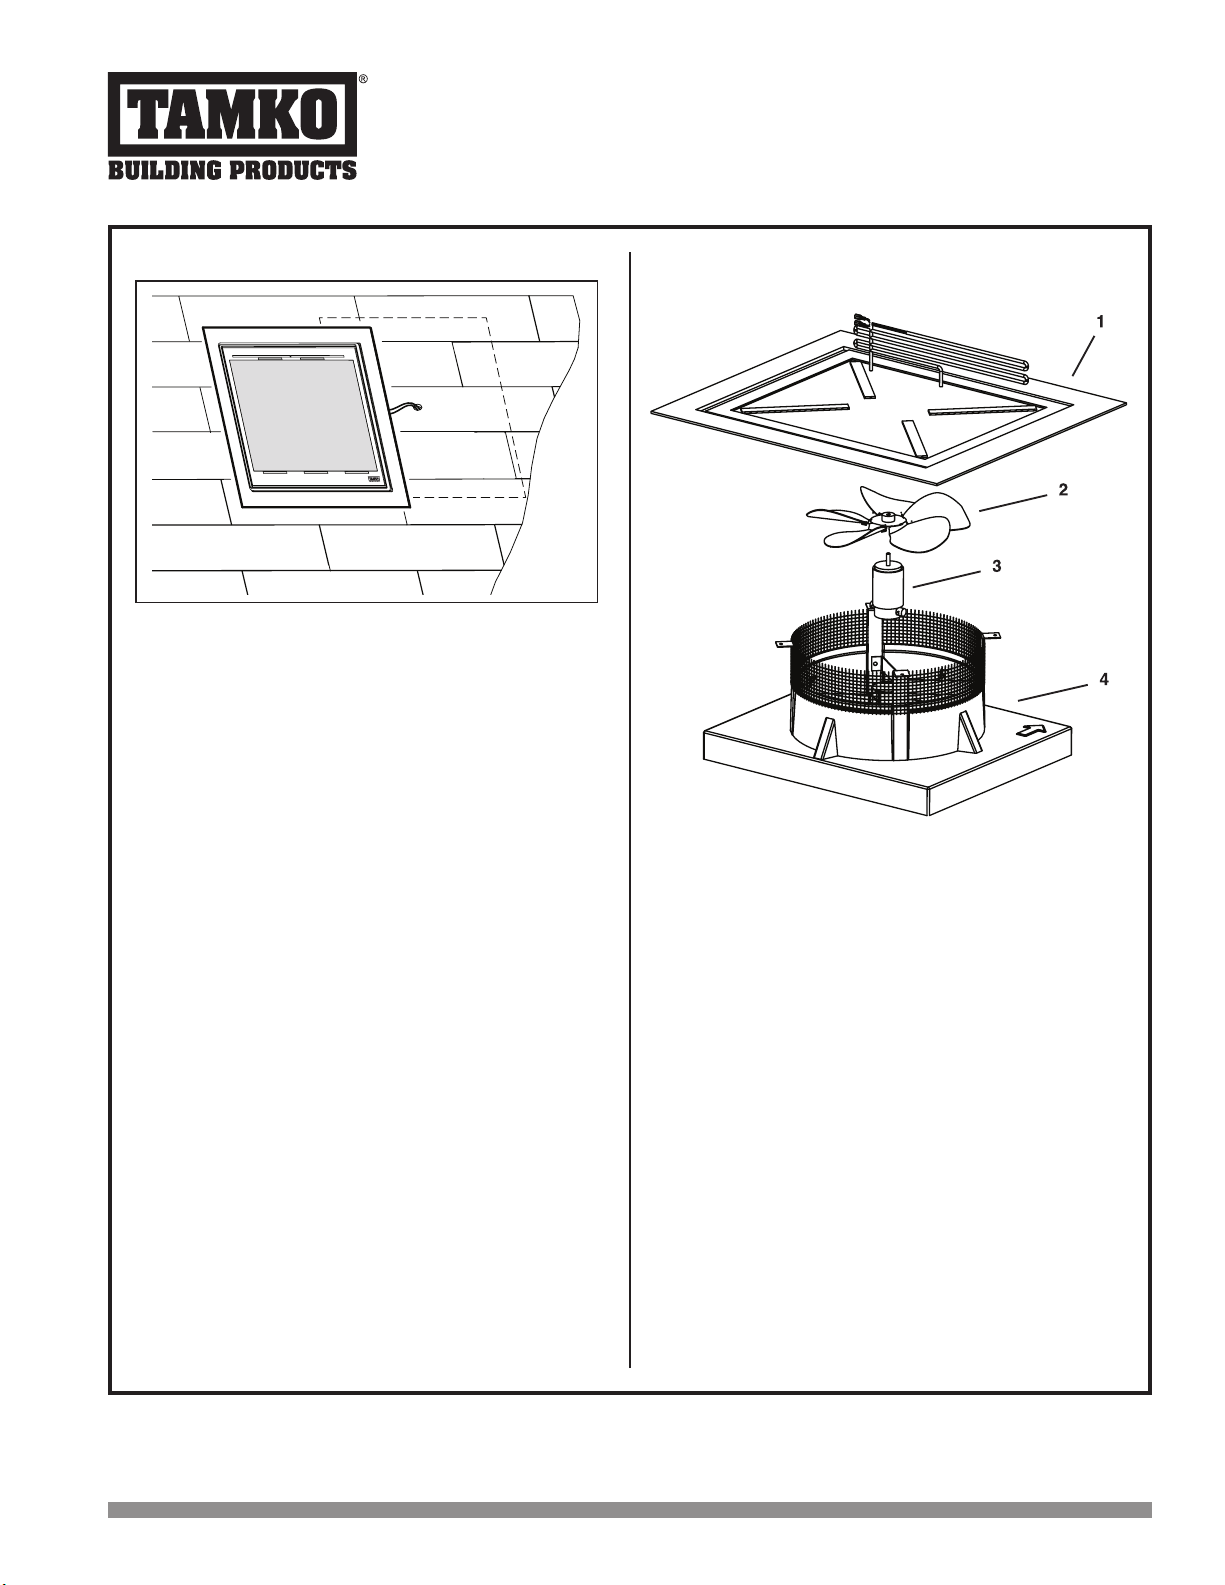
SERVICE PARTS
Model
Key
No.
1
2
3
31001283
(Black)
31001343
31001347
31001345
Description
Solar Panel Assembly
Fan Blade w/ Set Screw
Motor, DC
Visit Our Web Site at
tamko.com
4
Not
Shown
Central District 220 West 4th St., Joplin, MO 64801 800-641-4691
Northeast District 4500 Tamko Dr., Frederick, MD 21701 800-368-2055
Southeast District 2300 35th St., Tuscaloosa, AL 35401 800-228-2656
Southwest District 7910 S. Central Exp., Dallas, TX 75216 800-443-1834
Western District 5300 East 43rd Ave., Denver, CO 80216 800-530-8868
31001372
31001346
Roof Sheet Panel
Brush Kit, DC Motor
(Continued)
3
 Loading...