

Page 1

TAL NoiseMaker
User Guide
Author: Paul Hillier
Version: 1.0
Last Revision Date: 8/14/2012
Page 2

i
TAL NoiseMaker
Copyright © 2012 by Paul Hillier
Contact Information
Acknowledgements and Fair Use Disclaimer
User Guide
All rights reserved. No part of this user guide may be reproduced in any form, except
in the form of brief quotations, without permission of the author/publisher. This
content is provided "as is" with no warranty, guarantee, or promise of content
accuracy. Any use of this content is "at your own risk".
Paul Hillier
151 Exbury Road
Toronto ON M3M1R6
Email: paulkhillier@gmail.com
Website: http://paulkhillier.wordpress.com
This manual and related content is a final project for Seneca College’s Technical
Communications Graduate Certificate Program. This book may contain copyrighted
material, the use of which has not always been specifically authorized by the
copyright owner. This material is distributed without profit and has been made for
academic purposes.
For permission to reproduce the information in this document for commercial
redistribution, please email paulkhillier@gmail.com
.
Page 3

ii
Contents
1.1 Introduction
1.2 TAL NoiseMaker Specifications
1.3 Presets
1.4 Panels
1.5 Components and Elements
1.6 Legal
2.1 Windows
2.2 Macintosh
3.1 Built-in Presets
3.2 Saving and Loading Custom Presets
1 Introduction to TAL NoiseMaker ..................................................................... 1
1.2.1 Oscillators ...........................................................................................................................1
1.2.2 Master Effects ....................................................................................................................1
1.2.3 Filters ....................................................................................................................................1
1.2.4 ADSR Envelopes ...............................................................................................................2
1.2.5 LFOs ......................................................................................................................................2
1.2.6 Additional Effects ............................................................................................................2
1.2.7 Miscellaneous ....................................................................................................................2
1.5.1 Components ......................................................................................................................3
1.5.2 Elements ..............................................................................................................................4
......................................................................................................................................3
........................................................................................................................................3
..........................................................................................................................................4
...........................................................................................................................1
......................................................................................1
..............................................................................................3
2 Installation Guidelines ............................................................................................. 5
2.1.1 TAL-NoiseMaker.zip (32 bit) ........................................................................................5
2.1.2 TAL-NoiseMaker-x64.zip (64 bit) ...............................................................................5
2.2.1 TAL-NoiseMaker.vst.zip (32 bit) .................................................................................6
2.2.2 TAL-NoiseMaker.component.zip (32 bit) ...............................................................6
2.2.3 TAL-NoiseMaker-x64.component.zip (64 bit) ......................................................6
.................................................................................................................................5
................................................................................................................................6
3 Presets ..................................................................................................................................... 7
3.1.1 Overview .............................................................................................................................7
3.1.2 Preset Types .......................................................................................................................7
3.1.3 Loading Built-in Presets.................................................................................................7
3.2.1 Saving Custom Presets ...................................................................................................9
3.2.2 Loading Custom Presets ...............................................................................................9
.......................................................................................................................7
............................................................................9
Page 4

iii
4.1 The Synth 1 Panel
4.2 The Synth 2 Panel
4.3 The Envelope Editor Panel
4.4 The Control Panel
4.5 The Bottom Panel
4 TAL NoiseMaker in Detail ....................................................................................10
4.1.1 Overview .......................................................................................................................... 10
4.1.2 OSC 1 ................................................................................................................................. 10
4.1.3 OSC 2 ................................................................................................................................. 11
4.1.4 LFO 1.................................................................................................................................. 12
4.1.5 Master ................................................................................................................................ 14
4.2.1 Overview .......................................................................................................................... 15
4.2.2 LFO 2.................................................................................................................................. 16
4.2.3 Filter ................................................................................................................................... 17
4.2.4 ADSR .................................................................................................................................. 19
4.3.1 Overview .......................................................................................................................... 20
4.3.2 Drawing a Modulation Envelope ........................................................................... 21
4.3.3 Envelope Editor Settings ........................................................................................... 21
4.4.1 Overview .......................................................................................................................... 22
4.4.2 Velocity ............................................................................................................................. 22
4.4.3 Pitch Wheel ..................................................................................................................... 23
4.4.4 Master ................................................................................................................................ 23
4.4.5 Chorus ............................................................................................................................... 24
4.4.6 Reverb ............................................................................................................................... 24
4.4.7 Osc Crush ......................................................................................................................... 25
4.4.8 Delay .................................................................................................................................. 25
4.5.1 MIDI Map .......................................................................................................................... 26
4.5.2 Display ............................................................................................................................... 27
4.5.3 Load and Save Presets ................................................................................................ 27
4.5.4 PANIC ................................................................................................................................ 27
............................................................................................................. 10
............................................................................................................. 15
............................................................................................ 20
............................................................................................................. 22
............................................................................................................. 26
5 Index .......................................................................................................................................28
Page 5

TAL – Togu Audio Line ©2012 Introduction
1
1.2.1 Oscillators
1.2.2 Master Effects
1.2.3 Filters
1 Introduction to TAL NoiseMaker
1.1 Introduction
TAL NoiseMaker is a versatile subtractive virtual analog synthesizer that offers an easy-touse interface and a deep sound signature that is ideal for many modern electronic music
genres.
NoiseMaker is an improved version of TAL Elek7ro and has a completely new synth
engine and user interface. NoiseMaker includes two main oscillators, a sub oscillator,
multiple filter types, two LFOs, an envelope editor, and multiple effects.
This user guide will describe NoiseMaker’s components in detail, in order to guide the
development of unique presets that will make your music stand out from the crowd.
Let’s make some noise!
1.2 TAL NoiseMaker Specifications
• Three Oscillators
o Osc 1: +- 24 semitones, fine tune, phase control, saw, pulse, and noise
waveforms, and pulse modulation (PM) for pulse waveform
o Osc 2: +- 24 semitones, fine tune, phase control, saw, rectangle, triangle,
and sine waveforms, frequency modulation (FM) controlled by OSC 1
o Sub Osc (rectangle)
o Osc 1 & Osc 2 can sync to Sub Osc (when using saw, pulse, rectangle, and
triangle waveforms)
• Up to 6 voice polyphony
• Adjustable master tune and transpose
• Monaural and polyphonic portamento
• A ring modulator that modulates Osc 1 with Osc 2
• Self-resonating 4x oversampled filters (24 dB LP, 18 dB LP, 12 dB LP, 6 dB LP, 12
dB HP, 12 dB BP, Notch, SV 24 dB LP, SV 24 dB HP, SV 24 dB BP, No feedback
delay 24 dB LP)
• Negative and positive filter attack, decay, sustain, and release (ADSR)
Page 6

TAL NoiseMaker Specifications TAL – Togu Audio Line ©2012
2
1.2.4 ADSR Envelopes
1.2.5 LFOs
1.2.6 Additional Effects
1.2.7 Miscellaneous
• Volume ADSR envelope
• An additional routable ADSR that modulates Filter, Osc 1, Osc 2, PW, and FM
(negative and positive)
• Two LFO's with free, sync to host, and triggered by note running modes
• Modulates filter, Osc 1, Osc 2, FM, PW, LFO rate, pan, and volume
• Sine, triangle, saw, square, s&h, and noise patterns
• Positive and negative modulation
• Phase control
• Adjustable velocity dependent control over volume, filter contour, and cutoff
• Adjustable pitch wheel control over cutoff and pitch
• One pole high pass (HP) filter
• Random note detune
• Two-mode Juno chorus
• Reverb with adjustable wet/dry, size, pre-delay, and high/low cut
• Delay with tempo sync, left/right ping pong, and adjustable wet/dry, rate, and
feedback
• Adjustable filter drive
• Pre-filter stage adjustable Osc Crush
• Midi learn for all knobs
• Panic button
Page 7
TAL – Togu Audio Line ©2012 Presets
3
1.5.1 Components
1.3 Presets
NoiseMaker includes 256 built-in presets that are suitable for many electronic music
genres. See Section 3 “Presets” for more details.
1.4 Panels
NoiseMaker uses panels to display interface components. Click the title of a panel to
show/hide its associated components.
TAL NoiseMaker panels include:
• The Synth 1 Panel – LFO 1, Osc 1 and Osc 2, and Master volume and effects
• The Synth 2 Panel – LFO 2, Filter, and ADSR
• The Envelope Editor Panel – A dynamic, tempo-synced, custom envelope that
can control filter, oscillator pitch, FM, ring modulation, and master volume
• The Control Panel – Includes sliders that modify mod/pitch wheel values, and
multiple effects such as chorus, reverb, bitcrusher, delay, vintage noise, and filter
drive
• The Bottom Panel – Includes a multifunction display, a PANIC button, and
controls for MIDI map, loading, and saving presets.
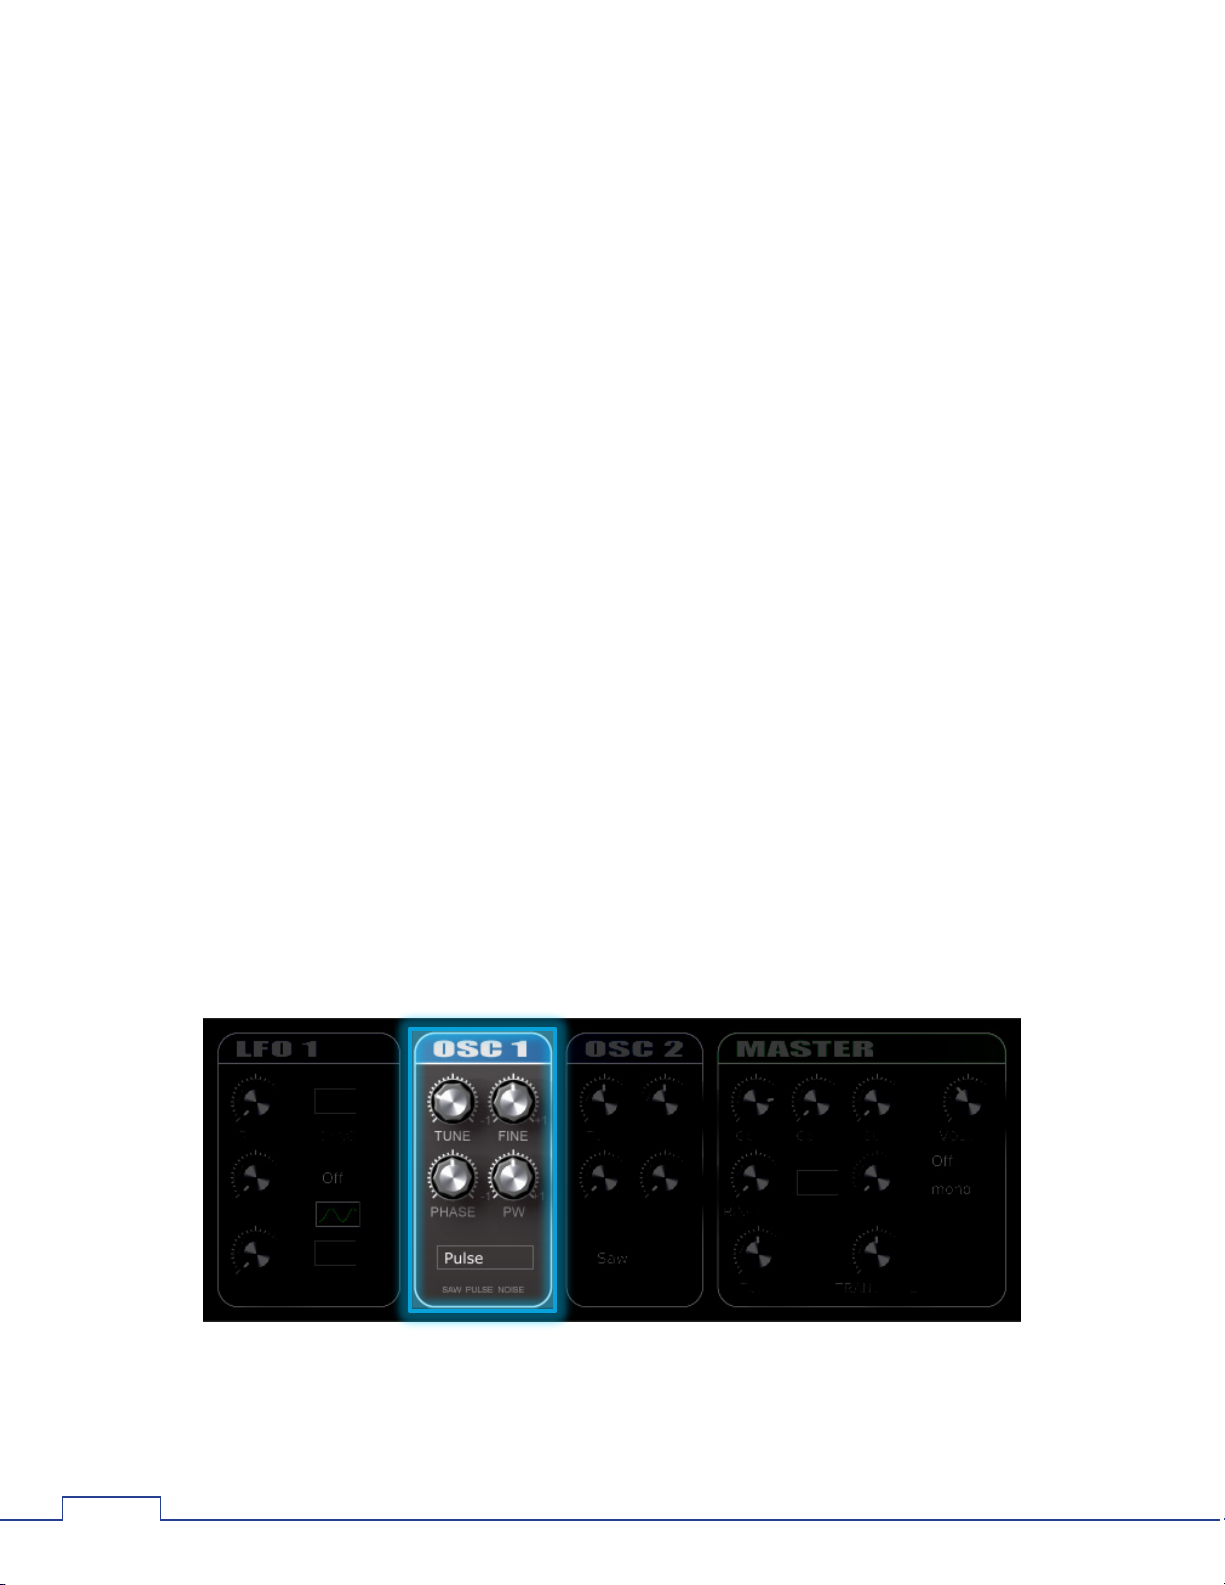
1.5 Components and Elements
Multiple components are nested within each interface panel. Components are the
building blocks that allow you to modify built-in presets or create your own sounds. In
the example below, OSC1 is the highlighted component of the Synth 1 panel.
Page 8
Legal TAL – Togu Audio Line ©2012
4
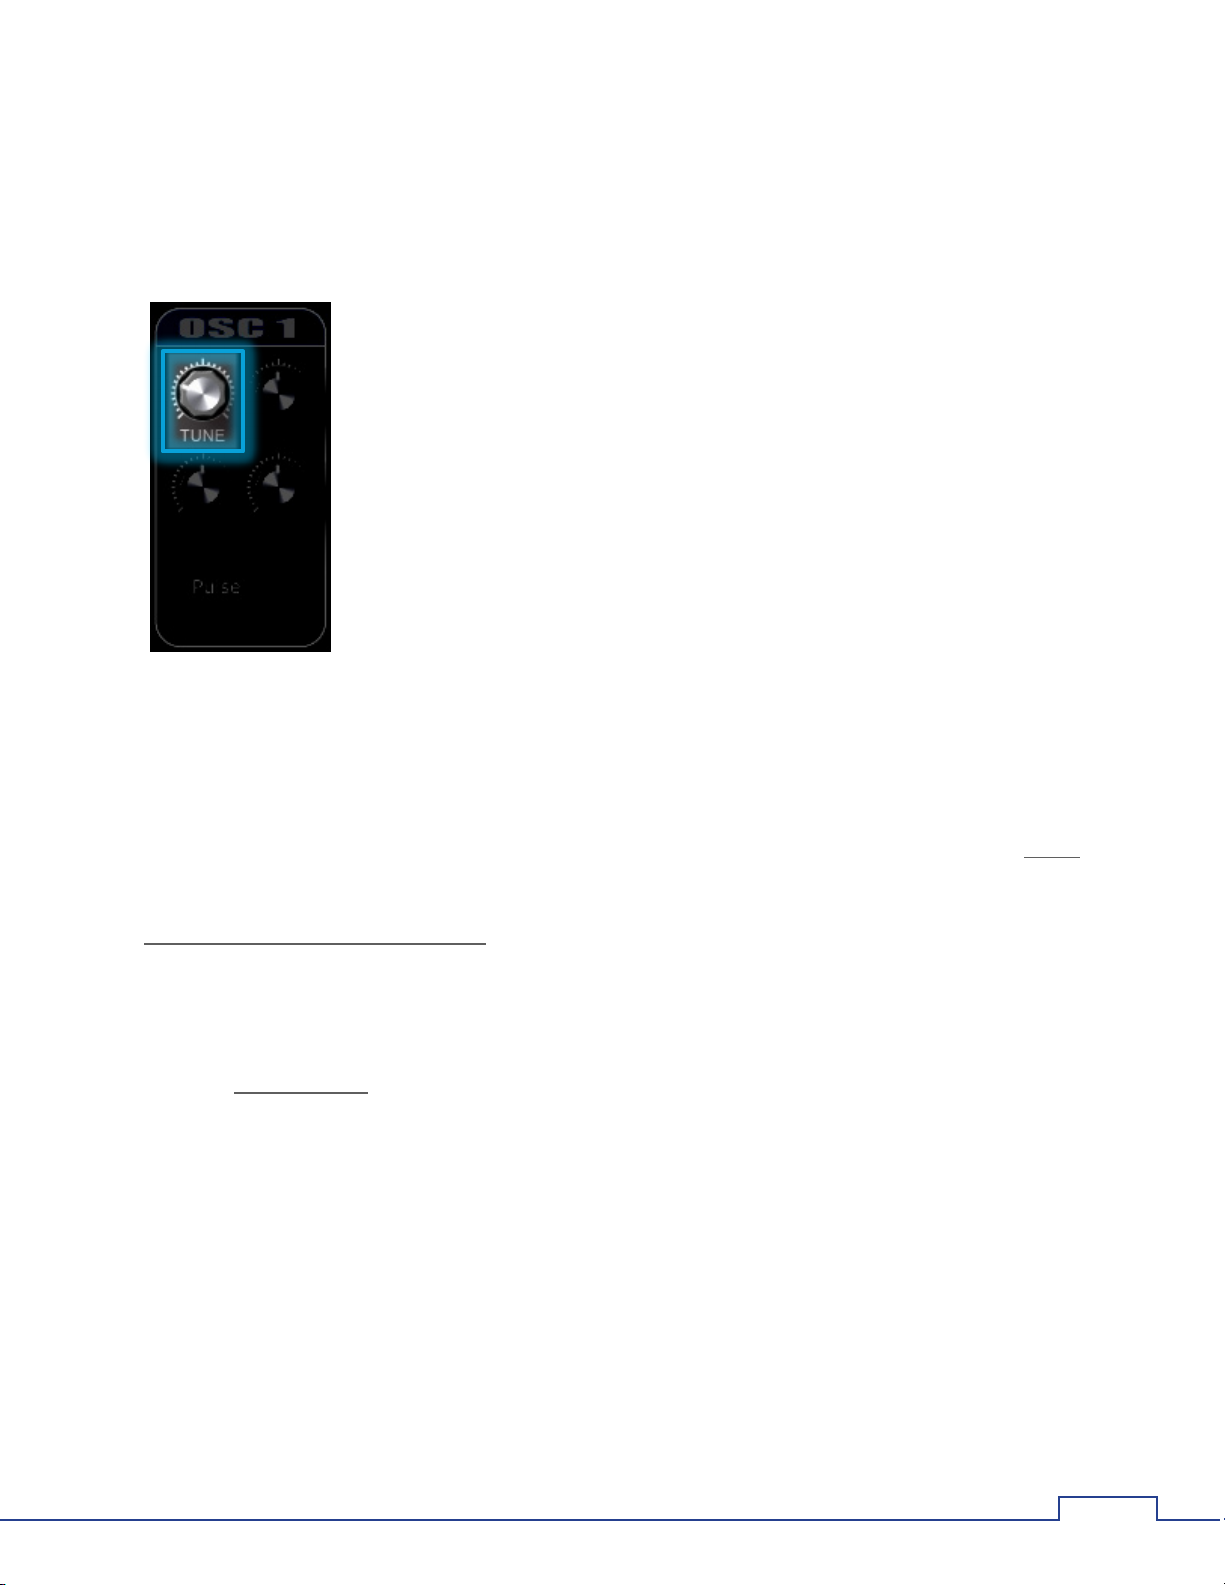
1.5.2 Elements
Tune
Elements are the knobs, sliders, buttons, etc. that can be directly manipulated using the
mouse or midi control to alter a sound in real time. In the example below, the
knob is an element of the OSC1 component.
1.6 Legal
TAL NoiseMaker is open source and may be freely distributed. Do not make any
modifications to this software or attempt to sell it.
The plugin uses the open source Jules' Utility Class Extensions (JUCE) framework. JUCE
is a comprehensive C++ class library for developing cross-platform software.
TAL NoiseMaker’s source code was released under the Gnu Public Licence, which
means it can be freely copied and distributed, and costs nothing to use in open source
applications.
The source code must be freely released if it is modified or used in any capacity. Please
contact Patrick Kunz (pkstar@gmx.ch) if you want use parts of the source code in a
commercial product.
Page 9

TAL – Togu Audio Line ©2012 Windows
5
2.1.1 TAL-NoiseMaker.zip (32 bit)
2.1.2 TAL-NoiseMaker-x64.zip (64 bit)
2 Installation Guidelines
TAL NoiseMaker can be used with 32 and 64 bit Linux, Mac OSX, and Windows
XP/Vista/7 VST hosts. It is also available as a 32 and 64 bit Mac Audio Units component.
Before installation, ensure that you have the correct zip file for your host and operating
system.
Note: If your VST host is open, you may need to re-scan the plugin directory or
restart the application after installation.
2.1 Windows
32 bit VST plugins are compatible with 32 bit and 64 bit Windows operating systems
and are supported by most VST hosts.
To install TAL NoiseMaker:
1. Open TAL-NoiseMaker.zip.
2. Copy TAL-Noisemaker.dll into the VST plugin folder of your host. The default
plugin folder for most VST hosts is C:\Program Files (x86)\VstPlugins\
64 bit VST plugins are only compatible with 64 bit Windows operating systems. Ensure
your VST host supports 64 bit plugins before installing TAL NoiseMaker.
To install TAL NoiseMaker:
1. Open TAL-NoiseMaker.zip.
2. Copy TAL-Noisemaker.dll into the VST plugin folder of your host. The default 64
bit plugin folder for most VST hosts is C:\Program Files\Vstplugins\
Page 10

Macintosh TAL – Togu Audio Line ©2012
6
2.2.1 TAL-NoiseMaker.vst.zip (32 bit)
2.2.2 TAL-NoiseMaker.component.zip (32 bit)
2.2.3 TAL-NoiseMaker-x64.component.zip (64 bit)
2.2 Macintosh
To install TAL NoiseMaker:
1. Open TAL-NoiseMaker.vst.zip.
2. Copy the TAL-Noisemaker.vst folder into the VST plugin folder of your host. The
default VST plugin folder for most hosts is /Library/Audio/Plug-Ins/VST/
To install TAL NoiseMaker:
1. Open TAL-NoiseMaker.component.zip.
2. Copy the TAL-Noisemaker.component folder into the Audio Units plugin folder of
your host. The default Audio Units plugin folder for most Audio Units hosts is
/Library/Audio/Plug-Ins/Components/
To install TAL NoiseMaker:
1. Open TAL-NoiseMaker-x64.component.zip
2. Copy the TAL-Noisemaker-x64.component folder into the Audio Units plugin
folder of your host. The default Audio Units plugin folder for most Audio Units
hosts is /Library/Audio/Plug-Ins/Components/
Page 11

TAL – Togu Audio Line ©2012 Built-in Presets
7
3.1.1 Overview
3.1.2 Preset Types
3.1.3 Loading Built-in Presets
Presets
3 Presets
3.1 Built-in Presets
TAL NoiseMaker includes 256 built-in presets. A basic single-oscillator saw wave
Juno Osc TAL)
Built-in presets are arranged according to the type of sound they produce. Preset types
include:
• Arpeggiated (ARP)
• Bass (BS)
• Chords (CH)
• Drums (DR)
• Special Effects (FX)
• Keyboards (KB)
• Leads (LD)
• Pads (PD)
Each preset name also indicates the preset’s author. For example, preset #1
Punk TAL)
to get a feel for the tonal variety that NoiseMaker offers. Preset authors (as of version
3.21) include:
is opened by default.
was created by Togu Audio Line (TAL). Try out presets from different authors
(Startup
(ARP 2050
• Togu Audio Line – Patrick Kunz
• Frank “Xenox” Neumann – Particular – Sound (FN)
• The Unshushable Coktor (TUC)
• Alexandra Sendy (AS)
The procedure for loading built-in presets depends on your VST host. Below are the
procedures for FL Studio, Ableton Live, Studio One, and Cockos REAPER.
(TAL)
FL Studio
1. Select in the step sequencer window to view the interface.
2. Click on the Fruity Wrapper menu bar, then select
3. A list of built-in presets appears. Select the preset you wish to use.
.
Page 12

Built-in Presets TAL – Togu Audio Line ©2012
8
Ableton Live
1. Click the midi track NoiseMaker is assigned to. The device editor window appears
in the bottom of the screen.
2. Click the drop-down menu.
3. A list of built-in presets appears. Select the preset you wish to use.
Studio One
1. Click on the Instrument panel and select TAL-NoiseMaker.
2. A drop-down menu appears on the lower-right. Select the preset you wish to use.
Cockos Reaper
1. Select on the virtual instrument track.
2. The FX: Track x window opens. Select VSTi: TAL NoiseMaker Plugin.
Page 13

TAL – Togu Audio Line ©2012 Saving and Loading Custom Presets
9
Load Preset
Save Preset
3.2.1 Saving Custom Presets
Save Preset
File Name
Save
3.2.2 Loading Custom Presets
Load Preset
3. Click the drop-down menu.
4. A list of built-in presets appears. Select the preset you wish to use.
3.2 Saving and Loading Custom Presets
The
buttons to save custom presets that can be shared with other NoiseMaker users.
TAL NoiseMaker does not store user presets in a default folder. Choose a folder/path
that will be easily recalled in the future.
To save a custom preset:
1. Click
2. A window opens. Navigate to the directory you wish to save the file.
3. In the
4. Press Enter or click the
To load a custom preset:
and
on the bottom panel.
text box, type a unique name for your preset.
buttons are located on the bottom panel. Use these
button.
1. Click
2. A window opens. Navigate to the directory that contains custom NoiseMaker
3. Click the *.NoiseMakerpreset file you wish to load.
presets.
on the bottom panel.
Page 14

The Synth 1 Panel TAL – Togu Audio Line ©2012
10
4.1.1 Overview
4.1.2 OSC 1
Tune
Fine
4 TAL NoiseMaker in Detail
4.1 The Synth 1 Panel
The Synth 1 panel includes an LFO, two oscillators, a ring modulator, oscillator sync,
portamento, and master volume, polyphony, and tuning controls.
Tune
The
knob adjusts oscillator frequency in increments of +/- 24 semitones.
Fine
The
knob adjusts oscillator frequency +/- 1 semitone.
Page 15

TAL – Togu Audio Line ©2012 The Synth 1 Panel
11
Phase
Pulse Width
4.1.3 OSC 2
Note: Adjusting the fine tuning of OSC 1 and OSC 2 produces a fat, aggressive
tone that stands out in a crowded mix. See preset ARP Danger Dance TUC for an
example.
Phase
The
when using the same wave type for both oscillators.
knob adjusts the phase of the selected oscillator type. This is audible only
PW (Pulse Width)
The
waveform is selected. Setting a high or low pulse width greatly reduces the waveform’s
low frequencies. See the figure below for an example.
knob adjusts the pulse width positively or negatively when the pulse
Select Waveform
Osc 1 may use Sawtooth, Pulse, or Noise waveforms. Click and select a
waveform type from the drop down menu.
Page 16

The Synth 1 Panel TAL – Togu Audio Line ©2012
12
Tune
Fine
Phase
4.1.4 LFO 1
Rate
Sync
Tune
The
knob adjusts oscillator frequency in increments of +/- 24 semitones.
Fine
The
knob adjusts oscillator frequency +/- 1 semitone.
Phase
The
when using the same wave type for both oscillators.
knob adjusts the phase of the selected oscillator type. This is audible only
FM (Frequency Modulation)
FM modulates Osc 2’s frequency up to 20x. At 20x, FM adds a tone approximately two
octaves higher than the oscillator’s actual pitch.
Select Waveform
Osc 2 may use Sawtooth, Pulse, Triangle, Sine, or Noise waveforms. Click
and select a waveform type from the drop down menu.
Rate
The
knob controls LFO modulation frequency (speed). By default, the LFO
frequency is adjusted in hertz (Hz).
Sync
When
sync with your project’s tempo.
is selected (centre of button is red), the LFO frequency is adjusted in
Page 17

TAL – Togu Audio Line ©2012 The Synth 1 Panel
13
Amount
Destination
Wave Type
Phase
Phase
Key Trig
Amount
The
positively or negatively.
knob controls the level of modulation. The LFO amount can be applied
Destination
The
Click to select the LFO destination. LFO 1 can modulate:
• Filter
• Osc 1
• Osc 2
• Osc 1 and Osc 2
• Pulse Width
• Frequency Modulation
• LFO 2 Rate
box applies the LFO to a specific element of the NoiseMaker preset.
Wave Type
The
box contains six wave types that affect modulation rate and amount.
Click and drag the mouse up/down to select the LFO wave type.
Phase
The LFO
the
oscillator.
knob adjusts the timing of the LFO in relation to the oscillators. When
knob is at +/- 100%, a tempo-synced LFO will be audibly ahead/behind the
Key Trig
The
(centre of button is red) to enable Key Trig.
box sets the LFO to retrigger itself each time a note is played. Click
Page 18

The Synth 1 Panel TAL – Togu Audio Line ©2012
14
4.1.5 Master
OSC 1
OSC 2
Sub
Volume
Ringmod
Sync
OSC 1
The
knob controls the volume of OSC 1.
OSC 2
The
knob controls the volume of OSC 2.
Sub
The
knob controls the volume of the Sub Osc. The Sub Osc produces a sine wave
that adds thickness and bass to complement Osc 1 and Osc 2. Select the preset
Flat Bass TAL
capabilities.
and adjust the Sub knob for a clear example of the sub-oscillator’s
BS Clean
Volume
The
knob controls the master volume.
Ringmod
The
At 100%, the input levels of Osc 1 and Osc 2 are multiplied such that the original
frequencies disappear totally from the output, leaving only the sum and difference
frequencies. Ring modulation is often used to simulate the sounds of tuned percussion
instruments such as bells and chimes. As demonstrated in the
preset, ring modulation can also be combined with Sync to add high-frequency “bite” to
a sound.
knob controls the amount of ring modulation applied to Osc 1 and Osc 2.
LD Ringing Lead TAL
Sync
The
button hard syncs Osc 1 and Osc 2 to the Sub Osc’s frequency. In cases where
Osc 1 and Osc 2 are detuned to different frequencies, they will play in tune, and may
Page 19

TAL – Togu Audio Line ©2012 The Synth 2 Panel
15
Porta
Voices
Tune
Transpose
4.2.1 Overview
give the impression of harmony or other unique timbres. Hard sync is possible even if
the sub-oscillator volume is zero.
Note: Sync only affects Saw, Pulse, and Triangle oscillators.
Porta
The
knob controls the speed of portamento (a gradual slide) from one note to
another. Click and select to enable portamento. Select to
enable portamento only when two notes are played at the same time.
Voices
The
polyphony from the drop-down menu. NoiseMaker supports up to six-voice polyphony.
box controls the polyphony of a preset. Click and select the desired
Tune
The
knob adjusts the pitch of all oscillators +/- 1 semitone.
Transpose
The
octave down.
knob transposes the pitch of all oscillators one/two octaves up or one
4.2 The Synth 2 Panel
The Synth 2 Panel includes an LFO, 11 Filter types, amplifier ADSR controls, and
additional Attack/Decay controls that can modulate the Filter, Osc 1, Osc 2, PW, or FM.
Page 20

The Synth 2 Panel TAL – Togu Audio Line ©2012
16
4.2.2 LFO 2
Rate
Sync
Amount
Destination
Wave Type
Rate
The
knob controls LFO modulation frequency (speed). By default, the LFO
frequency is adjusted in Hz.
Sync
When
sync with your project’s tempo.
is selected (centre of button is red), the LFO frequency is adjusted in
Amount
The
positively or negatively.
knob controls the level of modulation. The LFO amount can be applied
Destination
The
Click to select the LFO destination. LFO 2 can modulate:
• Filter
• Osc 1
• Osc 2
• Osc 1 and 2
• LFO 1 Rate
• Pan
• Volume
box applies the LFO to a specific element of the NoiseMaker preset.
Wave Type
The
Click and drag the mouse up/down to select the LFO wave type.
box contains six wave types that affect modulation rate and amount.
Page 21

TAL – Togu Audio Line ©2012 The Synth 2 Panel
17
Phase
Phase
Key Trig
4.2.3 Filter
Cutoff
Phase
The LFO
the
oscillator.
knob adjusts the timing of the LFO in relation to the oscillators. When
knob is at +/- 100%, a tempo-synced LFO will be audibly ahead/behind the
Key Trig
The
(centre of button is red) to enable Key Trig.
box sets the LFO to retrigger itself each time a note is played. Click
Filter Types
TAL NoiseMaker includes 11 filter types:
• Low pass 24 dB
• Low pass 18 dB
• Low pass 12dB
• Low pass 6 dB
• High pass 12 dB
• Band pass 12 dB
• Notch
• State-variable low pass 24 dB
• State-variable high pass 24 dB
• State-variable band pass 24 dB
• No feedback delay low pass 24 dB
Cutoff
The
standard low pass filter, cutoff determines the amount of high frequencies to be cut.
knob controls the amount of frequencies that pass through the filter. In a
Page 22

The Synth 2 Panel TAL – Togu Audio Line ©2012
18
Cutoff
Reso
Reso
Key
Cont
When using a high pass filter, the
that pass through the filter.
knob controls the amount of low frequencies
Reso
The
(resonance) knob intensifies the high frequencies of the filter. Turning the
knob to 100% (full right) causes the filter to self-oscillate.
Key
The
knob controls the amount of keyboard tracking. Keyboard tracking raises the
filter cutoff for higher notes on the scale. This is often used to split a sound into
bass/lead sections on the keyboard.
Filter Envelope
The Filter Envelope sliders control the Attack (A), Decay (D), Sustain (S) and Release (R)
of the filter.
Cont
The
(Contour) knob controls how much of the filter envelope is applied to filter
Cutoff.
Note: The filter envelope is not audible when: a) the filter Cutoff is at 100%; or b)
the Cont knob is at 0 (centred).
Page 23

TAL – Togu Audio Line ©2012 The Synth 2 Panel
19
4.2.4 ADSR
Dest
The ADSR (Envelope) component includes an Amplitude Envelope controlled by four
sliders and an Assignable Envelope controlled by three knobs.
Assignable Envelope
The Assignable Envelope can be assigned to:
• Filter
• Osc 1
• Osc 2
• Osc 1 PW
• Osc 2 FM
Click and select a modulation destination from the drop-down menu.
The Assignable Envelope can be modified with the A (Attack) and D (Decay) knobs. The
knob controls the level of modulation that is sent to the assigned destination.
Amplitude Envelope
The Amplitude Envelope sliders control the Attack (A), Decay (D), Sustain (S) and
Release (R) of all oscillators.
Page 24

The Envelope Editor Panel TAL – Togu Audio Line ©2012
20
4.3.1 Overview
Speed
4.3 The Envelope Editor Panel
The Envelope Editor panel allows visual editing of the following elements:
• Filter cutoff
• Osc 1 pitch
• Osc 2 pitch
• Osc 1 and Osc 2 pitch
• FM
• Ring modulation
• Track volume
Envelope points are placed on a “grid” that corresponds to the project’s tempo. Click the
Built-in presets that illustrate the Envelope Editor’s potential include:
button to adjust the grid speed from x1 (8 beats) to x16 (1/4 beat).
•
ARP Super Sync TAL
•
ARP Phasing Saws TAL
•
KB Drops TAL
•
FX Cool Sci Fi Ramp TAL
(portamento attack using Osc2 at x32)
(three-octave arpeggiator using Osc 1 at x8)
(arpeggiated filter using Filter at x4)
(one-shot ramp filter using Filter at x4)
Page 25

TAL – Togu Audio Line ©2012 The Envelope Editor Panel
21
4.3.2 Drawing a Modulation Envelope
4.3.3 Envelope Editor Settings
Dest
Speed
One Shot
120 bpm
Amount
Click anywhere on the white line to add a new envelope point. Drag the envelope point
to create your envelope shape. Every point has two control points (small dots) that also
change the envelope shape.
Double click or drag a point to the bottom to delete it.
Note: The envelope grid corresponds to the project tempo. Placing envelope
points on the grid will ensure a tempo-synced envelope.
The
button ( ) selects what the envelope modulates.
The
By default, envelopes are looped and tempo-synced. Click the
disable the envelope loop. Also, you can click the
and set the envelope speed to 120bpm. This is useful for testing your envelope before
pressing play on your sequencer.
The
button controls the speed/depth of the envelope.
button controls the amount of modulation.
button to disable tempo-sync
button to
Click the unnamed button ( ) at the bottom of the panel to reset the envelope
editor.
Page 26

The Control Panel TAL – Togu Audio Line ©2012
22
4.4.1 Overview
4.4.2 Velocity
Volume, Cont
Cutoff
4.4 The Control Panel
The Control Panel includes sliders for Velocity sensitivity and Pitch Wheel control, as well
as multiple effects such as:
• High pass filter
• Detune
• Vintage Noise
• Filter Drive
• Chorus
• Reverb
• Osc Crush
• Delay
These sliders control the velocity sensitivity of Note Volume, Filter Contour, and Filter
Cutoff.
Use the
, and
sliders to adjust the amount of velocity sensitivity.
Page 27

TAL – Togu Audio Line ©2012 The Control Panel
23
4.4.3 Pitch Wheel
Cutoff
Pitch
4.4.4 Master
HP
Detune
Within TAL NoiseMaker, the Pitch Wheel can be assigned to filter cutoff, master pitch, or
a combination of the two. As shown in the figure below, the Pitch Wheel is found on
the left side of most MIDI controllers.
Use the
and
sliders to adjust the amount of Pitch Wheel modulation.
Master includes four effects, each controlled by a single slider.
HP
The
slider controls the cutoff of a single-pole high pass filter. Move the slider
upwards to remove low frequencies from the overall sound signature.
Detune
The
slider controls the level of a subtle detune effect for all oscillators.
Page 28

The Control Panel TAL – Togu Audio Line ©2012
24
Vintage Noise
Filter Drive
4.4.5 Chorus
4.4.6 Reverb
Wet
Pre Del
Size
Pre Del
Vintage Noise
The
noise is especially useful for creating drum/percussion sounds.
slider controls the volume of an independent noise oscillator. Vintage
Filter Drive
The
characteristics of Filter Drive vary depending on the amount applied and current filter
settings.
Chorus includes two modes that emulate a classic Roland Juno Chorus effect combined
with detune and phase adjustment.
slider adds overdrive/distortion to the Synth 2 panel’s Filter. The sound
Click (centre of button is red) above I or II to enable/disable the Chorus effect.
Note: Chorus I and Chorus II can be applied simultaneously.
Reverb simulates a plate reverb with full control over wet/dry, reverb size, and pre-delay.
Reverb also includes simple high pass and low pass filters that control which frequencies
of the overall sound pass through the effect.
Wet
The
knob controls the amount of effect added to the overall sound. At 100%, the
original tones are removed from the preset. This can cause a noticable lag when
is also used.
Size
The
knob controls the size of the “room” used by the reverb effect. Size also affects
the decay of the reverb.
Pre Del
The
knob controls the time between a note-on and the application of reverb.
Page 29

TAL – Togu Audio Line ©2012 The Control Panel
25
LP
4.4.7 Osc Crush
Bits
4.4.8 Delay
Wet
Delay
HP
The HP knob controls the amount of high frequencies that pass through the reverb. At
100%, all high frequencies are uneffected.
LP
The
knob controls the amount of low frequencies that pass through the reverb. At
100%, all low frequencies are unaffected.
Note: The reverb effect is inaudible when HP and LP are at 100%.
Osc Crush produces distortion by reducing the resolution or bandwidth of TAL
NoiseMaker. The resulting noise may produce a warm or harsh sound depending on
the amount of reduction.
Click and drag the
Delay records NoiseMaker’s input and then plays it back after a period of time. The
delayed signal is played back multiple times to create the sound of a repeating, decaying
echo. Delay provides full control over tempo sync, left/right ping pong, and adjustable
wet/dry, rate, and feedback.
knob from right to left to apply Osc Crush to all oscillators.
Wet
The
knob controls the amount of delay added to the overall sound. At 100%, the
original tones are removed from the preset.
Delay
The
milliseconds (ms).
knob controls the speed/rate of the delay. By default, the rate is calculated in
Page 30

The Bottom Panel TAL – Togu Audio Line ©2012
26
Sync
Delay
x2 L/R
x2 L
x2 R
x2 L
x2 R
Delay
H Cut
L Cut
Feedb
4.5.1 MIDI Map
Sync
When
speed/rate in sync with your project’s tempo at 1/16, 1/8, 1/4, 1/2, 1/1, 2/1, and
tripled/dotted notes.
is selected (centre of button is red), the
knob controls the delay
x2 L/R
The
an effect known as “ping pong”.
Click (centre of button is red) to enable
When
delay will bounce from right to left. Enabling both will produce a doubling effect at
twice the rate set by the
buttons double the repeat speed and pan the delay left and right, producing
(top) or
is enabled, the delay will bounce from left to right. When
knob.
(bottom).
is enabled, the
H Cut
The
100%, all high frequencies are uneffected.
knob controls the amount of high frequencies that pass through the delay. At
L Cut
The
100%, all low frequencies are unaffected.
knob controls the amount of low frequencies that pass through the delay. At
Feedb
The
delay will repeate infinitely while increasing in volume.
(feedback) knob controls the decay of the delay effect. At over 100%, the
Note: Setting delay feeback at more than 100% may cause clipping and damage
your speakers.
4.5 The Bottom Panel
Page 31

TAL – Togu Audio Line ©2012 The Bottom Panel
27
4.5.2 Display
Display
4.5.3 Load and Save Presets
Load Preset
Save Preset
4.5.4 PANIC
Panic
Use MIDI Map to quickly map TAL NoiseMaker elements to knobs, sliders, or buttons on
your MIDI controller.
To map controls using MIDI map:
1. Click (centre of button is red) to turn on MIDI map.
2. Click and drag up/down the control you wish to assign.
3. Manipulate the knob/slider/button on your MIDI controller.
4. Repeat steps 2 and 3 to map more controls.
Note: MIDI Map is not compatible with FL Studio.
The
manipulating. Display values are numeric (for example, 0.25 = 25%) unless the
knob/slider is synced to tempo. In this case, Display will show the note value (for
example 1/2 or 1/8 dotted).
Use the
presets are accessed through your VST host. See Section 3, Presets, for more
information.
When the note-off message for a played note is not received by the VST host, the note
will sound on endlessly. This can potentially damage the speakers or other components
element shows parameter values related to the knob/slider you are
and
buttons to save and recall custom presets. Built in
of your sound system. Clicking the
a note-off command to all keys and stop any notes that are still playing.
button (centre of button is red) will send
Page 32

The Bottom Panel TAL – Togu Audio Line ©2012
28
Effects
Envelope Editor
Envelopes
Filter
LFOs
MIDI
Open Source
Oscillators
5 Index
chorus, 3, 26, 28
delay, 3, 26, 29
detune, 3, 26, 27
filter drive.
master effects, 1
osc crush, 3, 26, 29
ping pong, 30
pitch wheel control, 3, 27
portamento, 1, 17
reverb, 3, 26, 28
ring modulator, 1, 17
sync.
velocity control, 3, 26
vintage noise, 26, 28
See
Filter–filter drive
See
Oscillators–sync
control points, 24
destinations, 23, 24
envelope points, 24
grid, 23
speed, 23, 24
amplitude, 21, 22
assignable, 21, 22
band pass, 1, 20
contour, 3, 21, 26
cutoff, 3, 20, 26, 27
filter drive, 3, 28
filter envelope, 2, 3, 21, 22, 23
filter LFO, 3, 15, 19
filter types, 1, 20
high pass, 1, 3, 20, 26, 27, 28, 29
keyboard tracking, 21
low pass, 1, 20, 28, 29
notch, 1, 20
resonance, 20
self-oscillating, 20
amount, 15, 19
destinations, 15, 19
key trig, 16, 19
lfo 1, 3, 4, 15
lfo 2, 3, 4, 18
phase.
rate, 15, 18
speed.
sync, 15, 18
wave types, 16, 19
See
Oscillators–phase
See
LFOs–rate
midi controller, 27, 31
midi map, 3, 30
distribution, 5
juce, 5
source code, 5
default, 8
osc 1, 1, 4, 5, 12
osc 2, 1, 14
osc crush.
phase, 13, 14, 16, 19
polyphony.
pulse width, 13
self-oscillating filter.
oscillating
sub osc, 1, 16
sync, 1, 12, 17
transpose, 17
tune, 12, 14, 17
vintage noise.
noise
voices, 1, 17
volume, 16
waveforms, 13, 14, 17
See
Effects–osc crush
See
Oscillators–voices
See
Filter–self-
See
Effects–vintage
Page 33

TAL – Togu Audio Line ©2012 Index
29
Panels
Panic
Presets
TAL
VST hosts
bottom panel, 4, 30
control panel, 4, 26
display values, 31
envelope editor.
synth 1, 4, 12
synth 2, 4, 17
See
Envelope Editor
panic button, 3, 31
built-in presets, 4, 8, 9
custom presets, 10
examples, 13, 16, 17, 23
loading custom presets, 11
loading cutsom presets, 31
preset authors, 8
preset types, 8
saving custom presets, 10, 31
elektro, 1
noisemaker, 1, 4, 5, 6, 8, 12
Patrick Kunz, 5
togu audio line, 8
32 bit, 6, 7
64 bit, 6, 7
ableton live, 9
cockos reaper, 9
fl studio, 9
studio one, 9
Page 34

Togu Audio Line
http://kunz.corrupt.ch
 Loading...