

Page 1

M820-00 1
T820 Series II
Base Station Equipment
66-88MHz
Tuning & Adjustment Manual
July 2000
M820-00-2TA
Copyright TEL 01/04/00
Page 2

2 M820-00
T800
T800
Head Office
New Zealand
Tait Electronics Ltd
558 Wairakei Road
P.O. Box 1645
Christchurch
New Zealand
Phone: 64 3 358 3399
Fax: 64 3 358 3903
Radio Systems Division
535 Wairakei Road
P.O. Box 1645
Christchurch
New Zealand
Phone: 64 3 358 3399
Fax: 64 3 358 6486
Australia
Tait Electronics (Aust) Pty Ltd
186 Granite Street
Geebung
Queensland 4034
P. O . Bo x 6 79
Virginia
Queensland 4014
Australia
Phone: 61 7 3865 7799
Toll Free: 1 800 077 112
Fax: 61 7 3865 7990
Canada
Tait Mobile Radio Inc.
Unit 5, 158 Anderson Avenue
Markham
Ontario L6E 1A9
Canada
Phone: 1 905 472 1100
Toll Free: 1 800 890 8248
Fax: 1 905 472 5300
France
Ta i t F r a n c e S a r l
2 Avenue de la Cristallerie
92 316 Sèvres, Cedex
France
Phone: 33 1 41 14 05 50
Fax: 33 1 41 14 05 55
Germany
Tait Europe Limited
Geschäftsstelle Deutschland
Fürther Str. 27
D-90429 Nürnberg
Germany
Phone: 49 911 2870 7064
Fax: 49 911 2870 7160
Hong Kong
Tait Mobile Radio (HK) Ltd
Unit 2216, North Tower
Concordia Plaza
No. 1 Science Museum Road
Tsim Sha Tsui East
Kowloon
Phone: 852 2369 3040
Fax: 852 2369 3009
New Zealand
Tait Communications Ltd
Unit 4, 75 Blenheim Road
P. O. Bo x 1 1 8 5
Christchurch
Phone: 64 3 348 3301
Fax: 64 3 343 0558
Ta i w a n
Tait Mobile Radio (Taiwan) Ltd
5Fl., No. 159, Keelung Rd
Sec. 1
Tai p ei 110
Tai w a n
Phone: 886 2 2768 6600
Fax: 886 2 2761 9970
Thailand
Tait Mobile Radio Ltd
14/1 Suwan Tower
Third Floor
North Sathorn Road
Soi Saladaeng 1
Bangrak
Bangkok 10500
Thailand
Phone: 662 267 6290
Fax: 662 267 6293
United Kingdom
Tait Europe Ltd
Ermine Business Park
Ermine Road
Huntingdon
Cambridgeshire PE18 6YA
United Kingdom
Phone: 44 1480 52 255
Fax: 44 1480 411 996
USA
Tait Electronics (USA) Inc.
9434 Old Katy Road
Suite 110
Houston
Texas 77055
USA
Phone: 1 713 984 8684
Toll Free: 1 800 222 1255
Fax: 1 713 468 6944
Internet
http://www.taitworld.com
Beijing
Tait Mobile Radio (HK) Ltd
Beijing Representative Office
Room 610, Tower 2
Beijing Henderson Centre
No. 18 Jianguomennei Da Jie
Doncheng District
Beijing
China 100005
Singapore
Tait Electronics (Far East) Pte Ltd
4 Leng Kee Road
SIS Building #05-11A
Singapore 159088
Phone: 65 471 2688
Fax: 65 479 7778
01/04/00 Copyright TEL
Page 3

M820-00 3
About This Manual
Scope This manual contains general, technical, tuning and adjustment
information on T820 Series II 25W and 50W base stations which
comprise the following equipment:
25W base station T825 receiver
T826 25W transmitter
50W base station T825 receiver
T827 exciter
T828 50W power amplifier
PCB Information PCB information is provided for all current issue PCBs, as well
as all previous issue PCBs manufactured in production quantities, and is grouped according to PCB. Thus, you will find the
parts list, grid reference index (if necessary), PCB layouts and
circuit diagram(s) for each individual PCB grouped together.
Errors If you find an error in this manual, or have a suggestion on how
it might be improved, please do not hesitate to contact Customer
Support, Tait Electronics Ltd, Christchurch, New Zealand (full
contact details are on page 2).
Updating Equipment And Manuals
In the interests of improving performance, reliability or servicing, Tait Electronics Ltd
reserve the right to update their equipment and/or manuals without prior notice.
Copyright
All information contained in this manual is the property of Tait Electronics Ltd. All
rights are reserved. This manual may not, in whole or part, be copied, photocopied,
reproduced, translated stored or reduced to any electronic medium or machine readable
form without prior written permission from Tait Electronics Ltd.
Ordering Tait Service Manuals
You can order additional copies of this manual from your nearest Tait Dealer or Customer Service Organisation. When ordering, make sure you quote the correct Tait product code ("M" number). Note that only the latest issue of the manual will be available
for order.
Copyright TEL 01/04/00
Page 4

4 M820-00
Tab le Of Co n t e n ts
This manual is divided into five parts as listed below, with each part being further subdivided into sections. There is a detailed table of contents at the start of each part and/
or section.
Part Title
A Introduction To Servicing
B T825 Receiver
C T826 Transmitter & T827 Exciter
D T828 Power Amplifier
E T820 VCO PCB Information
01/04/00 Copyright TEL
Page 5

M820-00 AI
Part A Introduction To Servicing
This part of the manual is divided into the sections listed below. These sections provide
some general and advisory information on servicing procedures, and a brief history of
PGM800Win programming software.
Section Title Page
1
1.1
1.2
1.3
1.4
2
2.1
2.2
2.3
2.3.1
2.3.2
2.4
2.5
3
3.1
3.1.1
3.1.2
General
Additional Technical Information
Caution: CMOS Devices
Caution: Aerial Load
Caution: Beryllium Oxide & Power Transistors
Mechanical
Torx Recess Head Screws
Pozidriv & Philips Recess Head Screws
Disassembly/Reassembly
Receivers/Exciters/Transmitters
Power Amplifiers
Cover Screw Torques
Chassis & Cover Compatibility
Component Replacement
Leaded Components
Desoldering Iron Method
Component Cutting Method
1.1
1.1
1.1
1.2
1.2
2.1
2.1
2.2
2.3
2.3
2.3
2.3
2.4
3.1
3.1
3.1
3.1
3.2
3.3
4
4.1
4.2
Surface Mount Devices
Cased Mica Capacitors
Software History
PGM800Win V1.0
PGM800Win V2.00
Figure Title Page
1.1
1.2
2.1
2.2
2.3
Typical Product Code & Serial Number Labels
Typical Anti-static Bench Set-up
Torx Screw Identification
Pozidriv & Philips Screw & Screwdriver Identification
Identification Of New-Design Chassis & Covers
3.2
3.2
4.1
4.1
4.1
1.1
1.2
2.1
2.2
2.4
Copyright TEL 01/04/00
Page 6

AII M820-00
01/04/00 Copyright TEL
Page 7
M820-00 General A1.1
1 General
1.1 Additional Technical Information
If you have any questions about this manual or the equipment it describes, please contact your nearest Tait Dealer or Customer Service Organisation. If necessary, you can
get additional technical help from Customer Support, Radio Systems Division, Tait Electronics Ltd, Christchurch, New Zealand (full contact details are on page 2).
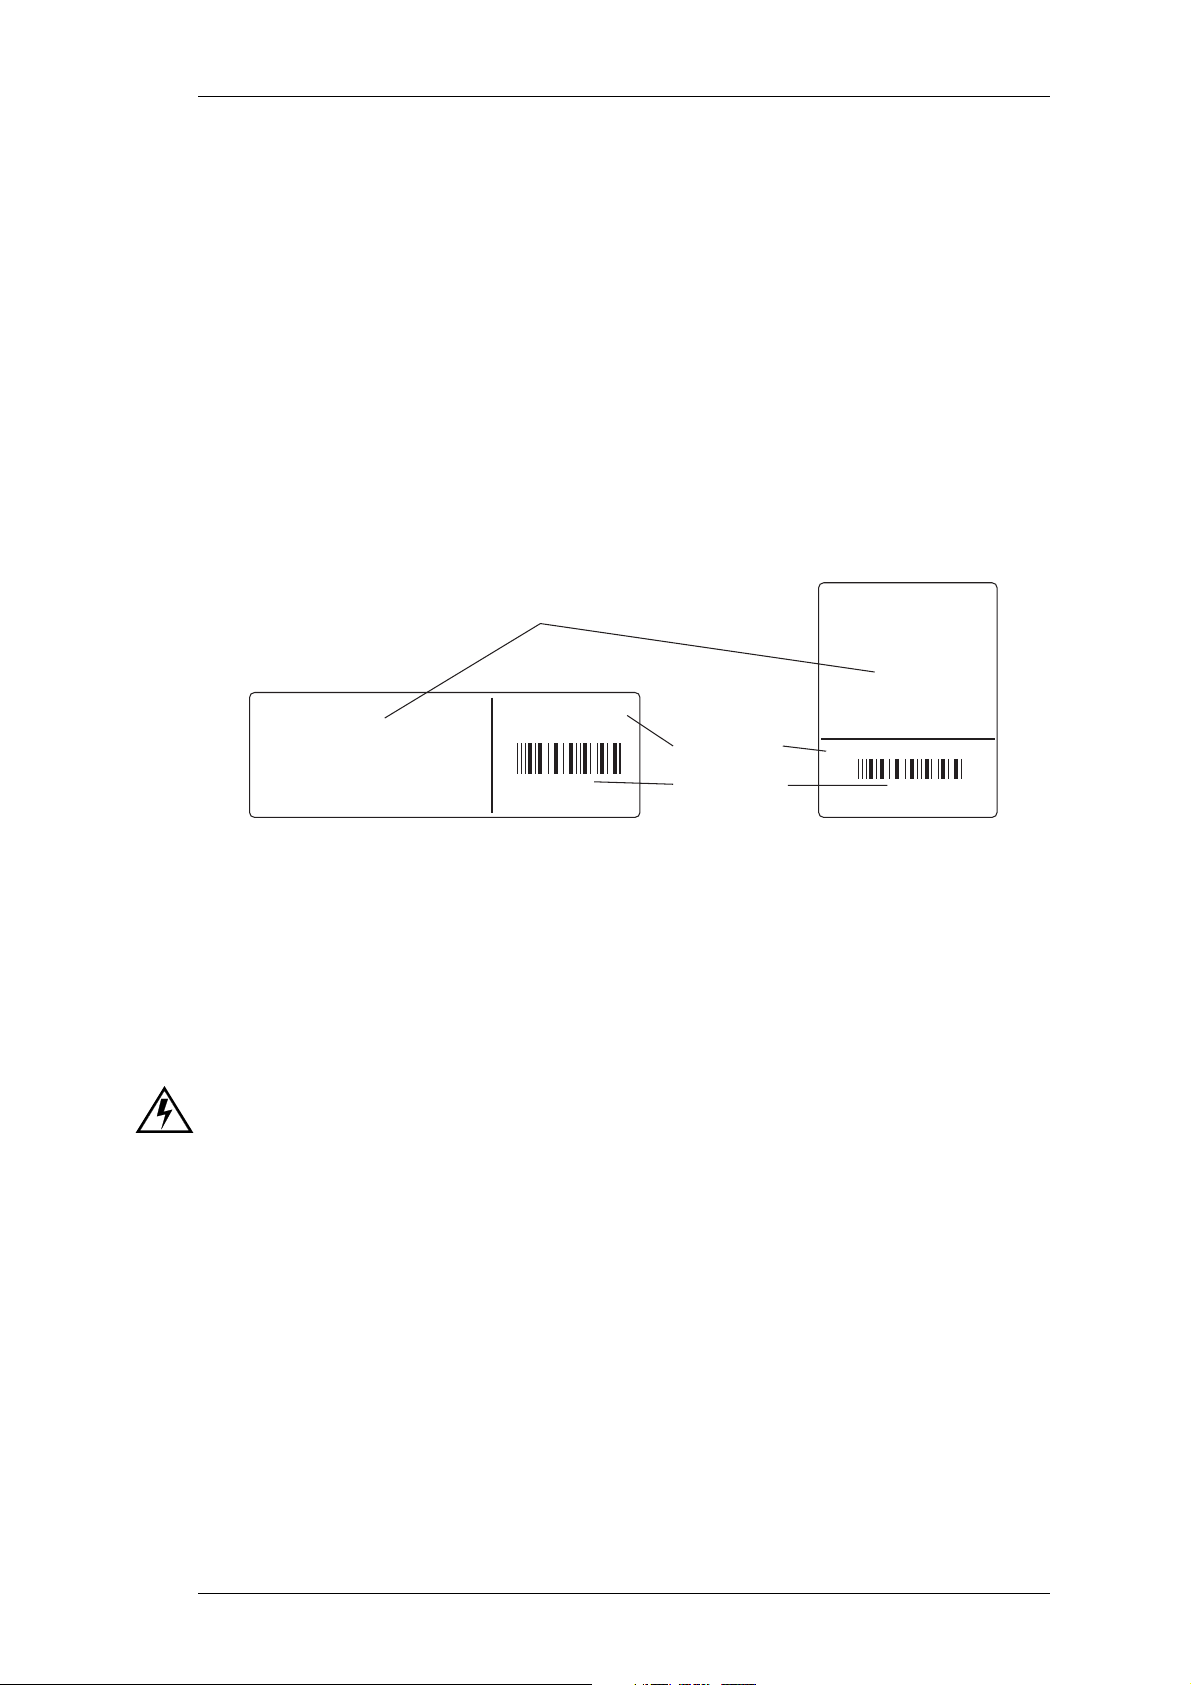
When requesting information, please quote either the manual product code (e.g.
M820-00-200), or the equipment product code and serial number which are printed on a
label on the back of the product (as shown in Figure 1.1).
this area used for regional
Type Approval information
T838-10-0000
Rev 1
900000
Tait Electronics Limited
Made in New Zealand
Figure 1.1 Typical Product Code & Serial Number Labels
product code
serial number
T835-10-0000 Rev 1
Tait Electronics Limited
Made in New Zealand
900000
If you require information about a particular PCB, please quote the full PCB internal
part number (IPN) which is screen printed onto the top side of the board (refer to the
appropriate PCB Information section in this manual for more details).
1.2 Caution: CMOS Devices
This equipment contains CMOS Devices which are susceptible to damage from static
charges. Care when handling these devices is essential. For correct handling procedures refer to the manufacturers' data books, e.g. Philips data books covering CMOS
devices, or Motorola CMOS data books, Section 5 'Handling', etc.
An anti-static bench kit (refer to Figure 1.2) is available from Tait Electronics Ltd under
the following product codes:
• KS0001 - 1 conductive rubber bench mat
- 1 earth lead to connect the mat to ground
• KS0004 - 1 wrist strap.
Copyright TEL 01/04/00
Page 8

A1.2 General M820-00
conductive
wrist strap
to building earth
(not mains earth)
Figure 1.2 Typical Anti-static Bench Set-up
1.3 Caution: Aerial Load
conductive rubber
bench mat
The equipment has been designed to operate safely under a wide range of aerial loading
conditions. However, we strongly recommend that the transmitter should always be
operated with a suitable load to prevent damage to the transmitter output power stage.
1.4 Caution: Beryllium Oxide & Power Transistors
The RF power transistors in current use all contain some beryllium oxide. This substance, while perfectly harmless in its normal solid form, can become a severe health
hazard when it has been reduced to dust. For this reason the RF power transistors
should not be broken open, mutilated, filed, machined, or physically damaged in any
way that can produce dust particles.
01/04/00 Copyright TEL
Page 9

M820-00 Mechanical A2.1
2 Mechanical
2.1 Torx Recess Head Screws
Torx recess head screws are becoming the standard screw head type in all T800 Series II
equipment, with Pozidriv and Philips recess head screws being used in fewer applications.
The Torx recess head has the advantage of improved screwdriver tip location, reducing
the chances of screw head damage caused by the driver tip rotating within the recess. In
addition, using a ball-tip Torx screwdriver allows you to drive a Torx head screw with
the driver on a slight angle, which can be useful in situations where access is restricted.
It is important that you use the correct Torx screwdriver tip:
M3 screws - T10
M4 screws - T20.
Figure 2.1 below shows a typical Torx recess head screw (actual hardware may differ
slightly from this illustration due to variations in manufacturing techniques).
"star" shaped recess with
six internal notches
Figure 2.1 Torx Screw Identification
Copyright TEL 01/04/00
Page 10

A2.2 Mechanical M820-00
2.2 Pozidriv & Philips Recess Head Screws
Pozidriv and Philips recess head screws will continue to be used in T800 Series II equipment in a few special applications. It is important that you use the correct type and size
screwdriver for each screw type to avoid damaging the screw head.
It is particularly important that you do not use Philips screwdrivers on Pozidriv screw
heads as the tapered driving flutes of the Philips screwdriver do not engage correctly
with the parallel-sided slots in the Pozidriv screw head. This can result in considerable
damage to the screw head if the screwdriver tip turns inside the recess.
Note:
If you find you need excessive downwards pressure to keep the screwdriver
tip in the Pozidriv screw head, you are probably using the wrong type and/
or size screwdriver.
Figure 2.2 below shows the main differences between typical Pozidriv and Philips screw
heads and screwdriver tips (actual hardware may differ slightly from these illustrations
due to variations in manufacturing techniques).
Pozidriv Philips
internal notches
no special markings
"star" markings
between slots
slots with parallel sides
slots with tapered sides
driving flutes with
parallel sides
driving flutes with
tapered sides
ridges between
driving flutes
Figure 2.2 Pozidriv & Philips Screw & Screwdriver Identification
01/04/00 Copyright TEL
Page 11

M820-00 Mechanical A2.3
2.3 Disassembly/Reassembly
2.3.1 Receivers/Exciters/Transmitters
To carry out alignment or change option links, you need to remove only the top cover,
i.e. the one adjacent to the front panel handle and on the opposite side to the main
D-range connector (D-range 1/PL100).
You need to remove the bottom cover to:
• access transmitter RF power transistors and many SMD components
• change solder blob links
• fit test leads to circuit block access points.
2.3.2 Power Amplifiers
You should carry out the tuning and power output level setting procedures with the
cover on.
2.4 Cover Screw Torques
Receivers/Exciters/Transmitters .. 1.36Nm/12in.lbf.
Power Amplifiers .. 0.9Nm/8in.lbf.
Copyright TEL 01/04/00
Page 12
A2.4 Mechanical M820-00
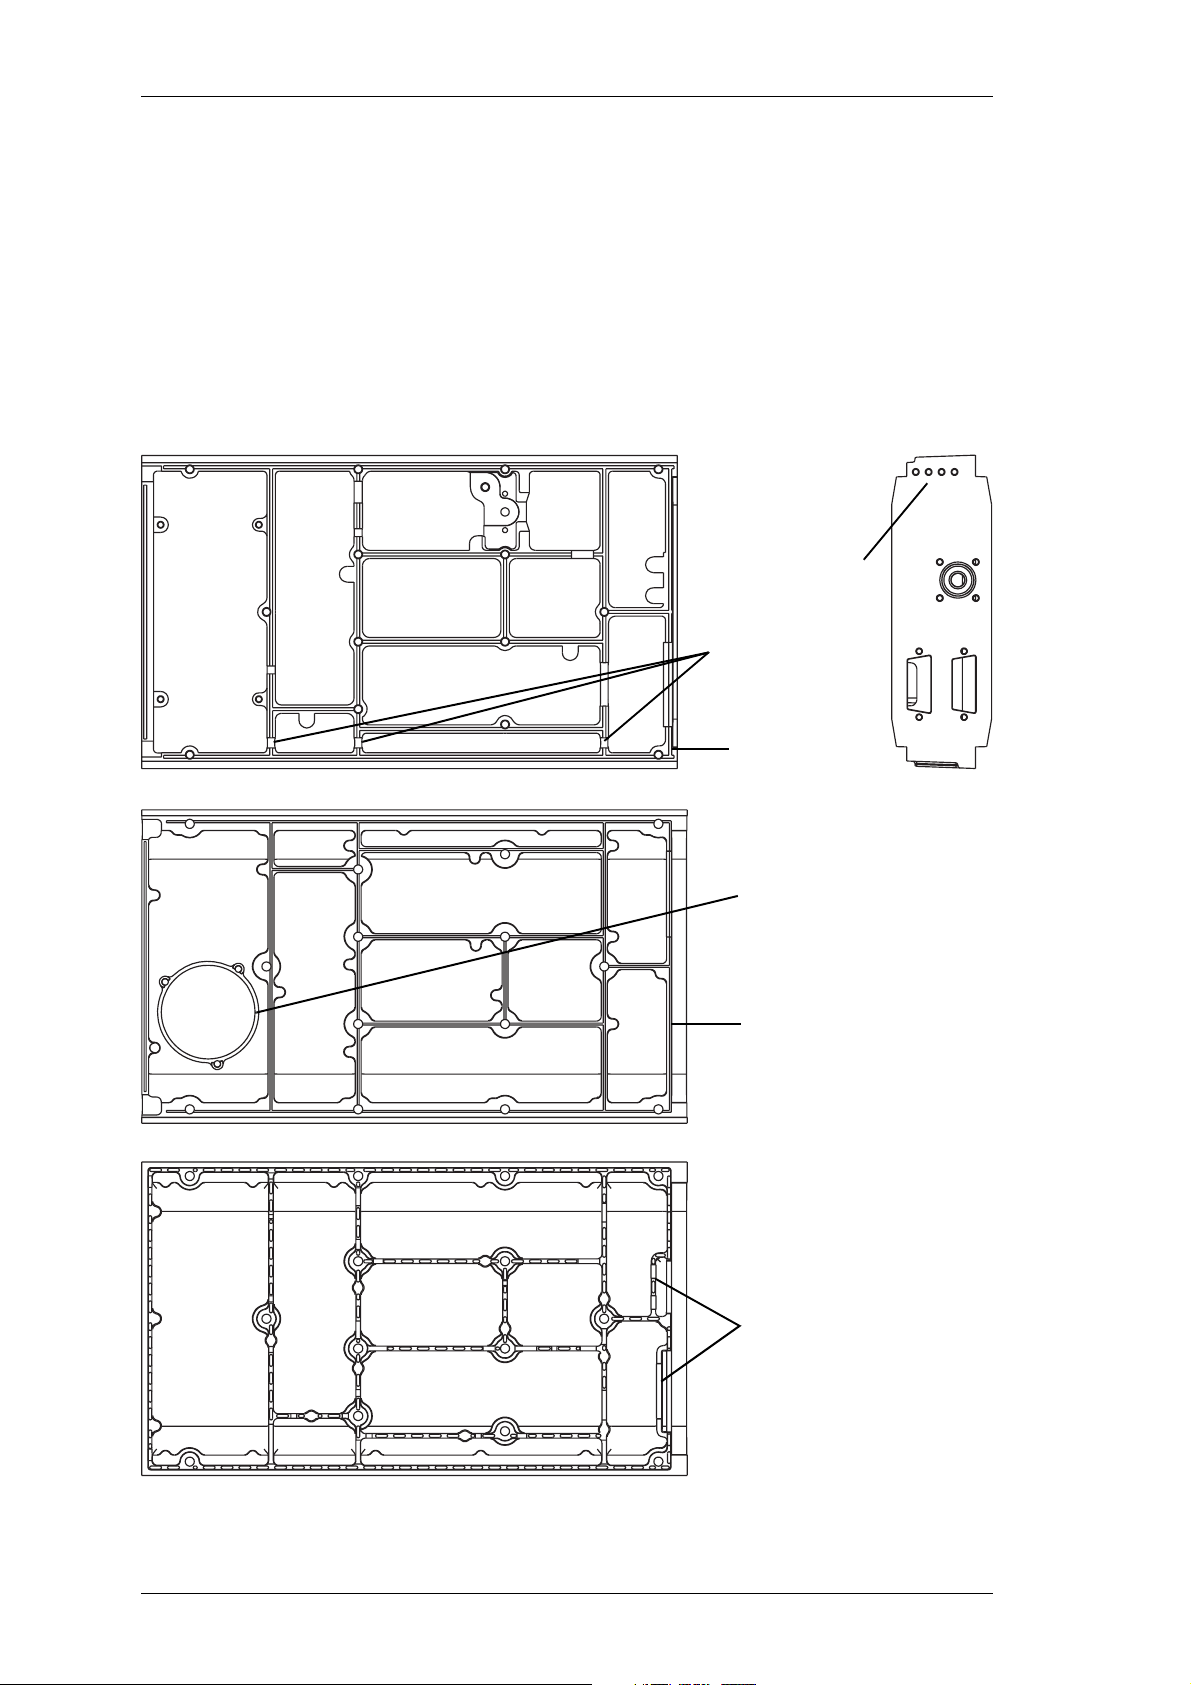
2.5 Chassis & Cover Compatibility
The chassis and covers used in T800 Series II modules incorporate a number of design
changes to improve Electro-Magnetic Compatibility (EMC) performance. It is important that only the new-design covers are fitted to the new chassis to ensure correct
mechanical fit and continued compliance with appropriate EMC Type Approval regulations.
Figure 2.3 below shows some of the main features which can be used to identify the
new-design chassis and covers.
Chassis
←Top View
loom channel in
top of walls
Rear View
4 holes in
rear panel
→
groove in top
of rear wall
Top Cover
provision for mounting speaker
(future development)
ridge on top
of rear wall
Bottom Cover
additional walls
Figure 2.3 Identification Of New-Design Chassis & Covers
01/04/00 Copyright TEL
Page 13

M820-00 Component Replacement A3.1
3 Component Replacement
3.1 Leaded Components
Whenever you are doing any work on the PCB that involves removing or fitting components, you must take care not to damage the copper tracks. The two satisfactory methods of removing components from plated-through hole (PTH) PCBs are detailed below.
Note:
The first method requires the use of a desoldering station, e.g. Philips SBC
314 or Pace MBT-100E.
3.1.1 Desoldering Iron Method
Place the tip over the lead and, as the solder starts to melt, move the tip in a circular motion.
Start the suction and continue the movement until 3 or 4 circles have been completed.
Remove the tip while continuing suction to ensure that all solder is removed from
the joint, then stop the suction.
Before pulling the lead out, ensure it is not stuck to the plating.
If the lead is still not free, resolder the joint and try again.
Note:
The desoldering iron does not usually have enough heat to desolder leads
from the ground plane. Additional heat may be applied by holding a soldering iron on the tip of the desoldering iron (this may require some additional help).
3.1.2 Component Cutting Method
Cut the leads on the component side of the PCB.
Heat the solder joint
out from the component side: do
Fill the hole with solder and then clear with solderwick.
Copyright TEL 01/04/00
sufficiently
to allow
not
easy
use undue force.
removal of the lead by drawing it
Page 14

A3.2 Component Replacement M820-00
3.2 Surface Mount Devices
Caution: Surface mount devices (SMDs) require special storage, handling,
removal and replacement techniques. This equipment should be serviced only by an approved Tait Dealer or Customer Service Organisation equipped with the necessary facilities. Repairs attempted with
incorrect equipment or by untrained personnel may result in permanent damage. If in doubt, contact your nearest Tait Dealer or Customer
Service Organisation.
3.3 Cased Mica Capacitors
Cased mica capacitors can be removed by heating the top with a heavy-duty soldering
iron and gently lifting the capacitor off the PCB with a solder-resistant spike or equivalent.
01/04/00 Copyright TEL
Page 15

M820-00 Software History A4.1
4 Software History
28/06/96 PGM800Win Version 1.0
18/08/97 PGM800Win Version 2.00
4.1 PGM800Win V1.0
PGM800Win V1.0 is different in concept from DOS versions of PGM800 in that it is Win-
1
dows
PGM800.
The major changes are outlined below:
based. It also includes many new and improved features over DOS versions of
• The Windows
• PGM800Win includes several new radio models which are not programmable
with DOS versions of PGM800.
• Out of range frequencies will result in warning messages and will not be accepted
for entry into the standard library module. User defined modules can be created,
however, allowing variation from the standard library module.
• Channel numbers default to 0-127 to match the EPROM memory locations. However, the user can change this setting so that the channel numbers run from 1-128
to suit his/her particular needs.
Note:
The data files produced by BASEPROG V1.0 and all DOS versions of
PGM800 are still compatible with PGM800Win V1.0.
environment makes data entry and editing significantly easier.
4.2 PGM800Win V2.00
PGM800Win V2.00 is an upgraded and expanded version of PGM800Win V1.0. It has
been developed specifically for T800 Series II base stations, but retains the ability to program Series I equipment.
The major changes are outlined below:
• PGM800Win V2.0 will program T800 Series II base station modules via serial communications.
• Deviation and reference modulation settings are written automatically to the
radio.
1. Windows is a registered trademark of the Microsoft Corporation.
Copyright TEL 01/07/00
Page 16

A4.2 Software History M820-00
• Extra information that is not stored in the radio (but which is still relevant to the
radio) can be saved to a file on disk (e.g. note field, auxiliary pin names, etc.).
Note:
The data files produced by BASEPROG V1.0, all DOS versions of PGM800,
and PGM800Win V1.0 are still compatible with PGM800Win V2.00.
01/07/00 Copyright TEL
Page 17

M820-00 BI
Part B T825 Receiver
This part of the manual is divided into six sections, as listed below. There is a detailed
table of contents at the start of each section.
Section Title
1 General Information
2 Circuit Operation
3 Initial Tuning & Adjustment
4 Functional Testing (not available for Tuning & Adjustment manual)
5 Fault Finding (not available for Tuning & Adjustment manual)
6 PCB Information
Copyright TEL 01/07/00
Page 18

BII M820-00
01/07/00 Copyright TEL
Page 19

M820-00 T825 General Information B1.1
1 T825 General Information
This section provides a brief description of the T825 receiver, along with detailed specifications and a list of types available.
The following topics are covered in this section.
Section Title Page
1.1 Introduction 1.3
1.2
1.2.1
1.2.2
1.2.3
1.2.4
1.2.4.1
1.2.4.2
1.2.4.3
1.2.5
1.2.6
1.2.6.1
1.2.6.2
1.2.6.3
1.3 Product Codes 1.10
1.4 Standard Product Range 1.11
Specifications
Introduction
General
RF Section
Audio Section
General
CTCSS
Mute Operation
Microcontroller
Tes t Sta n da rd s
European Telecommunication Standard (ETS)
DTI CEPT Recommendation T/R-24-01
Telecommunications Industry Association
1.4
1.4
1.5
1.5
1.7
1.7
1.7
1.8
1.8
1.8
1.8
1.9
1.9
Copyright TEL 01/04/00
Page 20

B1.2 T825 General Information M820-00
01/04/00 Copyright TEL
Page 21

M820-00 T825 General Information B1.3
1.1 Introduction
The T825 is a high performance microprocessor controlled FM base station receiver
designed for single or multichannel operation in the 66 to 88MHz frequency range
The receiver is a dual conversion superhet with a synthesised local oscillator. The first
IF is 10.7MHz, allowing exceptionally high spurious signal rejection to be achieved in
the receiver front end. The second IF section (455kHz) combines amplitude limiting,
detection and RSSI within a single integrated circuit. This IC also drives a noise level
detector for gating the audio output. RSSI can also be used to drive a carrier mute for
audio output gating (link selectable).
The audio section output can be adjusted to deliver >+10dBm to a 600 ohm balanced
output, and 1W to a local monitor speaker. A flat or de-emphasised audio response is
link selectable.
The synthesiser frequency is programmed via the serial communications port. Eight
channel select lines are accessible via an optional D-range connector (D-range 2 T800-03-0000) at the rear of the set.
All components except those on the VCO board are mounted on a single PCB. This is
secured to a die-cast chassis which is divided into compartments to individually shield
each section of circuitry. Access to both sides of the main PCB is obtained by removing
each of the two chassis covers. There is provision within the chassis to mount small
option PCBs.
1
.
The front panel controls include gating sensitivity, line level, monitor volume and a
monitor mute switch.
The T825 has a width of 60mm and occupies a single space in a Tait rack frame, which
has the ability to accommodate up to seven standard modules.
1. Although capable of operating over the 66-88MHz frequency range, the T825 has a
2MHz switching range (see Section 1.2.3 and Section 3.1).
Copyright TEL 01/04/00
Page 22

B1.4 T825 General Information M820-00
1.2 Specifications
1.2.1 Introduction
The performance figures given are minimum figures, unless otherwise indicated, for
equipment tuned with the maximum switching range and operating at standard room
temperature (+22°C to +28°C) and standard test voltage (13.8V DC).
Where applicable, the test methods used to obtain the following performance figures
are those described in the EIA and ETS specifications. However, there are several
parameters for which performance according to the CEPT specification is given. Refer
to Section 1.2.6 for details of test standards.
Details of test methods and the conditions which apply for Type Approval testing in all
countries can be obtained from Tait Electronics Ltd.
The terms "wide bandwidth" and "narrow bandwidth" used in this and following sections are defined in the following table.
Channel Spacing
Wide Bandwidth 25kHz ±5.0kHz 15.0kHz
Narrow Bandwidth 12.5kHz ±2.5kHz 7.5kHz
Sensitivity and distortion figures are stated for both de-emphasised and flat audio
responses under standard operating conditions. Note that the sensitivity and distortion
figures will be degraded when flat audio is selected.
Link PL210 Link PL220
De-emphasised Audio 1-2 2-3
Flat Audio 2-3 1-2
Modulation
100% Deviation
Receiver
IF Bandwidth
01/04/00 Copyright TEL
Page 23

M820-00 T825 General Information B1.5
1.2.2 General
Number Of Channels .. 128 (standard)
Supply Voltage:
Operating Voltage .. 10.8 to 16V DC
Standard Test Voltage .. 13.8V DC
Polarity .. negative earth only
Polarity Protection .. crowbar diode
Supply Current:
Standby .. 350mA
Full Audio .. 750mA
Operating Temperature Range .. -30°C to +60°C
Dimensions:
Height .. 183mm
Width .. 60 mm
Length .. 322mm
Weight .. 2.13kg
1
1.2.3 RF Section
Frequency Range .. 66-88MHz
Type .. dual conversion superheterodyne
Frequency Increment .. 5 or 6.25kHz
Switching Range .. 2MHz (i.e. ±1MHz from the centre
frequency)
Input Impedance .. 50 ohms
Frequency Stability .. ±2.5ppm, -30°C to +60°C
(see also Section 1.4) (±1ppm available for special
applications)
Signal Strength Indicator .. -115dBm to -70dBm, 3.5 to 6.5V
(RSSI) at approx. 15dB/V
1. Additional channels may be factory programmed. Contact your nearest Tait Dealer or
Customer Service Organisation.
Copyright TEL 01/04/00
Page 24

B1.6 T825 General Information M820-00
IF Amplifiers:
Frequencies .. 10.7MHz and 455kHz
Bandwidths-
Narrow Bandwidth (NB) .. 7.5kHz
Wide Bandwidth (WB) .. 15kHz
Sensitivity (De-emphasised Response):
Single Channel .. -117dBm
Bandspread (12dB Sinad) .. -115dBm (across switching range)
Sensitivity (Flat Response):
Single Channel .. -111dBm
Bandspread (12dB Sinad) .. -109dBm (across switching range)
Signal+Noise To Noise Ratio (Typical):
De-emphasised
RF Level -107dBm (CEPT) .. 30dB (WB) 25dB (WB)
25dB (NB) 20dB (NB)
Flat
RF Level -83dBm (CEPT) .. 50dB (NB) 45dB (NB)
RF Level -57dBm (EIA) .. 55dB (WB) 52dB (WB)
Selectivity:
Narrow Bandwidth (±12.5kHz) .. 90dB (CEPT)
Wide Bandwidth (±25kHz) .. 95dB (EIA)
Offset Selectivity (Canada only) .. 20dB
Spurious Response Attenuation .. 100dB EIA (typical)
Intermodulation Response Attenuation:
Narrow Bandwidth .. 80dB CEPT (typical)
Wide Bandwidth .. 85dB EIA (typical)
Blocking .. 100dB
Co-channel Rejection .. 6dB
Amplitude Characteristic .. 3dB
Spurious Emissions:
Conducted .. -90dBm to 4GHz
Radiated .. -57dBm to 1GHz
-47dBm to 4GHz
01/04/00 Copyright TEL
Page 25

M820-00 T825 General Information B1.7
1.2.4 Audio Section
1.2.4.1 General
Outputs Available .. line and monitor
Frequency Response .. flat or de-emphasised (750µs)
(link selectable)
Flat Response:
Bandwidth .. 67 to 3400Hz
Response .. within +1, -2dB of output level
at 1kHz
De-emphasised Response:
Bandwidth .. 300 to 3400Hz
Response .. within +1, -3dB of a 6dB/octave
de-emphasis characteristic (ref. 1kHz)
Line Output:
Power .. adjustable to >+10dBm
Load Impedance .. 600 ohms
Distortion (@ -70dBm signal level):
De-emphasised
Wide Bandwidth .. ≤2% ≤2%
Narrow Bandwidth .. ≤2% ≤4%
Monitor Output:
Power .. 1W
Speaker Impedance .. 4 ohms
Distortion .. ≤3%
(@ -70dBm signal level, links set to de-emphasis)
1.2.4.2 CTCSS
Linkable High Pass Filter:
Bandwidth .. 350 to 3400Hz
Response .. within +1, -3dB of level at 1kHz
Hum And Noise .. 30dB min. at 250.3Hz
(1kHz at 60% system deviation 35dB typical (67 to 240Hz)
CTCSS at 10% system deviation)
Flat
Ton e De t e ct :
Tone Squelch Opening .. better than 6dB sinad
3dB sinad at 250.3Hz (typical)
4dB sinad at 100Hz (typical)
Tone Detect Bandwidth .. ±2.1Hz accept (typical)
±3.0Hz reject (typical)
Response Time .. 150ms open and close (typical)
Copyright TEL 01/04/00
Page 26

B1.8 T825 General Information M820-00
1.2.4.3 Mute Operation
Systems Available .. noise mute and carrier mute
Noise Mute:
Operating Range .. 6-20dB sinad
Hysteresis .. 1.5 to 6dB
Threshold .. adjustable to -105dBm
Opening Time .. 20ms
Closing Time .. 50ms
Carrier Mute (Optional):
Operating Range .. -115 to -80dBm
Hysteresis .. 2 to 10dB
Opening Time .. 5ms
Closing Time .. 50ms
Note:
The opening and closing times given above are for the standard set-up
(SL210 linked and SL220 not linked - refer to Section 3.8).
1.2.5 Microcontroller
Auxiliary Ports:
Open Drain Type .. capable of sinking 2.25mA via 2k2Ω
max. .. 5V
V
ds
1.2.6 Test Standards
Where applicable, this equipment is tested in accordance with the following standards.
1.2.6.1 European Telecommunication Standard
ETS 300 086 January 1991
Radio equipment and systems; land mobile service; technical characteristics and test
conditions for radio equipment with an internal or external RF connector intended primarily for analogue speech.
ETS 300 113 March 1996
Radio equipment and systems; land mobile service; technical characteristics and test
conditions for radio equipment intended for the transmission of data (and speech) and
having an antenna connector.
ETS 300 219 October 1993
Radio equipment and systems; land mobile service; technical characteristics and test
conditions for radio equipment transmitting signals to initiate a specific response in the
receiver.
01/04/00 Copyright TEL
Page 27

M820-00 T825 General Information B1.9
ETS 300 279 February 1996
Radio equipment and systems; electromagnetic compatibility (EMC) standard for private land mobile radio (PMR) and ancillary equipment (speech and/or non-speech).
1.2.6.2 DTI CEPT Recommendation T/R-24-01
Annex I: 1988
Technical characteristics and test conditions for radio equipment in the land mobile
service intended primarily for analogue speech.
Annex II: 1988
Technical characteristics of radio equipment in the land mobile service with regard to
quality and stability of transmission.
1.2.6.3 Telecommunications Industry Association
ANSI/TIA/EIA-603-1992
Land mobile FM or PM communications equipment measurement and performance
standards.
Copyright TEL 01/04/00
Page 28

B1.10 T825 General Information M820-00
1.3 Product Codes
The three groups of digits in the T820 Series II product code provide information about
the model, type and options fitted, according to the conventions described below.
The following explanation of T820 Series II product codes is not intended to suggest that
any combination of features is necessarily available in any one product. Consult your
nearest Tait Dealer or Customer Service Organisation for more information regarding
the availability of specific models, types and options.
Model
The Model group indicates the basic function of the product, as follows:
T82X
-XX-XXXX T825 receiver
T826 25W transmitter
T827 exciter
T828 50W power amplifier
Type
The Type group uses two digits to indicate the basic RF configuration of the product.
The first digit in the Type group designates the frequency range:
T82X-X
The second digit in the Type group indicates the channel spacing:
T82X-XX
X-XXXX ’1’ for 66-88MHz
-XXXX ’0’ for wide bandwidth (25kHz)
’5’ for narrow bandwidth (12.5kHz)
Options
T82X-XX-XXXX The Options group uses four digits and/or letters to indicate
any options that may be fitted to the product. This includes
standard options and special options for specific customers.
’0000’ indicates a standard Tait product with no options fitted.
The large number of options precludes listing them here.
01/04/00 Copyright TEL
Page 29

M820-00 T825 General Information B1.11
1.4 Standard Product Range
The following table lists the range of standard T825 types (i.e. no options fitted) available at the time this manual was published. Consult your nearest Tait Dealer or Customer Service Organisation for more information.
Frequency Range (MHz)
IF Bandwidth (kHz) 7.5 15
b
TCXO
Receiver Type: T825- 15-0000 10-0000
a. Selectable by solder links - refer to Section 3.7.
b. A TCXO with a stability of ±1ppm (0°C to +60°C) is
±2.5ppm -30°C to +60°C
available to suit specific requirements. Contact your
nearest authorised Tait Dealer or Customer Service
Organisation for further details.
a
66-88
••
You can identify the receiver type by checking the product code printed on a label on
the rear of the chassis (Figure 1.1 in Part A shows typical labels). You can further verify
the receiver type by checking the placement of an SMD resistor in the table that is screen
printed onto the PCB (refer to Section 6.1 for more details).
Copyright TEL 01/04/00
Page 30

B1.12 T825 General Information M820-00
01/04/00 Copyright TEL
Page 31

M820-00 T825 Circuit Operation B2.1
2 T825 Circuit Operation
This section provides a basic description of the circuit operation of the T825 receiver.
Note:
Refer to Section 6 where the parts lists, grid reference index and diagrams will provide
detailed information on identifying and locating components and test points on the
main PCB. The parts list and diagrams for the VCO PCB are in Part E.
The following topics are covered in this section.
Unless otherwise specified, the term "PGM800Win" used in this and following sections refers to version 2.00 and later of the software.
Section Title Page
2.1 Introduction 2.3
2.2 Receiver Front End 2.4
2.3 Mixer 2.5
2.4 IF Circuitry 2.5
2.5 Noise Mute (Squelch) 2.6
2.6 Carrier Mute 2.6
2.7 Audio Processor 2.7
2.8 Power Supply And Regulators 2.8
2.9 Microcontroller 2.9
2.10 Synthesised Local Oscillator 2.10
2.11 VCO 2.11
2.12 Received Signal Strength Indicator (RSSI) 2.11
Figure Title Page
2.1
2.2
2.3
2.4
2.5
2.6
T825 High Level Block Diagram
T825 Front End, IF and Mute Block Diagram
T825 Audio Processor Block Diagram
T825 Power Supply And Regulators Block Diagram
T825 Microcontroller Block Diagram
T825 Synthesiser Block Diagram
2.3
2.4
2.7
2.8
2.9
2.10
Copyright TEL 01/04/00
Page 32

B2.2 T825 Circuit Operation M820-00
01/04/00 Copyright TEL
Page 33

M820-00 T825 Circuit Operation B2.3
2.1 Introduction
Noise
Mute
Mixer Mixer Limiter
Front
End
Synthesised
Local
Oscillator
10.7MHz
IF
Second
Local
Oscillator
12.8MHz
Master
Oscillator
455kHz
IF
Figure 2.1 T825 High Level Block Diagram
The T825 receiver consists of a number of distinct stages:
•front end
•mixer
• synthesised local oscillator
•IF
• audio processor
• mute (squelch)
FM
Detector
RSSI
Audio
Processor
Carrier
Mute
Speaker
600Ω
}
Line
•regulator circuits
• received signal strength indicator (RSSI).
These stages are clearly identifiable in Figure 2.1. Refer to the circuit diagrams in Section 6 for further detail.
Copyright TEL 01/04/00
Page 34

B2.4 T825 Circuit Operation M820-00
2.2 Receiver Front End
(Refer to the front end, IF section and audio processor circuit diagrams (sheets 4, 3 and 2
respectively) in Section 6.)
Local Oscillator
(From Synthesiser)
RF In
66-88MHz
Harmonic
Filter
Doublet
Filter
RF
Amp
Doublet
Filter
1dB
Pad
4dB Pad
Diplexer
Post
Mixer
Amp
4-Pole
Crystal
Filter
IF
Amp
Active
FilterLFAmp
Active
Gain
Adjust
Filter
2-Pole
Crystal
Filter
10.7MHz
Diode
Detector
Mixer
(MC3372)
Smoothing
Filter
Ceramic
Filter
2nd LO
10.245MHz
Link
Mixer
Option 1
Option 2
Comparator
Limiter
(MC3372)
RSSI
Mute
Adjust
FM
Detector
(MC3372)
Buffer
Amp
Comparator
t∆
Gating
Delays
10.7MHz
Low
Pass
Filter
Audio
(To Audio
Processor)
RSSI Output
Voltage
(To D-Range
Socket)
Buffer
Amp
Mute
Adjust
Rx Gate Out
(To Audio
Processor)
Comparator
Audio Section
Figure 2.2 T825 Front End, IF and Mute Block Diagram
The incoming signal from the N-type antenna socket is fed through a 7-pole, low pass
filter with a cut frequency of approximately 100MHz. This low loss filter (typically less
than 0.5dB insertion loss over 66-88MHz) provides excellent immunity to interference
from high frequency signals.
The signal is then further filtered, using a notched doublet (L410, L409) which provides
exceptional image rejection, before being amplified by approximately 12dB (Q400). The
signal is then passed through a further doublet (L403, L402) before being presented to
the mixer via an attenuator pad (1dB for narrow bandwidth, 0dB for wide bandwidth).
Each sub-block within the front end has been designed with 50 ohm terminations for
ease of testing and fault finding.
01/04/00 Copyright TEL
Page 35

M820-00 T825 Circuit Operation B2.5
2.3 Mixer
(Refer to the front end circuit diagram (sheet 4) in Section 6 and Figure 2.2.)
IC410 is a high level mixer requiring a local oscillator (LO) drive level of +17dBm (nominal). The voltage controlled oscillator (VCO) generates a level of +22dBm (typical) and
this is fed to the mixer via a 4dB attenuator pad. A diplexer terminates the IF port of the
mixer in a good 50 ohms, thus preventing unnecessary intermodulation distortion.
2.4 IF Circuitry
(Refer to the IF section circuit diagram (sheet 3) in Section 6 and Figure 2.2.)
Losses in the mixer are made up for in a tuned, common gate, post mixer amplifier
(Q302). Several stages of amplification and filtering are employed in the IF circuitry.
The first crystal filter is a 4-pole device (&XF300 and &XF301) which is matched into 50
ohms on both its input and output ports. This stage is followed by a two-stage amplifier
(designed as a 50 ohm block) and second crystal filter (2 pole, &XF302), after which the
signal is mixed down to 455kHz with the second local oscillator (10.245MHz) by IC330.
The 455kHz signal is filtered using a six-pole ceramic filter (&XF304) before being limited and detected.
The second IF mixer, limiter, detector and RSSI is in a 16-pin IC (IC330). Quadrature
detection is employed, using L330, and the recovered audio on pin 9 of IC330 is typically 1.0V p-p for 60% system deviation.
Copyright TEL 01/04/00
Page 36

B2.6 T825 Circuit Operation M820-00
2.5 Noise Mute (Squelch)
(Refer to the audio processor and IF section circuit diagrams (sheets 2 and 3 respectively) in Section 6 and Figure 2.2.)
The noise mute operates on the detected noise outside the audio bandwidth. An operational amplifier in IC340 is used as an active band pass filter centred on 70kHz to filter
out audio components. The noise spectrum is then further amplified in a variable gain,
operational amplifier (IC340), followed by another active band pass filter. The noise is
then rectified (D330) and filtered to produce a DC voltage proportional to the noise
amplitude. The lowest average DC voltage corresponds to a high RF signal strength
and the highest DC voltage corresponds to no signal at the RF input.
The rectified noise voltage is compared with a threshold voltage set up on RV230, the
front panel "Gating Sensitivity" potentiometer. Hysteresis is introduced by the feedback
resistor (R267) to prevent the received message from being chopped when the average
noise voltage is close to the threshold. R281 and R280 determine the mute opening and
closing times and, in combination with solder links SL210 and SL220, provide three time
delay options (SL210 is linked as standard - refer to Section 3.8). The mute control signal at pin 1 of IC270 is used to disable the speaker and line audio outputs. The speaker
output can be separately enabled for test purposes by operating the front panel mute
disable switch, SW201.
2.6 Carrier Mute
(Refer to the audio processor and IF section circuit diagrams (sheets 2 and 3 respectively) in Section 6 and Figure 2.2.)
A high level carrier mute facility is also available. The RSSI (refer to Section 2.12) provides a DC voltage proportional to the signal strength. This voltage is compared with a
preset level, set up on RV235, and may be linked into the mute timing circuit using
PL250. PL250 selects either the noise mute or the carrier mute. From this point both the
noise and carrier mute circuits operate in the same manner, using common circuitry.
01/04/00 Copyright TEL
Page 37

M820-00 T825 Circuit Operation B2.7
2.7 Audio Processor
(Refer to the audio processor circuit diagram (sheet 2) in Section 6.)
From
IF Stage
Demodulated
Signal
Flat/De-
emphasis
*IF
Comp
(*IF Audio
Compensation
Circuit)
PL210
2
3
LPF
Flat/De-
emphasis
Amplifier
PL220
2
1
3
Audio 1
Output
High Pass
Filter
Audio 2
Input
RSSI
(Optional)
Speech
PL240
1
2
3
4
5
1
2
3
PL230
Carrier
Mute
Noise
Mute
Monitor
Volume
Line
Level
PL250
3
2
1
PL260
12
Speaker
Mute
Line
Mute
PL270
1
2
Driver Amp
12V
Relay
Rx Disable
Timer
Driver Amp
Figure 2.3 T825 Audio Processor Block Diagram
The recovered audio on pin 9 of IC330 is passed through a frequency compensation network and a third order elliptic active filter (IC210) to give the required response. Linking (PL220 & PL210) is available to give either a flat or de-emphasised audio response,
with de-emphasis giving a 6dB/octave roll off. The output of IC210 is split to provide
separate paths for the speaker and line outputs. The "Audio 1", Audio 2" and "Speech"
lines allow access to the receiver ’s audio path for external signalling purposes (refer to
Section 3.5).
RSSI Output
Mute Relay
Gate Output
Rx Disable
(Optional Pad)
Mute Disable
Speaker Output
Line Output
Line Monitor
The signals are passed to audio drive amplifiers IC240 and IC260. Under muted conditions the inputs of these amplifiers are shunted to ground via transistors Q230 and Q290
respectively. The audio output of IC240 has a DC component which is removed by
C249, and this then drives a speaker directly. The output of IC260 is fed into a line transformer to provide a balanced 2-wire or 4-wire, 600 ohm output.
The speaker volume is set using the front panel "Monitor Volume" knob (RV205) and the
line level is set using the recessed "Line Level" potentiometer (RV210).
The red front panel "Gate" LED (D250) indicates the status of the mute circuit. When a
signal above the mute threshold is received, the LED is illuminated. The "Monitor
Mute" switch (SW201) on the front panel opens the mute, allowing continuous monitoring of the audio signal (on = audio muted; off = audio unmuted).
The mute control line is available on pads 234 and 231 ("RX GATE OUT") for control of
external circuitry. A high (9V) indicates that the audio is disabled and a low (0V) indicates that a signal above the mute threshold level is being received.
Copyright TEL 01/04/00
Page 38

B2.8 T825 Circuit Operation M820-00
The audio can also be disabled using the "RX-DISABLE" inputs, pads 225 or 228, having
connected the "RX-DISABLE" link between pins 1 & 2 of PL260. An adjustable time
delay (RV220) is provided on these lines. In order to disable the audio, either pad must
be pulled to 0V.
An undedicated relay is provided (RL210) for transmitter keying or other functions and
this can be operated from the mute line by linking pins 1 & 2 of PL270.
2.8 Power Supply And Regulators
(Refer to the regulators circuit diagram (sheet 6) in Section 6.)
13.8V Nom.
From Rear
D-Range 1
DC
Crowbar
Diode
5V
Reg
Amp
Switching
PS
5V Dig
Reg
LVI
LVI
µP
Reset
13.8V
Nom.
5V 5V Dig9V 20V
Figure 2.4 T825 Power Supply And Regulators Block Diagram
The T825 is designed to operate off a 10.8-16V DC supply (13.8V nominal). A 5.3V regulator (IC630) runs directly from the 13.8V rail, driving much of the synthesiser circuitry.
It is also used as the reference for a DC amplifier (IC640, Q630 & Q620) which provides
a medium current capability 9V supply.
A switching power supply, based on Q670 and Q660, runs off the 9V supply and provides a low current capability +20V supply. This is used to drive the synthesiser loop
filter (IC740), giving a VCO control voltage of up to 20V.
The 13.8V supply drives both output audio amplifiers without additional regulation. A
separate 5V regulator (IC610) drives the microprocessor and associated digital circuitry.
The output of this regulator is monitored by the Low Voltage Interrupt (LVI) circuit
(IC650).
A crowbar diode is fitted for protection against connection to a power supply of incorrect polarity. It also provides transient overvoltage protection.
Note:
A fuse must be fitted in the power supply line for the diode to provide effective protection.
01/04/00 Copyright TEL
Page 39

M820-00 T825 Circuit Operation B2.9
2.9 Microcontroller
(Refer to the microcontroller circuit diagram (sheet 8) in Section 6.)
Watchdog Timer
& LVI
Watchdog
EEPROM
Microcontroller Cavity
Channel
Select
Port
Auxiliary
Output
Port
Synthesiser
12.8MHz
Clock
External
Serial
Port
Audio In
Speech
5V Digital
Regulator
5V Reset
Microcontroller
Converter
CTCSS
Decoder
Figure 2.5 T825 Microcontroller Block Diagram
Overall system control of the T825 is accomplished by the use of a member of the 80C51
family of microcontrollers (IC810) which runs from internal ROM and RAM. Four ports
are available for input/output functions.
Non-volatile data storage is achieved by serial communication with a 16kBit EEPROM
(IC820). This serial bus is also used by the microcontroller to program the synthesiser
(IC740).
The main tasks of the microcontroller are as follows:
• program the synthesiser;
• interface with the PGM800Win programming software at 9600 baud via the
serial communication lines on D-range 1 (PL100) & D-range 2;
• monitor channel change inputs from D-range 2;
• generate timing waveforms for CTCSS detection;
• coordinate and implement timing control of the receiver;
• control the front panel "Supply" LED.
Copyright TEL 01/04/00
Page 40

B2.10 T825 Circuit Operation M820-00
2.10 Synthesised Local Oscillator
(Refer to the synthesiser circuit diagram (sheet 7) in Section 6 and the VCO circuit diagram in Part E.)
12.8MHz
Reference
Oscillator
Serial
Bus
FREQUENCY SYNTHESISER IC
Reference
Divider
/R
f
ref
Clk
Data
En
Controller
Phase
Detector
Charge
Pump
Programmable
Divider
/N
Loop
Filter
Prescaler
64/65
VCO Buffer
f
in
Buffer
VCO PCB
Output
Buffer
+22dBm
Figure 2.6 T825 Synthesiser Block Diagram
The synthesiser (IC740) employs a phase-locked loop (PLL) to lock a voltage controlled
oscillator (VCO) to a given reference frequency. The synthesiser receives the divider
information from the control microprocessor via a 3-wire serial bus (clock, data, enable).
When the data has been latched in, the synthesiser processes the incoming signals from
the VCO buffer (f
) and the reference oscillator (f
in
ref
).
A reference oscillator at 12.8MHz (=IC700) is buffered (IC710) and divided down to
6.25kHz or 5kHz within the synthesiser IC (IC740).
L.O.
A buffered output of the VCO is divided with a prescaler and programmable divider
which is incorporated into the synthesiser chip (IC740). This signal is compared with
the reference signal at the phase detector (also part of the synthesiser chip). The phase
detector outputs drive a balanced charge pump circuit (Q760, Q770, Q775, Q780, Q785)
and active loop filter (IC750, Q790) which produces a DC voltage between 0V and 20V
to tune the VCO. This VCO control line is further filtered (R510, C505) to attenuate
noise and other spurious signals. Note that the VCO frequency increases with increasing control voltage.
01/04/00 Copyright TEL
Page 41

M820-00 T825 Circuit Operation B2.11
2.11 VCO
(Refer to the VCO circuit diagram in Part E.)
The VCO transistor (Q1) operates in a common source configuration, with an LC tank
circuit coupled between its gate and drain to provide the feedback necessary for oscillation. The VCO control voltage from the loop filter (IC750) is applied to the varicaps
(D1-D6) to facilitate tuning within a 2MHz band of frequencies. A trimcap (&VC1-RX)
is used for coarse tuning of the VCO. The output from the oscillator circuit drives a cascode amplifier stage (Q2, Q3) which supplies +10dBm (typically) to a further stage of
amplification, Q5. This is the final amplifier on the VCO PCB, and delivers +22dBm
(typically) to the receiver mixer input pad.
A low level "sniff" is taken from the input to Q5 and used to drive the divider buffer for
the synthesiser (IC740).
The VCO operates at the actual frequency required by the first mixer, i.e. there are no
multiplier stages.
The VCO frequency spans from 76.7-98.7MHz and is tuned to 10.7MHz above the
desired receive frequency (high side injection) to produce a 10.7MHz IF signal at the
output of the mixer.
2.12 Received Signal Strength Indicator (RSSI)
(Refer to the IF section circuit diagram (sheet 3) in Section 6.)
The RSSI provides a DC voltage proportional to the signal level at the receiver input and
is an on-chip function of IC330. RSSI level adjustment, temperature compensation and
buffering is provided by IC332 and IC333. The RSSI voltage is available at D-range 1
(PL100 pin 5).
The RSSI also provides the capability for high level signal strength muting, which may
be selected on PL250 (refer to Section 3.5). The mute threshold may be set between
-115dBm and -70dBm at RV235.
Copyright TEL 01/04/00
Page 42

B2.12 T825 Circuit Operation M820-00
01/04/00 Copyright TEL
Page 43

M820-00 T825 Initial Tuning & Adjustment B3.1
3 T825 Initial Tuning & Adjustment
Caution: This equipment contains CMOS devices which are susceptible to dam-
age from static charges. Refer to Section 1.2 in Part A for more information on anti-static procedures when handling these devices.
The following section describes both short and full tuning and adjustment procedures
and provides information on:
• channel programming
• selecting the required audio links
• synthesiser alignment
• receiver front end and IF alignment
• noise and carrier level mute adjustment
• setting the line and monitor output levels
• setting up the RSSI.
Note:
Refer to Section 6 where the parts lists, grid reference index and diagrams will provide
detailed information on identifying and locating components and test points on the
main PCB. The parts list and diagrams for the VCO PCB are in Part E.
Unless otherwise specified, the term "PGM800Win" used in this and following sections refers to version 2.00 and later of the software.
Section Title Page
3.1 Introduction 3.3
3.2 Channel Programming 3.3
3.3 Test Equipment Required 3.4
3.4
3.4.1
3.4.2
3.4.3
3.4.4
3.4.4.1
3.4.4.2
Short Tuning Procedure
Introduction
Synthesiser Alignment
Front End Alignment
Mute Adjustment
Noise Mute
Carrier Level Mute
3.5
3.5
3.5
3.5
3.6
3.6
3.6
3.4.5
3.4.6
3.4.6.1
3.4.6.2
3.4.6.3
3.4.7
Copyright TEL 01/04/00
Line Amplifier Output
CTCSS
Decoder Operation
Opening Sinad
High Pass Filter
RSSI (If Used)
3.6
3.7
3.7
3.7
3.7
3.8
Page 44

B3.2 T825 Initial Tuning & Adjustment M820-00
Section Title Page
3.5
3.5.1
3.5.2
3.6 Synthesiser Alignment 3.10
3.7 Alignment Of Receiver Front End And IF 3.10
3.8 Gating Delay 3.12
3.9 Noise Mute Adjustment 3.12
3.10 Carrier Level Mute 3.12
3.11
3.11.1
3.11.2
3.12
3.12.1
3.12.2
3.12.3
Audio Processor Links
General
Audio Processor Linking Details For CTCSS
Audio Processor
Line Amplifier Output
Monitor Amplifier Output (Speaker Output)
CTCSS
Decoder Operation
Opening Sinad
High Pass Filter
3.8
3.8
3.9
3.13
3.13
3.13
3.13
3.13
3.13
3.14
3.13 RSSI 3.14
Figure Title Page
3.1
3.2
T825 Test Equipment Set-up For Short Tuning Procedure
T825 Test Equipment Set-up For Full Tuning & Adjustment
Procedure
3.4
3.4
01/04/00 Copyright TEL
Page 45

M820-00 T825 Initial Tuning & Adjustment B3.3
3.1 Introduction
When you receive your T825 receiver it will be run up and working on a particular frequency (the "default channel")
2MHz switching range (i.e. ±1MHz from the factory programmed frequency), you
should only need to reprogram the receiver with the PGM800Win software (refer to the
PGM800Win programming kit and Section 3.2 below).
However, if you want to switch to a frequency outside the 2MHz switching range, you
will have to reprogram and re-tune the receiver to ensure correct operation. In this case
you should carry out the short tuning procedure described in Section 3.4.
If you have carried out repairs or other major adjustments, you must carry out the full
tuning and adjustment procedure described in this section (except for Section 3.4).
1
. If you want to switch to a frequency that is within the
3.2 Channel Programming
You can program up to 128 channel frequencies into the receiver’s EEPROM memory
(IC820) by using the PGM800Win software package and an IBM
PGM800Win to select the receiver’s current operating frequency (or "default channel").
If the receiver is installed in a rack frame, you can program it via the programming port
in the speaker panel. However, you can also program the receiver before it is installed
in a rack frame as follows:
PC. You can also use
• by using a T800-01-0010 calibration test unit;
•via D-range 1;
• via D-range 2 (standard T800-03-0000 auxiliary D-range only);
• via SK805 (internal Micromatch connector).
If you do not use the T800-01-0010, you will have to connect the PC to the receiver via a
module programming interface (such as the T800-01-0004).
For a full description of the channel programming procedure, refer to the PGM800Win
programming software user’s manual.
Note:
When an auxiliary D-range kit (D-range 2 - T800-03-0000) is fitted, you can
also select a channel with an external switch, such as the DIP switch on the
rack frame backplane PCB. Refer to Part C in the T800 Series Ancillary
Equipment Service Manual (M800-00-101 or later issue) or consult your
nearest Tait Dealer or Customer Service Organisation for further details.
1. Use the "Read Module" function in PGM800Win to find out what the default channel is.
Copyright TEL 01/04/00
Page 46

B3.4 T825 Initial Tuning & Adjustment M820-00
3.3 Test Equipment Required
You will need the following test equipment:
• computer with PGM800Win installed
• T800 programming kit
• module programming interface (e.g. T800-01-0004 - optional)
• 13.8V power supply
• digital multimeter
•audio signal generator
• RF signal generator
or RF test set (optional)
• audio voltmeter
•sinad meter
• oscilloscope
not needed for short tuning procedure
• distortion meter
• T800-01-0010 calibration test unit (optional)
•4Ω speaker (not needed if the calibration test unit is used)
Figure 3.1 and Figure 3.2 show
typical test equipment set-ups
(with and without a T800-01-0010
calibration test unit).
RF Signal
Generator
Audio Signal
Generator
PGM800Win
PSU
External
Modulation
+13.8V
-Ve
RF In
Receiver
T800
Calibration
Test Unit
Line
Line
Sinad
Meter
Audio
Voltmeter
Figure 3.1 T825 Test Equipment Set-up For Short Tuning Procedure
PSU
RF Signal
Generator
External
Modulation
Audio Signal
Generator
PGM800Win
+13.8V
-Ve
RF In
Receiver
GND
via module programming interface
Serial
(e.g. T800-01-0004)
Com
Line
Line
Speaker
Output
600Ω
Distortion
Meter
Sinad
Meter
Audio
Voltmeter
Oscilloscope
CH1
ND
G
(Or 4Ω Resistor)
H2
C
Probe
4Ω Speaker
Figure 3.2 T825 Test Equipment Set-up For Full Tuning & Adjustment Procedure
01/04/00 Copyright TEL
Page 47

M820-00 T825 Initial Tuning & Adjustment B3.5
3.4 Short Tuning Procedure
Use this procedure only if you want to reprogram the receiver to a frequency outside the
2MHz switching range and do not intend to carry out any other major adjustments or
repairs.
3.4.1 Introduction
Reprogram the operating frequency as described in the PGM800Win programming kit (refer to Section 3.2).
Remove the top cover (nearest the handle).
Set up the test equipment as described in Section 3.3.
Set the links in the audio processor section as required (refer to Section 3.5).
3.4.2 Synthesiser Alignment
• Connect a high impedance voltmeter to PL4-1 or the junction of L1 & R1 in the
VCO (this measures the synthesiser loop voltage).
• Single Channel Tune VCO trimmer &VC1-RX for a synthesiser loop volt-
age of 9V.
Multichannel Tune VCO trimmer &VC1-RX for a synthesiser loop volt-
age of 9V on the middle channel.
If there is no middle channel, tune &VC1-RX so that the
channels are symmetrically placed around a loop voltage
of 9V.
All channels should lie within the upper and lower limits
of 13V and 5V respectively.
Do not attempt to program channels with a greater frequency separation than the specified switching range of
2MHz.
3.4.3 Front End Alignment
Note 1:
Note 2:
Copyright TEL 01/04/00
In this and following sections deviation settings are given first for wide
bandwidth sets, followed by settings in brackets for narrow bandwidth sets
[ ].
For multichannel operation align the receiver on a frequency in the middle
of the required band.
Set RV230 (front panel gating sensitivity) fully clockwise.
Page 48

B3.6 T825 Initial Tuning & Adjustment M820-00
Inject a strong on-channel RF signal with ±3kHz deviation [±1.5kHz] at 1kHz into
the antenna socket and adjust front end doublets L410, L409, L403 & L402 to give
best sinad.
Continually decrease the RF level to maintain 12dB sinad.
Readjust L410, L409, L403 & L402 to give best sinad.
With PL210 and PL220 connected for de-emphasised audio response, the receiver
sensitivity should be better than -117dBm, assuming that the audio levels are not
being overdriven (refer to Section 3.4.5).
3.4.4 Mute Adjustment
Carry out the one of the following sets of instructions according to the mute option you
have selected.
3.4.4.1 Noise Mute
Connect pins 1 & 2 of PL250 to enable the noise mute.
Set the RF level to -105dBm with ±3kHz deviation [±1.5kHz] at 1kHz.
Set RV230 (front panel gating sensitivity) fully anticlockwise.
Adjust RV331 (noise mute gain) fully anticlockwise to close the mute (if necessary
turn off the RF signal and then turn it on again).
Rotate RV331 clockwise until the mute just opens.
Reset the signal generator for the required opening sinad and adjust RV230 clockwise until the mute just opens.
3.4.4.2 Carrier Level Mute
Connect pins 2 & 3 of PL250 to enable the carrier mute and disable the noise mute.
Apply an on-channel signal from the RF generator at the required mute opening
level with ±3kHz deviation [±1.5kHz] at 1kHz.
Adjust RV235 (carrier mute) clockwise to close the mute (if necessary, momentarily turn off the RF), then slowly adjust it anticlockwise until the mute just opens.
The mute should now open at this preset level.
3.4.5 Line Amplifier Output
Apply an on-channel signal from the RF generator at a level of -70dBm with
±3kHz deviation [±1.5kHz] at 1kHz.
Adjust RV210 (front panel line level) to set the line level to the required output
level.
01/04/00 Copyright TEL
Page 49

M820-00 T825 Initial Tuning & Adjustment B3.7
3.4.6 CTCSS
3.4.6.1 Decoder Operation
Program a CTCSS tone on the default channel using PGM800Win.
Set the RF signal generator output to -70dBm.
Modulate the generator with both:
• a 1kHz tone at ±3kHz deviation [±1.5kHz];
• and a CTCSS tone at the programmed frequency at ±500Hz deviation
[±300Hz].
Check that the receiver gate opens and the front panel "Gate" LED is on.
3.4.6.2 Opening Sinad
Ensure a CTCSS tone is present (as described in Section 3.4.6.1).
Adjust RV230 (front panel gating sensitivity) fully clockwise.
Reduce the RF signal level to -110dBm.
Observe the sinad meter and reduce the RF level until the receiver mute closes.
Slowly increase the signal level until the receiver mute just opens and stays open.
With PL240 pins 1 & 2 linked (high pass filter bypassed), check that the sinad is
less than 6dB.
Reset the signal generator for the required opening sinad, adjust RV230 fully anticlockwise, then clockwise until the mute just opens.
3.4.6.3 High Pass Filter
Ensure a CTCSS tone is present (as described in Section 3.4.6.1).
Set the audio processor links as follows:
Plug Link Function
PL210 1 - 2
de-emphasised response
PL220 2 - 3
PL230 2 - 3 audio from internal CTCSS speech filter
PL240 4 - 5 audio input via PL230 or I/O pad
Reset the RF signal generator output to -70dBm and note the line level (measurement A).
Copyright TEL 01/04/00
Page 50

B3.8 T825 Initial Tuning & Adjustment M820-00
Reduce the 1kHz generator to zero output and measure the line level again (measurement B).
Check that measurement B is at least 30dB below measurement A.
3.4.7 RSSI (If Used)
Align the receiver as instructed in Section 3.6 and Section 3.7.
Apply an on-channel signal from the RF generator at a level of -100dBm with
±3kHz deviation [±1.5kHz] at 1kHz.
Adjust RV330 (RSSI level) to give 4.5V RSSI output on pin 5 of D-range 1 (PL100)
when measured with a high impedance DMM.
3.5 Audio Processor Links
3.5.1 General
Use the following table to set up the audio processor to the configuration you require.
You should set the audio processor links before carrying out the receiver alignment.
The factory settings are shown in brackets [ ].
Plug Link Function
PL210
PL220
PL230
PL240
[1 - 2]
2 - 3
1 - 2
[2 - 3]
a
a
1 - 2
[2 - 3]
3 - 4
1 - 2
[2 - 3]
or
3 - 4
audio from internal CTCSS speech filter
de-emphasised response
flat response
flat response
de-emphasised response
audio input via AUDIO-2 pad
audio input via I/O pad P250
bypass high pass filter
300Hz high pass filter in circuit
4 - 5
PL250
PL260
01/04/00 Copyright TEL
[1 - 2]
2 - 3
1 - 2
[2 - 3]
audio input via PL230 or I/O pad
noise mute
carrier mute
RX-DISABLE link
not connected
Page 51

M820-00 T825 Initial Tuning & Adjustment B3.9
Plug Link Function
PL270
a. Refer to Section 3.5.2 for further details.
[1 - 2]
2 - 3
relay link
not connected
3.5.2 Audio Processor Linking Details For CTCSS
You must connect the audio processor links correctly according to the CTCSS option
used, as shown in the table below.
CTCSS Option PL230 PL240
standard, no CTCSS 2 - 3 2 - 3
received CTCSS + speech
passed to line output
high pass filtered speech,
internal CTCSS detection
external CTCSS detection 1 - 2 4 - 5
3 - 4 1 - 2
2 - 3 4 - 5
The conditions stated in the above table are defined as follows:
• standard, no CTCSS - no CTCSS or other sub-audio signalling used
- audio bandwidth 300Hz to 3kHz
- hum & noise -55dB
• received CTCSS tone - tone and speech transmitted down 600 ohm line
+ speech to line output - audio bandwidth 10Hz to 3kHz
- hum & noise -45dB
• high pass filtered speech - 400Hz to 3kHz
+ internal CTCSS detection - hum & noise -30dB with 250.3Hz tone present
• external CTCSS detection - decoding performed through the receiver (but
externally)
- speech injected back into receiver via "AUDIO-2"
and sent down 600 ohm line
Note 1:
AUDIO-2 is available on D-range 1 (PL100) pin 7 via the link resistor R160.
Although PL100 pin 7 is already assigned to SERIAL-COM, this can be disabled by removing R808.
Note 2:
External CTCSS units can connect in series with the audio chain via
AUDIO-1 and AUDIO-2.
Copyright TEL 01/04/00
Page 52

B3.10 T825 Initial Tuning & Adjustment M820-00
3.6 Synthesiser Alignment
• Ensure that the receiver has been programmed with the required frequencies
using PGM800Win software.
• Connect a high impedance voltmeter to PL4-1 or the junction of L1 & R1 in the
VCO (this measures the synthesiser loop voltage).
• Single Channel Tune VCO trimmer &VC1-RX for a synthesiser loop volt-
age of 9V.
Multichannel Tune VCO trimmer &VC1-RX for a synthesiser loop volt-
age of 9V on the middle channel.
If there is no middle channel, tune &VC1-RX so that the
channels are symmetrically placed around a loop voltage
of 9V.
All channels should lie within the upper and lower limits
of 13V and 5V respectively.
Do not attempt to program channels with a greater frequency separation than the specified switching range of
2MHz.
• The TCXO (=IC700) output frequency should be trimmed when the IF is tuned refer to Section 3.7.
3.7 Alignment Of Receiver Front End And IF
Note 1:
Note 2:
In this and following sections deviation settings are given first for wide
bandwidth sets, followed by settings in brackets for narrow bandwidth sets
[ ].
Before carrying out this alignment procedure, check that the solder links
in the receiver front end are set as described in the following table:
Frequency Range Linked Not Linked
66-76MHz #SL400
#SL402
#SL403
#SL405
76-88MHz #SL401
#SL404
#SL401
#SL404
#SL400
#SL402
#SL403
#SL405
Align the synthesiser as instructed in Section 3.6. For multichannel operation
align the receiver on a frequency in the middle of the required band.
01/04/00 Copyright TEL
Page 53

M820-00 T825 Initial Tuning & Adjustment B3.11
Set RV230 (front panel gating sensitivity) fully clockwise.
Inject a strong on-channel RF signal with ±3kHz deviation [±1.5kHz] at 1kHz into
the antenna socket and adjust front end doublets L410, L409, L403 & L402 to give
best sinad.
Continually decrease the RF level to maintain 12dB sinad.
Tune quad coil L330 for maximum audio level.
While maintaining a low level unmodulated RF input to the receiver, loosely couple into the first IF an additional high level signal at 10.7MHz - you will hear a
beat note.
Trim the synthesiser TCXO (=IC700) for zero beat.
Note:
If a second oscillator is not available, you can connect a frequency counter to
IC710 pin 6 (i.e. after the TCXO buffer) via an oscilloscope probe to measure
the TCXO frequency directly (12.8MHz). At this point the voltage level is
approximately 4V p-p.
Readjust L410, L409, L403 & L402 to give best sinad.
Change the RF signal level to -70dBm and modulate with ±3kHz deviation
[±1.5kHz] at 1kHz.
Connect plugs PL210 and PL220 to give a flat audio response (refer to Section 3.5).
Adjust quad coil L330 and CV300 for minimum audio distortion.
Check that the distortion reading is:
wide bandwidth ≤2%
narrow bandwidth ≤4%.
If required, reconnect plugs PL210 and PL220 to give a de-emphasised audio
response and check that the distortion reading is ≤2% (both bandwidths).
Reduce the RF level until 12dB sinad is reached. The receiver sensitivity should
be better than -117dBm (de-emphasised) or -111dBm (flat), assuming that the
audio levels are not being overdriven (refer to Section 3.11).
Copyright TEL 01/04/00
Page 54

B3.12 T825 Initial Tuning & Adjustment M820-00
3.8 Gating Delay
Two solder links (SL210 & SL220) are provided on the top of the PCB to allow three gate
delay time options, as shown in the table below.
SL210 SL220 Closing Delay
linked not linked <50ms*
not linked linked <25ms
not linked not linked <20ms
*Factory setting.
3.9 Noise Mute Adjustment
Connect pins 1 & 2 of PL250 to enable the noise mute.
Align the receiver as instructed in Section 3.6 and Section 3.7.
Set the RF level to -105dBm with ±3kHz deviation [±1.5kHz] at 1kHz.
Set RV230 (front panel gating sensitivity) fully anticlockwise.
Adjust RV331 (noise mute gain) fully anticlockwise to close the mute (if necessary
turn off the RF signal and then turn it on again).
Rotate RV331 clockwise until the mute just opens.
Reset the signal generator for the required opening sinad and adjust RV230 clockwise until the mute just opens.
3.10 Carrier Level Mute
Connect pins 2 & 3 of PL250 to enable the carrier mute and disable the noise mute.
Apply an on-channel signal from the RF generator at the required mute opening
level with ±3kHz deviation [±1.5kHz] at 1kHz.
Adjust RV235 (carrier mute) clockwise to close the mute (if necessary, momentarily turn off the RF), then slowly adjust it anticlockwise until the mute just opens.
The mute should now open at this preset level.
01/04/00 Copyright TEL
Page 55

M820-00 T825 Initial Tuning & Adjustment B3.13
3.11 Audio Processor
3.11.1 Line Amplifier Output
Apply an on-channel signal from the RF generator at a level of -70dBm with
±3kHz deviation [±1.5kHz] at 1kHz.
Adjust RV210 (front panel line level) to give an output of +10dBm on the 600 ohm
line.
Check for any clipping or distortion on the oscilloscope.
Set the line level to the required output level.
3.11.2 Monitor Amplifier Output (Speaker Output)
Adjust RV205 (front panel monitor volume) to give an output of 2V rms into a 4
ohm resistive load.
Check for any clipping or distortion on the oscilloscope.
Switch to a 4 ohm speaker and adjust RV205 to the required level.
3.12 CTCSS
3.12.1 Decoder Operation
Program a CTCSS tone on the default channel using PGM800Win.
Set the RF signal generator output to -70dBm.
Modulate the generator with both:
• a 1kHz tone at ±3kHz deviation [±1.5kHz];
• and a CTCSS tone at the programmed frequency at ±500Hz deviation
[±300Hz].
Check that the receiver gate opens and the front panel "Gate" LED is on.
3.12.2 Opening Sinad
Ensure a CTCSS tone is present (as described in Section 3.12.1).
Adjust RV230 (front panel gating sensitivity) fully clockwise.
Copyright TEL 01/04/00
Page 56

B3.14 T825 Initial Tuning & Adjustment M820-00
Reduce the RF signal level to -110dBm.
Observe the sinad meter and reduce the RF level until the receiver mute closes.
Slowly increase the signal level until the receiver mute just opens and stays open.
With PL240 pins 1 & 2 linked (high pass filter bypassed), check that the sinad is
less than 6dB.
Reset the signal generator for the required opening sinad, adjust RV230 fully anticlockwise, then clockwise until the mute just opens.
3.12.3 High Pass Filter
Ensure a CTCSS tone is present (as described in Section 3.12.1).
Set the audio processor links as follows:
Plug Link Function
PL210 1 - 2 de-emphasised response
PL230 2 - 3 audio from internal CTCSS speech filter
PL240 4 - 5 audio input via PL230 or I/O pad
Reset the RF signal generator output to -70dBm and note the line level (measurement A).
Reduce the 1kHz generator to zero output and measure the line level again (measurement B).
Check that measurement B is at least 30dB below measurement A.
3.13 RSSI
Align the receiver as instructed in Section 3.6 and Section 3.7.
Apply an on-channel signal from the RF generator at a level of -100dBm with
±3kHz deviation [±1.5kHz] at 1kHz.
Adjust RV320 (RSSI level) to give 4.5V RSSI output on pin 5 of D-range 1 (PL100)
when measured with a high impedance DMM.
01/04/00 Copyright TEL
Page 57

M820-00 T825 PCB Information B6.1.1
6 T825 PCB Information
Caution: This equipment contains CMOS devices which are susceptible to damage from
static charges. Refer to Section 1.2 in Part A for more information on anti-static
procedures when handling these devices.
This section provides the following information on the T825 receiver:
•parts lists
• grid reference index
•PCB layouts
• circuit diagrams.
Section Title IPN Page
6.1 Introduction 6.1.3
6.2 T825 Receiver PCB 220-01446-03 6.2.1
Copyright TEL 01/04/00
Page 58

B6.1.2 T825 PCB Information M820-00
01/04/00 Copyright TEL
Page 59

M820-00 T825 PCB Information B6.1.3
6.1 Introduction
Product Type Identification
You can identify the receiver type by checking the product code printed on a label on the rear of the
chassis (product codes are explained in Section 1.3 in this Part of the manual, and Figure 1.1 in Part
A shows typical labels). You can further verify the receiver type by checking the placement of an
SMD resistor in the table that is screen printed onto the top side of the PCB, similar to the example
drawn below. In this example, the resistor indicates that the product was built as a T825-10-XXXX.
825- PRODUCT TYPE
825- 825-10 825825- 825- 825-
PRODUCT TYPE 825-15 825-
Note:
The only function of this resistor is to indicate the product type. It has no effect on the
circuitry or operation of the receiver.
PCB Identification
All PCBs are identified by a unique 10 digit “internal part number” (IPN), e.g. 220-12345-00, which
is screen printed onto the PCB (usually on the top side), as shown in the example below:
The last 2 digits of this number define the issue status, which starts at 00 and increments through 01,
02, 03, etc. as the PCB is updated. Some issue PCBs never reach full production status and are therefore not included in this manual. A letter following the 10 digit IPN has no relevance in identifying
the PCB for service purposes.
Note:
It is important that you identify which issue PCB you are working on so that you can
refer to the appropriate set of PCB information.
Copyright TEL 01/04/00
Page 60

B6.1.4 T825 PCB Information M820-00
y
Parts Lists
The 10 digit numbers (000-00000-00) in this Parts List are “internal part numbers” (IPNs). We can
process your spare parts orders more efficiently and accurately if you quote the IPN and provide a
brief description of the part.
The components listed in this parts list are divided into two main types: those with a circuit reference (e.g. C2, D1, R121, etc.) and those without (miscellaneous and mechanical).
Those with a circuit reference are grouped in alphabetical order and then in numerical order within
each group. Each component entry comprises three or four columns, as shown below:
circuit reference lists components
in alphanumeric
order
variant column indicates that this is
a variant component
which is fitted only to
the product type listed
description gives a brief description
of the component
Internal Part Number order the component
this number
b
The mechanical and miscellaneous section lists the variant and common parts in IPN order.
Parts List Amendments
At the front of the parts list is the Parts List Amendments box (an example of which is shown
below). This box contains a list of component changes which took place after the parts list and diagrams in this section were compiled. These changes (e.g. value changes, added/deleted components, etc.) are listed by circuit reference in alphanumeric order and supersede the information
given in the parts list or diagrams. Components without circuit references are listed in IPN order.
The number in brackets at the end of each entry refers to the Tait internal Change Order document.
IPN of new
component
Parts List Amendments
R306 Changed from 180Ω to 560Ω (036-13560-00) to increase sensitivity (71003).
Change Order
number
circuit reference
or IPN
01/04/00 Copyright TEL
description
of change
Page 61

M820-00 T825 PCB Information B6.1.5
Variant Components
A variant component is one that has the same circuit reference but different value or specification in
different product types. Where two products share the same PCB, the term “variant” is also used to
describe components unplaced in one product. Variant components have a character prefix, such as
“&”, “=” or “#”, before the circuit reference (e.g. &R100).
The table below explains the variant prefixes used in T800 Series II products:
If the variant prefix is. . . the component will. . .
& change according to channel spacing
= change according to frequency stability
# change according to frequency range
% change or be placed/unplaced for special applications
*
be unplaced in one product
(where two products share the same PCB)
Grid Reference Index
This section contains a component grid reference index to help you find components and labelled
pads on the PCB layouts and circuit diagrams. This index lists the components and pads in alphanumeric order, along with the appropriate alphanumeric grid references, as shown below:
PCB layout
components listed
in alphanumeric order
reference
circuit diagram
reference
component location
on the sheet
sheet number
component location
on the layer
layer number 1 = top side layer
2 = bottom side layer
Copyright TEL 01/04/00
Page 62

B6.1.6 T825 PCB Information M820-00
t
s
Using CAD Circuit Diagrams
Reading a CAD circuit diagram is similar to reading a road map, in that both have an alphanumeric
border. The circuit diagrams in this manual use letters to represent the horizontal axis, and numbers for the vertical axis. These circuit diagram “grid references” are useful in following a circuit
that is spread over two or more sheets.
When a line representing part of the circuitry is discontinued, a reference will be given at the end of
the line to indicate where the rest of the circuitry is located, as shown below. The first digit refers to
the sheet number and the last two characters refer to the location on that sheet of the continuation of
the circuit (e.g. 1R3).
hese grid references
how where the circuit
is continued
DISCRIMINATOR
1R3
2R9
2R9
8A2
IF-SIG
4R4
%R338
100
C301
4N7
C369
100P
L310
33U
C371
10U
R339
100K
R303
D
S
12
G
01/04/00 Copyright TEL
Page 63

M820-00 T825 PCB Information B6.2.1
6.2 T825 Receiver PCB
This section contains the following information.
IPN Section Page
220-01446-03
Parts List
Mechanical & Miscellaneous Parts
Grid Reference Index
PCB Layout - Top Side
PCB Layout - Bottom Side
Receiver Overview Diagram
Audio Processor Circuit Diagram
IF Section Circuit Diagram
Front End Circuit Diagram
VCO Section Circuit Diagram
Regulators Circuit Diagram
Synthesiser Circuit Diagram
Microcontroller Circuit Diagram
Harmonic Filter Circuit Diagram
6.2.3
6.2.9
6.2.11
6.2.15
6.2.16
6.2.17
6.2.18
6.2.19
6.2.20
6.2.21
6.2.22
6.2.23
6.2.24
6.2.25
Copyright TEL 01/04/00
Page 64

B6.2.2 T825 PCB Information M820-00
01/04/00 Copyright TEL
Page 65

IPN 220-01446-03
M820-00 T825 PCB Information
B6.2.3
T825 Parts List (IPN 220-01446-03)
How To Use This Parts List
The components listed in this parts list are divided into two main types: those with a circuit reference (e.g. C2, D1, R121, etc.) and
those without (miscellaneous and mechanical).
Those with a circuit reference are grouped in alphabetical order and then in numerical order within each group. Each component
entry comprises three or four columns: the circuit reference, variant (if applicable), IPN and description. A number in the variant column indicates that this is a variant component which is fitted only to the product type listed. Static sensitive devices are indicated by
an (S) at the start of the description column.
The miscellaneous and mechanical section lists the variant and common par ts in IPN order. Where possible, a number in the legend
column indicates their position in the mechanical assembly drawing.
The Parts List Amendments box below lists component changes that took place af ter the parts list and diagrams in this section were
compiled. These changes (e.g. value changes, added/deleted components, etc.) are listed by circuit reference in alphanumeric order
and supersede the information given in the parts list or diagrams. Components without circuit references are listed in IPN order.
Parts List Amendments
There were no amendments to the parts list at the time of publication.
Copyright TEL 01/04/00
Page 66

IPN 220-01446-03
B6.2.4
Parts List Amendments - Continued
This page is provided for entering future amendments to the parts list.
T825 PCB Information M820-00
01/04/00 Copyright TEL
Page 67

IPN 220-01446-03
M820-00 T825 PCB Information
Ref Var IPN D escripti on Ref Var IPN Description
C201 014-08100-00 CAP TANT CHIP 10M 16VW +-20%
C203 015-25100-08 CAP CER 0805 10N 10% X7R 50V
C205 015-24470-08 CAP CER 0805 4N7 10% X7R 50V
C207 014-07100-02 CAP TANT CHIP 1U0 3.2 X 1.6MM
C209 016-08470-03 CAP SMD ELEC 47mF 20% 25v 8.3m
C210 015-24100-08 CAP CER 0805 1N 10% X7R 50V
C211 015-24470-08 CAP CER 0805 4N7 10% X7R 50V
C212 015-26100-08 CAP CER 0805 100N 10% X7R 50V
C213 015-25470-08 CAP CER 0805 47N 10% X7R 50V
C215 015-21220-01 CAP CER 0805 2P2+-1/4P NPO 50V
C217 015-22470-01 CAP CER 0805 47P 5% NPO 50V
C219 015-24470-08 CAP CER 0805 4N7 10% X7R 50V
C221 015-24100-08 CAP CER 0805 1N 10% X7R 50V
C222 014-08100-00 CAP TANT CHIP 10M 16VW +-20%
C223 015-26100-08 CAP CER 0805 100N 10% X7R 50V
C225 015-26100-08 CAP CER 0805 100N 10% X7R 50V
C227 015-23100-01 CAP CER 0805 100P 5% NPO 50V
C229 014-08100-00 CAP TANT CHIP 10M 16VW +-20%
C231 014-08100-00 CAP TANT CHIP 10M 16VW +-20%
C233 014-08100-00 CAP TANT CHIP 10M 16VW +-20%
C235 015-24100-08 CAP CER 0805 1N 10% X7R 50V
C237 015-24100-08 CAP CER 0805 1N 10% X7R 50V
C238 015-26100-08 CAP CER 0805 100N 10% X7R 50V
C239 016-09100-05 CAP SMD ELECT 100U 25V 20%
C240A 015-24100-08 CAP CER 0805 1N 10% X7R 50V
C240B 015-26100-08 CAP CER 0805 100N 10% X7R 50V
C240C 016-09220-01 CAP SMD ELECT 220U 35V 20%
C249 016-09470-01 L)CAP ELECT 470U 20% SMD
C251 015-26100-08 CAP CER 0805 100N 10% X7R 50V
C253 016-09100-05 CAP SMD ELECT 100U 25V 20%
C255 015-24100-08 CAP CER 0805 1N 10% X7R 50V
C257 015-24100-08 CAP CER 0805 1N 10% X7R 50V
C259 015-26100-08 CAP CER 0805 100N 10% X7R 50V
C260A 015-24100-08 CAP CER 0805 1N 10% X7R 50V
C260B 015-26100-08 CAP CER 0805 100N 10% X7R 50V
C260C 016-09220-01 CAP SMD ELECT 220U 35V 20%
C261 016-09100-05 CAP SMD ELECT 100U 25V 20%
C262 016-09100-05 CAP SMD ELECT 100U 25V 20%
C264 015-26100-08 CAP CER 0805 100N 10% X7R 50V
C266 016-07470-06 CAP SMD ELECT BI-P 4U7 50V 20%
C268 016-07470-06 CAP SMD ELECT BI-P 4U7 50V 20%
C270 015-26100-08 CAP CER 0805 100N 10% X7R 50V
C272 015-25100-08 CAP CER 0805 10N 10% X7R 50V
C273 014-08100-00 CAP TANT CHIP 10M 16VW +-20%
C274 015-26100-08 CAP CER 0805 100N 10% X7R 50V
C276 015-25470-08 CAP CER 0805 47N 10% X7R 50V
C278 015-26100-08 CAP CER 0805 100N 10% X7R 50V
C280 015-25470-08 CAP CER 0805 47N 10% X7R 50V
C286 015-24470-08 CAP CER 0805 4N7 10% X7R 50V
C300 015-25100-08 CAP CER 0805 10N 10% X7R 50V
CV300 028-01500-01 CAP TRM 1.5/5P NPO TOP ADJ
C301 015-25100-08 CAP CER 0805 10N 10% X7R 50V
C302 015-22560-01 CAP CER 0805 56P 5% NPO 50V
C303 014-08100-00 CAP TANT CHIP 10M 16VW +-20%
C304 015-25100-08 CAP CER 0805 10N 10% X7R 50V
C305 015-25100-08 CAP CER 0805 10N 10% X7R 50V
C306 015-22390-01 CAP CER 0805 39P 5% NPO 50V
C307 015-23120-01 CAP CER 0805 120P 5% NPO 50V
C308 015-23100-01 CAP CER 0805 100P 5% NPO 50V
&C309 10 015-22180-01 CAP CER 0805 18P 5% NPO 50V
&C309 15 015-22220-01 CAP CER 0805 22P 5% NPO 50V
&C310 10 015-21180-01 CAP CER 0805 1P8+-1/4P NPO 50V
&C310 15 015-22180-01 CAP CER 0805 18P 5% NPO 50V
&C311 10 015-22180-01 CAP CER 0805 18P 5% NPO 50V
&C311 15 015-22220-01 CAP CER 0805 22P 5% NPO 50V
C312 015-23100-01 CAP CER 0805 100P 5% NPO 50V
C313 015-25100-08 CAP CER 0805 10N 10% X7R 50V
C314 014-08100-00 CAP TANT CHIP 10M 16VW +-20%
C315 015-25100-08 CAP CER 0805 10N 10% X7R 50V
C316 015-25100-08 CAP CER 0805 10N 10% X7R 50V
C317 015-25100-08 CAP CER 0805 10N 10% X7R 50V
&C318 10 015-23120-01 CAP CER 0805 120P 5% NPO 50V
&C318 15 015-23100-01 CAP CER 0805 100P 5% NPO 50V
&C319 10 015-22180-01 CAP CER 0805 18P 5% NPO 50V
&C319 15 015-22180-01 CAP CER 0805 18P 5% NPO 50V
C320 015-22270-01 CAP CER 0805 27P 5% NPO 50V
C321 015-23330-08 CAP CER 0805 330P 10% X7R 50V
&C325 10 015-22180-01 CAP CER 0805 18P 5% NPO 50V
&C325 15 015-22270-01 CAP CER 0805 27P 5% NPO 50V
&C326 10 015-22220-01 CAP CER 0805 22P 5% NPO 50V
C327 015-25100-08 CAP CER 0805 10N 10% X7R 50V
C329 015-25100-08 CAP CER 0805 10N 10% X7R 50V
C330 015-22470-01 CAP CER 0805 47P 5% NPO 50V
C331 015-22560-01 CAP CER 0805 56P 5% NPO 50V
C332 015-25100-08 CAP CER 0805 10N 10% X7R 50V
C333 014-07470-03 L) CAP TANT SMD 4U7 35V 20%
C334 015-25470-08 CAP CER 0805 47N 10% X7R 50V
C335 015-25100-08 CAP CER 0805 10N 10% X7R 50V
C336 015-25470-08 CAP CER 0805 47N 10% X7R 50V
C337 015-25470-08 CAP CER 0805 47N 10% X7R 50V
C338 015-25100-08 CAP CER 0805 10N 10% X7R 50V
C339 015-22100-01 CAP CER 0805 10P+-1/2P NPO 50V
C340 015-25100-08 CAP CER 0805 10N 10% X7R 50V
C341 015-24100-08 CAP CER 0805 1N 10% X7R 50V
C342 015-25100-08 CAP CER 0805 10N 10% X7R 50V
C343 015-22560-01 CAP CER 0805 56P 5% NPO 50V
C344 015-22560-01 CAP CER 0805 56P 5% NPO 50V
C345 015-24470-08 CAP CER 0805 4N7 10% X7R 50V
C348 015-25100-08 CAP CER 0805 10N 10% X7R 50V
C349 015-23120-01 CAP CER 0805 120P 5% NPO 50V
C350 015-22560-01 CAP CER 0805 56P 5% NPO 50V
C351 015-22560-01 CAP CER 0805 56P 5% NPO 50V
C352 015-26100-08 CAP CER 0805 100N 10% X7R 50V
C353 015-26100-08 CAP CER 0805 100N 10% X7R 50V
C354 015-26100-08 CAP CER 0805 100N 10% X7R 50V
C355 015-26100-08 CAP CER 0805 100N 10% X7R 50V
C357 015-25100-08 CAP CER 0805 10N 10% X7R 50V
C358 015-25100-08 CAP CER 0805 10N 10% X7R 50V
C359 015-26100-08 CAP CER 0805 100N 10% X7R 50V
C360 015-26100-08 CAP CER 0805 100N 10% X7R 50V
C361 015-25470-08 CAP CER 0805 47N 10% X7R 50V
C362 014-08100-00 CAP TANT CHIP 10M 16VW +-20%
C363 015-25470-08 CAP CER 0805 47N 10% X7R 50V
C364 015-25100-08 CAP CER 0805 10N 10% X7R 50V
C365 015-25100-08 CAP CER 0805 10N 10% X7R 50V
C366 014-08100-00 CAP TANT CHIP 10M 16VW +-20%
C367 015-26100-08 CAP CER 0805 100N 10% X7R 50V
C400 015-23220-01 CAP CER 0805 220P 5% NPO 50V
C401 015-23220-01 CAP CER 0805 220P 5% NPO 50V
C402 015-23100-01 CAP CER 0805 100P 5% NPO 50V
C403 015-22270-01 CAP CER 0805 27P 5% NPO 50V
C404 015-22270-01 CAP CER 0805 27P 5% NPO 50V
C405 015-23470-08 CAP CER 0805 470P 10% X7R 50V
C408 015-22390-01 CAP CER 0805 39P 5% NPO 50V
C409 015-23100-01 CAP CER 0805 100P 5% NPO 50V
C410 015-22560-01 CAP CER 0805 56P 5% NPO 50V
C411 015-22270-01 CAP CER 0805 27P 5% NPO 50V
C412 015-23100-01 CAP CER 0805 100P 5% NPO 50V
C416 015-22270-01 CAP CER 0805 27P 5% NPO 50V
C417 015-22270-01 CAP CER 0805 27P 5% NPO 50V
C418 015-22390-01 CAP CER 0805 39P 5% NPO 50V
C419 015-23100-01 CAP CER 0805 100P 5% NPO 50V
C420 015-24470-08 CAP CER 0805 4N7 10% X7R 50V
C424 015-24470-08 CAP CER 0805 4N7 10% X7R 50V
C425 015-24470-08 CAP CER 0805 4N7 10% X7R 50V
C426 015-25100-08 CAP CER 0805 10N 10% X7R 50V
C427 015-05470-08 CAP CER 1206 47N 10% X7R 50V
C428 015-24100-08 CAP CER 0805 1N 10% X7R 50V
C432 015-22820-01 CAP CER 0805 82P 5% NPO 50V
C433 015-23100-01 CAP CER 0805 100P 5% NPO 50V
C434 015-22270-01 CAP CER 0805 27P 5% NPO 50V
C435 015-22270-01 CAP CER 0805 27P 5% NPO 50V
C436 015-22390-01 CAP CER 0805 39P 5% NPO 50V
C440 015-23100-01 CAP CER 0805 100P 5% NPO 50V
C441 015-22560-01 CAP CER 0805 56P 5% NPO 50V
C442 015-22270-01 CAP CER 0805 27P 5% NPO 50V
C443 015-23100-01 CAP CER 0805 100P 5% NPO 50V
C444 015-22270-01 CAP CER 0805 27P 5% NPO 50V
C448 015-22270-01 CAP CER 0805 27P 5% NPO 50V
C449 015-22390-01 CAP CER 0805 39P 5% NPO 50V
C450 015-23100-01 CAP CER 0805 100P 5% NPO 50V
C505 015-26100-08 CAP CER 0805 100N 10% X7R 50V
C515 015-26100-08 CAP CER 0805 100N 10% X7R 50V
C530 014-08220-01 (L)CAP TANT 22UF10V276MSER
C535 015-26100-08 CAP CER 0805 100N 10% X7R 50V
C610A 015-25100-08 CAP CER 0805 10N 10% X7R 50V
C610B 014-09100-00 CAP TANT SMD 100U 16V 20%
C611A 014-09100-00 CAP TANT SMD 100U 16V 20%
C611B 015-25100-08 CAP CER 0805 10N 10% X7R 50V
C623 015-24100-08 CAP CER 0805 1N 10% X7R 50V
C625 020-09470-07 CAPEL470M16V20%V 8*20 3.5L.ESR
C626 015-24470-08 CAP CER 0805 4N7 10% X7R 50V
C628 015-24100-08 CAP CER 0805 1N 10% X7R 50V
C630 015-26100-08 CAP CER 0805 100N 10% X7R 50V
C631A 015-26100-08 CAP CER 0805 100N 10% X7R 50V
C631B 014-08100-03 CAP TANT SMD 10U 35V 20%
C637 015-24100-08 CAP CER 0805 1N 10% X7R 50V
C640 015-24100-08 CAP CER 0805 1N 10% X7R 50V
C650 015-26100-08 CAP CER 0805 100N 10% X7R 50V
C651 015-26100-08 CAP CER 0805 100N 10% X7R 50V
C658 015-26100-08 CAP CER 0805 100N 10% X7R 50V
C660 015-26100-08 CAP CER 0805 100N 10% X7R 50V
C665 014-08100-03 CAP TANT SMD 10U 35V 20%
C670 014-07330-10 CAP TANT SMD 3U3 35V 10%
C673 015-24470-08 CAP CER 0805 4N7 10% X7R 50V
C677 014-07100-02 CAP TANT CHIP 1U0 3.2 X 1.6MM
C681 015-26100-08 CAP CER 0805 100N 10% X7R 50V
C684 014-08100-03 CAP TANT SMD 10U 35V 20%
C687 015-24100-08 CAP CER 0805 1N 10% X7R 50V
C690 015-26100-08 CAP CER 0805 100N 10% X7R 50V
C693 014-08100-03 CAP TANT SMD 10U 35V 20%
C700 015-26100-08 CAP CER 0805 100N 10% X7R 50V
C702 015-24100-08 CAP CER 0805 1N 10% X7R 50V
C703 015-24100-08 CAP CER 0805 1N 10% X7R 50V
C705 015-21820-02 L)CAP 0805 8P2 15 NPO 50V
C707 015-22470-01 CAP CER 0805 47P 5% NPO 50V
C708 015-22470-01 CAP CER 0805 47P 5% NPO 50V
C709 015-22100-01 CAP CER 0805 10P+-1/2P NPO 50V
C710A 014-07470-00 CAP TANT CHIP 4U7 3.5 X 2.8MM
C710B 015-26100-08 CAP CER 0805 100N 10% X7R 50V
C710C 015-25100-08 CAP CER 0805 10N 10% X7R 50V
C711 015-23100-01 CAP CER 0805 100P 5% NPO 50V
C712 015-23100-01 CAP CER 0805 100P 5% NPO 50V
C713 015-25100-08 CAP CER 0805 10N 10% X7R 50V
C735 015-22470-01 CAP CER 0805 47P 5% NPO 50V
C736 015-22470-01 CAP CER 0805 47P 5% NPO 50V
B6.2.5
Copyright TEL 01/04/00
Page 68

IPN 220-01446-03
B6.2.6
Ref Var IPN Description Ref Var IPN Description
C740A 015-24100-08 CAP CER 0805 1N 10% X7R 50V
C740B 015-25100-08 CAP CER 0805 10N 10% X7R 50V
C741A 014-07470-00 CAP TANT CHIP 4U7 3.5 X 2.8MM
C741B 015-25100-08 CAP CER 0805 10N 10% X7R 50V
C742A 015-26100-08 CAP CER 0805 100N 10% X7R 50V
C742B 015-25100-08 CAP CER 0805 10N 10% X7R 50V
C743 015-22470-01 CAP CER 0805 47P 5% NPO 50V
C745 015-24470-08 CAP CER 0805 4N7 10% X7R 50V
C750 014-08100-03 CAP TANT SMD 10U 35V 20%
C757 015-25100-08 CAP CER 0805 10N 10% X7R 50V
C759 015-25100-08 CAP CER 0805 10N 10% X7R 50V
C761 015-25100-08 CAP CER 0805 10N 10% X7R 50V
C762 014-08220-01 (L)CAP TANT 22UF10V276MSER
C764 015-25100-08 CAP CER 0805 10N 10% X7R 50V
C765 014-07470-00 CAP TANT CHIP 4U7 3.5 X 2.8MM
C767 015-24100-08 CAP CER 0805 1N 10% X7R 50V
C769 015-24100-08 CAP CER 0805 1N 10% X7R 50V
C770 014-08220-01 (L)CAP TANT 22UF10V276MSER
C772 014-08220-01 (L)CAP TANT 22UF10V276MSER
C774 022-07100-05 CAP METAL PPS 1U 20% 63V 5MM
C776 015-25330-08 CAP CER 0805 CHIP 33NF
C782 015-24470-08 CAP CER 0805 4N7 10% X7R 50V
C784 015-24470-08 CAP CER 0805 4N7 10% X7R 50V
C786 015-26100-08 CAP CER 0805 100N 10% X7R 50V
C788 015-24470-08 CAP CER 0805 4N7 10% X7R 50V
C790 015-23100-01 CAP CER 0805 100P 5% NPO 50V
C792 015-24470-08 CAP CER 0805 4N7 10% X7R 50V
C793 015-24100-08 CAP CER 0805 1N 10% X7R 50V
C810 015-25100-08 CAP CER 0805 10N 10% X7R 50V
C812 015-23100-01 CAP CER 0805 100P 5% NPO 50V
C813 015-24100-08 CAP CER 0805 1N 10% X7R 50V
C814 015-24100-08 CAP CER 0805 1N 10% X7R 50V
C815 015-05100-07 CAP 1206 CHIP NPO 10nF 25V
C816 015-25100-08 CAP CER 0805 10N 10% X7R 50V
C818 015-25100-08 CAP CER 0805 10N 10% X7R 50V
C819 015-22330-01 CAP CER 0805 33P 5% NPO 50V
C820 015-23220-01 CAP CER 0805 220P 5% NPO 50V
C822 015-25220-08 CAP CER 0805 22N 10% X7R 50V
C824 015-25470-08 CAP CER 0805 47N 10% X7R 50V
C826 015-05100-07 CAP 1206 CHIP NPO 10nF 25V
C828 015-05100-07 CAP 1206 CHIP NPO 10nF 25V
C830 015-25470-08 CAP CER 0805 47N 10% X7R 50V
C832 014-07100-02 CAP TANT CHIP 1U0 3.2 X 1.6MM
C833 015-25220-08 CAP CER 0805 22N 10% X7R 50V
C834 015-25100-08 CAP CER 0805 10N 10% X7R 50V
C836 015-05100-07 CAP 1206 CHIP NPO 10nF 25V
C837 015-05100-07 CAP 1206 CHIP NPO 10nF 25V
C838 015-05100-07 CAP 1206 CHIP NPO 10nF 25V
C840 015-25470-08 CAP CER 0805 47N 10% X7R 50V
C842 014-07100-02 CAP TANT CHIP 1U0 3.2 X 1.6MM
C844 014-07100-02 CAP TANT CHIP 1U0 3.2 X 1.6MM
C846 014-07100-02 CAP TANT CHIP 1U0 3.2 X 1.6MM
C848 014-07100-02 CAP TANT CHIP 1U0 3.2 X 1.6MM
C850 015-25470-08 CAP CER 0805 47N 10% X7R 50V
C873 015-25220-08 CAP CER 0805 22N 10% X7R 50V
C876 014-09100-00 CAP TANT SMD 100U 16V 20%
C879 014-08100-00 CAP TANT CHIP 10M 16VW +-20%
C900 015-22330-01 CAP CER 0805 33P 5% NPO 50V
C901 015-22680-01 CAP CER 0805 68P 5% NPO 50V
C902 015-22680-01 CAP CER 0805 68P 5% NPO 50V
C903 015-22330-01 CAP CER 0805 33P 5% NPO 50V
%D111A 10 001-10015-50 DIODE SMD ZENER 1.5SMC22AT3
%D111A 15 001-10015-50 DIODE SMD ZENER 1.5SMC22AT3
D220 001-10000-56 S) DIODE SMD BAW56 D-SW SOT23
D230 001-10000-70 S) DIODE SMD BAV70 D-SW SOT23
D240 001-10000-99 S) DIODE SMD BAV99 D-SW SOT23
D250 008-00014-79 S)LED 3MM RED WITH WIRE
D260 001-10084-33 S)DIODE ZENSMD BZX84C3V3 SOT23
D270 001-10000-70 S) DIODE SMD BAV70 D-SW SOT23
D280 008-00014-80 S)LED 3MM GREEN WITH WIRE
D285 001-10011-73 DIODE SMD MRA4003T3 1A/300V SM
D289 001-10011-73 DIODE SMD MRA4003T3 1A/300V SM
D290 001-10011-73 DIODE SMD MRA4003T3 1A/300V SM
D295 001-10011-73 DIODE SMD MRA4003T3 1A/300V SM
D330 001-10000-99 S) DIODE SMD BAV99 D-SW SOT23
D400 001-10000-99 S) DIODE SMD BAV99 D-SW SOT23
D610 001-10000-99 S) DIODE SMD BAV99 D-SW SOT23
D640 001-10000-70 S) DIODE SMD BAV70 D-SW SOT23
D645 001-10010-40 DIODE SMD ZENER 33V BZG03-C33
D730 001-10165-00 DIODE BAT165 SCHOTTKY SOD-323
D740 001-10165-00 DIODE BAT165 SCHOTTKY SOD-323
D820 001-10165-00 DIODE BAT165 SCHOTTKY SOD-323
D860 001-10000-70 S) DIODE SMD BAV70 D-SW SOT23
D880 001-10000-70 S) DIODE SMD BAV70 D-SW SOT23
IC210 002-10003-58 S) IC SMD LM358 DUAL O-AMP
IC240 002-00014-05 S) IC TDA7231 1.6W AF PWR
IC260 002-00014-05 S) IC TDA7231 1.6W AF PWR
IC270 002-10003-58 S) IC SMD LM358 DUAL O-AMP
IC280 002-10003-58 S) IC SMD LM358 DUAL O-AMP
IC330 002-10337-20 S) IC MC3372D SMD IF DETECTOR
IC332 002-10003-58 S) IC SMD LM358 DUAL O-AMP
IC333 002-10003-58 S) IC SMD LM358 DUAL O-AMP
IC339 002-10078-05 S) IC SMD 78L05 5V REG
IC340 002-10008-40 S)IC SMD TL084CD 4X O-AMP JFET
IC410 002-10000-14 MIXER DBL BALANCE 2-500 MHZ
IC610 002-10078-05 S) IC SMD 78L05 5V REG
T825 PCB Information M820-00
IC630 002-12523-17 (S)IC LM317L REG TO-252 0.5A
IC640 002-10003-58 S) IC SMD LM358 DUAL O-AMP
IC650 002-10012-32 SMD DS1232LPS-2 LP RESET&W-DOG
=IC700 10 539-00010-41 TCXO 12.8MHZ +-2.5PPM -30 +70C
=IC700 15 539-00010-41 TCXO 12.8MHZ +-2.5PPM -30 +70C
IC710 002-74900-04 S) IC SMD 74HC04D 6X INV BUFFD
IC740 002-14519-10 S) IC MC145191F SMD SYNTH
IC750 002-10330-78 S) IC MC33078D 2X AMP LO NOISE
IC820 002-12416-00 S)IC SMD AT24C16N-10SC EEPROM
IC830 002-10003-24 S) IC SMD 324 4X O-AMP SO14
IC840 002-10040-53 S)MC14053B SMD BREAK B4 MAKE
IC850 002-10003-24 S) IC SMD 324 4X O-AMP SO14
L230 057-10100-60 IND SHLD 100UH SMD 600MA
L300 056-10102-12 IND SMD 1u2 1812CS 5%
L301 056-10802-12 IND SMD 8u2 1812CS 5%
L302 056-10105-12 IND SMD 1u5 1812CS 5%
&L303 10 056-10102-12 IND SMD 1u2 1812CS 5%
&L303 15 056-10105-12 IND SMD 1u5 1812CS 5%
&L304 10 056-10010-12 IND SMD 10uH 1812CS 5%
&L304 15 056-10802-12 IND SMD 8u2 1812CS 5%
&L305 10 056-10010-12 IND SMD 10uH 1812CS 5%
&L305 15 056-10802-12 IND SMD 8u2 1812CS 5%
&L306 10 056-10102-12 IND SMD 1u2 1812CS 5%
&L306 15 056-10105-12 IND SMD 1u5 1812CS 5%
&L307 10 056-10102-12 IND SMD 1u2 1812CS 5%
&L307 15 056-10105-12 IND SMD 1u5 1812CS 5%
&L308 10 056-10010-12 IND SMD 10uH 1812CS 5%
&L308 15 056-10802-12 IND SMD 8u2 1812CS 5%
&L309 10 056-10010-12 IND SMD 10uH 1812CS 5%
&L310 10 056-10802-12 IND SMD 8u2 1812CS 5%
&L325 15 056-10010-12 IND SMD 10uH 1812CS 5%
L330 050-15119-75 COIL SMD 455KHz IF 5119-T075
L400 056-10001-10 IND SMD 1uH 1206CS 5%
L401 056-10001-10 IND SMD 1uH 1206CS 5%
L402 050-00016-54 COIL 654 10 CAN T720
L403 050-00016-54 COIL 654 10 CAN T720
L404 056-14150-02 (L) IND SMD 1.5UH
L405 056-14150-02 (L) IND SMD 1.5UH
L406 056-10105-12 IND SMD 1u5 1812CS 5%
L409 050-00016-54 COIL 654 10 CAN T720
L410 050-00016-54 COIL 654 10 CAN T720
L750 056-10330-02 (L) IND SMD 330NH
L900 056-10121-00 IND SMD 120NH 1812SMS 5%
L901 056-10121-00 IND SMD 120NH 1812SMS 5%
L902 056-10121-00 IND SMD 120NH 1812SMS 5%
PL100 070-01001-00 D-RANGE 15 WAY COMPL T800
PL200 240-10000-16 HEADER 4W PCB MTG SMD
PL210 240-10000-16 HEADER 4W PCB MTG SMD
PL220 240-10000-16 HEADER 4W PCB MTG SMD
PL230 240-10000-16 HEADER 4W PCB MTG SMD
PL240 240-10005-00 HEADER 5W PCB MTG SMD
PL250 240-10000-16 HEADER 4W PCB MTG SMD
PL260 240-10000-16 HEADER 4W PCB MTG SMD
PL270 240-10000-16 HEADER 4W PCB MTG SMD
Q210 000-10008-48 S) XSTR SMD BCW60 NPN SOT23 SS
Q220 000-10008-48 S) XSTR SMD BCW60 NPN SOT23 SS
Q230 000-10008-48 S) XSTR SMD BCW60 NPN SOT23 SS
Q240 000-10008-57 S) XSTR SMD BCW70 PNP SOT23 SS
Q245 000-10008-57 S) XSTR SMD BCW70 PNP SOT23 SS
Q250 000-10008-48 S) XSTR SMD BCW60 NPN SOT23 SS
Q255 000-10008-57 S) XSTR SMD BCW70 PNP SOT23 SS
Q260 000-10008-48 S) XSTR SMD BCW60 NPN SOT23 SS
Q270 000-10008-17 S) XSTR SMD BC817-25 NPN SOT23
Q280 000-10008-48 S) XSTR SMD BCW60 NPN SOT23 SS
Q290 000-10008-48 S) XSTR SMD BCW60 NPN SOT23 SS
Q300 000-10008-48 S) XSTR SMD BCW60 NPN SOT23 SS
Q301 000-10008-48 S) XSTR SMD BCW60 NPN SOT23 SS
Q302 000-10003-10 S) XSTR SMD BFJ310 JFET UHF
Q303 000-10095-10 S) XSTR SMD BR951 NPN UHF
Q304 000-10095-10 S) XSTR SMD BR951 NPN UHF
Q331 000-10008-48 S) XSTR SMD BCW60 NPN SOT23 SS
Q400 000-10054-00 XSTR SMD BFG540 NPNUHF SOT143B
Q401 000-10008-57 S) XSTR SMD BCW70 PNP SOT23 SS
Q540 000-10008-48 S) XSTR SMD BCW60 NPN SOT23 SS
Q620 000-00033-12 XSTR BD242 TO-220 PNP ISOLTD
Q630 000-10003-00 S) XSTR BSR30 PNP AF SOT-89
Q660 000-10008-17 S) XSTR SMD BC817-25 NPN SOT23
Q670 000-10008-57 S) XSTR SMD BCW70 PNP SOT23 SS
Q750 000-10008-07 S) XSTR SMD BC807 PNP SOT23 AF
Q760 000-10008-48 S) XSTR SMD BCW60 NPN SOT23 SS
Q770 000-10008-57 S) XSTR SMD BCW70 PNP SOT23 SS
Q775 000-10008-57 S) XSTR SMD BCW70 PNP SOT23 SS
Q780 000-10008-48 S) XSTR SMD BCW60 NPN SOT23 SS
Q785 000-10008-57 S) XSTR SMD BCW70 PNP SOT23 SS
Q790 000-10003-12 S) XSTR SMD BFR31 N JFET SOT23
Q795 000-10009-30 XSTR SMD BFR93A NPN SOT23
Q810 000-10008-17 S) XSTR SMD BC817-25 NPN SOT23
Q820 000-10008-57 S) XSTR SMD BCW70 PNP SOT23 SS
Q840 000-10008-57 S) XSTR SMD BCW70 PNP SOT23 SS
Q850 000-10008-48 S) XSTR SMD BCW60 NPN SOT23 SS
Q860 000-10008-57 S) XSTR SMD BCW70 PNP SOT23 SS
Q870 000-10008-48 S) XSTR SMD BCW60 NPN SOT23 SS
Q880 000-10008-48 S) XSTR SMD BCW60 NPN SOT23 SS
Q890 000-10008-48 S) XSTR SMD BCW60 NPN SOT23 SS
Q895 000-10008-48 S) XSTR SMD BCW60 NPN SOT23 SS
01/04/00 Copyright TEL
Page 69

IPN 220-01446-03
M820-00 T825 PCB Information
Ref Var IPN D escripti on Ref Var IPN Description
R160 036-12100-00 RES M/F 0805 10E 5%
R201 036-14470-10 RES M/F 0805 4K7 1%
R202 036-14470-10 RES M/F 0805 4K7 1%
R204 036-15100-10 RES M/F 0805 10K 1%
R205 036-16220-00 RES M/F 0805 220K 5%
RV205 040-05100-22 POT 10K LOG DUAL PCB 6 OD SFT
R207 036-14820-10 RES M/F 0805 8K2 1%
&R209 10 036-15220-00 RES M/F 0805 22K 5%
&R209 15 036-15180-10 RES M/F 0805 18K 1%
R210 036-15150-00 RES M/F 0805 15K 5%
RL210 237-10010-00 RELAY 12V DPDT 10PIN SMD
RV210 040-05100-23 POT 10K LOG PCB 15MM SLOT SFT
R211 036-15390-00 RES M/F 0805 39K 5%
R213 036-14270-00 RES M/F 0805 2K7 5%
R215 036-15150-00 RES M/F 0805 15K 5%
R218 036-14390-10 RES M/F 0805 3K9 1%
&R219 10 036-15100-10 RES M/F 0805 10K 1%
&R219 15 036-14820-10 RES M/F 0805 8K2 1%
RV220 042-05100-05 RES PRESET SMD 10K CER 4MM SQ
R221 036-15470-10 RES M/F 0805 47K 1%
R222 036-16100-00 RES M/F 0805 100K 5%
%R223 10 036-12100-00 RES M/F 0805 10E 5%
%R223 15 036-12100-00 RES M/F 0805 10E 5%
R224 036-14390-10 RES M/F 0805 3K9 1%
R225 036-13470-00 RES M/F 0805 470E 5%
R227 036-14270-00 RES M/F 0805 2K7 5%
R229 036-14470-10 RES M/F 0805 4K7 1%
R230 036-14470-10 RES M/F 0805 4K7 1%
RV230 040-05100-21 POT 10K LIN PCB 15MM SLOT SFT
R232 036-15470-10 RES M/F 0805 47K 1%
R233 036-14820-10 RES M/F 0805 8K2 1%
R234 036-15470-10 RES M/F 0805 47K 1%
RV235 042-05100-05 RES PRESET SMD 10K CER 4MM SQ
R236 036-15470-10 RES M/F 0805 47K 1%
R238 036-11470-00 RES M/F 0805 4E7 10%
R239 036-14100-10 RES M/F 0805 1K 1%
R241 036-14100-10 RES M/F 0805 1K 1%
R242 036-13100-10 RES M/F 0805 100E 1%
R244 036-14680-10 RES M/F 0805 6K8 1%
R245 036-14100-10 RES M/F 0805 1K 1%
R247 036-14220-00 RES M/F 0805 2K2 5%
R249 036-15100-10 RES M/F 0805 10K 1%
R251 036-15390-00 RES M/F 0805 39K 5%
R252 036-14470-10 RES M/F 0805 4K7 1%
R254 036-14820-10 RES M/F 0805 8K2 1%
R255 036-15470-10 RES M/F 0805 47K 1%
R256 036-14270-00 RES M/F 0805 2K7 5%
R258 036-15470-10 RES M/F 0805 47K 1%
R260 036-11470-00 RES M/F 0805 4E7 10%
R261 036-13150-10 RES M/F 0805 150E 1%
R262 036-14100-10 RES M/F 0805 1K 1%
R264 036-15100-10 RES M/F 0805 10K 1%
R265 036-13100-10 RES M/F 0805 100E 1%
R266 036-15270-10 RES M/F 0805 27K 1%
R267 036-16180-00 RES M/F 0805 180K 5%
R269 036-14220-00 RES M/F 0805 2K2 5%
R271 036-16100-00 RES M/F 0805 100K 5%
R272 036-15470-10 RES M/F 0805 47K 1%
R273 036-15150-00 RES M/F 0805 15K 5%
R274 036-13120-00 RES M/F 0805 120E 5%
R275 036-13100-10 RES M/F 0805 100E 1%
R276 036-13120-00 RES M/F 0805 120E 5%
R277 036-14560-00 RES M/F 0805 5K6 5%
R278 036-16220-00 RES M/F 0805 220K 5%
R279 036-12270-00 RES M/F 0805 27E 5%
R280 036-16100-00 RES M/F 0805 100K 5%
R281 036-14470-10 RES M/F 0805 4K7 1%
R282 036-16100-00 RES M/F 0805 100K 5%
R284 036-13100-10 RES M/F 0805 100E 1%
R285 036-15470-10 RES M/F 0805 47K 1%
R287 036-15100-10 RES M/F 0805 10K 1%
R288 036-14470-10 RES M/F 0805 4K7 1%
R289 036-14680-10 RES M/F 0805 6K8 1%
R290 036-14100-10 RES M/F 0805 1K 1%
R292 036-14680-10 RES M/F 0805 6K8 1%
R293 036-13560-00 RES M/F 0805 560E 5%
R294 036-14100-10 RES M/F 0805 1K 1%
R295 036-14680-10 RES M/F 0805 6K8 1%
R296 036-14120-00 RES M/F 0805 1K2 5%
R297 030-52100-20 RES FILM AI 10E 5% 0.4W 4X1.6
R298 036-15470-10 RES M/F 0805 47K 1%
R299 036-15470-10 RES M/F 0805 47K 1%
R300 036-14680-10 RES M/F 0805 6K8 1%
R301 036-12270-00 RES M/F 0805 27E 5%
R302 036-12120-00 RES M/F 0805 12E 5%
R303 036-12100-00 RES M/F 0805 10E 5%
R304 036-13820-00 RES M/F 0805 820E 5%
R307 036-14100-10 RES M/F 0805 1K 1%
R308 036-14330-10 RES M/F 0805 3K3 1%
R309 036-14100-10 RES M/F 0805 1K 1%
R310 036-11470-00 RES M/F 0805 4E7 10%
R311 036-12470-00 RES M/F 0805 47E 5%
R312 036-13100-10 RES M/F 0805 100E 1%
R313 036-12560-00 RES M/F 0805 56E 5%
R314 036-12390-00 RES M/F 0805 39E 5%
R315 036-13470-00 RES M/F 0805 470E 5%
R317 036-14330-10 RES M/F 0805 3K3 1%
R318 036-12560-00 RES M/F 0805 56E 5%
R319 036-12390-00 RES M/F 0805 39E 5%
R320 036-13150-10 RES M/F 0805 150E 1%
R321 036-13150-10 RES M/F 0805 150E 1%
&R323 15 036-10000-00 RES M/F 0805 ZERO OHM
&R324 15 036-10000-00 RES M/F 0805 ZERO OHM
R329 036-17100-10 RES M/F 0805 1M 1%
R330 036-10000-00 RES M/F 0805 ZERO OHM
RV330 042-04220-05 RES PRESET SMD 2K CER 4MM SQ
RV331 042-05100-05 RES PRESET SMD 10K CER 4MM SQ
R333 036-12220-00 RES M/F 0805 22E 5%
R336 036-14150-10 RES M/F 0805 1K5 1%
R337 036-14220-00 RES M/F 0805 2K2 5%
R338 036-14100-10 RES M/F 0805 1K 1%
R339 036-15470-10 RES M/F 0805 47K 1%
R340 036-16220-00 RES M/F 0805 220K 5%
R341 036-16120-00 RES M/F 0805 120K 5%
R342 036-15220-00 RES M/F 0805 22K 5%
R343 036-15100-10 RES M/F 0805 10K 1%
R344 036-15100-10 RES M/F 0805 10K 1%
&R346 10 036-15560-10 RES MF 0805 56K 1%
&R346 15 036-16100-00 RES M/F 0805 100K 5%
R347 036-15470-10 RES M/F 0805 47K 1%
R348 036-14820-10 RES M/F 0805 8K2 1%
R349 036-14560-00 RES M/F 0805 5K6 5%
R350 036-14100-10 RES M/F 0805 1K 1%
R351 036-14560-00 RES M/F 0805 5K6 5%
R352 036-14390-10 RES M/F 0805 3K9 1%
R353 036-16220-00 RES M/F 0805 220K 5%
R354 036-16220-00 RES M/F 0805 220K 5%
R355 036-14330-10 RES M/F 0805 3K3 1%
R356 036-14220-00 RES M/F 0805 2K2 5%
R357 036-15270-10 RES M/F 0805 27K 1%
R358 036-16220-00 RES M/F 0805 220K 5%
R359 045-15100-00 RES NTC SMD 10K 5%
R360 036-15100-10 RES M/F 0805 10K 1%
R361 036-16390-00 RES M/F 0805 390K 5%
R362 036-15470-10 RES M/F 0805 47K 1%
R363 036-14100-10 RES M/F 0805 1K 1%
R365 036-13220-10 RES 0805 220E 1%
R368 036-15100-10 RES M/F 0805 10K 1%
R369 036-14220-00 RES M/F 0805 2K2 5%
R370 036-14100-10 RES M/F 0805 1K 1%
R371 036-14820-10 RES M/F 0805 8K2 1%
R372 036-14560-00 RES M/F 0805 5K6 5%
R373 036-16390-00 RES M/F 0805 390K 5%
R374 036-15100-10 RES M/F 0805 10K 1%
R375 036-16390-00 RES M/F 0805 390K 5%
R376 036-15100-10 RES M/F 0805 10K 1%
R377 036-16390-00 RES M/F 0805 390K 5%
R378 036-16390-00 RES M/F 0805 390K 5%
R382 036-15100-10 RES M/F 0805 10K 1%
R383 036-15470-10 RES M/F 0805 47K 1%
R384 036-15470-10 RES M/F 0805 47K 1%
R400 036-13220-10 RES 0805 220E 1%
R401 036-12220-00 RES M/F 0805 22E 5%
R402 036-13220-10 RES 0805 220E 1%
R403 036-12820-00 RES M/F 0805 82E 5%
R404 036-12820-00 RES M/F 0805 82E 5%
R408 036-11470-00 RES M/F 0805 4E7 10%
R409 036-13820-00 RES M/F 0805 820E 5%
R410 036-13820-00 RES M/F 0805 820E 5%
R411 036-17100-10 RES M/F 0805 1M 1%
R412 036-10000-00 RES M/F 0805 ZERO OHM
R416 036-17100-10 RES M/F 0805 1M 1%
R417 036-13560-00 RES M/F 0805 560E 5%
R418 036-12390-00 RES M/F 0805 39E 5%
R419 036-12390-00 RES M/F 0805 39E 5%
R420 036-12100-00 RES M/F 0805 10E 5%
R424 036-13330-00 RES M/F 0805 330E 5%
R425 036-14220-00 RES M/F 0805 2K2 5%
R426 036-13470-00 RES M/F 0805 470E 5%
R427 036-14330-10 RES M/F 0805 3K3 1%
R510 036-14220-00 RES M/F 0805 2K2 5%
R515 036-12560-00 RES M/F 0805 56E 5%
R555 036-13470-00 RES M/F 0805 470E 5%
R615 036-13100-10 RES M/F 0805 100E 1%
R617 036-10000-00 RES M/F 0805 ZERO OHM
R619 036-01100-10 RES 1 OHM 1 WATT 2512 CHIP
R621 036-01100-10 RES 1 OHM 1 WATT 2512 CHIP
R625 036-14100-10 RES M/F 0805 1K 1%
R629 036-03270-10 RES 270 OHM 1 WATT 2512 CHIP
R633 036-14680-10 RES M/F 0805 6K8 1%
R636 036-12220-00 RES M/F 0805 22E 5%
R637 036-12220-00 RES M/F 0805 22E 5%
R640 036-12100-00 RES M/F 0805 10E 5%
R641 036-14150-10 RES M/F 0805 1K5 1%
R645 036-13470-00 RES M/F 0805 470E 5%
R649 036-14470-10 RES M/F 0805 4K7 1%
R653 036-15100-10 RES M/F 0805 10K 1%
R681 036-13100-10 RES M/F 0805 100E 1%
R685 036-15150-00 RES M/F 0805 15K 5%
R689 036-12100-00 RES M/F 0805 10E 5%
R693 036-16100-00 RES M/F 0805 100K 5%
R696 036-15560-10 RES MF 0805 56K 1%
R701 036-12220-00 RES M/F 0805 22E 5%
R702 036-17100-10 RES M/F 0805 1M 1%
R703 036-17100-10 RES M/F 0805 1M 1%
R706 036-15150-00 RES M/F 0805 15K 5%
B6.2.7
Copyright TEL 01/04/00
Page 70

IPN 220-01446-03
B6.2.8
Ref Var IPN Description Ref Var IPN Description
R707 036-15470-10 RES M/F 0805 47K 1%
R708 036-13100-10 RES M/F 0805 100E 1%
R709 036-13100-10 RES M/F 0805 100E 1%
R710 036-13100-10 RES M/F 0805 100E 1%
R711 036-13100-10 RES M/F 0805 100E 1%
R712 036-12100-00 RES M/F 0805 10E 5%
R713 036-16470-00 RES M/F 0805 470K 5%
R730 036-13470-00 RES M/F 0805 470E 5%
R731 036-13470-00 RES M/F 0805 470E 5%
R732 036-13470-00 RES M/F 0805 470E 5%
R742 036-13150-10 RES M/F 0805 150E 1%
R743 036-13150-10 RES M/F 0805 150E 1%
R744 036-12220-00 RES M/F 0805 22E 5%
R746 036-12220-00 RES M/F 0805 22E 5%
R747 036-12220-00 RES M/F 0805 22E 5%
R748 036-15470-10 RES M/F 0805 47K 1%
R749 036-15470-10 RES M/F 0805 47K 1%
R750 036-12220-00 RES M/F 0805 22E 5%
R752 036-12220-00 RES M/F 0805 22E 5%
R753 036-17100-10 RES M/F 0805 1M 1%
R754 036-14100-10 RES M/F 0805 1K 1%
R756 036-16470-00 RES M/F 0805 470K 5%
R757 036-16470-00 RES M/F 0805 470K 5%
R758 036-14120-00 RES M/F 0805 1K2 5%
R759 036-13330-00 RES M/F 0805 330E 5%
R760 036-13180-00 RES M/F 0805 180E 5%
R762 036-13100-10 RES M/F 0805 100E 1%
R763 036-13100-10 RES M/F 0805 100E 1%
R765 036-13680-00 RES M/F 0805 680E 5%
R766 036-14100-10 RES M/F 0805 1K 1%
R767 036-13680-00 RES M/F 0805 680E 5%
R769 036-13180-00 RES M/F 0805 180E 5%
R771 036-14820-10 RES M/F 0805 8K2 1%
R772 036-15220-00 RES M/F 0805 22K 5%
R774 036-14820-10 RES M/F 0805 8K2 1%
R775 036-14270-00 RES M/F 0805 2K7 5%
R784 036-12680-00 RES M/F 0805 68E 5%
R785 036-14330-10 RES M/F 0805 3K3 1%
R786 036-12100-00 RES M/F 0805 10E 5%
R787 036-12100-00 RES M/F 0805 10E 5%
R790 036-13220-10 RES 0805 220E 1%
R793 036-13100-10 RES M/F 0805 100E 1%
R794 036-14100-10 RES M/F 0805 1K 1%
R804 036-15470-10 RES M/F 0805 47K 1%
R805 036-13470-00 RES M/F 0805 470E 5%
R808 036-12100-00 RES M/F 0805 10E 5%
R809 036-14470-10 RES M/F 0805 4K7 1%
R810 036-14470-10 RES M/F 0805 4K7 1%
R811 036-14470-10 RES M/F 0805 4K7 1%
R812 036-14470-10 RES M/F 0805 4K7 1%
R813 036-14470-10 RES M/F 0805 4K7 1%
R815 036-15470-10 RES M/F 0805 47K 1%
R816 036-16150-00 RES M/F 0805 150K 5%
R818 036-14470-10 RES M/F 0805 4K7 1%
R819 036-14470-10 RES M/F 0805 4K7 1%
R820 036-15470-10 RES M/F 0805 47K 1%
R821 036-15470-10 RES M/F 0805 47K 1%
R822 036-15470-10 RES M/F 0805 47K 1%
R823 036-15470-10 RES M/F 0805 47K 1%
R824 036-14220-00 RES M/F 0805 2K2 5%
R825 036-14220-00 RES M/F 0805 2K2 5%
R826 036-14220-00 RES M/F 0805 2K2 5%
R827 036-14220-00 RES M/F 0805 2K2 5%
R828 036-14220-00 RES M/F 0805 2K2 5%
R829 036-14220-00 RES M/F 0805 2K2 5%
R830 036-14220-00 RES M/F 0805 2K2 5%
R831 036-14220-00 RES M/F 0805 2K2 5%
R832 036-14220-00 RES M/F 0805 2K2 5%
R833 036-14220-00 RES M/F 0805 2K2 5%
R835 036-14220-00 RES M/F 0805 2K2 5%
R836 036-14220-00 RES M/F 0805 2K2 5%
R837 036-14220-00 RES M/F 0805 2K2 5%
R838 036-14470-10 RES M/F 0805 4K7 1%
R839 036-14470-10 RES M/F 0805 4K7 1%
R840 036-14220-00 RES M/F 0805 2K2 5%
R841 036-14220-00 RES M/F 0805 2K2 5%
R842 036-14220-00 RES M/F 0805 2K2 5%
R843 036-14220-00 RES M/F 0805 2K2 5%
R844 036-15470-10 RES M/F 0805 47K 1%
R845 036-16150-00 RES M/F 0805 150K 5%
R846 036-14470-10 RES M/F 0805 4K7 1%
R847 036-14470-10 RES M/F 0805 4K7 1%
R848 036-13470-00 RES M/F 0805 470E 5%
R852 036-14470-10 RES M/F 0805 4K7 1%
R853 036-13470-00 RES M/F 0805 470E 5%
R854 036-16330-00 RES M/F 0805 330K 5%
R855 036-15470-10 RES M/F 0805 47K 1%
R856 036-16150-00 RES M/F 0805 150K 5%
R857 036-16150-00 RES M/F 0805 150K 5%
R858 036-15270-10 RES M/F 0805 27K 1%
R859 036-17120-10 RES M/F 0805 1M2 1%
R860 036-16820-10 RES M/F 0805 820K 1%
R861 036-14510-10 RES M/F 0805 5K1 1%
R863 036-14470-10 RES M/F 0805 4K7 1%
R865 036-14270-00 RES M/F 0805 2K7 5%
R866 036-16820-10 RES M/F 0805 820K 1%
R867 036-16820-10 RES M/F 0805 820K 1%
R868 036-14470-10 RES M/F 0805 4K7 1%
T825 PCB Information M820-00
R869 03 6-15 270- 10 RES M/F 0805 27K 1%
R870 03 6-17 120- 10 RES M/F 0805 1M2 1%
R871 03 6-16 820- 10 RES M/F 0805 820K 1%
R872 03 6-14 510- 10 RES M/F 0805 5K1 1%
R873 03 6-14 220- 00 RES M/F 0805 2K2 5%
R875 03 6-14 470- 10 RES M/F 0805 4K7 1%
R876 03 6-16 100- 00 RES M/F 0805 100K 5%
R877 03 6-16 100- 00 RES M/F 0805 100K 5%
R878 03 6-16 100- 00 RES M/F 0805 100K 5%
R879 03 6-16 100- 00 RES M/F 0805 100K 5%
R881 03 6-15 470- 10 RES M/F 0805 47K 1%
R882 03 6-15 470- 10 RES M/F 0805 47K 1%
R884 03 6-16 150- 00 RES M/F 0805 150K 5%
R885 03 6-16 150- 00 RES M/F 0805 150K 5%
R886 03 6-15 100- 10 RES M/F 0805 10K 1%
R887 03 6-14 100- 10 RES M/F 0805 1K 1%
R888 03 6-14 820- 10 RES M/F 0805 8K2 1%
R889 03 6-16 100- 00 RES M/F 0805 100K 5%
R890 03 6-16 150- 00 RES M/F 0805 150K 5%
R891 03 6-16 100- 00 RES M/F 0805 100K 5%
R892 03 6-16 330- 00 RES M/F 0805 330K 5%
R894 03 6-14 470- 10 RES M/F 0805 4K7 1%
R895 03 6-15 100- 10 RES M/F 0805 10K 1%
R897 03 6-15 100- 10 RES M/F 0805 10K 1%
R898 03 6-16 470- 00 RES M/F 0805 470K 5%
R900 03 6-15 100- 10 RES M/F 0805 10K 1%
SW201 230-00010-30 SWITCH TOG SPDT R-ANG PCB MTG
SHLD610 062-00010-13 CAN 10MM SQ X 11MM CAN A4M1017
SK805 240-10000-07 CONN SMD SKT 16W 2R M-MATCH
SK810 240-04020-42 SKT 44 PIN SMD PLCC
T210 053-00010-17 XFMR T4030 LINE MATCH POTCORE
T610 050-15119-52 COIL SMD 680uH XFMR 5119-T052
&XF300 10 276-00010-36 FLTR XTAL 10.7M 15KHZ PR 4POLE
&XF300 15 276-00010-37 FLTR XTL 10.7M 7.5KHZ PR 4POLE
&XF301 10 276-00010-36 FLTR XTAL 10.7M 15KHZ PR 4POLE
&XF301 15 276-00010-37 FLTR XTL 10.7M 7.5KHZ PR 4POLE
&XF302 10 276-00010-20 FLTR XTAL 10.7M 15KHZ 2 POLE
&XF302 15 276-00010-19 FLTR XTAL 10.7M 7.5KHZ 2 POLE
X330 274-00010-10 XTAL 10.245MHZ SPEC TE/4
&XF304 10 276-10010-14 FLTR CER SMD 455KHz E15KHz B/W
&XF304 15 276-10010-13 FLTR CER SMD 455KHz G 9KHz B/W
01/04/00 Copyright TEL
Page 71

IPN 220-01446-03
M820-00 T825 PCB Information
T825 Mechanical & Miscellaneous Parts (220-01446-03)
IPN Leg en d Description IPN Legend Description
002-08951-20 S) IC AT89C51 PLCC44 MIC 12MHZ
220-01446-03 PCB T825 RX SII
230-00010-31 SWITCH COVER FOR 230-00010-30
240-02100-06 SKT COAX N TYPE PNL MTG OP-TER
240-04020-62 SKT 2 W RECEP SHORTING LINK
240-04021-77 SKT JACK 1.3 PCB MT 64W
303-11169-04 CHASSIS PAINTED T800 SER II
303-23118-00 COVER A3M2247 D RANGE T855/7
303-50074-00 CLIP A3M2246 SPRING CLAMP T857
308-01007-01 HANDLE BS SII 2 WASHERS INC
311-01015-00 KNOB 15MM & SKIRT 6MM SFT
312-01052-02 LID TOP T800 SER II PTND
312-01053-02 LID BOTTOM T800 SER II PNTD
316-06622-00 PNL FRT RX T800 SERIES II
349-00020-36 SCREW TT M3X8m PANTORX BLK
349-00020-36 SCREW TT M3X8m PANTORX BLK
349-00020-43 SCRW T/T M4X12MM P/POZ BZ
349-00020-45 SCRW T/T M4X20MM P/POZ BZ
349-00020-55 SCRW M3*8 P/P T/T BLCKZNC CHRM
352-00010-08 NUT M3 COLD FORM HEX ST BZ
352-00010-29 NUT M4 NYLOC HEX
353-00010-13 WSHR M3 S/PROOF INT BZ
353-00010-24 WSHR M4x8mm Flat
356-00010-03 TAG SOLDER 3MM LONG M614/3.2
362-00010-33 GROMMET LED MTG 3MM
399-00010-51 BAG PLASTIC 75*100MM
B6.2.9
Copyright TEL 01/04/00
Page 72

B6.2.10 T825 PCB Information M820-00
01/04/00 Copyright TEL
Page 73

IPN 220-01446-03
M820-00 T825 PCB Information
B6.2.11
T825 Grid Reference Index (IPN 220-01446-03)
How To Use This Grid Reference Index
The first digit in the PCB layout reference is a "1" or "2", indicating the top or bottom side layout respectively, and the last two characters give the location of the component on that diagram .
The first digit in the circuit diagram reference is the sheet number, and the last two charac ters give the location of the component on
that sheet.
Device PCB Circuit D evice PCB CircuitDevice PCB Circuit Device PCB Circuit
C201 1:B5 2-B9
C203 1:C5 2-B8
C205 1:D5 2-B8
C207 1:C5 2-C8
C209 1:C6 2-D8
C210 1:C5 2-P0
C211 1:C4 2-D7
C212 1:C5 2-E8
C213 1:C5 2-E7
C215 1:C4 2-E7
C217 1:C4 2-E7
C219 1:C5 2-H6
C221 1:C5 2-H6
C222 1:B5 2-J9
C223 1:B5 2-H8
C225 1:B5 2-J8
C227 1:B5 2-J8
C229 1:B6 2-K8
C231 1:B6 2-K8
C233 1:B5 2-J7
C235 1:B6 2-M6
C237 1:B6 2-N5
C238 1:B6 2-N7
C239 1:C6 2-P6
C240A 1:D5 2-P8
C240B 1:D5 2-P8
C240C 1 :D6 2-Q8
C249 1:D6 2-Q7
C251 1:C6 2-Q7
C253 1:D4 2-G4
C255 1:C7 2-L2
C257 1:C7 2-M2
C259 1:C7 2-M3
C260A 1:D7 2-N4
C260B 1:D7 2-M4
C260C 1:D8 2-M4
C261 1:C7 2-N2
C262 1:D7 2-P3
C264 1:C7 2-P3
C266 1:D2 2-R3
C268 1:D3 2-R3
C270 1:C8 2-E3
C272 1:C8 2-E1
C273 1:C9 2-E0
C274 1:C8 2-E1
C276 1:D8 2-B0
C278 1:D8 2-C0
C280 1:D9 2-E0
C286 1:B8 2-F2
C300 1:E9 3-B7
C301 1:F9 3-B6
C302 1:F8 3-C7
C303 1:E8 3-C8
C304 1:F9 3-C6
C305 1:E8 3-D8
C306 1:F8 3-D7
C307 1:F8 3-E7
C308 1:F8 3-F7
&C309 1:E7 3-F7
&C310 1:F7 3-G7
&C311 1:E7 3-H7
C312 1:F7 3-J7
C313 1:F6 3-J7
C314 1:E6 3-K8
C315 1:E6 3-K8
C316 1:E6 3-K7
C317 1:E6 3-L8
&C318 1:E5 3-M7
&C319 1:F5 3-N7
C320 1:F8 3-C7
C321 1:F8 3-C8
&C325 1:E5 3-P7
&C326 1:F5 3-Q7
C327 1:E5 3-Q8
C329 1:F4 3-D3
C330 1:E4 3-C3
C331 1:E4 3-C3
C332 1:E4 3-C3
C333 1:F4 3-E4
C334 1:F3 3-E4
C335 1:E3 3-G0
C336 1:E4 3-F4
C337 1:F4 3-F4
C338 1:E3 3-E1
C339 1:F4 3-F4
C340 1:E3 3-E2
C341 1:E3 3-G1
C342 1:F4 3-G3
C343 1:F3 3-H3
C344 1:E3 3-H3
C345 1:F3 3-J4
C348 1:D5 3-J2
C349 1:F3 3-K3
C350 1:F3 3-L4
C351 1:F3 3-L3
C352 1:E3 3-H4
C353 1:E3 3-J5
C354 1:E3 3-J4
C355 1:F3 3-L4
C357 1:F3 3-M4
C358 1:F3 3-N4
C359 1:E3 3-L0
C360 1:E4 3-N0
C361 1:E5 3-N4
C362 1:F6 3-P0
C363 1:E6 3-P4
C364 1:F5 3-P0
C365 1:F5 3-Q0
C366 1:F5 3-R0
C367 1:E3 3-M0
C400 1:G8 4-P3
C401 1:G8 4-P3
C402 1:H9 4-L3
C403 1:H9 4-L3
C404 1:H8 4-L4
C405 1:G8 4-Q3
C408 1:H8 4-L3
C409 1:H8 4-K3
C410 1:H8 4-K3
C411 1:J8 4-K3
C412 1:J9 4-K3
C416 1:J9 4-J3
C417 1:J8 4-J4
C418 1:J8 4-J3
C419 1:J8 4-J3
C420 1:J7 4-G5
C424 1:J8 4-G4
C425 1:K8 4-G3
C426 1:J8 4-G4
C427 1:J7 4-F4
C428 1:K7 4-F3
C432 1:K7 4-F3
C433 1:L9 4-E3
C434 1:M9 4-E3
C435 1:M8 4-E4
C436 1:M8 4-E3
C440 1:M8 4-D3
C441 1:M8 4-D3
C442 1:M8 4-D3
C443 1:M9 4-D3
C444 1:N9 4-C3
C448 1:N8 4-C4
C449 1:N8 4-C3
C450 1:N8 4-C3
C505 1:K6 5-H7
C515 1:H5 5-D5
C530 1:K5 5-G3
C535 1:K5 5-H3
C610A 1:M5 6-B6
C610B 1:M5 6-B6
C611A 1:M5 6-D6
C611B 1:M4 6-D6
C623 1:N6 6-N8
C625 1:M6 6-Q8
C626 1:M6 6-R8
C628 1:M6 6-R8
C630 1:N5 6-K4
C631A 1:M5 6-M6
C631B 1:N4 6-M6
C637 1:M6 6-P5
C640 1:M5 6-G0
C650 1:N5 6-L4
C651 1:M5 6-M4
C658 1:L5 6-K1
C660 1:L5 6-K1
C665 1:L5 6-L1
C670 1:L5 6-L1
C673 1:L5 6-N2
C677 1:L6 6-P1
C681 1:L6 6-Q2
C684 1:L6 6-Q2
C687 1:M6 6-P1
C690 1:L6 6-Q1
C693 1:L6 6-Q1
C700 1:J4 7-A8
C702 1:J4 7-B8
C703 1:J3 7-B8
C705 1:J3 7-C7
C707 1:J3 7-B5
C708 1:J3 7-C5
C709 1:H3 7-C5
C710A 1:H3 7-P7
C710B 1:J4 7-Q7
C710C 1 :J3 7-P7
C711 1:J2 7-E7
C712 1:H2 7-E7
C713 1:H2 7-E7
C735 1:J2 7-A1
C736 1:J2 7-B1
C740A 1:H2 7-B4
C740B 1:H2 7-B3
C741A 1:H2 7-C4
C741B 1:G2 7-C3
C742A 1:H2 7-D4
C742B 1:H3 7-D3
C743 1:H2 7-B1
C745 1:G3 7-D1
C750 1:H4 7-R7
C757 1:G4 7-G5
C759 1:G4 7-G4
C761 1:H3 7-J4
C762 1:G3 7-K4
C764 1:H3 7-J2
C765 1:G3 7-J2
C767 1:H3 7-K3
C769 1:H3 7-M4
C770 1:H4 7-M4
C772 1:G3 7-M2
C774 1:H4 7-N2
C776 1:H4 7-M1
C782 1:G3 7-N0
C784 1:G3 7-Q1
C786 1:G3 7-Q1
C788 1:G3 7-P0
C790 1:G4 7-Q0
C792 1:G4 7-Q0
C793 1:G3 7-Q1
C810 1:L4 8-J8
C812 1:K2 8-F4
C813 1:J3 8-J5
C814 1:L2 8-F6
C815 1:N3 8-B1
C816 1:N3 8-B2
C818 1:N3 8-C1
C819 1:N3 8-C2
C820 1:N4 8-D1
C822 1:N3 8-C2
C824 1:N3 8-C2
C826 1:N3 8-D0
C828 1:N3 8-D0
C830 1:M4 8-K0
C832 1:M3 8-E2
C833 1:M4 8-E1
C834 1:M3 8-F2
C836 1:M3 8-E0
C837 1:M3 8-F0
Copyright TEL 01/04/00
Page 74

IPN 220-01446-03
B6.2.12
Device PCB Circuit Device PCB CircuitDevice PCB Circuit Device PCB Circuit
C838 1:N4 8-F0
C840 1:M2 8-K1
C842 1:N2 8-L0
C844 1:N3 8-L0
C846 1:N2 8-M0
C848 1:N2 8-M0
C850 1:M2 8-N0
C873 1:M3 8-P2
C876 1:M4 8-P2
C879 1:M4 8-Q0
C900 1:P8 9-E4
C901 1:P7 9-E4
C902 1:P7 9-F4
C903 1:P6 9-G4
CTP410 2:K7 4-E3
CTP420 1:K8 4-H3
CTP430 1:H8 4-M3
CTP440 2:G8 4-Q3
CTP900 2:P8 9-D4
CV300 1:F7 3-G7
%D111 1:P5 1-R1
%D111A 1:P5 1-Q1
D220 1:C4 2-F4
D220 1:C4 2-F4
D230 1:C6 2-J5
D230 1:C6 2-J5
D240 1:C8 2-E2
D240 1:C8 2-E2
D250 1:B7 2-H0
D260 1:B7 2-H0
D270 1:B7 2-J1
D270 1:B7 2-H1
D280 1:B7 2-K1
D285 1:D2 2-L1
D289 1:B2 2-L0
D290 1:B2 2-L0
D295 1:B2 2-L0
D330 1:F3 3-M4
D330 1:F3 3-M4
D400 1:J7 4-F4
D400 1:J7 4-F5
D610 1:N6 6-L6
D610 1:N6 6-M6
D640 1:L5 6-M2
D640 1:L5 6-M1
D645 1:M5 6-H0
D730 1:H3 7-H1
D740 1:H3 7-K2
D820 1:J3 8-B7
D860 1:M2 8-P0
D860 1:M2 8-P0
D880 1:M2 8-R2
D880 1:M2 8-R2
IC210 1:C5 2-F7
IC210 1:C5 2-G7
IC210 1:C5 2-N0
IC240 1:C6 2-P7
IC260 1:C7 2-N3
IC270 1:C8 2-B2
IC270 1:C8 2-E3
IC270 1:C8 2-F2
IC280 1:D8 2-E0
IC280 1:D8 2-B0
IC280 1:D8 2-C0
IC330 1:E4 3-P0
IC330 1:E4 3-E3
IC330 1:E4 3-N0
IC330 1:E4 3-B3
IC332 1:E3 3-N0
IC332 1:E3 3-H1
IC332 1:E3 3-F2
IC333 1:E4 3-G1
T825 PCB Information M820-00
IC333 1:E4 3-M0
IC333 1:E4 3-H0
IC339 1:F5 3-P0
IC340 1:F3 3-L4
IC340 1:F3 3-L0
IC340 1:F3 3-K4
IC340 1:F3 3-H3
IC340 1:F3 3-K0
IC410 1:G8 4-N3
IC610 1:M5 6-C6
IC630 1:N5 6-K5
IC640 1:M5 6-N5
IC640 1:M5 6-J0
IC640 1:M5 6-G0
IC650 1:L5 6-C2
=IC700 1:J3 7-A8
IC710 1:H3 7-D7
IC710 1:H3 7-P7
IC710 1:H3 7-C6
IC710 1:H3 7-D6
IC710 1:H3 7-D6
IC710 1:H3 7-C6
IC710 1:H3 7-J0
IC740 1:H2 7-D1
IC750 1:H4 7-M3
IC750 1:H4 7-Q7
IC750 1:H4 7-H5
IC820 1:L4 8-N4
IC830 1:N4 8-G0
IC830 1:N4 8-D2
IC830 1:N4 8-D0
IC830 1:N4 8-F2
IC830 1:N4 8-K0
IC840 1:M2 8-L0
IC850 1:M3 8-P0
IC850 1:M3 8-Q2
IC850 1:M3 8-M2
IC850 1:M3 8-M2
IC850 1:M3 8-M0
L230 1:D2 2-L2
L300 1:F9 3-C7
L301 1:E8 3-D8
L302 1:E8 3-E7
&L303 1:E8 3-E7
&L304 1:E7 3-F7
&L305 1:E7 3-H7
&L306 1:F7 3-J7
&L307 1:E6 3-M8
&L308 1:E5 3-M8
&L309 1:E5 3-P8
&L310 1:E5 3-P8
&L325 1:E5 3-N7
L330 1:F4 3-F4
L400 1:G8 4-P3
L401 1:G8 4-P3
L402 1:H8 4-L3
L403 1:J8 4-J3
L404 1:J8 4-G4
L405 1:J7 4-G5
L406 1:G9 4-Q3
L408 1:K7 4-F3
L409 1:L8 4-E3
L410 1:M8 4-C3
L750 1:G3 7-Q0
L900 1:P7 9-E5
L901 1:P7 9-F5
L902 1:P7 9-G5
LINK1 1:B3 2-Q3
LINK2 1:A4 2-Q2
P100 1:Q6 1-R8
P160 1:P2 1-Q4
P170 1:P2 1-R4
P201 1:C8 2-A9
P204 1:D4 2-A9
P207 1:C5 2-A8
P210 1:D5 2-C7
P213 1:D3 2-P0
P216 1:D4 2-P0
P219 1:D3 2-P0
P222 1:B9 2 -P0
P225 1:C4 2-F4
P228 1:C4 2-F3
P231 1:C9 2-G3
P234 1:C4 2-G3
P236 1:C8 2-A1
P238 1:D8 2-A1
P240 1:C7 2-G1
P242 1:C4 2-G1
P244 1:C4 2-G8
P246 1 :B5 2-H9
P248 1 :A5 2-H9
P249 1:A5 2 -K9
P250 1:B2 2 -K9
P252 1:B2 2 -K9
P254 1:B2 2 -K9
P256 1:B2 2 -L8
P258 1:D3 2-P8
P260 1:D3 2-P7
P263 1:C2 2-R1
P266 1:C2 2-Q1
P268 1:C2 2-R1
P270 1:C1 2-R0
P280 1:C2 2-Q0
P282 1:C2 2-R0
P284 1:B4 2 -P4
P287 1:B2 2 -M0
P300 1:F5 3-Q7
P810 1:K2 8 -A5
P815 1:L4 8-C4
P820 1:K4 8 -L8
P825 1:K4 8 -L8
P830 1:K4 8 -L8
P835 1:K4 8 -L7
P840 1:K4 8 -L7
PIN4 1:J4 7-B8
PL100 1:P3 1 -A0
PL200 1:C6 2-R7
PL210 1:C5 2-B8
PL220 1:B5 2-H7
PL230 1:B2 2-L8
PL240 1:B6 2 -K7
PL250 1:C8 2-D2
PL260 1:C4 2-H2
PL270 1:C2 2-L1
Q210 1:B5 2-J8
Q220 1:B6 2-N7
Q230 1:B6 2-N6
Q240 1:C4 2-H4
Q245 1:B6 2-J4
Q250 1:C8 2-G2
Q255 1:C7 2-H1
Q260 1:B7 2-K1
Q270 1:B8 2-L0
Q280 1:B7 2-L3
Q290 1:B7 2-M3
Q300 1:E9 3-B7
Q301 1:F9 3-C7
Q302 1:F8 3-D7
Q303 1:E6 3-K7
Q304 1:F6 3-L8
Q331 1:E3 3-G0
Q400 1:K8 4-G3
Q401 1:J7 4-F4
Q540 1:K5 5-G4
Q620 1:N6 6-P8
Q630 1:M6 6-P5
Q660 1:L5 6-N1
Q670 1:L6 6-P2
Q750 1:G4 7-G3
Q760 1:G3 7-J3
Q770 1:H3 7-J1
Q775 1:H3 7-K3
Q780 1:H3 7-K3
Q785 1:H3 7-K2
Q790 1:H3 7-L3
Q795 1:G3 7-P0
Q810 1:K2 8-B6
Q820 1:K2 8-C6
Q840 1:K2 8-F5
Q850 1:L2 8-G5
Q860 1:K4 8-B4
Q870 1:L4 8-C4
Q880 1:L2 8-Q3
Q890 1:L4 8-H2
Q895 1:M3 8-P1
R160 1:P2 1-Q4
R201 1:C5 2-B8
R202 1:C5 2-B7
R204 1:C5 2-C9
R205 1:C5 2-C8
R207 1:C5 2-D8
&R209 1:C4 2-D8
R210 1:C5 2-D8
R211 1:C5 2-E8
R213 1:C5 2-G6
R215 1:B5 2-G9
R218 1:C5 2-G8
&R219 1:C5 2-G7
R221 1:C5 2-H7
R222 1:C5 2-H7
%R223 1:A5 2-J9
R224 1:B5 2-J8
R225 1:B5 2-J8
R227 1:B5 2-J7
R229 1:B6 2-M7
R230 1:C6 2-M5
R232 1:B5 2-M7
R233 1:B6 2-N7
R234 1:B6 2-N7
R236 1:B5 2-N7
R238 1:C6 2-Q6
R239 1:C6 2-Q7
R241 1:D4 2-G4
R242 1:C4 2-G4
R244 1:C4 2-G4
R245 1:C4 2-H4
R247 1:C7 2-J5
R249 1:C6 2-J4
R251 1:B7 2-L3
R252 1:C6 2-L4
R254 1:B7 2-L3
R255 1:B7 2-L3
R256 1:C6 2-M4
R258 1:C7 2-M3
R260 1:C7 2-P2
R261 1:C7 2-P3
R262 1:B4 2-P4
%R263 1:C4 2-Q3
R264 1:B8 2-B3
R265 1:B8 2-B2
R266 1:B8 2-B2
R267 1:C8 2-C3
%R268 1:C3 2-Q2
R269 1:C8 2-B1
R271 1:D8 2-A0
R272 1:D8 2-A1
R273 1:D8 2-C1
R274 1:B3 2-P3
R275 1:D8 2-E0
R276 1:B3 2-Q3
R277 1:D8 2-D0
01/04/00 Copyright TEL
Page 75

IPN 220-01446-03
M820-00 T825 PCB Information
Device PCB Circuit D evice PCB Circuit Device PCB CircuitDevice PCB Circuit
R278 1:D8 2-C1
R279 1:B3 2-Q3
R280 1:C8 2-D2
R281 1:C8 2-D2
R282 1:C8 2-E2
R284 1:C8 2-F3
R285 1:B8 2-E3
R287 1:C8 2-F2
R288 1:B8 2-F2
R289 1:C4 2-G2
R290 1:C4 2-H3
R292 1:C7 2-G1
R293 1:B7 2-H1
R294 1:B8 2-H0
R295 1:B6 2-J1
R296 1:B7 2-K1
R297 1:B2 2-M0
R298 1:B7 2-K1
R299 1:B7 2-K1
R300 1:E9 3-B7
R301 1:F9 3-C6
R302 1:F8 3-D7
R303 1:E8 3-D8
R304 1:F8 3-D8
R307 1:E6 3-K7
R308 1:F6 3-K8
R309 1:E6 3-K8
R310 1:E6 3-K7
R311 1:F6 3-K8
R312 1:E6 3-L9
R313 1:E6 3-L8
R314 1:E6 3-L7
R315 1:E6 3-L7
R317 1:F5 3-Q7
R318 1:F5 3-Q7
R319 1:F6 3-L8
R320 1:F6 3-L7
R321 1:F6 3-L7
&R323 1:E5 3-P8
&R324 1:E5 3-P8
R329 1:E4 3-D3
R330 1:E4 3-D3
R333 1:F3 3-E5
R336 1:F4 3-E4
R337 1:E3 3-G0
R338 1:E3 3-G0
R339 1:F4 3-F4
R340 1:E3 3-E2
R341 1:E3 3-F3
R342 1:E3 3-F3
R343 1:E3 3-G3
R344 1:D4 3-H1
&R346 1:F4 3-G5
R347 1:E3 3-H1
R348 1:F4 3-G3
R349 1:F4 3-H3
R350 1:E3 3-D2
R351 1:E3 3-E1
R352 1:E3 3-E1
R353 1:E3 3-E1
R354 1:E3 3-F2
R355 1:E3 3-D2
R356 1:E3 3-D2
R357 1:E4 3-G1
R358 1:E3 3-E2
R359 1:E3 3-E2
R360 1:E3 3-H1
R361 1:F3 3-H3
R362 1:E3 3-H1
R363 1:F3 3-J4
%R364 1:E4 3-J2
R365 1:E5 3-J2
R368 1:E3 3-J1
R369 1:E3 3-J1
R370 1:F3 3-K3
R371 1:F3 3-K4
R372 1:F3 3-L3
R373 1:F3 3-L3
R374 1:E3 3-H5
R375 1:E3 3-H4
R376 1:E3 3-J5
R377 1:E3 3-K4
R378 1:F3 3-L4
R382 1:F3 3-N4
R383 1:F3 3-N4
R384 1:E5 3-P4
R400 1:G7 4-Q4
R401 1:G7 4-P5
R402 1:H7 4-P4
R403 1:G8 4-P3
R404 1:G8 4-P3
R408 1:H9 4-M3
R409 1:G9 4-M3
R410 1:H9 4-M3
R411 1:J8 4-H3
R412 1:K8 4-H3
R416 1:K9 4-H3
R417 1:J8 4-G4
R418 1:J7 4-G5
R419 1:K8 4-G3
R420 1:K8 4-G3
R424 1:J7 4-G3
R425 1:J7 4-F4
R426 1:J8 4-F5
R427 1:J7 4-F4
R510 1:K6 5-H7
R515 1:H6 5-E5
R555 1:K5 5-G3
R615 1:M5 6-B6
R617 1:M5 6-D5
R619 1:N6 6-L8
R621 1:N6 6-L8
R625 1:N6 6-L7
R629 1:M6 6-P6
R633 1:M5 6-Q8
R636 1:M5 6-K6
R637 1:N5 6-K5
R640 1:M5 6-G0
R641 1:N5 6-L4
R645 1:N5 6-L5
R649 1:M5 6-M5
R653 1:M5 6-Q4
R681 1:L5 6-L2
R685 1:L5 6-N2
R689 1:L6 6-Q3
R693 1:L5 6-P1
R696 1:L6 6-P1
R701 1:J4 7-A9
R702 1:J4 7-B9
R703 1:J4 7-B8
R706 1:J3 7-C6
R707 1:J3 7-C7
R708 1:J2 7-D7
R709 1:H2 7-E7
R710 1:J3 7-B6
R711 1:H3 7-C6
R712 1:J4 7-P8
R713 1:J3 7-C6
R730 1:J2 7-A2
R731 1:J2 7-A2
R732 1:J2 7-A2
R742 1:H2 7-C4
R743 1:H2 7-C4
R744 1:G2 7-D4
R746 1:H3 7-D4
R747 1:H3 7-D4
R748 1:J2 7-A1
R749 1:J2 7-B1
R750 1:H4 7-Q8
R752 1:G4 7-F5
R753 1:G4 7-F3
R754 1:G3 7-F3
R756 1:G3 7-G5
R757 1:G4 7-H4
R758 1:H3 7-J4
R759 1:H3 7-J4
R760 1:H3 7-K4
R762 1:H3 7-K4
R763 1:H3 7-L4
R765 1:H3 7-J2
R766 1:G3 7-J3
R767 1:H3 7-K2
R769 1:H3 7-K3
R771 1:H4 7-L3
R772 1:G4 7-L2
R774 1:H3 7-L2
R775 1:H4 7-M2
R784 1:G3 7-P1
R785 1:G3 7-P1
R786 1:G3 7-Q2
R787 1:G2 7-Q2
R790 1:G3 7-P0
R793 1:G3 7-P1
R794 1:G3 7-Q1
R804 1:J3 8-B7
R805 1:J3 8-B7
R808 1:K2 8-B6
R809 1:K2 8-B6
R810 1:L2 8-C6
R811 1:L2 8-C6
R812 1:K2 8-C6
R813 1:K2 8-C5
R815 1:K2 8-F4
R816 1:K2 8-F4
R818 1:K2 8-G5
R819 1:L2 8-G5
R820 1:K4 8-B4
R821 1:L4 8-C4
R822 1:L4 8-C4
R823 1:L4 8-C4
R824 1:K4 8-K8
R825 1:K4 8-K8
R826 1:K4 8-K8
R827 1:K4 8-K7
R828 1:K4 8-K7
R829 1:K4 8-P9
R830 1:K3 8-P9
R831 1:K3 8-P9
R832 1:K3 8-P8
R833 1:K3 8-P8
R835 1:K3 8-P8
R836 1:K3 8-P8
R837 1:K3 8-P7
R838 1:L4 8-L6
R839 1:L4 8-L6
R840 1:K3 8-P7
R841 1:K3 8-P7
R842 1:K3 8-P6
R843 1:K3 8-P6
R844 1:L2 8-R3
R845 1:L2 8-R3
R846 1:L4 8-L6
R847 1:L4 8-M6
R848 1:L4 8-R5
R852 1:L2 8-G6
R853 1:L2 8-F6
R854 1:N3 8-C2
R855 1:N3 8-C2
R856 1:N3 8-C2
R857 1:N4 8-D2
R858 1:N3 8-C1
R859 1:N3 8-D0
R860 1:N3 8-D1
R861 1:M3 8-D0
R863 1:N3 8-E2
R865 1:M3 8-E2
R866 1:M3 8-F2
R867 1:M3 8-F1
R868 1:N4 8-E0
R869 1:M3 8-F0
R870 1:M3 8-F0
R871 1:N3 8-F0
R872 1:N4 8-F0
R873 1:N4 8-G0
R875 1:M4 8-F2
R876 1:M3 8-K1
R877 1:M2 8-K1
R878 1:M2 8-K0
R879 1:M2 8-K0
R881 1:L4 8-H2
R882 1:M4 8-H2
R884 1:M3 8-P3
R885 1:M3 8-P2
R886 1:M3 8-Q3
R887 1:M3 8-P3
R888 1:M3 8-P2
R889 1:M3 8-N1
R890 1:M3 8-P1
R891 1:M2 8-P0
R892 1:M2 8-P0
R894 1:M2 8-Q0
R895 1:M2 8-Q1
R897 1:M2 8-Q2
R898 1:M2 8-Q2
R900 1:P6 9-G4
RL210 1:C2 2-R0
RL210 1:C2 2-L1
RL210 1:C2 2-R1
RV205 1:B5 2-M7
RV210 1:B7 2-K3
RV220 1:D4 2-G4
RV230 1:B8 2-B2
RV235 1:D9 2-D0
RV330 1:E3 3-E1
RV331 1:F3 3-K3
SHLD610 1:L6 6-J3
SK501 1:G6 5-C6
SK502 1:G6 5-C6
SK503 1:G6 5-C5
SK504 1:G5 5-C4
SK505 1:G5 5-C4
SK513 1:H5 5-D4
SK522 1:H6 5-F6
SK531 1:K6 5-J6
SK532 1:K5 5-J6
SK533 1:K5 5-J5
SK534 1:K5 5-J4
SK535 1:K5 5-J4
SK805 1:K3 8-Q9
SK805 1:K3 8-Q9
SK805 1:K3 8-Q7
SK805 1:K3 8-Q8
SK805 1:K3 8-Q6
SK805 1:K3 8-Q8
SK805 1:K3 8-Q6
SK805 1:K3 8-Q8
SK805 1:K3 8-Q7
SK805 1:K3 8-Q8
SK805 1:K3 8-Q7
SK805 1:K3 8-Q5
SK805 1:K3 8-Q7
SK805 1:K3 8-Q6
SK805 1:K3 8-Q9
SK805 1:K3 8-Q6
SK810 1:L3 8-H5
SL210 1:C8 2-E1
SL220 1:C8 2-E1
#SL400 1:N8 4-C3
#SL401 1:M8 4-D3
B6.2.13
Copyright TEL 01/04/00
Page 76

IPN 220-01446-03
B6.2.14
Device PCB Circuit Device PCB CircuitDevice PCB Circuit Device PCB Circuit
#SL402 1:M8 4-E3
#SL403 1:J8 4-J4
#SL404 1:H8 4-K3
#SL405 1:H8 4-L4
SW201 1:B4 2-L6
T210 1:C3 2-Q3
T610 1:L6 6-N2
TP202 1:C8 2-D9
TP211 1:D3 2-P8
TP300 1:E8 3-E7
TP301 1:F6 3-J7
TP302 1:F6 3-M8
TP305 1:E6 3-P4
TP601 1:N5 6-K9
TP602 1:L5 6-R9
TP603 1:L5 6-J2
TP604 1:L4 6-N6
TP607 1:M4 6-E6
TP710 1:G4 7-J5
&XF300 1:F7 3-G7
&XF301 1:F7 3-H7
&XF302 1:E5 3-N8
X330 1:E4 3-C3
T825 PCB Information M820-00
&XF304 1:F4 3-E3
01/04/00 Copyright TEL
Page 77

M820-00 CI
Part C T826 Transmitter & T827 Exciter
This part of the manual is divided into six sections, as listed below. There is a detailed
table of contents at the start of each section.
Section Title
1 General Information
2 Circuit Operation
3 Initial Tuning & Adjustment
4 Functional Testing (not available for Tuning & Adjustment manual)
5 Fault Finding (not available for Tuning & Adjustment manual)
6 PCB Information
Copyright TEL 01/07/00
Page 78

CII M820-00
01/07/00 Copyright TEL
Page 79

M820-00 T826/827 General Information C1.1
1 T826/827 General Information
This section provides a brief description of the T826 transmitter and T827 exciter, along
with detailed specifications and a list of types available.
The following topics are covered in this section.
Section Title Page
1.1 Introduction 1.3
1.2
1.2.1
1.2.2
1.2.3
1.2.4
1.2.4.1
1.2.4.2
1.2.4.3
1.2.5
1.2.6
1.3 Product Codes 1.9
1.4 T826 Standard Product Range 1.10
1.5 T827 Standard Product Range 1.10
Specifications
Introduction
General
RF Section
Audio Processor
Inputs
Modulation Characteristics
CTCSS
Microcontroller
Tes t Sta n da rd s
1.4
1.4
1.4
1.5
1.6
1.6
1.7
1.7
1.7
1.8
Copyright TEL 01/04/00
Page 80

C1.2 T826/827 General Information M820-00
01/04/00 Copyright TEL
Page 81

M820-00 T826/827 General Information C1.3
1.1 Introduction
The T826 is a synthesised, microprocessor controlled FM base station transmitter
designed for single or multichannel operation in the 66 to 88MHz frequency range
1
with
a standard power output of 25W. The RF section of the transmitter comprises a frequency synthesiser which provides 125mW of frequency modulated RF drive to a two
stage, wide band output driver followed by a 25W power amplifier. A thermal shutdown feature is provided in the T826 in case operating temperatures exceed acceptable
levels.
The T827 is a synthesised, microprocessor controlled FM base station exciter designed
for single or multichannel operation in the 66 to 88MHz frequency range
1
. With a standard power output of only 1W, the exciter is designed for use with the T828 50W power
amplifier. The RF section of the exciter comprises a frequency synthesiser which provides 125mW of frequency modulated RF drive to a two stage, wide band output amplifier.
A wide selection of audio characteristics may be obtained from the audio processor.
Optional circuit blocks are an audio compressor and a pre-emphasis stage. They can be
bypassed or linked to one or both audio inputs, and then back into the remaining audio
circuitry in almost any combination. All audio processor options are link selectable.
The synthesiser frequency is programmed via the serial communications port. Eight
channel select lines are accessible via an optional D-range connector (D-range 2 T800-03-0000) at the rear of the set.
All components except those of the VCO are mounted on a single PCB. This is secured
to a die-cast chassis which is divided into compartments to individually shield each section of circuitry. Access to both sides of the main circuit board is obtained by removing
each of the chassis lids. There is provision within the chassis to mount small option
PCBs.
The front panel controls include line sensitivity, microphone socket and carrier switch.
This switch turns on the carrier (unmodulated) as an aid to servicing.
The T826 and T827 are both 60mm wide and each occupies a single space in a Tait rack
frame, which has the ability to accommodate up to seven standard modules.
1. Although capable of operating over the 66-88MHz frequency range, the T826 and T827
have an 8MHz switching range (see Section 1.2.3 and Section 3.1).
Copyright TEL 01/04/00
Page 82

C1.4 T826/827 General Information M820-00
1.2 Specifications
1.2.1 Introduction
The performance figures given are minimum figures, unless otherwise indicated, for
equipment tuned with the maximum switching range and operating at standard room
temperature (+22°C to +28°C) and standard test voltage (13.8V DC).
Where applicable, the test methods used to obtain the following performance figures
are those described in the EIA and ETS specifications. However, there are several
parameters for which performance according to the CEPT specification is given. Refer
to Section 1.2.6 for details of test standards.
Details of test methods and the conditions which apply for Type Approval testing in all
countries can be obtained from Tait Electronics Ltd.
The terms "wide bandwidth" and "narrow bandwidth" used in this and following sections are defined in the following table.
Channel Spacing
Wide Bandwidth 25kHz ±5.0kHz 15.0kHz
Narrow Bandwidth 12.5kHz ±2.5kHz 7.5kHz
Modulation
100% Deviation
Receiver
IF Bandwidth
1.2.2 General
Number Of Channels .. 128 (standard)
Supply Voltage:
Operating Voltage .. 10.8 to 16V DC
Standard Test Voltage .. 13.8V DC
Polarity .. negative earth only
Polarity Protection .. crowbar diode
Line Keying Supply (if required) .. -50V DC
Supply Current:
Transmit - T826 .. 4.5A (typical)
- T827 .. 650mA
Standby .. 160mA (typical)
1
Operating Temperature Range .. -30°C to +60°C
1. Additional channels may be factory programmed. Contact your nearest Tait Dealer or
Customer Service Organisation.
01/04/00 Copyright TEL
Page 83

M820-00 T826/827 General Information C1.5
Dimensions:
Height .. 183mm
Width .. 60mm
Length .. 322mm
Wei g h t . . 2 . 1 kg
Time-Out Timer (optional) .. 0 to 5 minutes
1
adjustable in 10 sec-
ond steps
Tail Timer .. 0 to 5 seconds adjustable in 100ms
2
steps
Transmit Key Time .. <30ms
Transmit Lockout Timer .. 0 to 1 minute adjustable in 10 second
steps
1.2.3 RF Section
Frequency Range .. 66-88MHz (refer to Section 1.4 and
Section 1.5)
Modulation Type .. FM
Frequency Increment .. 5 or 6.25kHz
Switching Range .. 8MHz (i.e. ±4MHz from the centre
frequency)
Load Impedance .. 50 ohms
Frequency Stability .. ±2.5ppm, -30°C to +60°C
(see also Section 1.4 and Section 1.5)
Adjacent Channel Power (full deviation):
Wide Bandwidth (WB) .. -70dBc
(±25kHz/15kHz B/W)
Narrow Bandwidth (NB) .. -60dBc
(±12.5kHz/7.5kHz B/W)
Transmitter Switching .. complies with ETS 300 113
Transmitter Side Band Noise:
(no modulation, 15kHz bandwidth)
At ±25kHz .. -95dBc
At ±1MHz .. -105dBc
1. Adjustable from 0 to 10 minutes in PGM800Win version 2.12 and later.
2. Adjustable in 20ms steps in PGM800Win version 2.12 and later.
Copyright TEL 01/04/00
Page 84

C1.6 T826/827 General Information M820-00
Intermodulation .. -40dBc with interfering signal of
-30dBc
.. -70dBc with 25dB isolation
& interfering signal of -30dBc
(PA with output isolator)
T826 Mismatch Capability:
Ruggedness .. refer to your nearest Tait Dealer or
Customer Service Organisation
Stability .. 3:1 VSWR (all phase angles)
Radiated Spurious Emissions:
Transmit .. -36dBm to 1GHz
-30dBm 1GHz to 4GHz
Standby .. -57dBm to 1GHz
-47dBm 1GHz to 4GHz
Conducted Spurious Emissions: (T826 Only)
Transmit .. -36dBm to 1GHz
-30dBm 1GHz to 4GHz
Standby .. -57dBm to 1GHz
-47dBm 1GHz to 4GHz
Power Output:
T826 - Rated Power .. 25W
- Range Of Adjustment .. 5-25W
T827 .. 1W ±300mW
Duty Cycle (T826 Only) .. 100% @ 25W at +25°C
.. 30% @ 25W at +60°C
.. 100% @ 10W at +60°C
1.2.4 Audio Processor
1.2.4.1 Inputs
Inputs Available .. line, microphone and CTCSS
Line Input:
Impedance .. 600 ohms (balanced)
Sensitivity (60% modulation @ 1kHz)-
With Compressor .. -50dBm
Without Compressor .. -30dBm
Microphone Input:
Impedance .. 600 ohms
Sensitivity (60% modulation @ 1kHz)-
With Compressor .. -70dBm
Without Compressor .. -50dBm
01/04/00 Copyright TEL
Page 85

M820-00 T826/827 General Information C1.7
1.2.4.2 Modulation Characteristics
Frequency Response .. flat or pre-emphasised (optional)
(below limiting)
Line And Microphone Inputs:
Pre-emphasised Response-
Bandwidth .. 300Hz to 3kHz (WB)
.. 300Hz to 2.55kHz (NB)
Below Limiting .. within +1, -3dB of a 6dB/octave
pre-emphasis characteristic
Flat Response .. within +1, -2dB of output at 1kHz
Above Limiting Response .. within +1, -2dB of a flat response
(ref. 1kHz)
Distortion .. 2% max.
Hum And Noise:
Wide Bandwidth .. -55dB (300Hz to 3kHz [EIA]) typical
Narrow Bandwidth .. -50dB (CEPT)
Compressor (optional):
Attack Time .. 10ms
Decay Time .. 800ms
Range .. 50dB
1.2.4.3 CTCSS
Standard Tones .. all 37 EIA group A, B and C tones
plus 13 commonly used tones
Frequency Error .. 0.08% max.
(from EIA tones)
Generated Tone Distortion .. 1.2% max.
Generated Tone Flatness .. flat across 67 to 250.3Hz to within 1dB
Modulation Level .. adjustable
Modulated Distortion .. <5%
1.2.5 Microcontroller
Auxiliary Ports:
Open Drain Type .. capable of sinking 2.25mA via 2k2Ω
max. .. 5V
V
ds
Copyright TEL 01/04/00
Page 86

C1.8 T826/827 General Information M820-00
1.2.6 Test Standards
Where applicable, this equipment is tested in accordance with the following standards.
1.2.6.1 European Telecommunication Standard
ETS 300 086 January 1991
Radio equipment and systems; land mobile service; technical characteristics and test
conditions for radio equipment with an internal or external RF connector intended primarily for analogue speech.
ETS 300 113 March 1996
Radio equipment and systems; land mobile service; technical characteristics and test
conditions for radio equipment intended for the transmission of data (and speech) and
having an antenna connector.
ETS 300 219 October 1993
Radio equipment and systems; land mobile service; technical characteristics and test
conditions for radio equipment transmitting signals to initiate a specific response in the
receiver.
ETS 300 279 February 1996
Radio equipment and systems; electromagnetic compatibility (EMC) standard for private land mobile radio (PMR) and ancillary equipment (speech and/or non-speech).
1.2.6.2 DTI CEPT Recommendation T/R-24-01
Annex I: 1988
Technical characteristics and test conditions for radio equipment in the land mobile
service intended primarily for analogue speech.
Annex II: 1988
Technical characteristics of radio equipment in the land mobile service with regard to
quality and stability of transmission.
1.2.6.3 Telecommunications Industry Association
ANSI/TIA/EIA-603-1992
Land mobile FM or PM communications equipment measurement and performance
standards.
01/04/00 Copyright TEL
Page 87

M820-00 T826/827 General Information C1.9
1.3 Product Codes
The three groups of digits in the T820 Series II product code provide information about
the model, type and options fitted, according to the conventions described below.
The following explanation of T820 Series II product codes is not intended to suggest that
any combination of features is necessarily available in any one product. Consult your
nearest Tait Dealer or Customer Service Organisation for more information regarding
the availability of specific models, types and options.
Model
The Model group indicates the basic function of the product, as follows:
T82X
-XX-XXXX T825 receiver
T826 25W transmitter
T827 exciter
T828 50W power amplifier
Type
The Type group uses two digits to indicate the basic RF configuration of the product.
The first digit in the Type group designates the frequency range:
T82X-X
The second digit in the Type group indicates the channel spacing:
T82X-XX
X-XXXX ’1’ for 66-88MHz
-XXXX ’0’ for wide bandwidth (25kHz)
’5’ for narrow bandwidth (12.5kHz)
Options
T82X-XX-XXXX The Options group uses four digits and/or letters to indicate
any options that may be fitted to the product. This includes
standard options and special options for specific customers.
’0000’ indicates a standard Tait product with no options fitted.
The large number of options precludes listing them here.
Copyright TEL 01/04/00
Page 88

C1.10 T826/827 General Information M820-00
1.4 T826 Standard Product Range
The following table lists the range of standard T826 types (i.e. no options fitted) available at the time this manual was published. Consult your nearest Tait Dealer or Customer Service Organisation for more information.
Frequency Range (MHz) 66-88
Deviation (kHz) 2.5 5
a
TCXO
Transmitter Type: T826- 15-0000 10-0000
a. A TCXO with a stability of ±1ppm (0°C to +60°C) is
You can identify the transmitter type by checking the product code printed on a label on
the rear of the chassis (Figure 1.1 in Part A shows typical labels). You can further verify
the transmitter type by checking the placement of an SMD resistor in the table that is
screen printed onto the PCB (refer to Section 6.1 for more details).
±2.5ppm -30°C to +60°C
available to suit specific requirements. Contact your
nearest authorised Tait Dealer or Customer Service
Organisation for further details.
••
1.5 T827 Standard Product Range
The following table lists the range of standard T827 types (i.e. no options fitted) available at the time this manual was published. Consult your nearest Tait Dealer or Customer Service Organisation for more information.
Frequency Range (MHz) 66-88
Deviation (kHz) 2.5 5
a
TCXO
Transmitter Type: T827- 15-0000 10-0000
a. A TCXO with a stability of ±1ppm (0°C to +60°C) is
You can identify the exciter type by checking the product code printed on a label on the
rear of the chassis (Figure 1.1 in Part A shows typical labels). You can further verify the
exciter type by checking the placement of an SMD resistor in the table that is screen
printed onto the PCB (refer to Section 6.1 for more details).
±2.5ppm -30°C to +60°C
available to suit specific requirements. Contact your
nearest authorised Tait Dealer or Customer Service
Organisation for further details.
••
01/04/00 Copyright TEL
Page 89

M820-00 T826/827 Circuit Operation C2.1
2 T826/827 Circuit Operation
This section provides a basic description of the circuit operation of the T826 transmitter
and T827 exciter.
Note:
Refer to Section 6 where the parts lists, grid reference index and diagrams will provide
detailed information on identifying and locating components and test points on the
main PCB. The parts list and diagrams for the VCO PCB are in Part E.
The following topics are covered in this section.
Unless otherwise specified, the term "PGM800Win" used in this and following sections refers to version 2.00 and later of the software.
Section Title Page
2.1 Introduction 2.3
2.2 Microcontroller 2.4
2.3
2.3.1
2.4
2.4.1
2.5
Synthesised Local Oscillator
Two Point Modulation
VCO
VCO Supply
Audio Processor
2.5
2.6
2.7
2.7
2.8
2.5.1
2.5.2
2.5.3
2.5.4
2.5.5
2.6 Power Supply & Regulator Circuits 2.10
2.7 Transmit Timers 2.11
2.8 T826 Drive Amplifier & PA 2.12
2.9 T827 Exciter Drive Amplifier 2.13
General
Audio Inputs
Keying Inputs
Compressor (Automatic Level Control (ALC))
Outputs To Modulators
2.8
2.8
2.9
2.9
2.9
Copyright TEL 01/04/00
Page 90

C2.2 T826/827 Circuit Operation M820-00
Figure Title Page
2.1
2.2
2.3
2.4
2.5
2.6
2.7
2.8
T826 High Level Block Diagram
T827 High Level Block Diagram
T826/827 Microcontroller Block Diagram
T826/827 Synthesiser Block Diagram
T826/827 Two Point Modulation
T826/827 Audio Processor Block Diagram
T826/827 Power Supply & Regulators Block Diagram
T826/827 Transmit Timers
2.3
2.3
2.4
2.5
2.6
2.8
2.10
2.11
01/04/00 Copyright TEL
Page 91

M820-00 T826/827 Circuit Operation C2.3
2.1 Introduction
The individual circuit blocks which make up the T826 and T827 are:
• synthesiser
•VCO
• audio processor
•drive amplifier
• power amplifier (T826 only)
• voltage regulators.
Each of these circuit blocks is set in its own shielded compartment, formed as an integral part of the main chassis.
The configuration of the circuit blocks may be seen on a functional level in Figure 2.1
and Figure 2.2. Refer to the circuit diagrams in Section 6.2 (T826) or 6.3 (T827) for more
detail.
Reference
Oscillator
12.8MHz
Microphone
Line
Tx Reg
Transformer
Reference
Oscillator
12.8MHz
Microphone
Line
Synthesiser
Audio
Processor
Transformer
+21dBm
Lock
Detect
&
Gate
PIN
Switch
Time
Delay
Time
Delay
Power
Control
Drive
Amp.
Ramp
Gen.
Exciter
Output
(+27dBm)
Figure 2.1 T826 High Level Block Diagram
Drive
Amp.
Ramp
Gen.
Switching
Control
Synthesiser
Audio
Processor
+21dBm
Lock
Detect
&
Gate
PIN
Switch
Time
Delay
PA
Time
Delay
Directional
Coupler
Low Pass
Filter
Low Pass
Filter
Exciter
Output
(1W)
PA Control Signal
(via exciter RF coax)
Transmitter
VCO
Output
(25W)
Tx Reg
Time
Delay
VCO
Figure 2.2 T827 High Level Block Diagram
Copyright TEL 01/04/00
Page 92

C2.4 T826/827 Circuit Operation M820-00
2.2 Microcontroller
(Refer to the microcontroller circuit diagram (sheet 8) in Section 6.2 or 6.3.)
Watchdog
Reset
Microcontroller Cavity
Channel
Auxiliary
Output
EEPROM
Select
Port
Dual Digital
Potentiometer
Port
Synthesiser
12.8MHz
Clock
External
Serial
Port
CTCSS Tone
5V Digital
Regulator
5V Reset
Microcontroller
Converter
CTCSS
Encoder
Figure 2.3 T826/827 Microcontroller Block Diagram
Overall system control of the T826/827 is accomplished by the use of a member of the
80C51 family of microcontrollers (IC810). It runs from internal ROM and RAM, thus
leaving all four ports free for input/output functions.
Non-volatile data storage is achieved by serial communication with a 16kBit EEPROM
(IC820). This serial bus is also used by the microcontroller to program the synthesiser
(IC740) and deviation control EPOTS (IC220).
The main tasks of the microcontroller are as follows:
• program the synthesiser and EPOT;
• interface with the PGM800Win programming software at 9600 baud via the
serial communication lines on D-range 1 (PL100) & D-range 2;
• monitor channel change inputs from D-range 2;
• generate timing waveforms for CTCSS encoding;
• coordinate and implement timing control of the exciter/transmitter;
• control the front panel "Supply" LED.
01/04/00 Copyright TEL
Page 93

M820-00 T826/827 Circuit Operation C2.5
m
2.3 Synthesised Local Oscillator
(Refer to the synthesiser circuit diagram (sheet 7) in Section 6.2 or 6.3 and the VCO circuit diagram in Part E.)
12.8MHz
Reference
Oscillator
Ref
Mod
Serial
Bus
Clk
Data
En
Fixed
Divider
/64
Phase
Modulator
FREQUENCY SYNTHESISER IC
Reference
f
ref
Controller
Divider
/R
Phase
Detector
Programmable
Charge
Divider
/N
Pump
Loop
Filter
Prescaler
64/65
Modulation
f
in
VCO
Σ
VCO Buffer
Divider Buffer
VCO PCB
Output
Buffer
Figure 2.4 T826/827 Synthesiser Block Diagram
The synthesiser (IC740) employs a phase-locked loop (PLL) to lock a voltage controlled
oscillator (VCO) to a given reference frequency. The synthesiser receives the divider
information from the control microprocessor via a 3 wire serial bus (clock, data, enable).
When the data has been latched in, the synthesiser processes the incoming signals from
the VCO buffer (f
) and the phase modulator (f
in
ref
).
A reference oscillator at 12.8MHz (=IC700) is buffered (IC710 pins 5 & 6) and divided
down to 200kHz (IC730). This 200kHz square wave is then summed with the modulating audio and passed to an integrator (IC720 pins 9 & 8, Q710, Q720). This produces a
ramping waveform which is centred around a DC level determined by the incoming
audio. IC720 pins 5 & 6 perform as a comparator, ultimately producing a phase-modulated 200kHz square wave. This is followed by another phase shifting stage (IC720 pins
3 & 4, Q730, Q740), before being divided down to 6.25kHz or 5kHz within the synthesiser IC (IC740).
+21dB
L.O.
A buffered output of the VCO (Q795) is divided with a prescaler and programmable
divider which is incorporated into the synthesiser chip (IC740). This signal is compared
with the phase modulated reference signal at the phase detector (also part of the synthesiser chip). The phase detector outputs drive a balanced charge pump circuit (Q760,
Q770, Q775, Q780, Q785) and active loop filter (IC750 pins 5, 6 & 7) which produces a
DC voltage between 0V and 20V to tune the VCO. This VCO control line is further filtered to attenuate noise and other spurious signals. Note that the VCO frequency
increases with increasing control voltage.
If the synthesiser loop loses lock, a pulsed signal appears at LD (pin 2) of IC740. This
signal is filtered and buffered by IC750 pins 1, 2 & 3, producing the Lock-Detect signal
used to shut off the power supply to the drive amplifier. IC750 pin 1 is at 20V when the
synthesiser is out of lock.
Copyright TEL 01/04/00
Page 94

C2.6 T826/827 Circuit Operation M820-00
2.3.1 Two Point Modulation
Frequency modulation occurs by modulating both the VCO input and the synthesiser
reference input. This process is called two point modulation and ensures a flat modulation response from 67Hz to 3kHz (2.55kHz for narrow bandwidth).
The PLL has a fast response time, allowing a Tx key-up time of <30ms. Because of this
fast response time the PLL sees lower modulation frequencies superimposed on the
VCO as an error and corrects for it, resulting in no modulation on the carrier. At modulation frequencies greater than 300Hz the loop cannot correct fast enough and modulation is seen on the carrier. The response of the loop to VCO modulation is shown by f
in Figure 2.5 below.
To achieve low frequency modulation, the reference oscillator is also modulated so that
the phase detector of IC740 detects no frequency error under modulation. Thus, the
synthesiser loop will not attempt to correct for modulation and the audio frequency
response of the transmitter remains unaffected. The response of the loop to reference
frequency modulation is shown by f
The reference modulation is controlled by a 256-step 10k electronic potentiometer
(EPOT) which is adjustable via PGM800Win. The EPOT is made up of 256 resistive sec-
tions (representing approximately 39Ω each) which can be individually addressed by
the microcontroller. Each section can be switched in or out of circuit to achieve the
required total resistance, thus giving control of the reference modulation.
in Figure 2.5.
1
2
Deviation
ff
12
TCXO VCO
Frequency
Figure 2.5 T826/827 Two Point Modulation
01/04/00 Copyright TEL
Page 95

M820-00 T826/827 Circuit Operation C2.7
2.4 VCO
(Refer to the VCO circuit diagram in Part E.)
The VCO transistor (Q1) operates in a common source configuration, with an LC tank
circuit coupled between its gate and drain to provide the feedback necessary for oscillation. The VCO control voltage from the loop filter (IC750 pin 7) is applied to the varicaps (D1-D6) to facilitate tuning within an 8MHz band of frequencies. A trimcap
(&VC1-TX) is used for coarse tuning of the VCO. The output from the oscillator circuit
drives a cascode amplifier stage (Q2, Q3) which supplies +10dBm (typically) to a further
stage of amplification, Q5. This is the final amplifier on the VCO PCB, and delivers
+21dBm (typically) to the exciter drive amplifier.
A low level "sniff" is taken from the output of Q3 and used to drive the divider buffer
(Q795) for the synthesiser (IC740).
The VCO operates at the actual output frequency of the exciter, i.e. there are no multiplier stages. The VCO is modulated by superimposing the audio signal onto the control
voltage and by phase modulating the reference signal.
2.4.1 VCO Supply
The VCO is supplied from two switched +9V supplies under the control of the Tx-Reg.
supply.
The VCO (Q1) and buffer amplifier (Q2 & Q3) are supplied from one +9V switched supply by Q540 via the capacitor multiplier (Q550, C550).
The output amplifier is supplied from the other +9V supply by Q520, Q530, and Q510.
A delay circuit holds the VCO on for a short time after the Tx-Reg. supply has been
switched off. This is to allow the RF power circuits (both exciter and PA) to ramp down
in the correct manner before the VCO is switched off.
Copyright TEL 01/04/00
Page 96

C2.8 T826/827 Circuit Operation M820-00
2.5 Audio Processor
(Refer to the audio processor circuit diagram (sheet 2) in Section 6.2 or 6.3.)
Carrier
Opto-Key
Tx Key
PTT
Microphone
Input
Line Input
+
_
Constant Current Sink
Opto-coupler
Microphone
Pre-amp.
Audio 1 Audio 2
Link
34
5
PL205
Compressor
5
N
3
M
12
L
Pre-
emphasis
B
6
C
mic.
Inputs
line
Multiplexer
Output
Inhibit
utput
O
6
4
Link
PL210
Figure 2.6 T826/827 Audio Processor Block Diagram
Tx Enable
Link
3
4
H
5
6
I
7
8
J
PL215
Link
34
E
2
1
D
PL220
Buffer
Output
To VCO
Limiter
Set Deviation
Digital Pot. (EPOT)
Σ
Low Pass
Filter
Ref. Mod. Adjust
Digital Pot. (EPOT)
Integrator
Ref.
Mod.
CTCSS
2.5.1 General
The audio processor comprises several link selectable circuit blocks which may be configured in a variety of combinations to suit individual requirements. The pre-emphasis
network and compressor may be linked individually or cascaded between either or both
audio inputs and the limiter.
Refer to Section 3.5.1 for linking details.
2.5.2 Audio Inputs
Two audio inputs are available: one from a 600 ohm balanced (or unbalanced) line, and
the other from a local microphone. The microphone signal is passed first to a pre-amplifier (Q210) and ultimately to a multiplexer (IC240), but in between may pass through
the compressor (depending on the linking details). The line transformer is also connected to the multiplexer and is disabled by the microphone PTT switch.
A third input for external CTCSS tones is also provided.
01/04/00 Copyright TEL
Page 97

M820-00 T826/827 Circuit Operation C2.9
2.5.3 Keying Inputs
There are four ways to key the exciter:
• pulling the Tx-Key line low (pin 13 on D-range 1 [PL100]) at the rear of the set);
• pushing the "Carrier" button on the front panel - this will inhibit all audio;
• using the PTT button on the local microphone, disabling audio from the line;
• via the opto-key inputs (pins 11 and 12 on D-range 1 [PL100]) when electrical
isolation is required. This features a constant current sink (Q270) to ensure reliable activation of the opto-coupler (IC250) at low keying voltages.
2.5.4 Compressor (Automatic Level Control (ALC))
The input signal is fed via a current controlled attenuator (Q230, Q220) to a high gain
stage (IC230) from which the output signal is taken. This signal is passed to a comparator (IC230) which toggles whenever the audio signal exceeds a DC threshold determined by RV220. Thus, the comparator produces a square wave whose mark-space
ratio is determined by the amplitude of the audio signal. This square wave pumps up
the reservoir capacitor (C233) which controls the attenuator (Q230, Q220), thus completing the feedback loop.
The compression level is set by adjustment of the comparator threshold (RV220).
Note:
Although the high dynamic range of the compressor allows the use of very
low audio signal levels, such conditions will be accompanied by a degradation of the signal-to-noise ratio. Very low audio input levels should therefore be avoided where possible.
2.5.5 Outputs To Modulators
The output signal from the limiter (IC210, IC230) is added with a CTCSS tone at a summing amplifier (IC260). The signal is then low pass filtered (IC260) and split to supply
the two modulators.
Since the VCO modulator is a true frequency modulator, its audio is simply buffered
(IC260). The reference modulator, however, is a phase modulator and its audio must
first be integrated (IC210).
It is vital that the audio levels to the modulators are accurately set,
other. Hence the inclusion of level adjustment in the reference modulator path. Once
set, adjustments to absolute deviation may be made only by IC220, a 256-step 10k electronic potentiometer (EPOT), which is controlled via PGM800Win. The EPOT is made
up of 256 resistive sections (representing approximately 39Ω each) which can be indi-
vidually addressed by the microcontroller. Each section can be switched in or out of circuit to achieve the required total resistance, thus adjusting the absolute deviation level.
relative to each
Copyright TEL 01/04/00
Page 98

C2.10 T826/827 Circuit Operation M820-00
2.6 Power Supply & Regulator Circuits
(Refer to the regulators circuit diagram (sheet 6) in Section 6.2 or 6.3.)
+9V
Buffer
Tx Enable
Micro-
controller
Power
Switch
Tx Reg.
13.8V Nom.
From Rear
D-Range
Crowbar
Diode
13.8V
Nom.
5V
Reg
DC
Amp
5V 5V Dig9V 20V
Switching
PS
5V Dig
Reg
Watchdog
Timer
LVI
Figure 2.7 T826/827 Power Supply & Regulators Block Diagram
The T826 and T827 are designed to operate from a 10.8-16V DC supply (13.8V nominal).
A 5.3V regulator (IC630) runs directly from the 13.8V rail, driving much of the synthesiser circuitry. It is also used as the reference for a DC amplifier (IC640, Q630, Q620)
which provides a medium current capability 9V supply.
A switching power supply (Q660, Q670) runs from the 9V supply and provides a low
current capability +20V supply. This is used to drive the synthesiser loop filter (IC750),
giving a VCO control voltage range of up to 20V, and the Lock-Detect amplifiers.
Ultimate control of the transmitter is via the Tx-Reg. supply, switched from 9V by Q610.
This is enabled via the Tx-Enable signal from the audio processor, and microprocessor.
µP
µP
Reset
A crowbar diode is fitted for protection against connection to a power supply of incorrect polarity. It also provides transient overvoltage protection.
Note:
A fuse must be fitted in the power supply line for the diode to provide effective protection.
01/04/00 Copyright TEL
Page 99

M820-00 T826/827 Circuit Operation C2.11
2.7 Transmit Timers
The transmit tail timer, transmit timeout timer and transmit lockout timer can all be set
from PGM800Win. The fields for setting these are found on the system information
page. These three timers operate as follows (refer also to Figure 2.8):
Timer Function Adjustment
Transmit Tail Sets the tail time during which the
transmitter stays keyed after the external key source has been removed.
Transmit Timeout Sets the maximum continuous trans-
mission time. Once the timer has
timed out, the transmitter must be
keyed again, unless prevented by the
transmit lockout timer.
Transmit Lockout Sets the period of time that must
elapse after a timeout before the transmitter can re-transmit. Once the timer
has timed out, the transmitter can be
keyed again.
a. Adjustable in 20ms steps in PGM800Win version 2.12 and later.
b. Adjustable from 0 to 600 seconds in PGM800Win version 2.12 and later.
Tx-Enable
On
Tx-Enable
Tx-Reg.
0-5 seconds in 100ms
a
steps
0-300 secondsb in 10
second steps
0-60 seconds in 10
second steps
Tail Time
On
Tx-Reg.
Lockout Time
Timeout
Time
Figure 2.8 T826/827 Transmit Timers
Copyright TEL 01/04/00
Page 100

C2.12 T826/827 Circuit Operation M820-00
2.8 T826 Drive Amplifier & PA
(Refer to Figure 2.1 and the exciter and PA circuit diagrams (sheets 3 & 4) in Section 6.2.)
The output power of the PA is maintained at a constant level via a power control loop
applied to the two-stage, wide band exciter amplifier (Q307, Q312). The forward and
reverse RF power levels are sensed via a dual directional coupler and detector diodes
(D440, D441 in the PA cavity). The detected DC signals are summed with the "power
set" level and fed to the control integrator (IC310 pins 1, 2 & 3). The output control voltage is buffered by Q309 and Q315, and applied to the collectors of the wide band exciter
amplifiers.
Note:
The maximum output power of the transmitter is limited by a voltage clamp circuit
(consisting of a potential divider formed by R369//R374 and R375//R359//R360) which
turns on Q308, clamping the control voltage to approximately 7.8V. When the maximum operating temperature is exceeded, the clamp voltage is reduced to approximately
5.7V by removing R359//R360 from the circuit (see below).
To reduce the spurious output level when the synthesiser is out-of-lock, the Tx-Reg. and
Lock-Detect signals are gated to inhibit the PA control circuit and to switch off the RF
signal at the input to the drive amplifier. The RF input signal is switched by a PIN
switch attenuator (D300, D301, D302).
Cyclic keying control is provided by additional circuitry consisting of several time
delay, ramp and gate stages:
This is to allow the RF power circuits (both exciter and PA) to ramp up and down in a
controlled manner so that minimal adjacent channel interference is generated during
the transition.
Forward and reflected power signals are summed so that, under high
VSWR, the power control will turn the output RF level down.
• Q305, IC310 power ramping
• Q304, Q305 Tx-Reg. and Lock-Detect
• Q300, Q301, Q302 delay and PIN switch drive.
gate
The output of the wide band amplifier is approximately 550mW (+27.5dBm) for an
input of 65mW (+18dBm) when the power control is set to maximum.
Note:
A temperature sensor (R480) is provided so that the RF output power can be reduced to
a preset level when a set temperature is exceeded. This is a protection circuit (IC310
pins 5, 6 & 7, Q311) to prevent overheating, as the unit is
ation at high temperatures (refer to Section 1.2.3 for duty cycle specifications). RV302
sets the PA output power while under high temperature fold-back conditions.
The output of the temperature-sense comparator (IC310 pin 7) also feeds to a secondary
shutdown clamp circuit (Q303, Q360, Q308). The clamp voltage is set to approximately
01/04/00 Copyright TEL
The VCO output level of 125mW (+21dBm) is attenuated by a 3dB attenuator (R517, R518 & R519) in the VCO cavity. This provides good VCO/exciter
isolation as well as the correct exciter drive level.
not rated for continuous oper-
 Loading...