

Page 1

Tact-2.2 XP
Auto Target Curve
Tact Audio Inc.
3844 Hawkins NE
Albuquerque, NM 87109
USA
9/18/2008 RCS/DRC Quick Start 1 of 5
Page 2
Tact-2.2 XP Auto Target Curve
In an effort to make automatically generated target curve feature more user
friendly, we have changed the auto target curve adjustment screen to include graphical
representation of the target curve changes. Auto target curve adjustment feature is active
only if AUTO option is set to AUTO-ON. If AUTO option is set to AUTO-OFF, 2.2 XP
will use computer generated target curve. For more details on computer generated ta rget
curve please see 2.2 XP help files.
Tact-2.2 XP can save up to seven room response measurements. These
measurements are saved in measurement files labeled as FILE: 1 through FILE: 7 (Fig.
3, field 4). Auto correction can use any of these measurement files to perform automatic
room correction. Auto correction screen (Fig. 3) is used to assign measurement files to
correction presets.
How does it work?
Using 2.2 XP measurements screen perform room response measurement as
described in 2.2 XP Automatic Room Correction documet. You can get this document
from the following link:
http://www.tactlab.com/Resources/Downloads/RCS22XP/Tact22XP_Automatic_Correction.pdf
After the room response measurement is completed enter auto target curve screen as
described bellow.
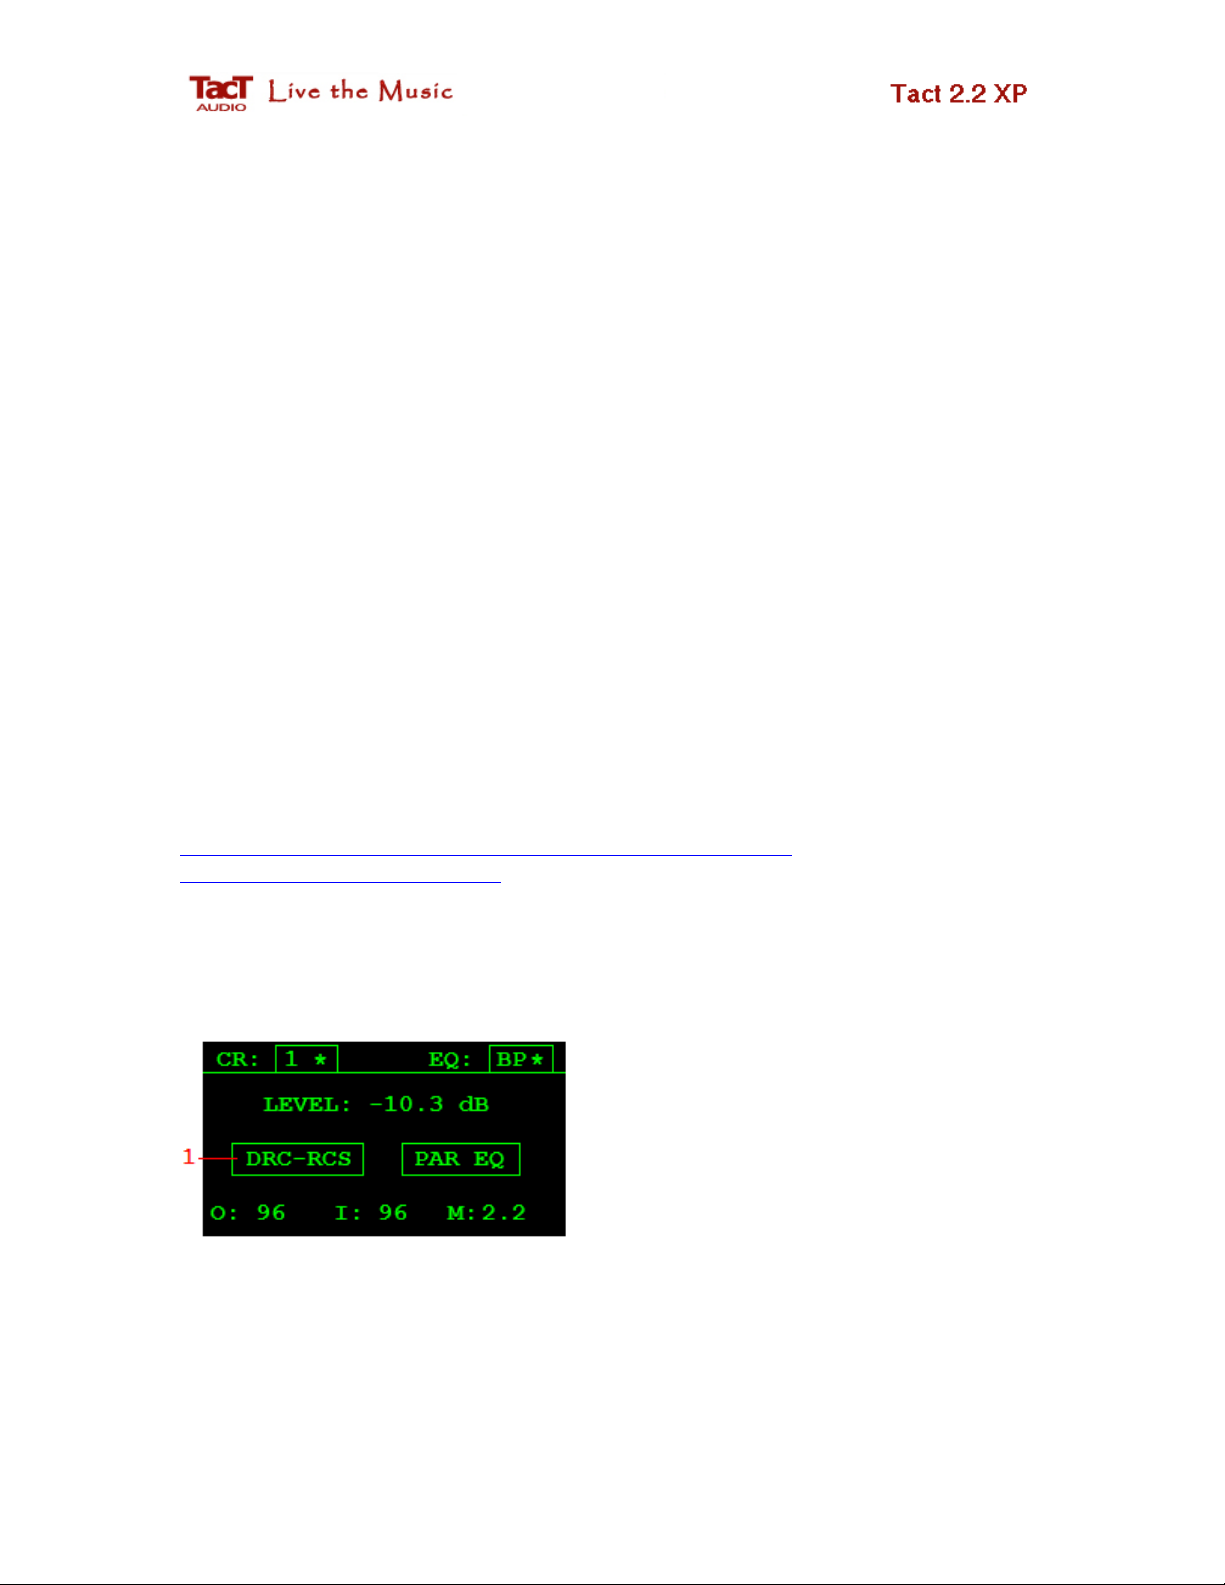
Fig. 1 Tact-2.2 XP first opening screen
Place the screen cursor over option (1) and
then click ENTER button to enter DRCRCS screen (Fig.2).
9/18/2008 RCS/DRC Quick Start 2 of 5
Page 3

Fig. 2 Tact-2.2 XP DRC-RCS screen
Place the screen cursor over AUTO-ON
(OFF) option (1) and then click ENTER
button to enter AUTO screen (Fig. 3). This
field is disabled if correction bypass is
selected. To enter auto correction screen you
must select one of nine correction presets and
NOT bypass.
Fig. 3 Tact-2.2 XP auto correction screen
Use this screen to enable/disable auto
correction, assign measurement file to
correction preset and enter auto target curve
editor screen.
1. Displays auto correction status. If this field displays ON auto correction is
enabled. If this field displays OFF auto correction is disabled and PC generated
target curve is used to perform room correction. Turning AUTO option to ON and
OFF you can switch between PC and automatically generated target curve.
2. Displays active correction preset. To change correction preset click on one of nine
remote control correction button. Auto correction has to be set for each correction
preset.
3. To enable or disable auto correction feature for the correction preset as displayed
in (2), place the screen cursor over this field (3) and then click ENTER button.
4. To select another measurement file place the screen cursor over this field, scroll
up and down and when desired measurement file is displayed click ENTER
button. 2.2 XP will recalculate new correction based on the measurement data as
saved in the selected measurement file. This field is not active when AUTO-OFF
is displayed in field (3).
9/18/2008 RCS/DRC Quick Start 3 of 5
Page 4

5. Place the screen cursor over this option and then click ENTER button to enter
auto target curve editor screen. This field is not active when AUTO-OFF is
displayed in field (3).
Auto Target Curve Editor Screen
When in auto correction mode 2.2 XP will automatically generate left and right
channel target curve. This target curve is generated based on the measurement data
contained in the selected measurement file. Auto generated target curve is constant for a
given measurement file. Users have no access to this curve. In order to facilitate some on
the fly target curve modification 2.2 XP implements auto target curve editor screen as
displayed in Fig.4.
Auto target curve can be modified at 12 different frequency bands. These bands
can be selected using the frequency band pointer (5). This pointer can be moved to the
left and to the right side using remote control LEFT/RIGHT buttons. As the pointer
moves, fields (6) and (7) will display frequency and level of the selected frequency band.
Once, a band is selected use UP/DONW buttons to modify selected band level.
Fig. 4 Tact-2.2 XP/MINI auto correction target
curve editor screen
Use front panel or remote control buttons to
modify any of these 12 frequency bands. After any
change is completed 2.2 XP/MINI will recalculate
all room correction filters on the fly as you listen
to your favorite track.
1. Maximum target curve gain is set to 10 dB
2. Maximum target curve attenuation is set to -10 dB
3. Minimum target curve frequency is set to 10 Hz
4. Maximum target curve frequency is set to 20 KHz
9/18/2008 RCS/DRC Quick Start 4 of 5
Page 5

5. Frequency band pointer.
6. Displays selected band frequency in Hz.
7. Displays selected band level in dB. Positive numbers indicate gain and negative
numbers indicate attenuation.
8. Display active correction preset. To select another correction preset use one of
nine remote control correction buttons.
Was this document helpful? Please send you comments and suggestions to Tact
support team at:
support@tactaudio.com
9/18/2008 RCS/DRC Quick Start 5 of 5
 Loading...