

Page 1

Owner ’s Manual
RCS 2.0S
Pre-amplifier / Room Correction System
Page 2

Blank Page
Page 3
WARNING
TO REDUCE THE RISK OF FIRE OR ELECTRIC SHOCK, DO
NOT EXPOSE THIS APPLIANCE TO RAIN OR MOISTURE.
CAUTION
RISK OF ELECTRIC
SHOCK DO NOT OPEN
CAUTION: TO REDUCE THE RISK OF ELECTRICAL SHOCK,
DO NOT REMOVE COVER. NO USER-SERVICEABLE PARTS
INSIDE. REFER SERVICING TO QUALIFIED PERSONNEL.
The exclamation point within an equilateral triangle is intended to alert
the user to the presence of important operating and maintenance (servicing) instructions in the literature accompanying the product.
The lightning with arrowhead symbol within an equilateral triangle is
intended to alert the user to the presence of “Dangerous Voltage”
within the product’s enclosure that maybe of sufficient magnitude to
constitute a risk of electrical shock to a person.
3T act Audio
Page 4
Important Safety
Instructions
1. Read these instructions entirely before installing or operating this equipment.
2. Keep these instructions.
3. Heed all warnings.
4. Do not use this equipment near water or allow it to become wet.
5. Do not block any ventilation openings. Install in accordance with the
manufacturer’s instructions.
6. Do not install near any heat sources such as radiators, heat registers, stoves, or
other appliances (including amplifiers) that produce heat,; doing so may
damage the unit and present a fire hazard.
7. Do not defeat the safety purpose of the polarized or grounding-type plug. A
polarized plug has two blades with one wider than the other. If the provided plug
does not fit into your outlet, consult an electrician for replacement of the outlet to
one that is polarized. To protect against electrical shock, match the wide blade
of the polarized plug to the wide slot in the outlet and fully insert the plug.
8. Protect the power cord from being walked on or pinched, particularly at plugs,
convenience receptacles, and the point where they exit the equipment. Do not
use this unit with a damaged cord or plug.
9. Only use attachments/accessories specified by the manufacturer .
10. Unplug this equipment during lightning storms or when unused for long periods of
time.
11. Refer all servicing to qualified service personnel.
1. Always unplug the unit from the electrical outlet before cleaning.
2. Do not use abrasive cleaners. Simply wipe the exterior with a clean soft cloth. A
small amount of nonabrasive cleaner may be used on the cloth to remove
excessive dirt or fingerprints.
CAUTION
CAUTION
“Note” symbol
4 T act Audio
Cleaning and
Maintenance
The >note< symbol indicates information very useful or essential to daily
operation.
Page 5
IMPORTANT!
Acknowledgments
© 2003 T act Audio Corporation. All rights reserved.
No part of this document may be reproduced or transmitted in any form or by any
means, electronic, mechanical, photocopying or other wise, without the prior
written consent of the Tact Audio Corporation.
The information contained in this document is subject to change without
notice.
Registration
Please record your serial number here for future reference. Y ou will need this for
future upgrades or should you ever require service on your RCS 2.0S Preamplifier.
RCS 2.0S serial number: _____________________
Optional modules installed:
DAC analog output :__
ADC analog input :__
5T act Audio
Page 6

Table of contents
Safety instructions 4
Acknowledgments/Registration 5
Unpacking the RCS 2.0S 7
CAUTION
Introduction 8
RCS 2.0S Connections 9
Front Panel Controls 1 3
Remote Control 1 4
Front Panel Display 1 6
Main screen 16
MAIN menu 17
Saving Menu Settings 17
DELA Y menu 17
LEVEL menu 18
ADC menu 18
DISPL menu 19
TEST menu 19
OUT menu 20
AMP menu 2 0
REM menu 21
ADDR menu 2 1
POL menu 2 2
P AREQ menu 22
TONE menu 24
OFS menu 2 5
INFO menu 2 5
CAUTION
6 T act Audio
T acT 2.0S Room Correction Software 2 6
System Requirements 26
Software Installation 26
Microphone Installation 26
Connect your RCS 2.0S to
your Computer 2 7
Quick Setup 2 9
Update the RCS 2.0S Firmware 33
Page 7

Unpacking the RCS 2.0S
Carefully remove the RCS 2.0S and accessory kit from the carton and visually check
for shipping damage. Contact both the shipper and Tact Audio immediately if the unit
shows any sign of damage from rough handling. All Tact Audio equipment is carefully
inspected before leaving our factory .
KEEP THE SHIPPING CART ON AND P ACKING MATERIALS for future use or in the
unlikely event that the unit needs servicing. If this unit is shipped without the original
packing, damage could occur and void the warranty .
Accessories
Operating voltage
Y ou should find the following items in the accessory kit:
- one AC mains cord
- RJ1 1 data cable
- RJ11-to-RS232 adapter
- 15’ RS232 cable
- CD-rom with RCS software
- Measurement microphone
- remote control
- 2 AAA batteries
- this manual
The RCS-2.0 S is designed with an automatic switching power supply . It will operate
on 65-265 volts at 50-60hz. No external settings are required.
The RCS-2.0 S has three operating modes:
- OFF AC mains power is cut off, either via the rear
panel mains switch, or by unplugging the unit from the
wall outlet.
- ST ANDBY The unit is powered but all outputs are muted and the
display is off. The unit uses very little current and
is “idling” or “sleeping”. Use the remote or front panel
“STANDBY” button to toggle between ON and STANDBY.
- ON Everything is powered and ready to go.
7T act Audio
Page 8

Introduction
Congratulations on your purchase of your RCS 2.0S. Y ou have now acquired one of
the most advanced Pre-amplifier / Room Correction System ever developed!
The new RCS 2.0S has four times the processing power of the famous RCS 2.0 and
even better AD and DA conversion. All of this combined with new features and
updated software takes TacT Audio’s room correction to new heights. In terms of
performance and sound quality, the RCS-2.0S is unmatched - even without room
correction engaged. The RCS-2.0S has no noise, extremely low distortion, and is
utterly transparent with effortless accurate sound. Every effort has been made to
make this preamplifier the best that money can buy . Add to this the latest evolution of
TacT Audio’s room correction technology and the result is absolutely staggering.
CAUTION
CAUTION
Room Correction
System
Modular design
True Upgradeability
TacT room correction technology has already been praised by the press all around
the world. Comments like “Wholesale improvement in sound quality” have become a
standard phrase for reviewers describing the results that can be achieved with TacT’s
room correction. Now we have taken room correction technology even further , not
only in terms of processing power, but also in terms of the measurement and
correction systems. The measurement is now done with a triple pulse for each
acquisition. This increases the measurement resolution in both the time and
frequency domains. Correction resolution is now four times higher than the original
RCS 2.0.
The internal layout of the RCS 2.0S is completely modular. All of the expensive components such as DSP’s, DA and AD converters are plug-in type and placed on a
motherboard. This allows for easy and inexpensive future upgrades. Even the rearpanel - including the sockets - can be exchanged to accommodate future interfaces
and extensions.
The front-panel and DSP’s are 100% software driven, and any future improvements or new features can be loaded through the RS232 port. It is our upgrade
policy to offer software upgrades at no cost, and we therefore encourage you to fill out
and submit the enclosed registration card by fax or email (info@tactaudio.com).
8 T act Audio
Page 9
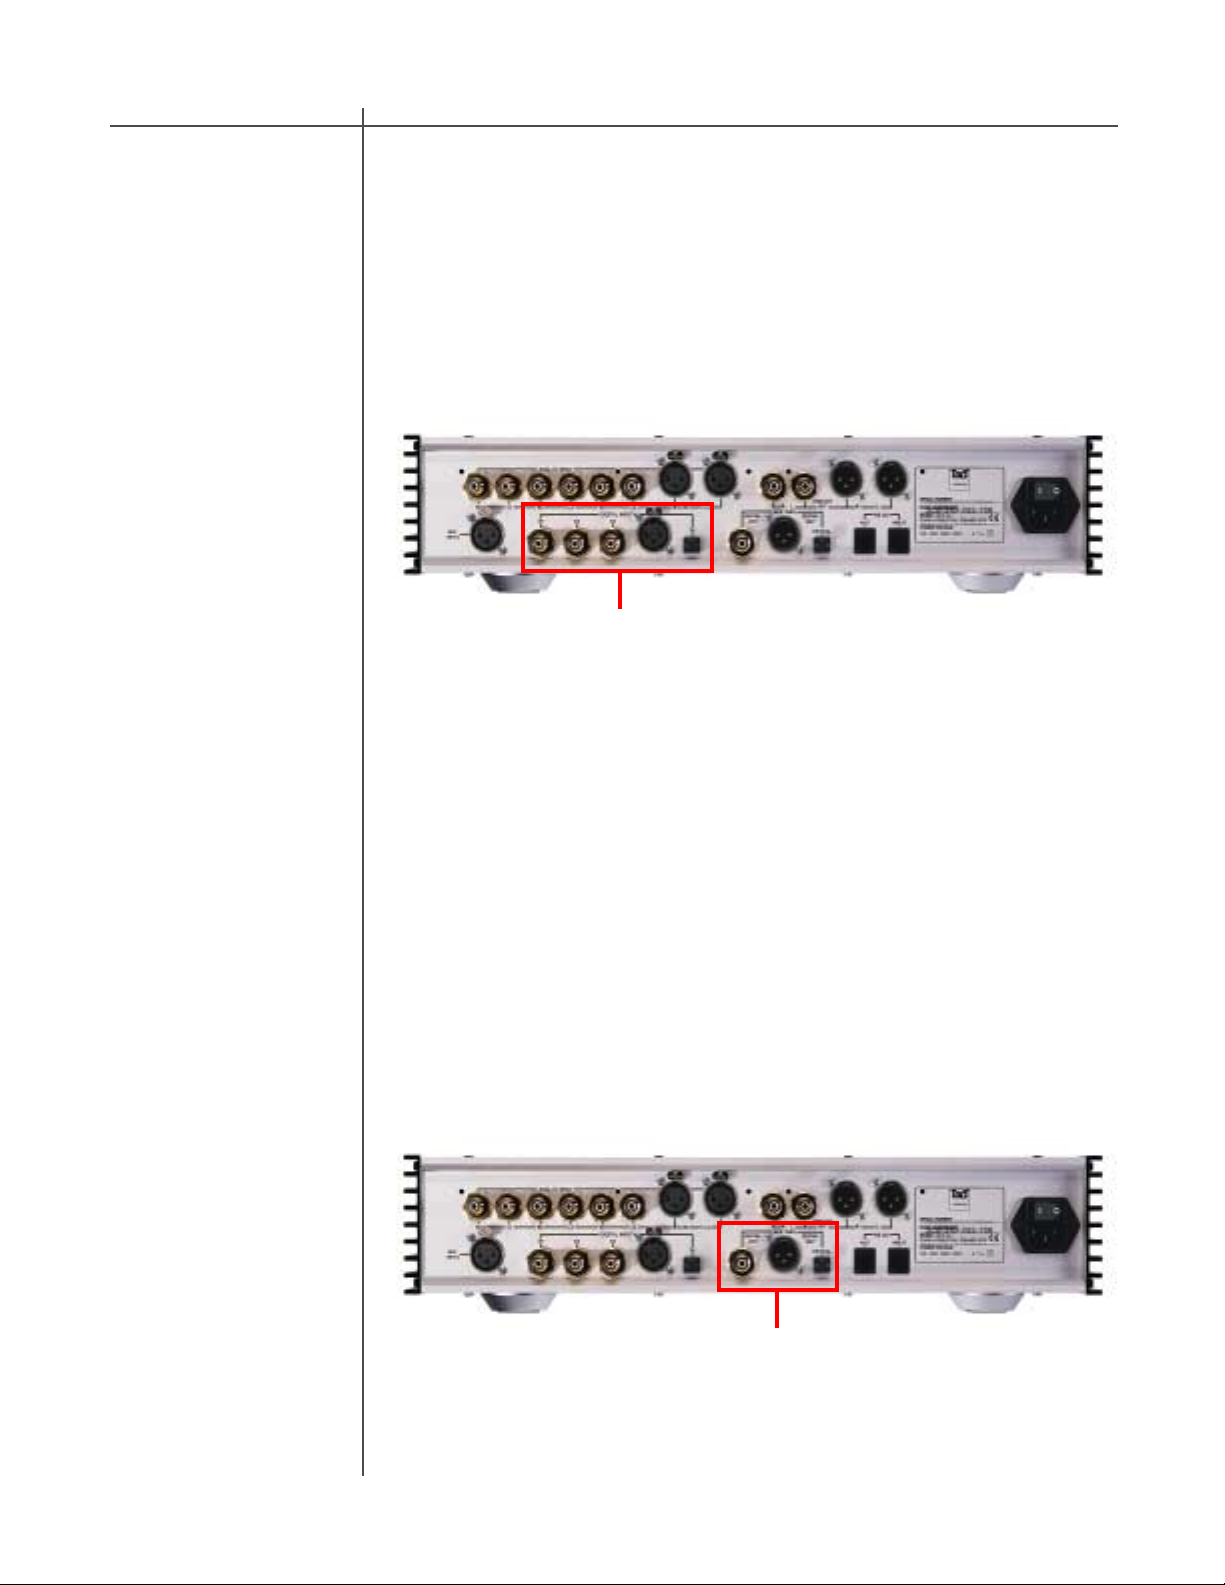
Digital input
RCS 2.0S Connections
The RCS 2.0S has 5 digital inputs:
- three RCA (S/PDIF)
- one AES/EBU (XLR)
- one TosLink (S/PDIF)
All of the digital inputs supports PCM audio data with sampling rates from 32kHz to
96kHz /16-24 bits, however , the AES/EBU and RCA/coaxial input also supports
192kHz.
Digital Input Section
Digital Output
The RCS 2.0S has three digital outputs for the main channels :
- one RCA (S/PDIF)
- one AES/EBU (XLR)
- one TosLink
All outputs are 24-bits at 44.1, 48, 88, 96 or 192 kHz sampling rates (TosLink does
not support 192kHz). The output sampling rate is set in the “OFS” menu located in
the RCS 2.0S general menus.
Connect one of these outputs to a TacT digital amplifier or external DA converter.
Digital Output Section
9T act Audio
Page 10

RCS 2.0S Connections
Optional Modules The RCS 2.0S is designed to accommodate virtually any input and output needed
without adding extra cost for features that users might not use. There are 2 optional
modules that can be installed:
- ADC -converter module. For example, for analog inputs such
as a Tuner, Cassette deck, VCR etc.
CAUTION
- DAC -converter module. For example, when the RCS 2.0S
is used with traditional analog amplifiers
These modules are based on the latest 24-bit/192kHz state-of-the-art technology and
offer performance far beyond that of most stand-alone converters. Due to the modular
design of the RCS 2.0S, these modules can be added any time or exchanged if
upgrades should become available.
CAUTION
Analog Input
(optional ADC module)
The RCS 2.0S has 4 stereo analog inputs when the optional ADC module is installed:
- three analog stereo single ended (RCA)
- one analog stereo balanced (XLR)
NOTE: A/D conversion is always performed at 24-bits/192kHz.
Analog Input Section
10 T act Audio
Page 11
RCS 2.0S Connections
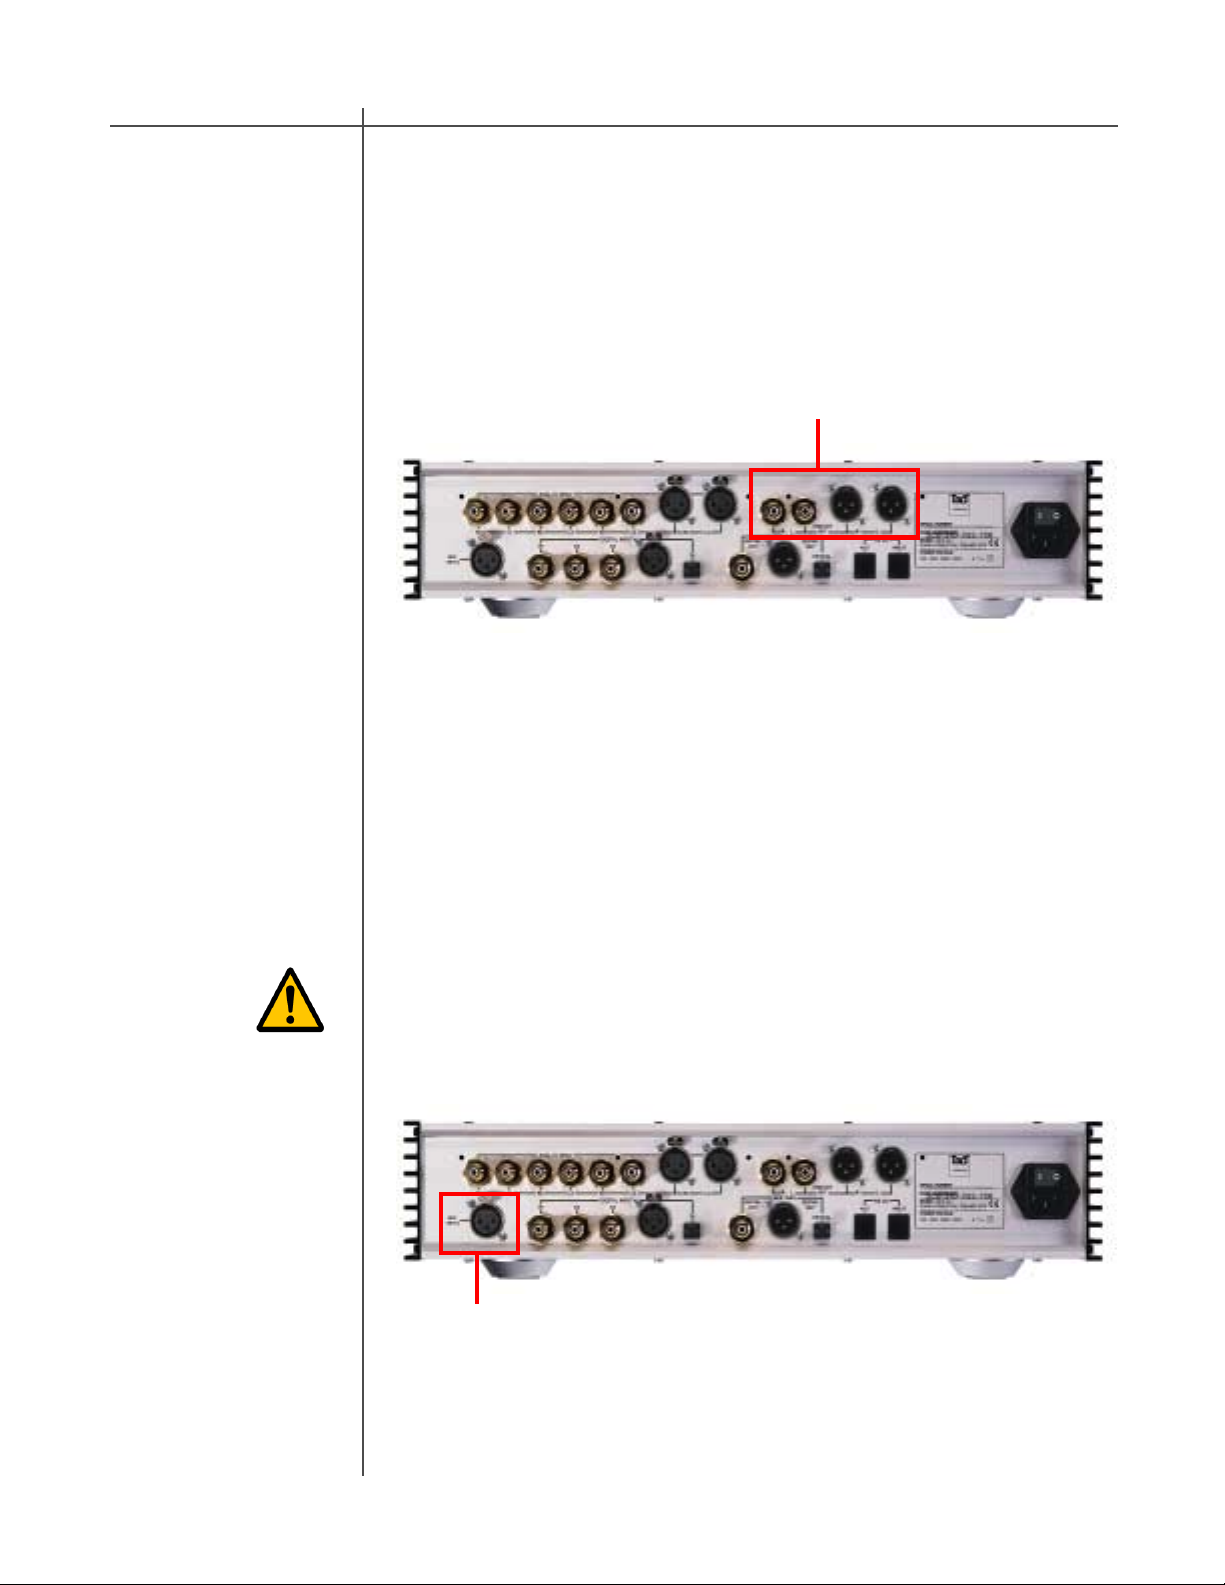
Analog Output
(optional DAC module)
The RCS 2.0S has 2 stereo analog outputs when the optional DAC module is
installed:
- one analog stereo single ended (RCA)
- one analog stereo balanced (XLR)
Analog Output Section
Microphone input
Connect the supplied measurement microphone to the “Mic Input” connector when
taking a room measurement for room correction.
CAUTION: To avoid damage through static discharge, we strongly recommend
to turn off the RCS 2.0S at the rear panel mains switch before connecting the
microphone.
Microphone Input
11T act Audio
Page 12

RCS 2.0S Connections
RS-232 interface
ports
The RCS 2.0S has two RS232 interface ports:
- INPUT
- AUX
Use the “INPUT” port for communication with your Personal Computer.
Use the “AUX” port to connect to TacT digital amplifiers.
CAUTION
CAUTION
RS-232 Interface Ports
AC mains input
& mains switch
12 T act Audio
Connect the RCS 2.0S to the AC mains wall socket.
Use the mains switch to turn power ON or OFF.
Use the supplied IEC mains cable, or if other - only a 3-prong grounded cable
AC mains input
& mains switch
Page 13

Front Panel Controls
The front panel controls on the RCS-2.0S will allow you to access and control all
menu settings.
Standby
Input selector
Navigation
/Enter
Menu Press the “MENU” button to access the front panel menu system. To exit the front
7. Master volume
/Mute
Input Display
Input SelectorStandby
Volume Level
Navigation/
Enter
Menu
Volume/
Mute
Use the “STANDBY” button to toggle between Standby mode and ON.
The display will indicate Standby mode by displaying a small green light in the left
side of the display. When the unit is placed in Standby mode all user settings are
saved.
Press the “DIGITAL” button to select a digital input. Press the “ANALOG” button to
select a analog input. These buttons are toggle switches and will scroll through the
multiple inputs by pressing each button multiple times. The selected input will be
displayed in the Input Display portion of the front panel display .
Use the navigational buttons to navigate the front panel menu options and make
selections by pressing the “Enter” button located in the middle.
panel menu system, press the “MENU” button until you return to normal display
mode.
The master volume is controlled by pressing the “UP” and “DOWN” volume buttons.
The green digits on the left side will change as you raise or lower the volume - this is
your master Volume Level indicator .
Use the “MUTE” button to mute or un-mute during playback. The Volume Level
indicator will switch to “--” in Mute mode. Y ou can still adjust the master volume while
the unit is in Mute mode - the Volume Level indicator will briefly indicate the level, then
switch back to the “--” mute indicator but sound will not be heard until the mute button
is pressed again.
NOTE: The optional ADC module is required for analog inputs.
NOTE: The remote and front panel controls are disabled whenever a Personal Computer is connected and the Room Correction or ParEQ software is
running.
13T act Audio
Page 14

Remote Control
The remote control is used to access the front panel display controls and menus.
CAUTION
CAUTION
11
12
1
4
7
9
2
3
5
6
10
8
14 T act Audio
Page 15

Remote Control
1 - ST ANDBY
The ST ANDBY button will turn the RCS 2.0S on or it will place it into st andby
mode. When in stand by mode, the unit is placed into a low power “idling” state.
The standby button is also used to save changes that were made in the menu
parameters. By placing the unit into standby mode the current menu settings are
saved.
2 - DIGIT AL
The DIGIT AL button will scroll sequentially , allowing the selection one of the 5
digital inputs.
3 - ANALOG
The ANALOG button will scroll sequentially, selecting one of 4 analog inputs.
allowing the selection one of the
4 - CORRECTION block
The CORRECTION block consists of 10 buttons. The buttons are numbered from 1
to 9 and one BYP ASS. Pressing the BYPASS button will place room correction
into bypass mode – no correction applied. Pressing any of the remaining nine
buttons will engage the corresponding room correction preset.
5 - MENU
The MENU button will switch the front panel display from the status screen to the
main menu screen.
6. VIDEO
The VIDEO button is inactive with this unit.
7. UP
The UP navigational button is used to select menu options and/or change their
values.
8. DOWN
The DOWN navigational button is used to select menu options and/or change their
values.
9. LEFT
The LEFT navigational button is used to select menu options and/or change their
values.
10. RIGHT
The RIGHT navigational button is used to select menu options and/or change their
values.
11. ENTER
The ENTER button will select the menu option currently marked by the blinking
cursor or is used to enter an edited parameter .
12. VOLUME Block
The VOLUME block consists of three buttons.
The “MUTE” button will mute/un-mute all enabled channels.
The “UP” button will increase the master volume level
The “Down” button will decrease the master volume level.
15T act Audio
Page 16

Front Panel Display
Main Status
Screen
When the RCS 2.0S is turned on the Main Status Screen will be displayed.
Main Screen :
CR:Cor #1 *F=96
5
-45.5 dB EQ: 1 *
To move the cursor indicator (5) use the front panel or remote control navigation
buttons. To select an option press the “ENTER” button.
1 - Correction preset selection. * (6) = active Correction preset
2 - EQ preset selection. * (7) = active EQ preset
3 - Input sampling frequency indicator.
4 - Master level in dB.
5 - Cursor indicator. (Underline with blinking cursor)
1
CAUTION
CAUTION
4
3
6
2
7
Correction preset selection
To select one of the nine correction presets or bypass them use the “LEFT” or
“RIGHT” navigation buttons to position the cursor over CR (1). Once the cursor is
positioned under CR (5) use the “UP” and “DOWN” navigation buttons to select the
desired correction preset and then press the “ENTER” button. This action will engage
the selected preset and display an astrict (6) to the right of the preset number. You
can also select a correction preset by pressing one of the ten buttons located in the
“CORRECTION” block on the remote control.
16 T act Audio
EQ preset selection
To select one of sixteen parametric EQ presets or bypass them use the “LEFT” or
“RIGHT” navigation buttons to position the cursor over EQ (2). Once the cursor is
positioned over EQ (2) use the “UP” and “DOWN” navigation buttons to select the
desired EQ preset and then press the “ENTER” button. This action will engage the
selected preset and display astrict (6) to the right of the preset number.
Note: An EQ preset must be selected to enable the ParaEQ or the Tone
controls. If the EQ preset is set to “BP” the ParaEQ and Tone controls are
disabled.
Note: with the remote control you can only select the first nine EQ presets. T o
select the rest you must use front panel controls.
Input sampling frequency indicator (3)
This is not a menu option. This displays the sampling frequency of the currently
selected digital input. The RCS 2.0S will automatically detect input signal presence
and display its sampling frequency .
Page 17

Front Panel Display
MAIN menu
Saving Menu
Settings
The main menu of the RCS 2.0S has three pages of general menu selections.
Main Menu :
DELAY LEVEL ADC
DISPL TEST OUT ->
<- AMP REM ADDR
POL PAREQ TONE ->
<- OFS INFO
To enter the Menu selection pages press the “MENU” button. Use the “LEFT” and
“RIGHT” navigational buttons to highlight an option with the selection cursor and to
proceed to a new page. To enter a highlighted option press the “ENTER” button.
Once you are in a menu option use the “MENU” button to go back one step (from
sub-menus) with each press or to return to the main operating screen.
Custom settings that are made to any of the menu selections can be saved by
placing the RCS 2.0S into standby mode. If you make changes to any of the menu
items and turn the unit off before placing it into standby mode all settings will be lost.
T o place the RCS 2.0S into st andby mode press ST ANDBY button found on the front
panel of the unit or the red “STANDBY” button on the remote control.
DELA Y menu
The Delay menu controls the systems time alignment. You can adjust the systems
time alignment by changing the delay time for the left and right outputs independently.
Delay Menu :
2
LEFT RIGHT CR:2
0.00 0.00 msec
1
1 - Individual channel delay time settings.
2 - Current correction preset. (selectable from the main screen)
Use the “LEFT” and “RIGHT” navigational buttons to highlight an option and use the
“UP” and “Down” buttons to change its value .
NOTE: The RCS 2.0S provides a unique set of two delay times (Left and
Right) for each room correction preset including bypass.
NOTE: System balancing is automatically implemented by the room correction software. You would change these parameters only if you needed addi-
tional adjustment.
17T act Audio
Page 18

Front Panel Display
LEVEL menu
The Level menu controls channel balancing. You can adjust the systems balance by changing the attenuation for the left and right output signals independently.
Level Menu :
LEFT RIGHT CR:2
0.0 0.0 dB
CAUTION
CAUTION
1
1 - Individual channel level settings.
2 - Active Correction preset.
2
Use the “LEFT” and “RIGHT” navigational buttons to highlight an option and use the
“UP” and “Down” buttons to change its value .
NOTE: The RCS 2.0S provides a unique set of two level controls (Left and
Right) for each room correction preset including bypass.
NOTE: System levels are automatically implemented by the room correction software. You would change these parameters only if you needed additional adjustments.
ADC menu
(module optional)
The RCS 2.0S can be equipped with a state of the art Analog to Digital Converter
(ADC module optional) . To further enhance the converters performance, the system
offers two selectable gain values for the ADC input stage. These two values can be
assigned to each input independently .
ADC Menu :
3
2
ADC: High IN: 2
Normal High
1
1 - Assignable gain values.
2 - Input channel currently selected.
3 - Active gain setting for selected input channel.
Normal = -6.0dB in reference to 0.0dB. Input sensitivity: 2.2 volt
High = 0.0dB in reference to 0.0dB. Input sensitivity: 4.4 volt
Use the “UP” and “DOWN” navigational buttons to scroll through the available options
and press the “ENTER” key to activate the currently displayed selection. To select an
analog Input (2) use the “ANALOG” selector button found on the RCS 2.0S front panel
or on the remote control to scroll to the input you would like to edit.
18 T act Audio
Page 19

Front Panel Display
DISPL menu
The display menu controls the display Time-Out feature. This option is used to turn
the front panel timer “ON” or “OFF”. When this option is set to “ON” the front panel
timer will turn the front display off when the front panel or remote control has
not been accessed for 10 seconds. When this option is set to “OFF” the display
will remain lit whenever the unit is on. To wake the display, simply push any button
on either the front panel or the remote control.
Display Menu :
2
Display Timeout OFF
OFF ON
1
1 - Display Timeout selections.
2 - Active Display Timeout setting.
Use the “LEFT” and “RIGHT” buttons to highlight the desired option and select it by
pressing the “ENTER” button.
TEST menu
The Test menu allows for a quick system check. When engaged it will produce
pink noise on all selected channels. You can produce a test tone for the “LEFT”,
“RIGHT” and “L & R” channels combined.
Test Menu :
Channel Test
LEFT RIGHT L & R
3 2 3
1 - Left channel test.
2 - Right channel test.
3 - Left and Right channel test.
Use the “LEFT” and “RIGHT” buttons to highlight the desired option and select it by
pressing the “ENTER” button. The pink noise will output from either the “LEFT”,
“RIGHT”, or “L & R” channels combined while the “ENTER” button is pressed. The
test tone will stop when the enter button is released.
19T act Audio
Page 20

Front Panel Display
OUT menu
AMP menu
The output menu is used to set the RCS 2.0S to either a Stereo or Mono output
mode.
Out Menu :
3
Output Mode:Stereo
STEREO MONO
1 - STEREO mode produces 2 output signals. This is standard two
channel stereo mode.
2 - Mono mode will output the same signal on both the Left and Right
channels.
3 - Active OUT setting.
Use the “LEFT” and “RIGHT” buttons to highlight the desired option and select it by
pressing the “ENTER” button.
The AMP menu is designed to allow the RCS 2.0S to interface with the TacT
M2150 and S2150 digital amplifiers. With the RCS 2.0S you can control multiple
digital amplifiers for a biamplified setup. This setting should only be ENABLED if
you have a Tact digital amplifier attached to the RCS 2.0S.
CAUTION
CAUTION
1
2
20 T act Audio
Amp Menu :
TACT-2150 AMP
ENABLED
1
1 - Active AMP settings.
To change the settings press the “ENTER” button. You will have to confirm your
selection before the AMP setting will be enabled.
NOTE: When a TacT digital amplifier is controlled by the RCS 2.0S, all of
the amplifiers front panel and IR controls are disabled. Use the RS232 port
and/or daisy chain RS232 ports to link multiple components.
CAUTION:The AMP setting should only be set to ENABLED if you have Tact
amplifiers connected to the RCS 2.0S. WHEN THE AMP OPTION IS SET TO
ENABLED BOTH THE ANALOG AND DIGIT A L OUTPUT WITH WILL OUTPUT A
FULL LEVEL SIGNAL REGARDLESS OF THE RCS 2.0S MASTER VOLUME
SETTING . If you do not have T act amplifiers connected to your system you
will not be able to control the output level from the RCS 2.0S volume control.
The output is sent at its maximum level and can result in damage to your
speakers.
Page 21

Front Panel Display
REM menu
The remote menu allows for disabling or enabling the remote control. Once the remote control is disabled the unit can only be controlled from the front panel of the
unit.
Remote Menu :
2
REMOTE CONTROL: ON
OFF ON
1
1 - Remote control settings.
2 - Active remote control setting.
Use the “LEFT” and “RIGHT” buttons to highlight the desired option and select it
with the “ENTER” button.
ADDR menu
The address menu allows for the setting of the systems exclusive address for the
unit. The default address setting is “001”. If multiple Tact products are used together, different addresses will allow for individual control of each product.
Address Menu :
2
CURRENT ADDRESS: 001
ADDRESS: 001
1
1 - Address settings.
2 - Active address setting.
Use the “UP” and “DOWN” navigational buttons to select the desired system address and then press the “ENTER” button to select it.
NOTE: If you change the device address make sure that you select the appropriate device address in the RCS 2.0S Room Correction software.
21T act Audio
Page 22

Front Panel Display
POL menu
P AREQ menu
This menu is designed to set the polarity for each channel. Each channel can be
set to “+” (0) or “-” (inverted).
Polarity Menu :
2 3
POL: Left + Right +
+ - + -
Use the “LEFT” and “RIGHT” buttons to highlight the desired option and select it
with the “ENTER” button.
CAUTION
CAUTION
1
1 - Assignable Polarity values.
2 - Left channel active setting.
3 - Right channel active setting.
1
Tttt
cc
The Parametric EQ menu is used to apply up to twelve bands of parametric equalization per output channel. The EQ processing can be applied in two different
ways, both the left and right channels can be linked together to apply processing
globally , or both the left and right channels can be processed independently for
unique settings for each channel. Depending on the Link setting you will see one
of two P AREQ menu screens. Below is an example of both screens.
Parametric EQ Menu :
LinkedNot Linked
6 5
PRESET: 3 LINK: N
EQ: L R Y N
421
1 - Left channel PAREQ selection. - Link “N”
2 - Right channel PAREQ selection. - Link “N”
3 - Left &Right channel PAREQ selection. - Link “Y”
4 - Link assignment selections.
5 - Active Link setting.
3 - Active EQ preset. (selected from the main screen)
6
PRESET: 3 LINK: Y
EQ: L & R Y N
3
5
4
Use the “LEFT” and “RIGHT” buttons to highlight the desired option and select it
with the “ENTER” button.
Note: An EQ preset from the main screen must be selected to enable the
PAREQ or the Tone controls. If the EQ preset is set to “BP” the PAREQ and
T one controls are disabled.
22 T act Audio
Page 23

Front Panel Display
Parametric EQ
Table - Linked
Below is an example of the linked parametric EQ filter table. Its display allows for
adjustment of all 12 filter parameters: Level, center frequency and Q factor .
Parametric EQ Menu :
1
LRF LEV FR OCT
1: 0.0 31.5 0.40
2
1 - Filter channel selection. This table has linked filters.
2 - Filter order selection. Scroll up and down for all 12 filters.
3 - Filter Level selection.
4 - Filter Frequency selection.
5 - Filter Octave selection.
T o change a p arameter first highlight it using the “LEFT” and “RIGHT” navigational
buttons then use the “UP” and “DOWN” buttons change the parameter value.
4
53
Parametric EQ
Table - Not Linked
Below is an example of the left channel parametric EQ filter table. Its display allows for adjustment of all 12 filter parameters: Level, center frequency and bandwidth for the left channel. There is a similar t able for the right channel. You can
enter the right channel table by selecting “R” from the previous menu.
Parametric EQ Menu :
1
L-F LEV FR OCT
1: 0.0 31.5 0.40
2
1 - Filter Channel selection. This table is for left channel filters.
2 - Filter Order selection. Scroll up and down for all 12 filters.
3 - Filter Level selection.
4 - Filter Frequency selection.
5 - Filter Octave selection.
T o change a p arameter first highlight it using the “LEFT” and “RIGHT” navigational
buttons then use the “UP” and “DOWN” buttons change the parameter value.
4
53
23T act Audio
Page 24

Front Panel Display
TONE menu
The Tone menu is designed to allow for easy and very detailed system tonal
control.
Note: An EQ preset from the main screen must be selected to enable the
PAREQ or the Tone controls. If the EQ preset is set to “BP” the PAREQ and
T one controls are disabled.
Tone Menu :
CAUTION
CAUTION
LOW MID HIGH
0.0 0.0 0.0 dB
2
1 - LOW filter attenuation.
2 - MID filter attenuation.
3 - HIGH filter attenuation.
Use the “LEFT” and “RIGHT” navigational buttons to highlight an option. To modify
the selected value use the “UP” and “DOWN” navigational buttons. Level control is
used to set the low, mid and high frequency filter attenuation. Filter level is given in
dB and can be changed in increments of 0.1 dB. Maximum filter level is 12 dB and
the minimum filter level is -12.0 dB. To set a frequency for the LOW, MID, or HIGH
highlight its level setting and press the “ENTER” button.
31
TONE menu
Frequency and Octave
24 T act Audio
The Frequency and Octave menu is designed to allow you to set the Frequency for
the low, mid and high filters and the Oct ave for the MID filter . The menu is accessed from the level Tone menu shown above. T o set a frequency for the LOW ,
MID, or HIGH highlight its level setting and press the “ENTER” button.
Tone Menu :
Fr OCT
100_Hz 0.40
1
1 - Frequency setting.
2 - Octave setting.
Use the “LEFT” and “RIGHT” navigational buttons to highlight an option. To modify
the Frequency(Fr) or Octave(OCT) use the “UP” and “DOWN” buttons. Press the
“MENU” button to return to the filter attenuation menu.
NOTE: Frequency Control is used to set the cutoff frequency for the low and
high frequency filters and to set the center frequency for mid (bandpass) filter.
2
Page 25

Front Panel Display
OFS menu
The RCS 2.0S is equipped with a sample rate converter for the digital output. The
output can be set to 44.1, 48, 88, 96 and 192 KHz sampling frequencies.
OFS Menu :
2
OUT Fs: 96 KHz
44 48 88 96 192
1
1 - Sample frequency settings.
2 - Active Digital Output sample frequency.
Use the “LEFT” or “RIGHT” navigation buttons to highlight the desired option and
press the “ENTER” button to make your selection. The new sampling frequency will
be displayed at the top in the “OUT Fs:” display .
NOTE: This menu does not affect the analog output sampling frequency .
INFO menu
The information screen displays the product name and the installed version of the
firmware installed in the RCS 2.0S.
Information Screen:
Tact-2.0 S
Version: 2.0 S V1.0
To exit the Info screen press the “MENU” button to return to the
RCS 2.0S main menu.
25T act Audio
Page 26

T acT 2.0S Room Correction Software
The RCS 2.0S employs some of the most advanced audio-software ever developed.
In order to use the proprietary TacT Room Correction System, you need to install
the supplied room correction software on your computer . Complete instructions for
using the room correction software can be found in the online help available in the
software. To make the room correction process easier for the first time user there is
a Quick Setup feature that is described later in this manual.
System requirements
Software Installation
Start The Room
Correction software
Y our computer system must meet the following requirements:
- An IBM compatible PC with Pentium 100 MHz, 64 MB Ram & 100 MB
free hard disk space or better
- Microsoft Windows 98, ME, 2000 or XP
- Operating system regional setting must be set to “English(United St ates)”
- Microsoft Windows-compatible graphics-card and monitor with screen
resolution 800x600 or better
- CD-ROM drive
- Microsoft windows compatible 2- or 3- button mouse
- Standard RS-232 serial port with DB-9 connectors
Follow the steps below to install the TACT 2.0S Room Correction Software:
1 - S tart windows and insert the TacT software CD into your CD-ROM drive.
2 - Double-click on the “My Computer” icon on the desktop.
3 - Double-click on the CD icon to launch the CD browser .
4 - Double-click on “Tact 2.0S vx.x.exe” and follow the instructions.
After the installation you will have the option to launch the RCS software. If you
would like to launch the program at this time when prompted, select “Launch
T acT-RCS2.0S” and the software will start. Y ou should now see the TacT 2.0S
Room Correction System main-screen.
T o st art the software go to the Windows “Start” menu, select “Programs” then
“T acT -2.0 S” and click on the “TacT-2.0 S” icon. You should now see the
TacT 2.0S Room Correction System main screen.
CAUTION
CAUTION
26 T act Audio
Microphone
Installation
All TacT measurement microphones are individually calibrated to perform with the
highest accuracy and come with a unique calibration file. This file needs to be
installed before you perform the correction process. The microphone can be enabled or disabled by clicking on the “mic:” display window found on the main
screen with your left mouse button to toggle its setting.
1 - Insert the TacT software disc into the computers CD-rom drive.
2 - Start the Tact 2.0S Correction System Software on your computer.
3 - Select “File” from the menu selection at the top of the main software screen.
4 - Select “Microphone” and a new window will open.
5 - Select your CD-Rom drive in the “Look-in” menu you should now see a
file in the larger window below.
6 - Select the “Micxxxxx.mic” file. The number in the file name should
match the serial number of the mic that came with your RCS 2.0S.
7 - The software installation will confirm with the “Mic installation
complete” message.
8 - After you have inst alled your mic the mic serial number should be
displayed in the “Microphone” section at the top of the main page. If is not
please close the software and restart it to register your microphone with the
software.
Page 27

TacT 2.0S Room Correction Software
Connect your
RCS-2.0 S to your
Computer
Y our RCS 2.0S must be connected to your computers serial port in order for it to
communicate with your computer and to run the Quick Setup and correction process. Please follow the steps below to connect your RCS 2.0S to your computer.
1 - Connect the RS 232 “Input” jack on the back of the RCS 2.0S to your
computers serial port using the supplied cables and adapters. Y our computer
must have a standard RS 232 serial port with a DB 9 connector .
NOTE: If you have any T act digital amplifiers please disconnect their RS232
connection at this time.
2 - Turn on your RCS 2.0S.
3 - T urn on your computer and start the Tact 2.0S Correction System Software.
NOTE:Y ou may receive a communication error message. Please close the mes-
sage window and proceed to the next step.
4 - Select the “Communication” button on the main software screen to open
the communication window.
5 - Under the Operating Mode select “Connect”.
6 - Under the COM Port section select “COM1”. If you receive an “invalid
port number” message please try selecting each of the port selections until
you do not receive this message. If you receive this message on all COM ports
you may not have a COM port installed on your computer . Please refer to your
computer manufactures documentation for help to install a COM port.
7 - To verify that RCS 2.0S is properly connected to the host computer click
on the “Start” button to perform the communication test. If everything is
functioning properly you should see the results below . Press the “Stop”
button after about 15 seconds to stop the test.
Rx Buf should display “0”.
Count should have counted in increments of 100.
Err Count should be “0”.
If the results are as above select the “Close” button to close the communication
window. Your RCS 2.0S is now connected to your computer.
If the results are not as above please go back to step number 6 and select
another COM port. Then repeat step 7.
NOTE: If you are still are not passing the communication test you may not
have a COM port installed on your computer or you may have another device such as a modem or hand held PC that may be sharing the COM port
on your computer. If you have a Tact amplifier attached it may be set to the
same address. The RCS requires a valid COM port that is not being used by
any other devices.
NOTE: You will only have to select the communication port once. The next
time you run the RCS 2.0S correction software it will remember your settings.
27T act Audio
Page 28

Blank Page
CAUTION
CAUTION
28 T act Audio
Page 29

Quick Setup
The Tact 2.0S Quick Setup wizard is designed to help both the first time and
experienced user perform complete room correction and create nine correction
presets quickly and easily . To perform the Quick Setup successfully you will need
to know your speaker configuration, your loudspeakers lower cut-off frequency , and
the type of amplifier(s) that you have connected. This information will allow the
Quick Setup to automate the room correction process for you so that you can
begin enjoying the benefits of room correction immediately . For a detailed
explanation of all of the software features and instruction for performing room
correction manually please see the online help available in the software.
Before Y ou Begin
1 - Connect the RS 232 “Input” jack on the back of the RCS 2.0S to your
computers serial port using the supplied cables and adapters.
NOTE: These instructions assume that you have already established
communication between the RCS 2.0S and the Room Correction Software
on your computer. See page 25.
2 - If you have one or more T acT M2150/S2150 digital amplifiers connect
them to the RCS 2.0S. Please make sure that a unique address has
been set for each device. For further instructions please refer to your
M2150/S2150 owner’s manual.
CAUTION: To avoid damage through static discharge, we strongly
recommend to turn off the RCS 2.0 S at the rear panel mains switch
before connecting the microphone.
3 - Make sure that the RCS 2.0S is powered off from the rear panel mains
switch and connect the supplied measurement microphone to the “Mic Input”
connector on the back of the RCS 2.0S. Place the mic at the primary listening
position at the height of your head. This will require a microphone stand, or
something similar.
4 - Turn your RCS 2.0S on.
5 - Set the OUT setting for the RCS 2.0S. This is the speaker
configuration your system will be using. Please refer to page 18 for more
information and instructions.
6 - Turn on your computer and start the T acT 2.0S Correction Software. If you have
not installed the software please see page 24 for instructions.
7 - Enable your microphone if you are using the Tact microphone that came with
your unit. To enable or disable the microphone click on the “mic:” display
window found on the main screen with your left mouse button to toggle its
setting. When the microphone number is displayed it is enabled. If you have
not installed your microphone please see page 24 for instructions.
29T act Audio
Page 30

Quick Setup
Getting Started
STEP I
St art the Quick Setup by selecting the yellow “Quick Setup” button located on the
T act 2.0 S Room Correction software’s main window .
The Tact 2.0S Quick Setup wizard is broken into three steps. As you complete
each step select the “NEXT” button proceed to the next step.
CAUTION
CAUTION
Set the Loudspeaker Lower Cutoff frequency . Your main loudspeaker
frequency response will determine the setting needed for this parameter . Please
refer to your main loudspeaker manual for this information.
30 T act Audio
STEP II
- Loudspeaker lower cutoff frequency (this is the lowest frequency that your
loudspeakers can reproduce)
Do you have one or more M/S 2150 digital amplifier connected to your
RCS 2.0S?
- If you do not use Tact digital amplifiers select “No”. Then select the “Next” button
and go to Step III.
Page 31

Quick Setup
- If one or more M/S 2150 digital amplifiers are connected to your RCS 2.0S
select “Yes”. Y ou will now need to select the options that match your RCS 2.0S
connections to your M/S 2150 amplifier(s). If you have more than one digital
amplifier you will need to select more than one option.
- Next you will have to enter the unique address number that is assigned to each
amplifier in the “Amp panel” section. The address entered for each amplifier
should match the address assigned in the “ADDR” menu of each amplifier. W e
suggest address 2 for the first amplifier and 3 for the second if connected. To
enter an address select the address window that you want to change with your
left mouse button and enter the address number that you have set for your
amplifier.
31T act Audio
Page 32

Quick Setup
STEP III
Verify that the selections you made are correct and st art the Quick Setup
automation.
CAUTION
CAUTION
32 T act Audio
- If the settings listed are not correct select the “Back” button to go back
and make the appropriate changes and return to the finish screen when
you are ready to start the Quick Setup.
- If the settings listed are correct select the “Finish” button. This will start
the Quick Setup measurement and programing automation. When the
automated process is completed the “Quick Setup Completed”
message will be displayed. You can now close the RCS 2.0S software
and audition your nine correction presets.
NOTE: The Quick Setup will give you a 15 second delay before the Quick
Setup automation starts. This gives you time to leave the listening area
before the measurement process begins.
Page 33

Update the RCS 2.0S Firmware
Y our RCS 2.0S has been pre-programmed with the latest firmware when shipped
from our factory and does not need to be updated with the program CD that came
with your unit. TacT Audio may occasionally release updated versions of the RCS
software that will be available on our website “www .tactaudio.com”. This new
software may contain updates or enhancements for your RCS 2.0S. When
instructed by a technician or messaged from our website please follow the
instruction below to update your RCS 2.0S firmware.
Step I:
Removing your old
RCS 2.0S Software
Step II:
Install your new
RCS 2.0S Software
Step III:
Reprogramming the
RCS 2.0S Firmware
First un-install the current version of the RCS 2.0S correction software on your
computer.
1 - Turn on your computer .
2 - Open the Windows control panel and select the “Add/Remove
Programs” option.
3 - Highlight the “TacT-2.0S” option and click on “Change/Remove”.
4 - Select “Yes” and the old T act 2.0S software will be removed.
NOTE:Y our target curves and measurement s stored under unique names
will NOT be removed.
Y ou now need to install the new TacT 2.0S RCS software on your computer.
- Double-click on the “T act 2.0S vx.x.exe” file that you have downloaded or is
found on the root of your CD and follow the installation instructions.
Program the new firmware for the RCS 2.0S.
1 - Connect the PC to the RCS 2.0S using the RS232 cable. Please refer to
the RCS 2.0S RS232 section of the user’s manual or the RS232 Connection
document for help.
CAUTION: There should only be one RCS 2.0S connected to the RS232 cable
during system reprogramming. Please disconnect any other RCS 2.0S units
that may be daisy chained to the RCS 2.0S that is being programmed.
2 - Start the RCS 2.0S correction sof tware on your computer
3 - Use the “Communication” option in the Tact 2.0S room correction software to
make sure that the RCS 2.0S and your computer are communicating. Please refer
to the RCS 2.0S RS232 section of the user’s manual or the RS232 Connection
document for help.
4 - Turn the RCS 2.0S OFF from the rear panel mains switch.
33T act Audio
Page 34

Update the RCS 2.0S Firmware
5 - Press and hold the “DIGITAL” and “ANALOG” buttons on the front panel of the
RCS 2.0S simultaneously while you turn the unit back ON from the rear-panel
mains switch. Hold the buttons until the display shows the “PROGRAMMING
MODE” screen.
CAUTION
CAUTION
Tact-2.0 S
Programing Mode
6 - From the T acT 2.0S RCS software main screen, click on “Add-Ins” and then
“Standard”. You should now see the Add-Ins window.
34 T act Audio
7 - Select the “Program” button and follow the prompts by answering all
questions. You will need to be able to answer “Yes” to all questions to start the
programming. The RCS 2.0S will turn OFF and the ON and return to normal
operation.
Page 35

Update the RCS 2.0S Firmware
Step IV:
Reprogram the
RCS 2.0S System Files
After updating the firmware the System Files now need to be reprogrammed.
1
1 - From the RCS 2.0S software main screen, click on the “Program T acT-2.0 S”
button. Y ou should now see the programming window .
2 - Press and hold the “Control” key on your computer keyboard and then press
the “S” key simultaneously . This should display the System Option (1) in the
bottom center of the programming window.
3 - Left click your mouse in the square next to System to select it with a check
mark.
4 - Press the “Program” button and follow the prompts by answering all
questions. You will need to be able to answer “Yes” to all questions to start the
system file reprogramming. The Program window will display a “programming
complete” message when the system is completed.
35T act Audio
Page 36

Update the RCS 2.0S Firmware
Step V:
Restoring the Default
RCS 2.0S Settings
This step is optional and is only required if you would like to reset all
internal settings in the unit to their factory defaults. If you proceed
you will erase your custom user settings.
Restore the default settings for the new firmware installed on the RCS 2.0S.
1- From the RCS 2.0S correction software main screen, click on the “Options”
menu selection and select the “Default Settings” option. Y ou should now see the
Default Settings window.
CAUTION
CAUTION
RCS 2.0S
update complete
36 T act Audio
2- Select the “Default” button and the default parameters for the RCS 2.0S will be
loaded into the RCS 2.0S. The RCS 2.0S will turn OFF and the ON and return to
normal operation.
NOTE: If you have T acT digital amplifiers attached to the RCS 2.0S you must
set the “AMP” settings to “DISABLED”. The default settings will not be
programed if these parameters are set to “ENABLED”.
Y ou have now completed updating your RCS 2.0S and it is ready for normal
operation.
Page 37

Blank Page
37T act Audio
Page 38

TacT Audio, Inc.
201 Gates Road Unit G, Little Ferry – New Jersey 07643, USA
Phone: +1 201 440 9300 – Fax: +1 201 440 5580 – Email: info@tactaudio.com
www.tactaudio.com
 Loading...