

Page 1

Tableau TD2u
USER GUIDE
Version 1.3
Page 2

Copyright© 2018 Guidance Software, Inc. All rights reserved.
EnCase®, EnScript®, FastBloc®, Guidance Software® and EnCE® are registered t rademarks o r trademarks owned b y Guidance
Software in the United St ates and other jurisdictions and m ay not be used withou t prior written permission. All other marks and
brands may be claimed as the property of their respect ive ow ners. Products and c orp orate names appearing in this work may o r
may not be registered trademarks or copyrights of their respective companies, and are used on ly for identification or explanation
into t he owners' benefit, without intent to infringe. Any use and d uplication of th is wo rk is subject to the terms of th e license
agreement between you and Guidance Software, Inc. Except as stated in the license agreement o r as otherwise permitted under
Sections 107 or 108of t he 1976United States Copyright Act, no part of this work may b e reproduced, stored in a retrieval system
or transmitted in any form or by any means, electronic, mechanical, photocop ying, recording, scanning, or otherwise. Pro duct
manuals and doc umentation are specific t o the software versions for which they are written. For previous or outdated versions
of this work, please c ontact Guidance Software, Inc. at https://www.guidancesoftware.com. Information contained in t his work
is furnished for informational use o nly, and is sub ject to change at any time without notice.
January 05, 2018
Page 3

CONTENTS
Preface 7
About this Guide 7
Conventions Used in this Guide 7
Disk Capacity and Transfer Rate Measurement Con-
ventions 7
CHAPTER 1 Overview 9
Tableau TD2u 11
TD2u Kit Contents 11
Navigating the TD2u 14
Reading the LEDs 15
USB Keyboard Support 15
CHAPTER 2 Setting up the TD2u 17
Startup Sequence 19
Initialization 19
Configuring the TD2u 19
User-Selected Startup Mode 19
System Settings (Menu 7.1) 20
Set Examiner Name (Menu 7.1.2) 21
Imaging Setup (Menu 7.2) 22
- iii -
Page 4

Error Recovery Modes 25
Factory Reset (Menu 7.3) 26
Duplicator Info (Menu 8) 26
Connecting Hard Drives 27
Drive Detection 29
CHAPTER 3 Using the TD2u 31
Overview 33
TD2u Menus and Options 33
Duplicate (Menu 1) 36
Initiating a Duplication Job (Menu 1) 36
Image Destinations 37
Preconditions Checking 38
Wipe Disk (Menu 2) 41
Single Pass Wipe 42
Multi-Pass Wipe 42
Secure Erase 42
Encryption (Menu 3) 43
Encrypt New Destination (Menu 3.1) 43
Unlock Destinations (Menu 3.2) 44
Change Dest Password (Menu 3.3) 45
Disk Information (Menu 4) 45
Disk Utilities (Menu 5) 47
Format (Menu 5.1) 47
Hash (Menu 5.2) 49
Blank Check (Menu 5.3) 49
HPA/DCO Removal (Menu 5.4) 50
Status Information 50
Logs Menu (Menu 6) 52
View Logs (Menu 6.1) 52
Save All Logs (Menu 6.2) 55
Delete All Logs (Menu 6.3) 55
- iv -
Page 5

Print All Logs (Menu 6.4) 55
Resetting and Clearing Internally Stored Information 56
CHAPTER 4 Troubleshooting and Support 59
Troubleshooting Common Problems 61
Power Supply Issues 61
Problems with Disk Detection 61
Problems with Encrypted Drives 63
Replacing the Backup Battery for the Real-timeClock 64
Compatible Batteries 64
Replacing the Battery 64
Testing the New Battery 67
Index 69
- v -
Page 6

- vi -
Page 7

Preface 7
PREFACE
About this Guide
This guide presents a wide range of technical information and procedures for using the TD2u. It
is divided into the following chapters.
l Overview: Provides general information about the TD2u as well as unpacking, starting
up, and navigating the TD2u menus and indicators.
l Setting up the TD2u: Provides system overview information about the TD2u as well as
procedures for configuring and connecting the TD2u.
l Using the TD2u: Provides detailed information and procedures for using the TD2u.
l Troubleshooting and Support: Provides a brief list of potential problems and solutions.
For more complete and current troubleshooting information as well as answers to frequently asked questions (FAQ), visit the Tableau web site at www.guid-
ancesoftware.com/tableau.
Conventions Used in this Guide
The TD2u has two soft keys placed immediately under the LCD display. The bottom line of the
display shows text indicating the current function for each of the two soft keys. In this guide,
soft key labels are indicated with square brackets. For example, [Select] indicates that Select is
displayed above a soft key on the display.
Disk Capacity and Transfer Rate Measurement Conventions
The computer industry generally adheres to two different conventions for the definitions of
the terms megabyte (MB) and gigabyte (GB). For computer RAM, 1 MB is defined as 220=
1,048,576 bytes and 1 GB is defined as 230= 1,073,741,824 bytes. For disk storage, 1 MB is
defined as 106= 1,000,000 bytes and 1 GB is defined as 109= 1,000,000,000 bytes. These two
conventions are known as powers of two and powers of ten respectively. Microsoft deviates
from the hard disk capacity measurement convention and uses the powers of two convention
for its operating systems.
Page 8

8 Tableau TD2u User Guide Version 1.3.0
Tableau reports disk capacities and transfer rates according to the industry standard powers of
ten convention. In TD2u screens, reports, and documentation, a 4 GB hard disk stores up to
4,000,000,000 bytes; a hard disk with a 150 MB/sec transfer rate transfers 150,000,000 bytes
per second.
Note: For a complete list of changes for a given TD2u firmware release, see the
release notes for the latest TFU version on the Tableau products web page at
www.guidancesoftware.com/tableau.
Page 9

CHAPTER 1
OVERVIEW
Tableau TD2u 11
TD2u Kit Contents 11
Navigating the TD2u 14
Reading the LEDs 15
USB Keyboard Support 15
Page 10

10 Tableau TD2u User Guide Version 1.3.0
Page 11

Item Model # Description
TD2u TD2u Forensic Duplicator
CHAPTER 1 Overview 11
Tableau TD2u
The Tableau TD2u is a forensic duplicator capable of performing 1:1, 1:2, and 1:3 duplications.
It has many of the functions traditionally found in general-purpose, IT-oriented hard disk
duplicators and provides features and functions that serve the specialized needs of forensic
practice, including:
l Sustained data transfer rates of up to 16 GB/minute, while performing calculations of
MD5 and SHA-1 hash values, also known as fingerprints.
l Native support for USB 3.0, SATA and IDE hard disks from the source interface.
l Parallel duplication to two SATA and one USB 3.0 destination hard disks.
l Parallel image and clone duplication.
l Optional destination disk encryption to ensure security of imaged source data.
l Detailed log generation for case documentation.
l Automatic blank checking of source and destination drives.
l HPA and DCO support for the detection and handling of hidden/protected data areas on
source and destination drives.
l Multi-lingual support for the UI and character input.
TD2u Kit Contents
The TD2u ships in a boxed kit that includes the following:
Page 12

Item Model # Description
TP5-NC
High-output power supply.
The TP5 provides enough
power to supply the TD2u
and most common combinations of source and destination hard disks. The TP5
uses a universal 2-pin AC line
cord and is compatible with
110-240VAC line voltages
worldwide.
TP5-LC-US
North America shipments
include the TP5-LC-US AC
line cord for use with the
TP5-NC power supply. When
shipped to other geographic
markets, the local reseller
typically adds an AC line
cord appropriate for the
local market.
TC2-8-R2
Hard disk power cable to
connect IDE and some legacy-style SATA hard disks to
the TD2u (3M to Molex).
TC3-8
SATA signal cable to connect
SATA hard disks to the TD2u.
12 Tableau TD2u User Guide Version 1.3.0
Page 13

Item Model # Description
TC4-8-R2
SATA/SAS power/signal
cable to SAS and 3M power
(2 pieces). This unified cable
connects power and signal
connectors current hard
disks.
TC5-8-R2
Hard disk power cable to
connect 15-pin SATA power
connectors to the TD2u
(SATA to 3M).
TC6-8
IDE signal cable to connect
IDE hard disks to the TD2u.
Do not use the TC6-8 IDE
cable to connect notebook
drive adapters to the TD2u.
Use the shorter TC6-2 IDE
cable shown with the TKA5AD adapter pack below.
TC8
USB 2.0 cable. Used to connect the TD2u to a host computer for firmware updates.
TQS-TD2u
Quick Start card for the
TD2u kit.
CHAPTER 1 Overview 13
Do not discard the foam packaging. It is designed to fit several industry-standard hard-sided
carrying cases. If you received the TD2u kit in the cardboard box shipped by Tableau, you can
buy a hard-sided case and reuse the foam insert directly in that case.
Page 14

14 Tableau TD2u User Guide Version 1.3.0
Navigating the TD2u
When using the TD2u, you may be prompted to enter certain information into the display. Use
the up/down/left/right arrow keys and the center button to select values.
While you are entering information, the TD2u displays two soft key functions at the bottom of
the LCD display. The soft keys perform major actions such as selecting a task, canceling a
function, or moving between different display screens. Use the arrow keypad to navigate
within a given screen/menu. The function of the soft keys depends on the current context. The
soft keys might have functions such as [Back] and [Next], as they do during the Configuration
Wizard. The soft keys might also serve to select items like [Cancel] and [Ok].
The center button on the arrow keypad also serves as a [Select] button when navigating
among TD2u menus. It cannot be used to start major tasks, such as duplication or disk wiping.
Only soft keys labeled [Select] or [Start] initiate major tasks. Vertical Arrow Keys scroll up or
down and highlight menu items for selection. Horizontal Arrow Keys scroll left or right and
toggle between character lists.
In the upper right corner of the Main menu, the TD2u displays the date and time. As you
navigate the TD2u menu structure, the menu item number displays in the upper left hand
corner. For example, the Disk Utilities menu is Menu 5, the Format menu is Menu 5.1, the
Hash menu is Menu 5.2, and so on. These menu numbers help you navigate the menu
hierarchy.
Page 15

CHAPTER 1 Overview 15
The TD2u ships with a Quick Start card illustrating the layout of the display, buttons,
connectors, and switches on the TD2u. Keep the Quick Start card with the TD2u as you
familiarize yourself with its operation.
Reading the LEDs
The front of the TD2u has nine light emitting diode (LED) indicators. A tenth LED is located on
the rear of the TD2u, near the power connector.
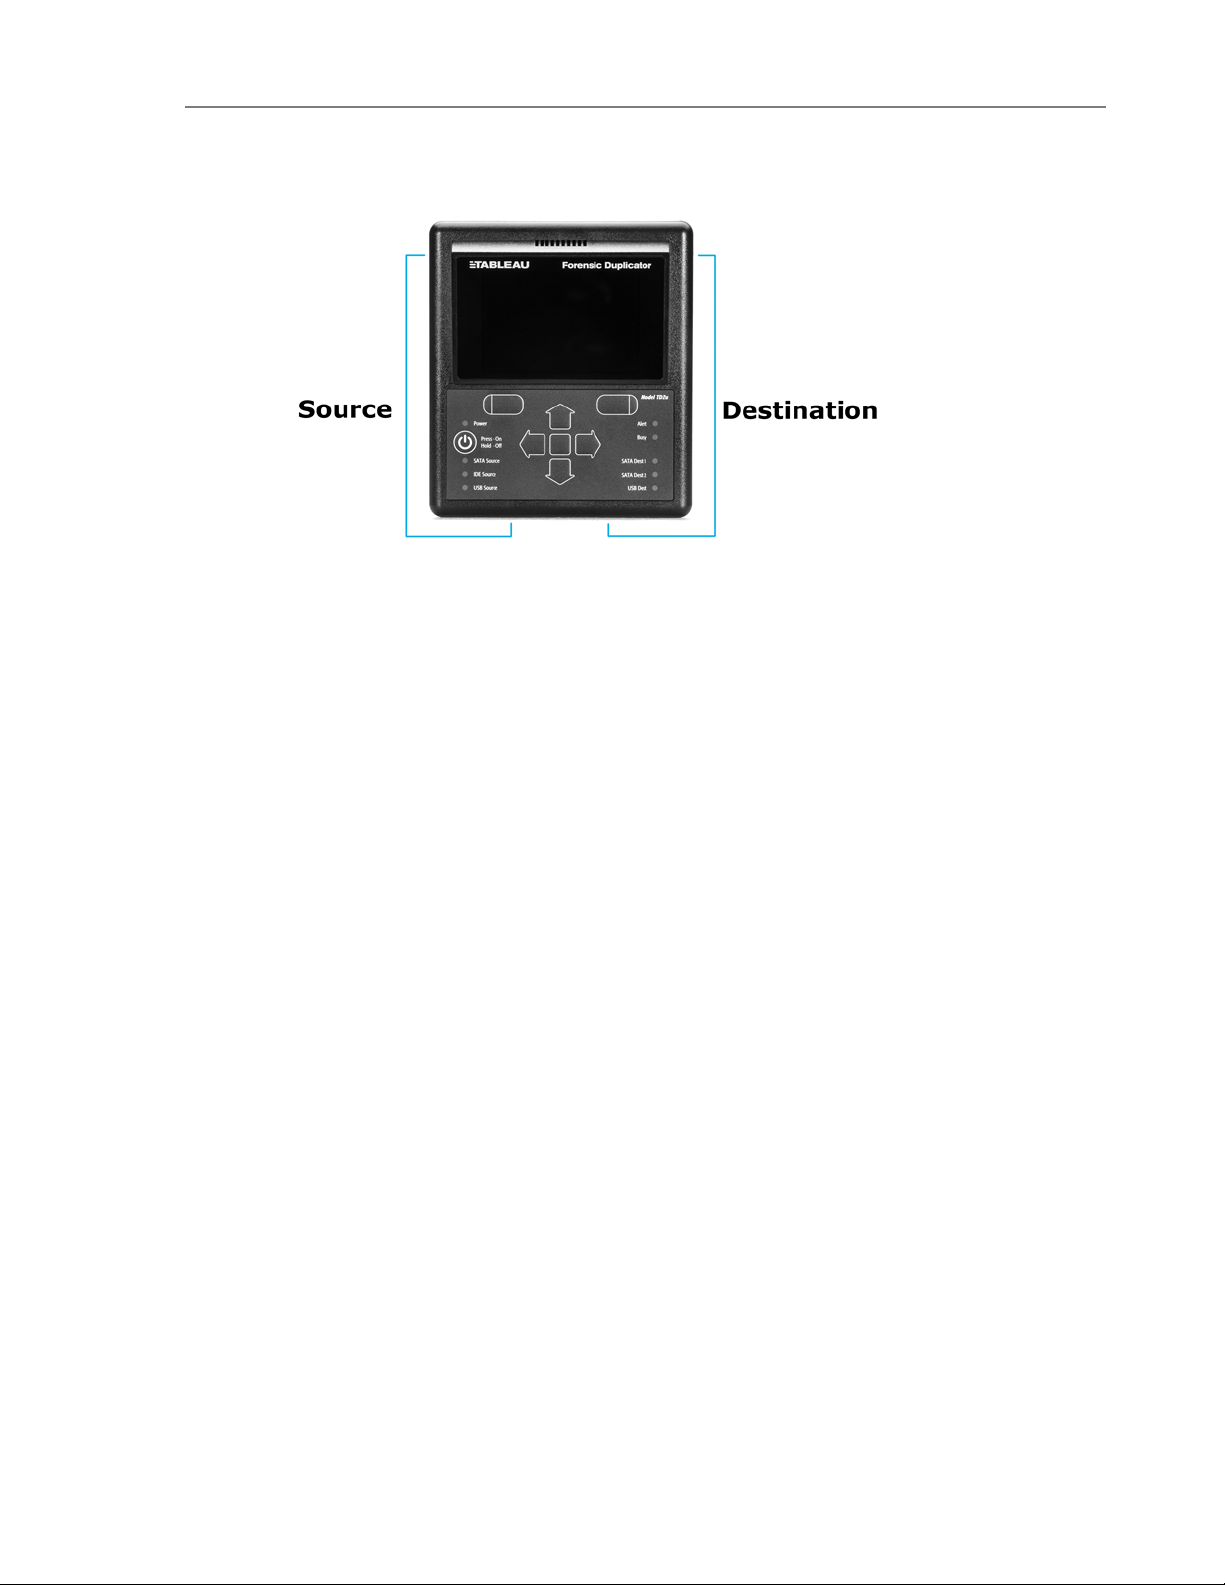
The SATA Source, IDE Source, and USB Source LEDs indicate that the source drive is connected
to the left side of the TD2u The SATA, Dest 1, SATA Dest 2, and USB DestLEDs indicate that
the destination drives are connected to the right side. A yellow Alert LED on the right flashes to
indicate the need for user intervention.
USB Keyboard Support
You can connect a standard USB keyboard to any of the USB ports on the front and back of the
TD2u. Using a keyboard for data entry can be faster and more convenient than using the arrow
keypad on the TD2u.
When using a USB keyboard the Enter key on the keyboard generally corresponds to the right
soft key on the TD2u. The Esc (escape) key on the keyboard generally corresponds to the left
soft key.
If your keyboard has arrow keys or a mouse-like input device, the up and down arrows (or
mouse actions) generally correspond to the up and down (vertical) arrows on the TD2u.
Page 16

16 Tableau TD2u User Guide Version 1.3.0
Page 17

CHAPTER 2
SETTING UP THE TD2U
Startup Sequence 19
Initialization 19
Configuring the TD2u 19
User-Selected Startup Mode 19
System Settings (Menu 7.1) 20
Set Examiner Name (Menu 7.1.2) 21
Imaging Setup (Menu 7.2) 22
Factory Reset (Menu 7.3) 26
Duplicator Info (Menu 8) 26
Connecting Hard Drives 27
Drive Detection 29
Page 18

18 Tableau TD2u User Guide Version 1.3.0
Page 19

CHAPTER 2 Setting up the TD2u 19
Startup Sequence
The TD2u is optimized for the needs of forensic practitioners and computer forensic processes.
Initialization
After you turn on the TD2u, the device takes about five seconds to initialize and run a self-test
procedure. The screen is blank and unlit until the self-test is complete. An LED check is then
conducted so you can verify that all of the LEDs are functioning. When initialization is
complete, the TD2u displays warning messages about any detected faults.
Configuring the TD2u
The TD2u comes ready to be connected to the TP5 power supply and turned on.
After running a three-second initialization and self-test procedure, the TD2u starts the
Configuration Wizard. The Configuration Wizard prompts you for the default username,
current date/time, and preferred startup mode. The TD2u stores these settings in non-volatile
flash memory for use at each startup.
The startup mode feature lets you customize the TD2u for a specific workflow. The Startup
Mode setting provides the following options.
l Main Menu
l Duplication (for cloning or imaging)
l Wipe Disk
You can configure the startup mode and other settings at any time from the System Settings
menu (Menu 7.1).
Once you have configured your TD2u, the startup sequence bypasses the Configuration
Wizard unless you have used Factory Reset (Menu 7.3) in the Setup menu.
User-Selected Startup Mode
The TD2u can be configured to display different screens at initial startup. This setting allows for
quick access to commonly used functions. For example, if you use the TD2u mainly for
duplications, you can customize the startup mode for disk duplication. Details on this and
other settings made by the Configuration Wizard are discussed below in the section on System
Settings (Menu 7.1).
Page 20

Option Choices Default Description
Startup
Screen
Main Menu
Duplication
Wipe Disk
Main
Menu
Specifies the TD2u startup mode as:
Main Menu = Main Menu
Duplication = Duplication setup screen
Wipe Disk = Wipe Disk
Set Examiner
Name
[Alphanumeric] NA
The Examiner Name option lets you set or
change the name of the examiner or user of the
TD2u. This information appears in each log recorded by the TD2u.
Alphabetic names can be entered using upper
and lowercase letters and spaces. The square
brackets in the screen indicate the selected data
entry mode: enter an upper case character,
enter a lower case character, enter a space (spc),
or delete a character (del). The up and down
arrows select the desired alphabetic character.
The center button on the arrow keypad enters a
letter or selects the delete function.
Once you have set the desired name, press the
[Save] soft key to record your changes. See
below for more details.
20 Tableau TD2u User Guide Version 1.3.0
System Settings (Menu 7.1)
The System Settings menu provides options for setting TD2u options, defaults, and the
current date/time. The System Settings menu also provides options for viewing TD2u
information and current status.
The following table lists additional options and values you can set in System Options.
Page 21

Option Choices Default Description
Set Date
+ Time
[Numeric] NA
The Date and Time option lets you set or change
the time stored by the real time clock in the
TD2u.
The angle brackets in the screen indicate the currently selected field. Use the up and down arrow
keys to select the desired field. Use the left and
right arrow keys to change the value in each field.
Once you have set the desired date and time,
press the [Save] soft key to record your changes.
Finished
Alert
Off
On
Off
When On, the TD2u flashes the yellow Alert LED
at the end of a normal/successful acquisition/task.
When Off, the TD2u flashes the yellow Alert LED
only if there is an unusual condition or error.
Language
English
French
German
Spanish
Turkish
English Sets the system wide language for the TD2u UI.
CHAPTER 2 Setting up the TD2u 21
Set Examiner Name (Menu 7.1.2)
Page 22

22 Tableau TD2u User Guide Version 1.3.0
If you are using an external keyboard, entering the Examiner Name is fairly straightforward.
Using the TD2u keypad requires scrolling through individual characters. The characters are
divided into four categories that appear at the bottom of the screen:
l Capital letters (A)
l Lowercase letters (a)
l Numbers (0)
l Space (spc)
A set of parentheses appears around the currently selected category. In the above display,
capital letters is selected.
For capital letters, lowercase letters, and numbers, use the Up and Down buttons to scroll
through characters.
Press the center button on the keypad to select a character.
To delete the last character you entered, select del from the keypad.
To clear all text, use the right arrow to move to the del item and press the up or down arrow.
This should change del to clr. Selecting this by pressing the center button clears all text.
Imaging Setup (Menu 7.2)
Imaging Setup lets you specify options related to disk imaging operations.
Page 23

Option Choices Default Description
File Type
Raw/DD
E01
EX01
Prompt
EX01
Specifies whether the Disk-to-File operation creates an EnCase .e01 or .Ex01 file, a Raw/DD
file, or if the user should be prompted at execution time.
File Size
4GB
2GB
1GB
700MB
UNLIMITED
2GB
Size of an individual image file generated during
Disk-to-File duplication operation.
E01/Ex01
Compression
On
Off
On
When On, .E01 and .Ex01 files use compression to decrease file size and increase write
and read speed when possible without compromising data.
Directory
Name
Date &
Time
Serial Number
Model and
Serial
Manual
Date &
Time
Specifies the directory name for the imaging
operation.
Date & Time generates a directory name of the
form yy-mm-dd hh-mm-ss that corresponds
to the date and time when the duplication started.
CHAPTER 2 Setting up the TD2u 23
Note: As of version 1.3, you can change settings specific to each operation start
screen by pressing the center button with the gear icon on that screen. Operations
that do not have settings do not have a gear icon on their start screens.
The following table lists the options and values you can set for each option.
Page 24

Option Choices Default Description
Custom Filename
Prompt
Skip
Prompt
When set to Prompt, the user is prompted to
enter the filename.
When set to Skip, the default filename is used.
Raw File Ext
Default
.dmg
Default Sets the extension to the default value or .dmg.
Case ID
Prompt
Skip
Skip
When set to Prompt, the TD2u prompts the
user to enter Case ID.
When set to Skip, the Case ID is suppressed in
subsequent logs.
Case Notes
Prompt
Skip
Skip
When set to Prompt, the TD2u prompts the
user to enter Case Notes.
When set to Skip, Case Notes are suppressed in
subsequent logs.
Error Recovery
Standard
Exhaustive
Standard
The TD2u supports two different error recovery
modes: Standard and Exhaustive. If an error is
encountered on the source drive during a read
operation, the TD2u can be configured to retry
the operation, depending on the Error Retry
Count setting.
The Standard setting retries the 32K block until
it either succeeds or the Error Retry Count is
exceeded.
The Exhaustive setting causes the TD2u to
attempt to recover each sector.
24 Tableau TD2u User Guide Version 1.3.0
Page 25

Option Choices Default Description
Error Retry
Count
Zero
One
Ten
100
One
Specifies the maximum number of errors
allowed on each operation on the source drive.
Image Verification
No Verification
Verify
Prompt
Prompt
Specifies if, at the end of an imaging operation,
the TD2u should automatically perform a hash
verification of the destination(s), prompt the
user, or do no verification at all.
Wipe Type
Single Pass
Multiple
Pass
Secure
Erase
Single Pass
Specifies the type of wipe to perform. Single
Pass is one pass of zeros across the drive.
Multiple Pass follows the pass of zeros with a
pass of ones and a final pass of random data.
For some SATA solid state destinations, Secure
Erase is a very fast wipe provided by the drive
manufacturer.
Restore to
Defaults
N/A N/A
Resets the above options to the factory
defaults.
CHAPTER 2 Setting up the TD2u 25
Error Recovery Modes
The TD2u supports two different error recovery modes, Exhaustive and Standard. Both modes
refer to the way in which the TD2u recovers from read errors on the source hard disk.
In the Exhaustive error recovery mode, when the TD2u detects a read fault, it begins a retry
strategy that attempts to read each sector in the 64-sector block that contains the error.
Exhaustive mode therefore produces the most complete destination image. However, if the
source drive has many read faults, the exhaustive strategy used by the TD2u can also be timeconsuming.
Page 26

26 Tableau TD2u User Guide Version 1.3.0
The Standard error recovery mode is intended for use with drives that have a high number of
read faults. When in Standard mode, the TD2u treats the source drive as a series of 64-sector
blocks (32,768-byte blocks). An error in any 64-sector block causes the entire block to be
treated as an error. This allows the TD2u to move quickly through a drive with many read
faults, but at the loss of some potentially readable sectors near each fault.
In both error recovery modes, the TD2u handles unreadable sectors in the same way. When
the TD2u has determined that a sector cannot be read from the source drive, it fills in the
missing data with zeros on the destination drive. Zero data inserted in this way is also included
by the TD2u when calculating the MD5 and SHA1 hashes for the duplication.
The TD2u treats all media errors on a destination disk as fatal or unrecoverable errors because
each destination disk is receiving a copy of evidence critical to a forensic examination. It is not
recommended to store data to a destination disk with known defects.
Factory Reset (Menu 7.3)
The Factory Reset option resets all TD2u configuration settings to the factory state. Factory
Reset also physically erases of all user settings and logs stored in TD2u flash memory.
After performing a Factory Reset the TD2u retains no user-specific or case-specific information.
The only setting not cleared by a Factory Reset is the current date and time.
Internally Stored Information provides additional information regarding data stored in nonvolatile memory by the TD2u.
Duplicator Info (Menu 8)
Selecting the TD2u Duplicator Info option displays selected information for the TD2u itself, as
shown below.
Page 27
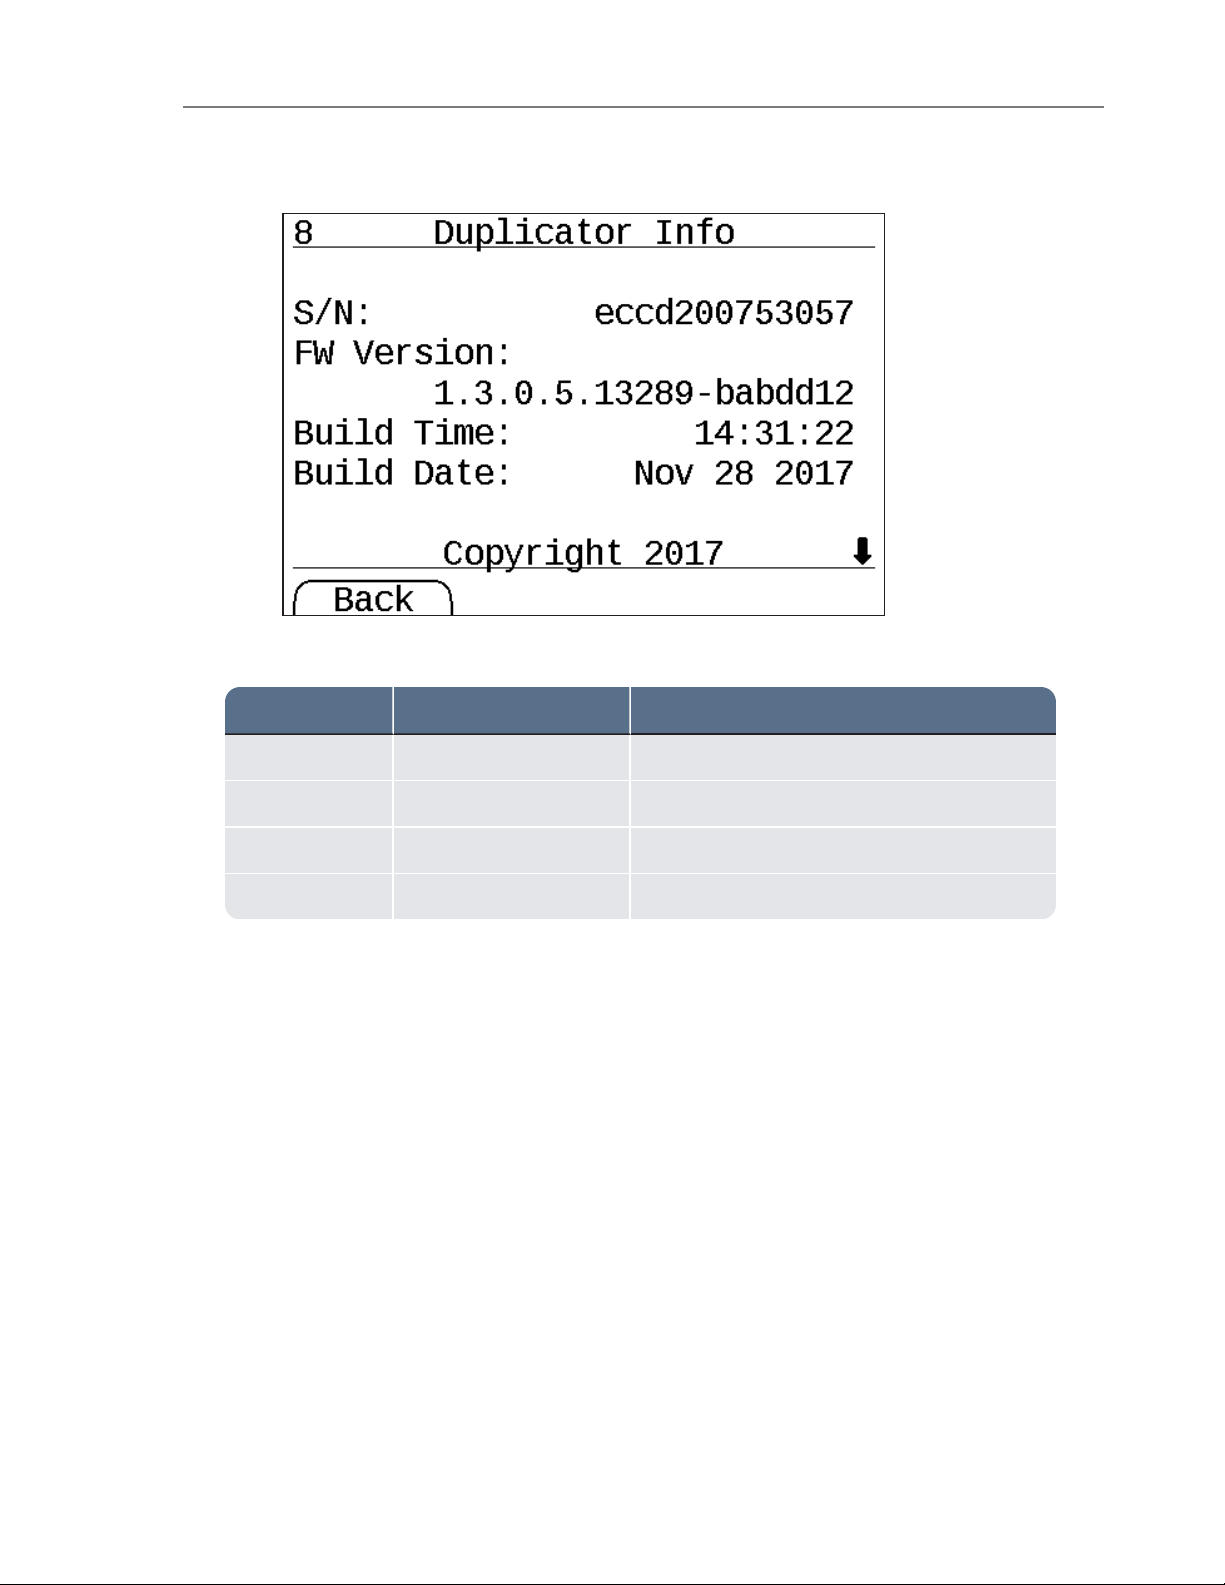
Legend Example Value Description
S/N eccd200753057 The TD2u serial number.
FW Version 1.3.0.5.13289-babdd12 The TD2u firmware release.
Build Time 14:31:22 The build time of the TD2u firmware release.
Build Date Nov 28, 2017 The build data of the TD2u firmware release.
CHAPTER 2 Setting up the TD2u 27
Connecting Hard Drives
Viewing the front of the TD2u, the source drive attaches to the left side of the duplicator and
the destination drive(s) attach to the right side.
Page 28
28 Tableau TD2u User Guide Version 1.3.0
The following procedure provides the steps for connecting hard disks to the TD2u. This
procedure applies to typical 3.5" SATA and IDE hard disks.
To connect hard disks to the TD2u:
1. Confirm that the TD2u power is off (the Power LED will not be lit).
2. Connect the source disk with its signal cable to the signal input on the left side of the
TD2u using the appropriate cable.
o
TC6-8 IDE signal cable
o
TC3-8 SATA signal cable
o
For USB hard drives, use the cable shipped with the USB drive, or a Tableau TCUSB318 cable
3. Connect the source disk with its power cable to the left side TD2u power input.
o
TC2-8-R2: IDE/SATA drive power cable
o
TC5-8-R2: SATA drive power cable
4. Connect the destination disk or disks to the right side of the TD2u with the appropriate
cable.
o
For SATA devices, use the TC4-8-R2 unified cable
o
For USB hard drives, use the cable shipped with the device or a Tableau TCUSB3-18
cable
5. On the back of the TD2u, connect the TP5 power supply to the TD2u power input.
6. Using the appropriate line cord, plug your TD2u into an AC power source. The green DC
Power In LED indicates that power is available at the power connector.
Page 29

CHAPTER 2 Setting up the TD2u 29
7. Turn on the TD2u by pressing the TD2u power switch located on the front of the unit to
the lower left. The green Power LED indicates that the duplicator is turned on.
Note: When connecting an IDE source disk to the TD2u, always connect the blue
end of the IDE cable (TC6-2 or TC6-8) to the TD2u and the black end to the hard
disk. If using other than a Tableau-supplied cable, ensure that the colored stripe on
the cable aligns with Pin #1 on the hard disk. Failure to do so can result in unreliable
communication between the hard disk and the TD2u.
You can connect two destination SATA disks to the TD2u. The TD2u can write to two
destination drives simultaneously. To create a single copy, connect a drive to either the Dest-1
or USB destination port.
Drive Detection
After initialization, the TD2u begins drive detection.
Steady illumination of the IDE, SATA, USB Source, Destination 1, Destination 2, and USB
Destination LEDs indicates drive detection. A blinking LED indicates that detection is still in
progress.
Note: Note: Because IDE drives do not support hot plug, they must be plugged in
before the TD2u is turned on in order to be detected. Unplugging an IDE drive that
has been detected by the TD2u will cause erratic or unexpected behavior since
there is no way for the TD2u to know that the IDE is no longer connected.
Page 30

30 Tableau TD2u User Guide Version 1.3.0
Page 31

CHAPTER 3
USING THE TD2U
Overview 33
TD2u Menus and Options 33
Duplicate (Menu 1) 36
Preconditions Checking 38
Wipe Disk (Menu 2) 41
Encryption (Menu 3) 43
Disk Information (Menu 4) 45
Disk Utilities (Menu 5) 47
Status Information 50
Logs Menu (Menu 6) 52
Resetting and Clearing Internally Stored Information 56
Page 32

32 Tableau TD2u User Guide Version 1.3.0
Page 33

Main Menu Sub-menu
1. Duplicate
2. Wipe
3. Encryption
3.1 Encrypt New Destination
3.2 Unlock Destinations
3.3 Change Dest Password
4. Disk Info
4.0 SATASource Info
4.1 IDESource Info
4.2 USBSource Info
4.3 SATADest 1 Info
4.4 SATADest 2 Info
4.5 USBDest Info
CHAPTER 3 Using the TD2u 33
Overview
This chapter covers detailed procedures and information for using the TD2u. It is organized
according to the TD2u menu tree to facilitate navigation of the TD2u.
TD2u Menus and Options
The menus and screens in the TD2u are arranged in a tree structure. Under the Main menu,
each branch of the tree is numbered to guide you as you navigate the menu tree. These
numbers also make it easy to refer back to this guide for detailed information. The following
outline provides the menu structure.
Page 34

Main Menu Sub-menu
5. Disk Utilities
5.1 Format
5.1.1 Format Destination
5.1.2 Format Accessory
5.2 Hash
5.3 Blank Check
5.4 HPA/DCORemoval
6. Logs
6.1 View Logs
6.2 Save All Logs
6.3 Delete All Logs
6.4 Print All Logs
34 Tableau TD2u User Guide Version 1.3.0
Page 35

Main Menu Sub-menu
7. Setup
7.1 System Settings
7.1.1 Startup Screen
7.1.2 Examiner Name
7.1.3 Set Date and Time
7.1.4 Finished Alert
7.2 Imaging Setup
7.2.1 File Type
7.2.2 File Size
7.2.3 E01/EX01 Compression
7.2.4 Directory Name
7.2.5 Custom Filename
7.2.6 Raw File Ext
7.2.7 Case ID
7.2.8 Case Notes
7.2.0 Error Recovery
7.2.10 Error Retry Count
7.2.11 Image Verification
7.2.12 Wipe Type
7.2.13 Restore Defaults
7.3 Factory Reset
8. Duplicator Info
CHAPTER 3 Using the TD2u 35
Page 36
36 Tableau TD2u User Guide Version 1.3.0
Duplicate (Menu 1)
The TD2u duplicates hard disks by either cloning or imaging them. Cloning, also known as diskto-disk duplication, is the process of copying a source disk, sector by sector, to a destination
disk. Source disk sector one is copied to destination disk sector one, then sector two is copied
to sector two, sector three to sector three, and so on. Imaging, also known as disk-to-file
duplication, is the process of copying a source disk to a series of files on destination disks.
Note: Starting with TD2u firmware version 1.3, the selection of clone or image for a
specific destination drive is no longer done through distinct sub-menus. Selecting the
Duplicate item will launch a Duplicate job setup page that allows for in-line selection
of clone or image for all connected destination drives. This allows each destination to
be selected as clone or image independently from other destinations.
Initiating a Duplication Job (Menu 1)
1. Follow the steps listed in Connecting Hard Drives on page27.
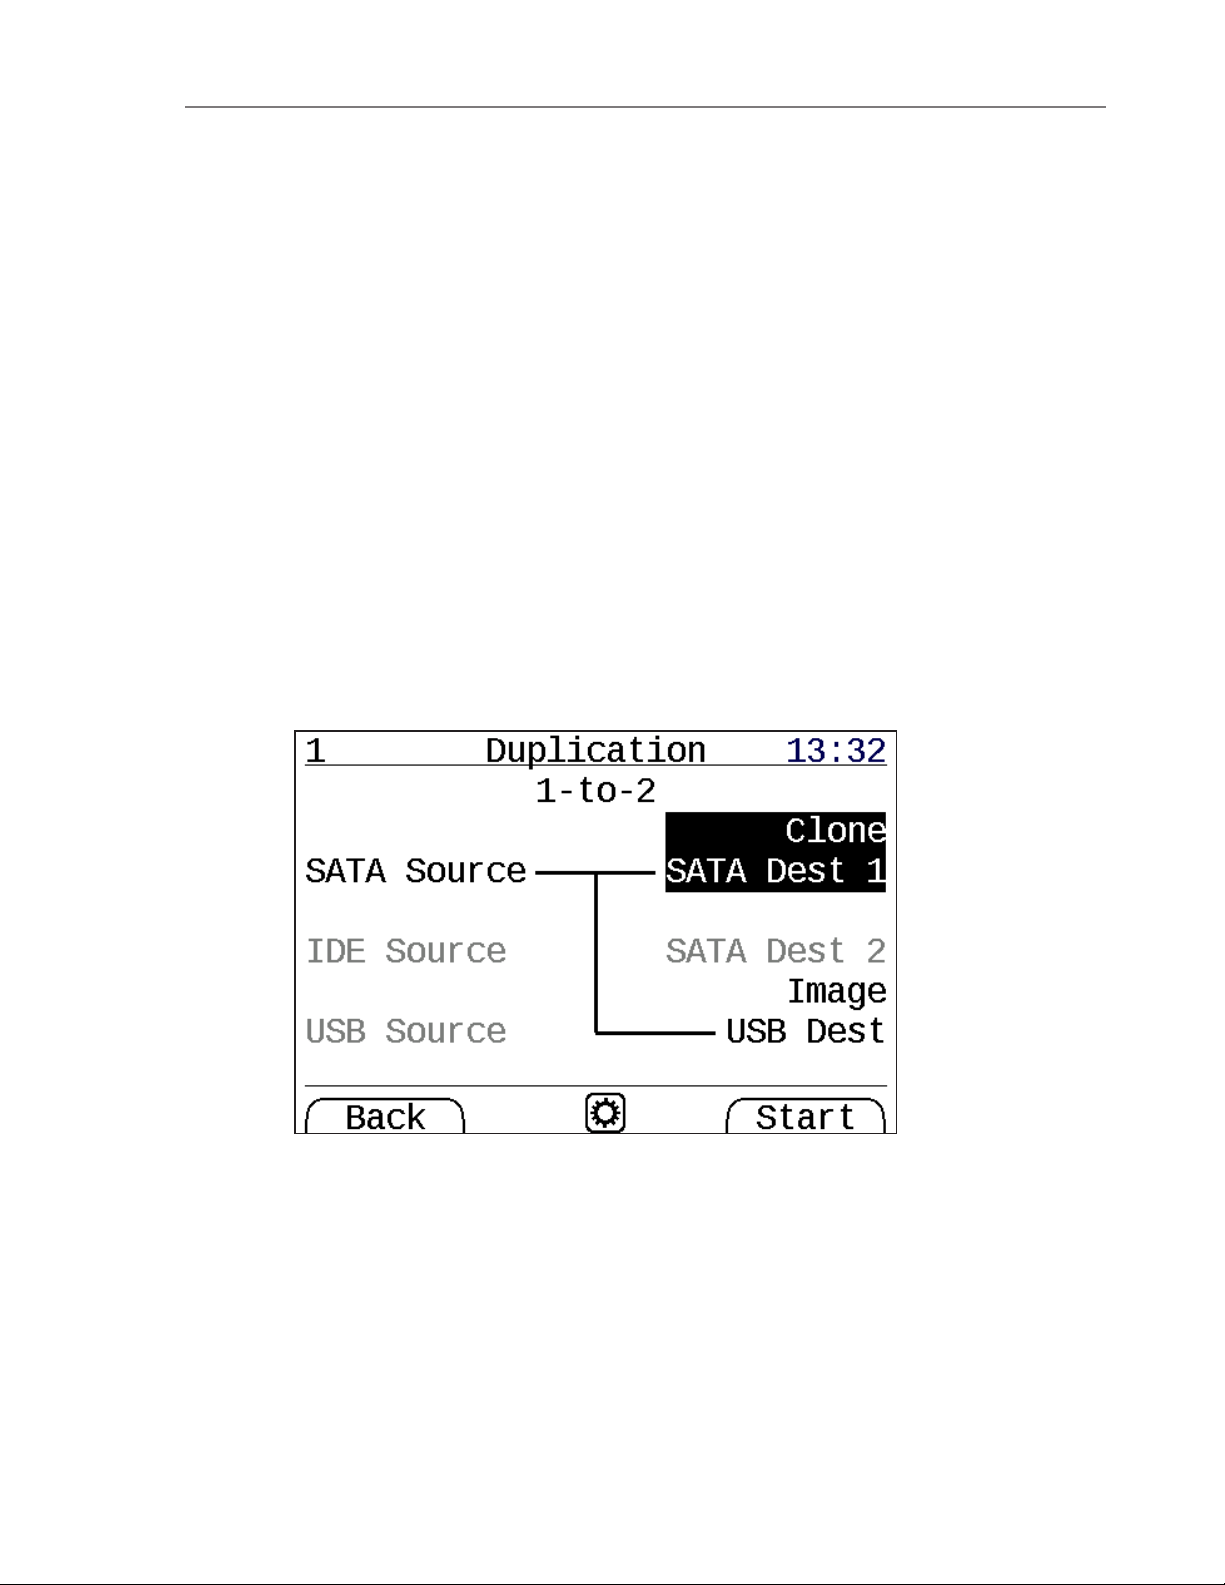
2. From the Main menu, use the arrow keys to navigate to Duplication (Menu 1).
3. For each connected destination, highlight that destination with the up and down arrow
keys, and use the left and right arrow keys to select Image or Clone per destination.
4. If any other settings need to be modified, the center button on the keypad will open a settings menu containing the Duplication/Imaging Setup settings.
Page 37

CHAPTER 3 Using the TD2u 37
Note: If you have enabled additional prompts (through Setup > Imaging
Options or through the options menu (gear icon) on the duplication start screen)
you will be prompted for additional information after pressing the [Start] soft key.
By default, directory and filename prompts are turned off. Through the setup menus
you can choose to enable prompts for those items as well as for Case ID and Case
Notes fields.
5. Press the [Start] soft key to initiate the duplication process.
6. If applicable based on Imaging Setup settings, select Verify or No Verification. To abort
the process, press the [Cancel] soft key.
7. If applicable based on Imaging Setup settings, enter a Case Note. To abort the process,
press the [Cancel] soft key.
8. If applicable based on Imaging Setup settings, enter a Case ID. To abort the process,
press the [Cancel] soft key.
9. Once all pre-condition checks have been satisfied, the duplication job begins and progress reports appear on the LCD. To see detailed information, press the [Details] soft
key.
The TD2u provides a high degree of flexibility in selecting defaults for each field so that you can
configure the TD2u to match your desired workflow.
Details about the current operation are available during or at the end of duplication. To view
details during duplication, press the [Detail] soft key which displays the log entry for the
duplication operation.
Image Destinations
When performing imaging, the TD2u creates files on the destination hard disk that contain the
data copied from the source hard disk.
Note: For Image destinations, the TD2u performs any necessary destination disk
formatting automatically. If a destination disk already has an acceptable format and
sufficient free space to store the image, the TD2u uses that format. If a destination
disk is not formatted the TD2u prompts you for confirmation to format the disk. This
reduces the risk of overwriting valuable data.
Files are written to the destination disk according to the following convention:
(root dir)/
TD2_IMG/
[directory name]/
[filename].E01
[filename].E02
...
[filename].E99
YYYY-mm-dd hh-mm-ss nnnnn TTT.LOG
Page 38

38 Tableau TD2u User Guide Version 1.3.0
[directory name] is the name generated by the TD2u for each separate acquisition. If an
acquisition spans multiple destination disks, the same [directory name] is used on each
destination disk. This makes it easy to group image files related to a particular acquisition.
The [directory name] can be auto-generated by the TD2u or you can enter it yourself.
Auto-generated names can be based on the date/time, the serial number of the source device,
or the model and serial number of the source device. The auto-generated [filename] is
IMAGE, although you may choose to override this value. For a complete list of the options you
can use to control the auto-generation and user prompting for directory and filenames, see
Imaging Setup (Menu 7.2) on page22.
For Raw/DD [filename].001 is the first file, or portion of the data copied from the source
disk. The file size is a user-settable option and may also be specified under the Setup >Imaging
Options menu.
When creating a DD image, you can also specify .DMG naming for files. .DMG refers to a file
naming convention used by Apple operating systems. If the .DMG naming option is selected,
the first file is named IMAGE.DMG instead of IMAGE.001. All other files have standard
filenames (for example, IMAGE.002, IMAGE.003, and so on).
A .LOG file is generated by the TD2u for each disk-to-file acquisition. yyyy-mm-dd hh-mm-sec
is the duplication task start date/time. The last part of the filename is the name of the type of
task.
Preconditions Checking
Before starting a duplication, the TD2u automatically checks for a number of preconditions.
Some preconditions are warnings and you can choose to continue or cancel after viewing each
one. Some preconditions are fatal and cause the duplication process to be aborted. One
precondition pauses the process and prompts you to intervene. The following table
summarizes the preconditions checked by the TD2u prior to duplication:
Page 39

Name
Clone or
Image Destin-
ations
Type Explanations
Source Hidden Data
Areas
Both Warning
Reports that DCO is in use
on the source disk.
The TD2u does not automatically remove DCO on
the source disk, as doing so
requires a permanent modification of the source disk.
You can cancel the duplication and manually remove
the DCO using the Disk Utilities option under the Main
menu.
Source Fits
into Destination
Both
Fatal/Warning
For Clone destinations, the
destination disk must be at
least as large as the source
disk. For Image destinations, the TD2u checks
the available space on the
destination disk.
If it is possible that the
source may not fit on the
Image destination (compression permitting), this
warning informs the user.
If it is certain that the
source will not fit on the
Image destination, this precondition is fatal.
CHAPTER 3 Using the TD2u 39
Page 40

Name
Clone or
Image Destin-
ations
Type Explanations
Source Not
Blank
Both Warning
The TD2u checks select sectors on the source disk
looking for non-blank data
patterns. If all of the
checked sectors appear to
be blank, the TD2u warns
that the source might be
blank. This does not mean
that the source is necessarily blank, but it could
mean that the source has
been partially wiped or that
an ATA password has been
set for the source drive.
Destination
Blank
Clone Warning
The TD2u checks select sectors on the destination disk
looking for non-blank data
patterns. If the destination
disk is not blank, an unintentional overwrite is possible. This warning provides
the opportunity to abort
the duplication.
40 Tableau TD2u User Guide Version 1.3.0
Page 41

Name
Clone or
Image Destin-
ations
Type Explanations
Destination
Filesystem
Image Warning
When performing Disk-toFile duplication the TD2u
requires each destination
disk to be formatted with
the FAT32 or exFAT file system.
If the destination disk is
already formatted for
FAT32 or exFAT, the TD2u
uses this formatting
without overwriting any
existing files.
If the destination disk does
not have a usable file system, the TD2u can format
one during duplication.
If the destination disk
appears to be blank, the
TD2u formats it without
any warnings.
Encrypted
Destinations
Unlocked
Both Warning
The TD2u checks if any of
the destinations appear to
have been encrypted in a
way that TD2u can unlock,
and prompts you to unlock
them if they are not
already unlocked.
CHAPTER 3 Using the TD2u 41
Wipe Disk (Menu 2)
You may want to wipe the destination disk before use, especially when doing disk-to-disk
cloning. The TD2u provides three options to wipe a destination disk: a fast single pass wipe, a
multi-pass wipe, or a Secure Erase. Follow the steps below to specify the type of wipe
Page 42

42 Tableau TD2u User Guide Version 1.3.0
operation to perform:
1. Navigate to Wipe (Menu 2), then press the center button to open the wipe specific settings options. Wipe Type is option 3 in this menu.
2. Select the Wipe Type setting to open the setting selection menu. You can choose Single
Pass, Multiple Pass, Secure Erase, or you can choose to have the wipe startup prompt
you for a type at that time.
3. Follow the steps listed in Connecting Hard Drives (see Connecting Hard Drives on
page27) and turn on the TD2u. No source disk is necessary.
4. From the Main menu, use the arrow keys to navigate back to Wipe (Menu 2).
5. To start the wipe process, press [Yes]. The wiping task starts and its progress appears on
the display.
Note: If you connect two or more destination disks of different sizes, the Wipe Disk
utility wipes all disks fully. It may take longer to wipe larger or slower disks.
Single Pass Wipe
The TD2u writes a constant pattern of zeros (00h) to the destination drive in a single pass. The
TD2u will display on-screen performance and timing metrics during the wiping process.
You can cancel the wiping operation at any time by pressing the [Cancel] soft key.
Note: The TD2u will not automatically overwrite a DCO on the destination drive.
Multi-Pass Wipe
The TD2u performs three write passes on the destination drive. The first pass writes zeros
(00h), the second pass writes ones (FFh), and the third pass writes a randomly selected
constant value between 01h and FEh. The TD2u will display on-screen performance and timing
metrics during the wiping process.
You can cancel the wiping operation at any time by pressing the [Cancel] soft key.
Secure Erase
The TD2u is capable of using the SATA Secure Erase command to use the internal firmware of a
hard drive to do a complete low level erasure of the disk contents. This feature is only
Page 43
CHAPTER 3 Using the TD2u 43
supported on SSDs. This limitation is due to a significant number of rotating media drives not
correctly supporting the SATA Secure Erase function, which results in hard drives that are
completely unusable.
Encryption (Menu 3)
The TD2u can encrypt destinations using whole disk encryption. All data stored on the
destination is encrypted and hosts will only read seemingly random data until it is decrypted.
Decrypting the data requires special decryption software/hardware and knowledge of the
password used for encryption. On Windows, the publicly available open source program,
VeraCrypt, can read disks encrypted by TD2u. However, drives encrypted first by VeraCrypt
likely cannot be used by TD2u without re-encryption.
See the Guidance Software website for more information about whole disk encryption used by
TD2u, including details about the exact algorithms used and the security of drives encrypted
this way.
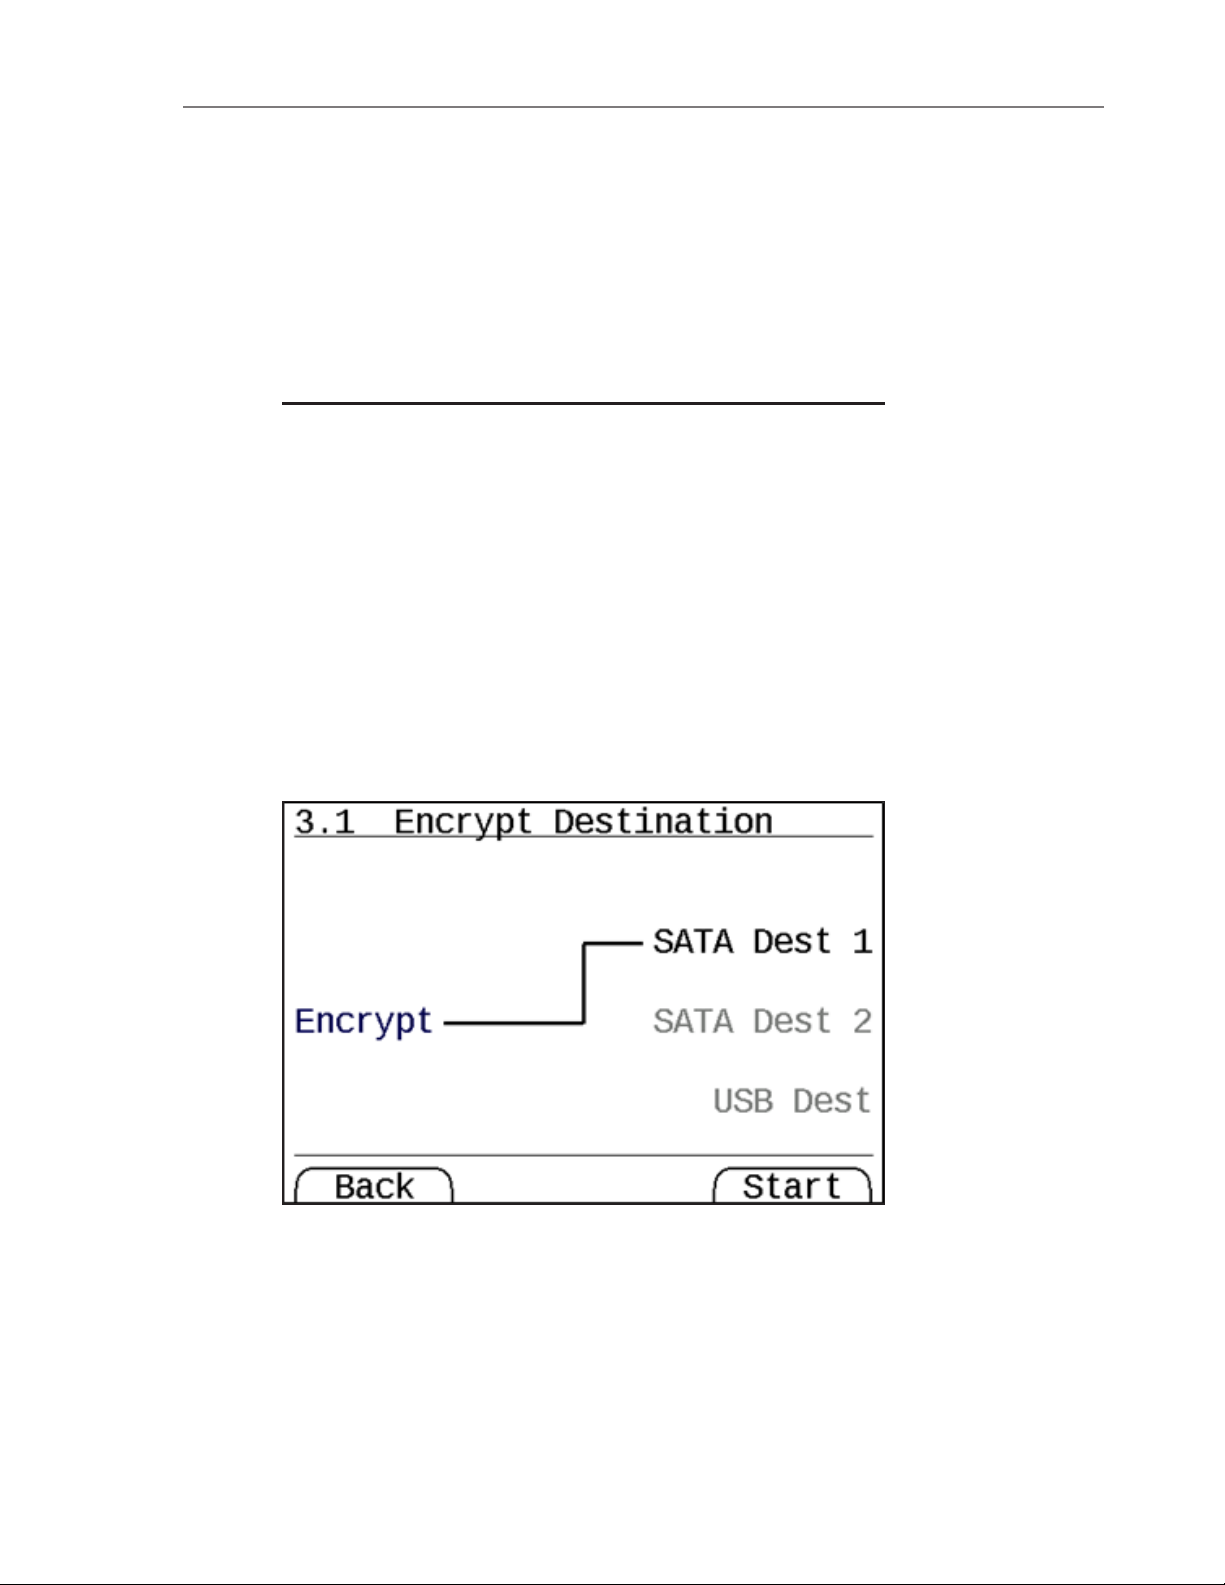
Encrypt New Destination (Menu 3.1)
This operation allows you to set up new encrypted destinations. Whole disk encryption
requires this setup, which writes over any data on the drive to create an encryption container
for whole disk encryption. Only drives encrypted this way are supported as encrypted drives
by TD2u. The TD2u identifies drives that appear to have been encrypted this way.
Page 44
44 Tableau TD2u User Guide Version 1.3.0
You are prompted to enter a new drive password for the drive or drives to be encrypted. This
password is required each time you want to access the data on the destination (read or write).
If the encryption header set up by Encrypt New Destination is overwritten, the encrypted data
is permanently lost. See the Guidance Software website for more information on the methods
and algorithms used for TD2u encryption.
Securely encrypting destinations takes 15 to 20 seconds.
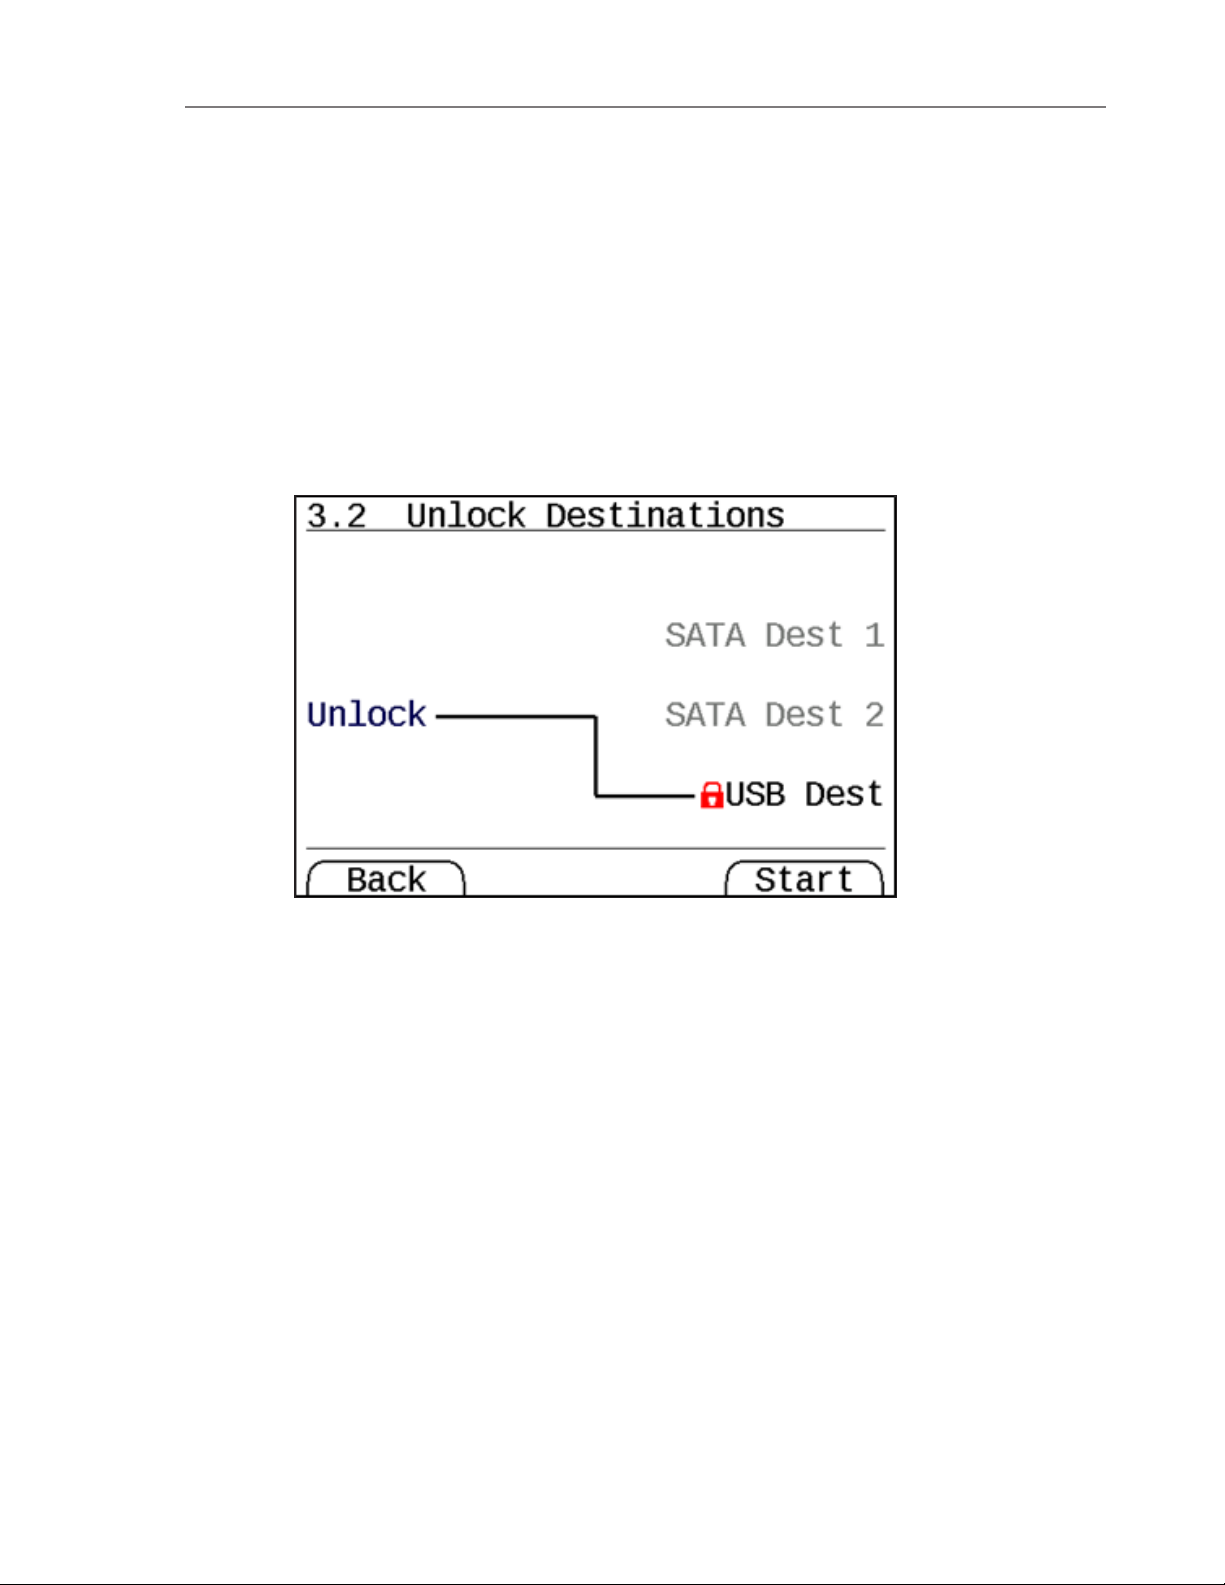
Unlock Destinations (Menu 3.2)
This operation allows you to unlock destinations that appear to have been encrypted by a
TD2u. When you click [Start] there is a prompt to enter passwords for each destination to be
unlocked. Unlocking encrypted destinations takes 15 to 20 seconds.
Page 45
CHAPTER 3 Using the TD2u 45
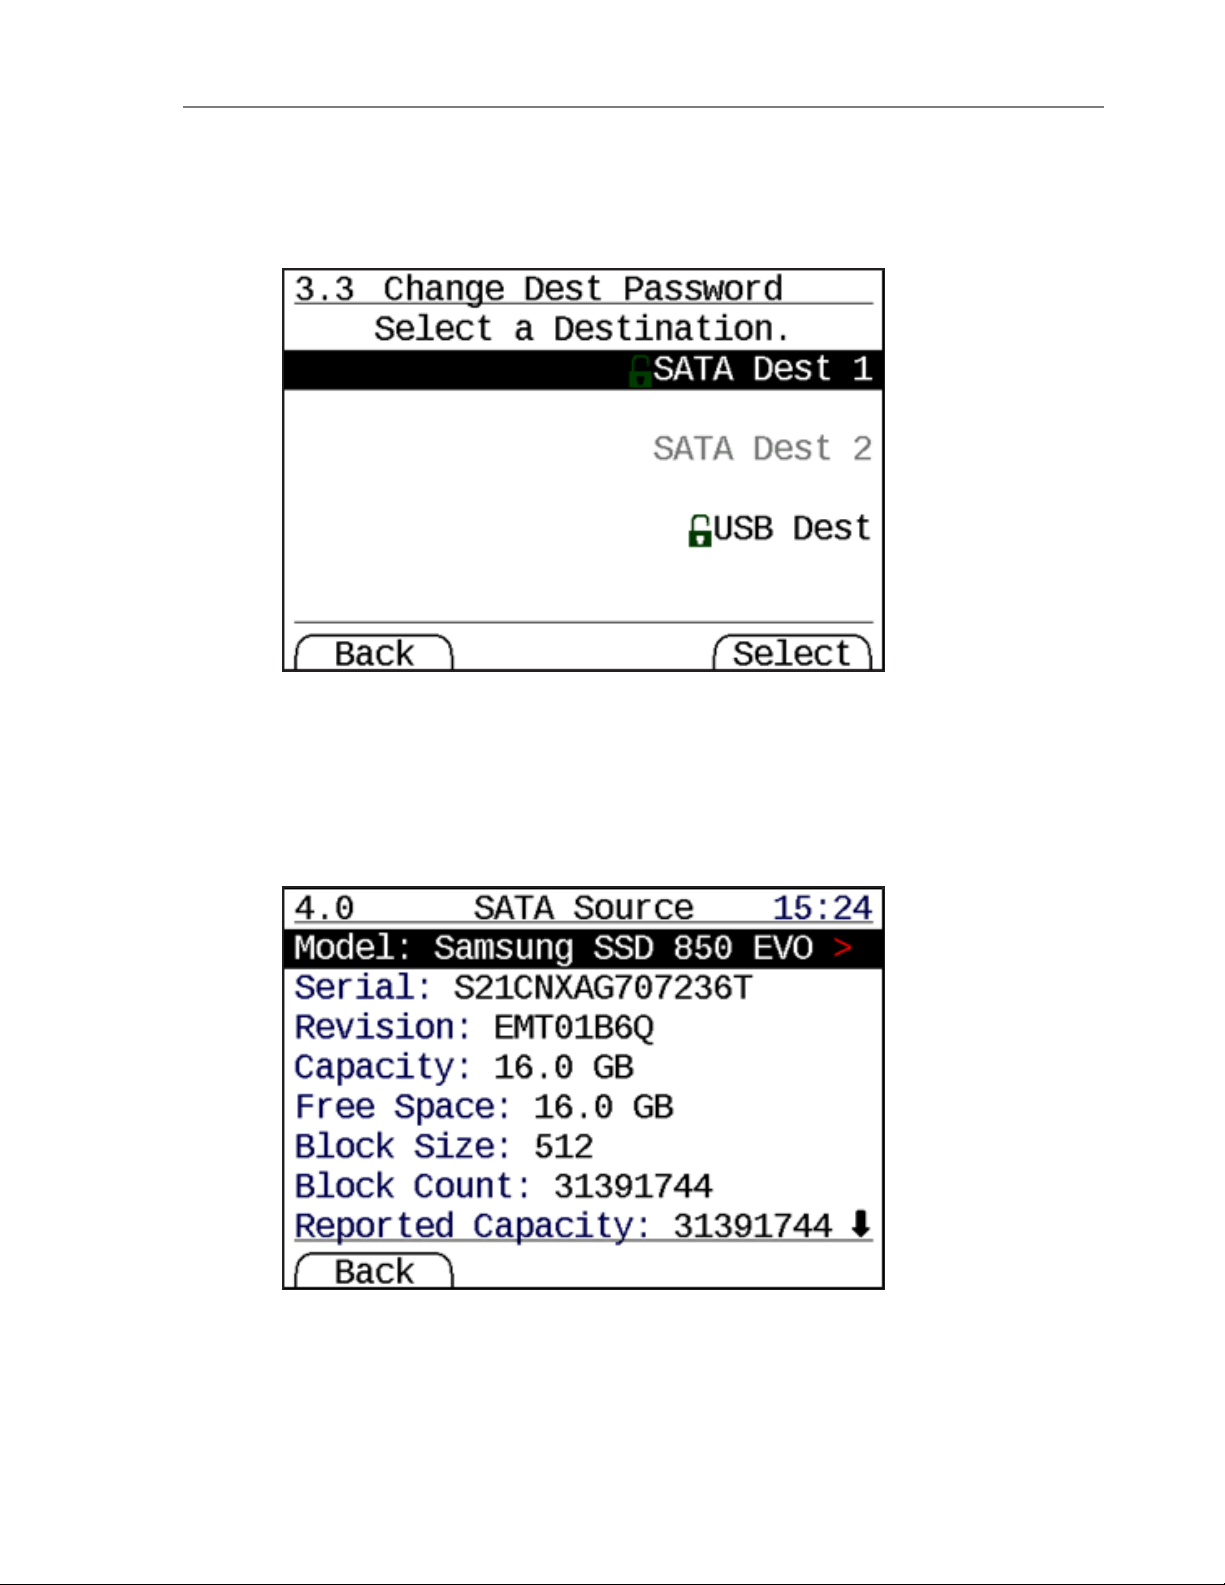
Change Dest Password (Menu 3.3)
This menu allows you to change the destination encryption header on an already unlocked
destination. This does not change the encryption across the drive. Generating a new secure
header takes 15 to 20 seconds.
Disk Information (Menu 4)
The TD2u can display detailed information about the source or the destination hard disk(s).
From the Disk Info (Menu 4.0) screen, select any drive attached to a source or destination
port.
Page 46

Legend
Example Value
Definition
Unlock
Drive
(none)
This field displays for encrypted drives that
are still locked. This behavior is the same as
that of the Unlock Destinations screen, and
is provided for convenience.
Legacy
Unlock
(VERYRARE)
(none)
This feature behaves like Unlock Drive, but
allows drives with 4096 byte sector sizes
that were encrypted prior to TD2u v1.3.0 to
be unlocked such that their data may be
recovered. These drives were not encrypted
in a way compatible with the Unlock Drive
feature nor with most third party tools like
VeraCrypt. See Troubleshooting Common
Problems on page61 for additional details
on how to recover previously encrypted
data from 4096 byte sector size drives.
Model
Samsung SSD850
EVO
Model name reported by the hard disk.
Serial
S21CNXAG707236T
Serial number reported by the hard disk.
USB Serial 3.ADD
(USB Devices Only) Serial reported over
USB, which may be different than the serial
number.
Revision 3.AAD
Firmware revision reported by the hard
disk.
Capacity 40.0 GB
Capacity of the hard disk as it will be
copied/used by the TD2u.
Reported
Capacity
20,000,000
Capacity in sectors as reported by the hard
disk at power ON.
46 Tableau TD2u User Guide Version 1.3.0
The following table lists the disk information displayed by the TD2u.
Page 47

Legend
Example Value
Definition
HPA Capacity
78,125,000
(ATA Devices Only) Capacity in sectors as
reported by the hard disk using the ATA
HPA (Host Protected Area) feature set.
DCO Capacity
156,301,488
(ATA Devices Only) Capacity in sectors as
reported by the hard disk using the ATA
DCO (Device Configuration Overlay) feature
set.
HPA in Use Yes
(ATA Devices Only) Yes, if the ATA HPA feature set is being used to reduce the apparent capacity of the hard disk.
DCO in Use Yes
(ATA Devices Only) Yes, if the ATA DCO feature set is being used to reduce the apparent capacity of the hard disk.
Security in
Use
No
(ATA Devices Only) Yes, if the ATA Security
feature set is being used to password protect the contents of the hard disk.
CHAPTER 3 Using the TD2u 47
Disk Utilities (Menu 5)
The TD2u offers several utilities to assist with the processing of drives. These utilities can be
found in Menu 5.
Format (Menu 5.1)
When using disk-to-file imaging, the destination drive must be formatted with a file system
that is recognizable by the TD2u. The TD2u only supports formatting drives with the exFAT
filesystem. However, the TD2u will also accept destination disks that are formatted as FAT32.
The FAT32 file size limit is 4 GB. The exFAT file size limit is 16 EB (16,000,000 TB). When file sizes
are larger than 4 GB, exFAT should be used.
From the formatting menu you can manually format either the destination disk or a USB mass
storage device attached to one of the TD2u USB ports.
1. From the Main menu, use the arrow keys to navigate to Disk Utilities (Menu 5) and then
to Format (Menu 5.1).
Page 48

48 Tableau TD2u User Guide Version 1.3.0
2. Select Format Destination (Menu 5.1.1) or Format Accessory (Menu 5.1.2).
3. Press the [Start] soft key to confirm your selection.The formatting task begins.
Advanced Format Support
Traditionally, hard drives have had an internal structure built around sectors of 512 bytes.
Newer drives, especially those with capacities greater than 2 TB, feature the Advanced Format
(AF) structure that uses internal sectors of 4096 bytes. Such drives still support I/O transfers
that reference 512-sectors; internally, the drives map these references to the internal 4096byte physical sectors. Implicit in this mapping is the need to accommodate writes that alter the
data stored in just a portion of a physical sector. This is accomplished by an inefficient readmodify-write cycle.
Historically, disks have been formatted with the first partition located at sector 63. However, if
a host computer aligns partitions and clusters of 512-byte sectors on boundaries that are not a
multiple of 8, then the frequency with which the drive must resort to read-modify-write cycles
can severely degrade performance.
The TD2u recognizes AF disks. It formats them accordingly with partitions and clusters
positioned at sector locations that are a multiple of 8.
Format Destination (Menu 5.1.1)
The Format Destination option allows you to format destination disks with the ExFAT file
system used by the TD2u. The TD2u performs what is generally referred to as a Quick Format,
during which it writes the necessary Master Boot Record, Partition Boot Record, and data
structures to the destination disk. The TD2u does not do a full surface scan of the destination
disk. If you want to verify the integrity of the destination disk you should format it using the
disk utilities of a traditional computer and operating system.
You do not need to preformat destination drives when using the disk-to-file duplication mode
of the TD2u. If a destination disk is unformatted and not blank, the TD2u prompts you to
format the disk before it begins the duplication. If a destination disk is unformatted and
appears to be blank, the TD2u automatically formats it.
The TD2u only formats disks using ExFAT; however, disks that have been preformatted with
FAT32 can be used on the system.
Page 49

CHAPTER 3 Using the TD2u 49
Format USB Accessory (Menu 5.1.2)
The Format USB Accessory option allows you to quickly format a USB disk connected to the
rear accessory port. It works the same as formatting a destination, except it operates on
theaccessory port rather than any destination disks.
Hash (Menu 5.2)
There are times when a forensic practitioner would like to calculate the hash values, or
fingerprints, for a source disk without making a copy of the disk. With the Hash Utilities
menu, you can generate an MD5 and SHA-1 hash value for the hard disk attached to the
source side of the TD2u.
You can cancel the hashing operation at any time by pressing the [Cancel] soft key.
If the source disk has an HPA-protected region, the TD2u automatically disables the HPA
before performing the hash calculation. This is the same behavior is exhibited by the TD2u
during duplication. If you compare the hash values produced when duplicating a disk and
when using the Hash Utilities, you should get the same hash results.
When the hashing operation is finished, the TD2u screen displays the hash results.
Blank Check (Menu 5.3)
The Blank Check menu lets you do a quick blank check on the source or either destination
drive.
The TD2u performs a quick check to determine if the selected disk appears to be blank by
reading sectors in the Primary and Secondary GPT. A sector is considered to be blank if it
contains only a repeating pattern such as 00h, E5h, or FFh. Any non-repeating pattern is
considered to be non-blank. If all sectors read by the TD2u have repeating patterns (though
not necessarily the same repeating pattern), then the TD2u concludes the drive may be blank.
This quick check is not an exhaustive check of the entire drive. It is possible for a drive to
appear to be blank according to the quick check while still storing forensically relevant
information. A forensic examiner should treat blank source disks with some suspicion and use
other tools, like a Tableau write blocker, to examine the drive to see if it contains forensically
relevant information.
Page 50

50 Tableau TD2u User Guide Version 1.3.0
HPA/DCO Removal (Menu 5.4)
The TD2u automatically detects the use of the ATA HPA (Host Protected Area) and DCO (Device
Configuration Overlay) feature sets. Both HPA and DCO feature sets can be used to reduce the
apparent capacity of a hard disk. From a forensic point of view it is valuable to know if HPA
and/or DCO are in use. With that knowledge, the forensic practitioner can make an informed
decision about whether or not to acquire data in the hidden regions of the drive.
You can disable HPA without making a permanent modification to the drive, so the TD2u
automatically disables HPA on any hard disk connected to the source side of the duplicator. It
is not, however, possible to disable DCO without making a permanent modification to the
hard disk. For this reason, the TD2u will not automatically disable DCO on the source hard
disk.
The TD2u cannot disable HPA or DCO on the destination disk(s), however, the TD2u does
detect and warn about DCO on the destination disk(s).
The options within the Disk Utilities menu allow you to permanently disable both the DCO and
HPA on the source disk.
Status Information
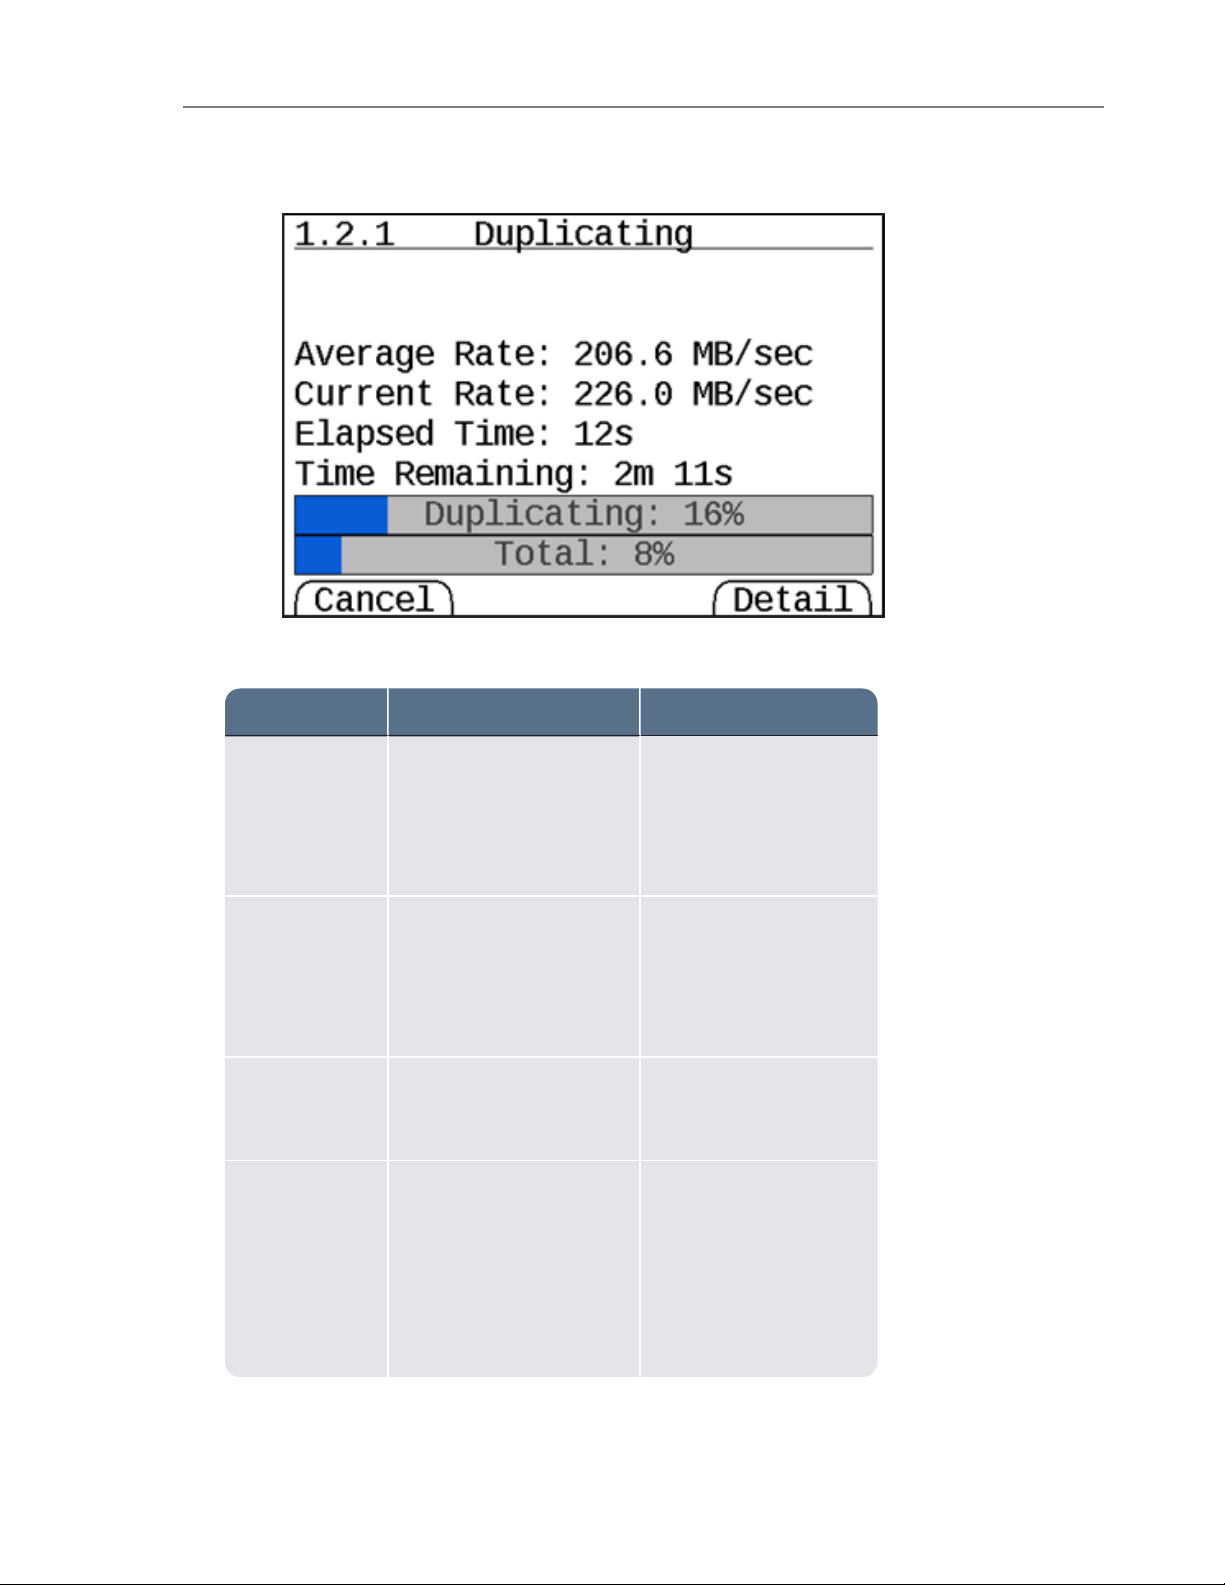
During long disk operations including duplication, wiping, and stand-alone hashing, the TD2u
displays five performance/timing metrics in a rotating loop to track progress of the selected
operation.
The following table describes each of the performance/timing metrics displayed by the TD2u.
Page 51
Metric Displayed As Description
Average Transfer Rate (bytes
per
second/minute)
Average Rate: yyy
GB/unit
The average transfer
rate since the start of
the current task.
Instantaneous
Transfer Rate
(bytes per
second/minute)
Current Rate: xxx MB/unit
The average transfer
rate over the last five
seconds.
Elapsed Time Elapsed Time: min sec
Total elapsed time since
the start of the current
task
Time Remaining
Time Remaining: min sec
Estimated remaining
time for the current
task. This time is calculated using the
amount of data remaining divided by the average transfer time.
CHAPTER 3 Using the TD2u 51
Page 52
52 Tableau TD2u User Guide Version 1.3.0
A rotating-media hard disk transfers data faster at the beginning of duplication than at the
end. Expect to see the instantaneous transfer rate at the beginning of a duplication task
decrease up to 50% by the end of the task. This transfer rate decrease is normal and does not
indicate a problem with any of the hard disks involved or with the TD2u.
Logs Menu (Menu 6)
Whenever the TD2u performs an operation which reads, writes, or modifies a hard disk, it
creates a log entry to record that operation.
The TD2u has an internal flash memory with the capacity to store approximately 59 of the
most recently logged operations. Once the TD2u has stored 59 log entries, the creation of a
new log entry will automatically overwrite the oldest log entry.
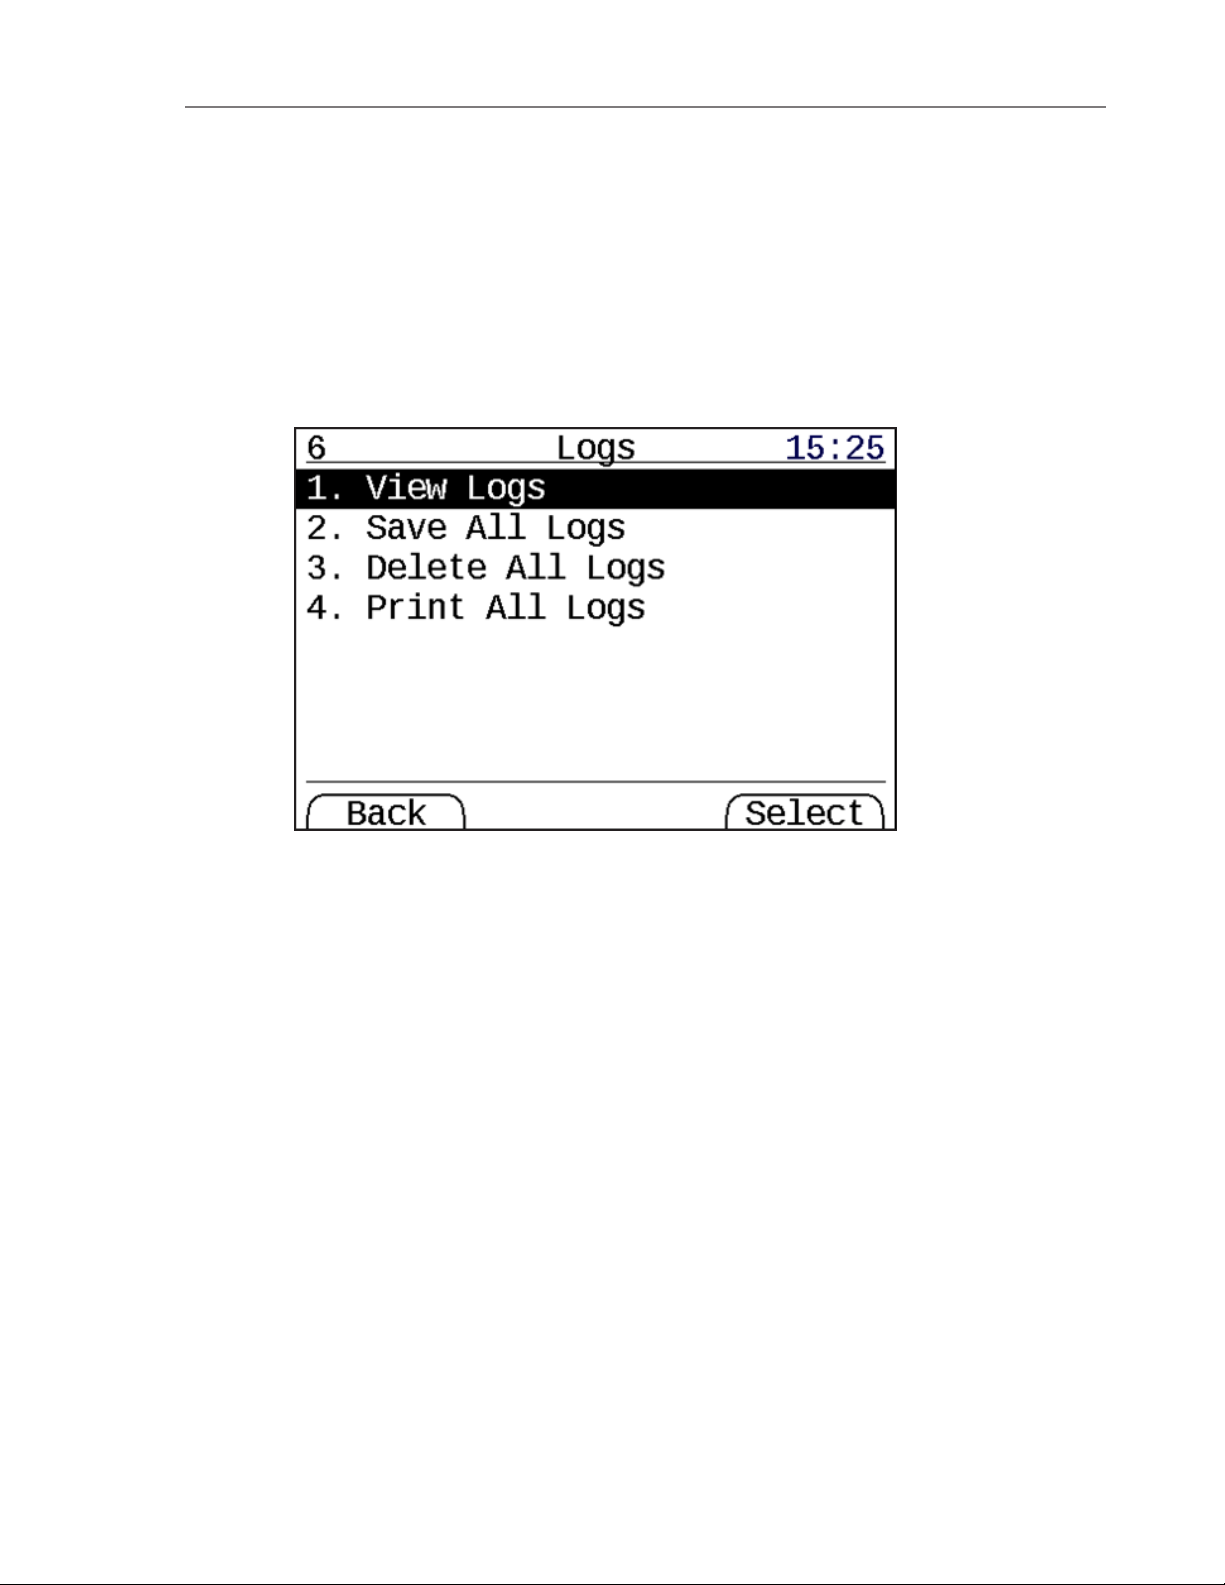
The Logs Options menu lets you view, print, save, and erase log entries.
View Logs (Menu 6.1)
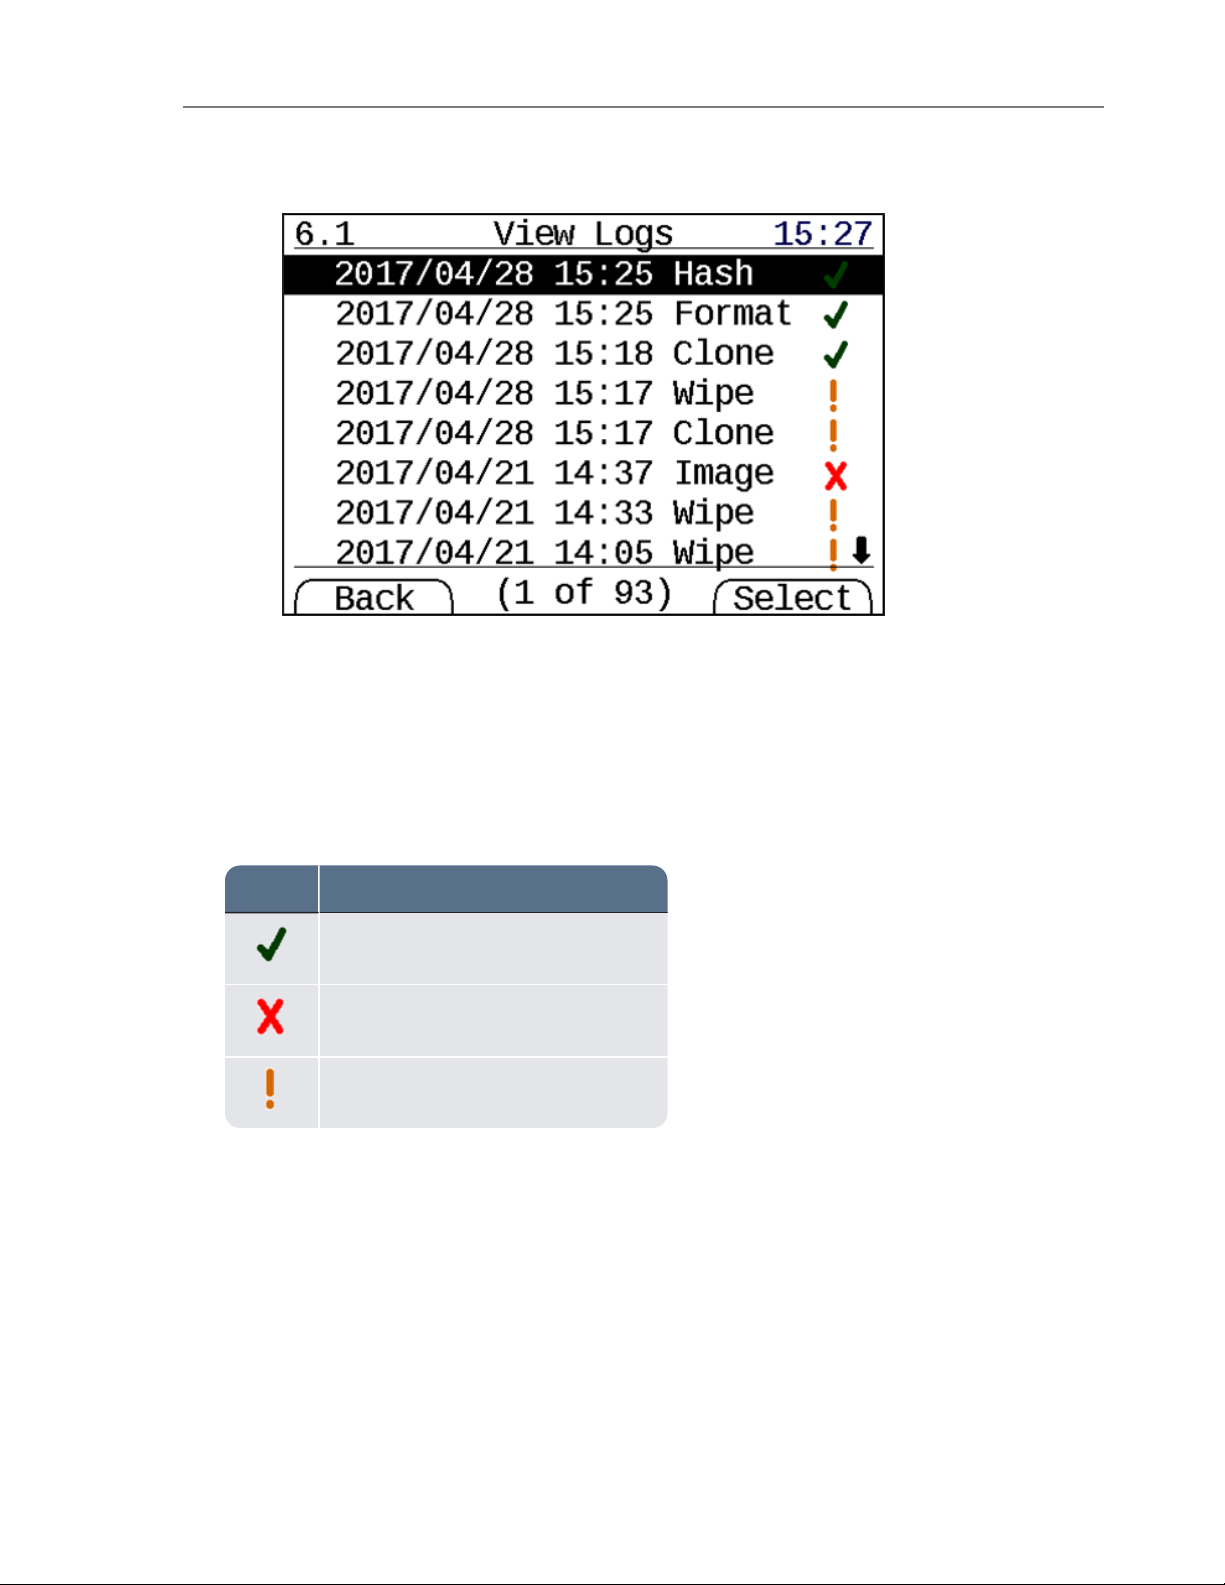
Selecting the View Logs option displays a list of the logs currently recorded in the internal flash
memory of the TD2u. The most recent log entry is displayed at the top of this list with the
oldest log entry at the bottom (end) of the list.
Page 53
Result Definition
Task completed normally.
Task did not completely normally.
Task canceled.
CHAPTER 3 Using the TD2u 53
The first part of the line is the date (YYYY/MM/DD) on which the log was recorded. The second
part is the time when the log was recorded (HH:MM) using a 24-hour clock format.
The third part of each line is a short form name of the type of operation the type of task
recorded in the log.
The last part of the line is a symbol indicating the result of the logged operation:
Sample TD2u Log
The TD2u maintains detailed logs for each task initiated by the user. Here is a sample of an
error-free log for a Disk-to-Disk acquisition.
------------------Start of TD2u Log Entry-----------------Task: Disk Duplication
Status: Ok
Created: Tue Nov 28 16:53:51 2017
Started: Tue Nov 28 16:53:51 2017
Closed: Tue Nov 28 16:57:15 2017
Page 54

54 Tableau TD2u User Guide Version 1.3.0
Examiner: Temperance
Case ID: <<not entered>>
Case Notes: <<not entered>>
Imager App: TD2u
Imager Ver: 1.3.0 (build 13276-271fb7f)
TD2u S/N: 000eccd2 00753057
-------------------------USB Source------------------------Interface: USB
Model: ADATA USB Flash Drive
Firmware Revision: 1.00
Serial Number: 000000000000001146
USB Serial Number: 000000000000001146
Capacity in Bytes: 15,805,186,048 (15.8 GB)
Block Size: 512 bytes
Block Count: 30,869,504
Encrypted: Yes
------------------------SATA Dest 2------------------------Interface: SATA
Model: WDC WD2002FAEX-007BA0
Firmware Revision: 05.01D05
Serial Number: WD-WMAY01455123
Capacity in Bytes: 2,000,398,934,016 (2.0 TB)
Block Size: 512 bytes
Block Count: 3,907,029,168
Power-ON Block Count: 3,907,029,168
HPA In Use: No
HPA Block Count: 3,907,029,168
DCO In Use: No
DCO Block Count: 3,907,029,168
Encrypted: No
Destination Type: Image
------------------------SATA Dest 1------------------------Interface: SATA
Model: INTEL SSDSC2BW120A4
Firmware Revision: DC32
Serial Number: CVDA409100871207GN
Capacity in Bytes: 120,034,123,776 (120.0 GB)
Block Size: 512 bytes
Block Count: 234,441,648
Power-ON Block Count: 234,441,648
HPA In Use: No
HPA Block Count: 234,441,648
Encrypted: No
Destination Type: Clone
--------------------------Imaging--------------------------Output File Format: E01 - EnCase format
File Compressed: Yes
File Size in Bytes: 2,000,000,000 (2.0 GB)
Page 55

CHAPTER 3 Using the TD2u 55
Files written: 3
Filename of First File: 2017-11-28_16-53-33/image.E01
------------------Disk Duplication Results-----------------Total Errors: 0
Acquisition MD5: 24dc702868cf6291f5ce28c6427d460a
Acquisition SHA-1: d50204ceeb167714cc692c0dff3fc62567541345
-------------------End of TD2u Log Entry--------------------
If the TD2u had detected any bad sectors on the source drive, it would have added a section at
the end of the TD2u log. This additional section would list the sector address and sector length
of each unreadable region of the source disk.
Save All Logs (Menu 6.2)
You can save all logs to a USB storage device connected to one of the TD2u USB ports. After
connecting a USB storage device to one of the TD2u USB ports, select the Save All Logs option
to save the logs. Logs are saved in an ASCII text format. Use any text editor to view the logs.
Writing Logs to a USB Storage Device
The TD2u lets you write logs to a USB storage device and adheres to the following directory
and naming conventions:
(root dir)/
td2u_logs/
yyyy_mm_dd_hh_ss_operationtype.log
The format of the .LOG filename is described inFiles Created During Disk-to-File Duplication on
page 1.
Delete All Logs (Menu 6.3)
If you want to delete the logs stored in the TD2u internal flash memory, select the Delete All
Logs option. It is not possible to recover the logs after the Delete All Logs procedure is
finished.
Print All Logs (Menu 6.4)
You can print all logs to a USB printer attached to one of the TD2u USB ports. After connecting
a USB printer to one of the TD2u USB ports, select the Print All Logs option to print the logs.
Page 56

56 Tableau TD2u User Guide Version 1.3.0
The TD2u is compatible with USB printers which support the USB Printer Class Specification.
The USB printer must support raw ASCII printing.
Resetting and Clearing Internally Stored Information
Some forensic and security applications require that the user be aware of the kinds of
information that the duplicator can store. In some cases, you may want to know what, if any,
information is preserved by the unit from one acquisition to the next. Or you might be in
security-sensitive environments and need to be able to sanitize equipment before it is
removed.
The TD2u has three separate non-volatile memories.
The first non-volatile memory is a flash device which is used to store the firmware and serial
number of the TD2u. The firmware can be updated using the Tableau Firmware Update utility
(available from www.guidancesoftware.com/tableau). This flash device is never used to record
any user-specific or acquisition-specific information.
The second non-volatile memory is a separate flash device used to store two different types of
information: configuration settings and logs. Configuration settings include the following:
l User/operator name (entered via Configuration Wizard or Setup Menu).
l Startup mode of operation (entered via Configuration Wizard or Setup Menu).
l Error handling settings (error recovery strategy and error counter limits).
l Default directory naming conventions for disk-to-file duplication (directory name format).
l Default file naming conventions for disk-to-file duplication (file name format).
l Default file format conventions (segment size, etc.).
l Last-used case ID and case notes.
l User preferences for prompts (directory name, file name, case information).
This second flash also records up to the most recent tasks performed by the duplicator. A task
in this context is any operation which operates on a disk device, including duplication,
formatting, wiping, hashing, blank checking, and HPA/DCO operations. Logs include detailed
information about each disk device attached to the TD2u; this includes make/model, serial
number, capacity, and so on.
Page 57

NonVolatile
Memory
Information
Stored
User or Case-Spe-
cific Info
Ability to Reset/Clear
Flash #1
TD2u firmware
None
Firmware cannot be erased, but can
be updated using the Tableau Firmware Update program, which can be
downloaded fromwww.guid-
ancesoftware.com/tableau.
TD2u serial
number
None
It is not possible to change the TD2u
serial number in the field.
CHAPTER 3 Using the TD2u 57
The third and final non-volatile memory is the on-board real-time clock (RTC) with battery
backup. The real-time clock records the date and time as set by the user. The real-time clock
does not record any user-specific or acquisition-specific information.
The following table lists the reset/clear information stored internally by the TD2u.
Page 58

NonVolatile
Memory
Information
Stored
User or Case-Spe-
cific Info
Ability to Reset/Clear
Flash #2
TD2u configuration
User-specific
All configuration settings can be
erased and restored to factory
defaults by selecting Setup > Factory
Reset. Configuration settings (exclud-
ing user name and startup mode)
can be reset to defaults using Setup
> Imaging Options >Restore
Options.
TD2u configuration
Case-specific (if case
ID/notes are enabled)
All configuration settings can be
erased and restored to factory
defaults by selecting Setup > Factory
Reset. Alternately, the Case ID/Notes
can be disabled through Setup >
Case Info Options.
TD2u logs
User-specific and
Case-specific
All logs can be erased by either selecting Logs > Erase Logs or Setup > Fact-
ory Reset. Alternately, logs can be
erased individually. When viewing a
specific log entry, select the
[Options] soft key, then select Erase
Log.
Real-Time
Clock
Date/Time None
The Date/Time cannot be restored to
a factory default state. However,
after performing a Factory Reset, the
TD2u prompts you to change the
Date/Time within the Setup Wizard.
The Date/Time can also be changed
by selecting Setup > Date and Time.
58 Tableau TD2u User Guide Version 1.3.0
The Factory Reset and Erase Logs options physically erase the flash memory corresponding to
each item. It is not possible to recover settings or log entries after the flash memory has been
physically erased.
Page 59

CHAPTER 4
TROUBLESHOOTING AND SUPPORT
Troubleshooting Common Problems 61
Replacing the Backup Battery for the Real-time Clock 64
Page 60

60 Tableau TD2u User Guide Version 1.3.0
Page 61

Problem Corrective Action
Hard disk does not
spin up
Check the power connection between the TD2u and the hard disk. Be
especially careful to ensure that the 4-pin power connectors are properly seated in the connectors on the TD2u and on the hard disk (if
using cable model TC2-8). The power and signal connectors should
be fully inserted, not loose, in the TD2u and hard disk.
TD2u does not
detect IDE hard
disk
IDE hard disks should be set for Master or Single Drive.
CHAPTER 4 Troubleshooting and Support 61
Troubleshooting Common Problems
This section provides the following troubleshooting issues and solutions:
l Power supply issues
l Problems with disk detection
l Replacing the backup battery for the real-time clock
Power Supply Issues
The TP5 power supply provided with the TD2u, when used with the appropriate adapter for
the TD2u, is a 15-volt power supply that uses a barrel connector to interface with the TD2u. It is
capable of powering the TD2u and nearly all combinations of one, two, or three SATA hard
disks. The TD2u also employs staggered power sequencing for the source and destination hard
disks. With staggered sequencing, power is first provided to one hard disk as it spins up, then
to the second hard disk as it spins up, and finally to the third hard disk. It is normal to hear the
source and destination drives spin up separately.
There is a green DC power LED on the rear edge of the TD2u, next to the female DC power
barrel connector. If the TP5 power supply is connected properly to the TD2u and to AC power,
the green LED illuminates. If you are having difficulty turning the TD2u on, check the status of
the DC power LED to ensure that the TD2u is receiving power from the TP5 power supply. The
LED will continue to blink if the DC power voltage is too high or low.
Problems with Disk Detection
When using a product like the TD2u, the most common problem users encounter is a failure to
achieve drive detection. Most drive detection problems are the result of improper cabling. The
following table lists the most common drive detection problems and corrective actions.
Page 62

Problem Corrective Action
TD2u does not
detect 3.5" IDE
hard disk
Normal 3.5" IDE hard disks can be connected to the TD2u using
either the 8" TC6-8 IDE cable or the 2" TC6-2 cable. In either case, the
blue end of the IDE cable must be connected to the TD2u.
You must not use an IDE cable longer than 8" with the TD2u. Always
use the Tableau-provided, high-quality, 80-conductor TC6-8 or TC6-2
cable.
Drive power and signal must be attached before the TD2u is powered
on.
TD2u does not
detect notebook
IDE hard disk
When using one of the notebook drive adapters (model TDA5-18,
TDA5-25, or TDA5-ZIF), you must always use the 2" TC6-2 IDE cable.
When using a notebook drive adapter, do not use the 8" TC6-8 IDE
cable or any non-Tableau IDE cable. When using notebook drive
adapters, the blue end of the TC6-2 IDE cable must be connected to
the TD2u, and the black end of the cable must be connected to the
notebook drive adapter.
TD2u does not
detect ZIF-style
notebook IDE hard
disk
There are several models of ZIF hard disks. When using the TDA5-ZIF
kit provided with the TD2u refer to the Support pages on the Tableau
web site (www.guidancesoftware.com/tableau) for documentation
regarding the proper selection and orientation of ZIF cables.
TD2u does not
detect SATA hard
disk
Use only the 8" TC3-8 SATA cable provided by Tableau. With some
SATA hard disks, the SATA connector might be loose. Ensure that the
TC3-8 cable is seated properly in the SATA connector of the hard disk.
62 Tableau TD2u User Guide Version 1.3.0
Tableau has tested the TD2u with an extensive in-house library of different hard disks spanning
many years of hard disk development, but there might be compatibility issues with some hard
disks. Tableau issues firmware updates to address most compatibility issues. If your hard disk
is not recognized by the TD2u, check the Support pages on the Tableau web site
(www.guidancesoftware.com/tableau) to see if any firmware updates are available for the
TD2u.
Page 63

CHAPTER 4 Troubleshooting and Support 63
Problems with Encrypted Drives
Prior to TD2u v1.3 release in December 2017, the method by which 4kbyte sector size drives
were encrypted was not compatible with the VeraCrypt standard. This would result in an
inability to properly decrypt a TD2u encrypted 4k drive on any system using the publicly
available VeraCrypt application. Drives with 512 byte sector sizes and advanced format drives
(4kbyte drives that act as 512 byte drives) were not affected by this issue.
This issue was fixed in TD2u v1.3 software. If you captured encrypted evidence on pre-v1.3
TD2u software, that evidence will no longer be usable on a TD2u that has been updated to v1.3
or later. Such a drive would be able to be unlocked, but the unlocked data container would
present unintelligible information to the system. In that scenario, if the improperly encrypted
4k drive was attached to a TD2u destination port, no filesystem would be detected and the
TD2u would prompt to format the drive during Duplication setup. That format request should
be declined in order to preserve the previously captured evidence.
In order to recover the previously captured evidence, the v1.3 firmware includes a “Legacy
Unlock” feature. If you have such a drive, the following procedure will allow for recapture of
the previous evidence:
1. Update your TD2u to version 1.3 or newer.
2. Connect the encrypted, 4k sector drive to the appropriate source port on the TD2u.
3. Connect a different drive to one of the destination ports of the TD2u. This drive must be
big enough to store the entirety of the 4k source.
4. Boot the TD2u.
5. Go to the Disk Info screen for the 4k source and select the Legacy Unlock (VERY RARE)
option. This option will only be present for encrypted 4k drives. It will guide you through
a familiar unlock process and instruct the TD2u to use the encryption style the 4k drive is
using.
6. If desired, encrypt the destination drive.
7. Using the Duplication feature, clone the legacy unlocked source to the new destination.
This will decrypt the data with the legacy encryption as it reads from the source, and
store the decrypted data on the destination.
8. Once this duplication completes, your new destination contains the evidence from the
source drive. If you want to put this data back on that drive, you can re-encrypt that
drive and duplicate the data back into it from the new copy. If the new copy is encrypted,
it can be unlocked as a source from Disk Info (not the legacy unlock option)
Page 64

Manufacturer Model #
Duracell DL1220
Energizer CR1220
Rayovac CR1220
64 Tableau TD2u User Guide Version 1.3.0
Replacing the Backup Battery for the Real-time Clock
The TD2u uses a real-time clock (RTC) with a backup battery. The battery has a shelf life of 12-18
months. If you use the TD2u regularly, expect the battery to last longer than 18 months. As the
battery discharges, the TD2u displays a low battery warning message.
This section provides an illustrated procedure for replacing the RTC backup battery.
Compatible Batteries
The TD2u uses an ANSI/NEDA type 5012LC battery. The following table lists three common
batteries compatible with the TD2u.
Replacing the Battery
It is necessary to open the TD2u case in order to replace the battery. You need a #1 Phillips
screwdriver to open the TD2u case and a small flat-blade screwdriver to remove the battery.
The following procedure provides the steps for replacing the battery:
1. Disconnect all the power supply and all cables from the TD2u before opening the TD2u
2. After disconnecting the power supply and all cables, turn the TD2u upside down on a
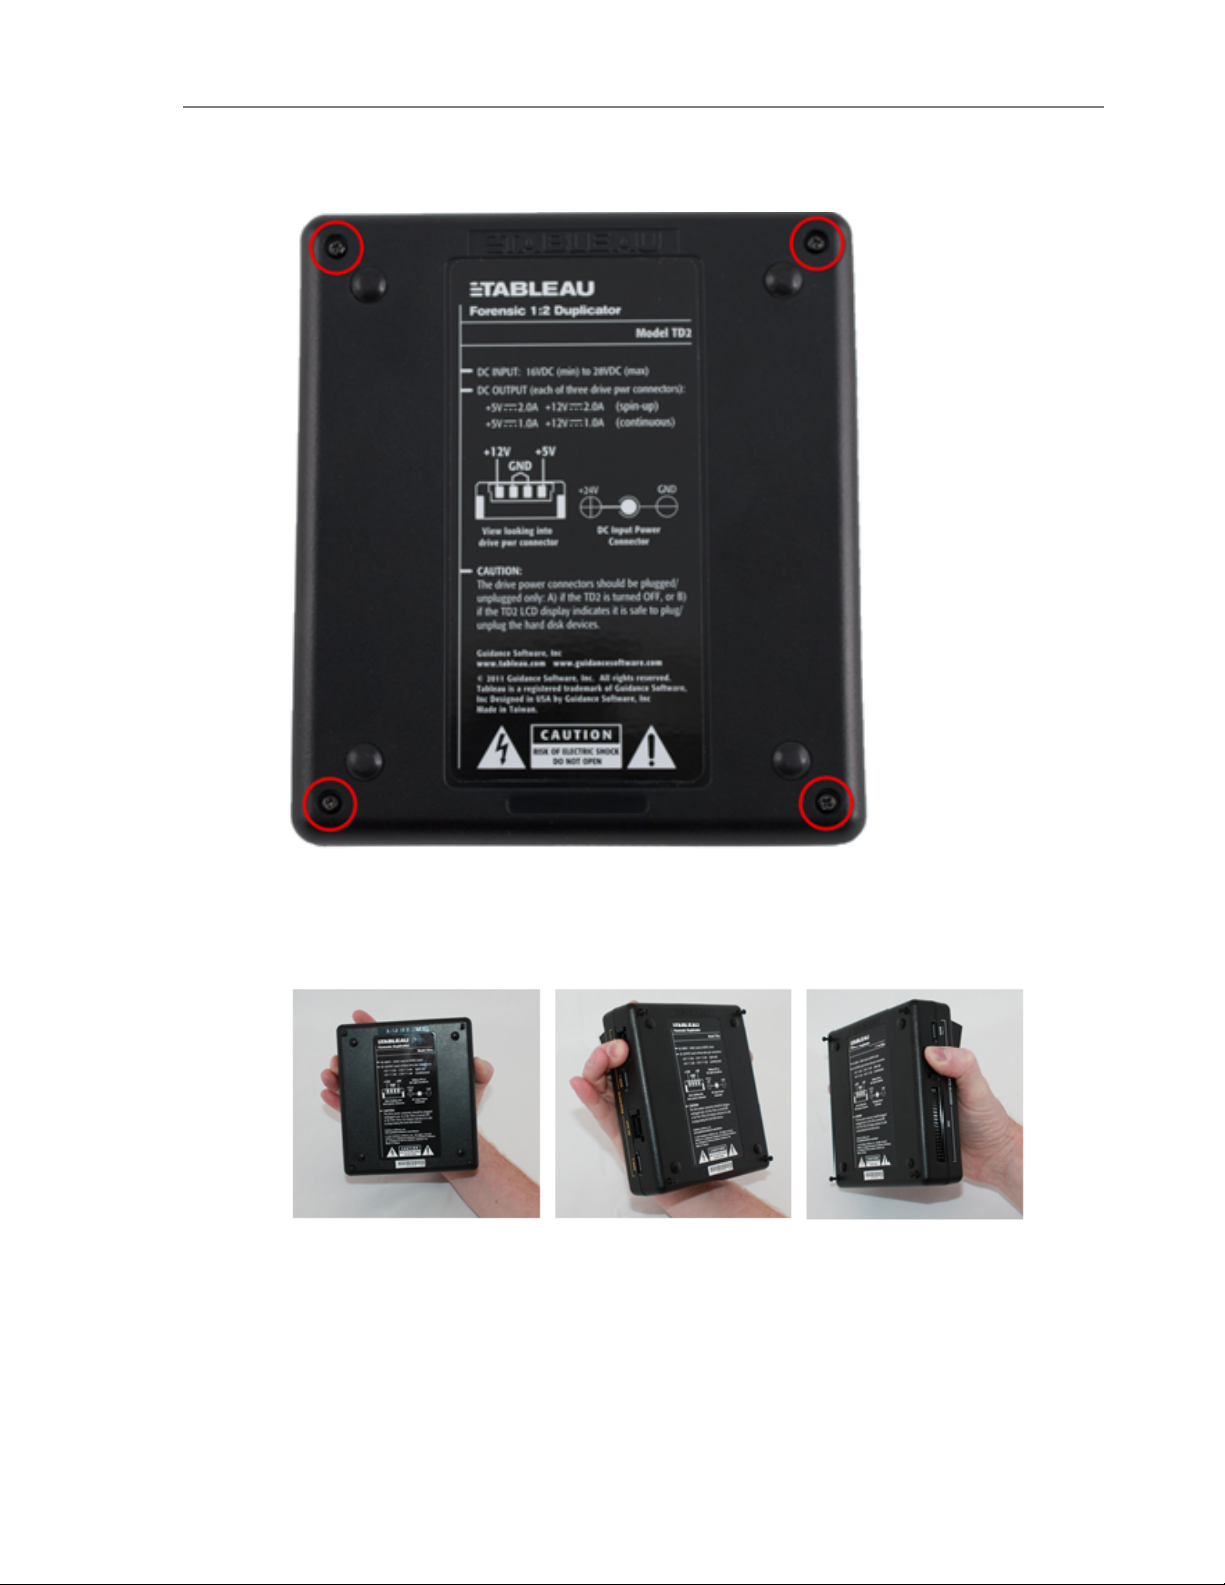
3. Remove the four screws and set them aside. The following photograph shows the loc-
case. Never connect the power supply or operate the TD2u with the case open.
clean work surface.
ation of the four case screws.
Page 65
CHAPTER 4 Troubleshooting and Support 65
4. If possible, hold the TD2u with one hand as shown in the pictures below. Hold one of the
3M power connectors one each side. This will allow the PCB (Printed Circuit Board) to
stay with the top of the case when the bottom is removed.
5. The fan used in the TD2u is attached to the lower half of the plastic case. Carefully lift the
lower half of the case away from you.
6. Set the TD2u on a flat surface, as shown below. So as to not stretch or disconnect the
cable from the fan, keep the bottom of the case as close to the rest of the unit as possible.
Page 66
66 Tableau TD2u User Guide Version 1.3.0
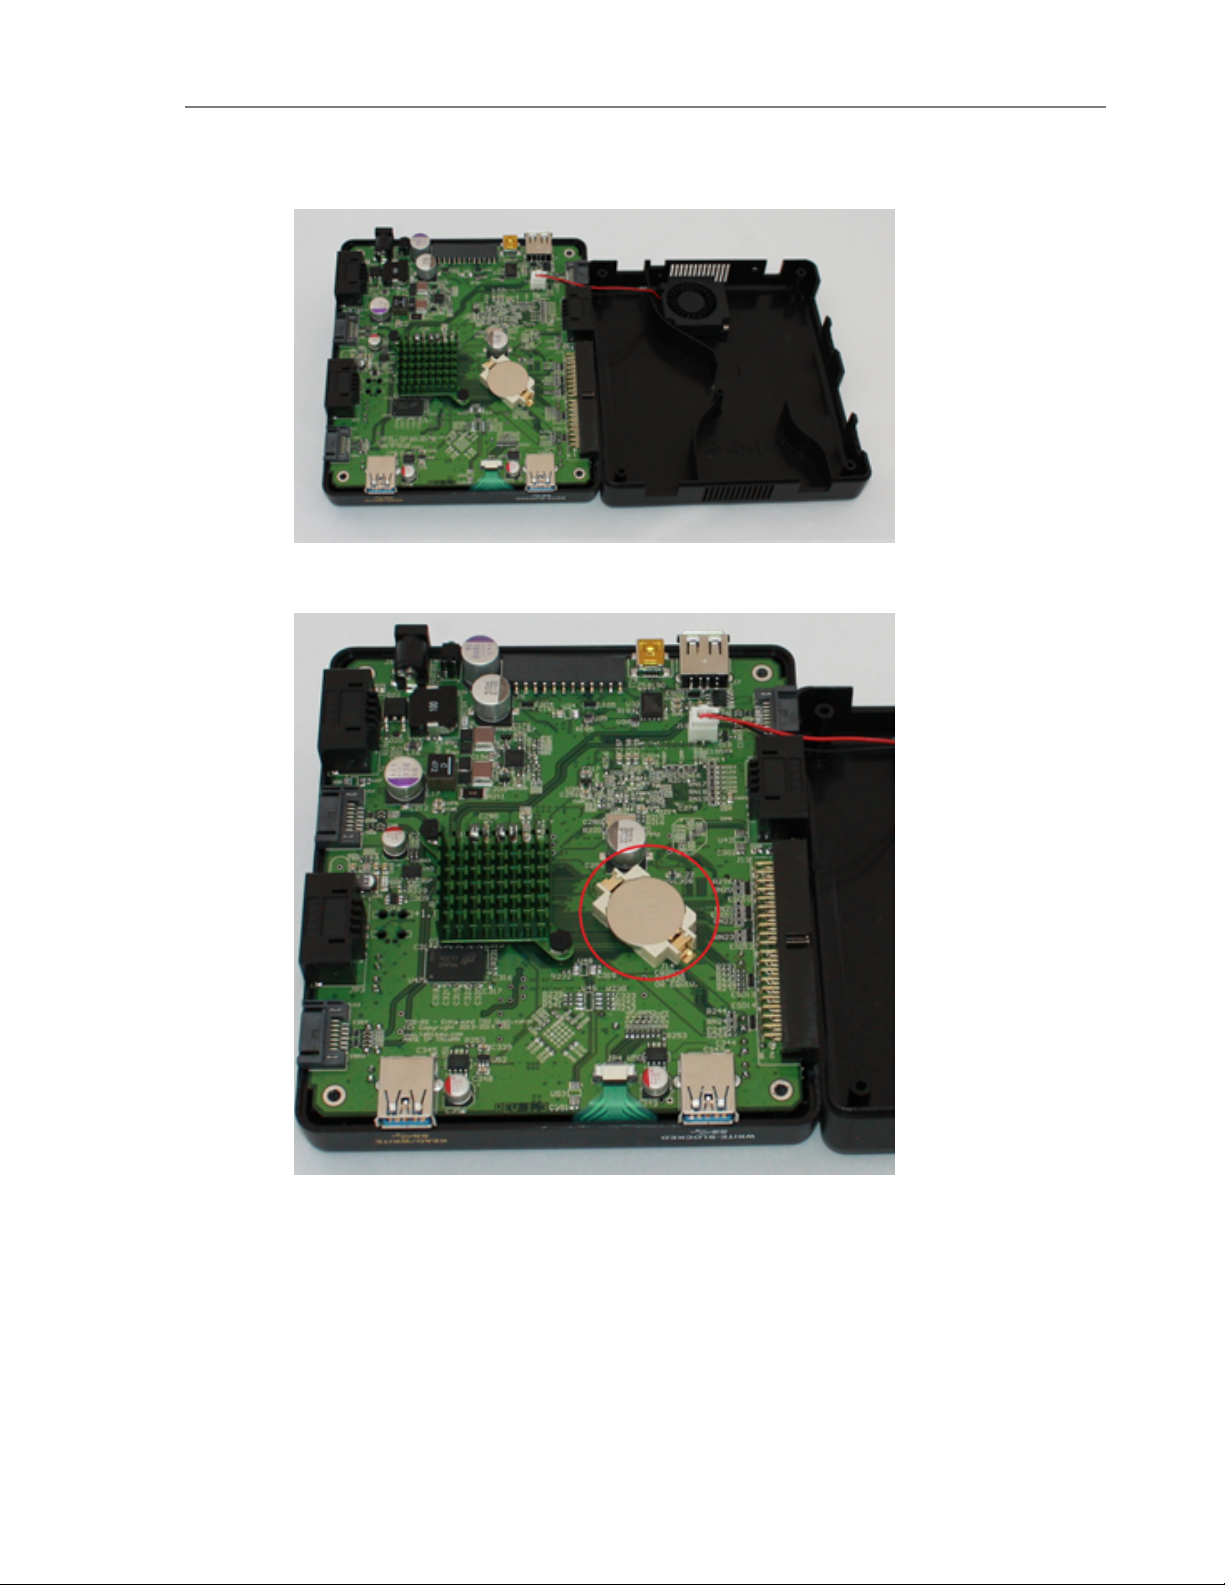
The backup battery is near the heatsink, as shown in the photograph below.
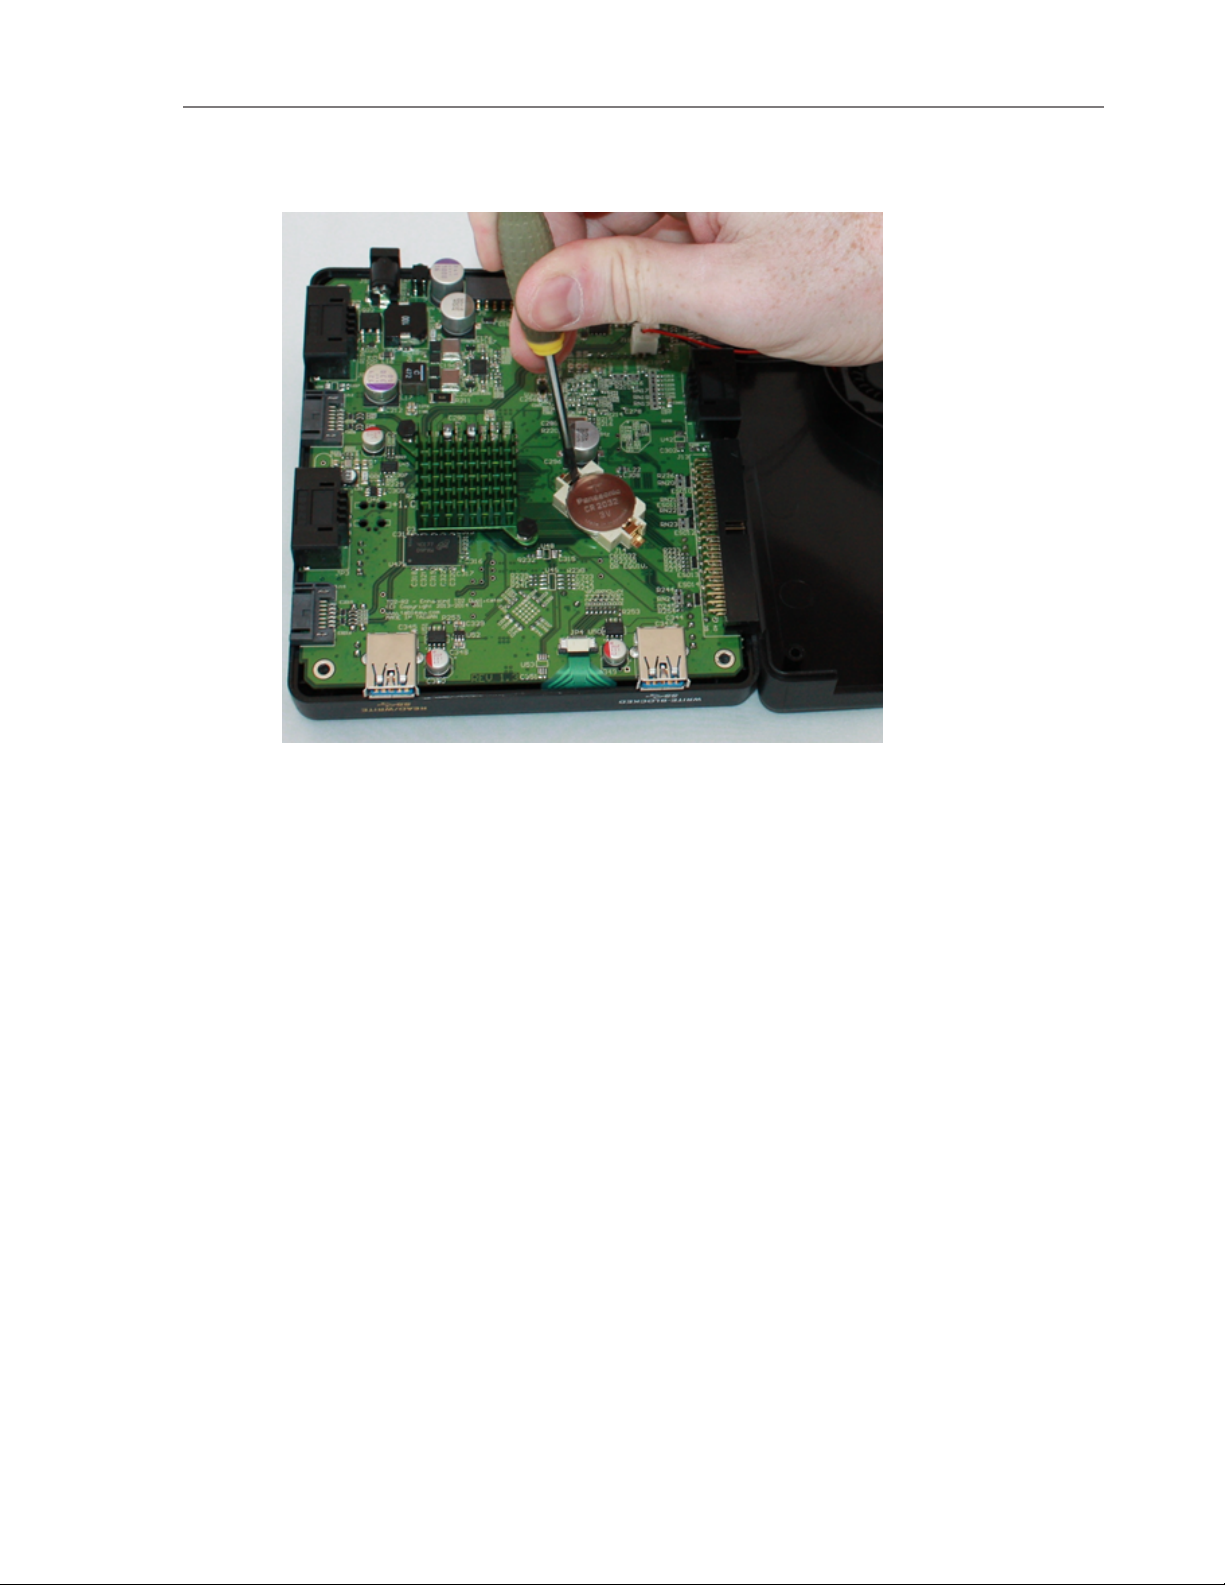
7. Using the flat-blade screwdriver, gently pry the battery from the battery holder.
Page 67
CHAPTER 4 Troubleshooting and Support 67
8. Using a compatible battery, replace the RTC backup battery, making sure that the positive terminal of the battery is facing upward. For a list of compatible batteries, see
Compatible Batteries on page64.
9. After replacing the battery, reattach the case:
o
Carefully place the bottom plastic section of the enclosure straight down on top of
the PCB, while aligning the screw openings with the appropriate connectors on the
PCB.
o
Ensure that the case and main circuit board are aligned and replace the four case
screws. The four screws that hold the TD2u case together also secure the main circuit board.
o
After replacing the four case screws, inspect the TD2u to ensure the case is tightly
secured.
Testing the New Battery
After you have securely fastened the TD2u case, return it to its normal upright position and
attach just the TP5 power supply. Turn the TD2u on and observe the startup sequence. You
should not see a battery warning dialog, but you will probably see a date/time warning to
reset the RTC.
Page 68

68 Tableau TD2u User Guide Version 1.3.0
To reset the date/time, from the TD2u Main menu, select System Settings > Set Date and
Time (Menu 7.1.3). For detailed information about setting the date and time, see System
Settings (Menu 7.1) on page20.
After resetting the date/time, turn the TD2u off, wait two minutes, and turn the TD2u on. The
date/time, located in the upper left corner of the Main menu, should be correct.
Page 69

INDEX
A
E
EnScript 2
Error Recovery Modes 25
About this Guide 7
Advanced Format Support 48
B
Blank Check (Menu 5.3) 49
C
Compatible Batteries 64
Configuring the TD2u 19
Connecting Hard Drives 27
Conventions Used in this
Guide 7
D
Delete All Logs (Menu 6.3) 55
Disk Capacity and Transfer
Rate Measurement Conventions 7
Disk Information (Menu 4) 45
F
Factory Reset (Menu 7.3) 26
Format (Menu 5.1) 47
Format Destination (Menu
5.1.1) 48
Format USB Accessory (Menu
5.1.2) 49
H
Hash (Menu 5.2) 49
HPA/DCO Removal (Menu
5.4) 50
I
Image Destinations 37
Imaging Setup (Menu 7.2) 22
Initialization 19
Initiating a Duplication Job
(Menu 1) 36
Disk Utilities (Menu 5) 47
Drive Detection 29
Duplicate 36
Duplicator Info (Menu 8) 26
L
Logs Menu (Menu 6) 52
Page 70

M
Multi-Pass Wipe 42
Resetting and Clearing Internally
Stored Information 56
S
N
Navigating the TD2u 14
O
Overview 9, 33
P
Power Supply Issues 61
Preconditions Checking 38
Preface 7
Print All Logs (Menu 6.4) 55
Problems with Disk Detection 61
Problems with Encrypted Drives 63
Sample TD2u Log 53
Save All Logs (Menu 6.2) 55
Secure Erase 42
Set Examiner Name (Menu 7.1.2) 21
Setting up the TD2U 17
Single Pass Wipe 42
Startup Sequence 19
Status Information 50
System Settings (Menu 7.1) 20
T
Tableau TD2u 11
TD2u Kit Contents 11
R
Reading the LEDs 15
Replacing the Backup Battery for
the Real-time Clock 64
Replacing the Battery 64
TD2u Menus and Options 33
Testing the New Battery 67
Troubleshooting and Support 59
Troubleshooting Common Prob-
lems 61
Page 71

U
USB Keyboard Support 15
User-Selected Startup Mode 19
Using the TD2u 31
V
View Logs (Menu 5.1) 52
W
Wipe Disk (Menu 2) 41
Writing Logs to a USB Storage
Device 55
 Loading...