

Page 1
®
SOLITAIRE
S 430
Bedienungsanleitung
User manual
Page 2

2
Page 3

Deutsch Seiten 5 - 19
English Pages 21 - 35
3
Page 4

4
Page 5

Willkommen
Wir freuen uns, dass Sie sich für ein T+A Produkt entschieden haben. Durch Ihre Wahl sind Sie Besitzer
hochwertiger Hi-Lautsprecher geworden, die sich auf
dem neuesten technologischen Standard benden.
Ständige Qualitätskontrollen während des Fertigungsprozesses und die ausschließliche Verwendung hochwertigen Materials garantieren erstklassige Verarbeitung und Spitzenqualität. Die Erzeugnisse unseres
Hauses werden von qualizierten und geschulten
Fachkräften gefertigt und erst nach strengster Kontrolle freigegeben. Jedes Lautsprecherpaar ist optimal
aufeinander abgestimmt.
Um Ihnen einen ungetrübten Musikgenuss zu garantieren, bitten wir Sie, die Hinweise dieser Anleitung
genau zu beachten.
elektroakustik GmbH & Co KG
5
Page 6

Inhaltsverzeichnis
Sicherheitshinweise 7
Lieferumfang 8
Montage der Lautsprecher 9
Allgemeines 9
Auspacken 9
Grundplatte und Rollen montieren 10
Montage der Spikes 11
Aufstellung 12
Anschluss 13
Verstärker 13
Anschlusskabel 13
Standard-Anschluss 13
Bi-Wiring 14
Bi-Amping 14
Abdeckung 15
Niveauausgleich 15
Raumanpassung 16
Pegeleinstellung 16
Umwelt 17
Pegehinweise 17
Technische Daten 19
6
Page 7
Sicherheitshinweise
Zu Ihrer eigenen Sicherheit sollten Sie bitte unbedingt
diese Betriebsanleitung vollständig lesen und insbesondere die Aufstellungs-, Betriebs- und Sicherheitshinweise genau befolgen. Die Bedienungsanleitung ist
Bestandteil der Lautsprecher. Heben Sie die Anleitung
gut auf und geben Sie sie bei einem evtl. Weiterverkauf
zur Verhinderung von Fehlbedienungen und zur Vermeidung von Gefahren an den Käufer weiter.
Die Lautsprecher haben ein sehr hohes Gewicht - Vorsicht beim Auspacken und beim
Transport. Heben und transportieren Sie die
Lautsprecher immer mit 2 Personen. Aufgrund
der gesetzlich bestehenden Vorschriften zum
Heben schwerer Lasten darf der Transport der
Lautsprecher nicht von Frauen vorgenommen
werden.
Achten Sie auf sicheren und festen Griff, lassen Sie das Gerät nicht fallen, tragen Sie beim
Bewegen der Lautsprecher Sicherheitsschuhe.
Stolpern Sie nicht. Achten Sie auf eine freie
Bewegungsäche, entfernen Sie Hindernisse und Stolperstellen auf dem Transportweg.
Vorsicht beim Abstellen! Um Quetschungen zu
vermeiden achten Sie darauf, dass Ihre Finger
nicht zwischen Lautsprecher und Aufstelläche gelangen.
Um Verletzungen zu vermeiden, gehen Sie mit den extrem spitzen Spikes äußerst vorsichtig um, und halten
Sie diese von Kindern fern!
Die Spikes können mit ihren Spitzen empndliche
Böden (z. B. Parkett oder Fliesen) beschädigen! Legen
Sie zum Schutz immer die Bodenkontaktplatte unter.
Das Gerät ist ausgelegt für den Betrieb in
Bei allen anderen Einsatzzwecken, insbesondere in
medizinischen oder sicherheitsrelevanten Bereichen,
ist vorher die Zulassung und Eignung des Gerätes für
diesen Einsatz mit dem Hersteller abzuklären und
schriftlich genehmigen zu lassen.
War das Gerät größerer Kälte ausgesetzt (z. B. beim
Transport), so ist mit der Inbetriebnahme zu warten,
bis sich das Gerät auf Raumtemperatur aufgewärmt
hat und das Kondenswasser restlos verdunstet ist.
gemäßigtem Klima und in Höhen bis zu
2000 m ü. NHN. Zulässiger Betriebstemperaturbereich ist +10 … +35. C.
Das Gerät ist ausschließlich zur Ton- und/
oder Bildwiedergabe im Heimbereich in
trockenen Räumen unter Berücksichtigung
aller in dieser Anleitung gemachten Angaben bestimmt.
Lagerung des Gerätes in der Originalverpackung an
einem trockenen frostfreien Ort. Lagertemperatur
0...40 °C.
Die Oberächen des Lautsprechers sollten zur Reinigung nur mit einem weichen, trockenen Tuch abgewischt werden. Verwenden Sie keine scharfen
Reinigungs oder Lösungsmittel! Vor der Wiederinbetriebnahme muss sichergestellt sein, dass keine Kurzschlüsse an den Anschlussstellen bestehen und dass
alle Anschlüsse ordnungsgemäß sind.
Sehr lautes dauerhaftes Hören von Programmmaterial über Ohr-, Kopfhörer und Lautsprecher kann zum
dauerhaften Verlust des Hörvermögens führen. Beugen Sie Gesundheitsschäden vor und vermeiden Sie
dauerhaftes Hören mit hoher Lautstärke.
Die mit dem -Symbol gekennzeich-
Ein Berühren der Anschlussstellen oder der Leiter der
daran angeschlossenen Kabel ist zu vermeiden. An
diese Anschlussstellen angeschlossene Leitungen erfordern das Verlegen durch eine unterwiesene Person
oder die Verwendung von anschlussfertigen Leitungen.
Elektro-Altgeräte Register: WEEE-Reg.-Nr. DE 72473830
Durch das am Gerät bendliche Zeichen erklärt
T+A die Konformität mit den EG-Richtlinien und den
daraus abgeleiteten nationalen Gesetzen. Die Konformitätserklärung kann bei Bedarf unter www.ta-hi.
com/DoC eingesehen werden.
Die unveränderte, unverfälschte Werksseriennummer
muss außen am Lautsprecher vorhanden und gut lesbar sein! Die Seriennummer ist Bestandteil unserer
Konformitätserklärung und damit der Betriebszulassung des Lautsprechers!
Seriennummern am Gehäuse und in den original T+A
Begleitpapieren (insbesondere den Kontroll- und
Garantiezertikaten) dürfen nicht entfernt oder verändert werden und müssen übereinstimmen.
Bei Verstoß gegen diese Bestimmungen gilt die
Konformitätszusage von T+A als widerrufen und ein
Betrieb innerhalb der EG ist untersagt und aufgrund
geltender EG und nationaler Gesetze unter Strafandrohung verboten.
neten Anschlussklemmen können hohe
Spannungen führen.
Für die spätere Entsorgung dieses Produkts
stehen örtliche Sammelstellen für Elektroschrott zur Verfügung.
Der Lautsprecher entspricht im Originalzustand allen derzeit gültigen deutschen
und europäischen Vorschriften. Er ist zum
bestimmungsgemäßen Gebrauch in der EG
zugelassen.
7
Page 8
Lieferumfang
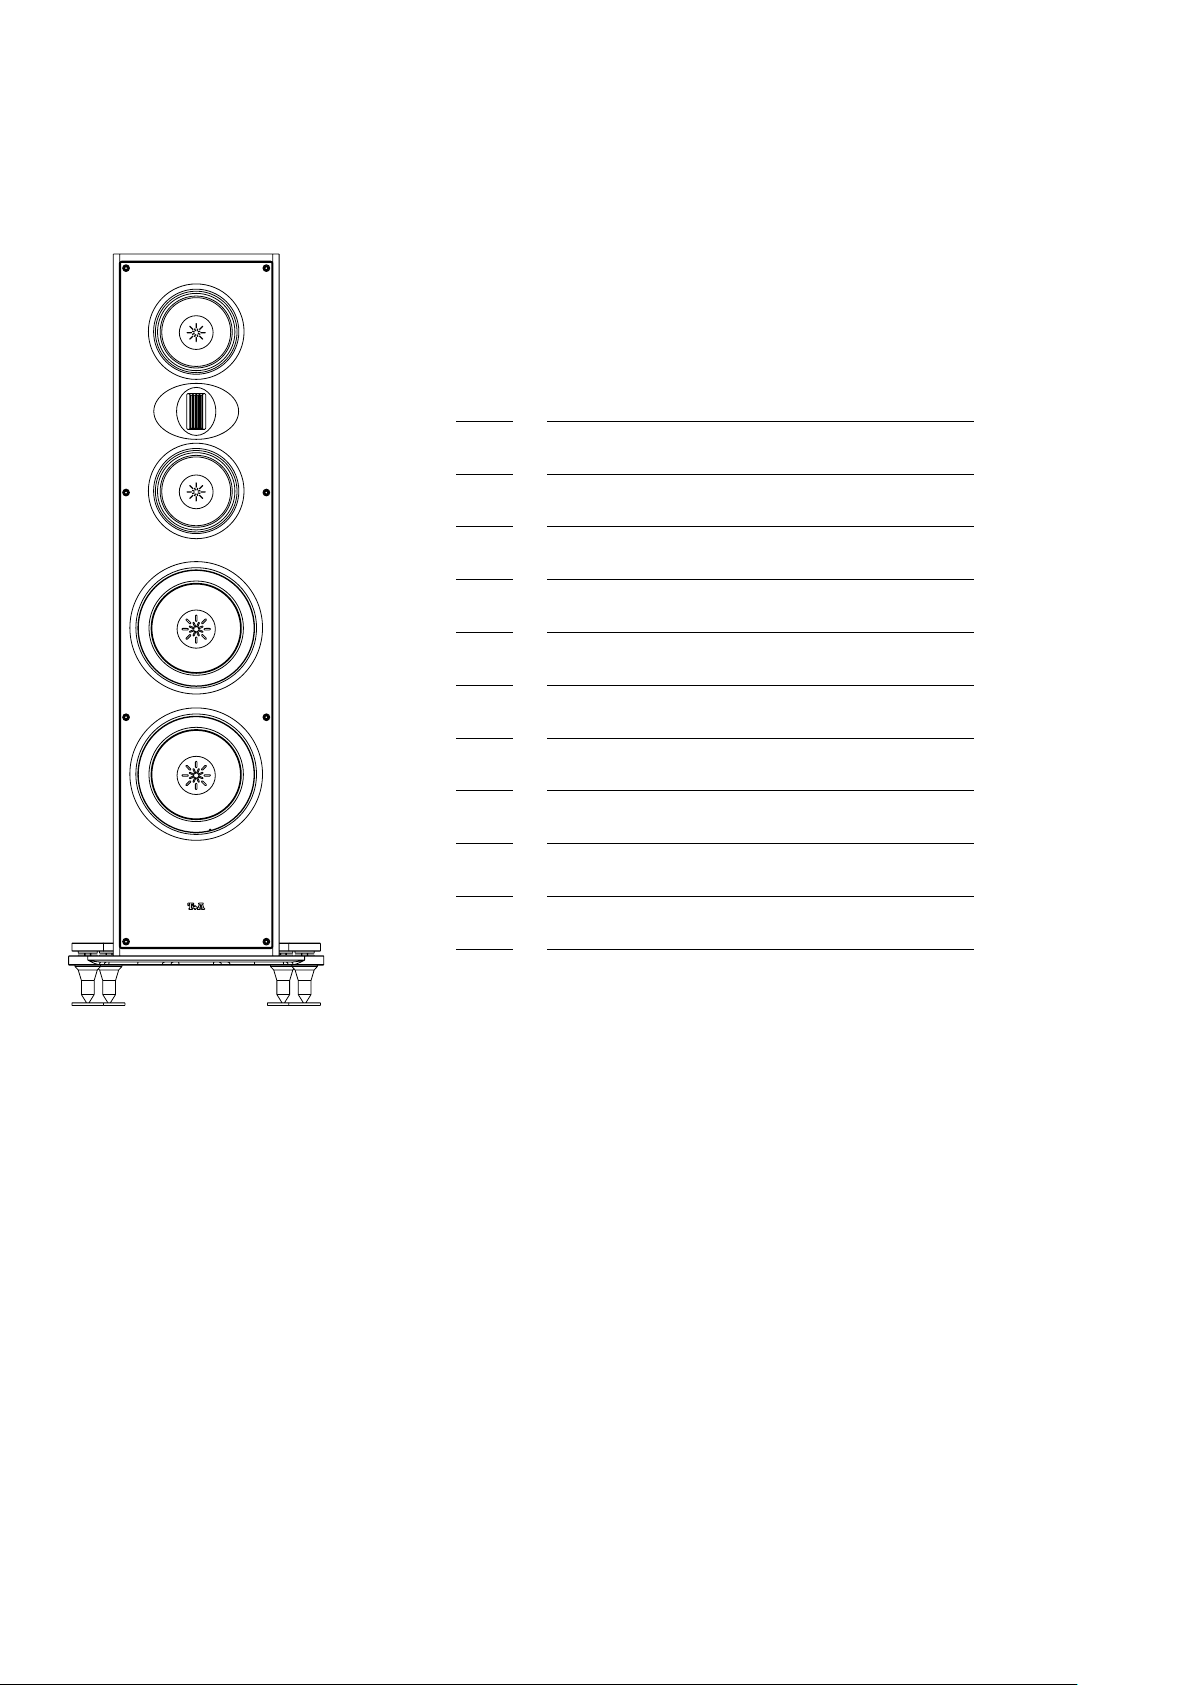
Solitaire S 430
2 Solitaire S 430
2 Schutzgitter
8 Spikes mit Rändelmutter
8 Kunstoffscheibe für Rändelmutter
8 Bodenkontaktplatte für Spikes
2 Grundplatte
8 M8 x 25 Schrauben (Grundplatte)
8 Transportrollen
4 Stoffhandschuhe
2 Inbusschlüssel
1 Bedienungsanleitung
8
Page 9
Montage der Lautsprecher
Allgemeines
Packen Sie den Lautsprecher vorsichtig aus und heben Sie die Originalverpackung
sorgfältig auf. Der Karton und das Verpackungsmaterial sind speziell für diesen Lautsprecher konzipiert und bei späteren Transporten ein sicherer Behälter. Um Defekte zu
vermeiden, Transportieren oder versenden Sie die Lautsprecher ausschließlich in der
originalen Verpackung.
Waren die Lautsprecher größerer Kälte ausgesetzt (z. B. beim Transport), so ist mit der
Inbetriebnahme zu warten, bis sich die Lautsprecher auf Raumtemperatur aufgewärmt
haben und das Kondenswasser restlos verdunstet ist.
Der Lautsprecher hat ein sehr hohes Gewicht - Vorsicht beim Auspacken und beim Trans-
Auspacken
port. Heben und transportieren Sie die Lautsprecher immer mit 2 Personen.
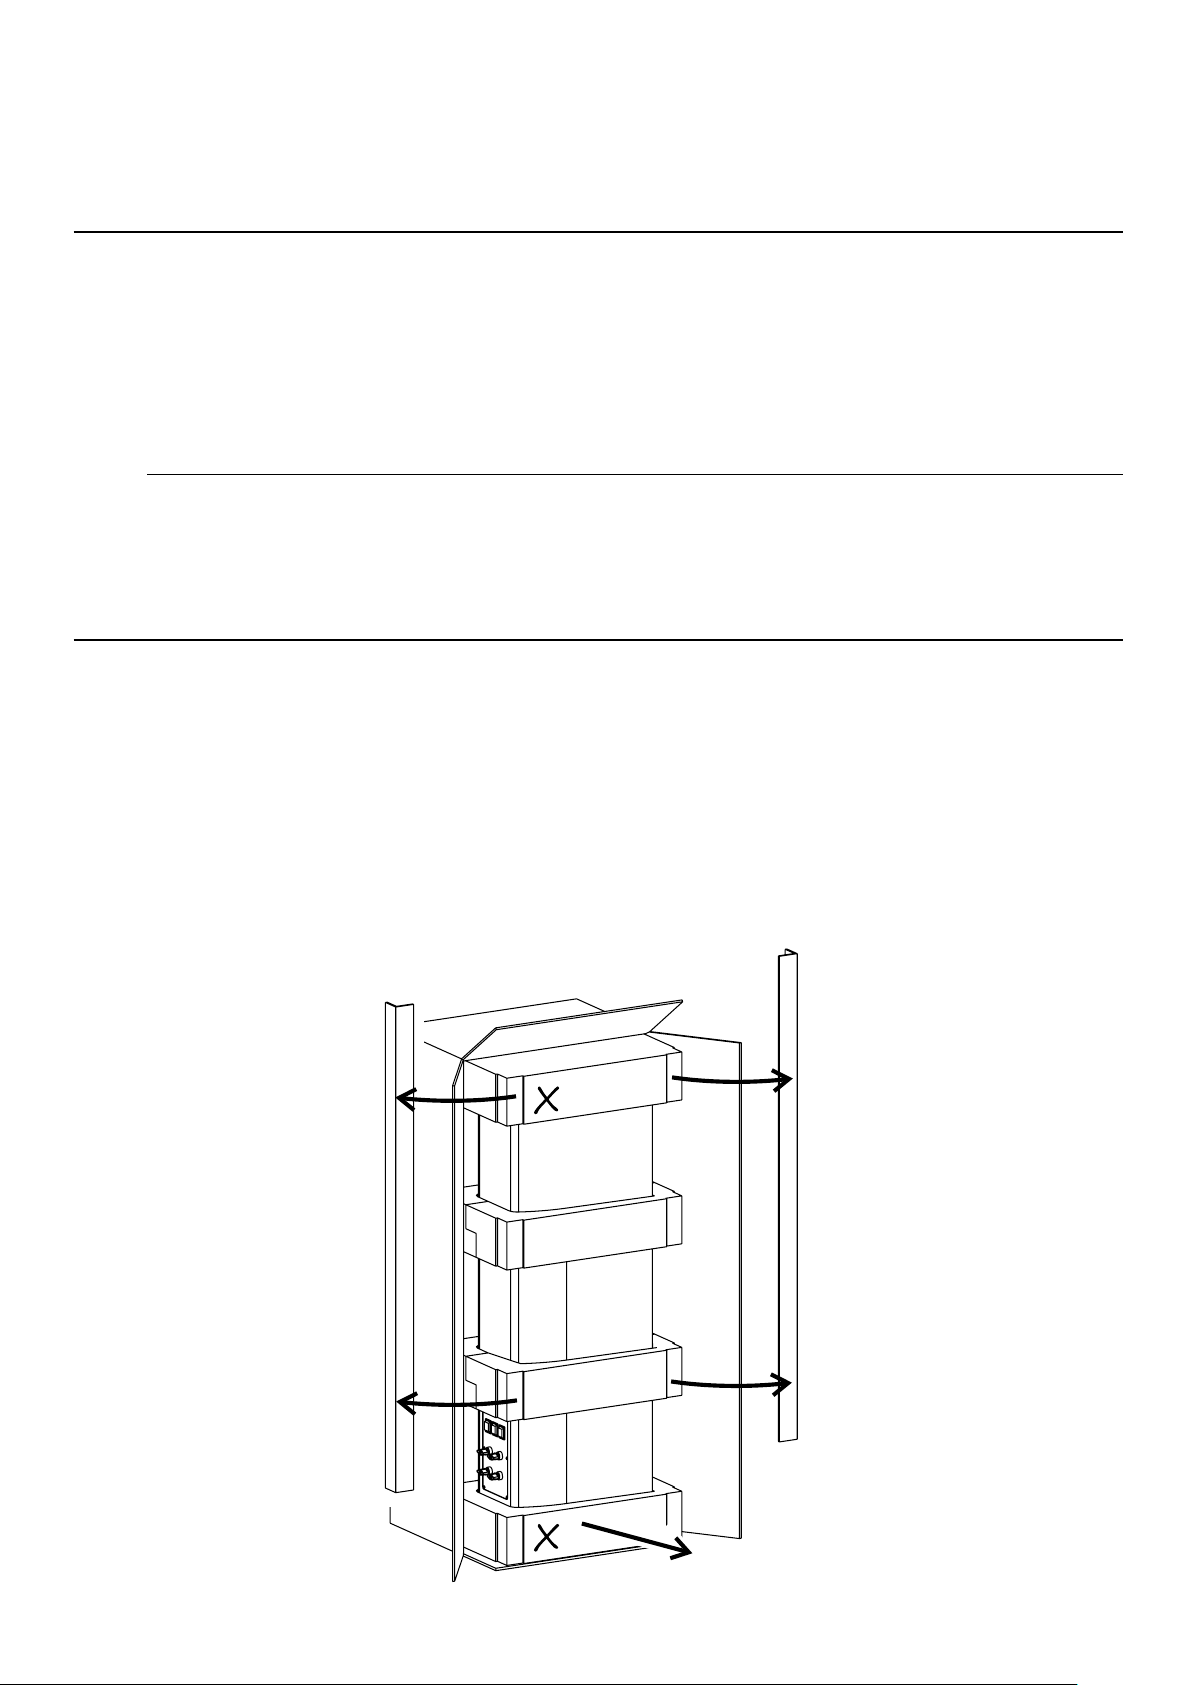
• Zum Auspacken den Karton aufrecht stellen.
• Öffnen Sie den Karton, wie unten abbgebildet, stehend und entfernen Sie
die Schutzecken.
• Anschließend den Lautsprecher vorsichtig stehend aus dem Karton ziehen.
• Legen Sie den Lautsprecher mitsamt der Schaumstoffformteile auf eine Seite.
Zum Schutz sollte ein Teppich oder etwas ähnliches untergelgt werden.
• Entfernen Sie als Nächstes das obere und untere Schaumstoffteil (X).
9
Page 10
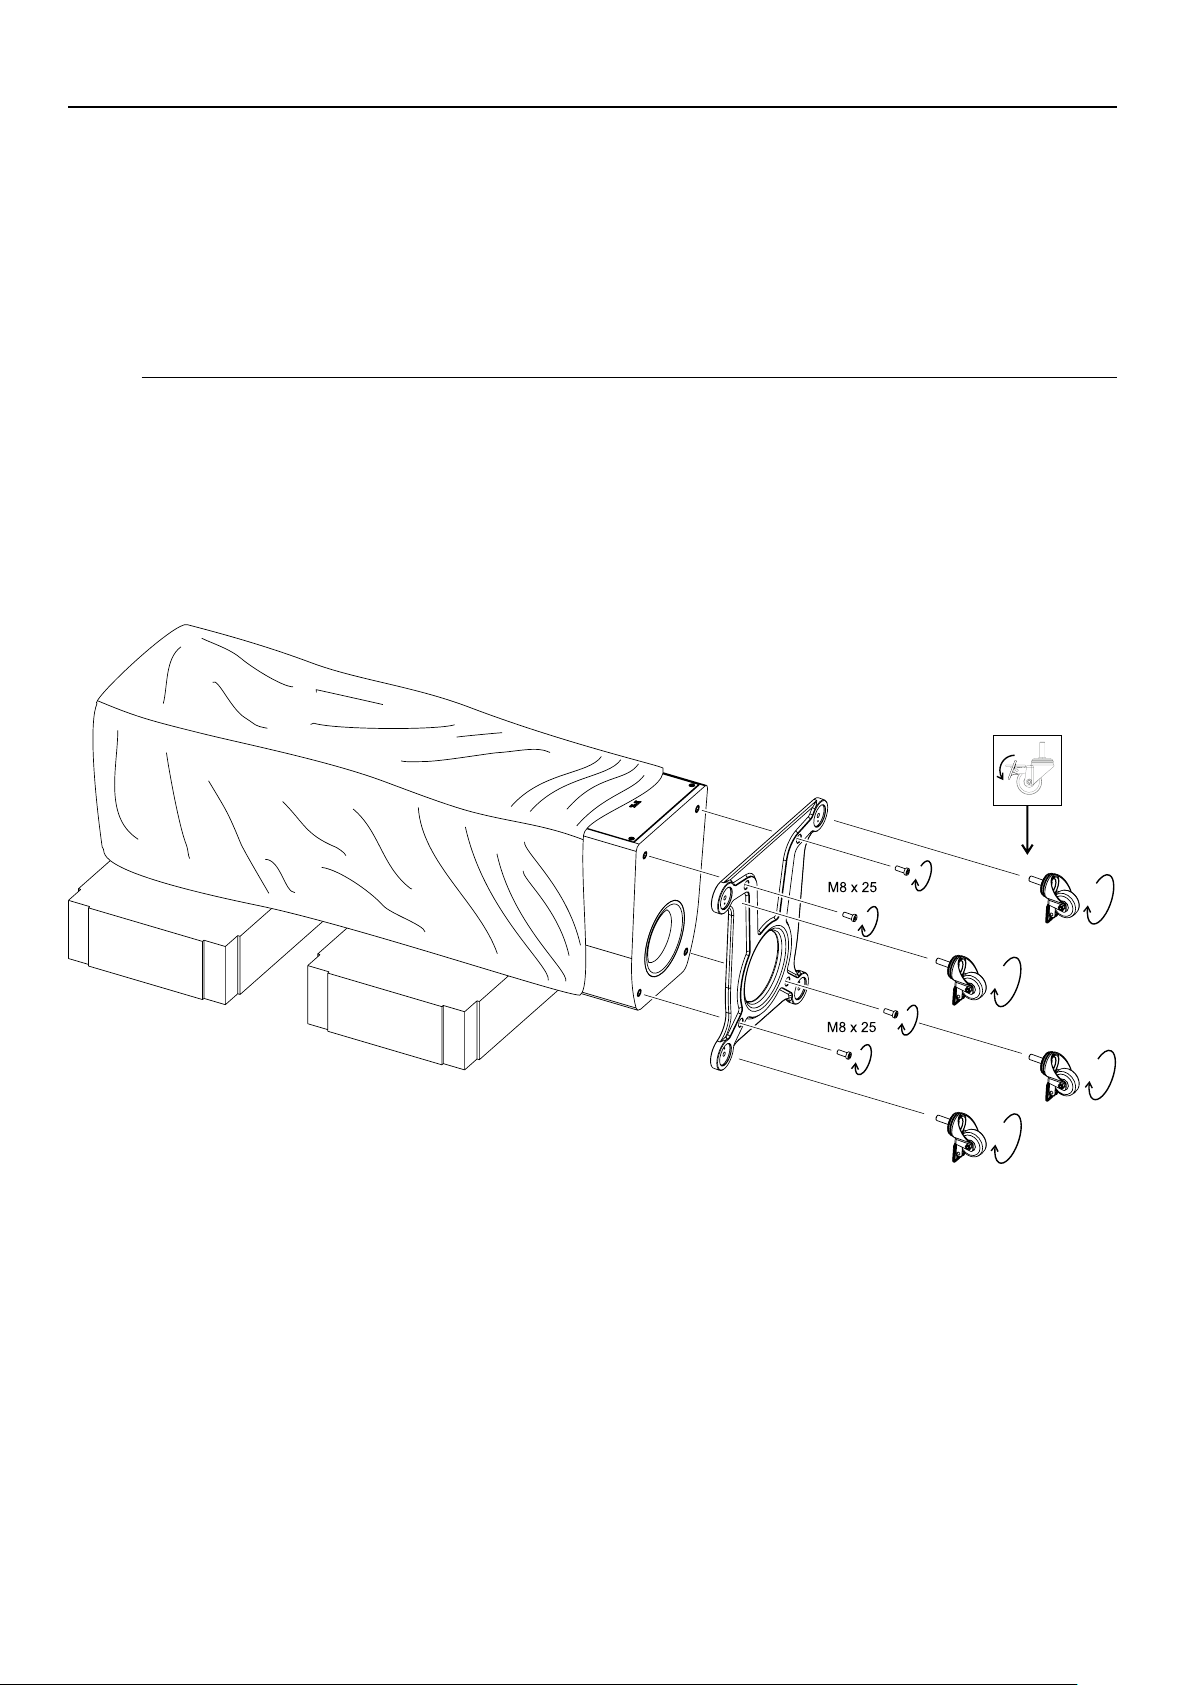
Grundplatte und Rollen montieren
• Die Schaumstoffteile (X) wie unten abbgebildet auf dem Boden positionieren.
• Legen Sie den Lautsprecher mit der textilen Schutzhülle auf die Schaumstoffteile.
• Montieren Sie die Grundplatte wie abbgebildet mit 4 Schrauben M8 x 25.
• Die Transportrollen können werkzeuglos von Hand eingeschraubt werden. Stellen Sie
hierzu die Bremsen der Rollen fest. Dies arretiert das Drehgelenk.
• Nachdem alles korrekt montiert ist, kann der Lautsprecher aufgerichtet werden.
• Richten Sie hierzu die Rollen nach innen aus und stellen Sie alle Bremsen fest.
Achten Sie beim Aufrichten auf die Kanten der Grundplatte. Legen Sie zum Schutz ggf. eine
weiche Unterlage unter.
10
Page 11
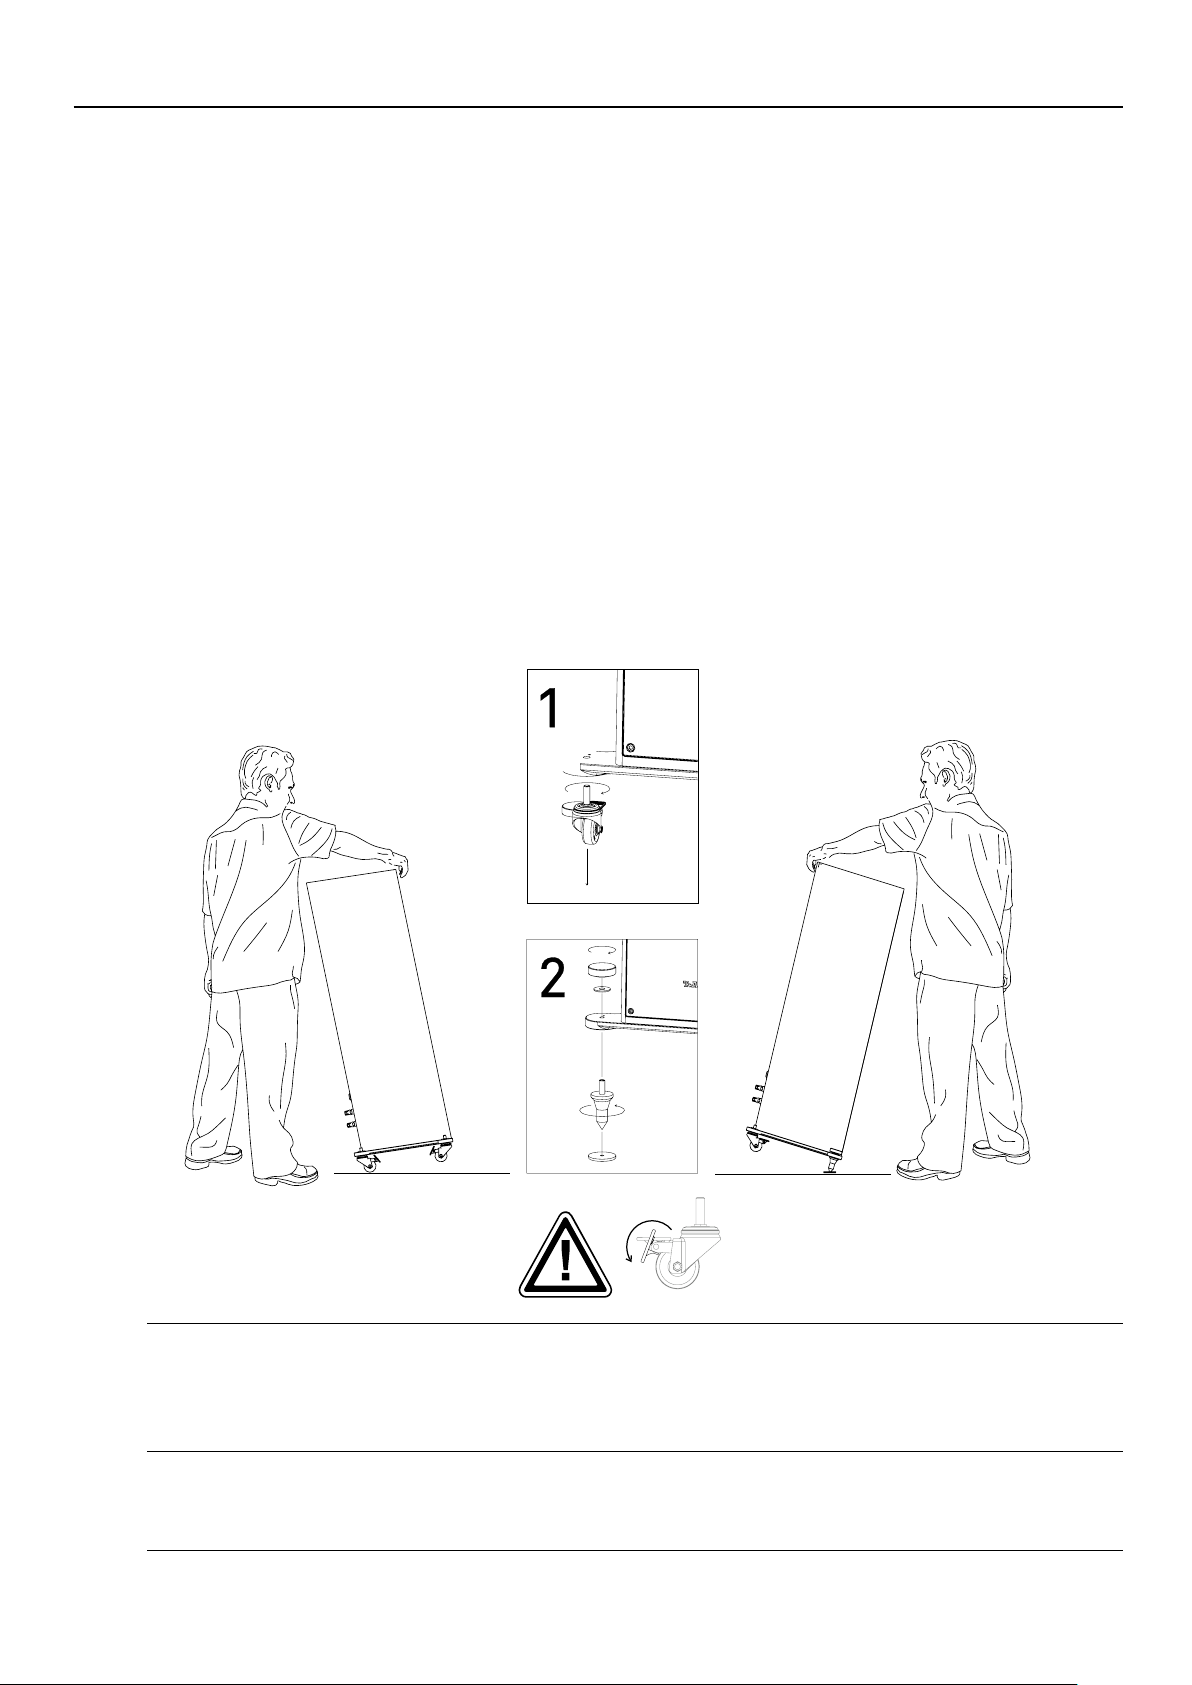
Montage der Spikes
• Stellen Sie die Lautsprecher zunächst an ihrem vorgesehenen Standort auf. Um die
richtigen Abstände (Wände, Hörplatz etc.) und Aufstellwinkel zum Hörplatz zu ermitteln, kann die Solitaire S 430 mit den montierten Möbelrollen leicht bewegt und
ausgerichtet werden.
• Wenn die Lautsprecher in ihrer endgültigen Position korrekt ausgerichtet sind,
sollten die Abstände und Winkel notiert oder markiert werden.
• Achten Sie zunächst darauf, dass die Bremsen der Rollen fest eingerastet sind.
• Montieren Sie zuerst die vorderen Spikes. Eine Person kippt die Solitaire S 430 leicht
nach hinten, während die weitere Person die Möbelrollen entfernt und die Spikes wie
unten gezeigt anbringt (2).
• Nachdem die Spikes montiert sind, müssen die Bodenkontaktplatten unter den
Spikes auf dem Boden positioniert werden.
• Senken Sie den Lautsprecher langsam ab, bis die Spikes auf den Bodenkontaktplatten auiegen. Korrigieren Sie gegebenenfalls die Position der Bodenkontaktplatten
noch einmal, bevor Sie die Lautsprecher vollständig abstellen.
• Die kleine Aussparung in der Bodenkontaktplatte zentriert den Spike.
• Wiederholen Sie nun die oben beschriebenen Schritte für die hinteren Spikes
Um Verletzungen zu vermeiden, gehen Sie mit den extrem spitzen Spikes äußerst vorsichtig
um, und halten Sie diese von Kindern fern!
Die Spikes können mit ihren Spitzen empndliche Böden (z. B. Parkett oder Fliesen) beschädigen! Legen Sie zum Schutz immer die Bodenkontaktplatte unter.
Achten Sie besonders darauf, dass der Lautsprecher auf den Bodenkontaktplatten nicht
wegrutscht. Neigen Sie den Lautsprecher nur soweit, dass die Spikes montiert werden können.
Vergewissern Sie sich, dass die Rollen gerade ausgerichtet und die Bremsen blockiert sind.
11
Page 12
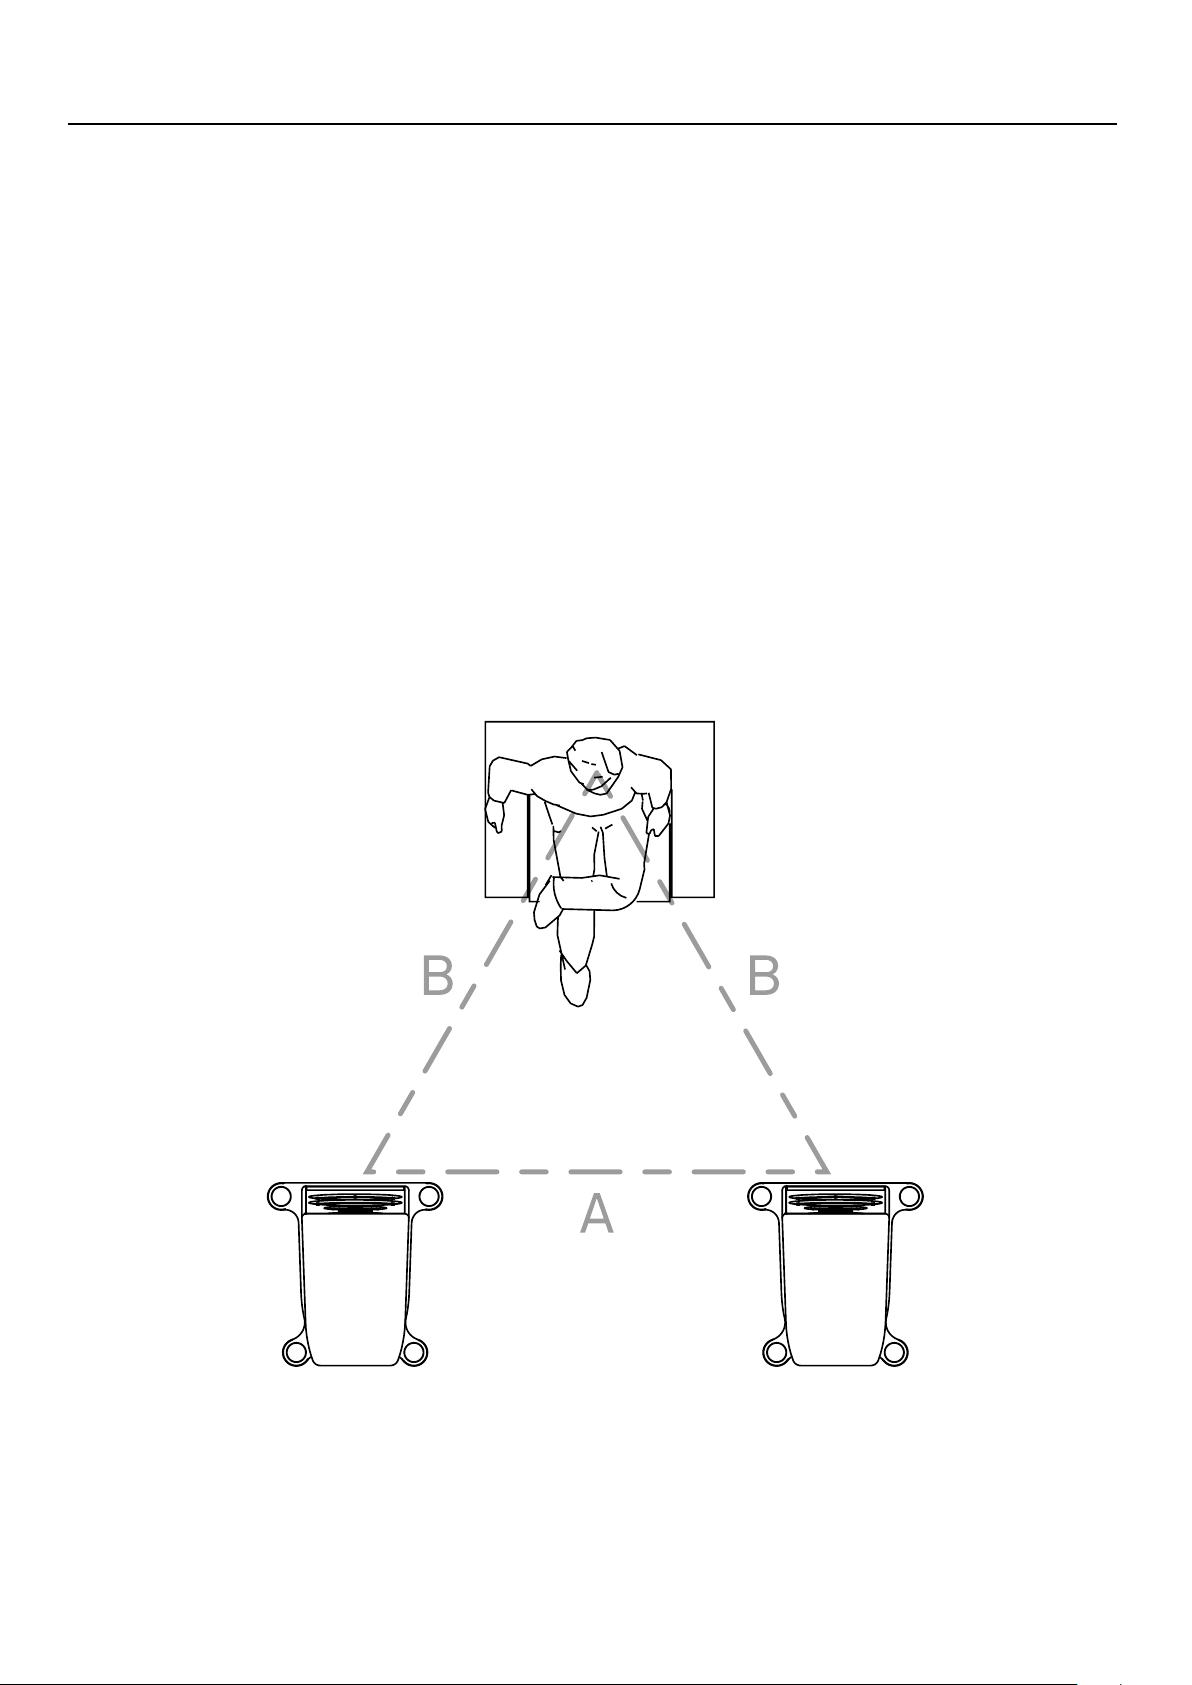
Aufstellung
Aufgrund ihres ausgezeichneten Abstrahlverhaltens ist die Aufstellung der Lautsprecherboxen unproblematisch. Bei Beachtung einiger Grundregeln lässt sich der ideale
Standort sicher bestimmen.
Sie sollten so platziert sein, dass die Entfernung zwischen den Boxen und die zum Hörer
ungefähr ein gleichseitiges Dreieck bildet.
Keinesfalls sollten die Boxen zu weit auseinander stehen. Die Hoch- und Mitteltöner
sollten sich etwa in Ohrhöhe benden. Ein Drehen der Boxen in den Raum bringt keine
Klangvorteile. Das Verstecken der Lautsprecher hinter Möbeln oder Vorhängen beeinträchtigt die Höhenwiedergabe außerordentlich.
Der minimale Hörabstand sollte 2 Meter nicht unterschreiten. Daraus ergibt sich nach
der o. g. Dreiecksregel ein Mindestabstand der Lautsprecher zueinander von 2 Metern.
12
Page 13
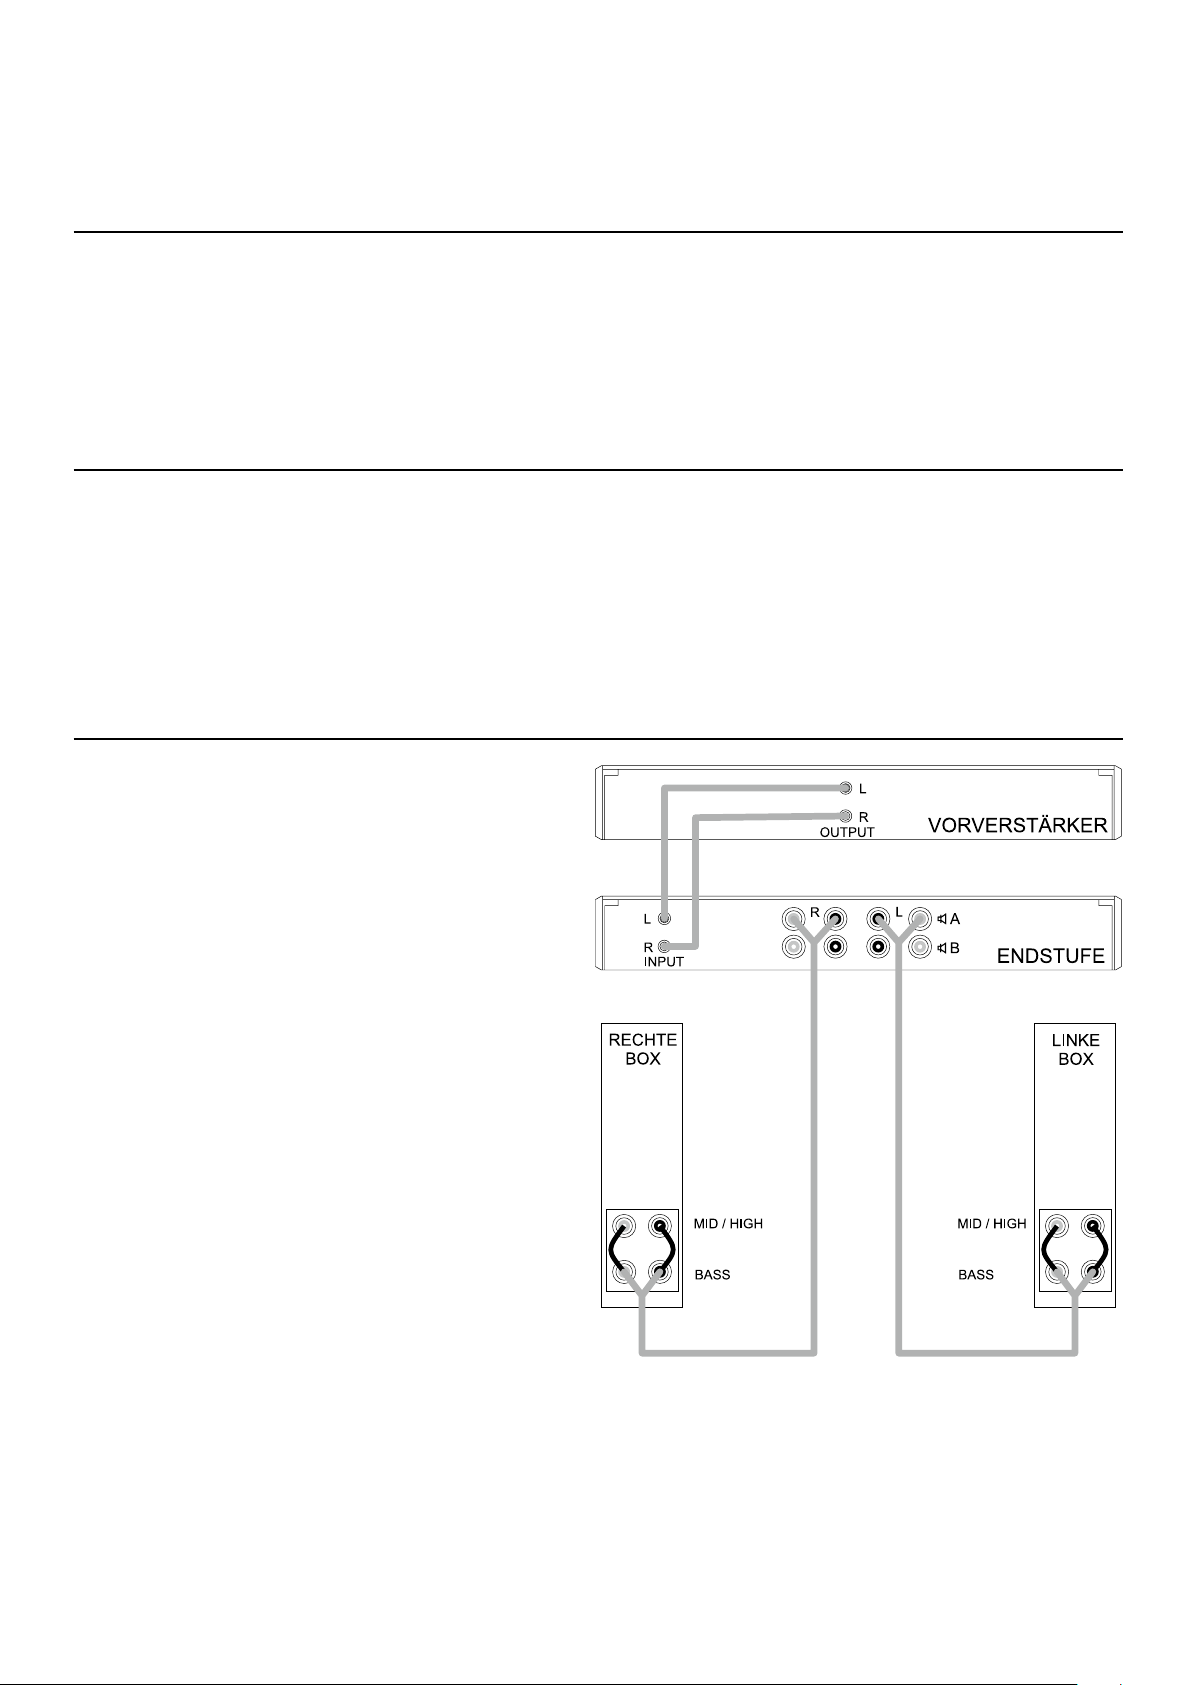
Anschluss
Verstärker
Die Solitaire S 430 können an alle Verstärker angeschlossen werden, die für eine Lastimpedanz von 4 Ohm ausgelegt sind.
Um das klangliche Potential dieser Lautsprecher voll zur Geltung zu bringen, empfehlen
wir laststabile Endstufen mit hoher Stromlieferfähigkeit >10 Ampere.
Anschlusskabel
Einen entscheidenden Einuss auf den Klang der Gesamtanlage übt das verwendete Kabel aus. T+A hat deshalb ein eigenes Kabelprogramm entwickelt, welches für
jede Anwendung das passende Kabel beinhaltet. Diese Kabel sind auf die speziellen
Eigenschaften unserer Lautsprecher abgestimmt. Alle verwendeten Kabel sollten
gleich lang sein!
Standard-Anschluss
Beim Standard-Anschluss wird pro Box
nur ein Lautsprecherkabel benötigt. Die
Verbindungsbrücken
zwischen Bass und
Mid / High bleiben
eingebaut
13
Page 14
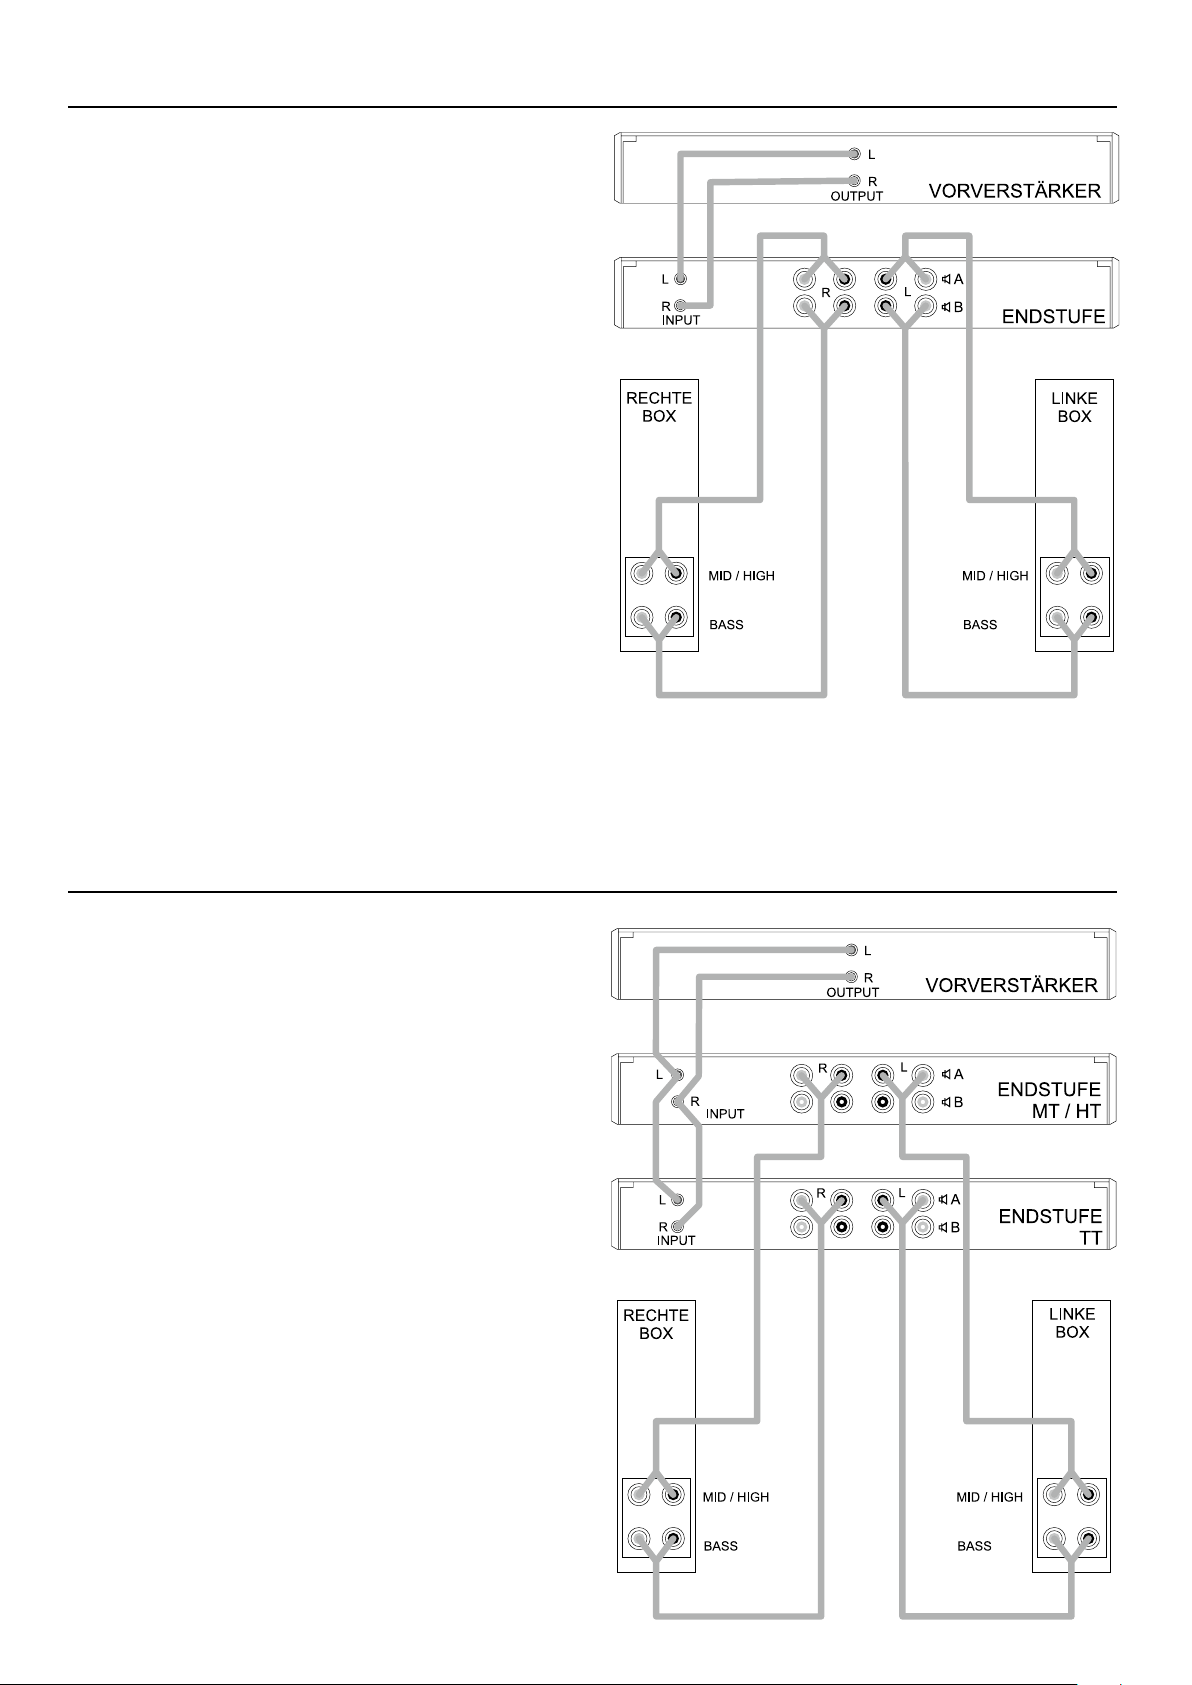
Bi-Wiring
Beim Bi-Wiring werden durch
getrennte Signalführung der
Bass- (Bass) und Mittel-/
Hochton-Signale (Mid / High)
bessere klangliche Ergebnisse
erzielt. Es werden pro Box zwei
Lautsprecherkabel benötigt.
An Endstufen mit zwei Lautsprecherausgängen (A und B)
werden die Boxen gemäß folgender Abbildung angeschlossen; bei Endstufen mit nur
einem Lautsprecherausgang
werden beide Kabel parallel an
diesen Ausgang angeschlossen.
Im Bi–Wiring-Betrieb müssen
unbedingt die Kabelbrücken
zwischen dem Tiefton (Bass)und Mittel/Hochtoneingang (Mid
/ High) entfernt werden.
Bi-Amping
Beim Bi-Amping werden die
Signalwege des Tiefton- und
des Mittel-/Hochtonbereiches
bereits vor der Endstufe getrennt.
Eine Stereo-Endstufe übernimmt die Verstärkung des
Tieftonbereiches für beide
Kanäle während die andere
Stereo-Endstufe den Mittel-/
Hochtonbereich beider Kanäle
treibt.
Im Bi–Amping-Betrieb müssen
unbedingt die Kabelbrücken zwischen dem Tiefton (Bass)- und
Mittel/Hochtoneingang (Mid /
High) entfernt werden.
14
Page 15
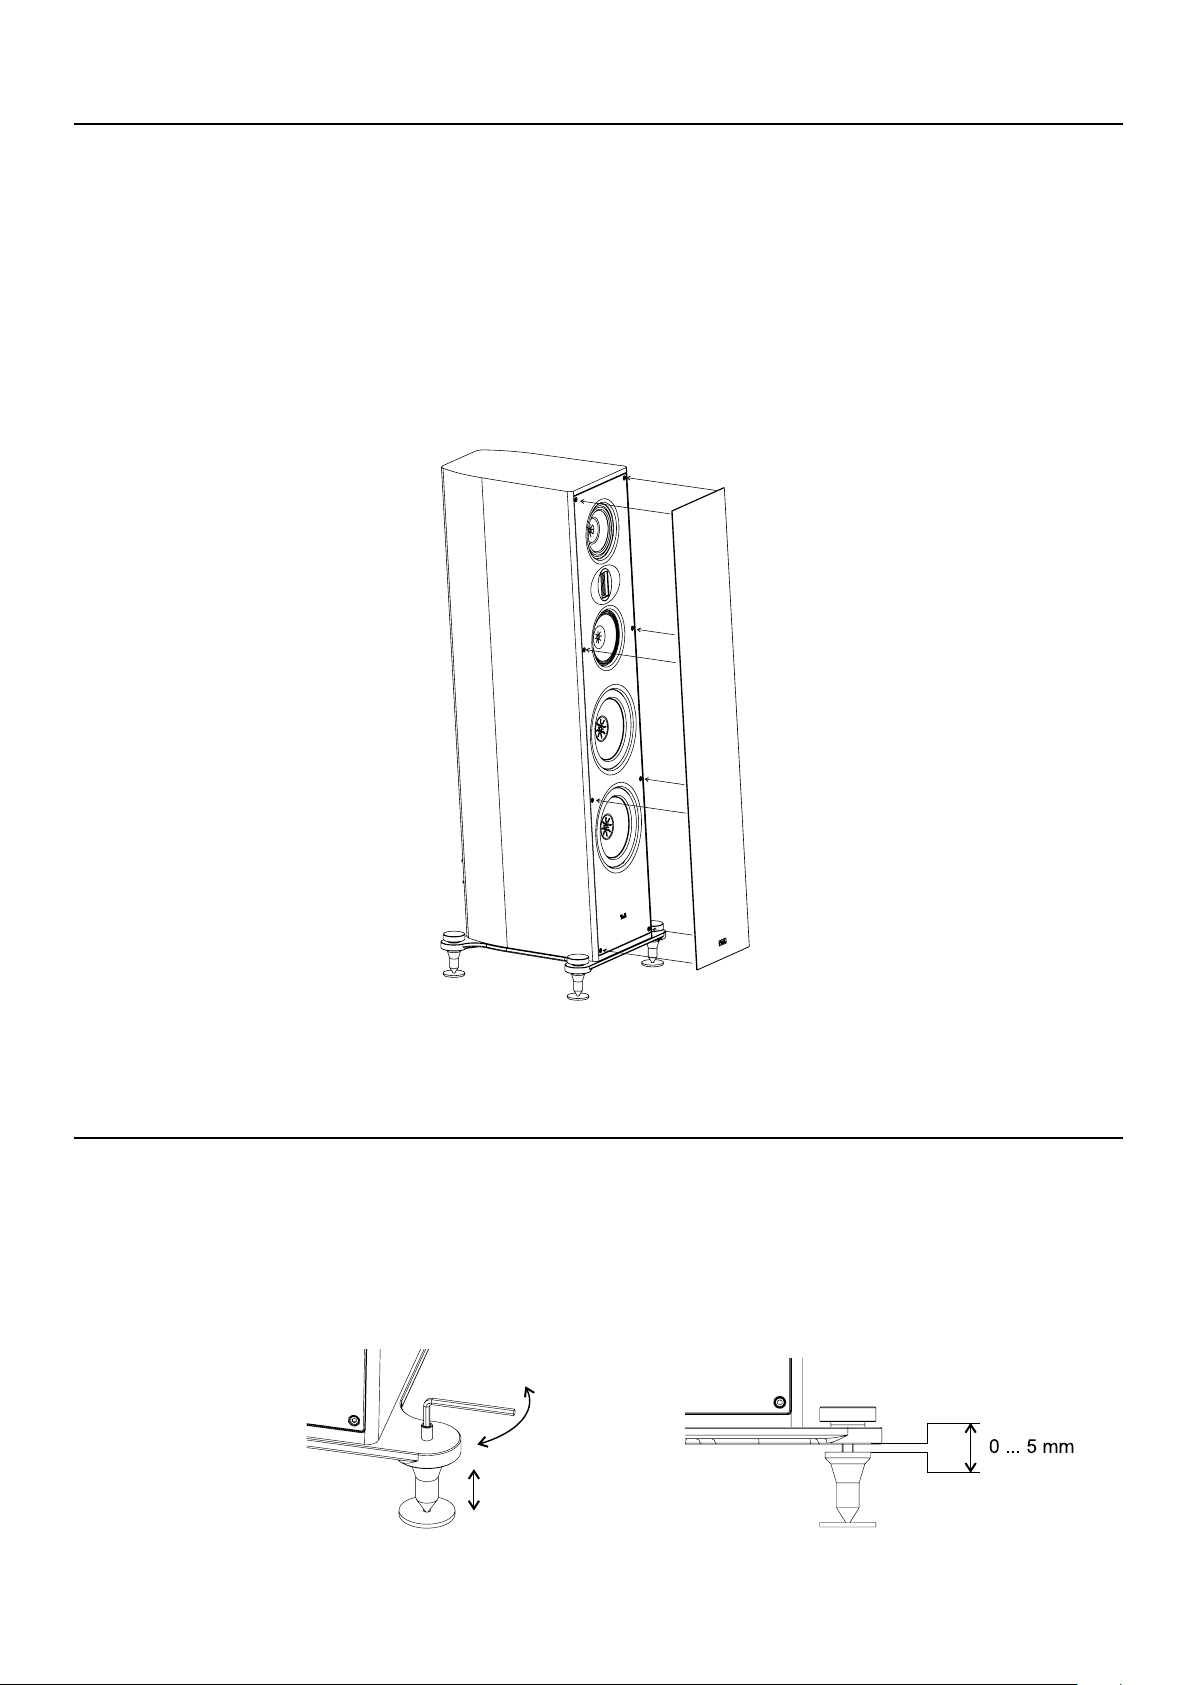
Abdeckung
Zum Schutz der Lautsprecherchassis können die im Lieferumfang enthaltenen Abdeckungen montiert werden. Die Abdeckungen sind akustisch optimiert. Für die bestmögliche Klangqualität, empfehlen wir jedoch die Abdeckungen während der Wiedergabe zu
entfernen.
Die Befestigung der Abdeckungen erfolgt durch integrierte Magnete. Zum Befestigen,
richten Sie die Abdeckungen an den Kanten der Aluminium-Schallwand aus und lassen
Sie diese am Gehäuse einrasten. Um die Abdeckungen wieder zu entfernen, ziehen sie
die diese vorsichtig nach vorne ab.
Niveauausgleich
Durch Hinein- und Herausdrehen der Spikes kann ein optimaler Höhenausgleich bei Unebenheiten des Untergrundes erreicht werden.
Die Spikes müssen so justiert sein, dass der Lautsprecher einen festen Kontakt zum
Untergrund hat und nicht „kippelt“.
15
Page 16
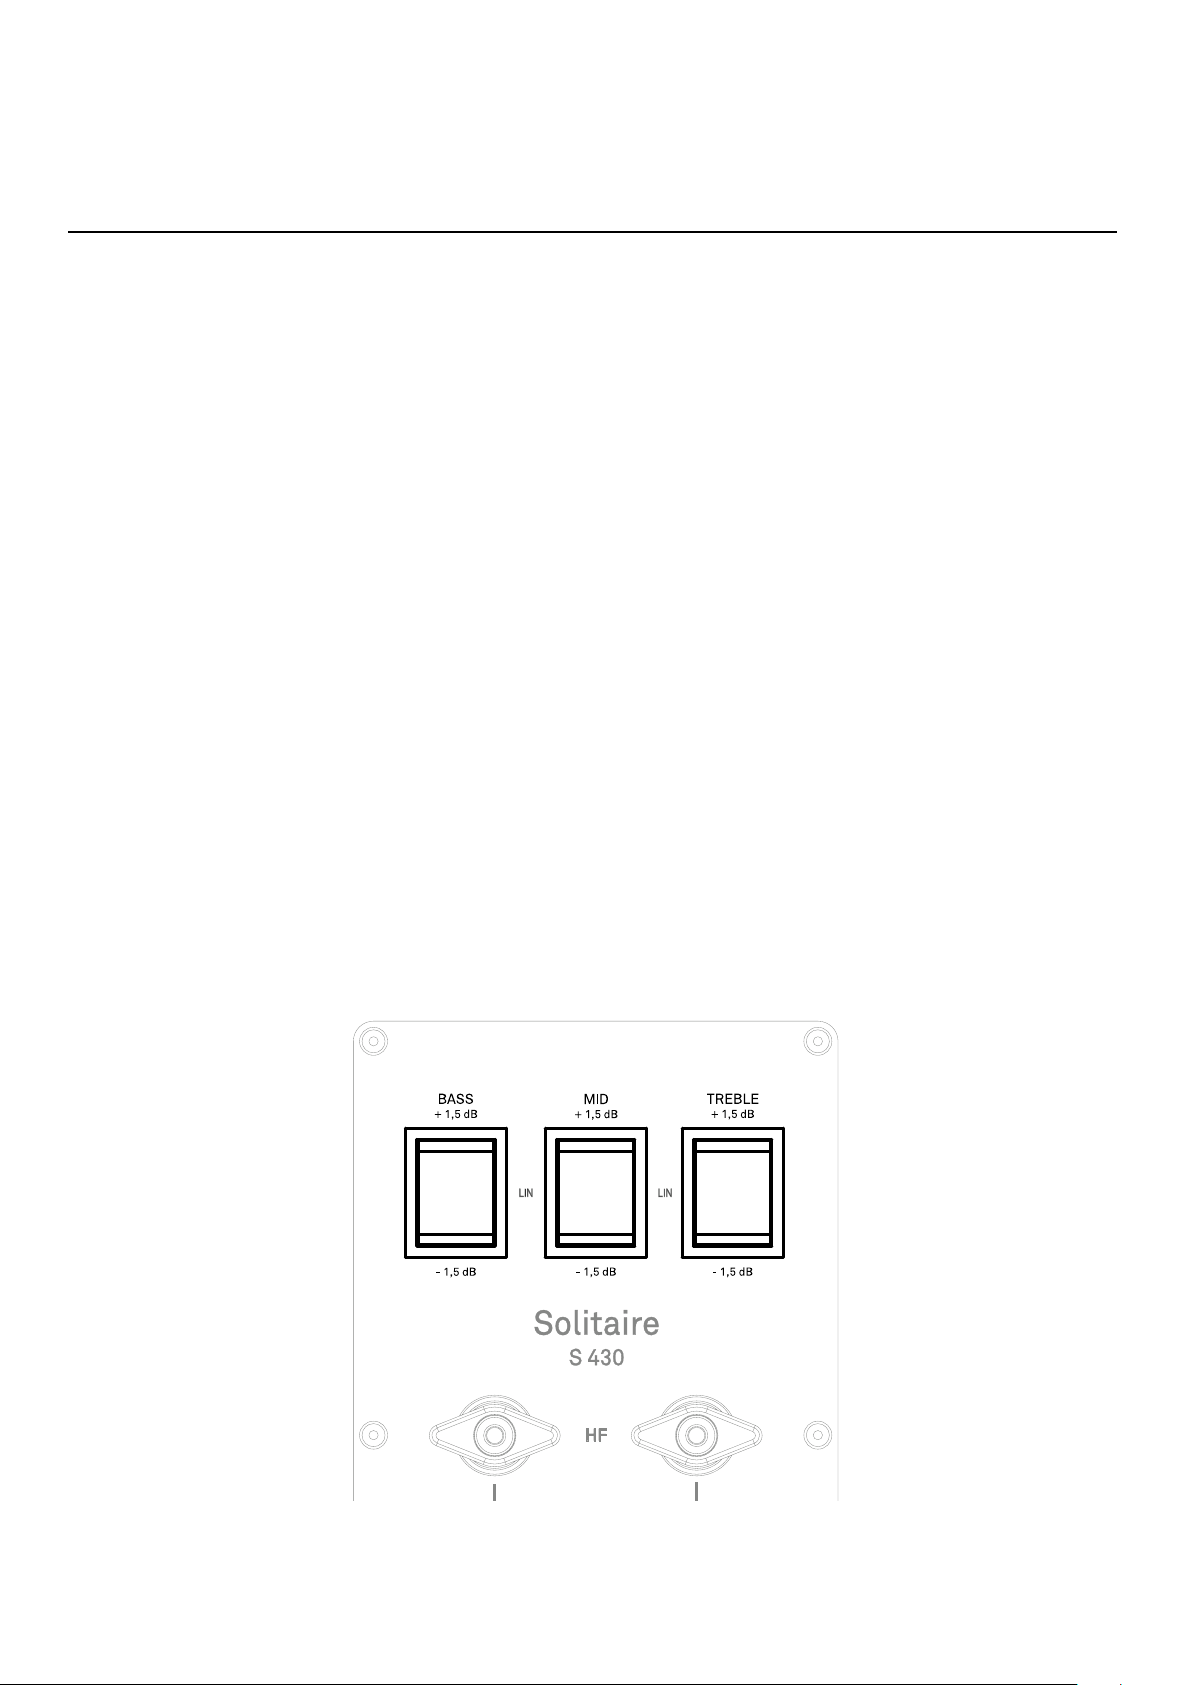
Raumanpassung
Pegeleinstellung
Die Solitaire S 430 kann problemlos an die akustischen Eigenschaften des Hörraumes
bzw. an besondere Aufstellungsbedingungen angepasst werden.
So ist es z.B. bei einer wandnahen Aufstellung der Lautsprecher oftmals erforderlich,
den Bassbereich abzusenken.
Zu diesem Zweck benden sich auf dem rückwärtigen Anschlussterminal der Lautsprecherbox drei Schalter (BASS, MID und TREBLE) mit je drei Stellungen: +1,5 dB, LIN und
1,5 dB
BASS
Für eine Aufstellung im Raum mit großem Abstand zur Wand (> 1,5 m) empehlt sich die
Schalterstellung +1,5 dB. Bei einer wandnahen Aufstellung ergeben sich erfahrungsgemäß die besten klanglichen Ergebnisse mit der Schalterstellung 0 dB. Die Aufstellung
der Box in einer Raumecke kann zu einer Überhöhung im Bassbereich führen. Die Einstellung 1,5 dB kompensiert diesen Effekt.
MID / TREBLE
Auf der Rückseite der Box benden sich zwei weitere Schalter für die Anpassung des
Hoch- und Mitteltonbereiches an den Hörraum. Werksseitig sind beide Schalter auf die
Normalstellung 0 dB eingestellt.
Diese Schalter ermöglichen eine Veränderung des Lautstärkepegels um ±1,5 dB. Als
Richtlinie für die Einstellung dieser Bereiche gilt die Halligkeit des Hörraumes. Für sehr
hallige Räume empehlt sich die 1,5 dB Stellung.
Dagegen kann eine Anhebung um 1,5 dB bei sehr stark bedämpften Räumen günstiger
sein.
16
Page 17

Umwelt
Bei der Entwicklung der SOLITARIE Lautsprechersysteme stehen nicht ausschließlich
innovative Problemlösungen und solide, durchdachte Konstruktionen im Vordergrund.
Ebensolche Bedeutung kommt der Einhaltung aller deutschen und europäischen Sicherheitsnormen und standards zu.
Eine genaue Qualitätsprüfung aller Materialien, die sorgfältige Produktion durch hochqualizierte Fachkräfte und eine rechnergesteuerte Endkontrolle gewährleisten die
hohe Produktqualität und die Einhaltung aller Spezikationen.
Darüber hinaus wird bereits bei der Entwicklung größter Wert auf den Einsatz umweltverträglicher Werkstoffe und Arbeitsmittel gelegt.
So wird die Verwendung gesundheitsgefährdender Stoffe wie chlorhaltige Lösungsmittel
und FCKW‘s vermieden.
Wir verzichten, wo irgend möglich, auf Kunststoffe (insbesondere auf PVC) als Konstruktionselement.
Stattdessen wird auf Metalle oder andere unbedenkliche Materialien zurückgegriffen,
die gut recyclebar sind.
Bei dem Dämmieß, das in unseren Boxen verwendet wird, handelt es sich um einen
Vliesstoff, der zu 100 % aus Polyesterfaser unter Verwendung einer Bindefaser hergestellt wird.
Dieses Material wurde auf Schadstoffe nach Öko-Tex Standard 100 geprüft. Dieser Test
ndet Anwendung für Bekleidung, Decken und Polster, Matratzen, Haustextilien usw.
Das von uns verwendete Vlies hat den Test ‚Schadstoffgeprüfte Textilien‘ bestanden und
erfüllt die derzeitig geltenden humanökologischen Anforderungen. Darüber hinaus hat
es selbst die sehr strengen Bedingungen des Tests für Babybekleidung bestanden.
Pegehinweise
Die Oberäche der Lautsprechergehäuse sollte zur Reinigung ausschließlich mit einem
weichen, trockenen Tuch abgewischt werden.
Keinesfalls dürfen scharfe Reinigungs- oder Lösungsmittel verwendet werden!
Das Frontgitter kann gegebenenfalls vorsichtig mit einem Staubsauger gereinigt werden.
Beachten Sie bitte, dass bei einigen Lautsprechertypen die Laut¬sprecherchassis unmittelbar hinter der Abdeckung montiert sind. Drücken Sie also mit dem Staub¬sauger
nicht zu heftig dagegen, damit die empndlichen Lautsprecherchassis nicht beschädigt
werden.
17
Page 18

18
Page 19
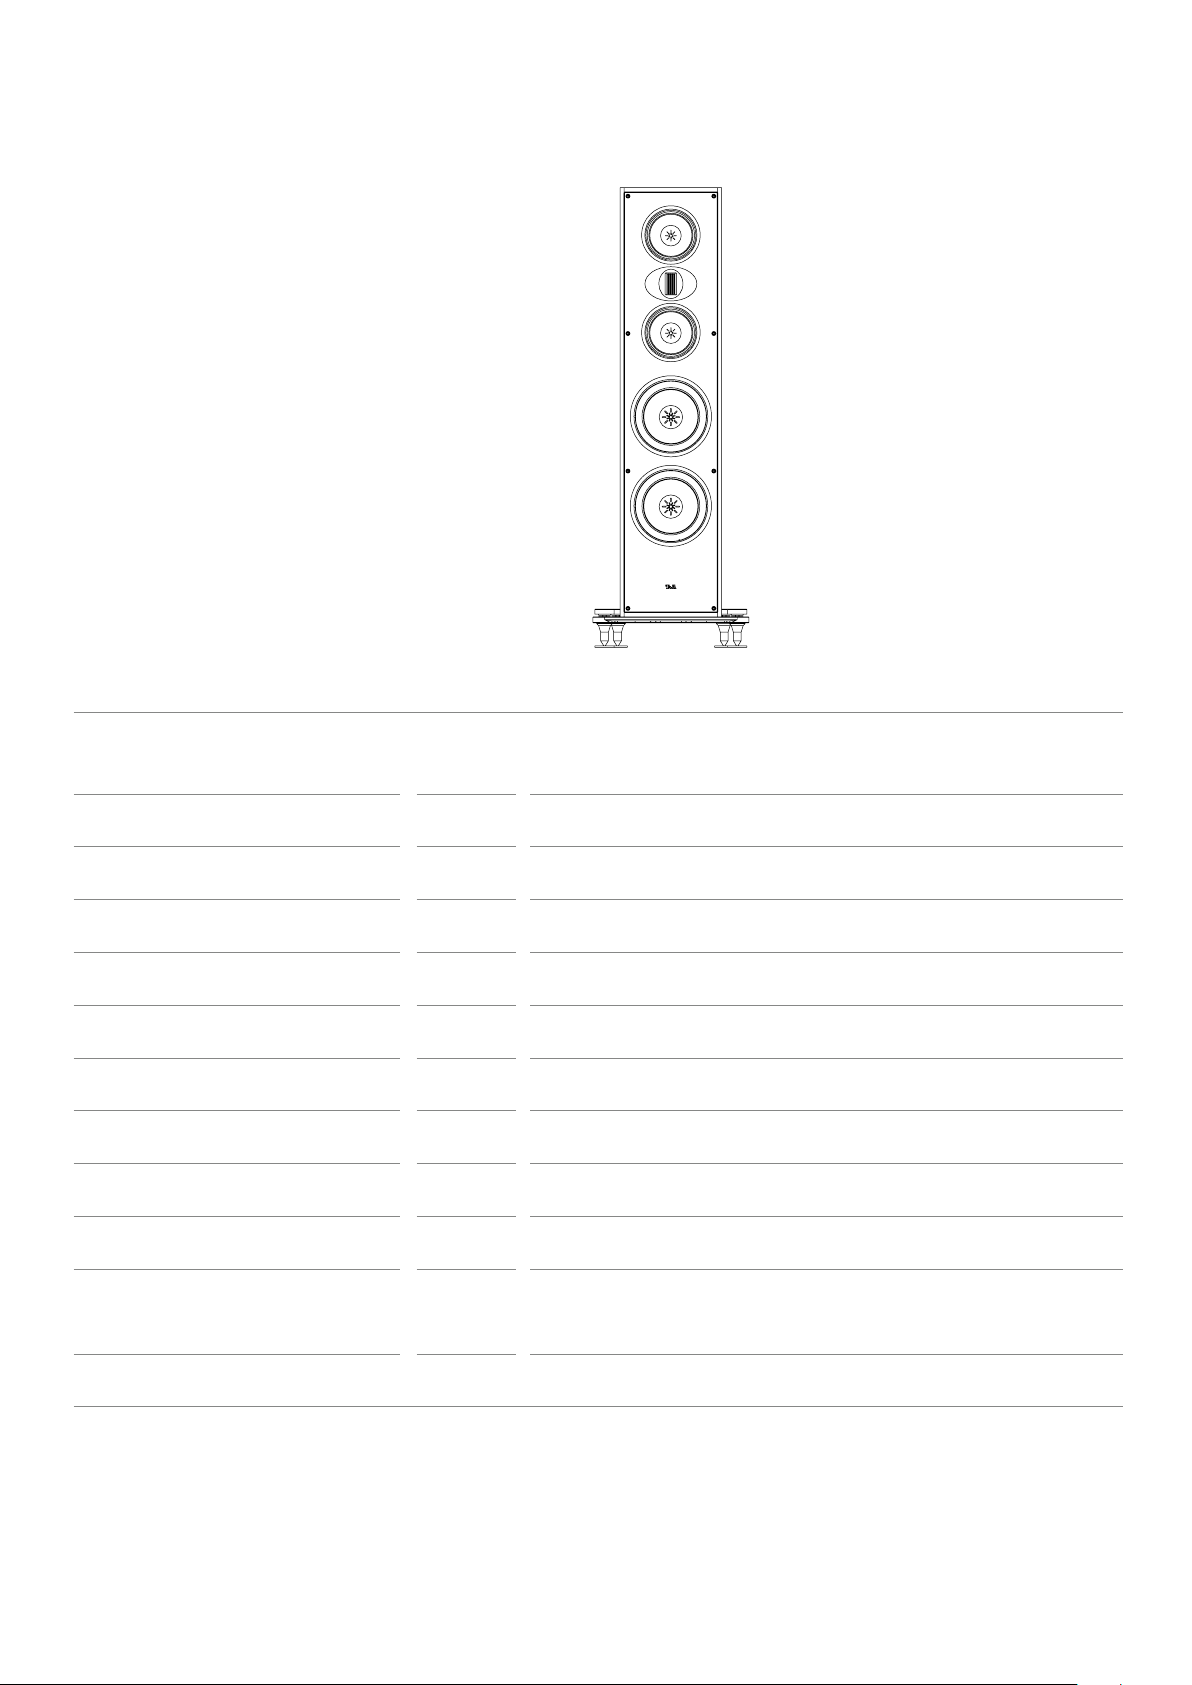
Technische Daten
Prinzip Standlautsprecher, 3-Weg,
Bassreex
Nennbelastbarkeit 200 Watt
Musikbelastbarkeit 250 Watt
Impedanz 4 Ohm
Übertragungsbereich 29 - 45000 Hz
Empndlichkeit 86 dB
Bestückung Tiefton 2 x 220 mm
Bestückung Mittelton 2 x 150 mm
Bestückung Hochton 1 x 50 mm Magnetostat
Trennfrequenzen 200 / 2200 Hz
Abmessungen
H x B x T
118 x 26 x 44 cm
Höhe mit Standfuß
Gewicht 55 kg
Technische Änderungen vorbehalten.
19
Page 20

20
Page 21

Welcome
We are delighted that you have decided to purchase a
T+A product.
The new loudspeakers you have just purchased are
Hi-Fi components of the nest quality, designed and
produced to the very highest technological standards.
Constant quality checking during the manufacturing process and the exclusive use of high-quality
materials guarantee a top-quality product built to
the highest standards of excellence. The products of
our company are produced by qualied and trained
specialist staff, and are not released until they have
passed an extremely strict quality check procedure.
Our loudspeakers are supplied as carefully matched,
balanced pairs.
To ensure maximum enjoyment and avoid problems,
please read through these instructions care-fully and
observe the given recommendations.
elektroakustik GmbH & Co KG
21
Page 22

Content
Safety notes 23
Scope of delivery 24
Assembling the loudspeakers 25
General information 25
Unpacking 25
Installing the base plate and castors 26
Fitting the spikes 27
Speaker placement 28
Connection 29
Amplier 29
Cables 29
Standard wiring 29
Bi-Wiring 30
Bi-Amping 30
Protection cover 31
Level adjustment 31
Room correction 32
Level adjustment 32
Environmental aspects 33
Maintenance 33
Technical Specications 35
22
Page 23
Safety notes
The operation instructions, the connection guidance
and the safety notes are for your own good - please
read them carefully and observe them at all times.
The operating instructions are an integral part of this
device. If you ever transfer the product to a new owner
please be sure to pass them on to the purchaser to
guard against incorrect operation and possible hazards.
The loudspeaker is extremely heavy caution is required when unpacking and
transporting it. Always lift and transport
the device with two persons.
Legal requirements pertaining to the lifting
of heavy loads prohibit the transport of the
device by women.
Ensure that you have a rm, secure hold
on the device. Do not let it fall. Wear safety
footwear when moving the device. Take
care not to stumble. Ensure an unobstructed area of movement by removing obstacles and possible hindrances from the route.
Take care when lowering the device! To avoid your ngers being crushed, ensure that
they are not trapped between the device
and the support surface.
The spikes have extremely sharp points which could
cause injury; please handle them with great care, and
keep them well away from children.
The spikes feature sharp points which may damage
delicate surfaces (e. g. parquet ooring or tiles).
The device is designed to operate in a tem-
Where the equipment is to be used for other purposes,
especially in the medical eld or any eld in which
safety is an issue, it is essential to establish the unit’s
suitability for this purpose with the manufacturer, and
to obtain prior written approval for this usage.
If the unit gets very cold (e. g. when being transported),
condensation may form inside it. Please do not switch
it on until it has had plenty of time to warm up to room
temperature, so that any condensation evaporates
completely.
perate climate and altitudes up to 2000 m
above sea level. The range of permissible
operating temperatures is +10 … +35°C.
This device is designed exclusively for
reproducing sound and/or pictures in the
domestic environment. It is to be used in a
dry indoor room which meets all the recommendations stated in these instructions.
If you need to clean your speaker cabinets, simply
wipe the surfaces with a soft dry cloth.
Never use powerful cleaning agents or solvents!
Before operating the unit again, make sure that there
are no short circuits at the connection terminals and
that all connections are correct.
Very loud continuous listening to program material via
earphones, headphones and loudspeakers can lead to
permanent loss of hearing. Prevent health risks and
avoid permanent hearing at high volume.
The terminals (marked with the -symbol)
Always avoid touching terminals and sockets and
the conductors of cables connected to them. Unless
ready-made cables are used, all cables connected to
these terminals and sockets must always be deployed
by a trained person.
By attaching the CE symbol to the unit T+A declares
its conformity the EC directives and the national laws
based on those directives. The declaration of conformity can be downloaded from www.ta-hi.com/DoC.
The original, unaltered factory serial number must be
present on the outside of the unit and must be clearly
legible! The serial number is a constituent part of our
conformity declaration and therefore of the approval
for operation of the device. The serial numbers on the
unit and in the original T+A documentation supplied
with it (in particular the inspection and guarantee certicates), must not be removed or modied, and must
correspond.
Infringing any of these conditions invalidates T+A
conformity and approval, and the unit may not be operated within the EC. Improper use of the equipment
makes the user liable to penalty under current EC and
national laws.
can carry high voltages.
The only permissible method of disposing of
this product is to take it to your local collection centre for electrical waste.
Registration according to the EU directive
“Waste Electrical and Electronic Equipment”
WEEE-Reg.-No.: DE 72473830W
In its original condition the loudspeaker meets all currently valid European
regulations. It is approved for use as
stipulated within the EC.
If the device has to be stored, place it in its original
packaging and store it in a dry, frost-free location.
Storage temperature range 0...40 °C
23
Page 24
Scope of delivery
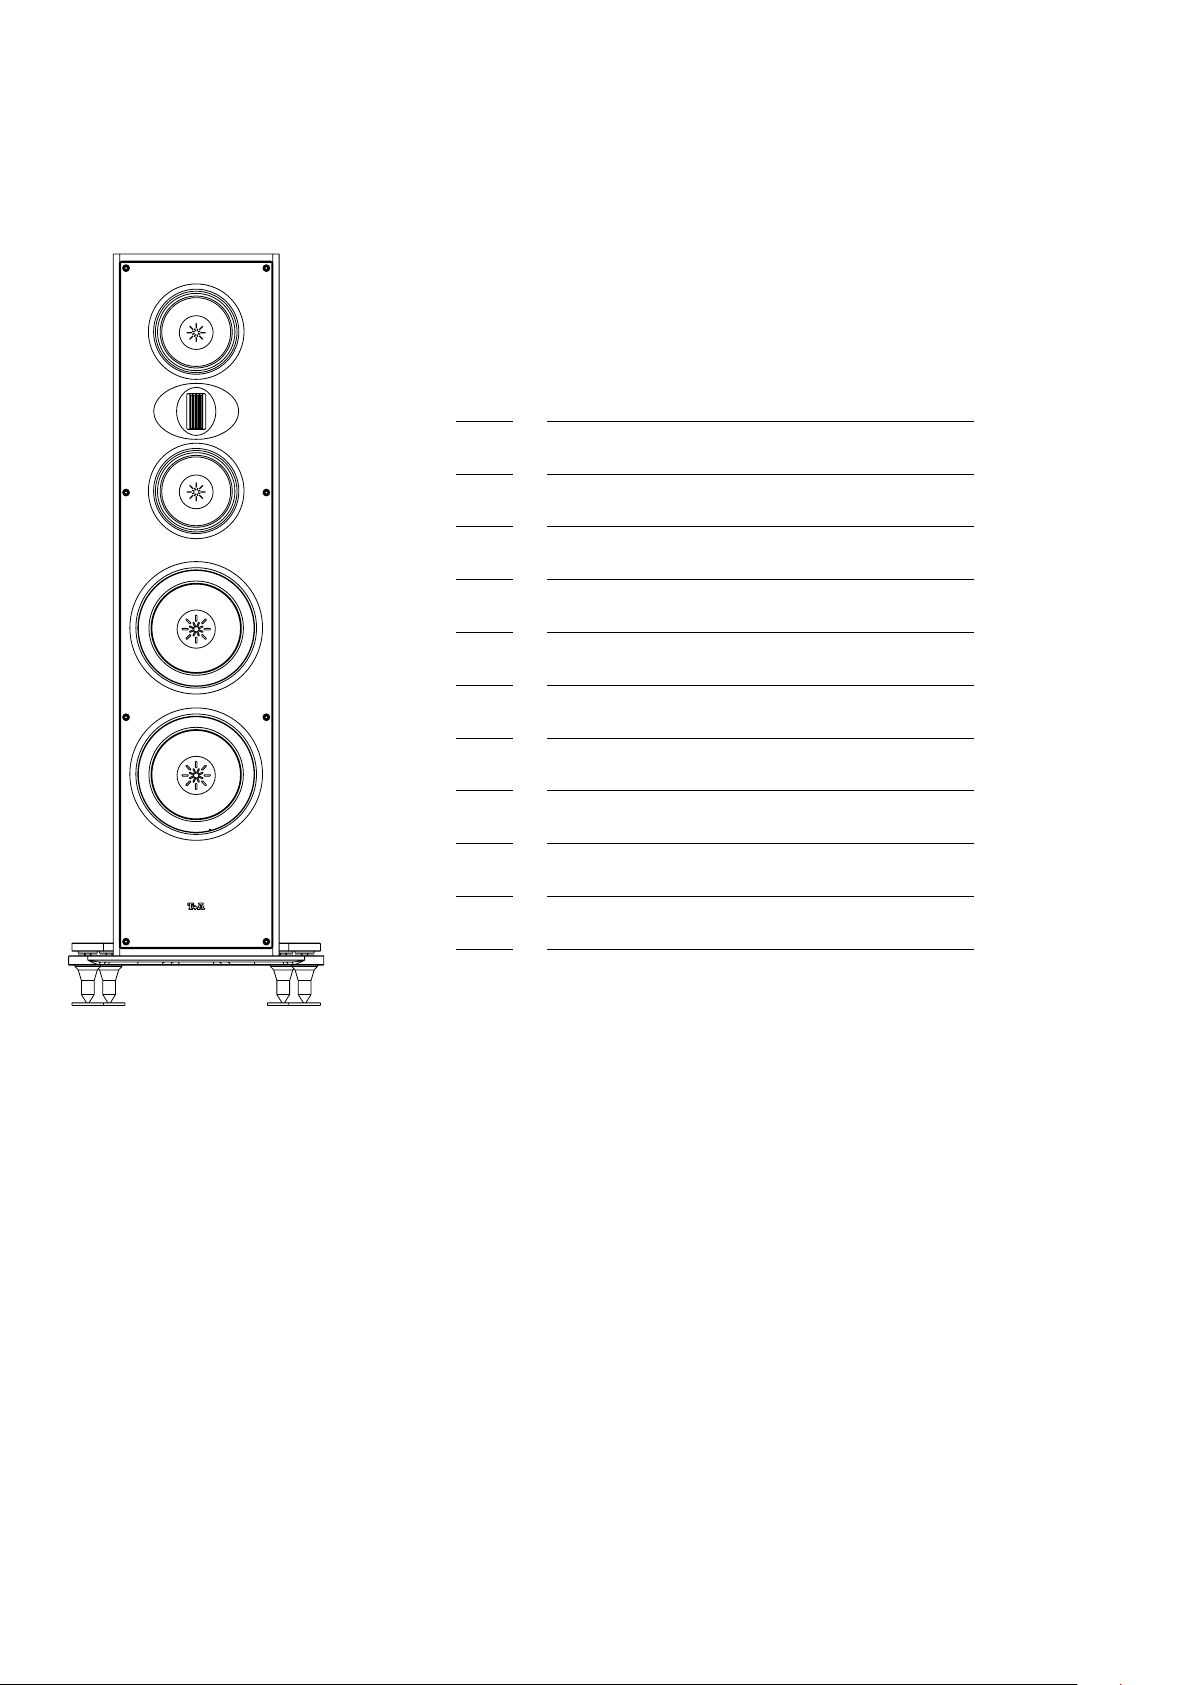
Solitaire S 430
2 Solitaire S 430
2 Protection grilles
8 Spikes with locknut
8 Plastic washer for the locknut
8 Floor contact plate for spikes
2 Base plate
8 M8 x 25 screws for the base plate
8 Transport rollers
4 Gloves
2 Allen keys
1 User manual
24
Page 25
Assembling the loudspeakers
General information
Carefully unpack the loudspeakers and store the original packing material carefully. The
carton and packing are specially designed for this loudspeaker and will be needed again
if you wish to move the equipment at any time. If you have to transport the loudspeaker,
it must always be carried or sent in its original packaging in order to prevent damage
and defects.
If the loudspeaker gets very cold (e. g. when being transported), condensation may form
inside it. Please do not switch it on until it has had plenty of time to warm up to room
temperature, so that any condensation evaporates completely.
To avoid damage, when setting up very heavy loudspeakers, please ask a friend to help you!
Unpacking
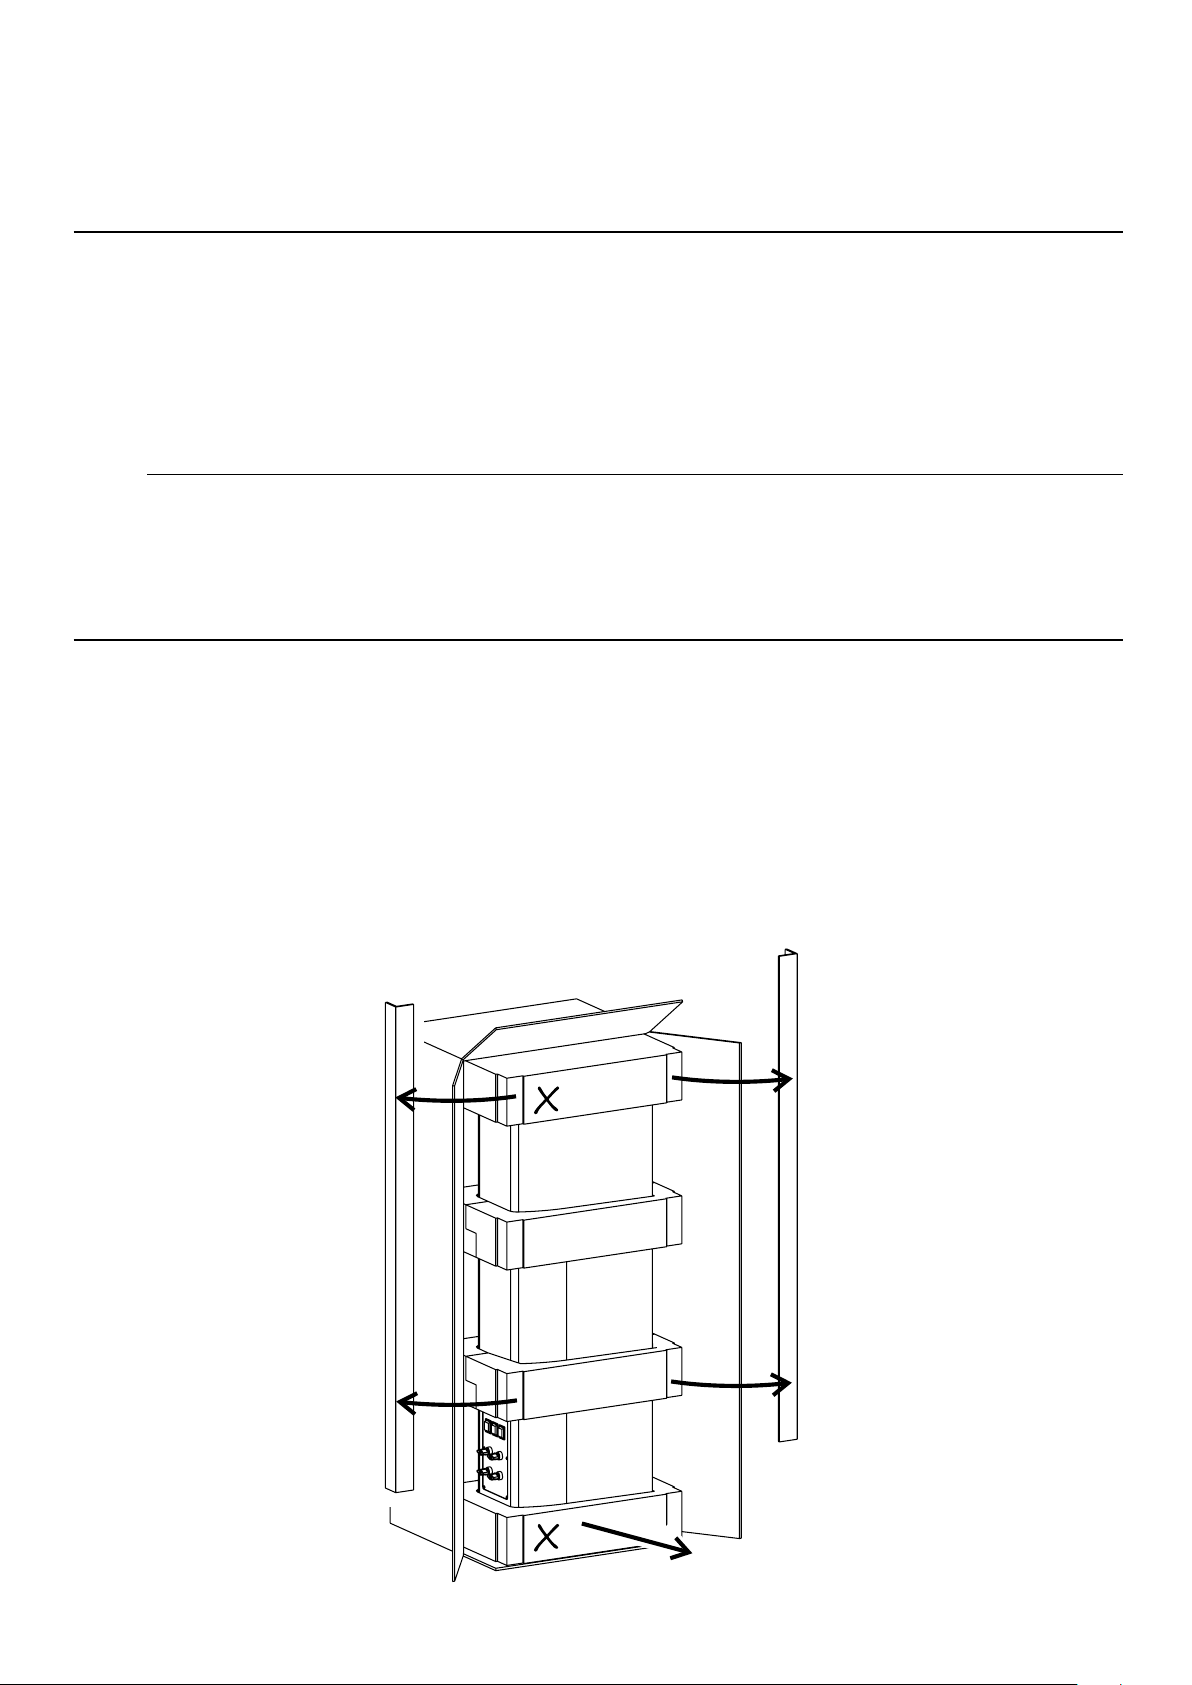
• To unpack, place the cardboard box in an upright position.
• Open the cardboard box vertically, as illustrated below, and remove the protective
cardboard corners.
• Then carefully pull the speaker out of the cardboard box while standing upright.
• Place the speaker, including the foam moldings, on one of its sides. Place a carpet or
a soft blanket underneath for protection.
• Now, remove the upper and lower foam parts (X).
25
Page 26
Installing the base plate and castors
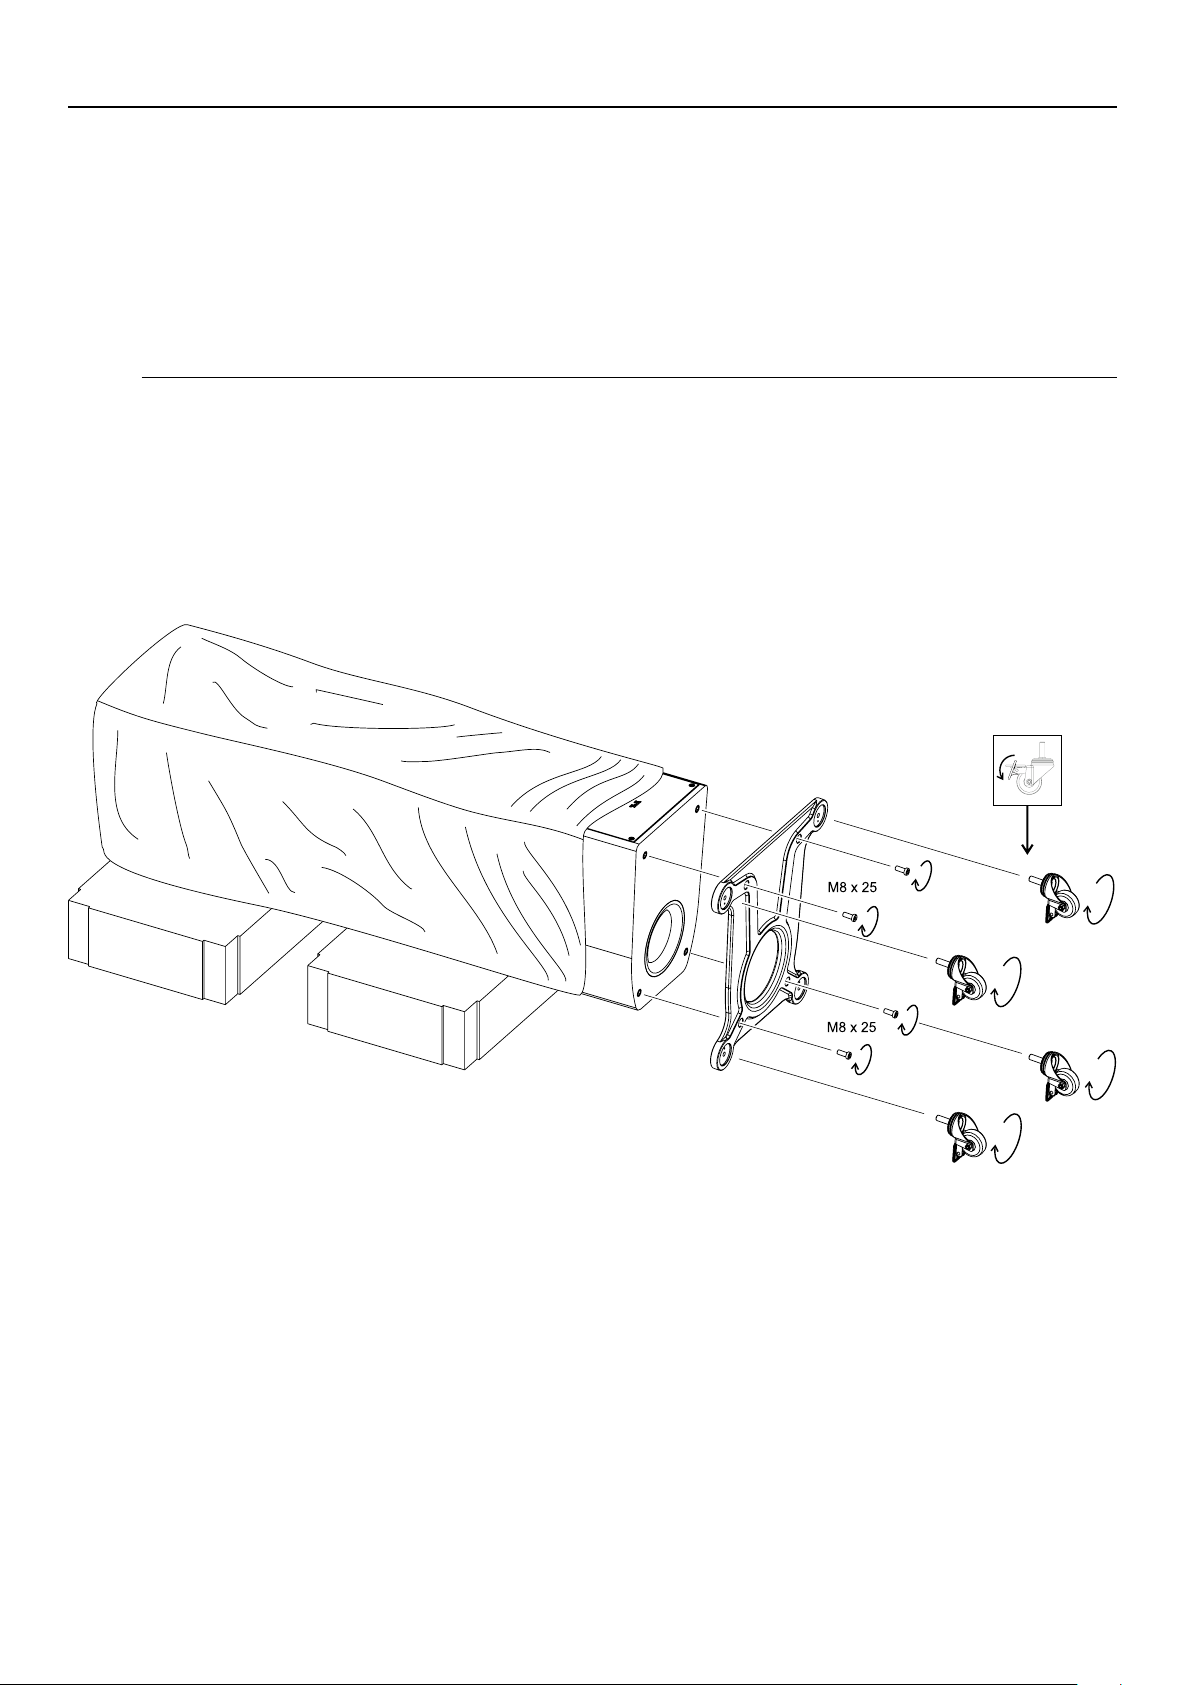
• Place the foam parts (X) on the oor as shown below.
• Position the loudspeaker with its textile protective cover on the foam parts.
• Attach the base plate with 4 M8 x 25 screws as shown.
• The transport castors can be screwed in by hand with no tools required. For this purpose, engage the brakes of the rollers. This locks the swivel joint.
• When everything is correctly assembled, the speaker can be set upright.
• To do this, align the castors inwards and lock all brakes.
Pay attention to the edges of the base plate when lifting up the loudspeaker. If necessary,
place a piece of soft material underneath for protection.
26
Page 27
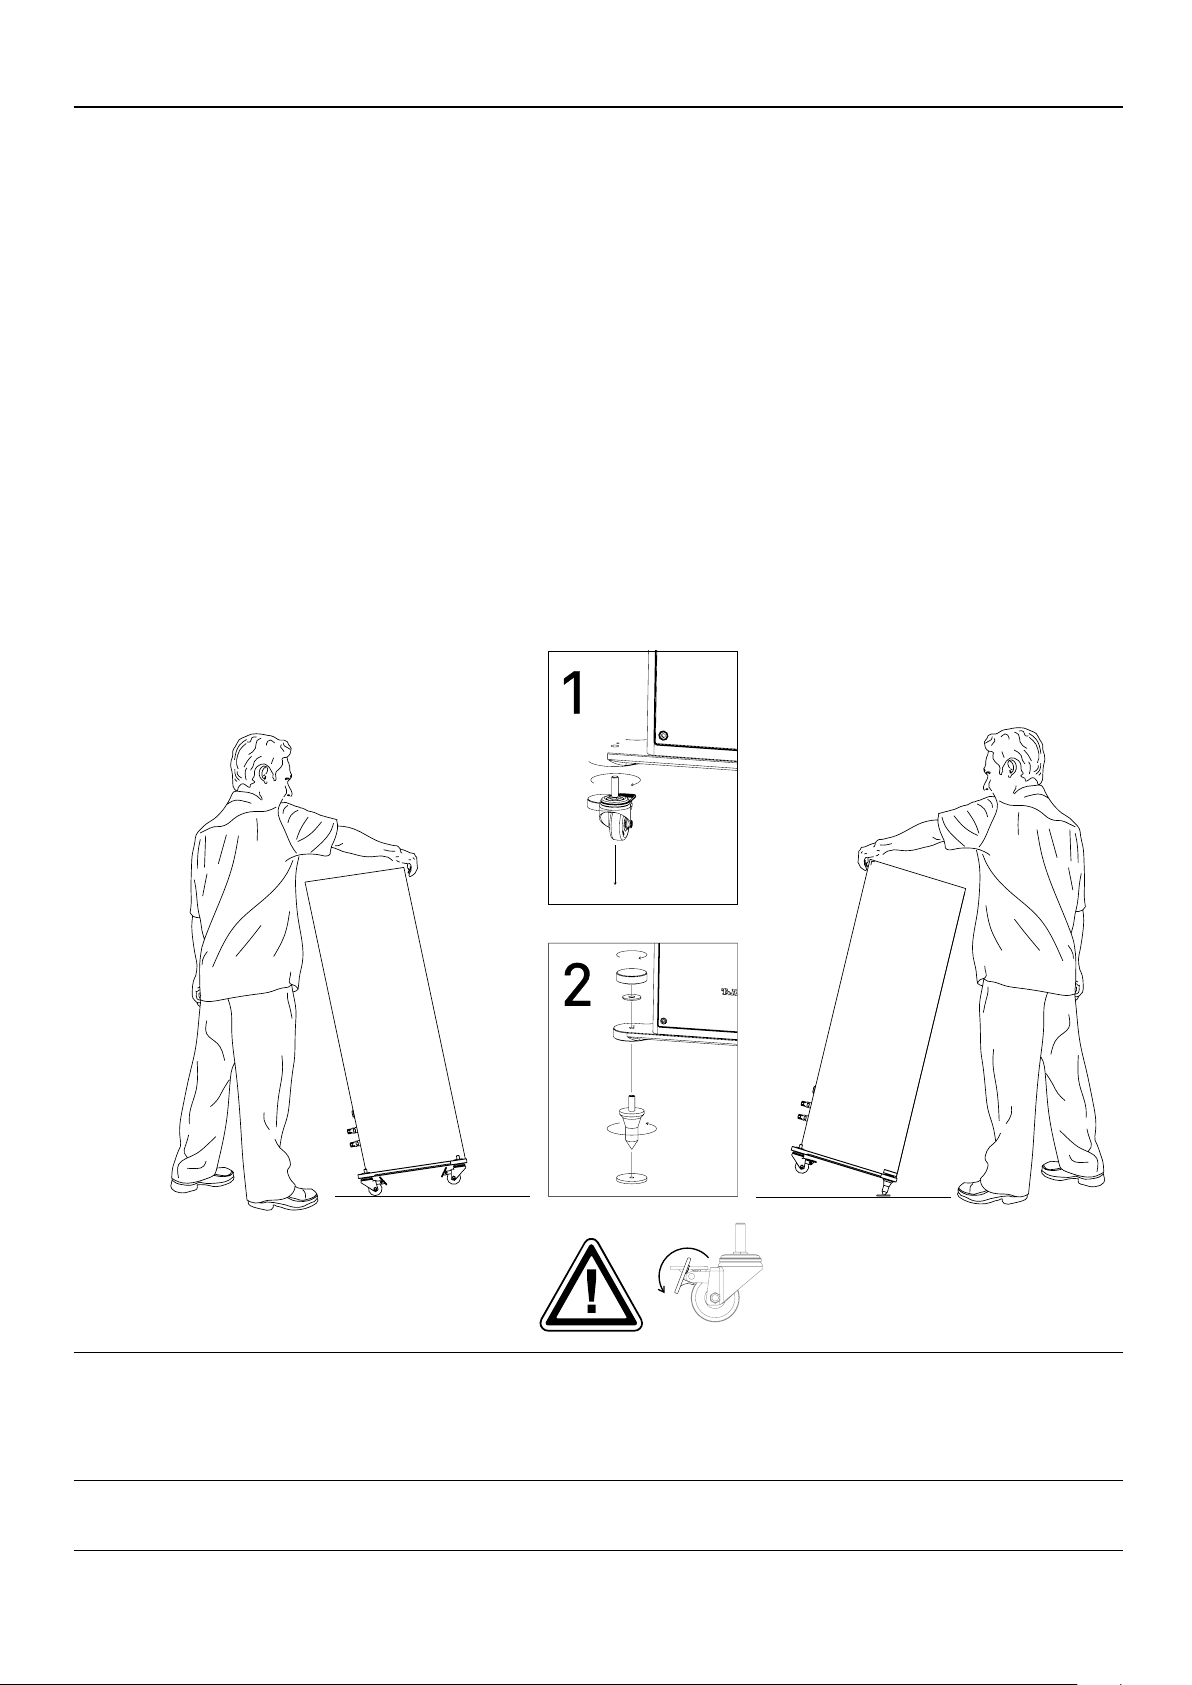
Fitting the spikes
• First set up the speakers at their intended location. To determine the correct distances (walls, listening position, etc.) and placement angle to the listening position, the
Solitaire S 430 can be easily moved and aligned with the assembled funiture castors.
• Once the speakers are correctly aligned in their nal position, the distances and angles should be noted or marked.
• First of all pay attention that the brakes of the casters are rmly locked.
• Install the front spikes rst. One person will slightly tilt the Solitaire S 430 backwards, while another person will remove the furniture castors and attach the spikes
as shown below (2).
• After the spikes are mounted, the oor contact plates must be positioned under the
spikes on the oor.
• Slowly lower the speaker until the spikes are on the oor contact plates. If necessary,
correct the position of the oor contact plates again before completely removing the
speakers.
• The small recess in the oor contact plate centers the spike.
• Now repeat the steps described above for the rear spikes.
The spikes have extremely sharp points which could cause injury; please handle them with
great care, and keep them well away from children.
The spikes feature sharp points which may damage delicate surfaces (e. g. parquet ooring
or tiles). Always place the oor contact plate underneath the spikes for protection.
Take special care that the speaker does not slip away on the oor contact plates. Tilt the
speaker only so far that the spikes can be mounted.
Make sure that the rollers are aligned straight and the brakes are locked.
27
Page 28
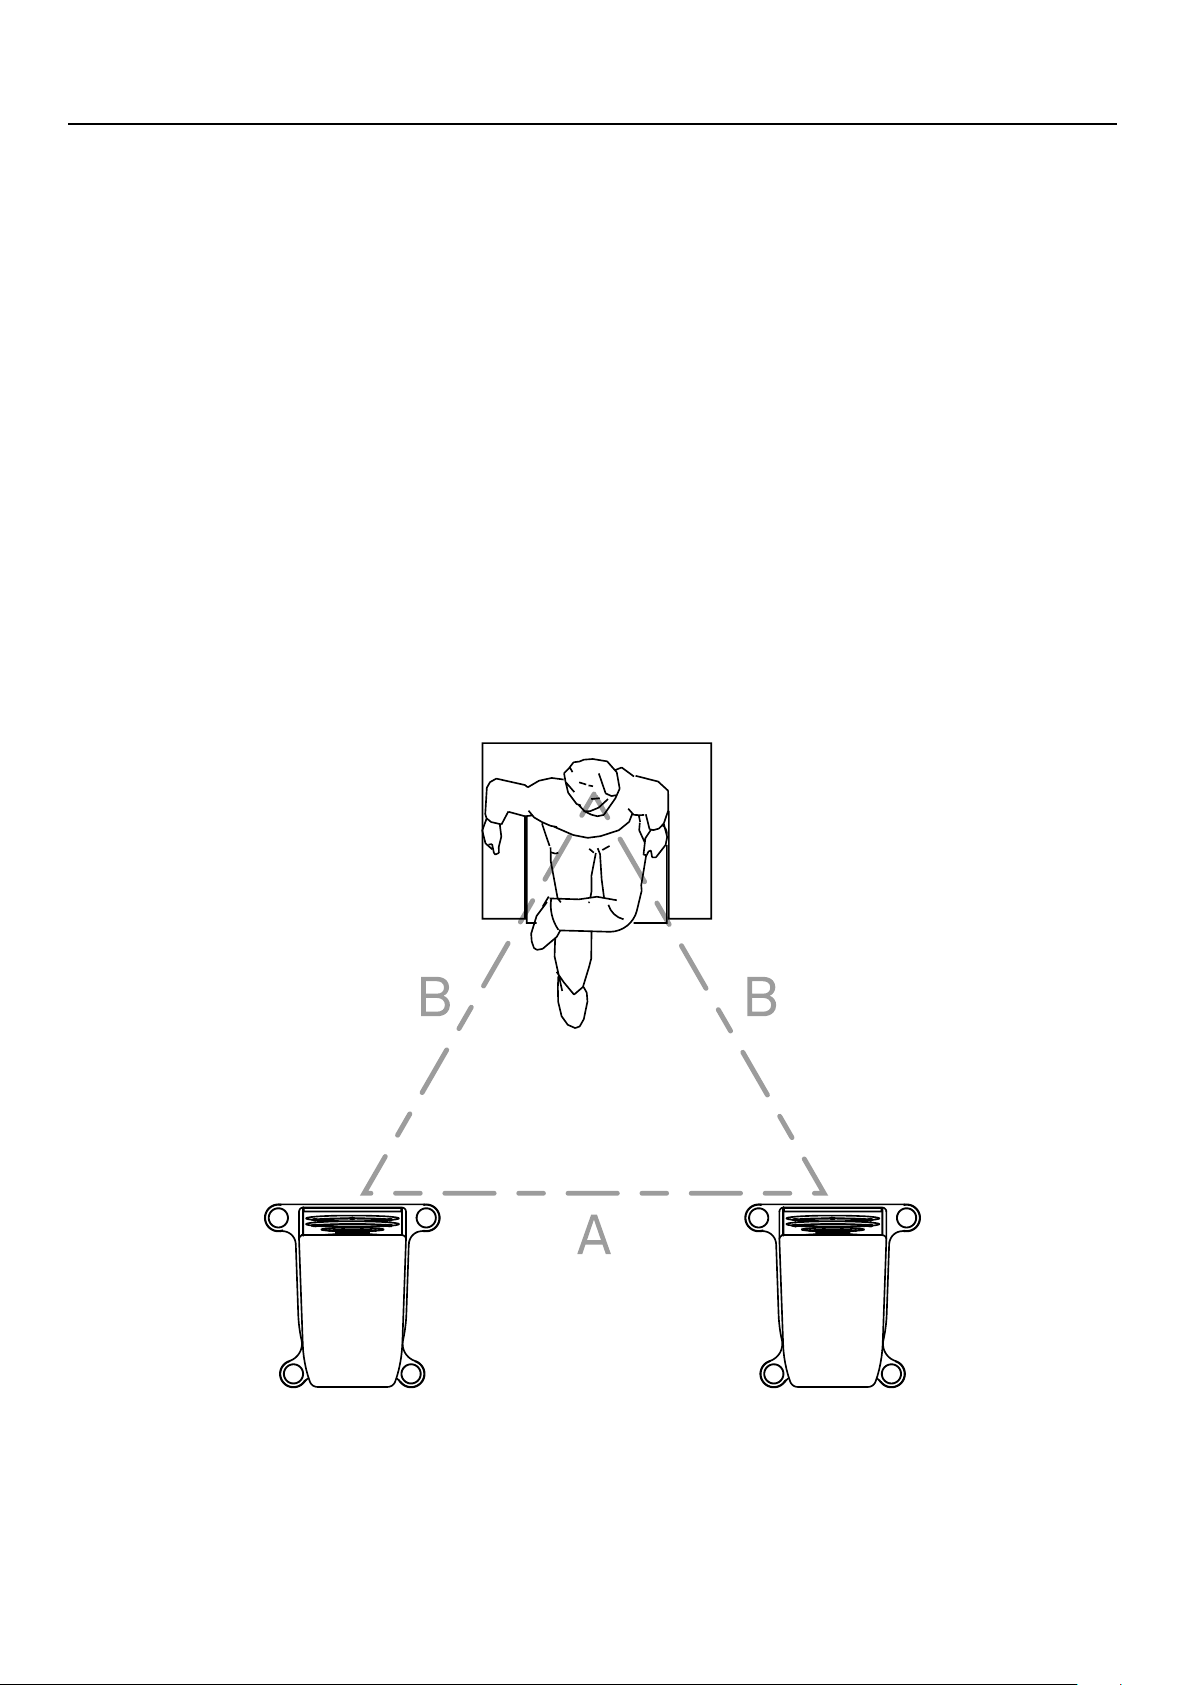
Speaker placement
The position of the loudspeakers is non-critical, since their radiation pattern is excellent. Provided that you keep to a few basic rules it is easy to deter-mine the ideal location for them.
They should be positioned in such a way that the two speakers and the listener form the
three points of an approximately equilateral triangle.
On no account set up the speakers too far apart. The treble and mid-range units should
be set up roughly at ear level. Angling the speakers in towards the listener improves the
sound quality. Hiding the speakers behind furniture or curtains reduces the high-frequency response dramatically.
The minimum listening distance is 2 metres and we do not recommend that you position
yourself any closer to the speakers than this. To full the equilateral triangle rule this
implies a minimum distance between the speakers of 2 metres.
28
Page 29
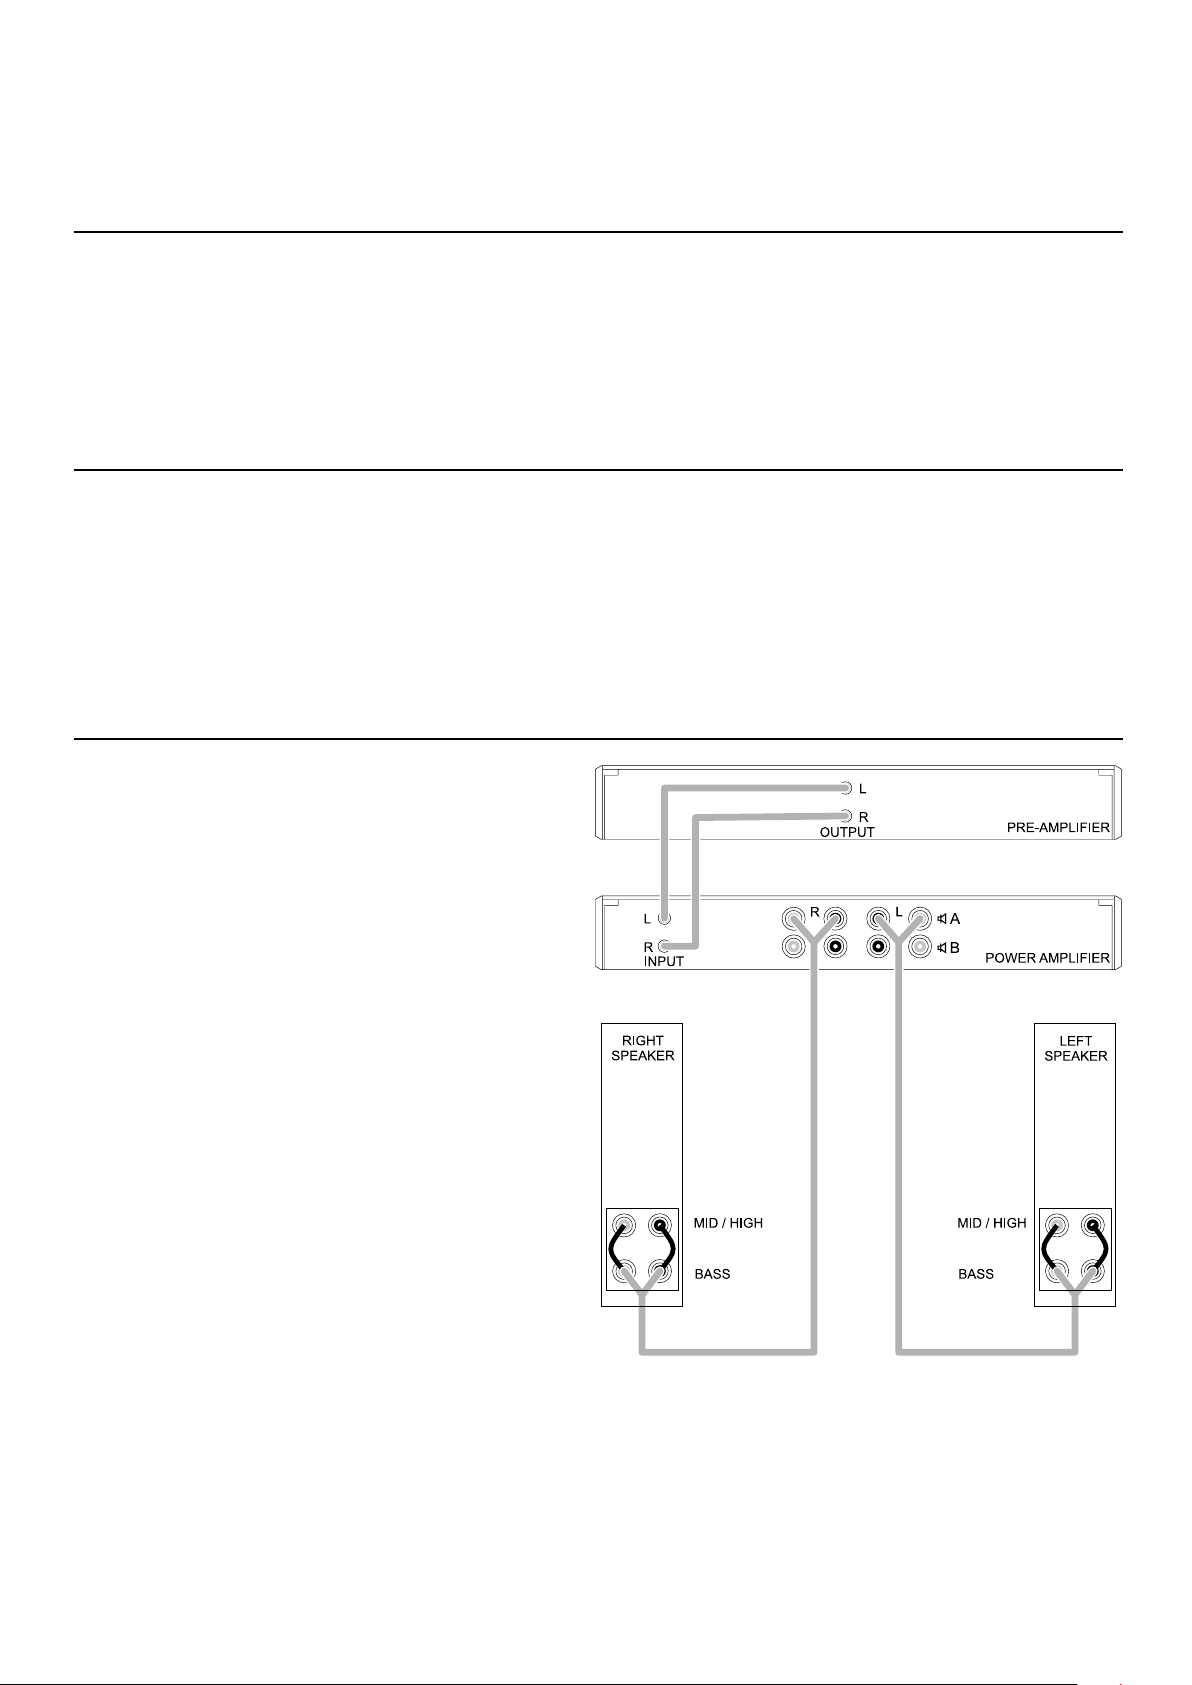
Connection
Amplier
The Solitaire S 430 can be connected to any amplier designed for a 4 Ohm speaker
load. However, if you wish to exploit the full sound potential of these speakers, we recommend power ampliers which are capable stable of supplying high currents.>10
Ampere.
Cables
The cables employed in any Hi-Fi system have a crucial inuence on the sound of the
system as a whole. For this reason T+A has developed its own range of cables which
includes the ideal type for every application. These cables are designed to match the
special characteristics of our loudspeakers. Please note that all the cables used should
be the same length!
Standard wiring
In the standard wiring
arrangement only one
speaker cable is required
for each loudspeaker. The
linking bridges between
Bass and Mid / High
must be left in place.
29
Page 30
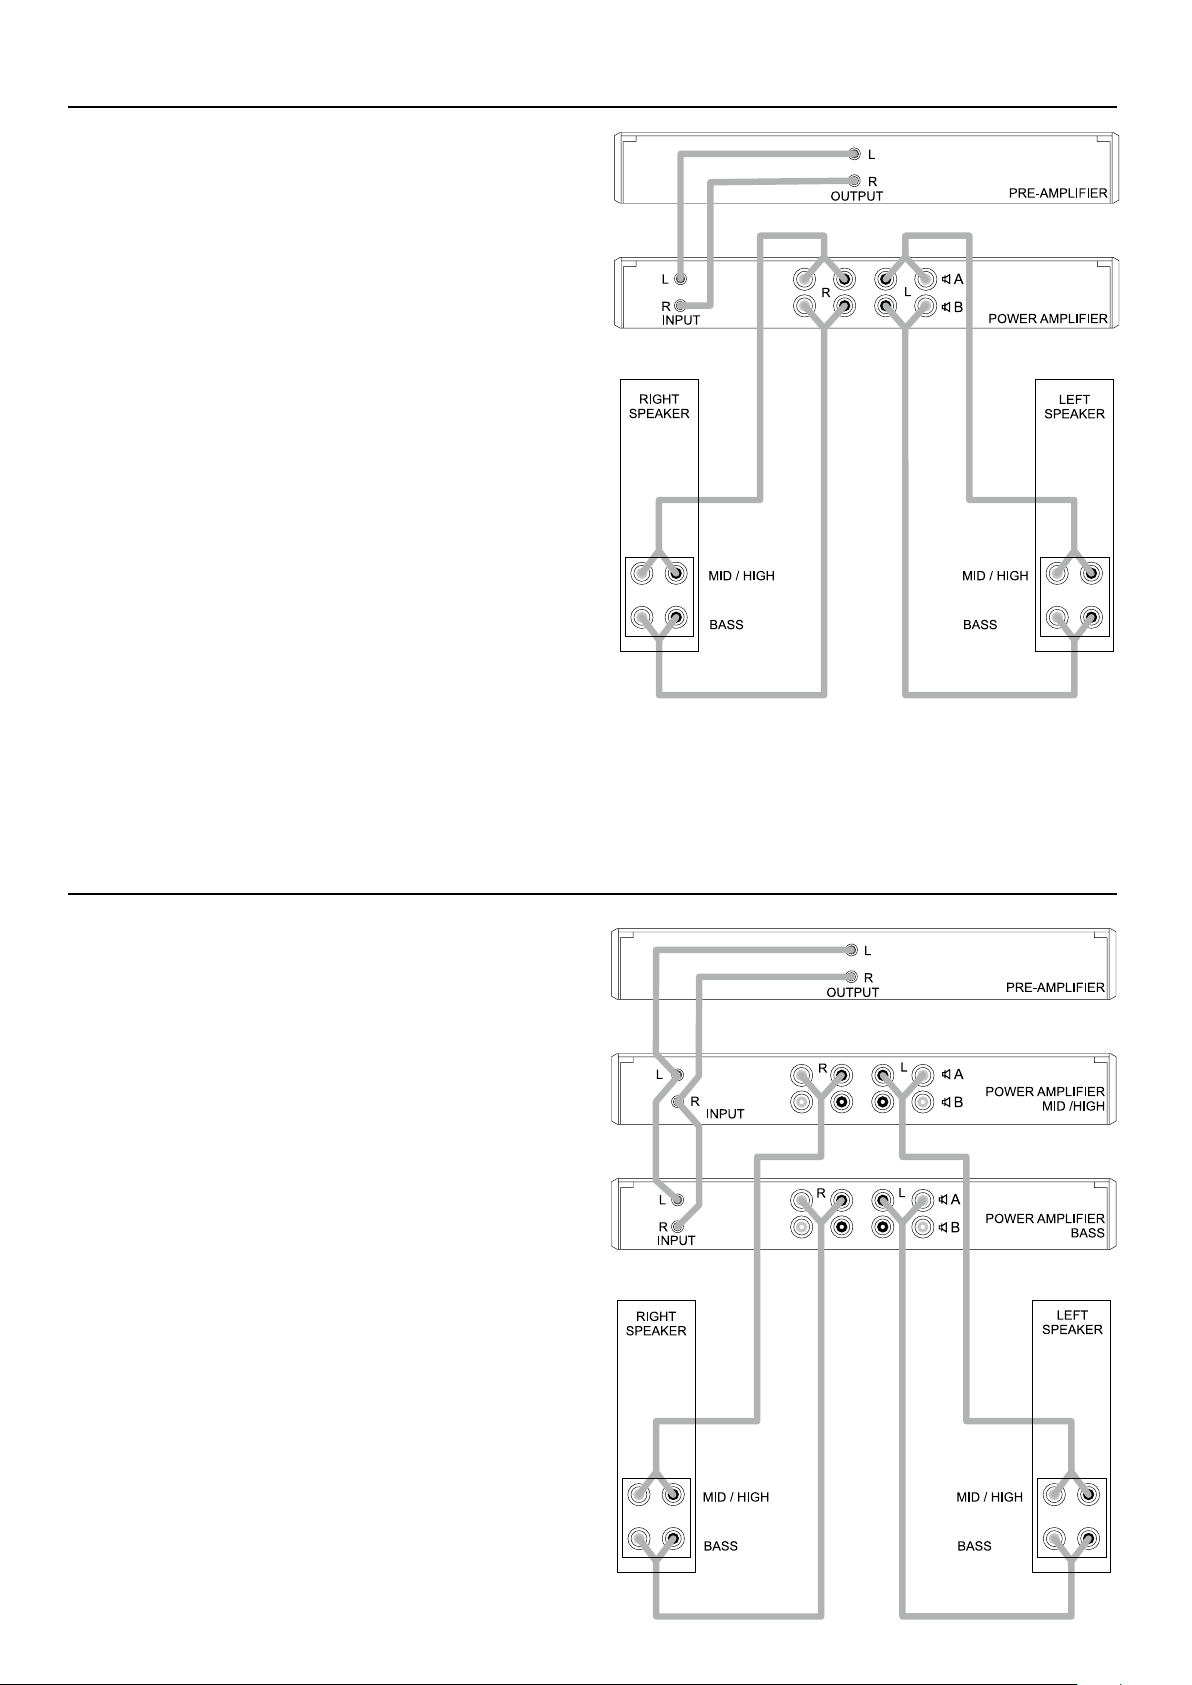
Bi-Wiring
Bi-wiring provides better
sound by separating the bass
(Bass) signal and mid-range/
treble signals (Mid/High). Two
speaker cables are required
for each loudspeaker.
If your power amplier has two
loudspeaker outputs (A and B),
the speakers are connected
as shown in the illustration
below; If the power amplier
has outputs for only one pair
of loudspeakers, connect both
cables to these outputs in
parallel.
In bi-wiring arrangements the
cables bridging of the woofer
(Bass) and mid/high (Mid/High)
input terminals must be removed!
Bi-Amping
For bi-amping, the signal paths
of the low and mid/high ranges
are separated before the power
ampliers.
One stereo power amplier
takes over the amplication
of the low frequency range for
both channels while the other
stereo power amplier drives
the mid/high frequency range
of both channels.
In bi-amping arrangements the
cables bridging of the woofer
(Bass) and mid/high (Mid/High)
input terminals must be removed!
30
Page 31
Protection cover
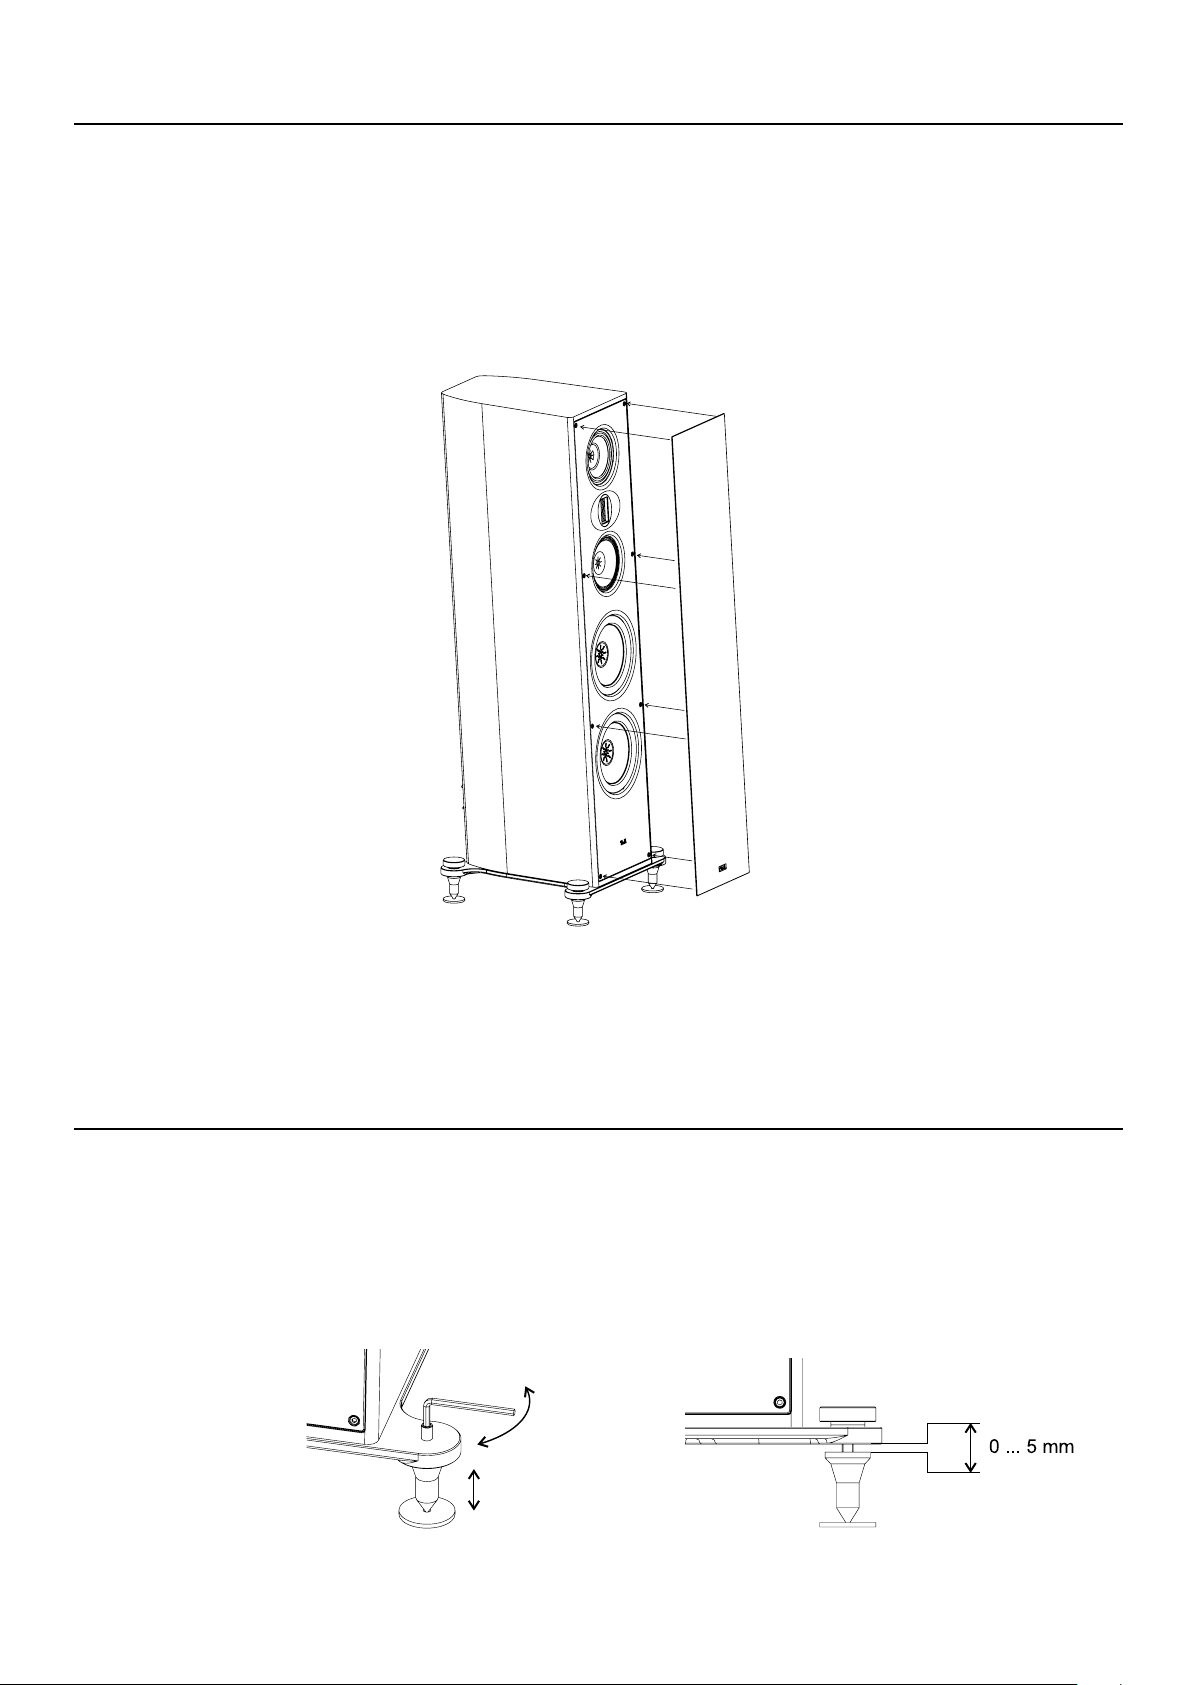
The covers included in the scope of delivery can be tted to protect the loudspeaker
drivers. The covers are acoustically optimized. For the best possible sound quality, we
recommend that you remove the covers during playback.
The covers are xed with integrated magnets. To attach, align the covers to the edges of
the aluminium front plate and let them snap into place. To remove the covers, carefully
pull them off towards the front.
Level adjustment
The spikes can be turned in and out to achieve optimum height compensation on uneven
surfaces.
The spikes must be adjusted in such a way that the loudspeaker has a solid contact to
the ground and does not „tilt“.
31
Page 32
Room correction
Level adjustment
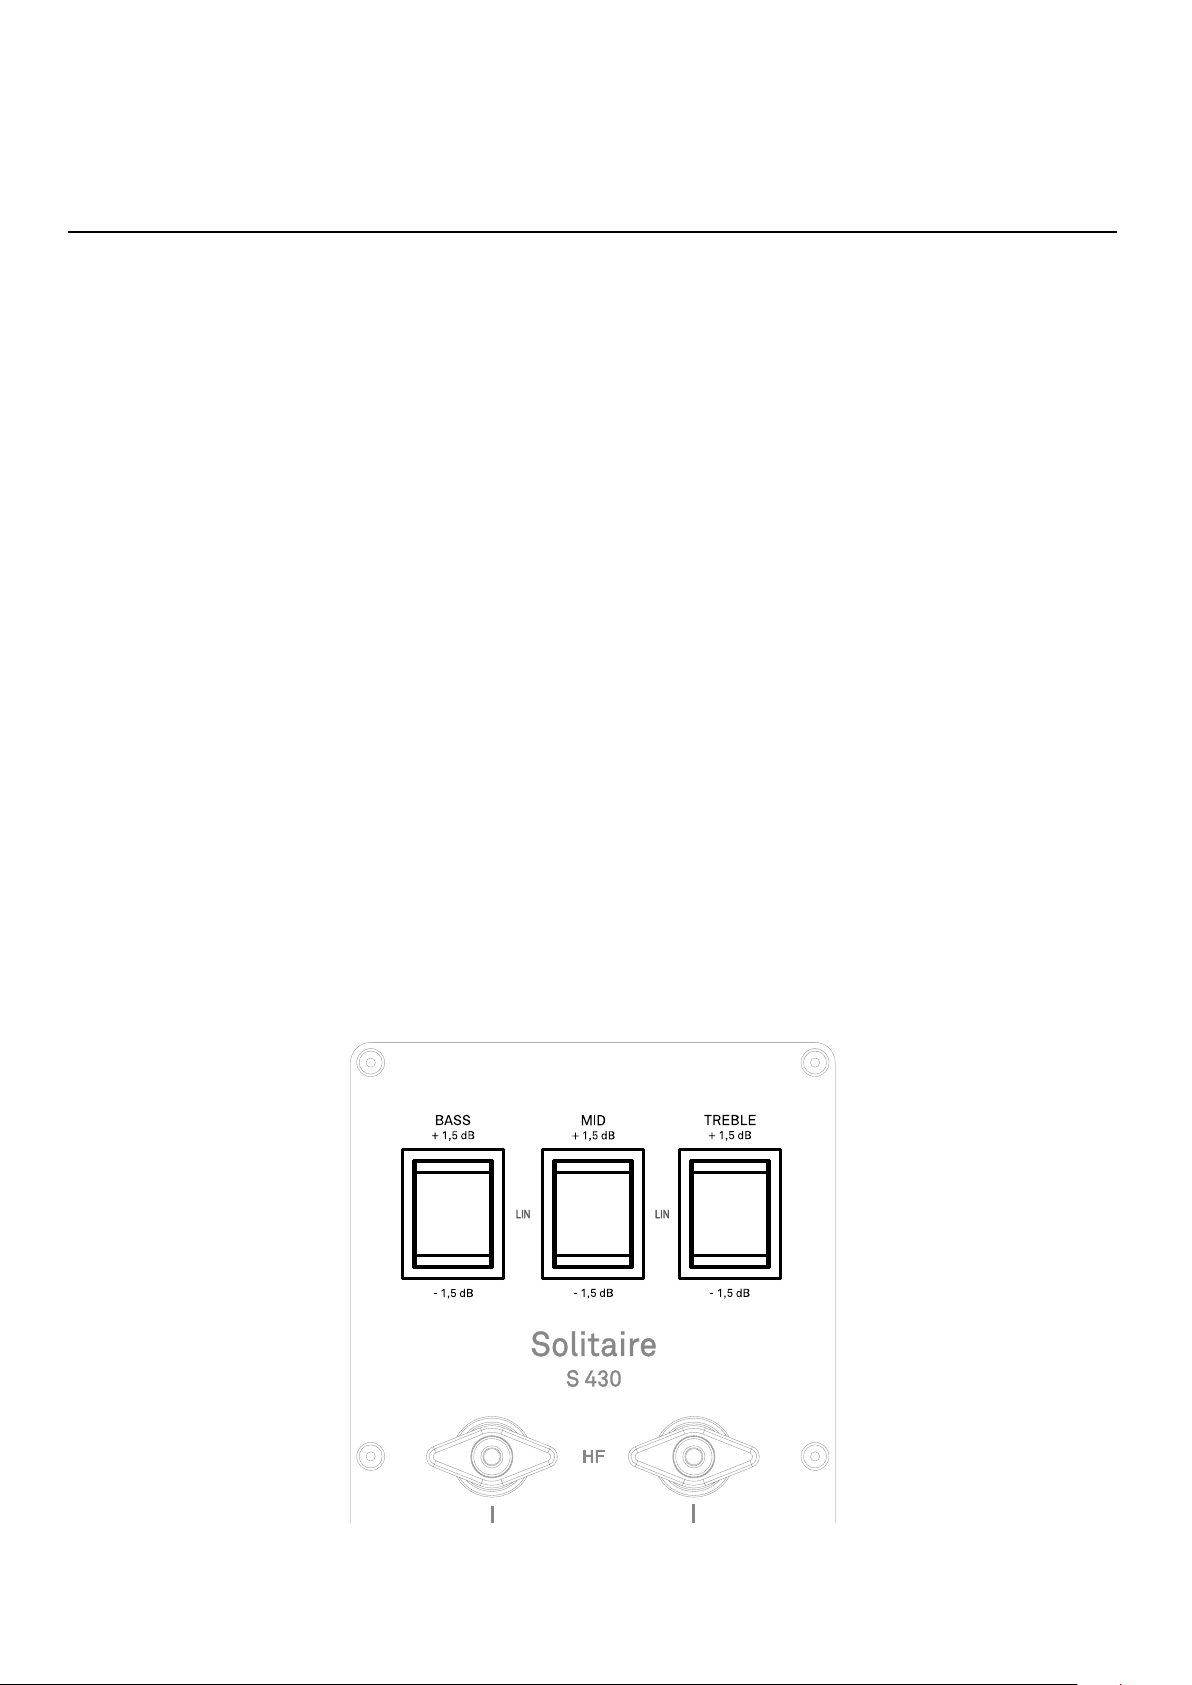
The Solitaire S loudspeakers can easily be adjusted to suit the acoustic qualities of the
listening room, or to particular conditions and speaker positions.
For example, it may well be necessary to reduce the bass range if the speakers are set
up close to a wall.
To facilitate these adjustments you will nd three switches (marked BASS, MID and TREBLE) on the rear terminal of the speaker cabinet; each switch has three positions: +1.5
dB, LIN and -1.5 dB.
BASS
If the loudspeakers are set up in a listening room a considerable distance from the walls
(> 1.5 m) we recommend setting the switch to +1.5 dB.
If the loudspeakers are set up in a listening room close to the walls, in our experience
the best results in terms of sound are obtained with the switch set to 0 dB.
If the loudspeakers are set up in one corner of the room, the result can be excessive
bass emphasis. The 1.5 dB setting compensates for this effect.
MID / TREBLE
On the rear of each speaker you will also nd two additional switches for adjusting the
treble and mid-range response to suit the listening room. The default position for both
switches is 0 dB.
These switches enable you to adjust the level by +/ 1.5 dB, and the adjustment is designed to compensate for very „hard“ (highly reective) or very „soft“ (highly damped)
rooms. For rooms which tend to echo, we recommend the 1.5 dB setting.
In contrast, a lift of 1.5 dB may be helpful in rooms which tend to damp sound down.
32
Page 33

Environmental aspects
In the development of SOLITAIRE loudspeakers we concentrate on innovative solutions
to problems, and solid, well thought-out designs, but these are not our only concerns.
We place equal importance on the maintenance of all German and European safety
norms and standards.
We are able to guarantee that our products are of the highest quality, and meet all our
specications in full, because we carry out strict quality checking of all materials, employ painstaking production methods controlled by highly qualied staff, and carry out a
fully automatic, computer-controlled nal quality control procedure.
At the earliest stage of development we also emphasise the importance of avoiding environmentally harmful materials and methods of working.
For example, we avoid the use of materials which are injurious to health, such as chlorine-based solvents and CFCs.
We also aim to avoid the use of plastics in general, and PVC in particular, in the design of
our products.
Instead we rely upon metals and other non-hazardous materials which are easy to recycle.
The sound-absorbent wadding used in our loudspeakers is made of 100 % polyester
bres, in conjunction with a binding bre.
This material has been tested for harmful ingredients to Eco-Tex Standard 100; the same
test is used for clothing, bedclothes, pillows, mattresses, household textiles etc.
The wadding we use has passed the test entitled ‚textiles tested for harmful materials‘
and fulls the currently valid humane-ecological requirements. It has even successfully
met the very exacting requirements of the standard test for baby clothing.
Maintenance
If you need to clean your speaker cabinets, simply wipe the surfaces with a soft dry
cloth.
Never use powerful cleaning agents or solvents! If necessary, you can clean the front
grille with a vacuum cleaner, but do take care!
Please note that the drive units of some loudspeakers are mounted immediately behind
the grille. Don’t press too hard against the grille with the vacuum cleaner, otherwise you
could damage the delicate speaker chassis.
33
Page 34

34
Page 35
Technical Specications
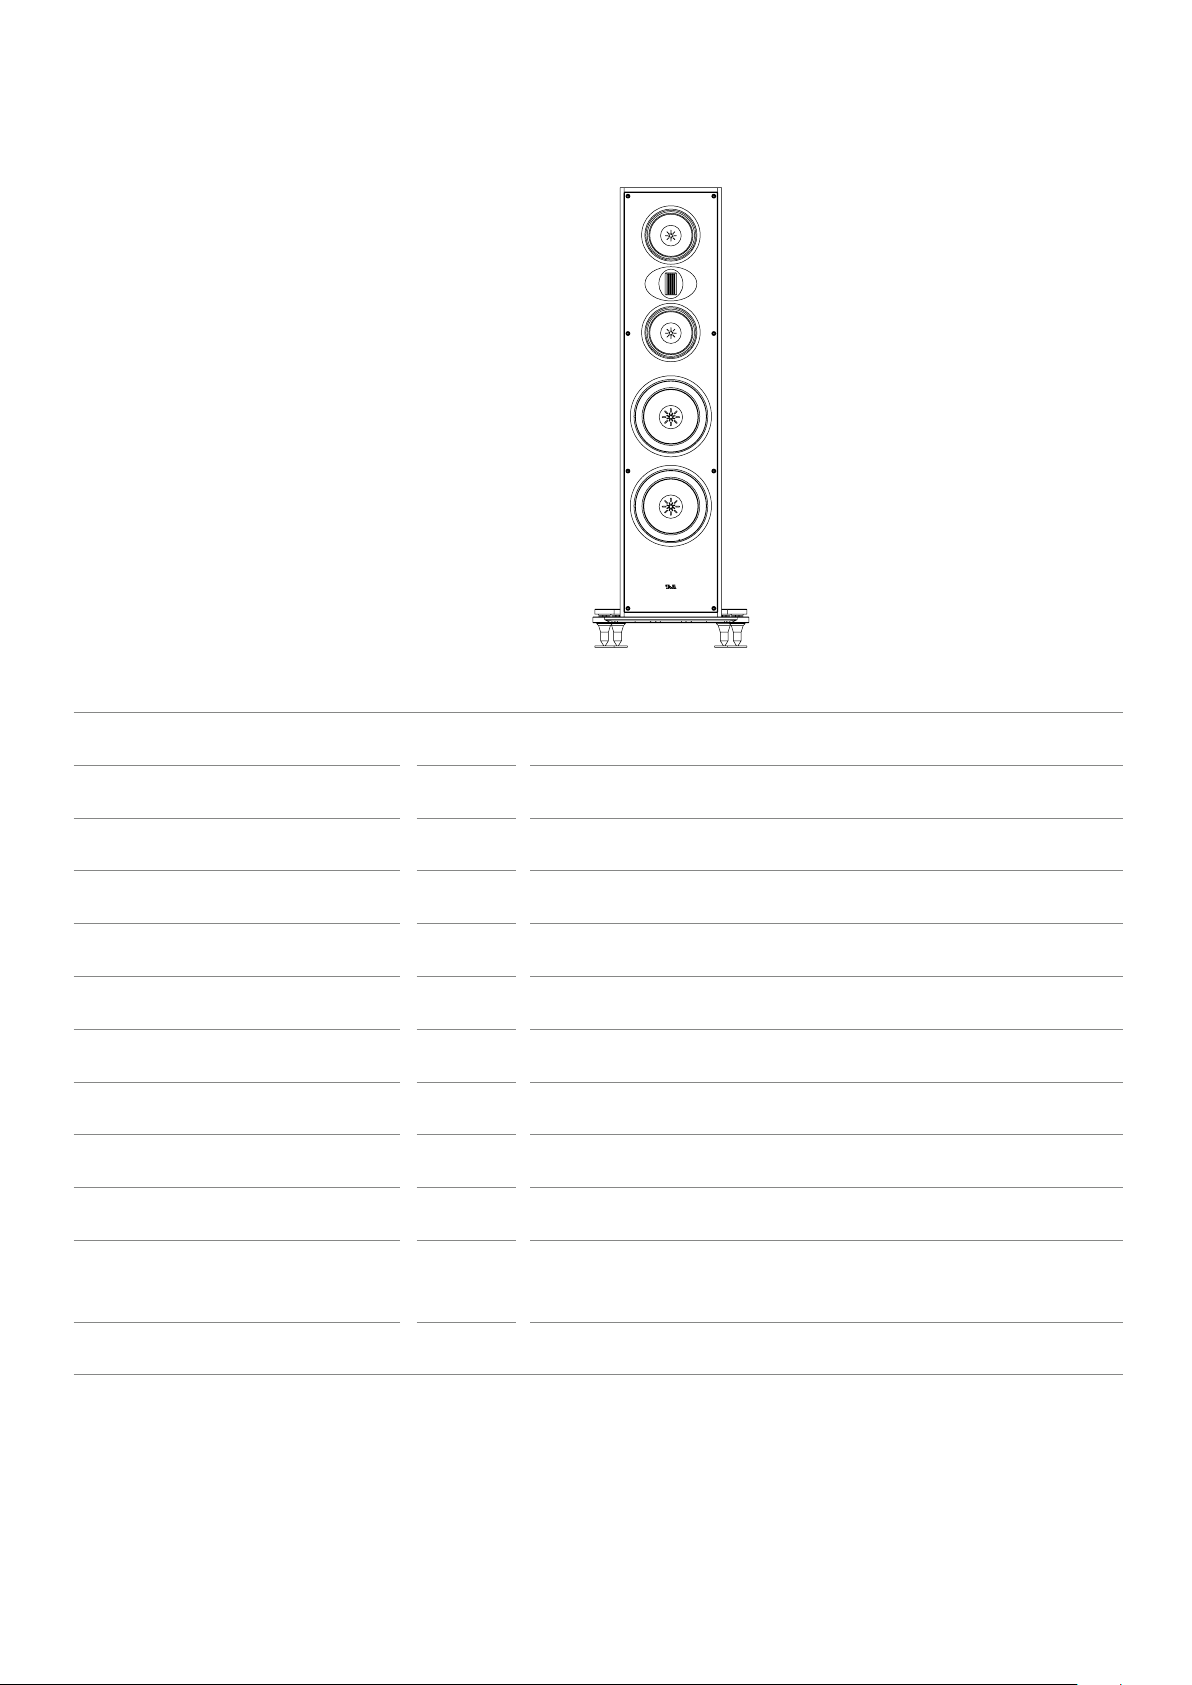
Principle Floor-standing speaker, 3-way, bass reex
Nominal power rating 200 Watts
Music power rating 250 Watts
Impedance 4 Ohm
Frequency range 29 - 45000 Hz
Sensitivity 86 dB
Drive units bass 2 x 220 mm
Drive units midrange 2 x 150 mm
Drive units highrange 1 x 50 mm Magnetostat
Cross-over frequencies 200 / 2200 Hz
Dimensions H x W x D 118 x 26 x 44 cm
Height incl. base
Weight 55 kg
We reserve the right to alter technical specications.
35
Page 36

T+A elektroakustik GmbH & Co. KG
Planckstraße 9 – 11
32052 Herford | Germany
T +49 5221 76760
F +49 5221 767676
info@ta-hi.com
www.ta-hi.com
9103 - 0610 (1)
 Loading...