

Page 1

SYSTRAN 5.0 Professional Premium
™
SYSTRAN 5.0 Professional Standard
™
Quick Start Guide
Language Translation Software
Page 2

SYSTRAN 5.0 Professional Quick Start Guide
SYSTRAN 5.0 Professional
Quick Start Guide
SYSTRAN 5.0 Professional Premium
™
SYSTRAN 5.0 Professional Standard
™
Welcome to the SYSTRAN 5.0 product family, which uses the same cuttingedge language translation technologies that have made SYSTRAN products
and solutions the choice of leading search engines, multinational corporations,
and governments for over three decades. SYSTRAN 5.0 represents the latest
generation of high-performance integrated translation tools.
This Quick Start Guide will help you get started using your SYSTRAN 5.0
product. The topics covered in this Guide are:
• Installing your Application
• Activating and Registering your Product
• Using the SYSTRAN Toolbar
• Translating Web pages
• Translating Microsoft
®
Word documents, PowerPoint presentations,
and Excel spreadsheets using “SYSTRAN Toolbar”
• Translating PDF files
• Translating email in Microsoft Outlook
• Translating any text using SYSTRAN Clipboard Taskbar
• Managing translation projects using SYSTRAN Translation
Project Manager
• Translating a set of files using SYSTRAN MultiTranslate Utility*
• Creating a User Dictionary with SYSTRAN Dictionary Manager
• SYSTRAN Products Feature Comparison
* SMTU is available in SYSTRAN Professional Premium 5.0 only.
Note: For a list of the differences among SYSTRAN products, please refer to the
SYSTRAN Products Feature Comparison at the end of this Guide.
For detailed information about a feature, see the SYSTRAN 5.0 User Guide.
Page 3

SYSTRAN 5.0 Professional Quick Start Guide
Installing Your Application
1. Inser t the CD into your computer’s CD-ROM drive, or, if you received your
software via download, run the installation program that you downloaded.
. When the installation popup appears, choose the language for
the installation and click OK.
. When the Welcome page appears, click Next.
4. When the License Agreement appears, read it carefully. If you agree
with the terms, click Next. (You must agree with the terms to proceed
with the installation.)
5. In the next screen, enter your Username and Organization information.
Select Install this application for anyone who uses the computer and
click Next.
6. In the next screen, choose the target folder for the installation
and click Next.
7. In the next screen, choose Complete Installation and click Next.
8. Click the Install button.
Activating and Registering your Product
1. When you run a translation on any of the installed SYSTRAN products for
the first time, a Welcome screen will be displayed. This will invite you to
activate your product. After reading the displayed information, click Next.
. Select Internet for quick and easy activation, and click Next. If you do not
have an internet connection, select Phone and follow the instructions.
. Fill out the user registration for m and click Next.
4. Type in your activation code. If you purchased SYSTRAN via download,
look for five groups of six digits on the purchase record that was emailed
to you from Digital River. If you purchased the CD version, you can find
the code on the back of the Quick Start Guide. Click Next.
5. The product is now activated. Click Finish and begin translating.
Page 4

SYSTRAN 5.0 Professional Quick Start Guide
4
Using the SYSTRAN Toolbar
The SYSTRAN Toolbar is common to all SYSTRAN 5.0 Professional
applications. You use the Toolbar to translate from an original (or “source”)
language into a different (or “target”) language. The SYSTRAN Toolbar
also provides buttons you can use to modify your translation. Since the
applications in SYSTRAN 5.0 offer dif ferent capabilities and features, these
buttons may vary between applications.
To use the SYSTRAN Toolbar:
1. Select a Source Language from the left-hand drop-down list, or use Auto
Detect to have the software automatically detect the language.
. Using the right-hand drop-down list, select a Target Language.
. Click the Translate button to per form the translation.
4. Optional: To improve your translations, click:
• 4a. The Translation Options button to select translation options such
as whether capitalized words and phrases should be left as they
are, and others.
• 4b.
The Dictionary button to select any dictionaries you want to use.
• 4c. The Review button for information about Not Found Words, etc.
• 4d. Other buttons specific to the SYSTRAN application to further
customize and improve your translation.
5. If you performed step 4, click the Translate button again to see the
results. Repeat steps 4 and 5 as necessary until the desired translation
is achieved.
Note: In the Microsoft Office plugins, the Source and Target Languages are
selected from a single drop-down list.
3 & 5 - Translate Button
1 - Source Language
Drop-down List
2 - Target Language
Drop-down List
4a - Translation
Options Button
4c - Review Button
4b - Dictionary
Button
4d - Application Specific
Buttons appear here
Page 5

SYSTRAN 5.0 Professional Quick Start Guide
5
Translating Web Pages
1. Open Internet Explorer.
. You should see the SYSTRAN Toolbar at the top of your browser window.
If the SYSTRAN Toolbar is not displayed, right-click IE Toolbars and check
the SYSTRAN item.
. Go to the URL you want to translate.
4. In the SYSTRAN Toolbar, select a Source Language or select Auto to have
the software automatically detect the language.
5. In the SYSTRAN Toolbar, select a Target Language.
6. In the SYSTRAN Toolbar, click the Translate button:
The translated page is displayed.
7. To switch back and forth between the original and target pages, click the
button on the far right side of the toolbar:
8. Select fluid navigation options to enable automatic translation of all links
on a Web page once the Web page has been translated:
A Web page is translated from English to German directly from the Office desktop.
Page 6
SYSTRAN 5.0 Professional Quick Start Guide
6
Translating Word Documents, PowerPoint
Presentations, and Excel Spreadsheets
1. Open the Microsoft Word document, PowerPoint presentation, or Excel
spreadsheet you want to translate.
. In the SYSTRAN Toolbar, select the Source-Target Language pair.
. In the SYSTRAN Toolbar, click the Translate button:
A popup prompts you to save the translated file.
4. Choose the target location and click Save. The translated
document is displayed.
5. Microsoft Word only: To select a sentence in the source or target
document and see the corresponding area highlighted in the other
document, enable extended alignment:
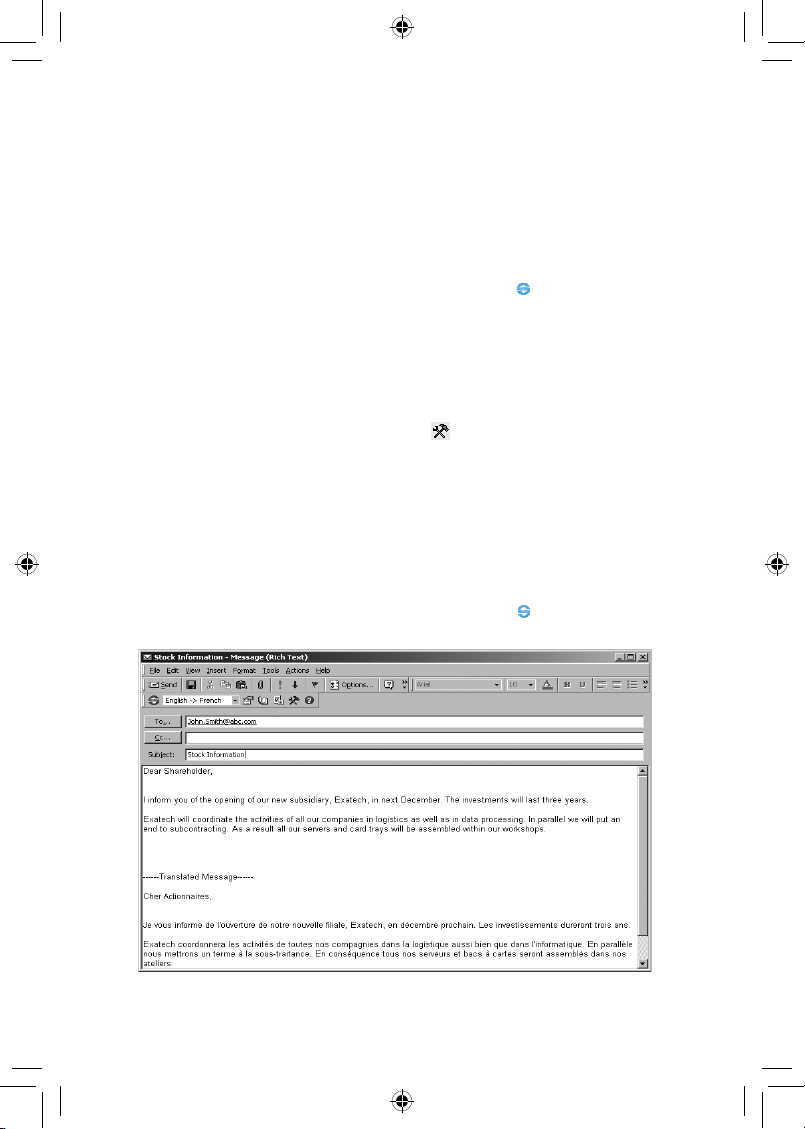
Translating Email in Microsoft Outlook
1. Open Microsoft Outlook.
. Open the mail you want to translate or type a new email.
. In the SYSTRAN Toolbar, use the Language drop-down list to select the
Source-Target Language pair.
4. In the SYSTRAN Toolbar, click the Translate button:
The translated email appears below the original message.
Instantly translate your email using the plugin integrated into Microsoft Outlook.
Page 7

SYSTRAN 5.0 Professional Quick Start Guide
7
Translating PDF Documents
PDF File Translation
SYSTRAN 5.0 provides a right-click command for translating Portable
Document Format (PDF) files from the Windows Explorer desktop or director y
window. To use this feature:
1. Right-click on the name of the PDF File you want to translate.
. In the Contextual menu, click the sub-menu > Translate to select
the language pair you want to translate (for example, Translate
English->Spanish).
. A progress bar which tracks the translation process then appears. When
the translation is completed, an RTF file named with the abbreviation of
the language pair used is automatically created in the same director y
as the original file. In other words, if you translated the filename
“Bus_Dev_Q4.doc” from English->Spanish, the name of the newly
created file is “Bus_Dev_Q4_enes.rtf”.
4. Optional: To improve the quality of your translations:
Click the Translation Options menu to activate translation options such
as spell-checking or markup of Not Found Words (words not found in
SYSTRAN’s main dictionaries).
5. If you per formed the option in step 4 above, click the Translate button
again to view the new results. You may repeat steps 3 and 4 until the
desired translation is achieved.
Note: PDF file translation is limited to the first 8 pages of your document.
Translate PDF documents directly from the Windows Explorer desktop
or directory window.
Page 8

SYSTRAN 5.0 Professional Quick Start Guide
8
Translating Any Text Using SCT
SYSTRAN Clipboard Taskbar (SCT) lets you translate text from almost
any application by cutting or copying text to the Windows Clipboard. SCT
automatically translates the Clipboard text, which you can then paste into
your application.
1. Open a file. You can use any word processor or email program such as
Microsoft Word, Notepad or WordPad.
. Click on the desktop icon labeled SYSTRAN Clipboard Taskbar or go to
Start, then Programs, and look for the SYSTRAN program group and then
click on SYSTRAN Clipboard Taskbar.
. Highlight the text that you would like to translate.
4. Copy the text to the Windows Clipboard (right-click on the highlighted text
and select Copy, go to Edit and select Copy or press CTRL+C).
5. Select the source and target languages on the SYSTRAN Clipboard
Taskbar.
6. Click the Translate button on the SYSTRAN Clipboard Taskbar, to the
left of the language selection menu.
Note: This step is not necessar y if you have set the Active Clipboard to Yes in the
Clipboard Translation Options panel:
7. Watch the progress bar on the right side of the Taskbar. When it’s done,
paste the translated text into your original file or email message.
8. To paste translated text into an application other than the one you
copied it from – such as copying text from a Web browser, translating the
text, and pasting it into a text editor – you may need to enable CrossApplication Support in the Clipboard Translation Options panel:
Managing Translation Projects Using STPM
SYSTRAN Translation Project Manager (STPM) is a “translation workbench”
that lets you manage translations from initial document analysis through
dictionary updates, and use reviewing tools for quality assurance.
1. Click the Start menu in the Windows taskbar. Click Programs, then
click the SYSTRAN folder. Double-click the SYSTRAN Translation Project
Manager link.
Page 9

SYSTRAN 5.0 Professional Quick Start Guide
. Use any of the following ways to start
a new project:
•From the File menu, click New Project.
•
Import a file by clicking Import File on
the File menu.
•
Open a Web page by entering the URL in
the address bar and click Open.
. In the SYSTRAN Toolbar, select
a Source Language.
4. In the SYSTRAN Toolbar, select
a Target Language.
5. Click the Translate button:
6. Optional tasks you can perform
from the SYSTRAN Toolbar:
•
Use alignment to select a sentence
in one document and see
the corresponding sentence in
the other document.
•
Review meanings, terminology,
source analysis, Translation Memory,
and sentences:
•Search and highlight words and expressions:
•Edit the documents to improve
the translation.
7. Save the project by clicking Save Project on the File menu.
8. You can later reopen your saved file by clicking
Open Project on the File menu.
Translating a Set of Files Using SMTU
The SYSTRAN MultiTranslate Utility (SMTU) lets you translate groups
(or “batches”) of documents at one time.
1. Click the Start menu in the Windows taskbar. Click Programs, then click
the SYSTRAN folder. Double-click the SYSTRAN MultiTranslate Utility link.
. To create a new batch project, click New Project on the File menu.
Use “Search and Highlight” to easily
locate words, terms and specific
entries with STPM.
Page 10

SYSTRAN 5.0 Professional Quick Start Guide
10
. Add to the batch file
the files, folders, and
Web pages you want to
translate.
4. Order the batch
file contents in the
appropriate sequence.
5. In the SYSTRAN Toolbar,
select a Source Language.
6. In the SYSTRAN Toolbar,
select a Target Language.
7. Use the Batch Entry
Options panel to specify
destination file locations
for the translated files,
as well as other processing
options:
8. Click the Translate button and select Translate Batch to translate
all the documents that you added to the batch project.
. Save the project by clicking Save Project
on the File menu.
10. You can later reopen your saved file by clicking Open Project
on the File menu.
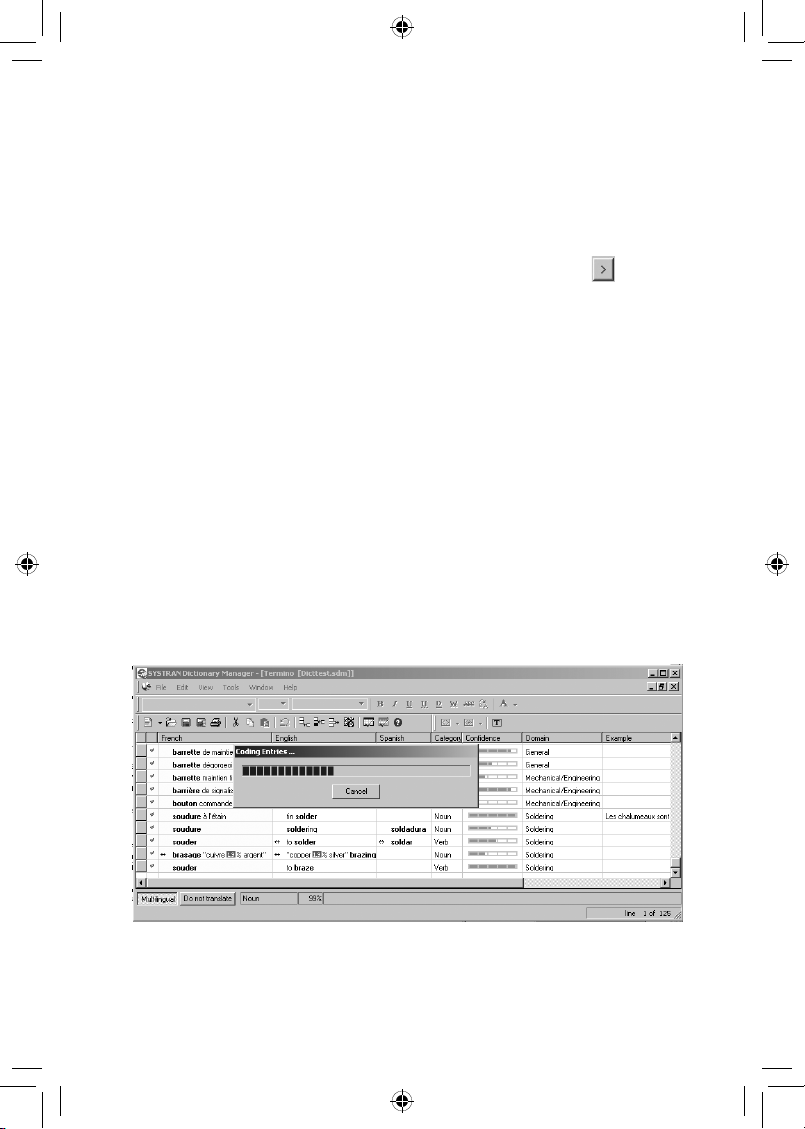
Creating a User Dictionary with SDM
User Dictionaries (UDs) let you train the software about your translation
requirements by adding or editing terms that are to be considered during
translations. UDs can be used with terms that have specific or unusual
meanings, such as your company name, or terms specific to your business
or industry that are not included in the SYSTRAN dictionaries.
You create UDs using SYSTRAN Dictionary Manager (SDM). The following
procedure provides basic instructions for creating a UD. To use SDM’s
advanced features, or for more information about UDs and SDM, see the
SYSTRAN 5.0 User Guide.
Control and track multiple translations at one time.
Page 11
SYSTRAN 5.0 Professional Quick Start Guide
11
1. Click the Start menu in the Windows taskbar. Click Programs, then click
the SYSTRAN folder. Double-click the SYSTRAN Dictionary Manager link.
. On the File menu, point to New and click Dictionar y Project.
. Select the source and target language(s) in Language tab:
•Select Source Language using the drop-down list.
•Select the target language(s) in Available Languages and click
to add them.
•Check Show Coding Status checkbox to view whether the coding
for an entry is successful.
4. Click the Proper ties tab.
5. Define the name that will be displayed when selecting the dictionary
for a translation in the corresponding textbox.
6. Click the OK button.
7. In the Edit menu, click Add Entry. In the leftmost column, type the word or
phrase for the source language. Move the cursor to the Target language
field and enter the appropriate word or phrase in the target language.
8. To add more words and phrases, repeat step 7.
. When you finish adding words and phrases, click the File menu and click
Save. Assign a name to the UD and click Save.
Your UD is now available in any SYSTRAN application.
A multilingual User Dictionary created with SDM.
Page 12

SYSTRAN 5.0 Professional Quick Start Guide
1
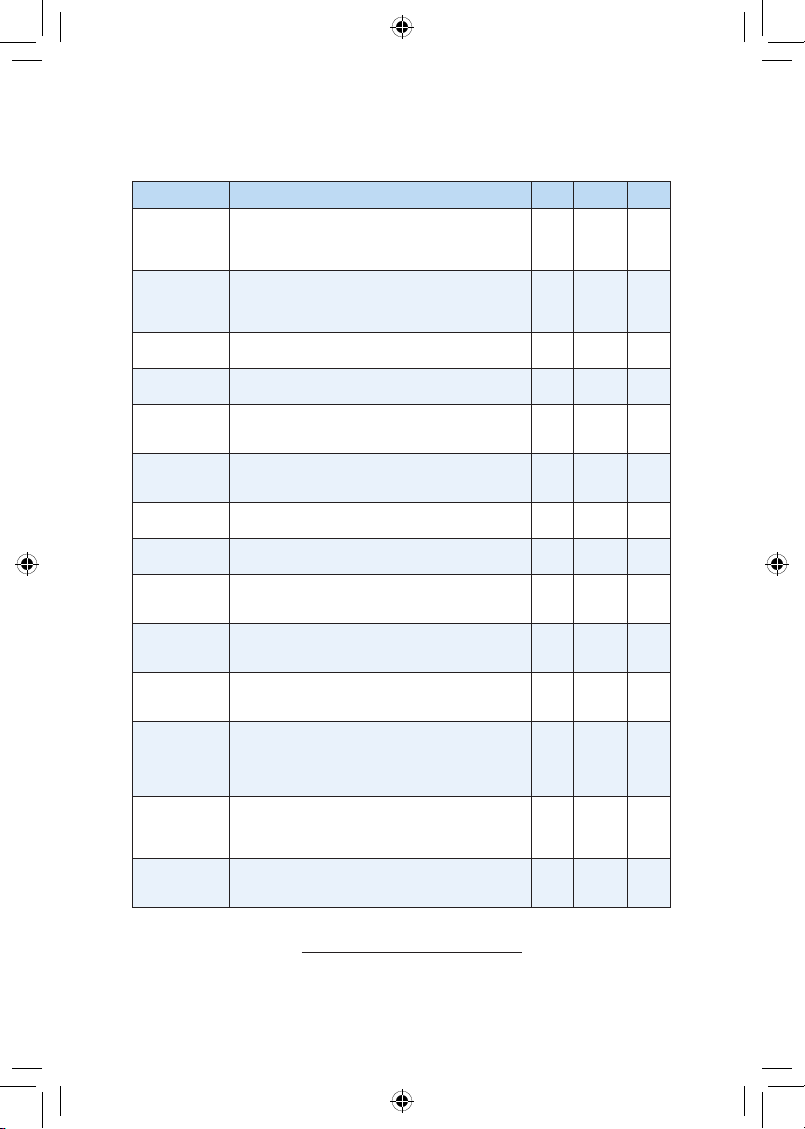
SYSTRAN Products Feature Comparison
The following table summarizes the GUI components supported by SYSTRAN 5.0
products. For more information, see the SYSTRAN 5.0 User Guide.
Feature
SYSTRAN PDF
Translator
SYSTRAN Web
Translator
SYSTRAN
Personal
SYSTRAN
Office
Translator
SYSTRAN
Professional
Standard
SYSTRAN
Professional
Premium
GUI Components
Translation for PDF
documents
✓ ✓ ✓
SYSTRAN Clipboard
Taskbar (SCT)
✓ ✓ ✓
Plugin for Internet Explorer
✓ ✓ ✓ ✓ ✓
Plugin for Microsoft Word
✓ ✓ ✓
Plugin for Microsoft Outlook
✓ ✓ ✓
Plugin for Microsoft
PowerPoint
✓ ✓ ✓
Plugin for Microsoft Excel
✓ ✓ ✓
SYSTRAN Translation
Project Manager (STPM)
Advanced Expert
SYSTRAN Dictionary
Manager (SDM)
Basic Basic Advanced Expert
SYSTRAN MultiTranslate
Utility (SMTU)
✓
Features
Language detection
✓ ✓ ✓ ✓ ✓ ✓
Translation options
✓ ✓ ✓ ✓ ✓ ✓
Dictionary updates
✓ ✓ ✓ ✓ ✓ ✓
Translation markup
✓ ✓ ✓ ✓
Translation customization UD UD UD
UD
TM
ND
Terminlology extraction NFW Only
✓
Access to SYSTRAN online
dictionaries
✓ ✓
Additional specialized
terminology
✓
Limitations
Document Size 8 pages None
2 pages
No limit
for IE
5 pages
No limit
for IE
None None
UD Size 100 500 2,000 20,000
UD Name Fixed Fixed Adjustable Adjustable
UD Type Bilingual Bilingual Bilingual Multilingual
ND Size 20,000
TM Size 40,000
Number of UDs that can
be loaded
NA NA 1 1 10 10
Number of TMs that can
be loaded
10
Number of NDs that can
be loaded
10
Page 13

SYSTRAN 5.0 Professional Quick Start Guide
1
The following table shows the features supported by the Advanced and Expert versions
of STPM. For more information about STPM, see the SYSTRAN 5.0 User Guide
Feature Description
Advanced Expert
Side-by-side
alignment
Side-by-side comparison and alignment of source and
translated documents.
✓ ✓
SDM
interaction
Interaction with SDM to build and validate a User
Dictionary from STPM.
✓ ✓
DNT definition Definition of Do Not Translate (DNT) blocks.
✓ ✓
Import
TXT,RTF,DOC
and HTML
files
Import of TXT, RTF, DOC, and HTML documents (HTML
documents could not be imported using SYSTRAN
version 4).
✓ ✓
Online
document
support
Can open an online document by providing its Web
address (URL).
✓ ✓
HTML editing HTML editing and formatting capabilities.
✓ ✓
Import/expor t
TMX files
Import and expor t of TMX files (format is not preser ved;
to preserve the for mat use SMTU).
✓
Translation
review tool
Post-translation analysis and editing, and integration
with SYSTRAN Translation Memory.
✓
Source text
linguistic
enrichment
Source text linguistic enrichment adds information to
improve translations. For instance, ambiguous terms in
text can be forced into a certain categor y. An example is
the word contact in the phrase Contact SYSTRAN, where
Contact can be analyzed as either a noun or a verb.
✓
Page 14
SYSTRAN 5.0 Professional Quick Start Guide
14
The following table shows the features supported by the Basic, Advanced, and Expert
versions of SDM. For more information about SDM, see the SYSTRAN 5.0 User Guide
Feature Description Basic Advanced Expert
Improved
Intuitive
Coding
Provides superior analysis of plain entries (those
without linguistic clues). Also supports special
characters and provides expert dictionar y coding
capabilities (through clues only, no Wizard).
✓ ✓ ✓
Coding
confidence
indicator
Software automatically analyzes and codes an entry.
Low confidence does not mean the entry is incor rect,
but that it is more likely to be incorrect than one with
a higher confidence.
✓ ✓ ✓
Print
dictionaries
Lets you print a hardcopy of the dictionaries.
✓ ✓
UD format
Converts User Dictionaries from SYSTRAN version 4
format to version 5 format.
✓ ✓
Improved
UD search
capabilities
Lets you search local dictionaries, as well as
search, browse, and download SYSTRAN Online User
Dictionaries.
✓ ✓
Multilingual
dictionary
editor
Makes it easy to create multilingual dictionaries.
✓
Import/Expor t
Imports/expor ts text and Microsoft Excel
dictionaries.
✓
Domain
definition
Supports SYSTRAN’s predefined domains and userdefined domains.
✓
Expert Coding
wizard
Lets you visualize and modify SYSTRAN’s analysis
of the entries for optimal dictionary usage and
coverage.
✓
Reverse
dictionaries
UDs typically have had only one source language and
several target languages. It is now possible to define
several source languages for UDs.
✓
Duplicate
entry
detection
Identifies duplicate entries in dictionaries and lets
you revise them.
✓
Support for
Translation
Memory and
Normalization
Dictionaries
Two new UD formats that can be integrated into
the translation process to customize and improve
translations.
✓
Import/expor t
of Translation
Memories to
TMX format
Lets you import and expor t Trados (TMX-formatted)
files.
✓
Entity coding
Lets you define and use “variables” in your dictionary
entries (such as “an IP address” or “a version
number.” Provided with predefined entities.
✓
To obtain the latest version of the SYSTRAN 5.0 User Guide, please visit our
online support website: www.systransoft.com/Support/
For more information on SYSTRAN, visit us online at www.systransoft.com.
Page 15

Page 16

© 2005 SYSTRAN Software, Inc. All rights reserved.
SYSTRAN, SYSTRAN Professional Premium, SYSTRAN Professional Standard, SYSTRAN
Personal, SYSTRAN Clipboard Taskbar, SYSTRAN Dictionar y Manager, SYSTRAN
MultiTranslate Utility, SYSTRAN Toolbar, and SYSTRAN Translation Project Manager are
registered trademarks of SYSTRAN Software, Inc. Microsoft, Windows and Office are
trademarks of Microsoft Corporation. ScanSoft® OCR © 1994-2002 ScanSoft, Inc. All
rights reserved. All other trademarks are the proper ty of their respective owners.
3211205
 Loading...