

Page 1

User Guide for
DiskStation Manager 7.0
1
Page 2

Table of
Contents
Chapter 5: File-Sharing & Sync 40
5.1 Shared Folder
5.2 File services
5.3 File Station
5.4 Synology Drive Server
5.5 Cloud Sync
5.6 WebDAV
Chapter 6: Data Backup 45
6.1 Active Backup Suite
6.2 USB Copy
Chapter 1: Introduction 01
Chapter 2: Quick Start Guide 04
2.1 Install drives
2.2 Get started with DSM
2.3 Sign up for a Synology Account
2.4 Navigate your DSM desktop
2.5 Check regional options
2.6 Specify your QuickConnect ID
2.7 Configure storage space
2.8 Create a shared folder and start sharing files
2.9 Install add-on packages
2.10 Create local users and groups
2.11 Manage notification settings
2.12 Fortify security
2.13 Keep your DSM updated
Chapter 3: Account & Privileges 30
3.1 Account & privileges
3.2 Directory clients
3.3 Synology Directory Server
3.4 LDAP Server
3.5 SSO Server
3.6 RADIUS Server
Chapter 4: Storage & Virtualization 34
4.1 Storage Manager
4.2 Storage expansion
4.3 Storage Analyzer
4.4 SAN Manager & Storage Console
4.5 Virtual Machine Manager
Chapter 7: NAS Protection 48
7.1 DSM configuration backup
7.2 Hyper Backup
7.3 Snapshot Replication
7.4 Synology High Availability
Chapter 8: Security 50
8.1 Security settings
8.2 Secure SignIn
8.3 Security Advisor
8.4 Antivirus
Chapter 9: Network 52
9.1 External Access
9.2 Network Settings
9.3 Proxy Server
9.4 DNS Server
9.5 DHCP Server
9.6 VPN Server
Chapter 10: Management 64
10.1 Hardware & Power Settings
10.2 Login Portal
10.3 Resource Monitor
10.4 Log Center
10.5 Universal Search
10.6 Central Management System
10.7 Active Insight
10.8 System reset
Page 3

Chapter 11: Productivity 70
11.1 Synology Office
11.2 Note Station
11.3 Synology Chat
11.4 Synology Calendar
11.5 Synology Contacts
11.6 Synology MailPlus
11.7 Web Station
Chapter 12: Multimedia 75
12.1 Synology Photos
12.2 Video Station
12.3 Audio Station
12.4 Media Server
12.5 Indexing Service
Chapter 13: Surveillance 79
13.1 Set up IP Cameras
13.2 Monitor Camera Feeds
13.3 Efficient Recording Playback
13.4 Comprehensive Management Features
13.5 Centralized Management System
Find your information
Synology publishes a wide range of supporting documentation.
Knowledge Base
In
as well as
video tutorials
, you will find useful
breaking up processes into handy
Help
and
FAQ
articles,
steps.
Synology Documentation
In
Solution Guides,
brochures, and
, you can find
White Papers
User's Guides
. Experienced
,
users and administrators will find answers and guidance in
technical
Administrator's Guides
Developer Guides
and
.
Got a problem and unable to find the solution in our official
documentation? Search hundreds of answers by users and
support staff in
Support
through the web form, email or telephone.
Synology Community
or reach
Synology
Appendix 82
Legal Information
Page 4

Chapter 1: Introduction
Chapter 1: Introduction
Synology DiskStation Manager (DSM) is an intuitive web-based operating system for every
Synology NAS, designed to help you manage your digital assets across all network locations.
With DSM 7.0, your network-attached storage device doesn't just serve as a file-sharing center
within your local area network but also enables you to accomplish more than what you can
imagine.
DSM main features and functionality includes:
File-sharing and syncing: Instantly access, share, and sync your digital assets conveniently
and securely across multiple devices whenever you want, no matter where you are.
Backup and restoration: Through our license-free backup solutions, back up and protect
your digital assets on your computers, virtual machines, cloud services, and NAS to avoid
service downtime that can jeopardize your personal or business goals.
Team collaboration: In the privacy of your own cloud, create a motivated team culture while
satisfying all collaboration needs with Synology Office, Calendar, and Chat.
Multimedia streaming: Through an intuitive web-based interface, access and compile your
multimedia content into a multimedia library that can be used by multimedia applications or
packages at your convenience.
Video surveillance: A complete surveillance solution that provides intelligent monitoring and
video management tools to safeguard your valuable assets in your business, home, and other
environments.
Virtualization storage: Streamlined provisioning and management of virtual machines to
access storage space over storage network, as if the space used were in one local disk, with
full certification for VMware® vSphere™, Microsoft® Hyper-V®, Citrix® XenServer™, and
OpenStack virtualization environments.
01
Page 5

Enhanced storage & SAN solutions
A brand-new Storage Manager comes with the new performance optimization features and
better protection against data degradation. Now designed for SAN environments, the Fibre
Channel Protocol(FCP) brings high availability and low latency to mission-critical storage
networks.
Advanced LUN functionality supports VMware VAAI and Windows ODX for improved VM
performance and provides swift snapshot creation, recovery, and cloning.
A streamlined management interface makes connection and permission management
exceptionally easy, even in large-scale SAN environments.
Support for iSCSI and Fibre Channel means that Synology storage systems integrate easily in
smaller setups as in enterprise environments.
Secure identity protection
Synology Secure SignIn offers wide range of flexible sign-in methods (2-factor authentication,
passwordless sign-in, and traditional authentication), app-based sign-in approval, hardware
security keys, and more 2-factor authentication options to eliminate weak password and
elevate your NAS protection. Safeguarding your account security has never been this easy.
Chapter 1: Introduction
All-in-one photo management
Synology Photos comes with all the tools you need to manage your photos efficiently.
Automated tools help you group your photos and videos chronologically or according to folder
structure, set a category to filter your media files, organize your photos with albums, and share
your content while keeping your memories safe and secure with secure share links.
More protection and faster recovery
Our top backup applications now let you protect more devices, online services, and DSM
applications. Active Backup expands your protection with new agent-based Linux backup for
five major distributions.
Protect your Synology NAS with Hyper Backup for more DSM settings and twelve additional
Synology software packages.
Secure file-sharing and collaboration
Collaboration made secure by Synology Drive's enhanced security and management features
to help admins keep track of users, permissions, and data with tighter security features.
Keep control over larger deployments of Synology Drive Server with new Synology Drive Admin
Console.
Keep file-sharing secure by granting sharing permissions to select users or groups. Users are
obliged to set passwords or expiration dates to tighten security when sharing files.
02
Page 6

Chapter 1: Introduction
Stay ahead of use trends and manage your storage before it hits the limit with Synology Drive
Server usage calculation.
Expand your storage to the cloud
You can now experience the flexibility of the cloud with Hybrid Share, it is a brand-new hybrid
cloud solution for simplified multi-site file-sharing. With your Synology Account, you can
connect your NAS to C2 Storage to build hybrid-cloud storage.
Combine the flexibility and scalability of Synology C2 Storage with the speed and power of on-
premises Synology NAS for fast and uninterrupted file access.
Instantly sync cloud-managed data to multiple Synology NAS and access files as if they were
locally stored, reducing on-premises storage footprint, network use, and costs.
Mount a Hybrid Share folder to any Synology NAS and gain instant access to your data on
Synology C2 Storage. No need to wait for a data recovery or migration process to finish.
Cloud-hosted NAS monitoring
Monitor your Synology NAS across locations with Active Insight that lets you monitor
performance in one unified portal. Its highly customizable notification settings let you detect
anomalies and provide solutions in an instant to minimize downtime.
Active Insight dispatches event notifications with detailed troubleshooting advice any time it
detects system anomalies in a Synology NAS under your administration.
Synology analyses anonymized data from a connected Synology NAS to identify indicators of
possible system failure and will notify customers if their device is at risk.
03
Page 7

Chapter 2: Quick Start Guide
This chapter provides an overview of the initial configurations of Synology DiskStation
Manager (DSM). To help you get started with your Synology NAS, perform the following
instructions about drive setup, OS installation, storage initialization, and several built-in
services of DSM management.
2.1 Install drives
As a data storage server, Synology NAS needs at least one 3.5" or 2.5" drive to ensure
functionality. For detailed information on drive installation, please refer to the Hardware
Installation Guide via Synology's Download Center.
Chapter 2: Quick Start Guide
Back up drives before installation
If your drive comes from an old Synology NAS, please follow the instructions in this article to
perform drive migration. The migration procedures mentioned in the article will help you keep
most of your data. However, we strongly recommend that you back up data on the original
Synology NAS, from which drives are moved, to avoid accidental data loss.
If your drive does not come from a Synology NAS that contains data, you need to back up data
before the installation because the system will format drives and erase all the existing data
during the installation.
Understand RAID types
After the drive installation, you should set up a RAID array to add extra security and
redundancy to your storage space. This section gives you a brief introduction to the RAID
technology and the difference between each RAID type.
RAID (Redundant Array of Independent Disks) is a data storage technology that allows multiple
independent drives to be combined into a RAID array for data redundancy and performance
improvement. In a RAID array, the same data will be stored in different places across multiple
drives to reduce the risk of data loss caused by a drive failure. Moreover, the RAID setup can
boost the read-write performance because data will be striped across drives under certain
RAID configurations.
Different RAID configurations provide different levels of redundancy and performance. The
following is an overview of the RAID types supported by Synology NAS:
04
Page 8

Chapter 2: Quick Start Guide
SHR: Synology Hybrid RAID (SHR) is an automatic RAID management system designed
by Synology. SHR provides fault tolerance when there are more than two drives. It is
recommended for novice users because it will automatically deploy drives for the best interest
of your storage space.
Basic: Basic configuration is composed of only one independent drive, so it does not provide
any fault tolerance or performance boost.
JBOD: JBOD (Just a Bunch of Disks) configuration combines all drives into a single drive stack.
Each JBOD drive is regarded as a separate and individual drive volume, so it allows easier
control management of data storage. JBOD configuration does not provide any fault tolerance
or performance boost.
RAID 0: In contrast to JBOD, RAID 0 combines two or more drives and treats them as a single
unit. In RAID 0, data are divided into blocks and split across multiple drives; therefore, the
read-write speed increases with more drives added.
RAID 1: RAID 1 requires at least two drives. In RAID 1, data are mirrored on all drives. Since
the same data exist on all the drives in the array, the volume of the smallest member drive
determines the total capacity of the array. This is the safest option to protect important data,
but the write performance and capacity are relatively limited.
RAID 5: RAID 5 requires at least three drives, and one of the drives is used for fault tolerance.
RAID 5 stripes data blocks across multiple drives and distributes redundancy information,
called parity, across all of the drives in the array. Upon failure of a single drive, the lost data
can be reconstructed with the parity existing on the rest of the drives.
RAID 6: RAID 6 requires at least four drives. RAID 6 features double distributed parity, so it
has better data redundancy than RAID 5. However, because RAID 6 needs to write two parity
blocks on all member drives, the write performance is slower than RAID 5.
RAID 10: RAID 10 requires at least four drives. The drives have to be even because drives
are combined into groups of two in which data is mirrored and striped. RAID 10 features the
performance of RAID 0 and the data protection of RAID 1.
RAID F1: RAID F1 requires at least three drives. Like RAID 5, RAID F1 implements data block
striping and distributes parity data across all member drives. The only difference is that one of
the drives will bear more parity information, so it will age faster, which prevents all the drives
from coming to the end of their lifespan at the same time. RAID F1 is recommended for an all-
flash array.
Notes:
• RAID F1 and SHR are only available on specific models. Refer to the specifications of each
model for detailed information.
05
Page 9

2.2 Get started with DSM
This section guides you through how to perform the first-time installation of DSM via a web
browser or Synology's mobile application.
Install DSM with Web Assistant
Your Synology NAS comes with a built-in tool, Web Assistant, which helps you download
the latest version of DSM from the Internet and install it on your Synology NAS. To use Web
Assistant, follow the steps below:
1. Power on your Synology NAS.
2. Open a web browser on a computer within the same network where your Synology NAS is
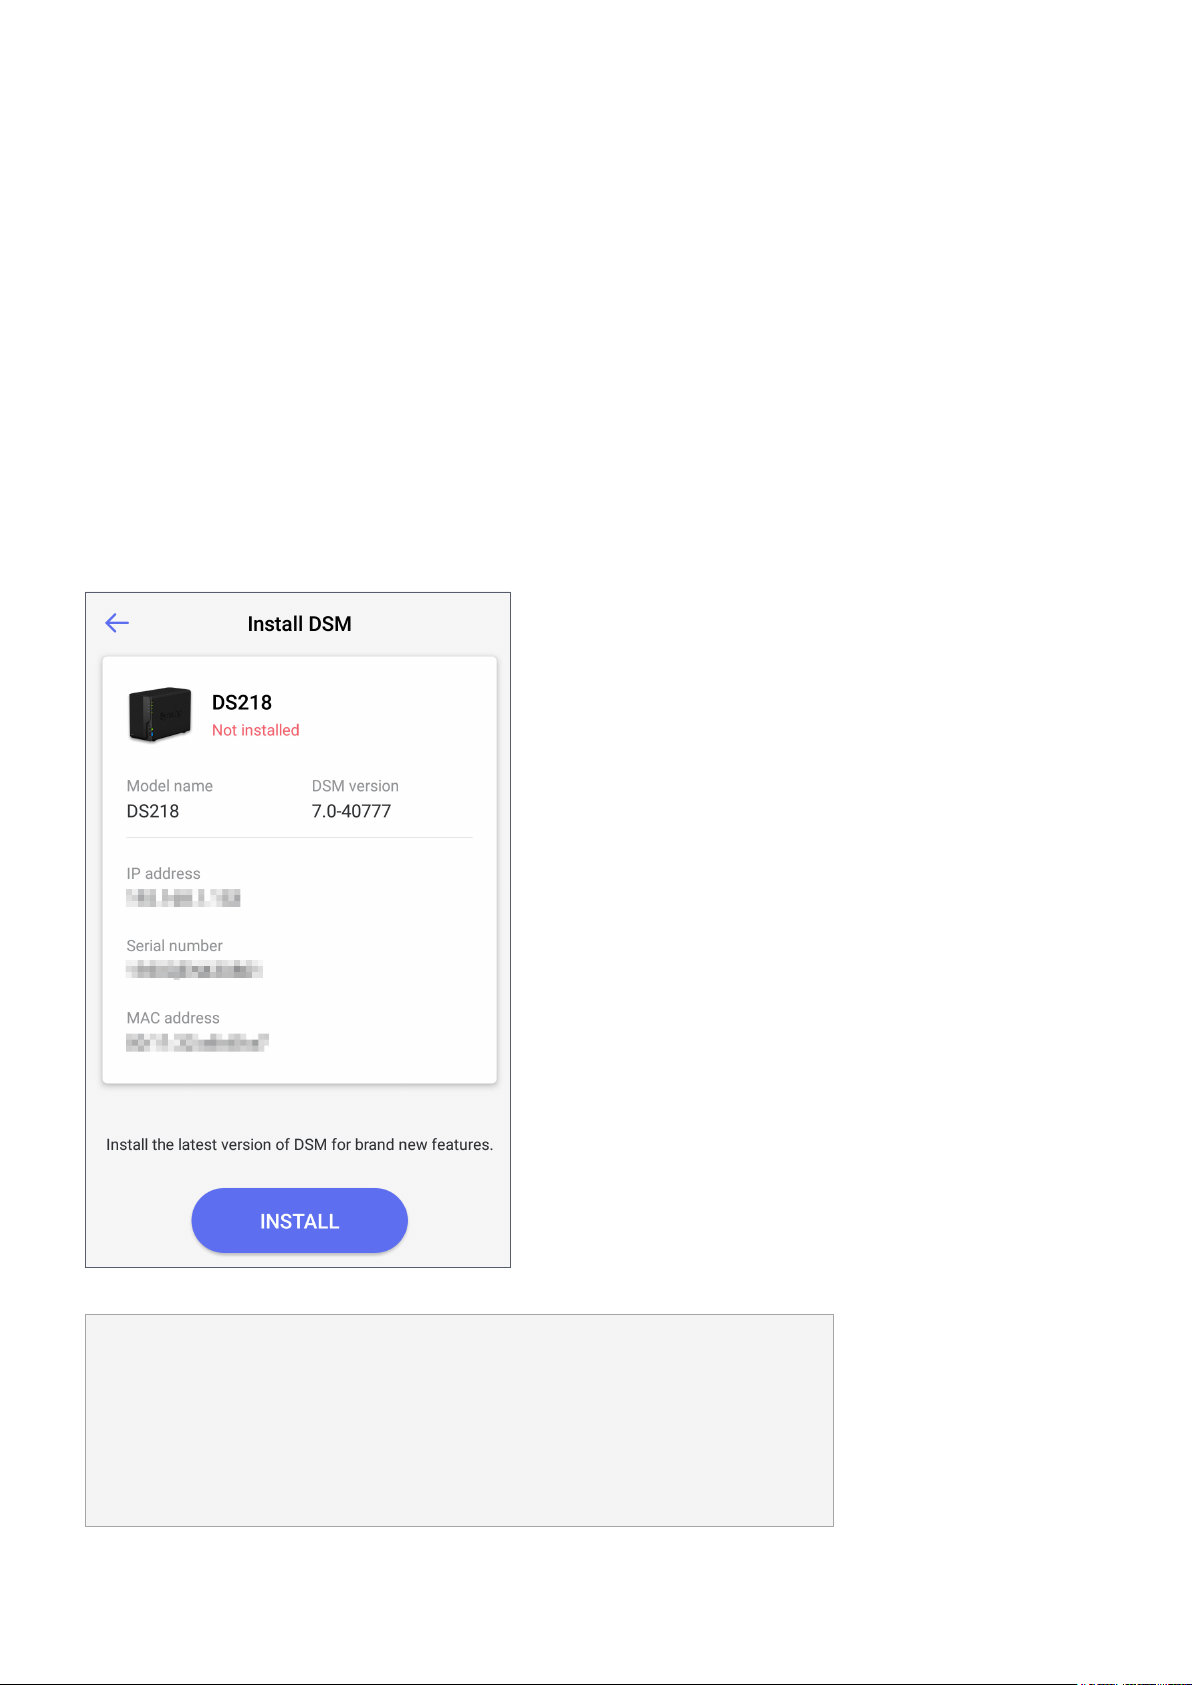
located, and go to "find.synology.com". The status of your NAS should be Not installed.
3. Select your Synology NAS and click Connect on Web Assistant.
4. Click Install to start the installation process and follow the on-screen instructions.
Chapter 2: Quick Start Guide
Notes:
• Both your Synology NAS and computer must be on the same local network.
• We suggest using Chrome or Firefox as the browser for DSM installation.
• For more information on the setup of Synology NAS and DSM, please refer to the
Hardware Installation Guide for your Synology NAS models available via Synology's
Download Center.
06
Page 10
Chapter 2: Quick Start Guide
Install DSM with DS finder
You can also install DS finder (App Store/Google Play Store) on your mobile device to install
DSM as demonstrated below:
1. Power on your Synology NAS.
2. Connect your mobile device to the local network where your Synology NAS is located, and
launch DS finder.
3. Tap SET UP NEW NAS to start the setup process.
4. Follow the on-screen instructions to establish the connection between your mobile device
and Synology NAS, and tap SEARCH. DS finder will search for your Synology NAS. The status
of your NAS should be Not installed.
5. Select your Synology NAS and tap INSTALL to start the installation process and follow the
on-screen instructions.
Notes:
• We take Android 10 as an example in this chapter. The actual steps may vary across OS
versions and devices.
• Both your Synology NAS and mobile device must be on the same local network.
• DS finder can only run on Android and iOS devices.
• DS finder supports installing DSM on most Synology NAS models (except rack-mount
models and desktop models of FS/XS series).
07
Page 11

2.3 Sign up for a Synology Account
As an owner of Synology NAS, you should have a Synology Account to access Synology online
services and manage your customer information. Different from DSM user accounts, which can
be used to sign in to DSM, a Synology Account allows you to manage your billing information,
registered Synology products, requests for technical support, and Synology online services (e.g.,
QuickConnect, DDNS, and Synology C2). For more information on the differences between
Synology Accounts and DSM user accounts, please refer to this article.
Sign up for a Synology Account and bind your Synology NAS during DSM installation or by
following the steps below:
1. Go to this website.
2. Complete the form and click Next. Then, follow the on-screen instructions to create a
Synology Account.
Chapter 2: Quick Start Guide
3. Go to the email box you have entered, and click the email titled Synology Account - sign
up (sent from "noreply@synologynotification.com") to get your verification code.
4. Enter the verification code and click Next.
5. Check the terms and privacy policy. Click Submit.
08
Page 12

Chapter 2: Quick Start Guide
6. Go to Control Panel > Synology Account, and click Sign in or sign up for a Synology
Account.
7. In the pop-up window, enter the credentials of your Synology Account and click Sign In.
8. Now you have successfully registered for a Synology Account and bound your NAS to it.
2.4 Navigate your DSM desktop
After installing DSM on your Synology NAS, you can sign in to DSM using the DSM user account
you have just added during the first-time installation. Follow the steps below to sign in via a
web browser:
1. Make sure your computer and Synology NAS are connected to the same local network.
2. Open a browser on your computer and enter one of the following in the address bar:
• find.synology.com: Enter this URL only if your computer and Synology NAS are connected
to the same local area network.
• IP address of your NAS:5000: If the IP address of your Synology NAS is "192.168.48.14", type
"192.168.48.14:5000". The IP address depends on the settings made during the initial setup.
3. Enter your username and click the rightward arrow.
09
Page 13
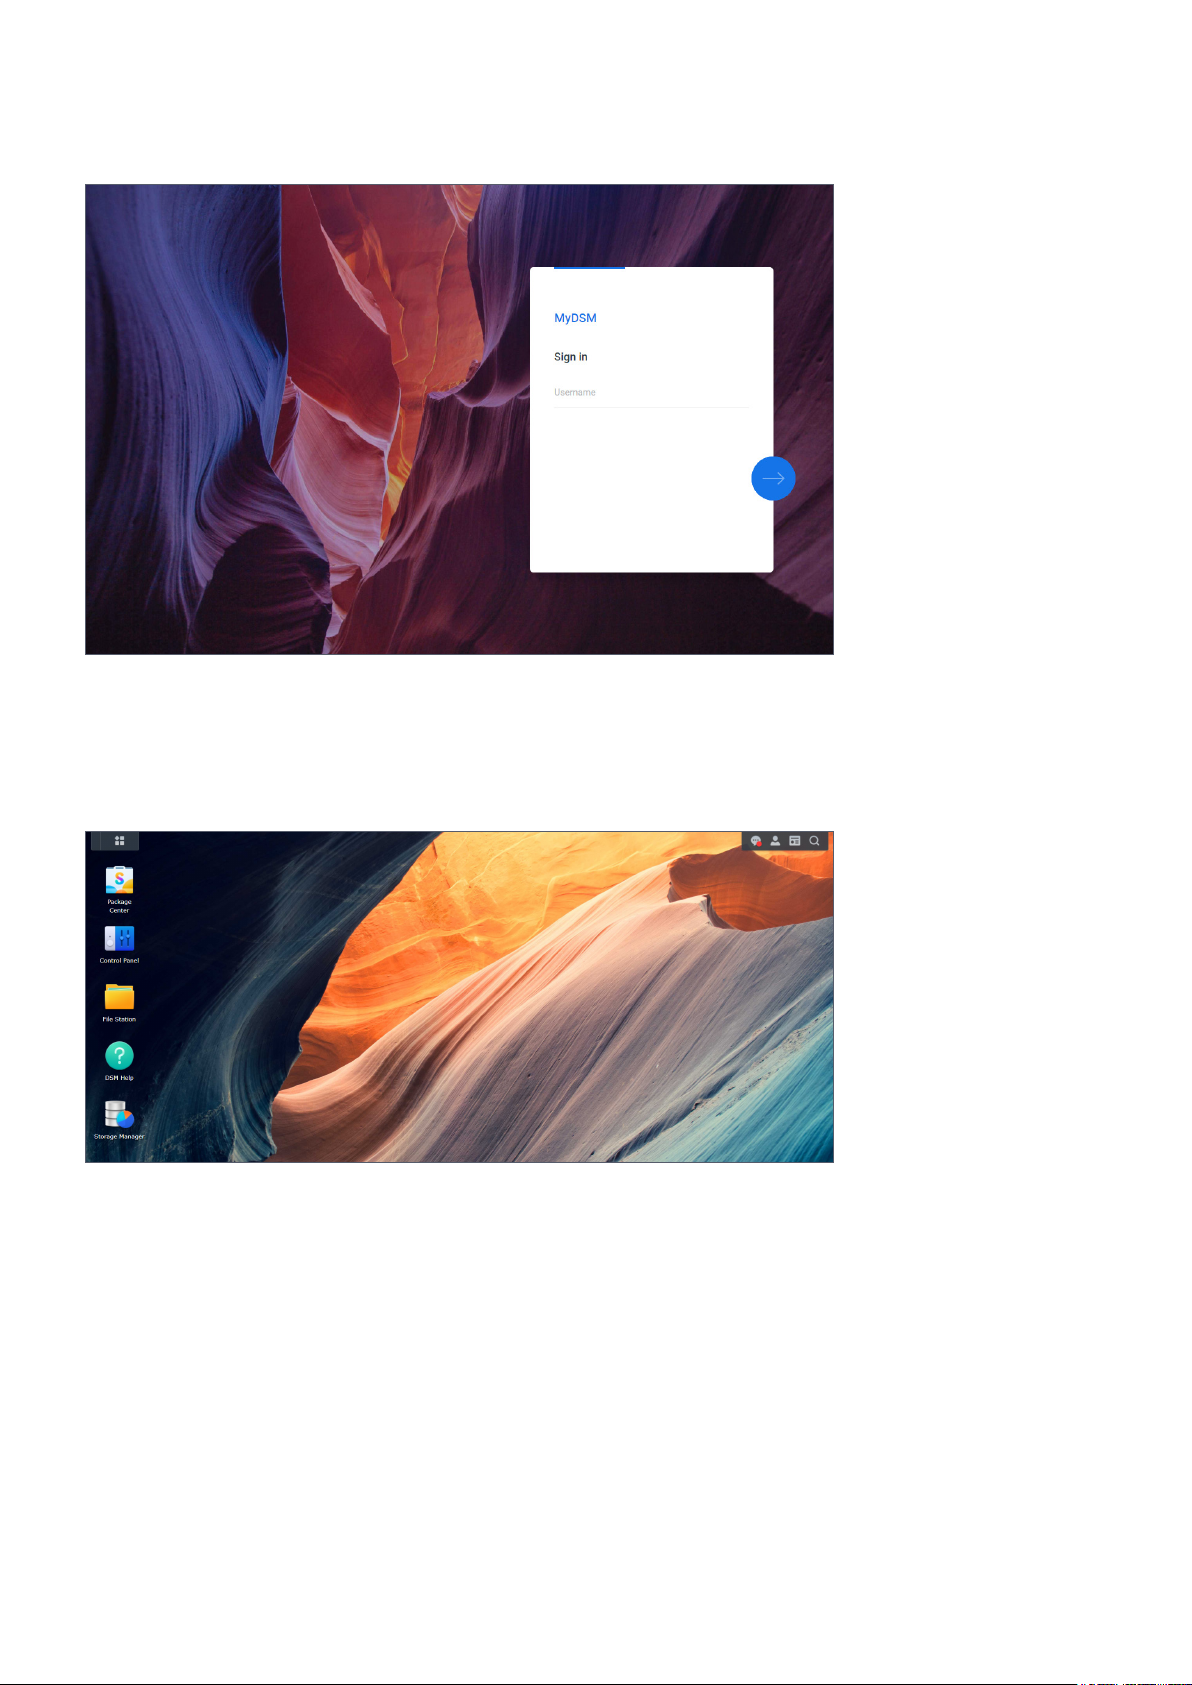
4. Enter your password and click the rightward arrow again to sign in.
Chapter 2: Quick Start Guide
DSM desktop
After signing in, you can see the DSM desktop, where your application and package windows
are displayed. You can also create desktop shortcuts to frequently used applications.
10
Page 14

Chapter 2: Quick Start Guide
Taskbar
The taskbar is located at the top of the screen and includes the following items:
1. Show Desktop: Minimize all launched applications and packages windows.
2. Main Menu: Click the icon to view and open applications and add-on packages. You can
also click and drag to create desktop shortcuts.
3. Open applications: Displays currently launched applications and packages. You can right-
click and pin the applications or packages to the taskbar for faster access in the future.
4. Upload Queue: Appears when you start uploading files to your Synology NAS. Click the icon
to see more details, such as progress and upload speed.
5. External Devices: Appears when an external device (e.g., a USB flash drive) is attached to
your Synology NAS.
6. Notifications: Displays notifications, such as errors, status updates, and package
installation notifications.
7. Options: Click the menu to shut down, restart, or sign out of your Synology NAS. You can
also select Personal from the menu to modify personal account settings.
8. Widgets: Show or hide widgets. Widgets are located on the right side of DSM desktop by
default, displaying various types of system information, such as storage, system health, etc.
9. Search: Quickly find specific applications, packages, or DSM Help articles.
Main menu
You can find a list of applications and packages installed on your Synology NAS here. To create
a desktop shortcut, open Main Menu, and click and drag an application or package to the side.
11
Page 15
Shutdown, restart, signing out, and personal settings
Click the Options menu (the person icon on the upper right) to shut down, restart, or sign out
of your Synology NAS.
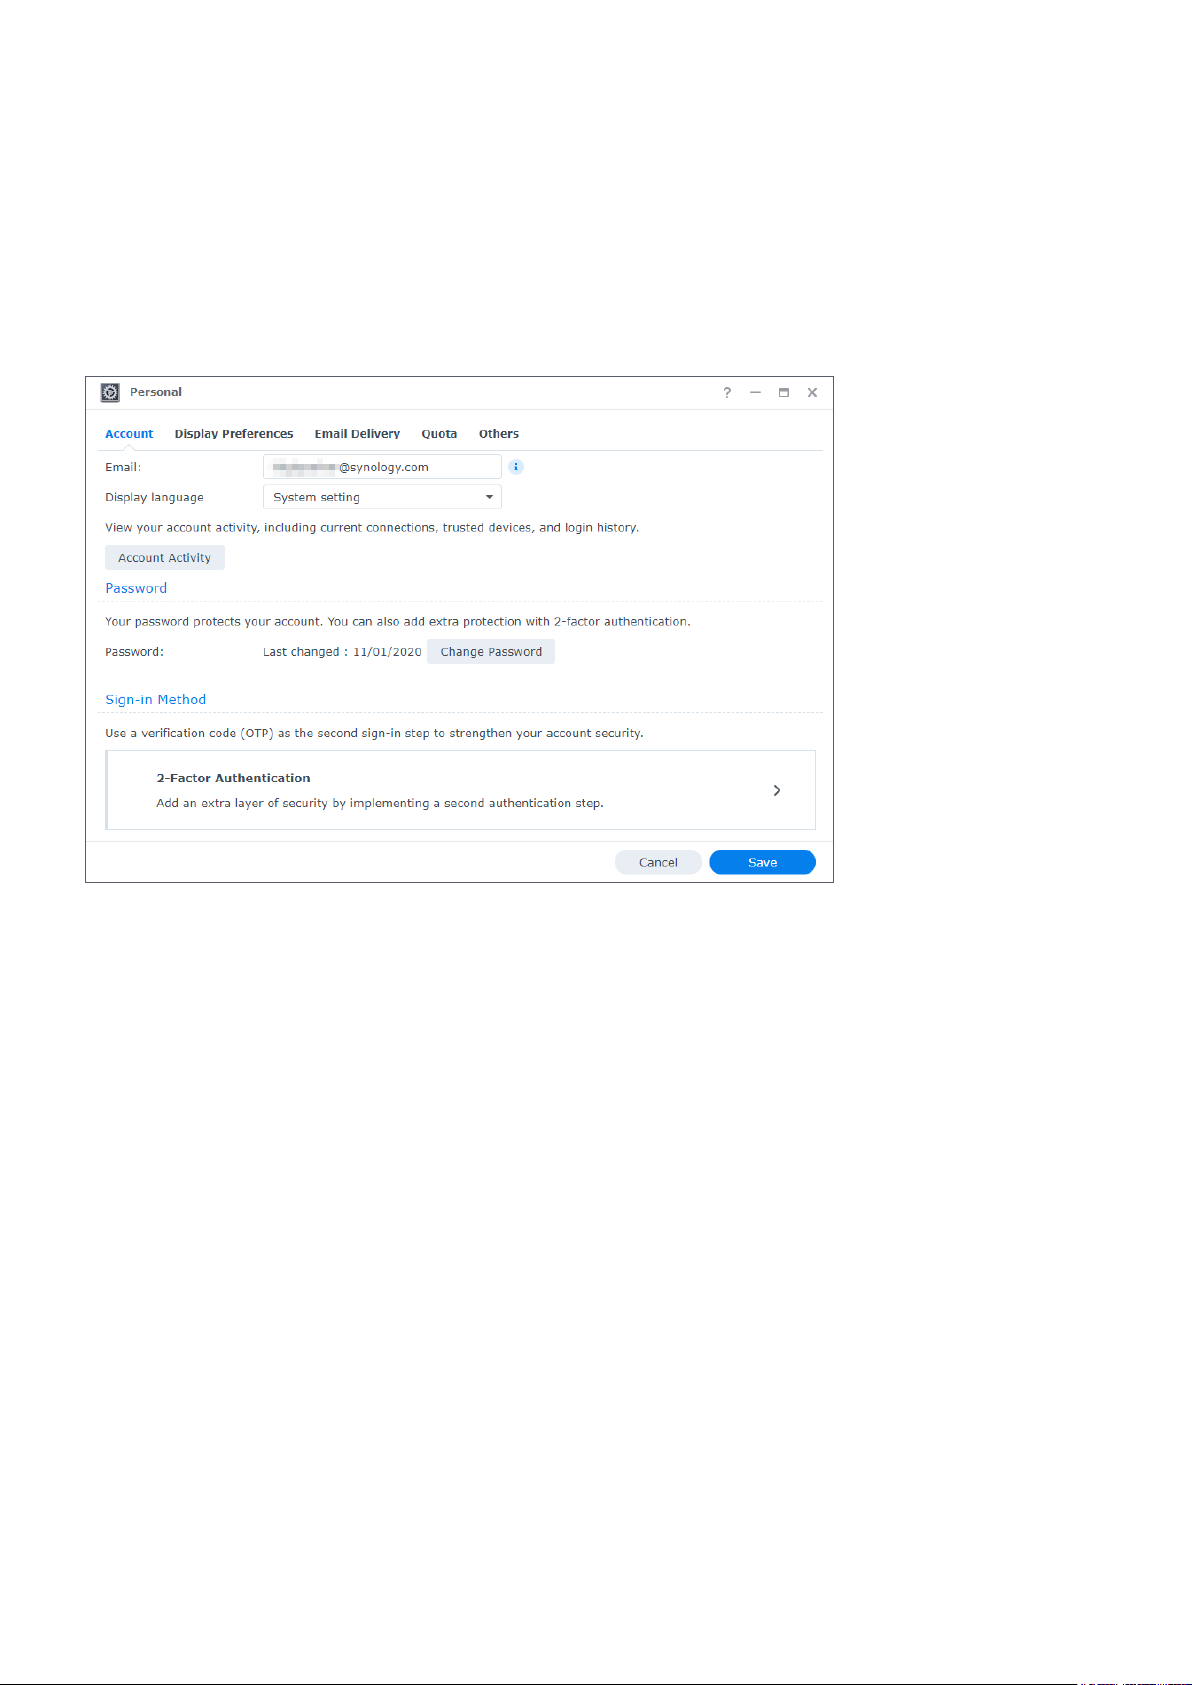
In addition, you can select the Personal option from the drop-down menu to manage your
account settings, such as the password, display language, sign-in methods, and display
preferences. The following gives you an overview of tabs under this option:
Chapter 2: Quick Start Guide
• Account: Edit account settings, enable advanced sign-in methods, and view recent login
activities of your DSM account (refer to this article for more information).
• Display Preferences: Edit date and time formats as well as the appearance of your desktop
(refer to this article for more information).
• Email Delivery: Add your email accounts at this tab. These email accounts are used in the
following scenarios (refer to this article for more information):
• Deliver files stored in File Station as attachments.
• Send event invitation emails via Synology Calendar.
• Send notification emails when sharing files with others via Synology Drive.
• Quota: View your quota on all volumes set by the administrator's account, as well as the
amount of capacity you have used on each volume. On models with Btrfs support, you can
also view the quota and capacity usage of each shared folder.
• Others: Customize other personal account options (refer to this article for more
information).
12
Page 16
Chapter 2: Quick Start Guide
2.5 Check regional options
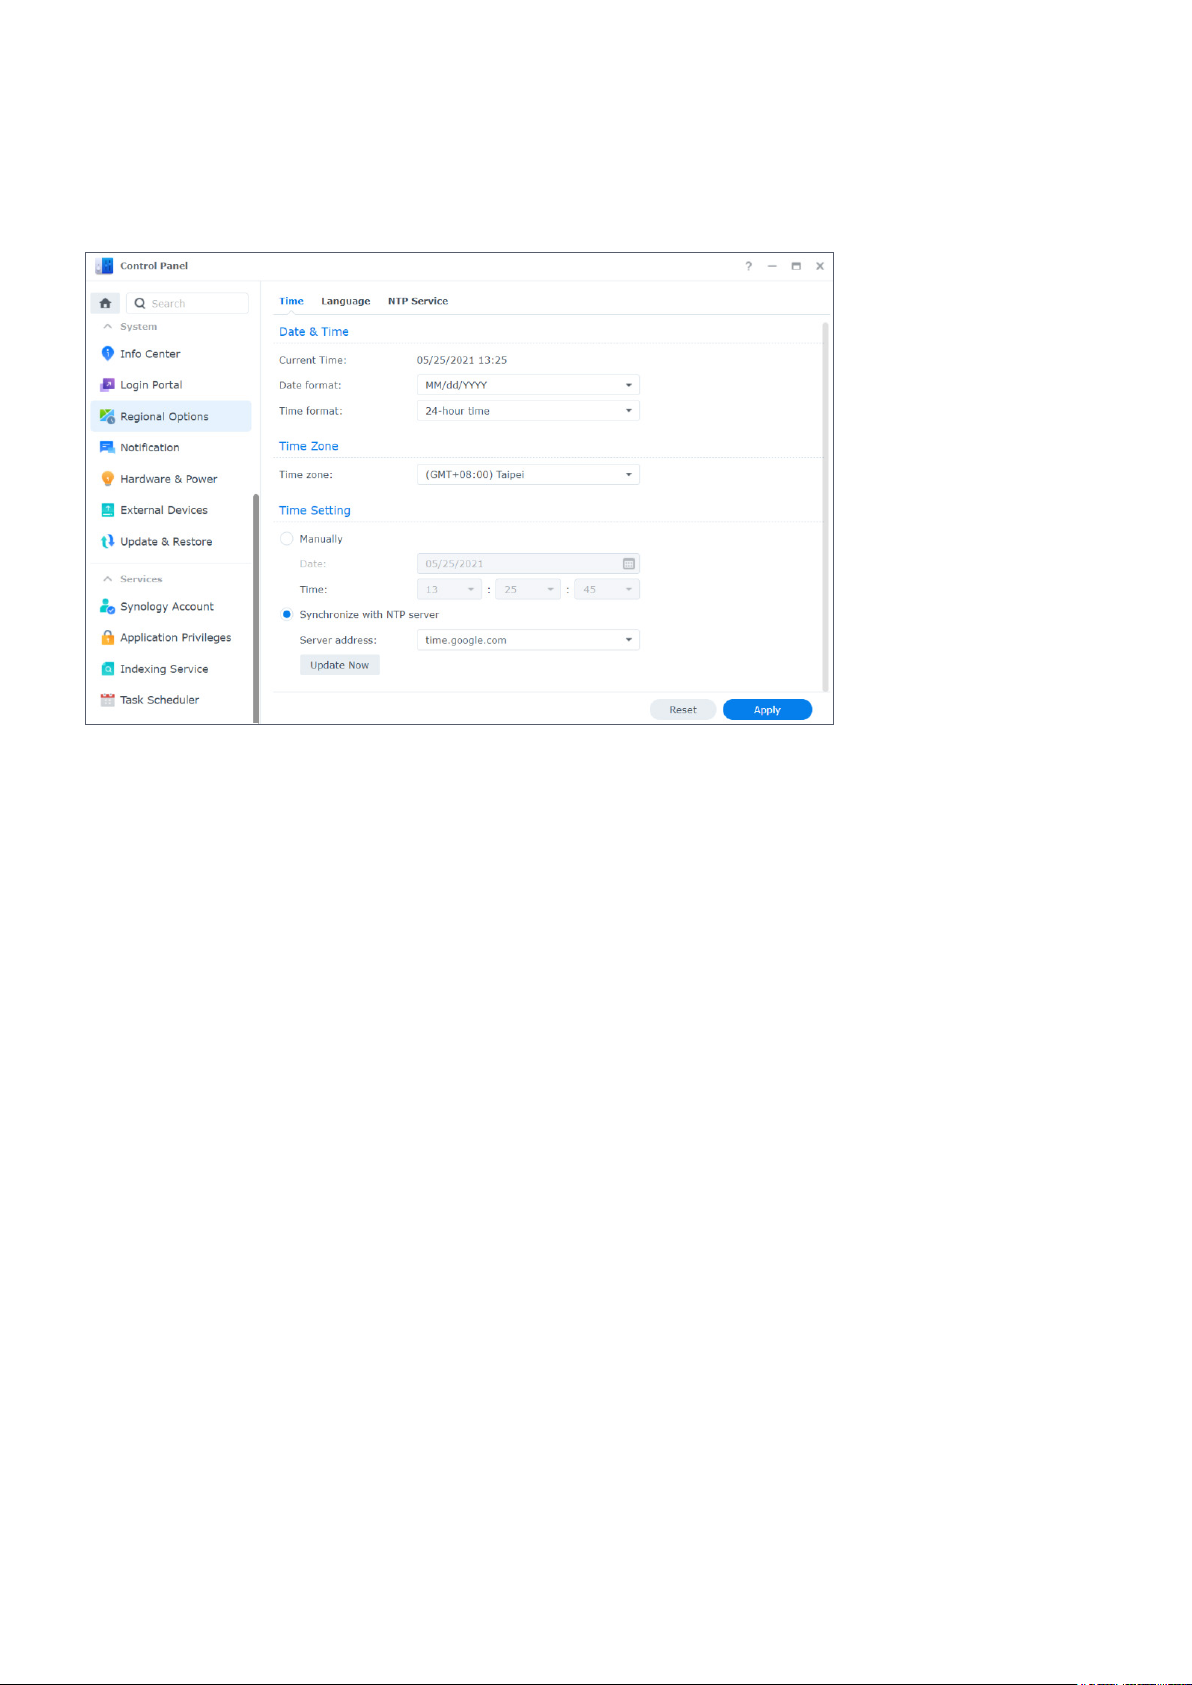
In Control Panel > Regional Options, you can configure the following regional settings:
• Time: Set up system time settings of your DSM. You can check the current time, manually set
the server's date and time, or have them set automatically using a network time server (refer
to this article for more information).
• Language: Set the language for display, notification, and code pages (refer to this article for
more information).
• NTP Service: Set your Synology NAS as a network time server to synchronize time with other
devices over networks. Please note that the NTP service is required for Surveillance Station
and a high-availability cluster. Therefore, if you have installed and launched Surveillance
Station or Synology High Availability on your Synology NAS, the NTP service cannot be
disabled.
2.6 Specify your QuickConnect ID
QuickConnect allows client applications to connect to your Synology NAS via the Internet
without setting up port forwarding rules. It can work with Synology-developed packages, such
as Audio Station, Video Station, Download Station, Surveillance Station, Synology Photos, File
Station, Note Station, CMS, Synology Drive, and mobile applications. You can either specify
your QuickConnect ID during DSM installation, or activate the service by following the steps
below:
1. Go to Control Panel > External Access > QuickConnect.
13
Page 17
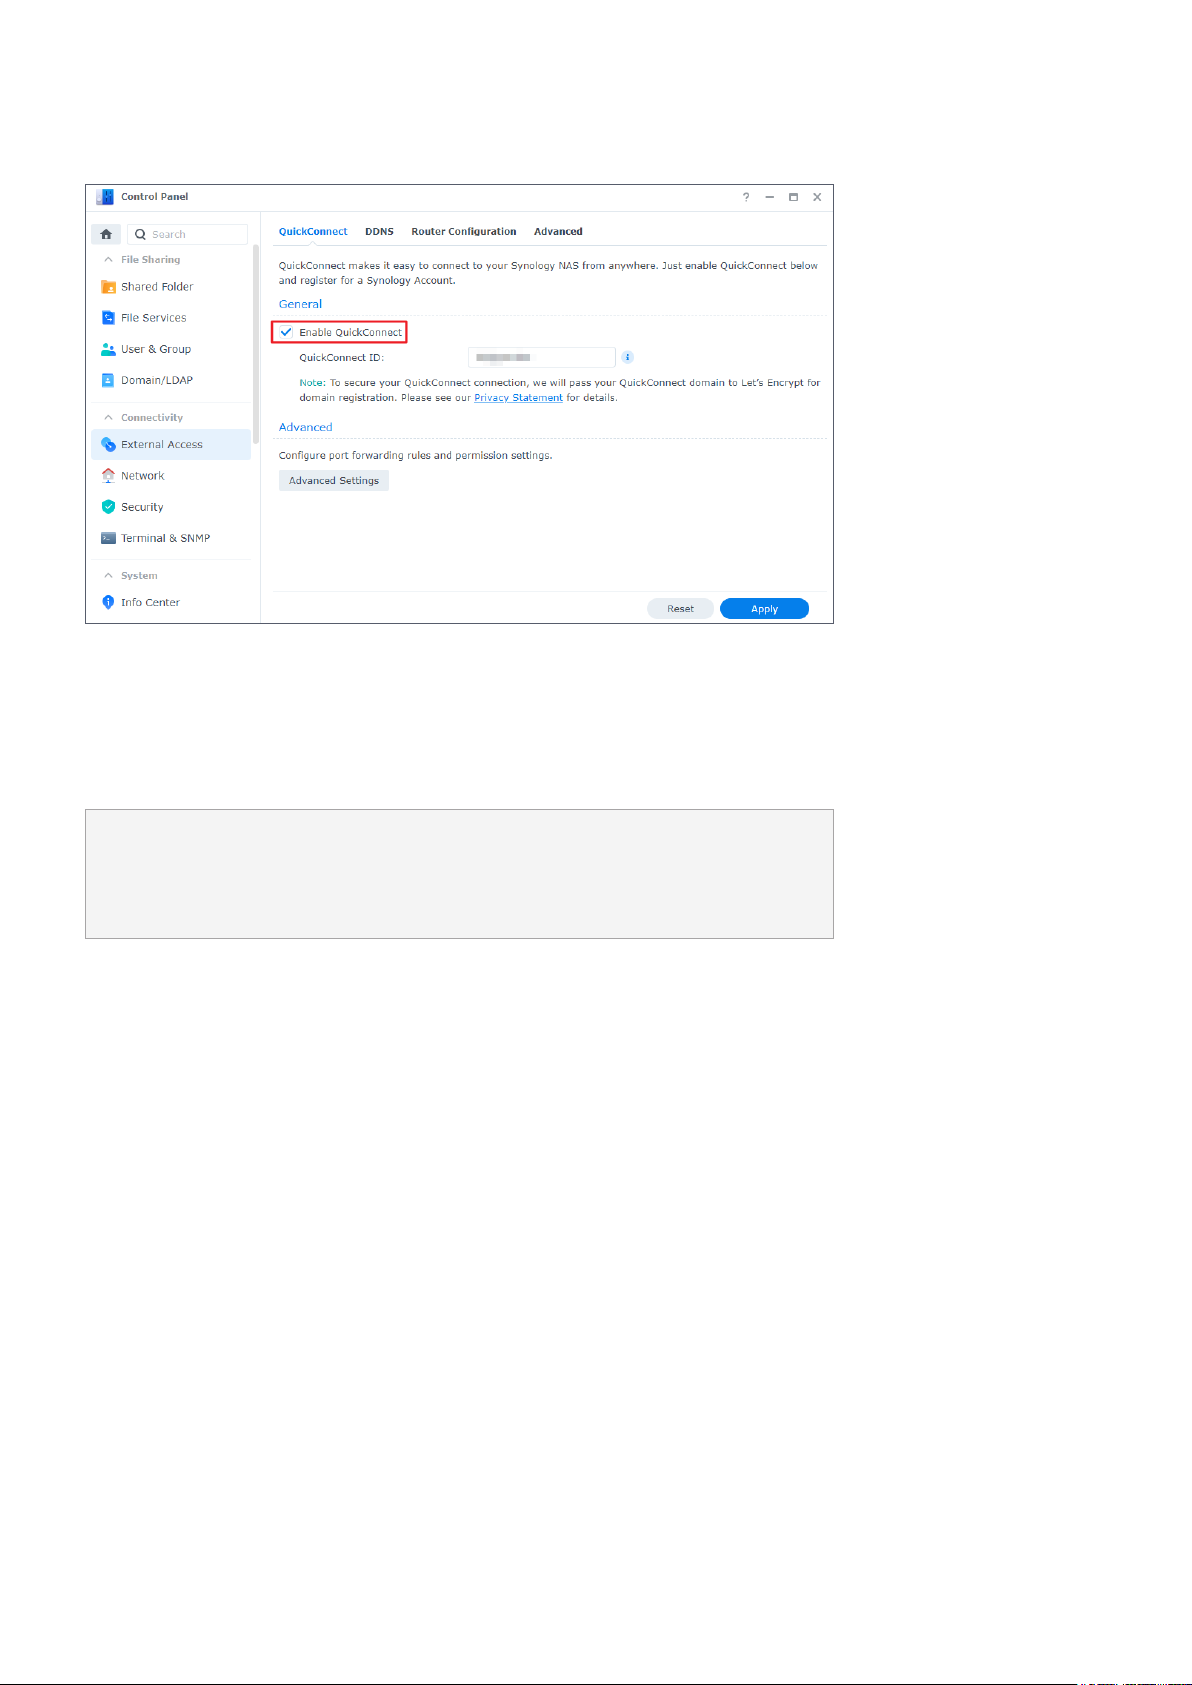
2. Tick the Enable QuickConnect checkbox.
3. If you have not signed in to your Synology Account, a login window will pop up. Enter your
existing Synology Account information or create a new account in the window.
Chapter 2: Quick Start Guide
4. Specify a new QuickConnect ID.
5. Click Apply.
Notes:
• A customized QuickConnect ID can only include English letters, numbers, and dashes (-). It
must start with a letter, and cannot end with a dash.
• For more information on QuickConnect, please refer to this article.
2.7 Configure storage space
This section guides you through the steps of storage pool creation using the built-in package,
Storage Manager.
Understand storage pools and volumes
When it's your first time to launch Storage Manager, Storage Creation Wizard will help
you create and configure storage pools and volumes. A storage pool is a single storage unit
consisting of multiple drives. A volume is a storage space created on a storage pool. You have
to create at least one volume to store data on your Synology NAS.
14
Page 18

Chapter 2: Quick Start Guide
Create storage pools and volumes
1. Launch Storage Manager in the Main Menu. Storage Creation Wizard will pop up to lead
you through the steps below.
2. Choose a RAID type to protect your storage. Some RAID types are available on certain
models according to the number of drive bays. To know which RAID type is proper for your
storage pool, you can refer to the Understand RAID types section or this article.
3. Deploy drives to constitute the storage pool.
4. Allocate the volume capacity.
5. Select a file system. We recommend Btrfs for its data protection features. To learn more
about the differences between Btrfs and ext4, you can refer to this article.
File system Description
Btrfs
ext4
6. Confirm the settings. The system will automatically run the storage creation and
optimization process in the background.
Supports various data protection features, e.g., snapshot,
replication, point-in-time recovery, and data integrity check.
Features wide compatibility with Linux operating systems. It
has fewer hardware requirements than Btrfs.
2.8 Create a shared folder and start sharing files
Through the setup of a shared folder, you can turn your Synology NAS into a convenient and
secure file-sharing center. This section explains the role of shared folders on DSM and gives
you instructions on file management using File Station and DS file.
Understand shared folders
A shared folder is a home directory where you can store and manage files and subfolders.
You must have at least one shared folder to store files on your Synology NAS. Data stored in
shared folders can be kept private or shared with specific users or groups based on custom
permission settings. Some packages or services require a dedicated shared folder to ensure
functionality. The table below shows the shared folders that are automatically created when
certain applications, services, or packages are installed or enabled.
Name Description
ActiveBackupforBusiness
chat
The ActiveBackupforBusiness folder will be created when
Active Backup for Business is installed. It is used to store
backup data and will contain database and configuration files
when a backup task is created.
The chat folder will be created when Synology Chat Server
is installed. It contains attachments in the package, including
uploaded files, URL thumbnails, and profile pictures.
15
Page 19

Chapter 2: Quick Start Guide
docker
home
homes
MailPlus
music
NetBackup
photo
The docker folder will be created when Docker is installed. It is
used to store the default mount path for a container.
The home folder will be created when the user home service
is enabled. It provides a private space for each user to store
data.
The homes folder will be created when the user home service
is enabled. It contains home folders of all users. Only the
system administrator can access and manage all users' home
folders.
The MailPlus folder will be created when Synology MailPlus
Server has been set up. It contains domain data, spam reports,
quarantine settings, etc.
The music folder will be created when Audio Station or Media
Server is installed. It is used to store music you wish to play
using Audio Station or stream to other DMA devices using
Media Server.
The NetBackup folder will be created when the rsync service
is enabled. It is used to store backup data of rsync accounts.
The photo folder will be created when Media Server is
installed or when you enable shared space in Synology Photos.
The surveillance folder will be created when Surveillance
surveillance
usbshare
video
web
web_packages
Station is installed. It is used to store Surveillance Station
recordings.
The usbshare[number] folder will be created when you
connect a USB drive to a USB port of your Synology NAS.
The video folder will be created when Video Station or Media
Server is installed. It is the default folder used to upload videos
to Video Station or stream videos to other DMA devices using
Media Server.
The web folder will be created when Web Station is installed. It
contains files for website hosting.
The web_packages folder will be created when Web Station is
installed. It contains files of installed third-party packages (e.g.,
phpMyAdmin).
Set up and remove a shared folder
If you are a user belonging to the administrators group, you can create shared folders and
grant users access permissions to the folders. You can also remove any shared folders as long
as they are created by you.
• To set up a shared folder, go to Control Panel > Shared Folder. Click Create and
follow Shared Folder Creation Wizard to configure shared folder settings. For detailed
information, please refer to this article.
• To remove a shared folder, go to Control Panel > Shared Folder. Select the shared folder to
delete and click Delete.
16
Page 20

Chapter 2: Quick Start Guide
Notes:
• Removing any shared folder removes all the data and their snapshots within the folder. If
you need the data, please back them up first before the removal.
Manage files via File Station
File Station is a built-in file management tool on DSM. File Station provides a centralized
interface where you can access and manage files and folders with web browsers and grant
other users access to files based on the permissions you set. This section guides you through
the steps of file management via File Station.
Customize File Station settings
Launch File Station and click Settings. You can perform the following actions here:
• Configure general settings.
• Mount shared folders, virtual drives, servers, and cloud service.
• Allow specific users to share file links or make a request for file access.
• Set speed limits for file transfer via File Station.
• Enable converting HTML files to plain text for security reasons.
Search for files or folders
File Station provides regular search and advanced search to meet different requirements:
• To perform a regular search, click the folder where the desired files or folders are located.
Type a keyword in the Search field.
• To perform an advanced search, go to the folder where the desired files or folders are
located. Click the magnifying glass icon next to the Search field to expand the advanced
search menu, where you can set multiple search conditions for a refined search result.
17
Page 21

Notes:
• For a quick search, it is recommended that you index shared folder contents. For detailed
instructions, please refer to this article.
Manage files and folders
Select a file or folder and click Action or simply right-click it to perform the following actions:
• To send a file as email attachments: Right-click a file and select Send as email attachments.
You can directly send and share files as email attachments in File Station once you have set
up email delivery settings in the pop-up Personal window.
• To view or rotate pictures: Double-click a picture to open it in a viewer window, where you
can view and rotate pictures.
• To edit the access permissions: Right-click a file or folder and select Properties. You can edit
access permissions at the Permission tab.
• To generate file-sharing links: Right-click a file or folder and select Share. A shared link will be
automatically generated. You can further specify validity periods or enable secure sharing.
Chapter 2: Quick Start Guide
Manage files via DS file
DS file is an app available on Android and iOS devices, which allows you to access and manage
files stored on your Synology NAS. With DS file, you can browse pictures, watch videos, and
check work documents on the go. This section guides you through the process of installing and
using DS file.
Install and sign in to DS file
1. Install DS file on your mobile device.
2. Enter the following information on the login page:
• Address or QuickConnect ID: This can be either an internal or external IP address, DDNS
hostname, or Synology QuickConnect ID. You have to enable QuickConnect in Control
Panel first to sign in via QuickConnect ID. For detailed information, please refer to the
Specify Your QuickConnect ID section.
• Account and Password
• HTTPS: Enable HTTPS connections if you want to make a secure HTTPS login. Please note
that playing multimedia content over HTTPS requires port forwarding configurations and
a valid SSL/TLS certificate. For detailed information, please refer to this article.
Manage files and folders
You can perform general file management by tapping the More options icon in the upper-
right corner or the icon next to a file or folder.
• To copy, delete, download, share, rename, compress, extract, or open an item: Long press an
item and tap the More options icon to select an action to perform.
• To add a folder: Enter its parent folder, tap the More options icon, and choose Add > Create
Folder.
18
Page 22

Chapter 2: Quick Start Guide
• To upload an item: Browse to the destination shared folder. Tap the More options icon,
choose Add > Upload, select files to upload. You can go to the Tasks page to view upload
progress.
• To pin a file: You can pin files from your Synology NAS to your local mobile device. Tap the
icon next to a file and choose Pin. Once you pin a file, you can access it at Offline Files >
Pinned Files.
• To sync a pinned file: You can make local pinned files stay synced with source files. Tap the
icon next to a file and choose Sync for instant sync. To sync all pinned files, refresh the
Pinned Files page. All files will be synced upon your next login to DS file.
• To add a folder to My Favorites: Tap the icon next to a folder and choose Add to My
Favorites.
• To archive an item: Tap the icon next to a folder and choose Add to Archive. DS file allows
file compression to save the storage space on your Synology NAS and provides password
configurations to protect sensitive files.
2.9 Install add-on packages
Package Center offers a variety of Synology-designed and third-party packages that are
compatible with your Synology NAS.
This section guides you through the utilization of Package Center.
Install packages via Package Center
1. Launch Package Center.
2. Go to the All Packages page to see available packages.
3. Find the package you wish to install and click Install. (For paid packages, click Buy to
purchase with a credit card or click Try to use the trial version for evaluation.)
4. Once the package is successfully installed, it should appear in the Main Menu.
Install packages from Download Center
1. Go to Synology's Download Center.
2. Select your model from the drop-down menus.
3. Go to the Packages tab of search results and download the desired package as a .spk file.
4. Launch Package Center.
5. Click the Manual Install button next to the search bar.
6. Click Browse to upload the .spk file.
7. Follow the wizard to install the new package.
In addition to package installation, you can configure package-related settings, including auto-
19
Page 23

update, and package sources in Package Center. For more information on the advanced
settings of Package Center, please refer to this article.
2.10 Create local users and groups
You can grant family members or business associates access to Synology NAS by creating user
accounts for them. For the ease of administration, you can create groups to categorize users
and manage them together. This section guides you through how to create users and groups
in Control Panel.
Create a user
1. Go to Control Panel > User & Group > User.
2. Click Create to launch User Creation Wizard.
3. On the Enter user information page, enter the following user information:
Chapter 2: Quick Start Guide
• Name
• Description (Optional)
• Email (Optional): Enter the user's email address. System notifications, such as password
reset messages, will be sent to the address specified here.
• Password
• Confirm password
4. On the same page, configure the following advanced settings that will be applied to the
user:
• Send a notification mail to the newly created user: You have to enable email
notifications in Control Panel > Notification > Email to allow the system to send emails.
If you have not yet set up notification settings, a confirmation dialog box will pop up and
lead you to the setup page when you tick this checkbox. For more information on the
notification settings, please refer to the Manage notifications section.
• Display user password in notification mail
• Disallow the user to change account password
• Password is always valid: You will not see this option If Password Expiration at the
Advanced tab is not enabled. This option makes this user's password always valid and
the rules of Password Expiration will not be applied to this user.
5. On the Join groups page, specify the groups to which the new user should belong. The
default groups are administrators, http, and users. Please refer to the Create a group
section to customize groups.
6. On the Assign shared folders permissions page, choose which shared folders the user
can access. When the user permissions conflict with group permissions, the privilege
priority is as follows: No access > Read/Write > Read only. The Preview column displays
the access privileges that will take effect.
20
Page 24

Chapter 2: Quick Start Guide
7. On the Assign user quota page, you can specify the maximum amount of space the user
can use for each volume/shared folder. Enter a value and select the size unit in the User
Quota field.
8. On the Assign application permissions page, you can control which services the user can
access. When the user permissions conflict with group permissions, the Deny permission
always has priority over the Allow permission.
9. On the Set user speed limit page, you can enable a speed limit for different services (e.g.,
File Station, FTP, rsync, etc.) to restrict the amount of bandwidth consumed by the user
when transferring files. For each service, you can select one of the following:
• Apply group settings: If the user belongs to multiple groups, the group with a higher
speed limit has priority over other ones.
• Set up speed cap: Specify upload and download speed limits in the fields to the right.
• Advanced settings: Two customized speed limits and the group limit can be applied to
the user according to the schedule you set. You can modify the speed limit settings and
set the schedule in the pop-up window.
10. On the Confirm settings page, check and confirm the setting summary.
11. Click Done to finish the settings.
Create a group
1. Go to Control Panel > User & Group > Group.
2. Click Create to launch Group Creation Wizard.
3. On the Enter group information page, enter a group name.
4. On the Select members page, add target users to the group.
5. On the Assign shared folder permissions page, specify group members' permissions to
each shared folder.
6. On the Assign group quota page, you can enable usage quota for each service to control
how much storage can be used by each group member.
7. On the Assign application permissions page, you can control which services group
members can access.
8. On the Set group speed limit page, you can enable a speed limit for different services (e.g.,
File Station, FTP, rsync, etc.) to restrict the amount of bandwidth consumed by each group
member when transferring files. For each service, you can select one of the following:
• Set up speed cap: Specify upload and download speed limits in the fields to the right.
• Advanced settings: Two customized speed limits and no limits can be applied according
to the schedule you set. You can modify the speed limit settings and set the schedule in
the pop-up window.
9. On the Confirm settings page, check and confirm the setting summary.
10. Click Done to finish the settings.
21
Page 25

2.11 Manage notification settings
You can set Synology NAS to automatically send notifications when specific events or errors
occur. Available notification methods include emails, SMS, and push notifications. This
section provides you a brief guide on the setup of notification delivery. Go to Control Panel >
Notification.
1. Go to the Email, SMS, or Push Service tabs to enter the required information. To learn how
to fill in the information, please refer to the following articles:
• Email
• SMS
• Push Service
2. Go to the Rules tab and configure the following settings:
• Event types: Select events that trigger the system to send notification messages and
specify delivery media for each selected event.
Chapter 2: Quick Start Guide
• Message content: Each event has its default notification message. You can also
customize message content by selecting an event and then clicking Edit Message.
Notes:
• You can go to Regional Options to change the notification language.
2.12 Fortify security
Once your Synology NAS is connected to the Internet, it is crucial to ensure system security.
This section provides you four methods to strengthen the security of your DSM.
22
Page 26

Chapter 2: Quick Start Guide
Activate the firewall
1. Go to Control Panel > Security > Firewall.
2. Tick Enable firewall and click Apply. The default firewall profile will be applied to your
DSM. To customize firewall profiles, please refer to this article for detailed instructions.
Leverage Security Advisor
Security Advisor is a built-in application that scans your Synology NAS, checks your DSM
settings, and provides advice on how to address security weakness. Keep your Synology NAS
secure by following the steps below:
Scan your Synology NAS immediately
1. Go to Security Advisor > Overview.
2. Click Scan.
3. Fix the security weaknesses according to the scanning results.
23
Page 27

Set up an automatic scan schedule
1. Go to Security Advisor > Advanced.
2. Tick Enable regular scan schedule under the Scan Schedule section. Select the time to
run scanning from the drop-down menus.
Chapter 2: Quick Start Guide
3. Click Apply to save the settings.
For more information, please refer to the articles under Security Advisor.
Protect your account with 2-factor authentication
2-factor authentication provides additional security for your DSM account. Once this option is
enabled, you will need to enter a one-time authentication code besides your password when
signing in to DSM. The code can be obtained through authenticator apps (e.g., Synology Secure
SignIn and Google Authenticator) installed on your mobile device.
24
Page 28

Chapter 2: Quick Start Guide
To enable 2-factor authentication for your account, please follow the steps below:
• Go to Personal > Account and click 2-Factor Authentication to launch the setup wizard.
Enter your password to continue.
• If Secure SignIn Service is already enabled in Control Panel > Security > Account,
select from either Approve sign-in, hardware security key, or OTP for the second sign-
in step.
• If Secure SignIn Service has not been enabled, OTP is the only available option for the
second sign-in step.
For more information on 2-factor authentication, please refer to this article.
Enable auto block, Account Protection, and DoS protection
You can safeguard DSM through these three mechanisms: auto block, Account Protection, and
DoS protection.
Auto block unauthorized access
1. Go to Control Panel > Security > Protection > Auto Block.
2. Tick Enable auto block.
3. Enter a value in the Login attempts field and a value in the Within (minutes) field. An IP
address shall be blocked when it exceeds the number of failed login attempts within the
specified duration.
4. Tick Enable block expiration and enter a value in the Unblock after (days) field to unlock
a blocked IP address after the specified number of days.
25
Page 29

5. Click Apply to save the settings.
Chapter 2: Quick Start Guide
Enable Account Protection to prevent login attacks
1. Go to Control Panel > Security > Account > Account Protection.
2. Tick Enable Account Protection.
3. Enter a value in the Login attempts field and a value in the Within (minutes) field. An
untrusted client will be blocked if it exceeds the number of failed login attempts within the
specified duration.
4. For Untrusted clients, enter a value in the Cancel account protection (minutes later)
field. The account protection will be canceled after the specified duration.
5. For Trusted clients, enter a value in the Unblock (minutes later) field. The account
protection will be canceled after the specified duration.
6. Click Apply to save the settings.
26
Page 30

Chapter 2: Quick Start Guide
Defend against DoS attacks
A Denial-of-Service (DoS) attack is a malicious attempt to render network services unavailable
by disrupting service functionality. To avoid this type of cyberattacks, follow the steps below:
1. Go to Control Panel > Security > Protection > Denial of Service (DoS) Protection.
2. Tick Enable Dos Protection and click Apply.
For more information on auto block, Account Protection, and DoS protection, please refer to
this article.
2.13 Keep your DSM updated
Synology releases DSM updates from time to time. Updates may include new features,
function improvements, and performance enhancements. This section guides you through the
configuration of DSM updates.
Perform manual DSM update
1. Go to Synology's Download Center.
2. Select your model from the two drop-down menus.
3. Go to the Operating System tab of search results and download an update file.
4. Go to DSM > Control Panel > Update & Restore > DSM Update.
5. Click Manual DSM Update.
27
Page 31

6. In the pop-up window, click Browse to upload the file.
Chapter 2: Quick Start Guide
7. Click OK and wait for the file to be uploaded.
8. After reading through the update information and ticking the confirmation checkbox, click
Update.
9. Click Yes in the confirmation box. The installation can take 20 to 40 minutes. Please do not
shut down the system during the update.
10. The system will restart all services and packages when the update is complete.
Notes:
• After a DSM update, you cannot downgrade to previous versions.
• Available updates and the latest versions may vary depending on your DSM configurations.
Set up automatic DSM update
1. Go to DSM > Control Panel > Update & Restore > DSM Update.
2. Click Update Settings.
3. In the pop-up window, you can configure the following settings to for check for DSM
releases via Synology's Download Center.
• Automatically install important updates that fixed critical security issues and bugs
(Recommended): Allow the system to automatically install important DSM updates. To
ensure that your system is always protected, we recommend enabling this option.
• Automatically install the latest update: Allow the system to automatically install new DSM
updates when the system check finds new updates available.
• Notify me and let me decide whether to install the new update: Have the system notify
you via desktop notifications when there is a new DSM update available. You can choose
whether to download the update after receiving the notification.
28
Page 32

Chapter 2: Quick Start Guide
• Check schedule: Decide when the system should check for available updates. Specify the
check time from the drop-down menus.
Notes:
• An automatic update only applies to minor updates and not to major updates. Generally,
minor updates consist of bug fixes and security patches, major updates include brand-new
features and performance enhancement in addition to bug fixes and security patches, and
important updates contain fixes of critical security issues or bugs. For more information
about important updates, please refer to this article.
29
Page 33

Chapter 3: Account & Privileges
3.1 Account & privileges
You can create user accounts to share DSM access with others and set up user groups to
simplify account and permissions management.
Assign each user shared folder access, application permissions, storage quotas, or access
speed limits. Grant access privileges to individual users or groups.
Administrative delegation allows you to assign management duties to users or groups that do
not have administrator rights. Task specific users with managing user accounts, shared folders,
or system services, or assign system monitoring duties.
Chapter 3: Account & Privileges
Delegating administrative tasks helps you distribute your IT workload and allows colleagues to
take over tasks when you are absent.
Account and privilege related settings can be configured in Control Panel > User & Group.
To learn how to create and manage users and groups, refer to the step-by-step guide in the
Quick Start Guide section. For more detailed information, refer to the articles under User and
Group.
Further reading
• Video tutorial: How to manage User Privileges on Your Synology NAS
30
Page 34

Chapter 3: Account & Privileges
3.2 Directory clients
In Control Panel > Domain/LDAP, you can join your Synology NAS to an existing directory
service such as Microsoft Active Directory, Synology Directory Server, or JumpCloud LDAP
service. As a directory client, you can manage directory users' access permissions to shared
folders, home folders, and DSM services.
You can also turn your Synology NAS into a Single Sign-On (SSO) client. WIth your Synology
NAS acting as an SSO client, users need to enter their credentials only once to access all their
Synology services and devices.
You can turn your Synology NAS into an SSO client whether or not you join it to a directory
service.
To learn how to join your Synology NAS to a directory service, refer to this article.
Further reading
• How can I implement an SSO solution on Synology NAS with Azure AD Domain
Services?
3.3 Synology Directory Server
Synology Directory Server lets you manage domain accounts and resources over Samba. It
supports commonly used Windows Active Directory features:
• Classifying objects with organizational units (OUs)
• Applying group policies for device management
• Using Kerberos for authentication
• Joining diverse client devices
With Synology Directory Server, you can securely store a directory database, manage user
accounts, and deploy devices based on your organization structure.
To learn how to set up a domain via Synology Directory Server, refer to this article.
Further reading
• How do I deploy roaming profiles for Synology Directory Server's users?
• How do I mount network drives for Synology Directory Server's users?
• How do I configure group policies for Synology Directory Server?
• Why are there "sysvol" and "netlogon" folders?
31
Page 35

3.4 LDAP Server
Run an account authentication service with LDAP Server. LDAP (Lightweight Directory Access
Protocol) is a cross-platform protocol used to consolidate and govern access to centrally
stored directory information over IP networks.
Different lists of users within your organization can be merged into one LDAP directory,
reducing the number of databases for you to manage.
With LDAP Server set up, you can:
• Build a Provider-Consumer server architecture.
• Specify connection settings to restrict access by anonymous, non-encrypted, or idle clients.
• Create and organize users and groups according to your needs.
• Customize sign-in and password settings to secure accounts.
• Back up and restore your LDAP database and package settings.
Chapter 3: Account & Privileges
• Turn your Synology NAS into an identity provider for Google Workspace domains.
To learn more about setting up LDAP Server, refer to this article.
Further reading
• How to join Mac/Linux client computers to the Synology LDAP directory service
• How can I sync Synology's LDAP Server with Google Workspace via Google Cloud
Directory Sync?
3.5 SSO Server
If you are hosting several applications on your Synology NAS, it pays to set up a single sign-on
by downloading Synology SSO Server. Integrating web applications allows access to apps with
one set of credentials. Both you and your users can benefit from the convenience and speed it
brings:
• Users only need to remember one set of sign-in credentials and do not have to sign in to
different apps separately.
• You can centralize your application management without keeping different sets of
credentials of the same user in your databases.
• The minimized database reduces sign-in issues.
Note that SSO Server requires a domain or LDAP service to function. To learn how to set up
SSO Server, refer to
this article
.
32
Page 36

Chapter 3: Account & Privileges
3.6 RADIUS Server
RADIUS Serveris an add-on package that offers centralized authentication, authorization, and
accounting (AAA) for wired and wireless network connections viathe Remote Authentication
Dial-In User Service (RADIUS) protocol. RADIUS Server lets you:
• Flexibly deploy wireless routers, VPN servers, and network switches with RADIUS support on
your network.
• Unify the security regulation process of different connection types.
• Choose between various authentication methods (e.g., PAP, MS-CHAP, PEAP, EAP-MSCHAPv2,
or EAP-TTLS).
• Import existing local DSM, domain, or LDAP user lists.
• Configure detailed restrictions for users and groups.
• Keep track of the access statuses with detailed reports.
For more information on RADIUS Server, refer tothis article.
33
Page 37

Chapter 4: Storage & Virtualization
Chapter 4: Storage & Virtualization
4.1 Storage Manager
Storage Manager allows you to organize the storage units on your Synology NAS, monitor
overall storage use, and inspect the health of all your drives.
Key Terms:
Before using Storage Manager, it can help to familiarize yourself with the following terms:
• Storage Pool:
• Combine one or more drives into a single storage unit called a storage pool. A storage
pool can be configured to be protected by a data storage technology known as
Redundant Array of Independent Disks (RAID).
• RAID:
• RAID is a data storage technology that aggregates multiple physical drives into one or
more logical units for improved fault tolerance, performance, and storage capacity.
• Supported RAID types vary according to your Synology NAS model. For details, refer to
this article and the product specs of your Synology NAS.
• Volume:
• Volumes are created on top of storage pools and provide the basic storage space on
your Synology NAS. All of your shared folders, documents, and package data will be
stored here.
34
Page 38

Chapter 4: Storage & Virtualization
Storage Pools and Volumes
Create at least one storage pool and volume to start storing data on your Synology NAS. For
more information, refer to the instructions in Chapter 2.7.
You can go to Storage Manager > Overview to find key information about your storage
system, such as overall system status, volume usage, drive information, and scheduled tasks.
View and manage all your storage pools and volumes at Storage Manager > Storage. The
actions you can perform here depend on your Synology NAS model and configurations:
• Change the RAID type of a storage pool without losing existing data.
• Convert a storage pool from single-volume support to multiple-volume support.
• Add or replace drives to expand the capacity of a storage pool and volume.
• Enable SSD TRIM to optimize the performance of an SSD-only storage pool.
• Perform or schedule data scrubbing on a storage pool to maintain data consistency.
• Perform file system defragmentation to improve a volume's file access performance.
Further reading
• For more information, refer to the articles under Storage Pool and Volume.
Hot Spare
Hot spare drives are standby drives that allow your Synology NAS to automatically repair
degraded storage pools. You can assign hot spare drives to protect storage pools with a drive
fault tolerance of one or more drives at Storage Manager > Storage > Hot Spare.
When a drive crashes and causes a storage pool to degrade, the hot spare drive replaces the
crashed drive, allowing the storage pool to recover. For more information, refer to this article.
35
Page 39

Notes:
Please note the following requirements and limitations:
• The RAID type of the storage pool must have a fault tolerance of 1 or more drives (i.e.,
RAID 1, RAID 5, RAID 6, RAID 10, RAID F1, and SHR comprising at least two drives).
• The capacity of the hot spare drive must be equal to or larger than the capacity of the
smallest drive in a RAID 1, RAID 5, RAID 6, RAID 10, or RAID F1 storage pool.
• The capacity of the hot spare drive must be larger than or equal to the capacity of the
largest drive in an SHR storage pool.
• HDDs and SSDs can each only be assigned as hot spares to storage pools of the same
drive type. Only SSD hot spares can protect SSD storage pools, and only HDDs can protect
HDD pools.
SSD Cache
SSD cache is a cost-effective way to improve the performance of HDD arrays. It improves
random access by storing frequently accessed data on the SSDs of an SSD cache mounted on
a volume or LUN. Note that this feature is only available on specific models. To find out which
Synology NAS models support this feature, refer to this article.
Chapter 4: Storage & Virtualization
There are two types of SSD cache:
• A read-only cache uses one or more SSDs to store frequently read data and accelerate
random read performance. No data loss will occur in the event of SSD failure because this
cache mode only stores copies of data from the volume.
• A read-write cache uses at least two SSDs to create a fault-tolerant cache. The read-write
cache first writes data to the SSDs to improve the random read/write performance and
accelerate data access speed.
Both types or modes of SSD cache can consist of up to 6 SSDs and must be comprised of
drives of the same type. For more information on requirements and how to set up an SSD
cache, refer to this article.
If you are unsure what is the best SSD cache size for your use case, we strongly recommend
running an analysis in Storage Manager > Storage > SSD Cache Advisor beforehand.
The SSD Cache Advisor analyzes your current data use patterns and recommends a suitable
SSD cache size for your selected volume. Allow the initial analysis to run for at least seven days
for more accurate results.
For more information about SSD Cache Advisor, refer to this article.
Further reading
You may want to read the following related articles for more information:
• Important considerations when creating SSD cache
• Frequently asked questions about using Synology SSD cache
• What is the minimum recommended size for my SSD cache?
36
Page 40

Chapter 4: Storage & Virtualization
HDD/SSD
Inspect the health of your drives and take follow-up actions in Storage Manager > HDD/SSD.
Depending on your storage setup and Synology NAS model you can:
• Examine your drives' health information, including location, storage pool allocation status,
health status, temperature, serial number, and firmware version.
• Schedule and run S.M.A.R.T. tests to examine the status of your drives.
• Assign drives to create, manage, or repair a storage pool or SSD cache.
• Enable SSD estimated lifespan notifications and request a warning whenever an SSD's
estimated life expectancy reaches a specified value.
• Enable write cache support to boost the system performance of your Synology NAS.
Further reading
• Refer to this article for more information on the HDD/SSD page.
4.2 Storage expansion
You can pair your Synology NAS with additional expansion units or external devices to scale up
your storage.
Expansion units
Scale up your Synology NAS with an expansion unit to increase your overall storage or
use the expansion unit server as a backup location. Expansion units are designed to work
automatically once connected to a Synology NAS and let you seamlessly upgrade your storage
space.
You can create and manage storage spaces that span across your main Synology NAS and
connected expansion units. However, we recommend keeping each storage space on one
device for better performance.
Further reading
• For information on Synology expansion unit models, visit this page.
• If you already own an expansion unit, you can refer to this solution guide for best
practice tips.
37
Page 41

External devices
Manage the external devices (e.g., SD cards or USB devices) connected to your Synology
NAS device inControl Panel > External Devices. Connected external devices will appear as
system-created shared folders that allow you to access their drive capacity.
Installing the USB Copy package allows you to copy files between your Synology NAS and
external storage devices in multiple ways. Synology NAS only recognizes certain file systems
over USB: Btrfs, ext3, ext4, FAT32, exFAT, HFS Plus, and NTFS. External drives with other file
systems must be formatted before use. For more information, refer to this article.
If you wish to access data stored on exFAT file systems, you can install theexFAT
Accesspackage on your Synology NAS. Refer tothis articlefor more information on the
exFAT package and this article for compatible models.
4.3 Storage Analyzer
Chapter 4: Storage & Virtualization
Storage Analyzer allows you to monitor the overall use trends of your Synology NAS. Create
reporting tasks to obtain detailed reports on volume usage that help you manage your
system and optimize your settings. For more information, refer to the articles under Storage
Analyzer.
4.4 SAN Manager & Storage Console
Make Synology NAS as extended storage for your computers with SAN Manager. You can
divide a part of a volume to create LUNs and connect to them using storage area networking
(SAN) services.
Synology NAS provides certified storage for VMware®, Microsoft®, and other virtualization
platforms. For better management efficiency, install Synology Storage Console for VMware and
Windows to manage your storage systems right in the hypervisor.
• Choose between iSCSI and Fibre Channel as the protocol to deploy your own SAN storage.
Deploying Fibre Channel requires an adequate switch and adapter.
• Create Thick-provisioned or Thin-provisioned LUNs as block-level data storage.
• Protect block-level storage with snapshot and replication features.
To learn how to configure your iSCSI or Fibre Channel services, refer to the articles under SAN
Manager. For more information on the plug-ins, check out the articles about Synology Storage
Console for VMware and Windows.
Further reading
• Refer to this tutorial for instructions on installing Synology Storage Console in your
VMware environment.
38
Page 42

Chapter 4: Storage & Virtualization
4.5 Virtual Machine Manager
Virtual Machine Manager is a full-fledged hypervisor for Synology NAS. You can run virtualized
Windows or Linux services on your Synology NAS and create virtual instances of Virtual DSM.
The clustering architecture allows you to manage virtual machines and operations across
multiple Synology NAS from a single portal. Allocate available hardware resources and migrate
virtual machines between different Synology NAS whenever needed.
For data protection, secure your virtual machines with snapshot and replication protection
plans. There’s also the built-in high-availability feature to minimize system downtime.
For more information on the package and its functionalities, refer to the articles under Virtual
Machine Manager.
39
Page 43

Chapter 5: File-Sharing & Sync
5.1 Shared Folder
Synology offers two types of shared folders for general storage purposes and multi-site file
access.
Shared Folder
The Shared Folder is the basic directory to store files and folders on your Synology NAS. You
need to create at least one shared folder before storing any data.
Chapter 5: File-Sharing & Sync
Store data in private shared folders, or share them with specific users or user groups by
configuring custom access permissions. You can also encrypt shared folders for an additional
layer of protection.
To learn how to create a shared folder and start sharing files, refer to Chapter 2.8 or the
articles under Shared Folder.
More advanced options for shared folders include:
• Cloning shared folders to create near-instantaneous copies (only available on Btrfs volumes).
• Enabling the Recycle Bin feature in shared folders to store deleted files and folders you wish
to retrieve.
• Using Key Manager to manage encryption keys of shared folders and to decrypt multiple
shared folders at a time.
Further reading
• I cannot access a shared folder on Synology NAS via SMB or AFP. What can I do?
Hybrid Share Folder
The Hybrid Share Folder is the cloud storage on Synology's public cloud solution, C2 Storage.
You can mount the Hybrid Share folder as a type of shared folder on Synology NAS and
connect your on-premises Synology NAS with your C2 Storage. Once the Hybrid Share folder
is mounted on Synology NAS, you can view all the cloud-based data locally and cache only the
most recently accessed files on the local site. The Hybrid Share folder is a feature of the Hybrid
Share service and can help you achieve the following:
• Multi-site file access: Mount the same Hybrid Share folder on multiple Synology NAS to
access the centrally stored data.
40
Page 44

Chapter 5: File-Sharing & Sync
• Disaster recovery: Mount a Hybrid Share folder on a Synology NAS to instantly access all
the stored data without going through a time-consuming process of recovering data when
migrating to a new NAS or experiencing a drive failure.
To get started, you will need the following:
• A Hybrid Share plan
• A Synology NAS running on DSM 7.0 or above versions
• The Hybrid Share Service package
• A Btrfs volume on which to mount the Hybrid Share folder
• Connection to an external network
For more information, refer to the articles.
Encryption
Synology NAS uses AES-256 encryption to protect shared folders and Hybrid Share folders
against unauthorized access.
• Shared folders: Encryption is optional for shared folders. For more information, refer to this
article.
• Hybrid Share folders: Hybrid Share folders are always encrypted on your NAS before
transfer to C2 Storage to ensure data security. You need an encryption key to mount and
decrypt any Hybrid Share folder. Data remain encrypted while they are uploaded and while
they are stored on C2 Storage.
Permissions
You can automatically implement Windows Access Control List (ACL) permissions settings for
shared folders and Hybrid Share folders. This also allows you to customize permissions for
individual files and subfolders in Windows ACL.
5.2 File services
SMB/AFP/NFS
Configure the SMB, NFS, and AFP networking protocols on your Synology NAS to use it as a file-
sharing center. Manage files in DSM shared folders from client computers as if you were using
local storage.
41
Page 45

DSM supports the most common protocols to provide seamless file access from Windows,
Linux, and Mac devices:
• For Windows: SMB/CIFS
• For Mac: AFP, SMB
• For Linux: NFS, SMB
Each operating system has a native file-sharing protocol that delivers the best performance for
that platform. SMB supports all three types of operating systems but may be slower than NFS
and AFP. Each protocol also has different security implications.
To enable one or more file-sharing protocols, go to Control Panel > File Services. For more
information, refer to SMB/AFP/NFS.
FTP
FTP is a convenient way to share files with known or anonymous users. Users can access an
FTP server from their computers using web browsers or FTP clients. You can level up transfer
security with FTP over SSL (FTPS) and SSH FTP (SFPT).
Chapter 5: File-Sharing & Sync
To learn how to configure FTP service, refer to the articles under FTP.
5.3 File Station
File Station is a built-in file manager for users to access and manage files easily. Share files
securely with customizable access permissions and temporary share links. It’s the centralized
location to view all files, including photos, songs, and even backup files.
Additional features include:
• Centralize file access by mounting remote folders and public cloud storage to File Station.
• Create file requests for non-DSM users to upload files to Synology NAS.
• Access files from anywhere with its mobile application, DS file.
To learn more, refer to the articles under File Station.
5.4 Synology Drive Server
Synology Drive is a comprehensive file management and collaboration solution that allows
you to easily manage, share, and collaborate files with peers. Its package includes three
components — Synology Drive Admin Console, Synology Drive, and Synology Drive ShareSync.
42
Page 46

Chapter 5: File-Sharing & Sync
In the admin console, administrators can appoint team folders, monitor client connections,
and manage service settings; the Synology Drive web portal allows everyone to browse,
manage, share, and collaborate using files and folders with peers; Synology Drive ShareSync is
an application that synchronizes files in Synology Drive across multiple Synology NAS.
Synology Drive also comes with a desktop utility (Synology Drive Client), and a mobile app
(Synology Drive). These applications are available on all mainstream platforms.
With Synology Drive, you can achieve:
• Local file backup: Sync and back up files on your client device.
• Version control: Retain up to 32 versions per file. Synology Drive’s Intelliversioning helps
you keep the most important changes.
• Offline accessibility: Pin important files to your client device for continuous accessibility,
even when your client device is offline.
• Multi-site exchange: Synchronize files and folders across multiple sites to simplify local
access and enhance cross-office file collaboration. It also provides additional file redundancy.
• Real-time collaboration: Integration with Synology Office and Synology Chat increases
productivity. Collaborate using documents, spreadsheets, or slides and initiate discussions
as you work.
To learn how to set up Synology Drive, refer to the articles under Synology Drive Server.
Further reading
• The storage space in Synology Drive Server is nearly full. What can I do?
• How do I back up data on my computer using Synology Drive Client?
• How do I sync data between multiple Synology NAS via Synology Drive Server?
5.5 Cloud Sync
Connect your Synology NAS with Google Drive, Dropbox, and other public cloud services to
create your own hybrid cloud. Choose between one-way or two-way synchronization to back
up or sync data between your private NAS and public clouds.
You can use one-way synchronization to back up data from your Synology NAS to public
clouds, or the other way around. File changes on the destination side of the synchronization
will not affect the source.
Meanwhile, two-way synchronization keeps files on your Synology NAS and in the public cloud
identical, automatically uploading and downloading changes on both sides.
One folder can be synced to more than one public cloud or to several accounts on the same
cloud to create multiple backups of your files. You can select exactly which files on your
Synology NAS or the public cloud you wish to synchronize, and in which direction.
43
Page 47

To prevent unauthorized access to files in the cloud, you can protect synced files with AES-256
encryption.
By scheduling sync tasks, capping traffic, or limiting system resource use, you can prevent
Cloud Sync from affecting other applications or processes.
To learn more about Cloud Sync, refer to Cloud Sync.
5.6 WebDAV
WebDAV (Web-based Distributed Authoring and Versioning) is an extension of the HTTP
protocol that allows users to manage files stored on remote servers. Common client programs
supporting WebDAV include Windows File Explorer, macOS Finder, and many Linux file
managers.
After setting up WebDAV Server, you can mount and access shared folders on Windows,
macOS, or Linux devices.
Chapter 5: File-Sharing & Sync
WebDAV has the following advantages over other file access protocols:
• Provides better performance than CIFS/SMB over VPN
• Supports editing files on client devices
• Takes advantage of HTTPS security
To learn how to enable WebDAV on your Synology NAS, refer to this article.
Further reading
• How do I access files on Synology NAS with WebDAV?
• How do I import calendars from WebDAV Server to Synology Calendar?
44
Page 48

Chapter 6: Data Backup
Chapter 6: Data Backup
6.1 Active Backup Suite
PC/Server/VM backup solution
Active Backup for Business
Your Synology NAS can be a backup destination of your personal computers, physical servers,
file servers, and virtual machines.
Active Backup for Business is an all-in-one business data protection solution that allows you
to easily manage, deploy, and monitor multiple customized backup tasks for multiple devices
in one centralized location. Active Backup for Business consists of an admin console and a
recovery portal. The admin console allows you to deploy and track the protection of multiple
devices. The recovery portal allows admin users and end-users delegated by the server admin
to access, browse, download and restore backed-up data. Maximize backup efficiency with
Active Backup for Business with global deduplication, data compression, and incremental
backup technologies. Even when data are backed up from different platforms, storage space
consumed by the same backup data can be greatly reduced.
Moreover, various restoration methods for backed-up devices, such as full device restoration
and instant restoration to virtual platforms, are provided to satisfy different IT needs. When
an IT disaster strikes, you can retrieve your backup data in a flash to shorten service downtime
and ensure business continuity.
Active Backup for Business supports the following backup devices:
• Windows personal computer
• Windows physical server
• Linux physical server
• VMware vSphere virtual machine
• Microsoft Hyper-V virtual machine
• SMB protocol file server
• rsync protocol file server
To learn how to create a backup task for each device in Active Backup for Business, refer to the
articles under Active Backup for Business.
45
Page 49

SaaS backup solution
Active Backup for Microsoft 365
Back up your important data located on Microsoft services, including OneDrive for Business,
Exchange Online, and SharePoint Online with Active Backup for Microsoft 365. Users of the
following Microsoft 365 plans: Business, Enterprise, Education, and Exchange Online can back
up their data on Microsoft services to Synology NAS.
Active Backup for Microsoft 365 comprises an admin console and a recovery portal. The
admin console is a centralized management interface, where Microsoft 365 global admins can
create backup tasks, monitor backup status, and manage storage consumption. After admins
perform a backup task in the admin console, users can restore backup data on their own in
the recovery portal.
With Active Backup for Microsoft 365, you can protect data kept on Microsoft 365 to minimize
the risk of data loss and flexibly retrieve backup data. Continuous backup allows businesses to
back up users' services in a non-stop manner, thereby minimizing the risk of data loss. When
data recovery is needed, granular restoration and data exportation are offered by the recovery
portal. Easily restore data to the original location or download data to the local device in one
single location.
Chapter 6: Data Backup
The following lists the supported backup options for each Microsoft service:
• OneDrive for Business: Files, file-sharing permissions, and corresponding metadata
• Exchange Online: Mailbox including mails, folder structure, email attachments, contacts,
and calendar along with event attachments.
• SharePoint Online: Document libraries and lists stored in Sites, My Sites, and Team Site.
To learn how to create a backup task in Active Backup for Microsoft 365, refer to this article.
Active Backup for Google Workspace
Active Backup for Google Workspace is designed to back up data stored in Google Drive, Gmail,
Google Contacts, and Google Calendar. Active Backup for Google Workspace comprises of an
admin console and a recovery portal. The admin console allows Google Workspace admins to
create backup tasks for all Google Workspace accounts and provides a centralized interface
with comprehensive management and monitoring features. The recovery portal features the
self-service of backup data restoration for admin and non-admin users.
With Active Backup for Google Workspace, you can protect data on Google Workspace to
minimize the risk of data loss and flexibly retrieve backup data. Continuous backup allows
businesses to back up users' services in a non-stop manner, thereby minimizing the risk of
data loss. When a data recovery is needed, granular restoration and data exportation are
offered by the recovery portal. Easily restore data to the original location or download data to
the local device by a single recovery portal.
The following lists the supported backup options for each Google Workspace service:
• Google Drive: Files, file-sharing permissions, and corresponding metadata in My Drive and
shared drives.
46
Page 50

Chapter 6: Data Backup
• Gmail: Mailbox including labels and email attachments.
• Google Contacts: Contact data.
• Google Calendar: Calendars including calendar events along with their attachments.
To learn how to create a backup task in Active Backup for Google Workspace, refer to this
article.
6.2 USB Copy
USB Copy lets you copy data between a Synology NAS and a USB storage device or an SD card.
For storage efficiency, you can configure the following settings for a copy task to ensure only
targeted data are exchanged and only important copy versions are retained:
• Customized filters according to file types and extensions.
• Incremental, mirroring, and multi-versioned copy modes.
• Version rotation for the multi-version copy mode.
You can customize a copy task for each USB/SD storage device. When a device once used for
a copy task is attached to the Synology NAS, it can be recognized and previous settings will be
automatically applied.
To learn about how to create a copy task, refer to this article.
Notes:
• All the USB/SD storage devices in the following Synology supported file systems are
allowed to copy data from or to a Synology NAS: FAT32, NTFS, ext3, ext4, and exFAT.
47
Page 51

Chapter 7: NAS Protection
7.1 DSM configuration backup
Regularly backing up system configurations lets you quickly retrieve and restore your settings
without any hassle. You can set up DSM to automatically back up system configurations to
your Synology Account in Control Panel > Update & Restore > Configuration Backup.
Backups can also be performed manually with the data saved to your computer.
Chapter 7: NAS Protection
To learn about how to set up DSM system configuration backup, refer to this article.
7.2 Hyper Backup
Hyper Backup enables you to back up and restore all data on your Synology NAS, such as
system configurations, permission settings, applications, folders, files, and LUNs. A wide
selection of backup destinations includes local folders, remote NAS, rsync file servers, and
multiple cloud service providers. This gives you more flexibility in structuring a backup
strategy.
48
Page 52

Chapter 7: NAS Protection
Multiple data backup versions can be retained to keep important information handy and
easy to track. Backup data are kept in an encrypted database that can be easily browsed,
downloaded, or restored using Hyper Backup Explorer on DSM, Windows, Mac, and Linux
platforms.
To learn how to create a backup task in Hyper Backup, refer to this article.
7.3 Snapshot Replication
Protect your NAS with schedulable and near-instantaneous snapshot and replication plans. A
snapshot is the state of your NAS at a point in time. Compared to full backups, snapshots use
minimum storage space and can be taken within seconds with the help of Btrfs. Recover your
data using snapshots after accidental or malicious data loss or corruption. You can view earlier
versions of files and restore them easily in File Station or Windows File Explorer. Automatically
delete unneeded older snapshots and free up storage space by customizing a retention policy.
If you have more than one Synology NAS that supports Snapshot Replication, you can replicate
snapshots to a remote NAS to further secure your data. Configure replication schedules to
regularly take snapshots of your share folders/LUNs and transfer snapshots as well to the
other NAS. When the replication source is not accessible, you can perform a failover to ensure
file access on the other NAS. This can be very helpful if you are planning for a disaster recovery
scenario, by making sure that you can always access the data on your NAS.
For more information on snapshot and replication, refer to this article.
7.4 Synology High Availability
High Availability refers to a server layout solution designed to reduce interruptions of services
caused by server malfunctions. With two Synology NAS, you can leverage Synology High
Availability to establish a "high-availability cluster" where one server assumes the role of
"active server" and the other acts as a standby "passive server".
Using a real-time data mirroring mechanism, all the data stored on the active server are
replicated to the passive server in real-time. This ensures all replicated data are quickly
accessible after incidents of hardware failure, minimizing your service downtime.
To learn how to set up a high-availability cluster, refer to this article.
49
Page 53

Chapter 8: Security
8.1 Security settings
Protect your Synology NAS from unauthorized logins with firewall rules, Auto Block, and
Account Protection from the Control Panel. Proper firewall settings let you control which IP
addresses or services have access to DSM.
The Auto Block and Account Protection features help make sure that your Synology NAS is
safe from brute-force attacks. They block IP addresses or DSM accounts with too many failed
login attempts within a specified period. When there are attempts to sign in to your NAS or
its services from a specific IP with random username/password combinations, Auto Block
prevents users of that IP address from gaining access to the NAS. Account Protection works
the same way but focuses on individual accounts, blocking users' access to specific accounts.
Chapter 8: Security
Certificates from Let's Encrypt or other certificate authorities help secure connections to
and from DSM. When you connect to DSM through a web browser, certificates encrypt
the information sent between DSM and the browser to prevent any possible information
interception.
Security settings can be configured in Control Panel > Security. To learn more about these
settings respectively, refer to the following articles: Firewall, Protection, and Certificate.
8.2 Secure SignIn
Secure SignIn Service is aimed at improving the overall security of DSM accounts while offering
easy-to-use and flexible login options. With the use of a single-tap prompt (Approve sign-
in) or a hardware security key, you can sign in without the fuss of manually typing in the
password. To further safeguard your account, enable the 2-factor authentication option. After
entering the password, as the second step of identity verification, select from either one-
time verification codes (OTP), Approve sign-in, or hardware security key for a seamless login
experience.
Synology offers a mobile authenticator app, Synology Secure SignIn, for approving sign-in
requests and receiving OTP codes.
To learn more about sign-in methods and 2-factor authentication, refer to the articles under
Sign-In Methods.
50
Page 54

Chapter 8: Security
8.3 Security Advisor
Security Advisor offers a comprehensive security checkup on the system settings of your
Synology NAS. It scans for security weaknesses and provides recommendations for you to take
action on.
With Security Advisor, you can perform the following security checks to ensure data and
system security:
• Detecting and removing malware.
• Checking for password strength.
• Scanning system and related network settings.
• Analyzing suspicious login activities.
• Checking for available DSM and package version updates.
You can run a manual/scheduled system checkup based on a preferred security baseline or
customize a checklist to meet your needs. The results can be consolidated into a daily/monthly
report by configuring the settings at Security Advisor > Advanced > Report Settings. To
receive the reports via email, go to Control Panel > Notification and enable notification
service.
To get started, refer to section 2.12 for step-by-step instructions.
For more information, refer to the articles under Security Advisor.
8.4 Antivirus
Protect your Synology NAS from malicious threats with an antivirus solution. You can run a
full system scan, scan specific folders, or schedule automatic scan tasks. Virus definitions will
automatically update to ensure maximum security.
Two antivirus packages are available in Package Center: Antivirus Essential (free, based on
the ClamAV scanning engine) and Antivirus by McAfee (paid service, powered by the McAfee
scanning engine). For more information, refer to the following articles: Antivirus Essential,
Antivirus by McAfee.
51
Page 55

Chapter 9: Network
9.1 External Access
If your Synology NAS is located within a private network (e.g., connected to a router as a client),
you can configure external access settings to allow your Synology NAS to be accessible from
anywhere over the Internet. This section explains the basics regarding three approaches to
external access: QuickConnect, DDNS, and port forwarding.
QuickConnect
Chapter 9: Network
QuickConnect is designed to make connections to your Synology NAS easy and quick from
outside of your local network. With a customized QuickConnect ID, you can access your
Synology NAS without needing to configure a static external IP address, set up NAT port
forwarding rules, or switch between WAN/LAN addresses when your Synology NAS is moved
to another location.
QuickConnect can be configured in Control Panel > External Access > QuickConnect. To
learn how to set up QuickConnect, refer to this article.
52
Page 56

Chapter 9: Network
Further reading
• What are the differences between QuickConnect and DDNS?
• Which packages or services support QuickConnect?
• I can't access my Synology device via QuickConnect. What can I do?
• Synology QuickConnect White Paper
DDNS
DDNS (Dynamic Domain Name System) is an efficient way to allow external access to Synology
NAS. It simplifies connections to your Synology NAS over the Internet by mapping a hostname
to its IP address. For example, you can access your Synology NAS using a DDNS hostname (e.g.,
"www.john.synology.me") instead of using an IP address (e.g., "10.17.1.1").
DDNS hostnames can be configured in Control Panel > External Access > DDNS. To learn
how to register a DDNS hostname for your Synology NAS, refer to this article.
Further reading
• What are the differences between QuickConnect and DDNS?
• Frequently asked questions about Synology DDNS service
53
Page 57

Port forwarding
Port forwarding allows external devices to access resources within a local area network. It
works by redirecting network packets from a NAT device (e.g., a router) to the IP address/port
combination of a local device.
Chapter 9: Network
Port forwarding rules can be configured in Control Panel > External Access > Router
Configuration.
To learn how to set up port forwarding rules on DSM, refer to this article.
Further reading
• For more information on port forwarding mechanism, refer to the mechanisms of port
forwarding section in this article.
• What network ports are used by DSM services?
• Video tutorial: How to Configure Port Forwarding to Remotely Access Your Synology
NAS
9.2 Network Settings
In most cases, you can start exploring services on your Synology NAS right after installing DSM
without the need to configure network settings. For those who wish to customize the settings,
you can do so by going to Control Panel > Network.
54
Page 58

Chapter 9: Network
The following introduces some generic network options available in Control Panel > Network
> General:
• Change the hostname: A hostname is a unique and absolute label for a device on a network
and is used to identify the device during network communication. To edit the hostname of
your Synology NAS, enter a new name in the Server name field under the General section.
• Assign the default gateway: A gateway connects multiple different networks so that the
data from your Synology NAS can be transmitted to other networks. The default gateway
will be the device used if no alternative routes are specified. To assign the default gateway,
click the Edit button beside Default gateway and arrange the priority order of connected
gateways.
• Specify DNS servers: The Domain Name System (DNS) resolves easy-to-memorize Internet
addresses to the numeric addresses that Internet-connected devices use. When your
Synology NAS connects to a domain name such as "www.synology.com", its DNS server
is responsible for querying the site's IP address "210.61.203.200", allowing your Synology
NAS to access the website’s information. Under the General section, you can tick Manually
configure DNS server and specify a preferred DNS server along with an alternative one.
• Connect via a proxy server: A proxy server functions on behalf of client devices to access
resources on the Internet. To specify a proxy for your Synology NAS, tick Connect via a
proxy server under the Proxy section, enter the Address and Port, and then click Apply.
For more information on settings in Control Panel > Network > General, refer to this article.
55
Page 59

Manage network interfaces
A network interface serves as a medium that connects your Synology NAS to local networks
or the Internet. There are three connection types for network interfaces you can configure in
Control Panel > Network > Network Interface, as listed below:
Chapter 9: Network
• Dynamic IP: Your Synology NAS will obtain a dynamic IP address automatically from a DHCP
(Dynamic Host Configuration Protocol) server (e.g., a router) after DSM has been installed.
If you have changed the connection type of Synology NAS but would like to use dynamic
IP mode again, select the specified network interface, click Edit, and tick Get network
configuration automatically (DHCP) at the IPv4 tab.
• Static IP: If you already have some fixed IP addresses, you can adopt this connection type
for network interfaces. For enterprise use, we suggest assigning a static IP address to your
Synology NAS because this makes it easier to be managed by IT administrators. To learn how
to set up a static IP address on DSM, refer to this article.
• PPPoE: If your Synology NAS connects to the Internet via a DSL or cable modem and you
have purchased a PPPoE (Point to Point Protocol over Ethernet) service from your ISP, you
can adopt this connection type to allow your NAS to directly connect to the Internet without
a router. To learn how to enable PPPoE connections on DSM, refer to this article.
In Control Panel > Network > Network Interface, you can configure more settings related to
the network interfaces of your Synology NAS, including IPv6 connections, VPN client settings,
and Link Aggregation. The following section will briefly introduce these options and guide you
on their configurations.
56
Page 60

Chapter 9: Network
Set up IPv6 connections
Besides connections to the Internet via the IPv4 protocol, DSM also supports IPv6 address
structure through the following two strategies (they can be adopted simultaneously):
• Dual stack: An IPv4/IPv6 dual-stack configuration lets you configure your Synology NAS with
both an IPv4 and an IPv6 address. Use this approach to access resources across IPv4 and
IPv6 network environments.
• Tunneling: Tunneling involves transmitting one protocol inside another through
encapsulation. Using this method allows your Synology NAS to encapsulate IPv6 packets in
IPv4 packets and send them across IPv4 networks.
To learn how to set up an IPv6-integrated network interface, refer to this article.
Further reading
• What services on Synology NAS support IPv6?
Turn your Synology NAS into a VPN client
57
Page 61

VPN (Virtual Private Network) service allows you to access resources confidentially through
your private networks, no matter your location. It can also be used to safeguard the network
connections of your Synology NAS via encrypted tunnels.
With DSM, you can easily connect to a VPN server with your Synology NAS via PPTP, OpenVPN,
or L2TP/IPSec protocols. If multiple VPN sources are available, you can also switch between
different servers by using VPN profiles.
To learn how to create VPN profiles on DSM, refer to this article.
Combine LANs with Link Aggregation
Chapter 9: Network
Link Aggregation increases the bandwidth of your Synology NAS by aggregating multiple
network interfaces and provides traffic failover to ensure uninterrupted network connections.
To learn how to bond network interfaces with Link Aggregation, refer to this article.
Control network traffic
58
Page 62

Chapter 9: Network
In Control Panel > Network > Traffic Control, you can control the outbound network traffic
of DSM services to prevent latency, congestion, and packet loss. If you wish to limit the traffic
of a specific service, you can specify its guaranteed and maximum bandwidths on the Traffic
Control page.
To learn how to create a traffic control rule, refer to this article.
Configure static routes
In Control Panel > Network > Static Route, you can add static routes to the routing table in
DSM. By doing so, service traffic on your DSM can be transmitted via different paths according
to network destinations, which improves the routing efficiency of gateway devices in your
network environment. To learn how to set up static routing, refer to this article.
9.3 Proxy Server
A proxy server acts as a gateway that forwards web requests and data between clients on your
network and servers on the internet.
59
Page 63

You can use a proxy server as a firewall, to filter web traffic, manage shared network
connections, and speed up responses for common web requests.
Chapter 9: Network
Proxy Server can be downloaded and installed at Package Center. To learn how to set up and
configure your proxy server with this package, refer to the articles under Proxy Server.
Further reading
• To learn how to connect your Synology NAS via a proxy server, refer to the Connecting
via Proxy Server section in this article.
60
Page 64

Chapter 9: Network
9.4 DNS Server
The Domain Name System (DNS) is an address book of the Internet. It maps meaningful names
(i.e., domain names such as "www.synology.com") into IP addresses (e.g., "210.61.203.220"),
allowing users to easily access web pages, computers, or other resources across networks.
In DSM, DNS service can be set up via DNS Server. This package is recommended for website
hosting and is necessary for Active Directory domain services. It has the following features:
• Master and slave zones: The DNS boundaries that allow granular control of DNS
components. You can store DNS information in one master zone (containing a read/write
copy of data) and multiple slave zones (containing read-only copies of data) to ensure high
availability of DNS service.
• DNS forwarding: An alternative method of DNS resolution that will be used when DNS
Server cannot find matching IP addresses in your zones.
• TSIG keys: Safeguard the synchronization of your DNS files with encryption.
• Split-horizon DNS: A function that provides each client with customized DNS information;
this can help improve security and privacy management of DNS zone records.
To learn how to set up your DNS server with this package, refer to the articles under DNS
Server.
Further reading
• How do I set up a DNS server on my Synology NAS?
61
Page 65

9.5 DHCP Server
A DHCP server automatically assigns IP addresses and network parameters (e.g., subnet mask,
DNS server, etc.) to client devices located within the same local area network. By doing so, the
administrator does not need to manually configure the network settings for each client device.
Chapter 9: Network
DHCP Server can be downloaded and installed at Package Center. To learn how to set up and
configure your DHCP server with this package, refer to this article.
9.6 VPN Server
You can turn your Synology NAS into a VPN (virtual private network) server, allowing DSM
users to securely connect to the local area network that the Synology NAS belongs to no
matter where they are.
62
Page 66

Chapter 9: Network
Supported VPN protocols:
• L2TP/IPSec: A combination of protocols that offers secure VPN connections. It is supported
by most clients (such as Windows, Mac, Linux, and mobile devices).
• OpenVPN: An open-source protocol for reliable and secure VPN connections. It protects VPN
connections with SSL/TLS encryption.
• PPTP: An older VPN protocol supported by most clients, including Windows, Mac, Linux, and
Android devices.
To learn how to create a VPN service using VPN Server, refer to this article.
Further reading
• How do I connect to Synology's VPN Server via Windows PC?
• How do I connect to Synology's VPN Server via Mac?
• How do I connect to Synology's VPN Server via an Android device?
• How do I connect to Synology's VPN Server via an iOS device?
• Frequently asked questions regarding VPN services on Synology NAS
63
Page 67

Chapter 10: Management
10.1 Hardware & Power Settings
Chapter 10: Management
Hardware Settings
General hardware settings of your Synology NAS can be configured in Control Panel >
Hardware & Power > General, including the following:
• Memory Compression
• Power Recovery
• Beep Control
• Fan Speed Mode
Power Settings
The power settings of your Synology NAS can be configured at the following tabs in Control
Panel > Hardware & Power:
• Power Schedule: Specify a time for DSM to start up and shut down automatically.
• HDD Hibernation: Specify the idle time before drives enter hibernation. This function helps
you save power consumption and extend the lifespans of drives.
64
Page 68

Chapter 10: Management
• UPS: Enable UPS support to extend the operation of your Synology NAS upon an unexpected
power outage. This will give DSM enough time to execute normal shutdown.
Further reading
• How do I recognize a hibernating Synology NAS via the LED indicators?
• What is the difference between HDD Hibernation, System Hibernation, and Deep
Sleep?
• What stops my Synology NAS from entering Hibernation?
10.2 Login Portal
You can customize the login web portals for DSM and various applications (e.g., File Station),
change their login background and appearance, and manage network settings using Login
Portal in Control Panel.
The HTTP/HTTPS port, domain name, or alias for your DSM or applications can be customized;
this allows users to access them via custom URLs. Instead of launching an application after
users sign in to DSM,a custom URLtakes them to the application interface directly. This not
only enables quick login when you want to launch a specific application but also allows you to
grant other users the permissions to only specific applications on your DSM.
Network settings management helps ensure the security of your Synology NAS. Configuring
access control rules restricts users of denied IP addresses from accessing your Synology NAS,
whereas configuring reverse proxy rules allows trusted users from sensitive ports to access
your Synology NAS.
To learn how to configure the relevant settings, refer to the articles under Login Portal.
65
Page 69

10.3 Resource Monitor
Monitor the CPU usage, memory usage, disk utilization, and network flow of your Synology
NAS in real-time using the built-in Resource Monitor.
You can view historical data to compare system usage over a specific period and customize
performance alarms to warn you of resource anomalies promptly.
Managing the services running on your DSM and the users connected to your Synology NAS
can ensure optimal system performance and control memory usage. For example, you can
stop services that have reached pre-configured speed limits from transferring files, force users
to sign out from DSM, or stop the connected users from accessing data on your NAS.
To learn how to configure relevant settings, refer to the articles under the Resource Monitor.
Chapter 10: Management
10.4 Log Center
Log Center centralizes management of system logs. You can configure notification settings to
inform administrators when specific events occur.
66
Page 70

Chapter 10: Management
Log Center is activated by default when your DSM is set up. For advanced features, such as
remote log transfer, and log archiving, you can install the Log Center package at Package
Center.
To learn how to use Log Center, refer to the following articles:
• Log Center (built-in function)
• Log Center (add-on package)
10.5 Universal Search
Perform keyword searches or do an advanced search into applications, folders, and files
on your Synology NAS with a few clicks using Universal Search. You can index folders or file
contents to conduct deep and fast searches into files located in folders, manage searches by
starring your favorite searches, specify a maximum number of search records, and more.
Universal Search covers the following items:
• Files (including images, music, and videos) in indexed folders
• Package-specific files:
• Notes in Note Station
• Spreadsheets and documents in Synology Office
• Offline DSM Help documents
• Applications
To learn how to search the items on your Synology NAS and configure relevant settings, refer
to the articles under Universal Search.
67
Page 71

10.6 Central Management System
Centrally and simultaneously manage multiple Synology NAS by designating a NAS as a
hostserver and other NAS as managed servers. On the host server, IT admins responsible
for the mass deployment of multiple NAS can apply policies (e.g., enable traffic control and
firewall) to managed servers and run tasks (e.g., enable Wake on LAN) or customized scripts
(e.g., create users or install packages) on these servers. This ensures that configurations across
all servers are the same and simplifies management.
On the unified dashboard, you can monitor the overall information (e.g., connection status
and storage usage) of the managed servers, delegate administrator permissions to specific
users or groups, install DSM versions and packages, perform updates on managed servers,
and more.
To learn how to configure relevant settings, refer to the help article under Central
Management System.
Chapter 10: Management
10.7 Active Insight
Synology Active Insight is a cloud-based service that provides real-time system monitoring for
your Synology NAS. It helps with the maintenance of your NAS through the following services:
• Cloud monitoring: This service actively monitors the health and performance of your
Synology NAS. It displays the top-rated NAS for each performance metric so that you can
quickly recognize abnormalities from unexpected high values.
• Centralized management: Active Insight provides an informative overview of all your
Synology NAS through a web portal and dedicated mobile apps. It can lighten the workload
of your IT personnel as they will not have to check up on each Synology NAS one by one;
everything can be seen in one central location.
68
Page 72

Chapter 10: Management
• Self-service troubleshooting: When a system abnormality occurs, Active Insight will deliver
a notification by email and through a push notification in the mobile app along with detailed
troubleshooting advice. Following the provided steps will reduce the time needed to find the
cause of abnormal events.
Synology Active Insight service can be enabled in Control Panel > Synology Account. To learn
how to set up and use Active Insight, refer to this article.
10.8 System reset
You can reset DSM to its factory default settings inControl Panel>Update & Restore>
System Reset. All user data and system configurations will be deleted and the DSM will be
restored to default settings. To learn about how to reset your DSM, refer to this article.
69
Page 73

Chapter 11: Productivity
11.1 Synology Office
Synology Office is a suite of tools allowing for interactive collaboration in real-time. With
Synology Document, Spreadsheet, and Slides, you can use editing tools to create, edit, and
share your work and ideas. Because all work files are saved online, they can be accessed
anytime, anywhere using different devices, including computers, mobiles, and tablets.
Your sensitive documents in Synology Office can be protected using file encryption.
Additionally, when Synology Chat is installed on the same Synology NAS, it allows instant and
interactive collaboration at your fingertips.
Chapter 11: Productivity
To learn how to get started with Synology Office, refer to this article.
Further reading
• What types of files can I import into Synology Office?
• How do I import files on my Synology NAS into Synology Office?
• Synology Chat Plugin
11.2 Note Station
Note Station is a note-keeping application that allows you to add, view, manage, and share
your content-rich notes. For every note you take, you can easily add elements such as
reference links or audio recordings. You can also save clipped texts/graphics using Synology
Web Clipper on your Chrome browser. Easily manage your notes by grouping them by tags or
categorizing them into notebooks or shelves.
70
Page 74

Chapter 11: Productivity
Note Station is available in web browsers, as a desktop utility, and in mobile app formats. To
learn how to manage Note Station, you can refer to this article.
Further reading
• How can I enhance my personal productivity in Note Station?
11.3 Synology Chat
Synology Chat is an instant messaging service that can be set up for both personal and
workplace communication. You can send one-on-one messages, encrypt messages for privacy,
or create channels for group discussions.
In Synology Chat Admin Console, administrators can manage channel settings, set content
deletion interval, and view logs; the Synology Chat web portal offers various features to help
increase efficiency, including pinning messages, bookmarks, scheduling messages, reminders,
and chatbots. .
The service can be integrated with Synology Office, Synology Drive, and Synology
Calendar to enhance workplace collaboration. For example, users can send messages, view
conversations, or link folders to a Chat channel when using Synology Office without having to
switch windows.
Synology Chat is available in web browsers, as a desktop utility, and in mobile app formats.
For more information on how to set up and manage Synology Chat Server, refer to the articles
under Synology Chat Server.
11.4 Synology Calendar
With Synology Calendar, you can set up personal calendars and share them with others. You
can create events and edit its details, including description, time, location, and alerts, as well as
share and invite guests.
71
Page 75

Advanced management options are available, such as repeating events, adding event colors,
attaching files to events, editing the guest list, switching between calendars, and exporting
calendars. Additionally, when Synology Calendar is installed on the same Synology NAS as
Synology MailPlus, information sync across services is available.
To learn how to set up Synology Calendar, refer to this article.
Further reading
• How do I host calendars with WebDAV Server?
11.5 Synology Contacts
With Synology Contacts, you can create contacts, personalize labels for easy identification, and
share address books with members of your organization. There is a default group address
book, Team Contacts, that contains all users in your account system (local, domain, or LDAP
users) so you don’t have to do it manually.
Chapter 11: Productivity
Additionally, Synology Contacts can serve as a contact management add-on for Synology
MailPlus when they are installed on the same Synology NAS. It is capable of suggesting email
recipients when client users send emails on Synology MailPlus.
To learn how to organize contacts with Synology Contacts, refer to this article.
Further reading
• How do I import contacts from a CardDAV server to Synology Contacts?
• How do I sync Synology Contacts to my mobile device via CardDAV?
11.6 Synology MailPlus
With Synology MailPlus, you can run and manage a privately owned mail service on a Synology
NAS. The MailPlus suite consists of two packages: Synology MailPlus Server and Synology
MailPlus.
Synology MailPlus Server
Synology MailPlus Server is an administration console where you can centrally manage and
monitor your mail server. The key features are as follows:
• Various security tools: The following tools are supported to keep spam and phishing emails
out of inboxes or to protect email privacy: DNSBL (Domain Name System-based Blackhole
List), antivirus scan, email quarantine, SPF/DKIM/DMARC authentication, and MCP (message
content protection).
• Multiple domain management: MailPlus Server can support multiple domains. You can
configure settings related to alias, auto BCC, usage limit, and disclaimer for each domain
from a single interface.
72
Page 76

Chapter 11: Productivity
• MailPlus high-availability: Two Synology NAS can form a MailPlus high-availability cluster
that minimizes service disruptions caused by server malfunction or overload. A two-way
synchronization will be performed to ensure mail data remain consistent across both
servers, thereby preventing data loss and shortening server downtime.
Synology MailPlus
Synology MailPlus is a versatile online mail client that works in all major browsers. The key
features are as follows:
• Email, calendar, and contact integration: When Synology MailPlus, Synology Calendar,
and Synology Contacts is run on the same Synology NAS, information can be synced across
different services. For example, email content can be added to Synology Calendar as
calendar events, and Synology Contacts can provide a contact list for auto-suggestions of
recipients.
• Shared mailbox: A personal mailbox can be shared with other internal users to create a
collaborative inbox for project tracking.
• Custom email filter: Multiple filter rules can be set up to automatically apply labels for quick
identification or move specific emails to a certain mailbox for centralized management.
• Individual blacklist and whitelist
To learn how to set up a mail server via Synology MailPlus Server, refer to this article.
Further reading
• How do I best deploy Synology MailPlus and select a suitable Synology NAS?
• How do I migrate emails from Microsoft Exchange to Synology MailPlus Server?
• How do I create a high-availability cluster for Synology MailPlus Server?
• How do I check my Synology MailPlus on Mozilla Thunderbird and Microsoft
Outlook?
• My users do not have permission to use Synology MailPlus. What can I do?
73
Page 77

11.7 Web Station
Chapter 11: Productivity
Web Station allows you to host websites on Synology NAS. With support for PHP, MySQL,
Nginx, Apache HTTP Server, and a variety of third-party packages, you can manage dynamic
and database-driven web entrances for your personal or business needs.
The following features makes website management flexible and easy:
• Virtual hosting: You can host multiple websites, each of which has a unique URL.
• Personal websites: You can assign each local, domain, and LDAP user an independent web
portal, which allows them to host their own website.
• User-defined profiles for PHP environments and error pages
For more information, refer to the articles under Web Station.
Further reading
• How do I host a website on my Synology NAS?
• How should I set access permissions to folders used for hosting websites?
74
Page 78

Chapter 12: Multimedia
Chapter 12: Multimedia
DSM’s multimedia applications allow everyone to smart-manage their photos, organize videos,
and enjoy music anytime and anywhere. This chapter highlights some of the key features for
you to enjoy the entertainment content on your Synology NAS.
12.1 Synology Photos
Synology Photos collects and displays photos and videos saved on your Synology NAS. With its
flexible arrangement options and detailed share settings, users can tailor photo management
to their liking.
Each tab of Synology Photos represents one key feature:
• Photos allows users to manage photo and video files with folders. Users can choose to
operate alone in their Personal Space or open up Shared Space and invite others to work
together.
• Albums are virtual, and allows users to create different collections of their photos without
taking up extra storage space.
• Sharing lists the albums shared to the user and shared with others.
Its mobile application is available on iOS and Android. It is built for effortless browsing,
organizing, and back up. You can also cast photos to other screens via AirPlay or Google
Chromecast.
To learn more about operating Synology Photos on web browsers, refer to this article. To
learn more about Synology Photos mobile, refer to this article.
75
Page 79

12.2 Video Station
Organize your video collections with Video Station. You can manage movies, TV shows, or
home videos on your Synology NAS and stream them to various devices, including computers,
DLNA/UPnP-compliant DMAs, AirPlay devices, and mobile devices.
The key features are highlighted as follows:
• Browse videos stored on your NAS: Manage videos by categorizing them intoMovie,TV
Show, andHome Videoor create a custom libraryfor easy browsing.
• Automatically retrieve video information: Locate your videos with the metadata (e.g., posters,
subtitles, and other video details) retrieved from the Internet. Information can be retrieved
by enabling theVideo Info Pluginfeature (atVideo Station>Settings>Advanced
Settings).
• Control playback of your videos: Adjust the volume, select video playback quality, or turn on
subtitles.
• Share videos with others: Share your videos with anyone using a link, or with specific users
by granting them the appropriate privileges.
Chapter 12: Multimedia
To learn how to manage Video Station, refer to the articles under Video Station.
Further reading
• How do I stream videos smoothly via Video Station/DS video?
• Can my Synology NAS convert videos for my device?
• Does my Synology NAS support streaming 4K videos?
12.3 Audio Station
Centralize your music collections in the cloud. With Audio Station, you can access music on
Synology NAS using a web browser or mobile device, or stream them to various devices for
playback.
76
Page 80

Chapter 12: Multimedia
Audio Station provides multiple browsing and playback features to make music management
simple. The following are a list of benefits that Audio Station can bring you:
• Enjoy music anytime, anywhere: Audio Station supports AirPlay, Chromecast, CarPlay,
Android Auto, and Amazon Alexa devices, making it easy for you to play music using different
types of devices.
• Efficiently organize your music library: You can sort music by artists, albums, composers, and
genres, or createPersonal/Group/Smartplaylists for simpler management.
• Access your music with ease: You can save playlists, artists, and albums toMy Pinsfor quick
access, view the latest added music collection inRecently Added, or listen toall types of
songs randomly selected for you withRandom 100.
• Easily share music with others: You can share a single song with anyone using a link or
compile multiple songs into aShared Playlistwith the option to customize its validity period
for enhanced security.
For more information on how to manage Audio Station, refer to the articles under Audio
Station.
Further reading
• How do I enable the Audio Station skill on Amazon Alexa?
12.4 Media Server
Turn your Synology NAS into a multimedia server. With Media Server, you can stream
multimedia content from your Synology NAS to DLNA/UPnP-compliantDMAs (e.g., stereo
systems, TV sets, or gaming consoles). By connecting these devices to your home network,
you can view photos, listen to music, and watch videos without installing any applications or
devices on them.
77
Page 81

Manage Media Server with the following options for enhanced DMA compatibility and a
smooth streaming experience:
• Audio/video conversion support to convert files into compatible formats.
• Custom MIME types that help individual devices identify file formats.
• Device lists to restrict the access of newly detected devices on LAN and to apply the settings
of predefined profiles.
For more information, refer to the articles under Media Server.
Further reading
• How to enjoy multimedia contents stored on Synology NAS with DLNA/UPnP-
compliant DMAs?
12.5 Indexing Service
Chapter 12: Multimedia
The indexing service provides a way to automatically scan and index multimedia files from
specified sharedfolders in File Station. Once indexed, these files will be accessible from your
DMAs and will be displayed in multimedia packages, including Synology Photos, Video Station,
Audio Station, Media Server, and iTunes Server.
By default, new files in thephoto,music, andvideofolders are automatically indexed. If you
wish to create an indexed folder, go to Control Panel > Indexing Service. At this page, you
can edit/remove indexed folders, set up thumbnail quality for photos and videos, or manage
conversion settings for videos.
For more information on the indexing service, refer to this article.
Notes:
• Mounted shared folders from remote servers cannot be added as indexed folders.
• You can add up to 100 indexed folders on your Synology NAS.
78
Page 82

Chapter 13: Surveillance
Chapter 13: Surveillance
Surveillance Station is a professional security solution that can be tailored to suit every user's
needs. Powered by its clean-cut web interface and extensive device compatibility, you can
easily monitor live feeds from cameras, customize video recording, receive instant alerts, and
do much more. The mobile version of Surveillance Station, DS cam, is also available for you to
manage your security on the go.
To learn how to deploy your surveillance system, refer to this document.
13.1 Set up IP Cameras
Surveillance Station is compatible with over 7,900 IP cameras – including PTZ, fisheye, multi-
lens, and other specialized devices. Video recording can either be scheduled or triggered by
Event Detection so that only valuable recordings take up your storage space.
To learn how to add cameras and apply their various features, refer to this article.
79
Page 83

13.2 Monitor Camera Feeds
Live View supports real-time streaming of up to 100 channels on a single layout. You can freely
switch between different camera views, directly operate cameras using the on-screen camera
controls, and enable event alerts so that no unusual actions will go unnoticed.
To learn how to operate Live View, refer to this article.
Chapter 13: Surveillance
13.3 Efficient Recording Playback
Timelineis where you view security footage. Check recordings of a specific time range with
Surveillance Station’s timeline, calendar, and seek function. Filters can be configured to target
specific events or cameras. Recordings can be played back in sync or shown one by one.
For more information on recording management, refer to this article.
80
Page 84
Chapter 13: Surveillance
13.4 Comprehensive Management Features
Administrators can extend their management beyond IP cameras and recordings. For instance:
• Action Rules automate a series of surveillance functions according to set rules, such as
setting schedules for your cameras to patrol.
• Privilege Profiles grant users with different administrative Manager/Spectator permissions to
Surveillance Station applications.
• System logs provide a full record of Surveillance Station activities while event logs list
detected events.
• Notifications can be customized to send instant alerts to security personnel.
Further reading
• For more information on action rules, refer to this article.
• For more information on users and privileges, refer to this article.
• For more information on logs in Surveillance Station, refer to this article.
• For more information on sending notifications, refer to this article.
13.5 Centralized Management System
Surveillance Station Centralized Management System (CMS) allows you to operate a multi-site
and multi-server surveillance system by turning your server into a host. Cameras, live feeds,
and recording footage can be operated via a single web portal. Automatic failover and backup
services are also available to ensure uninterrupted video surveillance.
Further reading
• For more information on how to set up Surveillance Station CMS, refer to this article.
• For more information on selecting a Synology product as a CMS host refer to this article.
81
Page 85

Appendix
Legal Information
• Privacy Statement
• Services Data Collection Disclosure
• Synology End User License Agreement
• Synology Package Center Terms of Services
Appendix
82
Page 86

Appendix
SYNOLOGY
INC.
Banqiao Dist., New Taipei City 220632
9F, No. 1, Yuandong Rd.
Tel: +886 2 2955 1814
Taiwan
SYNOLOGY
AMERICA CORP.
3535 Factoria Blvd SE, Suite #200,
Bellevue, WA 98006
Tel: +1 425 818 1587
USA
SYNOLOGY
UK LTD.
Unit 5 Danbury Court, Linford Wood,
Milton Keynes, MK14 6PL
United Kingdom
Tel.: +44 (0)1908048029
SYNOLOGY
FRANCE
102 Terrasse Boieldieu (TOUR W)
92800 Puteaux
Tel: +33 147 176288
France
SYNOLOGY
GMBH
Grafenberger Allee 295
40237 Düsseldorf
Deutschland
Tel: +49 211 9666 9666
synology.com
Synology may make changes to specifications and product descriptions at any time, without notice. Copyright
© 2021 Synology Inc. All rights reserved. ® Synology and other names of Synology Products are proprietary
marks or registered trademarks of Synology Inc. Other products and company names mentioned herein are
trademarks of their respective holders.
83
SYNOLOGY
SHANGHAI
200070, Room 201,
No. 511 Tianmu W. Rd.,
Jingan Dist., Shanghai,
China
SYNOLOGY
JAPAN CO., LTD.
4F, No. 3-1-2, Higashikanda,
Chiyoda-ku, Tokyo, 101-0031
Japan
 Loading...