

Page 1

Synology Router User's Guide
Based on SRM 1.2
Page 2

Table of Contents
Chapter 1: Set up Your Synology Router
Set up Synology Router Manager (SRM) 4
Set up Desktop Wallpaper 7
Reset Synology Router 7
Chapter 2: Choose the Operation Mode
Wireless Router 9
Wireless AP (Access Point) 9
Wireless Client 10
Wireless Repeater (WDS) 10
Chapter 3: Set up Your Wi-Fi Connection
Enable Smart Connect 11
Create Wi-Fi Networks (2.4GHz & 5GHz) 11
Create Guest Wi-Fi Networks (2.4GHz & 5GHz) 11
Create WPS Networks (2.4GHz & 5GHz) 12
Chapter 4: Build a Wi-Fi system network
Add Wi-Fi Points 13
Network Status 13
Congure Wi-Fi Points 13
Test Wi-Fi Performance 13
Chapter 5: Manage Client Devices
Monitor Device Status 14
Apply Trac Control 14
Apply Wake-On-LAN 14
Chapter 6: Enhance Connection Security
Secure Your Connections 15
Create Firewall Rules 16
Enforce Auto Block 16
Create Certicates 16
Use More Security Measures 16
Chapter 7: Update and Restore Your Synology Router
Update SRM and Packages 17
Back up and Restore SRM 17
Register Synology Account 17
Chapter 8: Manage Internet Connection
Internet Connection Types 18
ISP/VPN/IPv6 Settings 18
2
Page 3

Smart WAN 18
QuickConnect & DDNS 19
DMZ 19
Port Forwarding 19
Port Triggering 19
Chapter 9: Manage Local Network Connection
Set up an IPv6 Router 20
Set up DHCP Services 20
Set up Static Routes 20
Set up IPTV & VoIP 20
Chapter 10: Manage External Devices and Privileges
Install & Manage USB/SD Storage 21
Dene User/Folder Privileges 21
Install & Manage Network Printers 21
Install & Manage 3G/4G Dongles 21
Chapter 11: Discover SRM Packages
Safe Access 22
VPN Plus Server 22
Threat Prevention 22
Download Station 22
DNS Server 22
Cloud Station Server 23
Media Server 23
RADIUS Server 23
Chapter 12: Discover Synology Mobile Applications
DS router 24
Other Synology Mobile Applications 24
Chapter 13: Diagnosis Tools
Check Connection Status 26
Check Notications 26
Ping 26
Traceroute 26
Contact Technical Support 26
Chapter 14: FAQ
SRM Operation 27
Network 28
Wi-Fi 30
Syno_UsersGuide_Router_20161220
3
Page 4
Set up Your Synology Router
Set up Synology Router Manager (SRM)
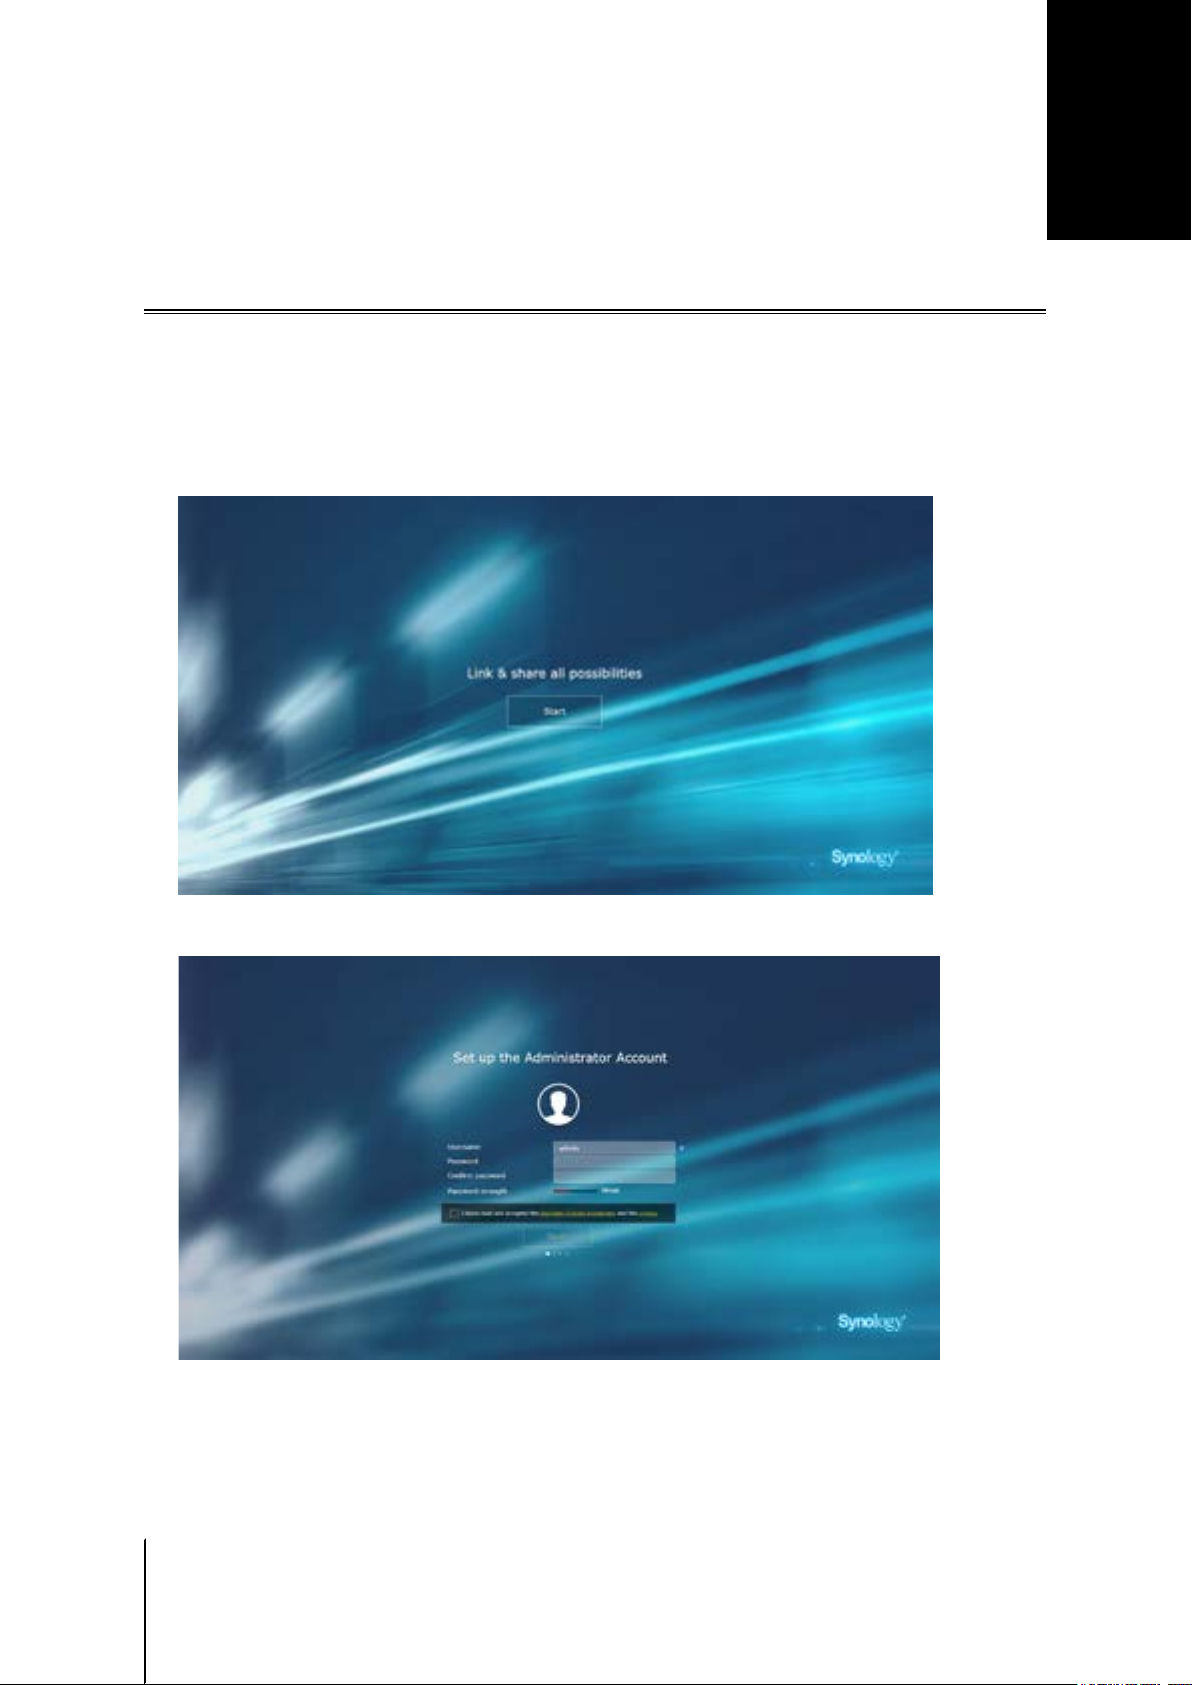
1 Use a computer or wireless device connected to the Synology Router's local network. If you use a wireless
device, scan and join the Wi-Fi network (SSID: SynologyRouter; Password: synology).
2 Open a web browser, and enter either URL into the address bar:
• http://router.synology.com
• http://192.168.1.1:8000
3 Once connected, click Start to launch the SRM Setup Wizard.
Chapter
1
4 Fill in the information to set up the administrator account. Click Next to continue.
4
4 Chapter 1: Set up Your Synology Router
Page 5
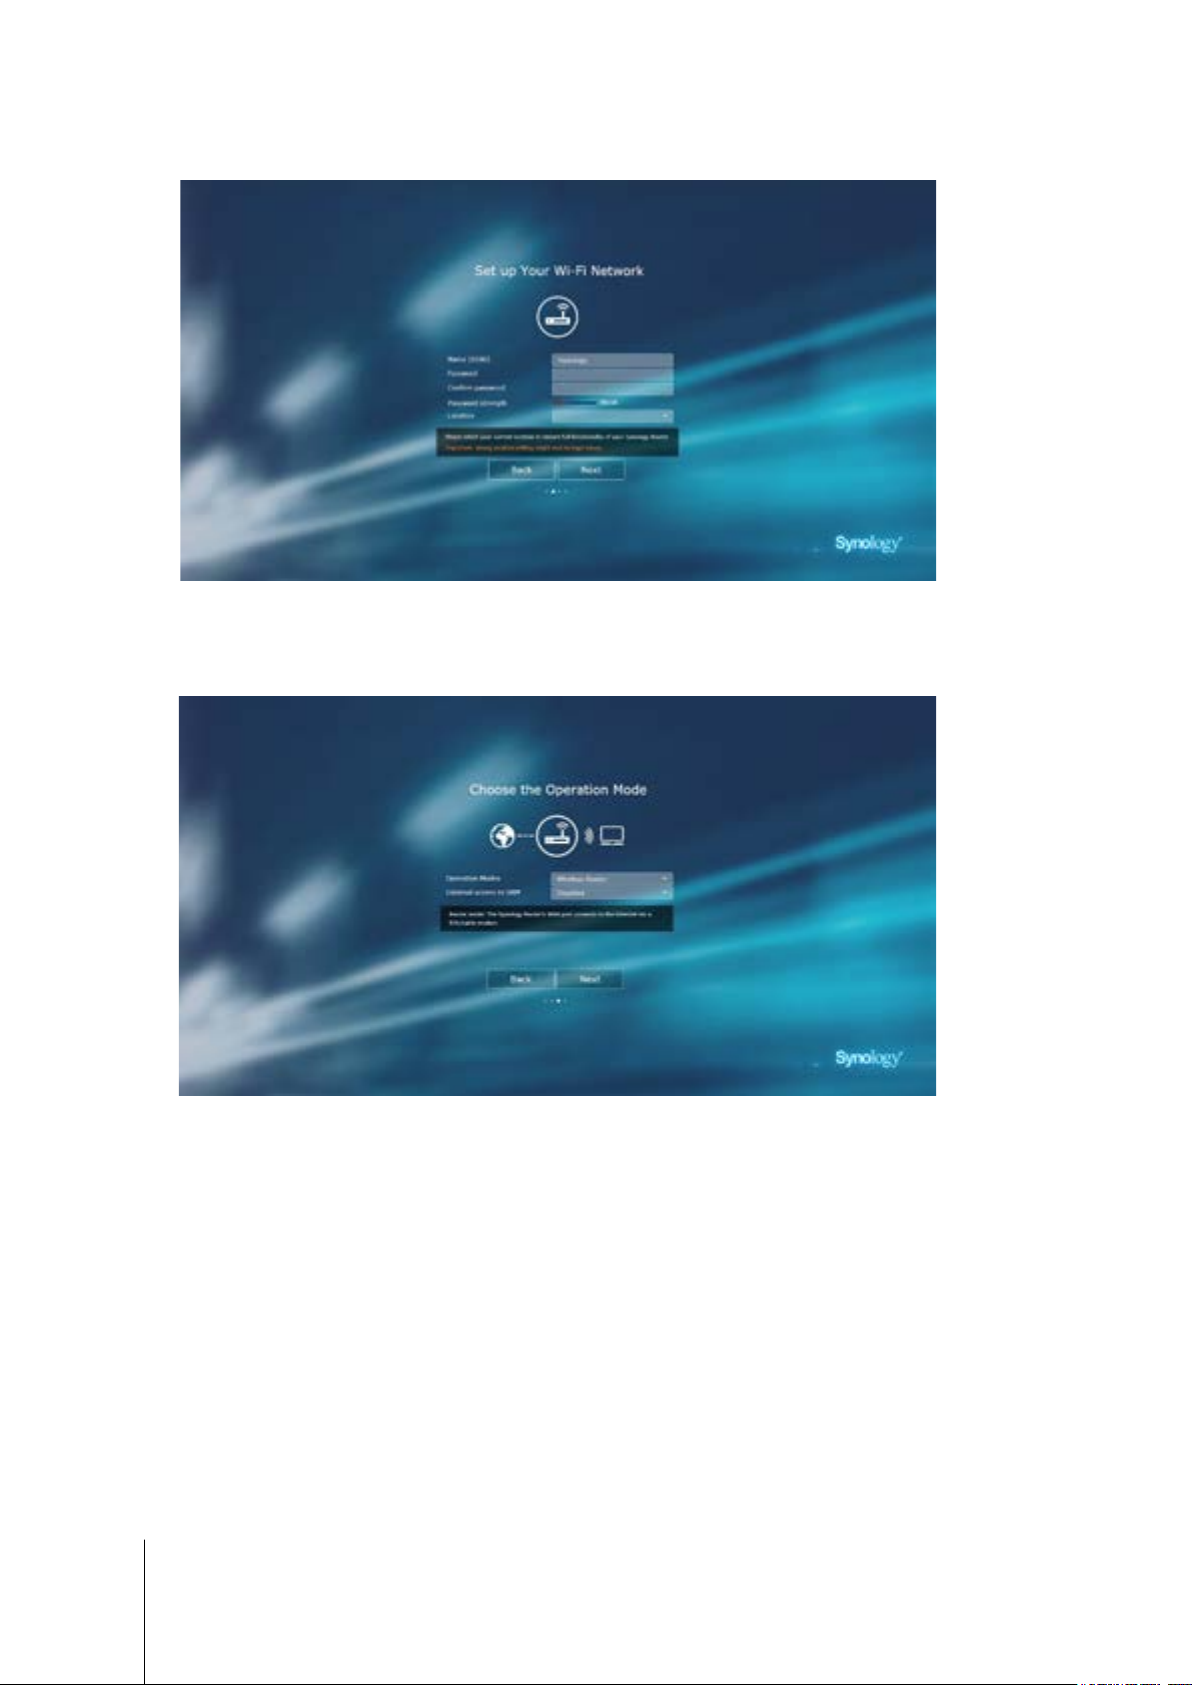
5 Fill in the information to set up the Wi-Fi network. Click Next to continue.
6 Set up the operation mode. When choosing the Wireless Router mode, you can also enable External access
to SRM so that only external access via the HTTP(S) port (e.g. 8000/8001) can reach SRM.
5 Chapter 1: Set up Your Synology Router
Page 6

7 Choose an Internet connection type:
• PPPoE: Choose this option if you have obtained PPPoE credentials from the ISP.
• Manual IP: Choose this option if you have obtained an available IP address for use.
• Auto IP: Choose this option if you rely on an ISP modem for automatic IP assignment.
• DS-Lite: Choose this option if you have obtained a DS-Lite service request from the ISP.
8 The wizard will continue to set up your Synology Router, and it may take up to three minutes to complete the
setup.
6 Chapter 1: Set up Your Synology Router
Page 7
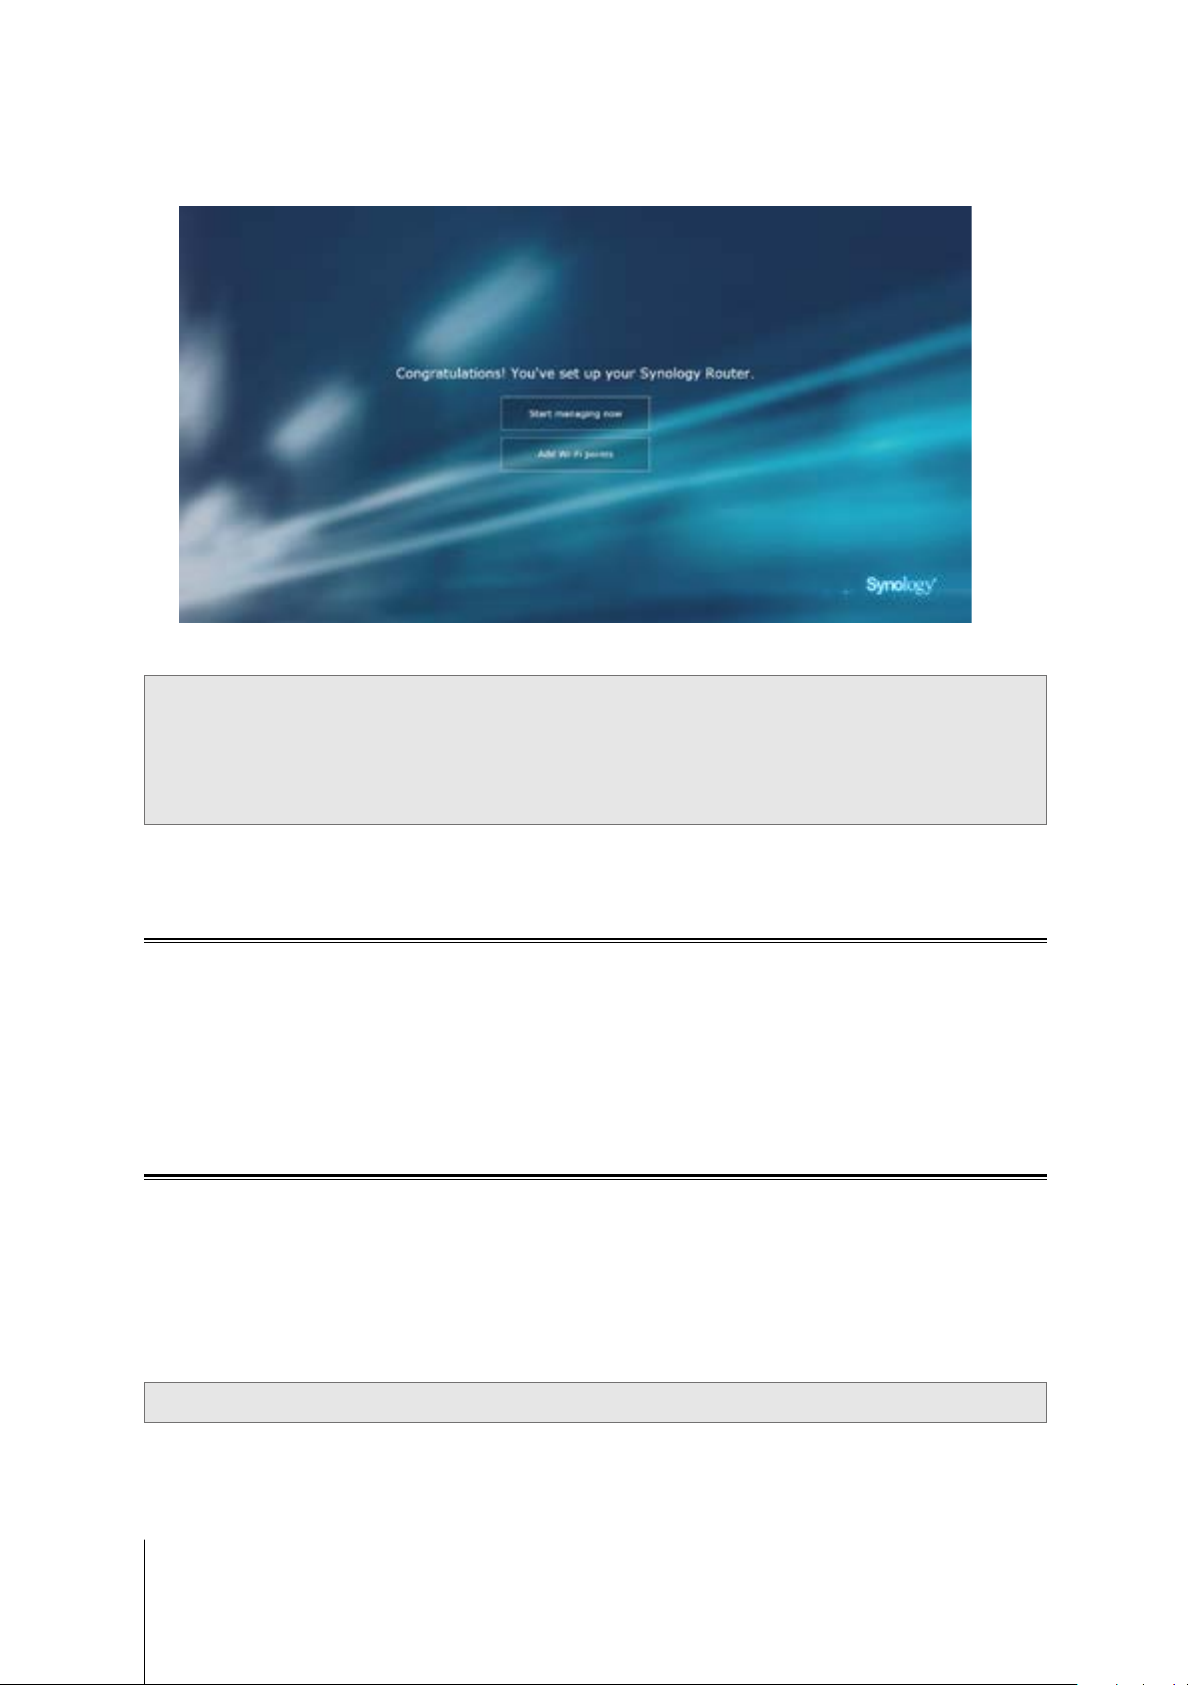
9 After the setup is complete, click Start managing now to enjoy SRM and its various features, or add Wi-Fi
points by clicking Add Wi-Fi points.
Note:
1. Above is a general demonstration of the SRM setup steps. The steps and available options may somewhat vary
depending on your device type (e.g. PC or wireless device), access type (LAN, WAN, or Wireless LAN), and
chosen operation mode (Wireless Router or Wireless AP).
2. If the setup is completed with a wireless device, remember to download DS router for anywhere management of
your Synology Router. To know more about this mobile application, see "DS router".
Set up Desktop Wallpaper
SRM allows you to customize the desktop with default wallpapers or with your own images. You can also
customize other desktop elements (e.g. text color and icon size).
Click Options (the person icon) on the top-right corner, and go to Options > Desktop:
• To change the desktop wallpaper: Select Customize wallpaper and click Select image. Click Default
Wallpaper or My Images depending on the image source.
• To customize other desktop elements: Change relevant settings to suit your needs.
Reset Synology Router
If you forgot the administrator/Wi-Fi password or the Synology Router becomes unreachable, you can x the
situations by pressing the RESET button on the bottom shell.
1 Use a pencil or ball pen to press and hold the RESET button.
2 Press and hold the RESET button for four or ten seconds:
• For four seconds (Soft Reset): The system will reset passwords of the admin and the administrator with
equal privileges but other users' credentials will remain unchanged. The system will also reset the following
settings (rewall , DHCP services, Wi-Fi, and Trac Control) and start the SRM Setup Wizard.
Note: On the MR2200ac model, only the admin password will be reset.
7 Chapter 1: Set up Your Synology Router
Page 8

Note: During Soft Reset, the LED indicators behave as below:
1. The STATUS LED turns static orange on the RT1900ac model, blinking orange on the RT2600ac, and static
blue on the MR2200ac model. The other LEDs become inactive for up to 30 seconds until the reset is complete.
2. The STATUS LED turns green (Soft Reset is complete) on the RT1900ac and RT2600ac model, blinking blue
on the MR2200ac model, and the other LEDs become active and behave as stated in the respective Hardware
Installation Guide.
• For ten seconds (Hard Reset): The system will be reset to the factory default. The data stored in the
external storages will remain intact.
Note: During Hard Reset, the LED indicators behave as below:
1. The STATUS LED turns blinking orange on the RT1900ac model, static orange on the RT2600ac, and static
blue on the MR2200ac model. The other LEDs become inactive for up to four minutes until the reset is complete.
2. The STATUS LED turns green (Hard Reset is complete), on the RT1900ac and RT2600ac model, blinking
blue on the MR2200ac, and the other LEDs become active and behave as stated in the respective Hardware
Installation Guide.
8 Chapter 1: Set up Your Synology Router
Page 9

Choose the Operation Mode
This chapter introduces the wireless operation modes available to your Synology Router to suit your networking
needs. To nd the operation modes, please go to Network Center > Operation Modes.
Wireless Router
Under this mode, your Synology Router works as a regular router that transfers data between two networks (e.g.
between a local network and the Internet) and nds the optimal path for data delivery. This mode also provides
wireless connection to wireless devices for continuous access.
The Wireless Router mode is recommended in the scenarios below:
• When you need extra connection security (e.g. rewall, NAT, and DMZ)
• When the connected client devices need wireless connection
• When you need to create subnets within the local network
Below are the suggested usages:
Chapter
2
If you have an ISP modem:
1 Connect your Synology Router (at the WAN port) with a network cable to the ISP modem (at the LAN port).
2 Congure basic network settings:
• Decide how your Synology Router obtains the IP address (at Network Center > Internet > Connection >
Primary Interface > Connection Type).
• Decide whether your Synology Router assigns IP addresses to its clients (at Network Center > Local
Network > General > DHCP Server).
3 Congure advanced network settings (at Network Center > Internet or Local Network). For setting details,
refer to the SRM help.
If you do not have an ISP modem:
1 Connect your Synology Router (at the WAN port) to the Internet (e.g. the Internet port on the wall/ground) with
a network cable.
2 Decide how your Synology Router obtains the IP address (at Network Center > Internet > Connection >
Primary Interface > Connection Type).
3 Congure advanced network settings (at Network Center > Internet). For setting details, refer to the SRM
help.
Wireless AP (Access Point)
Under this mode (also known as the Bridge mode), your Synology Router bridges all network interfaces (LAN,
wireless LAN, and WAN) and therefore all LAN ports (including the WAN port) are available to wired clients.
As a wireless AP, the router cannot assign IP addresses to the clients (the DHCP Server is disabled) and works
only as a wireless transmission device, sending/receiving data via Wi-Fi between wireless and wired networks.
The Wireless AP (Access Point) mode is recommended in the scenarios below:
• When your Synology Router (at LAN ports or WAN port) is already connected to an ISP modem (at the LAN
port) for Internet access
• When the connected devices need wireless connection
Note: Under this mode, the Synology Router will not provide the following functions/settings under Network Center:
Port Forwarding, Local Network, and Trac Control.
9 Chapter 2: Choose the Operation Mode
9
Page 10

Wireless Client
Under this mode, your Synology Router works as a Wi-Fi dongle (that is, a Wi-Fi client) and relies on the Wi-Fi
signal from another router or access point for Internet access.
The Wireless Client mode is recommended in the scenario below:
• When you need Internet access, but a wired connection is hard to set up between your Synology Router and
another router/ISP modem
Below is the suggested usage:
• Clients have to connect to the Synology Router (at the LAN port) with a network cable for Internet access.
Note:
1. This operation mode is available to the RT1900ac model.
2. Under this mode, your Synology Router must be within the range of the Wi-Fi source (e.g. a Wi-Fi router). If not,
the received Wi-Fi signal may be weak and aect the connection quality.
3. Wireless client devices cannot connect to the Synology Router to access the Internet.
Wireless Repeater (WDS)
Under this mode (also known as the WDS mode), your Synology Router bridges all network interfaces (LAN,
wireless LAN, and WAN) and therefore has ve LAN ports (LAN 1-4 and WAN) available to wired clients.
As a wireless repeater, the router can neither assign IP addresses to the clients (the DHCP Server is disabled)
nor send/receive data via Wi-Fi between wireless and wired networks.
Wireless AP (Access Point) is recommended in the scenarios below:
• When you wish to connect to an ISP modem but do not want to use wire connection for Internet access
• When the connected devices need wireless connection
Note:
1. This operation mode is available to the RT2600ac model.
2. Under this mode, your Synology Router must be within the range of the Wi-Fi source. A poor signal from the WiFi source may result in unstable or poor connection quality.
10 Chapter 2: Choose the Operation Mode
Page 11

Set up Your Wi-Fi Connection
This chapter introduces how to create Wi-Fi networks hosted by your Synology Router. Three types of Wi-Fi
networks can be created: 2.4GHz, 5GHz (5GHz-1 on Tri-band), and 5GHz-2.
• 2.4GHz: A 2.4GHz Wi-Fi network is used by most wireless devices and tends to have broader signal coverage
than a 5GHz Wi-Fi network. However, signal interference is likely to occur because most wireless devices rely
on this wireless frequency for connection.
• 5GHz (5GHz-1 on Tri-band): Many wireless devices do not rely on this wireless frequency, and signal
interference is less likely to occur. Besides, a 5GHz Wi-Fi network has narrower signal coverage than a 2.4GHz
Wi-Fi network, and its signal strength may weaken due to nearby obstacles.
• 5GHz-2: Tri-band models will show this radio option.
Enable Smart Connect
Smart Connect allows you to connect your devices to the combined SSID with the shared Wi-Fi settings for both
2.4GHz and 5GHz bands. SRM will determine whether to switch between the two frequency bands (i.e. 2.4GHz
and 5GHz) according to your specied policy and network conditions to ensure the best wireless connectivity
for your devices. Smart Connect does not switch between channels (e.g. 1 and 10) within each band for your
devices.
1 Go to Wi-Fi Connect > Wireless > Wi-Fi.
2 Turn on 2.4GHz/5GHz auto selection.
3 Specify the settings for the Smart Connect Wi-Fi network. Click Advanced options to make more adjustments.
4 Use your wireless device to scan and join the Wi-Fi network hosted by your Synology Router.
Chapter
3
Create Wi-Fi Networks (2.4GHz & 5GHz)
You can create a 2.4GHz or 5GHz Wi-Fi network:
1 Make sure your Synology Router is powered on and well-connected to the Internet.
2 Make sure the Wi-Fi button is "ON" on your Synology Router.
3 Go to Wi-Fi Connect > Wireless > Wi-Fi.
4 Select Enable wireless radio under 5GHz/2.4GHz, and continue the setup. Click Advanced options to make
more adjustments.
5 Use your wireless device to scan and join the Wi-Fi network hosted by your Synology Router.
Create Guest Wi-Fi Networks (2.4GHz & 5GHz)
A guest Wi-Fi network is typically time-limited network (from one hour to one week) created by small and mediumsized businesses for visitors/non-regular users. The visitors can only access the guest network but not the host
Wi-Fi network, to prevent unauthorized access to the host network.
To set up a guest Wi-Fi network, go to Wi-Fi Connect > Guest Network for the setup.
11 Chapter 3: Set up Your Wi-Fi Connection
11
Page 12

Create WPS Networks (2.4GHz & 5GHz)
WPS (Wi-Fi Protected Setup) is a standard promoted by the Wi-Fi Alliance to simplify Wi-Fi security settings for
users. Though the setup is quick, the WPS network may not be secure. To keep the WPS network safe, you can
use a push button or a PIN code.
Three ways are available to quickly set up a Wi-Fi network via WPS:
By push button:
1 Go to Wi-Fi Connect > Wireless > WPS, and select Enable WPS. Alternatively, press the WPS button on your
Synology Router.
2 Enable the WPS function on your wireless device. Your wireless device and the Synology Router will be paired
up.
By AP PIN code:
1 Go to Wi-Fi Connect > Wireless > WPS > Device PIN > By AP PIN code, and click Enable to generate an
AP PIN code.
2 Enter the generated PIN code into your wireless device. Your wireless device and the Synology Router will be
paired up.
By client PIN code:
1 Enter the PIN code of your wireless device at Wi-Fi Connect > Wireless > WPS > Device PIN > By client
PIN code.
2 Click Register. Your wireless device and the Synology Router will be paired up.
Note: Client iOS devices cannot join a WPS network because iOS does not support WPS.
12 Chapter 3: Set up Your Wi-Fi Connection
Page 13

Build a Wi-Fi system network
This chapter introduces various features to manage Wi-Fi points.
Add Wi-Fi Points
You can add new Wi-Fi Points to your Synology Wi-Fi Network to build a Wi-Fi system with complete coverage.
To set up a Wi-Fi point:
1 Place the Wi-Fi Point at a suitable location.
2 Go to Wi-Fi Connect > Wi-Fi point, and click Add to connect your new Wi-Fi Point to your Synology Wi-
Fi system. SRM will detect all your new devices, apply settings, and upgrade the Wi-Fi Points to the latest
version.
Note: Wi-Fi Points might fail to connect to the Primary Wi-Fi Point if the Primary Wi-Fi Point is reset to default. Please
reset all Wi-Fi Points and follow the instruction of the Add Wizard to build your Wi-Fi system.
Network Status
Chapter
4
To monitor the real-time status of all Wi-Fi Points in your Synology Wi-Fi System, go to Wi-Fi Connect > Status.
Congure Wi-Fi Points
At Wi-Fi Connect > Wi-Fi Point, you can nd the status of your Wi-Fi system network by Topology. All your
devices and their connection types are listed in this page — a solid line means the Wi-Fi Point is connected by
an Ethernet cable, and a dotted line means it is connected via Wi-Fi. The devices can be congured to suit your
needs:
• Detail: Name your Wi-Fi Points for easy recognition. You can nd the general information, network status, and
the connected list from the pop-up window.
• Manage: You can change the status of all Wi-Fi points.
• Turn o LED: Turn o the LED of this Wi-Fi Point.
• Blink to nd: Find this Wi-Fi Point with the blinking LED.
• Restart now: Reboot this Wi-Fi Point.
• Delete & Reset: Remove this Wi-Fi Point from the Wi-Fi network and reset it to default for adding.
Test Wi-Fi Performance
The performance between Wi-Fi Points are crucial as the Wi-Fi Network is designed to keep the connection
stable and with the best speeds. With the Wi-Fi Performance test, you can make sure your Wi-Fi Points are at the
best location to provide the best network experience.
To use the Performance test service, go to Wi-Fi Connect > Wi-Fi Point, and click Wi-Fi point performance
test.
13 Chapter 4: Build a Wi-Fi system network
Page 14

Manage Client Devices
This chapter introduces various features to manage client devices.
Monitor Device Status
To monitor the real-time status of all client devices under your Synology Router, go to Network Center > Status
> Device List.
Apply Trac Control
At Network Center > Trac Control, you can regulate client devices' individual network bandwidth. Several
control mechanisms are oered to suit your needs:
• Beamforming: Beamforming enhances the Wi-Fi signal for client devices with poor signal strength.
• Banned: The banned devices can only access resource in the same local network.
• Custom Speed: You can specify the upper and lower limits of upload/download trac for client devices.
Chapter
5
• High Priority: Devices set to High Priority will have prioritized network bandwidth allocation.
For ner management, you can also regulate network usage of specic applications (e.g. SSL or YouTube)
running on certain devices.
Note:
1. The beamforming option is available to the RT1900ac model only.
2. The RT2600ac model performs beamforming by default and thus does not provide relevant options.
3. To enhance Wi-Fi signal for client devices, make sure the devices have an 802.11ac prole to support
beamforming.
4. Beamforming can be applied to up to six client devices at once, and High Priority can be applied to three devices
at most.
You can monitor the network usage history by device and by application. To access the usage log, go to Network
Center > Trac Control > Monitor. You can identify the source of usage anomalies, such as malicious software/
websites, or identify users that misuse network resource.
You can generate a reader-friendly trac report that records the Synology Router's network trac statistics over
a certain period of time. You may dene automated trac report generation that can be sent to a dened email
address. To set up the report task, go to Network Center > Trac Control > Report.
Apply Wake-On-LAN
With Wake-On-LAN (WOL), you can remotely wake up the wired devices from shutdown. The devices joined to
the WOL service can be waken up via the MAC addresses or the connection list.
If you have a Synology NAS (e.g. DiskStation or RackStation) joined to the Synology Router's local network, you
can simply wake it up with the QuickConnect ID, without using its MAC address or the connection list.
To use the WOL-related service, go to Network Tools > Wake on LAN.
Note:
1. Please make sure the target device supports WOL.
2. Under dierent operation modes, your Synology Router has a varied range of devices that can be joined to the
WOL service.
14 Chapter 5: Manage Client Devices
14
Page 15

Enhance Connection Security
This chapter introduces various security features to protect your Synology Router and the client devices from
potential cyber threats and unwanted information leakage.
Secure Your Connections
SRM can secure the Internet connection in the following ways.
HTTP and HTTPS
HTTP is the unsecured, common protocol for web browsers to communicate with web servers. As the secured
version of HTTP, HTTPS protects your Synology Router and client devices from cyber threats and unauthorized
access.
By default, SRM provides HTTP and HTTPS connections. You may change the HTTP/HTTPS ports to avoid
malicious attacks.
Chapter
6
To change the HTTP/HTTPS ports, go to Control Panel > System > SRM Settings.
To access SRM via HTTP(S) connection, add the HTTP(S) port after the IP address:
• Synology_Router_IP_Address:8001 (8001 is the default HTTPS port.)
Example: 192.168.1.1:8001
HTTPS-related Measures
At Control Panel > System > SRM Settings, two other HTTPS-related measures are available:
• Automatically redirect HTTP connections to HTTPS: All the Internet connections via HTTP will be switched
to HTTPS to access SRM.
• Enable HSTS: Only web browsers using HTTPS connection can access SRM, while HTTP-using browsers are
denied access.
DoS Protection
DoS (Denial of Service) attacks bombard a computer system with numerous requests exceeding the target’s
capability. The attacked computer may miss important data/service requests (e.g. email messages) from outside,
and suer from limited Internet bandwidth and system resource.
To enable DoS protection, go to Network Center > Security > General.
Pass-through
When a Pass-through service exists behind your Synology Router, you can allow specic types of VPN client
trac (PPTP, L2TP, SIP, and IPSec) for pass-through to reach the server. This feature helps prevent potential
cyber threats from sneaking into the server via specic protocols.
To enable the pass-through function, go to Network Center > Security > General.
15 Chapter 6: Enhance Connection Security
Page 16

Create Firewall Rules
Firewall rules lter external IPv4 and IPv6 access to your Synology Router based on the specied conditions
(e.g. ports and source IP addresses). With rewall rules, you can ne-tune security policies for better care of your
Synology Router.
To create rewall rules on general trac, go to Network Center > Security > Firewall.
To modify Internet access policies on SRM services/packages, go to Network Center > Security > Service.
Note: Firewall rules can apply to trac from WAN to LAN or from WAN to SRM.
External Access Restriction
This function allows external access to SRM via the HTTP/HTTPS ports (e.g. 8000/8001). External access via
other ports will be denied.
To enable this function, go to Control Panel > System > SRM Settings and select Allow external access to
SRM.
Note: For security reasons, if you enable this option and disable it later, your Synology Router will deny all external
access even via the HTTP/HTTPS ports.
Enforce Auto Block
Auto block automatically blocks certain IP addresses with too many failed login attempts. Such IP addresses will
be identied as a source of potential malicious attacks that try to nd out the password.
To enable auto block, go to Network Center > Security > Auto Block.
Create Certicates
Creating a certicate from your Synology Router is equal to issuing a certied ID. If you import the certicate (a
.crt le) to another device (e.g. your mobile phone), your Synology Router can identify and communicate with the
device via a secured connection (e.g. HTTPS or SSL).
You can also import a certicate from a certicate authority so that your Synology Router can access another
server.
To create or manage the certicate, go to Control Panel > Services > Certicate.
Use More Security Measures
More security measures are available to ne-tune SRM security policies at Network Center > Security >
General. There you can set up a logout timer, help your browser skip IP checking, and do much more.
You are also recommended to use Security Advisor, an SRM security application that scans your SRM settings
and Synology Router. Security Advisor will check your settings and recommend changes that help keep your
Synology Router safe.
16 Chapter 6: Enhance Connection Security
Page 17

Update and Restore Your Synology Router
This chapter introduces how to update SRM and its packages and how to back up/restore SRM.
Update SRM and Packages
Synology periodically releases free SRM updates and package updates to x reported issues, enhance system
and package performance, and oer whole new features.
SRM
You can manually update SRM if you have obtained a .pat update le. The system will display the current SRM
version and check if a newer SRM update is available.
To update SRM and modify update preferences, go to Control Panel > System > Update & Restore.
Note: You cannot downgrade SRM using a version older than the current version running on your Synology Router.
Chapter
7
Packages
At Package Center, the system will display packages that have any updates for download. With an .spk update
le, you can manually update packages.
To update packages and tailor-make the update settings, go to Package Center.
Note: You cannot downgrade packages using a version older than the current version running on your Synology
Router.
Back up and Restore SRM
By backing up and restoring SRM, you can preserve important settings for future use. We suggest you regularly
back up SRM congurations and store the conguration le (.dss) on your Synology NAS or local computer.
At Control Panel > System > Update & Restore, you can back up current SRM congurations or restore
previous congurations by importing the .dss le here.
Note: If you click Restore factory default settings, all user data stored on the external storages will be erased and
the entire system will be restored to default settings. Please refer to SRM Help for more information.
Register Synology Account
Synology Account is a service-integrated platform that allows you to register and manage the personal account.
With your personal Synology Account, you can enjoy various services from Synology, and subscribe to Synology
eNews to know about important software updates and promotional events in your local area.
To register/access your Synology Account, go to Control Panel > System > Synology Account, or go to
Synology's ocial website.
17 Chapter 7: Update and Restore Your Synology Router
Page 18

Manage Internet Connection
This chapter introduces various features for easy and safe access to the Internet.
Internet Connection Types
At Network Center > Internet > Connection > Primary Interface, you can choose how to connect your
Synology Router to the Internet:
• Auto: Choose this option if you rely on an ISP modem for automatic IP assignment.
• PPPoE: Choose this option if you have obtained PPPoE credentials from the ISP.
• Manual: Choose this option if you have obtained an available IP address for use.
• DS-Lite: Choose this option if you have obtained a DS-Lite service request from the ISP.
You can enable the secondary interface to operate in the failover or load-balancing mode. Go to Network Center
> Internet > Connection > Secondary Interface (LAN 1) to enable this interface.
Chapter
8
ISP/VPN/IPv6 Settings
You can manage the following three Internet-related settings of your Synology Router.
ISP Settings
This function allows you congure MAC clone and extra DHCP options (12/60/61) to suit the needs of the ISPs
for successful registration. To do so, go to Network Center > Internet > Connection > Primary Interface > ISP
settings.
VPN Settings
A VPN (Virtual Private Network) helps you securely access resources on your private network from the Internet.
SRM currently supports L2TP/IPSec, openVPN, and PPTP.
To use your Synology Router as a VPN client, go to Network Center > Internet > Connection > Primary
Interface > VPN settings to modify the settings.
Note: Synology Router can only connect to OpenVPN servers which support tun-style tunnels on Layer 3.
IPv6 Settings
To set up IPv6 on your Synology Router, please go to Network Center > Internet > Connection > Primary
Interface > IPv6 setup. The supported IPv6 types include manual, 6in4 ,6to4 ,6rd ,DHCPv6-PD ,IPv6 Relay
(Pass-through) and FLET's IPv6.
Smart WAN
At Network Center > Internet > Smart WAN, you can congure network access plans for two dened outward-
facing internet interfaces (e.g. PPPoE, WAN, VPN, and 3G/4G LTE). You can choose either mode to determine
their roles in network connectivity:
• Failover: When one of the interfaces is down, the other will be responsible for all the network connectivity to
ensure stable connection at all times.
• Load Balancing + Failover: When both interfaces are well-functioning, this mode allows you to distribute
network trac to the interfaces for optimal network trac ow; when one of the interfaces is down, the other
will be responsible for all the network connectivity to ensure stable connection at all times.
18 Chapter 8: Manage Internet Connection
Page 19

Smart WAN also allows you to regulate network trac by setting up policy routes for specic devices. Such
devices will be able to access the Internet and receive Internet trac only through the dened interface.
QuickConnect & DDNS
At Network Center > Internet > QuickConnect & DDNS, you can enable the services below for easy connection
to your Synology Router.
QuickConnect
QuickConnect is a connection technology developed by Synology that helps you eortlessly access your
Synology Router from everywhere, only with your personal QuickConnect ID.
Enter the URL as below in a web browser to access your Synology Router via QuickConnect:
• quickconnect.to/QuickConnect_ID (Example: quickconnect.to/synologist)
For more information about the QuickConnect service, refer to this white paper.
DDNS
DDNS (Dynamic Domain Name Service) matches the hostname and the IP address of your Synology Router for
quick access. If you do not have a hostname, register one from Synology or other DDNS providers.To nd your
Synology Router with its DDNS hostname (e.g. john.synology.me), please enter the registered hostname in the
web browser.
DMZ
A DMZ (as a “demilitarized zone”) is part of the network directly exposed to the Internet or other external
untrusted networks. All external access will be directed to the host device in the DMZ. The DMZ host can directly
connect to the Internet and is free from rewall limitations and protection. It is useful to set up servers as the DMZ
host.
To enable DMZ, go to Network Center > Port Forwarding > DMZ for the setup.
Note: To connect to a host in the DMZ from an external network, you need the host’s external IP address retrieved by
your Synology Router.
Port Forwarding
Port forwarding redirects data ow between dierent ports and has the following advantages:
• It can improve performance for applications which might otherwise rely on a relay service.
• It protects the ports for services/client devices from direct exposure to cyber threats.
• It can oer open ports to resolve port conicts between multiple services/client devices
To set up port forwarding rules, go to Network Center > Port Forwarding > Port Forwarding.
Port Triggering
Port triggering requires you to set up one static port (the outgoing/trigger port) and one dynamic port (the
incoming port) for a service/device in the local network for data transmission. Once the data come out to an
external host through the trigger port, the incoming port is then triggered and opened to receive data from the
host. If no data come out, the incoming port turns o, shutting down a possible opening for malicious attacks.
To set up port triggering rules, go to Network Center > Port Forwarding > Port Triggering.
19 Chapter 8: Manage Internet Connection
Page 20

Manage Local Network Connection
The chapter introduces various features to eciently manage the local network.
Set up an IPv6 Router
By default, your Synology Router works as an IPv4 router assigning IPv4 addresses to client devices. It can also
become a mixed IPv4/IPv6 router to assign IPv6 addresses.
To set up your Synology Router as an IPv6 router, go to Network Center > Local Network > IPv6.
Note: Only IPv6-supported devices can receive IPv6 addresses assigned by your Synology Router.
Set up DHCP Services
As a DHCP (Dynamic Host Conguration Protocol) server, your Synology Router can assign dynamic IP
addresses to DHCP clients (i.e. network devices) within your local network.
Chapter
9
To nd a list of DHCP clients and their network congurations (e.g. MAC and IP addresses), go to Network
Center > Local Network > DHCP Clients.
To reserve the assigned IP addresses for the clients, go to Network Center > Local Network > DHCP
Reservation.
Note: Your Synology Router can assign both IPv4 and IPv6 IP addresses. To assign IPv6 IP addresses to DHCP
clients, please enable the IPv6 function at Network Center > Internet > Connection > Primary Interface > IPv6
setup rst.
Set up Static Routes
A static route is a routing path manually congured to pass data to a specic destination service/device. The static
route does not automatically change with the network conguration, and its routing information is not exchanged
between other routers.
Setting up static routes can benet you in the following scenarios:
• When the network (e.g. a home local network) is small and may not grow fast into a complex network
• When you do not wish to share routing information (e.g. IP addresses and network conguration) with other
routers for security reasons
To set up static routes, go to Network Center > Local Network > Static Route.
Note:
1. We advise you not to use static routes when the network is large and complex, because maintaining static routes
in this environment can be time-consuming.
2. You can set up IPv6 static routes after enabling the IPv6 function on your Synology Router.
Set up IPTV & VoIP
The IPTV & VoIP services allow you to connect an STB (set-top box) or VoIP phone to your Synology Router for
multimedia services from the ISP or for phone communication. Before using the services, you need to have the
VLAN ID provided by the ISP for the setup.
To set up the IPTV & VoIP services, go to Network Center > Local Network > IPTV & VoIP.
20 Chapter 9: Manage Local Network Connection
Page 21

Manage External Devices and Privileges
Install & Manage USB/SD Storage
With a USB/SD storage, your Synology Router can turn into a storage device for personal data and multimedia
les.
To install external USB/SD storage to your Synology Router, please attach the storage to the corresponding slot.
At Control Panel > Storage > Storage, you can nd out the total available external storage (e.g. USB drives &
SD cards) on your Synology Router. There you can also format and manage the storage to suit your needs.
Note:
1. Please refer to the compatibility list for approved USB/SD storage.
2. Some system services and packages may create temporary les on USB/SD storage devices. To safely eject the
USB/SD storage for system stability and prevent accidental data loss, press the Eject button on your Synology
Router or eject the storage at
Control Panel > Storage > Storage
.
Chapter
10
Dene User/Folder Privileges
After external storage is established on your Synology Router, you can create shared folders for public use (e.g.
“public”) and home folders for individual users.
To create shared folders, go to Control Panel > Storage > Shared Folder. There you can also set users’ access
privileges to the folder.
To create users, go to Control Panel > User > User. There you can also set the user’s access privilege to shared
folders.
Install & Manage Network Printers
Your Synology Router can become a printer server, allowing you to print out documents such as photos
and articles over the network. You can also set up Google Cloud Print to print out needed documents from
everywhere.
To install a network printer, please attach it to the USB slot.
To manage a network printer connected to your Synology Router, go to Control Panel > Device > Printer.
Note: Please refer to the compatibility list for approved network printers.
Install & Manage 3G/4G Dongles
With a 3G/4G dongle, your Synology Router can still provide Internet access to client devices via a 3G/4G
network. The dongle can transform your Synology Router into a Wi-Fi hotspot.
To install a 3G/4G dongle to your Synology Router, please attach it to the USB slot. The installed dongle will be
right available. If not, please check/modify the settings.
To manage the dongle settings, go to Network Center > Internet > 3G & 4G.
Note: Please refer to the compatibility list for approved 3G/4G dongles.
21 Chapter 10: Manage External Devices and Privileges
Page 22

Discover SRM Packages
This chapter introduces various Synology-developed packages to go with your Synology Router. The featured
packages are all available via Package Center or Synology Download Center.
Safe Access
Safe Access shields your network and allows you to easily manage the devices connected to your Synology
Router. You can create proles and assign devices to safegurad their Internet behavior, set up how long and what
time to block or allow their Internet access, and create web lters to manage what websites proles can visit.
Safe Access also includes the pause, reward, and access request features to help you exibly manage your
proles. Furthermore, by blocking dangerous websites, the Network Protection function of the package also gives
comprehensive protection to all the devices in your local network.
VPN Plus Server
Chapter
11
VPN Plus Server turns your Synology Router into a powerful VPN server. This package allows secure VPN
access through a web browser or client, and supports various VPN services including WebVPN, SSL VPN, SSTP,
OpenVPN, L2TP/IPSec, and PPTP. Its Remote Desktop also enables employees to easily and securely access
remote internal network resources through a web browser.
With Site-to-Site VPN, VPN Plus server allows multiple networks in dierent locations to establish secure
connections between each other over the Internet. Moreover, with multiple management tools, this package can
help the network administrator regulate and watch VPN trac at all times.
Threat Prevention
Threat Prevention can protect the network security of your Synology Router and the subordinate devices by
detecting/dropping malicious packets. This package oers various features to help you keep track of potential
malicious threats.
Download Station
Download Station is a web-based download application which allows you to search and download les from the
Internet through BitTorrent (BT), FTP, HTTP, NZB, Thunder, FlashGet, QQDL, and eMule, and subscribe to RSS
feeds to keep you updated on the most popular or latest BT. It oers the auto unzip service to help you extract
compressed les to your Synology Router whenever les are downloaded.
DNS Server
Domain Name System (DNS) helps users nd Internet applications, computers, or other network devices by
translating domain names into IP addresses. With DNS Server, your Synology Router can host multiple zones as
well as provide name and IP address resolution services.
22 Chapter 11: Discover SRM Packages
Page 23

Cloud Station Server
Cloud Station is a le sharing service that allows you to back up and synchronize les between a centralized
Synology Router and client devices (multiple local computers, mobile devices, and Synology devices). The Cloud
Station Server package is required to be installed on the host Synology Router, while a client utility has to be
installed on each client device you want to back up or sync with.
Cloud Station Backup
Cloud Station Backup is a client utility that allows you to back up your les from multiple client computers to a
centralized Synology router.
Cloud Station Drive
Cloud Station Drive is a client utility which syncs les between your computers and Synology Router via the
Internet, so that your data and documents are always up-to-date and stay beside you.
Media Server
Media Server provides a multimedia service for you to browse and play the multimedia contents on the Synology
Router via DLNA/UPnP home devices.
With Media Server, you can easily connect those DLNA-certied devices such as smart TV sets and stereo
systems to your home network, and stream multimedia les stored on your Synology Router to the devices to
enjoy music, photos, and videos.
Note: Please refer to the compatibility list for approved DLNA devices.
RADIUS Server
Remote Authentication Dial-In User Service (RADIUS) is a networking protocol that provides centralized
authentication, authorization, and accounting for wired and wireless network access.
23 Chapter 11: Discover SRM Packages
Page 24

Discover Synology Mobile Applications
This chapter introduces useful Synology mobile applications to go with your Synology Router.
DS router
DS router is designed to allow easy access to your Synology Router from your Android/iOS device. From the
initial setup of your Synology Router, to monitoring network usage, and to adjusting rewall settings, DS router
makes network management truly easy, intuitive and mobile. To dynamically inform you of the Wi-Fi connection
quality, DS router also allows you to see the link rate (Android/ iOS) and signal strength (Android) between your
mobile device and the Synology Router. With Safe Access, you can create proles and manage devices, set time
quotas, and apply web lters to protect certain users and supervise Internet access. You can also easily check
and control the Wi-Fi system though Network Map.
Install DS router
You can download DS router by clicking the operating system name or scanning the QR code:
Chapter
12
Android iOS
Other Synology Mobile Applications
Synology presents three mobile applications – DS le, DS get, and DS cloud – to help you manage File Station,
Download Station, and Cloud Station Server on your Synology Router.
DS le
DS le is ideal to manage les stored on your Synology Router, upload or download between your Synology
Router and your wireless device, or do basic editing tasks. Besides le management, DS le is also a useful tool
to do anything from browsing pictures, watching videos or checking work documents when you are on the go.
DS le is available for Android, iOS.
DS get
DS get allows you to access Download Station remotely from your wireless devices. You can easily nd content
online with the keyword search or simply by browsing your favorite websites: With a simple tap, you'll start the
downloading directly to the storage of your Synology Router. You can also view and manage your downloads, as
well as manage basic settings such as transfer speed limits, right from the app.
DS get is available for Android.
DS cloud
DS cloud is the counterpart to Cloud Station for your mobile device. It allows you to choose the folders on your
Synology Router which you want to sync to your mobile device and make available for oine viewing anywhere
you go. DS cloud also gives you total control over the sync criteria: For each folder, you can set the maximum le
size as well as the type of les you wish to sync.
DS cloud is available for Android and iOS.
24 Chapter 12: Discover Synology Mobile Applications
Page 25

VPN Plus
Though the Synology SSL VPN service powered by Synology Router, VPN Plus allows easy access to the
Internet and local network resources. This mobile application provides you with fast connection speeds, enhanced
security, and better capacity to pass through rewalls.
VPN Plus is now available for Android and iOS.
25 Chapter 12: Discover Synology Mobile Applications
Page 26

Diagnosis Tools
This chapter introduces the features on your Synology Router to diagnose system and connection problems.
Check Connection Status
To grasp its current status and pin down the possible causes of a down connection, you need a quick, wellrounded checkup on the wired and Wi-Fi connections at Network Center > Status. There you can also nd the
real-time network, CPU, memory usage, and device status.
For a detailed trac log (up to one month long) of devices and applications, please go to Network Center >
Trac Control > Monitor.
Check Notications
The Synology Router sends instant notications to have you informed of system/connection errors via various
media (e.g. SRM desktop, SMS, and email). You can quickly zero in on the errors and nd remedies.
Chapter
13
To tailor-make the notication service, go to Control Panel > Notication.
Ping
Ping is a utility used to diagnose throttling connections. Ping works by sending out a request packet to a target
website or IP address and calculating the time lapse for receiving a response packet from the target.
• Normal connection: The response packet comes from the target instantly.
• Slow connection: The response packet comes from the target with signicant delay.
Delayed packet transmission may occur in the suggested scenarios below:
• The target is busy dealing with huge trac to and from other hosts/clients
• The target website/IP address is down/not working
• The Internet/local network connection of your Synology Router is not properly congured
• The ISP service is down
If the problem is identied as extraneous to your Synology Router, you may consult the ISP or other relevant
service providers for assistance.
To diagnose connection problems with Ping, please go to Network Tools > Ping.
Traceroute
Traceroute is a utility used to examine the Internet pathways taken to reach specic destinations. The physical
route will be displayed on Google Map, along with the time lapse spent between two adjacent route points.
With Traceroute, you can better understand how your trac is being routed.
To diagnose connection problems with Traceroute, please go to Network Tools > Traceroute.
Contact Technical Support
Go to Support Center or Synology's ocial website to seek help from Synology Technical Support.
26 Chapter 13: Diagnosis Tools
Page 27

FAQ
SRM Operation
Why can't I log in to SRM?
• Make sure you use the correct IP/QuickConnect/DDNS address. Add the correct port number if you use the IP
or QuickConnect address.
• Make sure you use the correct username and password.
• Check if the network connection between the router and the enquiring device works properly.
What can I do if I forgot my SRM password?
• As the administrator:
Perform Soft Reset to reset the administrator password.
• As a non-administrator user:
a Ask the administrator to select Allow non-administrator users to reset forgotten passwords via email.
b The user should go to the SRM login page, and click Forgot your password?.
c Open the SRM-issued email at the previously specied email address and continue to reset the password.
Chapter
14
Why can't I update SRM successfully?
• Check if the update is newer than the current version running on the router.
• Check if you use a .pat update le ocially released by Synology.
What's the dierence between Soft Reset and Hard Reset?
Please see "Reset Synology Router".
How should I eject the USB/SD storage from my router?
To safely eject the external storage, please see "Install & Manage USB/SD Storage".
How should I get the best Wi-Fi experience with my router?
We recommend placing your router upright with the stand kit included for optimal wireless results and better
ventilation.
When your router is placed upright, the EJECT button will be hidden with the front panel facing down. In this
situation, you can go to Control Panel > Storage > Storage, and click Eject to perform this operation.
27 Chapter 14: FAQ
Page 28

Network
Why can’t I access the Internet?
• Make sure your wireless device is not banned under Trac Control.
• Go to Network Center > Status > Internet Connection, and check if the status is "Connected".
Why is the upload/download trac slow?
• If Trac Control is enabled, network speed promotion will be disabled and general transmission speed may
be lower. To disable Trac Control, go to Network Center > Trac Control > Advanced > Settings for
management.
• Check if your device's custom speed settings have been modied. Go to Network Center > Trac Control >
General and click the Custom speed icon to modify the settings.
• If you have created a large number of rewall or port forwarding rules, your network transmission performance
may become slower. To remove rewall rules, go to Network Center > Security > Firewall. To remove port
forwarding rules, go to Network Center > Port Forwarding > Port Forwarding.
What can I do if port-forwarding doesn't work properly?
• Go to Network Center > Port Forwarding > DMZ, enable DMZ, and specify the DMZ host IP address. Then,
see if the devices in the DMZ can be accessed from the Internet. As a specialized form of port forwarding, DMZ
helps you nd out whether the problem lies in port forwarding itself.
• If rewall is enabled on the router, suspend the rewall function for a while.
• Contact the ISP to know if the service port is blocked for any reason.
Why can't I nd my router via router.synology.com?
• You can only access your router via router.synology.com when the enquiring device is in the router's local
network.
• Make sure the enquiring device (e.g. your PC) and the router are well-connected to each other via network
cables or Wi-Fi connection.
• Re-connect your PC to the original port or anothe port on the router in case of poor contact between the
network cable and the port socket.
• Simplify the network conguration by connecting your router and the PC directly, without hubs/switches in
between, and try again.
Why do I have abnormal incoming/outgoing trac?
• Go to Network Center > Trac Control > Monitor, and select Enable trac statistics and Enable
application detection to check which device/application overuses network bandwidth. Locate the device/
application in question and disconnect/stop it.
• Go to Security Advisor and perform system scan to see if there is any malware overusing the network
bandwidth.
Does the router have SPI rewall?
Yes. In SRM, the SPI rewall is always enabled by default so no related management options are provided.
Can the VPN Server package work on my router if I use IPv6 connection?
If the router provides IPv6 connection, you can only use VPN Server as an OpenVPN server. The other types of
VPN (i.e. PPTP and L2TP/IPSec) are not supported under an IPv6 environment.
What can I do if I can't connect to the router via VPN connection?
Make sure you enable the VPN pass-through function and select the corresponding options of the VPN protocols
(PPTP, L2TP, IPSec) that you use.
28 Chapter 14: FAQ
Page 29

Wi-Fi
What can I do if I forgot the Wi-Fi SSID and its password?
• As the administrator, log in to SRM via wired connection and go to Wi-Fi Connect > Wireless > Wi-Fi to nd
out the Wi-Fi SSID and password.
• If you forgot the administrator's login credentials, you may perform Soft Reset to reset the Wi-Fi SSID and its
password. For more information, please see "Reset Synology Router".
Why did my Wi-Fi SSID disappear?
• Check if the Wi-Fi network is enabled (at Wi-Fi Connect > Wireless > Wi-Fi) and if the Wi-Fi switch is set
"ON" on the Synology Router.
• Check if the SSID status is "Show" (at Wi-Fi Connect > Wireless > Wi-Fi). Then disable the Wi-Fi network
and enable it again.
Why can't my device connect to the Synology Router wirelessly?
• Check if the Wi-Fi button on your router is set "ON", the Wi-Fi feature is enabled in SRM, and the antennas are
well-installed.
• Check if the device is too far away from the router or if there is any obstacle/electrical signal source that may
interrupt the Wi-Fi connection.
• Check if your wireless device is connected to the Wi-Fi network hosted by the router. If the device is not in the
router's local network, you cannot access SRM via router.synology.com or its local IP address.
• Move your wireless device closer to the router and reconnect again.
Why can't my wireless devices communicate with each other though they are
in the same Wi-Fi network?
AP isolation may have been enabled (at Wi-Fi Connect > Wireless > Wi-Fi > Advanced options). AP isolation
prevents wireless client devices that join the same Wi-Fi network (2.4GHz or 5GHz) from communicating with
each other.
Why is the Wi-Fi signal weak and how can I improve it?
Weak Wi-Fi signal may come from the following reasons:
• The router is too distant from the client devices.
• The router's Wi-Fi transmit power is not strong enough. Go to Wi-Fi Connect > Wireless > Wi-Fi > Advanced
options, and change the Transmit power level (Low, Middle, High).
• There might be intervening barriers (e.g. a large expanse of metal) that can block Wi-Fi signals. 5GHz Wi-Fi is
more sensitive to such barriers than 2.4GHz, as mentioned in "Set up Your Wi-Fi Connection".
• Nearby devices (e.g. microwaves/wireless phones) using the same frequency band may interfere with the
router's 2.4GHz Wi-Fi transmission.
To improve Wi-Fi signal strength, you may try the following solutions:
• Adjust the antennas to make them 45 degrees apart from each other as recommended in "Set up Synology
Router Manager (SRM)". If the Wi-Fi strength is not boosted, you may try other angles to nd out the best
antenna placement.
• Relocate your router to the center of the area where the client devices are placed, or to a position where the
router and the devices are within a visible distance without interfering barriers. However, the two locations may
not always work, and you may try other locations to nd out the best router placement.
• If there are radio transmitting devices near the router, to avoid channel overlapping, re-assign their operation
channels to channels 1, 6, or 11 (for devices using 2.4GHz Wi-Fi); to any non-overlapping channels (for
devices using 5GHz Wi-Fi).
29 Chapter 14: FAQ
Page 30

Why can't I boost a device's signal with beamforming?
• Only six devices can concurrently receive beamforming.
• Make sure your device supports beamforming too. This means the device must conform to the 802.11ac
standards.
• RT2600ac performs beamforming for all its Wi-Fi connections by default, and does not provide relevant option
on the management interface.
Which Wi-Fi frequency (2.4GHz and 5GHz) should I choose?
Please see "Set up Your Wi-Fi Connection".
Why can't I nd the router's 5GHz Wi-Fi network?
Due to previous NCC (National Communications Commission) regulations, in Taiwan wireless devices
manufactured before 2009 cannot make use of the 5GHz Wi-Fi channels 36-48. To help such wireless devices
connect to the 5GHz Wi-Fi network, you should use alternative channels rather than channels 36-48 (at Wi-Fi
Connect > Wireless > Wi-Fi > 5GHz > Advanced options).
30 Chapter 14: FAQ
Page 31

SYNOLOGY, INC.
END USER LICENSE AGREEMENT
IMPORTANT–READ CAREFULLY: THIS END USER LICENSE AGREEMENT ("EULA") IS A LEGAL AGREEMENT
BETWEEN YOU (EITHER AN INDIVIDUAL OR A LEGAL ENTITY) AND SYNOLOGY, INC. ("SYNOLOGY") FOR THE
SYNOLOGY SOFTWARE INSTALLED ONTO THE SYNOLOGY PRODUCT PUCHASED BY YOU (THE "PRODUCT"),
OR LEGALLY DOWNLOADED FROM WWW.SYNOLOGY.COM, OR ANY OTHER CHANNEL PROVIDED BY
SYNOLOGY ( "SOFTWARE").
YOU AGREE TO BE BOUND BY THE TERMS OF THIS EULA BY USING THE PRODUCTS CONTAINING THE
SOFTWARE, INSTALLING THE SOFTWARE ONTO THE PRODUCTS OR DEVICE CONNECTED TO THE PRODUCTS.
IF YOU DO NOT AGREE TO THE TERMS OF THIS EULA, DO NOT USETHE PRODUCTS CONTAINING THE
SOFTWAREOR DOWNLOAD THE SOFTWARE FROM WWW.SYNOLOGY.COM, OR ANY OTHER CHANNEL
PROVIDED BY SYNOLOGY.INSTEAD, YOU MAY RETURN THE PRODUCT TO THE RESELLER WHERE YOU
PURCHASED IT FOR A REFUND IN ACCORDANCE WITH THE RESELLER'S APPLICABLE RETURN POLICY.
Section 1. Limited Software License. Subject to the terms and conditions of this EULA, Synology grants you a limited, nonexclusive, non-transferable, personal license to install, run and use one copy of the Software loaded on the Product or on
your device connected to the Product solely relating to your authorized use of the Product.
Section 2. Documentation. You may make and use a reasonable number of copies of any documentation provided with the
Software; provided that such copies will only be used for internal business purposes and are not to be republished or
redistributed (either in hard copy or electronic form) to any third party.
Section 3. Backup. You may make a reasonable number of copies of the Software for backup and archival purposes only.
Section 4. Updates. Any software provided to you by Synology or made available on the Synology website at
www.synology.com ("Website") or any other channel provided by Synology that updates or supplements the original
Software is governed by this EULA unless separate license terms are provided with such updates or supplements, in which
case, such separate terms will govern.
Section 5. License Limitations. The license set forth in Sections 1, 2 and 3 applies only to the extent that you have ordered
and paid for the Product and states the entirety of your rights with respect to the Software. Synology reserves all rights not
expressly granted to you in this EULA. Without limiting the foregoing, you shall not authorize or permit any third party to: (a)
use the Software for any purpose other than that in connection with the Product; (b) license, distribute, lease, rent, lend,
transfer, assign or otherwise dispose of the Software; (c) reverse engineer, decompile, disassemble or attempt to discover
the source code of or any trade secrets related to the Software, except and only to the extent that such conduct is
expressly permitted by applicable law notwithstanding this limitation; (d) adapt, modify, alter, translate or create any
derivative works of the Software; (e) remove, alter or obscure any copyright notice or other proprietary rights notice on the
Software or Product; or (f) circumvent or attempt to circumvent any methods employed by Synology to control access to the
components, features or functions of the Product or Software. Subject to the limitations specified in this Section 5, you are
not prohibited from providing any services hosted by Synology NAS server to any third party for commercial purpose.
Section 6. Open Source. The Software may contain components licensed to Synology under the GNU General Public
License ("GPL Components"), currently available at http://www.gnu.org/licenses/gpl.html. The terms of the GPL will control
solely with respect to the GPL Components to the extent that this EULA conflicts with the requirements of the GPL with
respect to your use of the GPL Components, and, in such event, you agree to be bound by the GPL with respect to your
use of such components.
Section 7. Audit. Synology will have the right to audit your compliance with the terms of this EULA. You agree to grant
Synology a right to access to your facilities, equipment, books, records and documents and to otherwise reasonably
cooperate with Synology in order to facilitate any such audit by Synology or its agent authorized by Synology.
Section 8. Ownership. The Software is a valuable property of Synology and its licensors, protected by copyright and other
intellectual property laws and treaties. Synology or its licensors own all rights, titles and interests in and to the Software,
including but not limited to copyright and any other intellectual property rights.
Section 9. Limited Warranty. Synology provides a limited warrant that the Software will substantially conform to Synology's
published specifications for the Software, if any, or otherwise set forth on the Website, for a period required by your local
law. Synology will use commercially reasonable efforts to, in Synology's sole discretion, either correct any such
nonconformity in the Software or replace any Software that fails to comply with the foregoing warranty, provided that you
give Synology written notice of such noncompliance within the warranty period. The foregoing warranty does not apply to
any noncompliance resulting from any: (w) use, reproduction, distribution or disclosure not in accordance with this EULA;
(x) any customization, modification or other alteration of the Software by anyone other than Synology; (y) combination of
the Software with any product, services or other items provided by anyone other than Synology; or (z) your failure to
comply with this EULA.
Section 10. Support. During the period specified in the Section 9, Synology will make available to you the support services.
Following the expiration of the applicable period, support for Software may be available from Synology upon written
Page 32

request.
Section 11. Disclaimer of Warranties. EXCEPT AS EXPRESSLY SET FORTH ABOVE, THE SOFTWARE IS PROVIDED
"AS IS" AND WITH ALL FAULTS. SYNOLOGY AND ITS SUPPLIERS HEREBY DISCLAIM ALL OTHER WARRANTIES,
EXPRESS, IMPLIED OR STATUTORY, ARISING BY LAW OR OTHERWISE, INCLUDING BUT NOT LIMITED TO ANY
IMPLIED WARRANTIES OF MERCHANTABILITY, FITNESS FOR A PARTICULAR PURPOSE OR USE, TITLE AND
NONINFRINGEMENT, WITH REGARD TO THE SOFTWARE. WITHOUT LIMITING THE FOREGOING, SYNOLOGY
DOES NOT WARRANT THAT THE SOFTWARE WILL BE FREE OF BUGS, ERRORS, VIRUSES OR OTHER DEFECTS.
Section 12. Disclaimer of Certain Damages. IN NO EVENT WILL SYNOLOGY OR ITS LICENSORS BE LIABLE FOR ANY
INCIDENTAL, INDIRECT, SPECIAL, PUNITIVE, CONSEQUENTIAL OR SIMILAR DAMAGES OR LIABILITIES
WHATSOEVER (INCLUDING, BUT NOT LIMITED TO LOSS OF DATA, INFORMATION, REVENUE, PROFIT OR
BUSINESS) ARISING OUT OF OR RELATING TO THE USE OF OR INABILITY TO USE THE SOFTWARE OR
OTHERWISE UNDER OR IN CONNECTION WITH THIS EULA OR THE SOFTWARE, WHETHER BASED ON
CONTRACT, TORT (INCLUDING NEGLIGENCE), STRICT LIABILITY OR OTHER THEORY EVEN IF SYNOLOGY HAS
BEEN ADVISED OF THE POSSIBILITY OF SUCH DAMAGES.
Section 13. Limitation of Liability. SYNOLOGY'S AND ITS SUPPLIERS' LIABILITY ARISING OUT OF OR RELATING TO
THE USE OF OR INABILITY TO USE THE SOFTWARE OR OTHERWISE UNDER OR IN CONNECTION WITH THIS
EULA OR THE SOFTWARE IS LIMITED TO THE AMOUNT ACTUALLY PAID BY YOU FOR THE PRODUCT
REGARDLESS OF THE AMOUNT OF DAMAGES YOU MAY INCUR AND WHETHER BASED ON CONTRACT, TORT
(INCLUDING NEGLIGENCE), STRICT LIABILITY OR OTHER THEORY. The foregoing disclaimer of warranties,
disclaimer of certain damages and limitation of liability will apply to the maximum extent permitted by applicable law. The
laws of some states/jurisdictions do not allow the exclusion of implied warranties or the exclusion or limitation of certain
damages. To the extent that those laws apply to this EULA, the exclusions and limitations set forth above may not apply to
you.
Section 14. Export Restrictions. You acknowledge that the Software is subject to U.S. export restrictions. You agree to
comply with all applicable laws and regulations that apply to the Software, including without limitation the U.S. Export
Administration Regulations.
Section 15. Termination. Without prejudice to any other rights, Synology may terminate this EULA if you do not abide by
the terms and conditions contained herein. In such event, you must cease use of the Software and destroy all copies of the
Software and all of its component parts.
Section 16. Assignment. You may not transfer or assign your rights under this EULA to any third party, except for that preinstalled in the Products. Any such transfer or assignment in violation of the foregoing restriction will be void.
Section 17. Applicable Law. Unless expressly prohibited by local law, this EULA is governed by and construed in
accordance with the laws of the country, in accordance with which Synology Inc. was organized without regard to any
conflict of law principles to the contrary.
Section 18. Dispute Resolution. Any dispute, controversy or claim arising out of or relating to this EULA will be resolved
exclusively and finally by arbitration conducted by three neutral arbitrators in accordance with the procedures of the
Arbitration Law and related enforcement rules of the country in which Synology Inc. was organized. In such cases, the
arbitration will be limited solely to the dispute between you and Synology. The arbitration, or any portion of it, will not be
consolidated with any other arbitration and will not be conducted on a class-wide or class action basis. The arbitration shall
take place in Taipei and the arbitration proceedings shall be conducted in English or, if both parties so agree, in Mandarin
Chinese. The arbitration award shall be final and binding on the parties and may be enforced in any court having
jurisdiction. You understand that, in the absence of this provision, you would have had a right to litigate any such dispute,
controversy or claim in a court, including the right to litigate claims on a class-wide or class-action basis, and you expressly
and knowingly waives those rights and agrees to resolve any disputes through binding arbitration in accordance with the
provisions of this Section 18. Nothing in this Section shall be deemed to prohibit or restrict Synology from seeking injunctive
relief or seeking such other rights and remedies as it may have at law or equity for any actual or threatened breach of any
provision of this EULA relating to Synology's intellectual property rights.
Section 19. Attorneys' Fees. In any arbitration, mediation, or other legal action or proceeding to enforce rights or remedies
under this EULA, the prevailing party will be entitled to recover, in addition to any other relief to which it may be entitled,
costs and reasonable attorneys' fees.
Powered by TCPDF (www.tcpdf.org)
Section 20. Severability. If any provision of this EULA is held by a court of competent jurisdiction to be invalid, illegal, or
unenforceable, the remainder of this EULA will remain in full force and effect.
Section 21. Entire Agreement. This EULA sets forth the entire agreement of Synology and you with respect to the Software
and the subject matter hereof and supersedes all prior and contemporaneous understandings and agreements whether
written or oral. No amendment, modification or waiver of any of the provisions of this EULA will be valid unless set forth in a
written instrument signed by the party to be bound thereby.
Page 33

SYNOLOGY, INC.
LIMITED PRODUCT WARRANTY
THIS LIMITED WARRANTY ("WARRANTY") APPLIES TO THE PRODUCTS (AS DEFINED BELOW) OF SYNOLOGY,
INC. AND ITS AFFILIATES, INCLUDING SYNOLOGY AMERICA CORP, (COLLECTIVELY, "SYNOLOGY"). YOU
ACCEPT AND AGREE TO BE BOUND BY THE TERMS OF THIS WARRANTY BY OPENING THE PACKAGE
CONTAINING AND/OR USING THE PRODUCT. IF YOU DO NOT AGREE TO THE TERMS OF THIS WARRANTY, DO
NOT USE THE PRODUCT. INSTEAD, YOU MAY RETURN THE PRODUCT TO THE RESELLER WHERE YOU
PURCHASED IT FOR A REFUND IN ACCORDANCE WITH THE RESELLER'S APPLICABLE RETURN POLICY.
Section 1. Products
(a) "Products" refer to New Products or Refurbished Products.
(b) "New Product", includes: (1) "Category I Product" means Synology product models RS810+, RS810RP+, RX410, all FSseries models, all DS/RS NAS models with the XS+/XS suffix (except RS3413xs+) in or after 13-series, all DX/RX/RXD
expansion units with 12 or more drive bays in or after 13-series, 10GbE NIC, ECC DDR4 and ECC DDR3 memory
modules. (2) "Category II Product" means Synology product models RS3413xs+, RS3412xs, RS3412RPxs, RS3411xs,
RS3411RPxs, RS2211+, RS2211RP+, RS411, RS409RP+, RS409+, RS409, RS408-RP, RS408, RS407, DS3612xs,
DS3611xs, DS2411+, DS1511+, DS1010+, DS509+, DS508, EDS14, RX1211, RX1211RP, RX4, DX1211, DX510, DX5,
NVR1218, NVR216, VS960HD, VS360HD, VS240HD, M2D17, and all other non-ECC memory modules not included in
Category I. (3) "Category III Product" means Synology product models that match the following requirements: all DS NAS
models without the XS+/XS suffix and with 5 and more drive bays in or after 12-series, all RS NAS models without the
XS+/XS suffix in or after 12-series, and all DX/RX expansion units with 4 or 5 drive bays in or after 12-series. (4) "Category
IV Product" means all other Synology product models purchased by Customer after March 1, 2008. (5) "Category V
Product" means all other Synology product models purchased by Customer before February 29, 2008 and any "spare
parts" purchased directly from Synology.
(c) "Refurbished Product" means all Synology products which have been refurbished and sold directly by Synology through
Online Store, not including those sold by an authorized Synology distributor or reseller.
(d) Other definition: "Customer" means the original person or entity purchasing the Product from Synology or an authorized
Synology distributor or reseller; "Online Store" means an online shop operated by Synology or Synology’s affiliate;
"Software" means the Synology proprietary software that accompanies the Product when purchased by Customer, is
downloaded by Customer from the Web Site, or is pre-installed on the Product by Synology, and includes any firmware,
associated media, images, animations, video, audio, text and applets incorporated into the software or Product and any
updates or upgrades to such software.
Section 2. Warranty Period
(a) "Warranty Period" : The warranty period commences on the date the Product is purchased by customer and ending (1)
five years after such date for Category I Products; (2) three years after such date for Category II & lll Products; (3) two
years after such date for Category IV Products; (4) one year after such date for Category V Products; or (5) 90 days after
such date for Refurbished Products, except for those sold as "as is" or with "no warranty" on Online Store.
(b) “Extended Warranty Period” : For Customer purchasing EW201 optional service for applicable Products specified in
Section 1 (b), the Warranty Period specified in Section 2 (a) of the applicable Product registered with EW201 optional
service will be extended by two years.
Section 3. Limited Warranty and Remedies
3.1 Limited Warranty. Subject to Section 3.6, Synology warrants to the Customer that each Product (a) will be free of
material defects in workmanship and (b) under normal use will perform substantially in accordance with Synology's
published specifications for the Product during the Warranty Period. Such limited warranty does not apply to the Software
which shall be subject to the accompanying end user license agreement provided with the Product, if any. Synology
provides no warranty to Refurbished Product sold as "as is" or with "no warranty" on Online Store.
3.2 Exclusive Remedy. If Customer gives notice of noncompliance with any of the warranties set forth in Section 3.1 within
the applicable Warranty Period in the manner set forth below, then, upon verification of the noncompliance by Synology,
Synology will, at Synology's option: (a) use commercially reasonable efforts to repair the Product, or (b) replace the
noncomplying Product or part thereof upon return of the complete Product in accordance with Section 3.3 The foregoing
sets forth Synology's entire liability and Customer's sole and exclusive remedy for any breach of warranty under Section
3.1 or any other defect or deficiency in the Product. Customer will reasonably assist Synology to diagnose and validate any
nonconformity with the Product. The warranty set forth in Section 3.1 does not include: (1) any warranty relating to the
Software; (2) physical installation or removal of the Product from Customer's site; (3) visits to Customer's site; (4) labor
necessary to effect repairs or replace defective parts other than during Synology's or its contracted service providers'
normal local business hours, exclusive of weekends and service providers’ holidays; (5) any work with any third party
equipment or software; (6) any warranty of the hard disk if installed by Customer or any other third party; or (7) any
warranty of compatibility with the hard disk.
3.3 Return. Any Product returned by Customer under Section 3.2 must be assigned a Return Merchandise Authorization
Page 34

("RMA") number by Synology before shipment and must be returned in accordance with Synology's then current RMA
procedures. Customer may contact any authorized Synology distributor or reseller or Synology Support to obtain
assistance in obtaining an RMA, and must provide proof of purchase and product serial number when asking for such
assistance. For warranty claims, Customer must return the complete Product to Synology in accordance with this Section
3.3 to be eligible for coverage under this Warranty. Any Product returned without an RMA number, or any Product that has
been disassembled (except under the direction of Synology) will be refused and returned to Customer at Customer's
expense. Any Product that has been assigned a RMA number must be returned in the same condition as it was received
from Synology to the address designated by Synology, freight pre-paid, in packaging sufficient to protect the contents
thereof and with the RMA number prominently displayed on the outside of the box. Customer is responsible for insurance
and risk of loss with respect to returned items until they are properly received by Synology. A Product with a RMA number
must be returned within fifteen (15) days after issuance of the applicable RMA number.
3.4 Replacement by Synology. If Synology elects to replace any Product under this Warranty set forth in Section 3.1, then
Synology will ship a replacement Product at Synology's expense via the shipping method selected by Synology after
receipt of the nonconforming Product returned in accordance with Section 3.3 and validation by Synology that the Product
does not conform to the warranty. In some countries, Synology may at its own discretion apply the Synology Replacement
Service to certain Products, through which Synology will ship a replacement Product to Customer before its receipt of the
nonconforming Product returned by Customer ("Synology Replacement Service").
3.5 Support. During the Warranty Period, Synology will make available to Customer the support services. Following the
expiration of the applicable Warranty Period, support for Products may be available from Synology upon written request.
3.6 Exclusions. The foregoing warranties and warranty obligations do not apply to any Product that (a) has been installed
or used in a manner not specified or described in the Product specifications; (b) has been repaired, modified or altered by
anyone other than Synology or its agent or designee; (c) has been in any way misused, abused, or damaged; (d) has been
used with items not provided by Synology other than the hardware or software for which the Product is designed; or (e)
otherwise fails to conform to the Product specifications and such failure is attributable to causes not within or under
Synology's control. Further, the foregoing warranties will be void if (1) Customer disassembles the Product except as
authorized by Synology; (2) Customer fails to implement any correction, modification, enhancement, improvement or other
update made available to Customer by Synology; or (3) Customer implements, installs or uses any correction, modification,
enhancement, improvement or other update made available by any third party. The warranty set forth in Section 3 will
terminate upon Customer's sale or transfer of the Product to a third party.
3.7 Disclaimer of Warranties. THE WARRANTIES, OBLIGATIONS, AND LIABILITIES OF SYNOLOGY AND THE
REMEDIES OF CUSTOMER SET FORTH IN THIS WARRANTY ARE EXCLUSIVE AND IN SUBSTITUTION FOR, AND
CUSTOMER HEREBY WAIVES, RELEASES AND DISCLAIMS, ALL OTHER WARRANTIES, OBLIGATIONS AND
LIABILITIES OF SYNOLOGY AND ALL OTHER RIGHTS, CLAIMS AND REMEDIES OF CUSTOMER AGAINST
SYNOLOGY, EXPRESS OR IMPLIED, ARISING BY LAW OR OTHERWISE, WITH RESPECT TO THE PRODUCT,
ACCOMPANYING DOCUMENTATION OR SOFTWARE AND ANY OTHER GOODS OR SERVICES DELIVERED UNDER
THIS WARRANTY, INCLUDING, BUT NOT LIMITED TO ANY: (A) IMPLIED WARRANTY OF MERCHANTABILITY OR
FITNESS FOR A PARTICULAR PURPOSE OR USE; (B) IMPLIED WARRANTY ARISING FROM COURSE OF
PERFORMANCE, COURSE OF DEALING, OR USAGE OF TRADE; (C) CLAIM OF INFRINGEMENT OR
MISAPPROPRIATION; OR (D) CLAIM IN TORT (WHETHER BASED ON NEGLIGENCE, STRICT LIABILITY, PRODUCT
LIABILITY OR OTHER THEORY). SYNOLOGY MAKES NO GUARANTEE AND SPECIFICALLY DISCLAIMS ANY
WARRANTY THAT THE DATA OR INFORMATION STORED ON ANY SYNOLOGY PRODUCT WILL BE SECURE AND
WITHOUT RISK OF DATA LOSS. SYNOLOGY RECOMMENDS THAT CUSTOMER TAKES APPROPRIATE MEASURES
TO BACK UP THE DATA STORED ON THE PRODUCT. SOME STATES/JURISDICTIONS DO NOT ALLOW
LIMITATIONS ON IMPLIED WARRANTIES, SO THE ABOVE LIMITATION MAY NOT APPLY TO CUSTOMER.
Section 4. Limitations of Liability
4.1 Force Majeure. Synology will not be liable for, or be considered to be in breach of or default under this Warranty on
account of, any delay or failure to perform as required by this Warranty as a result of any cause or condition beyond its
reasonable control (including, without limitation, any act or failure to act by Customer).
4.2 Disclaimer of Certain Damages. IN NO EVENT WILL SYNOLOGY OR ITS SUPPLIERS BE LIABLE FOR THE COST
OF COVER OR FOR ANY INCIDENTAL, INDIRECT, SPECIAL, PUNITIVE, CONSEQUENTIAL OR SIMILAR DAMAGES
OR LIABILITIES WHATSOEVER (INCLUDING, BUT NOT LIMITED TO LOSS OF DATA, INFORMATION, REVENUE,
PROFIT OR BUSINESS) ARISING OUT OF OR RELATING TO THE USE OR INABILITY TO USE THE PRODUCT, ANY
ACCOMPANYING DOCUMENTATION OR SOFTWARE AND ANY OTHER GOODS OR SERVICES PROVIDED UNDER
THIS WARRANTY, WHETHER BASED ON CONTRACT, TORT (INCLUDING NEGLIGENCE), STRICT LIABILITY OR
OTHER THEORY EVEN IF SYNOLOGY HAS BEEN ADVISED OF THE POSSIBILITY OF SUCH DAMAGES.
4.3 Limitation of Liability. SYNOLOGY'S AND ITS SUPPLIERS' LIABILITY ARISING OUT OF OR RELATING TO THE
Page 35

USE OR INABILITY TO USE THE PRODUCT, ANY ACCOMPANYING DOCUMENTATION OR SOFTWARE AND ANY
OTHER GOODS OR SERVICES PROVIDED UNDER THIS WARRANTY IS LIMITED TO THE AMOUNT ACTUALLY PAID
BY CUSTOMER FOR THE PRODUCT REGARDLESS OF THE AMOUNT OF DAMAGES CUSTOMER MAY INCUR AND
WHETHER BASED ON CONTRACT, TORT (INCLUDING NEGLIGENCE), STRICT LIABILITY OR OTHER THEORY. The
foregoing disclaimer of certain damages and limitation of liability will apply to the maximum extent permitted by applicable
law. The laws of some states/jurisdictions do not allow exclusion or limitation of certain damages. To the extent that those
laws apply to the Product, the exclusions and limitations set forth above may not apply to Customer.
Section 5. Miscellaneous
5.1 Proprietary Rights. The Product and any accompanying Software and documentation provided with the Product include
proprietary and intellectual property rights of Synology and its third party suppliers and licensors. Synology retains and
reserves all right, title, and interest in the intellectual property rights of the Product, and no title to or ownership of any
intellectual property rights in or to the Product, any accompanying Software or documentation and any other goods
provided under this Warranty is transferred to Customer under this Warranty. Customer will (a) comply with the terms and
conditions of the Synology end user license agreement accompanying any Software furnished by Synology or an
authorized Synology distributor or reseller; and (b) not attempt to reverse engineer any Product or component thereof or
accompanying Software or otherwise misappropriate, circumvent or violate any of Synology's intellectual property rights.
5.2 Assignment. Customer will not assign any of its rights under this Warranty directly, by operation of law or otherwise,
without the prior written consent of Synology.
5.3 No Additional Terms. Except as expressly permitted by this Warranty, neither party will be bound by, and each party
specifically objects to, any term, condition or other provision that conflicts with the provisions of this Warranty that is made
by the other party in any purchase order, receipt, acceptance, confirmation, correspondence or otherwise, unless each
party specifically agrees to such provision in writing. Further, if this Warranty conflicts with any terms or conditions of any
other agreement entered into by the parties with respect to the Product, this Warranty will prevail unless the other
agreement specifically references the sections of this Warranty that it supersedes.
5.4 Applicable Law. Unless explicitly prohibited by local law, this Warranty is governed by the laws of the State of
Washington, U.S.A. for the Customers residing within the United States; and by the laws of the Republic of China (Taiwan)
for Customers not residing within the United States, without regard to any conflict of law principles to the contrary. The
1980 U.N. Convention on Contracts for the International Sale of Goods or any successor thereto does not apply.
5.5 Dispute Resolution. Any dispute, controversy or claim arising out of or relating to this Warranty, the Product or services
provided by Synology with respect to the Product or the relationship between Customers residing within the United States
and Synology will be resolved exclusively and finally by arbitration under the current commercial rules of the American
Arbitration Association, except as otherwise provided below. The arbitration will be conducted before a single arbitrator,
and will be limited solely to the dispute between Customer and Synology. The arbitration, or any portion of it, will not be
consolidated with any other arbitration and will not be conducted on a class-wide or class action basis. The arbitration shall
be held in King County, Washington, U.S.A. by submission of documents, by telephone, online or in person as determined
by the arbitrator at the request of the parties. The prevailing party in any arbitration or legal action occurring within the
United States or otherwise shall receive all costs and reasonable attorneys’ fees, including any arbitration fee paid by the
prevailing party. Any decision rendered in such arbitration proceedings will be final and binding on the parties, and
judgment may be entered thereon in any court of competent jurisdiction. Customer understands that, in the absence of this
provision, Customer would have had a right to litigate any such dispute, controversy or claim in a court, including the right
to litigate claims on a class-wide or class-action basis, and Customer expressly and knowingly waives those rights and
agrees to resolve any disputes through binding arbitration in accordance with the provisions of this Section 5.5. For
Customers not residing within the United States, any dispute, controversy or claim described in this section shall be finally
resolved by arbitration conducted by three neutral arbitrators in accordance with the procedures of the R.O.C. Arbitration
Law and related enforcement rules. The arbitration shall take place in Taipei, Taiwan, R.O.C., and the arbitration
proceedings shall be conducted in English or, if both parties so agree, in Mandarin Chinese. The arbitration award shall be
final and binding on the parties and may be enforced in any court having jurisdiction. Nothing in this Section shall be
deemed to prohibit or restrict Synology from seeking injunctive relief or seeking such other rights and remedies as it may
have at law or equity for any actual or threatened breach of any provision of this Warranty relating to Synology's intellectual
property rights.
5.6 Attorneys' Fees. In any arbitration, mediation, or other legal action or proceeding to enforce rights or remedies under
this Warranty, the prevailing party will be entitled to recover, in addition to any other relief to which it may be entitled, costs
and reasonable attorneys' fees.
5.7 Export Restrictions. You acknowledge that the Product may be subject to U.S. export restrictions. You will comply with
all applicable laws and regulations that apply to the Product, including without limitation the U.S. Export Administration
Regulations.
Page 36

5.8 Severability. If any provision of this Warranty is held by a court of competent jurisdiction to be invalid, illegal, or
unenforceable, the remainder of this Warranty will remain in full force and effect.
5.9 Entire Agreement. This Warranty constitutes the entire agreement, and supersedes any and all prior agreements,
between Synology and Customer related to the subject matter hereof. No amendment, modification or waiver of any of the
provisions of this Warranty will be valid unless set forth in a written instrument signed by the party to be bound thereby.
Powered by TCPDF (www.tcpdf.org)
Page 37

Radio Frequenc y Specific ations
802.11 abgn and 802.11ac up to 80MHz Bandwidth,
Support beamforming and TPC Function and MIMO 3*3 (RT1900ac)/4*4 (RT2600ac)
Frequency and output power details for maximum EIRP
Frequency Band Channel No. Frequency Channel No. Frequency
1 2412 MHz 7 2442 MHz
2 2417 MHz 8 2447 MHz
2400-2483.5MHz
5150-5250 MHz
(Band 1)
5250-5350 MHz
(Band 2)
5470-5725 MHz
(Band 3)
3 2422 MHz 9 2452 MHz
4 2427 MHz 10 2457 MHz
5 2432 MHz 11 2462 MHz
6 2437 MHz - 36 5180 MHz 44 5220 MHz
38 5190 MHz 46 5230 MHz
40 5200 MHz 48 5240 MHz
42 5210 MHz - 52 5260 MHz 60 5300 MHz
54 5270 MHz 62 5310 MHz
56 5280 MHz 64 5320 MHz
58 5290 MHz - -
100 5500 MHz 112 5560 MHz
102 5510 MHz 116 5580 MHz
104 5520 MHz 132 5660 MHz
106 5530 MHz 134 5670 MHz
108 5540 MHz 136 5680 MHz
5725-5850 MHz
(Band 4)
110 5550 MHz 140 5700 MHz
149 5745 MHz 157 5785 MHz
151 5755 MHz 159 5795 MHz
153 5765 MHz 161 5805 MHz
155 5775 MHz 165 5825 MHz
Page 38

Federal Communications Com mi s sion ( FCC) S t a t e m ent
You are cautioned that changes or modifications not expressly approved by the part responsible
for compliance could void the user’s authority to operate the equipment.
This equipment has been tested and found to comply with the limits for a Class B digital device,
pursuant to part 15 of the FCC rules. These limits are designed to provide reasonable protection
against harmful interference in a residential installation. This equipment generates, uses and can
radiate radio frequency energy and, if not installed and used in accordance with the instructions,
may cause harmful interference to radio communications. However, there is no guarantee that
interference will not occur in a particular installation. If this equipment does cause harmful interference
to radio or television reception, which can be determined by turning the equipment off and on, the user
is encouraged to try to correct the interference by one or more of the following measures:
-Reorient or relocate the receiving antenna.
-Increase the separation between the equipment and receiver.
-Connect the equipment into an outlet on a circuit different from that to which the receiver
is connected.
-Consult the dealer or an experienced radio/TV technician for help.
For product available in t he USA/Canada market, only channel 1~11 can be operated. Selecti on of
other channels is not possible.
When suing IEEE 802.11a wireless LAN, this product is restricted to indoor use, due to its operation in
the 5.15 to 5.25GHz frequency range.
This device complies with Part 15 of the FCC Rules. Operation is subject to the following
two conditions:
1) This device may not cause harmful interference, and
2) This device must accept any interference received, including interference that may
cause undesired operation.
FCC RF Radiation Exposure Statement:
This equipment complies with FCC radiation exposure limits set forth for an uncontrolled environment.
This equipment should be i nstalled and op erated with minim um distance 20 cm between the radiator
& your body. This transmitter must not be co-located or operating in conjunction with any other
antenna or transmitter.
Page 39

IC Statement
This device complies with Industry Canada licens e-exempt RSS st andard(s). Operatio n is subject to
the following two conditions: (1) this device may not cause interference, and (2) this device must
accept any interference, including interference that may cause undesired operation of the device.
Le présent appareil est conforme aux CNR d'Industrie Canada applicables aux appareils radio
exempts de licence. L'ex ploitatio n est autorisée a ux deux cond itions suivant es : (1) l'appar eil ne doit
pas produire de brou illage, et (2) l'uti lisateur de l'appar eil do it ac cepter t out br ouill age ra dioélec trique
subi, même si le brouillage est susceptible d'en compromettre le fonctionnement.
For product availabl e in the USA/Canada mar ket, only channel 1~11 can be operated. Selectio n of
other channels is not possible.
Pour les produits disponibles aux États-Unis / Ca nada du marc hé, seul le canal 1 à 11 peuvent être
exploités. Sélection d'autres canaux n'est pas possible.
This device and its antennas(s) must not be co-located or operating in conjunction with any other
antenna or transmitter except in accordance with IC multi-transmitter product procedures.
Cet appareil et son antenne (s) ne doit pas être co-localisés ou fonctionnement en association avec
une autre antenne ou transmetteur.
Dynamic Frequency Selection (DFS) for devices operating in the bands 5250- 5350 MHz, 5470-5600
MHz and 5650-5725 MHz
Sélection dynamique de fréquences (DFS) pour les dispositifs fonctionnant dans les bandes
5250-5350 MHz, 5470-5600 MHz et 5650-5725 MHz
The device for operation in the band 5150–5250 MHz is only for indoor use to reduce the potential for
harmful interference to co-channel mobile satellite systems.
les dispositifs fonctionnant dans la bande 5150-5250 MHz sont réservés uniquement pour une
utilisation à l’intérieur afin de réduire les risques de brouillage préjudiciable aux systèmes de satellites
mobiles utilisant les mêmes canaux.
Page 40

The maximum antenn a gai n perm itted for de vices in t he bands 52 50-53 50 MHz and 5470-5725 MHz
shall be such that the equipment still complies with the e.i.r.p. limit.
le gain maximal d’antenne permis pour les dispositifs utilisant les bandes 5250-5350 MHz et
5470-5725 MHz doit se conformer à la limite de p.i.r.e.
The maximum antenna gai n permitted f or devices in t he band 5725-5850 MHz shall be such that the
equipment still complies with the e.i.r.p. limits specified for point-to-point and non-point-to-point
operation as appropriate.
le gain maximal d’antenne permis (pour les dispositifs utilisant la bande 5725-5850 MHz) doit se
conformer à la limite de p.i. r.e. spécifiée po ur l’explo itation poi nt à point et non po int à point, sel on le
cas.
Users should also be advised t hat hi gh -power radars are allocated as primary users (i.e. priority users)
of the bands 5250-5350 M Hz and 5650-5850 MHz and that thes e radars could cause interference
and/or damage to LE-L AN dev ices
De plus, les utilisate urs dev r aient auss i être avis és que les u tilisat eurs de radar s de ha ute puiss ance
sont désignés utilisa teurs p r incip aux (c . -à-d., qu’ils ont la priorité) po ur les b and es 5250-5350 MHz et
5650-5850 MHz et que ces radars pourraient causer du brouillage et/ou des dommages aux
dispositifs LAN-EL.
For indoor use only.
Pour une utilisation en intérieur uniquement.
.
Page 41

IMPORTANT NOTE:
IC Radiation Exposure Statement:
This equipment complies with IC RSS-102 radiation exposure limits set forth for an
uncontrolled environm ent. This equipment should be installed and operated w ith minimum distance
20 cm between the radiator & your body.
Cet équipement est conforme aux limites d'exposition aux rayonnements IC établies pour un
environnement non contrôlé. Cet équipement doit être installé et utilisé avec un minimum de 20 cm de
distance entre la source de rayonnement et votre corps.
This radio transmitter RT 1900ac has been ap proved b y Industr y Cana da to op era te with th e anten na
types listed below with the maximum permissible gain and required antenna impedance for each
antenna type indicated. Antenna types not included in this list, having a gain greater than the
maximum gain indicated for that type, are strictly prohibited for use with this device.
Le présent émetteur radio RT1900ac a été approuvé par Industrie C anada pour fonctionn er avec les
types d'antenne én umérés ci-dessous et ayant un gain admissible maxima l et l'impédance requise
pour chaque type d'antenne. Les types d'antenne non inclus dans cette liste, ou dont le gain est
supérieur au gain maximal indiqué, sont strictement interdits pour l'exploitation de l'émetteur.
Page 42

EU Declaration of Conformity
Language Statement
Hereby, Synology Inc. declares that this Wireless Router is in compliance with the
English
essential requirements and other relevant provisions of Directive 1999/5/EC.
Synology Inc. vakuuttaa täten että Wireless Router tyyppinen laite on direktiivin
Finnish
Dutch
French
Swedish
Danish
German
1999/5/EY oleellisten vaatimusten ja sitä koskevien direktiivin muiden ehtojen
mukainen.
Hierbij verklaart Synology Inc. dat het toestel Wireless Router in overeenstemming is
met de essentiële eisen en de andere relevante bepalingen van richtlijn 1999/5/EG
Par la présente Synology Inc. déclare que l'appareil Wireless Router est conforme aux
exigences essentielles et aux autres dispositions pertinentes de la directive 1999/5/CE
Härmed intygar Synology Inc. att denna Wireless Router står I överensstämmelse
med de väsentliga egenskapskrav och övriga relevanta bestämmelser som framgår av
direktiv 1999/5/EG.
Undertegnede Synology Inc. erklærer herved, at følgende udstyr Wireless Router
overholder de væsentlige krav og øvrige relevante krav i direktiv 1999/5/EF
Hiermit erklärt Synology Inc. dass sich dieser/diese/dieses Wireless Router in
Übereinstimmung mit den grundlegenden Anforderungen und den anderen relevanten
Vorschriften der Richtlinie 1999/5/EG befindet"
Greek
Italian
Spanish
Portuguese
ΜΕ ΤΗΝ ΠΑΡΟΥΣΑ Synology Inc. ΔΗΛΩΝΕΙ ΟΤΙ Wireless Router ΣΥΜΜΟΡΦΩΝΕΤΑΙ
ΠΡΟΣ ΤΙΣ ΟΥΣΙΩΔΕΙΣ ΑΠΑΙΤΗΣΕΙΣ ΚΑΙ ΤΙΣ ΛΟΙΠΕΣ ΣΧΕΤΙΚΕΣ ΔΙΑΤΑΞΕΙΣ ΤΗΣ
ΟΔΗΓΙΑΣ 1999/5/ΕΚ
Con la presente Synology Inc. dichiara che questo Wireless Router è conforme ai
requisiti ess en zia li ed alle a ltre dis posi zi on i pertin ent i s tabili te dal la diret ti va 199 9/ 5/CE.
Por medio de la presente Synology Inc. declara que el Wireless Router cumple con los
requisitos esenciales y cualesquiera otras disposiciones aplicables o exigibles de la
Directiva 1999/5/CE
Synology Inc. declara que este Wireless Router está conforme com os requisitos
essenciais e outras disposições da Directiva 1999/5/CE.
Page 43

NCC 警語
經型式認證合格之低功率射頻電機,非經許可,公司、商號或使用者均不得擅自變更頻率、
加大功率或變更原設計之特性及功能。低功率射頻電機之使用不得影響飛航安全及干擾合
法通信;經發現有干擾現象時,應立即停用,並改善至無干擾時方得繼續使用。前項合法
通信,指依電信法規定作業之無線電通信。低功率射頻電機須忍受合法通信或工業、科學
及醫療用電波輻射性電機設備之干擾。
 Loading...