

Synology DiskStation DS411+II, DiskStation DS110+, DiskStation DS411j, DiskStation DS411slim, DiskStation DS410 User Manual
...Page 1
Synology DiskStation User's Guide
Based on DSM 3.1
Document ID
110302DSMUGENU
Applied Models
DS111
DS110+ DS110j DS211+ DS211
DS211j DS710+ DS411+II DS411j DS411slim
DS410 DS1511+ RS411 RS810+ RS810RP+
RS2211+ RS2211RP+
Page 2

2
Table of Contents
Chapter 1: Synology DiskStation at a Glance
1-Bay & 2-Bay Models ............................................................................................................................................................ 7
4-Bay Models ......................................................................................................................................................................... 10
5-Bay Models ......................................................................................................................................................................... 13
10-Bay Models ....................................................................................................................................................................... 14
Chapter 2: Get Started with Synology DiskStation Manager
Install Synology DiskStation ................................................................................................................................................ 15
Log in to Synology DiskStation Manager ........................................................................................................................... 15
DiskStation Manager Appearance ...................................................................................................................................... 19
Manage DSM with the Main Menu ..................................................................................................................................... 20
Manage Personal Options ................................................................................................................................................... 22
Chapter 3: Modify System Settings
Change DSM Settings .......................................................................................................................................................... 25
Change Network Settings .................................................................................................................................................... 29
Modify Regional Options ...................................................................................................................................................... 36
Use Energy Saving Features .............................................................................................................................................. 38
Chapter 4: Manage Storage Space
What is Volume and Disk Group? ....................................................................................................................................... 43
Manage Volumes or Disk Groups with Storage Manager ............................................................................................... 44
Manage iSCSI Target with Storage Manager ................................................................................................................... 52
Manage iSCSI LUNs with Storage Manager ..................................................................................................................... 54
Manage Hard Disks with Storage Manager ....................................................................................................................... 56
Manage External Disks ........................................................................................................................................................ 58
Chapter 5: Access your DiskStation from the Internet
Use the EZ-Internet Wizard ................................................................................................................................................. 59
Set Up Port Forwarding Rules for Router .......................................................................................................................... 59
Give Synology DiskStation a DDNS Hostname ................................................................................................................ 61
Chapter 6: Enhance Internet Security
Prevent Unauthorized Connection with Firewall ............................................................................................................... 64
Automatically Block Suspicious Login Attempts ............................................................................................................... 65
Chapter 7: Set Up File Sharing
Enable File Sharing Protocols for All Platforms ................................................................................................................ 67
Join a Windows ADS Domain or Workgroup .................................................................................................................... 70
Manage Users and Groups.................................................................................................................................................. 71
Set Up Shared Folders ......................................................................................................................................................... 79
Define Windows ACL Privileges for Shared Folder .......................................................................................................... 85
Index Shared Folder Contents ............................................................................................................................................ 86
Chapter 8: Access Files from Anywhere
Access Files within the Intranet........................................................................................................................................... 88
Access Files via FTP ............................................................................................................................................................ 91
Page 3

3 Table of Contents
Access Files via WebDAV ................................................................................................................................................... 93
Access Files via File Browser .............................................................................................................................................. 94
Access Files via File Station .............................................................................................................................................. 105
Chapter 9: Back Up Data
Back Up Computer Data .................................................................................................................................................... 106
Back Up Data on Synology DiskStation ........................................................................................................................... 108
Sync Shared Folder Contents between DiskStations .................................................................................................... 111
Backup DiskStation Data with Time Backup ................................................................................................................... 113
Use USBCopy to Back Up Data on USB Device ............................................................................................................ 114
Use SDCopy to Back Up Data on SD card ..................................................................................................................... 115
Chapter 10: Host Websites, Email Server, and Print Server
Use Web Station to Host Websites .................................................................................................................................. 116
Host Mail Server .................................................................................................................................................................. 123
Set Synology DiskStation as Print Server ....................................................................................................................... 125
Chapter 11: Share Photos, Videos, and Blogs with Photo Station
Enable Photo Station .......................................................................................................................................................... 130
Enable Personal Photo Station ......................................................................................................................................... 131
Manage Photo Station User Accounts ............................................................................................................................. 132
Create Albums ..................................................................................................................................................................... 133
Manage Albums .................................................................................................................................................................. 135
View and Edit Photos and Videos ..................................................................................................................................... 139
Customize Album Layout ................................................................................................................................................... 140
Use the Blog ........................................................................................................................................................................ 141
Chapter 12: Play Music with Audio Station
Enable Audio Station .......................................................................................................................................................... 144
Choose Audio Source......................................................................................................................................................... 145
Organize Your Music .......................................................................................................................................................... 147
Play Music ............................................................................................................................................................................ 150
Download Music .................................................................................................................................................................. 154
Chapter 13: Download Files with Download Station
Enable Download Station ................................................................................................................................................... 155
Set up B T/HTTP/FTP/NZB ................................................................................................................................................ 156
Create BT/HTTP/FTP/NZB Download Tasks .................................................................................................................. 159
Manage BT/HTTP/FTP/NZB Download Tasks ............................................................................................................... 165
Set up eMule ........................................................................................................................................................................ 167
Connect to ED2K Server/Kad ............................................................................................................................................ 169
Create eMule Download Tasks ......................................................................................................................................... 170
Manage eMule Download Tasks ....................................................................................................................................... 174
Chapter 14: Safeguard Your Environment with Surveillance Station
Enable Surveillance Station ............................................................................................................................................... 176
Manage IP Cameras ........................................................................................................................................................... 177
Watch Li v e View .................................................................................................................................................................. 182
Play and Manage Events ................................................................................................................................................... 185
Use E-Map ........................................................................................................................................................................... 192
Receive Email or SMS Notification ................................................................................................................................... 193
Manage Advanced Settings ............................................................................................................................................... 194
View Log ............................................................................................................................................................................... 196
Page 4

4 Table of Contents
Assign Privilege ................................................................................................................................................................... 197
About Camera License ....................................................................................................................................................... 198
Use VisualStation ................................................................................................................................................................ 198
Chapter 15: Manage Media Server and iTunes Service
Manage DLNA Media Server ............................................................................................................................................ 200
Manage iTunes Service ..................................................................................................................................................... 204
Chapter 16: Perform Advanced Management Tasks
Check System Information ................................................................................................................................................. 206
Monitor System Resources ................................................................................................................................................ 209
Update DSM ........................................................................................................................................................................ 210
Manage Packages .............................................................................................................................................................. 211
Receive Event Notification ................................................................................................................................................. 212
Reset admin's Password .................................................................................................................................................... 214
Restore Synology DiskStation to Factory Defaults......................................................................................................... 214
Reinstall Synology DiskStation ......................................................................................................................................... 215
Enable SNMP Service ........................................................................................................................................................ 215
Enable Terminal Services .................................................................................................................................................. 216
Chapter 17: Communicate with Mobile Devices
Use iOS and Android Apps ................................................................................................................................................ 217
Use Other Mobile Devices ................................................................................................................................................. 218
Appendix A: Synology DiskStation Specifications
1-Bay Models ....................................................................................................................................................................... 219
2-Bay Models ....................................................................................................................................................................... 220
4-Bay Models ....................................................................................................................................................................... 221
5-Bay Models ....................................................................................................................................................................... 222
10-Bay Models ..................................................................................................................................................................... 223
Limitations ............................................................................................................................................................................ 225
Appendix B: LED Indication Tables
1-Bay Models ....................................................................................................................................................................... 226
2-Bay Models ....................................................................................................................................................................... 227
4-Bay Models ....................................................................................................................................................................... 229
5-Bay Models ....................................................................................................................................................................... 231
10-Bay Models ..................................................................................................................................................................... 231
Page 5

5
Introduction
Congratulations on your purchase of Synology Dis kSt at ion. Sy nology D is kStat ion is a mult i-functional NetworkAttached Storage server, serving as a file-sharing center within your Intranet. Moreover, it is specially designed
for a variety of purpose, allowing you to perform the following tasks with the web-based Synology DiskStation
Manager:
Store and Share Files over the Internet
Windows users, Mac users, and Linux users can easily share files within the Intranet or through the Internet.
Unicode language support makes sharing files in different languages from Synology DiskStation simple.
Transfer Files via FTP
Synology DiskStation provides FTP service with bandwidth restriction and anonymous login. To transfer data
safely, FTP over SSL/TLS and uninvited IP auto-block are also available.
Manage Files with Web-Based File Browser
One of Synology DiskStation Manager’s applications, File Browser, can make it possible for users to manage
their files on Synology DiskStation easily through a web interface. If you want to manage DiskStation files through
a customized port, File Station is also available. You can also access the files stored on Synology DiskStation
with a mobile device.
Share Storage Capacity as iSCSI Target
You can designate portion of your Synology DiskStation volume space to be an iSCSI Target, which will allow the
iSCSI initiator to access the space like a local disk.
Back Up Files on Computer and Server
Synology DiskStation provides various backup solutions to back up computer data to Synology DiskStation, back
up Synology DiskStation data to an external hard drive, another Synology DiskStation, an rsync-compatible
server, or Amazon S3 server.
Enjoy Entertainment Content on the Server
Download Station allows you to download files from the Internet through BitTorrent, FTP, HTTP, eMule and NZB
to Synology DiskStation. Moreover, if you have an UPnP DMA connected in the LAN, you can share the
multimedia files on Synology DiskStation
1
With the USBCopy or SDCopy function, you can press the Copy button on your DiskStation to instantly copy files
from a camera or SD card to Synology DiskStation.
. If you just want to share and play music files stored on
Synology DiskStation, you can enable iTunes Service, and enjoy the music through any iTunes clients on LAN.
2
Share Photos, Videos, and Blogs with Photo Station
Photo Station gives you the freedom to share photos and videos over the Internet without complicated upload
steps. Album control ensures the content is shared with the right persons. Visitors can leave comments for your
photos. Furthermore, a brand new blogging system is integrated for you to easily share your life and thoughts
over the Internet.
---------
1
For recommended peripheral models, including hard drive, USB printer, DMA, and UPS, please visit www.synology.com.
2
USBCopy or SDCopy is supported on specific models only. See "Appendix A: Synology DiskStati on Specif ications" on Page
219 for more information.
Page 6

6 Introduction
Enjoy Music Anytime and Anywhere
Audio Station allows you to listen to music stored on the Synology DiskStation, from a connected iPod, or even
stream Internet Radio stations. In addition, you can stream music from the Synology DiskStation with a web
browser over the Internet.
Host Websites
The Virtual Host feature allows you to host up to 30 websites using Web Station, with PHP and MySQL
supported.
Record Videos with IP Cameras
Surveillance Station allows you to manage, view, and record videos from multiple IP cameras over the network.
By accessing the web-based management interface of Surveillance Station, you can watch the real-time image
the camera is monitoring, and record videos continuously, in motion-detection mode, or in alarm-recording mode.
USB Print Server
You can share up to 2 USB 2.0 Printers through the LAN.1
Online Resources
Click on the links to obtain Synology's online resources.
FAQ: www.synology.com/support/faq.php
Wiki: forum.synology.com/wiki
Forum: forum.synology.com
Download Center: www.synology.com/support/download.php
Technical Support: www.synology.com/support/support_form.php
---------
1
For recommended peripheral models, including hard drive, USB printer, DMA, and UPS, please visit www.synology.com.
Page 7

7
Chapter
1
Chapter 1: Synology DiskStation at a Glance
1-Bay & 2-Bay Models
Most Models
No. Article Name Location Description
1)
Power Button Front Panel
The Power Button is used to turn Synology DiskStation on or off.
To turn off Synology DiskStation, press the Power Button and hold it
until you hear a beep sound and the Power LED starts blinking.
2)
LED Indicators Front Panel
The LED indicator is used to display the status of the internal disk and
the system. For more information, see "Appendix B: LED Indication
Tables" on Page 226.
3)
Copy Button Front Panel
The Copy Button lights up when you connect a USB Device (for
example: digital camera, USB flash disk) to the USB port on the front
panel. Pressing the button will copy the data from the connected USB
device to Synology DiskStation’s internal HDD.
4)
USB Port
Front &
Back Panel
The Synology DiskStation offers USB ports for adding additional
external hard drives, USB printers, or other USB devices.
5)
eSATA Port
1
Front Panel
The eSATA port is for connecting with an external SATA HDD.
6)
Fan Back Panel
The fan is built to exhaust waste heat out of Synology DiskStation. It
will start automatically when the server starts. If the fan is
malfunctioning, system will beep every 1 second.
---------
1
eSATA Port is supported on specific models onl y. See "Appendix A: Synology DiskStation Specifications" on Page 219 for
more information.
Page 8
Synology DiskStation User's Guide
Based on DSM 3.1
8 Chapter 1: Synology DiskStation at a Glance
No.
Article Name
Location
Description
7)
RESET Button Back Panel
1. To rest ore IP , DNS, passwords f or the admin account to default
value.
2. To reinstall the Synology DiskStation.
8)
LAN Port Back Panel
The LAN port is where you connect RJ-45 cable to
Synology DiskStation.
9)
Power Port Back Panel
The power port is where you connect the AC adapter to
Synology DiskStation.
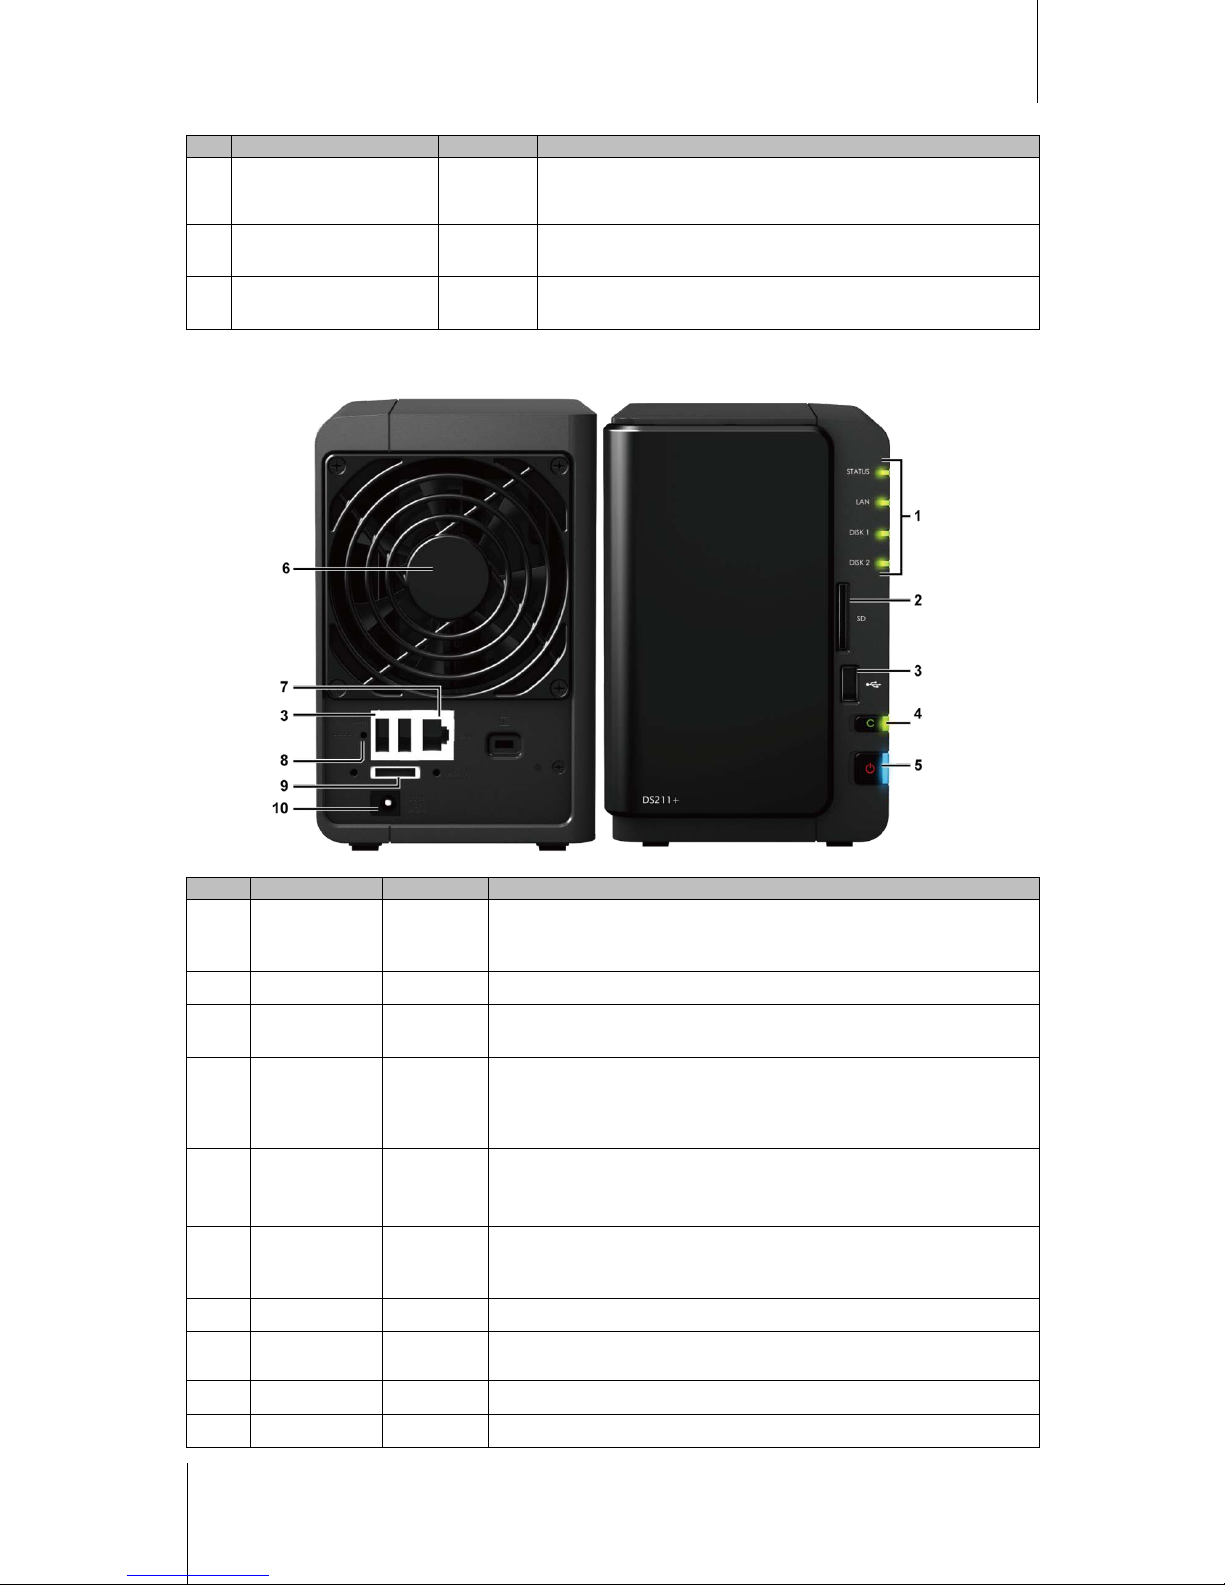
DS211+
No. Article Name Location Description
1) LED Indicators Front Panel
The LED indicator is used to display the status of the internal disk and the
system. For more information, see "Appendix B: LED Indication Tables" on
Page 226.
2) SD Card Slot Front Panel
The Synology DiskStation offers SD card slot for accessing a SD card.
3)
USB Port
Front &
Back Panel
The Synology DiskStation offers USB ports for adding additional external hard
drives, USB printers, or other USB devices.
4)
Copy Button Front Panel
The Copy Button lights up when you connect a USB Device to the USB port or
a SD card to the SD card slot on the front panel. Pressing the button will copy
the data from the connected USB device and SD card to Synology
DiskStation’s internal HDD.
5) Power Button Front Panel
The Power Button is used to turn Synology DiskStation on or off.
To turn off Synology DiskStation, press the Power Button and hold it until you
hear a beep sound and the Power LED starts blinking.
6) Fan Back Panel
The fan is built to exhaust waste heat out of Synology DiskStation. It will start
automatically when the server starts. If the fan is malfunctioning, system will
beep every 1 second.
7) LAN Port Back Panel
The LAN port is where you connect RJ-45 cable to Synology DiskStation.
8) RESET Button Back Panel
1. To rest ore IP , DNS, passwords f or the admin account to default value.
2. To reinstall the Synology DiskStation.
9) eSATA Port Back Panel
The eSATA port is for connecting with an external SATA HDD.
10)
Power Port Back Panel
The power port is where you connect the AC adapter to Synology DiskStation.
Page 9
Synology DiskStation User's Guide
Based on DSM 3.1
9 Chapter 1: Synology DiskStation at a Glance
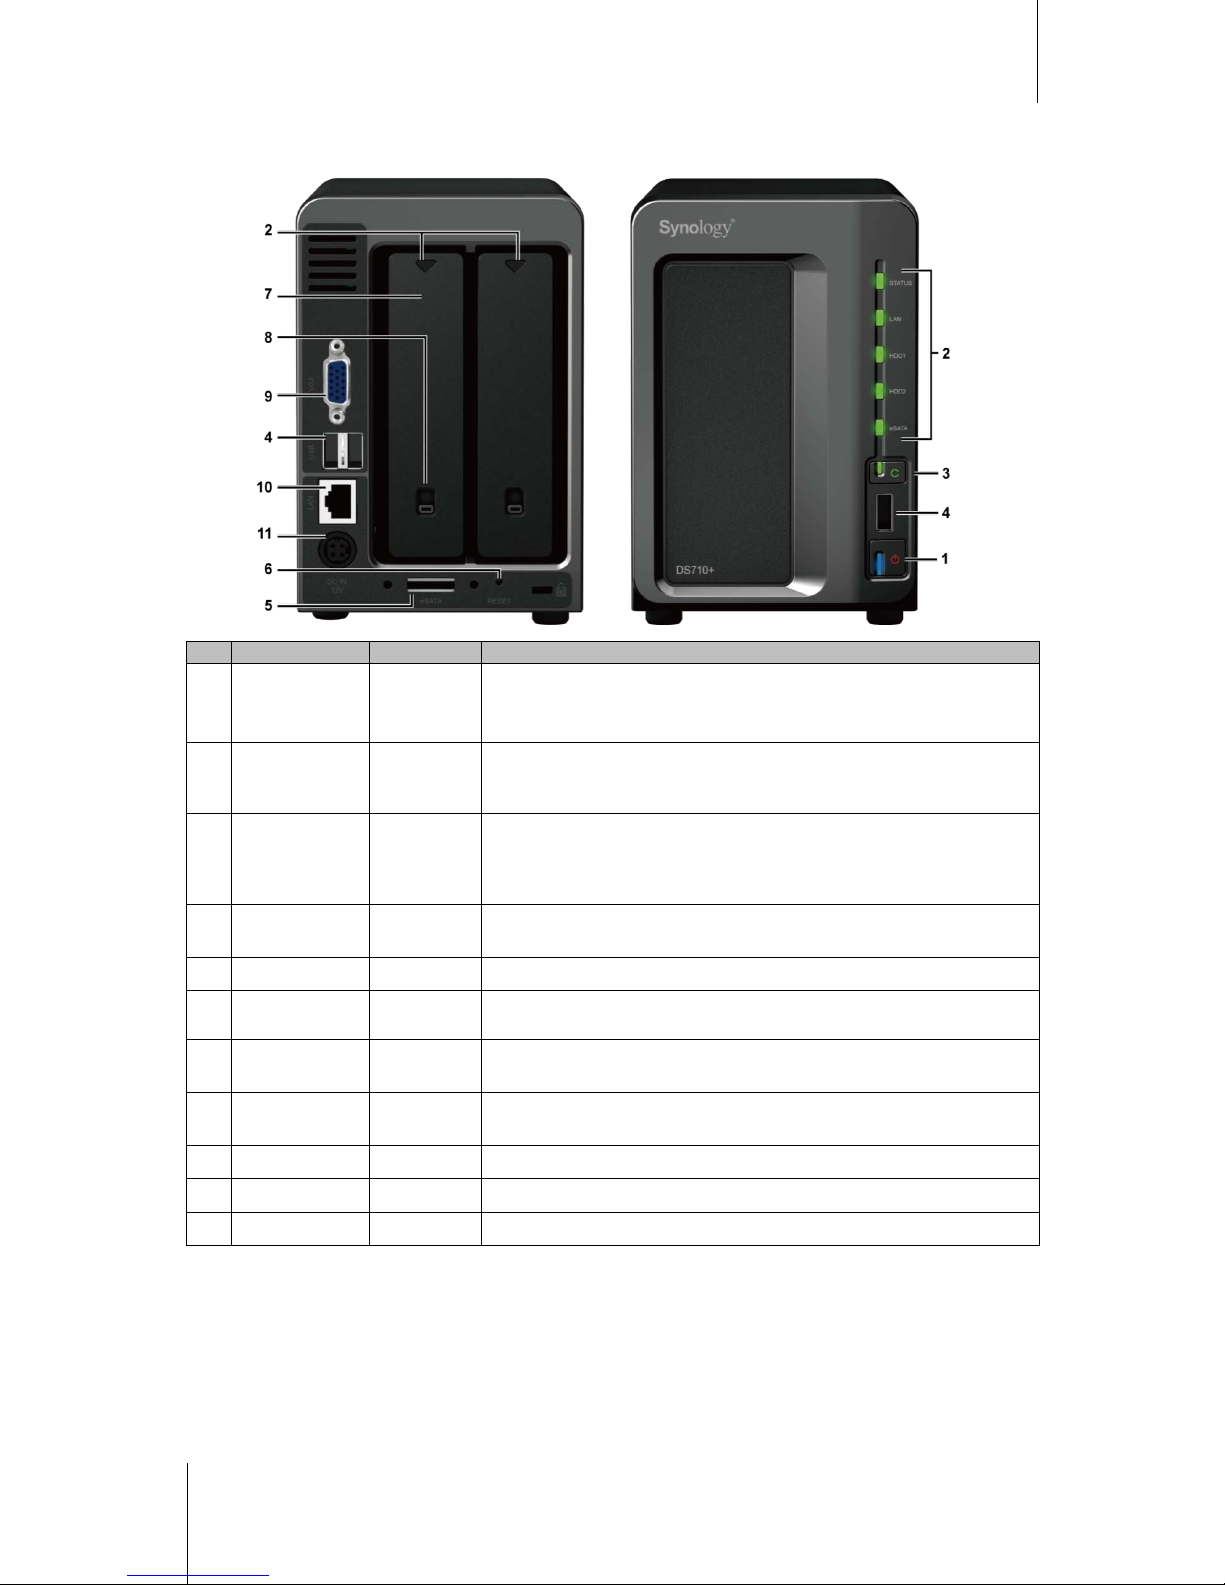
DS710+
No.
Article Name
Location
Description
1) Power Button F ront Panel
The Power Button is used to turn Synology DiskStation on or off.
To turn off Synology DiskStation, press the Power Button and hold it until you
hear a beep sound and the Power LED starts blinking.
2) LED Indicators Front Panel
The LED indicator is used to display the status of the internal disk and the
system. For more information, see "Appendix B: LED Indication Tables" on
Page 226.
3)
Copy Button Front Panel
The Copy Button lights up when you connect a USB Device (for example: digital
camera, USB flash disk) to the USB port on the front panel. Pressing the button
will copy the data from the connected USB device to Synology DiskStation’s
internal HDD.
4)
USB Port
Front & Back
Panel
The Synology DiskStation offers USB ports for adding additional external hard
drives, USB printers, or other USB devices.
5) eSATA Port Back Panel
The eSATA port is for connecting with an external SATA HDD.
6) RESET Button Back Panel
1. To rest ore IP , DNS, passwords f or the admin account to default value.
2. To reinstall the Synology DiskStation.
7)
Hard Drive Tray Back Panel
The hard drive tray is designed for loading the hard drives used in
Synology DiskStation.
8)
Hard Drive Tray
Lock
Back Panel
Each hard drive tray is equipped with one tray lock to lock or unlock the trays to
the DiskStation.
9) VGA Port Back Panel
This port is used for manufacturing use only.
10)
LAN Port Back Panel
The LAN port is where you connect RJ-45 cable to Synology DiskStation.
11) Power Port Back Panel
The power port is where you connect the AC adapter to Synology DiskStation.
Page 10
Synology DiskStation User's Guide
Based on DSM 3.1
10 Chapter 1: Synology DiskStation at a Glance
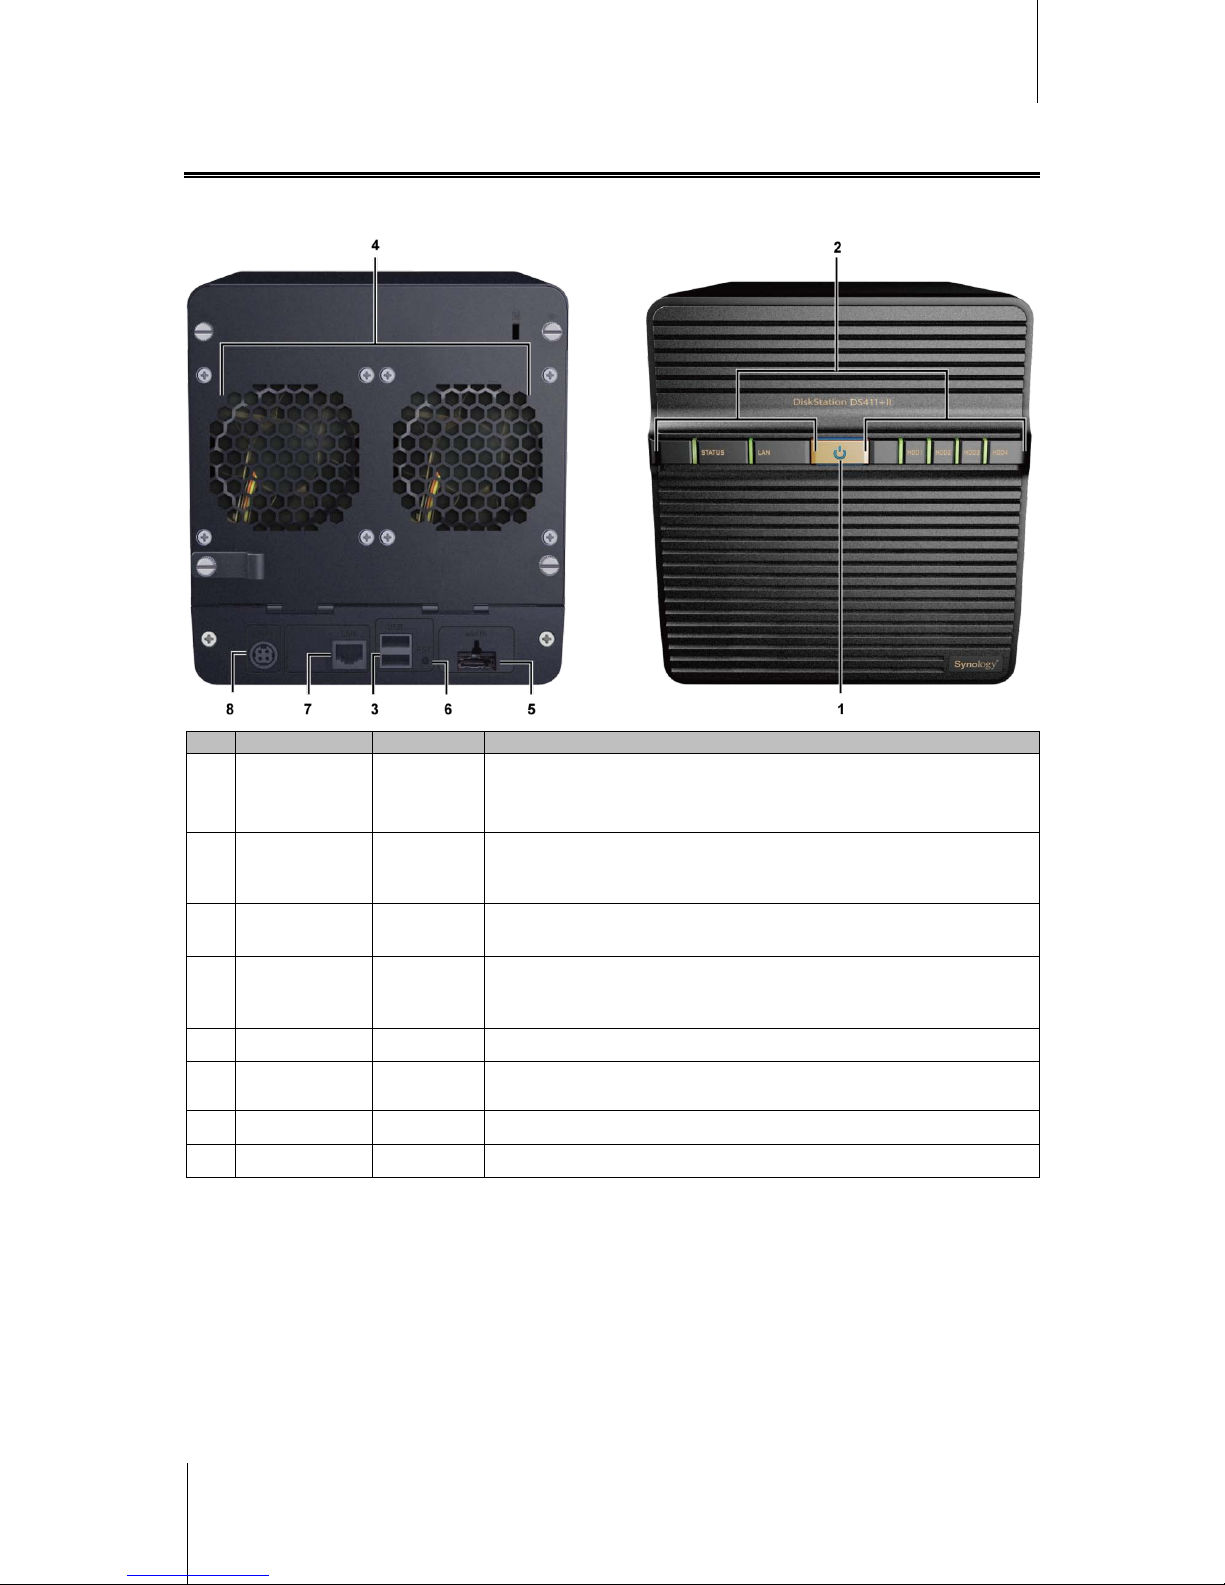
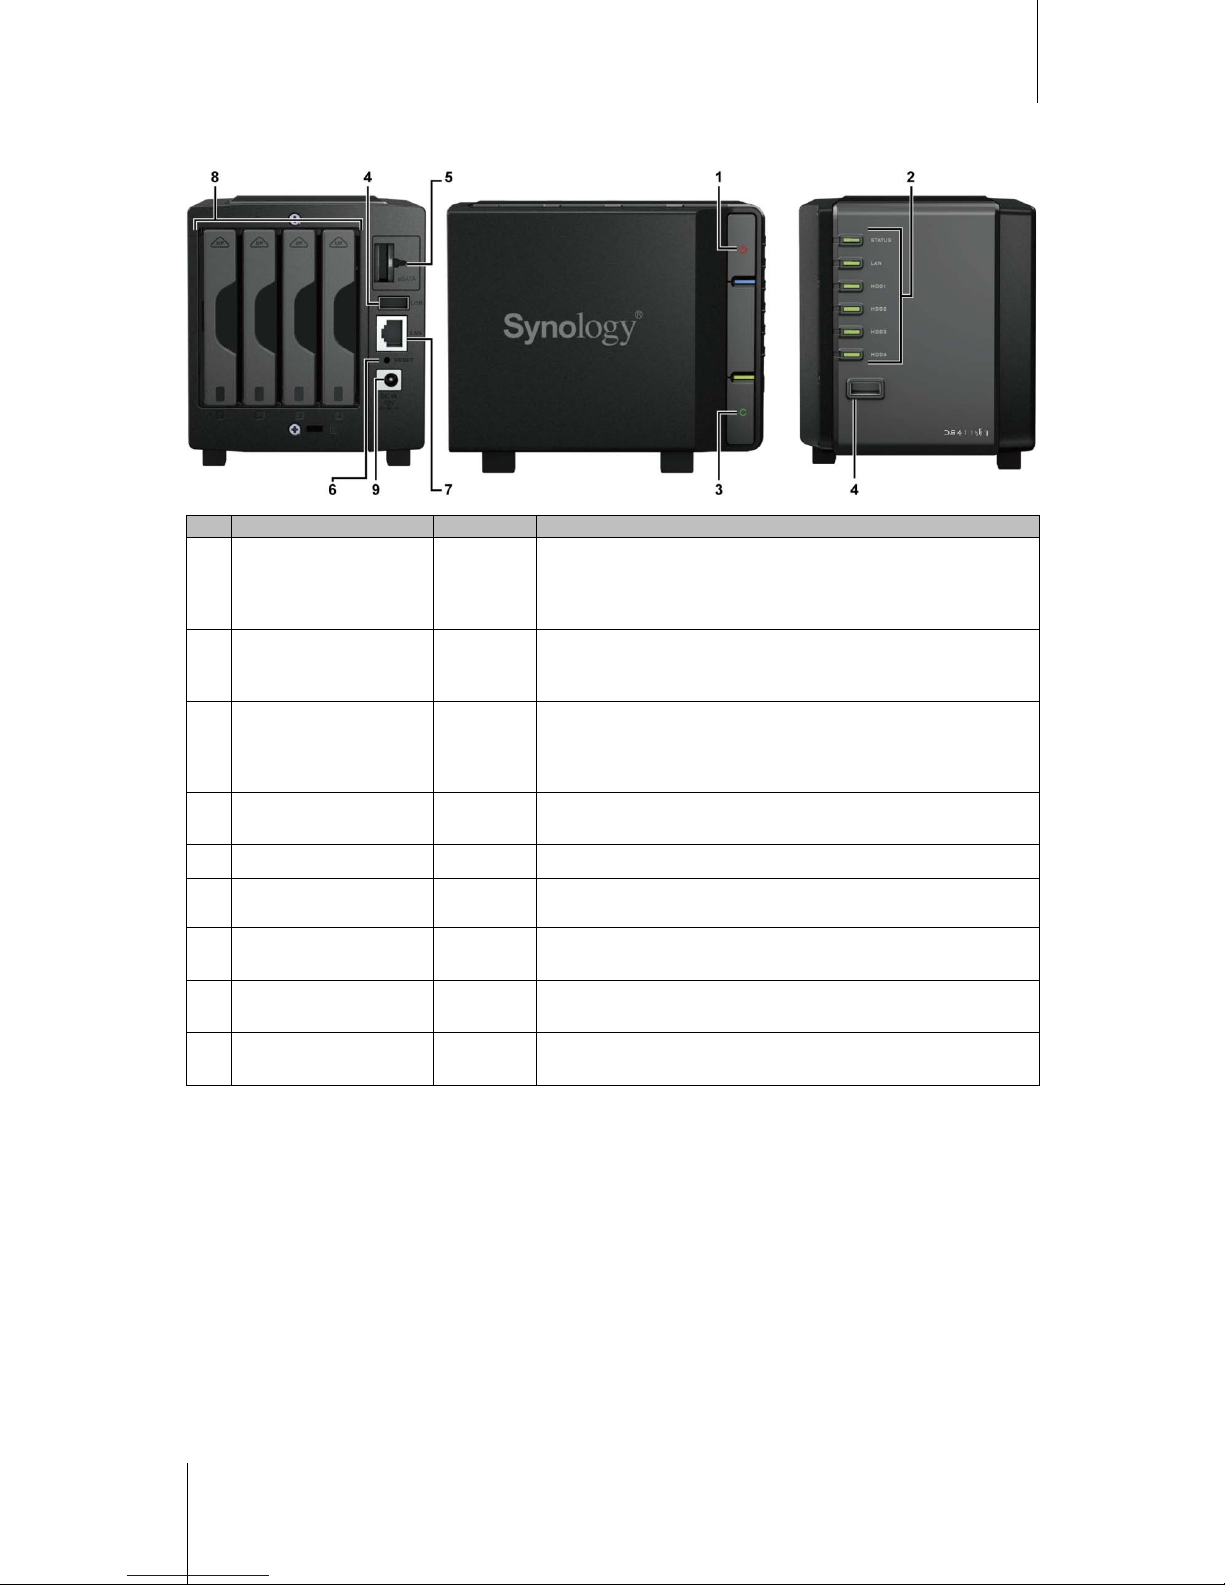
4-Bay Models
DiskStation
No. Name Location Description
1) P ower But t on Front Panel
The Power Button is used to turn Synology DiskStation on or off.
To turn off Synology DiskStation, press the Power Button and hold it until you
hear a beep sound and the Power LED starts blinking.
2) LED Indicators Front Panel
The LED indicator is used to display the status of the internal disk and the
system. For more information, see "Appendix B: LED I ndication Tables" on
Page 226.
3) USB Port Back Panel
The Synology DiskStation offers USB ports for adding additional external hard
drives, USB printers, or other USB devices.
4) Fan Back Panel
The fan is built to exhaust waste heat out of Synology DiskStation. It will start
automatically when the server starts. If the fan is malfunctioning, system will
beep every 1 second.
5) eSAT A Po r t
1
Back Panel
The eSATA port is for connecting with an external SATA HDD.
6) RESET Button Back Panel
1. To rest ore IP , DNS, passwords f or the admin account to default value.
2. To reinstall the Synology DiskStation.
7) LAN Port Back Panel
The LAN port is where you connect RJ-45 cable to Synology DiskStation.
8)
Power Port Back Panel
The power port is where you connect the AC adapter to Synology DiskStation.
---------
1
eSATA Port is supported on specific models only. See "Appendix A: Synology DiskStation Specifications" on Page 219 for
more information.
Page 11
Synology DiskStation User's Guide
Based on DSM 3.1
11 Chapter 1: Synology DiskStation at a Glance
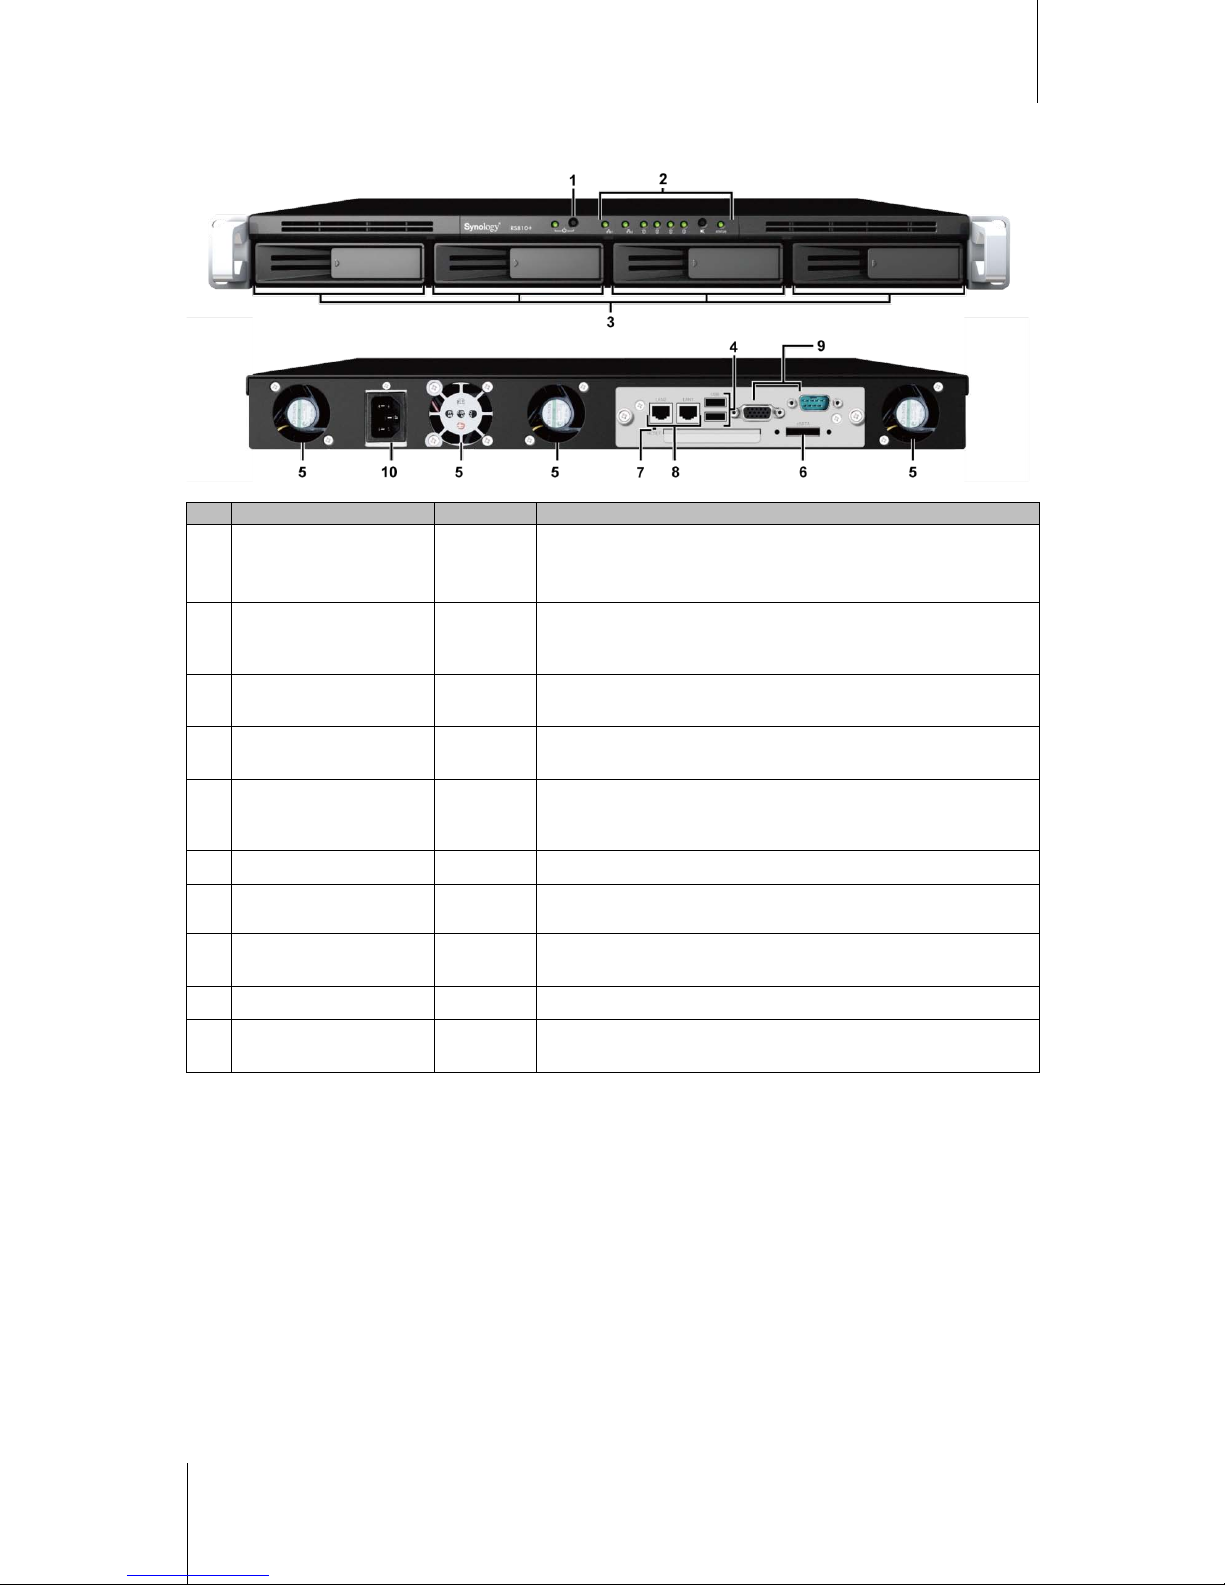
1U RackStation
No. Article Name Location Description
1) Power Button Front Panel
The Power Button is used to turn Synology RackStation on or off.
To turn off Synology RackStation, press the Power Button and hold it
until you hear a beep sound and the Power LED starts blinking.
2) LED Indicators Front Panel
The LED indicator is used to display the status of the internal disk and
the system. For more information, see "Appendix B: LED Indication
Tables" on Page 226.
3) Hard Drive Tray Front Panel
The hard drive tray is designed for loading the hard drives used in
Synology RackStation.
4) USB Port Back Panel
The Synology RackStation offers USB ports for adding additional
external hard drives, USB printers, or other USB devices.
5) Fan Back Panel
The fan is built to exhaust waste heat out of Synology RackStation. It
will start automatically when the server starts. If the fan is
malfunctioning, system will beep every 1 second.
6)
eSATA Port Back Panel
The eSATA port is for connecting with an external SATA HDD.
7)
RESET Button Back Panel
1. To rest ore IP , DNS, passwords f or the admin account to default value.
2. To reinstall the Synology RackStation.
8) LAN Port Back Panel
The LAN port is where you connect RJ-45 cable to
Synology RackStation.
9)
Console Port & VGA Port Back Panel
This port is used for manufacturing use only.
10) Power Port Back Panel
The power port is where you connect the AC adapter to
Synology RackStation.
Page 12
Synology DiskStation User's Guide
Based on DSM 3.1
12 Chapter 1: Synology DiskStation at a Glance
DS411slim
No. Name Location Description
1)
Power Button Front Panel
The Power Button is used to turn Synology DiskStation on or off.
To turn off Synology DiskStation, press the Power Button and hold it
until you hear a beep sound and the Power LED starts blinking.
2)
LED Indicators Front Panel
The LED indicator is used to display the status of the internal disk and
the system. For more information, see "Appendix B: LED Indication
Tables" on Page 226.
3) Copy Button Front Panel
The Copy Button lights up when you connect a USB Device (for
example: digital camera, USB flash disk) to the USB port on the front
panel. Pressing the button will copy the data from the connected USB
device to Synology DiskStation’s internal HDD.
4) USB Port
Front &
Back Panel
The Synology DiskStation offers USB ports for adding additional
external hard drives, USB printers, or other USB devices.
5) eSATA Port Back Panel
The eSATA port is for connecting with an external SATA HDD.
6) RESET Button Back Panel
1. To rest ore IP , DNS, passwords f or the admin account to default value.
2. To reinstall the Synology DiskStation.
7) LAN Port Back Panel
The LAN port is where you connect RJ-45 cable to
Synology DiskStation.
8) Hard Drive Tray Back Panel
The hard drive tray is designed for loading the hard drives used in
Synology DiskStation.
9)
Power Port Back Panel
The power port is where you connect the AC adapter to
Synology DiskStation.
Page 13
Synology DiskStation User's Guide
Based on DSM 3.1
13 Chapter 1: Synology DiskStation at a Glance
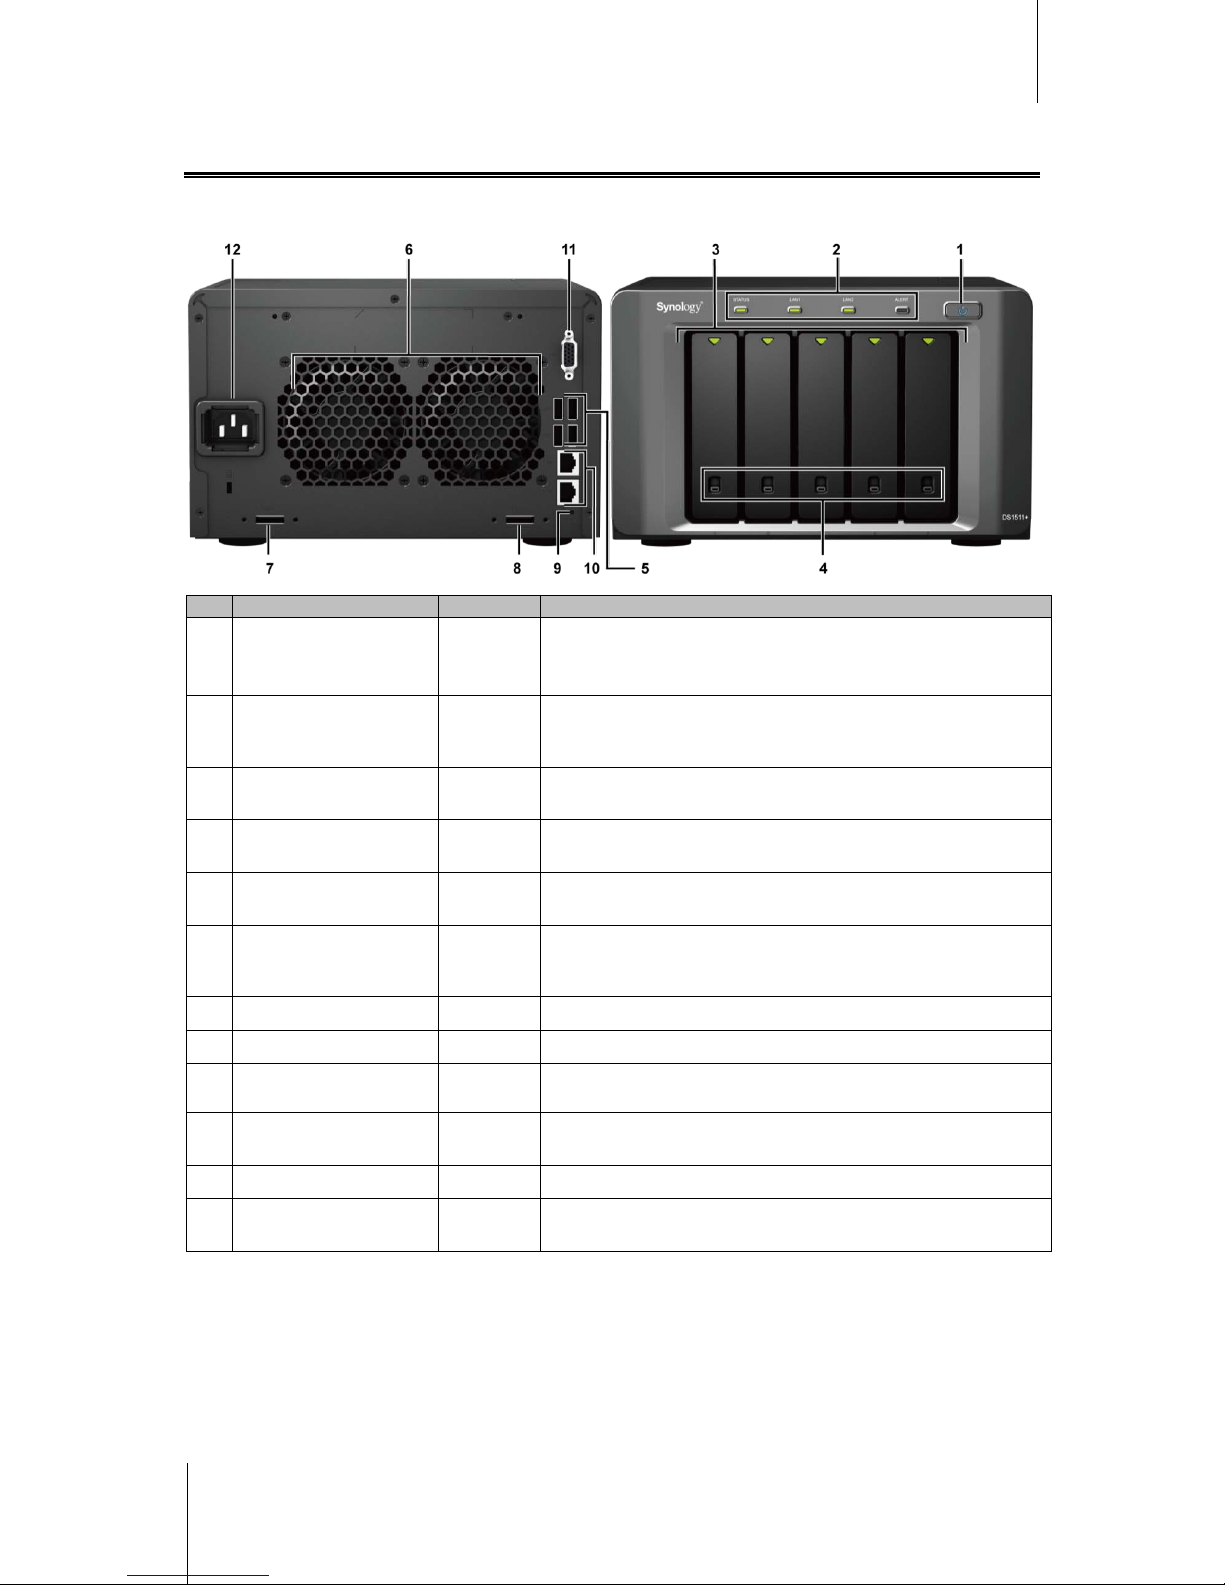
5-Bay Models
DS1511+
No. Article Name Location Description
1) Power Button Front Panel
The Power Button is used to turn Synology DiskStation on or off.
To turn off Synology DiskStation, press the Power Button and hold it until
you hear a beep sound and the Power LED starts blinking.
2) LED Indicators F ront P anel
The LED indicator is used to display the status of the internal disk and
the system. For more information, see "Appendix B: LED Indication
Tables" on Page 226.
3) Hard Drive Tray Front Panel
The hard drive tray is designed for loading the hard drives used in
Synology DiskStation.
4) Hard Drive Tray Lock Front Panel
Each hard drive tray is equipped with one tray lock to lock/unlock the
trays to the DiskStation.
5) USB Port Back Panel
The Synology DiskStation offers USB ports for adding additional external
hard drives, USB printers, or other USB devices.
6) Fan Back Panel
The fan is built to exhaust waste heat out of Synology DiskStation. It will
start automatically when the server starts. If the fan is malfunctioning,
system will beep every 1 second.
7)
eSATA Port 1 Back Panel
The eSATA port 1 is for connecting with the first external SATA HDD.
8) eSATA Port 2 Back Panel
The eSATA port 2 is for connecting with the second external SATA HDD.
9) RESET Button Back Panel
1. To rest ore IP , DNS, passwords f or the admin account to default value.
2. To reinstall the Synology DiskStation.
10) LAN Port Back Panel
The LAN port is where you connect RJ-45 cable to
Synology DiskStation.
11) VGA Port Back Panel
This port is used for manufacturing use only.
12)
Power Port Back Panel
The power port is where you connect the power cord to
Synology DiskStation.
Page 14
Synology DiskStation User's Guide
Based on DSM 3.1
14 Chapter 1: Synology DiskStation at a Glance
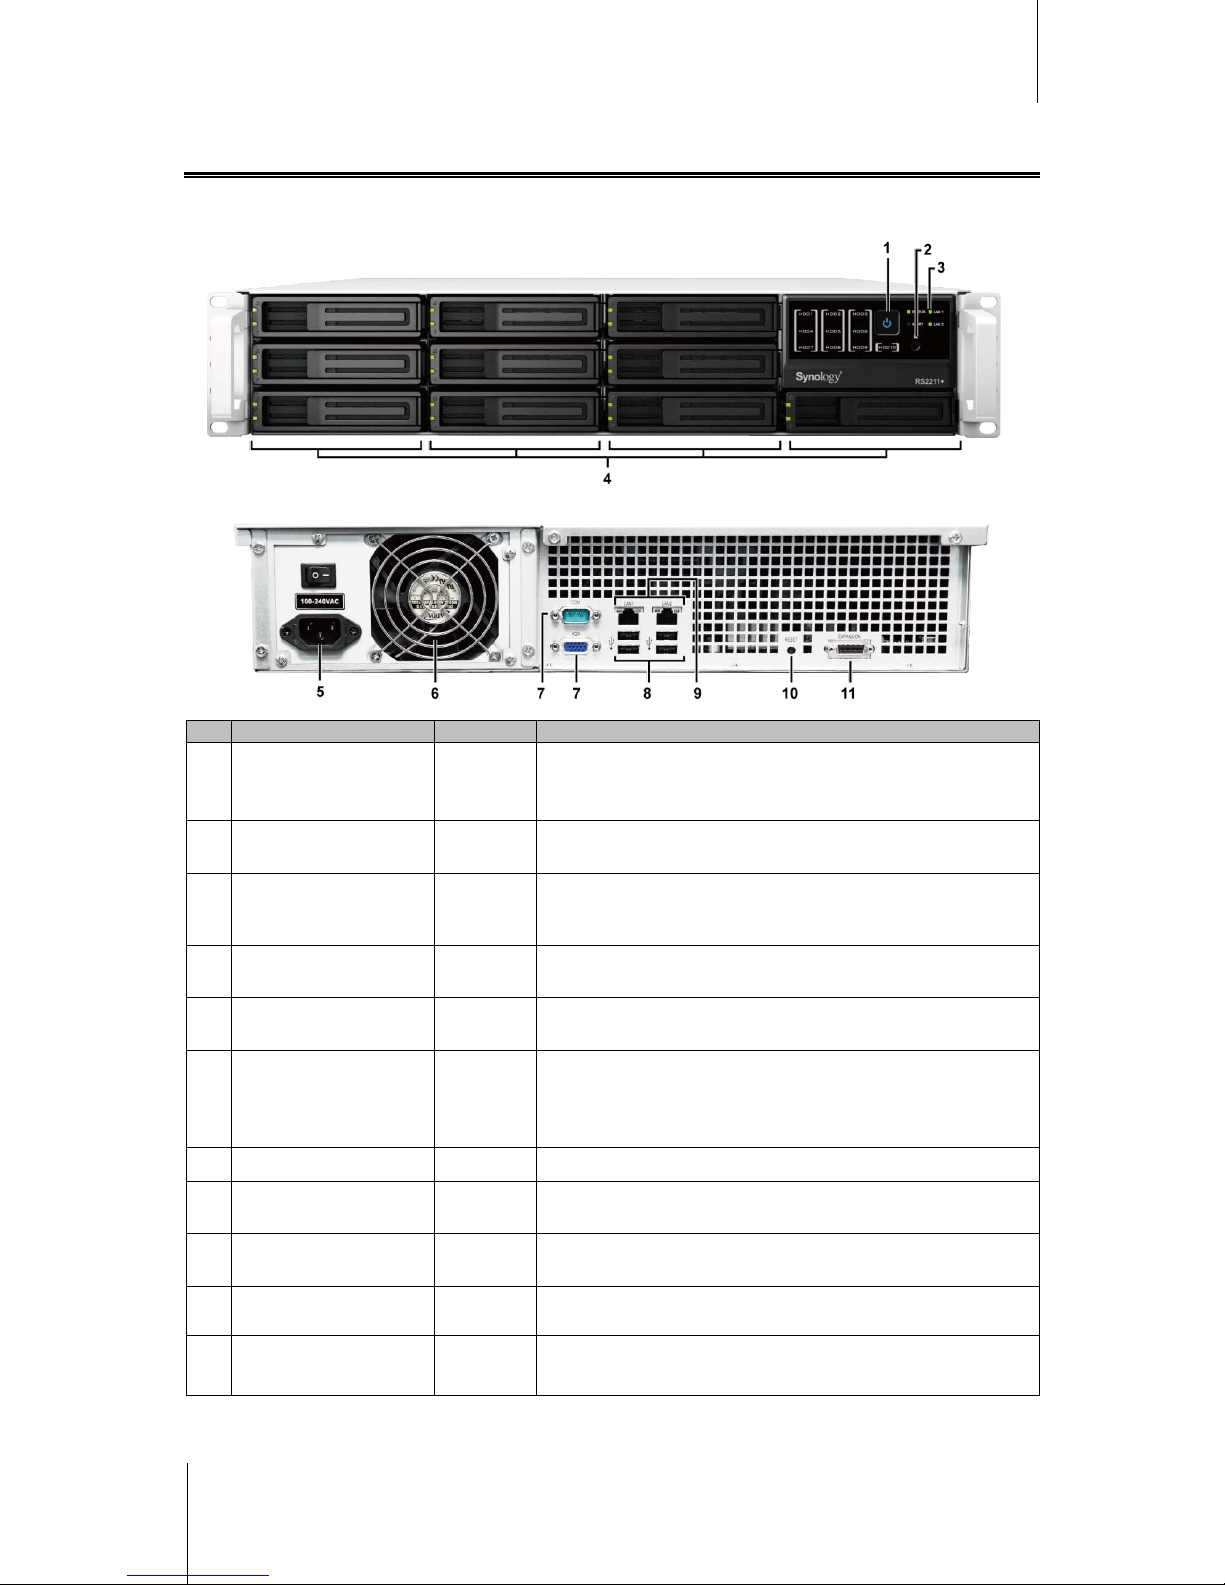
10-Bay Models
2U RackStation
No. Article Name Location Description
1) P ower Butt on Front Panel
The Power Button is used to turn Synology RackStation on or off.
To turn off Synology RackStation, press the Power Button and hold it
until you hear a beep sound and the Power LED starts blinking.
2) Beep off Button Front Panel
The Beep off Button is used to turn off the beep sound of
Synology RackStation.
3) LED Indicators Front Panel
The LED indicator is used to display the status of the internal disk and
the system. For more information, see "Appendix B: LED Indication
Tables" on Page 226.
4) Hard Drive Tray Front Panel
The hard drive tray is designed for loading the hard drives used in
Synology RackStation.
5)
Power Port Back Panel
The power port is where you connect the power cord to
Synology RackStation.
6) Fan Back Panel
The power fans are built to exhaust waste heat out of the power supply.
The system fans (inside RackStation) are built to exhaust waste heat
out of RackStation. If the fan is not working, the RackStation will “beep”
every few seconds.
7) Console Port & VGA Port Back Panel
This port is used for manufacturing use only.
8)
USB Port Back Panel
The Synology RackStation offers USB ports for adding additional
external hard drives, USB printers, or other USB devices.
9) LAN Port Back Panel
The LAN port is where you connect RJ-45 cable to
Synology RackStation.
10)
RESET Button Back Panel
1. To rest ore IP , DNS, passwords f or the admin account to default value.
2. To reinstall the Synology RackStation.
11)
Expansion Port Back Panel
The Expansion port is used to connect Synology Expansion Unit
1
Synology RackStation.
to
---------
1
Synology Expansion Unit is supported on specific models only. Please visit www.synology.com.
Page 15

15
Chapter
2
Chapter 2: Get Started with Synology DiskStation
Manager
This Chapter explains how to log in to Synology DiskStation's web-based management UI, Synology
DiskStation Manager (DSM), customize your own desktop, manage its taskbar, and use the Main Menu to
access DSM settings and applications.
Install Synology DiskStation
For more information setting up Synology DiskStation and installing DSM, see the Quick Installation Guide that
came with your installation disc.
Log in to Synology DiskStation Manager
You can log in to DSM with Synology Assistant or with a web browser.
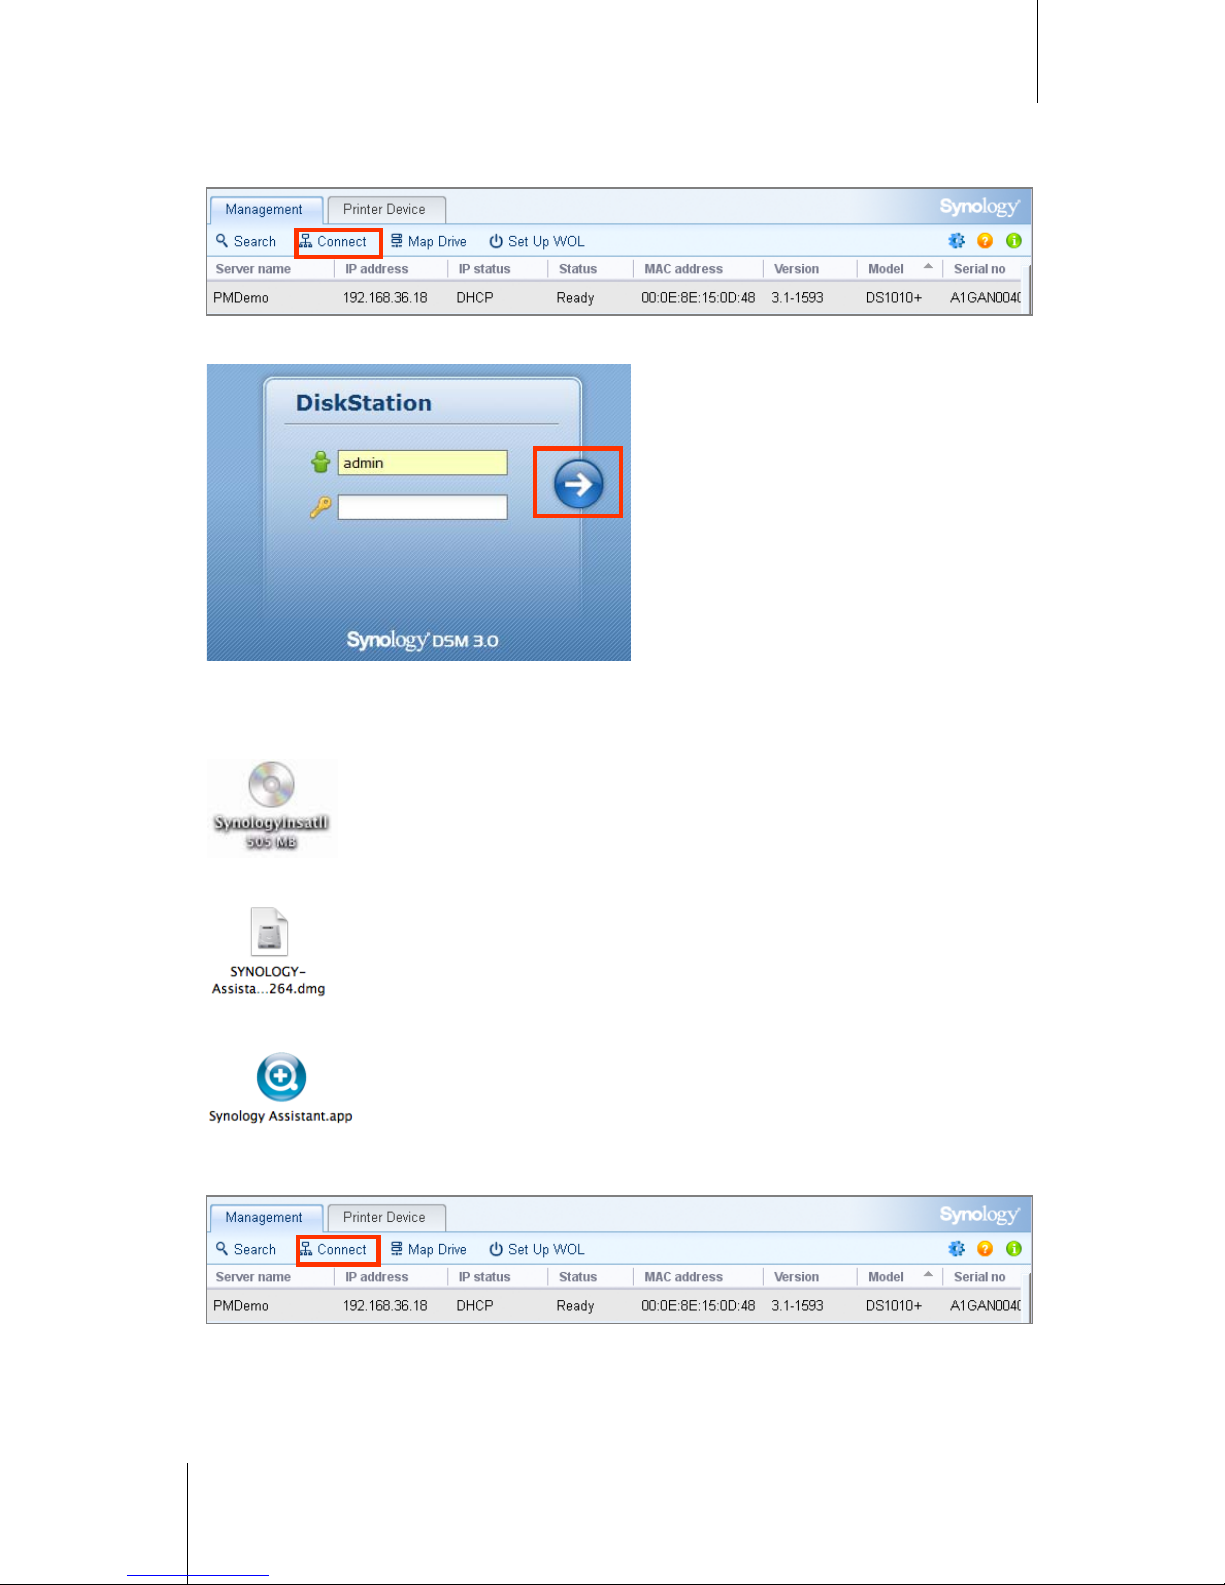
Use Synology Assistant
Windows User:
1 Insert the Installation CD or DVD into the CD/DVD-Rom Drive of your computer.
2 Choose Start from the autorun menu and follow the steps to complete installation.
3 After installation, double-click the desktop icon to launch Synology Assistant.
Page 16
Synology DiskStation User's Guide
Based on DSM 3.1
16 Chapter 2: Get Started with Synology DiskStation Manager
4 Choose the server you want to manage. Click Connect or double-click the selected server to go to DSM's
login screen.
5 Enter your user name and password, and click Login. The default password for admin is empty.
Mac OS X User:
1 Insert the Installation CD into CD/DVD-Rom Drive.
2 Double-click the CD-Rom Drive icon on the desktop.
3 Double-click the MacOSX icon, and then double-click the Synology Assistant-SYNOLOGY.dmg icon.
4 Double-click the Synology Assistant icon to run setup wizard.
5 Choose the server you want to manage. Click Connect or double-click the selected server to go to DSM's
login screen.
Page 17
Synology DiskStation User's Guide
Based on DSM 3.1
17 Chapter 2: Get Started with Synology DiskStation Manager
6 Enter your user name and password, and click Login. The default password for admin is empty.
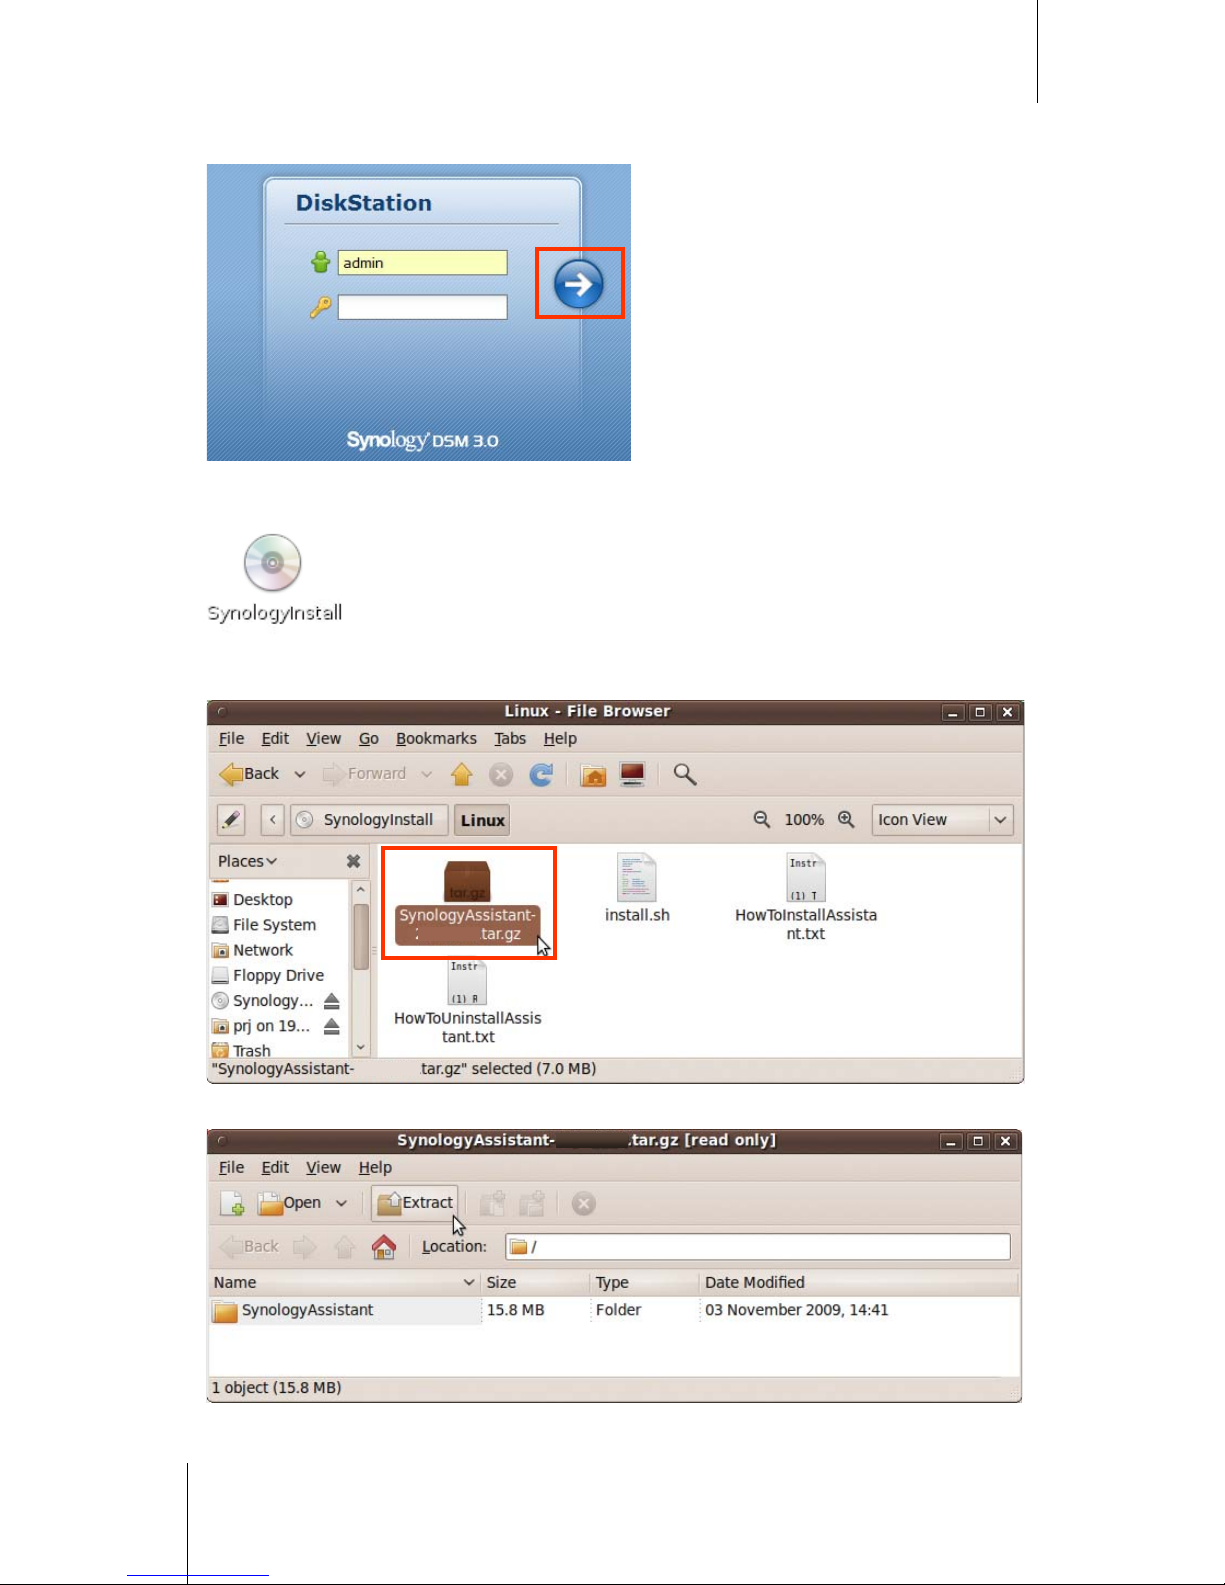
Linux (Ubuntu) User:
1 Insert the installation CD into your computer, and then double-click t he SynologyInstall icon on the desktop.
2 In the File Browser window that appears, double-click the Linux folder, and then double-click Synology
Assistant-3.1-[number].tar.gz.
3 Click Extract, and then extract the SynologyAssistant directory to the path /usr/local or any other path.
3.1-1566
3.1-1566
33..11--11556666
Page 18
Synology DiskStation User's Guide
Based on DSM 3.1
18 Chapter 2: Get Started with Synology DiskStation Manager
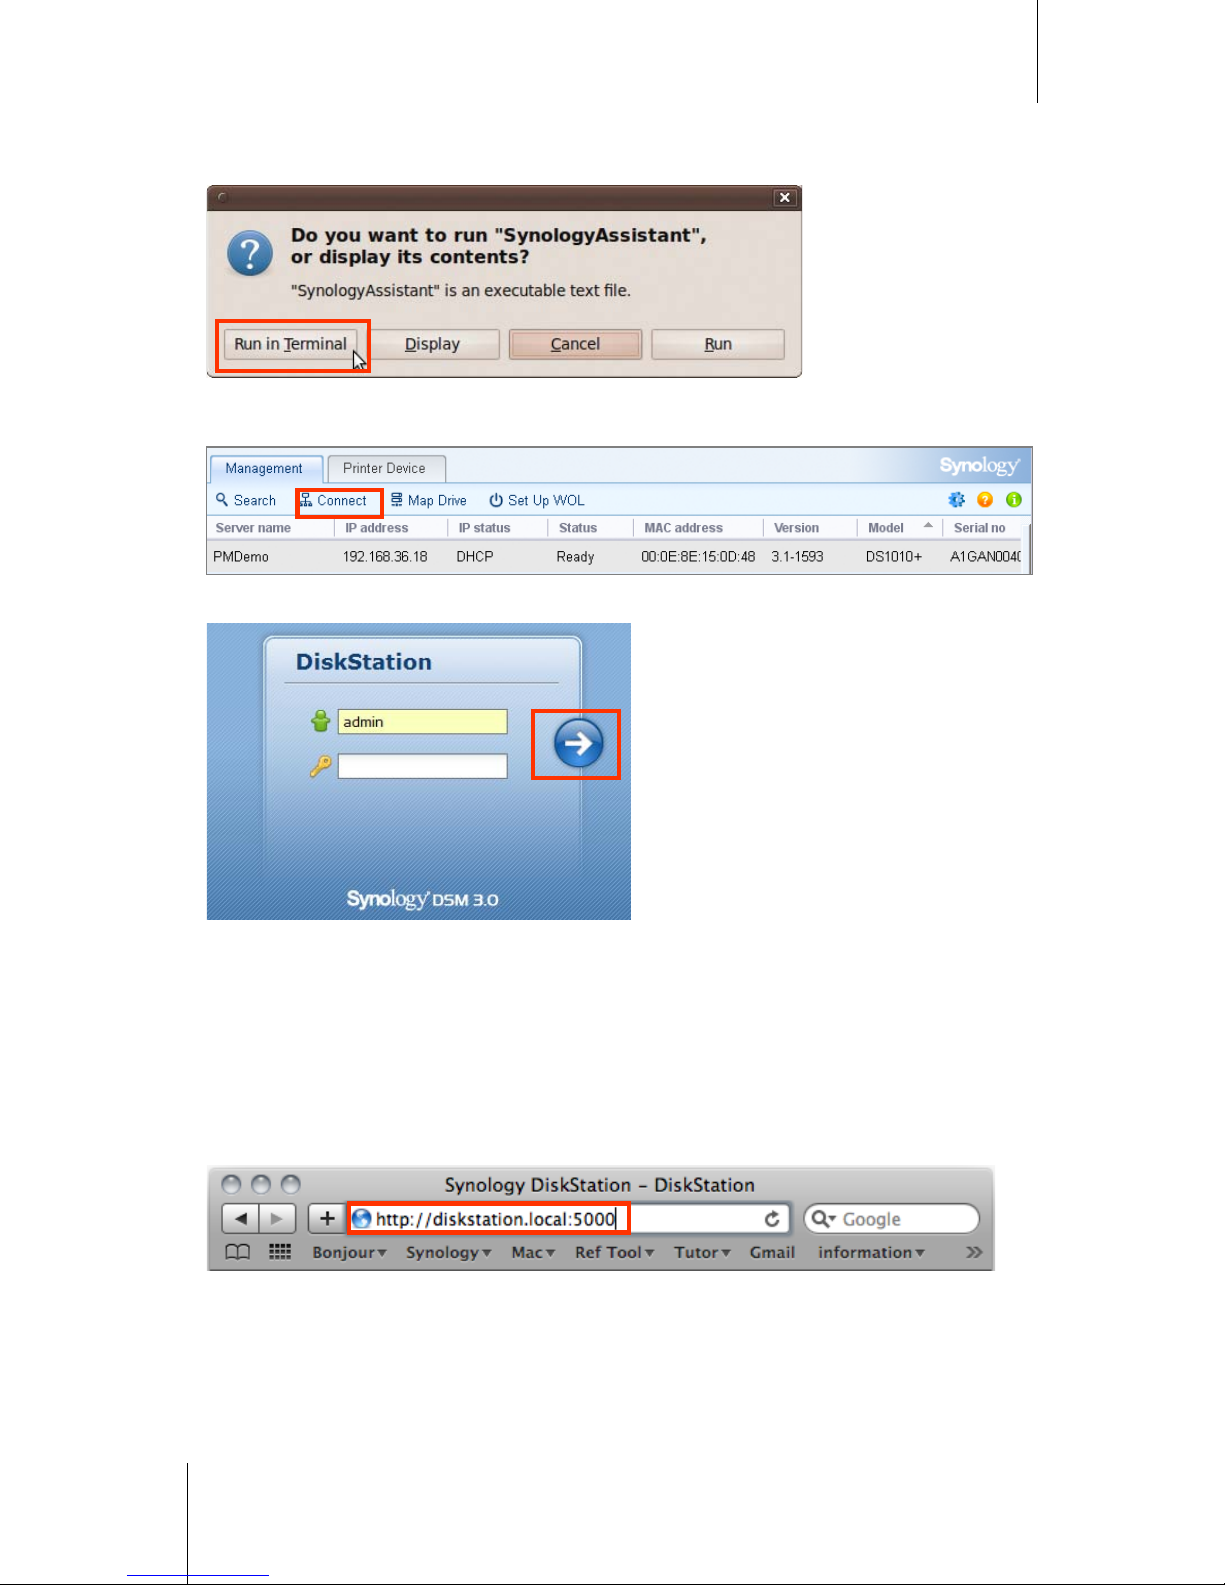
4 Go to the path /usr/local/SynologyAssistant (or [the path you just specified]/SynologyAssistant), double-
click SynologyAssistant, and then select Run in Terminal in the dialog box that appears.
5 Choose the server you want to manage. Click Connect or double-click the selected server to go to DSM's
login screen.
6 Enter your user name and password, and click Login. The default password for admin is empty.
Use a Web Browser
1 Open a web browser window.
2 In the address field, enter any of the following:
http://Synology_Server_IP:5000
http://Synology_Server_Name:5000/ (or http://Synology_Server_Name.local:5000/ on a Mac)
Synology_Server_Name should be replaced with the name you set up for Synology DiskStation during the
setup process. If you choose One-step Setup during the setup process, the Synology_Server_Name will be
DiskStation, CubeStation, USBStation, or RackStation.
3 Press Enter (PC) or Return (Mac) on your keyboard.
Page 19
Synology DiskStation User's Guide
Based on DSM 3.1
19 Chapter 2: Get Started with Synology DiskStation Manager
4 Enter your user name and password, and click Login. The default password for admin is empty.
Note: To ensure your connection to DSM runs smoothly, please use the following browsers.
Chrome: 8.0 or l ater
Firefox: 3.5 or later
Safari: 4.0 or later
Internet Explor er: 7.0 or later
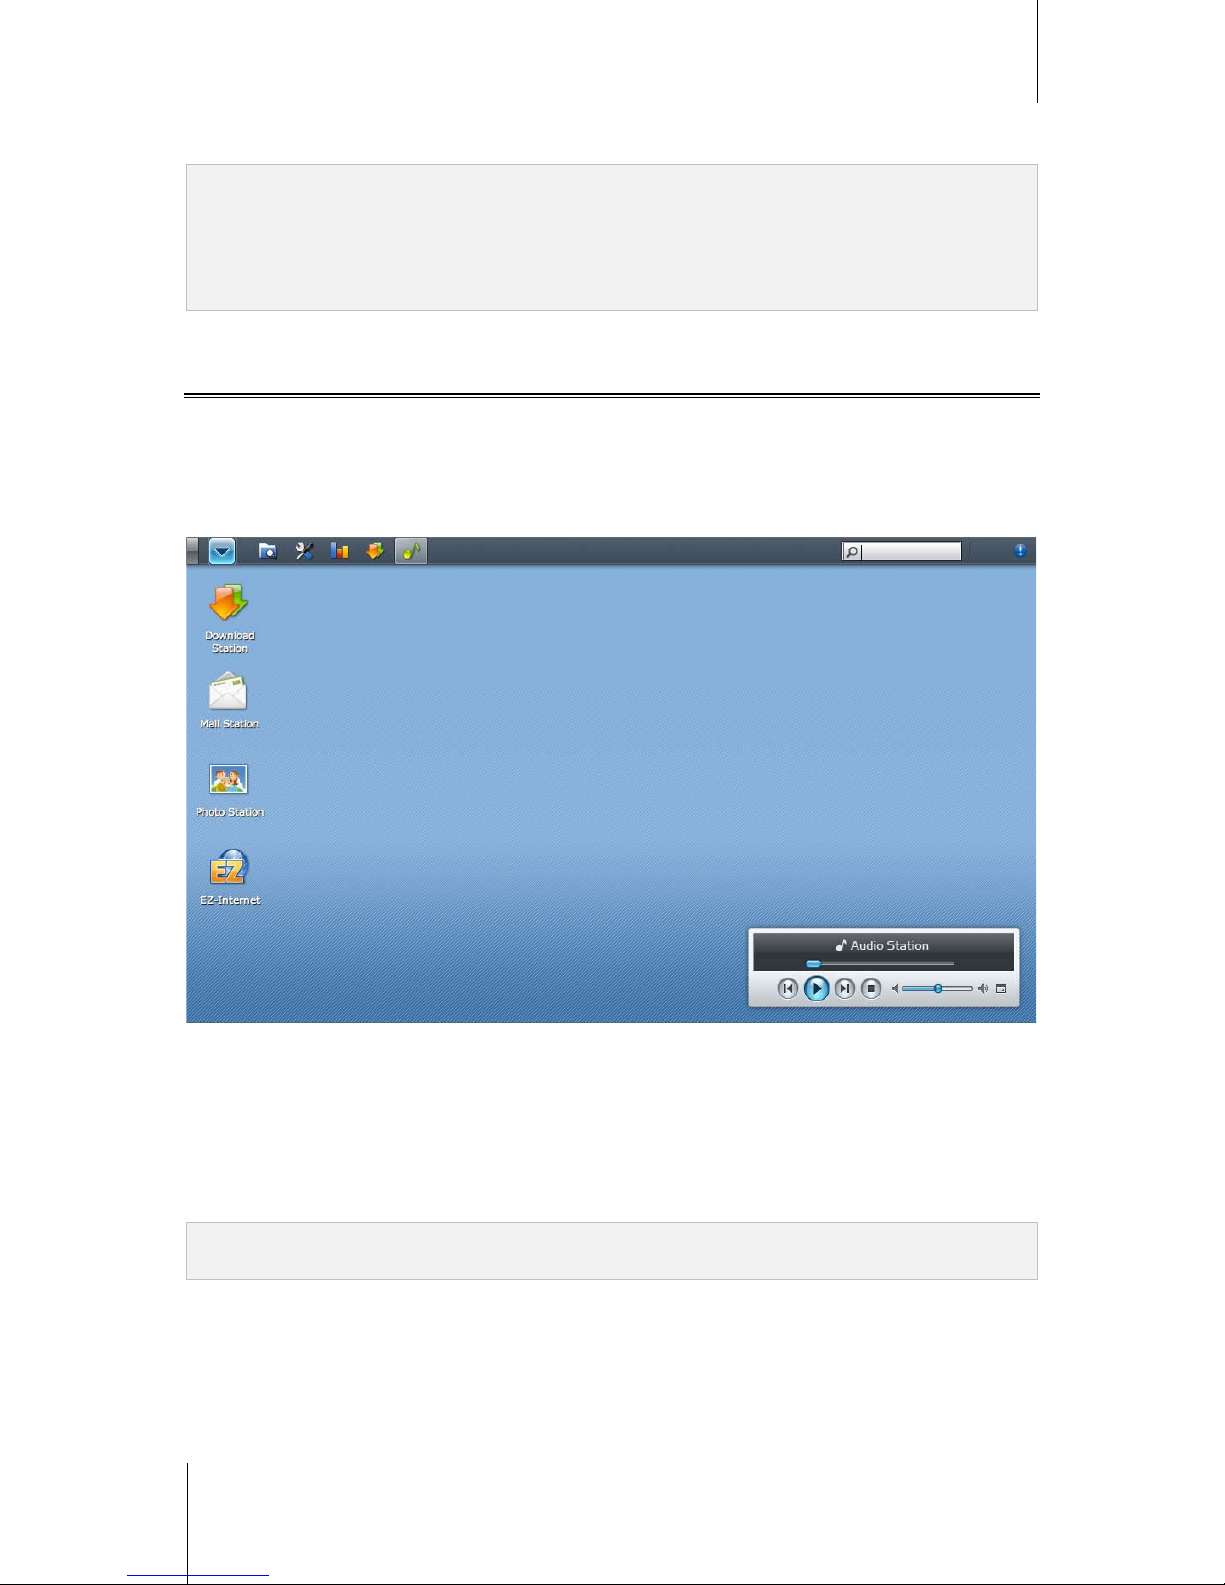
DiskStation Manager Appearance
When you log in to Synology DiskStation Manager (DSM), you can see the desktop and the taskbar.
Desktop and Shortcuts
The desktop is where your application windows are displayed. You can also create desktop shortcuts to
frequently used applications.
To create a desktop shortcut to an application:
Drag its thumbnail from the Main Menu to the desktop.
To remove a desktop shortcut to an application:
Right-click the shortcut and choose Remove shortcut.
To open Audio Station or Download Station in a new browser window:
Right-click the applications' Main Menu thumbnail or desktop shortcut and choose Open in New Window.
Note: You can also c ustomize your deskt op background color or w allpaper with the Desktop function. See "Desktop"
on Page23 for more inform ation.
Page 20

Synology DiskStation User's Guide
Based on DSM 3.1
20 Chapter 2: Get Started with Synology DiskStation Manager
Taskbar
The taskbar at the top of the desktop contains the following functions:
1 The Show Desktop button: Click to clear your application windows and reveal the desktop. Click again to
bring the windows back to the desktop. For more information about application windows, see "Open
Application Windows" on Page 21.
2 The Main Menu button: Click to reveal the Main Menu. See "Manage DSM with the Main Menu" on Page 20
for more information.
3 The icons of open applications:
Click the icon of an application to show or hide its window on the desktop.
Right-click the icon and choose from the shortcut menu to manage the application window (Maximize,
Minimize, Restore, Close) or its taskbar icon (Pin to Taskbar, Unpin from Taskbar).
4 The search field: Enter keywords to quickly find a list of relevant applications and DSM Help articles.
5 The Notification button (with an exclamation mark): Click to check the logs of important events. Click Clear
All to remove all events and hide the Notification button.
Note: For more inf ormation about sys tem log, see "Log" on Page 208.
6 The Upload Queue button: Click to open the File Task Monitor window, where you can check the progress
of all uploading and background tasks.
Manage DSM with the Main Menu
The Main Menu is where you can find all the applications and settings provided by Synology DiskStation
Manager.
Logout, Restart, and Shutdown
Click Logout, Restart, or Shutdown at the bottom-right corner of the M ain Menu to log out of DSM, restart
DiskStation, or turn it off, just like using any other operating systems.
Page 21
Synology DiskStation User's Guide
Based on DSM 3.1
21 Chapter 2: Get Started with Synology DiskStation Manager
Reorder Main Menu’s Thumbnails
Open Main Menu and drag any thumbnail to any position you want. When you see the "+" icon, release to
reposition the thumbnail.
Open Application Windows
In addition to the Control Panel, the Main Menu contains the thumbnails of all the other DSM applications. With
DSM’s multitasking ability, now you can open multiple application windows at the same time.
To open an application window:
Click any thumbnail of an application from the Main Menu to open the application window on the desktop and the
application icon on the taskbar.
Note: You can also open application windows through desktop shortcuts. See "Desktop and Shortcuts" on Page 19
for more information.
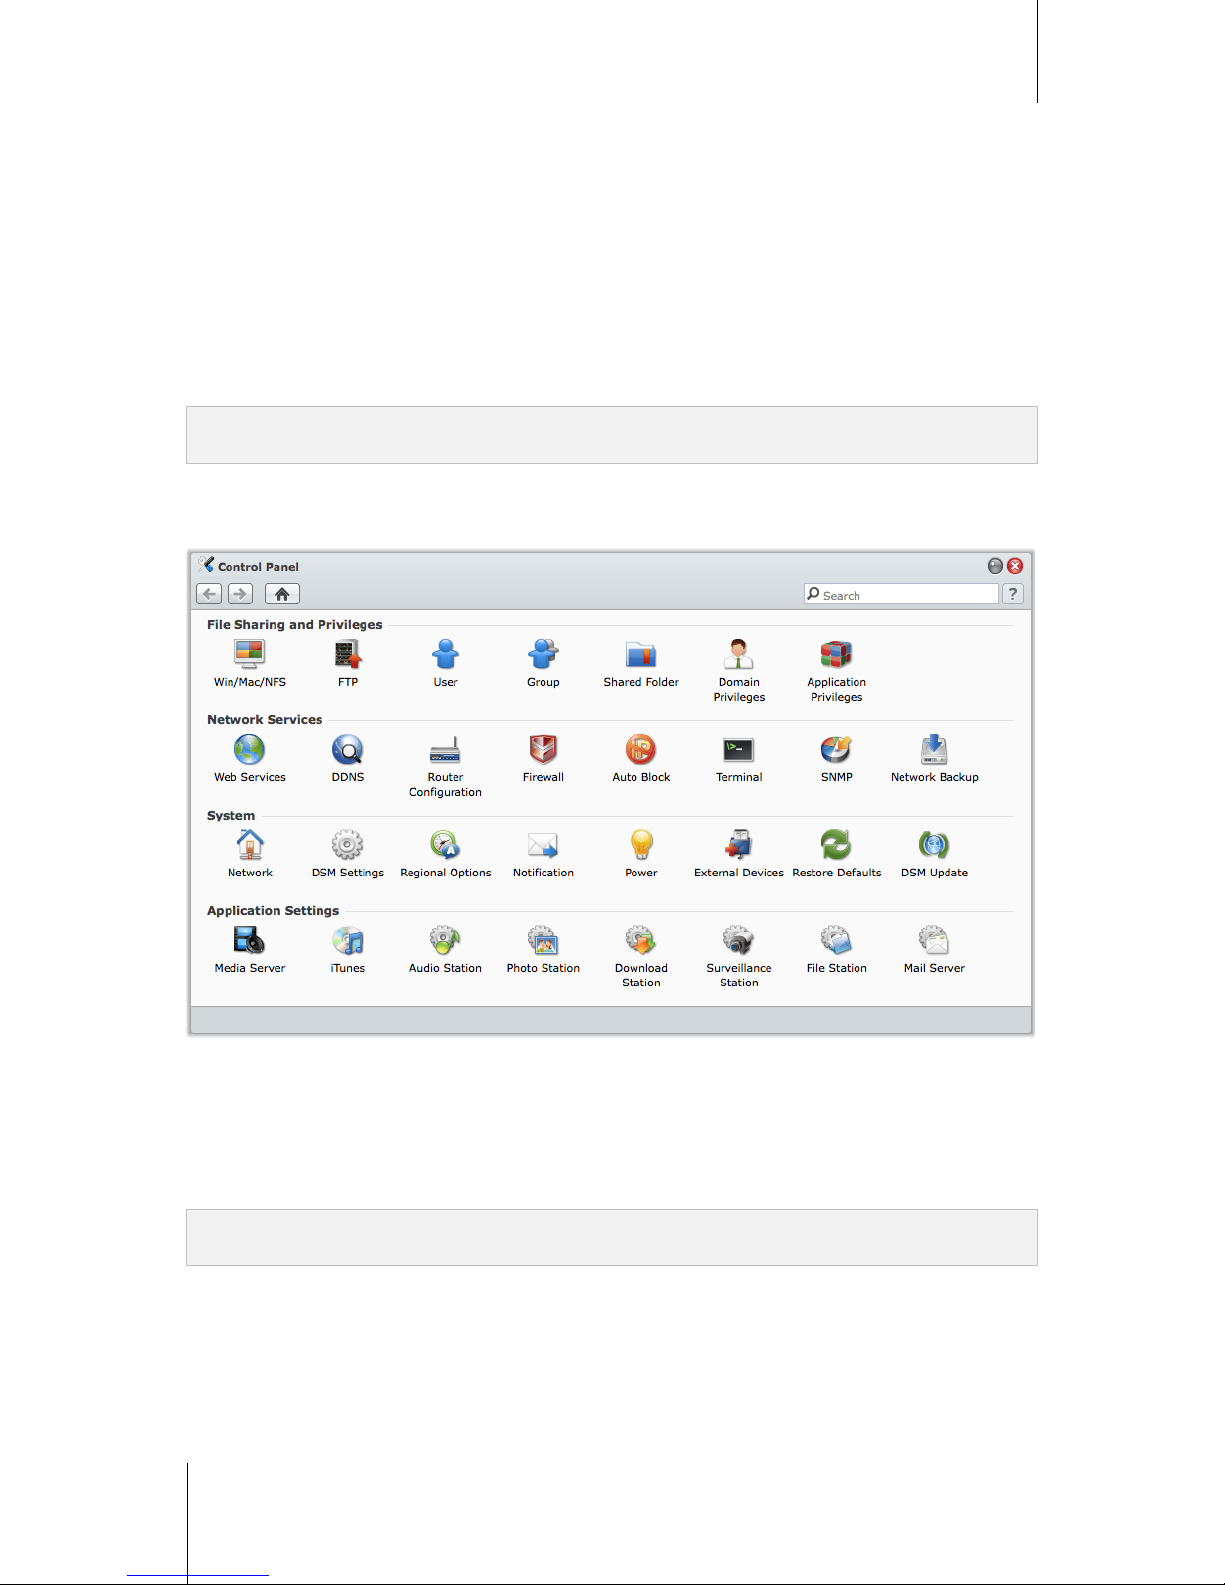
Use the Control Panel
Choose Control Panel from the Main menu to see the thumbnails of DSM settings.
The DSM settings on the Control Panel are grouped into the following categories:
File Sharing and Privileges: Set up Win/Mac/NFS/FTP file sharing service, and assign applicati on priv ileg es
for user accounts.
Network Services: Manage and edit the settings for network services and Internet conn ect i on.
System: Edit the basic settings on your DiskStation.
Application Settings: Enable the services of built-in applications.
Note: Control Panel is accessible only t o admin or users belonging to the administrators group. See "Create and
Edit Groups" on Page 77 for more information.
Page 22
Synology DiskStation User's Guide
Based on DSM 3.1
22 Chapter 2: Get Started with Synology DiskStation Manager
Manage Personal Options
Click the Options button at the top-right corner of Main Menu to manage the following options for your DSM user
account.
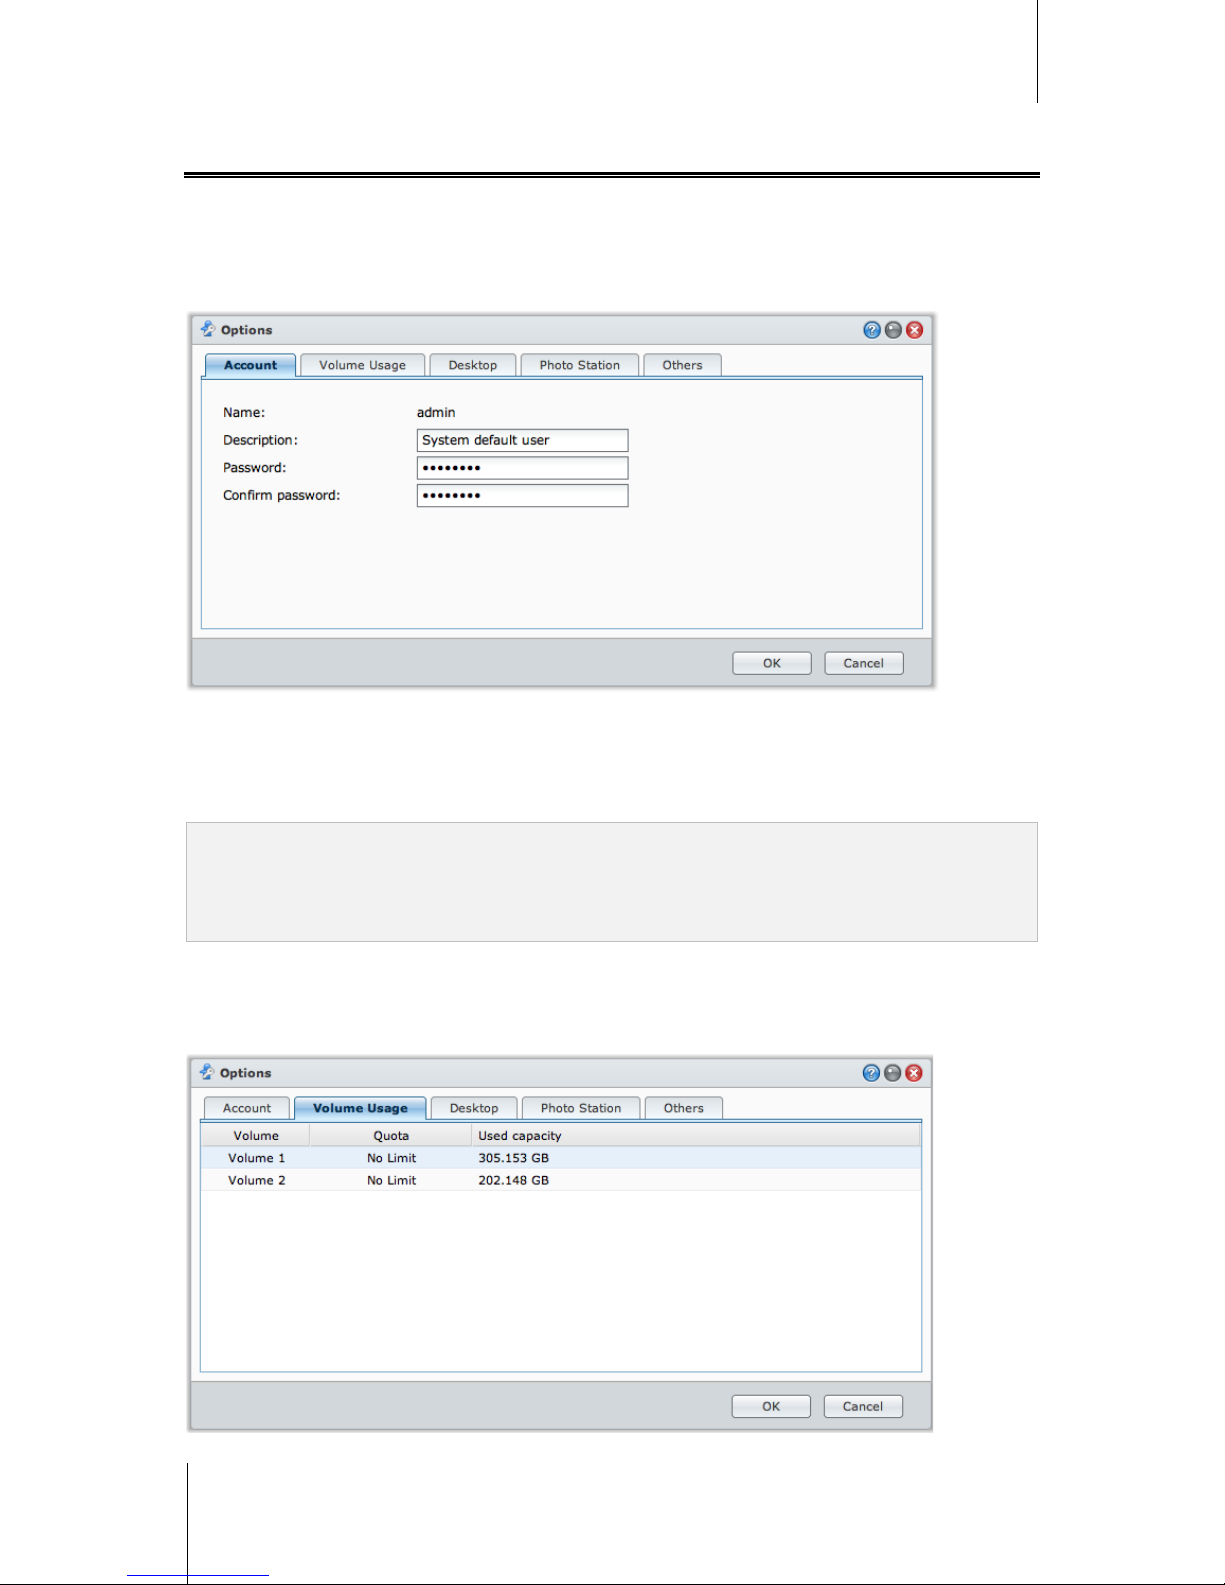
Account
Under Account, you can change your account's password and description.
To modify your account:
1 Enter a description for your account (optional).
2 If you want to change your account's password, enter the new one and confirm it.
3 Click OK.
Limitations:
The user description is case sensitive and can be 0 to 64 dis playable Unicode characters.
The passw ord is case sensiti ve and should be 0 to 127 displayable characters, including letters , numbers, signs,
and space.
Volume Usage
Under Volume Usage, you can view your quota on all DiskStation volumes set by admin, as well as the amount
of capacity you have used on each volum e.
Page 23

Synology DiskStation User's Guide
Based on DSM 3.1
23 Chapter 2: Get Started with Synology DiskStation Manager
Desktop
Under Desktop, you can customize desktop background color or wallpaper.
To choose a background color for your desktop:
1 Tick Customize Wallpaper.
2 Choose a color from the Background color drop-down menu, or enter your own color value.
3 Click OK.
To upload a customized image that will be used as your desktop wallpaper:
1 Tick Customize Wallpaper and then tick Customize image.
2 Click Select image to upload an image that will be used as your DSM's desktop wallpaper. In the dialog that
opens, do the following and then click OK:
a Select an image located on DiskStation or your computer.
b If you want to resize the image to a certain width or height, enter the values in the Scale to fit field.
Note: The maximum length must be less than 3280 pixels .
3 If you want to repeat your desktop wallpaper horizontally or vertically, tick Horizontal repeat or Vertical
repeat.
4 If you want to adjust the alignment of your desktop wallpaper, choose the options from the Background
alignment drop-down menu.
5 Click OK.
Page 24
Synology DiskStation User's Guide
Based on DSM 3.1
24 Chapter 2: Get Started with Synology DiskStation Manager
Photo Station
This tab is viewable only when DSM admin or users belonging to the administrators group enable Personal
Photo Station service. See "Enable Personal Photo Station" on Page 131 for more information.
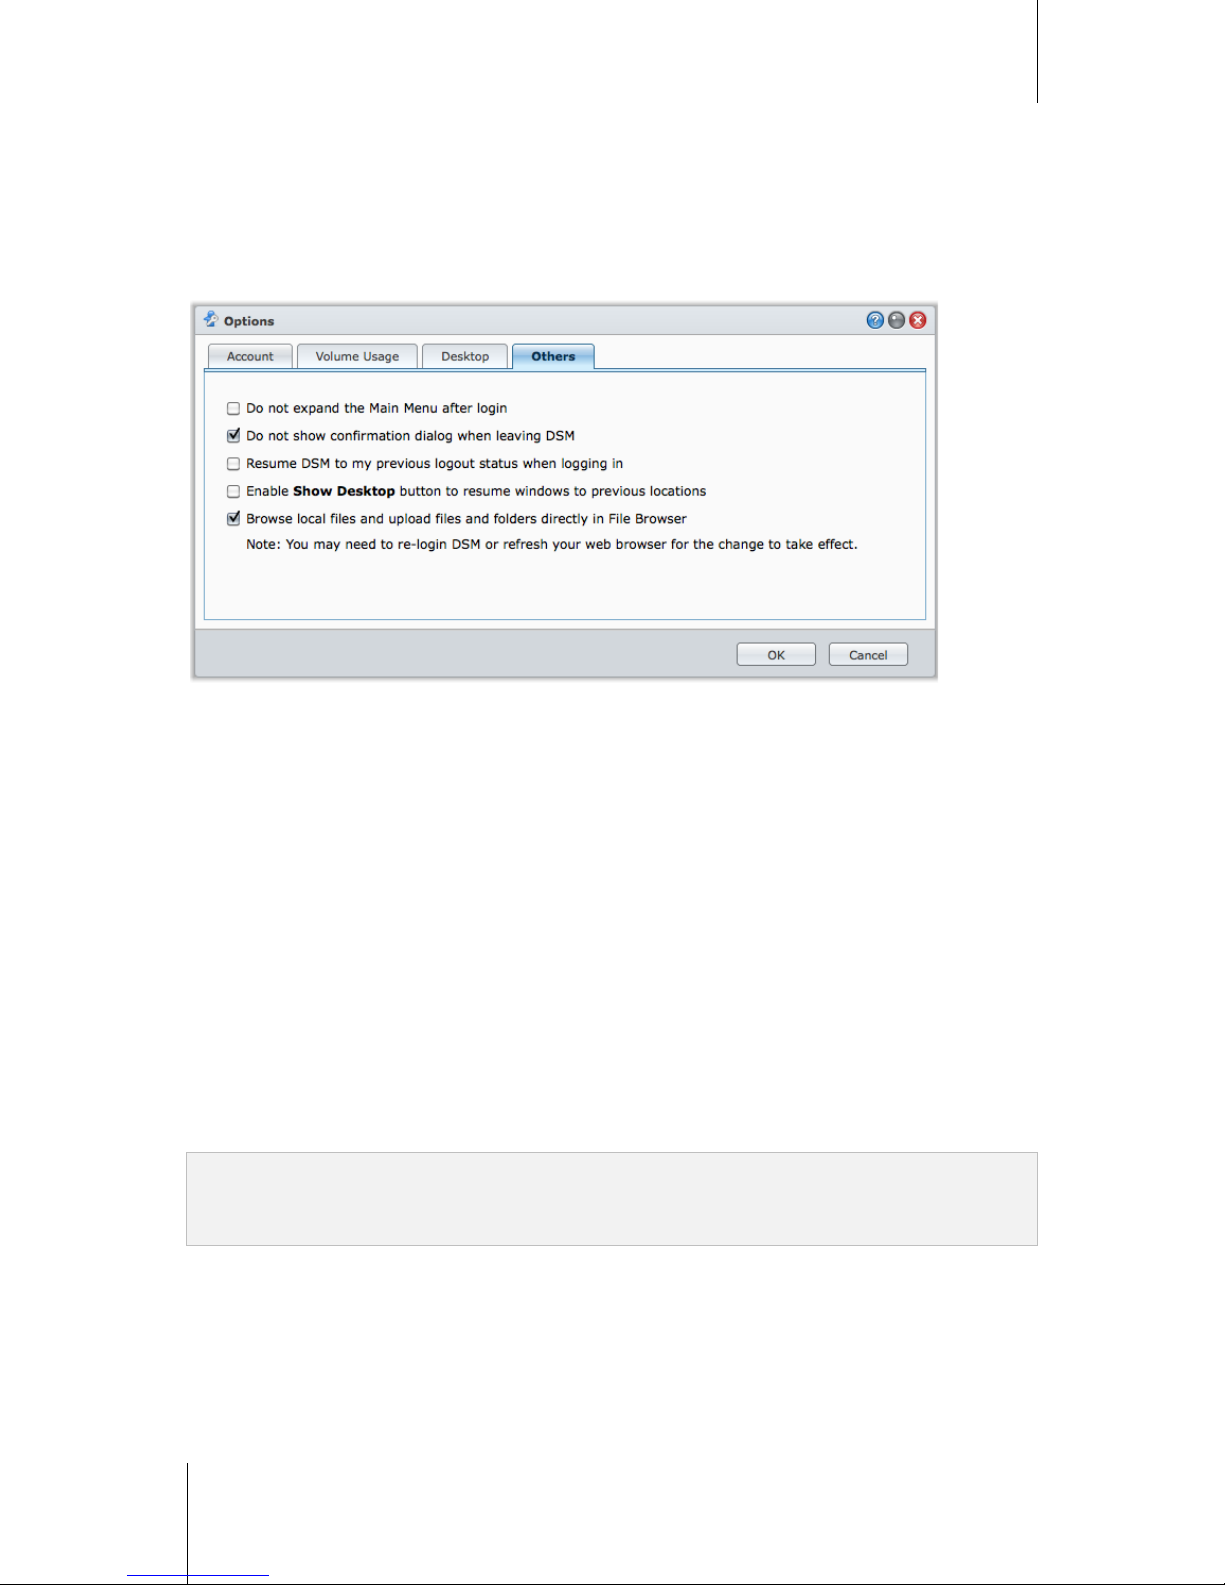
Others
Under Others, You can customize other personal options.
To decide whether to expand the application after login:
1 Tick Do not expand the Main Menu after login.
2 Click OK.
To skip the confirmation dialog when closing the browser window:
1 Tick Don't show confirmation dialog when leaving DSM.
2 Click OK.
To remember opened windows and restore them after the next login:
1 Tick Resume DSM to previous logout status when logging in.
2 Click OK.
To enable the Show Desktop button to restore windows after the windows are hidden:
1 Tick Enable Show Desktop button to resume windows to previous locations.
2 Click OK.
To browse computer files with File Browser:
1 Tick Browse local files and upload files and folders directly in File Browser.
2 Click OK.
Note:
Enabling this option allows you upload folders in Fil e B rowser.
Browsing l ocal files is not supported by Opera and Safari for Windows.
Page 25
25
Chapter
3
Chapter 3: Modify System Settings
After you have connected to Synology DiskStation Manager (DSM) and learned how to access its functions and
customize its appearance, you as admin or a user belonging to the administrators group can begin to modify its
basic settings.
This chapter explains how to change the network settings, specify default languages, set up time, and use energy
saving features.
Change DSM Settings
Go to Main Menu > Control Panel > DSM Settings to change the following DSM settings.
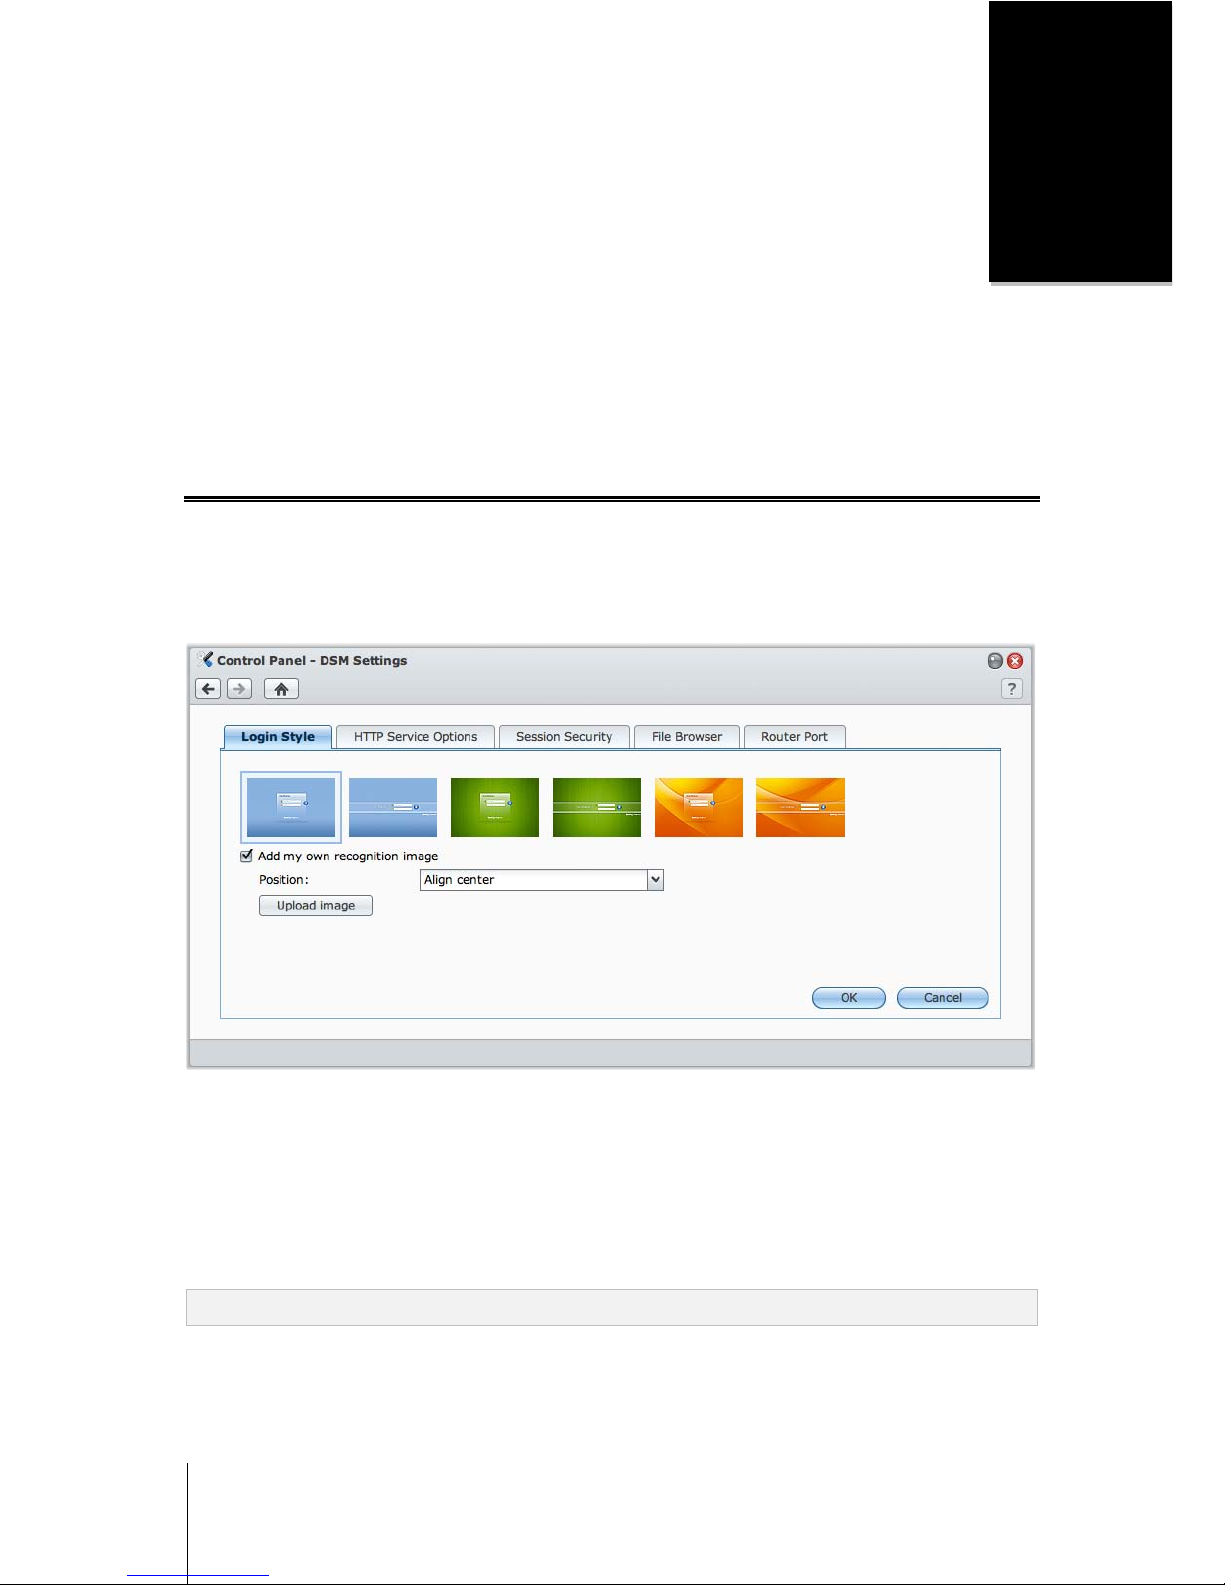
Login Style
Click the Login Style tab to modify the layout of DSM’s login screen. You can also upload customized image file
to show on the login page.
To change the style of login page:
There are 2 styles, both in 3 colors for you to choose from. Choose the style you like and click OK.
To display your own recognition image on the login page:
1 Tick Add my own recognition image.
2 Choose the position of the image.
3 Click Upload image button and choose the image file you want to use as your recognition image.
4 Click OK.
Note: The size of the image file must be l ess than 1 MB.
Page 26
Synology DiskStation User's Guide
Based on DSM 3.1
26 Chapter 3: Modify System Settings
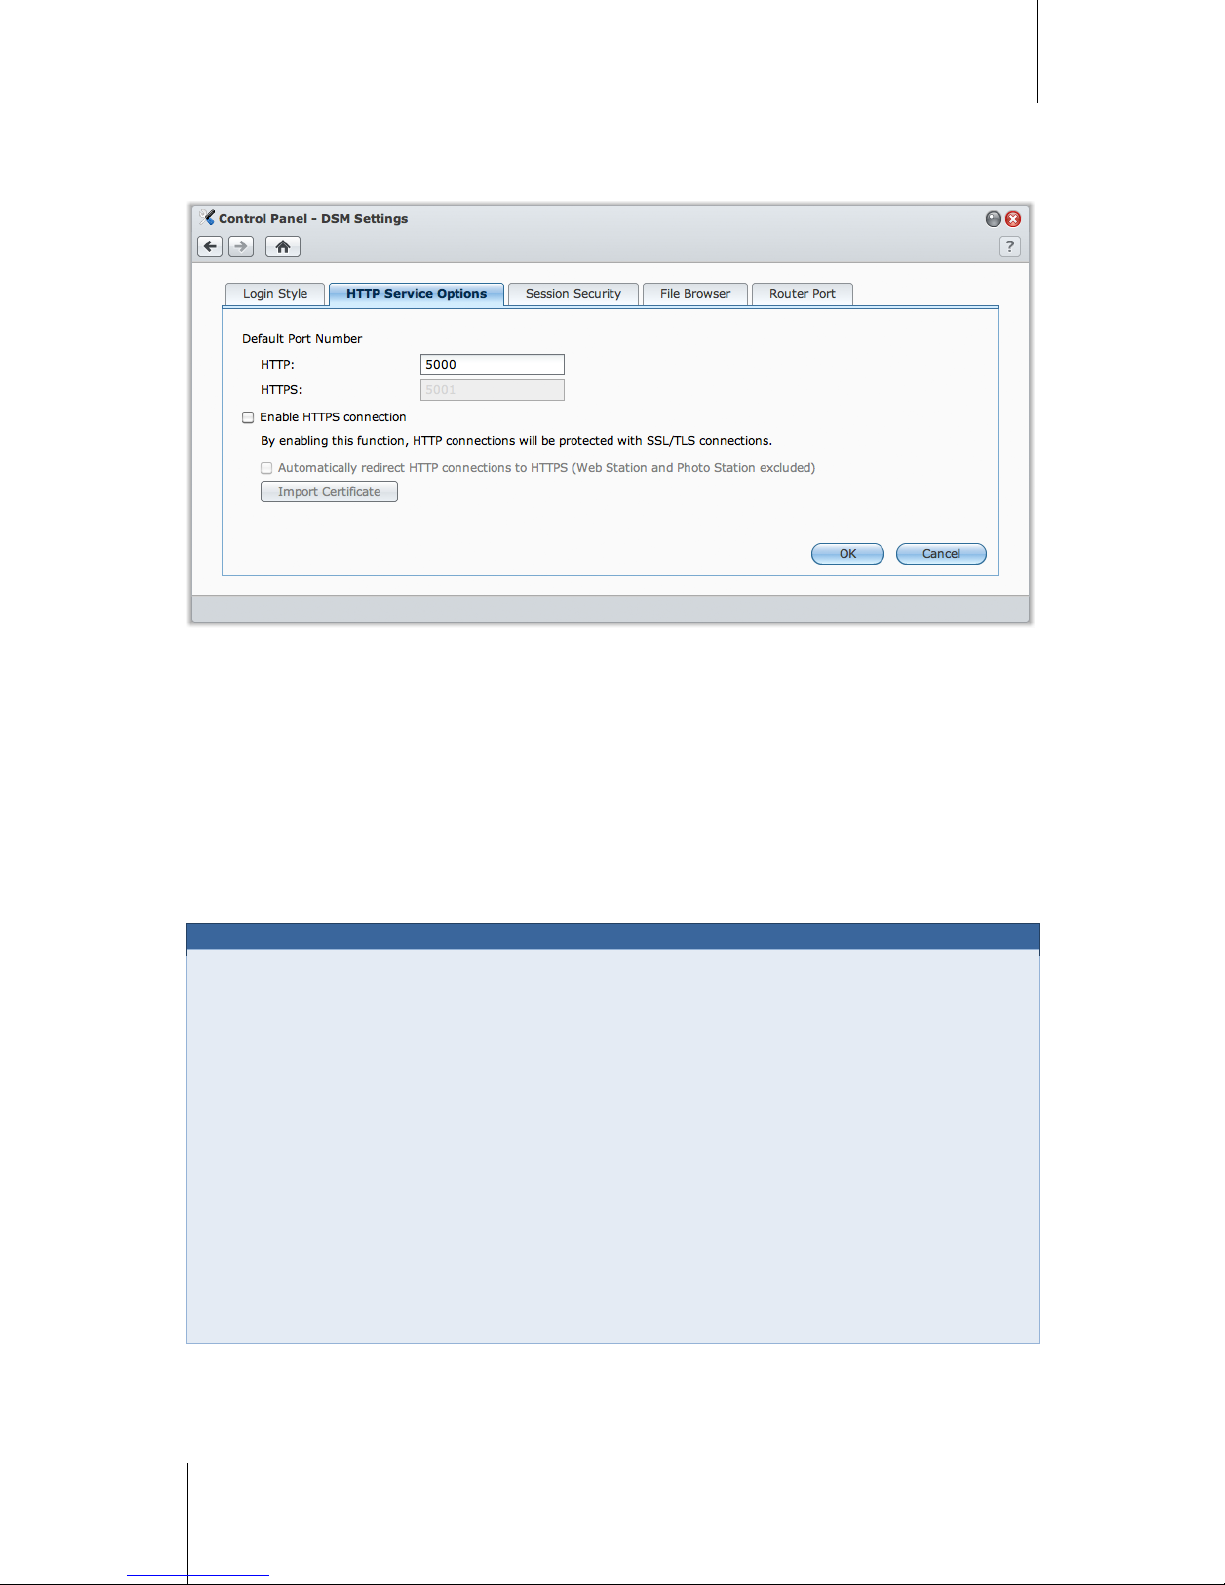
HTTP Service Options
Click the HTTP Service Options tab to change the port number or enable HTTPS connection.
To change the default HTTP or HTTPS port number (for DSM and Audio Station):
1 Enter the port number in the HTTP or HTTPS field.
2 Click OK.
To enable HTTPS connection:
1 Tick Enable HTTPS connection.
2 Click the optional Import Certificate or check Automatically redirect HTTP connections to HTTPS. (See
the section below for more information.)
3 Click OK.
When the HTTPS connection is enabled, any connection to Synology DiskStation via the HTTP protocol will be
encrypted with the SSL/TLS encrypting mechanism.
More Information
About redirecting to HTTPS connection:
When the option Automatically redirect HTTP connections to HTTPS is checked, you will be redirected to
port 5001 while trying to access the web management UI through port 5000.
Ports used for HTTPS connection:
DSM: The port number is 5001, so you can access the management UI through the secure channel:
https://Synology_Server_IP:5001/
Web Station: The port number is 443, so you can access Web Station through the secure channel:
https://Synology_Server_IP:443/ or https://Synology_Server_Name:443/
Photo Station: The port number is 443, so you can access Photo Station through the secure channel:
https://Synology_Server_IP:443/photo/ or https://Synology_Server_Name:443/photo/
About importing certificate:
If you have a certificate issued by the trusted Certificate Authority (CA), please click Import Certificate to
upload your own certificate and private key in order to host a valid SSL server. The certificate should match the
private key. Please keep your private key safely.
Page 27
Synology DiskStation User's Guide
Based on DSM 3.1
27 Chapter 3: Modify System Settings
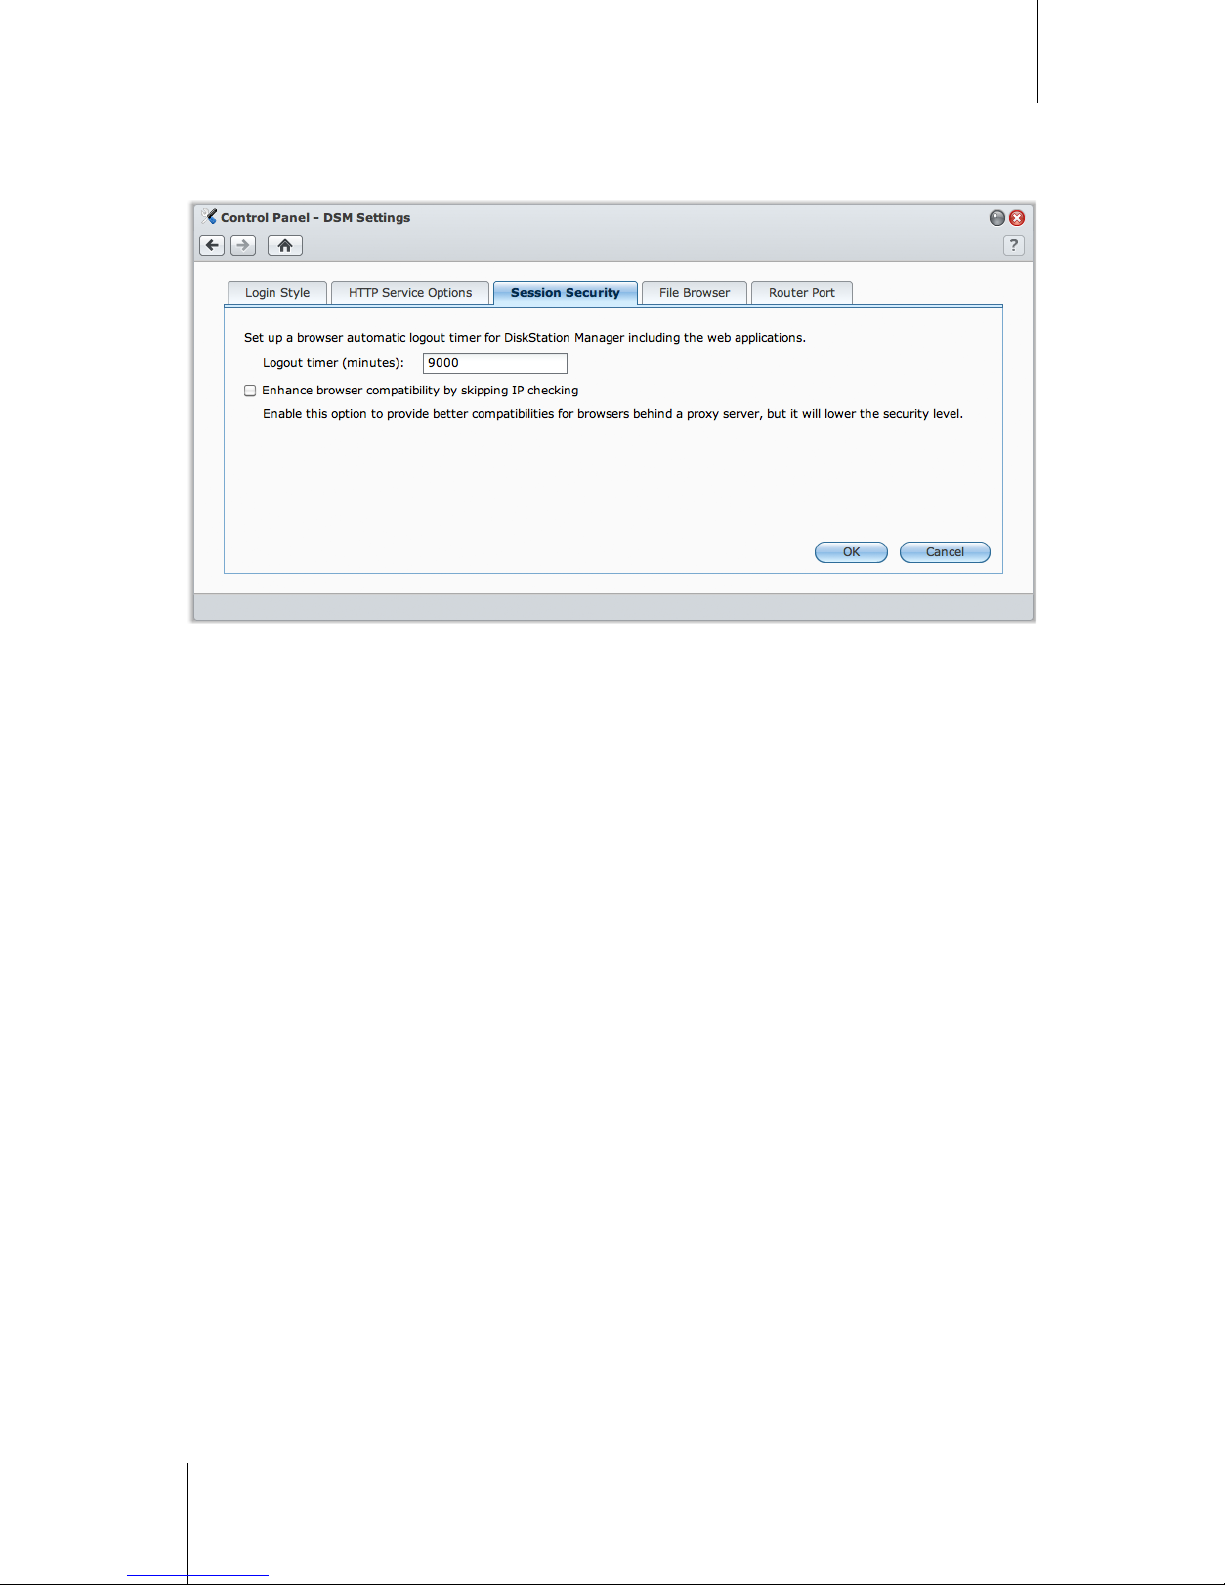
Session Security
Click the Session Security tab to modify the security level for each DSM browsing session.
To set the logout timer:
1 Enter any value between 1 to 65535 in Logout timer (minutes) to specify the idle time period before the
automatic logout.
2 Click OK.
An automatic logout occurs if you are inactive for the specified time period.
To skip IP checking:
1 Tick Enhance browser compatibility by skipping IP checking.
2 Click OK.
If you access DiskStation through a HTTP proxy and encounter random logouts, you can skip IP checking to
avoid this problem. Nonetheless, skipping IP checking will lower the security level.
Page 28

Synology DiskStation User's Guide
Based on DSM 3.1
28 Chapter 3: Modify System Settings
Enable File Browser log
Click the File Browser tab to start monitoring the File Browser activities of all users, including Upload,
Download, Delete, Rename, Move, Copy and Property set.
Note: For more inf ormation about File Browser, see "Access Files via File Browser" on Page 94.
To enable File Browser log:
1 Tick Enable File Browser log.
2 Click OK.
To see the File Browser log:
Click View Logs.
Note: For more inf ormation about sys tem logs, see "Log" on Page 208.
Page 29
Synology DiskStation User's Guide
Based on DSM 3.1
29 Chapter 3: Modify System Settings
Change Network Settings
Go to Main Menu > Control Panel > Network to modify the following network settings of your
Synology DiskStation.
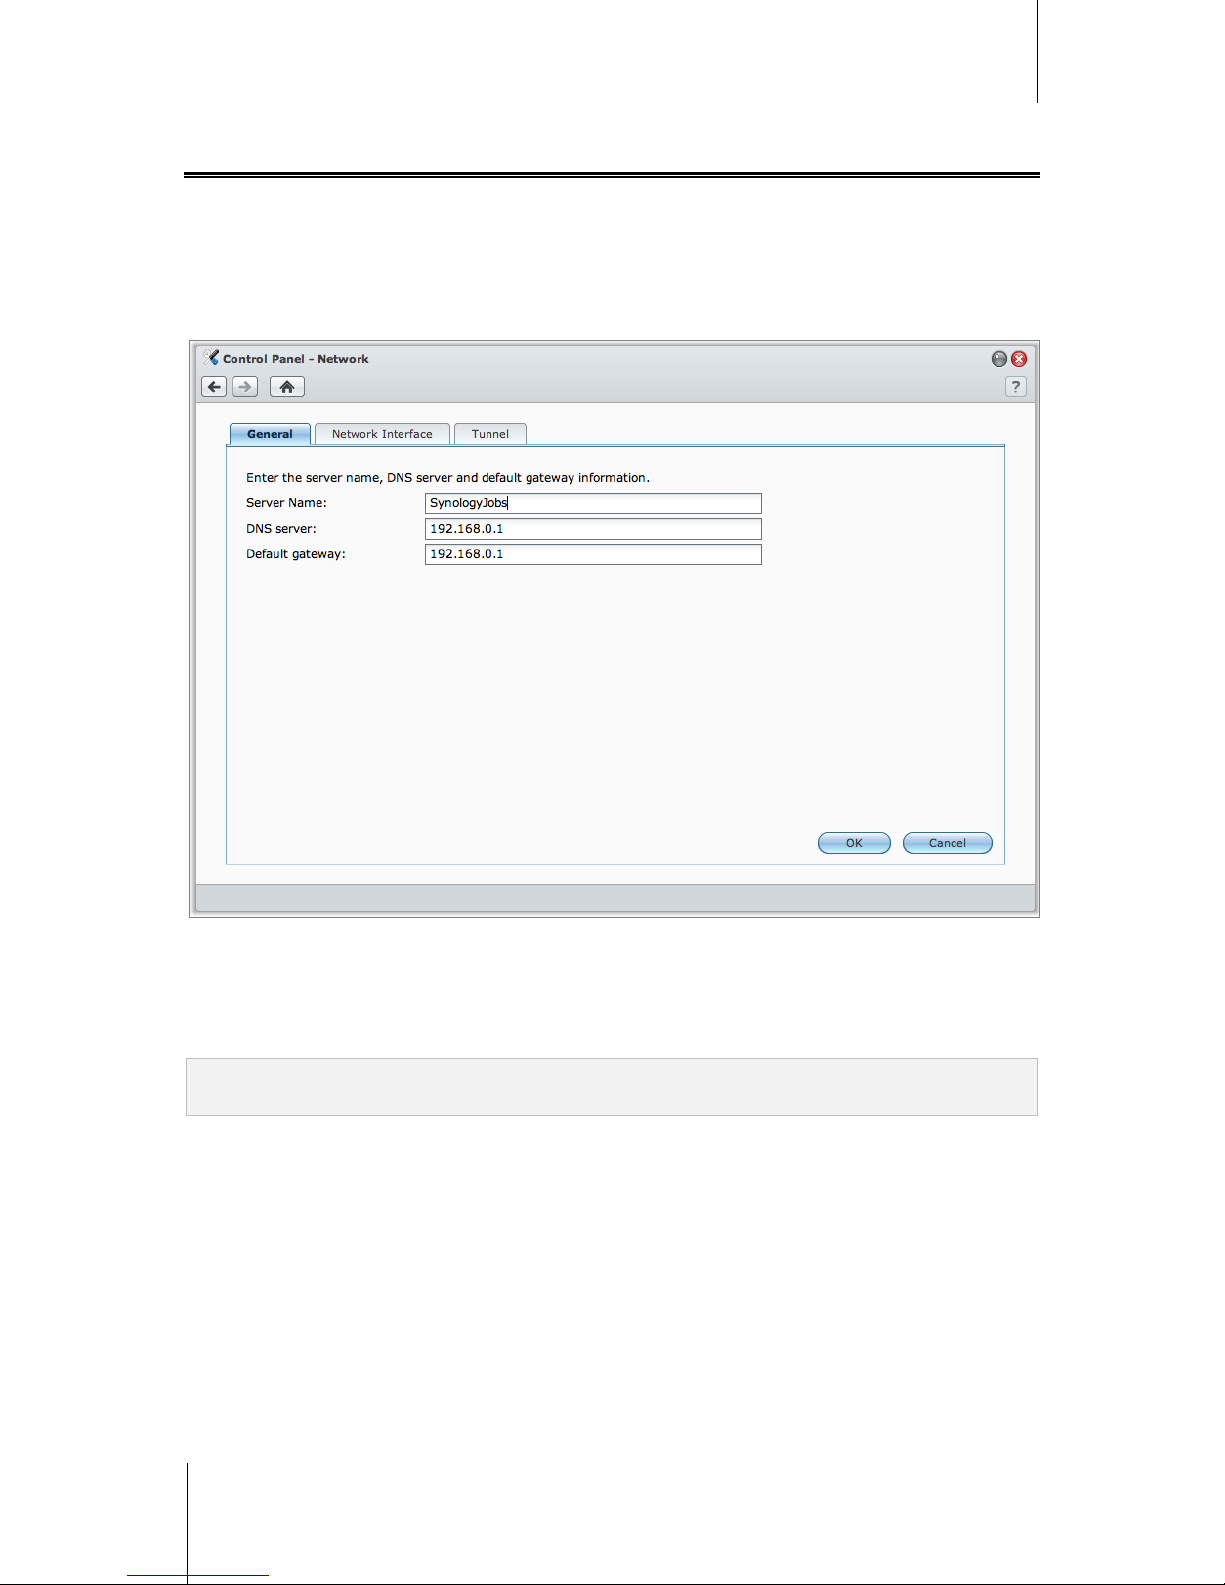
General
In this section, you can change your DiskStation identification on the network by entering a server name. You can
also set up the domain name server and default gateway here.
To rename DiskStation:
Enter the new server name in the Server Name field, and click OK.
To set up domain name server and default gateway:
Enter the IP address in the DNS server and Default gateway fields, and click OK.
Note: The DNS Server and Default Gateway fields will not be available for modification if all of your network
interfaces ar e configured automatically, or if your DiskStation is connected to the Internet vi a PPPoE.
Page 30
Synology DiskStation User's Guide
Based on DSM 3.1
30 Chapter 3: Modify System Settings
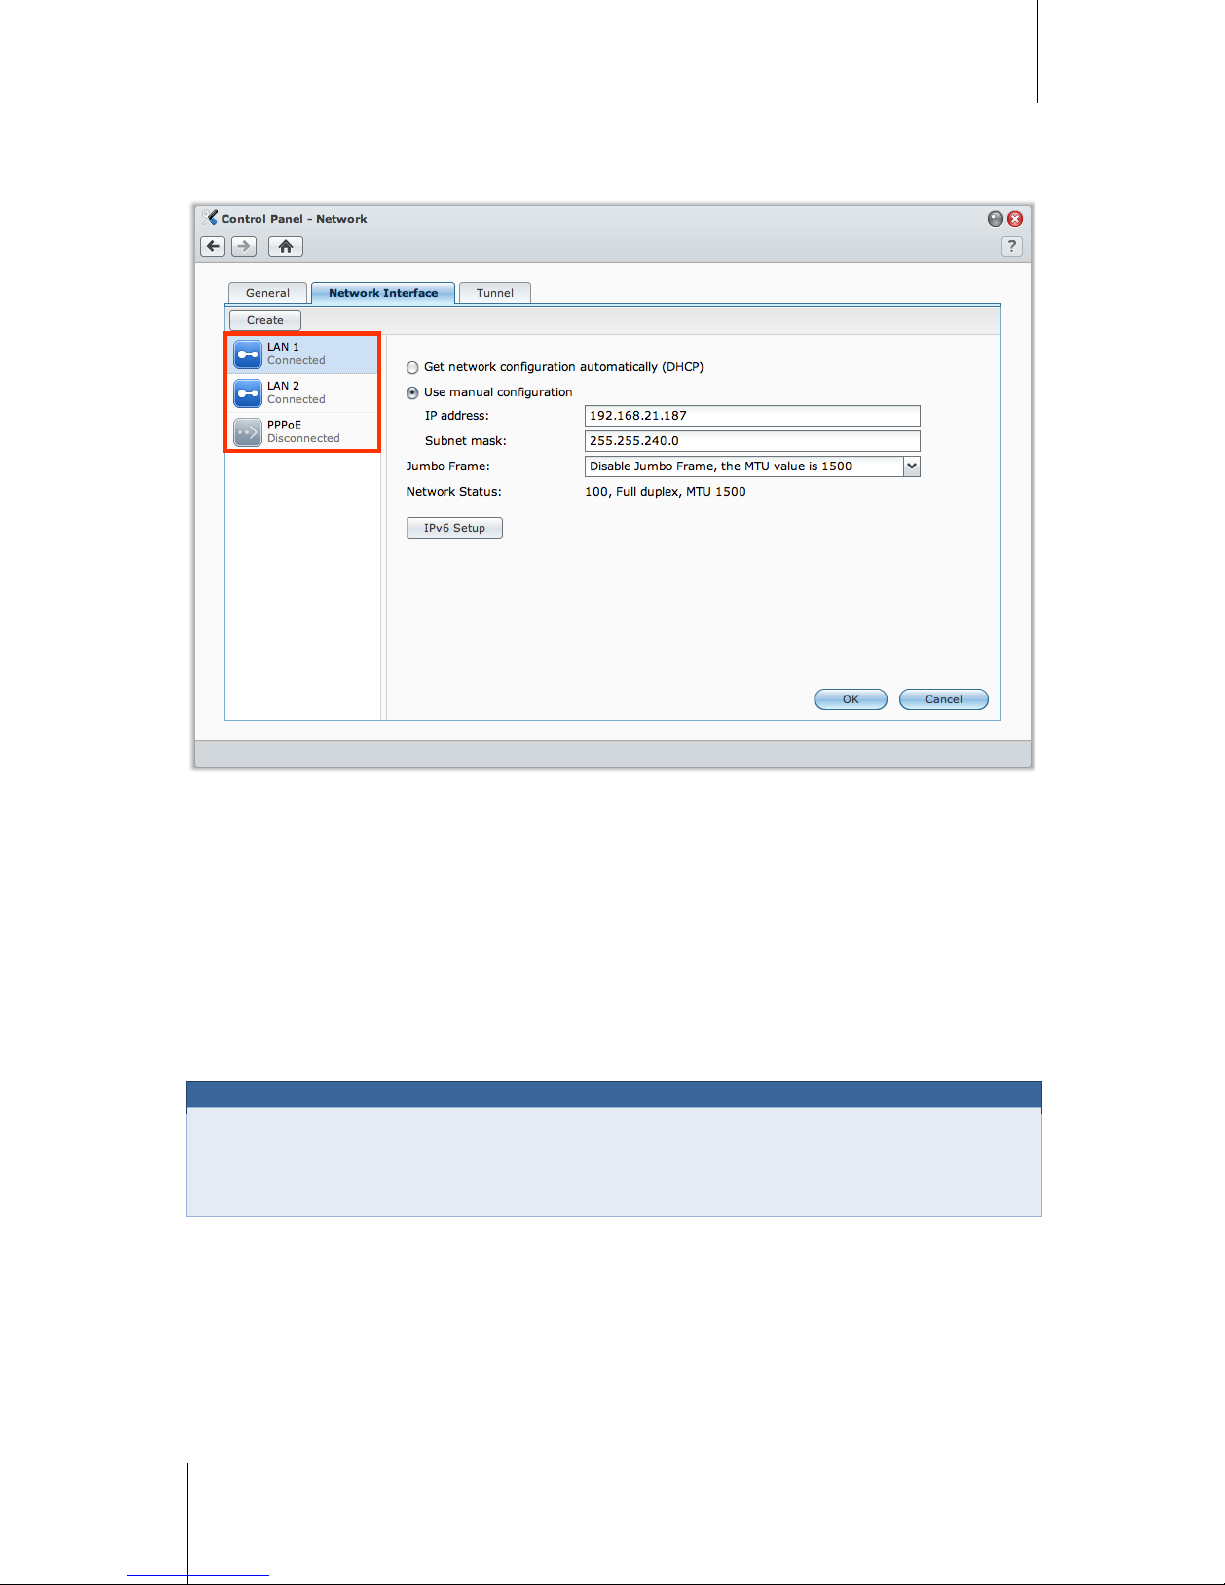
Network Interface
In this section, you can connect your DiskStation to the network via any of the following network interfaces.
LAN
If your DiskStation is connected to a local area network, you can click LAN or LAN [number] (for DiskStations
with multiple LAN ports) on the left side to configure the network interface.
To decide how your DiskStation obtains IP address:
1 Choose either of the following:
Get network configuration automatically (DHCP): Get IP address automatically via DHCP.
Use manual configuration: Manually enter the IP address, subnet mask, DNS, and gateway.
2 Click OK.
To set up IPv6:
Click IPv6 Setup. See "IPv6 Setup" on Page 33 for more information.
Term Explanation
Jumbo Frames: Jumbo Frames are Ethernet frames with more than the standard 1500 bytes of Maximum
Transmission Unit (MTU), allowing Ethernet transmission of large files to be more efficient. It can only be
enabled under Gigabit network environment. To ensure Jumbo Frame works properly, all the computers and
devices across the network accessing your DiskStation must support it and use the same MTU value.
Page 31

Synology DiskStation User's Guide
Based on DSM 3.1
31 Chapter 3: Modify System Settings
Bond
For DiskStations with multiple LAN ports, you can combine multiple LAN interfaces into the Bond [number]
interface with Link Aggregation
1
. You can configure this interface as you would with any LAN interface.
To combine multiple LAN interfaces with Link Aggregation:
1 Click Create.
2 Choose any of the following modes and click Next:
Note: Before you ena ble Link Aggregation, please make sure all LAN cables are connected to the same switch.
IEEE 802.3ad Dynamic Link Aggregation: IEEE 802.3ad is the standard for most Link Aggregation
implementations. A switch with 802.3ad support is required to use in this mode.
Network Fault Tolerance only: If the LAN 1 port becomes unavailable, the system will use LAN 2 to
provide service. You can select this option if your switch does not support IEEE 802.3ad.
3 Select two or more LAN interfaces that will be used for Link Aggregation, and click Next.
4 Configure the network settings and click Apply.
To separate the Bond interface into multiple LAN interfaces:
1 Click the Bond [number] int er face on the left side.
2 Click Remove and then click OK.
Term Explanation
Link Aggregation: For DiskStation with multiple LAN ports, you can set your DiskStation to connect multiple
LAN cables to the network at the same time, or assign it with two IP addresses under different subnets. With
Link Aggregation enabled, trunking (combining network bandwidth of aggregated LAN interfaces for multiplied
connection speed) and network fault tolerances (maintaining network connection when any of the aggregated
LAN interfaces is unavailable) are supported.
---------
1
Link Aggregation is only supported on DiskStations with multiple LAN ports.
Page 32

Synology DiskStation User's Guide
Based on DSM 3.1
32 Chapter 3: Modify System Settings
Wirel ess Netw ork
Click Wireless Network on the left side to connect Synology DiskStation to a wireless network.
1
Note: Wireless network is available only when a wireless dongle is plugged i nto the USB port of your S ynology
DiskStation.
To set up a wireless network:
Click Set up a wireless network and choose from the following options (If you are already connected to a
wireless network, click Disconnect first).
Join a wireless network: The wizard will scan available wireless access points or Ad-Hoc networks with their
signal strength and security status. If the access point you want to access is locked with password protection,
the wizard will ask you to enter the password.
Connect to a hidden wireless network: If an access point doesn't broadcast its SSID (Network Name) for
privacy reason, it will not be discovered during the scanning. You can manually connect to those hidden
access points by entering the required information manually.
Create an Ad-Hoc Network: In addition to infrastructure network, in which a central access point (AP) bridges
the wireless network to a wired Ethernet network, Ad-Hoc network is also widely used. In an Ad-Hoc network,
all wireless devices within range of each other can communicate in a peer-to-peer fashion without a central
access point. To set up an Ad-Hoc network, all wireless devices have to be configured for Ad-H oc mode
instead of the infrastructure mode.
Note: For a list of compatible wireless dongles, visit www.synology.com.
---------
1
Wireless network is supported on specific models only.
Page 33

Synology DiskStation User's Guide
Based on DSM 3.1
33 Chapter 3: Modif y System Settings
IPv6 Setup
When you are configuring the LAN or Wireless Network interface, click the IPv6 Setup button to change the
IPv6 settings.
Synology DiskStation supports IPv4/IPv6 dual stack scheme. This means that both IPv4 and IPv6 can work
simultaneously on Synology DiskStation. The default setting for IPv6 is Auto.
1
On the IPv6 Setup page, choose between the different setup types:
Auto: DiskStation will automatically generate a local IPv6 address. This is generated based on DiskStation's
MAC address.
DHCP: DiskStation will automatically get an IPv6 address from the DHCP server which supports IPv6.
Manual: Set up IPv6 manually by entering IPv6 address, Prefix length, and Default gateway.
Off: Disable IPv6 support.
Note: If you want to joi n an IPv4 network envi ronment with IPv6 address, you need to enable IPv6 Tunnel. See the
section below for m ore information.
---------
1
IPv6 service is only supported on 08-series models or later (excluding 108j, 109j).
Page 34

Synology DiskStation User's Guide
Based on DSM 3.1
34 Chapter 3: Modify System Settings
PPPoE
Click the PPPoE on the left side if your Synology DiskStation is connecting to a DSL or cable modem, and your
Internet Service Provider (ISP) uses PPPoE (Point to Point Protocol over Ethernet).
To connect to the Internet via PPPoE:
1 Click PPPoE Setting.
2 Enter the account information provided by your ISP.
3 Click OK.
Note: If you are still facing connection problems, contact your Internet Service Provider.
Page 35

Synology DiskStation User's Guide
Based on DSM 3.1
35 Chapter 3: Modify System Settings
Tunnel
Tunnel is a technique that encapsulates IPv6 packets within IPv4 packets, allowing isolated IPv6 host or network
to be compatible with IPv4 network backbone.
Click the Tunnel tab to allow your DiskStation to gain Internet access via IPv6 under the IPv4 environment.
To setup IPv6 Tunnel:
1 Tick Enable tunnel.
2 In Server address, enter the hostname or the IP of the tunnel service provider .
3 Select if you want to Conn ect anonymously or Connect with an existing account. If you choose the latter,
please also enter User name and Password.
4 Click OK to save the settings.
Note:
Your extern al IPv6 address may be aut om atically updated b y the service provider. However, Synology DiskStation
will not remove the old IPv6 address immediately.
If you are still facing connection problems, contact your Internet Service Provider.
Page 36

Synology DiskStation User's Guide
Based on DSM 3.1
36 Chapter 3: Modify System Settings
Modify Regional Options
Go to Main Menu > Control Panel > Regional Options to configure the following regional options.
Language
Click the Language tab to set the language for Synology DiskStation Manager, em ail noti fi cati on, and spe cify the
codepage for Unicode filename conversion.
Display Language: Choose your preferred display language, or have it the same as your default browser
setting.
Email Language: Set your preferred language for email notification from Synology DiskStation.
Codepage: Synology DiskStation uses Unicode to avoid file inaccessibility from computers using differe nt
languages. But for the following devices or applications to use Synology DiskStation services without problem,
you need to choose the appropriate codepage for them:
Computers without Unicode support
Applications that convert non-Unicode strings to Unicode, such as FTP service, UPnP support, music
metadata indexing
Page 37

Synology DiskStation User's Guide
Based on DSM 3.1
37 Chapter 3: Modify System Settings
Set Up Time
Click the Time tab to set up the time. You can check the current time, manually set the server's date and time, or
have them set automatically using a network ti me serv er.
To set the time zone:
1 Choose a time zone from the Time zone drop-down menu.
2 Click OK.
To set the date and time manually:
1 Choose Manually and select the date and time.
2 Click OK.
To sync the date and time with NTP server:
1 Make sure a valid DNS server IP has been entered at Main Menu > Control Panel > Network and that your
DiskStation is connected to the Internet.
2 Choose Synchronize with a NTP server.
3 Assign a sync frequency from the drop-down menu.
4 Enter the address of your network time server, or choose a server from the drop-down menu.
5 Click Update now to make sure you can successfully synchronize time with the server.
6 Click OK.
Page 38

Synology DiskStation User's Guide
Based on DSM 3.1
38 Chapter 3: Modify System Settings
More Information
Network Time Protocol (NTP) is used to synchronize the time of all clients and servers over a data network.
Below are a few recommended NTP servers:
time.apple.com
time.asia.apple.com
time.euro.apple.com
time.nist.gov
For more information about NTP Server, please visit http://www.eecis.udel.edu/~mills/ntp/servers.html
Use Energy Saving Features
Go to Main Menu > Control Panel > Power to manage the energy saving features provided by DSM.
Page 39

Synology DiskStation User's Guide
Based on DSM 3.1
39 Chapter 3: Modify System Settings
Manage General Settings
Click the General Settings tab to manage the following power control settings.
HDD Hibernation
You can manage HDD hibernation for all internal or external disks on your DiskStation.
When a disk enters HDD hibernation mode, it will stop spinning and become inactive, which not only saves
energy but also extends the disk's lifespan.
To manage HDD hibernation:
1 Choose any of the following from the Time drop-down menus:
A time period: Set the internal hard drive, external eSATA or USB disk to HDD hibernation mode after the
specified period of inactivity.
None: Disable HDD hibernation.
2 Click OK.
Power Recovery
You can set the following power recovery functions:
Boot up DiskStation automatically after power has been restored if the DiskStation was shut down abnormally
due to a power failure.
Enable Wake on LAN to allow remote startup.
1
To enable the power recovery function:
1 Tick Restart automatically after a power failure.
2 Click OK.
To enable Wake on LAN:
1 Tick Enable Wake on LAN (or Enable Wake on LAN [number] for DiskStations with multiple LAN ports).
---------
1
Wake on LAN is supported on specific models only. See "Appendix A: Synology DiskStation Specifications" on Page 219 for
more information.
Page 40

Synology DiskStation User's Guide
Based on DSM 3.1
40 Chapter 3: Modify System Settings
2 Click OK.
More Information
About Wake on LAN: After Wake on LAN is enabled for your DiskStation, you can turn on Synology DiskStation
over the local area network or the Internet by using a WOL (Wake on LAN) application. Activate the function by
entering DiskStation’s IP address (or DDNS hostname) and MAC address.
Wake on LAN works only after Synology DiskStation is shut down properly by pressing the Power button or
selecting Shutdown from DSM's Main Menu, and its power cord is plugged into a working power outlet.
Note: You can also perform Wake on LAN for supported Synology DiskStation with Synology Assistant. See the
Help of Synology Assistant for more information.
Fan speed mode
You can choose the appropriate fan speed mode according to your need (Cool Mode or Quiet mode), or
according to the size of your hard disks (2.5" hard disk mode or 3.5" hard disk mode), depending on the
DiskStation models you are using.
Cool Mode or 3.5" hard disk mode will provide better cooling effect, while Quiet Mode or 2.5" hard disk mode
can further reduce the noise level.
Manage Beep Control
Click the Beep Control tab to control beep alert when abnormal situations occur.
To manage beep control:
Tick or uncheck the checkboxes and click OK.
Page 41

Synology DiskStation User's Guide
Based on DSM 3.1
41 Chapter 3: Modify System Settings
Manage UPS
Under the UPS tab, you can enable UPS support to prevent data loss when an unexpected power failure occurs.
To enable local UPS support:
1 Connect a local UPS to the USB port of your DiskStation.
2 Tick the Enable UPS support checkbox.
3 Set the Time before DiskStation enters Safe Mode.
Note: If the local U PS is low on battery, or t he network UPS server enter s Safe Mode, DiskStation will ignore the
specified tim e period and enter Safe Mode im m ediately.
4 You can decide whether to send a shutdown signal to the UPS when the system enters Safe Mode. Most UPS
can restore power supply automatically when the power recovers.
5 Click OK.
Term Explanation
When entering Safe Mode, the system will first stop all services and unmount all data volumes to prevent data
loss, so that when the UPS shuts down, the system will be turned off safely. If the Power Recovery function has
been enabled, the system will restart automatically when power is restored.
To enable network UPS support:
1 Tick the Enable UPS support checkbox.
2 Enter the Network UPS server IP. (Make sure the server allow connection from Synology DiskStation)
3 Set the Time before DiskStation enters Safe Mode.
4 Click OK.
More Information
Network UPS support requirements:
You will need another server connected to an UPS that can be communicated via internet, i.e. a network
UPS server.
A network device, such as a switch or a hub, should be connected to the same UPS, so that Synology
DiskStation can still communicate with network UPS server during an unexpected power failure.
To enable Network UPS server:
1 Connect a USB UPS to Synology DiskStation.
2 Tick the Enable UPS support checkbox.
3 Tick the Enable Network UPS Server checkbox.
4 Enter the IP addresses which will be allowed to connect to Synology DiskStation.
5 Click OK.
Page 42

Synology DiskStation User's Guide
Based on DSM 3.1
42 Chapter 3: Modify System Settings
Power Schedule
Click the Power Schedule tab to start up or shut down automatically at a specified time.
To add a new startup/shutdown schedule:
1 Click the Create button to open the Add Schedule dialog.
2 Choose Startup or Shutdown.
3 Set the Date and Time for startup or shutdown.
4 Click OK.
5 Click Save.
The new schedule will be added to the schedule list.
To edit a schedule:
1 Select the schedule and click Edit to edit the schedule.
2 Click OK.
3 Click Save.
To enable or disable a schedule:
1 Tick or uncheck the checkbox for the schedule.
2 Click Save.
To enable or disable all schedules:
1 Tick or uncheck the Enabled checkbox.
2 Click Save.
To delete a schedule:
1 Select a schedule and click Delete.
2 Click Save.
To view schedule summary:
Click Summary to browse the weekly schedule for startup/shutdown.
Note: You can speci fy up to 100 schedules for one DiskStation.
Page 43

43
Chapter
4
Chapter 4: Manage Storage Space
Before sharing Synology DiskStation services with your users, you need to set up storage spaces first. This
chapter explains how to use Storage Manager to set up storage space (including volumes, Disk Groups, iSCSI
Targets, iSCSI LUNs), access external disks connected to DiskStation, and check hard drive's status.
What is Volume and Disk Group?
With the hard drives installed on your DiskStation, you can create volumes for storing and sharing your files.
Note: For more inf ormation about setting up file sharing on your DiskStation, see "Chapter 7: Set Up Fil e Sharing" on
Page 67.
Volume Creation Methods
For Synology DiskStation with 2 or more bays, you can create a volume with the following methods:
Combine several hard disks into a volume: This method allows you to create a volume with data protection.
See "Create a Volume Using the Quick Mode" on Page 45 and "Create a Volume by Combining Several Hard
Disks" on Page 46 for more information.
Combine several hard disks into a Disk Group, and then create multiple volumes on the Disk Group: This
method not only allows you to create a volume with data protection, but you can also specify volume capacity
according to your needs. See "Create a Volume by Allocating Partial Space on a Disk Group" on Page 46 and
"Create a Disk Group" on Page 47 for more information.
Synology DiskStation Supported RAID Types
For Synology DiskStation with 1 bay, you can create a Basic volume. For Synology DiskStation with 2 or more
bays, you can choose between several RAID types during volume or Disk Group creation. Some of the RAID
types can provide data protection, which means data integrity is protected when one or two of the hard drives fail.
RAID Type HDD #
Allowed
Failed HDD #
Description Capacity
SHR
1
1
0
Synology Hybrid RAID (SHR) can optimize the
storage capacity when combining hard drives with
different sizes. If a SHR storage space is
composed of two or three hard drives, data
integrity is protected when one of the hard drives
fail. If a SHR storage space is composed of four or
more hard drives, data integrity is protected when
one or two of the hard drives fail.
1 x (HDD size)
2 - 3
1
Optimized by the
system
≧ 4
1 - 2
Basic 1 0
A Basic volume is created with one hard drive as
an independent unit. When creating a Basic
volume, you can select only one hard drive at a
time.
1 x (HDD size)
JBOD
≧2
0
JBOD is a collection of hard drives.
Sum of all HDD
sizes
RAID 0
≧2
0
Combining multiple disks to build a storage space,
RAID 0 offers Striping, a process of dividing data
into blocks and spreading the data blocks across
several hard drives, but without safety measures.
(HDD #) x
(Smallest HDD
size)
---------
1
RAID types except for Basic are supported on specific models only. See "Appendix A: Synology DiskStation Specifications" on
Page 219 for more information.
Page 44

Synology DiskStation User's Guide
Based on DSM 3.1
44 Chapter 4: Manage Storage Space
RAID Type HDD #
Allowed
Failed HDD #
Description Capacity
RAID 1 2 - 4 (HDD #) - 1
The system will write identical data to each hard
drive at the same time, so data integrity is
protected when at least one disk is normal.
Smallest HDD
size
RAID 5
≧3
1
This configuration includes a backup option. It
uses parity mode to store redundant data on
space equal to the size of one disk for later data
recovery.
(HDD # – 1) x
(Smallest HDD
size)
RAID 5+Spare
≧4
2
A RAID 5+Spare storage space requires at least
four drives, one of which will act as a hot spare
drive to rebuild the failed drive of the volume
automatically.
(HDD # – 2) x
(Smallest HDD
size)
RAID 6
≧4
2
RAID 6 provides extra data protect i on. It us es
parity mode to store redundant data on space
equal to the size of two disks for later data
recovery.
(HDD # – 2) x
(Smallest HDD
size)
RAID 10
≧4
(even
number)
1 HDD within
each RAID 1
group
RAID 10 has the performance of RAID 0 and data
protection level of RAID 1. RAID 10 combines two
hard drives into a RAID 1 group, and combines all
the groups with RAID 0.
(HDD # / 2) x
(Smallest HDD
size)
Manage Volumes or Disk Groups with Storage Manager
Go to Main Menu > Storage Manager and click the Volume or Disk Group tab to create, set up, and manage
volumes or Disk Group.
Page 45

Synology DiskStation User's Guide
Based on DSM 3.1
45 Chapter 4: Manage Storage Space
Create a Volume
The Volume Creation Wizard allows you to create a volume on your DiskStation in several ways.
Note: Volume creat ion might take a while to finish, depending on the capacity to be created.
Create a Volume Using the Quick Mode
The system will create a SHR volume, which optimizes space allocation based on the capacity of the chosen
hard disks.
To create a SHR volume using the Quick mode:
1 Click the Volume tab.
2 Click Create to open the Volume Creation Wizard.
3 Choose the Quick mode, and click Next.
4 Choose the hard disks you want to add to the volume, and click Next.
5 If you select 4 or more disks in the previous step, choose the data protection level according to your needs.
6 Click Yes to confirm, and then choose whether to perform disk check. Click Next to continue.
7 Click Apply to start volume creation.
Page 46

Synology DiskStation User's Guide
Based on DSM 3.1
46 Chapter 4: Manage Storage Space
Create a Volume by Combining Several Hard Disks
This action allows you to create a volume by combining several hard disks.
To create a volume by combining several hard disks:
1 Click the Volume tab.
2 Click Create to open the Volume Creation Wizard.
3 Choose the Custom mode, and click Next.
4 Choose Single Volume on RAID, and click Next.
5 Choose the hard disks you want to add to the volume, and then click Next.
6 Click Yes to confirm, and then choose availa ble RAID ty pe for the new Disk Group. Click Next to continu e.
7 Choose whether to perform disk check, and then click Next.
8 Click Apply to start volume creation.
Create a Volume by Allocating Partial Space on a Disk Group
This action allows you to create a volume by allocating partial space on a Disk Group.
To create a volume by allocating partial space on a Disk Gr oup:
1 Click the Volume tab.
2 Click Create to open the Volume Creation Wizard.
3 Choose the Custom mode, and click Next.
4 Choose Multiple Volume on RAID, and click Next.
Page 47

Synology DiskStation User's Guide
Based on DSM 3.1
47 Chapter 4: Manage Storage Space
5 Choose either of the following:
Create a new Disk Group: This action will create a new Disk Group from unused hard disks, and then
create a volume on the newly-created Disk Group. Click Next and do the following:
a Choose the hard disks you want to add to the Disk Group, and then click Next.
b Click Yes to confirm, and then choose available RAID type for the new Disk Group. Click Next to continue.
c Choose whether to perform disk check, and then click Next.
Note: The newly-created Disk Group will be displayed under the Disk Group tab. You can also create a Disk
Group by following the instructions of "Create a Disk Group" (shown blow).
Choose an existing Disk Group: This action will create a volume on an existing Disk Group. Choose the
Disk Group from the drop-down menu, and click Next.
6 On the Allocate volume capacity page, enter a number in the Allocate Size (GB) field to specify the volume
capacity, and click Next.
7 Click Apply to start volume creation.
Create a Disk Group
You can also create a Disk Group on your DiskStation, and then create multiple volumes on the created Disk
Group.
To create a Disk Group:
1 Click the Disk Group tab.
2 Choose the hard disks you want to add to the Disk Group, and then click Next.
3 Click Yes to confirm, and then choose available RAID ty pe for the new Disk Group. Click Next to continu e.
4 Choose whether to perform disk check, and then click Next.
5 Click Apply to start Disk Group creation.
To create volumes on the created Disk Group:
Follow the instructions of "Create a Volume by Allocating Partial Space on a Disk Group" on Page 46. Choose
Choose an existing Disk Group in step 5, and choose the Disk Group to create a volume on it.
More Information
About Shared Folder Quota: DSM doesn't come with shared folder quota support. However, you can limit the
maximum size of a shared folder by doing the following:
1 Create a volume and specify its capacity by following the instructions of "Create a Volume by Allocating
Partial Space on a Disk Group" (shown above).
2 Create a single shared folder on the newly-created volume. (See "Set Up Shared Folders" on Page 79 for
more information.)
3 After the setup is complete, the maximum size of the shared folder will be limited to be the same as the
volume capacity.
Page 48

Synology DiskStation User's Guide
Based on DSM 3.1
48 Chapter 4: Manage Storage Space
Remove a Volume or Disk Group
1 Click the Volume or Disk Group tab.
2 Select the volume or Disk Group you want to remove.
3 Click Remove and follow the wizard to remove the volume or Disk Group.
Note: Data stor ed on the volume or Disk Group will be deleted aft er you remove the volume or Disk Group. Be
careful using this option.
Repair a Volume or Disk Group
The repair function is available for RAID 1, RAID 10, RAID 5, RAID 5+Spare, RAID 6, and SHR volumes or Disk
Groups. Depending on your RAID types, When one or two of the hard drives in the volume or Disk Group fails, it
will be in the degraded mode. You can repair the volume or Disk Group by replacing the crashed disk(s) to keep
the data on the volume or Disk Group protected.
Note: Synology DiskStation provides the hot swapping function, allowing you to replace the crashed dis k without
shutting down your Synology DiskStation.
1
To identify and replace the crashed disk:
1 Identify the crashed disk by doing one of the following:
Check the hard drive icons in Storage Manager. The icon of the crashed disk will appear with an
exclamation mark.
Go to Information > Status, and check the status column in the Hard disk( s) section. (See "Check System
Information" on Page 206 for more information.)
Check the LED indicators on your DiskStation. (See "Appendix B: LED Indication Tables" on Page 226 for
more information.)
2 Pull out the hard drive tray to replace the crashed disk with a new one.
Note: The replacement hard drive size must be larger or equal to the size of the small est disk in the volume or Disk
Group.
To repair a volume or Disk Group:
1 Click the Volume or Disk Group tab.
2 Click Manage.
3 Select Repair and follow the wizard to repair the volume or Disk Group.
Note:
The status of the repairing hard drive must be Initialized or Not Initialized.
If your volume is created by allocating partial space on a Disk Group (see "Create a Volume by Alloc ating Partial
Space on a Disk Group" on Page 46 for more inf ormation), you need to repair its Disk Group.
---------
1
This is supported on specific models only. See "Appendix A: Synology DiskStation Specifications" on Page 219 for more
information.
Page 49

Synology DiskStation User's Guide
Based on DSM 3.1
49 Chapter 4: Manage Storage Space
Change RAID Type
If you have created a Basic, RAID 1 or RAID 5 volume or Disk Group, you could add a new drive to the
Synology DiskStation, and then use Storage Manager to change the RAID type.
Available RAID type change includes:
Basic to RAID 1, RAID 5 or RAID 5+Spare
RAID 1 to RAID 5 or RAID 5+Spare
Add mirror disk to RAID 1
RAID 5 to RAID 5+Spare or RAID 6
RAID 5+Spare to RAID 6
To change the RAID type:
1 Click the Volume or Disk Group tab.
2 Select the volume or Disk Group you want to change.
3 Click Manage.
4 Choose Change RAID type and follow the wizard to complete the setup.
Note:
The status of the volume or Disk Gr oup must be normal.
The status of the added drive must be Initialized or Not Initialized.
If you want to change the RAID type, enough number of hard drives for the new type is required. See
"Synology DiskS tation Supported RAID Types" on Page 43 for the required amount of disks for the RAID type.
The size of the replacement hard drive must be larger than the smallest disk size of the volume or Disk Group.
Expand a Volume or Disk Group
You can expand the storage capacity of a volume or Disk Group.
Expand a Volume by Changing Volume Size
If your volume is created by allocating partial space on a Disk Group, you can do the following to expand the
volume.
To expand a volume by changing volume size:
1 Under the Volume tab, click the volume you want to expand.
Page 50

Synology DiskStation User's Guide
Based on DSM 3.1
50 Chapter 4: Manage Storage Space
2 Click Edit.
3 Enter a number in the Size (GB) field, or click Max to automatically fill in the number of the available size on
the Disk Group.
Note: The number mus t be larger than the original volume capac ity.
4 Click OK.
Expand a Volume or Disk Group by Replacing with Larger Disks
When the internal HDD storage runs out of space, you can follow the steps below to replace a larger HDD
without losing the original data.
For one-bay models:
1 Turn off the Synology DiskStation.
2 Replace the internal hard drive with a larger one.
3 Turn on the Synology DiskStation.
4 Reinstall the system. See "Reinstall Synology DiskStation" on Page 215 f or more information.
5 Connect the replaced hard drive to the USB or eSATA port.
6 Copy the data from the replaced hard drive to the new hard drive.
7 Remove the replaced hard drive.
For Basic or RAID 0 on models with two or more bays:
1 Back up all data stored on the Synology DiskStation.
2 Turn off the Synology DiskStation.
3 Replace the internal hard drives with larger ones.
4 Turn on the Synology DiskStation
5 Reinstall the system. See "Reinstall Synology DiskStation" on Page 215 for more information.
6 Copy the backup data to the new volume or Disk Group.
For RAID 1 and RAID 5, RAID 5+Spare, and RAID 6:
1 Turn off the Synology DiskStation (skip this step for models that support disk hot swapping).
2 Replace the first internal hard drive with a larger hard drive.
3 Turn on the Synology DiskStation and repair the volume or Disk Group. See "Repair a Volume" on Page 48 for
more information.
4 Repeat step 1 to 3 until all internal hard drives are replaced with larger hard drives.
5 The system will expand the volume or Disk Group automatically.
Note:
Before replacing the spare disk of a RAID 5+Spare volume or Disk Group, you ne ed to click Manage, click
Change RAID type, and then follow the wizard to change the volume or Disk Group.
When the system is removing a volume or Disk Group, all enabled services on other volumes will be t emporarily
stopped. When the volume or Disk Group i s removed successfully, those services will be resumed.
You can only r em ove the hard drive when the volume or Disk G roup is in Normal status; ot herwise it will cause
data loss. If the volume or Disk Group is in Degraded status, please repair the volume or Disk Group before
replacing it.
Page 51

Synology DiskStation User's Guide
Based on DSM 3.1
51 Chapter 4: Manage Storage Space
Expand a Volume or Disk Group by Adding Disks
If you have empty hard drive bays in your Synology DiskStation, you can expand JBOD, RAID 5, RAID 5+Spare,
RAID 6, and SHR volumes or Disk Groups by adding disks.
To expand a volume or Disk Group by adding disks:
1 Install a new hard drive for your Synology DiskStation.
2 Select the volume or Disk Group you want to expand.
3 Click Manage and choose Expand the volume by adding hard disks (for volume expansion) and Expand
the RAID by adding hard disks (for Disk Group expansion).
4 Select the hard drive in the Choose disks section.
5 Follow the wizard to complete the setup.
Note:
For RAID 5, RAID 5+Spare, and RAID 6 volume or Disk Gr oup, the hard drive size must be larger than the
smallest disk i n the volume or Disk Group.
The status of the volume or the Disk Group must be Normal.
The status of the added disk must be Initialized or Not Initialized.
You can also e xpand your volume wit h S ynology Expansion Unit using the same way.
1
---------
1
Synology Expansion Unit is supported on specific models only. Please visit www.synology.com.
Page 52

Synology DiskStation User's Guide
Based on DSM 3.1
52 Chapter 4: Manage Storage Space
Manage iSCSI Target with Storage Manager
Go to Main Menu > Storage Manager and click the iSCSI Target tab to manage iSCSI Targets on your
Synology DiskStation. You can manage up to 10 or 32
1
iSCSI Targets on one Synology DiskStation, and map
iSCSI LUNs to them.
Term Explanation
iSCSI
iSCSI is an Internet Protocol based storage networking standard for linking data storage facilities. By carrying
SCSI commands over IP networks, iSCSI can facilitate data transfers over local area networks (LANs), wide
area networks (WANs), or the Internet.
Through iSCSI, the space on storage server will be regarde d as loca l disk s by client’ s oper a tion sy ste m. But in
reality, all data transferred to the disk are actually transferred over network to the storage server.
iSCSI Target and LUN
In SCSI terminology, A LUN (logical unit number) represents an individually addressable (logical) SCSI device
that is part of a physical SCSI device (called "Target").
An iSCSI environment emulates the connection to a SCSI hard disk. An iSCSI Target is like a connection
interface, and LUNs are essentially numbered disk drives. When an iSCSI Target is connected by an iSCSI
initiator (a client), all the LUNs mapped to the iSCSI Target are virtually attached to the client’s operation system.
Therefore, Initiators can establish and manage file systems on iSCSI LUNs, as they would a raw SCSI or IDE
hard drive.
To create an iSCSI Target:
1 Click the Create button.
2 Enter the iSCSI Target's information, including Name, IQN, and whether to enable CHAP authentication.
3 Click Next.
4 Set up iSCSI LUN mapping. Select Create a new iSCSI LUN or Map existing iSCSI LUNs.
Note: For more inf ormation about creating iSCSI LUNs, see "M anage iSCSI LUNs with Storage Manager" on
Page 54.
5 Click Next.
6 Click Back to modify or Apply to confirm setti ng s.
---------
1
32 iSCSI targets are supported on specific models only. Please visit www.synology.com.
Page 53

Synology DiskStation User's Guide
Based on DSM 3.1
53 Chapter 4: Manage Storage Space
Term Explanation
IQN: IQN (iSCSI Qualified Name) is a set of unique name for an iSCSI Target. It should not conflict with iSCSI
Target IQNs on other servers. IQN must be less than 128 character s and can includ e lett er s(ca se ins ens itiv e),
numbers, colons, dashes, and dots. The suggested naming format is iqn.[date].[domain]:[device identifier], for
example: iqn.2000-04.com.synology:storage.diskarray.1.
CHAP authentication: If you select CHAP, the server will be able to verify the client's identity. In Mutual
CHAP, both the client and the server will authenticate each other. Username can be composed of 1 ~ 12 letters
and numbers, and password can be composed of 12 ~ 16 letters and numbers.
To remove an iSCSI Target:
You can remove an iSCSI Target and any mapped iSCSI LUNs. Note that when removing an iSCSI LUN, all data
on the iSCSI LUN will be deleted.
1 Select the iSCSI Target you want to remove.
2 Click Remove.
3 If you want to remove mapped iSCSI LUNs, select Delete mapped iSCSI LUNs as well and select the ones
you want to remove.
4 Click OK.
To edit an iSCSI Target:
1 Select the iSCSI Target you'd like to edit.
2 Click Edit.
3 Edit the settings to your preference. Click OK to save the changes.
Term Explanation
CRC Checksum: Enable CRC Checksum to check if any error occurred during data transmission.
Multiple Sessions: Allow multiple sessions from one or more initiators to connect to the same iSCSI Target at
the same time. To protect your files from corruption or unexpected data loss, it is strongly suggested that you
use a shared file system or cluster system such as VMware Virtual Machine File System (VMFS) and Oracle
Cluster File System (OCFS).
Masking: Masking allows an iSCSI Target to be exclusively accessed by specified iSCSI initiator IQNs.
To enable or disable an iSCSI Target:
1 Select the iSCSI Target you'd like to enable or disable.
2 Click Enable or Disable.
To register iSCSI Targets with an iSNS server:
1 Click iSNS.
2 Tick Enable iSNS.
3 Enter the IP address of the iSNS server in the iSNS Server field.
4 Click OK.
Term Explanation
iSNS
iSNS (Internet Storage Name Service) are often used in a local area network with complex storage deployment,
facilitating IT staffs to discover storage and manage iSCSI devices. You can register all the iSCSI Targets on
your DiskStation with the iSNS server on your network.
Page 54

Synology DiskStation User's Guide
Based on DSM 3.1
54 Chapter 4: Manage Storage Space
Manage iSCSI LUNs with Storage Manager
Go to Main Menu > Storage Manager and click the iSCSI LUN tab to manage iSCSI LUNs on your
Synology DiskStation. An iSCSI LUN (logical unit number) can be mapped to multiple iSCSI Targets to perform
storage operations such as read or write. You can create up to 10 or 256
1
iSCSI LUNs on your DiskStation.
There are 2 ways to create an iSCSI LUN:
Designate several disks (Block-level).
Designate a portion of your volume space (Regular Files).
If you create an iSCSI LUN with several disks, you can repair or expand it, or change its RAID type, just like using
a volume. (Please see Page 44 of this chapter for detailed information about volume management.)
To create an iSCSI LUN:
1 Click Create.
2 Select Custom.
3 Click Next.
4 Select the iSCSI LUN type you want to create.
iSCSI LUN (Regular Files): The iSCSI LUN is created by designating a portion of the volume space for its
usage. Set up iSCSI LUN configuration, including Name, Location, Thin Provisioning, Capacity (GB),
iSCSI Target mapping.
iSCSI LUN (Block-Level) - Single LUN on RAID: The iSCSI LUN is created by combining sev eral hard
disks. Enter the name for the LUN, choose iSCSI Target mapping and click Next. You can create and
manage the LUN just like working with a volume. See "Create a Volume by Combining Several Hard Disks"
on Page 46 for more informati on about volume creation.
iSCSI LUN (Block-Level) - Multiple LUN on RAID: The iSCSI LUN is created by allocating partial space on
a Disk Group. Enter the name for the LUN, choose iSC SI Target mapping and click Next. You can create
and manage the LUN just like working with a volume. You can repair or expand it, or change its RAID type,
just like using a volume. See "Create a Volume by Allocating Partial Space on a Disk Group " on Page 46 for
more information about volume creation.
---------
1
256 iSCSI LUNs are supported on specific models only. Please visit www.synology.com.
Page 55

Synology DiskStation User's Guide
Based on DSM 3.1
55 Chapter 4: Manage Storage Space
5 About iSCSI Target mapping:
If you choose Map existing iSCSI targets from the iSCSI Target mapping drop-down menu, you will be
prompted to choose an existing iSCSI Target.
If you choose Create a new iSCSI target from the iSCSI Target mapping drop-down menu, you will be
prompted to create a new iSCSI Target.
Note: For more inf ormation about iSCSI Target creation, see "Manage iSCSI Target with Storage Manager" on
Page 52 .
6 Follow the wizard to complete the setup.
Term Explanation
Thin Provisioning: Thin Provisioning is a method for optimizing storage utilization by allocating storage space
in a dynamic and on-demand manner. This setting is only available for iSCSI LUN (regular files).
iSCSI Target Mapping: Map the iSCSI LUN to one or more iSCSI Targets.
To remove an iSCSI LUN:
By removing an iSCSI LUN, all data on the iSCSI LUN will be deleted. The connection between the iSCSI LUN
and any mapped iSCSI Target will also be lost.
1 Select the iSCSI LUN you'd like to remove.
2 Click Remove.
3 Click Cancel to abort or OK to confirm.
To edit an iSCSI LUN:
1 Select the iSCSI LUN you'd like to edit.
2 Click Edit.
3 Edit the Properties and Mapping to your preference.
4 Click OK to save the settings.
Note: To avoid data loss when editing iSCSI LU N capacity, you can only make it larger than the current size.
Page 56

Synology DiskStation User's Guide
Based on DSM 3.1
56 Chapter 4: Manage Storage Space
Manage Hard Disks with Storage Manager
Go to Main Menu > Storage Manager and click the HDD Management tab to manage your hard disks.
Enable Write Cache Support for Hard Disks
Write cache support is only effective on hard disks that support it. Enabling cache offers you enhanced
performance on your Synology product. However, to ensure data protection, the usage of a UPS device is
strongly recommended. It is also highly suggested that the system is shut down properly every time after use.
In other words, while disabling cache offers the benefit of increasing resilience against abnormal power, there is
also the possibility of reduction in performance.
To enable write cache support for your disk:
1 Select a disk on the disk list and click Cache Management.
2 Tick Enable write cache. By default, this function is enabled.
3 Click OK.
Page 57

Synology DiskStation User's Guide
Based on DSM 3.1
57 Chapter 4: Manage Storage Space
Run S.M.A.R.T. Analysis
Disk S.M.A.R.T. will help you to examine and report the hard disk status to alert possible disk failures. It is
recommended that you change your disk if errors are detected.
To start S.M.A.R.T. test:
1 Select a disk on the disk list and click S.M.A.R.T. Test.
2 Choose any of the following test methods and click Start:
Quick Test
Extended Test
Note: The exact processing time mi ght vary under different system environment.
3 The latest test results are shown in the Test Result section.
4 Click Close to finish.
To check S.M.A.R.T. info:
1 Select a disk on the disk list and click S.M.A.R.T. Info. T he number s li sted can help you to diagnose the status
of your disk.
2 Click Close to finish.
Check Disk Info
Here you can see the disk's model name, serial number, firmware version, and total size.
To check disk info:
1 Select a disk on the disk list and click Disk Info.
2 Click Close to finish.
Page 58

Synology DiskStation User's Guide
Based on DSM 3.1
58 Chapter 4: Manage Storage Space
Manage External Disks
You can attach external USB or eSATA disks to the USB or eSATA port of your Synology DiskStatio n for backu p
or file sharing purposes.
1
Go to Main Menu > Control Panel > External Devices to manage the attached external disks.
To attach an external disk:
1 Connect an external USB or eSATA disk to the USB or eSATA port of your Synology DiskStation.
2 A new shared folder named usbshare1 (for USB device) or esatashare (for eSATA device) will be created
automatically and ready for access.
Note:
When mor e than 1 external USB disk is connected, usbshare2, usbshare3 … will be created.
DiskSt ation recognizes the following format: EXT3, EXT4, FAT, FAT32, and NTFS. Any unrecognized USB dis k
will have to be format ted first before being used on the system.
To get the information of the disk:
You can access disk information by clicking Get Info.
To eject or format an external disk:
Click Eject or Format.
Note:
For more inf ormation about external disks, see its help by clicking the Help button (with a question mark) at the
top-right corner .
You can also manage USB printer here. See "Set Synology Di skStation as Print Server" on Page 125 for more
information.
---------
1
eSATA is supported on specific models only. See "Appendix A: Synology DiskStation Specifications" on Page 219 for more
information.
Page 59

59
Chapter
5
Chapter 5: Access your DiskStation from the
Internet
You can connect to your Synology DiskStation over the Internet, allowing its services to be accessible from
anywhere and anytime.
This chapter explains how to set up Internet connection with the easy-to-use Synology EZ-Internet wizard, or with
the more advanced port forwarding function, and register a friendly DDNS hostname for your
Synology DiskStation.
Use the EZ-Internet Wizard
The EZ-Internet Wizard can set up DiskStation access via the Internet with an easy-to-use wizard, without goin g
through the complicated firewall settings, PPPoE setup, DDNS registration, and router port forwarding
configuration.
To use the EZ-Internet wizard:
Go to Main Menu > EZ-Internet and follow the wizard to complete the setup.
Set Up Port Forwarding Rules for Router
If your Synology DiskStation is within the Intranet, you can set up port forwarding rules for the router to allow your
Synology DiskStation to be accessible over the Internet.
Note: Before you start, make sure you have manually assigned a static IP address f or your Synology DiskStation.
See "Network Int erface" on Page 30 for more information.
Page 60

Synology DiskStation User's Guide
Based on DSM 3.1
60 Chapter 5: Access your DiskStation from the Internet
Go to Main Menu > Control Panel > Router Configuration to set up your router and port forwarding rules.
Note: To configure port forwarding rul es and assign static IP address, you must have the administrative permission
to the router.
Set up Router
Before adding port forwarding rules, you need to set up your router first.
To set up your router:
1 Click Set up router to open the settings window.
2 Select your router by doing the following :
a Choose your router from the Router drop-down menu.
b If you cannot find your router, click Update List to get the latest router support list from Synology.
c If you still have trouble finding your router even after the list is updated, contact Synology.
3 Enter the protocol and port for your router. The protocol and port vary depending on the model of your router. If
you cannot connect using the default HTTP protocol and 80 port, refer to the documentation that comes with
your router for correct settings.
4 If your router requires a custom account to allow it to be accessed, tick Use custo m account and fill in the
Account and Password fields.
5 Click OK.
Page 61

Synology DiskStation User's Guide
Based on DSM 3.1
61 Chapter 5: Access your DiskStation from the Internet
Add Port Forwarding Rules
Add port forwarding rules to specify the destination ports of your Synology DiskStation that will receive packages
from specific router ports.
To add port forwarding rules:
1 Click Create.
2 Do one of the following:
If you want to create port forwarding rules for system services (for example, FTP, Web Station, etc),
choose Built-in application and tick the system serv ices.
If you want to create port forwarding rules for custom services, choose Custom port. You can use the
following syntax to specify port numbers and range:
Use “-” to describe port range. For example, 6881-6890.
Use “,” to separate ports. For example: 21,22 or 21,55536-55663.
Note:
Some routers don't allow using cust om ports for system s ervices forwarding. See t he documentation that came
with your router for more information.
Each router port can be used for one forwarding rule only. Using a router port for two or more rules will cause
conflicts, and a warning message will appear on the screen. You need to set another port for the rule to avoid
conflicts.
3 Click Save.
You may need to wait for a few minutes before the rules start working, depending on the models of your routers.
To test whether your rules are working or not:
1 Select the rules you want to test and click Test Connection.
2 The result will be displayed in the Connection Test Result column.
Give Synology DiskStation a DDNS Hostname
You can register a DDNS (Dynamic Domain Name Server) hostname for your Synology DiskStation, allowing it to
be connected anywhere by entering the hostname in the address bar of your web browser.
Once set up, you and your friends no longer need to remember the IP address to access your
Synology DiskStation. Simply type in the DDNS hostname on the web browser as you would when connecting to
any website. After the setup is complete, the hostname will always point to the external IP of the Synology
DiskStation.
Page 62

Synology DiskStation User's Guide
Based on DSM 3.1
62 Chapter 5: Access your DiskStation from the Internet
Service Requirement
The DDNS server of the service provider is working normally.
The gateway connection is normal.
Synology DiskStation is able to connect to the DNS server.
The following addresses are unblocked in the Firewall:
http://members.dyndns.org:80
http://checkip.dyndns.org:80
DDNS will only run in a network environment where there is no proxy server required.
Register a DDNS hostname for Synology DiskStation
Go to Main Menu > Control Panel > DDNS and use one of the following methods to enter your DDNS
information.
Method 1: Visit any DDNS service provider's website to register a DDNS account
1 Visit any of the following DDNS service providers to register a DDNS account:
http://freedns.afraid.org
http://zoneedit.com
http://dnspod.com
http://changeIP.com
http://ddo.jp
http://www.selfhost.de/
http://www.dyndns.com/
http://www.no-ip.com/
http://www.3322.org/
http://www.twodns.de/
2 Tick Enable DDNS support and enter the hostname, username, and password for your Synology DiskStation.
3 Click OK.
Note: Remember to enter the full domain name in the Hostname field. (e.g. philip1234.dyndns.org)
Page 63

Synology DiskStation User's Guide
Based on DSM 3.1
63 Chapter 5: Access your DiskStation from the Internet
Method 2: Register a DDNS account at No-IP.com
1 Tick Enable DDNS support, choose No-IP.com from the Service provider drop-down menu, and then click
Register Now.
2 In the window that appears, enter the hostname you want in the Hostname field.
3 Enter your account information:
If you already have a No-IP.com account, select Use an existing No-IP.com account and enter the
account information in the Email and Password field to log in.
If you don't have a No-IP.com account, select Create a new No-IP.com account and fill out all the
required fields to register a new account.
4 Click OK to finish. The newly registered hostname for your Synology DiskStation will be activated in just a few
seconds.
Note: If you have any problem using your No-IP.com account, visit No-IP.com for troubleshooting information.
Page 64

64
Chapter
6
Chapter 6: Enhance Internet Security
After your Synology DiskStation is available on the Internet, you will need to safeguard it against any attacks from
Internet hackers.
This chapter explains how to set up firewall and enable auto block.
Prevent Unauthorized Connection with Firewall
The built-in firewall can prevent unauthorized logins, and control which services can be accessed. In addition,
you can choose to allow or deny access to certain network ports from specific IP addresses.
Go to Main Menu > Control Panel > Firewall to create firewall rules.
Note: You can creat e up to 100 rules for Synology DiskStation.
To create a firewall rule:
1 Click the LAN, Bond (multiple-LAN models only), PPPoE, or Wireless Network tab, depending on the type of
your network connection.
2 Click Create to open the settings window.
3 Choose an option in the Ports section. You can apply the rule to all ports or selected ports using one of the
following options:
All: Choose this option to apply the rule to all ports on Synology DiskStation.
Select from a list of built-in applications: Tick the system services that will be included in the rule.
Custom: Specify the type and protocol of the port, and enter the custom port number.
You can enter up to 15 ports separated with comma, or by specifying a port range.
Page 65

Synology DiskStation User's Guide
Based on DSM 3.1
65 Chapter 6: Enhance Internet Security
4 Specify the source IP address in the Source IP section. You can choose to allow or deny access from a
particular source IP using one of the following options:
All: Choose this option to apply the rule to all source IP addresses.
Single host: Choose this option to apply the rule to an IP address.
Subnet: Choose this option to apply the rule to a subnet.
5 Choose Allow or Deny in the Action section to allow or deny the source IP address to access the specified
ports.
Note:
When you com bine multiple LAN ports with link aggregation, firewall will apply the rules from the first network
interface, and reserve the rules of the second network interface. For more information about link aggr egation, see
"LAN" on Page 30.
1
If your system has multiple network ports connec ting to the same subnet, t he firewall rules might not work properly.
To change the priorities of rules:
Reorder the rules by dragging any of them up or down. Rules at the top will have higher priorities.
To disable rules:
Uncheck the checkboxes next to the rules.
To delete rules:
Select the rules you want to delete and click Delete.
Automatically Block Suspicious Login Attempts
Auto block allows you to prevent unauthorized login via SSH, Telnet, rsync, FTP, mobile devices, File Station,
and the management UI. After enabling the service, an IP address will be blocked automatically if it has too many
failed login attempts.
Go to Main Menu > Control Panel > Auto Block to use the auto block function.
---------
1
Link Aggregation is supported on specific models only.
Page 66

Synology DiskStation User's Guide
Based on DSM 3.1
66 Chapter 6: Enhance Internet Security
To enable auto block:
1 Tick Enable auto block.
2 Enter the following information to block an IP address with a number of failed login attempts within the
specified minutes :
Login attempts: The number for failed login attempts
Within (minutes): The number of minutes
3 Tick Enable block expiration and enter a number of days in the Unblock after (days) field if you want to
unblock the IP address after the specified days.
Note: The IP address will remain block ed if Unblock after (days) is set to 0.
4 Tick Enable email notification to receive email notification when an IP address is blocked. Make sure email
notification is enabled for your Synology DiskStation before using this option.
Note: For more inf ormation about email notification, see "Receive Email Notification" on Page 212.
To manage the blocked IP addresses:
1 Click Block List to check the blocked IP addresses.
2 If you want to remove an IP address from the block list, select it and click Remove.
Page 67

67
Chapter
7
Chapter 7: Set Up File Sharing
File sharing is one of Synology DiskStati on' s major functi on s. Sy nology DiskStation can become the file sharing
center within the Intranet or over the Internet, all ow ing users to acce ss its fil es anytim e and any where.
This chapter explains how to enable the support for file sharing protoc ols for all plat form s, c reate and man age
users and groups, set up shared folders, and allow or deny access to the shared folders, applications or
subfolders from specific users or groups.
Enable File Sharing Protocols for All Platforms
This section tells you how to enable Synology DiskStation to support file sharing protocols for all platforms.
Synology DiskStation supports the following file sharing protocols:
For Windows: SMB/CIFS (My Network Places), FTP, WebDAV
For Mac: SMB, FTP, AFP, WebDAV
For Linux: SMB, FTP, NFS, WebDAV
Manage Windows File Service
Click the Windows File Service tab at Main Menu > Control Panel > Win/Mac/NFS to enable Synology
DiskStation to be the Windows file server (CIFS server).
To enable Windows file service:
1 Tick Enable Windows file service.
2 Click OK.
Page 68

Synology DiskStation User's Guide
Based on DSM 3.1
68 Chapter 7: Set Up File Sharing
Advanced Settings
WINS Server
Microsoft Windows Internet Name Service (WINS) is a NetBIOS name- to-IP-addr e ss mapping service. Window
users will locate the system more easily on TCP/IP networks if the system has been configured to register with a
WINS server.
Support Windows offline files
This option will enable support for Windows offline files and automatically enables CIFS opportunistic locking.
However, enabling this option will affect DiskStation performance when accessing shared folders via network.
Optimize CIFS database operations
Checking this option will disable "Opportunistic Locking" of CIFS, resulting in increased performance when
database applications access database files on the shared folder of the Synology DiskStation via network.
Enable Local Master Browser
Enable Synology DiskStation to be the Local Master Browser.
Note: Enabling this function will disable the HDD hibernation mechanism and activate the guest account without
password.
Enable CIFS Recycle Bin
Checking this option will enable "Recycle Bin" of CIFS, resulting in moving the deleted files into the CIFS
Recycle Bin when users delete files in the shared folders via the CIFS protocol. When users delete files in a
shared folder, a folder called "#recycle" will be created automatically under the root directory of the shared
folder.
Empty CIFS Recycle Bin
Click Empty CIFS Recycle Bin
to clean all CIFS Recycle Bins, resulting in deleting all contents of CIFS Recycle
Bins in all the shared folders.
Enable Transfer Log
Enable this function to record the log of all file trans fer via the smb protocol. After the function is enabled, you
can see the log by clicking View Logs.
Manage Mac File Service
Click the Mac File Service tab at Main Menu > Control Panel > Win/Mac/NFS to make Synology DiskStation a
Mac file server (AFP Server).
Page 69

Synology DiskStation User's Guide
Based on DSM 3.1
69 Chapter 7: Set Up File Sharing
To enable Mac file service:
1 Tick Enable Mac file service checkbox to make Synology DiskStation a Mac file server (AFP server).
2 Set AppleTalk Zone or Time Machine backup fold er if necessary. (See the sections below for more
information.)
3 Click OK.
More Information
About AppleTalk Zone:
A "Zone" is a logical grouping of devices in an AppleTalk network. If there are AppleTalk zones configured in
your own network, the system will join the default zone automatically. You can also configure the system to join
other available zones.
About Time Machine backup folder:
To backup data from Time Machine to Synology DiskStation, select a shared folder from the drop-down menu.
Shared folders that are being used for other services will not be available for Time Machine.
To enable Bonjour printer broadcast:
Tick Enable Bonjour Printer Broadcast to allow Mac clients to browse and locate the printer connected to
Synology DiskStation.
Enable NFS Service for Linux Clients
Go to Main Menu > Control Panel > Win/Mac/NFS to allows Linux client to access DiskStation data.
To enable the NFS service:
1 Tick Enable NFS.
2 Click OK.
If you want to configure Linux client's NFS access privileges to the shared folders, see "Allow Users or Groups to
Access Shared Folders" on Page 81 for more information.
Page 70

Synology DiskStation User's Guide
Based on DSM 3.1
70 Chapter 7: Set Up File Sharing
Join a Windows ADS Domain or Workgroup
Click the Domain/Workgroup tab at Main Menu > Control Panel > Win/Mac/NFS to add your
Synology DiskStation to a workgroup or domain, depending on your network environment.
To join a workgroup:
Choose WORKGROUP and enter the name of the workgroup.
To join a domain:
1 Choose Domain and enter the domain name in the Domain field and DNS server (optional) in the DNS Server
field, and click OK.
2 In the window that appears, enter the user name and password for the administrator of the domain server, and
click OK.
After Synology DiskStation joins the domain, domain users can log in to Synology DiskStation with their domain
account and password.
Note:
If your domain user name includes “%” and “$”, you might not be able to access your hom e folder. Please ask your
domain administrator to give you a new user name.
Domain groups Domain Admins and Enterprise Admins w ill be added to the local group administrators
automatically. In other words, domain users in these groups have administrative right on the DiskSt ation, including
performing DSM/CIFS/FTP/AF P/WebDAV applications.
You can also c onfigure domain users’ access privileges to the shared folders on Synology DiskStation. See "Allow
Domain Users or Groups to Access Shared Folders" on Page 82 for m ore information.
Page 71

Synology DiskStation User's Guide
Based on DSM 3.1
71 Chapter 7: Set Up File Sharing
More Information
About DNS server:
You are recommended to specify a DNS server to help Synology DiskStation search for the domain. However,
if the domain is not registered on the DNS server, the procedure of joining domain may fail.
About advanced domain options:
In most cases, you do not need to fill in any of the advanced domain option. Advanced domain options are
needed only for specific domain environment.
DC IP: Specify a DC (Domain Controller) IP and Synology DiskStation will try to communicate with it. If there
is more than one IP, insert a comma in between each of them. Add an asterisk (*) after the last DC IP if you
wish, and Synology DiskStation will try to communicate with other DC when all specified ones failed. You
will need to add a comma between the asterisk and the last IP.
Domain NetBIOS name: Specify the NetBIOS name of the domain.
Domain FQDN (DNS name): Specify the FQDN (DNS name) of the domain.
Manage Users and Groups
Go to Main Menu > Control Panel > User or Group to create users or groups, and allow or deny their access to
different shared folders.
Page 72

Synology DiskStation User's Guide
Based on DSM 3.1
72 Chapter 7: Set Up File Sharing
Create and Edit Users
Follow the steps below to create a user account. The user can login to edit his/her account info after the user
account has been established. You can also choose to set an account expiration date or disallow the user to
change account password.
To create a user account:
1 Click Create to open the User Creation Wizard.
2 Enter the user name and other information, and click Next.
3 In the Join Group section, tick the checkboxes to select the user group for the user, and click Next. By default,
the user is categorized under the users group.
Note: For more inf ormation about groups, see "Create and Edit Groups" on Page 77.
4 In the Assign Privileges – shared folder section, do the following:
a Assign the following shared folder privileges for the user:
Read/Write: The user can access and make changes to the files and subfolders in the shared folder.
Read only: The user can access the files and subfolders in the shared folder, but cannot make changes
to them.
No access: The user cannot access the file s and subf old ers i n the shared fold er .
b See Privilege preview to see the user’s privilege that is decided based on the privileges setting of the user
and the groups joined by the user.
c See Group privileges for the shared folder privile ge s of the group the user bel ong s to.
Note:
When you encounter privilege conflicts, the privilege priority is as foll ow s: No access > Read/Write > Read
only.
For more information about editing a group's access privileges to shared folders, see "Allow Us ers or Groups to
Access Shared Folders" on Page 81.
5 In the User quota setting section, do the following if you want to set the maximum storage quota for the user.
a Tick Enable quota and enter a value under the Quota column.
b Click Next.
6 In the Assign Privileges – applications section, assign the application privileges for this user, and click Next.
7 Click Apply to finish.
Page 73

Synology DiskStation User's Guide
Based on DSM 3.1
73 Chapter 7: Set Up File Sharing
To create a user account by importing users list:
1 Create a text file which contains the following tab-delimited information in each line:
Username
Password
Description
Email
Quota (MB) in volume 1
Quota (MB) in volume 2 (and so on)
Note:
All fields are optional except Username.
An example of the text file is shown as follows:
eddy 1234 father eddy@abc.com 80000
rosy 5678 mother rosy@abc.com 80000
chaddy 8901 brother chaddy@abc.com 20000
eric 2345 cousin eric@abc.com 20000
2 Save the text file in UTF-8 encoding.
3 Go to Main Menu > Control Panel > User and click Import Users.
4 Choose the text file and click OK to start uploading. Tick Overwrite duplicate accounts if you want to replace
the existing duplicate accounts with the one from the users list.
After submission, a dialog will show the list of imported users.
Note: Users wit h abnormal status wi ll not be imported.
To edit a user:
1 Select the user you want to edit from the users list and click Edit or double-click the user.
2 Make changes to the settings and click OK.
Note:
If you disable an account, the account will stop functioning.
The quota val ue should be an integer greater than or equal to 0 G B, and less than the disk/volume capacity. A
quota value of 0 means unlimited quota size.
If there is more than one volume on the server, you can set a quota for the user on every vol ume.
Email information on the "Notification" page must be set correctly in or der for the system to notify the user by email
after the account information has been created or modified.
To search for a user:
Type the name of the user in the Search field and press Enter (PC) or Return (Mac) on your keyboard. The
search result will be displayed in the users list below.
This function is especially useful when there are numerous users for your Synology DiskStation.
To delete a user:
Select the user you want to delet e and click Delete.
Note: To see domain users in the users list, you must join the domain and assign shared folder privileges for the
users. For more information about W indows ADS domain, see "Join a Windows ADS Dom ain or Workgroup" on Pa ge
70.
Page 74

Synology DiskStation User's Guide
Based on DSM 3.1
74 Chapter 7: Set Up File Sharing
Apply Password Strength Rules
You can enable password strength service to make sure DSM users’ password is secure enough to withstand
malicious login attempt.
Note:
Password Strength rules only work for passwords created or modified after the Password Strength service is
enabled. Existing passwords won’t be affec ted by the rules.
The rules won’t apply to the passwords of users created by importing users list.
To apply password strength rules:
1 Click Password Strength.
2 Tick Apply password strength rules.
3 Tick any of the following rules:
Exclude name and description of user from password: The password must not contain user name or
description.
Mixed case: The password must cont ain mixed case letters.
Included numeric character: The password must contain at least one numeric character (0~9).
Included special character: The password must contain at least one special character (i.e., ~, `, !, @, #, $,
%, ^, &, *, (, ), -, _, =, +, [, {, ], }, \, |, ;, :, ', ", <, >, /, ?).
Minimum password length: The password must be longer than t he spe cifi ed val ue. The length should be a
number between 6 and 127.
4 Click Apply.
To cancel password strength rules:
1 Click Password Strength.
2 Uncheck Apply password strength rules.
3 Click Apply.
Page 75

Synology DiskStation User's Guide
Based on DSM 3.1
75 Chapter 7: Set Up File Sharing
Create User's Home Folder
Each DSM user (except for guest) can have his/her own folder called the home folder, which is accessible only
by the user and the system administrator.
For DSM admin and users belonging to the administrators group, DSM users’ home folders are here:
homes/[Username]
To enable user home service:
1 Click User Home.
2 Tick Enable user home service.
3 If there are more than one volume on Synology DiskStation, select where you want the homes folder to be
stored.
4 Click OK.
To disable user home service:
1 Click User Home.
2 Uncheck Enable user home service.
When the user home service is disabled, the homes folder will be kept but accessible by admin only . User s can
access their home folders again if the user home service is enabled again.
Note:
To delete the homes folder, the user home service must be disabled first.
The domain user home service would be disabled if the loc al user home service is disabled.
Page 76

Synology DiskStation User's Guide
Based on DSM 3.1
76 Chapter 7: Set Up File Sharing
Create Domain User’s Home Folder
Go to Main Menu > Control Panel > Domain Privileges to create domain user’s home folder.
For DSM admin or users belonging to the administrators group (including domain administrators), domain users’
home folders are in the @DH-[Domain_Name] folder. The name of the user's home folder is the user account
plus a unique number.
Like local users, all domain users can access their own home folder via CIFS, AFP, FTP, WebDAV, File Browser
or File Station.
admin and users belonging to the administrators group can access all personal folders located in the homes
default shared folder.
All domain users' home folders are located in one of the sub-folders under a folder named @DH-domain name.
The name of the user's home folder is the user account plus an unique number.
Note:
To delete the homes shared folder, user home service must be disabled first.
Enabling domain user home service will also enable the local user home service if it's not enabled yet.
The domain user home service would be disabled if the loc al user home service is disabled.
Page 77

Synology DiskStation User's Guide
Based on DSM 3.1
77 Chapter 7: Set Up File Sharing
Create and Edit Groups
Go to Main Menu > Control Panel > Group to create and edit a group, add users to the group, and then edit the
group's properties, saving you the trouble of editing users one by one.
Groups created by default include the following:
administrators: Users belonging to the administrators group have the same administrative priv il ege as
admin.
users: All users belong to the users group.
To create a new group:
1 Click Create and enter the group name and description.
2 Click OK.
To edit a group's name and description:
1 Select the group you want to edit from the groups list and click Edit or double-click the gr oup.
2 Make changes to the settings and click OK.
To delete a group:
Select the group you want to delete from the groups list and click Delete.
To add or remove group members:
1 Select the group you want to add users to from the groups list and click Edit Members.
2 Click Add or Remove, select users from the users list, and click OK. (Press and hold Shift or Ctrl while making
multiple selections.)
3 Click Finish.
Note: For more information about edit ing a group's access privileges to shared f olders or applications, see "Allow
Users or Groups to A ccess Shared Folders" on Page 81 and "Allow Users to Access Applications" on Page 78 for
more information.
Page 78

Synology DiskStation User's Guide
Based on DSM 3.1
78 Chapter 7: Set Up File Sharing
Allow Users to Access Applications
Go to Main Menu > Control Panel > Application Privileges to decide which applicatio ns c ould be acces sed by
a user.
To quickly find the user whose application privileges you want to modify:
1 Click the Local User or Domain User tab, depending on which type of users whose application privileges you
want to modify.
2 Do any of the following:
Use the drop-down menus next to Edit to view users with or without access privilege to the specified
application.
Enter the user's name in the search field and press "Enter" on your keyboard.
3 Wait for a while before the filter result is displayed.
4 Do any of the following if you want to see the complet e user s list:
Choose Privilege includes and any from the drop-down menus.
Delete the name you entered in the search field and press "Enter" on your keyboard.
To allow a user to access applications for Synology DiskStation:
1 Click the Local User or Domain User tab, depending on which type of users whose application privileges you
want to modify.
2 From the users list, select the user whose application privileges you want to modify.
3 In the window that appears, tick the checkboxes to grant access to the applications. You can also tick Grant to
grant access to all applications.
4 Click OK.
Note: The users l ist excludes admin and guest.
Page 79

Synology DiskStation User's Guide
Based on DSM 3.1
79 Chapter 7: Set Up File Sharing
Set Up Shared Folders
Go to Main Menu > Control Panel > Shared Folder to manage the shared folders, which are the root folders of
Synology DiskStation. (Folders within the shared folders are called subfolders.) You can store data in the shared
folders and share them with users or groups with access privileges.
Built-in Shared Folders Created by the System
System built-in shared folders are created when the services or applications requiring the folders are enabled.
System built-in shared folders include the following:
Name Description
public
The public folder will be created automatically after the first time you set up Synology 1-bay models.
web
The web folder contains contents of your website. It will be created automatically when Web Station is
enabled. For more information about Web Station, see "Use Web Station to Host Websites" on Page 116.
photo
The photo folder contains photos and videos you want to share on Photo Station. It will be created
automatically when Photo Station or DLNA/UPnP Media Server is enabled. For more information about
Photo Station and media server, see "Chapter 11: Share Photos, Videos, and Blogs with Photo Station" on
Page 129 and "Manage DLNA Media Server" on Page 200.
music
The music folder contains music you want to share on Audio Station. It will be created automaticall y when
Audio Station is enabled. For more information about Audio Station, see "Chapt er 12: Play Music with
Audio Station" on Page 143.
video
The video folder contains videos you want to browse through DLNA/UPnP DMA. It will be created
automatically when Media Server is enabled. For more information about Media Server, see "Manage DLNA
Media Server" on Page 200.
surveillance
The surveillance folder contains Surveillance Station recordings. It will be created automatically when
Surveillance Station is enabled. It is read-only and can only be accessed by the system administrator. For
more information about Surveillance Station, see "Chapt er 14: Safeguard Your Environm ent with
Surveillance Station" on Page 176.
home
The home folder provides a private space for each user to store data where only the user can access. It will
be created automatically when User Home is enabled. For more information about User Home, see "Create
User's Home Folder" on Page 75.
homes
The homes folder contains t he home folders of all users. It will be created automatically when User Home is
enabled. Only system administrator can access and manage all users' home folders. For more information
about User Home, see "Create User's Home Folder" on Page 75.
NetBackup
The NetBackup folder is created automatically when Network Backup Service is enabled. For more
information about network backup, see "Network Backup" on Page 108.
usbshare
The usbshare[number] folder is created automatically when you connect an USB disk to
Synology DiskStation’s USB port. For more information about external USB disks, see "Manage External
Disks" on Page 58.
satashare
The satashare folder is created automatically when you connect an eSATA disk to Synology DiskStation’s
eSATA port. For more information about external eSATA disks, see "Manage External Disk s" on Page 58.
Page 80

Synology DiskStation User's Guide
Based on DSM 3.1
80 Chapter 7: Set Up File Sharing
Create a Shared Folder
If you are admin or a user belonging to the administrators group, you can also create shared folders and assign
access privileges to the folders.
To create a new shared folder:
1 Click Create.
2 Enter the name and description for the shared folder, and select a volume
1
3 Tick Hide this shared folder in "My Network Places" if you want to hide the folder in Windows "My Network
Places".
where the folder will be created.
Note: If you have access privilege to a shared folder hidden in " M y N etwork Places", you can still access it by
pressing Windows-R and entering \\Synology_Server_Name\Shared_Folder_Name in the Open field.
4 If you want to encrypt the shared folder, do the following:
a Tick Encrypt this shared folder in the window that appears, and then enter the encryption key in the
Encryption key field, and enter the same key again in the Confirm key field to confirm it.
b Tick Mount automatically on startup to mount the encrypted folder automatically for access. If you didn't
tick this checkbox, the encrypted folder will be unmounted next time Synology DiskStation restarts. To view
or access an unmounted folder, you will need to mount the folder manually by importing or entering the
encryption key.
5 If you want to define Windows ACL privileges for the shared folder, click the Windows Access Control List
tab. See "Define Windows ACL Privileges for Shared Folder" on Page 85 for more information.
6 If you want to index contents within this shared folder, click the File Indexing tab. See "Index Shared Folder
Contents" on Page 86 for more information.
7 Click OK.
Note: One Synology D iskStation can contain up to 100 or 200
2
---------
1
Multiple volumes are available only on DiskStation with more than 1 bay.
shared folders, including the built-i n shared folders.
2
200 shared folders are supported on specific models only. See "Appendix A: Synology DiskStation Specifications" on Page
219 for more information.
Page 81

Synology DiskStation User's Guide
Based on DSM 3.1
81 Chapter 7: Set Up File Sharing
Remove a Shared Folder
If you are admin or a user belonging to the administrators group, you can remove any shared folder created by
yourself.
To remove a shared folder:
1 Select the shared folder you want to remove from the shared folder list.
2 Click Delete, and tick the checkbox on the dialogue prompt for confirmation.
3 Click OK.
Important: Removing any shared folder also removes all data within it. If you still need the data, back them up first.
Allow Users or Groups to Access Shared Folders
Go to Main Menu > Control Panel > Shared Folder to allow or deny users' or groups' access to the shared
folders.
To allow users or groups to access a shared folder:
1 Select the shared folder you want to edit from the shared folders list, and click Privileges Setup to open the
settings window.
2 Click the Privilege Setup tab, and select any of the following from the drop-down menu:
System Internal user: Anonymous FTP user. Before allowing anonymous FTP users to connect to a
shared folder, you need to allow their access to the folder first. For more information about anony mo us FTP,
see "Manage FTP Security Settings" on Page 93.
Local users: Synology DiskStation users (including guest). See "Manage Users and Groups" on Page 71
for more information.
Local groups: Synology DiskStation groups. See "Manage Users and Groups" on Page 71 for more
information.
3 Tick or uncheck the following privileges to assign access privileges for the users or groups:
Read/Write (RW): The user or group can access and make changes to the files and subfolders in the
shared folder.
Read only (RO): The user or group can access the files and subfolders in the shared folder, but cannot
make changes to them.
No access (NA): The user or group cannot access the files and subfolders in the shared folder.
Note: To set the ac cess privileges to subfolders, you can use File Browser. See "Allow Users and Groups to
Access Files and Subfolders" on Page 100 for more information.
4 Click the Advanced privileges tab if you want to do any of the following:
Disable directory browsing
Disable modification of existing files
Page 82

Synology DiskStation User's Guide
Based on DSM 3.1
82 Chapter 7: Set Up File Sharing
Disable file downloading
5 Click OK.
Note:
When you encounter privilege conflicts, the privilege priority is as follows: No access > Read/Write > Read only.
When you create a new shared folder, if the access privilege of admin (or a user belonging to the administrators
group) to the folder is set as No access, then admin (or the user belonging to the administrators group) will only
be able to see the folder by going to Main Menu > Cont rol Panel > Shared Folder.
To allow Linux clients to access a shared folder:
1 Select the shared folder you want to edit from the shared folder list, and click NFS Privileges.
2 Click Create to open the settings window.
3 Enter a Hostname or IP. You may specify a host in three ways:
Single Host: The FQDN (fully qualified domain name) or an IP address.
Wildcards: *,* .synology.com
IP networks: 203.74.205.3 2/ 2 55.25 5.25 2. 0, /24
4 Assign Privilege, assign Root Squash, or tick Enable asynchronous, and click OK.
5 Click OK.
Term Explanation
Asynchronous: NFS servers will reply to requests before the changes on the file are completed.
Allow Domain Users or Groups to Access Shared Folders
Go to Main Menu > Control Panel > Domain Privileges to set up and modify the access permission of a
domain user or group, and enable the home service for all domain users .
To manage domain users’ access privileges:
admin or users belonging to the administrators group can set up the shared folder permission and the quota of
disk capacity of each domain user. The rule of settings are:
Privileges priority: NA > RW > RO.
Privilege preview: User’s privilege would be shown here, and that is decided based on the privileges setting
of the user and the groups joined by the user.
Group privileges: Assign privileges to groups access to access shared folders.
Page 83

Synology DiskStation User's Guide
Based on DSM 3.1
83 Chapter 7: Set Up File Sharing
To manage domain group’s access privileges:
For each domain group, you can also configure the permission of all shared folders. The priority of privileges is:
NA > RW > RO.
Encrypt a Shared Folder
Go to Main Menu > Control Panel > Shared Folder to encrypt your shared folder.
1
The AES 256-bit encryption can block off all unauthorized access attempts. Without the encryption key, other
people will not be able to use the encrypted data even if they remove the hard drives from your
Synology DiskStation and mou nt it on their device .
To encrypt a shared folder:
1 Select a shared folder you want to encrypt, and then click Edit to open the settings window.
2 Tick Encrypt this shared folder, enter the encryption key in the Encryption key field, and enter the same key
again in the Confirm key field.
3 Tick Mount automatically on startup to mount the encrypted folder automatically after Synology DiskStation
starts up next time. By default, encrypted shared folder will be unmounted automatically on startup for security
reasons.
Note:
You can also enc rypt a folder when you create it.
The following built-in shared folders are not allowed for encryption since they are associated with system services:
web, photo, music, video, surveillance, download, Netbackup.
Encrypted s hared folders cannot be accessed via NFS. If you encrypt a shared folder containing NFS r ules, they
will be removed.
---------
1
Shared folder encryption is supported on specific models only.
Page 84

Synology DiskStation User's Guide
Based on DSM 3.1
84 Chapter 7: Set Up File Sharing
Edit an Encrypted Folder
After the folder is encrypted, you can use the Encryption drop-down menu to edit the folder.
The items shown in the menu depend on the status of the selected shared folder:
For unencrypted shared folder, the Encryption drop-down menu is disabled.
For an encrypted shared folder which is mounted, you can choose Unmount from the Encryption drop-
down menu to unmount the folder, or Export key to save the encryption key.
For an encrypted shared folder which is unmounted, you can choose Mount from Encryption drop-down
menu, and then enter or import the encryption key to mount the folder for access.
Note:
It is very impo rtant to remember the encryption key. It is strongly recommen ded that you export and save the
encryption key. If you forget or lose the k ey, there is no way to rescue the encrypted data.
If an encrypted folder is unmounted, you cannot rename it or change its volume l ocation.
Page 85

Synology DiskStation User's Guide
Based on DSM 3.1
85 Chapter 7: Set Up File Sharing
Define Windows ACL Privileges for Shared Folder
Windows Access Control List (ACL) is a list of privileges or permissions that determine specific access rights
under the Windows environment. This can help administrator define access control rules for an individual file or a
directory, and give different access rights for individual user or group.
Through Windows ACL, you can assign different privileges to local and domain users in the system. The
privileges apply to all file-related applications, such as FTP, File Station, NFS, AFP, WebDAV, etc.
To define Windows ACL settings for a shared folder:
You can define initial Windows ACL settings when creating a shared folder. Follow the steps below:
1 Click Shared Folder in Control Panel.
2 Click Create to create a shared folder.
3 Under the Shared Folder Info tab, enter the fields required.
4 Under the Windows Access Control List tab, check the Grant Full Control to Everyone while creating the
shared folder checkbox to initialize Windows ACL support.
5 Click OK to finish.
To edit Windows ACL settings:
You can further edit Windows ACL settings for a shared folder under Windows "Properties" page. Follow the
steps below:
1 In Windows, log into DiskStation using Windows Explorer.
2 Locate the shared folder or the file you want to manage.
3 Right-click on the folder or the file and choose Properties.
4 Go to the Security tab. You'll find the Everyone in the Group or user name section.
5 Click Edit.
6 In the Group or user name se ction, click Everyone.
7 Set the privileges in the Permission for Everyone section.
8 Click OK to save the settings.
9 Click OK.
Page 86

Synology DiskStation User's Guide
Based on DSM 3.1
86 Chapter 7: Set Up File Sharing
Advanced Settings
Besides editing the privilege for Everyone
, you can also define the access permissions for individual DiskStation
account on a certain file or folder. This includes domain user accounts as well. Follow the steps below:
1 Follow steps 1~5 in To edit Windows ACL settings.
2 Click Add.
3 Click Advanced.
4 Click Search Now
. The search result will include all user and groups, including domain user accounts, in your
DiskStation.
5 Select the account you want to add, click OK.
6 Click OK.
7 In the Group or user name section, click on the account you just added.
8 Follow steps 7~9 in To edit Windows ACL settings to finish.
When there's a conflict between Windows ACL settings and the shared folder privileges, the system will
automatically adopt the settings the two may have in common. For example, if the shared folder privilege is
"Read/Write", but ACL privilege is "Read". Then final privilege will be only be "Read".
Note:
Windows AC L is only supported on EXT 4 file system. For previous DSM 2.3 users , you need to create at leas t one
EXT4 volume to use ACL feature. This means, you have to format at least one hard disk and r e-create a volume.
Formatting DiskStation wi ll result in erasing all stored data and settings. Please make sure al l your data is
backed up before processing.
To define new pr ivileges for domain users, make sure D SM and Windows clients are in the same domain.
The ACL privi leges of the following shared folders cannot be modified: photo, surveillance, web.
Index Shared Folder Contents
You can index the contents of a shared folder for rapid file search by File Browser.
Page 87

Synology DiskStation User's Guide
Based on DSM 3.1
87 Chapter 7: Set Up File Sharing
To index files in a shared folder:
1 Select the shared folder you want to index.
2 Click Edit and then click the File Indexing tab.
3 Tick Enable file indexing.
4 Click OK.
Note: See "Access Files via File Browser" on Page 94 for more informat ion about File Browser.
Page 88

88
Chapter
8
Chapter 8: Access Files from Anywhere
When you have set up users or groups with proper access privileges to the shared folders, they can share their
files with your Synology DiskStation from anywhere.
This chapter explains the ways to access the Synology DiskStation shared folders within the Intranet or over the
Internet.
Access Files within the Intranet
This section explains how to allow users to use Windows, Mac, or Linux computer to access shared folders on
Synology DiskStation within the Intranet.
Note: Before acc essing, make sure the relative file sharing protocols have been enabled for your
Synology DiskSt ation. See "Enable Fi le Sharing Protocols for All Platforms" on Page 67 for more inform ation.
Access Shared Folders from Windows
To access shared folders from Windows, you can use any of the following methods.
Method 1: Use Synology Assistant to map the shared folders as network drives.
1 Run Synology Assistant and select the server from the server list.
2 Click Map Drive and follow the onscreen steps to finish the setup.
Upon completion, you can access the mapped shared folder directly in Windows Explorer.
Method 2: Use the Run window.
1 Press Windows-R to open the Run window.
2 Enter \\Synology_Server_Name\Shared_Folder_Name in the Open field.
Page 89

Synology DiskStation User's Guide
Based on DSM 3.1
89 Chapter 8: Access Files from Anywhere
Method 3: Use Window Explorer.
1 Open a Windows Explorer window and choose Tools > Map network drive to show the Map Network D rive
window.
2 Choose a drive number from the Drive drop-down menu.
3 Locate the shared folder by doing one of the following:
Enter \\Synology_Server_Name\Shared_Folder_Name in the Folder field.
Click Browse to locate the shared folder, and then click OK.
4 Click Finish.
5 Enter your user name and password for Synology DiskStation Manager and click OK.
Upon completion, you can access the mapped shared folder directly in Windows Explorer.
Page 90

Synology DiskStation User's Guide
Based on DSM 3.1
90 Chapter 8: Access Files from Anywhere
Access Shared Folders from Mac
1 Choose Go > Connect to Server from the menu bar.
2 Type Synology DiskStation's IP address or server name (appended with .local) preceded by smb:// or afp:// in
the Server Address field and click Connect. (e.g. smb://EricaWang.local or afp://192.168.0.2)
Note: For better performance, it is recommended that you connect to the shared f olders via SMB.
3 Select the shared folder you want to access. Upon completion, you can access the shared folder in the Finder
window.
Access Shared Folders from Linux
1 In Synology DiskStation Manager, Go to Main Menu > Control Panel > Shared Folder.
2 Select the shared folder you want to access, click NFS Privileges, and find the mount path at the bottom of
the window that appears.
Note: for more information about NFS Privileges, see "Allow Users or Groups to Access Shared Folders" on P age
81.
3 On a Linux computer, enter the mount path to mount the shared folders.
Page 91

Synology DiskStation User's Guide
Based on DSM 3.1
91 Chapter 8: Access Files from Anywhere
Access Files via FTP
If your Synology DiskStation is accessible over the Internet, you can use a FTP application to access the shared
folders.
Note: For more inf ormation about maki ng Synology DiskStation accessible over the Internet, see "C hapter 5: Access
your DiskStati on from the Internet" on Page 59.
Go to Main Menu > Control Panel > FTP to enable FTP service, allowing users to upload or download
Synology DiskStation data via FT P.
To enable FTP service:
1 Tick Enable FTP service.
2 Enter a value in Port number setting of FTP service (The default number is 21).
3 Specify the Port range of Passive FTP (PASV) by using the default range (55536-55663) or entering any
range between 1025 and 65535.
4 Click OK.
Note:
The default port number for the FTP service is 21. You can set it from 1 to 65535, excluding the following numbers:
20, 22, 23, 25, 80, 110, 137, 138, 139, 143, 199, 443, 445, 515, 543, 548, 587, 873, 993, 995, 3306, 3689, 5000,
5001, 5005, 5006, 5335, 5432, 9997, 9998, 9999, BitTorrent default port range: 688 1-6890, and Surveill ance
Station default port range: 55736-55863.
The port r ange of Passive (PASV) FTP can be from 1025 to 65535. It can contain up to 128 ports.
The guest ac count cannot log in to DiskStation via FTP.
The codepage setting on the FTP client computer must be the same as that of the Synology DiskStation in order to
access the data correctly.
On some spec ific models, FTP service supports connecting using SSL or TLS.
Page 92

Synology DiskStation User's Guide
Based on DSM 3.1
92 Chapter 8: Access Files from Anywhere
Advanced Settings
Report external IP in PASV mode
By enabling this option, the server will report its external IP to FTP clients. The reported IP will be listed in the
connection log of the FTP client. This option only works when the server is behind a NAT, and with the FTP
clients residing in a different subnet as the server. In most cases you don't need to enable this opt ion, but if th e
FTP clients fail to connect to the server, then please try with this option enabled.
Enable UTF-8 filename support
If FTP client supports UTF-8, enable this function to better handle multilingual filename. However, the support to
the old version of FTP clients is limited. If your FTP client has trouble to handle multilingual file name, you might
want to disable this function.
Enable FTP file transfer log
Enable this function to record the log of each downloaded or uploaded file.
To see the FTP file transfer log:
Go to Main Menu > System Information > Log, and choose FTP file transfer log from the drop-down menu.
Enabling FTP file transfer log will affect the system performance.
Set up FTP Connection Restriction
Click the Connection Restriction tab to limit DiskStation users' FTP access to DiskStation.
To set up FTP connection restriction, tick any of the following and click OK:
Allow SSL/TLS connection only: Accept only SSL or TLS connection requests from FTP clients.
Limit connections per IP: Limit the maximum connections per IP.
Enable FTP bandwidth restriction: Restrict the bandwidth of single FTP connection.
Page 93

Synology DiskStation User's Guide
Based on DSM 3.1
93 Chapter 8: Access Files from Anywhere
Manage FTP Security Settings
Click the Security Settings tab o enhance FTP security.
To manage FTP security settings, tick any of the following and click OK:
Change the selected users' root to user home: Click Select User to restrict the selected users’ FTP access
to their home folders only.
Enable Anonymous FTP: Allow anyone to log in to DiskStation's FTP service (with the anonymous or ftp
account). You can also tick Change Anonymous root and select a shared folder to restrict anonymous users’
FTP access to that folder only.
More Information
To configure the privilege of anonymous user:
1 Go to Main Menu > Control Panel > Shared Folder, select a shared folder, and click Privileges Setup.
2 Choose System internal user from the drop-down menu and tick the checkboxes.
3 Click OK.
Connect to Synology DiskStation Using a FTP Application
Open any FTP application on your computer and enter the following information to connect to
Synology DiskStation:
Synology DiskStation's IP address or domain name
Your user account and password
The port number (The default number is 21)
Access Files via WebDAV
By enabling WebDAV, you can manage and edit files on DiskStation remotely via the HTTP protocol. See
"Manage WebDAV" on Page 121 for more information.
Page 94

Synology DiskStation User's Guide
Based on DSM 3.1
94 Chapter 8: Access Files from Anywhere
Access Files via File Browser
File Browser is DSM's file management tool, allowing DSM users over the Internet to access DiskStation folders
with their web browsers. By launching two or more File Browsers, you can manage all your DiskStation data by
dragging and dropping them between different Fil e Browsers.
File Browser Requirement
To use the full featured File Browser, you will need the newest web browser, Java and Flash Player.
Browser: Chrome 8 or later, Firefox 3.5 or later, Safari 4.0 or later, Internet Explorer 7 or later; with AJAX and
JavaScript enabled
Java (For browsing folders on the local computer): Java Runtime Environment (JRE) 5 or later
Flash: Flash Player 9.0.28 or later
File Browser Appearance
Go to Main Menu > File Browser to open a File Browser window.
Left panel: Displays Synology DiskStation's shared folders and their subfolders in the upper part, and the
folders on your local computer in the lower part.
Main section: Displays contents of the currently-selected folder.
Help button (top-right corner): Click the Help button (with a question mark) to reveal the DSM Help, where
you can get useful help about how to use File Browser.
Search field (next to the Help button): Enter a keyword to filter through files or folders in the current folder.
Advanced Search (downward arrow below the Help button): Search for refined search results.
Page 95

Synology DiskStation User's Guide
Based on DSM 3.1
95 Chapter 8: Access Files from Anywhere
Search for Files or Folders
You can filter through files or folders in the current folder. You can also perform advanced search for more
refined search results.
To search for files or folders in the current folder:
1 Use File Browser to go to the folder containing contents you want to search.
2 In the Filter field at the top-right corner of the File Browser window, enter a keyword and see the filtered result
in the main area of the window.
To perform advanced search:
1 Use File Browser to go to the folder containing contents you want to search.
2 At the top-right corner of the File Browser window, click the button to the right of Advanced Search to reveal
the Advanced Search panel.
3 Enter information or choose from drop-down menus in the following search criteria:
Keyword: Enter a keyword to search for files or folders with matching names.
Note:
You can use global patt ern [*] (meaning any number of random characters) or [?] (meani ng 1 random character )
in the keyword. For example, [a*n] can r epresent [action], [attention], or [an].
You can use space pattern [ ] to separate more than one keywords. For example, [a tion] can represent
[action], [a function], [function added], or nation.
You can add double quote ["] at the beginning a nd the end of the keywor d to search for exact matches. For
example, ["a typ"] can r epresent [a type], but cannot represent [typical].
Location: The default location is the current folder. If you want to search other locations, select any of the
listed shared folders to search its contents, or select Other lo cati ons to select any other locations.
File Type: Choose Extension to limit the search range to specific types of files, or choose Folder to search
for folders only.
Size (MB): Choose from equals, is greater than, and is less than, and then enter a size to search for files
with matching sizes.
Modified Date or Created Date: Choose from is exactly, is before, and is after, and then choose a date
from the calendar to search for files with matching created or modified dates.
Owner/Group: Choose Owner or Group, and then choose from the drop-down menu to search for files or
folders belonging to the selected owner or group.
Note: Other than Location, you have to speci fy at least one search criterion.
4 Click Search to start the search, or click Reset and specify the search criteria again. When the search is
complete, matching files will be listed in the main area of File Browser.
Note: For quick er search result, it is recommended that you in dex shared folder contents. See "Index Shared Folder
Contents" on Page 86 for more information.
Page 96

Synology DiskStation User's Guide
Based on DSM 3.1
96 Chapter 8: Access Files from Anywhere
Set File Browser in Action
With the Action menu, right-clicking, and dragging-and-dropping, you can easily download, copy, move, rename,
delete, extract, and compress files or folders, and mor e.
Download Files or Folders from Synology DiskStation
Use any of the following methods to download files or folders from Synology DiskStation to your computer.
Method 1:
1 Select the files or folders you want to download. (Press and hold Shift or Ctrl while making multiple selections.)
2 Choose Download from the Action menu.
Method 2:
1 Select the files or folders you want to download. (Press and hold Shift or Ctrl while making multiple selections.)
2 Right-click the files or folders, and choose Download.
Note:
Under Windows environment, characters \ * ? " > | # % contained in the filename wil l be replaced by - after
downloading.
If you make multiple selections, File Browser wil l archive your select ions into a zip file before downloading.
Upload Files or Folders to Synology DiskStation
Use any of the following methods to upload files or folders from your computer to Synology DiskStation.
Method 1:
1 From the upper part of the left panel, choose a destination folder on Synology DiskStation.
2 Choose Upload, and select files or folders from your local computer.
3 Click OK to start uploading.
Method 2:
1 From the lower part of the left panel, select a folder on your local computer. The main section now displays the
contents of the selected folder.
2 Select the files or folders you want in the main section, and then click Upload.
3 Select a destination folder on DiskStation in the window that appears.
4 At the top-right corner of the window, select Overwrite if you want to overwrite files or folders with the same
name in the destination folder. Otherwise, select Skip.
5 Click OK to start uploading.
Method 3:
1 On the left panel, drag a folder from your computer (the lower part) to any folder on the DiskStation (the upper
part).
2 In the pop-up menu that appears, choose Upload - Overwrite to overwrite files or folders with the same name
in the destination folder. Otherwise, choose Upload - Skip to skip the files with the same filename.
Page 97

Synology DiskStation User's Guide
Based on DSM 3.1
97 Chapter 8: Access Files from Anywhere
Note: If you have installed JRE 5 or later , you can upload files wi th size over 4GB. Other wise, you can only upload
up to 2GB of contents at a time.
When you upload files and folders using any of the following methods, you can see the upl oadin g progr e ss of the
files and folders in the top-right corner of the desktop.
You can also click the upward arrow at the right end of the taskbar to see the Upload Que ue.
Copy or Move Files or Folders on Synology DiskStation
Use any of the following methods to copy files or folders between folders on Synology DiskStation.
Method 1:
1 Select the files or folders you want. (Press and hold Shift or Ctrl while making multiple selections.)
2 Choose Copy or Move from the Action menu.
3 Select a destination folder on Synology DiskStation in the window that appears.
4 At the bottom of the window, select Overwrite if you want to overwrite files or folders with the same name in
the destination folder. Otherwise, select Skip.
Method 2:
1 Select the files or folders you want. (Press and hold Shift or Ctrl while making multiple selections.)
2 Drag any DiskStation folders or files from the main section to another DiskStation folder on the left panel.
3 In the pop-up menu that appears, choo se Copy - Overwrite or Move - Overwrite to overwrite files or folders
with the same name in the destination folder. Otherwise, choose Copy - Skip or Move - Skip to skip the files
with the same filename.
Method 3:
1 Select the files or folders you want. (Press and hold Shift or Ctrl while making multiple selections.)
2 Go to Main Menu > File Browser to open a new File Browser window, and use the left panel to browse to a
destination folder on Synology DiskStation.
Page 98

Synology DiskStation User's Guide
Based on DSM 3.1
98 Chapter 8: Access Files from Anywhere
3 Drag any DiskStation folders or files from the original File Browser window to the window you just opened.
4 In the pop-up menu that appears, choose Copy - Overwrite or Move - Overwrite to overwrite files or folders
with the same name in the destination folder. Otherwise, choose Copy - Skip or Move - Skip to skip the files
with the same filename.
Note: When copying or moving files/folders to a directory in FAT file system, characters \ *?">| in the filename will be
replaced by –, and the Metadata of Mac files will be deleted.
Rename a File or Folder on Synology DiskStation
1 Select a file or a folder.
2 Do one of the following:
Choose Rename from the Action menu.
Right-click the file or folder and choose Rename.
3 Enter a new name in the window that appears and click OK.
Create a Folder
1 Go to the directory where you want to create a folder.
2 Do any of the following:
Click Create folder.
Choose Create folder from the Action menu.
3 Enter a new name in the window that appears and click OK.
Delete Files or Folders
1 Select the files or folders you want. (Press and hold Shift or Ctrl while making multiple selections.)
2 Do one of the following:
Choose Delete from the Action menu.
Right-click one of the files or folders and choose Delete.
Extract an Archive
1 Select an archive you want to extract.
2 Choose Extract from the Action menu. You can see the contents of the archive in the File list.
3 Click the Option tab to enter the password if the archive is password-protected.
4 Click Destination at the bottom, and select a destination folder on Synology DiskStation in the window that
appears.
5 Do one of the following:
To extract all files and folders in the archive, click Extract All.
To extract some files or folders in the archive, select them in the File list and click Extract Selected.
Note: File Browser can extract the following archive formats: .zip, .tar, .gz, .tgz, .rar, .7z, .iso (ISO 9660 + joli et)
Compress Files or Folders
1 In the main section, select the files or folders on Synology DiskStation that you want to compress. (Press and
hold Shift or Ctrl while making multiple selections.)
2 Do one of the following:
Choose Compress to “(file name)”.zip from the Action menu.
Right-click one of the selections and choose Compress to “(file name)”.zip.
To use advanced options (such as renaming or encrypting the archive, using different compr ession lev el s or
modes), choose Add to archive instead.
Note:
You cannot compress files or f olders on your local computer using File Browser.
Supported ar chive formats: .zip, .7z.
Page 99

Synology DiskStation User's Guide
Based on DSM 3.1
99 Chapter 8: Access Files from Anywhere
Open a File in a New Window
Open a file on Synology DiskStation in a new tab or window of the web browser to preview it instantly.
To open a file in a new window:
1 Select the file you want to preview.
2 Do one of the following:
Choose Open in New Window from the Action menu.
Right-click the file and choose Open in New Window.
If your browser can view the selected file, it will be opened in a new browser window.
Note: The browser setting wil l decide what file types can be viewed directly.
Edit the Properties of Files and Subfolders
You can edit the access privileges to files and subfolders (meaning folders and their subfolders in a shared
folder), copy download links and open file in a new browser window in the Properties window.
Page 100

Synology DiskStation User's Guide
Based on DSM 3.1
100 Chapter 8: Access Files from Anywhere
Allow Users and Groups to Access Files and Subfolders
With File Browser, you can set access privileges to files and subfolders. This function is especially useful when
you want to allow different groups of users to access different subfolders in a shared folder.
Note: To set access privileges to shared folders, us e S ynology DiskStati on M anager instead. See "Al low Users or
Groups to Access Shared Folders" on Page 81 for more informat ion.
To allow users and groups to access files and subfolders:
1 Select the files and folders for which you want to set access privileges. (Press and hold Shift or Ctrl while
making multiple selections.)
2 Do one of the following to open the Properties window:
Choose Properties from the Action menu.
Right-click one of the files or folders and choose Properties.
3 In the Owner & Group section, do the following:
Choose the owner of the selected files and folders from the Owner drop-down menu.
Choose the user group of the selected files and folders from the Group drop-down menu.
All the other users or groups not chosen here belong to the Others group.
4 In the Privilege section, allow or disallow Owner, Group, and Others to access the selected files and folders
by ticking any of the Read, Write and Execute checkboxes.
5 Tick Apply to this folder, sub-folders and files if you want to give the same access privileges to all the
subfolders and files within the selected subfolders.
6 Click OK.
Note: You are not allowed to edit the access privileges to files and subfolders in the photo shared folder here. To set
access privil eges to photo albums for Photo Station users , see "Set as Private Album" on Page 137 for more
information.
Obtain a File or Folder’s Download Link
You can obtain the download link to a file or folder and share the link with other users.
 Loading...