

Page 1

Synergy JOIN Installation and
Configuration Guide
Synergy JOIN 4.0
January 2020
© Synergy SKY 2019
Page 2

Synergy JOIN Install ation and Configuration Guide
Contents
Introduc tion 4
About Synergy JOIN 4
How Synergy JOIN works 5
Feature overview 5
Overallprocess from installto end user 5
Limitations 6
How the Skype URIs are generated 6
How the call is routed 7
Requirements 9
DeviceSupport 11
Exchange Resource Account Requirements 12
Microsoft Graph API 14
Google Cloud Platform Configuration 17
Google Cloud Platform 17
Enabling API's and Services 19
Service Account 22
Enable Serviceaccounts to access Calendar Resources 25
Polycom EWS Emulator 29
Exchange In-Body Update Requirements 32
Installing & Upgradi ng to Synergy JOIN 4.0 35
Synergy JOIN 4.0 36
Synergy JO IN Qui ck Setup Guide 38
Matching Rules for Skype for Business& Teams Meetings 40
Matching Rules for Hangouts Meetings 41
Matching Rules for WebRTC Meetings 42
Synergy JOIN with Dynamic VMR's 43
Matching Rules for StaticVMR's 44
Configuring Synergy JOIN 46
Task 1: Launching the configuration tool and installing the service 46
Google Cloud Platform Configuration 47
Google Cloud Platform 47
Enabling API's and Services 49
Service Account 52
Enable Serviceaccounts to access Calendar Resources 55
Polycom EWS Emulator 59
Task 2: Launching the configuration tool and installing the service 62
Task 3: Configuring the General Settings 64
Task 4: Testing that emailis working 65
Task 5: VMR Pools 66
Task 6: Creating Matching Rules 71
Task 7: Adding Rooms 76
Page 2 of 121
Page 3

Synergy JOIN Install ation and Configuration Guide
Task 8: Adding Video Systems 77
Task 9: Configuring Conference Settings 79
Task 10: Configuring Services(optional) 82
Task 11: Adding a License 87
Task 12: Configuring Emailtemplates 88
Task 13: Configuring a proxy server (optional) 90
Exampl e meeting scenari os 91
Scenario 1: Bookinga Skype meeting with one or more video-enabled meeting-rooms 91
Scenario 2: Bookinga Personal VMR (Virtual Meeting Room) meeting with one or more video-enabled meetingrooms 91
Scenario 3: Bookinga One-time-VMR withone or more video-enabled meeting-rooms 91
Scenario 4: Forwarding an existing invitation to a video-enabled meeting-room 92
Manually upgrading JO IN 93
Synergy JO IN Troubles hooti ng 94
Common troubleshooting scenarios 95
Exchange permissions 97
Using the logs 98
Licenses 99
Database 100
Exampl e meeting scenari os 101
Scenario 1: Bookinga Skype meeting with one or more video-enabled meeting-rooms 101
Scenario 2: Bookinga Personal VMR (Virtual Meeting Room) meeting with one or more video-enabled meetingrooms 101
Scenario 3: Bookinga One-time-VMR withone or more video-enabled meeting-rooms 101
Scenario 4: Forwarding an existing invitation to a video-enabled meeting-room 102
Example meeting scenarios 103
Task 14: Configuring Emailtemplates 105
Synergy JOIN emailTemplates 106
Manuallyupgrading JOIN 108
Appendix 1: Using Synergy JOIN for Skype IVR with Pexip 109
Example: 110
Appendix 2: Pexip PolicyScript for use with Synergy JOIN Skype IVR 114
Appendix 3: Pexip Virtual Reception for use with Synergy JOIN Skype IVR 115
Appendix 4: Using Synergy JOIN with AMX/Crestron for Cisco and Polycom endpoints 117
Appendix 5: How to create a StarLeaf Cloud authorization token 118
Appendix 6: Configuring Cisco Meeting Server profiles with Synergy JOIN 120
Appendix 7: Deleting unwanted future meetings 121
Page 3 of 121
Page 4

Synergy JOIN Install ation and Configuration Guide
Introduction
About Synergy JOIN
New technologies have made it possible for enterprise collaboration solutions to work seamlessly together. Today Skype for
Business users and video conferencingusers participate in joint meetings as standard, with high-quality video, audio and
content sharing. There are still some challenges, however, when it comes to the user experience.
Joining a meeting usingSkype is easy,but the video conference user has to dial the meeting address from a video touch pad or a
remote control. It may not even be possible to dialthe address from an endpoint if the meeting ishosted in Office365 (Skype
Online). Automating the connection process is therefore of great value to organizations.
Synergy JOIN (JOIN) solvesthis by automatically connecting video-enabled meeting-rooms to Skype meetings using Cisco One
Button To Push (Cisco OBTP) or Polycom Click To Join (Polycom CTJ). The end-user simplyschedules a new Skype meeting in
Microsoft Outlook and adds the required video-enabled meeting-rooms. JOIN manages the connectionand bringsthe Cisco
OBTP or Polycom CTJ information to the video endpoint. You can alsoforward a Skype meeting invitation to a video-enabled
meeting-room and automatically enable Cisco OBTP or Polycom CTJ. JOIN removes the riskof typing errors, and ensures that
allmeetings start on time.
In addition, JOIN can be used to schedule meetings in personal VMRs, and for Cisco and Pexip environments, in one-timeVMRs, sending the Cisco OBTP or Polycom CTJ information to the scheduled video endpoints and dialing out to endpoints that
do not support Cisco OBTP or Polycom CTJ.
JOIN is shipped as a Windows installer with a simple setup wizard that enables quick deployment.
The solution supports Pexip, CiscoCMS and StarLeaf Cloud environments, and on-premisesinstallations of Skype and
Microsoft Exchange as wellas Office 365.
Page 4 of 121
Page 5
Synergy JOIN Install ation and Configuration Guide
How Synergy JOIN works
Feature overview
JOIN supports the following feature set:
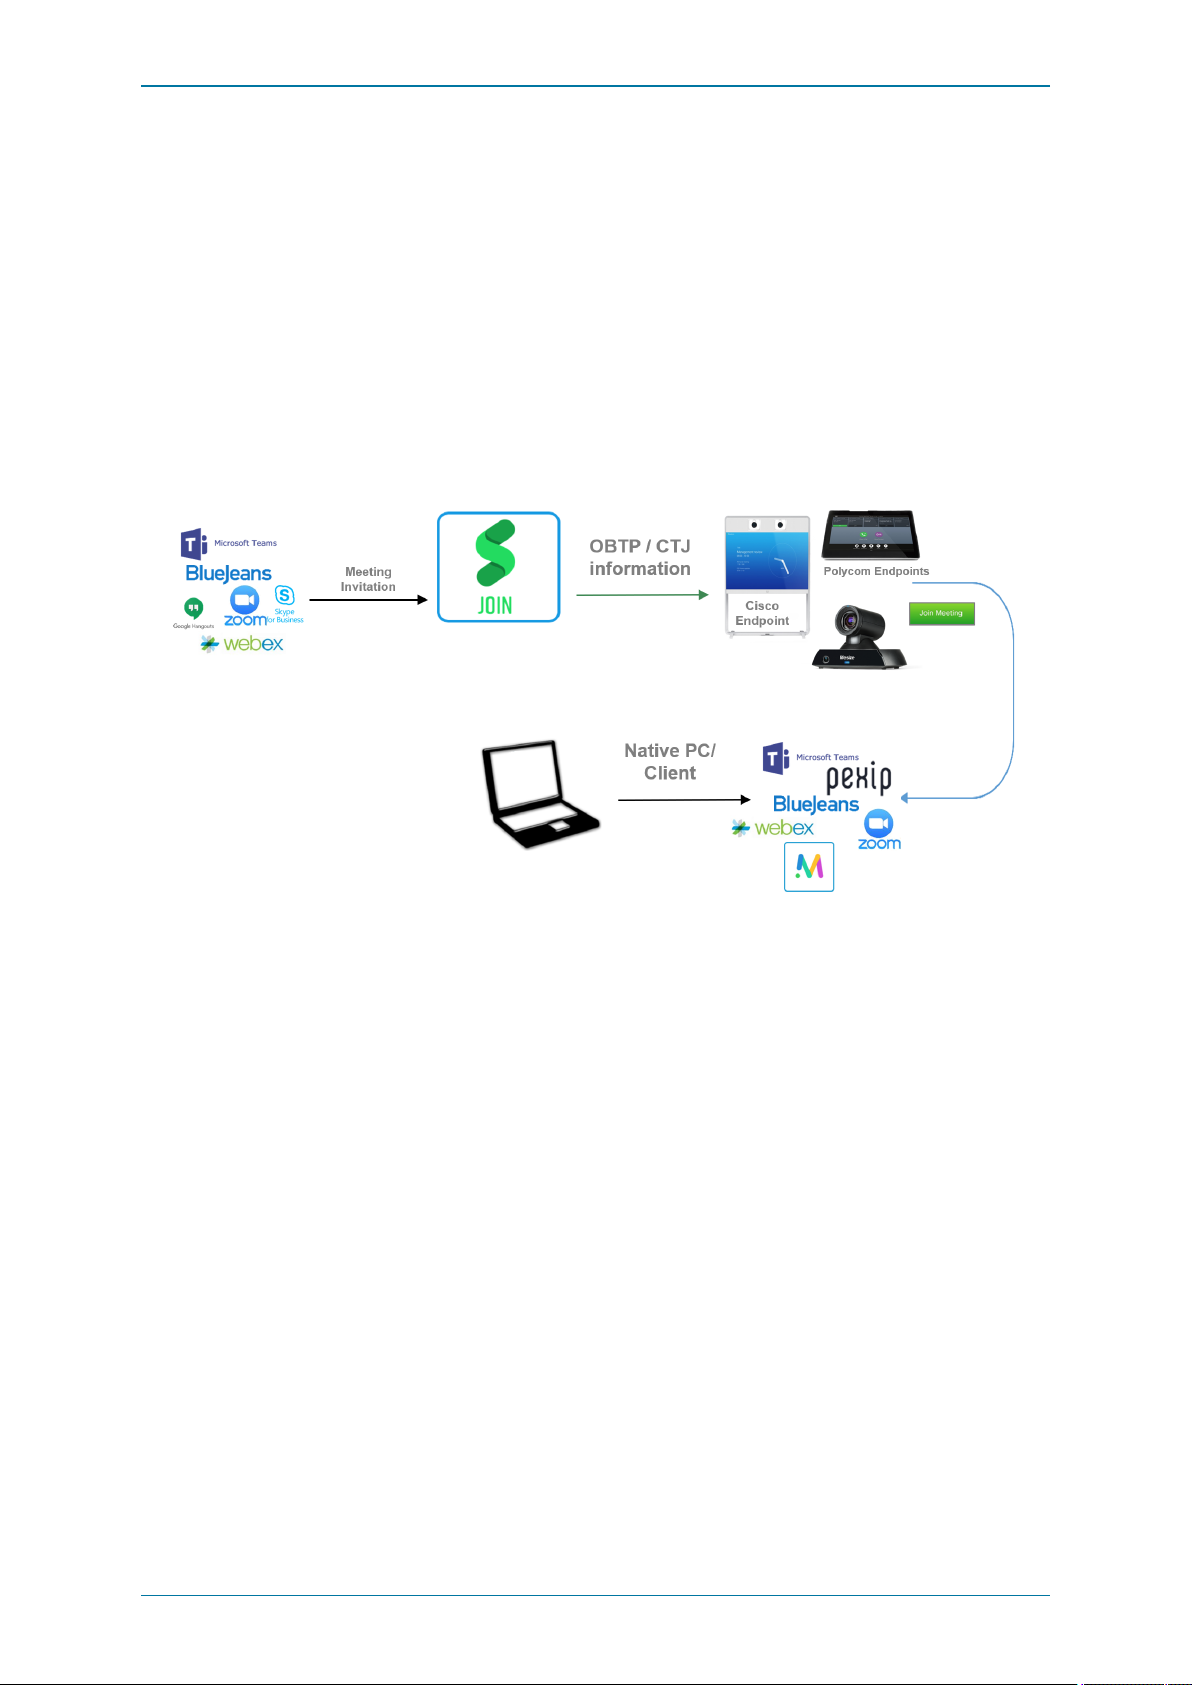
l BookingSkype or Teams meetings using Outlook: JOIN creates a Skype/Teams URI for the meeting that issent as Cisco
One Button To Push (Cisco OBTP) or Polycom Click To Join (Polycom CTJ) to allvideo endpointsscheduled in the same
meeting.
l BookingOne-time-VMRs (Cisco and Pexip only): the endpoints receivethe URI as Cisco OBTP or Polycom CTJ.
l JOIN can identifypatterns in meeting room invitationsso that the endpoint can be populated with Cisco OBTP or Polycom
CTJ information for personal VMRs (e.g. [email protected]).
l JOIN dials out to booked endpoints that don't support Cisco OBTP or Polycom CTJ.
l Emailscontaining the dial-ininformation for the meeting can automaticallybe sent to the meeting participants.
Overall process from install to end user
1. After installation, video admins add the following information into the JOIN configuration tool:
o
Exchange or G oogl e serv er connection settings.
o
MCU details (Pexip MCU that acts as Skype Gateway, CiscoCMS MCU for Dual Home meetings, Videonor as
MCUand SkypeGateway or StarLeaf Cloud).
o
Exchange video-enabled meeting-room resources or Google Hangouts meeting resources.
2. Users book a Skype, personal VMR or One-time-VMR video meeting from Outlook, inviting one or more video-enabled
meeting-room resources.
o
Users book a Google meeting from their Google Calendar, inviting one or more video enabled meeting-room
resources.
3. JOIN monitors the meeting-rooms at the interval specified in Polling interval in minutes , to check if they receive a
meeting invite. This is how it works with a Pexip MCU:
o
Skype invitations sent to meeting-room resources include a URI in thisformat:
sip:[email protected];gruu;opaque=app:conf:focus:id:TTC86056
endpoint can call eg:
(this format is defined in Matching Rules in the
configurator).
o
For one-time-VMR meetings, the URI is generated based on the format defined in Matc hing Rules in the
configurator.
o
For personal VMR meetings, the URI in the invite body is identified as the URI.
4. The URI issent to the endpoint as Cisco OBTP or Polycom CTJ ready for attendees to start the meeting.
5. The callis routed either through Pexip or CMS to the Skype server, using a gateway rule on the MCU, or through Cisco
CMS to the Skype server, usingthe Dual Home technology, or through the StarLeaf Cloud to the Skype server.
which JOIN rewrites to a URI the meeting-room
Page 5 of 121
Page 6
Synergy JOIN Install ation and Configuration Guide
Limitations
Cisco CMS
At thistime JOIN can only dial out from one-time-vmrs on CMS, not from personal VMRs and Skype for Business(S4B)
meetings. This means that for S4B calls and personal VMR callswhen using CMS, the meeting can onlybe joined via Cisco
OBTP/Polycom CTJ.
StarLeaf Cloud
At thistime JOIN can be used to enable Cisco OBTP/Polycom CTJ for the following scheduled meetings:
l Office 365 / Skype for Businesson-premises
l StarLeaf Cloud
How the Skype URIs are generated
Skype URIs for JOIN shouldbe based on your company dialplan.
Pexip /Videonor /Videxio
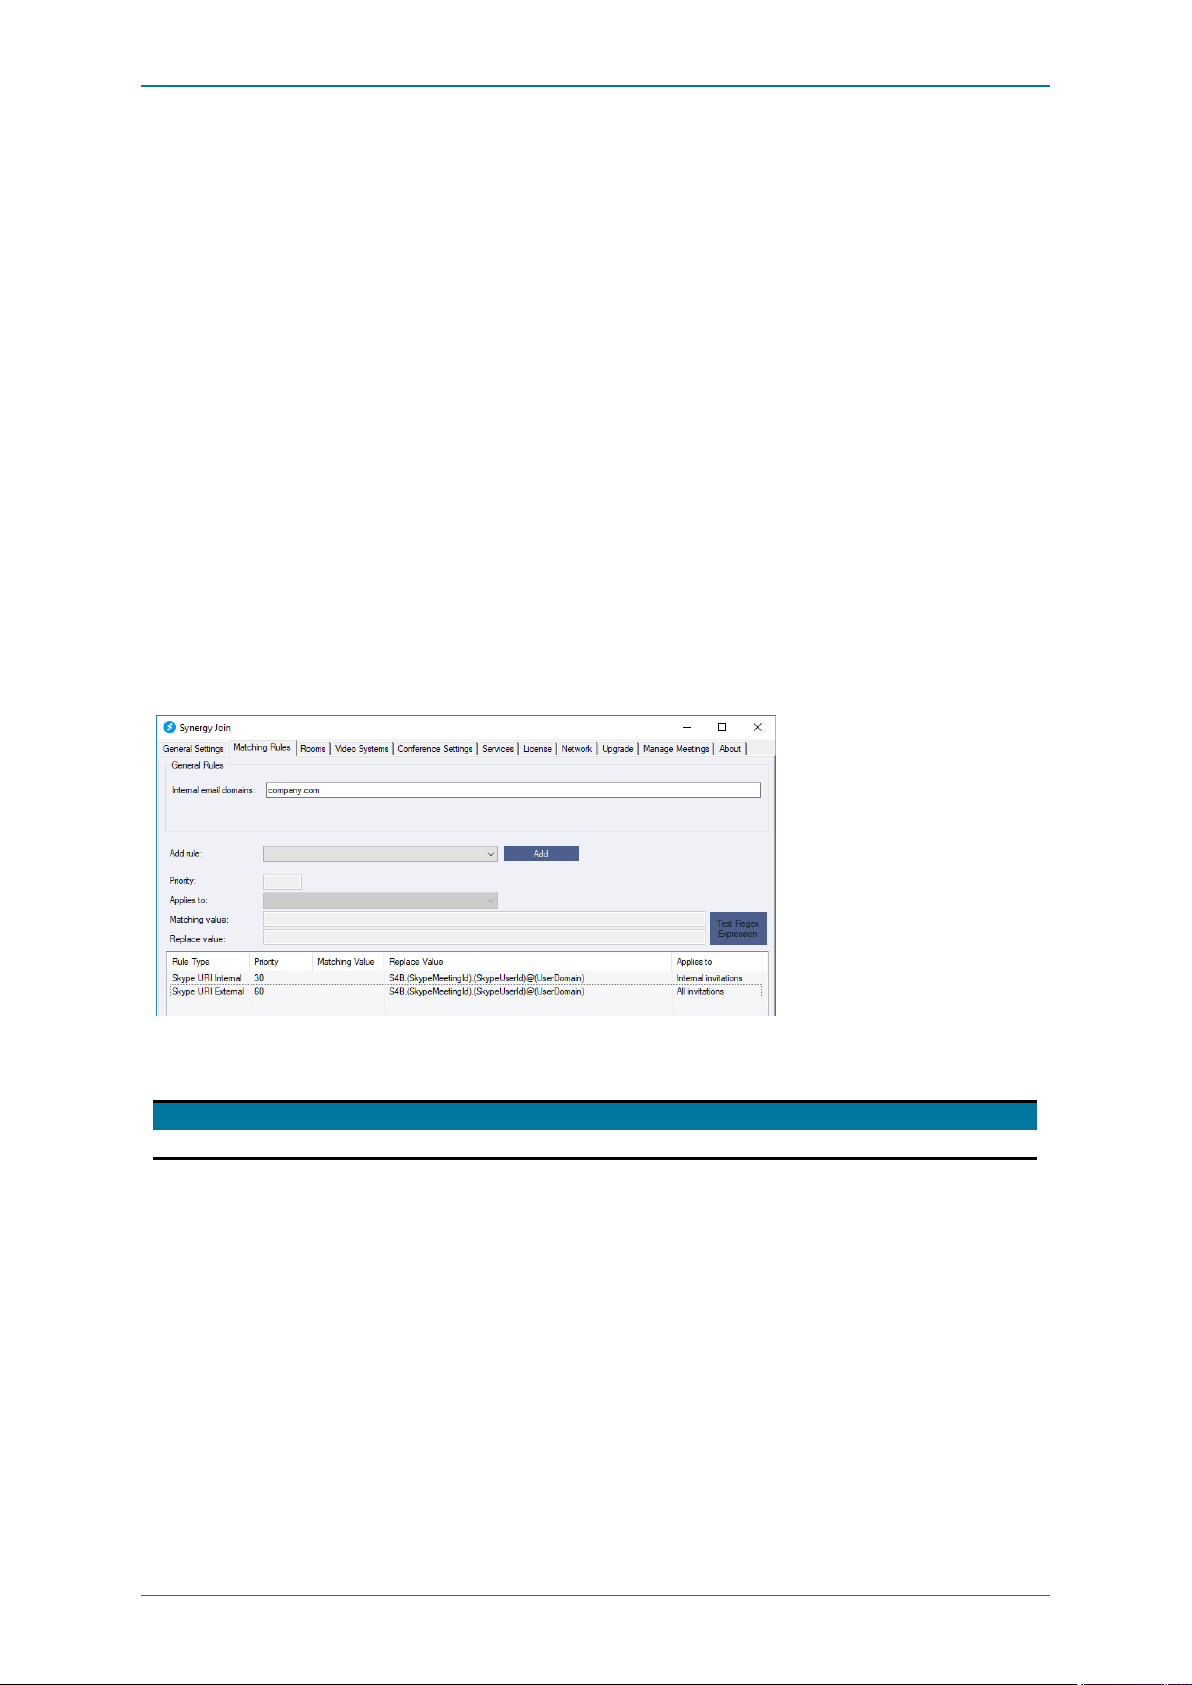
In thisexample, usinga Pexip MCU, our URI Prefix is S4B (for Skype for Business). We recommend usinga prefix that easily
identifies these URIs on your network as Synergy JOIN Skype for BusinessURIs.
NB. The prefix for Videxiois usually__sfb__ (two underscores + sfb + two underscores) but should be confirmed on installation.
The second part of the URI isthe Sky pe Meeting ID, and the last part is the Skype User ID.
A URIcreated from our matching rule pattern looks like this:
URI Prefix Skype Mee ting ID Skype Use r ID Full U RI
Cisco CMS
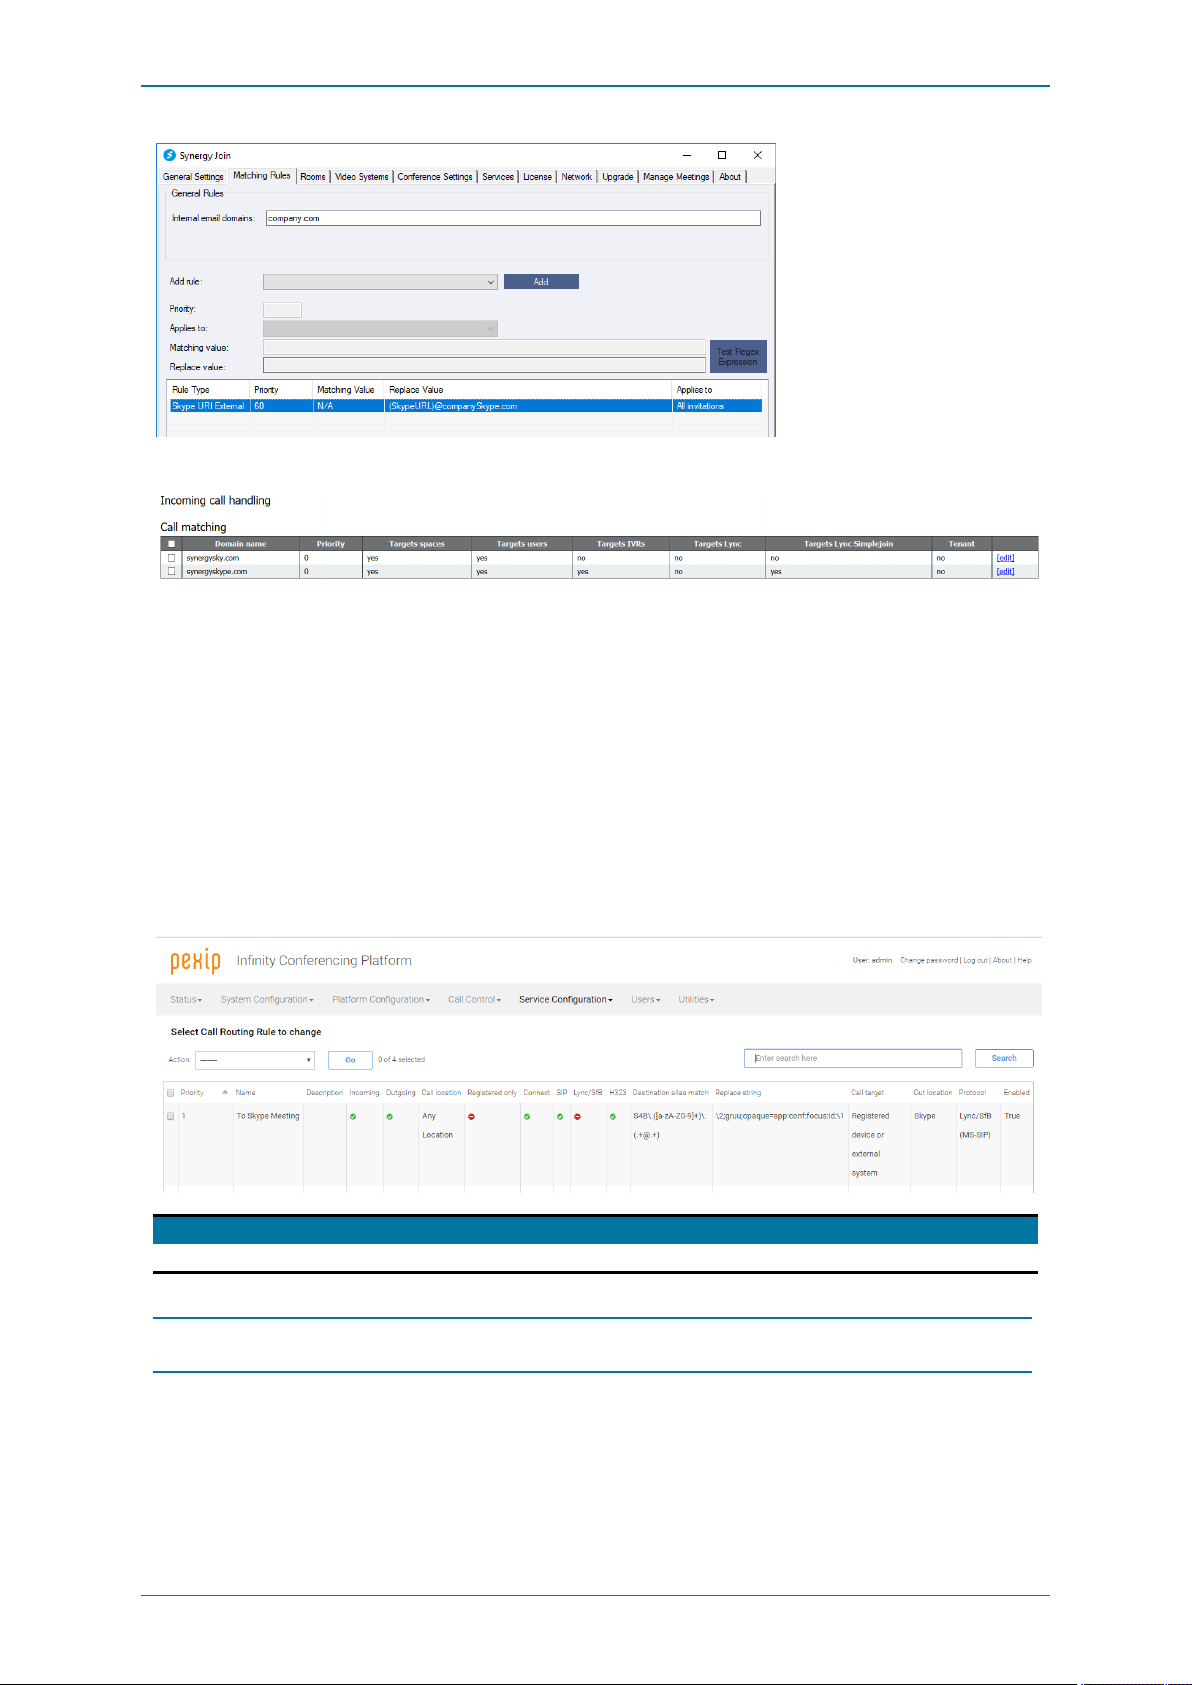
With CMS, the format of the replace value is
routing domain that ensures the callis routed to the CMS.
(SkypeURL)@CompanyCMSDomain.local
where “CompanySkype.com” is the
Page 6 of 121
Page 7
Synergy JOIN Install ation and Configuration Guide
This domain must alsobe added as a “Targets Lync Simplejoin” domain on the CMS under Configuration > Incoming Calls.
StarLeaf Cloud
The Skype URI sent to the endpoint isthe URI of the gateway callprovisioned in the StarLeaf Cloud by JOIN.
This URIisin this format:
How the call is routed
Pexip / Videonor /Videoxio
There must be a Destinati on alias match in a gateway rule on the Pexip that corresponds to the matching rule URI pattern so
that when the endpoint dialsthe skype URI, it is routed correctly.
The protocol for this rule must be MS-SIP.
Destin atio n a lia s ma tch Rep la ce strin g Protocol
S4B\.([a-zA-Z0-9]+)\.(.+@.+) \2;gruu;opaque=app:conf:focus:id:\1 Lync (MS-SIP)
See Pexip documentation for more information on creating gateway rules.
Note: If callsgo through a VCS, you need a search rule on the VCSto send calls corresponding with the prefix of your URI
pattern to Pexip (in our example, S4B).
Cisco CMS
The callis routed through the CMSto Skype using the Dual Home functionality:
Page 7 of 121
Page 8

Synergy JOIN Install ation and Configuration Guide
1. When a Skypemeeting is forwarded to a video-enabled meeting-room that has been added to JOIN, JOIN tellsthe
endpoint to callURL@simplejoindomain.
2. The VCS routes the callto CMS.
3. On CMS, the callhits the incoming callssimplejoin rule and CMS sets up the call.
Note: The “Lync simplejoindomain” must be present on the VCS.
StarLeaf Cloud
1. The endpoint callsout to the StarLeaf Cloud using the URIitreceived from JOIN.
2. The StarLeaf Cloud calls the Skype meeting.
Page 8 of 121
Page 9

Synergy JOIN Install ation and Configuration Guide
Requirements
Windows Server software
Oper atin g syste m Addition al fe atures req uired
Windows Server 2008 r2 64 bit ( or newer) Microsoft .NET 4.5.1 Fr amework
Windows Server hardware
Num be r o f video-en ab le d me eting
roo ms
0 - 100 4 Cores 8 GB 20 GB
100 - 300 4 Cores 16 GB 50 GB
300 - 900 4 Cores 32 GB 100 GB
900 - 2000 6 Cores 40 GB 150 GB
2500 + 8 Cores 64GB 250 GB
CPU RAM HDD
Network requirements
Sour ce Destin atio n Protocol Port (TCP
Synergy JOIN Microsoft Exchange HTTPS 443 Scheduling.
Synergy JOIN Cisco TMS HTTP
HTTPS
Synergy JOIN PexipManagement Node HTTPS 443 Initiatingdial-out calls.
Synergy JOIN PexipConferenceN ode HTTPS 443 Optional: JOIN requires access to onePexipconference nodefor
Synergy JOIN StarLeafCloud:
https://api.starleaf.com
Synergy JOIN Cisco CMS HTTP
Synergy JOIN Cisco codecs HTTP
Synergy JOIN Polycom codecs N/A N/A N/A - JOIN does not talk to the codec - the Polycom endpoints get
Synergy JOIN Synergy SKY Upgrade service HTTP 80 Automatic upgrade of JOIN via this URL:
Synergy JOIN Internet HTTP
Synergy JOIN Cisco IX, TX and CTS Codecs HTTP 8081/9501 Updating the IX,TX andC TS Codecs with Cisco OBTP information
HTTPS 443 Provisioning gateway call in StarLeaf Cloud.
HTTPS
HTTPS
HTTPS
un less
othe rw ise
stated )
80
443
80
443
80
443
80
443
Descr iptio n
Tracking codecs on DHCP.
Provisioning one-time VMRs.
displaying “End of Conference W arnings”
Initiating dial-outcalls.
Provisioning one-time VMRs.
Updating codecs with Cisco OBTP information.
them eetings from Exchange.
http://synergysky.com/upgradeService/
JOIN r equires internet access to findthe address to the Skype
meeting for CMS Office 365 meetings, and for all external Skype
invitations that are forwarded.
Port forwarding to Cisco endpoints
Ciscovideo systems that are on external networks can be reached directly over the internet by setting up a port forwarding rule
in the firewall to allow direct access to the video system.
Note the following if using port forwarding to Cisco endpoints:
• Ensure the Port Forwarding rule only accepts requests from the specific IP address that JOIN will connect from.
• Ensure the Port Forwarding rule forwards requests to the HTTPS service of the Video System.
Page 9 of 121
Page 10

Synergy JOIN Install ation and Configuration Guide
• Ensure the Video System's HTTPS service isenabled.
• Ensure the Video System has a strictpassword set.
• Include the port number after the IP address when configuring the Video System in JOIN (e.g. 213.112.33.179:8081).
Service accounts
Accoun t type Permission s re qu ired
Microsoft Exchange User (with a mailbox) Readand W rite access to Meetingr oom resource m ailboxes ( Editor access to user
PexipMCU Admin API account or LDAP API account.
Cisco CMS Admin API account.
StarLeafCloud Youneedto have Allow sch edu lin g e xtern al conferen ces enabled on your
Cisco codecs Admin user account.
Polycom codecs N/A - JOIN does not talk to the codec - the Polycom endpoints get themeetings from
Cisco TMS (optional - usedto track codecs on DHCP) Site administrator user account.
Google API Access API Scopes to allow for calendar access
Google Service Account Google Super Admin account in GSuite(admin.google.com). Additionally, Enable
mailboxes required if using in-body update)
organization’s account.
See"How to createa StarLeaf Cl oudauthorizationtoken" on page118
Exchange.
Domain Wide Delegation on the service account(console.cloud.google.com)
Page 10 of 121
Page 11

Synergy JOIN Install ation and Configuration Guide
Device Support
Devices that are supported with Synergy Join
Device Versio n Com me nts
Microsoft Exchange On Prem and 0ffice 365( Exchange
Cisco TMS 12.0 - 15.5
PexipMCU 13- 20
Cisco CMS 1.8- 2.4 Must be configuredwith Dual Home:
StarLeafCloud N/A Youneedto have Allow sch edu lin g e xtern al conferen ces
Cisco codecs:
l C -series
l M X-series
l SX-series
l EX-series
l D X-series
l IX -series
l TX-series
l C isco Spark Room Kit
l C isco Webex Room 55 Single & Dual
l C isco Webex Room 70 G2
l C isco Webex Room Kit Mini, Room Kit, Room
Kit Plus & Room Kit Pro
Polycom codecs:
l H DX
l Groupseries
l Trio
Online)
l 2010 SP2andlater
l 2013 all SPs
l 2016
The “Lync simplejoin domain” must be present on the VCS if the
endpoints route calls through one. Also, theCMS must have a
working Lync outbound rule set up ( Trunk type: Lync).
enabled on your organization’s account.
See"How to createa StarLeaf Cl oudauthorizationtoken" on
page118
l TC5.x and newer
l C E8.x andnewer
All versions supportingPolycom CTJ The endpoints m ust be configured to poll calendar data from
Exchange using the Polycom Calendaring service:
l The Polycom endpoints must be configured to get the m eetings
from their own room account in Exchange.
l JOIN will rewrite thebody of these meetings in the Exchange
room accounts to embedthe URI of the meeting in a Polycomfriendly way.
NOTE:
The Polycom Tr io i s supported with Polycom C lick To Join for oneTime-VMRs and regex/static VMRs in Synergy JOIN version 2.6.
Microsoft Skype and Teams support is available in JOIN version
3.0. The reasonis that the Tr io w ill incorrectly try to call thehidden
SkypeGRUU if it finds it in the meeting invitation header whenthere
is a different U RI in the Polycom VMR token Synergy JOIN
generates, even if theTrio is notregistered towards a Skypeserver.
Page 11 of 121
Page 12

Synergy JOIN Install ation and Configuration Guide
Exchange Resource Account Requirements
When deploying Synergy JOIN, we recommend running the following scriptson all of the rooms in Microsoft Exchange in order
to unlockthe full potential of the product:
Add-MailboxPermission -Identity <roomAlias> -User <ServiceAccount> -AccessRights FullAccess
Set-CalendarProcessing<roomalias> -DeleteComments $false-DeleteSubject$false -RemovePrivateProperty $false -
AddOrganizerToSubject $false -ProcessExternalMeetingMessages $true
The embedded test tool in the JOIN Configurator can be used to verify most of these properties, and suggestsPowerShell
commands to configure the rooms according to the JOIN recommendations.
The function of the various Exchange resource properties are explained in the table below.
Exchange Resource properties
Prop er ty nam e Fun ction in Microso ft Exchan ge Fun ction in Syner gy JOIN Reco mm en de d
DeleteC om ments The Dele teComm en ts parameter
DeleteSu bje ct Specifies whether to removeor keep the
Rem ove Priva tePrope rty The Re mo vePri vateProp er ty parameter
AddOrga nize rTo Sub je ct The AddOrganizerToSubject parametors
specifies whether to remove or keep any
text in the m essage body of incoming
meeting r equests.
Valid input for this parameter is
$false
.
This parameter is used only on resource
mailboxes where the
AutomatePro cessing parameter is set to
AutoAccept
.
subject of incomingmeeting requests.
Valid input for this parameter is
$false
.
The default value is
This parameter is used only on resource
mailboxes where the
AutomatePro cessing parameter is set to
AutoAccept
.
specifies whether to clear the private flag for
incomingmeeting requests.
Valid input for this parameter is
$false
.
The default value is
By default, the private flag for incoming
meeting r equests is cleared. To ensure the
privateflag that was sent by theorganizer in
theoriginal request remains as specified,
set this parameter to
specifies whether to add the organizers
name toethe subject line.
Valid input for this parameter is
$false
.
The default value is
$true
$true
$false
$true
$true
$true
.
$true
.
.
$true
.
When set to
body of themeeting invitationwhen
booking rooms.
As the matching rules rely onr eading
or
contentin the body of the email, this stops
Regex and the Skype URI i n Bod y rule
from working in JOIN.
When set to
subject of them eeting which means JOIN
does not display a meetingtitle on the
or
touch panel of the video system.
If you wantthesubject of the m eeting to
be hidden, you can select the Private flag
whenbookingthe m eeting in Outlook,
even i f this property is set to
Seealso Rem ove PrivatePrope rty.
When set to
Private flag when a Room is booked as a
resource in a meeting flagged as Private
in Outlook.This means that the meeting
or
title is visible to everyonefor all
meetings.
By setting this property to
hidethe title on meetings that are booked
as Private in Outlook, while showing the
title of all other meetings.
When set to
organizers fir st name and last name to
thesubject line of the meeting.
or
If you do not w antto display the meeting
name, at minimum we recommendto set
this field to
$true
, Exchange deletes the
$true
, Exchange deletes the
$true
, Exchange removes the
$true
, Exchange adds the
$tru e
$false
$false
you can
Setting
$false
$false
.
$false
$false
Req uire d
Yes,so that your
matching r ules
work correctly.
Yes,if youwant the
meeting title to be
displayed on the
touch panel.
No.
Yes,if youwant to
hidethe m eeting
title on the touch
panel.
Page 12 of 121
Page 13

Synergy JOIN Install ation and Configuration Guide
Prop er ty nam e Fun ction in Microso ft Exchan ge Fun ction in Syner gy JOIN Reco mm en de d
Proce ssExtern alM ee ting Me ssage s The Proce ssExtern alMe etin gM essa ge s
AutomatePro cessing The Auto mateProcessin g parameter
AllReq uestInPolicy
AllReq uestOutOfPolicy
Req uestInPol icy
Req uestOutOfPolicy
parameter specifies whether to process
meeting r equests thatoriginate outside the
Exchange organization.
Valid input for this parameter is
$false
.
The default value is
By default, meeting requests that originate
outside of the organization are r ejected.
enables or disables calendar processing on
them ailbox.
This parameter takes the followingvalues:
l
None
Both the r esource booking
attendantand the Calendar Attendant
are disabled on the m ailbox.
l
AutoUpdate
Attendant processes m eeting requests
and r esponses.
l
AutoAccept
Attendant andr esource booking
attendantare enabled on the mailbox.
This means that the Calendar Attendant
updates the calendar, and then the
resource bookingassistant accepts the
meeting basedupon the policies.
The default value on a resource mailbox is
AutoAccept
The default value on a user mailbox is
AutoUpdate
on a user mailbox.
Theseparameters specify whether to allow
users to submit policy requests.
Valid input for theseparameters are
$false
The default value is
Only the Calendar
Both the Calendar
.
, but you can't changethevalue
.
$false
$false
$true
.
.
When set to
allow external users to book Rooms
resources.
However, a r oom is booked on behalf of
or
theorganizer if a user forwards an invite
into a r oom. This setting must therefore
be set to
forward invitations to external Skype
meetings into their meeting r ooms, so
that they can benefit from easy callinginto
external Skype meetings.
external users booking their rooms
directly by usingan internal domain in the
room’s alias (e.g.
$false
$true
to allow internal users to
Note : Administrators can still avoid
Meetings that are booked in Room
resources are stored as
this settingis set to
Tentative meetings are not processed by
JOIN, as you can book multiple tentative
meetings within the same time interval in
one r esource.
Meetings booked in Room resources that
are configured with either of these
properties that require meetings to be
$true
or
approvedby a delegate,will not be
processed by JOIN until they are
approved.
This will lead to a significant delay for the
meeting organizers, andis therefore not
recommended.
, Exchange wil l not
)
Tentative
AutoAccept
.
Setting
$true
AutoAccept
unless
$false
Req uire d
Yes,so that
forwarding invites
from external
users works
correctly.
Yes.
Recommended:
configure so that
approval is not
required.
Enabling forwarding of external meeting invitations
Microsoft willonlyprocess meeting requests for meetings booked by external users if the settings
ProcessExternalMeetingMessages isset to “$true”. Enabling this setting potentiallyexposes your meeting rooms from being
booked directlyby external users, but can be mitigated in one of two ways:
l Either stop direct emailsfrom external users from ever reaching the room mailboxes; which can be done by a transport
rule in the Hub Transport server in Microsoft Exchange. The rule can be set to stop emailsfrom external users from
reaching the mailboxes in a specific distribution list like the list of meeting rooms
l Alternatively you can change the aliasof the rooms to a domain that isonly available internally in the Exchange
environment; i.e. changing [email protected] to [email protected]. The acme.localdomain shouldnot be
reachable from the outside, but willbe available for internal users.
Either of these changes will enable users to forward invitations they receive from the outside to their meetingsrooms, while
hindering any external users from booking their meeting rooms directly.
NOTE. Enabling ProcessExternalMeetingMessages does not in any way expose the information of existing meetings to external
users.
Page 13 of 121
Page 14
Synergy JOIN Install ation and Configuration Guide
Microsoft Graph API
Microsoft willbe deprecating Basic Auth access for EWS in October 13th, 2020. In line with thischange, Microsoft have created
anew authentication method known as Microsoft Graph. Microsoft Graph allows for increased performance towards the
Microsoft Cloud. Over time, Microsoft have introduced OAuth 2.0 for authentication and authorization, which is a more secure
and reliable way than Basic Authentication to access data.
You can find additional information relating to Microsft Graph here
We have provided instructions on how to set up Microsoft Graph with Synergy JOIN below.
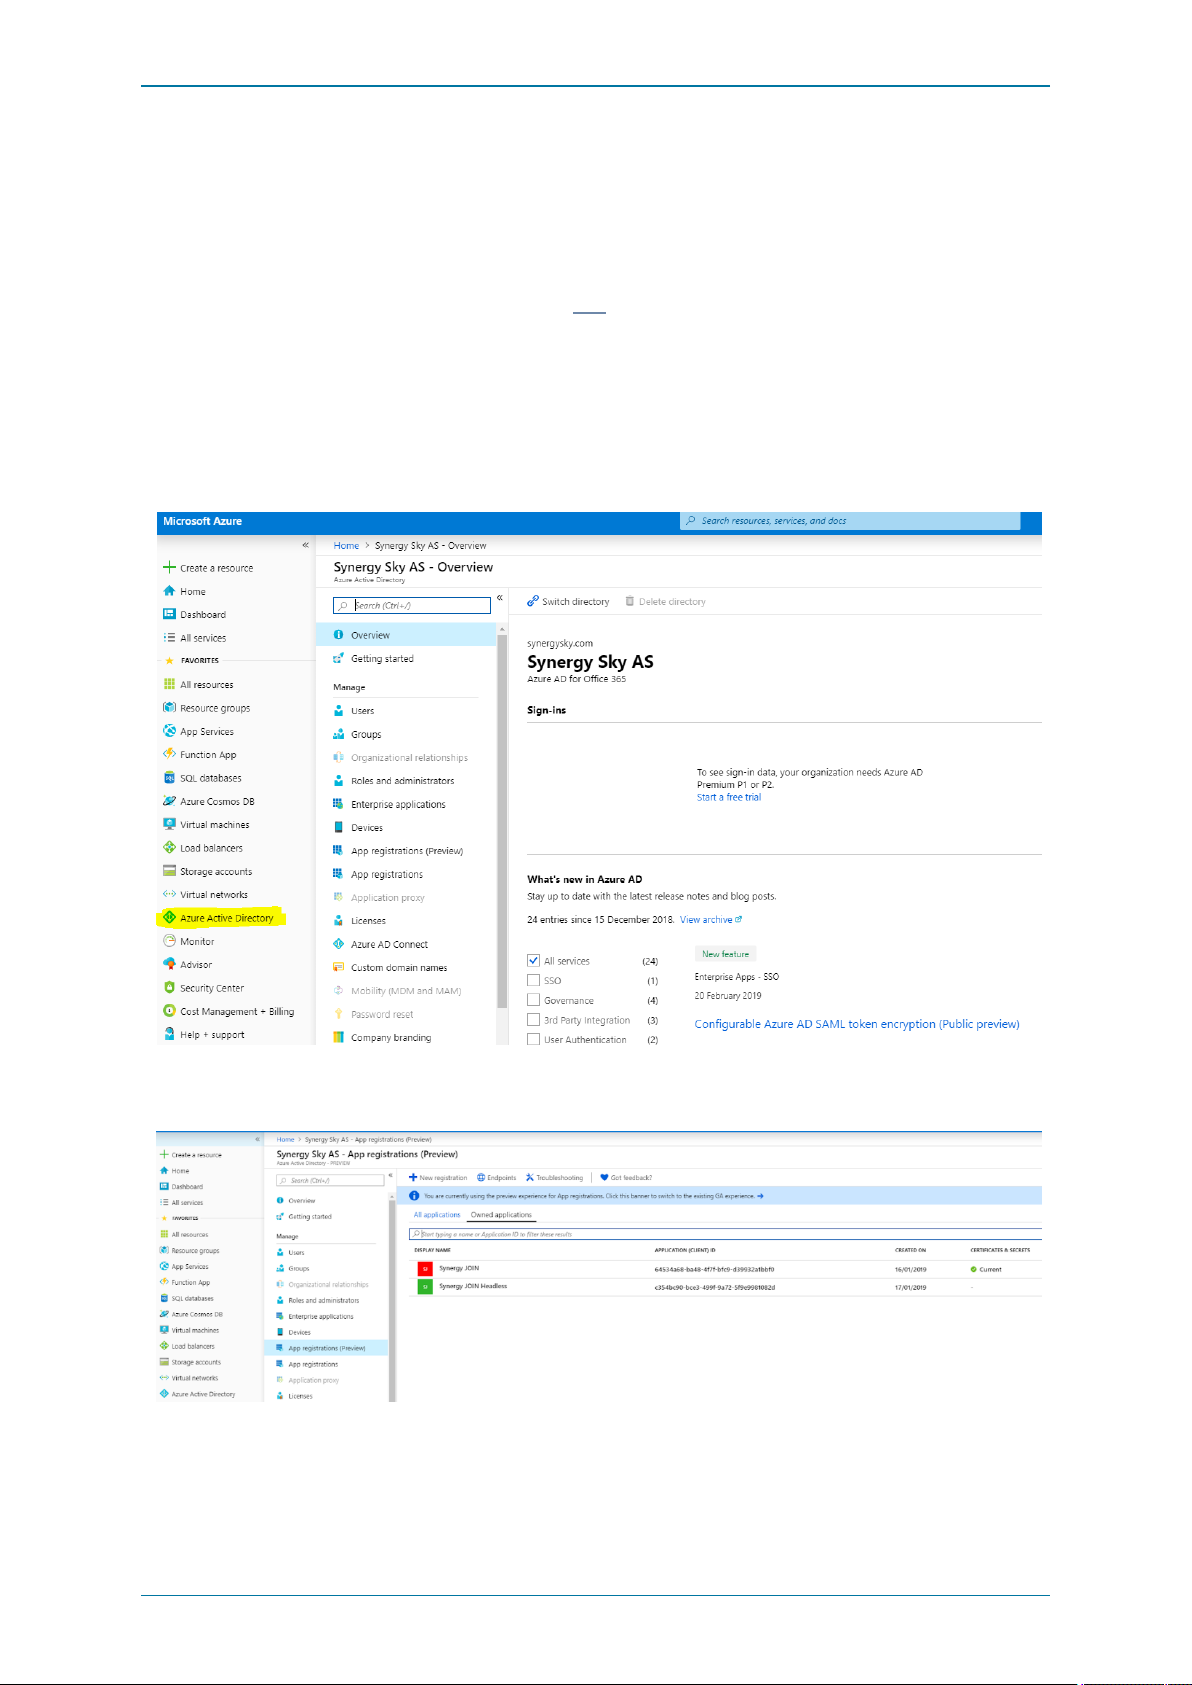
Configuring Microsoft Graph API
1. Log In to https://portal.azure.com
2. Click on Azure Active Directory
3. SelectApp Registrations
4. Click on New Registration
5. Enter a name and click on Register
6. Copy the fieldsApplication (client) ID and Directory (tenant) ID
a. These are to be used when configuring Synergy JOIN
Page 14 of 121
Page 15
Synergy JOIN Install ation and Configuration Guide
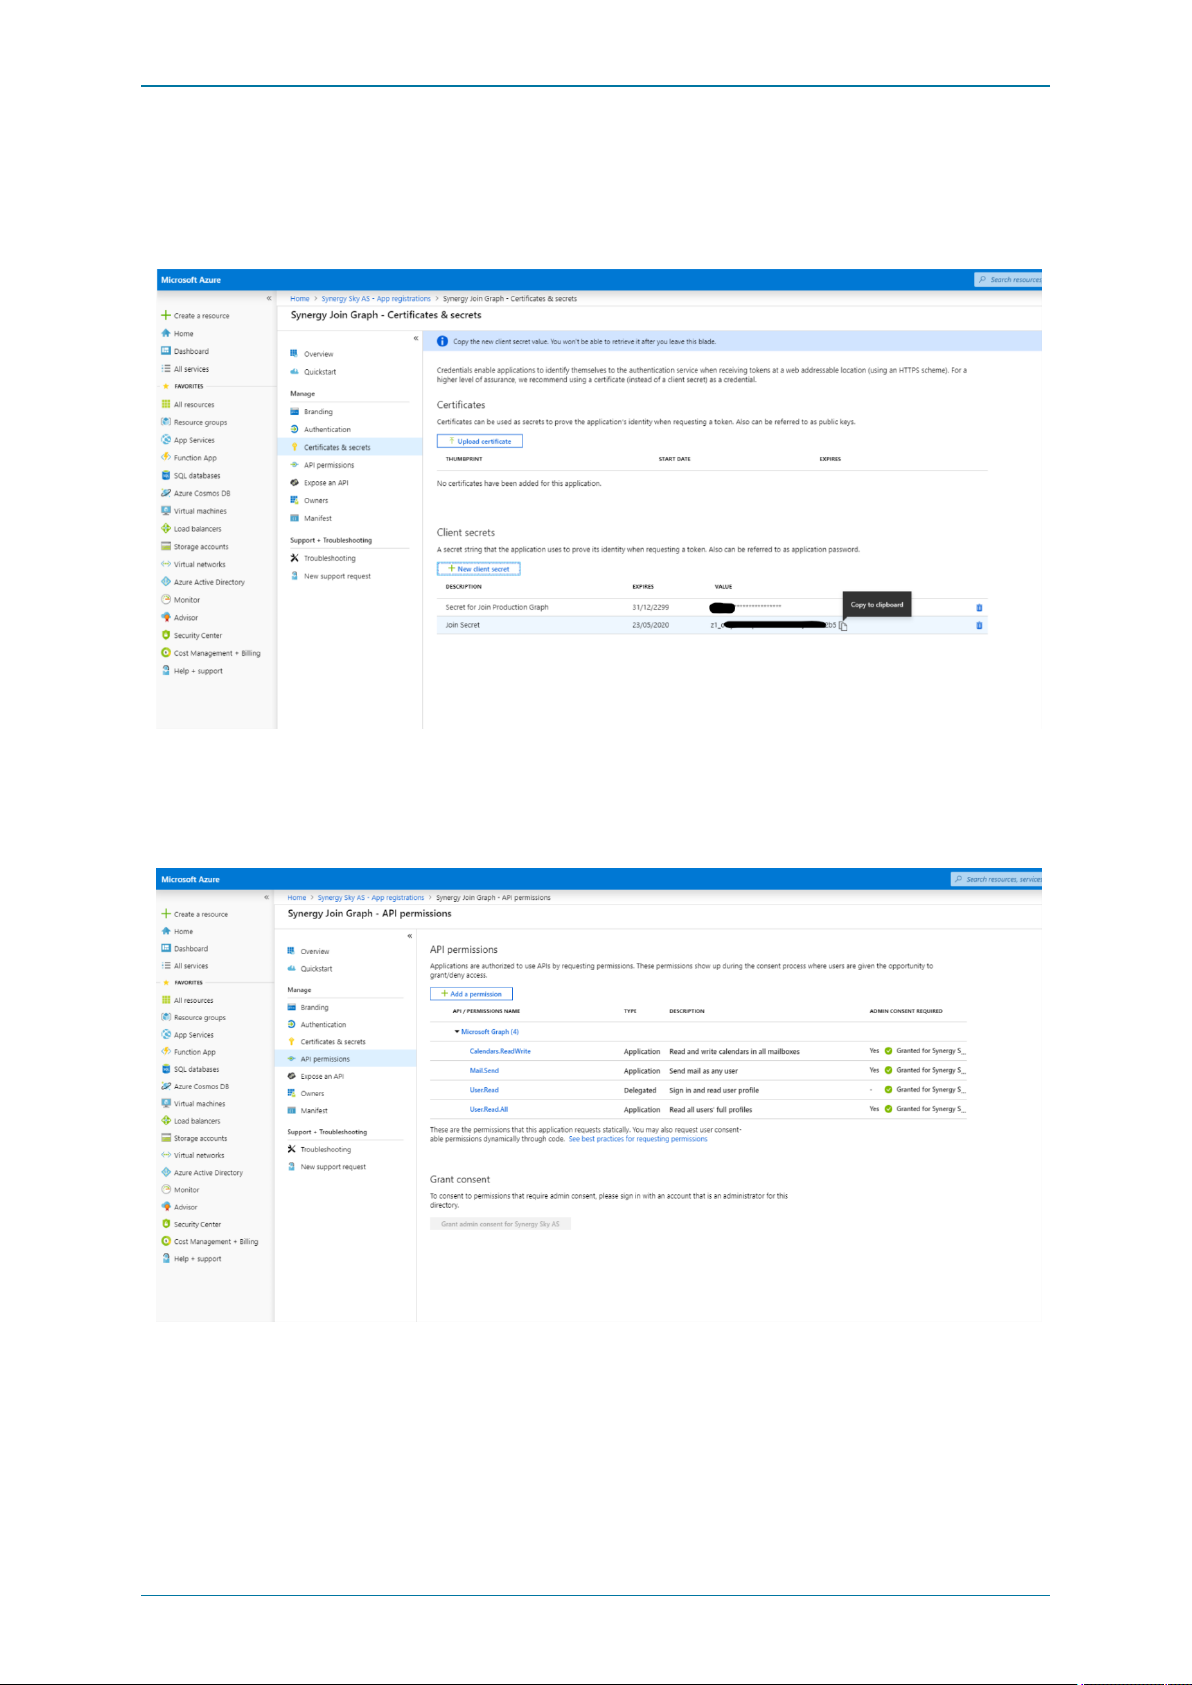
7. Click on Certificates& Secrets
8. Click on New client secret, then give it a name and set it to never expire. Clickon add
9. Copy the client secret
Note: Thissecret isto be used when configuring Synergy JOIN
10. Clickon API Permissions
11. Clickon Add a permission, Microsoft Graph, Application permissions. Check Calendar.ReadWrite, User.Read.Alland
Mail.Send, then clickthe Add permissions button
Grant Consent
12. An admin account would need to login and clickthe “Grant admin consent” button
Page 15 of 121
Page 16
Synergy JOIN Install ation and Configuration Guide
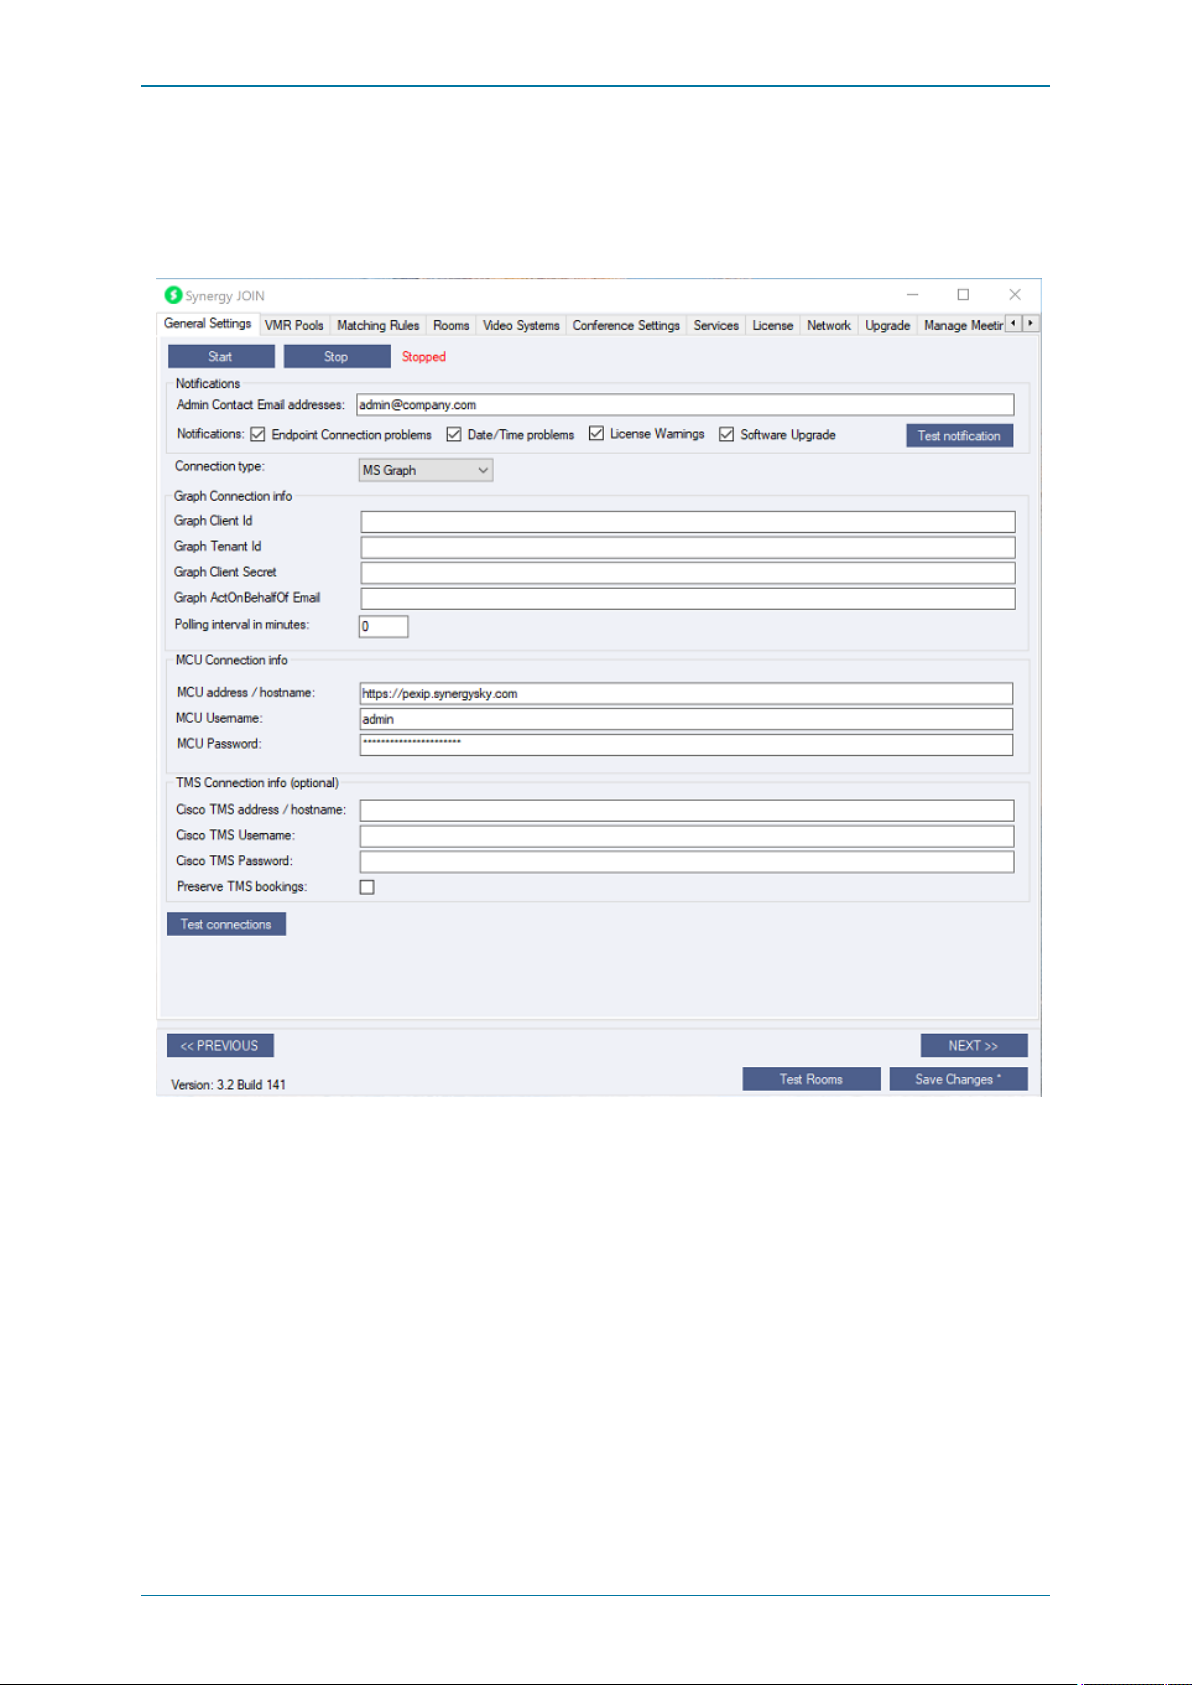
Configuring Microsoft Graph API in Synergy JOIN
Once you have completed the above setup in the Azure Active Directory, you willhave to go to your Synergy JOIN installation
and paste the Client ID, Tenant ID and Client Secret from your above configuration.
Once you have alsoselected the Graph ActOnBehalfOfEmail,you have completed the setup.
Click on Test Connections to make sure your configuration is correct.
Configurable Options for Graph API
Graph API provides the abilityto customize how Synergy JOIN is collecting information from your Exchange environment. These
valuesare to be changed manually in the config.json file.
If installed int he default directory, the Config.json file can be found in the following location:
C:\SynergySKY\SynergySKYEnterpriseScheduling\config\config.json
"CalendarSyncWindowSizeDays": 180, - Specifieshow many days in the future Synergy JOIN can collect meeting information
"CalendarSyncWindowRefreshIntervalDays": 30, - Specifies how often Synergy JOIN should re-syncits database with the
room calendar
i.e The 'CalendarSyncWindowSizeDays' does not applyto Recurring Meetings. When a recurring meeting isdetected by
Syneegy JOIN, the entire series is synced and provided with OBTP information
Page 16 of 121
Page 17
Synergy JOIN Install ation and Configuration Guide
Google Cloud Platform Configuration
Introduction
In order toinstallSynergy SkyJOIN with Google Calendar integration, the G Suite environment must be prepared. This isdone
through the following 4 steps
1. Create a GoogleCloud Platform Project or use an existing project
2. Enable three distinct APIs and Services
3. Create a service account or use an existing service account. This account must be given correct permissions. A private key
must be generated and copied to the JOIN server.
4. Appropriate Calendar Accessmust be given to the Service Account viathe G Suite Domain
Google Cloud Platform
A GoogleCloud Console Project is required in order for JOIN to be able to read calendar resource accounts, user accounts and
also have accessto APIs that enable the JOIN integration.
Create a Google Cloud Platform Project or use an existing Project. The Project willbe used for the API integration as wellas for
the Service Account.
Logging into the Google Cloud Platform console:
l Browse to the following URL: https://console.cloud.google.com/iam-admin/serviceaccounts
l Log in with your admin user account to manage your Google cloud console.
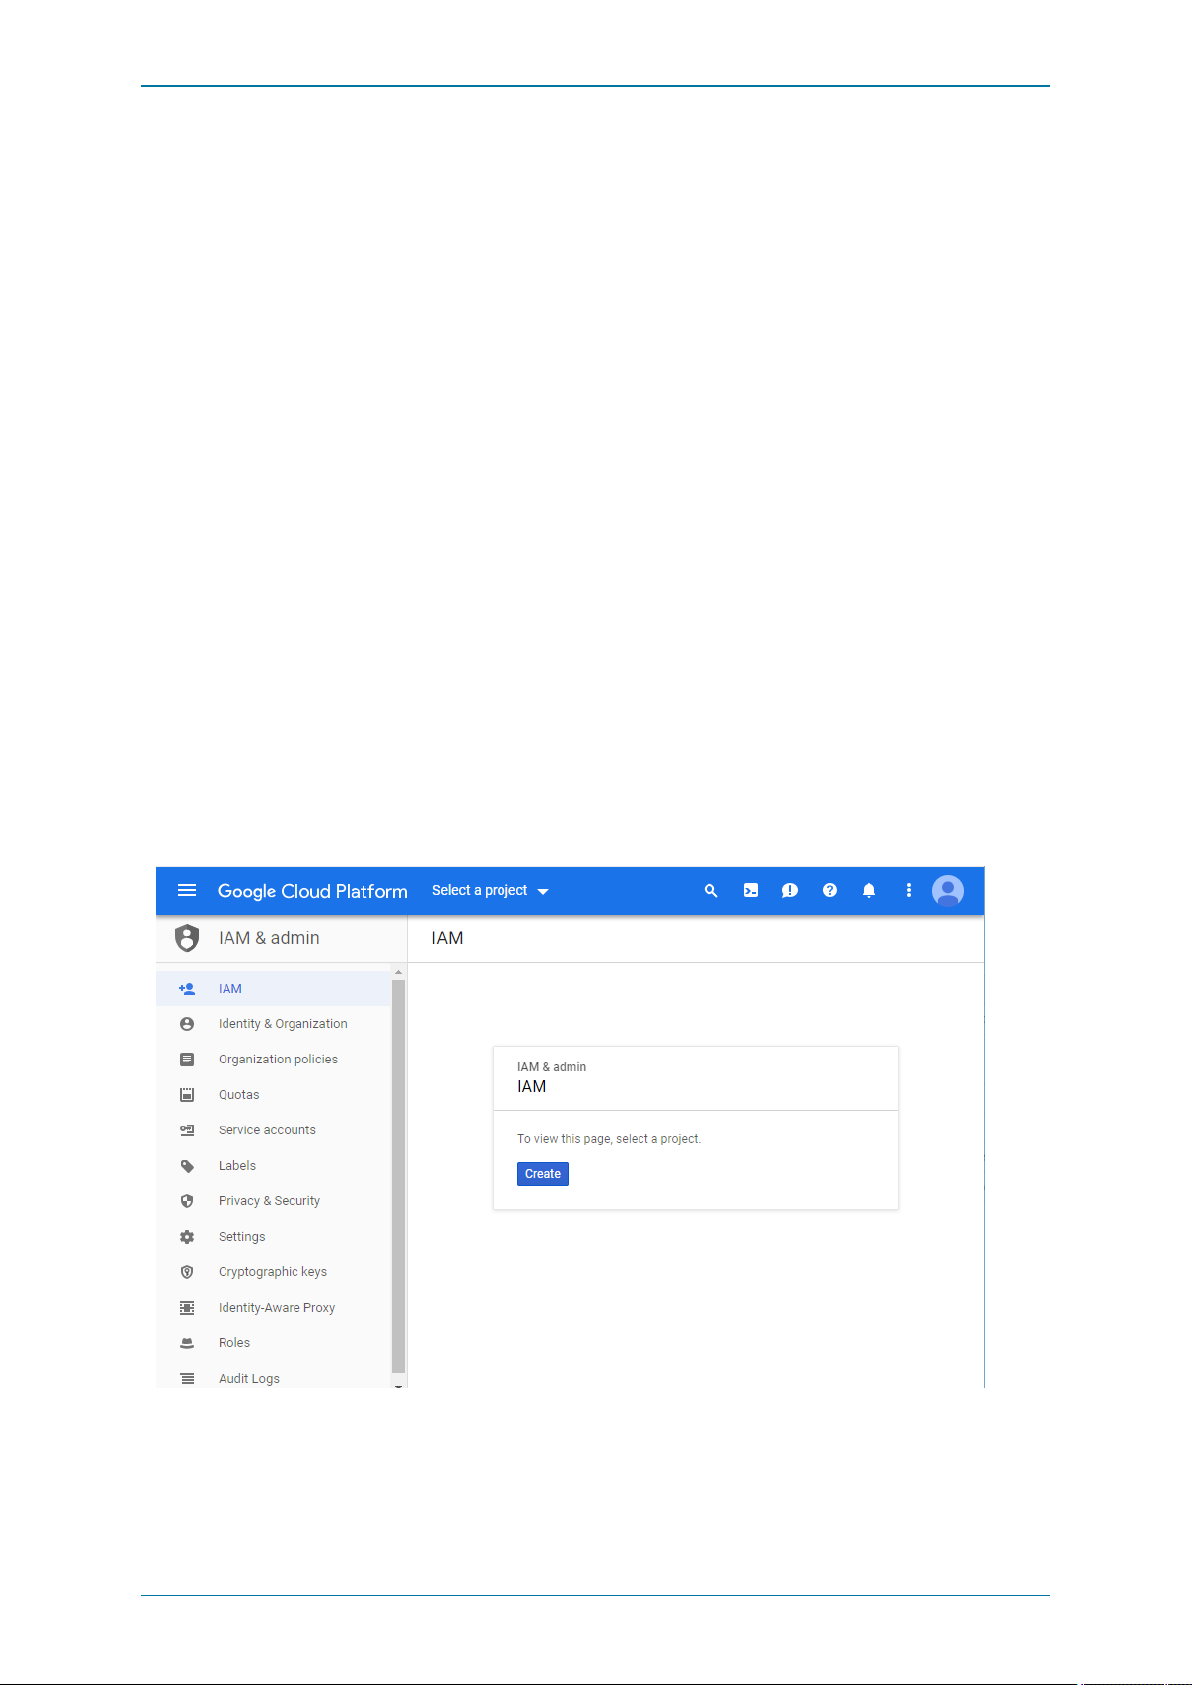
Creating a Project
(Skip this section if you already have a project you want to add this account to)
N.B on some occasions, Google failsto create the project and as such, sometimes you may need to create the project twice
To create new Google Cloud Console project,
l Select IAM & Admin
l Click the 'Create' button.
Page 17 of 121
Page 18
Synergy JOIN Install ation and Configuration Guide
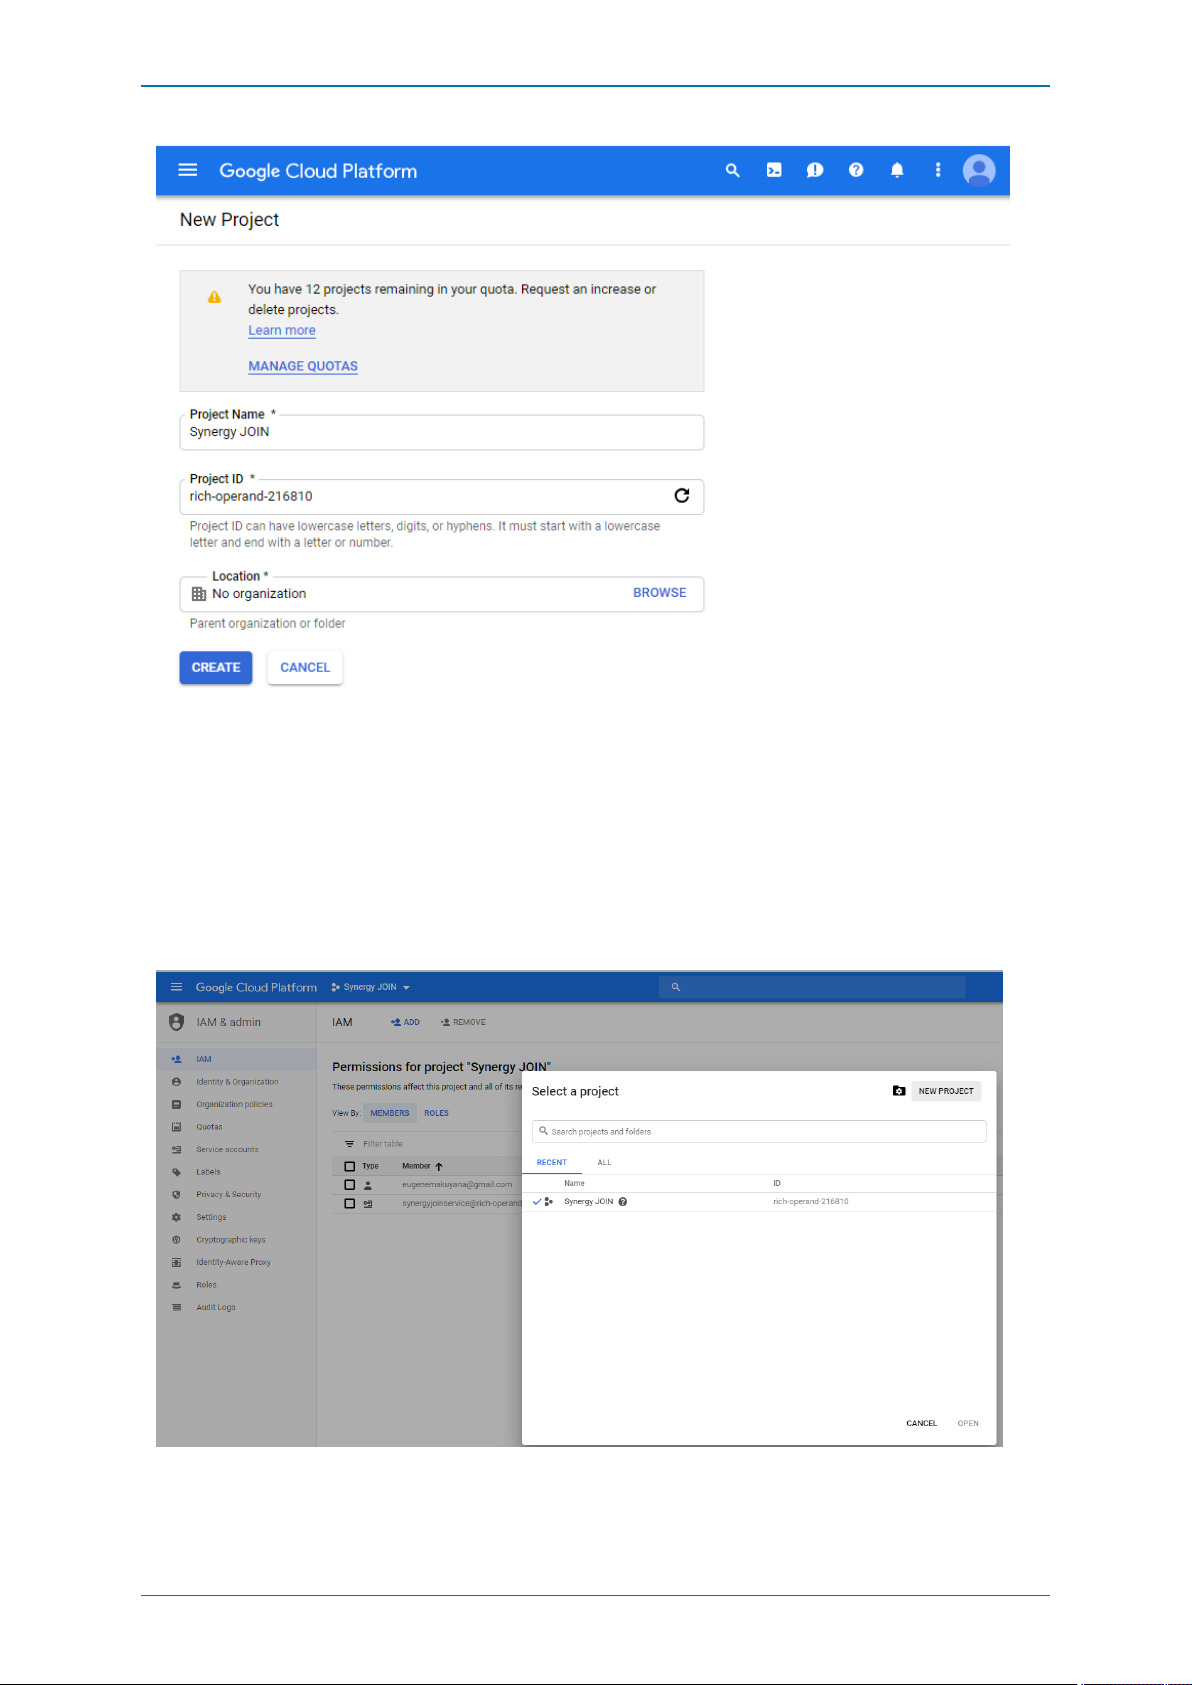
l F illin your projectname, i.e. 'SynergyJOIN'.
l Select Create
Choosing an Existing Project
Follow these steps if you already have existing projects you would like to use for this project,
Page 18 of 121
Page 19

Synergy JOIN Install ation and Configuration Guide
l Click on the Project Drop down arrow at the top left corner and you willbe presented with the 'Select a Project Window'.
l Select your desired project and click'Open'
Enabling API's and Services
You willhave to enable API's to work with the project you have created. The API's you willhave to enable are Google Calendar
API, GMailAPI & Admin SDK.
n Google Calendar API - To allow reading and updating resource calendars
n GMailAPI - To allow sending email
n Admin SDK - To allow listing out current available resourcesfrom the configuration tool
You need to enable one API at a time
Go to the Menu, Select APIs & Services > Dashboard
Select'Enable APIs and Services'
Page 19 of 121
Page 20
Synergy JOIN Install ation and Configuration Guide
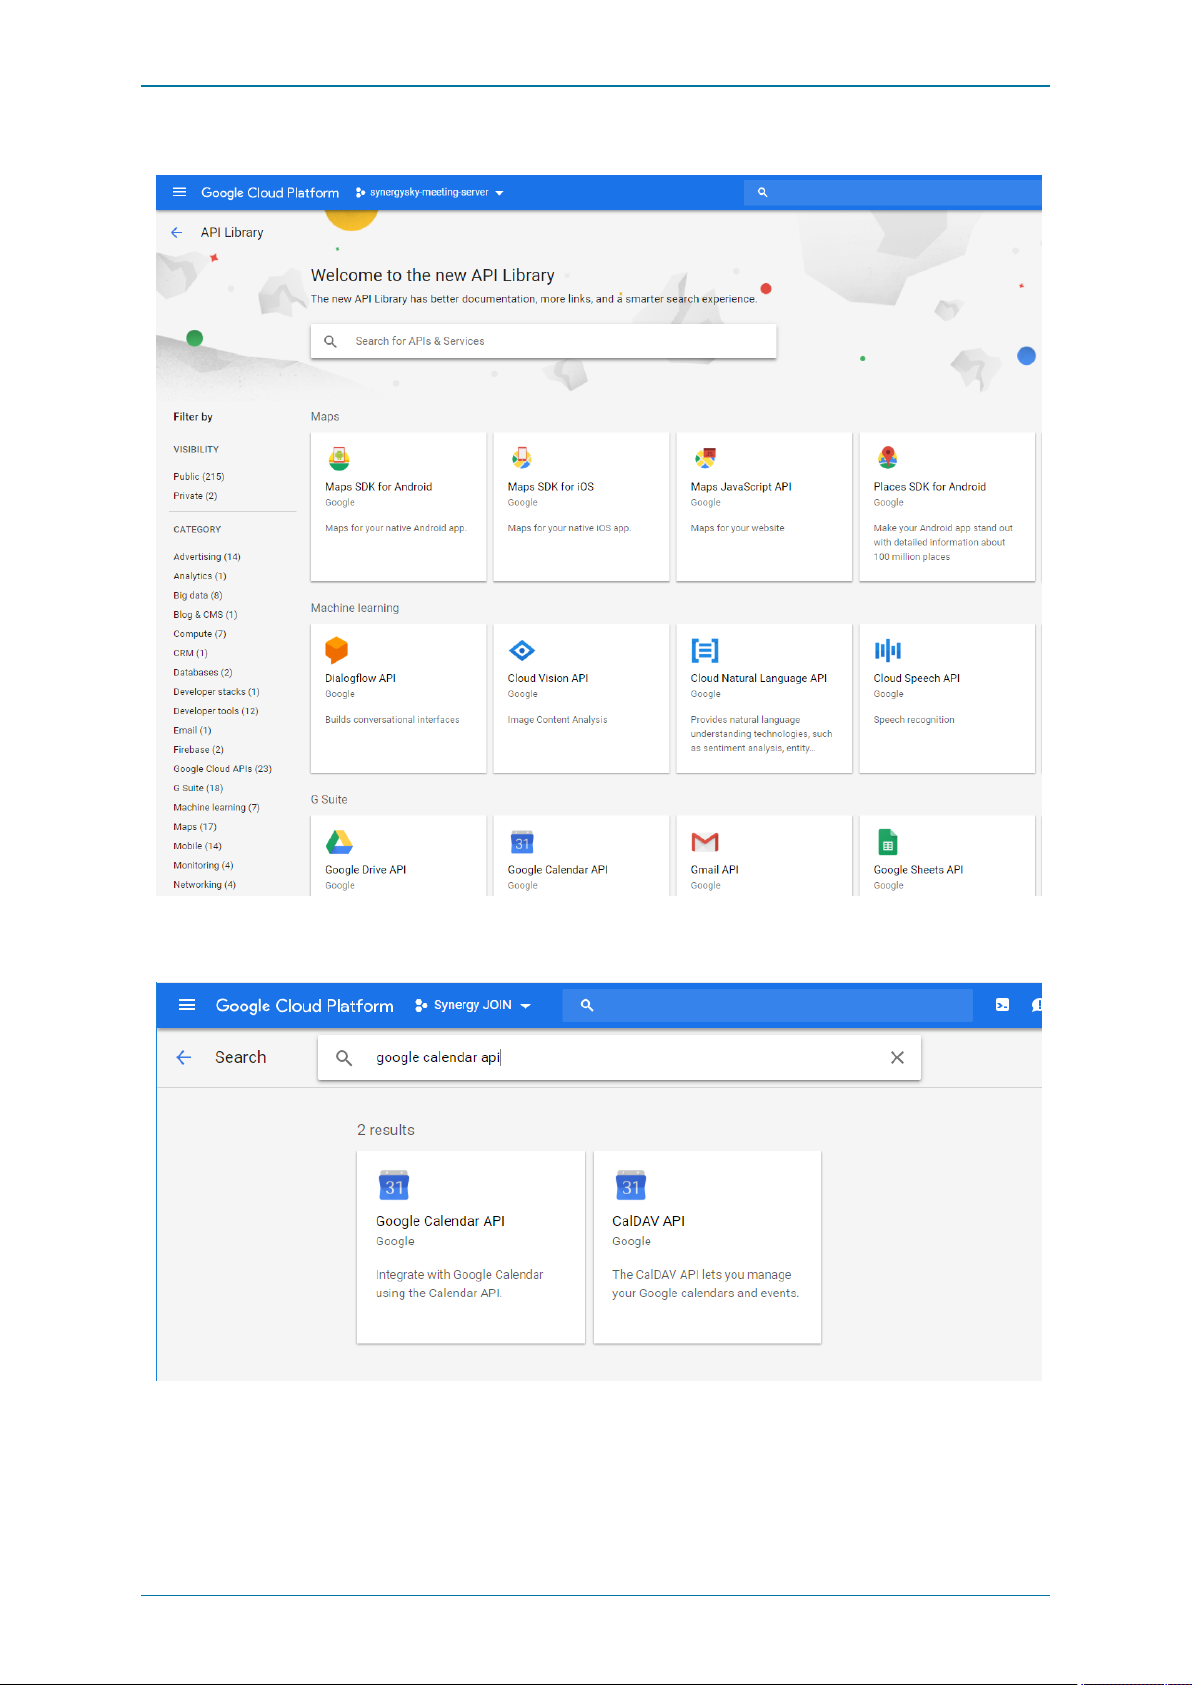
You should now be presented with the API Library.
You willhave to search for the APIs from this screen.
First, Search for 'Google Calendar API'
Selectthe 'Google Calendar API.
Page 20 of 121
Page 21
Synergy JOIN Install ation and Configuration Guide
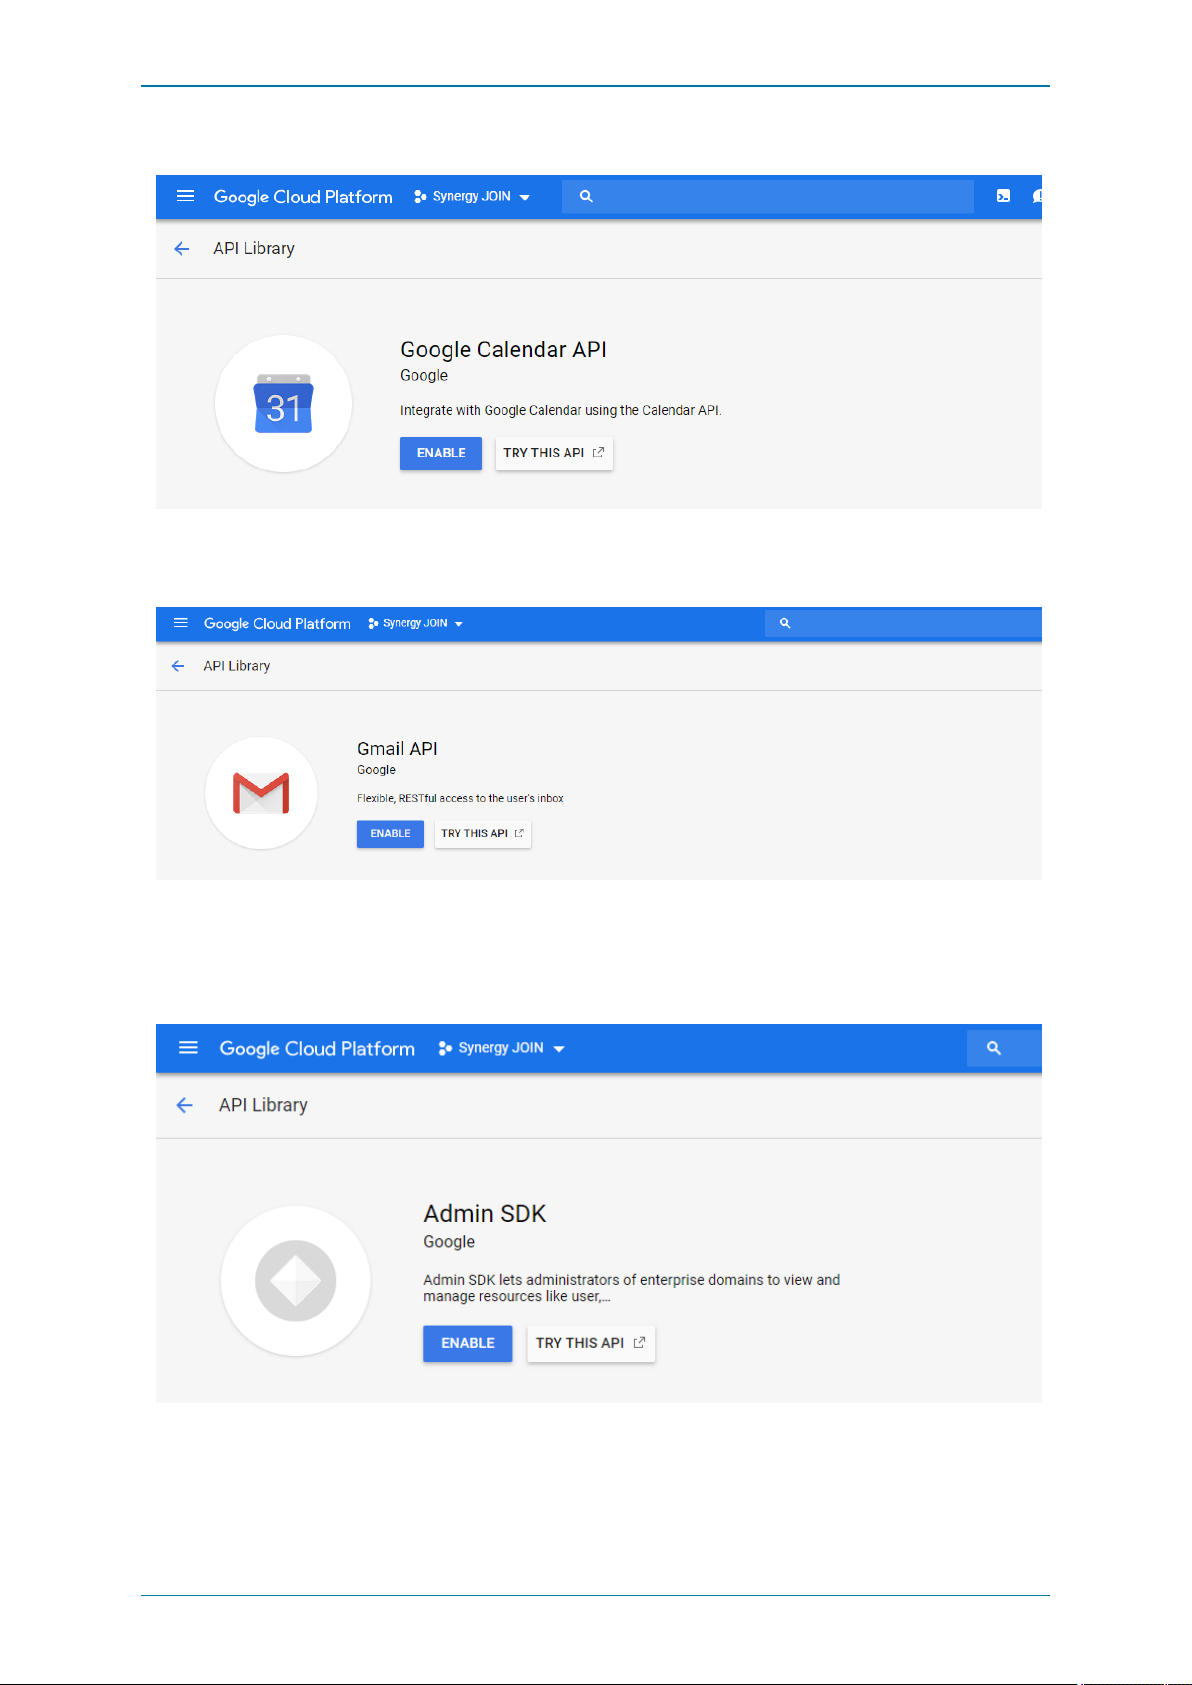
Click Enable
Once you have found this API, you willthen have to perform a new search for GMail API
SelectEnable for the GMail API
Once you have found this API, you willthen have to perform a new search for Admin SDK API
SelectEnable for the Admin SDK API
Page 21 of 121
Page 22
Synergy JOIN Install ation and Configuration Guide
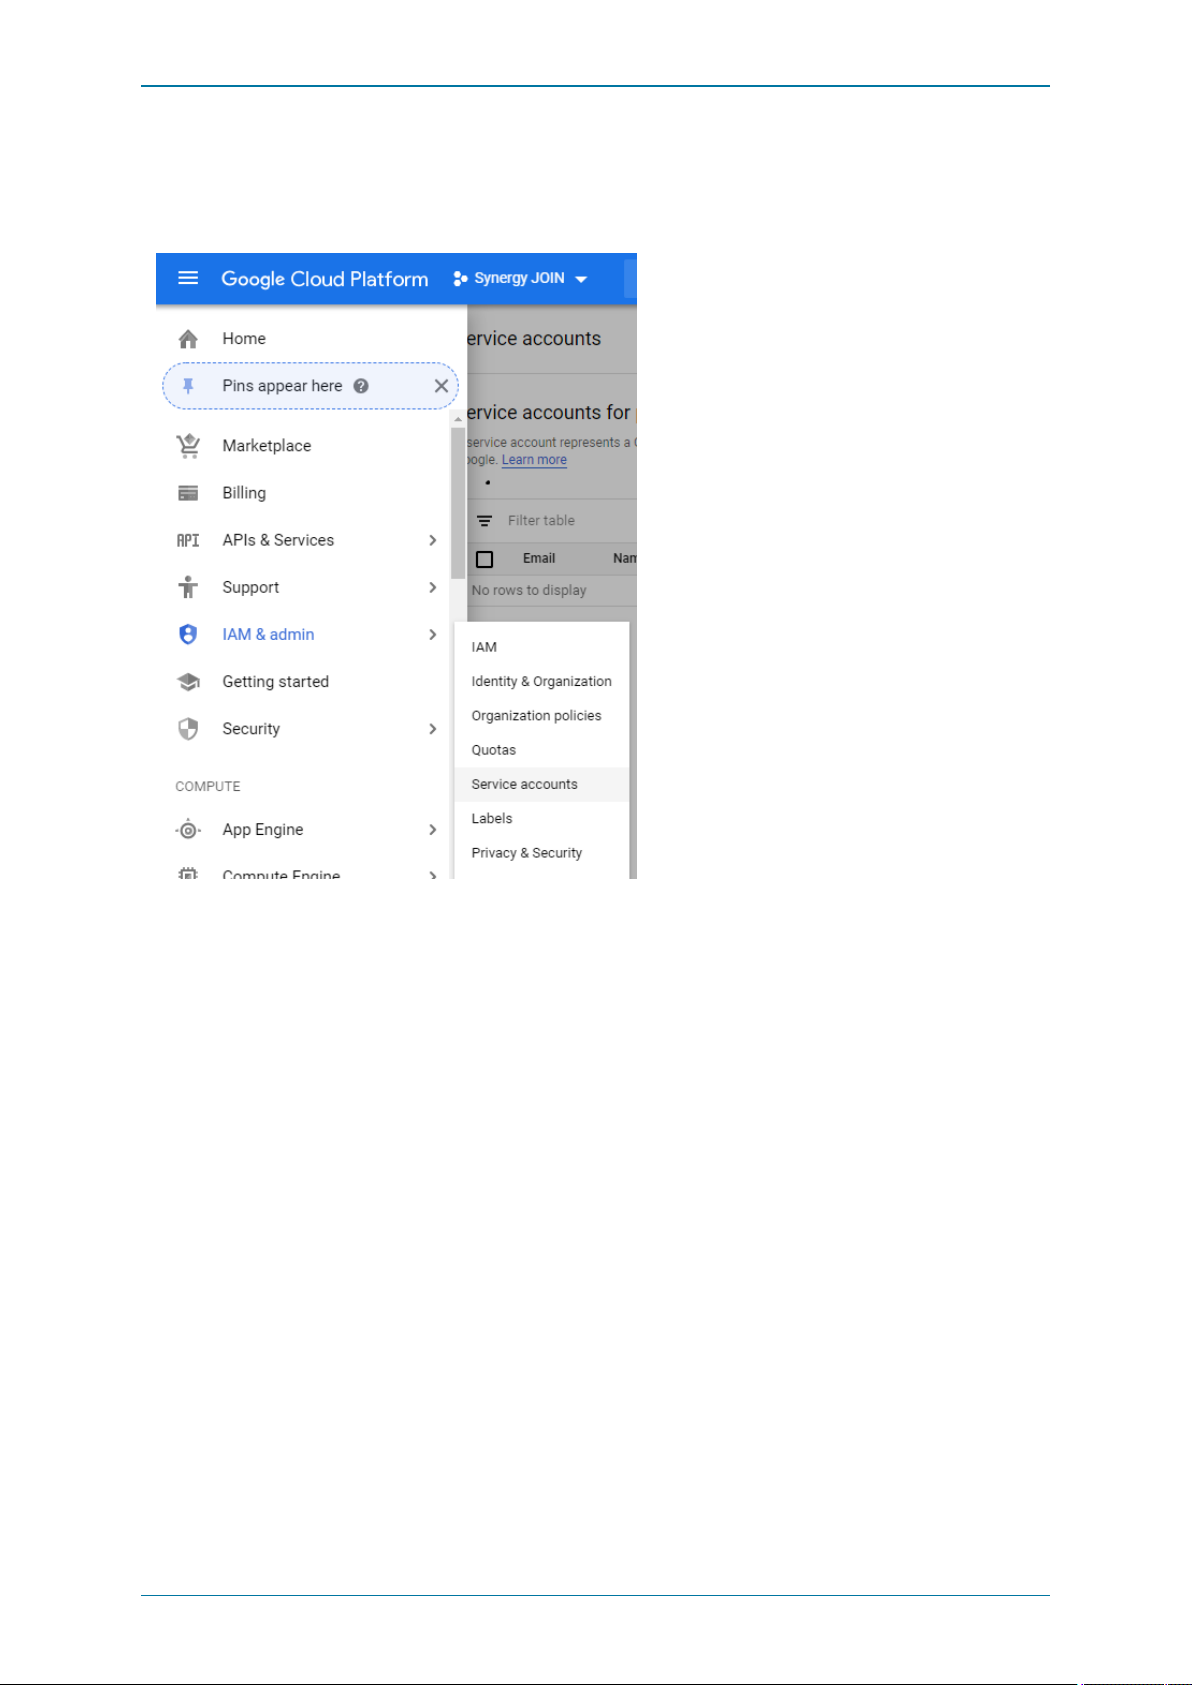
Service Account
Create Service Account
SelectIAM & Admin and Choose 'ServiceAccounts
Page 22 of 121
Page 23
Synergy JOIN Install ation and Configuration Guide
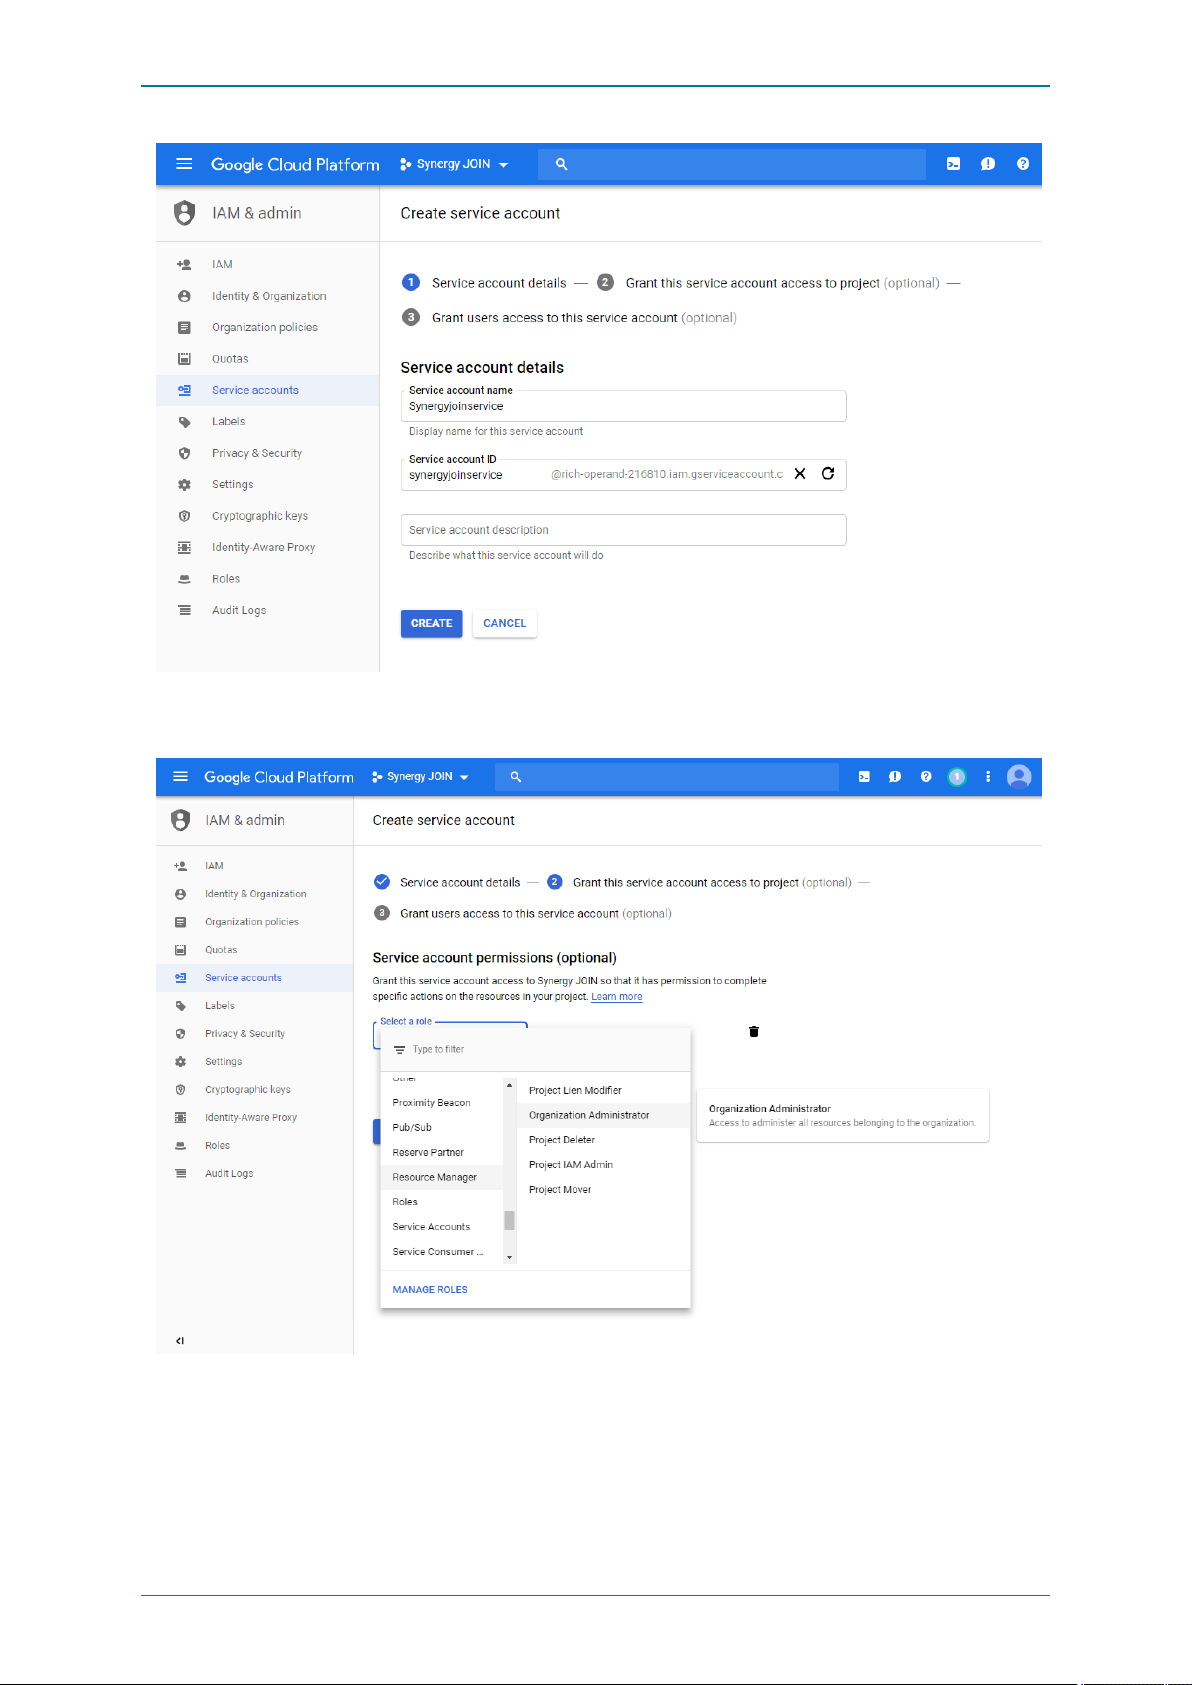
Enter a Service Account Name and select Create
Selectthe role for this service account. Resource Manager > Organization Administrator.
This willallow the service account to manage the meeting room resources.
Once you have selected the role, Clickthe 'Create Key' Button.
Page 23 of 121
Page 24
Synergy JOIN Install ation and Configuration Guide
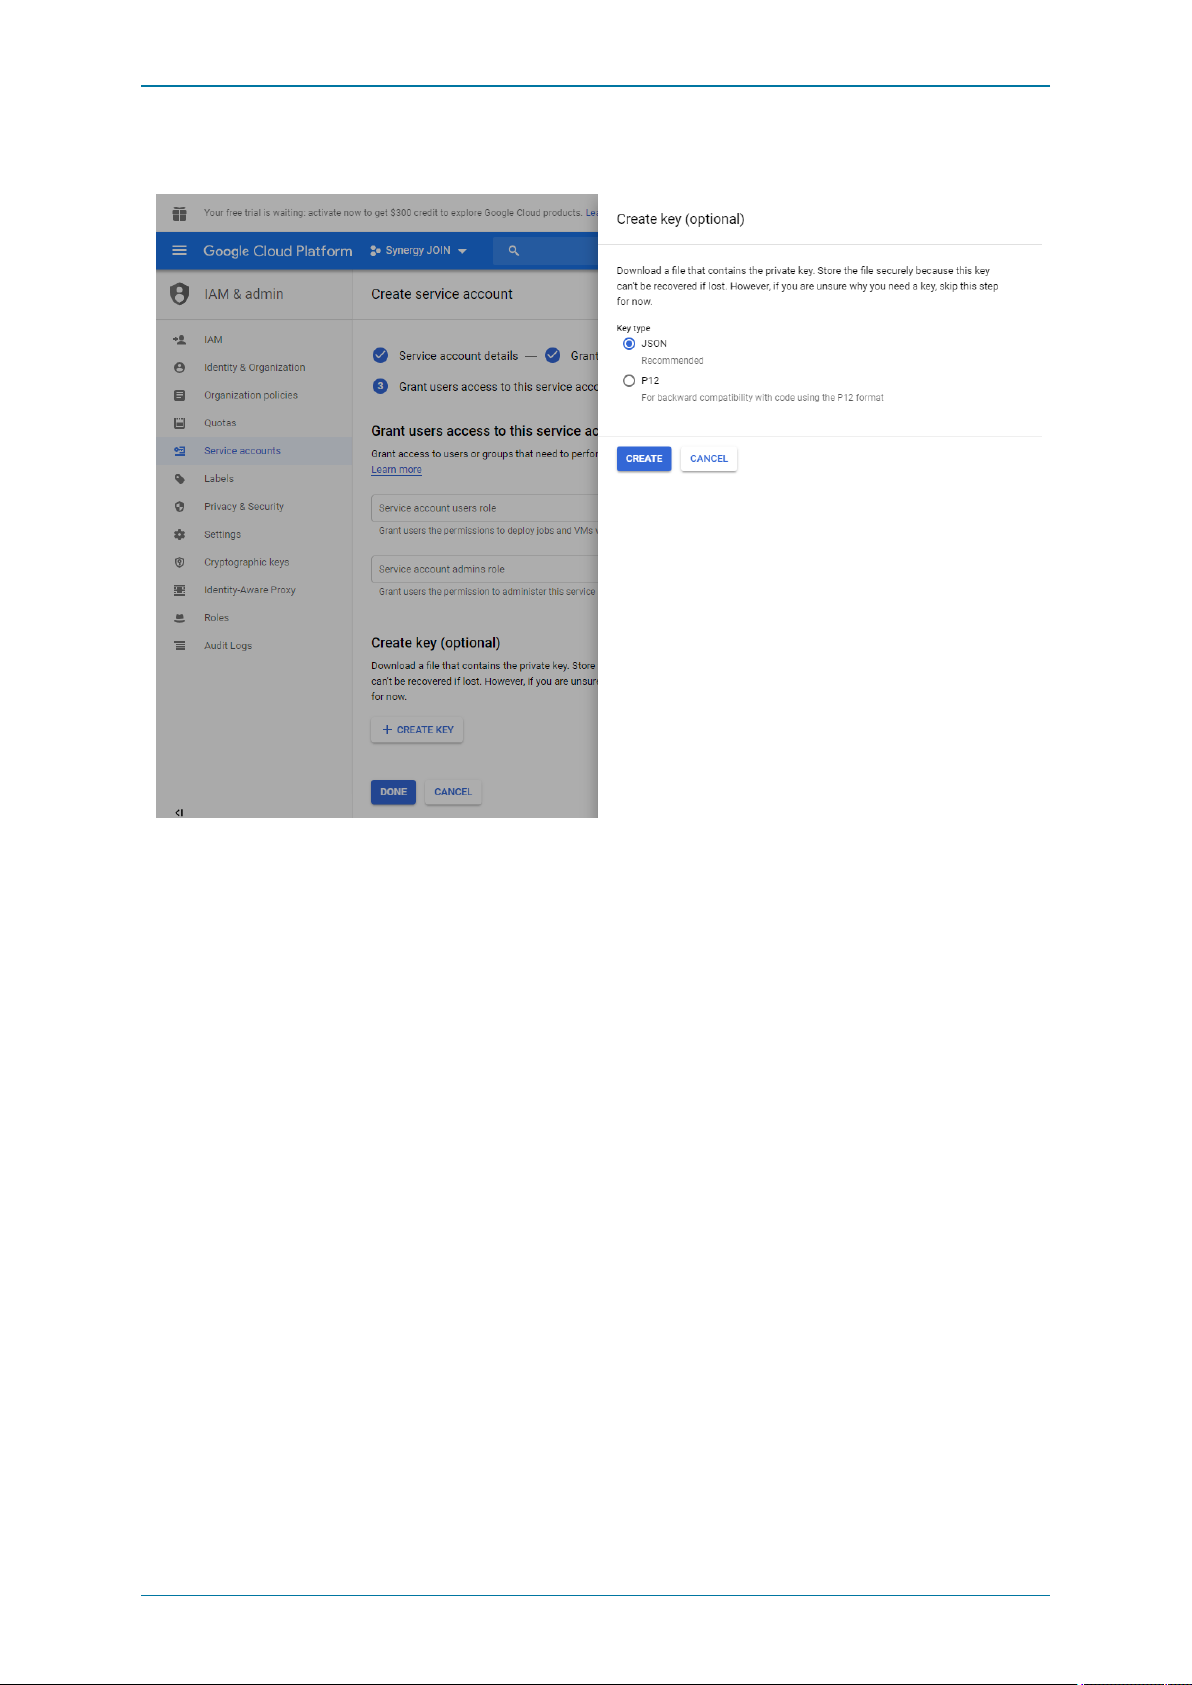
Create a Private Key for JOIN
On the next screen, choose the JSON radio button and click 'Create'
A file willbe downloaded to your disk, this is your authentication information to be used by the JOIN application.
l Copy thisfile to the same directory as the JOIN application. (i.e. c:\SynergySKY\SynergySKYEnterpriseScheduling).
l Keep a secure copy of this file, since a new serviceaccount isrequired to be created if its lost.
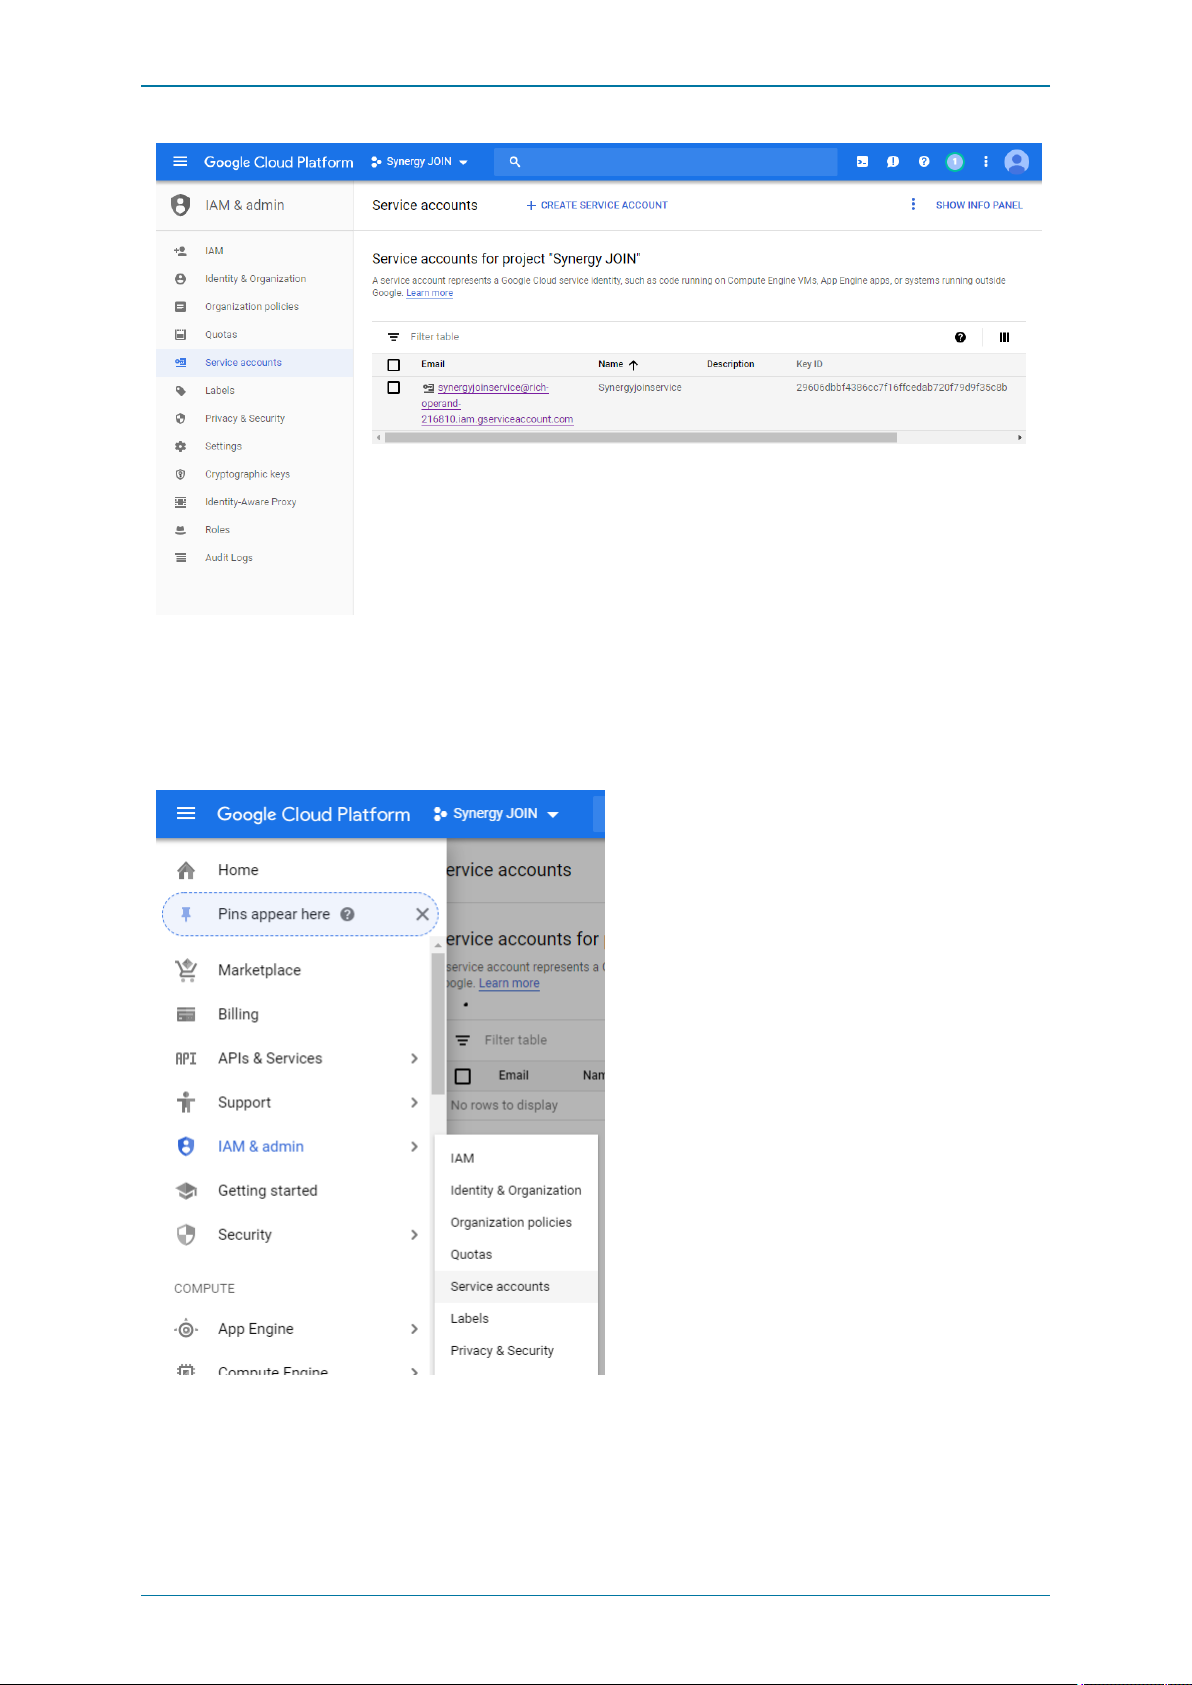
Once you are have moved the file to the same directory as the JOIN application and you click 'Done' you will be presented with a
screen similar to the below with your newly created service account visible in the list.
Page 24 of 121
Page 25
Synergy JOIN Install ation and Configuration Guide
Enable Service accounts to access Calendar Resources
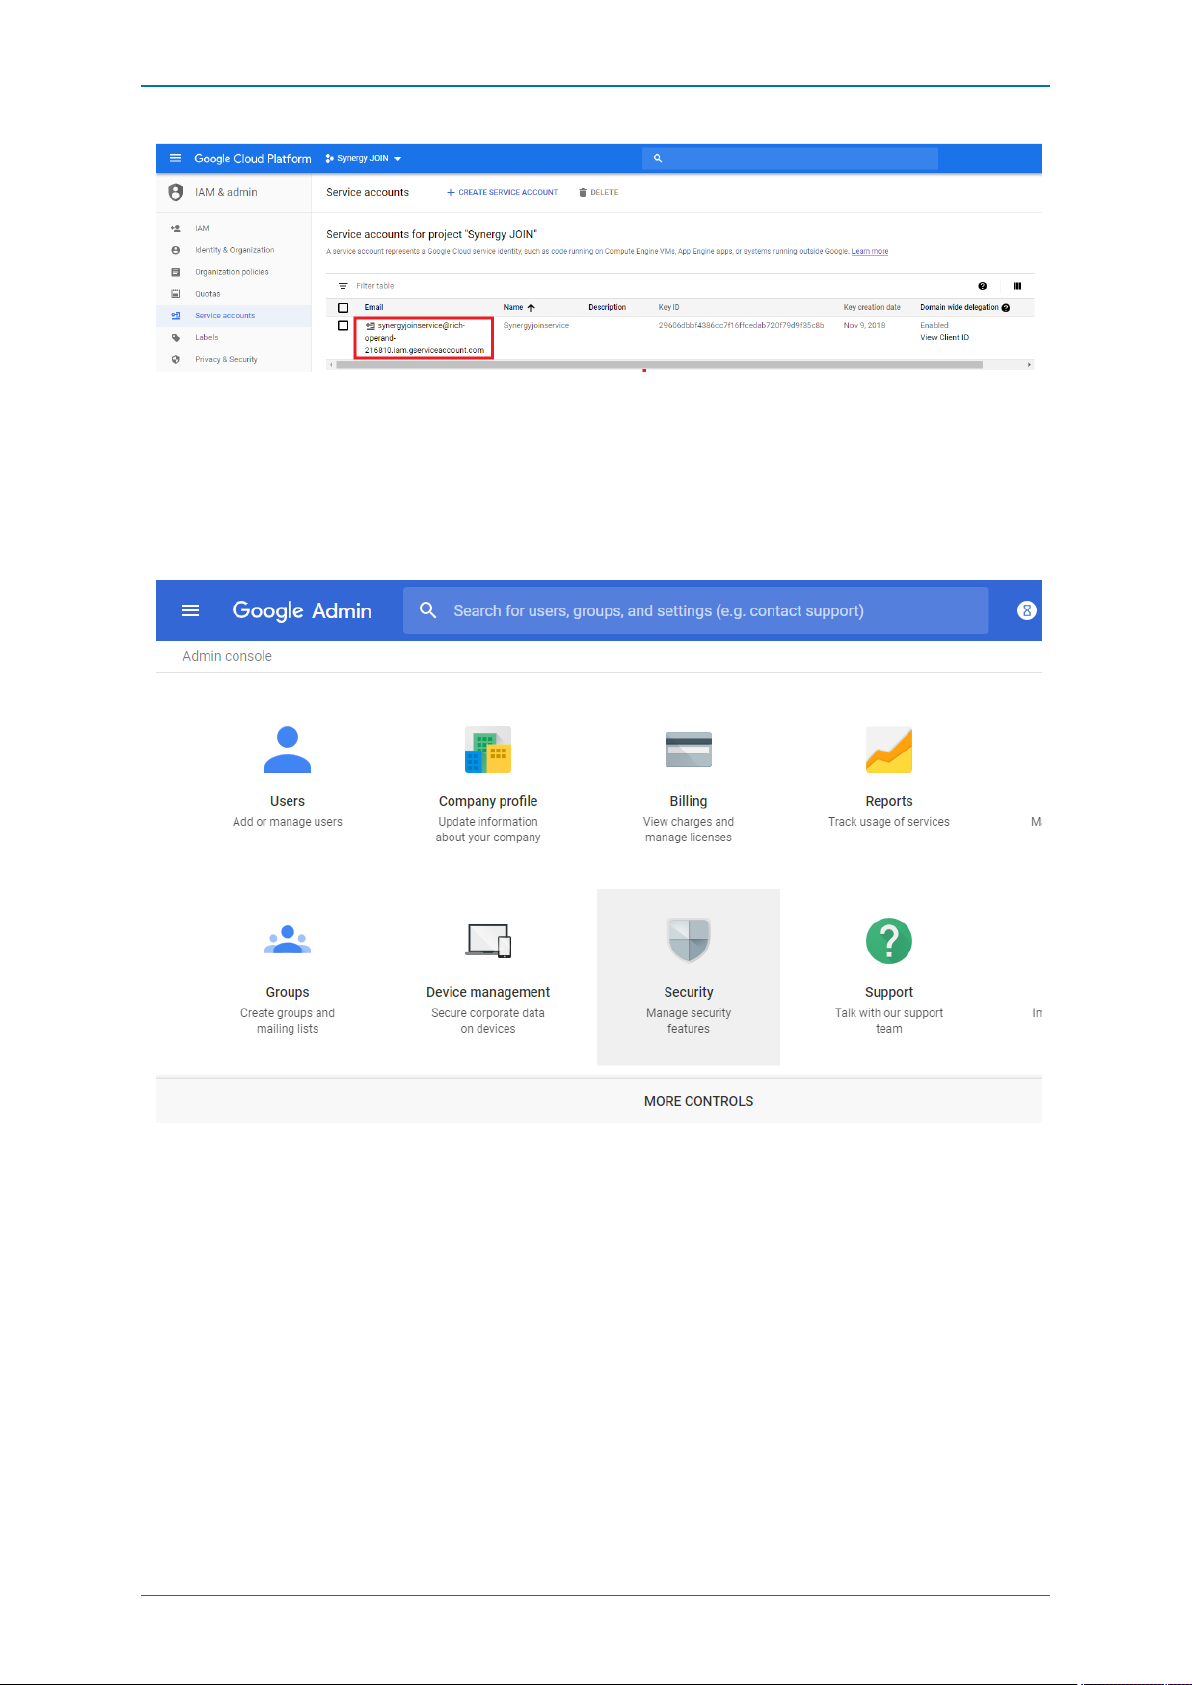
In order toenable Service accounts, first we need to find the Serviceaccount ID for the service account on
https://console.cloud.google.com
SelectIAM & Admin and Choose 'ServiceAccounts
Page 25 of 121
Page 26
Synergy JOIN Install ation and Configuration Guide
Copy the service account ID
An Administrator of the G Suite domain must complete the next steps
Google Admin Console
Browse to the Google Admin Console https://admin.google.com
SelectSecurity from the listof controls.
If you don't see Securitylisted, select More controls from the gray bar at the bottom of the page, then selectSecurity from the list
of controls.
N.B If you can't see the controls, make sure you're signed in as an administrator for the domain.
Page 26 of 121
Page 27

Synergy JOIN Install ation and Configuration Guide
SelectAdvanced settingsfrom the list of options
Select'Manage API clientaccess'in the Authentication section
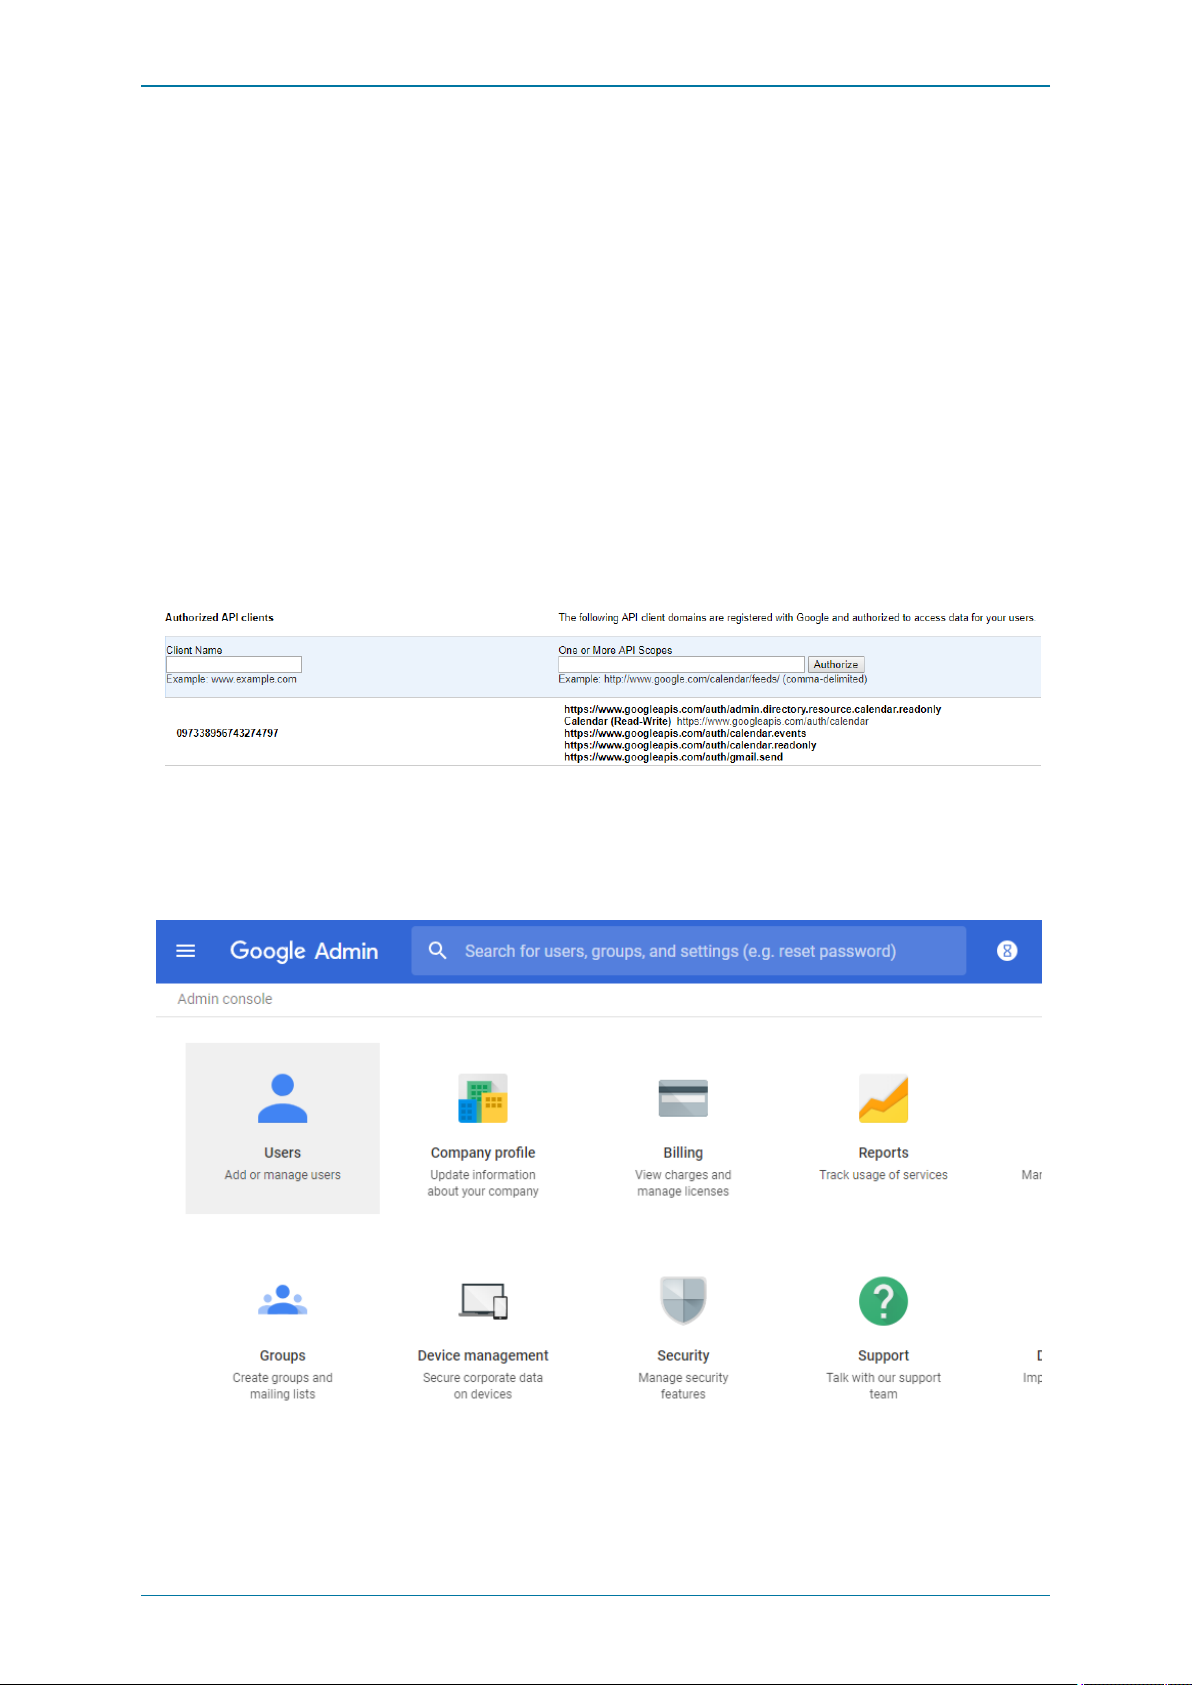
1. In the Client Name field enter the service account's Client ID or Service account ID (which we copied in the previous step).
In the One or More API Scopes field enter this list of scopes:
https://www.googleapis.com/auth/admin.directory.resource.calendar.readonly
- To populate AvailableRooms in the JOIN configtool
https://www.googleapis.com/auth/calendar.readonly
- To allow JOIN to access room calendars enabled in JOIN
Page 27 of 121
Page 28
Synergy JOIN Install ation and Configuration Guide
https://www.googleapis.com/auth/gmail.send
- To allow JOIN to send notifications to its administrators as wellas dial-in instructionsfor certain workflows (e.g. one-time
VMRs).
https://www.googleapis.com/auth/calendar
- For workflows requiring calendar invitation updates, suchas the green button for Polycom endpoints(if the EWS emulator is
not used) or meeting invitation body updates, JOIN also has to have a write calendar accessfor those rooms.
https://www.googleapis.com/auth/calendar.events
- For workflows requiring calendar invitation updates, such as the green button for Polycom endpoints(if the EWS emulator is
not used) or meeting invitation body updates, JOIN also has to have a write calendar access for those rooms. If read-only is
sufficient, it should be at leastthis one set there: https://www.googleapis.com/auth/calendar.events.readonly
Note: All of the scopes are required for the integration of Synergy JOIN with Google G Suite. It isnot possible to exclude
some of the scopes as this willcause parts of the integration not to work
You can copy and paste the below api scopes as they are into the 'One or More API Scops' field box
https://www.googleapis.com/auth/admin.directory.resource.calendar.readonly,
https://www.googleapis.com/auth/calendar,https://www.googleapis.com/auth/calendar.readonly,
https://www.googleapis.com/auth/gmail.send,https://www.googleapis.com/auth/calendar.events
Click Authorize.
The outcome should looklike the below example:
Service-act-on-behalf-of Email
Browse to the dashboard and select 'Users'
Page 28 of 121
Page 29
Synergy JOIN Install ation and Configuration Guide
In the users section, select the user that you would like to use as the 'service-act-on-behalf-of Email'in Synergy JOIN.
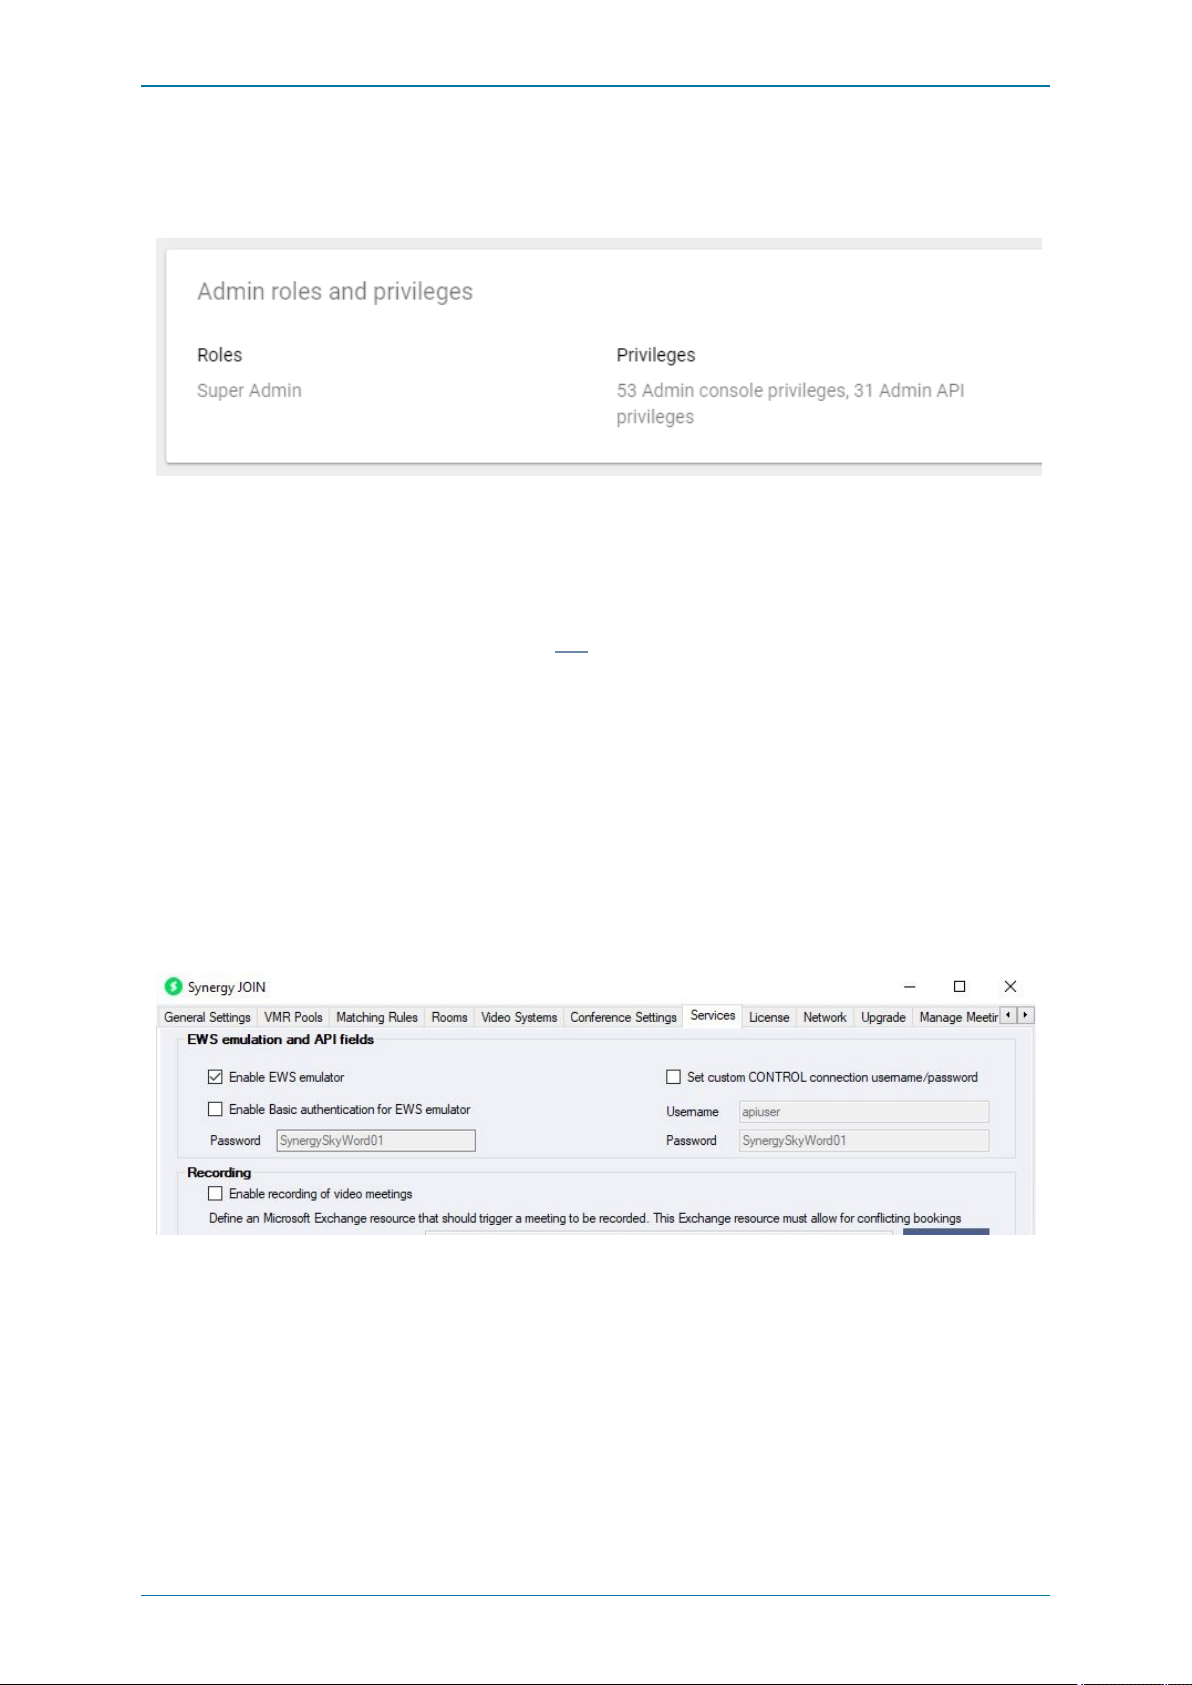
Scrolldown to the 'Admin roles and privileges' section and verifythat the user you would like to use has the role of 'Super Admin'
enabled.
Once you have verified this, copythe email address from this user and paste thisinto the 'service-act-on-behalf-of email' text
button in the 'General Settings' tab in the Synergy JOIN configuration tool.
More information on the general settingstab can be found here
Polycom EWS Emulator
There are instanceswhen the Polycom Endpoint is unable to communicatewith the Exchange Server and as such, the endpoint
isunable to use the builtin Polycom Click To Join technology. The EWS emulator within Synergy JOIN bringsback the ability to
utilize the Polycom Click To Join technology on your Polycom Endpoints.
The EWS Emulator is compatible with the HDX, Group Series and Trio endpoints.
Configuring Synergy JOIN
The Polycom Exchange Web Service(EWS) Emulator in Synergy JOIN acts as an Exchange Web Server. Thismeans Synergy
JOIN willretrieve the calendar information from exchange and populate thisto the endpoint.
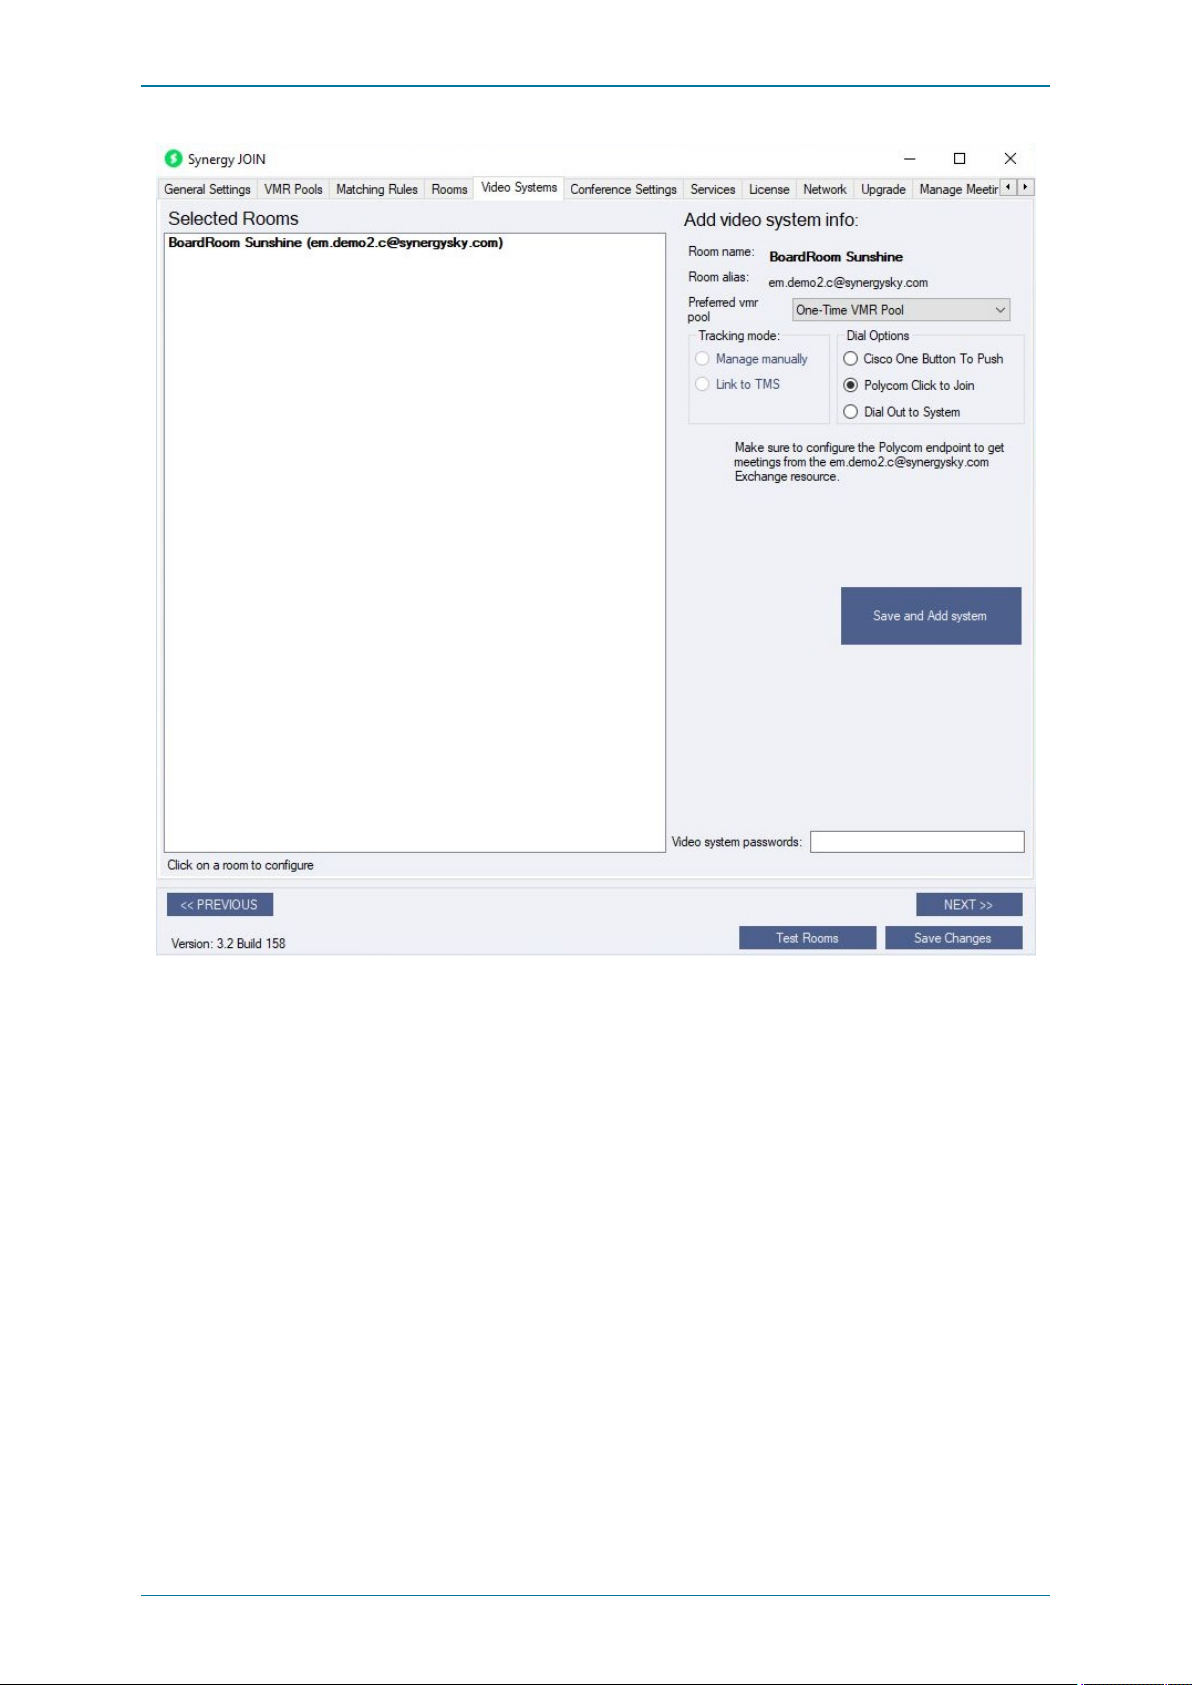
WithinSynergy JOIN you have to Enable the EWS Emulator from the Servicestab.
You have to then configure your Video System as a Polycom endpoint. Once you do this,Synergy JOIN willknow to send the
Polycom ClickTo Join Token to that endpoint.
Page 29 of 121
Page 30
Synergy JOIN Install ation and Configuration Guide
Configuring the HDX and Group Series Polycom Endpoint
The Polycom endpointsmust be configured to pollcalendar information from the JOIN server which willbe acting as an
Exchange Web Server.
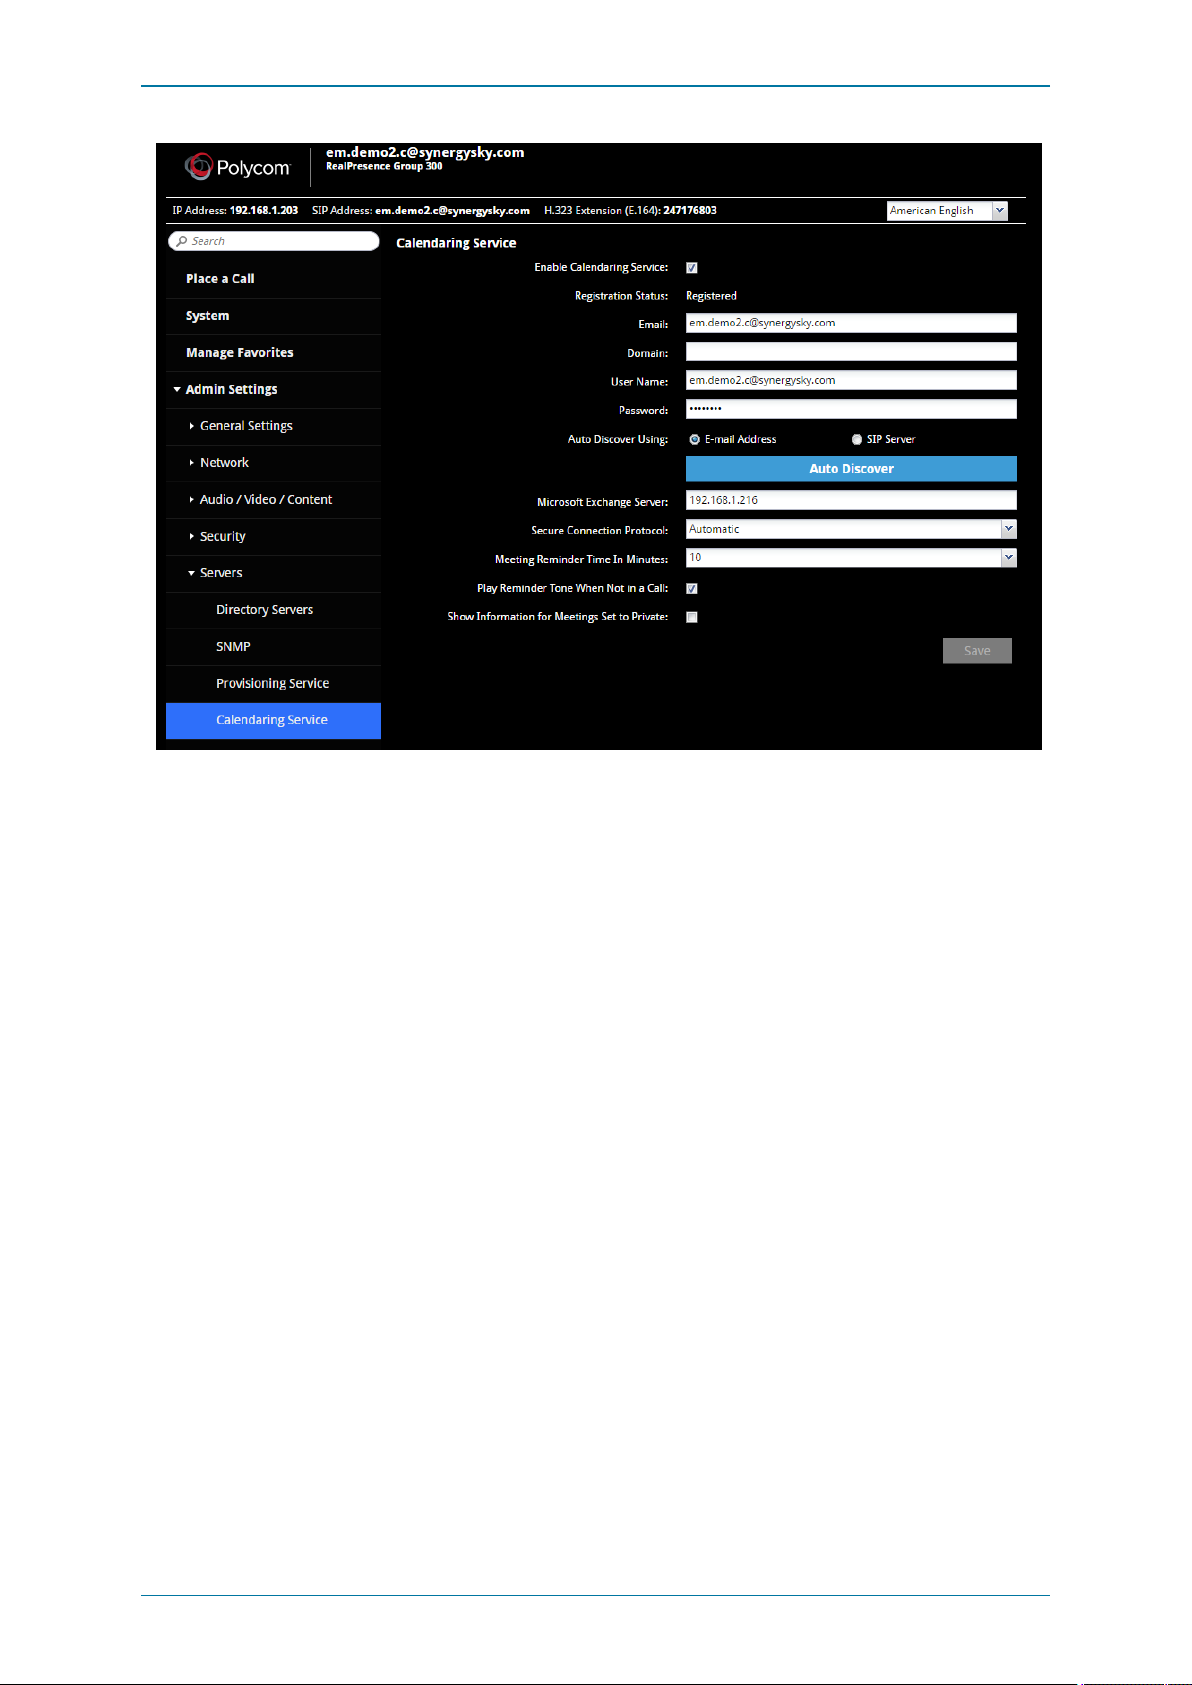
Instructions on how to configure this on a Polycom Group Series endpoint are below:
Page 30 of 121
Page 31
Synergy JOIN Install ation and Configuration Guide
1. Navigate to the Calendaring Service configuration section within your Polycom Codec.
2. Tick the 'Enable Calendaring Service' tick box
3. Email: This shouldbe the room/ resource email address that you have configured within Synergy JOIN.
4. Domain: This field isnot always required. If you are unable to register your endpoint to the EWS Emulator with this field
blank, you willhave to enter your domain
5. User Name: This shouldbe the room/ resource email address
6. Password: This isthe password configured in the 'EWS Emulation' section in the 'Services' tab of Synergy JOIN
7. Microsoft Exchange Server: This is the IP address of the JOIN server
Once you have configured the rest of the settingsto your liking, click'Save'
When the Registration Status is 'Registered', you can start booking video meetings and start utilizing Polycom Click To Join.
Configuring the Trio Series Polycom Endpoint
You have to meet the followingrequirements in order to start using the EWS Emulator with Polycom Trio
l You have to be running Synergy JOIN build 3.2.163 or above
l You have to tick the 'Enable BasicAuthentication for EWS Emulator' within the Services tab in Synergy JOIN
l T he Trio has to have a line registered as SIP
l You have to have physical access to the touch panel to set a username & password
l If you are running 5.9 firmware, AD Photo fetch needs to be disabled.
o
feature.contactPhotoIntegration.enabled = 0
o
More information about thiscan be found here - https://documents.polycom.com/bundle/trio-sfb-dg-5-9-0AA/page/c3189620.html
l T rio, if running 5.9.1.10419 – must upgrade to 5.9.1.11135 and set basicauth to enabled
o
https://community.polycom.com/t5/VoIP-SIP-Phones/Software-Trio-UC-Software-5-9-1-11135-RevAC/mp/107281
o
feature.exchange.allowBasicAuth= “1”
Page 31 of 121
Page 32

Synergy JOIN Install ation and Configuration Guide
Setting a Polycom Profile
The following setup information has been taken from the Polycom support website. The below configuration iswhat is
required in order for the EWS Emulator to work with the Trio.
The full Polycom documentation can be found here: https://otd.plcm.vc/support/docs/devices/polycom-trio#configure-deviceprofile
Configure Device Profile
1. Go to the management section of the device. You can get there by entering the IP address of the device into the browser
address.
Note: You must log in as an administrator.
2. SelectSimple Setup from the tab menu.
3. Ensure Generic is selected for the Base Profile. The Trio willnot function with One Touch Dial service using the other
profile options.
Configure Device Calendaring
1. Go to the management section of the device. You can get there by entering the IP address of the device into the browser
address. Note: You must log in as an administrator.
Example: https://<ip-address-of-trio>/
2. SelectSettings > Applic ations > Ex change Applic ations.
3. Enter the following fields:
n Enable: Exchange Calendar
n Disable: AutoDiscover
n Exc hange Server URL: https://ipaddressofjoin/EWS/Exchange.asmx
o
NOTE: Exchange URL is casesensetive
4. Click Save.
Configure Device Credentials
1. Provide calendaring credentials. This must be done on the device itself.
2. On the device touch panel go to Settings > Bas ic > Logi n Credentials.
3. Enter the following fields:
n Domai n: Example OTD
n Username: Example [email protected]
o
This is the room alias as it is configured in JOIN
n Password: Example F3kDFyu1bD
o
This is the JOIN EWS Emulator password
4. Click Save. The Registration Status should display Regis tered and the calendar should appear in a few seconds.
Exchange In-Body Update Requirements
N.B You only have to follow the below steps if you would like to enable in-body update in your Synergy JO IN
installation.
The "In-body Update"feature allows for updating the organizer's meeting invitation in their calendar and sending an updated
meeting invitation to all invitees, rather than sending a separate emailwith dial-in information to everyone. This feature requires
more permissions in the Microsoft Exchange environment than sending dial-ininformation emails.
The work flow of thisfeature involves Synergy JOIN logginginto the calendar of the meeting Organizer and updating the
appointment with the dial-ininformation for the meeting based upon the email template specified in "Configuring Email
templates" on page105. The invitation willbe re-sent to the inviteeswith the updated appointment body once successfully
updated. An email with the dial-in information willbe sent to the meeting organizer if the body could not be updated. The
administrator willalso be notified when a meeting could not be updated.
Note: Synergy JOIN willnot monitor each user's calendar for changesto meetings, but rather base this on changes to invitations
sent to room/ resource accounts.
The following permissions are required for the Calendar Update method to work. It is recommended that these commands are
added to the powershellscript used when creating new users so that all new users are set up with the right permissions:
l T he Exchange service account needs "Edi tor" accessto the calendar of each user to update the calendar appointment
with the dial-ininformation. This isnormallyaccomplished by running the following command. However the calendar
folder name may be something else than "calendar" if the user isnot set up with an English mailbox(e.g. Calendrier in
Page 32 of 121
Page 33

Synergy JOIN Install ation and Configuration Guide
French)
o
Add-MailboxFolderPermission -Identity
l T he Exchange service account needs "s endas " permissions for each user to send an updated invitation to allrecepients in
the appointment
o
Add-RecipientPermission -Identity [email protected] Trustee [email protected] -AccessRights
sendas -Confirm:$false
l Note: some Microsoft Exchange environments require the command to be in the following format:
o
Add-ADPermission -Identity [email protected] -User
[email protected] -AccessRights ExtendedRight
-ExtendedRights "Send As"
Updating calendars in other languages
Note that the sc ript will find the localiz ed name of the calendar to apply the permiss ions to the right folder.
The following script can be used to update allexisting users in the organization with the right permissions.
The sectionsthat you have to ammend are highlighted in red
$resourceAccount = '[email protected]'
foreach($mbx in Get-Mailbox -RecipientTypeDetails usermailbox -ResultSize Unlimited | SelectObject -ExpandProperty Alias){
$userAccount=$Mbx
$Mbx += ':\' + [string](Get-mailboxfolderstatistics -Identity $Mbx -folderscope calendar | whereobject {$_.FolderType -eq "Calendar"}).Name
$test = Get-MailboxFolderPermission -Identity $mbx -erroraction silentlycontinue
if($test -ne $null)
{
Write-Host "Setting Editor access on $mbx"
Add-MailboxFolderPermission -Identity $mbx -User $resourceAccount -AccessRights Editor
Write-Host "Setting sendas permissions for $userAccount"
Add-RecipientPermission -Identity $userAccount -Trustee $resourceAccount -AccessRights sendas Confirm:$false
}
}
The following script can be used to update just one user while letting the script figuring out the correct name of the
calendar folder:
The sectionsthat you have to ammend are highlighted in red
$userAccount = '[email protected]'
$resourceAccount = '[email protected]'
foreach($mbx in Get-Mailbox -RecipientTypeDetails usermailbox -Identity $userAccount -ResultSize
Unlimited | Select-Object -ExpandProperty Alias){
$Mbx += ':\' + [string](Get-mailboxfolderstatistics -Identity $Mbx -folderscope calendar | whereobject {$_.FolderType -eq "Calendar"}).Name
$test = Get-MailboxFolderPermission -Identity $mbx -erroraction silentlycontinue
if($test -ne $null)
{
Write-Host "Setting permissions for $mbx"
Page 33 of 121
Page 34

Synergy JOIN Install ation and Configuration Guide
Add-MailboxFolderPermission -Identity $mbx -User $resourceAccount -AccessRights Editor
Write-Host "Setting sendas permissions for $userAccount"
Add-RecipientPermission -Identity $userAccount -Trustee $resourceAccount -AccessRights sendas Confirm:$false
}
}
Private appointments
The scripts above do not allow for updating the invitation body of meetings that are booked as Private in Outlook.The line in the
script with "Add-MailboxFolderPermission" must be replaced with the line below which includes SharingPermissionFlags for
allowingthe update of private meetings:
Add-MailboxFolderPermission -Identity $mbx -User $resourceAccount -AccessRights Editor SharingPermissionFlags delegate,canviewprivateitems -SendNotificationToUser $true
Page 34 of 121
Page 35
Synergy JOIN Install ation and Configuration Guide
Installing & Upgrading to Synergy JOIN 4.0
You willbe provided with an installer:
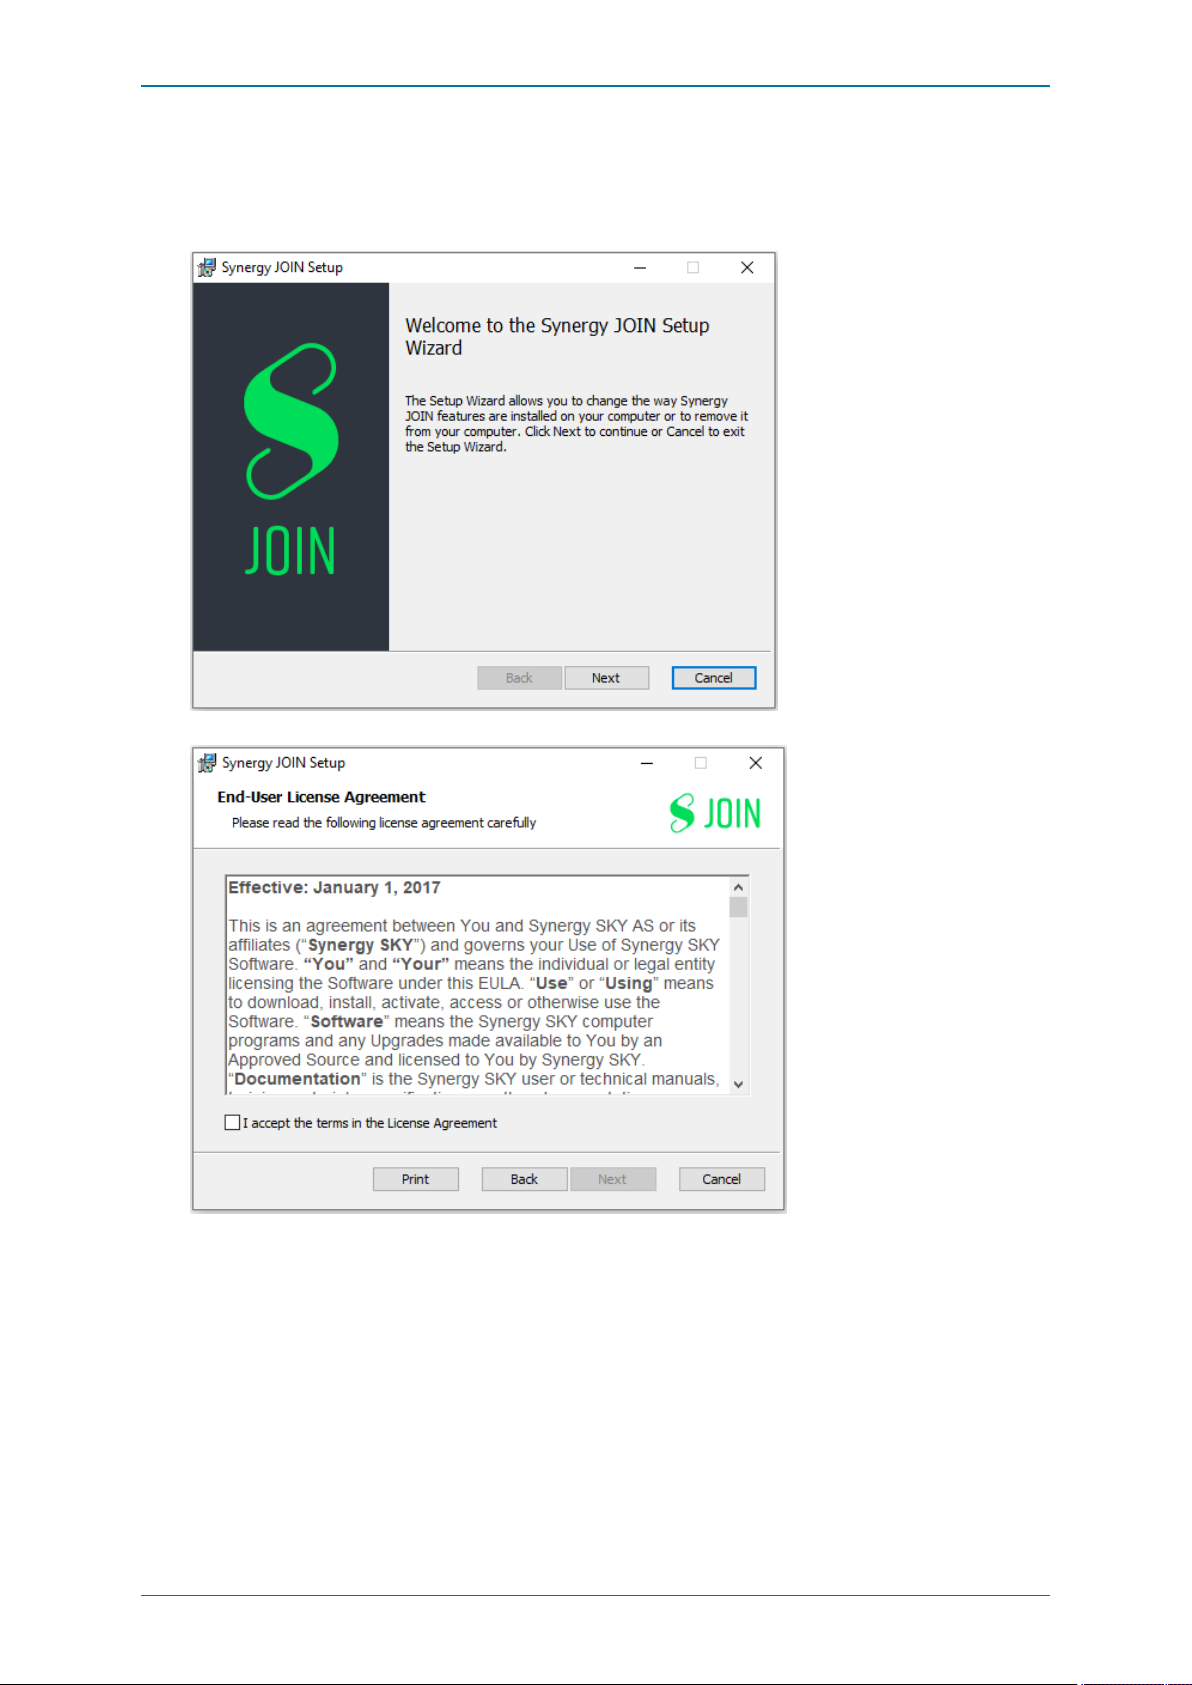
1. Double clickto run the installer.
2. Follow the simple install wizard, clicking Next to accept the licenseagreement.
SynergySKYJoinInstaller.v.4.x.xxx
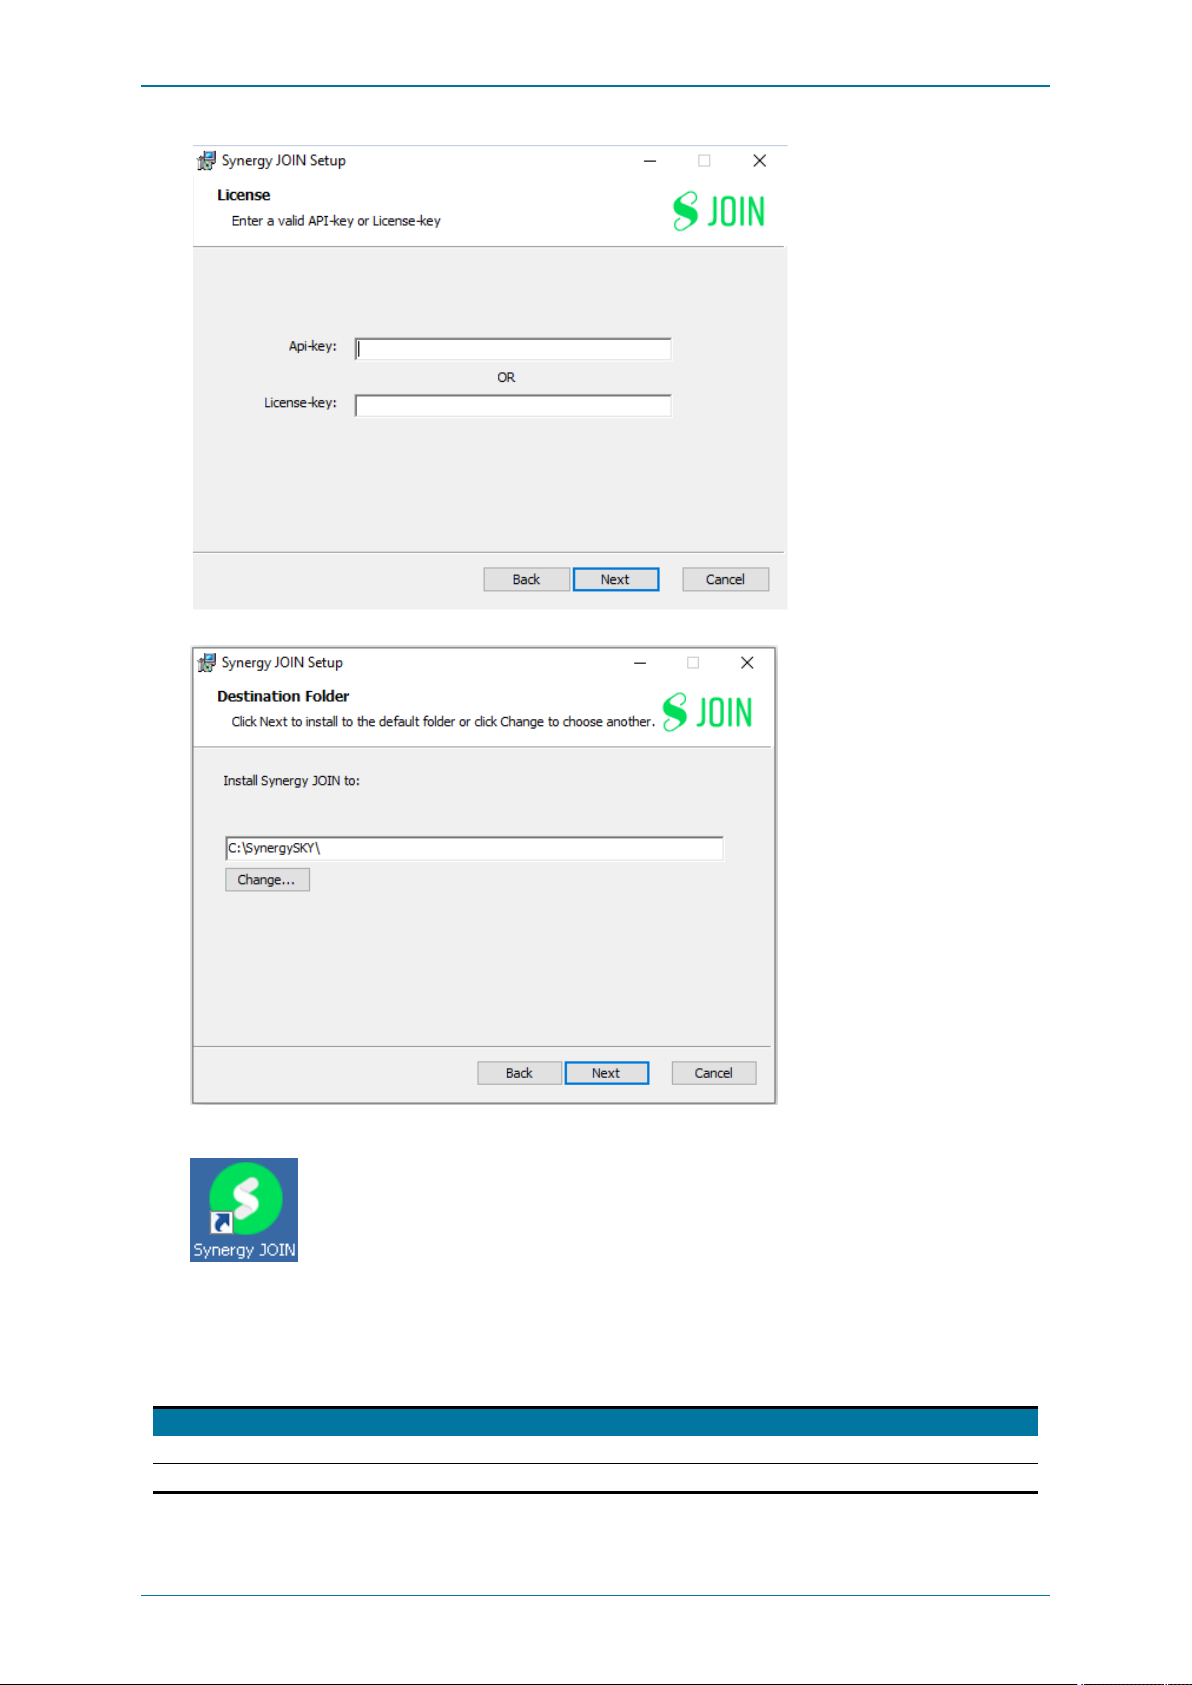
3. If upgrading to Synergy JOIN, you will have to Enter the API Key or LicenseKey provided to your by your Synergy SKY
Representative
Page 35 of 121
Page 36
Synergy JOIN Install ation and Configuration Guide
4. Selectthe installlocation, and click Next to confirm that you would like to start your installation.
5. Once the installhas completed, you willsee a shortcut to the configuration tool on the desktop.
Synergy JOIN 4.0
When installing Synergy JOIN 4.0, a PostgreSQL database server isalso installed.Additionally, there are two servicesthat are
installed at the same time.
Service Name Service Opera tion
Synergy JOIN Runs the Synergy JOIN threads andprocess.
SynergyJOINPostgreSQL Runs the Synergy JOIN PostGreSQL Database
Page 36 of 121
Page 37

Synergy JOIN Install ation and Configuration Guide
Synergy JO IN PostgreSQL connecti on information:
Username: postgres
Password: postgres
Port: 5432
A backupof the database can be performed by running the script in scripts\synergysky_db_export.bat. This willcreate a file
named synergysky_db_export.txt which containsall the data from the database.
This should be done on a regular basis.
The first time JOIN 4.0 starts, it willcreate the database and perform a migration of any pre-existing data.
Page 37 of 121
Page 38
Synergy JOIN Install ation and Configuration Guide
Synergy JOIN Quick Setup Guide
n Start the configuration tool by double-clicking on the JOIN icon on the desktop.
Note: On start-up, the server checksfor updates, so if you do not have internet accessconfigured on the server, you will
see an error here.
n ClickInstall Serv ice to installthe JOIN service on the server - once installed thisbutton disappears from the configuration
tool.
The Start and Stop buttonsare used once the serviceis installedto stop and start the service when necessary.
General Settings
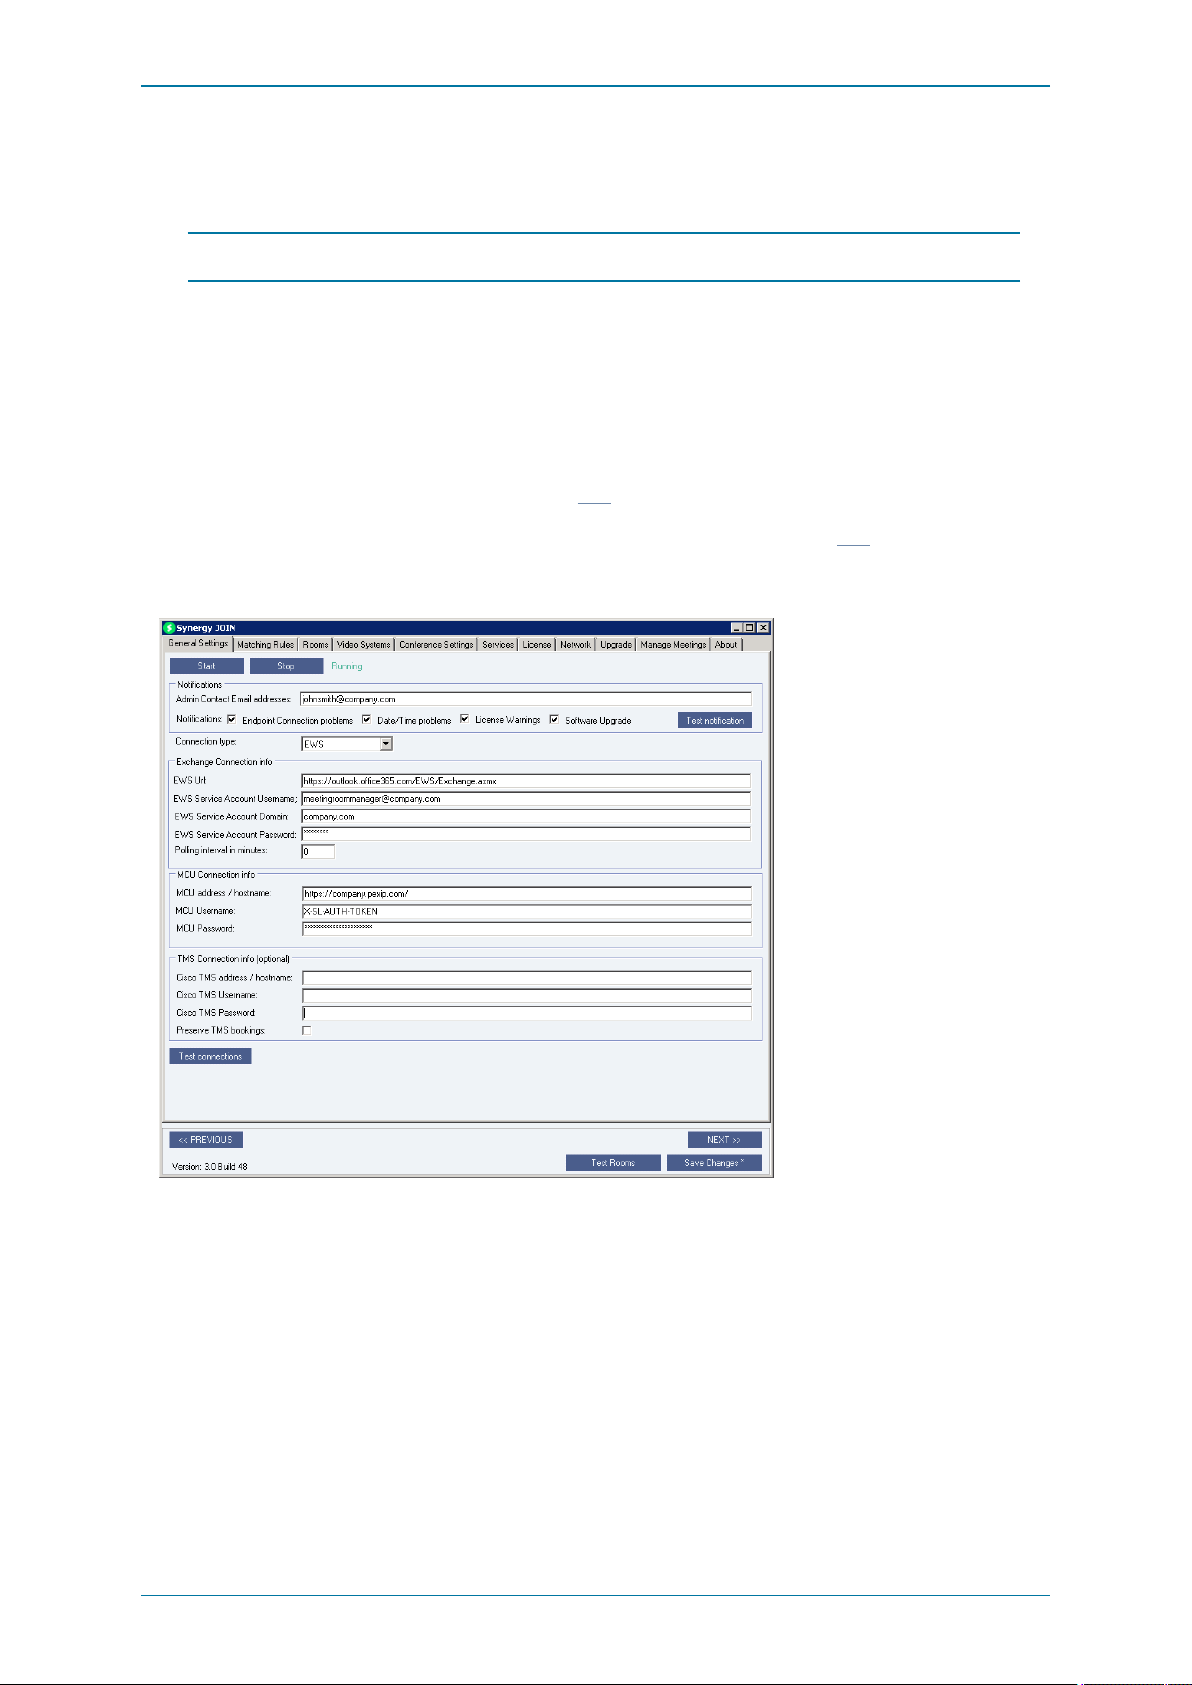
1. Enter an Admin Contact EmailAddress that Synergy JOIN can send notifications to.
2. Enter the EWS URL, Service Account User-name/Email address and password.
o
This should be configured by the Exchange Admin Prior to the configuration process of Synergy JOIN.
Requirements for the service account can be found here
3. If you have an MCU that you would like to use with your Synergy JOIN installation, enter the MCU Details under the
'MCU Connection info' section. Additionalinformation and configuration detailscan be found here
The next step isto add the video meeting rooms that Synergy JOIN is going to use to read existing appointments and book future
meetings in your organization.
Page 38 of 121
Page 39
Synergy JOIN Install ation and Configuration Guide
Rooms
Note: If you are not going to add any video enabled rooms to your environment you can skip this step and go straight to
Conference Settings tab.
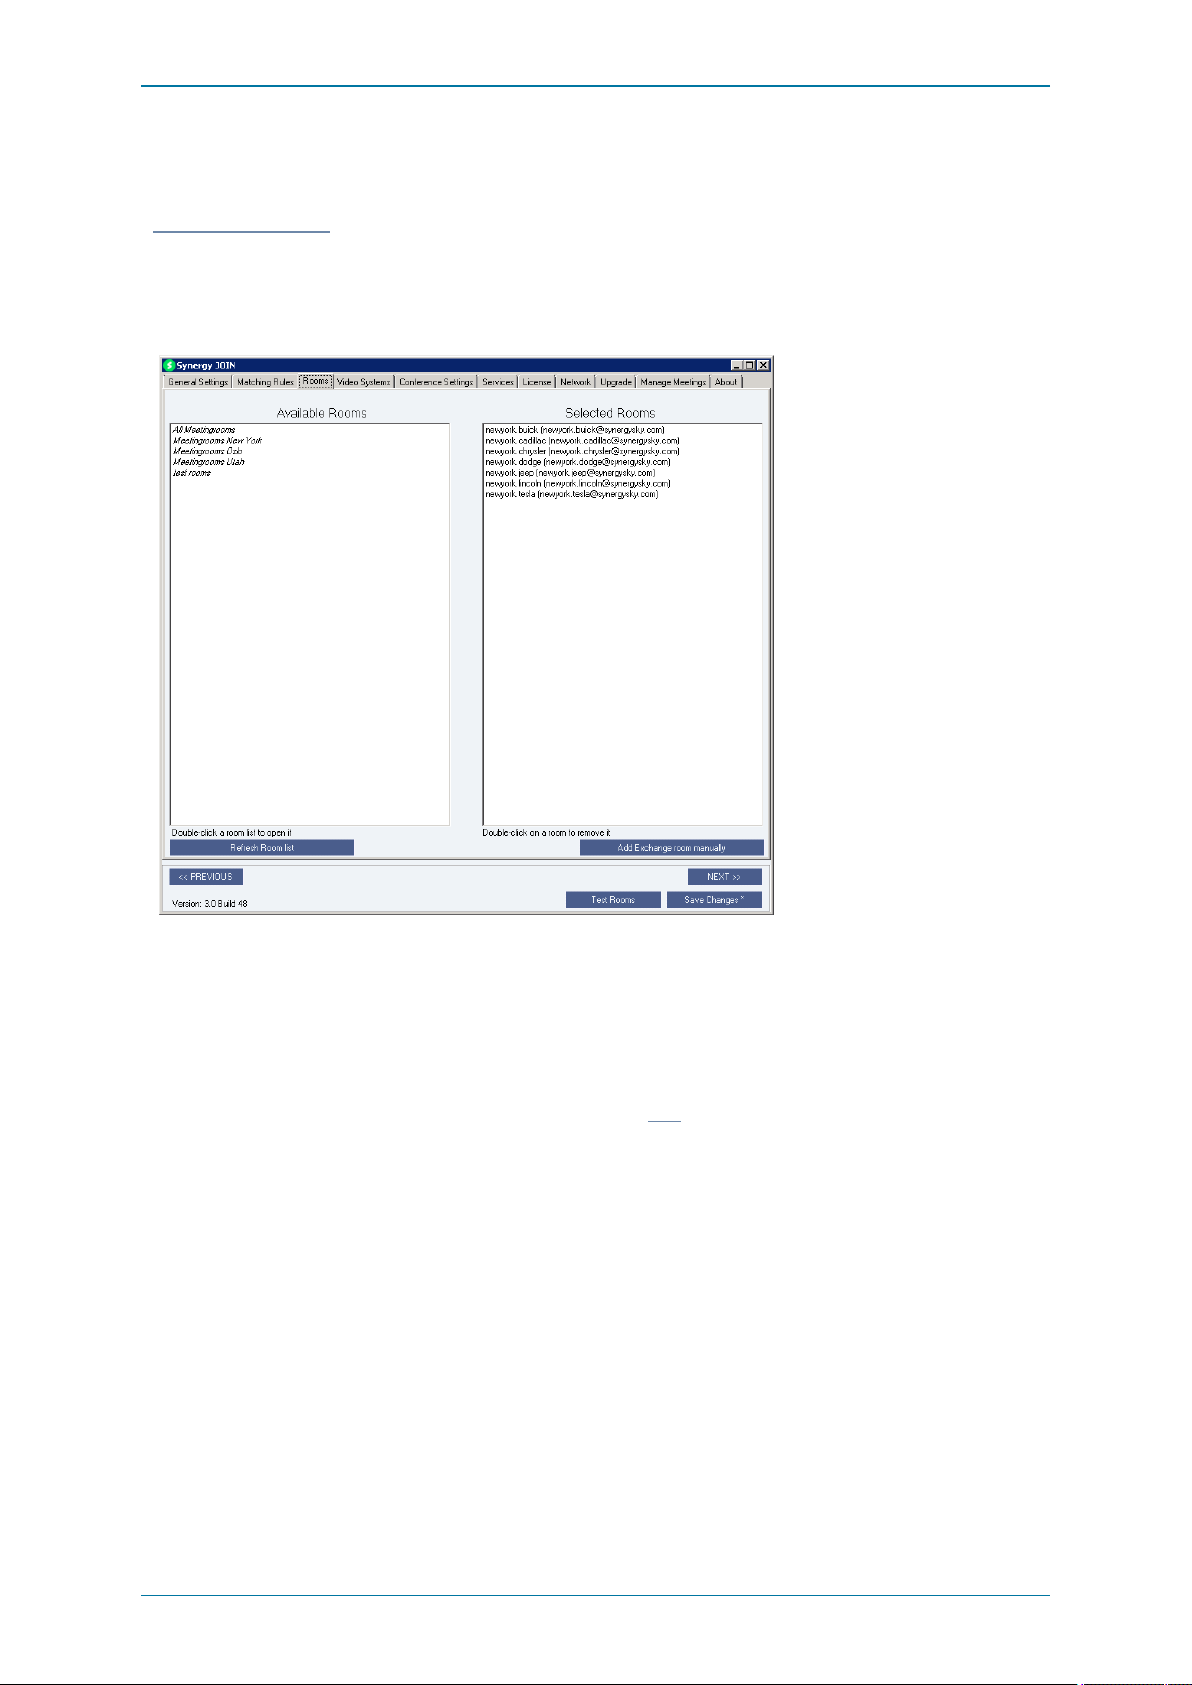
Once you have added your Exchange information in the General Settings tab, the 'Available Rooms' section under the Rooms
tab will prepopulate all of the rooms that it finds within your Exchange Room List . If you would like to add a room, simply
double clickon the room name and it will be added to the 'Selected Rooms' section.
During the POC (Proof of Concept) phase, we recommend only adding two or three rooms that you are going to use for testing.
Video Systems
This is where you connect the Exchange meeting-room resources to the Video Systems. Once a room has been added via the
Rooms tab, it willautomatically appear on the Video Systems tab. Video Systems can be added as Cisco One Button To Push,
Polycom ClickTo Join or DialOut to System.
Additionalinformation on the separate fieldswithin thistab can be found here
Conference Settings
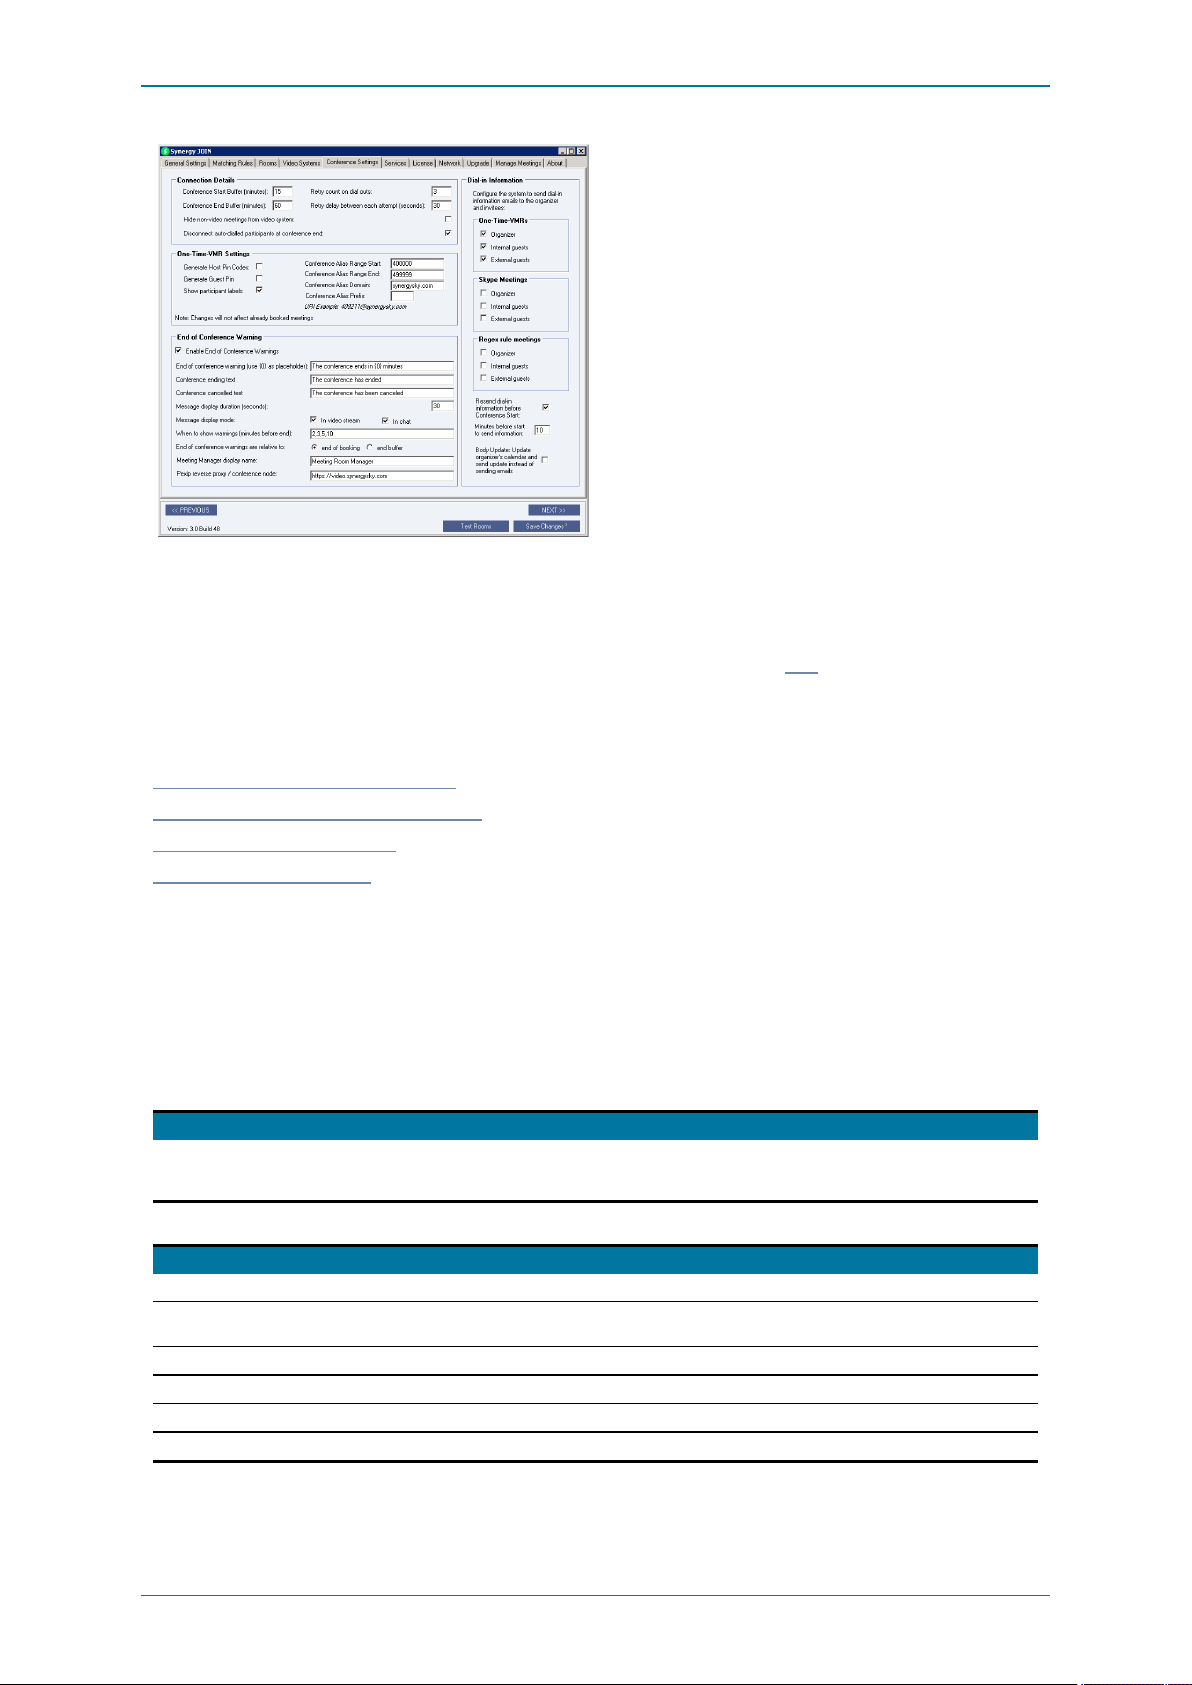
The Conference settings tab defines conference configuration, One-time VMR/URI details, Dial-In Information settings and End
of Conference warning settings.
Conference Start Buffer: This defines how long before the start and end of meetings, the Virtual Meeting Room(VMR) should
be provisioned or deprovisioned
End of Conference Warning: This defines the message that willbe displayed on the endpoint when the meeting isalmost
finished. You can alsochoose how many minutes before the end the message shouldbe displayed. (O nly available when an
MCU is added)
Page 39 of 121
Page 40
Synergy JOIN Install ation and Configuration Guide
Dial-In Information: T his section specifieswhether the organizer, internal guests and external guests should receive a dial-in
information email when meetings are booked.
Body Update: This setting willenable Synergy JOIN to log into the calendar of each meeting's organizer to update the calendar
invite and send an update to allinvitees on their behalf, instead of sending multiple emailscontainingdial information. Enabling
thisfunction requires additionalsettings on user mailboxes. Exchange settingscan be found here
Synergy JOIN can be used in multiple waysand as such, we have created additionalquickguides tailored to your specific
environment.
Synergy JOIN with Skype / Microsoft Teams
Synergy JOIN with Webex, Blue Jeans or Zoom
Synergy JOIN with Dynamic VMRs
Synergy JOIN with Static VMRs
Matching Rules for Skype for Business & Teams Meetings
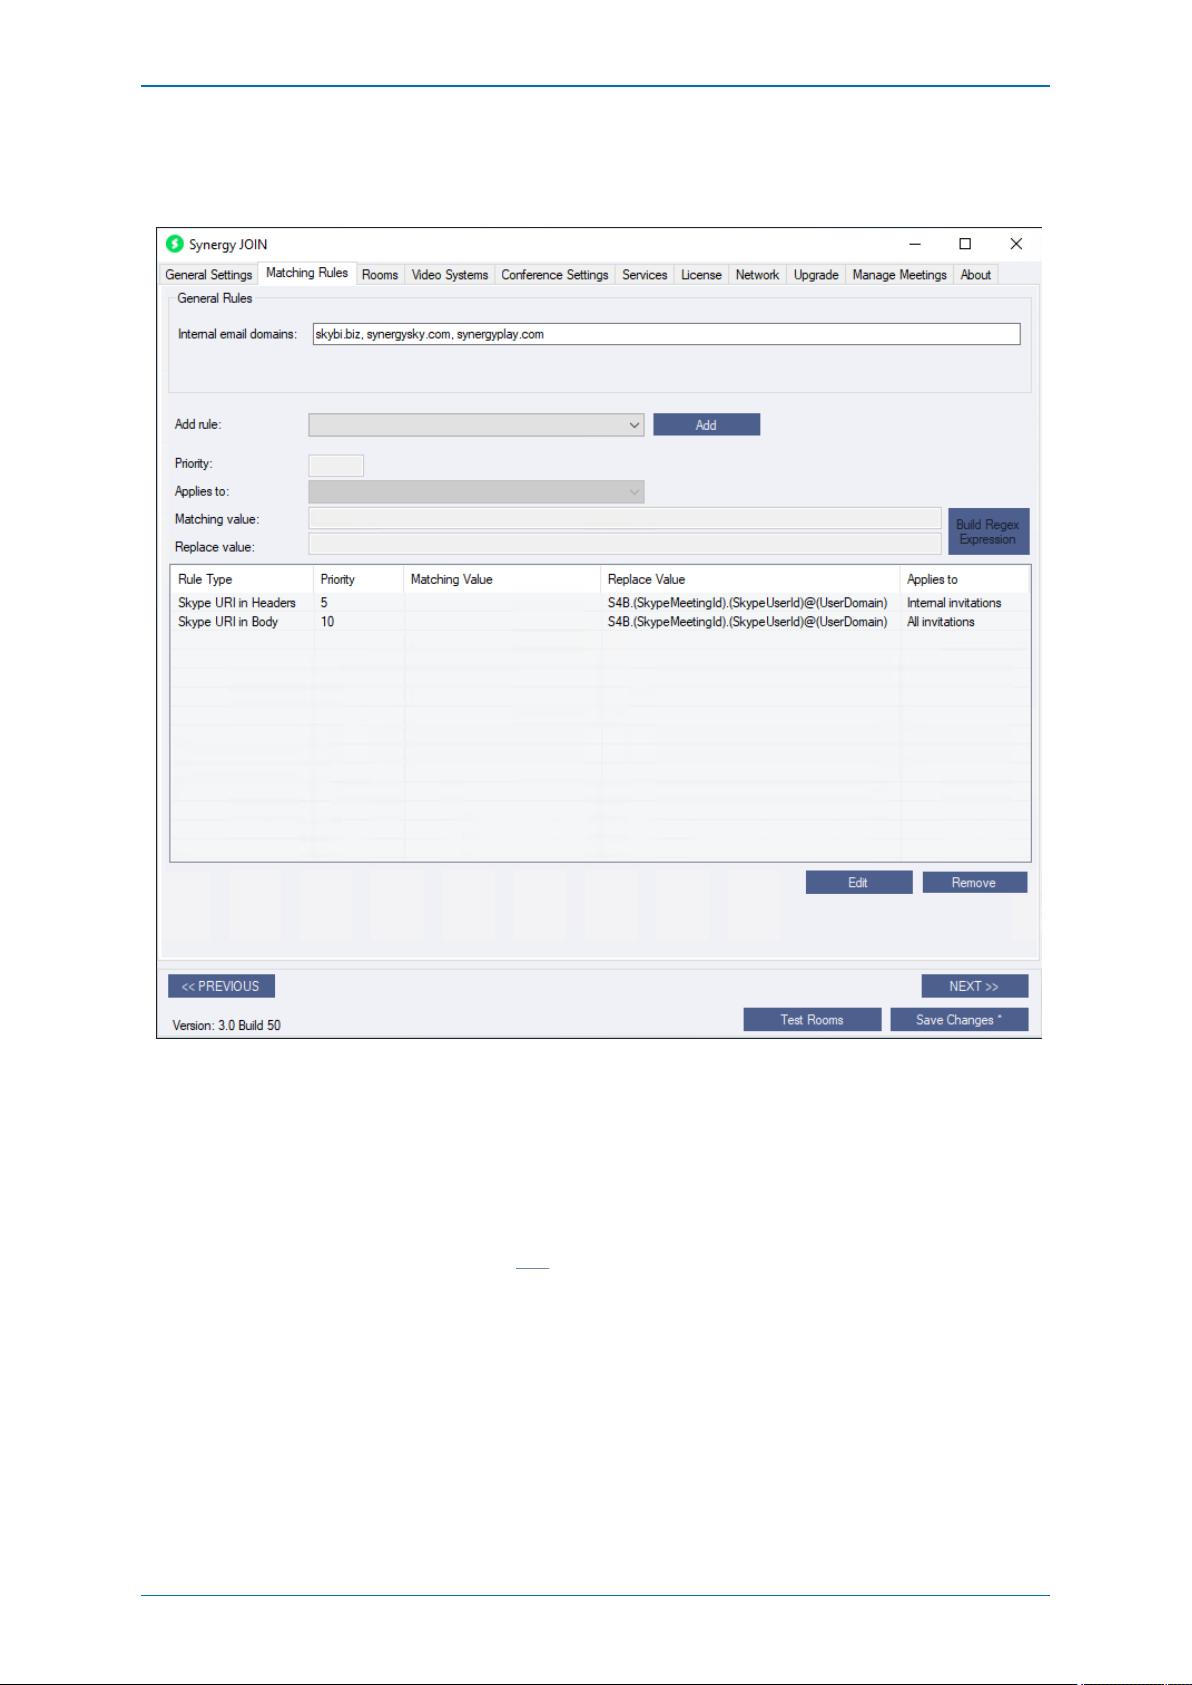
Matching Rules in Synergy JOIN will search the email for characters that are similar to you Skypeinvitation and willprovide you
with a OBTP option on your endpoint.
The matching rules in JOIN allow you to define how calendar bookingsshould be processed.
Configure the General Rules as follows:
Fiel d Descrip tion
Interna l em ail do mains Specify a comma separated list of the email domains your organizationuses. This list is used to determine whether a meetingr oom
Skype for Busin ess Matchi ng Rule Micro soft Te ams Ma tchin g Ru le
1. Click onthe'Add Rule' dropdown box andchoose 'Skyp e URI i n He ad e rs' 1. Cli ck on the'Add Rule' dropdown box and choose 'Tea ms URI in Head ers'
2. Add a Priority. The lowest number gives the highest priority. (E.g. 5 is processed
before 10).
3. Select 'Add'. 3. Select ' Add'.
4. Click onthe'Add Rule' dropdown box andchoose 'Skyp e URI i n Bod y' 4. Click onthe' Add Rule' dropdown box andchoose 'Tea ms URI in Bod y'
5. Add a Priotry 5. Add a Priotry
6. Select 'Add' 6. Select 'Add'
invitation is sent from an internal or external user. It is also used to determine which users are internal andexternal when sending out
connection informationemails. (e.g.
synergysky.com, synergysky.eu, synergysky.us
2. Add a Priority. The lowest number gives the highest priority. (E.g. 5 is processed
before 10).
)
Page 40 of 121
Page 41
Synergy JOIN Install ation and Configuration Guide
The Skype URI matching rules willscan the header and/or the body of the email to find the URI of the Skype meeting
NOTE: Thisfunction requires Synergy JOIN to have accessover HTTPS to the Skype server where the meeting is hosted;
either directlyor via a proxy server.
Once you are confident your Regex Rules are set correctly, click 'Save'.
Remember to Select 'Save Changes *' at the bottom right hand corner
Now go ahead and s tart booking test meetings in Synergy JOIN
If you would like to enable extra functionssuch as enabling recordings services, Skype IVR s ervice or enabling the builtin
Exchange Emulator, you can follow additionalsteps here
Matching Rules for Hangouts Meetings
Matching Rules in Synergy JOIN will search the email for characters that are similar to you WebRTC client and will provide both
a OBTP option on your endpoint as wellas a button your invitees can clickon within their email invitation.
The matching rules in JOIN allow you to define how calendar bookingsshould be processed.
Page 41 of 121
Page 42

Synergy JOIN Install ation and Configuration Guide
Configure the General Rules as follows:
Fiel d Descr iptio n
Interna l em ail do mains Specify a comma separated list of the email domains your organization uses. This list is usedto determine whether a meeting room
invitation is sent from an internal or external user. It is also used to determine which users are internal andexternal when sending out
connection informationemails. (e.g.
synergysky.com, synergysky.eu, synergysky.us
)
Hangouts Matching Rule
1. Click on the 'Add Rule' dropdown box and choose 'Hangout Meet'
2. Add a Priority. The lowest number gives the highest priority. (E.g. 5 isprocessed before 10).
3.Clickon the 'Add' button
Once you are confident your Regex Rules are set correctly, click 'Save'.
Remember to Select 'Save Changes *' at the bottom right hand corner
Now go ahead and s tart booking test meetings in Synergy JOIN
If you would like to enable extra functionssuch as enabling recordings services, Skype IVR s ervice or enabling the builtin
Exchange Emulator, you can follow additionalsteps here
Matching Rules for WebRTC Meetings
Matching Rules in Synergy JOIN will search the email for characters that are similar to you WebRTC client and will provide both
a OBTP option on your endpoint as wellas a button your invitees can clickon within their email invitation.
The matching rules in JOIN allow you to define how calendar bookingsshould be processed.
Configure the General Rules as follows:
Fiel d Descr iptio n
Interna l em ail do mains Specify a comma separated list of the email domains your organization uses. This list is usedto determine whether a meeting room
Web RTC Matching Rule
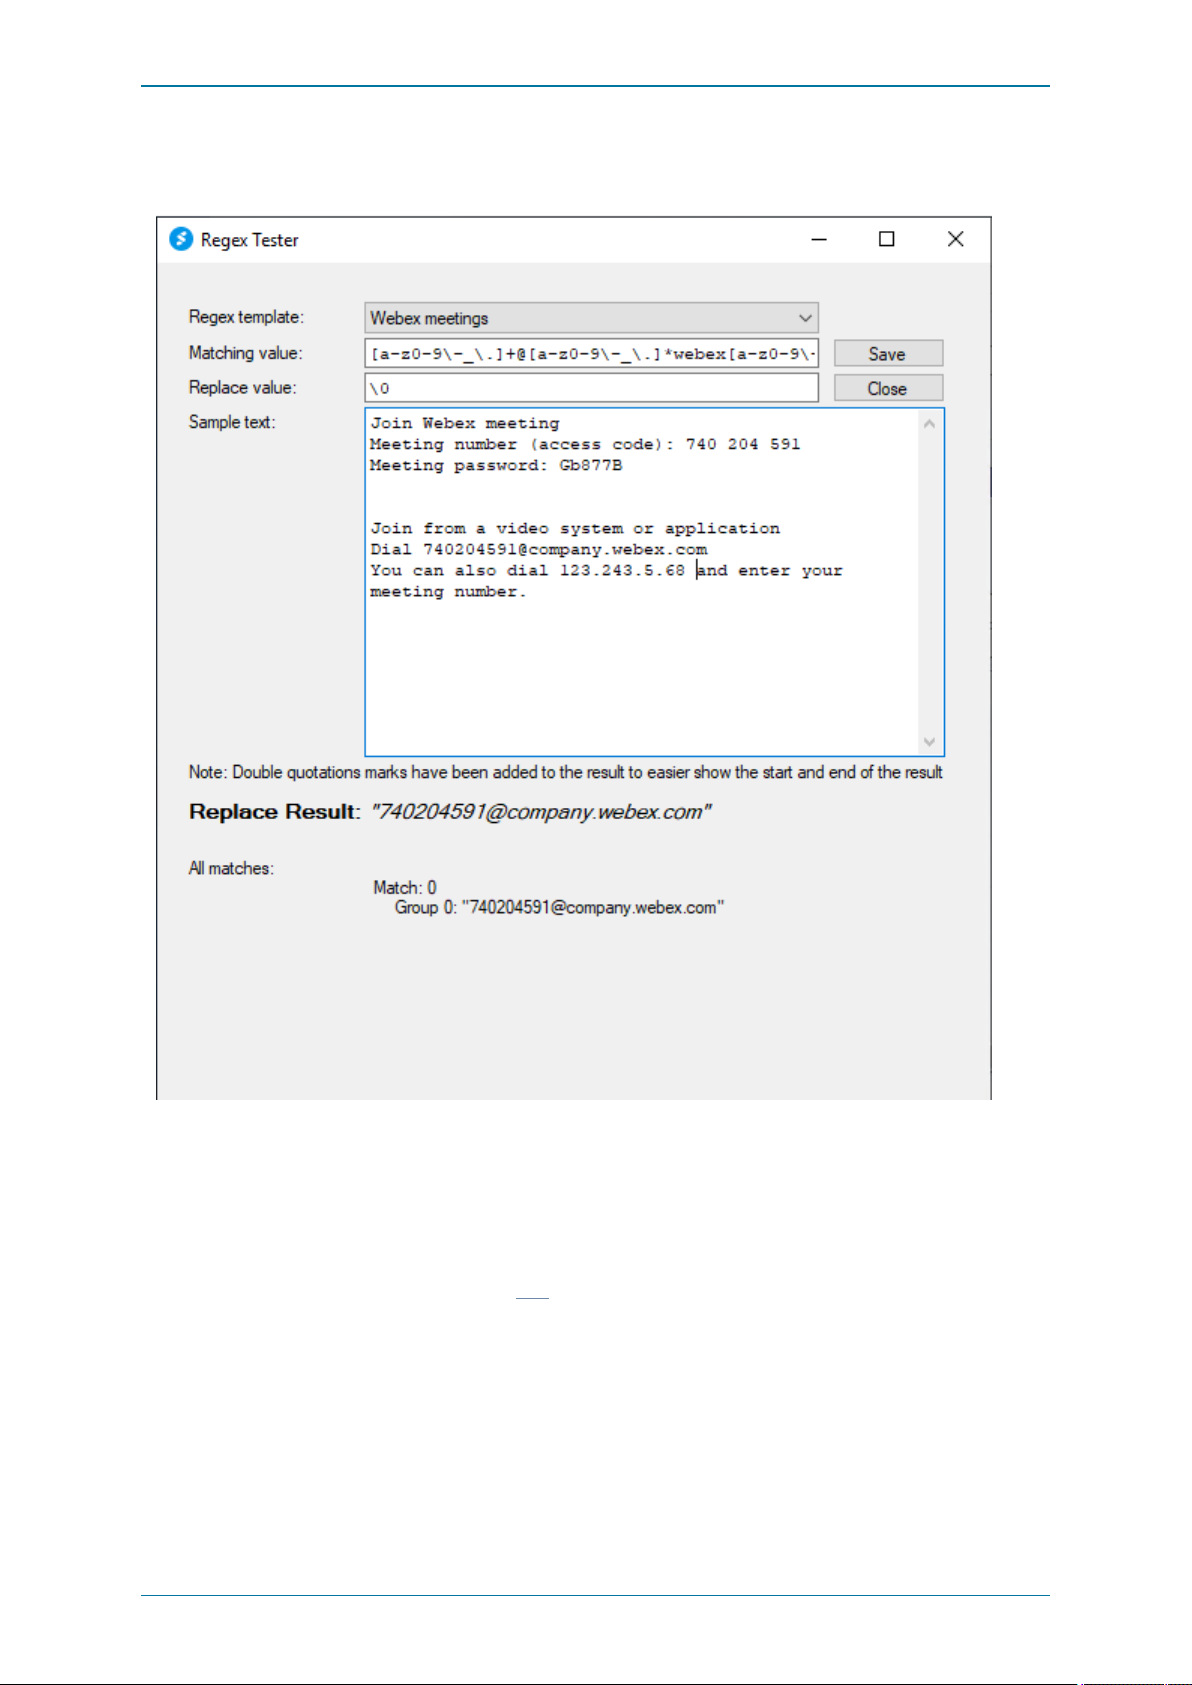
1. Click on the 'Add Rule' dropdown box and choose 'Regex Rule'
2. Add a Priority. The lowest number gives the highest priority. (E.g. 5 isprocessed before 10).
3. Select'Build Regex Expression'. This willopen the Regex Tester
4. Selectthe 'Regex template' dropdown box and choose your WebRTC meeting type (Webex, BlueJeans, StarLeaf Cloud,
Videxio VMR Meeting, or Zoom Meeting)
invitation is sent from an internal or external user. It is also used to determine which users are internal andexternal when sending out
connection informationemails. (e.g.
synergysky.com, synergysky.eu, synergysky.us
)
Page 42 of 121
Page 43
Synergy JOIN Install ation and Configuration Guide
Testing, editing and deleting rules
The tool willhelp you identify any errors in your regex by testing a Matching Value and Replace Value towards a text field
Once you are confident your Regex Rules are set correctly, click 'Save'.
Remember to Select 'Save Changes *' at the bottom right hand corner
Now go ahead and s tart booking test meetings in Synergy JOIN
If you would like to enable extra functionssuch as enabling recordings services, Skype IVR s ervice or enabling the builtin
Exchange Emulator, you can follow additionalsteps here
Synergy JOIN with Dynamic VMR's
Note: Thisfunction onlyworksif you have configured an MCU
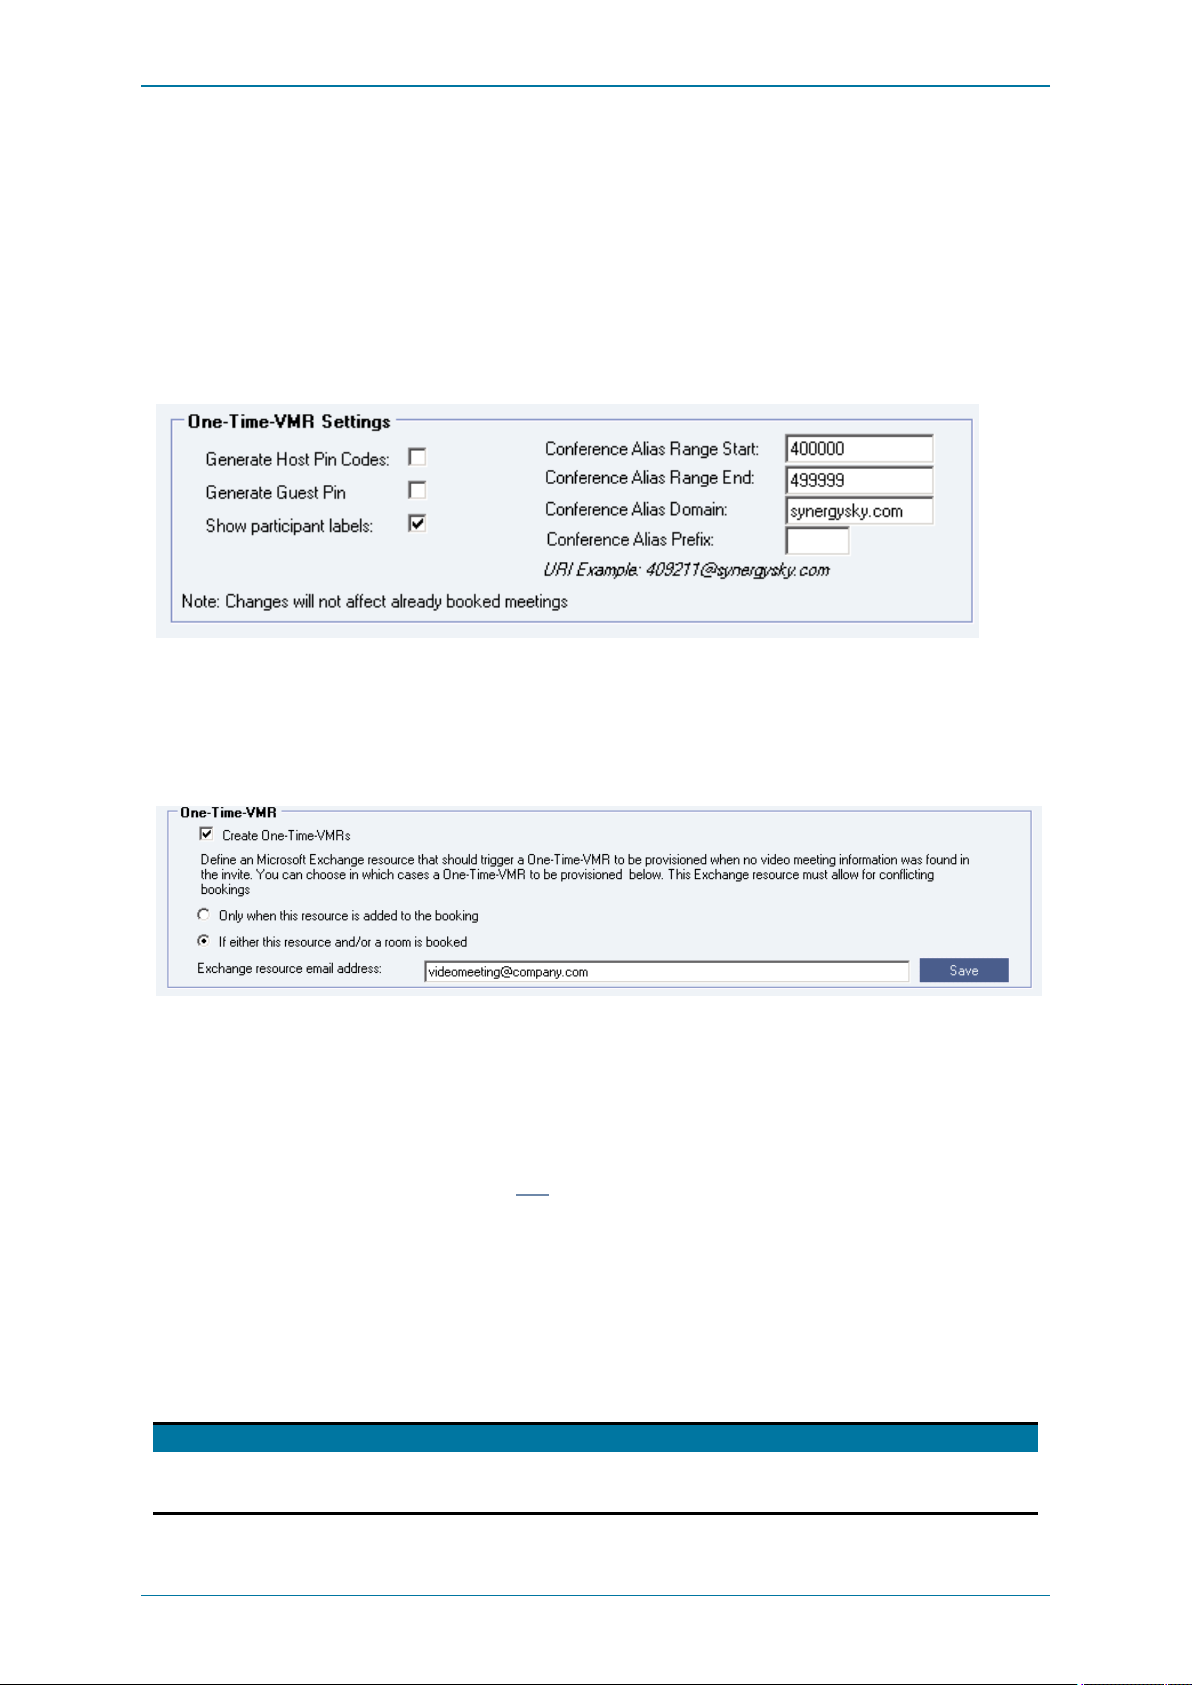
The One-Time-VMR (Dynamic VMR) option in JOIN enables users to easily schedule video meetings without any plug-ins in the
email client. Synergy JOIN willwillcreate a temporary virtualmeeting room on the MCU defined in the General Settingstab, with
a URI within the range defined in the Conference Settings tab. The One-T ime VMR information willthen be sent to allthe video
Page 43 of 121
Page 44
Synergy JOIN Install ation and Configuration Guide
systems that are included in the meeting invitation. Allinvitees will also receivethe dial-in information so that they can joinfrom
their personal device if they prefer that
Conference Settings
1. Browse to the 'Conference Settings' tab
2. Configure your Conference AliasRange (Start and End)
3. Configure the Conference AliasDomain that you would like to be used for your dynamic VMR's
4. Enter your Conference AliasPrefix (If required)
One Time VMR's
1. Browse to the 'Services'tab
2. Tick the 'Create One-Time VMRs' tickbox
3. Type in an emailaddressthat you would like to be used as a trigger for onetime VMR's to be created.
Now each time you book a meeting without any dial ininformation present, a one-time VMR willbe created for that meeting.
Remember to Select 'Save Changes *' at the bottom right hand corner
Now go ahead and s tart booking test meetings in Synergy JOIN
If you would like to enable extra functionssuch as enabling recordings services, Skype IVR s ervice or enabling the builtin
Exchange Emulator, you can follow additionalsteps here
Matching Rules for Static VMR's
Matching Rules in Synergy JOIN will search the email for characters that are similar to you StaticVMR's and willprovide both a
OBTP option on your endpoint as wellas a button your invitees can clickon within their email invitation.
The matching rules in JOIN allow you to define how calendar bookingsshould be processed.
Configure the General Rules as follows:
Fiel d Descr iptio n
Interna l em ail do mains Specify a comma separated list of the email domains your organization uses. This list is usedto determine whether a meeting room
invitation is sent from an internal or external user. It is also used to determine which users are internal andexternal when sending out
connection informationemails. (e.g.
synergysky.com, synergysky.eu, synergysky.us
)
Page 44 of 121
Page 45
Synergy JOIN Install ation and Configuration Guide
Static VMR Matching Rule
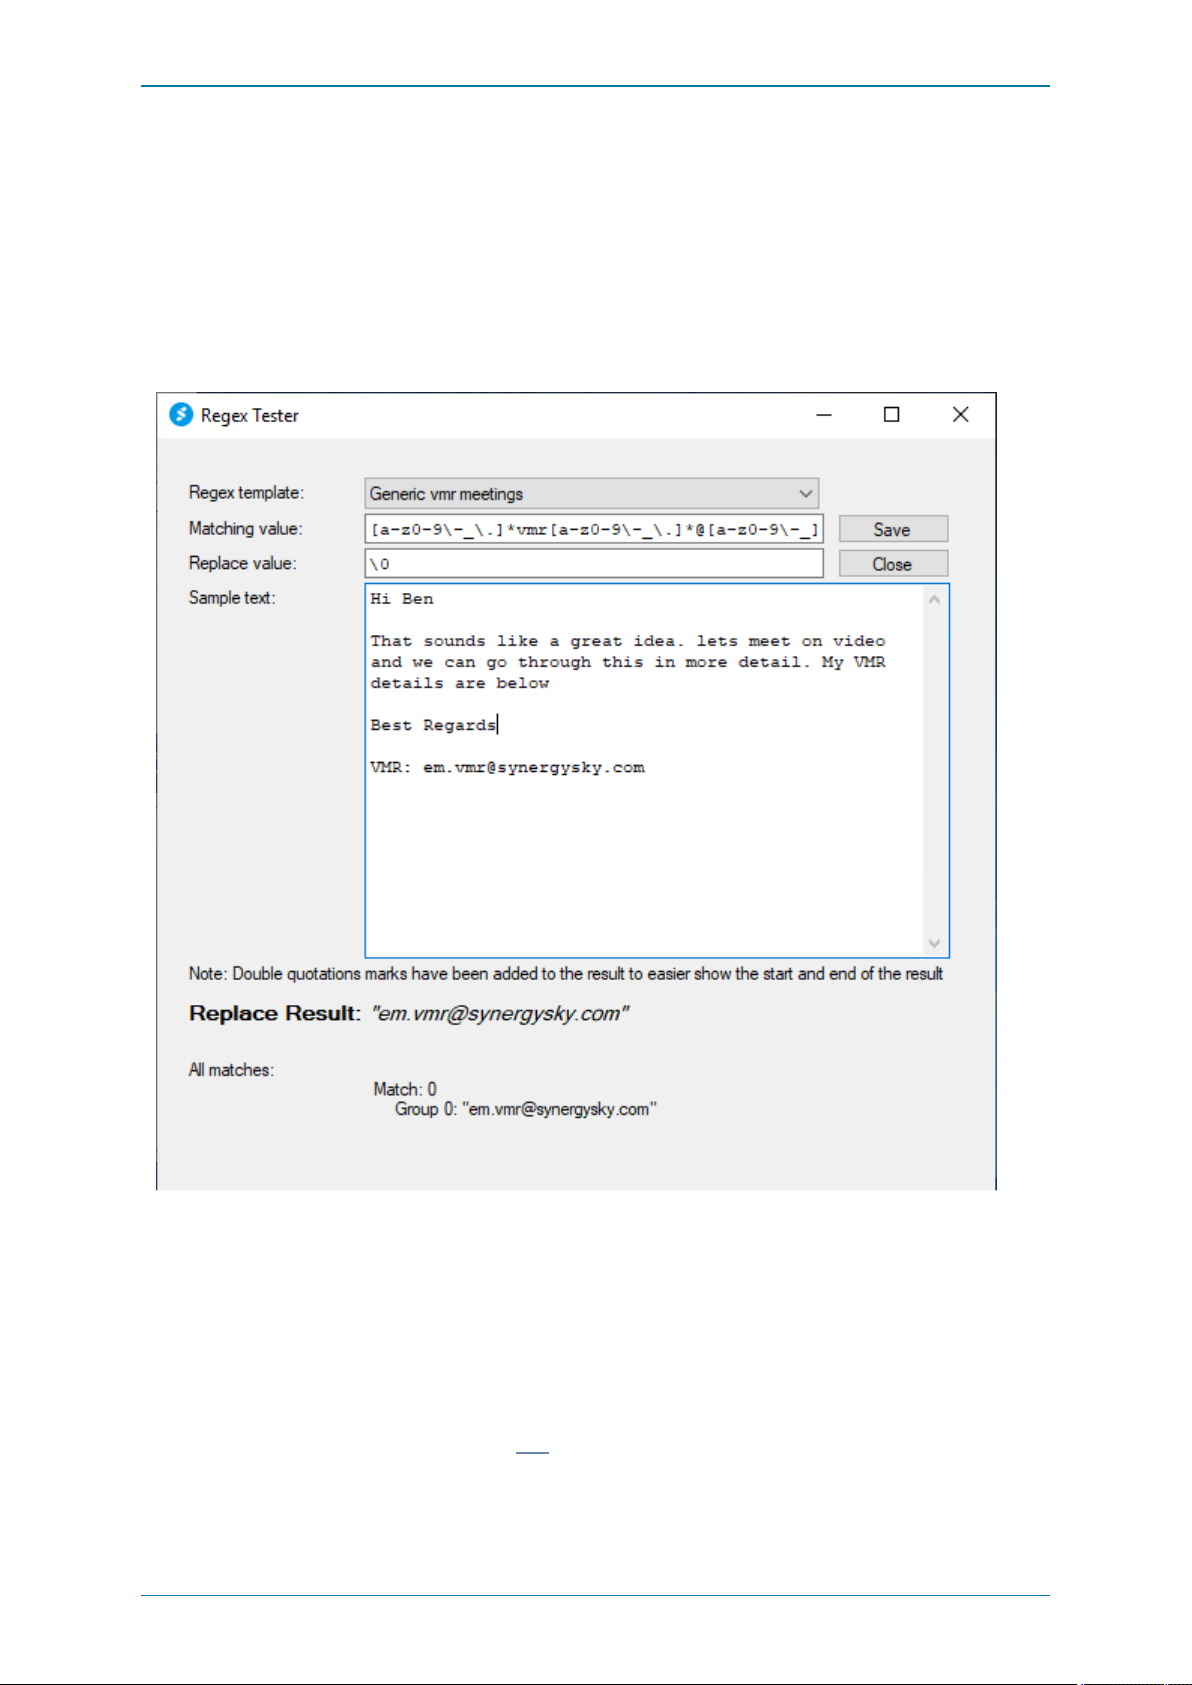
1. Click on the 'Add Rule' dropdown box and choose 'Regex Rule'
2. Add a Priority. The lowest number gives the highest priority. (E.g. 5 isprocessed before 10).
3. Select'Build Regex Expression'. This willopen the Regex Tester
4. Selectthe 'Regex template' dropdown box and choose 'Genericvmr meetings'
Testing, editing and deleting rules
The tool willhelp you identify any errors in your regex by testing a Matching Value and Replace Value towards a text field
The matching value above willsearch the email for anyline of text that has got ****[email protected].
Once you are confident your Regex Rules are set correctly, click 'Save'.
Remember to Select 'Save Changes *' at the bottom right hand corner
Now go ahead and s tart booking test meetings in Synergy JOIN
If you would like to enable extra functionssuch as enabling recordings services, Skype IVR s ervice or enabling the builtin
Exchange Emulator, you can follow additionalsteps here
Page 45 of 121
Page 46
Synergy JOIN Install ation and Configuration Guide
Configuring Synergy JOIN
Allconfiguration of the Synergy JOIN is done using the configuration tool.
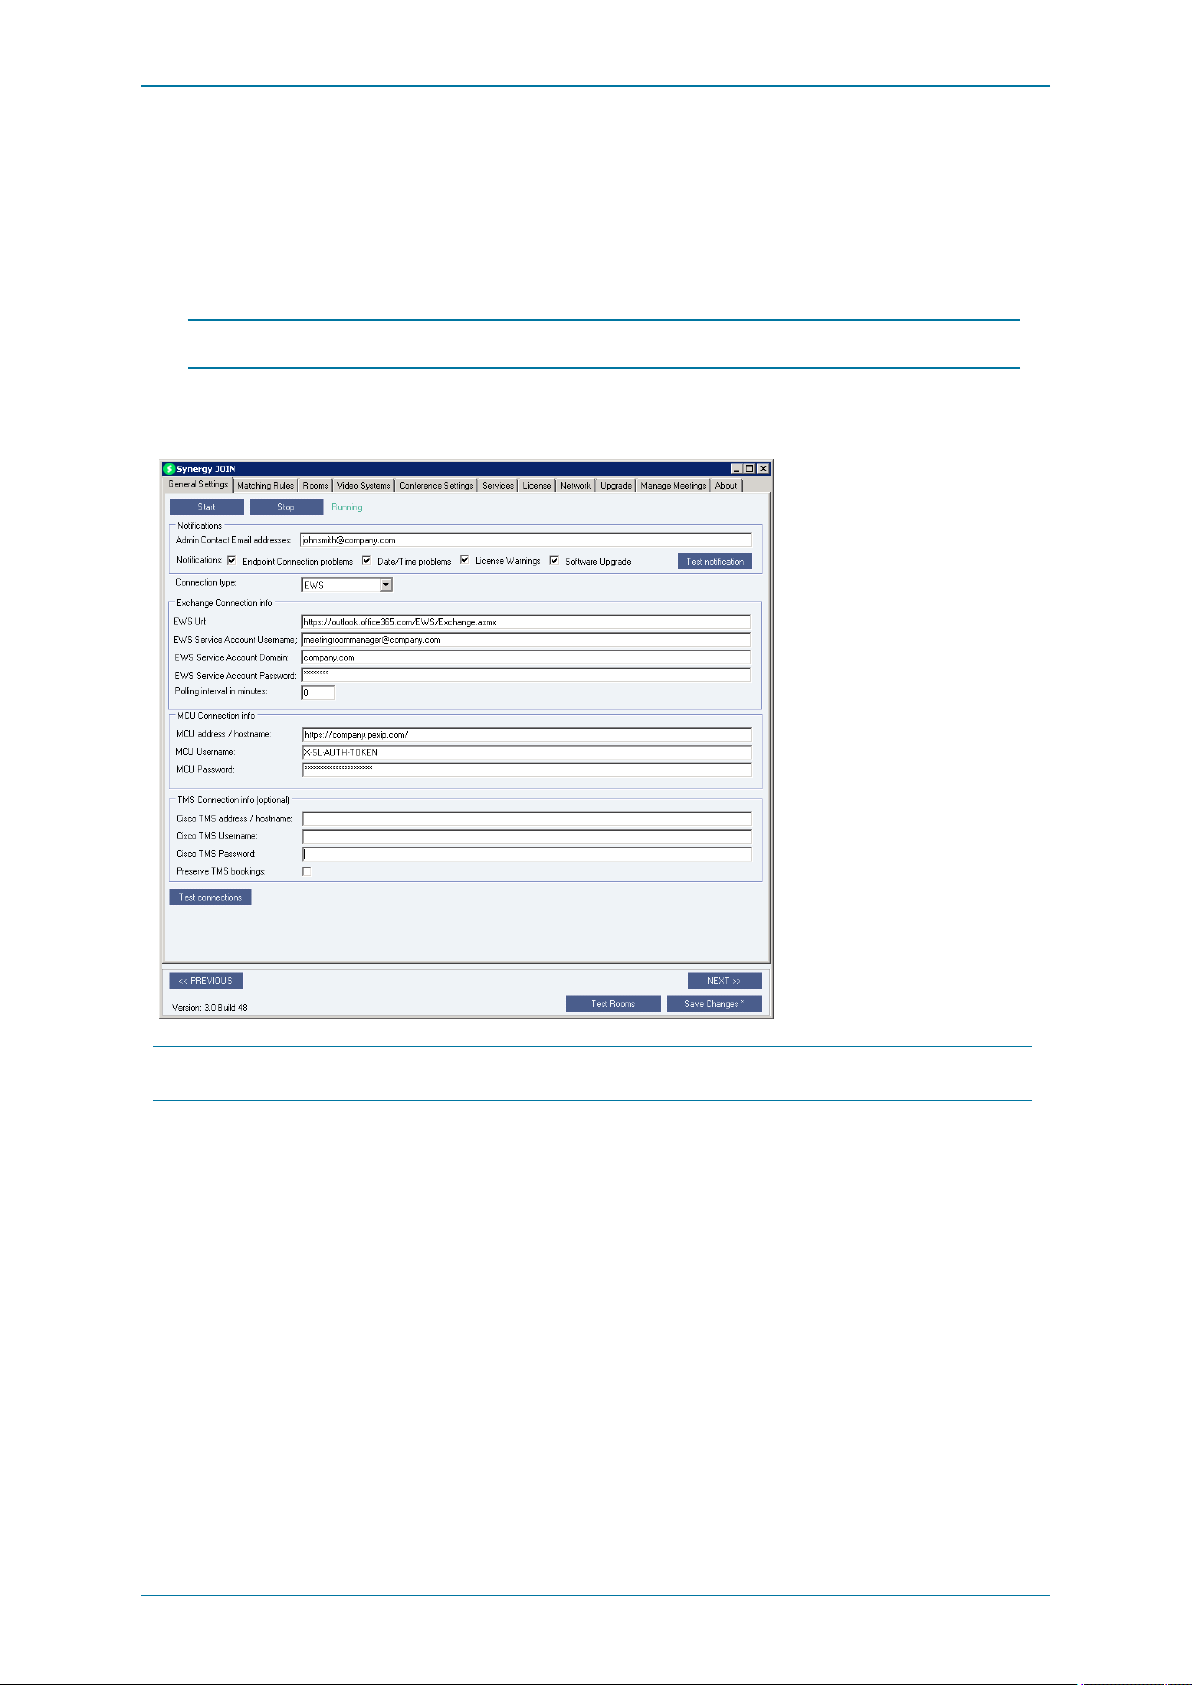
Task 1: Launching the configuration tool and installing the service
1. Start the configuration tool by double-clicking on the JOIN icon on the desktop.
Note: On startup, the server checksfor updates, so if you do not have internet accessconfigured on the server, you will
see an error here.
2. Click Install Servic e to installthe JOIN service on the server - once installed thisbutton disappears from the configuration
tool.
The Start and Stop buttonsare used once the serviceis installedto stop and start it, as necessary.
Note: Pressing Ctrl + F5 reveals the Unins tall Servic e button in the place of the Install Service button, which when clicked,
uninstalls the service from the server.
Page 46 of 121
Page 47
Synergy JOIN Install ation and Configuration Guide
Google Cloud Platform Configuration
Introduction
In order toinstallSynergy SkyJOIN with Google Calendar integration, the G Suite environment must be prepared. This isdone
through the following 4 steps
1. Create a GoogleCloud Platform Project or use an existing project
2. Enable three distinct APIs and Services
3. Create a service account or use an existing service account. This account must be given correct permissions. A private key
must be generated and copied to the JOIN server.
4. Appropriate Calendar Accessmust be given to the Service Account viathe G Suite Domain
Google Cloud Platform
A GoogleCloud Console Project is required in order for JOIN to be able to read calendar resource accounts, user accounts and
also have accessto APIs that enable the JOIN integration.
Create a Google Cloud Platform Project or use an existing Project. The Project willbe used for the API integration as wellas for
the Service Account.
Logging into the Google Cloud Platform console:
l Browse to the following URL: https://console.cloud.google.com/iam-admin/serviceaccounts
l Log in with your admin user account to manage your Google cloud console.
Creating a Project
(Skip this section if you already have a project you want to add this account to)
N.B on some occasions, Google failsto create the project and as such, sometimes you may need to create the project twice
To create new Google Cloud Console project,
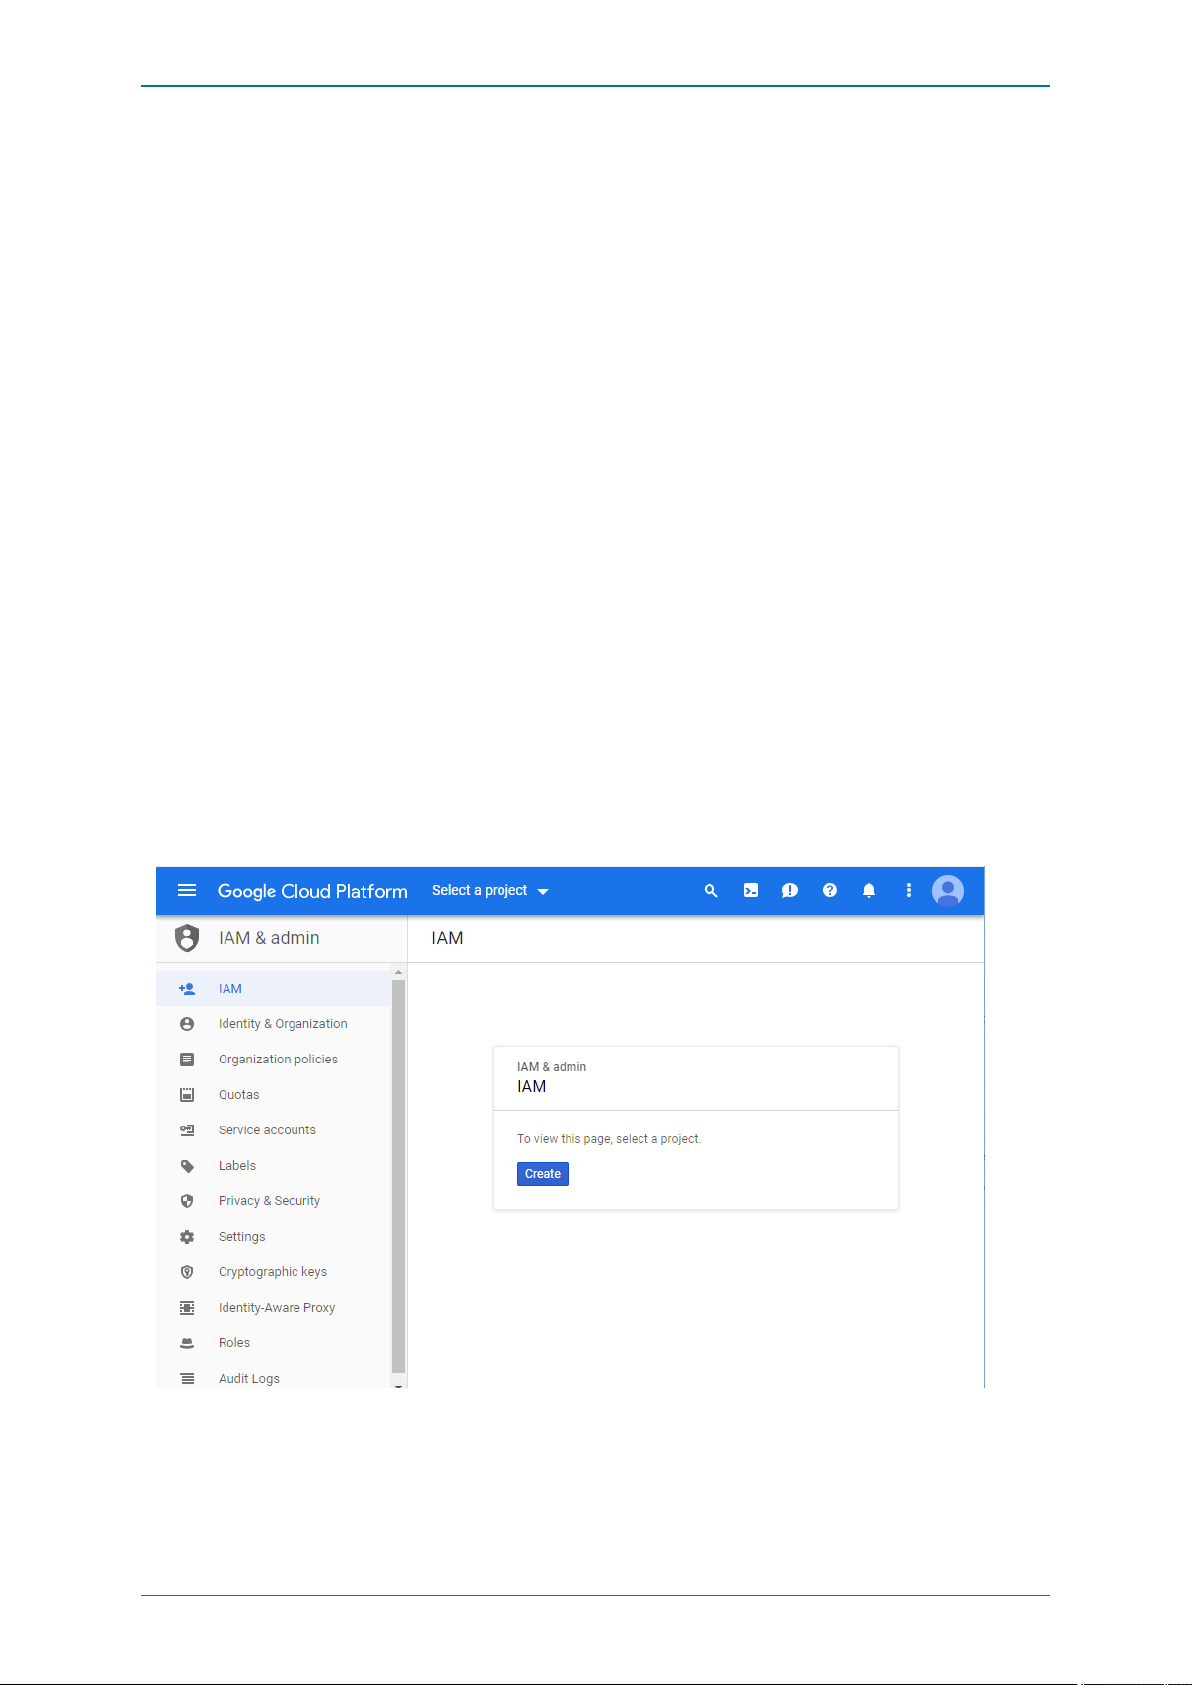
l Select IAM & Admin
l Click the 'Create' button.
Page 47 of 121
Page 48
Synergy JOIN Install ation and Configuration Guide
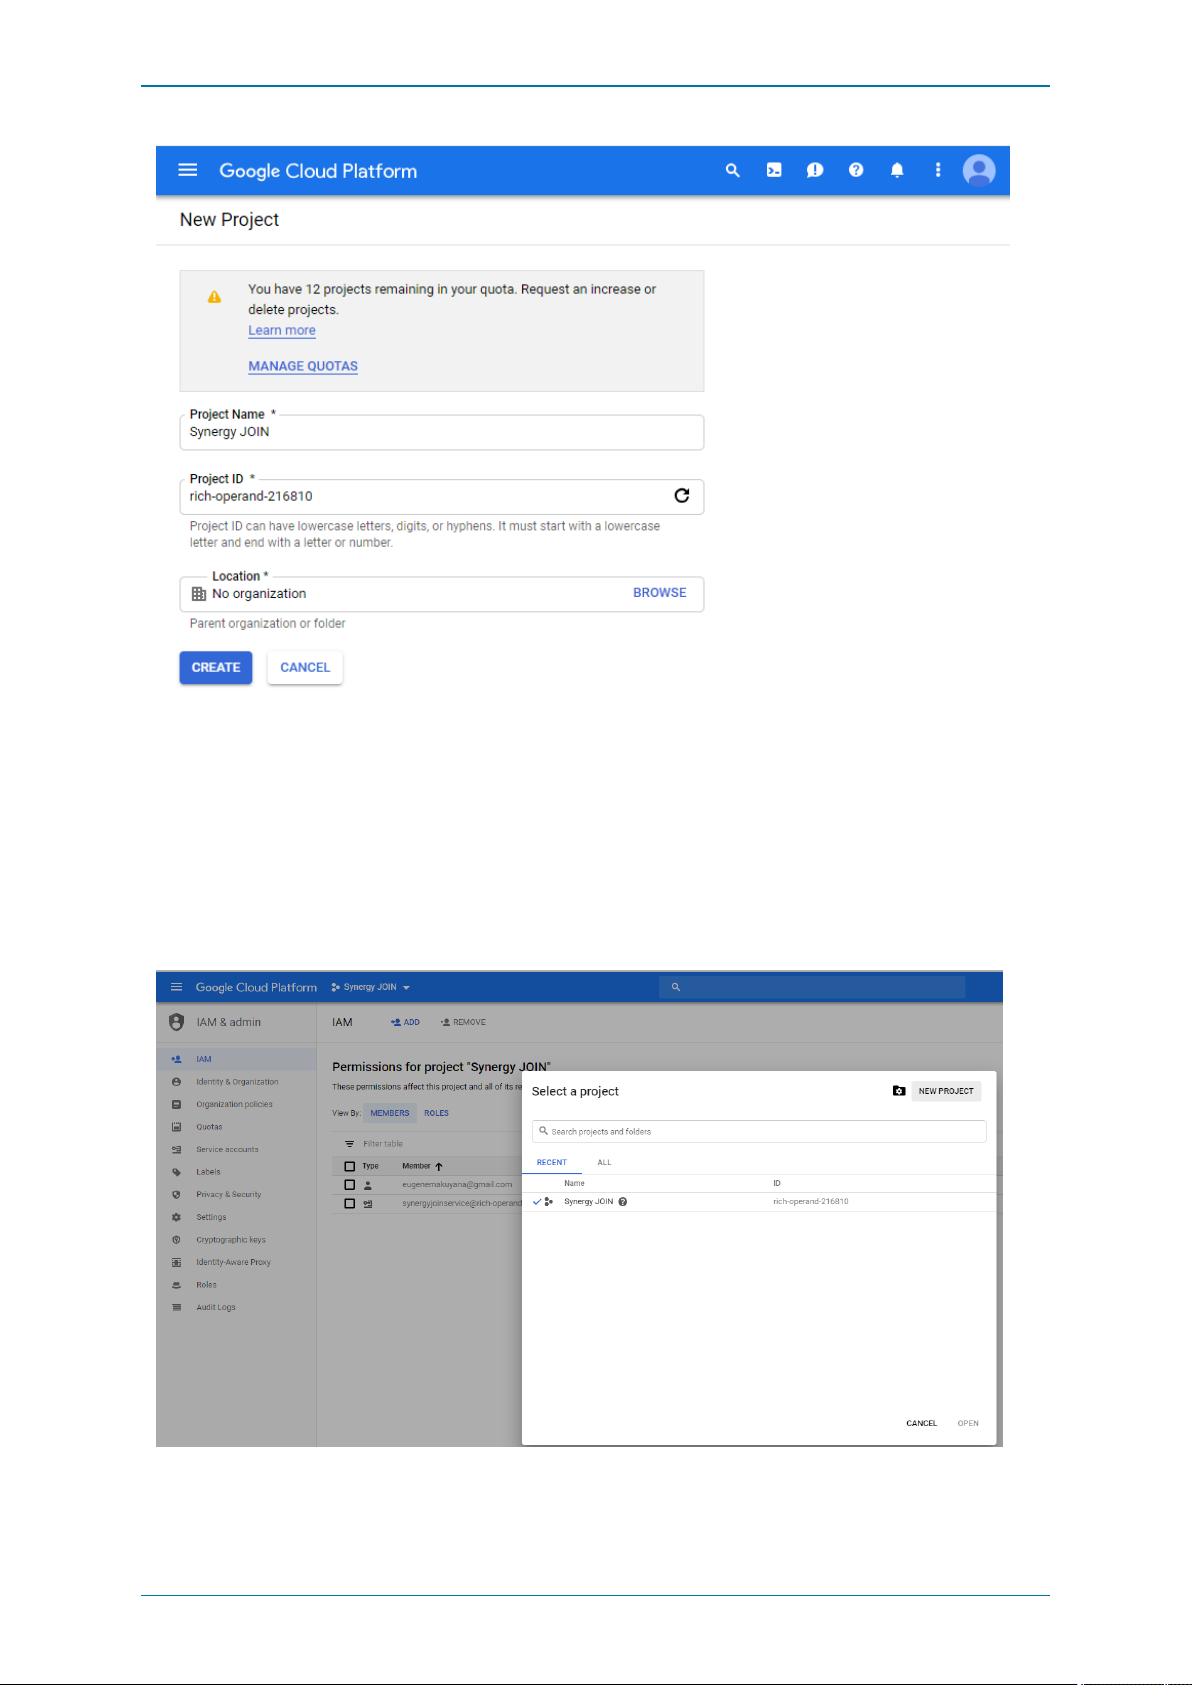
l F illin your projectname, i.e. 'SynergyJOIN'.
l Select Create
Choosing an Existing Project
Follow these steps if you already have existing projects you would like to use for this project,
Page 48 of 121
Page 49
Synergy JOIN Install ation and Configuration Guide
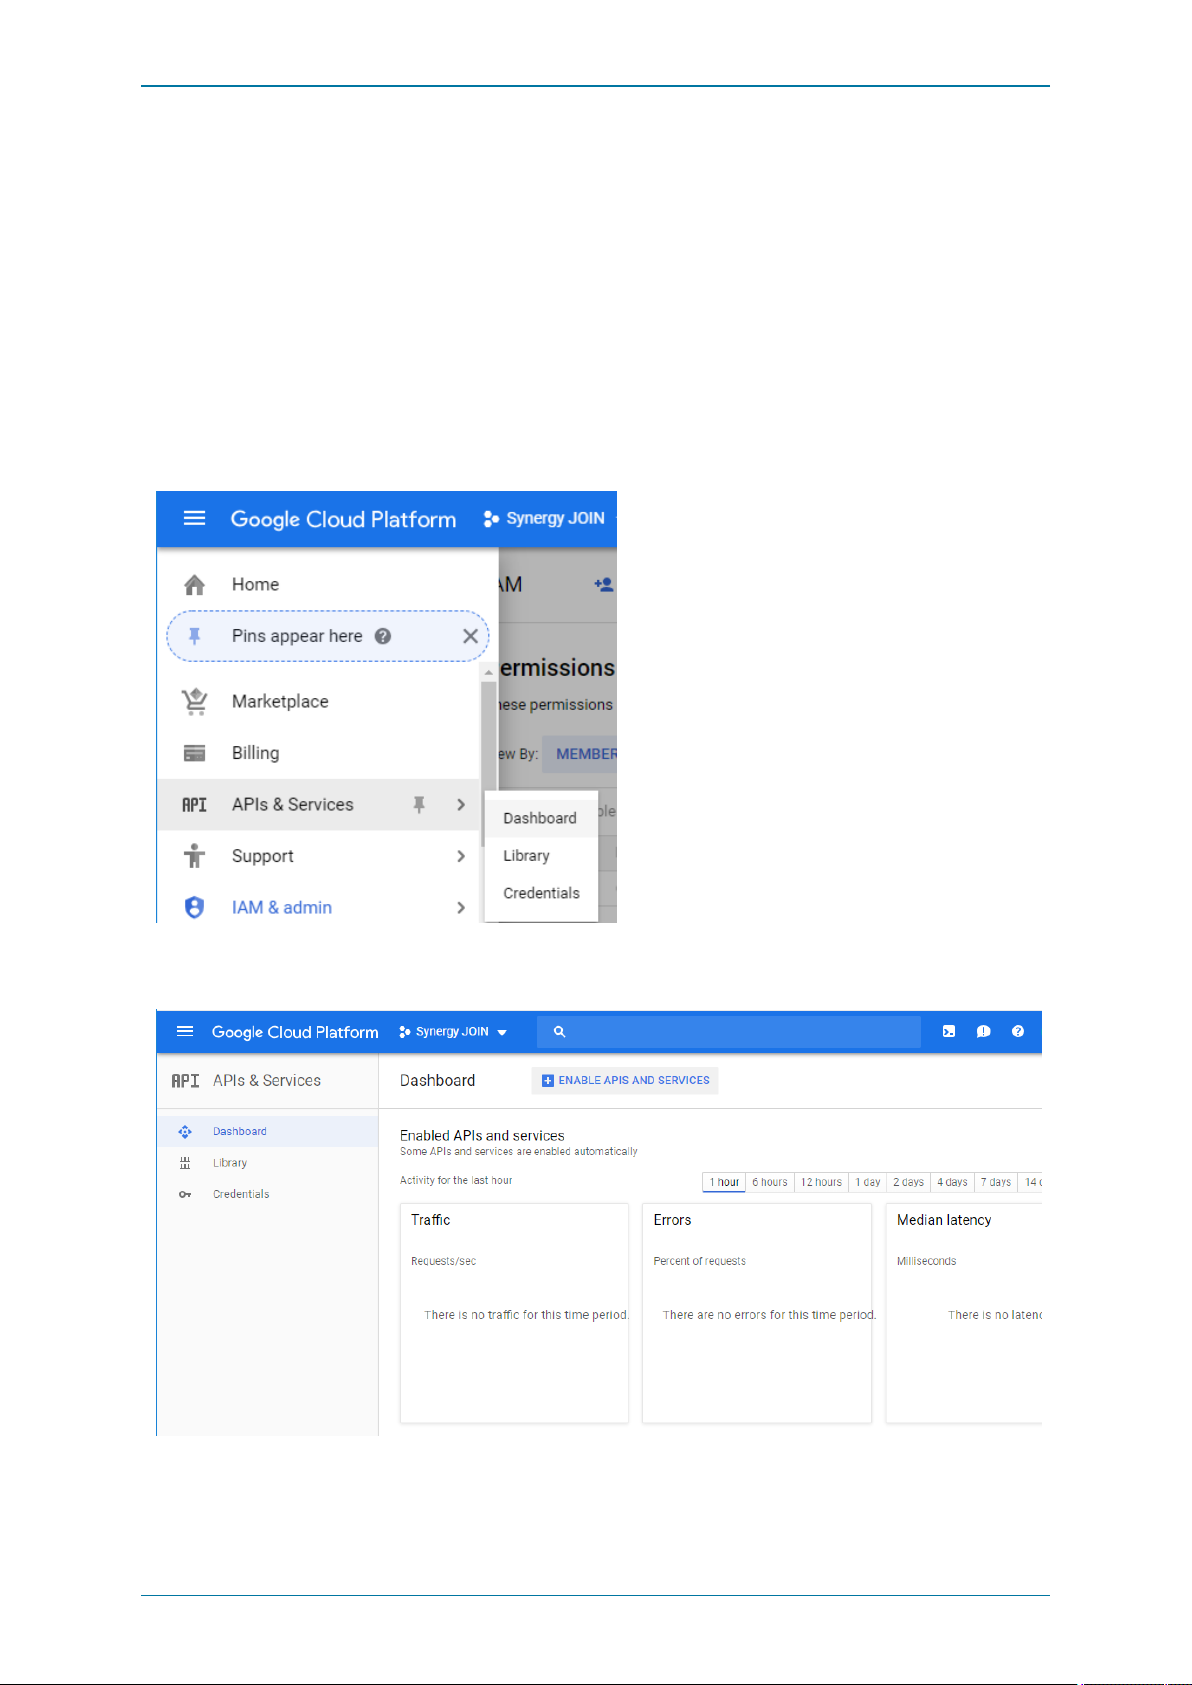
l Click on the Project Drop down arrow at the top left corner and you willbe presented with the 'Select a Project Window'.
l Select your desired project and click'Open'
Enabling API's and Services
You willhave to enable API's to work with the project you have created. The API's you willhave to enable are Google Calendar
API, GMailAPI & Admin SDK.
n Google Calendar API - To allow reading and updating resource calendars
n GMailAPI - To allow sending email
n Admin SDK - To allow listing out current available resourcesfrom the configuration tool
You need to enable one API at a time
Go to the Menu, Select APIs & Services > Dashboard
Select'Enable APIs and Services'
Page 49 of 121
Page 50
Synergy JOIN Install ation and Configuration Guide
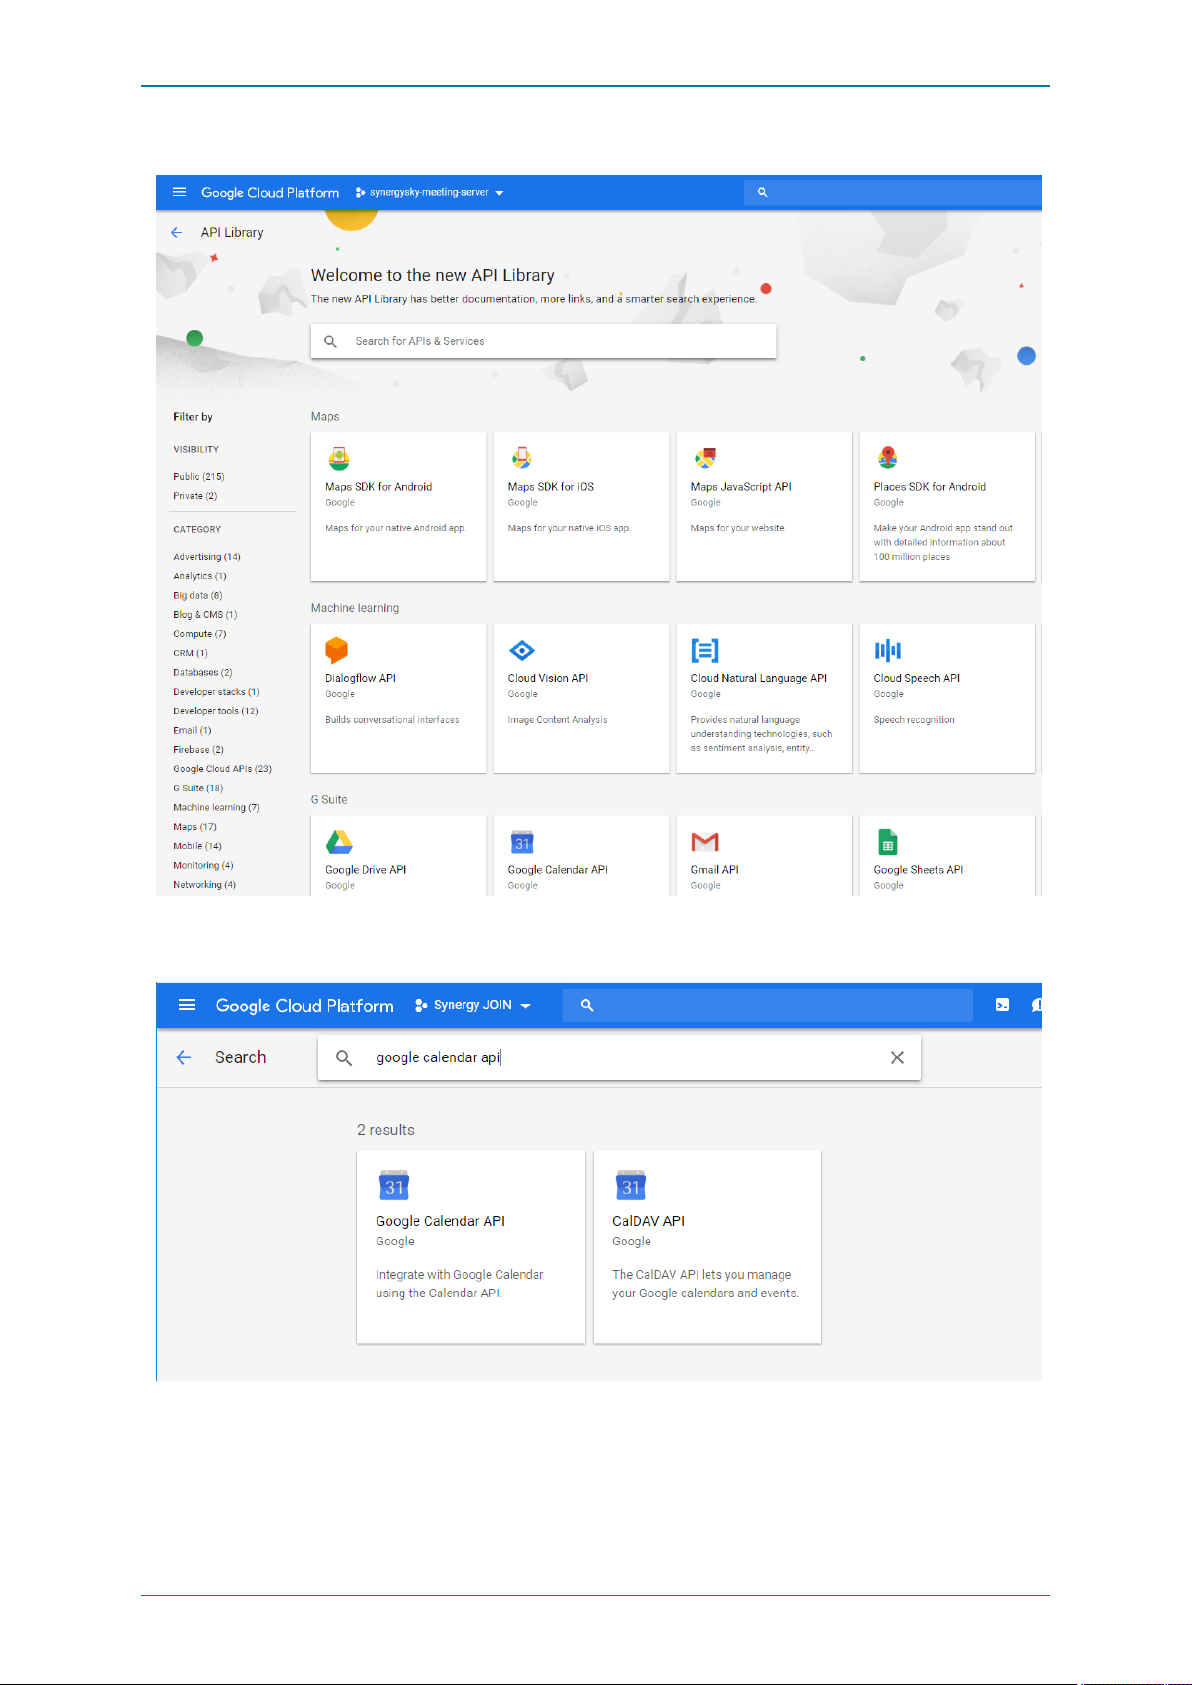
You should now be presented with the API Library.
You willhave to search for the APIs from this screen.
First, Search for 'Google Calendar API'
Selectthe 'Google Calendar API.
Page 50 of 121
Page 51
Synergy JOIN Install ation and Configuration Guide
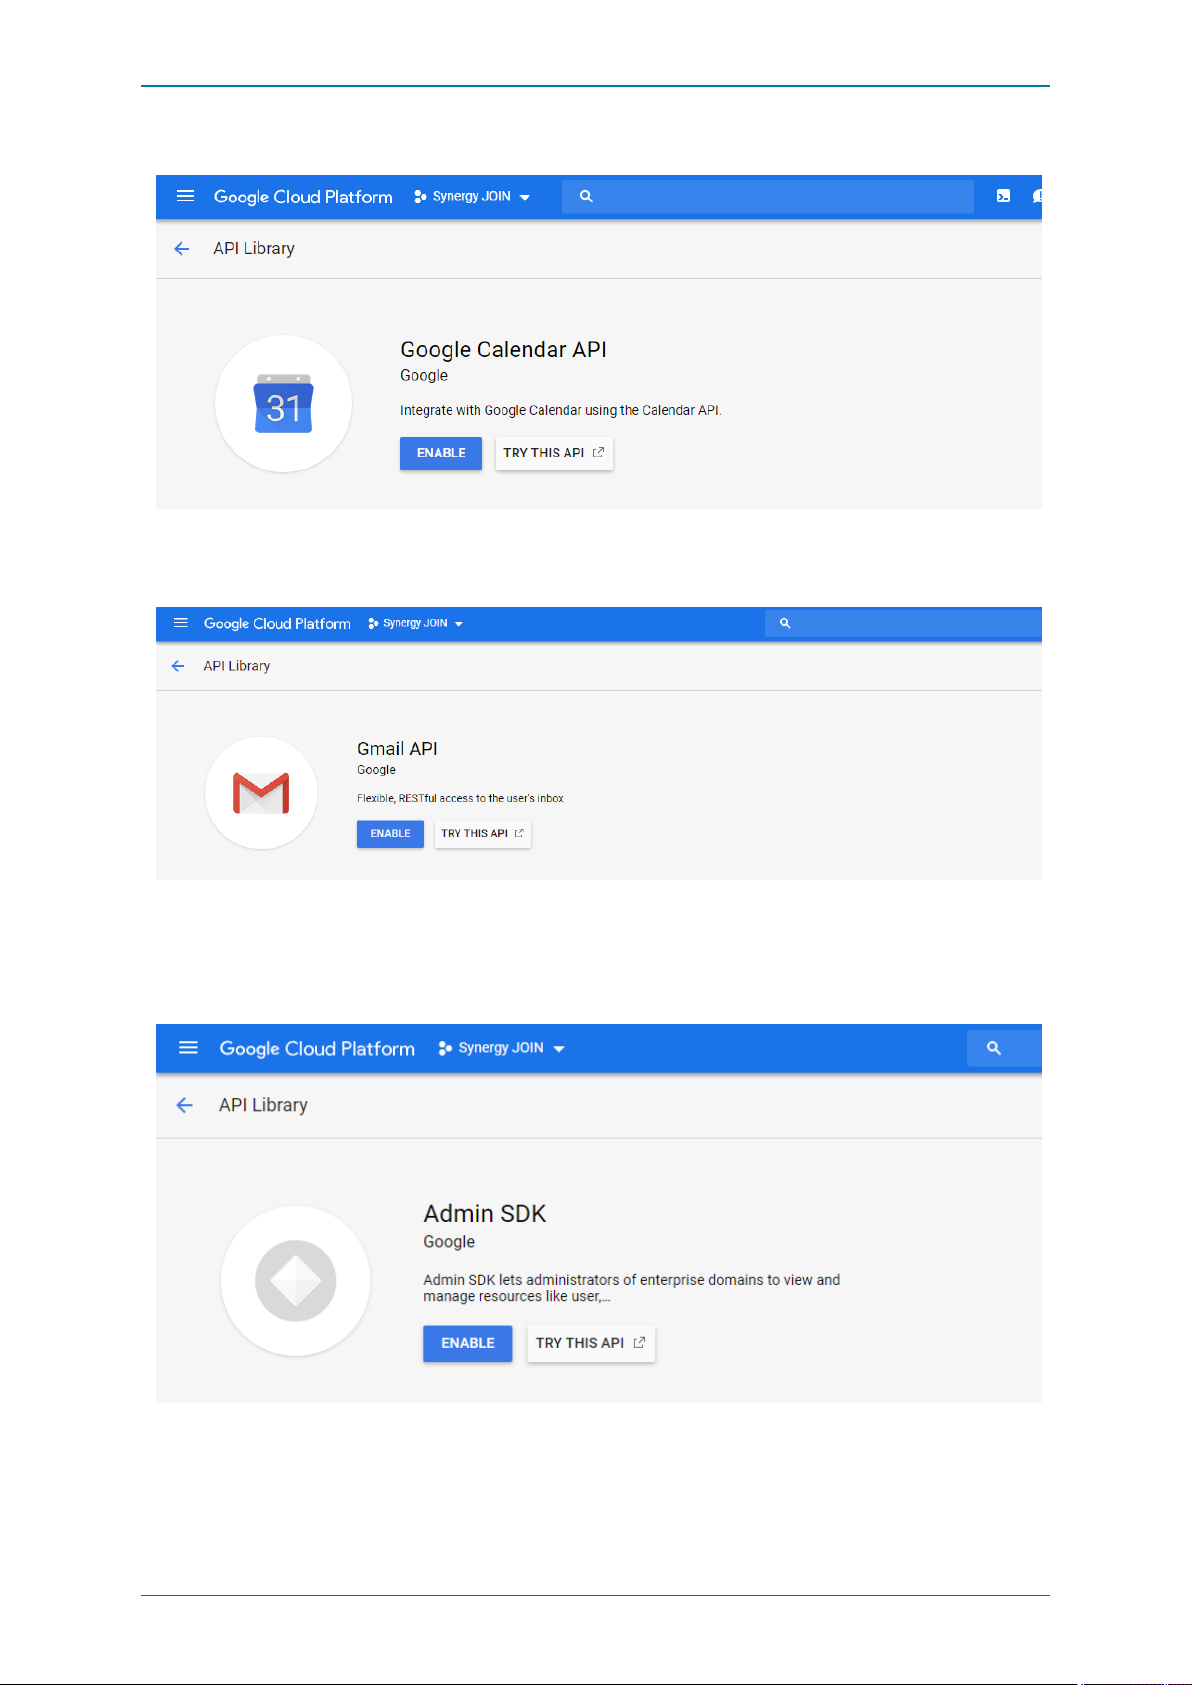
Click Enable
Once you have found this API, you willthen have to perform a new search for GMail API
SelectEnable for the GMail API
Once you have found this API, you willthen have to perform a new search for Admin SDK API
SelectEnable for the Admin SDK API
Page 51 of 121
Page 52
Synergy JOIN Install ation and Configuration Guide
Service Account
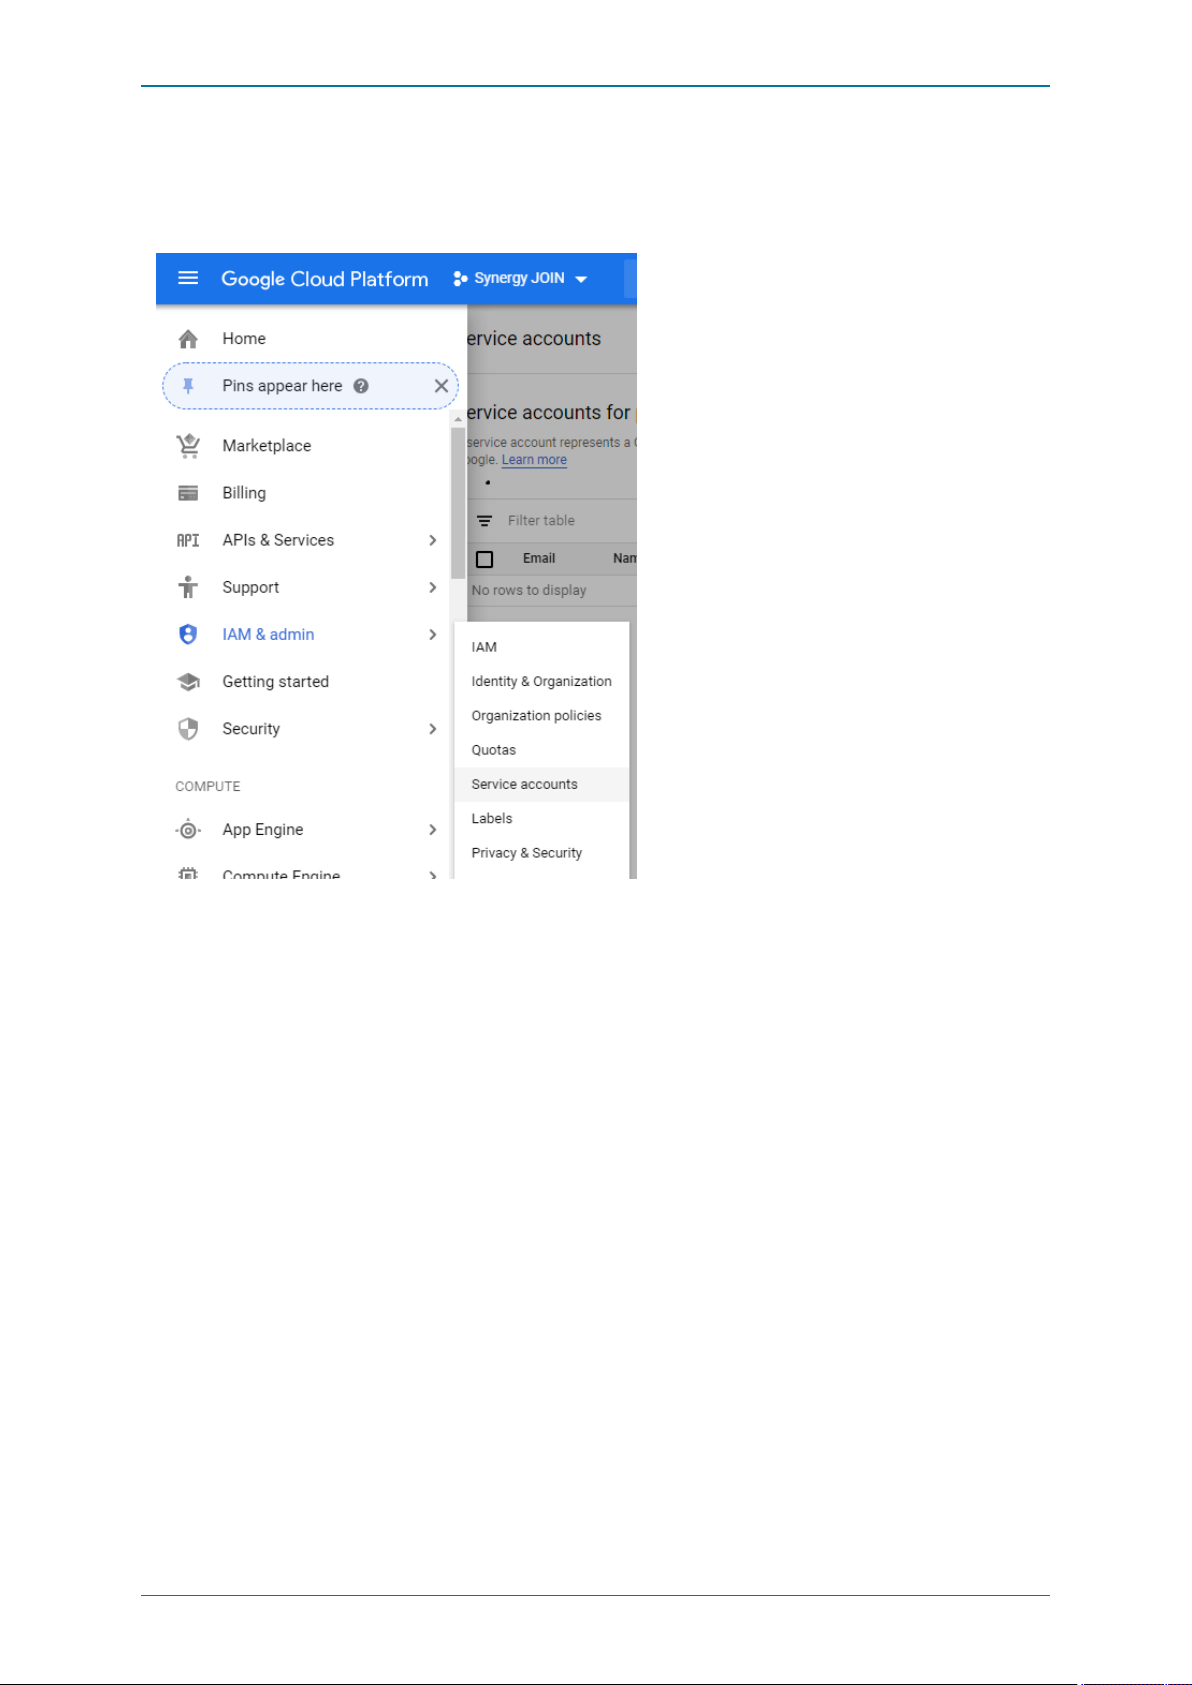
Create Service Account
SelectIAM & Admin and Choose 'ServiceAccounts
Page 52 of 121
Page 53
Synergy JOIN Install ation and Configuration Guide
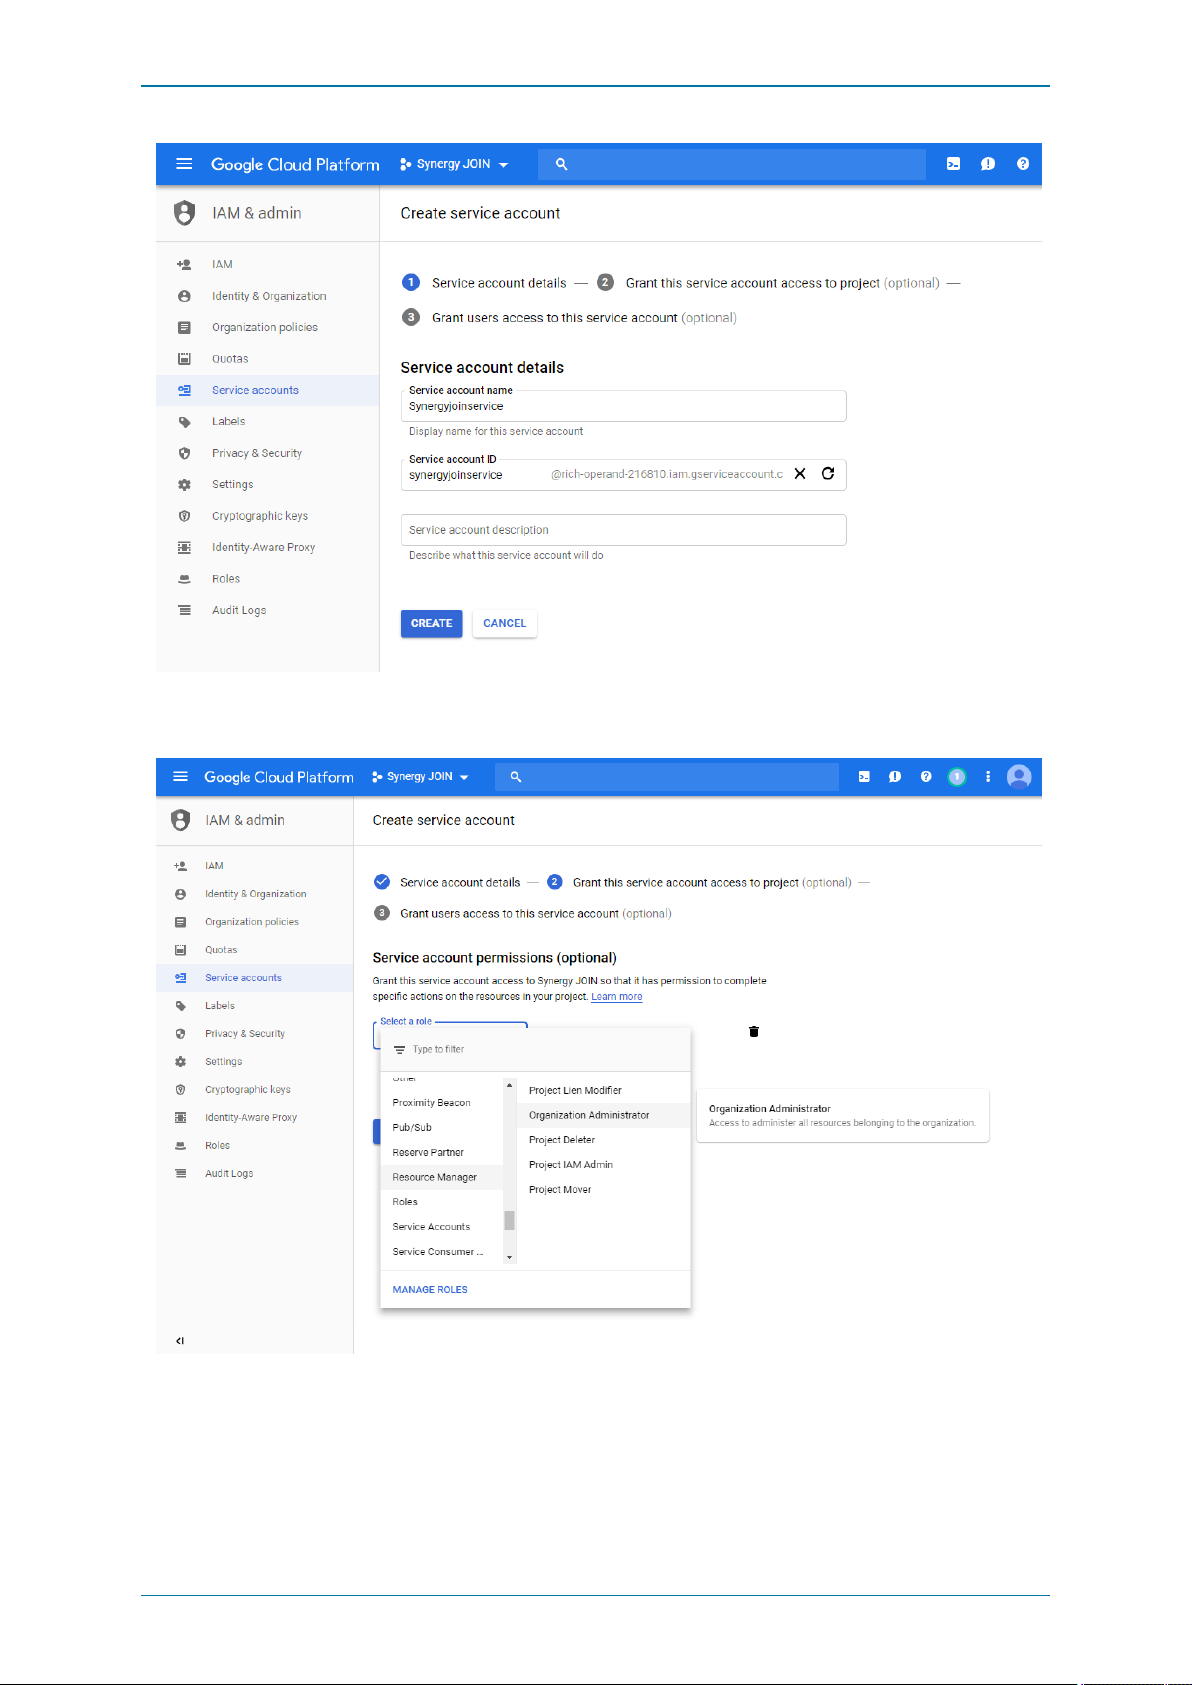
Enter a Service Account Name and select Create
Selectthe role for this service account. Resource Manager > Organization Administrator.
This willallow the service account to manage the meeting room resources.
Once you have selected the role, Clickthe 'Create Key' Button.
Page 53 of 121
Page 54
Synergy JOIN Install ation and Configuration Guide
Create a Private Key for JOIN
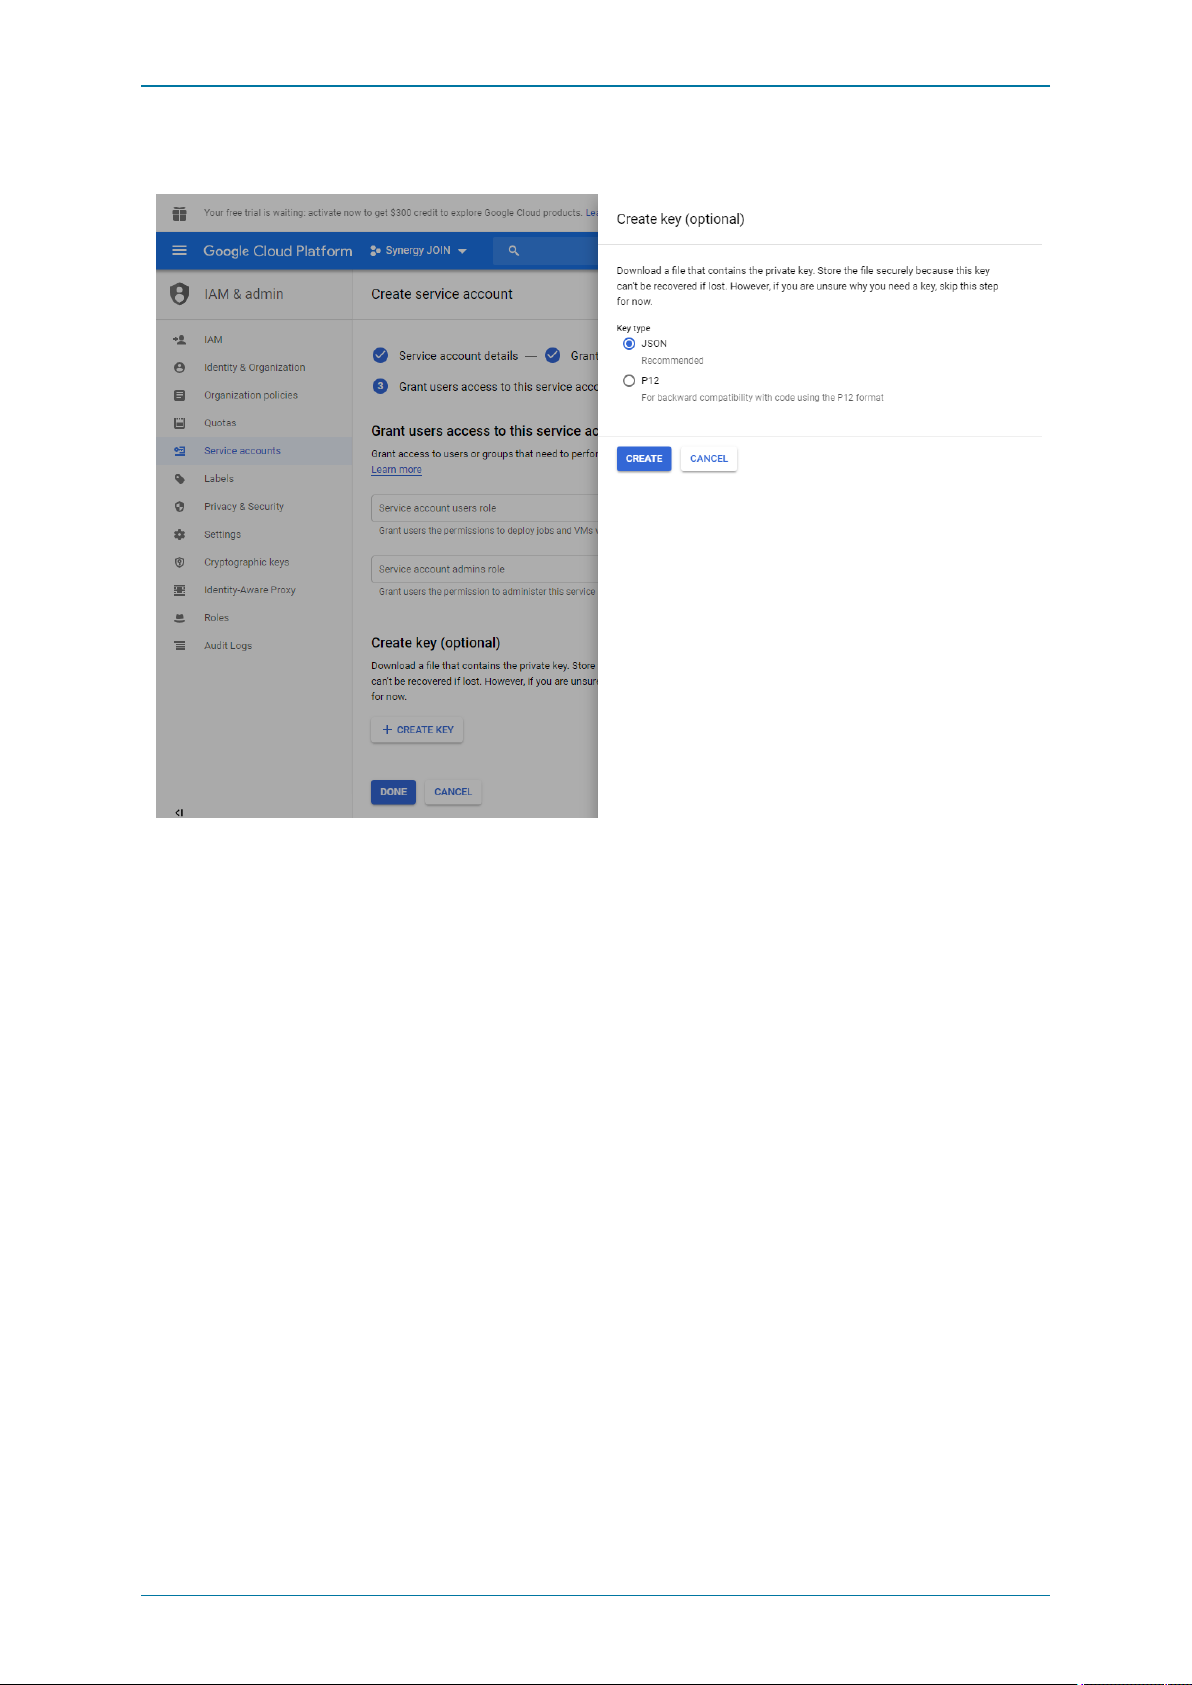
On the next screen, choose the JSON radio button and click 'Create'
A file willbe downloaded to your disk, this is your authentication information to be used by the JOIN application.
l Copy thisfile to the same directory as the JOIN application. (i.e. c:\SynergySKY\SynergySKYEnterpriseScheduling).
l Keep a secure copy of this file, since a new serviceaccount isrequired to be created if its lost.
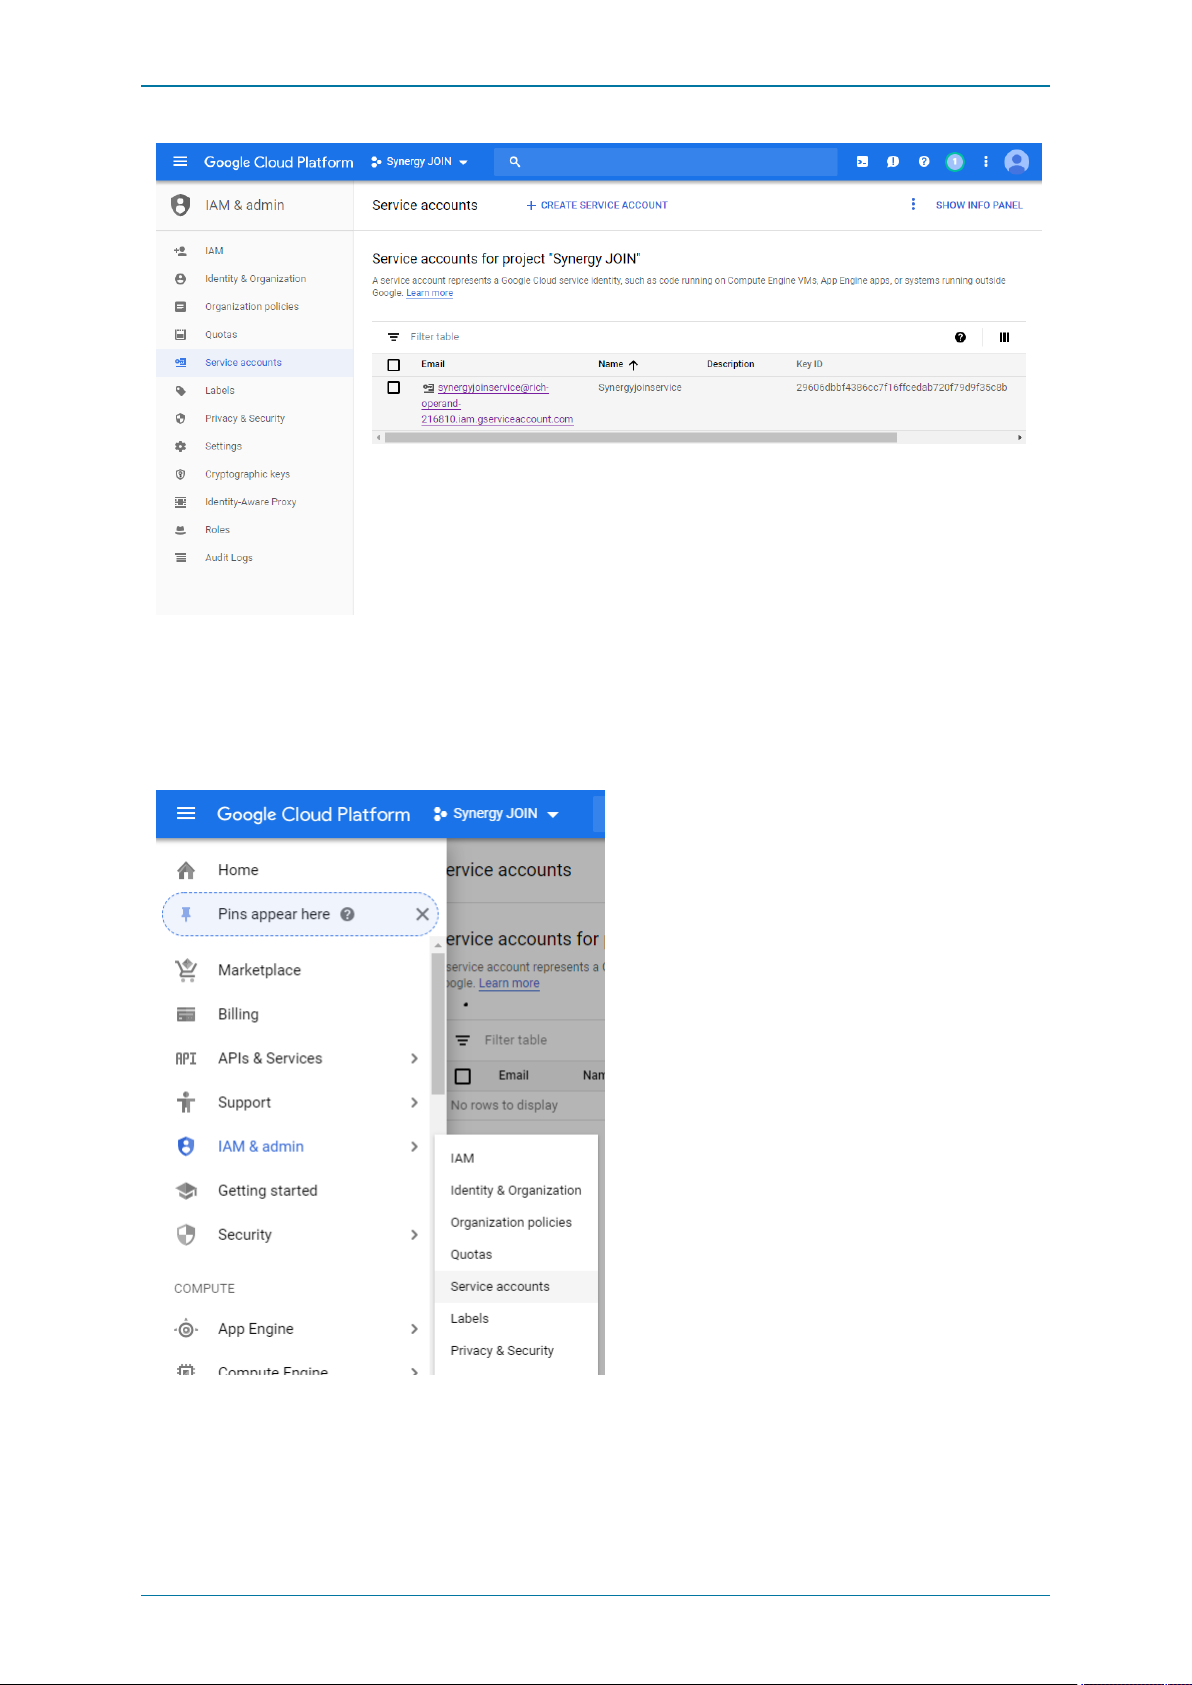
Once you are have moved the file to the same directory as the JOIN application and you click 'Done' you will be presented with a
screen similar to the below with your newly created service account visible in the list.
Page 54 of 121
Page 55
Synergy JOIN Install ation and Configuration Guide
Enable Service accounts to access Calendar Resources
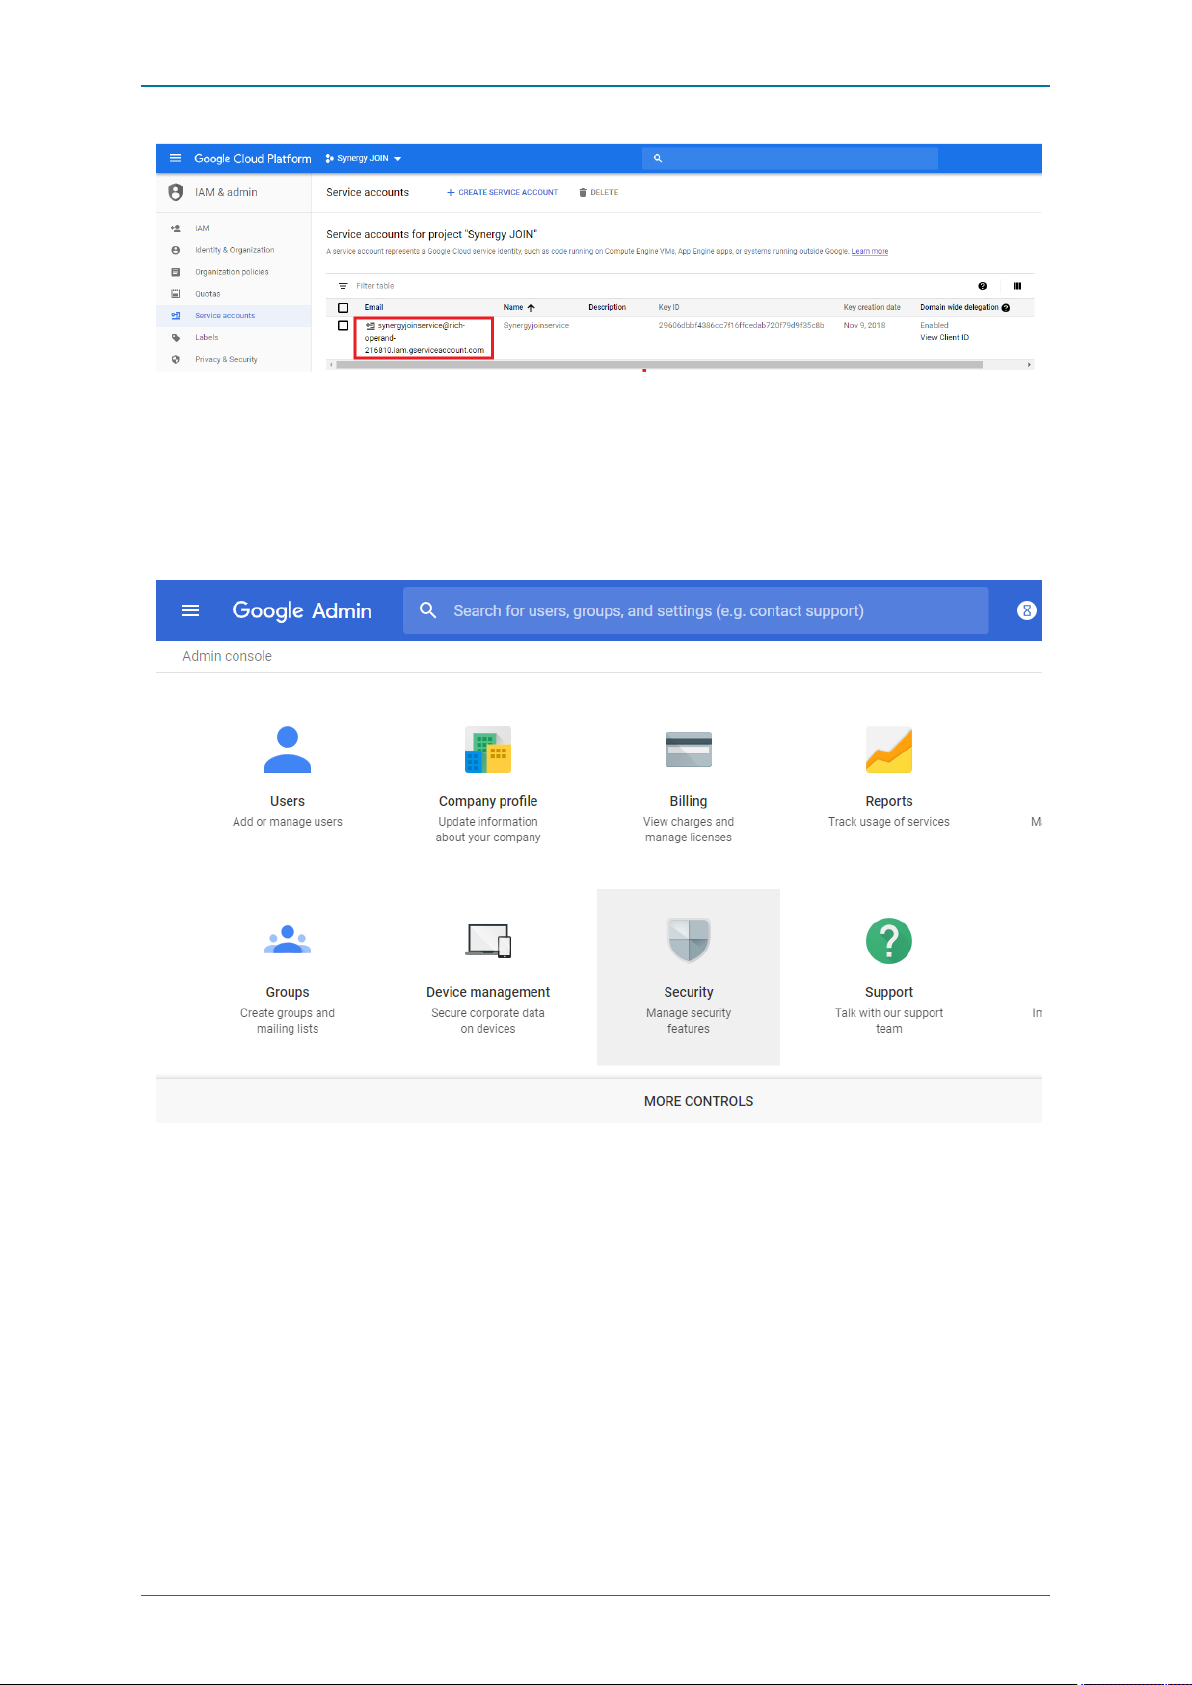
In order toenable Service accounts, first we need to find the Serviceaccount ID for the service account on
https://console.cloud.google.com
SelectIAM & Admin and Choose 'ServiceAccounts
Page 55 of 121
Page 56
Synergy JOIN Install ation and Configuration Guide
Copy the service account ID
An Administrator of the G Suite domain must complete the next steps
Google Admin Console
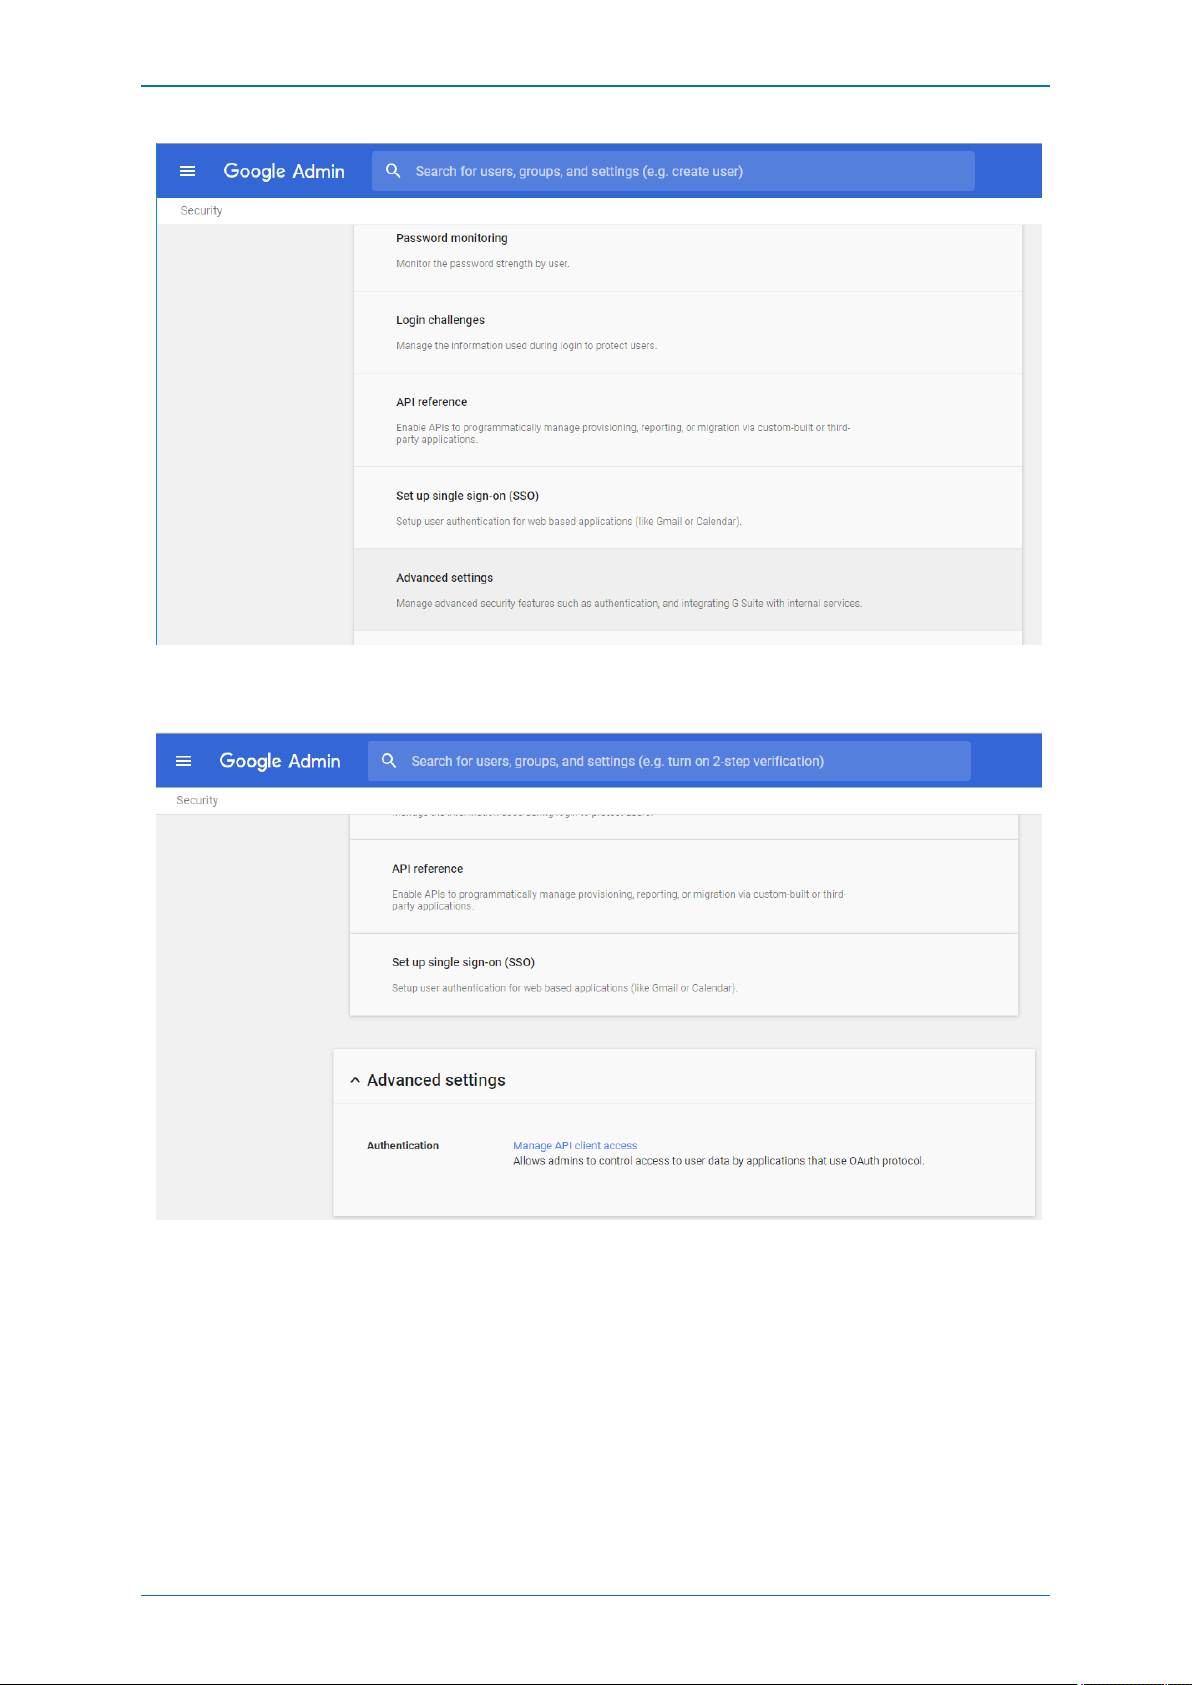
Browse to the Google Admin Console https://admin.google.com
SelectSecurity from the listof controls.
If you don't see Securitylisted, select More controls from the gray bar at the bottom of the page, then selectSecurity from the list
of controls.
N.B If you can't see the controls, make sure you're signed in as an administrator for the domain.
Page 56 of 121
Page 57
Synergy JOIN Install ation and Configuration Guide
SelectAdvanced settingsfrom the list of options
Select'Manage API clientaccess'in the Authentication section
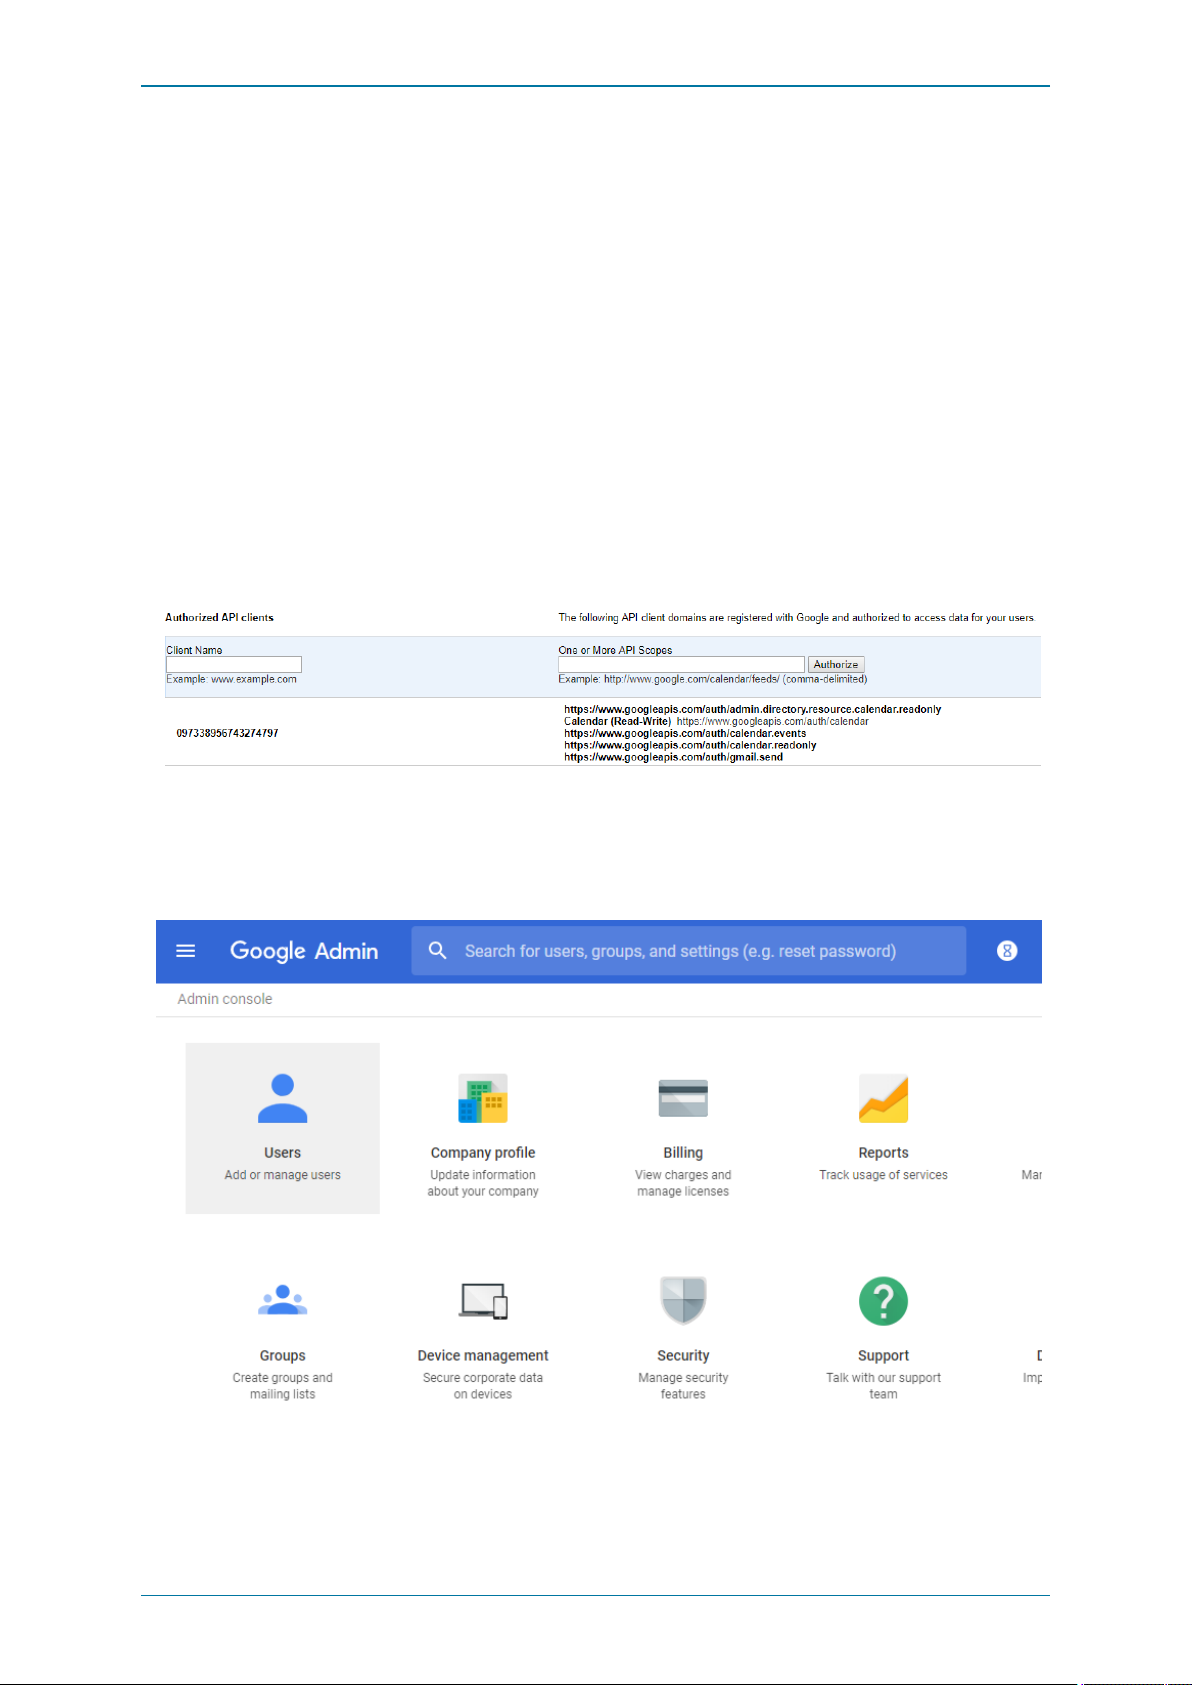
1. In the Client Name field enter the service account's Client ID or Service account ID (which we copied in the previous step).
In the One or More API Scopes field enter this list of scopes:
https://www.googleapis.com/auth/admin.directory.resource.calendar.readonly
- To populate AvailableRooms in the JOIN configtool
https://www.googleapis.com/auth/calendar.readonly
- To allow JOIN to access room calendars enabled in JOIN
Page 57 of 121
Page 58
Synergy JOIN Install ation and Configuration Guide
https://www.googleapis.com/auth/gmail.send
- To allow JOIN to send notifications to its administrators as wellas dial-in instructionsfor certain workflows (e.g. one-time
VMRs).
https://www.googleapis.com/auth/calendar
- For workflows requiring calendar invitation updates, suchas the green button for Polycom endpoints(if the EWS emulator is
not used) or meeting invitation body updates, JOIN also has to have a write calendar accessfor those rooms.
https://www.googleapis.com/auth/calendar.events
- For workflows requiring calendar invitation updates, such as the green button for Polycom endpoints(if the EWS emulator is
not used) or meeting invitation body updates, JOIN also has to have a write calendar access for those rooms. If read-only is
sufficient, it should be at leastthis one set there: https://www.googleapis.com/auth/calendar.events.readonly
Note: All of the scopes are required for the integration of Synergy JOIN with Google G Suite. It isnot possible to exclude
some of the scopes as this willcause parts of the integration not to work
You can copy and paste the below api scopes as they are into the 'One or More API Scops' field box
https://www.googleapis.com/auth/admin.directory.resource.calendar.readonly,
https://www.googleapis.com/auth/calendar,https://www.googleapis.com/auth/calendar.readonly,
https://www.googleapis.com/auth/gmail.send,https://www.googleapis.com/auth/calendar.events
Click Authorize.
The outcome should looklike the below example:
Service-act-on-behalf-of Email
Browse to the dashboard and select 'Users'
Page 58 of 121
Page 59
Synergy JOIN Install ation and Configuration Guide
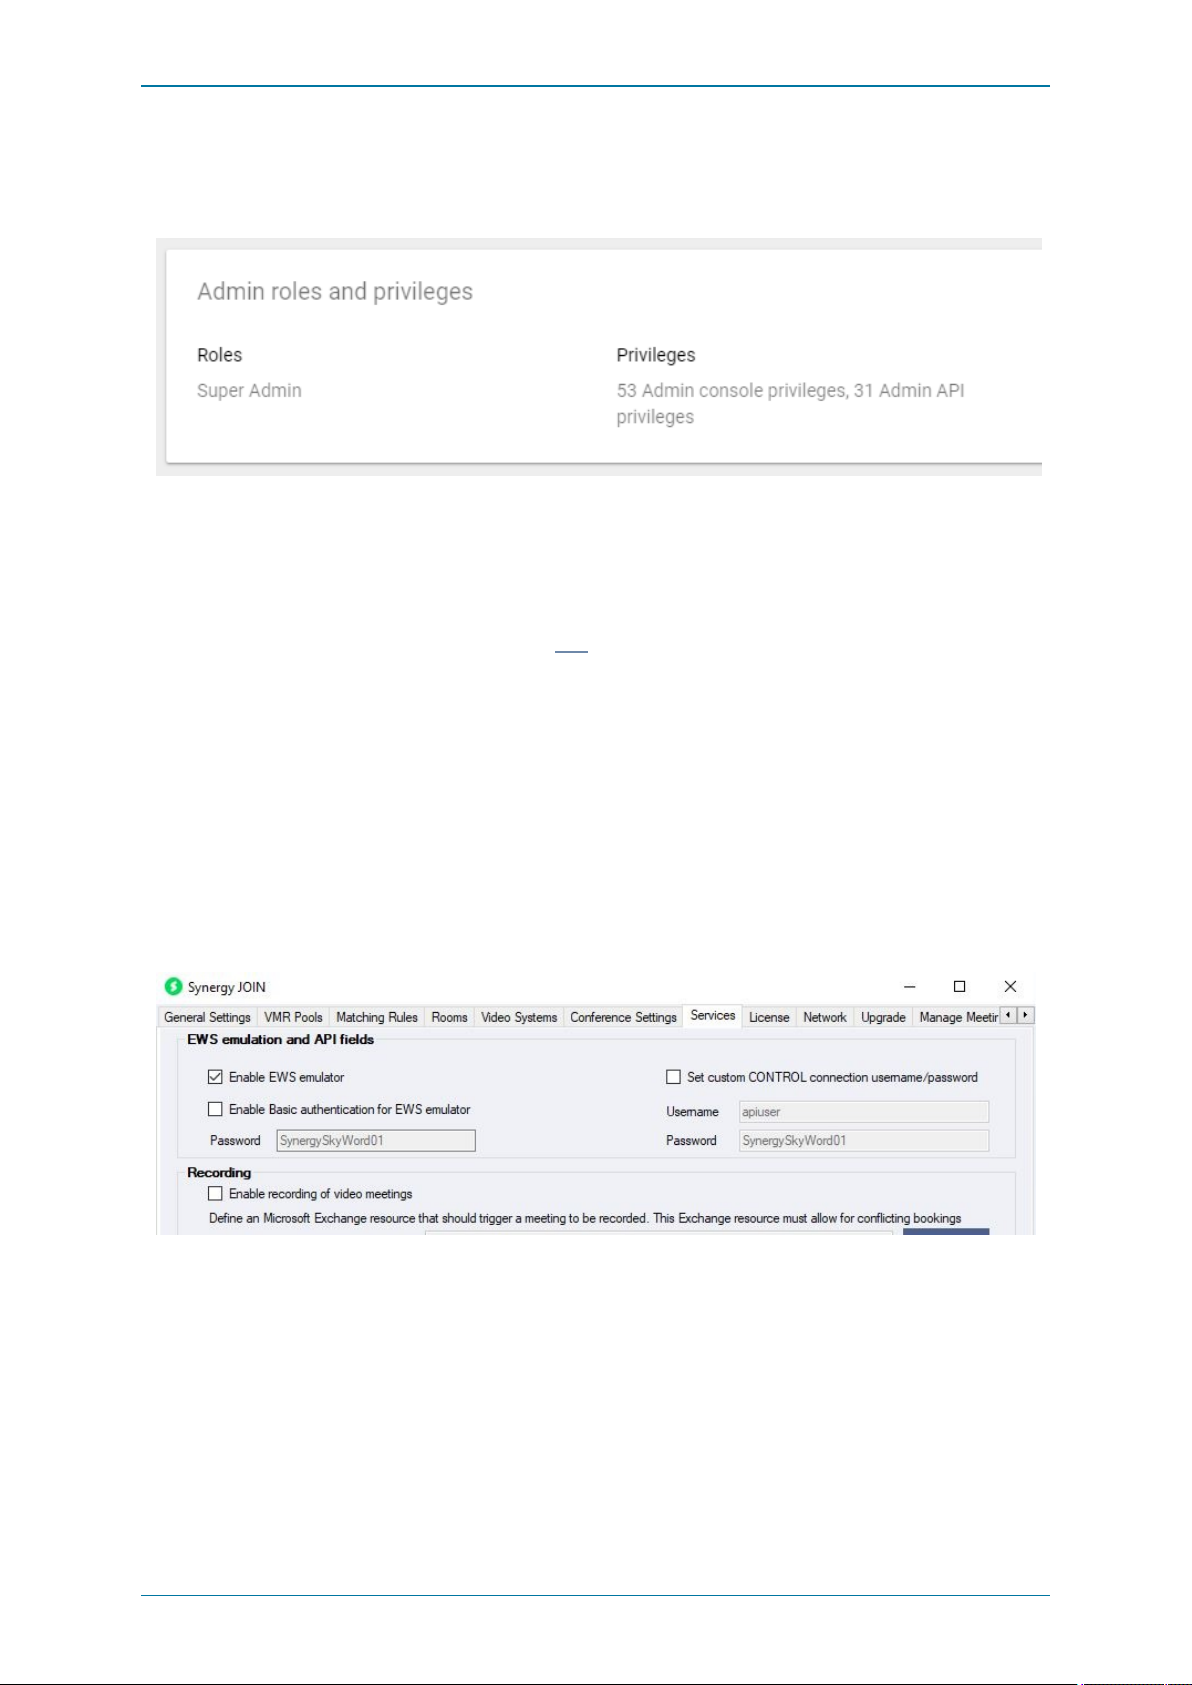
In the users section, select the user that you would like to use as the 'service-act-on-behalf-of Email'in Synergy JOIN.
Scrolldown to the 'Admin roles and privileges' section and verifythat the user you would like to use has the role of 'Super Admin'
enabled.
Once you have verified this, copythe email address from this user and paste thisinto the 'service-act-on-behalf-of email' text
button in the 'General Settings' tab in the Synergy JOIN configuration tool.
More information on the general settingstab can be found here
Polycom EWS Emulator
There are instanceswhen the Polycom Endpoint is unable to communicatewith the Exchange Server and as such, the endpoint
isunable to use the builtin Polycom Click To Join technology. The EWS emulator within Synergy JOIN bringsback the ability to
utilize the Polycom Click To Join technology on your Polycom Endpoints.
The EWS Emulator is compatible with the HDX, Group Series and Trio endpoints.
Configuring Synergy JOIN
The Polycom Exchange Web Service(EWS) Emulator in Synergy JOIN acts as an Exchange Web Server. Thismeans Synergy
JOIN willretrieve the calendar information from exchange and populate thisto the endpoint.
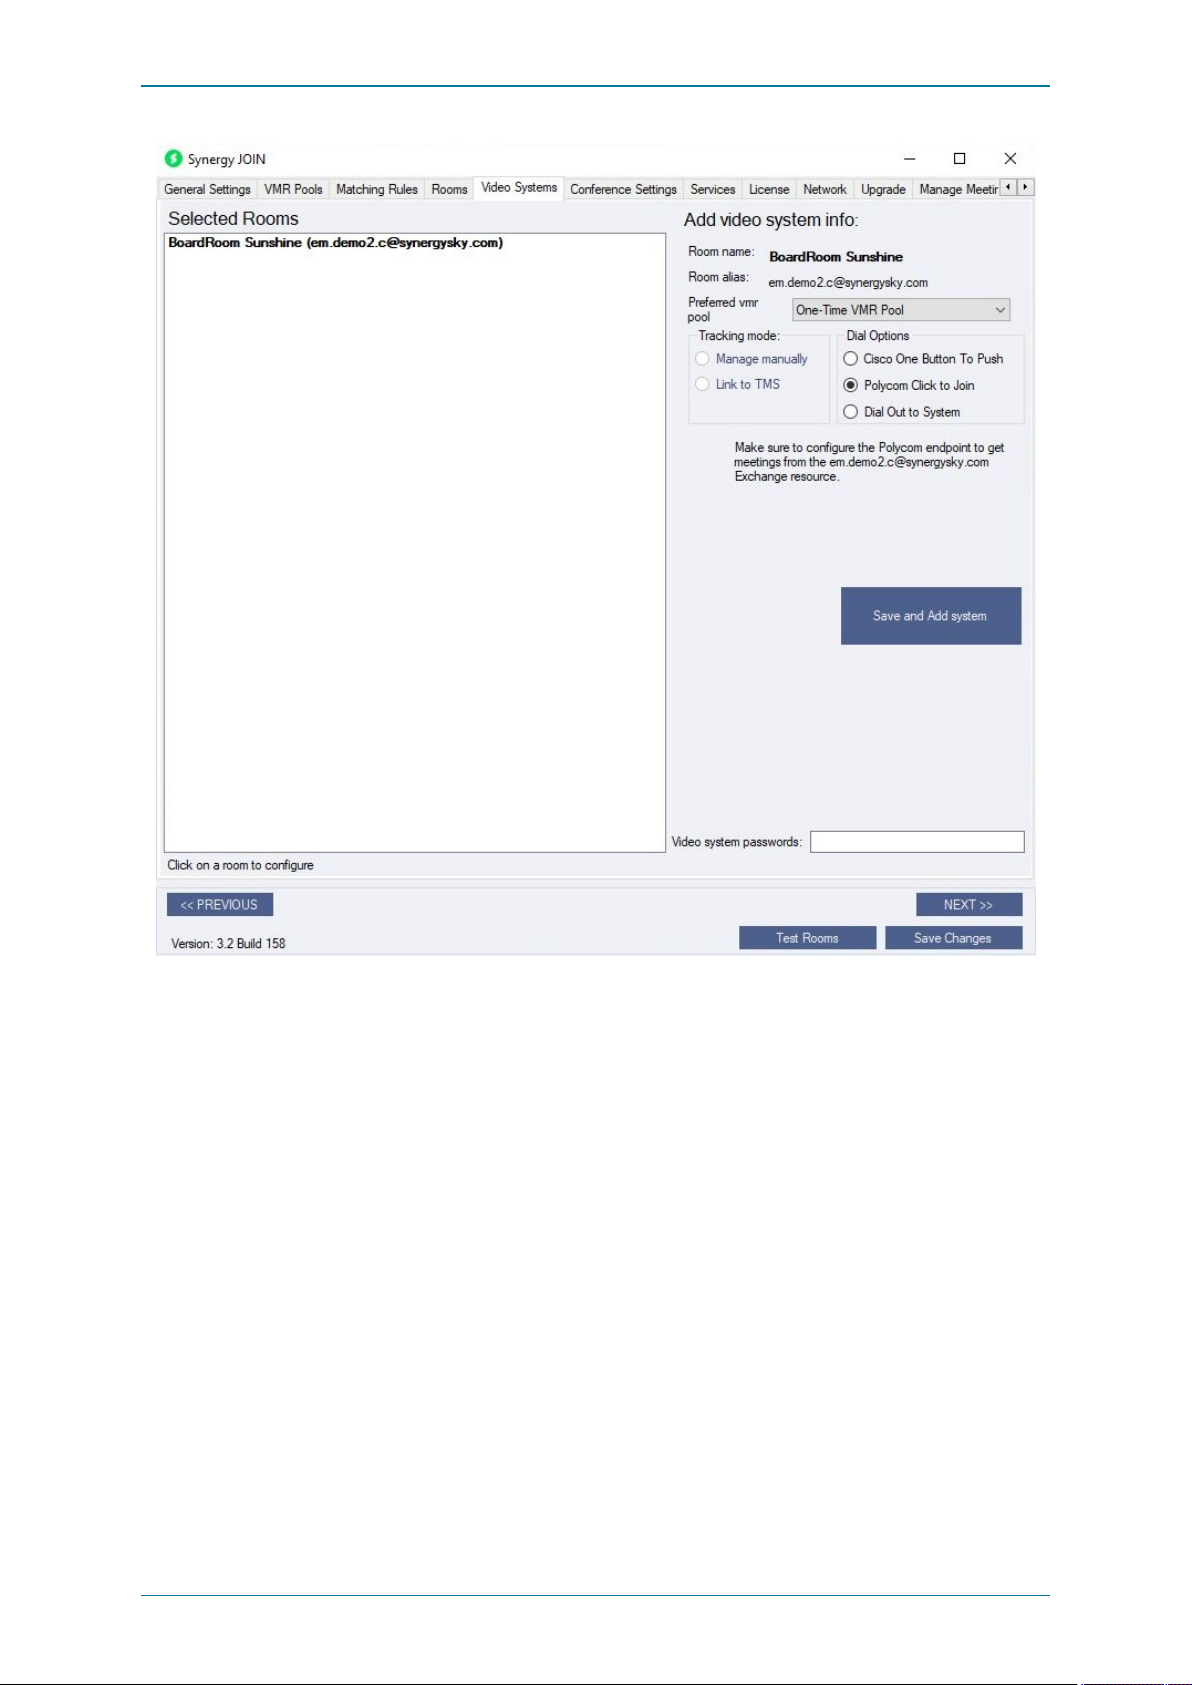
WithinSynergy JOIN you have to Enable the EWS Emulator from the Servicestab.
You have to then configure your Video System as a Polycom endpoint. Once you do this,Synergy JOIN willknow to send the
Polycom ClickTo Join Token to that endpoint.
Page 59 of 121
Page 60
Synergy JOIN Install ation and Configuration Guide
Configuring the HDX and Group Series Polycom Endpoint
The Polycom endpointsmust be configured to pollcalendar information from the JOIN server which willbe acting as an
Exchange Web Server.
Instructions on how to configure this on a Polycom Group Series endpoint are below:
Page 60 of 121
Page 61
Synergy JOIN Install ation and Configuration Guide
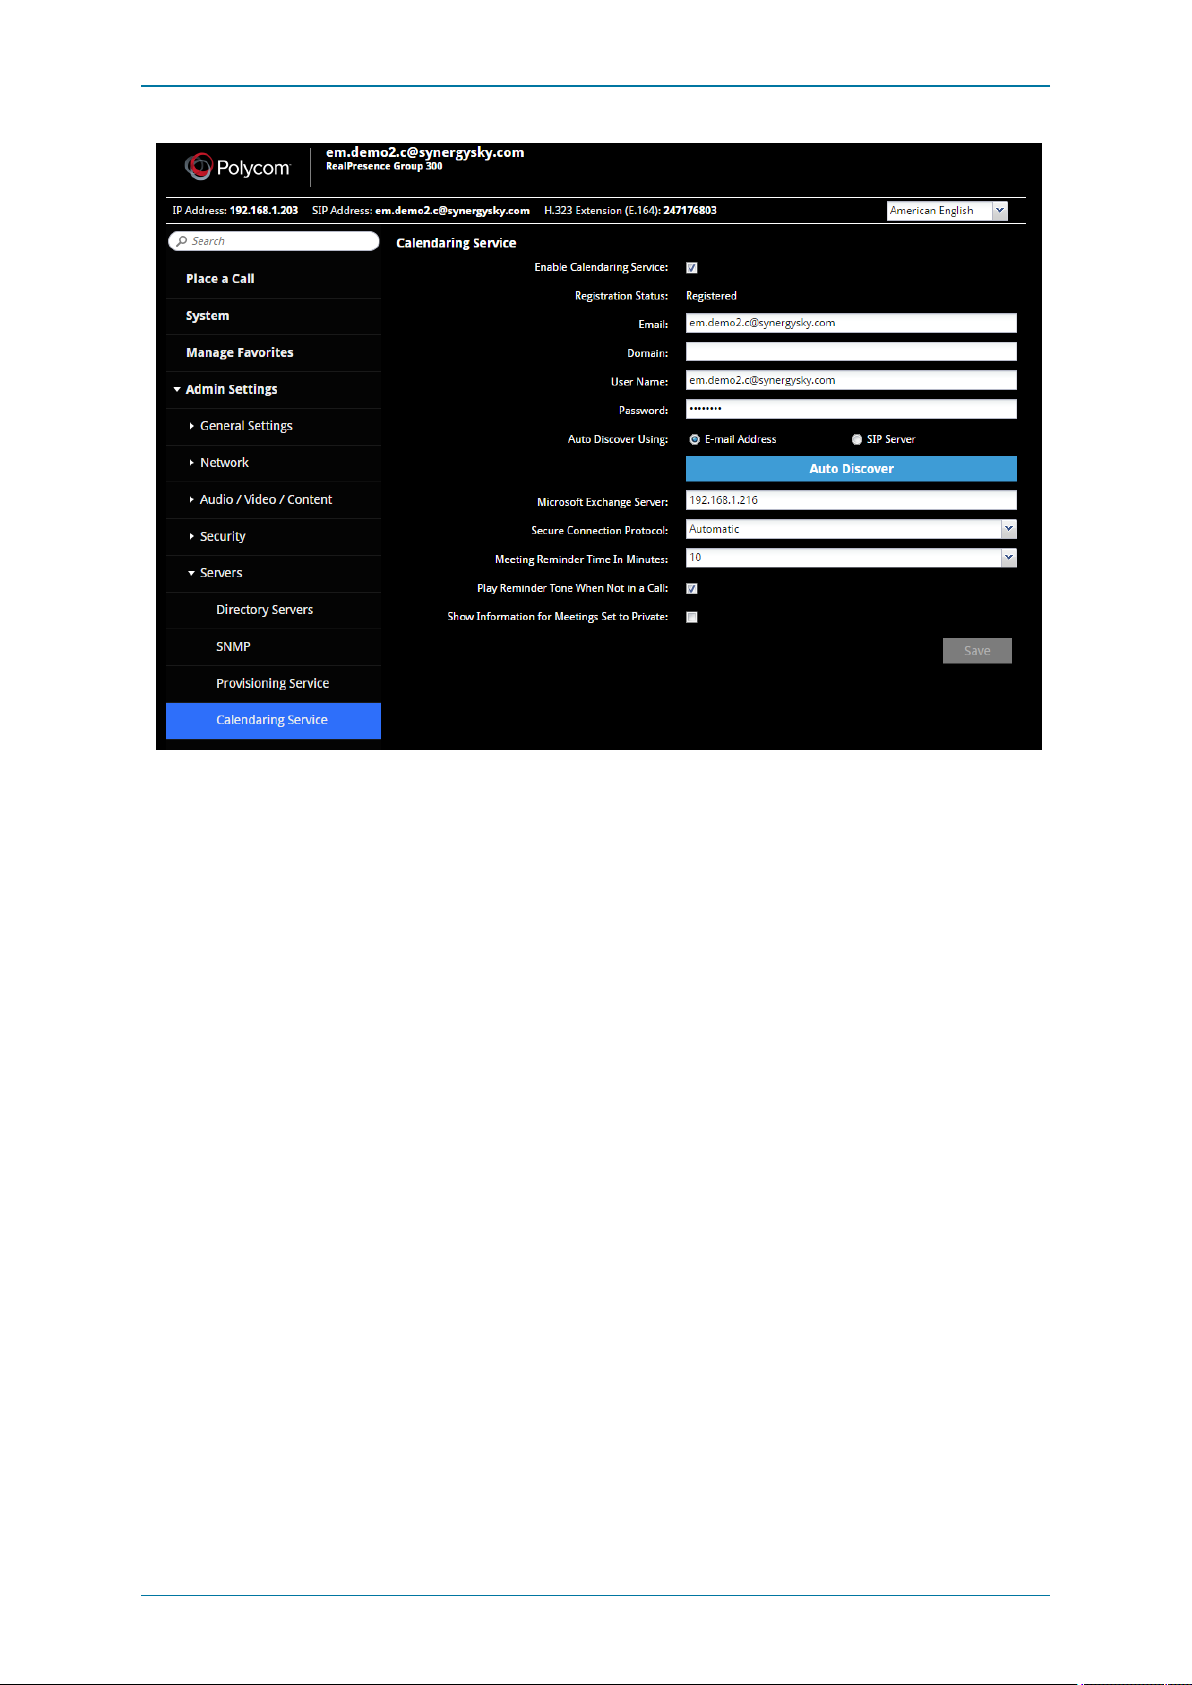
1. Navigate to the Calendaring Service configuration section within your Polycom Codec.
2. Tick the 'Enable Calendaring Service' tick box
3. Email: This shouldbe the room/ resource email address that you have configured within Synergy JOIN.
4. Domain: This field isnot always required. If you are unable to register your endpoint to the EWS Emulator with this field
blank, you willhave to enter your domain
5. User Name: This shouldbe the room/ resource email address
6. Password: This isthe password configured in the 'EWS Emulation' section in the 'Services' tab of Synergy JOIN
7. Microsoft Exchange Server: This is the IP address of the JOIN server
Once you have configured the rest of the settingsto your liking, click'Save'
When the Registration Status is 'Registered', you can start booking video meetings and start utilizing Polycom Click To Join.
Configuring the Trio Series Polycom Endpoint
You have to meet the followingrequirements in order to start using the EWS Emulator with Polycom Trio
l You have to be running Synergy JOIN build 3.2.163 or above
l You have to tick the 'Enable BasicAuthentication for EWS Emulator' within the Services tab in Synergy JOIN
l T he Trio has to have a line registered as SIP
l You have to have physical access to the touch panel to set a username & password
l If you are running 5.9 firmware, AD Photo fetch needs to be disabled.
o
feature.contactPhotoIntegration.enabled = 0
o
More information about thiscan be found here - https://documents.polycom.com/bundle/trio-sfb-dg-5-9-0AA/page/c3189620.html
l T rio, if running 5.9.1.10419 – must upgrade to 5.9.1.11135 and set basicauth to enabled
o
https://community.polycom.com/t5/VoIP-SIP-Phones/Software-Trio-UC-Software-5-9-1-11135-RevAC/mp/107281
o
feature.exchange.allowBasicAuth= “1”
Page 61 of 121
Page 62

Synergy JOIN Install ation and Configuration Guide
Setting a Polycom Profile
The following setup information has been taken from the Polycom support website. The below configuration iswhat is
required in order for the EWS Emulator to work with the Trio.
The full Polycom documentation can be found here: https://otd.plcm.vc/support/docs/devices/polycom-trio#configure-deviceprofile
Configure Device Profile
1. Go to the management section of the device. You can get there by entering the IP address of the device into the browser
address.
Note: You must log in as an administrator.
2. SelectSimple Setup from the tab menu.
3. Ensure Generic is selected for the Base Profile. The Trio willnot function with One Touch Dial service using the other
profile options.
Configure Device Calendaring
1. Go to the management section of the device. You can get there by entering the IP address of the device into the browser
address. Note: You must log in as an administrator.
Example: https://<ip-address-of-trio>/
2. SelectSettings > Applic ations > Ex change Applic ations.
3. Enter the following fields:
n Enable: Exchange Calendar
n Disable: AutoDiscover
n Exc hange Server URL: https://ipaddressofjoin/EWS/Exchange.asmx
o
NOTE: Exchange URL is casesensetive
4. Click Save.
Configure Device Credentials
1. Provide calendaring credentials. This must be done on the device itself.
2. On the device touch panel go to Settings > Bas ic > Logi n Credentials.
3. Enter the following fields:
n Domai n: Example OTD
n Username: Example [email protected]
o
This is the room alias as it is configured in JOIN
n Password: Example F3kDFyu1bD
o
This is the JOIN EWS Emulator password
4. Click Save. The Registration Status should display Regis tered and the calendar should appear in a few seconds.
Task 2: Launching the configuration tool and installing the service
1. Start the configuration tool by double-clicking on the JOIN icon on the desktop.
Note: On startup, the server checksfor updates, so if you do not have internet accessconfigured on the server, you will
see an error here.
2. Click Install Servic e to installthe JOIN service on the server - once installed thisbutton disappears from the configuration
tool.
The Start and Stop buttonsare used once the serviceis installedto stop and start it, as necessary.
Page 62 of 121
Page 63
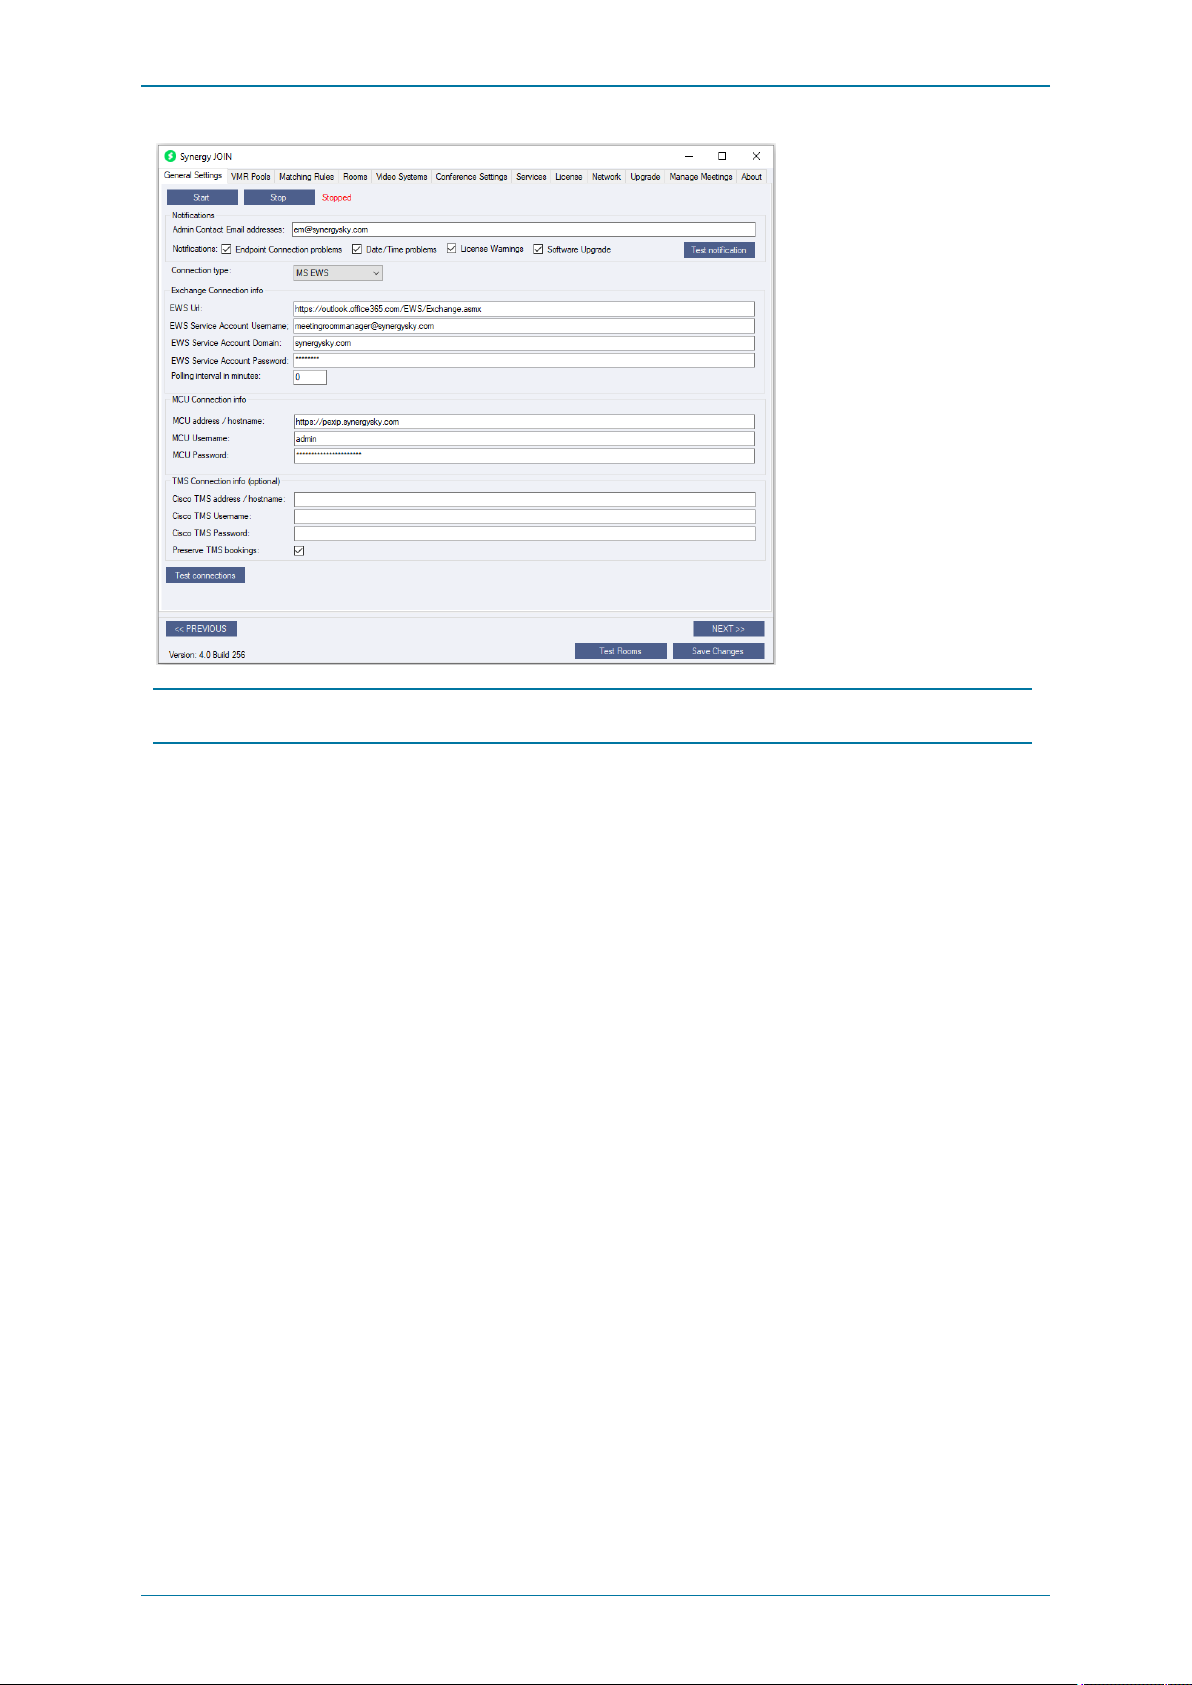
Synergy JOIN Install ation and Configuration Guide
Note: Pressing Ctrl + F5 reveals the Unins tall Servic e button in the place of the Install Service button, which when clicked,
uninstalls the service from the server.
Page 63 of 121
Page 64
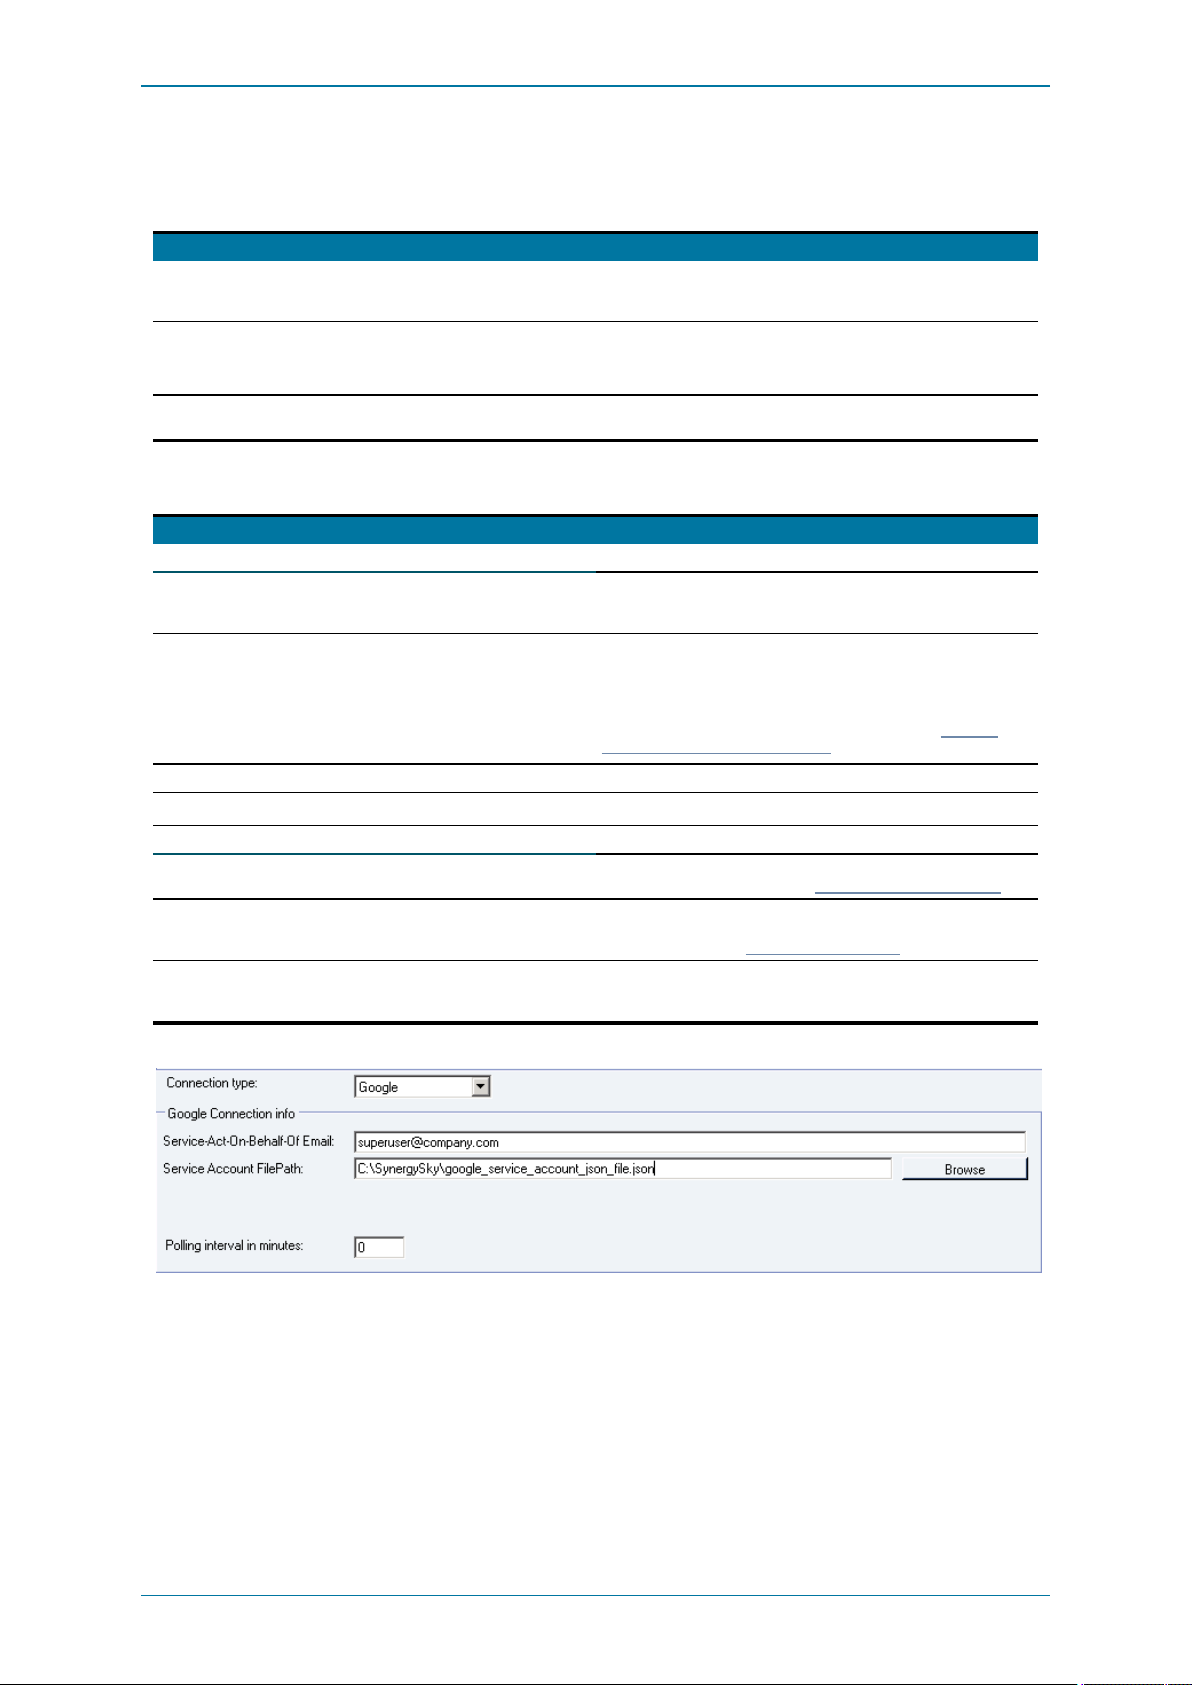
Synergy JOIN Install ation and Configuration Guide
Task 3: Configuring the General Settings
Fillin the fields in the General Settings tab as follows:
Section /Field n am e De scriptio n
Notifica tion s Contact details for theadministrator who should receive notifications of any problems
Admin Conta ct Email Add re sses The email addresses of administrators who wi ll receive email notifications for the
Notifica tion s Specify which events will trigger an email to be sent to theadministrator email
Connection Types
Section /Field n am e De scriptio n
Exchan ge Co nn ection i nfo The ExchangeW eb Service ( EWS) details for your Exchange environment.
EWS U rl The ExchangeW eb Service ( EWS) URL: if using Office 365, thenyou cannormally
EWS Se rvice Accou nt Use rn am e Theusername of theEWS service account.
EWS Se rvice Accou nt Do ma in The domainof the EWS service account.
EWS Se rvice Accou nt Password The password of theEWS service account.
Goog le conn ectio n in fo The details for your G-suite setup
Service -Act-On_ Beh alf-Of e ma il A super administrator in the admin.google.com section of the configuration.
Service Account FilePath Filepath to theservice account json file you have downloaded in connection with the
Pollin g inter val in minu tes The number of minutes betweenJOIN checkingthe mailbox. If you notice any issues
in the platform, for example if JOIN fails to push Cisco OBTP or Polycom CTJ
information to endpoints.
specified events.
Use a comma to separate multiple email addresses.
addresses specified above.
use the default value already populatedhere:
https://outlook.office365.com/EWS/Exchange.asmx
Microsoft Exchange sometimes requires the username to be in theformat of
"domain\username" and sometimes "username@domain". In the latter cases the
domain fieldis optional
For details of thepermi ssions required for the service account, see "Exchange
Resource Account Requirements" on page12
(Additional information can befoundin the Google CloudPlatform Configuration)
creation of theservice account (This is the json file thatwas copied in theGoogle
Configuration section under 'Create a Private Key for JOIN')
with your connection to your mailboxes takingl onger than expected, we advise to set
your Polling interval in minutes to 0.
Continuing with General Settings:
Page 64 of 121
Page 65

Synergy JOIN Install ation and Configuration Guide
Section /Field n am e De scriptio n
MCU Co nne ction info A Pexip Infinity Management Node, Cisco CMSMaster Nodeor StarLeaf Cloud
MCU a dd re ss / hostnam e Theaddress of theM CU. Will normally start with
MCU Use rn ame The username of an admin account on the M CU.
MCU Passw or d The password of an admin account ontheM CU.
TMSCon nectio n in fo (o ption al) Optionally you can add Cisco TMS to your JOIN; this is of value if thevi deosystems
Cisco TMS addre ss / ho stname The hostname or IP address of theTMS server. This could be prefixedwith either
Cisco TMS Userna me The username of a Site Administrator in TM S. The username would normally be
Cisco TMS Passwor d The password of a Site Administrator in TM S.
Prese rve TMS Boo kings* Check the checkbox if JOIN should preserve meetings that are pushed to thecodec
URL is required so that JOIN can:
l l aunch outbound calls to non-Cisco OBTP or Polycom CTJ systems
l provision one-time-VMRs whenbooking non-Skype meetings ( Cisco and Pexip
only)
Note that for StarLeaf you needto request an authentication token that gives you
access to Skype for Business interworking.
For StarLeaf Cloudenter
For Videonor Cloudenter
For StarLeaf Cloud, this field wil l show
For Videonor Cloud, this field wi ll show x
For StarLeaf Cloud, enter the access token from theStarLeafPortal. See "How to
createa StarLeaf Cloud authorization token" on page118
For Videonor Cloud, enter the access token you have been providedby Videonor
support
are configured with dynamic IP addresses ( DHCP) in your environment. JOIN will
then query TM S for updated IP addresses if it is unable to connect to thevi deo
systems. Adding TM S also makes it easier to add video systems, as they can thenbe
selected from a list instead of havingto enter their IP addresses manually.
http://orhttps://
named /TMS ( e.g.
prefix with theNETBIOSdomain ( e.g.
by other booking systems such as Cisco TMS.
Enablingthis feature w ill result in more network activity and higher cpu usage on the
codec and on JOIN because JOIN will increase the verificationr ate to ensure the
videoconferencing system has thecorrect meetings added.
We recommend that you only enablethis feature during a trial or m igrationphase.
https://api.starleaf.com
https://core.videonor.net
. JOIN assumes TMS is installed on the default web application
http://tms.company.com/tms
https://
X-SL-AUTH-TOKEN
-auth-token
).
company\admin
).
*Note that TMS pushes out the meetings later than JOIN and therefore overwrites the meetings that are pushed out by JOIN.
Note the following regarding using the Preserv e TMS Bookings setting above:
TMS JOIN w itho ut Preserve TMS Boo king s JOIN w ith Pre serve TMS Boo kings
Pushes out a list of all
meetings to endpoint when
a meeting is booked,
updated or deleted.
Pushes out a list of meetings for the next 24 hours when a meeting is
booked, updated or deleted.
Verifies andoverwr ites ( if necessary) them eeting list on the
endpoint every hour with meetings stored in JOIN for the next24
hours.
Verifies andoverwr ites ( if necessary) them eeting list on the
endpoint at Con fere nce Start Buffer before every meetingstarts
(start-up buffer is by default 10 m inutes) with m eetings stored in
JOIN for the next 24 hours.
Pushes out a list of meetings for the next 24 hours when a meeting is
booked, updated or deleted.
Verifies andmerges (with TMS m eetings if necessary) the meeting list
on the endpoint every hour with m eetings stored in JOIN for the next 24
hours.
Verifies andmerges (with TMS m eetings if necessary) the meeting list
on the endpoint at Con feren ce Start Buffer before every meetingstarts
(start-up buffer is by default 10 m inutes) with m eetings stored in JOIN for
thenext 24 hours.
Verifies andmerges (with TMS m eetings if necessary) the meeting list
on the endpoint continuously while a meetingis in progress with meetings
storedin JOIN for the next 24 hours.
Task 4: Testing that email is working
Click Test notification email to send a test emailto the Admin Contact Email Addresses using the EWS Serv ice Account or
the service-ac t-on-behalf-of email defined in the sections above.
Page 65 of 121
Page 66

Synergy JOIN Install ation and Configuration Guide
Task 5: VMR Pools
JOIN 3.1 and later introduces the concept of VMR pools.
A VMR pool is a defined set of VMRs; either a range or a predefined set of individualVMRs. Currently two types of pools are
defined:
OneTimeVmr
l T his definesa range of URIs and willbe used when provisioning VMRs on the assigned MCU
PreProv isi onedVMR
l T his definesa set of URIs and associated variables.These willnot be provisioned on any MCU, however JOIN assumes
that these URIs/VMR are already provisioned. Join willuse these and assignthem to meeting bookings, making sure they
are assigned in a non-overlapping way similar to the one-time VMRs.
Note: JOIN must have a valid connection the MCU that is hosting these VMR's in order for thisfunctionality to work
Page 66 of 121
Page 67
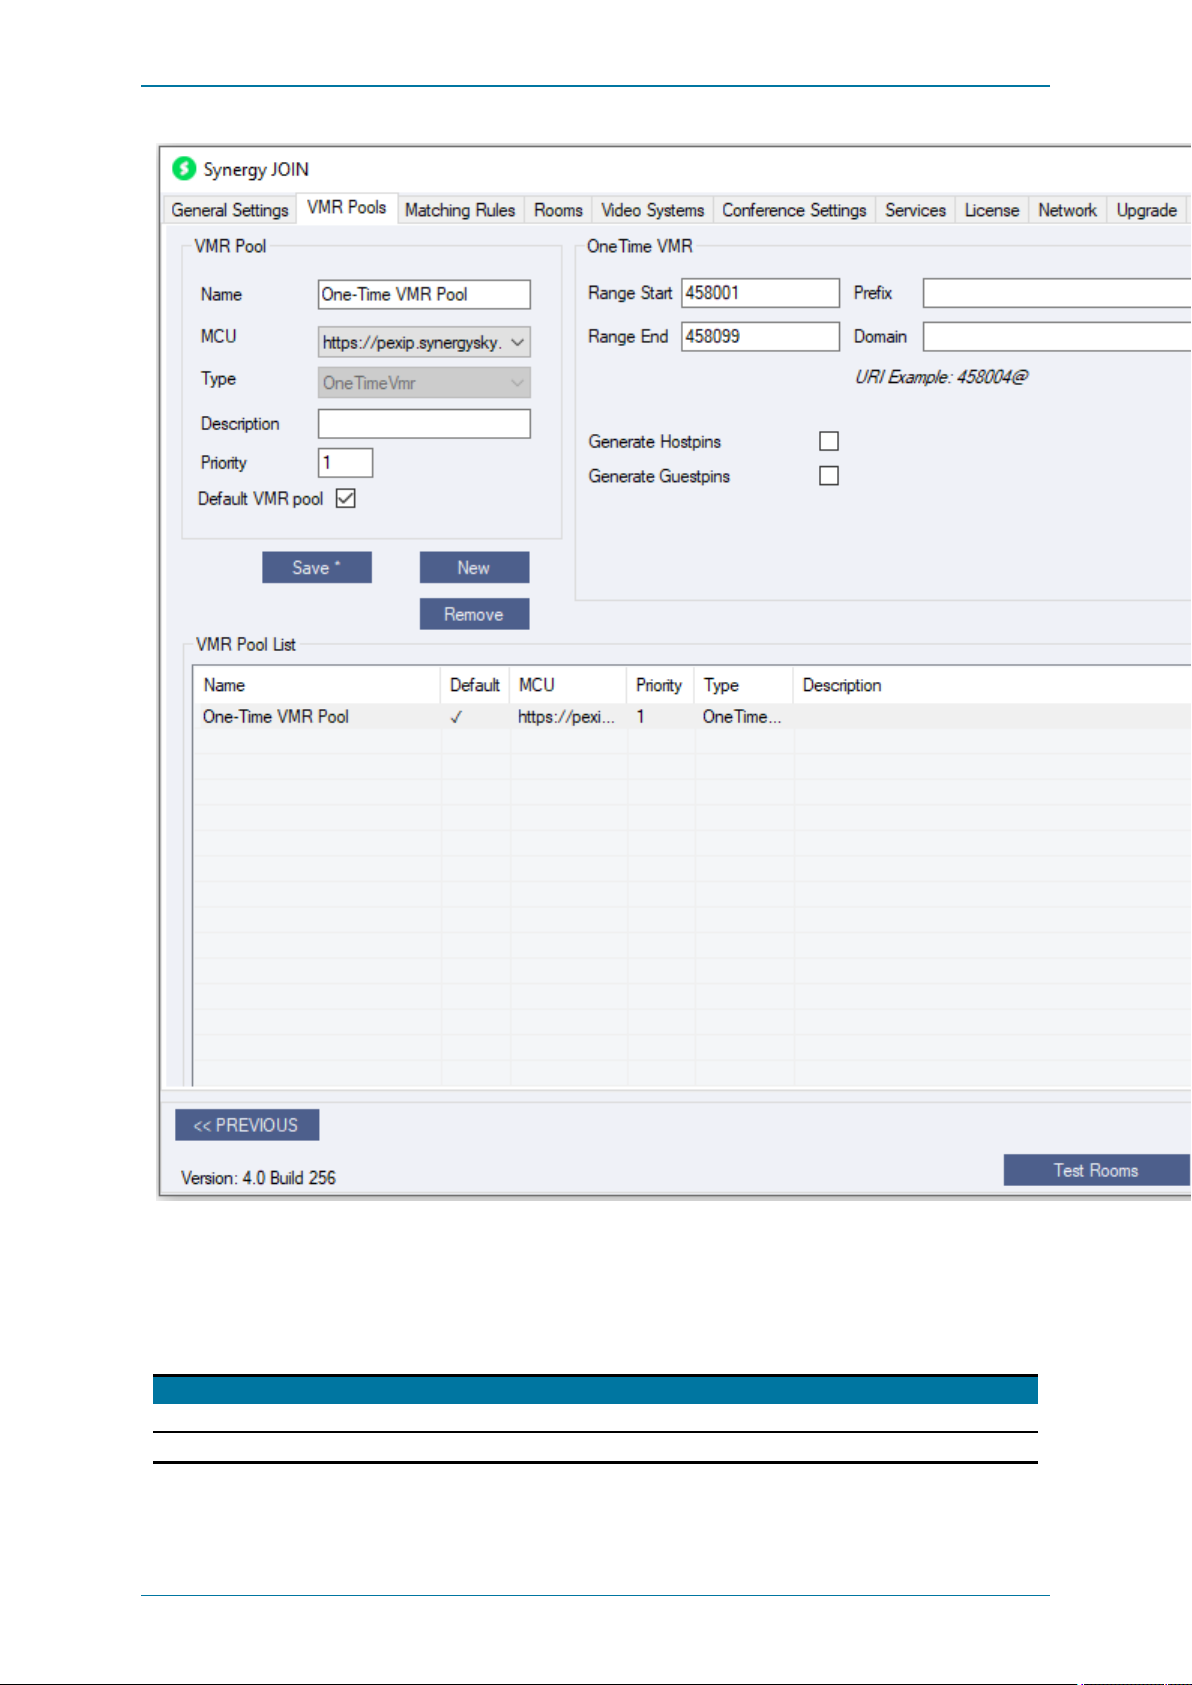
Synergy JOIN Install ation and Configuration Guide
Configuring VMR Pools
When you upgrade from a version older than JOIN 3.1, you will have a default One-Time VMR Pool already configured. The
One-Time VMR Pool settingsare taken from your previous configuration and will be copied across to the VMR Pools section.
The fields that are carried across are the Range Start, Range End, Prefixand Domain. To configure you own OneTime VMR
Pool you have to configure the below information:
Section /Field n am e Descrip tion
Nam e Given name, not used by the service
MCU Associated MCU (if any) Note: M CUs must be configuredprior to appearing in this dropdownlist
Page 67 of 121
Page 68

Synergy JOIN Install ation and Configuration Guide
Section /Field n am e Descrip tion
Type The defined type of pool. Currently two types are supported ‘OneTimeVmr’ and‘PreProvisionedVmr’ Note:
Descr iptio n Free text field to type the description of this VMR Pool
Prior ity Pool priority in case multiplepools are eligible as location for the m eeting
Defa ult VMR Poo l One pool has to beset as default. This pool wil l be usedif there is nopreferencew ithin the meetingbookingitself,
Host pin A 4-digit pin codewill be randomly generatedfor each one-time VMR for hosts to use to start themeeting. See
Guest p in A 4-digit pin code will be randomly generated for eachone-time VMR for guests to use to join the meeting.
Con fer en ce Alia s Rang e Start This defines the start value of thenumber range used to create the UR Is (e.g.
Con fer en ce Alia s Rang e End This defines theend value of thenumber range used to create the URI (e.g.
Con fer en ce Alia s Domain This defines thedomain of theURI.
Con fer en ce Alia s Prefix This defines a prefix that will be added in front of the numeric alias for provisioning the URI. The numeric alias will
Changingtype is not supported after it has beensaved
or if pools of higher priority have no available U RI/slot left
"Configuring Cisco MeetingServer profiles with Synergy JOIN " on page120 for controlling the behavior of hosts
and guests on Cisco MeetingServer
900000
).
9999999
).
still be provisioned as an alternative alias for the vmr to enable IVR dial-in.
NOTE: Videonor Cloudr equires all URIs to start with a alphanumeric prefix
To create a PreProvisioned VMR Pool you will have to configure additional parametors for the Pre Provisioned VMR's you
would like Synergy JOIN to detect.
Section /Field n am e Descr iptio n
URI The given URI of the VMR
Num er ic URI The N umeric URI of the VMR
HostPin (If Applicable) The 4-digit pin code hosts to useto start the m eeting withintheVMR
GuestPin (If Applicable ) The 4-digit pin code guests haveto useto join the VMR
Page 68 of 121
Page 69
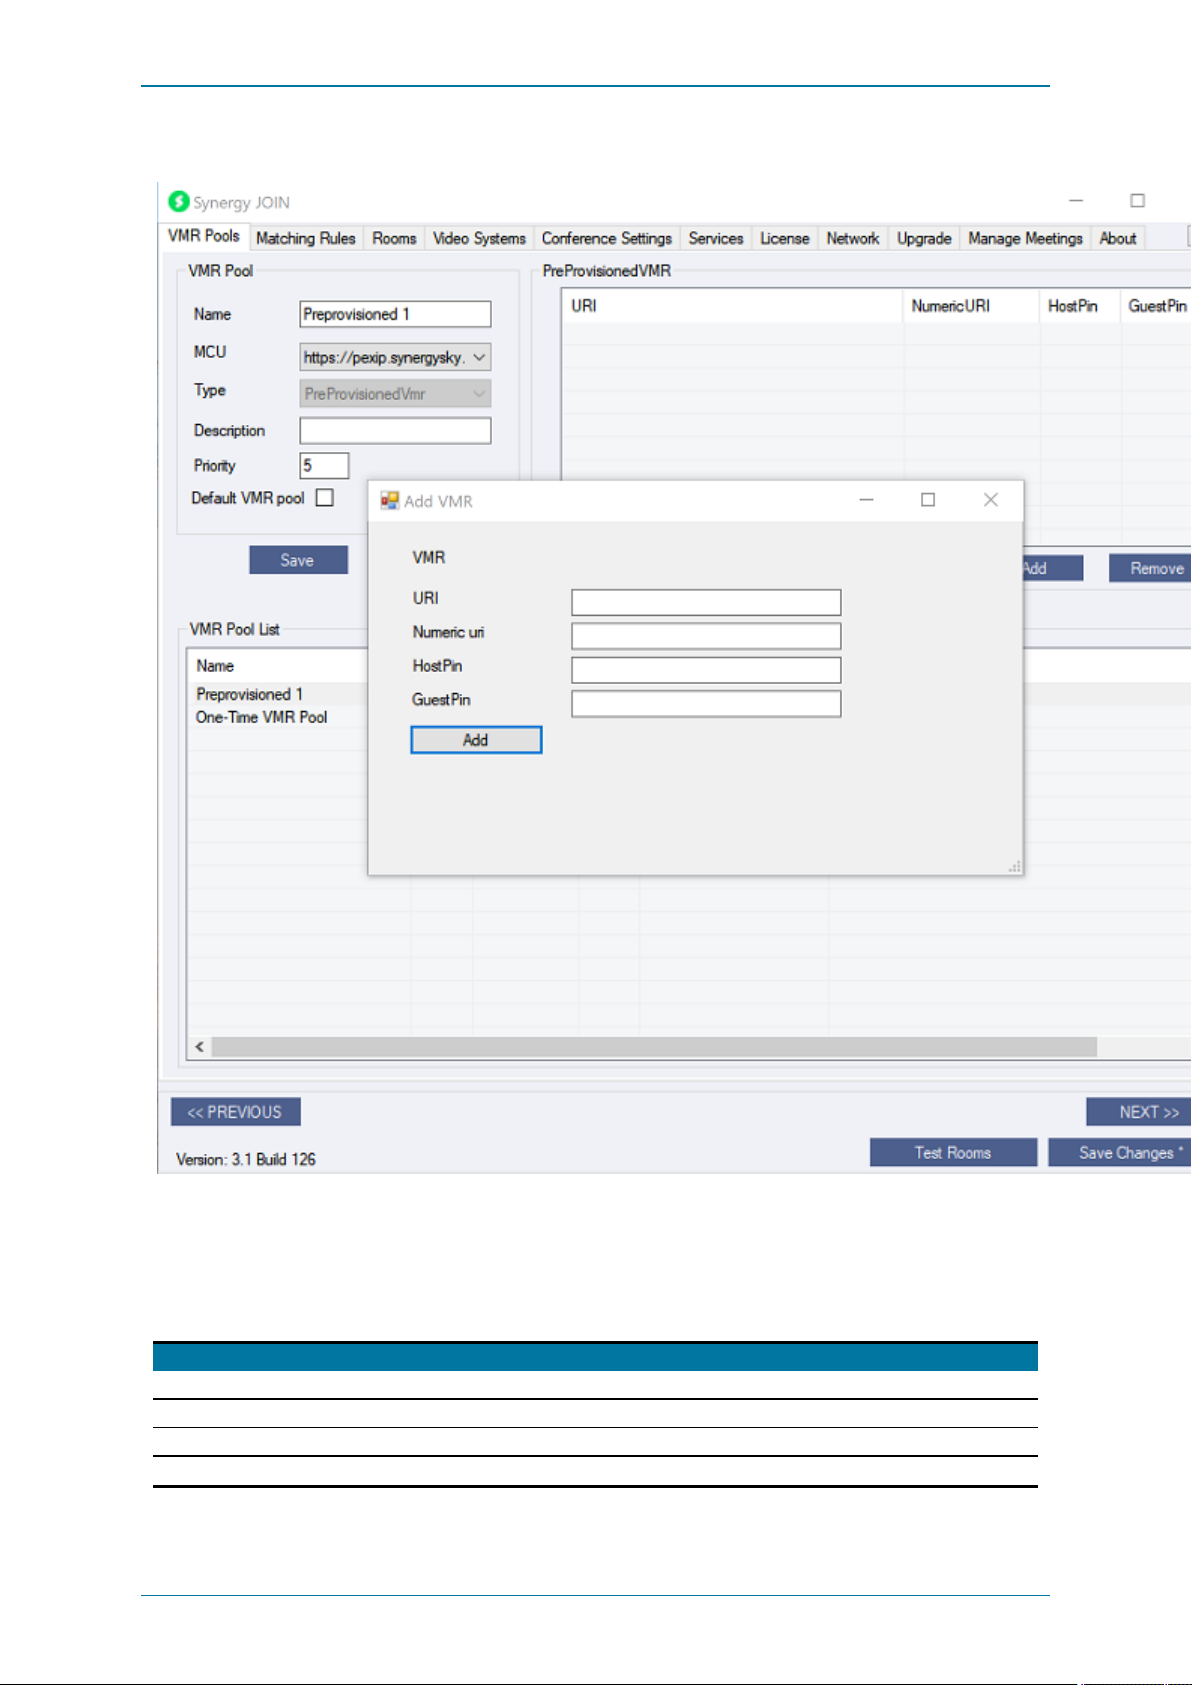
Synergy JOIN Install ation and Configuration Guide
VMR Pool List
The VMR Pool List listsallof the VMR's that existin Synergy JOIN
Section /Field n am e Descr iptio n
Nam e The field wi ll display the given name of the VMR
Defa ult If the VMR is a default VMR, there w ill be a ✔ si gn to indicatethat this is the default VMR
MCU The MCU that is associatedwith this VMR Pool
Prior ity The pool priority for this VMR Pool
Page 69 of 121
Page 70

Synergy JOIN Install ation and Configuration Guide
Section /Field n am e Descr iptio n
Type This field indicates whether this is a OneTimeVmr or a PreProvisionedVmr
Descr iptio n This fielddisplays thepredefined description of theVMR Pool
Page 70 of 121
Page 71
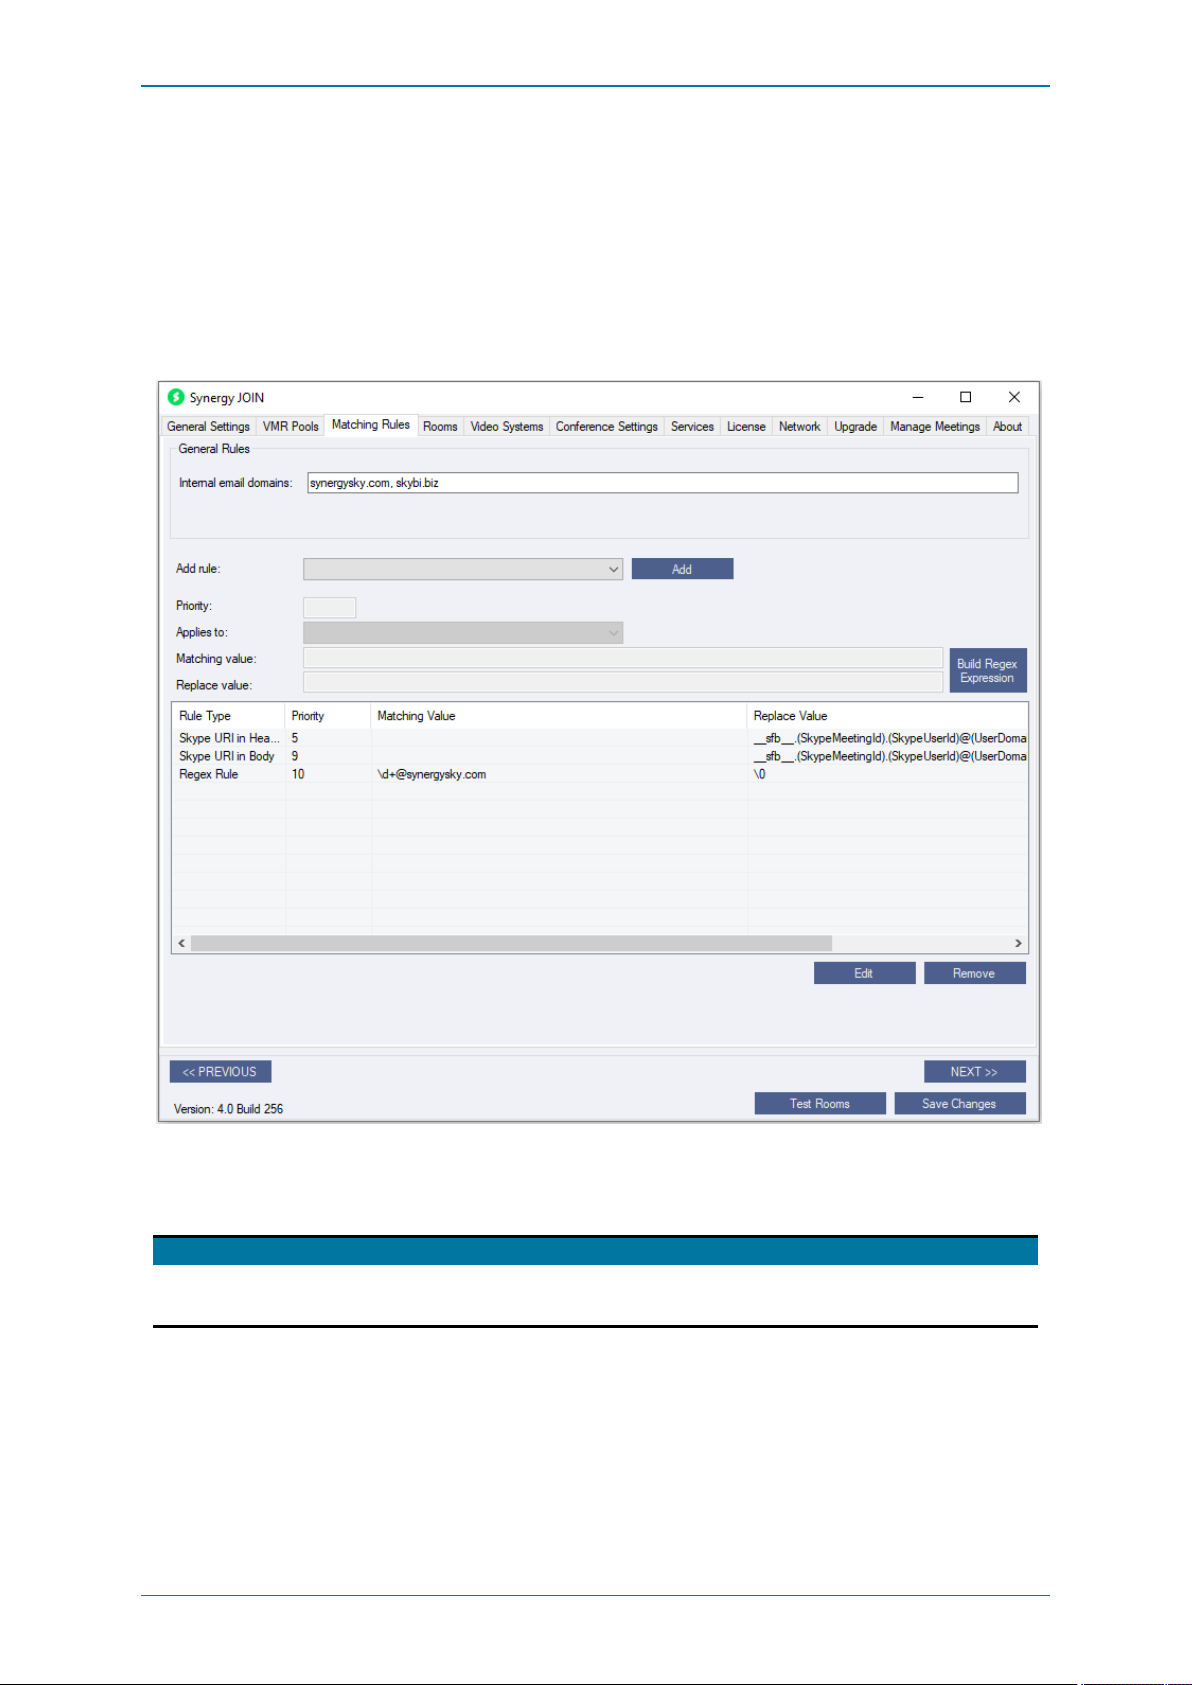
Synergy JOIN Install ation and Configuration Guide
Task 6: Creating Matching Rules
After configuring the General Settings, you need to create matching rules.
The matching rules in JOIN allow you to define how calendar bookingsshould be processed.
As an example, you can create rules that define that JOIN should do the following:
1. Look for personal VMRs in invitesfrom internal users.
2. Look for Skype invitesfrom all users.
3. Create a one-time-VMR if neither 1 or 2 apply.
Configuring the General Rules
Configure the General Rules as follows:
Fiel d Descr iptio n
Interna l em ail do mains Specify a comma separated list of the email domains your organization uses. This list is usedto determine whether a meeting room
invitation is sent from an internal or external user. It is also used to determine which users are internal andexternal when sending out
connection informationemails. (e.g.
synergysky.com, synergysky.eu, synergysky.us
)
Page 71 of 121
Page 72

Synergy JOIN Install ation and Configuration Guide
Creating the rules
First, selectthe type of rule you want to add from the Add Rule dropdown menu:
Rule type De scrip tion
Skype UR I in He ad er s This rule makes JOIN look for Skype invites in hidden text in theinvite.
This will normally work for all Skype meetings w henthe invitationis sentinternally in the organization. The
information may however be lost if the email jumps multiple Exchangeservers, or whenthe invite comes
from someone outside the organization.
Skype UR I in Bod y This rule analyzes the Hyperlink in the body of the invitationto find the URI of the Skype meeting. This will
Tea ms URI in He ad ers This r ule makes JOIN look for Teams invites in hiddentext in the invite.
Tea ms URI in Bod y This rule m akes JOIN look for Teams invites in the meeting body via Regex rule. The r ule can be adjusted
Reg ex Rule This rule enables you to use Regex to define how you want JOIN to work. Youcan define your own pattern
Han gou t Mee t This rule enables JOIN to look for Google Hangout m eetings in the Body of the Google Hangouts Meeting via
work in m ost environments, bothi nternally and externally, butis slower. It is therefore recommended to use
this as a fallback rule with lower priority than the Skype URI in Head er s rule.
NOTE:This function requires Synergy JOIN to haveaccess over HTTPStothe Skype server where the
meeting is hosted; either directly or via a proxy server.
This will normally work for all Teams m eetings when the invitationis sent internally in the organization. The
information may however be lost if the email jumps multiple Exchangeservers, or whenthe invite comes
from someone outside the organization.
NOTE:TheTeams rule should be added with a high priority than the Skype rules, since Teams invitations
also contains an Skype invitationin the header
according to the pattern in your Teams setup.
matches, and differentiatebetween invitations from internal and external organizers.
Youcan define both m atching patterns and replace patterns to transform theU RI whenr equired.
This rule can be added multipletimes.
Regex rule. This rule is prepopulated when you select it
Skype URI in Headers
Configure the remaining fields as follows:
Fiel d De scrip tion
Prior ity Thepriority defines theorder in which the rules are applied. The lowest number gives thehighest priority. (E.g.1 is processed
Applies to Internal invitations
Match ing value Not applicable
Rep la ce va lue Pexip:
before 5).
S4B.(Skype MeetingId).(SkypeUs erId) @(UserDomain)
where:
l SkypeMeeti ngId = alphanumeric m eeting Id foundi n every Skypem eeting invite
l S kyperUserId = the userpart of the organizer’s Skype SIP UR I
l U serDomain = the domain in theorganizer’s Skype SIP URI
NOTE: For Organizations with a Pexip Gateway hosted by a Service Provider, the recommended pattern would be:
S4B.(Skype MeetingId).(SkypeUs erId) _(UserDomain)@ servi ceProvidersDomain.c om
This allows the Service Provider to strip away their domain andreplacethe underscore w ith @ before sendingthe call through
thePexip Gateway.
CMS:
(Skyp eURL) @Com panyC MSDom ain.l ocal
where:
CompanyCMS Domain.local = the routing domain that ensures the call is routed to theCMS.
Note : This domain must also be added as a “Targets Lync Sim plejoin” domainon theCMS under Co nfigu ration > Incoming
Calls.
StarLea f Clou d:
This fieldis disabled as the r equired value is automatically configured.
Page 72 of 121
Page 73

Synergy JOIN Install ation and Configuration Guide
Skype URI in Body
Configure the remaining fields as follows:
Fiel d De scrip tion
Prior ity Thepriority defines theorder in which the rules are applied. The lowest number gives thehighest priority. (E.g.1 is processed
Applies to All i nvitations
Match ing value Not applicable
Rep la ce va lue Pexip:
before 5).
Use the same format as for Skype URI in Headers.
CMS:
Use the same format as for Skype URI in Headers.
StarLea f Clou d:
This fieldis disabled as the r equired value is automatically configured.
Teams URI in Headers
Configure the remaining fields as follows:
Fiel d De scrip tion
Prior ity Thepriority defines theorder in which the rules are applied. The lowest number gives thehighest priority. (E.g.1 is processed
Applies to Internal invitations
Match ing value Not applicable
Rep la ce va lue Pexip:
before 5).
Teams.(Tea msMeetingId)@compan y.com
where:
l T eamsMeetingId = alphanumeric meeting Id foundin the Teams meeting invite
The URIneeds to match the Teams gateway rule in the Pexip configuration. Pleaserefer to the Pexip documentation for more
details
Teams URI in Body
Configure the remaining fields as follows:
Fiel d De scrip tion
Prior ity Thepriority defines theorder in which the rules are applied. The lowest number gives thehighest priority. (E.g.1 is processed
Applies to All i nvitations
Match ing value Not applicable
Rep la ce va lue Pexip:
before 5).
Use the same format as for Skype URI in Headers.
Hangout Meet
Configure the remaining fields as follows:
Fiel d De scrip tion
Prior ity Thepriority defines theorder in which the rules are applied. The lowest number gives thehighest priority. (E.g.1 is processed
Applies to All i nvitations
before 5).
Page 73 of 121
Page 74

Synergy JOIN Install ation and Configuration Guide
Fiel d De scrip tion
Match ing value This fielddefines the Regex rule for matchingdata . For example:
This fieldis prepopulated to catchall hangout meetings
Rep la ce va lue This field defines how the matcheddata should be transformed before being sent to the endpoint.
This fieldis pre-populatedto replace thematching value that has beenidentified.
will matchall UR Is starting with a number and ending with
@company.com
)
Regex
Configure the remaining fields as follows:
Fiel d De scrip tion
Prior ity Thepriority defines theorder in which the rules are applied. The lowest number gives thehighest priority. (E.g.1 is processed
Applies to All i nvitations
Match ing value This fielddefines the Regex rule for matchingdata . For example:
Rep la ce va lue This field defines how the matcheddata should be transformed before being sent to the endpoint.
before 5).
Pexip:
The value \0 uses the entire matchedvalue, while \1 matches thefirst pair of parenthesis and so on.
Example:
Match ing Valu e: Id: (\d)
Rep la ce Value : \[email protected]
Email b ody: ConferenceId: 123456789
URI = [email protected]
CMS:
If you have CM S for internal dual-home, you can use a regex rule to look for "conference id: 123456" from internal m eeting
organizers.
will matchall UR Is starting with a number and ending with
@company.com
)
Page 74 of 121
Page 75
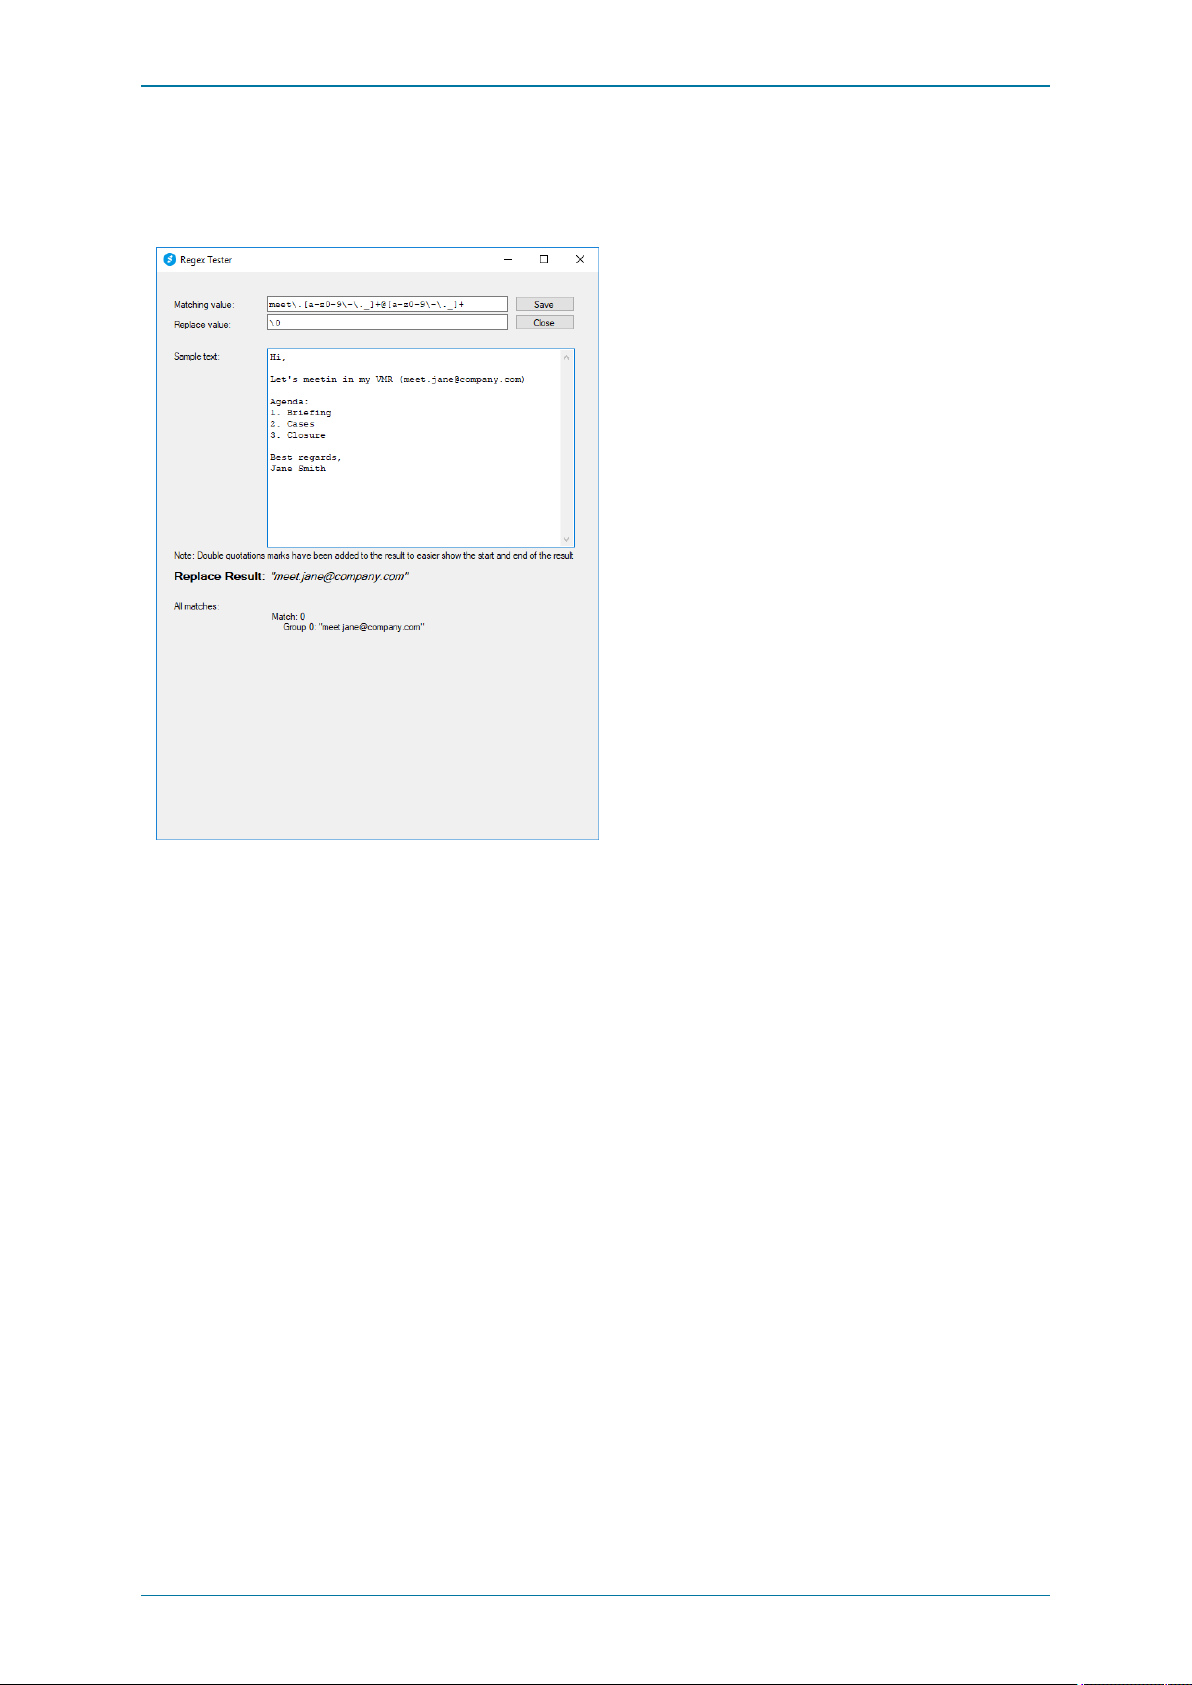
Synergy JOIN Install ation and Configuration Guide
Testing, editing and deleting rules
Click the large Test button in the Add Rules area of the Matching Rules tab to launch the Regex Test Tool. The tool willhelp
you identify any errors in your regex by testing a Matching Value and Replace Value towards a text field:
Page 75 of 121
Page 76
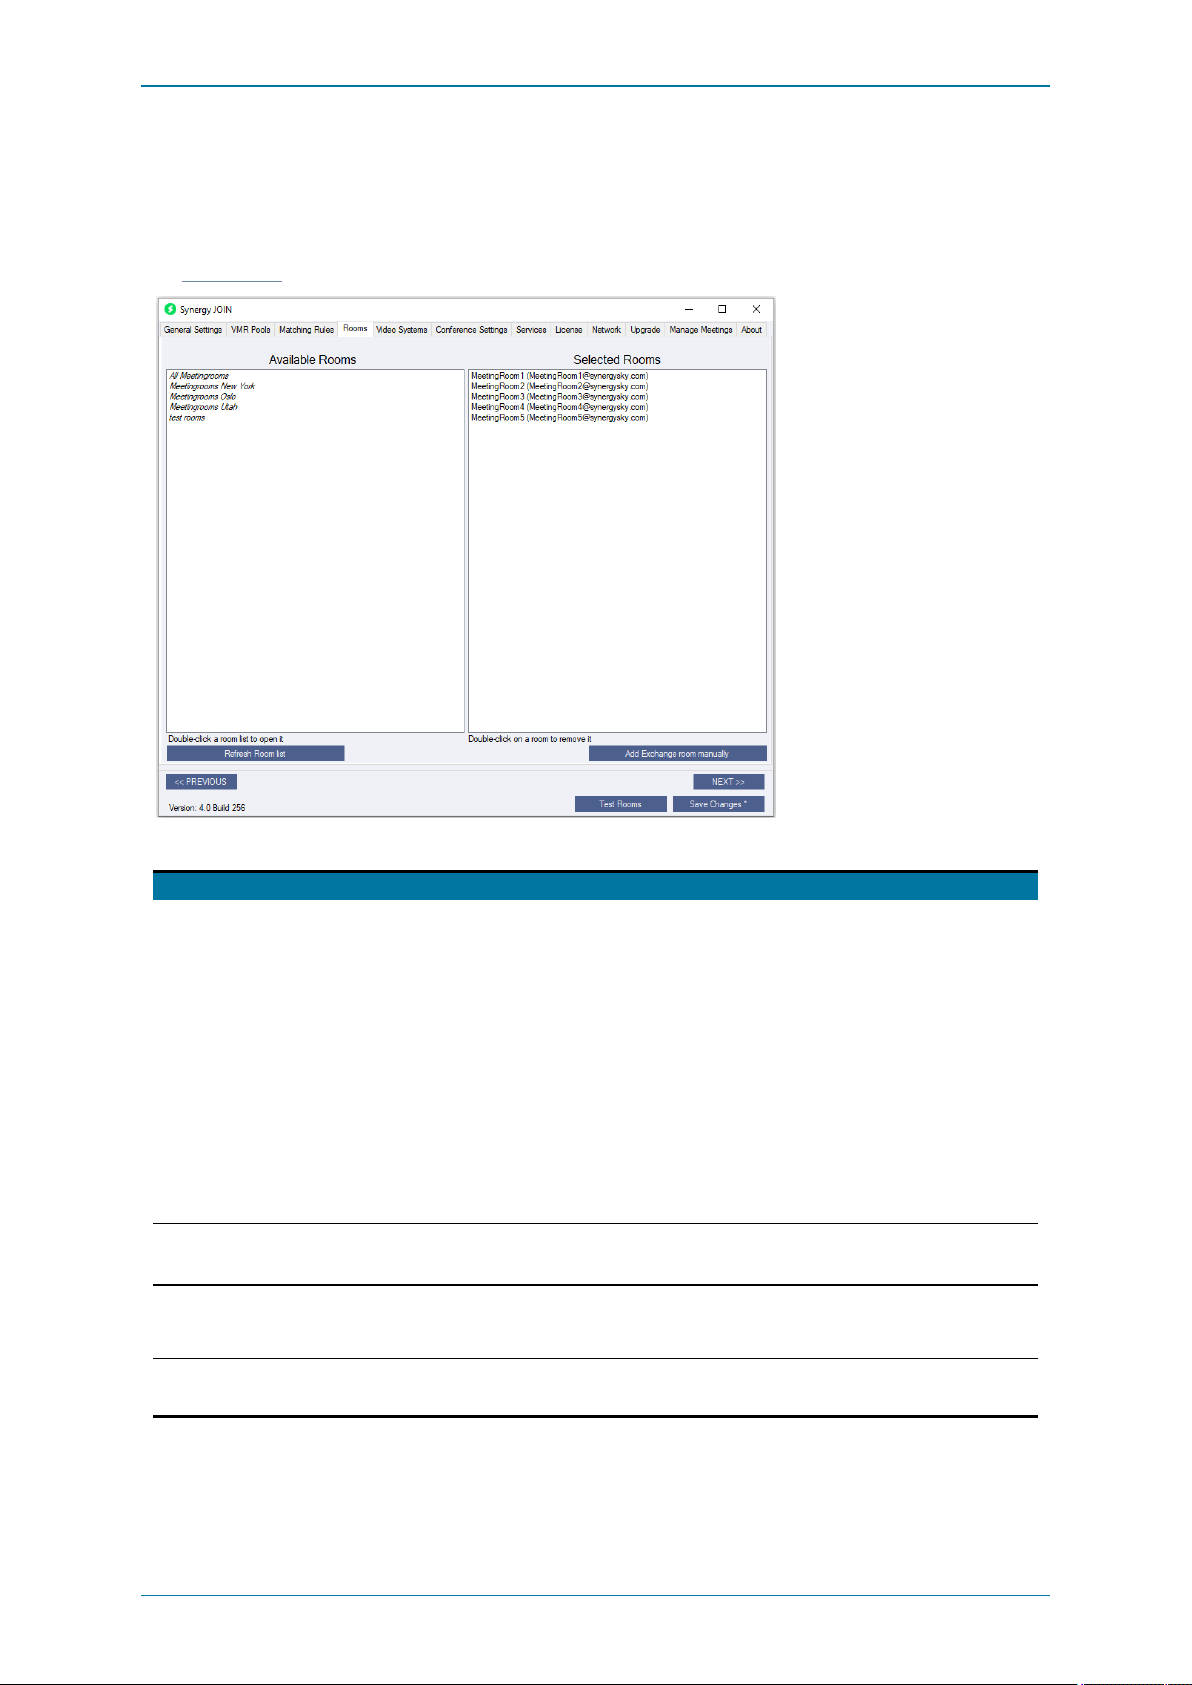
Synergy JOIN Install ation and Configuration Guide
Task 7: Adding Rooms
This tab iswhere you choose which meeting-room resources should be monitored by JOIN. The Microsoft Exchange User
service account requires Full Calendar Accessto these rooms when you have configured your installationwith Exchange. For
Google mode, a properlyset up Google Service account is required along with correctly set Calendar scopes. For more details
see Requirements.
This table explains the fields and buttons on the Rooms tab:
Section /Field n am e Descr iptio n
Availa ble Ro om s This list shows a li st of Roo m L ists from your Exchangeor Google Environment
Room li sts are special address books in Exchange/ Googlethat only contain Rooms.
If no r oom lists are shown, ask your administrator to create one for you based on the
examples below.
Oncea list of Room Lists is shown, double-click a l ist to open it. You can thendouble-click
rooms to addthem to the Selected R oo ms list.
Examplefor creatingr oom lists in the Microsoft ExchangePowerShell tool:
$RoomAlias = Get-Mailbox -RecipientTypeDet ails RoomMailbox Filter {Of fice -eq 'HQ'} | select -ExpandP roperty Alias
New-Distri butionGroup -RoomLi st -N ame 'HQ Me eting rooms' Members $R oomAlias
$RoomAlias = Get-Mailbox -RecipientTypeDet ails RoomMailbox |
select -Ex pandProperty Alias
New-Distri butionGroup -RoomLi st -N ame 'All Mee tingr ooms' Members $R oomAlias
Selected Roo ms This list shows which rooms are added to JOIN. They must be “connected” to videosystems
Refresh Room list This button is used to refreshtheroom list.
Add Excha nge room manu al ly Click this button to add r ooms from Exchangemanually.
in the Vid eo Systems tabbefore they can be used. Double-clicking rooms in this list will
remove them.
Note : It can take up to 15minutes before a room li st is visible here after adding a room l ist in
Exchange.
This is done by providing a display name and an alias for the room.
Page 76 of 121
Page 77
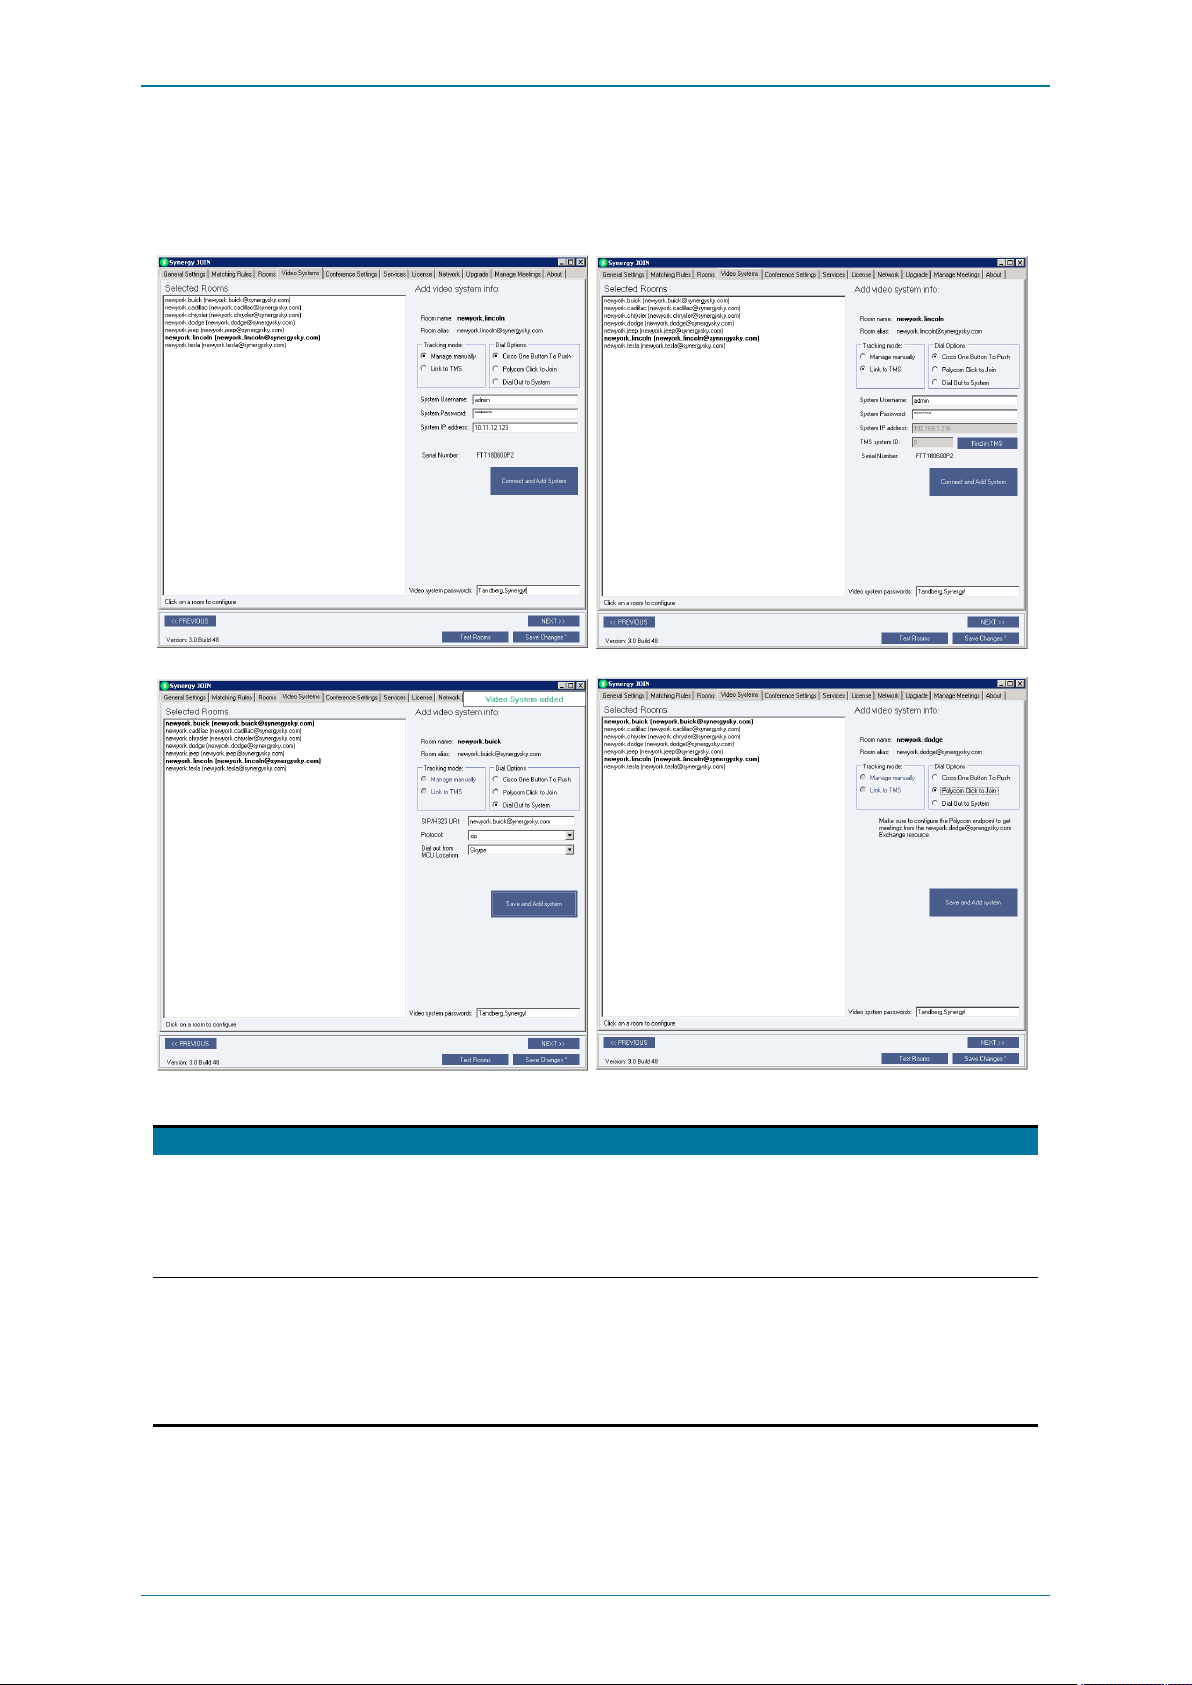
Synergy JOIN Install ation and Configuration Guide
Task 8: Adding Video Systems
This is where you connect the Exchange meeting-room resources to the Video Systems. The video systems can be defined
manuallyor retrieved from Cisco TMS.
This table explains the fields and options on the Video Systems tab:
Section /Field n am e Descr iptio n
Selected Roo ms This list shows a list of all Exchange Rooms that are added to JOIN.
l C orrectly configured systems are shown in bold.
l R ooms that are not connectedto video systems are shown with normal text.
l R ooms wi th incorrect details are show with strike-through text.
Select a room to configure it.
Tracking mode
l M an age manu al ly: Use if you want to addthe videosystem's details manually (video systems with static IP
address).
l L in k to TMS: Use i f youw antthevideosystem to be trackedby TMS (video systems with DH CP). Clicking Find in
TMS launches a TM S system browser. There may be a delay the first time thesystem browser l aunches.
o
System Username : The admin account for the video system ( e.g.
o
System Passwo rd : The password for the admin account. The system password is not available from TMS, so
you will always haveto add this manually.
o
System IP a dd re ss: The IP address or hostname of the video system.
admin
).
Page 77 of 121
Page 78

Synergy JOIN Install ation and Configuration Guide
Section /Field n am e Descr iptio n
Dial Option s This setting defines whether the videosystem should get One-Button-to-Push (C isco OBTP) or Click-to-Join(Polycom
CTJ) messages or bedialed out to.
l C isco On e Button to Push: The video system will receive Ci sco OBTP information about upcomingm eetings (l imited
to the next 24 hours). For a list of supportedvideo systems, see "Requirements" onpage9.
l Po lycom Click To Joi n: The video system will receive Polycom CTJ information about upcoming meetings. Polycom
endpoints will get the meetings for 'today'. The endpoint must get the m eetings from Exchange. Notethat HD X does not
support Office 365. For a list of supported video systems, see "Requirements" onpage9.
l D ial Ou t to System: The video system will receive an incoming call from the Pexip MCU/GW at the meetingstart
time. If theconnection attemptfails, the MC U will r etry connecting according to thesettings in theCon fere n ce
Setting s tab.
o
SIP/H32 3 U RI: TheURI thevideosystem can be r eachedon.This U RI must be dialable by the Pexip M CU/GW.
o
Dial ou t from MCU Loca tion : The location the Pexip MCU/GW will use when making the call.
Con nect an d Add System Displayed if Dia l Optio ns:
Cisco OneButton To Push
is selected.
Click this buttonto test theconnection and addthesettings.
The serial number of the videosystem will be saved andr emembered by JOIN to ensure it’s sendingthe Cisco OBTP
information to the corr ect video system.
Save a nd Add System Displayed if Dia l Options:
Polycom Click to JoinorDial Out to System
are selected.
Click this buttonto add the settings.
Video system passwo rd s Specify a list of default passwords that JOIN will try when connectingto video systems.
Note: JOIN performs a nightlycheckof connectivity and time/date of all Cisco OBTP-enabled endpoints. If configured on the
General Settings tab of the configurator, admins are notified of any issuesidentified during this check. The check takes place
between 2am and 3am local server time; thisisnon-configurable.
Note: If the video system’scodec isreplaced for any reason, and the video system isnot linked to and imported from Cisco
TMS, you must re-add the videosystem here.
Page 78 of 121
Page 79
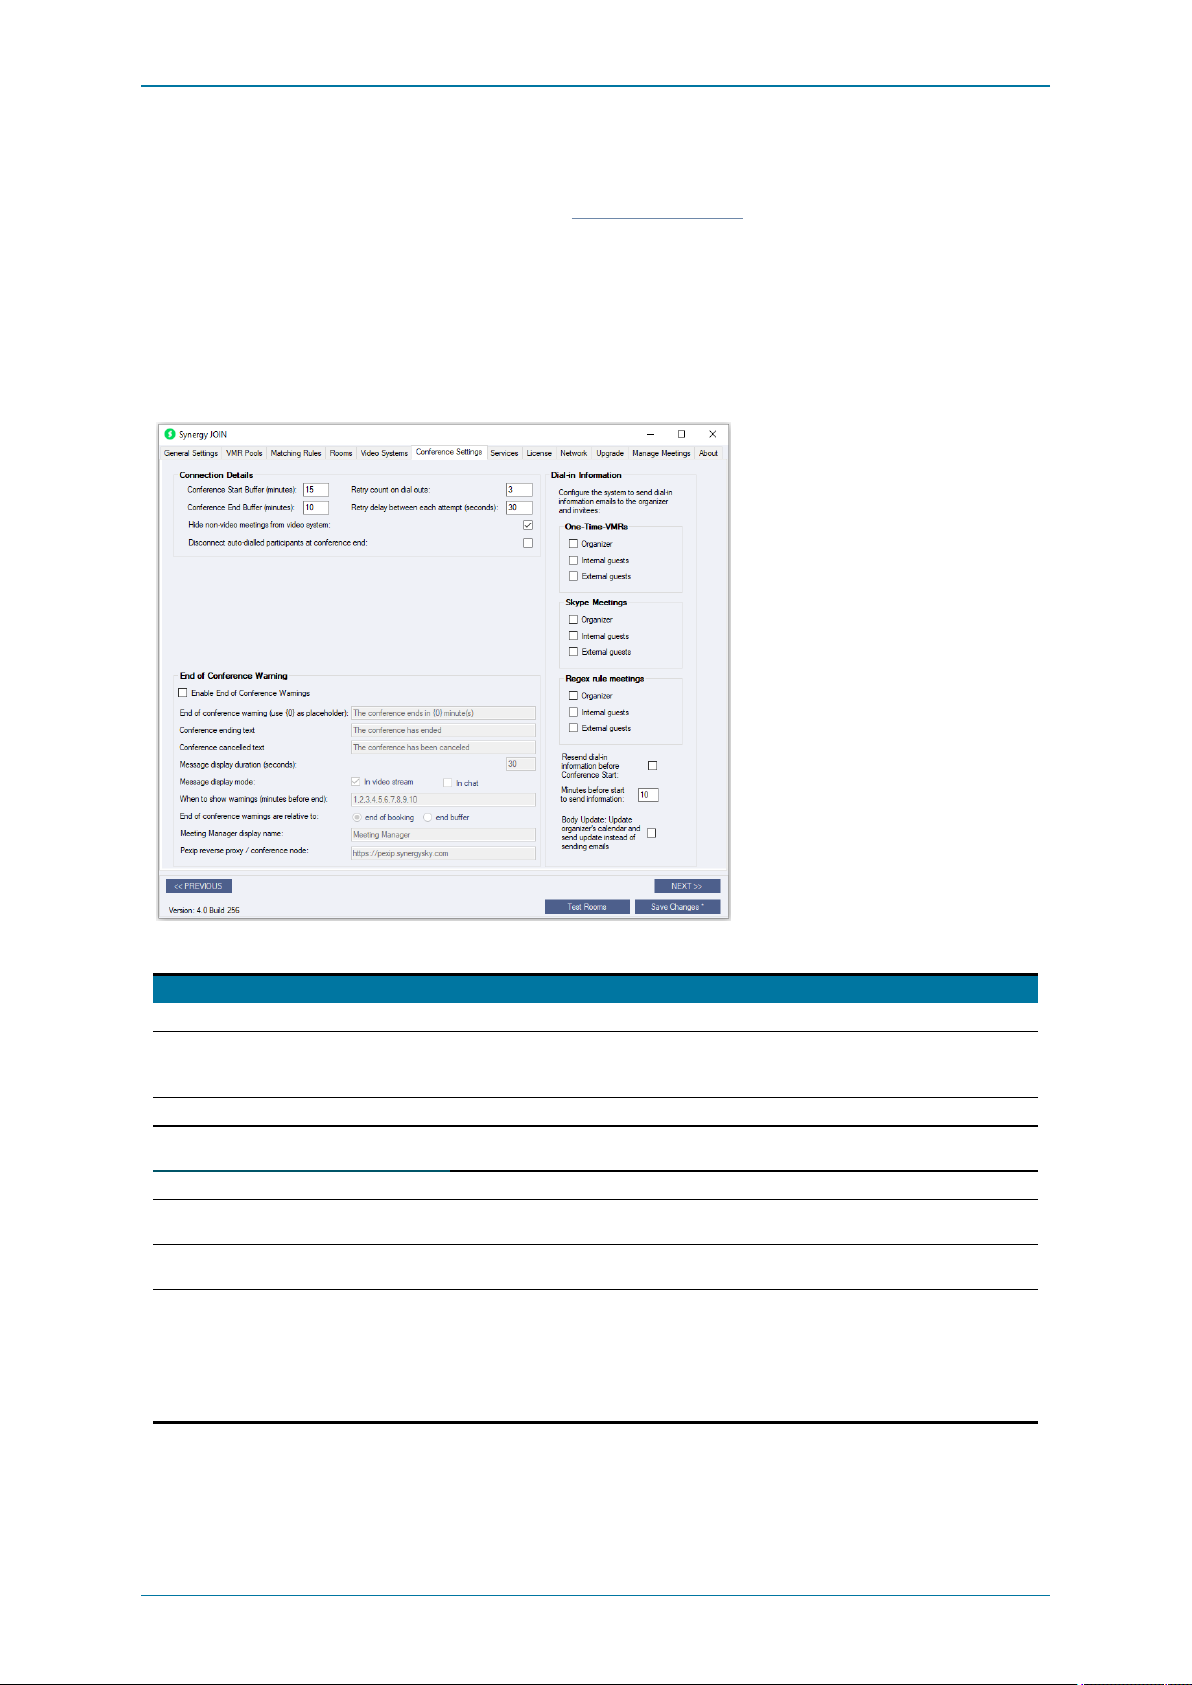
Synergy JOIN Install ation and Configuration Guide
Task 9: Configuring Conference Settings
If you are running Synergy JOIN 3.1 you willhave to read the "VMR Pools" on page66 section to configure One-Time-VMR
Settings.
The conference settings define:
l conference configuration
l one-time-VMR pin and URI details
l who receives conference dial-in information emails
l End of Conference Warnings
Configure the fields in the Conference Settings tab as follows:
Section /Field n am e Descrip tion
Con nectio n De tails
Con fer en ce Start Bu ffer (M inu tes) The start buffer defines whenVMRs are provisioned and can be dialed into, andi t defines whenthegreen button in
Con fer en ce End Buffer (Minu tes) The endbuffer defines whenthe VMRs are de-provisionedand the r emaining participants are disconnected.
Retry count on dial o uts The retry count controls how many call attempts are made to dial-out vi deosystems if theinitial connection
Retry delay b etwe en The retry delay controls how long JOIN wil l wait between the dial outattempts per participant.
Hide non -vid eo meeting s from vi de o system If selected, meetings without dialableURIs will not be visi ble as Cisco One ButtonTo Pushmeetings on booked
Disconn ect au to- dialle d p a rticip an ts at con feren ce
en d
One- Time-VMR Settings If you have specifiedthat JOIN should cr eate one-time VMRs, this is where you define whether the one-time
theC isco OBTPor Polycom CTJ messagecan bepressed on the video system. It also defines whenDial-in
information is resent to the i nvitees i f Rese nd dial- in informa tion at C on feren ce Start Buffer is ticked.
attempt fails.
endpoints.
If selected, JOIN will disconnectdial-out calls it has initiatedat conference end buffer, or if the m eeting is deleted.
VMRs should be configured with pin codes, andthenumeric alias number range and domain so the VMRs can be
reached via anIVR from telephones.
The pin codes are included in the emails that are sent out to the Organizer and internal/external guests.
Note : If using pin codes, you must update the email templates to ensure that the host pin is not sent to guest
participants.
Page 79 of 121
Page 80

Synergy JOIN Install ation and Configuration Guide
Section /Field n am e Descrip tion
Host pin A 4-digit pin code will be randomly generatedfor eachone-time VMR for hosts to useto start the meeting. See
"Configuring Cisco MeetingServer profiles with Synergy JOIN " on page120 for controlling the behavior of hosts
and guests on Cisco MeetingServer
Guest p in A 4-digit pin code wil l be randomly generated for eachone-time VMR for guests to use to join them eeting.
Con fer en ce Alia s Rang e Start This defines the start value of thenumber r ange used to create the URIs ( e.g.
Con fer en ce Alia s Rang e End This defines the end value of the number range used to create the URI (e.g.
900000
9999999
).
).
Con fer en ce Alia s Domain This defines thedomain of theURI.
Con fer en ce Alia s Prefix This defines a prefix that will be added in front of the numeric alias for provisioning the URI. The numeric alias
will still be provisionedas an alternative alias for the vmr to enable IVR dial-in.
NOTE: Videonor Cloudr equires all URIs to start with a alphanumeric prefix
End o f Con feren ce Warnin g
Enab le End of Con fere nce Warn in gs If ticked, End of Conference W arningnotifications will be presented in the videostream X m inutes before a
conference is aboutto end.
This applies for:
l Pexip personal VMRs
l Pexip onetime VMRs
l C MS onetime VMRs
Endof ConferenceW arningNotifications do not work for Gateway calls.
End o f confere nce text ( use {0} a s pla ceh olde r) Enter thetext youw ant to appear if Enab le End of C on feren ce W arnin gs is ticked.
The placeholder {0} will display the number of minutes l eft in them eeting, based on the settings you haveentered
below.
Con fer en ce e nd in g text The text that will appear whenthe scheduled end time of a conference is reached.
Con fer en ce ca nce lle d te xt The text that will appear when a conference the conference endbuffer has beenr eached or if the m eeting is deleted.
Messa g e d isplay duratio n (se cond s) The length of time in seconds thatEndof ConferenceW arnings should stay onthe scr een.
Messa g e d isplay mo de Definei f the m essages shouldbe visible i n the video stream, the chat ( WebRTC chat, Skype chat and Pexip/CMS
client chat) or both.
When to sh ow warning s (minu tes befor e e nd ) Specify whenthe End of Conference W arningNotifications shouldbe displayed. Multiple entries must be separated
by a comma.
End o f confere nce warn ings are r elative to
end of booking
end buffer
: durations and other specifications are relative to the end time of the bookedconference.
: durations and other specifications are relative to the conferenceend buffer.
Mee ting Ma nag er d isp lay name Define the name of the account that will be visible in the roster list while theend of conference messageis being
displayed.
Note : Not available for CMS.
Pexip r eve rse proxy / con fer en ce n ode Enter theURLfor the Pexip reverse proxy / conference node.
Note : Not requiredfor CMS.
Send Confe re nce Dial-i n Info rmation Ema ils This section specifies whether the organizer, internal guests andexternal guests should r eceivea dial-in
information email when meetings are booked.
To edit the email templates, go to
C:\SynergySKY\SynergySKYEnterpriseScheduling\emailTemplates
and
manually edit thetemplates usingan HTML editor. See"Configuring Email templates" on page105.
Note : The email domain list i n the Matchi ng Rules tab is used to determine which guest participants are
internal/external.
One- Time-VMR s Specify who will r eceivethedial-in information email when a one-time-vmr meeting is booked.
Skype Mee ting s Specify who will receive the dial-in information email whena Skype meeting is booked.
Reg ex rule mee ting s Specify who wil l receive the dial-in information email whena regex r ule meeting is booked.
Rese nd dial- in i nforma tion before Con fere nce
Start
Specify whether a dial-in informationemail will be resentto the specifiedrecipients shortly before the conference
start time.
Min utes before start to sen d in formatio n Specify the number of minutes before the conferencestart time that thedial-in information email will be resent to
thespecified recipients.
Page 80 of 121
Page 81
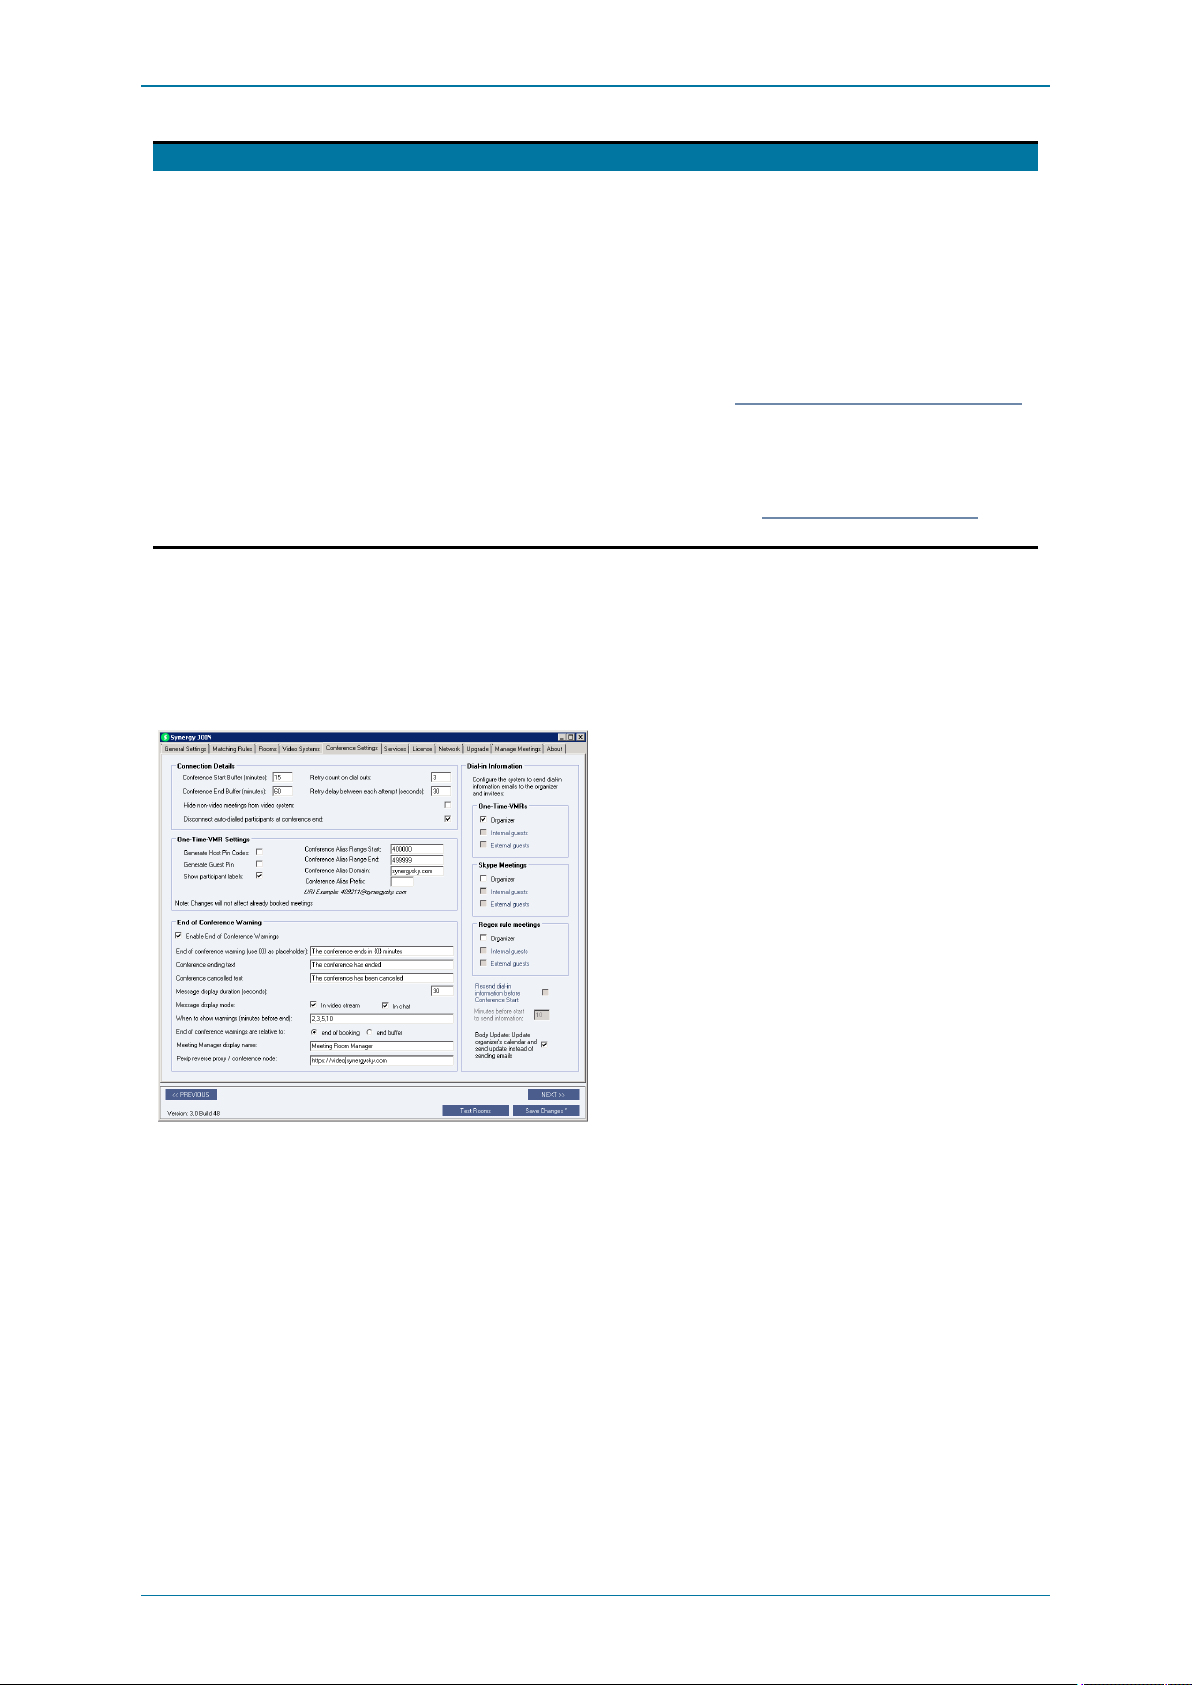
Synergy JOIN Install ation and Configuration Guide
Section /Field n am e Descrip tion
Body Up date: U pd ate orga ni zer's calen da r a nd
sen d u pd ate instead of se ndin g e ma ils
This functionw ill enable Synergy JOIN to log into the calendar of eachmeeting's organizer to updatethe calendar
invite andsend an update to all invitees. This enduser experience will allow users to book video meeting directly
from their nativecalendar clients without having any custom plug-ins installed, andstill havethe dial-in
information of the videom eeting automatically.
NOTE:Remember to define in which cases the body of the m eeting invitationshould be updated in the
checkboxes above; i.e. One-Time-VMR, SkypeM eeting, Regex rule meeting.
Failure to update the calendar will lead to an email beingsent to them eeting organizer with the dial-in details, with
instructions to update the invite manually. The administrator, defined in theGeneral Settings tab wil l also be
notified about the failure. The notification to the administrator will contain the commands required to fix
permissions problems to the organizer' s calendar. See"ExchangeResource Account Requirements" on page12
for information on how to set the correct permissi ons in Microsoft Exchangerequired for this feature to operate
correctly. for more details
Note:Enablingthe generation of Host pins for conferences and adding this to the email template will m ake the host
pin visible to all invitees since thesame informationis sent out to all participants in the m eeting. The host pin
should therefore be defined in the
details
hostPin.html
template. See "Configuring Email templates" on page105for more
The below example shows only the 'One-Time VMRs' check-box is ticked along with the 'Body Update' tickbox at the bottom.
This means that only when a one-time VMR isbooked, JOIN willupdate the Organizers calendar instead of sending an email.
Allof the other guest (internal and external) willreceive an emailwith the updated information.
The same rules applyfor Regex Rule Meetings & Skype Meetings.
Page 81 of 121
Page 82
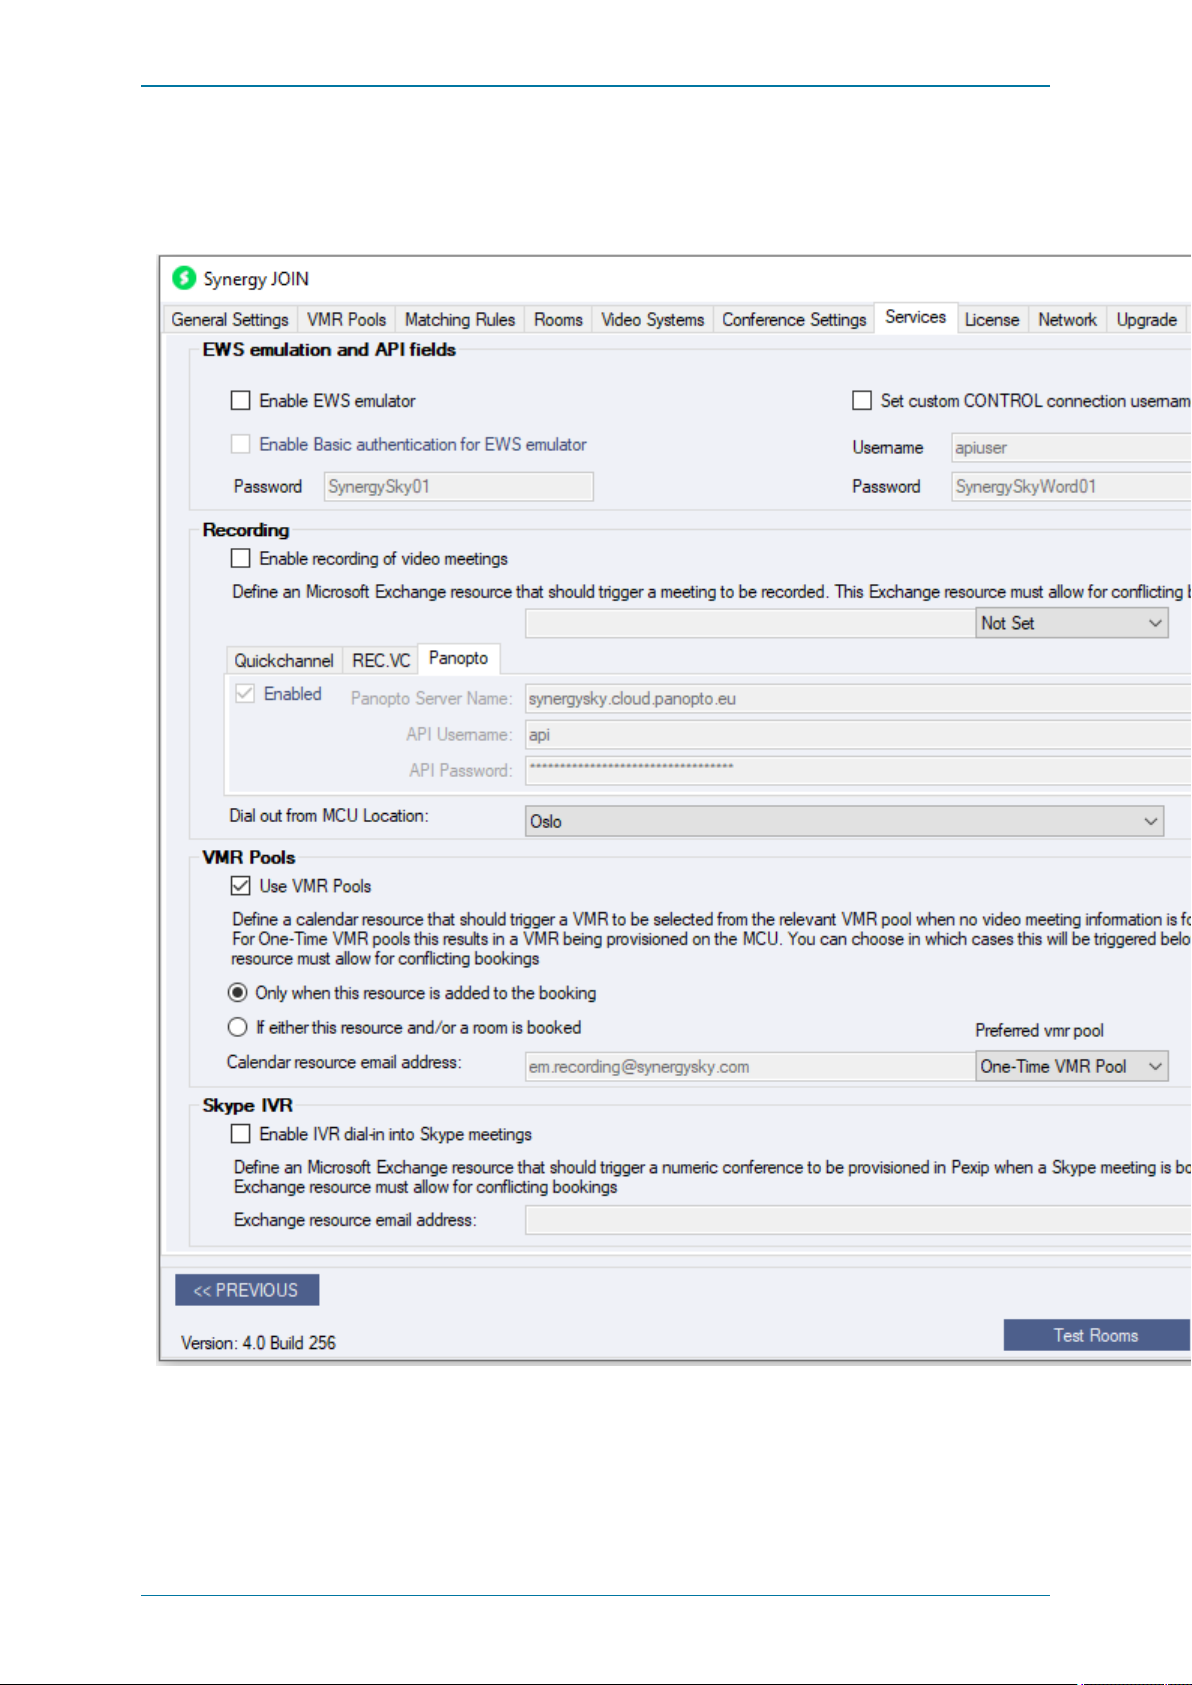
Synergy JOIN Install ation and Configuration Guide
Task 10: Configuring Services (optional)
JOIN can be set up with extra value added services. These services include EWS Emulators, Recording, One-Time-Vmrs and
IVR dial-in functionalityfor Skype Online Meetings.
Page 82 of 121
Page 83
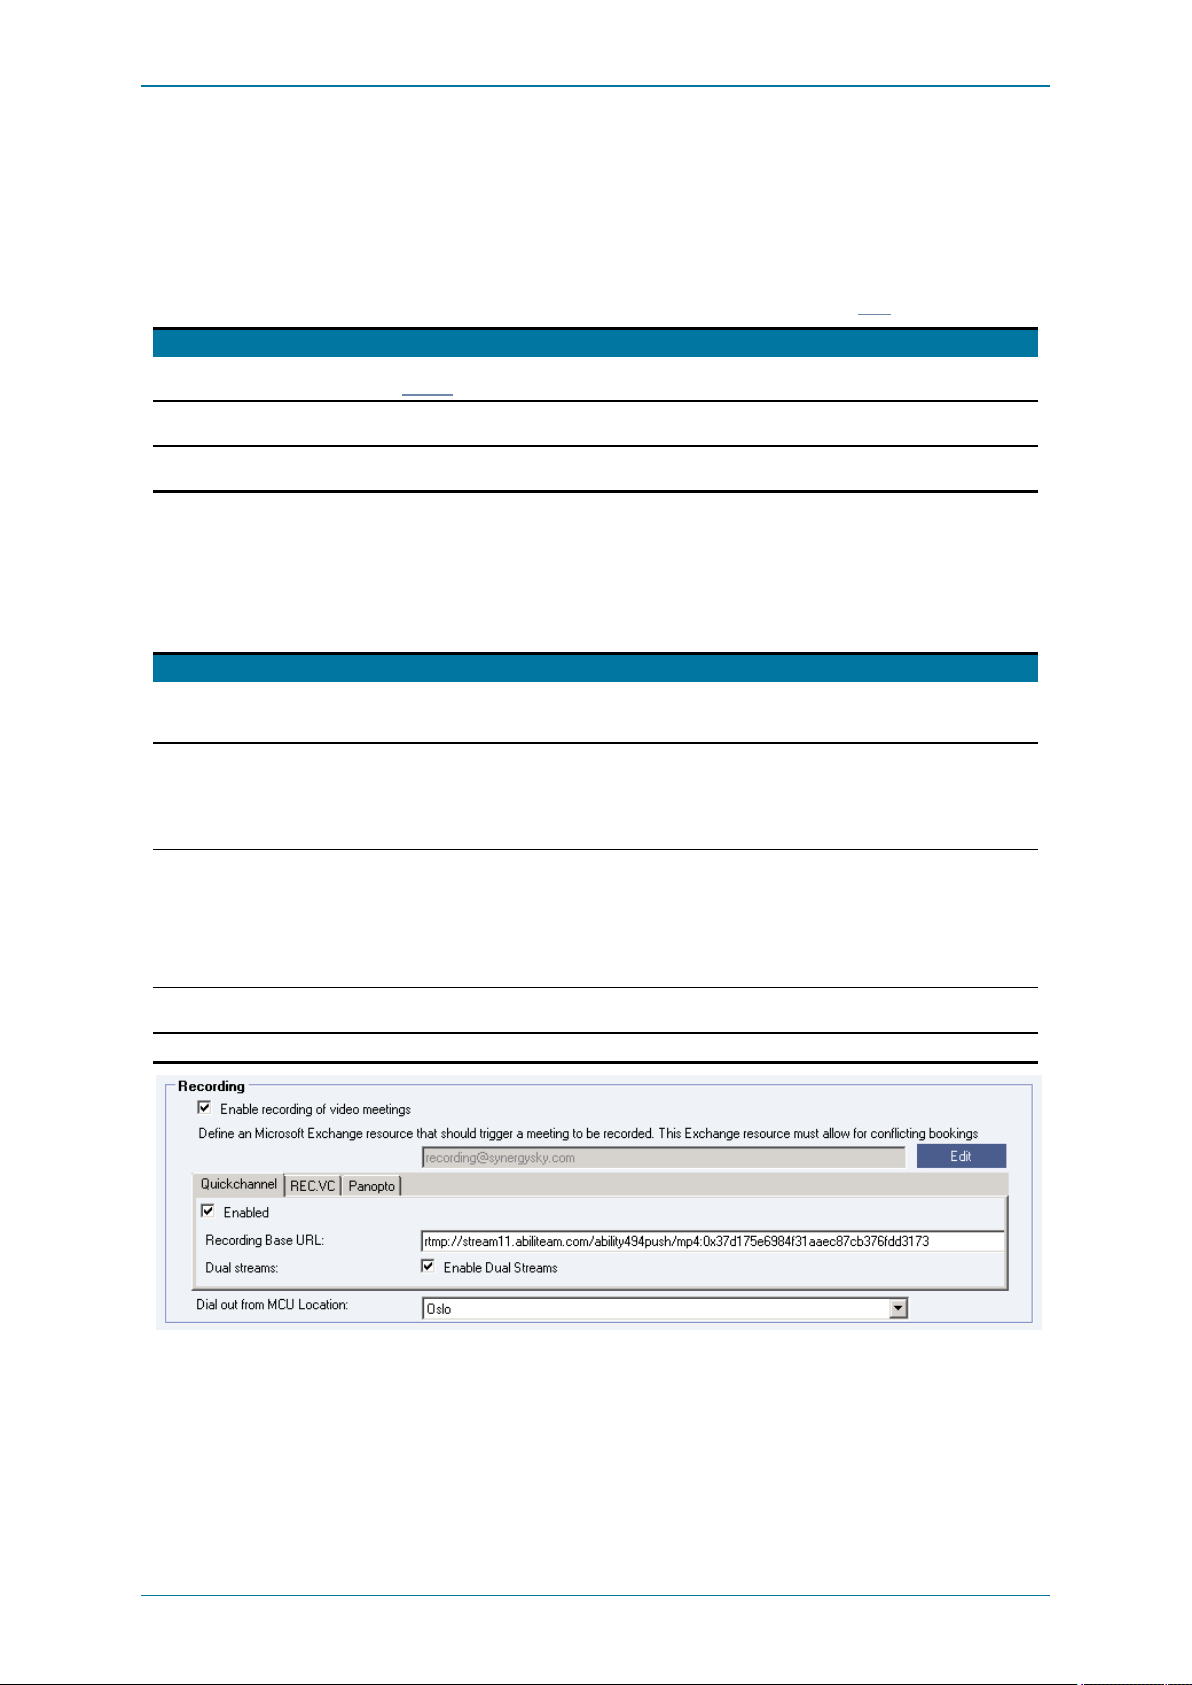
Synergy JOIN Install ation and Configuration Guide
EWS Emulation and API fields
EWS Emulation has been integrated in Synergy JOIN to allow Polycom endpoints to connect Synergy JOIN without the need for
a direct connection with an Exchange Online server
The JOIN API username/password box is used by Synergy JOIN to communicate with Synergy CONTROL.
Additionalinformation as wellas how to connect your Polycom Endpoint to Synergy JOIN can be found here
Section /Field n am e Descr iptio n
Enable EWS Emulator Enablingthe EWS emulator allows the HDX and Group Series Polycom endpoints to connect to JOIN as video rooms in the
Enab le Basic a uth en ticatio n fo r EWS
emu la tor
Set custom JOIN API
use rn ameÆ/passwo rd
rooms tab and can be added to meetings as meeting r oom resources
This enables authentication for theEWS emulator for Polycom endpoints connecting to JOIN. If the box is left unticked, no
password is required for theendpoint to connectto JOIN.
Allows you to change the default username and password for JOIN to communicate with CONTROL
Recording
The recording option in JOIN enables users to easily add recording to a meeting. The integration requires a recording serviceby
one of the supported providers and a resource account in Exchange that users add to their invitation when scheduling a meeting
in Outlook. The resource account can even be added to and/or removed from the meeting after the meeting has started to only
record a part of the meeting.
Section /Field n am e Descr iptio n
Quickch an ne l Quickchannel delivers a RTMP based recordingservice which is supported w ith Pexip Infinity MC U. Recordings are stored
Exchan ge re sou rce email ad dress The email addresses of the Microsoft Exchanger esource account that should be usedfor trigger therecording. The account
Reco rd in g Base URL This URLprovidedby Quickchannel for your recordingaccount. The URLyouget m ay containmore information thanshould
Dua l Strea ms Check this checkbox if the Quickchannel service should record both the m ain stream and the content channel. The streams
Dial ou t from MCULoca tion Select which Pexip l ocation should beused to connect to the Quickchannel recordingservice
in the Quickchannel service under the account of them eeting organizer with the same title that was definedin the meeting
invitation. A new account will be createdfor the organizer if anexisting account w as not found.
needs the same permissions andprocessing parameters as the other room accounts, and should also be set up to allow
conflicts so that it may bebookedin m ultiple meetings at thesame time.
Set-CalendarProcessing < resourcealias> -DeleteComments $false -RemovePrivateProperty $false AddOrganizerToSubject$false - DeleteSubject $false -ProcessExternalMeetingMessages $true- AllowConflicts $true
be added here, so everything after the first underscore should be removed ( including the underscore)
Example:
The URLmay be: rtmp://stream61.abiliteam.com/ability494push/mp4:0x37d175e6984f31aaec87cb376fdd3141_
abcdef12345abcdf_cam1
Butshould be: rtmp://stream61.abiliteam.com/ability494push/mp4:0x37d175e6984f31aaec87cb376fdd3141
are stored as individual streams but can beplayed back synchronized by theQuickchannel videoplayer.
Page 83 of 121
Page 84
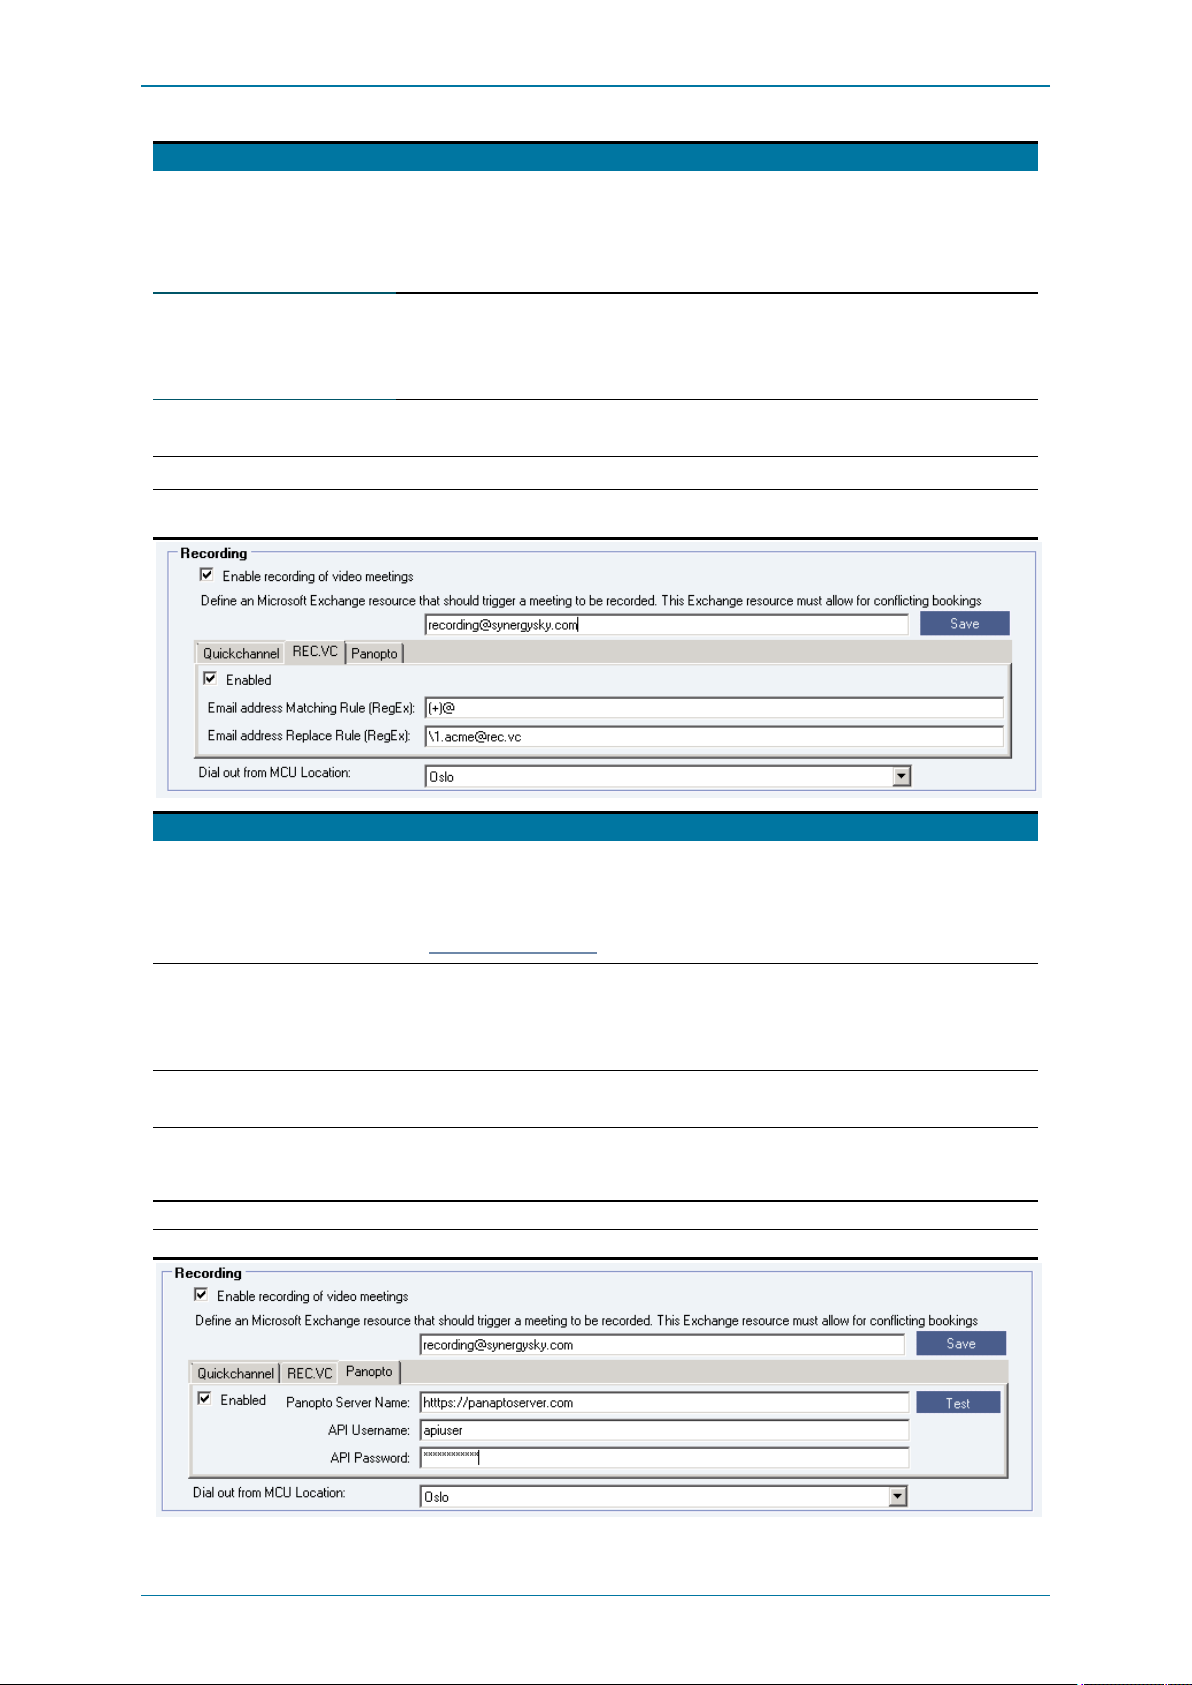
Synergy JOIN Install ation and Configuration Guide
Section /Field n am e Descr iptio n
REC.VC Media Network Service delivers a SIPbasedr ecording service called REC.VC, w hich is supported with both Pexip Infinity
and C isco M eeting Server. Recordings are stored in the REC.VC under the account of them eeting organizer. The recording
requires theorganizer to have an accountwith the REC.VC service, becausethe call to the service will be connected by a
dial-out to a re-written version of theorganizer's email address.
Example: [email protected] schedules a meetingthat goingto be recorded by REC.VC. Synergy JOIN will at thestart
time of themeeting initiate a sip call out to [email protected]. The re-wr ite r ule is defined in thefollowingsettings.
Exchan ge re sou rce email ad dress The email addresses of the Microsoft Exchanger esource account that should be usedfor trigger therecording. The account
needs the same permissions andprocessing parameters as the other room accounts, and should also be set up to allow
conflicts so that it may bebookedin m ultiple meetings at thesame time.
Set-CalendarProcessing < resourcealias> -DeleteComments $false -RemovePrivateProperty $false AddOrganizerToSubject$false - DeleteSubject $false -ProcessExternalMeetingMessages $true- AllowConflicts $true
Email a ddre ss Ma tchin g Rule (Re gex) The Regex rule to identify parts of the organizer's email address to beused i n the replace rule below
Example: ( .+)@acme.com
Email a ddre ss Re pla ce R ule (Re g ex) The Replacevalue to be usedwith the regex rule: \[email protected]
Dial ou t from MCULoca tion Select which Pexip l ocation should beused to connect to the Quickchannel recordingservice.
Note : Not requiredfor CMS.
Section /Field n am e Descr iptio n
Pano pto Panopto delivers a RTMP based recording service which is supported with Pexip Infinity M CU. Recordings are storedin the
Panopto cloud service under the account of them eeting organizer with the same title that was definedi n the meeting
invitation. The recording will be stored in the account of theapi user if theorganizer did not have a user in Panopto.
The Panopto service returns the URLusedto view the meeting whenthe meeting is booked. This URLcanbe automatically
be embedded into the m eeting invitationby referring to the %StreamingPath% variable in the recordingFooter.html template.
See""%StreamingPath%" on page106" for more information.
Exchan ge re sou rce email ad dress The email addresses of the Microsoft Exchanger esource account that should be usedfor trigger therecording. The account
needs the same permissions andprocessing parameters as the other room accounts, and should also be set up to allow
conflicts so that it may bebookedin m ultiple meetings at thesame time.
Set-CalendarProcessing < resourcealias> -DeleteComments $false -RemovePrivateProperty $false AddOrganizerToSubject$false - DeleteSubject $false -ProcessExternalMeetingMessages $true- AllowConflicts $true
Pano pto ser ver n ame This server name can be found in your Panopto profile.
Example: acme.cloud.panopto.eu
APIUserna me The username of the API account youhavecreated for the integration. The integration user needs to have
"admin"permissions in your Panopto account.
Example: api
APIPasswo rd The password of theAPIaccount.
Dial ou t from MCULoca tion Select which Pexip l ocation should beused to connect to the Panoptor ecording service
Page 84 of 121
Page 85
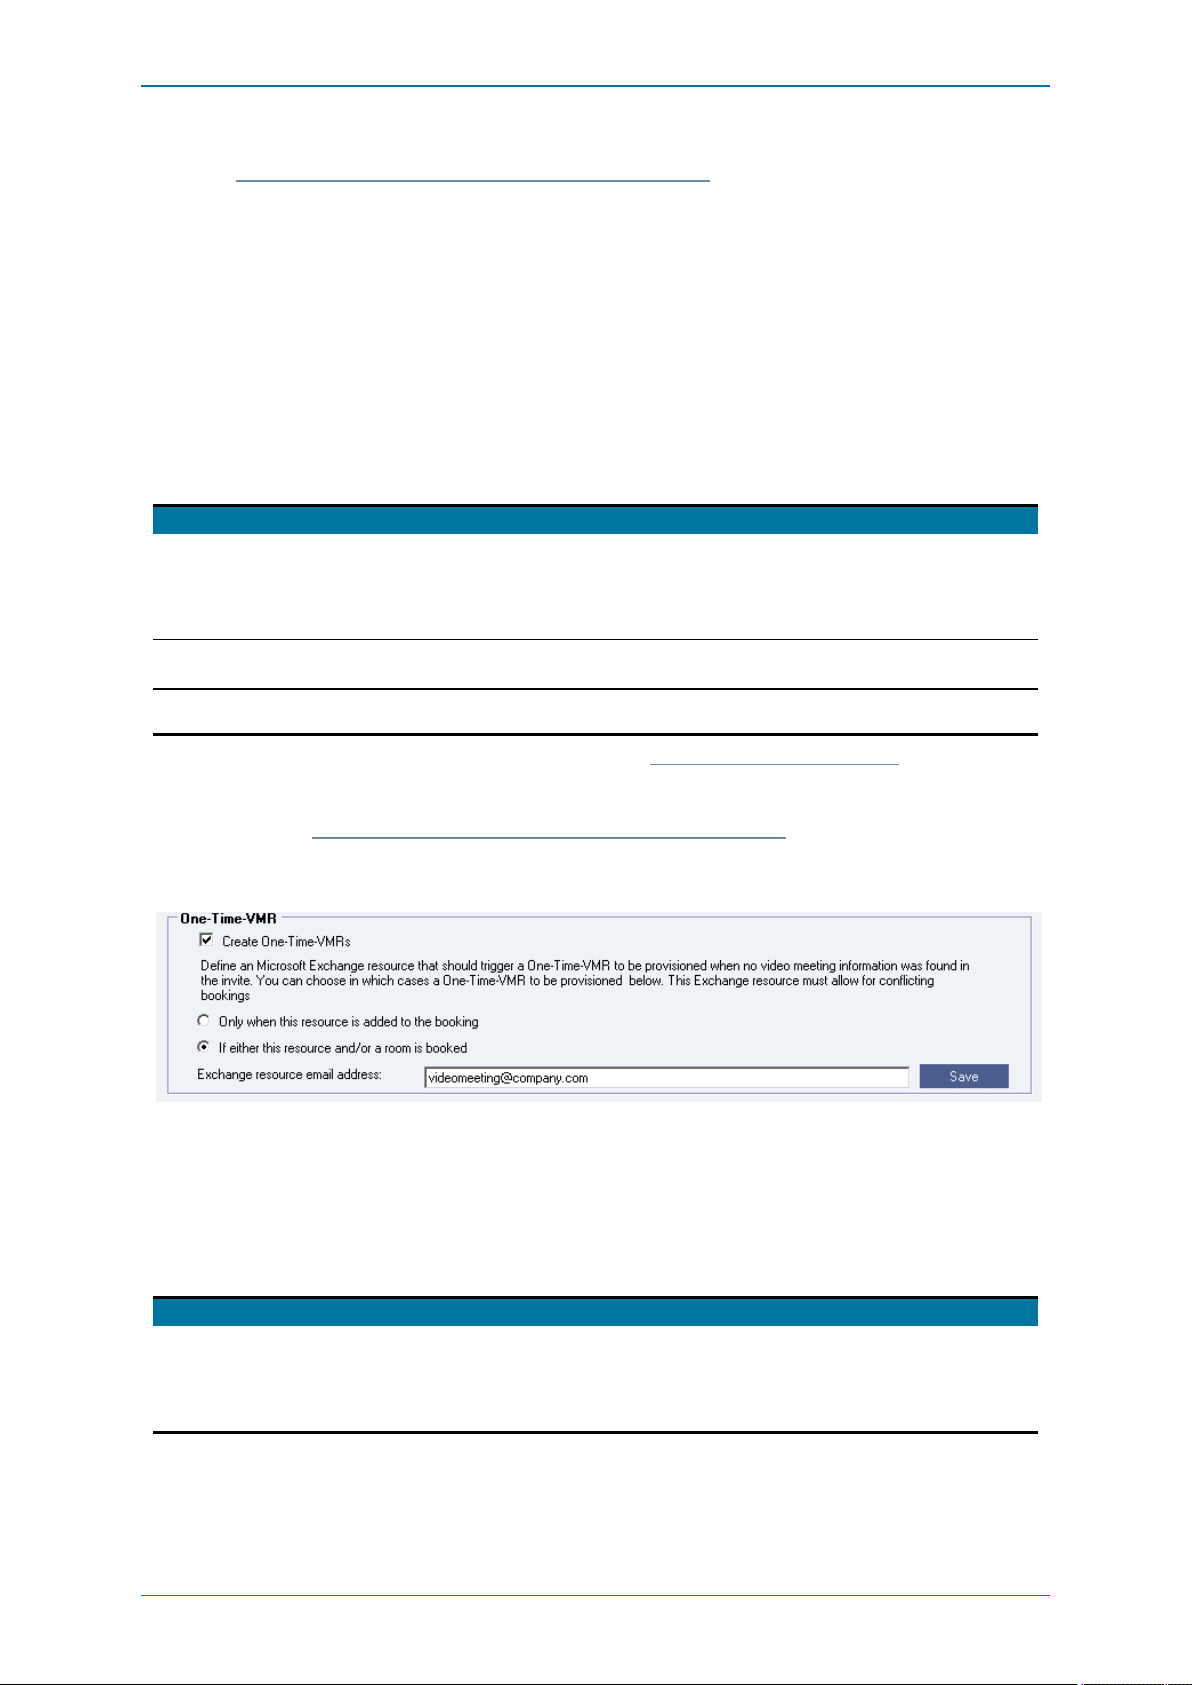
Synergy JOIN Install ation and Configuration Guide
Note: It is possibleto stop the booking confirmation emails from the recording service account to spam the user's mailbox by
setting up a "Second transport rule to remove accept confirmations" on page113
One-Time-VMR
The One-Time-VMR (Dynamic VMR) option in JOIN enables users to easily schedule video meetings without any plug-ins in the
email client. The function willcreate a temporary virtual meeting room on the MCUdefined in the General Settingstab, with a
URIwithin the range defined in the Conference Settings tab. Video systems that are included in the meeting invitation will be
provisioned with Cisco One Button To Push and Polycom ClickTo Join so that they can join the meeting by a push of a button. All
invitees willreceivethe dial-in information so that they can joinfrom their personal device if they prefer that. The dial-in
information can sent as a individual emails to each inviteeor included inthe calendar invitebody.
There are potentiallythree triggers that can be set up to enable One-Time-VMRs, and all three can be used simultaneously
l Adding a video enabled meeting room to the invite(e.g. [email protected])
l Adding a specificresource to the invitethat allow conflicts(e.g. [email protected])
l Adding a specifickeyword to the meeting invite (e.g. @video)
Section /Field n am e Descr iptio n
Exchan ge re sou rce email ad dress The email addresses of the Microsoft Exchanger esource account that should be usedfor trigger thecreation of theOne-
Only wh en this reso ur ce id add ed to the
bo okin g
If e ithe r thi s reso urce a nd/or a roo m is
bo oke d
Time-VMR. The account needs thesame permissions and processingparameters as the other room accounts, and should
also be set up to allow conflicts so that it may be bookedin multiple meetings at the same time.
Set-CalendarProcessing < resourcealias> -DeleteComments $false -RemovePrivateProperty $false AddOrganizerToSubject$false - DeleteSubject $false -ProcessExternalMeetingMessages $true- AllowConflicts $true
This setting restricts thecreation of One-Time-VMRs to when the Exchanger esource specified above is added to the
meeting invitation;either specifically by the user, or automatically by the Exchangetransport rule
This setting enables JOIN to create a One-Time-VMR if either a room is bookedor if the Exchanger esource specified above
is addedto the meetinginvitation.
Note 1:using a keyword (e.g. @video)to book video meetings require a "Hub Transport Rules" on page110 to be set up in the
Microsoft Exchange environment
Note 2: It is possibleto stop the booking confirmation emailsfrom the One-Time-VMR serviceaccount to spam the user's
mailboxby settingup a "Second transport rule to remove accept confirmations" on page113
Skype IVR
The Skype IVR (Skype Interactive Voice Respons) option in JOIN enables users to join Skype Online (Skype for BusinessOffice
365) meetings by dialing into a specific URI (e.g. [email protected]) and entering the numericConference Id that is
automatically inserted into the meeting invitation when booking a Skype Online meeting. The option also make it easyfor users
to jointhe Skype meeting via WebRTC which usually has a higher successrate than the SkypeWeb app. The picture below
show how the meeting invitation may look like with the footer describing how to join the meeting.
Section /Field n am e Descr iptio n
Exchan ge re sou rce email ad dress The email addresses of the Microsoft Exchanger esource account that should be usedfor trigger theIVR option. The account
needs the same permissions andprocessing parameters as the other room accounts, and should also be set up to allow
conflicts so that it may bebookedin m ultiple meetings at thesame time.
Set-CalendarProcessing < resourcealias> -DeleteComments $false -RemovePrivateProperty $false AddOrganizerToSubject$false - DeleteSubject $false -ProcessExternalMeetingMessages $true- AllowConflicts $true
Page 85 of 121
Page 86
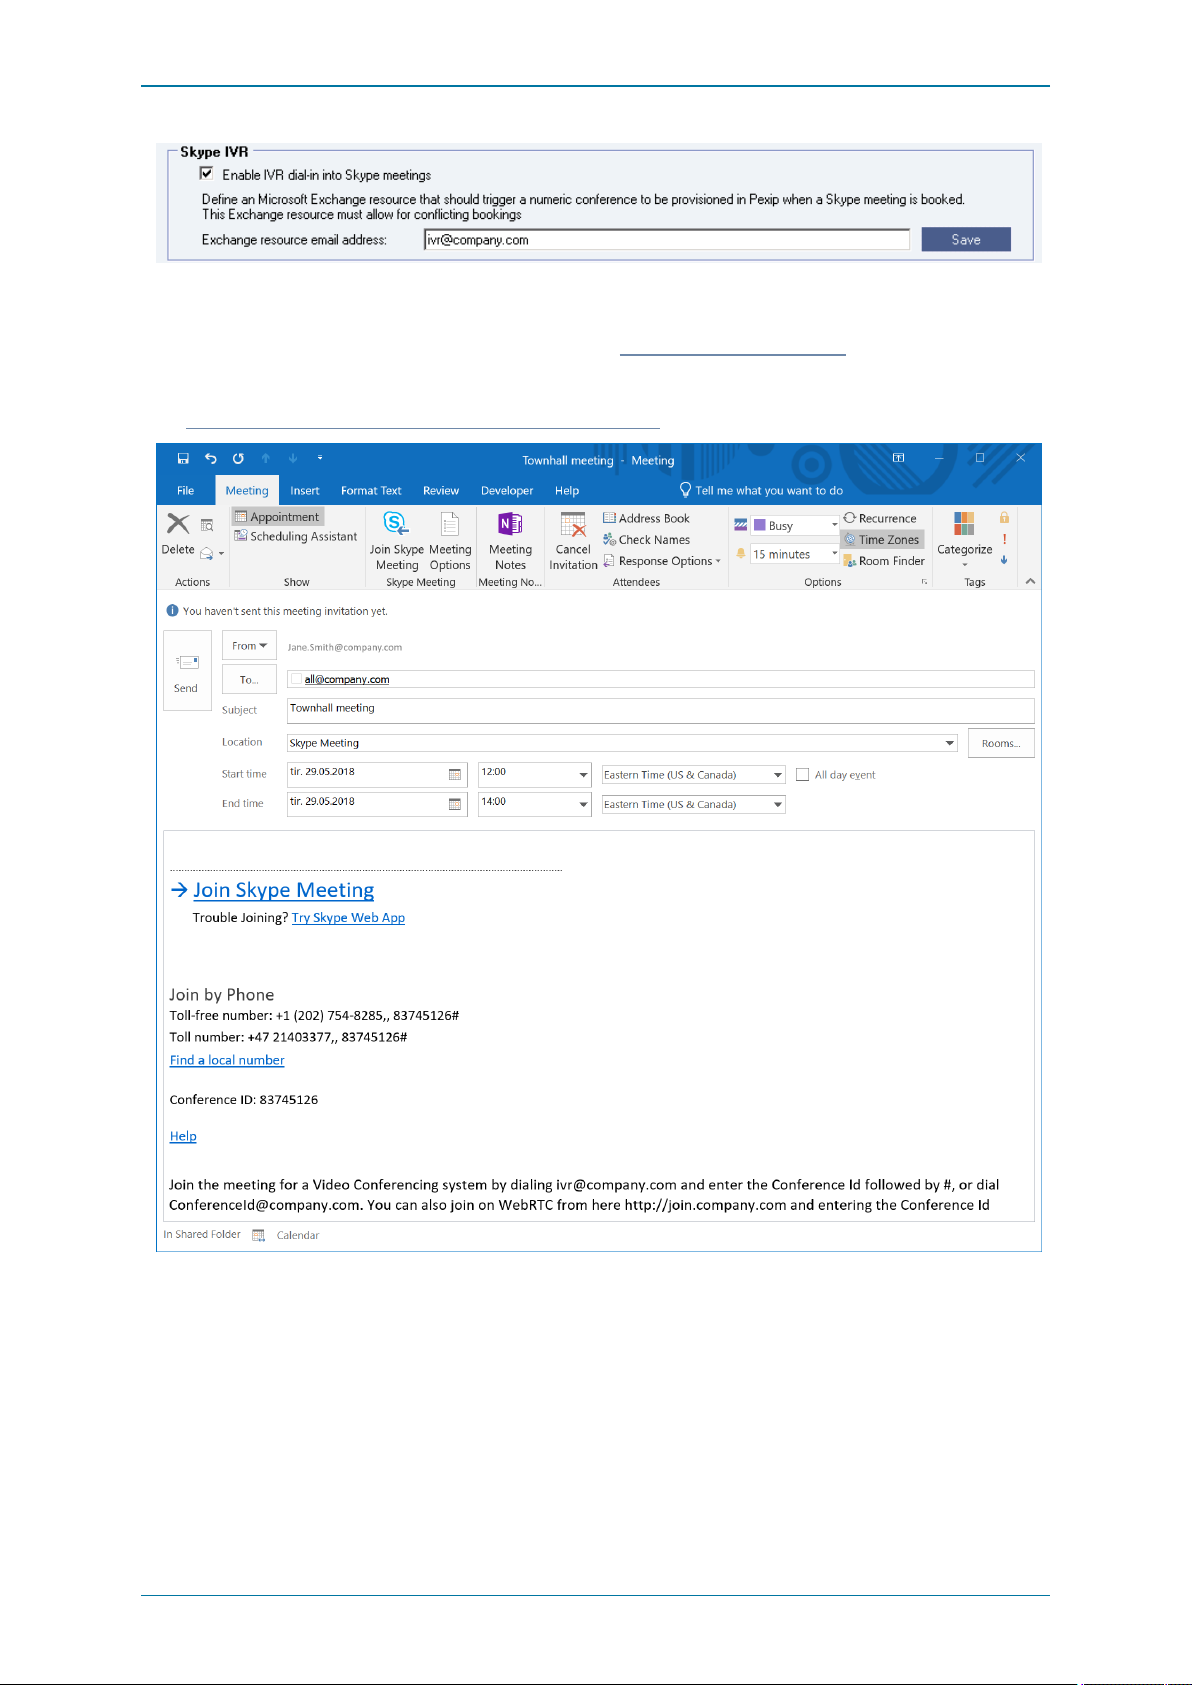
Synergy JOIN Install ation and Configuration Guide
Note 1:The Skype IVRoption requires the Audio Conferencing option to be enabled in the Skype Online subscription so that the
Conference Id ispopulated in the meeting invitation.
Note 2:The Skype IVRoption onlyworks with Pexip, and requires a "Local PolicyScript" on page114to be added to the Pexip
Management Node
Note 3: It is possibleto stop the booking confirmation emailsfrom the IVR service account to spam the user's mailboxby setting
up a "Second transport rule to remove accept confirmations" on page113
Page 86 of 121
Page 87
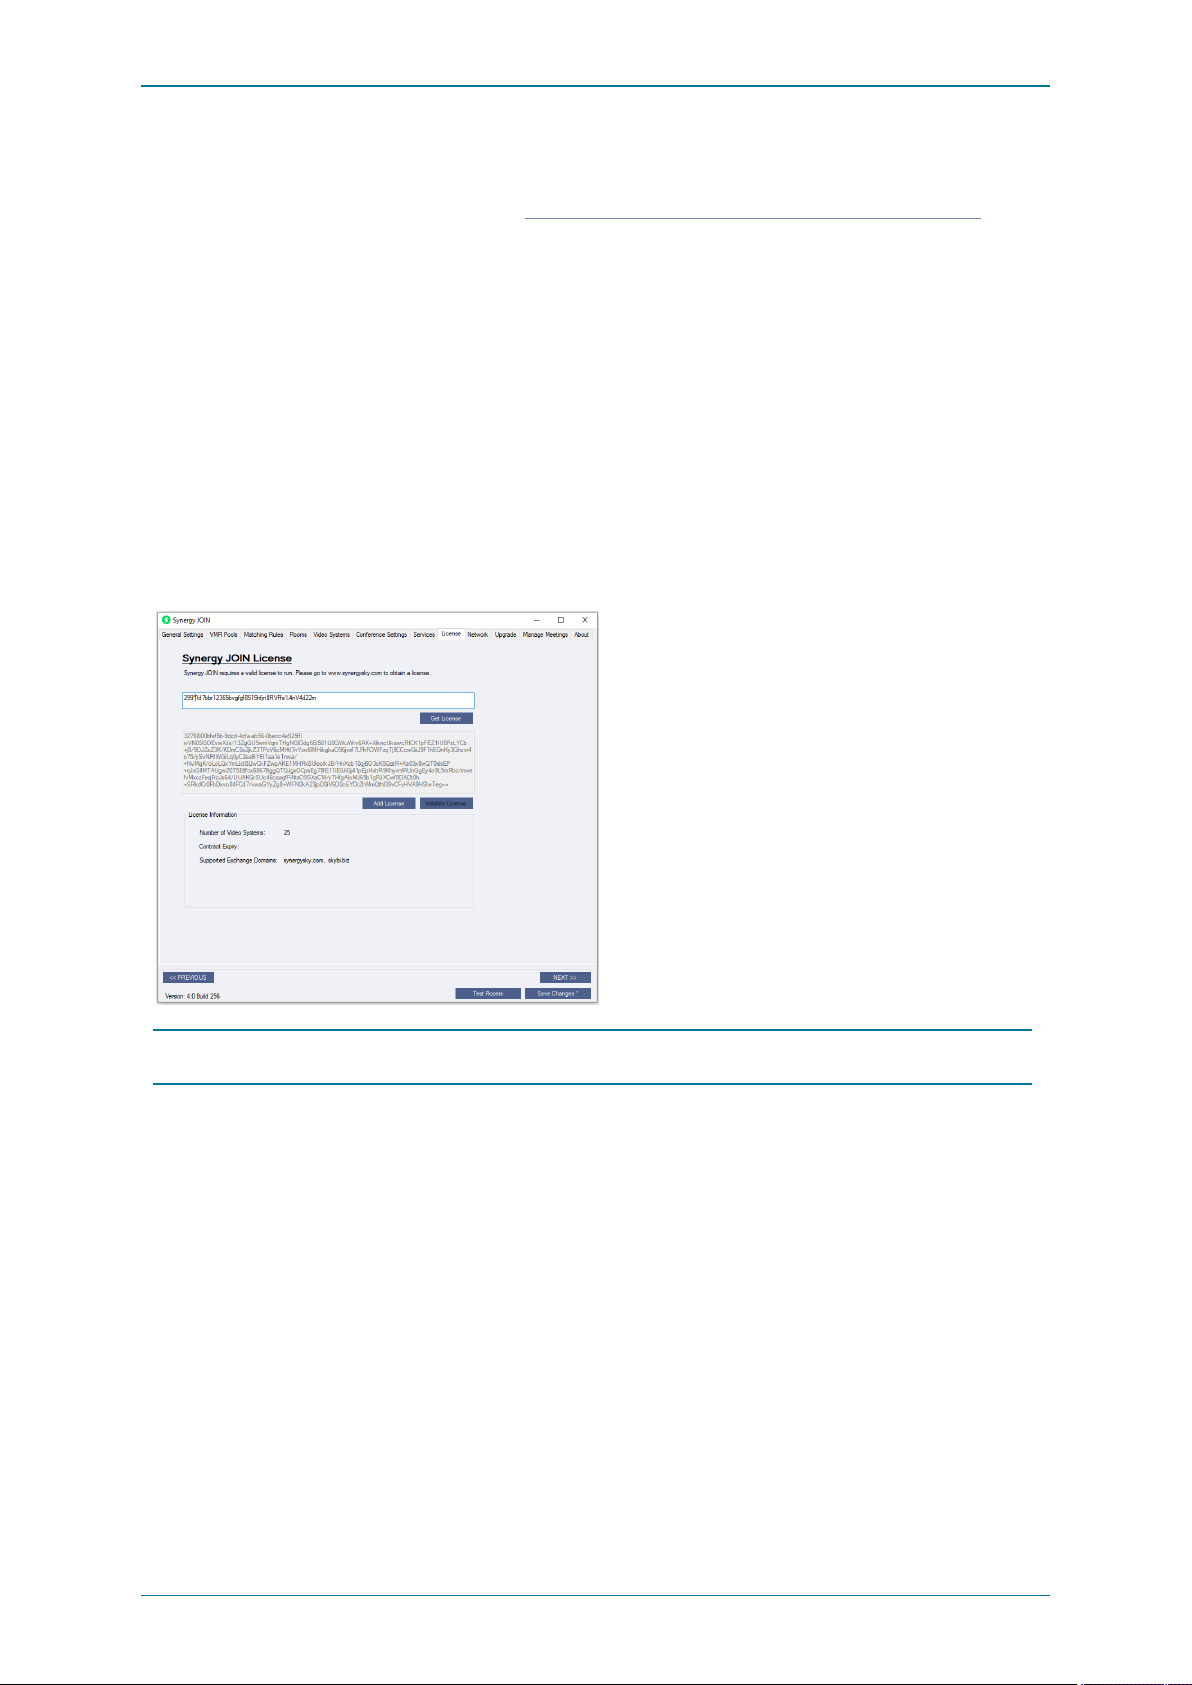
Synergy JOIN Install ation and Configuration Guide
Task 11: Adding a License
Add a license for your JOIN installation, obtained from www.synergysky.com or from your Synergy SKY Representative.
The licenscing mechansim from Synergy JOIN version4.x and above has changed. The licensing now operates via a License
Key or an API Key. The
1. API Key
Once you have been provided with an API key, paste thisinto the Product license API Key section. Synergy JOIN willfetch a new
License key from the licensing server. The license key will be retrieved and placed into the License Key section. The licensekey
refreshes itself every 14 days therefore JOIN requires accessto the Internet in order for the license key to stay active.
2. License Key
To obtain an offline licensekey you will have to get in touch with your Synergy SKY representative or send a request to Synergy
SkySupport ([email protected]).
You willhave to provide the Machine ID of the hosting server. This can be found by running the following Powershellscript get-
wmiobject Win32_ComputerSystemProduct | Select-Object -ExpandProperty UUID
Once we have the machine ID, we willprovide you with a License Key you can paste in to the Licensing tool.
Note: You can choose for administrators to receive emailnotifications ifthe license isabout to expire, this is configurable on the
General Settings tab of the configuration tool.
Page 87 of 121
Page 88

Synergy JOIN Install ation and Configuration Guide
Task 12: Configuring Email templates
Depending on the type of meeting booked, the following emailsare sent out to users from JOIN:
Type of e ma il Descrip tion Email te mp late file name
Error Recurr ing Me etin g Sent whena recurring meeting is bookedwith no end date as this is notsupported in
Orga nizer In vite Sent to them eeting organizer when a one-time-vmr meetingis booked.
Interna l Invite Sent to internal participants when a one-time-vmr meeting is booked. Includes dial-in
External Invi te Sent to participants external to your organizationwhena one-time-vmr meeting is
Orga nizer In vite Skype Sent to them eeting organizer when a Skype meeting is booked.
Interna l Invite Skype Sent to internal participants when a Skypemeeting is booked.
External Invi te Skype Sent to external participants w hena Skypemeeting is booked.
Orga nizer In vite Static Sent to the m eeting organizer when a regex r ule meeting is booked.
Interna l Invite Static Sent to the internal participants when a regex rule meetingi s booked.
External Invi te Static Sent to theexternal participants when a regex rule meeting is booked.
Information head e r for
ema ils to m ee ting orga nizer s
whe n Cale nda r Up da te fails
Host pin co de email EnablingtheCalendar Updatefunctionr esults in all invitees gettingthe same
Foo ter fo r me etin gs that are
be ing reco rded
JOIN.
NOTE:This informationwill be inserted into the calendar invite and is resent to all
invitees whenthe Calendar Update function is used
information for themeeting.
booked. Includes dial-in informationfor the meeting.
NOTE:This informationwill be inserted into the calendar invite and is resent to all
invitees whenthe Calendar Update function is used
NOTE:This informationwill be inserted into the calendar invite and is resent to all
invitees whenthe Calendar Update function is used
Added to the beginningof theemails to the organizers if the calendar could not be
updated automatically
information as theorganizer since the information is inserted in the calendar body.
The Host Pin will therefore besent to theOrganizer as a separateemail if Host Pin
generation is enabled
Added to the end of the email to the
error_recurringmeeting.html
organizerInvite.html
internalInvite.html
externalInvite.html
organizerInviteSkype.html
internalInviteSkype.html
externalInviteSkype.html
organizerInviteStaticVMR.html
internalInviteStaticVMR.html
externalInviteStaticVMR.html
fallbackHeader.html
hostPin.html
recordingFooter.html
The email templates are located here:
C:\SynergySKY\SynergySKYEnterpriseScheduling\emailTemplates
and you can edit
them using an HTML editor.
You can edit all text that is not between the % symbols. You can remove any % attributes that you do not want to displayin your
emails.
The following attributes can be used in the templates:
Attribute name Descr iptio n Exam ple
%NumericVMRURI% The numeric part of the meeting 12346578
%HostPin% The pin code for the host of the meeting 2412
%GuestPin% The pin code for theguests of them eeting 0211
%starttime % The start time of themeeting 01.01.2017 10:00
%endtime % The end time of the meeting 01.01.201711:00
%subject% The subject of the meeting Board m eeting
%invite bo dy% Thefull body of the meetingi nvitation …
%org anize r_ firstname % The first name of themeeting organizer Jane
%org anize r_ lastname% The last name of themeeting organizer Smith
%invite e% The name of theperson the meetingi nvite is sent to. John Jones
Page 88 of 121
Page 89

Synergy JOIN Install ation and Configuration Guide
Attribute name Descr iptio n Exam ple
%isPrivate % Aflag indicating if them eeting is booked as Privateor
True
not
%SkypeCo n fere nceId% The numeric conference Id foundin the invite of Skype
87564312
invitations that havePSTNdial-in capabilities
%SkypeGRUU% The Globally Routable Unique Identifier of Skype
sip:[email protected];gruu;opaque=app:conf:focus:id:TTC86056
meetings
%SkypeUR L% The URLfound in the Skype meetingi nvitation https://meet.lync.com/company-com/jsmith/6LN9569P
%Stream ingPath % The URLto view the live/on-demand video stream from
them eeting. Only applicable for Panoptor ecording
%HostSecret% The secret that need to bein the UR Ltoenable one-
https://cms.company.com/?secret=%HostSecret%&id=%NumericVMRURI%
click-joining as Host on W ebRTC i n One-time-VMRs
on the Cisco Meeting Server
%GuestSecr et% The secretthat need to be in the URLto enable one-
https://cms.company.com/?secret=%GuestSecret%&id=%NumericVMRUR I%
click-joining as Guest on W ebRTC in One-time-VMRs
on the Cisco Meeting Server
Page 89 of 121
Page 90
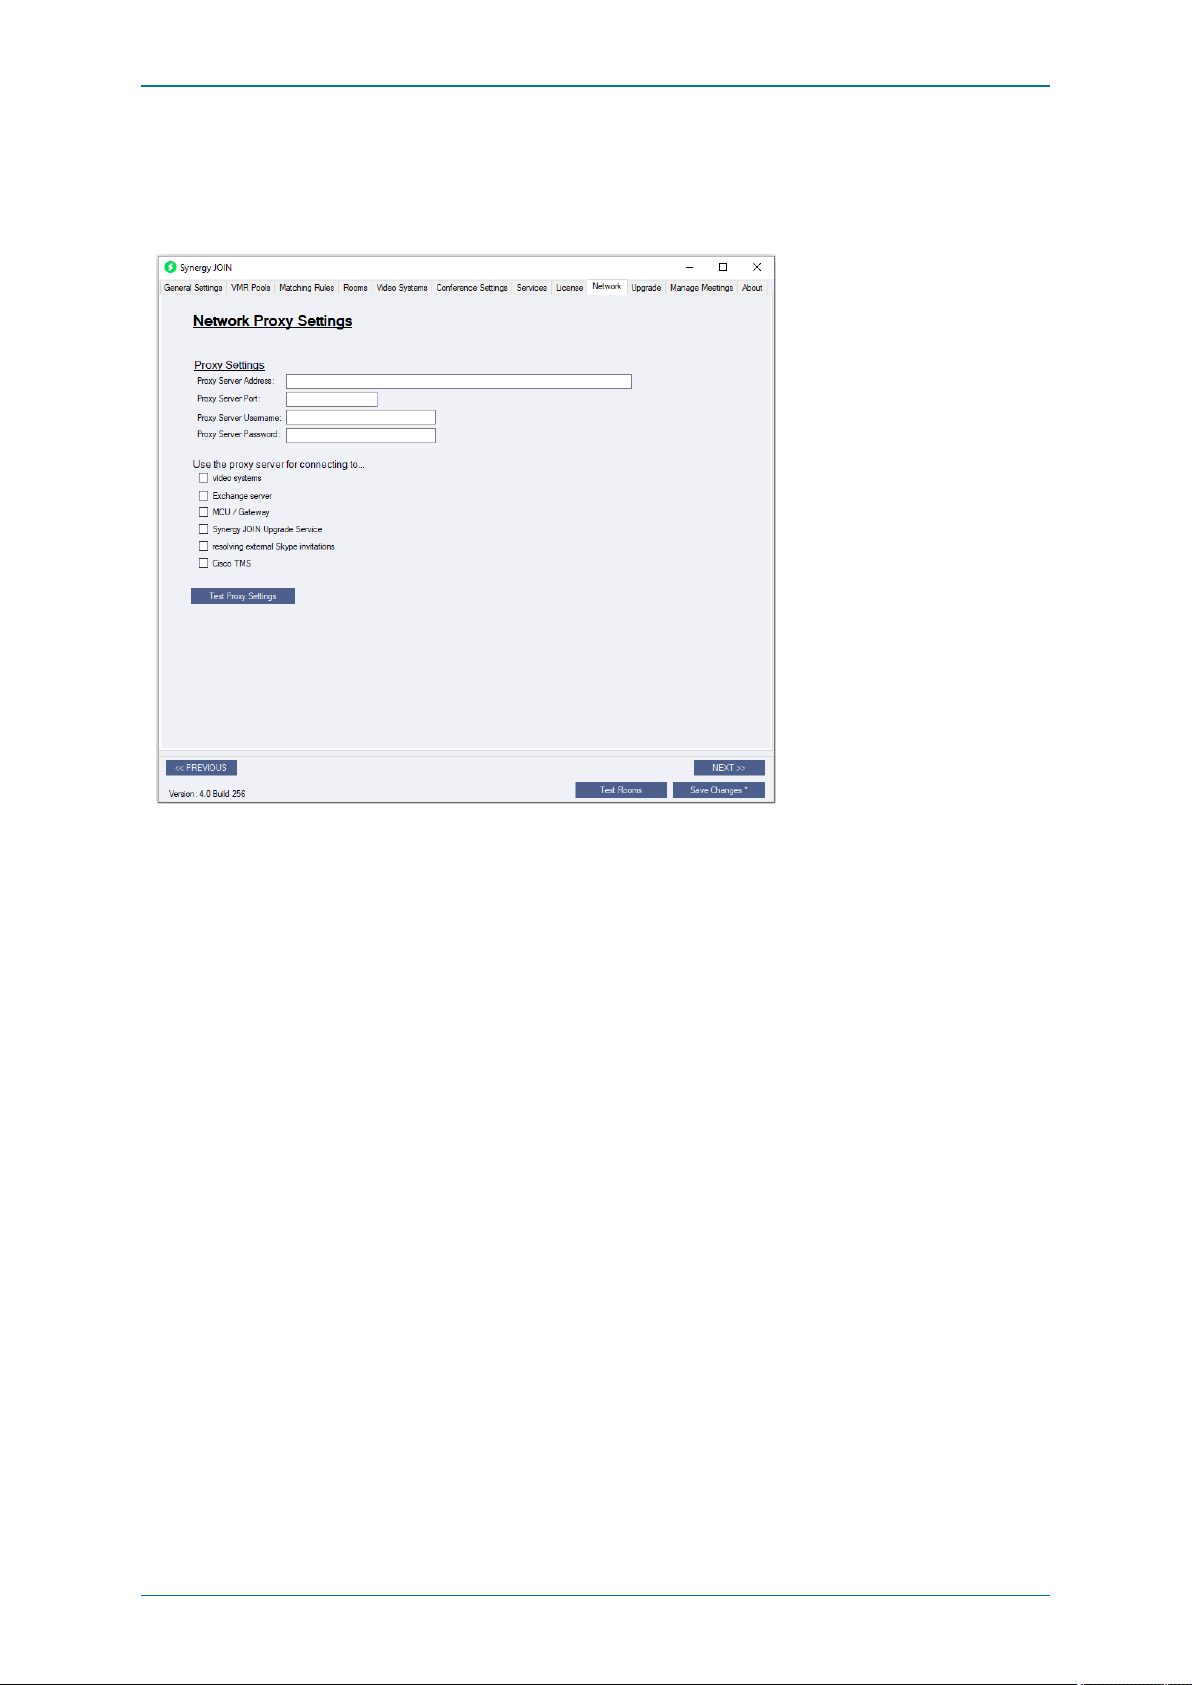
Synergy JOIN Install ation and Configuration Guide
Task 13: Configuring a proxy server (optional)
You can configure JOIN with a proxy server and specify which components you want to use the proxy server for in the
configurator on the Network tab. Once configured, you can test whether it isworking correctly.
Page 90 of 121
Page 91

Synergy JOIN Install ation and Configuration Guide
Example meeting scenarios
Scenario 1: Booking a Skype meeting with one or more video-enabled meeting-rooms
Descr iptio n Re qu ire me nts Examp le rule
l M eeting organizer schedules a Skype m eeting using Outlook.
l The invite includes video-enabledendpoints/meeting-rooms.
l JOIN sends the endpoints/meeting-rooms the Skypemeeting
URI as the One Button to Push ( Cisco OBTP) or Click to Join
(Polycom CTJ) message.
SkypeURI in Headers m atching
rule
SkypeURI in Body matching
rule
l Pexip:
o
S4B.(SkypeMeetingId).(SkypeUserId)@(UserDomain)
l StarLeaf C loud:
o
Auto-generated
l Pexip:
o
S4B.(SkypeMeetingId).(SkypeUserId)@(UserDomain)
l C isco CMS 2.2or later + O365Skypefor Business (CMS 2.2
or later):
o
Matching value: None
o
Replace value:
(SkypeURL)@CompanyCMSDomain.local
l StarLeaf C loud:
o
Auto-generated
Regex CIsco CM S+ Internal on premises Skypefor Business server:
l M atching value: id:\s*(\d+)
l R eplace value: \[email protected]
Scenario 2: Booking a Personal VMR (Virtual Meeting Room) meeting with
one or more video-enabled meeting-rooms
Descr iptio n Re qu ire me nts Examp le rule
l M eeting organizer schedules an ordinary Outlook
appointment.
l The invite includes video-enabledendpoints/meeting-rooms.
l The invite email body includes a personal VMR uri, for
l R egex matching rule
l A valid U RI included in the
email body, for example in
theemail signature.
(meet|vrm)\.[a-z0-9\-_\.]+@example\.com
example in the email signature.
l JOIN sends the endpoints/meeting-rooms the personal VMR
URI as the Ci sco OBTP or Polycom CTJ message.
Scenario 3: Booking a One-time-VMR with one or more video-enabled meeting-rooms
Descr iptio n Re qu ire me nts Examp le rule
l M eeting organizer schedules an ordinary Outlook
appointment.
l The invite includes video-enabledendpoints/meeting-rooms.
l There is no URIanywhere i n the body of the invitationthat
matches any of the regex matchingr ules.
l JOIN creates a one-time URI onthePexipMCU and sends
theendpoints/meeting-rooms theone-time-VMR URI as the
Cisco OBTP or Polycom CTJ message.
l An email containing the dial-in information for theone-time-
VMR is sentto the invitees (optional).
l In theJOIN C onfigurator,
Cre ate VMR is selected.
N/A
Page 91 of 121
Page 92

Synergy JOIN Install ation and Configuration Guide
Scenario 4: Forwarding an existing invitation to a video-enabled meetingroom
Descr iptio n Req uire ments Example rule s
l U ser receives a meeting invite from
someone internal or external to their
organization and wants to join the
meeting from a video-enabled
endpoint/meeting-room.
l U ser forwards the invite to the
endpoint/meeting-room.
l JOIN understands how to process the
meeting from the contents of the invite
email.
l JOIN forwards the appropriate dial
string to the m eeting-room as theOne
Button to Push (Ci sco OBTP) or Click to
Join (Polycom CTJ) message.
Currently the following meetingtypes are
supported for forwardingin JOIN:
l Skype
l Teams
l Personal VMR
l One-time-VMR
l BlueJeans
l C isco Webex
l Starleaf VMR
l StarLeaf Scheduled Meeting
l Videonor
l Videxio
l U nivago
l Zoom
Preprogrammed templates for theser ules
can be found in theRegex builder in the
Matching Rules tab.
l Skype
internal/external
matching r ule
l R egex
matching r ules
l M icro soft Skype :
o
Pexip:
o
Matching value: None
o
Replace value: S4B.(SkypeMeetingId).(SkypeUserId)@(UserDomain)
o
Cisco CMS (Internal and External invitations):
o
Matching value: None
o
Replace value: (SkypeURL)@CompanyCMSDomain.local
o
Cisco CMS: ( Internal invitations Only)
o
Matching value: id:\s*(\d+)
o
Replace value: \[email protected]
o
Videxio:
o
Matching value: None
o
Replace value: __sfb__(SkypeMeetingId).(SkypeUserId)@(UserDomain)
o
Videonor:
o
Get in touch with Videonor support for for your required Skype matching value and
replacevalue
o
StarLeafCloud
o
No m atching rule configuration r equired
l M icro soft Te am s:
o
Pexip:
o
Matching value: None
o
Replace value: Teams.(TeamsMeetingId)@company.com
l Ge ne ric rule s:
o
Personal VMR (uris contains the words: m eet or vmr)
o
Matching value: ([a-z0-9\-_\.]*(meet|vmr)[a-z0-9\-_\.]*)@[a-z0-9\-_\.]+
o
Replace value: \0
o
One-time-VMR (uris in the format: numeric@domain)
o
Matching value: \d+@[a-z0-9\-_\.]+
o
Replace value: \0
l C lou d p ro vid er s:
o
BlueJeans
o
Matching value: https://bluejeans.com/(\d+)
o
Replace value: \[email protected]
o
Cisco Webex
o
Matching value: \d+@[a-z0-9\-_\.]*webex[a-z0-9\-_\.]+
o
Replace value: \0
o
Starleaf VMR
o
Matching value: MeetingID: ([0-9]+) ([0-9]+)
o
Replace value: \1\[email protected]
o
Univago
o
Matching value: [a-z0-9\-_\.][email protected]
o
Replace value: \0
o
Videonor
o
Get in touch with Videonor support for for your required matching value andreplace
value
o
Videxio VMR meetings
o
Matching value: https://my.videxio.com/meet/(\d+)
o
Replace value: \[email protected]
o
Zoom
o
Matching value: https://[a-z0-9\-_\.]*zoom[a-z0-9\-_\.]*/j/(\d+)
o
Replace value: \[email protected]
Page 92 of 121
Page 93
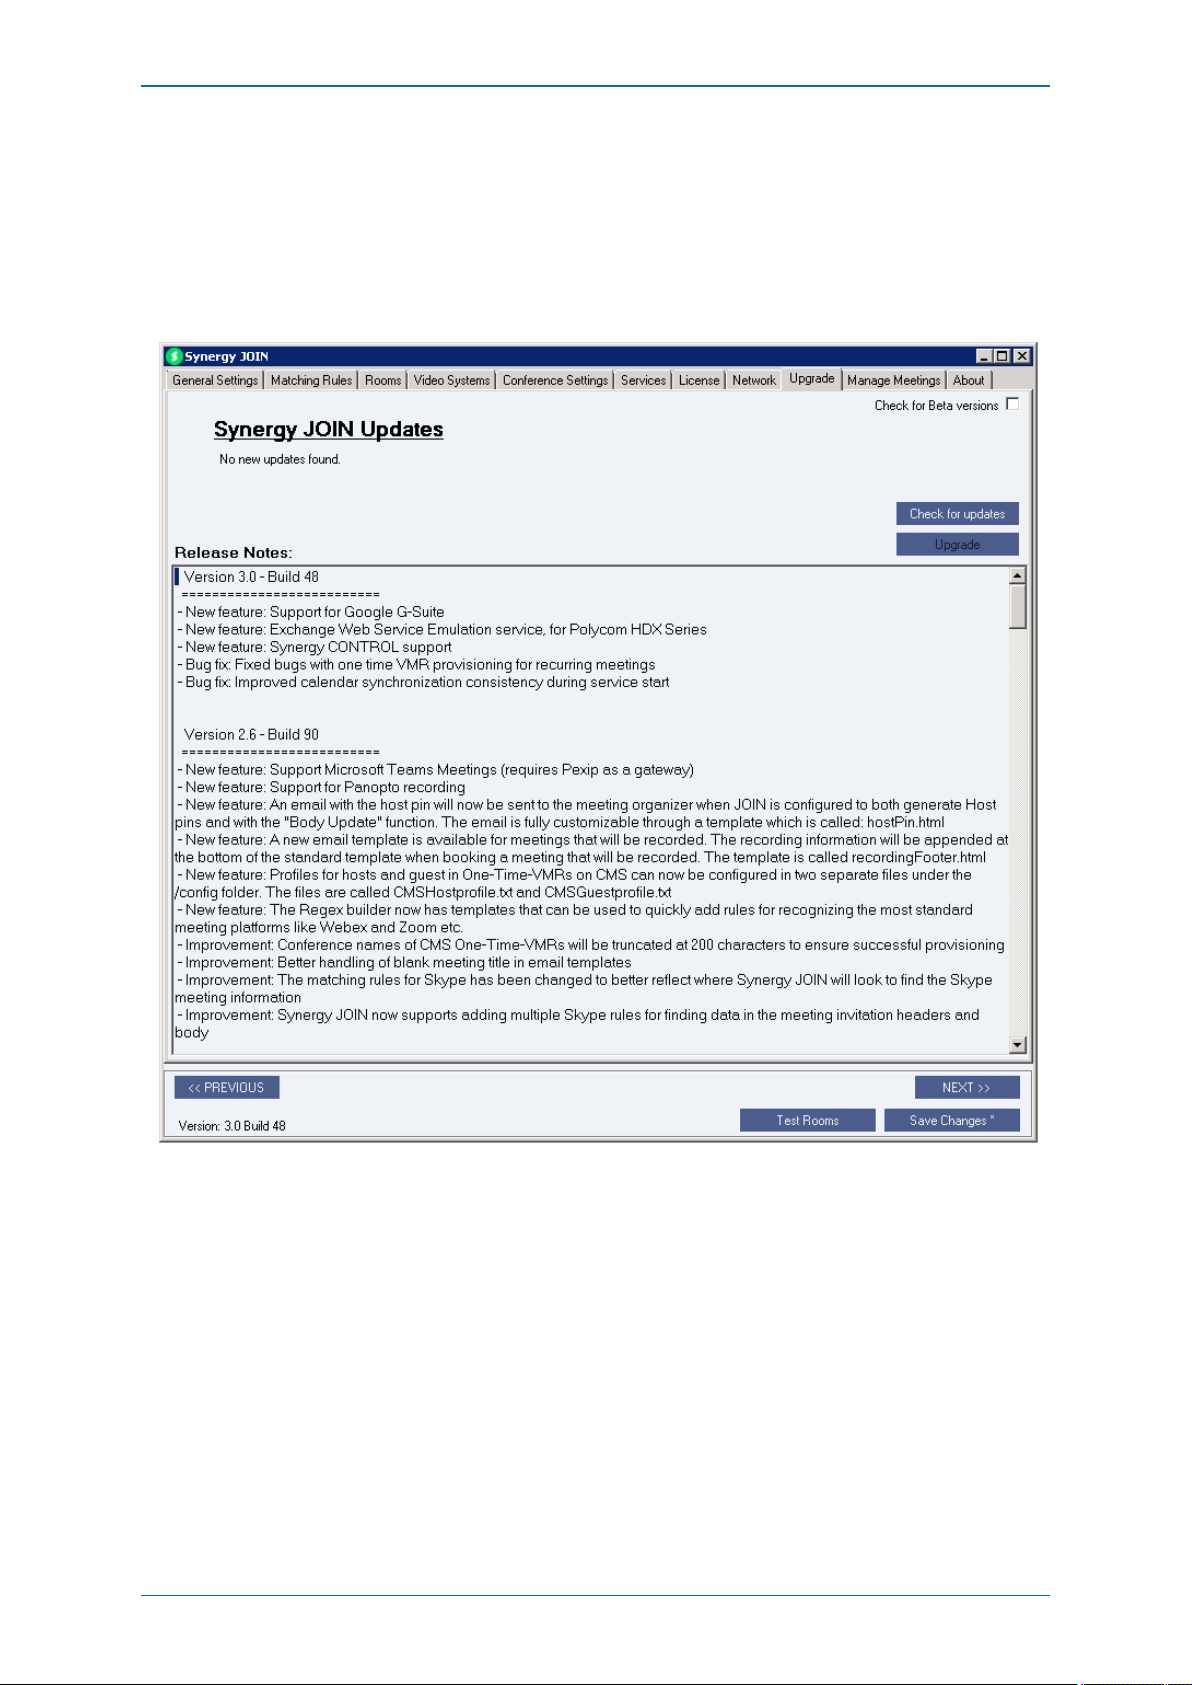
Synergy JOIN Install ation and Configuration Guide
Manually upgrading JOIN
You can Check for updates and Upgrade from the Upgrade tab in the configurator tool.
A message is displayed to notify you if there is a new version available.
This tab displays the release notes for the current version.
Synergy JOIN can be configured to automatically check for beta releases and release candidates by checking the checkbox in
the upper right corner. Remember to click"Save" after enabling the checkfor beta versions.
Page 93 of 121
Page 94

Synergy JOIN Install ation and Configuration Guide
Synergy JOIN Troubleshooting
This section provides information on how to Troubleshoot JOIN
Page 94 of 121
Page 95

Synergy JOIN Install ation and Configuration Guide
Common troubleshooting scenarios
Cisco OBTP or Polycom CTJ button does not appear on the endpoint touch panel
Symptoms Proba ble cause s Actions
When booking a Skype or one-time-VMR m eeting that includes one
or more Exchange resource meeting r oom(s) as a participant, the
Cisco OBTP or Polycom CTJ button never appears on the meeting
room(s) touchpanel.
One-Time-VMR is not provisioned on the MCU
Symptoms Proba ble cause s Actions
Calls to/from one-time-VMR meetings are failing. JOIN cannot contact the MCU . Press the Te st Con ne ctions button in theconfiguration tool to
JOIN could not find Skype
meeting information or VMR
information (based on regex
rules).
JOIN failed in reading the
booking in Exchange.
JOIN cannot contact the
endpoint.
VMR licenses are depleted. Check that you have sufficient VMR licenses on the MCU.
Conflicting alias on the MCU. Check the log for details.
Check the log for details, and correct ther ules accordingly.
Open the Configuration tool anduse the Test Exchang e Ro oms
buttonto test that the rooms are correctly configured.
Go to the Vid eo Systems and press Con ne ct an d sa ve to verify
that JOIN can connect to theendpoint.
verify that JOIN can communicatewith the MC U.
One-Time-VMR is not deprovisioned on the MCU
Symptoms Proba ble cause Action s
The VMRs are not disappearing from theM CU after the meetingis
finished, which w ouldeatup VMR licenses andpotentially stoplater
one-time-vmr m eetings from beingprovisioneddue to conflicting
aliases.
JOIN cannot contact the MCU.
l Press the Test Co nn e ction s buttonin the configurationtool to
verify that JOIN can communicatewith the MC U.
l C heck the log for details.
Error in configurator when adding rooms
Symptoms Proba ble cause Action s
Error '401 Unauthorized' when accessing the Roo ms tab in the
configuration tool.
JOIN cannot authenticate to
Exchange using the credentials
in the configurationtool.
In the JOIN Configurator Genera l Settin gs tab, check the format
of the EWSService Account Use rn am e. Sometimes Micr osoft
Exchange r equires that the username is entered using oneof the
followingformats:
l domain\username
l username@domain
Dial-out to meeting room does not happen at meeting start time
Symptoms Proba ble cause Action s
JOIN does not dial out to a meeting room participant at the meeting
start time.
l JOIN cannot contactthe
MCU.
l VMR is not correctly
provisioned:The MCU
location that JOIN is
instructing the MCU to dial
out from is not corr ectly
configured.
Check JOIN log andMCU log for details.
Page 95 of 121
Page 96

Synergy JOIN Install ation and Configuration Guide
Dial-out from the video system (Green Cisco OBTP or Polycom CTJ button) does
not work
Symptoms Proba ble cause Action s
The Cisco OBTP or Polycom CTJ button is disabledand cannot be
pushed.
The button is pushed,but call fails to connect. VMR is notcorrectly
The button becomes activatedat
the“ startupbuffer” tim e, and
cannot be pushed before that.
provisioned:The uri is invalid
due to incorrect regex rules.
Check the JOIN configuration.
l C heck the JOIN logs andr egex configuration.
l C heck the call history on the endpoint to see what it tried to
call.
l C heck the “Search History” in theVCS to seeif there was a
call routing issue.
Recipients do not receive dial-in information emails when meeting is booked
Symptoms Proba ble cause Action s
Specified recipients donotreceive any email containing dial-in
information when meetingis booked
Error in email template. Check thesyntax of theH TML in your email templates.
JOIN cannot contact the
Exchange server - Invalid
configuration.
Check the configurator Gen eral Settin gs tab to ensure that the
server and credentials are correct and that you are using the correct
format for theEWSService Accoun t Usern ame.
Page 96 of 121
Page 97

Synergy JOIN Install ation and Configuration Guide
Exchange permissions
Invalid permissionsin Exchange willlead to unexpected behavior in JOIN.
If the Exchange service account does not have appropriate calendar access, you willsee authorization errors in the log.
Here are some common errors with settingexchange permissions:
l F ailure to set the “DeleteComments=$false” willremove the body of the invitation, and make it impossible for JOIN to find
information in the body.
l F ailure to set the “AddOrganizerToSubject=$false” and “DeleteSubject=$false” willremove the subject of the meeting,
and make JOIN send the incorrect Cisco OBTP or Polycom CTJ information to the video endpoint
l F ailure to set “ProcessExternalMeetingMessages=$true” will hinder internal users forwarding invitations to external S4B
meetings to the meeting rooms
l F ailure to set “RemovePrivateProperty=$false” may make JOIN send the subjectof a private meeting as Cisco OBTP or
Polycom CTJ information to the video endpoint – thereby exposing a sensitive meeting subject on the video system’s touch
panel
l F ailure to set “AutomateProcessing=$true” willstop meetings from being processed, thereby hindering JOIN from seeing
the meetings
Page 97 of 121
Page 98
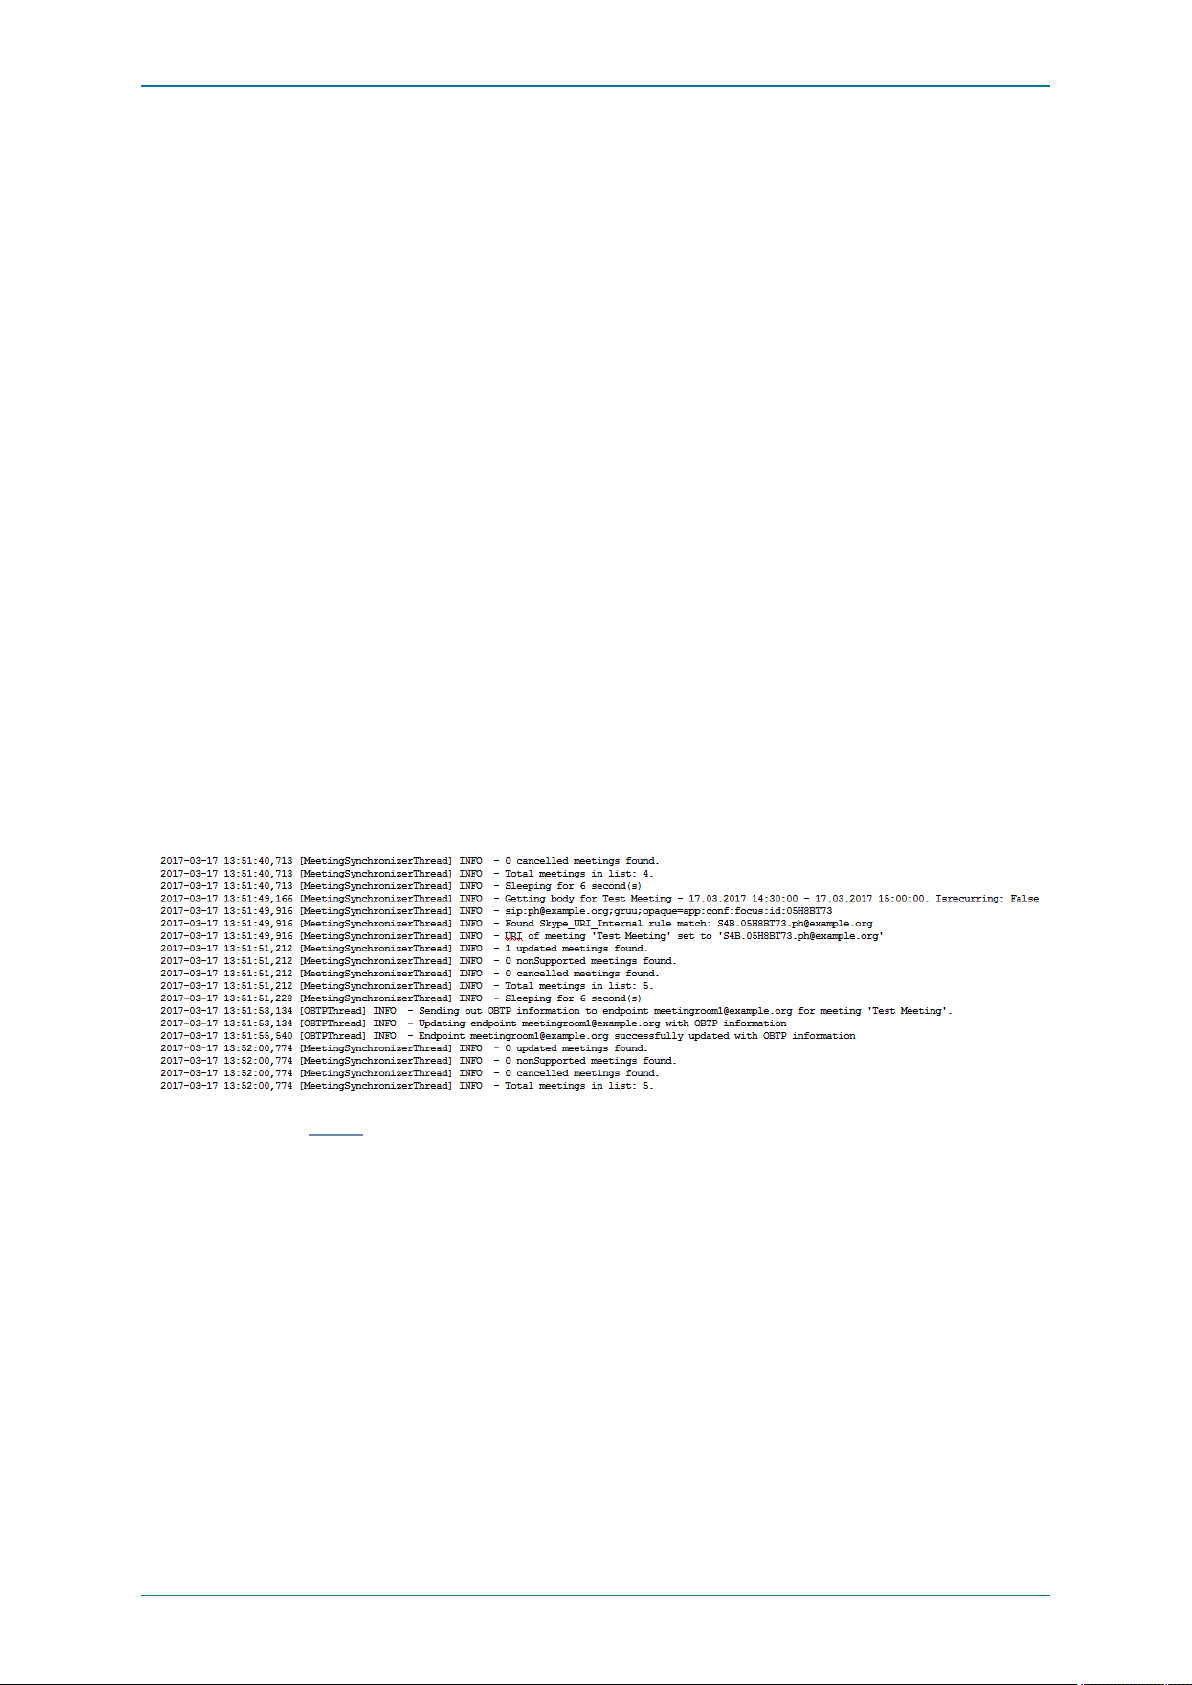
Synergy JOIN Install ation and Configuration Guide
Using the logs
JOIN logs allactivity.
There are two sets of log files stored in these default locations:
l Service:
o
C:\SynergySKY\SynergySKYEnterpriseScheduling\logs\
l Config Tool:
o
C:\SynergySKY\SynergySKYEnterpriseScheduling\config\logs\
Log levels:
The default log levelis INFO, which gives limited information about events and errors. Increasing the log levelto DEBUG will
provide more information that can be used to troubleshoot errors. The log levelis increased by replacing the text "INFO"with
"DEBUG" on line 4 in the log.config files. There is one log.config file for the configuration tool and one for the service, and the
change of log level only appliesthe log.config that is updated. It isnot recommended to run in DEBUGlog level in normal
operation due to the increased diskrequired.
The log.config files are found here:
l Service:
o
C:\SynergySKY\SynergySKYEnterpriseScheduling\log.config
l Config Tool:
o
C:\SynergySKY\SynergySKYEnterpriseScheduling\config\log.config
Log Size:
The logs willbe default roll over once they have reached 10MB, and a maximum of 10 log files are kept. You can increase the
size of the log files and the log file history by changing the maximumFileSize and maxSizeRollBackups attributes in the log.config
files. You can use KB, MB or GBas suffixwhen specifying the log maximumFileSize.
Here is example output from the service log from a successfullybooked Skypemeeting including one JOIN meeting room
resource:
We recommend using Baretail to monitor the logswhile troubleshooting.
Page 98 of 121
Page 99

Synergy JOIN Install ation and Configuration Guide
Licenses
JOIN willstop working as soon as the license expires. Administrators configured to receiveemail notifications about licenseswill
be notified every 7 days for the months preceding the license expiry date, and for the last 7 daysbefore the license expires.
A license that is expired willstop JOIN from being upgraded.
An expired or invalidlicense willresult in an entry in the log while starting up the JOIN service clearlystating that the license is
invalid.
Page 99 of 121
Page 100

Synergy JOIN Install ation and Configuration Guide
Database
l JOIN uses a file-based database. The default location for the database is:
C:\SynergySKY\SynergySKYEnterpriseScheduling\databases
l One database file iscreated per meeting. The databases folder also contains a folder for eachExchange room, in which a
synchronization cookie isstored.
o
The cookie ensures that whenJOINqueries Exchange, only updated meetings are returned.
o
You can delete the cookie if you want to perform a full synchronization for a meeting room.
l T he database is stored fullyin memory on the server, with the filesystem as a backup. The JOIN service may therefore
take a while to start if there are many rooms and/or many future meetings in the database.
Page 100 of 121
 Loading...