


 Loading...
User’s Manual
www.synapse-audio.com

Copyright © Synapse Audio Software 2019. All rights reserved.
Programming: Richard Hoffmann, Marcin Leżak
Graphic Design: Mikael Eidenberg, Marcin Leżak
Manual: Richard Hoffmann, Marcin Leżak
Sound Design: See Appendix
All technical specifications in the product described in this manual are subject to change without notice. The document may not be changed, particularly copyright notices may not be removed or changed. VST is a registered trademark of Steinberg Media Technologies GmbH. All other trademarks are property of their respective owners, and do not imply owner's endorsement of this product, or guarantee full compliance with owner's standards.
DUNE 3 User’s Manual - 2

Table of Contents |
|
1. Introduction................................................................................................................................................. |
6 |
1.1. Installation......................................................................................................................................... |
6 |
1.2. Activation........................................................................................................................................... |
7 |
1.3. Compatibility..................................................................................................................................... |
8 |
1.4. System Requirements....................................................................................................................... |
9 |
1.5. New features in Dune 3.................................................................................................................... |
9 |
2. Basic Operation......................................................................................................................................... |
12 |
2.1. Overview.......................................................................................................................................... |
12 |
2.2. Controlling parameters.................................................................................................................. |
13 |
2.3. MIDI Learn....................................................................................................................................... |
14 |
2.4. Modulation...................................................................................................................................... |
14 |
2.5. Playing a patch............................................................................................................................... |
14 |
2.6. Adjusting Polyphony....................................................................................................................... |
15 |
2.7. Pitch Bend and Modulation Wheel............................................................................................... |
15 |
3. The Center Screen..................................................................................................................................... |
16 |
3.1. Main................................................................................................................................................. |
16 |
3.2. Settings............................................................................................................................................. |
18 |
3.3. Modulation Matrix.......................................................................................................................... |
21 |
3.4. Arpeggiator...................................................................................................................................... |
22 |
4. Sound Parameters.................................................................................................................................... |
25 |
4.1. Patch Structure............................................................................................................................... |
25 |
4.2. Oscillators 1+2................................................................................................................................ |
26 |
4.2.1. Common parameters........................................................................................................... |
28 |
4.2.2. Synthesis models.................................................................................................................. |
30 |
4.3. Oscillator 3...................................................................................................................................... |
32 |
4.4. Noise Generator.............................................................................................................................. |
33 |
4.5. Ring Modulator............................................................................................................................... |
34 |
4.6. Mixer................................................................................................................................................ |
34 |
|
DUNE 3 User’s Manual - 3 |

4.7. Filter Section.................................................................................................................................... |
35 |
4.7.1. Filter Parameters.................................................................................................................. |
36 |
4.7.2. Filter Modes........................................................................................................................... |
39 |
4.7.3. Balance.................................................................................................................................. |
43 |
4.7.4. Link......................................................................................................................................... |
44 |
4.7.5. Insert Effect........................................................................................................................... |
44 |
4.7.6. Filter Route............................................................................................................................ |
47 |
4.8. Filter Envelope................................................................................................................................. |
47 |
4.9. Amplitude Envelope........................................................................................................................ |
49 |
4.10. Unison Voices................................................................................................................................ |
51 |
4.11. Voice Edit / Common.................................................................................................................... |
52 |
4.12. Master............................................................................................................................................ |
54 |
4.13. MSEGs............................................................................................................................................ |
55 |
4.14. LFOs ............................................................................................................................................... |
58 |
4.15. Effect Bus 1+2................................................................................................................................ |
61 |
4.15.1. Distortion............................................................................................................................ |
61 |
4.15.2. EQ-1 and EQ-2.................................................................................................................... |
63 |
4.15.3. Phaser.................................................................................................................................. |
66 |
4.15.4. Chorus................................................................................................................................. |
68 |
4.15.5. Delay.................................................................................................................................... |
70 |
4.15.6. Reverb.................................................................................................................................. |
73 |
4.15.7. Compressor......................................................................................................................... |
76 |
5. Wavetable Editor....................................................................................................................................... |
79 |
5.1. Toolbar............................................................................................................................................. |
79 |
5.2. Editor................................................................................................................................................ |
83 |
5.3. Using the editor............................................................................................................................... |
83 |
5.4. Waveform selection........................................................................................................................ |
85 |
5.5. Formula Editor................................................................................................................................ |
85 |
6. Modulation Matrix.................................................................................................................................... |
87 |
6.1. The differential unison engine (DUNE)......................................................................................... |
88 |
|
DUNE 3 User’s Manual - 4 |

6.2. List of Sources................................................................................................................................. |
89 |
6.3. List of Destinations......................................................................................................................... |
95 |
6.3.1. Common................................................................................................................................ |
95 |
6.3.2. Oscillator 1, 2, 3.................................................................................................................... |
96 |
6.3.3. Ring mod/Noise.................................................................................................................. |
100 |
6.3.4. Filter..................................................................................................................................... |
101 |
6.3.5. Amplifier.............................................................................................................................. |
103 |
6.3.6. MSEG.................................................................................................................................... |
103 |
6.3.7. LFO....................................................................................................................................... |
103 |
6.3.8. MM Amount 1-32................................................................................................................ |
104 |
6.3.9. FX Bus 1 and 2.................................................................................................................... |
104 |
7. MIDI Reference........................................................................................................................................ |
107 |
8. Optimizing performance........................................................................................................................ |
110 |
8.1. Optimizing your system............................................................................................................... |
110 |
8.2. Optimizing patch settings............................................................................................................ |
110 |
8.3. Polyphony...................................................................................................................................... |
110 |
8.4. Modulation Rate........................................................................................................................... |
111 |
8.5. Patch structure............................................................................................................................. |
111 |
9. Troubleshooting...................................................................................................................................... |
112 |
9.1. Notes click when pressing or releasing a key............................................................................ |
112 |
9.2. Patches do not recall.................................................................................................................... |
112 |
9.3. Parameters change unexpectedly............................................................................................... |
112 |
9.4. The sound is distorted.................................................................................................................. |
112 |
9.5. MIDI messages are not received................................................................................................. |
113 |
9.6. The CPU usage is very high.......................................................................................................... |
113 |
10. Legal Information................................................................................................................................. |
114 |
10.1. Trademarks................................................................................................................................. |
114 |
10.2. End User License Agreement (EULA)......................................................................................... |
114 |
Appendix. Sound Design Reference........................................................................................................... |
117 |
DUNE 3 User’s Manual - 5

1. Introduction
Thank you for choosing DUNE 3 by Synapse Audio!
Dune is a next-generation software synthesizer plugin designed for creating music on a computer. It was developed with the highest possible audio quality in mind and offers exceptional flexibility. The latter is achieved by its modulation system, the new differential unison engine (DUNE) – hence the name. Despite the complexity of the synthesizer, fast vector processing as well as support for multiple processor cores allows Dune to run with a moderate CPU load on modern systems.
Dune 3 was tested by experienced music producers to guarantee its ambitious design goals were met. It comes with high quality sounds, with few exceptions created entirely by professional sound designers.
1.1. Installation
Important note for Dune 1 and Dune 2 users: There is no need to uninstall Dune 1 or Dune 2 prior to installing Dune 3, they all run fine in parallel.
Furthermore note that Dune 3 is patch-compatible with Dune 2, so patches from Dune 2 can be fully used in Dune 3. The best way to do this is to simply move your patches/folders from Dune 2's Soundbanks folder over to Dune 3.
Installation on Windows
Unzip “dune30win.zip” and run SETUP.EXE to commence with the installation process.
The installer will guide you through the necessary steps. During installation, you will be asked to select the location of your VstPlugins directory. Make sure to choose the correct directory for your host software. Refer to your host software's manual if you are unsure about where the host software's VstPlugins directory is located.
DUNE 3 User’s Manual - 6

All content files like the factory presets, MIDI files, wavetables and the manual will be placed in the directory you specify during installation. By default this is the user directory (Synapse Audio/DUNE 3).
The next time you start your host software Dune 3 will appear in the VST instrument list.
Installation on Mac
Dune comes with a dedicated installer application. Download and open the file named
"dune30mac.dmg". Afterwards, double-click on the installer icon to begin the installation process. The installer will guide you through the necessary steps. The next time you start your host software Dune will appear in the AU and/or VST instrument list, depending on which format your host software supports.
1.2. Activation
After installation, the next step is to provide your license key by using the Activation Tool. On PC/Windows the tool is launched on first plug-in instance insert in your host (UI must be opened). On Mac OS X the tool is launched right after installation is completed.
After typing in the key, you will be asked to activate the license. This is required just once per computer. The preferred way is Online Activation, which requires only a single click. Activation permanently enables Dune 3 to run on your computer. You may activate Dune 3 on three computers simultaneously, provided you are the only user of those computers (for multiple users, multiple licenses need to be purchased). Note that when choosing Online Activation, no personal data is transmitted in the process, it is a perfectly safe method of activation.
If you wish to activate Dune 3 on a computer not connected to the Internet, choose Offline
Activation. You will be given a key which you can save to a USB stick or write down on a sheet of paper. Now switch to a different computer with Internet access and log in to your account at:
http://www.synapse-audio.com/support.html
DUNE 3 User’s Manual - 7

Click on the "Access product activations" link in the "Product activations" section on the left.
Enter the key previously stored and you will receive a response code, which you can type into the Offline Activation dialog to complete the installation process.
1.3. Compatibility
Dune 3 should run on any VST or AU-compatible host and comes with both 32-bit and 64-bit versions. If you encounter any compatibility issues with your host software, do not hesitate to contact us (service@synapse-audio.com). Dune 3 has been tested under the following hosts:
•Ableton Live
•Apple Logic Pro
•Avid Pro Tools
•Bitwig Studio
•Cockos Reaper
•Image Line FL Studio
•Magix Samplitude
•Native Instruments Komplete Kontrol
•Native Instruments Maschine
•PreSonus Studio One
•Propellerhead Reason
•Steinberg Cubase
•Synapse Audio Orion
DUNE 3 User’s Manual - 8

1.4. System Requirements
In order to maximize sound quality, Dune 3 employs complex DSP algorithms that are very CPU demanding. Optimized SSE vector processing, as well as support for multiple processor cores allow Dune 3 to perform very well despite its high complexity. To achieve best performance, a modern computer is required, however:
•Macs require OS X 10.9 or later, and should be equipped with a 2.8 GHz quad core processor or better. PPC processors are not supported.
•PCs require Windows 7 SP 1 or later, and should be equipped with a 2.8 GHz quad core CPU or better. Most importantly, Windows must be optimized for realtime audio, in order to maximize the benefits of Dune 3's multi-threaded engine. Too many software packages or services running in the background can severly degrade performance.
Furthermore, it is important to choose a good latency/audio buffer size. We recommend to use between 10-20ms, or 512 samples at a 44.1 / 48 kHz sample rate. On most systems, this should result in a good balance between low-latency, realtime feel and CPU performance. Note that using less than 128 sample buffers will disable multi-threaded processing, as the thread synchronisation overhead becomes too significant.
The memory requirement of Dune 3 is approximately 100 mb per instance. Thus if you wish to run many instances, your system should be equipped with 8 GB of memory or more.
1.5. New features in Dune 3
This section provides an overview of the most important changes since Dune 2 – new users can skip this section.
Dune 3 adds many new features compared to its predecessor. Despite many additions, Dune 3 is still fully compatible with patches made in Dune 2 and furthermore contains the entire factory soundbank from Dune 2.
DUNE 3 User’s Manual - 9

Oscillators
The Oscillator section features a new type named "Swarm". This is a Supersaw-type oscillator with modulation built in, controlled by the additional RATE knob. This can make the Supersaw sound more alive. Furthermore this type usually requires less oscillators than the other types, thus saving CPU. Using say 8 oscillators only in the Swarm mode may have a similar effect to using 32 oscillators in one of the other modes.
Filter Section
Where Dune 2 had only a single filter plus an effect with a pre/post switch, Dune 3 now contains two filters and an effect, with a freely adjustable order. The new Balance knob allows to blend seamlessly between both filters, the Link switch links all filter knobs to speed up the workflow in situations where the filter parameters are shared.
Apart from the structural changes, there is also new Filter and new Effect types. Of particular interest are the new analog-modeled lowpass filter types, as well as the Vocal and Formant effect programs allowing for completely new sounds not possible previously.
LFO
A new LFO type, "Random Pulse", has been added. This type is similar to S+H (Sample and Hold), but randomizes the pulse timing instead of its amplitude.
Effects
The two master effect busses offer the same effect types as in Dune 2 (Chorus/Flanger, EQ, Phaser, Delay 1+2, Reverb, Distortion, Compressor), however each effect has one or more new modes that did not exist previously, thus greatly enhancing the sound design capabilities.
The Equalizer has received the largest upgrade. Using the technology from our GQ-10 Graphic Equalizer, adjusting the timbre of sounds has never been easier due to the interactive display and the new, powerful features like the lowand high-cut filters.
DUNE 3 User’s Manual - 10
Undo/Redo
Dune 3 offers unlimited Undo/Redo via the PATCH menu.
MSEG Presets
MSEG curves can now be stored and recalled in the MSEG editor.
Arpeggiator
Dune 3 now features two full arpeggiator units instead of just one. This greatly increases the creative possibilities, e.g. two independent sequences can be played at the same time using different voices.
Wavetable Editor
Using the new comprehensive wavetable editor all factory wavetables can be modified, and new waveforms or wavetables can be created from scratch with great ease. Audio files in WAV format can be imported as well. See chapter 5. Wavetable Editor for a detailed explanation.
Skins
Four skin sizes allow Dune 3 to be used on many different target resolutions, in particular Full HD, 4K, 5K screens etc.
Performance
Dune 3 contains various performance improvements made to its core engine. Most of the performance gain is used by the new features that have been added. Some patches made in Dune 2 can still see a 10-15% saving in CPU demand, however.
DUNE 3 User’s Manual - 11

2. Basic Operation
2.1. Overview
The Dune 3 interface can be divided into four parts:
DUNE 3 User’s Manual - 12
The center screen (A) hosts the patch management, global and patch settings, the modulation matrix and the arpeggiator. The center screen is covered in chapter 3. The Center Screen.
The right side (B) contains the master section with global volume and the polyphony setting, as well as the unison voice controls. Dune 3 allows to directly edit the eight unison voices, either all at once or individually. This makes Dune 3 a multi-part synthesizer which facilitates synthesizing highly complex sounds.
The 8 switch buttons (C) toggle the bottom view between the keyboard, effect busses, LFOs, and four graphical envelopes (MSEG).
The remaining knobs and sliders (D) are Dune's main sound parameters: The oscillator stacks, mixer, filters, and ADSR envelopes. The layout roughly follows classic synthesizers, with the oscillators on the left, followed by the filter in the middle and the envelopes on the right.
Each unison voice has its own set of sound parameters. All sound parameters are covered in chapter 4. Sound Parameters.
2.2. Controlling parameters
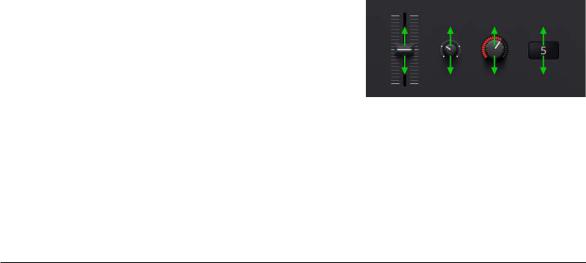
Knobs, faders, and numerical displays are controlled by left-clicking on them, then dragging the mouse up or down in vertical direction (see fig. 2.2).
Use Ctrl+Click to set knobs to their default position, and Shift+Click to slow down the movement, in order to set precise values.
Figure 2.2. Controlling parameters.
The mouse wheel is a very useful tool to speed up your workflow, and works on almost every parameter. Use the mouse wheel on numerical displays to increase or decrease the current value. Use the mouse wheel on drop-down lists, to select the previous or next parameter in the list. Knobs and faders can be fine tuned using the mouse wheel, in the graphical envelope editors it zooms the view.
DUNE 3 User’s Manual - 13

2.3. MIDI Learn
Right-click on a parameter then choose "MIDI Learn" to link it to a particular MIDI controller. Afterwards, turn any knob or fader on your MIDI gear to link it to that parameter. Unlink controllers by right-clicking on a parameter then choosing "MIDI Forget". Note that without any assignments, Dune 3 uses a default MIDI controller map (see chapter 7. MIDI Reference).
2.4. Modulation
Right-click on a parameter then choose "Modulate with" to set up a source/destination pair in the modulation matrix. Afterwards, change the amount parameter in the modulation matrix as desired. Setting up modulation in this manner is usually faster then choosing a destination from the popup menu in the modulation matrix.
Read chapter 6. Modulation Matrix for a more in-depth explanation of Dune's modulation matrix.
2.5. Playing a patch
You can play individual notes directly by clicking on the keyboard at the bottom of the user interface. The vertical click position determines the velocity of the sound. A much better way, however, is to use your host sequencer or a MIDI keyboard.
Whenever you play notes via your host sequencer or keyboard, the MIDI In indicator should flash up. If this is not the case, then the required note information is not transmitted to the plugin. Refer to your host software's manual to address this issue. If you use an external MIDI keyboard, check if your host sequencer receives any data to begin with.
Select a patch by clicking on the patch name in the center screen. A more detailed description of the patch management is given in chapter 3. The Center Screen.
DUNE 3 User’s Manual - 14

2.6. Adjusting Polyphony
Dune 3 allows you to play multiple notes at the same time. The "Polyphony" drop-down menu in the master section on the right adjusts the number of notes that can be played simultaneously.
Each note you play triggers one or more unison voices (the number of active voices are displayed in the MAIN section of the center screen). Since each voice costs processor time, it is a good idea to limit the polyphony as much as possible.
When choosing Mono or Legato, only one note can be played at a time. Legato allows to smoothly go from one note to another without re-triggering the envelopes. This can be useful for bass and lead sounds, particularly in combination with the glide knob. It creates a unique playing feel and sound which can be better for monophonic lines. Using mono or legato modes also results in the smallest CPU usage possible.
Note that the voice polyphony can be adjusted per patch. While all patches should employ an adequate setting out of the box, your individual playing style or usage of sounds may require adjusting the polyphony parameter at times.
2.7. Pitch Bend and Modulation Wheel
At the bottom left of the user interface, the pitch bend and modulation wheels are located. The pitch bend wheel is used to temporarily shift the pitch upor downwards. When released, it automatically snaps back to center position. The modulation wheel typically controls vibrato type effects, but can be used to modify other sound parameters as well. It remains in whatever position it was set to.
DUNE 3 User’s Manual - 15

3. The Center Screen
This chapter explains all parameters inside the center screen. The center screen hosts the patch management, global settings, patch settings, the modulation matrix and the arpeggiator.
3.1. Main
Selecting a patch
Each musical sound that you can play is called a Patch. A patch is selected by clicking on the patch name in the center screen:
Alternatively click on the left/right arrow buttons to go to the previous/next patch inside the current bank.
Dune 3 comes with multiple soundbanks, comprising a total of about 1000 patches. The patches are sorted into categories like Bass, Lead, Pads, SFX etc. The default bank shown is "Dune 3", containing the latest patches made specifically for Dune 3. Click on SOUNDBANK in order to choose a different bank/category.
Soundbanks and Patches are stored in the following directory:
•Mac OS X: /Library/Application Support/Synapse Audio/DUNE 3/Soundbanks
•Windows: User/Synapse Audio/DUNE 3/Soundbanks
Each patch is a single Cubase .FXP file, a common format for storing patches. Any directory within the Soundbanks directory represents a bank. Thus you can easily organize your patches and banks within the Soundbanks directory.
DUNE 3 User’s Manual - 16

Below the patch name, the patch description section gives some information about the currently selected patch, for example what the modulation wheel does to the sound, or whether the patch is intended for a particular tempo.
If you accidentally switch to another patch during editing a patch, do not panic. The Undo/Redo function will help you.
Patch menu
The patch menu is invoked by clicking on "Patch":
•Load Patch loads a particular patch from disk. This can be useful to browse patches outside of Dune's Soundbanks folder. Most of the time, however, you should store patches in your
Soundbanks folder, in order to be able to browse a whole bank quickly.
•Save Patch allows you to save the current patch to disk. Always save your changes before switching to a different patch or closing your host application, otherwise you will lose your changes. Of course you can also simply save the project in your host sequencer, this will automatically save the active patch as well. Any patch that has been modified is marked with an asterix (*), after saving the patch, the asterix is removed.
•Copy FX 1/2 copies all effect bus 1/2 parameters into the clipboard, in order to apply them to a different patch or to a different Dune 3 instance.
•Paste FX 1/2 pastes all effect parameters from the clipboard into effect bus 1/2.
•Initialize Patch resets the current patch to default settings. When designing new patches from scratch, it is useful to start with a "minimal" patch, i.e. a patch with an empty modulation matrix, all effects turned off, etc., which is what the Initialize Patch function does. Note that your current patch will be lost, so be sure to save it first if necessary.
DUNE 3 User’s Manual - 17

•Revert Patch allows you to restore the current patch from disk, in case you are unhappy with changes made to the patch.
•Undo allows you to go back to previous edit states. For instance if you accidentally switch the current patch during editing, simply click Undo to restore the previous patch you have been working on.
•Redo reverses the Undo.
Multithreading
Dune 3 can use up to six processor cores simultaneously.
Enabling multithreading is recommended in most cases, since it can significantly reduce CPU usage. Depending on the computer and the host sequencer used, multithreading may have no effect or even generate CPU peaks. In this case, multithreading should be disabled.
Skin
Click on Skin to switch to a different skin size. The default size is intended for typical Full HD displays. Use the Large or even Huge size for UltraHD displays. If you work on an older PC with a low-resolution display, choose the Small skin.
3.2. Settings
The settings tab controls velocity, pitch bend and the modulation rate.
Velocity
Each MIDI note transmits a velocity value, which can be connected to any sound parameter using the modulation matrix. Since velocity is often used to control the volume or brightness of a sound, the velocity section allows for a few common direct connections.
DUNE 3 User’s Manual - 18

•Volume adjusts how much velocity affects the volume of a patch. Set to zero, velocity has no effect on volume. Positive values cause higher velocities to increase volume, negative values invert the effect – higher velocities decrease volume.
•Pan adjusts how much velocity affects the stereo position. Set to zero, velocity has no effect on pan. Positive values move the sound to the right as velocity increases, negative values do the opposite.
•Filter adjusts how much velocity affects the filter cutoff. Set to zero, velocity has no effect on the filter. Positive values cause higher velocities to increase filter cutoff, negative values invert the effect.
•Env Amt adjusts how much velocity affects the envelope amount. Set to zero, velocity has no effect on the filter envelope amount. Positive values cause higher velocities to increase envelope amount, negative values invert the effect.
Velocity Curve
Using the velocity curve setting, you can change the effect the MIDI Velocity has on the selected patch. To change the velocity curve, left-click on the curve, then drag the mouse up or down in vertical direction.
By default, all MIDI velocity values control the destination in a linear manner (1:1).
For example, an incoming velocity value of 80 has twice the effect compared to a velocity of 40.
Figure 3.2. Velocity Curve.
By setting the curve parameter, you can change this 1:1 mapping to a nonlinear behavior. A value of zero corresponds to the default, linear scale.
DUNE 3 User’s Manual - 19

The curve parameters is useful to fine tune the velocity response towards your personal playing style, as well as to your MIDI keyboard.
Pitch Bend
The Bend up/down parameters specify by how many semitones a sound is pitch shifted up or down, when the pitch bend wheel is turned all the way up or down.
Click on the numbers and drag the mouse up or down to increase/decrease the pitch bend range.
If a MIDI keyboard is hooked up to your computer, turning the physical pitch bend or modulation wheel should turn the same wheel in Dune automatically. If this is not the case, then the required MIDI information is not transmitted to the plugin, and you should refer to your host software's manual to address the issue.
Modulation rate
The modulation rate determines how frequently the modulation matrix is evaluated.
•The Normal rate is almost always sufficient, and the best choice for the vast majority of sounds.
•The (Very) Fast rate is useful when you use rapid LFO modulations (>100 Hz), or when you use MSEGs with very fast envelopes.
•Audio Rate mode processes the entire synth engine sample by sample. This allows to e.g. use oscillators as modulation sources and modulate any (!) sound parameter with them accurately.
Note that audio rate modulation is very CPU-intensive and should be only used when really needed. Also note that a higher modulation rate does not equal better sound – if you cannot hear a difference, do not use a higher modulation rate, this will just waste precious CPU cycles.
DUNE 3 User’s Manual - 20
3.3. Modulation Matrix
The modulation matrix is accessed by clicking on the Mod Matrix button (see fig. 3.3). The purpose of a modulation matrix is to connect MIDI controllers, LFOs, and envelopes with Dune's sound parameters. In a nutshell, the modulation matrix is largely responsible for making sounds come alive.
Figure 3.3. Mod Matrix view.
Click anywhere in the source column to choose the modulation source, and anywhere in the destination column to select the sound parameter to modulate. In the amount column, click and drag vertically to change the modulation amount for a specific slot. In the example above
(fig. 3.3), LFO-1 modulates the amplitude with an amount of 100%, giving a tremolo effect.
The voice column on the right allows to limit the modulation to specific unison voices. By default, all voices are modulated, the column is empty ("---").
Clicking on the SOURCE or DESTINATION label sorts the modulation matrix. To clear the modulation matrix, right-click and choose "Initialize".
To get the most out of the modulation matrix, it is required to first understand how LFOs and envelopes work, and what the sound parameters do. Hence, the modulation matrix with all its sources and destinations is described more thoroughly in chapter 6. Modulation Matrix.
DUNE 3 User’s Manual - 21

3.4. Arpeggiator
An arpeggiator (short: ARP) is a module that generates melodic or rhythmic patterns from one or more keys pressed. This is achieved with the help of a little step sequencer containing note length, velocity and pitch information. For additional flexibility, standard MIDI files can be loaded as well.
Dune 3 features two Arp modules that can be used independently of each other. The arpeggiator parameters can be accessed by clicking on ARP-1 or ARP-2 in the monitor.
The arpeggiator is enabled or disabled using the ARP-1 or ARP-2 switch in the voice edit section, individually per unison voice.
Type
The arpeggiator can use either the built-in step sequencer or midi files as a basis, which can be chosen using the TYPE popup field in the top left of the monitor.
In Step Sequencer mode, monophonic patterns of up to 32 steps can be programmed directly within Dune. Click on buttons 1-8, 9-16, 17-24 or 25-32 to edit eight steps simultaneously.
Each step has three parameters, note, velocity, and tie. A nonzero note value transposes a step up or down by the given number of semitones, e.g. +12 corresponds to one octave up. The tie button glues two steps, which allows to either slide from one note to another seamlessly, or to simply increase its length. A rest can be programmed by turning down the note value all the way down, until three dashes ("---") appear.
The Midi mode allows to use standard MIDI files as a basis. The files should contain only a single track, and they should be monophonic. An exception is when the "Playback" mode is chosen, in this mode polyphonic MIDI files can be played back too.
DUNE 3 User’s Manual - 22

Arpeggiator Modes
The arpeggiator module in Dune comprises 9 different modes described below.
•Up mode successively triggers notes for all keys currently pressed, from the lowest to the highest note, then repeats the sequence starting with the lowest note again.
•Down mode does the same, but in reverse order.
•Up/Down mode triggers all keys pressed from the lowest to the highest note, then back.
•Down/Up works like Up/Down, except in reverse order.
•Alt Up is an alternative to Up mode, employing a different pattern when moving up.
•Alt Down mode is identical to Alt Up, except it operates in reverse order.
•Random mode traverses through all keys pressed, in random order.
•Chord mode chops up a chord into a rhythmic pattern, according to what is programmed in the step sequencer or MIDI file.
•Playback mode simply plays back the sequencer notes (or MIDI file), transposed according to the current MIDI key pressed. Pressing more than one key simultaneously has no effect in this mode. Playback mode is the only mode that allows to play back polyphonic MIDI files.
•Silent is a special mode in which the arpeggiator does not trigger any notes. The purpose of this mode is to use the arpeggiator exclusively for modulation, by choosing "Arp Note",
"Arp Velocity" or both as a source in the modulation matrix.
Octaves
This parameter specifies how many octaves the arpeggiated sequence spans. Set to one octave, the arpeggiator will use exactly the keys pressed. Set to two octaves, the arpeggiator will use all keys pressed, plus the very same keys one octave higher, etc.
DUNE 3 User’s Manual - 23

Steps/Bars
When in Step Sequencer mode, this parameter sets the pattern length in steps. When the arpeggiator reaches the end of the pattern, it will automatically jump to the beginning and start over. When MIDI mode is selected, this parameter sets the number of bars to use, up to 32 bars are possible. The arpeggiator loops MIDI sequences, too.
Rate
Adjusts the tempo in which the arpeggiator generates sequences from incoming MIDI notes. When SYNC is enabled, the tempo is slaved to the host sequencer and can be specified in musical intervals such as 8th note, 16th notes, dotted notes (*), triplets (T) etc. When SYNC is disabled, the rate is specified in Hz.
Length
Using the length parameter, the duration of all notes in the sequencer can be increased or decreased. Turned to the left, the notes get a staccato feel, while the opposite direction yields smoother sounding sequences.
Swing
This control shuffles the position of every other 16th note by the specified amount. This parameter can be used to obtain a typical swing feel with a setting of +33% and above. In the step sequencer, the shuffled notes are located at positions 2, 4, 6, 8, ..., 32.
Slide
This control adjusts the time it takes from the beginning of a slid note to reach its target pitch.
In order to get any audible effect, TIE must be used on a note, and at least two different note numbers must be used during the note. Note that Slide only works in Step Sequencer mode, not in MIDI mode.
DUNE 3 User’s Manual - 24

4. Sound Parameters
This section describes how a patch is constructed, the operation of all front panel knobs and switches, the effect section and the arpeggiator.
4.1. Patch Structure
The structure of a Dune 3 patch is shown in fig. 4.1. The block diagram shows the basic working principle of the entire synthesizer without taking into account the modulation matrix (which will be covered in detail in chapter 6. Modulation Matrix).
Figure 4.1. Structure of a DUNE 3 Patch.
DUNE 3 User’s Manual - 25

Whenever a MIDI note is played, one or more voices are triggered to synthesize that note. Each voice has the exact same structure shown, but may use different parameters. The voices are summed and fed into the effects unit to further refine the sound with eq, delay, reverb etc.
Each voice comprises three major building blocks, an oscillator block ("OSC 1-3"), a filter block
("Filter") and a volume control block ("Amp"). The blocks emulate the three basic properties of a sound: Pitch, Timbre and Volume. The oscillator block controls the pitch and basic timbre of a sound by generating one or more periodic waveforms. The resulting signal is typically very bright. To further refine the timbre, the signal is processed by the filter block, which attenuates frequencies specified by the user; usually, high frequencies are removed. Hence, this type of synthesis is commonly called "subtractive". The final block controls the volume of the signal.
On their own, the three basic building blocks synthesize a completely static sound. This is in contrast to acoustic sounds, where pitch, timbre and volume change over time. In order to obtain this possibility in a synthesizer, so called envelopes are used to add dynamic variation to a sound. The most important envelope is the amplitude envelope ("Amp Env"), which is essential to fade in and fade out notes and thus to make a synthesizer playable like a real instrument in the first place. Also very important is the filter envelope ("Filter Env"), which dynamically varies the brightness and thus the timbre over time. In addition to these two envelopes, Dune offers a further four freely programmable graphical envelopes ("MSEG"), which can be linked to any sound parameter.
While envelopes nicely control the overall progression of a sound, it is sometimes desirable to add periodic modulations. Such modulations can mimic vibrato or tremolo effects known from acoustic instruments, and can be added by using one or more of the low frequency modulation ("LFO") blocks.
4.2. Oscillators 1+2
An oscillator generates a periodic waveform and forms the basic building block of the majority of synthesizers. The most common waveforms are illustrated in fig. 4.2.
DUNE 3 User’s Manual - 26

Figure 4.2. Basic oscillator waveforms.
Dune's oscillator controls can be found in the top left section of the user interface:
Dune offers three oscillators and a separate noise generator. This corresponds to how many traditional synthesizers work. In Dune, however, the first two oscillators are actually stacks of up to 32 oscillators each, with adjustable detune and stereo spread. This allows to obtain thick pad, bass or lead sounds with just one oscillator alone. With Dune's 8 unison voices, up to 200 oscillators per key can be synthesized.
DUNE 3 User’s Manual - 27

4.2.1. Common parameters
Density
The number of oscillators can be changed by left-click/drag on the Density field in the top-left.
When set to zero, the oscillator stack is turned off, which saves processor time.
Amount
When choosing more than two oscillators using the density control, the amount (AMT) parameter allows to modify the level of the oscillators. The meaning of this parameter depends on the selected tuning mode, but usually adjusts the level of the oscillators around the center (which always remains at maximum).
Tuning
The chosen tuning mode affects the overall tuning and volume of the oscillator stack.
•Linear mode tunes all oscillators around the center with equal spacing.
•Nonlinear mode moves some oscillators closer to the center.
•Gaussian mode uses a gaussian distribution on the volume of the oscillators, which can be fine-tuned by the amount parameter.
•Alternate mode lowers every other oscillator in volume when changing the amount parameter.
•Random uses a random tuning for all oscillators, whenever a new key is pressed.
•Perfect 5th is like Linear, except that every other oscillator is pitched up by +7 semitones (a fifth).
•Minor is like Linear, except that a minor chord is generated with 4 oscillators or more.
•Major is like Linear, except that a major chord is generated with 4 oscillators or more.
DUNE 3 User’s Manual - 28

•Sub Osc is like Linear, except that every other oscillator is pitched down by -12 semitones
(one octave).
•Swarm is a new oscillator stack model in Dune 3, where all oscillators in the stack are individually modulated. This mode adds an extra knob Rate, controlling the rate of modulation.
Semi
The control labelled SEMI adjust the coarse tuning of the oscillator stack, in semitones. The range spans +/- 36 semitones. A larger range can be obtained by using the modulation matrix, if required. This will be covered in chapter 6. Modulation Matrix.
Fine
This parameter adjusts the fine tuning of the oscillator stack. A value of +/- 100 corresponds to half a semitone.
Detune
When two or more oscillators are active in the stack, the detune parameter allows to spread their pitch around the center frequency.
Spread
When two or more oscillators are active in the stack, the SPRD knob allows to spread the oscillators in the stereo field, around the center. Turned fully left, the oscillator stack will be mono.
Reset
When reset is enabled, all oscillators in the stack start at the same initial phase (by default zero, this can be changed in the modulation matrix).
DUNE 3 User’s Manual - 29

Setting the initial oscillator phase can be useful to obtain better control of the transient of a sound, for instance. When using more than one or two oscillators, note however that reset will create strong phasing effects. It is thus usually better to keep reset turned off when using multiple oscillators.
4.2.2. Synthesis models
Three different synthesis models, Virtual-Analog (VA), Wavetable (WT) and Frequency Modulation (FM) are available per oscillator. When using more than one voice, it is furthermore possible to specify different modes for different voices. The synthesis model can be changed by using one of the three buttons (VA/WT/FM):
VA mode
The virtual-analog (VA) mode synthesizes three basic waveformssawtooth, pulse and triangle.
Click on the waveform drawing to switch between the three different types. When the pulse waveform is chosen, you may additionally adjust its pulse width (see fig. 4.2.2). The default is 50%, corresponding to a square wave.
Figure 4.2.2. Pulse Width.
DUNE 3 User’s Manual - 30
Loading...