

Page 1
Carrington™
Roman Tub Faucet SRT-4470
Installation and Service Instructions
Caution: Be sure to turn off hot and cold water supplies before
installing or servicing faucet.
Installation Procedure:
Drill three 1 1/4” holes into the deck (maximum deck 1.
thickness 1-3/8” ).
Cut 1/2” copper tubing (RT-108) to length required.2.
Example: If a 10” valve center to valve center is required,
the tubing should be cut to 3 7/8”. e maximum overall
center to center dimension with supplied tubing is
18-1/4”.
For greater widths the installer will need to provide their
own tubing.
Ensure the centerbody nut (RT-103N) is threaded onto 3.
the centerbody (RT-100) and then install 3/8” plug (RT-
105).
Solder the branch of the tee (HPT-10) to the centerbody.
Cut to proper length and solder the two 1/2” copper
tubing (RT-108) into the run of the tee (HPT-10) and
into the valve bodies (RT-103).
e system can be tested at this time.7.
Remove plug (RT-105) when the spout (RT-135) is to be
assembled onto the faucet.
Grease o-ring (T-2) in the bore of the spout.8.
Assemble spout onto centerbody with gasket (RT-165)
under the spout.
Tighten spout (RT-135) in place with set screw
(SC-15A).
read handle escutcheons (RT-104) onto valve bodies.9.
read collar (LN-112) onto the valve body until it
reaches the escutcheons (RT-104).
Tighten three body nuts (RT-103N) securely.
Faucet handle installation:10.
Place handle on valve spindle and thread screw
(LN-121A) into valve.
Push assembly through deck holes from the bottom with 4.
hot on le .
Slip retaining plate (RT-101) over the centerbody (RT-
100) making sure the retaining plate (RT-101) slides over
the ange of the centerbody.
en turn the retaining plate 90 degrees under the
nut on the centerbody (RT-100) to hold in place. e
soldered assembly should be held in position on the
deck making sure the hot cartridge is on the le .
Ensure the tops of the valve bodies measure
approximately 1-7/8” from the nished deck by
adjusting centerbody and valve body nuts (RT-103N).
Note: If tile or nished surface will be installed while
the plumbing is in a “roughed in state” the retaining
plate (RT-101) should be shimmed the thickness of the
nishing material.
Tighten the centerbody nut (RT-103N) under the deck. 5.
read valve body nuts (RT-103N) up to base of deck
but do not tighten.
Solder 1/2” hot and cold supplies to valve bodies 6.
(RT-103).
It is very important to thoroughly ush the supply lines 11.
to prevent foreign matter, i.e. copper chips, sand, stones,
etc. from damaging the sealing surfaces of cartridge.
Remove aerator and open hot and cold to full open then
open both supplies.
Let water run through hot and cold long enough to ush
supply lines thoroughly.
Shut o faucet and replace aerator. Check for leaks.
Cartridge Replacement (KN-113 or KN-114)
Remove plug button (LN-243C or LN-243H), loosen 1.
Philip head screw (LN-121A) and remove handle (LN-
177).
Remove collar (LN-112) by turning counter clockwise. 2.
Caution: Do not use wrench as this may damage the
surface nish.
Place wrench on cartridge hex nut (KN-113, KN-114). 3.
Turn wrench counter clockwise until cartridge is
removed.
Install new cartridge. Turn cartridge with wrench until 4.
cartridge does not turn easily then turn 1/4 to 1/2 turn
further. Reassemble handle in reverse fashion.
Page 2
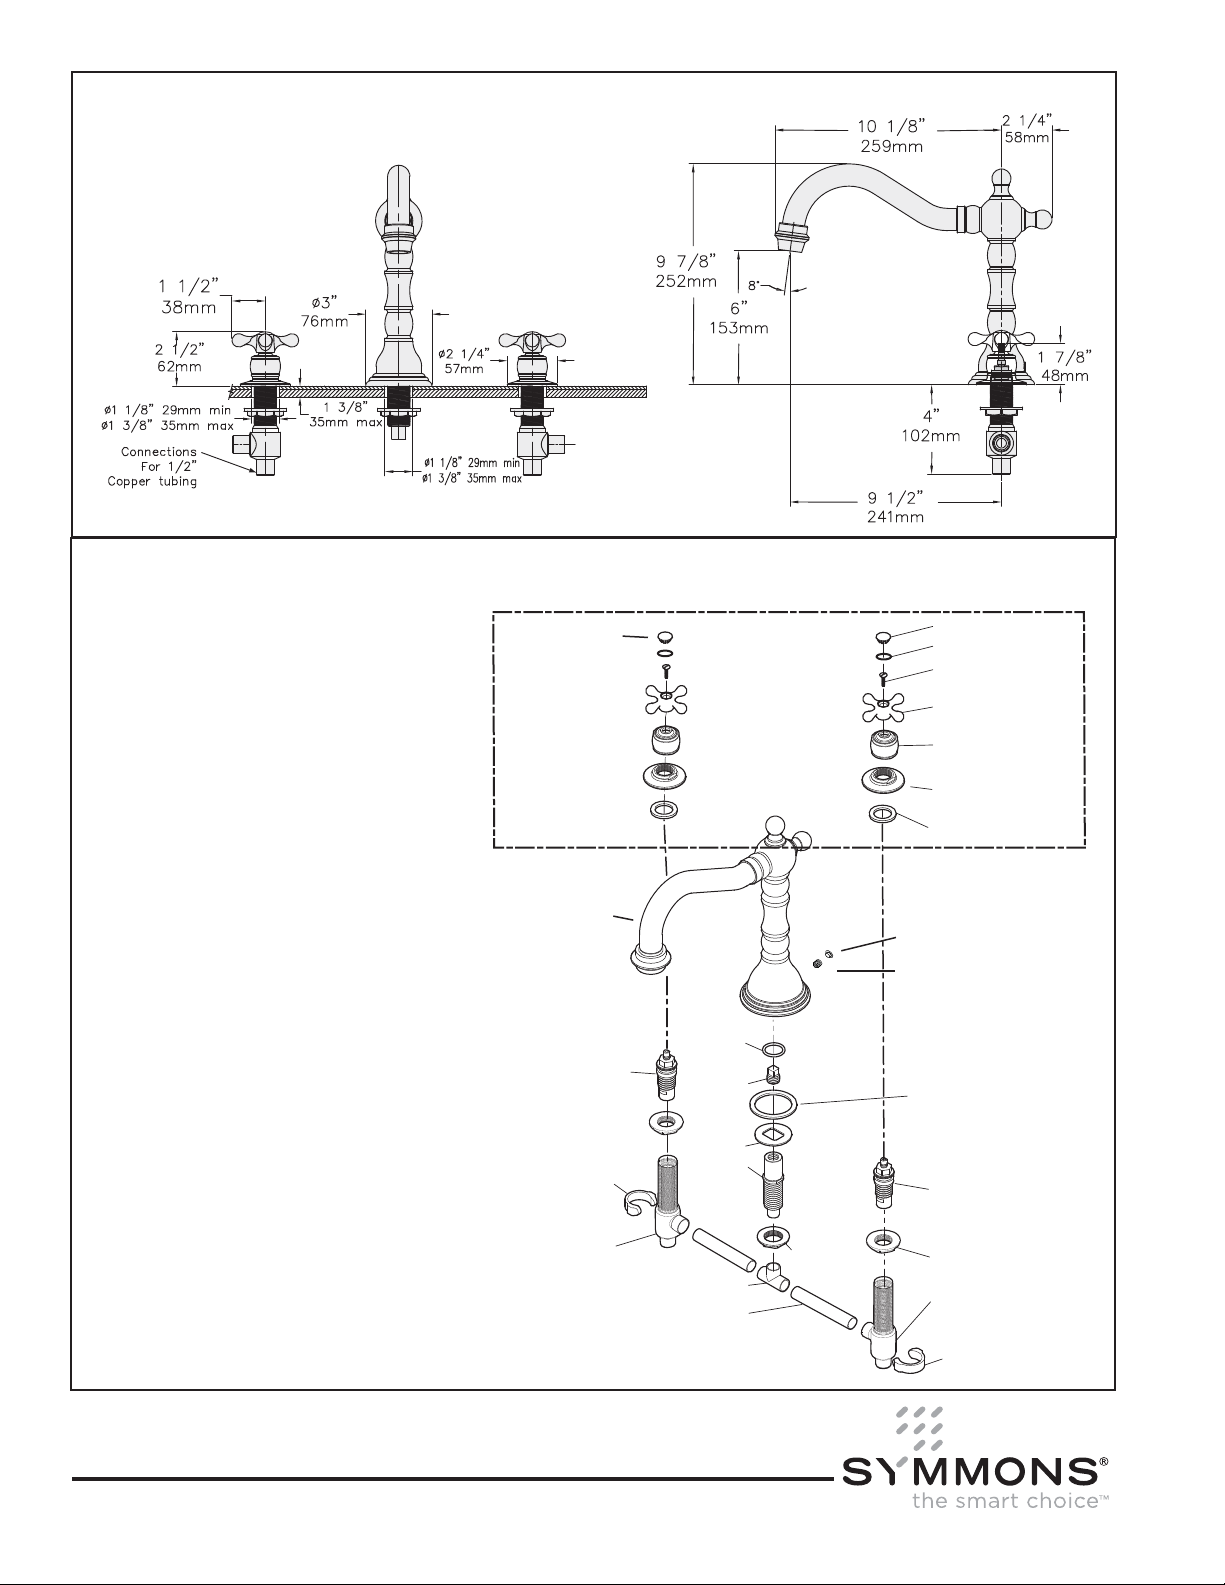
Dimensions Carrington Roman Tub Faucet, SRT-4470
Note: Dimensions subject to change without notice.
Dimensions Carrington Roman Tub Faucet, SRT-4470
HPT-10 1/2” Copper Tee
KN-113 Valve cartridge, cold
KN-114 Valve cartridge, hot
LN-112* Collar (lever handle) (2)
LN-121A* Oval Philips head screw (2)
LN-177* Cross handle (2)
RT-100 Centerbody
RT-101 Plate, Retaining
RT-103 1/2” Valve body (2)
RT-103N Nut (3)
RT-104 Escutcheon (2)
RT-105 Plug, 3/8” NPT Brass
RT-108 Tubing, 1/2” (2)
RT-116 Gasket, Escutcheon (2)
RT-135 Spout
RT-165-PL Ring
SC-15 Set screw (spout)
T-2 O-ring (spout)
T-288 Plug Button (spout)
RT-CRP-KIT* Handle kit (hot & cold handles)
*For Decorative Finish Faucets add sufx to
parts marked with an asterisk as follows:
LN-243H (1)
Handle kit
(qty 2 handles)
RT-135
KN-114
hot indicator
T-2
RT-105
RT-101
RT-100
LN-243C (1)
L-26 (2)
LN-121A (2)
LN-177 (2)
LN-112 (2)
RT-104 (2)
RT-116 (2)
T-288
SC-15
RT-165-PL
KN-113
Sufx STN: Radiance® satin nickel nish
11/19/08
Symmons Industries, Inc. ■ 31 Brooks Drive ■ Braintree, MA 02184
(800) 796-6667, (781) 848-2250
Website: www.symmons.com
©2007, 2008 Symmons Industries, Inc. Printed in U.S.A.
■ Fax (800) 961-9621, (781) 843-3849
■ Email: customerservice@symmons.com
RT-103
■ ZV-578 ■ 111908
HPT-10
RT-108
RT-103N
RT-103N
RT-103
cold indicator
 Loading...