

Page 1
363DTB-18, 363DTB-24, 363RH, 363TB-18,
363TB-24, 363TP, 363TR, 363TS-22, 363-SD2
Duro
Operation & Maintenance Manual
Model Numbers Specifications
™
Accessories
363DTB-18 18" Double Towel Bar
363DTB-24 24" Double Towel Bar
363RH Robe Hook
363TB-18 18" Towel Bar
363TB-24 24" Towel Bar
363TP Toilet Paper Holder
363TR Towel Ring
363TS-22 Towel Shelf with Bar
363-SD2 Soap Basket
All premium accessories made from brass plated in
standard polished chrome nish.
Compliance
For California Residents
WARNING: This product contains chemicals known to the
State of California to cause cancer, birth defects, or other
reproductive harm.
Modifications Warranty
-STN Satin nickel finish
Note: Append appropriate -sufx to model number.
Limited Lifetime - to the original end purchaser in
consumer installations.
5 Years - for commercial installations.
Refer to www.symmons.com/warranty for complete
warranty information.
Page 2
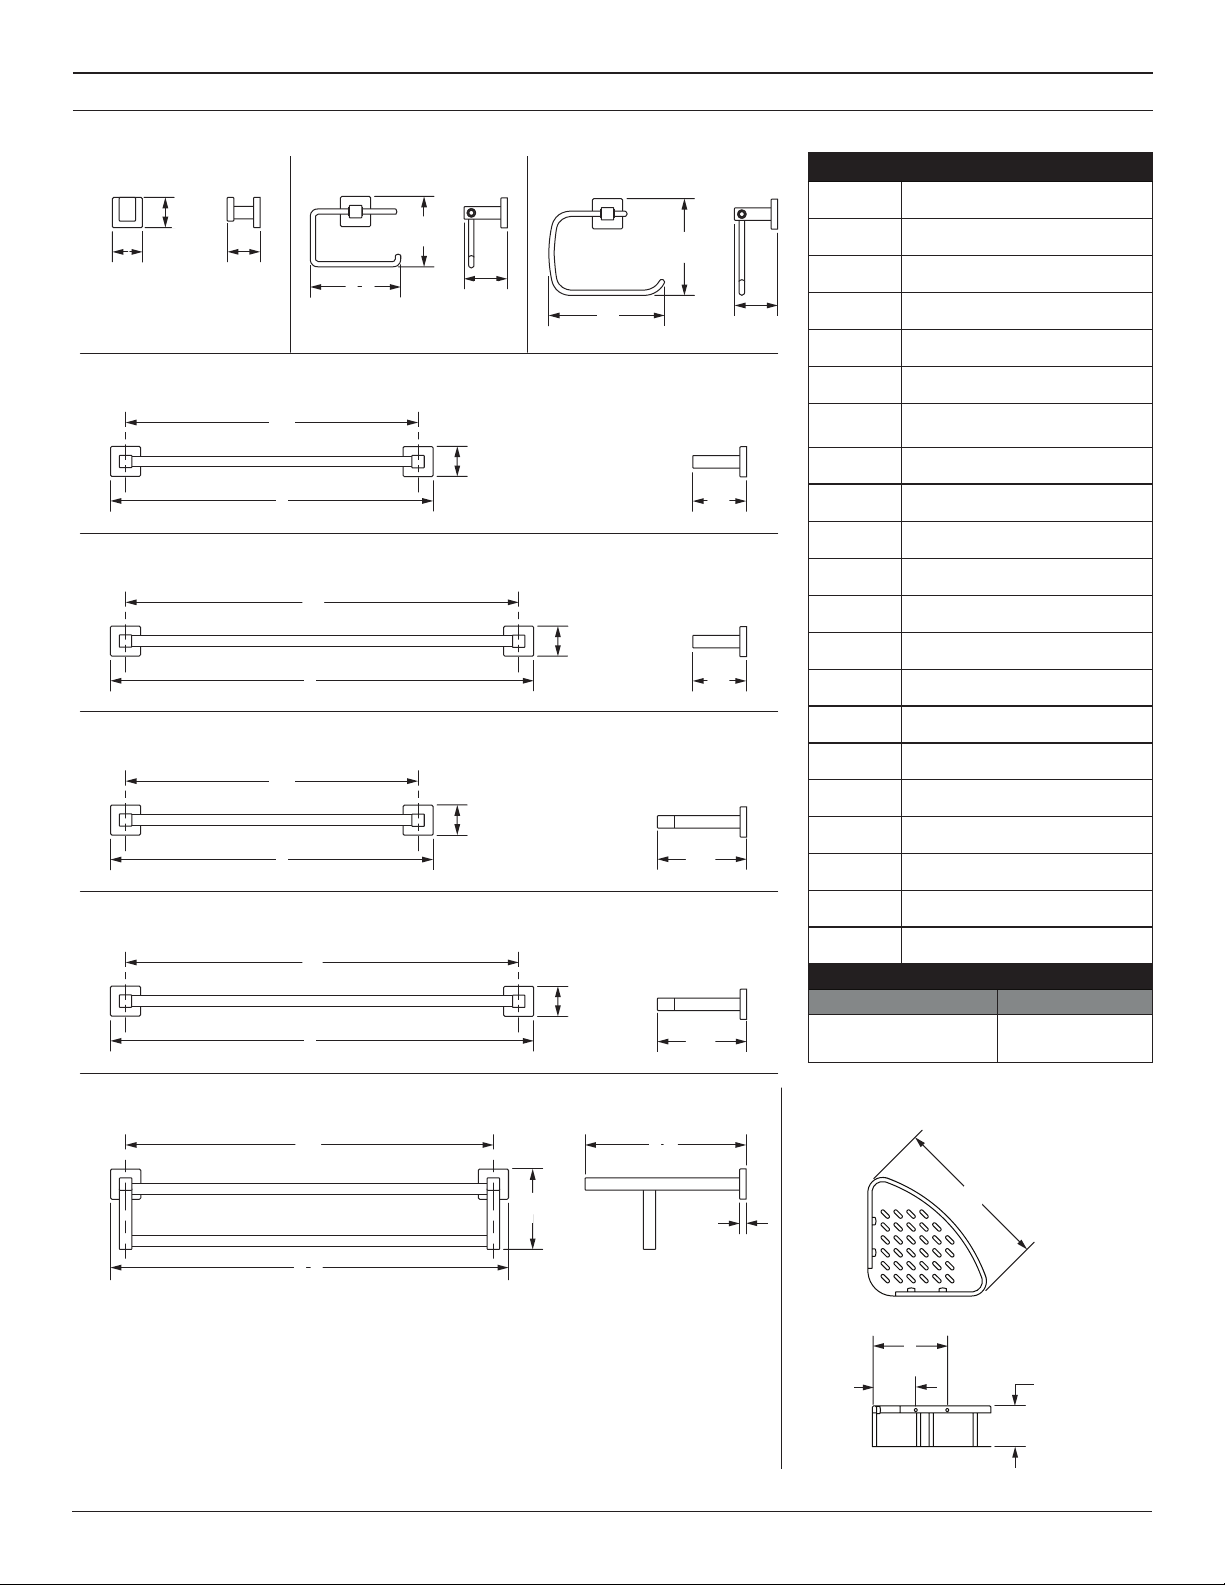
Dimensions
363RH
A
A
A
A
363TB-18
363TB-24
363DTB-18
B
B
H
H
H
H
I
I
I
I
363TP
C
C
K
K
L
L
D
D
A
A
A
A
E
E
363TR
FF
A
A
G
G
M
M
Measurements
A 1 7/8”, 48 mm
B 2”, 51 mm
C 5 3/8”, 137 mm
E
E
J
J
J
J
D 4 1/8”, 105 mm
E 2 1/2”, 64 mm
F 6 7/8”, 175 mm
G 5 3/4”, 146 mm
H 17 3/4”, 451 mm
I 19 5/8”, 498 mm
J 3 1/4”, 82 mm
K 23 7/8”, 606 mm
L 25 5/8”, 651 mm
M 5 3/8”, 136 mm
N 22”, 559 mm
O 23 7/8”, 606 mm
P 4 3/4”, 121 mm
Q 9 5/8”, 244 mm
R 3/8”, 10 mm
S 9”, 228 mm
363DTB-24
K
K
L
L
363TS-22
N
N
P
P
O
O
Note: Dimensions are subject to change without notice.
A
A
Q
Q
M
M
R
R
T 4 1/4”, 108 mm
U 2 3/8”, 60 mm
Replacement Parts
Description Part Number
Mounting
Hardware Kit
363-SD2
RA-017
SS
TT
EE
UU
2
Page 3

Installation
2
2
1) Measure and mark centerlines
for mounting bracket installation
using dimensions on page 2.
Notes: 363DTB-18, 363DTB-24,
363TB-18, 363TB-24, 363TS-22 only.
Make sure both centerline
level.
2a)
Dry Wall Option:
brackets into desired position.
Using brackets as a guide,
carefully drill 5/16" holes into
wall. Remove brackets and
install anchors.
marks are
Place mounting
2b) Stud Option: Center bracket on
centerline.
guide, carefully drill 3/16" holes
into wall.
Using brackets as a
1
3) With mounting brackets in position,
secure to wall using screws.
4) Hang top of accessory on
mounting bracket. Lower into
position.
1
2
5) Secure with set screw.
1
3
3
Note:
For plaster walls 1/2” thick
or less, insert toggle tool into
toggle to secure behind wall prior
to installing accessory trim.
363-SD2 Only:
holes into wall and install anchors.
Secure to wall using screws.
Carefully drill 5/16"
1
2
Care and Cleaning
1) Clean nished trim area with a soft cloth using mild soap and water or a non-abrasive cleaner and then quickly rinse
with water.
Symmons Industries, Inc. ■ 31 Brooks Drive ■ Braintree, MA 02184 ■ Phone: (800) 796-6667 ■ Fax: (800) 961-9621
Copyright © 2016 Symmons Industries, Inc. ■ symmons.com ■ gethelp@symmons.com ■ ZV-3020 REV D ■ 042516
 Loading...