

Page 1
PDT 8100 Series
for Pocket PC 2002
Page 2

PDT 8100 Series
for Pocket PC 2002
© 2001 - 2003 SYMBOL TECHNOLOGIES, INC. All rights reserved.
Symbol reserves the right to make changes to any product to improve reliability,
function, or design.
Symbol does not assume any product liability arising out of, or in connection with, the
application or use of any product, circuit, or applicat ion described herein.
No license is granted, either expressly or by implication, estoppel, or otherwise under
any patent right or patent, covering or relating to any combination, system,
apparatus, machine, material, method, or process in which Symbol products might
be used. An implied license only exists for equipment, circuits, and subsystems
contained in Symbol products.
Symbol and the Symbol logo are registered trademarks of Symbol T echnologies, Inc. Other
product names mentioned in this manual may be trademarks or registered trademarks of
their respective companies and are hereby acknowledged.
Symbol Technologies, Inc.
One Symbol Plaza
Holtsville, N.Y. 11742-1300
http://www.symbol.com
Patents
This product is covered by one or more of the following U.S. and foreign Patents:
U.S. Patent No. 4,593,186; 4,603,262; 4,607,156; 4,652,750; 4,673,805; 4,736,095;
4,758,717; 4,760,248; 4,806,742; 4,816,660; 4,845,350; 4,896,026; 4,897,532; 4,923,281;
4,933,538; 4,992,717; 5,015,833; 5,017,765; 5,021,641; 5,029,183; 5,047,617; 5,103,461;
5,113,445; 5,130,520; 5,140,144; 5,142,550; 5,149,950; 5,157,687; 5,168,148; 5,168,149;
5,180,904; 5,216,232; 5,229,591; 5,230,088; 5,235,167; 5,243,655; 5,247,162; 5,250,791;
5,250,792; 5,260,553; 5,262,627; 5,262,628; 5,266,787; 5,278,398; 5,280,162; 5,280,163;
5,280,164; 5,280,498; 5,304,786; 5,304,788; 5,306,900; 5,324,924; 5,337,361; 5,367,151;
5,373,148; 5,378,882; 5,396,053; 5,396,055; 5,399,846; 5,408,081; 5,410,139; 5,410,140;
5,412,198; 5,418,812; 5,420,411; 5,436,440; 5,444,231; 5,449,891; 5,449,893; 5,468,949;
5,471,042; 5,478,998; 5,479,000; 5,479,002; 5,479,441; 5,504,322; 5,519,577; 5,528,621;
5,532,469; 5,543,610; 5,545,889; 5,552,592; 5,557,093; 5,578,810; 5,581,070; 5,589,679;
5,589,680; 5,608,202; 5,612,531; 5,619,028; 5,627,359; 5,637,852; 5,664,229; 5,668,803;
5,675,139; 5,693,929; 5,698,835; 5,705,800; 5,714,746; 5,723,851; 5,734,152; 5,734,153;
5,742,043; 5,745,794; 5,754,587; 5,762,516; 5,763,863; 5,767,500; 5,789,728; 5,789,731;
5,808,287; 5,811,785; 5,811,787; 5,815,811; 5,821,519; 5,821,520; 5,823,812; 5,828,050;
5,848,064; 5,850,078; 5,861,615; 5,874,720; 5,875,415; 5,900,617; 5,902,989; 5,907,146;
5,912,450; 5,914,478; 5,917,173; 5,920,059; 5,923,025; 5,929,420; 5,945,658; 5,945,659;
5,946,194; 5,959,285; 6,002,918; 6,021,947; 6,029,894; 6,031,830; 6,036,098; 6,047,892;
6,050,491; 6,053,413; 6,056,200; 6,065,678; 6,067,297; 6,082,621; 6,084,528; 6,088,482;
6,092,725; 6,101,483; 6,102,293; 6,104,620; 6,114,712; 6,115,678; 6,119,944; 6,123,265;
6,131,814; 6,138,180; 6,142,379; 6,172,478; 6,176,428; 6,178,426; 6,186,400; 6,188,681;
6,209,788; 6,209,789; 6,216,951; 6,220,514; 6,243,447; 6,244,513; 6,247,647; 6,308,061;
6,250,551; 6,295,031; 6,308,061; 6,308,892; 6,321,990; 6,328,213; 6,330,244; 6,336,587;
6,340,114; 6,340,115; 6,340,119; 6,348,773; 6,380,949; 6,394,355; D305,885; D341,584;
D344,501; D359,483; D362,453; D363,700; D363,918; D370,478; D383,124; D391,250;
D405,077; D406,581; D414,171; D414,172; D418,500; D419,548; D423,468; D424,035;
D430,158; D430,159; D431,562; D436,104.
Invention No. 55,358; 62,539; 69,060; 69,187, NI-068564 (Taiwan); No. 1,601,796; 1,907,875;
1,955,269 (Japan); European Patent 367,299; 414,281; 367,300; 367,298; UK 2,072,832; France
81/03938; Italy 1,138,713
rev. 06/02
Page 3

Quick Reference
Introduction
Congratulations on your purchase of Symbol Technologies’ PDT
8100 Terminal! Its unique combination of features make this
product superior for use in a wide range of applications. These
features i nclude:
• Personal Information Management software
•Microsoft
• RF communication via Symbol’s Spectrum24 wireless
network (PDT 814x) or a wide area network (PDT 813x)
• 1- and 2-dimensional scanning capability
• Monochrome LCD or color TFT LCD display
• 28-key, 37-key, or 47-key keyboard
• Touch screen
• Printing support
• IrDA-compliant interface for printing and communications.
®
Windows® Pocket PC 2002 operating system
About This Guide
This guide descri bes how to s et up and use the terminal . The term
PDT 8100 refers to the b atc h, Sp ec trum24 , and WAN versions of
the terminal. Specific topics covered include:
• Parts of the PDT 8100 Series on page 3
• Getting Started on page 6
• Installing the SIM Card (PD T 8137 Only) on page 6
• Inserting a Compact Flash Card on page 7
• Removing a Compact Flash Card on page 8
• Installing the Battery on page 8
• Charging the Battery on page 9
• 15-Pin Serial Port Connector on page 11
• Attaching the Handstrap on page 11
• Starting the PDT 8100 on page 12
• Aligning the Screen on page 12
• Initiating a Network Connection on page 13
• Controlling the Backlight (Color TFT LCD) on page 13
• Adjusting the Contrast (Monochrome LCD) on page 14
• Using a Headset on page 14
1
Page 4

PDT 8100 Series
• Using the Keyboard on page 14
• Using the Stylus on page 20
• Today Screen on page 21
• Navigation Bar and Command Bar on page 22
• Input Met hods on page 22
• Scanning with the PDT 8100 on page 25
• Resetting Your PDT 8100 Terminal on page 27
• Host Communications on page 29
• Maintaining the PDT 81 00 on page 30
• Troubleshooting on page 31
• EID Number (PDT 8133 Only) on page 44.
The PDT 8 100 Produc t Reference Guide for Po cket PC 200 2 (p/n
72-55034-xx) details th e ap pli ca tio ns ava il abl e fo r the PD T 81 00.
Visit http://www.symbol.com/manuals for the lat est version of this
guide and translated versions.
Accessories
Each PDT 8100 requires one 1550 mAh lithium-ion battery. The
following optional accessories are available from Symbol
Technologies:
• Additional lithium-ion battery
• Stylus for per forming pen functions
• Cables:
- Serial charging cable
- DEX cable
- Autocharge cable
- Snap-on printer cable
• Single-slot cradle
• Four-slot cradle
• Vehicle cradle
• IrDA compliant printer
• Magnetic stripe reader
• Clip on modem module
• Headset
• Carrying case.
2
Page 5
Quick Reference
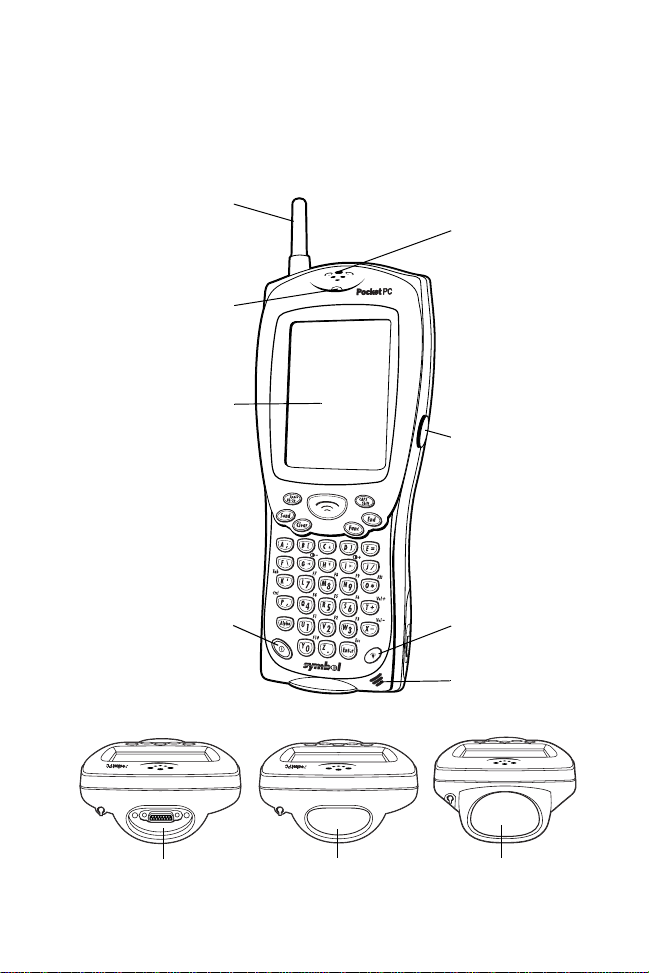
Parts of the PDT 8100 Series
Front View
WAN Antenna
(PDT 8133/8137 only)
Scan LED
LCD
(monochrome)
TFT LCD
(color)
Speaker
Scan Trigger
Power
Button
15-Pin Serial Port
(terminals without
scanner)
Top V iew
1-D Exit Window
(terminals with
scanner)
3
Backlight
Button
Microphone
2-D Exit Window
(terminals with
scanner)
Page 6
PDT 8100 Series
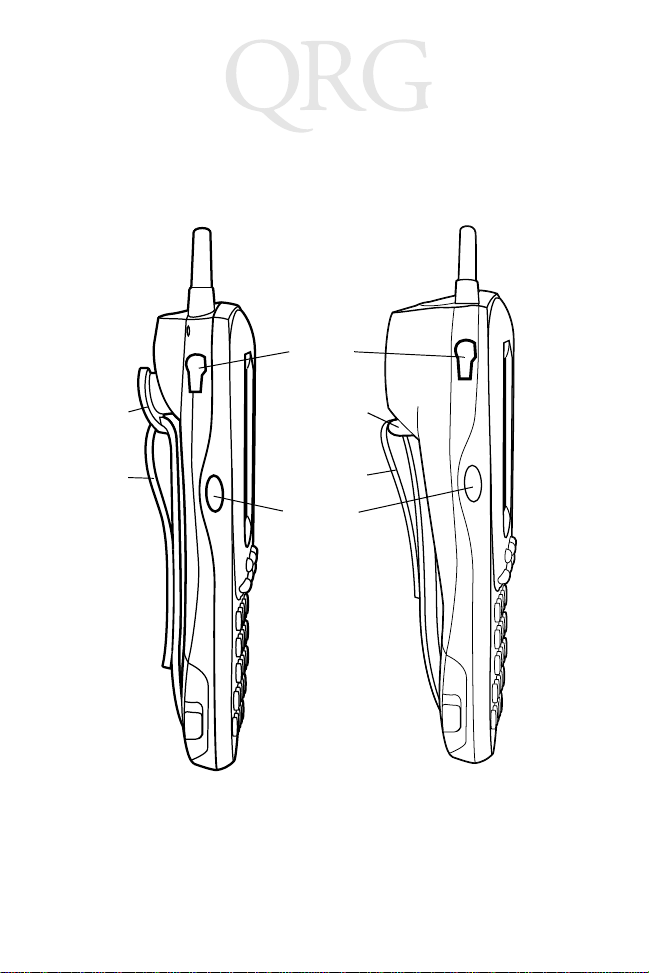
Parts of the PDT 8100 Series (continued)
Side View
Audio
connector
1-D terminal
Handstrap
clip
2-D terminal
Handstrap
bar
Handstrap
1-D Terminal
Handstrap
Scan Trigger
2-D Terminal
4
Page 7
Quick Reference
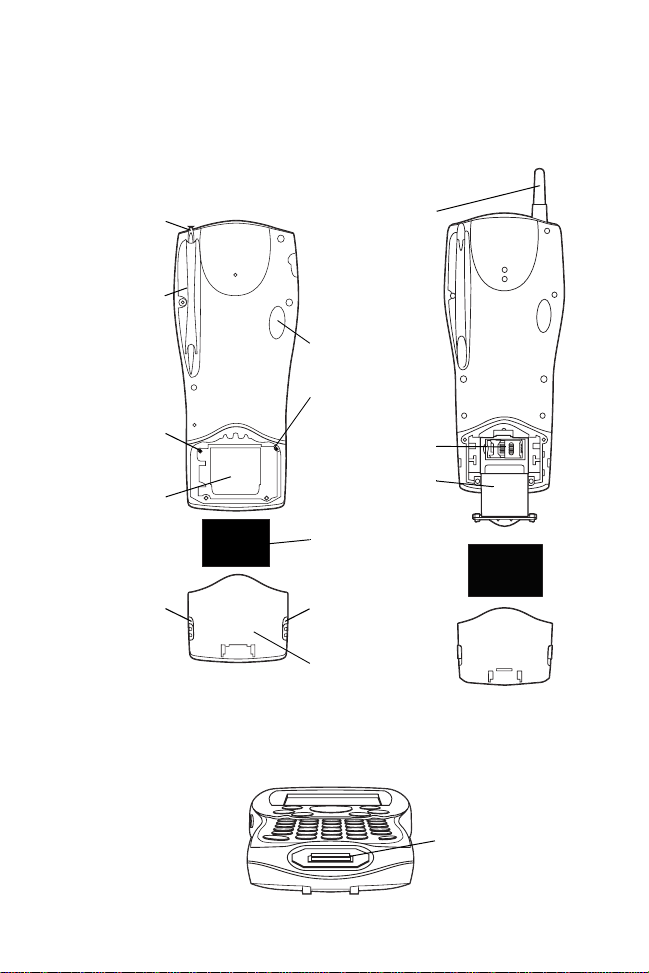
Parts of the PDT 8100 Series (continued)
Back View
Stylus
Stylus Silo
Battery Cover
Switch
Battery
Compartment
WAN Antenna
IrDA Port
Reset Button
Flash Card Cover
Lithium-ion
Battery
SIM Socket
Battery Door
Latch
Battery Door
Latch
Battery Door
Bottom View
5
Serial Port
Page 8
PDT 8100 Series
1.
Getting Started
Before you can use your PDT 8100, perform these basic setup
procedures:
• Install the antenn a package d with the termina l by screwing it
into the antenna receptacle on the top of the terminal
(PDT 8133/8137 only).
• Install the SIM card (PDT 8137 only).
• Insert the Compact Flash card (optional).
• Install and charge the battery.
• Start the PDT 81xx.
• Initiate the network connection (PDT 813x/814x only).
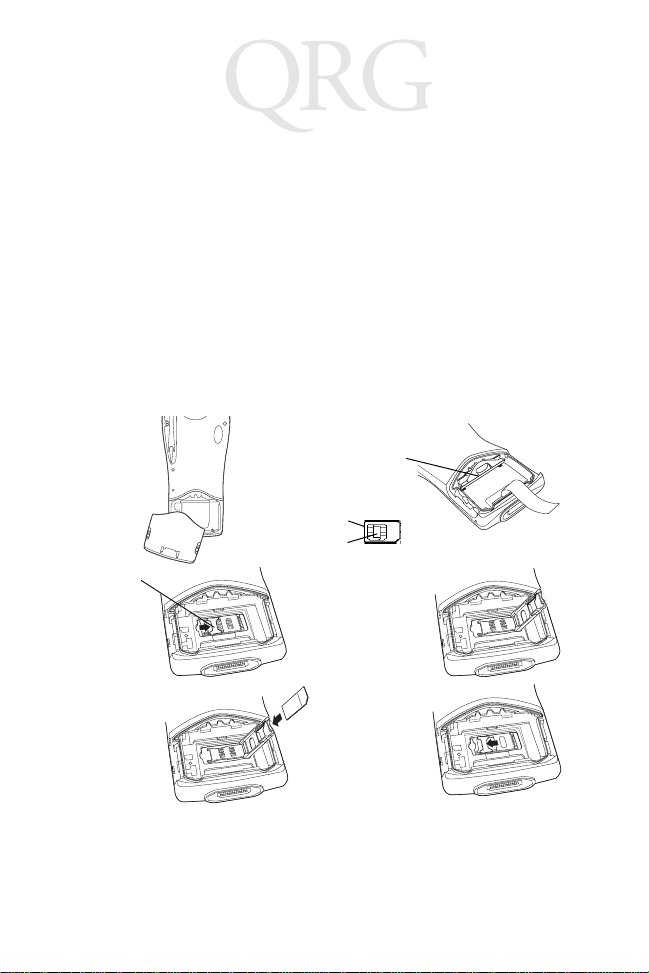
Installing the SIM Card (PDT 8137 Only)
Slide the
latches on the
battery door up
and lift the
battery door
away from the
PDT 8137. If
the battery is
installed,
remove it.
3. Slide the met al
clip on the SIM
cardholder door
to the right to
release the SIM
cardholder.
2. Remove the flash card cover
at the top of the battery
compartment by pulling th e top
out, and lifting the cover up.
SIM Card
Contact Area
4. Lift the
cardholder door to
an upright position
5. Insert the card
between the
cardholder body
and the metal clip;
be sure the
beveled corner of
the SIM card is on
the top right.
6. Close the
cardholder door
(with the contact
area of the card
facing down).
7. Slide the metal
clip to the left to
lock it in place.
8. Replace the
flash card cover.
9. Reinsert the
battery and battery
door (see Installing
the Battery on
).
page 8
6
Page 9
Quick Reference
Inserting a Compact Flash Card
The PDT 8100 contains a slot for a standard compact flash card,
which includes a locking mechanism that prevents the card from
coming loose if th e PDT 8100 is dropped. Insert the co mpact fl ash
card carefully to ensure it engages this locking mechanism.
1. Open the battery door and remove the battery.
2. Remove the flash card cover at the top of the battery compartment by pulling the top out, and lifting the cover up.
Compact
Flash Card
Cover
3. Insert the flash card into the compartment with the pins facing forward, and the main label facing down. It only fits one
way. The two metal tabs on the locking mechanism will prevent you from pushing the card all the way in.
4. T o fi t the card int o place, push d own and in at th e same time ,
so that the lip of the co mpact flash card s lips under the tabs
of the locking mechanism.
5. Replace the flash card cover by inserting the bottom firs t,
and pressing the top in.
Note: After you insert or remove a compact flash card, you
must replace the flash card cover or the terminal will
not function.
6. Reinsert the battery and battery door.
7. Perform a soft reset (see Performing a Soft Reset on page
27).
7
Page 10
PDT 8100 Series
Removing a Compact Flash Card
1. Open the battery door an d remove the battery and flash card
cover.
2. Use the stylus to press the flash card release button inside
the flash card compartment.
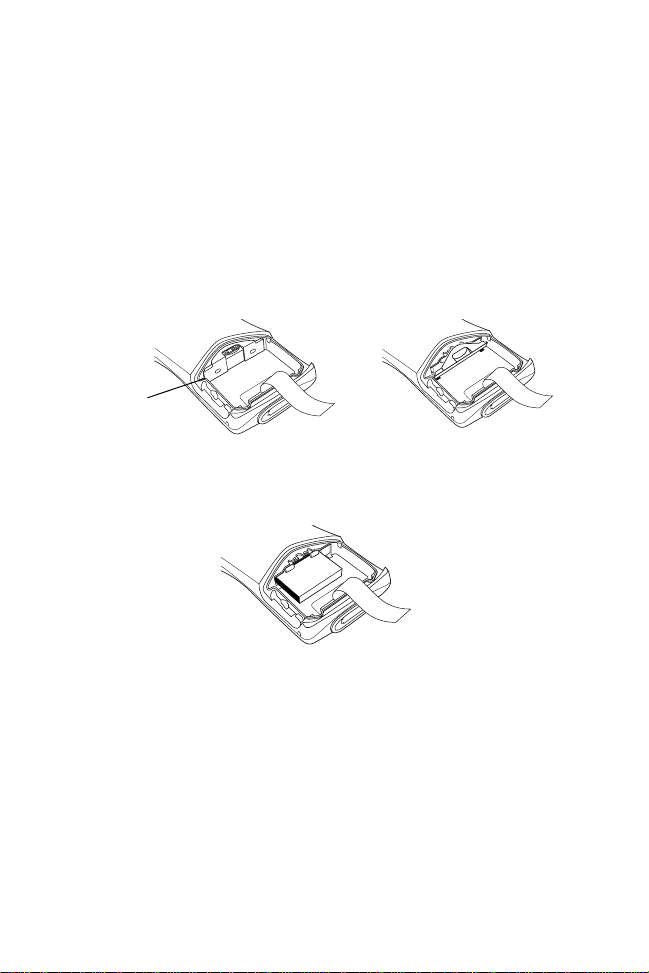
Installing the Battery
1. Slide the latches on the battery door up and lift the battery
door away from the PDT 8100.
Latches
8
Page 11
Quick Reference
2. Insert the lithium-ion battery in the battery compa rtment with
the battery tether positioned properly (as shown below),
making sure the battery snaps into place.
Tether
3. Replace the battery cover, pressing down firmly along the
top edge while slidin g the latc hes down into the locked position.
Charging the Battery
Before using your PDT 8100 for the first time, charge the lithiumion battery in the terminal for about 2 1/2 hours, using the CRD
8100 Cradle or the Synchronization Cable. Follow these same
procedures to recharge the battery.
Your terminal is equipped with a memory backup battery which
automatically charges from the fully-charged lithium-ion battery.
This backup battery retains data in memory when the terminal’s
battery is removed, and takes several hours to charge when you
first use your terminal.
Note: If you remove your lithium-ion battery before the back-
up battery is fully charged, data may be lost. For this
reason, DO NOT remove the battery within the first ten
hours of use.
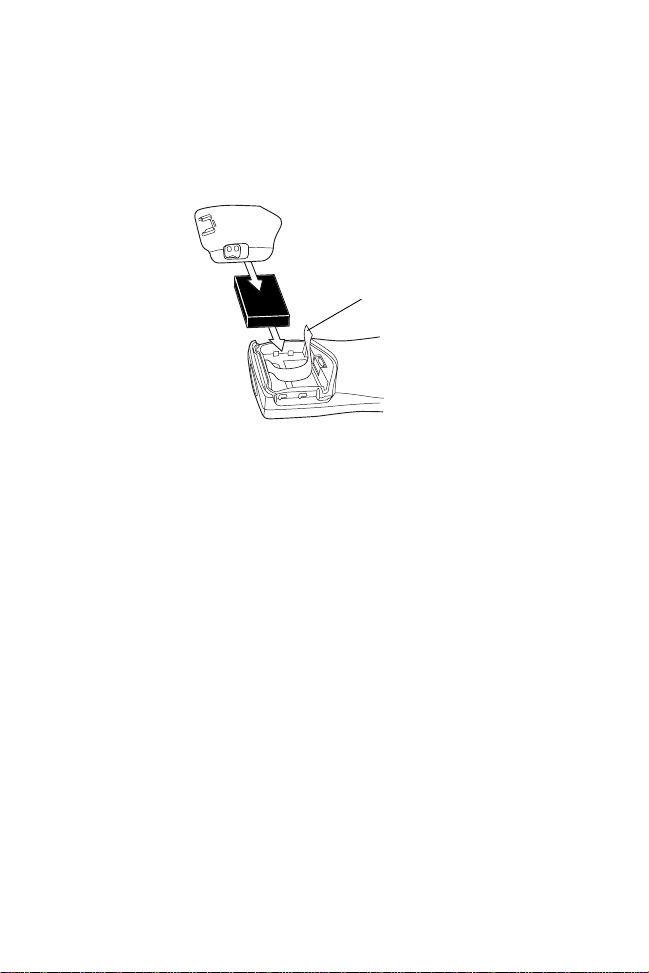
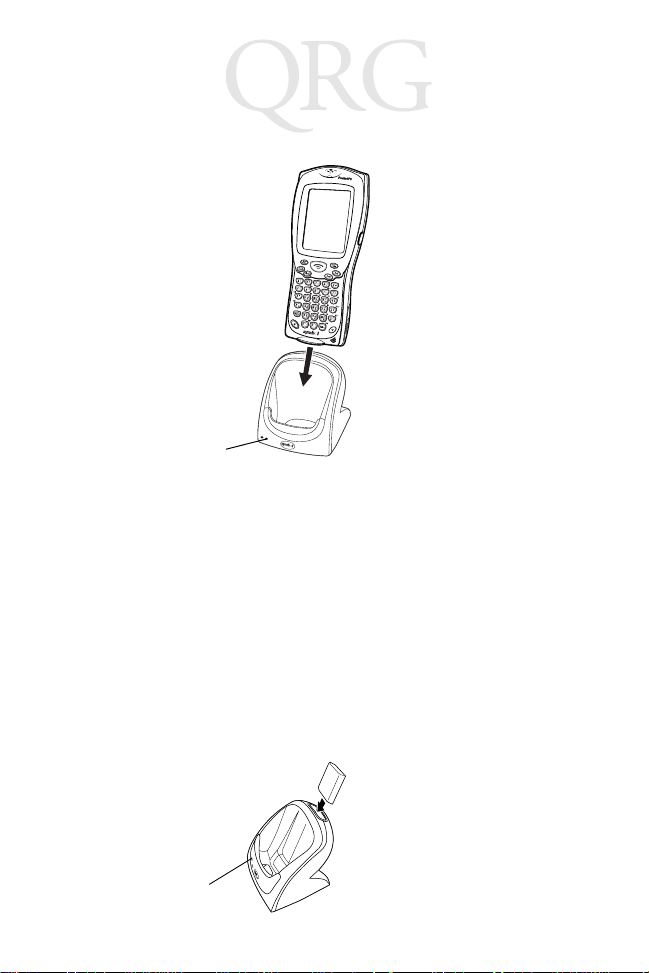
Charging the Battery Using the CRD 8100 Cradle
1. Set up the cradle according to the procedures in the CRD
8100 Quick Reference Guide.
9
Page 12
PDT 8100 Series
2. Insert the PDT 8100 terminal in the cradle.
Terminal Status LED
3. The Terminal Status LED turns red (may take up to one
minute) to indica te charging, then turn s off when the ba tter y
is fully charged. The terminal’s battery is fully charged after
approximately 2 1/2 hours.
Charging a Spare Battery
To recharge a sp ar e batte ry, inse rt it in the s pare battery chargi ng
slot in the back of the cradle, so the contact s are facin g down and
towards the back of the cradl e. Press the battery down into the slo t
until firmly seated.
The Spare Battery LED tur ns red to indic ate ch arging , then gre en
when the battery is ful ly charged. Th e battery is fully charged after
approximately 2 1/2 hours. See the CRD 8100-1000S Quick
Reference Guide (p/n 72-50974-xx) for more information.
Spare Battery LED
10
Page 13

Quick Reference
1. Insert the Synchroniza-
Charging the Battery Using the Synchronization Cable
tion cable into the bottom of the terminal.
2. Plug the power cable
into a wall outlet and
plug the other end into
the battery charging receptacle on the side of
the Synchronization
Cable.
Battery Charging Receptacle
Synchronization Cable
15-Pin Serial Port Connector
To connect to the Micro-D RS-232 port at the top of the terminal,
use an ITT Cannon brand mil-s pec connec tor (MDM-15SSB) with
captivated jack screws (mil p/n M83513/5-6) to protect the
connector’s contacts from damage during insertion and removal.
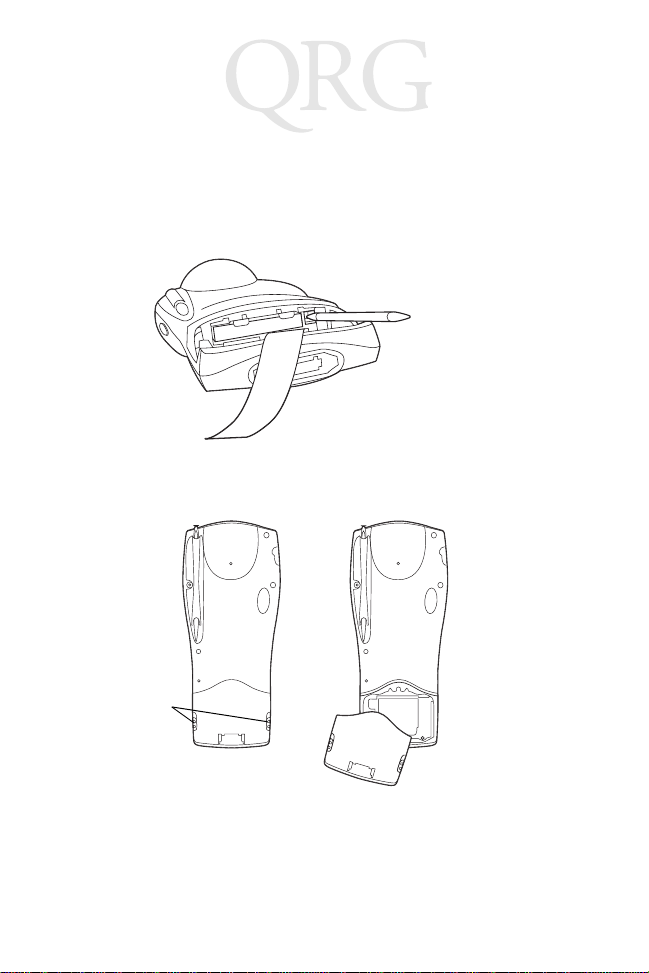
Attaching the Handstrap
1. Install the plastic
clip on the back of
the terminal using
the screw. (1-D
terminals only.)
2. Slide the end of the
strap into the
notches on the
bottom of the
battery door.
11
3. On 1-D terminals,
slip the top of the
strap through the
plastic clip on the
back of the terminal.
On 2-D terminals,
slip the top of the
strap through the
metal bar.
Adjust as necessary.
Page 14
PDT 8100 Series
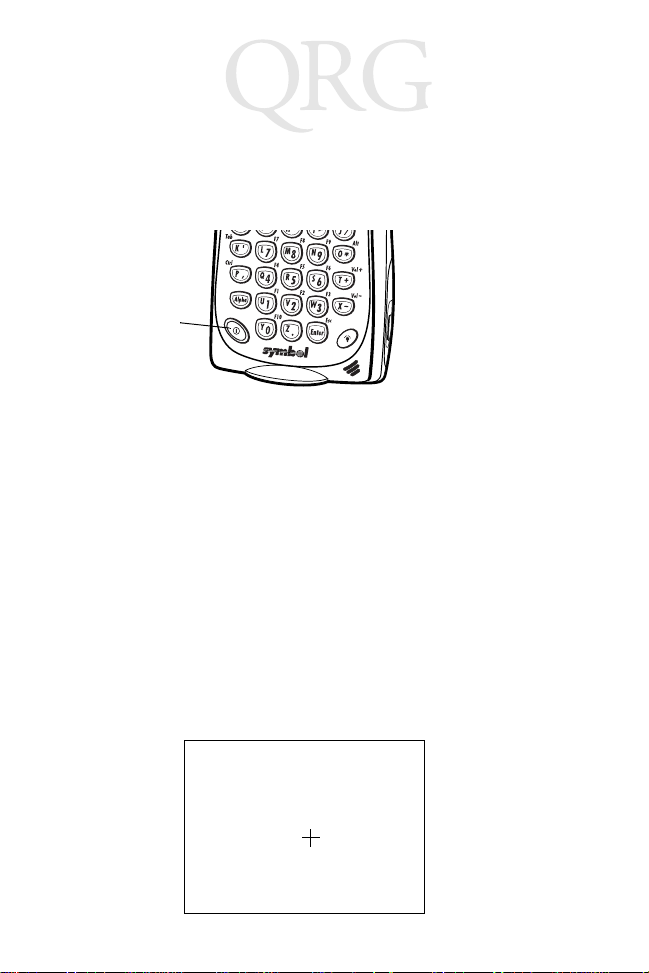
Starting the PDT 8100
Press the red power button to turn the PDT 8100 on and of f. If the
terminal does not power on, perf orm a hard rese t. See Performing
a Hard Reset on page 28.
Power Button
As the terminal ini tializes it s unique Flash File system, the Symbol
splash screen displays for about 10 seconds.
When the Welcome scre en appea rs, ta p anyw here on th e scree n
to continue to the Align screen. Note that these screens also
appear every time you perform a hard reset.
Aligning the Screen
To align your PDT 8100 so the cursor on the touch screen aligns
with the tip of your stylus:
1. If necessary , adju st the contrast (monochrome L CD only) on
the PDT 8100 so the screen is readable. See Adjusting the
Contrast (Monochrome LCD) on page 14.
2. Remove the stylus from its storage silo on the back of the
PDT 8100.
3. T ap the ce nter of each ta rget that appea rs on the screen w ith
the tip of the stylus.
Tap the target firmly and a ccur at ely at
each location on the screen. The target
will continue to move until the screen
is aligned.
12
Page 15

Quick Reference
4. Follow the directions on the screen which explain how to use
the stylus and pop-up men us, and al low y ou to s et yo ur ci ty
and time zone.
Initiating a Network Connection
Before using the term inal, set u p the Spectrum24 , CDPD (Cell ular
Digital Packet Data) or GSM (Global System for Mobile
Communication) network connection. Refer to the PD T 810 0
Series Product Reference Guide for Pocket PC 2002 for setup
instructions.
Controlling the Backlight (Color TFT LCD)
Turn the backlight on and off by pressing the Backlight button.
Power Button
Keyboard Keys Description
28-key Function + “1” Decrease backl ight (de crease brightness)
Function + “2” Increase backlight (increase brightness)
37-key Function + “G” Decrease backlight (decre ase brig htn ess)
Function + “I” Increase backlight (increase brightness)
47-key Function + “Y” Decrease backlight (de crease brightness)
Function + “W” Increase backlight (increase brightness)
Backlight Button
13
Page 16

PDT 8100 Series
If your terminal is equipped w ith an
Adjusting the Contrast (Monochrome LCD)
Keyboard Keys Description
28-key Function + “1” Decrease contrast (lighten the screen)
Function + “2” Increase contrast (darken the screen)
37-key Function + “G” Decrease contrast (lighten the screen)
Function + “I” Increase contrast (darken the screen)
47-key Function + “Y” Decrease contrast (lighten the screen)
Function + “W” Increase contrast (darken the screen)
Using a Headset
audio connector , a headset ma y be
installed for telephony operation.
To use the headset, plug the
headset jack into the audio
connector on the side of the
terminal.
Using the Keyboard
Note: Key functions can be changed by an application. Your
keyboard may not function exactly as described. For
more detailed keyboard information, refer to the PDT
8100 Product Reference Guide for Pocket PC 2002.
Using the 28-Key Keyboard
The 28-key keyboard u ses an alphanumeric keypad that prod uces
the 26-character alphabet (A-Z), numbers (0-9), and assorted
characters. The keyboard is co lor-coded to indicate which modifier
key (Alpha-Numeric, Func) to press to produce a particular
14
Page 17

Quick Reference
character or action. The keyboard default is numeric, producing
numbers.
Cursor keys
Space/
Backspace key
Send key
Scan key
Clear key
Caps/Shift key
End key
Scan key
Home
Tab key
Alpha key
Function key
Alt key
Power key
Page up &
down keys
Enter/Escape
key
Control key
Backlight key
Key Action
Note: Press Func, then another key to produce the value or function above
that key. See individual key descriptions in this table for additional Function
key usage.
Alpha Press Alpha to toggle between alpha and numeric
mode. In alpha mode, pressing a key produces the yellow letter on that key; in numeric mode, pressing a key
produces the number in gray.
Backlight See Controlling the Backlight (Color TFT LCD) on page
Caps/Shift Press Shift when in alpha mode, then another key to
13.
capitalize the letter on that key.
Press Func + Shi ft to toggle All Caps on and off. Func +
Shift also erases all entered data from the screen.
Clear Press Clear to clear the screen.
15
Page 18

PDT 8100 Series
Key Action
Contrast See Adjusting the Contrast (Monochrome LCD) on page
Cursor Press cursor keys to move the cursor left, right, up and
End Press End to move the cursor to the end of a line.
Enter/Escape Press Enter after entering data or a command.
Power See Starting the PDT 8100 on page 12.
Scan Press Scan to scan bar codes. (Also use right and left
Send The Send key is application dependent.
Space/Back-
space
Tab Press Tab to move from field to field.
14.
down on the screen.
Press Func + up cursor to raise the volume.
Press Func + down cursor to lower the volume.
Press Func + Enter to partially or completely escape
from an application level or screen.
scan triggers.)
Press Func + Bk-Sp to enter a blank space.
Press Bk-Sp to erase information entered on the display,
one character at a time.
Using the 37-Key Keyboard
The 37-key keyboard u ses an alphanumeric keypad that prod uces
the 26-character alphabet (A-Z), numbers (0-9), and assorted
characters. The keyboard is co lor-coded to indicate which modifier
key (Alpha-Numeric, Func) to press to produce a particular
16
Page 19

Quick Reference
character or action. The keyboard default is numeric, producing
the gray number or white character on that key.
Space/
Backspace key
Send key
Clear key
Tab key
Scan key
Caps/Shift key
End key
Function key
Alt key
Volume (+ ) key
Control key
Alpha key
Power key
Volume (-) key
Backlight key
Enter/Escape
key
Key Action
Note: Press Func, then another key to produce the value or function above
that key. See individual key descriptions in this table for additional Function
key usage.
Alpha Press Alpha to toggle between alpha and numeric
mode. In alpha mode, pressing a key produces the yellow letter on that key; in numeric mode, pressing a key
produces the number in gray or character in white.
Backlight See Controlling the Backlight (Color TFT LCD) on page
13.
Caps/Shift Press Shift when in alpha mode, then another key to
capitalize the letter on that key.
Press Func + Shift to toggle All Caps on and off. Func
+ Shift also erases all entered data from the screen.
Clear Press Clear to clear the screen.
17
Page 20

PDT 8100 Series
Key Action
Contrast See Adjusting the Contrast (Monochrome LCD) on page
Cursor keys:
C, G, H, I
End Press End to move the cursor to the end of a line.
Escape/Enter Press Enter after entering data or a command.
Power See Starting the PDT 8100 on page 12.
Scan Press Scan to scan bar codes. (Also use right and left
Send The Send key is application dependent.
Space/Back-
space
14.
Press cursor keys to move the cursor left, right, up and
down on the screen.
Press Func + Enter to partially or completely escape
from an application level or screen.
scan triggers.)
Press Func + Bk-Sp to enter a blank space.
Press Bk-Sp to erase information entered on the display,
one character at a time.
18
Page 21

Quick Reference
Using the 47-Key Keyboard
The 47-key keyboard uses an alphanum eric keypad that pro duces
the 26-character alphabet (A-Z), numbers (0-9), and assorted
characters. The keyboa rd is color-coded to indicate wh ich modifier
key (Alpha-Numeric, Func) to press to produce a particular
character or action. The keyboard default is the key value,
producing the gr ay numbe r or low er case yello w let ter on tha t key.
Scan key
Space/
Backspace
key
Caps/Shift key
End key
Send key
Clear key
Tab key
Control key
Power key
Key Action
Note: Press Func, then another key to produce the value or function above
that key. See individual key descriptions in this table for additional Function
key usage.
Backlight See Controlling the Backlight (Color TFT LCD) on page
13.
Function key
Alt key
Volume (+) & (-)
keys
Enter/Escape
key
Backlight key
19
Page 22

PDT 8100 Series
Key Action
Caps/Shift Press Shift when in alpha mode, then another key to
Clear Press Clear to clear the screen.
Contrast See Adjusting the Contrast (Monochrome LCD) on page
Cursor keys:
C, G, H, I
End Press End to move the cursor to the end of a line.
Escape/Enter Press Enter after entering data or a command.
Power See Starting the PDT 8100 on page 12.
Scan Press Scan to scan bar codes. (Also use right and left
Send The Send key is application dependent.
Space/Back-
space
capitalize the letter on that key.
Press Func + Shift to toggle All Caps on and off. Func
+ Shift also erases all entered data from the screen.
14.
Press cursor keys to move the cursor left, right, up and
down on the screen.
Press Func + Enter to partially or completely escape
from an application level or screen.
scan triggers.)
Press Func + Bk-Sp to enter a blank space.
Press Bk-Sp to erase information entered on the display,
one character at a time.
Using the Stylus
The stylus selects items and enters information. The stylus
functions as a mouse.
• Tap: T ouch the screen on ce with the stylus to open items and
select options.
• Drag: Hold the stylus on the screen and drag across the
screen to select text and image s. Drag in a lis t to sele ct multiple items.
• Tap-and-hold: Tap and hold the stylus on an item to see a
list of actions available for that item. On the pop-up menu
that appears, tap the action you want to perform.
20
Page 23

Quick Reference
Today Screen
When you turn on your termin al for the first time each day (or after
4 hours of inactivity ), the Today screen appears. You can also
display it by tapping , then Today. On the Today screen, you
can see important information for the day.
21
Page 24

PDT 8100 Series
Navigation Bar and Command Bar
The navigation bar at the top of the screen displays the active
program and current time , and al lows you t o select prog rams and
close screens. The command bar at the bottom of the screen
contains menus and buttons to perform tasks in programs.
Input Methods
Enter information in any p rogram by typi ng with the 28-, 3 7-, or 47key keyboard, or use the input panel to type with the soft keyboard,
write using Block Recognizer, or the Letter Recognizer. In any
case, the characters appear as typed text on the screen.
22
Page 25

Quick Reference
s
T o show or hi de the input panel , tap the Input Pane l button. T ap th e
arrow next to this button to view input methods.
Select input method setting
Select an input method
Input Panel Button
Tap to see your choice
When you use the inp ut panel, your terminal anticipate s th e word
you are typing or writing and displays it above the input panel.
When you tap the d isplayed word, it is inserted into you r text at the
insertion point. The more y ou use your termin al, the more words it
learns to anticipate.
Using the Soft Keyboard
1. T ap the arrow next to the Input Panel button, then Keyboard.
2. On the soft keyboard, tap the keys with your stylus.
Using the Block Recognizer
1. T ap the arrow next to the Input Panel bu tton, then Bloc k Recognizer.
23
Page 26

PDT 8100 Series
2. Write a letter in the left side of the box, or a number in the
right side, using special character strokes.
When you write a letter , i t is converted to typed text on the screen.
For instructions on entering Block Recognizer characters, with
Block Recognizer open, tap the question mark next to the writing
area, or see Block Recognizer Characters on page 25.
Using the Letter Recognizer
1. T ap the arrow n ext to the Input Panel b utton, then Letter Recognizer.
2. Write letters or numb ers in the writing area, jus t as you would
on paper . W rite capi tal lett ers in the left side of the bo x, numbers in the right side, and lower case letters in the center.
When you write a letter , i t is converted to typed text on the screen.
For instructions on using Letter Recognizer, with Letter
Recognizer open, tap the question mark next to the writing area.
24
Page 27

Quick Reference
Block Recognizer Characters
The following chart is a partial display of the characters you can
write while usin g the Bloc k Recogni zer (the do t on each characte r
is the starting point for writing).
Scanning with the PDT 8100
The PDT 8100 has an integrated scanner which collects data by
scanning bar cod es. See the PDT 8100 Prod uct Reference Guide
for Pocket PC 2002 for informa tion on configuring yo ur terminal for
scanning.
25
Page 28

PDT 8100 Series
To scan bar codes with the PDT 8100:
1. Aim the scanner at the bar code.
2. Press the scan trigger . Ensu re the red scan beam cov ers the
entire bar code. The green scan LED lights and a beep
sounds to indicate a successful decode.
Scanning PDF417 Bar Codes
The 2-D scanning PDT 8100 terminal su pport s PDF41 7 bar code
scanning. The raster pattern has multiple scanning rows to
accommodate the PDF417 symbol’s multiple rows.
1. Point the scanner at the bar code and press the trigger.
2. Center the aiming pattern on the bar code.
3. As the raster pattern spre ads, ke ep the p attern horizon tal to
the bar code.
3/4”
3/4”
4. The terminal indicates a successful scan by changing the
LED from red to green, beeping one or more times, and/or
displaying the bar code data on the screen.
If the PDF417 symbol is too “tall” where the vertical scan pattern
is not high enough to cover it, move the terminal slowly up and
26
Page 29

Quick Reference
down, keeping the beam horizontal to the rows, until the pattern
scans the entire symbol.
Resetting Your PDT 8100 Terminal
If your PDT 8100 terminal stops responding to input, reset it.
Performing a Soft Reset
A soft reset rest arts the ter minal and sa ves a ll sto red rec ords an d
entries.
Caution: Files that remain open during a soft reset may not be
retained.
DO NOT perform a soft reset if the terminal is sus pend-
ed. Press the Power button to wake th e termi nal; if t he
terminal does not turn on, perform a soft reset.
27
Page 30

PDT 8100 Series
To perform a soft reset:
Keyboard Keys
28-key Backlight + Down Arrow + Function
37-key Backlight + Alpha + Function
47-key Backlight + End + Function
Performing a Hard Reset
A hard reset also restarts your PDT 8100 terminal, but erases all
stored records and entrie s. Theref ore, never perform a h ard rese t
unless a soft reset does not solve your problem.
Note: You can restore any dat a previously synchron ized with
your computer during the next ActiveSync operation.
See the CRD 8100 Quick Reference Guide or the PDT
8100 Product Reference Guide for Pocket PC 2002.
To perform a hard reset on the terminal:
1. Remove the battery cover.
2. While holding dow n the Fun cti on key, use the stylus ( or si milar object without a sharp tip) to gently press the reset but-
ton.
Func Key
(37-key
keyboard
pictured)
Reset
Button
3. Replace the battery cover and press the Power button.
4. As the terminal reboots, the Symbol splash screen displays
for about 10 seconds.
5. Realign the screen as described on page 12.
28
Page 31

Quick Reference
Note: With a hard reset, Formats, Preferences, and other
settings are restored to their factory default settings.
Host Communications
The PDT 8100 Series terminal can communicate with a host PC
either directly through its communications port using an RS-232
serial cable, the cradle, or wirelessly via the Spect rum24® wireless
LANs, CDPD (Cellular Digital Packet Data), or GSM (Global
System for Mobile Communication). For more information on
setting up and pe rforming wireless com munications with your PDT
8100 Series terminal, refer to the PDT 8100 Series Product
Reference Guide for Pocket PC 2002.
Using the RS-232 Serial Cable
To connect the RS-232 serial cable for host communication:
1. Connect the R S-232 serial commu nication cable’ s connector
to the adapter cable’s connector.
2. Plug the adapter cable ’s submi niatur e conne ctor into the serial communication port on the bottom of the terminal.
3. Plug the other end o f the RS-232 serial com munication cable
into the host PC.
4. Begin host communication as specified by your application.
Using the Cradle
To communicate through the cradle:
1. Ensure all connections between the cradle and the host
computer are secure. See the Quick Referenc e Guide that
shipped with your cradle for instructions on setting up the
cradle.
2. Power on the host computer, the cradle, and the terminal.
3. Insert the terminal into the cradle.
4. Begin host commun ications as specifi ed by your ap plicatio n.
29
Page 32

PDT 8100 Series
Communicating with Printers
To print from a standard printer:
1. Attach an RS-232 serial ca ble to the serial port in the bottom
of the PDT 8100.
2. Attach the other end of the cable to the serial port on the
printer.
3. Run your application’s print function.
To print from an IrDA-compliant printer:
1. Point the IrDA port on the back of th e PD T 81 00 a t the Ir DA
port on the printer, at a maximum distance of 39 inches (1
meter).
2. Run the application’s print function.
Note: The PDT 8100 must have software conf igu red to com-
municate with the printer you are using.
Maintaining the PDT 8100
To maintain your PDT 8100 in good working order:
• Do not scratch the screen. Use the supp lied stylus or pla stictipped pens intended for use with a touch-sensitive screen.
Never use a pen or pencil or other sharp object on the
screen.
• Although your PDT 8100 is water and dust resistant, do not
expose it to rain or moisture for an extended period of time.
Treat your PDT 8100 as you would a poc ket calculator or other small electronic instrument.
• The touch-sensitive screen of your PDT 8100 cont ains glass.
Do not drop your PDT 8100 or subject it to strong impact.
• Protect your PDT 8100 from temperature extremes. Do not
leave it on the dashboard of a car on a hot day, and keep it
away from heat sources.
• Do not store or use y our PDT 81 00 in any lo ca tion th at is extremely dusty, damp or wet.
• If the surface of the PDT 8100 screen becom es soiled, clean
it with a soft cloth moistened wi th a dilute d window-cl eanin g
solution.
30
Page 33

Quick Reference
Troubleshooting
Problem Cause Solution
PDT 8100 does
not turn on.
Rechargeable
lithium-ion battery did not
charge.
Cannot see characters on display.
Lithium-ion battery not charged.
Lithium-ion battery not installed
properly.
System crash. Perform a hard reset. See Reset-
Battery failed. Replace battery. If your PDT 8100
PDT 8100 removed from cradle while battery
was charging.
PDT 8100 not
powered on.
Contrast not adjusted properly
(monochrome
LCD only).
Charge or replace the lithiu m-ion
battery in the PDT 8100.
Ensure battery is installed properly.
ting Your PDT 8100 Terminal on
page 27.
terminal still does not operate, try a
soft reset, then a hard reset; see
Resetting Your PDT 8100 Terminal
on page 27.
Insert PDT 8100 in cradle and begin charging. The lithium-ion battery requires up to 4 hours to
recharge fully.
Press the PWR key.
To adjust the contrast on your PDT
8100 terminal, see Adjusting the
Contrast (Monochrome LCD) on
page 14.
31
Page 34

PDT 8100 Series
Problem Cause Solution
Fail to communicate with IrDA
printer.
During data communication, no
data was transmitted, or transmitted data was
incomplete.
No sound is audible.
Distance from
printer is more
than 1 meter (39
inches).
Obstruction interfered with communication.
Application is not
enabled to run
IrDA printing.
Terminal removed from cradle or unplugged
from host PC during communications.
Incorrect cable
configuration.
Communication
software was incorrectly installed
or configured.
Volume setting is
low or turned off.
Bring the terminal closer to the
printer and attempt communications again.
Check the path to ensure no objects were in the way.
Printer support must be included
with the application to run IrDA
printing on the terminal. See your
System Administrator.
Replace th e t er m ina l in t h e cra dl e ,
or replace the Synchronization cable, and re-transmit.
See your System Administrator.
Perform setup as described in the
PDT 8100 Product Reference
Guide for Pocket PC 2002.
Check the System Volume slider in
the Sounds & Reminders properties dialog box (under Start/Set-
tings) to make sure the volume is
not turned down.
32
Page 35

Quick Reference
Problem Cause Solution
PDT 8100 t u rns
itself off.
PDT 8100
doesn’t recognize my handwriting.
Tapping the
screen butt ons or
icons does not
activate the corresponding feature.
PDT 8100 is inactive.
Character strokes
written incorrectly
with the stylus.
or
Character strokes
written on the
wrong part of the
LCD screen.
or
Lower- case and
upper-case letters, and numbers
written on the
wrong parts of the
LCD screen.
LCD scre en not
aligned correctly.
Yo ur P DT 810 0 tur ns of f af ter a p eriod of inactivity. This period can be
set from one to five minutes, in
one-minute intervals. Check the
Power dialog box (in the System
tab under Start/Settings), and
change the setting if you need a
longer delay before the automatic
shutoff feature activates.
If you’re usi n g t he Block Recognizer input method, characters must
be written a certain way. See the
PDT 8100 Product Reference
Guide for Pocket PC 2002 for infor-
mation about how to write character strokes.
If you’re usi n g t he Block Recognizer or Letter Recognizer input method, make the character strokes in
the lower character ent ry area on
the screen — not on the display
part of the screen.
Make sure you are writing letters
and numbers in the appropriate
section of the writing area.
Align the screen. Choose Align
Screen from the System tab under
Start/Settings, or hold down the
Function button and press the Action button.
33
Page 36

PDT 8100 Series
Problem Cause Solution
A message appears stat ing t hat
your PDT 8100
terminal memory
is full.
Beamed data
does not transmit.
When receiving
beamed data an
out of memory
message appears.
Too many files
stored on the terminal.
Memory allocation too low.
Too many applications installed on
the terminal.
PDT 8100 terminals too close together.
Insufficient room
lighting.
Not enough free
memory availa ble
for receiving data.
Delete unused memos and
records. You can save these
records on your computer.
Adjust the memory allocation. Select Start, then Settings, and select the System tab. Tap Memory
and adjust the slider.
If you have installed additional applications on your PDT 8100, remove them to recover memory.
Select Start, then Settings, and
select the System tab. Tap Re-
move Programs, select the unused program and tap Remove.
Confirm that the PDT 8100 terminals are 5” apart, and there is a
clear path between the two devices.
Adjust the room lighting or move to
a different location.
Your PDT 8100 terminal requires at
least twice the amount of memory
available as the data you are receiving. For example, if you are receiving a 30K application, you
must have at least 60K free.
34
Page 37

Quick Reference
Problem Cause Solution
Your PDT 8100
terminal does not
accept scan input.
Scanning application is not loaded.
Unreadable bar
code.
Distance between exit window
and bar code is incorrect.
Terminal is not
programmed for
the bar code.
Terminal is not
programmed to
generate a beep.
Battery is low. If the scanner stops emitting a la-
Verify that the unit is loaded with a
scanning application. See your
System Administrator.
Be sure the symbol is not defaced.
Be sure you are within proper
scanning range.
Be sure the terminal is programmed to accept the type of bar
code you are scanning.
If you are ex pecting a beep on a
good decode and don’t hear one,
check that the application is set to
generate a beep on good decode.
ser beam when you press the trigger, check your battery level. When
the battery is low, the scanner
shuts off before the terminal notifies you of the low battery condition.
Note: If the scanner is still not
reading symbols, contact your distributor or Symbol Technologies.
35
Page 38

PDT 8100 Series
END-USER LICENSE AGREEMENT
• You have acqu i red a d evice (“ DEVICE ”) t hat incl ud es softwar e lic ensed by Symbol Technolo-
gies, Inc. (“SYMBOL”) from Microsoft Licensing Inc. or its affiliates (“MS”). Those installed
software products of MS origin, as well as associated media, printed materials, and “online”
or electronic documentation (“SOFTWARE”) are protected by international intellectual property laws and treaties. The SOFTWARE is licensed, not sold. All rights reserved.
• IF YOU DO NOT AGREE TO THIS END USER LICENSE AGREEMENT (“EULA”), DO NOT
USE THE DEVICE OR COPY THE SOFTWARE. INSTEAD, PROMPTLY CONTACT SYMBOL FOR INSTRUCTIONS ON RETURN OF THE UNUSED DEVICE(S) FOR A REFUND.
ANY USE OF THE SOFTWARE, INCLUDING BUT NOT LIMITED TO USE ON THE
DEVICE, WILL CONSTITUE YOUR AGREEMENT TO THIS EULA (OR RATIFICATION OF
ANY PREVIOUS CONSENT).
• GRANT OF SOFTWARE LICENSE. This EULA grants you the following license:
• SOFTWARE includes software already installed on the DEVICE (“DEVICE Software”) and
MS software contained on the CD-ROM disk (“Desktop Software”).
SYSTEM Software. You may use the DEVICE Software as installed on the DEVICE.
Desktop Software. Desktop Software is included wi th your DEVICE , and you may insta ll and use
the Microsoft® Active Sync® 3.5 component on one (1) or more computers to exchange informatio n
with one (1) or more computing devi ces that cont ain a comp ati ble version of th e Micro soft® Pocket
PC Software 2002 operating system. For other software component(s) contained in the Desktop
Software, you may install and use such com ponents only in accor dance with the terms of the p rinted
or online end user license agreement(s) provi ded with such component(s). In the absence of an end
user license agreement for particular component(s) of the Desktop Software, you may install and
use only one (1) copy of such component(s) on the DEVICE or a single computer with which you
use the DEVICE.
Back-up Copy. If Manufacturer has not included a back-up copy o f the DEVICE Software with the
DEVICE, you may make a single back-up copy of the DEVICE Softw are. You may use the back-up
copy solely for archival purposes.
Microsoft® Outlook® 2002. If Microsoft Outlook 2002 is included with your Device, the following
terms apply to your use of Microsoft Outlook 2002: (i) regardless of the information contained in
“Software Installation and Use” sectio n of the online EULA you may install one (1) copy of Microsoft
Outlook 2002 on one (1) computer to use, exchange dat a, share dat a, access and intera ct with the
DEVICE, and (ii) the EULA for Microsoft Outlook 2002 is between Man ufacturer (as defined above )
and the end user – not between the PC Manufacturer and end user.
DESCRIPTION OF OTHER RIGHTS AND LIMITATIONS.
• Speech/Handwriting Recognition. If the SOFTWARE includes speech and/or handwriting
recognition component(s), you should understand that speech and handwriting recognition
are inherently statistical processes; that recognit ion errors are i nherent in the processes; that
it is your responsibility to provide for handling such errors and to monitor the recognition processes and correct any errors. Neither Manufacturer nor its suppliers shall be liable for any
damages arising out of errors in the speech and handwriting recognition processes.
• Limitations on Reverse Engineering, Decompilation and Disassembly. You may not
reverse engineer, de comp ile , or disasse mble the SOFTWARE, except an d only to th e extent
that such activity is expressly permitted by applicable law notwithstanding th is limitation.
• Single DEVICE. The DEVICE Software is licensed with the DEVICE as a single integrated
product. The DEVICE Software installed in read only memory (“ROM”) of the DEVICE many
only be used as part of the DEVICE.
• Single EULA. The package for the DEVICE may contain multiple versions of this EULA,
such as multiple translations and/or mult iple media ve rsions (e .g., i n the use r documentation
and in the software). Even if you receive multiple versions of the EULA, you are licensed to
use only one (1) copy of the DEVICE Software.
• Rental. You may not rent or lease the SOFTWARE.
• Software Transfer. You may permanently transfer all of your right s un der this EULA, only as
36
Page 39

Quick Reference
part of a sale or transfer of the D EVICE , prov ided you r et ain no copi es, yo u tran sfer a ll of the
SOFTWARE (including all component parts, the media and printed materials, any upgrades
or backup copies, this EULA and, if applicable, the Certificate(s) of Authenticity), and the
recipient agrees to the terms of this EULA. If the Software is an upgrade, any transfer must
include all prior versions of the SOFTWARE.
• Termination. Without prejudice to any other rights, Manufacturer or MS may terminate this
EULA if you fail to comply with the terms and conditions of this EULA. In such event, you
must destroy all copies of the SOFTWARE and all of its component parts.
UPGRADES AND RECOVERY MEDIA.
• DEVICE Software. If the DEVICE Software is provided by Manufacturer separate from the
DEVICE on media such as a ROM chip, CD ROM disk(s) or via web download or other
means, and is labeled “For Upgrade Purposes Only” or “For Recovery Purposes Only”, you
may install one copy of such DEVICE Software onto the DEVICE as a replacement copy for
the existing DEVICE Software and use it in accordance with Section 1 of this EULA.
• Desktop Software. If any Desktop Software component(s) is provided by Manufacturer separate from the DEVICE on CD ROM disk(s) or via web download or other means, and
labeled “For Upgrade Purposes Only” or “For Recovery Purposes Only”, you may (i) install
and use one copy of such component(s) on the computer(s) you use to exchange data with
the DEVICE as a replacement copy for the existing Desktop Software component(s).
COPYRIGHT. All title and intellectual property rights in and to the SOFTWARE (including but not
limited to any images, photographs, animations, video, audio, music, text and “applets,”
incorporated into the SOFTWARE), the accompanying printed materials, and any copies of the
SOFTWARE, are own ed by MS or its suppliers (including Micr osoft Corporati on). Y o u may not copy
the printed materials accomp anying the S OFTW ARE . All title and i ntellectual prop erty rig hts in and
to the content which may be accessed through use of the SOFTWARE is the property of the
respective content owner and may be protected by applicable copyright or other intellectual
property laws and treaties. This EULA grants you no rights to use such content. All rights not
specifically granted under this EULA are reserved by MS and its suppliers (including Microsoft
Corporation).
EXPORT RESTRICTIONS. You agree that you will not export or re-export the SOFTWARE to any
country, perso n, or entity subj ect to U.S. export restricti ons. You specifically agree not to export or
re-export the SOFTWARE: (i) to any country to which the U.S. has embargoed or restricted the
export of goods or services, which as of May 1999 include, but ar e not necessarily lim ited to Cuba,
Iran, Iraq, Libya, North Korea, Sudan, Syria, and the Federal Republic of Yugoslavia (including
Serbia, but not Montenegro), or to any nationa l of any such country, wherever located, who intends
to transmit or transport the product s back to such c ountry; (ii ) to any person or entity who you know
of have reason to know will utilize the SOFTWARE or portion thereof in the design, development or
production of nuclear, chemical or biological weapons; or (iii) to any person or entity who has been
prohibited from participating in U.S. export transactions by any federal agency of the U.S.
government.
NOTE ON JAVA SUPPORT. The SOFTWARE may contain support for programs written in Java.
Java technology is not fault tolerant and is not designed, manufactured, or intended for use or
resale as on-line control equipment in hazardous environments requiring fail-safe performance,
such as in the operation of nuclear facilities, aircra ft navigation or communication systems, air traf fic
control, direct life support machines, or weapons systems, in which the failure of Java technology
could lead directly to death, personal injury, or severe physical or environmental damage.
PRODUCT SUPPORT. Product support for the SOFTWARE is not provided by MS, its parent
corporation, Microsoft Corporation, or their affiliates or subsidiaries. For product support, please
refer to the SYMBOL support number provided in the documentation for the DEVICE. Should you
have any questions concerning this EULA, or if you desire to cont act SYMBOL for any other re ason,
please refer to the address provided in the documentation for the DEVICE.
37
Page 40

PDT 8100 Series
NO LIABILITY FOR CERTAIN DAMAGES. EXCEPT AS PROHIBITY BY LAW, MS SHALL HAVE
NO LIABILITY FOR ANY INDIRECT, SPECIAL, CONSEQUENTIAL OR INCIDENTAL DAMAGES
ARISING FROM OR IN CONNECTION WITH THE USE OR PERFORMANCE OF THE
SOFTWARE. THIS LIMITATION SHALL APPLY EVEN IF ANY REMEDY FAILS OF ITS
ESSENTIAL PURPOSE.
FOR APPLICABLE LIMITED WARRANTIES AND SPECIAL PROVISIONS PERTAINING TO
YOUR PARTICULAR JURISDICTION, PLEASE REFER TO YOUR WARRANTY BOOKLET
INCLUDED WITH THIS PACKAGE OR PROVIDED WITH THE SOFTWARE PRINTED
MATERIALS.
Ergonomic Recommendations
Caution: In order to avoid or minimize the potential risk of ergonomic injury follow the
recommendations below. Consult with your local Health & Safety Manager to ensure
that you are adher in g t o your company’s safety progr am s to prevent employe e injury.
• Reduce or eliminate repetitive motion
• Maintain a natural positio n
• Reduce or eliminate excessive force
• Keep objects that are used frequently within easy reach
• Perform tasks at correct heights
• Reduce or eliminate vibration
• Reduce or eliminate direct pressure
• Provide adjustable workstations
• Provide adequate clearance
• Provide a suitable working environment
• Improve work procedur es.
Regulatory Information
All Symbol devices are designed to be compliant with rules and regulations in
locations they are sold and will be labeled as required.
Any changes or modifications to Sy mbol Technologies equipment, not expressly
approved by Symbol Technologies, could void the user’s authority to operate the
equipment.
Laser Devices
Symbol products using lasers comply with US 21CFR1040.10, and IEC8251:1993, EN60825-1:1994+A11:1996. The laser classification is marked on
Class 1 Laser devices are not considered to be hazardous when used for their intended
purpose. The following statement is required to comply with US and international
regulations:
Caution: Use of controls, adjustments or performance of procedures other than those
specified herein may result in hazardous laser light exposure.
Class 2 laser scanners use a low power, visible light diode. As with any very bright light
source, such as th e sun, the user should a void staring directly int o th e l ight beam.
Momentary exposure to a Class 2 laser is not known to be harmful.
one of the labels on the product.
38
Page 41

Quick Reference
Scanner Labeling
!
!
!
!
!
!
!
!
!
!
!
!
!
!
!
39
Page 42

PDT 8100 Series
In accordance with Clause 5, IEC 825 and EN60825, the following information is
provided to the user:
ENGLISH HEBREW
CLASS 1 CLASS 1 LASER PRODUCT
CLASS 2 LASER LIGHT
DO NOT STARE INTO BEAM
CLASS 2 LASER PRODUCT
DANISH / DANSK ITALIAN / ITALIANO
KLASSE 1 KLASSE 1 LASERPRODUKT CLASSE 1 PRODOTTO AL LASER DI CLASSE 1
KLASSE 2 LASERLYF CLASSE 2 LUCE LASER
SE IKKE IND I STRÅLEN NON FISSARE IL RAGGIOPRODOTTO
KLASSE 2 LASERPRODUKT AL LASER DI CLASSE 2
DUTCH / NEDERLANDS NORWEGIAN / NORSK
KLASSE 1 KLASSE-1 LASERPRODUKT KLASSE 1 LASERPRODUKT, KLASSE 1
KLASSE 2 LASERLICHT KLASSE 2 LASERLYS IKKE STIRR INN I LYSSTRÅLEN
NIET IN STRAAL STAREN LASERPRODUKT, KLASSE 2
KLASSE-2 LASERPRODUKT
FINNISH / SUOMI PORTUGUESE / PORTUGUÊS
LUOKKA 1 LUOKKA 1 LASERTUOTE CLASSE 1 PRODUTO LASER DA CLASSE 1
LUOKKA 2 LASERVALO CLASSE 2 LUZ DE LASER NÃO FIXAR O RAIO LUMINOSO
ÄLÄ TUIJOTA SÄDETTÄ PRODUTO LASER DA CLASSE 2
LUOKKA 2 LASERTUOTE
FRENCH / FRANÇAIS SPANISH / ESPAÑOL
CLASSE 1 PRODUIT LASER DE CLASSE 1 CLASE 1 PRODUCTO LASER DE LA CLASE 1
CLASSE 2 LUMIERE LASER CLASE 2 LUZ LASER
NE PAS REGARDER LE RAYON FIXEMENT NO MIRE FIJAMENTE EL HAZ
PRODUIT LASER DE CLASSE 2 PRODUCTO LASER DE LA CLASE 2
GERMAN / DEUTCH SWEDISH / SVENSKA
KLASSE 1 LASERPRODUKT DER KLASSE 1 KLASS 1 LASERPRODUKT KLASS 1
KLASSE 2 LASERSTRAHLEN KLASS 2 LASERLJUS STIRRA INTE MOT STRÅLEN
NICHT DIREKT IN DEN LASERSTRAHL SCHAUEN LASERPRODUKT KLASS 2
LASERPRODUKT DER KLASSE 2
Power Supply
Note: Use only a Symbol-approved power supply (p/n 50-14000-107) output
Hinweis: Benutzen Sie nur eine Symbol Technologies genehmigt
rated 9 Vdc and minimum 2A. The power supply is certified to
EN60950 with SELV outputs.
Stromversorgung (p/n 50-14000-107) in den Ausgabe: 9 Vdc und
minimum 2A. Die Stromversorgung ist bescheinigt nach EN60950 mit
SELV Ausga be n.
40
Page 43

Quick Reference
FCC RF Exposure Guidelines
This device was tested for typical body-worn operations with the holster providing a
minimal spacing of 2.0 cm from the body to the back of the terminal/antenna. To
maintain compliance with FCC RF exposure compliance requirements, use only beltclips, holsters, or similar accessories that maintain a 2.0 cm separation distance
between the user’s body and the back of the terminal, including the antenna. The use
of third-party belt-clips, holsters, and similar accessories should not contain metallic
components in its assembly. The use of these accessories that do not satisfy these
requirements may not comply with FCC RF exposure compliance requirements, and
should be avoided.
GSM Regulatory Warnings
Emergency Calls
Note: Only applicable for Audio Enabled Devices
The Worldwide GSM standard provides a single uniform number, 112, to dial in cases
of emergency. Provided that your phone has found an network you will be able to
make an emergency call. The call can be made regardless of any security codes and
depending on a network, with or without a SIM card inserted.
Safety Information
The device complies with Internationally recognised standards covering Specific
Absorption Rate (SAR) related to human exposure to electromagnetic fields from
mobile phones.
It is advisable only to use the device only in the normal operating position.
Safety on the Road
Drivers are advised not to use the handset while their vehicle is in motion, except in
emergencies. Use the hands-free facility to speak only if it does not divert your
attention from the traffic.
Safety on Aircraft
You are required to switch off mobile phones when on board an aircraft or at any other
time when instructed to do so by a member of the crew.
Pacemakers
It is recommended by pacemaker manufacturers that a minimum of 15cm (6 inches)
be maintained between a handheld wireless phone and a pacemaker to avoid any
possible interference with the pacema ker. These recommen dations are consistent
with the independent research by and recommendations of Wireless Technology
Research.
41
Page 44

PDT 8100 Series
Persons with pacemake rs:
• Should always keep the device more than 15cm (6 inches) from their pacemaker when turned on
• Should not carry the device in a breast pocket
• Should use the ear furthest from the pacemaker to minimize the potential for
interference.
If you have any reason to suspect that interference is taking place turn off your device
immediately.
Hearing Aids
The device may interfere with some hearing aids. In the event of interference you may
want to consult your hearing aid supplier to discuss solutions.
Other Medical Devices
The device transmits radio frequency energy and has the potential to interfere with
inadequately protected medical devices. Consult your physician or the manufacturer
of the device to see if any particular device has sufficient protection.
It is good practice to turn off the device within a hospital or other medical facility where
sensitive medical equipment is in use. In some countries, this is a legal requirement
applying to all mobile phones and related equipment.
Effect on Vehicles
RF signals may affect improperly installed or inadequately shielded electronic
systems in motor vehicles (including safety systems). Check with the manufacturer
or its representative regarding your vehicle. You should also consult the manufacturer
of any equipment that has been added to your vehicle.
Warn ing Noti ces
Please observe all warning notices with regard to the usage of mobile phones.
Potentially Haz ardous Atmosphere s
You are advised not to use this device at a refuelling point. You are reminded of the
need to observe restrictions on the use of radio devices in fuel depots, chemical
plants etc.
42
Page 45

Quick Reference
Radio Frequency Interference Requirements
Note: This equipment has been tested and found to comply with the limits for a Class B
digital device, pursuant to Part 15 of the FCC rules. These limits are designed to provide
reasonable protection against har m fu l i nt er f er ence in a residentia l installation. This
equipment generates, uses, and can radiate radio frequency energy and, if not installed
and used in accordance with the instruction manual, may cause harmful interference to
radio communications. However there is no guarantee that interference will not occur in
a particular installatio n. If the equipment does cause harmful inte r fe rence to radio or
television reception, which can be determined by turning the equipment off and on, the
user is encouraged to try to correct the interference by one or more of the following
measures:
• Re-orient or relocate the re ceiving antenna
• Increase the separation bet ween the equipment and receiver
• Connect the equipment into an outlet on a circu it di ffe re nt f ro m that to which the
receiver is connecte d
• Consult the dealer or an experienced radio/TV technician for hel p.
Radio Frequency Interference Requirements - Canada
This device compli es wit h RSS 210 of I ndustr y & Scie nce C anada. Oper ation is subj ect
to the following two condi tions: (1) this device may not cause harmful interference and
(2) this device must accept any interference received, including interference that may
cause undesired operation.
This Class B digita l apparatus complies with Canadian ICES-003.
Cet appareil numéri que de la classe B est conforme à la norme N M B- 003 du Canada.
43
Page 46

PDT 8100 Series
CE Marking and European Economic Area (EEA)
For Wideband Radio Devices:
RLAN’s (2.4GHz) for use through the EEA have the following restrictions:
• Maximum radiated transmit power of 100 mW EIRP in the frequency range
2.400 -2.4835 GHz
• France, equipment is restricted to 2.4465 -2.4835 GHz frequency range
• Belgium outside usage, the equipment is restricted to 2.460 -2.4835 GHz frequency range
• Italy requires a user license.
Statement of Compliance for Non-Radio Devices
Symbol Technologies, Inc., hereby declares that this device is in compliance with all
the applicable Directives, 89/336/EEC, 73/23/EEC. A copy of the Declaration of
Conformity may be obtained from http://www2.symbol.com/doc/.
Statement of Compliance for Radio Devices
Symbol Technologies, Inc., hereby, declares that this device is in compliance with the
essential requirements and other relevant provisions of Directive 1999/5/EC. A
Declaration of Conformity may be obtained from http://www2.symbol.com/doc/.
Statement of Compliance for Radio Devices Integrated into Terminals
Symbol Technologies, Inc., hereby, declares that this device is in compliance with the
essential requirements and other relevant provisions of Directives 1999/5/EC,
89/336/EEC and 73/23/EEC. Declaration of Conformities may be obtained from
http://www2.symbol.com/doc/.
Statements (Other)
Wideband Radio Devices:
Mexico - Restrict Frequency Range of: 2.450 - 2.4835 GHz.
EID Number (PDT 8133 Only)
To enable CDPD service, contact your service provider to submit
your Electronic Identification number (EID). This number is
located on the back of your terminal.
Battery Caution
Caution: Danger of explosion if battery is incorrectly replaced.
Replace only with the same or equivalent type recommended by the manufacturer. Dispose of used batteries according to the manufacturer’s instructions.
44
Page 47

Quick Reference
Warranty
(A) Warranty Symbol Technologies (hereafter “Seller”) hardware Products are warranted against defects in
workmanship and m at erials for a period of twelve (12) months from the d at e of sh ipment, unless other w is e
provided by Seller in writing, provided the Product remains unmodified and is operat ed under normal and
proper conditions. Warranty provisions and durations on software, integrated installed systems, Product
modified or designed to meet specific customer specifications (“Custom Products”), remanufactured
products, and recondit ioned or upgraded products, shall be as provid ed in the applicable P roduct
specification in effect at th e t ime of purchase or in the accompanying softw are license.
(B) Spare Parts Spare parts (i.e. parts, components, or subassemblies sold by Seller for use in the service
and maintenance of Products) are warranted against defects in workmanship and materials for a period of
thirty (30) days from the date of shipment. Spare parts may be new or originate from returned units under
the conditions set fort h in subsection D below.
(C) Repair of Symbol-branded hardware For repairs on Symbol-branded hardw are Products under th is
Agreement, includ ing repairs covered by warranty, the repair services provided are warranted against
defects in workmanship and materials on the repaired component of th e Product for a period of th irt y (30)
days from the shipment date of the repaired Product, or until the end o f the original warranty period,
whichever is longer.
(D) Product Service Products may be serviced or manufactured with parts, components, or subassemblies
that originate from returned products and that have been tested as meeting applicable specifications for
equivalent new material and Products. The sole obligation of Seller for defective hardware Products is limited
to repair or replacement (at Seller’s option) on a “return to service depot” basis with prior Seller authorization.
Customer is responsible for shipment to the Seller and assumes all costs a nd risks associated with this
transportation; return shipment to the Cus t om er will be at Seller's expense. Customer sh all be responsible
for return shipment charges for product returned where Seller determines there is no defect (“No Defect
Found”), or for produc t ret urned that Seller dete rm ines is not eligible for warranty repair. No charge will be
made to Buyer for replacement parts for warranty repairs. Seller is not responsible for any damage to or loss
of any software programs, data or removable data storage media , or t he restoration or reins tall at ion of any
software programs or data other than the software, if any, installed by Seller during manufacture of the
Product.
(E) Original Warranty Period Except for the warranty applying solely to the repaired component arising from
a repair service as provided in Section C abov e, th e aforementioned provisions do not extend the original
warranty period of an y Pr oduct that had either been repaired or replaced by Seller.
(F) Warranty Provisions The above warran t y p rov is ions shall not apply to any Product (i) which has been
repaired , t amper ed wi th, alt ered or modi fied , exce pt b y Sel ler’ s au thor ized ser vice per sonne l; (ii) in w hich the
defects or damage to the Product result from no rm al wear and tear, misuse, negligence, improper stora ge,
water or other liquids , b at te ry leakage, use of parts or ac c es s ories not approved or supplied by Symbol, or
failure to perform ope rator handling and scheduled maintenance instructions sup plied by Seller; (iii) whic h
has been subjected to unusual physical or electrical stress, abuse, or accident, or forces or exposure beyond
normal use within the specified operational and environmental parameters set forth in the applicable Product
specification; nor shall the above warranty provisions apply to any expendable or consumable items, such
as batteries, supplied with the Product.
EXCEPT FOR THE WARR AN T Y OF TITLE AND TH E EXPRESS WARRANTIES STATED ABOVE,
SELLER DISCLAIMS ALL WARRANTIES ON PRODUCTS FURNISHED HEREUNDER INCLUDING ALL
IMPLIED WARRANTIES OF MERCHANTABILITY AND FITNESS FOR A PARTICULAR USE. ANY
IMPLIED WARRANTIES THAT MA Y BE IMPOSED BY LAW ARE LIMITED IN DURA TION TO THE LIMITED
WARRANTY PERIOD. SOME ST ATES OR COUNTRIES DO NOT ALLOW A LIMITATION ON HOW LONG
AN IMPLIED WARRANTY LASTS OR THE EXCLUSION OR LIMITATION OF INCIDENTAL OR
CONSEQUENTIAL DAMAGES FOR CONSUMER PRODUCTS. IN SUCH STATES OR COUNTRIES, FOR
SUCH PRODUCTS, SOME EXCLUSIONS OR LIMITATIONS OF THIS LIMITED WARRANTY MAY NOT
APPLY.
The stated express wa rranties are in lieu of all obligations or liabilitie s on t he part of Seller for damag es ,
including but not limited to, special, indirect or consequential damages arising out of or in connection with
the use or performan c e of th e Product or service. Seller’s liability for dam ages to Buyer or othe rs res ulting
from the us e of any P roduc t or ser vice furn ishe d he reunde r sh all i n no way ex cee d the purc hase pric e of said
Product or the fair market value of said service, except in instances of injury to persons or property.
Page 48

Service Information
Before you use the unit, it must be configured to operate in your facility’s network and
run your applications.
If you have a problem running your unit or using your equipment, contact your facility’s
Technical or Systems Support. If there is a problem with the equipment, they will
contact the Symbol Support Center:
United States
United Kingdom 0800 328 2424 Asia/Pacific +65-6796-9600
Australia 1-800-672-906 Austria/Österreich 1-505-5794-0
Denmark/Danmark 7020-1718 Finland/Suomi 9 5407 580
France 01-40-96-52-21 Germany/Deutch-
Italy/Italia 2-484441 Mexico/México 5-520-1835
Netherlands/Neder-
land
South Africa 11-8095311 Spain/España 91 324 40 00
Sweden/Sverige 84452900 +34 91 324 40 00
Latin America
Sales Support
Europe/Mid-East
Distributor Operations
1
Customer support is available 24 hours a day, 7 days a week.
1
1-800-653-5350
1-631-738-2400
315-271700 Norway/Norge +47 2232 4375
1-800-347-0178 Inside US
+1-561-483-1275 Outside US
Contact local distributor or call
+44 118 945 7360
Canada 905-629-7226
land
Inside Spain
Outside Spain
6074-49020
72-55171-01
Revision C — January 2003
Symbol Techno logies, Inc. One Symbol Plaza Holtsville, NY 11742-1300
 Loading...