

Page 1
PDT 8000 Series
Product Reference Guide
Page 2

Page 3

PDT 8000 Series
Product Reference Guide
72-58169-02
Revision A
October 2002
Page 4

2002 by Symbol Technologies, Inc. All rights reserved.
No part of this publication may be reproduced or used in any form, or by any electrical or
mechanical means, without permission in writing from Symbol. This includes electronic or
mechanical means, such as photocopying, recording, or information storage and retrieval
systems. The material in this manual is subject to change without notice.
The software is provided strictly on an “as is” basis. All software, including firmware,
furnished to the user is on a licensed basis. Symbol grants to the user a non-transferable
and non-exclusive license to use each software or firmware program delivered hereunder
(licensed program). Except as noted below, such license may not be assigned,
sublicensed, or otherwise transferred by the user without prior written consent of Symbol.
No right to copy a licensed program in whole or in part is granted, except as permitted under
copyright law. The user shall not modify, merge, or incorporate any form or portion of a
licensed program with other program material, create a derivative work from a licensed
program, or use a licensed program in a network without written permission from Symbol.
The user agrees to maintain Symbol’s copyright notice on the licensed programs delivered
hereunder, and to include the same on any authorized copies it makes, in whole or in part.
The user agrees not to decompile, disassemble, decode, or reverse engineer any licensed
program delivered to the user or any portion thereof.
Symbol reserves the right to make changes to any software or product to improve reliability,
function, or design.
Symbol does not assume any product liability arising out of, or in connection with, the
application or use of any product, circuit, or application described herein.
No license is granted, either expressly or by implication, estoppel, or otherwise under any
Symbol Technologies, Inc., intellectual property rights. An implied license only exists for
equipment, circuits, and subsystems contained in Symbol products.
Symbol, Spectrum One, and Spectrum24 are registered trademarks of Symbol
Technologies, Inc. Other product names mentioned in this manual may be trademarks or
registered trademarks of their respective companies and are hereby acknowledged.
Symbol Technologies, Inc.
One Symbol Plaza
Holtsville, New York 11742-1300
http://www.symbol.com
ii
Page 5

Contents
About This Guide
Introduction . . . . . . . . . . . . . . . . . . . . . . . . . . . . . . . . . . . . . . . . . . . . . . . . . . . . . . . . . . . . . . . . . . . . xi
Chapter Descriptions . . . . . . . . . . . . . . . . . . . . . . . . . . . . . . . . . . . . . . . . . . . . . . . . . . . . . . . . . . . . . xi
Notational Conventions . . . . . . . . . . . . . . . . . . . . . . . . . . . . . . . . . . . . . . . . . . . . . . . . . . . . . . . . . . xii
Related Documents . . . . . . . . . . . . . . . . . . . . . . . . . . . . . . . . . . . . . . . . . . . . . . . . . . . . . . . . . . . . . xiii
Service Information . . . . . . . . . . . . . . . . . . . . . . . . . . . . . . . . . . . . . . . . . . . . . . . . . . . . . . . . . . . . . xiii
Symbol Support Center . . . . . . . . . . . . . . . . . . . . . . . . . . . . . . . . . . . . . . . . . . . . . . . . . . . . . .xiv
Chapter 1. Getting Started
Chapter Contents. . . . . . . . . . . . . . . . . . . . . . . . . . . . . . . . . . . . . . . . . . . . . . . . . . . . . . . . . . . . . . 1-1
Introduction . . . . . . . . . . . . . . . . . . . . . . . . . . . . . . . . . . . . . . . . . . . . . . . . . . . . . . . . . . . . . . . . . . 1-3
Unpacking the Terminal. . . . . . . . . . . . . . . . . . . . . . . . . . . . . . . . . . . . . . . . . . . . . . . . . . . . . . . . . 1-3
Parts of the Terminal . . . . . . . . . . . . . . . . . . . . . . . . . . . . . . . . . . . . . . . . . . . . . . . . . . . . . . . . . . . 1-4
Accessories . . . . . . . . . . . . . . . . . . . . . . . . . . . . . . . . . . . . . . . . . . . . . . . . . . . . . . . . . . . . . . . . . . 1-6
Installing Batteries . . . . . . . . . . . . . . . . . . . . . . . . . . . . . . . . . . . . . . . . . . . . . . . . . . . . . . . . . . . . . 1-7
Charging the Terminal Battery. . . . . . . . . . . . . . . . . . . . . . . . . . . . . . . . . . . . . . . . . . . . . . . . . . . . 1-8
Using the Serial Charging Cable . . . . . . . . . . . . . . . . . . . . . . . . . . . . . . . . . . . . . . . . . . . . . . 1-9
Using the Snap-On Modem Module . . . . . . . . . . . . . . . . . . . . . . . . . . . . . . . . . . . . . . . . . . . 1-10
Using the Snap-On Autocharger . . . . . . . . . . . . . . . . . . . . . . . . . . . . . . . . . . . . . . . . . . . . . 1-11
Using the Single-Slot Cradle. . . . . . . . . . . . . . . . . . . . . . . . . . . . . . . . . . . . . . . . . . . . . . . . . 1-12
Using the Four-Slot Cradle . . . . . . . . . . . . . . . . . . . . . . . . . . . . . . . . . . . . . . . . . . . . . . . . . . 1-13
Charging Spare Batteries. . . . . . . . . . . . . . . . . . . . . . . . . . . . . . . . . . . . . . . . . . . . . . . . . . . . . . . 1-14
Using the Single-Slot Cradle. . . . . . . . . . . . . . . . . . . . . . . . . . . . . . . . . . . . . . . . . . . . . . . . . 1-14
Using the CHS8000-4000B . . . . . . . . . . . . . . . . . . . . . . . . . . . . . . . . . . . . . . . . . . . . . . . . . 1-15
Charge LED Indicator . . . . . . . . . . . . . . . . . . . . . . . . . . . . . . . . . . . . . . . . . . . . . . . . . . . . . . . . . 1-16
Checking Battery Power . . . . . . . . . . . . . . . . . . . . . . . . . . . . . . . . . . . . . . . . . . . . . . . . . . . . . . . 1-17
Inserting a Compact Flash Storage Card. . . . . . . . . . . . . . . . . . . . . . . . . . . . . . . . . . . . . . . . . . . 1-18
Replacing the Handstrap . . . . . . . . . . . . . . . . . . . . . . . . . . . . . . . . . . . . . . . . . . . . . . . . . . . . . . . 1-19
Starting the Terminal . . . . . . . . . . . . . . . . . . . . . . . . . . . . . . . . . . . . . . . . . . . . . . . . . . . . . . . . . . 1-21
Aligning the Screen . . . . . . . . . . . . . . . . . . . . . . . . . . . . . . . . . . . . . . . . . . . . . . . . . . . . . . . 1-21
iii
Page 6

PDT 8000 Series Product Reference Guide
Setting Time and Date . . . . . . . . . . . . . . . . . . . . . . . . . . . . . . . . . . . . . . . . . . . . . . . . . . . . . .1-23
Setting Up Your Terminal . . . . . . . . . . . . . . . . . . . . . . . . . . . . . . . . . . . . . . . . . . . . . . . . . . . . . . . 1-24
Chapter 2. Operating the Terminal
Chapter Contents . . . . . . . . . . . . . . . . . . . . . . . . . . . . . . . . . . . . . . . . . . . . . . . . . . . . . . . . . . . . . . 2-1
Introduction . . . . . . . . . . . . . . . . . . . . . . . . . . . . . . . . . . . . . . . . . . . . . . . . . . . . . . . . . . . . . . . . . . . 2-3
Using the Power Button . . . . . . . . . . . . . . . . . . . . . . . . . . . . . . . . . . . . . . . . . . . . . . . . . . . . . . . . . 2-3
Adjusting the Backlight . . . . . . . . . . . . . . . . . . . . . . . . . . . . . . . . . . . . . . . . . . . . . . . . . . . . . . . . . . 2-3
Using a Headset . . . . . . . . . . . . . . . . . . . . . . . . . . . . . . . . . . . . . . . . . . . . . . . . . . . . . . . . . . . . . . . 2-3
Using the Keyboard. . . . . . . . . . . . . . . . . . . . . . . . . . . . . . . . . . . . . . . . . . . . . . . . . . . . . . . . . . . . . 2-4
Terminal Keyboard. . . . . . . . . . . . . . . . . . . . . . . . . . . . . . . . . . . . . . . . . . . . . . . . . . . . . . . . . . 2-4
Using the Stylus . . . . . . . . . . . . . . . . . . . . . . . . . . . . . . . . . . . . . . . . . . . . . . . . . . . . . . . . . . . . . . . 2-6
Today Screen . . . . . . . . . . . . . . . . . . . . . . . . . . . . . . . . . . . . . . . . . . . . . . . . . . . . . . . . . . . . . . . . . 2-6
Status Icons . . . . . . . . . . . . . . . . . . . . . . . . . . . . . . . . . . . . . . . . . . . . . . . . . . . . . . . . . . . . . . . 2-7
Using the Navigation Bar and Command Bar . . . . . . . . . . . . . . . . . . . . . . . . . . . . . . . . . . . . . . . . . 2-8
Selecting Programs. . . . . . . . . . . . . . . . . . . . . . . . . . . . . . . . . . . . . . . . . . . . . . . . . . . . . . . . . . . . . 2-9
Using Pop-up Menus. . . . . . . . . . . . . . . . . . . . . . . . . . . . . . . . . . . . . . . . . . . . . . . . . . . . . . . . . . . 2-10
Notifications. . . . . . . . . . . . . . . . . . . . . . . . . . . . . . . . . . . . . . . . . . . . . . . . . . . . . . . . . . . . . . . . . . 2-11
Entering Information . . . . . . . . . . . . . . . . . . . . . . . . . . . . . . . . . . . . . . . . . . . . . . . . . . . . . . . . . . . 2-11
Entering Information Using the Input Panel . . . . . . . . . . . . . . . . . . . . . . . . . . . . . . . . . . . . . . 2-11
Writing on the Screen . . . . . . . . . . . . . . . . . . . . . . . . . . . . . . . . . . . . . . . . . . . . . . . . . . . . . .2-14
Selecting Text . . . . . . . . . . . . . . . . . . . . . . . . . . . . . . . . . . . . . . . . . . . . . . . . . . . . . . . . . . . . 2-17
Drawing on the Screen . . . . . . . . . . . . . . . . . . . . . . . . . . . . . . . . . . . . . . . . . . . . . . . . . . . . . 2-18
Recording a Message . . . . . . . . . . . . . . . . . . . . . . . . . . . . . . . . . . . . . . . . . . . . . . . . . . . . . .2-19
Entering Data via the Bar Code Scanner (Scan Wedge). . . . . . . . . . . . . . . . . . . . . . . . . . . . 2-20
Using My Text . . . . . . . . . . . . . . . . . . . . . . . . . . . . . . . . . . . . . . . . . . . . . . . . . . . . . . . . . . . . 2-20
Finding Information . . . . . . . . . . . . . . . . . . . . . . . . . . . . . . . . . . . . . . . . . . . . . . . . . . . . . . . . . . . . 2-21
Scanning . . . . . . . . . . . . . . . . . . . . . . . . . . . . . . . . . . . . . . . . . . . . . . . . . . . . . . . . . . . . . . . . . . . . 2-22
Scan LED Indicator . . . . . . . . . . . . . . . . . . . . . . . . . . . . . . . . . . . . . . . . . . . . . . . . . . . . . . . . 2-22
Resetting Your Terminal . . . . . . . . . . . . . . . . . . . . . . . . . . . . . . . . . . . . . . . . . . . . . . . . . . . . . . . . 2-23
Performing a Soft Reset. . . . . . . . . . . . . . . . . . . . . . . . . . . . . . . . . . . . . . . . . . . . . . . . . . . . .2-23
Performing a Hard Reset . . . . . . . . . . . . . . . . . . . . . . . . . . . . . . . . . . . . . . . . . . . . . . . . . . . . 2-23
Chapter 3. Customizing Your Terminal
Chapter Contents . . . . . . . . . . . . . . . . . . . . . . . . . . . . . . . . . . . . . . . . . . . . . . . . . . . . . . . . . . . . . . 3-1
Introduction . . . . . . . . . . . . . . . . . . . . . . . . . . . . . . . . . . . . . . . . . . . . . . . . . . . . . . . . . . . . . . . . . . . 3-3
Adjusting Settings . . . . . . . . . . . . . . . . . . . . . . . . . . . . . . . . . . . . . . . . . . . . . . . . . . . . . . . . . . . . . . 3-3
Flash Storage . . . . . . . . . . . . . . . . . . . . . . . . . . . . . . . . . . . . . . . . . . . . . . . . . . . . . . . . . . . . . . . . . 3-3
FFS Partitions . . . . . . . . . . . . . . . . . . . . . . . . . . . . . . . . . . . . . . . . . . . . . . . . . . . . . . . . . . . . . 3-4
Working with FFS Partitions. . . . . . . . . . . . . . . . . . . . . . . . . . . . . . . . . . . . . . . . . . . . . . . . . . .3-4
Non-FFS Partitions . . . . . . . . . . . . . . . . . . . . . . . . . . . . . . . . . . . . . . . . . . . . . . . . . . . . . . . . . 3-6
Assigning Applications to Application Buttons . . . . . . . . . . . . . . . . . . . . . . . . . . . . . . . . . . . . . . . . 3-7
iv
Page 7

Contents
Assigning User-Written Applications to Buttons. . . . . . . . . . . . . . . . . . . . . . . . . . . . . . . . . . . . . . . 3-7
Adding Programs . . . . . . . . . . . . . . . . . . . . . . . . . . . . . . . . . . . . . . . . . . . . . . . . . . . . . . . . . . . . . . 3-8
Adding a Program from the Internet . . . . . . . . . . . . . . . . . . . . . . . . . . . . . . . . . . . . . . . . . . . . 3-8
Adding a Program to the Start Menu . . . . . . . . . . . . . . . . . . . . . . . . . . . . . . . . . . . . . . . . . . . 3-9
Removing Programs . . . . . . . . . . . . . . . . . . . . . . . . . . . . . . . . . . . . . . . . . . . . . . . . . . . . . . . . . . 3-10
Chapter 4. Communications
Chapter Contents. . . . . . . . . . . . . . . . . . . . . . . . . . . . . . . . . . . . . . . . . . . . . . . . . . . . . . . . . . . . . . 4-1
Introduction . . . . . . . . . . . . . . . . . . . . . . . . . . . . . . . . . . . . . . . . . . . . . . . . . . . . . . . . . . . . . . . . . . 4-3
Synchronization Software Installation . . . . . . . . . . . . . . . . . . . . . . . . . . . . . . . . . . . . . . . . . . . . . . 4-3
Installing ActiveSync. . . . . . . . . . . . . . . . . . . . . . . . . . . . . . . . . . . . . . . . . . . . . . . . . . . . . . . . 4-3
Setting up a Partnership . . . . . . . . . . . . . . . . . . . . . . . . . . . . . . . . . . . . . . . . . . . . . . . . . . . . . 4-3
Communication Setup . . . . . . . . . . . . . . . . . . . . . . . . . . . . . . . . . . . . . . . . . . . . . . . . . . . . . . . . . . 4-5
Using the Serial Charging Cable . . . . . . . . . . . . . . . . . . . . . . . . . . . . . . . . . . . . . . . . . . . . . . 4-5
Using the Single-Slot Serial Cradle . . . . . . . . . . . . . . . . . . . . . . . . . . . . . . . . . . . . . . . . . . . . 4-6
Using the Single-Slot Modem Cradle or the Snap-On Modem . . . . . . . . . . . . . . . . . . . . . . . . 4-8
Chapter 5. Applications
Chapter Contents. . . . . . . . . . . . . . . . . . . . . . . . . . . . . . . . . . . . . . . . . . . . . . . . . . . . . . . . . . . . . . 5-1
Introduction . . . . . . . . . . . . . . . . . . . . . . . . . . . . . . . . . . . . . . . . . . . . . . . . . . . . . . . . . . . . . . . . . . 5-3
Calendar . . . . . . . . . . . . . . . . . . . . . . . . . . . . . . . . . . . . . . . . . . . . . . . . . . . . . . . . . . . . . . . . . . . . 5-3
Creating Appointments . . . . . . . . . . . . . . . . . . . . . . . . . . . . . . . . . . . . . . . . . . . . . . . . . . . . . . 5-4
Using the Summary Screen . . . . . . . . . . . . . . . . . . . . . . . . . . . . . . . . . . . . . . . . . . . . . . . . . . 5-5
Creating Meeting Requests . . . . . . . . . . . . . . . . . . . . . . . . . . . . . . . . . . . . . . . . . . . . . . . . . . 5-5
Contacts. . . . . . . . . . . . . . . . . . . . . . . . . . . . . . . . . . . . . . . . . . . . . . . . . . . . . . . . . . . . . . . . . . . . . 5-6
Using the Summary Screen . . . . . . . . . . . . . . . . . . . . . . . . . . . . . . . . . . . . . . . . . . . . . . . . . . 5-8
Tasks . . . . . . . . . . . . . . . . . . . . . . . . . . . . . . . . . . . . . . . . . . . . . . . . . . . . . . . . . . . . . . . . . . . . . . . 5-9
Using the Summary Screen . . . . . . . . . . . . . . . . . . . . . . . . . . . . . . . . . . . . . . . . . . . . . . . . . 5-11
Notes . . . . . . . . . . . . . . . . . . . . . . . . . . . . . . . . . . . . . . . . . . . . . . . . . . . . . . . . . . . . . . . . . . . . . . 5-12
Inbox . . . . . . . . . . . . . . . . . . . . . . . . . . . . . . . . . . . . . . . . . . . . . . . . . . . . . . . . . . . . . . . . . . . . . . 5-14
Synchronizing E-mail Messages. . . . . . . . . . . . . . . . . . . . . . . . . . . . . . . . . . . . . . . . . . . . . . 5-14
Connecting Directly to an E-mail Server. . . . . . . . . . . . . . . . . . . . . . . . . . . . . . . . . . . . . . . . 5-14
Using the Message List . . . . . . . . . . . . . . . . . . . . . . . . . . . . . . . . . . . . . . . . . . . . . . . . . . . . 5-15
Creating E-mail Messages . . . . . . . . . . . . . . . . . . . . . . . . . . . . . . . . . . . . . . . . . . . . . . . . . . 5-17
Managing E-mail Messages and Folders . . . . . . . . . . . . . . . . . . . . . . . . . . . . . . . . . . . . . . . 5-18
Chapter 6. Companion Programs
Chapter Contents. . . . . . . . . . . . . . . . . . . . . . . . . . . . . . . . . . . . . . . . . . . . . . . . . . . . . . . . . . . . . . 6-1
Introduction . . . . . . . . . . . . . . . . . . . . . . . . . . . . . . . . . . . . . . . . . . . . . . . . . . . . . . . . . . . . . . . . . . 6-3
Pocket Word . . . . . . . . . . . . . . . . . . . . . . . . . . . . . . . . . . . . . . . . . . . . . . . . . . . . . . . . . . . . . . . . . 6-3
Typing Mode. . . . . . . . . . . . . . . . . . . . . . . . . . . . . . . . . . . . . . . . . . . . . . . . . . . . . . . . . . . . . . 6-5
v
Page 8

PDT 8000 Series Product Reference Guide
Writing Mode . . . . . . . . . . . . . . . . . . . . . . . . . . . . . . . . . . . . . . . . . . . . . . . . . . . . . . . . . . . . . . 6-6
Drawing Mode . . . . . . . . . . . . . . . . . . . . . . . . . . . . . . . . . . . . . . . . . . . . . . . . . . . . . . . . . . . . . 6-6
Recording Mode . . . . . . . . . . . . . . . . . . . . . . . . . . . . . . . . . . . . . . . . . . . . . . . . . . . . . . . . . . . 6-7
Pocket Excel . . . . . . . . . . . . . . . . . . . . . . . . . . . . . . . . . . . . . . . . . . . . . . . . . . . . . . . . . . . . . . . . . . 6-8
Tips for Working in Pocket Excel . . . . . . . . . . . . . . . . . . . . . . . . . . . . . . . . . . . . . . . . . . . . . . . 6-9
MSN® Messenger. . . . . . . . . . . . . . . . . . . . . . . . . . . . . . . . . . . . . . . . . . . . . . . . . . . . . . . . . . . . . . 6-9
Setting Up Your Account . . . . . . . . . . . . . . . . . . . . . . . . . . . . . . . . . . . . . . . . . . . . . . . . . . . . 6-10
Working with Contacts . . . . . . . . . . . . . . . . . . . . . . . . . . . . . . . . . . . . . . . . . . . . . . . . . . . . . .6-10
Chatting with Contacts. . . . . . . . . . . . . . . . . . . . . . . . . . . . . . . . . . . . . . . . . . . . . . . . . . . . . .6-11
Windows Media Player . . . . . . . . . . . . . . . . . . . . . . . . . . . . . . . . . . . . . . . . . . . . . . . . . . . . . . . . . 6-13
Miscrsoft Reader. . . . . . . . . . . . . . . . . . . . . . . . . . . . . . . . . . . . . . . . . . . . . . . . . . . . . . . . . . . . . . 6-13
Getting Books on Your Device. . . . . . . . . . . . . . . . . . . . . . . . . . . . . . . . . . . . . . . . . . . . . . . . 6-14
Using the Library . . . . . . . . . . . . . . . . . . . . . . . . . . . . . . . . . . . . . . . . . . . . . . . . . . . . . . . . . . 6-14
Reading a Book . . . . . . . . . . . . . . . . . . . . . . . . . . . . . . . . . . . . . . . . . . . . . . . . . . . . . . . . . . . 6-15
Using Reader Features . . . . . . . . . . . . . . . . . . . . . . . . . . . . . . . . . . . . . . . . . . . . . . . . . . . . .6-15
Removing a Book . . . . . . . . . . . . . . . . . . . . . . . . . . . . . . . . . . . . . . . . . . . . . . . . . . . . . . . . .6-16
Chapter 7. Pocket Internet Explorer
Chapter Contents . . . . . . . . . . . . . . . . . . . . . . . . . . . . . . . . . . . . . . . . . . . . . . . . . . . . . . . . . . . . . . 7-1
Introduction . . . . . . . . . . . . . . . . . . . . . . . . . . . . . . . . . . . . . . . . . . . . . . . . . . . . . . . . . . . . . . . . . . . 7-3
Mobile Favorites . . . . . . . . . . . . . . . . . . . . . . . . . . . . . . . . . . . . . . . . . . . . . . . . . . . . . . . . . . . . . . . 7-3
Favorite Links . . . . . . . . . . . . . . . . . . . . . . . . . . . . . . . . . . . . . . . . . . . . . . . . . . . . . . . . . . . . . 7-3
Creating Mobile Favorites . . . . . . . . . . . . . . . . . . . . . . . . . . . . . . . . . . . . . . . . . . . . . . . . . . . .7-3
Saving Memory on your Terminal . . . . . . . . . . . . . . . . . . . . . . . . . . . . . . . . . . . . . . . . . . . . . . 7-4
Using AvantGo Channels . . . . . . . . . . . . . . . . . . . . . . . . . . . . . . . . . . . . . . . . . . . . . . . . . . . . . . . . 7-5
Using Pocket Internet Explorer . . . . . . . . . . . . . . . . . . . . . . . . . . . . . . . . . . . . . . . . . . . . . . . . . . . . 7-6
Browsing the Web . . . . . . . . . . . . . . . . . . . . . . . . . . . . . . . . . . . . . . . . . . . . . . . . . . . . . . . . . . 7-8
Chapter 8. Connections
Chapter Contents . . . . . . . . . . . . . . . . . . . . . . . . . . . . . . . . . . . . . . . . . . . . . . . . . . . . . . . . . . . . . . 8-1
Introduction . . . . . . . . . . . . . . . . . . . . . . . . . . . . . . . . . . . . . . . . . . . . . . . . . . . . . . . . . . . . . . . . . . . 8-3
Transferring Items Using Infrared . . . . . . . . . . . . . . . . . . . . . . . . . . . . . . . . . . . . . . . . . . . . . . . . . . 8-4
Connecting Directly to an E-mail Server . . . . . . . . . . . . . . . . . . . . . . . . . . . . . . . . . . . . . . . . . . . . .8-5
Setting Up an E-mail Service. . . . . . . . . . . . . . . . . . . . . . . . . . . . . . . . . . . . . . . . . . . . . . . . . .8-5
Disconnecting . . . . . . . . . . . . . . . . . . . . . . . . . . . . . . . . . . . . . . . . . . . . . . . . . . . . . . . . . . . . . . . . . 8-5
Getting Help Connecting. . . . . . . . . . . . . . . . . . . . . . . . . . . . . . . . . . . . . . . . . . . . . . . . . . . . . . . . . 8-6
Chapter 9. Spectrum24 Network Configuration
Chapter Contents . . . . . . . . . . . . . . . . . . . . . . . . . . . . . . . . . . . . . . . . . . . . . . . . . . . . . . . . . . . . . . 9-1
Introduction . . . . . . . . . . . . . . . . . . . . . . . . . . . . . . . . . . . . . . . . . . . . . . . . . . . . . . . . . . . . . . . . . . . 9-3
Configuring the PDT 8046 (11 MB Radio) . . . . . . . . . . . . . . . . . . . . . . . . . . . . . . . . . . . . . . . . . . . 9-3
vi
Page 9

Contents
Network Adapters Properties . . . . . . . . . . . . . . . . . . . . . . . . . . . . . . . . . . . . . . . . . . . . . . . . . 9-3
Using NICTT with the PDT 8046 . . . . . . . . . . . . . . . . . . . . . . . . . . . . . . . . . . . . . . . . . . . . . . 9-5
Chapter 10. Software Installation on Development PC
Chapter Contents. . . . . . . . . . . . . . . . . . . . . . . . . . . . . . . . . . . . . . . . . . . . . . . . . . . . . . . . . . . . . 10-1
Introduction . . . . . . . . . . . . . . . . . . . . . . . . . . . . . . . . . . . . . . . . . . . . . . . . . . . . . . . . . . . . . . . . . 10-3
Before You Install the SDK. . . . . . . . . . . . . . . . . . . . . . . . . . . . . . . . . . . . . . . . . . . . . . . . . . 10-3
Symbol Windows CE SDK . . . . . . . . . . . . . . . . . . . . . . . . . . . . . . . . . . . . . . . . . . . . . . . . . . . . . . 10-4
Installing the SDK on the Development PC . . . . . . . . . . . . . . . . . . . . . . . . . . . . . . . . . . . . . . . . . 10-4
Installing the SDK . . . . . . . . . . . . . . . . . . . . . . . . . . . . . . . . . . . . . . . . . . . . . . . . . . . . . . . . . 10-4
Installing Other Development Software . . . . . . . . . . . . . . . . . . . . . . . . . . . . . . . . . . . . . . . . . . . . 10-4
Chapter 11. Configuring the Terminal
Chapter Contents. . . . . . . . . . . . . . . . . . . . . . . . . . . . . . . . . . . . . . . . . . . . . . . . . . . . . . . . . . . . . 11-1
Introduction . . . . . . . . . . . . . . . . . . . . . . . . . . . . . . . . . . . . . . . . . . . . . . . . . . . . . . . . . . . . . . . . . 11-3
Starting Terminal Configuration Manager . . . . . . . . . . . . . . . . . . . . . . . . . . . . . . . . . . . . . . . . . . 11-4
Defining Script Properties . . . . . . . . . . . . . . . . . . . . . . . . . . . . . . . . . . . . . . . . . . . . . . . . . . . . . . 11-6
Creating the Script for the Hex Image . . . . . . . . . . . . . . . . . . . . . . . . . . . . . . . . . . . . . . . . . . . . . 11-8
Open a New or Existing Script . . . . . . . . . . . . . . . . . . . . . . . . . . . . . . . . . . . . . . . . . . . . . . . 11-8
Copy Components to the Script . . . . . . . . . . . . . . . . . . . . . . . . . . . . . . . . . . . . . . . . . . . . . . 11-8
Save the Script . . . . . . . . . . . . . . . . . . . . . . . . . . . . . . . . . . . . . . . . . . . . . . . . . . . . . . . . . . . 11-9
Building the Image . . . . . . . . . . . . . . . . . . . . . . . . . . . . . . . . . . . . . . . . . . . . . . . . . . . . . . . . . . . 11-10
Sending the Hex Image . . . . . . . . . . . . . . . . . . . . . . . . . . . . . . . . . . . . . . . . . . . . . . . . . . . . . . . 11-12
Connect The Terminal and Development PC . . . . . . . . . . . . . . . . . . . . . . . . . . . . . . . . . . . 11-12
Set Up IPL to Receive the File . . . . . . . . . . . . . . . . . . . . . . . . . . . . . . . . . . . . . . . . . . . . . . 11-12
Begin the Send in TCM . . . . . . . . . . . . . . . . . . . . . . . . . . . . . . . . . . . . . . . . . . . . . . . . . . . 11-16
Error Messages . . . . . . . . . . . . . . . . . . . . . . . . . . . . . . . . . . . . . . . . . . . . . . . . . . . . . . . . . . . . . 11-17
IPL Error Detection . . . . . . . . . . . . . . . . . . . . . . . . . . . . . . . . . . . . . . . . . . . . . . . . . . . . . . . 11-17
TCM Error Messages . . . . . . . . . . . . . . . . . . . . . . . . . . . . . . . . . . . . . . . . . . . . . . . . . . . . . 11-19
Creating and Loading a Splash Screen . . . . . . . . . . . . . . . . . . . . . . . . . . . . . . . . . . . . . . . . . . . 11-19
Loading the Splash Screen via TCM . . . . . . . . . . . . . . . . . . . . . . . . . . . . . . . . . . . . . . . . . 11-20
Chapter 12. Maintenance and Troubleshooting
Chapter Contents. . . . . . . . . . . . . . . . . . . . . . . . . . . . . . . . . . . . . . . . . . . . . . . . . . . . . . . . . . . . . 12-1
Introduction . . . . . . . . . . . . . . . . . . . . . . . . . . . . . . . . . . . . . . . . . . . . . . . . . . . . . . . . . . . . . . . . . 12-3
Maintaining the Terminal . . . . . . . . . . . . . . . . . . . . . . . . . . . . . . . . . . . . . . . . . . . . . . . . . . . . . . . 12-3
Troubleshooting . . . . . . . . . . . . . . . . . . . . . . . . . . . . . . . . . . . . . . . . . . . . . . . . . . . . . . . . . . . . . . 12-4
Appendix A. Block Recognizer Characters
vii
Page 10

PDT 8000 Series Product Reference Guide
Appendix B. Demo Program
Introduction . . . . . . . . . . . . . . . . . . . . . . . . . . . . . . . . . . . . . . . . . . . . . . . . . . . . . . . . . . . . . . . . . . .B-1
Scan Demo (VC Scan) . . . . . . . . . . . . . . . . . . . . . . . . . . . . . . . . . . . . . . . . . . . . . . . . . . . . . . . . . .B-2
Scanning Data Fields. . . . . . . . . . . . . . . . . . . . . . . . . . . . . . . . . . . . . . . . . . . . . . . . . . . . . . . .B-3
Scanning Options . . . . . . . . . . . . . . . . . . . . . . . . . . . . . . . . . . . . . . . . . . . . . . . . . . . . . . . . . .B-3
ActiveX Demo (VB Scan) . . . . . . . . . . . . . . . . . . . . . . . . . . . . . . . . . . . . . . . . . . . . . . . . . . . . . . . .B-4
HTML Scan Demo. . . . . . . . . . . . . . . . . . . . . . . . . . . . . . . . . . . . . . . . . . . . . . . . . . . . . . . . . . . . . .B-4
Wedge On/Off . . . . . . . . . . . . . . . . . . . . . . . . . . . . . . . . . . . . . . . . . . . . . . . . . . . . . . . . . . . . .B-5
ScanBrowse. . . . . . . . . . . . . . . . . . . . . . . . . . . . . . . . . . . . . . . . . . . . . . . . . . . . . . . . . . . . . . .B-5
Files . . . . . . . . . . . . . . . . . . . . . . . . . . . . . . . . . . . . . . . . . . . . . . . . . . . . . . . . . . . . . . . . . . . . . . . .B-6
Sounds (Audio Sample) . . . . . . . . . . . . . . . . . . . . . . . . . . . . . . . . . . . . . . . . . . . . . . . . . . . . . . . . .B-7
Images (ImageViewer Sample). . . . . . . . . . . . . . . . . . . . . . . . . . . . . . . . . . . . . . . . . . . . . . . . . . . .B-8
CE Apps . . . . . . . . . . . . . . . . . . . . . . . . . . . . . . . . . . . . . . . . . . . . . . . . . . . . . . . . . . . . . . . . . . . . .B-9
About . . . . . . . . . . . . . . . . . . . . . . . . . . . . . . . . . . . . . . . . . . . . . . . . . . . . . . . . . . . . . . . . . . . . . . .B-9
Utilities. . . . . . . . . . . . . . . . . . . . . . . . . . . . . . . . . . . . . . . . . . . . . . . . . . . . . . . . . . . . . . . . . . . . . .B-10
Control Panel . . . . . . . . . . . . . . . . . . . . . . . . . . . . . . . . . . . . . . . . . . . . . . . . . . . . . . . . . . . . .B-11
Appendix C. Technical Specifications
Environment . . . . . . . . . . . . . . . . . . . . . . . . . . . . . . . . . . . . . . . . . . . . . . . . . . . . . . . . . . . . . . . . . .C-1
COM Port Definitions . . . . . . . . . . . . . . . . . . . . . . . . . . . . . . . . . . . . . . . . . . . . . . . . . . . . . . . . . . .C-2
Pin-Outs . . . . . . . . . . . . . . . . . . . . . . . . . . . . . . . . . . . . . . . . . . . . . . . . . . . . . . . . . . . . . . . . . . . . .C-3
Appendix D. Keyboard Maps
Introduction . . . . . . . . . . . . . . . . . . . . . . . . . . . . . . . . . . . . . . . . . . . . . . . . . . . . . . . . . . . . . . . . . . .D-1
Keyboard. . . . . . . . . . . . . . . . . . . . . . . . . . . . . . . . . . . . . . . . . . . . . . . . . . . . . . . . . . . . . . . . . . . . .D-2
Index
viii
Page 11

About This Guide
Introduction
The PDT 8000 Series Product Reference Guide provides information about the PDT 8000
Series terminal using the Pocket PC 2002 Operating System, and its accessories. The PDT
8000 Series includes the following variations of the terminal:
• PDT 8000: batch
• PDT 804x: Spectrum24 LAN radio
Chapter Descriptions
Topics covered in this guide are as follows:
• Chapter 1, Getting Started explains the physical buttons and controls on your
terminal, how to install and charge the batteries, replace the handstrap, and start
your terminal for the first time.
• Chapter 2, Operating the Terminal explains how to use your terminal, including
instructions for powering on and resetting the terminal, using the stylus and a
headset, entering information, and scanning.
• Chapter 3, Customizing Your Terminal explains how to adjust settings on the
terminal, and add and delete programs.
• Chapter 4, Communications explains how to use Microsoft® ActiveSync™ for
communications between the terminal and host computer.
• Chapter 5, Applications describes how to use the Calendar, Contacts, Tasks, Notes
and Inbox applications.
• Chapter 6, Companion Programs describes how to use Pocket Word, Pocket
Excel, MSN Messenger, MS Media Player, and Microsoft Reader.
xi
Page 12

PDT 8000 Series Product Reference Guide
• Chapter 7, Pocket Internet Explorer explains how to set up favorite links and
channels, and browse the web on your terminal.
• Chapter 8, Connections describes how to connect the terminal to your e-mail
server, and transfer information via infrared.
• Chapter 9, Spectrum24 Network Configuration describes how to configure the
Spectrum24 wireless connection.
• Chapter 10, Software Installation on Development PC provides instructions for
installing the Software Developer’s Kit on your host computer.
• Chapter 11, Configuring the Terminal describes how to install and use the Terminal
Configuration Manager (TCM) and Initial Program Loader (IPL).
• Chapter 12, Maintenance and Troubleshooting provides information to help you
take proper care of your terminal and solve problems that may come up.
• Appendix A, Block Recognizer Characters details how to write letters on your
terminal using the Block Recognizer so they are correctly translated into text.
• Appendix B, Demo Program provides an overview of the PDT 8000 demo program
applications, such as scanning, setup, diagnostic utilities, and file management.
• Appendix C, Technical Specifications includes a table listing the technical
specifications for the terminal.
• Appendix D, Keyboard Maps includes tables listing key functionality for the
keyboard.
Notational Conventions
This document uses these conventions:
• “terminal” or “PDT 8000” refers to any model of the terminal.
• “User” refers to anyone using an application on the terminal.
• “You” refers to the End User, System Administrator or Technical Support person
using this manual as a reference to install, configure, operate, maintain and
troubleshoot the terminal.
• Italics are used to highlight specific items in the general text, and to identify
chapters and sections in this and related documents. It also identifies names of
screens, menus, menu items, and fields within screens.
• Courier text identifies buttons to be tapped or clicked on screens.
• Bullets (•) indicate:
• lists of alternatives or action items.
xii
Page 13

About This Guide
• lists of required steps that are not necessarily sequential.
• Numbered lists indicate a set of sequential steps, i.e., those that describe step-by-
step procedures.
Related Documents
The following documents provide more information on your terminal.
• PDT 8000 Quick Reference Guide, p/n 72-58168-xx
• MDM 8000 Snap-on-Modem Quick Reference Guide, p/n 72-55730-xx
• VCA 8000-01 Snap-on-Autocharger Quick Reference Guide, p/n 72-57868-xx
• CRD 8000-1000S Serial Cradle Quick Reference Guide, p/n 72-58170-xx
• CRD 8000-1000M Modem Cradle Quick Reference Guide, p/n 72-58171-xx
• CHS 8000-4000C/B Charging Cradle Quick Reference Guide, p/n 72-58172-xx
• UBC 2000 Universal Battery Charge Product Guide, p/n 70-33188-xx
• Windows CE Help File for Symbol Terminals, p/n 72E-38880-xx.
• Symbol Software Developer’s Kit (SDK) for the Pocket PC,
available at http://Software.Symbol.com/DevZone.
Service Information
If you have a problem with your equipment, contact the Symbol Support Center for your
region. See page xiv for contact information. Before calling, have the model number, serial
number, and several of your bar code symbols at hand.
Call the Support Center from a phone near the scanning equipment so that the service
person can try to talk you through your problem. If the equipment is found to be working
properly and the problem is symbol readability, the Support Center will request samples of
your bar codes for analysis at our plant.
If your problem cannot be solved over the phone, you may need to return your equipment
for servicing. If that is necessary, you will be given specific directions.
Note: Symbol Technologies is not responsible for any damages incurred
during shipment if the approved shipping container is not used.
Shipping the units improperly can possibly void the warranty. If the
xiii
Page 14

PDT 8000 Series Product Reference Guide
original shipping container was not kept, contact Symbol to have
another sent to you.
Symbol Support Center
For service information, warranty information or technical assistance contact or call the
Symbol Support Center in:
United States
Symbol Technologies, Inc.
One Symbol Plaza
Holtsville, New York 11742-1300
1-800-653-5350
United Kingdom
Symbol Technologies
Symbol Place
Winnersh Triangle, Berkshire RG41 5TP
United Kingdom
0800 328 2424 (Inside UK)
+44 118 945 7529 (Outside UK)
Australia
Symbol Technologies Pty. Ltd.
432 St. Kilda Road
Melbourne, Victoria 3004
1-800-672-906 (Inside Australia)
+61-3-9866-6044 (Outside Australia)
Denmark/Danmark
Symbol Technologies AS
Dr. Neergaardsvej 3
2970 Hørsholm
7020-1718 (Inside Denmark)
+45-7020-1718 (Outside Denmark)
1
Canada
Symbol Technologies Canada, Inc.
2540 Matheson Boulevard East
Mississauga, Ontario, Canada L4W 4Z2
905-629-7226
Asia/Pacific
Symbol Technologies Asia, Inc (Singapore
Branch)
230 Victoria Street #05-07/09
Bugis Junction Office Tower
Singapore 188024
Tel : +65-6796-9600
Fax : +65-6337-6488
Austria/Österreich
Symbol Technologies Austria GmbH
Prinz-Eugen Strasse 70 / 2.Haus
1040 Vienna, Austria
01-5055794-0 (Inside Austria)
+43-1-5055794-0 (Outside Austria)
Europe/Mid-East Distributor Operations
Contact your local distributor or call
+44 118 945 7360
xiv
Page 15

About This Guide
Finland/Suomi
Oy Symbol Technologies
Kaupintie 8 A 6
FIN-00440 Helsinki, Finland
9 5407 580 (Inside Finland)
+358 9 5407 580 (Outside Finland)
Germany/Deutchland
Symbol Technologies GmbH
Waldstrasse 66
D-63128 Dietzenbach, Germany
6074-49020 (Inside Germany)
+49-6074-49020 (Outside Germany)
Latin America Sales Support
7900 Glades Road
Suite 340
Boca Raton, Florida 33434 USA
1-800-347-0178 (Inside United States)
+1-561-483-1275 (Outside United States)
Netherlands/Nederland
Symbol Technologies
Kerkplein 2, 7051 CX
Postbus 24 7050 AA
Varsseveld, Netherlands
315-271700 (Inside Netherlands)
+31-315-271700 (Outside Netherlands)
France
Symbol Technologies France
Centre d'Affaire d'Antony
3 Rue de la Renaissance
92184 Antony Cedex, France
01-40-96-52-21 (Inside France)
+33-1-40-96-52-50 (Outside France)
Italy/Italia
Symbol Technologies Italia S.R.L.
Via Cristoforo Columbo, 49
20090 Trezzano S/N Navigilo
Milano, Italy
2-484441 (Inside Italy)
+39-02-484441 (Outside Italy)
Mexico/México
Symbol Technologies Mexico Ltd.
Torre Picasso
Boulevard Manuel Avila Camacho No 88
Lomas de Chapultepec CP 11000
Mexico City, DF, Mexico
5-520-1835 (Inside Mexico)
+52-5-520-1835 (Outside Mexico)
Norway/Norge
Symbol’s registered and mailing address:
Symbol Technologies Norway
Hoybratenveien 35 C
N-1055 OSLO, Norway
Symbol’s repair depot and shipping address:
Symbol Technologies Norway
Enebakkveien 123
N-0680 OSLO, Norway
+47 2232 4375
xv
Page 16

PDT 8000 Series Product Reference Guide
South Africa
Symbol Technologies Africa Inc.
Block B2
Rutherford Estate
1 Scott Street
Waverly 2090 Johannesburg
Republic of South Africa
11-809 5311 (Inside South Africa)
+27-11-809 5311 (Outside South Africa)
Sweden/Sverige
“Letter” address:
Symbol Technologies AB
Box 1354
S-171 26 SOLNA
Sweden
Visit/shipping address:
Symbol Technologies AB
Solna Strandväg 78
S-171 54 SOLNA
Sweden
Switchboard: 08 445 29 00 (domestic)
Call Center: +46 8 445 29 29 (international)
Support E-Mail:
Sweden.Support@se.symbol.com
1
Customer support is available 24 hours a day, 7 days a week.
Spain/España
Symbol Technologies S.L.
C/ Peonias, 2
Edificio Piovera Azul
28042 Madrid, Spain
91 324 40 00 (Inside Spain)
+34 91 324 40 00 (Outside Spain)
If you purchased your Symbol product from a Symbol Business Partner, contact that
Business Partner for service.
For the latest version of this guide go to:http://www.symbol.com/manuals.
xvi
Page 17

Chapter 1
Getting Started
Chapter Contents
Introduction . . . . . . . . . . . . . . . . . . . . . . . . . . . . . . . . . . . . . . . . . . . . . . . . . . . . . . . . . . . . . . . . . . 1-3
Unpacking the Terminal. . . . . . . . . . . . . . . . . . . . . . . . . . . . . . . . . . . . . . . . . . . . . . . . . . . . . . . . . 1-3
Parts of the Terminal . . . . . . . . . . . . . . . . . . . . . . . . . . . . . . . . . . . . . . . . . . . . . . . . . . . . . . . . . . . 1-4
Accessories . . . . . . . . . . . . . . . . . . . . . . . . . . . . . . . . . . . . . . . . . . . . . . . . . . . . . . . . . . . . . . . . . . 1-6
Installing Batteries . . . . . . . . . . . . . . . . . . . . . . . . . . . . . . . . . . . . . . . . . . . . . . . . . . . . . . . . . . . . . 1-7
Charging the Terminal Battery. . . . . . . . . . . . . . . . . . . . . . . . . . . . . . . . . . . . . . . . . . . . . . . . . . . . 1-8
Using the Serial Charging Cable . . . . . . . . . . . . . . . . . . . . . . . . . . . . . . . . . . . . . . . . . . . . . . 1-9
Using the Snap-On Modem Module . . . . . . . . . . . . . . . . . . . . . . . . . . . . . . . . . . . . . . . . . . . 1-10
Using the Snap-On Autocharger . . . . . . . . . . . . . . . . . . . . . . . . . . . . . . . . . . . . . . . . . . . . . 1-11
Using the Single-Slot Cradle. . . . . . . . . . . . . . . . . . . . . . . . . . . . . . . . . . . . . . . . . . . . . . . . . 1-12
Using the Four-Slot Cradle . . . . . . . . . . . . . . . . . . . . . . . . . . . . . . . . . . . . . . . . . . . . . . . . . . 1-13
Charging Spare Batteries. . . . . . . . . . . . . . . . . . . . . . . . . . . . . . . . . . . . . . . . . . . . . . . . . . . . . . . 1-14
Using the Single-Slot Cradle. . . . . . . . . . . . . . . . . . . . . . . . . . . . . . . . . . . . . . . . . . . . . . . . . 1-14
Using the CHS8000-4000B . . . . . . . . . . . . . . . . . . . . . . . . . . . . . . . . . . . . . . . . . . . . . . . . . 1-15
Charge LED Indicator . . . . . . . . . . . . . . . . . . . . . . . . . . . . . . . . . . . . . . . . . . . . . . . . . . . . . . . . . 1-16
Checking Battery Power . . . . . . . . . . . . . . . . . . . . . . . . . . . . . . . . . . . . . . . . . . . . . . . . . . . . . . . 1-17
Inserting a Compact Flash Storage Card. . . . . . . . . . . . . . . . . . . . . . . . . . . . . . . . . . . . . . . . . . . 1-18
Replacing the Handstrap . . . . . . . . . . . . . . . . . . . . . . . . . . . . . . . . . . . . . . . . . . . . . . . . . . . . . . . 1-19
Starting the Terminal . . . . . . . . . . . . . . . . . . . . . . . . . . . . . . . . . . . . . . . . . . . . . . . . . . . . . . . . . . 1-21
Aligning the Screen . . . . . . . . . . . . . . . . . . . . . . . . . . . . . . . . . . . . . . . . . . . . . . . . . . . . . . . 1-21
Setting Time and Date . . . . . . . . . . . . . . . . . . . . . . . . . . . . . . . . . . . . . . . . . . . . . . . . . . . . . 1-23
Setting Up Your Terminal. . . . . . . . . . . . . . . . . . . . . . . . . . . . . . . . . . . . . . . . . . . . . . . . . . . . . . . 1-24
1-1
Page 18

PDT 8000 Series Product Reference Guide
1-2
Page 19

Getting Started
Introduction
This chapter explains the physical buttons and controls on your terminal, how to install and
charge the batteries, replace the handstrap, and start your terminal for the first time.
Unpacking the Terminal
Carefully remove all protective material from around the terminal and save the shipping
container for later storage and shipping.
Verify that you received all equipment listed below:
•a terminal
• a handstrap, attached to the terminal
•a stylus
•a Quick Reference Guide for the terminal.
Inspect the equipment for damage. If you are missing any equipment or if you find any
damaged equipment, contact the Symbol Technologies Support Center immediately. See
page xiii for contact information.
1-3
Page 20
PDT 8000 Series Product Reference Guide
F
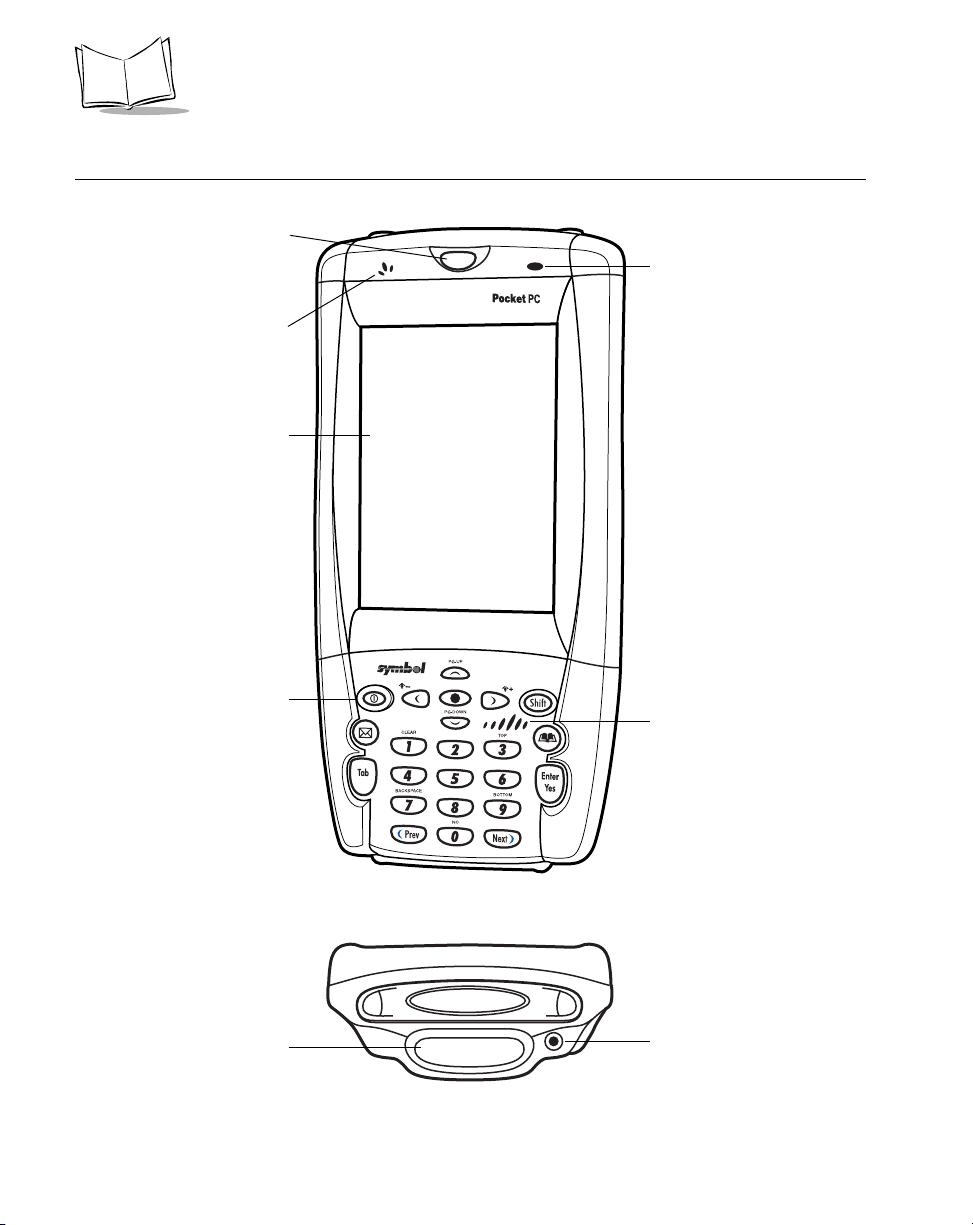
Parts of the Terminal
Scan LED
Microphone
TFT LCD
(color)
ront View
Charge
LED
1-4
Power
Button
1-D Exit
Window
Speaker
Top View
Audio Jack
Figure 1-1. Front & Top Views
Page 21
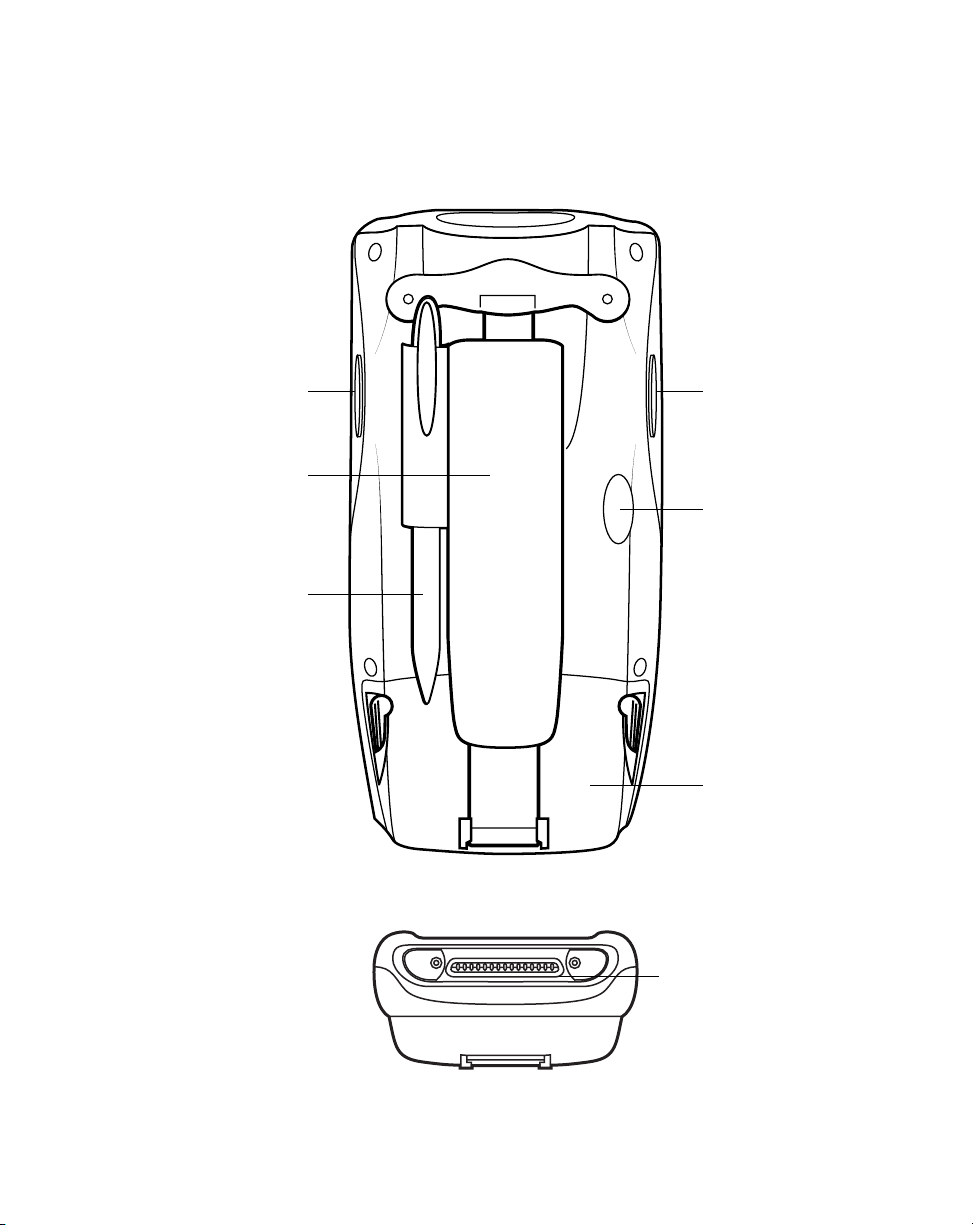
Back View
Getting Started
Scan Button
Handstrap
Stylu s
Scan Button
IrDA Port
Battery Door
Bottom View
Serial & Charge
Port
Figure 1-2. Back & Bottom Views
1-5
Page 22

PDT 8000 Series Product Reference Guide
Accessories
• Additional lithium-ion Battery (p/n 21-54882-01)
• Style (p/n 11-55475-05): for performing pen functions
• Cables:
• Snap-On DEX Cable (p/n CBL-8000-100-DEX): connects the terminal to a
vending machine.
• Snap-On Autocharger (p/n VCA8000-01): connects to the cigarette lighter in
a vehicle to charge the terminal.
• Snap-On Printer Cable (p/n CBL-8000-100-INT1): adds printing capabilities to
the terminal.
• AC Wall Adapter: (p/n CBL8000-100U, CBL8000-400U): charges the terminal.
• Serial Charging Cable (p/n 25-55853-01): allows serial connection of the
terminal to a host computer.
• Snap-On Modem Module (p/n MDM8000-xxx): allows dial-up connections of the
terminal to a remote host computer, while maintaining the portability of the terminal.
• Single-Slot Serial Cradle (p/n CRD8000-1000S): charges the terminal and
synchronizes the terminal with a host computer through a serial connection.
• Single-Slot Modem Cradle (p/n CRD8000-1000M): charges the terminal and
synchronizes the terminal with a host computer through a modem connection.
• Four-Slot Charging Cradle (p/n CHS8000-4000C): charges the terminal.
• Four-Slot Charging Cradle with Spare Battery (p/n CHS8000-4000B): charges
the terminal and a spare battery.
• UBC Adapter and Base (p/n 21-32665-33 and UBC2000-xxxxx): charges up to
four spare batteries.
• Holster (p/n 11-57530-02): stores the terminal when not in use.
• Symbol Software Developer’s Kit (SDK) for the PDT 8000 Pocket PC 2002.
1-6
Page 23
Getting Started
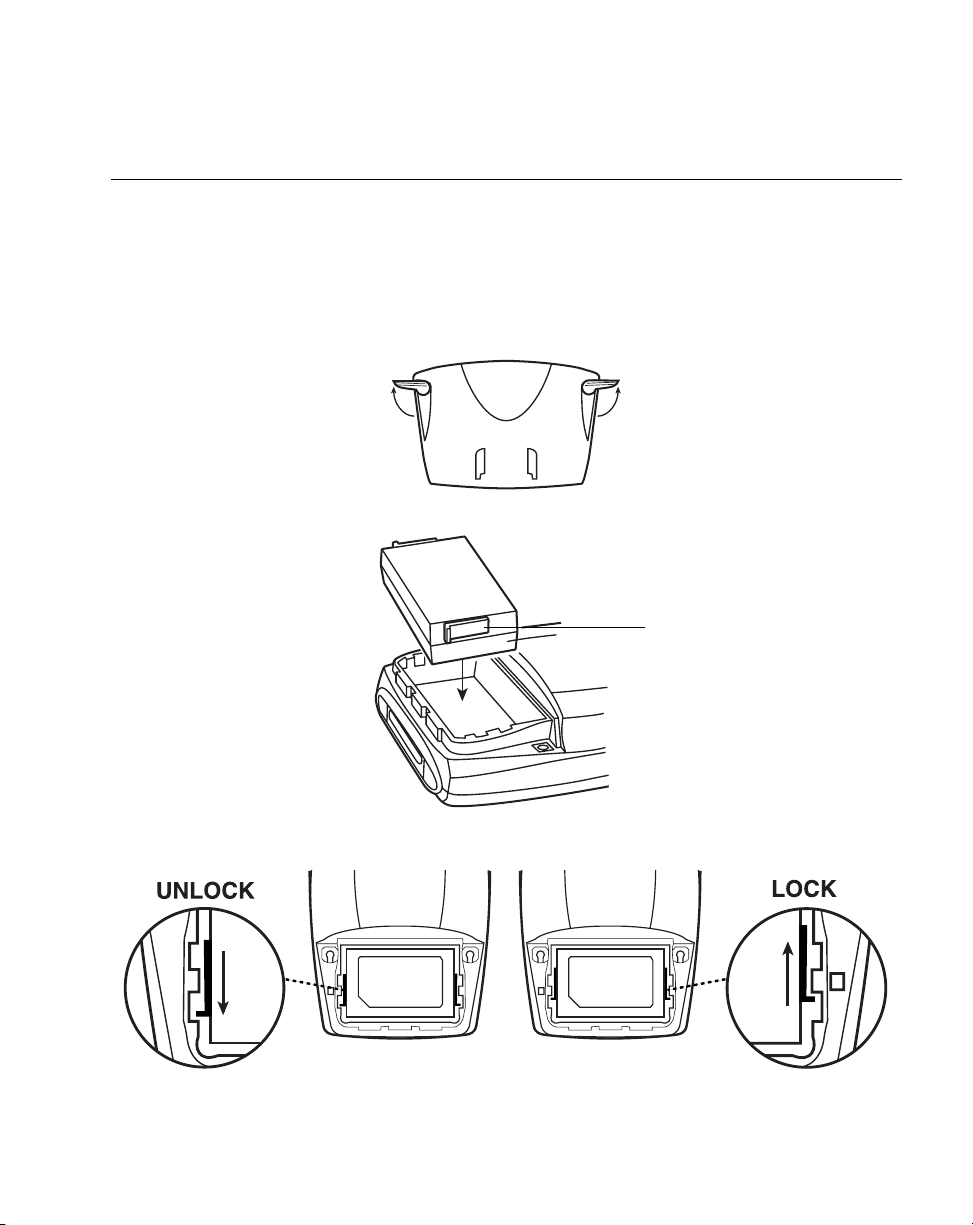
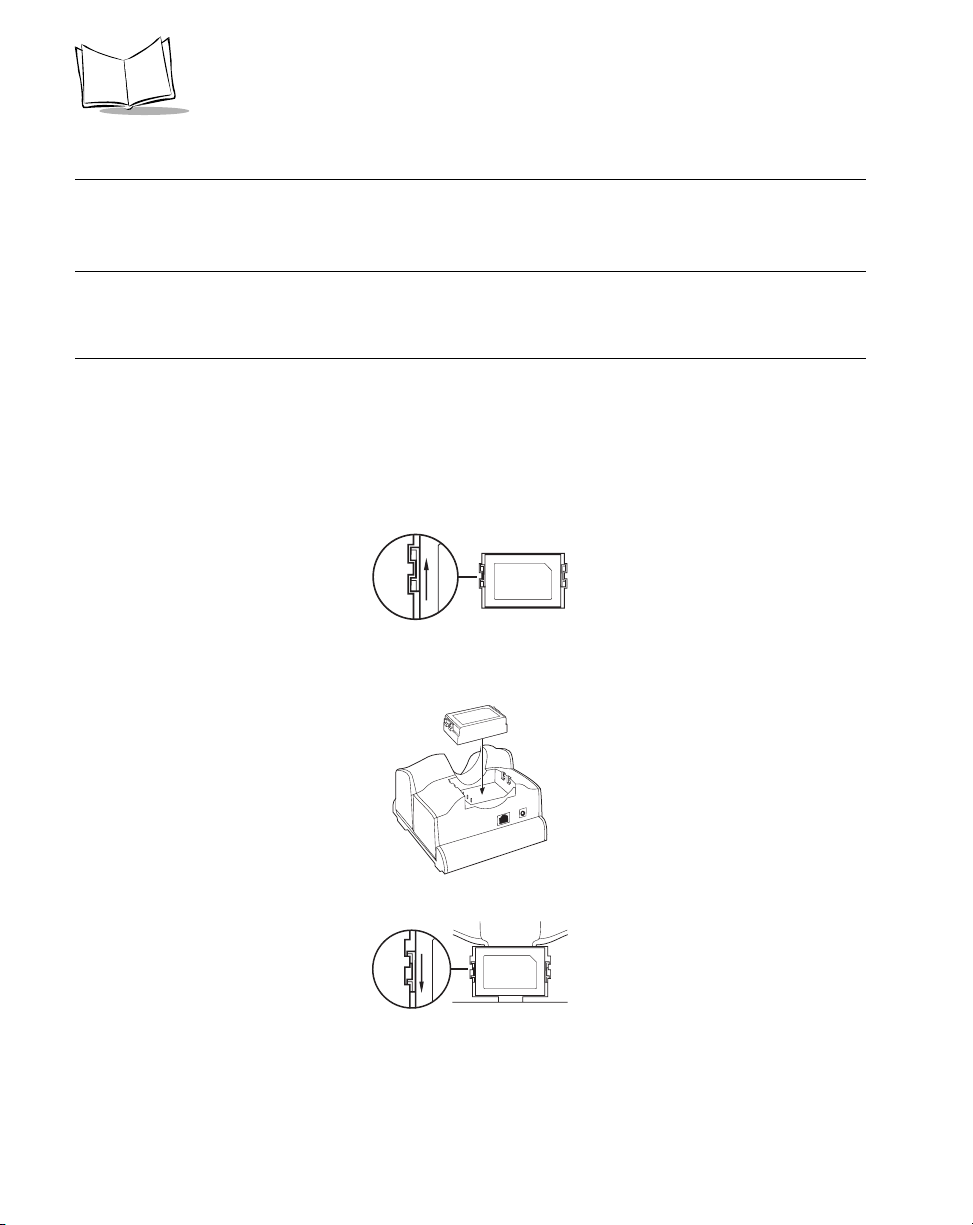
Installing Batteries
Before using your terminal, install the lithium-ion battery. The battery fits behind the battery
door on the back of the terminal.
To install the battery:
1. Rotate the latches on the battery door up and lift the battery door away from the
terminal.
2. Insert the lithium-ion battery into the battery compartment.
Slide the latches on both sides
of the battery down, to ensure
they are in the unlock position.
3. Lock the battery in place by sliding the latches on the battery up.
1-7
Page 24

PDT 8000 Series Product Reference Guide
4. Replace the battery door, hooking it onto the bottom of the compartment and then
pressing down firmly along the top edge while rotating the latches on the battery
door down into the locked position.
Note: Ensure that the latches on the battery door are in the up position
while securing the battery door on the terminal.
Caution
Do not expose the battery to temperatures in excess of 140°F (60°C). Do
not disassemble, incinerate, or short circuit the battery.
Charging the Terminal Battery
Before using your terminal for the first time, charge the lithium-ion battery in the terminal for
approximately four hours, using the Serial Charging Cable or an appropriate accessory.
Your terminal is equipped with a memory backup battery which automatically charges from
the fully-charged lithium-ion battery. This backup battery retains data in memory when the
terminal’s battery is removed, and can take up to 20 hours to charge when you first use your
terminal.
Note: If you remove your lithium-ion battery before the backup battery is
fully charged, data may be lost. For this reason, DO NOT remove the
battery before the backup battery is fully charged, which can take up
to 20 hours.
1-8
Page 25
Getting Started
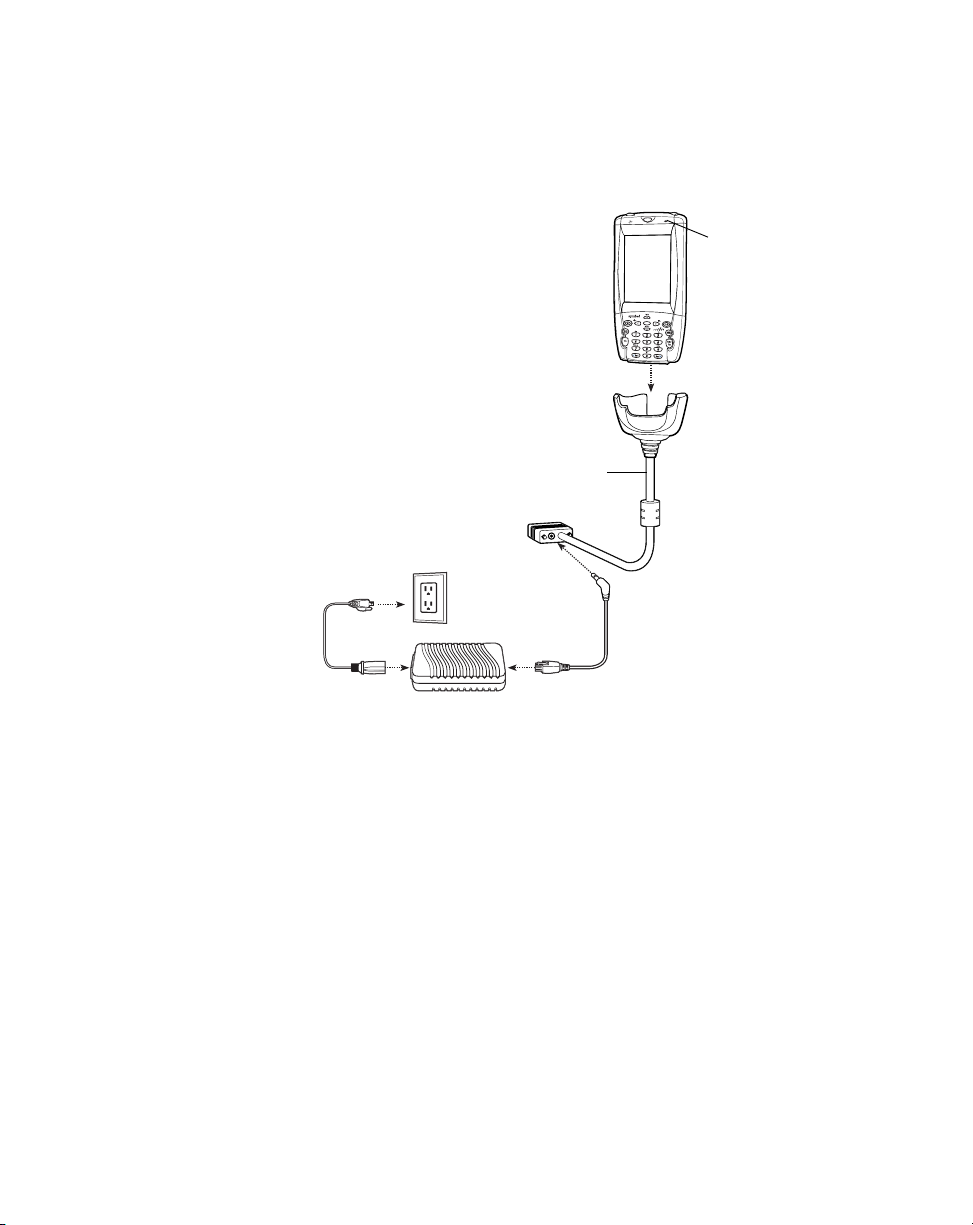
Using the Serial Charging Cable
To charge the terminal’s battery using the Serial Charging Cable, setup as shown below:
Terminal
Charge LED
Serial Charging
Cable
The terminal charge LED blinks amber to indicate that the terminal battery is charging and
turns solid amber when charging is complete. The battery usually charges in two hours or
less, but may take up to four hours to fully charge. See Charge LED Indicator on page 116 for other indications.
1-9
Page 26
PDT 8000 Series Product Reference Guide
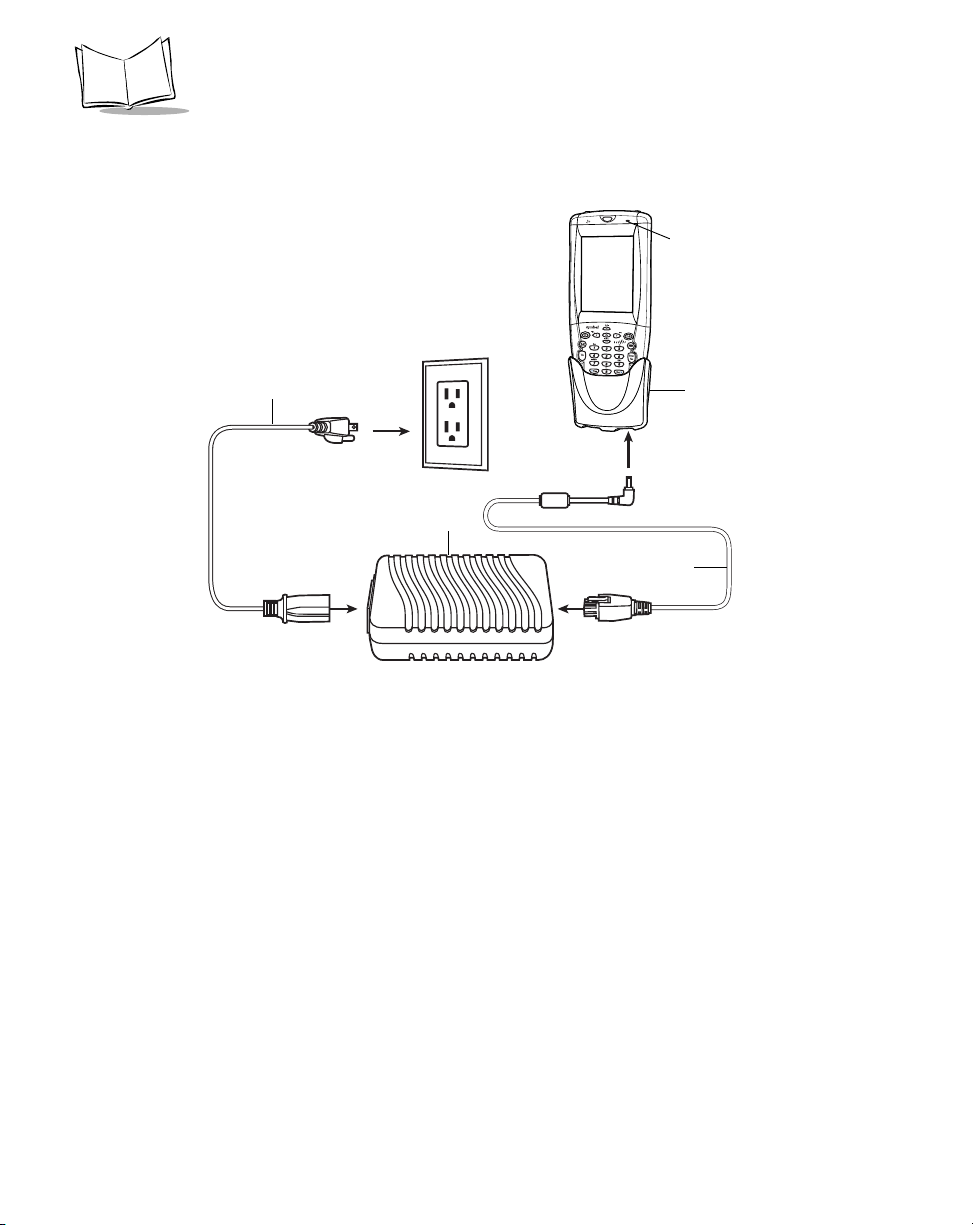
Using the Snap-On Modem Module
To charge the terminal’s battery using the Snap-On Modem Module, setup as shown below:
Terminal
Charge LED
AC Line
Cord
Power
Supply
DC Cable
Snap-On
Modem Module
The terminal charge LED blinks amber to indicate that the terminal battery is charging and
turns solid amber when charging is complete. The battery usually charges in two hours or
less, but may take up to four hours to fully charge. See Charge LED Indicator on page 116 for other indications.
1-10
Page 27
Getting Started
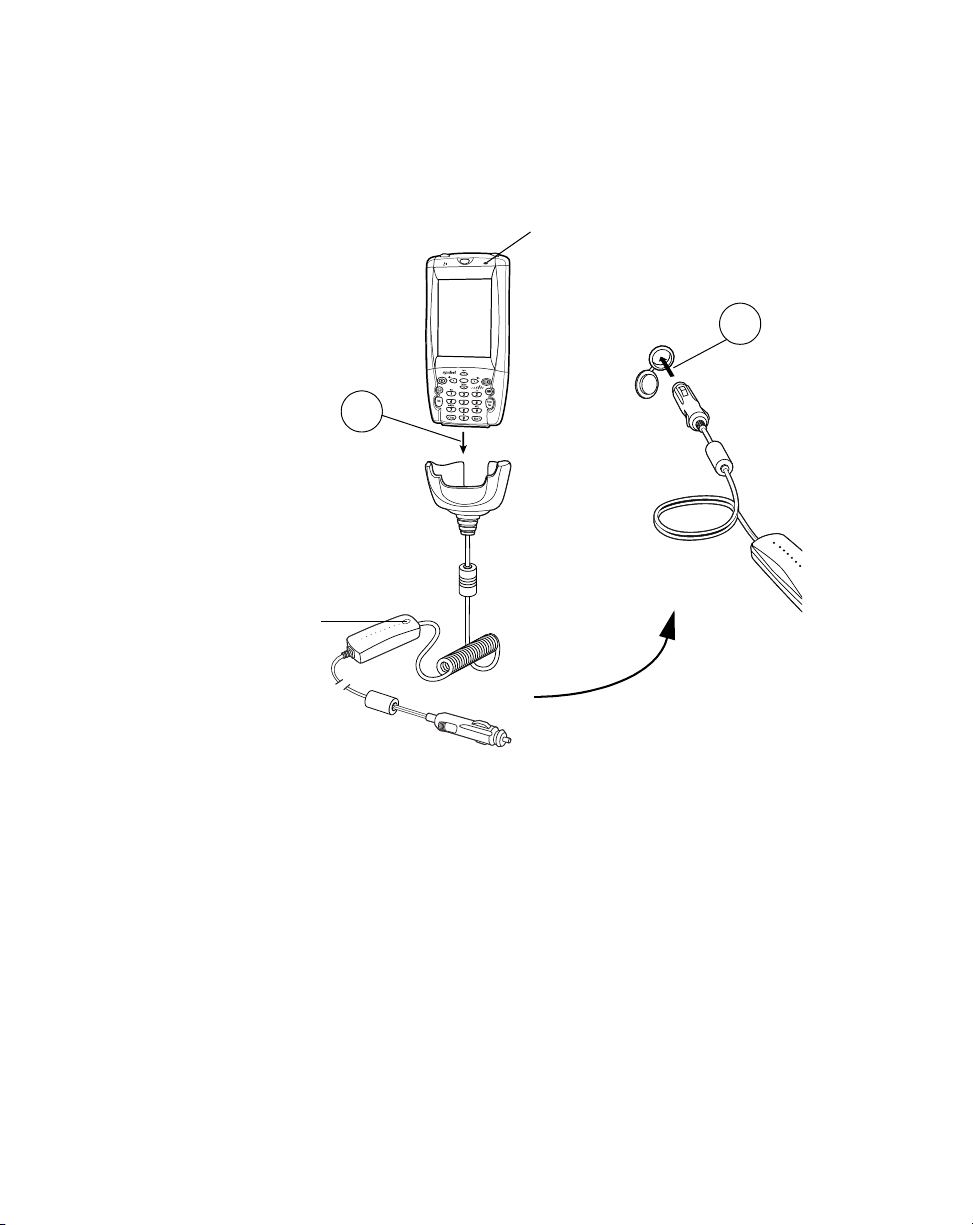
Using the Snap-On Autocharger
To charge the terminal’s battery using the Snap-On Autocharger, setup as shown below:
Terminal
Charge LED
2
1
Power
Indicator
Green
The terminal charge LED blinks amber to indicate that the terminal battery is charging and
turns solid amber when charging is complete. The battery usually charges in two hours or
less, but may take up to four hours to fully charge. See Charge LED Indicator on page 116 for other indications.
1-11
Page 28
PDT 8000 Series Product Reference Guide
Using the Single-Slot Cradle
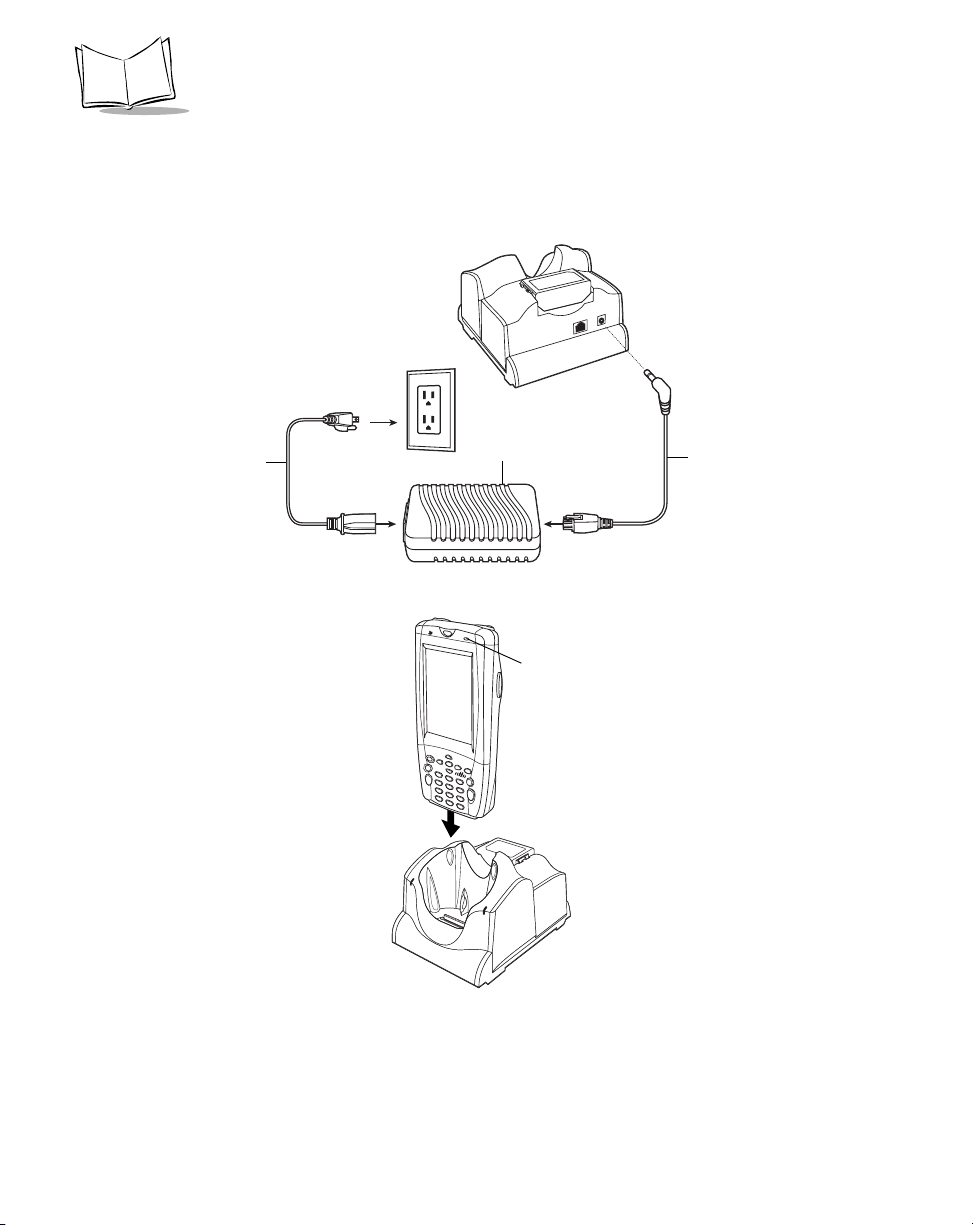
To charge the terminal’s battery using the CRD8000-1000S or the CRD8000-1000M:
1. Connect the cradle to a power source.
AC Line
Cord
Power
Supply
DC
Cable
2. Insert the terminal into the cradle. The terminal starts to charge automatically.
Terminal
Charge LED
The terminal charge LED blinks amber to indicate that the terminal battery is charging and
turns solid amber when charging is complete. The battery usually charges in two hours or
less, but may take up to four hours to fully charge. See Charge LED Indicator on page 116 for other indications.
1-12
Page 29

Getting Started
Using the Four-Slot Cradle
To charge the terminal’s battery using the CHS8000-4000C or the CHS8000-4000B:
1. Connect the cradle to a power source.
DC
Cable
AC Line
Cord
Power
Supply
2. Insert the terminal into the cradle. The terminal starts to charge automatically.
Terminal
Charge LED
The terminal charge LED blinks amber to indicate that the terminal battery is charging and
turns solid amber when charging is complete. The battery usually charges in two hours or
less, but may take up to four hours to fully charge. See Charge LED Indicator on page 116 for other indications.
1-13
Page 30
PDT 8000 Series Product Reference Guide
Charging Spare Batteries
A spare battery can be charged using either of the single-slot cradles (CRD8000-1000S or
CRD8000-1000M) or the CHS8000-4000B.
Note: You can also use a UBC Adaptor (p/n 21-32665-33) to charge spare
batteries. Refer to the UBC 2000 Universal Battery Charge Product
Guide for more information.
Using the Single-Slot Cradle
1. Connect the cradle to a power source.
2. Slide the latches on both sides of the battery up, to ensure they are in the unlock
position.
UNLOCK
3. Insert the battery into the Spare Battery Charging slot on the back of the cradle.
Position it with the charging contacts facing down (over charging pins) and gently
press down on the battery to ensure proper contact.
4. Lock the battery into place by sliding the latches on the battery down.
LOCK
The spare battery charging LED blinks amber to indicate that the battery is charging and
turns solid amber when battery is completely charged. The battery usually charges in two
hours or less, but may take up to four hours to fully charge. See Charge LED Indicator on
page 1-16 for other indications.
1-14
Page 31

Getting Started
Using the CHS8000-4000B
1. Connect the cradle to a power source.
2. Slide the latches on both sides of the battery up, to ensure they are in the unlock
position.
UNLOCK
3. Insert the battery into the Spare Battery Charging slot on the back of the cradle.
Position it with the charging contacts facing down (over charging pins) and gently
press down on the battery to ensure proper contact.
4. Lock the battery into place by sliding the latches on the battery down.
LOCK
The spare battery charging LED blinks amber to indicate that the battery is charging and
turns solid amber when battery is completely charged. The battery usually charges in two
hours or less, but may take up to four hours to fully charge. See Charge LED Indicator on
page 1-16 for other indications.
1-15
Page 32

PDT 8000 Series Product Reference Guide
Charge LED Indicator
Table 1-1. Charge LED Indicator
LED Indication
Terminal Charging (LED is on terminal)
Off Terminal not in cradle; terminal not placed
Slow blinking amber Terminal is charging.
Fast blinking amber Error in charging; check placement of terminal.
Solid amber Charging is complete.
Spare Battery Charging (LED is on Cradle)
Off No spare battery in slot; spare battery not placed
Slow blinking amber Spare battery is charging.
Fast blinking amber Error in charging; check placement of spare
Solid amber Charging is complete.
correctly; cradle is not powered
correctly; cradle is not powered.
battery.
1-16
Page 33
Getting Started
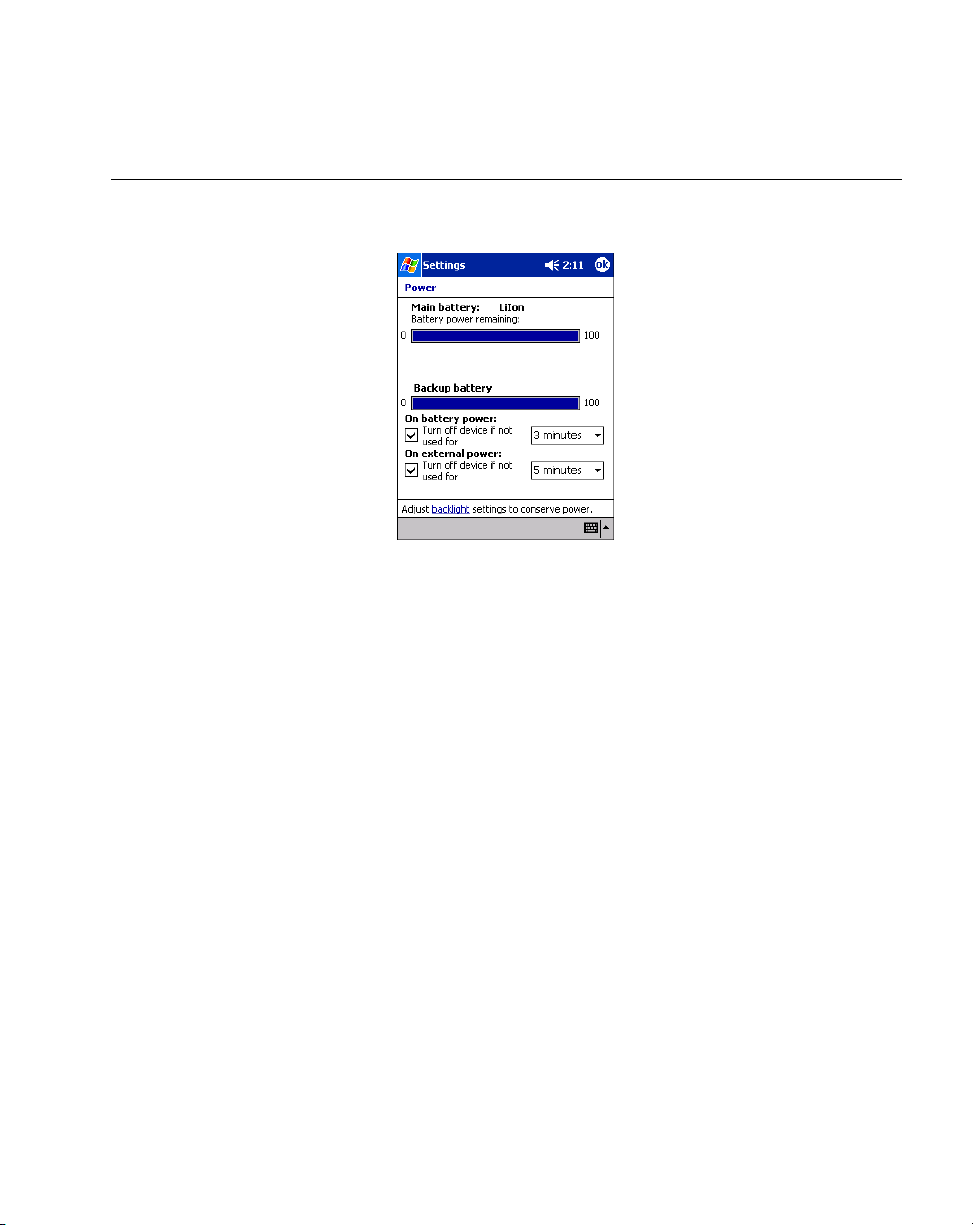
Checking Battery Power
To check whether the main battery or backup battery in the terminal is charged, tap Start Settings - System - Power to display the following Battery Status screen.
Figure 1-1. Battery Status Screen
To save battery power, set your terminal to turn off after a specified number of minutes on
battery power.
1-17
Page 34

PDT 8000 Series Product Reference Guide
Inserting a Compact Flash Storage Card
The PDT 8000 has a slot for a compact flash storage card which includes a compartment
door that prevents the card from coming out if the PDT 8000 is dropped.
To insert a compact flash card:
1. Unscrew and remove the compact flash card compartment door on the top of the
terminal.
2. Insert a compact flash card into the compartment.
3. Screw the compartment door back on.
To remove a compact flash card:
1. Unscrew and remove the compact flash card compartment door on the top of the
terminal.
2. Use the stylus to press the flash card release button inside the flash card
compartment. The card pops out.
1-18
Page 35
Getting Started
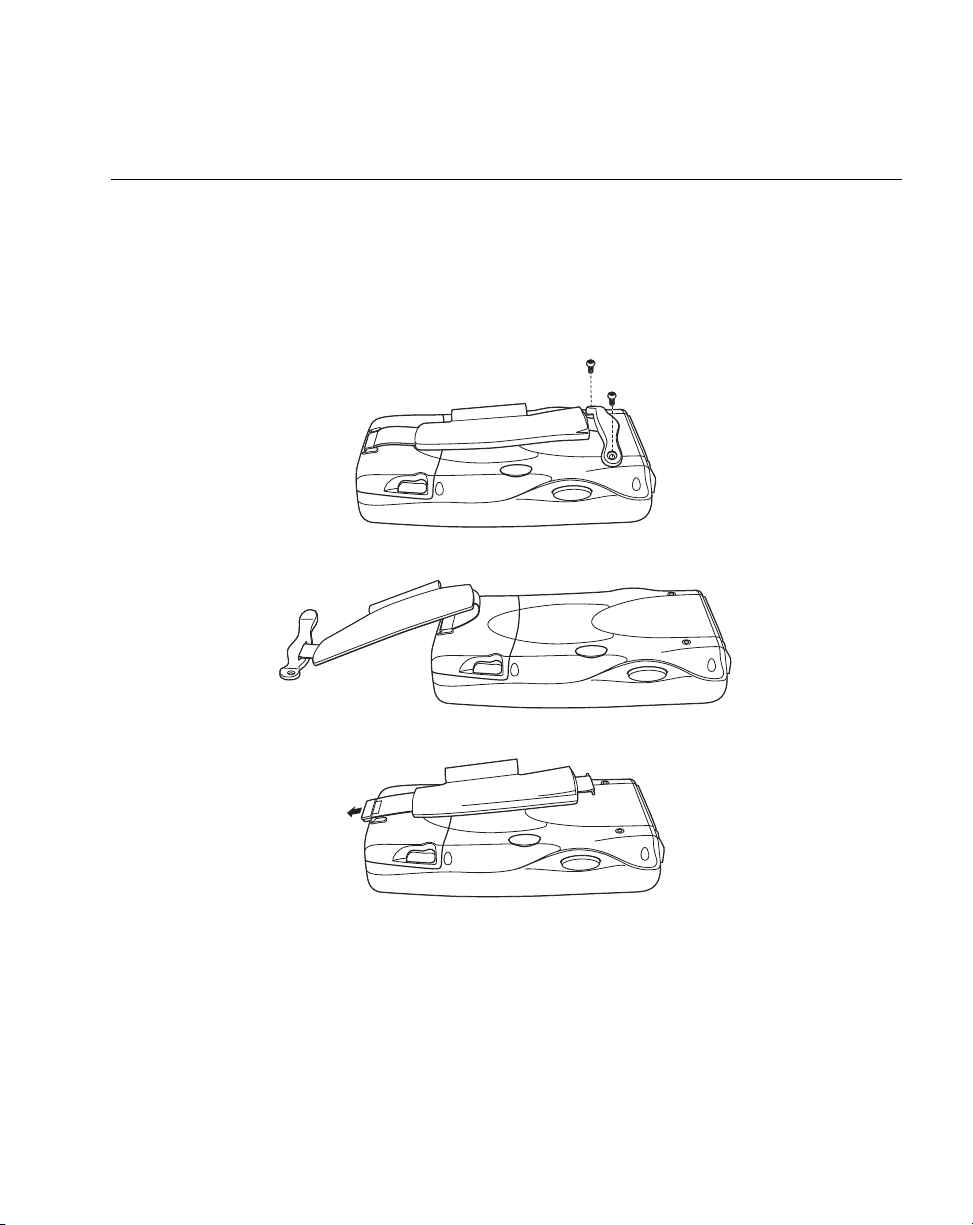
Replacing the Handstrap
The terminal has a factory-installed handstrap which increases comfort when holding the
terminal for extended periods of time. The handstrap may be removed or replaced, if
damaged.
To remove the handstrap
1. Unscrew the bar, on the top of the handstrap.
2. Remove the pin that connects the handstrap to the bar.
3. Unhook the bottom of the handstrap from it’s slot on the battery cover.
1-19
Page 36

PDT 8000 Series Product Reference Guide
To replace the handstrap:
1. Insert the pin of the handstrap into the bar.
2. Screw the bar onto the terminal.
3. Hook the bottom of the handstrap onto the battery cover.
1-20
Page 37
Getting Started
Starting the Terminal
After installing and charging the battery, start the terminal by pressing the red power button
(see Figure 1-2). If the terminal does not power on, reset it. See Resetting Your Terminal
on page 2-23.
Power
Button
Figure 1-2. Power Button
As the terminal initializes its unique Flash File System, the Symbol splash screen displays
for about 10 seconds. When the Welcome screen appears, tap anywhere on the screen to
continue to the Align screen. Note that these screens also appear every time you perform
a hard reset.
Aligning the Screen
To align your terminal so the cursor on the touch screen aligns with the tip of your stylus:
1. If necessary, adjust the backlight on the terminal so the screen is readable. See
Adjusting the Backlight on page 2-3.
2. Remove the stylus from its storage silo on the handstrap.
1-21
Page 38
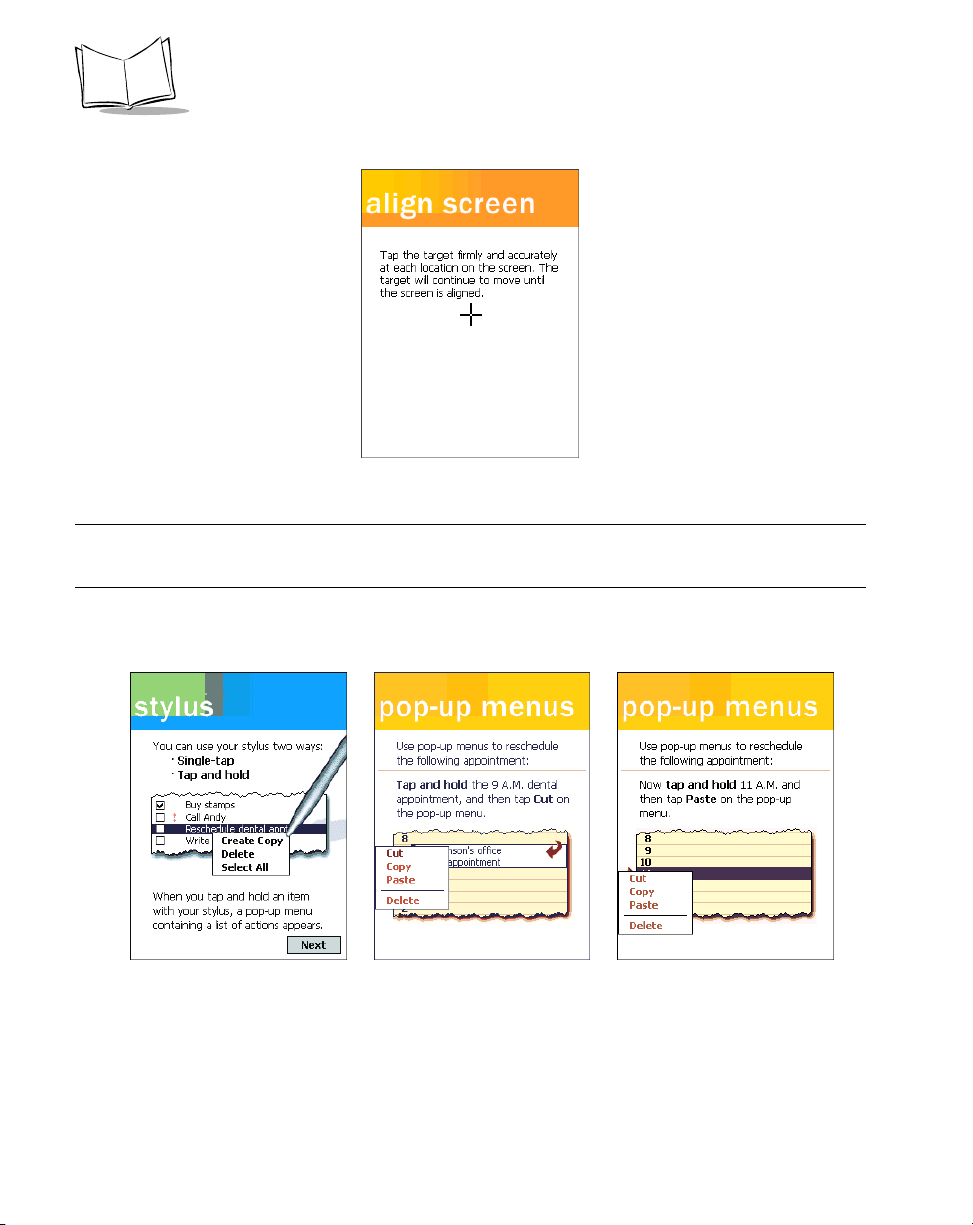
PDT 8000 Series Product Reference Guide
3. Tap the center of each target that appears on the screen with the tip of the stylus.
Figure 1-3. Tapping the Target
Note: To align the screen at anytime, press Shift + 2 to launch the
calibration screen.
4. Follow the directions on the screen which lead you through a simple exercise
illustrating how to use the stylus and pop-up menus.
1-22
Figure 1-4. Using Pop-up Menus
Page 39

5. Use the drop-down menu to set your time zone, and tap Next.
Figure 1-5. Setting Time Zone on the Terminal
Note: These initial setup screens appear each time you perform a hard
reset.
Setting Time and Date
Getting Started
The Time and Date screen does not appear after setting the time zone.
Ta p Start - Settings - System - Clock to use the clock control panel applet to set the time
and date after a hard reset.
Figure 1-6. Setting Time and Date
1-23
Page 40

PDT 8000 Series Product Reference Guide
Setting Up Your Terminal
Refer to the following chapters for setting up your terminal:
• For customizing the settings on your terminal, see Chapter 3, Customizing Your
Term in al .
• To set up ActiveSync to synchronize your terminal with your host computer, see
Chapter 4, Communications.
• To configure your terminal for Spectrum24, see Chapter 9, Spectrum24 Network
Configuration.
• To install development software on your development PC, see Chapter 10,
Software Installation on Development PC.
• To configure your terminal using the Terminal Configuration Manager, see Chapter
11, Configuring the Terminal.
1-24
Page 41

Chapter 2
Operating the Terminal
Chapter Contents
Introduction . . . . . . . . . . . . . . . . . . . . . . . . . . . . . . . . . . . . . . . . . . . . . . . . . . . . . . . . . . . . . . . . . . . . . 2-3
Using the Power Button . . . . . . . . . . . . . . . . . . . . . . . . . . . . . . . . . . . . . . . . . . . . . . . . . . . . . . . . . . . 2-3
Adjusting the Backlight . . . . . . . . . . . . . . . . . . . . . . . . . . . . . . . . . . . . . . . . . . . . . . . . . . . . . . . . . . . . 2-3
Using a Headset . . . . . . . . . . . . . . . . . . . . . . . . . . . . . . . . . . . . . . . . . . . . . . . . . . . . . . . . . . . . . . . . . 2-3
Using the Keyboard. . . . . . . . . . . . . . . . . . . . . . . . . . . . . . . . . . . . . . . . . . . . . . . . . . . . . . . . . . . . . . . 2-4
Terminal Keyboard . . . . . . . . . . . . . . . . . . . . . . . . . . . . . . . . . . . . . . . . . . . . . . . . . . . . . . . . . . . 2-4
Using the Stylus . . . . . . . . . . . . . . . . . . . . . . . . . . . . . . . . . . . . . . . . . . . . . . . . . . . . . . . . . . . . . . . . . 2-6
Today Screen . . . . . . . . . . . . . . . . . . . . . . . . . . . . . . . . . . . . . . . . . . . . . . . . . . . . . . . . . . . . . . . . . . . 2-6
Status Icons . . . . . . . . . . . . . . . . . . . . . . . . . . . . . . . . . . . . . . . . . . . . . . . . . . . . . . . . . . . . . . . . . 2-7
Using the Navigation Bar and Command Bar . . . . . . . . . . . . . . . . . . . . . . . . . . . . . . . . . . . . . . . . . . . 2-8
Selecting Programs . . . . . . . . . . . . . . . . . . . . . . . . . . . . . . . . . . . . . . . . . . . . . . . . . . . . . . . . . . . . . . . 2-9
Using Pop-up Menus. . . . . . . . . . . . . . . . . . . . . . . . . . . . . . . . . . . . . . . . . . . . . . . . . . . . . . . . . . . . . 2-10
Notifications. . . . . . . . . . . . . . . . . . . . . . . . . . . . . . . . . . . . . . . . . . . . . . . . . . . . . . . . . . . . . . . . . . . . 2-11
Entering Information . . . . . . . . . . . . . . . . . . . . . . . . . . . . . . . . . . . . . . . . . . . . . . . . . . . . . . . . . . . . . 2-11
Entering Information Using the Input Panel . . . . . . . . . . . . . . . . . . . . . . . . . . . . . . . . . . . . . . . . 2-11
Writing on the Screen . . . . . . . . . . . . . . . . . . . . . . . . . . . . . . . . . . . . . . . . . . . . . . . . . . . . . . . . 2-14
Selecting Text . . . . . . . . . . . . . . . . . . . . . . . . . . . . . . . . . . . . . . . . . . . . . . . . . . . . . . . . . . . . . . 2-17
Drawing on the Screen . . . . . . . . . . . . . . . . . . . . . . . . . . . . . . . . . . . . . . . . . . . . . . . . . . . . . . . 2-18
Recording a Message . . . . . . . . . . . . . . . . . . . . . . . . . . . . . . . . . . . . . . . . . . . . . . . . . . . . . . . . 2-19
Entering Data via the Bar Code Scanner (Scan Wedge). . . . . . . . . . . . . . . . . . . . . . . . . . . . . . 2-20
Using My Text . . . . . . . . . . . . . . . . . . . . . . . . . . . . . . . . . . . . . . . . . . . . . . . . . . . . . . . . . . . . . . 2-20
Finding Information . . . . . . . . . . . . . . . . . . . . . . . . . . . . . . . . . . . . . . . . . . . . . . . . . . . . . . . . . . . . . . 2-21
Scanning . . . . . . . . . . . . . . . . . . . . . . . . . . . . . . . . . . . . . . . . . . . . . . . . . . . . . . . . . . . . . . . . . . . . . . 2-22
Scan LED Indicator . . . . . . . . . . . . . . . . . . . . . . . . . . . . . . . . . . . . . . . . . . . . . . . . . . . . . . . . . . 2-22
Resetting Your Terminal . . . . . . . . . . . . . . . . . . . . . . . . . . . . . . . . . . . . . . . . . . . . . . . . . . . . . . . . . . 2-23
Performing a Soft Reset . . . . . . . . . . . . . . . . . . . . . . . . . . . . . . . . . . . . . . . . . . . . . . . . . . . . . . 2-23
Performing a Hard Reset . . . . . . . . . . . . . . . . . . . . . . . . . . . . . . . . . . . . . . . . . . . . . . . . . . . . . . 2-23
2-1
Page 42

PDT 8000 Series Product Reference Guide
2-2
Page 43

Operating the Terminal
Introduction
This chapter provides basic instructions for using and navigating your terminal.
Using the Power Button
Press the red power button on the top left-hand side of the terminal to turn it on and off. See
Starting the Terminal on page 1-21.
Adjusting the Backlight
Use the key combinations below to decrease and increase the backlight.
Keys Description
Shift + App Key 2
Shift + App Key 3
Shift + Left Arrow Decrease backlight (decrease brightness)
Shift + Right Arrow Increase backlight (increase brightness)
Turn backlight on or off.
Using a Headset
Your terminal is equipped with an audio connector. Therefore, a headset may be installed
for telephony operation. To use the headset, plug the headset jack into the audio connector
on the top of the terminal.
Figure 2-1. Using a Headset
2-3
Page 44

PDT 8000 Series Product Reference Guide
Using the Keyboard
Refer to Table 2-1 on page 2-5, for key functionality. Note that key functions can be changed
by an application. Your keyboard may not function exactly as described in these tables.
Note: For detailed keyboard configurations including ASCII values and VK
codes, see Appendix D, Keyboard Maps.
For information about using the soft keyboard from the input panel, refer to Using the Soft
Keyboard on page 2-13.
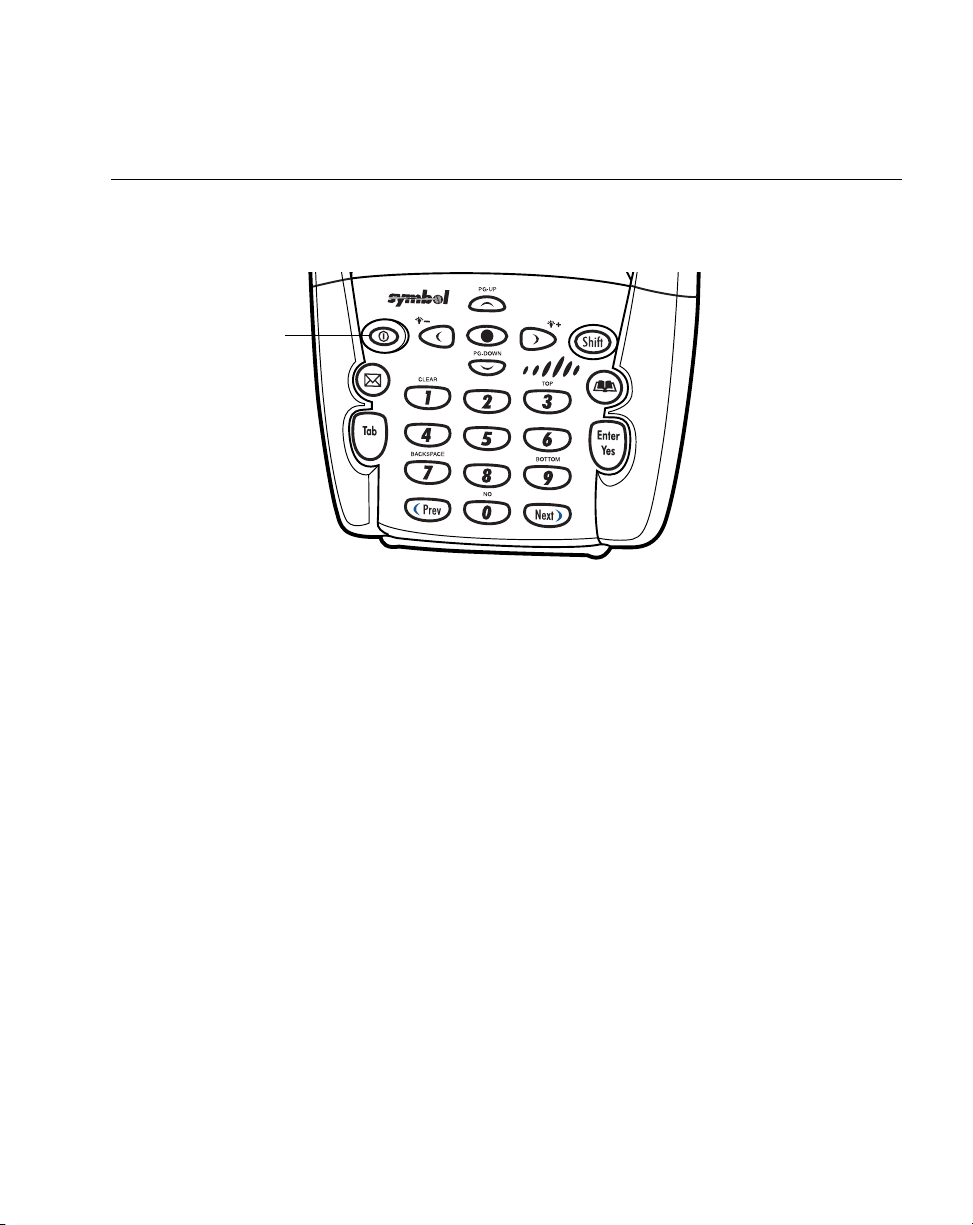
Terminal Keyboard
The keyboard uses a numeric keypad that produces the numbers (0-9) and assorted
functions. The keyboard is color-coded to indicate particular actions that are produced
when the modifier (Shift) key is pressed. The keyboard default is numeric, producing
numbers.
Page-up &
Down Keys
App Key 1
Right ArrowLeft Arrow
Power Key
App Key 2
Clear Key
Tab Key
Backspace Key
Previous Key
2-4
Shift Key
App Key 3
Top K e y
Enter/Yes Key
Bottom Key
Next Key
No Key
Figure 2-2. Terminal Keyboard
Page 45

Operating the Terminal
Table 2-1. Keyboard Actions
Key Action
Backspace Press Shift + 7 to erase information entered on the display, one
character at a time.
Bottom Press Shift + 9. Action is application dependent.
Clear Press Shift + 1. Action is application dependent.
Enter/Yes Press Enter after entering data or a command.
Left Arrow See Adjusting the Backlight on page 2-3.
Next Action is application dependent.
No Press Shift + 0. Action is application dependent.
Page-up and
Down
App Key 1 Launches application assigned to Button 1. See Assigning Applications
App Key 2 Press the App Key 2 to launch the Inbox application.
App Key 3 Launches application assigned to Button 3. See Assigning Applications
Power Press Power to suspend/resume the terminal.
Previous Action is application dependent.
Right Arrow See Adjusting the Backlight on page 2-3.
Shift Press the Shift key, then another key to produce the function above that
Tab Press Tab to move from field to field.
Top Press Shift + 3. Action is application dependent.
Press Shift + Up Arrow. Action is application dependent.
Press Shift + Down Arrow. Action is application dependent.
to Application Buttons on page 3-7 for more information on assigning
applications to buttons.
to Application Buttons on page 3-7 for more information on assigning
applications to buttons.
Also see Adjusting the Backlight on page 2-3.
See Starting the Terminal on page 1-21.
key. See individual key descriptions in this table for additional Shift key
usage.
2-5
Page 46

PDT 8000 Series Product Reference Guide
Using the Stylus
Your terminal has a stylus for selecting items and entering information. The stylus functions
as a mouse.
• Tap: Touch the screen once with the stylus to open items and select options.
• Drag: Hold the stylus on the screen and drag across the screen to select text and
images. Drag in a list to select multiple items.
• Tap-and-hold: Tap and hold the stylus on an item to see a list of actions available
for that item. On the pop-up menu that appears, tap the action you want to perform.
Today Screen
When you turn on your terminal for the first time each day (or after four hours of inactivity),
the Today screen appears. You can also display it by tapping Start - Today. On the Today
screen, you can see important information for the day.
Tap to switch
to a program
Tap to change volume or mute all sounds
Tap to change the date and time.
Tap to open an item.
2-6
Your day at a glance.
Tap to create a new item. Tap to view connection status.
Figure 2-3. Today Screen
Page 47

Operating the Terminal
Status Icons
You may see the following status icons on the command bar located at the bottom of the
screen:
Table 2-2. Status Icons
Icon Meaning
Turns all sounds on and off.
Backup battery is low.
Main batteries are charging.
Main batteries are low.
Main batteries are very low.
Main batteries are full.
Connection is active.
Synchronization is beginning or ending.
Synchronization is occurring.
Notification that one or more instant
messages were received.
Notification that one or more e-mail
messages were received.
There are more notification icons than can
be displayed. Tap to display remaining
icons.
2-7
Page 48

PDT 8000 Series Product Reference Guide
Using the Navigation Bar and Command Bar
The navigation bar at the top of the screen displays the active program and current time,
and allows you to select programs and close screens.
Use the command bar at the bottom of the screen to perform tasks in programs. The
command bar includes menu names, buttons, and the input panel button. To create a new
item in the current program, tap New. To see the name of a button, hold the stylus on the
button. Drag the stylus off the button so the command is not carried out.
Tap to change volume or mute all sounds
Tap to quickly select a program
you have recently used.
Tap to select a program.
2-8
Tap to see additional programs.
Tap to customize the device.
New button.
Figure 2-4. Screen Navigation
Menu
names.
Input panel
button.
Buttons.
Page 49

Operating the Terminal
Selecting Programs
To select a program, tap Start - Programs, then the program name. (To select which
programs appear on the Start menu, see Chapter 3, Customizing Your Terminal.)
Figure 2-5. Start Menu
Note: Some programs have abbreviated labels for check boxes and drop-
down menus. To see the full label, hold the stylus on the label. Drag
the stylus off the label so that the command is not carried out.
2-9
Page 50

PDT 8000 Series Product Reference Guide
Using Pop-up Menus
With pop-up menus, you can quickly choose an action for an item. For example, use the
pop-up menu in the contact list to delete a contact, make a copy of a contact, or send an email message to a contact. The actions in the pop-up menus vary from program to program.
To access a pop-up menu, hold the stylus on the item you want to perform the action on.
When the menu appears, lift the stylus, and tap the action to perform, or tap outside the
menu to close it without performing an action.
Tap and hold to display
the pop-up menu.
Lift the stylus and tap
the action you want.
Tap outside the menu
to close it without
performing an action.
2-10
Figure 2-6. Pop-up Menu
Page 51

Operating the Terminal
Notifications
Your terminal notifies you when you have something to do. For example, if you've set up an
appointment in Calendar, a task with a due date in Tasks, or an alarm in Clock, you'll be
notified in any of the following ways:
• a message box appears on the screen
• a sound, which you can set, is played
• a light flashes on your terminal.
To choose reminder types and sounds for your terminal, tap Start - Settings - Personal Sounds & Notifications. Select the desired options.
Entering Information
To enter information, you may:
• Use the keyboard. (See Using the Keyboard on page 2-4 and Appendix D,
Keyboard Maps for keyboard functions.)
• Use the input panel to enter typed text, either using the soft keyboard or writing
characters.
• Write directly on the screen.
• Draw pictures on the screen.
• Speak into the microphone to record a message.
• Scan bar code data into data fields.
• Use Microsoft
computer to your terminal. For more information on ActiveSync, see Chapter 4,
Communications or ActiveSync Help on your host computer.
®
ActiveSync® to synchronize or copy information from your host
Entering Information Using the Input Panel
Use the input panel to enter information in any program. You can either type using the soft
keyboard or write using Block Recognizer, Letter Recognizer, or Transcriber. In any case,
the characters appear as typed text on the screen.
2-11
Page 52

PDT 8000 Series Product Reference Guide
To show or hide the input panel, tap the Input Panel button. Tap the arrow next to this button
to view input methods.
Select an input method.
Tap to see your choices.
Input Panel Button
Figure 2-7. Input Panel Button
When you use the input panel, your terminal anticipates the word you are typing or writing
and displays it above the input panel. When you tap the displayed word, it is inserted into
your text at the insertion point. The more you use your terminal, the more words it learns to
anticipate.
To change input settings, such as the number of words suggested at one time, tap Options
from the Input Panel menu, and tap the tabs to see each setting screen.
2-12
Figure 2-8. Input Panel Options
Page 53
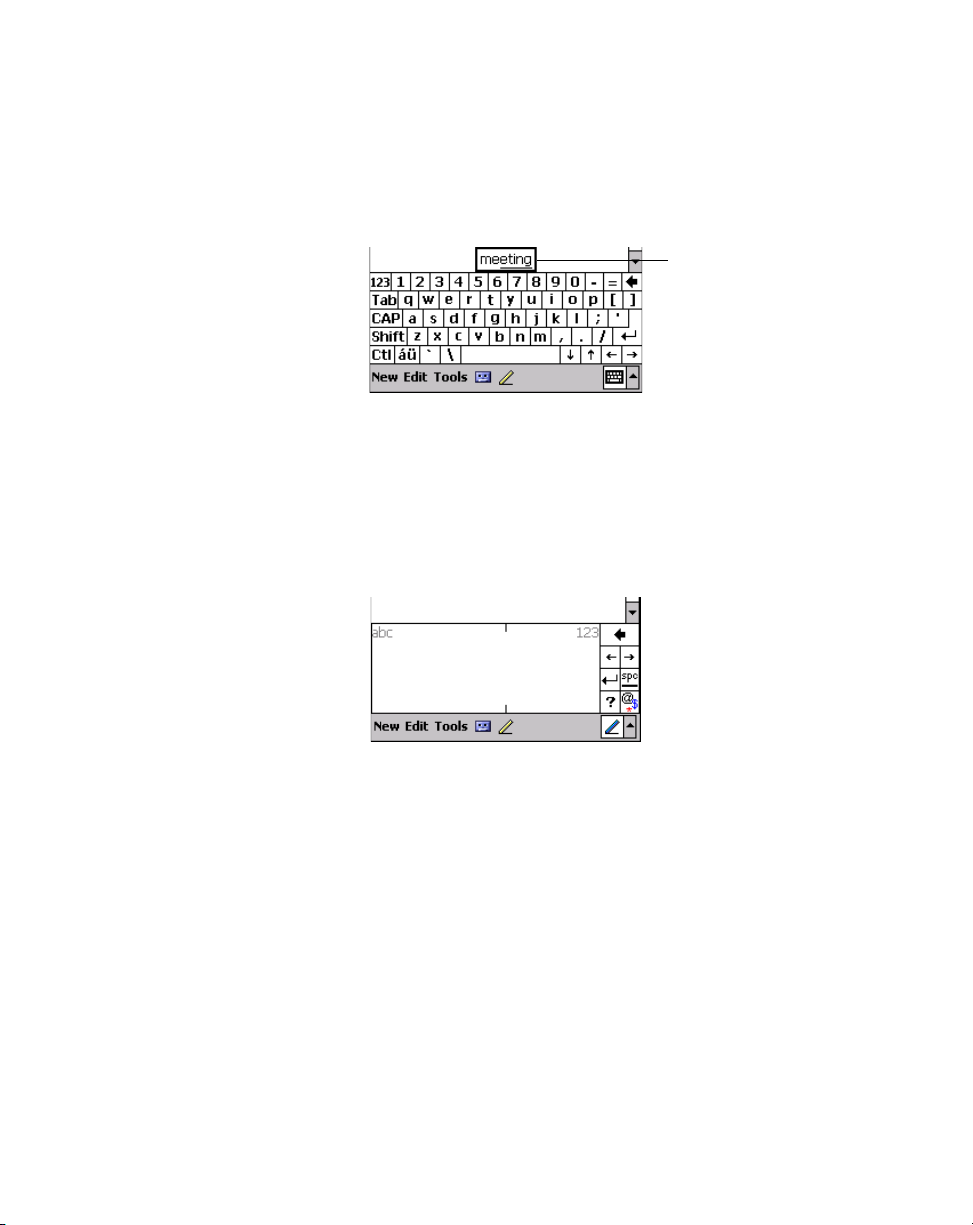
Using the Soft Keyboard
To type with the soft keyboard:
1. Tap the arrow next to the Input Panel button, then Keyboard.
Tap here if this is the right word.
Figure 2-9. Soft Keyboard
2. On the soft keyboard, tap the keys with your stylus.
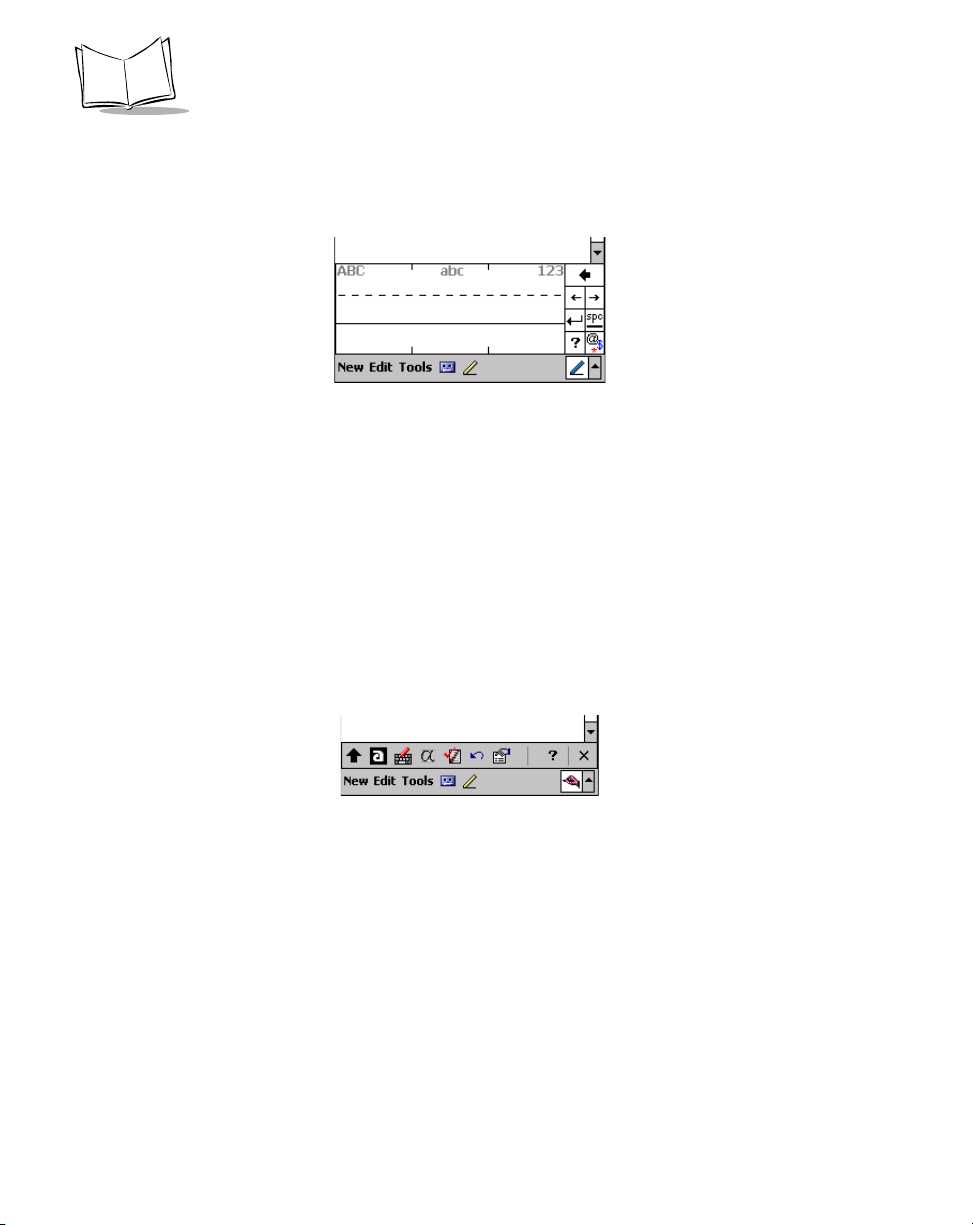
Using the Block Recognizer
To use Block Recognizer:
1. Tap the arrow next to the Input Panel button, then Block Recognizer.
Operating the Terminal
Figure 2-10. Block Recognizer
2. Write a letter in the left side of the box, or a number in the right side, using special
character strokes.
3. When you write a letter, it is converted to typed text on the screen. For specific
instructions on using Block Recognizer, with Block Recognizer open, tap the
question mark next to the writing area, or see Appendix A, Block Recognizer
Characters.
2-13
Page 54
PDT 8000 Series Product Reference Guide
Using the Letter Recognizer
To use Letter Recognizer:
1. Tap the arrow next to the Input Panel button, then Letter Recognizer.
Figure 2-11. Letter Recognizer
2. Write letters or numbers in the writing area, just as you would on paper. Write
capital letters in the left side of the box, numbers in the right side, and lower case
letters in the center.
When you write a letter, it is converted to typed text on the screen. For instructions on using
Letter Recognizer, with Letter Recognizer open, tap the question mark next to the writing
area.
Using the Transciber
To use Transcriber:
1. Tap the arrow next to the Input Panel button, then Transciber.
Figure 2-12. Transcriber
2. Write anywhere on the screen.
When you write anywhere on the screen, Transciber changes the written characters to
typed characters. For instructions on using Transcriber, with Transcriber open, tap the
question mark next to the writing area.
Writing on the Screen
In any program that accepts writing, such as the Notes program and the Notes tab in
Calendar, Contacts, and Tasks, you can use your stylus to write directly on the screen.
2-14
Page 55

Operating the Terminal
To write on the screen, tap the Pen button to switch to writing mode. Lines appear on the
screen to guide you.
Tap the Pen button and
use your stylus like a pen.
Figure 2-13. Writing on the Screen
Note: Some programs that accept writing do not have the Pen button. See
the documentation for that program to find out how to switch to
writing mode.
2-15
Page 56
PDT 8000 Series Product Reference Guide
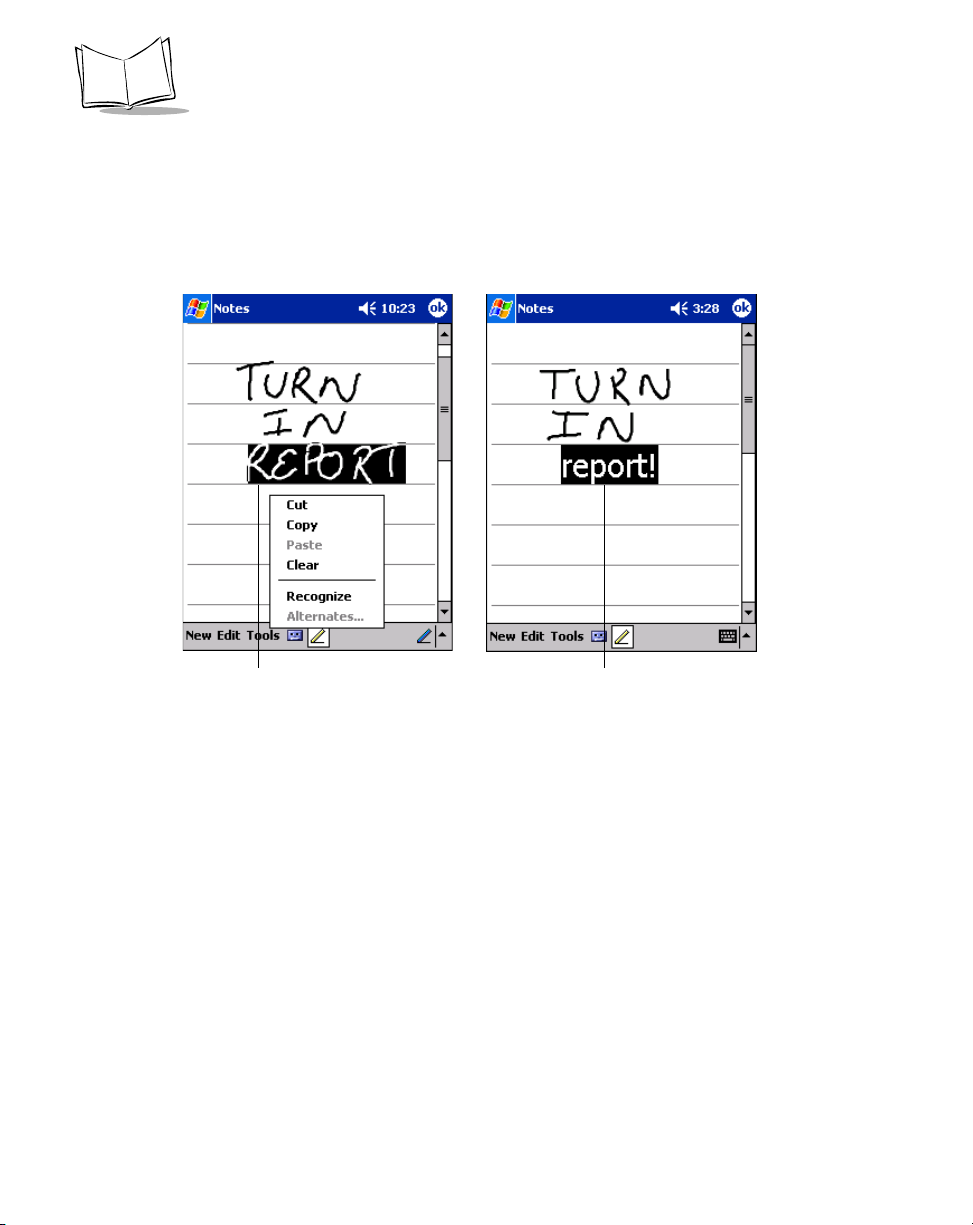
Converting Writing to Text
To convert your writing to text, tap Tool s - Recognize.
To convert certain words, select them before tapping Recognize on the To ol s menu (or tap
and hold the selected words, then tap Recognize on the pop-up menu). If a word is not
recognized, it is left as writing.
Select the text you wanto to convert and
tap Recognize on the pop-up menu.
The writing is
turned into text.
Figure 2-14. Writing on the Screen
If the conversion is incorrect, select different words from a list of alternates or return to the
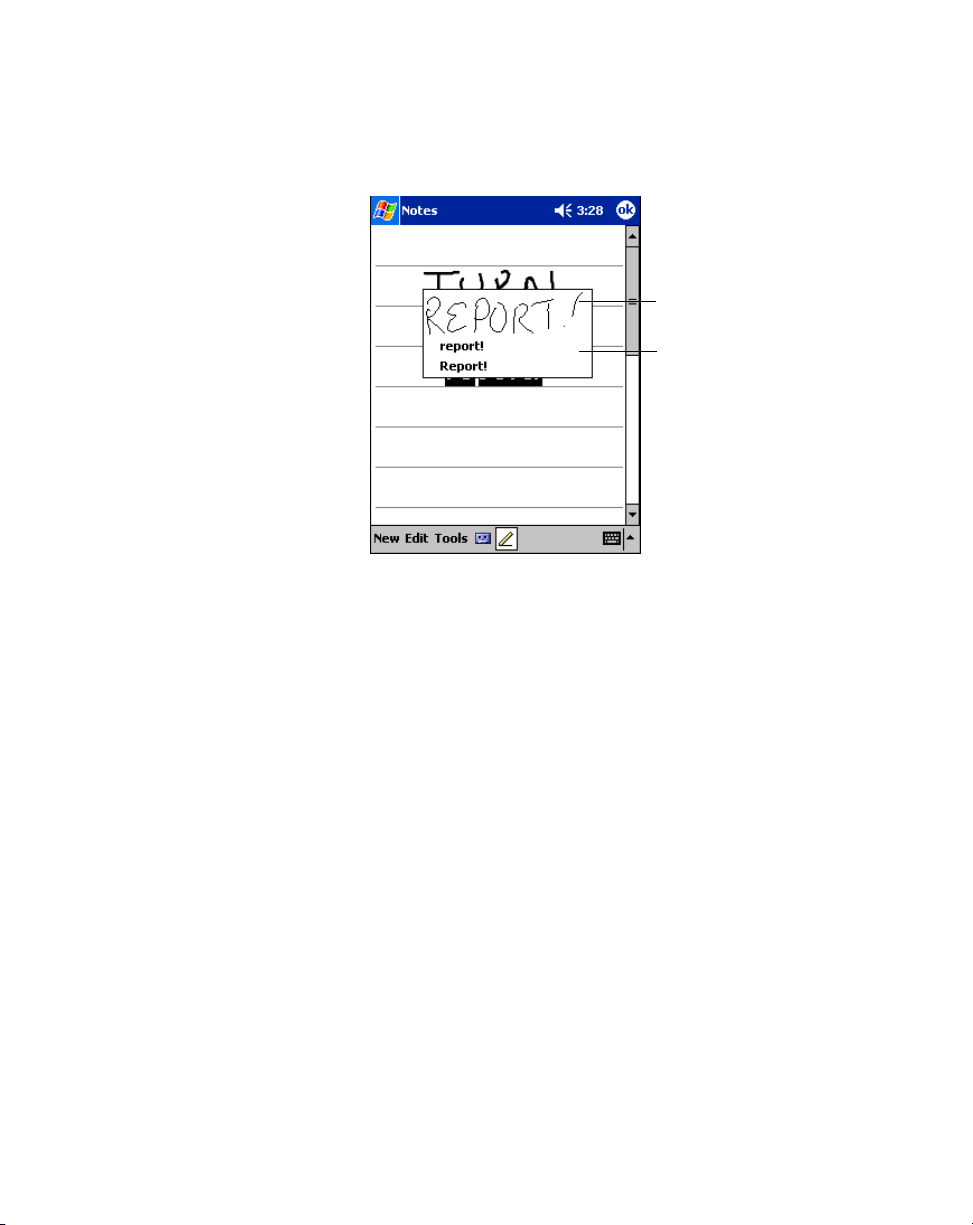
original writing. Tap and hold the incorrect word only. On the pop-up menu, tap Alternates.
2-16
Page 57
Operating the Terminal
A list of alternate words appears. Tap the word you want to use, or tap the writing at the top
of the menu to return to the original writing.
Tap to return to your
original writing.
Or, tap the word you
want to use.
Figure 2-15. Alternate List
Writing Tips
• Write neatly.
• Write on the lines and draw descenders below the line. Cross of the "t" and write
apostrophes below the top line so they are not confused with the word above. Write
periods and commas above the line.
• For better recognition, try increasing the zoom level to 300% using the To ol s menu.
• Leave large gaps between words so your terminal can easily tell where words
begin and end.
• Hyphenated words, foreign words that use special characters such as accents, and
some punctuation cannot be converted.
• If you add writing to a word to change it (such as changing a "3" to an "8") after you
attempt to recognize the word, the writing you add is not included if you try to
recognize the writing again.
Selecting Text
To edit or format typed text, select it by dragging the stylus across the text. Cut, copy, and/
or paste text by holding the selected words then tapping an editing command on the popup menu, or by tapping the command on the Edit menu.
2-17
Page 58

PDT 8000 Series Product Reference Guide
Selecting Writing
To select writing to edit or format:
1. Tap and hold the stylus next to the text you want to select until the insertion point
appears.
2. Drag the stylus across the text.
If you accidentally write on the screen, tap Tool s - Undo and try again. You can also select
text by tapping the Pen button to deselect it, then dragging the stylus across the screen.
You can cut, copy, and paste written text in the same way you work with typed text: tap and
hold the selected words, then tap the command from the pop-up menu, or select the
command from the Edit menu.
Drawing on the Screen
Drawing on the screen is similar to writing on the screen. To create a drawing, cross three
ruled lines on your first stroke. A drawing box appears. Subsequent strokes in or touching
the drawing box become part of the drawing. Drawings that do not cross three ruled lines
are treated as writing.
Pen button.
Figure 2-16. Drawing on the Screen
Note: To change the zoom level, tap Tools, then a zoom level.
2-18
The drawing box indicates the
boundaries of the drawing.
Page 59

Operating the Terminal
Selecting a Drawing
To select a drawing to edit or format, tap and hold the stylus on the drawing until the
selection handle appears.
To select multiple drawings, deselect the Pen button, then drag to select the drawings you
want.
To cut, copy, and paste drawings, tap and hold the selected drawing, then tap an editing
command on the pop-up menu, or tap the command on the Edit menu. To resize a drawing,
deselect the Pen button and drag a selection handle.
Recording a Message
You may record a message to capture thoughts, reminders, and phone numbers. In
Calendar, Tasks, and Contacts, you can include a recording in the Notes tab. In the Notes
program, you can either create a stand-alone recording or include a recording in a written
note. To include the recording in a note, open the note first.
To create a recording:
1. Hold the terminal’s microphone near your mouth or other source of sound.
2. Start the Notes Application.
3. Tap the Record icon to begin recording.
Tap to show or hide the
recording toolbar.
Figure 2-17. Recording Screen
Indicates an embedded
recording.
Tap to begin recording.
2-19
Page 60

PDT 8000 Series Product Reference Guide
4. When you are finished, tap the Stop button. The new recording appears in the note
list or as an embedded icon.
5. To play a recording, tap it in the list or tap its icon in the note.
Entering Data via the Bar Code Scanner (Scan Wedge)
Using the Scan Wedge program, the integrated bar code scanner on your terminal can
scan data into data fields in the same way data is entered via the keyboard. See HTML
Scan Demo on page B-4 for more information.
Using My Text
When using Inbox or MSN Messenger, use My Text to quickly insert preset or frequently
used messages into the text entry area. To insert a message, tap My Text and tap a
message.
Tap to select a
prewritten message.
Figure 2-18. Using My Text
Note: You can add text after inserting a My Text message before sending
it.
To edit a My Text message, tap Tool s - Edit - My Text Messages. Select the message you
wish to edit and make the changes.
2-20
Page 61

Operating the Terminal
Finding Information
The Find feature locates information. Tap Start - Find to launch this feature. Enter the text
you want to find, select a data type, then tap Go.
To find information taking up storage space on your terminal, select Larger than 64 KB in
Type.
You can also use the File Explorer to find files and organize them into folders. Tap Start -
Programs - File Explorer to launch Explorer.
Tap to change folders.
Select the sort
order for the list.
Tap the folder
name to open it.
Tap and hold to
create a new folder.
Figure 2-19. File Explorer
Note: To move files in File Explorer, tap and hold the item, then tap Cut or
Copy and Paste on the pop-up menu.
2-21
Page 62

PDT 8000 Series Product Reference Guide
Scanning
The terminal has an integrated scanner which allows you to collect data by scanning one
or two-dimensional bar codes. See Appendix B, Demo Program for a sample scanning
application.
To scan bar codes:
1. Ensure that your terminal is loaded with a scanning application.
2. Aim the scan exit window at the bar code.
3. Press either the right or left scan trigger. Make sure the red scan beam covers the
entire bar code. The green scan LED lights and a beep sounds to indicate a
successful decode.
Figure 2-20. Scanning
Scan LED Indicator
See Parts of the Terminal on page 1-4 for the location of the Scan LED on the terminal.
Table 2-3. Scan LED Indicator
LED Status Indication
Off Not scanning.
Solid Red Laser enabled. Scanning in process.
Solid Green Successful decode.
2-22
Page 63

Operating the Terminal
Resetting Your Terminal
If your terminal stops responding to input from buttons or the screen, reset it by performing
a soft or hard reset.
Performing a Soft Reset
A soft reset restarts the terminal and saves all stored records and entries. However, files
that remain open during a soft reset may not be retained.
Ensure that your terminal is awake before performing a soft reset. If necessary, press the
Power key to wake up your terminal.
To perform a soft reset press and hold the Power key (for approximately 10 seconds) and
release it as soon as the screen changes and the terminal begins to reboot.
Performing a Hard Reset
A hard reset also restarts your terminal, but erases all stored records and entries that are
not saved in the Flash File System.
reset does not solve your problem.
Therefore, never perform a hard reset unless a soft
Note: You can restore any data previously synchronized with your host
computer during the next ActiveSync operation.
To perform a hard reset:
1. Remove the battery door.
2. Press Power key + Scan button, and release.
3. Replace the battery door.
4. As the terminal reboots, the Symbol splash screen displays for about 60 seconds.
5. Realign the screen, as described in Aligning the Screen on page 1-21.
Note: With a hard reset, the current date and time, formats, preferences,
and other settings are restored to their factory default settings unless
they are restored by use of .reg files located in the Flash File
System.
2-23
Page 64

PDT 8000 Series Product Reference Guide
2-24
Page 65

Chapter 3
Customizing Your Terminal
Chapter Contents
Introduction . . . . . . . . . . . . . . . . . . . . . . . . . . . . . . . . . . . . . . . . . . . . . . . . . . . . . . . . . . . . . . . . . . 3-3
Adjusting Settings . . . . . . . . . . . . . . . . . . . . . . . . . . . . . . . . . . . . . . . . . . . . . . . . . . . . . . . . . . . . . 3-3
Flash Storage . . . . . . . . . . . . . . . . . . . . . . . . . . . . . . . . . . . . . . . . . . . . . . . . . . . . . . . . . . . . . . . . 3-3
FFS Partitions. . . . . . . . . . . . . . . . . . . . . . . . . . . . . . . . . . . . . . . . . . . . . . . . . . . . . . . . . . . . . 3-4
Working with FFS Partitions . . . . . . . . . . . . . . . . . . . . . . . . . . . . . . . . . . . . . . . . . . . . . . . . . . 3-4
Non-FFS Partitions . . . . . . . . . . . . . . . . . . . . . . . . . . . . . . . . . . . . . . . . . . . . . . . . . . . . . . . . . 3-6
Assigning Applications to Application Buttons . . . . . . . . . . . . . . . . . . . . . . . . . . . . . . . . . . . . . . . . 3-7
Assigning User-Written Applications to Buttons. . . . . . . . . . . . . . . . . . . . . . . . . . . . . . . . . . . . . . . 3-7
Adding Programs . . . . . . . . . . . . . . . . . . . . . . . . . . . . . . . . . . . . . . . . . . . . . . . . . . . . . . . . . . . . . . 3-8
Adding a Program from the Internet . . . . . . . . . . . . . . . . . . . . . . . . . . . . . . . . . . . . . . . . . . . . 3-8
Adding a Program to the Start Menu . . . . . . . . . . . . . . . . . . . . . . . . . . . . . . . . . . . . . . . . . . . 3-9
Removing Programs . . . . . . . . . . . . . . . . . . . . . . . . . . . . . . . . . . . . . . . . . . . . . . . . . . . . . . . . . . 3-10
3-1
Page 66

PDT 8000 Series Product Reference Guide
3-2
Page 67

Customizing Your Terminal
Introduction
This chapter provides basic instructions for customizing your terminal by adjusting settings
and installing additional software.
Adjusting Settings
To view available options for your terminal settings, tap Start - Settings. You can adjust
settings in either the Personal tab or the System tab at the bottom of the screen.
• Personal Tab
• Buttons: assign programs to the application hardware buttons
• Input: select an input method and change desired options
• Menus: customize what appears on the Start menu and enable a pop-up menu
from the New button
• Owner Information: enter your contact information
• Password: limit access to your terminal
• Sounds & Notifications: select the type of actions you want tohear sounds for
and customize how you are notified about different events
• Today: customize the information displayed on the Today screen.
• System Tab
• Backlight: customize when and for how long the backlight should stay on
• Clock: change the time or set alarms
• Power: set the terminal to turn off after a period of time to conserve battery
• Remove Programs: remove programs installed in the storage memory
• Screen: align the screen.
Flash Storage
Programs pre-installed on your terminal are stored in ROM (read-only memory). You
cannot remove, modify, or accidentally lose this software. You may add programs and data
files to RAM (random access memory).
In addition to the RAM-based storage standard on Pocket PC terminals, the terminal is also
equipped with a non-volatile Flash-based storage area which can store data (partitions) that
3-3
Page 68

PDT 8000 Series Product Reference Guide
can not be corrupted by a hard reset. This Flash area is divided into two categories: Flash
File System (FFS) Partitions and Non-FFS Partitions.
FFS Partitions
The terminal includes two FFS partitions. These partitions appear to the terminal as a hard
drive that the OS file system can write files to and read files from. Data is retained even if
power is removed.
The two FFS partitions appear as two separate folders in the Windows CE file system and
are as follows:
• Platform: The Platform FFS partition contains Symbol-supplied programs and
Dynamic Link Libraries (DLLs). This FFS is configured to include DLLs that control
system operation. Since these drivers are required for basic terminal operation,
only experienced users should modify the content of this partition.
• Application: The Application FFS partition is used to store application programs.
Working with FFS Partitions
Because the FFS partitions appear as folders under the Windows CE file system, they can
be written to and read like any other folder. For example, an application program can write
data to a file located in the Application folder just as it would to the Windows folder.
However, the file in the Application folder is in non-volatile storage and is not lost on a hard
reset (e.g., when power is removed for a long period of time).
Standard tools such as ActiveSync can be used to copy files to and from the FFS partitions.
They appear as the “Application” and “Platform” folders to the ActiveSync explorer. This is
useful when installing applications on the terminal. Applications stored in the Application
folder are retained even when the terminal is hard reseted, just as the PDT 8000 Demo
program is retained in memory.
Windows CE expects certain files to be in the Windows folder, residing in volatile storage.
Windows CE maintains the System Registry in volatile storage. There are two device
drivers included in the Windows CE image to assist developers in configuring the terminal
following a hard reset: RegMerge and CopyFile.
RegMerge.dll
Regmerge.dll is a built-in driver that allows registry edits to be made to the Windows CE
Registry. Regmerge.dll runs very early in the boot process and looks for registry files (.reg
files) in certain Flash File System folders during a hard reset. It then merges the registry
changes that are in these files into the system registry located in RAM.
3-4
Page 69

Customizing Your Terminal
Since the registry is re-created on every hard reset from the default ROM image, the
RegMerge driver is necessary to make registry modifications persistent over hard resets.
Regmerge is configured to look in two specific folders for .reg files in the following order:
\Platform
\Application
Regmerge continues to look for .reg files in these folders until all folders are checked. This
allows folders later in the list to override folders earlier in the list. This way, it is possible to
override Registry changes made by the Platforms partitions folders. Take care when using
Regmerge to make Registry changes. The SDK contains examples of .reg files.
Note: Regmerge only merges the .reg files on hard resets. The merge
process is skipped during a soft reset.
Typically, you should not need to make modifications to registry values for drivers loaded
before Regmerge. However, sometimes during software development, you may need to
modify these values. Since these early loading drivers read these keys before Regmerge
gets a chance to change them, you must soft reset the terminal after a hard reset. The soft
reset does not re-initialize the registry, and the early loading driver reads the new registry
values.
Do not use Regmerge to modify built-in driver registry values, or merge the same Registry
value to two files in the same folder, as the results are undefined.
CopyFile
CopyFile copies files from one folder to another on a hard reset. Files can be copied from
a non-volatile partition (Application or Platform) to the Windows or other volatile partition
during a hard reset. During a hard reset CopyFile looks for files with a .CPY extension on
the FFS partition. These files are text files containing the source and destination for the
desired files to be copied separated by “>”.
3-5
Page 70

PDT 8000 Series Product Reference Guide
Non-FFS Partitions
Non-FFS Partitions include additional software and data pre-loaded on your terminal that
can be upgraded. Unlike FFS Partitions, these partitions are not visible when the operating
system is running. They also contain system information. Non-FFS Partitions include the
following:
• Windows CE: the complete Windows CE operating system is stored on Flash
devices. If necessary, the entire OS image may be downloaded to the terminal
using files provided by Symbol. Any upgrades must be obtained from Symbol. This
partition is mandatory for the terminal.
• Splash Screen: a bitmap smaller than 16 Kb, displayed as the terminal cold-boots.
You may download a customized screen to display (see Chapter 11, Configuring
the Terminal).
• IPL (Initial Program Loader): This program interfaces with the host computer and
allows you to download any or all of the partitions listed above, as well as updated
versions of IPL. Use caution downloading updated IPL versions; incorrect
downloading of an IPL causes permanent damage to your terminal. IPL is
mandatory for the terminal.
• Partition Table: Identifies where each partition is loaded in the terminal.
3-6
Page 71
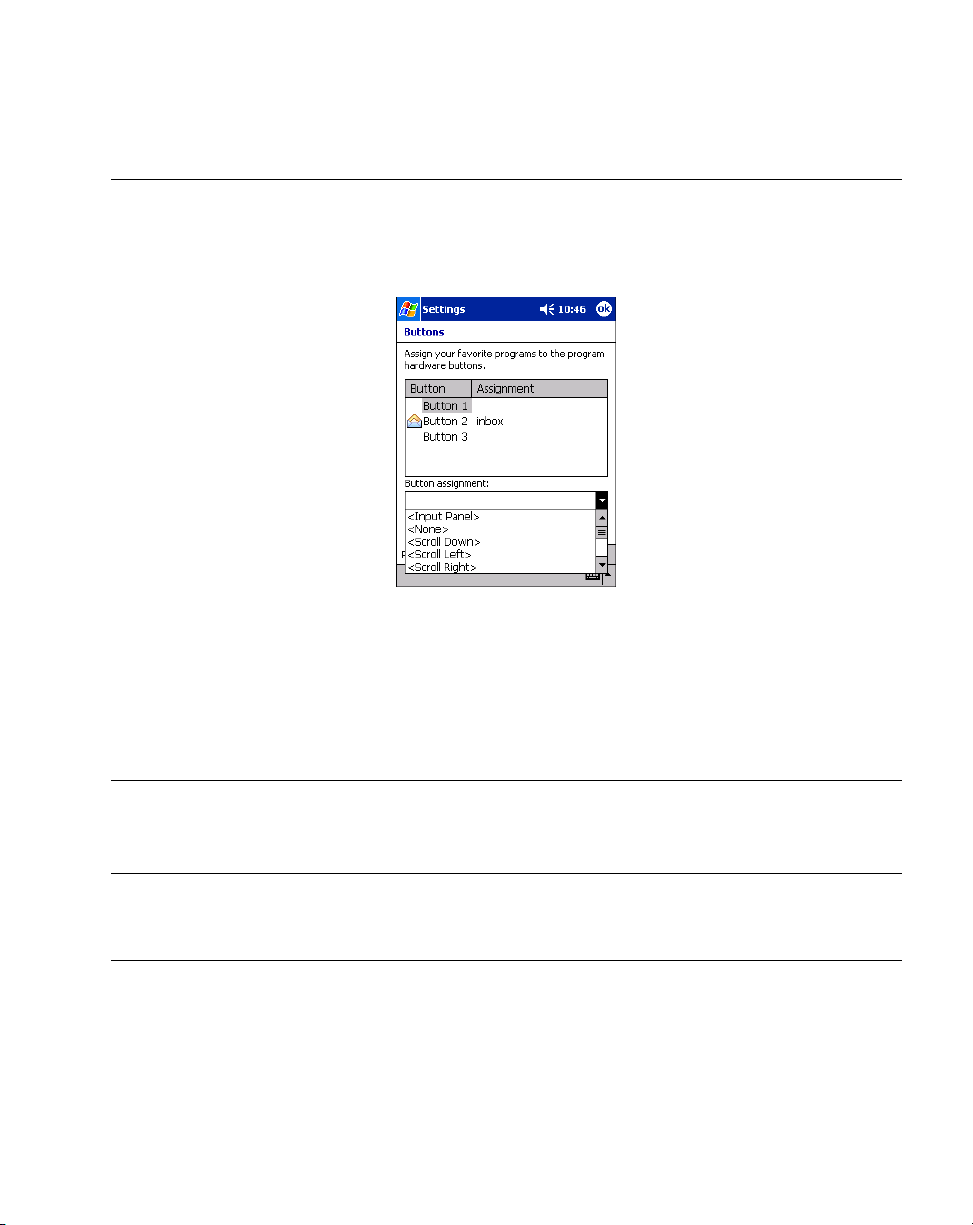
Customizing Your Terminal
Assigning Applications to Application Buttons
To re-assign a different application to a button:
1. Tap Start, then Settings.
2. On the Personal tab, tap Buttons.
Figure 3-1. Buttons Screen
3. Tap the button on the list that you want to change, then use the Button assignment
drop-down menu to select a new application for that button.
4. Tap OK.
Assigning User-Written Applications to Buttons
Use Regmerge to modify the registry during a hard reset to assign user-written applications
to the application buttons. These buttons remain assigned after a hard reset.
Note: Although located in the Flash File System, we recommend copying
user applications to the Windows directory (using CopyFile) and
running them from there. See the Help file for more information.
3-7
Page 72

PDT 8000 Series Product Reference Guide
Adding Programs
Install the appropriate software on your host computer before installing it on your terminal.
1. Tap Start - Settings. On the System tab, tap About. In the Version tab, note the
information in Processor.
2. Download the program to your host computer (or insert the CD or disk that contains
the program into your host computer). You may see a single *.xip file, *.exe file, a
*.zip file, or a Setup.exe file.
3. Read any installation instructions, Read Me files, or documentation that comes with
the program. Many programs provide special installation instructions.
4. Connect your terminal and host computer.
5. Double-click the *.exe file.
If the file is an installer, the installation wizard begins. Follow the directions on the
screen. Once the software is installed on your host computer, the installer transfers
the software to your terminal.
If the file is not an installer, an error message states that the program is valid but is
designed for a different type of computer. Move this file to your terminal. If you
cannot find installation instructions for the program in the Read Me file or
documentation, use ActiveSync Explore to copy the program file to the Program
Files folder on your terminal. For more information on copying files using
ActiveSync, see ActiveSync Help.
When installation is complete, tap Start, Programs, then the program icon to select it.
Adding a Program from the Internet
1. Tap Start - Settings. On the System tab, tap About. In the Version tab, note the
information in Processor.
2. Download the program to your terminal from the Internet using Pocket Internet
Explorer. You may see a single *.xip, *.exe, *.zip file, or a Setup.exe file.
3. Read any installation instructions, Read Me files, or documentation that comes with
the program. Many programs provide special installation instructions.
4. Tap the file, such as a *.xip or *.exe file, to launch the installation wizard. Follow the
directions on the screen.
3-8
Page 73
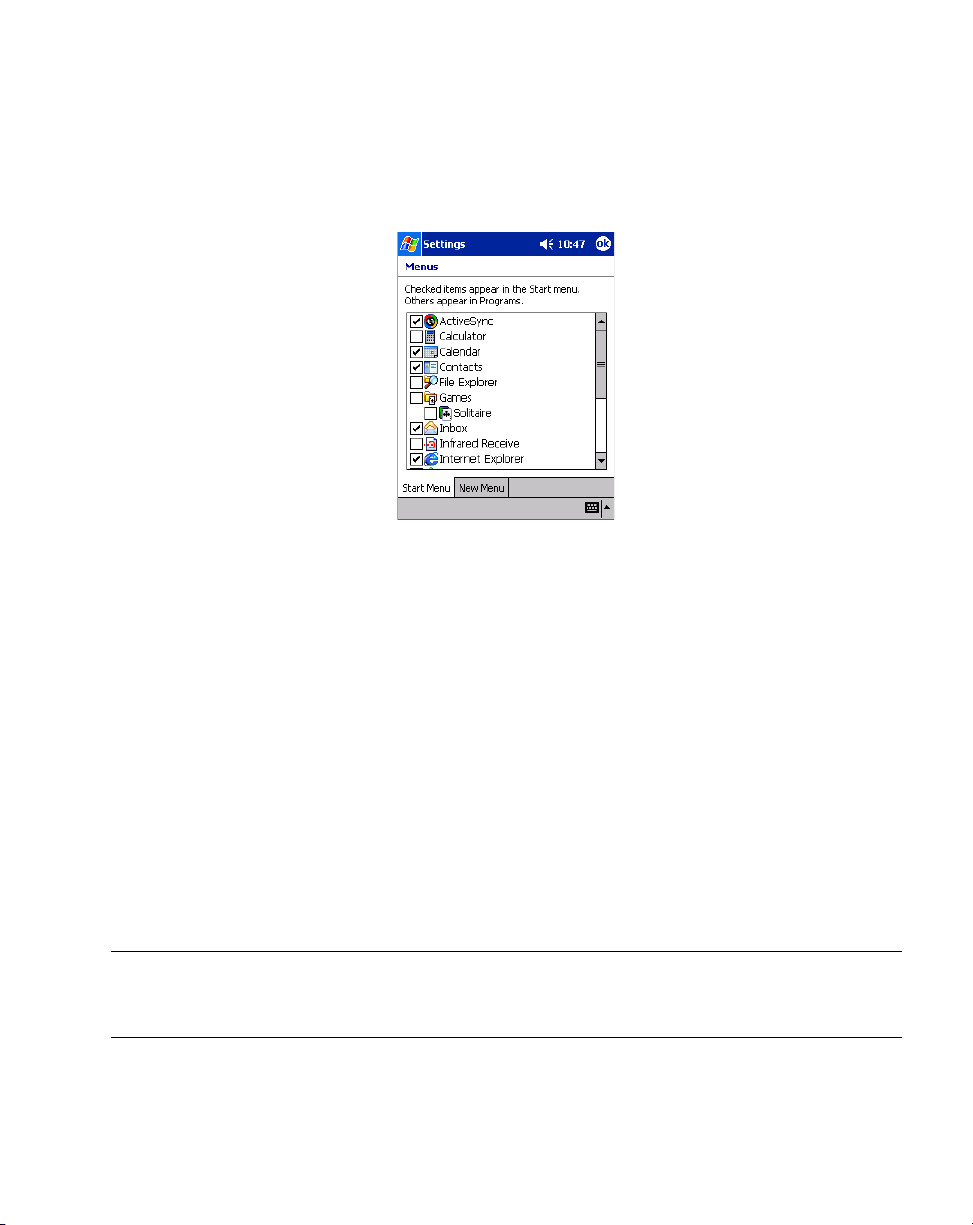
Customizing Your Terminal
Adding a Program to the Start Menu
Ta p Start - Settings - Menus. On the Start Menu tab, select the check box for the program
you want to add to the Start Menu.
Figure 3-2. Menus Screen
If you do not see the program listed, either use File Explorer to move the program to the
Start Menu folder or use ActiveSync on the host computer to create a shortcut to the
program and place the shortcut in the Start Menu folder.
Using File Explorer to Add to the Start Menu
1. Tap Start - Programs - File Explorer, and locate the program (tap the folder list,
labeled My Documents by default, then My Device to list all folders on the
terminal).
2. Tap and hold the program and tap Cut on the pop-up menu.
3. Open the Start Menu folder in the Windows folder, tap and hold a blank area of the
window, and tap Paste on the pop-up menu. The program appears on the Start
menu.
For more information on using File Explorer, see Finding Information on page 2-21.
Note: Avoid placing direct links in the Start Menu to programs located in
flash memory (Application or Platform). Copy these programs to the
Windows folder first.
3-9
Page 74

PDT 8000 Series Product Reference Guide
Using ActiveSync to Add to the Start Menu
1. Use the Explorer in ActiveSync on your host computer to explore your terminal’s
files and locate the program.
2. Right-click the program, then click Create Shortcut.
3. Move the shortcut to the Start Menu folder in the Windows folder. The shortcut
appears on the Start menu.
For more information, see ActiveSync Help.
Removing Programs
To remove a program, tap Start, then Settings. On the System tab, tap Remove Programs.
Figure 3-3. Remove Programs Screen
If the program does not appear in the list of installed programs, use File Explorer on your
terminal to locate the program, tap and hold the program, then tap Delete on the pop-up
menu.
3-10
Page 75

Chapter 4
Communications
Chapter Contents
Introduction . . . . . . . . . . . . . . . . . . . . . . . . . . . . . . . . . . . . . . . . . . . . . . . . . . . . . . . . . . . . . . . . . . 4-3
Synchronization Software Installation . . . . . . . . . . . . . . . . . . . . . . . . . . . . . . . . . . . . . . . . . . . . . . 4-3
Installing ActiveSync. . . . . . . . . . . . . . . . . . . . . . . . . . . . . . . . . . . . . . . . . . . . . . . . . . . . . . . . 4-3
Setting up a Partnership . . . . . . . . . . . . . . . . . . . . . . . . . . . . . . . . . . . . . . . . . . . . . . . . . . . . . 4-3
Communication Setup . . . . . . . . . . . . . . . . . . . . . . . . . . . . . . . . . . . . . . . . . . . . . . . . . . . . . . . . . . 4-5
Using the Serial Charging Cable . . . . . . . . . . . . . . . . . . . . . . . . . . . . . . . . . . . . . . . . . . . . . . 4-5
Using the Single-Slot Serial Cradle . . . . . . . . . . . . . . . . . . . . . . . . . . . . . . . . . . . . . . . . . . . . 4-6
Using the Single-Slot Modem Cradle or the Snap-On Modem . . . . . . . . . . . . . . . . . . . . . . . . 4-8
4-1
Page 76

PDT 8000 Series Product Reference Guide
4-2
Page 77

Communications
Introduction
Your terminal is capable of communicating with a number of hosts, including development
PCs, serial devices, printers, etc. The available accessories serve as essential data
communication devices, enabling you to synchronize the information on your terminal with
the information on your host device using ActvieSync. With the appropriate accessory and
software, the terminal can establish a number of connection types, such as a serial
connection and a modem connection.
This chapter provides information on installing the appropriate communication software
and setting up the appropriate accessory to enable communication between the terminal
and the host device.
Synchronization Software Installation
Using ActiveSync, you can synchronize the information on your terminal with the
information on your host computer. Changes you make on your terminal or host computer
appear in both places after you synchronize.
Installing ActiveSync
To install ActiveSync, download the latest version of the software from
http://www.microsoft.com. Refer to the installation and RAS instructions included with the
ActiveSync software you download.
Setting up a Partnership
After installation is complete, the ActiveSync Setup Wizard helps you connect your terminal
to your host computer, set up a partnership so you can synchronize information between
your terminal and host computer, and customize synchronization settings. Your first
synchronization occurs automatically when you finish using the wizard.
4-3
Page 78

PDT 8000 Series Product Reference Guide
During the first synchronization, information stored in Microsoft Outlook (Calendar,
Contacts, and Tasks) on your host computer is copied to your terminal. You can now
disconnect your terminal from your host computer.
View connection status.
Tap to connect and synchronize.
Tap to stop synchronization.
View synchronization status.
Tap to synchronize via IR or
change synchronization settings.
Figure 4-1. ActiveSync
Note: You must perform your first ActiveSync operation with a local, direct
connection.
To retain partnerships after a hard reset, capture partnership registry
information in a .reg file and save it in the Flash File System. See the
Windows CE Help file for details.
For more information about using ActiveSync, start ActiveSync on your host computer, then
see ActiveSync Help.
4-4
Page 79

Communications
Communication Setup
The terminal can communicate with the host computer using the following accessories:
• Serial Charging Cable (through a serial connection)
• Single-Slot Serial Cradle (through a serial connection)
• Single-Slot Modem Cradle (through a modem connection)
• Snap-On Modem (through a modem connection).
For each accessory, you will need to follow instructions on configuring your host computer,
setting up the connection between the terminal and the host computer, and configuring the
terminal.
Using the Serial Charging Cable
1. Install ActiveSync on your host computer.
2. Connect your terminal to the host computer, via the Serial Charging Cable, as
shown below:
To serial port of
host computer
Serial charging
cable
4-5
Page 80
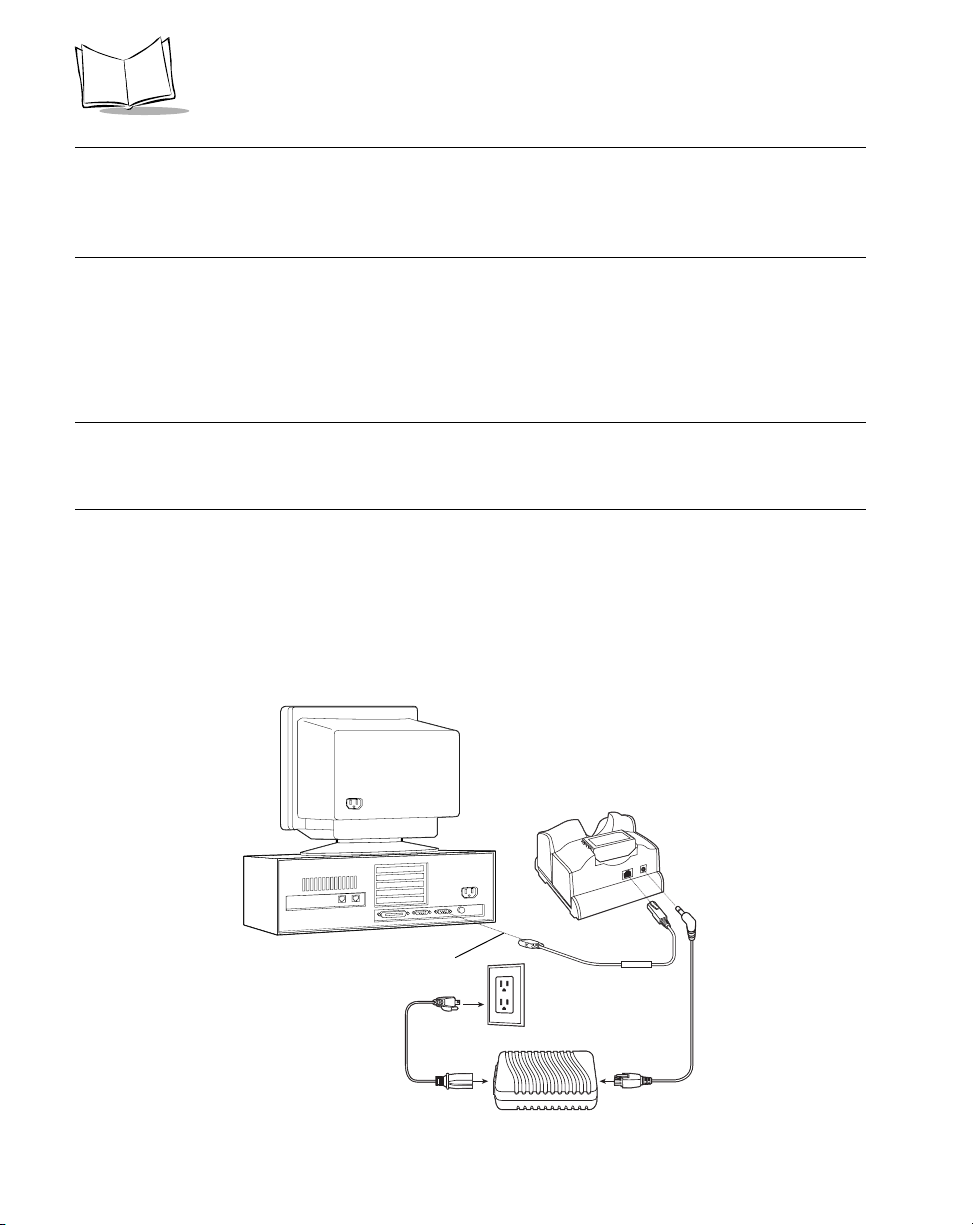
PDT 8000 Series Product Reference Guide
Note: The serial charging cable requires a dedicated port. It cannot share
a port with an internal modem or other device. If you are unsure
about the location of the serial port on your computer, refer to the
user’s manual supplied with the computer.
3. If this is your first synchronization, follow the instructions on the host computer
screen to setup the partnership. Items to be synchronized may be customized, and
you may select to synchronize continuously as information changes, upon
connection, or manually by clicking the Sync button on the toolbar of your host
computer.
Note: Every PDT 8000 terminal should have a unique device name. Never
try to synchronize more than one PDT 8000 terminal to the same
device name.
4. If you already created a partnership between your host computer and terminal,
synchronization will occur automatically, immediately following step 2.
Using the Single-Slot Serial Cradle
1. Install ActiveSync on your host computer.
2. Connect your CRD8000-1000S cradle to your host computer as shown below:
To serial port of
host computer
4-6
Page 81

Note: The cradle requires a dedicated port. It cannot share a port with an
internal modem or other device. If you are unsure about the location
of the serial port on your host computer, refer to the user’s manual
supplied with the computer.
3. Turn on the terminal and slide it into the cradle.
Communications
Figure 4-2. Inserting the Terminal in the Cradle
4. If this is your first synchronization, follow the instructions on the host computer
screen to setup the partnership. Items to be synchronized may be customized, and
you may select to synchronize continuously as information changes, upon
connection, or manually by clicking the Sync button on the toolbar of your host
computer.
Note: Every PDT 8000 terminal should have a unique device name. Never
try to synchronize more than one PDT 8000 terminal to the same
device name.
5. If you already created a partnership between your host computer and terminal,
synchronization will occur automatically, immediately following step 3.
4-7
Page 82

PDT 8000 Series Product Reference Guide
Using the Single-Slot Modem Cradle or the Snap-On Modem
1. Install ActiveSync on your host computer.
Note: Before communicating through a modem connection, you must
create a partnership between your terminal and your host computer
using a serial connection to your host computer. See Setting up a
Partnership on page 4-3 for detailed instructions.
2. Configure your terminal for a modem connection.
a. Tap Start - Settings - Connections tab - Connections icon.
b. Select Work from the My network card connects to: drop-down menu.
c. Tap the Modify button under the When needed, automatically connect to the
Internet using these settings: drop-down menu.
d. Tap New... in the Modem tab.
e. Enter a name for the connection in the Enter a name for the connection: text
box.
f. If you are using the single-slot modem cradle, select Hayes Compatible on
COM1 from the Select a modem: drop-down menu.
If you are using the snap-on modem, select Powered Serial on COM7 from the
Select a modem: drop-down menu.
g. Select 57600 from the Baud-rate: drop-down menu.
h. Tap the Advanced... button.
i. Select 8, None, 1, and Hardware in the Port Settings tab.
j. Select the apprpriate times for terminal use, if you dial-in server requires
manual input for each connection.
k. Tap the TCP/IP tab.
l. Enter parameters supported by your server.
m. Tap the Name Servers tab.
n. Enter parameters supported by your server.
o. Tap the OK button. The Make New Connection screen appears.
p. Tap the Next button.
q. Enter the appropriate country code, if necessary, in the Extra dial-string modem
commands: textbox.
r. Tap the Next button.
4-8
Page 83

Communications
s. Select other options.
t. If necessary, edit Extra dial-string modem commands: text to set country
parameters.
Note: The modem defaults to operation with US telephone networks. To
operate the modem with other country telephone networks, you
must change the modem Country Code. See Available Country
Codes on page 4-11 for the appropriate syntax and list of codes.
u. Tap the Finish button. The name you gave the modem in step 8 appears in the
Modem tab.
v. Tap the OK button.
w. Tap the Dialing Locations tab and setup the location you are calling from.
x. Tap the Dialing Patterns... button and enter the appropriate dialing patterns.
y. Tap the OK button until you exit the Connections screen.
4-9
Page 84
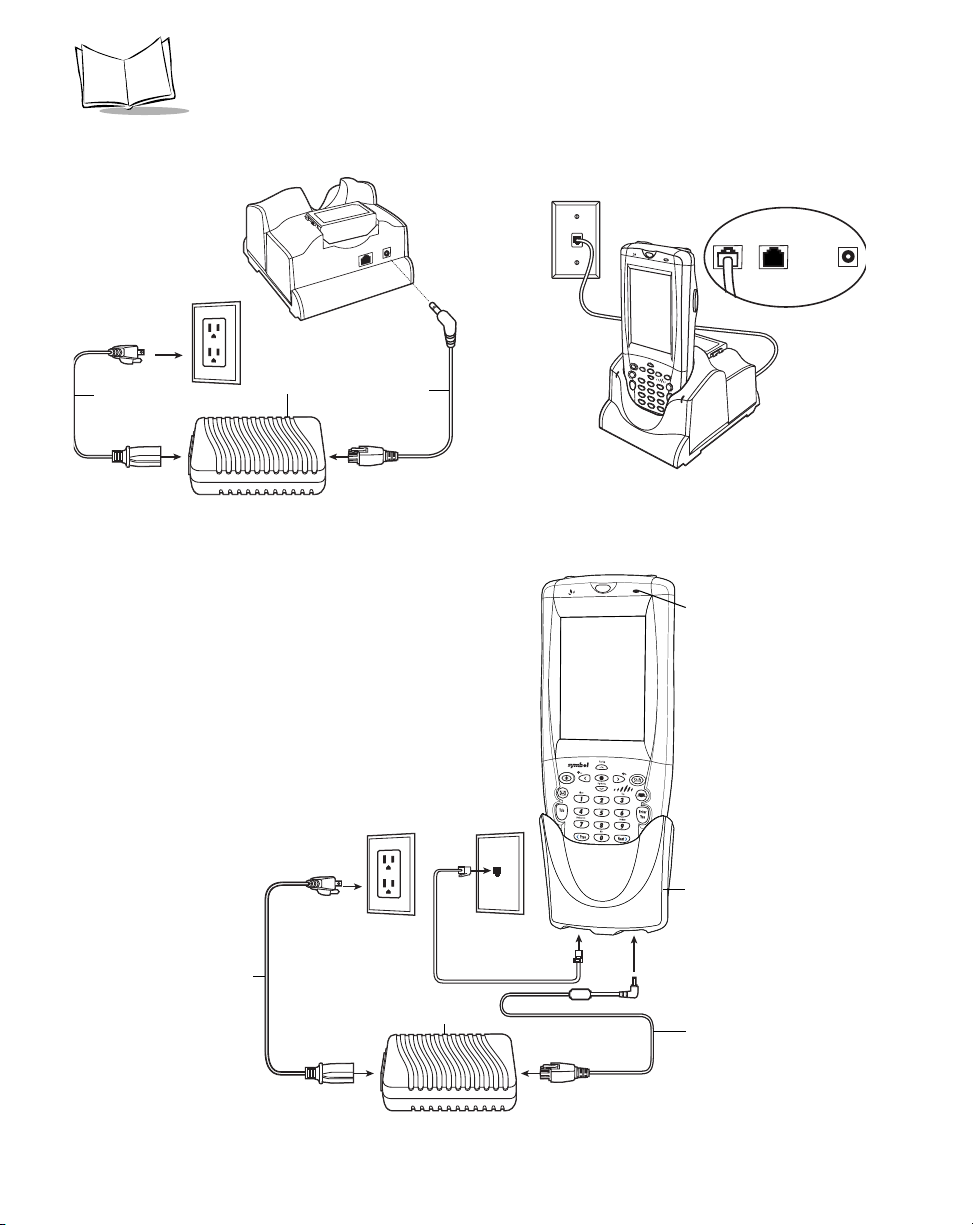
PDT 8000 Series Product Reference Guide
3. Setup your CRD8000-1000M cradle as shown below:
AC Line
Cord
Power
Supply
DC
Cable
OR
Setup the Snap-On Modem as shown below:
Te rm i n al
Charge LED
Snap-On
Modem Module
4-10
AC Line
Cord
Power
Supply
DC Cable
Page 85

Communications
With the above setup completed, you can use your modem connection to synchronize data
between your terminal and a host computer (see Synchronizing Data on page 4-11) or you
can connect to the Internet (see Connecting to the Internet on page 4-13).
Available Country Codes
The modem defaults to operation with US telephone networks (country code: B5). To
operate the modem with other country telephone networks, you must set the Country Code
by entering the Country of Installation command. The modem will adjust it’s operating
parameters to comply with the telephone network in the country specified.
Syntax used: +GCI=<country_code>;
Supported countries and there codes are:
Country Code Country Code Country Code
Austria FD or 0A Greece 46 Norway FD or 82
Belgium FD or 0F Iceland FD Portugal 8B
Brazil 16 Ireland FD or 57 Spain FD or A0
Canada 20 Italy FD or 59 Sweden FD or A5
Denmark FD or 31 Liechtenstein FD Switzerland FD or A6
Finland FD or 3C Luxembourg FD TBR-21
(Europe)
France FD or 3D Mexico 73 United
Kingdom
Germany FD or 42 Netherlands FD or 7B United States B5
Note: It is highly recommended that you use FD where possible. If you have trouble
connecting, use the alternate code where provided.
FD
FD or B4
(Default)
Synchronizing Data
1. Tap Start - ActiveSync - Tools - Options - PC and deselect the Enable
synchronization when cradled using: check box to temporarily disable serial cable
detect before using ActiveSync.
2. Tap Start - ActiveSync - Tools - Options - PC and select the Include PC when
synchronizing remotely and connect to: check box to ensure the host computer you
wish to synchronize with is identified.
3. Tap Start - Settings - Connections tab - Connections icon.
4-11
Page 86
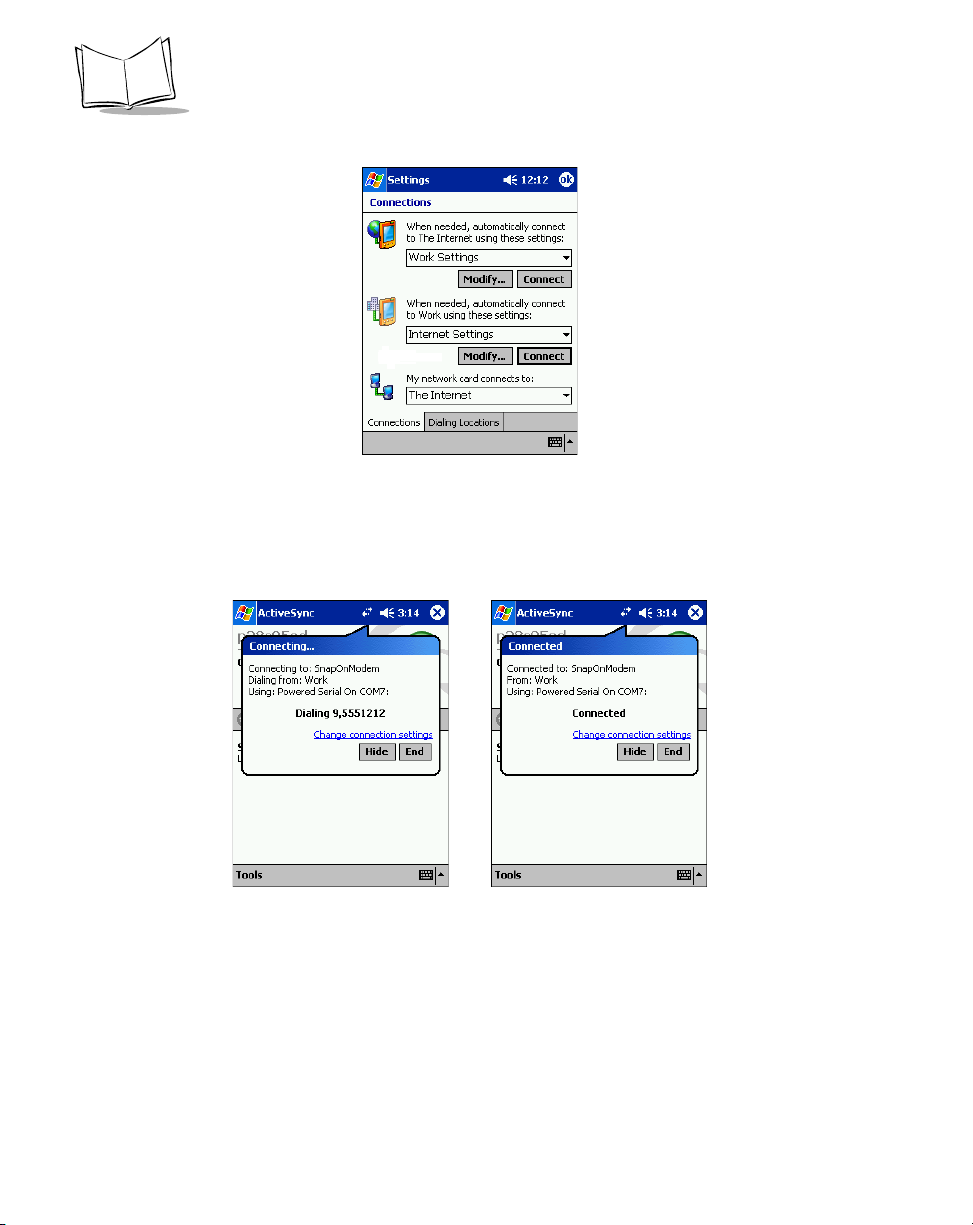
PDT 8000 Series Product Reference Guide
4. Ensure the following connections are made in your Connections tab:
5. Tap the Connect button under the When needed, automatically connect to work
using these settings: drop-down menu.
6. Enter a User name, Password, and Domain for your connection, if required.
7. Tap the OK button. The connection is authenticated by the host computer and, if
successful, a series of dialog boxes pop-up in succession, as shown below:
8. Tap Start - ActiveSync.
9. Tap the Sync icon (prior partnership via a serial connection is required). ActiveSync
connects and synchronizes with the host computer.
10. To disconnect, tap the Stop button on the ActiveSync screen.
4-12
Page 87
Communications
Connecting to the Internet
1. Tap Start - Settings - Connections tab - Connections icon.
2. Ensure the following connections are made in your Connections tab:
3. Tap the Connect button under the When needed, automatically connect to The
Internet using these settings: drop-down menu.
4. Enter a User name, Password, and Domain for your connection, if required.
5. Tap the OK button. The connection is authenticated by the host computer and, if
successful, a series of dialog boxes pop-up in succession, as shown below:
6. Tap Start - Internet Explorer to connect to the Internet.
7. To disconnect, tap the two arrows on the navigation bar to expose the Connected
dialog box.
8. Tap the End button.
4-13
Page 88

PDT 8000 Series Product Reference Guide
4-14
Page 89

Chapter 5
Applications
Chapter Contents
Introduction . . . . . . . . . . . . . . . . . . . . . . . . . . . . . . . . . . . . . . . . . . . . . . . . . . . . . . . . . . . . . . . . . . 5-3
Calendar . . . . . . . . . . . . . . . . . . . . . . . . . . . . . . . . . . . . . . . . . . . . . . . . . . . . . . . . . . . . . . . . . . . . 5-3
Creating Appointments . . . . . . . . . . . . . . . . . . . . . . . . . . . . . . . . . . . . . . . . . . . . . . . . . . . . . . 5-4
Using the Summary Screen . . . . . . . . . . . . . . . . . . . . . . . . . . . . . . . . . . . . . . . . . . . . . . . . . . 5-5
Creating Meeting Requests . . . . . . . . . . . . . . . . . . . . . . . . . . . . . . . . . . . . . . . . . . . . . . . . . . 5-5
Contacts. . . . . . . . . . . . . . . . . . . . . . . . . . . . . . . . . . . . . . . . . . . . . . . . . . . . . . . . . . . . . . . . . . . . . 5-6
Using the Summary Screen . . . . . . . . . . . . . . . . . . . . . . . . . . . . . . . . . . . . . . . . . . . . . . . . . . 5-8
Tasks . . . . . . . . . . . . . . . . . . . . . . . . . . . . . . . . . . . . . . . . . . . . . . . . . . . . . . . . . . . . . . . . . . . . . . . 5-9
Using the Summary Screen . . . . . . . . . . . . . . . . . . . . . . . . . . . . . . . . . . . . . . . . . . . . . . . . . 5-11
Notes . . . . . . . . . . . . . . . . . . . . . . . . . . . . . . . . . . . . . . . . . . . . . . . . . . . . . . . . . . . . . . . . . . . . . . 5-12
Inbox . . . . . . . . . . . . . . . . . . . . . . . . . . . . . . . . . . . . . . . . . . . . . . . . . . . . . . . . . . . . . . . . . . . . . . 5-14
Synchronizing E-mail Messages. . . . . . . . . . . . . . . . . . . . . . . . . . . . . . . . . . . . . . . . . . . . . . 5-14
Connecting Directly to an E-mail Server. . . . . . . . . . . . . . . . . . . . . . . . . . . . . . . . . . . . . . . . 5-14
Using the Message List . . . . . . . . . . . . . . . . . . . . . . . . . . . . . . . . . . . . . . . . . . . . . . . . . . . . 5-15
Creating E-mail Messages . . . . . . . . . . . . . . . . . . . . . . . . . . . . . . . . . . . . . . . . . . . . . . . . . . 5-17
Managing E-mail Messages and Folders . . . . . . . . . . . . . . . . . . . . . . . . . . . . . . . . . . . . . . . 5-18
5-1
Page 90

PDT 8000 Series Product Reference Guide
5-2
Page 91

Applications
Introduction
Your terminal includes Calendar, Contacts, Tasks, Inbox, and Notes applications. You can
use these programs individually or together. For example, e-mail addresses stored in
Contacts can be used to address e-mail messages in Inbox.
Using ActiveSync, you can synchronize information in these applications between your
host computer and your terminal. Each time you synchronize, ActiveSync compares the
changes you made on your terminal and host computer and updates both with the latest
information. For information on using ActiveSync, see Chapter 4, Communications, and
ActiveSync Help on the host computer.
You can switch to any of these programs by tapping them on the Start menu.
Calendar
Use Calendar to schedule appointments such as meetings. You can view your
appointments in different ways (Agenda, Day, Week, Month, and Year) and easily change
views using the View menu.
Tap to go to today.
Tap to display or edit the
appointment details.
Tap to create a new appointment.
Figure 5-1. Calendar Application
5-3
Page 92

PDT 8000 Series Product Reference Guide
Note: You can customize the Calendar display, such as changing the first
day of the week, by tapping Options on the To o ls menu.
Creating Appointments
To create an appointment:
1. To open Calendar, tap Start - Calendar.
2. If you are in Day or Week view, tap the desired date and time for the appointment.
3. Tap New.
Tap to return to the calendar (the
appointment is saved automatically).
Tap to choose from
predefined text.
Tap to choose from
previously entered locations.
Tap to select a time.
Tap to select a date.
Notes is a good place
for maps and directions.
Figure 5-2. Entering an Appointment
4. Using the input panel, enter the subject and a location. Tap first to select the field.
5. If needed, tap the date and time to change them.
6. Enter other desired information. Hide the input panel to see all available fields.
7. To add notes, tap the Notes tab. You can enter text, draw, or create a recording.
For more information on creating notes, see Notes on page 5-12.
8. When finished, tap OK to return to the calendar.
5-4
Page 93

Applications
Note: If you select Remind me in an appointment, your terminal notifies
you according to the options set in Start - Settings - Personal tab Sounds & Reminders.
Using the Summary Screen
When you tap an appointment in Calendar, a summary screen displays. Tap Edit to change
the appointment.
View appointment details.
View notes.
Tap to change
appointment.
Figure 5-3. Appointment Summary Screen
Creating Meeting Requests
You can use Calendar to set up meetings with users of Outlook or Pocket Outlook. The
meeting notice is created automatically and sent either when you synchronize Inbox or
when you connect to your e-mail server. Indicate how you want meeting requests sent by
tapping To ols , then Options. If you send and receive e-mail messages through ActiveSync,
select ActiveSync.
To schedule a meeting:
1. Create an appointment.
2. In the appointment details, hide the input panel, then tap Attendees.
5-5
Page 94

PDT 8000 Series Product Reference Guide
3. From the list of e-mail addresses you've entered in Contacts, select the meeting
attendees.
The meeting notice is created and placed in the Outbox folder. For more information on
sending and receiving meeting requests, see Calendar Help and Inbox Help on your
terminal.
Contacts
Contacts maintains a list of associates and friends so you can easily locate information at
home or on the road. Using the infrared (IR) port, you can share Contacts information with
other terminal users.
Select the category of contacts
you want displayed in the list.
Tap and enter part of a name
to quickly find it in the list.
Tap to see additional phone
numbers and e-mail addresses.
Tap to display or edit
the contact details.
Tap and hold to display a
pop-up menu of actions.
Tap to create a new contact.
Figure 5-4. Contact Application
Note: To change the way information is listed, tap Tools, then Options.
5-6
Page 95

To create a contact:
1. Tap New.
Applications
Tap to return to the contact list (the
contact is saved automatically).
Scroll to see more fields.
Notes is a good place for
maps and directions.
Figure 5-5. Creating a Contact
2. Using the input panel, enter a name and other contact information. Scroll down to
see all fields.
3. To assign the contact to a category, scroll to and tap Categories. Select a category
from the list. In the contact list, you can display contacts by category.
4. To add notes, tap the Notes tab. You can enter text, draw, or create a recording.
For more information on creating notes, see Notes on page 5-12.
5. When finished, tap OK to return to the contact list.
5-7
Page 96

PDT 8000 Series Product Reference Guide
You may find a contact in one of four ways:
• In the contact list, enter a contact name in the box under the navigation bar. To
show all contacts again, clear text from the box or tap the button to the right of the
box.
• In the contact list, tap the category list (labeled All Contacts by default) and select
the type of contact to display. To show all contacts again, select All Contacts. To
view a contact not assigned to a category, select None.
• To view the names of companies your contacts work for, in the contact list, tap View
- By Company. The number of contacts that work for that company appears to the
right of the company name.
•Tap Start - Find, enter the contact name, select Contacts for the type, then tap Go.
Using the Summary Screen
When you tap a contact in the contact list, a summary screen displays.
View contact details.
5-8
Tap to view notes.
Tap to change contact information.
Figure 5-6. Contacts Summary Screen
Page 97
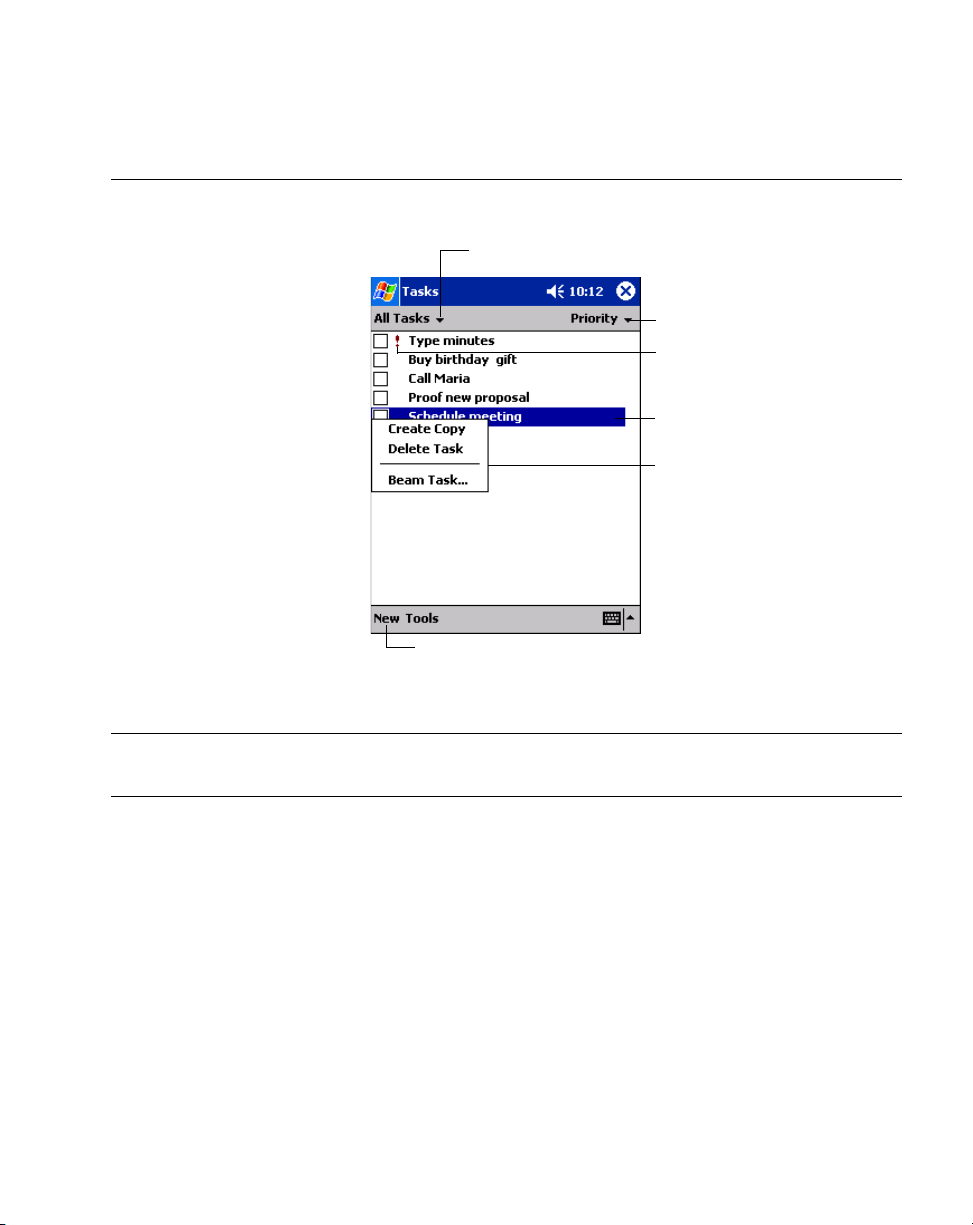
Tasks
Use Tasks to keep a “to do” list.
Applications
Select the category of tasks
you want displayed in the list.
Select the sort
order of the list.
Indicates high priority.
Tap to display or edit
the task details.
Tap and hold to display a
pop-up menu of actions.
Tap to create a new contact.
Figure 5-7. Task Application
Note: To change the way information displays in the list, tap To ol s, then
Options.
5-9
Page 98
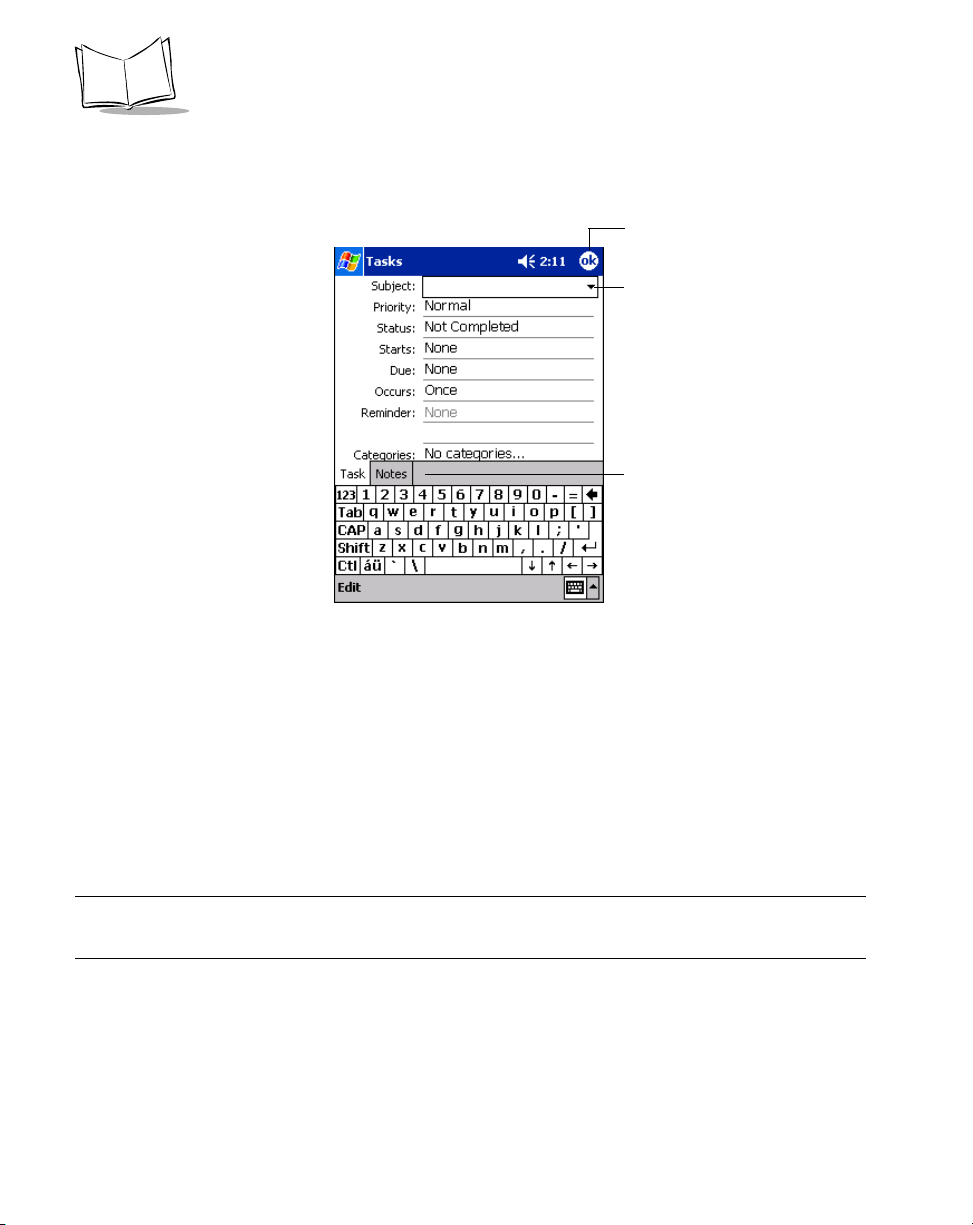
PDT 8000 Series Product Reference Guide
To create a task:
1. Tap New.
Tap to return to the task list (the
task is saved automatically).
Tap to choose from
predefined subjects.
Notes is a good place for
maps and directions.
Figure 5-8. Creating a Task
2. Using the input panel, enter a description.
3. You can enter a start date and due date or enter other information by first tapping
the field. If the input panel is open, hide it to see all available fields.
4. To assign the task to a category, tap Categories and select a category from the list.
In the task list, you can display tasks by category.
5. To add notes, tap the Notes tab. You can enter text, draw, or create a recording.
For more information on creating notes, see Notes on page 5-12.
6. Tap OK to return to the task list.
Note: To create a task with only a subject, tap Entry Bar on the Tools menu.
Then tap Tap h er e to add a new task and enter your task information.
5-10
Page 99
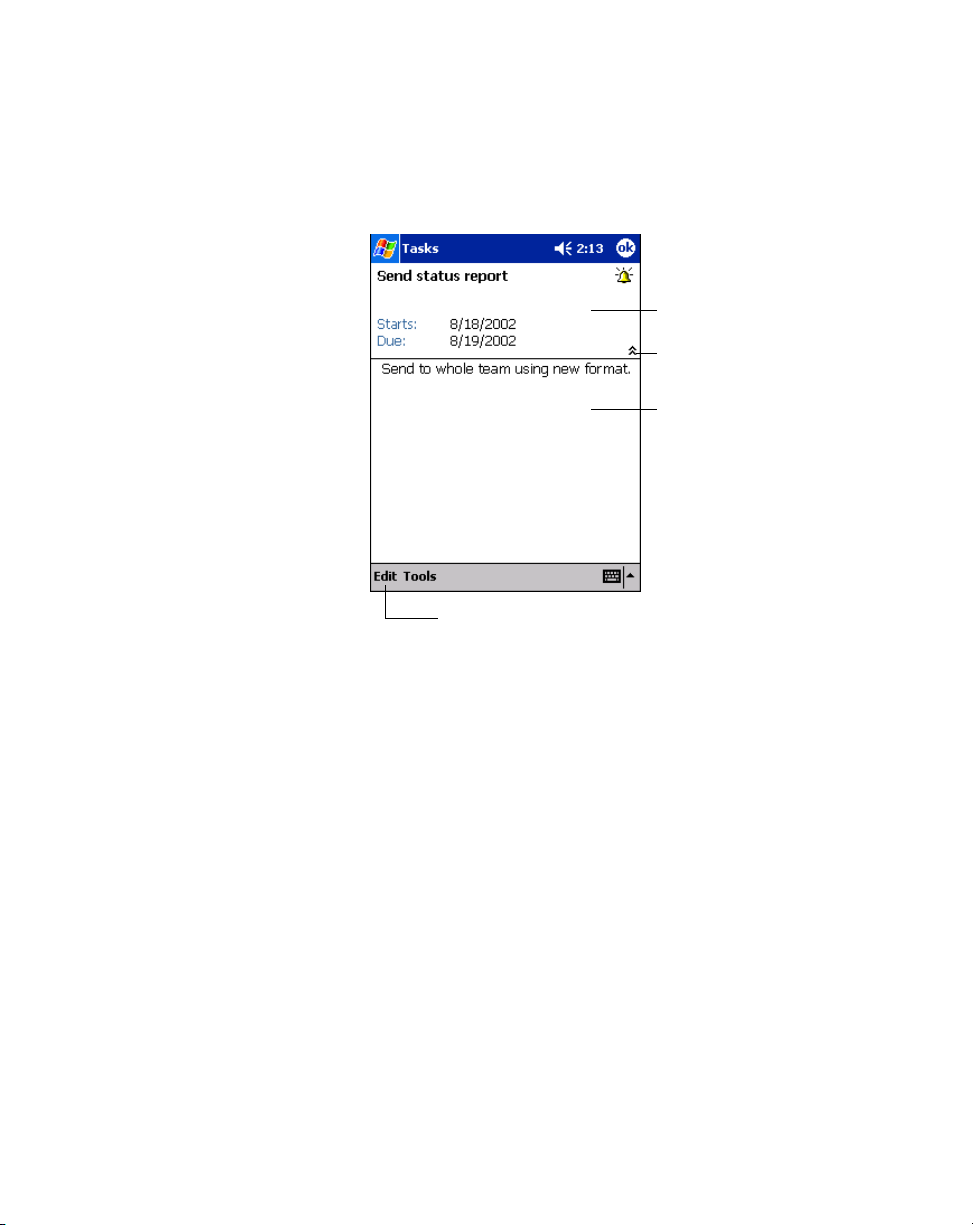
Applications
Using the Summary Screen
When you tap a task in the task list, a summary screen displays. To change the task, tap
Edit.
View task details.
Tap to show and hide additional
summary information.
View notes.
Tap to change task.
Figure 5-9. Task Summary Screen
5-11
Page 100

PDT 8000 Series Product Reference Guide
Notes
Capture thoughts, reminders, ideas, drawings, and phone numbers with Notes. You can
create a written note or a recording. You can also include a recording in a note. If a note is
open when you create the recording, it is included in the note as an icon. If the note list is
displayed, it is created as a stand-alone recording.
Tap to change the
sort order of the list.
Tap to open a note or
play a recording.
Tap and hold to display a
pop-up menu of actions.
Tap to record.
Tap to show or hide the
Tap to create a new contact.
Recording toolbar.
5-12
Figure 5-10. Notes Application
 Loading...