

Page 1

PDT 7500 Series
Page 2

PDT 7500 Series
1999-2000 SYMBOL TECHNOLOGIES, INC. All rights reserved.
Symbol reserves the right to make changes to any product to improve reliability,
function, or design.
Symbol does not assume any product liability arising out of, or in connection with, the
application or use of any product, circuit, or application described herein.
No license is granted, either expressly or by implication, estoppel, or otherwise under
any patent right or patent, covering or relating to any combination, system, apparatus,
machine, material, method, or process in which Symbol products might be used. An
implied license only exists for equipment, circuits, and subsystems contai ned in Symbol
products.
Symbol is a registered trademark of Symbol Technologies, Inc. Other product names
mentioned in this manual may be trademarks or registered trademarks of their
respective companies and are hereby acknowledged.
Symbol Technologies, Inc.
One Symbol Plaza
Holtsville, N.Y. 11742-1300
http://www.symbol.com
Patents
This product is covered by one or more of the following U.S. and foreign Patents:
U.S. Patent No.4,387,297; 4,460,120; 4,496,831; 4,593,186; 4,603,262; 4,607,156;
4,652,750; 4,673,805; 4,736,095; 4,758,717; 4,816,660; 4,845,350; 4,896,026;
4,897,532; 4,923,281; 4,933,538; 4,992,717; 5,015,833; 5,017,765; 5,021,641;
5,029,183; 5,047,617; 5,103,461; 5,113,445; 5,130,520; 5,140,144; 5,142,550;
5,149,950; 5,157,687; 5,168,148; 5,168,149; 5,180,904; 5,216,232; 5,229,591;
5,230,088; 5,235,167; 5,243,655; 5,247,162; 5,250,791; 5,250,792; 5,260,553;
5,262,627; 5,262,628; 5,266,787; 5,278,398; 5,280,162; 5,280,163; 5,280,164;
5,280,498; 5,304,786; 5,304,788; 5,306,900; 5,321,246; 5,324,924; 5,337,361;
5,367,151; 5,373,148; 5,378,882; 5,396,053; 5,396,055; 5,399,846; 5,408,081;
5,410,139; 5,410,140; 5,412,198; 5,418,812; 5,420,411; 5,436,440; 5,444,231;
5,449,891; 5,449,893; 5,468,949; 5,471,042; 5,478,998; 5,479,000; 5,479,002;
5,479,441; 5,504,322; 5,519,577; 5,528,621; 5,532,469; 5,543,610; 5,545,889;
5,552,592; 5,557,093; 5,578,810; 5,581,070; 5,589,679; 5,589,680; 5,608,202;
5,612,531; 5,619,028; 5,627,359; 5,637,852;5,664,229; 5,668,803; 5,675,139;
5,693,929; 5,698,835; 5,705,800; 5,714,746; 5,723,851; 5,734,152; 5,734,153;
5,742,043; 5,745,794; 5,754,587; 5,762,516; 5,763,863; 5,767,500; 5,789,728;
5,789,731; 5,808,287; 5,811,785; 5,811,787; 5,815,811; 5,821,519; 5,821,520;
5,823,812; 5,828,050; 5,850,078; 5,861,615; 5,874,720; 5,875,415; 5,900,617;
5,902,989; 5,907,146; 5,912,450; 5,914,478; 5,917,173; 5,920,059; 5,923,025;
5,929,420; 5,945,658; 5,945,659; 5,946,194; 5,959,285; 6,002,918;D305,885;
D341,584; D344,501; D359,483; D362,453; D363,700; D363,918; D370,478;
D383,124; D391,250; D405,077; D406,581; D414,171; D414,172, D419,548.
Invention No. 55,358; 62,539; 69,060; 69,187 (Taiwan); No. 1,601,796; 1,907,875;
1,955,269 (Japan).
European Patent 367,299; 414,281; 367,300; 367,298; UK 2,072,832; France 81/
03938; Italy 1,138,713.
rev. 03/00
Page 3

Quick Reference
Introduction
The PDT 7500 Series family of portable data terminals puts the
processing power of a 486 PC in the user’s hand. The terminal uses
a rechargeable Lithium-Ion 1400 mAh smart battery, and
incorporates pen technology and bar code scanning capability in a
key-based terminal.
The PDT 7500 ruggedized hand-held terminal combines:
• PC-standard architecture (32-bit 486 DX2)
•Microsoft
• Wireless communication capability using Symbol’s wireless
LAN technology
• An optional integrated Wireless Wide Area Network
(WWAN) cellular radio
• Integrated laser scanning capability (1- and 2-Dimensional)
• 35-key keypad for key input
• Touch screen
• IrDA-compliant interface for printing and communications.
®
MS-DOS 6.22 or Windows® CE OS
1
Page 4

PDT 7500 Series
About This Guide
This guide provides information on the operation of the PDT 7500
Series terminal. Specifically, the following topics are discussed:
• Parts of the PDT 7500 on page 3
• Installing New or Recharged Batteries on page 5
• Operating the PDT 7500 on page 7
• Using the PDT 7500 Keypad on page 10
• Using the Integrated Laser Scanner on page 11
• Host Communications on page 13
• Using the Touch Screen on page 14
• Troubleshooting on page 15.
Accessories
Each PDT 7500 requires one 1400 mAh Li-Ion battery (p/n 2138602-06). The following optional accessories are available from
Symbol Technologies:
• Additional Li-Ion battery
• Stylus for performing pen functions
• Single-slot cradle
• Four-slot cradle
• Vehicle cradle
• IrDA compliant printer
• UBC 2000 charging adapter
• Null modem cable
•Holster.
2
Page 5
Quick Reference
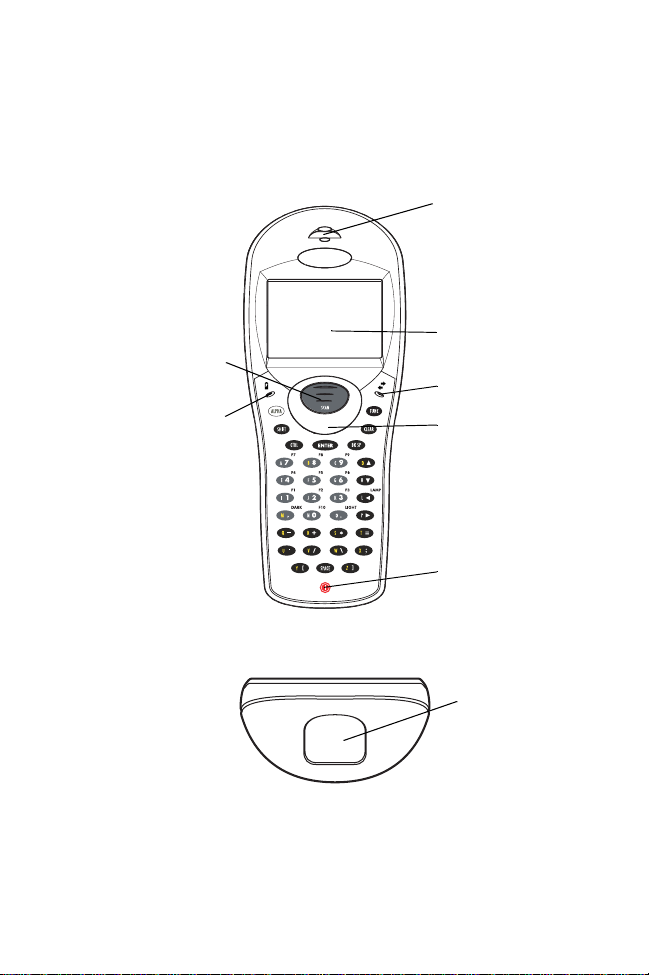
Parts of the PDT 7500
Front View
Scan Button
Battery Charge
LED
To p V i e w
Scan LED
LCD
Communication LED
Thumb Rest
Power Key
Scan Window
3
Page 6
PDT 7500 Series
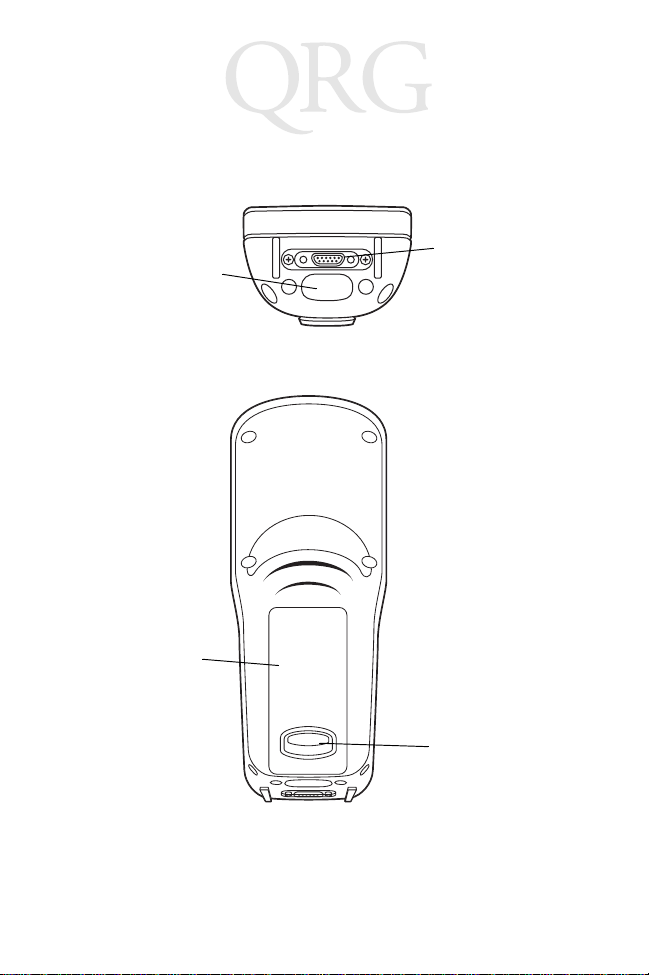
Parts of the PDT 7500 (continued)
Bottom View
IrDA Port
Back View
Li-Ion Battery
Serial
Communications
Port
Battery Latch
4
Page 7
Quick Reference
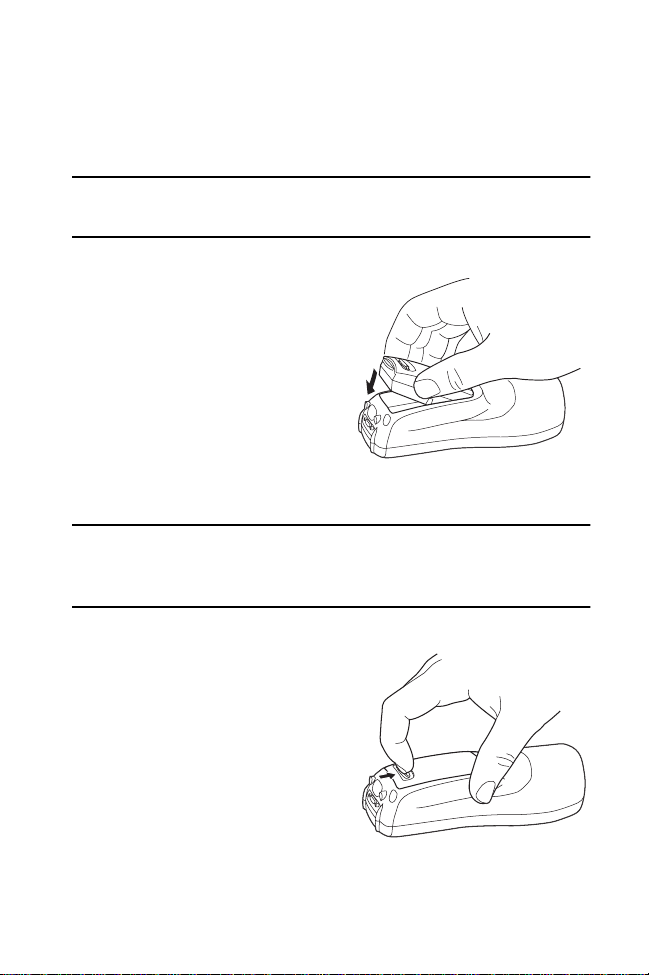
Installing New or Recharged Batteries
Caution: To ensure proper terminal operation, use ONLY the
Symbol Li-Ion battery in the PDT 7500.
To install a new or recharged Li-Ion
battery:
1. Hook the base of the new battery in the top of the battery
compartment, then press the
into place.
2. Slide the battery latch to secure the battery.
If the battery latch is not closed, do not operate the terminal,
otherwise data may be lost.
Caution: Do not expose the battery to temperatures in excess of
140°F (60°C). Do not disassemble, incinerate, or short
circuit the battery.
Removing the Battery from the Terminal
To remove the Li-Ion battery from
the terminal:
1. Suspend the terminal’s power.
2. Slide the battery release switch
towards the top of the terminal until the lock releases.
5
Page 8
PDT 7500 Series
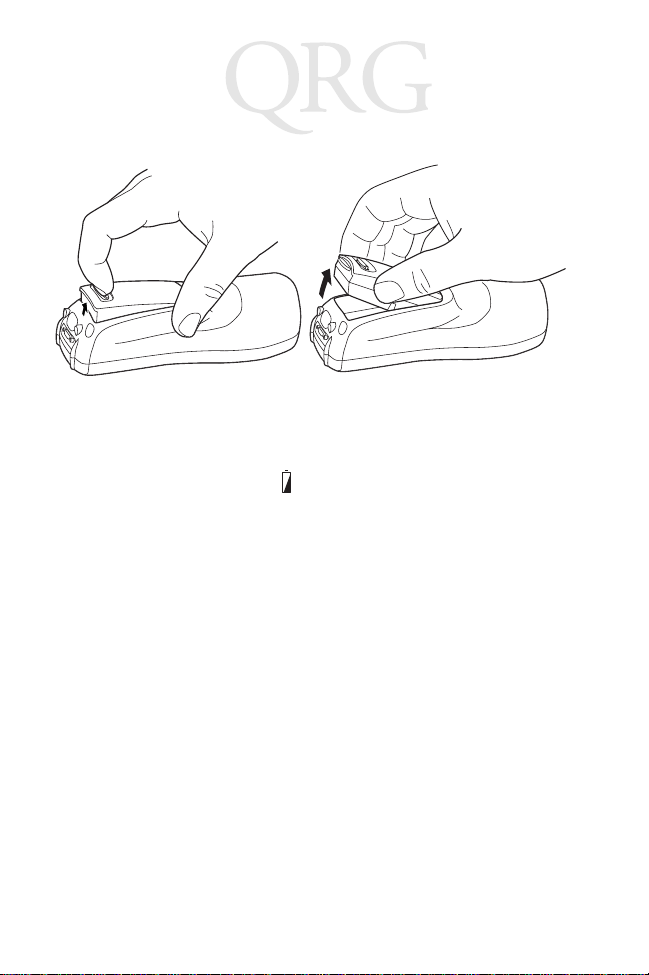
3. Lift the battery up and out of the battery compartment.
Charging the Battery in the Terminal
To charge the terminal’s battery, place the PDT 7500 in the cradle
or connect the synchronization/charging cable.
The terminal’s charging LED turns yellow while charging, then
turns green when the battery is fully charged, which takes 2-3
hours. A flashing yellow LED indicates there may be a problem with
the battery.
For instructions on setting up the cradle, refer to the Quick
Reference Guide that shipped with your cradle or to the PDT 7500
Series Product Reference Guide (72-39225-xx for DOS terminals,
or 72-41235-xx for Windows CE Terminals).
Charging the Spare Battery
The cradle also has a spare battery charging slot. To charge the
spare Li-Ion battery in the CRD 7500 cradle, place the battery into
the charging slot in the cradle. Charging begins automatically and
the charge LED on the cradle turns yellow. The charge LED turns
green upon successful completion of the charge cycle, which takes
approximately 4 hours. If the LED does not light, no battery is
present. If the LED blinks yellow, the battery is faulty.
6
Page 9

Quick Reference
You may also charge the battery in the UBC 2000 Battery Charger.
See the Quick Reference Guide which came with the UBC 2000 for
more information.
LED Indication
For all charging methods, the terminal’s battery charging LED
indicates the battery charging status, as follows:
Battery Charge State Charge LED Indication
Battery absent/no charge power Off
Battery charging Yellow
Battery fully charged Green
Abnormal battery Flashing Yellow
Operating the PDT 7500
Powering the Terminal On/Off
Note: Before the terminal can be powered on, it must be ini-
tialized and the battery must be fully charged. Refer to
the PDT 7500 Series Product Reference Guide for your
terminal for information on initializing the terminal.
To power on the terminal:
1. Make sure the terminal’s battery is fully charged.
2. Press the PWR key.
To suspend the terminal’s operation, press the PWR key.
Turning the Backlight On/Off
To turn the backlight on or off, press the blue FUNC key, then the
LAMP key.
7
Page 10

PDT 7500 Series
Controlling the Screen Contrast
To lighten the screen contrast, press the blue FUNC key, then the
LIGHT key. To darken the screen contrast, press the FUNC key,
then the DARK Key.
Resetting the PDT 7500
If your PDT 7500 Series terminal stops responding to input from
buttons on the screen, you must reset it.
Performing a Warm Boot (DOS and Windows CE Terminals)
A warm boot restarts the terminal and saves all stored records and
entries.
Note: Files that remain open during a warm boot may not be
retained.
To perform a warm boot, press and hold down the PWR key for 6
seconds, then release.
Performing a Cold Boot (DOS and Windows CE Terminals)
A cold boot restarts the terminal. In the Windows CE environment,
the registry and objects stored are reset to original settings.
To perform a cold boot, press and hold the PWR key for 15 seconds,
then release. On the DOS terminal, this value can be reconfigured
in Setup (see the Product Reference Guide for more information).
Performing a Hard Reset (Windows CE Terminals Only)
A hard reset also restarts the PDT 7500 Series terminal, but erases
all stored records and entries. Therefore, never perform a hard reset
unless a warm/cold boot does not solve your problem.
Note: On the Windows CE terminal, you can restore any data
previously synchronized with your computer during the
next ActiveSync operation. See the Quick Reference
Guide which came with your cradle, or the PDT 7500
Product Reference Guide for Windows CE for more information.
8
Page 11

Quick Reference
To perform a hard reset:
1. Remove the battery for 20 minutes or longer.
2. Replace the battery in the terminal.
3. The calibration screen displays.
Note: With a hard reset, formats preferences and other settings
are restored to their original factory defaults.
Calibrating the Screen (Windows CE Terminals Only)
The first time you start your PDT 7500 terminal (and whenever the
terminal is cold-booted), the calibration screen displays. This
section describes how to calibrate your terminal so the cursor on the
touch screen aligns with the tip of your stylus.
Note: If your terminal came loaded with another software ap-
plication, the calibration screen may not display.
To calibrate your PDT 7500 terminal:
1. If necessary, adjust the contrast on the PDT 7500 so the screen
is clear and readable. See “Controlling the Screen Contrast”
on page 8 for instructions.
2. As the screen instructs, carefully press and briefly hold the stylus on the center of each target. Repeat as the target moves
around the screen.
3. Tap the screen when prompted to accept new calibration.
9
Page 12

PDT 7500 Series
Using the PDT 7500 Keypad
The PDT 7500 uses an alphanumeric keypad that produces the 26character alphabet (A-Z), numbers (0-9), and assorted characters.
The keypad is color-coded to indicate which modifier key (ALPHA,
CTRL, FUNC, and SHIFT) to press to produce a particular
character or action.
Alpha key
Shift key
Cont rol key
Enter key
Power key
Function key
Clear key
Backspac e key
Spac e key
• The default numeric keypad produces the numbers 0-9.
•Press ALPHA and the appropriate key to produce the alpha
characters A-Z.
•Press FUNC (blue) and the corresponding numeric key to pro-
duce the function keys F1-F10.
• Press the cursor keys ( , , , ) to move the cursor left,
right, up and down on the screen.
•Press BKSP to erase information entered on the display, one
character at a time.
•Press SPACE to enter a blank space.
•Press CLEAR to partially or completely escape from an appli-
cation level or screen. CLEAR also erases all entered data
from the screen.
10
Page 13

Quick Reference
• Press ENTER after entering data or a command.
• Press CTRL to perform the control function. This key is under application control.
• Press SHIFT and a key to produce various character keys; refer
to the PDT 7500 Series Product Reference Guide for your ter-
minal or your application guide for the keypad mapping.
Note: Key function can be changed by an application. Your
keypad may not function exactly as described above.
Using the Integrated Laser Scanner
To use the laser scanner:
1. Verify the system is on. The LED lights yellow if scanning is
enabled and the laser is on.
2. Aim the PDT 7500 scan window at the bar code and press the
scan button.
Do not hold the PDT 7500 at a right angle to the bar code.
You can tilt the 7500 up to 65° forward or backward and
achieve a successful decode.
3. Ensure that the scan beam crosses all bars and spaces on the
symbol, as shown below.
Right
Wrong
Hold the scanner farther away for larger symbols, and closer
for symbols with bars that are close together.
4. The LED turns from yellow to green for successful decodes.
The PDT 7500 may also beep on successful decode.
11
Page 14

PDT 7500 Series
Scanning PDF417 Bar Codes
The PDF417 bar code symbol has multiple rows, but the raster
pattern also has multiple scanning rows. Two basic steps are
required as you scan:
1. Point the scanner at the bar code and press the scan button.
Slab Raster
2. As the raster pattern spreads, keep the pattern in the same horizontal plane as the bar code.
3/4”
3/4”
3. The terminal indicates a successful scan by changing the LED
from yellow to green, beeping one or more times, and/or displaying the decoded bar code on the screen.
“Tall” PDF Bar Codes
If the PDF417 symbol is “tall,” the vertical scan pattern may not be
high enough to cover it.
In this case, try a slow “up and down” scanning motion. With the
raster pattern open, try to move the scanner slowly down toward
the bottom of the symbol, keeping the beam horizontal to the rows,
and then slowly back upward toward the top.
12
Page 15

Quick Reference
The scan beam does not have to be perfectly parallel with the top
and bottom of the symbol (up to a 4
o
tilt will work).
Host Communications
The PDT 7500 Series terminal can communicate with a host PC
either directly through its communications port using an RS-232
serial cable or the cradle, or wirelessly via the Spectrum24
LANs. For more information on setting up and performing wireless
communications with your PDT 7540 terminal, refer to the PDT
7500 Series Product Reference Guide.
Using the RS-232 Serial Cable
To connect the RS-232 serial cable for host communication:
1. Connect the RS-232 serial communication cable’s connector
to the adapter cable’s connector.
2. Plug the adapter cable’s subminiature connector into the serial
communication port on the bottom of the terminal.
3. Plug the other end of the RS-232 serial communication cable
into the host PC.
4. Begin host communication as specified by your application.
13
®
wireless
Page 16

PDT 7500 Series
Using the Cradle
To communicate through the cradle:
1. Make sure all connections between the cradle and the host
computer are secure. See the Quick Reference Guide that
shipped with your cradle for instructions on setting up the cradle.
2. Power on the host computer, the cradle, and the terminal.
3. Insert the terminal into the cradle.
4. Begin host communications as specified by your application.
Communicating with Printers
The PDT 7500 communicates with IrDA-compliant peripherals
through the IrDA interface in the base of the terminal. To print,
point the PDT 7500’s IrDA port at the IrDA port on the IrDAcompliant printer from a maximum distance of 39 inches (1 meter)
and run the application’s print function. Printer communication can
also be established through an RS-232 cable connected directly to
the printer.
Using the Touch Screen
Some PDT 7500 terminals are equipped with a Touch Screen, which
has software that allows the stylus to function as a mouse. An
optional stylus is available from Symbol for use with the terminal.
Further use of the stylus function is application-dependent. Refer to
application documentation for more information.
14
Page 17

Quick Reference
Troubleshooting
Problem Cause Solution
PDT 7500 does
not power on.
Rechargeable
Li-Ion battery
did not charge.
Cannot see
characters on
display.
Scanner does
not power on
when the scan
button is
pressed.
Li-Ion battery
not charged.
System crash. Hold PWR key for 15 seconds.
Battery failed. Replace battery.
PDT 7500 removed from cradle while battery
was charging.
PDT 7500 not
powered on.
Contrast not adjusted properly.
Scanner is not
enabled.
Charge or replace the Li-Ion
battery in the PDT 7500.
DOS terminal users may change
this value in Setup.
Insert PDT 7500 in cradle and
begin charging. The Li-Ion battery requires 2-3 hours to recharge fully.
Press the PWR key.
Press the blue FUNC key and
then the Dark or Light keys to
adjust contrast.
See your System Administrator.
15
Page 18

PDT 7500 Series
Problem Cause Solution
Scanner does
not decode a
bar code.
Fail to communicate with
IrDA printer.
Bar code is unreadable.
Scan window is
dirty.
Scan code not
enabled.
Distance from
printer is more
than 1 meter
(3.28 feet).
Obstruction interfered with
communication.
Application is
not enabled to
run IrDA printing.
Verify that the bar code is not
defective, i.e., smudged or broken.
Clean scan window with a lens
tissue. Tissues for eyeglasses
work well. Do not use tissues
coated with lotion.
See your System Administrator.
Bring the terminal closer to the
printer and attempt communications again.
Check the path to ensure no objects were in the way.
Printer support must be included with the application to run
IrDA printing on the terminal.
See your System Administrator.
16
Page 19

Quick Reference
Pin-Outs
Pin Description
1GND
2DSR
3RXD
4CTS
5DCD
6GND
7PWROUT (+5V)
8PWRIN(+15V)
9DTR
10 Ring
11 TXD
12 RTS
13 Reserved
14 GND
15 PWRIN(+15V)
Ergonomic Recommendations
Caution: In order to avoid or minimize the potential risk of ergonomic injury follow
the recommendations below. Consult with your local Health & Safety Manager to
ensure that you are meeting with your company’s safety programs to prevent employee
injury.
• Reduce or eliminate repetitive motion
• Maintain a natural position
• Reduce or eliminate excessive force
• Keep objects that are used frequently within easy reach
• Perform tasks at correct heights
• Reduce or eliminate vibration
• Reduce or eliminate direct pressure
• Provide adjustable workstations
• Provide adequate clearance
• Provide a suitable working environment
• Improve work procedures.
17
Page 20

PDT 7500 Series
Regulatory Information
Radio Frequency Interference Requirements
This device has been tested and found to comply with the limits for a Class A digital
device pursuant to Part 15 of the Federal Communications Commissions Rules and
Regulation. These limits are designed to provide reasonable protection against harmful
interference when the equipment is operated in a commercial environment. This
equipment generates, uses, and can radiate radio frequency energy and, if not installed
and used in accordance with the instruction manual, may cause harmful interference to
radio communications. Operation of this equipment in a residential area is likely to
cause harmful interference in which case the user will be required to correct the
interference at his own expense.
However, there is no guarantee that interference will not occur in a particular
installation. If the equipment does cause harmful interference to radio or television
reception, which can be determined by turning the equipment off and on, the user is
encouraged to try to correct the interference by one or more of the following measures:
• Re-orient or relocate the receiving antenna.
• Increase the separation between the equipment and receiver.
• Connect the equipment into an outlet on a circuit different from that which the
receiver is connected.
• Consult the dealer or an experienced radio/TV technician for help.
This device complies with FCC Part 15. Operation is subject to the following two
conditions: (1) this device may not cause harmful interference and (2) this device must
accept any interference received, including interference that may cause undesired
operation.
Important Note: To comply with FCC and Industry Canada RF exposure requiremen ts,
this hand-held device is approved for operation in a user's hand when there is 20 cm or
more between the antenna and the user's body.
Radio Frequency Interference Requirements - Canada
This device complies with RSS 210 of Industry & Science Canada. Operation is subject
to the following two conditions: (1) this device may not cause harmful interference and
(2) this device must accept any interference received, including interference that may
cause undesired operation.
This Class B digital apparatus complies with Industry Canada Standard ICES-003.
Cet appareil numérique de la classe B est conform à la norme NMB-003 d’Industrie
Canada.
18
Page 21

Quick Reference
CE Marking and European Union Compliance
Products intended for sale within the European Union are ma rked with the
CE Mark which indicates compliance to applicable Directives and
European Normes (EN), as follows. Amendments to these Directives or
ENs are included:
Applicable Directives
• Electromagnetic Compatibility Directive 89/336/EEC
• Low Voltage Directive 73/23/EEC
Applicable Standards
• EN 55 022 - Limits and Methods of Measurement of Radio Interference Characteristics of Information technology Equipment
• EN 55024:1998; Information technology equipment-Immunity characteristicsLimits and methods of measurement.
• EN 50 082-1:1997 - Electromagnetic Compatibility - Generic Immunity Standard, Part 1: Residential, commercial, Light Industry
• IEC 1000-4-2(1995-01) - Electromagnetic compatibility (EMC) - Part 4:Testing
and measurement techniques - Section 2: Electrostatic discharge immunity test.
• IEC 1000-4-3(1995-03) - Electromagnetic compatibility (EMC) - Part 4:Testing
and measurement techniques - Section 3: Radiated, radio-frequency, electromagnetic field immunity test.
• IEC 1000-4-4(1995-01) - Electromagnetic compatibility (EMC) - Part 4:Testing and
measurement techniques - Section 4: Electrical fast transient/burst immunity test.
• EN 60 950 + Amd 1 + Amd 2 - Safety of Information Technology Equipment
Including Electrical Business Equipment
• EN 60 825-1 (EN 60 825) - Safety of Devices Containing Lasers.
Laser Devices
Symbol products using lasers comply with US 21CFR1040.10, Subchapter J and
IEC825/EN 60 825 (or IEC825-1/EN 60 825-1, depending on the date of
manufacture). The laser classification is marked on one of the labels on the product.
Class 1 Laser devices are not considered to be hazardous when used for their intended
purpose. The following statement is required to comply with US and international
regulations:
Caution: Use of controls, adjustments or performance of procedures other than those
specified herein may result in hazardous laser light exposure.
Class 2 laser scanners use a low power, visible light diode. As with any very bright light
source, such as the sun, the user should avoid staring directly into the light beam.
Momentary exposure to a Class 2 laser is not known to be harmful.
19
Page 22

PDT 7500 Series
RF Devices
Symbol’s RF products are designed to be compliant with the rules and regulations in
the locations into which they are sold and will be labeled as required. The majority of
Symbol’s RF devices are type approved and do not require the user to obtain license or
authorization before using the equipment. Any changes or modifications to Symbol
Technologies equipment not expressly approved by Symbol Technologies could void
the user’s authority to operate the equipment.
The Spectrum24 equipment is intended for use throughout the European Economic
Area, but it’s authorization for use in France is restricted as follows:
• PAN European Frequency Range: 2.400 - 2.4835 GHz, identified by -EU suffix to
the model number found on the product label.
• France - Restrict Frequency Range for use in France: 2.447 - 2.453 GHz, identified on SPT 1742 by the -FR suffix to the model number found on the product
label.
• Belgium - Operation in an out of doors environment in Belgium must be
restricted to 2460 - 2483.5 MHz band.
• Italy - Operation in Italy requires a user license.
ARNING
W
To satisfy FCC RF exposure compliance requirements for a portable transmitting device, this device should be used in hand-held, hand-operated configurations only. The device and its antenna should generally maintain a separation
distance of 20 cm or more from a person's body; except for the hands and wrists
because of higher exposure limit for extremities. This device is designed to be
used in a person's hands and its operating configurations, generally do not support normal transmissions while it is carried in pockets or holsters next to a person's body.
: FCC RF E
XPOSURE GUIDELINES
Caution: RF Devices
Symbol's RF products are designed to be compliant with the rules and regulations in the locations into which they are sold and will be labeled as required.
The majority of Symbol's RF devices are type approved and do not require the
user to obtain license or authorization before using the equipment. Any changes
or modifications to Symbol Technologies’ equipment not expressly approved by
Symbol Technologies could void the user's authority to operate the equipment.
20
Page 23

Quick Reference
Scanner Labeling
AVOID EXPOSURE - LASER LIGHT IS
EMITTED FROM THIS APERTURE
ÉVITER TOUTE EXPOSITION -
LUMIÈRE LASER ÉMIS PAR CETTE OUVERTURE
This label is located inside the battery compartment.
21
Page 24

PDT 7500 Series
In accordance with Clause 5, IEC 0825 and EN60825, the following information is
provided to the user:
ENGLISH HEBREW
CLASS 1 CLASS 1 LASE R PRODUCT
CLASS 2 LASER LIG HT
DO NOT STARE INTO BEAM
CLASS 2 LASER PRODUCT
DANISH
KLASSE 1 KLASSE 1 LASERPRODUKT ITALIAN
KLASSE 2 LASERLYF CLASSE 1 PRODOTTO AL LASER DI CLASSE 1
SE IKKE IND I STRÅLEN CLASSE 2 LUCE LASER
KLASSE 2 LASERPRODUKT NON FISSARE IL RAGGIOPRODOTTO
AL LASE R DI CL ASSE 2
DUTCH
KLASSE 1 KLASSE-1 LASERPRODUKT NORWEG IAN
KLASSE 2 LASERLICHT KLASSE 1 LASERPRODUKT, KLASSE 1
NIET IN STRAAL STAREN KLASSE 2 LASERLYS IKKE STIRR INN I LYSSTRÅLEN
KLASSE-2 LASERPRODUKT LASERPRODUKT, KLASSE 2
FINNISH PORTUGUESE
LUOKKA 1 LUOKKA 1 LASERTUOTE CLASSE 1 PRODUTO L ASER DA CLASSE 1
LUOKKA 2 LASERVALO
ÄLÄ TUIJOTA SÄDETTÄ CLASSE 2 LUZ DE LASER NÃO FIXAR O RAIO LUMINOSO
LUOKKA 2 LASERTUOTE PRODUTO LASER DA CLASSE 2
FRENCH SPANISH
CLASSE 1 PRODUIT LASER DE CLASSE 1 CLASE 1 PRODUCTO LASER DE LA CLASE 1
CLASSE 2 LUMIE RE LASER CLASE 2 LUZ LASER
NE PAS REGARDER LE RAYON FIXEMENT NO MIRE FIJAMENTE EL HAZ
PRODUIT LASER DE CLASSE 2 PRODUCTO LASER DE LA CLASE 2
GERMAN SWEDISH
KLASSE 1 LASERPRODUKT DER KLASSE 1 KLASS 1 LASERPRODUKT KLASS 1
KLASSE 2 LASERSTRAHLEN KLASS 2 LASERLJUS STIRRA INTE MOT STRÅLEN
NICHT DIREKT IN DEN LASERSTRAHL SCHAUEN LASERPRODUKT KLASS 2
LASERPRODUKT DER KLASSE 2
22
Page 25

Quick Reference
DECLARATION OF CONFORMITY
We, Symbol Technologies, Inc.
of One Symbol Plaza, Holtsville, NY 11742-1300, USA
declare under our sole responsibility that the product
Spectrum24, LA3021, Type II Radio Card
Spectrum24, LA302C, Type II Radio Card
Spectrum24, LA302T, Ty pe II Radio Card
to which this declaration relates, is in conformity with the following standards and/or
other normative documents.
ETS 300 328 (No vember 1996)
ETS 300 826 (No vember 1997)
EN 60950: 1992 Incl Amdt 1-4, 11
We hereby declare that all essential radio test suites have been carried out and that the above named products is in
conformity to al the essential requirements of Directive 1999/5/EC.
The conformity assessment procedure referred to in Article 10(5) and detailed in Annex IV of
Directive 1999/5/EC has been followed with the involvement of the following Notified Body(ies):
BABT, Claremont House, 34 Molesey Road, Walton-on-Thames, KT12 4RQ
Identification mark: 0168 The equipment will also carry the Class
The technical documentation relevant to the above equipment can be made available for
inspec t ion on application t o:
Symbol Technologies EMEA, Symbol Place, Winnersh Triangle, Berkshire, RG 41 5TP, UK
Dornu Narnor
(name)
Director, Re gulatory and Technical Sales
(title)
(signature of authoris ed per son) ( date)
2 equipment identifier
3, May 20 00
23
Page 26

PDT 7500 Series
DECLARATION OF CONFORMITY
We, Symbol Technologies, Inc.
of One Symbol Plaza, Holtsville, NY 11742-1300, USA
declare under our sole responsibility that the product
Spectrum24HR, LA4111, Type II Radio Car d
Spectrum24HR, LA411T, Type II Radio Card
to which this declaration relates, is in conformity with the following standards and/or
other normative documents.
ETS 300 328 (November 1996)
ETS 300 826 (November 1997)
EN 60950: 1992 I ncl Amdt 1- 4, 11
We hereby declare that all essential radio test suites have been carried out and that the above named products is in
conformity to al the essential requirements of Directive 1999/5/EC.
The conformity assessment procedure referred to in Article 10(5) and detailed in Annex IV of
Directive 1999/5/EC has been followed with the involvement of the following Notified Body(ies):
BABT, Claremont House, 34 Molesey Road, Walton-on-Thames, KT12 4RQ
Identification mark: 0168 The equipment will also carry the Class
The technical documentation relevant to the above equipment can be made available for
inspec t ion on application t o:
Symbol Technologies EMEA, Symbol Place, Winnersh Triangle, Berkshire, RG 41 5TP, UK
Dornu Narnor
(name)
Director, Re gulatory and Technical Sales
(title)
(signature of authorised person) (date)
2 equipment id entifier
3, May 2000
24
Page 27

Quick Reference
Note: The following End-User License Agreement applies only
to Windows CE versions of the PDT 7500 terminal.
END-USER LICENSE AGREEMENT FOR MICROSOFT SOFTWARE
MICROSOFT EXPORT SOFTWARE DEVELOPMENT KIT FOR WINDOWS CE
VERSION 2.11 (Referred to as the "Microsoft Export SDK")
IMPORTANT-READ CAREFULLY: This Microsoft End-User License Agreement
("EULA") is a legal agreement between you (either an individual or a single entity) and
Microsoft Corporation for the Microsoft software product identified above, which
includes computer software and may include associated media, printed materials, and
"online" or electronic documentation ("SOFTWARE PRODUCT"). By installing,
copying, or otherwise using the SOFTWARE PRODUCT, you agree to be bound by the
terms of this EULA. If you do not agree to the terms of this EULA, do not install, copy
or use the SOFTWARE PRODUCT.
SOFTWARE PRODUCT LICENSE
The SOFTWARE PRODUCT is protected by copyright laws and international
copyright treaties, as well as other intellectual property laws and treaties. The
SOFTWARE PRODUCT is licensed, not sold.
Introduction: The SOFTWARE PRODUCT was configured for you by a licensee of
Microsoft Windows CE Platform Builder v. 2.11.
For purposes of this EULA, the licensee of Microsoft Windows CE Platform Builder v.
2.11 is referred to as the "Platform Developer". The SOFTWARE PRODUCT as
delivered to you by the Platform Developer contains software and documentation from
Microsoft Corporation and may also contain software and documentation from the
Platform Developer. The software and documentation from the Platform Developer
("Platform Developer Components") and the terms under which you can use such
software and documentation are set forth below in a separate end-user license
agreement provided to you directly from the Platform Developer (the "Platform
Developer EULA"). References to SOFTWARE PRODUCT in this EULA are for the
Microsoft Export SDK and do not include Platform Developer Components.
The Microsoft Export SDK and the Platform Developer Components may only have
been delivered to you in tandem with the Platform Developer's product for Windows
CE developed in accordance with the Microsoft Windows CE Platform Builder, version
2.11 ("Product for Windows CE"). If you received the Microsoft Export SDK under
any other circumstances, you may not use the Microsoft Export SDK.
1. GRANT OF LICENSE. This EULA grants you the following limited, non-exclusive rights:
a. SOFTWARE PRODUCT. You may install and use the enclosed SOFT-
WARE PRODUCT on a single computer for the sole purposes of developing and testing your software application for use with the Product for
Windows CE with which the SOFTWARE PRODUCT was delivered ("Application for Windows CE").
b. Sample Code. You may modify the sample source code located in \Win-
dows CE Tools\WCE211\<SDK>\samples (where "SDK" is the name of the
25
Page 28

PDT 7500 Series
Platform Developer), ("Sample Code") to develop, and test your Application for Windows CE. You may also reproduce and distribute the Sample
Code in object code form, along with any modifications you make to the
Sample Code, provided that you comply with the Distribution Requirements described below. For purposes of this section, "modifications" shall
mean enhancements to the functionality of the Sample Code.
c. Distribution Requirements. You may copy and redistribute the Sample
Code and/or any modifications you make (collectively "REDISTRIBUTABLE COMPONENTS") as described above, pro vided that (a) you distribute the REDISTRIBUTABLE COMPONENTS only in conjunction with,
and as a part of, your Application for Windows CE; (b) your Application
for Windows CE adds significant and primary functionality to the REDISTRIBUTABLE COMPONENTS; (c) the REDISTRIBUTABLE COMPONENTS only operate in conjunction with Microsoft Windows CE; (d) you
do not permit further redistribution of the REDISTRIBUTABLE COMPONENTS by your end-user customers; (e) you do not use Microsoft's name,
logo, or trademarks to market your Application for Windows CE; (f) you
include a valid copyright notice on your Application for Windows CE; and
(g) you hereby agree to indemnify, hold harmless, and defend Microsoft
from and against any claims or lawsuits, including attorneys' fees, that
arise or result from the use or distribution of your Application for Windows CE. Contact Microsoft for the applicable royalties due and other licensing terms for all other uses and/or distribution of the
REDISTRIBUTABLE COMPONENTS.
d. Microsoft reserves all rights not expressly granted to you.
2. COPYRIGHT. All title, including but not limited to copyrights, in and to the
SOFTWARE PRODUCT and any copies thereof are owned by Microsoft or its
suppliers. All title and intellectual property rights in and to the content which
may be accessed through use of the SOFTWARE PRODUCT is the property of
the respective content owner and may be protected by applicable copyright or
other intellectual property laws and treaties. This EULA grants you no rights to
use such content. All rights not expressly granted are reserved by Microsoft.
Therefore, you m ust treat t he SOFTWARE PRODUCT like any other copyrighted material, except that you may either (a) make one copy of the SOFTWARE
PRODUCT solely for backup or archival purposes, or (b) install the SOFTWARE PRODUCT on a single computer, provided you keep the original solely
for backup or archival purposes. You may not copy the printed materials accompanying the SOFTWARE PRODUCT.
3. DESCRIPTION OF OTHER RIGHTS AND LIMITATIONS.
a. Limitations on Reverse-Engineering, D ecompilation, and Disassembly. You
may not reverse- engineer, decompile, or disassemble the SOFTWARE
PRODUCT, except and only to the extent that such activity is expressly
permitted by applicable law notwithstanding this limitation.
b. No Support. Microsoft does not provide support for the SOFTWARE
PRODUCT. Support, in any, may be available from the Platform Developer.
c. Rental. You may not rent, lease or lend the SOFTWARE PRODUCT.
26
Page 29

Quick Reference
d. Software Transfer. You may not transfer any of your rights under this
EULA
e. Termination. Without prejudice to any other rights, Microsoft may termi-
nate this EULA if you fail to comply with the terms and conditions of this
EULA. In such event, you must destroy all copies of the SOFTWARE
PRODUCT and all of its component parts.
4. EXPORT RESTRICTIONS. You agree that you will not export or re-export the
SOFTWARE PRODUCT, any part thereof, or any process or service that is the
direct product of the SOFTWARE PRODUCT (the foregoing collectively referred to as the "Restricted Components"), to any country, person or entity subject to U.S. export restrictions. You specifically agree not to export or re-export
any of the Restricted Components (i) to any country to which the U.S. has embargoed or restricted the export of goods or services, which currently include,
but are not necessarily limited to Cuba, Iran, Iraq, Libya, North Korea, Sudan
and Syria, o r to any national of any such country, wherever loca ted, who intends
to transmit or transport the Restricted Components back to such country; (ii) to
any entity who you know or have reason to know will utilize the Restricted
Components in the design, development or production of nuclear, chemical or
biological weapons; or (iii) to any entity who you know or have reason to know
has been prohibited from participating in U.S. export transactions by any federal agency of the U.S. government. You warrant and represent that neither the
BXA nor any other U.S. federal agency has suspended, revoked or denied your
export privileges.
5. U.S. GOVERNMENT RIGHTS. All SOFTWARE PRODUCT provided to the
U.S. Government pursuant to solicitations issued on or after December 1, 1995
is provided with the commercial rights and restrictions described elsewhere
herein. All SOFTWARE PRODUCT provided to the U.S. Government pursuant
to solicitations issued prior to December 1, 1995 is provided with RESTRICTED RIGHTS as provided for in FAR, 48 CFR 52.227-14 (JUNE 1987) or FAR,
48 CFR 252.227-7013 (OCT 1988), as applicable.
MISCELLANEOUS
If you acquired this product in the United States, this EULA is governed by the laws of
the State of Washington.
If you acquired this product in Canada, this EULA is governed by the laws of the
Province of Ontario, Canada. Each of the parties hereto irrevocably attorns to the
jurisdiction of the courts of the Province of Ontario and further agrees to commence
any litigation that may arise hereunder in the courts located in the Judicial District of
York, Province of Ontario.
If this product was acquired outside the United States, local law may apply.
NO WARRANTIES. Microsoft expressly disclaims any warranty for the SOFTWARE
PRODUCT. The SOFTWARE PRODUCT and any related documentation is provided
"as is" without w arranty or cond ition of any kind, either express or implied, including,
without limitation, the implied warranties or conditions of merchantability, fitness for
a particular purpose, or non infringement. The entire risk arising out of use or
performance of the SOFTWARE PRODUCT remains with you.
27
Page 30

PDT 7500 Series
NO LIABILITY FOR DAMAGES. In no event shall Microsoft or its suppliers be liable
for any damages whatsoever (including, without limitation, damages for loss of
business profits, business interruption, loss of business information, or any other
pecuniary loss) arising out of the use of or inability to use this Microsoft product, even
if Microsoft has been advised of the possibility of such damages. Because some states/
jurisdictions do not allow the exclusion or limitation of liability for consequential or
incidental damages, the above limitation may not apply to you.
Si vous avez acquis votre produit Microsoft au CANADA, la garantie limitée suivante
vous concerne:
GARANTIE LIMITÉE
EXCLUSION DE GARANTIES. Microsoft renonce entièrement à toute garantie pour
le LOGICIEL. Le LOGICIEL et toute autre documentation s'y rapportant sont fournis
« comme tels » sans aucune garantie quelle qu'elle soit, expresse ou implicite, y
compris, mais ne se limitant pas aux garanties implicites de la qualité marchande,
d'adaptation à un usage particulier ou d'absence de violation des droits des tiers. Le
risque total découlant de l'utilisation ou de la performance du LOGICIEL est entre vos
mains.
ABSENCE DE RESPONSABILITÉ POUR LES DOMMAGES. Microsoft ou ses
fournisseurs ne pourront être tenus responsables en aucune circonstance de tout
dommage quel qu'il soit (y compris mais non de façon limitative les dommages directs
ou indirects causés par la perte de bénéfices commerciaux, l'interruption des affaires, la
perte d'information commerciale ou toute autre perte pécuniaire) résultant de
l'utilisation ou de l'impossibilité d'utilisation de ce produit, et ce, même si la société
Microsoft a été avisée de l'éventualité de tels dommages. Parce que ertains états/
juridictions ne perm ettent pas l'exclusion ou la lim itation de res ponsabilité relative aux
dommages indirects ou consécutifs, la limitation ci-dessus peut ne pas s'appliquer à
votre égard.
La présente Convention est régie par les lois de la province d'Ontario, Canada.
Chacune des parties à la présente reconnaît irrévocablement la compétence des
tribunaux de la province d'Ontario et consent à instituer tout litige qui pourrait
découler de la présente auprès des tribunaux situés dans le district judiciaire de York,
province d'Ontario.
28
Page 31

Warr anty
Symbol Technologies, Inc. (“Symbol”) manufactures its hardware products in accordance with
industry-standard practices. Symbol warrants that for a period of twelve (12) months from date of
shipment, products will be free from defects in materials and workmanship.
This warranty is provided to the original owner only and is not transferable to any third party. It shall
not apply to any product (i) which has been repaired or altered unless done or approved by Symbol,
(ii) which has not been maintained in accordance with any operating or handling instructions supplied
by Symbol, (iii) which has been subjected to unusual physical or electrical stress, misuse, abuse, power
shortage, negligence or accident or (iv) which has been used other than in accordance with the product
operating and handling instructions. Preventive maintenance is the responsibility of customer and is
not covered under this warranty.
Wear items and accessories having a Symbol serial number, will carry a 90-day limited warranty. Nonserialized items will carry a 30-day limited warranty.
Warranty Coverage and Procedure
During the warranty period, Symbol will repair or replace defective products returned to Symbol’s
manufacturing plant in the US. For warranty service in North America, call the Symbol Support
Center at 1-800-653-5350. International customers should contact the local Symbol office or support
center. If warranty service is required, Symbol will issue a Return Material Authorization Number.
Products must be shipped in the original or comparable packaging, shipping and insurance charges
prepaid. Symbol will ship the repaired or replacement product freight and insurance prepaid in North
America. Shipments from the US or other locations will be made F.O.B. Symbol’s manufacturing
plant.
Symbol will use new or refurbished parts at its discretion and will own all parts removed from
repaired products. Customer will pay for the replacement product in case it does not return the
replaced product to Symbol within 3 days of receipt of the replacement product. The process for
return and customer’s charges will be in accordance with Symbol’s Exchange Policy in effect at the
time of the exchange.
Customer accepts full responsibility for its software and data including the appropriate backup
thereof.
Repair or replacement of a product during warranty will not extend the original warranty term.
Symbol’s Customer Service organization offers an array of service plans, such as on-site, depot, or
phone support, that can be implemented to meet customer’s special operational requirements and are
available at a substantial discount during warranty period.
General
Except for the warranties stated above, Symbol disclaims all warranties, express or implied, on
products furnished hereunder, including without limitation implied warranties of merchantability and
fitness for a particular purpose. The stated express warranties are in lieu of all obligations or liabilities
on part of Symbol for damages, including without limitation, special, indirect, or consequential
damages arising out of or in connection with the use or performance of the product.
Seller’s liability for damages to buyer or others resulting from the use of any product, shall in no way
exceed the purchase price of said product, except in instances of injury to persons or property.
Some states (or jurisdictions) do not allow the exclusion or limitation of incidental or consequential
damages, so the proceeding exclusion or limitation may not apply to you.
This product is marked with in accordance with the Class II product
requirements specified in the R&TTE Directive, 1999/5/EC.
The equipment is intended for use throughout the European Community, but it's authorization for
use in France is restricted as follows:
• PAN European Frequency Range: 2.402 - 2.480 GHz
• Restricted Frequency Range for use in France: 2.448 - 2.480 GHz
0168
Page 32

Service Information
Before you use the unit, it must be configured to operate in your facility’s network and
run your applications.
If you have a problem running your unit or using your equipment, contact your
facility’s Technical or Systems Support. If there is a problem with the equipment, they
will contact the Symbol Support Center:
United States 1-800-653-5350 Canada 905-629-7226
United Kingdom 0800 328 2424 Asia/Pacific 337-6588
Australia 1-800-672-906 Austria 1-505-5794
Denmark 7020-1718 Finland 9 5407 580
France 01-40-96-52-21 Germany 6074-49020
Italy 2-484441 Mexico 5-520-1835
Netherlands 315-271700 Norway 66810600
South Africa 11-4405668 Spain 9-1-320-39-09
Sweden 84452900
Latin America Sales Support 1-800-347-0178 Inside US
Europe/Mid-East Distributor Operations Contact local distributor or call
+1-561-483-1275 Outside US
+44 208 945 7360
72-38888-03
Revision A — August 2000
Symbol Technologies, Inc. One Symbol Plaza Holtsville, NY 11742-1300
 Loading...