

Page 1

NetVision Data Phone
User Guide
70-20530-01
May 1999
www.symbol.com
Page 2

The NetVision Data Phone provides in a small, hand-held unit on-site
wireless voice and data communications capability.
To use the NetVision Data Phone as a wireless network phone:
1. Press SND to turn on the NetVision Data Phone.
- To make a call, enter a number and press SND.
- To answer a call, press SND.
2. Press END to hang up a call.
3. Press and hold END to turn the phone off.
To use the NetVision Data Phone as a text messaging pager:
1. Press FCT RCL.
2. Press SND to review messages.
To use the NetVision Data Phone as bar code-scanning data client:
1. Push SCAN key to start Web client.
2. Aim NetVision Data Phone at a bar code.
3. Press SCAN.
4. Press END to return to phone mode.
2 NetVision Data Phone User Guide
Page 3

Contents
How to use the NetVision Data Phone .......................................................... 1
Getting Familiar................................................................................ 2
Getting Started.................................................................................. 3
Battery ...................................................................................... 3
Powering on the Phone...............................................................4
Phone status Display................................................................... 5
Powering off the Phone............................................................... 5
Adjusting Call Volume ................................................................ 5
Getting Detailed................................................................................ 6
Logging on with the Basic User Profile.......................................... 6
Logging on With a Site defined User Profile .................................. 7
Making Calls on a NetVision Data Phone..................................... 8
Receiving Calls on a NetVision Data Phone ..................................9
Intercom Calling ........................................................................ 9
Other Ways to Dial .................................................................. 10
Setting the Phone Ring Styles ..................................................... 12
Setting the Answering Mode...................................................... 14
Setting the Earpiece (Play) Volume ............................................. 15
Setting the Ring Volume............................................................ 16
Keypad Locking ....................................................................... 16
Setting the LCD Contrast........................................................... 17
Pre-Programmed Functions ....................................................... 18
Maintaining Speed-Dial List ...................................................... 19
Hot Battery Swap...................................................................... 19
Messages in the NetVision Data Phone....................................................... 20
Basic Scanner Operation ................................................................................ 21
Test the scanner .............................................................................. 21
Manually Entering Data on a Client Page .......................................... 21
NUMERIC Data........................................................................ 22
Alphabetic Data....................................................................... 22
Basic Web page navigation.............................................................. 23
BROWSER KEYS ....................................................................... 23
EDIT KEYS ...............................................................................24
Related Publications......................................................................................... 25
Regulatory Compliance................................................................................... 26
Customer Support ............................................................................................ 32
3
Page 4
How to use the NetVision Data Phone
1
2
4
5
8
6
3
7
10
13
16
12
14
9
11
15
17
18
19
17
20
21
1
Page 5

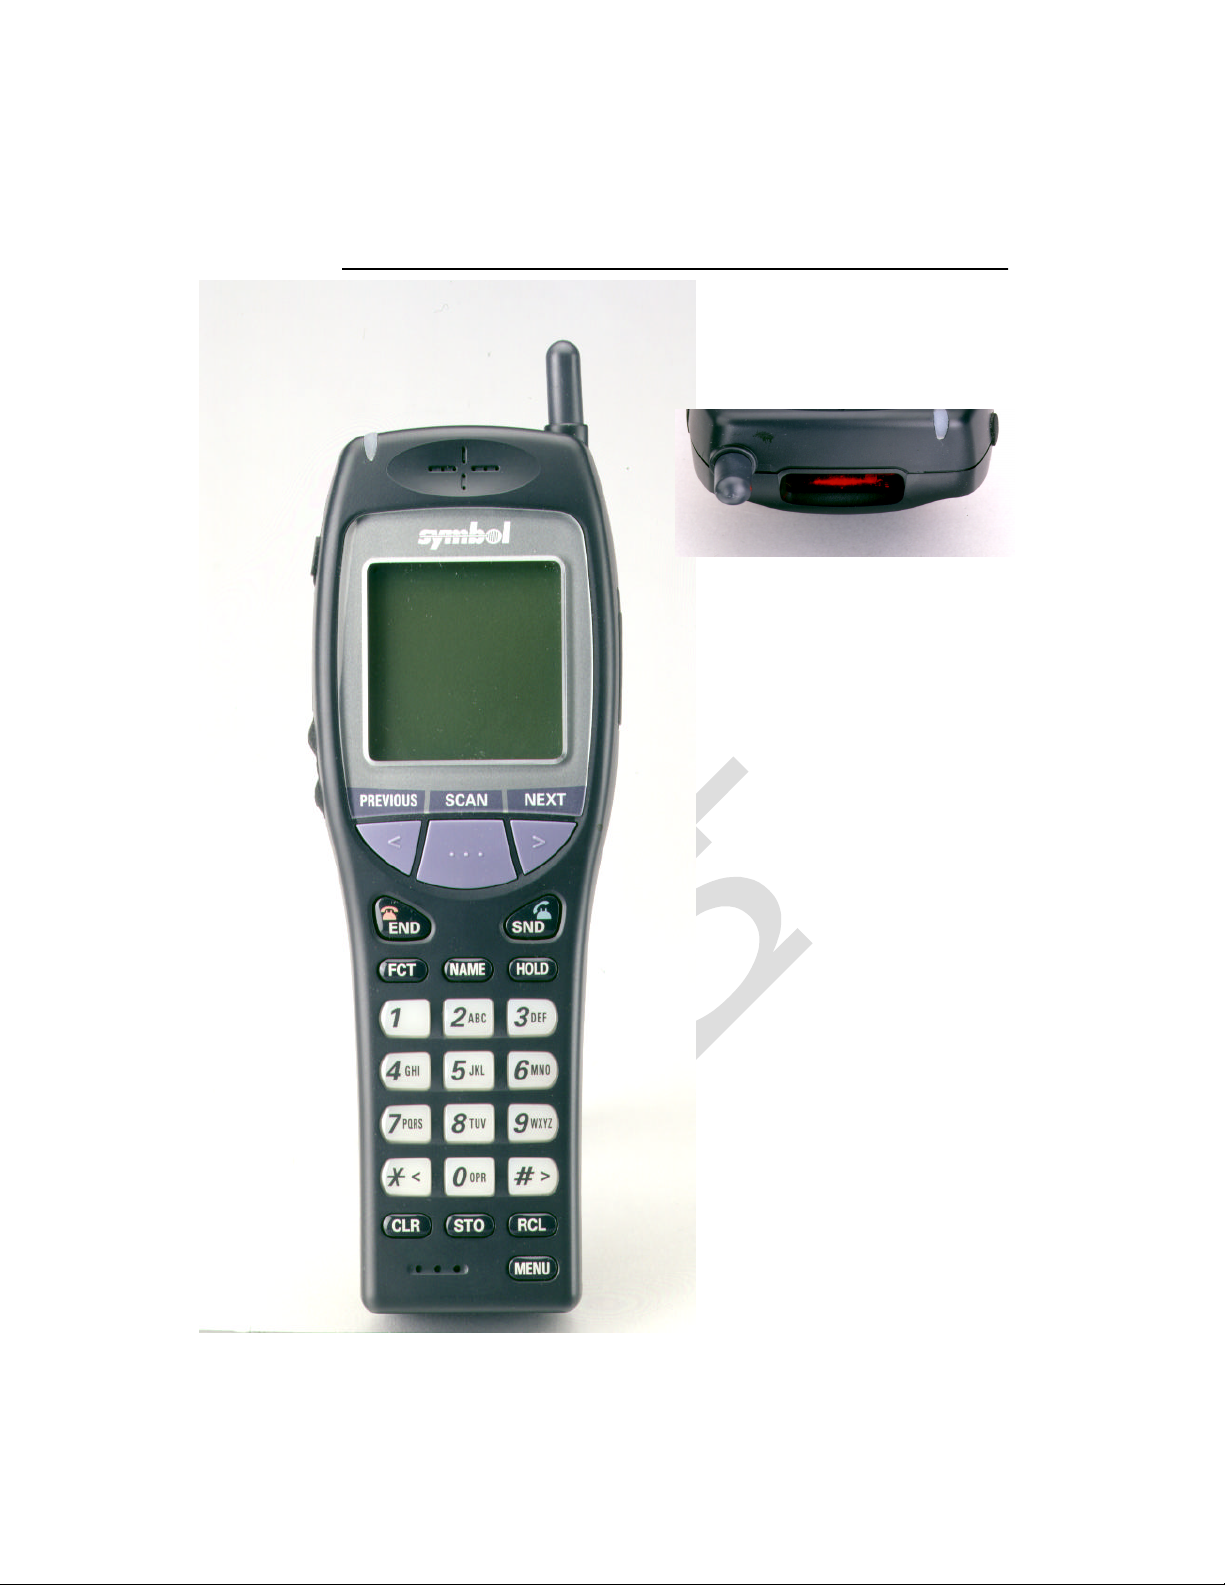
Getting Familiar
1. Antenna – high gain antenna. The antenna does not extend.
2. LED – indicates an incoming call.
3. Laser scanner. Warning: Do not stare into laser scanner.
4. Earpiece.
5. Mini-headset jack plug. headset into phone for hands-free use.
6. Serial port – download software.
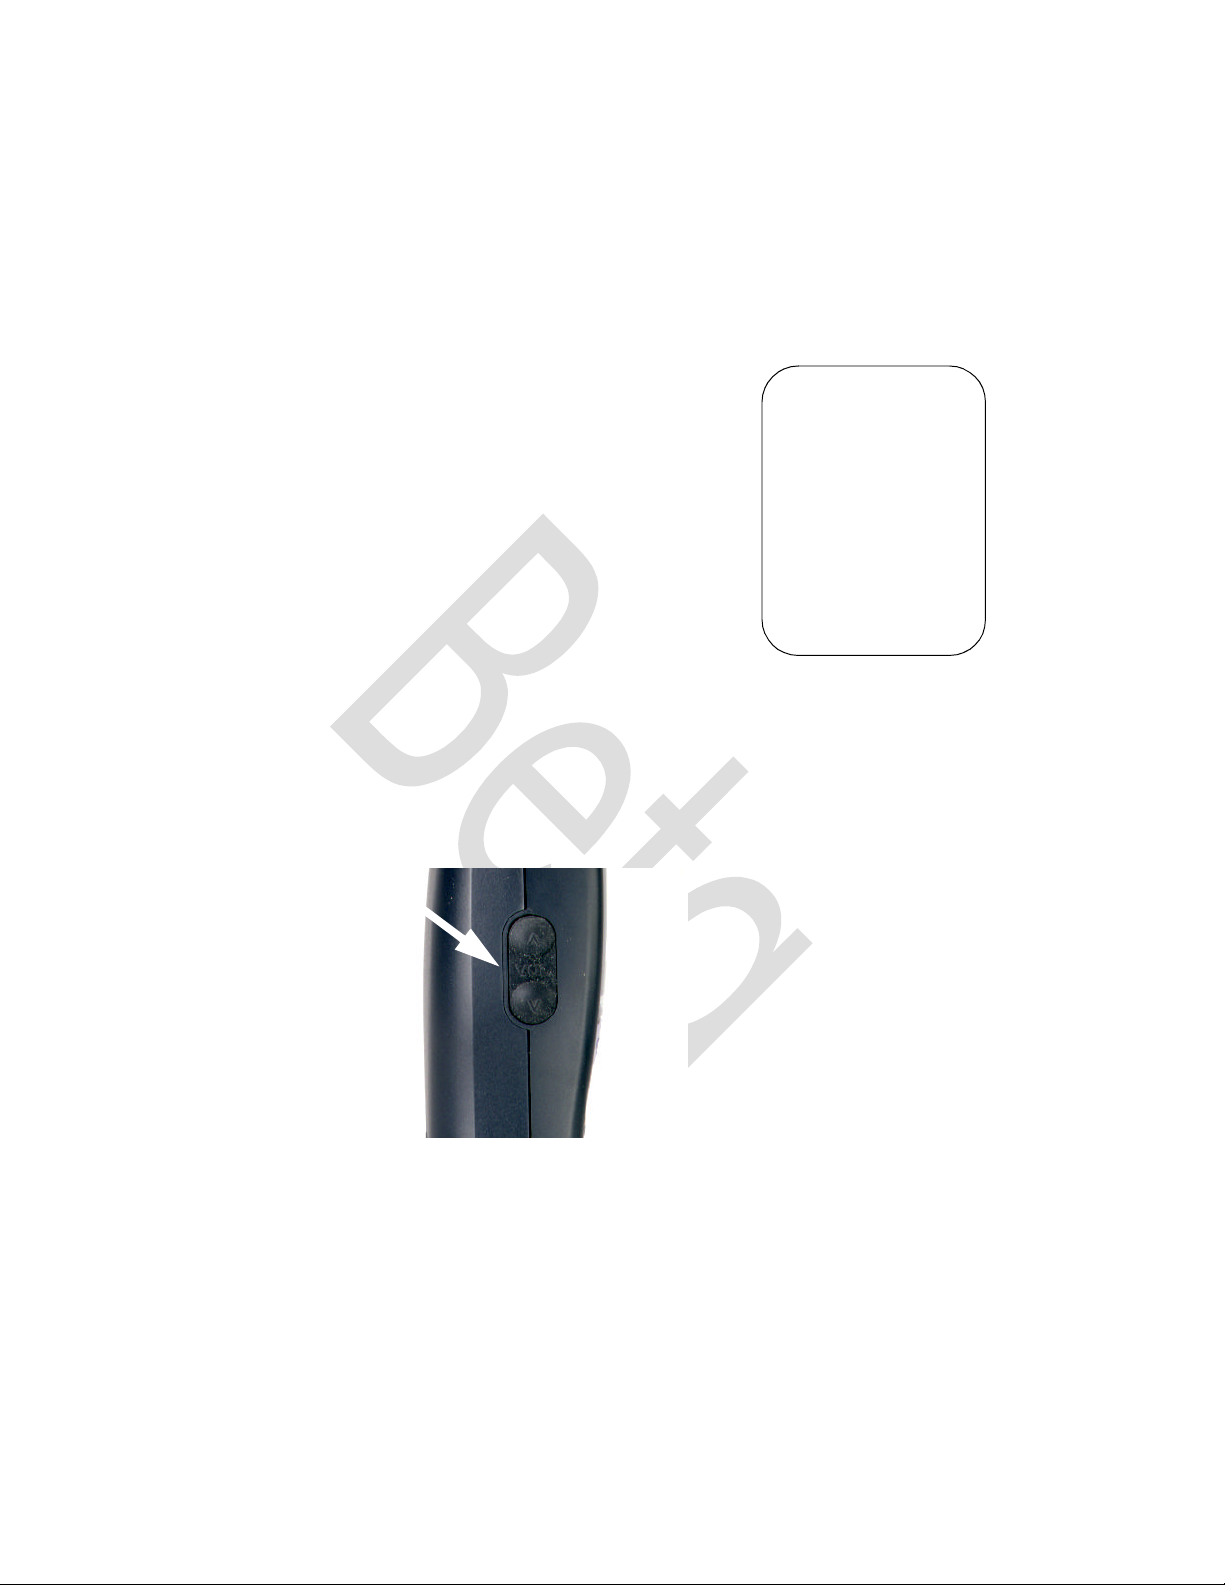
7. Volume adjust buttons – adjust the current call volume and scroll phone menus
and lists.
8. LCD – displays the phone status, menu options, messages and web client pages.
9. Previous Key – tab back between fields on a client page and up a phone menu.
Key wraps to last field.
10. Scan Key – activate the scanner in browser mode.
11. Next Key – tab forward between fields on the browser display and down a phone
menu. Key wraps to first field.
12. END key – end a call, refuse a call, power off the phone and return to a previous
menu.
13. SND key – call the number dialed, send data to the host, accept a call, power on
the phone and to select items in phone menus.
14. FCT key – access specially programmed phone features.
15. NAME key – display names directory.
16. HOLD key – put a call on hold and switch to the Web Client.
17. *< and #> keys – menu and list scrolling keys.
18. CLR key – remove the last digit entered from the keypad.
19. STO key – store a number in the speed-dial directory.
20. RCL key – recall the last number dialed, and to access the speed-dial directory.
21. MENU key – display the phone user menu.
2
Page 6

Getting Started
Battery
Fully charge the Lithium-ion battery for the NetVision Data Phone before first
using the phone. Charge the battery attached or detached from the phone.
Note: When charging the battery attached to the phone, turn off the phone
before inserting it into the charger.
Battery attaching/detaching
– Attach the battery to the phone by aligning the feet on the battery
with the notches on the phone. Push the battery top into the phone
until the catch clicks. ((PIC here showing feet))
– Detach the battery by depressing the catch and pulling the battery
top away from the phone. ((PIC here showing catch))
3
Page 7

Battery charging
Place the battery into rear charger slot or battery and phone combination
into front charger slot. The LED indicators for each slot on the charger
indicate the following status:
– GREEN – battery is fully charged and ready for use.
– RED – battery is charging; wait until LED changes to GREEN before
using battery.
– AMBER – charger is charging the other battery. The charger starts the
first device inserted; the charging cycle for the other device starts
when the first cycle finishes.
Warnings:
To prevent injury or burns do not short-circuit the battery terminals with metal
objects.
Do not charge the battery in a charger other than a Symbol NetVision
Telephone charger
Note: Dispose of the battery properly. ((instrux TBD))
Warning: do not stare into laser beam.
Powering on the Phone
Press SND. The phone displays the status in the LCD.
– NOTE: The Data Phone lights up the keyboard momentarily with
each button or key action. ((There is no backlight for the LCD.))
– Verify an association between the Spectrum24 network and the
phone.
After displayinging initial messages, the phone displays the message Idle
in the status display when the phone associates with a Spectrum24 AP. If the
phone cannot associate with an AP, the phone displays the message: No
Network. The phone cannot make or receive calls or communicate with
a server when it cannot establish an association with a Spectrum 24 network.
4
Page 8
Phone status Display
The Phone status display contains these indicators:
((PIC here of phone status display like this: (with callouts for the line icons,
the battery icon, the RSSI indicator, status and User Name) ))
1. User Name
2. Battery status icon
3. Radio Signal Strength Indicator (RSSI)
4. Network and phone status
5. Phone line icons
Powering off the Phone
Press and hold END until the LCD and the keyboard light go off (about two
seconds).
Adjusting Call Volume
Adjust the call volume with the volume buttons on the left side of the
NetVision Data Phone.
3
---- NVPHONE --
--- IDLE --
-- L1 L2 --
1
4
5
2
5
Page 9

Getting Detailed
Logging on with the Basic User Profile
The NetVision Data Phone contains the basic user profile name, NVPhone.
Symbol ships the telephone without a PIN. Use the telephone when it displays
the status display. Follow this procedure if the system administrator assigns a
PIN to the NVPhone profile:
1. Press FCT, NAME. The phone displays the User Names directory.
NVPhone
Setup
Support
Symbol
2. Scroll the list of profile names using the scroll keys *< and #>, the
Previous and Next keys, or the volume buttons until the NVPhone name
profile is highlighted. The other three profiles are for phone
configuration and diagnostic procedures.
3. Press SND to select the user profile.
4. Enter the PIN for the user profile and press SND to complete logging on.
The telephone displays the status display.
6
Page 10

Logging on With a Site defined User Profile
The NetVision Telephone Administrator can configure the NetVision Data
Phone with the Shared Phone Pool feature turned on. This feature allows
users to pick up any Data Phone from the pool, select a User Name from a
list and logon with a PIN to receive the features the system administrator
allocated to that User Name. Obtain a User Name and PIN from the
administrator.
SiteUser1
SiteUser2
Setup
Support
Symbol
To log on to the phone:
1. Press FCT, NAME. The phone displays the User Names directory.
2. Scroll the list of profile names using the scroll keys *< and #> or the
buttons.
3. Press SND to select a User Name.
4. Enter the PIN for the user profile and press SND to complete logging on.
The telephone displays the status display.
7
Page 11

Making Calls on a NetVision Data Phone
Extension Dialing (Gateway Telephony)
When a NetVision Data Phone operates in the gateway telephony style, it
routes the call through the gateway using the gateway IP address stored in
the phone. The gateway completes the call to the extension.
To make a call to an extension:
1. Dial the extension number (do not dial * or #).
2. Press SND.
IP Dialing (Peer-to-Peer Telephony)
Peer-to-peer telephony, or IP dialing, connects calls over the Spectrum24
network and does not involve a gateway or PBX. Peer-to-peer telephony does
not support telephone system features such as transfer, conference calls, call
forwarding and call park.
The NetVision Phone Administrator assigns eEach NetVision Data Phone a
unique IP address. An IP address contains four octets separated by periods.
Each octet contains up to three decimal digits, ranging from 0 to 255.
For example, to call another NetVision Data Phone in the same network:
1. Press the * key. The phone changes its display to:
Enter IPAdr???????????
2. Dial the IP address of another NetVision Telephone. Use the * key for the
period. Use complete octets.
An IP address contains 4 parts called octets, separated by periods. For
example, if a phone with IP address 123.123.123.123 calls a phone
with IP address 123.123.123.124, dial *124.
3. Press SND.
The phone displays the full IP address of the called phone:
Calling
123
For phones on different subnets, dial all or part of the IP address. Use the *
key as decimal point to separate the octets. The IP traffic goes through the
default gateway (router) IP address specified in the NetVision Data Phone.
8
Page 12

Receiving Calls on a NetVision Data Phone
Answering a Call
User action to receive calls varies from no action (auto-answer mode) to
pressing any key or button. This is a user-selectable option.
The NetVision Data Phone caller ID function works only on peer-to-peer
calls.
Refusing a Call
To refuse an incoming call, press the END key.
The called phone displays:
Call Finished
The calling phone displays:
Call Declined
Note: This feature is disabled in auto answer mode.
Ignoring a Call
The NetVision Data Phone rings until the caller ends the call, the call is
refused or the PBX passes the call to voice mail, when available.
Terminating Calls on a NetVision Data Phone
End calls on the NetVision Data Phone by pressing the END key. Any user can
quit participating in an intercom call, by pressing END.
Intercom Calling
Making Intercom calls
9
NetVision Data Phones can belong to up to 10 intercom groups. User
profiles set up by the system administrator govern access to intercom groups.
A group handles only one intercom call at a time.
Phones in the same group receive intercom calls together. Phones make calls
only to phones on the same network.
The NetVision Data Phone makes an intercom call in IP multi-cast mode. In
this mode, only one phone user talks and the rest listen. When the phone
receives an intercom call, the user presses any key or button to talk. The keys
do not activate the talk function: FCT, END, HOLD and the side-mounted
volume buttons.
To make an intercom call:
1. Press the # key, followed by the intercom group number. Single-digits
between 0 – 9 represent the group number.
2. Press SND. The NetVision Data Phone dials the intercom group,
occupying the channel.
Page 13

Receiving Intercom Calls
Telephones not in active conversation automatically answer an intercom call
after the first ring. The phone rings with the user-programmed intercom ring.
Each phone briefly displays the message Intercom from n. n
represents the group channel ID. The phone answers the call automatically
and changes the phone status to active.
Phones in active conversation give the intercom call-waiting tone (three
beeps) through the earpiece. The user can put the current call on hold or end
the current call. In both cases, the phone automatically connects to the
intercom call.
If a user ignores an intercom call while on another call, the phone joins the
intercom call (if still in progress) when the user ends or puts on hold the
current call.
Terminating Intercom Calls
To terminate the intercom call, the call originator presses END. All phones
display the Call Finished message and the channel is free for
another intercom call. If all the intercom participants quit the call, the
originator times out in 10 seconds, displays the Call Finished
message and frees the channel.
Other Ways to Dial
In name dialing, speed-dialing and redialing, the NetVision Data Phone
completes a call using the telephony style (gateway or IP) enabled on the
phone.
Redialing
The NetVision Data Phone stores the latest eight calls, including intercom
calls, calls made or received from the NetVision Data Phone or calls made to
the gateway. The NetVision Data Phone does not store the numbers for
external calls coming from the gateway.
To redial:
1. Press RCL to activate the NetVision Data Phone redial mode.
2. Press RCL repeatedly until the extension, IP address or name appears in
Note: Pressing the scroll buttons or keys after pressing RCL displays the
speed-dial directory.
3. Press SND. The NetVision Data Phone completes the call.
the LCD.
The NetVision Data Phone recall function stores the last eight numbers
displaying the most recent first.
10
Page 14

Name Dialing
The NetVision Data Phone name directory contains the user profile names
defined using the NetVision Data Phone Administrator. This directory
contains up to 25 names. Phone users cannot modify this directory.
To make a call using name dialing:
1. Press NAME to activate the NetVision Data Phone name directory or press
either side volume button.
2. Use the *< and #> keys to scroll through the NetVision Data Phone
name directory.
The calling phone displays the message,
Calling
Sitename1
The called phone displays the message:
Call from
Sitename2
When the names list is long, use the keypad to jump portions of the list. For
example, to find the name “Smith”,
1. press NAME,
2. Press the 7PQRS key four times.
11
The first time the user presses 7PQRS key the phone scrolls to the “P”
portion of the list (or the nearest name preceding “P”). Each subsequent
key pressing moves the list to the next portion of the list until the “S”
portion is reached. The phone displays the top of the list with continued
key pressing.
3. Press SND. The NetVision Data Phone initiates the call to the named
phone.
Speed-Dialing
Users can speed dial IP addresses, extensions or phone numbers loaded into
the NetVision Data Phone speed-dial directory.
To make a speed-dial call:
1. Press RCL to activate the phone speed-dial mode.
2. Key in the speed-dial location or use the scroll keys to locate the number.
A speed-dial number is a two-digit location between 00 and 99.
3. Press SND. The NetVision Data Phone completes the call.
Page 15

Note: Pressing the scroll buttons or keys after pressing RCL displays the
speed-dial directory.
Dialing to Extensions or the PSTN
Only phones using gateway telephony can make calls outside to the PSTN
either via the PBX or directly via the gateway.
To call an outside number:
1. Dial the outside line access code and the number.
2. Press SND.
The phone sends the number to the gateway using the IP address for the
gateway stored in the phone The gateway picks the call and passes the
call to the PSTN.
Note: The maximum number of digits is 31.
The NetVision Data Phone ships ready for use with default settings. End users
can only access and adjust basic phone usage options. The system
administrator can enable more advanced capability.
Setting the Phone Ring Styles
There are two types of incoming calls for the NetVision Data Phone, intercom
calls and telephone calls. Set a ringing style for each. In addition, set a
ringing style for the Auto-answer mode. Select a tone, the vibrator or the LED
to signal an incoming call. Available ring options include:
Style name Style Description (all styles flash the LED)
Tone 1 One-second beep
Tone 2 Two short beeps
Tone 3 A half-second beep
Tone 4 A two-second beep
Tone 5 One short beep
Tone 6 Five short beeps
LED-only Repeated LED flashes
Vibrator Repeated brief vibrations
12
Page 16

Setting Telephone Ring Style
To adjust the ring style for incoming telephone calls:
1. Press MENU. The phone displays the main menu.
2. Use the *< and #> keys to scroll through the items.
3. Choose User Options. Press SND. The phone displays the User
Options menu.
4. Scroll through the user options.
5. Select Phone Ring . Press SND. The phone displays the current setting.
6. Scroll through the ring options. Press SND to set the ring style. The phone
rings once using the selected tone. Press END to cancel.
Adding Vibration to Ring Style
To add vibration to the ring style:
1. Press MENU. The phone displays the main menu.
2. Use the *< and #> keys to scroll through the items.
3. Choose User Options. Press SND. The phone displays the User
Options menu.
4. Scroll through the user options.
13
5. Select Ring Vibrate and press SND. The phone displays the current
ring setting, either Enable or Disabled.
6. Use the scroll keys to toggle between Enable and Disabled through the
ring options. Press SND to set. Press END to cancel.
Setting Auto-answer Ring Style
To set this value, which the phone uses in Auto-answer mode:
1. Press MENU. The phone displays the main menu.
2. Use the *< and #> keys to scroll through the items.
3. Select User Options and press SND. The phone displays the NetVision
Data Phone user options.
4. Scroll through the user options.
5. Select AutoAns Ring and press SND. The phone displays the current
auto-answer ring style.
6. Scroll to select a ring option.
7. Press SND to set the Auto answer ring style. The phone rings once using
the selected tone. Press END to cancel.
Page 17

Setting Intercom Ring Style
The phone uses this ring style when the incoming call is an intercom call:
1. Press MENU. The phone displays the main menu.
2. Use the *< and #> keys to scroll through the items.
3. Select User Options and press SND. The phone displays the NetVision
Data Phone user options.
4. Scroll through the user options.
5. Select Intrcm Ring and press SND. The LCD displays the current
intercom ring style.
6. Scroll and select a ring option.
7. Press SND to set the intercom ring style. The phone rings once using the
selected tone. Press END to cancel.
Setting the Answering Mode
Users can select from three answering modes on the NetVision Data Phone.
Auto-Answer
In this mode, the NetVision Data Phone answers a call after the first ring. To
program the phone for auto-answering:
1. Press MENU. The phone displays the Main menu.
2. Use the *< and #> keys to scroll through the items.
3. Select User Options and press SND. The phone displays the User
Options menu.
4. Scroll through the user options.
5. Select Phone Answr and press SND. The phone displays the current
auto-answer mode.
6. Scroll through the phone answer options.
7. Select Auto and press SND. The NetVision Data Phone sets the Auto
answer mode and returns to the User Options menu. Press END to
cancel.
Single-Key Answering
In this mode, the NetVision Data Phone answers a call when the user presses
SND. To program the phone for single-key answering:
1. Press MENU. The phone displays the main menu.
2. Use the *< and #> keys to scroll through the items.
14
Page 18

3. Select User Options and press SND. The phone displays the NetVision
Data Phone user options.
4. Scroll through the user options.
5. Select Phone Answr and press SND.
6. Scroll through the phone answer options.
7. Select One Key and press SND. The NetVision Data Phone sets the
single-key answer mode and returns to the User Options menu. Press
END to cancel.
Any-Key Answering
In this mode, the NetVision Data Phone answers a call when the user presses
any key or button. The END and HOLD keys retain their call-refusing and
context switching functions.
To program the phone for any-key answering:
1. Press MENU. The phone displays the Main menu.
2. Use the *< and #> keys to scroll through the items.
3. Select User Options and press SND. The phone displays the NetVision
Data Phone user options.
4. Scroll through the user options.
5. Select Phone Answr and press SND.
6. Scroll through the phone answer options.
7. Select Any Key and press SND. The NetVision Data Phone sets the anykey answer mode and returns to the User Options menu. Press END to
cancel.
Setting the Earpiece (Play) Volume
The NetVision Data Phone play volume is the volume level heard during call.
To adjust the play volume:
1. Press MENU. The phone displays the main menu.
2. Use the *< and #> keys to scroll through the items.
3. Select User Options and press SND. The phone displays the NetVision
Data Phone User Options menu.
4. Scroll through the user options.
5. Select Play Volume and press SND.
6. The phone displays a slider control with the current play volume marked
15
Page 19

with a |.
L H
[-----|----]
7. Scroll and select the desired volume level.
8. Press SND to set the new volume level. Press END to cancel.
Setting the Ring Volume
Users can set the ring volume that signals an incoming call.
To adjust the ring volume:
1. Press MENU. The phone displays the Main menu.
2. Use the *< and #> keys to scroll through the items.
3. Select User Options and press SND. The phone displays the NetVision
Data Phone user options.
4. Scroll through the user options.
5. Select Ring Volume and press SND. The phone displays a slider control
with the current ring volume marked with a |.
L H
[-----|----]
6. Scroll and select the desired volume level.
7. Press SND to set the new volume level. Press END to cancel.
Keypad Locking
1. Lock the keypad to prevent accidental calls and unnecessary battery
2. Press MENU. Scroll the list to select User Options.
3. Press SND.
4. Scroll the list to Keypad Lock.
5. Press SND.
6. Use scroll keys to toggle to Enabled.
7. Press SND.
8. Press END to return to status display. After about five seconds the phone
To unlock, press the SND key prior to entering any other keys once the phone
enters power save mode. Pressing the SND unlocks the keypad and performs
no telephony functions.
power consumption. To lock the keypad:
displays Locked for status.
16
Page 20

Any incoming call automatically unlocks the keypad, so that pressing SND
(or other key in any key answer mode) answers the call.
To unlock the keypad:
1. Press MENU. Scroll the list to select User Options.
2. Press SND.
3. Scroll the list to Keypad Lock.
4. Press SND.
5. Use scroll keys to toggle to Disabled.
6. Press SND.
7. Press END to return to status display. After about five seconds the phone
displays Locked for status.
Setting the LCD Contrast
Users can configure the NetVision Data Phone LCD for different contrast
(shading) levels.
To adjust the contrast:
1. Press MENU. The phone displays the Main menu.
2. Use the *< and #> keys to scroll through the items.
17
3. Select User Options and press SND. The phone displays the NetVision
Data Phone user options.
4. Scroll through the user options.
5. Select Contrast and press SND. The phone displays a slider control
with current contrast value marked with a |.
L H
[-----|----]
6. Scroll to select the desired contrast level. Use L for lighter and H for
darker. The contrast changes as the user adjusts the slider.
7. Press SND to set the contrast setting. Press END to cancel.
Page 21

Pre-Programmed Functions
Adjusting the Volume During a Call
Use one of these alternative methods to adjust the earpiece volume without
going through the phone menu.
To make a permanent adjustment:
1. Press FCT, 9.
2. Use the scroll keys *< and #> to adjust the volume.
3. Press SND to set the volume.
To make a temporary adjustment for the current call, use the volume buttons
on the left side of the phone.
Using Site-Programmed Functions
The system administrator can program certain PBX functions into NetVision
Data Phones. To access these functions:
1. Press FCT.
2. Scroll down to the function, or enter its number from the keypad.
3. Press SND.
Microphone Muting
Mute the microphone on the phone by pressing FCT and scrolling the list
until Mute is selected. Press SND. The phone display displays Muted in
place of Active.
Logon
To display the list of profile names installed on the phone, press FCT and
scroll the list until Logon is selected. Press SND. Enter a PIN as necessary.
Call Blocking
The NetVision Data Phone can block incoming calls. This feature is set to off
each time the phone powers on. To block all incoming calls:
1. Press FCT, 8.
2. When set to accept calls, the phone displays the Message:
Calls unblck
Block?
3. Press SND to block, press END to cancel. The phone returns to the status
display.
The calling phone displays the message: Call declined
To unblock all incoming calls:
1. Press FCT, 8.
18
Page 22

When set to block calls, the phone displays the message:
Calls blckd
Unblock?
Press SND to unblock, press END to cancel. The phone returns to the
status display.
Maintaining Speed-Dial List
Adding a Number to the Speed-Dial List
To add or replace a number in the speed-dial list:
1. Dial a number. Do not press SND.
2. Press STO. A field appears for entering or replacing a two-digit speeddial extension.
3. Key in the two-digit location. The phone stores the number in the list, and
returns to the status display.
Clearing the Speed-Dial List
To clear existing speed-dial directory from the speed-dial list:
1. Press MENU. The phone displays the Main menu.
2. Use the *< and #> keys to scroll through the items.
3. Select User Options and press SND. The phone displays the NetVision
Data Phone user options.
Hot Battery Swap
19
4. Scroll through the user options.
5. Select Clear SD and press SND. The phone clears the speed dial list.
The NetVision Data Phone features a “hot battery swap”. When the phone
beeps to warn that the battery is about to reach a level that cannot support
phone functions, remove the battery without first powering off the phone and
install a fully charged battery. Install a fresh battery within 3 minutes before
the User Name and URL are lost. With the new battery installed, press SND;
the phone logs on, reassociates and redisplays the last URL page.
Because the radio circuitry uses the most power, the NetVision Data Phone
loses the active telephone call when the user removes the battery.
Page 23

Messages in the NetVision Data Phone
The NetVision Data Phone has a built-in messaging facility that accesses a
message account. The phone alerts the user to new messages with a special
tone. Press FCT, RCL to view any messages. Users cannot access messages
from the Web client.
To view messages:
1. Press FCT, RCL. The phone displays “n messages” indicating the number
of messages ( n is a single digit 2 thru 9). (In the case of one message
waiting, the phone automatically displays the message.)
2. View a message by pressing the corresponding number key. For
example, view the fifth message by pressing 5. Press SND repeatedly to
view messages sequentially.
To view the message Subject, Sender and Recipient, press the RCL key
repeatedly.
Pressing SND on the last message displays the first message.
To delete a message, press CLR while viewing the message.
Press END to return to phone mode.
20
Page 24

Basic Scanner Operation
The NetVision Data Phone contains a built-in laser-scan engine for data
applications. The default Uniform Resource Locator (URL), built-in to the
phone, contains a scanner-enabled field.
Actual Web client phone use depends on the application.
Warning: Do not stare into Laser aperture.
Test the scanner
Follow the procedure below to test the scanner of the NetVision Data Phone.
When the NetVision Data Phone first boots up, it goes into phone mode.
1. To switch to the data or client mode (called context switching), push
SCAN.
2. Aim the laser scanner (antenna end) of the phone at this bar code.
*0123456789*
In a successful scan the field on the phone receives this string:
0123456789.
The success of a scan depends on the image quality, size, the scan distance
and scan angle from the scanner to the image. Optimum distance is
approximately six to ten inches (15 to 25 cm).
Consult the Product reference guide for details about entering data manually
in client fields.
Manually Entering Data on a Client Page
The NetVision Data Phone facilitates entering data through the scanner and
numeric keypad. Enter alphabetic data through the keypad.
21
Page 25

NUMERIC Data
Directly enter numeric data using the keypad.
Alphabetic Data
Enter alphabetic data using the FCT key and the keys in the table below.
Press and hold the FCT key, press a keypad key to display a list of characters
associated with that key, press the corresponding key.
Key
1
2
3
4
5
6
7
8
9
*
0
#
For example, to enter the word “Phone,” follow these steps:
1. Press and hold FCT until step 7.
Characters associated with these keys:
1 2 3 4 5 6 7 8 9 * 0 #
Blank . / | : _ + - = ? < >
A B C a b c À Á Â Ã Ä Å
D E F d e f È É Ê Ë Ç
G H I g h i Ì Í Î Ï
J K L j k l
M N O m n o Ñ Ò Ó Ô Õ Ö
P Q R S p q r s
T U V t u v Ù Ú Û Ü
W X Y Z w x y z Ý ý
< [ ( { ¼ ½ ¾
? ¿ ¢ £ ¥ © µ Þ ß Æ æ
> ] ) }
2. Press 7 to display list, press 1 for uppercase P.
3. Press 4 to display list, press 5 for lowercase h.
4. Press 6 to display list, press 6 for lowercase o.
5. Press 6 to display list, press 5 for lowercase n.
6. Press 3 to display list, press 5 for lowercase e.
7. Release FCT.
22
Page 26

Basic Web page navigation
The Web client maps the keypad to many common browser and field-level
functions.
The table below lists the keys and the associated functions.
Press
Key
NAME
STO
RCL
BROWSER KEYS
Press and hold the NAME key to access the browser functions listed below:
Example: to force the client back to the home URL,
1. Press and hold NAME.
Function Name of key Status
indicator
Help for Browser keys B Browser navigation/command keys
Help for Scroll keys S Page navigation control keys
Help for Edit keys E Field editing keys
Key
<
>
1
2
3
4
Name and meaning
Go backward (go to previous saved URL)
Go forward (go to next saved URL)
Hide/Show URL field
Go home (to home URL)
Stop (loading)
Reload current URL.
Description
23
The phone displays the list of browser functions available.
2. Press 2ABC.
3. Release NAME.
The client displays the home URL page.
SCROLL KEYS
Press and hold the STO key to access the page movement functions listed
below:
Key Name and meaning
Page 27

EDIT KEYS
< Page left. Scroll the page towards the left margin.
> Page right. Scroll the page towards the right margin.
8 Page up. Scroll the page towards the top margin.
0 Page down. Scroll the page towards the bottom
margin.
4 Line left. Scroll the page one column towards the left
margin.
6 Line right. Scroll the page one column towards the
right margin.
2 Line up. Scroll the page one line towards the top
margin.
5 Line down. Scroll the page one line towards the
bottom margin.
Press and hold the RCL key to access the field-editing functions listed below:
KEY Name and meaning
< Cursor Left (do not use the previous key or volume
increase button)
> Cursor Right (do not use the next key or volume
decrease button)
1 Cursor Home. Move cursor to beginning of field.
2 Cursor End. Move cursor to end of field.
3 Delete
4 Backspace
8 Cursor Up. In a multiline field moves cursor up one line.
0 Cursor Down In a multiline field moves cursor down
one line.
24
Page 28

Related Publications
• NetVision Phone Accessory Guide
• NetVision Telephone Administrator
• NetVision Data Phone Product Reference Guide
• NetVision Data Phone Web Client Administrator Guide
25
Page 29

Regulatory Compliance
To comply with U.S. and international regulatory requirements, the following
information has been included. The document applies to the complete line of
Symbol products. Some of the labels shown, and statements applicable to other
devices might not apply to all products.
Radio Frequency Interference Requirements
This device has been tested and found to comply with the limits for a Class A
digital device pursuant to Part 15 of the Federal Communications Commissions
Rules and Regulation. These limits are designed to provide reasonable
protection against harmful interference when the equipment is operated in a
commercial environment. This equipment generates, uses, and can radiate radio
frequency energy and, if not installed and used in accordance with the
instruction manual, may cause harmful interference to radio communications.
Operation of this equipment in a residential area is likely to cause harmful
interference in which case the user will be required to correct the interference at
his own expense.
However, there is no guarantee that interference will not occur in a particular
installation. If the equipment does cause harmful interference to radio or
television reception, which can be determined by turning the equipment off and
on, the user is encouraged to try to correct the interference by one or more of the
following measures:
• Re-orient or relocate the receiving antenna.
• Increase the separation between the equipment
and receiver.
• Connect the equipment into an outlet on a circuit different from that which
the receiver is connected.
• Consult the dealer or an experienced radio/TV technician for help.
Radio Frequency Interference Requirements - Canada
This Class A digital apparatus meets the requirements
of the Canadian Interference-Causing Equipment Regulations.
CE Marking & European Union Compliance
Products intended for sale within the European Union are marked with
the CEMark which indicates compliance to applicable Directives and
European Normes (EN), as follows. Amendments to these Directives or
ENs are included: Normes (EN), as follows.
26
Page 30

Applicable Directives:
• Electromagnetic Compatibility Directive 89/336/EEC
• Low Voltage Directive 73/23/EEC
Applicable Standards:
• EN 55 022 - Limits and Methods of Measurement of Radio Interference
Characteristics of Information technology Equipment
• EN 50 082-1 - Electromagnetic Compatibility - Generic Immunity Standard,
Part 1: Residential, commercial, Light Industry
• IEC 801.2 - Electromagnetic Compatibility
for Industrial Process Measurement and
Control Equipment Part 2: Electrostatic
Discharge Requirements
• IEC 801.3 - Electromagnetic Compatibility for Industrial Process
Measurement and Control Equipment Part 3: Radiated Electromagnetic
Field Requirements
• IEC 801.4 - Electromagnetic Compatibility
for Industrial Process Measurement and
Control Equipment Part 4: Electrical Fast
Transients Requirements
• EN 60 950 + Amd 1 + Amd 2 - Safety of
Information Technology Equipment Including Electrical Business Equipment
RF Devices
27
• EN 60 825-1 (EN 60 825) - Safety of Devices Containing Lasers
Symbol’s RF products are designed to be compliant with the rules and
regulations in the locations into which they are sold and will be labeled as
required. The majority of Symbol’s RF devices are type approved and do not
require the user to obtain license or authorization before using
the equipment. Any changes or modifications to Symbol Technologies equipment
not expressly approved by Symbol Technologies could void the user’s authority to
operate
the equipment.
Page 31

Telephone Devices (Modems)
United States
If this product contains an internal modem it is compliant with Part 68 of the
Federal Communications Commission Rules and Regulations and there will be a
label on the product showing the FCC ID Number and the REN, Ringer
Equivalence Number. The REN is used to determine the quantity of devices
which maybe connected to the telephone line. Excessive RENs on the telephone
line may result in the device not ringing in response to an incoming call. In most
but not all areas, the sum of the RENs should not exceed 5.0. To be certain of
the number of devices that may be connected to the line, as determined by the
total number of RENs, contact the telephone company to determine the
maximum REN for the calling area.
If the modem causes harm to the telephone network, the telephone company will
notify you in advance; however, if advance notice is not practical, you will be
notified as soon as possible. Also, you will be advised of your right to file a
complaint with the FCC if you believe it is necessary.
The telephone company may make changes in its facilities, equipment,
operations or procedures that could affect
the operation of the modem. If this happens the telephone company will provide
advance notice so you may
make any necessary modifications to maintain uninterrupted service.
Canada
If this product contains an internal modem it is compliant with CS-03 of Industry
Canada and there will be a Canadian certification number (CANADA: )
on a label on the outside of the product. This certification means that the
equipment meets certain telecommunications network protective, operational
and safety requirements. The Department does not guarantee the equipment will
operate to the user’s satisfaction.
Before installing this equipment, users should ensure that it is permissible to be
connected to the facilities of the local telecommunications company. The
equipment must also be installed using an acceptable method of connection. In
some cases, the company’s inside wiring associated with a single-line, individual
service maybe extended by means of a certified convector assembly (telephone
extension cord). The customer should be aware that compliance with the above
conditions may not prevent degradation of service in some situations.
28
Page 32

Repairs to certified equipment should be made by an authorized Canadian
maintenance facility designated by the supplier. Any repairs or alterations made
by the user to this equipment, or equipment malfunctions, may give the
telecommunications company cause to request the user to disconnect the
equipment.
User should ensure for their own protection that the electrical ground
connections of the power utility, telephone lines and internal metallic water pipe
system, if present, are connected together. This precaution may be particularly
important in rural areas.
User should not attempt to make such connections themselves, but should
contact the appropriate electric inspection authority, or electrician, as
appropriate.
The Load Number (LN) assigned to each terminal device denotes the percentage
of the total load to be connected to the telephone loop which is used by the
device, to prevent overloading. The termination of a loop may consist of any
combination of devices, subject only to the requirement that the total of the Load
Numbers of all devices not exceed 100. The Load Number is located on a label
on the product.
Laser Devices
29
Contact your local Symbol Technologies, Inc., representative for service and
support.
Symbol Technologies, Inc.,
Canadian Sales and Service
2540 Matheson Boulevard East
Mississauga, Ontario
Canada L4W 4Z2
Phone - 905 629 7226
Symbol products using lasers comply with US 21CFR1040.10, Subchapter J and
IEC825/EN 60 825 (or IEC825-1/EN 60 825-1, depending on the date of
manufacture). The laser classification is marked one of the labels on the product.
Class 1 Laser devices are not considered to be
hazardous when used for their intended purpose. The following statement is
required to comply with US and international regulations:
Page 33

Use of controls, adjustments or performance of procedures other than those
specified herein may result in hazardous visible or invisible laser light exposure.
Class 2 laser scanners use a low power, visible light diode. As with any very
bright light source, such as the sun, the user should avoid staring directly into the
light beam. Momentary exposure to a Class 2 laser is not known to
be harmful.
Laser information labels are found in the product Quick Reference Guide.
30
Page 34

31
Page 35

Customer Support
Symbol Technologies provides its customers with prompt and accurate customer
support. Use the Symbol Support Center as the primary contact for any technical
problem, question or support issue involving Symbol products.
If the Symbol Customer Support specialists cannot solve a problem, access to all
technical disciplines within Symbol becomes available for further assistance and
support. Symbol Customer Support responds to calls by email, telephone or fax
within the time limits set forth in individual contractual agreements.
When contacting Symbol Customer Support, please provide the following
information:
• serial number of unit
• model number or product name
• software type and version number.
North American Contacts
Inside North America, contact Symbol by:
• Symbol Technologies, Inc.
One Symbol Plaza
Holtsville, New York 11742-1300
Telephone: 1-516-738-2400/1-800-SCAN 234
Fax: 1-516-738-5990
• Symbol Support Center:
– telephone: 1-800-653-5350
– fax: (516) 563-5410
– Email: support@symbol.com
International Contacts
Outside North America, contact Symbol by:
• Symbol Technologies Technical Support
12 Oaklands Park
Berkshire, RG41 2FD, United Kingdom
Tel: 011-44-118-945-7000 or 1-516-738-2400
ext. 6213
Additional Information
Obtain additional information by contacting Symbol at:
32
Page 36

• 1-800-722-6234, inside North America
• +1-516-738-5200, in/outside North America
• http://www.symbol.com
33
 Loading...