

Page 1

1813 VoIP Gateway
User’s Guide
Document Number 1813-A2-GB20-00
November 2004
Page 2

1813 VoIP Gateway User’s Guide
Copyright © 2004 Paradyne Corporation.
All rights reserved.
Printed in U.S.A.
Notice
This publication is protected by federal copyright law. No part of this publication may be copied or distributed,
transmitted, transcribed, stored in a retrieval system, or translated into any human or computer language in any form
or by any means, electronic, mechanical, magnetic, manual or otherwise, or disclosed to third parties without the
express written permission of Paradyne Corporation, 8545 126th Ave. N., Largo, FL 33773.
Paradyne Corporation makes no representation or warranties with respect to the contents hereof and specifically
disclaims any implied warranties of merchantability or fitness for a particular purpose. Further, Paradyne Corporation
reserves the right to revise this publication and to make changes from time to time in the contents hereof without
obligation of Paradyne Corporation to notify any person of such revision or changes.
Changes and enhancements to the product and to the information herein will be documented and issued as a new
release to this manual.
Warranty, Sales, Service, and Training Information
Contact your local sales representative, service representative, or distributor directly for any help needed. For
additional information concerning warranty, sales, service, repair, installation, documentation, training, distributor
locations, or Paradyne worldwide office locations, use one of the following methods:
Internet: Visit the Paradyne World Wide Web site at www.paradyne.com. (Be sure to register your warranty at
www.paradyne.com/warranty.)
Telephone: Call our automated system to receive current information by fax or to speak with a company
representative.
Within the U.S.A., call 1-800-870-2221
Outside the U.S.A., call 1-727-530-2340
Document Feedback
We welcome your comments and suggestions about this document. Please mail them to Technical Publications,
Paradyne Corporation, 8545 126th Ave. N., Largo, FL 33773, or send e-mail to userdoc@paradyne.com. Include
the number and title of this document in your correspondence. Please include your name and phone number if you
are willing to provide additional clarification.
Trademarks
Acculink, Bitstorm, Comsphere, DSL the Easy Way, ETC, Etherloop, FrameSaver, GranDSLAM, GrandVIEW,
Hotwire, the Hotwire logo, Jetstream, MVL, NextEDGE, Net to Net Technologies, OpenLane, Paradyne, the
Paradyne logo, Paradyne Credit Corp., the Paradyne Credit Corp. logo, Performance Wizard, StormPort, TruePut are
registered trademarks of Paradyne Corporation. ADSL/R, Connect to Success, Hotwire Connected, iMarc, JetFusion,
JetVision, MicroBurst, PacketSurfer, Quick Channel, ReachDSL, Reverse Gateway, Spectrum Manager, and
StormTracker are trademarks of Paradyne Corporation. All other products and services mentioned herein are the
trademarks, service marks, registered trademarks, or registered service marks of their respective owners.
CE Marking
When the product is marked with the CE mark on the equipment label, a supporting Declaration of Conformity may be
downloaded from the Paradyne World Wide Web site at www.paradyne.com. Select Library → Technical Manuals
→ CE Declarations of Conformity.
2
Page 3

1813 VoIP Gateway User’s Guide
Preface
This manual is written to provide information to network administrators. It covers the
installation, operation and applications of the 1813 VoIP Gateway.
Important Safety Instructions
1. Read and follow all warning notices and instructions marked on the product or included in
the manual.
2. Slots and openings in the cabinet are provided for ventilation. To ensure reliable operation of
the product and to protect it from overheating, these slots and openings must not be blocked
or covered.
3. Do not allow anything to rest on the power cord and do not locate the product where persons
will walk on the power cord.
4. Do not attempt to service this product yourself, as opening or removing covers may expose
you to dangerous high voltage points or other risks. Refer all servicing to qualified service
personnel.
5. When installed in the final configuration, the product must comply with the applicable Safety
Standards and regulatory requirements of the country in which it is installed. If necessary,
consult with the appropriate regulatory agencies and inspection authorities to ensure
compliance.
6. A rare phenomenon can create a voltage potential between the earth grounds of two or more
buildings. If products installed in separate buildings are interconnected, the voltage potential
may cause a hazardous condition. Consult a qualified electrical consultant to determine
whether or not this phenomenon exists and, if necessary, implement corrective action prior to
interconnecting the products.
7. Input power to this product must be provided by one of the following: (1) a UL Listed/CSA
certified power source with a Class 2 or Limited Power Source (LPS) output for use in North
America, or (2) a certified transformer, with a Safety Extra Low Voltage (SELV) output
having a maximum of 240 VA available, for use in the country of installation.
8. In addition, since the equipment is to be used with telecommunications circuits, take the
following precautions:
— Never install telephone wiring during a lightning storm.
— Never install telephone jacks in wet locations unless the jack is specifically designed for wet
locations.
— Never touch uninsulated telephone wires or terminals unless the telephone line has been
disconnected at the network interface.
— Use caution when installing or modifying telephone lines.
3
Page 4

1813 VoIP Gateway User’s Guide
— Avoid using a telephone (other than a cordless type) during an electrical storm. There may be
a remote risk of electric shock from lightning.
— Do not use the telephone to report a gas leak in the vicinity of the leak.
CE Marking
When the product is marked with the CE mark on the equipment label, a supporting Declaration
of Conformity may be downloaded from the Paradyne World Wide Web site at
www.paradyne.com. Select Support -> Technical Manuals -> Declarations of Conformity.
FCC Part 15 Declaration
An FCC Declaration of Conformity may be downloaded from the Paradyne World Wide Web
site at www.paradyne.com. Select Support -> Technical Manuals -> Declarations of
Conformity.
This device complies with Part 15 of the FCC Rules. Operation is subject to the following two
conditions: (1) this device may not cause harmful interference, and (2) this device must accept
any interference received, including interference that may cause undesired operation.
The authority to operate this equipment is conditioned by the requirement that no modifications
will be made to the equipment unless the changes or modifications are expressly approved by the
responsible party.
This equipment has been tested and found to comply with the limits for a Class B digital device,
pursuant to Part 15 of the FCC Rules. These limits are designed to provide reasonable protection
against harmful interference in a residential installation. This equipment generates, uses, and can
radiate radio frequency energy and, if not installed and used in accordance with the instructions,
may cause harmful interference to radio communications. However, there is no guarantee that
interference will not occur in a particular installation. If this equipment does cause harmful
interference to radio or television reception, which can be determined by turning the equipment
off and on, the user is encouraged to try to correct the interference by one or more of the
following measures:
• Reorient or relocate the receiving antenna.
• Increase the separation between the equipment and receiver.
• Connect the equipment into an outlet on a circuit different from that to which the receiver is
connected.
• Consult the dealer or an experienced radio/TV technician for help.
4
Page 5

1813 VoIP Gateway User’s Guide
Table of Contents
CHAPTER 1 INTRODUCTION...........................................................................................................................7
1.1 PRODUCT OVERVIEW .......................................................................................................................................7
1.2 FEATURES.........................................................................................................................................................7
1.3 APPLICATIONS..................................................................................................................................................8
CHAPTER 2 HARDWARE INSTALLATION....................................................................................................9
2.1 RESET BUTTON ................................................................................................................................................9
2.2 WIRING INSTALLATION...................................................................................................................................10
2.3 FRONT PANEL LED INDICATORS ....................................................................................................................11
CHAPTER 3 LOGIN VIA THE WEB BROWSER..........................................................................................12
3.1 IP ADDRESS ...................................................................................................................................................12
3.2 VERSION ........................................................................................................................................................13
3.3 LOGIN PROCEDURE ........................................................................................................................................14
CHAPTER 4 BASIC CONFIGURATION.........................................................................................................15
4.1 ACCESS CONTROL..........................................................................................................................................15
4.2 WAN SETUP ..................................................................................................................................................17
4.3 LAN IP ADDRESS ..........................................................................................................................................20
4.4 SAVE ..............................................................................................................................................................22
4.5 ERASE ............................................................................................................................................................22
4.6 REBOOT .........................................................................................................................................................23
CHAPTER 5 SIP CONFI GURATION...............................................................................................................23
5.1 INTRODUCTION ..............................................................................................................................................24
5.2 LOCAL............................................................................................................................................................25
5.3 PHONELIST ....................................................................................................................................................27
5.4 REMOTE .........................................................................................................................................................29
5.5 CALLFORWARD..............................................................................................................................................31
CHAPTER 6 PERFORMANCE MONITORING.............................................................................................32
6.1 SYSTEM STATISTICS .......................................................................................................................................32
CHAPTER 7 SOFTWARE UPGRADE VIA FTP.............................................................................................36
APPENDIX A: SPECIFICATIONS.........................................................................................................................38
APPENDIX B: PIN ASSIGNMENTS......................................................................................................................40
APPENDIX C: TROUBLESHOOTING.................................................................................................................41
APPENDIX D: GLOSSARY.....................................................................................................................................42
5
Page 6

1813 VoIP Gateway User’s Guide
6
Page 7
1813 VoIP Gateway User’s Guide
Chapter 1 Introduction
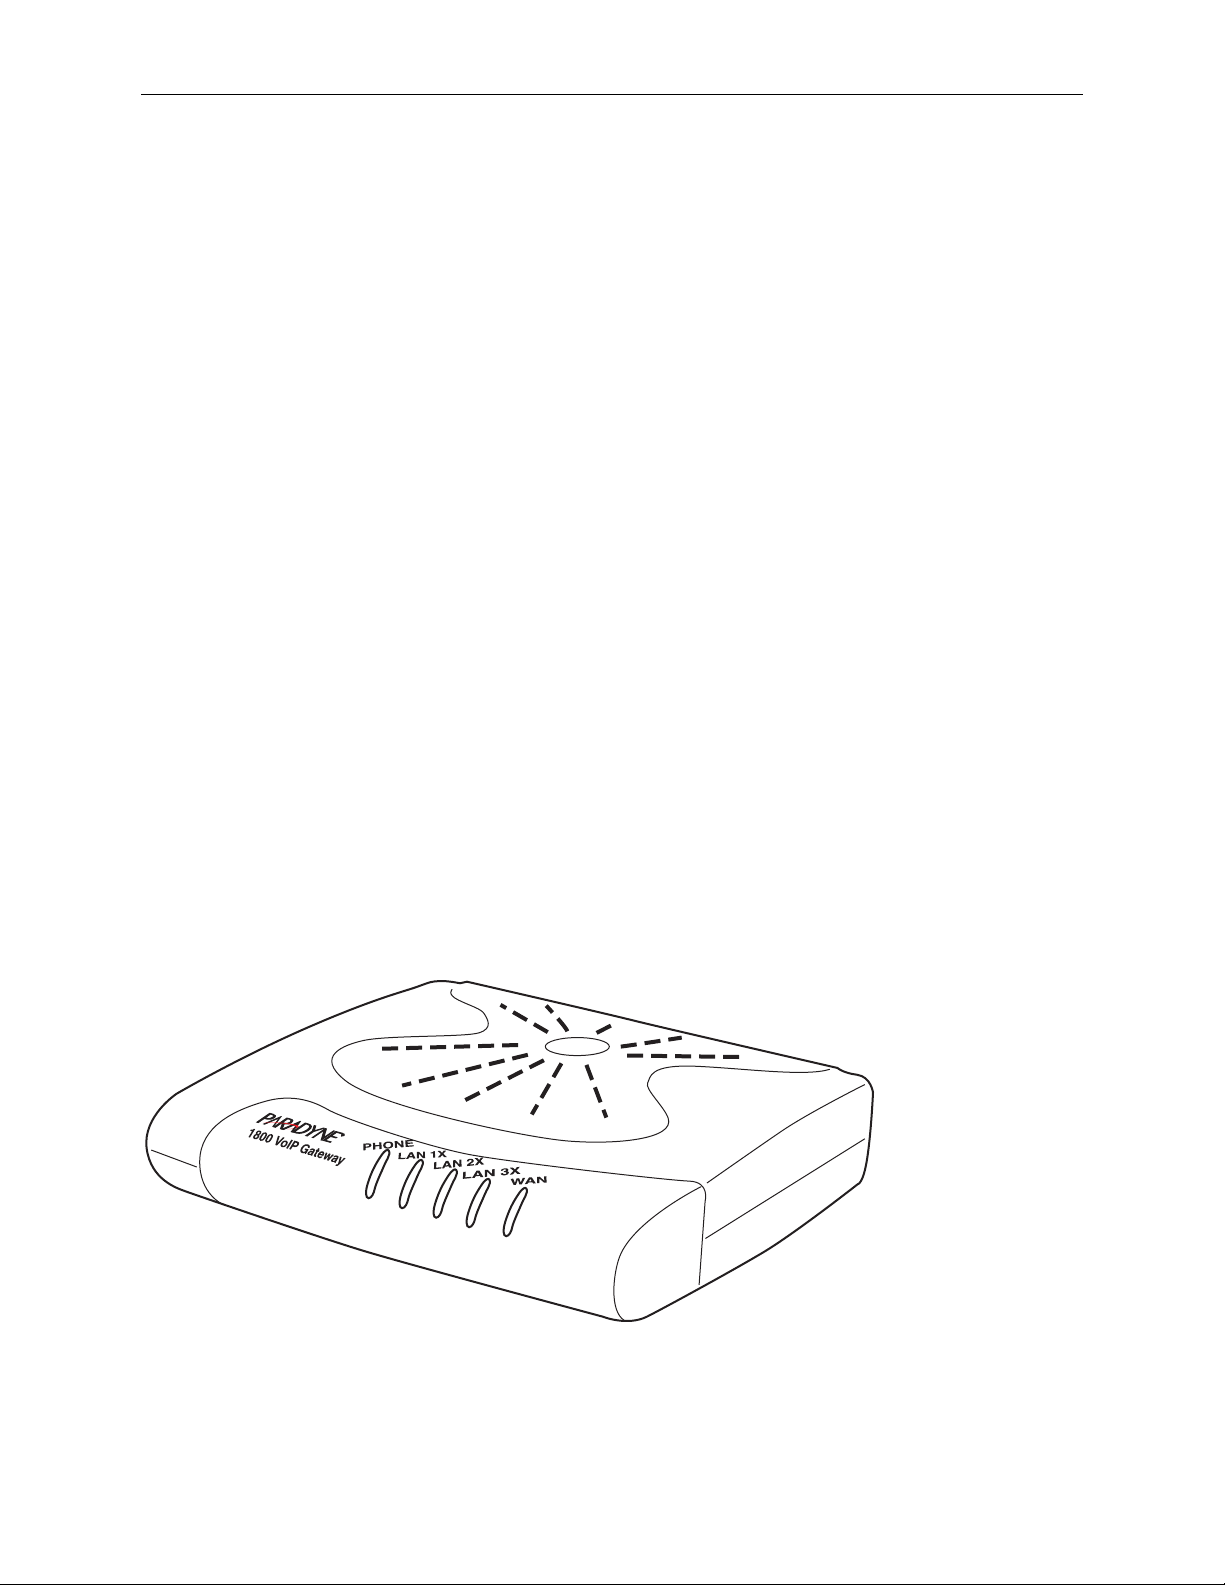
This chapter introduces the 1813 VoIP Gateway. It includes a product overview, a description of
the product’s features and applications, and an explanation of the front panel LED indictors.
1.1 Product Overview
Paradyne’s 1813 is a powerful VoIP Gateway, providing predictable, real-time, toll-quality voice
over the Internet. The 1813 VoIP Gateway is designed for residential and business users. It
connects to an external Cable or DSL modem to access your broadband service.
An ordinary telephone connects to the RJ11 port (telephone jack) on the back of the 1813 VoIP
Gateway, allowing calls to be routed to anywhere in the world— significantly reducing or
eliminating long distance charges. Your PCs connected to the 1813 VoIP Gateway do not have to
be turned on for you to make calls. The 1813 VoIP Gateway solves all of your network and
telephony needs in one integrated unit, which reduces the space requirements and cost of
hardware and cabling. This makes the 1813 VoIP Gateway the most cost effective solution for
your application.
1.2 Features
Supports Voice over IP (VoIP) using SIP (Session Initiation Protocol, RFC 3261)
Uses an ordinary telephone to make Internet calls with low cost
Use just one IP address to access the Internet over your entire network
Supports Caller ID
Supports silence suppression
Configurable through your networked PC’s web browser
Remote administration and remote firmware upgrades over the Internet
Supports PPTP, L2TP, and IpSec pass-through
Internal 4-Port switch dramatically speeds up your gaming and multimedia connections
04-17595
7
Page 8
1813 VoIP Gateway User’s Guide
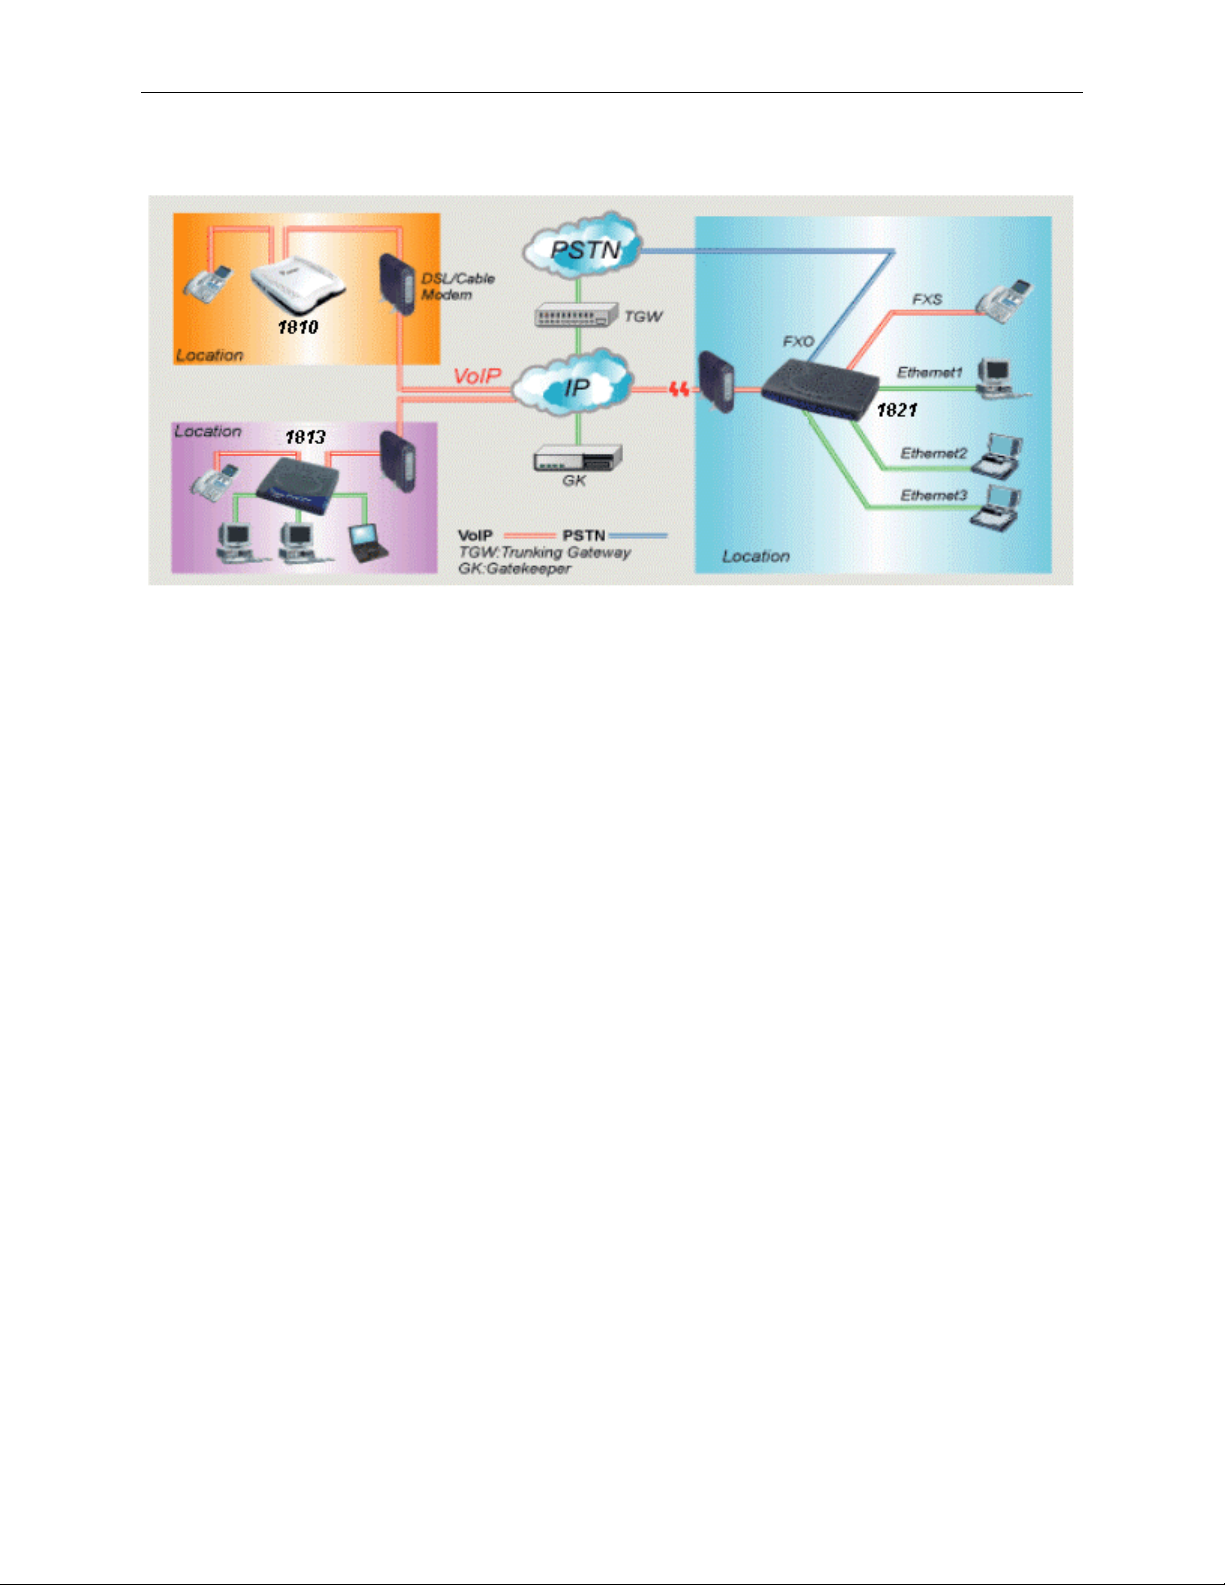
1.3 Applications
8
Page 9
1813 VoIP Gateway User’s Guide
Chapter 2 Hardware Installation
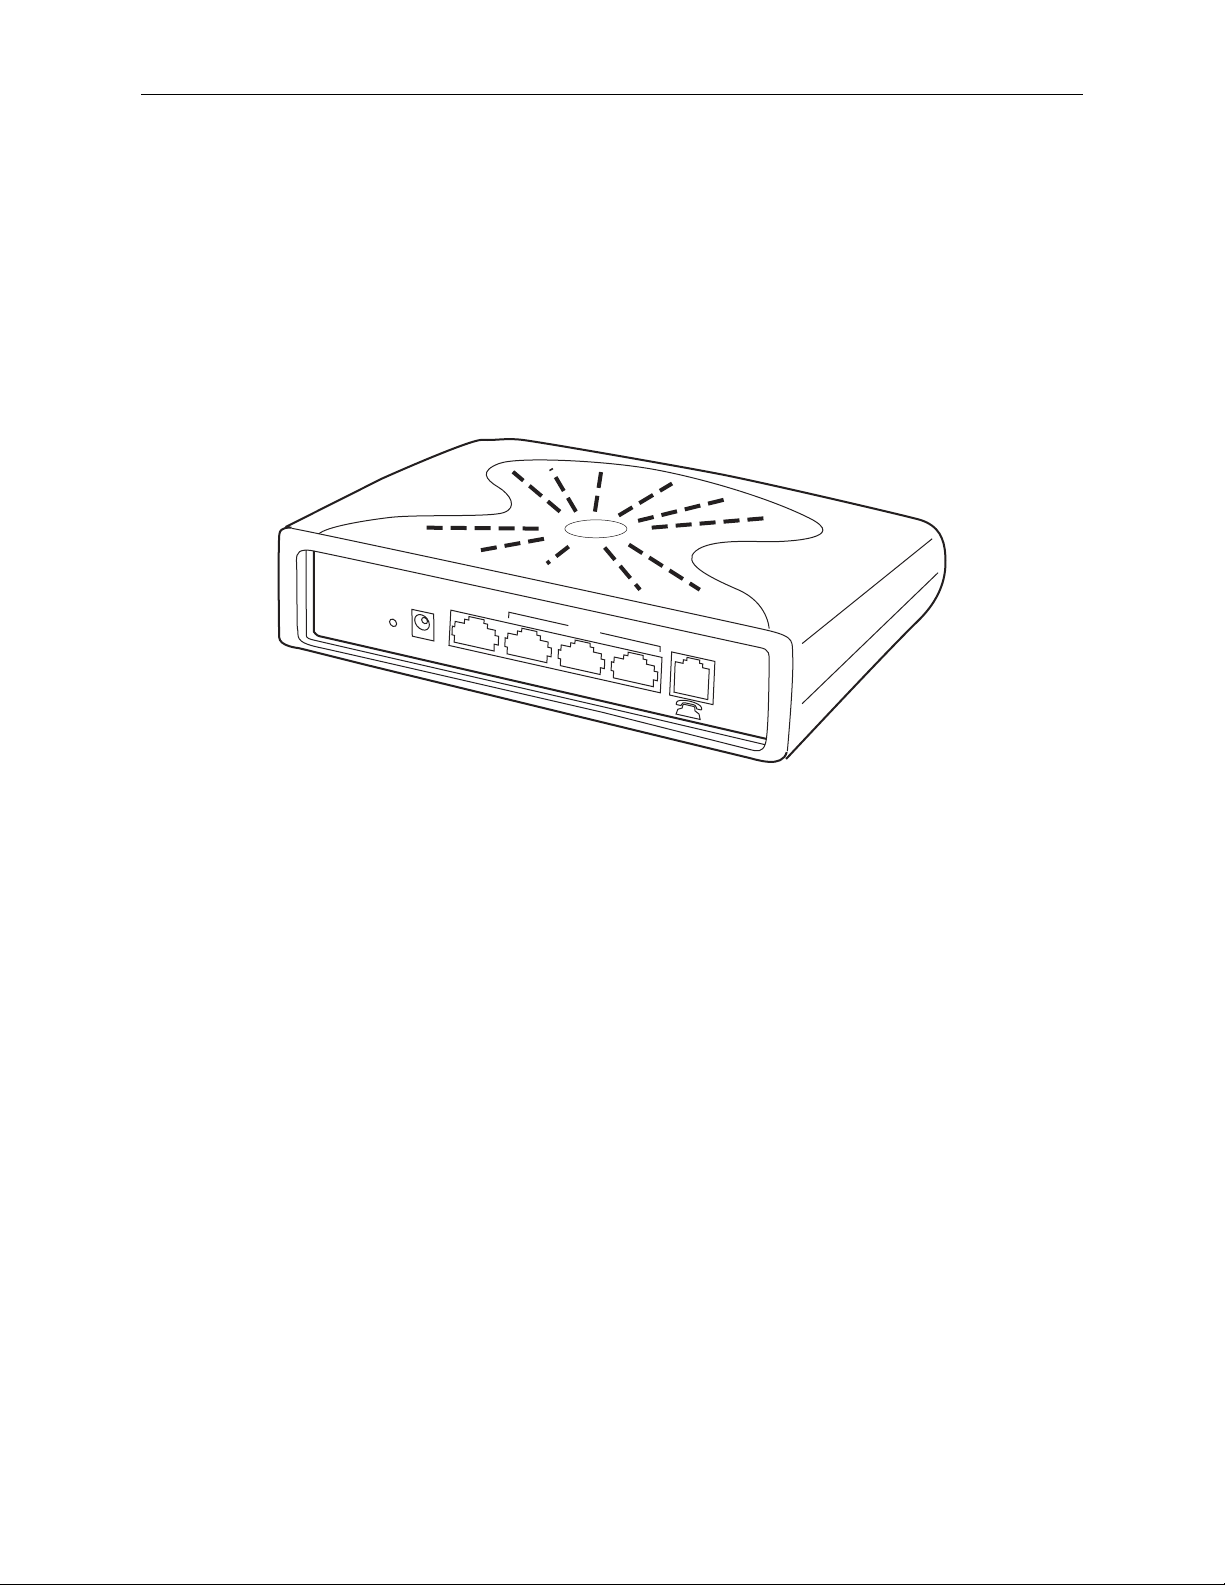
2.1 Reset Button
The figure below illustrates the back panel of the Gateway. On the left side of the rear panel
there is a reset button. This button is used to reload the factory default settings. Use a small
object like a ballpoint pen to press the button and hold it down for over three seconds. The
Gateway will be reset and all parameters will return to their factory default settings. You can
verify this process by monitoring the PHONE LED. It will turn off and then on again as the
Gateway restarts.
P
OWER
W
AN
LAN
3X
2
X
PHONE
1
X
04-17596
9
Page 10
1813 VoIP Gateway User’s Guide
2.2 Wiring Installation
The next figure illustrates the wiring connections for the Gateway.
WAN
POWER
LAN
3X
2X
PHONE
1X
Power Cable
ADSL LAN Port
ADSL Router Modem
Ethernet
Cable
(RJ45)
Network
Card
Port
04-17594
Telephone Cable
(RJ11)
Telephone
Internet
PC
Note: If you have an installed DSL connection, disconnect the RJ45 cable from the back of your
computer and connect it to the WAN port of the 1813 VoIP Gateway.
1. Connect the power adapter to the POWER jack of the Gateway, then plug the power adapter
into an AC wall outlet.
2. Connect the WAN port of the Gateway to your DSL or cable modem’s LAN port with an
RJ45 connector cable.
3. Connect the LAN ports (1X- 3X) of the Gateway to your PC’s Ethernet port, or to an
Ethernet switch or hub, with an RJ45 cable. One is supplied with the Gateway.
4. Connect the Phone port of the Gateway to your analog telephone set with an RJ11 connector
cable.
Note 1: If the device fails to power on, or it malfunctions, first verify that the power supply is
correctly connected, and then power it on again.
Note 2: Restore the default parameters of the Gateway at any time by holding down the Reset
button for over three seconds.
10
Page 11
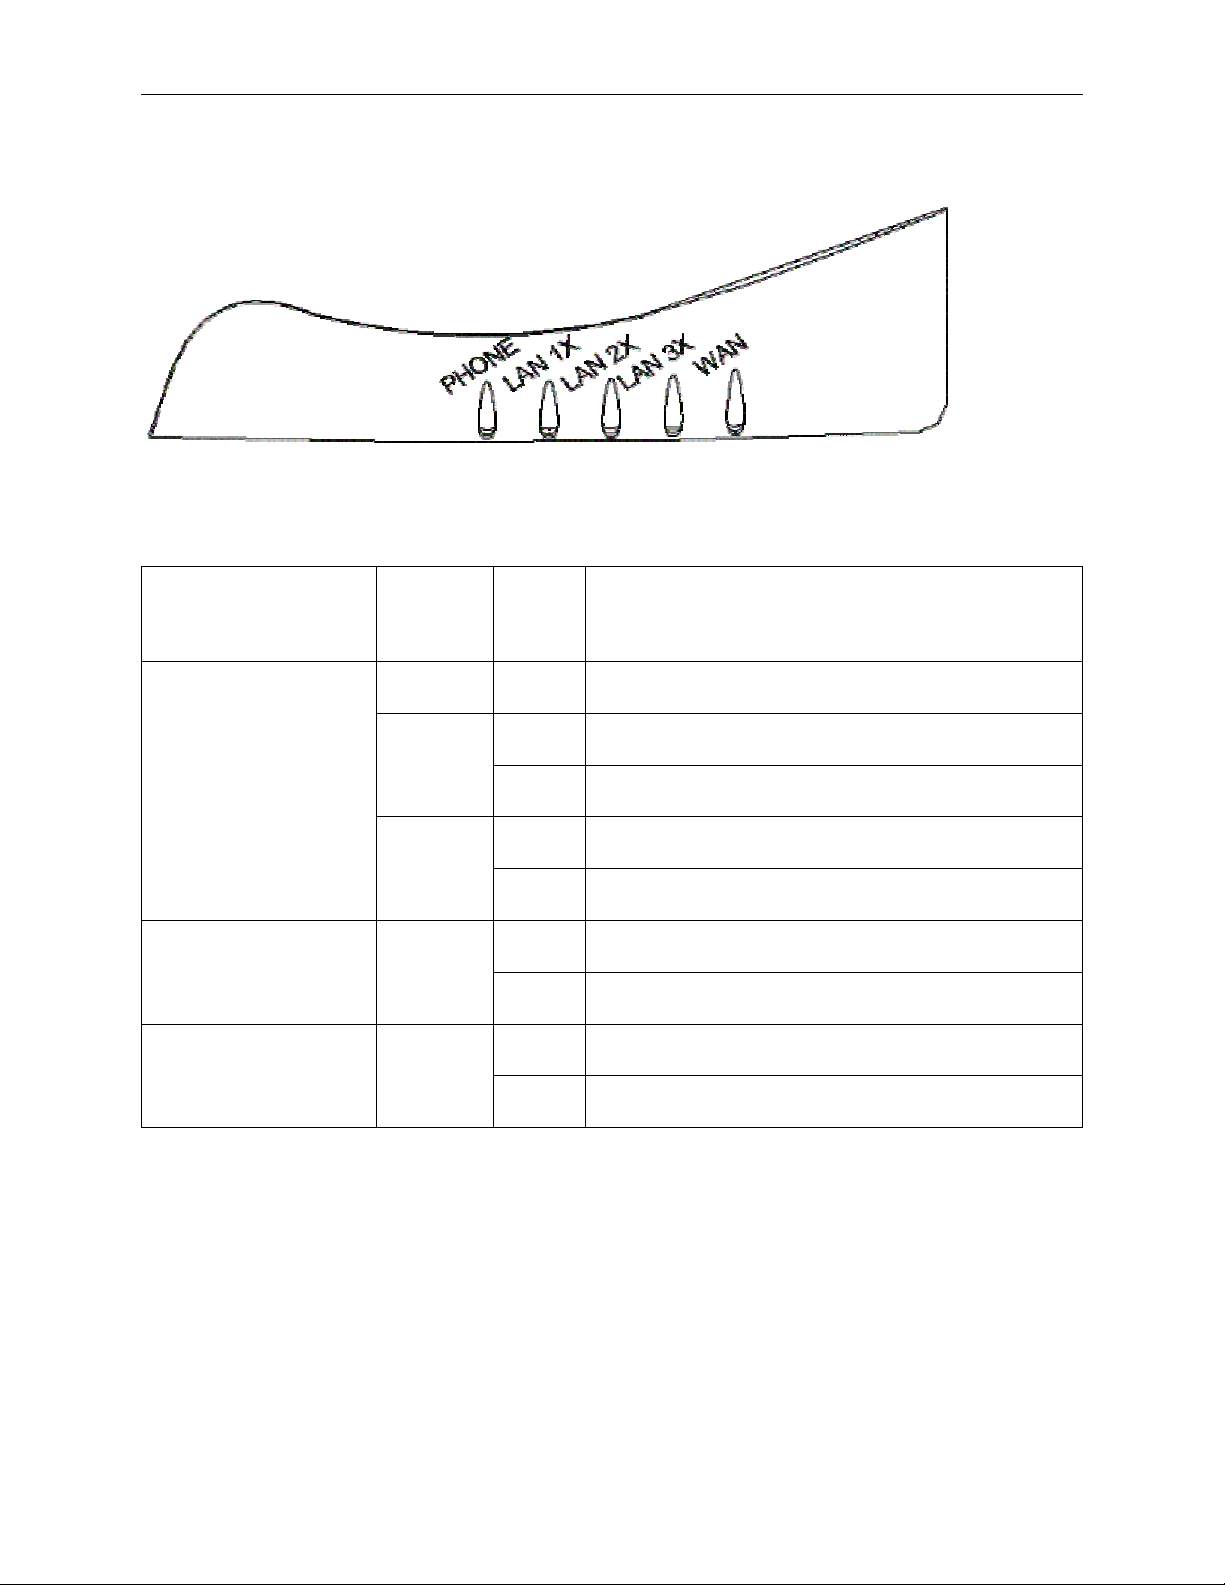
2.3 Front Panel LED Indicators
LED Indicator Color Mode Function
1813 VoIP Gateway User’s Guide
PHONE
Red On Device booting
On Registered to SIP proxy successfully Green
Flash Phone is off-hook
Orange
On Not registered to SIP proxy
Flash Phone is off-hook
On An Ethernet link is established LAN 1X – 3X Green
Off An Ethernet link is not established
On The WAN link is established WAN Green
Off Device booting
Note: If the device fails to power on, or it malfunctions, first verify that the power supply is
correctly connected, and then power it on again.
11
Page 12
1813 VoIP Gateway User’s Guide
Chapter 3 Login via the Web Browser
This section describes how to manage the VoIP gateway via a Web browser from the local or
remote end. You can use a web browser such as Microsoft Internet Explorer version 6 or above,
or Netscape Navigator version 6 or above. It is best to set your display resolution to 1024 x 768.
To change the resolution, go to the Microsoft Windows control panel and click on the Display
icon. You will find the display settings there.
A unique default user account is assigned with user name root and password 1234. You can
change the default password later.
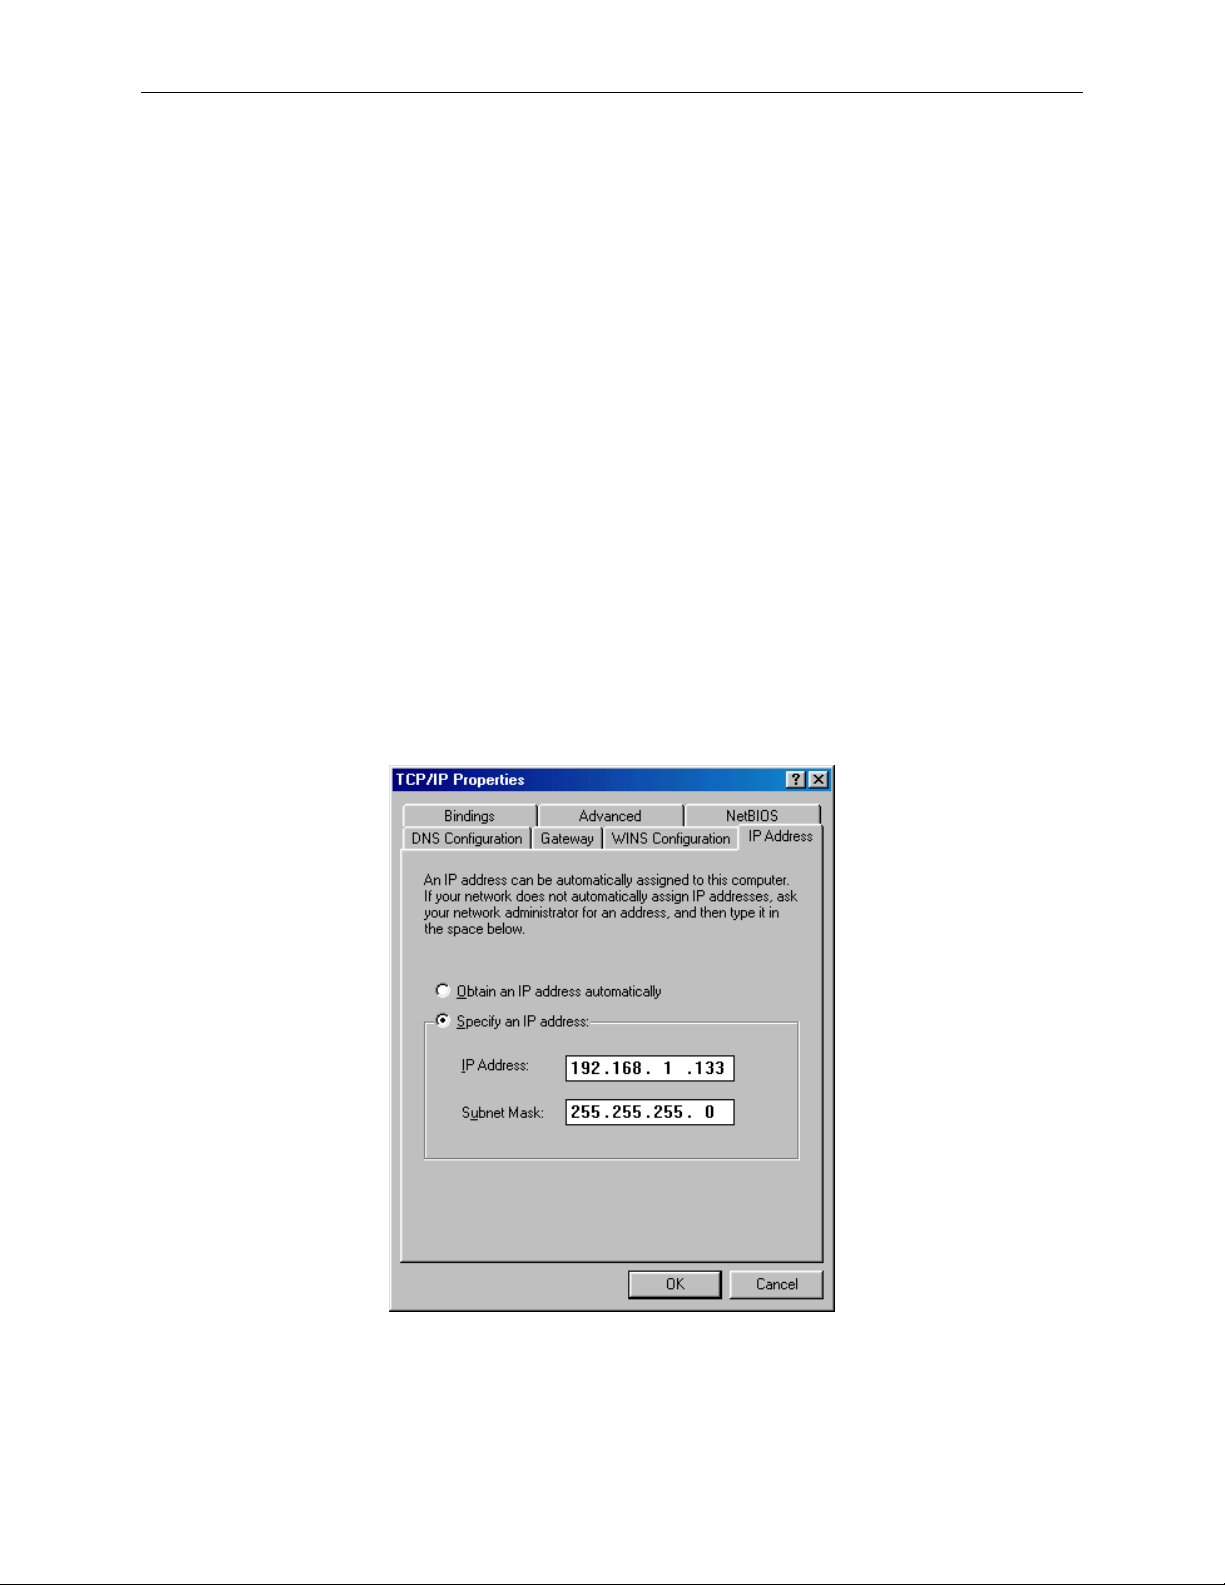
3.1 IP Address
To log on to the device using a web browser, your workstation and the Gateway must both be on
the same network segment. The default IP address for the Gateway is 192.168.1.101. You can
modify the IP address of your PC by modifying its TCP/IP parameters. Follow the steps below:
STEP 1: In Windows, go to Control Panel and select Network Connections. Select your Local
Area Connection (LAN) and right-click on it. Select Properties from the ensuing menu.
On the General tab, scroll down to Internet Protocol (TCP/IP) and select it. Then click
on the Properties button.
STEP 2: On the IP Address tab of the TCP/IP screen, change the IP address to the domain of
192.168.1.x/24.
STEP 3:
Click on OK to submit the settings. You are prompted to restart the computer. Reboot
the computer as requested.
STEP 4: Start your Internet browser with the default IP address 192.168.1.101.
12
Page 13
1813 VoIP Gateway User’s Guide
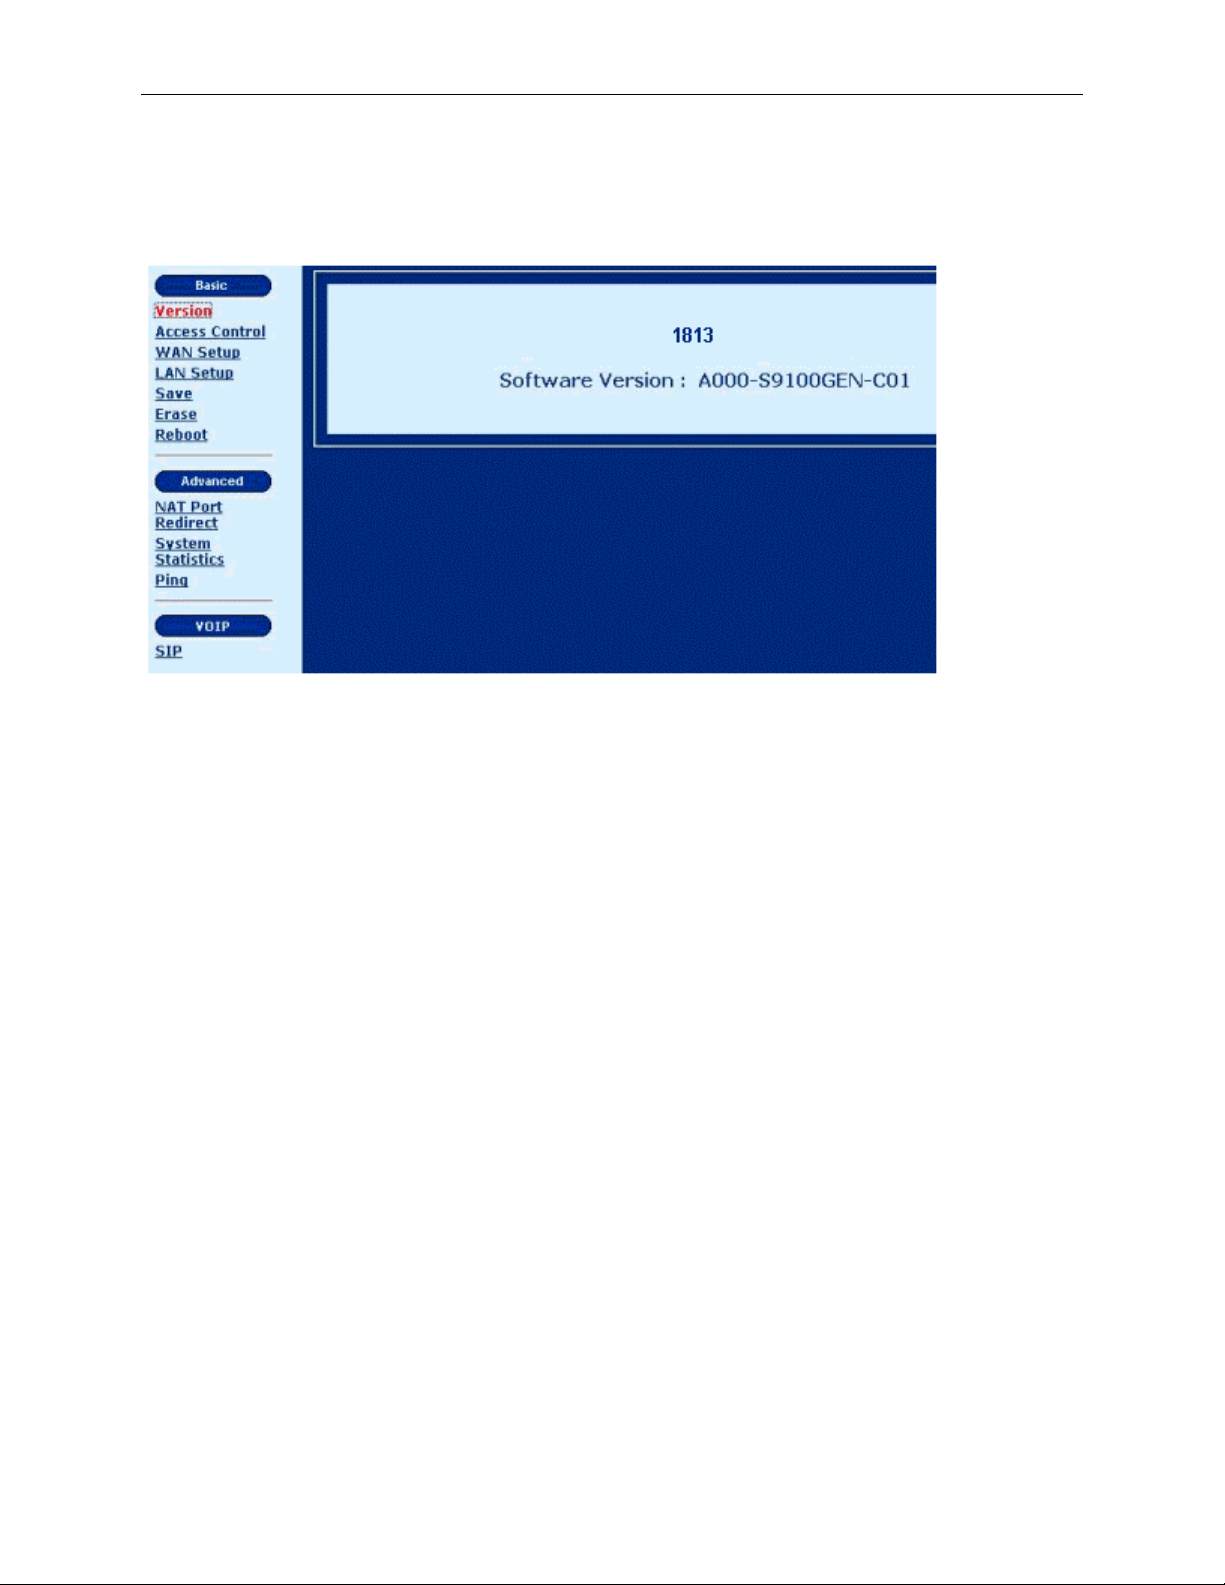
3.2 Version
To verify the software version of your Gateway, from the Basic Menu bar, click on Version
Information. The software version is displayed.
13
Page 14
1813 VoIP Gateway User’s Guide
3.3 Login Procedure
To log on to the system from the web browser, follow the steps below:
STEP 1: Start your Internet browser.
STEP 2: Type the IP address for the Gateway in the Web address field. For example, if
the IP address is 192.168.1.101, type
STEP 3: You will be prompted to enter your user name and password. Type the
password. The default user Name is root, and the default password is 1234. The
user name and password are case-sensitive.
STEP 4: After successfully logging in, you will reach the main menu. On the left is a
list of links, categorized into three types via: Basic, Advanced, and VOIP.
http://192.168.1.101.
14
Page 15
1813 VoIP Gateway User’s Guide
Chapter 4 Basic Configuration
From the Basic menu bar, you can change passwords, configure the WAN/LAN interfaces, set
up routing, save settings, reboot the device, and retrieve the factory default settings.
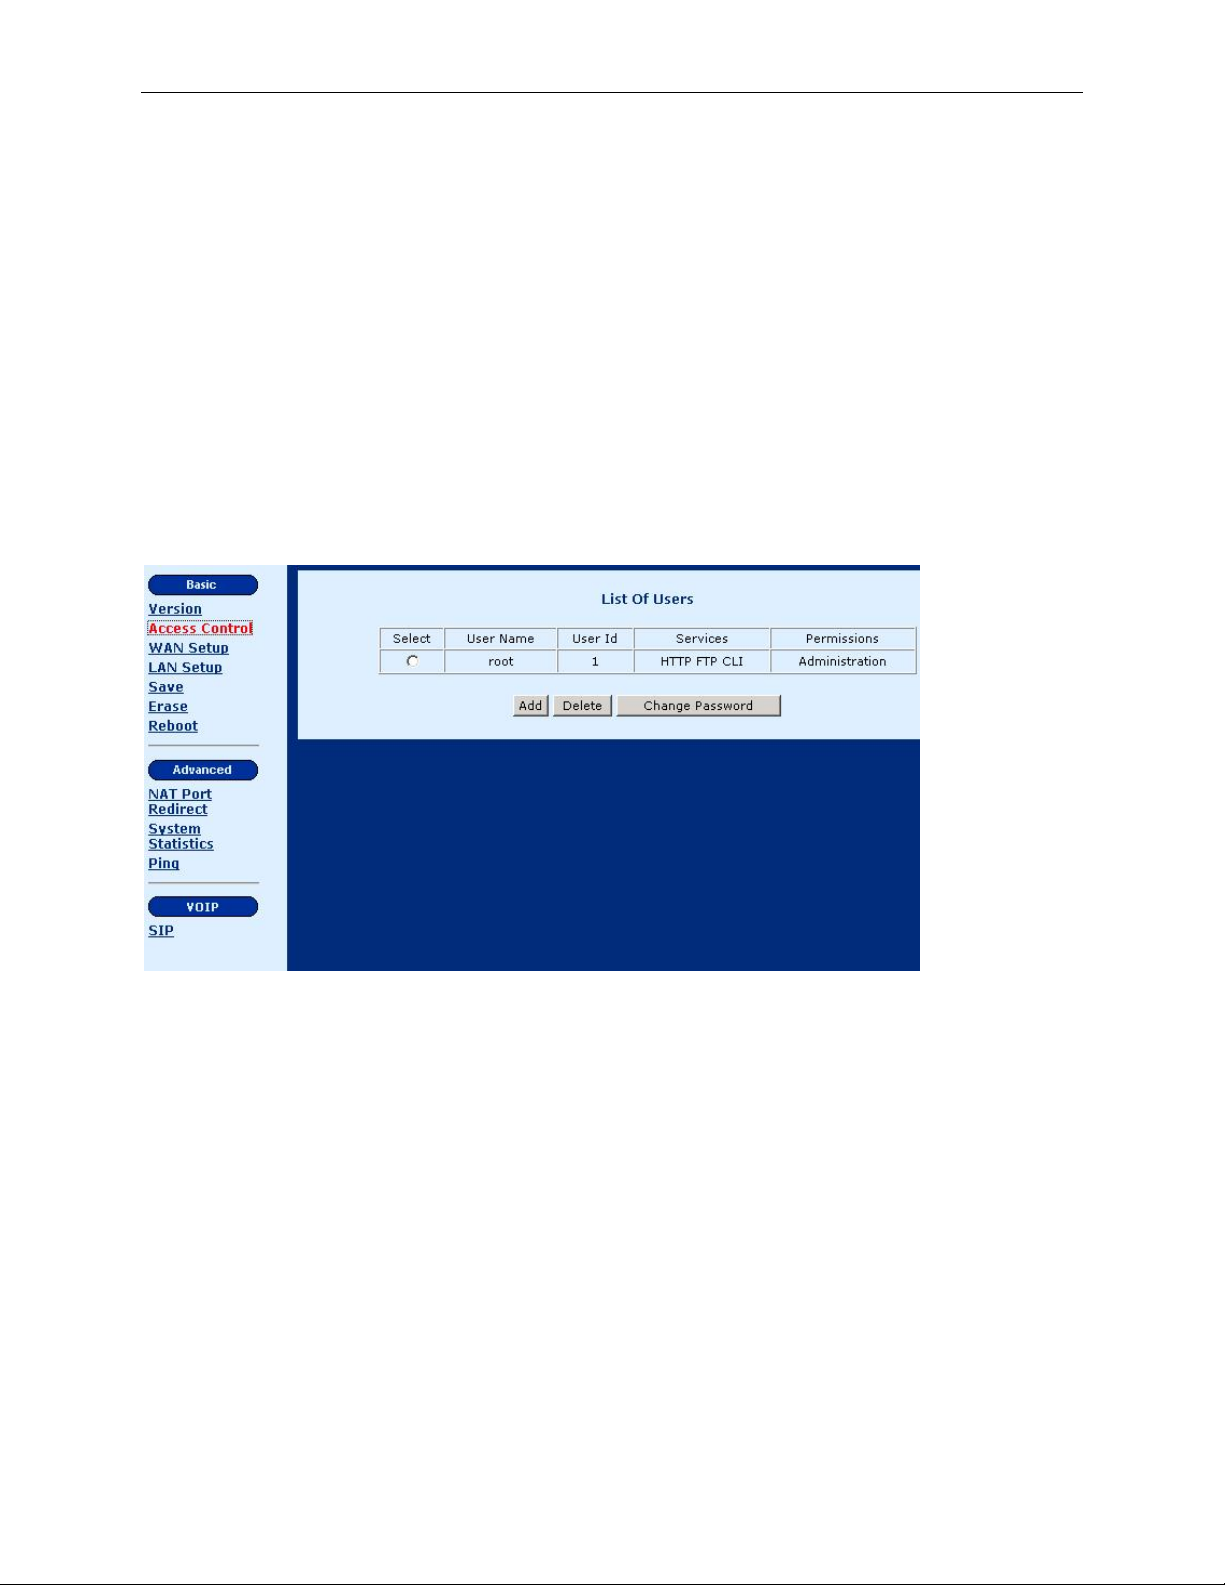
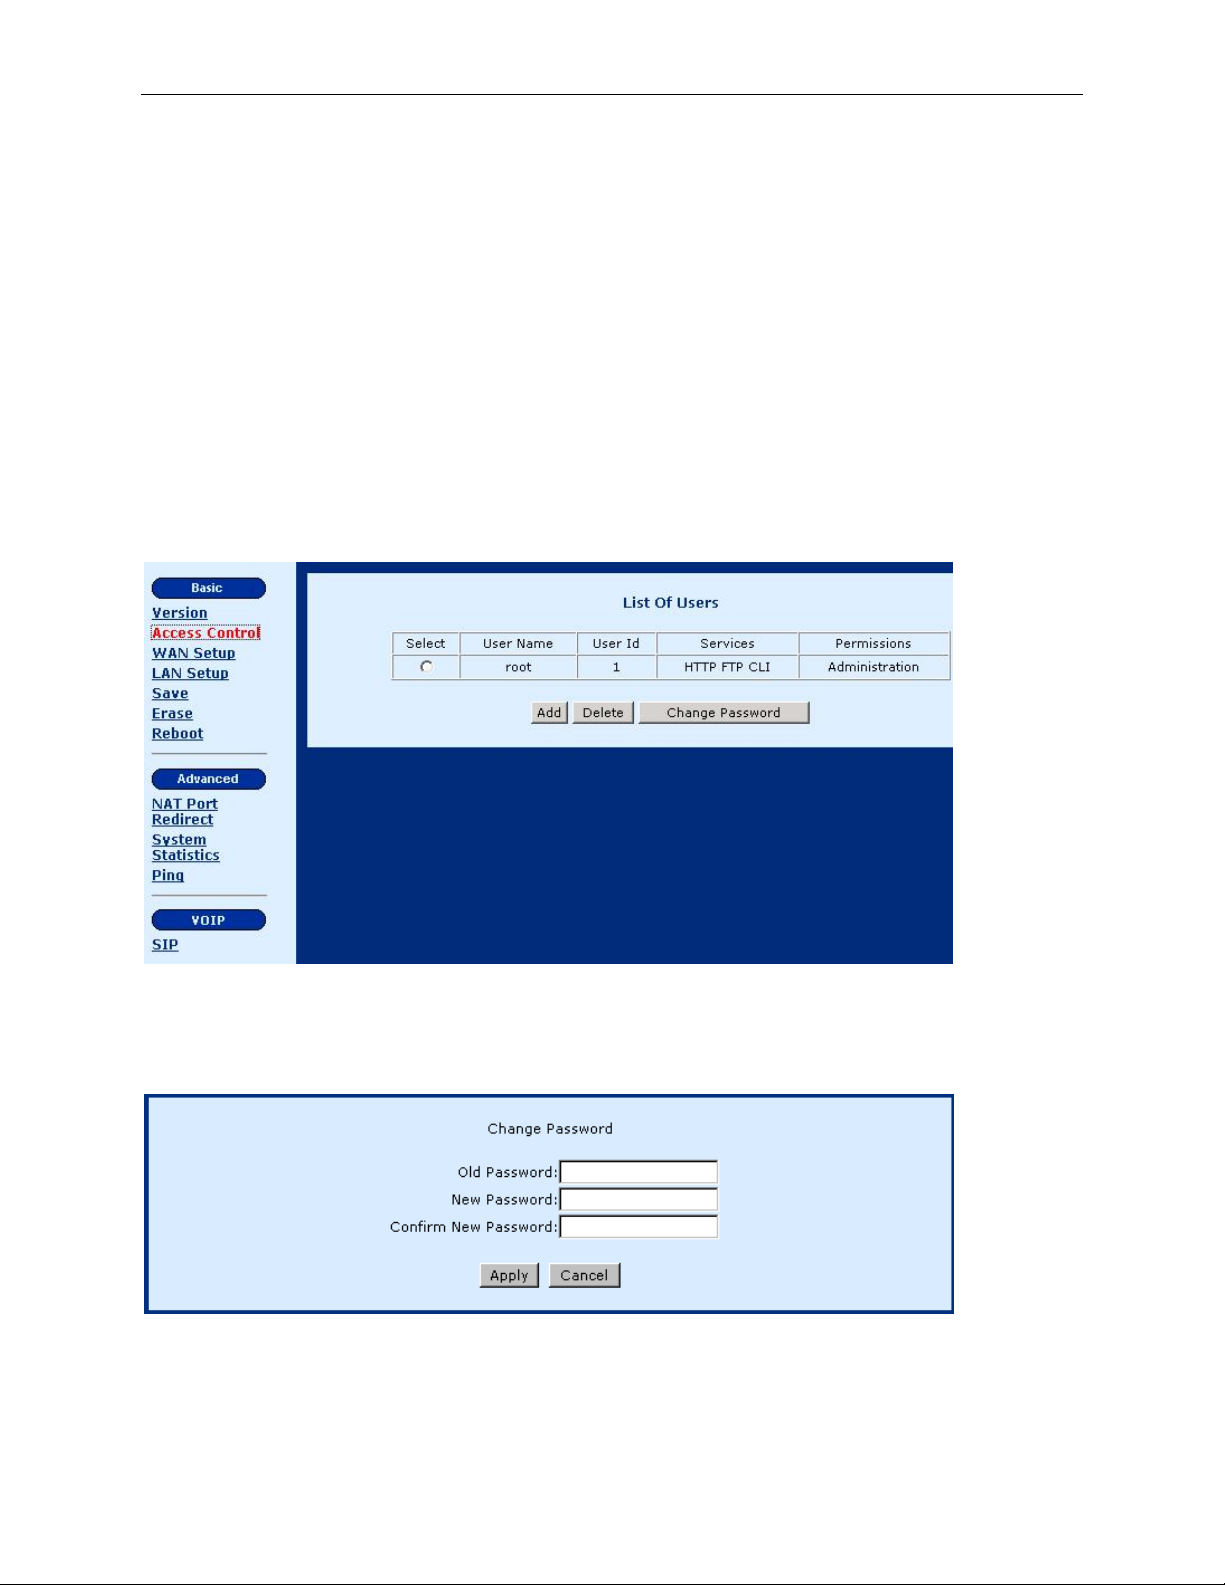
4.1 Access Control
To manage the List of Users, click on Access Control on the menu bar. On the Access Control
screen, you can add or delete users, and change their passwords.
4.1.1 Change the Password
To modify the password, click on Access Control on the menu bar. Select the applicable User, then click on Change Password.
On the Change Password screen, type the old password and type the new password twice. Click
on Apply to submit the settings.
If you change the password, make sure you keep a record of it in a safe place, as you will require
it the next time you log on.
15
Page 16

1813 VoIP Gateway User’s Guide
4.1.2 Add User
To add a user entry, click on the Add button, and fill out the parameters shown below.
Click on Apply to submit the settings.
• User Name: Enter the new user name; the User Name is case-sensitive and cannot
contain spaces.
• Password: Enter a password for the new user; the password is case-sensitive and cannot
contain spaces.
• Services: Select authorization for CLI, HTTP or FTP services.
• Permissions: Select Ordinary or Administration user permission. Users with
Administration authority (like root) can alter the Gateway configuration.
4.1.3 Delete User
To delete a User from the list of users, complete the following steps:
STEP 1: Click on Access Control on the menu bar.
STEP 2: Choose a User entry, and click on Delete.
16
Page 17

4.2 WAN Setup
Click on WAN Setup from the tool bar.
1813 VoIP Gateway User’s Guide
The following are the common settings to set up these services.
Static IP address: Your Internet Service Provider (ISP) assigns you a static IP address, or the IP
address of the host needs to be manually configured in your network.
DHCP mode: You obtain an IP address from your ISP automatically, via DHCP protocol.
PPPoE mode: Your ISP requires the use of PPPoE to connect to its service.
17
Page 18

1813 VoIP Gateway User’s Guide
4.2.1 Static IP address
Select WAN Setup in the Basic Menu. Then select Static IP address (your ISP assigns you a static IP address, or an IP address of the hosts needs manually configured in your network), and click on Next. The following screen is displayed.
Fill in the parameters and click on Next.
WAN IP address Enter the WAN IP address.
Subnet Mask The subnet mask of the selected interface.
Default Gateway Enter the gateway IP address of the IP network
Primary DNS Server
Secondary DNS Server
Enter the primary DNS server IP address.
Enter the secondary DNS server IP address that will be
used in the event that the primary server IP address fails
or is not available.
18
Page 19

1813 VoIP Gateway User’s Guide
4.2.2 DHCP Mode
Select WAN Setup in the Basic Menu. Then select DHCP mode (the host obtains an IP address from the ISP automatically via DHCP protocol) and click on Next. The following screen is displayed. Click on Yes.
4.2.3 PPPoE
PPPoE provides session authentication using either Password Authentication Protocol (PAP) or
Challenge Handshake Authentication Protocol (CHAP). Session accounting is possible and
conservation of bandwidth can be achieved by closing down unused sessions. By utilizing PPP,
link and network parameters are easily negotiated between the Gateway and the ISP.
When using PPPoE, the system is assigned an IP address from the Internet Service Provider as
part of establishing the network connection. The system can be configured as a DHCP server for
the LAN, and NAT can be used to translate private addresses to public addresses. In this way,
computers in the LAN do not have to have their own public IP addresses.
To set up PPPoE, select WAN Setup in the Basic Menu. Enter your user name and password (as assigned by your ISP) and click on Apply.
19
Page 20

1813 VoIP Gateway User’s Guide
4.3 LAN IP Address
The default LAN IP address is 192.168.1.101. Click on LAN Setup from the menu bar to
configure the LAN IP address and subnet mask. The following screen is displayed.
20
Page 21

1813 VoIP Gateway User’s Guide
Enter or select the parameters as explained below. Click on Apply to submit the settings.
LAN IP Address Enter the LAN IP address.
NetMask Enter the subnet mask of the IP network.
DHCP Server Click on Enable or Disable.
Starting IP Address
End IP Address
Enter the first IP address of the address pool in the DHCP
server. Note that the IP address should be in the same
subnet as the Gateway’s LAN IP address.
Enter the last IP address of the address pool in the DHCP
server. Note that the IP address should be in the same
subnet as the Gateway’s LAN IP address.
Click on No to change the configuration only. Click on Yes to save the configuration and reboot
the system. The Web configuration will be interrupted. Use the new IP address to login (whether
you clicked on the Yes or No button).
21
Page 22

1813 VoIP Gateway User’s Guide
4.4 Save
To save the settings to Flash, click on Save & Reboot from the menu bar. In the main pane, click on Save.
4.5 Erase
To erase the settings and reset to the original default click on Erase on the menu bar. In the main pane of the following display, click on Erase. Then, reboot the system.
22
Page 23

1813 VoIP Gateway User’s Guide
4.6 Reboot
To reboot the Gateway, click on Reboot from the menu bar. In the main pane, click on Reboot.
Chapter 5 SIP Configuration
SIP, the Session Initiation Protocol, is a signaling protocol for Internet conferencing, telephony,
presence, events notification, and instant messaging. It is the Internet Engineering Task Force
(IETF) standard for multimedia conferencing over IP, described in RFC 3261. It is designed to
address the functions of signaling and session management within a packet telephony network.
Signaling allows call information to be carried across network boundaries. Session management
provides the ability to control the attributes of an end-to-end call.
Session Initiation Protocol is a peer-to-peer protocol. There are four components in the SIP
standard:
• User Agent (UA)
• Proxy Server
• Registrar Server, and
• Redirect Server.
This section describes the SIP User Agent and the call establishment between User Agents.
23
Page 24

1813 VoIP Gateway User’s Guide
5.1 Introduction
The SIP page appears when SIP is clicked in the in the hyperlinks menu under VoIP. This is the
first and the initial screen for SIP configuration, which lists configured SIP Parameters.
The screen allows the following actions to be performed. Their configurations are described in
the following sections.
• Local: VoIP host/voice CODEC configuration for the Gateway, and SIP proxy/registrar
configuration if necessary.
• PhoneList: SIP phone number configuration for the Gateway.
• Remote: Buddy phone number configuration. The Gateway looks up the buddy list for
the dialed phone number first. If the phone number is not listed, then the Gateway queries
the SIP proxy. This setting is also suitable for peer-to-peer calling in cases where there is
no SIP Registrar/proxy.
• CallForward: Call forwarding configuration.
24
Page 25

1813 VoIP Gateway User’s Guide
5.2 Local
The Local tab configures the local terminal parameters. The page displays the SIP Configuration
List. To configure the local parameters, you can click on the Config button or Modify button.
The Config button changes all the local parameters based on the default settings. The Modify
button configures the parameters for the selected part.
The following screen appears when you select Config.
25
Page 26

1813 VoIP Gateway User’s Guide
Config Host
Enter or select the SIP host parameters:
Interface
Choose an interface over which the SIP host will transmit /receive the
SIP messages. The WAN interface is mandatory and there are no
other selectable options.
Transport
Choose the transport protocol. It can be either UDP or TCP. The
default is UDP. Presently only UDP is supported.
Max Digits The limited maximum number of digits allowed.
Port No
Port number of user-agent where it receives the SIP messages. The
default port number is 5060, which is a well-known port for SIP
protocol.
Use Proxy
Choose YES if a Proxy or Registrar server will be used. Also
configure the Proxy Info and Registrar. Choose No if a
Proxy/Registrar server won’t be used. With this setting, the proxy and
registrar information will be ignored.
Config Proxy/ Registrar
This section configures the proxy server IP address and port number. A proxy is an intermediary
program that acts as both a server and a client for the purpose of making requests on behalf of
other clients. Requests are serviced internally or transferred to other servers. A proxy interprets
and, if necessary, rewrites a request message before forwarding it.
• Host Addr: IP address of the SIP proxy server, used for VOIP service.
• Port No: Port number of the SIP-Proxy server. The default port number is 5060.
Domain Information
This section configures the Registrar Server IP address and port number. A Registrar server
accepts REGISTER requests. A registrar is typically collocated with a Proxy or Redirect server
and may offer location services. The Registrar saves information about where a party can be
found.
• Domain: domain name of the SIP Registrar server.
CODECs Information
This section configures the Codecs to be supported for the configured User-Agent. PCMU (u-
law), PCMA (a-law), and G.729 are the codecs which can be selected. Multiple items can be
checked. The final CODEC is up to the negotiation with the party or SIP proxy.
26
Page 27

1813 VoIP Gateway User’s Guide
5.3 PhoneList
The PhoneList tab lists and configures the local phone parameters. This section configures the
SIP parameter required to build SIP messages for the phone attached to the Gateway to send
signaling information to the other party. When a call is received, the Gateway checks whether
the called number matches any of the entries in the phone port list. If no entry is matched, the
call request is dropped. The 1813 VoIP Gateway supports an FXS port for phone service and
there is a single entry, Port No. 1, in the phone list.
Port No
User Name
Display Name
Expire:
Qvalue
This displays the port number. Port No. 1 is mandatory
and is not selectable.
Name of the local SIP host. When a call is received, the
host checks whether the called number matches the entry
in the phone port list. If it is not matched, the call request
will be dropped.
The name displayed on phone sets that support the Caller
ID function, when you call them. It is for identification
purposes only, and can be used to hide or show the actual
user name.
The time period the user’s registration is valid with the
Registrar/Proxy Server. The default value is 120 seconds.
Enter a value between 0 and 1 for registering with the
proxy (in case the same username is registered from a
different location). Decimals are accepted, such as 0.3.
In general, a larger number has higher priority for the
proxy to connect the call. If the same Qvalue is used, the
call connection is up to the call policy of the proxy.
Codec:
The preferred codec of this user. The default is PCMU
first.
27
Page 28

1813 VoIP Gateway User’s Guide
DTMF The DTMF method is inband.
Packetization Period
The period of time that the voice packets are packetized.
The value always shows 20 milliseconds.
Auth User Name
The authentication user name for the Registrar/proxy,
which is assigned by the service provider.
Auth Password
The authentication password for the Registrar/proxy,
which is assigned by the service provider.
The Register button allows the user to manually make the Gateway register with the remote
proxy server. The Modify button changes the phone parameters.
If the Register button is not clicked on after modification of phone information, the Gateway
will automatically register with the remote proxy until the expiration of timeout (120 seconds by
default). It is recommended to execute the Register button after any modification in order for the
proxy to keep the up-to-date phone information of the Gateway.
28
Page 29

1813 VoIP Gateway User’s Guide
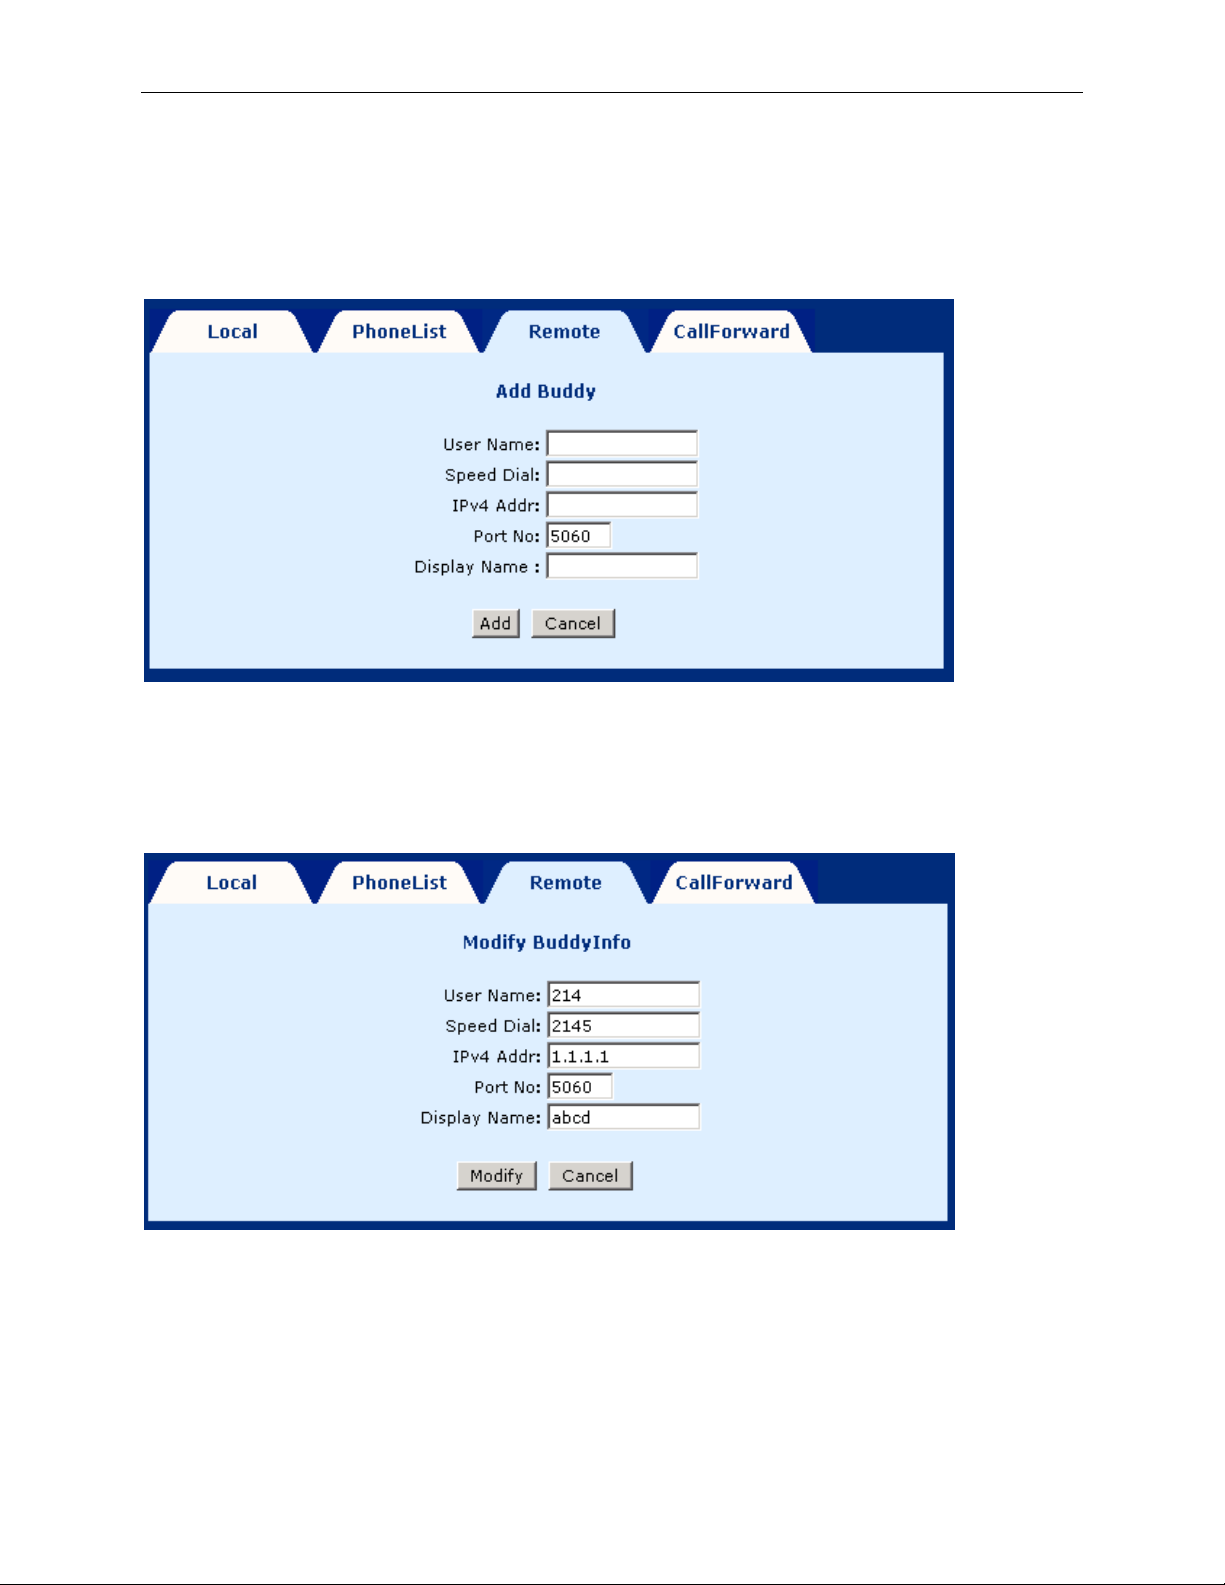
5.4 Remote
The Remote tab configures the buddy list. The Gateway looks up the buddy list for the dialed
phone number first. If the phone number is not listed, then the Gateway queries the SIP proxy. It
is also suitable for peer-to-peer calling in cases without a SIP Registrar/proxy. For the case
without a SIP Registrar/proxy, the host phone port can’t call the user agent that is not in the
buddy list.
User Name
Name of the remote SIP host, which should be the name of peer
SIP host.
Speed Dial
The phone number maps to the remote party SIP-URI after
dialing on key/phone pad. This should be unique for different
SIP-URI.
HOST The host IP address to call.
Port No
Port number of the remote user agent where it will receive SIP
messages. The default port number is 5060, which is a well-
known port for SIP protocol.
Display Name
The name displayed on phone sets that support the Caller ID
function. It is for identification purposes only, and can be used to
hide the actual user name.
29
Page 30
1813 VoIP Gateway User’s Guide
Add
New buddy entries can be added using the Add button. After entering the parameters, click on
Add to submit the settings.
Modify
Select the entry by ticking it in the Select field and click on Modify (see the following figure).
After changing the parameters, click on Modify to submit the settings.
Delete
Select the entry by ticking it in the Select field and click on Delete.
30
Page 31

1813 VoIP Gateway User’s Guide
5.5 CallForward
This CallForward tab lists the configured call forward information.
To configure the call forwarding parameters, tick the item and click on Modify. After changing
the parameters, click on Modify to submit the settings.
Phone No
User Name
IPv4 Addr
Port No
Fwd Call
Displays the selected phone port number for configuration. (Port
No. 1 is mandatory and is not selectable.)
Sip user name of the forwarding address where the calls will be
forwarded.
The IP address of the SIP user name to which the phone calls will
be forwarded.
Port number of the forwarding address where the calls will be
forwarded. The default port number is 5060.
Choose YES if the phone will be forwarded. Choose NO if the
phone will not be forwarded.
31
Page 32

1813 VoIP Gateway User’s Guide
Chapter 6 Performance Monitoring
6.1 System Statistics
To view the system statistics, click on the System Statistics button located near the bottom of the menu bar. Statistics are recorded regarding Interfaces and TCP-IP.
6.1.1 Interface Statistics
To display the interface statistics, click on the Interfaces tab, located at the top-left of the
System Statistics screen. The Interface Statistics page displays statistics for all interfaces.
The following information is displayed:
Interface Name The name of the interface
Admin Status Indicates whether the interface is Up or Down
Octets In The number of Octets (bytes) received
Unicast PktsIn The number of unicast packets received
Broadcast PktsIn The number of broadcast packets received
Discards In The number of packets received that were discarded
Errors In The number of inward errors
Octets Out The number of Octets (bytes) transmitted
Unicast PktsOut The number of unicast packets transmitted
Broadcast PktsOut The number of broadcast packets transmitted
Discards Out The number of packets transmitted that were discarded
Errors Out The number of outward errors
32
Page 33

1813 VoIP Gateway User’s Guide
6.1.2 TCP-IP
To view TCP-IP statistics click on the TCP-IP tab at the top of the System Statistics page. The TCP-IP page displays the IP statistics, UDP statistics, TCP statistics, and ICMP statistics.
33
Page 34

1813 VoIP Gateway User’s Guide
6.1.3 Ping
To access the Ping screen, click on the Ping button, which is located under the Advanced menu bar. This screen performs the ping test.
A ping test is used to verify the status of a network connection after the RIP or static route
function is enabled. Ping sends a request message to the host and waits for a return message.
This function can verify if the remote host is reachable. Ping can also measure the round-trip
time to the remote host. To access the Ping test screen, click on the Ping tab. Enter the Host
Name or IP address of the remote terminal and click on Submit to start the ping and display the
results.
34
Page 35

The following is an example of the ping result.
1813 VoIP Gateway User’s Guide
The information returned is as follows:
Packets transmitted The number of packets that were transmitted.
Packets received The number of packets that were received.
Packet loss (%)
The percentage of packets lost (transmitted and
received)
Minimum round trip time The fastest round-trip time.
Maximum round trip time The slowest round-trip time.
35
Page 36

1813 VoIP Gateway User’s Guide
Chapter 7 Software Upgrade via FTP
Follow the steps below to upgrade the firmware version of the Gateway via FTP.
The procedures below use LAN port IP address 192.168.1.101 for illustration.
STEP 1: Connect the Gateway to a PC using the LAN cable. Set the PC to the same subnet as
the Gateway (192.168.1.101).
STEP 2: Start an FTP program on the PC.
STEP 3: Start DOS and enter the menu where the new firmware is installed:
Example: C:\Upgrade
STEP 4: Enter the command: ftp 192.168.1.101 (Gateway’s IP address)
STEP 5: At the USER prompt type root (small case)
STEP 6: At the Password prompt type 1234
STEP 7: After you see the message User Logged in, type: Bin
STEP 8: After you see the message Type set to I, type: ha
STEP 9: After you see the message Hash mark printing, type:
put <filename.bin> app
Example: put firmware app
36
Page 37

1813 VoIP Gateway User’s Guide
STEP 10: After a moment, the file should begin transferring, after you see the message Transfer
complete, the upgrade process is complete.
37
Page 38

1813 VoIP Gateway User’s Guide
Appendix A: Specifications
WAN Interface
Ethernet x 1 IEEE 802.3 10/100 Base-T, Auto-crossing
LAN Interface
Ethernet x 3 IEEE 802.3 10/100 Base-T, Auto-crossing
Analog Interface
FXS x 1
Management
Telnet, Web-based management
Software upgrade via TFTP client or FTP server
Routing Functions
Default gateway Static route, NAT/PAT, DHCP Server/DHCP client, DNS, ARP
Security Functions
Authentication protocols PAP, CHAP,
VPN features PPTP/L2TP/IpSec pass-through
Voice Functions
SIP RFC 3261
H.323, H.323, H.225, H.245
Codec G.711, G.723.1,G.729ab
RTP RFC 1889
SDP RFC 2327
On/Off hook Caller ID ETSI based
Echo cancellation G.168
Silence suppression G.711, G.723.1, G.729ab
38
Page 39

LED
WAN, LAN 1x, LAN 2x, LAN 3x, PHONE
Power Supply
The universal power adapter of the Gateway supports 110–240Vac.
The linear power adapter of the Gateway supports 110 or 220Vac.
Environmental Conditions
Operating temperature 0 – 50 degrees Celsius
Relative humidity 5 – 90% (non-condensing)
1813 VoIP Gateway User’s Guide
Dimensions
150 mm (W) x 42 mm (H) x 140 mm (D)
5.9 in (W) x 1.7 in (H) x 5.5 in (D)
39
Page 40

1813 VoIP Gateway User’s Guide
Appendix B: Pin Assignments
LAN Port (RJ45 Auto-cross)
Pin number Definition Pin number Definition
1 Transmit data+ 5 NC
2 Transmit data- 6 Receive data3 Receive data+ 7 NC
4 NC 8 NC
40
Page 41

Appendix C: Troubleshooting
Event Checking Procedure or possible cause
1813 VoIP Gateway User’s Guide
Unable to access the
Web management
Web login reject
Check the LAN connection.
Check your PC’s TCP/IP setup
Check your password. The default user name is root; the
default password is 1234. The user name and password
are case sensitive.
41
Page 42

1813 VoIP Gateway User’s Guide
Appendix D: GLOSSARY
.
100BaseT: A 100 Mbps Ethernet standard that uses twisted-pair wiring.
10BaseT: A 10 Mbps Ethernet standard that uses twisted-pair wiring.
address: The symbol (usually numeric) identifying an interface attached to a network.
ADSL: An asynchronous form of DSL in which the bandwidth available for downstream
connection is significantly larger than for upstream.
analog loop: A test in which a modem’s voice signal is looped to its receiver.
analog signal: A continuously variable signal (compare with digital).
Annex A: The part of the G.992.1 standard that refers to ADSL over POTS (adopted by the
US).
Annex B: The part of the G.992.1 standard that refers to ADSL over ISDN (adopted by Europe)
Annex C: The part of the G.992.1 standard that refers to ADSL over ISDN (adopted by Japan).
ANSI: American National Standards Institute.
ASCII: American Standard Code for Information Interchange.
attenuation: The loss of power of a transmitted signal as it travels over a wire.
auto-summary: A RIP command to restore the default behavior of automatic summarization
of subnet routes into network-level routes.
backbone: The main circuit that carries data before it is split into extended circuits going to
their
final destination. Often used to refer to the part of the network that joins LANs together.
bandwidth: The range of frequencies of a transmission channel. The wider the range the higher
the data rate that can be sent. Hence, bandwidth is also taken to mean the data rate.
Baud: One baud is one symbol (state-transition or level-transition) per second.
BERT: Bit Error Rate Test. A test that compares a received pattern with a known transmitted
pattern to determine the quality.
Bit: A binary digit, with the value of 0 or 1.
boot: Start a device.
Bps: Bits per second. The speed at which bits are transmitted across a data connection.
42
Page 43

1813 VoIP Gateway User’s Guide
bridge: A device that links local or remote area networks together, forwarding packets based on
a MAC address (compare with Gateway).
broadband: Communication channels operating at transmission rates in excess of 64 kbps.
broadcast: The simultaneous transmission to two or more communication devices.
BT: Burst Tolerance. The limit parameter of the Generic Cell Rate Algorithm (GCRA).
buffer: A temporary storage used to compensate for a difference in the rate of flow of data.
bus: An assembly of conductors that carries signals to and from devices along its path and
serves as a common connection for a group of related devices.
busy: A device’s operational state, when the device is occupied with processing a call.
Byte: Eight bits arranged in sequence.
channel: A bi-directional communications pathway between a host server and a client.
CHAP: Challenge-Handshake Authentication Protocol. A PPP protocol to ensure authentication
of the connection between two devices.
circuit: A logical connection between two devices.
CO: Central Office, the local telephone exchange, also called PSTN.
COM port: A computer’s serial communications port.
CPE: Customer Premises Equipment. Equipment used by the end user.
cross talk: Undesired coupling of a signal from one circuit, or channel, to another.
data rate: The speed measured in bits per second that data is transferred over the carrier line.
Default: A pre-defined original value.
demodulation: The recovery, from a modulated carrier, of a signal.
DHCP server: A server that dynamically allocates network addresses and delivers
configuration parameters to hosts.
DHCP: Dynamic Host Configuration Protocol. A TCP/IP protocol that enables a network
connected to the Internet to automatically assign a temporary IP address to a host when the host
connects to the network.
digital signal: A discrete or discontinuous signal where the states are discrete intervals apart,
such as +10 volts and –10 volts. These states are then represented by the binary digits 0 and 1.
digital: loopback test: A test that connects the device’s receiver output back to the transmitter
input. This test will disrupt the transmission of primary data.
DLL: Dynamic Link Library. DLLs are files that are automatically loaded into memory when
required.
43
Page 44

1813 VoIP Gateway User’s Guide
DMT: Discrete MultiTone. The T1.413 standard modulation scheme for Digital Subscriber Line
technology.
DNS: Domain Name Server. A server that retains the addresses and routing information for
TCP/IP PAT users.
download: To receive a file over a network (compare with upload).
driver: A software module that provides an interface between a network interface card and the
upper-layer protocol software running on a computer.
DSL: Digital Subscriber Line. A family of broadband services provided over a traditional phone
line, such as ADSL, SHDSL, and VDSL.
DSP: Digital Signal Processor. The microprocessor that handles line signaling in a modem.
DTE: Data Terminal Equipment. Equipment that transmits or receives data in the form of digital
signals.
dynamic detection: A process of a automatic detection of a new device added or removed
from the PC.
EOC: Embedded Operations Channel. An in-band channel between DSL devices that operates
at the physical layer for administration and maintenance data.
error control: An algorithm used to detect and correct data transmission errors.
errored second: An item in performance measurement report, which pertains to a one second
period with one or more errored blocks.
Ethernet address: Another name for MAC address.
Ethernet: A standard protocol (IEEE 802.3) for a 10-Mb/s baseband local area network (PAT)
bus that supports high-speed communication among systems. It operates at the Physical Layer of
the OSI Model.
ETSI: European Telecommunications Standards Institute.
FCC: Federal Communications Commission of the United States.
filter: A configuration that stops the flow of certain types data frames.
firmware: Software that has been temporarily or permanently loaded into ROM.
flash memory: A type of RAM that retains its information, even after powering-down.
flow control: A process that uses buffers to stop and start the flow of data in a network to avoid
losing data, and allow devices with different transmission schemes to communicate with each
other.
FTP: File Transfer Protocol. A TCP/IP standard protocol for transferring files.
full-duplex: transmitting in two directions simultaneously.
44
Page 45

1813 VoIP Gateway User’s Guide
G.991.2: An ITU-T specification for high speed DSL known as G.SHDSL.
G.DMT: Another name for the G.992.1 ITU specification.
G.lite: Another name for the G.992.2 ITU specification.
gateway: A communications device that connects two different networks.
header: The beginning of a frame or cell that contains management and addressing information.
hop: One point-to-point transmission in a series required to transmit a message between two
hosts in a network.
host: An addressable computer connected to a network.
hub: A device that serves as the central location for attaching wires form workstations.
ICMP: Internet Control Management Protocol. An Internet protocol that allows for the
generation of error messages, tests packets, and information messages related to IP.
IDSL: A form of ISDN DSL using 2B1Q line code.
IEEE: Institute of Electrical and Electronics Engineers.
IEEE: The Institute of Electrical and Electronics Engineers.
ILMI: Interim Local Management Interface. Provides ATM layer management between a
switch and a client device.
IP address: Internet Protocol address. The decimal-numeric, fixed-length address assigned to
an Internet host.
IP multicast: A technique that allows packets to be simultaneously transmitted over the
Internet to multiple destinations.
IPOA: IP over ATM.
IRQ: Interrupt re-quest, a hardware interrupt on a PC.
ISO: International Standards Organization.
ISP: Internet Service Provider. An organization that provides access to the Internet.
ITU: International Telecommunications Union. The telecommunications agency of the United
Nations.
kbps: Kilobits per second.
LAN: Local Area Network. A LAN is a data communications system that lies within a limited
spatial area, has a specific user group, and has a specific topology.
latency: The time it takes a signal to transmit from its source to its destination.
LED: Light Emitting Diode. A light or status indicator.
45
Page 46

1813 VoIP Gateway User’s Guide
LOC: Loss of Cell delineation. A situation where receiving equipment is unable to identify the
boundaries of a cell.
local analog loopback: A test in which the modem’s VF signal is looped to its receiver.
local loop: An ordinary telephone line.
local loopback test: An analog loopback test that loops a device’s transmitter output back to
receiver input.
loopback: A diagnostic procedure where a test message is sent back to its origination point, in
order to isolate an equipment or data line problem.
LOS: Loss of Signal. A digital line condition where there are no pulses.
MAC address: Media Access Control address. The unique fixed address of a piece of
hardware, normally set at the time of manufacture and used in PAT protocols.
MAC: Medium Access Control, a protocol for determining which device has access to the
network at any one time.
Mbps: Megabits per second. One megabit is 1,048,576 (10242) bits.
MCU: Multi-Commercial Unit. A commercial building or complex with multiple tenants.
MDU: Multi-Dwelling Unit. A residential building with multiple tenants.
MIB II: MIB Release 2. An update of the MIB standard, defined by RFC 1213.
MIB: Management Information Base. A database of managed objects used by network
management protocols to provide network management information and device control.
modem: Modulator Demodulator. A device used to convert a digital signal into an analog signal
and vice-versa so that data can be transmitted over a telephone line.
modulation: The process of varying the amplitude, frequency, or phase of a carrier wave to
form data transmissions.
multicasting: The ability of a network node to send the same data to multiple endpoints.
multiframe: An ordered, functional sequence of frames on a multiplexed digital circuit.
NAT: Network Address Translation is a transparent routing function that translates a Private IP
address on a PAT into a Public address that can be used in a public network.
network address: The network portion of an IP address.
network protocol: Network protocols encapsulate and forward data packets from one interface
to another.
NIC: A Network Interface Card is a card installed in a device to provide network
communication capabilities to and from that device.
46
Page 47

1813 VoIP Gateway User’s Guide
node: A connection or switching point in a network, also called a host.
noise: Unwanted interference to a transmitted signal by an outside source.
PAP: Password Authentication Protocol. PPP protocol that ensures authentication of the
connection between two devices.
PAT: Port Address Translation is a form of NAT that maps multiple Private IP addresses to a
single Public IP address.
ping: An internet utility signal sent to check the accessibility of a device.
Plug-and-Play: The ability of a PC to configure expansion boards and other devices
automatically without requiring the user to turn off the system during installation.
point-to-point connection: Any connection with only two endpoints. A dedicated data link
that connects only two stations.
poison reverse: A routing protocol command that tells its neighbor gateways that one of the
gateways is no longer connected.
POP: Point Of Presence.
Port: An access point where data can enter or exit.
POTS: Plain Old Telephone Service.
PPP over ATM: Point-to-Point Protocol over Asynchronous Transfer Mode.
PPP: Point-to-Point Protocol. A protocol (RFC 1661) for transmitting packets over serial links
between devices made by the same or different manufacturers.
PPPoE: Point-to-Point Protocol over Ethernet. A method for establishing sessions and
encapsulating PPP packets over an Ethernet, specified by RFC 2516.
PPTP: Point-to-Point Tunneling Protocol. An extension of Point-to-Point Protocol used to
create virtual private networks between PCs.
protocol: A set of rules that govern the transmission of data between interconnected devices to
maintain or improve communication.
proxy server: Provides a list of items available on other servers to increase the availability and
speed of retrieving that information.
PSTN: Public Switched Telephone Network. The standard telephone network.
PVC: Permanent Virtual Circuit. Virtual circuit that is permanently established.
QoS: Quality of Service. The expected data loss or latency.
remote access: Communication from a remote location or facility through a data link.
47
Page 48

1813 VoIP Gateway User’s Guide
remote digital loopback test: This test loops the remote digital receiver output back into the
transmitter input.
remote host: The computer receiving the network commands.
RFC: Request for Comments. Documents published by the Internet Engineering Task Force
pertaining to Internet protocols and policies.
RIP: Routing Information Protocol. The protocol governing the exchange of routing
information.
RJ11: A 6-position jack used with dial networks and telephone sets.
RJ45: An 8-position jack used with programmable dial networks.
router: Protocol-dependent device that connects subnets together. Routers operate at the
network layer (layer 3) of the ISO Open Systems Interconnection Reference Model.
routing table: A table that lists routing paths to enable a node to route traffic to another node in
the network.
RS-232: a low-speed, 25-position, DCE/DTE interface.
server: Hardware or software that offers a specific service, such as database management, to a
client.
SHDSL: Symmetric High Bit Rate Digital Subscriber Loop. A DSL technology that allows
symmetrical transmissions over longer distances. Defined by the G991.2 ITU standard.
SLA: Service Level Agreement. A contract between a service provider and a customer, which
guarantees a minimum level or quality of service to the customer.
SMTP: Simple Mail Transport Protocol. A protocol used to transfer e-mail between or among
servers.
SNMP agent: An application program that enables communication between a management
system and a device.
SNMP trap: A message sent to a SNMP manager to communicate information about changes
in the network, such as a device being reset.
SNMP: Simple Network Management Protocol. Protocol for open networking management.
static route: A route that is permanent rather than a route that is dynamically assigned by
another router.
STP: Shielded Twisted Pair. Telephone wire that is wrapped in a sheath to eliminate external
interference.
subnet address: The subnet portion of an IP address.
subnet mask: A number that identifies the subnet portion of a network address. so that IP
addresses can be shared on a local area network.
48
Page 49

1813 VoIP Gateway User’s Guide
subnet: An independent network segment, that is, it has the same network address, but its
subnet address is different.
switch: A data switch connects computing devices to host computers, enabling multiple devices
to share a limited number of ports. An electrical switch is a device for making, breaking, or
changing the connections in an electrical circuit.
synchronous transmission: Transmission with the transmitter and receiver synchronized so
that data is transmitted at a fixed rate.
synchronous: Any operation that is controlled by a clock or timing mechanism. (Compare with
asynchronous).
TCP/IP: Transmission control protocol/Internet protocol, a set of protocols that govern peer-to-
peer connectivity functions for local and wide area networks.
TCP: Transmission Control Protocol.
Telnet: The TCP/IP virtual terminal protocol that allows a user at one site to access a remote
system at another site.
throughput: The number of bits, characters, or blocks that are able to pass through a data
communication system.
training: A process where two modems try to determine the correct protocols and transmission
speeds to establish a communication session.
trellis-coded modulation: Advanced error correction coding technique for forward error
correction to a modulation scheme by adding an additional bit to each baud.
UDP: User Datagram Protocol. A connectionless protocol that converts data messages generated
by an application into packets to be sent over IP.
UNIX: An operating system developed at AT&T Bell Laboratories.
upload: To receive a file transmitted over a network.
URL: Uniform Resource Locator. An Internet standard addressing protocol for describing the
location and access method of a resource on the Internet.
USB: Universal Serial Bus. A bi-directional, isochronous, serial interface for adding
dynamically connectable peripheral devices, without the need for a reboot.
UTP: Unshielded twisted pair is the most common kind of copper telephone wiring.
VC: Virtual Circuit. A logical connection or packet-switching mechanism established between
two devices at the start of transmission.
VCI: Virtual Channel Identifier. The 16-bit field in an ATM cell header that specifies the virtual
channel over which the cell is to be transmitted.
49
Page 50

1813 VoIP Gateway User’s Guide
VDSL: Very-high-speed DSL. A DSL protocol running at up to 52 Mbps, that is restricted to
short distances.
virtual circuit: A logical circuit established between two devices at the start of transmission
VOD: Video On Demand. A service that provides video to subscribers upon request.
VPI: Virtual Path Identifier
VPI: Virtual Path Identifier. The 8-bit field in an ATM cell header that specifies the routing path
for a cell.
VPN: Virtual Private Network. A network implemented over a public network that is made
“private” by use of encryption.
VT100: A terminal used for asynchronous communications.
WAN: Wide area network. A communications network that connects geographically separated
areas (Compare with LAN).
xDSL: A generic term for all varieties of DSL.
XOFF: A character that notifies a device to stop transmitting data.
XON: A character that notifies a device to start or resume transmitting data.
50
 Loading...