

Page 1
PPT 8800
Page 2

PPT 8800
© 2003-2005 SYMBOL TECHNOLOGIES, INC. All rights
reserved.
Symbol reserves the right to make changes to any product to
improve reliability, function, or design.
Symbol does not assume any product liability arising out of, or in
connection with, the application or use of any product, circuit, or
application described herein.
No license is granted, either expressly or by implication, estoppel,
or otherwise under any patent right or patent, covering or relating
to any combination, system, apparatus, machine, material,
method, or process in which Symbol products might be used. An
implied license only exists for equipment, circuits, and subsystems
contained in Symbol products.
®
Symbol, the Symbol logo and Spectrum24
trademarks of Symbol Technologies, Inc. Bluetooth
are registered
®
wireless
technology is a trademark of Bluetooth SIG, Inc. Other product
names mentioned in this manual may be trademarks or registered
trademarks of their respective companies and are hereby
acknowledged.
Symbol Technologies, Inc.
One Symbol Plaza
Holtsville, N.Y. 11742-1300
http://www.symbol.com
Patents
This product may be covered by one or more U.S. and foreign
patents. For patent information go to:
http://www.symbol.com/patents.
Page 3

Quick Reference
Introduction
Congratulations on your purchase of Symbol Technologies’ PPT
8800 Series terminal! Its unique combination of features make this
product superior for use in a wide range of applications. These
features include:
• Small rugged lightweight form factor
•Microsoft
• RF communication via Symbol’s Spectrum24® wireless network or Bluetooth™
• Printing support
• Scanning capability
• Standard 6-key and 15-key keypad configurations
• Transflective color LCD display.
About This Guide
This guide describes how to set up and use the terminal. The term
PPT 8800 Series refers to the batch, Spectrum24 and Bluetooth
versions of the terminal. Specific topics covered include:
• Accessories on page 2
• Parts of the Terminal on page 3
• Getting Started on page 5
• Resetting the Terminal on page 13
• Host Communications on page 15
• Attaching the Neck Strap on page 16
• Maintenance on page 17
• Troubleshooting on page 17
• Regulatory Information on page 21
• Warranty on page 25
• Service Information on backcover.
®
Embedded Windows® CE .NET operating system
1
Page 4

PPT 8800
The PPT 8800 Series Product Reference Guide for Embedded
Windows
available for the terminal. For the latest version of this guide, visit:
http://www.symbol.com/manuals.
®
CE .NET (p/n 72E-58094-XX) details the applications
Accessories
The following optional accessories will be available from Symbol:
• Spare lithium-ion rechargeable battery
• Large capacity lithium-ion rechargeable battery kit
• Single-Slot Serial Cradle
• Four-Slot Serial Cradle
• Four-Slot Ethernet Cradle
• Holster(s) or case
• Stylus or tethered stylus
• Wall-charging cable
• Serial Charging Cable
• Universal Cable Cup for attachable cables:
- Printer cable options
- DEX cable
- Auto charging cable
• Pistol Grip Handle
• Magnetic Strip Reader
• Vehicle Cradle.
2
Page 5
Quick Reference
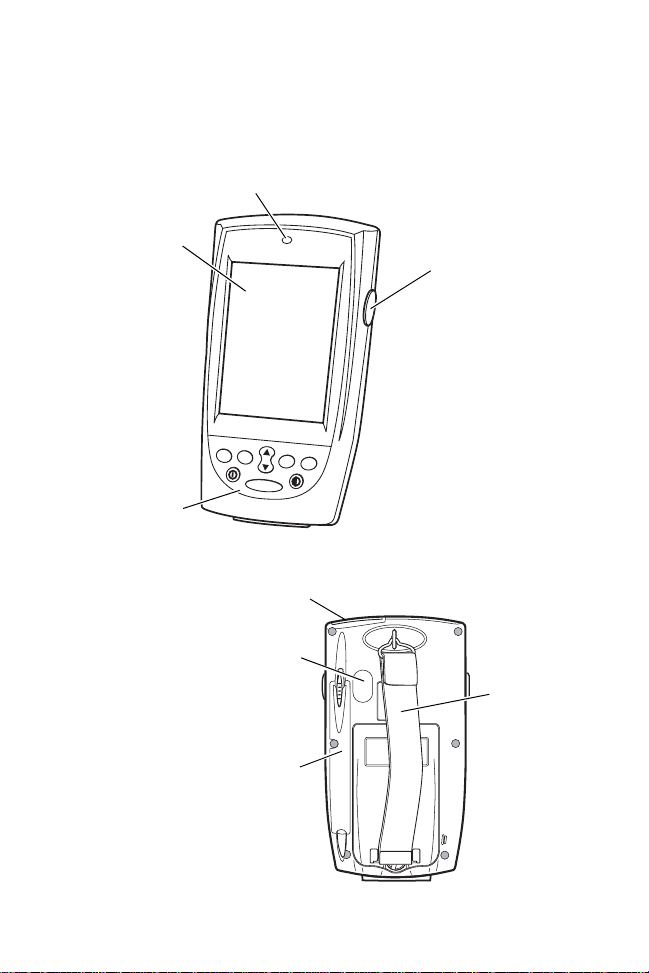
Parts of the Terminal
Scan LED
LCD Display
Keypad
F1
F2
F3
Scan Window
Infrared Port
Stylus Silo
Right Scan
Trigger
F4
Handstrap
3
Page 6
PPT 8800
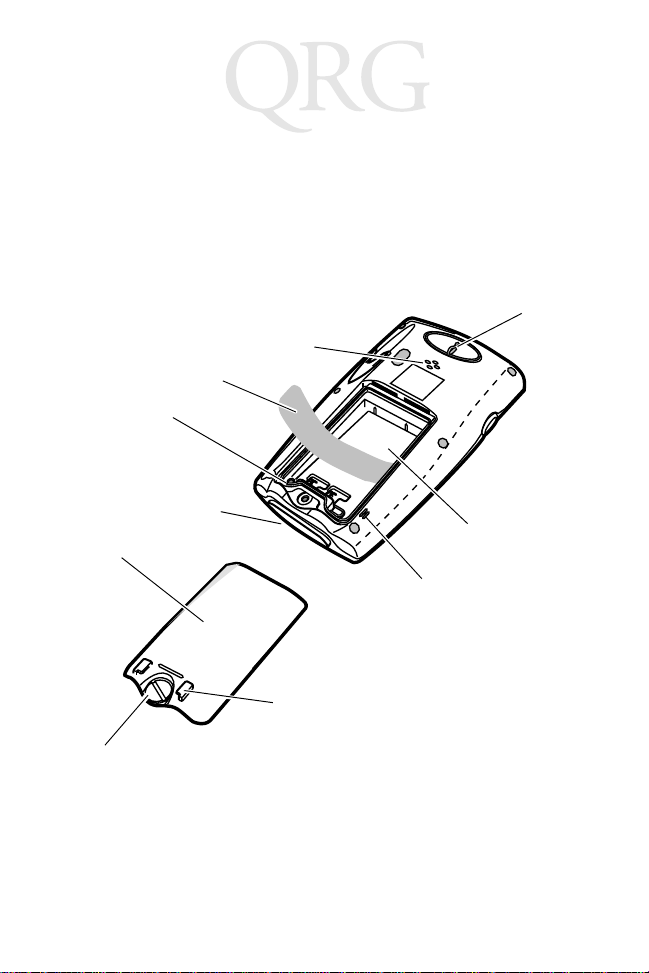
Parts of the Terminal (continued)
Speaker
Tether
Reset Button
Serial Port
Battery Cover
Microphone
Neckstrap/
Handstrap
Connector
Battery
Compartment
Locking
Screw
Handstrap Connectors
4
Page 7
Quick Reference
Getting Started
Before using the PPT 8800, perform the basic setup procedures:
• Install and charge the main battery and backup battery
• Start the terminal
• Initiate the network connection.
Installing the Battery
Note: Also use the following procedures for installing the op-
tional large capacity lithium-ion battery and battery
cover.
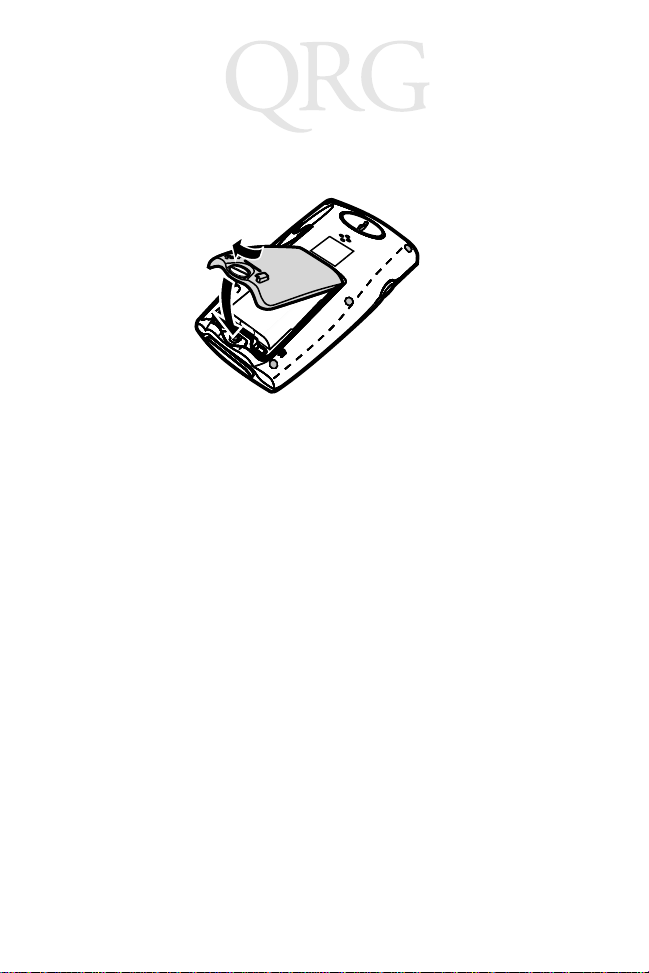
1. Turn the locking screw counterclockwise until the battery
cover releases from the terminal.
2. Lift the battery cover away from the terminal.
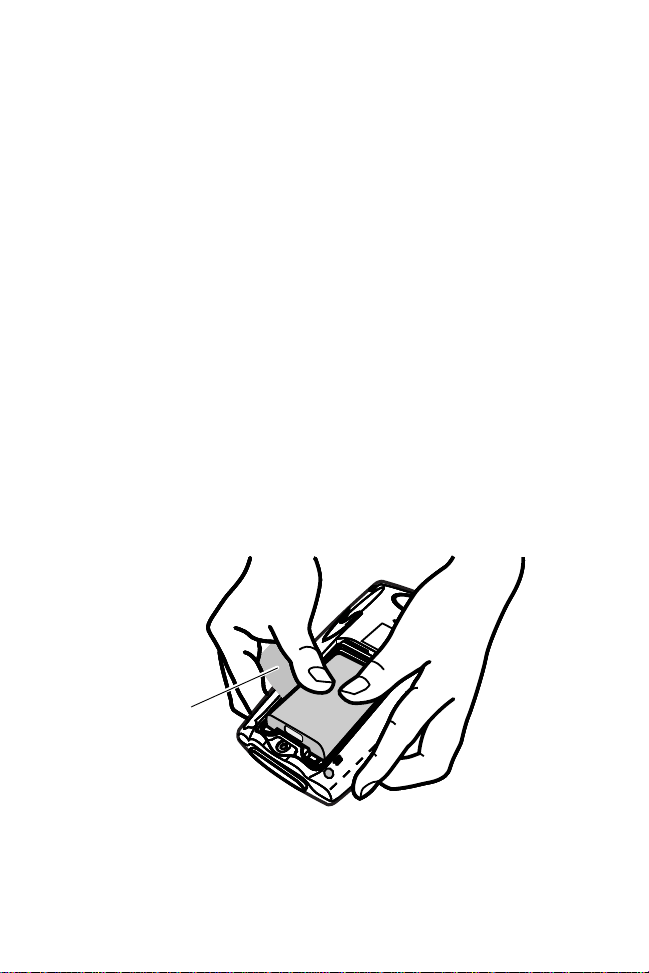
3. Insert the battery in the battery compartment with the battery
tether positioned as shown, ensuring that the battery snaps
into place.
Tether
5
Page 8
PPT 8800
4. Replace the battery cover by inserting the top first, then
pressing the bottom in firmly.
5. Turn the locking screw clockwise to secure the cover to the
terminal.
Charging the Battery
Note: To charge the battery for your mobile device, battery
and charger temperatures must be between +32° F
and +104° F (0° C to +40° C).
Before using your terminal for the first time, charge the main
battery in the terminal for approximately 2 1/2 hours, using a
cradle or the serial charging cable.
Your terminal is equipped with a memory backup battery which
automatically charges from the fully-charged main battery . This
backup battery retains data in memory when the terminal’s battery
is removed, and takes about 24 hours to charge when you first use
your terminal.
Note: If the main battery is removed before the backup bat-
tery is fully charged, data may be lost. For this reason,
DO NOT remove the battery within the first 24 hours of
use.
6
Page 9
Quick Reference
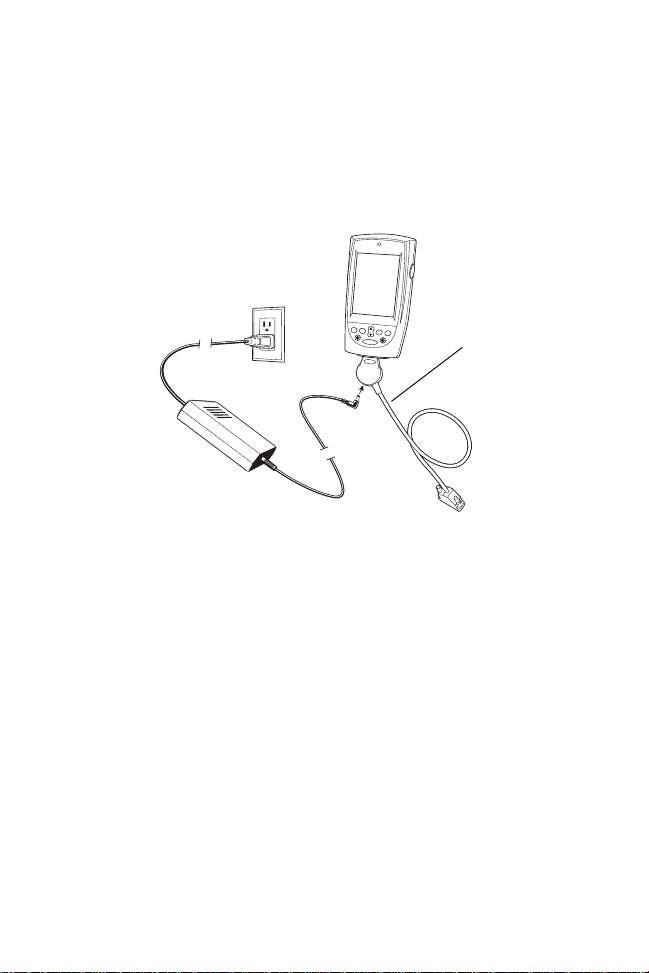
Charging the Battery Using the Serial Charging Cable
Charge the main battery using the Serial Charging Cable. The
battery charges in approximately 2 1/2 hours.
F
1
F
2
F3
F4
Serial Charging
Cable
Charging the Battery Using a Cradle
Note: To ensure the quickest charging time, turn the terminal
off while charging.
Charge the main battery using the UBC Adapter or the CRD 8800
Single-Slot Cradle. The battery charges in approximately 2 1/2
hours. For more information, see the setup instructions in the CRD
8800 Single-Slot Cradle Quick Reference Guide.
Charging a Spare Battery
Charge a spare battery using the UBC Adapter or the CRD 8800
Single-Slot Cradle. For more information on charging with the
cradle, see the setup instructions in the CRD 8800 Single-Slot
Cradle Quick Reference Guide.
7
Page 10
PPT 8800
Starting the Terminal
Press the button to turn on the terminal. If the terminal does
not power on, perform a hard reset. See Performing a Hard Reset
on page 13.
As the terminal initializes its unique Flash File system, the Symbol
splash screen displays for about a minute followed by the
calibration screen. Note that these screens also appear every time
you perform a hard reset.
Calibrating the Screen
To calibrate the screen so the cursor on the touch screen aligns
with the tip of your stylus:
1. Remove the stylus from its storage silo on the back of the terminal.
2. Carefully press and briefly hold the tip of stylus on the center
of each target that appears on the screen.
Note: To re-calibrate the screen at anytime, press +
on a 15-key terminal or press
Standard 6-key terminal to launch the calibration
screen application.
+ on a
8
Page 11
Quick Reference
Using the Power Button
The button turns the terminal on and off and controls the
display’s backlight.
Adjusting the Backlight
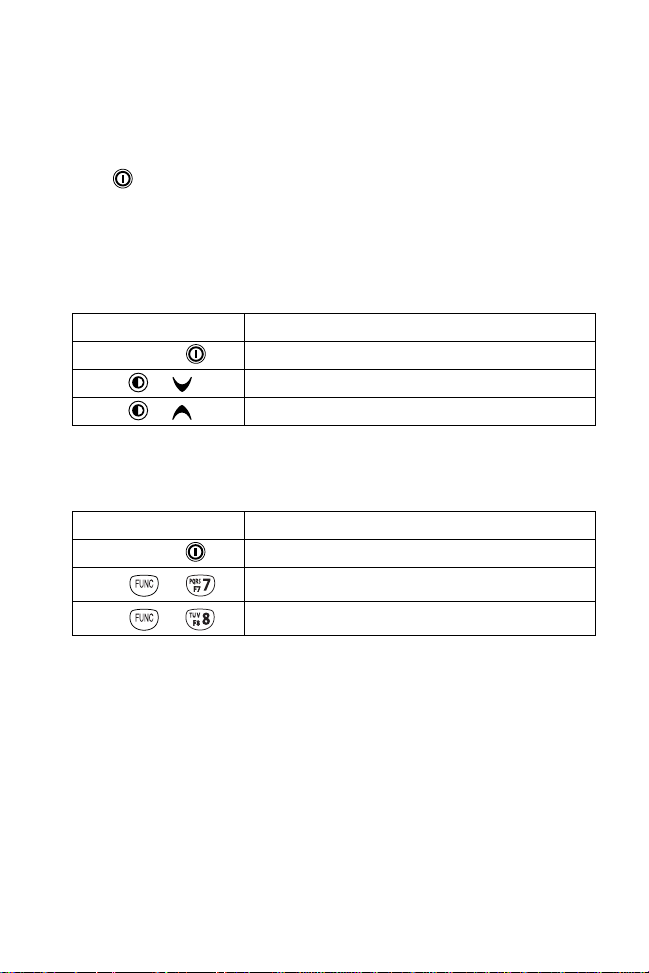
Standard 6-Key Configuration
Use the key combinations below to adjust the backlight.
Keys Description
Press and hold
Press +
Press +
15-Key Configuration
Use the key combinations below to adjust the backlight.
Keys Description
Press and hold
Press +
Press +
Turn backlight on or off.
Decrease backlight (decrease brightness).
Increase backlight (increase brightness).
Turn backlight on or off.
Decrease backlight (decrease brightness).
Increase backlight (increase brightness).
9
Page 12
PPT 8800
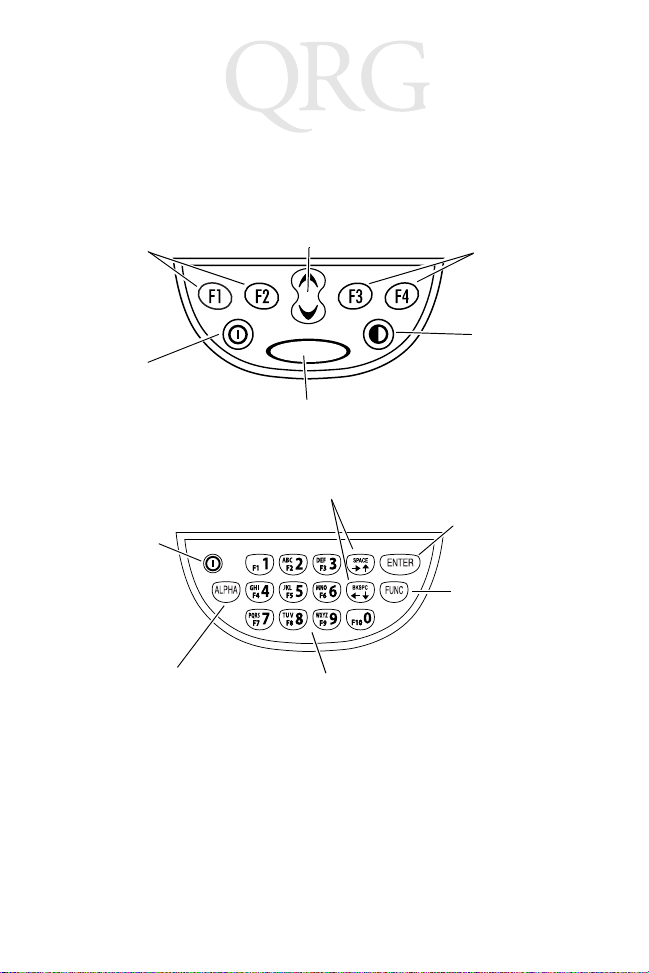
Using the Keypad
The terminal has two keypad configurations: A Standard 6-key and
a 15-key configuration.
Application
Keys
Power Button
Power Button
Scroll Keys
Enter key
Standard 6-Key Configuration
*
Alpha Key
Alphanumeric
15-Key Configuration
Application
Keys
Function key
Scroll Keys
Enter Key
Function Key
.
Keys
10
Page 13

Quick Reference
Using the Stylus
The stylus selects items and enters information. The stylus
functions as a mouse.
• Tap: Touch the screen once with the stylus to press option
buttons and open menu items.
• Double-Tap: Touch the screen twice to execute application
software.
• Drag: Hold the stylus on the screen and drag across the
screen to select text and images. Drag in a list to select multiple items.
Scanning
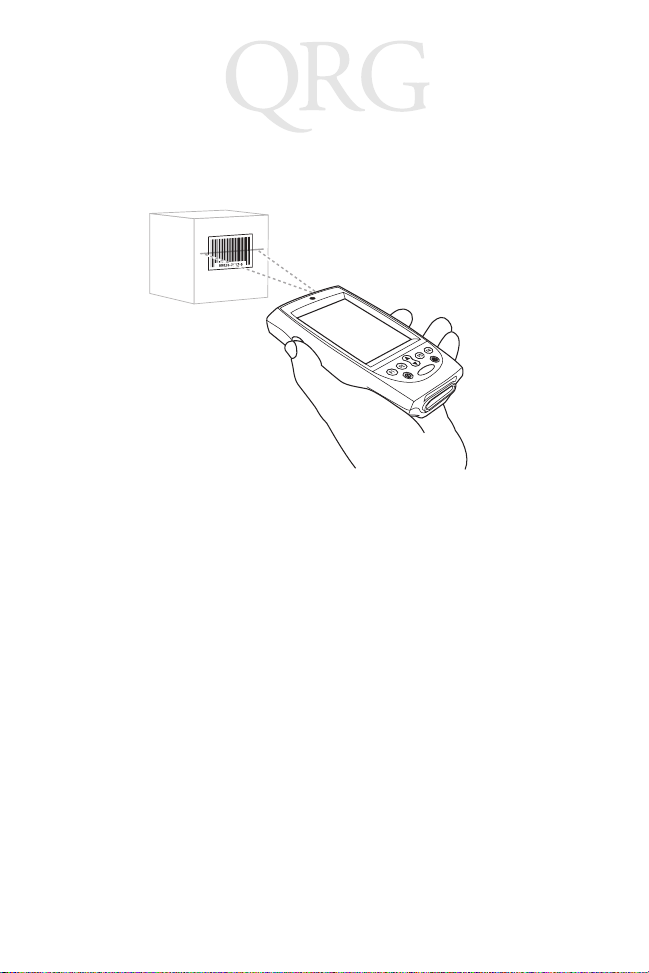
The terminal has an integrated scanner which collects data by
scanning bar codes. See the PPT 8800 Series Product Reference
Guide for information on configuring your terminal for scanning.
To scan bar codes:
1. Launch the terminal’s scanning application.
2. Aim the scanner at the bar code.
11
Page 14
PPT 8800
3. Press either the right, or left scan trigger. Ensure the red
scan beam covers the entire bar code. The green scan LED
lights and a beep sounds to indicate a successful decode.
Initiating a Network Connection
Before using the terminal, set up the Spectrum24 network or
Bluetooth connection. Refer to the PPT 8800 Series Product
Reference Guide for setup instructions.
12
Page 15
Quick Reference
Resetting the Terminal
If the terminal stops responding to input, reset it.
Performing a Soft Reset
A soft reset restarts the terminal and saves all stored records and
entries.
Caution: Files that remain open during a soft reset may not be
retained.
DO NOT perform a soft reset if the terminal is suspend-
ed. Press the power button to wake the terminal.
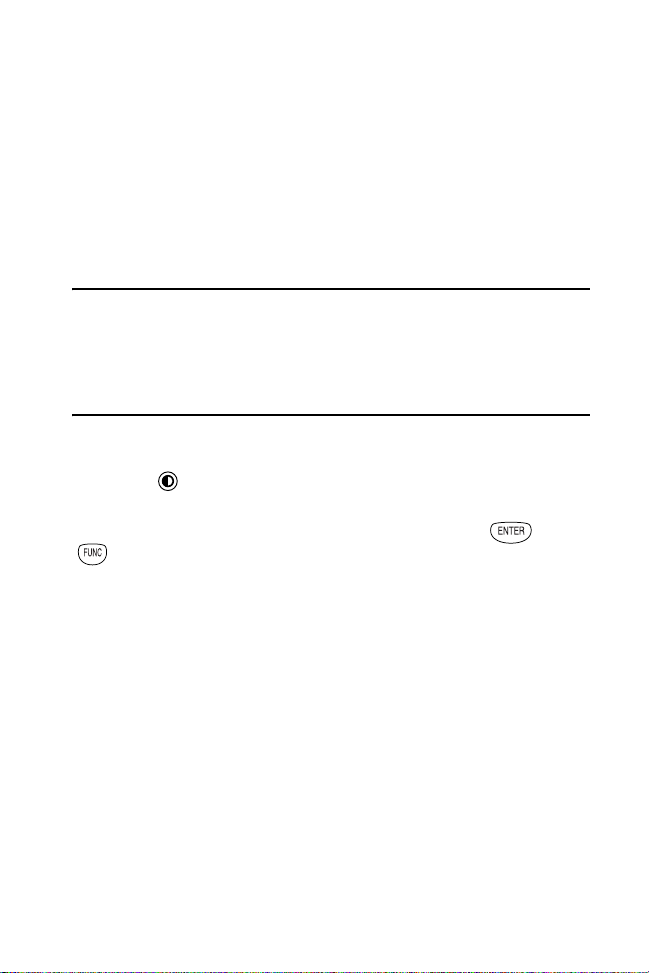
To perform a soft reset on the Standard 6-key keypad, press the
Enter and keys while holding down either the left or right scan
trigger and then releasing the keys.
To perform a soft reset on the 15-key keypad, press and
keys while holding down either the left or right scan trigger
and then releasing the keys.
Performing a Hard Reset
A hard reset also restarts the terminal , bu t erases all stored
records and entries. Therefore, never perform a hard reset unless
a soft reset does not solve the problem.
Note: You can restore any data previously synchronized with
a computer during the next ActiveSync operation. See
the PPT 8800 Series Product Reference Guide.
13
Page 16
PPT 8800
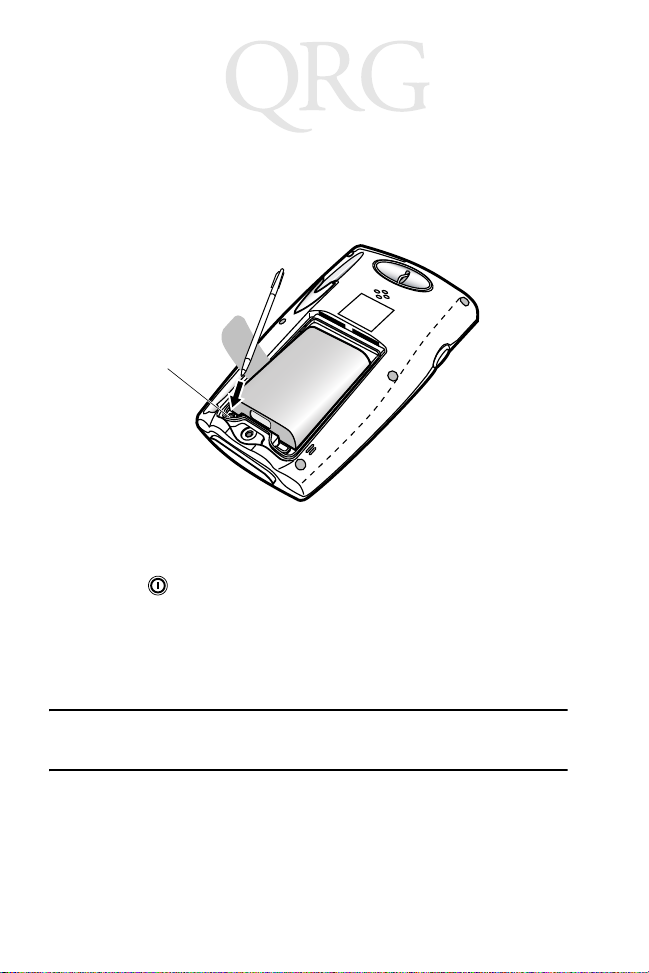
To perform a hard reset:
1. Remove the battery cover.
2. While holding down the Function key, use the stylus to gently
press the reset button.
Reset
Button
3. Release the Function key.
4. Replace the battery cover.
5. Press .
6. As the terminal initializes its unique Flash File system, the
Symbol splash screen displays for about a minute.
7. See Calibrating the Screen on page 8 to perform an initial
setup of the terminal.
Caution: With a hard reset, formats, preferences, and other set-
tings are restored to their factory default settings.
14
Page 17

Quick Reference
Host Communications
The terminal can communicate with a host computer either directly
through its communications port using the cradle, or wirelessly via
the Spectrum24
more information on setting up and performing wireless
communications with your terminal, refer to the PDT 8800 Series
Product Reference Guide.
Using the Serial Charging Cable
To connect the serial charging cable for host communication:
1. Insert the cable into the bottom of the terminal.
2. Connect the other end of the cable into the serial port of the
host computer.
3. Begin host communications as specified by your application.
Using the Cradle
The terminal can communicate with a host computer using the
single-slot serial cradle, four-slot serial cradle and four-slot
ethernet cradle. For more information, see the connection
instructions in the cradle’s Quick Reference Guide.
Communicating with Printers
To print to a standard printer:
1. Attach the Universal Cable Cup to the bo ttom of the termi nal.
2. Attach the appropriate printer cable to the serial port in the
bottom of the Universal Cable Cup.
3. Attach the other end of the cable to the data communications
connector on the printer.
4. Run the application's print function.
®
wireless LAN or Bluetooth Wireless PAN. For
15
Page 18
PPT 8800
To print from an IrDA-compliant printer:
1. Point the IrDA port on the back of the terminal at the IrDA
port on the printer, at a maximum distance of 39 inches (1
meter).
2. Run the application's prin t fu nct i on.
Note: The terminal must have software configured to com-
municate with the printer you are using.
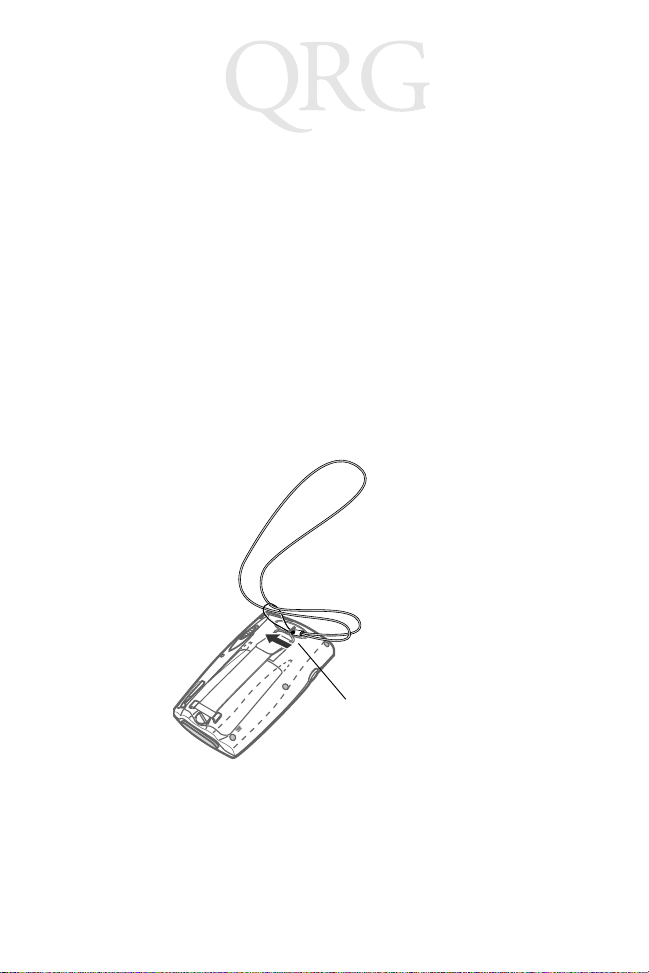
Attaching the Neck Strap
1. Thread the elastic band on the neck strap through the handstrap connector on the back of the terminal.
2. Slip the strap through the elastic band, and pull it through to
secure the strap to the connector.
Thread elastic band
through connector
16
Page 19

Quick Reference
Maintenance
• Do not scratch the screen. Use the supplied stylus or plastic
tipped pens intended for use with a touch-sensitive screen.
Never use a pen or pencil or other sharp object on the
screen.
• Do not drop the terminal or subject it to strong impact.
• Do not use the terminal where there is a lot of dust and dirt in.
• Do not leave the terminal in direct sunlight, in very high humidity, and near heat source.
• Do not use the terminal where there is water.
• If the surface of the screen becomes soiled, clean it with a
soft cloth moistened with a diluted window-cleaning solution.
• Discard used lithium-ion battery according to a regulation.
Never put the terminal into a fire because it may explode.
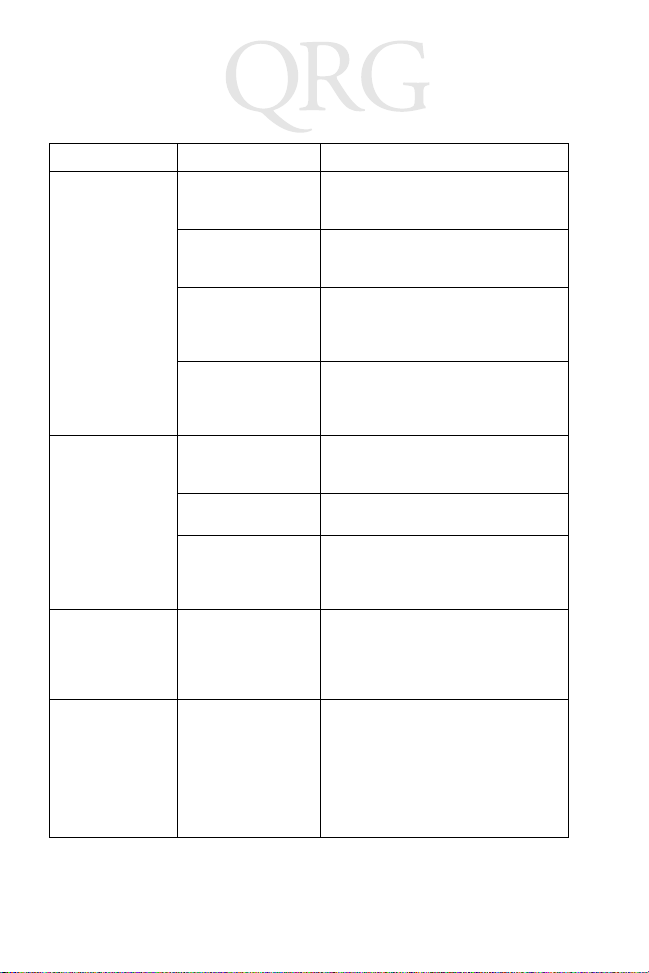
Troubleshooting
Problem Cause Solution
T erminal d oes not
turn on.
Rechargeable lithium-ion battery
did not charge.
Cannot see characters on display.
Battery not charged. Charge or replace the battery in the
Battery not installed
properly.
System crash. Perform a hard reset. See Mainte-
Battery failed. Replace battery. If your terminal still
Terminal removed
from cradle while
battery was charging.
Terminal not powered on.
terminal.
Ensure battery is installed properly.
See Installing the Battery on page 5.
nance on page 17.
does not operate, try a soft reset, then
a hard reset; see Resetting the T ermi-
nal on page 13.
Insert terminal in cradle and begin
charging. The lithium-ion battery requires up to 2 1/2 hours to recharge
fully.
Press the Power key.
17
Page 20
PPT 8800
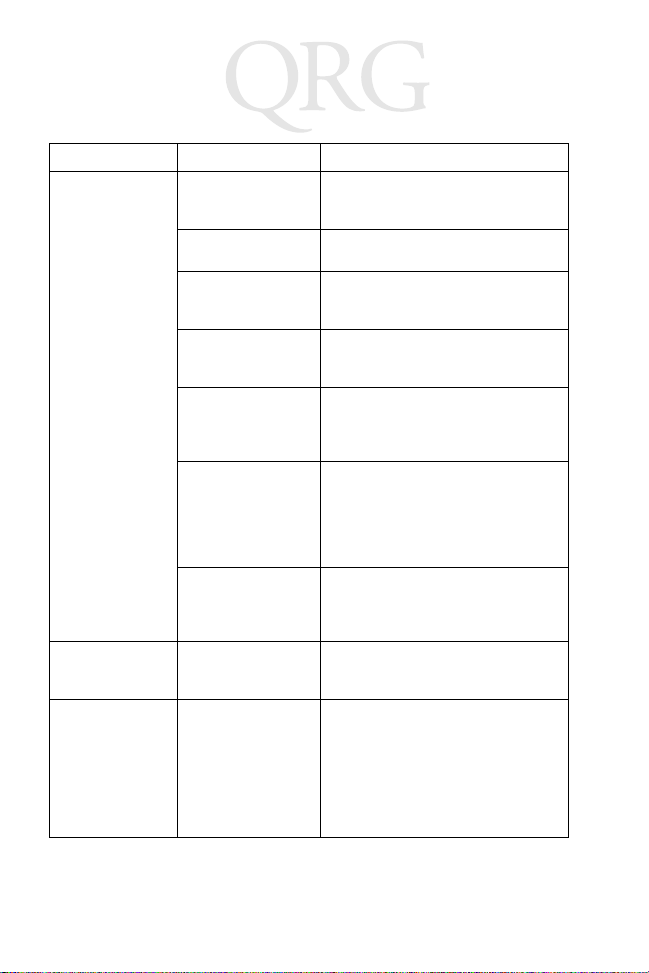
Problem Cause Solution
Fail to communicate with IrDA
printer.
During data communication, no
data was transmitted, or transmitted
data was incomplete.
No sound is audible.
Terminal turns itself off.
Distance from printer is more than 1
meter (39 inches).
Obstruction interfered with communication.
IrDA window is dirty
or obstructed.
Application is not
enabled to run IrDA
printing.
Terminal removed
from cradle during
communications.
Incorrect cable configuration.
Communication
software was incorrectly installed or
configured.
Volume setting is
low or turned off.
T erminal is inactive. Your terminal turns off after a period of
Bring the terminal closer to the printer
and attempt communications again.
Check the path to ensure no objects
were in the way.
Gently clean the IrDA window using a
tissue or other non-abrasive material.
Do not spray any cleaner directly on
the IrDA window.
Printer support must be included with
the application to run IrDA printing on
the terminal. See your System Administrator.
Replace the terminal in the cradle and
re-transmit.
See your System Administrator.
Perform setup as described in the
PPT 8800 Series Product Reference
Guide.
Check the System Volume slider in
the V olume & Sounds properties dia-
log box (under Start - Settings) to ensure the volume is set to an adequate
level.
inactivity. This period can be set from
one to five minutes, in one-minute intervals. Check the Power dialog box
(under Start - Settings), and change
the setting if you need a longer delay
before the automatic shutoff feature
activates.
18
Page 21

Quick Reference
Problem Cause Solution
T erminal d oes not
respond to a hard
reset.
Tapping the
screen buttons or
icons does not activate the corresponding feature.
A message appears stating that
your terminal’s
memory is full.
When receiving
beamed data an
out of memory
message appears.
Beamed data
does not transmit.
Battery cover is attached.
Battery is not
charged.
LCD screen not calibrated correctly.
Too many files
stored on the terminal.
Memory allocation
too low.
Too many applications installed on the
terminal.
Not enough free
memory available
for receiving data.
Terminals too close
together.
Insufficient room
lighting.
IrDA window is dirty
or obstructed.
You must remove the battery cover
before performing a hard reset.
Charge the terminal. See Charging
the Battery on page 6.
Calibrate the screen. See Calibrating
the Screen on page 8.
Delete unused memos and records.
You can save these records on your
computer.
Adjust the memory allocation. Select
Start, then Settings, and select the
System tab. Tap Memory and adjust
the slider.
If you have installed additional appli-
cations on your terminal, remove
them to recover memory. Se lect Start,
then Settings. Tap Remove Pro-
grams, select the unused program
and tap Remove.
Your terminal requires at least twice
the amount of memory available as
the data you are receiving. For example, if you are receiving a 30K application, you must have at least 60K free.
Confirm that the terminal s ar e 12”
apart, and there is a clear path between the two devices.
Adjust the room lighting or move to a
different location.
Gently clean the IrDA window using a
tissue or other non-abrasive material.
Do not spray any cleaner directly on
the IrDA window.
19
Page 22
PPT 8800
Problem Cause Solution
Your terminal
does not accept
scan input.
Main Battery Very
Low message ap-
pears.
Backup Battery
Low or Backup
Battery Very Low
message appears.
Scanning application is not loaded.
Unreadable bar
code.
Distance between
exit window and bar
code is incorrect.
Terminal is not programmed for the bar
code.
Terminal is not programmed to generate a beep.
Battery is low. If the scanner stops emitting a laser
Scan window is dirty
or obstructed.
The capacity of the
lithium-ion battery is
low.
The capacity of the
built-in backup battery is low.
Verify that the unit is loaded with a
scanning application. See your System Administrator.
Ensure the symbol is not defaced.
Ensure you are within proper scanning range.
Ensure the terminal is programmed to
accept the type of bar code you are
scanning.
If you are expecting a beep on a g ood
decode and don’t hear one, check that
the application is set to generate a
beep on good decode.
beam when you press the trigger,
check your battery level.
Note: If the scanner is still not reading
symbols, contact your distributor or
Symbol Technologies.
Gently clean the scan window using a
tissue or other non-abrasive material.
Do not spray any cleaner directly on
the scanner window.
Replace battery with fully charged
battery or re-charge the battery.
Re-charge the main battery using the
cradle or serial charging cable. DO
NOT remove the battery from the terminal. Note: When the terminal is
turned on for the first time, the backup
battery message appears. Ignore this
message because the backup battery
has not yet been fully charged.
20
Page 23

Quick Reference
Ergonomic Recommendations
Caution: In order to avoid or minimize the potential risk of ergonomic injury follow
• Reduce or eliminate repetitive motion
• Maintain a natural position
• Reduce or eliminate excessive force
• Keep objects that are used frequently within easy reach
• Perform tasks at correct heights
• Reduce or eliminate vibration
• Reduce or eliminate direct pressure
• Provide adjustable workstations
• Provide adequate clearance
• Provide a suitable working environment
• Improve work procedures.
Bluetooth
For PPT 8860: This product contains Bl uetooth compleme ntary subsystems B00838
and B01108.
the recommendations below. Consult wit h your local Health & Safety
Manager to ensure that you are adhering to your company' s safety programs to prevent employee injury.
®
Wireless Technology Information
Regulatory Information
All Symbol devices are designed to be compliant with rules and regulations in
locations they are sold and will be labeled as required.
Any changes or modifications to Symbol Technologies equipment, not expressly
approved by Symbol Technologies, could void the user's authority to operate the
equipment.
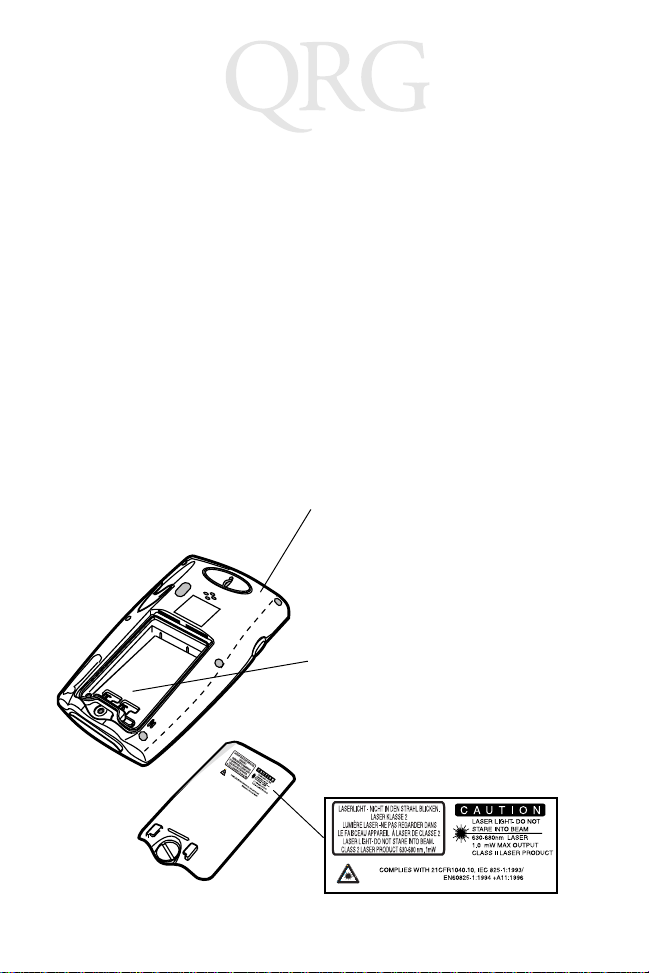
Applying the Regulatory Country Stamp
A regulatory label is applied to signify the device is approved for use in the f ollowin g
countries: United States, Canada, Australia, Japan & Europe.
Note: Europe includes, Austria, Belgium, Croatia, Denmark, Estonia, Fin-
In addition to the list above other countries may require a regulatory stamp to be
affixed to the product. Please refer to www.symbol.com for the list of countries where
mandatory stamps are required. For countries that requ ire regulatory label, a sheet
of stamps may be enclosed within the package. If the appropriate stamp is not
provided, please contact your supplier. To apply the country stamp:
land, France, Germany, Greece, Iceland, Ireland, Italy, Liechtenstein,
Luxembourg, Netherlands, Norway , Portugal, Spain, Sweden, Switzerland, United Kingdom.
21
Page 24
PPT 8800
1. Peel the stamp appropriate to the country where this device is to be used.
2. Apply the country stamp in the space provided in the battery well.
Operation of the device without a regulatory label or the correct country Stamp is
illegal.
Laser Devices
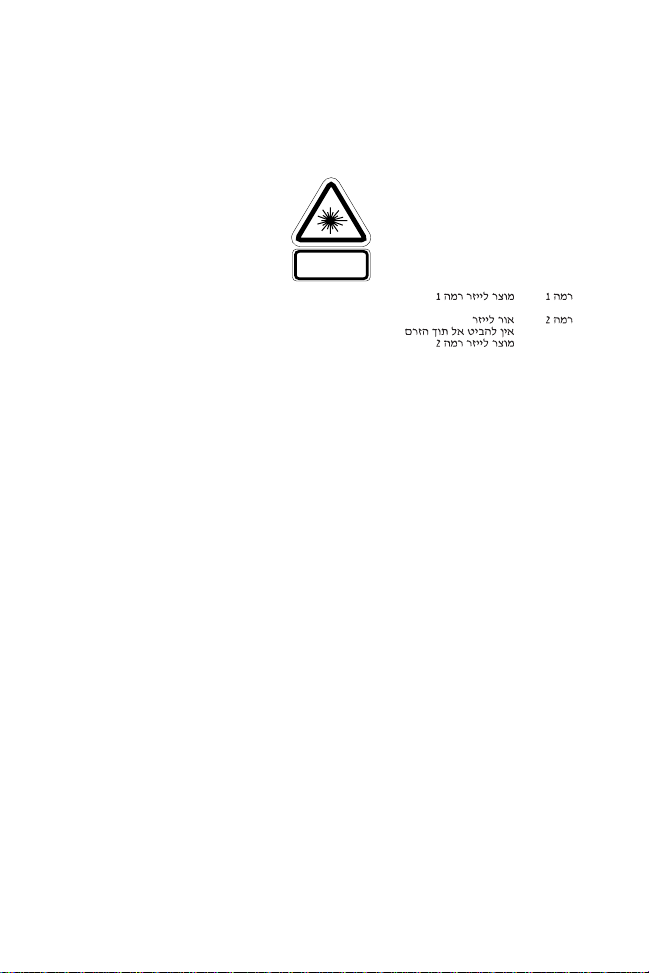
Symbol devices using lasers comply with US 21CFR1040.10, and IEC825-1:1993,
EN60825-1:1994+A11:1996. The laser classification is marked on one of the labels
on the device.
Class 1 Laser devices are not considered to be hazardous when used for their
intended purpose. The following statement is required to comply with US and
international regulations:
Caution: Use of controls, adjustments or performance of proce dures other than those
specified herein may result in hazardous laser light exposure.
Class 2 laser scanners use a low power, visible light diode. As with any very bright
light source, such as the sun, the user should avoid staring directly into the light
beam. Momentary exposure to a Class 2 laser is not known to be harmful.
Scanning Label
AVOID EXPOSURE - LASER LIGHT IS EMITTED FROM THIS APERTURE
EVITER TOUTE EXPOSITION - LUMIERE LASER
LASER EMIS PAR CETTE
DANGER - LASER LIGHT WHEN OPEN. AVIOD DIRECT
EYE EXPOSURE. ATTENTION - LUMIÈRE LASER EN CAS
D’OVERTURE. EXPOSITION DANGEREUSE AU FAISCEAU
VORSICHT - LASERLICHT, WENN ABDECKUNG
GEÖFFNET. NICHT STRAHL AUSSETZEN. SEE QUICK
REFERENCE GUIDE FOR PATENT INFORMATION
OUVERTURE
22
Page 25
Quick Reference
In accordance with Clause 5, IEC 825 and EN60825, the following information is
provided to the user:
ENGLISH HEBREW
CLASS 1 CLASS 1 LASER PRODUCT
CLASS 2 LASER LIGHT
DO NOT STARE INTO BEAM
CLASS 2 LASER PRODUCT
DANISH / DANSK ITALIAN / ITALIANO
KLASSE 1 KLASSE 1 LASERPRODUKT CLASSE 1 PRODOTTO AL LASER DI CLASSE 1
KLASSE 2 LASERLYF CLASSE 2 LUCE LASER
SE IKKE IND I STRÅLEN NON FISSARE IL RAGGIOPRODOTTO
KLASSE 2 LASERPRODUKT AL LASER DI CLASSE 2
DUTCH / NEDERLANDS NORWEGIAN / NORSK
KLASSE 1 KLASSE-1 LASERPRODUKT KLASSE 1 LASERPRODUKT, KLASSE 1
KLASSE 2 LASERLICHT KLASSE 2 LASERLYS IKKE STIRR INN I LYSSTRÅLEN
NIET IN STRAAL STAREN LASERPRODUKT, KLASSE 2
KLASSE-2 LASERPRODUKT
FINNISH / SUOMI PORTUGUESE / PORTUGUÊS
LUOKKA 1 LUOKKA 1 LASERTUOTE CLASSE 1 PRODUTO LASER DA CLASSE 1
LUOKKA 2 LASERVALO CLASSE 2 LUZ DE LASER NÃO FIXAR O RAIO LUMINOSO
ÄLÄ TUIJOTA SÄDETTÄ PRODUTO LASER DA CLASSE 2
LUOKKA 2 LASERTUOTE
FRENCH / FRANÇAIS SPANISH / ESPAÑOL
CLASSE 1 PRODUIT LASER DE CLASSE 1 CLASE 1 PRODUCTO LASER DE LA CLASE 1
CLASSE 2 LUMIERE LASER CLASE 2 LUZ LASER
NE PAS REGARDER LE RAYON FIXEMENT NO MIRE FIJAMENTE EL HAZ
PRODUIT LASER DE CLASSE 2 PRODUCTO LASER DE LA CLASE 2
GERMAN / DEUTCH SWEDISH / SVENSKA
KLASSE 1 LASERPRODUKT DER KLASSE 1 KLASS 1 LASERPRODUKT KLASS 1
KLASSE 2 LASERSTRAHLEN KLASS 2 LASERLJUS STIRRA INTE MOT STR ÅLE N
NICHT DIREKT IN DEN LASERSTRAHL SCHAUEN LASERPRODUKT KLASS 2
LASERPRODUKT DER KLASSE 2
Power Supply
Note: Use only a Symbol-approved power supply (50-14000-107) output rat -
Hinweis: Benutzen Sie nur eine Symbol Technologies genehmigt Stromversor-
ed 9.0 Vdc and minimum 2.0 A. The power supply is certified to
EN60950 with SEL V outputs.
gung (50-14000-107) in den Ausgabe: 9.0 Vdc und minimum 2.0 A.
Die Stromversorgung ist bescheinigt nach EN60950 mit SELV Ausgaben.
23
Page 26
PPT 8800
FCC RF Exposure Guidelines
This device was tested for typical body-worn operations with the holster providing a
minimal spacing of 2.0 cm from the body to the back of the terminal/antenna. To
maintain compliance with FCC RF exposure compliance requirements, use only beltclips, holsters, or similar accessories that maintain a 2.0 cm separation distance
between the user's body and the back of the ter minal, including the an tenna. The use
of third-party belt-clips, holsters, and similar accessories should not contain metallic
components in its assembly. The use of these accessories that do not satisfy these
requirements may not comply with FCC RF exposure compliance requirement s, and
should be avoided.
This equipment generates and radiates radio-frequency energ y. T o co mply with FCC
RF exposure compliance requirements, the following antenna installation and device
operating configurations must be satisfied:
(1) Users are not permitted to make changes or modify the system in any way, and
(2) connecting external antennas to the card is pro hibited. This device and its antenna
must not be co-located or operated with any other antenna or transmitter.
Radio Frequency Interference Requirements
Tested to comply
with FCC Standards
FOR HOME OR OFFICE USE
installation. This equipment generates, u ses and can radia te radio frequency energ y
and, if not installed and used in accordance with the inst ructions, may cause harmful
interference to radio communications. However there is no guarantee that
interference will not occur in a particular installation. If this equipment does cause
harmful interference to radio or television reception, which can be determined by
turning the equipment off and on, the user is encouraged to try to correct the
interference by one or more of the following measures:
• Reorient or relocate the receiving antenna
• Increase the separation between the equipment and receiver
• Connect the equipment into an outlet on a circuit different from that to which th e
receiver is connected
• Consult the dealer or an experienced radio/TV technician for help.
This device complies with FCC Part 15. Operation is subject to the following two
conditions:
(1) This device may not cause harmful interference and (2) This device must accept
any interference received, including interference that may cause undesired
operation.
Note: This equipment has been tested and found to comply with
the limits for a Class B digital device, pursuant to Part 15 of the
FCC rules. These limits are designed to provide reasonable
protection against harmful interference in a residential
24
Page 27
Quick Reference
Radio Frequency Interference Requirements - Canada
This device complies with RSS 210 of Industry & Science Canada. Operation is
subject to the following two conditions: (1) this device may not cause harmful
interference and (2) this device must accept any interference received, including
interference that may cause undesired operation.
This Class B digital apparatus complies with Canadian ICES-003.
Cet appareil numérique de la classe B est conforme à la norme NMB-003 du Canada.
Label Marking: The T erm "IC:" before the radio certif ication only signifies that Industry
Canada technical specifications were met.
Marking and European Economic Area (EEA)
RLAN's (2.4GHz) for use through the EEA have the following restrictions:
• Maximum radiated transmit power of 100 mW EIRP in the frequency range
2.400 -2.4835 GHz
• France, equipment is restricted to 2.4465 -2.4835 GHz frequency range
• Belgium outside usage, the equipment is restricted to 2.460 -2.4835 GHz frequency range
• Italy requires a user license for outside usage.
Bluetooth for use through the EEA have the following restrictions:
• Maximum radiated transmit power of 10mW EIRP in the f reque ncy ra nge 2. 400
-2.4835 GHz
• Belgium outside usage, the equipment is restricted to 2.460 -2.4835 GHz frequency range
• Italy requires a user license for outside usage.
Statement of Compliance
Symbol T echnologies, Inc., h ereby , declares that this device is in compliance with the
essential requirements and other relevant provisions of Directives 1999/5/EC, 89/
336/EEC and 73/23/EEC. Declaration of Conformities may be obtained from http://
www2.symbol.com/doc/.
Other Countries
Mexico - Restrict Frequency Range to: 2.450 - 2.4835 GHz.
Israel - Restrict Frequency Range to: 2.418 - 2.457 GHz.
Sri Lanka- Restrict Frequency Range to: 2.400 - 2.430 GHz.
Hazard Location Usage
A. "THIS EQUIPMENT IS SUITABLE FOR USE IN CLASS I, DIVISION 2, GROUPS
A, B, C, AND D OR NON-HAZARDOUS LOCATIONS ONLY."
B. “WARNING ! EXPLOSION HAZARD ! SUBSTITUTION OF COMPONENTS MA Y
IMPAIR SUITABILITY FOR CLASS I, DIVISION 2."
25
Page 28

PPT 8800
Battery Information
Symbol rechargeable battery packs are designed and constructed to the highest
standards within the industry.
However, there are limitations to how long your battery can operate or be stored
before needing replacement. Many factors affect th e actual life cycle of your battery
pack, such as heat, cold, harsh environmental conditions and severe drops.
When batteries are stored over six (6) months, some irreve r s i b le de terioration in
overall battery quality may occur . S tore your bat teries discharged in a dry , cool pl ace,
removed from the equipment to prevent loss of cap acity, rusting of metallic p art s and
electrolyte leakage. When storing batteries for one year or longer, they should be
charged and discharged at least once a year. If an electrolyte leakage is observed,
avoid any contact with affected area and prope rly di spose of the battery.
An indication that your Symbol battery needs replacement is when normal run ti me
begins to diminish. When you consistently experience significant loss of run time,
replace your battery.
Standard warranty per iod for all Symbol batteries is 30 days, regardless if the batt ery
was purchased separately or included as part of the mobile computer or bar code
scanner.
For more information on Symbol batteries, please visit:
http://mysymbolcare.symbol.com/battery/batbasics1.html
Taiwan
EPA (Environmental Protection Administration) requires dry battery producing or
importing firms in accordance with Article 15 of the Waste Disposal Act are required
to indicate the recycling marks on the batteries used in sales, giveaway or promotion.
Contact a qualified Taiwanese recycler for proper battery disposal.
Fire Prevention
WARNING
Avoid exposing the product, including the cradle, to contact with
hot oil or other flammable liquids. If such exposure occurs,
immediately clean the product (or cradle) in accordance with the
cleaning guidelines specified in the Product Reference Guide
(p/n 72E-58094-xx).
26
Page 29

Quick Reference
27
Page 30

PPT 8800
28
Page 31

Quick Reference
Warranty
(A) Warranty Symbol Technologies (hereaf ter “Seller”) hardwar e Product s are warrant ed against defect s in
workmanship and materials for a period of twelve (12) months from the date of shipment, unless otherwise
provided by Seller in writing, provided the Product remains unmodified and is operated under normal and
proper conditions. Warranty provisions and durations on software, integrated installed systems, Product
modified or designed to meet specific customer specifications (“Custom Products”), remanufactured
products, and reconditioned or upgraded products, shall be as provided in the applicable Product
specification in effect at the time of purchase or in the accompanyin g software license.
(B) Spare Parts Spare parts (i.e. parts, components, or subassemblies sold by Seller for use i n the service
and maintenance of Products) are warranted against defects in workmanship and materials for a period of
thirty (30) days from the date of shipment. Spare parts may be new or originat e from returned unit s under th e
conditions set forth in subsection D below.
(C) Repair of Symbol-branded hardware For repairs on Symbol-branded hardware Products under this
Agreement, including repairs covered by warranty, the repair services provided are warranted against
defects in workmanship and materials on the repaired component of the Product for a period of thirty (30)
days from the shipment date of the repaired Product, or until the end of the original warranty period,
whichever is longer.
(D) Product Service Products may be serviced or manufac tured with p arts, c omponents, or subassemblies
that originate from returned products and that have been tested as meeting applicable specifications for
equivalent new material and Products. The sole obligation of Seller for defective hardware Products is limited
to repair or replacement (at Seller’s option) on a “return to servi ce depot” basis with prior Selle r authorization.
Customer is responsible for shipment to the Seller and assumes all costs and risks associ ated with this
transportation; return shipment to the Customer will be at Seller's expense. Customer shall be responsible
for return shipment charges for product returned where Seller determines there is no defect (“No Defect
Found”), or for product returned that Seller determines is not eligible for wa rranty repair. No charge will be
made to Buyer for replacement parts for warranty repa irs. Seller is not res ponsible for any damage to or l oss
of any software programs, data or removable data storage media, or the restoration or reinstallation of any
software programs or data other than the software, if any, installed by Seller during manufacture of the
Product.
(E) Original Warranty Period Except for the warranty applying solely to the repai red component arising from
a repair service as provided in Section C above, the aforementioned provisions do not extend the original
warranty period of any Product that had either been repaired or replaced by Seller.
(F) Warranty Provisions The above warranty provisions shall not apply to any Product (i) which has been
repaired, tampered with, altered or modified, exce pt by Seller’s authorized service person nel; (ii) in which the
defects or damage to the Product result from normal wear and tear, misuse, negligence, improper storage,
water or other liquids, battery leakage, use of parts or accessori es not approved or supplied by Symbol, or
failure to perform operator handling and scheduled maintenance instructions supplied by Sell er; (iii) which
has been subjected to unusual physical or electrical stress, abuse, or accident, or forces or exposure beyond
normal use within the specified operational and environment al parameters set forth in the appli cable Product
specification; nor shall the above warranty provisions apply to any expendable or consumable items, such
as batteries, supplied with the Product.
EXCEPT FOR THE WARRANTY OF TITLE AND THE EXPRESS WARRANTIES STATED ABOVE,
SELLER DISCLAIMS ALL WARRANTIES ON PRODUCTS FURNISHED HEREUNDER INCLUDING ALL
IMPLIED WARRANTIES OF MERCHANTABILITY AND FITNESS FOR A PARTICULAR USE. ANY
IMPLIED WARRANTIES THAT MA Y BE IMPOSED BY LAW ARE LIMITED IN DURA TION TO THE LIMITED
WARRANTY PERIOD. SOME STATES OR COUNTRIES DO NOT ALLOW A LIMITATION ON HOW LONG
AN IMPLIED WARRANTY LASTS OR THE EXCLUSION OR LIMITATION OF INCIDENTAL OR
CONSEQUENTIAL DAMAGES FOR CONSUMER PRODUCTS. IN SUCH STATES OR COUNTRIES, FOR
SUCH PRODUCTS, SOME EXCLUSIONS OR LIMITATIONS OF THIS LIMITED WARRANTY MAY NOT
APPLY.
The stated express warranties are in lieu of all obligations or liabilities on the part of Seller for damages,
including but not limited to, special, indirect or consequential damages arising out of or in connection with
the use or performance of the Product or service. Seller’s liability for damages to Buyer or others resulting
from the use of any Product or service furnished hereunder shall in no way exceed the purchase price of said
Product or the fair market value of said service, except in instances of injury to per sons or property.
29
Page 32

Service Information
Before you use the unit, it must be configured to operate in your facility’s network and
run your applications.
If you have a problem running your unit or using your equipment, cont act your facility’s
Technical or Systems Support. If there is a problem with the equipment, they will
contact the Symbol Support Center:
United States 1-800-653-5350
United Kingdom 0800 328 2424 Asia/Pacific +65-6796-
Australia 1-800-672-906 Austria/Österreich 01-5055794-0
Denmark/Danmark 7020-1718 Finland/Suomi 9 5407 580
France 01-40-96-52-21 Germany/Deut-
Italy/Italia 2-484441 Mexico/México 5-520-1835
Netherlands/Neder-
land
South Africa 11-809 5311 Spain/España
Sweden/Sverige 08 445 29 00 Outside Spain+34 91 324 40 00
Latin America
Sales Support
Europe/Mid-East
Distributor Operations
For the latest version of this guide go to: http://www.symbol.com/manuals.
1-631-738-2400
315-271700 Norway/Norge +47 2232 4375
1-800-347-0178 Inside US
+1-954-255-2610 Outside US
Contact local distributor or call
+44 118 945 7360
Canada 905-629-7226
9600
schland
Inside Spain91 324 40 00
6074-49020
72-58093-04
Revision A - March 2005
Symbol Technologies, Inc. One Symbol Plaza, Holtsville, N.Y. 11742-1300
 Loading...