

Page 1

1
1. CONTENTS
1. Contents .................................................................................................................... 1
2. Control location .......................................................................................................... 3
3. Before riding............................................................................................................... 4
4. Safe riding ................................................................................................................ 4
5. Driving ...................................................................................................................... 5
6. Use genuine spare parts ........................................................................................... 5
7. Use of each component ............................................................................................ 6
Gauges .................................................................................................................... 6
Operation of ignition switch ....................................................................................... 7
Operation of steering handle lock switch ................................................................... 7
Operation of seat open switch ................................................................ ................... 7
Use of buttons .......................................................................................................... 8
Storage box ................................................................................................................. 9
Safety helmet hook...................................................................................................... 9
Fuel tank cap ........................................................................................................... 10
Brake ....................................................................................................................... 10
8. Important points and cautions for starting engine .................................................... 11
9. The best way to drive off ......................................................................................... 12
The control of throttle valve handle ......................................................................... 12
Parking method ...................................................................................................... 12
10. Inspection and maintenance before riding ................................ ............................... 13
Routine inspection .................................................................................................. 13
Engine oil inspection and change ................................ ............................................ 13
Fuel inspection ......................................................................................................... 14
Transmission oil inspection and change ................................................................... 14
Inspection and adjustment of brake free play .......................................................... 15
Disc brake inspection (depending on models) ......................................................... 15
Throttle valve handle clearance adjustment ............................................................. 16
Inspection and maintenance of battery .................................................................... 16
Tire inspection ........................................................................................................ 18
Steering handle front shock absorbers inspection .................................................... 18
Checking and changing fuses ................................................................................. 19
Checking the turn signal lights and horn ................................................................. 19
Checking the front and rear lights ........................................................................... 19
Checking the brake light ......................................................................................... 19
Page 2

2
1. CONTENTS
Checking for fuel leakage ........................................................................................ 20
Checking the lubrication of body’s various mechanisms .......................................... 20
Checking the spark plug ......................................................................................... 20
Checking the air cleaner ......................................................................................... 20
11. When there is an abnormal condition or a trouble ................................................... 21
Diagnosis when engine does not start ..................................................................... 21
12. Suggestions on engine fuel ..................................................................................... 21
13. Transmission oil ..................................................................................................... 21
14. Cautions for riding motorcycle ................................................................................ 22
Anti-lock brake system ............................................................................................. 23
15. Periodical maintenance schedule............................................................................... 24
16. Specification ........................................................................................................... 25
Page 3
3
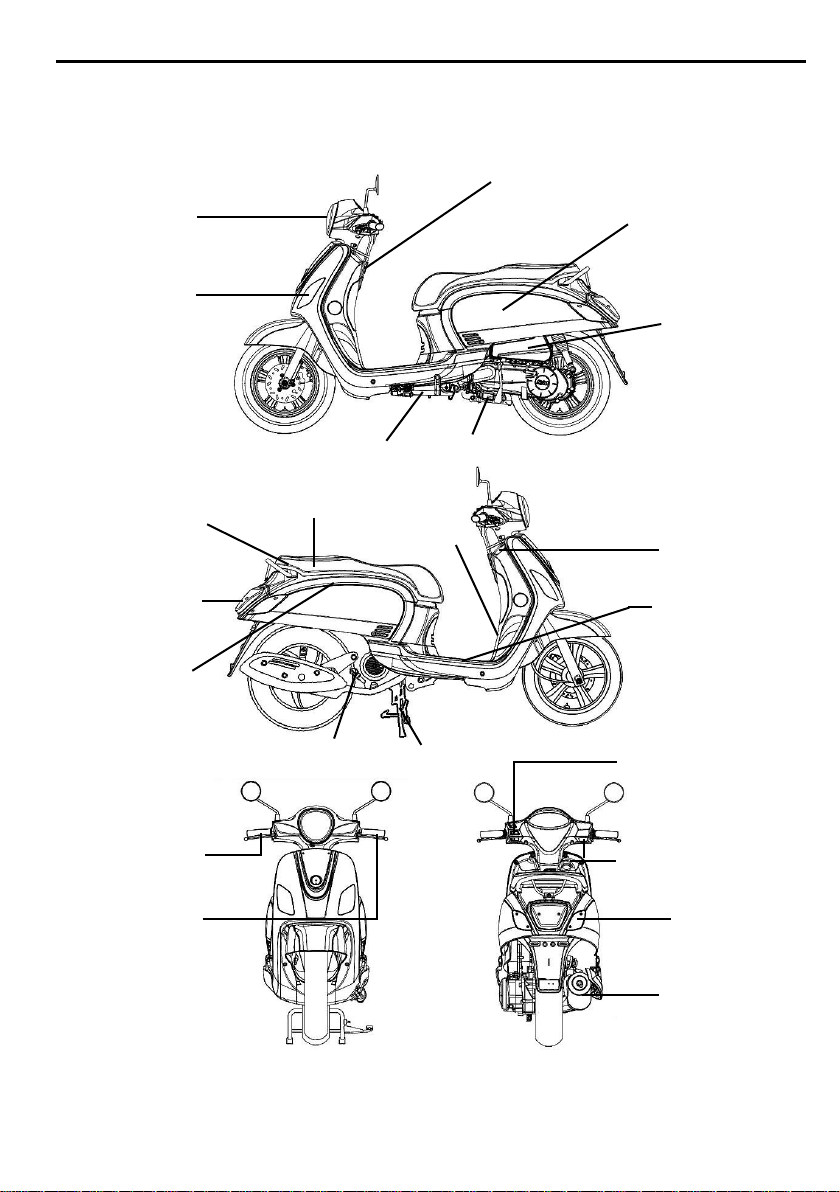
2. CONTROL LOCATION
MODEL: XA05W4-EU/NL(Fiddle Ⅲ 50i CC)
XA12W2-EU XA12W3-EU (Fiddle Ⅲ 125i CC)
XA20W2-EU XA20W3-EU (Fiddle Ⅲ 200i CC)
Fuel tank cap
Starter switch
High& Low beam/Turn
signal/Seat open/Horn
Switch
Front light
Engine number
Front brake level
Tail/Stop light
Battery
Air Cleaner
Oil level
Front turn
signal light/
Position light
Helmet hook
Storage box
Side stand
Ignition switch
Rear turn
signal light
Engine start
control switch
Rear brake level
Exhaust muffler
Main stand
Frame number
Fuses
Page 4
4
3. BEFORE RIDING
This manual describes the correct usage of this motorcycle including safety riding, simple inspection
methods and so on.
For a more comfortable and safety riding, please read this manual carefully.
In case the motorcycle’s specifications and construction are modified and different from the photos
and diagrams on the owner’s manual / catalogues, the specifications and construction of the actual
motorcycle shall prevail.
4. SAFE RIDING
It is very important to be relaxed and clothe properly when driving, observe traffic regulations, do not rush,
always drive carefully and relaxed.
Usually, most people would ride their newly bought motorcycle very carefully, but after they became familiar
with their motorcycles, they tended to become reckless which may result in an accident.
WARNING!!
To avoid getting burned by exhaust pipe when taking a passenger. Make sure your passenger has
put his/her feet on the pedals.
After running, the exhaust pipe is very hot, be careful not to get burned when conducting an
inspection or maintenance.
After running, the exhaust pipe is very hot, select a suitable location to park your motorcycle to avoid
others getting burned by the exhaust pipe.
Thank you very much for your patronage
In order to maximize your motorcycle’s performance, a periodical inspection and maintenance
should be completely carried out.
We recommend that after riding your new motorcycle for the first 300 kilometers, you should take
your motorcycle to the original dealer for an initial inspection, and to have your motorcycle inspected
periodically every 1000 kilometers thereafter.
To remind you:
Please wear a safety helmet, and properly tighten the chin belt when riding a motorcycle.
Clothes with open or loose cuffs may be blown by wind and cause the cuffs to get caught on the
steering handle and thus affects riding safety.
So, put on clothes with tight sleeves.
Hold the steering handle by both hands when riding. Never ride with only one hand.
Observe the speed limit.
Wear suitable low-heel shoes.
Perform periodical maintenance and inspection in accordance with the schedule.
For your benefit, please ask your SANYANG dealer the operating manual and carefully read the following:
Correct use of the motorcycle.
Pre-delivery inspection and maintenance.
CAUTION:
Modified motorcycle will affect its structure or performance, and cause poor engine operation or
exhaust noise, which will result in shortening the motorcycle’s service life.
Besides, modification is illegal and does not conform to the original design and specifications.
A modified motorcycle will not be covered by warranty, therefore, do not modify your motorcycle at will.
Page 5
5
5.
DRIVING
Keep the related parts of your body such as arms, palms, lumbar, and toes relax and ride
with the most comfortable posture in order to be able to react quickly whenever it is
necessary.
Rider’s posture will greatly affect riding safety. Always keep your body’s gravity in the center of the
saddle, if your body’s gravity is on the rear part of saddle, the front wheel load will be reduced, and
this will cause the steering handle shaking. It is dangerous to ride a motorcycle with an unstable
handle.
It will be much easier to make a turn if rider inclines his body inward when turning. On the other
hand, the rider will feel unstable if his body and the motorcycle do not incline.
The motorcycle is hard to control on a bumpy, unleveled, unpaved road, try to know the road
conditions in advance, slow down and use your shoulder’s force to control the handle.
Suggestion: Do not load objects on the front pedals unnecessarily, to avoid affecting the riding safety
and the operation of steering handle.
6.
USE GENUINE SPARE PARTS
In order to maintain the motorcycle’s best performance, each part’s quality, material, and machined
precision must conform with the design requirements. “SYM Genuine Spare Parts” were made from
the same high quality materials used for the original motorcycle. No parts would be sold to the market
until they could meet the designed specifications through sophisticated engineering and stringent quality
control. Therefore, it is necessary to purchase “SYM Genuine Spare Parts” from “SYM Authorized
Dealers or Franchised Dealers” when replacing spare parts. If you buy cheap, or fake substitute parts
from the market, no guarantee can be provided either for the quality or durability. Also, it may result in
unexpected troubles and lower the motorcycle’s performance.
Always use SYM Genuine Spare Parts to keep your motorcycles pure blood and to ensure its long
service life.
CAUTION:
The rider’s feeling on the handle is slightly different with a load or without a load.
Overload may cause the handle to swing and affects the riding safety.
Therefore, do not overload your motorcycle.
CAUTION:
Do not place flammable materials such as rags between the body side cover and engine to avoid
components damaging by fire.
Do not load objects on areas not specified for loading to avoid damage.
SUGGESTION
To maximize the motorcycle’s performance and prolong its service life:
The first month or first 1000km is the wear- in period for the engine and components.
Avoid rapid acceleration, and keep the speed below 60km/hr.
Page 6
6
CAUTION:
Do not wipe plastic components, e.g. instrument panel, headlight, with organic solvents such as
gasoline…etc to avoid damaging these components.
The panel figure for speedometer may vary from model to model, but the location usually are the
same.
7.
USE OF EACH COMPONENT
(The following is SYM 4 stroke air-cooling50c.c.&.125c.c.&200c.c. scooter’s basic
operation, and they could vary from different individual models. Please consult the end
of this manual.)
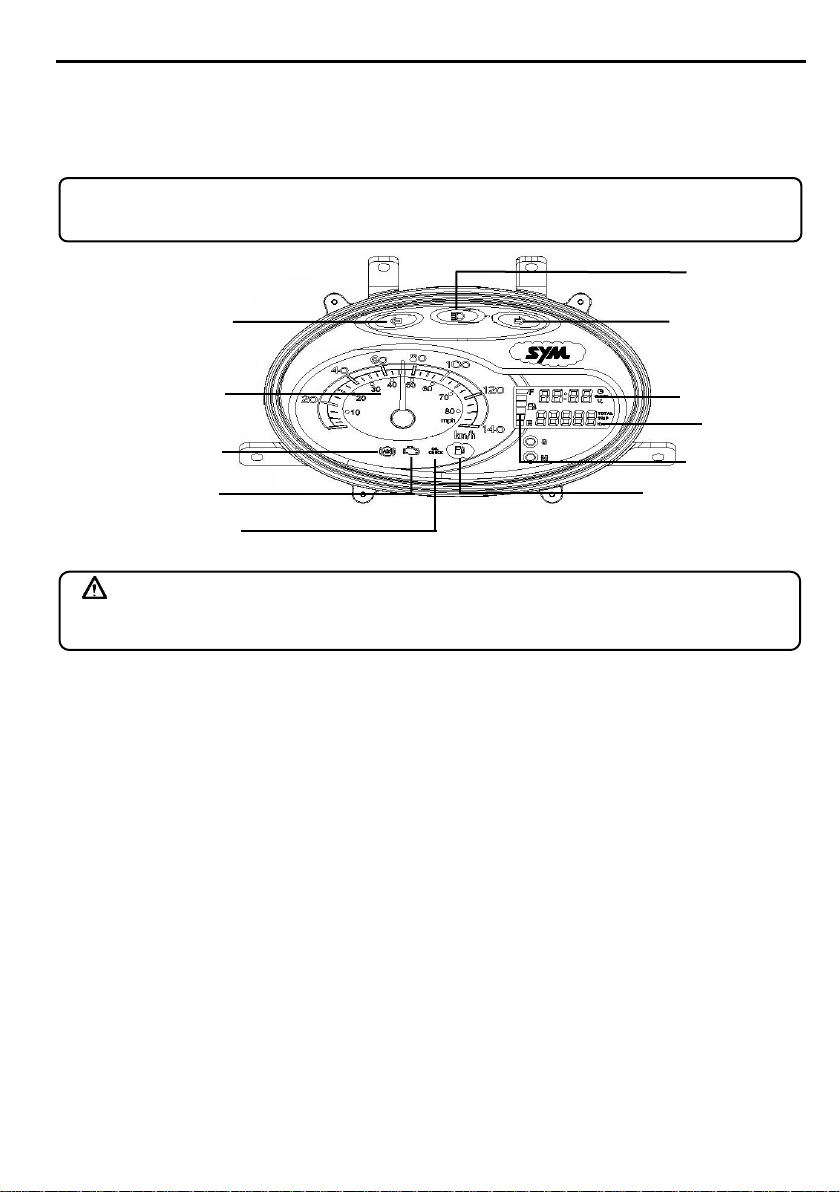
§GAUGES§
Speedometer/ Tachometer:
Indicates driving speed or engine rpm.
Odometer:
Indicates total accumulated distance traveled.
High Beam Indicator:
This indicator comes on with high beam
headlight is turned on.
Turn (left/right) Signal Indicator:
The left or right Indicator will be flashing
according to the operated directions of turn
signal light switch when it is turned on.
Fuel Meter:
The pointer in this meter shows how much fuel
remains in the tank.
The pointer stays in “E” position when key
switch is turned to “OFF”.
Voltmeter/time:
Display average voltage of battery or time.
Under the normal display status, press "SET" button 0.5 second, it can switch “VOLTAGE” display
mode or “CLOCK” display mode.
Fault indicator light:
If there is something wrong with the ECS, the warning light will light all the time.
Engine oil replacement warning lamp:
It is used to indicate the oil exchange time, with lights, when the vehicle was driven about 1000 kilometers,
indicator light will light up, warn the users to replace the oil.
After finish oil change, After the oil change, put the main switch in “ON”, long press "SET" button more
than 2 seconds in “ODO” mode, then the indicator light will go out.
Low fuel load warning light:
When there is a little fuel inside the tank, the warning light will be on.
High Beam
Indicator
Fuel meter
Odometer
Turn Right
Signal Indicator
Turn Left Signal
Indicator
Tachometer
/Speedometer
Voltmeter/time
ABS Indicator
Fault indicator light
Engine oil replacement
warning lamp
Low fuel load warning
light
Page 7

7
ABS indicator light:(ABS Model)
Normally the ABS indicator light goes on when the ignition switch is turned on and goes off shortly
after the scooter starts moving.
The ABS (Anti-lock Brake System) indicator light goes on when the ignition switch is turned on and goes
off shortly after the scooter starts moving. If the ABS is normal, it stays off. If something is wrong with the
ABS, the indicator goes on and stays on. When the indicator light is on, the ABS does not function but if
the ABS fails, the conventional brake system will still work normally.
1.“S” button:
Press“S” button about one or two seconds to switch to voltage display. Return to time display automatic
about one minute later, or press“S” button short time to return to time display immediately.
2.“M” button:
a. Press“M” button for long time to enter hour adjustment, then hour display will flash. Press“S” button to
adjust hour, and press“M” button shortly to switch to minute adjustment. At this time minute display will
flash. Press“S” button shortly to increase a minute, press“S” button long time minute figure will
automatically be increased continuously.
b. After adjust time well, press“M” button for long time to exit setting state, or wait for about 1 ~ 2 minutes
to exit setting state automatically.
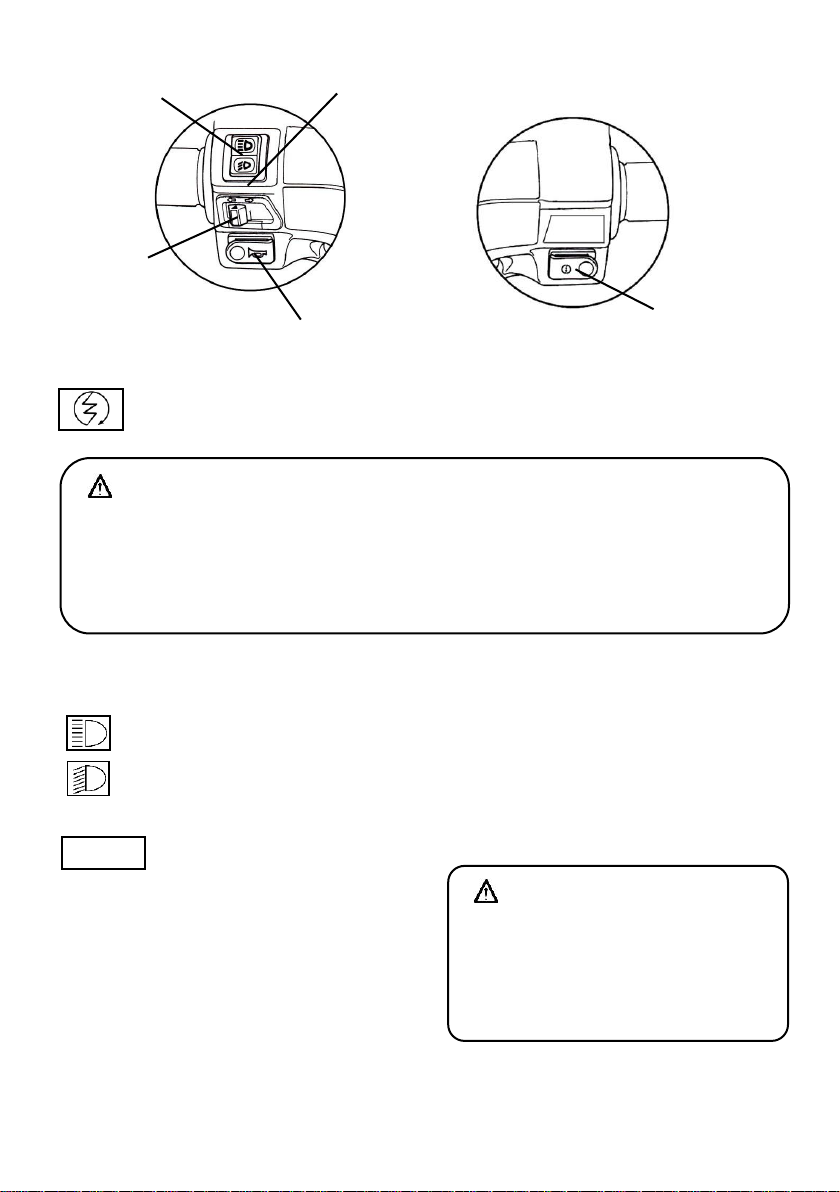
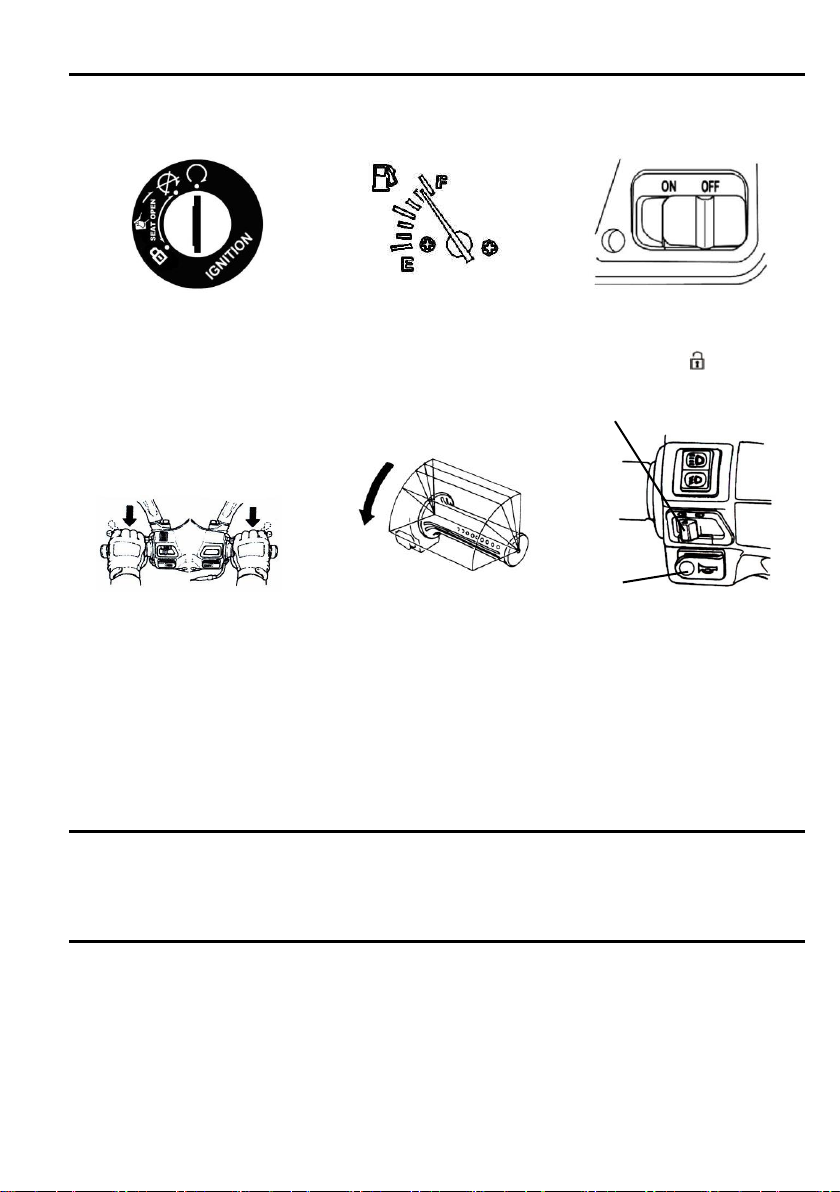
§OPERATION OF IGNITION SWITCH §
“ON” position:
Engine can be started in this position.
Ignition switch key can not be removed.
“OFF” position:
Engine is shut off and can not be started in this
position .
Ignition switch key can be removed.
§OPERATION OF STEERING HANDLE LOCK SWITCH §
“Steering handle lock” position
Turn the steering handle to left and insert the key into,
press ignition switch key clockwise and then lightly
turn it to left to the “lock” position.
The steering handle is locked in this position.
Ignition switch key can be removed.
When unlocking, simply turn the key from the “LOCK”
position to the “OFF” position.
§OPERATION OF SEAT OPEN SWITCH§
Inserted the ignition switch key in the main switch lock.
Turn the ignition switch key to the“seat open” position counter-clockwise.
Then, the seat will be open.
CAUTION:
Never operate the ignition switch key when the motorcycle is running. To turn the ignition switch
to “OFF” and “LOCK” position will shut off the electrical system and that may result in a
dangerous accident. Therefore, the ignition switch can only be turned off after the motorcycle has
been completely stopped.
Always remove the key and be sure to take the key away with you after locking the steering handle
before leaving your motorcycle.
If ignition switch remains in the “ON” position for a prolonged period after the engine has been
stopped, the battery’s capacity will be reduced and this may affect the engine’s start ability.
Make sure to take the key away with you before you lock your seat.
IGNITION SWITCH
CAUTION:
Make sure to take the
key away with you before
you lock your seat.
Page 8
8
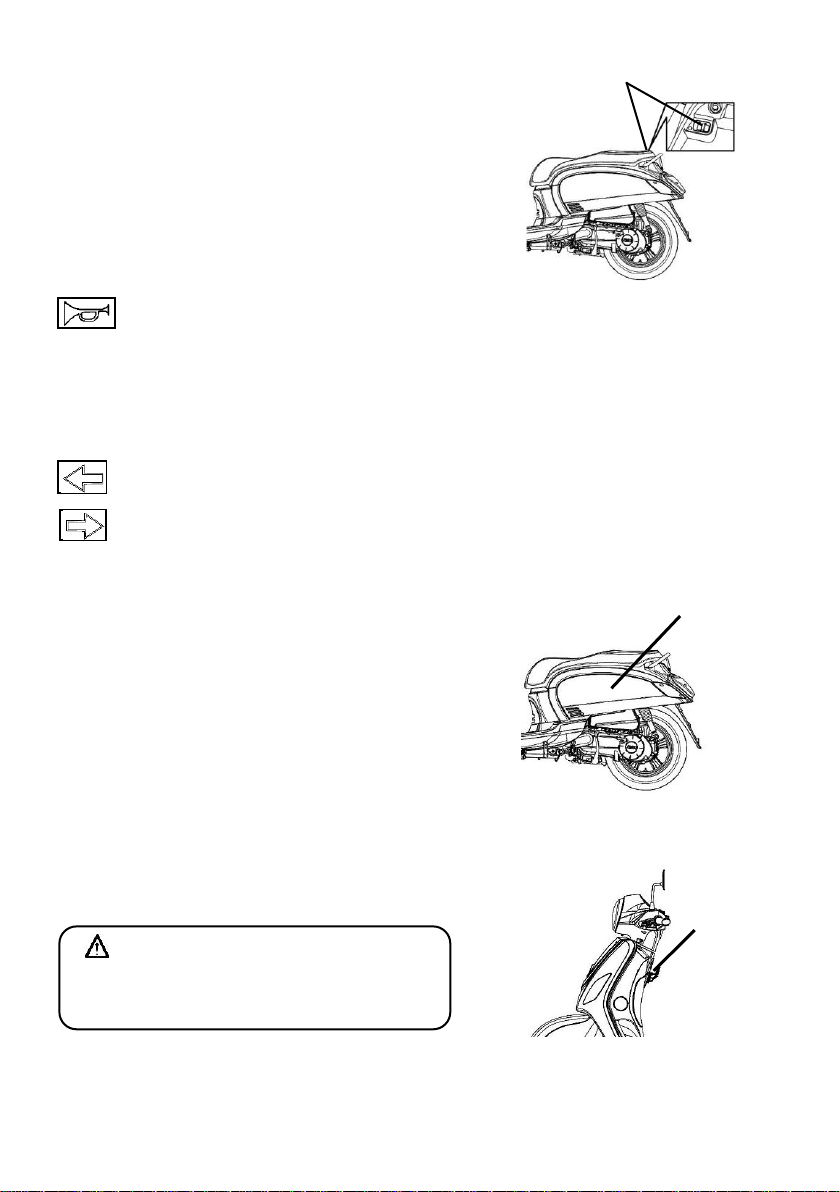
§USE OF BUTTONS§
Electrical starter button
This is a starting motor button(switch) for engine starting.
With the main switch “on”, press this button while holding the front or rear brake lever will start
the engine.
High/low beam switch
This is the high and low beam of headlight switching switch. Press this switch to switch between high
and beams.
This is for high beam.
This is for low beam.(please turn to low beam riding in city.)
Seat open switch
Turn ignition switch to the“ON” position and press this button down. Then, the seat will be
open.
This button will return to original position after
releasing.
Press the seat down and it will be locked
automatically.
After the seat catch has been locked , check to
make sure it has locked properly by lightly lifting
the seat.
CAUTION:
Release this button immediately after engine has been starter, and never press the button again to
avoid damaging the engine.
This mechanism is a safety design. The engine can only be started after the front or rear brake
lever (pedal) has been applied.
Do not use light system. Turn headlight and turn signal light to the “off” position when the engine
is being started.
Seat open
switch
CAUTION:
Be sure to remove the key after the seat has
been locked.
Do not put the key inside the storage box
after unlocking to avoid the key being locked
inside the storage box when the seat is
pressed down automatically.
Turn Signal
Switch
Horn Switch
High/low
beam switch
Seat open
switch
Electrical starter
button
Page 9
9
Engine start control switch
The switch button position is under seat.
“ON” position: Engine is locked and can not be started engine
in this position.
“OFF” position: When the ignition switch is “on” position, the
start control switch is “off” position, press
electrical starter button while holding the front or
rear brake lever will start the engine.
Horn Switch
Press this button down when ignition switch is in the “ON” position, the horn will sound.
Turn Signal Switch
Turn signal lights are used when turning left/right or changing lane.
Turn ignition switch to the “ON” position, and slide the turn signal switch to left or right . Then, the turn
signal lights will flash.
To release, simply return the turn signal light button to the original position.
Left-side turn signal light flashing means you intend to make a left turn.
Right-side turn signal light flashing means you intend to make a right turn.
§STORAGE BOX§
This box is located under the saddle.
Maximum load capacity:10kg.
Do not store valuables in the box.
Make sure that the saddle has been locked completely
after it was pressed down.
Take out valuables before washing to avoid wetting these
objects.
Do not place thermal sensitive objects in the box
because of engine’s heat and high temperature.
§SAFETY HELMET HOOK§
Stop the motorcycle, and hook the safety helmet
chin belt the hook.
CAUTION:
Do not hang the safety helmet onto this hook
when riding to avoid damaging motorcycle and
loosing safety helmet’s function.
Engine start
control switch
Storage box
Hook
Page 10

10
§FUEL TANK CAP§
1.Insert the key into the seat lock and open the seat, and turn the fuel cap anticlockwise, then the cap
can be removed.
2. Do not fill above the fuel upper limit when refueling.
3. Align the “△”mark on the cap with the “△”mark on the fuel tank, then turn the fuel cap clockwise
and lock the seat.
§BRAKE§
Pull the right brake lever to operate the front brake.
Pull the left brake lever to operate the front and rear brake simultaneously (CBS model).
Pull the left brake lever to operate the rear brake (ABS model).
Avoid unnecessary sudden braking.
Use front and rear wheel brakes simultaneously when braking.
Avoid brake continuously for a long period of time because that may overheat the brakes and reduce
its braking efficiency.
Slow down and brake early when riding in rainy days on slippery roads. Never apply the brakes
suddenly to prevent skidding and falling.
Using only the front brake or the rear brake increases the risk of falling because the motorcycle is
tend to pulled to one side.
Even in motorcycles equipped with ABS, braking during cornering may cause wheel slip. When
turning a corner, it is better to limit braking to the light application of both brakes or not to brake at all.
Reduce your speed before you get into the corner.
《Engine Brake》
Return the throttle valve handle back to its original position, and apply engine brake.
It is necessary to apply brake both for front wheel and for rear wheel intermittently when riding on a long or
stiff slope.
CAUTION:
Main stand should be put down on the ground, engine should be shut off and flames should be
strictly prohibited to ensure safety when refueling.
Do not fill above fuel upper limit when refueling. Otherwise, fuel will flow out through a hole on the
cap that may damage the body’s painting, in serious cases; it serious cases; it may cause a fire to
burn down the motorcycle.
Make sure the fuel cap has been tighten properly.
For Front Wheel
For Front Wheel
For Front Wheel And
Rear Wheel
For Rear Wheel
ABS model
CBS model
Page 11

11
8.IMPORTANT POINTS AND CAUTIONS FOR STARTING ENGINE
1.Turn ignition switch key to the ”ON” position.
2.Apply hand (foot) rear wheel brake.
3.Do not accelerate, press starter button when the brake is applied.
[We care for you! Before drive off, keep the hand brake applied on the rear wheel.]
CAUTION:
If engine can not be started after press the kick starter arm for 3~5 times, turn the throttle valve
handle 1/8~1/4 turns, and then press the kick starter arm again for an ease start.
In order to avoid damaging the starter motor, please do not press the starter button continuously
over 15 seconds.
If engine still can not be started after pressing starter button over 15 times, stop and wait for 10
seconds before start it again.
It is harder to get the engine started after the motorcycle has been left idle for a long time or after
refueling only after the fuel has been depleted. Then, it is necessary to press starting lever or
starter button several times, and keep the throttle valve handle at the close position to start the
engine.
It may need several minutes to warm up engine if it is a cold start.
Exhaust contains harmful gases (CO), therefore please start the engine at a well ventilated place.
CAUTION:
Please check the oil and fuel volume are adequate or not before starting the engine.
To start the engine the main parking stand must be firmly on the ground and the brake is applied
on the rear wheel to prevent the motorcycle from moving forward suddenly.
1/4
1/8
Page 12
12
8. THE BEST WAY TO DRIVE OFF
Turn on the turn signal light before moving, and make sure no vehicle is coming from behind. Then, drive
off.
§THE CONTROL OF THROTTLE VALVE HANDLE §
Acceleration : To increase speed. When riding on an inclined road, turn the throttle valve handle slowly to
allow the engine to output its power.
Deceleration : To decrease speed.
§PARKING METHOD §
When approaching the parking lot:
1. Turn on the turn signal light early, and pay attention to the vehicles in front, from rear, left and right, then
take the inner lane and approach slowly.
2. Return the throttle valve handle back to its original position, and apply brakes in advance. (Brake light
comes on when braking to warn drivers of vehicles behind.)
When stop completely:
3. Press the turn signal switch back to its original position, and turn the ignition switch key to the “OFF”
position to shut off the engine.
4. Get off the motorcycle from left side after the engine has been stopped, and select a parking place
where the motorcycle will not interfere with traffic and the ground is level, then put down motorcycle’s
main parking stand.
5. Hold the steering handle with your left hand, and hold down the front end of saddle or hold the parking
handle on the lower-left side of saddle with your right hand.
6. Press the main parking stand with your right foot, put down the main parking stand firmly on the ground.
To remind you: Lock the steering handle and remove the key after parking to prevent the motorcycle
from being stolen.
CAUTION:
Park your motorcycle at a safe place where it will not interfere with traffic.
Deceleration
Acceleration
Page 13
13
9. INSPECTION AND MAINTENANCE BEFORE RIDING
(Please refer to the components location diagram for the following components.)
§ROUTINE INSPECTION §
Check Items
Check Key Points
Engine Oil
Is there enough engine oil?
Fuel
Is it enough? Is it Octane 90 or above
Brake
Front
Braking condition?
(Brake lever free play: 10~20mm)
Rear
Braking condition?
(Brake lever free play: 10~20mm)
Tires
Front
Is tire pressure normal?
(Standard: 1.75kg/cm2)
Rear
Is tire pressure normal?
(Standard: 2.0 kg/cm2 for 1 person, 2. 25 kg/cm2 for 2 persons)
Steering Handle
Does the handle vibrate abnormally or is difficult to turn?
Speedometer, lights, and rearview
mirror
Is it operated properly?
Do lights come on? Can it be seen clearly from behind?
Tightness of Main Components
Are screws, nuts loosen?
Abnormal Points
Do the previous troubles still exist?
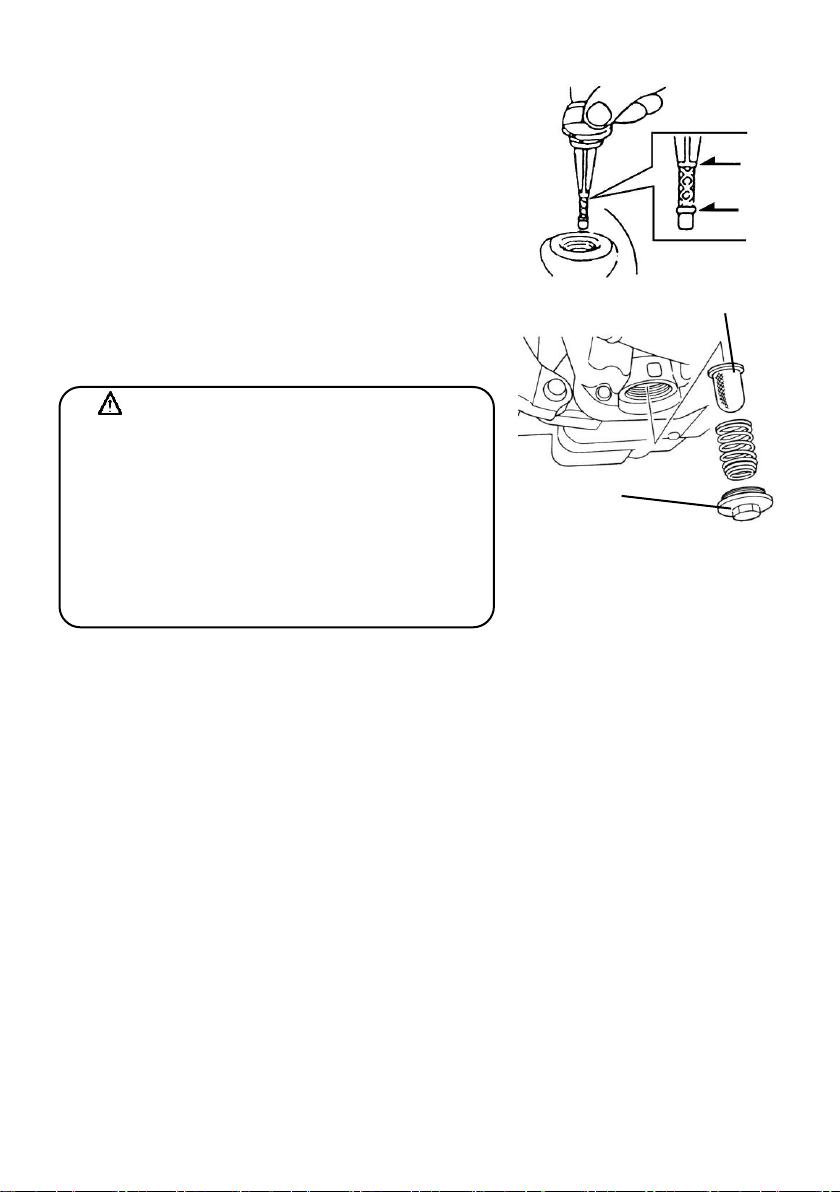
§ENGINE OIL INSPECTION AND CHANGE §
INSPECTION:
1. Use the main parking stand to support the motorcycle
on a level ground, remove the dipstick after engine
stopped for 3~5 minutes. Wipe oil off the dipstick and
then insert it into the guide tube again (Do not rotate
it.)
2. Remove the dipstick and check whether oil level is in
between the upper and lower marks.
Add oil to upper limit if oil is under the lower limit.
(Check cylinder, crankcase…etc for leakage.)
CAUTION:
If any problem founded during routine inspection, correct the problem before using the motorcycle
again, have your motorcycle checked and repaired by the “SYM dealer or authorized service
personnel” if necessary.
Page 14
14
OIL CHANGE:
Change engine oil after the first 300km, and change the
engine oil every 1000km thereafter.
In order to maintain the engine’s maximum performance,
check whether the engine oil is enough every 500km.
Add oil to upper limit if the engine oil has been found to be
inadequate.
Engine Oil : Use (API) SH/CD SAE 10W-30 grade or better
engine oil. Otherwise, damage will not be covered by
warranty.
※ Recommended Oil: SYM Genuine 4X OIL.
Oil Capacity : 50cc : 0.80 L(0.70 L for routine change)
125cc : 0.95 L (0.8 L for routine change).
【Oil Filter Cleaning】
The oil filter nut assembly of the element, and remove the
element. Remove the foreign materials from the element by
using a gasoline or air spraying gun.
§FUEL INSPECTION§
Turn main switch key to “ON” position, and check fuel gauge’s needle range to make sure there is
enough amount of fuel in the fuel tank.
This motorcycle’s engine is designed for using the unleaded fuel of Octane 90 or above.
Firmly secure the main stand on the ground, shut off the engine and keep flames away from the
motorcycle when refueling.
Do not fill above fuel upper limit lever when refueling.
Make sure the fuel tank cap had been tighten properly.
§TRANSMISSION OIL INSPECTION AND CHANGE§
INSPECTION:
Use the main stand to support the motorcycle on a level ground, after the engine stops, wait for 3~5
minutes. Remove the transmission oil infusion bolt, put a measuring glass under the drain bolt, and
remove the drain bolt. Let the oil flows into measuring glass and check for decreased or not. 50cc :
(at disassembly : 110c.c./at change: 100c.c.). 125cc (at disassembly:180c.c./at change: 170c.c.).
OIL REPLACEMENT:
Stop the engine and use the main stand to support your motorcycle on a lever ground. Remove the
infusion bolt and drain bolt, drain out the oil.
Install the drain bolt and tighten it. Fill new transmission oil, and install the infusion bolt and tighten it.
(make sure that bolts are tightened and check that there’s no leakage.)
Recommend Oil: Genuine SYM HYPOLD GEAR OIL (SAE 85W-140).
Use SAE85-90 when outside temperature is below 0℃.
WARNING:
Oil level will not be correct when checking the oil level
with the motorcycle parked on an unleveled ground or
immediately after the engine stopped.
Engine and exhaust pipe are hot right after engine
stopped. Pay special attention not to get burned when
checking or replacing engine oil.
If the oil lever approach lower limit again after refilled,
check the engine for leaks and refill it again.
Keep away from spark and flames when refilling the oil.
Upper limit
Lower limit
Oil filter
Filter nut
Page 15
15
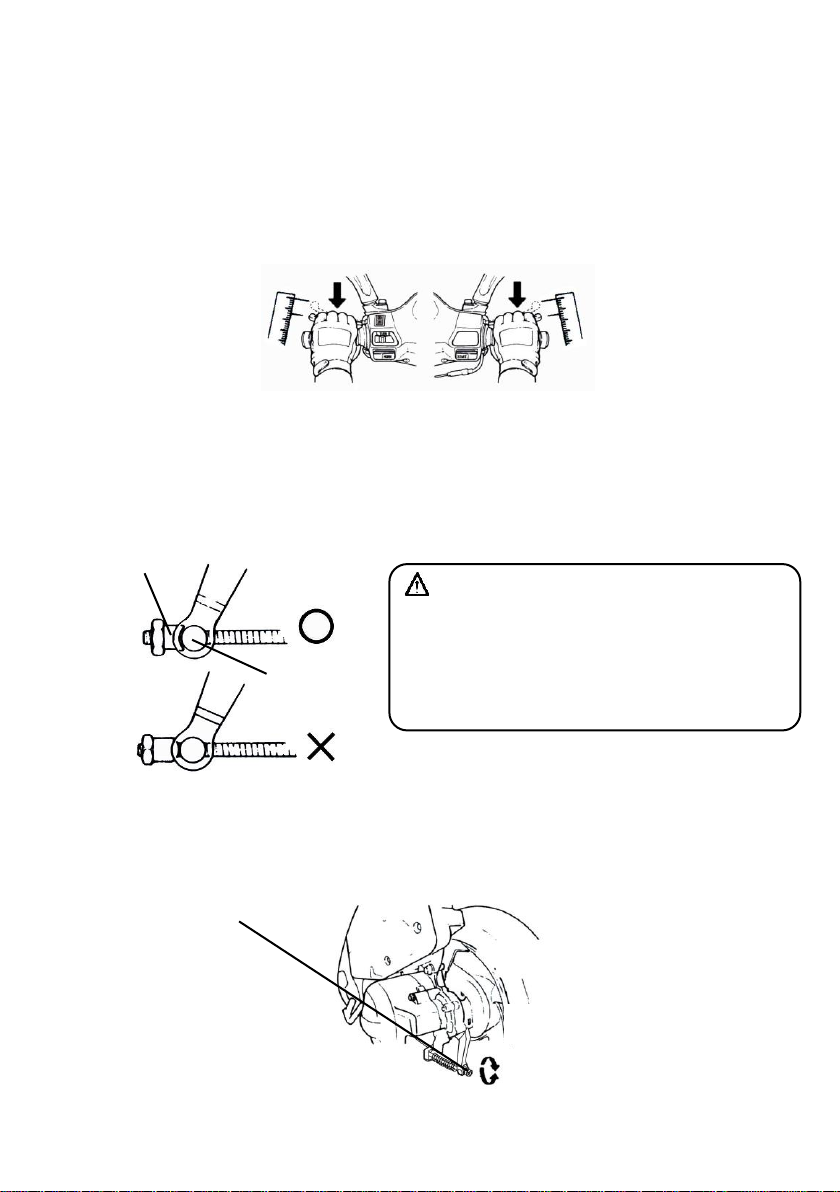
§INSPECTION AND ADJUSTMENT OF BRAKE FREE PLAY§
INSPECTION: (Brake lever free play must checked with the engine shut off.)
Brake lever and pedal free play for front and rear wheels.
◆If checking the hand-braking lever for front wheels, its free play (the stroke of hand-braking lever from
no braking to initial braking) should be 10~20mm. It is abnormal if the feel is spongy when holding the
hand-braking lever forcefully.
◆If checking the foot-braking pedal for rear wheels, its free play (the stroke of foot-braking pedal from
no braking to initial braking) should be 20~30mm. It is abnormal if the feel is spongy when press the
foot-braking pedal forcefully.
Adjustment:﹙Drum type﹚
The indentation of brake adjustment nut must be aligned with the pin. (see below figure)
Turn the adjustment nut on brake arm of front and rear wheels to adjust the free play of hand-brake
lever.
Hold the hand-brake levers after adjusting with both hands until there is effective brake feeling.
Measure the free play with a ruler.
10~20 mm
Rear Wheel hand-brake type
CAUTION:
When free play is between 10~20 mm, check brake
indicators of front and rear wheels. If the arrow on
the brake arm aligned with the “△ ” marked on the
brake disk, that means the brake lining has been
excessively worn, and must be replaced immediately.
To decrease
free play
To increase
free play
Adjustment nut
Rear Wheel drum type
Pin
Adjustment nut
Page 16
16
§DISK BRAKE INSPECTION§(Applicable for model equipped with disc brake.)
Visual check brake lines for leakage, or damage, check
brake lines connections for looseness using a wrench or
similar tool, and check whether steering handle vibration in
driving, or any parts’ interference may have damage the
brake lines. If so, bring your motorcycle to your SANYANG
dealer for repairing or service.
(leak, damaged, looseness of brake line)
(Checking front brake lining)
check the brake from behind the brake
caliper. The brake pad must be replaced with
new lining when the brake pad wear limit
reaches the brake disk.
(Checking oil quantity in brake oil reservoir)
Park the motorcycle on a lever ground, and
check if fluid lever is under the “LOWER”
mark. Recommended Brake Fluid: WELL
RUN BRAKE OIL (DOT 3).
(Replenishment of front wheel brake fluid)
1.Loosen the screws and remove the master cylinder cover.
2.Wipe clean foreign materials, dirt around the reservoir,
being careful not to let foreign materials fall into the
reservoir.
3. Remove the diaphragm plate and the diaphragm.
4. Add brake fluid to upper lever.
5.Install the diaphragm plate and the diaphragm, and install
the master cylinder cover.
6.please note the diaphragm direction, and do not let foreign
materials fall into the reservoir. And tighten the master
cylinder cover securely.
CAUTION:
Please drive your motorcycle on a dry road surface
slowly and operate front and rear brakes in order to
find out if there is any malfunction so as to ensure
the motorcycle is at optimum condition and safe
ride. .
Brake disk
Brake caliper
Brake pad wear
limit grooves
CAUTION:
TO prevent chemical reaction, please do not use brake fluids other than those recommended.
Do not fill above the upper limit when adding brake fluid and avoid dropping on painting or plastic
components to prevent damage.
Screw
Master cylinder
cover
Diaphragm
Upper
Brake fluid
Page 17
17
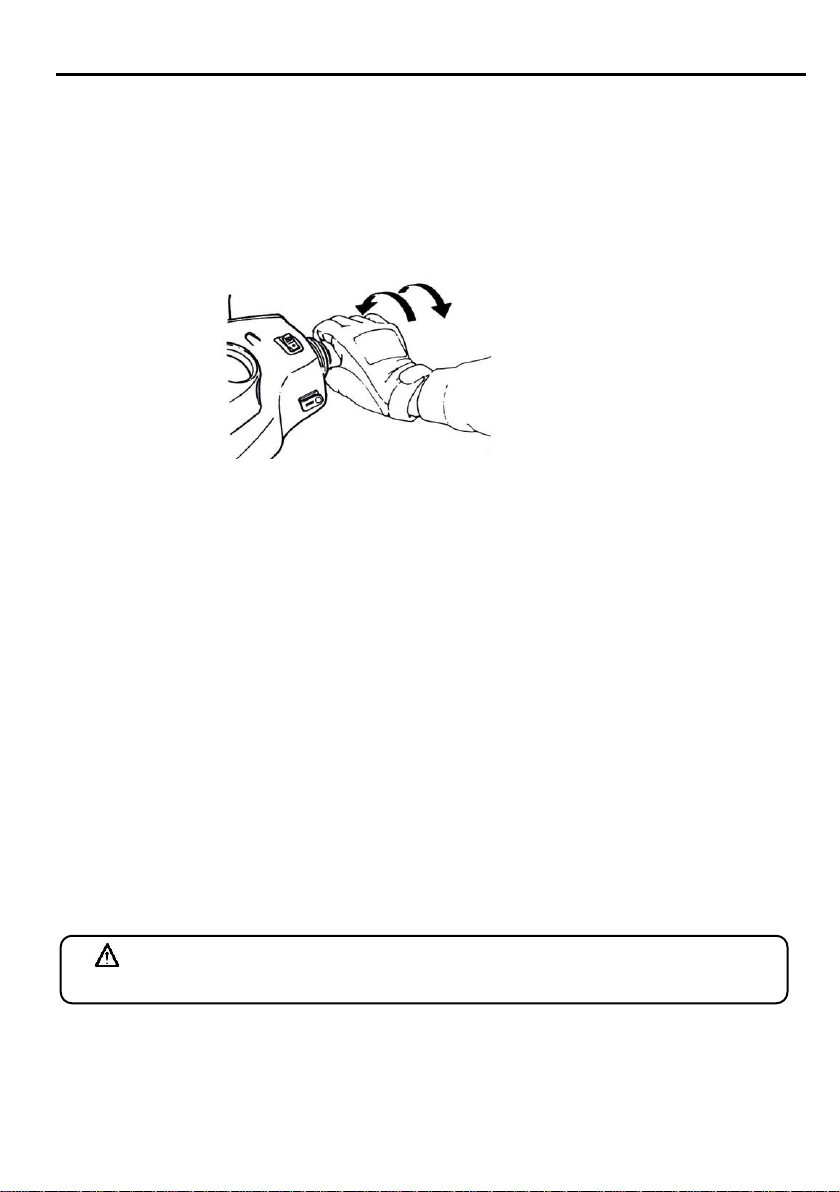
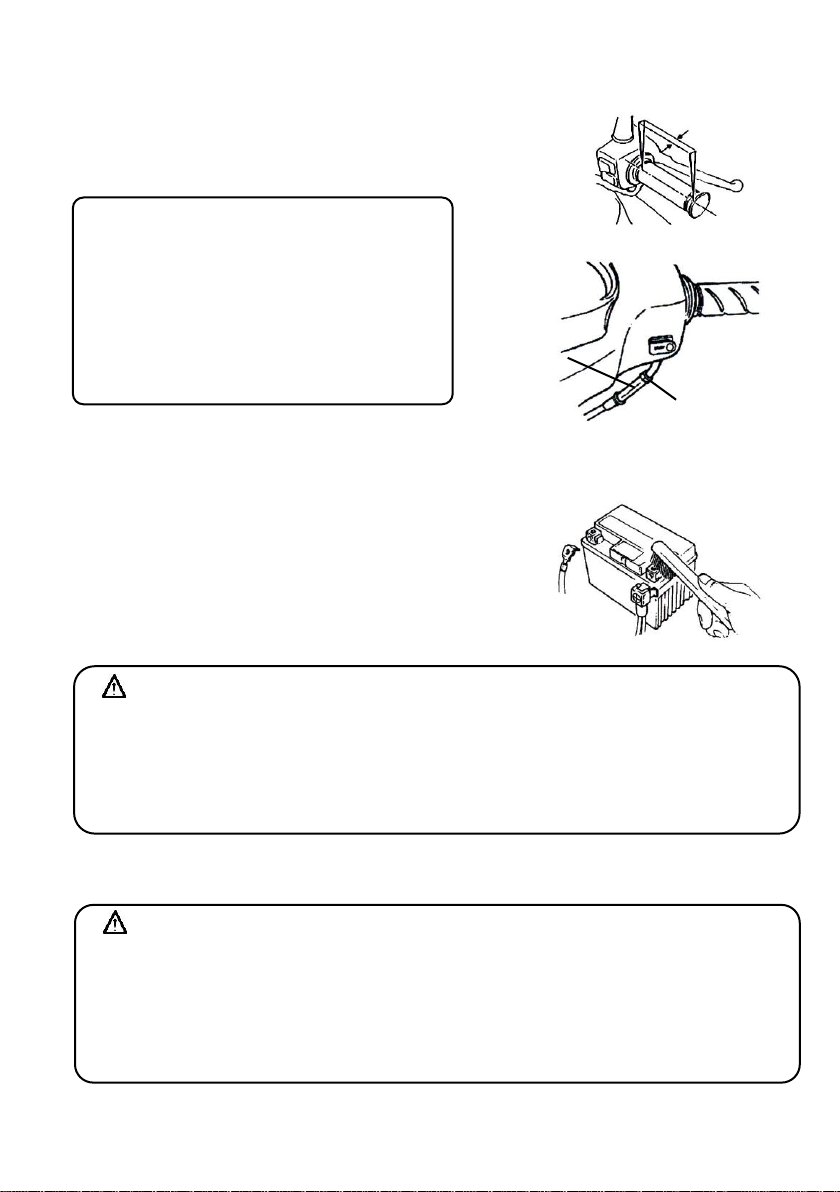
§THROTTLE VALVE HANDLE CLEARANCE ADJUSTMENT §
Correct clearance allows throttle vale handle to
rotate 2~6mm.
Loosen the lock nut first, then turn the adjust nut to
adjust. Tighten the lock nut securely when
finished.
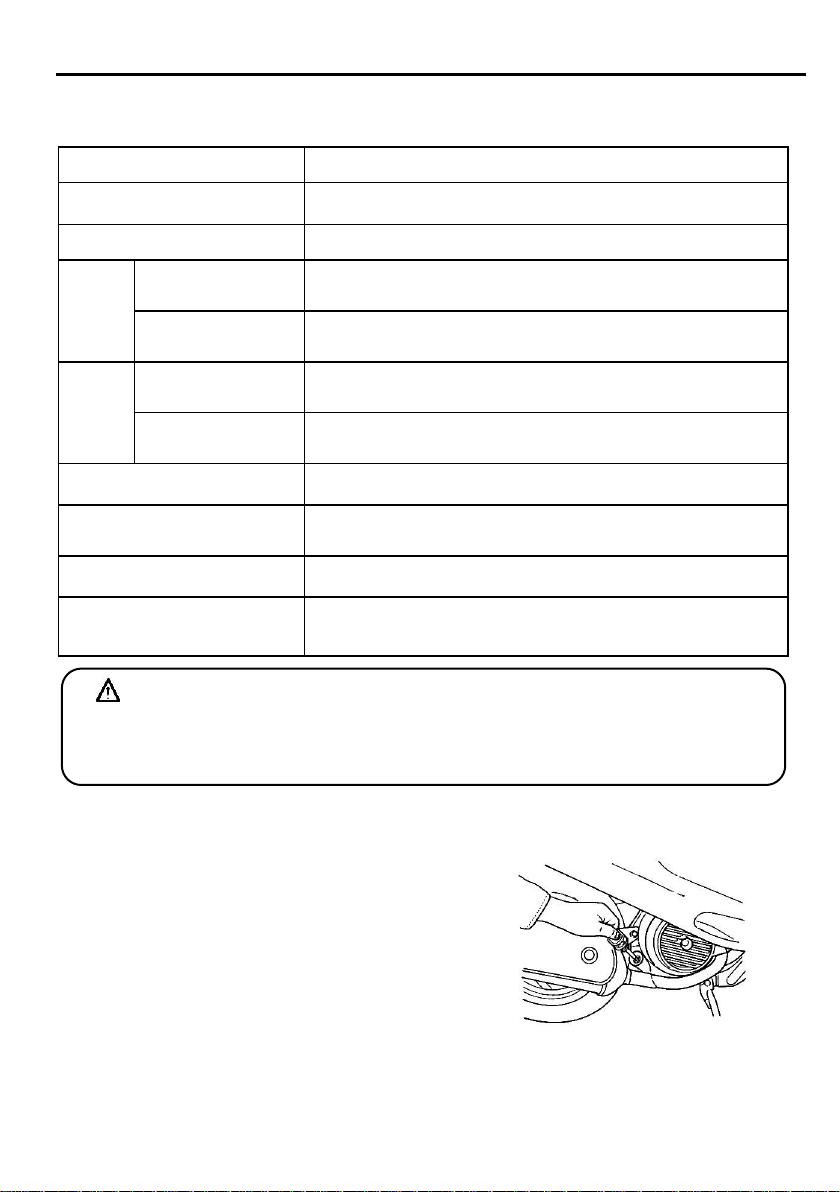
§INSPECTION AND MAINTENANCE OF BATTERY §
The motorcycle is equipped with a maintenance-free type battery, so it is unnecessary to check and
add electrolyte. Have your motorcycle checked by SYM Authorized Dealer or Franchised Dealer
should any abnormality is found.
﹙Cleaning of battery terminals﹚
Remove the battery terminals and clean if there
are dirt and corrosion on them.
Battery removal procedures are as follows:
Turn ignition switch to the “OFF” position, then
remove negative cable screw firstly and
disconnect the negative cable. Then, remove
positive cable screw and positive cable.
The motorcycle is equipped with a maintenance-free type battery, so it is unnecessary to check and
add electrolyte. Have your motorcycle checked by SYM Authorized Dealer or Franchised Dealer
should any abnormality is found.
Check Items:
1. Check throttle valve cable to see if it can be moved
smoothly from a closed position to a wide open
position.
2. Rotate steering handle from side to side to check if
the throttle valve cable is interfered.
3. Check to see if the throttle valve cable is
obstructed by other cables preventing it from being
operated smoothly.
2~6 mm
CAUTION:
Clean the battery posts with warm water if the posts are eroded and have some white powders on
them.
If there is an obvious erosion on the terminals, disconnect the cables, and then clean the erosion
off with a steel brush or a piece of sandpaper.
Install battery cable after cleaning and apply a thin coat of grease on the terminals.
Install battery in reverse order of removal.
Negative
Positive
CAUTION:
This is a closed type battery. Never remove the caps.
In order to prevent electric leakage and self-discharge when the battery sits idle for long periods.
Remove battery from motorcycle, store it in well-ventilated and dimly lighted place after the battery
has been fully charged. Disconnect battery’s negative cable if the battery is still kept on the
motorcycle.
If the battery needs to be replaced, replace with a same closed-type battery(Maintenance-Free).
Lock nut
Adjust nut
Page 18
18
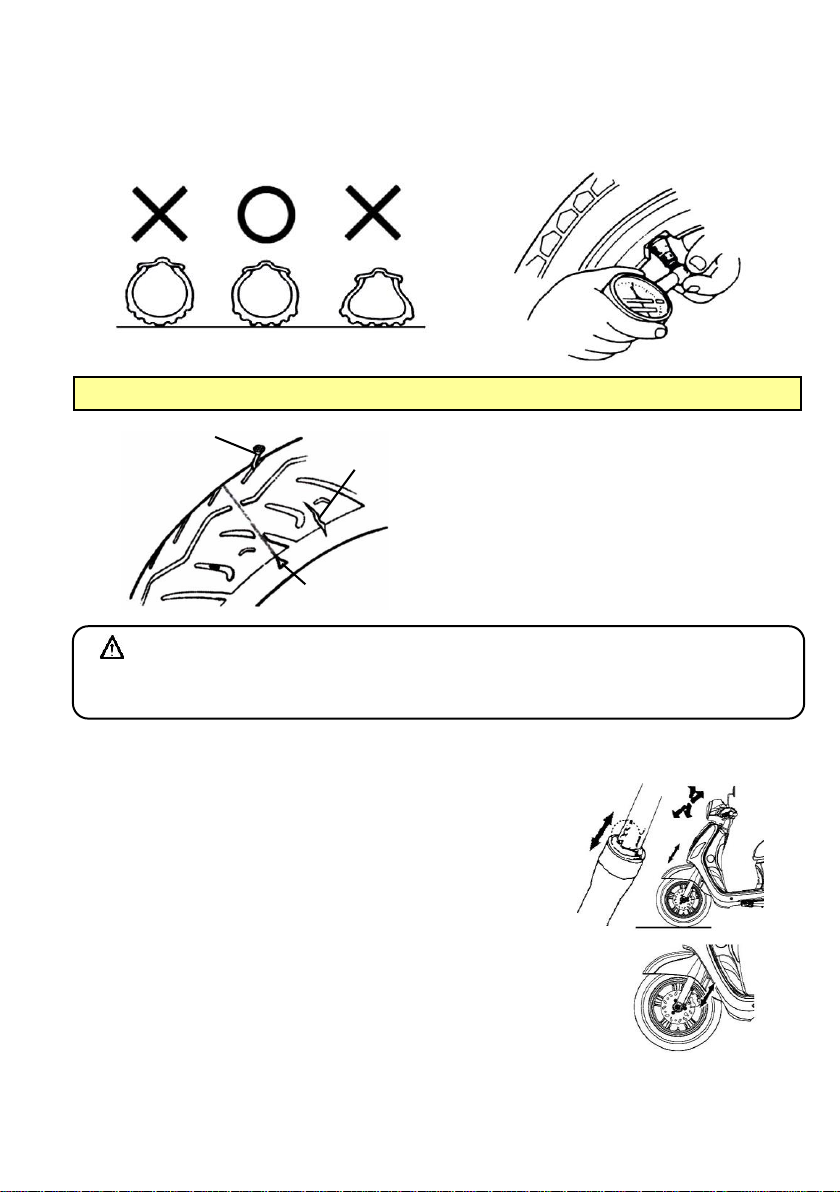
§TIRE INSPECTION §
Tires should be checked and inflated with the engine shut off.
If a tire’s ground contacting curve is abnormal, check it with an air pressure gauge and inflate it to
the specified pressure.
Tires pressure must be checked with an air pressure gauge when cold.
Visual check tires for frontal and lateral side walls
for crack or damage.
Visual check tires for any nails or small stones
wedged in the tread.
Check the “tread wear indicator” condition to see if
tread groove depth is insufficient.
A tire with a wear bar showing is worn out and
should be replaced immediately.
§STEERING HANDLE FRONT SHOCK ABSORBERS INSPECTION §
Perform this check with engine shut off and ignition switch
key removed.
Visual check front shock absorbers for damage.
Operate steering handle up and down, and check front
shock absorbers for noises due to bends.
Check the bolts and nuts of front shock absorbers with
wrenches for tightness.
Shake steering handle up & down, left & right, and front &
rear to check if it is loosen, has too much resistance and
pulls to one side.
Check steering handle if it is being pulled too tight by the
brake cables.
Take your motorcycle to SYM Authorized Dealer or
Franchised Dealer for a check or adjustment if any
abnormal conditions are found.
PLEASE REFER TO SPECIFICATIONS FOR STANDARD TIRE PRESSURE
CAUTION:
Abnormal tire pressure, wear, or crack is the most important cause that results in the loss control
of the steering handle and a punctured tire(s).
Tread wear
indicator
Crack and
damage
Foreign materials
(nails or small
stones)
Page 19
19
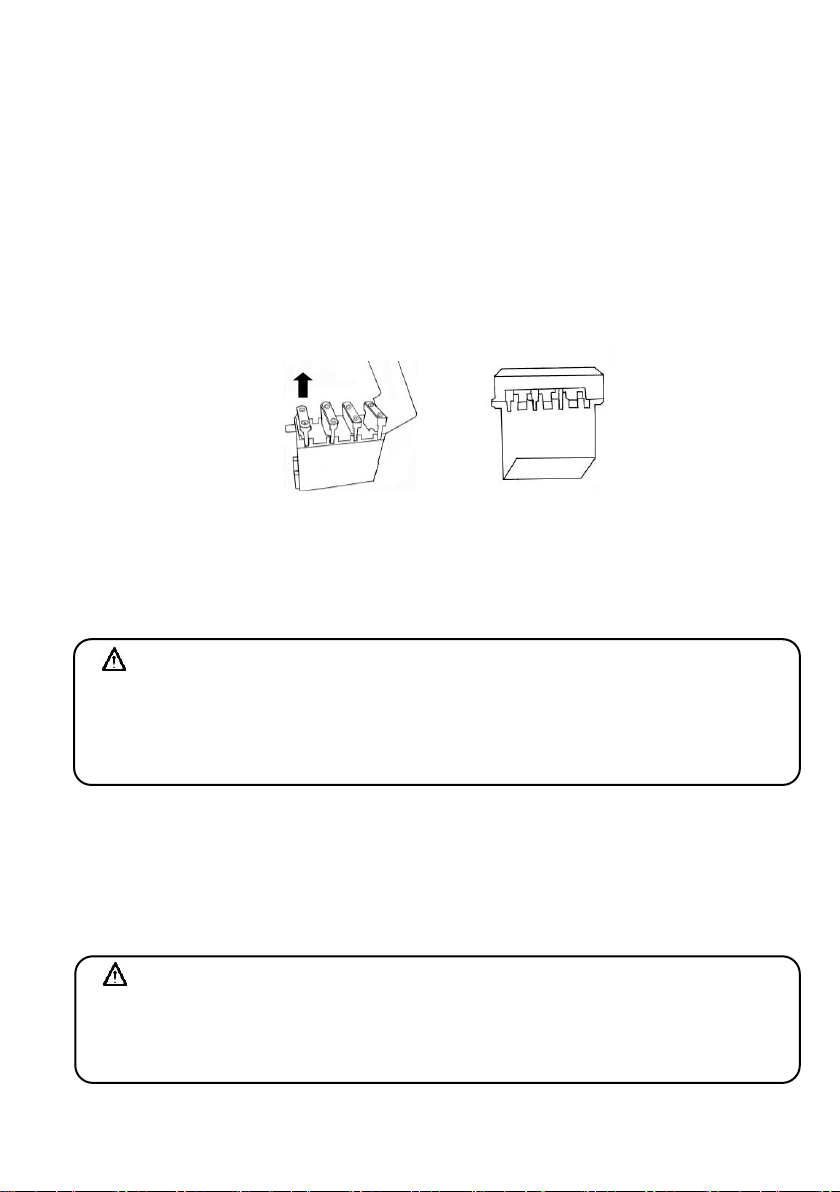
§CHECKING AND CHANGING FUSES §
Fuse box is on the frame body, remove the luggage box then you can see the fuse box is on the frame body
right side and it is near start magnetic switch. Turn off ignition switch, and check fuses if they are intact.
Replace the blown fuse with a new one having the same specified amperage rating (10A*2 and 15A*1
and 20A*1 ). Using a fuse which the amperes is larger than specification, a brass or iron wire to replace a
blown fuse is strictly prohibited to avoid damaging the electrical system and the circuit.
Remove the storage box, and you’ll find the fuse holder near battery.
Open the fuse box cover, and pull out the fuse. Check it for damage or broken.
Fuses must be firmly secured with wire connectors when replacing. Loose connections will result in
overhead and damage.
Use only parts having the specified specification to replace electrical components such as light
bulbs. Using parts not having the specified specifications for replacement may cause the fuse to
blow and over-discharge the battery.
Avoid spraying water directly on or around fuse box when washing the motorcycle.
If the new fuse burn out quickly again, please check the faulty reason before replace it again. Take
your motorcycle to your dealer for an inspection if a fuse is blown by unknown causes.
§CHECKING THE TURN SIGNAL LIGHTS AND HORN §
Turn the ignition switch key to the “ON” position.
Turn on the turn signal light switch, and make sure that the front & rear and left & right signal lights
flashes and also check if the warning buzzer sounds.
Check turn signal light covers if they are dirty, crack, or loosen.
Press horn button to check if it works.
§CHECKING THE FRONT AND REAR LIGHTS §
Start engine and turn on the head lamp switch. Check if head lamp and rear lamp come on.
Check the brightness and direction of front light by wall to see if it is correct.
Check the head lamp cover if it is dirty, crack, or loosen.
§CHECKING THE BRAKE LIGHT §
Turn the ignition switch key to the “ON” position, hold the hand-braking levers for front and rear
wheels. Check if the brake lights come on.
Check the brake light cover if it is dirty, crack, or loosen.
CAUTION:
Specified specification bulbs should be used for turn signal lights. Otherwise, the normal
operation of turn signal lights will be affected.
Turn on the turn signal light before turning or switching lane to warn driver of vehicles behind.
Turn off the turn signal light immediately by pressing its button down after using. Otherwise, the
flashing of twin signal lights may confuse the drivers of vehicles behind.
CAUTION:
Use only specified specification bulbs, do not use bulbs with different specifications to avoid
damaging electrical system, burning out bulbs, and discharging the battery.
Do not modify or add other electrical components to prevent over load or short circuit which may
result in a fire and burn down the motorcycle in serious cases.
Page 20
20
§CHECKING FOR FUEL LEAKAGE§
Check fuel tank, fuel cup, fuel hose, and carburetor for leakage.
§CHECKING THE LUBRICATION OF BODY’S VARIOUS MECHANISMS§
Check the body’s pivot points if they have enough lubrication.
(for example, the pivot points on the main stand, the side stand, and the brake lever…etc.).
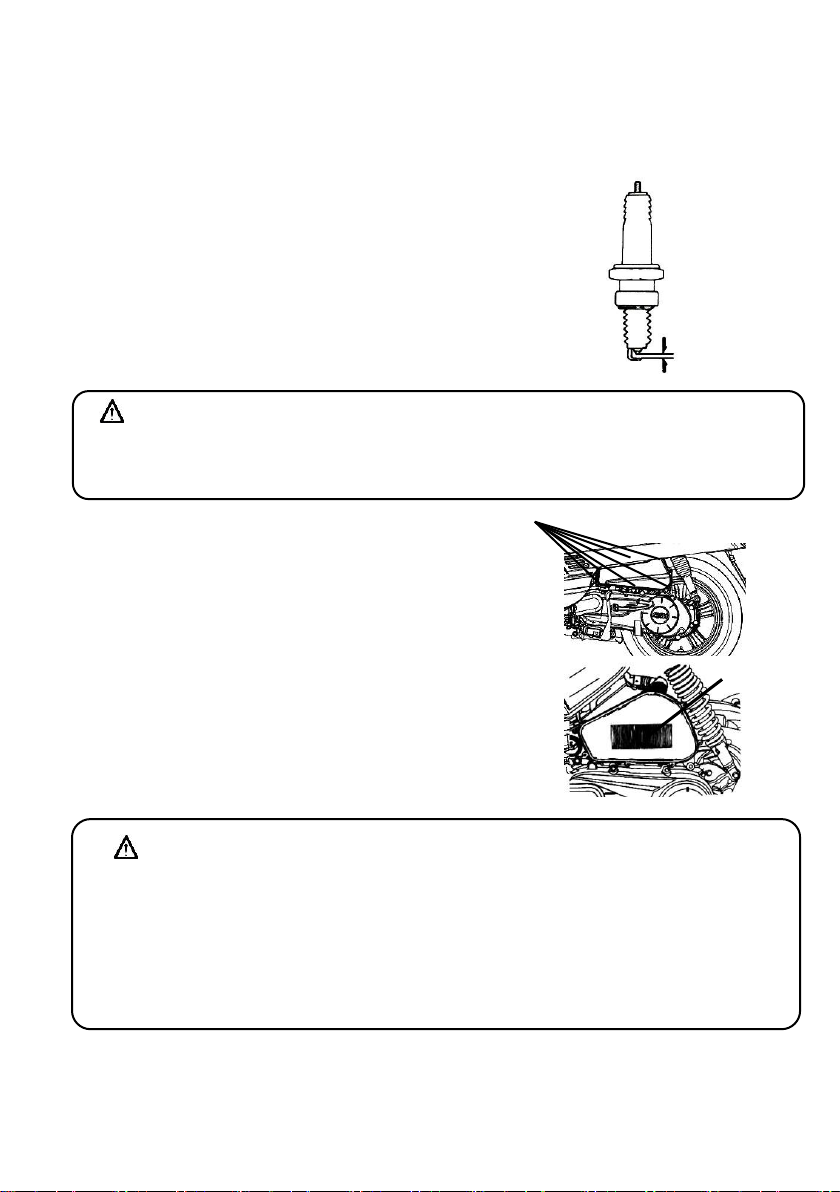
§CHECKING THE SPARK PLUG§
Remove the cap of spark plug cable (remove the spark plug using the
spark plug wrench in the tool kit.
Check the electrode if it is dirty or fouled by carbon deposits.
Remove the carbon deposits on the electrode with steel wire, and
clean the spark plug with gasoline, then, wipe dry with a rag.
Check the electrode, and adjust its gap to 0.6~0.7 mm. (Check it with
a feeler gauge)
Hand tight the spark plug as far as it can go and then tighten it another
1/2~3/4 turns with a wrench.
§CHECKING THE AIR CLEANER §
《DISASSEMBLE PRCEDURE》
1. Remove left frame body cover firstly.
2.Remove tapping screws from air cleaner cover.
3.Remove the air cleaner cover, remove the element
screws , then remove filter element.
4.Take the element out and clean it. (Refer to
maintenance schedule.)
《DISASSEMBLE PRCEDURE》
Assemble the air cleaner in reverse order of disassemble.
CAUTION:
Dust deposit is one of the major causes of reducing output horsepower and increasing fuel
consumption.
Change the air cleaner element more frequently to prolong the engine’s service life if the
motorcycle is driven on dusty roads very often.
If air cleaner is installed improperly, dust will be absorbed into cylinders, which may cause a
premature wear and reducing output power and engine life.
Be careful not to soak the air cleaner when washing the motorcycle. Otherwise, it will cause
engine hard to start.
WARNING:
The engine is very hot after running. Pay attention not to get burned.
※ Use only spark plugs suitable for the engine specifications of this motorcycle recommended by the
manufacturer. (Refer to specifications.)
0.6~0.7 mm
Element
Screws
Page 21
21
10. WHEN THERE IS AN ABNORMAL CONDITION OR A TROUBLE
§DIAGNOSIS WHEN ENGINE DOES NOT START §
(1). Has the ignition switch key
been turned to the “ON”
position?
(2). Is there enough fuel in the fuel
tank?
(3). Anti-thief switch stir to
〝OFF〞or〝 〞position?
(4). Is the rear or front wheel
brakes applied when
pressing starting button?
(5). Do you rotate the throttle
valve handle while pressing
starting the button?
(6). Turn the ignition switch key to the
“ON” position, and press horn
button down, if the horn does not
sound, the fuse may have been
blown.
【Have your motorcycle checked by SYM authorized dealer or franchised dealer immediately if there are
no problems with the above items and engine still can not be started.】
11. SUGGESTIONS ON ENGINE FUEL
This motorcycle is designed to use UNLEADED gasoline of Octane No. 90 or higher.
If the motorcycle is operated in high attitude (where the atmosphere pressure is lower), it is
suggested that the air/fuel ratio should be readjusted to maximize the engine performance.
12. TRANSMISSION OIL
Recommended OIL: GENUINE SYM HYPOID GEAR OIL (SAE 85W-140)
1/4
1/8
Turn Signal Switch
Horn Switch
For rear wheel
For front wheel
Page 22
22
13. CAUTIONS FOR RIDING MOTORCYCLE
1. Raise the motorcycle with the main stand, and sit on the saddle.
Push the motorcycle forwarding to raise the main parking stand.
2. Get on the motorcycle from the left side, and sit on the saddle properly, keep your right feet firmly on
the ground to prevent the motorcycle from falling.
3. Rotate the throttle valve handle slowly, and then the motorcycle will begin to move.
【Do not use the brake suddenly and make a sharp turn】
Rapid braking and sharp turning will cause slip and fall.
Rapid braking or sharp turning will cause slipping, lateral slipping, or fall especially in rainy days
when the road is wet and slippery.
【Drive with extreme caution during rainy days】
The brake distance in rain day or on wet road will longer than that on a dry road. Therefore, slow
down and prepare to apply the brake earlier.
The throttle valve handle should be released, and the brakes should be properly applied as it is
needed while reducing the speed when going down a slope.
CAUTION:
Never rotate the throttle valve handle at will to increase the engine RPM before driving off.
CAUTION:
Apply brake on the rear wheel before driving off.
CAUTION:
Rapidly rotate the throttle valve handle or release the clutch lever may cause the motorcycle
moving forward suddenly and it is very dangerous.
Make sure the side parking stand is spring back completely before driving off.
Page 23
23
§Anti-lock brake system§
ABS is designed to help prevent the wheel from locking up when hard brakes are applied while running
straight. The ABS automatically regulates brake force. Intermittently gaining gripping force and braking
force helps prevent wheel lock-up and allows stable steering control while stopping.
Brake control function is identical to that of a conventional motorcycle. The brake lever is used for the
front brake and the brake pedal for the rear brake.
Although the ABS provides stability while stopping by preventing wheel lock-up, remember the following
characteristics:
ABS cannot compensate for adverse road conditions, misjudgment or improper application of brakes.
You must take the same care as with motorcycles not equipped with ABS.
ABS is not designed to shorten the braking distance. On loose, uneven or downhill surfaces, the stopping
distance of a scooter’s with ABS may be longer than that of an equivalent motorcycle without ABS. Use
special caution in such areas.
ABS will help prevent wheel lock-up during straight-up braking, but it cannot control wheel slip which may
be caused by braking during cornering. When turning a corner, it is better to limit braking to the light
application of both brakes or not to brake at all.. Reduce your speed before you get into the corner.
The computers integrated in the ABS compare vehicle speed with wheel speed. Since non-recommended
tires can affect wheel speed, they may confuse the computers, which can extend braking distance.
CAUTION:
ABS cannot protect the rider from all possible hazards and is not a substitute for safe riding practices. Be
aware of how the ABS system operates and its limitations. It is the rider’s responsibility to ride at
appropriate speeds and manner for weather, road surface and traffic conditions.
Page 24

24
14. PERIODICAL MAINTENANCE SCHEDULE
Item
Maintenance
kilometer
300KM
Every
1000KM
Every
3000KM
Every
6000KM
Every
12000KM
Remarks
Check Items
Maintenance
Interval
NEW
1 Month
3 Months
6 Months
1 Year
1
Air cleaner element (Remark)
I C
R(paper)
R(sponge)
2 Air cleaner I 3 Oil filter (Screen)
C C 4
Engine oil R I
Replacement for every 3000KM
5 Tire, pressure
I I 6
Battery I I 7 Spark plug I I R 8 Carburetor (idle speed)
I I 9
Steering bearing and handles
I I 10
Check transmission for leakage
I I 11
Check crankcase for leakage
I I 12
Transmission oil
R
Replacement for every 5000KM(5 Months)
13
Drive belt/roller
I R 14
Fuel tank switch and lines
I I 15
Throttle valve operation and cable
I I 16
Engine bolts and nuts
I I
17
Cylinder head, cylinder, and piston
I
18
Exhaust system/cleaning carbon
I 19
Cam Chain/ignition time
I I 20
Valve clearance
I I 21
Shock absorbers
I I 22
Front/rear suspension
I I 23
Main/side stands
I
I/L
24
Crankcase Blow-by system(PCV)
I I 25
Clutch disk I
26
Brake mechanism/brake lining (pad)
I I 27
Bolts/nuts for each components
I I
☆ The above maintenance schedule is established by taking the monthly 1000 kilometers as a reference
which ever comes first.
※ Have your motorcycle checked and adjusted periodically by your SYM Authorized Dealer or
Franchised Dealer to maintain the motorcycle at the optimum condition.
Code: I ~ Inspection, cleaning, and adjustment R ~ Replacement
C ~ Cleaning (replaced if necessary) L ~ Lubrication
Remark: 1.Clean or replace the air cleaner element more often when the motorcycle is operated on dusty
roads or in the Heavily- polluted environment.
2. Maintenance should be performed more often if the motorcycle is frequently operated in high
speed and after the motorcycle has accumulated a higher mileage.
【Notes in the remarks are used to indicate the applicable models.】
Page 25

25
15. SPECIFICATION
Model
Fiddle Ⅲ 50c.c
Item
Specification
XA05W4-EU/ XA05W5-EU
XA05W4-NL/XA05W5-NL
Length
1900mm
Width
690mm
Height
1130mm
Wheel base
1330mm
Net Weight
107kg(Front:42kg Rear:65kg)
Model
Single cylinder,4- stroke, forced air cooled engine
Fuel
Unleaded gasoline
Displacement
49.46 c.c.
Compression ratio
12.6 ± 0.2:1
Maximum net power output
2.6 kw/7500 rpm
2.2 kw/6500 rpm
Net Maximum torque
3.5 N.m/6500 rpm
3.3 N.m/6500 rpm
Idling speed
2100±100 rpm
Valve clearance: IN/EX
0.10±0.02/0.10±0.02 mm
Starting methods
Kick & electrical starter
Front shock absorber
Telescopic fork
Rear shock absorber
Unit swing
Clutch
Auto centrifugal type
Transmission
C.V.T.
Front tire
110/70-12
Rear tire
120/70-12
Rim type
Aluminum
Tire pressure
Front: STD 1.75 kg/cm2,
Rear: STD 2.00kg/cm2 for 1 person, 2.25kg/cm2 for 2 persons
Front brake
Disk type (Ø 226 mm)
Rear brake
Drum type (Ø 110 mm)
Head lamp(high, low)
12V 35/35W
Front position lamp
12V LED
Front/ Rear direction indicator
12V 10W
Rear position lamp/Stop lamp
12V 5W/12V 21W
Rear registration plate lamp
12V 5W
Engine oil capacity
0.80L (0.7L for change)
Transmission oil capacity
110 cc (100cc for change)
Fuel tank capacity
6.5L
Fuse
2A*1&5A*1&10A*1&15A*1
Spark plug
CR6HSA
Battery capacity
12V 6AH (closed type, maintenance-free battery)
Air cleaner
Paper type
Page 26

26
Model
XA12W2-EU XA12W3-EU (Fiddle Ⅲ 125i cc)
Item
Specification
Length
1900mm
Width
690mm
Height
1130mm
Wheel base
1330mm
Net Weight
117kg(Front:44kg Rear:73kg)
Model
Single cylinder,4- stroke, forced air cooled engine
Fuel
Unleaded gasoline
Displacement
124.6 c.c.
Compression ratio
10.6±0.2 :1
Maximum net power output
7.5kw/8500rpm
Net Maximum torque
9.2 N.m/7000 rpm
Valve clearance: IN/EX
0.12/0.12 mm
Starting methods
Electrical starter
Front shock absorber
Telescopic fork
Rear shock absorber
Unit swing
Transmission
C.V.T.
Front tire
110/70-12
Rear tire
120/70-12
Rim type
Aluminum
Tire pressure
Front: STD 2.00 kg/cm2,
Rear: STD 2.00kg/cm2 for 1 person, 2.25kg/cm2 for 2 persons
Front brake
Disk type (Ø 226 mm)
Rear brake
Disk type (Ø 220 mm)
Head lamp(high, low)
12V 35/35W
Front position lamp
12V LED
Front/ Rear direction indicator
12V 10W
Rear position lamp/Stop lamp
12V 5W/12V 21W
Rear registration plate lamp
12V 5W
Engine oil capacity
0.95 L (0.80 L for change)
Transmission oil capacity
180c.c (170c.c for change)
Fuel tank capacity
6.5L
Fuse
10A*2 and 15A*1 and 20A*1
Spark plug
CR7HSA
Battery capacity
12V 6Ah(closed type, maintenance-free battery)
Air cleaner
Paper type
Page 27

27
Model
XA12W4-EU (Fiddle Ⅲ 125i cc)
Item
Specification
Length
1900mm
Width
690mm
Height
1355mm
Wheel base
1330mm
Net Weight
117kg(Front:44kg Rear:73kg)
Model
Single cylinder,4- stroke, forced air cooled engine
Fuel
Unleaded gasoline
Displacement
124.6 c.c.
Compression ratio
10.6±0.2 :1
Maximum net power output
7.5kw/8500rpm
Net Maximum torque
9.2 N.m/7000 rpm
Valve clearance: IN/EX
0.12/0.12 mm
Starting methods
Electrical starter
Front shock absorber
Telescopic fork
Rear shock absorber
Unit swing
Transmission
C.V.T.
Front tire
110/70-12
Rear tire
120/70-12
Rim type
Aluminum
Tire pressure
Front: STD 2.00 kg/cm2,
Rear: STD 2.00kg/cm2 for 1 person, 2.25kg/cm2 for 2 persons
Front brake
Disk type (Ø 226 mm)
Rear brake
Drum type (Ø 110mm)
Head lamp(high, low)
12V 35/35W
Front position lamp
12V LED
Front/ Rear direction indicator
12V 10WX2
Rear position lamp/Stop lamp
12V 5W/12V 21W
Rear registration plate lamp
12V 5W
Engine oil capacity
0.95 L (0.80 L for change)
Transmission oil capacity
180c.c (170c.c for change)
Fuel tank capacity
6.5L
Fuse
10A*2 and 15A*1 and 20A*1
Spark plug
CR7HSA
Battery capacity
12V 6Ah(closed type, maintenance-free battery)
Air cleaner
Paper type
Page 28

28
Model
XA20W2-EU XA20W3-EU (Fiddle Ⅲ 200i cc)
Item
Specification
Length
1900mm
Width
690mm
Height
1140mm
Wheel base
1330mm
Net Weight
121kg(Front:45kg Rear:76kg)
Model
Single cylinder,4- stroke, forced air cooled engine
Fuel
Unleaded gasoline
Displacement
168.9 c.c.
Compression ratio
10.16±0.2 :1
Maximum net power output
8.8kw/8000rpm
Net Maximum torque
13 N.m/6000 rpm
Valve clearance: IN/EX
0.12/0.12 mm
Starting methods
Electrical starter
Front shock absorber
Telescopic fork
Rear shock absorber
Unit swing
Clutch
Auto centrifugal type
Transmission
C.V.T.
Front tire
110/70-12
Rear tire
120/70-12
Rim type
Aluminum
Tire pressure
Front: STD 2.00 kg/cm2,
Rear: STD 2.00kg/cm2 for 1 person, 2.25kg/cm2 for 2 persons
Front brake
Disk type (Ø 190/226 mm)
Rear brake
Disk type (Ø 220 mm)
Head lamp(high, low)
12V 35/35W
Front position lamp
12V LED
Front/ Rear direction indicator
12V 10W
Rear position lamp/Stop lamp
12V 5W/12V 21W
Rear registration plate lamp
12V 5W
Engine oil capacity
0.95 L (0.80 L for change)
Transmission oil capacity
180c.c (170c.c for change)
Fuel tank capacity
6.5L
Fuse
10A*2 and 15A*1 and 20A*1
Spark plug
CR7HSA
Battery capacity
12V 6Ah(closed type, maintenance-free battery)
Air cleaner
Paper type
Page 29

29
Model
XA12W5-EU
Item
Specification
Length
1900mm
Width
690mm
Height
1355mm
Wheel base
1330mm
Net Weight
117kg(Front:44kg Rear:73kg)
Model
Single cylinder,4- stroke, forced air cooled engine
Fuel
Unleaded gasoline
Displacement
124.6 c.c.
Compression ratio
10.6±0.2 :1
Maximum net power output
7.5kw/8500rpm
Net Maximum torque
9.2 N.m/7000 rpm
Valve clearance: IN/EX
0.12/0.12 mm
Starting methods
Electrical starter
Front shock absorber
Telescopic fork
Rear shock absorber
Unit swing
Transmission
C.V.T.
Front tire
110/70-12
Rear tire
120/70-12
Rim type
Aluminum
Tire pressure
Front: STD 2.00 kg/cm2,
Rear: STD 2.00kg/cm2 for 1 person, 2.25kg/cm2 for 2 persons
Front brake
Disk type (Ø 226 mm)
Rear brake
Drum type (Ø 110mm)
Head lamp(high, low)
12V 35/35W
Front position lamp
12V LED
Front/ Rear direction indicator
12V 10W
Rear position lamp/Stop lamp
12V 5W/12V 21W
Rear registration plate lamp
12V 5W
Engine oil capacity
0.95 L (0.80 L for change)
Transmission oil capacity
180c.c (170c.c for change)
Fuel tank capacity
6.5L
Fuse
10A*2 and 15A*1 and 20A*1
Spark plug
CR7HSA
Battery capacity
12V 6Ah(closed type, maintenance-free battery)
Air cleaner
Paper type
Page 30

30
1. SOMMAIRE
1. Sommaire .............................................................................................................. 30
2. Emplacement des composants .............................................................................. 32
3. Avant utilisation ..................................................................................................... 33
4. Utilisation en toute sécurité .................................................................................... 33
5. Conduite ................................................................ ................................................ 34
6. Utilisation des pièces de rechange d'origine ........................................................... 34
7. Fonctionnement de chaque composant .................................................................. 35
Instruments ............................................................................................................ 35
Fonctionnement du commutateur de démarrage .................................................... 36
Fonctionnement du commutateur de verrouillage de guidon ................................... 36
Fonctionnement du commutateur d'ouverture de selle ............................................ 36
Utilisation des commandes .................................................................................... 37
Casier de selle ....................................................................................................... 38
Crochet pour casque .............................................................................................. 38
Bouchon de réservoir de carburant ......................................................................... 39
Freinage ................................................................................................................ 39
8. Points importants et précautions à prendre lors du démarrage du moteur ............... 40
9. Le meilleur moyen de démarrer .............................................................................. 41
Commande de la poignée d'accélérateur ................................................................ 41
Méthode de stationnement ..................................................................................... 41
10. Inspection et entretien avant utilisation .................................................................. 42
Inspection de routine .............................................................................................. 42
Contrôle et remplacement de l'huile moteur ............................................................ 42
Contrôle du carburant ............................................................................................ 43
Contrôle et remplacement de l’huile de transmission .............................................. 43
Inspection et réglage de la garde du frein ............................................................... 44
Inspection du frein à disque (selon le modèle) ........................................................ 44
Réglage de la garde à la poignée d’accélérateur .................................................... 45
Inspection et maintenance de la batterie ................................................................. 45
Inspection des pneus ............................................................................................. 47
Inspection des amortisseurs avant ......................................................................... 47
Contrôle et remplacement des fusibles ................................................................... 48
Contrôle des clignotants et de l’avertisseur ............................................................. 48
Contrôle des feux avant et arrière ................................ ........................................... 48
Contrôle du feu stop ............................................................................................... 48
Page 31

31
1. SOMMAIRE
Recherche d’une fuite de carburant ........................................................................ 49
Contrôle de la lubrification des différents mécanismes du châssis .......................... 49
Contrôle de la bougie ............................................................................................. 49
Contrôle du filtre à air ............................................................................................. 49
11. En cas d’anomalie ou d’incident ............................................................................. 50
Diagnostic en cas de non démarrage du moteur ..................................................... 50
12. Recommandations sur le carburant ........................................................................ 50
13. Huile de transmission ............................................................................................. 50
14. Précautions d’utilisation de la machine ................................................................... 51
Circuit de freins antiblocage ................................................................................... 52
15. Périodicités d'entretien ................................................................ ........................... 53
16. Spécifications ........................................................................................................ 54
Page 32

32
2. EMPLACEMENT DES COMPOSANTS
MODÈLE : XA05W4-EU/NL (Fiddle Ⅲ 50i cm3)
XA12W2-EU XA12W3-EU (Fiddle Ⅲ 125i cm3)
XA20W2-EU XA20W3-EU (Fiddle Ⅲ 200i cm3)
Bouchon de réservoir
de carburant
Commande de démarreur
Commutateur de feu de
croisement et de route/
de clignotant/
d’ouverture de selle/
d’avertisseur
Projecteur
Numéro de série du moteur
Levier de frein
avant
Feu arrière/
feu stop
Batterie
Filtre à air
Niveau d’huile
Clignotant avant/
Feu de position
Crochet pour casque
Casier de selle
Béquille latérale
Commutateur
de démarrage
Clignotant
arrière
Commutateur
de commande
de démarrage
Levier de frein
arrière
Silencieux
d’échappement
Béquille principale
Numéro de châssis
Fusible
Page 33

33
3. AVANT UTILISATION
Ce manuel décrit comment utiliser correctement cette machine et fournit des consignes de sécurité,
d’entretien, etc.
Pour une conduite confortable et en toute sécurité, veuillez lire attentivement ce manuel.
Si les spécifications et la construction de la machine sont modifiées et diffèrent des photos et
schémas figurant dans le manuel d’utilisation/les catalogues, ce sont les spécifications et la
construction de votre machine qui prévalent.
4. UTILISATION EN TOUTE SÉCURITÉ
Lors de l’utilisation du scooter, il est essentiel d’être détendu et correctement équipé, de respecter le code
de la route, de ne pas conduire exagérément vite et d’être toujours concentré et détendu.
Généralement, lors des premiers kilomètres, les propriétaires de motocycle neuf conduisent prudemment,
mais à mesure qu’ils se familiarisent avec leur machine, ils tendent à devenir imprudents, d’où un risque
d’accident.
AVERTISSEMENT !
Lors du transport d’un passager, pour éviter que celui-ci ne se brûle avec l’échappement, vérifiez
qu’il a placé ses pieds sur les pédales.
Après utilisation, la tuyauterie d’échappement est très chaude ; procédez avec une extrême
précaution si vous devez effectuer une inspection ou un entretien.
Après utilisation, la tuyauterie d'échappement est très chaude ; choisissez un emplacement
approprié pour stationner votre machine afin d’éviter que des personnes environnantes puissent s’y
brûler.
Merci de votre confiance
Afin d'optimiser les performances de votre machine, il convient de procéder à une inspection et une
maintenance périodiques.
Après les 300 premiers kilomètres, nous vous recommandons de rapporter votre machine chez le
concessionnaire qui vous l’a vendue afin de procéder à une inspection initiale puis de la faire
entretenir tous les 1000 km par la suite.
Rappel :
Portez systématiquement un casque et serrez-le correctement avec la sangle de maintien en
conduite.
Les vêtements avec poignets larges ou ouverts peuvent, sous l’effet du vent, se coincer dans le
guidon et affecter la sécurité de conduite.
Portez des vêtements à manches étroites.
Tenez le guidon des deux mains en conduite. Ne conduisez jamais d’une main.
Respectez les limitations de vitesse.
Portez des chaussures adaptées à talon plat.
Respectez le programme de maintenance et d’inspection.
Dans votre intérêt, demandez le manuel d’utilisation à votre concessionnaire SANYANG et lisez
attentivement les rubriques suivantes :
Utilisation correcte de la machine.
Inspection et maintenance avant livraison.
ATTENTION :
Toute modification de votre machine peut affecter sa structure ou ses performances, entraîner un
mauvais fonctionnement du moteur ou des bruits à l'échappement, et ainsi réduire la durée de vie en
service de votre machine.
En outre, les modifications sont illégales et ne se conforment pas à la conception et aux spécifications
d’origine.
Toute machine modifiée ne sera pas couverte par la garantie ; aussi, ne procédez à aucune
modification.
Page 34

34
5.
CONDUITE
Gardez les parties de votre corps telles que les bras, les mains, le dos et les pieds,
détendues et conduisez dans la position la plus confortable afin de pouvoir réagir
rapidement chaque fois que nécessaire.
La position du conducteur affecte considérablement la sécurité de conduite. Maintenez le centre de
gravité de votre corps au centre de la selle ; si votre centre de gravité se situe sur l’arrière de la
selle, la charge sur les roues avant sera réduite et le guidon risque de vibrer. Il est dangereux de
conduire un motocycle avec un guidon instable.
Il est beaucoup plus facile de négocier un virage si le conducteur penche son corps vers l’intérieur
du virage. Par ailleurs, le conducteur ressentira une certaine instabilité si son corps et sa machine
ne penchent pas dans le virage.
Le motocycle est difficile à contrôler sur route cahoteuse, irrégulière, non pavée ; essayez
d’anticiper les conditions de la route, ralentissez et contrôlez le guidon à la force des épaules.
Suggestion : Si possible, ne placez rien sur le repose-pied avant pour éviter d’affecter la sécurité de
conduite et le maniement du guidon.
6.
UTILISATION DES PIÈCES DE RECHANGE D’ORIGINE
Pour conserver les performances de la machine, la qualité, la matière et la précision d’usinage de
chaque pièce doivent se conformer aux exigences de conception. Les « pièces de rechange SYM
d’origine » ont été réalisées dans les mêmes matériaux de haute qualité que ceux utilisés pour les
pièces d’origine de la machine. Aucune de ces pièces n’est commercialisée tant qu’elle n’est pas mise
en conformité avec les spécifications requises par le biais de techniques de fabrication sophistiquées et
d’un contrôle très strict de la qualité. Par conséquent, en cas de remplacement de pièces,
procurez-vous impérativement les « pièces de rechange SYM d’origine » auprès de « distributeurs
SYM agréés ou de concessionnaires franchisés ». Si vous achetez sur le marché des pièces de
remplacement à bas prix ou contrefaites, vous ne pourrez obtenir aucune garantie quant à leur qualité et
leur durabilité. De même, vous risquez d’être confronté à des problèmes imprévus et des performances
réduites de votre machine.
Utilisez systématiquement des pièces de rechange SYM d'origine pour conserver les
performances de votre machine et lui garantir une longue durée de vie en service.
ATTENTION :
La sensation au guidon est légèrement différente en charge et à vide.
Toute surcharge peut provoquer un mouvement inopiné du guidon et affecter la sécurité de conduite.
Aussi, ne surchargez pas votre motocycle.
ATTENTION :
Ne placez pas de matières inflammables telles que des chiffons près du carénage latéral et du
moteur pour éviter tout incendie et détérioration des composants.
Ne chargez pas d’objets sur des zones non prévues à cet effet.
SUGGESTION
Pour maximiser les performances de la machine et prolonger sa durée de vie en service :
Le premier mois ou les 1000 premiers kilomètres constituent la période de rodage du moteur et des
composants.
Évitez les fortes accélérations et les vitesses supérieures à 60 km/h.
Page 35

35
ATTENTION :
N’essuyez pas les pièces plastiques telles que le combiné des instruments ou le projecteur avec des
solvants organiques tels que l’essence, etc. pour éviter toute détérioration de ces composants.
L’esthétique de l’indicateur de vitesse peut varier selon les modèles mais son emplacement est
généralement le même.
7.
FONCTIONNEMENT DE CHAQUE COMPOSANT
(Les pages suivantes présentent le fonctionnement d’un scooter SYM 50 cm
3
, 125 cm3
et 200 cm3 4 temps à refroidissement par air ; il peut varier selon les modèles.
Veuillez vous référer à la fin de ce manuel.)
§INSTRUMENTS§
Indicateur de vitesse/compte-tours :
Indique la vitesse de conduite ou le régime
moteur.
Totalisateur kilométrique :
Indique la distance totale parcourue.
Témoin de feu de route :
S’allume lorsque le feu de route est allumé.
Témoin de clignotants (gauche/droit) :
Le témoin gauche ou droit clignotera en fonction
du sens de commande du commutateur de
clignotants.
Jauge à carburant :
L’aiguille de la jauge indique la quantité de
carburant restante dans le réservoir.
L’aiguille reste en position « E » lorsque le
contact est coupé.
Voltmètre/montre de bord :
Affiche la tension moyenne de la batterie ou l'heure.
En mode d'affichage normal, appuyer sur le bouton « SET » et le maintenir enfoncé pendant 0,5
seconde pour passer du mode d'affichage de la tension au mode d'affichage de l'heure ou
inversement.
Témoin d'anomalie :
En cas d'anomalie de l'ECS, ce témoin clignote en continu.
Témoin de rappel de vidange :
S’allume pour indiquer quand remplacer l'huile moteur. Lorsque la machine a parcouru environ 1 000
kilomètres, ce témoin s'allume pour rappeler à son utilisateur de remplacer l'huile.
Une fois l'huile remplacée, établir le contact, appuyer sur le bouton « SET » et le maintenir enfoncé
pendant plus de 2 secondes en mode « ODO » ; le témoin s'éteint alors.
Témoin de faible niveau de carburant :
Témoin de feu
de route
Jauge à carburant
Kilométrage
Témoin de
clignotant droit
Témoin de
clignotant gauche
Compte-tours/
indicateur de vitesse
Voltmètre/
montre de bord
Témoin ABS
Témoin d'anomalie
Témoin de rappel de
vidange
Témoin de faible
niveau de carburant
Page 36

36
S'allume lorsque le niveau de carburant dans le réservoir est faible.
Témoin ABS : (modèle ABS)
Le témoin ABS s'allume normalement à l'établissement du contact, puis s'éteint rapidement lors du
déplacement du scooter.
Le témoin ABS (système de freinage antiblocage) s'allume à l'établissement du contact, puis
s'éteint rapidement lors du déplacement du scooter. Si le système ABS fonctionne correctement,
le témoin correspondant reste éteint. En cas de dysfonctionnement du système ABS, le témoin
s'allume et reste allumé. Lorsque le témoin est allumé, cela indique que le système ABS ne
fonctionne pas, mais le système de freinage reste quant à lui totalement opérationnel.
1. Bouton « S »
Appuyer sur le bouton « S » et le maintenir enfoncé pendant une ou deux secondes pour afficher
la tension. L'heure s'affiche à nouveau automatiquement après environ une minute. Il est aussi
possible de réactiver l'affichage de l'heure sans attendre en appuyant brièvement sur le bouton
« S ».
2. Bouton « M »
a. Appuyer sur le bouton « M » et le maintenir enfoncé pour activer le mode de réglage de l'heure.
L'affichage des heures se met alors à clignoter. Appuyer sur le bouton « S » pour régler les heures,
puis brièvement sur le bouton « M » pour passer au réglage des minutes. L'affichage des minutes
se met alors à clignoter. Appuyer brièvement sur le bouton « S » pour augmenter l'heure d'une
minute ou le maintenir enfoncé pour que le chiffre augmente automatiquement de manière
continue.
b. Une fois l'heure réglée, appuyer sur le bouton « M » et le maintenir enfoncé pour quitter le mode de
réglage, ou attendre environ 1 ~ 2 minutes pour qu'il se désactive automatiquement.
§FONCTIONNEMENT DU COMMUTATEUR DE DÉMARRAGE§
Position « ON » :
Dans cette position, le moteur peut être démarré.
La clé de contact ne peut pas être retirée du commutateur
de démarrage.
Position « OFF » :
Dans cette position, le moteur est arrêté et ne peut pas
être démarré.
La clé de contact peut être retirée du commutateur de
démarrage.
§FONCTIONNEMENT DU COMMUTATEUR DE VERROUILLAGE DE GUIDON§
Position « verrouillage du guidon »
Tourner le guidon vers la gauche et engager la clé dans
le commutateur de démarrage, la tourner dans le sens
des aiguilles d’une montre, puis légèrement vers la
gauche en position « verrouillage ».
Dans cette position, le guidon est verrouillé.
La clé de contact peut être retirée du commutateur de
démarrage.
Pour le déverrouillage, tourner simplement la clé de
la position « LOCK » à la position « OFF ».
§FONCTIONNEMENT DU COMMUTATEUR D’OUVERTURE DE SELLE§
Engager la clé de contact dans le commutateur de démarrage.
Tourner la clé de contact dans le sens inverse des aiguilles d’une montre en position « selle
ouverte ».
Puis, ouvrir la selle.
ATTENTION :
Ne jamais actionner la clé de contact lorsque la machine se déplace. Le déplacement de la clé de
contact en position « OFF » et « LOCK » désactive le circuit électrique, ce qui peut entraîner un
accident grave. Aussi, le contact peut être coupé uniquement lorsque la machine est totalement
arrêtée.
Retirer systématiquement la clé et veiller à la conserver après verrouillage du guidon.
Si le contact reste établi pendant une période prolongée après arrêt du moteur, la capacité de la
batterie sera réduite, ce qui peut affecter les performances de démarrage du moteur.
Penser à reprendre la clé avant de verrouiller la selle.
ATTENTION :
Penser à reprendre la
clé avant de verrouiller la
selle.
COMMUTATEUR
DE DÉMARRAGE
Page 37

37
§UTILISATION DES COMMANDES§
Commande de démarreur électrique
Ce bouton (commutateur) permet de démarrer le moteur.
Lorsque le contact est établi, appuyer sur ce commutateur tout en maintenant le levier de frein
avant ou arrière pour démarrer le moteur.
Inverseur feu de route/feu de croisement
Il s’agit du commutateur de permutation des feu de route et feu de croisement. Appuyer sur ce
commutateur pour basculer du feu de croisement au feu de route et vice versa.
Position du feu de route.
Position du feu de croisement (à adopter en conduite en ville).
Commutateur d’ouverture de selle
Établir le contact et enfoncer le commutateur. Puis, ouvrir la selle.
Ce commutateur revient dans sa position
d’origine une fois relâché.
Appuyer sur la selle pour la verrouiller
automatiquement.
Une fois le verrou engagé, vérifier que la selle
est correctement verrouillée en la soulevant
légèrement.
ATTENTION :
Relâcher immédiatement le commutateur une fois le moteur démarré et ne jamais l’enfoncer à
nouveau pour éviter toute détérioration du moteur.
Ce mécanisme est un dispositif de sécurité. Le moteur ne peut être démarré que lorsque le levier
de frein avant ou arrière (pédale) est serré.
Ne pas activer le circuit d’éclairage. Désactiver l’éclairage et les clignotants lors du démarrage du
moteur.
Commutateur
d’ouverture de
selle
ATTENTION :
Veiller à retirer la clé une fois la selle
verrouillée.
Ne pas placer la clé dans le casier de
rangement après déverrouillage pour éviter
qu’elle n’y soit enfermée lorsque la selle est
automatiquement rabattue.
Commutateur de
clignotants
Commande d'avertisseur
Inverseur feu
de route/
feu de
croisement
Commutateur
d’ouverture de
selle
Commande de
démarreur électrique
Page 38

38
Commutateur de commande de démarrage
Ce commutateur est situé sous la selle.
Position « ON » : Dans cette position, le moteur est arrêté et
ne peut pas être démarré.
Position « OFF » : Lorsque le commutateur de démarrage est
en position « ON » et le commutateur de
commande de démarrage en position « OFF »,
appuyer sur la commande de démarreur
électrique tout en maintenant le levier de frein
avant ou arrière pour démarrer le moteur.
Commande d'avertisseur
Appuyer sur ce commutateur lorsque le contact est établi pour activer l’avertisseur.
Commutateur de clignotants
Les clignotants sont utilisés lors d’un braquage à gauche/droite ou lors d’un changement de file.
Établir le contact et déplacer le commutateur de clignotants vers la gauche ou la droite. Dès lors, les
clignotants clignotent.
Pour désactiver les clignotants, ramener simplement le commutateur dans sa position d’origine.
Clignotant à gauche pour indiquer un braquage à gauche.
Clignotant à droite pour indiquer un braquage à droite.
§CASIER DE RANGEMENT§
Ce casier est situé sous la selle.
Capacité de charge maximum : 10 kg.
Ne pas placer d’objets de valeur dans ce casier.
Vérifier que la selle est correctement verrouillée une
fois remise en place.
Retirer les objets présents dans le casier lors du
lavage de la machine pour éviter de les mouiller.
Ne pas placer de nourriture et des produits frais dans
le casier en raison de la chaleur du moteur et de la
température élevée.
§CROCHET POUR CASQUE§
Arrêter la machine et accrocher le casque par sa
sangle de maintien sur le crochet.
ATTENTION :
Ne pas accrocher le casque sur le crochet en
conduite pour éviter de détériorer la machine et le
casque.
Commutateur de commande
de démarrage
Casier de
selle
Crochet
Page 39

39
§BOUCHON DE RÉSERVOIR DE CARBURANT§
1. Engager la clé dans le verrou de selle et ouvrir la selle, puis tourner le bouchon de réservoir de
carburant dans le sens inverse des aiguilles d’une montre pour le déposer.
2. Ne pas ravitailler au-delà de la limite supérieure.
3. Aligner le repère « △ » sur le bouchon avec le repère « △ » sur le réservoir de carburant puis
tourner le bouchon dans le sens des aiguilles d’une montre et verrouiller la selle.
§FREINAGE§
Actionner le levier de frein droit pour serrer le frein avant.
Actionner le levier de frein gauche pour serrer les freins avant et arrière simultanément (modèle CBS).
Actionner le levier de frein gauche pour serrer le frein arrière (modèle ABS).
Éviter tout freinage brutal inutile.
Utiliser simultanément les freins avant et arrière au freinage.
Éviter de freiner en continu pendant une longue période car il y a risque d’échauffement des freins
et de perte de l’efficacité de freinage.
Ralentir et anticiper le freinage en conduite par temps de pluie sur routes glissantes. Ne jamais
serrer les freins brutalement pour éviter tout dérapage ou toute chute.
L’emploi du frein avant ou du frein arrière seul augmente le risque de chute car la machine aura
tendance à se déporter d’un côté.
Même sur les motocycles équipés de l'ABS, un freinage en virage peut entraîner un dérapage. En
virage, il est préférable de serrer légèrement les freins avant et arrière ou de ne pas freiner du tout.
Réduire plutôt la vitesse de la machine à l'approche du virage.
《Frein moteur》
Ramener la poignée d’accélérateur dans sa position d’origine et utiliser le frein moteur.
Il est nécessaire de serrer le frein avant et le frein arrière par intermittence en conduite sur une pente à
fort pourcentage ou longue.
ATTENTION :
Placer la béquille principale sur le sol, arrêter le moteur, éloigner toute flamme nue pour un
ravitaillement en toute sécurité.
Ne pas ravitailler au-delà de la limite supérieure. À défaut, le carburant risque de s’écouler par le
trou du bouchon et ainsi de détériorer la peinture voire de provoquer un incendie.
Vérifier que le bouchon est correctement serré.
Pour la roue avant
Pour la roue avant
Pour la roue avant et
la roue arrière
Pour la roue arrière
Modèle ABS
Modèle CBS
Page 40

40
8. POINTS IMPORTANTS ET PRÉCAUTIONS À PRENDRE LORS DU
DÉMARRAGE DU MOTEUR
1. Établir le contact.
2. Serrer le frein arrière.
3. Ne pas accélérer, appuyer sur la commande de démarreur lorsque le frein est serré.
[Précaution ! Avant de démarrer, maintenir le frein arrière serré.]
ATTENTION :
Si le moteur ne peut être démarré après 3 à 5 tentatives d’actionnement du démarreur à kick,
tourner la poignée d’accélérateur de 1/8-1/4 tour puis actionner à nouveau le kick pour faciliter le
démarrage.
Pour éviter de détériorer le démarreur, ne pas enfoncer la commande de démarreur en continu
pendant plus de 15 secondes.
Si le moteur ne démarre toujours pas après 15 secondes, arrêter et attendre 10 secondes avant
toute nouvelle tentative.
Il est plus difficile de démarrer le moteur lorsque la machine est restée immobilisée pendant une
longue période ou lorsqu'elle a été ravitaillée après une panne sèche. Il est alors nécessaire
d’actionner le levier de démarrage ou la commande de démarreur plusieurs fois, et de maintenir la
poignée d’accélérateur en position fermée pour démarrer le moteur.
La mise à température du moteur peut prendre quelques minutes en cas de démarrage à froid.
Les gaz d’échappement contiennent des gaz nocifs (CO) ; aussi, démarrer le moteur dans un
ATTENTION :
Vérifier les niveaux d’huile et de carburant avant de démarrer le moteur.
Pour démarrer le moteur, la béquille principale doit reposer fermement sur le sol et le frein arrière
doit être serré pour éviter que la machine ne se déplace brusquement vers l’avant.
1/4
1/8
Page 41

41
9. LE MEILLEUR MOYEN DE DÉMARRER
Activer les clignotants avant tout changement de direction et vérifier que la voie de circulation est libre.
Puis démarrer.
§COMMANDE DE LA POIGNÉE D’ACCÉLÉRATEUR§
Accélération : Pour augmenter la vitesse. En conduite sur une route en pente, tourner la poignée
d’accélérateur lentement pour permettre au moteur de développer sa puissance.
Décélération : Pour réduire la vitesse.
§MÉTHODE DE STATIONNEMENT§
À l’approche d’une zone de stationnement :
1. Activer les clignotants à l’avance et tenir compte des véhicules à l’avant, à l'arrière, à gauche et à
droite, puis s'engager dans la voie intérieure et procéder lentement à l'approche.
2. Ramener la poignée d’accélérateur dans sa position d’origine et utiliser les freins. (Le feu stop s’allume
au freinage pour avertir les véhicules suiveurs.)
Lors d’un arrêt complet :
3. Ramener le commutateur de clignotant dans sa position d’origine et couper le contact pour arrêter le
moteur.
4. Descendre de la machine du côté gauche une fois le moteur arrêté, stationner dans un endroit où
elle ne gênera pas la circulation et sur un sol plan puis mettre en place la béquille principale.
5. Maintenir le guidon de la main gauche et l’avant de la selle ou la poignée de stationnement située sur
le côté inférieur gauche de la selle de la main droite.
6. Actionner la béquille principale du pied droit et la placer fermement sur le sol.
Rappel : Verrouiller le guidon et retirer la clé après le stationnement pour éviter tout vol de la machine.
ATTENTION :
Stationner la machine dans un endroit sûr où elle ne gênera pas la circulation.
Décélération
Accélération
Page 42

42
10. INSPECTION ET ENTRETIEN AVANT UTILISATION
(Se reporter au schéma d’emplacement des composants pour localiser les composants suivants.)
§INSPECTION DE ROUTINE§
Points de contrôle
Contrôle
Huile moteur
Le niveau d’huile moteur est-il suffisant ?
Carburant
Le niveau de carburant est-il suffisant ? Le carburant utilisé
présente-t-il un indice d’octane d’au moins 90 ?
Frein
Avant
Le frein est-il en bon état ?
(Garde du levier de frein : 10~20 mm)
Arrière
Le frein est-il en bon état ?
(Garde du levier de frein : 10~20 mm)
Pneus
Avant
La pression de gonflage est-elle normale ?
(Valeur prescrite : 1,75 kg/cm2)
Arrière
La pression de gonflage est-elle normale ?
(Valeur prescrite : 2 kg/cm2 pour 1 personne, 2,25 kg/cm2 pour 2
personnes)
Guidon
Le guidon vibre-t-il de façon anormale ou est-il difficile à braquer ?
Indicateur de vitesse, éclairage et
rétroviseurs
L’indicateur de vitesse fonctionne-t-il correctement ?
Les feux s'allument-ils ? La machine est-elle facilement visible de
l'arrière ?
Couple de serrage des principaux
composants
Les vis et écrous sont-ils correctement serrés ?
Points anormaux
Les anomalies précédentes persistent-elles ?
§CONTRÔLE ET REMPLACEMENT DE L’HUILE MOTEUR§
INSPECTION:
1. Utiliser la béquille principale pour maintenir la
machine sur un sol de niveau, retirer la jauge 3 à 5
minutes après arrêt du moteur. Essuyer la jauge
puis la réengager dans le tube (ne pas la tourner).
2. Retirer la jauge et vérifier si le niveau d’huile se situe
entre les repères supérieur et inférieur.
Faire l’appoint en huile jusqu’au repère supérieur si
nécessaire. (Vérifier l’étanchéité du cylindre, du bas
moteur, etc.)
ATTENTION :
Si un problème est identifié lors d’une inspection de routine, corriger le problème avant d’utiliser la
machine, la faire vérifier et réparer par un « concessionnaire SYM ou un atelier agréé » si
nécessaire.
Page 43

43
REMPLACEMENT DE L'HUILE :
Remplacer l’huile moteur après les 300 premiers
kilomètres puis tous les 1000 km.
Pour conserver au moteur ses performances maximum,
vérifier le niveau d’huile tous les 500 km. Faire l’appoint
en huile jusqu’à la limite supérieure si nécessaire.
Huile moteur : Utiliser de l’huile moteur (API) SH/CD SAE
10W-30 ou de grade supérieur. À défaut, toute
détérioration ne sera pas couverte par la garantie.
※ Huile recommandée : Huile 4X SYM d’origine.
Contenance en huile : 50 cm3 : 0,80 l (0,70 l en
vidange)
125 cm3 : 0,95 l (0,8 l en vidange)
【Nettoyage du filtre à huile】
Desserrer l’écrou de filtre à huile et déposer l’élément.
Éliminer les corps étrangers de l’élément avec de l’essence
ou une soufflette.
§CONTRÔLE DU CARBURANT§
Établir le contact, vérifier la position de l’aiguille sur la jauge pour s’assurer que le niveau de
carburant est suffisant.
Le moteur de la machine est conçu pour fonctionner au sans plomb 90 et plus.
Mettre fermement en place la béquille principale, arrêter le moteur et éloigner toute flamme de la
machine lors du ravitaillement en carburant.
Ne pas ravitailler au-delà de la limite supérieure.
Vérifier que le bouchon du réservoir de carburant est correctement serré.
§CONTRÔLE ET REMPLACEMENT DE L’HUILE DE TRANSMISSION§
INSPECTION:
Utiliser la béquille principale pour maintenir la machine sur un sol de niveau, patienter 3 à 5
minutes après arrêt du moteur. Déposer la vis de remplissage d’huile de transmission, placer un
récipient gradué sous la vis de vidange et déposer la vis de vidange. Laisser l’huile s’écouler dans
le récipient et vérifier si la quantité est suffisante. 50 cm3 : (au démontage : 110 cm3/lors de la
vidange : 100 cm3). 125 cm3 : (lors du démontage : 180 cm3/lors de la vidange : 170 cm3).
REMPLACEMENT DE L’HUILE :
Arrêter le moteur et utiliser la béquille principale pour maintenir la machine sur un sol de niveau.
Déposer la vis de remplissage et la vis de vidange, vidanger l’huile.
Reposer la vis de vidange et la serrer. Verser de l’huile de transmission neuve, reposer la vis de
remplissage et la resserrer. (Vérifier le serrage des vis et l’absence de fuite.)
Huile recommandée : Genuine SYM HYPOID GEAR OIL (SAE 85W-140).
Utiliser une huile SAE85-90 lorsque la température extérieure est inférieure à 0°C.
AVERTISSEMENT :
Le niveau d’huile ne sera pas correct si le contrôle est effectué
sur un sol inégal ou immédiatement après arrêt du moteur.
Le moteur et la tuyauterie d’échappement sont extrêmement
chauds après arrêt du moteur. Procéder avec une extrême
précaution lors du contrôle ou du remplacement de l’huile pour
éviter toute brûlure.
Si le niveau d’huile avoisine la limite inférieure après l’appoint,
rechercher la présence éventuelle de fuites au niveau du moteur
et refaire l’appoint.
Éloigner toute flamme et étincelle lors de l’appoint en huile.
Limite supérieure
Limite
inférieure
Filtre à huile
Écrou de filtre
Page 44

44
§INSPECTION ET RÉGLAGE DE LA GARDE DU FREIN§
INSPECTION: (Vérifier le jeu du levier de frein moteur à l’arrêt.)
Garde au levier et à la pédale de frein pour les roues avant et arrière.
◆ Levier de frein manuel pour la roue avant : la garde (course du levier de frein entre absence et début
du freinage) doit être égale à 10~20 mm. Toute sensation spongieuse lors du serrage d’un levier de
frein est anormale.
◆ Pédale de frein pour la roue arrière : la garde (course de la pédale entre absence et début du freinage)
doit être égale à 20~30 mm. Toute sensation spongieuse lors de l’enfoncement de la pédale est
anormale.
Réglage : (type à tambour)
La marque sur l’écrou de réglage de frein doit être alignée avec l’axe. (voir figure ci-dessous)
Tourner l’écrou de réglage sur le bras de frein des roues avant et arrière pour régler la garde du
levier de frein.
Maintenir les leviers de frein après réglage des deux mains jusqu’à ressentir un freinage efficace.
Mesurer le jeu libre à l’aide d’une réglette.
10~20 mm
Frein arrière
ATTENTION :
Lorsque la garde se situe entre 10-20 mm, vérifier les
indicateurs d’usure de frein des roues avant et arrière.
Si la flèche sur le bras de frein est alignée avec le
repère « △ » sur le disque de frein, la garniture de
frein est excessivement usée et doit être remplacée
immédiatement.
Broche
Écrou de réglage
Pour réduire
la garde
Pour augmenter la
garde
Écrou de réglage
Tambour de roue arrière
Page 45

45
§INSPECTION DU FREIN À DISQUE§
Inspection visuelle des tuyauteries de frein pour identifier
toute fuite ou détérioration, contrôle du serrage des
raccords des tuyauteries de frein à l’aide d’une clé
dynamométrique ou d’un outil similaire, recherche de
vibrations du guidon en conduite, recherche de tout contact
avec d’autres pièces susceptible de détériorer les
tuyauteries de frein. Dans ces cas, apporter votre machine
chez votre concessionnaire SANYANG pour un entretien
ou une réparation.
(fuite, détérioration, desserrage de la
tuyauterie de frein)
(Contrôle de la garniture de frein avant)
Contrôler les freins depuis l'arrière de l'étrier.
Les plaquettes de frein doivent être
remplacées si la limite d’usure est atteinte.
(Contrôle de la quantité de liquide de frein
dans le réservoir)
Garer la machine sur une surface plane et
vérifier si le niveau de liquide se situe sous le
repère « LOWER » (MIN.). Liquide de frein
recommandé : WELL RUN BRAKE OIL
(DOT 3).
(Appoint en liquide de frein de roue avant)
1. Desserrer les vis et déposer le couvercle du
maître-cylindre.
2. Éliminer les corps étrangers et la saleté autour du
réservoir, en veillant à ce qu’aucune impureté ne pénètre
dans le réservoir.
3. Déposer le plateau de membrane et la membrane.
4. Ajouter du liquide de frein jusqu’à la limite supérieure.
5. Reposer le plateau de membrane, la membrane et le
couvercle du maître-cylindre.
6. Noter le sens de montage de la membrane en veillant à
ce qu’aucune impureté ne pénètre dans le réservoir.
Resserrer le couvercle de maître-cylindre.
ATTENTION :
Conduire lentement la machine sur une surface
sèche et actionner les freins avant et arrière pour
identifier toute anomalie et vérifier que la machine
est en parfait état et offre une totale sécurité. .
Disque de frein
Étrier de frein
Gorges de limite
d'usure des
plaquettes de
frein
ATTENTION :
Pour éviter toute réaction chimique, ne pas utiliser de liquides de frein autres que ceux
recommandés.
Ne pas faire l’appoint au-delà de la limite supérieure lors de l’ajout de liquide de frein et éviter
toute projection sur la peinture ou les composants plastiques pour éviter toute détérioration.
Vis
Couvercle de
maître-cylindre
Membrane
Repère
supérieur
Liquide de
frein
Page 46

46
§RÉGLAGE DE LA GARDE À LA POIGNÉE D’ACCÉLÉRATEUR§
La garde doit permettre à la poignée d’accélérateur
de tourner de 2~6 mm.
Desserrer tout d’abord le contre-écrou puis tourner
l’écrou pour régler la garde. Resserrer
correctement le contre-écrou une fois le réglage
terminé.
§INSPECTION ET MAINTENANCE DE LA BATTERIE§
La machine est équipée d’une batterie sans entretien, il est donc inutile de vérifier et d'ajuster le
niveau d’électrolyte. Faire vérifier la machine par un concessionnaire SYM agréé ou un
concessionnaire franchisé en cas d’anomalie.
(Nettoyage des bornes de la batterie)
Déposer les bornes de batterie et éliminer les
impuretés et la corrosion.
Procédure de dépose de la batterie :
Couper le contact puis déposer la vis de câble
négatif et débrancher le câble négatif. Puis
déposer la vis de câble positif et le câble positif.
La machine est équipée d’une batterie sans entretien, il est donc inutile de vérifier et d'ajuster le
niveau d’électrolyte. Faire vérifier la machine par un concessionnaire SYM agréé ou un
concessionnaire franchisé en cas d’anomalie.
Points de contrôle :
1. Vérifier le câble d’accélérateur pour définir s’il peut
être déplacé librement de la position fermée à la
position ouverte.
2. Tourner le guidon de butée en butée pour vérifier si
le câble d’accélérateur présente un blocage.
3. Vérifier si le câble d’accélérateur est entravé par
d’autres câbles l’empêchant d’être actionné
correctement.
2~6 mm
ATTENTION :
Nettoyer les bornes de batterie avec de l’eau tiède si elles sont érodées et les garnir de talc.
En cas de corrosion évidente des bornes, débrancher les câbles puis éliminer l’érosion à l’aide
d’une brosse en acier ou de papier de verre.
Rebrancher le câble de batterie après nettoyage et appliquer une fine couche de graisse sur les
bornes.
Reposer la batterie dans l’ordre inverse des opérations de dépose.
Négatif
Positif
ATTENTION :
Il s’agit d’une batterie de type fermé. Ne jamais déposer les capuchons.
Pour éviter toute fuite électrique ou décharge de la batterie pendant une période de remisage
prolongée de la machine : Déposer la batterie de la machine, la stocker dans un endroit bien ventilé
et faiblement éclairé après recharge totale. Débrancher le câble négatif de la batterie si celle-ci n’est
pas déposée de la machine.
Si la batterie doit être remplacée, utiliser une batterie de même type (sans entretien).
Écrou de
réglage
Contre-écrou
Page 47

47
§INSPECTION DES PNEUS§
La pression de gonflage des pneus doit être contrôlée et réglée moteur à l’arrêt.
En cas de portée anormale d’un pneu avec le sol, vérifier le pneu concerné à l’aide d’un manomètre
et le regonfler à la pression prescrite.
La pression de gonflage des pneus doit être contrôlée à froid à l’aide d’un manomètre.
Contrôle visuel des pneus pour identifier
d’éventuelles fissures ou détériorations des flancs.
Contrôle visuel des pneus pour identifier
d’éventuels clous ou gravillons incrustés dans la
bande de roulement.
Contrôle de l'état du « témoin d’usure de la bande
de roulement » pour savoir si la profondeur des
sculptures est suffisante.
Un pneu avec une barre de témoin d’usure
apparente est usé et doit être remplacé
immédiatement.
§INSPECTION DES AMORTISSEURS AVANT§
Procéder à ce contrôle moteur à l’arrêt et clé de contact
retirée du commutateur de démarrage.
Rechercher tout signe de détérioration des amortisseurs
avant.
Appuyer sur le guidon de haut en bas et rechercher
d'éventuels bruits des amortisseurs avant dans les courbes.
Contrôler le serrage des vis et écrous des amortisseurs
avant à l’aide d’une clé dynamométrique.
Déplacer le guidon de haut en bas, de gauche à droite et
d'avant en arrière pour vérifier qu'il n’est pas desserré, ne
présente pas de résistance excessive ou n’est pas
décentré.
Vérifier que le braquage du guidon n’est pas entravé par les
câbles de frein.
Confier la machine à un concessionnaire franchisé ou un
concessionnaire SYM agréé pour un contrôle ou un réglage
en cas d’anomalie.
SE REPORTER AUX SPÉCIFICATIONS POUR LA PRESSION DE GONFLAGE PRESCRITE
ATTENTION :
Une pression de gonflage, usure ou fissure anormale constitue la principale cause de perte de
contrôle du guidon ou de crevaison.
Témoin
d’usure
Fissures et
détériorations
Corps étrangers
(clous ou
gravillons)
Page 48

48
§CONTRÔLE ET REMPLACEMENT DES FUSIBLES§
La boîte à fusibles est située sur le châssis, l’ouverture de la selle permet de voir la boîte à fusibles sur le
côté droit ainsi que le solénoïde de démarreur situé à proximité. Couper le contact et vérifier l’état des
fusibles. Remplacer tout fusible grillé par un fusible neuf de même ampérage (10 A*2 et 15 A*1 et 20 A*1).
Il est interdit de remplacer un fusible grillé par un fusible d’un ampérage supérieur à celui d’origine par un
fil de cuivre ou de fer afin d’éviter de détériorer le circuit électrique.
Déposer le casier de rangement pour accéder à la boîte à fusibles près de la batterie.
Ouvrir le couvercle de la boîte à fusibles et tirer sur le fusible. Définir s’il est détérioré ou grillé.
Les fusibles doivent être fermement maintenus par leurs connecteurs lorsqu’ils sont remis en place.
En cas de jeu dans les contacts, il y a risque de surchauffe et de détérioration.
Utiliser uniquement des pièces de spécifications prescrites pour remplacer les composants
électriques tels que les ampoules. L’emploi de pièces autres peut provoquer une détérioration du
fusible et une décharge de la batterie.
Éviter de projeter de l’eau directement sur ou à proximité de la boîte à fusibles lors du lavage de la
machine.
Si le fusible neuf grille à nouveau, chercher la cause avant de le remplacer. Amener la machine
chez un concessionnaire pour une inspection si le fusible grille sans raison apparente.
§CONTRÔLE DES CLIGNOTANTS ET DE L’AVERTISSEUR§
Établir le contact.
Actionner le commutateur de clignotants et vérifier que les clignotants avant et arrière, gauche et droit
fonctionnent ; vérifier également le fonctionnement de l’avertisseur.
Inspecter les optiques des clignotants pour vérifier si elles sont sales, présentent des fissures ou sont
desserrées.
Appuyer sur le commutateur d’avertisseur pour vérifier qu’il fonctionne.
§CONTRÔLE DES FEUX AVANT ET ARRIÈRE§
Démarrer le moteur et actionner le commutateur d'éclairage. Vérifier si le projecteur et le feu arrière
s’allument.
Vérifier la luminosité et le faisceau pour s’assurer qu’ils sont corrects.
Vérifier si l’optique du projecteur est sale, fissurée ou desserrée.
§CONTRÔLE DU FEU STOP§
Établir le contact, serrer les leviers de freins avant et arrière. Vérifier si le feu stop s’allume.
Vérifier si l’optique du feu stop est sale, fissurée ou desserrée.
ATTENTION :
Des ampoules de spécifications spéciales doivent être utilisées pour les clignotants. À défaut, le
fonctionnement normal des clignotants sera affecté.
Activer les clignotants avant de changer de direction ou de file pour alerter les conducteurs des
véhicules suiveurs.
Désactiver les clignotants immédiatement après la manœuvre. À défaut, le clignotement risque de
troubler les autres usagers de la route.
ATTENTION :
Utiliser exclusivement des ampoules de spécifications prescrites, ne pas utiliser d’ampoules de
spécifications différentes pour éviter de détériorer le circuit électrique, de griller des ampoules et
de décharger la batterie.
Ne pas modifier ni ajouter de composants électriques pour éviter toute surcharge ou court-circuit
susceptible d’entraîner un incendie ou de détériorer la machine.
Page 49

49
§RECHERCHE D'UNE FUITE DE CARBURANT§
Rechercher une fuite au niveau du réservoir de carburant, du bouchon
de carburant, du flexible d'alimentation ou du carburateur.
§CONTRÔLE DE LA LUBRIFICATION DES DIFFÉRENTS MÉCANISMES DU
CHÂSSIS§
Vérifier la lubrification des points d’articulation du châssis.
(Par exemple, points d’articulation de la béquille principale, de la béquille latérale, du levier de frein,
etc.)
§CONTRÔLE DE LA BOUGIE§
Déposer le capuchon de la bougie (déposer la bougie à l’aide de la clé
à bougie de la trousse à outils).
Vérifier si l’électrode est sale ou recouverte de calamine.
Éliminer les dépôts de calamine sur l’électrode à l’aide d’un fil d’acier
et nettoyer la bougie avec de l’essence puis l’essuyer avec un chiffon.
Vérifier l’électrode et régler l’entrefer à l’aide d’une jauge d’épaisseur
(L’entrefer doit être égal à 0,6~0,7 mm).
Serrer la bougie au maximum à la main puis la serrer de 1/2-3/4 tour
supplémentaire à l’aide d’une clé dynamométrique.
§CONTRÔLE DU FILTRE À AIR§
《PROCÉDURE DE DÉMONTAGE》
1. Déposer tout d'abord le carénage de châssis gauche.
2. Déposer les vis de fixation du couvercle du filtre à air.
3. Déposer le couvercle du filtre à air, les vis de l’élément
puis l’élément du filtre.
4. Extraire l’élément et le nettoyer. (Se reporter au
programme d’entretien.)
《PROCÉDURE DE MONTAGE》
Remonter le filtre à air dans l’ordre inverse des opérations de démontage.
ATTENTION :
Les dépôts de poussières constituent l’une des causes majeures de la réduction de puissance et de
l’augmentation de la consommation de carburant.
Remplacer l’élément du filtre à air plus fréquemment pour prolonger la durée de vie en service du moteur si
la machine est conduite régulièrement sur des routes poussiéreuses.
Si le filtre à air est mal monté, la poussière sera aspirée dans les cylindres, ce qui peut provoquer une usure
prématurée et réduire la puissance et la durée de vie en service du moteur.
Veiller à ne pas noyer le filtre à air lors du lavage de la machine. À défaut, le moteur aura des difficultés à
démarrer.
AVERTISSEMENT :
Le moteur est extrêmement chaud après fonctionnement. Procéder avec une extrême précaution pour
éviter toute brûlure.
※Utiliser exclusivement des bougies adaptées aux spécifications du moteur de la machine et
recommandées par le constructeur. (Se reporter aux spécifications).
0,6~0,7 mm
Élément
Vis
Page 50

50
11. EN CAS D’ANOMALIE OU D’INCIDENT
§DIAGNOSTIC EN CAS DE NON DÉMARRAGE DU MOTEUR§
(1). La clé de contact est-elle en
position « ON » ?
(2). Y a-t-il suffisamment de
carburant dans le réservoir ?
(3). Commutateur antivol en
position « OFF » ou
« » ?
(4). Les freins avant et arrière
sont-ils serrés lors de la
commande du bouton de
démarrage ?
(5). La poignée d’accélérateur
est-elle actionnée lors de la
commande du bouton de
démarrage ?
(6). Amener la clé de contact en
position « ON » et appuyer sur la
commande d’avertisseur, si
l’avertisseur ne retentit pas, le
fusible peut être grillé.
【Faire vérifier immédiatement la machine par un concessionnaire franchisé ou un concessionnaire SYM
agréé si la cause du non démarrage du moteur ne figure pas parmi celles indiquées ci-dessus.】
12. RECOMMANDATIONS SUR LE CARBURANT
Cette machine est conçue pour fonctionner à l'essence sans plomb d'un indice d'octane 90 ou
plus.
Si la machine est utilisée à haute altitude (où la pression atmosphérique est inférieure), il est
recommandé de régler le rapport air/carburant pour maximiser les performances du moteur.
13. HUILE DE TRANSMISSION
Huile recommandée : GENUINE SYM HYPOID GEAR OIL (SAE 85W-140).
1/4
1/8
Commutateur de clignotants
Commande
d'avertisseur
Pour la roue
arrière
Pour la roue
avant
Page 51

51
14. PRÉCAUTIONS D’UTILISATION DE LA MACHINE
1. Placer la machine sur la béquille principale et s’asseoir sur la selle.
Pousser la machine vers l’avant pour relever la béquille principale.
2. Monter sur la machine depuis le côté gauche et s’asseoir correctement sur la selle, garder le pied
droit fermement sur le sol pour éviter que la machine ne tombe.
3. Tourner lentement la poignée d’accélérateur, la machine commence alors à se déplacer.
【Ne pas utiliser le frein brutalement en virage】
Tout freinage brusque dans un virage serré peut provoquer un dérapage et une chute.
Un freinage brusque ou un virage serré peut provoquer un patinage, un dérapage ou une chute
notamment par temps de pluie lorsque la route est mouillée et glissante.
【Conduire avec une extrême prudence par temps de pluie】
La distance de freinage par temps de pluie ou sur route mouillée sera plus longue que sur route
sèche. Dans ce cas, ralentir et se préparer à freiner plus tôt.
La poignée d’accélérateur doit être relâchée et les freins doivent être correctement serrés si besoin
pour réduire la vitesse en pente.
ATTENTION :
Ne jamais tourner la poignée d’accélérateur dans le vide pour augmenter le régime moteur avant
de démarrer.
ATTENTION :
Serrer le frein arrière avant de démarrer.
ATTENTION :
Toute rotation rapide de la poignée d’accélérateur ou tout relâchement brutal du levier peut
provoquer un déplacement soudain de la machine qui peut s’avérer très dangereux.
Vérifier que la béquille latérale est complètement rentrée avant de démarrer.
Page 52

52
§Système de freinage antiblocage§
Le système ABS est conçu pour éviter tout blocage des roues en cas de freinage appuyé en ligne droite.
Il ajuste automatiquement la force de freinage. Les forces d'adhérence et de freinage déployées de
manière intermittente par le système ABS empêchent le blocage des roues et garantissent une maîtrise
constante de la direction au freinage.
Le contrôle du freinage s'effectue comme sur un motocycle classique. Le levier de frein est utilisé pour
serrer le frein avant, tandis que la pédale de frein sert à actionner le frein arrière.
Même si le système ABS assure la stabilité du scooter au freinage en empêchant tout blocage des roues,
il est important de noter les points suivants :
Le système ABS ne permet pas de pallier des conditions de circulation défavorables, une erreur de
pilotage ou un serrage inapproprié des freins. La même attention est requise que lors du pilotage d'un
motocycle non équipé de l'ABS.
Le système ABS n'a pas pour fonction de réduire la distance de freinage. Sur les surfaces meubles,
irrégulières ou en pente, la distance de freinage d'un scooter équipé de l'ABS peut même être plus
longue que celle d'un motocycle équivalent sans ABS. Il convient d'être particulièrement vigilant dans ce
type de situation.
Le système ABS empêche le blocage des roues lors d'un freinage en ligne droite, mais il ne peut pas agir
sur le risque de dérapage que peut causer un freinage en virage. En virage, il est préférable de serrer
légèrement les freins avant et arrière ou de ne pas freiner du tout. Réduire plutôt la vitesse de la machine
à l'approche du virage.
Les contrôleurs intégrés au système ABS comparent la vitesse du motocycle et celle des roues.
L'installation de pneus non spécifiés peut affecter la vitesse des roues et ainsi perturber le
fonctionnement des contrôleurs, ce qui risque d'augmenter la distance de freinage du scooter.
ATTENTION :
Le système ABS ne peut pas protéger le pilote de tous les dangers de la route et ne se substitue en
aucun cas au respect des précautions de sécurité. Il est important de bien connaître le fonctionnement et
les limites du système ABS. Il est de la responsabilité du pilote d'adapter sa conduite et la vitesse de son
scooter aux conditions météorologiques, au type de route et aux conditions de circulation.
Page 53

53
15. PÉRIODICITÉS D’ENTRETIEN
Élé-
ment
Périodicité
(kilométrage)
300 km
Tous les
1000 km
Tous les
3000 km
Tous les
6000 km
Tous les
12000 km
Remarque
s
Points de contrôle
Périodicité
ÉTAT NEUF
1 mois
3 mois
6 mois
1 an
1
Élément du filtre à air (remarque)
I N
R (papier)
R (éponge)
2 Filtre à air I 3 Filtre à huile (crépine)
N N 4
Huile moteur R I
Remplacement tous les 3000 km
5 Pression de gonflage des pneus
I I 6
Batterie I I 7 Bougie d'allumage
I I R 8
Carburateur (ralenti)
I I 9
Roulement et guidon
I I
10
Recherche de fuites au niveau de la
transmission
I I 11
Recherche de fuites au niveau du bas
moteur
I I
12
Huile de transmission
R
Remplacer tous les 5000 km (5 mois)
13
Courroie/galet d’entraînement
I R
14
Contacteur et tuyauteries de réservoir de
carburant
I I
15
Fonctionnement et câble d’accélérateur
I I
16
Vis et écrous du moteur
I I 17
Culasse, cylindre et piston
I 18
Échappement/élimination de la calamine
I 19
Chaîne de distribution/Durée d’allumage
I I 20
Jeu des soupapes
I I 21
Amortisseurs I I
22
Suspension avant/arrière
I I 23
Béquilles principale/latérale
I
I/L
24
Système de ventilation des gaz du carter
(PCV)
I I
25
Disque d’embrayage
I
26
Mécanisme de freinage/garniture de frein
(plaquette)
I I
27
Vis/écrous de chaque composant
I I
☆Le programme d’entretien ci-dessus repose sur une périodicité d'un mois ou 1 000 kilomètres, selon
première échéance.
※ Afin de préserver son état optimal de fonctionnement, la machine doit être contrôlée et réglée
régulièrement par un concessionnaire franchisé ou réparateur SYM agréé.
Légende : I ~ Inspection, nettoyage et réglage R ~ Remplacement
N ~ Nettoyage (remplacement si nécessaire) L ~ Lubrification
Remarque : 1. Nettoyer ou remplacer l’élément du filtre à air plus souvent lorsque la machine est
utilisée sur routes poussiéreuses ou dans un environnement fortement pollué.
2. L’entretien doit être effectué plus souvent si le motocycle roule fréquemment à vitesse
élevée ou s'il a atteint un kilométrage supérieur à celui prévu par le programme.
Page 54

54
16. SPÉCIFICATIONS
Modèle
Fiddle Ⅲ 50 cm3
Élément
Spécifications
XA05W4-EU / XA05W5-EU
XA05W4-NL / XA05W5-NL
Longueur
1900 mm
Largeur
690 mm
Hauteur
1130 mm
Empattement
1330 mm
Poids net
107 kg (Avant : 42 kg Arrière : 65 kg)
Modèle
Moteur monocylindre, 4 temps, refroidi par air forcé
Carburant
Sans plomb
Cylindrée
49,46 cm3
Taux de compression
12,6 ± 0,2/1
Puissance nette maximale
2,6 kW/7500 tr/min
2,2 kW/6500 tr/min
Couple net maximal
3,5 Nm/6500 tr/min
3,3 Nm/6500 tr/min
Ralenti
2100±100 tr/min
Jeu des soupapes : ADM/ÉCH
0,10±0,02/0,10±0,02 mm
Modes de démarrage
Électrique et kick
Amortisseur avant
Fourche télescopique
Amortisseur arrière
Bras oscillant
Embrayage
Automatique de type centrifuge
Transmission
C.V.T.
Pneu avant
110/70-12
Pneu arrière
120/70-12
Type de jante
Aluminium
Pression de gonflage des pneus
Avant : STD 1,75 kg/cm2,
Arrière : STD 2 kg/cm2 pour 1 personne, 2,25 kg/cm2 pour 2 personnes
Frein avant
À disque (Ø 226 mm)
Frein arrière
À tambour (Ø 110 mm)
Projecteur (feu de route, feu de
croisement)
12 V, 35/35 W
Feu de position avant
LED 12 V
Clignotant avant / arrière
12 V 10 W
Feu de position arrière/feu stop
12 V 5 W /12 V 21 W
Éclairage de plaque
d'immatriculation arrière
12 V 5 W
Contenance en huile moteur
0,80 l (0,7 l en vidange)
Contenance en huile de
transmission
110 cm3 (100 cm3 en vidange)
Contenance du réservoir de
carburant
6,5 l
Fusible
2 Ax1+5 Ax1+10 Ax1+15 Ax1
Bougie d'allumage
CR6HSA
Capacité de la batterie
12 V 6 Ah (batterie fermée sans entretien)
Filtre à air
Type papier
Page 55

55
Modèle
XA12W2-EU XA12W3-EU (Fiddle Ⅲ 125i cm3)
Élément
Spécifications
Longueur
1900 mm
Largeur
690 mm
Hauteur
1130 mm
Empattement
1330 mm
Poids net
117 kg (Avant : 44 kg Arrière : 73 kg)
Modèle
Moteur monocylindre, 4 temps, refroidi par air forcé
Carburant
Sans plomb
Cylindrée
124,6 cm3
Taux de compression
10,6±0,2/1
Puissance nette maximale
7,5 kW/8500 tr/min
Couple net maximal
9,2 Nm/7000 tr/min
Jeu des soupapes : ADM/ÉCH
0,12~0,12 mm
Modes de démarrage
Démarreur électrique
Amortisseur avant
Fourche télescopique
Amortisseur arrière
Bras oscillant
Transmission
C.V.T.
Pneu avant
110/70-12
Pneu arrière
120/70-12
Type de jante
Aluminium
Pression de gonflage des pneus
Avant : STD 2,00 kg/cm2,
Arrière : STD 2 kg/cm2 pour 1 personne, 2,25 kg/cm2 pour 2 personnes
Frein avant
À disque (Ø 226 mm)
Frein arrière
À disque (Ø 220 mm)
Projecteur (feu de route, feu de
croisement)
12 V, 35/35 W
Feu de position avant
LED 12 V
Clignotant avant / arrière
12 V 10 W
Feu de position arrière/feu stop
12 V 5 W /12 V 21 W
Éclairage de plaque
d'immatriculation arrière
12 V 5 W
Contenance en huile moteur
0,95 l (0,8 l en vidange)
Contenance en huile de
transmission
180 cm³ (170 cm³ en vidange)
Contenance du réservoir de
carburant
6,5 l
Fusible
10 A*2 et 15 A*1 et 20 A*1
Bougie d'allumage
CR7HSA
Capacité de la batterie
12 V 6 Ah (batterie fermée sans entretien)
Filtre à air
Type papier
Page 56

56
Modèle
XA12W4-EU (Fiddle Ⅲ 125i cm3)
Élément
Spécifications
Longueur
1900 mm
Largeur
690 mm
Hauteur
1355 mm
Empattement
1330 mm
Poids net
117 kg (Avant : 44 kg Arrière : 73 kg)
Modèle
Moteur monocylindre, 4 temps, refroidi par air forcé
Carburant
Sans plomb
Cylindrée
124,6 cm3
Taux de compression
10,6±0,2/1
Puissance nette maximale
7,5 kW/8500 tr/min
Couple net maximal
9,2 Nm/7000 tr/min
Jeu des soupapes : ADM/ÉCH
0,12~0,12 mm
Modes de démarrage
Démarreur électrique
Amortisseur avant
Fourche télescopique
Amortisseur arrière
Bras oscillant
Transmission
C.V.T.
Pneu avant
110/70-12
Pneu arrière
120/70-12
Type de jante
Aluminium
Pression de gonflage des pneus
Avant : STD 2,00 kg/cm2,
Arrière : STD 2 kg/cm2 pour 1 personne, 2,25 kg/cm2 pour 2 personnes
Frein avant
À disque (Ø 226 mm)
Frein arrière
À tambour (Ø 110 mm)
Projecteur (feu de route, feu de
croisement)
12 V, 35/35 W
Feu de position avant
LED 12 V
Clignotant avant / arrière
12 V 10 WX2
Feu de position arrière/feu stop
12 V 5 W /12 V 21 W
Éclairage de plaque
d'immatriculation arrière
12 V 5 W
Contenance en huile moteur
0,95 l (0,8 l en vidange)
Contenance en huile de
transmission
180 cm³ (170 cm³ en vidange)
Contenance du réservoir de
carburant
6,5 l
Fusible
10 A*2 et 15 A*1 et 20 A*1
Bougie d'allumage
CR7HSA
Capacité de la batterie
12 V 6 Ah (batterie fermée sans entretien)
Filtre à air
Type papier
Page 57

57
Modèle
XA20W2-EU XA20W3-EU (Fiddle Ⅲ 200i cm3)
Élément
Spécifications
Longueur
1900 mm
Largeur
690 mm
Hauteur
1140 mm
Empattement
1330 mm
Poids net
121 kg (Avant : 45 kg Arrière : 76 kg)
Modèle
Moteur monocylindre, 4 temps, refroidi par air forcé
Carburant
Sans plomb
Cylindrée
168,9 cm3
Taux de compression
10,16±0,2/1
Puissance nette maximale
8,8 kW/8000 tr/min
Couple net maximal
13 Nm/6000 tr/min
Jeu des soupapes : ADM/ÉCH
0,12~0,12 mm
Modes de démarrage
Démarreur électrique
Amortisseur avant
Fourche télescopique
Amortisseur arrière
Bras oscillant
Embrayage
Automatique de type centrifuge
Transmission
C.V.T.
Pneu avant
110/70-12
Pneu arrière
120/70-12
Type de jante
Aluminium
Pression de gonflage des pneus
Avant : STD 2,00 kg/cm2,
Arrière : STD 2 kg/cm2 pour 1 personne, 2,25 kg/cm2 pour 2 personnes
Frein avant
À disque (Ø 190/226 mm)
Frein arrière
À disque (Ø 220 mm)
Projecteur (feu de route, feu de
croisement)
12 V, 35/35 W
Feu de position avant
LED 12 V
Clignotant avant / arrière
12 V 10 W
Feu de position arrière/feu stop
12 V 5 W /12 V 21 W
Éclairage de plaque
d'immatriculation arrière
12 V 5 W
Contenance en huile moteur
0,95 l (0,8 l en vidange)
Contenance en huile de
transmission
180 cm³ (170 cm³ en vidange)
Contenance du réservoir de
carburant
6,5 l
Fusible
10 A*2 et 15 A*1 et 20 A*1
Bougie d'allumage
CR7HSA
Capacité de la batterie
12 V 6 Ah (batterie fermée sans entretien)
Filtre à air
Type papier
Page 58

58
Modèle
XA12W5-EU
Élément
Spécifications
Longueur
1900 mm
Largeur
690 mm
Hauteur
1355 mm
Empattement
1330 mm
Poids net
117 kg (Avant : 44 kg Arrière : 73 kg)
Modèle
Moteur monocylindre, 4 temps, refroidi par air forcé
Carburant
Sans plomb
Cylindrée
124,6 cm3
Taux de compression
10,6±0,2/1
Puissance nette maximale
7,5 kW/8500 tr/min
Couple net maximal
9,2 Nm/7000 tr/min
Jeu des soupapes : ADM/ÉCH
0,12~0,12 mm
Modes de démarrage
Démarreur électrique
Amortisseur avant
Fourche télescopique
Amortisseur arrière
Bras oscillant
Transmission
C.V.T.
Pneu avant
110/70-12
Pneu arrière
120/70-12
Type de jante
Aluminium
Pression de gonflage des pneus
Avant : STD 2,00 kg/cm2,
Arrière : STD 2 kg/cm2 pour 1 personne, 2,25 kg/cm2 pour 2 personnes
Frein avant
À disque (Ø 226 mm)
Frein arrière
À tambour (Ø 110 mm)
Projecteur (feu de route, feu de
croisement)
12 V, 35/35 W
Feu de position avant
LED 12 V
Clignotant avant / arrière
12 V 10 W
Feu de position arrière/feu stop
12 V 5 W /12 V 21 W
Éclairage de plaque
d'immatriculation arrière
12 V 5 W
Contenance en huile moteur
0,95 l (0,8 l en vidange)
Contenance en huile de
transmission
180 cm³ (170 cm³ en vidange)
Contenance du réservoir de
carburant
6,5 l
Fusible
10 A*2 et 15 A*1 et 20 A*1
Bougie d'allumage
CR7HSA
Capacité de la batterie
12 V 6 Ah (batterie fermée sans entretien)
Filtre à air
Type papier
Page 59

59
1. INHALT
1. Inhalt ..................................................................................................................... 59
2. Lage der Bedienelemente ................................................................ ....................... 61
3. Vor dem Fahren ..................................................................................................... 62
4. Sicheres Fahren ..................................................................................................... 62
5. Fahren ................................................................................................................... 63
6. Nur Originalersatzteile verwenden .......................................................................... 63
7. Verwendung der einzelnen Komponenten ............................................................... 64
Anzeigen ................................................................................................................ 64
Betätigung des Zündschlüssels ................................ .............................................. 65
Lenkschloss aktivieren ........................................................................................... 65
Sitz öffnen .............................................................................................................. 65
Verschiedene Bedienknöpfe ................................................................................... 66
Staufach ................................................................................................................ 67
Haken für Schutzhelm ............................................................................................ 67
Kraftstofftankdeckel ............................................................................................... 68
Bremse .................................................................................................................. 68
8. Wichtige Punkte und Vorsichtsmaßnahmen beim Starten des Motors ..................... 69
9. Beste Methode zum Losfahren ............................................................................... 70
Betätigung des Gasdrehgriffs ................................................................................. 70
Parken ................................................................................................................... 70
10. Inspektions- und Wartungsmaßnahmen vor dem Fahren ....................................... 71
Routinekontrolle ..................................................................................................... 71
Kontrolle und Wechsel des Motoröls ...................................................................... 71
Kontrolle des Kraftstoffstands ................................................................................. 72
Kontrolle und Wechsel des Getriebeöls .................................................................. 72
Prüfung und Einstellung des Spiels der Bremse ...................................................... 73
Prüfung der Scheibenbremse (je nach Modell) ........................................................ 73
Einstellung des Spiels des Gasgriffs ....................................................................... 74
Kontrolle und Wartung der Batterie ........................................................................ 74
Prüfung der Reifen ................................................................................................. 76
Kontrolle der vorderen Stoßdämpfer ....................................................................... 76
Prüfen und Wechseln der Sicherungen ................................................................... 77
Überprüfung der Blinker und der Hupe .................................................................... 77
Überprüfung des Frontscheinwerfers und des Rücklichts ........................................ 77
Überprüfung der Bremsleuchte ............................................................................... 77
Page 60

60
1. INHALT
Prüfung auf Kraftstofflecks ..................................................................................... 78
Überprüfung der Schmierung der verschiedenen Gelenke ....................................... 78
Überprüfung der Zündkerze .................................................................................... 78
Überprüfung des Luftfilters ..................................................................................... 78
11. Störungen oder Probleme ...................................................................................... 79
Diagnose bei Startschwierigkeiten des Motors ........................................................ 79
12. Empfehlungen zum verwendeten Kraftstoff ............................................................. 79
13. Getriebeöl .............................................................................................................. 79
14. Vorsichtsmaßnahmen beim Fahren des Rollers ...................................................... 80
ABS-Bremssystem ................................................................................................. 81
15. Regelmäßige Wartungsmaßnahmen ...................................................................... 82
16. Technische Daten .................................................................................................. 83
Page 61

61
2. LAGE DER BEDIENELEMENTE
Modell: XA05W4-EU/NL(Fiddle Ⅲ 50i CC)
XA12W2-EU XA12W3-EU (Fiddle Ⅲ 125i CC)
XA20W2-EU XA20W3-EU (Fiddle Ⅲ 200i CC)
Kraftstofftankdeckel
Starterschalter
Fern- und Abblendlicht /
Schalter für Blinker / Sitz
Öffnen / Hupe
Frontscheinwerfer
Motornummer
VorderradBremshebel
Rück-/
Bremslicht
Batterie
Luftfilter
Ölstand
Vorderrad-Blinker/
Positionsleuchte
Haken für Schutzhelm
Staufach
Seitenständer
Zündschlüssel
Hintere
Blinkleuchte
Startsperre-Schalter
HinterradBremshebel
Auspuff
Hauptständer
Rahmennummer
Sicherungen
Page 62

62
3. VOR DEM FAHREN
Die vorliegende Anleitung beschreibt die richtige Verwendung dieses Rollers, einschließlich Empfehlungen
für sicheres Fahren, einfachen Kontrollmethoden und anderem.
Lesen Sie diese Anleitung bitte aufmerksam durch, um alle Möglichkeiten dieses Fahrzeugs für
angenehmeres und sichereres Fahren nutzen zu können.
Sollten die technischen Daten und Konstruktionsmerkmale des Rollers geändert worden sein und
von den Abbildungen und Schaubildern der Bedienungsanleitung und Kataloge abweichen, so
gelten die technischen Daten und die Bauart des aktuellen Rollers.
4. SICHERES FAHREN
Es ist sehr wichtig beim Fahren entspannt und richtig gekleidet zu sein, alle Verkehrsregeln zu beachten,
nicht zu rasen und Vorsicht walten zu lassen.
Anfangs fahren die meisten Leute ihren neu gekauften Roller mit großer Vorsicht, sobald sie sich jedoch
an ihn gewöhnt haben, neigen sie zu Fahrlässigkeit, was dann zu Unfällen führen kann.
Warnung!!
Darauf achten, dass sich ein Beifahrer nicht am Auspuff verbrennt. Sicherstellen, dass der
Beifahrer immer beide Füße auf den Fußrasten abstellt.
Der Auspuff ist nach der Fahrt extrem heiß. Dies beachten, um Verbrennungen bei Kontrollen oder
Wartungsarbeiten zu vermeiden.
Den Roller immer so abstellen, dass sich niemand an dem, nach dem Fahren erhitzten Auspuff
verbrennen kann.
Wir danken Ihnen für den Kauf eines Fahrzeugs unseres Angebots.
Um alle Leistungsmöglichkeiten dieses Rollers voll nutzen zu können, ist es angebracht, alle
vorgeschriebenen regelmäßigen Kontroll- und Wartungsmaßnahmen komplett auszuführen.
Wir empfehlen, nachdem Sie die ersten 300 km mit dem Roller zurückgelegt haben, diesen dem
Händler, bei dem Sie ihn gekauft haben, zu einer Anfangskontrolle zurückzubringen und ihn danach
regelmäßig alle 1000 km überprüfen zu lassen.
Folgendes nie vergessen:
Beim Fahren eines Rollers immer einen Helm mit richtig festgezogenem Kinnriemen tragen.
Offene oder weite Kleidungsstücke können im Wind flattern, sich im Lenker verfangen und somit
die Fahrsicherheit beeinträchtigen.
Es sollten deshalb immer, besonders an den Armen, enganliegende Kleidungsstücke getragen
werden.
Den Lenker beim Fahren immer mit beiden Händen festhalten. Nie einhändig fahren.
Geschwindigkeitsbegrenzungen einhalten.
Geeignete Schuhe mit niedrigen Absätzen tragen.
Die im Wartungsplan vorgeschriebenen Wartungs- und Kontrollmaßnahmen durchführen.
Lasse Sie sich bitte die Bedienungsanleitung von Ihrem SANYANG-Händler aushändigen und lesen Sie
bitte folgende Abschnitte besonders aufmerksam durch:
Richtige Verwendung des Rollers.
Kontrolle und Wartung vor der Auslieferung.
VORSICHT:
Am Roller vorgenommene Änderungen beeinträchtigen dessen Struktur und Leistung, wirken sich
nachteilig auf die Arbeitsweise des Motors aus oder verstärken Auspuffgeräusche, wodurch letztlich
die Lebensdauer des Rollers verkürzt wird.
Zudem sind Änderungen rechtswidrig und widersprechen dem ursprüngliche Design und den
technischen Daten.
Für einen geänderten Roller treten die Garantiebestimmungen außer Kraft, weshalb der Roller in
keiner Weise absichtlich geändert werden sollte.
Page 63

63
5.
FAHREN
Zum Fahren wichtige Körperteile, wie Arme, Handflächen, Lenden und Fußspitzen locker
und entspannt halten und in bequemster Haltung fahren, um jederzeit, falls notwendig
schnell reagieren zu können.
Die Haltung des Fahrers ist für die Fahrsicherheit ausschlaggebend. Den Körperschwerpunkt
immer in der Sitzmitte bewahren, verschiebt er sich auf dem Sitz nach hinten, so wird das
Vorderrad weniger belastet und der Lenker neigt zum Flattern. Das Fahren eines Rollers mit
unstabilem Lenker ist gefährlich.
Kurven fahren sich wesentlich leichter, wenn sich der Fahrer nach innen neigt. Der Fahrer fühlt sich
unsicher, wenn sich sein Körper und der Roller in einer Kurve nicht neigen.
Auf einer unebenen, unbefestigten Straße ist der Roller schwer zu kontrollieren, weshalb man sich
besser im voraus über die Straßenzustände informieren sollte. Bei schlechten Straßen langsam
fahren und versuchen den Lenker aus den Schultern zu handhaben.
Empfehlung: Keine Gegenstände auf dem Lenker transportieren, da dies die Fahrsicherheit und die
Handhabung des Lenkers beeinträchtigt.
6.
NUR ORIGINALERSATZTEILE VERWENDEN
Der Roller kann seine beste Leistungsstärke nur bewahren, wenn Qualität, Material und
Bearbeitungspräzision seiner Teile den Designanforderungen entsprechen. „SYM Originalersatzteile”
wurden aus den gleichen Materialien hoher Qualität gefertigt, wie die im Roller ursprünglich verbauten
Teile. Es werden nur Teile verkauft, für welche mittels anspruchsvoller Fertigungsmethoden und
strenger Qualitätskontrolle sichergestellt wurde, dass sie den technischen Daten des ursprünglichen
Designs entsprechen. Müssen Teile ausgetauscht werden, so sind deshalb nur „SYM
Originalersatzteile” von “zugelassenen SYM-Händlern oder SYM-Vertragshändlern” zu erwerben.
Beim Kauf billiger oder nachgemachter im Handel erhältlicher Teile ist weder die Qualität, noch die
Haltbarkeit gewährleistet. Auch können sich unerwartete Störungen ergeben oder die Leistungsfähigkeit
des Rollers kann gemindert werden.
Immer SYM Originalersatzteile verwenden, um den Roller unverfälscht zu bewahren und ihm
lange Lebensdauer zu sichern.
VORSICHT:
Eine mitgeführte Last ändert das Lenkgefühl.
Zu starke Beladung kann den Lenker zum Schwingen bringen und sich auf die Fahrsicherheit auswirken.
Den Roller deshalb nicht überladen.
VORSICHT:
Zur Vermeidung jeglicher Brandgefahr keine brennbaren Materialien (z.B. Lappen) zwischen
Seitenverkleidung und Motor lassen.
Keine Gegenstände an Stellen laden, die nicht hierfür vorgesehen sind, da dies den Roller
schädigen könnte.
EMPFEHLUNG
Zur Optimierung der Leistung des Rollers und zur Verlängerung seiner Einsatzdauer:
Der erste Monat oder die ersten 1000 km sind als Einfahrzeit für den Motor und andere Komponenten zu
betrachten.
Während dieses Zeitraums sollte nur mit Geschwindigkeiten unter 60 km/h gefahren werden und schnelle
Page 64

64
VORSICHT:
Keine Kunststoffteile, wie die Abdeckung der Anzeigen, den Frontscheinwerfer usw. mit Lösungsmitteln
(z.B. Benzin) abwischen, da diese sonst beschädigt werden können.
Der hier abgebildete Tachometer kann bei den verschiedenen Modellen von anderer Form sein,
befindet sich jedoch normalerweise an der gleichen Stelle.
7.
VERWENDUNG DER EINZELNEN KOMPONENTEN
(Das Folgende gilt für den grundlegenden Betrieb mit dem luftgekühlten
4-Takt-Einzylindermotor, 50/125/200 ccm, von SYM. Bei verschiedenen einzelnen
Modellen sind Abweichungen möglich. Sehen Sie hierzu bitte am Ende dieser
Anleitung.)
§ANZEIGEN§
Tachometer / Drehzahlmesser:
Anzeige der Fahrgeschwindigkeit oder der
Motordrehzahl.
Wegstreckenzähler:
Zeigt die gesamte zurückgelegte
Wegstrecke an.
Fernlicht-Anzeige:
Nach Einschalten des Fernlichts leuchtet
diese Anzeige.
Links-/Rechts-Blinkanzeige:
Je nach eingeschaltetem Blinker blinkt die
rechte oder linke Leuchte.
Kraftstoffanzeige:
Hier wird die im Tank verbliebene
Kraftstoffmenge angezeigt.
Bei auf „OFF“ stehendem Zündschlüssel
steht die Anzeige bei „E“.
Batteriespannung / Uhrzeit:
Anzeige der Batteriespannung oder der Uhrzeit.
Wird bei Normalanzeige die Taste „SET“ während 0,5 Sekunden gedrückt gehalten, so wird
zwischen der Anzeige der Batteriespannung und der Uhrzeit umgeschaltet.
Störungsanzeige:
Bei einer Störung der Motorsteuerung brennt diese Warnleuchte permanent.
Motorölwechsel-Warnlampe:
Diese Leuchte zeigt dem Benutzer die Notwendigkeit eines nach jeweils 1000 zurückgelegten
Kilometern vorzunehmenden Ölwechsels an.
Nach Vornahme des Ölwechsels den Zündschlüssel auf „ON“ stellen und die Taste „SET“ bei
Wegstrecken-Modus während über 2 Sekunden drücken, wonach die Leuchte erlischt.
Kraftstoffstand-Warnlampe:
Diese Leuchte schaltet ein, wenn nur noch wenig Kraftstoff im Tank verbleibt.
Fernlicht-Anzeige
Kraftstoffanzeige
Wegstreckenzähler
RechtsBlinkanzeige
Links-Blinkanzeige
Drehzahlmesser /
Tachometer
Batteriespannung /
Uhrzeit
ABS-Anzeige
Störungsanzeige
MotorölwechselWarnlampe
KraftstoffstandWarnlampe
Page 65

65
ABS-Anzeige: (Modell mit ABS)
Normalerweise schaltet die Leuchte des ABS-Bremssystems ein, wenn der Zündschlüssel auf
„ON“ gestellt wird, und sie erlischt kurz nach Anfahren des Rollers.
Normalerweise schaltet die Leuchte des ABS-Bremssystems ein, wenn der Zündschlüssel auf
„ON“ gestellt wird, und sie erlischt kurz nach Anfahren des Rollers. Arbeitet das ABS normal, so bleibt
danach die Anzeige erloschen. Ist das ABS-Bremssystem nicht in Ordnung, so schaltet die Leuchte ein
und bleibt eingeschaltet. Bei eingeschalteter Leuchte funktioniert das ABS nicht, wobei jedoch das
hergebrachte Bremssystem weiterhin normal arbeitet.
1. Taste „S“:
Durch Drücken der Taste „S“ während 1 bis 2 Sekunden kann zur Anzeige der Spannung
umgeschaltet werden. Nach ungefähr 1 Minute erfolgt automatisch Rückkehr zur Anzeige der Zeit.
Kurzes Drücken der Taste „S“ bewirkt sofortige Rückkehr zur Zeitanzeige.
2. Taste „M“:
a. Nach längerem Drücken auf „M“ wird zur Uhrzeiteinstellung umgeschaltet und die Stundenanzeige
beginnt zu blinken. Nun kann mittels der Taste „S“ die Stundenzahl eingestellt werden. Durch kurzes
Drücken auf „M“ erfolgt Übergang zur Einstellung der Minuten. Hierbei blinkt die Minutenzahl. Durch
kurzes Drücken auf „S“ wird die Minutenzahl erhöht. Wird „S“ gedrückt gehalten, so nimmt die Zahl der
Minuten kontinuierlich zu.
b. Nach Einstellung der richtigen Zeit kann die Zeiteinstellung durch längeres Drücken auf
„M“ verlassen werden. Sie wird auch automatisch verlassen, wenn während 1 bis 2 Minuten nichts
getan wird.
§BETÄTIGUNG DES ZÜNDSCHLÜSSELS§
Position „ON“
In dieser Position kann der Motor gestartet werden.
Ein Abziehen des Zündschlüssels ist nicht möglich.
Position „OFF“:
In dieser Position ist der Motor abgestellt und kann
nicht gestartet werden.
Der Zündschlüssel kann abgezogen werden.
§LENKSCHLOSS AKTIVIEREN§
Position „Lenkschloss aktiviert“
Den Lenker nach links drehen, den Zündschlüssel
einführen und nach rechts drücken und dann leicht
nach links in Sperrposition drehen.
In dieser Position ist das Lenkschloss eingerastet.
Der Zündschlüssel kann abgezogen werden.
Zum Entriegeln einfach den Schlüssel von Position
„LOCK“ auf Position „OFF“ drehen.
§SITZ ÖFFNEN§
Den Zündschlüssel einführen.
Den Zündschalter im Gegenuhrzeigersinn auf Position „Sitz öffnen“ drehen.
Hierauf öffnet der Sitz.
VORSICHT:
Den Zündschlüssel auf keinen Fall bei fahrendem Roller betätigen. Wird der Zündschlüssel auf
„OFF“ oder „LOCK“ gedreht, so nimmt dies die elektrische Anlage außer Betrieb, was einen
gefährlichen Unfall verursachen kann. Am Zündschalter darf erst nach vollständigem Halt des
Rollers abgeschaltet werden.
Vor Verlassen des Rollers und nach Verriegeln des Lenkschlosses immer den Zündschlüssel
abziehen und mitnehmen.
Bleibt der Zündschlüssel nach Abstellen des Motors lange in Position „ON“, so wird hierdurch die
Batterie entladen, was das Starten des Motors beeinträchtigen kann.
Nicht vergessen vor dem Verriegeln des Sitzes den Schlüssel weg- und mitzunehmen.
ZÜNDSCHLÜSSEL
VORSICHT:
Nicht vergessen vor
dem Verriegeln des
Sitzes den Schlüssel
weg- und mitzunehmen.
Page 66

66
§VERWENDUNG DER TASTEN§
Motor-Starterknopf
Dieser Knopf dient zum Starten des Motors.
Mit dem Zündschlüssel auf „ON“ diesen Knopf drücken und dabei gleichzeitig den Vorderoder Hinterradbremshebel betätigen, worauf der Motor startet.
Fern-/Abblendlicht-Umschalter
Hier wird zwischen Fern- und Abblendlicht umgeschaltet. Hier drücken, um zwischen Fern- und
Abblendlicht umzuschalten.
Hier wird auf Fernlicht geschaltet.
Hier wird auf Abblendlicht geschaltet (Im Stadtverkehr bitte mit Abblendlicht fahren.)
Sitz öffnen
Den Zündschlüssel zu Position „ON“ drehen und diesen Knopf drücken. Hierauf öffnet der
Sitz.
Dieser Knopf kehrt nach seiner Freigabe in
seine Ausgangsposition zurück.
Den Sitz nach unten drücken, wonach er
automatisch einrastet.
Nach dem Einrasten des Sitzes diesen leicht
nach oben ziehen, um sicherzustellen, dass er
richtig verschlossen ist.
VORSICHT:
Den Knopf nach dem Starten des Motors sofort loslassen und ihn keinesfalls erneut drücken, da
dies den Motor schädigen kann.
Dieses Verfahren wurde aus Sicherheitsgründen so ausgelegt. Der Motor kann nur bei Halten des
Vorder- oder Hinterrad-Bremshebels gestartet werden.
Dabei die Beleuchtung ausgeschaltet lassen. Beim Starten des Motors die Frontscheinwerfer und
Blinkleuchten abgeschaltet lassen.
Sitz öffnen
VORSICHT:
Nicht vergessen nach Schließen des Sitzes
den Schlüssel abzuziehen.
Nach dem Entriegeln den Schlüssel nicht in
das Staufach legen, um sicherzustellen,
dass er beim Zudrücken des Sitzes nicht
eingeschlossen wird.
Blinkerschalter
Schalter der Hupe
Fern-/AbblendlichtUmschalter
Sitz öffnen
Motor-Starterknopf
Page 67

67
Startsperre-Schalter
Dieser Schalter befindet sich unter dem Sitz.
Position „ON“ In dieser Position ist der Motor abgestellt und
kann nicht gestartet werden.
Position „OFF“: Bei Zündschlüssel in Position „ON“ und
Startsperre-Schalter in Position „OFF“ kann der
Motor bei Halten des Vorder- oder
Hinterrad-Bremshebels mit dem
Motor-Elektrostarterknopf gestartet werden.
Schalter der Hupe
Bei Drücken dieses Knopfs (bei Zündschlüssel auf „ON“) ertönt die Hupe.
Blinkerschalter
Der Blinker wird zum Abbiegen nach rechts und links, sowie zur Anzeige eines Fahrbahnwechsels
verwendet.
Bei Zündschlüssel in Position „ON“ den Blinkerschalter nach links oder rechts schieben. Dies lässt die
jeweiligen Blinklichter blinken.
Zum Abschalten ist der Blinkerschalter wieder in die Ausgangsposition zu schieben.
Ein links blinkendes Licht zeigt die Absicht zum Linksabbiegen an.
Ein rechts blinkendes Licht zeigt die Absicht zum Rechtsabbiegen an.
§STAUFACH§
Das Fach befindet sich unter dem Sitz.
Maximale Belastbarkeit: 10kg.
Keine Wertsachen im Gepäckfach lassen.
Sicherstellen, dass der Sitz beim Herunterdrücken
vollständig einrastet.
Vor dem Waschen alle Gegenstände aus dem
Gepäckfach nehmen, damit sie nicht nass werden.
Keine wärmeempfindliche Gegenstände im
Gepäckfach verstauen, da in ihm wegen der vom
Motor abgegebenen Wärme die Temperatur ansteigt.
§HAKEN FÜR SCHUTZHELM§
Nach Anhalten des Rollers den Schutzhelm mit
seinem Kinnriemen an diesen Haken hängen.
§KRAFTSTOFFTANKDECKEL§
VORSICHT:
Nicht mit am Haken hängendem Schutzhelm
fahren, da dies den Roller schädigen könnte
und der Helm seine Schutzfunktion nicht mehr
erfüllt.
Startsperre-Schalter
Staufach
Haken
Page 68

68
1. Den Zündschlüssel in das Sitzschloss einführen und den Sitz öffnen, dann den
Kraftstofftankdeckel im Gegenuhrzeigersinn drehen und den Deckel abnehmen.
2. Beim Nachtanken nicht über die obere Füllstandsgrenze hinaus füllen.
3. Die Markierung “△” am Tankdeckel auf die gleiche Markierung am Tank ausrichten, ihn im
Uhrzeigersinn festdrehen und dann den Sitz verschließen.
§BREMSE§
Zur Betätigung der Vorderradbremse den linken Bremshebel anziehen.
Zur gleichzeitigen Betätigung von Vorder- und Hinterradbremse den linken Bremshebel anziehen
(Modell mit CBS).
Zur Betätigung der Hinterradbremse den linken Bremshebel anziehen (ABS-Modell).
Unnötiges plötzliches Bremsen vermeiden.
Beim Bremsen die Vorder- und Hinterradbremse gleichzeitig betätigen.
Längeres fortgesetztes Bremsen vermeiden, da dies die Bremsen überhitzen und ihre Wirksamkeit
beeinträchtigen kann.
Bei Regenwetter oder rutschigen Straßen langsam fahren und früh bremsen. Schlagartiges
Bremsen vermeiden, da dies zu Schleudern und Stürzen führen kann.
Bei alleiniger Verwendung der Vorder- oder Hinterradbremse besteht erhöhte Sturzgefahr, da der
Roller dann dazu neigt zur Seite zu ziehen.
Auch bei Ausrüstung mit einem ABS-System kann ein Wegrutschen beim Bremsen in einer Kurve
nicht unbedingt verhindert werden. Beim Durchfahren einer Kurve ist es besser beide Bremsen nur
leicht oder überhaupt nicht zu betätigen. Die Geschwindigkeit ist vor dem Einfahren in eine Kurve
zu reduzieren.
《Motorbremse》
Den Gasgriff ganz zurückdrehen und somit die Motorbremse anwenden.
Beim Abwärtsfahren auf einer langen oder steilen Gefällstrecke sollten Vorder- und Hinterradbremse
abwechselnd verwendet werden.
VORSICHT:
Beim Tanken sollte der Roller auf seinem Hauptständer stehen und es ist darauf zu achten, dass
sich keine Zündquellen oder offene Flammen in der Nähe befinden.
Beim Nachtanken nicht über die obere Füllstandsgrenze hinaus füllen. Ist der Tank zu voll, so
kommt es zum Austritt von Kraftstoff durch ein Loch im Kraftstofftankdeckel. Dies könnte die
Lackierung beschädigen oder gar einen Brand verursachen.
Nach dem Tanken darauf achten, den Kraftstofftankdeckel richtig zu schließen.
Für Vorderrad
Für Vorderrad
Für Vorderrad und
Hinterrad
Für Hinterrad
ABS-Modell
CBS Modell
Page 69

69
8. WICHTIGE PUNKTE UND VORSICHTSMASSNAHMEN ZUM STARTEN DES
MOTORS
1. Den Zündschlüssel auf Position „ON“ drehen.
2. Die Hinterrad-Bremse anlegen (Hebel oder Pedal).
3. Nicht beschleunigen, bei angelegter Bremse den Starterknopf betätigen.
[Wir sorgen uns um Sie! Vor dem Abfahren die Hinterradbremse angelegt lassen.]
VORSICHT:
Kann der Motor nach 3 bis 5 maliger Betätigung des Kickstarters nicht gestartet werden, den
Gasgriff um 1/8 bis 1/4 Drehung drehen und den Kickstarter erneut betätigen.
Um jegliche Beschädigung des Startermotors zu vermeiden, den Starterknopf nicht länger als 15
Sekunden gedrückt halten.
Springt der Motor nach 15 Sekunden Drücken des Starterknopfs immer noch nicht an, vor einem
weiteren Versuch 10 Sekunden warten.
Das Starten des Motors ist schwieriger, wenn der Roller längere Zeit stillgestanden ist oder ein
leergefahrener Tank neu gefüllt wurde In einem solchen Fall ist der Starterknopf mehrmals zu
betätigen und der Gasgriff beim Anlassen des Motors geschlossen zu halten.
Bei einem Kaltstart kann das Aufwärmen des Motors mehrere Minuten dauern.
Die Auspuffgase haben giftige Bestandteile (CO), weshalb der Motor immer an einem gut
gelüfteten Ort gestartet werden sollte.
VORSICHT:
Vor dem Starten des Motors den richtigen Füllstand von Motoröl und Kraftstoff prüfen.
Zum Starten des Motors muss der Roller auf seinem Hauptständer stehen und die
Hinterradbremse angelegt sein, so dass er nicht plötzlich nach vorn schießen kann.
1/4
1/8
Page 70

70
9. BESTE METHODE ZUM LOSFAHREN
Vor dem Wegfahren vom Parkplatz immer den Blinker betätigen und darauf achten, dass kein
Fahrzeug von hinten kommt. Dann wegfahren.
§BETÄTIGUNG DES GASDREHGRIFFS §
Beschleunigung: Zum Erhöhen der Geschwindigkeit. Beim Befahren einer Steigung den Gasgriff
langsam hochdrehen, um es dem Motor zu ermöglichen seine gesamte Kraft zu entfalten.
Verlangsamen: Zum Senken der Geschwindigkeit.
§PARKEN§
Beim Heranfahren an den Parkplatz:
1. Den Blinker frühzeitig einschalten und auf alle voran- oder hinterherfahrenden, rechts oder links
befindlichen Fahrzeuge achten. Dann die innere Fahrbahn nehmen und langsam heranfahren.
2. Den Gasgriff zur Ausgangsstellung zurückdrehen und rechtzeitig die Bremse betätigen. (Die Fahrer
nachfolgender Fahrzeuge werden durch Einschalten der Bremsleuchte gewarnt.)
Nach vollkommenem Halt:
3. Den Blinkerschalter in Neutralposition zurückschieben und den Zündschlüssel zum Abschalten des
Motors auf „OFF“ stellen.
4. Bei abgestelltem Motor zur linken Seite vom Roller steigen, einen ebenen Abstellplatz suchen, an
dem er den Verkehr nicht stört, und dort seinen Hauptständer nach unten klappen.
5. Hierzu mit der linken Hand den Lenker und mit der rechten das vordere Ende des Sitzes oder den
Haltegriff links unten am Sitz ergreifen.
6. Mit dem rechten Fuß gegen den Hauptständer drücken und diesen fest auf dem Boden aufsetzen.
Folgendes nie vergessen: Nach dem Parken zur Verhinderung eines Diebstahls das Lenkschloss
schließen und den Schlüssel abziehen.
VORSICHT:
Den Roller an einem sicheren Ort parken, an dem er den Verkehr nicht stört.
Gas wegnehmen
Beschleunigen
Page 71

71
10. INSPEKTIONS- UND WARTUNGSMASSNAHMEN VOR DEM FAHREN
(Beziehen Sie sich bitte zur Lage der folgenden Komponenten auf die Übersichtszeichnung des Rollers.)
§ROUTINEKONTROLLE§
Zu prüfende Elemente
Bei der Prüfung beachten
Motoröl
Ausreichender Füllstand
Kraftstoff
Ausreichende Menge 90 Oktan oder mehr
Bremse
Vorderrad
Zustand der Bremse
(Spiel des Bremshebels: 10 - 20mm)
Hinterrad
Zustand der Bremse
(Spiel des Bremshebels: 10 - 20mm)
Reifen
Vorderrad
Reifendruck
(Standard: 1,75 kg/cm2)
Hinterrad
Reifendruck
(Standard: 2,0 kg/cm2 für 1 Person, 2,25 kg/cm2 für 2 Personen)
Lenker
Ungewöhnliche Vibrationen oder schwer drehbar
Tachometer, Beleuchtung und
Rückspiegel
Richtige Funktionsweise
Schalten Lichter ein? Von hinten gut sichtbar?
Fester Sitz der wesentlichen
Komponenten
Lose Schrauben oder Muttern
Störungen
Treten bereits behobene Störungen erneut auf?
§KONTROLLE UND WECHSEL DES MOTORÖLS§
PRÜFUNG:
1. Den Roller auf seinem Hauptständer auf ebenem
Boden abstellen. 3 bis 5 Minuten nach Abschalten
des Motors den Ölmessstab herausziehen. Den
Ölmessstab abwischen und erneut in sein
Führungsrohr stecken (ihn nicht drehen).
2. Den Ölmessstab herausziehen und sicherstellen,
dass der Ölstand zwischen den Markierungen für
Ober- und Untergrenze liegt.
Nähert sich der Ölstand der Untergrenze, bis zur
Obergrenze nachfüllen. (Zylinder, Kurbelgehäuse
usw. auf Lecks absuchen)
VORSICHT:
Bei der Routinekontrolle festgestellte Probleme sollten vor erneuter Verwendung des Rollers
behoben werden. Gegebenenfalls ist der Roller vom „SYM-Händler oder zugelassenen
Kundendienstpersonal“ reparieren zu lassen.
Page 72

72
ÖLWECHSEL:
Das Motoröl zum ersten Mal nach 300km wechseln und
danach alle 1000km.
Zur Bewahrung maximalen Leistungsvermögens des
Motors sollte der Ölstand alle 500 km geprüft werden. Bei
zu niedrigem Ölstand bis zur Obergrenze Öl nachfüllen.
Motoröl: Ein Öl nach API SH/CD der Viskoseklasse SAE
10W-30 oder ein besseres Motoröl verwenden. Bei
Verwendung schlechteren Öls geht der Anspruch auf
Garantie verloren.
※ Empfohlenes Öl: SYM Genuine 4X OIL.
Öl-Füllmenge: 50 ccm: 0,80 Liter (0,70 Liter beim
planmäßigen Ölwechsel)
125 ccm: 0,95 Liter (0,8 Liter beim planmäßigen
Ölwechsel).
【Reinigung des Ölfilters】
Den Deckel der Filtereinheit abschrauben und das Filtersieb
entnehmen. Jegliche Verschmutzungen aus dem Filtersieb
mittels Benzin oder Durchblasen von Druckluft entfernen.
§KONTROLLE DES KRAFTSTOFFSTANDS§
Den Zündschlüssel auf "ON" drehen und die Kraftstoffanzeige ablesen, um sicherzustellen, dass
noch ausreichend Kraftstoff im Tank ist.
Der Motor dieses Rollers ist für Betrieb mit unverbleitem Kraftstoff von 90 Oktan oder mehr
ausgelegt.
Den Roller mit abgeschaltetem Motor fest auf seinem Hauptständer abstellen und beim Tanken
darauf achten, dass sich keine Zündquellen oder offene Flammen in der Nähe befinden.
Beim Nachtanken nicht über die obere Füllstandsgrenze hinaus füllen.
Nach dem Tanken darauf achten, den Kraftstofftankdeckel richtig zu schließen.
§KONTROLLE UND WECHSEL DES GETRIEBEÖLS§
PRÜFUNG:
Den Roller mit abgeschaltetem Motor fest auf seinem Hauptständer abstellen und 3 - 5 Minuten
abwarten. Die Schraube der Getriebeöleinfüllöffnung herausdrehen, dann ein Messglas unter die
Ablassschraube stellen und die Ablassschraube entfernen. Das Öl in das Messglas fließen lassen
und die Füllmenge prüfen. 50 ccm: (Bei Zerlegen: 110 ccm / bei Ölwechsel: 100 ccm). 125 ccm:
(Beim Zerlegen: 180 ccm / bei Ölwechsel: 170 ccm).
GETRIEBEÖLWECHSEL:
Den Roller mit abgeschaltetem Motor auf ebenem Boden fest auf seinem Hauptständer abstellen. Die
Schraube der Einfüllöffnung und die Ablassschraube entfernen und das Öl auslaufen lassen.
Die Ablassschraube wieder einschrauben und festziehen. Neues Getriebeöl einfüllen und die
Schraube der Einfüllöffnung eindrehen und festziehen. (Sicherstellen, dass die Schrauben
festgezogen sind und keine Lecks vorliegen.)
Empfohlenes Getriebeöl: SYM-GETRIEBEÖL „SYMOIL“ (SAE 85W-140).
Bei Außentemperaturen unter 0°C ist Öl der Viskoseklasse SAE85-90 zu verwenden.
WARNUNG:
Ist der Roller nicht auf horizontalem Boden abgestellt
oder wird der Messstab sofort nach Abschalten des
Motors geprüft, so kann kein richtiger Wert abgelesen
werden.
Motor und Auspuff bleiben nach dem Abschalten des
Motors noch einige Zeit sehr heiß. Beim Prüfen oder
Wechseln des Motoröls ist deshalb zur Vermeidung von
Verbrennungen mit Umsicht vorzugehen.
Sinkt der Ölstand nach dem Nachfüllen rasch ab,
eventuelle Lecks am Motor beheben und erneut einfüllen.
Das Einfüllen des Öls fern von Funken oder offene
Flammen erzeugenden Vorrichtungen durchführen.
Obergrenze
Untergrenze
Ölfilter
Schraubdeckel
Page 73

73
§PRÜFUNG UND EINSTELLUNG DES SPIELS DER BREMSE§
PRÜFUNG: (Das Spiel des Bremshebels muss bei abgestelltem Motor geprüft werden.)
Spiel von Bremshebel und -pedal der Vorder- und Hinterradbremse.
◆ Der Bremshebel der Vorderradbremse sollte ein Spiel (von Ruhestellung bis Bremsbeginn) von 10 -
20 mm aufweisen. Bei gezogener Bremse darf kein Spiel fühlbar sein.
◆ Das Bremspedal der Hinterradbremse sollte ein Spiel (von Ruhestellung bis Bremsbeginn) von 20 -
30 mm aufweisen. Bei stark gedrücktem Bremspedal darf kein Spiel fühlbar sein.
Einstellung: ﹙Trommelbremse﹚
Die Kerbe der Bremseinstellmutter muss auf den Bolzen ausgerichtet sein. (Siehe nachstehende
Abbildung)
Das Spiel des Hebels von Vorder- und Hinterradbremse an der Einstellmutter des jeweiligen
Bremsarms einstellen.
Nach der Einstellung den Bremshebel mit beiden Händen betätigen bis wirksames Anlegen der
Bremse fühlbar ist.
Das Spiel mit einem Lineal messen.
10 - 20 mm
Hinterrad-Bremshebel
VORSICHT:
Bei einem Spiel von 10 - 20 mm die
Abnutzungsindikatoren an Vorder- und Hinterrad
prüfen. Zeigt der Pfeil auf dem Bremsarm zur
Markierung “△” auf dem Bremsbelag, so ist letzterer
zu stark abgenutzt und muss umgehend ersetzt
werden.
Bolzen
Einstellmutter
Vermindern
des Spiels
Erhöhen
des Spiels
Einstellmutter
Page 74

74
§PRÜFUNG DER SCHEIBENBREMSE§ (für mit Scheibenbremse ausgerüstete Modelle)
Bei einer Sichtkontrolle der Bremse auf Lecks und
Schäden absuchen, mittels eines Schraubenschlüssels
sicherstellen, dass die Bremsschläuche fest
angeschlossen sind. Sollten die Schläuche durch
Bewegungen des Lenkers oder Reiben anderer Teile
beschädigt sein, so ist der Roller sofort einem
SANYANG-Händler zur Durchführung der nötigen
Reparaturarbeiten zu überlassen.
(Lecks, Schäden, lose Bremsschläuche)
(Überprüfung der Bremsbeläge der
Vorderradbremse)
Die Bremsbeläge von der Rückseite des
Bremssattels prüfen. Die Bremsbeläge
müssen erneuert werden, wenn sie bis zur
Verschleißmarkierung abgenutzt sind.
(Füllstand in Bremsflüssigkeitsbehälter
prüfen)
Den Roller auf einem ebenen Boden
abstellen und prüfen, ob die
Bremsflüssigkeit unter der unteren
Füllstandsmarke (LOWER) steht.
Empfohlene Bremsflüssigkeit: WELL RUN
BRAKE OIL (DOT 3).
(Nachfüllen der Bremsflüssigkeit der Vorderradbremse)
1. Die Schrauben lösen und den Deckel des Hauptzylinders
abnehmen.
2. Jeglichen Schmutz und Fremdkörper im Umkreis des
Behälters entfernen, um sicherzustellen, dass kein
Fremdmaterial in den Behälter fällt.
3. Den Membranteller und die Membran entfernen.
4. Bremsflüssigkeit bis zur oberen Füllstandsgrenze
nachfüllen.
5. Den Membranteller und die Membran einsetzen und den
Deckel des Hauptzylinders wieder anbringen.
6. Die Membran richtig gerichtet einsetzen und kein
Fremdmaterial in den Behälter fallen lassen. Den Deckel
des Hauptzylinders wieder gut festschrauben.
VORSICHT:
Langsam mit dem Roller auf trockener Straße
fahren und Vorder- und Hinterradbremse betätigen
und sicherstellen, dass sie richtig funktionieren, so
dass auf optimale Weise sicher gefahren werden
kann. .
Bremsscheibe
Bremssattel
Verschleißrillen
der Bremsbeläge
VORSICHT:
Zur Vermeidung unerwünschter chemischer Reaktionen nur Bremsflüssigkeiten der empfohlenen
Klassen verwenden.
Beim Nachfüllen von Bremsflüssigkeit nicht über die Obergrenze hinaus füllen und keine
Bremsflüssigkeit auf Lackierung oder Kunststoffteile tropfen lassen, welche sie schädigen
könnte.
Hinterrad-Trommelbre
Schraube
Deckel des
Hauptzylinders
Membran
Obere Grenze
Bremsflüssigkeit
Page 75

75
§EINSTELLUNG DES SPIELS DES GASGRIFFS§
Bei richtigem Spiel kann der Gasgriff um 2 bis 6
mm verdreht werden.
Zunächst die Gegenmutter lösen und dann mit der
Einstellmutter einstellen. Nach der Einstellung die
Gegenmutter wieder fest anziehen.
§KONTROLLE UND WARTUNG DER BATTERIE§
Dieser Roller hat eine wartungsfreie Batterie, bei welcher sich ein Überprüfen oder Nachfüllen des
Elektrolyts erübrigt. Sollten irgendwelche Unregelmäßigkeiten festgestellt werden, den Roller von
einem zugelassenen SYM-Händler oder SYM-Vertragshändler überprüfen lassen.
(Reinigen der Batterieanschlüsse)
Die Batterieanschlüsse abnehmen und jeglichen
Schmutz oder Korrosionsspuren entfernen.
Zum Ausbau der Batterie folgendermaßen vorgehen:
Den Zündschlüssel auf „OFF“ drehen und dann
die Schraube des negativen Anschlusskabels
entfernen und das Kabel abnehmen. Dann die
Schraube des positiven Anschlusses und dessen
Kabel abnehmen.
Dieser Roller hat eine wartungsfreie Batterie, bei welcher sich ein Überprüfen oder Nachfüllen des
Elektrolyts erübrigt. Sollten irgendwelche Unregelmäßigkeiten festgestellt werden, den Roller von
einem zugelassenen SYM-Händler oder SYM-Vertragshändler überprüfen lassen.
Zu prüfende Punkte:
1. Den Gaszug prüfen und sicherstellen, dass er sich
von geschlossener zu voll geöffneter Position
ungehindert bewegen kann.
2. Den Lenker von einem Anschlag zum andern
drehen und prüfen, ob dabei der Gaszug berührt
wird.
3. Prüfen, ob die Bewegung des Gaszugs nicht
durch andere Züge oder Leitungen behindert wird.
2 - 6 mm
VORSICHT:
Abnutzungsspuren oder einen weißlichen Staubbelag aufweisende Batteriepole sind mit warmem
Wasser zu reinigen.
Bei stark abgenutzten Polen, die Anschlüsse abklemmen und die angegriffenen Stellen mit einer
Stahlbürste oder Schmirgelpapier reinigen.
Nach der Reinigung die Kabel wieder anschließen und eine dünne Fettschicht auf den
Anschlussstellen auftragen.
Zum Wiedereinbau der Batterie in der umgekehrten Ausbaureihenfolge vorgehen.
Negativ
Positiv
VORSICHT:
Die vorliegende Batterie ist verschlossen. Die Kappen dürfen auf keinen Fall entfernt werden.
Andernfalls besteht das Risiko von Kriechströmen und Entladen an einer längere Zeit unbenutzten
Batterie. Die Batterie vom Roller ausbauen und sie voll geladen an einem gut gelüfteten und
schwach beleuchteten Ort aufbewahren. Muss die Batterie auf dem Roller verbleiben, nur ihr
negatives Kabel abklemmen.
Muss die Batterie ersetzt werden, so ist sie durch eine verschlossene (wartungsfreie) Batterie
gleichen Typs zu ersetzen.
Einstellmutter
Gegenmutter
Page 76

76
§KONTROLLE DER REIFEN§
Reifen sind bei abgeschaltetem Motor zu prüfen und aufzupumpen.
Bei zu großer Aufstandsfläche der Reifen ihren Luftdruck messen und zum vorgeschriebenen
Druck aufpumpen.
Der Luftdruck ist immer am kalten Reifen zu messen.
Bei einer Sichtkontrolle die Lauf- und Seitenflächen
auf Risse und Schäden absuchen.
Überprüfen, dass keine Nägel oder Steinchen in
den Vertiefungen des Profils eingeklemmt sind.
Die Abrieb-Indikatoren begutachten, um zu sehen,
ob das Reifenprofil noch ausreicht.
Sind Abrieb-Indikatoren erreicht, so sollte der
Reifen schnellstens gewechselt werden.
§KONTROLLE DER VORDEREN STOSSDÄMPFER§
Diese Prüfung ist bei abgeschaltetem Motor und
abgezogenem Zündschlüssel vorzunehmen.
Die vorderen Stoßdämpfer (Teleskopgabel) auf
Beschädigungen absuchen.
Den Lenker auf- und abwärts bewegen und auf eventuell
durch Verbiegungen verursachte Geräusche in den
Stoßdämpfern achten.
Schrauben und Muttern der vorderen Stoßdämpfer mit
passenden Schlüsseln auf festen Sitz prüfen.
Den Lenker auf und ab, seitlich und längs hin- und her
schütteln, um zu überprüfen, ob er zu lose oder zu
schwergängig ist oder nach einer Seite zieht.
Überprüfen, dass der Lenkausschlag nicht durch Züge
oder Leitungen beeinträchtigt wird.
Bei Auffinden irgendwelcher ungewöhnlichen Punkte den
Roller dem zugelassenen SYM-Händler oder
SYM-Vertragshändler zur Überprüfung und Einstellung
überlassen.
DIE STANDARDWERTE DES REIFENDRUCKS FINDEN SICH IN DEN TECHNISCHEN DATEN
VORSICHT:
Falscher Reifendruck, Abnutzung oder Schädigungen der Reifen sind Hauptursachen für den
Verlust der Kontrolle über den Roller und platte Reifen.
Abrieb-Indikator
Risse und
Schäden
Fremdkörper
(Nägel oder
Steinchen)
Page 77

77
§PRÜFEN UND WECHSELN DER SICHERUNGEN§
Der Sicherungskasten befindet sich rechts am Rahmen. Nach Entnahme des Staufachs ist er nahe des
Startsperre-Schalters sichtbar. Den Zündschlüssel abziehen und die Sicherungen prüfen. Durchgebrannte
Sicherungen durch neue Sicherungen gleichen Nennstroms ersetzen (2 von 10 A und je eine von 15 und
20 A). Es ist streng verboten Sicherungen höheren Nennstroms zu verwenden oder sie durch einen
Messing- oder Eisendraht zu ersetzen, da hierdurch die elektrische Anlage und einzelne Schaltungen
geschädigt werden können.
Das Staufach entfernen, worauf der Sicherungskasten nahe der Batterie sichtbar ist.
Den Deckel des Sicherungskastens öffnen und die Sicherung herausziehen. Überprüfen, ob sie
beschädigt oder durchgebrannt ist.
Ersetzte Sicherungen müssen fest in ihren Anschlüssen sitzen. Bei gelockerten Kontakten kommt
es zu Erwärmungen und Schäden.
Zum Auswechseln nur Elektroteile (zum Beispiel Birnen) mit den in den technischen Daten
genannten Werten verwenden. Die Verwendung anderer Teile kann ein Durchbrennen der
Sicherung oder eine Überlastung der Batterie zur Folge haben.
Beim Waschen des Rollers kein Wasser direkt auf den Sicherungskasten oder in dessen Nähe
spritzen.
Brennt eine neu eingesetzte Sicherung rasch wieder durch, so ist vor erneutem Auswechseln die
Fehlerursache aufzufinden. Ist eine Sicherung aus nicht auffindbaren Gründen durchgebrannt,
sollte der Roller zur Untersuchung zum Händler gebracht werden.
§ÜBERPRÜFUNG DER BLINKER UND DER HUPE§
Den Zündschlüssel auf Position „ON“ drehen.
Den Blinkerschalter betätigen und sicherstellen, dass die rechten und linken Blinkleuchten vorn und
hinten richtig arbeiten und dabei der Signalton hörbar ist.
Sicherstellen, dass die Abdeckungen der Blinkleuchten sauber sind, keine Risse aufweisen und fest
sitzen.
Den Schalter der Hupe betätigen und deren Funktion prüfen.
§ÜBERPRÜFUNG DES FRONTSCHEINWERFERS UND DES RÜCKLICHTS§
Den Motor starten und den Schalter der Frontscheinwerfer betätigen. Überprüfen, dass die
Frontscheinwerfer und das Rücklicht einschalten.
Die Scheinwerfer gegen eine Wand richten und sicherstellen, dass sie ausreichend hell und richtig
gerichtet sind.
Sicherstellen, dass die Abdeckungen der Scheinwerfer sauber sind, keine Risse aufweisen und fest
sitzen.
§ÜBERPRÜFUNG DER BREMSLEUCHTE§
Den Zündschlüssel zur Position „ON“ drehen und die Bremshebel von Vorder- und Hinterrad
betätigen. Sicherstellen, dass die Bremsleuchte einschaltet.
Die Abdeckung der Bremsleuchte muss sauber sein, darf keine Risse aufweisen und muss fest
sitzen.
VORSICHT:
In den Blinkleuchten sind nur Lampen der in den technischen Daten genannten Art und mit den
dort erwähnten Nennwerten zu verwenden. Andernfalls kann die normale Funktionsweise der
Blinkleuchten beeinträchtigt werden.
Die Blinkleuchten zur Warnung nachfolgender Verkehrsteilnehmer immer rechtzeitig vor
Abbiegen oder Fahrbahnwechsel betätigen.
Nach dem Richtungswechsel die Blinkleuchten sofort an ihrem Schalter abschalten.
Andernfalls kann das Blinken der beiden Leuchten nachfolgende Fahrer verwirren.
VORSICHT:
Zur Vermeidung von Schädigungen der elektrischen Anlage, des Durchbrennens der Sicherung
und des Entladens der Batterie dürfen nur Birnen und Lampen der in den technischen Daten
genannten Art und mit den dort erwähnten Nennwerten verwendet werden.
Keine Elektrobauteile abändern oder zufügen, um jegliche Überlastungen oder Kurzschlüsse zu
vermeiden, die einen Brand auslösen und schlimmstenfalls den ganzen Roller in Brand setzen
könnten.
Page 78

78
§PRÜFUNG AUF KRAFTSTOFFLECKS§
Den Kraftstofftank, dessen Deckel und die Kraftstoffleitung auf Lecks
absuchen.
§ÜBERPRÜFUNG DER SCHMIERUNG DER VERSCHIEDENEN GELENKE§
An allen Gelenkstellen des Rollers prüfen, ob sie richtig geschmiert sind.
(Zum Beispiel an den Gelenken des Hauptständers, des Seitenständers, der Bremshebel usw.).
§PRÜFEN DER ZÜNDKERZE§
Den Zündkerzenstecker abziehen (zum Ausbau der Zündkerze den
Zündkerzenschlüssel des Werkzeugsatzes verwenden).
Überprüfen, ob die Elektroden durch Kohlenstoff oder andere
Ablagerungen verschmutzt sind.
Alle Ablagerungen mit einer Stahlbürste entfernen, die Zündkerze mit
Benzin reinigen und mit einem Lappen trocken reiben.
Den Elektrodenabstand messen und mittels einer Fühlerlehre auf 0,6 -
0,7 mm einstellen.
Die Zündkerze per Hand möglichst weit einschrauben und dann mit
dem Schlüssel um 1/2 - 3/4 Drehung weiter anziehen.
§ÜBERPRÜFUNG DES LUFTFILTERS§
《AUSBAUEN》
1. Zunächst die linke Abdeckung entfernen.
2. Die den Luftfilterdeckel haltenden selbstschneidenden
Schrauben entfernen.
3. Den Luftfilterdeckel abnehmen, die Schrauben des
Filterelements entfernen und dieses herausnehmen.
4. Das Filterelement herausnehmen und reinigen. (Auf
den Wartungsplan Bezug nehmen.)
《EINBAUEN》
Zum Einbau des Luftfilters in umgekehrter Ausbaureihenfolge vorgehen.
VORSICHT:
Die Ablagerung von Staub ist eine der wesentlichen Ursachen für Leistungsminderungen und erhöhten
Kraftstoffverbrauch.
Wird der Roller oft auf staubigen Straßen gefahren, so ist das Luftfilterelement zur Verlängerung der
Lebensdauer des Motors häufiger auszuwechseln.
Ist der Luftfilter falsch eingesetzt, so wird Staub in die Zylinder eingesaugt und kann dort vorzeitigen
Verschleiß und eine Verminderung der Leistung und der Lebensdauer des Motors zur Folge haben.
Beim Waschen des Rollers darauf achten den Luftfilter nicht zu befeuchten. Andernfalls kann dies das
Starten des Motors erschweren.
WARNUNG:
Der Motor ist nach dem Betrieb sehr heiß. Darauf achten sich nicht zu verbrennen.
※Nur Zündkerzen verwenden, die den technischen Daten des vorliegenden Rollers entsprechen und
von dessen Hersteller empfohlen werden. (Auf die technischen Daten Bezug nehmen.)
0,6 - 0,7 mm
Filterelement
Schrauben
Page 79

79
11. STÖRUNGEN ODER PROBLEME
§Diagnose bei Startschwierigkeiten des Motors §
(1). Wurde der Zündschlüssel auf
„ON“ gedreht?
(2). Ist genug Kraftstoff im Tank?
(3). Startsperre-Schalter auf
„OFF“ oder „ “?
(4). Ist beim Drücken des
Starterknopfs die Hinteroder Vorderradbremse
angelegt?
(5). Wurde beim Drücken des
Starterknopfs der Gasgriff
gedreht?
(6). Den Zündschlüssel auf Position
„ON“ stellen und den Knopf der
Hupe drücken. Ertönt die Hupe
nicht, so kann die Sicherung
durchgebrannt sein.
【Den Roller sofort von einem zugelassenen SYM-Händler oder Vertragshändler überprüfen lassen, falls
alle oben geprüften Punkte in Ordnung sind und der Roller weiterhin nicht startet.】
12. EMPFEHLUNGEN ZUM VERWENDETEN KRAFTSTOFF
Der Roller ist für den Betrieb mit unverbleitem Benzin von 90 Oktan oder mehr vorgesehen.
Wird der Roller in großer Höhe über dem Meeresspiegel betrieben (wo der Luftdruck geringer ist),
so ist es zur vollen Nutzung der Motorleistung empfehlenswert das
Luft/Kraftstoff-Mischungsverhältnis nachzustellen.
13. GETRIEBEÖL
Empfohlenes Öl: GENUINE SYM HYPOID GEAR OIL (SAE 85W-140)
1/4
1/8
Blinkerschalter
Schalter der Hupe
Für Hinterrad
Für Vorderrad
Page 80

80
14. Vorsichtsmaßnahmen beim Fahren des Rollers
1. Sich auf den Sitz des auf seinem Hauptständer stehenden Rollers setzen.
Den Roller nach vorn schieben, um den Hauptständer einzuklappen.
2. Den Roller von der linken Seite besteigen und sich richtig auf den Sitz setzen, mit beiden Füßen auf
dem Boden, so dass der Roller nicht umkippen kann.
3. Den Gasgriff langsam betätigen, worauf sich der Roller in Bewegung setzt.
【Plötzliches Bremsen und scharfes Kurvenfahren vermeiden】
Bei plötzlichem Bremsen oder scharfem Abbiegen besteht Sturzgefahr durch Wegrutschen.
Schnelles Bremsen oder enges Kurven kann den Roller besonders bei Regenwetter und nasser
rutschiger Fahrbahn nach vorn oder seitlich wegrutschen lassen und Stürze verursachen.
【Bei Regenwetter äußerst vorsichtig fahren】
Bei Regenwetter oder auf nasser Straße ist der Bremsweg wesentlich länger als auf einer
trockenen Straße. Bei solchen Bedingungen langsamer fahren und frühzeitig mit dem Bremsen
beginnen.
Beim Abwärtsfahren den Gasgriff loslassen und den Bedingungen gemäß zur Reduzierung der
Geschwindigkeit bremsen.
VORSICHT:
Hierbei nicht den Gasgriff drehen, um die Drehzahl des Motors vor dem Wegfahren zu erhöhen.
VORSICHT:
Vor dem Wegfahren die Hinterradbremse anlegen
VORSICHT:
Schnelles Drehen des Gasgriffs oder Lösen der Kupplung kann den Roller auf gefährliche Weise
nach vorn schießen lassen.
Vor dem Wegfahren auch sicherstellen, dass der Seitenständer hochgeholt ist.
Page 81

81
§ABS-Bremssystem§
Das ABS-System soll bei starkem Bremsen auf gerader Strecke ein Blockieren der Bremsen vermeiden.
Das ABS-System regelt automatisch die Bremskraft. Dabei wird beim Bremsen die Bremskraft so
gesteuert, dass ein Blockieren der Räder verhindert und die Lenkkontrolle beibehalten wird.
Die Bremse wird auf gleiche Weise wie bei einem herkömmlichen Roller betätigt. Der linke Bremshebel
wird zum Bremsen des Vorderrads und der rechte Bremshebel für das Hinterrad verwendet.
Obwohl das ABS-System beim Bremsen durch Verhinderung der Radblockierung für Stabilität sorgt,
dürfen folgende Punkte nicht außer Acht gelassen werden:
Das ABS-System kann nicht allen schlechten Straßenzuständen, Fehlbeurteilungen und falschen
Bremsbetätigungen zuvorkommen. Es ist mit gleicher Sorgfalt wie bei einem nicht mit ABS
ausgerüsteten Kraftrad zu fahren.
Das ABS-System ist nicht dafür vorgesehen, den Bremsweg zu verkürzen. Auf lockerer, unebener oder
abfallender Fahrbahn kann der Bremsweg des Rollers mit ABS-System länger sein, als bei einem
gleichwertigen Kraftrad ohne ABS. Auf solchen Fahrstrecken ist besondere Vorsicht walten zu lassen.
Das ABS-System hilft dabei Radblockierungen beim Bremsen auf gerader Strecke zu verhindern, kann
jedoch das Wegrutschen beim Bremsen in einer Kurve nicht verhindern. Beim Durchfahren einer Kurve
ist es besser beide Bremsen nur leicht oder überhaupt nicht zu betätigen. Die Geschwindigkeit ist vor
dem Einfahren in eine Kurve zu reduzieren.
Die Computer des ABS-Systems vergleichen die Fahrzeuggeschwindigkeit mit der Radgeschwindigkeit.
Da nicht empfohlene Reifen die Radgeschwindigkeit beeinflussen können, sind Störungen der
Berechnungen möglich, was zu einer Verlängerung des Bremswegs führen kann.
VORSICHT:
Das ABS-System kann den Fahrer nicht vor allen möglichen Gefahren schützen und ist kein Ersatz für
sichere Fahrpraxis. Man sollte sich der Funktionsweise des ABS-Systems und seiner Beschränkungen
bewusst sein. Der Fahrer ist selbst dafür verantwortlich auf eine, den Wetter-, Straßen- und
Verkehrsbedingungen angepasste Weise und mit der richtigen Geschwindigkeit zu fahren.
Page 82

82
15. REGELMÄSSIGE WARTUNGSMASSNAHMEN
Punkt
Wartungsintervall
in Kilometer
300 km
Alle 1000
km
Alle 3000
km
Alle 6000
km
Alle 12000
km
Anmerkungen
Zu prüfende
Elemente
Wartungsintervall
nach Zeit
NEU
1 Monat
3 Monate
6 Monate
1 Jahr
1
Luftfilterelement (Anmerkung)
P R
R (Papier) R 2 Luftfilter P 3 Ölfilter (Filtersieb)
R R 4
Motoröl E P
Austausch alle 3000 km
5 Reifendruck
P P 6
Batterie P P 7 Zündkerze P P E 8 Vergaser (Leerlaufdrehzahl)
P P 9
Lager und Griffe des Lenkers
P P 10
Getriebe auf Lecks überprüfen
P P 11
Dichtigkeit des Kurbelgehäuses
P P 12
Getriebeöl E Alle 5000 km (5 Monate) wechseln
13
Antriebsriemen/Rolle
P E 14
Kraftstofftankschalter und Leitungen
P P
15
Funktionsweise und Zug der
Drosselklappe
P P
16
Schrauben und Muttern des Motors
P P 17
Zylinderkopf, Zylinder und Kolben
P
18
Auspuffsystem /
Kohlenstoffablagerungen entfernen
P
19
Steuerkette / Zündzeitpunkt
P P 20
Ventilspiel P P
21
Stoßdämpfer
P P 22
Federelemente vorn und hinten
P P 23
Haupt-/ Seitenständer
P
P/S
24
Kurbelgehäuseentlüftung
P P 25
Kupplungsscheibe
P 26
Bremsmechanismus / Bremsbeläge
P P
27
Schrauben/Muttern der einzelnen
Komponenten
P P
☆Der obige Wartungsplan basiert auf Intervallen von 1000 km oder 1 Monat, wobei die Wartung an
dem zuerst eintretenden Zeitpunkt vorzunehmen ist.
※Den Roller regelmäßig von einem zugelassenen SYM-Händler oder Vertragshändler überprüfen
lassen, um sicherzustellen, dass er optimal arbeitet.
Code: P - Prüfung, Reinigung und Einstellung E - Ersetzen
R - Reinigen (Auswechseln, falls nötig) S - Schmieren
Anmerkung: 1. Das Luftfilterelement öfter reinigen oder auswechseln, wenn der Roller auf staubigen
Straßen oder in einer stark verschmutzten Umgebung betrieben wird.
2. Wartungsmaßnahmen sind häufiger durchzuführen, wenn der Roller oft mit hoher
Geschwindigkeit gefahren wird oder bereits viele Kilometer zurückgelegt hat.
【Unter den Anmerkungen sind Hinweise zu betroffenen Modellen einzutragen】
Page 83

83
16. TECHNISCHE DATEN
Modell
Fiddle Ⅲ 50 ccm
Punkt
Technische Daten
XA05W4-EU/ XA05W5-EU
XA05W4-NL/XA05W5-NL
Länge
1900mm
Breite
690mm
Höhe
1130mm
Radstand
1330mm
Leergewicht
107kg (vorn 42kg hinten 65kg)
Modell
Gebläsegekühlter 4-Takt-Einzylindermotor
Kraftstoff
Unverbleites Benzin
Hubraum
49,46 ccm
Verdichtungsverhältnis
12,6 ± 0,2 : 1
Maximale Nutzleistung
2,6 kW / 7500 U/min
2,2 kW / 6500 U/min
Maximales Nettodrehmoment
3,5 Nm / 6500 U/min
3,3 Nm / 6500 U/min
Leerlaufdrehzahl
2100±100 U/min
Ventilspiel: EIN/AUS
0,10 ± 0,02 / 0,10 ± 0,02 mm
Startmethode
Kickstarter und Elektrostarter
Vordere Stoßdämpfer
Teleskopgabel
Hintere Stoßdämpfer
Triebsatzschwinge
Kupplung
Fliehkraftkupplung
Getriebe
Stufenlos (CVT)
Vorderradreifen
110/70-12
Hinterradreifen
120/70-12
Felgentyp
Aluminium
Reifendruck
Vorn: STD 1,75 kg/cm2,
Hinten: STD 2,00 kg/cm2 für 1 Person, 2,25 kg/cm2 für 2 Personen
Vorderradbremse
Scheibenbremse (Ø 226 mm)
Hinterradbremse
Trommelbremse (Ø 110 mm)
Frontscheinwerfer (Fern- und
Abblendlicht)
12V 35/35W
Vordere Positionsleuchte
12V LED
Vordere / Hintere Blinkleuchte
12V 10W
Rücklicht / Bremsleuchte
12V 5W /12V 21W
Lampe der hinteren
Nummernschildbeleuchtung
12V 5W
Motorölfüllmenge
0,80 l (0,7 l für Wechsel)
Getriebeölfüllmenge
110 ㏄m (100 ccm bei Wechsel)
Kraftstofftankinhalt
6,5 l
Sicherung
2A, 5A, 10A, 15A (je eine)
Zündkerze
CR6HSA
Batteriekapazität
12V 6Ah (dichte, wartungsfreie Batterie)
Luftfilter
Papier
Page 84

84
Modell
XA12W2-EU XA12W3-EU (Fiddle Ⅲ 125i cc)
Punkt
Technische Daten
Länge
1900mm
Breite
690mm
Höhe
1130mm
Radstand
1330mm
Leergewicht
117 kg (vorn 44 kg hinten 73 kg)
Modell
Gebläsegekühlter 4-Takt-Einzylindermotor
Kraftstoff
Unverbleites Benzin
Hubraum
124,6 ccm
Verdichtungsverhältnis
10,6 ± 0,2 :1
Maximale Nutzleistung
7,5 kW / 8500 U/min
Maximales Nettodrehmoment
9,2 Nm / 7000 U/min
Ventilspiel: EIN/AUS
0,12 / 0,12 mm
Startmethode
Elektrostarterknopf
Vordere Stoßdämpfer
Teleskopgabel
Hintere Stoßdämpfer
Triebsatzschwinge
Getriebe
Stufenlos (CVT)
Vorderradreifen
110/70-12
Hinterradreifen
120/70-12
Felgentyp
Aluminium
Reifendruck
Vorn: STD 2,00 kg/cm2,
Hinten: STD 2,00 kg/cm2 für 1 Person, 2,25 kg/cm2 für 2 Personen
Vorderradbremse
Scheibenbremse (Ø 226 mm)
Hinterradbremse
Scheibenbremse (Ø 220 mm)
Frontscheinwerfer (Fern- und
Abblendlicht)
12V 35/35W
Vordere Positionsleuchte
12V LED
Vordere / Hintere Blinkleuchte
12V 10W
Rücklicht / Bremsleuchte
12V 5W /12V 21W
Lampe der hinteren
Nummernschildbeleuchtung
12V 5W
Motorölfüllmenge
0,95 l (0,80 l für Wechsel)
Getriebeölfüllmenge
180 ccm (170 ccm für Wechsel)
Kraftstofftankinhalt
6,5 l
Sicherung
2 von 10 A und je eine von 15 und 20 A
Zündkerze
CR7HSA
Batteriekapazität
12V 6Ah (dichte, wartungsfreie Batterie)
Luftfilter
Papier
Page 85

85
Modell
XA12W4-EU (Fiddle Ⅲ 125i cc)
Punkt
Technische Daten
Länge
1900mm
Breite
690mm
Höhe
1355mm
Radstand
1330mm
Leergewicht
117kg (vorn 44kg hinten 73kg)
Modell
Gebläsegekühlter 4-Takt-Einzylindermotor
Kraftstoff
Unverbleites Benzin
Hubraum
124,6 ccm
Verdichtungsverhältnis
10,6 ± 0,2 :1
Maximale Nutzleistung
7,5 kW / 8500 U/min
Maximales Nettodrehmoment
9,2 Nm / 7000 U/min
Ventilspiel: EIN/AUS
0,12 / 0,12 mm
Startmethode
Elektrostarterknopf
Vordere Stoßdämpfer
Teleskopgabel
Hintere Stoßdämpfer
Triebsatzschwinge
Getriebe
Stufenlos (CVT)
Vorderradreifen
110/70-12
Hinterradreifen
120/70-12
Felgentyp
Aluminium
Reifendruck
Vorn: STD 2,00 kg/cm2,
Hinten: STD 2,00 kg/cm2 für 1 Person, 2,25 kg/cm2 für 2 Personen
Vorderradbremse
Scheibenbremse (Ø 226 mm)
Hinterradbremse
Trommelbremse (Ø 110mm)
Frontscheinwerfer (Fern- und
Abblendlicht)
12V 35/35W
Vordere Positionsleuchte
12V LED
Vordere / Hintere Blinkleuchte
12 V 10WX2
Rücklicht / Bremsleuchte
12V 5W /12V 21W
Lampe der hinteren
Nummernschildbeleuchtung
12V 5W
Motorölfüllmenge
0,95 l (0,80 l für Wechsel)
Getriebeölfüllmenge
180 ccm (170 ccm für Wechsel)
Kraftstofftankinhalt
6,5 l
Sicherung
2 von 10 A und je eine von 15 und 20 A
Zündkerze
CR7HSA
Batteriekapazität
12V 6Ah (dichte, wartungsfreie Batterie)
Luftfilter
Papier
Page 86

86
Modell
XA20W2-EU XA20W3-EU (Fiddle Ⅲ 200i cc)
Punkt
Technische Daten
Länge
1900mm
Breite
690mm
Höhe
1140mm
Radstand
1330mm
Leergewicht
121kg (vorn 45kg hinten 76kg)
Modell
Gebläsegekühlter 4-Takt-Einzylindermotor
Kraftstoff
Unverbleites Benzin
Hubraum
168,9 ccm
Verdichtungsverhältnis
10,16 ± 0,2 :1
Maximale Nutzleistung
8,8 kW / 8000 U/min
Maximales Nettodrehmoment
13 Nm / 6000 U/min
Ventilspiel: EIN/AUS
0,12 / 0,12 mm
Startmethode
Elektrostarterknopf
Vordere Stoßdämpfer
Teleskopgabel
Hintere Stoßdämpfer
Triebsatzschwinge
Kupplung
Fliehkraftkupplung
Getriebe
Stufenlos (CVT)
Vorderradreifen
110/70-12
Hinterradreifen
120/70-12
Felgentyp
Aluminium
Reifendruck
Vorn: STD 2,00 kg/cm2,
Hinten: STD 2,00 kg/cm2 für 1 Person, 2,25 kg/cm2 für 2 Personen
Vorderradbremse
Scheibenbremse (Ø 190 / 226 mm)
Hinterradbremse
Scheibenbremse (Ø 220 mm)
Frontscheinwerfer (Fern- und
Abblendlicht)
12V 35/35W
Vordere Positionsleuchte
12V LED
Vordere / Hintere Blinkleuchte
12V 10W
Rücklicht / Bremsleuchte
12V 5W /12V 21W
Lampe der hinteren
Nummernschildbeleuchtung
12V 5W
Motorölfüllmenge
0,95 l (0,80 l für Wechsel)
Getriebeölfüllmenge
180 ccm (170 ccm für Wechsel)
Kraftstofftankinhalt
6,5 l
Sicherung
2 von 10 A und je eine von 15 und 20 A
Zündkerze
CR7HSA
Batteriekapazität
12V 6Ah (dichte, wartungsfreie Batterie)
Luftfilter
Papier
Page 87

87
Modell
XA12W5-EU
Punkt
Technische Daten
Länge
1900mm
Breite
690mm
Höhe
1355mm
Radstand
1330mm
Leergewicht
117kg (vorn 44kg hinten 73kg)
Modell
Gebläsegekühlter 4-Takt-Einzylindermotor
Kraftstoff
Unverbleites Benzin
Hubraum
124,6 ccm
Verdichtungsverhältnis
10,6 ± 0,2 :1
Maximale Nutzleistung
7,5 kW / 8500 U/min
Maximales Nettodrehmoment
9,2 Nm / 7000 U/min
Ventilspiel: EIN/AUS
0,12 / 0,12 mm
Startmethode
Elektrostarterknopf
Vordere Stoßdämpfer
Teleskopgabel
Hintere Stoßdämpfer
Triebsatzschwinge
Getriebe
Stufenlos (CVT)
Vorderradreifen
110/70-12
Hinterradreifen
120/70-12
Felgentyp
Aluminium
Reifendruck
Vorn: STD 2,00 kg/cm2,
Hinten: STD 2,00 kg/cm2 für 1 Person, 2,25 kg/cm2 für 2 Personen
Vorderradbremse
Scheibenbremse (Ø 226 mm)
Hinterradbremse
Trommelbremse (Ø 110 mm)
Frontscheinwerfer (Fern- und
Abblendlicht)
12V 35/35W
Vordere Positionsleuchte
12V LED
Vordere / Hintere Blinkleuchte
12V 10W
Rücklicht / Bremsleuchte
12V 5W /12V 21W
Lampe der hinteren
Nummernschildbeleuchtung
12V 5W
Motorölfüllmenge
0,95 l (0,80 l für Wechsel)
Getriebeölfüllmenge
180 ccm (170 ccm für Wechsel)
Kraftstofftankinhalt
6,5 l
Sicherung
2 von 10 A und je eine von 15 und 20 A
Zündkerze
CR7HSA
Batteriekapazität
12V 6Ah (dichte, wartungsfreie Batterie)
Luftfilter
Papier
Page 88

88
1. INHOUD
1. Inhoud ................................................................................................................... 88
2. Locatie Bedieningsorganen .................................................................................... 90
3. Voor het rijden ....................................................................................................... 91
4. Veilig rijden ............................................................................................................ 91
5. Rijden .................................................................................................................... 92
6. Gebruik originele onderdelen .................................................................................. 92
7. Gebruik van elk component .................................................................................... 93
Sensoren ............................................................................................................... 93
Bediening van de contactschakelaar ....................................................................... 94
Bediening van de vergrendelknop van het stuur ...................................................... 94
Bediening van de openingschakelaar van het zadel ................................................ 94
Schakelaars ........................................................................................................... 95
Opbergruimte ......................................................................................................... 96
Haak veiligheidshelm ............................................................................................. 96
Benzinetankdop ..................................................................................................... 97
Remmen ................................................................................................................ 97
8. Aandachtspunten en voorzorgen bij het starten ...................................................... 98
9. De beste manier om te vertrekken .......................................................................... 99
Bediening van het gashendel .................................................................................. 99
Parkeren ................................................................................................................ 99
10. Inspectie en onderhoud voor het wegrijden .......................................................... 100
Dagelijkse inspectie ............................................................................................. 100
Motorolie controleren en vervangen ...................................................................... 100
Benzineniveau controleren ................................................................................... 101
Transmissieolie controleren en vervangen ............................................................ 101
Vrije slag van de remmen controleren en afstellen ................................................ 102
Schijfrem controle (naargelang het model) ........................................................... 102
Gashendel afstellen ............................................................................................. 103
Inspectie en onderhoud van de accu .................................................................... 103
Banden controleren ................................................................ .............................. 105
Stuur- en voorvork controleren ............................................................................. 105
Zekeringen controleren en vervangen ................................................................... 106
Richtingaanwijzers en claxon controleren ............................................................. 106
Voor- en achterlichten controleren ........................................................................ 106
Remlicht controleren ............................................................................................ 106
Page 89

89
1. INHOUD
Benzine lekkage controleren ................................................................................. 107
Smeerpunten van verschillende mechanismen controleren ................................... 107
Bougie controleren ............................................................................................... 107
Luchtfilter controleren ........................................................................................... 107
11. Storings- en diagnoseschema .............................................................................. 108
Wanneer de motor niet start ................................................................................. 108
12. Welke brandstof ................................................................................................... 108
13. Transmissieolie .................................................................................................... 108
14. Voorzorgen bij motorfiets rijden ............................................................................ 109
Anti-lock Remsysteem ........................................................................................ 110
15. Periodiek onderhoudsschema .............................................................................. 111
16. Specificaties ........................................................................................................ 112
Page 90

90
2. LOCATIE BEDIENINGSORGANEN
MODEL: XA05W4-EU/NL(Fiddle Ⅲ 50i CC)
XA12W2-EU XA12W3-EU (Fiddle Ⅲ 125i CC)
XA20W2-EU XA20W3-EU (Fiddle Ⅲ 200i CC)
Benzinetankdop
Starterschakelaar
Hoog & Laagstralende
koplamp/
Richtingaanwijzer/ Zadel
open/ Claxonschakelaar
Koplamp
Motornummer
Remniveau voor
Achterlicht/
Remlicht
Accu
Luchtfilter
Oliepeil
Richtingaanwijzerlampjes
voor/ Positielicht
Helmhaak
Opbergruimte
Zijstandaard
Contactschakelaar
Richtingaanwijzerlampjes
achter
Bedieningsschakelaar
motor starten
Remniveau
achter
Knaldemper uitlaat
Hoofdstandaard
Frame nummer
Zekeringen
Page 91

91
3. VOOR HET RIJDEN
Deze handleiding beschrijft het correcte gebruik van deze motorfiets, evenals veilig rijden, eenvoudige
inspectiemethodes en controles van de motorfiets.
Voor een veiliger en comfortabeler gebruik van de motorfiets is het noodzakelijk deze handleiding goed door
te nemen.
Wanneer de specificaties en de constructie van de motorfiets anders zijn dan de in deze
handleiding afgebeelde motorfiets, dan gelden de specificaties en de constructie van uw motorfiets.
4. VEILIG RIJDEN
Het is belangrijk dat u ontspannen en juist gekleed bent voordat u op de motorfiets stapt. Houdt u aan de
geldende verkeersregels, handel voorzichtig in het verkeer, ga niet te snel, rij ontspannen.
De meeste mensen rijden erg voorzichtig met een nieuwe motorfiets, maar worden snel roekelozer
naarmate ze meer gewend raken aan de motorfiets. Dit roekeloze gedrag kan ongelukken veroorzaken.
OPGELET!!
Om brandwonden van de uitlaat te vermijden als u een passagier meeneemt. Let erop dat hij/zij de
voeten op de pedalen zet.
Tijdens en na het rijden wordt de uitlaat heet. Let ook op als u een inspectie uitvoert of onderhoud
pleegt als de motorfiets net uit staat.
Na het rijden is de uitlaat heet, kies een geschikte plaats om uw motorfiets te parkeren om te
vermijden dat anderen zich kunnen branden aan de uitlaat.
Bedankt voor uw keuze
Om de prestaties van uw motorfiets op het juiste niveau te houden, is het belangrijk om periodiek
onderhoud en controles door uw dealer te laten uitvoeren.
Wij adviseren u om na 300 km rijden met uw nieuwe motorfiets naar de SYM dealer te gaan voor
een controle en afstelling van uw motorfiets. Na de eerste beurt dient u om de 1000 km naar de
dealer te gaan voor periodiek onderhoud.
Ter herinnering:
Draag altijd een goedgekeurde helm en draag deze op de correcte manier.
Loszittende kledij kan door de wind openwaaien en in de weg zitten bij de hendels, wat het veilig
rijden kan beïnvloeden.
Draag dus kledij met aansluitende mouwen.
Houd het stuur met twee handen vast wanneer u rijdt. Rijd nooit met één hand.
Houdt u aan de snelheidslimieten.
Draag geschikt schoeisel met lage hakken.
Zorg voor uw motorfiets zoals het onderhoudsschema voorschrijft.
Vraag uw SANYANG dealer om de handleiding van uw motorfiets en lees de volgende hoofdstukken
zorgvuldig door:
Het juiste gebruik van de motorfiets.
Inspectie en onderhoud voor aflevering
WAARSCHUWING:
Het ombouwen van de motorfiets zal de structuur en het vermogen beïnvloeden en resulteren in een
slecht werkend blok of een luide uitlaat, waardoor de motorfiets minder lang zal meegaan.
Bovendien zijn ombouwingen illegaal en niet conform met het originele design en de specificaties.
Een verbouwde motorfiets wordt niet gedekt door de fabrieksgarantie. Vermijd dus om de motorfiets
zelf te wijzigen.
Page 92

92
5.
RIJDEN
Neem een comfortabele houding aan waar alle delen van uw lichaam ontspannen zijn:
armen, benen, tenen, handen, rug, zodat u zo snel mogelijk kunt reageren indien nodig.
De houding van de rijder is van groot belang voor de veiligheid Houd het zwaartepunt van uw
lichaam altijd in het midden van het zadel. Wanneer u te ver achterop zit, neemt de druk af en
begint het stuur te schudden. Het is gevaarlijk om te rijden op een motorfiets met een onstabiel
stuur.
Het zal veel makkelijker zijn om een bocht te nemen wanneer de rijder zijn lichaam naar binnen helt
bij het draaien. Anderzijds zal de rijder een instabiel gevoel krijgen wanneer zijn lichaam en de
motorfiets niet hellen.
Op ongelijke wegen met kuilen en hobbels kan uw motorfiets onstabiel worden. Tracht de
omstandigheden van de wegen op voorhand te achterhalen, minder snelheid en gebruik de kracht
van uw schouders om het stuur te controleren.
Suggestie: Laad geen bagage op de treeplank, om de veiligheid niet te beperken en het stuurgedrag
niet in gevaar te brengen.
6.
GEBRUIK ORIGINELE ONDERDELEN
Om de beste prestaties van uw motorfiets te garanderen moet de kwaliteit, het materiaal en de precisie
van elk onderdeel overeenstemmen met de ontwerpeisen. “SYM Originele onderdelen” zijn met
dezelfde precisie geproduceerd als de rest van uw motorfiets. Geen enkel onderdeel wordt verhandeld
indien het niet de designspecificaties volgt in overeenstemming met precieze engineering en een strenge
kwaliteitscontrole. We raden u aan om “SYM Originele Onderdelen” te kopen van “SYM Erkende
Dealers of Gefranchiseerde Dealers” wanneer u onderdelen moet vervangen. Als u goedkope of
onechte onderdelen koopt in de handel kan de kwaliteit en duurzaamheid daarvan niet gewaarborgd
worden. Niet originele onderdelen kunnen onverwachte problemen veroorzaken en de prestaties van de
motorfiets verlagen.
Gebruik dus altijd SYM Originele Onderdelen om de maximale prestaties en levensduur van uw
motorfiets te waarborgen.
WAARSCHUWING:
Het gevoel van de rijder aan het stuur is verschillend met of zonder lading.
Wanneer u teveel gewicht op de motorfiets laadt zal deze onstabiel stuurgedrag vertonen wat de
veiligheid beïnvloedt.
Let dus op uw motorfiets niet te overladen.
WAARSCHUWING:
Plaats geen ontvlambare materialen zoals vodden tussen de motor en de bedekking om te vermijden
dat onderdelen vuur vatten.
Om schade te vermijden, laad geen voorwerpen op plaatsen die niet specifiek voor ladingen zijn
bestemd.
SUGGESTIE
Om de prestaties en de levensduur van uw motorfiets te optimaliseren en te verlengen:
De eerste 1000 km is de inrijd periode voor de motorfiets en componenten.
Geef niet meteen vol gas en houd de snelheid onder de 60km/uur.
Page 93

93
WAARSCHUWING:
Kunststof componenten zoals instrumentenpanelen, koplampen enz. niet schoonmaken met
oplosmiddelen zoals benzine enz. om schade aan de componenten te voorkomen.
De afbeelding van het paneel van de snelheidsmeter kan verschillen naargelang het model, maar
deze bevindt zich op dezelfde plaats.
7.
GEBRUIK VAN ELK COMPONENT
(Hieronder wordt de bediening beschreven van de SYM 4-takt, luchtgekoelde
50c.c.&.125c.c.&200c.c. scooter, die kan verschillen van de verschillende individuele
modellen. Gelieve hiervoor de eindpagina's van deze handleiding te raadplegen)
§SENSOREN§
Snelheidsmeter/ Toerenteller:
Geeft de motersnelheid of het motortoerental
aan.
Odometer:
Geeft de totaal afgelegde afstand aan.
Grootlicht lampje:
Dit lampje gaat aan als het grote licht van de
koplamp aan is.
Richtingaanwijzerlampje (links/rechts):
Dit lampje zal knipperen wanneer de linker- of
rechter richtingaanwijzer wordt gehanteerd,
respectievelijk links of rechts.
Brandstofmeter:
Deze meter geeft weer hoeveel benzine er nog
in de tank is.
Deze gaat automatisch naar de “E” stand
wanneer het contact uit staat (“OFF”).
Voltmeter/tijd:
Weergave van de gemiddelde accuspanning of tijd.
In de normale weergavestatus drukt u de knop "SET" 0,5 seconden in. Hiermee schakelt u om
tussen "VOLTAGE" weergave of "CLOCK" weergave.
Storinglampje:
Als er iets fout ging met de ECS, zal het waarschuwingslicht voortdurend oplichten.
Waarschuwingslicht motorolie vervangen:
Het wordt gebruikt om aan te geven wanneer de olie moet worden ververst, door het oplichten van een
lampje. Nadat het voertuig ongeveer 1000 kilometer heeft afgelegd zal het lampje oplichten om de
gebruiker te waarschuwen dat de olie moet worden ververst.
Na het verversen van de olie plaatst u de hoofdschakelaar op "ON", drukt u de knop "SET" langer dan 2
seconden in tot in de "ODO" functie. Het lampje dooft dan.
Grootlicht
lampje
Brandstofmeter
Odometer
Richtingaanwijzerlampje
rechts
Richtingaanwijzerlampje
links
Toerenteller /
Snelheidsmeter
Voltmeter/tijd
ABS Indicator
Storinglampje
Waarschuwingslicht
motorolie vervangen
Waarschuwingslicht
laag brandstofniveau
Page 94

94
Waarschuwingslicht laag brandstofniveau:
Wanneer er weinig brandstof in de tank aanwezig is, licht het waarschuwingslicht op.
ABS-waarschuwingslichtje: (ABS model)
Normaal gezien gaat het ABS (Anti-lock Brake System) waarschuwingslichtje aan als het
contactschakelaar wordt aangedaan en gaat dan snel weer uit kort nadat de scooter rijdt.
Normaal gezien gaat het ABS (Anti-lock Brake System) waarschuwingslichtje aan als het
contactschakelaar wordt aangedaan en gaat dan snel weer uit kort nadat de motorfiets rijdt. Als het ABS
systeem normaal werkt blijft het lichtje uit. Als er iets fout is met het ABS systeem gaat het
waarschuwingslichtje aan en blijft het aan. Als de indicator aan is, dan werkt het ABS systeem niet maar
in dat geval werkt de klassieke rem nog wel.
1.“S” knop:
Houd de “S” knop één of twee seconden ingedrukt voor het omschakelen naar de spanningsweergave
Automatische terugkeer naar de tijdweergave na één minuut of druk de "S" knop kort in om onmiddellijk
terug te keren.
2.“M” knop:
a. Druk de “M” knop langdurig in om de uren in te stellen, de uurweergave knippert. Druk op de “S”
knop om het uur in te stellen en kortstondig op de “M” knop om de minuten in te stellen. De
minuutweergave zal dan knipperen. Druk de “S” knop kort in om minuten toe te voegen en druk de “S”
knop lang in om het aantal minuten automatisch en continu te verhogen.
b. Nadat de tijd is ingesteld de “M” knop lang indrukken om de instelfunctie te verlaten of 1 ~ 2 minuten
wachten om de functie automatisch te verlaten.
§BEDIENING VAN DE CONTACTSCHAKELAAR §
“ON” stand:
De motor kan gestart worden.
De contactsleutel kan niet verwijderd worden.
“OFF” stand:
De motor staat uit en kan niet gestart worden.
De contactsleutel kan verwijderd worden.
§BEDIENING VAN DE VERGRENDELKNOP VAN HET STUUR §
“LOCK” stand (stuurslot)
Draai het stuur naar links en steek de sleutel in het
contactslot, druk de contactsleutel neer en keer dan
zachtjes naar links naar de “LOCK” stand.
In deze stand is het stuur geblokkeerd.
De contactsleutel kan verwijderd worden.
Voor het ontgrendelen draait u de sleutel eenvoudig
van de “LOCK” stand naar de “OFF” stand.
§BEDIENING VAN DE OPENINGSCHAKELAAR VAN HET ZADEL§
Steek de contactsleutel in de contactschakelaar.
Draai de contactsleutel rechtsom in de stand “zadel open”.
Het zadel gaat dan open.
§SCHAKELAARS§
WAARSCHUWING:
Gebruik de contactsleutel niet wanneer de motor draait. Het contact naar “OFF” en “LOCK”
draaien tijdens het draaien van de motor zou het elektrisch systeem afsluiten wat kan resulteren in
een zwaar ongeval. Daarom mag het contact alleen afgezet worden wanneer de motorfiets
volledig stil staat.
Verwijder steeds de sleutel en neem de sleutel altijd mee nadat u de motorfiets op het stuurslot
hebt gezet en u uw motorfiets achterlaat.
Als de sleutel langere tijd op de „ON“ positie staat, terwijl de motor niet draait, kan de capaciteit
van de accu minder worden. Dit kan invloed hebben op het starten van de motor.
Verzeker u ervan dat u uw sleutel in handen hebt voordat u het zadel vergrendelt.
CONTACTSCHAKELAAR
WAARSCHUWING:
Verzeker u ervan dat u
uw sleutel in handen
hebt voordat u het zadel
vergrendelt.
Page 95

95
Elektrische startknop
Dit is de startknop om de motor te starten.
Met de hoofdschakelaar op “ON”, druk op deze knop om de motor te starten terwijl u de voorof achterrem dichthoudt.
Schakelaar grootlicht/dimlicht
Dit is de schakelaar voor de hoog en laagstralende koplamp. Druk op deze schakelaar om van
grootlicht naar dimlicht en terug te schakelen.
Dit symbool staat voor het grootlicht.
Dit symbool staat voor het dimlicht. (gelieve met dimlicht te rijden in de bebouwde kom.)
Schakelaar openen zadel
Draai het contact op “ON” en druk deze knop neer. Het zadel gaat dan open.
Deze knop keert terug naar de oorspronkelijke
stand na het loslaten.
Druk op het zadel om het automatisch te
vergrendelen.
Als het zadel vergrendeld is, controleer of het
goed vergrendeld is door het lichtjes op te
heffen.
WAARSCHUWING:
Laat deze knop meteen los na het starten van de motor, druk er niet meer op terwijl de motor draait
om schade aan het blok te vermijden.
Dit is een beveiligingsmechanisme. De motor kan enkel gestart worden als de voor- of
achterremhendel (pedaal) gebruikt wordt.
Zet geen lichten aan Zet de lichtschakelaar en de richtingaanwijzers in de "OFF" stand wanneer u
de motor start.
Schakelaar
openen zadel
WAARSCHUWING:
Verzeker u ervan de sleutel bij te hebben
nadat u het zadel hebt vergrendeld.
Berg de sleutel niet op in de opbergruimte
na het ontgrendelen om te vermijden dat de
sleutel opgesloten wordt in de opbergruimte
wanneer het zadel automatisch naar
beneden wordt gesloten.
Richtingaanwijzer
schakelaar
Claxon schakelaar
Schakelaar
grootlicht/
dimlicht
Schakelaar
openen zadel
Elektrische
startknop
Page 96

96
Bedieningsschakelaar motor starten
De schakelaarstand ziet u onder het zadel.
“ON” stand: De motor staat uit en kan niet gestart worden.
“OFF” stand: Wanneer de contactschakelaar op "on" staat,
staat de bedieningsschakelaar Starten op “off”.
Druk de elektrische startknop in terwijl u de
voor- of achterrem dichthoudt om de motor te
starten.
Claxon schakelaar
Druk op deze knop wanneer het contact op “ON” staat en de claxon zal weerklinken.
Richtingaanwijzer schakelaar
Wanneer u links of rechts afdraait of een straat indraait moet u dit melden door gebruik van uw
richtingaanwijzers.
Draai het contact op “ON” en schuif de richtingaanwijzer naar links of naar rechts. De
richtingaanwijzers zullen knipperen.
Om ze uit te zetten zet u de schakelaar gewoon weer in de oorspronkelijke stand.
Een knipperend signaal aan de linkse kant toont aan dat u naar links wilt draaien.
Een knipperend signaal aan de rechter kant toont aan dat u naar rechts wilt draaien.
§OPBERGRUIMTE§
Deze ruimte bevindt zich onder het zadel.
Maximum laadgewicht:10kg.
Berg geen waardevolle spullen op in deze ruimte.
Controleer of het zadel afgesloten is nadat u het hebt
dichtgeklapt.
Haal waardevolle spullen uit deze ruimte voor u uw
motorfiets wast.
Plaats geen warmtegevoelige zaken zoals vers voedsel
in deze ruimte want deze wordt warm door de
temperatuur van de motor.
§HAAK VEILIGHEIDSHELM§
Zet de motorfiets uit en haak de kinriem van de
veiligheidshelm vast aan de haak.
WAARSCHUWING:
Maak geen gebruik van de helmhaak wanneer u
rijdt, anders kunt u de motorfiets beschadigen en
de helmhaakfunctie verliezen.
Bedieningsschakelaar motor starten
Opbergruimte
Haak
Page 97

97
§BENZINETANKDOP§
1.Steek de sleutel in het zadelslot, open het zadel en draai de brandstofdop linksom totdat hij kan
worden verwijderd.
2. Let op dat u niet meer tankt dan de maximum limiet.
3. De markering “△” moet op één lijn worden geplaatst met de markering “△” op de brandstoftank.
Vervolgens draait u de brandstofdop rechtsom en vergrendelt u het zadel.
§REMMEN§
Trek aan de rechter remhendel om de voorrem te activeren.
Trek aan de linker remhendel om de voor- en achterrem tegelijkertijd te bedienen (CBS model).
Trek aan de linkse remhendel om de achterrem te activeren).
Vermijd onnodig plots remmen.
Gebruik bij het remmen zowel de voor- als de achterrem.
Vermijd langdurig remmen want dit kan de remmen oververhitten en hun efficiëntie beïnvloeden.
Minder tijdig vaart en rem op tijd bij regenweer of op een glad wegdek. Maak geen plotselinge
remmanoeuvres om slippen en vallen te voorkomen.
Door alleen de voorrem of alleen de achterrem te gebruiken, verhoogt men het risico op vallen,
doordat de motorfiets naar één kant zal overhellen.
Zelfs op motorfietsen met ABS kan remmen in de bocht leiden tot slippen. Als u een bocht neemt,
is het beter om lichtjes te remmen met beide remmen of helemaal niet te remmen. Verminder dus
vaart voor u een bocht neemt.
《Motorrem》
Draai het gashendel tot de oorspronkelijke stand en gebruik de motorrem.
Het is noodzakelijk om de rem afwisselend aan te trekken voor het voor- en achterwiel wanneer u een
lange of steile helling afdaalt.
WAARSCHUWING:
Zet de motorfiets stabiel op zijn hoofdstandaard, zet de motor uit en houd vlammen weg van de
motorfiets tijdens het vullen.
Vul niet meer dan maximaal toegelaten. Anders zal de brandstof naar buiten vloeien via een
opening in de dop waardoor de lak zou kunnen worden beschadigd en in ernstige gevallen; in
ernstige gevallen; kan het brand veroorzaken waardoor de motorfiets afbrandt.
Zorg dat de tankdop correct is afgesloten.
Voor het voorwiel
Voor het voorwiel
Voor voorwiel en
achterwiel
Voor het achterwiel
ABS model
CBS model
Page 98

98
8. AANDACHTSPUNTEN EN VOORZORGEN BIJ HET STARTEN
1. Draai de contactsleutel op de “ON” stand.
2. Trek de hand(voet)rem aan van het achterwiel.
3. Versnel niet, druk op de starter knop als de rem geactiveerd is.
[Wij geven om uw welzijn! Voordat u start, houdt u de handrem vast op het achterwiel.]
WAARSCHUWING:
Als de motor niet kan worden gestart na 3 tot 5 keer indrukken van de kickstarter, draait u
gashendel 1/8~1/4 slag en drukt u de kickstarter opnieuw in voor eenvoudig starten.
Om schade aan de startmotor te voorkomen, mag de starterknop niet 15 seconden lang continu
worden ingedrukt.
Wanneer na 15 seconden de motor nog steeds niet start, wacht dan 10 seconden voor u opnieuw
probeert.
Het is moeilijker om de motor te starten nadat hij een lange tijd stationair heeft gedraaid of
wanneer u pas tankt nadat de tank volledig leeg was. U moet dan meerdere malen starten en het
gashendel activeren om de motor te starten.
Bij een koude start kan het een aantal minuten duren voor de motor opwarmt.
De uitstoot bevat schadelijke gassen (CO), start daarom de motorfiets alleen op een goed
verluchte plaats.
WAARSCHUWING:
Voordat u de motor start, controleer of de olie en de brandstof op het goede peil staan.
Als de motor wordt gestart moet de hoofdstandaard stevig op de grond staan en de achterrem
geactiveerd. Dit voorkomt dat de motorfiets plotseling naar voren schiet.
1/4
1/8
Page 99

99
9. DE BESTE MANIER OM TE VERTREKKEN
Gebruik de richtingaanwijzer voordat u wegrijdt en verzeker u ervan dat er geen voertuig achter u komt.
U kunt dan wegrijden.
§BEDIENING VAN HET GASHENDEL §
Acceleratie: Om de snelheid op te voeren. Wanneer u op een hellend vlak rijdt draait u zachtjes aan het
gashendel om de motor toe te laten rustig zijn kracht vrij te geven.
Deceleratie: Om de snelheid te minderen.
§PARKEREN §
Bij het naderen van een parkeerplaats:
1. Zet tijdig uw richtingaanwijzer aan en let op de voertuigen voor en achter en links en rechts van u,
benader dan rustig uw parkeerplaats.
2. Draai het gashendel tot de oorspronkelijke stand en gebruik de remmen op voorhand. (De remlichten
zullen oplichten om naderend verkeer te waarschuwen).
Bij complete stilstand:
3. Zet de richtingaanwijzer uit en draai de contactsleutel naar de “OFF” stand om de motor uit te zetten.
4. Stap van de motorfiets langs de linkerkant nadat u de motor hebt uitgeschakeld. Kies een
parkeerplaats uit waar de motorfiets het verkeer niet hindert en het grondoppervlak effen is. Zet de
motorfiets op zijn hoofdstandaard.
5. Houd het stuur met uw linkerhand vast en duw het voorste uiteinde van het zadel naar beneden of
neem de parkeerhendel linksonder het zadel vast met de rechterhand.
6. Duw op de hoofdstandaard met uw rechtervoet en zet hem stevig op de grond.
Ter herinnering: Zet het stuurslot op en verwijder de contactsleutel na het parkeren om te vermijden
dat uw motorfiets wordt gestolen.
WAARSCHUWING:
Parkeer uw motorfiets op een veilige plaats waar hij het verkeer niet hindert.
Deceleratie
Acceleratie
Page 100

100
10. INSPECTIE EN ONDERHOUD VOOR HET WEGRIJDEN
(Zie het locatie schema van de componenten voor de volgende componenten)
§DAGELIJKSE INSPECTIE §
Controle items
Controle punten
Motorolie
Is er voldoende olie in de tank?
Brandstof
Hebt u voldoende benzine? Is het 90 Octaan of hoger?
Rem
Voor
Staat van de remmen?
(Vrije slag: 10~20mm)
Achter
Staat van de remmen?
(Vrije slag remhendel: 10~20mm)
Banden
Voor
Is de bandendruk correct?
(Standaard: 1.75kg/cm2)
Achter
Is de bandendruk correct?
(Standaard: 2.0 kg/cm2 voor 1 persoon, 2. 25 kg/cm2 voor 2
personen)
Stuur
Vibreert het stuur abnormaal of draait het moeilijk?
Snelheidsmeter, lichten en
achteruitkijkspiegel
Werken deze correct?
Gaan de lichten aan? Is de achterkant goed zichtbaar?
Montage van de onderdelen
Zijn er geen losse schroeven of moeren?
Afwijkingen
Werden alle eerdere problemen opgelost?
§MOTOROLIE CONTROLEREN EN VERVANGEN §
CONTROLE:
1. Zet de motorfiets op een stabiele grond op de
hoofdstandaard. Nadat de motor 3 tot 5 minuten uit
staat kunt u de peilstok verwijderen. Veeg deze
schoon en plaats hem opnieuw in de peilstokhouder
(zonder hem te draaien).
2. Haal de peilstok eruit en check of het oliepeil tussen
de minimum en maximum limiet staat.
Wanneer het oliepeil te laag is, vul dan bij tot de
maximale limiet. (Controleer cilinder, carter, etc. op
lekken.)
WAARSCHUWING:
Wanneer u een probleem tegenkomt tijdens de routinecontrole, los dit dan eerst op voor u gaat
rijden, laat indien nodig uw motorfiets nakijken en herstellen door een officiële “SYM dealer of
erkend onderhoudspersoneel" indien nodig.
 Loading...