

Sym CRUiSYM 300i, LV30W1-EU, CRUiSYM 250i, LV25W1-EU Owner's Manual

1. Contents
1. Contents ....................................................................................................................... 1
2. Control Location ......................................................................................................... 3
3. Before Riding ................................................................................................................. 4
4. Safe Riding .................................................................................................................. 4
5. Driving .......................................................................................................................... 5
6. Use Genuine Spare Parts ........................................................................................... 5
7. Use of Each Component ............................................................................................. 6
Multi-Function Display ......................................................................................................... 6
Operation of Ignition Switch ............................................................................................... 8
Use of Buttons ................................................................................................................... 9
Power Supply Port .......................................................................................................... 11
USB charge unit with blue led .......................................................................................... 11
Luggage box .................................................................................................................. 12
Fuel Tank Cap ............................................................................................................... 12
Rear footrest .................................................................................................................. 12
Brake ............................................................................................................................ 12
Anti-lock Brake System ................................................................................................... 12
8. Important Points and Cautions for Starting Engine ............................................... 13
9. The Best Way to Drive off ......................................................................................... 14
The Control of Throttle Grip Handle .................................................................................. 14
Parking Method .............................................................................................................. 14
10. Inspection and Maintenance before Riding .............................................................. 15
Routine Inspection .......................................................................................................... 15
Engine Oil Inspection and Change .................................................................................... 15
Fuel Inspection .............................................................................................................. 16
Transmission Oil Inspection and Change ........................................................................... 16
Inspection and Adjustment of Brake Free Play ................................................................... 17
Disc Brake Inspection ..................................................................................................... 17
Throttle Grip Handle Clearance Adjustment ....................................................................... 18
Inspection and Maintenance of Battery .............................................................................. 19
Tire Inspection ............................................................................................................... 20
Steering Handle Front Shock Absorbers Inspection ............................................................. 20
Rear Cushion Hardness Setting ....................................................................................... 21
Checking and Changing Fuses ......................................................................................... 21
Checking the Turn Signal Lights and Horn ......................................................................... 21
1
1. Contents
Checking the Front and Rear Lights
Checking the Brake Light ................................................................................................. 22
Checking for Fuel Leakage .............................................................................................. 22
Checking the Lubrication of Body’s Various Mechanisms ..................................................... 22
Checking the Spark Plug ................................................................................................. 22
Cooling system inspection ............................................................................................... 23
Replenishment of coolant ................................................................................................ 23
A reference table for anti-freeze concentration percentages under different temperatures ........ 24
Crankcase Blow-By Ventilation ......................................................................................... 24
Checking the Air Cleaner ................................................................................................. 25
Checking The Left Crankcase Cover Air Cleaner ................................................................ 25
.................................................................................. 22
11. When there is an Abnormal Condition or a Trouble .............................................. 26
Diagnosis when Engine does not Start .............................................................................. 26
12. E.C.U. Interface System ............................................................................................ 27
13. Suggestions on Engine Fuel .................................................................................... 27
14. Transmission Oil ....................................................................................................... 27
15. Cautions for Riding Scooter ..................................................................................... 27
16. Periodical Maintenance Schedule ........................................................................... 28
17. Specification .............................................................................................................. 29
18. Postscript .................................................................................................................. 30
2
r
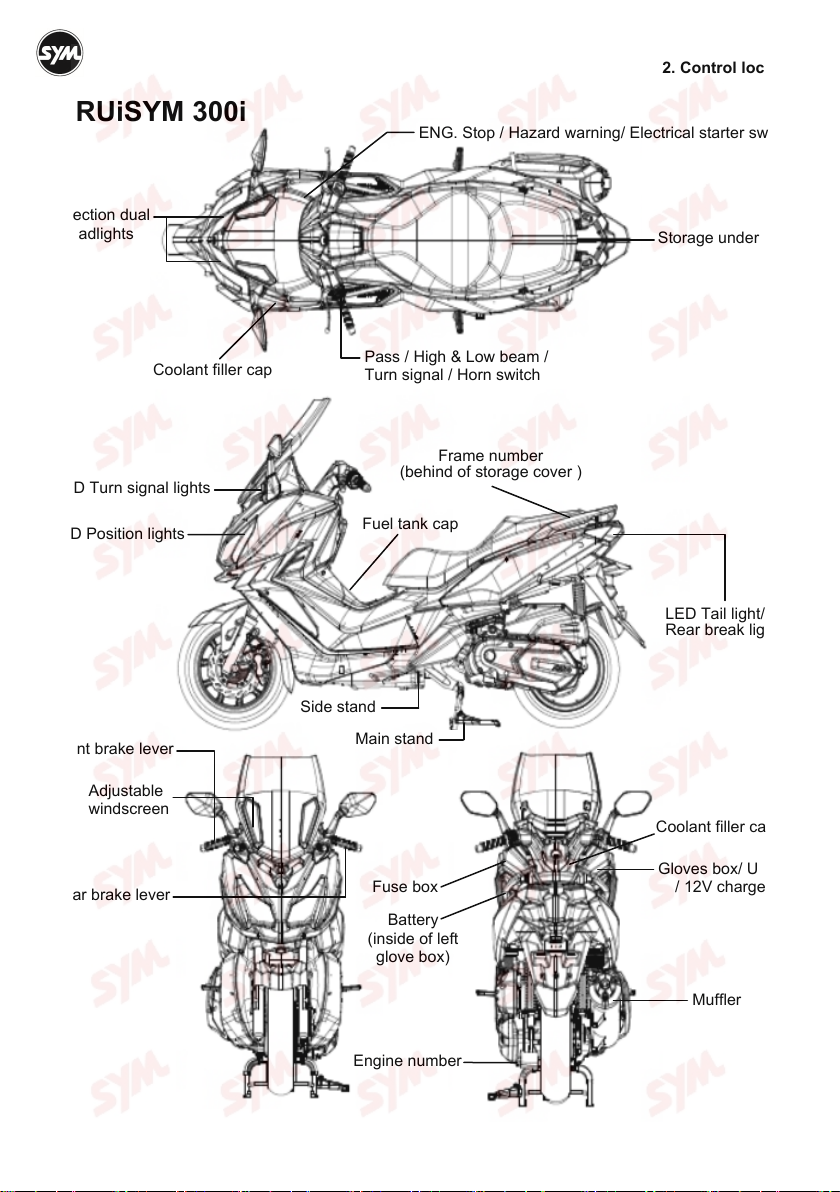
CRUiSYM 300i
Projection dual
headlights
2. Control location
ENG. Stop / Hazard warning/ Electrical starter switch
Storage under seat
Coolant filler cap
LED Turn signal lights
LED Position lights
Front brake lever
Adjustable
windscreen
Rear brake lever
Fuel tank cap
Side stand
Main stand
Pass / High & Low beam /
Turn signal / Horn switch
Frame numbe
(behind of storage cover )
Fuse box
Battery
(inside of left
glove box)
LED Tail light/
Rear break light
Coolant filler cap
Gloves box/ USB
/ 12V charger
Muffler
Engine number
3

3. Before riding
4. Safe riding
This manual describes the correct usage of this scooter including safety riding, simple inspection methods
and so on.
For a more comfortable and safety riding, please read this manual carefully.
For your benefit, please ask your SYM dealer the operating manual and carefully read the following:
Correct use of the scooter.
Pre-delivery inspection and maintenance.
Thank you very much for your patronage
In order to maximize your scooter’s performance, a periodical inspection and maintenance should be
completely carried out.
We recommend that after riding your new scooter for the first 300 kilometers, you should take your
scooter to the original dealer for an initial inspection, and to have your scooter inspected periodically
every 1000 kilometers thereafter.
In case the scooter’s specifications and construction are modified and different from the photos and
diagrams on the owner’s manual / catalogues, the specifications and construction of the actual scooter
shall prevail.
4. SAFE RIDING
It is very important to be relax and clothe properly when driving, observe traffic regulations, do not rush,
always drive carefully and relaxed.
Usually, most people would ride their newly bought scooter very carefully, but after they became familiar
with their scooters, they tended to become reckless which may result in an accident.
To remind you:
Please wear a safety helmet, and properly tighten the chin belt when riding a scooter.
Clothes with open or loose cuffs may be blown by wind and cause the cuffs to get caught on the
steering handle and thus affects riding safety.
So, put on clothes with tight sleeves.
Hold the steering handle by both hands when riding. Never ride with only one hand.
Observe the speed limit.
Wear suitable low-heel shoes.
Perform periodical maintenance and inspection in accordance with the schedule.
WARNING!!
To avoid getting burned by exhaust pipe when taking a passenger. Make sure your passenger has
put his/her feet on the pedals.
After running, the exhaust pipe is very hot, be careful not to get burned when conducting an
inspection or maintenance.
After running, the exhaust pipe is very hot, select a suitable location to park your scooter to avoid
others getting burned by the exhaust pipe.
CAUTION:
Modified scooter will affect its structure or performance, and cause poor engine operation or exhaust
noise, which will result in shortening the scooter’s service life.
Besides, modification is illegal and does not conform to the original design and specifications.
A modified scooter will not be covered by warranty, therefore, do not modify your scooter at will.
Tire and rim modifications will make it unsafe to ride and may cause severe injury or death.
4
5. Driving
6. Use Genuine Spare Parts
5. DRIVING
Keep the related parts of your body such as arms, palms, lumbar, and toes relax and ride with the most
comfortable posture in order to be able to react quickly whenever it is necessary.
Rider’s posture will greatly affect riding safety. Always keep your body’s gravity in the center of the
saddle, if your body’s gravity is on the rear part of saddle, the front wheel load will be reduced, and this
will cause the steering handle shaking. It is dangerous to ride a scooter with an unstable handle.
It will be much easier to make a turn if rider inclines his body inward when turning. On the other hand,
the rider will feel unstable if his body and the scooter do not incline.
The scooter is hard to control on a bumpy, unleveled, unpaved road, try to know the road conditions in
advance, slow down and use your shoulder’s force to control the handle.
Suggestion: Do not load objects on the front pedals unnecessarily, to avoid affecting the riding safety
and the operation of steering handle.
CAUTION:
The rider’s feeling on the handle is slightly different with a load or without a load.
Overload may cause the handle to swing and affects the riding safety.
Therefore, do not overload your scooter.
Overloading the scooter will cause the scooter to become unstable and hard to maneuver, it may cause
serious damage to the tires and rims, as well as it may change the center of gravity, which could result
in an accident that could cause injury or death. Do not exceed the maximum authorized load.
CAUTION:
Do not place flammable materials such as rags between the body side cover and engine to avoid
components damaging by fire.
Do not load objects on areas not specified for loading to avoid damage.
SUGGESTION
To maximize the scooter’s performance and prolong its service life:
The first month or first 1000km is the wear- in period for the engine and components.
Avoid rapid acceleration, and keep the speed below 60km/hr.
6. USE GENUINE SPARE PARTS
In order to maintain the scooter’s best performance, each part’s quality, material, and machined precision
must conform with the design requirements. “SYM Genuine Spare Parts” were made from the same high
quality materials used for the original scooter. No parts would be sold to the market until they could meet
the designed specifications through sophisticated engineering and stringent quality control. Therefore, it is
necessary to purchase “SYM Genuine Spare Parts” from “SYM Authorized Dealers or Franchised
Dealers” when replacing spare parts. If you buy cheap, or fake substitute parts from the market, no
guarantee can be provided either for the quality or durability. Also, it may result in unexpected troubles and
lower the scooter’s performance.
Always use SYM Genuine Spare Parts to keep your scooters pure blood and to ensure its long service
life.
5

7. Use of each component
g
r
r
(The following is SYM 4 stroke liquid cooling scooter’s basic operation, and they could vary from different
individual models. Please consult the end of this manual.)
Multi-function display
High Beam
Indicato
EFi trouble warning
Indicator
Turn Si
Speedometer
ABS Indicato
nal Indicator
Oil change
indicator
Fuel Gauge
Side stand
Down Indicator
Engine coolant
temperature gauge
Storage box
Indicator
Turn Signal Indicator
Tachometer
“MODE” button
“SET” button
Clock meter Voltage gauge
Total odometer
Trip odometer
Oil change trip meter
LCD display
Speedometer:
This shows your speed in kilometers per hour (km/h) or in mileage per hour (mph).
Odometer:
This odometer shows the total kilometers this motor has been driven.
Total odometer : This shows the total kilometers of this scooter. It shows six digits; 5 in kilometers and 1 in
Trip odometer : The rider can measure the trip kilometers. It shows four digits; 3 in kilometers and 1 in
WARNING:
To ensure safe riding always observe the speed limit and other road signs.
hundred meter. (The total odometer will return to zero if it runs over 100,000 kilometers.)
hundred meter. (The trip odometer will return to zero if its measurement is over 1,000
kilometers.)
6

7. Use of each component
Turn Signal Indicator:
The left or right Indicator will be flashing according to the operated directions of turn signal light switch
when it is turned on.
Fuel Gauge:
The pointer in this gauge shows how much fuel remains in the tank.
The pointer stays in “E” position when key switch is turned to 〝OFF〞.
When key switch is turned to “ON”, and the “pointer” also in “E” position (red area). Refuel immediately
ABS indicator
Normally the ABS (Anti-lock Brake System) indicator light goes on when the ignition switch is turned on
and goes off shortly after the scooter starts moving. If the ABS is normal, it stays off. If something is
wrong with the ABS, the indicator goes on and stays on. When the indicator light is on, the ABS does
not function but if the ABS fails, the conventional brake system will still work normally.
Side Stand Warning Indicator
When the side stand pulls down , the warning indicator tights on and the engine cannot be started ,when
the side stand raises up ,the indicator goes out and the engine can be started.
CAUTION :
Not to have trouble on electrical meter working, or damage the electrical meter.
Do not wipe plastic components, such as the instrument panel, the headlight, body covers, etc. with
solvents, such as gasoline, etc. Wiping plastic components with solvents can damage these components.
Storage box Indicator:This demonstrated the Storage box lamp opens.
Engine coolant temperature
To indicate engine coolant temperature.
When turn the main switch to “ON”, the LCD and the water temperature indicator keeps coming on.
Normally, the LCD indicator should be below the (H) position when the scooter is operating. If the LCD
indicator stays above (H) position, the water temperature indicator flashes. Please check the coolant level
of spare coolant tank and check cooling fan for proper operation.
CAUTION:
The indicator will stay above (H) position when engine is run under high temperature for a long period
of time. In this case, the only way to cool the engine is to stop the engine.
EFi trouble warning Indicator
When turn the main switch to “ON”, this warning indicator will come on and then go off after the engine is
running. It displays the condition of the EFi system is working correctly. If there is any problem on the EFi
system, the warning indicator will remain on all the time or does not come on. Please contact with a SYM
dealer to check the self-diagnosis system or electrical connections.
Engine oil check indicator“OIL CHANGE”
Engine oil check indicator is for showing engine oil inspection / replacement time. When the vehicle is
ridden for approximately 1,000 kilometer, engine oil indicator illuminates which means engine oil
inspection / replacement is needed. Press “S” (Oil Reset) button to reset engine oil mileage. Engine oil
indicator goes off when the “S” button is pressed and the engine oil mileage will be recalculated from the
current riding mileage. Engine oil level should be checked every 1,000 kilometer and replaced every
5,000 kilometer.
7
7. Use of each component
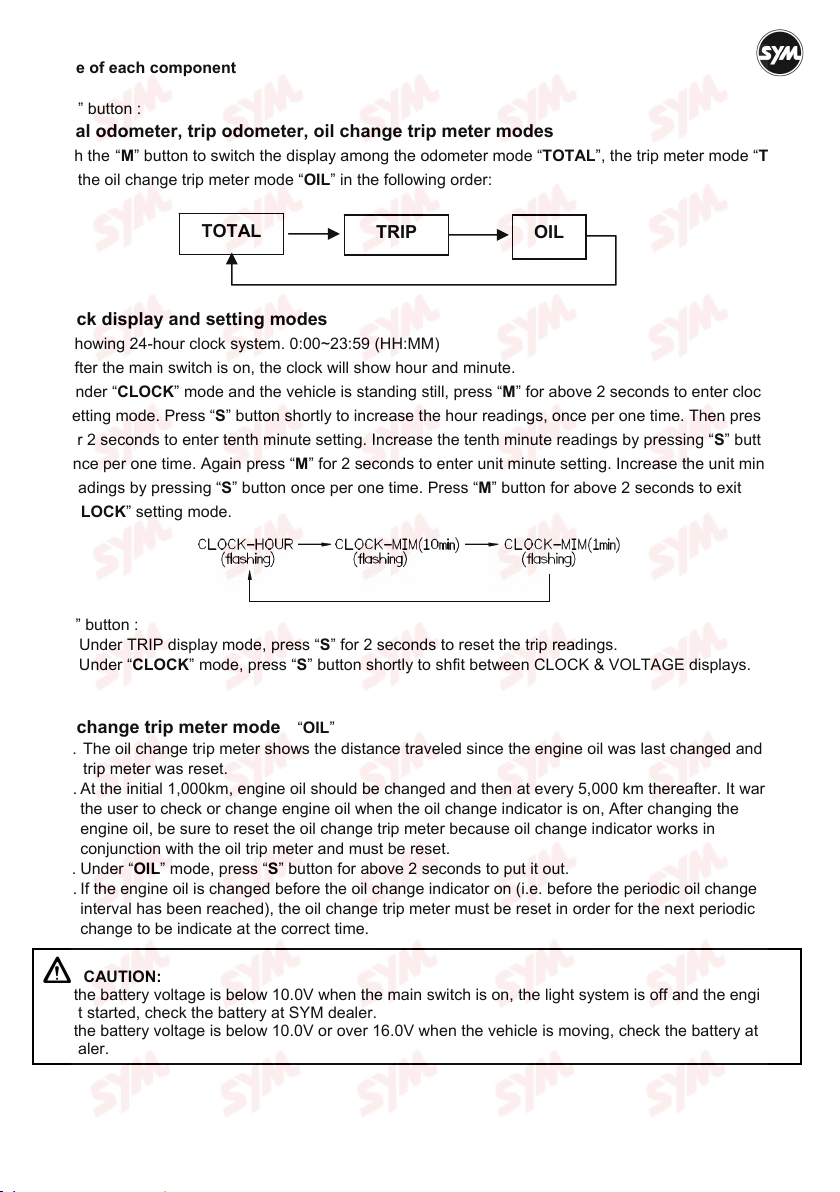
1. “M” button :
Total odometer, trip odometer, oil change trip meter modes
Push the “M” button to switch the display among the odometer mode “TOTAL”, the trip meter mode “TRIP”,
and the oil change trip meter mode “OIL” in the following order:
TOTAL
TRIP OIL
Clock display and setting modes
1.
Showing 24-hour clock system. 0:00~23:59 (HH:MM)
2.
After the main switch is on, the clock will show hour and minute.
3.
Under “CLOCK” mode and the vehicle is standing still, press “M” for above 2 seconds to enter clock
setting mode. Press “S” button shortly to increase the hour readings, once per one time. Then press “M”
for 2 seconds to enter tenth minute setting. Increase the tenth minute readings by pressing “S” button
once per one time. Again press “M” for 2 seconds to enter unit minute setting. Increase the unit minute
readings by pressing “S” button once per one time. Press “M” button for above 2 seconds to exit
“CLOCK” setting mode.
2. “S” button :
a. Under TRIP display mode, press “S” for 2 seconds to reset the trip readings.
b. Under “CLOCK” mode, press “S” button shortly to shfit between CLOCK & VOLTAGE displays.
Oil change trip meter mode “OIL”
a. The oil change trip meter shows the distance traveled since the engine oil was last changed and this
trip meter was reset.
b. At the initial 1,000km, engine oil should be changed and then at every 5,000 km thereafter. It warns
the user to check or change engine oil when the oil change indicator is on, After changing the
engine oil, be sure to reset the oil change trip meter because oil change indicator works in
conjunction with the oil trip meter and must be reset.
c. Under “OIL” mode, press “S” button for above 2 seconds to put it out.
d. If the engine oil is changed before the oil change indicator on (i.e. before the periodic oil change
interval has been reached), the oil change trip meter must be reset in order for the next periodic oil
change to be indicate at the correct time.
CAUTION:
If the battery voltage is below 10.0V when the main switch is on, the light system is off and the engine is
not started, check the battery at SYM dealer.
If the battery voltage is below 10.0V or over 16.0V when the vehicle is moving, check the battery at SYM
dealer.
8
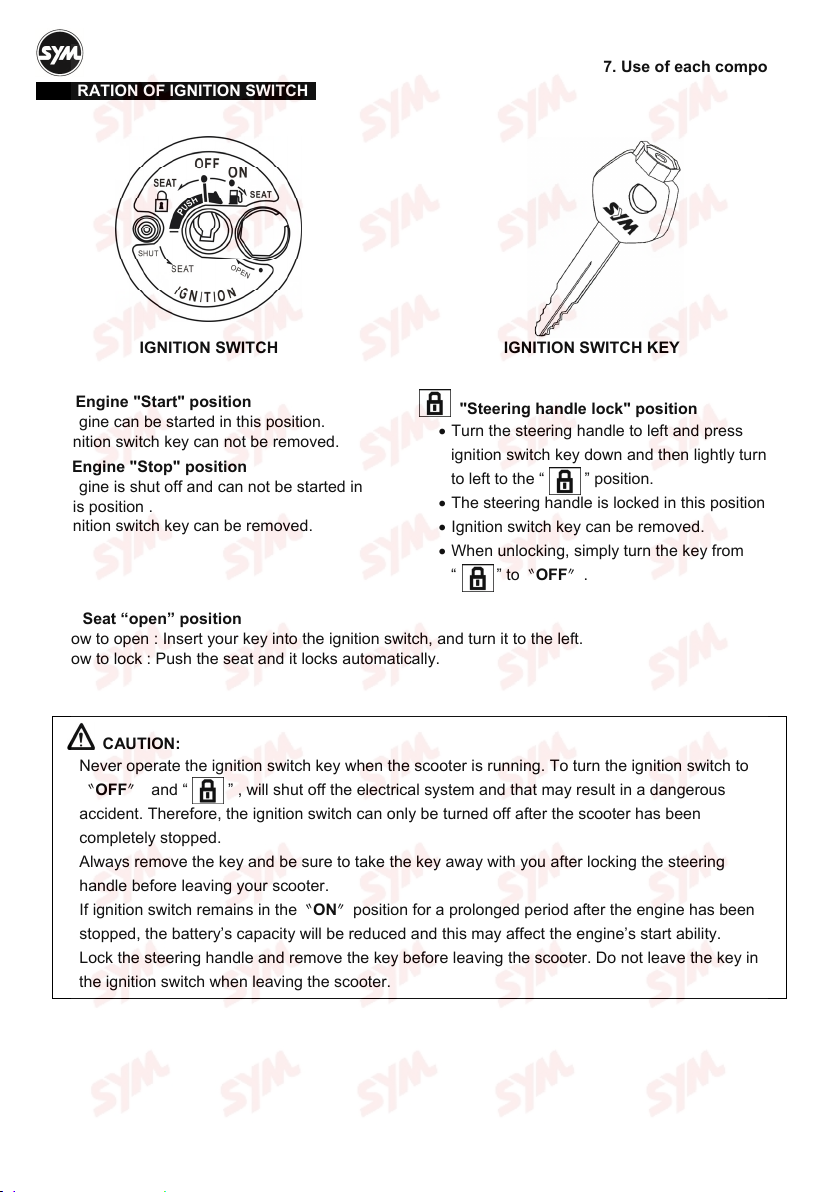
OPERATION OF IGNITION SWITCH
IGNITION SWITCH IGNITION SWITCH KEY
ON Engine "Start" position
Engine can be started in this position.
Ignition switch key can not be removed.
OFF Engine "Stop" position
Engine is shut off and can not be started in
this position .
Ignition switch key can be removed.
SEAT Seat “open” position
How to open : Insert your key into the ignition switch, and turn it to the left.
How to lock : Push the seat and it locks automatically.
"Steering handle lock" position
Turn the steering handle to left and press
ignition switch key down and then lightly turn it
to left to the “ ” position.
The steering handle is locked in this position.
Ignition switch key can be removed.
When unlocking, simply turn the key from
“ ” to〝OFF〞.
7. Use of each component
CAUTION:
Never operate the ignition switch key when the scooter is running. To turn the ignition switch to
〝OFF〞 and “ ” , will shut off the electrical system and that may result in a dangerous
accident. Therefore, the ignition switch can only be turned off after the scooter has been
completely stopped.
Always remove the key and be sure to take the key away with you after locking the steering
handle before leaving your scooter.
If ignition switch remains in the〝ON〞position for a prolonged period after the engine has been
stopped, the battery’s capacity will be reduced and this may affect the engine’s start ability.
Lock the steering handle and remove the key before leaving the scooter. Do not leave the key in
the ignition switch when leaving the scooter.
9
 Loading...