

Page 1

User’s Manual – SMPK1072
Cautions
z Do not subject the device to severe impact or drop it from high position.
z Do not use the player in extreme hot or cold, dusty or damp field. Do not
expose it to direct sunshine.
z Excessive sound pressure from earphones and headphones can cause
hearing loss.
z Prolonged listening at full power can damage the ear of the user.
z Avoid using the player in strong magnetic field.
1
Page 2

z Keep the device away from water or other liquids. In the event that water
or other liquids enter the device, power off the product immediately, and
clean the device.
z Do not use chemical solution to clean the device in order to avoid
corrosion. Clean it with a dry cloth.
z We are not responsible for the damages or lost data caused by
malfunction, misusing, repairing the device or battery replacement.
z Do not attempt to disassemble, repair or modify the product. This will
invalidate guarantee.
z The design of the player or actual display may be different from what is
shown in this manual. It should be subject to the actual display or design.
2
Page 3

1 Key Features
z MP3&WMA Player
z AVI Video player
z JPEG image viewer
z Folder Navigation
z Voice Recorder
z Removable Storage Device
z Built-in rechargeable lithium-ion battery
z Customized settings
3
Page 4

2 System Requirements
z Hardware: IBM PC & Compatible PC, Notebook with USB interface
z Operating System: Windows98/SE, Windows Me, Windows2000/XP,
Windows Vista
3 Package Content
z Main Unit
z Stereo earphones
z USB cable
z User Manual
z CD with video converter
4
Page 5

4 Before Using
4.1 Connect to a PC and download audio files
This player is plug & play for WIN2000/XP/ME/Vista OS. But for Windows98/SE,
you are required to install a driver before connection.
To connect it with PC for transferring files,
(1) Plug the larger end of the USB cable to the USB port of the PC, and plug
the smaller end to the USB port of the player.
(2) When the “ ” icon appear at the right bottom of the PC screen, double
click “My Computer” on the desktop, you see a removable disk which
indicates the player. Just use the removable disk as a regular local disk,
copying files from or to it.
5
Page 6

4.2 Removing the player from the PC safely
For Windows2000/XP/ME/Vista:
(1) Left click the icon at the right hand corner of the taskbar.
(2) Click the pop-up mini-window with message of “Stop the USB Mass
Storage Device – Drive (X)”.
(3) When you are prompted to remove the device, pull out the player.
For Win98/SE, please make sure the data transfer is completed before
unplugging the MP3 player.
4.3 Charge the battery
The device has a built-in lithium-icon rechargeable battery. It is charged via USB
6
Page 7

connection. You are required to charge it when you use it for the first time. It takes
about 3 hours to fully charge the battery. Connect the larger end of the USB cable
to the USB interface of PC, and connect the other smaller end of the USB cable to
the USB interface of this player. The device is connected to PC and being
charged.
NOTICE: For maximum performance, lithium-ion batteries need to be used often. If you
don’t use the device often, be sure to recharge the battery at least once per month.
7
Page 8
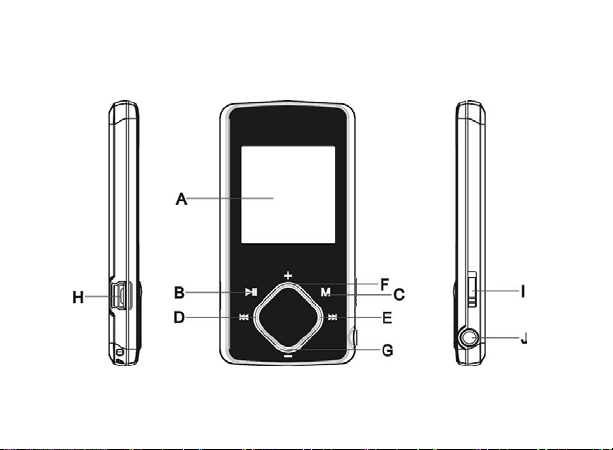
5 Keys Description
8
Page 9

A. LCD Display
B. Play/Pause: Turn on or turn off the device. Also play or pause audios.
C. MENU: Hold for a while to enter the main menu. Briefly press to confirm
selection confirm or enter the folder navigation mode.
D. Previous: Play the previous track. Also move up.
E. Next: Play the next track. Also move down.
F. VOL+: Turn up the volume.
G. VOL-: Turn down the volume.
H. USB port
I. Power Switch: Turn on or turn off the power
J. Earphone Jack
9
Page 10

6 Power On/Off
To power on,
(1) Slide the Power Switch to “ON” to turn on the power.
(2) Press and hold the PLAY/PAUSE button until you see prompt on the
display.
To power off,
(1) Press and hold the PLAY/PAUSE button until you see prompt on the
display.
(2) Slide the Power Switch to ”OFF” to turn off the power. (Be sure to
complete this step for saving battery charge.)
10
Page 11

Note: This player has a power-saving feature which enables the device to power off
automatically if it is idle for about 3 minutes.
7 Basic operation
Function Operation
Play/Pause
Adjust Volume
Previous Track
Next Track
Fast Forward
Rewind
Press the PLAY/PAUSE button to play or pause.
Shortly press the VOL+/VOL- button to decrease or
increase volume.
Shortly press the PREVIOUS button.
Shortly press the NEXT button.
Press and hold the NEXT button.
Press and hold the PREVIOUS button.
11
Page 12

A-B Repeat
Lock/Unlock buttons
12
To repeat a specified section of a track,
(1) During playing, press and hold the VOL+ button to
select the start point of the repeat.
(2) Press and hold the VOL+ button again to select the
stop point. The music section between the start point
and the stop point is repeated.
(3) To stop A-B repeat, press the VOL+ button.
To protect the buttons against being pressed accidentally or
unlock buttons, hold down the MENU button and the VOL-
together.
Page 13

8 Playing music
8.1 Enter the music mode
Press and hold the MENU button to display the main menu. Use the PREVIOUS/NEXT
button to select “Music” menu, and press the MENU button to confirm selection. Now
you are in the MUSIC mode, refer music playing to the basic operations.
8.2 Folder navigation
To navigate through folders:
(1) In the MUSIC mode, shortly press the MENU button to enter folder navigation
mode.
(2) Press the PREVIOUS/NEXT button to select a folder or track, and press the
MENU button to confirm selection, or press the PLAY/PAUSE button to return.
13
Page 14

9 Playing videos
(1) Press and hold the MENU button to display the main menu.
(2) Use the PREVIOUS/NEXT button to select the “Video” menu, and press the
MENU button to enter the video player mode.
(3) Press the PREVIOUS/NEXT button to search a video file that you want to play,
and press the MENU button to play. For detail information about playing, see the
“Basic Operation” section. (Note: During playing, you can shortly press the MENU
button to enter folder navigation mode.)
Note: This player can only play AVI videos. For other formats, you need to use the
converting tool included on the driver CD to convert them. For detail information about
14
Page 15

the converter, see AVI Converter Quick User Guide on the CD and at the end of this manual.
10 Viewing photos
To view photos,
(1) Press and hold the MENU button to display the main menu.
(2) Select “Photo” and press the MENU button to confirm.
(3) Press the PREVIOUS/NEXT button to select a folder or image, and press the
MENU to confirm.
(4) Select the photo that you want to display and press the MENU button to enlarge it
to full screen.
(5) In the full screen mode, you can press the PREVIOUS/NEXT button to display the
15
Page 16

previous or the next photo. Press the PLAY/PAUSE to start or stop an auto slide
show. Press the MENU button to enter folder navigation mode.
Note: Some images may not be displayed. Try to use an image editor to convert them
or save them as other files.
11 Reading E-book
11.1 Reading
(1) Press and hold the MENU button to display the main menu.
(2) Select “E-book” and press the MENU button to confirm.
(3) Press the PREVIOUS/NEXT button to select a .txt file, and press the MENU
16
Page 17

button to open the selected file.
(4) Press the PREVIOUS/NEXT button to page up or page down manually, or press
the PLAY/PAUSE button to page up or down automatically (by setting the time
interval between 1 and 5 in Settings/Auto Slide show/Text).
(5) During reading, you can use the bookmark to mark the page for resuming reading
later. For information about bookmark, see “Using bookmark” section.
11.2 Using bookmark
(1) Go to the page that you want to mark.
(2) Briefly press the VOL+ button to show up a “Save Bookmark” window for saving
bookmark.
(3) Press the PREVIOUS/NEXT button to select a bookmark number and press the
17
Page 18

MENU button to confirm. The bookmark is saved. It starts from the first line of
current page.
(4) To read the page that you marked, shortly press the VOL- button to show up the
“Load Bookmark” window. Press the PREVIOUS/NEXT button to select a
bookmark and press the MENU button to confirm. You will be guided to that page.
Note: Some TXT file may not be read. This may because its format is not supported.
Skip it or reload another file.
12 Browsing all files
To browse all files stored in the player,
(1) Press and hold the MENU button to display the main menu.
18
Page 19

(2) Select “Navigation”,and press the MENU button to enter the browser
mode.
(3) Press PREVIOUS/NEXT button to select a file that you want to view, and
press the MENU button to play or display it.
13 Voice Recording
z Record
(1) Press and hold the MENU button to display the main menu.
(2) Select“Record”,and press the MENU button to enter the recorder mode.
(3) Shortly press the PLAY/PAUSE button to start recording. During recording,
you can press the PLAY/PAUSE button to pause or resume recording.
19
Page 20

(4) Shortly press the MENU button to stop and save recording. Press and hold
the MENU button to return to the main menu.
z Play recordings
To play the recording,
(1) Select “Navigation” on the main menu to enter the folder navigate mode.
(2) Open the “VOICE” folder, and select the recording file that you want to play.
14 Deleting file
To delete a file,
(1) Select “Navigation” on the main menu to enter the folder navigate mode.
20
Page 21

(2) Briefly press the VOL- button to display a dialogue box.
(3) Use the PREVIOUS/NEXT button to select “YES” and press the MENU
button to confirm.
15 Customizing Settings
To customize the player settings:
(1) On the main menu, select the “Settings” item and press the MENU button
to enter the system settings mode.
(2) Press the PREVIOUS/NEXT button to select setting item and press the
MENU button to confirm or press the PLAY/PAUSE button to
cancel/return.
21
Page 22

Music Repeat mode
Once(Play current track once and
then stop)
Repeat One (Repeat current track)
Folder(Play all audio files in the
current folder and stop after
playing)
Folder Rep.(Repeat all audio files in
the current folder)
22
Normal(Play all audio files stored in
Page 23

the player and stop after playing all)
Repeat All(Repeat all audio files
stored in the player)
Intro(Play the first 10 seconds of
every audio file)
Play mode
Preset EQ
User EQ set
(User-defined
Order(Play audio files in order)
Shuffle(Play audio files randomly)
Normal, 3D, Rock, Pop, Classical,
Bass, Jazz, User EQ
(1) Press the PREVIOUS/NEXT
button to switch EQ column.
23
Page 24

24
equalizer
setting)
(2) Press the VOL+/VOL- button
to adjust the value of the
selected column.
(3) Repeat pressing the NEXT
button until the cursor is on
the YES button, and then
press the MENU button to
confirm.
(4) Go to the “Preset EQ” menu,
and select “User EQ” to
enable the equalizer setting.
Page 25

Record
Auto Slide Show
Display
REC Quality High Quality, General Quality
REC Volume +1、+2、+3、+4、+5
Text Browse (Set interval between the previous and the
next page when the device is in auto page up/down
mode.)
Photo Browse (Set interval between the previous and
the next slide in auto slide show mode.)
5 seconds, 10 seconds, 15
Backlight Time
Brightness (Set the brightness of the screen)
seconds, 20 seconds, 30 seconds,
Always On.
25
Page 26

System
Sleep Timer
(Set the continuous
playing time before the
player is turned off
26
Normal
Backlight mode
About - Information about the product
Upgrade - Upgrade the firmware
Load Default - Restore the player to default setting
Off, 10 minutes, 15minutes, 30 minutes, 60 minutes,
120 minutes
Power Save (Turn off the screen
when there is no activity within a
certain time)
Page 27

automatically.)
Language
( Select language in
which the on-screen text
is displayed)
English, Français, Spanish
16 Troubleshooting
Problem Possible Cause Solution
The LCD displays
nothing when the
device is started.
Battery is too low. Charge the battery.
27
Page 28

an audio file.
The volume is too low. Adjust the volume. No sound when playing
Bad audio file. Delete or skip the file.
The player cannot be
connected to the PC.
The displayed time is
changing constantly.
The PC has error when The player is Do not disconnect the
28
The USB interface is not
supported by PC’s
motherboard.
The bit rate of the MP3
file is changing during
playback.
Update or replace the
PC’s motherboard.
Try to use fixed bit rate to
compress the MP3 file.
Page 29

you plug and unplug
the player.
Total memory displayed
on the player is not in
accordance with the
marked amount.
Some of MP3 files
cannot be played
properly.
disconnected from the
PC abruptly while
transferring files.
Part of memory is used to
store programs and
display characters.
The MP3 file is
compressed by a
standard, such as MPEG
I Layer 1 or Layer 2 that
player from the PC when
transferring files.
1. Delete the unsupported
MP3 files.
2. Use MPEG I Layer 3
standard to compress
29
Page 30

The video cannot be
played.
The photo cannot be
displayed
30
the player does not
support.
The file format is not
supported.
The video data is
corrupted
The file format is not
supported
the unsupported MP3
files.
Make sure the video is in
AVI format. If not, use the
provided converting tool to
convert it.
Skip it or reload another
file
Try to use an image editor
to convert it or save it as
another file.
Page 31

The TXT file cannot be
read
The image resolution is
beyond limitation of the
device.
The file format is not
supported.
The device supports a
maximum resolution of
2048 X 2048. Make sure
resolution of the image
does not excess this
limitation.
Skip it or reload another
file.
31
Page 32

17 Technical Specifications
Item Specification
Capacity 1GB
Battery Type Rechargeable Lithium Battery
Battery Life
LCD Display 1.5-inch CSTN screen
Earphone Power 5mW+5Mw
Video Format AVI (XviD)
Audio Format MP3, WMA
Photo Format JPEG
32
8 – 10 Hours(only for MP3) or About 4Hours(AVI
VIDEO)
Page 33

Image Resolution 2048 X 2048 (Max.)
Bit Rate MP3: 8-320kbps; WMA: 64-384kbps
SNR >90dB
USB Port USB2.0
Operational Temperature 0℃ ~ +55℃
Storage Temperature -20℃ ~ +55℃
Operational Relative
Humidity *
Storage Relative Humidity 20% ~ 93% (40℃)
20% ~ 90% (40℃)
33
Page 34

18 Notice
z Make sure all keys are enabled before operation. If they are locked, hold down the
MENU and VOL- button to unlock them.
z Please charge the battery immediately when the display indicates low battery, or
the device will be powered off automatically.
z Please disconnect the player from PC properly to avoid data loss.
z The transfer rate displayed on the PC may be different depending on the operating
system. Exact transfer rate should be subject to the player's indication.
34
Page 35

Précautions d’utilisation
z Ne soumettez pas l’unité à des chocs ou à des chutes importantes.
z N’utilisez pas le lecteur dans des endroits extrêmement chauds ou froids,
poussiéreux ou humides. N’exposez pas le lecteur aux rayonnements
directs du soleil.
z Une écoute prolongée à haut niveau de volume avec des
écouteurs/casque d’écoute peut entrainer la perte de l’ouïe.
z Lorsque le niveau de volume est défini au maximum, une écoute
prolongée peut entrainer des dommages à votre ouïe.
z N’utilisez pas l’appareil en présence de puissants champs magnétiques.
z Maintenez l’unité à l’écart de l’eau et des autres liquides. S’il arrive que
35
Page 36

l’unité entre en contact avec de l’eau ou tout autre liquide, éteignez le
produit immédiatement et nettoyez-le.
z Afin de prévenir toute corrosion, n’utilisez pas de produits chimiques pour
nettoyer l’unité. Nettoyez celle-ci avec un chiffon sec.
z Nous ne sommes en aucun cas responsables des dommages causés
par un dysfonctionnement, utilisation incorrecte, réparation de l’unité ou
remplacement de la batterie.
z Ne tentez pas de désassembler, réparer ou modifier le produit. Ceci
annulera la garantie.
z La conception du lecteur et son aspect extérieur peuvent différer du
manuel. L’aspect/conception du produit réel prévaut.
36
Page 37

1 Fonctionnalités principales
z Lecteur MP3&WMA
z Lecteur vidéo AVI
z Visualisation d’images JPEG
z Navigation de répertoires
z Enregistreur de sons
z Périphérique de stockage amovible
z Batterie lithium-ion rechargeable intégrée
z Réglages personnalisés
37
Page 38

2 Configuration système requise
z Matériel: ordinateur IBM & ordinateur compatible, ordinateur portable
disposant d’un connecteur USB
z Systèmes d’exploitation : Windows98/SE, Windows Me,
Windows2000/XP, Windows Vista
3 Contenu de l’emballage
z Unité
z Ecouteurs stéréo
z Cordon USB
z Manuel d’utilisation
z CD avec convertisseur vidéo
38
Page 39

4 Avant toute utilisation
4.1 Raccordement à un ordinateur et transfert de fichiers audio
Ce lecteur est compatible plug & play sous les systèmes d’exploitation
WIN2000/XP/ME/Vista OS. Cependant, sous Windows98/SE, il est nécessaire
d’installer un pilote avant d’effectuer le raccordement.
Pour raccorder le lecteur à un ordinateur et transférer des fichiers,
(1) Connectez la large extrémité du cordon USB au connecteur USB de votre
ordinateur, raccordez l’autre extrémité du cordon USB au connecteur USB
du lecteur.
(2) Lorsque l’icône “ ” s’affiche sur la partie inférieure droite de l’écran,
effectuez un double clic sur l’icône “Poste de travail” située sur le bureau,
39
Page 40

recherchez le disque amovible correspondant au lecteur. Utilisez le lecteur
comme un périphérique de stockage normal, vous pouvez y copier des
fichiers ou transférer des fichiers sur l’ordinateur.
4.2 Déconnexion du périphérique en toute sécurité
Sous Windows2000/XP/ME/Vista:
(1) Effectuez un clic gauche sur l’icône situé sur le côté droit de la barre
des tâches.
(2) Cliquez sur l’info bulle qui s’affiche et contient le message “Désactiver le
périphérique de stockage de masse USB – Lecteur (X)”.
(3) Lorsqu'il vous est demandé de déconnecter le périphérique, déconnectez
le lecteur.
40
Page 41

Sous Win98/SE, assurez-vous que le transfert de données est terminé avant de
déconnecter le lecteur MP3.
4.3 Mise en charge de la batterie
Cette unité possède une batterie rechargeable lithium-ion intégrée. La mise en
charge s'effectue via connexion USB. Il est nécessaire de mettre en charge la
batterie lors de la première utilisation. La mise en charge nécessite 3 heures.
Connectez la large extrémité du cordon USB au connecteur USB de votre
ordinateur, raccordez l’autre extrémité du cordon USB au connecteur USB du
lecteur. L’unité est raccordée à l'ordinateur et se met en charge.
41
Page 42

REMARQUE: pour des performances optimales, il est nécessaire de souvent utiliser les
batteries lithium-ion. Si vous utilisez rarement l’unité, assurez-vous de mettre la batterie
en charge au moins une fois par mois.
42
Page 43

5 Présentation des commandes
43
Page 44

A. Ecran LCD
B. Play/Pause: permet de mettre en marche/éteindre l’unité. Permet
également de lancer/mettre en pause la lecture de fichiers audio.
C. MENU: Maintenez enfoncée cette touche pour accéder au menu principal.
Appuyez brièvement sur cette touche pour confirmer votre sélection ou
entrer en mode de navigation de répertoires.
D. Previous: Permet de lire la piste précédente. Permet également de
déplacer le curseur vers le haut.
E. Next: Permet de lire la piste suivante. Permet également de déplacer le
curseur vers le bas.
F. VOL+: Pour augmenter le volume.
G. VOL-: Pour diminuer le volume.
H. Port USB
44
Page 45

I. Commutateur d’alimentation: permet de mettre en marche/éteindre
l’unité.
J. Connecteur Ecouteurs
6 Mise en marche/arrêt
Pour mettre en marche l’unité,
1) Faites glisser l'interrupteur d'alimentation sur "ON" pour allumer le pouvoir.
Pour éteindre l’unité,
2) Faites glisser l'interrupteur d'alimentation sur "OFF" pour éteindre l'appareil.
(Assurez-vous de compléter cette étape pour économiser la charge de la
batterie.)
45
Page 46

Remarque: Ce lecteur dispose d’une fonction d’économie d’énergie qui permet
d’automatiquement éteindre le lecteur au bout de 3 minutes d’inactivité.
7 Fonctionnement basique
Fonction Opération
Lecture/Pause
Réglage du volume
Sélection de la piste
précédente
46
Appuyez sur la touche PLAY/PAUSE pour lancer/mettre
en pause la lecture.
Appuyez brièvement sur la touche VOL+/VOL- pour régler
le volume.
Appuyez brièvement sur la touche PREVIOUS.
Page 47

Sélection de la piste
suivante
Avance rapide
Rembobinage
Répétition A-B
Appuyez brièvement sur la touche NEXT.
Appuyez et maintenez enfoncée la touche NEXT.
Appuyez et maintenez enfoncée la touche PREVIOUS.
Pour répéter la lecture d’une section d'une piste,
(1) En cours de lecture, appuyez et maintenez enfoncée
la touche VOL+ pour définir le point de départ de la
répétition.
(2) Appuyez et maintenez enfoncée la touche VOL+ à
nouveau pour définir le point de fin de la répétition.
La section définie est alors lue en boucle.
47
Page 48

(3) Appuyez sur la touche VOL+ pour désactiver la
répétition A-B.
Touche de
verrouillage
/déverrouillage
Pour protéger les commandes de toute pression
accidentelle ou déverrouiller les touches, maintenez
enfoncées les touches MENU et VOL-.
8 Lire une musique
8.1 Accéder au mode Musique
Appuyez et maintenez enfoncée la touche MENU pour afficher le menu principal.
Utilisez les touches PREVIOUS/NEXT pour sélectionner l’option “Musique”, et appuyez
sur la touche MENU pour confirmer votre sélection. Vous êtes désormais en mode
MUSIQUE, référez-vous à la section Lecture de musiques pour connaitre le
48
Page 49

fonctionnement basique de cette fonction.
8.2 Navigation de répertoires
Pour naviguer parmi les répertoires:
(1) En mode MUSIQUE, appuyez brièvement sur la touche MENU pour accéder au
mode Navigation de répertoires.
(2) Appuyez sur la touche PREVIOUS/NEXT pour sélectionner un répertoire ou piste,
et appuyez sur la touche MENU pour confirmer votre sélection ou appuyez sur la
touche PLAY/PAUSE pour revenir.
9 Lire des vidéos
(1) Appuyez et maintenez enfoncée la touche MENU pour afficher le menu principal.
(2) Utilisez les touches PREVIOUS/NEXT pour sélectionner l’option “Vidéo” et
49
Page 50

appuyez sur la touche MENU pour accéder au mode Lecteur vidéo.
(3) Appuyez sur la touche PREVIOUS/NEXT pour sélectionner le fichier vidéo que
vous souhaitez visionner et appuyez sur la touche MENU pour lancer la lecture.
Pour davantage d’informations sur la lecture, référez-vous à la section
“Fonctionnement basique”. (Remarque: En cours de lecture, vous pouvez
brièvement appuyer sur la touche MENU pour accéder au mode Navigation de
répertoires.)
Remarque: ce lecteur peut seulement lire les fichiers vidéo AVI. Pour les autres formats,
vous devez utiliser l’outil de conversion fourni dans le disque pour les convertir. Pour
davantage d’informations sur le convertisseur de fichiers vidéo, référez-vous à la section
50
Page 51

Guide d’utilisation rapide du convertisseur sur le CD-ROM.
10 Visionner des photos
Pour visionner des photos,
(1) Appuyez et maintenez enfoncée la touche MENU pour afficher le menu principal.
(2) Sélectionnez l’option “Photo” et appuyez sur la touche MENU pour confirmer.
(3) Appuyez sur la touche PREVIOUS/NEXT pour sélectionner un répertoire ou
image, et appuyez sur la touche MENU pour confirmer.
(4) Sélectionnez la photo que vous souhaitez afficher et appuyez sur la touche
MENU pour agrandir la photo en plein écran.
(5) En mode plein écran, vous pouvez appuyer sur la touche PREVIOUS/NEXT pour
51
Page 52

afficher la photo précédente/suivante. Appuyez sur la touche PLAY/PAUSE pour
lancer/arrêter le diaporama. Appuyez sur la touche MENU pour accéder au mode
Navigation de répertoires.
Remarque: certaines images peuvent ne pas s’afficher. Essayez d’utiliser un éditeur
d’images pour les convertir sous un autre format.
11 Lecture d’E-book
11.1 Lecture
(1) Appuyez et maintenez enfoncée la touche MENU pour afficher le menu principal.
(2) Sélectionnez l’option “E-book” et appuyez sur la touche MENU pour confirmer.
52
Page 53

(3) Appuyez sur la touche PREVIOUS/NEXT pour sélectionner un fichier .txt, et
appuyez sur la touche MENU pour ouvrir le fichier sélectionné.
(4) Appuyez sur la touche PREVIOUS/NEXT pour manuellement sélectionner la
page précédente/suivante ou appuyez sur la touche PLAY/PAUSE pour
automatiquement changer de page (en définissant l’intervalle de 1 à 5 dans
Paramètres/Diaporama/Texte).
(5) En cours de lecture, vous pouvez utiliser les signets pour marquer une page afin
de reprendre la lecture plus tard à partir de cette page. Pour davantage
d’informations sur la fonction Signets, référez-vous à la section “Fonctionnement
des signets”.
53
Page 54

11.2 Fonctionnement des signets
(1) Allez à la page que vous souhaitez marquer.
(2) Appuyez brièvement sur la touche VOL+ pour afficher une fenêtre “Stocker
signet” et sauvegarder un signet.
(3) Appuyez sur la touche PREVIOUS/NEXT pour sélectionner un numéro de signet
et appuyez sur la touche MENU pour confirmer. Le signet est sauvegardé.
Celui-ci figure à la première ligne de la page sélectionnée.
(4) Pour lire la page marquée, appuyez brièvement sur la touche VOL- pour afficher
la fenêtre “Charger signet”. Appuyez sur la touche PREVIOUS/NEXT pour
sélectionner l’option Signet et appuyez sur la touche MENU pour confirmer. Vous
serez amené à cette page.
54
Page 55

Remarque: certains fichiers TXT peuvent ne pas pouvoir être lus. Cela peut être dû à
leur format. Sautez la lecture de ces fichiers ou lisez-en d’autres.
12 Naviguer parmi les fichiers
Pour naviguer parmi les fichiers stockés dans la mémoire du lecteur,
(1) Appuyez et maintenez enfoncée la touche MENU pour afficher le menu
principal.
(2) Sélectionnez l’option “Navigation” et appuyez sur la touche MENU pour
accéder au mode Navigation de fichiers.
(3) Appuyez sur la touche PREVIOUS/NEXT pour sélectionner le fichier que
vous souhaitez visionner, et appuyez sur la touche MENU pour l’afficher
55
Page 56

ou le lire.
13 Enregistrement de sons
z Enregistrement
(1) Appuyez et maintenez enfoncée la touche MENU pour afficher le menu
principal.
(2) Sélectionnez l’option “Enregistrement”,et appuyez sur la touche MENU
pour accéder au mode Enregistrement.
(3) Appuyez brièvement sur la touche PLAY/PAUSE pour démarrer
l’enregistrement. En cours d’enregistrement, vous pouvez appuyer sur la
touche PLAY/PAUSE pour mettre en pause/continuer l’enregistrement.
56
Page 57

(4) Appuyez brièvement sur la touche MENU pour arrêter l’enregistrement et
le sauvegarder. Appuyez et maintenez enfoncée la touche MENU pour
revenir au menu principal.
z Ecouter un enregistrement
Pour écouter un enregistrement,
(1) Sélectionnez l’option “Navigation” du menu principal pour accéder au
mode Navigation de répertoires.
(2) Ouvrez le répertoire “VOICE” et sélectionnez l'enregistrement que vous
souhaitez écouter.
57
Page 58

14 Suppression de fichiers
Pour supprimer un fichier,
(1) Sélectionnez l’option “Navigation” du menu principal et accédez au mode
Navigation de répertoires.
(2) Appuyez brièvement sur la touche VOL- pour afficher la boîte de dialogue.
(3) Utilisez les touches PREVIOUS/NEXT pour sélectionner l’option “OUI” et
appuyez sur la touche MENU pour confirmer.
15 Réglage des paramètres
Pour configurer les paramètres du lecteur:
(1) Dans le menu principal, sélectionnez l’option “Réglage” et appuyez sur la
58
Page 59

touche MENU pour accéder au mode Configuration système.
(2) Appuyez sur la touche PREVIOUS/NEXT pour sélectionner l’option
Configuration et appuyez sur la touche MENU pour confirmer ou appuyez
sur la touche PLAY/PAUSE pour annuler/revenir.
Musique Mode Répétition
1 fois(lecture de la piste sélectionnée, la
lecture d’arrête une fois terminée)
Répéter(répétition de la piste sélectionnée)
1 fois(lecture de tous les fichiers audio du
répertoire sélectionné, la lecture s’arrête
une fois terminée)
Répét(répétition de tous les fichiers audio
59
Page 60

60
du répertoire sélectionné)
Une fois tous(lecture de tous les fichiers
audio stockés dans la mémoire du lecteur,
l’a lecture s’arrête une fois la lecture de tous
les fichiers terminée)
Répét tous(répétition de tous les fichiers
audio stockés dans la mémoire du lecteur)
Intro(lecture des 10 premières secondes de
chaque fichier audio)
Rég lecture
Ordre(lecture des fichiers audio par ordre
de séquence)
Page 61

Egalisateur
Egal.Person.
(égaliseur défini
par l’utilisateur)
Aléatoire (lecture aléatoire des fichiers
audio)
Normal, 3D, Rock, Pop, Classique, Basses,
Jazz, Egal. Person.
(1) Appuyez sur la touche
PREVIOUS/NEXT pour modifier la
colonne Egal.Person.
(2) Appuyez sur la touche VOL+/VOL-
pour régler la valeur de la colonne
sélectionnée.
(3) Appuyez à nouveau sur la touche
61
Page 62

Enregistrement
Navigation
62
NEXT jusqu’à ce que le curseur soit
positionné sur OUI, appuyez ensuite
sur la touche MENU pour confirmer.
(4) Accédez au menu “Egalisateur”,
sélectionnez ensuite “Egal.Person”
pour activer l’égaliseur.
Qualité
d’enregistrement
Vol ume
d’enregistrement
Navigation de texte (permet de définir un intervalle de temps
Haute qualité, qualité normale
+1、+2、+3、+4、+5
Page 63

entre chaque page lorsque le mode de lecture automatique est
activé.)
Navigation de photos (permet de définir un intervalle de temps
entre chaque photo du mode Diaporama.)
Te m ps ré tr o
Affichage
Système Info
Réglage lumino (permet de régler la luminosité de l’écran)
Mode de rétro
éclairage
5 secondes, 10 secondes, 15 secondes, 20
secondes, 30 secondes, Touj. allumé.
Normal
Economiseur (extinction automatique de
l’écran au bout d’une période d’inactivité)
63
Page 64

Minuteur OFF
(permet de
définir une
durée de
lecture avant
l’extinction
automatique du
lecteur.)
64
Mise à jour– Pour mettre à niveau le firmware
Réinitialiser – permet de restaurer la configuration d’origine du
lecteur
Eteindre, 10 minutes, 15minutes, 30 minutes, 60 minutes, 120
minutes
Page 65

Langue
(Permet de
sélectionner
une langue
d’affichage)
ENGLISH, Français, Spanish
16 Dépannage
Problème Cause possible Solution
L’écran LCD ne s’allume
pas lorsque je mets en
marche l’unité.
Le niveau de charge de
la batterie est trop faible.
Mettez en charge la
batterie.
65
Page 66

j’essaie d’écouter un
fichier audio.
Le volume est trop faible. Réglez le volume. Aucun son lorsque
Fichier audio défectueux.
Supprimez ou sautez la
lecture du fichier.
Impossible de raccorder
le lecteur au PC.
La durée affichée
change constamment.
66
L’interface USB du
lecteur n’est pas prise en
charge par la carte mère
de l’ordinateur.
Le débit du fichier MP3
varie pendant la lecture
Mettez à jour ou
remplacez la carte mère
de l’ordinateur.
Essayez de compresser
un fichier MP3 en utilisant
un débit constant.
Page 67

Une erreur se produit sur
l’ordinateur lorsque je
connecte le lecteur.
L’espace mémoire total
affiché sur le lecteur ne
correspond pas à celui
indiqué sur l’emballage.
Impossible de lire
certains fichiers MP3.
Le lecteur a été
déconnecté lors d’un
transfert de fichier.
Une partie de la
mémoire est utilisée pour
stocker des programmes
et polices de caractère.
Le fichier MP3 est
compressé en utilisant
un codec comme MPEG
I Layer 1 ou Layer 2
Ne déconnectez pas le
lecteur lors d’un transfert
de fichier.
1. Supprimez les fichiers
MP3 non supportés.
2. Utilisez le codec MPEG
I Layer 3 pour
67
Page 68

Impossible de lire le
fichier vidéo
68
non pris en charge par le
lecteur.
Le format de fichier n’est
pas pris en charge.
Le fichier vidéo est
corrompu
compresser les fichiers
MP3 non supportés.
Assurez-vous que le
fichier vidéo est au format
AVI. S’il ne l’est pas,
utilisez l’outil de
conversion fourni pour
convertir le fichier.
Sautez la lecture du fichier
ou chargez un autre
fichier
Page 69

Tentez d’utiliser un éditeur
Le format de fichier n’est
pas pris en charge.
Impossible d’afficher la
photo
Impossible de lire le Le format de fichier n’est Sautez la lecture du fichier
La résolution de l’image
n'est pas prise en charge
par l'unité.
d’images pour convertir
l’image vers un autre
format.
L’unité prend en charge
une résolution maximale
de 2048 X 2048.
Assurez-vous que la taille
de vos images n’excède
pas cette limite.
69
Page 70

fichier TXT pas pris en charge. ou chargez-en un autre.
17 Spécifications techniques
Elément Spécifications
Capacité 1 GB
Type de batterie Batterie au lithium rechargeable
Autonomie de la batterie
Ecran LCD Ecran 1.5 pouce CSTN
Puissance du connecteur
Ecouteurs
70
8 – 10 heures (seulement pour les fichiers MP3)
ou environ 4 heures (fichiers vidéo AVI)
5mW+5Mw
Page 71

Format vidéo supporté AVI (XviD)
Formats audio supportés MP3, WMA
Format image supportés JPEG
Résolution de l’image 2048 X 2048 (Max.)
Débit MP3: 8-320kbps; WMA: 64-384kbps
Rapport B/B >90dB
Port USB USB2.0
Température de
fonctionnement
Température de rangement -20 ~ +55
0 ~ +55
71
Page 72

Humidité relative de
fonctionnement *
Humidité relative de
rangement *
20% ~ 90% (40)
20% ~ 93% (40)
18 Remarques
z Assurez-vous que les commandes du lecteur sont déverrouillées avant toute
opération. Si les touches sont verrouillées, maintenez enfoncée les touches
MENU et VOL- pour les déverrouiller.
z Veuillez immédiatement mettre en charge la batterie une fois que l’écran affiche
un niveau de charge de batterie faible. Autrement, l’unité s’éteindra
automatiquement.
72
Page 73

z Veuillez correctement déconnecter le lecteur de votre PC afin de prévenir toute
perte de données.
z Le débit de transfert affiché sur votre ordinateur varie en fonction du système
d’exploitation installé. Le débit de transfert exact est affiché sur le lecteur.
73
Page 74

AVI Converter Quick User Guide
Note: Before installing the AVI converter, make sure that the Windows OS is installed with
DirectX9.0 or above.
Before you download videos to the device, make sure they are AVI files and can be played by
the device. If not, convert them using the included converting tool on the driver CD. The
following steps show how to convert:
1) Install the AVI Converter
(1) Place the included CD on the CD-ROM tray of a computer.
(2) Double click the “AVI converter” folder.
(3) Run “AVI Converter CHN – EN setup.exe” to show up the following window.
(4) Select an installation interface language.
(5) Click “Next” to continue. Browse to a destination for the installation.
- 74 -
Page 75

AVI Converter Quick User Guide
(6) Click “Install” to start installation.
(7) Wait for the installation to be completed before you see the following window. Click “Fi ni sh”
to finish installation.
- 75 -
Page 76

AVI Converter Quick User Guide
2) Use the AVI converter
(1) Select “Program files” → “AVI Converter” on the Start menu to see the following window.
(2) Click
(3) For the “Source File” field, specify the file that you want to convert by clicking the button on
the right. For the “Target File Path” field, specify the destination where the converted file is
saved.
button to display “Conversion Setting” window.
(4) Select the resolution of the player’s screen. (320*240 is for 2.4-inch screen. 220*176 is for
2.0-inch screen. 160*128 is for 1. 8-inch screen. 128*128 is for 1.5-inch screen.)
- 76 -
Page 77

AVI Converter Quick User Guide
(5) Set the conversion quality in the Quality field and display mode in the Aspect Ratio filed.
(6) Click “Save” to save your setting. To convert another file, repeat the steps above.
(7) Click “close” button to close the setting window.
(8) Click “Convert Now” to start converting.
(9) Click “Finish” after the converting is finished.
- 77 -
 Loading...