

Page 1

User Manual-SMPK1021
Overview
●Refined exterior design
Unique design fits for hand.
●Multi file format support
This player recognize MP3, WMA ,WAV and video in AMV formats.
●Firmware upgrade available
You can download and upgrade software from website enhancing player’s function.
●E-BOOK You can download text files into the player
●Driver free USB memory
Manage your files in USB memory without specified software, no need drivers in WIN2000 or furthers.
●Recorder / Repeat
Voice can be recorded and saved in WAV or ACT format. Snippet/Contrast repeat available.
●Equalizer
Normal, Rock, Pop, Classic, Soft, Jazz, DBB
1
Page 2

● Play modes
Normal, Repeat One,Folder, Repeat Folder, Repeat All,Random,Intro
●Timing turning off
The player provides Sleep and battery saving mode, more convenience for you!
●Complete dynamical menu
Visualized dynamical menus with text instructions make you easy control.
Declarations
Please read this manual carefully.
Functions and performance may change without prior notice.
2
Page 3
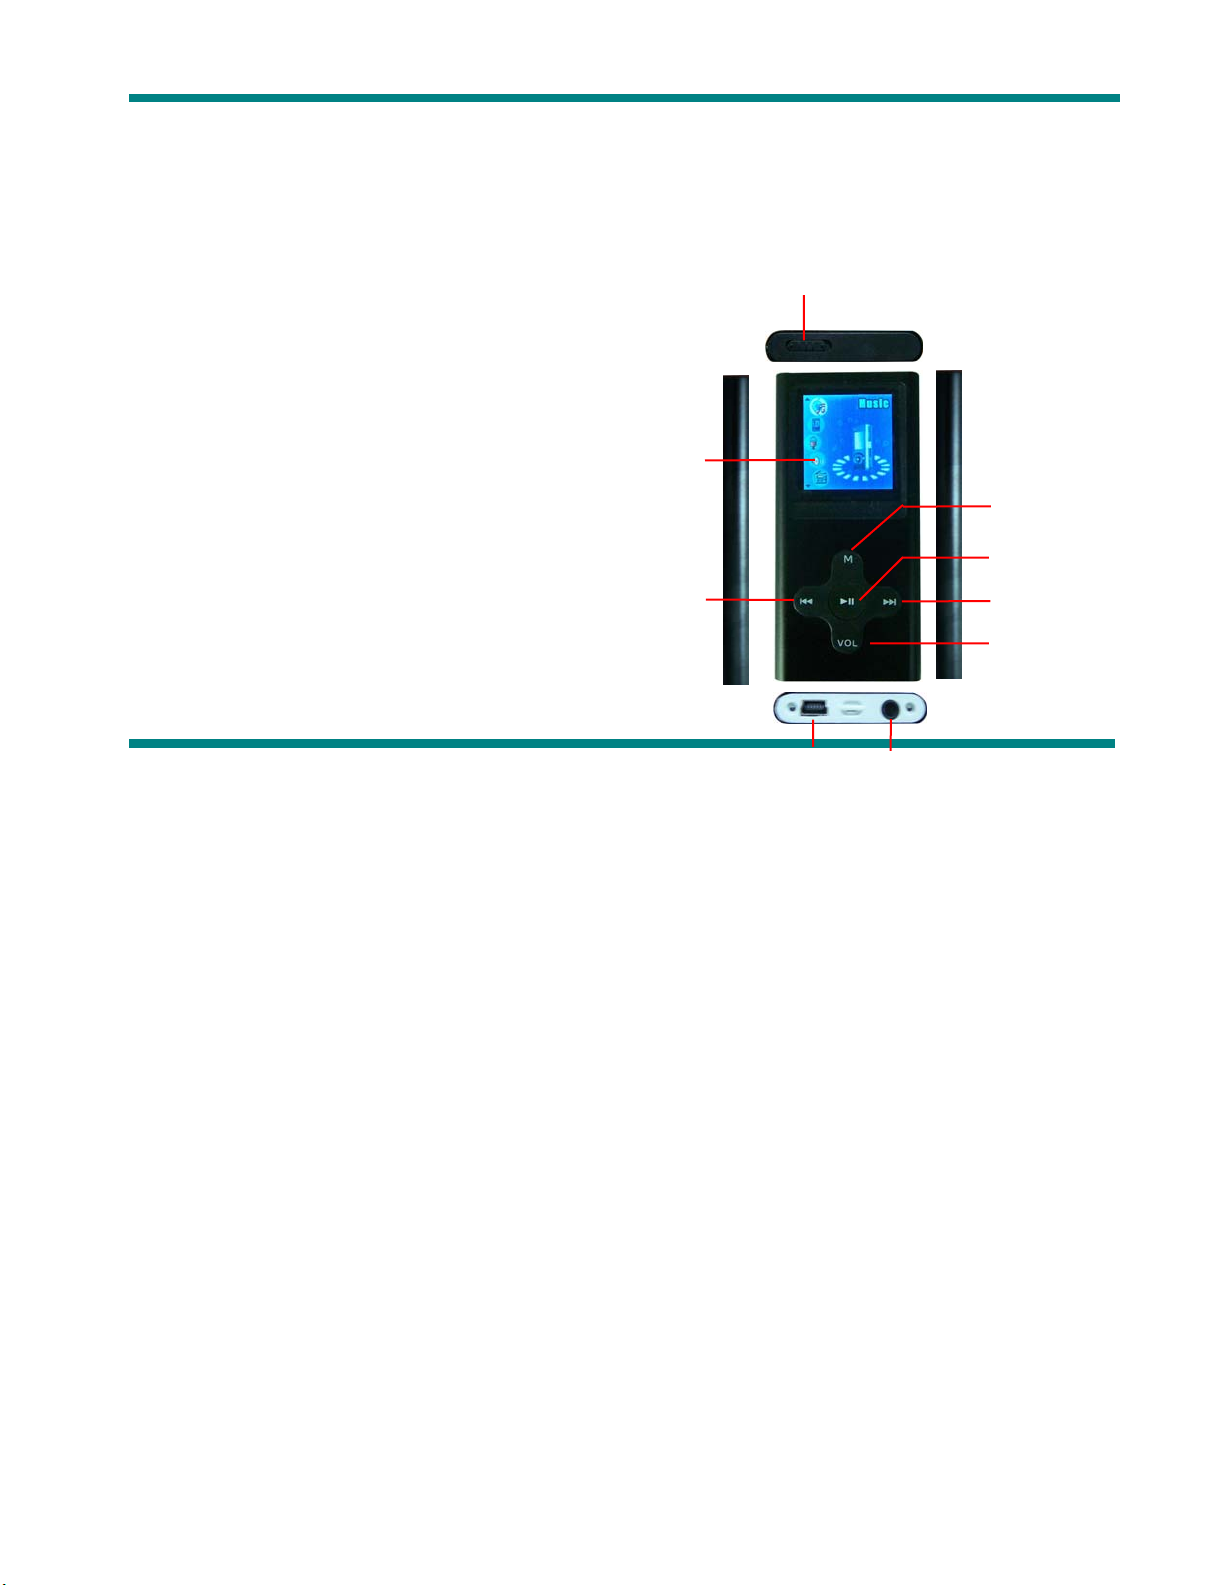
Know your player
z Exterior and Key
`
1. DISPLAY SCREEN
2. EARPHONE
3. USB
4. MENU/MODE
5. NEXT/VOL+
6. POWER ON/OFF
7. PLAY/PAUSE/STOP
8. VOL
9. PREVIOUS/VOL-
1
9
6
4
7
5
8
3
3
2
Page 4
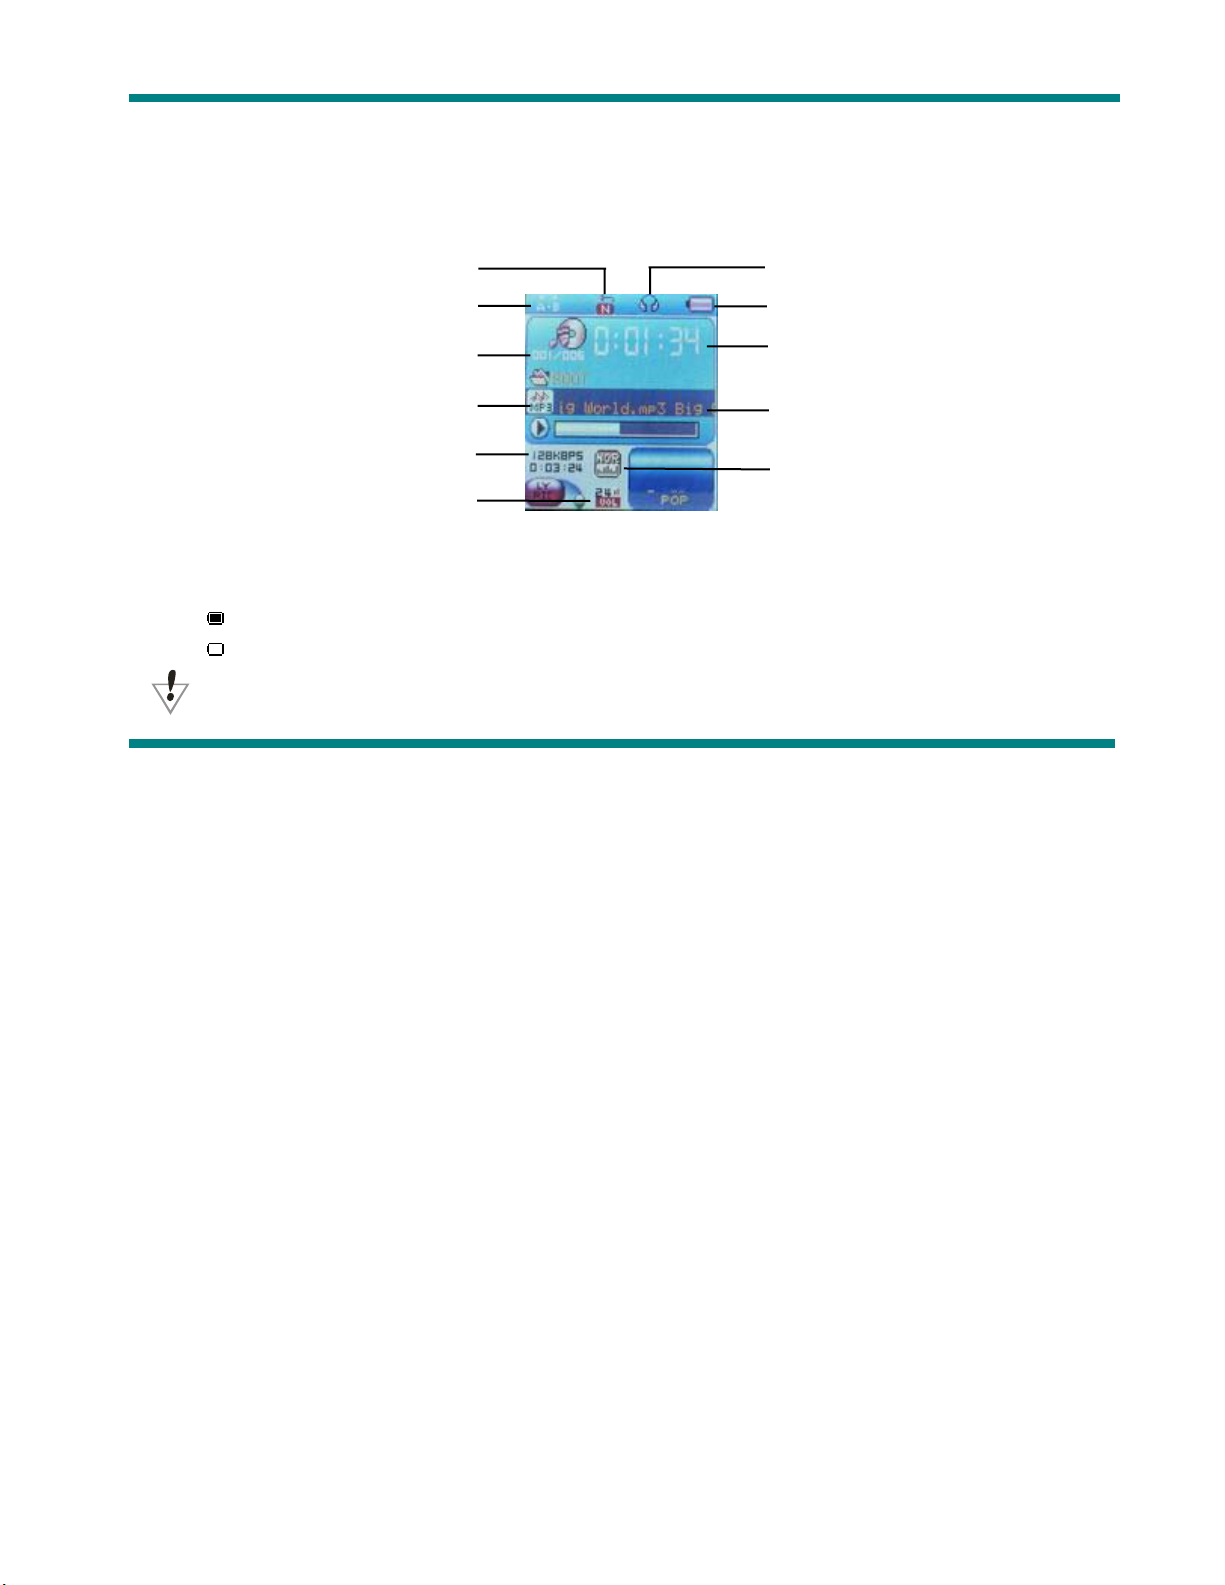
z Displayer
z Battery Level
The player shows capacity in 9 levels
Battery is full on 3.8V. As time goes on, capacity indication will monish.
Indicator shows blank when battery almost ran out. You should charge your battery at that time.
Repeat Mode
Replay Mode
Number
File Formats
Bit Rate
Volume
Earphone
Battery Reveal
Play Time
Title/Artist
Sound Effects Mode
Please switch on the player before charge. This player cannot be charged in case of power off/
4
Page 5

Please switch off power when not using the player.
Basic Functions
z Access to Menus
Press Mode to access menus.
z Scrolling
○ Scroll music, menus
○ Fast Forward / Reverse when playing music.
z List of Menus
To access different menu functions from main menu.
Main menu: (Hold Mode to access)
5
Page 6

Music Mode: Recorder Mode: Play Mode:
Settings: E-Documents:
6
Page 7
Browsing pictures: USB Mode (Connect to PC):
z Volume Adjust
Press VOL to adjust volume, press Next/PREVIOUS to increase or decrease volume.
7
Page 8

z Switch on/off
Press and hold Play to switch on when the player is off.
Press and hold Play to switch off when the player is on.
z Play & Pause; exit from submenu
On music mode, Press Play to play music.
When playing music, press Play to pause; press and hold to stop playing.
z Start / Stop recording
On recording mode, press Play to stop.
Keys Processing
z Keys Functions Definition
1. Play: Power On/Off, Play, Pause, Stop
2. MODE (Menu ): Enter main menu or exit from current menu.
3. Next: Next, FF, Volume increase
4. PREVIOUS: Previous, Rev, Volume decrease
5. USB: USB outlet
6. Earphone: Standard earphone outlet
7. ON/OFF: Power switch
8
Page 9

z Key Processing Definition
Keys processing includes 2 actions: Press , Press and Hold
Press: Press a key and work immediately;
Press and Hold: Press a key and hold it at least 2s
4、Play music
z Simple actions
1.Put earphone plug into earphone outlet;
Power switch On : Press and hold Play Key to open the player, then enter Main Menu.
2.
Choose“Music”option,and press“MENU”key to enter and press “ PLAY” key to play music。
3.Select music: PREVIOUS: Previous music;
Next: Next music.
z Equalizer Mode
1. When playing music
2. Press Mode to enter play submenu;
3. Press Next choosing Equalizer Mode;
9
Page 10

4. Press Mode to enter ‘Equalizer Mode’ submenu.
Select an equalizer:
5. Detail of each equalizer (EQ):
Natural, Rock, Pop, Classical, Soft, Jazz, DBB
6. Press Next to select an EQ and press Mode to confirm.
z Synchronous Lyric Display
The player supports lyric files with *.LRC suffix, and displays synchronously.
How to use lyric files?
Please make sure the lyric has the same name to the music, For example:
Music file: Journey.mp3 Lyric file: Journey.lrc
10
Page 11

z How to know if lyric available?
If lyric matched, a green icon will be displayed on the left down corner of screen,
1. When marched lyric available: 2. Press and hold Mode to enter lyric interface;
3. Lyric displays 4. Press Mode return to music mode.
Voice Recording
Please make sure the battery has enough capacity before making record.
Each fold can save up to 99 voice recording files.
z Recording on “Record mode”
1. .Enter main menu.
11
Page 12

2. Press Next scroll to Record mode
3. Press Mode to select Record mode, screen will display as below:
4. Press Play to start recording.
Voice will be recorded in current fold which set through ’Record stop / Main fold’
If displayed “Memory full”, it means no space to save new record files, please delete other files to
release memory space.
If “Fold full” shown, it means there are 99 record files in this fold. Please choose another one.
The player only responses to Play and A-B when record processing
12
Page 13

z Select Record Type
1. When in the interface of ‘Record stop’
2. Press Mode to enter record submenu 3. Press next scrolling into ‘Rec type’
submenu then presses Mode to select it.
Fine REC
wav file,fine quality
Long REC act file, normal quality
Fine VOR wav file, (Recording controlled by voice, pause when mute)
Long VOR act file, (Recording controlled by voice, pause when mute)
4. Press Next to choose appropriate type and press Mode to select it
13
Page 14

5. Press Play to start recording.
z Play recorded files
1. Enter main menu
2. Press Next to choose ‘VOICE’
3. Press Mode to enter playing interface
4. Press Play key to start playing the file.
5. Choose voice record files:
PREVIOUS: Select previous file;
Next: Select the next file;
Convert ACT Files into WAV format
The ACT file which produced by this player can be converted into WAV format by using software provided.
1. Imply “Sound Converter” program. 2. Select the ACT files you would like
Clock “OPEN” button to convert
14
Page 15

3. Click ‘CONVERT’ button, the program will start converting,
15
Page 16

PS: This tool can also play WAV and MP3 files.
16
Page 17

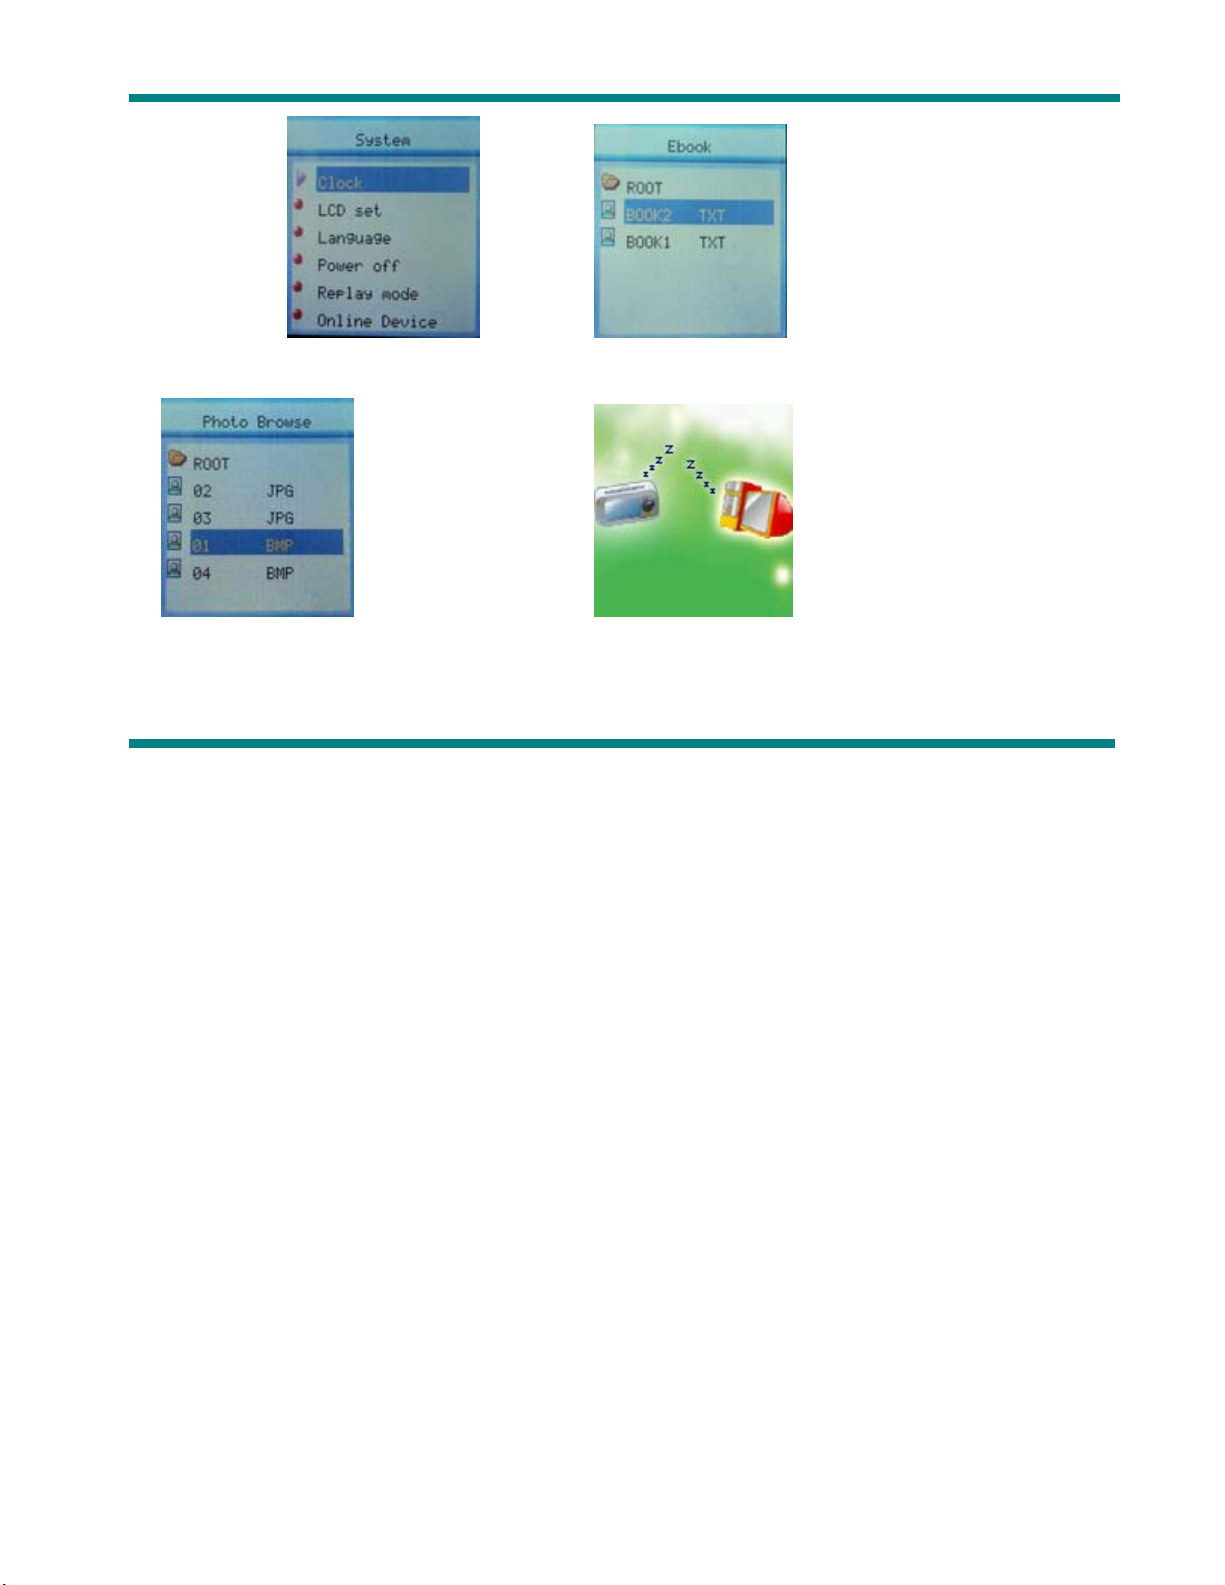
Settings
z Enter Settings
You can set system performances here,
options may vary in different firmware version
1. Enter main menu
2. Press Next Scrolling into “SETUP”
3. Press Mode to enter.
z Options introduction:
(Clock) Setting date and time when saving recorded file
(LCD set) Screensaver setting
(Language) Choosing different languages
(Power off)
(Replay mode) Setting Replay status
(Online Device) MTP and USB Disk setting
(Online Mode) Connect PC mode
(Memory info) Check memory space and usage status
Setting a count down time in minutes, the player will shut
off when time out.
17
Page 18

(DRM Time) Greenwich Mean Time
(Firmware version) Version of player’s firmware
(Firmware upgrade) Use for upgrade firmware
(Remove MTPinfo) Exit MTP mode
(Exit) Exit from Setting interface
z List of menus:
○’Clock’ Setting
1. System setting interface
2. Press Mode to enter ‘Clock’ interface recording time:
3. Press VOL setting from years. While setting, year on twinkling.
4. Press Next the value will increase (PREVIOUS on opposite)
18
Page 19

5. After setting, press Mode to exit.
○ “LCD set” Setting
1. Press Mode enter “LCD set”
2. Press PREVIOUS or Next for choosing corresponding submenu .
3. press“Mode”key to enter and press “PREVIOUS or Next” key
to adjust time
4. press Mode to exit.
○ Language Setting
This player have 18 display languages: Simplified Chinese, English, Traditional Chinese ect.
1. Press Mode to enter ‘Language’ setting
2. Press PREVIOUS or Next to choosing and press “Mode” key to enter.
3. press play to exit.
○”Power off” setting
Please note:
You can set time in seconds on ‘Battery saving’ mode, allow the player shut down automatically
when player become stop and idle for the period you have set. This function id void if the time set to 0.
You can set time in minutes on ‘Sleep mode’, allow the player shut down automatically when the
player become idle (regardless current status) for the period you have set. It is designed for listening
19
Page 20

music before sleep. Please note: Sleep mode valid only once after setting, you have to set again if you
want to use it next time.
○ “Replay mode” Settings
Note: in “Manual Mode” you should set repeat point manually.
In “Automatic Mode” the player can identify sentence automatically when on A-B repeat. (This
function is designed for repeat sentences in language studies.)
○ “Online Device” Settings
press“Mode”key to enter and Press PREVIOUS or Next to select it and press“Mode”key to confirm
○ “Online Mode” Settings
press“Mode”key to enter and Press PREVIOUS or Next to select it and press“Mode”key to confirm
○’Memory info’ check
You can check total memory space and the percentage of usage.
○”DRM Time” check
press“Mode”key to enter and check
○’Firmware version’
You can find the player’s firmware’s version.
○’Firmware upgrade’
press“Mode”key to enter. Use for upgrade player’s firmware.
○’Remove MTPinfo’
20
Page 21

press“Mode”key to enter
Tips: Press Play can exit current menu quickly.
AMV Play
1. Enter main menu, press Next scrolling to “AMV”(Only AMV files available):
2. Press MODE to enter.
3. Press PLAY key to start playing
21
Page 22

z Reading files
1. On main menu, press Next/PREVIOUS choosing E-BOOK,
2. Press Mode to enter corresponding submenu:
3.Press Next or PREVIOUS choosing the document you want to read,
then press Play to read it.
z Browsing Pictures
This function is available for JPEG /BMP format.
1. On main menu, press Next/PREVIOUS choosing PHOTO.
2. Press Mode to enter submenu:
3. Press Next or PREVIOUS choosing the document you want to read,
then press Play to play it..
22
Page 23

9、Using USB Disk
The player is also a standard USB disk. Supported by Windows98 (drivers needed), Windows 2K or above
(no need for drivers), Mac OS 10.3, Redhead Linux 8.0 or above.
This player supports USB power supply, it can be used without battery. Press Mode at ‘Waiting Mode’,
Can quickly exit to main menu, and you can choose a mode you would like to enter.
This player support suspend mode.
There are three display modes available when connected to ‘pc’.
1. Waiting
2. Downloading
23
Page 24

3. Uploading
10、Enter MTP Media
1. Choose “Setup” option on the main menu.
2 .Press “Next or PREVIOUS ” the select “Online Device”—“Media Device” ,Press “Mode ” the confirmation
3.Connect PC enter into MTP media player.
4.Support DRM 10 songs
Other settings
z Choose other folder (Stop submenu)
You can classify files into several different folders that ease to manage them (folders should be created
on PC). The player can identify 9 folders in root
24
Page 25

1. When stopped
2. Press Mode to enter Stop submenu
3. Press Mode to enter folder choosing interface
4. Press Next or PREVIOUS to choose a
folder
5.Press Mode to enter selected folder.
Please note: You can set folders independently in Music / Recorder / Play mode
25
Page 26

z Delete file (Stop submenu)
You delete correspond files。
1.When Stopped.
2.Press Mode to enter Stop submenu
4. Press Next or PREVIOUS to choose ‘Delete ’ or
‘Delete all’.
4. Press Next to choose ‘YES’
5.Press Mode to confirm delete.
26
Page 27

‘Delete all’ will delete all files in current folder of current mode. I.e. Choose ‘Delete all’ in Music mode
will delete all music files; recorder files will not be affected.
Please removed player safely and plug USB cable after delete files on PC, otherwise some files will
not be removed.
z Play mode (Play submenu)
You can choose different play mode (i.e. repeat, shuffle) when playing music or recorded files.
The first option on Play submenu is ‘Play mode’
○ REPEAT
(Normal)
(Repeat One)
(Folder)
(Repeat Folder)
(Repeat All)
(Random)
(Intro)
Playing music files in sequence until the end of folder
Repeat single music file
Play all music files in folder
Repeat all music files in folder
Repeat all music files
Play music files in folder randomly
Play the 10s of each music files in sequence
27
Page 28

● Equalizer mode (Play submenu)
1. When playing music
2. Press Mode to enter play submenu
3. Press Next key to choose ‘
Equalizer’ option
4. Press Mode to enter, Press PREVIOUS or Next to choose : Normal, Rock, Pop, Classic, Soft, Jazz,
DBB
z Tempo rate(Play submenu)
You can choose different play speed and not affect to sound. (Only valid to MP3 files)
1. While playing music
2. Press Mode to enter play submenu
3. Press Next scrolling to ‘Play speed’ option
4. Press Mode to enter
5. Press Next for faster, PREVIOUS for slower
Note: Play speed will applied to all music file
z Replay
○ A-B Replay
1. When playing music or recording
2. Press Mode to enter play submenu
3. Press Next key to choose ‘Replay’ option
4. Press Mode to enter
mode (Play submenu)
28
Page 29

Replay Mode: ‘A’ of Symbol flashes, waiting for starter A
5. Press Next to select ‘A’
‘B’ of symbol
6. Press Next to select B. Symbol
flashes, waiting ender B
fixed and starting repeat between A-B, while playing,
you can Press PREVIOUS to reset A point.
Press PREVIOUS returns to Repeat A-B status.。
Press Mode to exit repeat mode upon above three modes.
z Replay times (Play submenu)
1. When playing music
2. Press Mode to enter play submenu
3. Press Next key to choose ‘
Replay times’ option
4. Press Mode to enter, Press PREVIOUS or Next to adjust times
z Replay gap(Play submenu)
1. When playing music
2. Press Mode to enter play submenu
3. Press Next key to choose ‘
4. Press Mode to enter, Press PREVIOUS or Next to adjust time.
29
Replay gap’ option
Page 30

z New Function Recommends!
About Secret Space
Some MP3 user may worry about divulging secret. They do not want others to find private
information contained, therefore these data have to be removed before lend their own MP3 to others. It
makes some trouble.
However, this problem has totally solved by ‘Secret Space’ technique!
You can use provided software to divide the whole USB disk into two parts, and encrypt one of them.
You can move your privacy into the encrypted part; they will be protected by password.
To active ‘Secret Space’:
1. Connect your player to PC
2. Run MP3 Player Disk Tool which can be found in provided CDROM: (Picture 11-1)
3. Click ‘Allocation and Encrypt’ card, Allocate appropriate space and set username and password,
and then click Start. (Picture 11-2)
30
Page 31

(Picture 11-1) (Picture 11-2)
4. After space allocation, shown as below: (Picture 11-3)
5. Click ‘OK’ to restart.
6. After restart you will find two disks (only one disk can be seen on Windows 2K SP4or prior),
click the encrypted disk (the second one), you will find three files, two are hidden, one is executable.
31
Page 32

(Picture 11-3) (Picture 11-4)
7. Running executable file ‘RdiskDecrypt.exe’ and input username and password. If all are correct,
disk will be opened, and files can be copied into.
8. You must enter username and password each time access
encrypted disk.
Warning: Divide one disk into parts will remove all data, and
so does combine process.
32
Page 33

Warning: Please remember username and password. If you forget it, you can only making
combine processing and you will loss all encrypted data.
Convert Video files into AMV
This program is used to convert video files into AMV
format, currently only WMV format is supported.
1. Run “AMV Convert Tools”, click
the folder where to save the AMV files, then click
to choose
to
select the folder where the original files are.
(Picture 12-1)
2.Select unprocessed AMV files, then click
icon will be highlighted into
and a dialog box will
, the
shown. Choosing Pixels of AMV to “128 * 128” and
Frames per second to “middle”, then click OK to confirm.
(Note: Only pixels in 128*128 can be supported) (Picture 12-1)
(Picture 12-2)
33
Page 34

3.Click to start converting. (Picture 12-3)
(Picture 12-2) (Picture 12-3)
4.After convert, the AMV files will be played automatically.
34
Page 35

●Troubleshooting
No Power Check if battery had installed properly
Make sure you have switched the player on
No Sound Make sure volume is not on 0 position and the
connection to earphone is valid
Please make sure the earphone is clean
Damaged MP3 files may have noise and even cannot be
played
Strange characters on display Make sure you have chose correct language
Cannot Download Music Check USB cable, and make sure the player is properly
connected to the PC
Check if the driver has well installed
Make there is still blank memory
35
Page 36

Technical Specifications
Dimension / Weight (L)90*(W)41*(H)8.6 / 40g
Screen 65K full-color 1.5 CSTN screen.
Connecting to PC High Speed USB2.0
Memory 128M – 4GB Flash
Voice Recorder
MP3、WMA、WMV
Supported Formats
Operate Temperature -5 to 40 degree
17 Languages Display Simp Chinese, English, Trad Chinese, Japanese, Korean, Itanlan etc.
Supported Systems
Please note: Design and characters may change without prior notice.
Sample rate 8KHz
Format WAV (32K bps), ACT (8K bps)
Time 35hours (ACT, 128M Flash)
Max. Output (L) 10mW + (R)10mW (32Ohm)
MP3 Bit rate 8K bps – 320K bps
WMA、WMV、ASF Bit rate
Freq. Response 20Hz to 20KHz
SNR 85dB
Music : MP3, WMA ; Video: AMV ;
Windows98/SE/ME/2K/XP、Mac OS 10、Linux 2.4.2
5K bps – 384K bps
Voice: wav
36
 Loading...