

Page 1
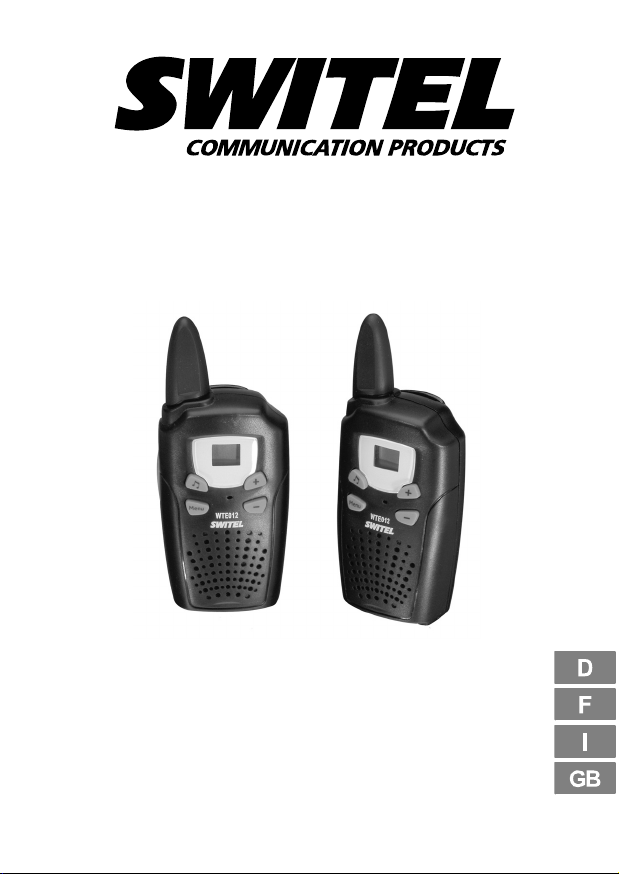
WTE012
Bedienungsanleitung
Mode d’emploi
Istruzioni per l’uso
Operating Instructions
Page 2

2
WTE012
Bedienungsanleitung 3. . . . . . . . . . . . .
Mode d’emploi 11. . . . . . . . . . . . . . . . . . .
Istruzioni per l’uso 20. . . . . . . . . . . . . . . .
Operating Instructions 28. . . . . . . . . . . .
Declaration of Conformity 36. . . . . . . . .
2
Page 3

1
Inhaltsverzeichnis
1 Sicherheitshinweise 4. . . . . . . . . . . . .
2 Bedienelemente 5. . . . . . . . . . . . . . . .
3 Funkgeräte in Betrieb nehmen 6. . . . . .
4 Wie bediene ich meine Funkgeräte? 7. .
5 Index 9. . . . . . . . . . . . . . . . . . . . . . . .
3
Page 4
Sicherheitshinweise
1 Sicherheitshinweise
Lesen Sie diese Bedienungsanleitung sorgfältig durch.
Bestimmungsgemäße Verwendung
Diese Sprechfunkgeräte sind geeignet für die Kommunikation mit
anderen Sprechfunkgeräten gleichen Standards. Jede andere Verwendung gilt als nicht bestimmungsgemäß. Eigenmächtige Veränderungen oder Umbauten sind nicht zulässig. Öffnen Sie die Geräte
in keinem Fall selbst und führen Sie keine eigenen Reparaturversuche durch.
Verwendungsbereich
Vermeiden Sie Belastungen durch Rauch, Staub, Erschütterungen,
Chemikalien, Feuchtigkeit, Hitze oder direkte Sonneneinstrahlung.
Verwenden Sie die Funkgeräte nicht in explosionsgefährdeten Bereichen.
Aufladbare Akkus/Batterien
Achtung: Werfen Sie Akkus/Batterien nicht ins Feuer und
tauchen Sie sie nicht ins Wasser.
Medizinische Geräte
Achtung: Benutzen Sie die Funkgeräte nicht in der Nähe
von medizinischen Geräten. Eine Beeinflussung kann
nicht völlig ausgeschlossen werden. Funkgeräte können
in Hörgeräten einen unangenehmen Brummton verursachen.
Entsorgung
Sie sind gesetzlich zur sachgerechten Entsorgung von Gebrauchsgütern verpflichtet. Das nebenstehende Symbol
bedeutet, dass elektrische und elektronische Altgeräte und
Akkus getrennt vom Hausmüll zu entsorgen sind.
Elektrische oder elektronische Geräte entsorgen Sie bei
einer Sammelstelle eines geeigneten Entsorgungsträgers.
Akkus/Batterien entsorgen Sie beim batterievertreibenden Handel sowie bei zuständigen Sammelstellen, die entsprechende Behälter bereitstellen.
Verpackungsmaterialien entsorgen Sie entsprechend
den lokalen Vorschriften.
4
Page 5
2 Bedienelemente
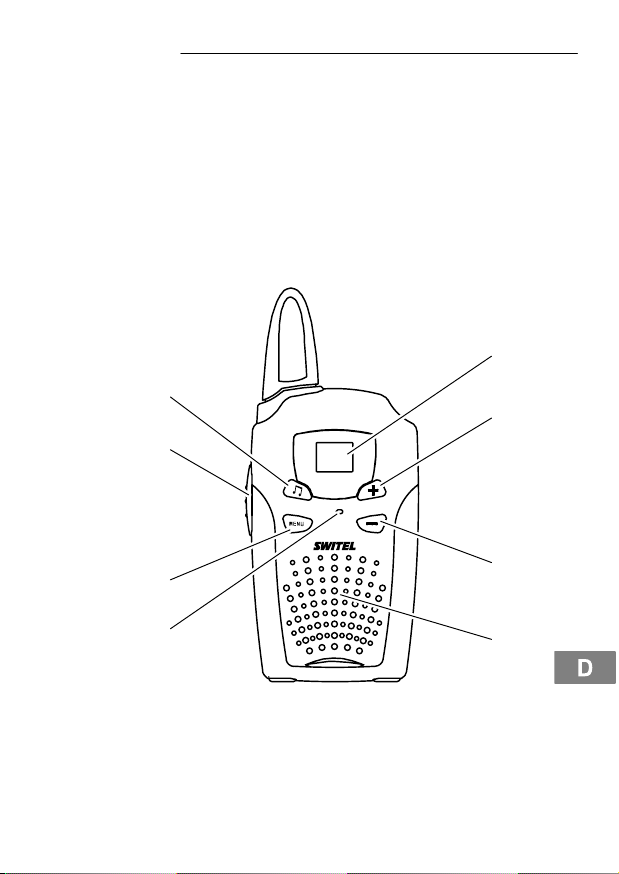
1
Mobilteil
1 Display
2 Lautstärke, Einstellung aufwärts / Kanalsuche ein/aus
3 Lautstärke, Einstellung abwärts / Kanalsuche ein/aus
4 Lautsprecher
5 Mikrofon
6 Menü
7 PTT − Sprechtaste
8 Rufton senden
8
7
WTE012
Bedienelemente
1
2
6
5
1
Die Tasten werden in dieser Bedienungsanleitung mit einer einheitlichen Kontur abgebildet. Abweichungen von Tastensymbolen
Ihres Funkgerätss gegenüber den hier abgebildeten Tastensymbolen sind möglich.
3
4
5
Page 6
Funkgeräte in Betrieb nehmen
3 Funkgeräte in Betrieb nehmen
Sicherheitshinweise
Achtung: Lesen Sie vor der Inbetriebnahme unbedingt
die Sicherheitshinweise in Kapitel 1.
Verpackungsinhalt prüfen
Zum Lieferumfang gehören:
− zwei Funkgeräte mit
Gürtelclip
− eine Bedienungsanleitung
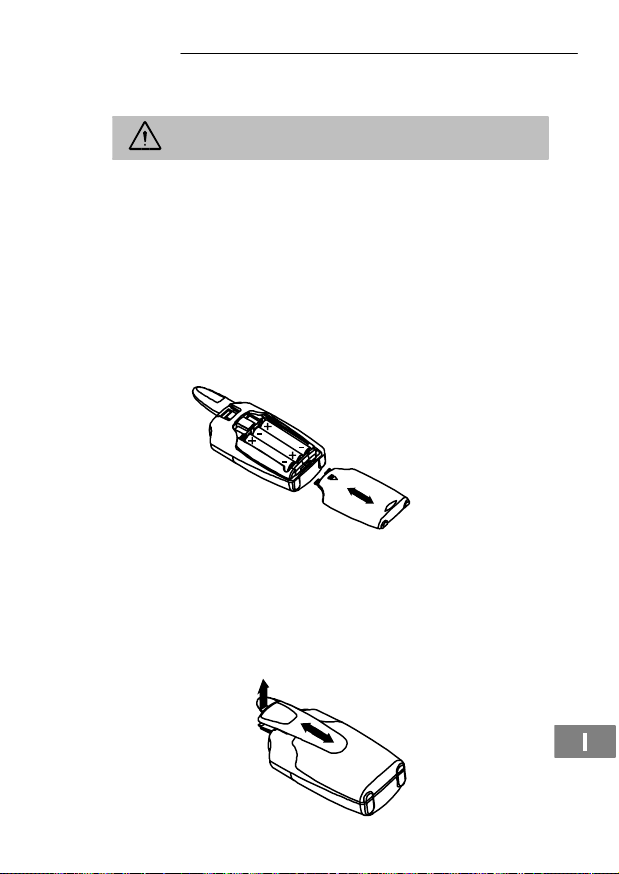
Akkus/Batterien einlegen
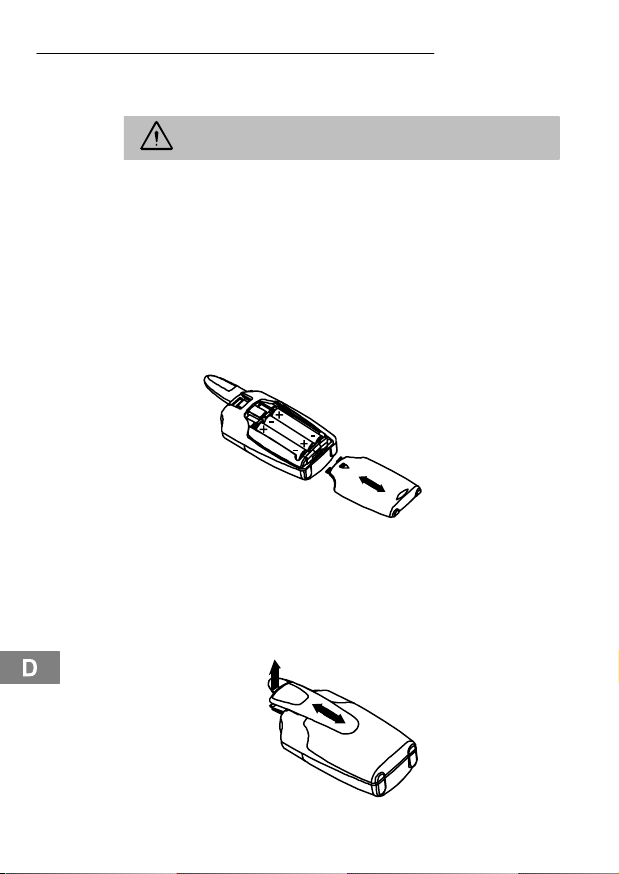
Legen Sie die Akkus/Batterien in das geöffnete Batteriefach ein.
Verwenden Sie nur Akkus oder Batterien des Typs AAA, 1,2 V. Achten Sie auf die richtige Polung! Schließen Sie das Batteriefach.
Gürtelclip anbringen
Nachdem Sie die Batterien eingelegt haben, können Sie die mitgelieferten Gürtelclips befestigen. Schieben Sie den Gürtelclip von
oben in die Führung, bis er hörbar einrastet. Um den Gürtelclip wieder zu entfernen, heben Sie die Befestigungslasche mit dem Fingernagel etwas an und schieben den Gürtelclip nach oben.
6
Page 7
Wie bediene ich meine Funkgeräte?
4 Wie bediene ich meine Funkgeräte?
Darstellungen und Schreibweisen
Abgebildete Taste drücken
, Abgebildete Taste lange
, Abgebildete Taste loslassen
y
Blinkender Text im Display
In das Mikrofon sprechen
Ein− / Ausschalten der Funkgeräte
, Funkgerät ein−/ausschalten
Lautstärkeregelung
Sie können die Lautstärke in 15 Stufen anpassen.
,
, , Lautstärke verringern
, Lautstärke erhöhen
Senden und Empfangen
, , Senden
Halten Sie das Funkgerät ca. 5 bis 7 cm vom Mund entfernt
und sprechen Sie mit normaler Lautstärke. Um mit anderen Teilnehmern zu sprechen, müssen alle Funkgeräte auf
den gleichen Kanal eingestellt sein.
, Empfangen
Sie können keine Funksignale empfangen, wenn Sie die
Taste gedrückt halten.
Rufton senden
Der Rufton macht andere Teilnehmer darauf aufmerksam, dass Sie
ein Gespräch beginnen möchten.
Rufton senden
, max. zehn Ruftöne senden
drücken
7
Page 8
Wie bediene ich meine Funkgeräte?
Kanalwahl
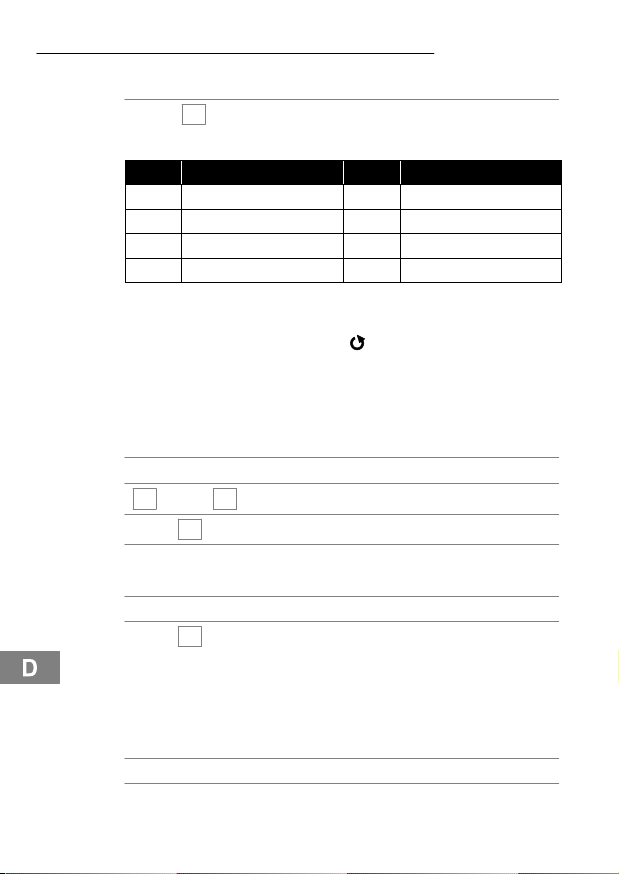
Es stehen Ihnen acht Übertragungskanäle zur Verfügung.
, [], , Kanal auswählen und
bestätigen
Kanal Frequenz (MHz) Kanal Frequenz (MHz)
1 446.00625 5 446.05625
2 446.01875 6 446.06875
3 446.03125 7 446.08125
4 446.04375 8 446.09375
Kanalsuche
In einer Endlosschleife wird auf den acht Kanälen nach Signalen
gesucht. Im Display erscheint das
Kanal gefunden, stoppt die Kanalsuche.
Drücken Sie die Taste um am Funkverkehr teilzunehmen.
Wenn Sie die Taste nicht drücken, wird die Kanalsuche nach
fünf Sekunden fortgesetzt.
Kanalsuche starten
, Menü öffnen
y
] oder [] Aktuelle Einstellung im Display
[
, [y], Kanalsuche starten
/ Kanalsuche fortsetzen
Kanalsuche beenden
, Menü öffnen
, [
], Kanalsuche beenden
Auto−Squelch
Auto−Squelch unterdrückt das Rauschen und schwache Funksignale. Um schwache Funksignale zu empfangen, müssen Sie
Auto−Squelch deaktivieren. Wenn kein Funksignal empfangen wird,
ist Auto−Squelch nach fünf Sekunden automatisch wieder aktiv.
, , Auto−Squelch deaktivieren
Auto−Squelch aktivieren
−Symbol. Wird ein aktiver
8
Page 9

5 Index
A
Akkus/Batterien einlegen, 6
Auto−Squelch, 8
B
Bedienelemente, 5
D
Darstellungen, 7
E
Ein− / Ausschalten der
Funkgeräte, 7
F
Funkgeräte in Betrieb nehmen, 6
G
Gürtelclip anbringen, 6
Index
K
Kanalsuche, 8
Kanalwahl, 8
L
Lautstärkeregelung, 7
R
Rufton senden, 7
S
Schreibweisen, 7
Senden und Empfangen, 7
Sicherheitshinweise, 4
V
Verpackungsinhalt, 6
W
Wie bediene ich meine
Funkgeräte?, 7
9
Page 10

10
Page 11

2
Table des matières
1 Consignes de sécurité 12. . . . . . . . . . . .
2 Eléments de manipulation 14. . . . . . . . .
3 Mise en service des
émetteurs−récepteurs 15. . . . . . . . . . .
4 Comment vous servir de vos
émetteurs−récepteurs ? 16. . . . . . . . .
5 Index 19. . . . . . . . . . . . . . . . . . . . . . . .
11
Page 12
Consignes de sécurité
1 Consignes de sécurité
Lisez très attentivement ce mode d’emploi.
Utilisation conforme aux prescriptions
Ces émetteurs−récepteurs conviennent pour la communication avec
d’autres émetteurs−récepteurs de même standard. Toute autre utilisation est considérée comme non conforme à l’usage. Des modifications ou changements effectués d’un propre gré ne sont pas autorisés. N’ouvrez en aucun cas les appareils et n’effectuez aucun
essai de réparation vous−même.
Champ d’utilisation
Evitez toute nuisance par la fumée, la poussière, les tremblements,
les produits chimiques, l’humidité, la grande chaleur ou l’ensoleillement direct.
N’utilisez pas les émetteurs−récepteurs dans des pièces exposées
aux explosions.
Piles/pilesrechargeables
Attention : Ne jetez jamais les piles/piles rechargeables
dans le feu et ne les plongez pas dans l’eau.
Appareils médicaux
Attention : N’utilisez pas les émetteurs−récepteurs à pro-
ximité d’appareils médicaux. Une influence ne peut être totalement exclue. Ces appareils peuvent causer un bourdonnement désagréable dans les prothèses auditives.
Elimination
La loi vous oblige à éliminer de manière appropriée les
biens de consommation. Le symbole placé ci−contre signifie que les anciens appareils électriques et électroniques
ainsi que les piles rechargeables ne doivent pas être éliminés avec les ordures ménagères normales.
Éliminez les appareils électriques ou électroniques
dans le centre de collecte d’un organisme approprié d’évacuation des déchets.
12
Page 13

Consignes de sécurité
Éliminez les piles/piles rechargeables auprès d’un reven-
deur spécialisé ainsi que dans des centres de collecte qui
tiennent à votre disposition les collecteurs appropriés correspondants.
Éliminez les matériaux d’emballage conformément au
règlement local.
13
Page 14
Eléments de manipulation
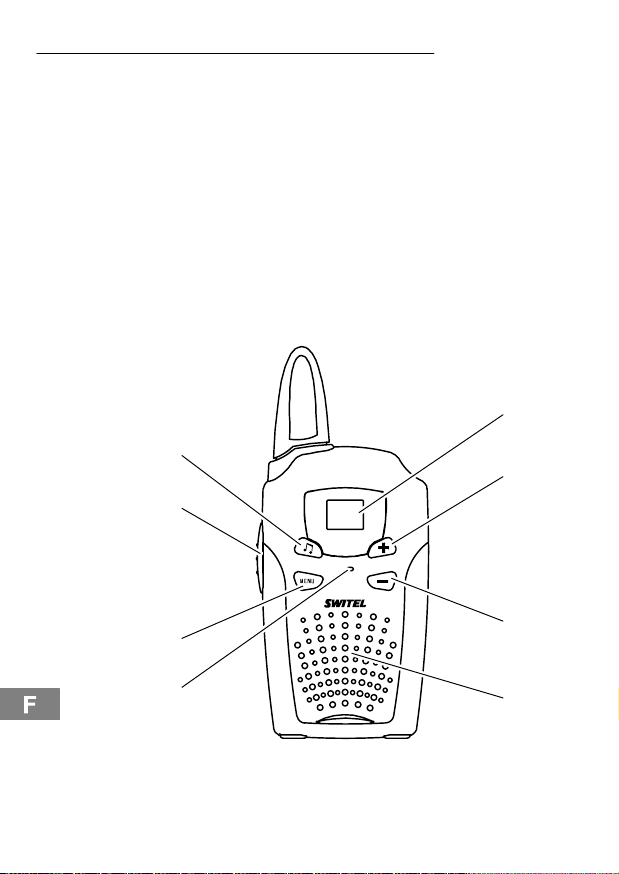
2 Eléments de manipulation
Combiné
1 Ecran
2 Réglage du volume sonore + augmenter /
canal démarrage/terminer
3 Réglage du volume − diminuer / recherche du canal
démarrage/terminer
4 Haut−parleur
5 Microphone
6 Menu
7 Touche de conversation PTT (press to talk)
8 Emission d’une sonnerie
8
7
1
recherche du
1
2
WTE012
14
6
5
1
Les touches sont représentées dans ce mode d’emploi par un
contour uniforme. Les icônes des touches de votre émetteur−
récepteur peuvent différer de celles représentées ici.
3
4
Page 15
Mise en service des émetteurs−récepteurs
3 Mise en service des émetteurs−récepteurs
Remarques concernant la sécurité
Attention : Avant de mettre votre appareil en service, lisez
impérativement les consignes de sécurité mentionnées au
chapitre 1.
Vérifier le contenu de l’emballage
Les éléments suivants font partie de la livraison :
− deux émetteurs−récepteurs
avec clip de ceinture
− un mode d’emploi
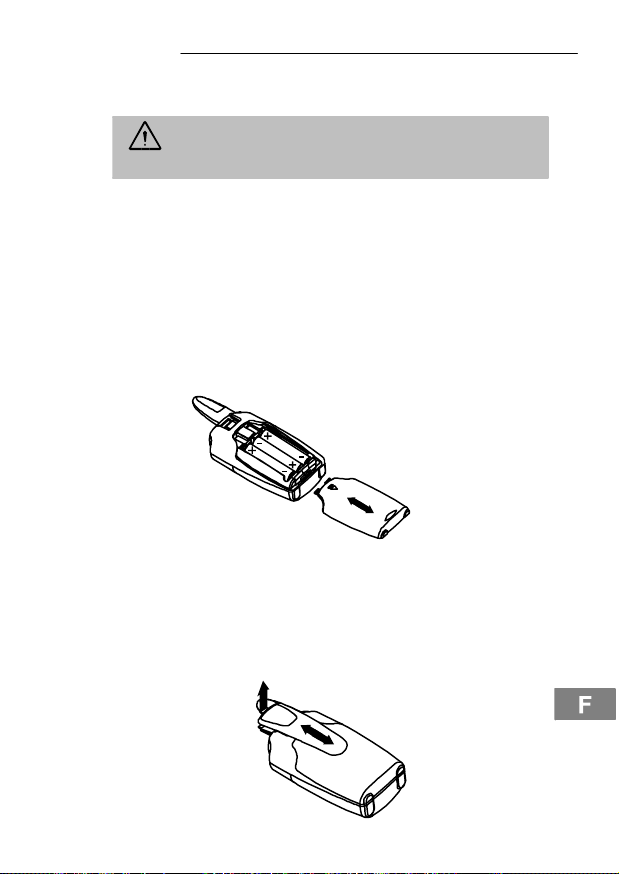
Pose des piles/piles rechargeables
Placez les piles/piles rechargeables dans le compartiment ouvert.
N’utilisez que des piles/piles rechargeables du type AAA, 1,2 V. Observez une polarisation correcte ! Fermez le compartiment à piles.
Fixation du clip de ceinture
Après avoir inséré les piles, vous pouvez fixer les clips de ceinture
livrés avec l’appareil. Introduisez le clip de ceinture par le haut dans
le guidage jusqu’à ce qu’il s’enclenche. Pour l’enlever, soulevez
légèrement la languette de fixation avec l’ongle et poussez le clip
vers le haut.
15
Page 16
Comment vous servir de vos émetteurs−récepteurs ?
4 Comment vous servir de vos
émetteurs−récepteurs ?
Représentations et notations
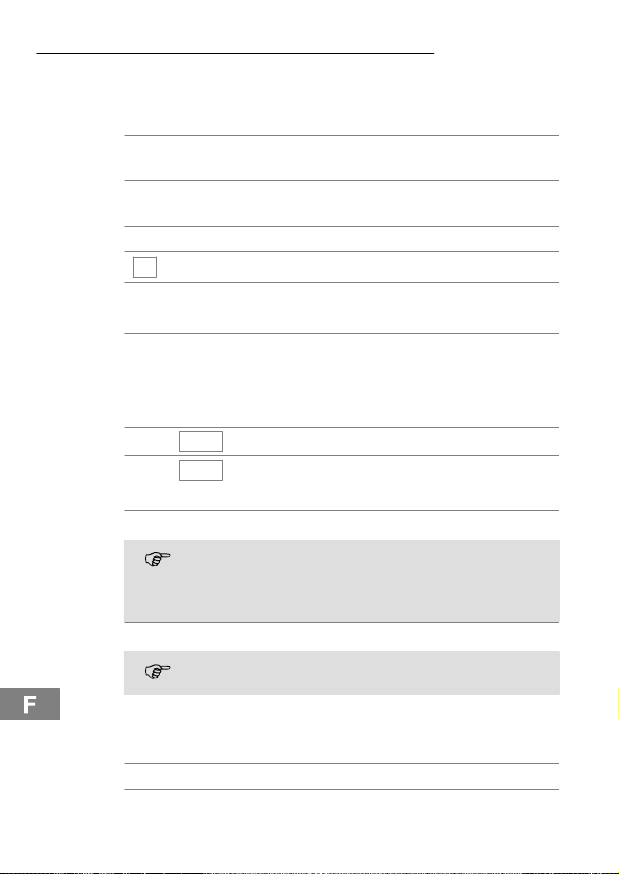
Appuyer sur la touche
, Appuyer longtemps sur la
, Relâcher la touche représentée
y
Texte clignotant sur l’écran
Parler dans le microphone
Branchement / débranchement des émetteurs−récepteurs
, Branchement / débranchement
Réglage du volume sonore
Vous pouvez choisir entre 15 niveaux différents de volume sonore.
,
, , Diminuer le volume sonore
, Augmenter le volume sonore
Emission et réception
, , Emission
Tenez l’émetteur−récepteur à environ 5 à 7 cm de votre
bouche et parlez avec un volume sonore normal. Pour parler avec d’autres correspondants, il faut que tous les appareils soient réglés sur le même canal.
, Réception
Vous ne pouvez pas recevoir de signaux radio si vous
maintenez appuyée la touche .
Emission d’une sonnerie
La sonnerie fait remarquer à d’autres correspondants que vous
désirez entamer une conversation.
Emission d’une sonnerie
, Emission de dix sonneries max.
représentée
touche représentée
des émetteurs−récepteurs
16
Page 17
Comment vous servir de vos émetteurs−récepteurs ?
Choix du canal
Vous disposez de huit canaux de transmission.
, [], , Sélectionner le canal et
confirmer
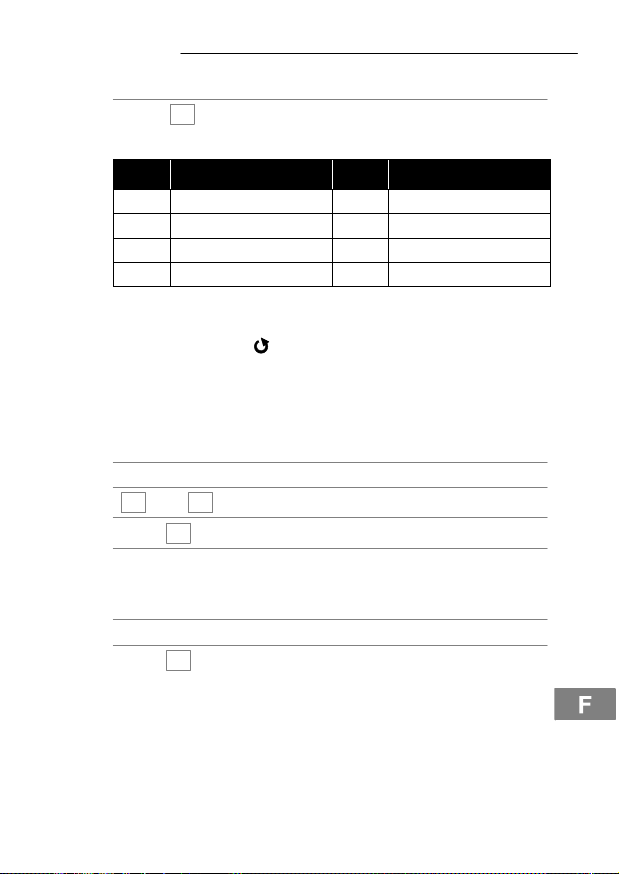
Canal Fréquence (MHz) Canal Fréquence (MHz)
1 446.00625 5 446.05625
2 446.01875 6 446.06875
3 446.03125 7 446.08125
4 446.04375 8 446.09375
Recherche du canal
Dans une boucle infinie, l’appareil cherche des signaux sur les huit
canaux. Le symbole
trouvé, la recherche du canal s’arrête.
Appuyez sur la touche pour entrer en contact radio. Si vous
n’appuyez pas sur la touche , la recherche du canal se pour-
suivra au bout de cinq secondes.
Démarrage de la recherche du canal
, Ouvrir le menu
[y] ou [] Réglage actuel à l’écran
y
, [
/ Poursuivre la recherche du
], Démarrer la recherche du canal
Terminer la recherche du canal
, Ouvrir le menu
, [
], Terminer la recherche du canal
apparaît à l’écran. Si un canal actif est
canal
17
Page 18

Comment vous servir de vos émetteurs−récepteurs ?
Auto−amortisseur de bruit
L’auto−amortisseur de bruit étouffe le bruit de fond et les signaux radio faibles. Pour recevoir des signaux radio faibles, vous devez
désactiver l’auto−amortisseur de bruit. Si vous ne recevez aucun signal radio, l’auto−amortisseur de bruit est automatiquement réactivé
au bout de cinq secondes.
, , Désactiver l’auto−amortisseur de
Activer l’auto−amortisseur de
bruit
bruit
18
Page 19

5 Index
A
Auto−amortisseur de bruit, 18
B
Branchement / débranchement des
émetteurs−récepteurs, 16
C
Choix du canal, 17
Comment vous servir de vos émet-
teurs−récepteurs ?, 16
Consignes de sécurité, 12
Contenu de l’emballage, 15
E
Eléments de manipulation, 14
Emission d’une sonnerie, 16
Emission et réception, 16
Index
F
Fixation du clip de ceinture, 15
M
Mise en service des émetteurs−
récepteurs, 15
N
Notations, 16
P
Pose des piles/piles rechargea-
bles, 15
R
Recherche du canal, 17
Réglage du volume sonore, 16
Représentations, 16
19
Page 20

3
Sommario
1 Indicazioni di sicurezza 21. . . . . . . . . . .
2 Elementi di comando 22. . . . . . . . . . . . .
3 Mettere in funzione i radiotrasmettitori 23.
4 Come funzionano i miei
radiotrasmettitori? 24. . . . . . . . . . . . . . .
5 Indice 27. . . . . . . . . . . . . . . . . . . . . . . .
20
Page 21
Indicazioni di sicurezza
1 Indicazioni di sicurezza
Leggere attentamente le presenti istruzioni per l’uso.
Impiego conforme agli usi previsti
Questi ricetrasmettitori si prestano alla comunicazione con altri apparecchi ricetrasmittenti aventi lo stesso standard. Qualsiasi altro
impiego è considerato come non conforme agli usi previsti. Non
sono consentite modifiche o trasformazioni non autorizzate. Non
aprire per nessuna ragione gli apparecchi autonomamente ed evitare di compiere riparazioni di propria iniziativa.
Ambito di impiego
Evitare un’esposizione a fumo, polvere, vibrazioni, sostanze chimiche, umidità, calore e raggi solari diretti. Non utilizzare i radiotrasmettitori in aree esposte al rischio di deflagrazione.
Batterie ricaricabili / Batteriestandard
Attenzione: Non gettare le batterie ricaricabili / batterie
standard nel fuoco, né sommergerle in acqua.
Apparecchiature mediche
Attenzione: Evitare di utilizzare i radiotrasmettitori nelle
vicinanze di apparecchiature mediche. Non è possibile
escludere completamente il rischio di eventuali influssi.
Radiotrasmettitori possono causare un fastidioso ronzio in
apparecchi acustici.
Smaltimento
Sussiste l’obbligo legislativo al corretto smaltimento di beni
di consumo. Il simbolo raffigurato qui a lato indica che apparecchi elettrici ed elettronici usati e batterie esauste non
sono da smaltire assieme ai normali rifiuti domestici.
Procedere allo smaltimento di apparecchi elettrici o elet-
tronici presso un centro di raccolta incaricato con lo smaltimento conforme.
Consegnare batterie ricaricabili / batterie standard per lo
smaltimento presso rivenditori al dettaglio di batterie o centri di
raccolta che mettono a disposizione appositi contenitori.
Smaltire confezioni ed imballaggi in base a quanto indicato dalle norme in vigore a livello locale.
21
Page 22
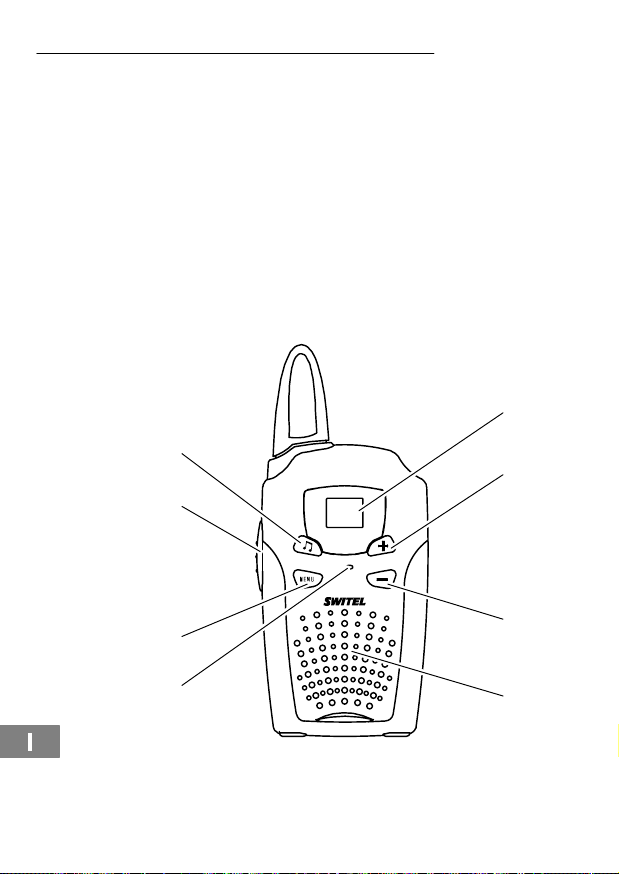
Elementi di comando
2 Elementi di comando
Unità portatile
1 Display
2 Volume + / Impostazione verso sopra /
avviare/concludere
3 Volume − / Impostazione verso sotto / ricerca del canale
avviare/concludere
4 Altoparlante
5 Microfono
6 Menu
7 Tasto di conversazione PTT
8 Trasmettere il segnale di chiamata
8
7
1
ricerca del canale
1
2
WTE012
22
6
5
1
I tasti riportati nelle presenti istruzioni per l’uso sono raffigurati
con un bordo uniforme. Con riserva di scostamenti per tasti e
simboli visualizzati sul display del radiotrasmettitore rispetto a tasti e simboli di display qui raffigurati.
3
4
Page 23
Mettere in funzione i radiotrasmettitori
3 Mettere in funzione i radiotrasmettitori
Indicazioni di sicurezza
Attenzione: Prima della messa in funzione, leggere atten-
tamente le indicazioni di sicurezza riportate al capitolo 1.
Verificare il contenuto della confezione
La confezione contiene:
− due radiotrasmettitori con
gancio per cintura
− un manuale di istruzioni per
l’uso
Inserire batterie ricaricabili / batterie standard
Inserire le batterie ricaricabili / batterie standard nel rispettivo vano
batterie aperto. Utilizzare a tale scopo solo batterie ricaricabili o batterie standard del tipo AAA, 1,2 V. Osservare la corretta polarità!
Chiudere infine il vano batterie.
Applicare il gancio per cintura
Dopo aver inserito le batterie è possibile fissare i ganci per cintura
forniti in dotazione. Introdurre il gancio per cintura dall’alto nella
guida fino a farlo scattare in posizione. Per rimuovere nuovamente
il gancio per cintura, sollevare leggermente la linguetta di fissaggio
con l’unghia del dito spingendo il gancio per cintura verso sopra.
23
Page 24
Come funzionano i miei radiotrasmettitori?
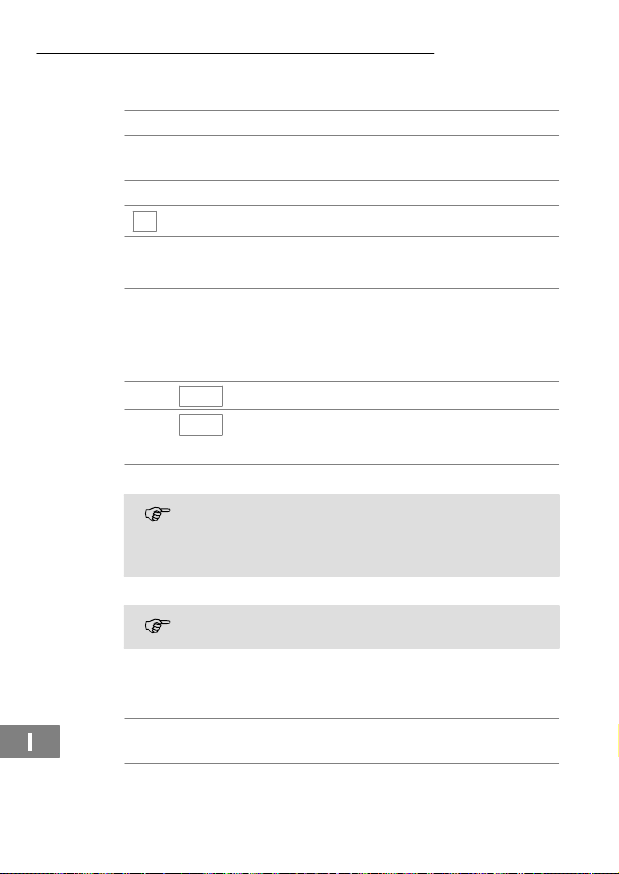
4 Come funzionano i miei radiotrasmettitori?
Rappresentazioni e modi di scrittura
Premere il tasto raffigurato
, Premere a lungo il tasto
, Rilasciare il tasto raffigurato
y
Testo lampeggiante sul display
Parlare rivolti verso il microfono
Attivare / Disattivare i radiotrasmettitori
, Attivare / Disattivare il
Regolazione del volume
E’ possibile impostare il volume in 15 livelli.
,
, , Ridurre il volume
, Aumentare il volume
Trasmettere e ricevere
, , Trasmettere
Mantenere con il radiotrasmettitore una distanza di ca. 5 −
7 cm dalla bocca e parlare con voce normale. Per poter comunicare con altri interlocutori, tutti i radiotrasmettitori devono essere impostati sullo stesso canale.
, Ricevere
Non è possibile ricevere alcun segnale radio se si tiene
premuto il tasto .
Trasmettere un segnale di chiamata
Il segnale di chiamata richiama l’attenzione degli altri interlocutori
indicando che il chiamante desidera avviare una conversazione.
Trasmettere un segnale di
, Trasmettere al max. dieci
raffigurato
radiotrasmettitore
chiamata
segnali di chiamata
24
Page 25
Come funzionano i miei radiotrasmettitori?
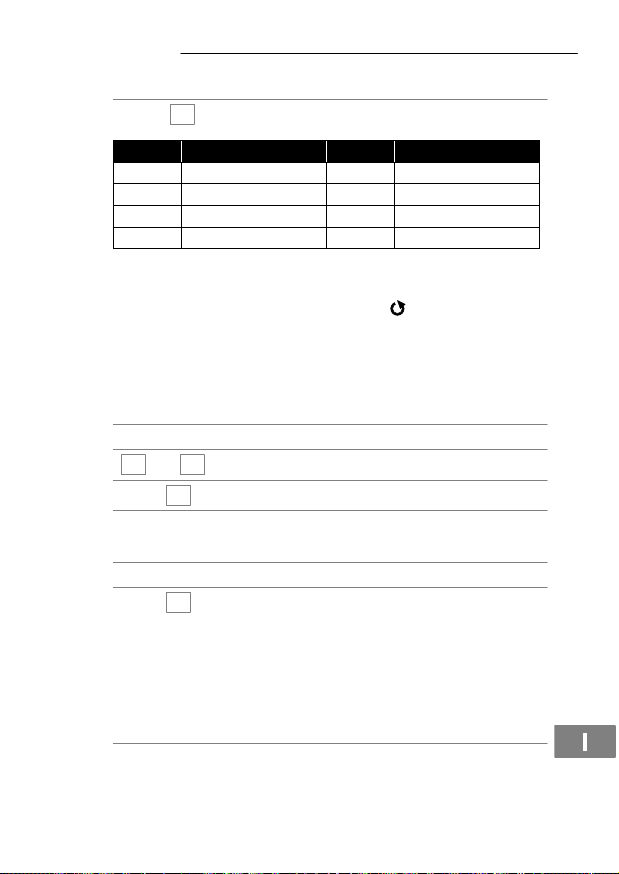
Selezione del canale
Sono disponibili otto canali di trasmissione.
, [], , Scegliere il canale e confermare
Canale Frequenza (MHz) Canale Frequenza (MHz)
1 446.00625 5 446.05625
2 446.01875 6 446.06875
3 446.03125 7 446.08125
4 446.04375 8 446.09375
Ricerca del canale
In un ciclo continuo l’apparecchio scorre gli otto canali alla presenza di
segnali. Sul display è visualizzato il simbolo . Non appena è individuato un canale attivo, la ricerca del canale è interrotta.
Premere quindi il tasto per partecipare alla comunicazione via
radio. Se il tasto non è premuto, la ricerca del canale prosegue
dopo cinque secondi.
Avviare la ricerca del canale
, Aprire il menu
y
] o [] Impostazione attuale nel display
[
y
, [
/ Proseguire la ricerca del canale
Concludere la ricerca del canale
, Aprire il menu
, [], Concludere la ricerca del canale
Funzione di auto squelch
La funzione di auto squelch sopprime fenomeni di fruscio e segnali
radio deboli. Per ricevere segnali radio deboli è necessario disattivare la funzione di auto squelch. Se non si riceve alcun segnale radio, la funzione di auto squelch è di nuovo automaticamente attivata
dopo cinque secondi.
, , Disattivare la funzione di auto
], Avviare la ricerca del canale
squelch
25
Page 26

Come funzionano i miei radiotrasmettitori?
Attivare la funzione di auto
squelch
26
Page 27

5 Indice
A
Applicare il gancio per cintura, 23
Attivare / Disattivare i radiotrasmet-
titori, 24
C
Come funzionano i miei radiotras-
mettitori?, 24
Contenuto della confezione, 23
E
Elementi di comando, 22
F
Funzione di auto squelch, 25
I
Indicazioni di sicurezza, 21
Inserire batterie ricaricabili / batte-
rie standard, 23
Indice
M
Mettere in funzione i radiotrasmet-
titori, 23
Modi di scrittura, 24
R
Rappresentazioni, 24
Regolazione del volume, 24
Ricerca del canale, 25
S
Selezione del canale, 25
T
Trasmettere e ricevere, 24
Trasmettere un segnale di
chiamata, 24
27
Page 28

4
Contents
1 Safety Information 29. . . . . . . . . . . . . . .
2 Operating Elements 30. . . . . . . . . . . . . .
3 Preparing the Walkie−Talkies for Use 31. .
4 Operating the Walkie−Talkies 32. . . . . . .
5 Index 35. . . . . . . . . . . . . . . . . . . . . . . .
28
Page 29
Safety Information
1 Safety Information
Please read this operating instruction manual thoroughly.
Intended use
These walkie−talkies have been conceived for communication with
other walkie−talkies complying to the same standards. Any other
use is considered unintended use. Unauthorised modification or reconstruction is not permitted. Under no circumstances open the devices or complete any repair work yourself.
Ambient conditions
Prevent excessive exposure to smoke, dust, vibration, chemicals,
moisture, heat and direct sunlight.
Do not use the walkie−talkies in potentially explosive areas.
Rechargeable batteries
Caution: Do not throw rechargeable batteries into a fire or
immerse them in water.
Medical equipment
Caution: Never use the walkie−talkies in the vicinity of me-
dical equipment. It cannot be fully ruled out that they will not
affect equipment. Walkie−talkies can cause an unpleasant
humming sound in hearing aids.
Disposal
You are obliged to dispose of consumable goods according to legal requirements. The adjacent symbol indicates
that electrical and electronic apparatus and batteries no
longer required must be disposed of separate from domestic waste.
Electrical and electronic devices must be disposed of at
suitable collection points provided by the public waste
authorities.
Batteries must be disposed of at the point of sale or at appropriate collection points provided by the public waste authorities.
Packaging materials must be disposed of according to
local regulations.
29
Page 30
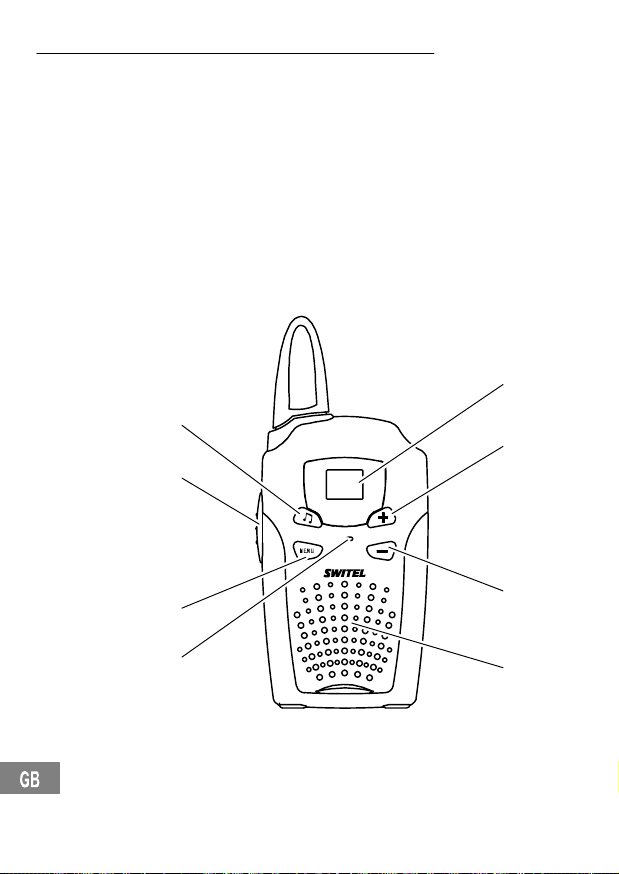
Operating Elements
2 Operating Elements
Handset
1 Display
2 Volume + / Increase setting / C
3 Volume − / Decrease setting / Channel search start/stop
4 Loudspeaker
5 Microphone
6 Menu
7 PTT − Talk button
8 Transmit ringing tones
8
7
1
hannel search start/stop
1
2
WTE012
30
6
5
1
The buttons in this operating manual are depicted with a
uniform contour. Variations in the symbols on the walkie−talkie
buttons compared to those depicted here are possible.
3
4
Page 31
Preparing the Walkie−Talkies for Use
3 Preparing the Walkie−Talkies for Use
Safety information
Caution: It is essential to read the Safety Information in
Chapter 1 before starting up.
Checking the contents of the package
The package contains:
− two walkie−talkies with
belt clip
− an operating manual
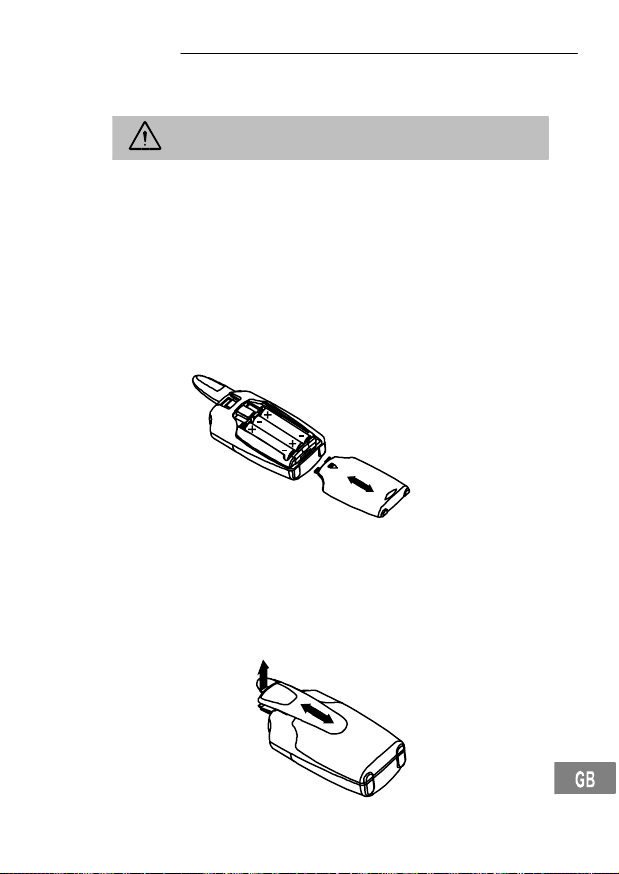
Inserting the batteries
Insert the batteries in the open battery compartment. Only use AAA
1.2 V batteries. Pay attention to correct polarity. Close the battery
compartment cover.
Attaching the belt clips
After having inserted the batteries, the belt clips supplied can be
attached. Slide the belt clip in the guide from the top until it audibly
snaps into place. To detach the belt clip, prize the fastening tab up
a little with your fingernail and slide the belt clip upwards.
31
Page 32
Operating the Walkie−Talkies
4 Operating the Walkie−Talkies
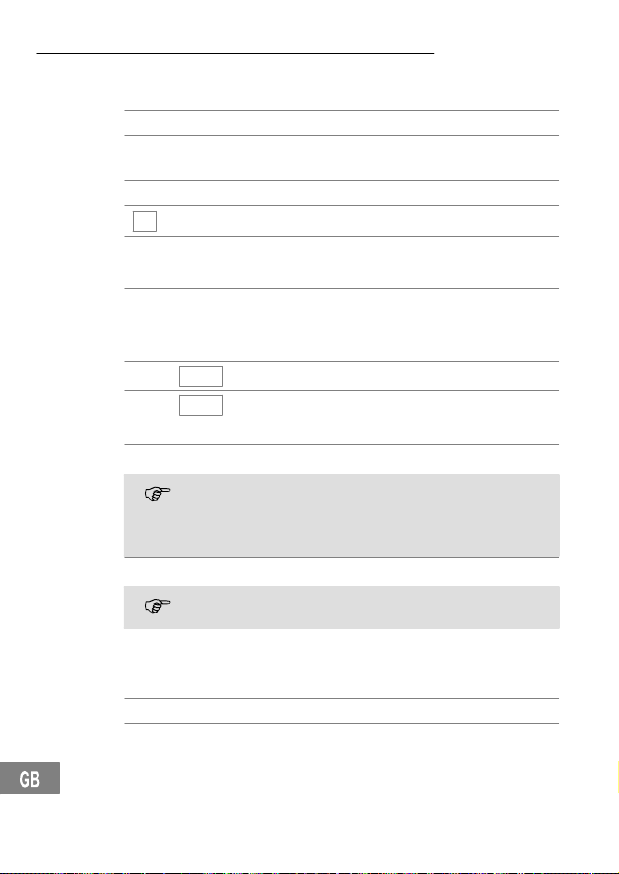
Display and explanation of operation sequences
Press the button displayed
, Press and hold the button
, Release the button displayed
y
Text flashes in the display
Speak into the microphone
Switching the walkie−talkies on/off
, Switch the walkie−talkies on/off
Volume control
The volume can be set to one of 15 different volume levels.
,
, , Reduce the volume
, Increase the volume
Transmitting and receiving
, , Transmit
Hold the walkie−talkie approx. 5 to 7 cm from your mouth
and speak at a normal volume. In order to talk to other subscribers, the respective walkie−talkies must be set to the
same channel.
, Receive
Radio signals cannot be received when the button
is being pressed.
Sending ringing tones
The ringing tones indicate to other subscribers that you want to talk
to them.
Send ringing tones
, Send up to ten ringing tones
displayed
32
Page 33
Operating the Walkie−Talkies
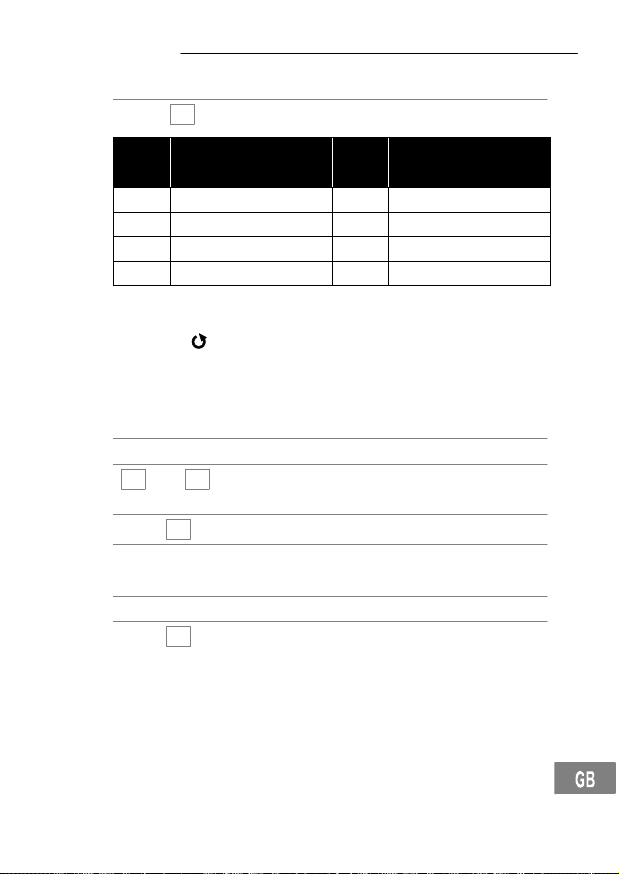
Selecting a channel
There are eight different transmission channels available for use.
, [], , Select the channel and confirm
Chan-
nel
Frequency (MHz) Chan-
nel
1 446.00625 5 446.05625
2 446.01875 6 446.06875
3 446.03125 7 446.08125
4 446.04375 8 446.09375
Searching for a channel
Signals are searched for in the eight channels in a continuous
cycle. The
detected, the channel search stops.
Press the button to enable radio communication. If the
button is not pressed, channel search resumes after five seconds.
icon appears in the display. If an active channel is
Starting channel search
, Open the menu
y
] or [] The current setting appears in
[
the display
, [y], Start the channel search
/ Continue the channel search
Stopping channel search
, Open the menu
, [], Stop the channel search
Frequency (MHz)
33
Page 34

Operating the Walkie−Talkies
Auto squelch
Auto Squelch suppresses any noise and weak radio signals. In
order to receive weak radio signals, the Auto Squelch function must
be deactivated. If no radio signal is received, Auto Squelch is automatically reactivated after five seconds.
, , Deactivate the Auto Squelch
Activate the Auto Squelch
function
function
34
Page 35

5 Index
A
Attaching the belt clips, 31
Auto squelch, 34
D
Display, 32
E
Explanations, 32
I
Inserting the batteries, 31
O
Operating elements, 30
Operating the walkie−talkies, 32
Index
P
Package contents, 31
Preparing the walkie−talkies, 31
S
Safety information, 29
Searching for a channel, 33
Selecting a channel, 33
Sending ringing tones, 32
Switching the walkie−talkies
on/off, 32
T
Transmitting and receiving, 32
V
Volume control, 32
35
Page 36
Declaration of conformity
WE TELGO AG
OF Route d’Englisberg 17
CH−1763 Granges−Paccot
Declare under our own responsibility that the product
MODEL: WTE 012
DESCRIPTION: Private Mobile Radio,
Is in conformity with directives: R&TTE Directive (1999/5/EC)
COMPLIANCE IS ACHIEVED BY CONFORMITY TO THE
FOLLOWING:
ETSI EN 300 296−1 v1.1.1:2001−03
ETSI EN 300 296−2 v1.1.1:2001−03
ETSI EN 301 489−1 v1.4.1:2002−08
ETSI EN 301 489−5 v1.3.1:2002−08
EN 60950:2000
AUTHORISED BY:
Signed:
Name (printed): Selim Dusi
Position in company: Managing Director
Date of issue: 23.09.2005
Copies of this document will be held on file for a period of 10 years
after the last production.
Supplier: TELGO AG,
0336
Product: WTE 012
This product transmits in a non−EU−harmonised frequency band (446MHz)
and may thus only be used within those countries that permit usage of such
equipment.
frequency 446 MHz
______________________
Route d’Englisberg 17,
CH−1763 Granges−Paccot
 Loading...