

Page 1
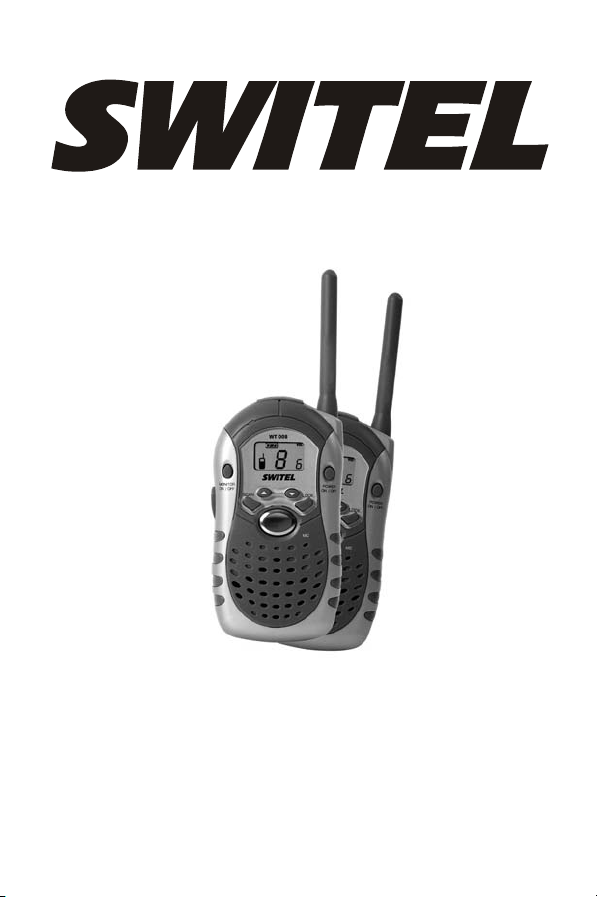
WT108
Bedienungsanleitung
Mode d’emploi
Istruzioni per l'uso
Operating Instructions
Page 2

WT108
Bedienungsanleitung __________ 1
Mode d’emploi ______________ 15
Istruzioni per l'uso __________ 27
Operating instructions ________ 39
Declaration of Conformity_____ 50
2
Page 3

- Inhaltsverzeichnis -
Bedienelemente ............................. 4
1
2 Inbetriebnahme ............................. 5
2.1 Verpackungsinhalt prüfen ..................... 5
2.2 Akkupacks einsetzen ............................ 5
2.3 Headset anschliessen ........................... 6
3 Bedienung..................................... 7
3.1 Ein-/Ausschalten der Funkgeräte ........... 7
3.2 Kanalwahl........................................... 7
3.3 Anruf bei einem anderen Teilnehmer...... 8
3.4 Automatischer Batteriesparmodus ......... 9
3.5 Kanalsuche (Scan-Modus)..................... 9
3.6 Tastatursperre .................................... 9
3.7 Reichweite der Funkgeräte...................10
3.8 Erhöhung der maximalen Reichweite.....10
3.9 Rufton auswählen ...............................10
3.10 Roger Beep ein-/ausschalten................11
3.11 Ausschaltautomatik.............................11
4 Wichtige Informationen ..................12
4.1 Technische Daten ...............................12
4.2 Pflegeanleitung...................................13
3
Page 4

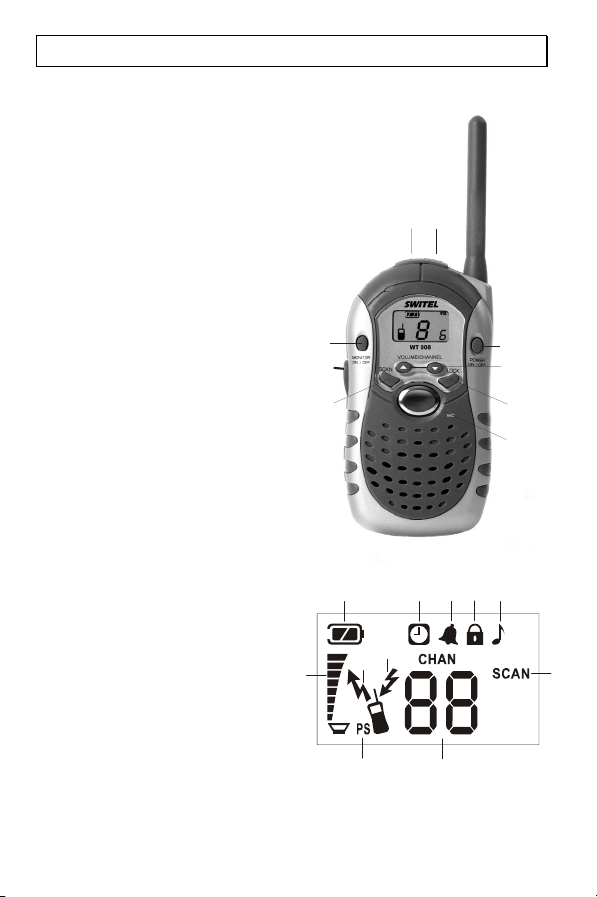
- Bedienelemente -
1 Bedienelemente
1. DC 7,5V Anschluss
2. Mikro- Kopfhöreranschluss
3. Ein/Aus-Taste
4. Auswahltaster
5. Tastatursperre
6. Taste MENÜ
7. Kanalsuche (SCAN)
8. Taste PUSK TO TALK
9. Monitor On/Off
Displayanzeigen
1. Batteriekapazität
2. Ausschaltautomatik ein
3. Rufsignal
4. Tastatursperre
5. Roger Beep
6. Lautstärke
7. Senden
8. Batteriesparmodus
9. Empfangen
10. Funkkanal
11. Kanalsuche (SCAN)
!und "
6
2
1
9
8
7
2
1
9
7
8
3
10
3
4
5
6
45
11
4
Page 5

- Inbetriebnahme -
2 Inbetriebnahme
2.1 Verpackungsinhalt prüfen
Zum Lieferumfang gehören:
zwei Funkgeräte mit Gürtelclip eine Bedienungsanleitung
zwei Headsets zwei Akkupacks
ein Steckernetzteil
2.2 Akkupacks einsetzen
Mit dem wiederaufladbaren Akku besitzt jedes Funkgerät eine
Standbyzeit von 30 Stunden und eine Gesprächszeit von ca. 12
Stunden. Über die Buchse DC 7,5V können die Funkgeräte mit dem
Steckernetzteil innerhalb von 16 Stunden wieder aufgeladen werden.
Das Steckernetzteil besitzt zwei Anschlüsse, so dass beide
Funkgeräte gleichzeitig geladen werden können.
Hinweis: Bitte verwenden Sie keine fremden Akkupacks, normale
wiederaufladbare Batterien oder andere Steckernetzteile, die die
Funkgeräte zerstören können.
Akkupacks einsetzen
1. Lösen Sie die Befestigungsschraube des Gürtelclips und drehen
Sie den Gürtelclip zur Seite.
2. Entriegeln Sie den Batteriefachdeckel und öffnen Sie das Fach.
3. Legen Sie das Akkupack ein und achten Sie auf die richtige Polung.
4. Schliessen Sie das Batteriefach.
5. Drehen Sie den Gürtelclip wieder an die richtige Stelle und drehen
Sie die Schraube wieder fest.
Hinweis: Anstelle des Akkupacks können Sie auch vier 1,5V AAA
Alkaline-Batterien verwenden. Bitte verwenden Sie nur beste Qualität.
Beim Einlegen achten Sie bitte auf die richtige Polung.
Anzeige der Batteriekapazität
5
Page 6

- Inbetriebnahme -
Die Batteriekapazität wird in drei Stufen angezeigt:
Voll Mittel Schwach
Sobald die Anzeige im Display blinkt und Warntöne zu hören sind,
müssen die Batterien ausgetauscht werden.
Akkupacks nicht ins Feuer werfen oder ins Wasser tauchen. Alte oder
defekte Akkupacks nicht mit dem normalen Hausmüll entsorgen.
2.3 Headset anschliessen
Die Funkgeräte können einem externen Mikrofon und Ohrhörer, ein so
genanntes Headset, betrieben werden. So bleiben Ihre Hände für
andere Tätigkeiten frei. Der Anschluss befindet sich auf der Oberseite
unter einer Abdeckung.
Öffnen Sie die Abdeckung an der Oberseite des Funkgerätes und
stecken Sie den Stecker in die Anschlussbuchse.
Achten Sie darauf, dass die Mikrofonöffnung frei bleibt. Bei
Verwendung des Headsets empfehlen wir die Tastatursperre am
Funkgerät zu aktivieren, damit nichts unbeabsichtigt verstellt werden
kann.
6
Page 7

- Bedienung -
3 Bedienung
3.1 Ein-/Ausschalten der Funkgeräte
Um ein Funkgerät einzuschalten, halten Sie die Taste POWER
ON/OFF bis zu einem Signalton gedrückt.
Für einige Sekunden wird das Display beleuchtet und alle
Displaysymbole werden angezeigt. Danach zeigt das Display den
aktuell eingestellten Kanal.
Halten Sie die Taste POWER ON/OFF für eine Sekunde gedrückt, um
das Funkgerät wieder auszuschalten.
3.2 Kanalwahl
Die Funkgeräte verfügen über 8 verschiedene Übertragungskanäle,
die von dem europäischen Komitee für Funkkommunikation als
„Private Mobile Radio“, kurz PMR genannt, freigegeben wurden.
Um zwischen zwei Funkgräten zu sprechen, müssen beide
Geräte auf den gleichen Kanal eingestellt sein.
Wählen Sie zwischen den 8 Kanälen, indem Sie den Taster MENÜ
einmal drücken. Im Display blinkt die Meldung CHAN.
Wählen Sie nun mit den Tasten
zwischen 1 und 8 aus. Das Display zeigt den jeweils eingestellten
Kanal an. Bestätigen Sie die Auswahl mit der Taste PUSH TO TALK
auf der linken Seite oder warten Sie 10 Sekunden bis das Display
wieder in den normalen Betriebsmodus zurückkehrt.
Sie können auch mit anderen Geräten in Verbindung treten, die
ebenfalls über die PMR Kanäle verfügen, und auf dieselbe Frequenz
eingestellt sind. Bitte beachten Sie hierzu die technischen Daten.
!und " den gewünschten Kanal
7
Page 8
- Bedienung -
3.3 Anruf bei einem anderen Teilnehmer
Wenn Sie mit anderen Teilnehmern sprechen möchten, gehen Sie wie
folgt vor: Die beiden Funkgeräte müssen eingeschaltet und auf den
gleichen Kanal eingestellt sein.
Um zu sprechen drücken Sie die Taste PUSH TO TALK auf der linken
Seite. Halten Sie das Gerät ca. 5 cm vom Mund entfernt und sprechen
Sie in normaler Lautstärke. Lassen Sie danach die Taste PUSH TO
TALK wieder los. Ihr Gesprächspartner hört einen Signalton (Roger
Beep), wenn Sie die Taste TALK loslassen. Damit wird dem anderen
Teilnehmer angezeigt, dass Sie mit dem Sprechen fertig sind und auf
eine Antwort warten.
Hinweis: Während Sie die Taste PUSH TO TALK festhalten,
können Sie keine ankommenden Anrufe hören. Von beiden
Gesprächspartnern kann, wie bei Funkgeräten üblich, nur ein
Gesprächspartner sprechen.
Warten Sie also immer, bis Sie den Signalton (Roger Beep) hören,
bevor Sie wieder die Taste PUSH TO TALK drücken.
Während Sie die Taste PUSH TO TALK drücken, erscheint im Display
das Symbol
Display das Symbol
Lautstärke einstellen
Die Lautstärke des ankommenden Anrufsignals hängt von Ihrer
Lautstärkeeinstellung ab. Mit den Tasten
Lautstärkestufen eingestellt werden.
Rufsignal senden
Drücken Sie die Taste PUSH TO TALK und einmal die Taste
dem gerufenen Gerät erklingt ein Rufton von zwei Sekunden.
. Wenn Sie ein Gespräch empfangen, erscheint im
.
!und " können acht
8
!. An
Page 9

- Bedienung -
3.4 Automatischer Batteriesparmodus
Das Funkgerät schaltet automatisch in den Batteriesparmodus, sobald
einige Sekunden keine Bedienung stattfindet. Im Display blinkt die
Anzeige PS. In diesem Zustand ist das Funkgerät für 120 ms ein- und
für 480ms ausgeschaltet. Dadurch wird Batteriekapazität eingespart.
Der normale Betrieb ist hierdurch nicht beeinträchtigt.
3.5 Kanalsuche (Scan-Modus)
Bei eingeschalteter Kanalsuche (Scan) werden alle 8 Kanäle
permanent abgefragt, bis das Funkgerät einen Kanal gefunden hat,
auf dem gesprochen wird.
1. Halten Sie die Taste SCAN für eine Sekunde gedrückt. Die
Anzeige SCAN blinkt im Display.
2. Nacheinander werden nun alle Kanäle abgesucht. Sobald ein
gerade benutzter Kanal gefunden wird, wird die Kanalsuche für 2
Sekunden unterbrochen. Drücken Sie in dieser Zeit die Taste
PUSH TO TALK, wenn Sie den gefundenen Kanal behalten und
die Kanalsuche beenden möchten.
3. Drücken Sie die Taste SCAN für eine Sekunde, um die
Kanalsuche zu beenden.
Während der Kanalsuche sind die Tasten PUSH TO TALK,
MONITOR und LOCK ohne Funktion.
3.6 Tastatursperre
Um zu verhindern, dass unbeabsichtigt etwas verstellt wird, können
Sie die Tastatursperre einschalten.
Halten Sie dazu die Taste LOCK für eine Sekunde gedrückt. Im
Display erscheint das Symbol
eingeschaltet. Die Taste PUSH TO TALK ist nicht gesperrt und Sie
können weiterhin mit Ihrem Gesprächspartner sprechen. Auch das
Senden eines Rufsignals mit den Tasten PUSH TO TALK und
möglich.
und die Tastatursperre ist
! ist
9
Page 10

- Bedienung -
Um die Tastatursperre wieder aufzuheben, halten Sie die Taste LOCK
wieder für eine Sekunde fest. Das Symbol verschwindet und die
Tastatursperre ist aufgehoben.
3.7 Reichweite der Funkgeräte
Die Funkgeräte haben eine Reichweite von bis zu 5 km. Diese
maximale Reichweite kann durch bestimmte Umstände verringert
werden. Bei flachen, offenen Bedingungen erreichen Sie die maximale
Reichweite. Befinden sich Gebäude oder Bäume im Signalweg wird
die Reichweite verringert. Die Reichweite wird in hügeligem Gelände
noch weiter verringert.
3.8 Erhöhung der maximalen Reichweite
Die Funkgeräte sind mit einem so genannten AUTO-SQUELCH
ausgestattet, mit dem automatisch schwache Übertragungen und
unerwünschte Geräusche während der Benutzung ausgeblendet
werden. Dieser AUTO-SQUELCH kann vorübergehend ausgeschaltet
werden, um die Reichweite zu erhöhen. Halten Sie die
Taste MONITOR ON/OFF für eine Sekunde bis zu einem Signalton
gedrückt. Die automatische Unterdrückung ist abgeschaltet, und es
können nun auch sehr schwache Signale empfangen werden.
Um das AUTO-SQUELCH wieder einzuschalten, drücken Sie wieder
die Taste MONITOR ON/OFF für eine Sekunde.
3.9 Rufton auswählen
Sie können an die anderen Funkgeräte ein Rufsignal senden, sobald
Sie das Gespräch beginnen möchten. Es stehen dafür 5
unterschiedliche Melodien zur Verfügung.
1. Drücken Sie zweimal kurz die Taste MENÜ. Die Anzeige CHAN
blinkt.
2. Mit den Tasten
verschiedenen Ruftönen auswählen.
3. Bestätigen Sie die Auswahl mit der Taste PUSH TO TALK auf
der linken Seite oder warten Sie 10 Sekunden bis das Display
wieder in den normalen Betriebsmodus zurückkehrt.
!und " können Sie nun zwischen 5
10
Page 11

- Bedienung -
3.10 Roger Beep ein-/ausschalten
Der Roger Beep signalisiert dem anderen Gesprächspartner, dass
nun gesprochen werden kann. Dieser Signalton beim Loslassen der
Taste PUSH TO TALK, lässt sich aus- und einschalten.
1. Drücken Sie viermal kurz die Taste MENÜ. Die Anzeige
blinkt.
2. Mit den Tasten
(On) oder ausschalten (Off)
3. Bestätigen Sie die Auswahl mit der Taste PUSH TO TALK auf
der linken Seite oder warten Sie 10 Sekunden bis das Display
wieder in den normalen Betriebsmodus zurückkehrt.
Ist der Roger Beep eingeschaltet, erscheint im Display die Anzeige
!und " können Sie den Roger Beep ein-
3.11 Ausschaltautomatik
Die Funkgeräte sind mit einer Einrichtung zum Verlängern der
Batterielebensdauer ausgestattet. Wenn innerhalb einer bestimmten
Zeit keine Übertragungen vorkommen, schaltet sich das Gerät
automatisch aus.
1. Drücken Sie fünfmal kurz die Taste MENÜ. Die Anzeige
blinkt.
2. Mit den Tasten
Einstellungen vornehmen:
0 = Batteriesparmodus ausgeschaltet
1 bis 3 = Angabe der Stunden, nachdem das Funkgerät
3. Bestätigen Sie die Auswahl mit der Taste PUSH TO TALK auf
der linken Seite oder warten Sie 10 Sekunden bis das Display
wieder in den normalen Betriebsmodus zurückkehrt.
Ist die Ausschaltautomatik eingeschaltet, erscheint im Display die
Anzeige
Hinweis: Eine Minute bevor das Funkgerät ausgeschaltet wird, hören
Sie einen Signalton.
.
!und " können Sie nun folgenden
automatisch ausgeschaltet wird.
11
.
Page 12

- Wichtige Informationen -
4 Wichtige Informationen
4.1 Technische Daten
PMR Kanal Frequenzen (MHz) :
Kanal 1: 446,00625 Kanal 5: 446,05625
Kanal 2: 446,01875 Kanal 6: 446,06875
Kanal 3: 446,03125 Kanal 7: 446,08125
Kanal 4: 446,04375 Kanal 8: 446,09375
Empfänger:
Empfindlichkeit
für 12 Sind: -119 dem
für Anrufsignalerkennung: -121 dem
Max. Rauschabstand bei 47 dem RF Eingang 40 dB
Max. Audioausgang bei 10% Klirrfaktor >150 mW
Squelch
Empfindlichkeit -121 dBm
Tonfrequenzverhalten
bei 400 Hz +4 dB
bei 2500 Hz -11 dB
Signaldistanz Bandbreite +/- 5 kHz
Kanaltrennung 12.5 kHz
Intermodulationsunterdrückung 60 dB
Störunterdrückung 60 dB
Sender:
Effektive Ausgangsleistung 500 mW
Trägerfrequenzbeständigkeit +/- 1kHz
Modulationsbegrenzung 2,5 kHz
Ansprechzeit Träger 30 ms
Tonfrequenzverhalten
bei 400 Hz -7 dB
bei 2,5 kHz 2 dB
Tonverzerrung 2%
Brummen und Rauschen 35 dB
Vorübergehendes Frequenzverhalten
Sender ein 30 ms
Sender aus <10 ms
Stromversorgung:
Gemischter Betrieb ca. 12 Stunden
Standby 30 Stunden
Batteriespannung 6.0 V
Die technischen Daten können ohne vorherige Ankündigung geändert werden.
12
Page 13

- Wichtige Informationen -
4.2 Pflegeanleitung
Die Gehäuseoberfläche kann mit einem trockenen, weichen und
fusselfreien Tuch gereinigt werden. Niemals Reinigungsmittel oder gar
aggressive Lösungsmittel verwenden.
Legen Sie das Gerät niemals an einen feuchten oder staubigen Platz.
Vermeiden Sie die Nähe zu Wärmequellen wie Heizkörpern und
setzen Sie das Gerät keiner direkten Sonnenbestrahlung aus.
13
Page 14

- Wichtige Informationen -
14
Page 15

- Éléments de commande -
Éléments de commande .................16
1
2 Mise en service .............................17
2.1 Vérifier le contenu de l’emballage .........17
2.2 Mettre les batteries rechargeables
en place ............................................17
2.3 Raccorder un micro-casque..................18
3 Utilisation.....................................19
3.1 Mise en marche / arrêt des
émetteurs-récepteurs..........................19
3.2 Sélection de canal...............................19
3.3 Appeler un autre utilisateur..................20
3.4 Mode automatique d’économie de
pile ...................................................21
3.5 Recherche de canal (mode scan) ..........21
3.6 Verrouillage du clavier.........................21
3.7 Portée des émetteurs-récepteurs ..........22
3.8 Augmentation de la portée
maximale ..........................................22
3.9 Sélectionner la sonnerie d’appel ...........22
3.10 Activer / désactiver le bip de
message bien reçu..............................23
3.11 Dispositif automatique de
désactivation .....................................23
4 Informations importantes ...............24
4.1 Caractéristiques techniques .................24
4.2 Instructions d’entretien .......................25
15
Page 16
- Éléments de commande -
1 Éléments de commande
1. Raccordement micro-casque
2. Raccordement DC 7,5 V
3. Touche marche/arrêt
4. Touches de sélection
5. Verrouillage du clavier
6. Touche MENÜ
7. Recherche de canal (SCAN)
8. Touche PUSK TO TALK
9. Témoin on/off
!et "
9
8
7
Affichages d’écran
1. Capacité de batterie
2. Dispositif automatique
de désactivation activé
3. Signal d’appel
4. Verrouillage du clavier
5. Bip de message bien reçu
6. Volume
7. Émettre
8. Mode économie de piles
9. Réception
10. Canal radio
11. Recherche de canal (SCAN)
1
9
6
7
8
16
2
1
3
4
5
6
2
45
3
11
10
Page 17

- Mise en service -
2 Mise en service
2.1 Vérifier le contenu de l’emballage
Le contenu de l’emballage :
Deux émetteurs-récepteurs avec
clip-ceinture
Deux micro-casque Deux batteries rechargeables
Un bloc d’alimentation
Un mode d’emploi
2.2 Mettre les batteries rechargeables en
place
Avec la batterie rechargeable, chaque émetteur-récepteur possède
une durée en veille de 30 heures et une durée de communication
d’env. 12 heures. La prise DC 7,5V permet de recharger les
émetteurs-récepteurs avec le bloc d’alimentation en 16 heures. Le
bloc d’alimentation possède deux raccordements permettant le
chargement simultané des deux émetteurs-récepteurs.
Remarque : Veuillez ne pas utiliser de bloc de batterie d’autres
fabricants, de batteries normales rechargeables ou d’autres blocs
d’alimentation qui risqueraient d’endommager les émetteursrécepteurs.
Mettre la batterie rechargeable
1. Desserrez la vis de fixation du clip-ceinture et tournez le clip-
ceinture sur le côté.
2. Déverrouillez le couvercle du compartiment de piles et ouvrez le
compartiment.
3. Placez-y ensuite la batterie rechargeable en respectant la
polarité adéquate. Une polarité incorrecte peut endommager
l’appareil.
4. Refermez le compartiment des piles.
5. Retournez le clip-ceinture à l’emplacement correct et resserrez la
vis.
Remarque : Vous pouvez utiliser également quatre piles alcalines
AAA de 1,5V à la place du bloc de batteries. Veuillez n’utiliser que la
meilleure qualité. En les mettant en place, veillez à ce que la polarité
soit correcte.
17
Page 18

- Mise en service -
Indication de la capacité des piles
La capacité des piles est affichée selon trois niveaux :
Pleine Moyenne Faible
Il faut changer les piles dès que l’affichage clignote à l’écran et que
des signaux d’avertissement retentissent.
Ne pas jeter les piles au feu, ni les plonger dans l’eau. Ne pas jeter les
piles usées ou défectueuses en même temps que les ordures
ménagères.
2.3 Raccorder un micro-casque
Les émetteurs-récepteurs peuvent être utilisés avec un micro externe
et un écouteur, c’est-à-dire un « micro-casque ». Vous gardez ainsi
les mains libres pour d’autres activités. Le raccordement se trouve sur
la face supérieure sous un cache.
Ouvrez le cache sur la face supérieure de l’émetteur-récepteur et
enfoncez la fiche dans la prise de raccordement.
Veillez à ce que l’orifice du micro soit dégagé. Si vous utilisez un
micro-casque, nous vous recommandons d’activer le verrouillage du
clavier sur l’émetteur-récepteur afin d’éviter tout déréglage
involontaire.
18
Page 19

- Utilisation -
3 Utilisation
3.1 Mise en marche / arrêt des émetteursrécepteurs.
Pour mettre en marche un émetteur-récepteur, maintenez la touche
POWER ON/OFF enfoncée jusqu’au retentissement d’un signal
sonore.
L’écran s’éclaire pendant quelques secondes et toutes les icônes
d’écran s’affichent. L’écran affiche ensuite le canal actuellement réglé.
Maintenez la touche POWER ON/OFF enfoncée durant une seconde
pour désactiver à nouveau l’émetteur-récepteur.
3.2 Sélection de canal
Les émetteurs-récepteurs disposent de 8 canaux de transmission
autorisés par le comité européen de radiocommunication en tant que
« private mobile radio » (radio portative privée), en abrégé PMR.
Pour permettre l’établissement d’une conversation entre deux
appareils, ceux-ci doivent être réglés sur le même canal.
Sélectionnez l’un des 8 canaux en appuyant une fois sur le bouton
MENU. L’indication CHAN clignote à l’écran.
Sélectionnez le canal souhaité 1 à 8 à l’aide des touches ! et ".
L’écran affiche le canal réglé. Validez la sélection à l’aide de la touche
PUSH TO TALK située sur le côté gauche ou attendez 10 secondes
que l’écran retourne au mode de fonctionnement normal.
Vous pouvez aussi établir une liaison avec d’autres appareils dotés
également de canaux PMR et réglés sur la même fréquence. Tenez
compte à cet effet des caractéristiques techniques.
19
Page 20

- Utilisation -
3.3 Appeler un autre utilisateur
Procédez de la manière suivante si vous souhaitez converser avec
d’autres utilisateurs : les deux émetteurs-récepteurs doivent être mis
en marche et réglés sur le même canal.
Pour parler, appuyez sur la touche PUSH TO TALK située sur le côté
gauche. Maintenez l’appareil à env. 5 cm de votre bouche et parlez
d’une voix normalement forte. Relâchez ensuite la touche PUSH TO
TALK. Votre interlocuteur entend un signal sonore (message bien
reçu) lorsque vous relâchez la touche TALK. Cela indique à l’autre
utilisateur que vous avez fini de parler et que vous attendez une
réponse.
Remarque : Vous ne pouvez pas entendre les appels que
vous recevez lorsque vous maintenez la touche PUSH TO
TALK enfoncée. Un seul interlocuteur à la fois peut parler,
comme c’est habituellement le cas pour les émetteursrécepteurs.
Attendez donc toujours le signal sonore (message bien reçu) avant
d’appuyer à nouveau sur la touche PUSH TO TALK.
Pendant que vous appuyez sur la touche PUSH TO TALK, l’icône
s’affiche à l’écran. Lorsque vous recevez un appel, l’écran affiche
l’icône
Régler le volume
Le volume du signal d’appel que vous recevez dépend du volume que
vous avez réglé. Les touches
volume sur 8 niveaux différents.
Émettre un signal d’appel
Appuyez sur la touche PUSH TO TALK et une fois sur la touche
Une sonnerie retentit pendant deux secondes sur l’appareil appelé.
.
!et " vous permettent de régler le
!.
20
Page 21

- Utilisation -
3.4 Mode automatique d’économie de pile
L’émetteur-récepteur se met automatiquement en mode d’économie
de pile en l’absence d’utilisation durant quelques secondes.
L’indication PS clignote à l’écran. Dans cet état, l’émetteur-récepteur
est activé durant 120 ms et désactivé durant 480 ms. Cela permet
d’économiser les piles. Cela ne gêne pas le mode de fonctionnement
normal.
3.5 Recherche de canal (mode scan)
Lorsque la recherche de canal (scan) est activée, tous les 8 canaux
sont interrogés en permanence jusqu’à ce que l’émetteur-récepteur
trouve un canal sur lequel des conversations ont lieu.
1. Maintenez la touche SCAN enfoncée durant une seconde.
L’indication SCAN clignote à l’écran.
2. Tous les canaux sont recherchés l’un après l’autre. Dès que le
canal actuellement utilisé est trouvé, la recherche de canal
s’interrompt durant 2 secondes. Appuyez pendant ce temps sur
la touche PUSH TO TALK si vous souhaitez conserver le canal
trouvé et mettre fin à la recherche de canal.
3. Appuyez sur la touche SCAN durant une seconde pour mettre fin
à la recherche de canal.
Durant la recherche de canal, les touches PUSH TO TALK,
MONITOR et LOCK sont sans fonctions.
3.6 Verrouillage du clavier
Vous pouvez activer le verrouillage du clavier pour empêcher tout
déréglage involontaire.
Maintenez à cet effet la touche LOCK enfoncée durant une seconde.
L’icône
touche PUSH TO TALK n’est pas verrouillée et vous pouvez
continuer à converser avec votre interlocuteur. Il est également
possible d’émettre un signal d’appel à l’aide des touches PUSH TO
TALK et
s’affiche à l’écran et le verrouillage de clavier est activé. La
!.
21
Page 22

- Utilisation -
Pour supprimer le verrouillage du clavier, maintenez la touche LOCK
à nouveau enfoncée durant une seconde. L’icône disparaît et le
verrouillage du clavier est supprimé.
3.7 Portée des émetteurs-récepteurs
Les émetteurs-récepteurs ont une portée pouvant atteindre 5 km.
Cette portée maximale peut être réduite dans certaines conditions.
Vous obtenez une portée maximale sur un terrain plat et dans un
espace ouvert. La portée est réduite si la trajectoire des signaux est
entravée par des bâtiments ou des arbres. La portée est davantage
réduite sur un terrain accidenté.
3.8 Augmentation de la portée maximale
Les émetteurs-récepteurs sont équipés d’un système « AUTOSQUELCH » permettant la suppression automatique des
transmissions faibles et des bruits indésirables survenant durant
l’utilisation. Vous pouvez désactiver provisoirement cette fonction
AUTO SQUELCH afin d’augmenter la portée.
Maintenez la touche MONITOR ON/OFF enfoncée durant une
seconde jusqu’au retentissement d’un signal sonore. La suppression
automatique est désactivée et vous pouvez à présent recevoir même
de très faibles signaux.
Pour réactiver la fonction AUTO-SQUELCH, appuyez de nouveau sur
la touche MONITOR ON/OFF durant une seconde.
3.9 Sélectionner la sonnerie d’appel
Vous pouvez transmettre une sonnerie d’appel aux autres émetteursrécepteurs à l’aide de la touche CALL dès que vous souhaitez
commencer le conversation. Vous disposez à cet effet de 5 mélodies
différentes.
1. Appuyez deux fois brièvement sur la touche MENU. L’indication
CHAN clignote.
2. Les touches
sonneries d’appels différentes.
3. Validez la sélection à l’aide de la touche PUSH TO TALK située
sur le côté gauche ou attendez 10 secondes que l’écran retourne
au mode de fonctionnement normal.
!et " permettent de sélectionner l’une des 5
22
Page 23

- Utilisation -
3.10 Activer / désactiver le bip de message
bien reçu
Le bip de message bien reçu signale à l’autre interlocuteur qu’il est à
présent possible de converser. Ce signal sonore en relâchant la
touche PUSH TO TALK peut être désactivé ou activé.
1. Appuyez quatre fois brièvement sur la touche MENU.
L’indication
2. Les touches
désactiver (Off) le bip de message bien reçu.
3. Validez la sélection à l’aide de la touche PUSH TO TALK située
sur le côté gauche ou attendez 10 secondes que l’écran retourne
au mode de fonctionnement normal.
Si le bip de message bien reçu est activé, l’indication
l’écran.
clignote.
!et " vous permettent d’activer (On) ou de
s’affiche à
3.11 Dispositif automatique de
désactivation
Les émetteurs-récepteurs sont dotés d’un dispositif permettant de
rallonger la durée de vie des piles. L’appareil se désactive
automatiquement si aucune transmission ne survient au bout d’un
certain temps.
1. Appuyez cinq fois brièvement sur la touche MENU. L’icône
clignote.
2. Les touches
réglages suivants :
0 = Mode d’économie des piles désactivé
1 à 3 = Indication du nombre d’heures après lesquelles
l’émetteur-récepteur se désactive automatiquement.
3. Validez la sélection à l’aide de la touche PUSH TO TALK située
sur le côté gauche ou attendez 10 secondes que l’écran retourne
au mode de fonctionnement normal.
Si le mode automatique de désactivation est activé, l’icône
s’affiche à l’écran.
Remarque : Un signal sonore retentit une minute avant la
désactivation de l’émetteur-récepteur.
! et " permettent alors de procéder aux
23
Page 24

- Informations importantes -
4 Informations importantes
4.1 Caractéristiques techniques
Fréquences des canaux PMR (MHz) :
Canal 1 : 446,00625 Canal 5 : 446,05625
Canal 2 : 446,01875 Canal 6 : 446,06875
Canal 3 : 446,03125 Canal 7 : 446,08125
Canal 4 : 446,04375 Canal 8 : 446,09375
Récepteur :
Sensibilité
pour 12 sinad : -119 dBm
pour détection de signaux d’appel : -121 dBm
Rapport signal / bruit max. à 47 dBm
radiofréquence entrée 40 dB
Sortie audio max. à 10% de facteur de distorsion >150 mW
Squelch
Sensibilité -121 dBm
Comportement de fréquence vocale
à 400 Hz +4 dB
à 2500 Hz -11 dB
Distance de signal largeur de bande +/- 5 kHz
Séparation des canaux 12.5 kHz
Suppression de l’intermodulation 60 dB
Suppression des parasites 60 dB
Émetteur:
Puissance de sortie effective 500 mW
Stabilité de la fréquence porteuse +/- 1 kHz
Limitation de modulation 2,5 kHz
Durée de réponse porteuse 30 ms
Comportement de fréquence vocale
à 400 Hz -7 dB
à 2,5 kHz 2 dB
Distorsion du son 2%
Ronflement et souffle 35 dB
Réponse en fréquence passagère
Émetteur marche 30 ms
Émetteur arrêt <10 ms
Alimentation électrique :
Les caractéristiques techniques peuvent être modifiées sans avis
24
Usage mixte env. 12 heures
Autonomie en veille 30 heures
Courant de batterie total 6,0 V
préalable.
Page 25

- Informations importantes -
4.2 Instructions d’entretien
Vous pouvez utiliser un chiffon sec, doux et non-pelucheux pour
nettoyer les surfaces du boîtier. N'utilisez jamais de produits
nettoyants ou de solvants agressifs.
Ne placez jamais l’appareil dans un endroit humide ou poussiéreux.
Évitez de placer l’appareil à proximité de sources de chaleur tels que
les radiateurs et évitez une exposition directe au soleil.
25
Page 26

- Informations importantes -
26
Page 27

- Sommario -
Elementi di comando......................28
1
2 Messa in funzione..........................29
2.1 Controllare il contenuto
dell'imballaggio ..................................29
2.2 Inserimento delle batterie ricaricabili.....29
2.3 Collegamento per auricolare ................30
3 Impiego .......................................31
3.1 Inserimento e disinserimento delle
ricetrasmittenti...................................31
3.2 Selezione del canale............................31
3.3 Chiamata in un altro utente .................32
3.4 Modalità automatica di risparmio delle
batterie .............................................33
3.5 Ricerca del canale (modo Scan)............33
3.6 Blocco della tastiera ............................33
3.7 Portata delle ricetrasmittenti ................34
3.8 Aumento della massima portata ...........34
3.9 Selezione del segnale di chiamata.........34
3.10 Attivazione/disattivazione del Roger
Beep .................................................35
3.11 Disinserimento automatico...................35
4 Informazioni importanti..................36
4.1 Dati tecnici ........................................36
4.2 Istruzioni per la manutenzione .............37
27
Page 28

- Elementi di comando -
1 Elementi di comando
1. micro-collegamento cuffia
2. collegamento DC 7,5V
3. interruttore ON/OFF
4. selettore
5. blocco della tastiera
6. tasto MENU
7. ricerca canale (SCAN)
8. tasto PUSH TO TALK
9. monitor ON/OFF
!e "
9
8
7
Indicazioni sul display
1. Capacità delle batterie
2. Disinserimento automatico ON
3. Segnale di chiamata
4. Blocco della tastiera
5. Roger Beep
6. Volume
7. Trasmissione
8. Modalità di risparmio
delle batterie
9. Ricezione
10. Canale radio
11. Kanalsuche (SCAN)
1
6
7
8
28
2
1
3
4
5
6
45
2
3
9
11
10
Page 29

- Messa in funzione -
2 Messa in funzione
2.1 Controllare il contenuto
dell'imballaggio
La dotazione comprende:
Due ricetrasmittenti con clip a cintura Istruzioni per l'uso
Due auricolare Due batterie ricaricabili
Un alimentatore di rete
2.2 Inserimento delle batterie ricaricabili
Con queste batterie ricaricabili ogni ricetrasmittente possiede una
durata di funzionamento in standby di 30 ore ed una durata di
conversazione di ca. 12 ore. Le ricetrasmittenti possono essere
ricaricate attraverso la boccola DC 7,5V con l'alimentatore di rete
entro 16 ore. L'alimentatore di rete possiede due collegamenti, che
consentono di ricaricare contemporaneamente ambedue le
ricetrasmittenti.
Nota: si prega di non utilizzare accumulatori di altri produttori, normali
batterie ricaricabili o altri alimentatori di rete che possano danneggiare
le ricetrasmittenti.
1. Allentare la vite di fissaggio del clip della cintura e girare da parte
quest'ultimo.
2. Sbloccare il coperchio dell'alloggiamento delle batterie ed aprilo.
3. Introdurre a questo punto le batterie e rispettare la corretta
polarità. Un'inversione di polarità può danneggiare l'apparecchio.
4. Chiudere infine lo scompartimento delle batterie.
5. Girare nuovamente il clip della cintura nella corretta posizione e
stringere di nuovo la vite.
Avvertenza: al posto degli accumulatori potete anche utilizzare
quattro batterie alcaline da 1,5V del tipo AAA. Si prega di utilizzare
esclusivamente la migliore qualità. Rispettare la corretta polarità
all'introduzione.
29
Page 30

- Messa in funzione -
Indicazione della capacità delle batterie
La capacità delle batterie viene indicata in tre gradi:
Piono Medio Debole
Le batterie devono essere cambiate, non appena lampeggia
l'indicazione nel display accompagnata da rispettivi segnali acustici
d'avvertimento.
Non gettare mai le batterie nel fuoco e non immergerle nell'acqua. Le
batterie vecchie o difettose non devono mai essere smaltite nei
normali rifiuti urbani.
2.3 Collegamento per auricolare
Le ricetrasmittenti possono essere impiegate con un microfono
esterno ed una cuffia, un cosiddetto sistema auricolare. Ciò permette
per esempio di avere sempre le mani libere per delle altre attività. Il
collegamento si trova nella parte superiore sotto un coperchio.
Aprire il coperchio nella parte superiore della ricetrasmittente e
inserire la spina nella boccola di collegamento.
Accertatevi però che l'apertura del microfono rimanga sempre libera.
Nell'impiego dell'auricolare si raccomanda di attivare il blocco della
tastiera nella ricetrasmittente, per prevenire delle variazioni
involontarie delle regolazioni.
30
Page 31

- Impiego -
3 Impiego
3.1 Inserimento e disinserimento delle
ricetrasmittenti
Per inserire una ricetrasmittente, mantenere premuto il tasto POWER
ON/OFF, fino a sentire un segnale acustico.
Per alcuni secondi si illumina il display con la visualizzazione di tutti i
simboli d'indicazione. Dopodiché nel display viene visualizzato il
canale attualmente selezionato.
Mantenere premuto per un secondo il tasto POWER ON/OFF, per
spegnere così la radio.
3.2 Selezione del canale
Le ricetrasmittenti dispongono di 8 diversi canali di radiotrasmissione,
omologati dal Comitato Europeo per radiocomunicazioni per l'impiego
come „radio mobile privata“, detto in breve RMP.
Per parlare attraverso due radiotrasmettitori, è necessario che
ambedue le unità siano regolate sullo stesso canale.
Selezionate uno degli 8 canali, premendo una volta sul tasto MENU.
Dopodiché nel display lampeggia l'indicazione CHAN.
Selezionare a questo punto il canale desiderato tra 1 e 8 tramite i tasti
!e ". Nel display viene visualizzato il canale attualmente regolato.
Confermare la selezione tramite il tasto PUSH TO TALK situato nella
parte sinistra o attendere fino a 10 secondi, finché il display non si
ricommuta al modo di funzionamento normale.
Potete anche metterVi in comunicazione con delle altre unità, che
dispongono altrettanto dei canali RMP e che sono regolati alla
medesima frequenza. A tal fine si prega di osservare i dati tecnici.
31
Page 32

- Impiego -
3.3 Chiamata in un altro utente
Se desiderate parlare con degli altri utenti, occorre procedere nel
modo seguente: ambedue le ricetrasmittenti devono essere inserite
nonché regolate sullo stesso canale.
Per parlare occorre premere il tasto PUSH TO TALK situato nella
parte sinistra. Mantenere una distanza di ca. 5 cm dall'apparecchio e
parlare a voce normale. Dopodiché rilasciare il tasto PUSH TO TALK.
L'interlocutore a questo punto sente un segnale acustico (Roger
Beep), non appena rilasciate il tasto TALK. In tal modo al Vostro
interlocutore viene segnalato il termine della Vostra frase e che siete
in attesa di una risposta.
Nota: Mentre mantenete premuto il tasto PUSH TO TALK,
non potete sentire le chiamate in arrivo. Come accade
generalmente nei radiotrasmettitori, può sempre parlare un
solo interlocutore alla volta.
Perciò, dovete sempre attendere fino a sentire il segnale acustico
(Roger Beep), prima di premere nuovamente il tasto PUSH TO TALK.
Mentre premete il tasto PUSH TO TALK, nel display viene
visualizzato il simbolo
verrà visualizzato il simbolo
Regolazione del volume
Il volume del segnale di chiamata dipende sostanzialmente dalla
regolazione del Vostro volume. Tramite i tasti
regolare otto stadi di volume.
Trasmissione del segnale di chiamata
Premere il tasto PUSH TO TALK e una volta il tasto
di due secondi nell'unità chiamata si sente un rispettivo segnale
acustico.
. Se ricevete una chiamata, nel display
.
!e " si possono
!. Per la durata
32
Page 33

- Impiego -
3.4 Modalità automatica di risparmio delle
batterie
La ricetrasmittente si commuta automaticamente al modo di risparmio
delle batterie, quando dopo alcuni secondi non viene più premuto
alcun tasto. Dopodiché nel display lampeggia l'indicazione PS. In
questo stato la ricetrasmittente rimane inserita per 120 ms e
disinserita per 480ms. In tal modo viene risparmiata la capacità delle
batterie. Il funzionamento normale non viene comunque pregiudicato.
3.5 Ricerca del canale (modo Scan)
Nella funzione di ricerca del canale (Scan) attivata avviene
un'interrogazione continua di tutti gli 8 canali, finché la ricetrasmittente
ha trovato un canale su cui avviene una conversazione.
1. Mantenere premuto per un secondo il tasto SCAN. Nel display
lampeggia l'indicazione SCAN.
2. A questo punto avviene una ricerca consecutiva di tutti i canali.
Non appena è stato trovato un canale attualmente in uso, la
funzione di ricerca dei canali verrà interrotta per 2 secondi.
Premete entro questo periodo il tasto PUSH TO TALK, se
desiderate restare sul canale trovato e per disattivare quindi la
funzione di ricerca del canale.
3. Mantenere premuto per un secondo il tasto SCAN, per
terminare la ricerca del canale.
Durante la ricerca del canale, i tasti PUSH TO TALK, MONITOR e
LOCK sono senza funzione.
3.6 Blocco della tastiera
Al fine di evitare una commutazione involontaria o non autorizzata
delle impostazioni effettuate, è anche possibile interdire la tastiera.
A tal fine occorre mantenere premuto per 1 secondo il tasto LOCK.
Nel display viene ora visualizzato il simbolo
Il tasto PUSH TO TALK non è bloccato e vi consente così di parlare
ulteriormente col vostro interlocutore. Ma è anche possibile
trasmettere un segnale di chiamata tramite i tasti PUSH TO TALK e
e la tastiera è bloccata.
!.
33
Page 34

- Impiego -
Per disattivare successivamente il blocco della tastiera, mantenere di
nuovo premuto per un secondo il tasto LOCK. Il simbolo scompare ed
il blocco della tastiera è disattivato.
3.7 Portata delle ricetrasmittenti
Le ricetrasmittenti hanno una portata massima di 5 km. Questa
portata massima può essere ridotta a causa di determinate
circostanze. In condizioni piane ed all'aperto si ottengono i migliori
risultati e la massima portata. Se nella traiettoria dei segnali
dovessero trovarsi degli edifici oppure alberi allora verrà
rispettivamente ridotta la portata. La portata viene ulteriormente ridotta
anche nelle zone collinose.
3.8 Aumento della massima portata
Le ricetrasmittenti sono equipaggiate con un cosiddetto AUTOSQUELCH, tramite il quale vengono automaticamente soppressi i
rumori di fruscio dovuto ad una radiotrasmissione troppo debole e non
voluti durante l'impiego. Questo AUTO-SQUELCH può anche essere
disattivato momentaneamente, per aumentare così la portata.
Mantenere premuto il tasto MONITOR ON/OFF per un secondo, fino a
sentire un segnale acustico. La funzione di soppressione automatica
è disattivata e a questo punto si possono ricevere anche i segnali
radio più deboli.
Per inserire di nuovo la funzione AUTO-SQUELCH, basta mantenere
nuovamente premuto per un secondo il tasto MONITOR ON/OFF.
3.9 Selezione del segnale di chiamata
Alle altre unità ricetrasmittenti potete anche trasmettere un segnale di
chiamata tramite il tasto CALL, non appena volete iniziare una
conversazione. A tal fine sono disponibili 5 melodie diverse.
1. Premere brevemente due volte il tasto MENU. Lampeggia ora
l'indicazione ??.
2. Mediante i tasti
diversi segnali di chiamata.
3. Confermare la selezione tramite il tasto PUSH TO TALK situato
nella parte sinistra o attendere fino a 10 secondi, finché il
display non si ricommuta al modo di funzionamento normale.
!e " potete ora selezionare uno dei 5
34
Page 35

- Impiego -
3.10 Attivazione/disattivazione del Roger
Beep
Il Roger Beep segnala all'altro interlocutore che adesso si può parlare.
Questo segnale acustico, che viene trasmesso al rilascio del tasto
PUSH TO TALK, può essere attivato o disattivato.
1. Premere brevemente quattro volte il tasto MENU. Lampeggia
ora l'indicazione
2. Tramite i tasti
segnale Roger Beep.
3. Confermare la selezione tramite il tasto PUSH TO TALK situato
nella parte sinistra o attendere fino a 10 secondi, finché il
display non si ricommuta al modo di funzionamento normale.
Dopo che avete attivato il Roger Beep, nel display verrà visualizzata
l'indicazione
.
.
!e " potete attivare (On) oppure disattivare il
3.11 Disinserimento automatico
Le ricetrasmittenti sono equipaggiate con un dispositivo per il
prolungamento della durata utile delle batterie. Se entro un
determinato periodo non avviene più alcuna radiotrasmissione,
l'apparecchio di spegnerà automaticamente.
1. Premere brevemente cinque volte il tasto MENU. Lampeggia
ora l'indicazione
2. Tramite i tasti
impostazioni:
0 = disattivazione del modo di risparmio delle batterie
1 fino 3 = indicazione delle ore che devono trascorrere dopo il
disinserimento automatico della ricetrasmittente.
3. Confermare la selezione tramite il tasto PUSH TO TALK situato
nella parte sinistra o attendere fino a 10 secondi, finché il
display non si ricommuta al modo di funzionamento normale.
Dopo che avete attivato il modo di disinserimento automatico, nel
display verrà visualizzata l'indicazione
Nota: Un minuto prima del disinserimento della ricetrasmittente viene
attivato un rispettivo segnale acustico.
.
!e " si possono effettuare le seguenti
.
35
Page 36

- Informazioni importanti -
4 Informazioni importanti
4.1 Dati tecnici
PMR Canale Frequenze (MHz) :
canale
1: 446,00625 canale 5: 446,05625
canale 2: 446,01875 canale 6: 446,06875
canale 3: 446,03125 canale 7: 446,08125
canale 4: 446,04375 canale 8: 446,09375
Ricevitore:
Sensibilità
per 12 Sinad: -119 dBm
per riconoscimento del
segnale di chiamata: -121 dBm
distanza di fruscio max. nell’ingresso 47 dBm RF 40 dB
uscita audio max. in un fattore di
distorsione del 10% >150 mW
Squelch
sensibilità -121 dBm
Comportamento di frequenza
a 400 Hz +4 dB
a 2500 Hz -11 dB
ampiezza di banda distanza segnale +/- 5 kHz
separazione canale 12.5 kHz
soppressione d’intermodulazione 60 dB
soppressione disturbi 60 dB
Trasmettitore:
potenza d’uscita effettiva 500 mW
resistenza della frequenza portante 500 Hz
delimitazione della modulazione 2,5 kHz
tempo di reazione portante 30 ms
comportamento di frequenza
a 400 Hz -7 dB
a 2,5 kHz 2 dB
distorsione acustica 2%
ronzio e fruscio 35 dB
comportamento momentaneo di frequenza
trasmettitore ON 30 ms
trasmettitore OFF <10 ms
Alimentazione di corrente:
servizio misto ca. 12ore
standby 30 ore
tensione totale batterie 6 V
I presenti dati tecnici possono essere modificati, senza alcun preavviso.
36
Page 37

- Informazioni importanti -
4.2 Istruzioni per la manutenzione
Le superfici del contenitore possono essere pulite con un panno
pulito, asciutto e privo di peluria. Non utilizzare mai dei detergenti o
delle soluzioni aggressive.
Non disporre mai l'apparecchio in luoghi umidi e polverosi. Evitare
possibilmente fonti di calore, quali riscaldamenti, termosifoni, ecc. e
non esporre l'apparecchio direttamente ai raggi solari.
37
Page 38

- Informazioni importanti -
38
Page 39

- Contents -
User controls ................................40
1
2 Setting up ....................................41
2.1 Check contents of pack .......................41
2.2 Fitting the rechargeable batteries .........41
2.3 Connecting the headset .......................42
3 Operation.....................................43
3.1 Switching the radios on and off ............43
3.2 Channel selection ...............................43
3.3 Calling another subscriber ...................44
3.4 Automatic battery saving mode ............45
3.5 Channel search (scan mode) ................45
3.6 Keypad lock .......................................45
3.7 Range of the radios.............................46
3.8 Increasing the maximum range ............46
3.9 Selecting a call tone............................46
3.10 Switching the Roger beep on/off...........47
3.11 Automatic switch-off ...........................47
4 Important information....................48
4.1 Technical data....................................48
4.2 Care instructions ................................49
39
Page 40

- User controls -
1 User controls
1. Microphone and headphone connection
2. DC 7.5V connection
3. On/Off button
4. Selection buttons
5. Keypad lock
6. MENU button
7. Channel search (SCAN)
8. PUSH TO TALK button
9. Monitor On/Off
!and "
9
8
7
Display symbols
1. Battery capacity
2. Automatic switch-off on
3. Call signal
4. Keypad lock
5. Roger beep
6. Volume
7. Transmit
8. Battery saving mode
9. Receive
10. Radio channel
11. Channel search (SCAN)
1
6
7
8
40
2
1
3
4
5
6
45
2
3
9
11
10
Page 41

- Setting up -
2 Setting up
2.1 Check contents of pack
The following items are supplied:
two radios with belt clip one instruction manual
two headsets two rechargeable battery packs
one power supply
2.2 Fitting the rechargeable batteries
With the rechargeable battery, each radio has a standby time of 30
hours and a talk time of ca. 12 hours. The radios can be recharged in
16 hours by means of the plug-in mains power supply using the 7.5V
DC socket. The plug-in power supply has two connectors so that both
radios can be charged simultaneously.
Note: Please do not use different battery packs, normal rechargeable
batteries or other power supplies, as these can damage the radios.
Fitting the battery packs
1. Undo the fixing screw for the belt clip and swivel the belt clip to the
side.
2. Unclip the battery compartment cover and open the compartment.
3. Now insert the batteries taking care to ensure that the polarity is
correct. Incorrect polarity can damage the unit.
4. Close the battery compartment.
5. Swivel the belt clip back into its correct position and retighten the
screw.
Note: In place of the battery pack you can also use four 1.5V AAA
alkaline batteries. Please use only the best quality. Take care to
ensure that the polarity is correct when inserting.
41
Page 42

- Setting up -
Indication of battery capacity
The battery capacity is shown in three steps:
Full Medium Low
The batteries must be replaced when the indicator in the display
flashes and warning tones are heard.
Do not throw batteries into the fire or immerse in water. Do not
dispose of old or defective batteries with the normal household waste.
2.3 Connecting the headset
The radios can be used with an external microphone and earpiece, a
so-called headset. In this way, you can keep your hands free for other
activities. The connection will be found on the top underneath a
cover.
Open the cover on the top of the radio and insert the plug into the
socket.
Make sure that the microphone opening remains unobstructed. When
using the headset, we recommend that the keypad lock on the radio is
activated so that no settings can be changed unintentionally.
42
Page 43

- Operation -
3 Operation
3.1 Switching the radios on and off
To switch on the radio, hold the POWER ON/OFF button pressed until
a signal tone sounds.
The display will be illuminated for some seconds and all the symbols
will be shown in the display. After this the display will show the
currently selected channel.
To switch the radio off again, hold the POWER ON/OFF button
pressed for one second.
3.2 Channel selection
The radios have 8 different transmission channels, which are released
by the European Committee for Radio Communications as " Private
Mobile Radio" channels, known as PMR for short.
In order to be able to speak between two radios, both units
must be set to the same channel.
Choose one of the 8 channels by pressing the MENU button once.
The message CHAN will flash in the display.
Now select the required channel between 1 and 8 using the
!and
" buttons. The display will show the channel that is currently
selected. Confirm the selection with the PUSH TO TALK button on the
left-hand side or wait for 10 seconds until the display returns to the
normal operating mode once more.
You can also make contact with other units that likewise make use of
the PMR channels and which are set to the same frequency. Please
refer to the technical data for more information.
43
Page 44

- Operation -
3.3 Calling another subscriber
When you want to talk to other subscribers, proceed as follows: The
two radios must be switched on and set to the same channel.
To speak, press the PUSH TO TALK button on the left-hand side.
Hold the unit about 5 cm from your mouth and speak in a normal
voice. When you have finished, release the PUSH TO TALK button.
The person you are speaking to will hear a signal tone (Roger beep)
when you release the TALK button. This will indicate to the other
subscriber that you have finished speaking and are waiting for a reply.
Note: While you are holding the PUSH TO TALK button, you
will not be able to hear any incoming calls. As is usual with
radio units, only one of the two participants in the call can
speak at any one time.
Therefore, always wait until you hear the signal tone (Roger beep)
before pressing the PUSH TO TALK button again.
While you are pressing the PUSH TO TALK button, the
will appear in the display. When you receive a call, the
appear in the display.
Volume adjustment
The volume of the incoming call signal depends on your volume
setting. Eight volume levels can be set using the
Transmitting a call signal
Press the PUSH TO TALK button and press the
ringing tone will sound on the called unit for two seconds.
!and " buttons.
! button once. A
symbol
symbol will
44
Page 45

- Operation -
3.4 Automatic battery saving mode
The radio switches automatically to battery saving mode if no button
has been pressed for a few seconds. The message PS will flash in
the display. In this condition, the radio is switched on for 120 ms and
off for 480 ms. Battery capacity is saved in this way. This does not
restrict normal operation.
3.5 Channel search (scan mode)
When channel search (scan) is switched on, all 8 channels are
continuously polled until the radio finds a channel that is being used
for speech.
1. Press and hold the SCAN button for one second. The message
SCAN will flash in the display.
2. All channels will now be scanned one after the other. As soon as
a channel is found that is currently in use, channel search will be
interrupted for 2 seconds. Press the PUSH TO TALK button
during this time if you want to keep the channel that has been
found and exit the channel search.
3. Press the SCAN button for one second to exit channel search.
The PUSH TO TALK, MONITOR and LOCK buttons are inoperative
during channel search.
3.6 Keypad lock
In order to prevent settings from being changed unintentionally, you
can switch on the keypad lock.
To do this, press and hold the LOCK button for one second. The
symbol will appear in the display and the keypad lock will be activated.
The PUSH TO TALK button is not locked and you will be able to
continue talking to the other person. It is also possible to transmit a
call signal with the PUSH TO TALK and
To turn the keypad lock off once more, press and hold the LOCK
button again for one second. The symbol will disappear and the
keypad lock will be deactivated.
! buttons.
45
Page 46

- Operation -
3.7 Range of the radios
The radios have a range of up to 5 km. This maximum range can be
reduced under certain circumstances. You can achieve maximum
range in open, flat conditions. If there are buildings or trees in the
signal path then the range will be reduced. The range is even further
reduced in hilly terrain.
3.8 Increasing the maximum range
The radios are equipped with a so-called AUTO-SQUELCH system,
by means of which weak transmissions and undesirable noises are
automatically filtered out during use. This AUTO-SQUELCH system
can be temporarily switched off in order to increase the range.
Press and hold the MONITOR ON/OFF button for one second until
you hear a signal tone. The automatic suppression will be switched
off and it will now be possible for even very weak signals to be
received.
To switch the AUTO-SQUELCH on again, press the MONITOR
ON/OFF button once more for one second.
3.9 Selecting a call tone
You can transmit a call tone to the other radios using the CALL button
when you want to begin a call. 5 different melodies are available for
this purpose.
1. Press the MENU button briefly twice. The CHAN indicator will
flash.
2. You can now choose one of 5 different call tones using the
!and " buttons.
3. Confirm the selection with the PUSH TO TALK button on the left-
hand side or wait for 10 seconds until the display returns to the
normal operating mode once more.
46
Page 47

- Operation -
3.10 Switching the Roger beep on/off
The Roger beep signals to the other caller that it is now possible to
speak. This signal tone on releasing the PUSH TO TALK button can
be switched on and off.
1. Press the MENU button briefly four times. The
flash.
2. The Roger beep can now be switched On and Off using the
indicator will
!and " buttons.
3. Confirm the selection with the PUSH TO TALK button on the left-
hand side or wait for 10 seconds until the display returns to the
normal operating mode once more.
When the Roger beep is activated, the
display.
3.11 Automatic switch-off
The radios are equipped with a device for prolonging the battery life. If
no transmissions take place within a certain time, the unit switches
itself off automatically.
1. Press the MENU button briefly five times. The
flash.
2. You can now make the following settings with the
buttons.
0 = Battery saving mode off
1 to 3 = Number of hours after which the radio will automatically
be switched off.
3. Confirm the selection with the PUSH TO TALK button on the left-
hand side or wait for 10 seconds until the display returns to the
normal operating mode once more.
When automatic switch-off mode is activated, the
appears in the display.
Note: You will hear a signal tone one minute before the radio is
switched off.
indicator appears in the
indicator will
!and "
indicator
47
Page 48

- Important information -
4 Important information
4.1 Technical data
PMR Channel Frequencies (MHz) :
Channel 1: 446,00625 Channel 5: 446,05625
Channel 2: 446,01875 Channel 6: 446,06875
Channel 3: 446,03125 Channel 7: 446,08125
Channel 4: 446,04375 Channel 8: 446,09375
Receiver:
Sensitivity
for 12 Sinad: -119 dBm
for call signal recognition: -121 dBm
Max. signal to noise ratio at - 47 dBm RF input 40 dB
Max. audio output at 10% harmonic distortion >150 mW
Squelch
Sensitivity -121 dBm
Audio frequency response
at 400 Hz +4 dB
at 2500 Hz -11 dB
Signal distance bandwidth +/- 5 kHz
Channel separation 12.5kHz
Intermodulation suppression 60 dB
Interference suppression 60 dB
Transmitter:
Effective output power 500 mW
Carrier frequency persistence +/- 1kHz
Modulation limit 2.5 kHz
Reaction time, carrier 30 ms
Audio frequency response
at 400Hz -7 dB
at 2,5 kHz 2 dB
Audio distortion 2%
Hum and noise 35 dB
Transient frequency response
Transmitter on 30 ms
Transmitter off <10 ms
Power supply:
Mixed usage ca. 12 hours
Standby 30 hours
Total battery voltage 6.0 V
Technical data are subject to change without previous notice.
48
Page 49

- Important information -
4.2 Care instructions
The surface of the case can be cleaned with a dry, soft and lint-free
cloth. Never use cleaning agents, particularly aggressive solvents.
Never leave the unit in a damp or dusty place. Avoid proximity to
sources of heat such as radiators and do not expose the unit to direct
sunlight.
49
Page 50

- Declaration of Conformity -
WE TELGO AG
Of Route d'Englisberg 17
Declare under our own responsibility that the product
Model: SWITEL WT008
Description: Private Mobile Radio, frequency 446 MHz
Is in conformity with directives: 1999/5/EC R & TTE Directives
Compliance is achieved by conformity to the following:
EN 300 296-2 : 2001, EN 300 279 : 1999,
EN 60065 : 1998 + corrigendum
Test report number:
ET-R0305039, ET-R0301161, ET-R0301160
AUTHORISED SIGNATORY:
Signature: ______________________
Name: Selim Dusi
Position in the company: Managing Director
Date of issue: 25.03.2003
A copy of this declaration will be retained for 10 years after cessation
of production.
CH-1763 Granges Paccot
SUPPLIER: TELGO AG
Route d'Englisberg 17
CH-1763 Granges Paccot
PRODUCT: SWITEL WT008
This product transmits in a non-EU-harmonised
frequency band (466.00625 – 446.09375 MHz distribute
on 8 channels) and may thus only be used within those
countries that permit usage of such equipment.
50
Page 51

Page 52

 Loading...