

Page 1
Sicherheitstelefon
Téléphone de sécurité
Telefono di sicurezza
Security Phone
TC49S
Bedienungsanleitung
Mode d’emploi
Istruzioni per l’uso
Operating Instructions
Page 2

2
Bedienungsanleitung 3. . . . . . . .
Mode d’emploi 17. . . . . . . . . . . .
Istruzioni per l’uso 31. . . . . . . . . .
Operating Instructions 46. . . . . . .
Declaration of Conformity 60. . . .
2
Page 3

1
Inhaltsverzeichnis
1 Sicherheitshinweise 4. . . . . . . . . . . . . . . . . . . . . . . . . .
2 Telefon in Betrieb nehmen 5. . . . . . . . . . . . . . . . . . . . . .
3 Bedienelemente 7. . . . . . . . . . . . . . . . . . . . . . . . . . . . .
4 Telefonieren 9. . . . . . . . . . . . . . . . . . . . . . . . . . . . . . . .
5 Rufnummernanzeige (CLIP) 11. . . . . . . . . . . . . . . . . . . . .
6 Nebenstellenanlagen / Zusatzdienste 13. . . . . . . . . . . . . .
7 Technische Eigenschaften / Problembehandlung 14. . . . . .
8 Pflegehinweise / Garantie 15. . . . . . . . . . . . . . . . . . . . . .
9 Stichwortverzeichnis 16. . . . . . . . . . . . . . . . . . . . . . . . . .
3
Page 4

Sicherheitshinweise
1 Sicherheitshinweise
Lesen Sie diese Bedienungsanleitung sorgfältig durch.
Bestimmungsgemäße Verwendung
Dieses Telefon ist geeignet für das Telefonieren innerhalb eines Telefonnetzes. Jede andere Verwendung gilt als nicht bestimmungsgemäß. Eigenmächtige Veränderungen oder Umbauten sind
nicht zulässig. Öffnen Sie das Gerät in keinem Fall selbst und führen Sie keine eigenen Reparaturversuche durch.
Aufstellungsort
Vermeiden Sie Belastungen durch Rauch, Staub, Erschütterungen, Chemikalien, Feuchtigkeit,
Hitze oder direkte Sonneneinstrahlung. Verwenden Sie das Telefon nicht in explosionsgefährdeten
Bereichen.
Stellen Sie das Telefon nicht in die unmittelbare Umgebung von anderen elektronischen Geräten
wie z.B. Mikrowellen oder HIFI−Geräten, da es sonst zu gegenseitiger Beeinflussung kommen
kann. Der Aufstellort hat einen entscheidenden Einfluss auf einen einwandfreien Betrieb des Telefons.
Stellen Sie das Telefon auf eine ebene und rutschfeste Fläche. Normalerweise hinterlassen die
Füsse keine Spuren auf der Aufstellfläche. Wegen der Vielzahl der verwendeten Lacke und Oberflächen kann es jedoch nicht ausgeschlossen werden, dass durch die Gerätefüße Spuren auf der
Abstellfläche entstehen.
Hörgeräte−kompatibel
Das Telefon ist mit den meisten am Markt befindlichen Hörgeräten kompatibel. Das Telefon besitzt
eine Spezialschaltung auf Induktionsbasis zur Sprachübertragung an Hörgeräten. Bitte stellen Sie
Ihr Hörgerät auf T".
Durch die Vielzahl der angebotenen Modelle kann keine einwandfreie Funktion mit jedem Hörgerät garantiert werden.
Entsorgung
Hat Ihr Gerät ausgedient, bringen Sie das Altgerät zur Sammelstelle Ihres kommunalen
Entsorgungsträgers (z.B. Wertstoffhof). Das nebenstehende Symbol bedeutet, dass
das Altgerät getrennt vom Hausmüll zu entsorgen ist. Nach dem Elektro− und Elektro−
nikgerätegesetz sind Besitzer von Altgeräten gesetzlich gehalten, alte Elektro− und
Elektronikgeräte einer getrennten Abfallerfassung zuzuführen.
Batterien entsorgen Sie beim batterievertreibenden Handel sowie bei zuständigen
Sammelstellen, die entsprechende Behälter bereitstellen.
Verpackungsmaterialien entsorgen Sie entsprechend den lokalen Vorschriften.
4
Page 5
Telefon in Betrieb nehmen
2 Telefon in Betrieb nehmen
Sicherheitshinweise
Achtung: Lesen Sie vor der Inbetriebnahme unbedingt die Sicherheitshinweise
in Kapitel 1.
Verpackungsinhalt prüfen
Zum Lieferumfang gehören:
− ein Telefon (Grundgerät) − vier Batterien (AA 1.5V Alkaline)
− ein Telefonhörer − ein Wandhalter
− ein Spiralkabel − eine Bedienungsanleitung
− ein Telefonanschlusskabel
Telefonhörer anschließen
Verwenden Sie das Spiralkabel, um den Telefonhörer mit dem Grundgerät zu verbinden. Das Spiralkabel hat zwei identische Anschlüsse; stecken Sie das eine Ende des Kabels in die Buchse am
unteren Ende des Hörers, das andere Ende des Kabels in die Buchse auf der linken Seite des
Grundgeräts. Die Stecker rasten hörbar ein.
Batterien einsetzen
Die Batterien werden für die Displayanzeige und für weitere Funktionen des Telefons benötigt.
Bevor Sie die Batterien einbauen oder wechseln, achten Sie darauf, dass das Telefon
Das Batteriefach befindet sich auf der Unterseite Ihres Telefons. Öffnen Sie das Fach mit Hilfe eines spitzen Gegenstands (z. B. Kugelschreiber) und legen Sie vier Batterien vom Typ AA 1.5V Alkaline ein.
Achten Sie dabei auf die richtige Polung der Batterien: Schieben Sie den Minus−Pol der Batterie
(flache Seite) gegen die Spiralfeder und drücken Sie anschließend den Plus−Pol nach unten. Die
korrekte Lage der Batterien ist zusätzlich auf dem Grund des Batteriefachs abgedruckt.
Verwenden Sie nur Batterien vom angegebenen Typ.
Schließen Sie das Batteriefach, bis der Deckel hörbar einrastet.
Die Batterien müssen gegen neue ausgetauscht werden, sobald auf dem Display des Telefons das
Batteriesymbol
Ohne Batterien bleibt der Speicherinhalt im Telefon 3 Minuten erhalten.
2
nicht mit dem Telefonnetz verbunden ist!
erscheint.
Datum und Uhrzeit
Datum und Uhrzeit werden mit eingegangenen Anrufen automatisch übermittelt.
Bedingung: Ihr Netzwerkbetreiber unterstützt diese Funktion.
Displaykontrast einstellen
Möchten Sie den Displaykontrast ändern, drücken Sie die Tasten y und z gleichzeitig für
4 Sekunden. Im Display erscheint die Meldung
Tasten y oder z einstellen (1−5) und mit der Taste bestätigen.
. Den Displaykontrast mit den
5
Page 6
Telefon in Betrieb nehmen
Telefonleitung anschließen
Verwenden Sie das beiliegende Telefonanschlusskabel, um Ihr Telefon mit der Telefonsteckdose
zu verbinden. Stecken Sie das Kabel in die Buchse auf der Rückseite Ihres Telefons, bis es hörbar
einrastet. Das andere Ende des Telefonanschlusskabels schließen Sie an der Telefonsteckdose
an.
Passen Kabel und Anschlussdose nicht zusammen, wenden Sie sich bitte an Ihren Netzbetreiber.
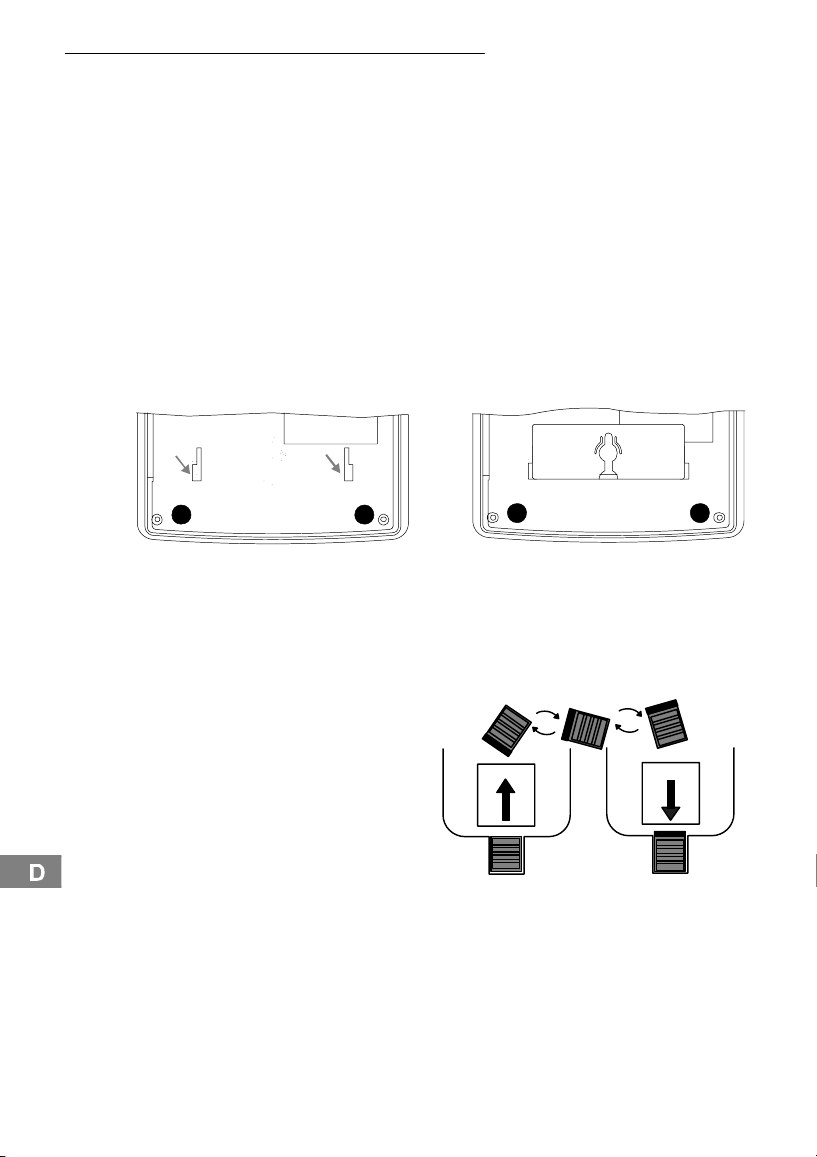
Wandmontage
Ihr Telefon kann auch an einer Wand angebracht werden.
In Vorbereitung der Wandmontage befestigen Sie zunächst den mitgelieferten Montageadapter an
der Unterseite des Telefons. Drehen Sie dazu das Telefon um und stecken Sie den Adapter in die
gekennzeichneten Gehäuseöffnungen. Achten Sie darauf, dass die Aussparung in der Mitte des
Montageadapters nach unten hin geöffnet ist (siehe Abbildung). Schieben Sie dann den Adapter
nach oben, bis dieser hörbar einrastet. Ein Schnapper fixiert den Montageadapter in seiner Position.
(Um den Montageadapter wieder zu entfernen, drücken Sie den Schnapper nach unten und ziehen sie den Adapter darüber hinweg nach vorne.)
Bringen Sie anschließend zwei Schrauben (nicht im Lieferumfang enthalten) an der Wand an: Die
Schrauben müssen sich im Abstand von 83 mm senkrecht untereinander befinden und 5 mm aus
der Wand herausragen.
Stecken Sie nun das Telefon mit seiner Rückseite auf die Schrauben und drücken Sie das Gerät
etwas nach unten, um es fest zu montieren.
Damit der Hörer bei der Wandmontage
nicht vom Gerät rutscht, müssen Sie jetzt
nur noch den Einhängehaken am Grundgerät umdrehen. In der Werkseinstellung befindet er sich in versenkter Position (für das
Aufstellen des Telefons auf einer ebenen
Fläche). Schieben Sie den Einhängehaken
nach oben heraus, drehen Sie ihn um und
schieben Sie ihn in dieser neuen Lage wieder in die Aussparung zurück, bis er hörbar
einrastet (siehe Abbildung).
Nebenstellenanlagen
Auf Seite 13 erhalten Sie weitere Informationen, falls Sie Ihr Telefon an einer Nebenstellenanlage
anschließen möchten.
6
Page 7
Bedienelemente
3 Bedienelemente
Draufsicht
1 Optische Rufanzeige
2 Aufwärts−Taste y
3 Abwärts−Taste z
4 Direktwahl−Tasten
^_`
5 Kurzwahl−Taste
6 Raute−Taste #
7 Stern−Taste *
8 Wahlwiederholung £
9 R−Signal−Taste R
10 Speicher−Taste
11 Stumm−Taste
12 Index
13 Lösch−Taste
14 Wählen
aus der Anruferliste ~
Die Tasten Ihres Telefons werden in dieser Bedienungsanleitung nachfolgend mit vereinfachten
Symbolen dargestellt (s.o.). Es ist daher möglich, dass die verwendeten Symbole von den Tasten
und Symbolen Ihres Telefones leicht abweichen.
Displayanzeigen
12
11
10
9
8
13
14
1
2
3
4
5
6
7
16
15
15 RPT: Anzeige wiederholter Anruf vom selben Anrufer
16 Akkukapazität
17 Hinweis auf neue Anrufe
18 Uhrzeit
19 Datum
20 CALL#: Aktuell ausgewählter Speicherplatz in der Anruferliste
21 Ziffern−Feld
22 Text−Feld
17 18 19
22
20
21
7
Page 8
Bedienelemente
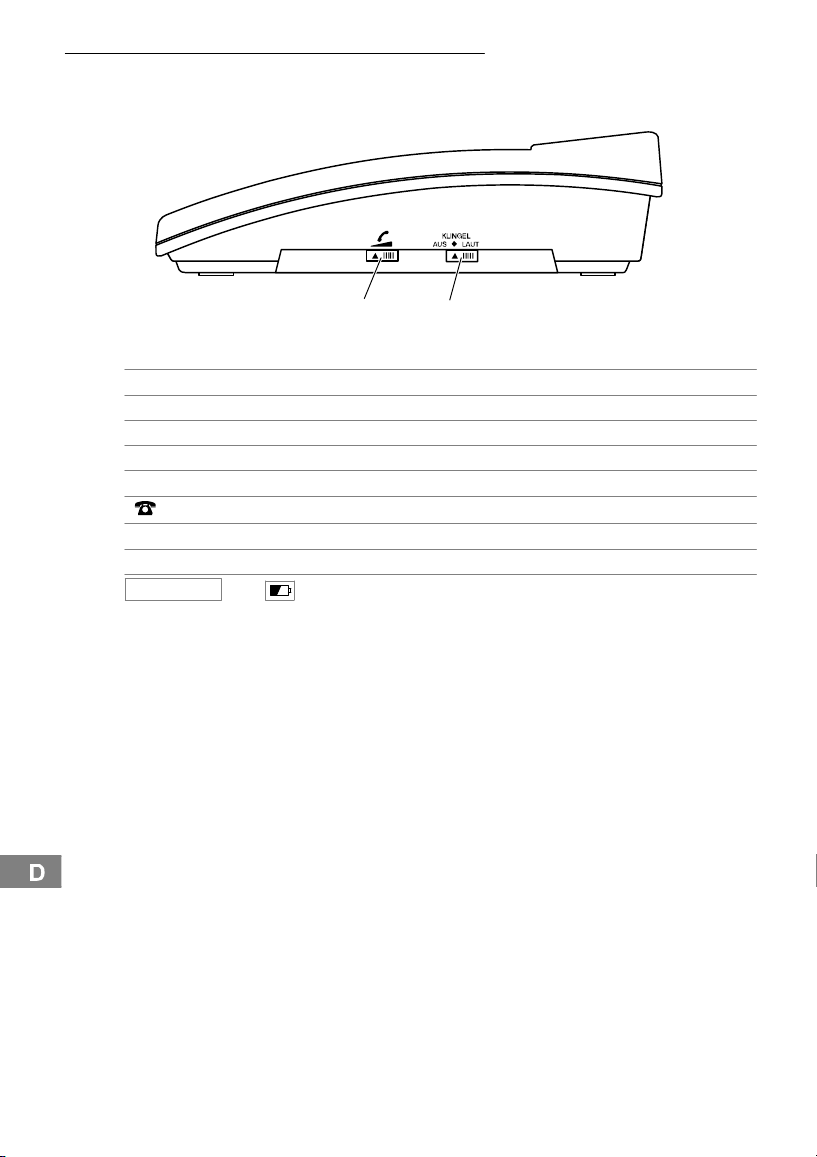
Seitenansicht
23 Klingellautstärke
24 Hörerlautstärke
24
23
Darstellungen und Schreibweisen
ë Nummern eingeben
* Abgebildete Taste kurz drücken
2 sec * Abgebildete Taste 2 Sekunden drücken
halten * Abgebildete Taste halten
loslassen * Abgebildete Taste loslassen
{
} Telefon klingelt
è Hörer abnehmen
é Hörer auflegen
oder Text oder Symbol im Display
8
Page 9
Telefonieren
4 Telefonieren
Anruf annehmen
Zusätzlich zu dem Rufsignal leuchtet bei jedem Anruf auch die optische Rufanzeige.
{
}, è Hörer abnehmen / Anruf annehmen
Gespräch beenden
é Hörer auflegen / Gespräch beenden
Anrufen
è Hörer abnehmen
ë Rufnummer eingeben
Nachdem Sie die Rufnummer eingegeben haben, wird die Verbindung automatisch hergestellt.
Das Display kann maximal 14 Ziffern anzeigen.
Hat eine Rufnummer mehr Ziffern, werden immer nur die 14 letzten Stellen angezeigt.
Ist Ihr Telefon an eine Nebenstellenanlage angeschlossen, erfahren Sie auf Seite 13, was
Sie beim Führen von Anrufen zusätzlich noch beachten müssen.
Wahlwiederholung
Ihr Telefon speichert die zuletzt gewählte Rufnummer. Möchten Sie diese Rufnummer noch einmal
wählen, z. B. weil der Anschluss zuvor besetzt war oder Sie niemanden erreichen konnten, nutzen
Sie die Wahlwiederholung:
è Hörer abnehmen
£ Wahlwiederholungs−Taste drücken
Die gespeicherte Rufnummer wird automatisch gewählt und die Verbindung wird hergestellt.
Direktwahl
Sie haben die Möglichkeit drei Telefonnummern so abzuspeichern, dass diese jeweils nur durch
den Druck einer Taste gewählt werden (Direktwahl).
Hierfür sind die drei Tasten ^, _und ` vorgesehen. Die Taste ` ist dabei rot ein-
gefärbt und eignet sich damit z. B. für das Einprogrammieren einer Notruf−Nummer.
Direktwahltasten programmieren
è Hörer abnehmen
ë Rufnummer eingeben (max. 16 Ziffern)
^ gewünschte Direktwahltaste drücken
é Hörer auflegen / Programmierung beenden
Anrufen über Direktwahltaste
è Hörer abnehmen
^ gewünschte Direktwahltaste drücken (hier z. B. ^)
Die gespeicherte Rufnummer wird automatisch gewählt.
Speichertaste drücken
Speichertaste drücken
9
Page 10
Telefonieren
Kurzwahl
Sie haben die Möglichkeit 10 Telefonnummern so abzuspeichern, dass diese jeweils nur durch
den Druck von drei Tasten gewählt werden (Kurzwahl).
Kurzwahltasten programmieren
è Hörer abnehmen
ë Rufnummer eingeben (max. 16 Ziffern)
0 gewünschte Speicherplatznummer eingeben
é Hörer auflegen / Programmierung beenden
Anrufen über Kurzwahltaste
è Hörer abnehmen
Kurzwahltaste drücken
0 Speicherplatznummer eingeben (hier z. B. für Speicherplatz 0)
Die gespeicherte Rufnummer wird automatisch gewählt.
Anzeige der Gesprächsdauer
Einige Sekunden nach Beginn eines Gesprächs zeigt Ihnen das Display die aktuelle Gesprächsdauer in Minuten und Sekunden an.
Hörerlautstärke erhöhen
Sollte Ihnen die Stimme Ihres Gesprächspartners einmal zu leise sein, können Sie während eines
Gesprächs die Hörerlautstärke erhöhen, indem Sie sie mit dem Schiebeschalter auf der rechten
Seite des Telefongeräts anpassen.
Tonruflautstärke einstellen
Sie haben die Möglichkeit mit dem Schiebeschalter KLINGEL auf der rechten Seite des Telefongeräts die Lautstärke des Tonrufs zu verändern. Der Schiebeschalter ermöglicht drei Positionen:
Für einen lauten Tonruf schieben Sie den Schalter in die ganz rechte Position (LAUT). Wählen Sie
die mittlere Position, um den Tonruf LEISE" zu stellen. Möchten Sie einmal nicht gestört werden,
schieben Sie den Schalter in die linke Position (AUS), um gar keinen Tonruf zu hören.
Mikrofon im Telefonhörer stummschalten
Sie können während eines Telefongesprächs das Mikrofon des Telefonhörers aus− und einschalten.
Stumm−Taste drücken und halten um das Mikrofon
Speichertaste drücken
Speichertaste drücken
(hier z. B. für Speicherplatz 0)
einzuschalten, loslassen zum Ausschalten
10
Page 11
Rufnummernanzeige (CLIP)
5 Rufnummernanzeige (CLIP)
Die Rufnummernanzeige (CLIP) sowie die Anzeige von Datum und Uhrzeit sind optionale
Dienste Ihres Netzbetreibers. Bitte fragen Sie diesen nach weiteren Informationen.
Steht Ihrer Telefonanlage die CLIP−Funktion zur Verfügung (CLIP = Calling Line Identification Pre-
sentation), zeigt das Display bei einem eingehenden Anruf die Rufnummer des Anrufers an, soweit
dieser der Rufnummerübertragung zugestimmt hat.
Hat der Anrufer das Übertragen seiner Rufnummer unterdrückt, wird die Rufnummer nicht
angezeigt; stattdessen erscheint im Display die Meldung
Zeigt das Display die Meldungen , ist keine Information zum Anrufer
vorhanden; in diesem Fall könnte es sich auch um ein internationales Gespräch handeln.
Im Fall, dass eine Rufnummer nur teilweise oder fehlerhaft empfangen wurde, zeigt das
Display
Nehmen Sie einen Anruf nicht an, bleibt die Anzeige für ca. 20 Sekunden im Display,
Anruferliste
Während Ihrer Abwesenheit werden alle eingehenden Anrufe in einer Anruferliste gesammelt. Insgesamt können dort bis zu 64 Rufnummern gespeichert werden. Für jeden Anruf werden Datum
und Uhrzeit des Eingangs festgehalten. Ist die Anruferliste voll, wird immer die älteste Rufnummer
gelöscht, um Platz für den neuesten Anruf zu schaffen.
Wurden während Ihrer Abwesenheit Anrufe registriert, zeigt das Display die Anzahl der neu gespeicherten Rufnummern an. Beispiel: 2 neue Anrufe
Außerdem blinkt die optische Rufanzeige.
Zusätzlich wird die Gesamtzahl aller in der Anruferliste gespeicherten Rufnummern angezeigt.
Beispiel: Insgesamt 4 Einträge in der Anruferliste
Anruferliste ansehen
Um nähere Informationen zu den entgangenen Anrufen zu erhalten, gehen Sie bitte wie folgt vor:
z öffnet die Anruferliste
Ist die Anruferliste leer, zeigt das Display die Meldung .
bevor anschließend wieder die aktuelle Uhrzeit und das Datum angezeigt werden.
4
3
.
.
und zeigt den zuletzt eingegangenen Anruf an
.
.
yz weitere Anrufe aus der Anruferliste ansehen
Haben Sie den letzten Speicherplatz der Anruferliste erreicht, zeigt das Display die Meldung
.
11
Page 12

Rufnummernanzeige (CLIP)
Das Display zeigt Ihnen verschiedene Informationen zu den entgangenen Anrufen an:
Die Zahl unterhalb der Anzeige CALL# gibt an, auf welchem der insgesamt 64 Speicherplätze
Sie sich gerade befinden.
Datum und Uhrzeit des Anrufeingangs.
Hat ein Anrufer mehrmals versucht Sie zu erreichen, beziehen sich das angezeigte Datum
und die Uhrzeit immer nur auf seinen letzten Anruf. Die Anzeige RPT erscheint in der linken
oberen Ecke des Displays.
In der zweiten Zeile des Displays wird die Rufnummer des Anrufers angezeigt, sofern sie
übermittelt wurde.
Andernfalls erscheint in der dritten Zeile des Displays eine entsprechende Mitteilung (s.o.).
Wird innerhalb von 20 Sekunden keine Taste gedrückt, wird die Anruferliste automatisch
geschlossen und das Display zeigt wieder die aktuelle Uhrzeit und das Datum sowie die
Gesamtzahl der in der Anruferliste gespeicherten Anrufe und die Anzahl neu gespeicherter Eingänge.
Werden alle neu aufgezeichneten Rufnummern kontrolliert, wird die Anzeige automatisch auf Null
zurückgesetzt und die optische Rufanzeige erlischt.
Rufnummer aus der Anruferliste anrufen
Sie können Rufnummern aus der Anruferliste direkt anwählen / zurückrufen:
è Hörer abnehmen
y z Anruferliste öffnen und gewünschten Eintrag auswählen
~ Telefontaste drücken
Die Verbindung wird hergestellt.
Oder:
y z Anruferliste öffnen und gewünschten Eintrag auswählen
~
è Hörer abnehmen
Die Verbindung wird hergestellt.
Einzelnen Eintrag aus der Anruferliste löschen
y z Anruferliste öffnen und gewünschten Eintrag auswählen
Löschtaste zweimal drücken entfernt den Eintrag aus der
Alle Einträge aus der Anruferliste löschen
y oder z Anruferliste öffnen
4 sec Löschtaste für 4 Sekunden drücken. Im Display erscheint die
Rufnummer aus der Anrufliste speichern
Eine Rufnummer kann direkt aus der Anrufliste gespeichert werden.
è Hörer abnehmen
y oder z Anrufliste öffnen und Eintrag auswählen
Speichertaste zweimal drücken
Telefontaste drücken
Anruferliste
Meldung
Löschtaste drücken. Die komplette Anruferliste wurde gelöscht.
gewünschte Speicherplatznummer auswählen
(0−9 oder M1−M3)
12
Page 13
Nebenstellenanlagen / Zusatzdienste
6 Nebenstellenanlagen / Zusatzdienste
R−Taste an Nebenstellenanlagen
Das Telefon kann auch an einer Nebenstellenanlage angeschlossen werden. Ob Ihr Telefon an Ihrer Nebenstellenanlage einwandfrei funktioniert, erfahren Sie bei dem Händler, bei dem die Anlage
gekauft wurde.
Ist Ihr Telefon an einer Nebenstellenanlage angeschlossen, können Sie über die R−Taste Funktionen, wie z. B. Anrufe weiterleiten und automatischen Rückruf, nutzen.
Zugangskode (Amtskennziffer)
Bei Nebenstellenanlagen ist es erforderlich, eine Amtskennzahl vorzuwählen, um ein Freizeichen
zu bekommen. Oftmals ist die Amtskennzahl eine 0" oder eine 9". Tippen Sie zuerst diese Amtskennziffer ein und warten Sie das Freizeichen ab. Jetzt können Sie die eigentliche Rufnummer eingeben.
Wenn Sie die Direkt− und Kurzwahlfunktionen Ihres Telefons auch an einer Nebenstellen-
anlage nutzen möchten, beachten Sie bitte, dass Sie beim Programmieren der Direkt− und
Kurzwahltasten die Amtskennziffer der eigentlichen Rufnummer voranstellen.
Zwischen Amtskennziffer und Rufnummer können Sie gegebenenfalls auch noch eine
Wahlpause einprogrammieren. Abschnitt Wahlpause"
Wahlpause
Bei Nebenstellenanlagen ist es erforderlich, eine Amtskennzahl vorzuwählen, um ein Freizeichen
zu bekommen. Bei wenigen, älteren Nebenstellenanlagen dauert es einige Zeit, bis das Freizeichen zu hören ist. Für diese Nebenstellenanlagen kann nach der Amtskennzahl eine Wahlpause
eingefügt werden, um direkt weiter wählen zu können, ohne das Freizeichen abzuwarten.
è Hörer abnehmen
ë Amtskennziffer eingeben
£ Wahlpause hinzufügen
Im Display erscheint ein
ë Rufnummer eingeben
Nach der Amtsholung wartet Ihr Telefon für 3 Sekunden mit dem Wählen der eigentlichen Rufnum-
mer.
Die Pause kann auch bei der Einprogrammierung von Rufnummern als Direkt− oder Kurz-
wahlnummern gespeichert werden.
Anrufbeantworter im Telefonnetz
Der Anrufbeantworter im Telefonnetz ist ein Angebot vieler Netzbetreiber. Über diese Funktion
können Sie nur dann verfügen, wenn Ihr Netzbetreiber diesen Service anbietet. Bitte fragen Sie
diesen nach weiteren Informationen.
Rufnummernanzeige (CLIP)
Wenn diese Funktion an Ihrer Telefonleitung zur Verfügung steht, wird Ihnen die Rufnummer des
Anrufers bereits angezeigt, wenn das Telefon klingelt. Seite 11
Die Rufnummernanzeige ist ein optionaler Service Ihres Netzbetreibers.
Fragen Sie Ihren Netzbetreiber nach weiteren Informationen.
für Pause".
6
5
13
Page 14

Technische Eigenschaften / Problembehandlung
7 Technische Eigenschaften / Problembehandlung
Technische Daten
Merkmal Wert
Batterien 4 x 1.5V Alkaline, Größe: AA
Wahlverfahren Ton−Wahlverfahren
Zulässige Umgebungstemperatur 10°C bis 30°C
Zulässige relative Luftfeuchtigkeit 20% bis 75%
Flash−Zeit 100 ms
Pause 3,6 sec
Konformitätserklärung
Dieses Gerät erfüllt die Anforderungen der EU−Richtlinie:
1999/5/EG Richtlinie über Funkanlagen und Telekommunikationsendeinrichtungen und
die gegenseitige Anerkennung ihrer Konformität. Die Konformität mit der o. a. Richtlinie
wird durch das CE−Zeichen auf dem Gerät bestätigt.
Problembehandlung
Haben Sie Probleme mit Ihrem Telefon, prüfen Sie bitte zuerst, ob Ihre Telefonleitung gestört ist
oder ob das Problem beim Telefon liegt.
Entfernen Sie dazu zunächst alle zusätzlichen Telefonapparate von Ihrer Telefonanlage und verbinden Sie nur das TC49S direkt mit der Telefonbuchse. Sollte der Fehler immer noch auftreten,
verbinden Sie ein anderes Telefon (wenn vorhanden) mit der Telefonbuchse. Tritt der Fehler weiterhin auf, ist vermutlich Ihre Telefonleitung gestört. Wenden Sie sich in diesem Fall an die Störungsstelle Ihres Telefonnetzanbieters, die Ihnen weitere Hinweise zum Überprüfen Ihrer Anlage
gibt.
Sollte das Problem bei Ihrem Telefon liegen, wenden Sie sich bitte an den Händler, bei dem Sie
das Telefon gekauft haben. Zur Wahrnehmung von Gewährleistungsansprüchen halten Sie in diesem Fall bitte Ihren Kaufbeleg bereit.
14
Page 15

Pflegehinweise / Garantie
8 Pflegehinweise / Garantie
Pflegehinweise
Reinigen Sie die Gehäuseoberflächen mit einem trockenen, weichen und fusselfreien Tuch.
Verwenden Sie keine Reinigungs− oder Lösungsmittel.
Außer einer gelegentlichen Gehäusereinigung ist keine weitere Pflege erforderlich.
Garantie
SWITEL − Geräte werden nach den modernsten Produktionsverfahren hergestellt und geprüft.
Ausgesuchte Materialien und hoch entwickelte Technologien sorgen für einwandfreie Funktion und
lange Lebensdauer. Ein Garantiefall liegt nicht vor, wenn die Ursache einer Fehlfunktion des Gerätes bei dem Telefonnetzbetreiber oder einer eventuell zwischengeschalteten Nebenstellenanlage
liegt. Die Garantie gilt nicht für die in den Produkten verwendeten Batterien. Die Garantiezeit beträgt 24 Monate, gerechnet vom Tage des Kaufs.
Innerhalb der Garantiezeit werden alle Mängel, die auf Material− oder Herstellungsfehler zurückzuführen sind, kostenlos beseitigt. Der Garantieanspruch erlischt bei Eingriffen durch den Käufer
oder durch Dritte. Schäden, die durch unsachgemäße Behandlung oder Bedienung, durch falsches Aufstellen oder Aufbewahren, durch unsachgemäßen Anschluss oder Installation sowie
durch höhere Gewalt oder sonstige äußere Einflüsse entstehen, fallen nicht unter die Garantieleistung. Wir behalten uns vor, bei Reklamationen die defekten Teile auszubessern oder zu ersetzen
oder das Gerät auszutauschen. Ausgetauschte Teile oder ausgetauschte Geräte gehen in unser
Eigentum über. Schadenersatzansprüche sind ausgeschlossen, soweit sie nicht auf Vorsatz oder
grober Fahrlässigkeit des Herstellers beruhen.
Sollte Ihr Gerät dennoch einen Defekt innerhalb der Garantiezeit aufweisen, wenden Sie sich bitte
unter Vorlage Ihrer Kaufquittung ausschließlich an das Geschäft, in dem Sie Ihr SWITEL − Gerät
gekauft haben. Alle Gewährleistungsansprüche nach diesen Bestimmungen sind ausschließlich
gegenüber Ihrem Fachhändler geltend zu machen. Nach Ablauf von zwei Jahren nach Kauf und
Übergabe unserer Produkte können Gewährleistungsrechte nicht mehr geltend gemacht werden.
15
Page 16

Stichwortverzeichnis
9 Stichwortverzeichnis
A
Alle Einträge aus der Anruferliste löschen, 12
Amtskennziffer, 13
Anruf annehmen, 9
Anrufbeantworter im Telefonnetz, 13
Anrufen, 9
Anruferliste, 11
Anruferliste ansehen, 11
Anruferliste bearbeiten, 12
B
Batterien einsetzen, 5
Bedienelemente, 7
C
CLIP, 11
D
Darstellungen, 8
Datum und Uhrzeit, 5
Displayanzeigen, 7
Displaykontrast einstellen, 5
E
Einhängehaken, 6
Einzelnen Eintrag aus der Anruferliste löschen, 12
Erklärung der schematischen Tastensymbole, 7
G
Garantie, 15
Gespräch beenden, 9
Gesprächsdauer, 10
H
Hörerlautstärke erhöhen, 10
K
Konformitätserklärung, 14
Kontrast, 5
L
Lautstärke Hörer, 10
Lautstärke Tonruf, 10
M
Montageadapter, 6
N
Nebenstellenanlagen, 6, 13
P
Pflegehinweise, 15
Problembehandlung, 14
R
R−Taste an Nebenstellenanlagen, 13
Rufnummer aus der Anruferliste anrufen, 12
Rufnummernanzeige, 13
Rufnummernanzeige (CLIP), 11
S
Schiebeschalter KLINGEL, 10
Schreibweisen, 8
Sicherheitshinweise, 4
Stummschaltung, 10
T
Tastensymbole, 7
Technische Daten, 14
Telefon in Betrieb nehmen, 5
Telefonhörer anschließen, 5
Telefonieren, 9
Telefonleitung anschließen, 6
Tonruflautstärke einstellen, 10
V
Verpackungsinhalt, 5
W
Wahlpause, 13
Wahlwiederholung, 9, 12
Wandmontage, 6
Z
Zugangskode, 13
Zusatzdienste, 13
16
Page 17

7
Table des matières
1 Consignes de sécurité 18. . . . . . . . . . . . . . . . . . . . . . . . .
2 Mettre le téléphone en service 19. . . . . . . . . . . . . . . . . . .
3 Eléments de manipulation 21. . . . . . . . . . . . . . . . . . . . . .
4 Téléphoner 23. . . . . . . . . . . . . . . . . . . . . . . . . . . . . . . . .
5 Affichage du numéro d’appel (CLIP) 25. . . . . . . . . . . . . . .
6 Installations à postes supplémentaires /
Services supplémentaires 27. . . . . . . . . . . . . . . . . . . . .
7 Caractéristiques techniques /
Traitement des problèmes 28. . . . . . . . . . . . . . . . . . . .
8 Remarques d’entretien / Garantie 29. . . . . . . . . . . . . . . . .
9 Index 30. . . . . . . . . . . . . . . . . . . . . . . . . . . . . . . . . . . . .
17
Page 18

Consignes de sécurité
1 Consignes de sécurité
Lisez très attentivement ce mode d’emploi.
Utilisation conforme aux prescriptions
Ce téléphone convient pour téléphoner à l’intérieur d’un réseau téléphonique. Toute autre utilisation est considérée comme non conforme à l’usage. Des modifications ou changements effectués
d’un propre gré ne sont pas autorisés. N’ouvrez en aucun cas l’appareil et n’effectuez aucun essai
de réparation vous−même.
Lieu d’installation
Evitez toute nuisance par la fumée, la poussière, les tremblements, les produits chimiques, l’humidité, la grande chaleur ou l’ensoleillement direct. N’utilisez pas le téléphone dans des régions susceptibles d’explosion.
Ne placez pas le téléphone dans les environs immédiats d’autres appareils électroniques, comme
par ex. le micro−ondes ou les appareils HIFI, car il peut y avoir interaction. Le lieu
d’installation exerce une influence décisive sur le fonctionnement impeccable du téléphone.
Installez le téléphone sur une surface plane et antidérapante. Normalement, les pieds n’y laissent
pas de traces. Toutefois, en raison de la diversité des laques et des surfaces utilisées, il n’est pas
exclu que les pieds de l’appareil puissent malgré tout en laisser.
Compatible avec les prothèses auditives
Le téléphone est compatible avec la plupart des prothèses auditives se trouvant sur le marché. Le
téléphone est pourvu d’un circuit spécial à base inductive pour la transmission de la parole aux
prothèses auditives. Veuillez mettre votre prothèse auditive sur "T".
En raison de la quantité importante de modèles offerts sur le marché, un fonctionnement impeccable ne peut pas être garanti pour chaque prothèse auditive.
Élimination
Si votre appareil ne sert plus, veuillez l’apporter au centre de collecte de l’organisme
d’élimination des déchets de votre commune (par ex. centre de recyclage). Le symbole
ci−après signifie que l’appareil usagé ne doit pas être éliminé avec les ordures
ménagères, mais séparément. D’après la loi relative aux appareils électriques et électroniques, les propriétaires d’appareils usagés sont tenus de mettre tous les appareils
électriques et électroniques usagés dans un collecteur séparé.
Éliminez les piles auprès d’un revendeur spécialisé ainsi que dans des centres de
collecte qui tiennent à disposition les collecteurs appropriés correspondants.
Éliminez les matériaux d’emballage conformément au règlement local.
18
Page 19

Mettre le téléphone en service
2 Mettre le téléphone en service
Remarques concernant la sécurité
Attention : Lisez impérativement les consignes de sécurité du chapitre 1 avant la mise
en service.
Vérifier le contenu de l’emballage
Les éléments suivants font partie de la livraison :
− un téléphone (appareil de base) − quatre piles (AA 1.5V alcalines)
− un écouteur − un support mural
− un câble spiralé − un mode d’emploi
− un câble de raccordement téléphonique
Raccorder l’écouteur
Utilisez le câble spiralé pour raccorder l’écouteur à l’appareil de base. Le câble spiralé est équipé
de deux branchements identiques ; mettez le bout du câble dans la prise situé à l’extrémité
inférieure de l’écouteur et l’autre bout du câble dans la prise située sur le côté gauche de l’appareil
de base. L’enclenchement des fiches se fait entendre.
Mettre les piles en place
Les piles sont nécessaires pour l’affichage de l’écran et pour d’autres fonctions du téléphone.
Avant de les placer ou de les remplacer, veillez à ce que le téléphone ne soit pas relié au
réseau téléphonique !
Le compartiment à piles se trouve sur la face inférieure de votre téléphone. Ouvrez le compartiment à l’aide d’un objet pointu (par ex. un stylo) et insérez les quatre piles de type AA 1.5V alcalines.
Veillez à la polarité correcte des piles. Poussez le pôle négatif de la pile (côté plat) contre le ressort en spirale et appuyez ensuite le pôle positif vers le bas. La polarité correcte des piles est imprimée en plus sur la base du compartiment à piles.
N’utilisez que des piles du type indiqué.
Fermez le compartiment à piles jusqu’à ce que le couvercle s’enclenche de manière audible.
Les piles doivent être remplacées par des neuves dès que le symbole des piles apparaît sur
l’écran du téléphone.
Sans piles, le contenu de la mémoire est conservé 3 minutes dans le téléphone.
8
Date et heure
La date et l’heure sont automatiquement transmises à l’arrivée des appels.
Condition : votre opérateur de réseau assiste cette fonction.
Régler le contraste de l’écran
Si vous désirez modifier le contraste de l’écran, appuyez simultanément sur les touches y et
z pendant 4 secondes. Le message suivant apparaît à l’écran :
le contraste de l’écran au moyen des touches y ou z(1−5) et confirmer avec la touche
.
. Régler
19
Page 20

Mettre le téléphone en service
Raccorder le fil téléphonique
Servez−vous du câble de raccordement téléphonique ci−joint pour raccorder votre téléphone à la
prise téléphonique. Mettez le câble dans la prise située sur le côté arrière de votre téléphone jusqu’à ce qu’il s’enclenche de manière audible. Raccordez l’autre bout du câble de raccordement
téléphonique à la prise téléphonique.
Si le câble et la prise de raccordement ne vont pas ensemble, veuillez vous adresser à votre
opérateur.
Montage mural
Vous pouvez également poser votre téléphone au mur.
Pour préparer le montage mural, fixez tout d’abord l’adaptateur de montage fourni avec l’appareil
sur le côté arrière du téléphone. A cet effet, retournez le téléphone et mettez l’adaptateur dans les
ouvertures du boîtier désignées. Veillez à ce que l’évidement situé au centre de l’adaptateur de
montage soit ouvert vers le bas (voir illustration). Poussez alors l’adaptateur vers le haut jusqu’à
ce qu’il s’enclenche de manière audible. Un dispositif de verrouillage fixe l’adaptateur de montage
dans sa position.
(Pour enlever de nouveau l’adaptateur de montage, appuyez le dispositif de verrouillage vers le
bas et tirez l’adaptateur en dehors vers l’avant.)
Posez ensuite deux vis au mur (non comprises dans la livraison) : Les vis doivent se trouver l’une
au−dessous de l’autre, être séparées verticalement par une distance de 83 mm et faire saillie du
mur de 5 mm.
Posez maintenant le téléphone avec la face arrière sur les vis et appuyez légèrement l’appareil
vers le bas pour le monter fermement.
Afin que l’écouteur ne glisse pas de l’appareil pendant le montage mural, il ne vous reste plus qu’à tourner le crochet de suspension de l’appareil de base. En réglage
usine, il affleure le bord (pour la mise en
place du téléphone sur une surface plane).
Faites sortir le crochet de suspension en le
poussant vers le haut, tournez−le et poussez−le à nouveau dans l’évidement, dans
cette nouvelle position, jusqu’à ce qu’il
s’enclenche de manière audible (voir illustration).
Installations à postes supplémentaires
La page 27 vous donnera de plus amples informations au cas où vous désireriez raccorder votre
téléphone à une installation à postes supplémentaires.
20
Page 21

Eléments de manipulation
3 Eléments de manipulation
Vue de dessus
1 Signalisation optique d’appel
2 Touche de montée y
3 Touche de descente z
4 Touches de sélection directe
^_`
5 Touche de sélection
abrégée
6 Touche dièse #
7 Touche étoile *
8 Répétition automatique des
derniers numéros £
9 Touche de signal R R
10 Touche de mémoire
11 Touche secret
12 Index
13 Touche d’effacement
14 Composer un numéro à partir
de la liste d’appels
Les touches de votre téléphone sont représentées ci−après dans ce mode d’emploi par des icônes
simplifiées (voir ci−dessus). Il est donc possible que les icônes des touches utilisées soient légèrement différentes de celles de votre téléphone.
Affichages sur l’écran
12
11
10
9
8
13
14
1
2
3
4
5
6
7
16
15
15 RPT : Affiche qu´un même correspondant a appelé plusieurs fois
16 Capacité des piles rechargeables
17 Remarque concernant les nouveaux appels
18 Heure
19 Date
20 CALL# : Place de mémoire actuellement sélectionnée dans la liste d’appels
21 Zone de chiffres
22 Zone de texte
17 18 19
22
20
21
21
Page 22

Eléments de manipulation
Vue de côté
23 Volume de la sonnerie
24 Volume sonore de l’écouteur
24
23
Représentations et notations
ë Saisir des chiffres
* Appuyer brièvement sur la touche représentée
2 sec * Appuyer 2 secondes sur la touche représentée
Maintenir * Maintenir apppuyée la touche représentée
Relâcher * Relâcher la touche représentée
{
} Le téléphone sonne
è Décrocher l’écouteur
é Reposer l’écouteur
ou
Texte ou icône sur l’écran
22
Page 23

4 Téléphoner
Prendre l’appel
En plus du signal acoustique d’appel, la signalisation optique d’appel s’allume en plus à chaque
appel.
{
}, è Décrocher l’écouteur / Répondre à l’appel
Terminer la communication
é Reposer l’écouteur / Terminer la communication
Appeler
è Décrocher l’écouteur
ë Saisir le numéro d’appel
Après que vous avez saisi le numéro d’appel, la liaison sera automatiquement établie.
L’écran peut afficher 14 chiffres max..
Si un numéro d’appel a plus de chiffres, seules les 14 dernières positions seront affichées.
Si votre téléphone est raccordé à une installation à postes supplémentaires, vous trouve-
rez page 27 ce que vous devez en plus respecter lorsque vous appelez.
Touche de répétition automatique des derniers numéros
Votre téléphone enregistre le dernier numéro d’appel composé. Si vous désirez composer à nouveau ce numéro d’appel, par ex. parce que la ligne était occupée auparavant ou que vous n’avez
pas réussi à atteindre la personne, servez−vous de la répétition automatique des derniers numéros
:
è Décrocher l’écouteur
£ Appuyer sur la touche de répétition automatique des derniers
Le numéro d’appel sauvegardé se compose automatiquement et la liaison s’établit.
Sélection directe
Vous avez la possibilité de sauvegarder trois numéros de téléphone de sorte que vous pouvez
composer chacun d’eux en appuyant simplement sur une touche (sélection directe).
Les trois touches ^, _ et ` sont prévues à cet effet. La touche ` est colorée en
rouge et convient ainsi par ex. à la programmation d’un numéro d’appel d’urgence.
Programmer les touches de sélection directe
è Décrocher l’écouteur
ë Composer le numéro d’appel (max. 16 chiffres)
^ Appuyer sur la touche de sélection directe désirée
é Reposer l’écouteur / Terminer la programmation
numéros
Appuyer sur la touche de mémoire
Appuyer sur la touche de mémoire
Téléphoner
23
Page 24

Téléphoner
Appeler par l’intermédiaire de la touche de sélection directe
è Décrocher l’écouteur
^ Appuyer sur la touche de sélection directe désirée (ici par ex.
Le numéro d’appel sauvegardé se compose automatiquement.
Sélection abrégée
Vous avez la possibilité de sauvegarder 10 numéros de téléphone de sorte que vous pouvez composer chacun d’eux en appuyant simplement sur trois touches (sélection abrégée).
Programmer les touches de sélection abrégée
è Décrocher l’écouteur
ë Composer le numéro d’appel (max. 16 chiffres)
0 Saisir le numéro de place en mémoire désiré
é Reposer l’écouteur / Terminer la programmation
Appeler par l’intermédiaire de la touche de sélection abrégée
è Décrocher l’écouteur
Appuyer sur la touche de sélection abrégée
0 Saisir le numéro de place en mémoire(ici par ex. pour la place
Le numéro d’appel sauvegardé se compose automatiquement.
Affichage de la durée de la communication
Quelques secondes après le début d’une communication, l’écran vous indique la durée actuelle de
la communication en minutes et secondes.
Augmenter le volume sonore de l’écouteur
Si la voix de votre correspondant devait pour sembler être trop faible, vous pouvez augmenter le
volume sonore de l’écouteur pendant une communication en l’adaptant au moyen de l’interrupteur
à coulisse situé sur le côté droit du téléphone.
Régler le volume de la sonnerie
Vous avez la possibilité de régler le volume de la sonnerie au moyen de l’interrupteur à coulisse
KLINGEL (sonnerie) situé sur le côté droit du téléphone. L’interrupteur à coulisse permet trois positions :
Pour une sonnerie d’appel forte, poussez l’interrupteur sur la position de droite (LAUT = fort).
Sélectionner la position médiane pour mettre la sonnerie sur FAIBLE". Si vous désirez un jour ne
pas être dérangé, poussez l’interrupteur sur la position (AUS = arrêt) pour, en aucun cas, n’entendre la sonnerie.
Mettre le microphone de l’écouteur sur silencieux
Pendant une communication, vous pouvez brancher et débrancher le microphone de l’écouteur.
Appuyer sur la touche secret et la maintenir appuyée pour
^)
Appuyer sur la touche de mémoire
Appuyer sur la touche de mémoire
(ici par ex. pour la place en mémoire 0)
en mémoire 0)
activer le microphone, la relâcher pour le désactiver
24
Page 25

Affichage du numéro d’appel (CLIP)
5 Affichage du numéro d’appel (CLIP)
L’affichage du numéro d’appel (CLIP) ainsi que l’affichage de la date et de l’heure sont des
services optionnels de votre opérateur. Veuillez lui demander de plus amples informations.
Si votre installation téléphonique dispose de la fonction CLIP (CLIP = Calling Line Identification
Presentation), l’écran indique le numéro d’appel du correspondant à l’arrivée d’un appel dans la
mesure où ce correspondant est favorable à la transmission de son numéro.
Si le correspondant a bloqué la transmission de son numéro, celui−ci n’est pas affiché ; le
message suivant s’affiche à sa place :
Si l’écran affiche le message
relative au correspondant ; dans ce cas, il pourrait s’agir également d’une communication
internationale.
Dans le cas où un numéro d’appel n’a été réceptionné que partiellement ou de manière
erronée, l’écran indique
Si vous ne répondez pas à un appel, l’affichage reste à l’écran pendant env. 20 secondes
avant que l’heure actuelle et la date soient ensuite affichées.
Liste d’appels
Pendant votre absence, tous les appels entrants sont rassemblés dans une liste d’appels. Jusqu’à
64 numéros d’appel en tout peuvent y être sauvegardés. La date et l’heure de l’entrée sont retenues à chaque appel. Si la liste d’appels est pleine, c’est toujours le numéro d’appel le plus ancien
qui sera effacé pour faire place au nouvel appel.
Si des appels ont été enregistrés pendant votre absence, l’écran indique le nombre de numéros
d’appel récemment sauvegardés. Exemple : 2 nouveaux appels .
En outre, la signalisation optique d’appel clignote.
De plus, le nombre total de tous les numéros sauvegardés dans la liste d’appels est affiché. Exem-
ple : 4 enregistrements en tout dans la liste d’appels
Consulter la liste d’appels
Afin d’obtenir de plus amples informations sur les appels entrés, veuillez procéder comme suit :
z Ouvre la liste d’appels
Si la liste d’appels est vide, l’écran affiche le message NO CALLS.
10
et indique l’appel entré en dernier
9
, c’est qu’il n’existe pas d’information
.
.
.
yz Consulter d’autres appels de la liste d’appels
Lorsque vous avez atteint la dernière place de mémoire de la liste d’appels, l’écran affiche le mes-
sage
.
25
Page 26

Affichage du numéro d’appel (CLIP)
L’écran vous affiche différentes informations relatives aux appels manqués :
Le nombre situé sous l’affichage CALL# indique à laquelle des 64 places de mémoire au total
vous vous trouvez actuellement.
Date et heure de l’entrée de l’appel.
Si un correspondant a essayé plusieurs fois de vous atteindre, la date et l’heure affichées ne
se rapportent toujours qu’à son dernier appel. L’affichage RPT apparaît sur le côté supérieur
gauche de l’écran.
Dans la deuxième ligne de l’écran, le numéro d’appel du correspondant est affiché, dans la
mesure où celui−ci a été transmis.
Sinon, un message correspondant apparaît dans la troisième ligne de l’écran (voir ci−dessus).
Si vous n’appuyez sur aucune touche pendant 20 secondes, la liste d’appels se ferme au-
tomatiquement et l’écran indique à nouveau l’heure actuelle et la date ainsi que le nombre
total d’appels enregistrés dans la liste d’appels et le nombre de numéros récemment enregistrés.
Quand tous les numéros d’appel récemment enregistrés ont été contrôlés, l’affichage se remet automatiquement à zéro et la signalisation optique d’appel s’éteint.
Appeler des numéros à partir de la liste d’appels
Vous pouvez composer / rappeler des numéros directement à partir de la liste d’appels :
è Décrocher l’écouteur
y z Ouvrir la liste d’appels et sélectionner l’enregistrement désiré
~ Appuyer sur la touche du téléphone
La liaison s’établit.
Ou :
y z Ouvrir la liste d’appels et sélectionner l’enregistrement désiré
~
è Décrocher l’écouteur
La liaison s’établit.
Effacer un seul enregistrement de la liste d’appels
y z Ouvrir la liste d’appels et sélectionner l’enregistrement désiré
En appuyant deux fois sur la touche de suppression, vous
Effacer tous les enregistrements de la liste d’appels
y ou z Ouvrir la liste d’appels
4 sec Appuyer pendant 4 secondes sur la touche de suppression. Le
Enregistrer des numéros à partir de la liste d’appels
Vous pouvez enregistrer un numéro directement à partir de la liste d’appels.
è Décrocher l’écouteur
y ou z Ouvrir la liste d’appels et sélectionner l’enregistrement
Appuyer deux fois sur la touche de mémoire
Appuyer sur la touche du téléphone
effacez l’enregistrement de la liste d’appels
message suivant apparaît à l’écran :
Appuyer sur la touche de suppression. La liste d’appels
complète a été effacée.
Sélectionner le numéro de place en mémoire désiré
(0−9 ou M1−M3)
26
Page 27

Installations à postes suppl. / Services suppl.
6 Installations à postes suppl. / Services suppl.
Touche R sur les installations à postes supplémentaires
On peut également raccorder le téléphone à une installation à postes supplémentaires. Votre revendeur, auprès duquel vous avez acheté l’installation, vous informera si votre téléphone fonctionne parfaitement sur ce genre d’installation.
Si votre téléphone est raccordé à une installation à postes supplémentaires, vous pouvez, par l’intermédiaire de la touche R, tirer profit des fonctions comme par ex. le transfert d’appels et le rappel
automatique.
Code d’accès (chiffre de la ligne principale)
Dans le cas d’installations à postes supplémentaires, il est nécessaire de composer auparavant un
code réseau pour obtenir la tonalité. Souvent, le code réseau est un 0" ou un 9". Composez tout
d’abord ce chiffre de la ligne principale et attendez la tonalité. Maintenant, vous pouvez saisir le
numéro d’appel réel.
Si vous désirez également profiter des fonctions d’appel direct ou de sélection abrégée
de votre téléphone sur une installation à postes supplémentaires, veillez à placer le chiffre
de la ligne principale avant le numéro d’appel réel lorsque vous programmez les touches
d’appel direct et celles de sélection abrégée.
Entre le chiffre de la ligne principale et le numéro d’appel, vous pouvez également encore
programmer une pause de numérotation. passage Pause de numérotation"
Pause de numérotation
Dans le cas d’installations à postes supplémentaires, il est nécessaire de composer auparavant un
code réseau pour obtenir la tonalité. Sur les quelques installations à postes supplémentaires plus
anciennes, cela dure quelques instants jusqu’à ce que vous entendiez la tonalité. Pour ces installations à postes supplémentaires, une pause de numérotation peut être insérée après le code
réseau afin de pouvoir continuer à numéroter directement sans attendre la tonalité.
è Décrocher l’écouteur
ë Saisir le chiffre de la ligne principale
£ Ajouter la pause de numérotation
Un pour Pause" apparaît à l’écran.
ë Saisir le numéro d’appel
Après la prise de ligne, votre téléphone attend 3 secondes pour composer le numéro d’appel réel.
La pause peut également être sauvegardée lors de la programmation de numéros d’appel
comme numéros d’appel direct ou de sélection abrégée.
Répondeur dans le réseau téléphonique
Le répondeur dans le réseau téléphonique est un service offert par beaucoup d’opérateurs. Vous
ne pouvez disposer de cette fonction que si votre opérateur offre ce service. Veuillez lui demander
de plus amples informations.
Affichage du numéro d’appel (CLIP)
Si cette fonction est à votre disposition sur votre ligne téléphonique, le numéro du correspondant
vous sera affiché dès que le téléphone sonnera. page 25
L’affichage du numéro d’appel est un service optionnel de votre opérateur.
Veuillez lui demander de plus amples informations.
12
11
27
Page 28

Caractéristiques techniques / Traitement des problèmes
7 Caractéristiques techniques / Traitement des problèmes
Données techniques
Caractéristique Valeur
Piles 4 x 1.5 V, alcalines, taille : AA
Numérotation Numérotation par tonalité
Température ambiante autorisée 10°C à 30°C
Humidité atmosphérique relative autorisée 20% à 75%
Temps de flash 100 ms
PAUSE 3,6 sec
Déclaration de conformité
Cet appareil répond aux exigences des directives de l’union européenne (UE) :
1999/5/CE Directive sur les installations de radio et de télécommunication et la recon-
naissance réciproque de leur conformité. La conformité avec la directive mentionnée ci−
dessus est confirmée sur l’appareil par le symbole CE.
Traitement des problèmes
Si vous avez des problèmes avec votre téléphone, veuillez d’abord contrôler si votre ligne téléphonique est en dérangement ou si le problème dépend de votre téléphone.
À cet effet , retirez d’abord de votre installation tous les appareils téléphoniques supplémentaires
et ne raccordez que le TC49S directement à la prise téléphonique. Si des erreurs devaient encore
se produire, raccordez un autre téléphone (si vous en avez un) à la prise téléphonique. Si l’erreur
continue à se produire, c’est que votre ligne téléphonique est problablement perturbée. Dans ce
cas, adressez−vous au service des dérangements de votre opérateur qui vous donnera d’autres
précisions utiles au contrôle de votre installation.
Si le problème devait tenir à votre téléphone, veuillez vous adresser au revendeur chez lequel
vous avez acheté le téléphone. Veuillez tenir à disposition votre bon d’achat afin de percevoir les
droits à la garantie.
28
Page 29

Remarques d’entretien / Garantie
8 Remarques d’entretien / Garantie
Remarques d’entretien
Nettoyez les surfaces du boîtier avec un chiffon sec, doux et non pelucheux.
N’utilisez pas de produits d’entretien ou de solvants.
Mis à part un nettoyage occasionnel du boîtier, aucun entretien n’est nécessaire.
Garantie
Les appareils Switel sont fabriqués et testés selon les procédés de production les plus modernes.
Des matériels sélectionnés et des technologies de pointe ont pour effet un fonctionnement irréprochable et une longue durée de vie. La garantie ne rentre pas en jeu si l’exploitant du réseau
téléphonique ou une installation à postes supplémentaires éventuellement intercalée est responsable du dysfonctionnement de l’appareil. La garantie ne s’étend pas aux piles utilisées dans les
produits. La durée de la garantie est de 24 mois, à partir de la date d’achat.
Pendant la durée de la garantie, tous les défauts, dus à des vices de matériel ou de fabrication, seront éliminés gratuitement. Le droit à la garantie expire en cas d’intervention de l’acheteur ou de
tiers. Les dommages provenant d’un maniement ou d’une manipulation incorrects, d’une mauvaise
mise en place ou d’une mauvaise conservation de l’appareil, d’un raccordement non conforme
ainsi que d’un cas de force majeure ou autres influences extérieures, sont exclus de la garantie.
En cas de réclamations, nous nous réservons le droit de réparer ou de remplacer les pièces défectueuses ou d’échanger l’appareil. Les composants remplacés ou les appareils échangés deviennent notre propriété. Les demandes de dommages et intérêts sont exclues tant qu’elles ne reposent pas sur l’intention ou une négligence grossière du fabricant.
Si votre appareil présente cependant un défaut pendant la période de garantie, veuillez vous
adresser exclusivement au magasin où vous l’avez acheté en présentant votre bon d’achat. Vous
ne pouvez faire valoir vos droits à la garantie selon ces dispositions qu’auprès de votre revendeur
exclusivement. Deux ans après l’achat et la remise de nos produits, il n’est plus possible de faire
valoir les droits à la garantie.
29
Page 30

Index
9 Index
A
Adaptateur de montage, 20
Affichage du numéro d’appel, 27
Affichage du numéro d’appel (CLIP), 25
Affichages sur l’écran, 21
Appeler, 23
Appeler des numéros à partir de la liste d’appels, 26
Augmenter le volume sonore de l’écouteur, 24
C
Chiffre de la ligne principale, 27
CLIP, 25
Code d’accès, 27
Compatible avec les prothèses auditives, 18
Consignes de sécurité, 18
Consulter la liste d’appels, 25
Contenu de l’emballage, 19
Contraste, 19
Crochet de suspension, 20
D
Date et heure, 19
Déclaration de conformité, 28
Données techniques, 28
Durée de la communication, 24
E
Editer la liste d’appels, 26
Effacer tous les enregistrements de la liste d’appels, 26
Effacer un seul enregistrement de la liste d’appels, 26
Eléments de manipulation, 21
Élimination, 18
Explication de la schématisation des touches par les
icônes, 21
G
Garantie, 29
I
Icônes des touches, 21
Installations à postes supplémentaires, 20, 27
Interrupteur à coulisse KLINGEL, 24
L
Lieu d’installation, 18
Liste d’appels, 25
M
Mettre le téléphone en service, 19
Mettre les piles en place, 19
Mettre sur silencieux, 24
Montage mural, 20
N
Notations, 22
P
Pause de numérotation, 27
Prendre l’appel, 23
R
Raccorder l’écouteur, 19
Raccorder le fil téléphonique, 20
Régler le contraste de l’écran, 19
Régler le volume de la sonnerie, 24
Remarques d’entretien, 29
Répétition automatique des derniers numéros, 26
Répondeur dans le réseau téléphonique, 27
Représentations, 22
S
Services supplémentaires, 27
T
Téléphoner, 23
Terminer la communication, 23
Touche de répétition automatique des derniers
numéros, 23
Touche R sur les installations à postes
supplémentaires, 27
Traitement des problèmes, 28
U
Utilisation conforme aux prescriptions, 18
V
Volume de la sonnerie, 24
Volume sonore de l’écouteur, 24
30
Page 31

13
Contenuto
1 Indicazioni di sicurezza 32. . . . . . . . . . . . . . . . . . . . . . . .
2 Mettere in funzione il telefono 33. . . . . . . . . . . . . . . . . . . .
3 Elementi di comando 35. . . . . . . . . . . . . . . . . . . . . . . . . .
4 Compiere telefonate 37. . . . . . . . . . . . . . . . . . . . . . . . . .
5 Visualizzazione del numero di chiamata (CLIP) 39. . . . . . .
6 Impianti telefonici interni / Servizi addizionali 41. . . . . . . . .
7 Specifiche tecniche / Eliminazione di problemi 43. . . . . . .
8 Consigli per la cura / Garanzia 44. . . . . . . . . . . . . . . . . . .
9 Indice alfabetico 45. . . . . . . . . . . . . . . . . . . . . . . . . . . . .
31
Page 32

Indicazioni di sicurezza
1 Indicazioni di sicurezza
Leggere attentamente le presenti istruzioni per l’uso.
Impiego conforme agli usi previsti
Il presente apparecchio consente di compiere telefonate all’interno di una rete di telecomunicazione. Qualsiasi altro impiego è considerato come non conforme agli usi previsti. Non sono consentite modifiche o trasformazioni non autorizzate. Non aprire per nessuna ragione l’apparecchio
autonomamente e svolgere riparazioni di propria iniziativa.
Luogo di installazione
Evitare un’esposizione a fumo, polvere, vibrazioni, sostanze chimiche, umidità, calore e raggi solari diretti. Evitare l’uso del telefono in aree esposte al rischio di deflagrazione.
Non posizionare il telefono nelle dirette vicinanze di altri apparecchi elettronici come per es. forni a
microonde o impianti HIFI, condizione che può invece causare un’influenza reciproca. Il luogo di
installazione influenza decisamente il corretto funzionamento del telefono.
Posizionare il telefono su una superficie piana e antiscivolo. In linea di massima i piedini non lasciano tracce sulla superficie di posizionamento. A causa del numero crescente di vernici e superfici diverse non è comunque possibile escludere che i piedini dell’apparecchio possano lasciare
delle tracce sulla superficie di appoggio.
Compatibilità con apparecchi acustici
Il telefono è compatibile con la maggior parte di apparecchi acustici disponibili sul mercato. Esso
dispone di uno speciale dispositivo di commutazione ad induzione per la trasmissione vocale su
apparecchi acustici. Impostare a tale scopo il proprio apparecchio acustico su "T".
A causa del grande numero di modelli non è possibile garantire il perfetto funzionamento del telefono in combinazione con qualsiasi apparecchio acustico.
Smaltimento
Alla fine della vita utile dell’apparecchio si ricorda che è necessario consegnare l’apparecchio vecchio presso uno dei punti di raccolta istituiti dalla propria società di smaltimento rifiuti comunale (per es. centro di riclico materiali). Il simbolo qui raffigurato indica il divieto di smaltire l’apparecchio vecchio assieme ai rifiuti domestici. Secondo
quanto previsto dalla legge sugli apparecchi elettrici ed elettronici i proprietari di apparecchi vecchi sono per legge tenuti alla consegna di tutti gli apparecchi elettrici ed
elettronici presso un centro di rilievo rifiuti in raccolta differenziata.
Consegnare batterie esaurite per lo smaltimento presso i rivenditori al dettaglio di batterie o i centri di raccolta che mettono a disposizione appositi contenitori.
Smaltire confezioni ed imballaggi in base a quanto indicato dalle norme in vigore a livello locale.
32
Page 33

Mettere in funzione il telefono
2 Mettere in funzione il telefono
Indicazioni di sicurezza
Attenzione: Prima della messa in funzione, leggere attentamente le indicazioni di sicu-
rezza riportate al capitolo 1.
Verificare il contenuto della confezione
La confezione contiene:
− un telefono (apparecchio base) − quattro batterie (AA 1.5V alcaline)
− un ricevitore − un supporto a parete
− un cavo a spirale − un manuale di istruzioni per l’uso
− un cavo di collegamento telefonico
Collegare il ricevitore
Utilizzare il cavo a spirale per collegare il ricevitore all’apparecchio base. Il cavo a spirale presenta
due punti di collegamento identici; inserire un’estremità del cavo nella presa presente sulla parte
inferiore del ricevitore, l’altra estremità del cavo è invece destinata alla presa presente sulla sinistra dell’apparecchio base. Al momento dell’inserimento il connettore scatta in posizione in maniera
udibile.
Inserire le batterie
Le batterie sono necessarie alla visualizzazione dei testi di display e per alcune altre funzioni del
telefono.
Prima di inserire o sostituire le batterie, assicurarsi che il telefono non sia collegato alla
Il vano batterie si trova sul lato inferiore del telefono. Aprire il vano con l’aiuto di un oggetto appuntito (per es. una penna a biro) ed inserire le quattro batterie del tipo AA 1.5V alcaline.
Osservare in tal caso la corretta polarità delle batterie: Spingere il polo negativo della batteria (lato
piatto) contro la molla a spirale e premere contemporaneamente il polo positivo in basso. La corretta posizione delle batterie è altresì raffigurata sul fondo del vano batterie.
Utilizzare solo batterie del tipo specificato.
Chiudere il vano batterie e fare scattare il coperchio in posizione.
Le batterie devono essere sostituite da batterie nuove non appena sul display del telefono appare
il simbolo batterie
Con batterie estratte, quanto memorizzato nella memoria del telefono rimane disponibile
14
rete telefonica!
.
per 3 minuti.
Data e ora
Ricevendo una chiamata, data e ora sono trasmessi automaticamente.
Condizione: Il gestore della propria rete telefonica supporta questa funzione.
Impostare il contrasto di display
Se si desidera modificare il contrasto del display, premere i tasti y e z contemporaneamente per 4 secondi. Sul display è visualizzata l’indicazione
il contrasto di display, premere i tasti y o z (1−5) e il tasto per confermare.
. Per impostare
33
Page 34

Mettere in funzione il telefono
Collegare la linea telefonica
Utilizzare il cavo di collegamento telefonico fornito in dotazione per collegare il proprio telefono
alla presa telefonica. Inserire il cavo nella presa presente sul retro del telefono facendolo scattare
in posizione in maniera udibile. Collegare l’altra estremità del cavo di collegamento telefonico alla
presa telefonica.
Se cavo e presa di collegamento non dovessero essere compatibili si prega di rivolgersi al proprio
gestore di rete telefonica.
Il telefono si presta altresì al montaggio a parete.
Predisporre il montaggio a parete applicando innanzitutto il dispositivo per montaggio a parete for-
nito in dotazione sul retro del telefono. Girare il telefono e inserire il dispositivo nell’apposita apertura presente e contrassegnata sulla custodia. Fare attenzione a posizionare la rientranza al centro del dispositivo per montaggio a parete e rivolta verso il basso (vedi figura). Spingere quindi
l’adattatore verso sopra facendolo scattare in posizione in maniera udibile. Un chiavistello fissa il
dispositivo per montaggio a parete nella rispettiva posizione.
(Per rimuovere di nuovo il dispositivo per montaggio a parete è sufficiente tirare il chiavistello verso
il basso ed estrarre l’adattatore dal davanti.)
Posizionare quindi due viti (non comprese nella confezione) sul muro: Le viti devono avere una distanza di 83 mm, essere posizionare in senso orizzontale una sotto l’altra e mantenere una distanza di 5 mm dalla parete.
Appoggiare quindi la parte posteriore del telefono sulle viti e spingere l’apparecchio leggermente
verso il basso per fissarlo.
Per non fare scivolare il ricevitore in caso di
montaggio a parete dall’apparecchio si consiglia infine di girare il gancio di montaggio
presente sull’apparecchio base. Nella configurazione iniziale il gancio è in posizione
rientrata (per l’installazione del telefono su
una superficie piana). Spingere il gancio di
montaggio verso fuori, farlo girare e spingerlo in questa posizione di nuovo nella rispettiva rientranza facendolo scattare in posizione in maniera udibile (vedi figura).
Impianti telefonici interni
A pagina 41 sono riportate ulteriori informazioni in caso si volesse collegare il telefono ad un impianto telefonico interno.
34
Page 35

Elementi di comando
3 Elementi di comando
Vista da sopra
1 Visualizzazione di chiamata
ottica
2 Tasto di scorrimento verso
sopra y
3 Tasto di scorrimento verso
sotto z
4 Tasti di selezione diretta
^_`
5 Tasto di selezione
abbreviata
6 Tasto cancelletto #
7 Tasto asterisco *
8 Ripetizione di selezione £
9 Tasto di segnale R R
10 Tasto memoria
11 Tasto di mute
12 Indice
13 Tasto di cancellazione
14 Selezione dall’elenco chiamate ~
I tasti di questo telefono sono raffigurati nel presente manuale di istruzioni per l’uso ricorrendo a
simboli semplificati (vedi sopra). È pertanto possibile che i simboli utilizzati per raffigurare tasti e
simboli si discostino leggermente da quelli in realtà visualizzati sul telefono.
Visualizzazioni di display
12
11
10
9
8
13
14
1
2
3
4
5
6
7
16
15
15 RPT: Visualizza che la stessa persona ha chiamato ripetutamente
16 Capacità di carica delle batterie
17 Indica la presenza di nuove chiamate
18 Ora
19 Data
20 CALL#: Posizione di memoria selezionata attualmente nell´elenco chiamate
21 Campo cifre
22 Campo lettere
17 18 19
22
20
21
35
Page 36

Elementi di comando
Vista laterale
23 Volume di squillo
24 Volume del ricevitore
24
23
Rappresentazioni e modi di scrittura
ë Inserire numeri
* Premere brevemente il tasto raffigurato
2 sec * Premere il tasto raffigurato per 2 secondi
tenere * Tenere premuto il tasto raffigurato
rilasciare * Rilasciare il tasto raffigurato
{
} Il telefono squilla
è Sollevare il ricevitore
é Agganciare il ricevitore
oppure Testo o simbolo sul display
36
Page 37

Compiere telefonate
4 Compiere telefonate
Ricevere una chiamata
Oltre alla segnalazione di chiamata acustica si accende anche la visualizzazione di chiamata ottica.
{
}, è Sollevare il ricevitore / Ricevere la chiamata
Concludere una chiamata
é Agganciare il ricevitore / Concludere la chiamata
Telefonare
è Sollevare il ricevitore
ë Inserire il numero di chiamata
Dopo aver inserito il numero di chiamata il collegamento è instaurato automaticamente.
Il display è in grado di visualizzare al massimo 14 cifre.
In presenza di un numero di chiamata con più cifre, sul display sono visualizzate solo le
ultime 14 cifre del numero.
Se il telefono è collegato ad un impianto telefonico interno, si rimanda a pagina 41 per otte-
nere maggiori informazioni riguardo la conduzione di chiamate.
Ripetizione di selezione
Il telefono memorizza l’ultimo numero di chiamata selezionato. Volendo selezionare il numero di
chiamata un’altra volta, per es. perché la linea era prima occupata o non avendo raggiunto nessuno, è possibile servirsi della funzione di ripetizione di selezione:
è Sollevare il ricevitore
£ Premere il tasto di ripetizione di selezione
Il numero selezionato è composto automaticamente ed il collegamento è instaurato.
Selezione diretta
È consentito memorizzare tre numeri telefonici selezionabili in seguito premendo semplicemente
un unico tasto (selezione diretta).
A tale scopo sono previsti i tre tasti ^, _ e `. Il tasto ` è contrassegnato in rosso
e si presta in particolar modo per la programmazione per es. di un numero di emergenza.
Programmare i tasti di selezione diretta
è Sollevare il ricevitore
ë Inserire un numero di chiamata (max. 16 cifre)
^ Premere il tasto di selezione diretta desiderato
é Agganciare il ricevitore / Concludere la programmazione
Premere il tasto memoria
Premere il tasto memoria
37
Page 38

Compiere telefonate
Telefonare con il tasto di selezione diretta
è Sollevare il ricevitore
^ Premere il tasto di selezione diretta desiderato (qui per es.
Il numero di chiamata memorizzato è selezionato automaticamente.
Selezione abbreviata
È consentito memorizzare 10 numeri telefonici selezionabili in seguito premendo semplicemente
tre tasti (selezione abbreviata).
Programmare i tasti di selezione abbreviata
è Sollevare il ricevitore
ë Inserire un numero di chiamata (max. 16 cifre)
0 inserire il numero della posizione di memoria desiderata
é Agganciare il ricevitore / Concludere la programmazione
Telefonare con tasto di selezione abbreviata
è Sollevare il ricevitore
Premere il tasto di selezione abbreviata
0 inserire il numero relativo alla posizione di memoria (qui ad es.
Il numero di chiamata memorizzato è selezionato automaticamente.
Visualizzazione della durata di conversazione
Alcuni secondi dopo l’inizio della chiamata sul display è visualizzata la durata di conversazione attuale espressa in minuti e secondi.
Aumentare il volume del ricevitore
Se durante la conservazione la voce del proprio partner di chiamata dovesse essere troppo fioca,
è possibile aumentare il volume del ricevitore con chiamata in corso servendosi dell’interruttore a
scorrimento presente sul lato destro del telefono.
Impostare il volume della suoneria
L’interruttore a scorrimento KLINGEL presente sulla destra del telefono consente di regolare il volume della segnalazione acustica di chiamata. L’interruttore a scorrimento prevede tre posizioni:
Spingere per ottenere una suoneria alta l’interruttore interamente a destra (LAUT). La posizione al
centro consente di abbassare il volume della suoneria scegliendo LEISE". Se si volesse invece rimanere indisturbati, spostare l’interruttore interamente a sinistra (AUS) per non avvertire più alcuna segnalazione di chiamata.
Silenziamento del microfono nel ricevitore del telefono
È possibile attivare e disattivare il microfono del ricevitore con chiamata telefonica in corso.
Tenere premuto il tasto di muting per attivare il microfono,
^)
Premere il tasto memoria
Premere il tasto memoria
(qui ad es. per posizione di memoria 0)
per posizione di memoria 0)
rilasciare il tasto per disattivare
38
Page 39

Visualizzazione del numero di chiamata (CLIP)
5 Visualizzazione del numero di chiamata (CLIP)
La visualizzazione del numero di chiamata (CLIP) oltre che l’indicazione di data e orario
sono servizi opzionali del proprio gestore di rete telefonica. Si prega di consultare il proprio
provider per ricevere ulteriori informazioni.
Se il proprio impianto telefonico è abilitato alla funzione CLIP (CLIP = Calling Line Identification
Presentation), il display visualizza in caso di chiamata in arrivo il numero di chiamata dell’interlocutore, qualora questi abbia acconsentito alla trasmissione del proprio numero telefonico.
Se il chiamante ha invece soppresso la trasmissione del proprio numero telefonico, il numero
non è visualizzato; sul display appare quindi l’indicazione
Se il display visualizza l’indicazione
informazione riguardo il chiamante. In tal caso si potrebbe altresì trattare di una chiamata
dall’estero.
Se il numero di chiamata è invece ricevuto solo in parte o in maniera errata, sul display
appare
Se la chiamata non è accettata, l’indicazione rimane sul display per ulteriori ca. 20 secondi
prima di passare di nuovo alla visualizzazione di ora e data attuali.
.
Elenco chiamate
In caso di assenza tutte le chiamate giunte sono memorizzate in un apposito elenco chiamate. In
tutto è possibile memorizzare fino a 64 numeri di chiamata. Per ogni chiamata sono altresì salvate
le informazioni riguardo data e ora della chiamata. Se l’elenco chiamate è pieno, l’apparecchio
procede cancellando sempre il numero di chiamata più vecchio in modo da creare spazio per la
chiamata nuova.
In caso di assenza sono quindi registrate tutte le chiamate ed il display visualizza il numero dei numeri di chiamata di nuova registrazione. Esempio: 2 chiamate nuove
Inoltre lampeggia la visualizzazione di chiamata ottica.
In più è indicato il numero complessivo di numeri memorizzati nell’elenco. Esempio: Complessive
4 voci nell’elenco chiamate
Aprire l’elenco chiamate
Per ottenere maggiori informazioni sulle chiamate mancate, procedere come indicato qui di seguito:
z Apre l’elenco chiamate
Se l’elenco chiamate è invece vuoto, sul display è visualizzata l’indicazione .
.
16
ed indica il numero di chiamata mancato per ultimo
15
, significa non è disponibile alcuna
.
.
yz Apre altre chiamate riportate nell’elenco chiamate
Se si raggiunge l’ultima posizione di memoria dell’elenco chiamate, sul display appare l’indica-
zione
Il display fornisce diverse informazioni riguardo la chiamata mancata:
Il numero sotto l’indicazione CALL# indica la posizione di memoria tra le 64 disponibili su cui
ci si trova attualmente.
Data e ora in cui la chiamata è stata ricevuta.
Se un interlocutore avesse tentato ripetutamente di chiamare, data e ora indicate si riferiscono
sempre all’ultima chiamate effettuata. L’indicazione RPT è visualizzata nell’angolo in alto a
sinistra del display.
.
39
Page 40

Visualizzazione del numero di chiamata (CLIP)
Nella seconda riga di display è indicato, qualora trasmesso, il numero di chiamata
dell’interlocutore.
In tal caso la terza riga di display è riservata alla visualizzazione di una rispettiva indicazione
(vedi sopra).
Se entro 20 secondi non si preme alcun tasto, l’apparecchio chiude automaticamente l’e-
lenco chiamate e sul display ritorna la visualizzazione di ora e data attuali, del numero
complessivo di telefonate memorizzate nell’elenco chiamate e di numeri di chiamata
nuovi.
Scorrendo attraverso tutti i numeri di chiamata nuovi, l’indicazione relativa a chiamate nuove è automaticamente azzerata e la visualizzazione di chiamata ottica si spegne.
Selezionare un numero telefonico dall’elenco chiamate
È possibile selezionare / richiamare numeri di chiamata direttamente dall’elenco chiamate:
è Sollevare il ricevitore
y z Aprire l’elenco chiamate e selezionare la voce desiderata
~ Premere il tasto del telefono
Il collegamento è instaurato.
Oppure:
y z Aprire l’elenco chiamate e selezionare la voce desiderata
~
è Sollevare il ricevitore
Il collegamento è instaurato.
Cancellare una singola voce dall’elenco chiamate
y z Aprire l’elenco chiamate e selezionare la voce desiderata
Premere due volte il tasto di cancellazione per rimuovere la
Cancellare tutte le voci dell’elenco chiamate
y o z Aprire l’elenco chiamate
4 sec Premere il tasto di cancellazione per 4 secondi. Sul display è
Memorizzare numeri di chiamata dall’elenco chiamate
È possibile memorizzare direttamente un numero dall’elenco chiamate.
è Sollevare il ricevitore
y o z Aprire l’elenco chiamate e selezionare una voce
Premere due volte il tasto memoria
Scegliere il numero della posizione di memoria
Premere il tasto del telefono
voce dall’elenco chiamate
visualizzata l’indicazione
Premere il tasto di cancellazione. L’intero elenco chiamate
risulta cancellato.
(0−9 o M1−M3)
40
Page 41

Impianti telefonici interni / Servizi addizionali
6 Impianti telefonici interni / Servizi addizionali
Tasto R in impianti telefonici interni
Il telefono è altresì collegabile ad un impianto telefonico interno. Il rivenditore specializzato è in
grado di indicare se il telefono acquistato funzionerà senza alcun problema nel proprio impianto telefonico interno.
Avendo collegato il telefono ad un impianto telefonico interno, il tasto R consente di accedere a
tutte le altre funzioni disponibili come per es. trasferimento di chiamata e funzione di richiamata automatica.
Codice di accesso (cifra per il segnale dalla centrale)
In presenza di impianti telefonici interni è necessario preselezionare un numero di accesso alla
rete esterna per ottenere un segnale di linea libera prima di poter compiere una telefonata. Spesso
il numero di accesso alla rete esterna corrisponde a 0" o 9". Digitare prima questa cifra per il segnale dalla centrale ed attendere il segnale di linea libera. A questo punto è possibile inserire il numero di chiamata vero e proprio.
Volendo utilizzare le funzioni di selezione diretta e di selezione abbreviata del proprio tele-
fono anche all’interno di un impianto telefonico interno, si prega di prevedere in sede di
programmazione dei tasti di selezione diretta e di selezione abbreviata la cifra per il segnale dalla centrale necessaria per la selezione del rispettivo numero di chiamata.
Tra cifra per il segnale dalla centrale e numero di chiamata è inoltre anche possibile programmare un’ulteriore pausa di selezione. Paragrafo Pausa di selezione"
Pausa di selezione
In presenza di impianti telefonici interni è necessario preselezionare un numero di accesso alla
rete esterna per ottenere un segnale di linea libera prima di poter compiere una telefonata. Alcuni
impianti telefonici interni di vecchia data richiedono un intervallo di tempo di poco superiore prima
di trasmettere un segnale di libero. In particolare, proprio per questi impianti telefonici interni è
possibile prevedere, dopo aver inserito il numero di accesso alla rete esterna, una pausa di selezione che consente di comporre il numero di chiamata desiderato senza dover necessariamente
attendere il segnale di libero.
è Sollevare il ricevitore
ë Inserire la cifra per il segnale dalla centrale
£ Aggiungere una pausa di selezione
Sul display è visualizzato per Pausa".
ë Inserire il numero di chiamata
Una volta ottenuto il segnale di linea libera, il telefono aspetta 3 secondi prima di procedere con la
selezione del numero che si desidera chiamare.
La pausa è memorizzabile anche in sede di programmazione dei numeri di chiamata
come numeri di selezione diretta e di selezione abbreviata.
Segreteria telefonica integrata nella rete telefonica
La segreteria telefonica integrata nella rete telefonica è un servizio offerto da numerosi gestori di
rete telefonica. Tali funzioni saranno peraltro solo accessibili nel caso in cui il gestore di rete telefonica offra i servizi descritti. Si prega di consultare il proprio provider per ricevere ulteriori informazioni.
17
18
41
Page 42

Impianti telefonici interni / Servizi addizionali
Visualizzazione del numero di chiamata (CLIP)
A condizione che il collegamento telefonico disponga di questa funzione, l’apparecchio visualizza
il numero telefonico del chiamante non appena il telefono squilla. pagina 39
La visualizzazione del numero di chiamata è un servizio opzionale offerto dal proprio ge-
store di rete telefonica. Si consiglia di rivolgersi al proprio gestore di rete telefonica per ricevere ulteriori informazioni a riguardo.
42
Page 43

Specifiche tecniche / Eliminazione di problemi
7 Specifiche tecniche / Eliminazione di problemi
Specifiche tecniche
Caratteristica Valore
Batterie 4 x 1.5V alcaline, tipo: AA
Procedura di selezione Procedura di selezione a toni
Temperatura ambiente consentita 10°C fino 30°C
Umidità atmosferica relativa consentita da 20% a 75%
Tempo flash 100 ms
Pausa 3,6 sec
Dichiarazione di conformità
Questo apparecchio risponde a quanto disposto dalla Direttiva UE:
1999/5/CE Direttiva concernente le apparecchiature radio, le apparecchiature terminali
di telecomunicazioni e il reciproco riconoscimento della loro conformità. La conformità
con la Direttiva di cui sopra viene confermata dal marchio CE applicato sull’apparecchio.
Eliminazione di problemi
In presenza di problemi con il proprio telefono si prega di verificare innanzitutto se la linea di collegamento telefonico è disturbata o se il problema riguarda invece il telefono.
Rimuovere tutti gli apparecchi telefonici addizionali collegati al proprio impianto telefonico e collegare l’apparecchio TC49S direttamente alla presa telefonica. Se la disfunzione è ancora presente,
collegare un altro telefono (se disponibile) alla presa telefonica. Se il problema continua a presentarsi, ciò indica un probabile guasto alla propria linea telefonica. Rivolgersi in tal caso alla centrale
guasti e interferenze del proprio gestore di rete telefonica che fornirà ulteriori indicazioni per la verifica del proprio impianto.
Se il problema dovesse invece riguardare il telefono, si prega di rivolgersi al rivenditore autorizzato
presso il quale è stato acquistato l’apparecchio. A titolo di conferma e verifica dei propri diritti di garanzia è necessario tenere a portata di mano lo scontrino di acquisto.
43
Page 44

Consigli per la cura / Garanzia
8 Consigli per la cura / Garanzia
Consigli per la cura
Pulire le superfici della custodia con un panno asciutto, morbido e antipilling.
Non utilizzare mai detergenti o solventi.
Al di là di una pulizia di tanto in tanto della custodia esterna, non sono necessari ulteriori interventi
di pulizia e cura.
Garanzia
Gli apparecchi Switel sono costruiti e collaudati in osservanza dei processi di produzione più moderni. L’impiego di materiali selezionati e tecnologie altamente sviluppate sono garanti di una perfetta funzionalità e lunga durata in vita. La garanzia non viene considerata esecutiva qualora la
causa del malfunzionamento dell’apparecchio è dovuta al gestore della rete telefonica oppure se
questa è da attribuirsi ad un impianto telefonico interno interposto. La garanzia non si estende a
batterie utilizzate all’interno degli apparecchi. Il periodo di garanzia è di 24 mesi a partire dalla
data di acquisto.
Entro il periodo di garanzia si procederà all’eliminazione gratuita di tutti i guasti dovuti a difetti di
materiale o di produzione. Il diritto di garanzia cessa in caso di interventi da parte dell’acquirente o
di terzi. La presente garanzia non ricopre danni dovuti all’uso o all’esercizio non conformi a quanto
previsto, a montaggio o conservazione errati, a collegamento o installazione impropri così come a
forza maggiore o a qualsiasi altro influsso esterno. Con riserva di apportare modifiche di miglioria,
sostituire le parti difettose oppure cambiare l’apparecchio completo in caso di reclami. Parti sostituite o apparecchi rimpiazzati divengono di nostra proprietà. Sono esclusi diritti di risarcimento per
danni qualora non siano dovuti a intenzione o colpa grave del produttore.
Nel caso in cui il presente apparecchio dovesse ciò nonostante presentare un difetto durante il periodo di garanzia, si prega di rivolgersi esclusivamente al negozio di rivendita dell’apparecchio
SWITEL assieme al relativo scontrino di acquisto. In base a quanto riportato nelle presenti disposizioni, tutti i diritti di garanzia dovranno essere rivendicati nei confronti del rivenditore autorizzato.
Decorso il termine di due anni dalla data di acquisto e consegna dei nostri prodotti non sarà più
possibile fare valere alcun diritto di garanzia.
44
Page 45

9 Indice alfabetico
A
Aprire l’elenco chiamate, 39
Aumentare il volume del ricevitore, 38
C
Cancellare tutte le voci dall’elenco chiamate, 40
Cancellare una singola voce dall’elenco chiamate, 40
Cifra per il segnale dalla centrale, 41
CLIP, 39
Codice di accesso, 41
Collegare il ricevitore, 33
Collegare la linea telefonica, 34
Compatibilità con apparecchi acustici, 32
Compiere telefonate, 37
Concludere una chiamata, 37
Consigli per la cura, 44
Contenuto della confezione, 33
Contrasto, 33
D
Data e ora, 33
Dichiarazione di conformità, 43
Durata di conversazione, 38
E
Elaborare l’elenco chiamate, 40
Elementi di comando, 35
Elenco chiamate, 39
Eliminazione di problemi, 43
G
Garanzia, 44
I
Impianti telefonici interni, 34, 41
Impiego conforme agli usi previsti, 32
Impostare il contrasto di display, 33
Impostare il volume della suoneria, 38
Indicazioni di sicurezza, 32
Inserire le batterie, 33
Interruttore a scorrimento KLINGEL, 38
L
Luogo di installazione, 32
M
Mettere in funzione il telefono, 33
Modi di scrittura, 36
P
Pausa di selezione, 41
Indice alfabetico
R
Rappresentazioni, 36
Ricevere una chiamata, 37
Ripetizione di chiamata, 40
Ripetizione di selezione, 37
S
Segreteria telefonica integrata nella rete telefonica, 41
Selezionare un numero telefonico dall’elenco
chiamate, 40
Servizi addizionali, 41
Silenziamento, 38
Simboli sui tasti, 35
Smaltimento, 32
Specifiche tecniche, 43
Spiegazione dei simboli schematici sui tasti, 35
T
Tasto R in impianti telefonici interni, 41
Telefonare, 37
V
Visualizzazione del numero di chiamata, 42
Visualizzazione del numero di chiamata (CLIP), 39
Visualizzazioni di display, 35
Volume del ricevitore, 38
Volume della suoneria, 38
45
Page 46

19
Contents
1 Safety Information 47. . . . . . . . . . . . . . . . . . . . . . . . . . . .
2 Putting the Telephone into Operation 48. . . . . . . . . . . . . . .
3 Operating Elements 50. . . . . . . . . . . . . . . . . . . . . . . . . . .
4 Telephoning 52. . . . . . . . . . . . . . . . . . . . . . . . . . . . . . . .
5 Caller Number Display (CLIP) 54. . . . . . . . . . . . . . . . . . .
6 PABX / Supplementary Services 56. . . . . . . . . . . . . . . . . .
7 Technical Properties / Troubleshooting 57. . . . . . . . . . . . .
8 Maintenance / Guarantee 58. . . . . . . . . . . . . . . . . . . . . . .
9 Index 59. . . . . . . . . . . . . . . . . . . . . . . . . . . . . . . . . . . . .
46
Page 47

Safety Information
1 Safety Information
Please read this operating instruction manual thoroughly.
Intended use
The telephone is suitable for telephoning within a public telephone network system. Any other use
is considered unintended use. Unauthorised modification or reconstruction is not permitted. Under
no circumstances open the device or complete any repair work yourself.
Installation location
Prevent excessive exposure to smoke, dust, vibration, chemicals, moisture, heat and direct sunlight. Do not use the telephone in potentially explosive areas.
Do not place the telephone in the direct vicinity of other electronic equipment, such as microwave
ovens or hi−fi systems, since they could cause mutual disturbance. The installation location is a decisive factor to ensure trouble−free operation.
Place the telephone on a level, non−slip surface. Normally, the footpads do not leave any marks on
the surface where it is located. However, due to the diverse types of paints and surfaces which
come into question, it cannot be fully ruled out that the footpads will leave marks on the surface on
which it is located.
Hearing aid compatibility
The telephone is compatible with most hearing aids available on the market. The telephone is
equipped with an induction based special circuit for voice transmission to hearing aids. Please set
your hearing aid to T".
However, due to the wide range of hearing aids available, there is no guarantee that the telephone
will function problem−free with every model.
Disposal
If your device has come to the end of its service life, bring it to a collection point provided by your local public waste authorities (e.g. recycling centre). The adjacent symbol
indicates that the old device must be disposed of separate from domestic waste. According to laws on the disposal of electronic and electrical devices, owners are obliged to
dispose of old electronic and electrical devices in a separate waste container.
Batteries must be disposed of at the point of sale or at the appropriate collection points
provided by the public waste authorities.
Packaging materials must be disposed of according to local regulations.
47
Page 48

Putting the Telephone into Operation
2 Putting the Telephone into Operation
Safety information
Caution: It is essential to read the Safety Information in Chapter 1 before starting up.
Checking the contents of the package
The package contains:
− a telephone (base unit) − four batteries (AA 1.5V alkaline)
− a receiver − a wall mounting bracket
− a helix cable − an operating manual
− a telephone connection cable
Connecting the receiver
Use the helix cable to connect the receiver to the telephone base unit. The helix cable has two
identical connectors; plug one end of the cable into the socket at the bottom end of the receiver,
plug the other end of the cable into the connection socket on the left−hand side of the telephone
base unit. The plugs engage in the sockets audibly.
Inserting the batteries
The batteries are required for the display indicators and other telephone functions.
Prior to inserting or replacing the batteries, ensure that the telephone is disconnected from
The battery compartment is located on the underside of the telephone. Open the battery compartment using a pointed tool (e.g. ball−point pen) and insert four AA 1.5V alkaline batteries.
Pay attention to correct polarity of the batteries: Slide the minus pole of the battery (flat end)
against the coiled spring and then press the plus pole down. The correct position of the batteries is
also imprinted on the base of the battery compartment.
Only use batteries of the specified type.
Close the battery compartment properly; the cover locks audibly in place.
The batteries must be replaced by new ones when the battery icon
display.
The telephone’s memory content is retained for 3 minutes when no batteries are installed.
20
the telephone network.
appears in the telephone
Date and time
The date and time will be set automatically with the first CLIP call received.
Condition: Your network provider supports this feature.
Setting the display contrast
If you need to change the display contrast, press the y and z buttons simultaneously for
4 seconds. The message
buttons to adjust the contrast (1−5) and confirm the selection by pressing the button.
48
appears in the display. Use the y or z
Page 49

Putting the Telephone into Operation
Connecting the telephone cable
Use the telephone connection cable supplied to connect the telephone to the telephone line sokket. Plug the cable connector in the socket on the rear of the telephone until it audibly engages.
Plug the other end of the telephone connection cable in the telephone line socket.
If the cable connector does not fit in the line socket, please contact your telephone network provider.
Wall installation
The telephone can also be mounted on a wall.
Before the telephone can be installed on a wall, the mounting bracket supplied must first be fixed
to the bottom of the telephone. To do this, turn the telephone over and fix the mounting bracket in
the slots in the housing, indicated below. Pay attention that the opening for the slot in the middle of
the mounting bracket is at the bottom (refer to diagram). Then slide the bracket upwards until it audibly locks in place. A catch fixes the mounting bracket in position.
(In order to remove the mounting bracket again, press the catch down and pull the bracket over it
and away to the front.)
Insert two screws (not included in the material supplied) in the wall: the screws must be 83 mm
apart, be vertically one above the other and the heads project 5 mm from the wall.
Mount the telephone, with one screw fitted in the hole in the underside of the telephone and the
other in the bracket, and force the unit gently downwards to fix it.
In order to prevent the receiver slipping
from the base unit when installed on a wall,
you must now turn the hook on the telephone base. When the equipment leaves
the factory, the hook is in a countersunk position (for positioning the telephone on a flat
surface). Slide the hook up and out, turn it
180° and slide it back into the recess while
in this projected position until it audibly
locks in place (refer to diagram).
Private branch exchanges
If you want to connect the telephone to a private branch exchange, more information is provided
on Page 56.
49
Page 50

Operating Elements
3 Operating Elements
Plan view
1 Visual call indicator
2 Scroll up button y
3 Scroll down button z
4 One−touch dialling buttons
^_`
5 Memory button
6 Hash button #
7 Star button *
8 Redialling £
9 R−signal button R
10 Store button
11 Mute button
12 Index
13 Delete button
14 Dial from calls list ~
The buttons on the telephone are depicted with simplified icons throughout this operating manual
(see above). Therefore, it is possible that the icons differ slightly from those actually provided on
the telephone.
Display indicators
15
12
11
10
9
8
16
17 18 19
13
14
20
1
2
3
4
5
6
7
50
22
15 RPT: Indicates several calls have been received from the same caller
16 Battery capacity
17 Indicates new calls have been received
18 Time
19 Date
20 CALL#: Indicates the memory location currently selected in the calls list
21 Digit field
22 Text field
21
Page 51

Side view
23 Ringer volume
24 Receiver volume
2324
Display and explanation of operation sequences
ë Enter digits
* Press the button depicted briefly
2 sec * Press the button depicted for 2 seconds
Press and hold * Press and hold the button depicted
Release * Release the button depicted
{
} Telephone rings
è Lift the receiver
é Replace the receiver on−hook
or
Text or icon in the display
Operating Elements
51
Page 52

Telephoning
4 Telephoning
Taking a call
In addition to the ringing tone, the visual call indicator lights up when a call is received.
{
}, è Lift the receiver / Take the call
Ending a call
é Replace the receiver on−hook / End the call
Making a call
è Lift the receiver
ë Enter the phone number
A connection is made automatically after you have entered the phone number.
The display can show a maximum of 14 digits.
If the phone number has more digits, only the last 14 are displayed.
If your telephone is connected within a private branch exchange, refer to Page 56 for
information on other things to be taken into account when making calls.
Redialling
Your telephone stores the last phone number dialled. If you want to dial this number again, e.g. because the connection was engaged or the call was not taken, use the redialling function:
è Lift the receiver
£ Press the redialling button
The phone number stored is automatically dialled and a connection established.
One−touch dialling
It is possible to store three phone numbers so that they are dialled simply by pressing the respective button (one−touch dialling).
Three buttons, ^, _ and `, are provided for this. The ` button is coloured red and
is thus perfect, for example, for programming an emergency call number.
Programming one−touch dialling buttons
è Lift the receiver
ë Enter the phone number (max. 16 digits)
^ Press the required one−touch dialling button
é Replace the receiver on−hook / End programming
Making calls using the one−touch dialling buttons
è Lift the receiver
^ Press the required one−touch dialling button (e.g. ^)
The phone number stored is automatically dialled.
Press the Store button
Press the Store button
52
Page 53

Telephoning
Quick dialling
It is possible to store 10 phone numbers so that they are dialled simply by pressing three buttons
(quick dialling).
Programming quick dial buttons
è Lift the receiver
ë Enter the phone number (max. 16 digits)
0 Enter the required memory location number
é Replace the receiver on−hook / End programming
Making calls using the quick dial buttons
è Lift the receiver
Press the quick dial button
0 Enter the memory location number (e.g. in this case, memory
The phone number stored is automatically dialled.
Talk time display
A few seconds after a call has begun, the current duration of the call appears in the display in minutes and seconds.
Increasing the receiver volume
If the caller’s voice is too quiet, you can increase the receiver volume during the call simply by setting the receiver volume switch on the right−hand side of the telephone base
Setting the ringing tone volume
It is possible to change the volume of the ringing tone by adjusting the RING sliding switch on the
right−hand side of the telephone base. The sliding switch has three positions:
For loud ringing, move the sliding switch to the right−hand side (LAUT). For normal ringing volume,
move the sliding switch to the middle (KLINGEL). If you do not want to be disturbed, move the sliding switch to the left−hand side (AUS), the ringing tone is switched off.
Muting the receiver microphone
The microphone in the receiver can be activated and deactivated during a telephone conversation.
Press and hold the Mute button to activate the microphone,
Press the Store button
Press the Store button
(e.g. in this case for memory location 0)
location 0)
release the Mute button to resume.
53
Page 54

Caller Number Display (CLIP)
5 Caller Number Display (CLIP)
The caller number display (CLIP) and display of date and time are optional services
offered by your telephone network provider. Contact them for any further information.
If the CLIP function is available for your telephone system (CLIP = Calling Line Identification Presentation), the number of the caller appears in the display when a call is received − as long as callers have agreed to transmission of their phone number.
If the caller has suppressed transfer of his phone number, the number is not displayed. The
message
If the message
could concern an international call, for example.
If a phone number is only received in part or with errors, the message
appears in the display.
If you do not take a call received, the information remains in the display for approx. 20 se-
Calls list
All incoming calls received in your absence are recorded in a calls list. The calls list can contain up
to 64 phone numbers. The time and date of receipt are recorded for each call. When the calls list is
full, the oldest phone number is deleted to make space for the new one received.
When incoming calls are registered during your absence, the display indicates the number of new
phone numbers recorded. Example: 2 new calls received
In addition, the visual call indicator flashes.
The total number of phone numbers in the calls list is also displayed. Example: A total of 4 entries
in the calls list
Viewing the calls list
Please proceed as follows to obtain more detailed information on the missed calls:
z Open the calls list and display the last call missed
If the calls list is empty, the message appears in the display.
conds before the current time and date reappear.
.
22
21
appears in the display.
appears, no information on the caller is available; this
.
54
yz View further calls in the calls list
On reaching the last memory location in the calls list, the message
the display.
The display provides various information on missed calls:
The number below the CALL# indicator indicates which of the 64 memory locations available
you are currently in.
The date and time the call was received.
If a caller has tried to contact you several times, the date and time relates to the last attempt
received. The RPT appears in the left−hand corner.
The second line in the display shows the phone number of the caller, in cases where it was
transmitted.
Otherwise, a corresponding message appears in the third line (see above).
If no button is pressed for 20 seconds, the calls list is automatically closed and the display
reverts to showing the current time, date, total number of phone numbers in the calls list
and number of newly registered phone numbers.
When all the newly recorded phone numbers have been viewed, the display is automatically reset
to zero and the visual call indicator goes out.
appears in
Page 55

Caller Number Display (CLIP)
Dialling numbers in the calls list
You can dial / call back phone numbers directly from the calls list:
è Lift the receiver
y z Open the calls list and select the required entry
~ Press the ‘dial from calls list’ button
A connection is established.
Or:
y z Open the calls list and select the required entry
~
è Lift the receiver
A connection is established.
Deleting individual entries from the calls list
y z Open the calls list and select the required entry
Press the Delete button twice to clear the entry from the calls
Deleting all entries from the calls list
y or z Open the calls list
4 sec Press the Delete button for 4 seconds. The message
Storing a phone number from the call log
A phone number stored in the call log can be stored directly.
è Lift the receiver
y or z Open the call log and select an entry
Press twice the memory button
Press the ’dial from calls list’ button
list
Press the Delete button. All the entries in the calls list are
deleted.
Enter the required memory location number
(0−9 or M1−M3)
appears in the display.
55
Page 56

PABX / Supplementary Services
6 PABX / Supplementary Services
R button on private branch exchanges
The telephone can also be connected to a private branch exchange. The dealer where you purchased the exchange can provide information as to whether the telephone will work properly with
the exchange.
If the telephone is connected to a private branch exchange, all the functions associated with the
R−button, such as transferring calls, automatic call back, etc., can be used.
PABX access code (number for an outside line)
When using private branch exchanges, it is necessary to dial a specific number to obtain the dialling tone for an outside line. The number for an outside line is often 0" or 9". Dial this number first
and wait for the dialling tone. You can then dial the actual phone number.
If one−touch and quick dial buttons are to be used for the telephone when connected to
a private branch exchange, please take this into consideration and enter the access code
before the actual phone number when programming the one−touch and quick dial buttons.
It is also possible to program a dialling pause between the number for an outside line and
the actual phone number. Section Dialling pause"
Dialling pause
When using private branch exchanges, it is necessary to dial a specific number to obtain the dialling tone for an outside line. When using some older private branch exchanges, it takes a little time
before the dialling tone becomes audible. In the case of such private branch exchanges, a dialling
pause can be inserted after the number for an outside line in order to continue dialling directly without having to wait for the dialling tone.
è Lift the receiver
ë Dial the number for an outside line
£ Insert the dialling pause
appears in the display for Pause".
A
ë Dial the phone number
After dialling the number for the outside line, the telephone then waits 3 seconds before dialling the
actual phone number.
The pause can also be stored when programming phone numbers as one−touch and quick
dial numbers.
Answering machine in the telephone network
An answering machine in the telephone network is offered by many telephone network providers.
This function can only be used when your telephone network provider actually offers the service.
Contact them for any further information.
Call number display (CLIP)
If this function is available with your telephone line, the number of the caller appears in the display
when the phone rings. Page 54
The caller number display function is an optional service offered by telephone network
providers.
Contact your network provider for further information.
23
24
56
Page 57

Technical Properties / Troubleshooting
7 Technical Properties / Troubleshooting
Technical data
Feature Value
Batteries 4 x 1.5V Alkaline, size: AA
Dialling mode Tone dialling mode
Permissible ambient temperature 10°C to 30°C
Permissible relative humidity 20% to 75%
Recall time (Flash time) 100 ms
Pause 3.6 sec
Declaration of Conformity
This device fulfils the requirements stipulated in the EU directive:
1999/5/EU directive on radio equipment and telecommunications terminal equipment
and the mutual recognition of their conformity. Conformity with the above mentioned directive is confirmed by the CE symbol on the device.
Troubleshooting
If you experience problems with the telephone, first check whether the cause of the problem is a
defect telephone line or the telephone itself.
To do this, disconnect all additional telephone equipment from the telephone system and connect
only the TC49S directly to the telephone line socket. If the problem prevails, plug another phone (if
available) into the jack. If the fault continues to occur, the telephone line is probably defective. In
this case, contact the Service Department of your telephone network provider who can provide
more assistance on checking your system.
If the problem lies with the telephone itself, please contact the sales outlet where you purchased
the telephone. To assert claims under the terms of guarantee, it is essential to produce the sales
receipt.
57
Page 58

Maintenance / Guarantee
8 Maintenance / Guarantee
Maintenance
Clean the housing surfaces with a soft, dry, fluff−free cloth.
Do not use any cleaning agents or solvents.
Apart from occasionally cleaning the housing, no other upkeep is necessary.
Guarantee
SWITEL equipment is produced and tested according to the latest production methods. Carefully
selected materials and highly developed technology ensure perfect functioning and a long service
life. The terms of guarantee do not apply where the cause of equipment malfunction is the fault of
the telephone network operator or any interposed private branch extension system. The terms of
guarantee do not apply to the batteries used in the products. The period of guarantee is 24 months
from the date of purchase.
All deficiencies related to material or manufacturing errors within the period of guarantee will be redressed free of charge. Rights to claims under the terms of guarantee are annulled following tampering by the purchaser or third parties. Damage caused as the result of improper handling or operation, incorrect positioning or storage, improper connection or installation or Acts of God and other
external influences are excluded from the terms of guarantee. In the case of complaints, we reserve the right to repair or replace defect parts or provide a replacement device. Replaced parts or
devices become our property. Claims for damages are excluded except in cases of intent or gross
negligence on the part of the manufacturer.
If your device shows signs of defect during the period of guarantee, please return it to the sales
outlet in which you purchased the SWITEL device together with the purchase receipt. All claims
under the terms of guarantee in accordance with this agreement can only be asserted at the sales
outlet. No claims under the terms of guarantee can be asserted after a period of two years from the
date of purchase and hand−over of the product.
58
Page 59

9 Index
A
Answering machine in the telephone network, 56
B
Button icons, 50
C
Call number display, 56
Caller number display (CLIP), 54
Calls list, 54
CLIP, 54
Connecting the receiver, 48
Connecting the telephone cable, 49
Contrast, 48
CONTRAST sliding switch, 48
D
Date and time, 48
Declaration of Conformity, 57
Deleting all entries from the calls list, 55
Deleting individual entries from the calls list, 55
Dialling numbers in the calls list, 55
Dialling pause, 56
Display, 51
Display indicators, 50
Disposal, 47
E
Editing the calls list, 55
Ending a call, 52
Explanation to the icons depicted on the buttons, 50
Explanations, 51
G
Guarantee, 58
H
Hearing aid compatibility, 47
Hooks, 49
I
Increasing the receiver volume, 53
Inserting the batteries, 48
Installation location, 47
Intended use, 47
M
Maintenance , 58
Making a call, 52
Mounting bracket, 49
Muting the receiver microphone, 53
N
Number for an outside line, 56
O
Operating elements, 50
Index
P
PABX access code, 56
Package contents, 48
Private branch exchanges, 49, 56
Putting the telephone into operation, 48
R
R button on private branch exchanges, 56
Receiver volume, 53
Redialling, 52
RING sliding switch, 53
Ringing volume, 53
S
Safety information, 47
Setting the display contrast, 48
Setting the ringing tone volume, 53
Storing a phone number from the call log, 55
Supplementary services, 56
T
Taking a call, 52
Talk time, 53
Technical data, 57
Telephoning, 52
Troubleshooting, 57
V
View calls list, 54
W
Wall installation, 49
59
Page 60

Declaration of Conformity
Für die komplette Konformitätserklärung nutzen Sie bitte den kostenlosen Download von unserer
Pour obtenir la déclaration de conformité intégrale, veuillez vous servir du téléchargement gratuit de
Per la dichiarazione di conformità completa si prega di voler usufruire del servizio gratuito di download
To view the complete Declaration of Conformity, please refer to the free download available at our
Diese Anlage entspricht der europäischen R&TTE Richtlinie.
Website www.switel.com
Cet équipement est conforme à la directive européenne R&TTE.
notre site Internet www.switel.com
Quest’apparecchiatura è conforme alla direttiva europea R&TTE.
dal nostro sito Internet www.switel.com
This equipment complies with the European R&TTE directive.
web site: www.switel.com
.
.
.
.
Service Hotline
Bei technischen Problemen können Sie sich an unsere Service−Hotline unter Tel. 0900 00 1675 inner-
S’il s’agit de problèmes techniques, vous pouvez vous adresser à notre hotline de service en Suisse en
appelant le numéro 0900 00 1675 (frais Swisscom à la date d’impression de ce manuel : CHF 2.60/min).
In caso di problemi tecnici è possibile rivolgersi alla nostra hotline di assistenza tecnica chiamando al
In the event of technical problems, you can contact our hotline service, Tel. 0900 00 1675 within Switzer-
halb der Schweiz (Kosten Swisscom bei Drucklegung: CHF 2.60/min) wenden.
numero 0900 00 1675 valido per la Svizzera
(spese da rete Swisscom alla data di stampa: CHF 2.60 / min).
land (cost via Swisscom at time of going to print: CHF 2.60/min).
Version 1.1 − 03.12.2008
 Loading...